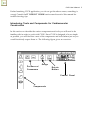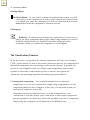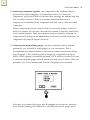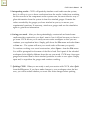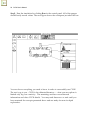
1
Cardio-Vascular Construction Kit (CVCK) Version 3.4 User’s Manual Sarah Douglas Daniel Udovic Nils S. Peterson University of Oregon University of Oregon Washington State University A BioQUEST Library VII Online module published by the BioQUEST Curriculum Consortium The BioQUEST Curriculum Consortium (1986) actively supports educators interested in the reform of undergraduate biology and engages in the collaborative development of curricula. We encourage the use of simulations, databases, and tools to construct learning environments where students are able to engage in activities like those of practicing scientists. Email: [email protected] Website: http://bioquest.org Editorial Staff Editor: Managing Editor: Associate Editors: John R. Jungck Ethel D. Stanley Sam Donovan Stephen Everse Marion Fass Margaret Waterman Ethel D. Stanley Online Editor: Amanda Everse Editorial Assistant: Sue Risseeuw Beloit College Beloit College, BioQUEST Curriculum Consortium University of Pittsburgh University of Vermont Beloit College Southeast Missouri State University Beloit College, BioQUEST Curriculum Consortium Beloit College, BioQUEST Curriculum Consortium Beloit College, BioQUEST Curriculum Consortium Editorial Board Ken Brown University of Technology, Sydney, AU Joyce Cadwallader St Mary of the Woods College Eloise Carter Oxford College Angelo Collins Knowles Science Teaching Foundation Terry L. Derting Murray State University Roscoe Giles Boston University Louis Gross University of Tennessee-Knoxville Yaffa Grossman Beloit College Raquel Holmes Boston University Stacey Kiser Lane Community College Peter Lockhart Massey University, NZ Ed Louis The University of Nottingham, UK Claudia Neuhauser University of Minnesota Patti Soderberg Conserve School Rama Viswanathan Beloit College Linda Weinland Edison College Anton Weisstein Truman University Richard Wilson (Emeritus) Rockhurst College William Wimsatt University of Chicago Copyright © 1993 -2006 by Sarah Douglas, Daniel Udovic, and Nils S. Peterson Copyright, Trademark, and License Acknowledgments Portions of the BioQUEST Library are copyrighted by Annenberg/CPB, Apple Computer Inc., Beloit College, Claris Corporation, Microsoft Corporation, and the authors of individually titled modules. All rights reserved. System 6, System 7, System 8, Mac OS 8, Finder, and SimpleText are trademarks of Apple Computer, Incorporated. HyperCard and HyperTalk, MultiFinder, QuickTime, Apple, Mac, Macintosh, Power Macintosh, LaserWriter, ImageWriter, and the Apple logo are registered trademarks of Apple Computer, Incorporated. Claris and HyperCard Player 2.1 are registered trademarks of Claris Corporation. Extend is a trademark of Imagine That, Incorporated. Adobe, Acrobat, and PageMaker are trademarks of Adobe Systems Incorporated. Microsoft, Windows, MS-DOS, and Windows NT are either registered trademarks or trademarks of Microsoft Corporation. Helvetica, Times, and Palatino are registered trademarks of Linotype-Hell. The BioQUEST Library and BioQUEST Curriculum Consortium are trademarks of Beloit College. Each BioQUEST module is a trademark of its respective institutions/authors. All other company and product names are trademarks or registered trademarks of their respective owners. Portions of some modules' software were created using Extender GrafPak™ by Invention Software Corporation. Some modules' software use the BioQUEST Toolkit licensed from Project BioQUEST. Acknowledgements The co-principal developers of this project wish to thank many organizations and individuals for their continued support of this research from its inception in 1987 until the present. The Fund for the Improvement of Postsecondary Education (FIPSE), U. S. Department of Education, gave very generous funding for two years, 1987-1989, with Grant #G008730445 under the title “Biology Laboratory Construction Kit with Intelligent Tutoring”. Apple Computer Corp. donated two Macintosh SE’s in January 1988 for the initial programming development. In September 1989, the National Science Foundation, the University of Oregon and Apple Computer collectively donated funds for the establishment of a Macintosh laboratory in the Dept. of Biology for the support of the use of computers in Biology instruction. This lab allowed the testing and continued refinement of the Cardio-Vascular Construction Kit as a curriculum component in Introductory Biology, Animal Physiology and Comparative Anatomy classes. Finally, the University of Oregon, through the Office of Research and Sponsored Programs under the direction of Vice-President John Moseley, provided us with last minute funding to make software improvements and to prepare for publication. Many individuals have contributed their personal creative efforts, expertise and criticisms. Carla Wenzlaff did the programming of the initial version of the software. Eckehard Doerry, Zheng-Yang Liu, and Keith Downing have served as Computer and Information Science Dept. graduate research assistants performing programming, basic research, and manuscript preparation. David Novack, Anant Kartik Mithal and Terence Chandler, while students at the University,wrote and tested various versions of student laboratory manuals. We are also indebted to many unsung heroes such as the students who, as experimental subjects, plodded through horrible early versions of the software helping us better define and understand both the user interface and pedagogical aspects of our project; and the teachers of several University biology classes who gave us much needed guidance on curriculum integration. Table of Contents What is the Cardiovascular Construction Kit?.....................................................1 What You Should Read .............................................................................................3 If you are unfamiliar with the Macintosh..................................................3 If you want to know whether you have the right equipment...............3 If you are familiar with the Macintosh but not with CVCK ..................3 If you have been through the overview and want to know more details..................................................................................................................3 If you’ve read through the manual, but have found something that doesn’t seem to work in CVCK.....................................................................3 What You Need to Know ..........................................................................................4 A Beginner’s Overview of the CardioVascular Construction Kit.....................6 Starting the Program.......................................................................................6 Introducing Tools and Components for Cardiovascular Construction 7 The component palette.......................................................................8 Basic Components ...............................................................................8 Ventricle ....................................................................................8 Vessel..........................................................................................9 One-way valve..........................................................................9 Elbow ..........................................................................................9 Tee...............................................................................................9 Capillary Bed.............................................................................10 Producers/Consumers........................................................................10 Muscle ........................................................................................10 Lung............................................................................................10 Measuring Instruments......................................................................10 Gauge..........................................................................................10 Controlling the Simulation...............................................................11 Rotating Objects....................................................................................12 Cleaning up...........................................................................................12 The Construction Process...............................................................................12 Creating new components.................................................................12 Connecting components together....................................................13 Connecting and manipulating gauges ............................................13 Running the simulation....................................................................14 Interpreting results..............................................................................15 Saving your work ................................................................................15 Quitting CVCK .....................................................................................15 A Sample Construction..............................................................................................16 Advanced Information, Techniques and Tips ......................................................21 Component Parameters..................................................................................21 Changing Component parameters...................................................21 Component Parameter descriptions................................................21 Changing Gauge Measurement....................................................................22 Techniques ........................................................................................................23 Comparative measurement ..............................................................23 Tricks and Tips .................................................................................................23 Appendix A Hardware and Software Requirements.......................................................24 Appendix B Trouble-shooting the System........................................................................25 IT DOESN’T WORK!! .....................................................................................25 I can’t get this program to start! ........................................................25 CVCK runs but is apparently not working right...........................26 CVCK User’s Manual 1 What is the Cardiovascular Construction Kit? Cardiovascular systems are the key components of all vertebrates. Without some means to distribute oxygen to and remove waste from the tissues, only the simplest tiny organisms could exist. However, while all vertebrates have a cardiovascular system, there is wide variation among them: some have lungs while others use gills; some have one heart while others have several. This observation raises a number of interesting questions: • Why do cardiovascular systems vary for different organisms? • Couldn’t one simply design a single “best” cardiovascular system for all organisms to use? • Given some cardiovascular system, can we suggest improvements that will allow a given organism to perform/survive more effectively? Unfortunately, such questions have traditionally been very difficult to answer. Because the cardiovascular system is so central to an organism’s well-being, it is very difficult and costly to experiment on. A full-scale surgical station with elaborate equipment is needed even for the most simple modifications. Many advanced experiments involving more radical modifications have proven to be beyond current technology. However, many of the questions we would like to answer are of a relatively simple and general nature. For instance: How high are the pressures and flows in various components? Do all components receive sufficient oxygen? The Cardiovascular Construction Kit (CVCK) allows you, the user, to design and construct a wide range of cardiovascular systems, testing each one to see how it behaves and whether it could actually exist and survive in a real organism. The Kit provides you with a set of basic components, e.g., pumps, vessels, capillaries and so on, which you may piece together to construct a cardiovascular system you are interested in exploring. Gauges and measurement techniques are provided so you can draw conclusions from your experiments. This program will help you to discover the basic principles of cardiovascular design. It has been carefully constructed to be as simple and easy to use as possible in order to allow you to begin productive experimentation almost immediately. CVCK User’s Manual 3 What You Should Read If you are unfamiliar with the Macintosh computer. Read the next section: What You Need to Know. If you want to know whether you have the right equipment to run CVCK program. Read the Appendix entitled: Hardware and software requirements. If you are familiar with the Macintosh but not with CVCK program. Read the section entitled: A Beginners Overview of the CardioVascular Construction Kit. If you have been through the overview and want to know more details. Read the section entitled: Advanced Information, Techniques and Tips. If you’ve read through the manual, but have found something that doesn’t seem to work in CVCK. Read the Appendix entitled: IT DOESN’T WORK! 4 CVCK User’s Manual What You Need to Know Throughout this manual, we will assume that you are already familiar with basic Macintosh operations and concepts. If you are not comfortable with these, refer to the Macintosh Owner’s Guide or some other introduction to the Macintosh before starting. To help you on your way, the following is a list of Macintosh concepts you will need to understand, along with a brief explanation. For more information, consult one of the references mentioned above or simply ask someone who has worked with a Macintosh before to explain briefly. • Pointing. Pointing simply refers to positioning the cursor, which is shaped like a pointer, over some object. • Clicking. Also known as single-clicking. Position the cursor over the desired object and click the mouse button once. For example, “Single click on the heart to select it” means position the cursor over the heart object and click once. Clicking objects is typically used to select them (see below). • Double-clicking. Just like single-clicking except that you click the mouse button twice, in rapid succession, instead of just once. • Dragging. This is used to move objects around on the screen. To drag an object, “grab” the object by pointing to it and depressing the mouse button. Don’t click the button! Depress it and hold it down. Now move the mouse -- the object is dragged around on the screen. When you have positioned the object where you want it, release the mouse button to “drop” the object. • Selecting. This operation is used to pick one or more objects from a group of objects. Selecting is usually accomplished by clicking on the object to be selected. Typically, selected objects will become highlighted to indicate they have been selected. Example: “Select the capillary by clicking on it.” • Opening. Often there are parameter values associated with objects. For instance, a parameter of a ventricle might be the rate at which it beats. To access and adjust such parameters, one can often open the object by double-clicking on it. Example: “Open the gauge by doubleclicking it”. CVCK User’s Manual 5 The concepts listed above are few, but are central to the operation of most any Macintosh program. There are a number of less fundamental concepts which we will ignore or will introduce as we encounter them. 6 CVCK User’s Manual A Beginner’s Overview of the CardioVascular Construction Kit Starting the Program To start CVCK program, simply double-click on CVCK icon. System 6 CVCK Icon System 7 CVCK Icon The program will now begin to load. Be patient! Loading the program takes about 10-15 seconds. When it is finished, you will be presented with the laboratory workspace similar to the one shown below: CVCK User’s Manual If after launching CVCK application, you do not get the above screen, something is wrong! Consult the IT DOESN’T WORK! section near the end of this manual for trouble-shooting tips. Introducing Tools and Components for Cardiovascular Construction In this section we describe the various components and tools you will need to be familiar with in order to work with CVCK. Since CVCK is designed to be as simple as possible, you will find that most of the components and tools behave just as you would intuitively expect them to. The following figure gives an overview: Gauge Producers/ Consumers Rotate Button Control Panel Components 7 8 CVCK User’s Manual The component palette Using CVCK involves constructing various cardiovascular systems by piecing them together using several basic components. The components are available as icons in the panel to the left of the workspace (see figure above). To use a component, simply drag its icon from the panel into the workspace. As the component leaves the panel, an instance (that is, a copy) of it is created in the workspace for you to use in your construction. The icon of the component will remain visible in the panel as well. In this way, you can create as many copies of a given kind of component as you like. Once you drag a component into the workspace, you may notice that it changes subtly. Most importantly, you will see that a number of hotspots appear on the component. Hotspots look like small dots and are placed at various locations on the component. They are used to indicate where you may attach gauges to components as you work to measure parameters like pressure and flow. You may measure system values such as pressure, oxygen concentration, and flow at any of the hotspots on this component. In addition, most components have a number of component parameters which affect the behavior of that component. For instance, most components have a diameter which describes how hard it is to push blood through the component. Such parameters may be changed by you as you explore different cardiovascular system. The parameters of each component type and the details of modifying them are discussed in the section entitled Advanced Information, Techniques, and Tips. For now, we simply list, for each type of component, the parameters associated with it. Basic Components Ventricle. Ventricles provide the motivating force in any cardiovascular system. They are a source of pressure, which is crucial for creating flow of blood. IMPORTANT!! Do not confuse ventricles in CVCK with typical mammalian hearts. CVCK ventricles are simpler: they have no valves to direct flow through them. In order to create a valved heart, you may combine a ventricle with one or more one-way valves. If you have more than one ventricle in your system, they will all beat at the same rate. Changing the CVCK User’s Manual heart rate of one will automatically change the rate of the other(s). However, heart strength can be set individually. Parameters: Heart Rate, Heart Strength Vessel. Vessels are simply straight pieces of pipe. They represent the arteries and veins which constitute a large part of any circulatory system. Parameters: Diameter. One-way valve. One-way valves allow blood to pass through the valve in one direction only. For instance, the valve shown here will allow blood to pass only from left to right through it. In general, the valve which appears in the pipe points in the direction in which flow is possible. Parameters: Diameter. Elbow. Elbows are simply curved vessels. Parameters: Diameter. Tee. Tees allow branching in a cardiovascular construction since they have three connections. Parameters: Diameter. 9 10 CVCK User’s Manual Capillary Bed. Capillaries are very important components. In a living organism, capillaries act as oxygen transfer points between the blood and oxygen producers (lungs) and consumers (muscles). Thus, capillaries serve as attachment points for muscles and lungs in CVCK. You must include capillaries in a construction in order to be able to incorporate lungs and muscles. Parameters: Diameter, Branching. Producers/Consumers. Muscle. Muscles represent the oxygen consumers of a living organism. Thus, when muscles are attached to a cardiovascular construction, the oxygen concentration of the system will begin to fall as the muscles use up available oxygen. Parameters: Work Rate. Lung. Lungs are sources of oxygen. Thus, when lungs are attached to a cardiovascular construction, the oxygen concentration of the system will begin to rise as the lungs produce oxygen. Parameters: Breathing Effort, Atmospheric Oxygen Concentration. Measuring Instruments. Gauge. In order to analyze the behavior of some cardiovascular system you have constructed, you will need to be able to determine system values (e.g., pressure, flow, oxygen) at various places in the construction. Gauges allow you to do this. When you create a new gauge by dragging it into the CVCK User’s Manual workspace, it is a generic gauge -- you have not yet told it which parameter to measure. However, when it is attached to a hotspot on a cardiovascular construction, the system will list the parameters which can be measured at that point and prompt you to select one to measure. For instance, if you select FLOW from the list presented, the gauge becomes a flow measuring gauge. As detailed, in the section entitled Advanced Information, Techniques and Tips, there is a way to change the parameter being measured by a gauge. Controlling the Simulation. The control panel. When you are finished constructing a cardiovascular system and attaching gauges, you will want to start the simulation to see how it behaves. The control panel, in the upper margin of the workspace, is used for this purpose. Set the number of ventricle beats you would like the simulation to run (start with just one!) by clicking on the beat box and then typing a number. Click on Run to start the simulation -- you will be able to see the ventricles pumping and the blood flowing in the system. In addition, if you have any open gauges, you will see them recording their respective parameter values. The speed of the simulation can be controlled by moving the slider in the control panel. Click on the slider arrows to move it back and forth. Click on Stop to halt the simulation at any point. You may have to wait until the currently active beat finishes before the simulation stops. Click on Step to slowly step through a beat cycle. This will allow you to more easily observe rapidly changing values and/or flows in the system. Sometimes you may accidentally leave some vessel unconnected, with one or both ends unconnected to another component. When you start to simulation, this will cause all of the blood to drain out of the system (patient dies of massive blood loss!). Click on Reset to reset the blood in each component to its original level. This will allow you to continue experimenting without creating entirely new components. 11 12 CVCK User’s Manual Rotating Objects The Rotate Button. As you work to construct a cardiovascular system, you will often need to rotate components in order to place them as you desire. Doing so is simple; just select the component you wish to rotate and then click the rotate button until the component is oriented correctly. Cleaning up. BioWaste. At various points during your exploration, you may want to simply get rid of components and gauges. Simply drag whatever you wish to discard to the BioWaste Icon, located in the lower left margin of the workspace. When you release the component, it will disappear. The Construction Process In the last section, we described the various components and tools to be found in CVCK. In this section, we turn to the actual construction process, the composition of individual components into functioning cardiovascular systems. In general, the process is very straightforward: You simply create components, connect them together to form some cardiovascular system of interest, and explore the construction by measuring quantities and analyzing system behavior. 1. Creating new components. You’ve already learned how to create new components to use for your construction: simply drag components out of the component palette into the workspace. In this way, you can create as many of each type of component as you like. Sometimes you may accidentally create too many components for your construction or you may change your construction so that certain components become superfluous. In either case, it becomes desirable to get rid of components. Simply drag the components to be deleted into the BioWaste area. CVCK User’s Manual 2. Connecting components together. Any component in the workspace may be positioned by simply dragging it to the desired location. To connect two components, just position them so that they their openings are adjacent and they look (visually) connected. When a successful connection between two components is established, both components will flash once to indicate a valid connection. Often, a component must be rotated in order to create the system you have in mind. For instance, the one-way valves must be rotated so that they direct blood in the desired direction. Thus, any component may be rotated by selecting the component and clicking on the rotate button. Each time you click this button, the component will rotate 90 degrees clockwise. 3. Connecting and manipulating gauges. In order to measure various systemic parameters, you will need to attach gauges to your construction. This is accomplished by a method similar to that used to connect components. Simply drag the gauge so that its head touches a hotspot on a component (see figure below). When a gauge is successfully attached, CVCK will ask you what you want to measure using that gauge and will present you with a list of choices. Select the parameter you wish to measure and click OK. The gauge is now attached. Note that, once attached, the gauge may be dragged away from the connection point without breaking the connection; a solid line between the gauge and its 13 14 CVCK User’s Manual connection point indicates that the connection is still valid and helps you to remember where the gauge is attached. This is to allow you to arrange gauges in a manner which avoids cluttering the workspace unnecessarily. Also, it will be useful for comparative analysis, which we discuss in the section entitled Advanced Information, Techniques, and Tips. A gauge may be in one of two states: open or closed. When it initially appears in the workspace a gauge is closed and looks like the small rounded icon shown in the tool palette. However, this icon is not much use -- it doesn’t convey any information! To read a gauge, you must open it: simply double-click on the closed gauge to open it. When opened, a gauge takes the form of a graph, showing the variation of the parameter it is measuring over time. Doubleclicking an open gauge causes it to revert to its closed form. The figure below summarizes this behavior. Gauges are always active, whether open or closed. Thus, it doesn’t matter if you open a gauge before or after running the simulation --- the results will be the same. However, if you open a gauge before running the simulation, you can actually watch the values being filled in as the simulation runs. 4. Running the simulation. When you reach this step, you should have a complete cardiovascular construction in your workspace, with all gauges attached. It is now time to run your new system to see how it performs. Move to the control panel and click on Run to start the simulation. Watch your construction closely, paying special attention to the arrows within the components which indicate the direction of blood flow as the simulation runs. CVCK User’s Manual 5. Interpreting results. CVCK will perfectly simulate a real cardiovascular system, but it is still up to you to draw conclusions from the results. Aside from watching the flow arrows in the components as the system runs, the most effective way to glean information from the system is from the attached gauges. Examine the values recorded by the gauges you have attached as you try to answer your experimental questions. If necessary, attach new gauges and run the simulation again to gain more information. 6. Saving your work. After you have painstakingly constructed and tested some cardiovascular construction, you don’t want to lose it all just because you have to go home. CVCK allows you to easily save an entire workspace so that you can continue your exploration later. Simply pull down the File menu and select Save or Save as... . The system will save your work under a file name you specify. To continue working on a saved construction, select Open... from the File menu. You will be prompted for the name of the file to load. Don’t panic if the reloaded workspace looks slightly different from the one you saved. CVCK may close open gauges and return them to their attached positions in order to save space. Simply open and/or reposition the gauges and continue working. 7. Quitting CVCK. When you are ready to end your session with CVCK, select Quit from the File menu. If you have made changes to your workspace since the last save, you will be asked whether you want save those changes before quitting. 15 16 CVCK User’s Manual A Sample Construction In previous sections, you learned everything you need in order to successfully use CVCK to construct and analyze cardiovascular systems. However, even the most complete description may leave the reader wondering how to put it all together. This section gives a brief example for you to follow. It should help you get the hang of things. Step1. Begin with an empty workspace. Create one ventricle, two one-way valves, one vessel, two capillaries, and four elbows by dragging these components into the workspace from the component palette. Your workspace should look something like: CVCK User’s Manual Step2. Connect the components. Arrange and connect the components to construct the cardiovascular system shown below. You may have to rotate the elbows and one-way valves in order to position them correctly. Refer back to the previous section if you’ve forgotten how. 17 18 CVCK User’s Manual Step3. Create three gauges by dragging them into the workspace. Make one of them a pressure gauge, by attaching it to the middle hotspot of the ventricle; make another a flow gauge, by attaching it to the leftmost hotspot of the right hand valve; and make the last one an oxygen gauge, attaching it to the central hotspot of the capillary. After you have attached the gauges to the hotspots, you can drag the gauges to a more convenient location. The gauges will be connected to the hotspot by a line. The resulting construction is shown below. CVCK User’s Manual Step4. Open all of the gauges by double-clicking them. This changes the gauge icon into a graph for plotting changes in the sampled variable during a simulation. For easier comparison, position the graphs, one above the other as shown below. 19 20 CVCK User’s Manual Step5. Run the simulation by clicking Run in the control panel. All of the gauges should busily record values. The next figure shows the workspace just after the run. You now know everything you need to know in order to successfully use CVCK. The rest is up to you. CVCK is the ultimate laboratory — what you can explore is limited only by your creativity. The remaining sections cover advanced information and other CVCK details. You may read them now or wait until you have mastered the concepts presented above and are ready for more in-depth exploration. CVCK User’s Manual Advanced Information, Techniques and Tips In this section, we’ll work to expose some of the hidden functionality and features of CVCK. Before you read this section, be sure you understand the basic principles and usage of CVCK. Component Parameters Earlier, we noted that each component has one or more component parameters which determine the behavior of that component. Here, we show how to vary those parameters and describe them in more detail. However, we are purposefully sketchy on the effects of changing various parameters values to avoid giving anything away. We encourage you to explore various settings yourself to determine their effect. Changing Component parameters Regardless of the component, the way to examine and/or modify a component’s parameters is the same: simply double-click the component. You will be shown a list of the component’s parameters along with their current settings. You may change the settings by selecting a new value. Component Parameter descriptions All components have a diameter. This determines the resistance in the component — how hard it is to push blood through the component. Decreasing the diameter will (for a given pressure) cause a decrease in flow. The ventricle has several unique parameters. Beat rate indicates how fast the ventricle is beating. If you have more than one ventricle in your system, they will all beat at the same rate. Changing the rate of one will automatically change the rate of the other(s). Heart Strength allows you to vary the strength of the ventricle. For instance, the heart strength of an organism typically decreases with age. If you have more than one ventricle, heart strength can be set individually. 21 22 CVCK User’s Manual Multiple Ventricles. The ventricle has several unique parameters. Beat rate indicates how fast the ventricle is beating. If you have more than one ventricle in your system, they will all beat at the same rate. Changing the rate of one will automatically change the rate of the other(s). Heart Strength allows you to vary the strength of the ventricle. For instance, the heart strength of an organism typically decreases with age. If you have more than one ventricle, heart strength can be set individually. The capillary bed has a number of unique parameters. Branching of the capillary bed specifies how many tiny vessels the bed is composed of. The higher the branching, the more the surface area of the capillaries and the more oxygen can be transferred in the capillary bed. Diameter indicates the size of the vessels in the capillary bed. Smaller vessels create more resistance. The muscle has an important parameter known as the work rate, which determines how much oxygen it draws from the system. Clearly, higher work rates require more oxygen. The lung has several important parameters. The breathing effort of the lung indicates how fast the organism is breathing. That is, more oxygen can be brought into the system by heavy quick breathing. The Atmospheric Oxygen Concentration indicates the amount of oxygen available in the atmosphere. For instance, there is more oxygen in the air at sea level than at the top of a mountain. Changing Gauge Measurement It may sometimes be the case that you want to change the system value that some gauge is measuring. For instance, you may have an oxygen gauge attached at some point, but decide you would rather measure pressure there instead. One way to manage this is to throw away the oxygen gauge and then to create and attach a pressure gauge at that point. But there is an easier way. Select the gauge and then choose Measure... from the Control menu. You will be presented with a list a values that can be measured at that point. Select the value you would like to measure. CVCK User’s Manual Techniques Comparative measurement. CVCK does not present you with precise numerical values for parameters. This would only be unnecessarily confusing, since we are interested in the overall concepts and not the precise equations. As a result, it is not possible to perform common operations like addition and subtraction on the values displayed by the gauges. Thus, we adopt a comparative approach: we compare the results of two gauges to determine their behavior relative to each other. For example, suppose we are trying to determine what the pressure does with respect to the flow in the example construction from the last section. To make comparative analysis easy, we simply place the graphs for pressure and flow directly above one another. In this way, we can easily see that the flow increases when the pressure in the ventricle rises. There are numerous other occasions where this technique of lining up graphs is useful for simplifying analysis. Tricks and Tips Trick1: It is often the case that you have several gauges attached to a component. When you prepare to throw away such a component, it is not necessary to first throw away all of the attached gauges. Simply throw the component away --- all attached gauges are automatically deleted as well. Trick2: The workspace has a grow box in the lower right hand corner. To adjust the size of the workspace, simply drag this box. As you drag, you will see the outlines of the workspace changing. When it is sized to your satisfaction, stop dragging. Trick3: Sometimes you may forget something about a tool or component in CVCK. To get a brief description of something, highlight it and select Describe from the Help menu. 23 24 CVCK User’s Manual Appendix A: Hardware and Software Requirements CVCK is designed to operate best on the Macintosh II family of computers. However, it will run nicely (though slower on lower end models) on Macintoshes of any type, so long as at least 4 megabytes are available to the program. Aside from having CVCK application program itself, you must have several other pieces of software installed in order for the application to run. In particular, CVCK application assumes that the files bitmaps and icons, which are included in CVCK software package, are available and are placed in the same folder as CVCK application. When you start the program, it looks for these resource files in its folder. If they are not there, the program will not load successfully! CVCK is not System 7 compatible. Operation under Apple's new System 7 operating system may be somewhat unreliable due to significant changes in the way memory management is handled in System 7. Under certain configurations, especially those with minimal amounts of memory, the system may crash after opening several new laboratory windows or after the CVCK has been used continuously for a long period (i.e. without quitting and restarting). During a crash, the CVCK may "lock up", failing to respond to further user input, or may quit altogether with the message that "application has quit unexpectedly". In any case, the Macintosh must be restarted before CVCK can be re-launched. In general, we recommend allocating CVCK as much memory as possible on your system. If you still experience significant problems running CVCK under System 7, we suggest using a System 6.05 (or 6.03 or 6.04) floppy disk to restart your Macintosh and running CVCK under this operating system. Note that, using this approach, the CVCK application itself may still reside in and be launched from a folder on the Macintosh hard disk and need NOT be launched from floppy disk or the CD-ROM. Summary of Hardware and Software Requirements • Macintosh computer with at least 4 megabytes of available random access memory (RAM). • CVCK application installed in a folder. • The resource files icons and bitmaps installed in the same folder as the application. • CVCK is not reliably System 7 compatible. CVCK User’s Manual 25 Appendix B: Trouble-shooting the System IT DOESN’T WORK!! Even the best program has some bugs in it . However, there are many situations in which there is some other problem, something that is not an error at all. In general, there are two types of problems: failure to start the program and failure in working with CVCK. I can’t get this program to start! The Symptoms The Problem The Cure CVCK program won’t load. After double clicking the icon, the program begins to load, but just freezes up and never presents the user with a workspace. The problem is most likely that CVCK program can’t find the resources it needs. The Icons and Bitmaps files must be in the same folder as CVCK in order for loading to be successful. Move the Icons and Bitmaps files into the same folder as CVCK application. Restart the computer and try again. 26 CVCK User’s Manual The Symptoms The Problem The Cure CVCK program reports an insufficient memory error during startup. This means there is not enough memory. Are you sure the machine has at least 4 megabytes of free (RAM) memory? Are you running other applications (under Multifinder) which can be closed? First, find out how much memory you have: Under the Apple () menu, select “About Finder...”. You will see a dialog box detailing the current memory usage in your system. The crucial figure is the Largest Unused Block. This value must be over 3000K in order for the system to run. If it is not, and there are no other applications currently running, then CVCK can not be run on that machine. If there are other applications currently running, try quitting those applications in order to free up memory. CVCK runs but is apparently not working right. Sometimes there is no crash or explicit error, but the results of the simulation simply don’t seem right. We have discovered several such scenarios, which we list below. CVCK User’s Manual 27 It IS working! The most likely scenario is that the simulation is, in fact, working perfectly and that you, the user, have overlooked something. For instance, you may have: • Constructed a system with no ventricle. Since the ventricle is the only “moving part” in a cardiovascular system, not much will happen if you don’t include one in your construction. Like the famous Tin Man of Oz, your organism has no heart! • Opposing valves. One-way valves allow pressure to flow only in one direction. Thus, if you surround a ventricle on both sides with one-way valves both pointed inward, the blood will have no way to leave the heart. This is analogous to holding your nose and mouth while trying to exhale -- there is nowhere for the air to go. Similarly, if both valves point outward, blood will be allowed to flow out of the heart but never back in. Again, nothing will happen after the first few beats. • Out of blood. If you’ve left some component unconnected at one end, all of the blood will “spill” out of the system when you run it. Correct the “leak” and click on Reset in the control panel to refill the system with blood. 28 CVCK User’s Manual Closed System Any functioning cardiovascular system must be a closed system. That is, blood should be conserved. In an open system, there may be “leaks” which allow blood to trickle away, causing the system to fail. Component A piece that may be used in constructing a cardiovascular simulation. For instance, hearts, lungs, and muscles are all components. Control Panel This is the control mechanism for the simulation. It is similar to the controls for a typical videotape machine. CVCK The CardioVascular Construction Kit (this program). Dialog Box A window that displays certain information and/or contains a request for information of some sort. The parameter windows for the cardiovascular components are examples of dialog boxes. CVCK User’s Manual 29 Gauge A gauge is a specialized tool that can be used to measure various quantities at a given place in a cardiovascular construction. Quantities that can currently be measured include oxygen concentration, pressure, and flow. Qualitative Analysis In quantitative analysis, a scientist looks at precise values (numbers) in order to draw conclusions. In contrast, qualitative analysis involves looking at overall trends and behavior. Thus, the values displayed by gauges in CVCK are qualitative in that they are not precise values but rather graphs that show the abstract behavior of the quantity being measured. It has been hypothesized that all scientific discovery begins with qualitative thinking and analysis; quantitative analysis is only invoked when the problem has been solved abstractly, in order to get precise answers. Scientific Method A well-defined approach to experimentation. See your Biology text for a detailed explanation. A key feature of this approach is hypothesis formation, which must occur as a first step and which should drive all further experimentation. In CVCK, students are asked to come up with a hypothesis about the functioning of some cardiovascular system and then use CVCK to construct a simulation that will prove or disprove that hypothesis.