1
Analysis program
Mitec Monitor
User Manual
Mitec Monitor
User Manual
Mitec’s products are designed and manufactured by
Mitec Instrument AB in Säffle, Sweden.
Copywrite for products, software and documentation
Belongs exclusively to Mitec Elektronik AB 1982-2000
This user manual applies to software version 1.70
and to other versions in appropriate parts.
All rights to technical modifications are reserved.
Document no. B10019 Rev. A
Mitec Instrument AB
Västra Storgatan 18 661 30 Säffle Sweden
+46 (0)533 16050 www.mitec.se
Contents
Mitec Monitor
From data to compentence
7
7
Installation and start
Installation
8
8
General program information
Introduction
Structures
Menus and appearance
12
12
14
16
Measuring and data collection
Measuring with measuring stations
Work method for Monitor
Define a measuring object
Change and delete a measuring object
Collect measuring values manually
Collect measuring values automatically
How and where data is saved
17
17
18
19
30
31
33
34
Show the measuring result
General
Work method
Display and print out graph
Analysis tools
Compose a diagram
Change the appearance of a graph
Use graph formats
Calculations and formula
Export to other programs
Export to web
Report
39
39
40
42
45
55
73
75
78
87
89
90
Program settings
General settings
Printers
92
92
102
Additional information
What is a Data logger?
103
103
From data to compentence
Mitec Monitor
Mitec Monitor
From data to compentence
Welcome to Mitec Monitor, our program for collecting, processing
and analysing measuring data.
The purpose of all measurements is to increase knowledge of the
surrounding environment. For this to be possible, measuring data must
be organized and displayed in a logical manner.
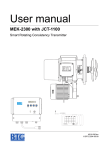
Data
Information
Knowledge
Competence
Measuring data must be organised so that it provides meaningful
information. Information leads to knowledge about the surrounding
environment and improves the decision-making process.
Ultimately, the combined knowledge will increase the competence of
both the individual and the organization.
WinLog presents measuring data to PC screen or printer as graphs, bar
charts, statistics etc. WinLog has functions for communication,
database management, calculation and analysis.
Monitor can be used by anyone with Windows on their PC. It is suitable
for smaller measurements with single sensors but is most suitable for
more comprehensive projects with large quanties of data and a fixed
installed system.
It can be used with all Mitec data loggers and measuring stations.
WinLog is a Swedish program developed by Mitec, for our customers
and market.
mitec Monitor
7
Installation
Installation and start
Installation and start
We recommend that you study relevant sections of the user manual
before starting measurement.
You can however get started quickly by following the instructions in
this chapter to get an insight into how the program works.
Installation
System requirements
Mitec Monitor is designed for use on a PC. The program is not
available for Mac. The program is designed for a single user, but by
saving measuring data on a common harddisk, several operators can use
the program at the same time.
Monitor requires that you have at least Windows 3.1 and a 386
computer. No extra memory need be installed. WinLog can therefore be
run on older computers.
Monitor is designed for Windows 3.11 but can be run on Windows
95/98 without problems.
Windows NT can also be used but full functionality can not be
guaranteed (printer and COM ports are not completely compatible.)
Mitec Monitor requires at least the following equipment:
• Windows version 3.1 with associated requirements.
•
A 386-computer or compatible.
•
A free COM port for connection of communication equipment and
data loggers.
The following equipment is recommended:
• Pentium PC with 32 - 64 Mbyte memory
•
Screen with 800x600 point resolution on screen and graphic card.
•
Colour printer
All modern PCs can be used with Monitor, the faster the better. Monitor has been designed so it can be also be used
on older computers. The program is extremely compact and only requires approximately 0.5 Mb harddisk memory. The
amount of RAM in the PC marginally affects Monitor.
Sometimes a computer will only have a single COM port and if the mouse is connected to this, an extra port must be
installed. Monitor accepts communication on COM1 to COM4.
8
mitec Monitor
Installation
Installation and start
Installing the program
The program is delivered on a 1.4 Mbyte diskette or via Internet. In
addition to the software, the diskette includes sample measuring data.
There is no special network, server or client version. All programs are
the same. Refer information below regarding simultaneous multiple
users.
It is assumed that you have first started Windows on your computer.
• Insert installation diskette in drive A: (or other name)
• Select File and then Run from Program manager / Start
• Type A:\INSTALL in the text box and select OK.
• Follow screen instructions.
Licence number
A licence number is required so the software can be used,. If the licence
number is not correct the program will be run in demo mode.
The licence number consists of a combination of numbers and letters
with 17 characters, for example 12RY2-345QW-UIO23.
The licence number is supplied by Mitec when the program is delivered
and can be found on the accompanying Licence Agreement.
• Click on the menu option
? and then on Licence.
A Dialog box appears for entering the licence number.
.
• Enter the licence number (17 characters) and press OK.
Read more about licence numbers in the Program Installation chapter.
Multiple simultaneous users in network
The program is essentially a single-user program.
By providing a common searchpath on the local network to the
measuring data, several different operators can use the program at the
same time.
A program must be installed on each computer to be used. The
installation procedure is the same regardless of the computer, and the
same installation disk can be used.
A unique license number is required for each computer.
The common searchpath must be given in every program. This is done
from within the program after the installation is completed and the
program has been started. Refer General settings below.
mitec Monitor
9
Installation
Installation and start
Note. The same license number cannot be used, with a common
searchpath to the data, on different computers. Monitor will issue a
warning and measuring data cannot be accessed.
Note. If several users are to share information, it is most practical if one
of the computers is regarded as the ”communication computer” and
equipped with modem etc. The other computers can then be used purely
for analysis.
What happens during installation?
During installation a library is created, C:\MONITOR if not indicated
otherwise.
The program code and help files are located in this library. No changes
are made or required in AUTOEXEC.BAT, CONFIG.SYS or in
Windows .INI-files or directories.
Exclusive of data, the program only takes approximately 1.0 MB of
hard disk memory.
PROGRAM UPDATES
Mitec software is continually updated with new functions and improvements, normally 2-4 times annually. From v1.70
updates are available via internet.
Support Center on Internet
On http://www.mitec.se under the heading Service & Support, there is a special Customer Support Center.
The Support Center is available to all Mitec customers by requesting a User-ID and password.
New versions of WinLog and user manuals are available from the Support Center as well as general technical
information
Support agreement
The best way to guarantee constant access to new versions is to take out a support agreement. By doing this you
receive a new licence number for your software that enables you to download and install new program versions free of
charge.
Starting the program
During installation, a program group is created called Mitec Monitor.
This includes two programs Mitec Monitor and Monitor Help.
Windows 3.1 creates a program group with icons that are shown on the
10
mitec Monitor
Installation
Installation and start
screen. Click directly on the Monitor icon to start the program.
In Windows 95 the program can be started by pressing the Start button
and choosing Program and Mitec Monitor. With the help of Setup and
Control Panel, an icon is created for Monitor that is placed directly on
the screen.
When Monitor starts, the program will first ask if the date is correct. If
not, set the clock in the computer and try again.
Uninstalling the progr
program
am
Monitor can be removed from the computer at any time. All files
required by the program are located in the Monitor directory or its
subdirectories.
Monitor does not locate any files in the computer’s system directories
or any other files.
Use Explorer and select the Monitor directory. Press the Delete key on
the keyboard and follow the instructions on the screen.
NOTE! This method will also remove all measuring data.
Ensure that important information is first saved to diskette or other
backup. Read more about backup in the chapter Measuring and data
collection.
mitec Monitor
11
Introduction
General program information
General program information
Introduction
Applications for Monitor
Monitor is a program for collecting, processing and analysing
measuring values from Mitec’s data acquisition instruments.
The program presents measuring data on the screen and printer, as
graphs, bar charts, statistics etc.
Mitec Monitor has powerful functions for communication and data
collection.
Monitor can communicate via standard and GSM modem, and also
provides automatic data collection, SMS-alarm and Internet
presentation.
This means that Monitor is suitable for larger projects that run over
longer time periods and where measuring equipment may be
geographically spread.
Monitor is the heart of the Measuring Central in Mitec’s automatic
monitoring system for Logistics and Industrial service.
Monitor also has powerful analysis tools with X-Y graphs,
macrofunctions, etc.
Monitor can also directly use measuring data saved from the less
advanced programs Mitec WinSat and WinLog.
Other Mitec software
Mitec WinLog is designed primarily for occasional measurements with
a limited number of sensors.
The program is based on a working method where one or more
measuring instruments are equipped with sensors and placed out in the
field during a limited time period.
The instrument is then connected directly to the PC and colleced
information downloaded to the computer for presentation.
The concept behind Mitec WinLog is that you should quickly, without
significant installation, present a measuring result in a time chart with
key statistics. This simplicity does not compromise the program’s
functionality
WinSat is designed specifically for Mitec’s SatelLite range of data
loggers. WinSat has a limited number of functions and is suited to more
simple measurements. Measuring data from WinSat can be directly
used by WinLog and Monitor.
12
mitec Monitor
Introduction
General program information
Year 2000
All systems for measuring and data acquisition were affected by the
transition to the year 2000.
Mitec’s products are assured under to the IT Commission’s definition
for transition to the year 2000. This means that the turn of the century
did not affect the products, and that the year 2000 is considered a leap
year.
Mitec’s Windows programs are specifically designed for handling long
series of measuring data and have highly advanced functions for time
calculation and analysis.
Time calculation is based on the Gregorian calendar and is starts from
the year 0000. Time is saved as a 64-bit number with a resolution of
1/1024th second. All time calculations include lear year adjustments
every 100th and 400th year, and are handled up until the year 9999..
Year 2038
The next bomb will arrive in the year 2038!
On the 18th January year 2038, all time calculations based on so-called
UNIX time will reach the limit.
This time counts the number of seconds starting from 1-1-1970 and
2,147,483,647 seconds later, all 32 bits are used up.
Mitec WinSat, Monitor och Monitor will however continue to function
as normal, due to the fact that we calculate time with 64-bit number.
At least up until the year 9999.....
mitec Monitor
13
Structures
General program information
Structures
Structure of the program
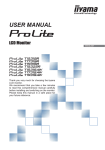
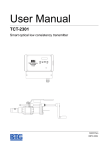
Monitor is based on three basic functions that are reflected in its
functionality and operation.
• Communication (data acquisition)
• Saving of data
• Analysis and presentation
From an operational perspective, communication and storage of data
are integrated and managed in the measuring system’s configuration.
Measuring data that is collected and saved can then by studied using the
program’s analysis tools.
Measuring
object
Presentation
(TRYCK1:MAX)
Measuring system
Analysis tools
Measuring system
The Measurement section contains information on how the
measurement was made, the sensors used, scale factors, measuring
instruments, etc. Each measurement belongs to a measuring object,
which is the place, equipment etc that the measurement is carried out
on. Measuring data is saved under the object’s name.
For every new measuring situation, the user defines the appearance of
the measuring system and creates a new object.
Note that new measuring data can continually be added to an existing
measuring object as more information is collected
Program help
Collected information can be processed and presented in different ways
in Monitor. The program has advanced analysis tools that can perform
calculations and graphic presentation of measuring data.
Measuring data can also be transfered to other programs for further
processing.
14
Calculation
mitec Monitor
Structures
General program information
Internet
Mitec Monitor also has inbuilt functions for automatic presentation to a
website. All measuring information including graphics, statistics and
calculations can be exported.
Mitec also provide complete internet solutions for navigation and
presentation. Refer www.mitec.se for additional information.
On the demo center on the Mitec website you can see on-line
measurements that are automatically published from some of our
measuring centrals.
Mitec’s system for automatic measuring and monitoring
Alarm
The sytem also includes functions for alarm, both local and via SMS to
GSM-telephone.
Help function
The program’s inbuilt help functions complement the user manual.
mitec Monitor
Help buttons.
15
Menus and appearance
General program information
Menus and appearance
The program uses symbols and concepts that are similar to standard
Windows programs such as Microsoft Word.
The idea is that the program should be self-educational and that the user
can navigate intuitively without in-depth prior knowledge.
Menu bar
The uppermost bar is called the program’s menu bar. All functions
available in the program can be reached through it.
The menu bar changes in appearance depending on its location in the
program.
When the program is started, the following short menu is displayed.
When a graph is open, there are additional menu options. The program
can be setup so that the full menu is always displayed.
Buttons
Under the menu bar there is a row of buttons, a toolbar. Active buttons
have black illustrations and those with light grey symbols are not
currently active. The toolbar can be hidden if you wish.
In this example the printer button is grey because a printer has not been selected for the current graph.
Status bar
At the bottom right hand corner of the screen is a status bar that shows
what the program is doing, for example with communication. The right
side of the status bar shows date and time. Both the status bar and time
display can be hidden.
The right-most button on the toolbar quickly provides help for each function displayed on the screen. Click on the
button and drag the question mark symbol to the current function.
16
mitec Monitor
Measuring with measuring stations
Measuring and data collection
Measuring and data collection
Measuring with measuring stations
General information on measuring time series
Monitor is a program for managing series of measuring data, not single
measurements. In this user manual we use the term time series. This
refers to a number of measuring values taken at a regular set time
interval. It is easiest to measure a time series with automatic equipment,
a data logger, often known as a data acquisition instrument.
A data logger is a measuring instrument with a memory. One or more
sensors can be connected to the data logger and the logger configured to
automatically measure and save signals from sensors, at a certain
registration interval.
There are inbuilt data logger functions in Mitec’s RMS40 and RMS31
measuring stations.
Data in the memory is then collected using a PC program such as
Monitor and saved to the computer’s hard disk for further analysis and
presentation.
Mitec Monitor is designed for use with Mitec data loggers and can not
communicate with other products.
Mitec data loggers
loggers
Mitec has manufactured data loggers since the early 1980s. Several
generations have been developed since this. Monitor can manage
measuring data from all Mitec data loggers.
• MTM20, MTM200 *)
• PM20, PM200 *)
• AT30, Mitec303 *)
• AT31, AT40, RMS31, RMS40
• SatelLite type -T, -TH, -U, -E.
• eLog series, SatelLite50 type -TK/6, -TK/12, -TH/E, -U and future
additions
*) no longer manufactured.
AT40, AT31, SatelLite and eLog are equipped with Mitec’s system for
automatic identification of sensors. This means that features such as the
magnitude, unit and other information about the sensors are
automatically transferred to the PC, thus making analysis and
presentation significantly easier.
Measuring data from Mitec’s data loggers is transferred to the PC via
direct connection or via telephone or GSM modem (Monitor).
mitec Monitor
17
Work method for Monitor
Measuring and data collection
Work method for Monitor
A measuring project requires a certain amount of planning to be
effective.
Monitor has been developed from practical experience of field
measurements and its structure and functionality adapted to this.
Work with Monitor follows a basic pattern:
• Define a measuring object
Decide how the measuring system should look, which
sensors and measuring instruments are used, etc. This is
defined using Measurement, Configuration.
• Present your measurement result
Show the measuring result in a graph. The graph is created
automatically or manually. The Analysis and Composition
menus are used.
This user manual describes the operation and function of each part of
the program. The description essentially follows the methodology
described above
PRINCIPLES FOR MEASURING OBJECT
Mitec software saves measuring data in a measuring object.
The measuring object is given a name by the user. Measuring data is then collected and analysed using this name.
A measuring object can contain measuring data from one or more measuring instruments. Every instrument can in turn
have one or more sensors.
•
All related measuring data under a single name
•
Data records can be extended as often as you wish – still under the same name
•
The same graph can be used for all similar measuring objects – switch to collecting data from another
object with a keystroke.
It is therefore not necessary to deal with saving measuring data as files. If you wish to collect measuring data from a
measurement and then continue the measurement, the additional data is added to previously saved data and an
infinite data record can be built up.
For example, data from Mitec’s weather station for Säffle on www.seffle.com is collected each day. In the course of a
year there are 365 data collections. All are automatically saved in a single measuring object – without opening and
closing files.
Simple data acquisition programs require that each transfer is a file. This would mean that in the example above, 365
files per year are saved and 365 files are gathered into a graph. A hopeless task. Mitec’s program solves this
automatically.
18
mitec Monitor
Define a measuring object
Measuring and data collection
Define a measuring object
A fundamental concept in Monitor is Measuring object. A measuring
object is the place, equipment or similar where the measurement is
made.
Measuring data saved under the object’s name.
For each new measurement, the measuring object must first be defined.
Under the heading Measurement you define how the measurement will
be made, which sensors are used, scale factors, measurement
instruments etc.
Configuration of a new object
The measuring object is described under the Measurement menu.
• Click on Measurement and select Configuration.
The dialog box Configuration is opened
• Select Add to create a new measuring object..
A new dialog box Configuration of object is opened. (Use
Edit to change existing objects and Delete to remove an
object.)
PASSWORDTo prevent unauthorised changes to the measuring system, Configuration of the measuring system is
protected with a password. Click on the button Password and enter up to 16 characters. To access configuration
information, the password must be entered.
• Complete the dialog box with your choice of name for the
measuring object.
• Press Add new to go continue.
A new dialog box Group with xxx is opened:
INFO FIELD
mitec Monitor
19
Define a measuring object
Measuring and data collection
In the top right hand corner there are 5 fields for optional text. Here you can enter information such as address,
customer name or similar. The information is a VARIABLE in the formula language and contents of the field can be
connected to a text box in a graph using %I. Refer also FORMULA LANGUAGE.
CONSTANTS
Each object can also be assigned constants (CONST) which are used in formula during calculations. CONST 1 to 5
are constants that are connected to the current measuring object. Constrants are used in different expressions and
can be entered in the dialog box above or changed during analysis by selecting CONST from the analysis menu (or
press F10). Refer also FORMULA LANGUAGE.
Dialog box for ”Group”
Each Group has a common communications path. A group can contain
up to 16 different measuring instruments but it has just a single
communications path. This can be a modem (with telephone number) or
a certain serial port on the computer.
• Enter the name of the group under measuring object and
select the correct family of measuring instrument.
• Note any useful information about the group.
• Select the communications method in the Connect type box
• Press OK to continue
A new dialog box Group to xxxxx is opened:
20
mitec Monitor
Define a measuring object
Measuring and data collection
GROUP
The name can be freely selected with up to 8 characters. The group name is only used to differentiate different groups
of measuring instruments with different communication methods in a single measuring object.
Family indicates which type of measuring equipment there is in the group. If different types of instrument are to be
used in the object, a new group must be created.
Memory note is a field reserved for internal comments.
Connection type concerns how the communication with the group is to occur.
Serial port
Modem
Addressable short haul
modem
Slow link
Half duplex (2-wire)
Search logger
(broadcast)
should be selected if the measuring equipment is connected to one of the computer’s COMports, directly or via shorthaul modem. At the same time select baudrate (same baudrate as
in measuring equipment). Cross CTS/RTS handshake if the measuring equipment is directly
connected without modem.
is selected if the measuring equipment has a modem (or GSM telephone) and is connected
to the telenet. Enter the actual telephone number. (If dialling should go via an exchage enter
0W before the number to first dial 0.) If Mitec instruments in the 20/30/200 series are used,
the extra Init string should be used. Refer help text in the program.
Should be crossed if a ESC-addressable shorthaul modem is used (direct to the Serial port
or together with a normal modem), such as MA-43. This can only be used with the 31/40
series.
Should be crossed if the communications link is slow. With a slow link, Monitor waits longer
for the data that is sent from the logger.
Should be crossed if only half duplex is possible. This applies for example to short haul
modems where only 2 wires are used. Using half duplex, Monitor makes a short pause
when the data direction is changed between Monitor and the logger.
Should be crossed if Monitor should automatically search for connected measuring
equipment and collect data from them. The instrument or instruments found will then be
automatically included in the measuring system the their sensors assigned an available
sensor name.
Automatic collection concerns how automatic collection of measuring data should be made.
Next, date
Date for next automatic collection
Next, time
Time for next automatic collection.
Interval
Time interval between automatic collection or None for no automatic collection.
Logger Shows a list of available loggers to select from. These have previously been selected manually or
automatically in the group.
mitec Monitor
21
Define a measuring object
Measuring and data collection
Indicate which measuring equipment is connected
Previously, a group of measuring equipment has been selected. The
program must also know which individual instruments there are. This
can be done automatically by crossing the box Broadcast (refer above)
or manually.
Manual configuration is preferable when you also want to set up scale
factors for sensors.
• Press the Add button.
A new dialog box appears.
• Select the type of measuring equipment and give its serial
number. Give the address of the shorthaul modem if one is
used.
LOGGER
Type: specify which instrument is used. Select from the scroll list.
Pos: is the position in the group from 1-16. This does not normally need to be specified as it is selected automatically.
Serial number: is the serial number of the current instrument.
Address for shorthaul modem: If an addressable shorthaul modem such as Westermo MA-43 is used, its address
should be entered here.
Sensors. A list of names of the sensors used on the current instrument. These have previously been defined.
22
mitec Monitor
Define a measuring object
Measuring and data collection
Adding sensors
• Press the button Add in the dialog box Configuration of
sensors
A new dialog box Sensors to xxxxx is opened.
The new dialog box containes a number of fields for different
functions. Refer below for a description of every field.
• Indicate the name of the sensor.
See rules below for sensor names.
If scale factors are needed, enter in the box Gain and
Offset. Use the calculation sheet to make calculation easier.
• Complete by pressing OK
DIALOG BOX FOR SENSORS
Name: Enter the name of the sensor, 1-8 characters.
Channel: Indicate which measuring channel on the instrument is used (automatic function).
Calculation sheet: Here there are a number of options for automatic scaling of input signals. Selct from the dropdown list and press Exec. sheet.
Parameters for next data record: These are the scale factors to be used by the program from next collection of data
from the logger. The equation Y=kx+m is used. k=Gain and m=Offset
Parameters for all data records: This is the information on type, signal type, measuring range etc. The information
applies to all data records including those already saved. AT40/31 and SatelLite loggers automatically complete the
information, but if other loggers are used they must be entered manually. The information is used by Monitor for
scaling graph axes when graphs are generated automatically.
Data record: This shows which data records, i.e. blocks of measuring data, have previously been collected into the
program. This therefore is the program’s database for the current sensor’s measuring data.
SENSORS AND SENSOR NAME
A number of different types of sensors can be connected to Mitec’s measuring system to measure different physical
elements such as pressure, temperature, power etc.
Each sensor is assigned a name in the program. Using this name, measuring data collected by the program can be
analysed and presented.
The sensor name can have up to 8 characters. The name can be assigned manually when the measuring object is
configured. It must start with a letter and can only contain the characters A-Z, 0-9 and _. Examples are TEMP,
PRESS10, FLOW_2 etc.
If no name is assigned, the program automatically assigns sensors the label G1, G2 and so on.
HOW THE NAME OF THE OBJECT AFFECTS THE SENSOR
Internally, Monitor uses both the ”first name” and ”surname” when measuring data is managed.
” First name” = The object’s name (eg ELSTREET)
” Surname” = The sensor’s name (eg L1)
For example, the measuring object ELSTREET has three sensors called L1, L2 and L3 (measuring three phases of
current).
The complete internal name is ELSTREET.L1, ELSTREET.L2 and ELSTREET.L3.
During analysis the graph first checks which object has been selected and then which of the sensor names are used in
the graphs. Measuring data can then be collected from both the correct object and sensor.
mitec Monitor
23
Define a measuring object
Measuring and data collection
SCALING OF INPUT SIGNALS
Measuring sensors output an electrical signal that carries information about the parameter (eg pressure) being
measured. The information is carried in the signals current, voltage or frequency. Mitec data loggers have functions for
automatic scaling of input signals.
However it is often practical to manually input scale factors while measuring data is being processed. Monitor can
manage this either during presentation of the diagram or during collection of measuring data.
We recommend that scaling is done during data collection to simplify presentation. In the sensor dialog box the
sensor’s name and gain is provided. Refer to above explanation of the different fields.
24
mitec Monitor
Define a measuring object
Measuring and data collection
Parameters for all data records
Parameters for all data records contains information that affects all
measuring data for the current sensor as well as previously collected
data and new data to be collected in the future.
The box has five different fields with the functions described below.
When Mitec data loggers AT40/AT31 and SatelLite are used, the fields
are completed automatically and don’t need to be changed.
If older Mitec data loggers MTM20, PM20 or AT30 are used, the fields
should be entered manually.
TYPE Type indicates which input type is used by the sensor. Options are Analog, Pulse, Time, Status and Auto.
MAGNITUDE Magnitude is used by Monitor to label the Y-axes when the graph is created automatically during
analysis. This shows the quantity of the measuring signal, eg Pressure, Flow, Temperature etc. The information is
collected automatically from the sensor when newer Mitec data loggers are used.
UNIT Unit is used by WinLog to label the Y-axes when the diagram is created automatically during analysis. This
indicates the unit of the measuring signal, eg Bar, m3/h, etc. The information is collected automatically from the sensor
when newer Mitec data loggers are used.
START Indicates where the measuring range starts on the sensor. This is used by WinLog to scale the Y-axes when
the diagram is created automatically during analysis, as well as when new scale factors are calculated using
calculation sheets.
STOP Indicates where the measuring range ends on the sensor. This is used by WinLog to scale the Y-axes when the
diagram is created automatically during analysis, as well as when new scale factors are calculated using calculation
sheets.
mitec Monitor
25
Define a measuring object
Measuring and data collection
Parameters for the next data record
Parameters for next data record includes information that affects
measuring data that will be saved from and including the next collection
of measuring data from the data logger.
The box has three different fields with the functions explained below.
• Calculate new gain and enter in field. Alternatively, a
calculation sheet can be used. Select format and press Exec.
sheet. Complete the fields and close.
SCALING OF INPUT SIGNALS
Data loggers convert signals and save them with the type (size) that is being measured. For example, a pressure
measurement can output a 4-20mA signal that may actually mean 0 - 10 Bar. Mitec AT40 and AT31 data loggers
automatically perform the scaling and save in the correct way.
In some cases you will want to do the scaling yourself using WinLog. The program has powerful functions for
converting and scaling of measuring data.
INFO is a field for variable text which can be used for comments. Information is saved here along with the data record
(measuring data) and can be displayed in the graph using the text functions in Monitor’s formula language (%M function)
GAIN is the k-factor in the equation Y=kx+m. The expression is used to recalculate the sensor’s input signal to the
signal required. Scaling is equivalent to area in everyday terminology.
OFFSET is the m-factor in the equation Y=kx+m. The expression is used for recalculating the sensor’s input signal to
the signal required. Offset is equivalent to zero-point.
Correction factors for measuring sensors
Parameters for the next data record can also be used for correction of
output signals from sensors.
26
mitec Monitor
Define a measuring object
Measuring and data collection
When a sensor is calibrated, two methods can be used to compensate
for error.
• Adjustment means that the sensor or instrument is adjusted so that
the value shown is the same as the actual value.
• Correction means that the sensor is not adjusted, and the incorrect
signal will remain. Instead, a correction factor is used to compensate
for the error.
In the second case, Monitor can be used to automatically correct
incorrect values from the sensor.
The correction factors must then be calculated and expressed as an
offset (zero point) and a factor (range) according to a linear equation.
For example, if a pressure sensor with measuring range 0-10.00 Bar that
should have a nominal output of 0-10.00V appears to output 0-9.85V,
then the correction factor will be 10/9.85=1.015 which is then entered
in the Gain box in Monitor.
In the same way, the correction for zero point failure can be calculated
and entered in the box Offset.
When it collects measuring data, Monitor will compensate for incorrect
display and recalculate to the correct value.
Each time a new gain is entered in Monitor, a new data record is
created. The comments entered in the Info box are also saved here.
This means that changes cannot be made without the program noting
them, and thus it is possible to track changes and manipulations to meet
the requirements of all serious quality systems.
mitec Monitor
27
Define a measuring object
Measuring and data collection
Edit a data record
After scaling, measuring data is saved on the computer’s hard disk as a
data record under a sensor name.
The data record contains all information about the current sensor.
Sometimes it is necessary to change previously collected data. Monitor
therefore has a function which is called Edit the data record.
Measuring data cannot be changed. However, the gain and offset as
well as the timestamp can later be corrected for:
• Correction of incorrect calculation constants
• Calibration of sensors
• Adjustment of time if the clock in the logger has been incorrect.
To edit a data record:
• Click on data record
Edit and Delete buttons are activated
• Press the Edit button
A new dialog box appears
• Enter the new gain, new start time for data record or Info.
End with OK
Date and time for the data record indicate the time point for the first measurement (when it is stored in the data logger)
in the data record. By changing this time, the clock can be ”adjusted” after the event, for example if the clock in the
logger was incorrect during the measurement.
Delete data record
Occasionally it is necessary to completely delete a data record. This is
done in a similar way to Editing.
Note: data records must be deleted in order, with the oldest data record
deleted first.
To delete a data record:
• Click on data record
Edit and Delete buttons are activated
28
mitec Monitor
Define a measuring object
Measuring and data collection
• Press the Delete button
The program will display warning messages and ask
whether the data record should be deleted. Follow the
instructions on the screen.
WHAT IS A DATA RECORD?
A data record is a certain quantity of data which is saved on the computer’s hard disk. A new data record is created
automatically when a new measurement is started for the first time.
Each sensor has its own data record. When additional measuring data is collected, the data record is extended.
The same sensors can have several data records without them being visible in the graph. A new data record is created
if you change the configuration, eg gain, or if measuring data is missing relative to the previous data record (gap in
measuring data caused by a deliberate break in the measurement for example).
mitec Monitor
29
Change and delete a measuring object
Measuring and data collection
Change and delete a measuring object
Measuring objects that have been created can easily be changed and
deleted. Measuring objects are configured under the Measurement
menu.
• Click on Measurement and select Configuration.
The dialog box Configuration is opened
• Select measuring object from the scroll list.
The buttons Edit and Delete are activated. With Edit you
can change existing objects and with Delete you can
remove measuring objects.
By double-clicking on the object name you quickly enter the Edit function.
Delete removes all settings and all data belonging to the object.
If you wish to only remove measuring data, go into Edit the object and use the function Delete data record. See
description above.
The program will provide a number of warnings before the data is deleted. Nothing can be accidentally removed.
30
mitec Monitor
Collect measuring values manually
Measuring and data collection
Collect measuring values manually
Measuring data can be collected into the program manually or
automatically at a given date and time. The manual collection process is
described below.
Collection of measuring data
WinLog can collect information from all Mitec data loggers. The
information can be read into the program in different ways:
• Via one of the PC’s COM ports
• Via modem or GSM-telephone connected to the PC’s COM ports
• Import of Mitec file format
Collecting data from the logger
Before measuring values can be read into Monitor, a measuring object
must be first defined. Refer to the description above for Configuration
of the measuring system. After that, measuring data can be collected
and saved.
Operation is the same regardless of which type of communication is
used. Collection is run under the Measurement, Collection menu. .
For collection direct to the COM port:
• Connect the data logger to the COM port using one of
Mitec’s cables.
If collection should occur via modem:
• Check that the modem is correctly connected and switched
on.
Refer to the chapter General Setup for connection of
modem.
• Select Measurement and Collection from the menu.
A new dialog box is opened.
• Enter to which measuring object and to which group the
measuring data should be collected to and press OK.
A Collect Data window appears.
• Check that data collection has started and that no error
messages are shown
mitec Monitor
31
Collect measuring values manually
Measuring and data collection
A message is shown in the status window when collection
is complete. End data collection with OK.
Importing measuring data
Monitor can import .A40 files and save them in the same way as when
data is collected directly from the logger. This file format has been used
previously in some of Mitec’s help programs.
Measuring data from Mitec’s older DOS program Logbase can also be
input to WinLog. These files have the suffix .LB.
• Select Measurement and Import from the main menu.
A new dialog box is opened.
• Press the Files button to select which file should be imported
to WinLog. Choose from .A40 or .LB files.
When the file is selected, a new dialog box is opened Select
import.
• Select which measuring object the data is to be imported to.
NOTE. The type and serial number of the data logger
must match for the import to work!
When the import is complete, a dialog box will appear.
32
mitec Monitor
Collect measuring values automatically
Measuring and data collection
Collect measuring values automatically
Measuring data can be collected into the program manually or
automatically.
If a measuring object is to have automatic collection, this is defined
under Measurement and Configuration. Here it is specified on which
date and at which timepoint the collection should start, and at which
time intervals the collection should occur. No additional action is
required from the user. Refer description above.
If data should be collected to many measuring objects, it can be suitable
to spread the time points evenly over time. Monitor can however
manage many processes simultaneously, and should collection be
requested by several objects at the same time the requests will be
queued and carried out in order.
Other programs can be used at the same time as Monitor is
communicating. Similarly, other functions in the program such as
analysis can be used at the same time.
Activities in the program are saved in a so-called Log file. It is
recommeded that the contents of this file is studied now and then
(Options, Log) to check any possible errors in the measuring.
Always ensure that the modem is switched on and connected in the
correct way to the telephone net and to the computer. Refer to the
chapter General Setup below for more information on modem
connection.
mitec Monitor
33
How and where data is saved
Measuring and data collection
How and where data is saved
Measuring data is saved automatically when it is collected and no
special action is required.
Transfer from instrument to PC is made using a secure communications
protocol that has self-correcting functions. If no error message is
received, you can be sure that the measuring data has been saved
correctly.
Data format
The user sees data saved in a measuring object where each sensor has a
name.The data can be studied by composing a graph and indicating the
current sensor name and measuring object.
If you study the hard disk (using ”Explorer” or similar) you will see the
program’s internal data structure.
Folders for measuring objects
Measuring data is saved in the directory shown under Options and
Setup. In this directory each measuring object is assigned an individual
folder with the object’s name. For example, the measuring object
HUS318 will have a folder with the name hus318.dat.
Files for measuring data
The folders contain measuring data for the sensors associated with the
object. Each sensor has its own file. For example, a sensor with the
name LEVEL_7A will be assigned the name level_7a..
The folder also contains a file with information about the measuring
object. The file is given the name $setup$.dat. This file name occurs in
every folder with measuring data (ie one for every measuring object).
Measuring data in the sensor files is stored in binary format. Every
measuring value will use 2 bytes on the hard disk. (The ASCII format
generally used in spreadsheet and other programs takes three to four
times as much space).
34
mitec Monitor
How and where data is saved
Measuring and data collection
Search paths
During installation of the program, you can select which folder the
program should be installed in.
Normally measuring data will be saved in new folders under the main
folder.
However, it is possible to save measuring data in a location other than
the program’s main directory, for example on a common file-server.
Refer Setup above for information about multiple simultaneous users.
The search path to the common directory is shown on the Options
menu. The search path can be changed at any time. The program must
however be restarted after each change.
• Select menu Options and the submenu Setup.
A new dialog box is opened.
• Enter the current folder under the menu Directory and restart
the program to use the new folder.
Dialog box for setup of the measuring data folder.
Refer General setup chapter for explanation of other settings in the
dialog box.
mitec Monitor
35
How and where data is saved
Measuring and data collection
Data record
Measuring data is saved in a data record. Each sensor has its own data
record. Large quantities of data can be saved from each and every
sensor.
What is a data record?
A data record is a certain amount of measuring data that is saved to the
computer’s hard disk. A new data record is created automatically when
a new measurement is input for the first time.
Every sensor has its own data record. When additional measuring data
is collected, the data record is extended.
Each sensor can have several data records without it being apparent in
the graph. A new data record is created if you change the configuration
in some way, such as adjusting the gain, or if measuring data is missing
relative to the previous data record (eg there is a gap caused by a
deliberate pause in the measurement).
Browse function
The program has a function for detailed study of the database. The
function is called Browse and is found under the Measurement menu.
This function can also be reached using the button on the toolbar.
• Press the Browse button.
A new dialog box is opened. The technical information for
each measuring object is displayed here, including which
sensors are used and how they are configured.
OBJECT is a list of the objects in the system. SENSORS are the sensors associated with the current object. DATA
RECORD shows which data records exist for each sensor and their time range. The INFO field shows which
information has been entered in the Info box in Measurement configuration. DATA RECORD INFO includes possible
comments for each data record. In the lower right hand corner, you can see detailed information regarding the current
measuring sensor (refer below).
• Highlight the measuring object to be studied
A list of sensors for the object is shown and Info for the
object is shown.
• Select a sensor from the list
All data records for the sensor are shown.
• Select the data record from the list
Detailed information about the data record and the
associated sensors is displayed
• Close the dialog box using OK
36
mitec Monitor
How and where data is saved
Measuring and data collection
SENSOR INFORMATION
The data record box contains a lot of detailed information about the sensor that is used in the data record. Here you
can see information such as the individual serial number of the sensor, which means that the equipment and
measurement are traceable back to Mitec and back via Mitec’s norms to international measurement norms.
Logger
Channel
Quantity
Unit
Start
Stop
Type
Next gain.
Next offset
Serial number for current instrument.
Shows which measuring channel on the
instrument is in use.
Quantity (type) of the measured parameter.
Unit (kind) of the measured parameter.
Shows where the measuring range starts.
Shows where the measuring range stops.
Input signal type (Analog, Pulse, Time,
Status).
Gain to be used in the next collection.
Offset to be used in the next collection.
Gain
Offset
Factor
Term
ID
Date
Serial no.
Reg. Int.
Reg no.
Per reg.
Gain used in this collection.
Offset used in this collection.
Calculation factor (for internal control).
Calculation factor (for internal control).
ID-number for current signal cable.
Manufacturing data for signal cable.
Signal cable’s individual serial number.
Registration interval for data record.
No. of registrations in the data record.
No. of measuring values per registration (1
or 3).
Backup
Collected measuring data can become highly valuable.
Thus we recommend that regular backup copies are made. The simplest
way is to include measuring data in the company’s normal routines for
backup by saving it for example to the company’s file server. Refer to
the section above on how to set up different searchpaths.
Backup copies can also be made to diskette by using Explorer in
Windows 95 or later.
Typically one diskette is used per measuring object. Around 0.5 to 0.6
million measuring values fit onto a standard 3 1/2” diskette.
• Insert an empty diskette in A:
• Start Explorer in Windows 95 or later (File manager in
mitec Monitor
37
How and where data is saved
Measuring and data collection
Windows 3.1) and go to the directory where measuring data
is stored.
• Select the directory or directories to be copied and drag them
to A: You can also use Copy in the Edit menu and then Paste
in A:
• Highlight and copy the graphs that are to be backed up in
this way. Note that all graphs that have the suffix .mon, are
saved in the main directory (eg. C:\monitor) indicated under
the search path.
Move measuring data
To move measuring data to another computer or another folder, use
Explorer or File manager in the same way as described above for
backup.
38
mitec Monitor
General
Show the measuring result
Show the measuring result
General
Simple but advanced
Measuring data must be arranged in such a way that it provides
reliable information. Nothing is gained by a collection of data in a
table. The information should lead to knowledge about the world
around and be useful in the decision process.
In Monitor you are completely free to decide how much to transform
your data before the result is presented to the user.
Export transfers the collected raw data from a measuring sensor direct
to a file in ASCII format. The file can then be opened by other
programs.
Report also transfers measuring data to a file. However, Report takes
information from a graph, ie measuring data that has been processed
using different calculations, gains and so on. Time resolution can also
be adjusted and information from several sensors can be transferred to
the same data file.
Graph shows the information in graphic form. Measuring data is
presented to screen or printer as curves, bars, statistics etc. Monitor has
powerful functions for calculation and analysis which can be used in
graph presentation.
Monitor’s presentation functions are optimized to enable you to quickly
and with minimal preparation transform measuring data to information.
But not at the cost of functionality.
The user should be able to focus on gathering knowledge about his
process. Not waste it on learning to use the tools.
Presentation functions
Monitor’s functionality is designed to manage most of the day-to-day
requirements of field measurements:
• Object-oriented.
• Time graphs with lines and bars
• Individual graph appearance
• Advanced calculations
• Graph formats as accessories
• Export, report
• Print out to printer, export to clipboard
mitec Monitor
39
Work method
Show the measuring result
Work method
Measuring object and graph formats
An important and fundamental property of Monitor is the relationship
between saved measuring data and its presentation in a graph.
The same graph can be used to present measuring data from different
measuring objects.
This means that a graph can be made (composed) as a format which can
then be adapted for different applications.
The only requirement is that comparable measuring sensors are given
the same name in every object!
How do you look at measuring data?
It is assumed that measuring data has been input to the PC and saved on
the hard disk under an Object name.
• First open a graph.
• If there is no suitable graph available, create one automatically with
Generate, or manually using Composition.
• Then select measuring data to view by selecting Object.
• You then use the Analysis tools to study details, select time period
etc.
• You can then print out to printer, export or create a report. You may
choose to export graphics to clipboard and paste the graph into
another program.
Read more below on how to use the different parts of the program.
OBJECT STRUCTURE
The table below illustrates the relationship between Measuring object and Graph..
\
Graph 1
Graph 2
Graph n
....
......
Measuring object 1
Measuring object 2
Measuring object n
....
....
Each graph can be used for all measuring objects using a matrix structure. The only requirement is that measuring
sensors have the same name.
Measuring object to be presented is selected with the button or from the menu under Analysis and Object.
The presentation graph is selected with the button or from the menu under Graph and Open.
40
mitec Monitor
Work method
Show the measuring result
Analysis
Analysis focussed on the work carried out by the user to study and
process measuring data.
The analysis task and the tools used are described in the chapter
Analysis tools below.
Composition
Composition refers to the composition of the graph.
A graph does not need to be created for every measurement! It is
sufficient to make a format similar to a fax format on a word processing
program.
Individually designed graphs can be created using the the tools in the
Composition menu. Graphs can also be created automatically using the
”Generate” function.
Read further in the chapter Compose graph below
Generate a graph automatically
Monitor can also create graphs automatically using the Generate
function.
A standardised graph format is created automatically. The user just
specifies which measuring sensors are to be used for drawing the
curves.
Axes and scaling are based on the size of the data record and by which
measuring sensors are required in the diagram. Select Graph and New
and press the button...... Read more below!
The Graph menu
The Graph menu is located where you normally find File in word
processing and similar programs.
Different presentations are opened and closed from the Graph
menu, and from here you can select the presentation type you want to
use.
Measuring data is not connected to a specific graph!
A unique function that makes the analysis task significantly easier is the
minimal number of graph formats required. Regardless of how many
hundred measurements have been made or how many thousand sensors
used.
mitec Monitor
41
Display and print out graph
Show the measuring result
Display and print out graph
Open graph
A graph is a ready presentation that has been previously created and
stored under your choice of name.
How the graph is created is described in the chapter on Composition
below.
• Select Graph from the menu bar
Pull-down menu for Graph is shown
• Select Open and click with the mouse
A dialog box with previously saved graphs is shown.
• Select the graph required from the scroll list and then click
OK.
The selected graph is opened in a new window. Measuring
data can now be studied and the graph printed out.
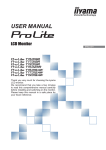
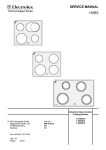
Scaling and inin-depth study
Below is an example of an open graph.
In this case a graph format for calculation of power and energy based
on measurement of current.
The diagram has a Y-axis for power as well as text boxes with formula
for calculating power and energy. In this case the graph is shown as a
line, but a bar-chart can be selected.
The diagram can be regarded as a ”display window” where a part of the
graph (time series) is shown.
Using different analysis tools, various parts of the graph can be
enlarged and reduced, and different time areas selected.
The chapter Analysis tools below describes in detail which tools are
available and how they can be used.
Graph
name
Free choice of
text for graph
42
mitec Monitor
Text box with
variable-based
text information
Display and print out graph
Show the measuring result
Fixed Each graph can have up to 16 Y-axes, 128 curves, an unlimited number of text boxes with formula and fixed
text text. Placement and size can be freely selected. Measuring data is collected from any measuring object. A
virtual LEGO!
Output to printer
The Graph is printed out by pressing the . button.
The printer is part of the graph’s composition, ie different graphs can
be connected to different printers and have individual units etc. (For the
Y-axis printout to be successful, a printer must first have been selected for the
graph during composition. If a printer has not been selected, the button
is ”grey”.)
• Click on the graph to be printed out.
• Press the button in the button bar.
The graph is printed out. If nothing happens check that the
printer is connected and turned on and that the correct
printer is selected.
Read Curve
further(graph)
in the chapter Composition under Page layout. Read also
Time axis
in the chapter Printers about how to select and configure different
printers.
Text box with
calculations
Import the graph to word processing program
Graphs presented in Monitor can be directly transferred as a graphic to
other programs, usually a word processing program, using the copy and
paste function.
• Press on the button in the button panel.
The graph is transferred to the clipboard.
• Start the word processing program and select paste in the
required document
The graphs will now be included in the current document.
The word processor’s text tools can now be used to enlarge / reduce,
add text and comments, change colours, typestyles etc.
mitec Monitor
43
Display and print out graph
Show the measuring result
Several windows
Monitor can simultaneously manage a large number of graphs which
are opened in different windows in the same way as documents in a
word processing program.
The windows can be arranged in various ways using the Window menu.
• Click on Window in the menu bar.
A pull-down menu is opened.
• Select required presentation by clicking on the options.
Switch between active windows by clicking on the desired
graph name.
In the above example MALL_S2 is selected while
MALL_I2 is open but not active.
44
mitec Monitor
Analysis tools
Show the measuring result
Analysis tools
General information about analysis
Every measuring project is unique. The user’s knowledge about the
physical process being measured is critical to how good the result will
be.
The analysis tools are available to help the user to transform measuring
data to information and knowledge.
Monitor has highly powerful functions for presentation, calculation and
printing of collected measuring data.
• Graphic analysis and presentation
• Calculation
• Export
• Report
• Printing
This chapter describes which tools are available and how these can be
used.
NOTE! Measuring data is not affected in any way by analysis work.
Zoom, scroll, calculations etc. affect only the appearance of the
”display window”.
Enter
constants
Search measuring
values
Zoom in and out
Select measuring
object
New, Open, Save
graph
Scroll
Manual
scaling
Select standard
setup
Print out
Copy graph to
clipboard
Generate
report to file
Traceability
analysis
Composition /
analysis switch
Help
The most important tools are accessible on the button panel. Tools are also found in the menus and can be
activated from the keyboard.
mitec Monitor
45
Analysis tools
Show the measuring result
Tools on the menus
The functions shown on the button panel above are also found in the
pulldown menu under Analysis on the menu bar.
• Object selects from different measuring objects
• CONST opens dialog for input of constants in formula
• Find values searches forwards or backwards in time after measuring
data
• Scale opens dialog for manual entry of gain
• Zoom zooms In or Out in both Y and time directions
• Scroll moves the graph up, down, to right or left
• Mode for Mark, Zoom, Scroll, shows which functions are now used
by the right mouse button
Right mouse button
By clicking on the right mouse button you quickly switch between
different analysis tools.
Each click of the mouse button changes the cursor’s appearance. Four
different cursors are available:
Normal mode
No tool is connected.
Mark mode
Shows specific value and its time stamp at any position. Refer to the
chapter Show actual value below.
Zoom mode
Enlarges a selected area in the graph. Refer chapter Zoom below
Scroll mode
A graph can be tracked in detail with the fine-scroll function. Refer
chapter Tracking graphs below.
The cursor changes appearance only when it is moved into the graph or
onto one of the graph’s axes. Outside the graph it resumes its normal
form.
46
mitec Monitor
Analysis tools
Show the measuring result
Zoom
To get a quick overview, you can use the Zoom Out function, and for
detailed study you can Zoom In the graph.
It is easiest to use the buttons on the button panel.
Zooming occurs in both the Y-axis and time axis simultaneously.
• Click on Zoom Out (- button)
All graphs in the diagram are reduced. The time frame
increases and the range of the Y-axis is increased.
• Click on Zoom in (+ button)
All graphs in the diagram are enlarged. The time scale is
reduced and the range of the Y-axis is reduced.
Every Zoom out can be compensated with a Zoom in.
The function is also available on the Analysis menu but is much easier
to use from the button panel.
Scroll
Another way of moving around in the graph is to use the Scroll
function.
It is easiest to use the buttons on the button panel.
Scrolling works in both the horizontal and vertical direction.
• Click on Scroll up / down
Curves in the graph are moved a half-diagram height down
or up respectively.
• Click on Scroll right / left
Curves in the graph are moved a half-diagram width to the
left or right respectively.
These functions are also available on the Analysis menu but it is easiest
to use the button panel.
mitec Monitor
47
Analysis tools
Show the measuring result
Show current value
Current measuring values for each curve can be displayed by placing a
cursor in the form of a vertical bar in the diagram. The function can be
enabled using the right mouse button or selected from the Analysis
menu and Cursor type.
• One click (from normal) with the right mouse button enables
the cursor type.
The vertical line is placed in the
required place and both
measuring value and time is
displayed.
The cursor changes appearance to two vertical bars and a
vertical line appears in the diagram.
• Press and hold the left mouse button.
The vertical line jumps to the cursor.
• Holding the mouse button, drag the cursor sideways to the
required position on the curve.
The current measuring value and its time is continually
displayed.
You can select the colour of the cursor under Page layout in
Composition.
Select time range manually
Different parts of the diagram can be accessed, enlarged and reduced using
the mouse and buttons on the menu.
The desired time and measuring range can also be entered in numerical
format from the keyboard using Manual scaling.
The button can also be used.
• Select Analysis and Scaling from the menu. Then select
Manual.
The dialog box is shown below.
A dialog box for manual scaling is displayed.
Start date / time is the time stamp for the first measuring value shown in
the graph.
Stop date / time is the time stamp for the last measuring value shown in
the graph.
Axes show Left #1 to Left #8 or Right #1 to Right #8.
Start is the minimum value for the Y-axis selected.
Stop is the maximum value for the Y-axis selected.
48
mitec Monitor
Analysis tools
Show the measuring result
Setup time range
• Place the cursor in one of the time frames and enter the time
point to be modified.
The time format given under Alternative and Setup must be used.
Setup axis scales
• Select which of the 16 possible axes are to be used by clicking
on the pull-down list.
• Place the cursor in the Start or Stop box and enter the desired
value.
Complete setup by clicking on OK.
NOTE.
The quickest way to open a dialog box for manual scaling is to double
click with the left mouse button on an empty field in the graph!
mitec Monitor
49
Analysis tools
Show the measuring result
Automatic scaling
WinLog has several functions for automatic scaling of graphs in the
dialog box Analysis, Scale.
In addition to Manual described above, there is Standard, Last value,
All values.
Standard resets the diagram to the scaling that was defined when the
diagram was composed (time range, Y-scale).
Last value rescales the diagram so that it shows the entire last data
record
All values rescales the diagram so that it shows all measuring values
(all data records) that have been collected for the current sensor.
When the diagram is created automatically using the Generate function,
the function Last value will automatically be used and the graph will be
shown with the latest data record.
Last value
A graph may have several data records with different times, ie several measurements made with different instruments.
When Last value is run in this case, the latest measuring value from the last data record will always be shown in the
bottom right hand corner of the diagram. The graph will then reach as far to the left as the shortest data record.
In other words, the graph stops at the end of the data record that finishes last and starts at the beginning of the data
record that commences first.
All values
The graph starts where the oldest data record starts and ends where the most recent data record finishes.
Zoom out a frame
Any area in the diagram can be enlarged, zoomed out, by drawing a
frame over the area.
The function can be initiated with the right mouse button or selected
from the Analysis menu and Cursor position.
Two clicks (from normal) with the right mouse button shows a
magnifying glass.
• Click in a corner of the diagram with the left mouse button
and hold the button in
• Drag the mouse diagonally over the area to be enlarged.
A frame will be displayed over the selected area.
50
mitec Monitor
A frame is drawn and the area
enlarged.
Analysis tools
Show the measuring result
• Release the button.
The area is enlarged.
The sequence can be repeated and in this way the area is gradually
enlarged.
To return to the default setting, click the button in the button panel.
Track a curve
An enlarged curve can be tracked using the fine-scroll function.
The function can be enabled with the right mouse button or selected
from the Analysis menu and Cursor position.
Three clicks (from normal) with the right mouse button enables the
fine-scroll function. The cursor changes in appearance to an arrow.
The principle is that with every click with the left mouse button, the
center of the graph is moved to the point where the cursor (cross) was.
The center of the diagram is
marked with a fixed cross.
• Click with the left mouse button on the curve.
The range where the cross is places jumps to the center of
the graph.
By clicking repeatedly, you can track the curve in detail back and
forth in time.
Placement is made by increasing one of the grids in the graph, which
means that if you want higher resolution for scrolling you should
compose the graph using a denser grid..
The cursor colour can be selected under Page Layout in Composition.
mitec Monitor
51
Analysis tools
Show the measuring result
Stretch axes
Monitor is uniquely able to quickly enlarge sections of the graph using
a function we call stretch
The mouse is used to drag and release a time-point or Y-value on one of
the axes.
• First select one of the mouse’s analysis tools by clicking one
or more times on the right mouse button.
The cursor changes appearance
• Drag the cursor to a value on the time or Y-axis.
The cursor is changed to a double arrow, horizontal or
vertical, depending on the axis selected.
• Press and hold the left mouse button.
A box is highlighted around the current value.
• With the mouse button still held in, drag the box with its
value to the new position where the value should be placed.
Release the button.
The graph has now been rescaled.
If the time axis is stretched it will affect all curves.
If one of the Y-axes is stretched, it affects only that axis and the curves
that are connected to the current axis.
To return to the original graph, click on the button in the button bar.
Search first and last measuring value
A large quantity of measuring data can be managed by WinLog.
Measuring data is saved under a measuring object that can contain
measuring data from many different sensors.
Data can be collected repeatedly from each sensor and an increasingly
long series of data built up in WinLog as new data transfers are made.
A data record is created.
If there is a break in measuring, for example due to a deliberate pause
in data collection (perhaps a measurement is made in spring and a new
check made in autumn) a new data record is created for the sensor. This
is not evident to the user but is an internal action in Monitor.
Monitor is however equipped with analysis tools that jump between the
different data records.
They can be found in the menu under Analysis and Find values.
The tools are useful for searching for data. The different options are
52
mitec Monitor
Axis before stretch
Axis after stretch. The value 20
has been moved with the mouse
to the end of the axis and the axis
and graph has been enlarged.
Analysis tools
Show the measuring result
Previous, Next, First and Last.
Last will place the latest measuring value last in the diagram.
First will place the earliest measuring value first in the diagram.
Next and Previous switch back and forth between subsequent data
records.
Next and Previous are also on the button panel.
SEARCH MEASURING VALUE is very useful when you make repeated measurements for the same measuring
object.
Say that once per month you check an object.
The operation is then very simple. It is sufficient to make a data transfer to the same measuring object as previously,
no configuration or file management is needed. During analysis you open the old diagram and press on the Next or
Previous button. Measuring data is searched for and shown in the diagram.
It is also possible to attach comments to each data record that can be shown in the diagram.
When you have zoomed too far
Monitor has many ways of doing quick and easy analysis using
different tools such as zoom, scroll etc.
Sooner or later you will ”zoom too far” and want to return to the
starting point. For this purpose there is a special button on the button
panel.
It is called Standard scaling and the function is also found on the Menu
under Analysis, Scaling and Standard.
• Press the button on the button panel.
The standard value defined when the graph is created is
used and the axes are rescaled.
When the button is pressed, WinLog will return to the start and select
the time range and default values that the graph was originally set up
for.
Change standard scaling
Changes these original values in Composition by opening the
appropriate axis or grid and modifiying.
Read more below in the Composition chapter.
mitec Monitor
53
Analysis tools
Show the measuring result
Constants for calculation
Monitor contains a powerful formula language that can be used for
calculations between time series (curves) and to produce statistics and
summaries.
The formula language is used when a graph or presentation is composed
and is described in detail below.
An important part of all calculations are constants, ie fixed numbers that
are entered in formula such as density, resistance, limit values etc.
It is sometimes necessary to quickly change these constants from an
operating menu without going into the formula and changing it.
Monitor therefore uses a concept based on constants, ”CONST”. (Named
Const so that it is easily recognized when a formula is created). Usage of
constants is described in detail in the Composition chapter below.
Changing constants
In the Analysis menu there is an option called CONST.
The function can also be reached from the menu bar with the button.
• Press or select CONST from the Analysis menu.
A dialog box is opened.
• Click in one of the CONST fields and enter the new value.
The definitions of the respective CONSTants are defined under
Measurement and Configuration and are entered as text.
Read more above about how to define a measuring object along with how
you use formula language.
54
mitec Monitor
Compose a diagram
Show the measuring result
Compose a diagram
A building system
Monitor has many ways to create presentations and perform
calculations suited to the users requirements.
• Optional choice of grid with time scaling
• Up to 16 different Y-axes
From the composition menu you
can reach all the work tools
needed to create a presentation.
• Up to 128 different curves (graphs)
• Powerful formula language for calculations of time series (curves)
• Unlimited number of text boxes
• Advanced formula in text boxes
• Virtual (theoretically created) graphs
• Free choice of print format
Composition works like a drawing program that contains different
building blocks. The user can easily create and change presentations as
required.
Principles
It is a straightforward process to compose and modify a graph.
The aim is for a diagram to be composed ”once and for all” and then
used for different measurements.
A number of well thought-through graphs are sufficient. Naturally
modifications are needed now and then for new applications and new
conditions but it should not be necessary for every measurement to
require a new graph.
Measurement data is completely independent of the presentation. The
graph is simply a ”display window”.
•
•
•
•
•
•
•
•
Remember!
The graph consists of a number of ”building blocks”.
Double clicking on the building block opens a dialog box.
Drag and release the building blocks in the graph.
Click and drag the corner of every building block to change its
size.
Add building blocks from the Composition menu.
Remove building blocks using the Delete key.
Switch between Analysis and Composition using the -button.
Press every time the composition is changed and left.
Create a new graph
Graphs can be created in two ways: Manually or automatically.
The fastest is to let the computer automatically create a graph based on
a typical measurement.
mitec Monitor
55
Compose a diagram
Show the measuring result
Then you can change the contents and appearance of the graph to suit
your requirements.
Automatic graph
When a new measurement is made that is different to previous
measurements, a new graph is needed. It is easiest to allow WinLog to
automatically create the initial version of the diagram.
The required changes can then be made manually.
• Select Graph and New from the menu or click on the button
in the menu bar.
The dialog box Page layout is opened.
• Select printer and press OK (Refer to Page Layout chapter
below for detailed modifications)
A new dialog box New is opened.
• Click first on the measuring object to be used and then click
on the measuring sensor to be graphed. Use Ctrl- and Shiftkeys to select more than one.
• Then select Generate.
A graph is opened, in this case with two curves and a single
Y-axis.
The measurement is shown and you can start analysis work.
The graph’s appearance and content can then be modified
as needed.
Y-axis
automatically
scaled
Statistics
Example of automatically generated graph with two current curves.
56
mitec Monitor
Box with
object name
Compose a diagram
Show the measuring result
Manual graph
To create a graph completely manually, start in the same way as for
automatic composition.
• Select Graph and New from menu or click on the button in
the menu bar.
The dialog box Page layout is opened. Refer above.
• Select printer and press OK. (Refer chapter Page layout
below regarding more detailed changes).
A new dialog box New is opened. Refer above.
• Click on New Empty.
A new window with an empty work space is opened. The
window is given the name COMPx (where x is a digit).
Composition switches the program to composition mode
and the button is pressed.
It is now possible to start adding content to the empty graph.
The work can, for example, be done step-by-step in the following order:
1. Grid
2. Y-axis
3. Graphs (Curves and bars)
4. Text boxes
5. Text boxes with formula for statistics
6. Printers and format
The following detailed description explains how you add different
components to the graph. All necessary tools are available in the
Composition menu.
mitec Monitor
57
Compose a diagram
Show the measuring result
Create a gride for XX-T graph
The most basic part of the graph is the grid. There are two types: X-Y
graphs (time charts) and X-Y graphs. An X-T graph functions as
follows:
There must always be a grid in Monitor presentations. It can be made
very small and given a white colour so it beomes invisible, but it must
exist.
The description below assumes that you have first clicked on the menu
Composition and Composition mode.
•
Click on Create X-axis and Time graph.
A dialog box Time graph is opened.
• Now select Type from the drop-down menu.
A Curve is the most usual and is easiest to work with.
Continue and select style and appearance on the grid using
the various choices in the dialog box.
Refer below for explanations of the various options!
NOTE! The information
provided will now be the graph’s
standard values.
During analysis, scaling can be
easily reset to standard values
using the button.
• Complete setup by pressing OK.
The Dialog box is closed and you can now go on to add
new components in the graph or review them to see how
they look.
• Press on the button to exit composition and go into analysis
mode.
• Now press the button to collect the standard values selected.
Check and continue graph composition.
These settings can now be saved from the Graph menu. The program
will also check if you want to save them when the dialog box is closed.
NOTE!
If you want to change the composition of the graph,
click on the component to be changed.
A dialog box is opened.
To change the Y-axis, double-click on the axis.
To change a curve, double-click on the curve’s text box etc.
NB! Switch first into composition mode.
TIME GRAPH
DIALOG
On the left side of the dialog box you can select parameters common to both curve and bar charts. On the right side
are boxes that are specific to each type. Use the buttons to select typestyle and colour.
GRAPH TYPE has options for Curves, Side bars, Top bars and Offset and Step curves.
58
mitec Monitor
Compose a diagram
Show the measuring result
Side bars place different sensors beside each other and top bars on top of each other (stacked). Offset curves are
used to repeat curves, eg to align the days of the week over one another.
Y-SCALES selects the number of horizontal lines.
TIME RANGE is the time range that you want the diagram to cover.
TIME SCALING sets the times between vertical gridlines. Any number can be entered and from the drop-down list you
can select from second to year. Take care not to select a combination of large time range and short time scaling.
There can be many gridlines!
TIME DISPLAY is the method used to show time on the T-axis. You can select different variables: including absolute
time (date and timestamp); relative time, which is time in seconds for example, from the beginning of the graph; and
relative registration number.
Tip: Select Date and Time to start with.
HORIZONTAL and VERTICAL grid lines are optional.
HOW SHOULD THE GRAPH LOOK?
In the middle section of the dialog box there are options regarding the appearance of the graph.
In the upper box you can enter RESOLUTION which is simply the curve’s thickness on the screen. This applies only if
you have previously selected the Graph type ”Curve”.
Consider that the thicker the curve you select the more measuring values are hidden behind each ”colour spot” (a
curve consistes of a number of dots so near each other that they merge). Monitor keeps track of how many measuring
values a spot contains and calculates a median value of all. Then the spot is drawn in the place where the median
value should be.
This means that the thicker the line (higher resolution) you choose, the more ”smoothed out” the curve will become.
In the lower box you can select the width of bars in a BAR CHART. Enter any number in the left box and from the dropdown list select a width from second to year.
Monitor will calculate a mean value for the selected time period and position the top of the bar at this point. The
appearance of the bar (pattern, colour, etc) is selected from another dialog box (connected to the graph, refer
description below).
BUTTONS
TYPESTYLE and COLOUR can be freely selected using the standard Windows approach. The COLOUR ON X-AXIS
selects the colour of the time display while COLOUR selects the colour of the grid.
Tip: If you wish to hide the grid and only show calculations or text select white colour!
BROWSE provides access to a summary of the measuring structure. Here you can find a summary of information
about sensors, objects etc.
Create grid for XX-Y graph
The most basic part of the graph is the grid. There are two types: X-Y
graphs (time charts) and X-Y graphs. An X-T graph functions as
follows.
There must always be a grid in Monitor presentations. It can be made
very small and given a white colour so it beomes invisible, but it must
exist.
The description below assumes that you have first clicked on the menu
Composition and Composition mode.
• Click on Create X-axis and XY-graph
A dialog box XY-graph is opened.
• Enter the name of the sensor that will be the reference on the
X-axis.
mitec Monitor
NOTE! The information
provided will now be the graph’s
59
Compose a diagram
Show the measuring result
Continue filling in the other fields in the dialog box.
Refer to the explanation below of the different options!
• Complete setup by pressing OK.
standard values.
During analysis, scaling can be
easily reset to standard values
using the button.
The Dialog box is closed and you can now go on to add
new components in the diagram or review them to see how
they look.
• Press on the button to exit composition and go into analysis
mode.
• Now press the button to activate the standard values
selected.
• Check and continue graph composition.
Check and continue graph composition.
XY-GRAPH DIALOG
XY-graphs make it possible to compare two sensors to each other. For example, the x-axis can show termperature and
various Y-axes can show power consumption.
Y-scale specifies the number of grid marks in the X-axis.
X-scale specifies the number of grid marks on the Y-axis.
Resolution specifies the thickness (in mm) of the graph displayed on the screen.
Consider that the thicker the curve you select the more measuring values are hidden behind each ”colour spot” (a
curve consistes of a number of dots so near each other that they merge). WinLog keeps track of how many measuring
values a spot contains and calculates a median value of all. Then the spot is drawn in the place where the median
value should be.
This means that the thicker the line (higher resolution) you choose, the more ”smoothed out” the curve will become.
Significant digits indicates how many digits the axis gradient should have.
SI-Units indicate that the prefix milli, kilo etc. is used.
Horizontal and Vertical lines can be selected or switched off.
Auto Settings collects information automatically from the sensor (see equivalent box in Measurement Configuration).
If information is entered in these boxes, this will be used instead of default values.
BUTTONS
TYPESTYLE and COLOUR can be freely selected using the standard Windows approach. The COLOUR ON X-AXIS
selects the colour of the time display while COLOUR selects the colour of the grid.
Tip: If you wish to hide the grid and only show calculations or text select white colour!
BROWSE provides access to a summary of the measuring structure. Here you can find a summary of information
about sensors, objects etc.
60
mitec Monitor
Compose a diagram
Show the measuring result
Create YY-axis
Monitor can have up to 16 different Y-axes, 8 on each side. Normally
however, only 2-4 axes are used at the same time. Before the axes are
added a grid must exist. Refer above.
In the description below it is assumed that you have first clicked on the
menu Composition and Composition mode.
• Click on Create Y-axis.
A dialog box for the axis appears.
• Select the axis position using the drop-down list, select the
number of digits on the axis along with the desired SI-prefix
(milli, kilo, etc).
WinLog suggests the first available place for a new axis.
Read below for further
information on the functions in
this box.
• The box Auto settings can be filled in if desired but can be
left empty.
• Select colour and typestyle for the axis.
• Complete with OK.
The dialog box is closed and you can now continue to add
new components to the graph or check the appearance.
• Press the button to leave composition and go into analysis
and then press the button to collect the standard values
selected.
Check and continue graph composition.
The settings can now be saved from the Graph menu. The program will
also ask if you want to save when the dialog box is closed.
SIGNIFICANT DIGITS indicates how many digits the axis gradient should have. SI-UNITS mean that the prefix milli,
kilo etc are used.
AUTO SETTINGS collects information automatically from the measuring sensor (refer equivalent box in Measurement
Configuration). If information is entered in this box it will be used instead of default values.
mitec Monitor
61
Compose a diagram
Show the measuring result
Create curves and bars
Measuring data can be presented as curves or bars. The common name
in WinLog is Graphs.
An unlimited number of graphs can theoretically exist in a diagram and
each graph can have its own Y-axis or share with another graph.
Before the graph is created, a grid must exist. It therefore makes sense
to first create the Y-axes. Refer description above.
In the description below it is assumed that you have first clicked on the
menu Composition and Composition mode.
• Click on Create Y-axis.
A dialog box for the axis opens.
• Enter the name of the measuring sensor to be presented in
the box Formula.
The name can be part of a formula combined with the
names of other sensors. Press the Browse button for a
summary of which sensors are available in the system.
• Enter a comment that describes the sensor or its function in
the Comments box.
This information will then be shown in the graph for the
current sensor. If no comment is entered, the formula /
sensor name in the Formula field will be displayed.
• Complete the other information in the dialog box
Refer below for a description of the various fields in the
dialog box.
• End with OK
The dialog box is closed and you can continue to add new
components in the graph or check how it looks.
• Press the button to leave composition and go into analysis
mode, and then press the button to select default values.
Check and continue graph composition.
• The settings can now be saved from the Graph menu. The
program will also ask if you want to save when the graph is
closed.
62
mitec Monitor
WinLog has an enormous
capacity for calculating time
series.
Review the chapter on Formula
Language about available
mathematical functions.
Compose a diagram
Show the measuring result
mitec Monitor
63
Compose a diagram
Show the measuring result
GRAPH DIALOG BOX
Graphs can be fully designed to suit the user’s requirements, in terms of both function and appearance.
Graphs can have two basic appearances, Curve or Bar. Selecting the appearance is related to the grid and is done in
the dialog box Time graph. This means that either a bar chart or a curve is used, and the two types cannot be
combined in the same graph.
When the dialog box is opened, there are a number of options for the most typical properties. It is sufficient to simply
enter the sensor’s name and press OK.
FORMULA is the field that must be completed with at least the sensor’s name. You can also enter a formula and
thus perform a calculation where the sensor name is included as a variable.
Example of a formula: CURRENT230*0.9/1000.
This formula multiplies the CURRENT sensor by the power 230 (V) and the effect factor 0.9 (both values have been
provided in this measurement). The result is then divided by 1000 and the result is an effect curve in kW.
CURVES AND BARS contain information on how the graph should look. In the drop-down list Y-axis you select which
axis should be used for the graph. This axis should then correspond with the contents of the graph (ie if you measure
for example a 0-10 Bar pressure it is not suitable to use a Y-axis that is scaled -100 to 400°C!).
The checkbox Hide comments hides the optional text that is entered in the Comments box above. Hide curve / bar
hides the graph on presentation. This can be useful if a curve is only used as a transitional step in a calculation and
doesn’t need to be shown. Hide in report removes the graphs measuring values from the report to a file that can be
generated with the button Report. Graph number is a sequence number that is assigned to every graph. The number
is used with certain calculations using formula language.
ADJUSTMENT is used to adjust the text in the graphs text box (that shows the comment).
BAR setup is used to provide pattern and appearance (applies only if a bar chart is selected as the grid).
OFFSET CURVE makes it possible to displace curves one graph width and in this way repeat curves, eg one week’s
measuring data can be shown as 7 curves with a 24-hour width for the graph.
BUTTONS to the right make it possible to select optional colour and typestyle appearance using the normal Windows
approach.
Tip! Select the same colour for the graph as on the Y-axis. Refer below for configuration of alarm
64
mitec Monitor
Compose a diagram
Show the measuring result
Alarm
Monitor has functions for both local and external alarm. The alarm is
activated when a user-defined limit value is exceeded.
The alarm will be triggered at the same pace as new measuring data
comes in and is presented.
The alarm is defined during Graph composition and is therefore part of
the program’s analysis tools. Alarm limit is a specific graph based on a
constant that is entered by the user.
For the alarm to be activated, it is necessary for the current graph to be
open.
Definition of alarm limits
Alarm limits are entered as a curve (graph). This level is defined during
composition or taken from a constant (Const).
• Open a graph with curves for the current measuring object
and go into Composition mode.
• Click on Composition and select Create curve.
• Specify the required curve alarm as a numerical value along
with the axis that is to be used for the alarm curve.
The alarm level has now been defined and will be shown as
a line in the graph.
For an alarm to be activated an action must be defined.
Refer below.
mitec Monitor
65
Compose a diagram
Show the measuring result
Indicate which curve (graph) should trigger alarm
• Click the Alarm buttonn in the dialog box.
A new dialog box will be opened.
• Indicate which graph the alarm should affect as well as
whether Min or Max alarm should be used.
ALARM LEVEL FUNCTION
All graphs can be used for alarm and in all graph dialog boxes there is a button ALARM.
The system is completely general. All graphs can send alarms on all other graphs. Because each graph is assigned a
number, all combinations are possible.
CONDITIONS
The graph with alarm settings must be open for the alarm to be given. The diagram can however be reduced to an icon
on the screen. The alarm is given immediately it is noticed by Monitor, in other words measuring data must have been
collected in from the measuring station.
MAX and MIN alarm
The alarm function is based on a comparison between selected graphs. The alarm can be given either when a limit is
exceeded from either above or below. In the dialog box the sign < (less than) and > (greater than) are used to indicate
the relationship.
The dialog box works on the basis that the Max alarm is given if ”this graph is greater than graph number X” and the
Min alarm is given if ”this graph is less than graph number X”.
ACTION ON ALARM
When a limit is exceeded, the alarm triggers the actions that have been specified (Alarm 1 to Alarm 4). Up to 4 events
can therefore be activated at the same time. A single event can for example cause the system to ring two GSM
numbers, activate a dialog box on the screen and send a Mini Call.
TEST FUNCTIONS
In the menu Measurement there is an option Alarm. This can be used to TEST the alarm function and this does not
affect the settings in the various graph dialog boxes.
Indicate what should occur on alarm
• Click on one of the buttons Alarm 1 to Alarm 4.
A new Alarm dialog box is opened.
• Select from the drop-down list which type of alarm is to be
used.
Select Local Alarm or SMS (modem connection with text
message requires special software on the receiving PC).
66
mitec Monitor
Compose a diagram
Show the measuring result
• If SMS or Mini Call is selected, enter the number to the
operator’s message central (refer help text in the program).
Different operators have different telephone numbers.
• Provide the number of the receiver’s GSM telephone or Mini
Call receiver.
• If Mini Call is used, provide your sender number and
password.
An authorised send subscription is required to be able to
send Mini Call messages.
• Write the text message that is to be sent out for the particular
alarm.
• Press OK to close the Graph alarm dialog box and OK again
to close the Alarm dialog. Then close Graph settings and
press OK in the Graph dialog box.
GRAPH ALARM DIALOG BOX
Max alarm
Alarm if current graph has greater value than alarm graph.
Min alarm
Alarm if current graph has lower value than alarm graph.
Alarm 1
Alarm number 1 to perform on alarm, refer Alarm
Alarm 2
Alarm number 2 to perform on alarm.
Alarm 3
Alarm number 3 to perform on alarm.
Alarm 4
Alarm number 4 to perform on alarm.
OK
Use these settings.
Cancel
Cancel
Help
Display help text
ALARM DIALOG BOX
Alarm type
Local alarm
Modem
SMS
Tel to message
central
Extra modem
initialisation
Tel to receiver
Origin
Password
Message to send
OK
Cancel
Help
Type of alarm:
Gives alarm on screen and via speaker on computer.
Rings up a modem and sends alarm as text. The modem that replies can for example be
connected to a printer.
Sends SMS messages to GSM telephone or Mini Call.
Telephone number for modem to ring up. This is the number to an answering modem or to
SMS central.
Modem initialisation in addition to that done in modem settings. Normally no extra is required.
Telephone number to GSM or Mini Call that should receive the SMS message. This
telephone number is not dialled, but is sent to the message central.
Number of sender.
Sender password.
Text to display or send.
Use these settings.
Cancel
Help text.
mitec Monitor
67
Compose a diagram
68
Show the measuring result
mitec Monitor
Compose a diagram
Show the measuring result
Create text boxes
A very important function in the Monitor diagram is the Text box.
In theory, an unlimited number of text boxes can be added to a diagram.
The boxes can be placed anywhere in the diagram and made whatever
size you want. The colour and size of the typestyle is optional.
Text boxes can contain optional text or formula for calculations of
measuring data. Information can also be collected automatically from
the measuring system’s composition using the %I variable.
In the description below it is assumed that you have first clicked on the
menu Composition and Composition mode.
• Click on Create Text.
A dialog box Text opens.
• Enter the required text or formula. Refer Formula language
for description or press the help button.
In the example above, only the Maximum value and Bar
will be shown as text. When ”%F[” is entered it means that
”here comes a formula” which is then completed with ”]”.
The above formula is PRESSURE:MAX which means
collect and show the highest value from the PRESSURE
sensor.
Several rows of text and formula
can be combined in a single text
box.
Use Ctrl C and Ctrl V to copy
and paste text and formula.
• Select the typestyle and colour and adjustments then press
OK.
A new text box is opened in the graph
• Click on the box and drag it to the required place. Click in
the corner and stretch the box to the required size.
• Press the button to switch from composition mode to
analysis.
The completed text box is now shown in the assigned place
on the graph.
NOTE! If ###### is displayed in the box instead of a
numerical value, it may be because the incorrect time range
was selected in the graph. It is easiest to search for data
using the buttons or enter the time using Analysis, Scaling,
Manual.
• Return to the composition and complete. To open the dialog
box Text again Double click on the text.
mitec Monitor
69
Compose a diagram
Show the measuring result
• Settings can now be saved from the Graph menu. The
program will also ask if you want to save when the graph is
closed.
COORDINATES WINDOW
The placement and size of components in Monitor diagrams can be controlled using a coordinate window. The window
can be accessed in Composition mode and can be switched on and off from the menu Composition and Coordinates.
The window shows both the size and placement of the active component (grid, text, etc)..
70
mitec Monitor
Compose a diagram
Show the measuring result
Page layout
The size of the graph during printing and display as well as the colours
of the cursor and background can be set in Page layout in Composition
mode.
Selection of printer and other related settings can also be made in Page
layout.
• Click on Composition and Page layout in the menu panel.
A dialog box Page layout opens.
• Select the printer to be used from the drop-down list. Press
the Setup button to select paper size, colour settings, etc.
NOTE! In Monitor all settings
for page layout are saved
individually in each graph.
A dialog box for the current printer is opened.
• Select the size of printout to screen and printer.
Tip! Select approx. 130% on printer scaling and then select
Landscape A4 in printer setup.
• Select cursor colour (analysis tool Cursor). If a background
colour other than white is required, select using the
Background colour button.
Shortcut!
Double-click anywhere on the
diagram’s background to open
the dialog box Page layout
(must be in Composition mode).
SIZE indicates the size of the graph in mm that will be printed to the printer if 100% Scaling, Printer is selected.
SCALING scales from this size up or down on the screen and printer.
MAX SIZE adjusts the graph to the current screen so that the graph will always be as large as possible.
Save and delete a graph
graph works like a document in a word processing program. It can be
Opened, Saved and Deleted in the same way.
• Click on the menu Graph.
A pulldown menu is opened.
• Select Save or Save as.
A graph name must be given. Select a name that describes
the function of the graph, avoid associating it with the
measuring object’s name unless the graph is made
specifically for a single measurement. Refer graph formats
below.
• Select Delete.
mitec Monitor
71
Compose a diagram
Show the measuring result
A list of previously-created graphs is opened.
Click on the graph to be deleted.
NOTE! Only the graph is deleted. NOT the measuring
data!
The measuring data is in a database that can only be deleted
under Measurement, Composition.
72
mitec Monitor
Change the appearance of a graph
Show the measuring result
Change the appearance of a graph
If you have read and understood the chapter Compose graph above, this
chapter will be a repetition.
Composition mode
Usually a graph is used to analyse existing information. There are a
number of analysis tools available that are described in the chapter
Analysis tools above.
When the graph should be changed for some reason - perhaps you want
to add a calculation, change the standard values for time range etc., the
graph should be in Composition mode.
In addition to the Composition mode menu the button can also be used,
and is the quickest way to switch in and out of composition mode.
• Press the button to switch to Composition
• Release the button to switch to Analysis.
Default value
When a graph is composed, it is assigned certain properties such as the
width of the grid, the number of gridlines, scaling of the Y-axis etc.
These properties are called Default values.
In Analysis, both the time-scales and Y-scales are changed using zoom,
scroll etc. To return to the graph’s default values there is a special
button This function can also be reached from the menu Analysis,
Scaling, Default.
• In Analysis mode, press the button to collect the graph’s
default values.
The graph is rescaled and takes on its original scale values.
Note that absolute time (the time window that you want to
look at) may need to be changed again.
Make a habit of pressing the button when you leave Composition.
mitec Monitor
73
Change the appearance of a graph
Show the measuring result
Add and delete graph elements
A graph consists of a number of components (”building blocks”) as
shown in the above diagram Manual graph in the Compose chapter
above.
The components can be added or deleted.
Add a component with Create.... in the Compose menu.
Delete a component by clicking on the it and then pressing the Delete
key.
Note that you must first switch to Composition mode using the
button (or from the menu).
Change colour and other properties
All componenets have properties that can be changed.
Size
Time range
Y-axes
Quantity and unit
Formula and sensors
Time format
Typestyle
Scale lines
Colours
• Go into Composition mode using the button.
• Click on the current component.
A box appears round the component.
• Change the size by clicking on and dragging the corner of
the component
• Double click in the frame and the dialog box for the
component opens.
Make the required changes. Refer to the chaper Compose
Graph for details on each dialog box.
74
mitec Monitor
Use graph formats
Show the measuring result
Use graph formats
Graphs in Monitor are independent of displayed measuring data.The
graph is just a ”display window” that has certain properties for different
applications.
For example, a graph can be modified to show details over a 24-hour
period - 24-hr diagram. You can then compose a graph to get an
overview of the same measuring data - such as a Monthly diagram.
Composed well, a graph can be a general format that is not connected to
a specific measuring object or a specific measurement.
Copy a diagram
The easiest way to create a new graph is to copy an existing one!
• Open a graph.
• Select Save as in the Graph menu.
Enter a name for the new graph.
• Go into Composition, make the required changes, then Save
the new graph with its new properties.
Measuring object
Measuring data in Monitor is saved under a Measuring object (that has
been previously defined and that you have collected measuring data
for).
Monitor can have many different measuring objects.
By planning ahead you can use a single graph for different
measuring objects. The only requirement is that you must give the
sensors the same names.
Obviously this assumes that the measurements are similar, ie the you
measure the same things.
Therefore graph formats are suitable for applications where you have
repetitive and similar measurements.
Read in the Structures chapter about Program design and in the Work
method chapter above. This explains the relation between measuring
object and graph.
Well into a graph you decide to collect data from the required
measuring object using the button (or in the Analysis menu, Object, or
using the F2-key).
mitec Monitor
75
Use graph formats
Show the measuring result
Importance of using the right sensor name
For graph formats to function, different measuring objects must use the
same sensor names.
If for example you measure 3-phase current on a series of measuring
objects, you can name the phases L1, L2 and L3 on each object. In
other words, the same name. (Alternatively you can let WinLog name
the sensors automatically and they will automatically be named G1, G2
and so on.).
You need to ensure that the sensors are connected in the same way from
measurement to measurement so that the phase one will always be L1,
phase 2 L2 etc.
Later during graph composition, you create a graph that collects data
from L1 and so on.
Using the %I variable described below, you can manage the header text
and collect information from the measuring object.
You have now created a general graph that can be used for different
measurements.
Using the %I variable
If you change object during analysis and thereby collect measuring data
from another measurement, possibly made at another geographic
location, you will most likely want the headings and other information
to be changed automatically.
The variable %I is used for this purpose.
Wherever %I is used in the graph’s text box, Monitor will go into the
current object and replace %I with the text information entered by the
user when the measuring object was defined.
The variable exists in an array of forms, with six different meanings.
%I is always the measuring object’s name.
%I[1] is Info 1 defined in Measurement, Configuration.
%I[2] is Info 2 defined in Measurement, Configuration
and so on up to %I[5].
Refer also to the example below.
76
mitec Monitor
Use graph formats
Show the measuring result
Example using the %I-variable.
A heading text can be created in a Text box using only the variables %I.
In analysis mode, the text box will create the header in the graph:
The information is taken from the Info field in the current measuring
object:
mitec Monitor
77
Calculations and formula
Show the measuring result
Calculations and formula
Formula language
Monitor can carry out many calculations on collected and saved
measuring data. A series of measuring data, consisting of two to
millions of measuring values, is known as a data record.
A time series is regarded as a variable in an equation, for example
(TEMP1 + TEMP2)/2 calculates mean value of two temperatures. In
Monitor, the temperatures can consist of a year’s measuring data from
two different sensors collected at one minute intervals. In other words,
two data records with around half a million measuring values each.
Monitor creates a new data record (a graph) that is the mean value of
each measuring point and draws a new curve.
Another example of a calculation is (POWER1:INT/3600) - in this case
calculated as the area under the curve (integral) of the data record
POWER (which could perhaps be pulses from a current meter collected
over three months at 15-minute intervals, around 9000 measuring
values).
Monitor creates a total that is in this case the energy during the time
period. Because Monitor always calculates in SI-units, the integral will
be in seconds and must therefore be multiplied by 3600 to get kWh
(where the type of the pulse was kW).
This therefore results a numerical value rather than a graph, and the
calculation must be displayed in a text box and not in the graph.
Both examples above use a way of expressing, naming and creating a
mathematical expression. In Monitor, we call this formula language.
Formula language is described in the program’s help text and each
formula and expression is explained there in detail.
The overall structure is described below to provide an understanding of
the system.
78
mitec Monitor
Calculations and formula
Show the measuring result
Calculations in the graph
Calculations can, as explained in the example above, be made on graphs
and / or on text boxes.
Calculations in above graphs are entered in the dialog box Graph that is
created under the Composition menu.
Explanation of the above example:
The example show a mathematical expression that calculates the power
factor (cos fi) from a measurement of active and reactive effect. The
measurement has been made using Mitec’s AT40 data logger along
with a combined current-meter with pulse output.
The calculation expression is based on Pythagorean theorem:
√ ( Pa2 x Pr2 ).
Power factor = Pa /√
Pa: Active power
Pr: Reactive power
Using the formula language, the expression is written in much the same
way as when it expressed manually.
The result is a third ”virtual” curve created theoretically from two
actual measured signals from a current-meter.
mitec Monitor
79
Calculations and formula
Show the measuring result
Calculations in text boxes
Calculations in text boxes are also made out on a data record. However
the result of the calculation is a value rather than a new data record.
A text box is shown below with a formula that calculates the maximum
value from a data record based on measuring data from the sensor
PRESSURE.
The result of the calculation is shown in the graph as part of a line of
text.
Many similar calculations can be made using formula language and are
described in more detail under the heading Text formula.
FORMULA LANGUAGE
The formula language in Monitor is a set of tools and a method for carrying out advanced calculations on measuring
data (data records). Formulas can be used to:
- make calculations on curves and enter them in GRAPH dialog boxes.
- make calculations that give a numerical result and enter it in text boxes.
Using Formula language, powerful calculations can be made on long series of measuring values (curves) as if they
were individual numbers.
The formula language can be split into parts:
Formula
Constants
Variables
Operators
Functions
Text formulas
SI-prefix
GRAPH-objects
The formula are written in the same way as you normally would with manual calculations. The approach is described in
more detail below.
80
mitec Monitor
Calculations and formula
Show the measuring result
FORMULA
A formula is a mathematical expression that can
contain Constants, Variables, Operators and
Functions.
Formula are used both in graphs and in Text formula.
A formula gives the result as a number.
This number can be one of many that together form a
new Graph. This is the case when the formula is used
in a Graph (data record).
A value can also be presented in a text box using
Text formula.
Example:
TEMP
TEMP_IN-TEMP_UT
EFFICIENCY.FLOW*(TEMP_IN:MAX-TEMP_UT:MIN)
LOG(G1/EXP(G2:INT)+BAS.OFF)
CONSTANTS
Constants are numerical values.
The number can include + - signs, digits, decimal
points, exponents.
(The exponent part can contain both + - sign and
digits, eg. 1E3 is equivalent to 1*10^3, ie 1000).
The modifier can be any of the following:
AVG
Mean value, SUM/NUM.
MAX
Maximum value.
MIN
Minimum value.
DER
Derivative, difference between the
values divided by the difference in
seconds.
INT
Integral, the sum of all the values
multipled by the registration-interval in
seconds.
TIM
Total time in seconds relative to all
values.
SUM
The sum of all values.
NUM
The number of values.
RMS
Root Mean Square, SQRT(SM2/NUM).
STD
Standard deviation, square root of the
variance, SQRT(VAR).
SM2
The squared sum of all values.
VAR
Variance, squared standard deviation,
(SM2-SUM^2/NUM)/(NUM-1).
Calculation time range for variables
When a variable is used in a formula, it collects the
measuring data from the sensor during the selected
time range.
When the variable is used in graphs, the calculation is
made with the resolution given by the curve’s
thickness or the column’s width.
Examples:
1
12
5,2
+3
-6,4
1E6
Examples of variables:
VARIABLES
In Monitor, variables are measuring data from the
sensors.
Variable name is the name given to the sensors
during Configuration of the Measuring system.
To differentiate variables from constants, variables
start with a letter. This is the reason that object and
sensor names also start with a letter.
The other characters in the variable can be letters,
digits or the underscore sign.
TEMP
Sensor name
STORG18.TEMP_UTE
Object and sensor name
FLOW:MAX
Sensor name (with Modifier)
A variable can consist of three parts.
Object.Sensor:Mod
- the first part indicates the object
- the second, sensor (under the object)
- the third part is a so-called modifier of measuring
data
Note that colon : is used to indicate that a modifier
shall be used.
If the object is not defined, the current object is used
(the object that is selected with the Object button. If
Mod is not defined AVG is used (refer below)
mitec Monitor
81
Calculations and formula
Show the measuring result
TEXT FORMULA
Text formula are formula in a text box. The text formula can be combined with normal descriptive text.
% F[formula|valuenumber|SI-prefix]
”Formula”.
When %F is written in the text, Monitor interprets it
that the following character is a formula and not text.
A formula is a mathematical expression that can
contain Constants, Variables, Operators and
Functions.
The formula starts with the character ”[” and finishes
with ”]” (Alt Fn along with 8 or 9).
Before the square brackets you can also indicate the
number of digits that should be presented in the
result, as well as the SI-prefix that should be used
(milli, kilo etc). The symbol ”|” is used as a divider. (|
is Alt Fn and the ”<>|” key).
Example:
%F[CURRENT:MIN|2]
The above formula takes the lowest value from the
data record (measuring value from the sensor)
CURRENT and displays it with two digits (rounded).
Because no SI-prefix was given, this is excluded. If
significant digits is not indicated, it will always default
to 4.
It is NOT possible to leave out significant digits and
include the SI-prefix. You must exclude ”from the
end”.
Example:
%F[CURRENT:MIN|4|SI] %U
Here we have indicated that the SI-prefix should be
used. Therefore we must also indicate that the type
(%U) must automatically be used (collected from the
measuring object). This means that if current is
0.995A for example, it is presented as 955mA. If it
reaches 1001A it is presented as 1,001kA.
SI-prefix
10Prefix:
exponent:
18
E
15
P
12
T
9
G
6
M
3
k
0
-3
m
-6
u
-9
n
-12
p
-15
f
-18
a
82
%U[Object.Sensor]
Unit.
When %U is written in the text, Monitor will look up
the type of Sensor under Object and use that
instead.
You can leave out the Object name and enter just the
sensor name. Information will then be collected from
the object that was selected using the object button.
If you leave out both the object name and the sensor
and in addition use SI earlier in the formula, the SIunit will be displayed and you then need to manually
indicate the type using text
Example:
%F[CURRENT:MIN] %U[CURRENT]. Will be
displayed as 3,102 A (if the minimum value was
3,102).
%I[Index|Object]
Info.
When %I is written in the text, Monitor will look up text
information about the measuring object and display it.
The text information has been previously entered
during Composition of the measuring system.
Index is a digit from 1 to 5. You can leave out the
object’s name, in which case the object selected with
the Object button will be used.
Example:
%I[3].
Read the text in info box 3: found under Measurement
system configuration. If you enter only %I you get the
current object’s name
%M[Object.Sensor]
Measurement
When %M is entered in the text, Monitor will look up
Data record information for the correct Object and
Sensor.
Data record information is the text you enter in
Measurement Configuration along with the sensor.
The heading on the box is ”Parameters for the next
data record” and Info.
If several data records are currently displayed in the
diagram, the first within the time range is used.
If Object is left out, the current object is used.
Example:
%M[CURRENT].
Information on the current data record for the
CURRENT sensor will be collected (possibly notation
on current calibration).
mitec Monitor
Calculations and formula
Show the measuring result
%D[Type]
Date.
When %D occurs, Monitor inserts the date in the text.
Type indicates the type of date, which can be START,
STOP or CLOCK.
START indicates the date for the start of the graph.
STOP indicates the date for the end of the graph.
CLOCK is the current date.
If you write just %D, the start date will be used.
%T[Type]
Time.
When %T occurs, Monitor enters a timestamp in the
text.
Type indicates the type of time, which can be START,
STOP or CLOCK.
START indicates the time for the start of the graph.
STOP indicates the time for the end of the graph.
CLOCK is the current time.
If you write just %T, the start time will be used
Example:
%D[START] %T[START] to %D[STOP] %T[STOP]
can be shown as 991118 12:00 to 991218 18:00 if
this is the range selected in the graph.
THE GRAPH-OBJECT
In Text formula, a special object in Variables can be
used, known as GRAPH.
The ”Sensor ” for the object GRAPH is simply a curve
- a graph. Graphs are assigned sequential numbers
when they are created (refer Graph dialog). This
number is used in Text formula. (eg GRAPH.1 or
GRAPH.4)
By using the GRAPH object in the text formula, you
can make calculations faster during analysis, and
simplify input during composition.
Formula such as TEMP1-TEMP2 will not always give
the required result when they are used in text formula.
Individual values can be, for example, from different
times (clock stamps) and this means the calculation
will not work.
In such cases, a graph can be created with the
formula ”TEMP1-TEMP2”. The graph’s number is then
used in the Text formula instead of the direct
calculation. The GRAPH object is simply an interim
step in the calculation.
If the modifiers (refer Variables) MAX or MIN are used
in the GRAPH object (eg GRAPH.1:MAX), you can
also get different maximum and minimum values
depending on how much you have zoomed in in the
graph.
The values provided represent the visible maximum
and minimum in the graph.
If you require an absolute maximum or minimum, the
sensor’s name should be used directly in the
calculation. eg. TEMP:MAX.
mitec Monitor
83
Calculations and formula
Show the measuring result
MORE THAN THESE FOUR CALCULATION METHODS!
Variables and constants are not sufficient to build a complete formula.
You also need calculation methods, such as plus, minus, square etc. In WinLog’s Formula language we have divided
these into OPERATORS and FUNCTIONS.
In addition, Monitor has SELECTORS for sorting measuring data from different time periods, MACROS to simplify
formula and TABLES to express relationships between different variables.
OPERATORS
Operators perform a mathematical operation on one
or more formula (expressions).
Functions:
ABS(x)
Absolute value of x
ACOS(x)
Arc cosine of x
Operators are listed below in the order they are
performed if combined in an expression (known as
precedence order).
Higher precedence is performed before lower
precedence, eg A+B*C is the sames as A+(B*C) and
A^B*C is the same as (A^B)*C.
Parentheses can always be used in formula in
Monitor.
ADD(x;y)
x+y
ASIN(x)
Arc sine of x
ATAN(x)
Arc tangent of x
ATAN2(x;y)
Arc tangent of x/y
CEIL(x)
Gives the lowest whole number
that is greater than or equal to x
CHS(x)
Change the sign on x, same as
1*x
Operators:
COS(x)
Cosine of x
x^y
Exponent, calculated x to the power of y
COSH(x)
Hyperbolic cosine of x
x*y
Multiplication, x multiplied by y
DIV(x;y)
x/y
x/y
Division, x divided by y
EXP(x)
x+y
Addition, x plus y
Natural exponent function of x,
e^x
x-y
Subtraction, x minus y
FLOOR(x)
Gives the greatest whole number
that is less than or equal to x
HIGH(x;y)
1 if x>=y, 0 if x<y
LOG(x)
Natural logarithm of x
LOG10(x)
10 logarithm of x
LOW(x;y)
1 if x<=y, 0 if x>y
MOD(x;y)
The remainder of the division x/y
MUL(x;y)
x*y
NOP(x)
Gives x, same as x
POW(x;y)
x^y
RANGE(x;y;z)
1 if x>=y and x<=z, 0 if x<y or x>z
SIGN(x)
1 if x>=0, -1 if x<0
SIGNZERO(x)
0 if x=0, 1 if x>0, -1 if x<0
SIN(x)
Sine of x
SINH(x)
Hyperbolic sine of x
SQRT(x)
Square root of x
SUB(x;y)
x-y
TAN(x)
Tangent of x
TANH(x)
Hyperbolic tangent of x
FUNCTIONS
Functions in formula perform a mathematical function
on one or more arguments in the form of formula
(expressions).
The argument of a function is written within
parentheses. The entire expression can therefore be
used as an argument.
The argument is separated with a character defined
under Setup (in the definitions below a semicolon is
used as as separator).
Certain functions can not always be assigned a
defined result value when certain arguments are used
(eg logarithm of 0). In such cases, the entire formula
will be undefined and no result is given.
In Text formula this is presented as ########, and in
graphs there will be dots in the diagram or an entire
bar will be missing.
SELECTORS
84
mitec Monitor
Calculations and formula
Show the measuring result
Selectors are used in formula to select measuring
data from sensors within a specified time period.
Selectors can be used in both graphs and text boxes.
Selectors can be freely defined by the user under the
menu Alternative and Selectors.
Selectors are indicated within { and } inside the
formula. All variables after (to the right of) a given
selector are affected by that selector until a possible
new selector is used in the formula.
If you indicate {}, in other words curve parentheses
without a selector, it means that no selector should be
applied to the following variables.
Selectors can not be used with the GRAPH object.
Instead of indicating a sensor name we use #1, #2
etc.
When we later use the macro MEAN with our two
sensors G1 and G2 for calculating in a text box, we
write:
MEAN(G1;G2).
Monitor now inserts G1 in place of #1 and G2 in place
of #2 and the calculation that is performed will be:
(G1+G2)/2
Example 1.
{MONDAY}TEMP
Show or calculate measuring values from Mondays.
Example 2.
A more realistic example is to convert a measuring
sensor to another physical magnitude. Such a macro
function could for example look like this:
23,93934 + 3,44623 * (#1) + 5,3481 * (#1)^2 +
0,12334 * (#1)^3
Example 2.
G1/{SEL1}G2
Sensor G1 is divided by measuring data from sensor
G2 but only G2 data during the time defined in the
selector SEL1
If the macro function is called NH2 and is used as
follows:
NH2(G1).
The following will be calculated:
23,93934 + 3,44623 * (G1) + 5,3481 * (G1)^2 +
0,12334 * (G1)^3
Example 3.
({DAY}TP-{NIGHT}TP)*{}FLOW
The difference in measuring values from sensor TP
during day and night is produced. (ie all measuring
values that are not day or night).
These are then multiplied by flow without time
selection.
Note:
MACRO
Macro is used to simplify complex calculation
expressions that are frequently used and that would
be complicated to write.
The macro can be locked and in this way valuable
calculation expressions can be protected against
copying and unauthorised usage in other contexts.
Macro functions are functions that are defined by the
user using Macro functions under the Options menu.
•
In all the above examples the argument (#1, #2,
etc) has been the sensor, but this does not have
to be the case.
The argument can be a complex expression, or
any type of text. When #N is replaced, the given
text is used.
•
Up to four individual arguments can be used.
•
A macrofunction can not call up another
macrofunction.
•
NOTE parantheses round (#1) och (#2)
You should always use parentheses when the
argument is a part of an expression.
The principle for Macro is simple. A complex
calculation expression contains different
mathematical functions, constants and variables
”packaged” and given a name.
Example 1.
You want to make a general formula for calculation of
a median value of two sensors.
The calculation to be made is (G1+G2)/2. In other
words, add G1 and G2 and divide in two.
We define a macro and call it MEAN:
((#1)+(#2))/2
mitec Monitor
85
Calculations and formula
Show the measuring result
TABLES
The table function in Monitor is a method of defining a
relationship between two variables.
The advantage of tables is that you don’t need to
develop an equation to describe a relationship
between two variables. It is sufficient that that
relationship exists in a table.
The table is defined by the user and imported to
Monitor. The table can then be used in calculation
expressions.
Table format
There is a relationship between a pressure and a
temperature. The relationship is expressed in a table
where you can, for every temperature between 0 and
100 degrees, go in and look up a pressure.
The table could look like this: (Temp=X, Tryck =Y)
Temp
oC
1
2
3
4
etc.
Pressure
Bar
0,2
0,27
0,34
0,45
The table’s name is therefore followed by the sensor’s
name in parentheses.
You can also indicate a constant instead of the
sensor’s name, for example:
TAB(2,0)
The result in our example will always be 0.27.
Note:
•
Use a text file (ASCII-file).
•
Separate numeric pairs with Monitor’s list
separator.
•
Import tables to Monitor and give them a name
with up to 8 characters.
•
The table can be used both in text boxes and to
draw graphs.
•
Refer operation description in the chapter General
settings below.
To use a table in Monitor, only a text file is required
where the table values are separated with Monitor’s
list separator (semicolon if not otherwise specified
under Options Setup).
The table above is written as:
1;0,2
2;0,27
3;0,34
4;0,45
etc
It is saved in text format in a file given an optional
name in an optional place and then imported to
Monitor. Refer operation description elsewhere in the
user manual.
When the table is used in a calculation expression, a
temperature sensor is used to generate an entry
value to the table. A pressure is produced as a result.
In other words, if the temperature was 3 degrees, the
value 0.34 will be produced by the expression.
Monitor performs a linear intrapolation of values
between the table values. If the temperature was 3.5
degrees, the resulting value will be in between 0.34
and the next value 0.45 (0.395).
Example
Assume that the above table has been imported to
Monitor and given the name TAB. Assume that we
have a temperature sensor that is called TEMP1.
To make a calculation in text boxes or graphs you
write:
TAB(TEMP1)
86
mitec Monitor
Export to other programs
Show the measuring result
Export to other programs
Monitor’s analysis tools and formula language provide unique
opportunities to create presentations and calculations for most
requirements.
In addition to this, measuring data can also be transferred to other
programs via files saved to disk. Measuring data is stored in ASCIIformat in rows and columns that can be read by programs such as
Excel, Word, Notepad etc.
Measuring data can be transferred in two main ways:
Export transfers all measuring data from one sensor at a time to a file.
Report transfers measuring data from curves in an open graph to a file.
Export
Export transfers measuring data from any given sensor to a file with any given name.
All measuring data within the selected time range is transferred with the registration
interval used during measurement. Export can be said to transfer ”raw data”.
• Click on Measurement and select Export.
A dialog box for export is opened.
• Click on Object and Sensor to be exported.
Example of data format for export
• Enter a file name and a search path where the file should
be saved. Select file and directory with the Files button.
• Select the time range All or select the time range
manually.
• Click on Options.
The dialog box is enlarged. Formatting details can now
be changed.
• End using OK.
If Run Notepad has been ticked, the file with exported
data will be shown on the screen.
EXPORT DIALOG BOX
File name is the searth path and the file name that the file will be saved under. Select using the Files button or enter
directly.
Export all values can be ticked if all collected measuring values should be exported. Alternatively the required time
range can be given in Start and Stop, Date and Time.
mitec Monitor
87
Export to other programs
Show the measuring result
Object and Sensor shows which measurements there are. Click first on Object and then Sensor. Only a single sensor
at a time can be exported. (Refer Report if multiple sensors should be exported simultaneously).
Date format defines which format should be used for the date. For example, yyyy-mm-mm presents the date as 200002-14. Enter the required format.
Decimal Separtor defines which character should be used as a decimal point.
List separator defines which character should be used as a divider between columns.
Include unit means that the sensor’s unit should be written after every measuring value.
Convert to DOS characters converts the contents of the file to DOS standard. Otherwise Windows characters are
used.
Milliseconds mean that time is presented including milliseconds. (Monitor saves data with 1/1000th of a second
resolution).
Run notepad starts the Notepad program automatically.
88
mitec Monitor
Export to web
Show the measuring result
Export to web
In monitoring applications it is often necessary to share information
among a group of users.
Often these users are in different geographic locations and can also
belong to different organisations.
In this case Internet is a good way of providing access to common
information.
Monitor therefore has inbuilt tools for automatic export of analysis
results and graphs to a website.
The web solution will alway be individual and should therefore be
created in partnership with Mitec and the organisation’s IT personnel.
When the system is customised and installed, graphs will automatically
be exported to the website or intranet whenever data collection occurs.
Export can also be done manually under Analysis, Send to web.
• Select Analysis from the menu.
• Select Send to Web
The current graph will be exported automatically to the
website via the computer’s / network’s normal Internet
connection.
mitec Monitor
89
Report
Show the measuring result
Report
Report is another way of saving measuring data to a data file. Report
transfers measuring data from a graph (as opposed to Export that
transfers measuring data direct from the sensor).
Report can be said to transfer processed measuring data.
This means that:
- several sensors are presented at the same time in different columns
- measuring data can be processed using calculations, a virtual data
record can be created
- the quantity of measuring data can be reduced using a mean
calculation
- time range can be selected via the graph.
• Open the graph to be reported.
• Press on the button on the button menu or select Analysis
and Create report from the menu.
A Report dialog box is opened.
• Enter the file name and search path where the measuring
data is to be saved or use the Files button to select.
• Indicate the time steps used to save measuring data to file.
• Press OK.
The measuring data will be written to the selected file.
90
mitec Monitor
Report
Show the measuring result
Details in the report format can be changed by expanding the dialog
box using the Options button.
• Press Options
The Dialog box is expanded.
• Tick the appropriate options and then press OK to generate
the report. Completed settings will be saved to the next
report.
THE REPORT DIALOG BOX
File name is the search path and file name that the file will be saved under. Select using Files button or enter directly.
Time format defines the format to be used for time, for example hh:mm:ss presents the time as 12:26:10. Indicate the
required format.
Date format defines the format to be used for the date, for example yyyy-mm-dd presents the date as 2000-02-14.
Indicate the required format.
Decimal separator defines which character should be used as a decimal point.
List separator defines which character should be used as a separator between columns.
Significant digits indicates how many digits should be included in the report.
Headlines indicates whether only measuring data should be reported or whether a summary of important information
regarding the measurement should be included in a table heading.
Include unit means that the sensor’s unit is written after every measuring value.
Convert to DOS characters converts the contents of the file to DOS-standard. Otherwise Windows characters are
used.
Milliseconds indicates that time is written including milliseconds (WinLog saves measuring data with 1/1000 second
resolution).
Run notepad starts the Notepad program automatically.
Use 0 when error or no value indicates that the digit 0 (zero) should be written if measuring values are missing or are
incorrect at a specific timepoint. Otherwise NaN (not available now) is used.
Time mark at start of the period means that the first measuring value included is the time when the measurement
commenced. Normally the time of the first registration is used (or calculated, reduced registration depending on
interval time).
Example of a report from two measuring sensors. Table heading included.
Example of a report without table heading but including type
mitec Monitor
91
General settings
Program settings
Program settings
General settings
In addition to settings that affect measuring and
presentation, there is a menu for general customisation of
Monitor. This is located under the menu Options as well as
the menu ?
The
Options menu
? menu
Date format, decimal separator and other
• From the menu select Options and Setups.
A dialog box Setup is opened.
Searchpaths
In the dialog box Setup there is a field with the name Directory. When
the program is started the first time, the search path to the program and
its data files is shown.
You can select here to save measuring data in a place other than in the
main directory, for example on a file server in the network or in a
directory belonging to a specific project.
Example 1:
On the company’s file server there is a hard disk that is used for
common information. This has been given the name X:
To save measuring data on X:, the directory name in Monitor must be
changed.
• Select Options from the menu and click on Setup.
• Enter the name of the directory on X: where the measuring
data should be saved.
Next time Monitor is started, measuring data is collected
from the new directory and will continue to do so until a
new search path is provided.
Measuring data will now be saved in subdirectories under
X:\MÄTDATA according to Monitor’s standard method. Refer to the
chapter How and where measuring data is saved for more information.
92
mitec Monitor
General settings
Program settings
NOTE. The program remains on the computer where it was originally
installed. Only measuring data and graphs will be saved in the new
directory.
In this way measuring data can also be divided between different users
that have access to the common resource X: in the network.
Example 2:
A project with the name ELANALYS is to be started and the measuring
data saved on the computer’s hard disk in a directory with the same
name.
To locate measuring data on C:\ELANALYS, the Directory name in
Monitor should be changed.
• Select Options from the menu and click Setup.
• Enter the name C:\ELANALYS: in the directory field
Next time Monitor is started, measuring data is collected from the new
directory and will continue to do so until a new search path is provided
as in Example 1 above..
SETUP DIALOG BOX
Directory
Default (main) directory, where all graphs and measuring objects are saved.
Time format
Time format used with display and input of time. The time format is indicated using hh, mm and
ss representing hours, minutes and seconds, with optional order and choice of
separator. Example: hh:mm:ss or hh.mm.ss.
Date format
The date format used with display and input of date. The date format is indicated using yyyy yyyy,
yy, mm and dd representing year with or without century, month and day, with optional order and
choice of separator. Example: yyyy-mm-dd or dd/mm-yy.
Decimal separator Sign to use as decimal point
List separator
Character used to separate items in lists and function arguments.
Serial port
The serial port to use during data collection from the measurement instrument. Speed (baud-rate)
that is used for collection is 1200 bps for 20/30/200-series, 9600 bps for 31/40-series och 19200
for eLog-series. Refer also to description of communications port below.
Alternative colour Alternative colour for dialog box and various other windows.
Clock
The clock should be displayed in the status field.
All menus
All menus should always be displayed.
Toolbar
Toolbar should be displayed.
Status field
The Status field should be displayed.
Nearest colour
Use special nearest-colour converting for units (screens, printers, etc.) wth 16 colours or less.
OK
Use this setup.
Cancel
Cancel
Help
Display help side.
mitec Monitor
93
General settings
Program settings
Selectors
Selectors are part of the formula language used to divide up time series.
They can be used with both presentation of graphs and calculations.
Refer also to the chapter Calculations and formula.
Selectors can be defined by the user based on Month, Weekday and
Time.
• Select Options and Selectors from the menu.
A new dialog box is opened.
• Provide a name for the selector to be created and complete
the time point as well as select days and months.
• Press the Add button and then Close.
To change or delete a Selector, press the appropriate button.
In the above example, work time is defined as the time between 6.30am
and 5pm Monday to Friday all months.
94
mitec Monitor
General settings
Program settings
Macro
Macro is used to simplify complex calculation expressions that are
frequently used.
Refer also to the chapter Calculations and formula.
Macro functions are functions that are defined by the user.
• Select Options and Macro functions.
A dialog box is opened.
Previously defined macros are shown in the list. The macro’s definition
and description are displayed in the Formula and Comments box.
To create a macro:
• Enter the macro’s name, formula and comment text.
• Press the add button.
The macro is now saved.
• To protect the macro press the Lock button.
A new dialog box is opened.
• Enter a password and press OK
The Macro will now be protected.
The macro’s function is not affected by being locked. Locking only
prevents the calculation expression being displayed.
A locked macro is opened by pressing the Unlock button and then
giving the current password.
mitec Monitor
NOTE. Make a note of the
password!
95
General settings
Program settings
THE MACRO DIALOG BOX
Function
Name of the function to change or add.
Formula
Comment
The macro function’s formula. When the macro function is used, #1, #2, #3 and #4 will be
replaced by the expression that is used as an argument for the macro function.
Optional text.
Close
Close the dialog box.
Change/Add
Change or add settings.
Restore/Clear
Restore or clear settings.
Delete
Delete selected changes.
Lock/Unlock
Lock or unlock selected functions. The Lock dialog is shown where password is provided.
Help
Display help text.
96
mitec Monitor
General settings
Program settings
Tables
Table functions in Monitor are a way of defining a relationship between
two variables.
The advantage of tables is that you don’t need to develop an equation to
describe a relationship between two variables. It is sufficient that the
relationship exists in a table.
Tables are defined by the user and imported to Monitor. The table can
then be used in a calculation expression.
Importing a table.
• Select Options and Table functions from the menu.
A dialog box is opened.
• Enter the table name selected and press Import.
A new dialog box is opened:
• Enter the name and searchpath to the text file with the table
to be imported. Press OK.
The file is imported.
Press Add and then Close to finish.
NOTE. Read more about tables
in the chapter Calculations and
Formula above.
THE TABLE DIALOG BOX
Function
Name of the function to change or add.
X-start
First X-value in the current table.
X-interval
Constant interval between X-values in the current table.
Number of values
Number of values (numerical pairs) in the current table.
Comments
Optional text.
Close
Complete the dialog.
Change/Add
Change or add settings.
Restore/Clear
Restore or clear changes.
Delete
Delete selected function.
Lock/Unlock
Lock or unlock the selected function. The Lock dialog is shown when a password is provided.
Help
Help text
Import
Import table. The Table import dialog is run.
Export
Export table. The Table export dialog is run.
mitec Monitor
97
General settings
Program settings
Modem settings
A vital component in the Mitec measuring system is the modem.
The modem is used for collecting measuring values from measuring
stations equipped with either a standard modem or a GSM-telephone.
Most standard modems on the market can be used with Mitec Monitor.
The modem is adapted to Monitor using settings which are made in a
dialog box under Options and Modem settings.
These settings are general and are used for communication with all
Mitec’s measuring instruments and measuring stations.
Individual modem settings can be made for each measuring group under
Measurement, Configuration, if required. In practice this is only
necessary when one of Mitec’s older systems in the 20/30/200 series is
used.
• Select Options and Modem settings from the menu.
A new dialog box is opened.
• Complete the different fields in the dialog box. Refer to the
program’s help text for detailed information on different
modems.
Complete with OK. Test the modem.
MODEM DIALOG BOX
Serial port
Serial port (COM1, COM2, etc) used by the modem.
Baud rate
Speed (baud-rate) between the computer and the modem, to be used during modem
initialisation and dialling.
Tick if hardware handshake with CTS/RTS should be used.
CTS/ RTS
handshake
Locked baud
Init 1
Tick if Baud rate should also apply after connection is made, otherwise the baud rate will be
changed to that given by the modem’s CONNECT-message.
Initialisation command 1. This command is sent to the modem first. Standard command: ATZ.
OK
Initialisation command 2. This command is sent after Init 1. Standard comand:
AT&C1&D2S0=0S2=255S7=60.
Dialling command. This command is sent after a possible command defined for the current
group (refer Configuration of group dialog). Standard command: ATDT
Use settings.
Cancel
Cancel
Help
Help text.
Init 2
Dial prefix
The modem should be configured / initialised so that it does / completes the following:
•
The modem must made use of text commands and text replies (not codes).
•
As a reply for an accepted command the modem must answer OK.
•
When a carrier is established, the modem must reply CONNECT, possibly followed by baud rate if locked baud is
not used. The modem should only reply with a single text row on an established carrier.
•
If the modem sends a text reply for ringing, this should be RINGING.
•
It must be possible for the modem to break a connected connection when the DTR signal is deactivated.
•
The modem must not affect or be affected by data that is sent by the modem, including characters such as
XON/XOFF.
98
mitec Monitor
General settings
Program settings
Tips:
Always tick CTS/RTS as well as Locked baud.
If the communication does not function Test using AT&F as Init 1 and leave Init 2 empty.
Ring upp should always be ATDT. If the modem is connected to an exchange enter ATDT0w to dial the zero and wait
for the tone. ATDT0 can be required for certain modems.
mitec Monitor
99
General settings
Program settings
Fonts
In the Options menu there is also a selection for Font. This is used to
set the font to be used in the Status bar lowest down in Monitor.
• Select Options and Fonts.
The standard Windows dialog box for font selection is
displayed.
Options
From version 1.70 and on, Monitor has a number of add-on functions
that can be purchased as accessories.
Some of these functions can be reached from the Options dialog box. In
the example above the option Serial number external probe.
Log report
Internal events in Monitor are registered in a log as an aid in troubleshooting. The log can be read using the menu Log report.
• Select Options and Log report.
The report is started automatically and shows a report of
events during the current day.
The log report is erased automatically every day. If you want to save a
report it can be done using the function Save as in Notepad.
In Monitor there is also a detailed program log that saves all events.
Select Extended log under Options and Setup. This extends the detailed
information that can be useful with trouble-shooting, for example with
communication.
Information rows with a plus (+) in front are only shown if Extended
log is selected.
• Select Options and Log.
An information box that shows all events in the program is
opened.
Tips: The log file can grow and be quite large, particularly if Extended
log is selected. The file can then simply be deleted, a new one will be
created automatically.
100
mitec Monitor
General settings
Program settings
Licence number
Along with the introduction of WinLog 1.70 a new system of licence
numbers was started.
The licence number consists of a combination of digits and letters with
17 characters, such as 12RY2-345QW-UIO23.
The licence number includes information about which options are
available in the program and whether a service agreement has been
taken out or not. The licence number is received from Mitec when the
program is purchased.
The number is also used to differentiate between single and multi-user
versions in network, and warns when programs with identical numbers
are used on a network.
A valid licence number is required for the program to function fully. If
the licence number is missing or is incorrect, the program will be run as
a demo version.
• Click on the menu bar ? and then on Licence.
A dialog box is shown for entering the licence number.
.
• Enter the licence number (17 characters) received from
Mitec and press OK.
A new dialog box is shown which confirms that the licence
number has been accepted.
• Press OK and start using the program.
Mitec will continually release program updates via internet which are
available to everyone with a service agreement.
For further infomation see http://www.mitec.se.
Should a new version with increased functionality be released, a new
licence number may have to be entered.
Use this approach and follow the instructions in the dialog box.
mitec Monitor
101
Printers
Program settings
Printers
All printers installed in Windows can be used for printing out Monitor
graphs.
Installation of printers is done in Windows and is completely
independent of Monitor.
Connection
The normal printers connected to the computer or network should be
used. These are usually connected to the computer’s parallel port
(LPT1 or LPT2) with a printer cable.
Refer to the printer’s user manual for connection and installation of
associated driver routines.
Settings
In Monitor a specific printer can be connected to a specific graph.
This means that no ”general” printers are available and that all printer
installations should be made in individual graphs.
Print format, colour, printer are therefore individual and adapted as
required in the graph composition.
Printer settings are made in the Composition and Page layout menu.
(Composition mode must be on). The following dialog box is shown.
Refer to the previous chapter Display and print out graph for details on
settings.
102
mitec Monitor
What is a Data logger?
Additional information
Additional information
What is a Data logger?
Background
The term data logger has, like many other technical terms, been borrowed from the English language. Log
comes from the naval term to log meaning in a logbook, ie to make careful notes about events.
By data logger we therefore mean careful ”notes” of measured data in a mass memory.
Mitec introduced its first data logger in 1984. It was the 4-channel logger MTM20 that we called a TEMPrecorder. Shortly afterwards we introduced a related instrument, the PULSE-recorder PM20. The next
generation was the ANALOG-recorder AT30 and later the AT31 and AT40 UNIVERSAL-recorder and
SatelLite data loggers.
Our product names have made their mark. In Sweden you can look in such guides as the ”Buyers Guide for
Engineers” (Ekonomisk Litteratur AB) under ”Recorder” where our product names have been used as
headlines in the product index.
The data logger is not a new invention. You can find old literature references such as ”Airborne recorder
and Computer Speed flight-text data processing system” from 1958.
The loggers were developed in step with the development of semi-conductors. The microprocessor plays a
very important role.
The real and major breakthrough came in the early 1990s after the data logger had gained general
acceptance.
How does it work?
The principle is quite simple. The main parts of a modern logger are the microprocessor, the semiconductor memory and an analog/digital convertor.
A sensor gives out an analog signal, such as 4-20mA. The micro-processor with a built-in clock controls the
process. The sensor is read at set time intervals and the measured values are saved in the memory.
Eventually it has collected a number of measured values that forms a data record. The data record can be
printed out as a graph on a printer or to a computer screen.
Moderm data loggers are quite sophisticated and are able to process information in many ways. These are
some of the more common terms used:
Memory is of course important. Common it varies between approx. 1000 values to several hundred
thousand. Non-volatile memories are available with a built-in battery so that data will not be lost in the
event of power failure.
Measuring channels indicate how many sensors can be connected at the same time. Hand-held professional
data loggers generally have two to eight channels.
Type of input indicates the type of sensor that can be connected. Most sensors can measure temperature or
a voltage signal such as 1-10V. Different types of sensors can be connected to more advanced loggers.
Registration interval is the time between two measurements saved in the memory. It is usually adjustable in
steps between 1 second and 24 hours. The registration interval determines the speed of processes that can
be measured. A rule of thumb is to make at least two registrations per period for the measuring signal.
Measuring interval is the time between two measurements. The most modern loggers measure several
times per registration to ensure a more accurate value. The measuring interval can be adjustable.
mitec Monitor
103
What is a Data logger?
Additional information
A clock is required. Modern loggers have a crystal clock with date and time.
Start condition is the condition required for measuring to start and data saved in the memory. It may be a
manual start, time start or start on external factor such as when a temperature is exceeded.
Stop condition determines when the measurement should stop. Can be manual, time, external factor or
when the memory is full.
Storage conditions can be set on some loggers. You can choose to store only the mean value during a
registration or multiple values such as minimum, mean and maximum.
How to handle the measured data
Collected measured values are saved in digital format as data bytes. Before you can use the information it
must first be processed.
Older loggers simply printed out the information as numeric values on a printer. This resulted in long and
cumbersome tables that were hard to interpret.
The best way is to present information in graphic format as a curve. Some loggers draw curves directly to a
printer or a plotter, and this is acceptable if you are satisfied with unprocessed data.
The most common method is to transmit the information to a PC for analysis in a program.
The main advantages with this are that the information can then be stored on magnetic media for later
analysis and that the work involved with the analysis has been made easier as the calculation and
presentation capacity of the computer can be used.
Modern PCs using Windows have made it very efficient to handle this information due to the graphical
interface and mouse functions.
What should be considered.
You should first ensure that you have an instrument appropriate to your application.
Type
Decide whether you need a portable instrument or fixed installation. For field measurements, low weight
and battery operation are important.
Some suppliers also use a PC in the field. Consider that the PC is attractive to thieves and should not be left
unsecured.
Certain cheaper loggers are made as ”black boxes” without keys or display. With these you are completely
dependent on the PC for installations and operation, even in the field. These loggers often have a built-in
battery and the instrument will be discarded when the battery runs out.
Ergonomics
Unfortunately the industry has been very ”high-tech” inspired. Many instruments are difficult to overview
and have a number of keys for different functions. Select an instrument that has a logical construction. It
should also have a display with letters and figures and some clearly marked keys.
Expansion
Check also the procedure for connecting different types of sensors and expanding the equipment. Some
instruments are only designed for certain types of sensors. If you need to connect other types of sensors you
need to purchase a new instrument or special circuit boards.
104
mitec Monitor
What is a Data logger?
Additional information
Battery life time
It is important to check power consumption. A modern battery-driven logger should not consume more than
0.1mA in standby position.
During measuring it may consume considerably more, approx 30-40mA. Note that short registration
intervals (1-30 seconds) significantly increase consumption.
Input signals
You have maximum flexibility if you select an instrument with universal inputs. You can connect different
types of sensor directly using the appropriate cable and connection.
Some loggers require external signal transducers to scale the sensors. Consider that these generally use a lot
of power and also take up a lot of space.
An important aspect is the power supply to the sensors. If an external power supply is needed there is the
inconvenience of extra cables. Quality loggers have a built-in supply directly via the sensor cable.
Watch out for the power consumption here! A humidity sensor for example can flatten a 9V battery in 24
hours if connected the entire time. Select a logger that can control the power supply to the sensor.
Accuracy
Many suppliers do not differentiate between resolution and accuracy and yet they are actually two different
things. The resolution indicates how ”small” the parts of the signal are that can be identified. Many
suppliers have, for cost reasons, only used 8 bits and this provides a resolution of 1/256.
With a measuring range of, for example, 300°C /572°F this means a resolution of just over 1°C /1.8°F. At
least 10-12 bits are required (a resolution of 1/1000 to 1/4000).
Accuracy is an indication of how well everything works together. This should be specified in a technical
unit, such as °C or %. Also insist that the supplier can demonstrate traceability for the calibration, ie that he
can prove the instrument measures correctly.
Memory
Today, memory capacity is no longer a limitation. 25 - 50,000 measured values are standard. Note however
that some suppliers show the memory in kbyte (kilobyte = 1000 bytes). To store a measured value with an
acceptable resolution you need two bytes, ie 128 kbyte is sufficient for 64,000 measured values. Most
memories can also be delivered with a power failure protection.
Bruksanvisningar.
Se till att få svenska bruksanvisningar. Importerade instrument har i allmänhet engelska manualer vilka kan
vara svåra att förstå. Kontrollera att leverantören kan ge service!
Mitec data loggers.
Mitec data loggers are designed and manufactured by Mitec in Säffle. As a customer you are always able to
get help and advice if you have a measurement problem.
We deliver instruments for physical measuring signals, in other words we don’t leave you with a 1-10V
input. We also deliver the sensor or a cable that directly fits your existing sensors.
mitec Monitor
105
What is a Data logger?
Additional information
Designed for use in the field
Our instruments are designed with the user in mind. We put a lot of emphasis on simple operation and
flexibility. Our data loggers are based on nearly 20 years experience manufacturing data loggers for use in
the field.
Simple operation
A display in English will guide you through the configuration. The simple and clear structure of setup and
readings means you will be able to master the instrument straight away.
Flexible
Universal inputs for volt, mA, electricity meters, temperature sensors, current clamps, flow meters, etc.
mean that our instruments can be used for a wide range of applications. Without rebuilding or additions.
Our Mitec SmartCable concept ensures that you can directly see signal type and unit in the display without
any programming.
Technical performance
The latest microprocessor technology makes it possible to build ”high-tech Christmas trees”. However, long
experience has taught us that technology should not be an end in itself. Our instruments have ”sufficient”
performance to quote a well-known English car manufacturer.
106
mitec Monitor