1
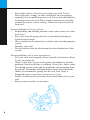
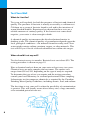
Environment and Labour Environmental Monitoring & Compliance A Guide for Private Well Owners Contents Locate and Construct Your Well Properly . . Where should my well be located? . . . . . . When should I construct my well? . . . . . . How do I select a water well contractor? . . What if I have to make changes to my well? . . . . . . . . . . . . . . . . . . . . . . . . . . . . . . . . . . . . . . . . . . . . . . . . . . . . . . . . . . . . . . . . . . . . . . . . . . . . . . . . . . . . . . . . . . . . . . . . . . . . 4 4 4 4 5 Protect Your Well . . . . . . . . . . . . . . . . . . . . . . . . . . . . . . . . . . . . . 5 Well Inspection Checklist . . . . . . . . . . . . . . . . . . . . . . . . . . . . . . . . 7 Test Your Well . . . . . . . . . What do I test for?. . . . . . . When should I test my well? Well testing log . . . . . . . . How to test for bacteria . . . What do the results mean? . . . . . . . . . . . . . . . . . . . . . . . . . . . . . . . . . . . . . . . . . . . . . . . . . . . . . . . . . . . . . . . . . . . . . . . . . . . . . . . . . . . . . . . . . . . . . . . . . . . . . . . . . . . . . . . . . . . . . . . . . . . . . . . . . . . . . . . . . . . . . . . . . . . . . . . . . . . . . . . . . . . . . . . . . . . . . . . . . . . . . 8 8 8 9 10 11 Treat Your Well . . . . . . . . . . . . . . . . . . . . . . . Use liquid bleach to disinfect your well . . . . . . . How to disinfect your well . . . . . . . . . . . . . . . Do I need to resample my well after chlorination? . . . . . . . . . . . . . . . . . . . . . . . . . . . . . . . . . . . . . . . . . . . . . . . . . . . . . . . . . . . . . . . . 12 12 13 14 Almost half of Nova Scotians rely on groundwater from dug or drilled wells for their private water supply. If you own your own well, you are responsible for it. You must make sure it is constructed to provincial standards. You must also arrange to have your water tested regularly. For public water sources, we have put in place a multiple-barrier water management system. Our system has three main lines of defence: keeping clean water clean, making it safe, and proving it’s safe. We recommend the same vigilant approach for those of you with private wells. This guide offers some tips to help you maintain clean, safe drinking water. Why should I test my well? Your health, and the health of your family, is dependent on clean, safe water. The only way you can be sure your water is safe is to have it tested. Water for drinking, cooking, and other domestic uses should be of good quality. That means it should be free from organisms that may cause disease and from chemical substances that may pose a health risk. Your water should also be aesthetically pleasing, meaning it should look, smell and taste good. Steps to Safe Well Water Locate and construct your well properly Protection starts with the proper location and construction of your well. If you are planning to construct a well, get the advice of a certified well contractor. Protect your well Continued maintenance of your well and the area surrounding your well is essential to obtaining safe drinking water. Test your well Regular monitoring of your well water quality is the only way to be sure your water is safe. The bacterial quality should be checked every six months. Test the chemical quality at least every two years. Test earlier if you notice any changes. Treat your well When problems do occur it is essential to take corrective action immediately. You may want to obtain the services of a certified professional to evaluate your well construction. 3 Locate and Construct Your Well Properly Where should my well be located? The actual location of the well on your property will often be determined by factors other than the geology. Land surface features such as steep slopes and poor drainage areas are considerations in the location of the well and building. The well should be located and maintained so that it is accessible for cleaning, treatment, repair, testing, inspection, and other activities that may be necessary over time. When should I construct my well? You should construct your well before building your home. When you drill a well, you are actually exploring to determine the quantity and quality of water available. Totally dry holes are uncommon, but low yielding wells are more common than you may realize. If problems arise with your well, the cost to repair them is less if you construct your well first, because only the cost of the well is involved. Also, if a second well must be dug or drilled, there is more likely to be sufficient space on the property if the house is not already there. Too many homes have inadequate water supplies because the property owner did not have a well constructed before the home was built. How do I select a water well contractor? Under well construction regulations, those constructing and repairing wells must have a certificate of qualification from Nova Scotia Environment and Labour. Nova Scotia has approximately 50 certified drilled-well and 250 certified dug-well contractors. The list of certified well contractors can be found on the Nova Scotia Environment and Labour website at <www.gov.ns.ca/enla/water>. 4 What if I have to make changes to my well? Remember to always hire a certified well contractor when modifying an existing well. Locate your well away from pollution sources, such as septic systems. Slope the area around the well to drain surface runoff away from the well. When abandoning a well, hire a certified well contractor to fill or seal the well in a manner approved by Environment and Labour. For more information on well construction, please refer to Before You Construct a Water Well: Facts a homeowner should know, which is available at your local Environment and Labour office or online at <www.gov.ns.ca/enla/water/pdf/h2owells.PDF>. Protect Your Well Prevent problems by keeping clean water clean. The best way to protect your well is to prevent contaminants from getting into your well water. Prevent problems by keeping clean water clean: • Create a grass buffer zone around your wellhead. • Slope the area around the wellhead so that the surface water runs away from your well. • Dispose of wastes safely – Never put wastes in an abandoned well. Never dispose of hazardous materials in your septic system or on the ground. • Take care when using any chemicals on your property, especially near your well. Never mix or use pesticides, fertilizers, herbicides, degreasers, fuels, and other pollutants near your well. Better still, consider alternatives to harmful or dangerous pesticides or fertilizers. Watch that lawn mowers and snow blowers are not leaking fuels. • Keep sources of E. coli bacteria away from your well. Animal and kitchen waste can contain E. coli bacteria. Do not allow animals to urinate or defecate near your well. Do not allow liquids or wastes from contaminant sources such as garbage and manure piles to drain towards your well. These can lead to bacteria leaching into your water supply, especially during spring thaw. 5 • Keep other sources of bacteria away from your well. Do not bury brush piles, stumps, or other such debris on your property, especially near or uphill from your well. Do not use bark mulch or wood chips near your well. These organic materials are breeding grounds for insects such as earwigs, which can cause bacteria in your well. Prevent problems following a flood: • Stop drinking and washing with this water source until your water tests clean. • Stay away from the pump electrical system during flooding to avoid electrical shock. • Hire a certified well contractor to evaluate your well and pumping system. • Disinfect your well. • Test for bacteria after the disinfectant has been flushed out of the system. Prevent problems with regular maintenance: • Test your well water regularly. Every 6 months for bacteria. Every 2 years for chemicals. • Check visible parts of your well system each month for possible problems. Newer wells have a wellhead 15 cm (6 in.) above grade. You should see the casing and an aluminium cap protruding from the ground. This makes well maintenance easier and reduces the chance of contaminants getting into the well. Don’t bury it. • Pump and inspect your septic system every 3 years. • Install a vermin-proof cap to keep insects and rodents out of your well. • Keep accurate records in a safe place. 6 Well Inspection Checklist Routinely inspect your well to make sure that it is functioning properly and to determine whether activities around your well are harming the quality of your drinking water. That means a quick check for problems each month and a complete inspection every six months, when testing for bacteria. Month 1 Date Cracking or corrosion? Yes No Broken or missing well cap? Yes No Settling and cracking of surface seals? Yes No Month 2 Date Cracking or corrosion? Yes No Broken or missing well cap? Yes No Settling and cracking of surface seals? Yes No Month 3 Date Cracking or corrosion? Yes No Broken or missing well cap? Yes No Settling and cracking of surface seals? Yes No Month 4 Date Cracking or corrosion? Yes No Broken or missing well cap? Yes No Settling and cracking of surface seals? Yes No Month 5 Date Cracking or corrosion? Yes No Broken or missing well cap? Yes No Settling and cracking of surface seals? Yes No Month 6 Date Cracking or corrosion? Yes No Broken or missing well cap? Yes No Settling and cracking of surface seals? Yes No Well cap securely in place? Yes No Vent screen intact and not blocked by vegetative growth? Yes No Connections in the well casing properly sealed? Yes No Surface drainage near the well directed away from the well casing? Yes No The well pump and distribution system is functioning properly, with no leaks? Yes No Time to test for bacteria in water. 7 Test Your Well What do I test for? Test your well regularly for both the presence of bacteria and chemical quality. The presence of bacteria is usually assessed by a coliform test. Coliform are a group of bacteria found in soil and in the intestines of warm-blooded animals. Experience has shown that these tests are a reliable measure of sanitary quality. If the bacteria test comes back negative, your water is clean enough to drink. A chemical quality test measures the dissolved mineral matter in drinking water. The chemical quality of groundwater depends upon the local geological conditions – the minerals found in nearby rock. Your water might contain sodium, uranium, copper, or other minerals. This test will tell you if levels of dissolved mineral are within safe ranges. When should I test my well? Test for bacteria every six months. Bacterial tests cost about $20. The testing procedure is shown on page 10. Have a chemical analysis done on your water at least every two years. Chemical tests are more complex and cost more. The current cost ranges from $90 to $150, depending on the type of analysis required. To determine the type of test you require and the testing procedure, consult your local laboratory or a trained professional before sampling. Laboratories test for numerous chemicals as required by the Canadian Drinking Water Quality Guidelines, including arsenic, lead, and sodium. The best time to test your well is when the possibility of contamination is greatest. This will usually occur after a heavy rain, a large snowmelt, or an extended period of non-use. 8 Well Testing Log Year 1 Month 6 Bacterial test Date Results Month 12 Bacterial test Date Results Year 2 Month 6 Bacterial test Date Results Month 12 Bacterial test Date Results Date Results Chemical analysis Year 3 Month 6 Bacterial test Date Results Month 12 Bacterial test Date Results Date Results Pump & inspect septic system Year 4 Month 6 Bacterial test Date Results Month 12 Bacterial test Date Results Date Results Chemical analysis Year 5 Month 6 Bacterial test Date Results Month 12 Bacterial test Date Results Year 6 Month 6 Bacterial test Date Results Month 12 Bacterial test Date Results Date Results Date Results Chemical analysis Pump & inspect septic system 9 How to test for bacteria Prepare bottle and paperwork 1 Get a collection bottle from your local laboratory or your local Nova Scotia Environment and Labour office. This bottle is sterilized and contains a preservative. Don’t open it yet. 2 Label the bottle with your name and address, the location of your water source, and the date and time. 3 Complete the requisition form. Collect the sample 4 If you have a chlorine disinfection treatment unit, measure and record the chlorine residual on the requisition form. 5 Remove any aerators, strainers, purification devices, or any other attachments from the tap. If using an outside faucet, remove the garden hose. 6 Disinfect the end of the faucet by wiping with a cloth soaked in chlorine bleach. 7 Run a cold-water tap at full capacity for five minutes to flush the system. 8 Reduce the tap flow rate to about the width of a pencil. This is to avoid splashing when collecting the sample. 9 Open the bottle. Do not touch the inside of the bottle, the bottle lip, or inside the cap. Hold the cap in one hand with the inside facing down while the bottle is being filled. Do not lie it down. Take care not to breath on the bottle or cap. 10 Fill the bottle to the fill line. Do not overflow. Store and transport the sample 11 Refrigerate the sample immediately or place in a cooler at 4°C. Do not freeze. 12 Transport the sample to the laboratory within 24 hours of collection. 10 What do the results mean? The results will tell you if your water is safe to drink. Bacterial test The laboratory results will report the presence or absence of total coliform bacteria and E. coli. If the test indicates total coliform or E. coli are present, retest your well with a new sample bottle just in case the first sample was contaminated during collection. While waiting for the results of the second sample, use bottled water or another source of water for drinking, cooking, washing fruits and vegetables, brushing teeth, and so forth. If the test results of the second sample still indicate the presence of bacteria, you will need to disinfect your well. Remember to use another source of water while you investigate the cause of the problem. You may want to obtain the services of a certified professional to evaluate your well construction. Chemical analysis A chemical analysis will provide you with values that are compared to the Guidelines for Canadian Drinking Water Quality. If you have questions about the test results or what the results mean, contact your local Nova Scotia Environment and Labour office. For a list of accredited laboratories in Nova Scotia visit <www.gov.ns.ca/enla/water/>. 11 Treat Your Well Use liquid bleach to disinfect your well You can use liquid bleach to disinfect your well. The process is called chlorination or “shock chlorination.” It flushes your well and water system with a chlorine solution to kill bacteria and other microorganisms. This process is usually recommended if a water sample from the well has tested positive for bacteria. Disinfecting your well with chlorine is an effective method to eliminate a one-time case of bacteria contamination. If there is an on-going problem related to faulty well construction or contaminated groundwater, disinfection is only a temporary fix. Have the problem investigated and corrected at the source. Use chlorine in a well-ventilated area only. Be sure to follow the directions on the chlorine bottle label for safe storage and use. For flushing your well, use common, unscented household bleach that does not contain detergent or other additives such as fabric-guard. Depth of well water (metres) 1 3 5 10 30 50 100 1 2 12 Amount of unscented household bleach1 Drilled well Dug Well casing diameter 15 cm (6 inches)2 Casing diameter 92 cm (36 inches)2 40 ml 1.5 L 125 ml 4.0 L 200 ml 6.5 L 400 ml 13.0 L 1.0 L – 2.0 L – 3.5 L – Assumes liquid bleach with approximately 5.2% hypochlorite. This will produce about 100 mg/L of chlorine solution when mixed with the water in the well. For wells with other casing diameters, contact your local Environment and Labour office. How to disinfect your well The process of disinfecting your well may take up to 24 hours to complete. Before you begin, make sure you store enough water to meet your household needs during this period. 1. 2. 3. 4. 5. 6. Mix the amount of liquid bleach (shown in the previous table) in 10 to 20 litres (2 to 5 gallons) of water. Use common, unscented household bleach that does not contain detergent or other additives such as fabric-guard. Remove the well cap and pour the mixed chlorine solution into the well. If your wellhead is buried (with the old type of well seal), you can access the well through the top of the well or through the air vent. You can expose the top of the well, remove the well seal, and pour the solution directly into the well. If it would be easier, you can pour the solution through a clean funnel into the air vent or use a siphon through the air vent. If using the air vent, flush the air line with clean water after chlorination. Open one faucet in the system and let the water run until the chlorine odour is detected. Turn this faucet off. Repeat at each faucet in the system one at a time, until all faucets have been completed. Be sure to include inside and outside faucets, cold and hot water, dishwashers, toilets, baths, showers, sinks, etc. If possible, connect a garden hose to a nearby tap and place the other end in your well. Turn on the tap and allow the water to circulate for about one hour. This will recirculate the chlorine, making sure it is thoroughly mixed in your well. Seal the top of your well and let the system sit idle for about 12 hours, preferably overnight. Do not leave chlorine for more than 24 hours because it may affect some pump parts. After this time, flush the system by discharging the chlorinated water through an outside tap until the chlorine odour has completely disappeared. This procedure may take several hours, or longer. To complete the flushing, run each indoor faucet until the odour disappears. When pumping chlorinated water to waste, avoid discharging into your on-site sewage disposal system. Also, discharge away from streams, grasses, shrubs, and landscaped areas. Chlorine will kill plants and is hazardous to aquatic life. 13 Do I need to resample my well after chlorination? Yes, three times. After 5 days, after 2 to 4 weeks, and after 3 to 4 months. You must determine whether contamination was a one-time event or a continuing problem. After disinfection, sample the water for total coliform and E. coli bacteria to confirm that the water is safe to drink. Wait about five days after the disinfection process before you collect a water sample for testing. While waiting for the results, boil water for human consumption for at least one minute or use another water source. If the sample result indicates that both coliform bacteria and E. coli are absent, confirm that disinfection has been effective by taking two additional samples, one in the next 2 to 4 weeks, and another after 3 to 4 months. To check the safety of your water over the long term, continue to monitor bacterial quality at least twice a year, or more often if you suspect any changes in your water quality. If the sample result indicates that either coliform bacteria or E. coli are present, we recommend that you seek advice from a certified professional or Nova Scotia Environment and Labour. In the meantime, continue to use boiled water or an alternative source for human consumption (drinking, brushing teeth, washing food). The disinfection process may cause dirty or discoloured water, staining, or sedimentation problems. These should be temporary. The water should clear with time. For more information This booklet is a guide only. If you have questions about your well, check the information on our website at < www.gov.ns.ca/enla/water> or call your local Nova Scotia Environment and Labour office. 14 Environment and Labour Offices Western Region Kentville Regional Office 136 Exhibition Street Kentville, NS B4N 4E5 P: 679-6086 F: 679-6186 Liverpool Regional Office Waterfront Plaza, 1 Gorham Street Liverpool, NS B0T 1K0 P: 354-5784 F: 354-2453 Middleton Regional Office 101 Magee Drive Middleton, NS B0S 1P0 P: 825-2123 F: 825-4471 Yarmouth Regional Office 13 First Street Yarmouth, NS B5A 1S9 P: 742-8985 F: 742-7796 Bridgewater Regional Office 60 Logan Road Bridgewater, NS B4V 3J8 P: 543-4685 F: 527-5480 Central Region Bedford Regional Office 1595 Bedford Highway, Suite 224 Bedford, NS B4A 3Y4 P: 424-7773 F: 424-0597 Sheet Harbour Regional Office Fire Hall, 22835 Highway #7 Sheet Harbour, NS B0J 3B0 P: 885-2462 F: 885-2743 Northern Region Colchester County Regional Office 44 Inglis Place, 2nd Floor, Suite 3 Truro, NS B2N 5G6 P: 893-5880 F: 893-0282 Antigonish & Guysborough County Regional Office Kirk Place, 219 Main Street, Suite 205 Antigonish, NS B2G 2C1 P: 863-7389 F: 863-7411 Cumberland County Regional Office 32 Church Street Amherst, NS B4N 3A8 P: 667-6205 F: 667-6214 Pictou County Regional Office PO Box 675 (Granton Road) New Glasgow, NS B2H 5E7 P: 396-4194 F: 396-4765 Eastern Region CBRM, Victoria County and Northern Inverness Regional Office 295 Charlotte Street Sydney, NS B1P 6H7 P: 563-2100 F: 563-2387 Richmond County, Southern Inverness, Mulgrave and Auld’s Cove Regional Office 400 Reeves Street, Unit 126 Port Hawkesbury, NS B9A 2R5 P: 625-0791 F: 563-2387 15 This information has been prepared by Nova Scotia Environment and Labour. For further information about protecting your well water, please contact us at Nova Scotia Environment and Labour P.O. Box 697 5151 Terminal Road, 5th Floor Halifax, NS B3J 2T8 (902) 424-2547 or toll free: 1-877-9ENVIRO (1-877-936-8476) Fax: (902) 424-0569 Website: www.gov.ns.ca/enla/water