1
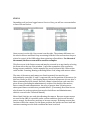
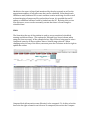
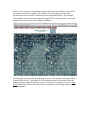
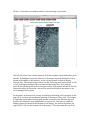
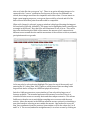
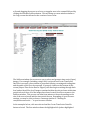
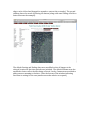
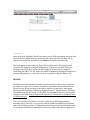
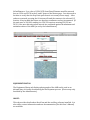
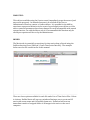
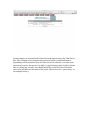
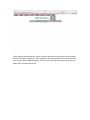
RootView User Manual (Based on RV version 2.0.0.18) 20 July 2011 GETTING STARTED: RootView is a web-‐based program for accessing and controlling Automated MiniRhizotrons (AMRs). It is accessible via a web browser (Internet Explorer or Firefox are recommended) or, in some special situations, can be run stand-‐alone on a laptop connected to an AMR in the event a network connection isn’t available. The primary link for accessing all AMRs is: http://cens.jamesreserve.edu/rootview/ Each AMR has three levels of access: Administrator, User and Guest. The Guest account is special in that it is called “guest” and the password is “guest.” It allows read-‐only access to all data collected. The other accounts have varying degrees of write privileges including the ability to schedule new scans and delete old scans. Typically, each AMR has one administrator and several user accounts. The administrator is typically responsible for making sure that the AMR and its associated laptop are running properly and that software on both is up to date. There are a wide array of functions and controls available to the Administrator all of which can dramatically change how the AMR functions. Further information about these functions is available in the technical manual. User accounts are meant for researchers. They allow not only access to all data collected by the AMR , but also allow the scheduling of scans. This manual is intended for Guest and User accounts. To logon to an AMR, follow the link above. Once on the main page, there is a pull-‐ down that, when selected, will provide a list of available AMRs. If you have a user account, you may logon using it, otherwise, please use the guest account (password = guest). STATUS: Depending on if you have logged on as a Guest or User, you will see a screen similar to one of the two below: Guest screen is on the left; User screen is on the right. The primary difference are the tabs for Motors and Panic Stop are missing from the Guest screen since they are related to control of the AMR rather than reviewing collected data. For the rest of the manual, the User screen will be used for examples. This first screen is the Status screen and may be returned to at any time by selecting the Status tab at the top of the window. It provides a snapshot of the system by listing current conditions. In this example, the overall system is Idle. Other states could include: Scanning, Homing or Homing Before Scan, along with various others. The state of the motors and camera are listed separately because they are independently controlled. X: and Y: represent the current position of the motors (in this case, Home (or 0,0)). Last Homing Report indicates the amount of error after a Home command has been issued. Because a Home is done before each scan, this gives all users (including the administrator) an idea of the health of the motors, motor controller and transmissions. An error of greater than 100 microns on subsequent Homes can indicate a potential failure. (Fortunately, RootView has an alert feature for such exceptions that can alert both Users and Administrators, which is covered in the Technical Manual.) Motor Limit Switches are used when Homing the camera. Because stepper motors are used in the AMR, it is possible under certain conditions (such as an extended power outage), for the motor positions to become corrupt. By having sensors that can detect when the camera is at the Home position, the system can reset itself and continue scanning once the fault condition has been corrected. Hard drive free space is listed (and monitored by the alert system) as well as the approximate number of full-‐tube scans that can be scheduled. Even though each AMR has a small, dedicated PC to run it and does routine archiving of scans as well as housekeeping of temporary files and archived scans, it is possible that an OS update or additional software could be loaded onto the PC. By being able to view free disk space, a user can be reasonably certain that there is room enough to schedule scans. SCAN: The Scan tab at the top of the window is used to access completed, scheduled, running and deleted scans. (The options for Edit and Copy are not shown when using the Guest account.) In the example below, Filter Scans is being used to select Completed scans by All Users with no date or Scan ID range selected. When changing values for any of the filters, one must press the Go button at the far right to update the widow. Compare Mode allows entire scans (Mosaics) to be compared. To do this, select the box in the far right column for each scan to be compared, then select the Compare button. Fit To Screen is recommend in most cases and is the default setting. It fits the scans selected to the width of the window you are using in your browser. Normal size is most useful for smaller sub-‐scans (explained later). The example below shows two scans being compared using the Fit To Screen mode. To view the length (Y direction) of the scan, simply scroll down. View brings-‐up a new window displaying a mosaic of all images associated with the Scan ID at the far left. Copy takes all of the metadata from the associated Scan ID and presents a completed template on a new screen for creating a new scan. (New Scan (below Filter Scans on the left) does essentially the same thing, only presents a blank template.) If View, is selected a new window similar to the following is presented: The left side of the View window displays all of the metadata associated with a given Scan ID. A thumbnail composite (Mosaic) of all images captured during the scan is drawn in the middle of the window. At the top are options for how to display selected tiles. The default Popup NxN is one tile. Selecting other values (such as 2x2 or 3x3) will display multiple tiles in a matrix of that many tiles. Note that the selected tile will always be in the bottom left corner of the matrix and that if tiles are beyond the edges of the mosaic, they will be intentional blank in the matrix or an error message will be given. As the mosaic is moused-‐over, values are displayed indicating a tile’s position on the page (X, Y) as well as the mechanical position of the motors (Xnn, Ynn). The former is especially useful when working with another researcher at a different physical location as it allows for easy identification of a given tile. The latter is useful for finding a given tile based on the filename of the image. For historical reasons, the origin (X=0, Y=0) is at the bottom left of the mosaic. This represents the top of the tube so it looks like the roots grow “up.” There is an option allowing images to be captured in the “correct” orientation, but because of the way the filenames are stored, those images would not be compatible with older scans. If a user wants to begin a new imaging sequence, roots grow down could be selected and all of the data collected from that point forward would be compatible. When a tile (image) is selected, a pop-‐up window is displayed showing the image at full resolution (typically, 640x480). The image is also highlighted with a small green rectangle in the mosaic. Note that tiles will sometimes be out of focus. This can be due to the shallow depth of field of the camera, the amount of soil compaction in different areas around the tube and the movement of the soil due to insects, animals, precipitation and root growth. A tile may also be selected using Highlight Tile (near the top of the mosaic) and entering the X, Y value (Xnn, Ynn). (Again, a useful feature when working with a large mosaic and a colleague at a different physical location.) Switch to SubScan presents a screen similar to View only with a larger set of features available. The intended and most efficient way to use RootView is to schedule full-‐tube scans on a weekly basis and then compare mosaics. This allows SubScans to then be run at much higher sampling rates on areas with the most activity. Above the mosaic in the SubScan window are two options for scheduling a new scan based on selecting an area within the mosaic. One method is to use the Xnn, Ynn coordinates from the previous Scan window to fill in the values for X to X and Y to Y. The second, and most straightforward, is to select an area by clicking on a tile and dragging the mouse to select a rectangular area to be scanned followed by clicking the Schedule SubScan button. This will bring up a new window similar to the Copy screen that allows for the creation of a new scan. The SubScan window also serves as a way to select and generate time series (lapse) images. If a rectangle (including a single tile) is selected and Create Time Series Data File is pressed, a new window is presented offering a starting and ending date and the name of the file to be exported. If pressed, a button at the bottom of this screen (Export Time Series Data to Flipper) will then begin searching through both local and archived files for all images contained within the selected area within time period selected. Once all of the images have been located, RootView returns to the SubScan window. This process can take from minutes to hours depending on the size of the area selected and the time period chosen. Depending on your browser settings, you may be able to observe a message similar to: “Waiting for cens.jamesreserve.edu. . .” in your browser window. In the examples below, a tile was selected and the Create Time Series Data file button selected. The first window shows the highlighted tile (whose highlighted edges can be clicked and dragged to expand or contract the rectangle). The second window shows the result of pressing the button (along with some editing of fields to better illustrate the example). The default Starting and Ending dates were modified so that all images at the selected location for that time period were included. The default filename was also modified to better reflect the data being collected. Lastly, Comments were added to add even more meaning to the data. (Note the bottom of the window indicating RootView is waiting for the cens.jamesreserve.edu website to respond.) Once the search is finished, RootView returns to the SubScan window and new data can be selected. When finished, the Movies tab can be selected and data can be downloaded or further processed. (See Movies, for further information.) The final option in this window is Show Selected Filenames. Selecting this will return the X,Y values (in tenths of millimeters) of the motor location where the image(s) was collected as well as the file’s physical location on the computer controlling the AMR. The X,Y values are useful for manually moving the camera to a location independent of a scan and can be accomplished using the Motors tab. MOTORS: The Motors tab (not available from the Guest account) provides a way to position the camera to a given X,Y location. In addition, it provides similar information as Status, but also allows viewing of the Motor Log history (mostly for debugging purposes) and the ability to manually Home the motors. (Manual motor controller Commands may also be issued, but this NOT recommended since they can actually damage to the AMR. Manual Commands should only be entered by advanced Users or Administrators. The Go To portion of the Motors screen is useful for positioning the camera manually over a given tile. It is typically used in conjunction with Show Filename under the SubScan window. It is important that the values given in Show Filename are in tenths of millimeters and that the values specified on the Motors page are in full millimeters. So, a value of 1234-‐5678 from Show Filename would be entered here as 123.4 and 567.8 in the X: and Y: boxes of the Motors page. Care also need to be taken to verify that the Step Units pull-‐down is set to mm (versus steps). After values are entered, pressing the Go button will send the camera to the selected X,Y location. Keep in mind that these are absolute coordinates and not incremental. (If the unit were at 200,200, sending it to 250,250 requires entering 250,250 not 50,50.) Also note that any values entered are compared against the minimum and maximum values of the AMR (as set by the Administrator). EQUIPMENT PHOTOS: The Equipment Photos tab displays photographs of the AMR and is used as an informal way of visually documenting the development process. (Photos may only be added by the Administrator.) ABOUT: This tab provides details about RootView and the ancillary software installed. It is also where contact information and user documentation (like this User’s Manual) are available. PANIC STOP: This tab (not available using the Guest account) immediately stops the motors (and any scan in progress). Its intended purpose is as a failsafe if the User or Administrator observes a motor or camera failure. It is possible for the AMR to experience unexpected behavior in the event of a prolonged power failure or if the motor controller parameters have been changed in a way incompatible with normal system function. As with the Motors tab, it is recommended this function only be used by an experienced User or by the Administrator. MOVIES: The Movies tab is essentially a repository for time series data collected using the SubScan function (Scan | SubScan | Create Time Series Data file). The example below uses the file created earlier in this manual. There are three options available for each file under List of Time Series Files. Delete is obvious. Build a Movie will pop-‐up a window allowing a user to create an AVI movie with a new name and a selectable frame rate. Download will start an immediate transfer of a zipped folder of all images in the series to the user’s computer. In this example, we selected Build a Movie from the option next to the Time Series File. The resulting screen then presents options for how to build and name it. Depending on how much data is in the Time Series File selected, it can take from minutes to hours for the movie to be built. (A good starting value for Movie Frame Rate is 1 frame per second.) Once Build Movie File is selected, List of Pre-‐built movie files will indicate the status of the build. (Shown in red as …processing… in the example below.): (Note that the reload button on your browser may need to be pressed several times before the build is complete.) Once the movie is ready, the Movie Window will show two options: Delete and Download. These work in exactly the same way as they do under List of Time Series Files. LOG OUT: Exits the RootView Program and returns your browser to the Log On Screen. Additional Information: Further information about the design and use of the AMR and RootView software is available by contacting: Mike Taggart Sr. Development Engineer Center for Conservation Biology Center for Embedded Networked Sensing University of California at Riverside Riverside, CA 92521 951-‐492-‐9369 [email protected] http://ccb.ucr.edu/