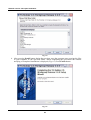
1
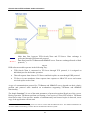
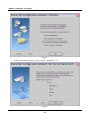
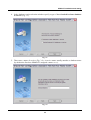
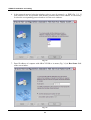
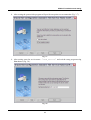
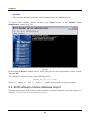
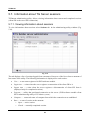
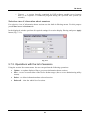
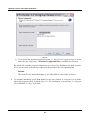
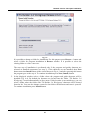
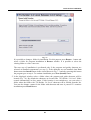
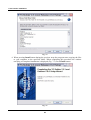
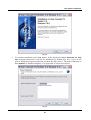
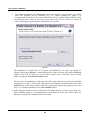
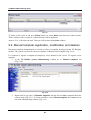
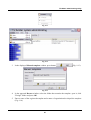
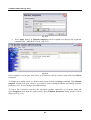
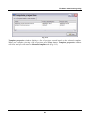
EOD software module 2.6
Administrator's manual
EOD software module 2.6
Administrator's manual
Contents
Contents
EOD SOFTWARE MODULE 2.6 ......................................................................................... II
CHAPTER 1. GENERAL DATA ON EOD SOFTWARE MODULE ARCHITECTURE ........7
CHAPTER 2. SOFTWARE AND HARDWARE REQUIREMENTS .....................................9
2.1. Software Requirements .................................................................................................... 9
2.2. Hardware Requirements ................................................................................................ 10
CHAPTER 3. ORACLE INSTALLATION AND SETTING .................................................13
3.1. ORACLE installation ..................................................................................................... 13
3.2. ORACLE setting............................................................................................................. 13
3.2.1. Communication service (alias) ................................................................................. 13
3.2.2. Communication service setting for ORACLE version 9.2.х...................................... 13
3.2.3. Communication service manual setting .................................................................... 18
CHAPTER 4. NETWORK VERSION SERVER PART INSTALLATION ..........................19
4.1. TG Server installation process ....................................................................................... 19
4.2. TG Server updating peculiarities................................................................................... 24
CHAPTER 5. TG SERVER................................................................................................25
5.1. DB Generation in Oracle................................................................................................ 25
5.2. EOD software module database deletion ....................................................................... 27
5.3. EOD software module database export ......................................................................... 27
5.4. EOD software module database import......................................................................... 28
5.5. EOD software module database clearing....................................................................... 29
5.6. Oracle communication service setting ........................................................................... 30
5.7. Information about TG Server sessions .......................................................................... 32
5.7.1. Viewing information about sessions......................................................................... 32
5.7.2. Operations with the list of sessions........................................................................... 33
CHAPTER 6. NETWORK VERSION CLIENT PART INSTALLATION .............................34
3
Contents
6.1. Network version client part installation ........................................................................ 34
6.2. Peculiarities of network version client part updating ................................................... 39
CHAPTER 7. LOCAL VERSION INSTALLATION ............................................................40
7.1. Local version installation ............................................................................................... 40
7.2. Peculiarities of local version updating ........................................................................... 45
CHAPTER 8. USER GUIDES INSTALLATION.................................................................46
CHAPTER 9. TG ADMIN ADMINISTERING UTILITY.......................................................51
9.1. Operations with accounts ............................................................................................... 53
9.2. Manual template registration, modification and deletion............................................. 56
CHAPTER 10. TASK INTERLOCKS CONTROL ..............................................................60
4
Welcome
Welcome
Welcome to the Administrator’s Manual for EOD software module version 2.6 – TG Admin.
The present manual should help administrators of EOD software module in the process of system
installation, to solve problems arising during installation and understand peculiarities of on-line
technical manual team preparation system.
Audience
The present manual is intended for the network and database administrators responsible for EOD
software module administering. It is assumed that the reader is acquainted with terms specific for
these spheres.
Notation Agreements
The following agreements are used in the document text to mark out different meanings in the text
of the manual:
Pattern
Description
Italics
system component names or new terms
Bold
names of dialog windows, interface keys and menu items
unseriffed
identification of chapters and sections of the present
document
SMALL CAPS
combinations of keys to be pressed
monospace
text typed from the keyboard
buttons of graphic interface
Besides the following agreements concerning abbreviation of identifications and names are used:
Abbreviation
Description
DBMS
DataBase Management Systems
context menu
menu opening in the indicator position by right-click
EOD
Electronic operational documentation
system
EOD software module
5
Welcome
Additional Information
This document is delivered together with the product in electronic form as a reference system.
6
General data on EOD software modul architecture
Chapter 1. General data on EOD software
module architecture
The EOD system for technical documentation development consist of subsystems, dedicated to:
supervision of development process (TG Admin), creation of templates (TG Designer),
development of data modules and CSDB management (TG Builder), browsing of interactive
technical publications (TG Browser). Further, in the frame of this manual, mentioned above names
of subsystems will be widely used.
EOD software module is a system of on-line technical manuals team preparation. To prevent illegal
use EOD software module package is protected by the hardware and software protection system
Guardant™, which consists of the Guardant™ dongle.
There are two version types of EOD software module:
·
Local version.
·
Network version.
The network version is intended for working in multi-user operation mode when several originators
simultaneously develop one and the same project of electronic documentation. Due to the need to
store data of big volume (audio, video, 3-D models, graphics etc.), network version of the EOD
software module is based on ORACLE DBMS™, known all over the world as a reliable database to
store big volumes of information.
The network version of the system includes three main components (Fig. 1.1):
·
Client SW – TGB Oracle Client.
·
Server SW – TG Server.
·
ORACLE DBMS.
7
General data on EOD software modul architecture
Main data flow between TGB Oracle Client and TG Server. Data exchange is
performed through UDP network protocol.
Data flow between TG Server and ORACLE server. Data are exchanged based on Net8
protocol (1).
Fig. 1.1
EOD software module operates in the following way:
·
TGB Oracle Client is connected to TG Server through TCP protocol, it is assigned an
individual port for the further operation.
·
Then all requests from client to TG Server and back replies are sent through UDP protocol.
·
TG Server in turn translates client requests into requests to ORACLE server and returns
received replies to the client.
A type of communication protocol for TG Server and ORACLE server depends on their relative
position and protocol stack installed on workstations supporting TG Server and ORACLE
functionality.
The dongle Guardant™ is one of the main guarantees of protection against illegal use of the system.
During operation TG Server performs accounting of run copies of client SW called to TG Server
from time to time. If an excessive number of simultaneously run licensed copies is detected, a new
copy of the application will not start!
1
Assumed a certain data exchange protocol to connect a client and the ORACLE server. For detailed information see
"Oracle installation and setting", and also files of the ORACLE reference system.
8
Software and Hardware Requirements
Chapter 2. Software and Hardware
Requirements
A computer planned for installation of a copy of network or local version of the system should meet
some requirements of system and application software and meet some requirements for hardware.
2.1. Software Requirements
1. Operating system (any of listed below):
•
Windows 2000 Professional.
•
Windows 2000 Server.
•
Windows 2000 Advanced Server.
•
Windows XP Home / Professional Edition.
2. Supplementary SW (partially included in EOD software module delivery set):
•
Macromedia Flash Player 6 and its later versions.
•
MS Internet Explorer 5.5 (to be installed where required).
•
Windows Media Player 7 and its later versions (to be installed where required).
3. SW for protection against unauthorized (unlicensed) use:
Guardant soft/hardware protection system is used in the system. The protection system may
include several independent USB-dongles for 1 (one) license each or one (or several)
network USB- dongle for several licenses. In the latter case the system comprises also
customized software – license server. Detailed information on the system application can be
found at address:
http://www.guardant.ru/hotline/download/manual/ .
To install a copy of TG Server 2.6 network version the computer should have Oracle DBMS
version 8.1.6 or its later versions installed (for proper work Oracle DBMS version 9.2 is
recommended) and prepared database to store information of client part of the system network
version.
9
Software and Hardware Requirements
CAUTION:
For correct operation of TG Server 2.6 and Oracle DBMS version 8.1.6 and 8.1.7 it is
required to install additionally SW Java™ 2 Runtime Environment Standard Edition
version 1.2.2_008 or its later versions. You can obtain the specified SW at:
http://java.sun.com/products/jdk/1.2/jre/download-windows.html
2.2. Hardware Requirements
To provide adequate operation of server part of the system network version (TG Server 2.6) the
following computer configuration given in the table is recommended.
Table 2-1
Device
Possible options
CPU
AMD Athlon 64 3000+ <Socket754> or
Intel Pentium-4 520 <2.8GHz, 800FSB, 1024Kb, LGA775>.
RAM
not less than 512 Mb (1024 Mb is recommended) DDR400,
dual-port
HDD
not less than 160 GB (Serial ATA interface is recommended).
CD-drive
DVD-R/CD-RW (for file backup and database export).
Network interface card
not less than 100 Mbps (1Gbps is recommended) at each
computer.
Printer
Laser printer of not less than 300 dpi resolution to print
documentation in paper form.
Monitor
17", with resolution of up to 1024×768@85Hz or better.
Other parameters of computer and required peripherals are selected according to tasks assumed to
be performed using the system.
A minimum computer configuration is given in the table below.
10
Software and Hardware Requirements
Table 2-2
Device
Possible options
CPU
AMD К6-III-500 or Intel Pentium III 500.
RAM
128 Mb
HDD
10 Gb.
Network interface card
10 Mbps at each computer.
Other parameters of computer and required peripherals are selected according to tasks assumed to
be performed using the system.
To provide adequate operation of client part of the network version and the local version of the
system the computer configuration specified in the table is recommended.
Table 2-3
Device
Possible options
CPU
AMD Athlon 64 2800+ <Socket754> or Intel Pentium-4
2400A <533FSB, 1024Kb, Socket478>.
RAM
not less than 256 Mb (512 Mb is recommended) DDR400.
HDD
not less than 40 Gb (80 Gb is recommended).
CD-drive
DVD-R/CD-RW.
Monitor
17", with resolution of up to 1024×768@85Hz or better.
The following is required to install a copy of network version:
Network interface card
Not less than 100 Mbps (1Gbps is recommended) at each
computer.
Other parameters of computer and required peripherals are selected according to tasks assumed to
be performed using the system.
A minimum computer configuration is given in the table below.
11
Software and Hardware Requirements
Table 2-4
Device
Possible options
CPU
AMD К6-III-233 or Intel Celeron 300.
RAM
64 Mb.
HDD
4 Gb.
The following is required to install a copy of network version:
Network interface card
10 Mbps at each computer.
Other parameters of computer and required peripherals are selected according to tasks assumed to
be performed using the system.
12
ORACLE installation and setting
Chapter 3. ORACLE installation and setting
This section describes steps of installation and setting of ORACLE DBMS, the administrator should
pay attention to.
3.1. ORACLE installation
ORACLE installation is performed in accordance with the installation program instructions. All
Oracle setting options can be kept default. It is necessary to create a database on ORACLE server, it
is possible to leave all default settings.
3.2. ORACLE setting
To install a database of EOD software module to ORACLE it is necessary to set ORACLE
communication service.
3.2.1. Communication service (alias)
For the system operation it is necessary to register communication service (Net Service) with name
ietm_service on each computer where ORACLE server and TG Server are installed. It is
possible to create the service manually and using programs from ORACLE delivery. In ORACLE
9.2 (9.2.x) this utility program is called Net Configuration Assistant.
3.2.2. Communication service setting for ORACLE version 9.2.х
Net Configuration Assistant program is made as a wizard. Setting is performed step by step, and the
wizard displays the separate window tab for each step. To move between the program tabs Next
(move to the next window of the program) and Back (move to the previous window) buttons are
used.
1. To start the program select Start | Program | Oracle – OraHome 92| Configuration and
Migration Tools| Net Configuration Assistant in ОS Windows system menu.
2. In the first program window specify a type of set configuration selecting Local Net Service
Name configuration (Fig. 3.1).
13
ORACLE installation and setting
Fig. 3.1
3. In the next window specify a type of action – Add (Fig. 3.2).
Fig. 3.2
14
ORACLE installation and setting
4. In the database version selection window specify a type of base Oracle 8i or later database
or service (Fig. 3.3).
Fig. 3.3
5. Then enter a name of service (Fig. 3.4). A service name usually matches a database name
(by default the first base ORACLE is assigned a name ORCL).
Fig. 3.4
15
ORACLE installation and setting
6. In the network protocol selection window select a type of protocol, e.g. TCP (Fig. 3.5). If
your network is set for operation with another protocol, then in this window it is necessary
to select the corresponding protocol and set it in the next windows.
Fig. 3.5
7. Enter IP-address of computer with ORACLE DB or its name (Fig. 3.6) in Host Name field
of the next window.
Fig. 3.6
16
ORACLE installation and setting
8. After setting the protocol the program will provide an option to test connection (Fig. 3.7).
Fig. 3.7
9. After testing enter the service name – "ietm_service" and exit the setup program using
Next button (Fig. 3.8).
Fig. 3.8
17
ORACLE installation and setting
10. In the next window answer No the question on the next service configuration and press Next
button (Fig. 3.9).
Fig. 3.9
11. To terminate the wizard press Cancel button in the next window.
3.2.3. Communication service manual setting
When setting communication service manually it is necessary to find in ORACLE home directory
file home_dir\NETWORK\ADMIN\TNSNAMES.ORA (for ORACLE 9.2.x), where home_dir –
folder name (usually Ora92), where ORACLE is installed and add the following lines (for ORACLE
network mechanism which operates based on TCP/IP):
IETM_SERVICE =
(DESCRIPTION =
(ADDRESS_LIST =
(ADDRESS = (PROTOCOL = TCP)(HOST = X.X.X.X)(PORT = 1521))
)
(CONNECT_DATA =
(SERVICE_NAME = orcl)
)
))
where X.X.X.X – the computer IP address where ORACLE server is installed or its domain name.
For simplicity it is possible to copy this record from the existing record, e.g. from Tcploopback.world and then correct IP address.
Communication service can work on a base of TCP/IP as well as other network protocols.
18
Network version server part installation
Chapter 4. Network version server part
installation
This section describes a system network version service part installation process (TG Server 2.6).
All examples are given for version 2.6.0 (TG Server 2.6 Release 2.6.0).
4.1. TG Server installation process
Installation should be performed by Windows OS user having the administrator’s rights. The
installation program is made as a wizard. Installation is performed step by step, the wizard displays
a new window for each step. To move to the next step press Next button in the dialog window of
the wizard, to return to the previous step press Back button.
CAUTION:
Before installation it is strongly recommended to close all applications run earlier.
To install TG Server 2.6:
1. Run file tgb-2.6.X-server-setup.exe2 located on the disk with license copy of this product.
For this purpose select a file and press ENTER or double click by the left mouse button. After
the installation program run the wizard window will be displayed (Fig. 4.1).
2
A symbol "X" in a file name indicates an issue number. In this example – file tgb-2.6.0-server-setup.exe.
19
Network version server part installation
Fig. 4.1
2. To continue installation press Next button. Attentively read the License Agreement in the
displayed dialog window. If you agree with all the items select I accept license agreement
and press Next button.
If you do not agree with the license agreement terms exit the setup program. For this
purpose press Cancel button and confirm installation cancellation in the displayed window
pressing Yes button.
3. After accepting the terms of the license agreement select TG Server 2.6 program
components you desire to install (Fig. 4.2):
·
Shortcuts.
·
Register and run TGB service.
20
Network version server part installation
Fig. 4.2
If it is not necessary to install any component, uncheck the corresponding flag.
4. To continue installation press Next button. In the next window select folder where the
program will be installed (Fig. 4.3). The folder for installation is C:\Program
Files\TGServer 2.6 by default.
21
Network version server part installation
Fig. 4.3
It is possible to change a folder for installation. For this purpose press Browse… button and
select a folder for program installation in Browse window. It is possible to select the
existing folder or create a new one.
The next step of installation is performed only if the program shortcuts are selected as
installed components (see step 3). If the program shortcuts are not installed, then Next
button changes the appearance into Install button in the wizard shown in and after pressing
this button the program goes to the step 6. To continue installation press Next button
(Install).
5. In the displayed window select folder where the program shortcuts will be located (Fig. 4.4).
By default the shortcuts are located in TG Server 2.6. folder created automatically in Start
menu. If this location is not satisfactory, you can select a folder where the folder with TG
Server 2.6 shortcuts will be located from the list. You can also change a name for the folder
with shortcuts and enter it yourself. To continue installation press Install button.
22
Network version server part installation
Fig. 4.4
6. When pressing Install button during the previous steps the program starts copying the files
to your computer to the specified folder. When completing this procedure the window
notifying of completed installation is displayed (Fig. 4.5). Press Finish button.
Fig. 4.5
23
Network version server part installation
Installation of TG Server 2.6 is completed successfully.
4.2. TG Server updating peculiarities
To update TG Server 2.6 program run installation of the new version. When running file tgb-2.6.Хserver-setup.exe the warning window is displayed, it informs on necessity to delete the previous
version and requests to confirm deletion.
When answering Yes the program deletes the version installed earlier and starts the process of TG
Server 2.6 installation described in the previous section.
When No answer is selected, the window with a message on installation cancellation is displayed.
Press OK button to close the window.
24
TG Server
Chapter 5. TG Server
TG Server is an intermediate link between the client applications EOD software module at
workstations and ORACLE DBMS. Beside intermediate functions TG Server allows automatically
exporting, importing, deleting or clearing EOD software module database and operating with
corresponding ORACLE services.
5.1. DB Generation in Oracle
Upon competing installation of ORACLE and TG Server 2.6 server components it is necessary to
generate EOD software module database in ORACLE. For that proceed as follows:
1. Run administering utility TG Server. To run the administering utility call it through
Windows OS system menu Start | TG Server 2.6 | TG Server or run the program
TGServerUI.exe from the folder where a copy of the system (TG Server 2.6) network
version was installed. Then Specify Oracle location dialog window will be displayed (Fig.
5.1).
Fig. 5.1
2. In the window double left click and specify the correct location of ORACLE database where
EOD software module system data will be stored (Fig. 5.1).
3. Enter name and password to access the database (Fig. 5.2). The name and password matches
the name and password set when creating an empty database during ORACLE installation
into the computer.
25
TG Server
4. Select the corresponding service for communication with database in ORACLE (Fig. 5.2).
Fig. 5.2
5. Press Entry button. If all procedures are performed correctly, the main window of
TG Server TG Builder server administrator utility is opened (Fig. 5.3). Go to Utilities
tab.
Fig. 5.3
If there is the old database, it is necessary to delete it before installation of new database. The
procedure of DB deletion is given in section 5.2 "EOD software module database deletion".
To install EOD software module database press Install button. It generates base structure and
imports a demonstrational example. If there is EOD software module data in ORACLE DB, then the
window with the following message will be displayed: "To proceed with the operation delete files
from the previous database. Are you sure you want to delete files?".
26
TG Server
CAUTION:
Press Yes button only if you delete DB before it. Otherwise the control files required for
ORACLE DB start will be deleted.
5.2. EOD software module database deletion
To delete EOD software module base press Delete button in TG Builder server administrator
window (Fig. 5.4).
Fig. 5.4
CAUTION:
When performing this operation all data will be permanently deleted. If it is necessary to
create data backup before it, perform export operation (see section 5.3 "EOD software
module database export").
5.3. EOD software module database export
This operation is intended for EOD software module data backup. The export procedure is run from
TG Server and performed by ORACLE means. The export operation is used to create an EOD
software module data dump to transfer between different ORACLE DBMS versions.
27
TG Server
CAUTION:
This operation should be performed on the computer that is the ORACLE server
To export EOD software module database press Export button in TG Builder server
administrator window (Fig. 5.5).
Fig. 5.5
In the displayed Browse window select a folder where the file with exported data will be created
and press Ok.
The created file will have a name of the following format:
TGDump_mm_dd_hh_nn.dmp,
where mm – month, dd – day, hh – hour, nn – minute (data and time of export operation).
5.4. EOD software module database import
This operation restores EOD software module database from the backup file created by export (see
section 5.3 “EOD software module database export”).
28
TG Server
CAUTION:
1. This operation should be performed on the computer that is the ORACLE server.
2. During this operation EOD software module old data will be overwritten. If it is
necessary to create data backup before it, perform export operation (see section
5.3 "EOD software module database export").
To import the database press Import button in TG Builder server administrator window (Fig.
5.6).
Fig. 5.6
In the displayed Open window select a dmp file created before by export operation.
5.5. EOD software module database clearing
EOD software module database clearing is a process of all data physical deletion from DB in
ORACLE which are not used when preparing technical manual. For example it concerns deleted
data modules, projects, manual templates which were stored in the system before.
If database clearing is required, use built-in base cleaning function.
To clear the database use Clear button in the TG Builder server administrator window (Fig.
5.7). When the operation is completed the corresponding window is displayed.
29
TG Server
Fig. 5.7
5.6. Oracle communication service setting
If it is required to make resetting of Oracle communication service, it is possible to use TG Server
built-in means:
1. Press Options button in TG Builder server administrator window (Fig. 5.8).
30
TG Server
Fig. 5.8
2. In the displayed Oracle communication service creation and editing window create the
required settings (Fig. 5.9).The setting creation is described in section "Communication
service setting for ORACLE version 9.2.х".
Fig. 5.9
3. If necessary test entered settings pressing Test button. Correctly enter parameters of the
account to connect with ORACLE DB in the next window.
4. When setting is completed press Apply button to accept entered settings or Cancel button to
cancel all actions on connection setting.
31
TG Server
5.7. Information about TG Server sessions
TG Server administering utility allows viewing information about current and completed sessions
(client SW to the server SW connection).
5.7.1. Viewing information about sessions
To view information about sessions select Sessions tab in the administering utility window (Fig.
5.10).
Fig. 5.10
The tab displays a list of sessions logged from a moment of last save of the list or from a moment of
last restart of the utility. The following information is displayed for each session:
·
User — a user name registered in EOD software module.
·
Login time — a time when the server registers a connection of the client SW to it.
·
Logout time — a time when the server registers a disconnection of client SW from it
(displayed only for completed sessions).
·
Program — utility that performed connection to the server (EOD software module client
SW or administering utility of TG Admin system ).
·
Computer — a network name of computer from which the connection was established.
·
State — a state of session at the moment:
o Open — active session.
o Closed — normally completed session.
32
TG Server
o Timeout — a session forcedly completed by EOD software module server because
there is no response of connected program during the specified time period (60
seconds).
Selective view of information about sessions
For selective view of information about sessions use the built-in filtering means. For this purpose
press Filter button in Sessions tab.
In the displayed window perform all required settings for session display filtering and press Apply
button (Fig. 5.11).
Fig. 5.11
5.7.2. Operations with the list of sessions
Using the session list context menu the user can perform the following operations:
·
Update – to update displayed list to get recent information about sessions.
·
Save – to save a current state of the list for further usage (after a server administering utility
restart).
·
Delete – to delete information about selected session.
·
Delete all – clear the whole list of sessions.
33
Network version client part installation
Chapter 6. Network version client part installation
The present section describes a process of installation for the client part of the system network
version on your computer. All examples are given for version 2.6.0.
6.1. Network version client part installation
When installing network version client part you can install the full version which includes software
part and user manual or shortened version which only includes software part. The installation
program is made as a wizard. The program is installed step by step, the wizard displays a new
window for each step. To move to the next step press Next button in the dialog window of the
wizard, to return to the previous step press Back button.
CAUTION:
Before installation it is strongly recommended to close all applications run earlier.
To install network version client part:
1. Run one of the files listed below 3 located on the disk with license copy of this product:
·
tgb-2.6.X-wg-setup.exe – to install the full version;
·
tgb-2.6.X-wg-lite-setup.exe – to install the shortened version.
For this purpose select a file and press ENTER or double left click. After the installation
program run the wizard window will be displayed (Fig. 6.1).
3
A symbol "X" in a file name indicates an issue number. In this example – files tgb-2.6.0-wg-setup.exe and tgb-2.6.0wg-lite-setup.exe.
34
Network version client part installation
Fig. 6.1
2. To continue installation press Next button. Attentively read the License Agreement in the
displayed window. If you agree with all the items select I accept license agreement and
press Next button.
If you do not agree with the license agreement terms, exit the setup program. For this
purpose press Cancel button and then press Yes button in the displayed window.
3. After accepting the terms of the license agreement select the program components you
desire to install:
·
If you install the full program version, i.e. file tgb-2.6.Х-wg-setup.exe is run, then the
following components are available for selection (Fig. 6.2):
- Help files
- Shortcuts for apps and help.
35
Network version client part installation
Fig. 6.2
·
If you install the shortened program version, i.e. file tgb-2.6.Х-wg-lite-setup.exe is run,
then only one component – Shortcuts for apps and help is available for selection.
By default all available program components are selected for installation for both versions.
If it is not necessary to install any component, then uncheck the corresponding flag.
Remark:
The main files are installed obligatory. It is impossible to cancel their selection.
4. To continue installation press Next button. In the next window it is required to set folder
where the program will be installed (Fig. 6.3). The installation is located into "C:\Program
Files\TGBuilder 2.6 Wg\" by default.
36
Network version client part installation
Fig. 6.3
It is possible to change a folder for installation. For this purpose press Browse… button and
select a folder for program installation in Browse window. It is possible to select the
existing folder or create a new one.
The next step of installation is performed only if the program and guides shortcuts are
selected as installed component (see step 3). If the shortcuts are not installed, then Next
button turns into Install button in the wizard shown in Fig. 6.3 and after pressing this button
the program goes to the step 6. To continue installation press Next (Install) button.
5. In the displayed window select a folder where the program and guide shortcuts will be
installed (Fig. 6.4). By default the shortcuts are located into the folder "TG Builder 2.6
Workgroup" created automatically in Start menu. If this location is not satisfactory, you can
select a folder where the folder with "TG Builder 2.6 Workgroup" shortcuts will be located
from the list. You can also change a name for the folder with shortcuts and enter it yourself.
To continue installation press Install button.
37
Network version client part installation
Fig. 6.4
6. After pressing Install button during the previous steps the program starts copying the files
to your computer to the specified folder. When completing this procedure the window
notifying of completed installation is displayed (Fig. 6.5). Press Finish button.
Fig. 6.5
38
Network version client part installation
Installation is completed successfully.
6.2. Peculiarities of network version client part updating
To update the network version client part program run the installation of the new version. When
running file tgb-2.6.Х-wg-setup.exe or tgb-2.6.Х-wg-lite-setup.exe the warning window is displayed,
it informs about necessity to delete the previous version and requests to confirm deletion.
When Yes answer is selected, the program deletes the version installed earlier and starts the process
of network version client part installation described in the previous section.
When No answer is selected, the window with a message about installation cancellation is
displayed. Press OK button to close the window.
39
Local version installation
Chapter 7. Local version installation
The present section describes a process of installation for the local version of the system on your
computer. All examples are given for version 2.6.0.
7.1. Local version installation
When installing local version you can install the full version including software part and user guides
or the shortened version including only software part. The installation program is made as a wizard.
Installation is performed step by step, the wizard displays a new window for each step. To move to
the next step press Next button in the dialog window of the wizard, to return to the previous step
press Back button.
CAUTION:
Before installation it is strongly recommended to close all applications run earlier.
To install local version:
1. Run one of the files4 listed below located on the disk with license copy of this product:
·
tgb-2.6.Х-loc-setup.exe – to install the full version;
·
tgb-2.6.Х-loc-lite-setup.exe – to install the shortened version.
For this purpose select a file and press ENTER or double left click. After run the wizard
window will be displayed (Fig. 7.1).
4
A symbol "X" in a file name indicates an issue number. In this example – files tgb-2.6.0-wg-setup.exe and tgb-2.6.0wg-lite-setup.exe.
40
Local version installation
Fig. 7.1
2. To continue installation press Next button. Attentively read the License Agreement in the
displayed window. If you agree with all the terms of the license agreement select I accept
license agreement and press Next button.
If you do not agree with the license agreement terms, exit the setup program. For this
purpose press Cancel button and press Yes button in the displayed window.
3. After accepting the terms of the license agreement select the program components you
desire to install (Fig. 7.2):
·
Help files. This program component is available only during installation of the full
version, i.e. running the file tgb-2.6.Х-loc-setup.exe.
·
Empty local database. This component is recommended to be selected at initial
installation of program.
·
Shortcuts for apps and help. When installing the shortened program version, i.e.
running file tgb-2.6.Х-loc-lite-setup.exe, this component will be named Shortcuts.
41
Local version installation
Fig. 7.2
By default all available program components are selected for installation. If it is required to
change the component selection, then uncheck or check the corresponding flag.
Remark:
The main files of are installed obligatory. It is impossible to cancel their
selection.
4. To continue installation press Next button. In the next window it is required to set a folder
where the program will be installed (Fig. 7.3). The installation is located into "C:\Program
Files\TGBuilder 2.6 Loc" by default.
42
Local version installation
Fig. 7.3
It is possible to change a folder for installation. For this purpose press Browse…button and
select a folder for program installation in Browse window. It is possible to select the
existing folder or create a new one.
The next step of installation is performed only if the program and guides shortcuts are
selected as installed components (see step 3). If the shortcuts are not installed, then Next
button turns into Install button in the wizard shown in Fig. 7.3 and after pressing this button
the program goes to step 6. To continue installation press Next (Install) button.
5. In the displayed window select a folder where the program and guide shortcuts will be
located (Fig. 7.4). By default the shortcuts are located into "TG Builder 2.6 Local" folder
created automatically in Start menu. If this location is not satisfactory, you can select a
folder where the folder with "TG Builder 2.6 Local" shortcuts will be located from the list.
You can also change a name for the folder with shortcuts and enter it yourself. To continue
installation press Install button.
43
Local version installation
Fig. 7.4
6. When pressing Install button during the previous steps the program starts copying the files
to your computer to the specified folder. When completing this procedure the window
notifying of completed installation is displayed (Fig. 7.5). Press Finish button.
Fig. 7.5
44
Local version installation
Installation of local version is completed successfully.
7.2. Peculiarities of local version updating
To update local version program run the installation of the new version. When running file tgb2.6.Х-loc-setup.exe or tgb-2.6.Х-loc-lite-setup.exe the warning window is displayed, it informs
about necessity to delete the previous version and requests to confirm deletion.
When No answer is selected, the window with a message on installation cancellation is displayed.
Press OK button to close the window.
When Yes answer is selected, the program deletes the version installed before and starts an update
process for local version.
The update process for local version is similar to the process of initial installation described in the
previous section. In this case it is necessary to take into account the following:
1. When selecting program components for installation (step 3 of installation process) it is
recommended to uncheck the selection flag before Empty local database component.
2. If the selection flag before Empty local database component is not unchecked, then
pressing Install button (step 6 of the installation process) displays the message: "The empty
DB installation option was selected. But the installation directory already contains a local
database. Keep the current DB without changes (Yes) or replace with empty DB (No)?
When replacing the current DB with the empty one a backup copy of the current DB will be
created in the directory Blobs_Backup. When keeping the current DB the empty database
will be located in the directory Blobs_ Default".
When Yes answer is selected Blobs_Default folder where the empty local DB is located is
created in the installation folder "TG Builder 2.6 Local". The current local DB is kept without
changes in Blobs folder.
When No answer is selected, Blobs_Backup folder where the current local DB is copied is
created in "TG Builder 2.6 Local" installation folder. The empty local DB is located in Blobs
folder.
This order guarantees safety of projects, templates and other data.
45
User guides installation
Chapter 8. User guides installation
The present section describes a process of installation for user guides of system on your computer.
All examples are given for version 2.6.0.
The user guides are recommended to be installed when it is required to update documentation
without changing the program part of EOD software module. As a result of installation the
following documents are updated:
·
Administartor’s manual – TG Admin.pdf file.
·
TG Browser User guide – TGBrowser.pdf file.
·
EOD software module User guide – help.pdf file.
·
TG Designer User guide – design.pdf file.
The installation program is made as a wizard. Installation is performed step by step, the wizard
displays a new window for each step. To move to the next step press Next button in the dialog
window of installation wizard, to return to the previous step press Back button.
CAUTION:
Before installation it is strongly recommended to close all applications run earlier.
To install user guides:
1.
5
Start tgb-2.6.Х-help-setup.exe5 file located on the disk with license copy of this product.
For this purpose select file and press ENTER or double left click. After running the file the
wizard window will be displayed (Fig. 8.1).
A symbol "X" in a file name indicates an issue number. In this example – file tgb-2.6.0-help-setup.exe.
46
User guides installation
Fig. 8.1
2.
To continue installation press Next button. In the displayed window Shortcuts for help
files program component is selected for installation by default (Fig. 8.2). If you do not
wish to install this program component, uncheck the flag before it. The main component of
User manuals is installed obligatory. It is impossible to cancel its selection.
Fig. 8.2
47
User guides installation
3.
To continue installation press Next button. In the next window it is required to set a folder
where the program will be installed (Fig. 8.3). When updating the guides it is
recommended to install into the same folder where the user guides installed before when
installing the full version of network version client part or local version are located. It
allows replacing the guides but not adding their new revision.
Fig. 8.3
The installation is located into "C:\Program Files\TGBuilder 2.6 Help" by default. To
change location press Browse… button and specify a folder to locate user guides in Browse
window. Press ОК. It returns you to the wizard window and a full name of the selected
folder is displayed in Destination folder field.
The next step of installation is performed only if the guide shortcuts are selected as installed
component (see step 2). If the guide shortcuts are not installed, then Next button turns into
Install button in the wizard window and after pressing this button the program goes to the
step 5. To continue installation press Next (Install) button.
4. In the displayed window select a folder where the guide shortcuts will be located (Fig. 8.4).
When updating guides it is recommended to locate shortcuts in the same folder where the
shortcuts of user guides installed before are located.
48
User guides installation
Fig. 8.4
By default the shortcuts are located in "TG Builder 2.6 Help" folder created automatically in
Start menu. In the displayed list select the folder where the shortcuts of user guide installed
before are located. To continue installation, press Install button.
5. After pressing Install button during the previous steps the program starts copying the files to
your computer to the specified folder. When completing this procedure the window
notifying of completed installation is displayed (Fig. 8.5). Press Finish button.
49
User guides installation
Fig. 8.5
Installation of user guides is completed successfully.
50
TG Admin administering utility
Chapter 9. TG ADMIN administering utility
To set the system administering procedure is required. The administering utility allows
registering, deletion and changing manual templates, as well as creating and deleting
users.
CAUTION:
1. Only system users with administrator access rights have access to the
Administering utility. To log in the system use a basic user account "ietmu" for
which password "ietmu" and administrator rights are set.
2. When using EOD software module network version, a server name shall be
selected additionally.
The administering utility is started according to one for the following two methods:
1. Call through Windows OS system menu Start | Programs | TG Builder | TG Admin or
run the program administration.exe from the folder where the system was installed.
2. Run the TG Builder module and press TG Admin icon in the Welcome window (Fig. 9.1).
51
TG Admin administering utility
Fig. 9.1
Upon running the Administering utility TG Builder system administraing dialog window will be
displayed (Fig. 9.2).
Fig. 9.2
52
TG Admin administering utility
9.1. Operations with accounts
To administer user groups and included in them users Users tab is intended (Fig. 9.2). By default
there are two groups of users: "Administrators" and "General". The "Administrators" group includes
"ietmu" user.
To create a new user group:
1. Right-click at any place of Users tab. Then context menu will be displayed (Fig. 9.3).
Fig. 9.3
2. Select Create a group command in the context menu.
3. In Group window enter the name and press Apply button (Fig. 9.4). Then the created user
group name will be displayed in Users tab.
Fig. 9.4
Remark:
The user groups are organized into peer set, i.e. group embedment is impossible.
Besides it is possible to change any groups except the special group General which
users are all users not included in any group by default.
To add a new user to the group:
1.
Right-click in any place of this tab and select Add a user command from the context menu
(Fig. 9.5).
Fig. 9.5
53
TG Admin administering utility
2.
Enter user parameters in the displayed User profile window (Fig. 9.6).
Fig. 9.6
Enter a user name in User field.
Enter a password to log in the system in Password and Password confirmation fields.
Enter data to Surname, Name, Patronymic and Phone fields.
Select one of the following values in the drop-down list in Rights field:
·
Administrator. A user with Administrator rights can create and delete users, change their
profiles, register, delete and change manual templates.
·
Project manager. A user with such rights when creating a project in TG Builder module
assigns project performers from users created by the administrator. He also develops a
project structure and distributes project sections between performers.
·
User. A user with such rights can operate particular project sections assigned by a project
manager.
·
Guest. A user with such rights can view projects.
Specify a group which will include a user, e.g. "General" in Group field.
When filling a user profile in User profile window press Apply button. It returns you to Users tab,
the created user will be displayed in the group list (Fig. 9.7).
54
TG Admin administering utility
Fig. 9.7
All operations with users (groups) are performed using the context menu called by right-click at a
user (group) name. The context menu for the user includes the following commands (Fig. 9.8).
Fig. 9.8
"Delete" command
To delete a user (group) select Delete command. When deleting a group all its users are deleted
from the system.
"Unblock" command
Simultaneous operation of two users with one account is impossible. If operation session is
completed incorrectly, e.g. caused by fault, repeated log-in of the user will be blocked. To cancel
user blocking select its name in the list, call the context menu and select Unblock command.
"Tasks list" command
This command is intended for viewing and deleting tasks assigned for the user. If a task (tasks) is
created for the user, then selecting Tasks list command will open User tasks window (Fig. 9.9).
55
TG Admin administering utility
Fig. 9.9
To delete a task select it and press Delete button (or select Delete item from the context menu).
Then a window with a request to confirm deletion will be displayed.
Answer "Yes" will delete the task. Then you will return to User tasks window.
9.2. Manual template registration, modification and deletion
Electronic technical documentation is created on a base of template developed in the TG Designer
module. The system is delivered with two templates: in Russian and in English (Fig. 9.10).
It is required to register a template developed by a user himself in the system. To register a new
template:
1. In the TG Builder system administrating window go to Manuals templates tab
(Fig. 9.10).
Fig. 9.10
2.
Right-click in any place of Manuals templates tab and select Create command from the
context menu (Fig. 9.11). It is also possible to select Manual template in Create menu in
the main administrating window (Fig. 9.12).
56
TG Admin administering utility
Fig. 9.11
Fig. 9.12
3.
In the displayed Manual template window press button
(Fig. 9.13).
Fig. 9.13
4.
In the appeared Browse window select the folder that contains the template, open it, click
"Design" folder and press OK.
5.
Enter a name of the registered template and a name of organization developed the template
(Fig. 9.14).
57
TG Admin administering utility
Fig. 9.14
6.
Press Apply button. In Manuals templates tab the template list displays the registered
template name "AIRCRAFT-2010" (Fig. 9.15).
Fig. 9.15
If the template is not urgent, then select it for deletion, call the context menu and select Delete
command.
To change the template select it, call the context menu and select Change command. Then Manual
template window will open, where it is possible to load a changed template and change template
parameters in it. To save changes press Save button.
To view a list of projects created by the registered template, right-click at a template name and
select Properties item from the context menu. Then Template properties dialog window will be
displayed (Fig. 9.16).
58
TG Admin administering utility
Fig. 9.16
Template properties window displays a list of projects created based on the selected template.
When you complete viewing a list of projects press Close button. Template properties window
will close and you will return to Manuals templates tab (Fig. 9.15).
59
Task interlocks control
Chapter 10. Task interlocks control
In multiuser operation mode the following situation may occur: a user addresses the task used
(interlocked) by the other user at the moment. The system is provided with an option of viewing a
current state of task and canceling interlocks.
To go to interlocks control:
1. Run the TG Builder module and press Project manager icon in Welcome window
(Fig. 10.1).
Fig. 10.1
2. Select Interlocks control
in the toolbar in the right part of the displayed Project
manager dialog window. When tool is selected, Synchronization window will be displayed
(Fig. 10.2).
60
Task interlocks control
Fig. 10.2
Synchronization window is divided into two parts. The upper part of the window displays a list of
tasks (objects) indicating:
·
task status (state);
·
date of revision;
·
user performed revision;
·
causes of revision.
To view a task status change history, select the task in the upper part of the window. The lower part
of the window will display the task status change history.
Synchronization window displays a task state at a moment of window opening. To view
information at the current moment press Update button.
Object state change
In multiuser operation mode a need to cancel interlock of the task used by other user may occur. For
example, tasks which had "Captured" status at abnormal termination of TG Builder module may
keep the specified status after the system restart in spite of the fact that the user is not operating with
the object. In such cases a user with administrator rights may cancel interlock of the task. For that
proceed as follows:
1. Select the corresponding line in the upper part of Synchronization window (Fig. 10.2).
61
Task interlocks control
2. Make sure that the user is not operating with the object (by phone, messages or other
method).
3. Press Release the pool button in the upper part of the window. The object interlock will be
cancelled, the lower part of the window will display information about the object status
"Free".
62