1
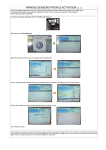
 INSTALLATION INSTRUCTIONS FOR
"MultiDiag® for DiagBox"
CONTENTS
PRELIMINARY STAGE
- Preparing DiagBox
- Updating the DiagBox software version
- Activating the Bluetooth (X200/X201 only)
- Updating the DiagBox profile
INSTALLING MULTI-DIAG® for DIAGBOX
- Installing the software
- Starting Multi-Diag®
- Configuring the language of Multi-Diag®
- Configuring the Multi-Diag® VCI
ADDITIONAL INFORMATION
- Updating Multi-Diag®
- Configuring the link to the technical documentation
- Multi-Diag® user manual
En
PRELIMINARY STAGE
Preparing DiagBox for the installation
of «Multi-Diag® for DiagBox»
► Updating the DiagBox software version
- Open DiagBox
- In the upper banner, check that you have update V06.11 or later
- If not, update the software
- Close DiagBox
► Activating the Bluetooth for X200 / X201 only
For X200 or X201 computers only, you must activate the Bluetooth as follows:
- Switch off then restart the tool fully
- Start the Bluetooth patch from the menu:
Start\All programmes\PSA Bluetooth Configuration\start’
- A DOS screen indicating that the installation is in progress is displayed.
- On the task bar, a crossed out Bluetooth icon appears in the Windows
notification zone. If it does not appear, it may be hidden.
- The computer restarts automatically on completion of the configuration of the
Bluetooth patch.
- Once the computer has restarted, the user must confirm the steps displayed
by the Windows configuration pop-ups (Found new hardware wizard).
This process takes place in two stages:
Stage 1: installing BCM2033…
En
1
2
3
Stage 2: installing Microsoft Bluetooth Enumerator…
1
2
- Finished (The Bluetooth card is now installed with the Microsoft stack and is
ready to use)
Note: exceptions
Machine already patched
Incompatible machine
If the machine has already been configured with the Bluetooth patch, installation of this patch stops. A pop-up message appears indicating to the operator
that the computer is up to date
If the machine is not compatible with
the Bluetooth patch, for example
X220, X61T, Dell, HP... the installation
process stops and the following
message appears
► Updating the DiagBox profile
Open DiagBox
- In the menu
Home, select
Configuration
- Confirm
Activation/
Deactivation
- Confirm
Deactivation
En
- Select
Automatic
Deactivation
- The
information
relating to the
deactivation
appears
- Move on
to the
Activation
stage: select
Automatic
activation
En
- Check
the customer code
then wait
- Select the
correct profile.
The following
data must
be entered:
• Authorised Repairer
• ….
• Multi-Diag®
• Citroën data
• in Multi-Diag®
• or Peugeot data
• in Multi-Diag®
• ….
- Once the correct
profile has been
selected, confirm
and wait.
You reach the
home page
of the chosen
marque, then
the "Multi-Diag®"
icon appears.
Close the application
Installing "Multi-Diag® for DiagBox"
► Installing the software
- Place the Multi-Diag® for DiagBox installation DVD in the drive
- The installation starts automatically.
- Accept the terms
of the licence contract
- Enter the serial
number of the MultiDiag® communication
interface
indicated on the label on
the back ofthe card,
made up of 6 digits.
- Multi-Diag® carries out
the online registration
of the communication
interface.
Make sure that
you have an
internet connection.
- The installation of
Multi-Diag® continues.
En
- Click on "yes,
this time only",
then on "next".
- Click on "install
the software
automatically
(recommended)",
then on "next".
- Wait
En
- Click on
"Finish"
- Click on "yes, I want to
restart my
computer now",
then on
"Finish".
Eject the DVD.
When the computer
restarts,
start Diagbox
► Starting Multi-Diag®
- Start Diagbox
- Click on "Multi-Diag®".
The application
starts. Note:
- The application sometimes starts in the background. In this case, click in the
lower banner of Windows to make the application appear.
- The Multi-Diag® newsletter also appears at the first start-up in the lower
banner.
► Configuring the language of Multi-Diag®
- Click on the tab "applications configuration"
- Click on “choose of
language”
- Select your
country.
En
► Configuring the Multi-Diag® VCI
- Connect the Multi-Diag® communication
interface to a USB port and to the OBD
socket of a vehicle (to supply the interface
with power).
Note:
the communication interface of DiagBox
PSA XS must remain connected to the
USB port.
- Click on the tab "applications configuration"
- Click on the tab
"configuration
of Multi-Diag® ".
- Enter the 6-digit serial
number of the
communication
interface
- Click on the icon.
- Cliquer sur l’onglet
« configuration
Bluetooth ».
En
- When the screen
above appears,
the Bluetooth
pairing is
complete.
You can now
disconnect the
USB
cable connecting
the tool to the
interface.
The installation of
Multi-Diag®
is complete.
Note:
Each Multi-Diag® communication interface is paired with a single tool.
If you have several Multi-Diag® tools, remember to pair each interface.
Additional information
► Updating Multi-Diag®
You will receive 3 major updates per year in DVD format.
Internet updates are also available between each DVD. (Frequency of one per
month on average.)
- Click on the "internet update" button.
- Click on "software".
- Click on "confirm".
- The list of remote
updates appears.
Confirm to start
the download
► Configuring the link to the technical documentation
By default, the link to the "VIVID" technical documentation is activated. If you
do not wish to subscribe to this catalogue, you can delete the link.
En
- Click on "configuration
of technical
documentation"
- Untick the link
then confirm.
► Multi-Diag® user manual
- Click on the "Documentation" icon.
- The list of
documentation
relating to Multi-Diag®
appears.