1
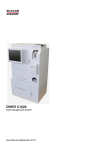
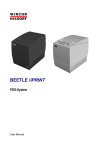
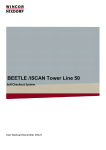
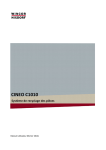
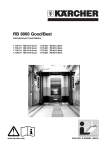
CINEO C1020 Cash Management System User Manual (October 2014) We would like to know your opinion on this publication. Please send us a copy of this page if you have any constructive criticism on: - the contents - the layout - the product. We would like to thank you in advance for your comments. With kind regards, Wincor Nixdorf International GmbH RD PD1 Wohlrabedamm 31 D-13629 Berlin E-Mail: [email protected] _________________________________________________________________________________________________________________ Your opinion CINEO C1020, User Manual, Order Nr.: 01750222636E All product names mentioned in this document are registered trademarks. Copyright ©Wincor Nixdorf International GmbH, 2014 The reproduction, transmission or use of this document or its contents is not permitted without express authority. Offenders will be liable for damages. All rights, including rights created by patent grant or registration of a utility model or design, are reserved. Delivery subject to availability; technical modifications possible. Contents Introduction ....................................................................................................................................................................... 7 About this manual.......................................................................................................................................................... 7 Warranty ........................................................................................................................................................................ 7 Unpacking and Checking the System ........................................................................................................................... 8 ESD (Electrostatic Sensitive Devices) .......................................................................................................................... 8 Fixing the device on the floor ........................................................................................................................................ 9 Removing the Transportation Locks ............................................................................................................................. 9 Important Notes .............................................................................................................................................................. 10 LCD Displays ............................................................................................................................................................... 11 Connecting the CINEO C1020 ........................................................................................................................................ 12 Start up ........................................................................................................................................................................ 12 CINEO C1020 Stand Alone ......................................................................................................................................... 12 Power Connection and LAN Support....................................................................................................................... 12 Disconnecting the System from the Mains .................................................................................................................. 13 CINEO 1020 as Peripheral Device.............................................................................................................................. 13 Power Connection ................................................................................................................................................... 13 Disconnecting the System from the Mains .................................................................................................................. 14 Components CINEO C1020 ........................................................................................................................................... 15 CINEO C1020 Trolley Variant ......................................................................................................................................... 16 Coin Module .................................................................................................................................................................... 17 Device Overview ......................................................................................................................................................... 17 Coin Module open ....................................................................................................................................................... 17 Operating Unit open .................................................................................................................................................... 18 Access to the Coin Module ......................................................................................................................................... 19 Basic Operation ........................................................................................................................................................... 21 General .................................................................................................................................................................... 21 Function elements ................................................................................................................................................... 21 Acoustic signals ....................................................................................................................................................... 22 Modes ...................................................................................................................................................................... 22 Coin In ......................................................................................................................................................................... 23 Currencies, Denominations and Coin Maximum ..................................................................................................... 23 Coin dispensing ........................................................................................................................................................... 26 Emptying the overflow box .......................................................................................................................................... 26 Malfunctions ................................................................................................................................................................ 27 Error messages and warnings ................................................................................................................................. 27 Eliminate Coin Jams.................................................................................................................................................... 31 Coin entry Tank ....................................................................................................................................................... 31 Separator Disk ......................................................................................................................................................... 31 Coin Validator .......................................................................................................................................................... 33 Transport Chain Conveyor ...................................................................................................................................... 34 Emptying a Coin Hopper ......................................................................................................................................... 36 Cleaning Instruction..................................................................................................................................................... 37 Generell Informations .............................................................................................................................................. 37 Coin Validator .......................................................................................................................................................... 38 Hopper Sensor ......................................................................................................................................................... 41 Filling the Cash Drawer Money Compartment ................................................................................................................ 44 Capacities .................................................................................................................................................................... 47 KA16, KA17, KA21 .................................................................................................................................................. 47 Cash Bases Flip Lid 460 .......................................................................................................................................... 47 Cash Bases Flip Lid 460 Universal .......................................................................................................................... 47 Universal .................................................................................................................................................................. 48 SL3000..................................................................................................................................................................... 49 KA-EURO ................................................................................................................................................................ 49 Filling the Safebag (optional) .......................................................................................................................................... 50 Printer TH230+ ................................................................................................................................................................ 53 Safety Instructions ....................................................................................................................................................... 53 Caution: ....................................................................................................................................................................... 53 Overview...................................................................................................................................................................... 54 Operator Panel ............................................................................................................................................................ 54 FEED ....................................................................................................................................................................... 55 POWER ................................................................................................................................................................... 55 PAPER ..................................................................................................................................................................... 55 ERROR .................................................................................................................................................................... 55 OPEN ....................................................................................................................................................................... 56 Maintenance of the TH230+ ........................................................................................................................................ 57 Print Head / Rubber Roller Cleaning ....................................................................................................................... 57 Paper Roll Exchange ................................................................................................................................................... 59 Paper Near End Sensor Adjustment ........................................................................................................................... 61 Connector Variants ...................................................................................................................................................... 62 Energy-saving Mode ................................................................................................................................................... 62 Technical Data ............................................................................................................................................................ 63 Paper Specification ..................................................................................................................................................... 64 Print Area..................................................................................................................................................................... 65 Display BA83................................................................................................................................................................... 66 Operator Panel Module ............................................................................................................................................... 66 USB Interface .......................................................................................................................................................... 66 On Screen Display ................................................................................................................................................... 66 LED (Front Side of the Module) ............................................................................................................................... 67 ON/OFF Button ........................................................................................................................................................ 67 EPC (Central Unit) .......................................................................................................................................................... 68 BEETLE /S-II plus ........................................................................................................................................................... 69 Appendix ......................................................................................................................................................................... 70 Technical Data ............................................................................................................................................................ 70 Environmental Requirements ...................................................................................................................................... 71 Approved Cleaning Materials: Order Numbers ........................................................................................................... 72 Certifications of the manufacturer ............................................................................................................................... 73 Note on Radio Interference Suppression .................................................................................................................... 73 FCC-Class A Declaration ............................................................................................................................................ 73 Recycling the CINEO C1020 ....................................................................................................................................... 74 CINEO C1020, User Manual CINEO C1020 User Manual Introduction Introduction With the CINEO C1020 Wincor Nixdorf offers an entry-level model for coin processing in cash offices. This system processes up to 8 coin denominations and recycles them; So that coins are available again for dispensing. Capacity per denomination averages 1,200 coins (based on the 1-euro coin). The CINEO C1020 is suitable for use in midsized store formats such as supermarkets, discounters or specialty stores. CINEO C1020 either installed as Stand Alone or as peripheral device. About this manual i This symbol is used to mark important information in this manual. Text following this symbol should be given special attention in order to avoid damage and injury. Warranty Wincor Nixdorf generally guarantees a warranty engagement for 12 months beginning with the date of delivery. This warranty engagement covers all damages which occur despite a normal use of the product. Damages because of improper or insufficient maintenance, improper use of the product or unauthorized modifications of the product, inadequate location or surroundings will not be covered by the warranty. For further information on the stipulation consult your contract. All parts of the product which are subject to wear and tear are not included in the warranty engagement. For detailed warranty arrangements please consult your contract documents. 7 CINEO C1020 User Manual Introduction Unpacking and Checking the System Unpack the system and verify that the scope of delivery is identical to the information on the delivery ticket. Should you notice any • transport damages or • discrepancies between package contents and delivery ticket or • functional defects, please inform your contracting parties or the branch office of Wincor Nixdorf immediately. Please indicate the number of your delivery ticket and delivery ticket position and serial number of the respective device. It is absolutely necessary to check the function of the original equipment before you perform any changes (e.g. by installing an expansion card). Only then it is possible to accept a functional defect as a claim. We recommend to save the original packaging for transport at a later time (protection from impact and shock). ESD (Electrostatic Sensitive Devices) Assemblies containing electrostatic sensitive devices (ESD) may be labeled with this sticker. When installing an assembly or drive, please follow the guidelines below, which apply to all electrostatic sensitive devices (ESD): 8 Make sure you are not carrying a static charge before working with components marked as ESD by first touching a grounded object (such as a radiator from a hot water heating system). All tools and devices you use must be free from static charges. Always unplug the power cord before installing or removing any assemblies. Always handle assemblies by their edges. Never touch the terminal pins of the circuits on an assembly. CINEO C1020 User Manual Introduction Fixing the device on the floor Follow the dimensions in the illustration below to fix the CINEO C1020 on the floor. Dimensions in mm Removing the Transportation Locks After unwrapping the system, remove the transportation locks from the components (see arrows). 9 CINEO C1020 User Manual Important Notes Important Notes The following safety instructions should be read carefully and strictly observed when handling technical appliances and before doing any work on the device. Further safety, installation, operating and maintenance instructions can be found in the manuals available on the internet: http://www.wincor-nixdorf.com/internet/site_EN/EN/Support/Downloads/downloads_node.html Should you have any questions, please contact your dealer or our service department. Devices supplied by Wincor Nixdorf International GmbH (WN) comply with the respective safety regulations for data-processing devices and information technology devices, including electrical office equipment for use within an office or store environment. 10 Always consult the installation and operating instructions before doing any work with an appliance. These manuals are available on the internet (see above). If an appliance is brought into the service area from a colder environment, condensation may occur. The appliance must be absolutely dry before activation. This requires an acclimatization time of at least two hours. Observe warning and information labels on the device. Appliances that are equipped with safety tested power cables must be plugged into a grounded socket. Always lay the supply leads and cables in such a way that they cannot be stepped on or tripped over. Make sure that there is always free access to the grounded sockets used or to the electrical circuit-breakers of the house installation. Check that the set nominal voltage of the appliance corresponds to the local mains voltage. In order to completely separate the appliance from the mains voltage, switch off the appliance and disconnect it from the mains. Ensure that no foreign objects (e.g. paper clips) or liquids enter the housing of the appliance. This may result in electric shock or short circuit. Always keep the ventilation slots free of obstruction to ensure adequate air circulation and avoid overheating. Data cables must not be plugged in or unplugged during electrical storms. Always hold the plug when removing the power cable or other cables. Never pull the cable itself. Have damaged power cables replaced immediately. Only use accessories and extension components that have been approved by Wincor Nixdorf. Nonobservance can result in damage to the device or violations of regulations concerning safety, radio interference and ergonomical requirements. Protect the appliance from vibrations, dust, moisture and heat. Transport the appliance only in its original packaging (to protect it against knocks and bumps). CINEO C1020 User Manual Important Notes In case of an emergency (e.g. damaged cabinets, controls or power cables, liquids or foreign objects in the device) take the following steps: Deactivate the device immediately by: - Switching off the automatic circuit-breaker or removing the fuse inset from the fuse holder in the distribution box of the building installation; - Disconnecting the plug connector of the power supply cable from the grounded socket in the building installation. - Inform the customer service responsible for you. Properly dispose of worn out parts that may be environmentally hazardous (e.g. batteries). If a lithium battery is supplied with the appliance, ensure that the battery is replaced with an equivalent type. Otherwise there is danger of explosion! Lithium batteries may only be replaced with identical types or other types recommended by the manufacturer. Batteries must be disposed of according to local regulations on the disposal of special waste. Appliances may only be repaired by authorized technicians. Unauthorized opening of the housing or inexpert repairs can result not only in considerable personal danger, but will also invalidate your warranty and liability protection. LCD Displays If the display element is damaged and the liquid crystal solution leaks out onto your hands or clothing, please wash your hands or clothing immediately under running water for at least 15 minutes, using soap or alcohol. If the liquid comes into contact with your eyes, consult a medical doctor immediately. Inside the display, the high voltage needed for backlighting the LCD display is generated by the inverter! High Voltage! Before opening the device, make sure, that the device is disconnected from the main power supply. Only authorized personnel is permitted to open the device. 11 CINEO C1020 User Manual Connecting the Device Connecting the CINEO C1020 The delivered system is completely configured. There are just a few things to do, before starting up the CINEO C1020. Start up The power supply system must be equipped with separately guided protective earth conductor (PE). This kind of electricity system is known as TN-S network. Do not use PEN conductors! Ratings of CINEO C1020: 220 V-240 V; 50-60 Hz, 0,5 A 110 V-120 V; 50-60 Hz; 1.0 A Caution! Check that the set nominal voltage of the appliance corresponds to the local mains voltage. CINEO C1020 Stand Alone Power Connection and LAN Support The CINEO C1020 supports Ethernet 10/100 BASE-T local area network (LAN) communication protocol. The CINEO C1020 provides a female RJ-45 connection port for the LAN. A 6-foot LAN cable is provided with the system. LAN and power supply: will be connected at the back side of the device. 1 12 Remove the cover at the back side of the device (see arrow). CINEO C1020 User Manual 2 Connecting the Device Connect the rubber connector to the socket outlet and the LAN cable to the LAN socket (sockets at the side of the device). * Deviations from illustration possible After starting up the system, you will see the start screen of the operating system. Disconnecting the System from the Mains Shut down the system by the software application. Caution! To separate the device completely from power supply unplug the power cable at the back side of the device. CINEO 1020 as Peripheral Device Power Connection The Power supply will be connected at the back side of the device. 1 Remove the cover at the back side of the device (see arrow). 13 CINEO C1020 User Manual 2 Connecting the Device Connect the rubber connector to the socket. 3 Connect now the CINEO C1020 with the external unit via an RS232 cable. * Deviations from illustration possible After starting up the system, you will see the start screen of the operating system. Disconnecting the System from the Mains Shut down the system by the software application. Caution! To separate the device completely from power supply unplug the power cable at the back side of the device. 14 CINEO C1020 User Manual Components Components CINEO C1020 1 2 3 6 4 5 7 8 1 Coin In 5 Printer TH230 2 Display Coin Module 6 Screen 3 Lock Coin Module 7 Coin Out 4 Access PSU, PC, Coin Module 8 Reject 15 CINEO C1020 User Manual CINEO C1020 Trolley Variant The CINEO C1020 is also available mounted on a trolley for flexible placement. 16 Coin Module CINEO C1020 User Manual Coin Module Coin Module Device Overview The coin module is a coin deposit / coin dispenser module which has been designed for indoor installation. The device is operated via the product-specific software for the system unit (PC) connected to the device. Deposits are made by placing one or more coins in the coin entry tank. From here, they are transported to the separator disk. Coins are fed via the coin validator to the transport chain conveyor, where they are transported to the appropriate coin hoppers and stored. Coins of one denomination only can be stored in each coin hopper. The configuration of the eight available coin hoppers is preset in the factory and cannot be changed. Coins are dispensed to the cash drawer from the coin hoppers. Coin Module open 3 4 2 1 2 1 Overflow Box 3 Sorting Unit 2 Coin Hoppers 4 Power Supply 17 CINEO C1020 User Manual Coin Module Operating Unit open 1 2 4 3 18 1 Transport Chain Conveyer 3 Separator Disk 2 Cover Coin Validator 4 Handle to raise the Unit CINEO C1020 User Manual Coin Module Access to the Coin Module Plug the key into the lock, turn it to the left side and open the front door. Push the cover to the left (1) and remove it upwards (2). 2 1 19 CINEO C1020 User Manual Coin Module Turn the key to the right till the stop (see arrow). The unit willl be unlocked. Raise the sorting unit by the black handle (1). 1 Lower the sorting unit with the black handle (1) until it locks in. 20 CINEO C1020 User Manual Coin Module Basic Operation General To operate the coin module, you will need the application software, which is installed on the connected system unit (PC). i You will not be able to carry out support/maintenance tasks without the product-specific software. The product-specific software is necessary, for example, when you empty the coin hoppers. The dialog for the product-specific software is executed via the system unit (PC). Function elements Status LED Status LED (1) displays the status of the cash module. 1 Status LED Green Green blinking Yellow Blinking yellow Red Meaning The device is being supplied with power. The device is ready for operation. The device is ready for deposit. A warning is displayed on the customer panel's display. The device is ready to take coins and a warning is displayed. A problem has occurred. In order to remedy a problem, see chapter "Malfunctions". If you cannot remedy the problem, contact Service. 21 CINEO C1020 User Manual Coin Module Acoustic signals Acoustic signals are output over the loudspeaker (1). Modes The Coin module provides three modes: 1 2 3 Operation Management Maintenance (for service technicians only) Without a key, the cash module is at the Operation mode (1). With the aid of the key, the Management (2) or Maintenance (3) mode can be selected. In Management mode, the coin module can be cleaned or coin jams cleared. The Maintenance mode is only intended for use by service staff. 22 CINEO C1020 User Manual Coin Module Coin In The hoppers can be filled either by inserting the coins directly into the coin entry tank or by using the filling unit (1). When using the filling unit for inserting coins make sure that no more than 150 coins (unit = 1€) are in the filling unit (ca. 1 kg, 2.68 pounds). 1 i The coin types / sizes that the coin hoppers can handle are preset in the factory. Currencies, Denominations and Coin Maximum Europe EUR Denomination Filling Level CINEO C1020 Coins 2 1000 1 1200 0,50 1150 0,20 1550 0,10 2100 0,05 2100 0,02 2850 0,01 3000 Overflow Box Based on 1 850 Norway NOK Denomination Filling Level CINEO C1020 Coins 20 1300 (2 x 650) 10 2600 (2 x 1300) 5 2200 (2x1100) 23 CINEO C1020 User Manual Coin Module 1 4000 (2 x 2000) Overflow Box Based on 20 450 Sweden SEK Denomination Filling Level CINEO C1020 Coins 10 2200 (2 x 1100) 5 1300 (2 x 650) 1 4800 (4 x 1200) Overflow Box Based on 5 450 Denmark DKK Denomination Filling Level CINEO C1020 Coins 20 1400 (2 x 700) 10 1100 5 650 2 2600 (2 x 1300) 1 2100 0,5 2100 Overflow Box Based on 20 500 Great Britain GBP Denomination Filling Level CINEO C1020 Coins 2 600 1 1000 0,5 700 0,2 1900 0,1 1200 0,05 2400 0,02 1100 0,01 2000 Based on 2 400 Overflow Box 24 CINEO C1020 User Manual Coin Module 25 CINEO C1020 User Manual Coin dispensing The coin dispensing is controlled by the user specific application. i Please refer to your software manual to get all important informations. Emptying the overflow box Open the sorting unit (see section "Access to the coin module"). Remove the overflow box (see arrow) and empty it. Lower the sorting unit (see section "Access to the coin module"). 26 Coin Module CINEO C1020 User Manual Coin Module Malfunctions If a problem occurs or a warning is issued, the status LED will light up red or yellow. The messages are displayed on the LCD display of iteh coin module. If the rejection rate of the coins rises, the coin validator must be cleaned. Error messages and warnings Problem Remedy CINEO C1020 cannot be started. Check the position of the key, the 'Maintenance' position interrupts the power supply. Check whether the power supply unit is turned on. Check whether the cables are plugged in properly. The PC cannot access the CINEO C1020 via the V.24 interface. Check the position of the key; the 'Management' position rejects all commands from the PC. Check that the correct data rate is set in the 'Select I/F' menu (see chapter "Modes", section "'Select I/F' menu"). Check that the right COM interface is set for the PC. Check that the V.24 cable connecting the PC to the coin module is correctly inserted. The PC cannot access CINEO C1020 via the USB interface. Check the position of the key; the 'Management' position rejects all commands from the PC. Check that 'USB' is set in the 'Select I/F' menu (see chapter "Modes", section "'Select I/F' menu"). Check that the right USB interface is set for the PC. Check that the USB cable connecting the PC to the coin module is plugged in properly. 27 CINEO C1020 User Manual Coin Module Message Meaning Remedy no battery Backup battery not available Insert a new battery. low battery Backup battery is weak Insert a new battery. upgraded Firmware updated none Restarted by WDT Firmware malfunction Carry out a firmware update. Restarted by POS Reset performed none E_21 – E_28 Despite a count result above zero, one coin hopper proves to be empty on payout attempt. Check/correct the counts of the coin hoppers. The two-digit code names the coin hopper: 21=H, 22=G, 23=F, 24=E, 25=D, 26=C, 27=B, 28=A (see chart below) E_30 – E_38 One cover of the sorting unit cannot be opened. Check the sorting unit for jammed foreign objects and dirt. The two-digit code names the coin hopper under the particular cover: Carry out an operational check on 30=Reject, 31=H, 32=G, 33=F, 34=E, the particular lifting magnet. 35=D, 36=C, 37=B, 38=A (see chart below) E_40 – E_48 One cover of the sorting unit cannot be closed. Check the sorting unit for jammed foreign objects and dirt. The two-digit code names the coin hopper under the particular cover: Carry out an operational check on the particular lifting magnet. 40=Reject, 41=H, 42=G, 43=F, 44=E, 45=D, 46=C, 47=B, 48=A (see chart below) E_51 – E_58 More coins than intended have been paid out. The two-digit code names the coin hopper: 51=H, 52=G, 53=F, 54=E, 55=D, 56=C, 57=B, 58=A (see chart below) 28 Check/correct the counts of the coin hoppers. CINEO C1020 User Manual Coin Module Message Meaning Remedy E_90 CRS Board error Restart the device. Replace the coin validator. E_91 CRS Entry magnetic sensor error During turn-on procedure a coin was located in the input tray. Remove the coin and restart the device. E_92 CRS coin sensor error During turn-on procedure a coin was located in the coin validator (magn. sensor). Remove the coin and restart the device. E_93 CRS optical sensor error. During turn-on procedure a coin was located in the coin validator (opt. sensor). Remove the coin and restart the device. E_94 CRS flash ROM error Reload the coin data or replace the coin validator. E_A1 - E_A8 Payout sensor LOW error in one of the coin hoppers. Check/Clean the payout sensor in the particular coin hopper. Replace the coin hopper. The two-digit code names the coin hopper: A1=H, A2=G, A3=F, A4=E, A5=D, A6=C, A7=B, A8=A (see chart below) E_B1 - E_B8 Payout sensor HIGH error in one of the coin hoppers. The two-digit code names the coin hopper: Check/Clean the payout sensor in the particular coin hopper. Replace the coin hopper. B1=H, B2=G, B3=F, B4=E, B5=D, B6=C, B7=B, B8=A (see chart below) 29 CINEO C1020 User Manual Coin Module Message Meaning Remedy E_C1 - E_C8 Payout sensor TIME error in one of the coin hoppers (detected signal too long/short). Check/Clean the payout sensor in the particular coin hopper. Replace the coin hopper. The two-digit code names the coin hopper: C1=H, C2=G, C3=F, C4=E, C5=D, C6=C, C7=B, C8=A (see chart below) E_D0 No overflow box Insert the overflow box. E_D1 Overflow box is ful Empty the overflow box. E_D2 The shutter beneath the separator disk is open. Check whether the shutter of the separator disk shuts without any problems. Check the fork light barrier for dirt and foreign objects. E_D3 Object in separator disk Check the separator disk for foreign objects. Check/clean the transmitted light sensors (emitter/receiver) of the separator disk. E_D4 The coin payout tray is not in the right Check whether the coin payout position. tray is correctly lowered. E_D5 Coin payout tray full Empty the coin payout tray. Make sure the sensor is not covered. E_D9 Jam in coin entry tank, separator disk, coin validator or on transport chain conveyor. Clear the jam. E_DA No dust box Insert the dust box. Shutdown in deposit Reset after deposit problem Check/correct the counts of the coin hoppers. Shutdown in dispense Reset after dispense problem Check/correct the counts of the coin hoppers. 30 Check the sensor both of the coin entry conveyor (close to the transport motor and the timing disk) and the coin validator. CINEO C1020 User Manual Coin Module Eliminate Coin Jams Coin entry Tank Check to make sure that no coins are jammed in the coin entry tank (see arrow). Clear the coin jam. 31 CINEO C1020 User Manual Coin Module Separator Disk Open the coin modul (see "Access to the Components"). 2 1 Lift up the green lever (1) and swing the operation unit open (2). Check whether there are any foreign objects (1) in the separator disk and make sure that no coins are jammed. Remove the foreign objects or coins. If foreign objects are jammed between the separator disk and the delivery flap (1) for the dust box, remove the foreign objects by pressing against the joint (2) as shown by the arrow in order to lower the delivery flap slightly. Close the device in reverse order. 32 CINEO C1020 User Manual Coin Module Coin Validator Open the coin module (see section "Access to the coin module"). Pull the green lever (1) and swing the front operating unit open (2). 2 1 Unlock the green levers (arrows) and open the cover to the right. 33 CINEO C1020 User Manual Coin Module Check whether there are any foreign objects (1) in the separator disk and make sure that no coins are jammed. Remove the foreign objects or coins. If it is not possible in the position, turn the green whell to the left until you can remove it. 1 2 Close the separator cover and the device. Transport Chain Conveyor Open the coin module (see section "Access to the coin module"). Pull the green lever (1) and swing the front operating unit open (2). 2 1 34 CINEO C1020 User Manual Coin Module Unlock the green levers (arrows) and open the cover to the right. Check the transport chain conveyor for jammed coins (1). For this purpose open the cover of the coin validator to the right and keep it open while turning the green wheel counter-clockwise (2) and removing coins (3). 3 1 2 Close the coin validator cover again until you hear it lock into position. Press the operating unit down and close the CINEO C1020. 35 CINEO C1020 User Manual Coin Module Emptying a Coin Hopper Open the coin module (see chapter "Access to the Coin Module"). Remove the relevant hopper upwards (example, see arrow). Empty the hopper and put it back in place. i The coin hoppers are mechanically coded and therefore can only be inserted in appropriate position. i To avoid inventory discrepancies the same amount of coins must be placed in the hopper. Lower the sorting unit again and close the CINEO C1020. 36 CINEO C1020 User Manual Coin Module Cleaning Instruction Generell Informations The device must be switched off for service and maintenance works. You should service and clean the parts of the device at the specified intervals listed below. In addition, please note the following: Take care not to drop any cleaning liquids into the device. Only use the cleaning material listed in this manual. Do not use thinners. Find the resources and Order Numbers of the approved cleaning materials in the section «Approved Cleaning Materials». Maintenance Check the dust box once a day and empty it, if necessary. Visually inspect of the coin hoppers and coin paths. Clean the coin paths. Housing Cleaning interval: Cleaning material: for stainless steel surfaces for varnished surfaces for plastic surfaces as needed Wet cleaning cloths Ballistol oil for cleaning stainless steel Cleaning set for IT systems Cleaning set for IT systems Coin Paths The conveyer belts must not come into contact with alcoholic solutions. Clean the coin paths with compressed air. Cleaning interval: When necessary, at least once a month Cleaning material: Wincor Nixdorf air duster Coin Validator Cleaning interval: Cleaning material: When necessary Cloth moistured with isoprophylalcohol, cleaning brush, dry cleaning cloth 37 CINEO C1020 User Manual Coin Module Coin Validator Plug the key into the lock, turn it to the left side and open the front door. Push the cover to the left (1) and remove it upwards (2). 2 38 1 CINEO C1020 User Manual Coin Module Grab the green lever and open the front cover (1). 1 Unlock the green levers (arrows) and open the cover to the right and hold it open. 39 CINEO C1020 User Manual Coin Module Use cloths moist with isopropyl alcohol, die cleaning brush and a lint-free cotton cloth. You can order all these materials from Wincor Nixdorf. i Use the isopropyl alcohol cloth to remove crumbs and stuff and to dissolve fouling on the Teflon® edge (3). Then clean the area (yellow transparent) and the Teflon® edge (3) with the cleaning brush and dry the area with a lint-free cotton cloth. To clean the whole area, turn the green wheel (1) to move the rotor into a different position. Also clean the edges and surfaces of the rotor. Never use knifes, scissors or any other sharp objects to clean the device as this may lead to damages and will void the Wincor Nixdorf warranty. 2 3 3 Teflon® edge top view 1 40 CINEO C1020 User Manual Also mind to clean the silver wheel with the cleaning brush Mount the device in logically reverse order. Coin Module Hopper Sensor Plug the key into the lock, turn it to the left side and open the front door. 41 CINEO C1020 User Manual Coin Module Push the cover to the left (1) and remove it upwards (2). 2 1 Unlock the CINEO C1020 (1), move the cover at green lever a little to the right (2) and remove it upwards. Turn the key to the right (1). The unit opens to the top (2). 2 1 42 CINEO C1020 User Manual Coin Module Remove the hopper one after the other upwardly and clean the sensors (1) with a cloth moistened with isopropyl alcohol. You can order these cleaning materials from Wincor Nixdorf. 1 Set the hoppers back in place and close the device. 43 CINEO C1020 User Manual Money Compartment Filling the Cash Drawer Money Compartment Depending on your configuration one of the money compartments of cash drawers KA21 or Cash Bases Flip Lid 460 can be installed in the CINEO C1020. Pull out the money compartment unit. Place your money compartment into the unit , e.g. some diffferent money compartments: KAxx 44 CINEO C1020 User Manual Money Compartment Cash Bases Flip Lid 460 Universal compartment 45 CINEO C1020 User Manual KA-EURO Fill the compartment with coins via the software application. 46 Money Compartment CINEO C1020 User Manual Money Compartment Capacities KA16, KA17, KA21 Currency 0,01 € 0,02 € 0,05 € 0,10 € 0,20 € 0,50 € 1,00 € 2,00 € Quantity (max.) 180 145 100 110 85 65 70 60 KA21 KA17 KA16 Cash Bases Flip Lid 460 Currency 0,01 € 0,02 € 0,05 € 0,10 € 0,20 € 0,50 € 1,00 € 2,00 € Quantity (max. ) 235 165 130 130 95 70 80 65 Cash Bases Flip Lid 460 Cash Bases Flip Lid 460 Universal Currency 0,01 € 0,02 € 0,05 € 0,10 € 0,20 € 0,50 € 1,00 € 2,00 € Quantity (max.) 160 115 90 90 60 45 45 40 Cash Bases Flip Lid 460 Universal 47 CINEO C1020 User Manual Money Compartment Universal Currency 0,01 € 0,02 € 0,05 € 0,10 € 0,20 € 0,50 € 1,00 € 2,00 € Quantity (max.) 465 340 260 265 185 135 155 130 Universal Currency 0,50 DKK 1,00 DKK 2,00 DKK 5,00 DKK 10,00 DKK 20,00 DKK Quantity (max.) 270 300 350 110 150 210 Currency 1,00 NOK 5,00 NOK 10,00 NOK 20,00 NOK Quantity (max.) 520 280 330 220 Currency 1,00 SEK 5,00 SEK 10,00 SEK Quantity (max.) 640 220 160 Currency £0,01 £0,02 £0,05 £0,10 £0,20 £0,50 £1,00 £2,00 Quantity (max.) 290 135 365 170 250 140 120 90 48 CINEO C1020 User Manual Money Compartment SL3000 Currency 0,01 € 0,02 € 0,05 € 0,10 € 0,20 € 0,50 € 1,00 € 2,00 € Quantaty (max.) 310 230 185 190 125 115 130 110 KA-EURO Currency 0,01 € 0,02 € 0,05 € 0,10 € 0,20 € 0,50 € 1,00 € 2,00 € Quantaty (max.) 150 120 100 80 60 40 60 60 49 CINEO C1020 User Manual Safebag Filling the Safebag (optional) If this function is available, the whole amount of money can be filled from the hoppers through the funnel into the safety box or into the safebag. Money Compartment Safebag/-box 50 CINEO C1020 User Manual Safebag Safety box in the bottom drawer Bottom drawer: Safebag in safety box 51 CINEO C1020 User Manual Safebag This function will be started by the software application The holders of the cash drawer are open at the bottom so that money can pass through.Die Funktion wird über die Softwareapplikation gestartet. Example: KAxx: 1 2 1 Safety Box 2 Holder of cash drawer 52 CINEO C1020 User Manual Printer TH230+ Printer TH230+ Safety Instructions Do not touch the cutter and tear bar of the printer. The print head is a thermal element and it is at high temperature during printing or just after operation, therefore please do not touch it and its peripherals for safety reasons. The thermal head is an ESD-sensitive device. To prevent damage, do not touch either its printing part or connecting parts. Caution: Do not allow the printer to start printing when there is no recording paper installed, otherwise the print head and platen roller will be damaged. To ensure quality print and normal lifetime, use recommended or good quality paper. Shut down the printer when connecting or disconnecting interfaces connectors to avoid damage to the control board. Set the print darkness to a lower grade as long as the print quality is acceptable. This will help to keep the print head durable. Operate the printer only with power supplies and cables approved by Wincor Nixdorf. Keep this manual safe and at hand for ready reference. 53 CINEO C1020 User Manual Printer TH230+ Overview The TH230+ is a powerful and low cost thermal printer for all kind of POS systems. Printer cover Paper output Operator panel On/Off Switch 54 CINEO C1020 User Manual Printer TH230+ Operator Panel FEED If you push this button once and release it, the printer feeds paper for one line (1/6 inch). If you push this button and hold it down, the printer feeds the paper as long as the button is not released. The button can be locked by the application software and then will be without function. POWER All LED off: Green POWER LED power is not stable on: power is stable Green POWER LED blinking: printing speed may be low (*) if necessary contact your technical support Green POWER LED flashes: printer in idle mode (*) The printer will run with the lowest power value (48W) if a non current power supply unit from Wincor Nixdorf or an external power supply unit without automatic current identification is used. With a suitable power supply unit type the maximal power value can be defined with the configuration menu from 48 Watt up to 90 Watt. PAPER Yellow PAPER LED off: Paper is properly inserted. Yellow PAPER LED on: Paper roll is near end. Yellow PAPER and red ERROR on: Paper end is reached. ERROR Red ERROR LED off: Normal condition Red ERROR LED on: Not ready for operating. Printer cover is not closed or in combination with Yellow PAPER LED on, paper end is reached Red ERROR LED blinking: An error occured. Switch off the printer and on again. Contact your technical support if this does not work. 55 CINEO C1020 User Manual Printer TH230+ LED overview Operation POWER PAPER ERROR green yellow red off off off Meaning No power on Power on blinking If necessary call for technical support flashing IDLE mode (power savings) Paper off Paper properly inserted on Paper near end on Error on Paper end blinking If necessary, call for technical support on Cover not closed OPEN Press this button to unlock and open the cover. Thereby, the switch sheet flaps into an upright cover position Switch Sheet If an error occures do not open the cover with force. Open the printer cover only if the cutter is in its home position. Otherwise the cutter or the cover may be damaged. 56 CINEO C1020 User Manual Printer TH230+ Maintenance of the TH230+ Print Head / Rubber Roller Cleaning Clean the print head and the rubber roller at least every three months. In case of an intensive use of the printer clean both items more often to guarantee a stable print quality. Rubber roller Print head Open the printer cover and remove the paper-roll; the rubber roller and the print head mechanism are then visible. Let the print head cool down before cleaning it. 57 CINEO C1020 User Manual Printer TH230+ Clean print head and rubber roller with a soft lint-free cloth moistened with pure Isopropyl alcohol (e.g. ISOPADS which can be ordered from Wincor Nixdorf). Visually inspect the print head. If you can still see dirt, the cleaning procedure must be repeated. You can identify the relevant and important thermal element zone by the thin line crossed by wires. Paper end sensor Pay attention not to damage the paper end sensor when cleaning the print head. Do not touch the rubber roll with your fingers. While cleaning turn the rubber roller by hand with the lateral gear wheel make sure that the entire roller will be cleaned. Cleaning the print head not properly may cause an early failure. Wait until the isopropyl alcohol has evaporated. Insert the (new) paper-roll and close the cover. Print out a test ticket (see application handbook) and verify the printing quality (density, alignment and consistency). 58 CINEO C1020 User Manual Printer TH230+ Paper Roll Exchange For a paper roll exchange follow the steps below: - Open the printer cover - Remove the (nearly) empty paper roll and any residual paper. - If necessary clean the print head and the rubber roller. - Unwind the outer layer (winding) of the paper roll. 59 CINEO C1020 User Manual Printer TH230+ Insert the paper roll. Lay the unwinded paper over the front edge of the printer. Hold down the paper and close the printer cover. Press on the middle of the cover until it audibly and distinctly locks into place. 60 CINEO C1020 User Manual Printer TH230+ Tear off residual paper at the tear-off edge. Paper Near End Sensor Adjustment The paper end premonition is a control function. It allows to adjust a predefined amount of remaining paper on the roll. The paper end premonition depends on the core diameter and the paper thickness of the paper roll in use. You can adjust the remaining amount of paper yourself follow the steps below: - Open the printer cover. - Remove the paper roll. - Loosen the locking screw at the inner wall of the printer for instance with the aid of a coin (do not remove the screw). Adjusting grip Locking screw Sensor 61 CINEO C1020 User Manual Printer TH230+ Move the adjusting grip to determine the remaining paper amount. A lower distance mark (adjustment grip downwards) will cause a lower amount of remaining paper and vice versa: The scale reaches from 0.5mm to 12.5mm. After determination of the distance mark: - Tighten the locking screw - Insert the paper roll - Close the printer cover and lock it Connector Variants USB/CASH DRAW/DC24V Energy-saving Mode If the TH230+ is switched on but without a print job it stays in standby mode, which means, that all functions of the printer are powered with low voltage to be ready for operation. In order to save more energy the printer changes into idle mode after an adjustable waiting time. Under idle condition the least amount of energy will be consumed. The mode will be indicated by flashing of the POWER LED. If the printer receives print data it will change into full powered printing mode. Having done the print job the TH230 will turn to standby mode and then to idle mode again. In the delivery status of the printer the function “idle mode” will be deactivated. The function and the according waiting time must be enabled in the configuration menu or via software. 62 CINEO C1020 User Manual Printer TH230+ Technical Data Technology High-speed thermal print Resolution 8 dots/mm (203 dpi) Printing speed One colour: 220 mm/s, Two colours: 110 mm/s TH230+ draft mode up to 300 mm/s (reduced density) Cash Drawer Interface 6pin RJ12, 1A@24V max. Interface Options USB 2.0 full speed, PoweredUSB, RS232c, Ethernet Cutter Material: tempered steel Speed full cut: < 300ms Paper Transport Forward; to use paper to full capacity after cutting: up to 12mm backwards (approx. 3.5 lines at 7.52 lpi) Control Functions Print head temperature control with adjustment of Print speed Paper near end control and paper end control Paper cutter error message Printer cover open/closed Self test with printout Option Paper width 57,5mm, print width =51mm = 408 dot Housing Colour light grey or black Power Supply 24 V DC Automatical and manual capacity control: 48 – 110 Watt Dimensions 148 x 145 x 195mm (H x W x D) Weight approx. 2kg (w/o paper roll) Features Simple Paper roll exchange: Optional two colour print with special paper (100mm/sec) Paper near end message: adjustable by user Statistical Data Total number of dots Total line feeds Total number of cuts Max. head temperature Paper jam counter Cutter error counter Thermistor error counter High voltage/low voltage error counter Number of firmware updates Power on time in hours Power on counter 63 CINEO C1020 User Manual Printer TH230+ Reliability TH230+ 70 Mio 3 Mio 150 km Graphic Feature TH230+ is fully graphic-compliant Paper Specification Paper width 79.5mm - 80mm optionally 57.0 - 57,5mm Paper weight 55g/m² ± 5 g/m² Paper thickness 0.055mm – 0.08mm Thermo-Coat Outside of paper roll Paper roll outer diameter 90mm max. Paper roll width 80.3 mm max. Paper length ~100m Core size Core diameter: 10mm +2mm Wall thickness of the core: 2mm ± 0.3mm; Paper end not glued to core. Length of paper fold over at core: max 35mm 64 CINEO C1020 User Manual Printer TH230+ Print Area For optional paper width 57,5 mm, print width =51mm = 408 dot 65 CINEO C1020 User Manual BA83 Display BA83 The TFT LCD flat panel display is an XGA-compatible 15-inch flat panel display which is absolutely flicker free and free from radiation. It is designed for a resolution of max. 1024 x 768 pixel. Application programs should be used with this resolution! Operator Panel Module Find the operator panel at the back side of the module (see arrow). USB Interface Menu Scrolling back forward USB Interface Connect here peripherals during operation, e.g. a keyboard. On Screen Display Menu Via the menu you can set loudness, brightness, contrast or color 66 ON/OFF CINEO C1020 User Manual BA83 Scrolling The arrows serve for scrolling forwards or backwards in the menu items. LED (Front Side of the Module) Dark Power Off Green Power On Orange Power save Mode The LED flashes in the standby mode Red Out of Range ON/OFF Button With this button you can switch off the device. 67 CINEO C1020 User Manual EPC EPC (Central Unit) The EPC controlls the peripheral devices like printer, coin module etc. 1 x DC12 V power input port 1 x on/off push button 1 x LED for system status 1 x LED for HDD status 1 x VGA port 1 x DVI port 3 x COM port 6 x USB 2.0 1 x LAN 1x stereo line-out/speaker-out 1x line in 68 CINEO C1020 User Manual BEETLE /S-II plus BEETLE /S-II plus The BEETLE /S-II plus is optional to controll the peripheral devices like printer, coin module etc. Interface Connector-Type COM1 9 pin D-sub male COM2* 9 pin D-sub female Keyboard, Mouse 6 pin Mini Din (PS/2) USB 1, 2 USB-LAN Stack connector 2x USB-A CRT (via adapter from DVI-I) 15 pin HDD-sub female PLink (via Bridge) 40 pin Mini Delta Ribbon DVI 24pin DVI female LAN USB-LAN Stack connector RJ45 female Line Out 3,5 mm female Microphone 3,5 mm female USB 6, 7 4+ 4pin Power USB 12V connector USB 8 4+ 4pin Power USB 24V connector RMT 4pin RJ10 female 69 CINEO C1020 User Manual Appendix Appendix Technical Data Supply Voltage Range 110 – 120 V; 220 – 240 V Nominal Frequency 50/60 Hz Data Transmission Port V.24 Dimensions (H x W x D) 1,274 mm x 750 mm x 530 mm Weight: without coins with coins approx.160 kg approx. 250 kg Current Consumption Standby (EPC, Cash Module) Replenish Coin Hoppers Electric Current 350 mA, 67 W 600 mA; 120 W 260 mA 70 CINEO C1020 User Manual Appendix Environmental Requirements Operating conditions Ambient temperature: Humidity: Temperature change: Barometric pressure: 5 °C – 35 °C 5% r.h. (1 g/m3 ) – 85% r.h. (25 g/m3 ) 0.5 K/min (max. 7.5K/30 min) 70 kPa (70kPa corresponds to an installation at approximately 2000 meters above sea level) Installation environments with long periods of sunshine should be avoided Storage conditions Ambient temperature: Humidity: Temperature change: 5 °C – 40 °C 5% r.h. (1 g/m3 ) – 85% r.h. (25 g/m3 ) 0.5 K/min 0.5 K/min (max. 7.5K/30 min) Transport conditions Ambient temperature: Humidity: Temperature change: -25 °C – 60 °C 15% r.h. (1 g/m3 ) – 98% r.h. (32 g/m3 ) -25 °C / 25 °C 71 CINEO C1020 User Manual Appendix Approved Cleaning Materials: Order Numbers The items listed below can be ordered from Wincor Nixdorf branch office or your Wincor Nixdorf sales partner. Product Name Order Number Explanation Cleaning set for EDP devices: 01750097335 For cleaning and maintaining keyboards and varnished and plastic-coated housing 01750097332 Alcohol-based solution for cleaning and maintaining delicate EDP devices, keyboards and housing. Not suitable for cleaning conveyer belts! 01750097334 For cleaning display panes 01750097331 Cleaned compressed air, CFC-free, for removing loose dust and dirt particles Cloth with ISOPROPYL 1000 pieces 01750104065 Pure isopropyl alcohol for cleaning coin validator, displays etc. Not suitable for cleaning conveyer belts! Cleaning card 01750016388 For cleaning magnetic heads and chip contacts in ID card readers Cleaning brush set 1x brush incl. 20xcleaning cloth with ISOPROPYL 01770037265 For cleaning the coin validator 125ml plastic cleaner w/o alcohol 125ml TFT/LCD/screen cleaner 35 dust cloths 3 keyboard swabs for places difficult to reach 1 keyboard sponge Damp cleaning cloths Dispenser box with 100 cloths Damp cleaning cloths Antistatic and fluff free Dispenser box 60 cloths Compressed air spray PRESSAIR 400ml bottle w/o valve, 70cm hose Please follow the manufacturer’s specifications on the packaging and on the information sheet included in the packaging. The product may be damaged or soiled if materials are used that are not approved or if used improperly. 72 CINEO C1020 User Manual Appendix Certifications of the manufacturer This device complies with the requirements of EEC directive 2004/108/EEC with regard to "Electromagnetic Compatibility" and 2006/95/EEC, "Low Voltage Directive". Therefore, you will find the CE mark on the device or on its packaging. CINEO C1020 has received the CSA symbol. Note on Radio Interference Suppression All secondary appliances that are connected to an appliance must be equipped with radio interference suppression in accordance with EC directive 89/336/EEC. Products that fulfill this requirement are accompanied by an appropriate manufacturers certificate bear the CE-symbol or the radio protection symbol. Products that do not fulfill these requirements may only be operated with specific permission of the relevant authorities. FCC-Class A Declaration This equipment has been tested and found to comply with the limits for a Class A digital device, pursuant to part 15 of the FCC Rules. These limits are designed to provide reasonable protection against harmful inter-ference when the equipment is operated in a commercial environment. This equipment generates, uses, and can radiate radio frequency energy and, if not installed and used in accordance with the instruction manual, may cause harmful interference to radio communications. Operation of this equipment in a residential area is likely to cause harmful interference in which case the user will be required to correct the interference at his own expense. Modifications not authorized by the manufacturer may void users authority to operate this device. This class A digital apparatus complies with Canadian ICES-003. Cet appareil numerique de la classe A est conforme à la norme NMB-003 du Canada. 73 CINEO C1020 User Manual Appendix Recycling the CINEO C1020 CINEO C1020 was designed according to the Wincor Nixdorf standard "Environmentally Conscious Product Design and Development”. CINEO C1020 is manufactured without the use of CFCs and CCHs and is manufactured to a great extent out of materials and components which are recyclable. For recycling purposes do not attach any additional adhesive labels to the device. Wincor Nixdorf disposes of old devices in an environmentally responsible manner at a recycling center that is ISO 9001 and ISO 14001 certified, as is the entire company. Follow your local regulations on the disposal of toxic waste. Your Wincor Nixdorf vendor will answer any questions you have concerning returns, recycling, and disposal of our products. 74 Wincor Nixdorf International GmbH D-33094 Paderborn Order No.: 01750222636E _