1
V1.1
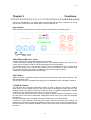
“WASH” Button
Pressing this button turns on the lamp. It means that the dasher motor starts operating. In order
to make the machine operate in WASH mode, the STANDBY button and/or the AUTO button
must be canceled in advance.
“AUTO” Button
Pressing this button turns on the lamp. This means that the machine starts operating in the Main
Refrigeration mode.
During the AUTO mode, the WASH and STANDBY functions are automatically canceled. The
MIX function is automatically controlled so that the quantity of mix may be maintained in the
storage container.
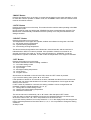
“SELECT” Button
Pressing this button turns on the lamp.
The temperature of mix hopper and cylinder, ambient are indicated on the green color FND.
2-1 : Mix hopper sensing temperature
2-2 : Cylinder sensing temperature
2-3 : Surrounding sensing temperature
The above items and temperature are indicated at 2 second intervals, and the next item is
indicated when “SELECT” button is pressed. If the operation of button is not done for 30
seconds, the level of ice-cream on “AUTO” mode is indicated, on “STAND BY” mode the
temperature of cylinder is indicated, on “MIX” mode the temperature of mix hopper is indicated.
“SET” Button
Pressing this button turns on the lamp.
This button indicated the status of setting conditions.
1-1 : Ice-cream setting current
1-2 : No-load motor current
1-3 : Input voltage
1-4 : Mix hopper setting temperature
1-5 : Voice service
1-6 : Program version
Above items are indicated on the red color FND, when the “SET” button is pressed.
If you check the setting value, press “▼” or “▲” button.
If the operation of button for 30 seconds is not done, indicated the value of motor current now.
And the user can change the hardness of ice-cream, the temperature of mix hopper and the
select of voice service.
If “SET” button is pressed for 3 seconds, the setting conditions can be changed when the
password is entered. (Initial password is 0, 0, 0, 0)
3-1 : Change the ice-cream setting current
3-4 : Change mix hopper setting temperature
3-5 : Select the voice service
The secret code can be selected by “▼” or “▲” button. After that press “SET” button.
If the user want to change the password, enter the new password after the now secret code
when the 3 button of “▼”, “▲”, “SET“ are pressed for 5 seconds at a time.
If you have lost the password, turn on dip switch No. 1 of 1 in the display PCB, and energize the
PCB to reset the password to the initial value "0, 0, 0, 0". it is not possible to change the setting
conditions.
So keep it mind.
9