1
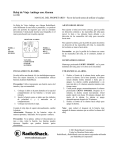
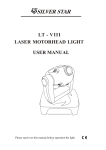
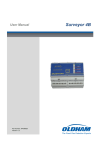
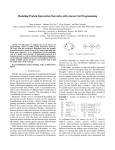
I
9
S k A
A Mt L E l/' -* A A ATM
`LI Ivl G INX%M. H Irl
b "ILLUMINATING
THE
EV
DENCEpp
User Manual
NIGH-LUMEN LED LIGNT
WITH BUILT-IN
DIGITAL VIDEO RECORDER IDVRI
C E Ft RoHS
WELCOME
Congratulations on your Durchase of the LumenCamT°! This hinh nijalitu
naol idyl n Will I vryraal V IUCU newtuer tUVl1)
will auu years oT saTery to wnat
you do, as well as document evidence, inventory, events, people, or
activities .
Please read the user manual carefully before using this product .
PACKING LIST
• LumenCam'" x 1
• USB Cable x t
• Software CD x 1
4D Power Adapter x 1
• Safety Strap x 1
• Lithium Battery x 1
The pictures are for reference only, please
refer to actual product .
STRUCTURE
Indicator LED
Recording on/off
i
f
Flashlight on/off
Handle
OPERATION GUIDE
Basic Operation :
1 . Press the flashlight on/off button once for
ultra-bright setting, suitable for illuminating distant
objects . Press again for wide angle setting, suitable
for lighting nearby objects . Press a third time to turn
off flashlight ;
2 . Press the recording on/off button to start recording
and once again to stop . A flashing blue working
indicator LED light indicates recording in progress .
Recording
on/off .
Flashlight
on/off
Indicator
LED
TIP! When recording objects up close at night, it is
recommended to use the wide angle LED setting .
Video Output :
1 . Unscrew the handle of LumenCam'" and locate
the USB port.
2 . Using the included USB cable, connect
LumenCam'" to any computer with a USB port .
3 . Your computer should automatically recognize the
new hardware, which you may browse by
double-clicking on the My Computer icon on your
desktop, and then navigating into the Mobile Disk
directory.
* If your computer is unable to playback desired
video files, please first install the video player software
from the included CD .
Charge Indicator Light
Installing Lithium Battery :
1 . Unscrew the handle of LumenCam'" and locate the handle ;
2 . Insert the Li-battery into the handle with proper orientation .
Recharging Lithium Battery:
1 . Locate and remove the waterproofing plug at the base of LumenCam'" ;
2 . Connect the power adapter to LumenCam' and an (100-240V - 50/60Hz)
power source . The indicator will illuminate green when charging, and turn off
when fully charged .
1 . The indicator LED flashing red signifies critically low battery, recharge
immediately. If power is completely exhausted, the file you are recording will
be saved automatically before shutting down .
2 . If your memory is full, pressing the recording on/off button will
cause the blue Indicator LED to stop and recording will not take place,
3 . When LumenCam'" is connected to your computer via USB cable, it acts
as a separate drive where files may be stored .
Date/Time Reset :
If the date/time of your video does not match the local date/time, please
follow the these steps :
1 . Set the date/time on your computer to match the local date/time ;
2 . Connect LumenCam TM to your computer via the USB cable provided ;
3 . Double-click the My Computer icon on your desktop, and then navigate
into the Mobile Disk directory . This is the directory that the LumenCam'"
SD card uses ;
4 . Insert the CD provided into your computer's CD drive ;
5 . Search your CD drive for a file named 'getsystemTime .exe', copy and
paste this file into the Mobile Disk folder ;
6 . Double click the file and wait for your system to automatically produce a
7 . You may now close all folders and disconnect the USB cable, set up has
been successfully completed .
Formatting Memory :
It is highly recommended to use the software on the CD provided to format
LumenCam" built-in memory . Using the functions of a Windows PC system
to format LumenCam'" will alter certain values, causing video file storage
time to become slower . Follow the instructions below to format :
1 . Insert the CD provided into your computer's CD drive, and search your
CD drive for a file named 'UDiskFormat .exe' and double-click on this file :
-3-
2 . In the dialogue window, enter the disk name that LumenCam" is given
when it is connected to your computer, e .g ., H :/, G :/, etc . (open 'My
Computer' to locate the disk name) :
3 . Click 'Format' to format the memory, or 'Exit' to close .
4. After formatting successfully, you may click 'Exit' .
-4-
PROPER RECORDING ORIENTATION
Please ensure that
the recording on/off
and flashlight on/off
buttons are facing
upwards during
recording, otherwise
video files will not
display correctly.
NOTICE
• Turn off the LumenCam TM if not in use ;
• Do not put the battery in fire or water. Dispose of properly ;
• Do not use metal objects to connect the battery polarities ;
• Do not open the battery ;
-5 -
SPECIFICATIONS
* All the specifications are subject to minor change without prior notice .
-6
-
FCC Information
This device complies with part 15 of the FCC Rules . Operation
is subject to the following two conditions :
(1) this device may not cause harmful interference ;
(2) this device must accept any interference received, including
interference that may cause undesired operation . Changes or
modifications not expressly approved by the party responsible for
compliance could void the user's authority to operate the equipment .
d0
A
IL
U Irl G IN
11x1
•
LM
S A S S N
"ILLUMINATING THE EV
EU Environmental Protection
Waste electrical products
should not be disposed of
with household waste. Please
recycle where facilities exist .
Check with your local authority
or retailer for recycling advice . llllll~
ATM
I3ENCE"