1
Point of Sale
with Electronic Bank Draft Capture and Cash Drawer Control
Part #107
User Manual
Version 7.3
Information in this document is subject to change without notice and does not represent a commitment on
the part of Data Pro Accounting Software, Inc. The software described in this document is furnished under
a license agreement or nondisclosure agreement. The software may be used or copied only in accordance
with the terms of those agreements. The purchaser may make one copy of this software for backup
purposes. No part of this manual or other materials included with the package, may be reproduced or
transmitted in any form or by any means electronic or mechanical, including photocopying and recording
for any purpose, other than the purchaser’s personal use, without the written permission of Data Pro
Accounting Software, Inc.
© 1985-2008 Data Pro Accounting Software, Inc.
Data Pro Accounting Software is a trademark of Data Pro Accounting Software, Inc.
No investigation was made into the common-law trademark rights of any word. Every effort was made to
capitalize or highlight, in some manner, any word with current registrations.
All companies, products, addresses, and persons contained herein are intended to be completely fictitious
and are designed solely to document and exemplify the use of Data Pro Accounting Software, Inc.’s
products.
Page i
This page intentionally left blank.
Page ii
TABLE OF CONTENTS
Description
Page
CHAPTER 1 INTRODUCTION ............................................................................................... 1-1
BATCH PROCESSING.......................................................................................................................1-2
SALES RECEIPT SELECTION ........................................................................................................1-3
SYSTEM INTEGRATION..................................................................................................................1-3
Integration with General Ledger........................................................................................................................ 1-3
Integration with Manufacturing Inventory Management................................................................................... 1-4
Integration with Accounts Receivable ............................................................................................................... 1-4
Integration with Check Reconciliation .............................................................................................................. 1-4
DATA FILE DESCRIPTIONS ...........................................................................................................1-5
PREPRINTED FORMS.......................................................................................................................1-6
BAR CODE READER .........................................................................................................................1-7
ERROR MESSAGES...........................................................................................................................1-8
TRANSACTION PROCESSING FLOWCHARTS........................................................................1-13
CHAPTER 2 SET UP AND MAINTENANCE ........................................................................ 2-1
GENERAL OVERVIEW.....................................................................................................................2-1
NAVIGATION TOOLS.......................................................................................................................2-4
SET UP SALES CODES......................................................................................................................2-5
Inquiry Mode ..................................................................................................................................................... 2-5
Add Mode (AR0405)......................................................................................................................................... 2-5
Change Mode (AR0406).................................................................................................................................... 2-8
Delete Mode (AR0407) ..................................................................................................................................... 2-8
Copy Mode (AR0408) ....................................................................................................................................... 2-9
SET UP SALESMEN ...........................................................................................................................2-9
Inquiry Mode (AR0408) .................................................................................................................................. 2-10
Add Mode (AR0409)....................................................................................................................................... 2-10
Change Mode (AR0410).................................................................................................................................. 2-11
Delete Mode (AR0411) ................................................................................................................................... 2-11
Copy Mode (AR0412) ..................................................................................................................................... 2-12
SET UP TAX RATES ........................................................................................................................2-12
Inquiry Mode (AR0424) .................................................................................................................................. 2-13
Add Mode (AR0425)....................................................................................................................................... 2-13
Change Mode (AR0426).................................................................................................................................. 2-14
Delete Mode (AR0427) ................................................................................................................................... 2-14
Copy Mode (AR0428) ..................................................................................................................................... 2-14
IMPORT TAX RATES (AR0603) ....................................................................................................2-15
Fixed Length ASCII Files................................................................................................................................ 2-16
Variable Length ASCII Files ........................................................................................................................... 2-16
Comma Delimited *.PRN Files ....................................................................................................................... 2-16
File Import Modules Overview........................................................................................................................ 2-17
SET UP REGISTERS ........................................................................................................................2-19
Inquiry Mode (PS0450) ................................................................................................................................... 2-19
Add Mode (PS0451) ........................................................................................................................................ 2-19
Change Mode (PS0452)................................................................................................................................... 2-21
Delete Mode (PS0453) .................................................................................................................................... 2-21
Copy Mode (PS0454) ...................................................................................................................................... 2-21
CHANGE MASTER CONFIGURATION (PS0418) ......................................................................2-22
Master Configuration....................................................................................................................................... 2-22
Entry Screen .................................................................................................................................................... 2-25
Invoice Format................................................................................................................................................. 2-27
Devices ............................................................................................................................................................ 2-30
System Integration ........................................................................................................................................... 2-31
Page iii
TABLE OF CONTENTS (continued)
Description
Page
MAINTAIN DATA FILES (PS0420)................................................................................................2-32
SET UP PAYMENT TYPES (PS0460).............................................................................................2-33
Inquiry Mode ................................................................................................................................................... 2-33
Add Mode (PS0461) ........................................................................................................................................ 2-34
Change Mode (PS0462)................................................................................................................................... 2-36
Delete Mode (PS0463) .................................................................................................................................... 2-37
Copy Mode (PS0464) ...................................................................................................................................... 2-37
SET UP CREDIT CARD PROCESSORS (PS0470) .......................................................................2-37
Inquiry Mode ................................................................................................................................................... 2-38
Add Mode (PS0471) ........................................................................................................................................ 2-38
Change Mode (PS0472)................................................................................................................................... 2-42
Delete Mode (PS0473) .................................................................................................................................... 2-42
Copy Mode (PS0474) ...................................................................................................................................... 2-43
START NEW YEAR'S FILES (PS0421)..........................................................................................2-43
SET UP CUSTOMERS......................................................................................................................2-45
Inquiry Mode (AR0400) .................................................................................................................................. 2-45
Add Mode (AR0401)....................................................................................................................................... 2-50
Contact Info (Button)............................................................................................................................... 2-55
Price Plans (Button)................................................................................................................................. 2-63
Change Mode (AR0402)................................................................................................................................. 2-63
Delete Mode (AR0403) ................................................................................................................................... 2-64
Copy Mode (AR0404) ..................................................................................................................................... 2-64
SET UP INVENTORY ITEMS.........................................................................................................2-65
Inquiry Mode [IM0100]................................................................................................................................... 2-67
Add Mode (IM0401)........................................................................................................................................ 2-68
Special Cases: .................................................................................................................................................. 2-74
Change Mode [IM0402] .................................................................................................................................. 2-85
Delete Mode [IM0403] .................................................................................................................................... 2-85
Copy Mode [IM0404]...................................................................................................................................... 2-86
SET UP INVOICE TEXT TEMPLATES ........................................................................................2-86
Add Mode (AR0435)....................................................................................................................................... 2-86
Change Mode (AR0436).................................................................................................................................. 2-87
Delete Mode (AR0437) ................................................................................................................................... 2-87
Copy Mode (AR0438) ..................................................................................................................................... 2-88
CHAPTER 3 ENTER TRANSACTIONS ................................................................................. 3-1
RECORD A QUICK SALE (ps0111) .................................................................................................3-1
RECORD A SALE/PRINT RECEIPT (ps0101)................................................................................3-6
RECORD A RETURN/REFUND (ps0102)......................................................................................3-17
OPEN REGISTER/NO SALE (ps0103) ...........................................................................................3-27
RECORD PAYMENTS (ps0105)......................................................................................................3-28
PRINT DEPOSIT REGISTER (ar0112)..........................................................................................3-33
RECORD SALES CODE ADJUSTMENTS (ar0104) ....................................................................3-35
RECORD COS ADJUSTMENTS (ps0106) .....................................................................................3-36
AUTOMATIC COS ADJUSTMENTS (ar0114) .............................................................................3-37
ENTER REGISTER BALANCES (ps0100) ....................................................................................3-38
Currency .......................................................................................................................................................... 3-39
PERFORM DRAFT CAPTURE BATCH (ps0702) ........................................................................3-39
REGISTER LOGIN - CTRL + F9....................................................................................................3-43
REGISTER LOGOUT - CTRL + F10..............................................................................................3-43
CHAPTER 4 PRINT REPORTS............................................................................................... 4-1
standard features for reports ..............................................................................................................4-1
Page iv
TABLE OF CONTENTS (continued)
Description
Page
CTRL+O (Output Options)................................................................................................................................ 4-1
Font Attributes................................................................................................................................................... 4-2
Report Print Options .......................................................................................................................................... 4-2
Displayed Report Options.................................................................................................................................. 4-3
Range of Orders................................................................................................................................................. 4-3
Report Sorting Preference.................................................................................................................................. 4-3
Masking (Wildcards) ......................................................................................................................................... 4-4
Period to Report On ........................................................................................................................................... 4-4
Cancel the Print Job ........................................................................................................................................... 4-4
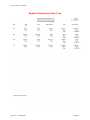
Register summary by sales type (PS0201)..........................................................................................4-4
REGISTER VARIANCE REPORT (PS0202)...................................................................................4-7
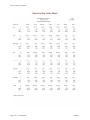
SALES BY DAY OF THE WEEK (PS0203) .....................................................................................4-9
SALES CODE SUMMARY (AR0220) .............................................................................................4-11
SALES JOURNAL (AR0204)............................................................................................................4-15
SALES JOURNAL BY CUSTOMER (AR0205) .............................................................................4-18
SALES JOURNAL BY SALESMAN (AR0206)..............................................................................4-21
SALES JOURNAL BY SALES CODE (AR0222)...........................................................................4-25
SALES TAX REPORT (AR0207).....................................................................................................4-27
ANALYTICAL REPORTS ...............................................................................................................4-29
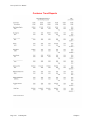
Customer Trend Reports (AR0208)................................................................................................................. 4-29
Salesman Trend Report (AR0209) .................................................................................................................. 4-31
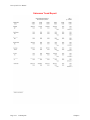
Sales Code Trend Report (AR0210)................................................................................................................ 4-33
Commission Report (AR0211) ........................................................................................................................ 4-35
Salesman Ranking (AR0212) .......................................................................................................................... 4-37
Inventory Detail by Salesman (AR0214)......................................................................................................... 4-39
Sales Code Listing (AR0216) .......................................................................................................................... 4-42
Salesman Listing (AR0217) ............................................................................................................................ 4-46
Tax Rate Listing (AR0218) ............................................................................................................................. 4-49
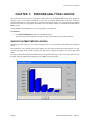
CHAPTER 5 PERFORM ANALYTICAL GRAPHS ............................................................... 5-1
For Windows: ................................................................................................................................... 5-1
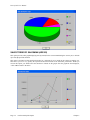
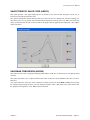
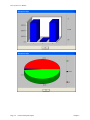
SALES BY PAYMENT METHOD (AR0300) ...................................................................................5-1
SALES TREND BY SALESMAN (AR0302) .....................................................................................5-2
SALES TREND BY SALES CODE (AR0303) ..................................................................................5-3
SALESMAN COMPARISON (AR0305)............................................................................................5-3
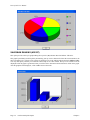
SALES CODE COMPARISON (AR0306).........................................................................................5-5
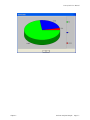
SALESMAN RANKING (AR0307) ....................................................................................................5-6
INDEX............................................................................................................................................ 1
Page v
This page intentionally left blank.
Page vi
Point of Sale User Manual
CHAPTER 1
INTRODUCTION
Simply stated, the purpose of a Point of Sale system is to record the sale of goods or services and generate a sales
receipt at the time of the sale. Normally, this type of transaction occurs in a retail store while the customer is waiting
with “goods in hand.” The Infinity POWER Point of Sale module is specifically designed to process this kind of
transaction efficiently and effectively, as well as providing electronic credit card processing services, cash register
management and sales analysis reporting.
One very important aspect of processing transactions in a Point of Sale environment is accepting credit cards as
payment for goods or services. Electronic Draft Capture (EDC) provides significant advantages to all parties
involved in a retail credit transaction. For buyer and seller, credit authorization requests are electronically sent to the
authorizing institution for immediate approval (or denial). This eliminates the time and effort involved in making a
manual telephone inquiry.
For the seller, EDC eliminates the manual collection and submission of credit claims, and expedites seller
reimbursement. The use of a magnetic strip card reader, while optional, provides further savings of time and effort in
an EDC transaction. A quick pass of the credit card through the magnetic reader obtains the card number, expiration
date and card holder's name. This information is immediately transmitted to the authorizing institution without
further manual intervention.
There are, however, certain basic requirements that must be met to allow this process to occur. Your computer
system must first be equipped with a telephone modem and credit card reader. Two types of information must be
provided to the Point of Sale module before using the EDC capability:
•
Access to the EDC networks (MAPP, NOVA, PCCharge or IC Verify); and
•
Designating which payment methods use EDC. Once supplied, set-up information need be
changed only as user needs change, or in rare circumstances, as physical access to the EDC
network changes.
NOTE
Before you will be able to activate your Infinity POWER Point of Sale draft
capture, it is mandatory that you contact a company that can provide you with
electronic bank draft capture services through MAPP (Global Payment
Systems), NOVA Corporation, PCCharge or IC Verify. These major
international credit processing firms that are capable of providing virtually all
types of credit card processing capabilities for your firm.
This would include credit cards such as MasterCard, VISA, American
Express, Discover and many others. Their firm uses local independent sales
organizations (ISOs) to process all applications from merchants and make all
of the necessary inspections that are required to be able to process
electronically. If you need assistance in finding a supplier of these services,
you may call Data Pro Sales Department at 727-803-1500..
Point of Sale functions may be handled in their normal manner, even without the configuration of the “credit card
service” features. These features can be added at any time. The initial “point of sale” transaction, or sale, is
designed to allow very rapid input of the sale. An unlimited number of computers (registers) may operate
simultaneously to process Cash, Check, MasterCard, Visa, American Express, etc. type transactions. There are up to
ten (10) types available, all user-definable.
The defaults that are built into the system are set to allow you to use the automated payment and dial up functions;
or if necessary, select payment methods manually. This allows you to process normally whether the credit card
authorization network is operating or not.
Chapter 1
Introduction
Page 1-1
Point of Sale User Manual
Computers may be transformed into “cash registers” by optionally using Credit Card Readers, Cash Drawers
and/or Bar Code Readers. Other options include the use of special “Cash Register” type PC units that have been
tailored to look like a cash register, but have all of the functionality of a personal computer. Full on-line interaction
is provided to the Infinity POWER Manufacturing Inventory Management module, which will generate the
appropriate 3 of 9 bar code price labels for your inventory kept in stock.
In addition, specific item costing may be utilized with serial number encoded bar code price labels. This interaction
provides an excellent tool for your floor planning or re-ordering projections. Several analytical “register” reports
and graphs are available showing sales by payment method, daily cash variances by register and sales trends by day
of the week. Sales journals, salesman commission reports and sales tax liability reports are also available.
At your discretion, you may optionally require a “salesman login” with password protection to open the cash
drawer. A detailed audit trail may then be generated showing every time a cash drawer is opened, (by salesman) and
for what purpose. If your business also requires periodic “credit” sales to customers who have an account with you,
full integration is provided with the Infinity POWER Accounts Receivable modules.
As you can see, the Point of Sale module not only provides you with an efficient way to process your customers'
sales, but also provides complete management reporting. This allows you to reduce register cash variances, improve
your cash flow, perform automatic commission calculations, help schedule employees to work “peak” sales days
and analyze your sales trends.
BATCH PROCESSING
All “Electronic Draft Capture” (EDC) transactions are contained within a batch. This batch is kept on the host
computer network maintained by MAPP, NOVA, PCCharge or ICVerify. After consulting with your
representative from MAPP, NOVA, PCCharge or ICVerify, you will be deciding which batch processing method
is best for your company and the way you do business. The batch processing procedures and communications with
MAPP, NOVA, PCCharge or ICVerify is your “link” to the automatic transfer of funds. With NOVA, we only
support hybrid auto close batch processing.
Within the “Transactions” section of the Point of Sale module, “Perform Draft Capture Batch,” addresses the
batching procedures. Again, the handling of these items will depend on the batch processing method you will be
using.
A batch must be assigned or “opened,” prior to performing EDC transactions. This may be accomplished in two
ways:
1) Manually
A batch may be opened by selecting the “Open a New Batch” option on the “Perform Draft Capture Batch”
screen. The Point of Sale program prompts for a batch number and date, and then accesses the EDC network to open
the batch. NOVA does not support this option.
2) Automatically
Arrangements may be made with the authorizing institution to open the batch automatically. A new batch is
automatically opened upon receiving the day's first monetary transaction. Once a batch is open, EDC transaction
processing can begin. Batches that are automatically opened are generally automatically closed through MAPP.
NOVA batches are always automatically opened and closed at 3:00 AM or when a maximum of 950 entries have
been made.
Page 1-2
Introduction
Chapter 1
Point of Sale User Manual
SALES RECEIPT SELECTION
Recognizing that not all companies have the same needs, this module is designed to allow several variations of all
“preprinted” and white paper forms throughout. The Point of Sale module provides several variations of Sales
Receipt and Invoice formats. The sales receipt formats are designed to print on a continuous roll of paper, similar to
an adding machine tape, in compressed print (16.5 pitch) and normal pitch.
The “SRA” form in particular takes advantage of the “credit card service” features and prints lines for the
customer to sign when using a credit card as a payment method. Naturally, this format is designed to be used with
multiple part “carbonless” paper to provide both the merchant and customer a copy of the transaction with
signatures. Two types of “full page” invoices that print on plain paper are also available. Three additional preprinted
invoice forms may be selected, if you prefer.
You may select which sales receipt or invoice to use in the Point of Sale Master Configuration. You may also
change form selections at any time. Please refer to the Sample Reports chapter of this manual to review the many
available form selections.
SYSTEM INTEGRATION
This section includes a brief overview of how the Point of Sale module integrates with various other accounting
modules. These modules include: General Ledger, Manufacturing Inventory Management, Accounts
Receivable and Check Reconciliation.
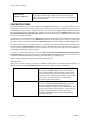
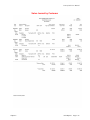
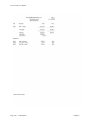
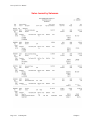
Integration with General Ledger
If your Point of Sale module is interactive with the General Ledger module, the General Ledger will be updated
periodically after printing the current Sales Code Summary Report. Each sales code has a General Ledger account
associated with it that will be used in the batch journal entry. This journal entry may be posted daily, weekly or
monthly.
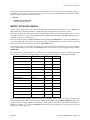
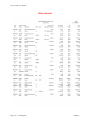
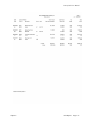
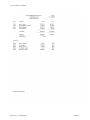
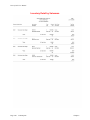
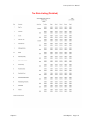
The following displays the typical journal entry:
Account Description
Debit
SALES JOURNAL ENTRY
Cash
X
Master Card - Receivable
X
AMEX – Receivable
X
Credit
Sales Account
X
Sales Tax Accrual
X
Sales Discounts
X
COST OF SALES JOURNAL ENTRY
Cost of Sales
X
Inventory
X
You may update your general ledger at any time by entering the General Ledger module and executing the “Post
Integration Files” option. (See your General Ledger manual for details.) Or, if you choose the option
“Automatically Post Integration Modules” in the General Ledger Master Configuration, these same transactions
will be posted in real time to the General Ledger each time a transaction is entered into the Point of Sale system.
Chapter 1
Introduction
Page 1-3
Point of Sale User Manual
Integration with Manufacturing Inventory Management
The Manufacturing Inventory Management interface is somewhat of a two way street; however, Point of Sale does
all the work. When recording sales and other transactions in Point of Sale, the inventory item's default sales code,
descriptions, unit of measure, costs and price tables are retrieved. The sales code, costs and prices are used to update
the Point of Sale sales journal and historical files. The other information is printed on the invoice for billing
description purposes.
If the “Unit of Measure Conversion” tables are set up on the Inventory Item(s), the system will prompt the user for
the “unit of measure” for which you are selling the item. It will also retrieve the cost and pricing set up on that
conversion table. The update performed in Manufacturing Inventory Management upon validation of these
transactions is identical to the Manufacturing Inventory Management option of “Record Withdrawals,” except that
the General Ledger update is handled by Point of Sale.
Integration with Accounts Receivable
The Accounts Receivable and Point of Sale modules are integrated through the use of common transaction, tax
rate, sales code, salesmen and register files. In a typical point of sale environment, the two systems co-exist with all
“in-house” credit sales handled through the Accounts Receivable “Write Invoices and Other Transactions” option,
while all other sales transactions are handled through the Point of Sale “Record a Sale” option. However, if you are
integrated to the Accounts Receivable module, the system will post all transactions made through the Point of Sale
module to the Accounts Receivable Open Item File. These transactions will show up on a Customer Inquiry as paid
items.
There are additional features that can affect the Point of Sale module. These involve the setup and usage of price
plans. This feature, which is set up in Inventory and defined by customer in Accounts Receivable, contains
definitions of user-definable price plans. These price plans can be assigned to a specific customer or a range of
customers.
Therefore, if you elect to charge a customer's account during Point of Sale data entry, and that customer has a
specific price plan assigned to it, the system will automatically calculate pricing for that customer's purchases and
place their pricing on the data entry screen.
No additional steps are required on the data entry operator's part. Likewise, no additional set up in the Point of Sale
module is required either. If you are integrated with the Accounts Receivable module, you will also have the ability
to choose to use Multiple Accounts Receivable Processing. This feature, which is set up in the Accounts Receivable
Master Configuration and AR codes are defined by customer, will allow the Accounts Receivable transactions to
post to various Accounts Receivable Accounts in the General Ledger.
Integration with Check Reconciliation
If Point of Sale is integrated with Check Reconciliation, the “Print Deposit Register” will prompt the user to post
the entire deposit register amount to the Check Reconciliation. It will use bank account number defined on the cash
receipts sales code used when recording payments to a customer’s account if integrated with Accounts Receivable.
The system uses the current system date as the reference number in Check Reconciliation for the deposit. EFT
transactions that are created in the Point of Sale/Accounts Receivable module are not considered part of the daily
deposit register. However, if EFT transactions are created in Point of Sale/Accounts Receivable, these transactions
will be added to the Check Reconciliation module as “uncleared” deposits after the EFT batch has been processed.
Page 1-4
Introduction
Chapter 1
Point of Sale User Manual
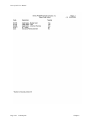
DATA FILE DESCRIPTIONS
The Point of Sale module utilizes the following data files:
1)
2)
3)
4)
5)
6)
7)
8)
Master Configuration
Transaction File
Transaction Detail File
Salesman File
Tax Rate File
Sales Code File
Register File
General Ledger Integration File
File Name
Description
Master Configuration File
(filetype: AR00)
(filename: coAR0.dbf, where
“co” is the company number)
Transaction File
(filetype: AR03)
(filenames: coAR3dy.dbf and
coAR3dy.mdx)
This file contains certain configuration information, such as your
customer label, cash drawer configuration, preprinted form formats,
systems to integrate with, etc.
Transaction Detail File
(filetype: AR04)
filenames: coAR4dy.dbf and
coAR4dy.mdx)
This file may be optionally used to maintain the sales journal detail
for the entire year. If you wish to maintain transaction detail on a
daily, weekly or monthly basis, this file may be cleared out
periodically at your discretion.
The information stored in this file varies between transaction types;
however, all detail sales code information entered for each
transaction will be stored in this file.
Salesman File
(filetype: AR05)
(filenames: coAR5dy.dbf and
coAR5dy.mdx)
This file contains each salesman's name, number, commission rates
and current year's sales summary information.
Tax Rate File
(filetype: AR06)
(filenames: coAR6dy.dbf and
coAR6dy.mdx)
This file contains the sales tax rates and descriptions for each county
or state.
Sales Code File
(filetype: AR07)
(filenames: coAR7dy.dbf and
coAR7dy.mdx)
This file contains the sales codes' descriptions, taxable status,
General Ledger accounts, unposted General Ledger summary
amounts and monthly sales and cost of sales summaries for the
current year.
Register File
(filetype: AR20)
(filenames: coAR20.dbf and
coAR20.mdx)
This file contains the beginning and ending register balances used in
the calculations of the Register Variance Report.
Chapter 1
This file may be optionally used to maintain the sales journals and
cash drawer activity for the entire year. If you wish to maintain
transaction detail on a daily, weekly or monthly basis, this file may
be cleared out periodically at your discretion.
The information stored in this file varies between transaction types;
however, all information entered for each transaction will be stored
in this file.
Introduction
Page 1-5
Point of Sale User Manual
General Ledger
Integration File
(filename: AR2GL.co)
If you are processing interactive with General Ledger, all transactions
which require General Ledger updates will post to this file. Once the
update is performed in General Ledger, this file will be cleared and made
ready for new transactions.
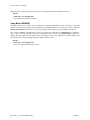
PREPRINTED FORMS
This section outlines the various forms available for the Point of Sale module. As in our other modules, several
types of forms may be used with this program. For convenience, custom forms modifications may be made to
accommodate any specific needs of a particular business. The forms that are shipped standard with this module and
the preprinted forms that are supported by the accounting system are described in the Point of Sale sections of the
Infinity POWER Supported Forms Reference Manual. This can be found in the User Manuals section of the Data
Pro web site and on the CD-ROM.
Preprinted forms will be illustrated in the DPAForms catalog in the Product Kit or on the CD-ROM. If you find that
customization of your forms is necessary, DPAForms can adjust any preprinted form to meet your specific form
printing need. Most of the forms illustrated in the DPAForms catalogue are also available in “Laser Form” format.
This means these versions of the forms are pre-cut to specifically meet the needs of the various HP LaserJet and
compatible printers. Infinity POWER programs have already included the necessary forms files with your software
for you to utilize this advanced feature. All forms that have an “L” in their form name have been modified to
accommodate form printing on LaserJet printers.
To utilize any of the forms listed here, access the Point of Sale>Set Up and Maintenance>Change Master
Configuration option. In Change mode, select the “Invoice Format” tab and input the name of the form you want
to use in the “Invoice Form” field. This tells the system which form you would like to use.
You may change forms styles as often as you would like and at any time.
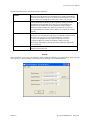
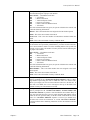
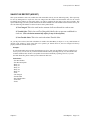
SPECIAL KEYS
This section covers any special keys that take on additional meanings when used with this particular module. All
other keys defined in the System Administrator manual continue to operate in their normal fashion.
Set Up Customers - CTRL + F7
Allows you to quickly add a customer from the option you are
performing in the Point of Sale module. All of the normal
setup features available in the Accounts Receivable module
are also available at this point in the program. When you exit
this option, you may then call up the customer you just added
to the system. You must be interactive with Accounts
Receivable to perform this function.
Set Up Inventory Items - CTRL + F8
Allows you to quickly add an inventory item from the option
you are performing in the Point of Sale module. All of the
normal setup features available in the Manufacturing
Inventory Management module are also available at this point
in the program. When you exit this option, you may then call
up the item you just added to the system. You must be
interactive with Manufacturing Inventory Management to
perform this function.
Page 1-6
Introduction
Chapter 1
Point of Sale User Manual
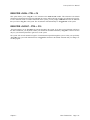
Register Login - CTRL + F9
Register Logout - CTRL + F10
This allows you to “Log In” a new salesman to the Point of
Sale module. This salesman is the default salesman for all
transactions being posted through the system, until he/she
logs out and a new salesman is logged in. If a new salesman
wants to record a transaction on the system, you may simply
press CTRL F9 (Character-based Windows) and select the
salesman that you wish to “Log In” to the system. The old
salesman will automatically be “Logged Out” of the system.
This allows you to “Log Out” the current salesman in the
system. If you have several salesmen working on the same
cash drawer, you may want to make your transactions and
then immediately “Log Out” so that no one else may use
your salesman password to gain access to the system.
The system will record a transaction register of each
transaction posted through the system. Unless you specifically
“Log Out,” the system will maintain the last “Logged In”
salesman as the default salesman until you change it or exit
the program.
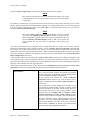
BAR CODE READER
This section discusses the usage of Bar Code Readers with the Point of Sale module. The Manufacturing Inventory
Management module provides you with the ability to print Bar Code Price Labels that can be recognized with an
approved bar code reader.
The format of the label is as follows:
1) Normal user readable text which contains the Item Description.
2) Normal user readable text which includes the Item's Part Number and Price.
3) Encoded Inventory Item Number.
When using the bar code reader with Accounts Receivable, Accounts Payable, Sales Order Entry, Purchase
Order Entry, Point of Sale, and Manufacturing Inventory Management, pass the bar scanner over the item
number. The scanner may pass in a left to right, or a right to left direction, but it must be kept at about a 45 degree
vertical angle to the bar code. You may use the bar code entry method any time you are prompted by the system to
enter the inventory item number.
The bar code scanner should be configured to automatically perform a carriage return after scanning the code. Keep
in mind that the Inventory Item Number is coded as one (1) field of text. This means that the modules involved
should be configured to “Default to IM,” because the Item Number segmentation is not supported.
Chapter 1
Introduction
Page 1-7
Point of Sale User Manual
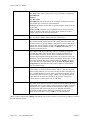
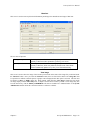
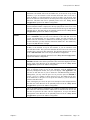
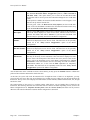
ERROR MESSAGES
The following pages will define, by alphabetic listing, each of the error codes that may be encountered within the
Infinity POWER Point of Sale module or the MAPP, NOVA, PCCharge or ICVerify system.
Error Message
Description
Account Number Error
Credit card number that has been entered contains a missing or invalid
character.
Amount Error
Amount of money that has been entered contains a missing or invalid
character.
Batch Already Closed
The batch number entered during a “Close an Existing Batch” procedure
has already been closed.
Batch Balance Error
The batch total entered during a “Close an Existing Batch” procedure
does not match the batch total of MAPP.
Batch Empty
The batch number entered during a “Perform Batch Inquiry” or “Pend
an Existing Batch” does not exist on the MAPP network.
Batch Number Error
The batch number entered during a “Open a New Batch” or “Close an
Existing Batch” procedure contains a missing or invalid character.
Batch Out of Balance
The batch total entered during a “Close an Existing Batch” procedure
does not match the MAPP batch total. However, the batch has been closed.
Busy, No Answer, No
Carrier
The system is unable to establish a communication link to the MAPP
network. Possible causes are:
1) The local MAPP telephone number is busy.
2) The telephone network cannot provide dial tone, or no carrier was
detected from the modem at the MAPP site.
If this is the first attempt to access the MAPP or NOVA network, a second
and third attempt will be made using the same telephone number.
If all attempts to complete a communication link to the network have failed,
you may elect to retry dialing now or at a later time.
Calculate Message LRC
Character
Upon receiving a transaction request from the Point of Sale module, and
taken appropriate action, MAPP sends a character sequence to the Point of
Sale module reflecting the result of the action.
The Point of Sale module evaluates the format of the character sequence to
determine if the sequence is valid; an “lrc” character calculation is a
validation test. This message will appear only if the Message Level is set to
“9.”
Call Center
You should call MAPP for voice authorization. This message may be
displayed for the following transaction requests: sale, forced sale,
authorization without data capture.
Call Service, Report Error
##
This is a miscellaneous error from the MAPP network. Report the error
number to a MAPP representative. This message will appear only if the
Message Level is set to “9.”
Card OK
MAPP has checked the credit card number against a lost or stolen file and
the card number is not in the file.
Page 1-8
Introduction
Chapter 1
Point of Sale User Manual
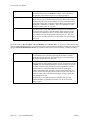
Error Message
Description
Card OK - Check for
Valid Card Number
The credit card number that has just been supplied is being evaluated to
determine if it is valid. This message will appear only if the Message Level
is set to “9.”
Continue
When performing a “Batch Review,” this message confirms that more
transactions remain to be reviewed.
Copy psa amount to tym
The Point of Sale module is internally converting the given point-of-sale
information into the format required by MAPP. This message will appear
only if the Message Level is set to “9.”
Credit Card Error
There is a problem either obtaining the credit card information, or with the
information itself. This message will appear only if the Message Level is
set to “9.”
Date Error
A missing or invalid date has been entered.
Declined
The credit card authorization has been rejected by MAPP. This message
may be displayed for the following transaction requests: sale, forced sale,
card authorization without data capture, and negative file.
Dialing
The Point of Sale module is about to make its first attempt to establish a
communication link to the MAPP network.
Device failure
The Point of Sale module is unable to establish a telephone connection to
the MAPP local access telephone number. The problem is related to some
malfunction or improper setting of local hardware or software.
Examples include, but are not limited to: the modem has been turned off, it
is improperly cabled or malfunctioning; the communications board has
been improperly configured or malfunctioning; the required
communications data files have been improperly configured or are
inaccessible.
If all attempts to establish a telephone connection to MAPP have failed,
you may elect to retry dialing now or at a later time.
Disconnect
The system has lost the communication link to the MAPP network.
Duplicate. Do you wish to
force this transaction?
MAPP already contains data for the transaction submitted. The system is
asking you whether the transaction data should be accepted by MAPP
which would “force the transaction.”
Enter “Y” to force the transaction, “N” or ESC not to force the transaction.
Duplicate Transaction
The information for this transaction has already been submitted to MAPP.
Duplication Transaction
Post Authorization
Completed
When performing the “Post Authorization” option, this message displays
that MAPP has successfully captured a transaction (although a duplicate)
which was authorized but not captured in a previous transaction.
End of Batch
When performing a “Batch Review,” this message confirms that no more
transactions remain to be reviewed.
Get Q
The MAPP network is ready to accept validation information for log on to
the network. The Point of Sale module is about to assemble the necessary
validation information, transmit the information to MAPP and wait for a
response. This message will appear only if the Message Level is set to “9.”
Get Credit Card Info
The Point of Sale module is accessing the credit card number and
expiration date. This message will appear only if the Message Level is set
to “9.”
Chapter 1
Introduction
Page 1-9
Point of Sale User Manual
Error Message
Description
Get Greeting
The Point of Sale module has established a communication link to the
MAPP network and is now waiting for a four-character response or
“greeting” from MAPP. The “greeting” indicates that MAPP is available
for access. This message will appear only if the Message Level is set to
“9.”
Get Login
The Point of Sale module has established a communication link with the
MAPP network, and is now waiting for MAPP to send it a character
sequence signifying a request for user validation information. This message
will appear only if the Message Level is set to “9.”
Get Response
MAPP has acknowledged receiving a transaction request from the Point of
Sale module. The Point of Sale module is now waiting for MAPP to
confirm that it has taken action on the request. This message will appear
only if the Message Level is set to “9.”
Got Q
The Point of Sale module had transmitted validation information for log on
to the MAPP network, and has now received confirmation from MAPP that
log on was successful. MAPP is now ready to receive a transaction request.
This message will appear only if the Message Level is set to “9.”
Got Credit Card Info
The operator has successfully obtained credit card information. This
message will appear only if the Message Level is set to “9.”
Got Greeting
The Point of Sale module had established a communication link to the
MAPP network, was waiting for a four-character response or “greeting”
from MAPP, and successfully received the “greeting.” The “greeting”
indicates that MAPP is available for access. This message will appear only
if the Message Level is set to “9.”
Got Login
The Point of Sale module had established a communication link with the
MAPP network, was waiting for MAPP to send it a character sequence
signifying a request for user validation information, and successfully
received the character sequence. MAPP is now ready to receive validation
information from the system. This message will appear only if the Message
Level is set to “9.”
Invalid Date
The date entered contains a missing or invalid character.
Invalid Batch Date
During a request to open a batch, an invalid batch date was entered.
Invalid Terminal ID
Number
The terminal ID number entered on the “Set Up Draft Capture” screen is
incorrect. MAPP cannot process a transaction with an invalid terminal ID
number. Verify that the terminal ID number on this screen is correct. If the
number appears correct, check with the source that issued the terminal ID
number to verify that the number is valid.
Invalid Transaction Code
The Point of Sale module has sent the MAPP network a transaction
request which is a non-existent MAPP function. This message will appear
only if the Message Level is set to “9.”
Invalid Transaction Type
The Point of Sale module has encountered an unknown Infinity transaction
type. This message will appear only if the Message Level is set to “9.”
No Q
The Point of Sale module had transmitted validation information for log on
to the MAPP network, and was waiting for confirmation from MAPP that
log on was successful. The system is unable to log on to MAPP, either
because MAPP has not sent confirmation of log-on after a given time
period has elapsed, or else MAPP has not sent a confirming response that
the system recognizes as correct (that is, an ENQ character).
Page 1-10
Introduction
Chapter 1
Point of Sale User Manual
Error Message
Description
If this is the first attempt to access the MAPP or NOVA network, a second
and third attempt will be made using the same telephone number.
If all attempts to complete a communication link to the network have failed,
you may elect to retry dialing now or at a later time. This message will
appear only if the Message Level is set to “9.”
No Active Batch
When performing a “Batch Review” or “Pend an Existing Batch,”
MAPP finds no open or active batch on the network.
No Authorization Code
The authorization code provided to MAPP for a post authorization
transaction is invalid or missing.
No Batches Stored
MAPP finds no active or pended batches on the network.
No Greeting
The Point of Sale module has established a communication link to the
MAPP network and is waiting for a four-character response or “greeting”
from MAPP. The greeting indicates that MAPP is available for access.
No greeting has been received after a given time period has elapsed.
If this is the first attempt to access the MAPP network, a second attempt
will be made using the same telephone number. If this is the second
attempt, and alternate telephone numbers were provided on the “Set Up
Draft Capture” screen, the alternate telephone numbers will be used.
If all attempts to complete a communication link to MAPP have failed, you
may elect to retry dialing now or at a later time. This message will appear
only if the Message Level is set to “9.”
No Login
The Point of Sale module had established a communication link with the
MAPP network and was waiting for MAPP to send it a character sequence
signifying a request for user validation information.
No such character sequence was detected by the system after a given period
of time had elapsed.
If this is the first attempt to access the MAPP network, a second attempt
will be made using the same telephone number. If this is the second
attempt, and alternate telephone numbers were provided on the “Set Up
Draft Capture” screen, the alternate telephone numbers will be used.
If all attempts to complete a communication link to MAPP have failed, you
may elect to retry dialing now or at a later time. This message will appear
only if the Message Level is set to “9.”
No Transactions for Card
Type xx
MAPP finds no transactions for the requested credit card type “xx”, where
“xx” is a two-character code representing the card type, such as
MasterCard or Visa.
No Transactions in Batch
This message indicates that there are no transactions associated with the
specified batch number.
Please Retry
The Point of Sale module is unable to process a transaction request.
Possible causes are failure to establish a communication link with the
MAPP network, failure to log on to the MAPP network or failure while
transmitting a transaction request to the MAPP network. (If the message
level setting is 9, more specific analysis is provided.)
You may elect to retry dialing now or at a later time.
Post Authorization
Completed
MAPP has successfully captured a transaction which was authorized but
not captured in a previous transaction.
Chapter 1
Introduction
Page 1-11
Point of Sale User Manual
Error Message
Description
Redialing
The Point of Sale module is about to make a subsequent attempt to
establish a communication link to the MAPP network after failing to
establish the link on a previous attempt.
Send ACK
MAPP has confirmed taking action on a transaction request by sending the
Point of Sale module a message describing the results of the action. The
Point of Sale module has evaluated the message format, determined the
format to be correct, and is acknowledging this result to MAPP. This
message will appear only if the Message Level is set to “9.”
Send Transaction
The Point of Sale module has successfully logged on to the MAPP
network, and is preparing to transmit the operator's transaction request to
the network. This message will appear only if the Message Level is set to
“9.”
Set Transaction Type
The Point of Sale module is determining the MAPP transaction code based
on the point-of-sale function to be performed. This message will appear
only if the Message Level is set to “9.”
System Error:
xxxxxxxxxxxx
The Point of Sale module has sent MAPP a transaction request, but there
is an error in the request format. This message will appear only if the
Message Level is set to “9.”
Time-out, Invalid
Response From Host
The Point of Sale module has been waiting for MAPP to confirm that it
has taken action on a transaction request.
Either MAPP has failed to confirm taking action after a given amount of
time has passed, or has not provided the type of confirmation that the
system recognizes as correct.
If all attempts to complete a communication link to MAPP have failed, you
may elect to retry dialing now or at a later time. This message will appear
only if the Message Level is set to “9.”
Time-out, No STX From Host - The Point of Sale module has transmitted
a transaction request to MAPP and is waiting for an acknowledgment (in
the form of an STX character) that MAPP has received the request.
After waiting for a given amount of time without acknowledgment from
MAPP, the system assumes that MAPP did not receive the request.
If all attempts to complete a communication link to MAPP have failed, you
may elect to retry dialing now or at a later time. This message will appear
only if the Message Level is set to “9.”
Transaction Terminated
by Operator
You have elected to cancel the current transaction request before
transmitting the request to MAPP.
Try Later
After a given time period has elapsed, MAPP is unable to complete the
transaction request. This message may be displayed for the following
transaction requests: sale, forced sale, authorization without data capture.
Unable to Locate
Matching Transaction
MAPP cannot find a transaction to match the search criteria in a batch
transaction inquiry request.
Page 1-12
Introduction
Chapter 1
Point of Sale User Manual
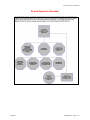
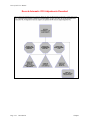
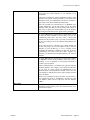
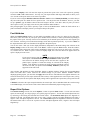
TRANSACTION PROCESSING FLOWCHARTS
This section covers the processing flow for the different types of transaction processing in the Manufacturing
Inventory Management system.
Record a Quick Sale Flowchart
Chapter 1
Introduction
Page 1-13
Point of Sale User Manual
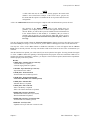
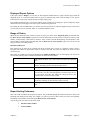
Open Register Flowchart
Page 1-14
Introduction
Chapter 1
Point of Sale User Manual
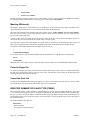
Record Payments Flowchart
Chapter 1
Introduction
Page 1-15
Point of Sale User Manual
PRINT DEPOSIT REGISTER FLOWCHART
Page 1-16
Introduction
Chapter 1
Point of Sale User Manual
Record Sales Code Adjustments Flowchart
Chapter 1
Introduction
Page 1-17
Point of Sale User Manual
Record Automatic COS Adjustments Flowchart
Page 1-18
Introduction
Chapter 1
Point of Sale User Manual
Enter Register Balances Flowchart
Chapter 1
Introduction
Page 1-19
Point of Sale User Manual
This page intentionally left blank.
Page 1-20
Introduction
Chapter 1
Point of Sale User Manual
CHAPTER 2
SET UP AND MAINTENANCE
This chapter will provide you with a step-by-step procedure for the initial set up and maintenance of your Point of
Sale files. When you select this menu option, a complete list of choices will be displayed as shown on the following
screen:
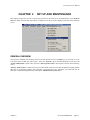
GENERAL OVERVIEW
Once you have installed your module(s) and reviewed the System Overview, (Chapter 1), you are ready to set up
your master Point of Sale files from scratch. Select the “Systems” option from the Menu Bar. Then, select the
“System Administrator” option. Then, select the “Start up from Scratch” menu option as shown on the following
screen.
“Start Up From Scratch” is utilized to set up your initial Point of Sale and any other integrated accounting module
data files for a particular company. This procedure is performed only once. Thereafter, your data files may be
packed or re-indexed through the Point of Sale option “Maintain Point of Sale Files.”
Chapter 2
Set Up and Maintenance
Page 2-1
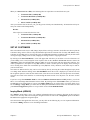
Point of Sale User Manual
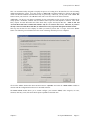
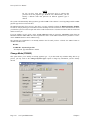
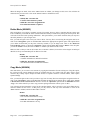
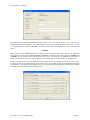
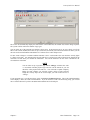
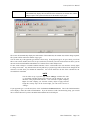
Once this option is selected, the following screen will appear showing a listing of all accounting modules that have
been installed on your computer system.
Page 2-2
Set Up and Maintenance
Chapter 2
Point of Sale User Manual
This is an automated utility designed to simplify the process of creating all of the data files for each accounting
module throughout the system. Users may choose to “Select All” accounting modules by clicking on this button
which will check all modules and make them ready for processing. Otherwise, you may click on the “Clear All”
button to undo your selections. The “Invert” button will reverse the order of all current selections.
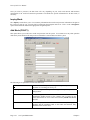
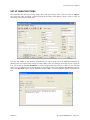
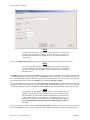
Additionally, you may use your mouse to manually click on each module to click it on or off to be included in the
startup process. Remember, modules such as Purchase Order require Accounts Payable to function. Sales Order
Entry requires Accounts Receivable and Time Sheet Entry requires the Payroll data files. Point of Sale and
Accounts Receivable share common files which is why it is so noted on the screen. Therefore, if you have
already created Accounts Receivable files, it will not be necessary to perform this option for Point of Sale.
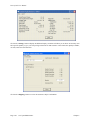
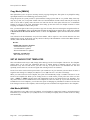
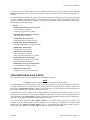
This step must be done for each company for which you intend to process data. To begin, click on the “Start”
button. The following screen illustrates how the screen will change when the process is completed.
Click on the “Close” button when done and then return to “Systems” and select the “Point of Sale” module to
continue with the configuration functions to be described from here.
The Point of Sale module allows you to custom configure your customer “label,” sales categories, tax rates,
salesmen, data entry screen, Electronic Draft Capture capabilities and much more.
Chapter 2
Set Up and Maintenance
Page 2-3
Point of Sale User Manual
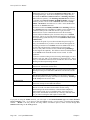
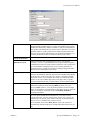
The following sections of this chapter will explain the execution of these options, as well as a recommended backup
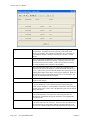
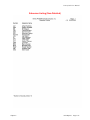
procedure. Once you select this option, the following data files will be created:
File Name
Description
Master Configuration File
(filename: coAR0.dbf)
This file contains your Master Configuration, Customer Label, cash
drawer configuration, preprinted form formats, systems to integrate with,
etc.
Transaction File
(filename: coAR3dy.dbf)
This file may be optionally used to the sales journals and cash drawer
activity for the entire year.
Transaction Detail File
(filename: coAR4dy.dbf)
This file may be optionally used to the sales journal sales code detail for
the entire year.
Salesman File
(filename: coAR5dy.dbf)
This file contains the master information for each of the salesmen,
including the gross and net sales for each period of the fiscal year.
Tax Rate File
(filename: coAR6.dbf)
This file contains the tax rates for each tax entity that you set up.
Sales Code File
(filename: coAR7.dbf)
This file contains the sales code master information and gross sales and
cost for each period of the fiscal year.
Register File
(filename: coAR20.dbf)
This file contains the beginning and ending register balances used in the
calculations of the Register Variance Report.
Payment Types File
(filename: coARO.dbf)
This file is a multi-indexed file that allows the user to define an unlimited
number of payment types. Its impact is driven throughout the Accounts
Receivable, Sales Order Entry, Point of Sale, and POWERServer
modules.
NAVIGATION TOOLS
Within this module there are numerous references to navigation. The following navigation buttons are defined for
reference when used through this chapter.
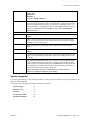
Navigation Button
Function
Selects the first record.
Selects the previous record.
Selects the next record.
Selects the last record.
Scroll view. Selects a specific record from a list.
Page 2-4
Set Up and Maintenance
Chapter 2
Point of Sale User Manual
Navigation Button
Function
Creates a record.
Modifies the current record.
Deletes the current record.
Creates a record based on the current record.
Maintains notes for this record.
Displays record timestamp information.
SET UP SALES CODES
This section discusses the ways to add, change, delete and copy sales codes. Sales Codes are used by the Point of
Sale system to group certain types of sales. They are also used to define the General Ledger accounts to be used with
all types of transactions performed in the Point of Sale module. Sales Codes can also be used to define Multiple
Accounts Receivable accounts, which can then be set up on the customer master record. This assignment will default
all transactions for that customer to a separate Accounts Receivable account in the General Ledger.
Sales Codes can be set up to determine whether a type of sales category is taxable or non-taxable. You may also set
up a default unit of measure, a default unit cost and unit price, and a default JC Cost Code. There are also several
default sales codes defined in the “Master Configuration” option that must be set up for the system to use during
transaction processing.
NOTE
When writing an invoice, there may be times when you would like to enter
one or more lines on the invoice which are for description purposes only. By
entering any sales codes that begins with a period (.), the system will allow
you to enter a description line. It is recommended that at least one of your
sales codes is set up as a description code.
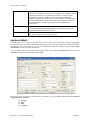
Inquiry Mode
The “Inquiry” mode allows you to view summary information about your Accounts Receivable Sales Codes.
Navigate to the record you wish to view. You may find a record using the navigation tool bar or click on the
“Navigation” option on the Menu Bar and then the appropriate navigation option.
Add Mode (AR0405)
This option allows you to set up new sales codes. Sales codes must be used when recording sales to classify the type
of merchandise you are selling. Many of the sales reports use sales codes for totaling or summarizing. Sales Codes
are also used to define Account Receivable accounts which make the system flexible by allowing distribution of
transactions by customer to multiple Accounts Receivable accounts. Sales Codes are a means for the Accounts
Receivable program to categorize various types of transactions. Depending on the nature of your business, you may
desire either very specific and detailed sales reporting of sales, cost of sales, methods of payments, taxable/nontaxable type sales, etc., or you may simply want to keep everything very simple and non-detailed as possible.
Chapter 2
Set Up and Maintenance
Page 2-5
Point of Sale User Manual
Sales Codes allow you to define a default unit of measure, unit sales price, a default unit cost and a default JC Cost
Code. Regardless of your preference, Sales Codes will allow you to customize your system to report this type of
information in the manner that you choose. For instance, in our sample company illustrated throughout the sample
reports section, our company sells various types of residential and commercial cleaning products. For many firms it
may be sufficient to simply say, “We sold $1000 worth of electrical products last month.”
However, other companies may want to know that they actually sold $150 worth of electric fuses, $475 of 50 gauge
electric wire, and $375 worth of electric fuse boxes. Either method of reporting is possible with this module. It is
simply a matter of configuring Sales Codes.
Various special sales codes are required to track freight, taxes, discounts, and several other types of non-sale
activity. The system comes with several default sales codes to keep track of these various “basic” sales codes.
These default sales codes are the sales codes that the system needs to use during the processing of most transactions.
These sales codes must be defined in the option “Master Configuration” as well as being set up in your sales code
file. If you elect to use the defaults, these sales codes are already configured for you. You will need to change the
General Ledger account numbers on these codes to match your General Ledger account numbers.
Because there are different “special reporting” needs that sales codes perform, such as sales discounts, sales tax,
deposits, freight, etc., it is important to classify certain sales codes in specific ways. Sales Codes that will be used to
track any type of item other than sales amounts should be assigned a code number that start with the letters “SC.”
This includes Sales Codes that are set up to track Multiple Accounts Receivable accounts. This will tell the system
to automatically place these codes in the lower section of the Sales Code Summary report, which is for special items
or non-sales type items. If during the posting of payments, you desire to post cash receipts to multiple cash accounts
or to a specific AR account, then an additional Sales Code should be created for each cash account and each
accounts receivable account that is to receive postings.
At the prompt “GL Sales Account,” enter the account number for each specific cash account to be set up. The
system will allow you to specify a different Cash Sales Code as an override to the default Cash Receipts Sales Code
during the posting of payments.
During the processing of transactions, if the system needs to update one of these sales codes, and it cannot be found
in the sales code file, an error sales code will be added with the sales code number “ERROR” and a description of
“Sales Code Not Found.”
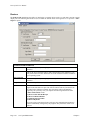
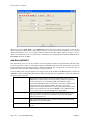
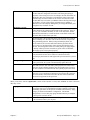
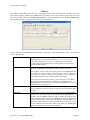
If you are adding a new record, navigation is not required. Click on the “Create a New Record” button or choose the
“Operation” option from the Menu Bar and then “Add.” The following is an explanation of each of the data items
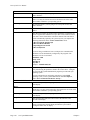
set up on a sales code.
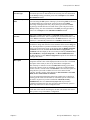
Sales Code
This is the ten (10) character (alpha/numeric) code used to define this
sales code.
Description
This is the thirty (30) character (alpha/numeric) description of the sales
code. This will be displayed on all of the sales summary reports. This
will also be the default description of an item that is being sold when
entering an invoice, if no other description is input when entering an
invoice line.
Taxable
This field specifies whether or not any sales entered using this sales code
are taxable or non-taxable. This tax status may be overridden at the time
of writing an invoice if the option, “Override Tax by Invoice Line” is
turned “on” in the Master Configuration. If this sales code is to be a
taxable item, then click “on” the box.
Default U/M
This is a four (4) character (alpha/numeric) field which is used to define
a default Unit of Measure. This unit of measure will be shown when this
sales code is selected. If it is required, you may override this unit of
measure at the time of entry.
Page 2-6
Set Up and Maintenance
Chapter 2
Point of Sale User Manual
Unit Price
This is the default unit sales price for this sales code. When you select a
sales code which has a unit sales price defined, this will be the unit price
for that line item on the transaction. You will have the option of
overriding this unit price during data entry of the transaction.
Unit Cost
This is the default unit cost for this sales code. When you select a sales
code which has a unit cost defined, this will be the unit cost for that line
item on the transaction. The unit cost will be multiplied by the quantity
entered to calculate the cost of sales for that line item on the transaction.
For normal “sales type” sales codes, this is the General Ledger Sales or
Income account that will be credited when sales are entered. For special
“non-sales type” sales codes, this is the account that will be used for the
necessary debit or credit. For example; the Cash Account, Discount
Account, Sales Tax Account, etc.
Sales Account
Sales Amount
For “AR Code type” sales codes, this is the Accounts Receivable
account that will be used for the necessary debit or credit. This type of
sales code is utilized to distribute Sales and Cash Receipt entries to
specific Accounts Receivable accounts set up in the General Ledger.
These codes are defined in the set up of the customer's record, and at the
time of transaction entry. If you do not wish to execute the multiple AR
account tracking, the default Accounts Receivable account set up in the
Accounts Receivable Master Configuration will be the account used.
This is the current, unposted amount of sales that have been entered
through the “Enter Transactions” option. This amount will be
accumulated until the Sales Code Summary Report is printed and the
option “Clear Current Amounts” is selected, which will also update the
General Ledger Integration file, if it is set to be interactive.
Asset Account
If Accounts Receivable is interactive with Manufacturing Inventory
Management, the system will calculate the cost of sales for any inventory
item sold. Additional cost of sales may be entered for any invoice. This
account is the Inventory Asset account that will be the credit offset for all
cost of sales postings to this sales code. The GL Asset Account is not
used in conjunction with “non-sales type” or “AR Code type” sales
codes.
COS Account
This is the General Ledger Cost of Sales account that will be debited for
any inventory item or additional cost of sales that is charged to this sales
code. The GL COS Account is not used in conjunction with “non-sales
type” or “AR Code type” sales codes.
COS Amount
This is the current, unposted amount of cost of sales that has been
calculated when entering transactions. This amount will be accumulated
until the Sales Code Summary Report is printed and the option “Clear
Current Amounts” is selected, which will also update the General
Ledger Integration file, if it is set to be interactive.
JC Cost Code
This is the default Job Cost Code that will be used for this sales code.
When this code is defined and used in conjunction with Order Entry, the
sales and cost of sales amounts for each invoice will be posted to this
Cost Code on the job or project number defined on each order.
Chapter 2
Set Up and Maintenance
Page 2-7
Point of Sale User Manual
Checking Account
This checking account number is used to define a valid bank account set
up in the Check Reconciliation module. It will be used to post daily
deposit amounts to the Check Reconciliation module. At the time the
deposit register is run and integration to the Check Reconciliation
module is turned on, the system will prompt you to post the deposit
amount to the Check Reconciliation module.
Details
Click on the “Details” button and a screen will appear to allow you to
enter the Total Sales and Total Cost of Sales amounts for each period of
the fiscal year. These amounts will be automatically updated during
normal processing. When completed, click on the “Save” button to save
these changes.
If you are adding a sales code specifically for EFT transaction payments,
the sales code MUST begin with “SC.” The checking account number
that you select MUST be one that was set up specifically for EFT
transactions. For more information on the EFT processing procedures,
please refer to Chapter 1 of the Check Reconciliation manual.
Once all information is entered for this sales code, click on the “Save” button to validate this information or click on
the “Cancel” button to cancel this entry.
Results:
coAR7dy.dbf - Sales Code File
- Sales Code is Added
- Historical Information is Updated (optional)
Change Mode (AR0406)
This option allows you to change information on an existing sales code. If you have made any mistakes during this
set up process, you may return to the “Change A Sales Code” option to change any information you have already
entered.
First, you must navigate to the record you wish to change. You may find a record using the navigation tool bar or
click on the “Navigation” option on the Menu Bar and then the appropriate navigation option. If you are changing a
record, click on the “Modify the Current Record” button or choose the “Operation” option from the Menu Bar and
then “Change.” Make the changes required and click on the “Save” button to save your changes or click on the
“Cancel” button to cancel the changes made.
Results:
coAR7dy.dbf - Sales Code File
- Sales Code Information is Updated
- Historical Information is Updated (optional)
Delete Mode (AR0407)
This option allows you to delete an existing sales code. Do NOT delete a sales code that has had activity in the
current year. This will distort your sales figures. This option allows you to delete sales codes you may have entered
by mistake or no longer want.
First, you must navigate to the record you wish to delete. You may find a record using the navigation tool bar or
click on the “Navigation” option on the Menu Bar and then the appropriate navigation option. This option allows
you to delete sales codes that you may have entered by mistake, or you no longer want. Click on the “Delete the
Current Record” button or choose the “Operation” option from the Menu Bar and then “Delete.” This will place
you into the “Delete” mode, then click on “Save” to validate your deletion of this record.
Page 2-8
Set Up and Maintenance
Chapter 2
Point of Sale User Manual
Make sure this is what you want to do, because once a sales code is deleted, it can not be retrieved again. A backup
of data files is always recommended prior to deletion of records.
Results:
coAR7dy.dbf - Sales Code File
- Sales Code Information is marked for Deletion
Copy Mode (AR0408)
This mode allows you to create a new sales code by copying the information from an existing one. Using this option,
the system provides a quick method of setting up sales codes that are very similar. Many items may only vary by
description, tax status, or any other variable. The rest of the information relevant to these items may be exactly the
same.
First, you must navigate to the record you wish to copy from. You may find a record using the navigation tool bar or
click on the “Navigation” option on the Menu Bar and then the appropriate navigation option. Click on the “Create
a Record Based on the Current Record” button or choose the “Operation” option from the Menu Bar and then
“Copy.”
You will notice all the information, except for the sales code number, will be copied to a new record. Enter the new
sales code number for this record. At this point you may choose to edit any of the information or click on the
“Save” button to validate, which will then add it to the file.
Results:
coAR7dy.dbf - Sales Code File
- Sales Code is Added
- Historical Information is Updated (optional)
SET UP SALESMEN
This section discusses the ways to add, change, delete, and copy Salesman. It also discusses how to print the
Salesman Listing which is used to verify all information input into the salesman file. The Accounts Receivable
system has the ability to track sales by salesman, calculate and print commission reports, and print or graph a
ranking of salesman by sales. For each salesman, you have the ability to define how commissions will be calculated,
their commission rates, and gross and net sales history for each period of the fiscal year. You may add "notes" to
any Accounts Receivable Salesman that may be viewed on the screen for additional information or planning. This
may be done when adding a new salesman, changing an existing salesman or copying an salesman.
This section discusses the ways to add, change, delete, and copy Salesman. It also discusses how to print the
Salesman Listing which is used to verify all information input into the salesman file. The Accounts Receivable
system has the ability to track sales by salesman, calculate and print commission reports, and print or graph a
ranking of salesman by sales. For each salesman, you have the ability to define how commissions will be calculated,
their commission rates, and gross and net sales history for each period of the fiscal year. You may add “notes” to
any Accounts Receivable Salesman that may be viewed on the screen for additional information or planning. This
may be done when adding a new salesman, changing an existing salesman or copying an salesman.
By clicking on the Note Pad Button, a screen will appear that will allow you to add or review free-form notes. If
you are adding a new record, navigation is not required. Click on the “Create a New Record” button or choose the
“Operation” option from the Menu Bar and then “Add.” A screen will appear with the current date and time. You
will be prompted for a description of fifty (50) characters, which is used as part of the display when selecting to
review existing notes. Each note recorded has up to ten (10) lines of fifty characters each which may be used for
your free-form notes.
Once notes are added to the file, they can be reviewed at any time by accessing the vendor through an inquiry mode
or a change mode and then clicking on the Note Pad Button. Once this screen is displayed you will have the tool
bar navigation options to select the first detail record, select the next record detail, select the previous record detail,
Chapter 2
Set Up and Maintenance
Page 2-9
Point of Sale User Manual
select the last record in the detail list or search through the detail records. You may then view the notes for this
vendor.
If you have set up User-Definable Fields in either the Windows Character-based or UNIX products, you will be
able to view and change data information in these fields. By clicking on the “User Fields” button, you will access
an additional screen of data fields. If you are in an Inquiry Mode, then you will be able to view these fields. If you
are in a Change or Copy Mode, you will be able to modify the information in these fields. You must make sure that
your General Configuration options are set up to allow access to User-Definable Fields.
Inquiry Mode (AR0408)
The "Inquiry" mode allows you to view summary information about salesmen. Navigate to the record you wish to
view. You may find a record using the navigation tool bar or click on the "Navigation" option on the Menu Bar and
then the appropriate navigation option.
Add Mode (AR0409)
This mode allows you to set up new salesmen. Every time you enter sales you must supply a salesman number.
Some reporting and the commission calculations are dependent on the salesman. This option allows you to add new
salesmen to the salesman file. Each salesman must be assigned a salesman number, which can be up to five (5)
characters (alpha/numeric). Each customer that you later add to the system must be assigned one of the salesman
numbers that is entered here.
If you are adding a new record, navigation is not required. Click on the "Create a New Record" button or choose
the "Operation" option from the Menu Bar and then "Add." The following is an explanation of each of the data
items set up on each salesman.
Salesman
This is a five (5) (alpha/numeric) character code representing this
salesman.
Name
This is the twenty (20) character name of the salesman that will be
displayed on all reports and screens.
COMMISSION TYPE
This option defines the way commissions will be calculated for the
salesman. The types available are described in the following cells
None
No commission will be calculated for the salesman.
Gross Sales
Commission will be calculated on the gross amount of each sale, minus
any taxes or freight.
Net Sales
Commission will be calculated on the net amount of each sale. This net
amount will be calculated by using the gross amount of the sale, minus
taxes and freight, minus the cost of sales amount for the sale.
NOTE: If the Master Configuration is set to calculate commissions
based on cash receipts, all commissions will be calculated on the total
dollars received, regardless of this type.
Click on the appropriate Commission Type for this salesman.
Base Commission %
These data items define the commission percentages that will be used
when calculating the commission amount. The "Base Commission %"
is the starting percent that will be used up to the "Level 1 Break"
amount.
The "Level 1 Commission %" will be used on sales above "Level 1
Break" point up to "Level 2 Break" point. The "Level 2 Commission
%" will be used on all sales above "Level 2 Break" point.
This allows for several different commission rates for each salesman,
depending on the volume of sales that were made.
Page 2-10
Set Up and Maintenance
Chapter 2
Point of Sale User Manual
Details
By clicking on the "Details" button a screen will appear to allow you to
enter the Gross and Net Sales for this salesman for each period of the
fiscal year. These amounts will be automatically updated during normal
processing. When completed, click on the "Save" button to validate
these changes.
When all information is entered for the salesmen, click on the "Save" button to validate this entry, or click on the
"Cancel" button to cancel this entry.
Results:
coAR5dy.dbf - Salesman File
- Salesman is Added to Salesman File
Change Mode (AR0410)
This option allows you to change information for an existing salesman. If you have made any mistakes during this
set up process, you may return to the "Change a Salesman" option to change any information you have already
entered.
First, you must navigate to the record you wish to change. You may find a record using the navigation tool bar or
click on the "Navigation" option on the Menu Bar and then the appropriate navigation option. If you are changing a
record, click on the "Modify the Current Record" button or choose the "Operation" option from the Menu Bar and
then "Change." Make the changes required and click on the "Save" button to save your changes or click on the
"Cancel" button to cancel the changes made.
Results:
coAR5dy.dbf - Salesman File
- Salesman File Updated
Delete Mode (AR0411)
This option allows you to delete an existing salesman. Do NOT delete a salesman that has had activity in the current
year - this will distort your sales and commission figures. This option allows you to delete salesmen you may have
entered by mistake, or no longer want.
First, you must navigate to the record you wish to delete. You may find a record using the navigation tool bar or
click on the "Navigation" option on the Menu Bar and then the appropriate navigation option. Click on the "Delete
the Current Record" button or choose the "Operation" option from the Menu Bar and then "Delete." This will
place you into the "Delete" mode, then click on "Save" to validate your deletion of this record.
Make sure this is what you want to do, because once a salesman is deleted, it can not be retrieved again. A backup of
data files is always recommended prior to deletion of records.
Results:
coAR5dy.dbf - Salesman File
- Salesman Information is marked for Deletion
Chapter 2
Set Up and Maintenance
Page 2-11
Point of Sale User Manual
Copy Mode (AR0412)
This option allows you to create a new salesman by copying the information from an existing one. Using this option,
the system provides a quick method of setting up salesmen that are very similar. Many salesmen records may only
vary by their names. The rest of the information relevant to these salesmen may be exactly the same.
First, you must navigate to the record you wish to copy from. You may find a record using the navigation tool bar or
click on the "Navigation" option on the Menu Bar and then the appropriate navigation option. Click on the "Create
a Record Based on the Current Record" button or choose the "Operation" option from the Menu Bar and then
"Copy."
You will notice all the information, except for the salesman number, will be copied to a new record. Enter the new
salesman number for this record. At this point you may choose to edit any of the information or click on the "Save"
button to validate, which will then add it to the file.
Results:
coAR5dy.dbf - Salesman File
- Salesman Added to the File
SET UP TAX RATES
This section discusses the ways to set up, change, delete, copy tax rates and import tax rates from an ASCII file or
update them through the Independent Systems tax rate file. It also discusses how to print the Tax Rate Listing,
which is used to verify all information input into the Tax Rate file. The Tax Rates are used by the Accounts
Receivable system to define how sales tax will be calculated for each sale. The tax rate can be up to ten (10)
characters (alpha/numeric). Each tax rate has two levels of tax rates. The first rate will be used until the sale amount
exceeds the break point specified and then the second rate will be used on all sales above the break point.
Each level of tax rates has five different entity rates that may be specified. The total of the five entities will be the
overall tax rate used in the invoice calculations. This will enable you to track several different types of taxes for each
sale. For example, if you need to charge five percent tax for state tax, and one percent tax for county tax; set up
Entity 1 as 5% and Entity 2 as 1%; for a total tax rate of 6%.
Now, if the county tax was to be charged only on the first $1000 of sales, you should enter $1000 as the break point,
and set the second tax rate up with 5% for Entity 1 and 0% for Entity 2.
You may add "notes" to any Accounts Receivable Tax Rate that may be viewed on the screen for additional
information or planning. This may be done when adding a new tax rate, changing an existing tax rate or copying a
tax rate.
By clicking on the Note Pad Button, a screen will appear that will allow you to add or review free-form notes. If
you are adding a new record, navigation is not required. Click on the "Create a New Record" button or choose the
"Operation" option from the Menu Bar and then "Add." A screen will appear with the current date and time. You
will be prompted for a description of fifty (50) characters, which is used as part of the display when selecting to
review existing notes. Each note recorded has up to ten (10) lines of fifty characters each which may be used for
your free-form notes.
Once notes are added to the file, they can be reviewed at any time by accessing tax rates through an inquiry mode or
a change mode and then clicking on the Note Pad Button. Once this screen is displayed you will have the tool bar
navigation options to select the first detail record, select the next record detail, select the previous record detail,
select the last record in the detail list or search through the detail records. You may then view the notes for this tax
rate.
If you have set up User-Definable Fields in either the Windows Character-based or UNIX products, you will be
able to view and change data information in these fields. By clicking on the "User Fields" button, you will access
an additional screen of data fields. If you are in an Inquiry Mode, then you will be able to view these fields. If you
are in a Change or Copy Mode, you will be able to modify the information in these fields. You must make sure that
your General Configuration options are set up to allow access to User-Definable Fields.
Page 2-12
Set Up and Maintenance
Chapter 2
Point of Sale User Manual
NOTE
If you will be using entities to track the different types of taxes, make sure
that you are consistent with which type of tax is put in each entity. For
example, if you need to set up several tax rates for the different rates in
several counties of the same state, always use the first entity as the state tax
and the other entities as county tax. It is also recommended that you also set
up a Tax Rate for Tax Exempt customers. These tax rates should have zeroes
set up for all tax rates.
Inquiry Mode (AR0424)
The "Inquiry" mode allows you to view summary information about your tax rates. Navigate to the record you
wish to view. You may find a record using the navigation tool bar or click on the "Navigation" option on the Menu
Bar and then the appropriate navigation option.
Add Mode (AR0425)
This option allows you to add a new sales tax rate. The rate has a two tier structure allowing a standard tax rate and
an optional sales dollars break point with a higher (or lower) tax rate on sales above the break point. This option
allows you to add new Tax Rates to the Tax Rate file. Each customer that is entered must be assigned a tax rate. This
default customer tax rate may be overridden at time of invoicing.
If you are adding a new record, navigation is not required. Click on the "Create a New Record" button or choose
the "Operation" option from the Menu Bar and then "Add." The following is an explanation of each of the data
items.
Tax Rate #
This is the number you assign to define your tax rate. This is a ten (10)
character (alpha/numeric) field.
Description
This is the description of the Tax Rate which will be displayed on all
reports and screens. This is a thirty (30) character (alpha/numeric)
description field.
Primary Tax Rate
These rates are the tax rates for each of the five entities for the 1st tax
rate. As you enter or change the rate, the total tax rate will automatically
be adjusted.
Break Point
This is the dollar amount of sales that is the break point to begin using
the second rate. All sales above the break point will be taxed at the 2nd
rate.
Secondary Tax Rate
These rates are the tax rates for each of the five entities for the 2nd tax
rate. As you enter or change the rate, the total tax rate will automatically
be adjusted.
NOTE: The "entity" field is simply a feature that allows the breakdown
of tax liability into several different categories, such as state, county, city,
etc. This provides reporting which is very useful in determining your tax
liability for each government entity.
Details
By clicking on the "Details" button, a new screen will appear and will
be updated as new sales are added to the system. Each tax rate affected
will be updated with monthly information that consists of Total Sales,
Taxable Sales, Taxable Subject Limit, Total Tax and Amount over Limit.
When you have completed entering your information, click on the
"Save" button to validate this screen.
Chapter 2
Set Up and Maintenance
Page 2-13
Point of Sale User Manual
When you have completed all data entry for this tax rate, click on the "Save" button to validate this record or click
on the "Cancel" button to cancel the entry of this record.
Results:
coAR6dy.dbf - Tax Rate File
- Tax Rate Added to the File
Change Mode (AR0426)
This option allows you change information on an existing tax rate. If you have made any mistakes during this set up
process, you may return to the "Change a Tax Rate" option to change any information you have already entered.
First, you must navigate to the record you wish to change. You may find a record using the navigation tool bar or
click on the "Navigation" option on the Menu Bar and then the appropriate navigation option.
If you are changing a record, click on the "Modify the Current Record" button or choose the "Operation" option
from the Menu Bar and then "Change." Make the changes required and click on the "Save" button to save your
changes or click on the "Cancel" button to cancel the changes made.
Results:
coAR6.dbf - Tax Rate File
- Tax Rate File Updated
Delete Mode (AR0427)
This option allows you to delete an existing tax rate. Do NOT delete a tax rate that has had activity in the current
year - this will distort your sales tax reporting. This option allows you to delete tax rates you may have entered by
mistake or no longer want.
First, you must navigate to the record you wish to delete. You may find a record using the navigation tool bar or
click on the "Navigation" option on the Menu Bar and then the appropriate navigation option. Click on the "Delete
the Current Record" button or choose the "Operation" option from the Menu Bar and then "Delete." This will
place you into the "Delete" mode, then click on "Save" to validate your deletion of this record.
Make sure this is what you want to do, because once a tax rate is deleted, it cannot be retrieved. Be sure that no
activity has been posted to any tax rates during the current year or your Sales Tax reports will be distorted.
Results:
coAR6dy.dbf - Tax Rate File
- Tax Rate Information is marked for Deletion
Copy Mode (AR0428)
This option allows you to create a new tax rate by copying the information from an existing one. Using this option,
the system provides a quick method of setting up tax rates that are very similar. Many rates may only vary by the
description of the tax entity. The rest of the information relevant to these items may be exactly the same.
First, you must navigate to the record you wish to copy from. You may find a record using the navigation tool bar or
click on the "Navigation" option on the Menu Bar and then the appropriate navigation option. Click on the "Create
a Record Based on the Current Record" button or choose the "Operation" option from the Menu Bar and then
"Copy."
Page 2-14
Set Up and Maintenance
Chapter 2
Point of Sale User Manual
You will notice all the information, except for the tax rate number, will be copied to a new record. Enter the new tax
rate number for this record. At this point you may choose to edit any of the information or click on the "Save"
button to validate, which will then add it to the file.
Results:
coAR6dy.dbf - Tax Rate File
- Tax Rate Added to the File
IMPORT TAX RATES (AR0603)
The File Import options allow you to bring information into the appropriate modules from text, or ASCII files.
Word processors, spreadsheets, databases, or many other types of programs may create these text files.
This option is designed to allow you to import Tax Rates directly into the Accounts Receivable module. The tax
rates will be updated as if processed through the normal "Add" mode in the Set Up Tax Rates menu option from
within the Accounts Receivable system.
When you select the option to "Import Tax Rates" from the "Set Up and Maintenance" section of the Menu Bar, a
new screen will appear. At this point, you may choose to print the standard map file or create a map file on the hard
drive to modify. To print the map file, click on the "Print Map" button.
This will print out the format in which this option is looking for information to be organized in. To create a map file
in the program directory, click on the "Create Map" button. This will put a file in the program directory named
AR0603.map.
If the import file is a comma delimited file, the data can be variable length. If the import file is a fixed length ASCII
file, it must have a logical record length of 206 bytes. Both types of files must have the following field lengths.
Description
Type
Position Length
Action #
CHAR
1
1
Tax Rate Number
STRING
2
10
Description
STRING
12
30
Prim Entity 1
FLOAT
42
15
Prim Entity 2
FLOAT
57
15
Prim Entity 3
FLOAT
72
15
Prim Entity 4
FLOAT
87
15
Prim Entity 5
FLOAT
102
15
Break Point
DOUBLE
117
15
See Entity 1
FLOAT
132
15
See Entity 2
FLOAT
147
15
See Entity 3
FLOAT
162
15
See Entity 4
FLOAT
177
15
See Entity 5
FLOAT
192
15
If it is not in this format, you will encounter errors during the import process or not be allowed to continue at all.
The File Import features allow for the importing of "text" file information into the Infinity POWER program. This
includes the ability to import Master File information, such as Charts of Accounts, Customer Names and Addresses,
Employees, Vendors, etc. as well as "transaction" information for those master files, such as invoices and credit
memos, journal entry updates, etc.
Chapter 2
Set Up and Maintenance
Page 2-15
Point of Sale User Manual
These "text" files may be created by a wide range of sources, which may include word processors, spreadsheets,
databases, or other types of accounting programs. These sources may also include other computer systems that
utilize different operating systems and functions, such as mainframes, minicomputers, or various types of PCs.
After printing or creating the map file, you will then be prompted for three (3) data items.
1) Import File Format
2) Import File Name
3) Process Import File
The "Import File Format" is prompting you to select the type of file you will be using during the import process.
There are three choices:
1) Fixed Length (ASCII)
2) Variable Length (ASCII)
3) Comma Delimited (.PRN)
These three choices are described below.
Fixed Length ASCII Files
Fixed Length ASCII "text" Files are those files in which each data field starts on a specific number of characters
from the start of each record. There should be no separators between data fields and each record should be the exact
same length. The program recognizes each record by the number of characters that is expected per record. There is
no Carriage Return/Line Feed sequence necessary to separate records.
For example:
1
11125 Cash In Bank - Can
1 0
0
0
0
0
0
0
0
0
0
0
0
0
1
68500 Lodging Expense
12 0 100 200 300 400 500 600 700 800 900 1000 1100 1200
Variable Length ASCII Files
Variable Length ASCII "text" Files are those files in which each data field starts on a specific number of characters
from the start of each record and each record is separated by a Carriage Return/Line Feed sequence {CR}{LF}.
There should be no separators between data fields. The program recognizes each record by the Carriage Return/Line
Feed sequence, which allows for other data to be in the file.
For example:
1
11125 Cash In Bank - Can
1 0
0
0
0
0
0
0
0
0
0
0
0
0 {CR}{LF}
1
68500 Lodging Expense
12 0 100 200 300 400 500 600 700 800 900 1000 1100 1200 {CR}{LF}
Comma Delimited *.PRN Files
Comma Delimited *.PRN "text" files are those files in which text type data fields are enclosed in double quotes ("),
and all data fields are separated by commas (,). The text files must contain the information for one record on a single
line of the file. Each line, or record, must be terminated by a Carriage Return/Line Feed sequence {CR}{LF}.
For example, a transaction import should look like this:
1,"11125","Cash In Bank - Can",1,0,0,0,0,0,0,0,0,0,0,0,0,0,0{CR}{LF}
1,"68500","Lodging
Expense",12,0,100,200,300,400,500,600,700,800,900,1000,1100,1200{CR}{LF}
Page 2-16
Set Up and Maintenance
Chapter 2
Point of Sale User Manual
Click on one of the three choices to define the type of file you will be using. You will be prompted to enter the
name of the file to be imported. You may use any name consistent with Windows naming structures. You will have
the option to browse for your import file, which may be located anywhere on your hard drive or any network you
may be attached to.
Next, you will be prompted as to whether the system should print an audit trail first before starting the import
process. It is highly recommended that you click on this option. It is selected by default. This will allow you to see if
there are any discrepancies within your "import" file.
The system will first print an audit trail of what will be imported into the Infinity POWER accounting module.
Upon completion of this report, you will be prompted whether or not to go ahead and process the import of data.
If there are any discrepancies that make your import file incompatible, the Infinity POWER import options will not
allow the information to update the system. This audit trail would then serve to assist you in correcting any
problems.
Once you have answered these three questions, click on the "Start" button to begin the process and the system will
begin to either print the audit trail first or go ahead and perform the "import" process based upon your answer. If
you have chosen to print the audit trail, the system will display the printer option screen for you to choose your
method of output.
The screen will then reflect the number of transactions that have been posted to the system as it goes through the
import process. Once it completes the "import" process, the system will return you to the screen and if there are
additional files to import, you may click on the "Next" button, otherwise, click on the "Close" button to return you
to the Menu Bar.
Below is a more comprehensive description of how Import Modules work within the Infinity POWER.
File Import Modules Overview
Because the concept of transferring information from one system or program to another via "text" interface files is
more technical than the normal operation of most word processors or the Infinity POWER modules, this
documentation must assume that the reader has some understanding of the terms and concepts explained here.
Otherwise, you may want to work with your reseller or consultant regarding the actual implementation and use of
these modules with your Infinity POWER programs. The ability of importing information into the Infinity
POWER modules provides the user with several benefits.
•
They allow the rapid conversion and setup from other computer based accounting systems,
without the manual re-keying of information that is normally required.
•
They allow the batch entry of transactions processed in other specialized or custom software
programs. This may even include updates from Infinity modules running at different locations or
on different network or UNIX fileservers.
•
They allow the update of the accounting system files from remote transaction processing sites.
Please note that the Infinity POWER programs do allow for the exportation of all accounting reports to text files.
The formats of these standard Infinity POWER reports, however, are not compatible with the use of any of the
Infinity POWER File Import options. The order in which information is sent to "text" files and their format do not
correspond to the formats that the File Import Modules require.
The Infinity POWER Report Writer program, however, does provide the user with this ability to organize
information from the various Infinity POWER programs into the formats required by the File Import options. The
text files that contain the information to be imported must be in one of three forms:
1) Fixed Length ASCII Records
2) Variable length ASCII Records
3) Comma Delimited Text
Chapter 2
Set Up and Maintenance
Page 2-17
Point of Sale User Manual
These three types of files are discussed earlier in this section. For all three types of text files, the format of the data
must be accurate for the import options to read the correct information. Each field, or data item, must be in the
correct order across the line, or record, and in the correct format depending on the type of text file.
Each of the import options allow you to print a transaction journal as the import is being performed. This provides
an audit trail of the information being updated into your data files. This report will also indicate if the import of a
record was not performed due to errors encountered in the importation process.
Some of the import file structures allow you to specify "action numbers." These "action numbers" tell the system
whether you want the information being imported to be added, changed, or deleted. The action numbers are listed
below.
1 = Add Record to file
2 = Change record in file
3 = Delete record in file
4 = Add record if it doesn't exist, otherwise change it
Some of the transaction import file structures require a field called "Cont? (0=NO, 1=YES)." This field indicates to
the import programs whether or not the transaction is continued in the next record. For example, in the Accounts
Receivable Transaction import, there may be several lines of detail on an invoice that is being imported. Each line
should be placed in a separate record of the text file with a "1" for YES to indicate that the transaction is continued.
The last line should contain a "0" for NO indicating the end of the transaction.
For each transaction-related import, there are certain fields that are required and used by the system to verify the
validity of the information being imported. These fields are marked in the field definition section with an asterisk
(*).
For each type of import that you wish to perform, the import text file must contain all of the fields specified for that
particular import option. Any text fields that are blank will overwrite existing fields in the data files. Also, numeric
fields that are blank will be considered as zero.
To allow the import of only a subset of the import structure, you must have a custom "MAP" file created. This will
allow you, for example, to only update the retail price in Inventory without affecting, or requiring, any other fields.
You may obtain or create custom import "MAP" files one of two ways. You may first click on the "Create Map"
button at the point in the program when you have selected the "import" option. The result is to produce a
"XXXXXX.map" file in the program directory. The "Xs" in this file name represent the actual name of the
Infinity POWER option within the program (e.g., AP0604.MAP).
The "XXXXXX.map" file is used by the import option to override the default layout of the import transaction file.
By using file editing tools such as EDIT under DOS, Notepad under Windows or "vi" under UNIX, you may
create a customized import record layout. Whenever a "XXXXXX.map" file is created, it overrides the default
predefined import record layout.
Items can be deleted entirely from the record layout file or moved from one position to another. If a field is not
specified in an import file, that field may be deleted from the record layout file.
NOTE: "Key Value" fields must be present in the import file and cannot be deleted from the record layout file.
"Key Value" fields are those fields that are designated with an asterisk (*) in the documented import record layouts.
You may also have customized "MAP" files created for you by calling the Data Pro Support Services group at
727-803-1550.
Page 2-18
Set Up and Maintenance
Chapter 2
Point of Sale User Manual
SET UP REGISTERS
This section discusses, in detail, the options necessary to set up Point of Sale cash registers. This option allows you
to add, change, delete and copy custom configurations for your Point of Sale registers. Set up includes the register
numbers, descriptions, cash drawer interface and external video display codes.
Inquiry Mode (PS0450)
The "Inquiry" mode allows you to view summary information about your point of sale registers. Navigate to the
record you wish to view. You may find a record using the navigation tool bar or click on the "Navigation" option
on the Menu Bar and then the appropriate navigation option.
Add Mode (PS0451)
This option allows you to add a new Point of Sale register. There is no limit on the amount of registers that you can
add to this file, however, the number of users that can be simultaneously active will be determined by the "user
count" you have purchased.
If you have the "Require Login" parameter turned on in the Point of Sale Master Configuration, each time you
execute any transaction entry option in the Point of Sale module, the system will require that you enter a Register
number. When you set up your register, you have the option of setting a password for the register. This will enable
only those personnel that have the password to login with that register number.
A salesman can be assigned to a specific register. This will update all transactions with that particular salesman's
number. There is an additional parameter that will enable the system to utilize the salesman's number set up on the
customer, if you are integrated with the Accounts Receivable module.
The Point of Sale module has the ability of interfacing to external devices such as a cash drawer and an external
video display unit. This includes device names and control codes. After entering the Register Number, a screen will
appear with the following data items which are used to define the Point of Sale Register.
Register
This is the three character register number that you assign.
Description
This is a thirty (30) character (alpha/numeric) description for this
register. This will be displayed in the "Select Login Register" window
when selecting a register upon initial login.
Password
This is a ten (10) character (alpha/numeric) field which is a password for
this register. Upon initial login, the system will request a register number
and password, if a password is defined on the register set up.
Use AR SLM
This check box will determine whether or not the salesman that is
assigned to a customer in the Accounts Receivable module should be the
default salesman applied to all transactions when this register in logged
in. This only applies if you are integrated with the Accounts Receivable
module. By clicking "on" the check box, the system will utilize the
default salesman.
Salesman
This data item will determine which salesman number will be the default
on all transactions entered from this register number. However, if Use
AR SLM is turned on, the system will use the salesman set up on each
customer. If there is no salesman set up on a customer, the system will
use this data item as the default.
Chapter 2
Set Up and Maintenance
Page 2-19
Point of Sale User Manual
CASH DRAWER INTERFACE
Use Device
Click on this option if you are going to use a device name for the cash
drawer interface.
Device
This is the device name that will be used as the interface to the cash
drawer. Use may click on the arrow box and choose one of the valid
device names available to your operating system.
Use Script File
Click on this option if you are going to use a script file for the cash
drawer interface.
Script File
Enter the Script File name that will be used as the interface to the cash
drawer.
Control Codes
This data item contains the decimal codes separated by commas that are
sent as a signal to the cash drawer to open. The correct Control Code for
your drawer can be found in the cash drawer manual. The cash drawer
will be automatically opened by the system any time you complete the
following transactions in the "Enter Transactions" menu.
1) Record a Sale & Print Receipt
2) Record a Return/Refund
3) Open Register/NO SALE
4) Record Payments
If you are using a cash drawer from a serial port, the communication
parameters will be automatically configured by the programs. The
parameters will be set as follows:
Baud Rate: 1200
Parity: None
Data Bits: 8
Stop Bits: 1
Example: - MODE 1200,N,8,1
UNIX
If you are using a cash drawer from a serial port, you must configure the
port yourself using the parameters listed in the section above. Configure
the port using the system administration programs provided with your
operating system.
For more information on configuring cash drawers in the UNIX
operating system, see the System Administrator manual Chapter 2,
under "Servo-Actuated Cash Drawer Set Up."
EXTERNAL VIDEO DISPLAY
Use Device
Click on this option if you are going to use a device name for the external
video display.
Device
This is the device name that will be used as the interface to the external
display unit. Use may click on the arrow box and choose one of the valid
device names available to your operating system.
Use Script File
Click on this option if you are going to use a script file for the external
video display.
Script File
Enter the Script File name that will be used as the interface to the
external video display.
Start Codes
This data item contains the decimal codes, separated by commas, that are
sent as a signal to the external display unit that the system will be
sending the dollar value to display.
Page 2-20
Set Up and Maintenance
Chapter 2
Point of Sale User Manual
Stop Codes
This data item contains the decimal codes separated by commas that are
sent as a signal to the external display unit that the system has finished
sending the dollar value to display. The external display unit is an LED
display that the system will use to display the extended amount of each
item being sold, the total amount of the sale, the amount tendered and the
change due.
Click on the "Save" button to add your new register configuration.
Results:
- coARK.dbf - Register File
Add a new register.
Change Mode (PS0452)
This option allows you to change a Point of Sale register set up that already exists. If you have made any mistakes
during this set up process, you may return to the "Change a Register" option to change any information you have
already entered.
First, you must navigate to the record you wish to change. You may find a record using the navigation tool bar or
click on the "Navigation" option on the Menu Bar and then the appropriate navigation option. If you are changing a
record, click on the "Modify the Current Record" button or choose the "Operation" option from the Menu Bar and
then "Change." Make the changes required and click on the "Save" button to save your changes or click on the
"Cancel" button to cancel the changes made.
Results:
coARK.dbf - Register File
- Register File Updated
Delete Mode (PS0453)
This option allows you to delete an existing Point of Sale register. This option allows you to delete registers you
may have entered by mistake, or no longer want.
First, you must navigate to the record you wish to delete. You may find a record using the navigation tool bar or
click on the "Navigation" option on the Menu Bar and then the appropriate navigation option. This option allows
you to delete accounts that you may have entered by mistake, or you no longer want. Click on the "Delete the
Current Record" button or choose the "Operation" option from the Menu Bar and then "Delete." This will place
you into the "Delete" mode, then click on "Save" to validate your deletion of this record.
Make sure this is what you want to do, because once a Point of Sale register is deleted, it cannot be retrieved.
Results:
coARK.dbf - Register File
- Register is marked for Deletion
Copy Mode (PS0454)
This option allows you to copy an existing Point of Sale register. Using this option, the system provides a quick
method of setting up registers that are very similar. Many may only vary by the description or device names. The
rest of the information relevant to these items may be exactly the same. By using the "Copy Mode," you are able to
quickly create and enter new registers into the file.
First, you must navigate to the record you wish to copy from. You may find a record using the navigation tool bar or
click on the "Navigation" option on the Menu Bar and then the appropriate navigation option.
Chapter 2
Set Up and Maintenance
Page 2-21
Point of Sale User Manual
Click on the "Create a Record Based on the Current Record" button or choose the "Operation" option from the
Menu Bar and then "Copy."
You will notice all the information, except for the register number, will be copied to a new record. Enter the new
register number for this record. At this point, you may choose to edit any of the information or click on the "Save"
button to validate, which will then add it to the file.
Results:
coARK.dbf - Register File
- Register Added to the File
CHANGE MASTER CONFIGURATION (PS0418)
This option allows you to set up the Master Configuration, Payment Methods, Entry Screen, Invoice/Receipt
Format, Cash Drawers, Video Display, Draft Capture information and the integration with other systems.
A default configuration is already built into the Point of Sale module. However, you may prefer to change this
configuration to meet your company's specific requirements. If you do decide to assume the default values, please
review them carefully before you begin processing. After selecting this option, a screen will appear displaying the
following tabs:
•
Master Configuration
•
Entry Screen
•
Invoice Format
•
Devices
•
System Integration
As you proceed to select each tab, enter all required changes or click on the "OK" button to validate and assume the
default configuration.
Master Configuration
The master configuration will display the data items necessary for configuring your Point of Sale data files. The
following is a list of each of these data items and the default values and descriptions of each.
All fields on this screen except Special Instructions, Cash Cust. Mask, and Require Login? are shared with the
Accounts Receivable module. If you have the Accounts Receivable module and you change any fields other than
those listed above, the Master Configuration options will also be changed for Accounts Receivable.
Page 2-22
Set Up and Maintenance
Chapter 2
Point of Sale User Manual
Customer Label
Default: Customer
The Point of Sale module allows you to identify your customer in any
manner you like. Many companies refer to their customers as clients, or
patients, etc. This is a ten (10) character field (alpha/numeric) used for
whatever "label" you want to identify your customers by. This label will be
displayed on all screens and reports (except menus, which will continue to
use the term "customer").
Special Field
Default: *U-Define
This field is the heading of a special description field that may be used in the
customer file. If the first character of this heading is an asterisk "*" the
system will automatically turn this field into a search and sort field. This may
be most useful if you need to set up your customers to be easily retrieved by a
special key such as the owner of the company, customer classification, etc.
NOTE: If this field is not going to be used in your system, it is recommended
that you do not set it up as a search field. This will speed up the search and
update time of your customer file.
Special Instructions
Default: Special Instr.
This field is the heading of the twenty (20) character field on the data entry
screen for special instructions. You may change the heading (and meaning)
of this field by changing this description. For example, you may want to
change this field to "Ordered By." The data entry screen and the invoice
form will now display this as the description of this field.
Cash Customer Mask
Default: CASH
This data item contains the customer number mask of the customer records
that you have set up to be cash only. If you are interactive with Accounts
Receivable, the system will require you to enter a customer number when
recording a sale. This mask for the customer number will indicate to the
system those of your customers are cash only.
Chapter 2
Set Up and Maintenance
Page 2-23
Point of Sale User Manual
Require Login
Default: ON
This data item specifies whether or not you will be required to log into the
system to access any of the "Enter Transactions" menu options. The login
procedure requires you to enter a salesman number and password before the
execution of any option, which allows opening of the cash drawer. Once
logged in, a salesman may use all of these options without additional logins
unless, of course, he logs off.
You may log into the system by using CTRL F9. If you select an option that
requires you to be logged in, the system will automatically force you to login.
Once logged in, you may log off by pressing CTRL F10.
Invoice Re-Print
Default: OFF
This question allows you to turn off the ability to re-print invoices during the
invoice writing function in Point of Sale. This is optional and would normally
only be done to prevent employees from creating multiple copies of the
invoice form or to remove one less keystroke from the transaction process.
Sales Code
Default: (below)
Sales Tax Charges: SC001
Freight Charges: SC003
Sales Discounts: SC004
Sales Codes are a means for the Point of Sale program to categorize various
types of transactions. Depending on the nature of your business, you may
desire either very specific and detailed sales reporting of sales, cost of sales,
methods of payments, taxable/non-taxable type sales, etc., or you may simply
want to keep everything very simple and non-detailed as possible.
Regardless of your preference, Sales Codes will allow you to customize your
system to report this type of information, in the manner that you choose. For
instance, in our sample company illustrated throughout the sample reports
section, our company sells various types of residential and commercial
cleaning products. For many firms it may be sufficient to simply say, "We
sold $460 worth of brooms last month."
However, other companies may want to know that we actually sold $124
worth of plastic handled brooms, $278 of wood handled brooms and $58
worth of push brooms. Either method of reporting is possible with this
module. It is simply a matter of configuring Sales Codes. Sales Codes will
also track freight, taxes, discounts and many other types of items. The system
comes with several default sales codes to keep track of these various "basic"
sales codes.
Default sales codes are the sales codes that the system needs to use during the
processing of transactions. The sales codes specified here must be entered
into the system through the "Add a Sales Code" option, if you decide not to
use the defaults. These special sales codes are updated at special times as
described on the following page:
Sales Tax Charges: This sales code is updated with the amount of all sales
tax charged on every transaction.
Freight Charges: This sales code is updated with the amount of all freight
charged on every transaction.
Sales Discounts: This sales code is used to summarize the total amount of
sales discounts given.
Each of these sales must start with the letters "SC" to delineate that they are
designed to track these types of special calculations. By doing so, they will be
placed in the lower portion of the "Sales Code Summary" report which will
Page 2-24
Set Up and Maintenance
Chapter 2
Point of Sale User Manual
break down all types of transaction amounts by sales code/category.
These items are not normally used in direct profit calculations and therefore
should not be reflected in the upper section of the report. During the
processing of transactions, if the system needs to update one of these sales
codes, and it cannot be found in the sales code file, an error sales code will be
added with the sales code number "ERROR" and a description of "Sales
Code Not Found."
A/R Account (GL)
Default: 06100
This account number is used to update the General Ledger, if you are
interactive with that module. The default account number assumes that you
are using the default Chart of Accounts. This account is used to post the debit
to Accounts Receivable when a credit invoice is written.
The Accounts Receivable module will print a report displaying the journal
entry that would be posted to the General Ledger, even if you are not
interactive with the General Ledger. It is recommended that if you are not
interactive with the General Ledger, you enter the account number from your
manual General Ledger so that the journal entry report may be posted to your
manual General Ledger without confusion.
Commission Basis
Default: None
The commission basis may be set to one of three ways for your company:
None
Sales
Cash Receipts
This configures which type of transaction will be used when calculating the
commission for each salesman. If you do no commission tracking, obviously
you would select "None." Many companies do pay various types of
commissions to their sales staffs and they will generally pay their sales staffs
based on one of two methods of payment.
The first is based on paying commissions when the sale is recorded. This is
the "Sales" method of paying commissions. Regardless of when a customer
takes delivery, pays their bills, etc., the salesman gets credit for payment of
commissions at the next pay cycle.
The second method is based on "collections" or when a customer pays their
bills. Many firms do not want to "advance" pay their salesmen when they
have yet to collect on the sale. Therefore, this method does not post any
allocations to the commissions reports until "Cash Receipts" have been
made. The "Sales" method records the commission calculation at the time of
the sale. There are advantages to both methods. However, the nature of your
specific business will dictate the best method to use.
G/L Journal #
Default: 06 Sales Journal
This number corresponds with the General Ledger default journal number in
the General Ledger module for Point of Sale transactions. All transactions
will be posted to this journal.
Entry Screen
The Point of Sale module provides several user definable capabilities including the ability to select which items you
want to appear on the data entry screen. Turning any unnecessary data items off will speed the data entry process of
recording a sale. If you turn on the option, the system will display the data item's description and allow you to input
the data. If you leave the option blank, the system will blank the data item's description and skip over the input field.
Chapter 2
Set Up and Maintenance
Page 2-25
Point of Sale User Manual
The following twelve (12) items may be turned on or left off in the main entry screen used in the Point of Sale
module.
1)
2)
3)
4)
5)
6)
7)
8)
9)
10)
11)
12)
13)
Tax Rate
Price Level
Discount Percent
Transaction Description
Customer Purchase Order Number
Sales Order Number
Date Ordered
Special Instructions
Freight
Additional Cost of Sales
Salesman
Scheduled Payments
Quick Validation
You may also specify whether or not you want to start the screen at the validation prompt. If you turn this option on,
the system will immediately start at the validation prompt. From there, you may elect to change any of the default
data or click on the "Details" button which takes you to the next scrolling screen to start entering the detail of the
sale.
Page 2-26
Set Up and Maintenance
Chapter 2
Point of Sale User Manual
Invoice Format
The following data items are used to define the invoice form that is to be used with Point of Sale processing,
numbering sequences, and a range of other user definable fields that allow you to tailor the format and functionality
of the invoice processing options.
NOTE
All fields on this screen except Invoice Form and Minimum Input at Sale are
shared with the Accounts Receivable module. If you have the Accounts
Receivable module and you change any fields other than those listed above,
the Master Configuration options will also be changed for Accounts
Receivable.
Tax by Line
Default: OFF
Each line entered on an invoice is entered through the use of a sales code which
defines the category of sales and certain defaults. One of these defaults is the tax
status: Taxable and Non-Taxable.
If you turn on this option, you will be allowed to override the tax status of the sales
code while entering the invoice. By leaving this option blank, you will speed up the
data entry process by reducing the number of questions that needs to be entered
when inputting an invoice. This allows you to charge tax on selective lines of the
invoice regardless of the sales code.
Discount by Line
The Point of Sale module has the ability to calculate a discount on each line of an
invoice as well as for the entire invoice amount. Turning this option on will tell the
system to ask for a discount amount on every line of the invoice. Leaving this option
blank will speed up the data entry process by not having to press TAB on every line
of an invoice for "discount percent" if not required.
Quantity Check
Default: OFF
If you have the Manufacturing Inventory Management module, and Point of Sale is
set to be interactive with Inventory, the system will allow you to directly update the
Chapter 2
Set Up and Maintenance
Page 2-27
Point of Sale User Manual
Inventory files at the time the invoice is written. If this option is turned on the
system will give you a warning if you are trying to invoice a quantity of an
inventory item that is not currently on hand or available.
Leaving this option blank, will tell the system to place any quantity above what is
currently on hand into a "Quantity to Adjust" field in inventory. Therefore, you
may ignore the warnings now and automatically know which items will need
adjustment at a later time. This may be useful if your business has situations where
the warehouse is not able to keep the system fully updated at all times.
Minimum Input at Sale
Default: ON
This data item indicates to the system whether or not you wish to utilize minimum
data input during the transaction entry process. If you turn this option on, certain
fields in the detail section of the "Record a Sale and Returns" option will use
assumed values which you will not be allowed to change. These fields will still be
displayed and all calculations will continue as normal, however, the system will not
allow your additional input. These fields are:
Unit of Measure
Extended Price
These fields will only be affected if you are interactive with Manufacturing
Inventory Management and you are selling an inventory item. Therefore, the total
data input for recording a sale would be the inventory item number, the quantity
(Default: 1) and the unit price. All three of these fields may be entered with the Bar
Code Reader from the price labels generated by Manufacturing Inventory
Management module.
Reduce Quantity Reserved
Default: OFF
If you have the Manufacturing Inventory Management module, and Point of Sale is
set to be interactive with Inventory, the system will automatically reduce the
quantity on hand and quantity reserved when the invoice is printed.
If you are using the Sales Order Entry module to record sales orders and place the
items on reserve, this could cause the reserved quantities in inventory to not match
the backorder quantities on your sales orders. Normally if you have the Sales Order
Entry module, you should leave this item blank. Otherwise, you should turn this
item on.
Customer Price Level
Default: OFF
If your system is set to be interactive with Manufacturing Inventory Management
and Accounts Receivable, the system will automatically select the correct selling
price of items based on the price level set up for the selected customer. During the
invoicing option, you are normally allowed to change the default price level for the
customer. If you leave this item blank, you will not be permitted to override this
default price level.
Price Level by Line
Default: - OFF
If your system is set to be interactive with Manufacturing Inventory Management,
the system will automatically use the correct selling price of items based on the
overall specified price level. During the invoicing option, you are normally allowed
to override the calculated price on each inventory item sold. If you leave this item
blank, you will not be allowed to override the default price of inventory items.
Default to Item #
Default: ON
If your system is set to be interactive with Manufacturing Inventory Management,
you may sell items directly from your inventory item file. If you turn this item on,
you may choose an inventory item.
** SPECIAL NOTE **
Page 2-28
Set Up and Maintenance
Chapter 2
Point of Sale User Manual
You MUST answer (Y)es to the "Default to Inventory Item" data item if you plan
on using the "Record a Quick Sale" method of transaction entry.
Unit Price Decimals
Default: 2
This number is used to determine how many decimal places are necessary for the
unit price of each item on the invoice. You may choose up to five (5) decimal places
for this item.
Quantity Decimal
Default: 2
This number is used to determine how many decimal places are necessary for
fractional quantities. For example, the use of percentage units of measures (e.g., 1/4
pound or .25) for inventory items, would dictate the use of two (2) decimal places to
the right. You may choose up to five (5) decimal places for this item.
Invoice Form
Default: SRA
This is the name of the invoice form that will be used when printing invoices See
the Point of Sale sections of the Infinity POWER Supported Forms Reference
Manual for a listing of the standard forms available with these modules and the
preprinted forms that are supported by the accounting system. A selection of
preprinted forms are available through DPAForms and may also be found in the
DPAForms Catalog included in the Product Kit. They may also be found on the
CD-ROM presentation. Once you have reviewed the available forms, simply enter
the form name into this field to activate it as the current form being used. This
option may be changed as often as desired. If none of the standard forms fit your
particular company's needs, custom modifications are available to configure to your
needs.
Automatic Numbering
Default: (Below)
These are the numbering sequences that will be used by the system for the different
transaction types.
The default values are:
Invoice: 10000000
Credit Memo: -1
Debit Memo:
-1
Deposit: 0
This is where you would install your numbering sequence for these types of
transactions. If you have been running another system (computerized or manual),
you may continue to utilize the same numbering sequence with this program.
If the value is zero (0), the system will assume there is no automatic numbering, and
will prompt you for the transaction number with each transaction generated. If the
number is -1 for credit memo, debit memo or deposit, the system will use the
invoice numbering sequence for these transaction types. For instance, if your next
invoice number is 1206, your next credit memo number will be 1206. NOTE:
You MUST utilize the automatic sequencing of invoice numbers if you plan on
using the "Record a Quick Sale" method of transaction entry.
Chapter 2
Set Up and Maintenance
Page 2-29
Point of Sale User Manual
Devices
The Point of Sale module has the ability of interfacing to external devices such as a cash drawer and an external
display unit. The following data items are used to define the default values when registers are set up in the "Add A
Register" option.
CASH DRAWER INTERFACE
Use Device
Click on this option if you are going to use a device name for the cash drawer
interface.
Device
This is the device name that will be used as the interface to the cash drawer. Use
may click on the arrow box and choose one of the valid device names available to
your operating system.
Use Script File
Click on this option if you are going to use a script file for the cash drawer
interface.
Script File
Enter the Script File name that will be used as the interface to the cash drawer.
Control Codes
Page 2-30
This data item contains the decimal codes, separated by commas, that are sent as a
signal to the cash drawer to open. The correct Control Code for your drawer can
be found in the cash drawer manual. The cash drawer will be automatically
opened by the system any time you complete the following transactions in the
"Enter Transactions" menu.
1) Record a Sale & Print Receipt
2) Record a Return/Refund
3) Open Register/NO SALE
4) Record Payments
If you are using a cash drawer from a serial port, the communication parameters
will be automatically configured by the programs. The parameters will be set as
follows:
Set Up and Maintenance
Chapter 2
Point of Sale User Manual
Baud Rate: 1200
Parity: None
Data Bits: 8
Stop Bits: 1
Example: - MODE 1200,N,8,1
UNIX
If you are using a cash drawer from a serial port, you must configure the port
yourself using the parameters listed in the section above. Configure the port using
the system administration programs provided with your operating system. For
more information on configuring cash drawers in the UNIX operating system, see
the System Administrator manual Chapter 2, under "Servo-Actuated Cash
Drawer Set Up."
EXTERNAL VIDEO DISPLAY
Use Device
Click on this option if you are going to use a device name for the external video
display.
Device
This is the device name that will be used as the interface to the external display
unit. Use may click on the arrow box and choose one of the valid device names
available to your operating system.
Use Script File
Click on this option if you are going to use a script file for the external video
display.
Script File
Enter the Script File name that will be used as the interface to the external video
display.
Start Codes
This data item contains the decimal codes, separated by commas that are sent as a
signal to the external display unit that the system will be sending the dollar value
to display.
Stop Codes
This data item contains the decimal codes, separated by commas that are sent as a
signal to the external display unit that the system has finished sending the dollar
value to display. The external display unit is an LED display that the system will
use to display the extended amount of each item being sold, the total amount of
the sale, the amount tendered and the change due.
Please note that you must use an "alpha/numeric" two line, twenty (20)
characters per line pole display for proper display.
System Integration
If you have purchased any of the following modules, you may turn the integration on by simply clicking on the
check box where applicable.
The default values for integration with other modules are as follows:
General Ledger:
N
Detail GL Post?
N
Inventory:
N
Accounts Receivable:
N
Check Reconciliation:
N
Chapter 2
Set Up and Maintenance
Page 2-31
Point of Sale User Manual
The system will, however, automatically configure this option based on the modules you select for the option “Start
New Files From Scratch.” Based on this selection, the system will determine what options should be integrated
automatically and set them for you. You may use this option to custom configure these choices in a different
manner.
If the "Detail GL Post?" option is not clicked on, the information posted to General Ledger will be in a summary
format showing the total amount of sales, total amount of receivables, total amount of payments etc.
This summary posting requires that the "Sales Code Summary" report be printed before any posting procedure to
General Ledger can be performed. Printing the "Sales Code Summary" report will create the integration file that is
posted to the General Ledger. Refer to Chapter 4, "Sales Code Summary Report" for more details.
The option to "Detail GL Post" allows you to post all transactions into the General Ledger in detail rather than in a
summary format. If this is clicked on, each transaction will be posted into General Ledger with all associated
information including Invoice Number, Customer Number and Total Amount of Invoice.
The advantage of posting in detail to General Ledger is the enhanced audit information that will be stored. However,
posting in detail will require the file sizes for the General Ledger transactions to be increased, as the posting
information could be quite large. If you choose to "Detail GL Post," you will NOT have to print the "Sales Code
Summary" report before "Posting Integration Files" in General Ledger. If you choose to use the "Record a
Quick Sale" method of transaction entry, the integration to Inventory must be turned on. If "EFT" processing is
required, then integration to Check Reconciliation must be set to (Y)es.
If you choose to post to General Ledger in Summary, it is advisable to print the sales code summary on a daily basis,
and post to the General Ledger. That way, if there was a discrepancy during auditing, the account would only be
one day's transactions.
MAINTAIN DATA FILES (PS0420)
This option includes both "Pack" and "Re-Index" utilities to manage your Accounts Receivable files after a
hardware or media failure. This procedure will also physically remove records that have been marked for deletion.
You should NOT rely on this option to replace backups. Your backup procedures should include daily backups and
weekly offsite backups.
There are several situations in which this option need be accessed.
Page 2-32
Set Up and Maintenance
Chapter 2
Point of Sale User Manual
•
Power (hardware) failure.
•
Media Errors (bad disk)
•
Remove records marked for deletion
Before you execute the Pack option, check the file size of your Accounts Receivable files. The system will sort each
of the current "out of index" files into new "indexed" files before deleting the old ones.
If you do not have enough disk space available to perform this function, an error will be generated at the time the
system runs out of disk space. This, however, could be some time later, depending on the size of your data files. If
your data files are 2MB in combined size, you will need at least 2.2MB in additional free space before proceeding
with this option.
NOTE
This option will only reorganize undamaged data within your files. Therefore,
you should carefully audit all information after you execute this option and
make any necessary adjustments to your data.
The following files are available for maintenance:
•
** ALL FILES **
•
Transaction File
•
Transaction Detail File
•
Salesman File
•
Tax Rate File
•
Sales Code File
•
Register File
You may select individual files or all files for either of these procedures. There are buttons on the right hand side of
the screen that allow you to "Select All" files, "Un-select All" files, and "Invert Selection," which selects those
files that were not selected in a previous pack or re-index condition. There is also a button, "Details" that provides
pertinent information about that particular data file. This information includes the directory path and file name, the
type of file, the pattern of the filename structure and the total records including those records marked for deletion in
that data file.
To begin the procedure of a pack or re-index, simply click on the "Start" button, after selecting the files you wish
to manage. You are then given the options to "Pack" or "Re-Index" the selected data file(s). Pack is a utility that
physically removes any deleted records from that data file. These procedures display a "Percentage of
Completion" graph on the screen while the files are being processed. Re-Index is a utility to rebuild the index file.
It is also run automatically at the end of a "Pack" procedure.
Results:
All Records in all or specified Accounts Receivable Files will be packed and/or re-indexed.
SET UP PAYMENT TYPES (PS0460)
This section discusses the ways to add, change, delete, and copy payment type information to identify different
methods of payment such as cash, check and specified credit cards.
Inquiry Mode
The “Inquiry” mode allows you to view summary information about payment type information. Navigate to the
record you wish to view. You may find a record using the navigation tool bar or <click> on the “Navigation” option
on the Menu Bar and then the appropriate navigation option.
Chapter 2
Set Up and Maintenance
Page 2-33
Point of Sale User Manual
Add Mode (PS0461)
This option allows you to add new payment type information into the system. Information includes credit card
details, customer number, and associated billing information. You cannot access any other operation mode until you
the initial payment type information is entered and saved in the system.
Page 2-34
Set Up and Maintenance
Chapter 2
Point of Sale User Manual
The following is an explanation of each of the data items.
Id
Enter a unique id for the new payment type.
Description
Enter a description of the payment type. Ex: *Visa, *American Express.
Payment Type
Select the payment type from the pull-down menu. Valid values are:
cash, check, or credit card. Only specify a credit card type if the actual
credit card information needs to be recorded.
Sales Code
If a sales code applies, enter the desired sales code or select a sales code
by navigating or scrolling through the exiting sales codes on record.
Customer
Enter a Receivable customer number if the transaction temporarily
creates a “receivable” function within your General Ledger. This would
occur, for instance, if one of your payment methods were a credit card
such as MasterCard. Although your customer has provided you a means
to be paid for their purchases (MasterCard), you still do not have
available cash in the bank for this transaction.
This is because you now have to wait for MasterCard to provide you with
the actual funds in your cash account, which causes a “receivable”
situation. Therefore, from a true accounting point of view, each of these
types of credit card firms (MasterCard, VISA, American Express, etc.)
should be set up as a “customer” in the Accounts Receivable module.
Then, their customer number would be entered into the “A/R Customer”
field next to their respective “Payment Method Description.” This way a
customer aging report or statement would then be able to reflect how
much money is tied up in payments not yet received from each credit
card firm. When monies are received, then a payment would be applied
to their account, just like any other customer. The Accounts Receivable
balance on the Balance Sheet would be lowered, and the Cash in Bank
balance would be increased by the payment amount.
Currency Color
This function is not available at this time.
Credit Card Mask
This is the beginning number designating the card type.
Ex: 3=AMEX, 4= Visa, 5 = MC, etc.
Processor Id
This is the name of the processor being used to process crediti cards such
as PC Charge, ICVerify, MAPP, etc.
For each payment type, you need to indicate the Payment Type and Sales code. For Credit Card Transactions, it is
important that you enter the Credit Card Mask and the Processor ID. The Credit Card Mask should be entered as
follows:
•
American Express
•
Visa
•
Mastercard
•
Discover
The system will no longer look for an * (asterisk) in the Description to determine when to dial out for an
authorization. Instead, any payment type with a Processor ID will indicate to the system that it should dial out for a
credit card authorization.
Chapter 2
Set Up and Maintenance
Page 2-35
Point of Sale User Manual
NOTE
Be sure you have setup each of your processors prior to entering that
processor ID on the payment type. With the new enhancements, you can
identify a different credit card processor for different payment types if
desired.
The system will automatically add a payment type called “cash” if the customer is receiving change and the “cash”
payment type does not exist in the files.
The Maintain Payment Types screen is also where you may optionally indicate the Default Customer Liability
account for each payment type. The default Customer Liability Account is useful for credit card transactions where
you want the system to create an open item on the Credit Card Processor’s customer account to show the credit card
monies owed to you.
If you are adding a record, <click> on the “Create a Record” button or choose the “Operation” option from the
Menu Bar and then “Add.” Make the entries required and <click> on the “Save” button to save your data or <click>
on the “Cancel” button to cancel without saving.
The payment type information is not actually added to the file until you have <clicked> the “Save” button to
validate from this screen.
Results:
CoARO.dbf – Payment Types File
- New Payment Type Information is Added
Change Mode (PS0462)
This option allows you to modify an existing payment type. If you have made any mistakes during this set up
process, you may return to the “Change Payment Types” option to change any information you have already
entered.
Page 2-36
Set Up and Maintenance
Chapter 2
Point of Sale User Manual
First, you must navigate to the record you wish to change. You may find a record using the navigation tool bar or
<click> on the “Navigation” option on the Menu Bar and then the appropriate navigation option. If you are
changing a record, <click> on the “Modify the Current Record” button or choose the “Operation” option from the
Menu Bar and then “Change.” Make the changes required and <click> on the “Save” button to save your changes
or <click> on the “Cancel” button to cancel the changes made.
Results:
CoARO.dbf – Payment Types File
- New Payment Type Information is Updated
Delete Mode (PS0463)
This option allows you to delete an existing payment type that you may have entered by mistake or is no longer
valid. First, you must navigate to the record you wish to delete. You may find a record using the navigation tool bar
or <click> on the “Navigation” option on the Menu Bar and then the appropriate navigation option. If you are
deleting a record, <click> on the “Delete Current Record” button or choose the “Operation” option from the Menu
Bar and then “Delete” Make the changes required and <click> on the “Save” button to save your changes or
<click> on the “Cancel” button to cancel the changes made.
Make sure this is what you want to do, because once this payment type is deleted, it cannot be retrieved.
Results:
CoARO.dbf – Payment Types File
- New Payment Type Information is Deleted
Copy Mode (PS0464)
This option allows you to create a new payment type by copying the information from an existing payment type.
Using this option, the system provides a quick method of setting up payment types that are very similar. By using
the “Copy an Existing Payment Type” menu option, you are able to quickly create and enter new payment types.
First, you must navigate to the record you wish to copy from. You may find a record using the navigation tool bar or
<click> on the “Navigation” option on the Menu Bar and then the appropriate navigation option. <Click> on the
“Create a Record Based on the Current Record” button or choose the “Operation” option from the Menu Bar and
then “Copy.”
You will notice all the information, except for the id, will be copied to a new record. Enter the new id for this record.
At this point, you may choose to edit any of the information or <click> on the “Save” button to validate, which will
then add it to the file.
This new information is not actually added to the file until you have <clicked> the “Save” button to validate from
this screen.
Results:
CoARO.dbf – Payment Types File
- New Credit Card Information is Set Up
SET UP CREDIT CARD PROCESSORS (PS0470)
This option allows you to define the credit card network access information. Once this information has been defined,
it will be updated only as your needs change; or in rare circumstances, as physical access to the any of the networks
change.
Some of the items within this option are not necessary in order to use the Electronic Draft Capture (EDC) options in
the Accounts Receivable and/or Sales Order Entry module. The total number of data items required for
completion will depend on which processor method you choose.
Chapter 2
Set Up and Maintenance
Page 2-37
Point of Sale User Manual
Once you select a processor, the data items will vary depending on your credit card network and hardware
configuration. Your credit card network representative will define the specific information for all other items, if
necessary.
Inquiry Mode
The “Inquiry” mode allows you to view summary information about credit card processor information. Navigate to
the record you wish to view. You may find a record using the navigation tool bar or <click> on the “Navigation”
option on the Menu Bar and then the appropriate navigation option.
Add Mode (PS0471)
This option allows you to add a new credit card processor into the system. You cannot access any other operation
mode until you the initial credit card processor information is entered and saved in the system.
The following is an explanation of each of the data items.
Id
Enter the name of the processor being used to process your credit card
payments. Ex. PCCharge, ICVerify, etc.
Description
Enter a description of the processor being used to process your credit
card payments.
Terminal ID
This is a thirty (30) character field (not all will be used) for the Terminal
identification number issued to your company and is required by the
credit card network for access. This field is used by MAPP and NOVA
networks.
Merchant ID
This is a thirty (30) character field (not all will be used) identifying the
merchant and the merchant’s bank to the credit card network. Only
NOVA networks use this field.
Page 2-38
Set Up and Maintenance
Chapter 2
Point of Sale User Manual
Processor ID
This is a thirty (30) character field (not all will be used) identifying the
Credit Card Processing Network to the PC Charge payment server
software system. Only PC Charge uses this field.
Modem Port
This is the COM device or port name that the modem is connected to for
communications to the credit card network. Most UNIX-based systems
have a name in the form “ttynn” where “nn” is a two-digit number for
the device name used for the modem. MS-DOS based systems are either
“1” or “2” for “COM1” or “COM2” respectively. This field is used by
MAPP and NOVA networks.
Communications Settings
The communication parameters consist of four (4) parts, comma
delimited (separated by commas). These parts include the baud rate,
data, stop and parity. By default, the system will assume 1200, 8, 1, “n”.
Another example of a valid communication parameter would be 2400, 8,
1, “n”. This field is used by MAPP and NOVA networks.
First Telephone #
This is a thirty (30) character field for the primary telephone number
used to access the credit card network. The entire phone number
(including a “1” and then area code if long distance) must be specified
with hyphens (-) being optional. This field is used by MAPP and NOVA
networks.
Second Telephone #
If you have verified that the primary network is down, then the number
entered here can be turned on by <clicking> “on” the "Use 2nd Y/N"
check box. Only <click> “on” this check box if the primary network is
disabled. The entire phone number (including a “1” and then area code
if long distance) must be specified with hyphens (-) being optional. This
number is optional. Only NOVA networks use this field.
Shared Directory
This is a central shared directory for passing request to IC Verify. This
directory must be on an accessible server and needs to be the same
directory where IC Verify was installed. The field must end with a
backslash (or forward slash in UNIX). Only IC Verify networks use this
field.
Example:
TCP/IP Server
Chapter 2
F:\ICVWIN20\REQUEST\
If you are using the Data Pro Credit Card Server to interface to any of
the supported credit card networks, <click> “on” the check box and
specify the Port Number and Domain Name where the Credit Card
Server is located. All networks can use this field, but it is not required.
This field is REQUIRED if you are using the PCCharge Payment
Server.
If you are using the Data Pro Credit Card Server, the Port # should be
specified as the same TCP/IP Port # that the Credit Card Server is
configured for. If you are using the PCCharge Payment Server, enter
the Port # as “31419” which is the default Port # for the PCCharge
Payment Server.
Next, you must enter the domain of the server where the Data Pro
Credit Card Server or PCCharge Payment Server software is
installed. This must be a Windows 98/NT/2000/XP PC. It does not
matter if your accounting software is running on SCO UNIX or LINUX
as long as the Data Pro Credit Card Server or PCCharge Payment
Server is connected to the same network. If so, the server will be able to
provide credit card authorizations to all UNIX-based servers as well as
Windows-based platforms.
Set Up and Maintenance
Page 2-39
Point of Sale User Manual
The “Domain” entry should be either the actual IP Address or the
domain name of the server itself (i.e. paymentserver.dpro.com). Save
this configuration page. Once this is completed, don’t forget that you
must install the Data Pro Credit Card Server or PCCharge Payment
Server software separately. The PCCharge Payment Server software
is available on the Data Pro Infinity POWER CD-ROM. Once this is
installed, you must <click> on the “Advanced” button under “Setup”
“Menu” “Preferences” and make sure to <click> on the checkbox that
specifies to use TCP/IP connection.
All connections between Infinity POWER and the PCCharge software
use a TCP/IP connection. Regardless of whether you are actually using
a modem to dial up to the credit card network to get your actual
authorizations or not, the communications between the accounting
software and this middleware piece of software always uses a TCP/IP
connection. This is very fast and efficient and compatible with all of the
various operating systems that may be involved (Windows and/or SCO
UNIX/LINUX).
To maximize the speed of your credit card transaction processing, it is
always recommended to try to utilize a credit network that supports the
processing of transactions via TCP/IP connections. NOVA was one of
the first credit card processors to support this type of processing.
However, many other networks are now available through PCCharge
that also support this capability. The difference between a dialup modem
verses TCP/IP can be about 35 seconds verses 3 seconds. It is that
significant!
If you are a customer waiting in line or browsing and shopping over an ecommerce web site, that is a big difference in processing time. This is
always a consideration business owners should take into account when
choosing a credit card processing network.
Maximum Users
Enter the Maximum number of users you are licensed for on your credit
card network. All networks use this field.
Mail Order
This check box can be left blank unless your credit card network requires
Internet processing to be identified as Mail Order. All networks use this
field.
AVS
This check box should only be left blank if you are using a credit card
network that penalizes for using AVS when it is unnecessary. PCCharge
and IC Verify networks use this field.
Prompt CVV2
Credit card verification. Usually 3 or 4 digits found on the back of the
credit card. Prompts for the additional numbers.
Demo Mode
This check box determines whether the draft capture dial up is running in
demo or live mode. The demo mode could be used for testing,
demonstrating credit card transactions, or Internet Web examples of
credit card processing. It gives a simulated effect of how the process
really works. All networks use this field. By <clicking> “on” this check
box, you will be running the draft capture in demo mode.
If you plan on using the MAPP network, you will require a valid Prefix/Terminal Type and a TSI (Terminal
Service Indicator) code. If you plan on using the NOVA network, you will require a Terminal ID and Bank
Number. MAPP is the only network not using Address Verification process, unless accessed through GO
Software’s PCCharge or IC Verify products.
Page 2-40
Set Up and Maintenance
Chapter 2
Point of Sale User Manual
The Data Pro Credit Card Server can be implemented with the MAPP, NOVA or IC Verify configurations. This
is a separate utility, available from Data Pro, which gives you the ability to have multiple workstations (running
either Point-of-Sale, Sales Order Entry, or Accounts Receivable) work with one central credit card server. The
Credit Card Server handles dialing the modems and receiving the authorizations. If you have several workstations
that need to process credit card transactions and you don't want to have a modem attached to each workstation, this
gives you an alternative solution. The Credit Card Server supports multiple modems for very busy installations
and also allows you to connect to your Credit Card Server from anywhere you can establish a TCP/IP connection,
including the Internet.
GO Software’s PCCharge Payment Server product is included on the Infinity POWER CD-ROM and may be
purchased and activated by contacting Data Pro Accounting Software, Inc. This product provides the most support
for the variety of Credit Card Networks currently available for both “dial up” authorizations as well as “IP-based”
access and on-going credit card processing. See the Third Party Programs section of the CD-ROM for a current
listing of all supported credit card networks.
•
Credit Card Network
This field allows you to choose from four (4) available credit card networks. Technically, only MAPP (Global
Payment Systems) and NOVA are credit card networks. IC Verify and PCCharge are third party applications that
provide access to both of these two networks and a variety of other third party credit card networks. Data Pro has
selected PCCharge from GO Software as its primary product for supporting all credit card networks for years to
come and will be discontinuing support for IC Verify and direct support for specific networks in the near future.
•
MAPP Network
•
NOVA Network
•
IC Verify
•
PCCharge
NOTE
If you are using the PCCharge Payment Server, there are two considerations
in regards to users and the Security Administrator setup that must be taken
into account. First, depending on how many users your company has that will
require credit card processing, you will need to determine which version of
the PCCharge Payment Server you need. The default product comes with a
Single Merchant/Single User License. Additional Users Counts and
additional Merchant IDs may be added for $125 each.
Therefore, if you have an office with six workstations processing Accounts
Receivable transactions or a similar combination processing orders at the
same time in Sales Order Entry, you will need to add five additional user
licenses to the PCCharge software. All users must be setup in the Security
Administrator software and also setup in the PCCharge software as well to
correspond for credit card processing capability. The setup in both cases
MUST BE IDENTICAL! This is always the case unless you purchase the
“Unlimited” version of PCCharge in which case the software does not care
about specific user IDs and will handle the communication differently.
If you have four different stores, you will need FOUR DIFFERENT
MERCHANT IDs which may be added for $125 each, plus whatever amount
of user licenses that are necessary. The additional user licenses will not be
necessary if you purchase the “Unlimited License” which runs $1295.
Purchasing the “Unlimited License” may easily solve many merchant’s
configuration needs and should always be considered at the outset of any
configuration.
Chapter 2
Set Up and Maintenance
Page 2-41
Point of Sale User Manual
Results:
coARL.dbf – Credit Card Processor File
- Credit Card Processor File is Added
Change Mode (PS0472)
This option allows you to modify an existing payment type. If you have made any mistakes during this set up
process, you may return to the “Change Payment Types” option to change any information you have already
entered.
First, you must navigate to the record you wish to change. You may find a record using the navigation tool bar or
<click> on the “Navigation” option on the Menu Bar and then the appropriate navigation option. If you are
changing a record, <click> on the “Modify the Current Record” button or choose the “Operation” option from the
Menu Bar and then “Change.” Make the changes required and <click> on the “Save” button to save your changes
or <click> on the “Cancel” button to cancel the changes made.
Results:
coARL.dbf – Credit Card Processor File
- Credit Card Processor File is Updated
Delete Mode (PS0473)
This option allows you to delete an existing payment type that you may have entered by mistake or is no longer
valid. First, you must navigate to the record you wish to delete. You may find a record using the navigation tool bar
or <click> on the “Navigation” option on the Menu Bar and then the appropriate navigation option. If you are
deleting a record, <click> on the “Delete Current Record” button or choose the “Operation” option from the Menu
Bar and then “Delete” Make the changes required and <click> on the “Save” button to save your changes or
<click> on the “Cancel” button to cancel the changes made.
Page 2-42
Set Up and Maintenance
Chapter 2
Point of Sale User Manual
Make sure this is what you want to do, because once this payment type is deleted, it cannot be retrieved.
Results:
coARL.dbf – Credit Card Processor File
- Credit Card Processor File is Deleted
Copy Mode (PS0474)
This option allows you to create a new payment type by copying the information from an existing payment type.
Using this option, the system provides a quick method of setting up payment types that are very similar. By using
the “Copy an Existing Payment Type” menu option, you are able to quickly create and enter new payment types.
First, you must navigate to the record you wish to copy from. You may find a record using the navigation tool bar or
<click> on the “Navigation” option on the Menu Bar and then the appropriate navigation option. <Click> on the
“Create a Record Based on the Current Record” button or choose the “Operation” option from the Menu Bar and
then “Copy.”
You will notice all the information, except for the id, will be copied to a new record. Enter the new id for this record.
At this point, you may choose to edit any of the information or <click> on the “Save” button to validate, which will
then add it to the file. This new information is not actually added to the file until you have <clicked> the “Save”
button to validate from this screen.
Results:
coARL.dbf – Credit Card Processor File
- Credit Card Processor File is Setup
START NEW YEAR'S FILES (PS0421)
This option starts up your Point of Sale files for the new fiscal year. Before executing this option, you should make
multiple copies of the old year's files for archival purposes.
To select this option, you will go to “Systems” from the Menu Bar and select “System Administrator.” The
following screen illustrates where to locate this option.
Chapter 2
Set Up and Maintenance
Page 2-43
Point of Sale User Manual
Before selecting this option you should make several backups of the old year for archival purposes before starting
the new year. You must also be in the last fiscal period (month) of the year before you can execute this option.
If you are in any other period or month other than the last fiscal period of the year, the system will not allow the user
to select any modules to “Start New Year’s Files.”
Therefore, if you are looking to create 2007 data files as the new year, the old year is 2006 and your date should be
set to a day in the last fiscal period of 2006. If you are prepared to begin data files for the new fiscal year, you may
choose the “Select All” button which will highlight all Registered Systems. Or, you may choose the “Clear All”
button to undo your choices. The “Invert” button reverses the choices currently selected on the screen.
You may also take your mouse and click on each accounting module one by one to specify which module(s) to
select for this function. It is not uncommon for many users to be prepared to begin certain data files for the new
fiscal year such as General Ledger and Accounts Payable while holding back on certain modules such as the Sales
Order Entry module. This would allow users to continue processing orders in the prior fiscal year to allow
additional sales to get on the books or to complete orders prior to starting the new order file for the new year. Once
this file is started, only outstanding orders will be transferred to the new fiscal year.
General Ledger, however, is one module whereby users may create new data files for the new fiscal year and
continue to process in both the prior and new fiscal years and the same time. Once postings are made to the prior
fiscal year, the option to “Bring Balances Forward” into the new year is run to bring all adjusted balances current.
Select the module(s) to Start New Year’s Files for and click on the “Start” button. The program will create the new
year's data files. The system will show a message next to each module stating “System already started.” The
bottom of the screen will show “Processing Completed.”
Click on the “Close” button to return to the Menu Bar.
Page 2-44
Set Up and Maintenance
Chapter 2
Point of Sale User Manual
When you “Start New Year’s Files,” the following files are copied into or created for the new year:
•
Transaction File (coAR3dy.dbf)
•
Transaction Detail File (coAR4dy.dbf)
•
Salesman File (coAR5dy.dbf)
•
Sales Code File (coAR7dy.dbf)
After you create the files for the new year, you may process in both years simultaneously. All transaction activity for
each year will be tracked independently.
Results:
Files Copied to or Created for the New Year:
•
Transaction File (coAR3dy.dbf)
•
Transaction Detail File (coAR4dy.dbf)
•
Salesman File (coAR5dy.dbf)
•
Sales Code File (coAR7dy.dbf)
SET UP CUSTOMERS
This section discusses the ways to add, change, import, delete, and copy customers. It also discusses how to print the
Customer Listing, which is used to verify all information input into the Customer File. You may add “notes” to any
Customer Account that may be viewed on the screen for additional information or planning. This may be done when
viewing an inquiry, adding a new account, changing an existing account or copying an account.
By clicking on the Note Pad Button, a screen will appear that will allow you to add or review free-form notes. If
you are adding a new record, navigation is not required. Click on the “Create a New Record” button or choose the
“Operation” option from the Menu Bar and then “Add.” A screen will appear with the current date and time. You
will be prompted for a description of fifty (50) characters, which is used as part of the display when selecting to
review existing notes. Each note recorded has up to ten (10) lines of fifty characters, each which may be used for
your free-form notes.
Once notes are added to the file, they can be reviewed at any time by accessing the vendor through an inquiry mode
or a change mode and then clicking on the Note Pad Button. Once this screen is displayed you will have the tool
bar navigation options to select the first detail record, select the next record detail, select the previous record detail,
select the last record in the detail list or search through the detail records. You may then view the notes for this
vendor.
If you have set up User-Definable Fields in either the Windows Character-based or UNIX products, you will be
able to view and change data information in these fields. By clicking on the “User Fields” button, you will access
an additional screen of data fields. If you are in an Inquiry Mode, then you will be able to view these fields. If you
are in a Change or Copy Mode, you will be able to modify the information in these fields. You must make sure that
your General Configuration options are set up to allow access to User-Definable Fields.
Inquiry Mode (AR0400)
The “Inquiry” mode allows you to view summary information about your customers. Navigate to the record you
wish to view. You may find a record using the navigation tool bar or click on the “Navigation” option on the Menu
Bar and then the appropriate navigation option.
Once the customer has appeared on the screen, you may click on the following keys to view important information.
Click on the “Billing” button to review the billing information.
Chapter 2
Set Up and Maintenance
Page 2-45
Point of Sale User Manual
Click on the “Contact Info” button to review the optional Contact Management fields available for this record as
shown on the following screen. All of these fields are “free form” text fields and may be used in any fashion
desired. Primarily, these fields are used with Data Pro’s advanced DP/DashBoard (Enterprise Management
System) for special Customer Relationship Management (CRM) capabilities. The fields such as “Do Not Mail,”
“Do Not E-Mail,” and “Do Not Fax” are used for Custom Report Writer features which highlight the ability to set
flags on a specific contact record and whether to include each record when using the Infinity POWER Report
Writer as an advanced data extraction tool for mailing, e-mailing and faxing.
Page 2-46
Set Up and Maintenance
Chapter 2
Point of Sale User Manual
Click on the “Open Items” button to review all current open items and multiple payments made on a specific
invoice as shown below.
This will only occur if the “Payment” button is highlighted due to the fact that one or more payments have been
applied to a specific invoice as shown below.
Click on the “Aging” button to review the current aging summary, Year-to-Date sales amount, last check date, last
check number and amount and highest credit balance.
Chapter 2
Set Up and Maintenance
Page 2-47
Point of Sale User Manual
Click on the “Pricing” button to display an additional inquiry screen that will allow you to choose an inventory item
and a specific quantity to give you exact pricing on that item for that customer. It also checks the quantity available,
on-order, and reserved for that item.
Click on the “Shipping” button to review the customer’s Ship To information.
Page 2-48
Set Up and Maintenance
Chapter 2
Point of Sale User Manual
Click on the “Historical” button to review the historical information of invoices and gross sales by month.
Click on the “Price Plans” button to view the Price Plans that have been assigned to this customer.
Chapter 2
Set Up and Maintenance
Page 2-49
Point of Sale User Manual
When accessing the “Open Items” or the “Historical” features, the screen will have the option to view the first
detail record, page up the detail list, page down the detail list, view the last record in the detail list, view a specific
detail record based on text or view a specific detail record based on a line number. When you select to view by
either a record based on text or a record based on a line number, enter the appropriate information (either text or a
line number) and click on “OK.”
Add Mode (AR0401)
This option allows you to set up new customers. You may input all customer specific information with this option
except for open items. There is a considerable amount of information kept track of for each customer in your files.
Not all information requested must be filled in. Different companies have varying levels of need for this type of
information. Utilize only those fields that apply to your specific needs.
If you are adding a new record, navigation is not required. Click on the “Create a New Record” button or choose the
“Operation” option from the Menu Bar and then “Add.” The following is an explanation of each of the data items
set up on a customer account:
Customer Number
Each customer must be assigned a customer number that may be up to ten
(10) characters (alpha/numeric). This is the primary number the system uses
to track customers by. To best utilize the F2 search method, it may be
recommended that the first three to four letters of a customer’s name be used
as the first portion of the customer number. This way, if you cannot
remember the customer's full number, you may enter a portion of the number
and the system will then go to the closest “match.” You would then be able
to use your up or down arrows to highlight their actual number.
Customer Description
This is the company or customer name that will be displayed on all screens,
reporting, invoices, and statements. This name may be up to thirty (30)
characters (alpha/numeric).
Address
This is the full billing address of the customer. There are four lines of thirty
(30) characters each for the address.
City
This is the city of the customer. There are thirty (30) characters allocated for
the city.
Page 2-50
Set Up and Maintenance
Chapter 2
Point of Sale User Manual
State
The system will allow fifteen (15) characters for the state of this customer.
Country
If you have elected to include “Country in Address” (an option during the set
up of a Company) the system will include “Country,” as a data field in the
address information for this company. The system will allow for fifteen (15)
characters for the country.
Zip
This is a ten (10) character zip code for the customer’s address.
For example:
Customer Name: ABC Company, Inc.
Address:
123 Main Street
Suite 1030
Building 123
City:
Vancouver
State:
Brit. Columbia
Cntry:
Canada
Zip:
V6E 4A2
Region
This is a five (5) character (alpha/numeric) field for an abbreviation
indicating the customer's region. This may be a very useful field because all
customer reports may be printed using a region “mask.”
Salesman
This is the five (5) character (alpha/numeric) salesman number of the
salesman you would like to assign to this customer.
E-Mail
This is a fifty (50) character (alpha/numeric) field for the E-Mail address
name for the company or contact for this customer. This field is for reference
purposes only.
Special
This field will be called whatever you have set up as the “Special Field”
heading in the Master Configuration. This is a twenty (20) character field for
any special comments or key data that may be searched or sorted on.
Contact
This is a twenty (20) character field for the name of the person to contact at
this customer. This will be displayed on all screens, and reports. On some
invoice forms it will be displayed below the mailing address as the “ATTN:.”
Phone
This is the twenty (20) character field for the customer's phone number. There
is enough room for the full phone number, including area code, and all
parentheses, spaces, and hyphens.
Fax Number
This is the twenty (20) character field for the customer's fax number. There is
enough room for the full fax number, including area code, and all
parentheses, spaces, and hyphens.
Billing (Button)
This button will allow you to change the billing information for this customer.
If you click on this button, another window will be displayed which will
allow you to change the following information.
Tax Rate
This is the Tax Rate Number, which may be up to ten (10) characters
(alpha/numeric) that has been set up in the tax rate file that you would like to
assign the customer. There must be a tax rate number entered in this field, so
any “exempt” customers must be assigned a tax rate that has been set up with
zero tax percentages.
Chapter 2
Set Up and Maintenance
Page 2-51
Point of Sale User Manual
Price Levels
The price level assigned here will be used when invoicing, if you have
configured the system to be interactive with Manufacturing Inventory
Management. If you are not interactive with Manufacturing Inventory
Management, the Price Level section will not be displayed.
If you are interactive with Manufacturing Inventory Management, click on
the price level from inventory that you want to assign this customer. You may
choose 1-10 or 11 for “no price.” When you are invoicing a customer for an
inventory item, the program will automatically calculate the correct unit price
based on the inventory item selected, the price level specified, and the
quantity break, if applicable.
Discount Percent
You may also place a “negative discount” into this field. This is for those
customers who base their pricing to their customers on a “cost plus” basis. In
other words, an inventory price level may be established for each customer.
The price level that is assigned could, in essence, be your “cost” for each
inventory item. By placing a negative discount in this field, the system will
look at whatever the sales price is for that price level and add the effective
discount amount on top of the sales price. This is how automatic “cost plus
pricing” may be applied. This “negative discount amount” may also be
overridden at the time of invoicing, if the prompt “Allow Line Item
Discounts” in the Master Configuration is turned “on.”
Credit Limit
This is the dollar credit limit that you wish to assign the customer. It will be
used in the Customer Inquiry screen to calculate the available credit for a
customer. When creating invoices, a warning message will be generated if the
total amount of the transaction is larger than the available credit limit
remaining.
Customer's Bank
Account
This is the Customer's Bank Account number. This may be entered for
informational purposes or for use with the Electronic Funds Transfer (EFT)
system included in the Check Reconciliation module. If used with the EFT
system, the Customer’s Bank Routing number MUST be entered to complete
the information required to send the transaction to the EFT Processor. For
more information on the EFT processing procedures, please refer to Chapter
1 of the Check Reconciliation manual.
Customer's Bank
Routing
This is the Customer's Bank Routing number. This is a nine (9) character field
in which to enter the routing number for your bank account. The nine
character format will verify that it meets with the United States requirements
and performs a validation check when a nine digit number is entered into this
field. You may also enter a six (6) digit number into this field for use in the
United Kingdom and other countries. However, when a six digit number is
entered into this field, no validation of what is being entered is being done by
the system.
This may be entered for informational purposes or for use with the Electronic
Funds Transfer (EFT) system included in the Check Reconciliation module.
If used with the EFT system, the Customer’s Bank Account number MUST
be entered to complete the information required to send the transaction to the
EFT Processor. For more information on the EFT processing procedures,
please refer to Chapter 1 of the Check Reconciliation manual.
Page 2-52
Set Up and Maintenance
Chapter 2
Point of Sale User Manual
Customer’s Bank
Account Type
This is either Checking or Savings and is used to define the type of bank
account the previous two data fields will be accessing. For more information
on the EFT processing procedures, please refer to Chapter 1 of the Check
Reconciliation manual.
Customer Payment by
EFT
This data item is used to define whether this customer’s transactions will be
processed using the EFT system. If during Cycle Invoicing, EFT has been set
up and this data item is turned on the system will proceed with EFT
processing. If during Payment entry, the payment type selected is an EFT
payment type and this data item is turned on the system will proceed with
EFT processing. For more information on the EFT processing procedures,
please refer to Chapter 1 of the Check Reconciliation manual.
Consumer Bank
Account
This refers to whether this account is a “personal” bank account verses a
“business” bank account. This is a required piece of information that is sent
to the ACH network during transmission of the EFT transaction. If it is not
checked, it is automatically assumed to be a “business” bank account.
Comments
These are two lines of fifty (50) characters each for any comments that you
would like to assign this customer. These comments can be used to “flag” the
user, drawing attention to pertinent information before recording transactions
in the system. This feature can be set by turning “on” the Display Customer
Comments field in the Accounts Receivable Master Configuration. Any
Comments will then display on the screen when performing “Write Invoices
& Credit Memos,” “Prepare Proposals,” or “Record Manual Invoices”
for that customer. See the “Master Configuration” option for more details on
setting up this feature.
Invoice Terms
Description
This is a twenty (20) character description of the terms that you wish to
assign this customer. This will be displayed on the invoice form. The default
description will be what you have set up in the Master Configuration.
This field may be utilized to invoke a Credit Check warning system when
this specific customer is put on credit hold. To activate a credit hold status
for this customer, enter the words "Credit Hold" as the terms description. In
doing this, the system will not allow an invoice to be entered for this
customer, instead a warning will be displayed "This Customer is on Credit
Hold, No New Transactions are allowed."
If you are integrated with the Sales Order Entry module, this Credit Check
warning system will be activated there as well and the system will not allow
the order to be placed. If you have installed the Advanced Security
Administrator, there is a custom security object that may be used in
conjunction with this field. You can set up the Advanced Security system to
allow only certain users to edit or change this field.
# of Days
This is the number of days from either the invoice date or the end of the
month that will be used in calculating the due date. The default value will be
what you have set up in the Master Configuration.
Chapter 2
Set Up and Maintenance
Page 2-53
Point of Sale User Manual
Terms Type
The terms type defines how the due date for each invoice will be calculated.
The default value will be what you have set up in the Master Configuration.
Fixed Due Date
Net Days
Net Days EOM
Fixed Due Date will tell the system not to calculate a due date, but ask you
what the due date is at the time of the transaction.
Net Days will calculate the due date in a specified number of days from the
invoice date.
Net days EOM will tell the system to calculate the date for the end of the
month in which the transaction was written. Then, calculate a specified
number of days from the end of the month date.
Finance Charges
This field indicates whether this customer is subject to finance charges. If
they are subject to finance charges, then click “on” the box.
Balance Forward
This field indicates how the open items (invoices, payments, credit memos,
etc.) for this customer will be treated by the system. The default values will
be what you have set up in the Master Configuration. Leave this box blank to
indicate this customer should be treated as an “open item” type customer. To
indicate this customer should be treated as a “Balance Forward” type
customer, click “on” the box.
A/R Sales Code
This is the Accounts Receivable Sales Code you would like to assign this
customer. This Sales Code represents the Accounts Receivable chart of
account number that will be used for Invoice and Payment entries to the
General Ledger integration file for this customer. If you choose to leave this
field blank, you are choosing not to utilize the Multiple Accounts Receivable
processing functions. The system will then obtain the “default” Accounts
Receivable chart of account number from the Accounts Receivable Master
Configuration for all transaction entries, unless otherwise specified at the
time of transaction entry.
Project #
This data item is a ten (10) character (alpha/numeric) field which represents a
project number associated with this customer. This is a reference only field
unless certain conditions exist. If you are utilizing the Sales Order Entry and
Job Cost Main Modules to track revenues associated with a project, you can
use this field to define a specific project number to be associated with each
order entered in the Order entry module for this customer. This project
number may be overridden at the time of order entry.
Password
The remote access password is used in conjunction with an Internet Web Site
environment. It is a security feature to allow customers to login to a web site
and gain access to specific information. This information could be specific
pricing based on that customer pricing level or important information
specifically for that customer. Enter a password and re-key the same
password for verification. Click on “OK” to save this information.
When you have completed the “Billing” information section of the customer’s record, click on “Save” to return to
the main data entry screen.
Page 2-54
Set Up and Maintenance
Chapter 2
Point of Sale User Manual
Contact Info (Button)
When you click on the “Contact Info” button, you may enter and/or review the optional “Contact Management”
fields available for this record as shown on the following screen. All of these fields are “free form” text fields and
may be used in any fashion desired. Primarily, these fields are used with Data Pro’s advanced DP/DashBoard
(Enterprise Management System) for special Customer Relationship Management (CRM) capabilities.
Salutation
This data item is a ten (10) character (alpha/numeric) field which
represents how you would normally address a person (i.e. Mr. Mrs. Dr.).
Title
This data item is a thirty (30) character (alpha/numeric) field which
allows you to store the person’s title. This is normally for titles like
President, Vice President, Sales Manager, Collections Manager,
Assistant, etc.
First Name
This data item is a twenty (20) character (alpha/numeric) field which
allows you to store the person’s first name (i.e. Mary, Thomas, John).
Middle Name
This data item is a twenty (20) character (alpha/numeric) field which is
used to store the person’s middle name.
Last Name
This data item is a twenty (20) character (alpha/numeric) field which is
used to store a person’s last name. The storage of the combination of the
three fields (First Name, Middle Name, Last Name) is ideal for Contact
Management applications and for Mail Merge purposes.
Alternate Phone
This data item is a twenty (20) character (alpha/numeric) field which is
used to store an alternate phone number unique possibly to this contact
and different than the main phone number stored on the main Customer
record.
Extension
This data item is a six (6) character (alpha/numeric) field which is used
to store this contact’s extension for their Alternate Phone Number.
Chapter 2
Set Up and Maintenance
Page 2-55
Point of Sale User Manual
Cell Phone
This data item is a twenty (20) character (alpha/numeric) field which is
used to store this person’s “Cell Phone” number. This could also be
used for their pager number or however you deem appropriate.
Business Type
This data item is a thirty (30) character (alpha/numeric) field which is
used to store the type of business for this Customer Record. This could
actually be the SIC Code for the company or a more generic description
of the nature of their firm. Examples could be Hotel, Convenience Store,
Manufacturer, Distributor, or Retailer. This is user-definable so it may
be whatever makes sense for your firm.
Tax ID
This data item is a twenty (20) character (alpha/numeric) field which is
used to store this Customer’s Tax ID number. Many firms are exempt
from Sales Tax and therefore have a Tax ID number that they provide
their vendors to keep from paying state and local sales tax. This field
may be used to store this customer’s Tax ID number so it is permanently
kept on file.
The fields such as “Do Not Mail,” “Do Not E-Mail,” and “Do Not Fax” are used for Custom Report Writer
features which highlight the ability to set flags on a specific contact record and whether to include each record when
using the Infinity POWER Report Writer as an advanced data extraction tool for mailing, e-mailing and faxing.
Open Items (Button)
The Open Items button provides the user with the ability to view all of
the outstanding invoices and non-applied payments that are pending
against this specific customer. The following pieces of information are
also displayed regarding each open item.
Item #
This is simply the line number or item number of the total number of
open items that are being displayed on this screen. You may have a total
of 10,000 open items displayed during this open item inquiry at one time.
Obviously, with this many possible open items available, this could be
cumbersome to try and find a specific item to pay or inquire upon
without some helpful tools. Therefore, while you have this screen open,
you may click on the Navigation choice at the top of the screen and you
will be provided with several options including a “Search” tool to find
items throughout the file.
The following screen illustrates this menu and how and open item
transaction number is highlighted in Yellow once the item is found
during a search.
Page 2-56
Set Up and Maintenance
Chapter 2
Point of Sale User Manual
Once you select the Search option or press F10, you may enter the information you are looking for such as an
invoice number, date of transaction, invoice amount or check number as shown on the following screen. You may
also choose to search up or down the file, pick if it is to be case sensitive and more.
You may scroll up or down through the file manually to find the open item you are seeking and if there is one or
more partial payments made against an open item, the “Payments” button located directly underneath the Item #
and titled Payment History will be shown as active. If it is active, you may click on this button and a new screen
will appear displaying all of the partial payments made to date against this specific open item as shown on the
following screen.
Chapter 2
Set Up and Maintenance
Page 2-57
Point of Sale User Manual
Type
This is the transaction type that was assigned during the origination of
this open item. It could be an invoice, payment, credit memo, debit
memo as an example. This will always inform the user of the nature of
the transaction and how it should be affecting the customer’s account
balance.
Transaction #
This is the Transaction Number that was created for this open item at the
time the transaction occurred. For instance, if this was an invoice, this
would represent an invoice number. If this was a payment on account,
this would normally be the customer’s check number.
Description
This is the description of the open item. During the origination of the
transaction, the user has the ability to override the default description (i.e.
invoice, credit memo, payment) and enter another description to provide a
simplified description of the nature of this specific transaction. Whatever
description was entered will appear into this field. If no description was
entered, the default descriptions will appear.
Total Amount
This is the complete amount of the transaction, including any taxes,
freight or other charges.
Date
This is the date of the transaction based on the System Date that was used
to post the transaction. This is different than the actual posting date
which uses the computer’s clock/calendar to keep track of when items are
actually posted to the system. This is the date that will be used to start all
agings and reports.
Due Date
This is the date that the invoice is due from the customer. Based on the
terms of the transaction used at the time of invoicing, this date was
automatically calculated at the time the transaction was originated and
store into the file.
Job Number
If the integration to the Job Cost Main Module was turned ON, this open
item can be related to a Job or Project. The invoice may be a Job Invoice
and a payment may be associated to making a payment related to a job.
The Job Cost Collections Report utilizes this field when the report is run.
Page 2-58
Set Up and Maintenance
Chapter 2
Point of Sale User Manual
G/L Account Number
If you have configured your system to use multiple Accounts Receivable
accounts and have changed the A/R Sales Code during the posting of
payments or the writing of invoices for example, this will information be
displayed in this field. This Sales Code ultimately relates to the actual
General Ledger Account Number for the various Accounts Receivable
accounts that may be stored on your Balance Sheet reflecting each unique
“receivables” account. Each posting could therefore be updating a
different GL account uniquely although they are being billed and/or paid
through the same customer account.
Remaining Amount
This number would be the remaining balance still due on this open item
if there had been any partial payments made on this open item. If this is
the case, you would have the ability to click on the “Payments” button
under the Payment History column and check on the details of all of the
payments made to date on this open item.
Post Date
The posting date is the System Date at the time the transaction occurred.
This is normally set to the same value as the Invoice Date, except when
using scheduled payments. When posting scheduled payments, the
Invoice Date will be set to the future dates that the payments should
occur. However, the Posting Date will be the date the transaction was
entered. The Posting Date will be used when printing the Aging Report
to identify which open items existed at any point in time so that backdated aging reports can be printed properly.
Payment History
As mentioned earlier, if a partial payment is made against a specific open
item, this button becomes active and stores a detail of all of the
associated payments that are made against the open item until it is paid in
full.
Complete Papyment Date
This is the date that the actual open item is completely paid off. Once this
item is paid in full, the system will automatically update this field.
Partial Payment Date
This field stores the “last” date that a partial payment was made on this
open item. Even if multiple payments have been made to this open item,
the date stored here will reflect the last date a partial payment was made.
Check Number
This field stores the “last” check number that was posted against this
open item. Even if multiple payments have been made to this open item,
the Check Number stored here will reflect the last Check Number that
was used on a payment for this open item.
When you are done with the “Open Items” section of the customer’s record, click “Cancel” to return to the main
data entry screen.
Aging (Button)
When you click the “Aging” button, a new screen will appear to provide
you with several pieces of information including a summary of all of the
outstanding open items for this specific customer broken down by Aging
Category as defined in the Master Configuration. The Default
configuration is set to a thirty day aging calculation but may be changed
to meet specific customer needs.
Unpaid Finance Charges
This field is storing the amount of finance charges that have been billed
to the customer but have yet to be paid.
Chapter 2
Set Up and Maintenance
Page 2-59
Point of Sale User Manual
Year-To-Date Finance
Charges
This field stores the total amount of Finance Charges that have been
billed to this customer Year-To-Date. Finance Charges are a specific
transaction type and calculated uniquely. See the Accounts Receivable
Master Configuration setup as to how your company is defined in the
method of how it is charging finance charges, if at all.
Available Credit
This is an on-going calculated balance that is automatically generated by
the system and defined by taking the customer’s Credit Limit and
subtracting their current outstanding balance. This includes any
outstanding invoices, credits, debit memos and payments on account.
Last Check Number
For inquiry purposes, this field is used to store the Last Check Number
the customer used in making payments to their account. Therefore, if the
customer calls and inquires whether a payment was received or not, it is
easy to view this screen and immediately determine whether you
received their check or not.
Check Date
Likewise, when the last payment is received on the customer’s account,
the Check Date field is also updated immediately as well. This is the
date entered at the time the payment was made. This is typically the date
that was printed on the customer’s check.
Check Amount
This field stores the “last” check amount that was posted against this
open item. Even if multiple payments have been made to this open item,
the Check Amount stored here will reflect the last Check Amount that
was used on a payment for this open item.
Year-To-Date Sales
This is a calculated field by the system that keeps an on-going total of
Sales Totals for this customer based on all invoices, credit memos, and
debit memos that have been issued to this account.
Average Days to Pay
This field is a calculated weighted average based on the number of days
it takes this customer to pay each open item. On average, you will be
able to determine that the customer is a good paying client, slow paying
client, or in between based on this on-going calculation.
# Invoices in Average
This field stores the total number of invoices that have been used in the
“Average Days to Pay” calculation. Therefore, you don’t want to base a
credit decision necessarily on one or two invoice payments. On the other
hand, if it is based on fifty invoices, a better history has been defined and
can assist you more accurately in your decisions.
High Balance
This field stores the highest outstanding balance the customer has
maintained with your company.
Aging Date
This field stores the last date of when a customer aging was calculated
for this account. Therefore, when you are looking at all of the balances
in each of the following Aging Categories, make sure to look at this date
to ensure that the date is fairly recent. If it is fairly old, then you should
go to the Reports menu option and run the option to “Calculate Age of
Accounts” to realign all of the open items into the current aging
categories before making any business decisions.
Aging Amounts
This section is actually contained in seven fields of information. This
system displays a Total Balance, as well as six fields for the Aging
Categories that have been defined in the Accounts Receivable Master
Configuration. This includes the Current category plus each increment
thereafter (i.e. 30 days each).
Page 2-60
Set Up and Maintenance
Chapter 2
Point of Sale User Manual
Last Invoice Date
This field stores the “last” invoice date that was posted against this
customer account. This field is automatically updated on the customer’s
record whenever an invoice is generated for a customer.
Last Order Date
This field stores the “last” Order date that was posted against this
customer account. This field will be updated directly from the Sales
Order Entry module each time a new order is entered into the system.
When you are done with the “Aging” section of the customer’s record, click “Cancel” to return to the main data
entry screen.
Pricing (Button)
Chapter 2
When the “Pricing” button is selected, a new screen will appear that will
allow the user to enter an Inventory Item into the system and have the
system calculate a price for the item selected for this customer.
Depending on whether the customer has any specific price plans defined,
or if there are any quantity breaks defined for each of the inventory
items, the system will automatically calculate the customer’s price on
demand while at the same time show a display of the status of the item’s
inventory levels.
As shown on the following screen, you may enter the Inventory Item
directly or use the scrolling screen to select the specific item. Once
selected, the screen will show if the item has multiple units of measure,
its Quantity On-Hand, On-Order, Reserved, Required for Manufacturing,
and total Available. You will then be prompted to enter a Quantity that
you would like the system to “Calculate a Price” for. Although this
screen shows a price of $5.25 for the following item, this field only
appears AFTER the quantity was entered.
Set Up and Maintenance
Page 2-61
Point of Sale User Manual
When you are done with the “Pricing” section of the customer’s record, click “Cancel” to return to the main data
entry screen.
Shipping Address (Button)
This shipping address allows merchandise to be shipped to a company or
separate location with an entirely different name than the Customer
Name. You will be able to set up multiple shipping addresses for each
customer set up in this option.
Ship-to Name
This is the company name that will be printed above the ship to address
on the invoice. If this field is “Same,” the program will use the Customer
Name. Once the customer has been added to the file, you may select the
option, “Set Up Ship-To Addresses” from the menu to add up to one
million additional shipping addresses (Windows Character-based) or nine
million under (UNIX).
Ship-to Address
This is the address that will be printed in the “Ship To:” area of the
invoice. If this field has the word “Same,” the program will use the
Billing Address. This information may be changed at the time of
invoicing for additional flexibility. This allows bills to be sent to one
location while merchandise may be shipped to another.
When you have completed the “Shipping” information section of the customer’s record, click on “Save” to return
to the main data entry screen.
Historical Information
(Button)
This option will allow you to change the historical information for this
customer. Another screen will be displayed which will allow you to
change the following information:
Unpaid Finance Charges
This is the amount of finance charges that have been charged to the
customer's account and have not yet been paid. Whenever the option,
“Calculate Finance Charges” is executed, the amount of finance
charges calculated will be added to this field until it is specifically paid.
YTD Finance Charges
This is the total amount of finance charges that have been charged to this
customer's account for the year. This amount will be cleared when the
option, “Start a New Year” is performed. This amount will be displayed
on the Year-end Customer Statement.
Average Days to Pay
This is the average number of days that it takes for this customer to pay
an invoice. It will automatically be calculated when payments are entered
and posted against an invoice in full. This could be a very useful number
when deciding the amount of credit to extend to a customer.
Basis - # of Inv.
This is the number of invoices that was used in the calculation of
“Average Days to Pay.”
The bottom portion of this screen, allows you to enter the total number of
invoices and the gross sales for each period of the fiscal year. These
figures will automatically be updated during normal processing.
When you have completed the “Historical” information section of the customer’s record, click on “Save” to return
to the main data entry screen.
Page 2-62
Set Up and Maintenance
Chapter 2
Point of Sale User Manual
Price Plans (Button)
This option allows you to change the “Price Plan” information for this customer. By clicking on the “Price Plans”
button, another screen will be displayed which will allow you to add, change, or delete price plans for this customer.
The system allows up to twenty (20) different price plan assignments for each customer.
Inventory Price Plans must first be set up in the Manufacturing Inventory Management module to be available for
use with this option. Once they are set up, they may be accessed and assigned to each customer on this screen. Keep
in mind that if an inventory item is used in more than one plan, the first plan that is listed here to include that item
will be used for its pricing as long as all other criteria are met. Therefore, the order in which plans are assigned here
is very important.
Type in the Plan Number for each line or click the Down Arrow (F2 by default) and select from the available list
and its description will appear immediately to the right.
When you have completed the “Price Plans” information section of the customer’s record, click on “Save” to
return to the main data entry screen.
To validate this entire customer record click on the “Save” button. To exit from this option click on the “Close”
button.
Results:
coAR1dy.dbf - Customer File
- Customer is Added to File
coARF.dbf - Price Plan Assignment File
- Price Plans are Added to File
Change Mode (AR0402)
This mode allows you to change information on an existing customer. If you have made any mistakes during this set
up process, you may return to the “Set Up Customers” option to change any information you have already entered.
First, you must navigate to the record you wish to change. You may find a record using the navigation tool bar or
click on the “Navigation” option on the Menu Bar and then the appropriate navigation option. If you are changing a
record, click on the “Modify the Current Record” button or choose the “Operation” option from the Menu Bar and
then “Change.” Make the changes required and click on the “Save” button to save your changes or click on the
“Cancel” button to cancel the changes made.
While in “Change” mode, you may choose to change Historical information by clicking on “Historical” button.
This screen is a scrolling window, which contains the purchase amounts for each month of the year. It also has the
Year-To-Date Payments and Average Days to Pay, and Number of Invoices.
Once this screen is displayed you will have the tool bar navigation options to select the first detail record, select the
next record detail, select the previous record detail, page up the detail list, page down the detail list, select the last
record in the detail list, select a specific detail record based on text or select a specific detail record based on a line
number. When you select by either a record based on text or a record based on a line number, enter the appropriate
information (either text or a line number) and click on “Save.”
When you choose to select a specific record in the file, you may search for that record by customer number, name or
special (u-define) field. Click on the either of the choices and enter the information you want to search on. Once you
have found the record you wish to be displayed, you may either double click on it or just highlight it and click on
“OK.”
Once you have navigated to the correct detail line, you may make the changes necessary. You may use the operation
tool bar options to clear data in current field, insert a detail line before the current detail line, delete the current detail
line and save for pasting (cut), delete current detail line and shift all subsequent detail lines up one line, copy a detail
line for subsequent pasting, and paste a previously cut detail line.
Chapter 2
Set Up and Maintenance
Page 2-63
Point of Sale User Manual
When all changes are made, click on the “Save” button to validate your changes to this screen. You will then be
returned to the previous screen. Click on the “Save” button to validate this record.
Results:
coAR1dy.dbf - Customer File
- Customer Information is Updated
coARF.dbf - Price Plan Assignment File
- Price Plan Information is Updated
Delete Mode (AR0403)
This mode allows you to delete a customer account. You cannot, however, delete a customer that has current open
items. In addition, you should not delete customers that have had any account activity during the current period. This
will result in incorrect sales reporting information. This option allows you to delete customers that you may have
entered by mistake, or you no longer want.
First, you must navigate to the record you wish to delete. You may find a record using the navigation tool bar or
click on the “Navigation” option on the Menu Bar and then the appropriate navigation option. This option allows
you to delete accounts that you may have entered by mistake, or you no longer want. Click on the “Delete the
Current Record” button or choose the “Operation” option from the Menu Bar and then “Delete.” This will place
you into the “Delete” mode, then click on “Save” to validate your deletion of this record.
Make sure this is what you want to do, because once a customer is deleted, it can not be retrieved again. A backup of
data files is always recommended prior to deletion of records.
Results:
coAR1dy.dbf - Customer File
- Customer Information is marked for Deletion
coARF.dbf - Price Plan Assignment File
- Price Plans Information is marked for Deletion
Copy Mode (AR0404)
This mode allows you to create a new customer by copying the information from an existing one. Using this option,
the system provides a quick method of setting up customers that are very similar. This may apply where a single
customer may actually require multiple accounts because of separate locations or branch offices, which require
separate billings.
First, you must navigate to the record you wish to copy from. You may find a record using the navigation tool bar or
click on the “Navigation” option on the Menu Bar and then the appropriate navigation option. Click on the “Create
a Record Based on the Current Record” button or choose the “Operation” option from the Menu Bar and then
“Copy.” You will be asked if you wish o copy customer pricing information. Choose “yes” or “no.”
You will notice all the information, except for the customer number, will be copied to a new record. Enter the new
customer number for this record. At this point, you may choose to edit any of the information or click on the
“Save” button to validate, which will then add it to the file.
Results:
coAR1dy.dbf - Customer File
- New Customer Information is Set Up
coARF.dbf - Price Plan Assignment File
- Price Plan Information is Set Up
Page 2-64
Set Up and Maintenance
Chapter 2
Point of Sale User Manual
SET UP INVENTORY ITEMS
This section discusses the ways to set up, change, delete, and copy inventory items. It also covers how to “import”
new items from other accounting systems and print the Inventory Detail Report, which is used to verify all
information input into the inventory files.
You may add “notes” to any Inventory Item that may be viewed on the screen for additional information or
planning. This may be done when viewing an inquiry, adding a new item, changing an existing item or copying an
item. By clicking on the Note Pad Button, a screen will appear that will allow you to add or review free-form
notes. If you are adding a new record, navigation is not required. Click on the “Create a New Record” button or
choose the “Operation” option from the Menu Bar and then “Add.” A screen will appear with the current date and
time.
Chapter 2
Set Up and Maintenance
Page 2-65
Point of Sale User Manual
You will be prompted for a description of fifty (50) characters which is used as part of the display when selecting to
review existing notes. Each note recorded has up to ten (10) lines of fifty characters each which may be used for
your free-form notes.
Once notes are added to the file, they can be reviewed at any time by accessing the item through an inquiry mode or
a change mode and then clicking on the Note Pad Button. Once this screen is displayed you will have the tool bar
navigation options to select the first detail record, select the next record detail, select the previous record detail,
select the last record in the detail list or search through the detail records. You may then view the notes for this
record.
If you have set up User-Definable Fields in either the Windows Character-based or UNIX products, you will be
able to view and change data information in these fields. By clicking on the “User Fields” button, you will access
an additional screen of data fields. If you are in an Inquiry Mode, then you will be able to view these fields. If you
are in a Change or Copy Mode, you will be able to modify the information in these fields.
You must make sure that your General Configuration options are set up to allow access to User-Definable Fields
and that you have run Item #1 below “Convert Data Pro file to match data dictionary.” This option is located
under “Productivity Tools” on the “Systems Menu.” This will ensure that your data files are in sync with any new
fields you have added to the system.
Page 2-66
Set Up and Maintenance
Chapter 2
Point of Sale User Manual
Inquiry Mode [IM0100]
This option allows you to view assorted summary information about your inventory items. You may check certain
inventory information by selecting the Inventory Item Inquiry menu option. First, you must navigate to the record
you wish to inquire on. You may find a record using the navigation tool bar or click on the “Navigation” option on
the Menu Bar and then the appropriate navigation option.
Once the item has appeared on the screen, you will notice several buttons on the bottom of the screen. You may
view each of these additional screens of information about this inventory item.
Re-Order
This button allows you to view the primary and secondary vendors associated
with this inventory item, as well as re-order quantities, lead time for integration
to the Invertech Manufacturing Requirements Product (MRP); plus the
minimum and maximum quantities to stock.
Price Table
This button allows you to view the pricing that was assigned for this inventory
item. There are up to ten (10) price levels assigned to an inventory item.
Historical
This button allows you to view the summarized history of sales and purchases
for the current year, month by month.
Manufact
This button allows you to view the summarized manufacturing history of this
inventory item for the current year, month by month. This includes usage
quantity and quantity produced.
View Image
This button only allows access if an image file name has been defined in the
“Internet” section of this part number. This image must be in either a JPG or
BMP format.
Bill of Mat
This button allows you to view the “Bill of Materials” associated with the
manufacturing of this inventory item.
Internet
This button allows you to view the image, text, audio and video files associated
with this inventory item that will be used in conjunction with an internet web
site.
Cost Layers
This button allows you to view all cost layers for this particular inventory item.
Chapter 2
Set Up and Maintenance
Page 2-67
Point of Sale User Manual
Serial/Lot
This button allows you to view “Serial Number” or “Lot Number”
information for a selected inventory item. A scrolling screen will appear with all
available Serial Number or Lot Number items. When you select one of the
displayed items and click on “OK,” a screen will appear with additional
information about that specific Serial Number or Lot Number. This information
includes an additional description, Serial Number or Lot Number, quantity onhand, the bin number, warranty flag setting and two fifty (50) character
comment lines.
Location
This button displays the Multi-Location inventory inquiry. This information
includes the On-Hand and Available Quantities of all inventory locations for
each defined location for this inventory item.
Costs
This button allows you to view the total cost and average unit cost of the item.
This feature is set this way for security purposes.
Add Mode (IM0401)
This option allows you to set up new inventory items. Several screens will be used, taking you step-by-step through
the sequential process of properly and thoroughly identifying your inventory items. This process will repeat itself for
each inventory item. After initial set up, all cost and historical information should be input through “Enter
Transactions” in order to maintain an audit trail.
If you are adding a new record, navigation is not required. Click on the “Create a New Record” button or choose the
“Operation” option from the Menu Bar and then “Add.”
Enter the inventory item number in the format that you initially set up in the Master Information (e.g., the default
configuration is shown below.)
1) Category
2) Class
3) Item
4) Location
Page 2-68
Set Up and Maintenance
Chapter 2
Point of Sale User Manual
NOTE
If you add new inventory items in the old year after performing “Year End
Procedures,” the new inventory items added will not appear in the new year.
This is because the inventory item file was already created during Year End
Procedures. To alleviate this problem, simply change your system date to the
New Year, and re-enter the new inventory items and pertinent costs, pricing
and quantity information.
The following is an explanation of each of the data items required for a new inventory item:
Item Description
There are four (4) lines available for your inventory item description. Each line
consists of thirty (30) characters (alpha/numeric) including spaces. All lines of
the description will print on all reports except in one instance. If a line of
description (except for the first line) is preceded with a single asterisk (*), that
line will not print on any external documents generated by the system, (e.g.,
Price Labels, Price Lists, or documents printed by other modules, such as
Invoices, Packing Lists, etc.). In this way, certain information can be part of the
file, but remain for internal use only.
Category
This is a ten (10) character (alpha/numeric field) that will identify the category
of this inventory item. This field can be used for informational purposes or it
may be used to categorize items for specific sort routines for Internet related
access of inventory items.
Bin No.
This ten (10) character (alpha/numeric) field identifies the location number of
items stored in bins.
Unit Wgt.
This ten (10) character field specifies the quantity of weight associated with this
particular item number. It is used in conjunction with the Sales Order Entry
system for Bill of Ladings.
Cost Method
Costing Methods are defined for each individual inventory item. The default
costing method which appears automatically will be the costing method set up
in the Inventory Master Configuration. There are eight (8) costing methods to
choose from. They are:
1) LIFO
2) FIFO
3) Average
4) Latest
5) Standard
6) Serial Number
7) Lot Number
8) Fixed O/H
Careful consideration of the way your business operates is highly suggested
before this selection is made. Refer to Chapter 1, Normal Costing Methods for
more information on each of these inventory costing methods. Once you have
selected the costing method here and have begun to receive additional inventory
items into stock, you cannot just switch costing methods. Make sure to check
with your accountant or CPA prior to making any changes of this nature to your
accounting files.
Cost Label
This data item is a fifteen (15) character (alpha/numeric) field which will only
be available if you have selected the Lot Number type costing method for this
inventory item. The Cost Label is used to define the structure of the Lot
Numbers to be used with this specific inventory item.
For example, you may have a shoe store which carries boots. The boots can be
stored as lots with the label “Style/Color/Sz.”
Chapter 2
Set Up and Maintenance
Page 2-69
Point of Sale User Manual
The store may also carry accessories for boots, such as, anklets or taps, which
may only require a cost label of “Style/Color.” Each “lot” inventory item can
have a different cost label. The “cost label” is also used to describe the
warehouse location in the Multi-Warehouse set up of your inventory. For
example, the cost label may be “Warehouse No.” or “Truck Number” or “Store
Number.”
Asset
This is the account number used to update the General Ledger module to reflect
any increases or decreases in the value of this particular inventory item. This
account number is also used to print the Manufacturing Inventory Management
Value Summary Report which does not require General Ledger to be
interactive. This account is used when transactions are originated in the
Manufacturing Inventory Management module or when receipts of inventory
are entered through Accounts Payable or Purchase Order. If the Accounts
Receivable module is integrated with Inventory, the AR Sales code defined on
the Inventory Item will dictate the Inventory Asset account to be used for sale
and return transactions.
COS
This is the account number used to update the General Ledger module to reflect
any increases or decreases in the Cost of Sales calculations when recording a
sale, withdrawal, or return of an item.
Sls Code
This code is used by the Accounts Receivable module to group sales of items
into various categories of sales. This determines total sales by various
breakdowns defined by you or you may simply use one code to represent all
sales. This code may be up to ten (10) characters (alpha/numeric). Make sure
that if you are interactive with Accounts Receivable that any codes you use
when you set up Inventory are set up in Accounts Receivable. Otherwise, when
invoicing and such, the system will always be looking for near matches instead
of assuming the proper number immediately.
U/M
This is a four (4) character (alpha/numeric) field that will identify the count
value of that item; (e.g., ea., lb., doz., gal., etc.). This will define the default or
“stocking unit of measure” if the Unit of Measure Conversion options are
utilized.
Job Cost Code
This is the default Cost Code used to transfer the cost of inventory into a job.
You may override this default code at the time of allocation to a specific job or
project, but the code entered here will be used as the default value for the
system. You may click on the Down Arrow (F2 by default) if you are integrated
with the Job Cost Main Module to review a scrolling list of valid list of Cost
Codes to enter into this field. This is very important to configure in advance,
particularly if you intend to utilize the Sales Order Proposal Writing feature that
allows quotes to be converted into Jobs once the quote has been accepted by the
customer. If these line items on the Proposal have been setup properly with
their Cost Code setup, they will be added as “Budgeted Cost Codes” on the
new Job when the option “Transfer SO Proposals to Job Cost” is run.
Alternative Part
Numbers
If your inventory includes similar products from different vendors, you may
assign separate inventory numbers to them. Quite often, when one vendor's
product is not available, an alternative vendor's product can be substituted. With
this feature, you have the ability to quickly reference these alternative part
numbers. A twenty (20) character (alpha/numeric) field is provided. If this
feature is not applicable to your inventory, ignore these fields or use them for
miscellaneous descriptions.
Page 2-70
Set Up and Maintenance
Chapter 2
Point of Sale User Manual
QUANTITIES
Information is entered here only once in the “Add” mode. Thereafter, all
activity to that item will be updated and reflected automatically in these fields.
Last Count
Last Count: Default : 0
This is the count value as of your last physical inventory count. After executing
the “Update Book to Physical Count,” discussed later, this quantity will be
zeroed out.
NOTE: This is not the amount of beginning inventory quantity that is on-hand.
This field is used by the Physical Count Procedure. To define the beginning
quantity and unit cost for this item, reference the “Change Cost Information”
field on this screen.
On-Order
Default: 0
This number reflects the quantity of product you currently have on order. This
field is updated when you either “Enter Purchase Orders” or “Record
Receipts.”
Reserved to Ship
Default: 0
This number reflects the quantity of product you have committed to pending
Sales Orders. Any number entered here will alter the quantity available for this
item. This field is automatically updated by either the option to “Record Sales
Orders,” from the Sales Order module when a sales order is added or changed
with a quantity for this item or if the “Auto-Reserve Bill of Materials” switch in
the Master Configuration is turned “on.” If it is, this quantity will also include
the quantity required for the manufacturing of the finished good items which
have been placed on customer Sales Orders.
Qty. to Adjust
Default: 0
This field is used by the system to reflect any discrepancies which may occur
during processing (e.g., if you were to make a withdrawal or a transfer of goods
greater than the quantity on hand.) The quantity difference would be displayed
here. This is a management-by-exception auditing tool. It serves as a flag to
inform you that an exception has occurred. The system does not attempt to
analyze or correct this exception, (due to the uniqueness of each business) but
instead, provides this field for your individual attention. You must manually
zero this field only after you have determined the cause of the adjustment
quantity, and have made the necessary accounting adjustments. If you are
interactive with Accounts Receivable or Point of Sale, this field can be cleared
when the option to “Record COS Adjustments” is performed. This field is
extremely important to watch. Therefore, it is highly recommended that the
Inventory Quantity Report, with the criteria selection to include only those
items with a “Quantity to Adjust,” be run at least on a weekly basis to stay on
top of any potential problems with overselling of inventory items.
On-Hand
Default: 0
This field is automatically calculated and displayed by the system based on the
transactions and initial setup quantities posted to the system. This is the
perpetual “Quantity On-Hand” field for each inventory item. Therefore, when
performing an inquiry on an item, this would be the field to be viewed to
immediately determine what the current amount of inventory is on-hand at any
given time.
Chapter 2
Set Up and Maintenance
Page 2-71
Point of Sale User Manual
Req. Manf.
Default: 0
This field (Required for Manufacturing) is automatically updated by following
the procedures in the “Enter Projected Usage Amounts” menu option. There
are two different ways that the Inventory system can track, display, and report
the manufacturing requirements.
As a manager, you must decide how you are deploying your Bill of Materials
processing system and you must be comfortable with the way in which you
want to determine the requirements you will need for sub-assemblies of items
used in the Manufacturing cycle.
First there is a field under the “Re-Order” button called “Proj. Requirements” as shown on the following screen.
Projected
Requirements
This field is used in the calculation of an item’s Projected Bill of Material
requirements amounts during the use of the “Projected Usage Amounts” menu
options. This field contains the quantity that you need to manufacture to meet the
requirements of outstanding sales orders or stocking levels. However, the key to this
function is that management must overtly utilize the “Projected Usage Amounts”
option to calculate what requirements exist for a specific sub-assembly or Bill of
Materials item. Typically, this “Projected Requirements” field would be used for
Finish Goods and not for sub-assemblies and/or Bill of Materials items.
Req. Manf.
This field is the calculated quantity of the sub-assembly or raw material which will be
required to meet the manufacturing requirements calculated in the “Projected Usage
Amounts” option. For instance, you may have sub-assemblies and raw materials that
are used in the manufacturing of several different finished good items. You could use
the “Projected Usage Amounts” option to transfer all of your Sales Order backorder
quantities to the “Projected Manufacturing Requirements” and then calculate the
manufacturing requirements. The “Req. Manf.” field would then contain the total
quantity required to meet all of your manufacturing needs and will be used in the
“Projected Materials Usage Report” to let you know what raw material items you
may need to order.
Page 2-72
Set Up and Maintenance
Chapter 2
Point of Sale User Manual
As you can see, the “Require for Manufacturing” quantities of your sub-assemblies and raw materials will only be
set by using the “Projected Usage Amounts” option. This provides you with a lot of flexibility in calculating the
requirements as you prepare for your manufacturing cycles.
However, the quantities required for manufacturing are not automatically updated as users are entering customer
orders and the Sales Order, Accounts Receivable, and Point of Sale modules will not warn the user if the quantity of
the Inventory Item being entered is required for the manufacturing process.
The second method that the Inventory System has of maintaining the manufacturing requirements is by updating the
Reserved Quantity of the sub-assemblies and raw materials as the finished good items are being entered on the
customer Sales Order. If you are selling the sub-assembly and raw material items as well as using them in your
manufacturing process and need the Sales Order, Accounts Receivable, and Point of Sale systems to dynamically
warn the users that the quantity being entered has been reserved for manufacturing then this method should be used.
Depending on the Advanced Security Object configuration you define in the system for each user, they may
override and continue to sell the item or not be allowed to proceed at all. This becomes a very dynamic way of
tracking the needs of Bill of Material items verses using the other methodology which uses a more planned
approach. To utilize this feature, you must have the Inventory Master Configuration option “Auto-Reserve Bill of
Materials” clicked on as shown on the following screen:
Available
Default: 0
This field will constantly be updated to reflect the total quantity of an item that
is currently available to sell. The system takes into account the current Quantity
On-Hand plus the Quantity On-Order minus the Quantity Reserved to determine
the current Quantity Available.
Manuf. Type
Default: Blank
This is a ten (10) character (alpha/numeric) field designed to accommodate a
wide variety of manufacturing codes. Each user may define their own set of
definitions which can tell them whether this item is to be manufactured by the
company, sub-contracted out to another firm to be made, or if they should be
buying it from a third party (i.e. distributor). If you are integrating with the
Invertech Manufacturing Requirements Planning (MRP) system, you may
define your own codes or use the standard codes as follows:
M = Make
S = Subcontract
P = Buy this Part (Purchase)
Chapter 2
Set Up and Maintenance
Page 2-73
Point of Sale User Manual
Special Cases:
These data items will have default values. Respond to these items by clicking on the appropriate button and an
“Option Window” will appear for the keying of additional information.
User Fields:
This button provides access to all of the “User Defined Fields” that may have been created for the Inventory file.
This assumes that the option in the “Configuration” setup has been turned on and new fields have been added to
the system. Otherwise, this button will not be accessible.
If “User Defined Fields” have been added to the system, a new screen will appear and display the total number that
has been added. If more fields have been added than what fits on a single screen, the screen will become a scrolling
screen that will allow the user to move up and down and make entries into these fields accordingly. You must click
on “Save” this screen to save all entries made to this screen and store you work before you will be returned to the
main screen. Click on “Save” again to ensure these entries are completely saved. User Defined information entered
into these fields is accessible by the Infinity POWER Report Writer and POWERServer module for web
applications.
Re-Order:
The Vendor Information required by this screen includes the Vendor # or your primary source for acquiring this
inventory item. If your system is integrated with Accounts Payable, the vendor numbers should match in both
programs. This field is ten (10) characters (alpha/numeric) in length. This field must be completed in order to
transfer a sales order into a purchase order.
Page 2-74
Set Up and Maintenance
Chapter 2
Point of Sale User Manual
Vendor Item #
A twenty (20) character (alpha/numeric) field identifying the number
assigned to that particular item by its vendor. This number will be used by
the Purchase Order Entry module, if interactive, and if a form that utilizes
the vendor's item number has been selected. This would allow you to issue
purchase orders to vendors with their items numbers printed on them for
their ease of recognition and uniformity. The numbers maintained in your
inventory module do not have to conform to those of your vendors.
Other Vendor and
Vendor Item Number
Minimum/Maximum
Quantities to Stock
These are used for alternative sources for this item.
Projected Requirements
A special analytical quantity used for the material requirement reporting
based on manufacturing. Normally this field will be updated automatically
by the option to “Enter Projected Usage Amounts.” Fields are ten (10)
characters (numeric only) in length. The system will round to the nearest
number if you enter a number larger than seven digits. This is typically
used for Finished Goods and not sub-assemblies or Bill of Material items.
Lead Time
A numeric field with two additional decimal places for use with third party
Manufacturing Requirements Planning (MRP) products such as the
Invertech MRP software. Users may define lead times in terms of hours,
days, weeks months or years depending on what makes sense for each item.
This is a field that is not currently used within Infinity POWER for
reporting calculations.
Price Table
If you set up the default factor information for your entire inventory
system, (using the “Inventory Configuration, Price Levels” option), the
information to be entered on this screen would only be the Retail Price or
Price Level #1; or the Base Price or Price Level #6.
You would then click on the “Reset Prices” button. The system will
automatically calculate all the prices for that item based on the factors set
up.
Chapter 2
These are the limits that you determine are best for your particular
inventory “turnover.” The minimum may be set up to reflect the quantity
established to get the price break you have based all of your pricing factors
on. The maximum is designed to keep excess inventory amounts to a
minimum. These two fields are essential to printing the Suggested Order
Report and Overstock Report, respectively.
Set Up and Maintenance
Page 2-75
Point of Sale User Manual
If you want to override the default factors set up in the Master Configuration, you may do it here on an item by item
basis. You may also use this option to do “What If” calculations of prices by changing the factors around and then
clicking on the “Reset Prices” button to recalculate the prices. Clicking on the “Reset Factors” button will restore
the Master default factors when you are done.
If you are utilizing the Unit of Measure Conversion procedures, the selling price will be based on the Price Level
defined for each unit of measure in the Unit of Measure Conversion table.
Costs:
This screen is used to display the average cost of this item and the current total value of the item in stock. This is
based on the total quantity on hand times the price paid for those quantities regardless of the costing method in
effect for this item. An average cost is then calculated based on total value divided by the number of quantities in
stock. The following screen shows how this would appear.
Page 2-76
Set Up and Maintenance
Chapter 2
Point of Sale User Manual
Additionally, the lower portion of the screen displays the “Last Received Date,” “Last Received Quantity,” and
the “Last Received Unit Cost.” This provides the user an instant lookup ability to see the last time this item was
purchased, how much was purchased and what was paid for the item. This avoids having to run reports to determine
whether certain items should be kept, discontinued or re-ordered. All three of these fields are automatically updated
each time a “receipt” transaction is posted in the system for this item.
Remember this item is an Advanced Security object and can be defined for users to see or not on a user by user
basis or by groups. This allows management the flexibility to control who has access to viewing cost and who
doesn’t.
Historical:
This screen is used to enter any historical information pertaining to the movement and profit of that item. The three
areas of input are:
•
Purchases
•
Sales (as expressed in dollars and quantities)
•
Cost of Sales
Purchases
For each period (month) of the accounting cycle, you would enter the total
dollar amount spent on purchasing that item and then the quantity of items
that amount represents.
Sales
For each period (month) of the accounting cycle, you would enter the total
dollar amount of Sales for that item and then the quantity of items that
amount represents.
Cost of Sales
For each period (month) of the accounting cycle, you would enter the total
dollar amount of Cost of Goods Sold for that item to allow the system to
determine the gross profit per item for that period.
NOTE
Historical information is only input during the initial setup process. The
system will automatically update this information as transactions are posted to
the system.
Chapter 2
Set Up and Maintenance
Page 2-77
Point of Sale User Manual
U/M Conv:
This data item will facilitate the need to receive and sell this inventory item at different units of measure. You must
have a unit of measure defined in the “U/M” field on the primary screen, Unit of Measure, before the system will
allow access to this option. The “stocking unit of measure” will be the smallest level of stocking (usually each).
This should be the unit of measure that was defined in the “U/M” field.
You can define up to ten (10) different unit of measure conversions in this option for this inventory item. The four
areas of data input are:
U/M
Mult. Factor
Each of the unit of measure conversions will define a four (4) character
(alpha/numeric) unit of measure identifier (e.g., ea., lb., doz., gal., etc.).
These units of measure will “pop up” on data entry screens when the
system recognizes that the inventory item selected has a unit of measure
conversion table defined.
The multiplying factor is the number used to calculate the quantities being
received or sold when a unit of measure conversion table is defined.
For example, you may stock your inventory at the lowest level (each), but
by defining a unit of measure conversion table, you can define the
conversion for a “case.” A case may be comprised of twelve (12) items.
The multiplying factor for the “case” should be twelve (12).
Price Level
Price Plan
Page 2-78
When you receive items into inventory, you can enter one (1) case. When
the inventory files are updated, they will show twelve (12) each. The
multiplying factor allows the system to calculate the quantities received and
sold at the lowest stocking level.
This data item will allow you to define the Price Level for each individual
Unit of Measure Conversion. These are the price levels defined in Data
Item #23.
Pricing Levels can also be defined by implementing special “Price Plans.”
You may set up a Price Plan to correspond with an individual unit of
measure, such as “dozens.” Include in that price plan, all inventory items
that would have a unit of measure of “dozens.” The pricing established in
that Price Plan should be pricing based on “dozens.” All Price Plans set up
and used as described above, will override the Price Level set up on the
Unit of Measure conversion table. These price plans are “special price
plans” and should not be assigned to any customer.
Set Up and Maintenance
Chapter 2
Point of Sale User Manual
Manufact:
This screen is used to enter any historical information pertaining to the manufacture and usage of that item.
The two areas of input are:
User Quantity
For each period (month) of the accounting cycle, you would enter the total
quantity of this item used in production (producing other items).
Quantity Produced
For each period (month) of the accounting cycle, you would enter the total
quantity of this item, which was produced (manufactured). These fields
will be automatically updated every time you record manufacturing.
View Image
This screen is used to show the image of the Inventory Item based on the name of the image file you defined under
the “Internet” button. Once you select the “Internet” button, there are four choices and it is the “image file” that
is required to be defined so that the picture or graphic can be displayed when this option is selected. This file must
be stored as a “JPG” or “BMP” image file. Keep in mind, when using the “View Image” feature the best results
for image display would be 186 X 265 pixels. A sample is shown below of what is possible. These images may also
be used interactively with the Infinity COMMERCE tools that are included as a standard feature of the System
Administrator module which drive all of the Data Pro e-commerce solutions.
Chapter 2
Set Up and Maintenance
Page 2-79
Point of Sale User Manual
Bill of Mat:
This screen is used to enter all inventory items, which go into the manufacture of the current assembly. This bill of
materials may consist of up to one thousand (1000) total raw materials, sub-assemblies, and by-products.
Page 2-80
Set Up and Maintenance
Chapter 2
Point of Sale User Manual
The following fields may be input for each of the components:
Component Item
Number
Each component on the bill of materials must be an existing inventory item.
When you enter the number, the description will be displayed immediately
below the item number. If you are not certain of the item number, you may
press TAB to scroll through the inventory file to make your selection.
Quantity
This field indicates the quantity of this component, which goes into the
manufacture of this assembly. Every time you record production, this
quantity will be withdrawn from the component's on-hand quantity.
Entering a negative quantity may specify by-products. Every time you
record production, this quantity will be added to the component's on-hand
quantity.
Unit Cost
This field contains the unit cost of this component at the last time
production was recorded. This field will be automatically updated with the
new unit cost every time you record manufacturing (except for byproducts). The default cost is the current average unit cost of the
component. When a by-product is produced or when you record
disassembly, this amount is the unit cost used to update the component's
cost information.
Total Cost
This field is a display only field, which shows the extended cost of the
quantity times the unit cost.
Internet:
These fields allow you to specify the filenames, which contain the marketing text, graphic images, audio clips and
video clips for use when presenting your Inventory Items internally or on an Internet Web Site.
Chapter 2
Set Up and Maintenance
Page 2-81
Point of Sale User Manual
Marketing Text
Filename
This field is used for a marketing text filename up to twenty (20) characters
(alpha/numeric) to define a text or html type file to be used in conjunction
with display mechanisms on an Internet Web site. Keep in mind, when in
the UNIX operating system, filenames are case sensitive.
Item Image Filename
This field is used for an image filename up to twenty (20) characters
(alpha/numeric) to define image file to be used in conjunction with display
mechanisms on your local pc or an Internet Web site. Keep in mind, when
in the UNIX operating system, filenames are case sensitive. To utilize the
“View Image” feature on the Inventory Item, the image file must be in a
JPG or BMP format. The entire path name to where the image resides must
be included in this field. The default directory would be the Infinity
POWER program directory unless otherwise defined. You may use the
“Browse” button to look for and select the image file. Keep in mind, when
using the “View Image” feature the best results for image display would be
186 X 265 pixels.
Audio Filename
This field is used for an audio filename up to twenty (20) characters
(alpha/numeric) to define any type of audio file to be used in conjunction
with audio mechanisms on an Internet Web site. Keep in mind, when in the
UNIX operating system, filenames are case sensitive.
Video Filename
This field is used for a video filename up to twenty (20) characters
(alpha/numeric) to define any type of video file to be used in conjunction
with display mechanisms on an Internet Web site. Keep in mind, when in
the UNIX operating system, filenames are case sensitive.
Cost Layers
This button is designed to display the various cost layers accumulated for the quantities currently on hand. As the
following screen illustrates, the screen will show Item # for each unique cost layer based on a different price layer
that the item was purchased. The system will show the Cost Date, Description, Quantity of the item at that layer,
which vendor it was purchased from, the Vendor’s Invoice #, the unit cost and the total cost. The screen will
become a scrolling screen depending on how many layers of prices there are. This is an inquiry screen only and no
changes will be allowed.
Page 2-82
Set Up and Maintenance
Chapter 2
Point of Sale User Manual
Serial/Lot
When you click on the “Serial/Lot” button, the system is going to look at the costing method that is being used for
the specific item that is currently selected first. Only if the item is coded as either using Serialized or Lot Number
tracking will this button be active. If the item is one of these two choices, a new screen will be displayed showing a
listing of the various Serial Numbers or Lot Numbers that are currently in stock. Two columns will be displayed.
“Status” will indicate to the user if the specific Serial Number or Lot # is “RES” or reserved by an order in the
Sales Order Entry module. This means there are commitments for the item but it has not been removed (shipped)
from the inventory yet.
You may scroll up or down to review the listing of available numbers available in the system based on the current
quantity in stock. Click on the item you want and then click “OK.” Or, you may click “Cancel” to return to the
main item number screen.
If you click “OK” the following screen will appear displaying information on the specific Serial Number or Lot
Number.
Chapter 2
Set Up and Maintenance
Page 2-83
Point of Sale User Manual
This would include various information entered at the time of its receipt such as which bin it is located in, any
warranty information, or comments. For Serialized Items, obviously, the quantity on hand would be one. For Lot
#’s, the quantity can be variable. Click “OK” to exit this option to select another number or return to the main item
screen.
Location
When you click on the “Location” button, the system is going to look at all of the various inventory files that have
been defined in the menu option “Set Up Inventory Locations” to determine the current quantities “on-hand” and
“available” for the current item at each location on the screen. You must have pre-defined these locations in
advance for this option to function. The description of each location and its company number is also displayed.
Further, you must use the same item number across all locations for correct matching to occur in the system. If you
this done, users have an instant lookup at what inventory levels are available at all locations throughout the related
store locations or warehouses in the company’s system. The following screen illustrates how stock can be instantly
checked at four locations with one click of the mouse.
Page 2-84
Set Up and Maintenance
Chapter 2
Point of Sale User Manual
Once you have entered all the information for each item, click on “Save” and you are ready to input the next item.
Click on “Cancel” to exit the screen without saving any changes.
Results:
coIM1dy.dbf - Inventory Item File
- All Item Information is set up
- Cost Information is updated
- Historical Information is updated
coIM3.dbf - Assembly File
- Bill of Materials is Set Up
Change Mode [IM0402]
This option allows you to change all information for any inventory item. After initial set up, all cost and historical
information should be input through “Enter Transactions” in order to maintain an audit trail. If you have made any
mistakes during this set up process, you may return to the “Change Inventory Items” option to change any
information you have already entered.
First, you must navigate to the record you wish to change. You may find a record using the navigation tool bar or
click on the “Navigation” option on the Menu Bar and then the appropriate navigation option. If you are changing a
record, click on the “Modify the Current Record” button or choose the “Operation” option from the Menu Bar and
then “Change.” Make the changes required and click on the “Save” button to save your changes or click on the
“Cancel” button to cancel the changes made. Keep in mind that changes made through this option to any of the cost
layers in terms of quantities or dollar amounts do not print an audit trail or update any transaction registers. This is
not how you would enter new quantities into the system. A password is highly recommended for this option.
Results:
coIM1dy.dbf - Inventory Item File
- Item Information is updated
- Cost Information is updated
- Historical Information is updated
coIM3.dbf - Assembly File
- Bill of Materials is Updated
Delete Mode [IM0403]
This option allows you to delete inventory items. NOTE: You cannot delete an item which has a quantity on hand.
If you delete an item that has YTD sales or purchases information, it will distort some of your reports. This option
allows you to delete items you may have entered by mistake, or no longer want. Select the menu option “Delete
Inventory Items” and enter the item number you wish to delete.
First, you must navigate to the record you wish to delete. You may find a record using the navigation tool bar or
click on the “Navigation” option on the Menu Bar and then the appropriate navigation option. This option allows
you to delete accounts that you may have entered by mistake, or you no longer want. Click on the “Delete the
Current Record” button or choose the “Operation” option from the Menu Bar and then “Delete.” This will place
you into the “Delete” mode, then click on “Save” to validate your deletion of this record.
Make sure this is what you want to do, because once an item is deleted, it can not be retrieved.
Results:
coIM1dy.dbf - Inventory Item File
- Item Information is marked for Deletion
coIM3.dbf - Assembly File
- Bill of Materials is marked for Deletion
Chapter 2
Set Up and Maintenance
Page 2-85
Point of Sale User Manual
Copy Mode [IM0404]
This option allows you to set up new inventory items by copying existing ones. This option is very helpful in setting
up multiple locations or in renumbering your inventory items.
Using this option, the system provides a quick method of setting up items that are very similar. Many items may
only vary by color, size, or any other variable. The rest of the information relevant to these items may be exactly the
same. You are able to quickly create and enter new items into the file. This option will also save a considerable
amount of re-keying of the same information when setting up the same items for multiple locations or when
assigning new numbers to old inventory items.
First, you must navigate to the record you wish to copy from. You may find a record using the navigation tool bar or
click on the “Navigation” option on the Menu Bar and then the appropriate navigation option. Click on the “Create
a Record Based on the Current Record” button or choose the “Operation” option from the Menu Bar and then
“Copy.”
You will notice all the information, except for item number, will be copied to a new record. Enter the new item
number for this record. At this point, you may choose to edit any of the information or click on the “Save” button to
validate, which will then add it to the file.
Results:
coIM1dy.dbf - Inventory Item File
- All Item Information is set up
- Cost Information is updated
- Historical Information is updated
coIM3.dbf - Assembly File
- Bill of Materials is Set Up
SET UP INVOICE TEXT TEMPLATES
This section discusses the ways to add, change, delete and copy Invoice Text Templates. The Invoice Text Template
routines allow you to create text information and store it without having to manually enter the invoice text
information every time on each invoice you write. You may set up the invoice text information one time and
repeatedly use the same text over and over again when entering invoices for customers.
Invoice Text can be used to solicit a special sale to your customers or to give customers your store hours. It can be a
single line text message or a multiple (ten (10) lines of sixty (60) characters each) line text message.
When you create an Invoice Text Template, the system will automatically assign it a number and store it in the
Invoice Text Templates file. When you are writing invoices or credit memos you may select one of the two sales
codes, ".TEXT or ..TEXT" and the system will automatically look for any stored Invoice Text Templates. You
may choose from a list of available Invoice Text Templates or create one on the fly. If you select from the list of
available Invoice Text Templates, you will have the option of changing any information on that text for that line
item. Changes to Invoice Text Templates, while invoicing are not saved back to the original Invoice Text Template.
Add Mode (AR0435)
This option allows you to add a new Text Template. A Text Template is comprised of a name, a description and text
information (up to ten (10) lines of sixty (60) characters each) that your company can use on their invoices or during
Sales Order Entry.
Page 2-86
Set Up and Maintenance
Chapter 2
Point of Sale User Manual
The following is an explanation of each of the data items.
Template Name
The Template Name is a twenty (20) character alpha-numeric field. It can
be any combination of letters or numbers. However, keep in mind that
the file is sorted in alphabetically. When accessing the Text Template
File for search purposes it can be sorted by name or description.
Template Description
This field contains a thirty (30) character alpha-numeric field. This is the
description you wish to give this Text Template. Keep in mind that the
file is sorted in alphabetically. When accessing the Text Template File
for search purposes it can be sorted by name or description.
Text
This is a free form text area that is comprised of ten (10) lines of text at
sixty (60) characters each line. Enter any text you wish for the template.
When you have finished entering text, press the Page Down key to exit
the text box.
Then, click on the "Save" button to validate and save the Text Template.
Results:
coARC.dbf - Text Template File
- Text Template Information is Added
coARD.dbf - Text Template History File
- Text Template Information is Added
Change Mode (AR0436)
This option allows you to change information on an existing text template. If you have made any mistakes during
this set up process, you may return to the "Change A Text Template" option to change any information you have
already entered. Select the data item you want to change on the first overhead screen by either entering the Text
Template number and pressing TAB or use your up or down arrows to move around the screen to the data item you
want to change.
Make the change desired and press TAB to move to the validation prompt. Click on the "Save" button to validate
the text template when you are finished making all of your changes.
Results:
coARC.dbf –Text Template File
- Text Template Information is Updated
coARD.dbf –Text Template History File
- Text Template Information is Updated
Delete Mode (AR0437)
This option allows you to delete an existing text template. This option allows you to delete text templates you may
have entered by mistake or no longer want. Select the menu option "Delete a Text Template" and enter the text
template number you wish to delete. The text template will appear on the screen and the system will ask you to:
"Click on the "Save" button to delete the item above
(ESC to exit)."
Chapter 2
Set Up and Maintenance
Page 2-87
Point of Sale User Manual
Make sure this is what you want to do, because once a text template is deleted, it cannot be retrieved.
Results:
coARC.dbf – Text Template File
- Text Template is marked for Deletion
Copy Mode (AR0438)
This option allows you to create a new text template by copying the information from an existing one. Using this
option, the system provides a quick method of setting up text templates that are very similar. By using the "Copy an
Existing Text Template" menu option, you are able to quickly create and enter new text templates into the file.
First, enter the "Source" text template you want to copy from. Next, enter the new "Destination" text template to
copy to. The next screen will bring you the new text template and you will be in the "Change Mode" to make any
changes that would differ from the original source text template. The new text template is not actually added to the
file until you have clicked the "Save" button to validate from this screen.
Results:
coARC.dbf – Text Template File
- New Text Template Information is Set Up
Page 2-88
Set Up and Maintenance
Chapter 2
Point of Sale User Manual
CHAPTER 3
ENTER TRANSACTIONS
This section discusses the several different ways transactions may be entered into the Point of Sale module. These
transactions include writing invoices, recording returns, opening the register, recording sales code adjustments,
entering register balances and performing “Draft Capture Batch” functions. These options should not be utilized
until after the initial set up has been completed.
RECORD A QUICK SALE (PS0111)
This option allows you to record a quick sale and print the appropriate sales receipt. The sales receipt will print
according to the format that you specify in the “Master Configuration.” This option should be used to enter sales
transactions into the Point of Sale module when your customer needs a formal document printed. This method of
sales transaction entry allows the user the ease of scanning a bar code for each product being purchased or manually
entering the part number for up to two hundred (200) inventory items. If the option “Require Login” is turned on in
the Master Configuration, a small window will appear on the screen prompting you to enter the Register # that is to
be “logged” into this cash drawer. Enter the Register Number or press TAB to review near matches.
You may use the up or down arrows to scroll through the register file to make your selection. Press TAB and the
system will then prompt you for the "Password" for this register, if one was established. This password is assigned
during the setup of the register. If no password is assigned to a register, <click> on the "Login" button to continue.
The system will use "XXXXXXXXX" to cover the entry of any passwords for security purposes. If the password
entered does not match, then enter it again or select a different register number.
Keep in mind that this will be the default register number until this register "logs-out" or until another register is
"logged-in." The option to "log-in" and "log-out" are available by using the right <click> of the mouse and
selecting the Login/Logout options or simply using the combination keys (CTRL F9 and CTRL F10 keys
respectively).
The entry of quick sale transactions may be enhanced by the use of a bar code scanning device. By scanning the bar
code label on the item (labels may be produced from the Inventory module), the information about that item will
appear. The part number and description of the item will be displayed on the screen, as well as the retail price of the
item.
Chapter 3
Enter Transactions
Page 3-1
Point of Sale User Manual
The option "Record a Quick Sale" will only allow the entry of inventory part numbers.
NOTE
Enter either the actual Inventory Item # or Alternate SKU number. The system
will automatically cross reference the actual inventory item # and will display
it in this field.
The quantity is assumed to be one (1) and the item's current retail price will be used as the sales price. For items
having a greater quantity than one, that part number will need to be scanned multiple times, once for each individual
item. If you need to change the sales price or use "sales codes" in conjunction with inventory items, you must use
the option "Record a Sale/Print Receipt."
NOTE
This option is NOT available when automatic numbering of invoices is turned
off or when the "Default to Inventory Item" question is turned off in the
Master Configuration of Point of Sale. The system will automatically take you
into the "Record a Sale/Print Receipt" option so that you can specify the
invoice number and use sales codes in conjunction with inventory part
numbers.
If you have specified that you are interactive with Accounts Receivable, the system will ask for the customer
number for this transaction. Enter a customer number or <click> the Down Arrow (F2 by default) to scroll through
the customer file to make your selection. If the customer you have selected has an AR Code defined in their
customer file, this is the AR Code that will be used to define which Accounts Receivable account will be used to
process this transaction. Otherwise, the default Accounts Receivable account defined in the Accounts Receivable
Master Configuration will be used.
If the customer number selected matches the "Cash Customer Mask" specified in the Master Configuration, the
system will allow only cash type transactions. Otherwise, you may specify whether the transaction is cash or credit.
If you have specified that you are not interactive with Accounts Receivable, the system will immediately display the
data entry screen and allow only cash type transactions.
After you have selected the customer for this transaction (or immediately if you are not interactive with Accounts
Receivable), a screen will be displayed showing the detail entry information for this transaction.
Inventory Item Number
(Part Number)
Page 3-2
Enter Transactions
The field at the left side of the first line of data on each data
line is reserved for the inventory item number. The heading
for this field will be the heading set up in the Manufacturing
Inventory Management Master Configuration.
If the inventory item selected has a Unit of Measure
Conversion defined in the set up of the Inventory Item, a
window will appear with the available "units of measure" to
choose from.
The system will record the withdrawal of inventory in the
selected unit of measure format. The unit of measure format
selected will appear on the Sales Journal reports. However,
the inventory cost layers in the Inventory module will be
updated with the "stocking unit of measure" (lowest
common denominator) available (usually eaches) by using
the factor set up on the unit of measure conversion definition.
For more information on the Unit of Measure Conversion
procedure, refer to the "Set Up Inventory Items" section of
the Inventory manual. If you select an inventory item which
utilizes either a "Serial #" or "Lot #" type costing method,
the system will request additional information.
Chapter 3
Point of Sale User Manual
Since you are withdrawing inventory from stock, the system
will require the Serial Numbers or Lot Numbers to be
withdrawn.
The system is designed to sell Serial Number inventory in the
quantity of one (1). By entering a quantity of one (1) on Serial
Numbered items, this information will then be included as
part of this record in the Detailed Transaction file.
Once the item has been selected and it is a "Serial #" type
costing method, the system will prompt you for the Serial
Number. Please note that you can use a Bar Code Scanner at
this point to capture the Serial Number off of the product,
providing the manufacturer has it printed on the packaging.
Serial Number
A twenty (20) character (alpha/numeric) field which is used
to enter the Serial Number of the inventory item you are
withdrawing from stock. You may enter a valid Serial
Number for this inventory item or you may press the F2 key
to view a scrolling screen of the available Serial Numbers for
this item.
If the item selected is a "Lot #" type costing method, the
system will prompt you for a Lot Number. Enter a valid Lot
Number or press the F2 key to view a scrolling screen
containing all available Lot Numbers for this item. If you are
withdrawing from stock items that require separate Lot
Numbers, you should enter individual detail lines for each Lot
Number.
Lot Number
A twenty (20) character (alpha/numeric) field used to identify
a "likeness" of items being withdrawn from stock. This is
normally a "run" of products or color groups associated to
various types of products.
Unlike Serialized Items, Lot Number items can be stored with
multiple quantities. For example, you received four (4) cases
of red paint for resale, which was manufactured at two
different plants. The manufacturer marked on the cases the
Lot Numbers so that the paint can be sold in quantity with the
same dye match.
When you recorded the receipt of this stock, you entered it as
two separate line items or "cost layers," two (2) cases with
Lot Number "123" and two (2) cases with Lot Number
"789."
Description
This is a thirty (30) character (alphanumeric) field for the
description of the inventory item. You cannot override or reenter this description.
Chapter 3
Enter Transactions
Page 3-3
Point of Sale User Manual
Extended Price
Since there is only one item per line, the system automatically obtains the retail price of each item entered or
scanned.
Continue adding as many line items as desired (up to200 lines). Once you key in all items, <click> on the
"Process" button to validate this portion of the transaction. The system displays a window for identifying the
payment information for this transaction.
The screen displays the total amount of the transaction, the amount due and the change required. . You can select
any of the payment types that have been set up. If the payment type is set up as check, you will be able to enter a
check number, and if it is set up as credit card, it will take you to the credit card screen where you can enter the
credit card information and authorize it if connected to a credit card processor.
If your payment type is a credit card, then <click> the Process Credit Card button. Or you can <click> the
Charge to Account button to charge the customer’s account on file. The Credit Card Information screen displays.
Page 3-4
Enter Transactions
Chapter 3
Point of Sale User Manual
NOTE
A valid credit card must be entered. For security purposes the actual credit
number is not revealed in this example. If the CVV2 Code is “grayed” out,
this means that this option is not enabled in the Set Up Credit Card Processors
configuration.
<Click> the Authorization button after entering the complete credit card information to process the card.
NOTE
The purchase of the Infinity POWER Point of Sale module does not
guarantee your company access to a credit card approval and draft capture
network. Before you will be able to process automated credit card transactions
in the Advanced Point of Sale module, it is mandatory that you contact a
company that can provide you with electronic bank draft capture services
through MAPP (MasterCard Automated Point-of-Sale Program), NOVA or
IC Verify.
You may still use this module without the "Electronic Draft Capture" features to process sales until your system is
activated for EDC processing or, if for some reason, you are unable to obtain approval with a credit card network.
You may now <click> on the "Save" button to validate the transaction. A screen will appear with the "Invoice
Form" that is currently selected. You may enter another valid invoice form for the next series of transactions you
will enter.
After the form has been printed, you will be asked if you need to print the form again. You may print the form again
or <click> on OK to finalize the updating of all integrated files and prepare for the next transaction. Make sure to
complete this final step immediately; otherwise, you may have invoices that are printed, but haven't been updated or
reflected properly in the sales journal.
Results:
coAR1dy.dbf - Customer File (if credit sale)
- Customer History is Updated
- Customer Aging Totals are Updated
coAR2.dbf - Open Item File (if credit sale)
- Open Item Record is Added
coAR3dy.dbf - Transaction File
- Transaction Record is Added (optional)
coAR4dy.dbf - Transaction Detail File
- Transaction Detail Records Added (optional)
coAR5dy.dbf - Salesman File
- Salesman History is Updated
coAR7dy.dbf - Sales Code File
- Sales Code History is Updated
- Sales Code Current Amounts are Updated
coIM1dy.dbf - Inventory Item File
- Withdrawal Recorded (Return if a Refund)
- Historical Information Updated
coIM2dy.dbf - Inventory Transaction File
- Transaction Record Added (optional)
coIM6.dbf - Cost Layer File
- Updated Cost Layers with sale or return of stock
Chapter 3
Enter Transactions
Page 3-5
Point of Sale User Manual
RECORD A SALE/PRINT RECEIPT (PS0101)
This option allows you to record a sale and print the appropriate sales receipt. The sales receipt will print according
to the format that you specify in "Master Configuration." This option should be used to enter sales transactions
into the Point of Sale module when your customer needs a formal document printed. If the option "Require Login"
is turned on in the Master Configuration, a small window will appear on the screen prompting you to enter the
Register # that is to be "logged" into this cash drawer. Enter the Register Number or <click> the Down Arrow (F2
by default) to review near matches. You may use the up or down arrows to scroll through the register file to make
your selection. Press TAB and the system will then prompt you for the "Password" for this register if one was
established.
This password is assigned during the setup of the register. If no password is assigned to a register, <click> on the
"Login" button to continue. The system will use "XXXXXXXXX" to cover the entry of any passwords for security
purposes. If the password entered does not match, then enter it again or select a different register number.
Keep in mind that this will be the default register number until this register "logs-out" or until another register is
"logged-in." The options to "log-in" and "log-out" are available by right <clicking> on the mouse or using the
Combination Keys (CTRL F9 and CTRL F10 keys respectively).
If you have specified that you are interactive with Accounts Receivable, the system will ask for the customer
number for this transaction. Enter a customer number or <click> the Down Arrow (F2 by default) to scroll through
the customer file to make your selection.
Once you have made your selection, and if you have chosen to utilize the feature to "Display Customer
Comments," any comments on this customer's master file will be displayed on the screen. To continue, <click> on
the OK button and a screen will be displayed showing the customer number, name and the data items necessary to
record this transaction.
If the customer you have selected has an AR Code defined in their customer file and you have turned on the options
to "Allow Override of AR Sales Codes," in the Accounts Receivable Master Configuration, this is the AR Code
that will be used to define which Accounts Receivable account will be used to process this transaction. Otherwise,
the default Accounts Receivable account in the Accounts Receivable Master Configuration will be used.
If the customer number selected matches the "Cash Customer Mask" specified in the Master Configuration, the
system will allow only cash type transactions. Otherwise, you may specify whether the transaction is cash or credit.
Page 3-6
Enter Transactions
Chapter 3
Point of Sale User Manual
If you have specified that you are not interactive with Accounts Receivable, the system will immediately display the
data entry screen and allow only cash type transactions.
After you have selected the customer for this transaction (or immediately if you are not interactive with Accounts
Receivable), a screen will be displayed showing the overhead information for this transaction. If you have turned on
the feature "Begin Data Entry at Validation Prompt" in the Master Configuration, you may <click> on the
"Details" button to continue to the transaction detail screen or use your tab key to move to any of the data items that
you wish to change. Otherwise, the system will begin at the first data item to allow you to edit the default overhead
information.
The data items on the overhead screen are described as follows:
Customer
This is the name of the customer for this transaction. If you are
interactive with Accounts Receivable, the default value will be the
name of the customer selected from the customer file.
Address
This data item consists of the following data fields:
Address (Four lines of 30 characters each)
City (15 characters)
State (2 characters)
Zip (10 characters)
These fields contain the mailing address of the customer and are
completely optional. You may enter the address if you want the
information to appear on the sales receipt invoice (depending on the
form you select). If you are interactive with Accounts Receivable, the
default values will be the mailing address of the customer selected.
If you have elected to use "International Addresses" (a set up feature
in Global Functions) the system will include "Country," as a data
field in the address information for this company. The address
information will consist of four lines of thirty (30) characters for the
address, fifteen (15) characters for the city, fifteen (15) characters for
the state, fifteen (15) characters for the country and (10) ten characters
for the zip code.
For example:
Customer Name: ABC Company, Inc.
Address:
123 Main Street
Suite 1030
City:
Vancouver
State:
Brit. Columbia
Cntry:
Canada
Zip:
V6E4A2
Tax Rate
This is the tax rate number that will be used in the calculation of sales
tax for this transaction. The default will be tax rate number one, or the
tax rate set up for the customer, if you are interactive with Accounts
Receivable. Enter a tax rate or press the F2 key to scroll through the
tax rate file to make your selection. After the tax rate has been
selected, the tax rate description will be displayed below this data item.
This data item can be optionally turned off in the "Entry Screen
Configuration" option of the Master Configuration.
Salesman
This allows you to change the current salesman that is logged into the
system. The current salesman number is displayed in the top right
portion of the screen. This salesman will be the one recorded on all
transactions until he logs out and another salesman logs in. This data
item can be optionally turned off in the "Entry Screen Configuration"
option of the Master Configuration.
Chapter 3
Enter Transactions
Page 3-7
Point of Sale User Manual
Transaction Number
If the numbering sequence is set up in the Master Configuration, this
item will be set to "Automatic" and you will not be allowed to enter
this data item. The system will automatically use the sequence number
and then increment the number when the transaction is validated. If the
numbering sequence is turned off for this transaction, you must enter
the transaction number here. The number may be up to ten (10)
characters in length.
Discount Percent
This is the overall discount that will be given on this transaction. The
default will be 0%, or the discount set up for the customer, if you are
interactive with Accounts Receivable. The system will calculate this
discount on the total of the extended prices entered for this transaction.
This discount amount will be posted to the "Sales Discount" sales
code set up in the Master Configuration.
This data item can be optionally turned off in the "Entry Screen
Configuration" option of the Master Configuration.
Date Ordered
This is the date that the customer originally placed the order. You may
press ENTER to default to the current system date. This field will be
displayed on some invoice forms. This data item can be optionally
turned off in the "Entry Screen Configuration" option of the Master
Configuration.
Price Level
This is the price level in inventory that will be used when calculating
the unit price of inventory items. If you are not interactive with the
Manufacturing Inventory Management module, the system will display
"Not Applicable" and will not use this data item. If you are
interactive with Manufacturing Inventory Management, you may select
the price level or press the space bar ENTER to review a "Pop Up"
window to choose the price level. The default will be price level
number one, or the price level set up for the customer, if you are
interactive with Accounts Receivable.
After selecting the price level, the price level description will be
displayed below this data item. This data item can be optionally turned
off in the "Entry Screen Configuration" option of the Master
Configuration. Q
Freight Amount
This is the dollar amount of freight that you would like to charge this
customer for this transaction. This amount will be added to the net
amount of the invoice and will also be posted to the sales code for
freight that is set up in the Master Configuration. This data item can be
optionally turned off in the "Entry Screen Configuration" option of the
Master Configuration.
AR Sales Code
This data item will only be present on the data entry screen if you have
turned on the Accounts Receivable Master Configuration question,
"Allow Override of AR Sales Code." This option allows you to
select the Accounts Receivable account that will be used to process
this transaction through the use of AR Sales Codes.
If this option is available, the customer's default AR Sales Code will
appear, if one has been set up on their customer file.
You may <click> the Down Arrow (F2 by default) to select an AR
Sales Code or leave the field blank to default to the Accounts
Receivable account set up in the Accounts Receivable Master
Configuration.
Page 3-8
Enter Transactions
Chapter 3
Point of Sale User Manual
Transaction Description
This is a twenty (20) character field for the overall description of this
transaction. This field will be displayed on some invoice forms,
statement forms and sales journals. The default value will be
"Invoice" if you leave this field blank.
This data item may be optionally turned off in the Master
Configuration.
Sales Order Number
This is a reference number for your internal sales order for this
transaction. This field will be displayed on some invoice forms. This
data item can be optionally turned off in the "Entry Screen
Configuration" option of the Master Configuration.
Customer Purchase Number
This is a ten (10) character field for the customer's purchase order
number. This field will be displayed on some invoice forms. This data
item can be optionally turned off in the "Entry Screen Configuration"
option of the Master Configuration.
Special Instructions
This is a (20) twenty character field for a description of any special
instructions that may be necessary for this transaction. This field will
be displayed on some invoice forms. The description of this field on
the screen, and on some invoice forms, will be the description set up in
the Master Configuration for "Special Instructions." This field could
be used for such things as credit card number, authorization number,
etc., in the event the EDC capabilities are temporarily unavailable.
This data item can be optionally turned off in the "Entry Screen
Configuration" option of the Master Configuration.
After all data items on the overhead screen have been entered, you may
press the "Details" button to validate this portion of the transaction
and enter the detail of the sale.
At this time, the system will check the transaction file for duplicate
items. If there are no duplicates, you may proceed to the next screen.
The next screen displayed is a scrolling screen in which you may enter
the detail of the transaction. The top of this screen displays the total
amounts such as Subtotal, Subtotal after Discount, Tax, Freight and
Invoice Total.
The bottom portion of the screen is a scrolling window which allows
you two hundred lines of detail for the transaction. The following
describes each of the data items for each line of detail. Depending on
how you have the Master Configuration set for "Default to Inventory
Item" under the "Invoice Format," the order will vary for these data
items. The order described here assumes that the configuration is
turned off.
Chapter 3
Enter Transactions
Page 3-9
Point of Sale User Manual
Details
The following describes each of the data items for each line of detail.
Sales Code
This is the sales code, which classifies the sale for this line.
You may enter the sales code or press TAB to scroll through
the sales code file.
The ".TEXT" sales codes work during invoicing in Accounts Receivable to allow free form text notes that will
print on the invoices. This replaces the need to use "." and ".." sales codes where the limit of characters per line is
only thirty (30) characters each. This option allows ten (10) lines of free form text for each ".TEXT" sales code
entered which is centered on the invoice form and is sixty (60) characters wide and uses an auto-wrap feature during
data entry.
Further, although the ".TEXT" sales code may be up to ten (10) lines in length, each one only uses a single line
during data entry so as not to consume all of the lines of the invoices’ detail section. Multiple ".TEXT" sales codes
can be used for each invoice. This is ideal for highly descriptive invoice writing capabilities.
The ".TEXT" sales code can be used as a "template" for repeated use. Templates can store any information that
will be repeated on a series of invoices. This option allows users to create standard groups of text statements that
can be used repetitively on invoices and sales orders and selected during invoicing and Sales Order Entry without
having to re-key the same information into the system time and again. This would be ideal for items such as
warranty statements, support policies, return policies and much more!
There are both ".TEXT" and "..TEXT" sales codes which are added to each system when the company’s data files
are created from scratch. The codes can be used similar to the use of all other sales codes in the system. A single
dot sales code does not have to be attached to any inventory items whereas double dot sales code items are
associated to the previous inventory item entered into the system.
If you are creating a new company from scratch, these two sales code variations will be created automatically by the
software. For existing Infinity POWER users upgrading from a prior version, these sales codes have to be added
manually to each company that you are processing in. No other data such as, General Ledger account numbers and
such are required to be setup.
However, existing users will have to "pack" their data files first before they will have access to this option. To
"pack" your data files, select the menu option, "Maintain Data Files," and select "**ALL FILES**."
If you are interactive with Manufacturing Inventory Management, you may press the TAB key to retrieve an item
from inventory. If you press TAB, a window will appear asking for the "Inventory Item Number."
NOTE
Enter either the actual Inventory Item # or Alternate SKU number. The system
will automatically cross reference the actual inventory item # and will display
it in this field.
If the inventory item selected has a Unit of Measure Conversion defined in the set up of the Inventory Item, a
window will appear with the available "units of measure" to choose from. The system will record the withdrawal
of inventory in the selected unit of measure format. The unit of measure format selected will appear on the Sales
Journal reports.
However, the inventory cost layers in the Inventory module will be updated with the "stocking unit of measure"
(lowest common denominator) available (usually eaches) by using the factor set up on the unit of measure
conversion definition. For more information on the Unit of Measure Conversion procedure, refer to the "Set Up
Inventory Items" section of the Inventory manual. If you select an inventory item which utilizes either a "Serial
#" or "Lot #" type costing method, the system will request additional information. Since you are withdrawing
inventory from stock, the system will require the Serial Numbers or Lot Numbers to be withdrawn. The system is
designed to sell Serial Number inventory in the quantity of one (1). By entering a quantity of one (1) on Serial
Numbered items this information will then be included as part of this record in the Accounts Receivable Detailed
Transaction file.
Page 3-10
Enter Transactions
Chapter 3
Point of Sale User Manual
You may enter more than a quantity of one. However, you lose the capability of including individual Serial
Numbers on several reports in the Accounts Receivable module. Only the last Serial Number entered for a given
inventory sale line, with a quantity greater than one, will be included on the available reporting.
All inventory records and files are updated with all pertinent information on all Serial Numbers. Therefore all detail
reporting on Serial Numbers and Lot Numbers can be accessed from the Inventory module. Once the item has been
selected and it is a "Serial #" type costing method, the system will prompt you for the Serial Number. Please note
that you can use a Bar Code Scanner at this point to capture the Serial Number off of the product, providing the
manufacturer has printed one on the packaging. The Serial Number is a twenty (20) character (alpha/numeric) field
which is used to enter the Serial Number of the inventory item you are withdrawing from stock. You may enter a
valid Serial Number for this inventory item or you may press TAB to view a scrolling screen of the available Serial
Numbers for this item.
If you are planning to use a quantity greater than one (1) on serialized items, during the validation and update of the
transaction, you will be prompted for a Serial Number for each of the quantity of items you are withdrawing once
you validate the transaction. If the quantity to withdraw is ten, then you will be prompted for ten Serial Numbers.
If the item selected is a "Lot #" type costing method, the system will prompt you for a Lot Number. Enter a valid
Lot Number or press the TAB key to view a scrolling screen containing all available Lot Numbers for this item.
If you are withdrawing from stock items that require separate Lot Numbers, you should enter individual detail lines
for each Lot Number. The Lot Number is a twenty (20) character (alpha/numeric) field used to identify a
"likeness" of items being withdrawn from stock. This is normally a "run" of products or color groups associated to
various types of products.
Unlike Serialized Items, Lot Number items can be stored with multiple quantities. For example, you received four
(4) cases of red paint for resale, which was manufactured at two different plants. The manufacturer marked on the
cases the Lot Numbers so that the paint can be sold in quantity with the same dye match. When you recorded the
receipt of this stock, you entered it as two separate line items or "cost layers," two (2) cases with Lot Number
"123" and two (2) cases with Lot Number "789."
Selling these types of items may be done one of two ways. The first, by entering the total quantity you are selling.
The system will request a Lot Number. If there is not enough stock in the Lot Number requested, during the
validation and update of the transaction, it will continue to ask for additional Lot Numbers until the quantity entered
has been sufficed. The second way is to separate out the quantities by line item so that Lot Numbers can be
distinguished for each line item.
Once the item number has been selected, the system will set the sales code to the one set up in the Inventory Item
File for this particular item. If this item's default sales code is non-existent, then you will be allowed to select a near
match. If an inventory item is selected, the system then checks the customer file to verify if a price plan has been
assigned which contains this specific inventory item. If this item has been defined in a price plan that has been
assigned to this customer, it then confirms any minimum or maximum quantity criteria and retrieves the calculated
price for the unit price field automatically. Once the item number has been selected, the system will set the sales
code to the one set up in the Inventory Item File for this particular item. If this item's default sales code is nonexistent, then you will be allowed to select a near match.
The Advanced Security Administrator module also provides an advanced "Security Object" for use with this
option which provides management with the ability to control whether users will be allowed to sell items that are in
stock or not. This is a decision that must be made on a "company by company" basis. It is not uncommon in many
industries where there is only a quantity of one of an item that overselling the item would be a major problem (i.e.
jewelry). The Point of Sale module also provides an advanced option which allows for the ability to "Record Cost
of Sale Adjustments" for those transactions where the actual quantities were not in stock at the time of the sale.
However, the quantities were later received and these adjustments could be made which allows the system to update
the Sales Journal for the appropriate amount of Cost of Sales to the specific and affected invoiced customer
transactions. In some companies, their receiving docks cannot always keep up with the receipt of their inventory.
Therefore, they have the products and customers ready to take delivery of those products and they do not want to
slow down the billing of those products. Therefore, even if this option warns them that the quantity on hand is less
that what is being invoiced, the user may be allowed to proceed because management knows they will adjust the
system at some point in time in the future when receiving catches up.
Chapter 3
Enter Transactions
Page 3-11
Point of Sale User Manual
In light of these scenarios, the Advanced Security Administrator provides management with the advanced tools to
configure the system to run based on their specific needs. The system can be set to never allow an item to be sold if
the quantity on hand is less than what is being invoiced. Or, it can be set to allow it to be invoiced but only if a
Manager’s Authorization password is entered into the system providing the authorization necessary to proceed. Or,
the system may be configured to allow the users to proceed in all cases.
Again, this is an Advanced Security Administrator module security object called "IM ONHAND" which requires
that the Advanced Security Administrator module be fully deployed to take advantage of this feature. It must be
setup in advance to provide the proper level security depending on what this company’s management desires.
NOTE
The Master Configuration option allows you to change this field to default to
the Inventory Item instead of the sales code. This may be preferable if the
majority of sales are inventory or if you will be using a bar code reader to
enter the item numbers.
If the sales code selected has a period "." as the first character of the sales code, the system will recognize this as a
description line only. In this case, you will be allowed to enter only the description line and then move to the next
line of data. This gives you the flexibility to create as descriptive an invoice as you desire.
You may also mix various lines of descriptions. In other words, lines of descriptions do not have to all be in one
single order. Therefore, you may enter an inventory item, and then enter a line of description only. Then you may
add another item and six lines of description and so on.
If you are not integrated with the Manufacturing Inventory Management module, and you have selected a sales code
to describe this line item you are selling, certain defaults may appear according to how this sales code was set up.
The defaults that are available during set up of a sales code are unit of measure, unit cost, unit sales price and JC
Cost Code. You may choose to accept these defaults or you may override these fields.
Description
This is a thirty (30) character (alpha/numeric) field for the description
you would enter for this line of the transaction. If you press TAB, the
description will default to the description of the sales code. If you are
interactive with Manufacturing Inventory Management and you have
selected an inventory item for this line, this description will be the
description of the inventory item and you will not be allowed to change
this field.
Tax
This check box indicates whether or not this item is taxable. The
default value will be the value set up for the sales code of this line.
You will not be allowed to change this data item unless you have
turned on the option to "Override Tax by Line" in the Master
Configuration. If the check box has been checked, then the line item is
taxable.
Quantity
This is the quantity of the item you are billing. The format of this field
will be the number of decimal places that you have specified for unit
price in the Master Configuration. If the current transaction is a credit
memo, this quantity will be assumed to be a negative number. If you
are interactive with Manufacturing Inventory Management, this is the
quantity that will be removed from the Quantity On-Hand for the
inventory item.
If you are utilizing the "Unit of Measure Conversion" feature, you
will want to enter the quantity based on the unit of measure you have
selected to use on this line item. Do NOT enter the quantity as the
"stocking unit of measure" if you have chosen an alternative unit of
measure.
Page 3-12
Enter Transactions
Chapter 3
Point of Sale User Manual
If you have set the "Verify Quantity Available" field in the master
configuration to be turned on, the system will check the inventory file
to see if there is enough quantity on hand or available to remove the
quantity entered. If you have set the "Verify Quantity Available"
field to be turned on, and the "Exclude On Order on Quantity
Check" field in the Master Configuration to be turned on, the system
will exclude any On Order quantities from the Quantity Check.
If there is insufficient quantity on hand or available, a "Pop Up"
windows will be displayed from which you may elect to re-enter the
quantity, choose from alternative part numbers that have been set up
for this item, or you may continue with the billing.
The number of choices in this window will depend based on the
number of alternative part numbers you have set up for each inventory
item.
If you elect to bill more than the quantity on hand, the quantity above
the on hand quantity will be placed in the "Quantity to Adjust" field
for the inventory item. You would then need to use the option to
"Record Cost of Sale Adjustments" after the items you oversold have
been received. Otherwise, none of your sales journals, commission
reports, and inventory profit margin reports will be accurate.
It is very important to understand this concept prior to just proceeding
and selling items that are not in stock. All of these calculations are
based on a "known" cost amount. When items are oversold, only the
cost of those quantities in stock are "known." All others are recorded
at zero cost.
Therefore, profitability is grossly overstated until the Cost of Sale
adjustment is made. If you are paying commissions based on the
profitability of the sale, you may be paying far more than what you
should.
U/M
This is a four (4) character field for the unit of measure for this item. If
you are interactive with Manufacturing Inventory Management, this
will default to the unit of measure set up for the inventory item
selected. If you are interactive with Manufacturing Inventory
Management and you are not using the "Unit of Measure
Conversion" feature, this will default to the unit of measure set up for
the inventory item. Otherwise, the unit of measure field will contain
the unit of measure selected for the specific unit of measure conversion
for this item(s).
Unit Price
This is the unit price of the item being billed. This will be multiplied
by the quantity to calculate the extended price. If you are interactive
with Manufacturing Inventory Management, the unit price will be
calculated from the price level you have selected for this transaction
and the price table for the inventory item. All quantity breaks will be
automatically calculated, if applicable. You may also press the F2
function key to change the price level for this item only. If you have
turned on the feature "Allow Line Item Price Changes" in the Master
Configuration, you will be allowed to override the calculated unit
price, if necessary.
If you are utilizing the special Price Plan feature that is set up in
Inventory module and have assigned this customer one or more Price
Plans to be used, if the criteria is met based on the assign Price Plan for
this customer, then the system will automatically place the customized
price in this field.
Chapter 3
Enter Transactions
Page 3-13
Point of Sale User Manual
Discount %
This is the percent discount that will be given on this line when
calculating extended price. If you have set the "Allow Discount % by
Line" field in the Master Configuration to be turned on, you will be
allowed to enter a percent here. Otherwise, the system will skip this
data item. If you desire to utilize a "cost plus" type of pricing
mechanism for your customers, you may set one of your inventory
price levels up as "cost" and issue a "negative discount" at this point.
By doing so, the system will take whatever the price is based on the
price level and mark it up according to the amount entered. For
instance, a negative discount of "-20%" would make the sale price of
an item based at $10.00, equal to $12.00.
Extended Price
This is the calculated extended price for this line of the transaction.
When you have entered all detail lines necessary for this transaction,
you may <click> on the "Save" button to return to the overhead
screen.
Additional Cost of Sales
The "Add. COS" button allow you to enter the additional cost of sales
amount for this transaction. This may be used if you are not interactive
with Manufacturing Inventory Management or if you are billing the
customer for an item not currently in the inventory file. The sales
journal and commission reports that you may print later will include
this cost and will calculate a gross profit amount and percentage. Using
this field for non-inventory type sales will insure accurate gross profit
calculations on these reports. The system will display a small window
which will allow you to enter the additional cost of sales amount and
sales code. This sales code will be used when posting the cost amount
to the sales code file. You may <click> the Down Arrow (F2 by
default) to scroll through the sales code file to make your selection.
When you have entered the additional cost of sales amount for this
transaction, you may <click> on the "Save" button to return to the
overhead screen.
Scheduled Payment
This data item will allow you to specify that you want to schedule a set
of payments for the invoice rather than use the invoice terms. If you
have specified "None" as the "Scheduled Payment Type" in the
Master Configuration, the system will skip over this question. If you
enter (Y)es, the system will display a small window from which you
may specify how you want the invoice amount scheduled into
payments. The three data items are discussed here.
Number of Payments
This indicates how many payments the invoice will be divided into.
The net amount of the invoice (minus the down payment) will be
divided by this number to determine the amount of each payment. Any
rounding error will be added to, or subtracted from, the first payment.
Day of Month for Each
Payment
This data item defines when each payment will be due. The due date
for the first payment will follow the terms definition on the invoice.
This item will contain either which day of the month each additional
payment will be due, or how may days apart each additional payment
will be (if you have specified "Specific Number of Days" as the
Scheduled Payment Type).
You may now <click> on the "Process" button to validate the transaction and display a window for identifying how
the payment will be made for this transaction. The screen will automatically display the total amount of the
transaction, the amount due, and the change required. The system will first ask for the number of pay types.
Page 3-14
Enter Transactions
Chapter 3
Point of Sale User Manual
You can select any of the payment types that have been set up. If the payment type is set up as check, you will be
able to enter a check number, and if it is set up as credit card, it will take you to the credit card screen where you can
enter the credit card information and authorize it if connected to a credit card processor.
NOTE
For credit cards that dial out for authorization, these payment types should
specify this function in the description of the Payment Type. Ex: Visa Dialed
or *Visa. As long as the description is clear to the user which card dial out
and which do not.
If your payment type is a credit card, then <click> the Process Credit Card button. The Credit Card Information
screen displays. Enter the credit card information. If you do not have Credit Card Processing setup, you can still
enter a valid credit card if you have an authorization number and it will still post.
Chapter 3
Enter Transactions
Page 3-15
Point of Sale User Manual
NOTE
A valid credit card must be entered. For security purposes the actual credit
number is not revealed in this example. If the CVV2 Code is “grayed” out,
this means that this option is not enabled in the Set Up Credit Card Processors
configuration.
<Click> the Authorization button after entering the complete credit card information to process the card.
If a user wants to charge to a customer and that customer is not a “cash customer” the user must have security rights
to “charge to account”. Any amount of the sale not paid for by a payment type will be allowed to be charged to the
customer’s account when you validate the transaction. You will be allowed to do this if the customer has not
exceeded their credit limit.
NOTE
You can either set up a payment type named “Charge” with the sales code
“.” associated with that payment type and zero out the amount or you can
delete the entire payment line and save. You will need to Update Company
Rights for each company you want this security object to apply and also
assign this security object to the Users/Groups you want to have access to
“Charge”.
If the EDC capability has been enabled, the EDC procedure will take you to another screen and begin dialing out for
an authorization on the credit card. If you have a "card reader" device connected to your machine, you may slide
the credit card through the reader at this time or type in the credit card numbers and expiration date on the keyboard.
The expiration date must be entered in as MMYY (e.g., "1204" for December of 2004).
The system will return with either an error condition (discussed on the next page) or, if the transaction is successful,
an approval number and a transaction reference number. Both of these items will print on the receipt. After the
customer has signed the receipt, he will retain the carbon (bottom) copy, while the top copy is kept for your records.
NOTE
The purchase of the Infinity POWER Point of Sale module does not
guarantee your company access to a credit card approval and draft capture
network. Before you will be able to process automated credit card transactions
in the Advanced Point of Sale module, it is mandatory that you contact a
company that can provide you with electronic bank draft capture services
through MAPP (MasterCard Automated Point-of-Sale Program), NOVA or
IC Verify.
You may still use this module without the "Electronic Draft Capture" features to process sales until your system is
activated for EDC processing or, if for some reason, you are unable to obtain approval with a credit card network.
You may now <click> on the "Save" button to validate the transaction. A screen will appear with the "Invoice
Form" that is currently selected. You may enter another valid invoice form for the next series of transactions you
will enter.
After the form has been printed, you will be asked if you need to print the form again. You may print the form again
or <click> on OK to finalize the updating of all integrated files and prepare for the next transaction. Make sure to
complete this final step immediately; otherwise, you may have invoices that are printed, but haven't been updated or
reflected properly in the sales journal.
Page 3-16
Enter Transactions
Chapter 3
Point of Sale User Manual
Results:
coAR1dy.dbf - Customer File (if credit sale)
- Customer History is Updated
- Customer Aging Totals are Updated
coAR2.dbf - Open Item File (if credit sale)
- Open Item Record is Added
coAR3dy.dbf - Transaction File
- Transaction Record is Added (optional)
coAR4dy.dbf - Transaction Detail File
- Transaction Detail Records Added (optional)
coAR5dy.dbf - Salesman File
- Salesman History is Updated
coAR7dy.dbf - Sales Code File
- Sales Code History is Updated
- Sales Code Current Amounts are Updated
coIM1dy.dbf - Inventory Item File
- Withdrawal Recorded (Return if a Refund)
- Historical Information Updated
coIM2dy.dbf - Inventory Transaction File
- Transaction Record Added (optional)
coIM6.dbf - Cost Layer File
- Updated Cost Layers with sale or return of stock
RECORD A RETURN/REFUND (PS0102)
This option allows you to record a return and/or refund. The return will automatically update inventory (if
interactive). This option may be used to record the return of merchandise and/or a refund to a customer. The
information necessary to execute this option is the same as the information in the option "Record a Sale & Print
Receipt." However, this option will assume a negative quantity and/or extended price on each detail line of the
transaction. In addition, at the completion of this transaction the system will tell you what dollar amount should be
refunded to your customer.
All other aspects of this option are identical to the "Record a Sale & Print Receipt" option. They are discussed
again here for your review. If the option "Require Login" is turned on in the Master Configuration, a small window
will appear on the screen prompting you to enter the Register # that is to be "logged" into this cash drawer. Enter
the Register Number or press <click> the Down Arrow (F2 by default) to review near matches. You may use the up
or down arrows to scroll through the register file to make your selection. Press TAB and the system will then prompt
you for the "Password" for this register if one was established.
This password is assigned during the setup of the register. If no password is assigned to a register, <click> on the
"Login" button to continue. The system will use "XXXXXXXXX" to cover the entry of any passwords for security
purposes. If the password entered does not match, then enter it again or select a different register number.
Keep in mind that this will be the default register number until this register "logs-out" or until another register is
"logged-in." The options to "log-in" and "log-out" are available by right <clicking> the mouse and selecting the
option or using the Combination Keys (CTRL F9 and CTRL F10 keys respectively).
If you have specified that you are interactive with Accounts Receivable, the system will ask for the customer
number for this transaction. Enter a customer number or <click> the Down Arrow (F2 by default) key to scroll
through the customer file to make your selection.
Chapter 3
Enter Transactions
Page 3-17
Point of Sale User Manual
Once you have made your selection, and if you have chosen to utilize the feature to "Display Customer
Comments," any comments on this customer's master file will be displayed on the screen. To continue, <click> on
the OK button and a screen will be displayed showing the customer number, name and the data items necessary to
record this transaction.
If the customer you have selected has an AR Code defined in their customer file and you have answered the question
"Allow Override of AR Sales Codes," (Y)es in the Accounts Receivable Master Configuration, this is the AR
Code that will be used to define which Accounts Receivable account will be used to process this transaction.
Otherwise, the default Accounts Receivable account in the Accounts Receivable Master Configuration will be
used.
If the customer number selected matches the "Cash Customer Mask" specified in the Master Configuration, the
system will allow only cash type transactions. Otherwise, you may specify whether the transaction is cash or credit.
If you have specified that you are not interactive with Accounts Receivable, the system will immediately display the
data entry screen and allow only cash type transactions.
After you have selected the customer for this transaction (or immediately if you are not interactive with Accounts
Receivable), a screen will be displayed showing the overhead information for this transaction.
If you have turned on the feature "Begin Data Entry at Validation Prompt" in the Master Configuration, you may
press the "Details" button to continue to the transaction detail screen or use your arrow keys to move to any of the
data items that you wish to change. Otherwise, the system will begin at the first data item to allow you to edit the
default overhead information.
The data items on the overhead screen are described as follows:
Customer
This is the name of the customer for this transaction. If you are interactive with
Accounts Receivable, the default value will be the name of the customer selected
from the customer file.
Address
This data item consists of the following data fields:
Address (Four lines of 30 characters each)
City (15 characters)
State (2 characters)
Zip (10 characters)
These fields contain the mailing address of the customer and are completely
optional. You may enter the address if you want the information to appear on the
sales receipt invoice (depending on the form you select). If you are interactive
with Accounts Receivable, the default values will be the mailing address of the
customer selected.
If you have elected to use "International Addresses" (a set up feature in Global
Functions) the system will include "Country," as a data field in the address
information for this company. The address information will consist of four lines of
thirty (30) characters for the address, fifteen (15) characters for the city, fifteen
(15) characters for the state, fifteen (15) characters for the country and (10) ten
characters for the zip code.
For example:
Customer Name: ABC Company, Inc.
Address:
123 Main Street
Suite 1030
City:
Vancouver
State:
Brit. Columbia
Cntry:
Canada
Zip:
V6E4A2
Page 3-18
Enter Transactions
Chapter 3
Point of Sale User Manual
Tax Rate
This is the tax rate number that will be used in the calculation of sales tax for this
transaction. The default will be tax rate number one, or the tax rate set up for the
customer, if you are interactive with Accounts Receivable. Enter a tax rate or
press the F2 key to scroll through the tax rate file to make your selection. After
the tax rate has been selected, the tax rate description will be displayed below this
data item. This data item can be optionally turned off in the "Entry Screen
Configuration" option of the Master Configuration.
Salesman
This allows you to change the current salesman that is logged into the system. The
current salesman number is displayed in the top right portion of the screen. This
salesman will be the one recorded on all transactions until he logs out and another
salesman logs in. This data item can be optionally turned off in the "Entry Screen
Configuration" option of the Master Configuration.
Transaction
Number
If the numbering sequence is set up in the Master Configuration, this item will be
set to "Automatic" and you will not be allowed to enter this data item. The
system will automatically use the sequence number and then increment the
number when the transaction is validated. If the numbering sequence is turned off
for this transaction, you must enter the transaction number here. The number may
be up to ten (10) characters in length.
Discount Percent
This is the overall discount that will be given on this transaction. The default will
be 0%, or the discount set up for the customer, if you are interactive with
Accounts Receivable. The system will calculate this discount on the total of the
extended prices entered for this transaction. This discount amount will be posted
to the "Sales Discount" sales code set up in the Master Configuration.
This data item can be optionally turned off in the "Entry Screen Configuration"
option of the Master Configuration.
Date Ordered
This is the date that the customer originally placed the order. You may press
ENTER to default to the current system date. This field will be displayed on some
invoice forms. This data item can be optionally turned off in the "Entry Screen
Configuration" option of the Master Configuration.
Price Level
This is the price level in inventory that will be used when calculating the unit
price of inventory items. If you are not interactive with the Manufacturing
Inventory Management module, the system will display "Not Applicable" and
will not use this data item. If you are interactive with Manufacturing Inventory
Management, you may select the price level or press the space bar ENTER to
review a "Pop Up" window to choose the price level. The default will be price
level number one, or the price level set up for the customer, if you are interactive
with Accounts Receivable.
After selecting the price level, the price level description will be displayed below
this data item. This data item can be optionally turned off in the "Entry Screen
Configuration" option of the Master Configuration.
Freight Amount
This is the dollar amount of freight that you would like to charge this customer for
this transaction. This amount will be added to the net amount of the invoice and
will also be posted to the sales code for freight that is set up in the Master
Configuration. This data item can be optionally turned off in the "Entry Screen
Configuration" option of the Master Configuration.
Chapter 3
Enter Transactions
Page 3-19
Point of Sale User Manual
AR Sales Code
This data item will only be present on the data entry screen if you have turned on
the Accounts Receivable Master Configuration question, "Allow Override of
AR Sales Code." This option allows you to select the Accounts Receivable
account that will be used to process this transaction through the use of AR Sales
Codes.
If this option is available, the customer's default AR Sales Code will appear, if one
has been set up on their customer file.
You may press <click> the Down Arrow (F2 by default ) to select an AR Sales
Code or leave the field blank to default to the Accounts Receivable account set up
in the Accounts Receivable Master Configuration.
Transaction
Description
This is a twenty (20) character field for the overall description of this transaction.
This field will be displayed on some invoice forms, statement forms and sales
journals. The default value will be "Invoice" if you leave this field blank. This
data item may be optionally turned off in the Master Configuration.
Sales Order
Number
This is a reference number for your internal sales order for this transaction. This
field will be displayed on some invoice forms. This data item can be optionally
turned off in the "Entry Screen Configuration" option of the Master
Configuration.
Customer
Purchase Number
This is a ten (10) character field for the customer's purchase order number. This
field will be displayed on some invoice forms. This data item can be optionally
turned off in the "Entry Screen Configuration" option of the Master
Configuration.
Special
Instructions
This is a (20) twenty character field for a description of any special instructions
that may be necessary for this transaction. This field will be displayed on some
invoice forms. The description of this field on the screen, and on some invoice
forms, will be the description set up in the Master Configuration for "Special
Instructions." This field could be used for such things as credit card number,
authorization number, etc., in the event the EDC capabilities are temporarily
unavailable. This data item can be optionally turned off in the "Entry Screen
Configuration" option of the Master Configuration.
After all data items on the overhead screen have been entered, you may press the "Details" button to validate this
portion of the transaction and enter the detail of the sale.
At this time, the system will check the transaction file for duplicate items. If there are no duplicates, you may
proceed to the next screen. The next screen displayed is a scrolling screen in which you may enter the detail of the
transaction. The top of this screen displays the total amounts such as Subtotal, Subtotal after Discount, Tax, Freight
and Invoice Total.
The bottom portion of the screen is a scrolling window which allows you two hundred lines of detail for the
transaction. The following describes each of the data items for each line of detail. Depending on how you have the
Master Configuration set for "Default to Inventory Item" under the "Invoice Format," the order will vary for these
data items. The order described here assumes that the configuration is turned off.
Page 3-20
Enter Transactions
Chapter 3
Point of Sale User Manual
Details
The following describes each of the data items for each line of detail.
Sales Code
This is the sales code which classifies the sale for this line. You may enter the sales
code or press F2 to scroll through the sales code file.
NOTE
The Master Configuration option allows you to change this field to default to
the Inventory Item instead of the sales code. This may be preferable if the
majority of sales are inventory or if you will be using a bar code reader to
enter the item numbers.
If the sales code selected has a period "." as the first character of the sales code, the system will recognize this as a
description line only. In this case, you will be allowed to enter only the description line and then move to the next
line of data. This gives you the flexibility to create as descriptive an invoice as you desire.
You may also mix various lines of descriptions. In other words, lines of descriptions do not have to all be in one
single order. Therefore, you may enter an inventory item, and then enter a line of description only. Then you may
add another item and six lines of description and so on.
If you are not integrated with the Manufacturing Inventory Management module, and you have selected a sales code
to describe this line item you are selling, certain defaults may appear according to how this sales code was set up.
The defaults that are available during set up of a sales code are unit of measure, unit cost, unit sales price and JC
Cost Code. You may choose to accept these defaults or you may override these fields.
Inventory Item Number
The heading for this field will be the heading set up in the Manufacturing
Inventory Management Master Configuration. If the inventory item
selected has a Unit of Measure Conversion defined in the set up of the
Inventory Item, a window will appear with the available "units of
measure" to choose from. The system will record the withdrawal of
inventory in the selected unit of measure format. The unit of measure
format selected will appear on the Sales Journal reports.
However, the inventory cost layers in the Inventory module will be
updated with the "stocking unit of measure" (lowest common
denominator) available (usually eaches) by using the factor set up on the
unit of measure conversion definition. For more information on the Unit
of Measure Conversion procedure, refer to the "Set Up Inventory Items"
section of the Inventory manual.
If you select an inventory item which utilizes either a "Serial #" or "Lot #" type costing method, the system will
request additional information. Since you are withdrawing inventory from stock, the system will require the Serial
Numbers or Lot Numbers to be withdrawn. The system is designed to sell Serial Number inventory in the quantity
of one (1). By entering a quantity of one (1) on Serial Numbered items this information will then be included as part
of this record in the Accounts Receivable Detailed Transaction file.
You may enter more than a quantity of one, however, you lose the capability of including individual Serial Numbers
on several reports in the Accounts Receivable module. Only the last Serial Number entered for a given inventory
sale line, with a quantity greater than one, will be included on the available reporting.
All inventory records and files are updated with all pertinent information on all Serial Numbers. Therefore all detail
reporting on Serial Numbers and Lot Numbers can be accessed from the Inventory module. Once the item has been
selected and it is a "Serial #" type costing method, the system will prompt you for the Serial Number.
Chapter 3
Enter Transactions
Page 3-21
Point of Sale User Manual
Please note that you can use a Bar Code Scanner at this point to capture the Serial Number off of the product,
providing the manufacturer has printed one on the packaging. The Serial Number is a twenty (20) character
(alpha/numeric) field which is used to enter the Serial Number of the inventory item you are withdrawing from
stock. You may enter a valid Serial Number for this inventory item or you may press ENTER to view a scrolling
screen of the available Serial Numbers for this item.
If you are planning to use a quantity greater than one (1) on serialized items, during the validation and update of the
transaction, you will be prompted for a Serial Number for each of the quantity of items you are withdrawing once
you validate the transaction. If the quantity to withdraw is ten, then you will be prompted for ten Serial Numbers.
If the item selected is a "Lot #" type costing method, the system will prompt you for a Lot Number. Enter a valid
Lot Number or press the ENTER key to view a scrolling screen containing all available Lot Numbers for this item.
If you are withdrawing from stock items that require separate Lot Numbers, you should enter individual detail lines
for each Lot Number.
The Lot Number is a twenty (20) character (alpha/numeric) field used to identify a "likeness" of items being
withdrawn from stock. This is normally a "run" of products or color groups associated to various types of products.
Unlike Serialized Items, Lot Number items can be stored with multiple quantities. For example, you received four
(4) cases of red paint for resale, which was manufactured at two different plants. The manufacturer marked on the
cases the Lot Numbers so that the paint can be sold in quantity with the same dye match. When you recorded the
receipt of this stock, you entered it as two separate line items or "cost layers," two (2) cases with Lot Number
"123" and two (2) cases with Lot Number "789."
Selling these types of items may be done one of two ways. The first, by entering the total quantity you are selling.
The system will request a Lot Number. If there is not enough stock in the Lot Number requested, during the
validation and update of the transaction, it will continue to ask for additional Lot Numbers until the quantity entered
has been sufficed. The second way is to separate out the quantities by line item so that Lot Numbers can be
distinguished for each line item.
Once the item number has been selected, the system will set the sales code to the one set up in the Inventory Item
File for this particular item. If this item's default sales code is non-existent, then you will be allowed to select a near
match. If an inventory item is selected, the system then checks the customer file to verify if a price plan has been
assigned which contains this specific inventory item.
If this item has been defined in a price plan that has been assigned to this customer, it then confirms any minimum
or maximum quantity criteria and retrieves the calculated price for the unit price field automatically. Once the item
number has been selected, the system will set the sales code to the one set up in the Inventory Item File for this
particular item. If this item's default sales code is non-existent, then you will be allowed to select a near match.
NOTE
If the switch in the Master Configuration "Default to Inventory Item" is
turned "on," this field will contain the sales code for each line item.
Description
This is a thirty (30) character (alpha/numeric) field for the description you
would enter for this line of the transaction. If you press TAB, the description
will default to the description of the sales code. If you are interactive with
Manufacturing Inventory Management and you have selected an inventory
item for this line, this description will be the description of the inventory item
and you will not be allowed to change this field.
Tax
This check box indicates whether or not this item is taxable. The default value
will be the value set up for the sales code of this line. You will not be allowed
to change this data item unless you have turned on the option to "Override
Tax by Line" in the Master Configuration. If the check box has been
checked, then the line item is taxable.
Page 3-22
Enter Transactions
Chapter 3
Point of Sale User Manual
Quantity
This is the quantity of the item you are billing. This field may be left at zero,
in which case you will have to enter the extended price manually. The format
of this field will be the number of decimal places that you have specified for
unit price in the Master Configuration.
If the current transaction is a credit memo, this quantity will be assumed to be
a negative number. If you are interactive with Manufacturing Inventory
Management, this is the quantity that will be removed from the Quantity OnHand for the inventory item.
If you are utilizing the "Unit of Measure Conversion" feature, you will want
to enter the quantity based on the unit of measure you have selected to use on
this line item. Do NOT enter the quantity as the "stocking unit of measure"
if you have chosen an alternative unit of measure.
If you have set the "Verify Quantity Available" field in the master
configuration to be turned on, the system will check the inventory file to see if
there is enough quantity on hand or available to remove the quantity entered.
If you have set the "Verify Quantity Available" field to be turned on, and
the "Exclude On Order on Quantity Check" field in the Master
Configuration to be turned on, the system will exclude any On Order
quantities from the Quantity Check.
If there is insufficient quantity on hand or available, a "Pop Up" windows
will be displayed from which you may elect to re-enter the quantity, choose
from alternative part numbers that have been set up for this item, or you may
continue with the billing. The number of choices in this window will depend
based on the number of alternative part numbers you have set up for each
inventory item.
If you elect to bill more than the quantity on hand, the quantity above the on
hand quantity will be placed in the "Quantity to Adjust" field for the
inventory item. You would then need to use the option to "Record Cost of
Sale Adjustments" after the items you oversold have been received.
Otherwise, none of your sales journals, commission reports, and inventory
profit margin reports will be accurate.
It is very important to understand this concept prior to just proceeding and
selling items that are not in stock. All of these calculations are based on a
"known" cost amount. When items are oversold, only the cost of those
quantities in stock are "known." All others are recorded at zero cost.
Therefore, profitability is grossly overstated until the Cost of Sale adjustment
is made. If you are paying commissions based on the profitability of the sale,
you may be paying far more than what you should.
U/M
This is a four (4) character field for the unit of measure for this item. If you
are interactive with Manufacturing Inventory Management, this will default to
the unit of measure set up for the inventory item selected. If you are
interactive with Manufacturing Inventory Management and you are not using
the "Unit of Measure Conversion" feature, this will default to the unit of
measure set up for the inventory item. Otherwise, the unit of measure field
will contain the unit of measure selected for the specific unit of measure
conversion for this item(s).
Chapter 3
Enter Transactions
Page 3-23
Point of Sale User Manual
Unit Price
This is the unit price of the item being billed. This will be multiplied by the
quantity to calculate the extended price. If you are interactive with
Manufacturing Inventory Management, the unit price will be calculated from
the price level you have selected for this transaction and the price table for the
inventory item. All quantity breaks will be automatically calculated, if
applicable. You may also press the F2 function key to change the price level
for this item only. If you have turned on the feature "Allow Line Item Price
Changes" in the Master Configuration, you will be allowed to override the
calculated unit price, if necessary.
If you have entered an inventory item, you will not be allowed to change the
unit price if you have turned off the feature to "Allow Line Item Price
Changes" in the Accounts Receivable Master Configuration.
If you are utilizing the special Price Plan feature that is set up in Inventory
module and have assigned this customer one or more Price Plans to be used, if
the criteria is met based on the assign Price Plan for this customer, then the
system will automatically place the customized price in this field.
Discount %
This is the percent discount that will be given on this line when calculating
extended price. If you have set the "Allow Discount % by Line" field in the
Master Configuration to be turned on, you will be allowed to enter a percent
here. Otherwise, the system will skip this data item. If you desire to utilize a
"cost plus" type of pricing mechanism for your customers, you may set one
of your inventory price levels up as "cost" and issue a "negative discount"
at this point. By doing so, the system will take whatever the price is based on
the price level and mark it up according to the amount entered. For instance, a
negative discount of "-20%" would make the sale price of an item based at
$10.00, equal to $12.00.
Extended Price
This is the calculated extended price for this line of the transaction. When you
have entered all detail lines necessary for this transaction, you may <click> on
the "Save" button to return to the overhead screen.
Additional Cost of
Sales
The "Add. COS" button allow you to enter the additional cost of sales
amount for this transaction. This may be used if you are not interactive with
Manufacturing Inventory Management or if you are billing the customer for
an item not currently in the inventory file. The sales journal and commission
reports that you may print later will include this cost and will calculate a gross
profit amount and percentage. Using this field for non-inventory type sales
will insure accurate gross profit calculations on these reports. The system will
display a small window which will allow you to enter the additional cost of
sales amount and sales code. This sales code will be used when posting the
cost amount to the sales code file. You may <click> the Down Arrow (F2 by
default) to scroll through the sales code file to make your selection.
When you have entered the additional cost of sales amount for this
transaction, you may <click> on the "Save" button to return to the overhead
screen.
You may now <click> on the "Process" button to validate the transaction and display a window for identifying how
the payment will be made for this transaction.
Page 3-24
Enter Transactions
Chapter 3
Point of Sale User Manual
The screen will automatically display the total amount of the transaction, the amount due, and the change required.
The system will first ask for the number of pay types.
You can select any of the payment types that have been set up. If the payment type is set up as check, you will be
able to enter a check number, and if it is set up as credit card, it will take you to the credit card screen where you can
enter the credit card information and authorize it if connected to a credit card processor.
If a user wants to charge to a customer and that customer is not a “cash customer” the user must have security rights
to “charge to account”. Any amount of the sale not paid for by a payment type will be allowed to be charged to the
customer’s account when you validate the transaction. You will be allowed to do this if the customer has not
exceeded their credit limit.
NOTE
You can either set up a payment type named “Charge” with the sales code
“.” associated with that payment type and zero out the amount or you can
delete the entire payment line and save. You will need to Update Company
Rights for each company you want this security object to apply and also
assign this security object to the Users/Groups you want to have access to
“Charge”.
If your payment type is a credit card, then <click> the Process Credit Card button. The Credit Card Information
screen displays. Enter the credit card information. If you do not have Credit Card Processing setup, you can still
enter a valid credit card if you have an authorization number and it will still post.
Chapter 3
Enter Transactions
Page 3-25
Point of Sale User Manual
NOTE
A valid credit card must be entered. For security purposes the actual credit
number is not revealed in this example. If the CVV2 Code is “grayed” out,
this means that this option is not enabled in the Set Up Credit Card Processors
configuration.
<Click> the Authorization button after entering the complete credit card information to process the card.
NOTE
For credit cards that dial out for authorization, these payment types should
specify this function in the description of the Payment Type. Ex: Visa Dialed
or *Visa. As long as the description is clear to the user which card dial out
and which do not.
If the EDC capability has been enabled, the EDC procedure will take you to another screen and begin dialing out for
an authorization on the credit card. If you have a "card reader" device connected to your machine, you may slide
the credit card through the reader at this time or type in the credit card numbers and expiration date on the keyboard.
The expiration date must be entered in as MMYY (e.g., "1204" for December of 2004).
The system will return with either an error condition (discussed on the next page) or, if the transaction is successful,
an approval number and a transaction reference number. Both of these items will print on the receipt. After the
customer has signed the receipt, he will retain the carbon (bottom) copy, while the top copy is kept for your records.
NOTE
The purchase of the Infinity POWER Point of Sale module does not
guarantee your company access to a credit card approval and draft capture
network. Before you will be able to process automated credit card transactions
in the Advanced Point of Sale module, it is mandatory that you contact a
company that can provide you with electronic bank draft capture services
through MAPP (MasterCard Automated Point-of-Sale Program), NOVA or
IC Verify.
You may still use this module without the "Electronic Draft Capture" features to process sales until your system is
activated for EDC processing or, if for some reason, you are unable to obtain approval with a credit card network.
Page 3-26
Enter Transactions
Chapter 3
Point of Sale User Manual
You may now <click> on the "Save" button to validate the transaction. A screen will appear with the "Invoice
Form" that is currently selected. You may enter another valid invoice form for the next series of transactions you
will enter.
After the form has been printed, you will be asked if you need to print the form again. You may print the form again
or <click> on OK to finalize the updating of all integrated files and prepare for the next transaction. Make sure to
complete this final step immediately; otherwise, you may have invoices that are printed, but haven't been updated or
reflected properly in the sales journal.
Results:
coAR1dy.dbf - Customer File (if credit sale)
- Customer History is Updated
- Customer Aging Totals are Updated
coAR2.dbf - Open Item File (if credit sale)
- Open Item Record is Added
coAR3dy.dbf - Transaction File
- Transaction Record is Added (optional)
coAR4dy.dbf - Transaction Detail File
- Transaction Detail Records Added (optional)
coAR5dy.dbf - Salesman File
- Salesman History is Updated
coAR7dy.dbf - Sales Code File
- Sales Code History is Updated
- Sales Code Current Amounts are Updated
coIM1dy.dbf - Inventory Item File
- Withdrawal Recorded (Return if a Refund)
- Historical Information Updated
coIM2dy.dbf - Inventory Transaction File
- Transaction Record Added (optional)
coIM6.dbf - Cost Layer File
- Updated Cost Layers with return of stock
OPEN REGISTER/NO SALE (PS0103)
This option allows you to open the cash drawer for a "No Sale" transaction.
NOTE
A "No Sale" transaction will be recorded every time this option is selected.
This option should be used any time that you wish to open the cash drawer for any reason, other than a normal sale
or refund. You may also execute this option while you are in another option by right mouse <clicking> on the screen
and selecting "Open Register/No Sale." When you select this option, you will be asked to enter the dollar amount
that is being withdrawn from, or deposited into the cash drawer.
You should enter a positive number if you are depositing money into the drawer and a negative number if you are
taking money out of the drawer. You may press TAB to leave the amount zero if you are not changing the balance
of the cash drawer (e.g., making change). The only exception to entering the dollar amount for money withdrawn or
deposited is in handling the beginning and ending balances of the day.
If you will be using the option "Enter Register Balances" to record the money placed in the register at the
beginning of the day and the balance that was counted at the end of the day, you should not record those dollar
amounts here. The "Register Variance Report" will use the beginning and ending register balances and all
transactions during the day, including NO SALE amounts, to calculate the register variance.
Chapter 3
Enter Transactions
Page 3-27
Point of Sale User Manual
If you have multiple "shifts" using the system during the course of the day with multiple cash drawers, it is not
necessary to perform the procedure of closing out a drawer before a new drawer can be inserted.
Simply make sure that each drawer/user logs into the programs with a separate "user number" (e.g., DP 1, DP 2).
All cash drawers are tracked by this number. Therefore, the first user/drawer simply exits the programs and the next
user/drawer logs in and enters their beginning drawer balances. The first user may then enter their ending balances at
any time they desire (end of day) from any terminal by logging in as their respective user number.
After you have entered the dollar amount, or pressed TAB for zero dollars, <click> on the "Open" button to
validate. When you validate, the system will immediately open the cash drawer and record a NO SALE type
transaction in the transaction file. The transaction information recorded will include the date and time, salesman
number, register number and amount deposited or withdrawn.
These transactions will be included on the sales journals and register reports.
Results:
coAR3dy.dbf - Transaction File
- No Sale Transaction Recorded
RECORD PAYMENTS (PS0105)
This option allows you to record payments for your Accounts Receivable Customers. This option is only available if
Point of Sale is interactive with Accounts Receivable. This option is similar to the "Record Payments and
Deposits" option in Accounts Receivable. However, the entries are restricted to payments only and Point of Sale
must be interactive with Accounts Receivable.
You must first select the customer number for this transaction. Enter the customer number or <click> the Down
Arrow (F2 by default) to scroll through the customer file to make your selection. The following describes each of
the data items.
Check Number
This is a ten (10) character field for the check number of the deposit or payment
received. This will be stored as the transaction number of the open item and
transaction. If you have the Master Configuration option "Require Unique Customer
Check #s" turned on, the system will not allow the posting of the same customer
check number into the system. This reduces the possibility of duplicate check postings.
Check Date
This is the date of the check received. This will be stored as the transaction date of the
open item. The transaction record will use the current system date. Press TAB to
assume the current system date. <Click> on the "Validate" button so that the system
can verify for duplicate entries and you may then continue entering the following
information.
Check Amount
This is the amount of the check received. This amount will be posted as a credit to the
customer's account and to the cash sales code set up in the Master Configuration. If
you have open item type customers, there may be instances in which you want to apply
any existing credits on a customer's account towards the debits without actually
entering another credit. This may be done through this option by leaving the check
amount as zero and post a "Zero Payment." This will allow you to match existing
Credit Memos against existing Invoices and Debit Memos. It also allows you to match
"Unapplied Cash" payments against specific invoices.
Zero Payments
When the system asks for the check amount, enter zero (0). Next enter the invoice
number as the check number. You may then enter a miscellaneous description
regarding the whole transaction under the "Open Item Description" field. (e.g.,
Correction for wrong posting) You may then proceed to match the Credit Memo(s)
with the Invoice(s) you want to apply against each other. Make sure though, that the
totals of each balance each other out and you should have a total amount remaining
balance of $0.00.
Page 3-28
Enter Transactions
Chapter 3
Point of Sale User Manual
Tender
<Click> on this button to define the payment method of this transaction. The screen
will automatically display the total amount of the transaction, the amount due, and the
change required. The system will first ask for the number of pay types.
The screen will automatically display the total amount of the transaction, the amount due, and the change required.
The system will first ask for the number of pay types.
You can select any of the payment types that have been set up. If the payment type is set up as check, you will be
able to enter a check number, and if it is set up as credit card, it will take you to the credit card screen where you can
enter the credit card information and authorize it if connected to a credit card processor.
If a user wants to charge to a customer and that customer is not a “cash customer” the user must have security rights
to “charge to account”. Any amount of the sale not paid for by a payment type will be allowed to be charged to the
customer’s account when you validate the transaction. You will be allowed to do this if the customer has not
exceeded their credit limit.
NOTE
You can either set up a payment type named “Charge” with the sales code
“.” associated with that payment type and zero out the amount or you can
delete the entire payment line and save. You will need to Update Company
Rights for each company you want this security object to apply and also
assign this security object to the Users/Groups you want to have access to
“Charge”.
If your payment type is a credit card, then <click> the Process Credit Card button. The Credit Card Information
screen displays. Enter the credit card information. If you do not have Credit Card Processing setup, you can still
enter a valid credit card if you have an authorization number and it will still post.
Chapter 3
Enter Transactions
Page 3-29
Point of Sale User Manual
NOTE
A valid credit card must be entered. For security purposes the actual credit
number is not revealed in this example. If the CVV2 Code is “grayed” out,
this means that this option is not enabled in the Set Up Credit Card Processors
configuration.
<Click> the “Authorization” button after entering the complete credit card information to process the card.
NOTE:
For credit cards that dial out for authorization, these payment types should
specify this function in the description of the Payment Type. Ex: Visa Dialed
or *Visa. As long as the description is clear to the user which card dial out
and which do not.
If the EDC capability has been enabled, the EDC procedure will take you to another screen and begin dialing out for
an authorization on the credit card. If you have a "card reader" device connected to your machine, you may slide
the credit card through the reader at this time or type in the credit card numbers and expiration date on the keyboard.
The expiration date must be entered in as MMYY (e.g., "1204" for December of 2004).
The system will return with either an error condition (discussed on the next page) or, if the transaction is successful,
an approval number and a transaction reference number. Both of these items will print on the receipt. After the
customer has signed the receipt, he will retain the carbon (bottom) copy, while the top copy is kept for your records.
NOTE
The purchase of the Infinity POWER Point of Sale module does not
guarantee your company access to a credit card approval and draft capture
network. Before you will be able to process automated credit card transactions
in the Advanced Point of Sale module, it is mandatory that you contact a
company that can provide you with electronic bank draft capture services
through MAPP (MasterCard Automated Point-of-Sale Program), NOVA or
IC Verify.
Page 3-30
Enter Transactions
Chapter 3
Point of Sale User Manual
You may still use this module without the "Electronic Draft Capture" features to process sales until your system is
activated for EDC processing or, if for some reason, you are unable to obtain approval with a credit card network.
You may now <click> on the "Save" button to validate the transaction
Description
This is the description that will be used for this transaction. This description will
be displayed on all aging reports, sales journals, and customer statements.
Job Number
If the integration to Job Cost is turned ON, you may enter a ten (10) character job
or project reference number. You must have the Job Cost Main Module to take
advantage of this reference field.
Salesman
This data item contains the salesman number that this transaction will be recorded
under. The default value will be the manager set up in the customer's master file.
Normally, you may press TAB to assume the default. However, if you pay
commissions to your manager based on cash received, you should change this to
the salesman that was originally assigned the sale that this payment is for or the
salesman that is to collect commissions on this transaction.
This data item will only be accessible on the data entry screen if you have turned
on the Accounts Receivable Master Configuration option to, "Allow Override
of AR Sales Codes." This option allows you to select the Accounts Receivable
account that will be used to process this transaction through the use of AR Sales
Codes.
A/R Sales Code
If this option is available, the customer's default AR Sales code will appear, if one
has been set up on their customer file. You may <click> the Down Arrow (F2 by
default) to select an AR Sales code or leave the field blank to accept the default
Accounts Receivable account set up in the Accounts Receivable Master
Configuration.
If the customer is a "Balance Forward" type of customer or if there are currently
no open items on this customer's account, the system will allow the posting of
unapplied cash. You may now <click> on the "Post" button to allocate the
unapplied cash. This amount can be allocated to up to twenty (20) different sales
codes. This procedure will allow you to allocate the cash to various general ledger
accounts (through the use of sales codes) without having to enter an invoice,
posting it to the customers account and then entering a payment against the
invoice.
Allocate
Once the amount remaining has been disbursed, the system will save the
transaction, print the transaction register and return for the next transaction. If you
do not wish to allocate the amount remaining to various sales codes, and you
prefer to have it post as unapplied cash (a credit open item) to the customer's
account, <click> on the "Save" button and the system will save the transaction,
print the transaction register and return for the next transaction.
By <clicking> on the "Allocate" button and if the customer is an "Open Item"
customer and there are other open items on the customer's account, the system will
display a scrolling window showing all open items. This scrolling window will
allow you to apply the payment or deposit toward an existing open item. You may
use your page up and page down keys to review each open item on the account
and choose those items you wish to apply the payment toward.
You also have the tool bar navigation options to select the first detail record, select the next record detail, select the
previous record detail, page up the detail list, page down the detail list, select the last record in the detail list, select a
specific detail record based on text or select a specific detail record based on a line number. When you select by
either a record based on text or a record based on a line number, enter the appropriate information (either text or a
line number) and <click> on "OK."
Chapter 3
Enter Transactions
Page 3-31
Point of Sale User Manual
The top of this screen displays the amount of the check, the amount that has been distributed, and the amount
remaining. As you apply the payment toward the open items, these figures will be adjusted accordingly. When you
find an open item that you would like to apply the payments toward, you may <click> on the check box in the
column titled "Pay." The system will then ask you for the amount to apply toward this open item. The default
amount will be either the amount of the open item, or, if the payment is less than the open item, the amount of the
payment remaining.
After you have completed applying the payment, you may <click> on the "Save" button. After you have <clicked>
on the "Save" button to validate the entry, there are two cases in which the system displays a warning message and
asks you for a response.
1) If there is a credit amount remaining, the system will display the amount and ask if you want to
allocate this amount remaining. This amount can be allocated to up to five (5) different sales
codes. This procedure will allow you to allocate the cash to various general ledger accounts
(through the use of sales codes) without having to enter an invoice, posting it to the customers
account and then entering a payment against the invoice. Once the amount remaining has been
allocated, the system will save the transaction, print the transaction register and return for the next
transaction.
If you do not wish to allocate the amount remaining to various sales codes, and you prefer to have it post as
unapplied cash (a credit open item) to the customer's account, <click> on the "Save" button and the system will
save the transaction, print the transaction register and return for the next transaction.
2) If there is a debit amount remaining, the system will display the amount and ask if you wish to
apply the amount as a payment discount. If you <click> on "Yes," the system will apply the
amount as a debit to the Payment Discount sales code set up in the Master Configuration.
An example of this would be if you allow your customers a two percent discount on invoices if paid within a certain
number of days. If the invoice was $100.00 and the check was $98.00 ($100.00 less 2% discount), you would enter
the check as $98.00 and apply $100.00 toward the invoice.
This would leave an over-applied amount of $2.00, which would be applied toward the payment discount sales code.
Additionally, to allow the balancing of the AR Aging Report to the General Ledger Balance Sheet from a prior
fiscal year, you can not post partial payments to the system.
The "open item" file can only keep track of the latest check number and check amount that was posted against
each open item, not all of the partial payments for each open item. Therefore, if you receive multiple payments for a
single open item, you must post these partial amounts as "unapplied cash" until the total amount of the open item
has been received. At that point, you may post a "zero" check to match all of the partial payments against the open
item.
By following this line of procedures, you will be able to have the AR Aging Report match the Accounts Receivable
balance on a prior period's General Ledger Balance Sheet. If you are not concerned with balancing the Balance
Sheet and AR Aging Report from a prior period, you may continue to post partial payments as normal.
Results:
coAR1dy.dbf - Customer File
- Customer History is Updated
- Customer Aging Totals are Updated
coAR7dy.dbf - Sales Code File
- Sales Code is Updated
- Sales Code Current Amounts are Updated
coAR2.dbf - Open Item File
- Open Item is Added if Payment is to be Left Unapplied
- Open Items that have had an Amount Applied toward
them will either be Marked as Paid or Partially Paid
coAR3dy.dbf - Transaction File
- Transaction Record is Added (optional)
coAR4dy.dbf - Transaction Detail File
- Transaction Detail Records Added (optional)
Page 3-32
Enter Transactions
Chapter 3
Point of Sale User Manual
PRINT DEPOSIT REGISTER (AR0112)
This option provides a listing of all payments and deposits for a specified date range. If integration to the Check
Reconciliation module is turned on in the Point of Sale Master Configuration and the cash receipts sales code has a
Checking Account number assigned, this report routine will prompt you to "Post this deposit to Check
Reconciliation."
This report provides a simple way to generate a listing that could be attached to your normal bank deposit slip.
Using this report provides your bank with the detail of each check, its amount, whom it was received from, and the
date of each check. This saves you the time of not having to manually write this information on the deposit slip form
itself.
When you select this option, the system will prompt you to enter the "Beginning Date" and "Ending Date" of all
payments to be included on this report. You may select a single day by using the same date for both fields, or enter
the range of dates as requested. It will also prompt you for the "Bank Account." All payments and deposits
received from all customers during the specified date range will then be included on the report. The system will then
"total" all of the amounts at the bottom of the report. This is the amount to be entered on your deposit slip to the
bank. Make sure to verify each check against this listing prior to making any deposits with the bank to verify that
you have included all actual checks for deposit.
If integration to the Check Reconciliation module is turned on in the Point of Sale Master Configuration and the
cash receipts sales code has a Checking Account number assigned, this report routine will prompt you to "Post this
deposit to Check Reconciliation."
This will post the entire deposit register amount to the Check Reconciliation module as the daily deposit. The system
will use the current system date as the reference/check number. <Click> on the "Start" button to initiate this
report.
Field Names:
- Date
- Check #
- Customer #
- Customer Name
- Check Amount
- Total
Chapter 3
Enter Transactions
Page 3-33
Point of Sale User Manual
Deposit Register
Page 3-34
Enter Transactions
Chapter 3
Point of Sale User Manual
RECORD SALES CODE ADJUSTMENTS (AR0104)
This option allows you to record adjustments to sales and cost of sales amounts by transferring a specified amount
from one sales code to another. You may discover at some point that you have entered a sale to the wrong sales
code. Or, while processing a transaction, the system may find that one of the sales codes entered in the Master
Configuration has not been added to the sales code file.
If this is the case, you may want to adjust the sales code amount for the error that was made. By selecting this option
the program will adjust the current sales and cost of sales amounts and the sales and cost of sales amount history for
the current fiscal period.
When you select this option, a screen will be displayed showing the seven (7) data items necessary to record the
adjustment. The following is a list of the data items and a description of each.
Customer Number
Enter the number or <click> the Down Arrow (F2 by
default) to scroll though the customer file to make you
selection.
Transaction Number
This is the transaction number that this adjustment will be
recorded as. You should enter the original invoice number
that is being adjusted.
Transaction Description
This is the transaction description that this adjustment will be
recorded with. The default description will be "Adjustment."
From Code
This is the sales code that has had an amount posted to it in
error and needs to be adjusted. Enter the sales code or <click>
the Down Arrow (F2 by default) to scroll through the sales
code file to make your selection. The sales code description
will be displayed once the sales code has been selected.
Sales Amount
This is the sales amount that you would like to adjust for the
sales code. After entering the sales amount, the opposite
amount will be displayed as the "Transfer to Sales
Amount."
C.O.S. Amount
This is the cost of sales amount that you would like to adjust
for this sales code. After entering the cost of sales amount, the
opposite amount will be displayed as the "Transfer To
C.O.S. Amount."
To Code
This is the sales code which should have had the sales and
cost of sales amounts posted to it. Enter the sales code or
<click> the Down Arrow (F2 by default) to scroll through
the sales code file to make your selection.
The sales code description will be displayed once the sales code has been selected. The Sales and Cost of Sales
Amount for the "Transfer to Sales Code" will automatically be entered by the system with the appropriate sign.
<Click> on the "Start" button to validate this transaction. Then select the appropriate Output Device and select
"Continue." The Sales Code Adjustment Register will be printed as each adjustment is posted to the system.
Results:
coAR3dy.dbf - Transaction File
- Transaction Record is Added (optional)
coAR4dy.dbf - Transaction Detail File
- Transaction Detail Records Added (optional)
coAR7dy.dbf - Sales Code File
- Sales Code File is Adjusted
Chapter 3
Enter Transactions
Page 3-35
Point of Sale User Manual
RECORD COS ADJUSTMENTS (PS0106)
This option allows you to record cost adjustments to previous Inventory sales on a specific invoice. This option is
only available if Point of Sale is interactive with Manufacturing Inventory Management.
This option allows you to adjust the Cost of Sales on transactions you have already recorded. This option is designed
to allow this function on a "transaction by transaction" basis. This would be required if inventory was sold before
it was recorded as "received" in the inventory system. When inventory items are sold that have not yet been
recorded as "received," the system will record whatever costs are available to Cost of Sales.
However, the program has no idea what the costs of the remaining items are. The result is a negative number of units
in the "quantity to adjust" field for the affected inventory items, indicating that items have been sold for a cost
which has not been recorded. When the inventory receipt is recorded later, the cost will not be automatically
adjusted for previous sales. Additionally, the quantities in the "On-Hand" and "Available" fields will not be
correct because a portion of the items have already been sold.
This option allows you to adjust the Cost of Sales and to correct the inventory quantity fields "On-Hand," and
"Available." This is an important adjustment to make so that your sales journals and commission reports reflect
accurate Cost of Sales amounts, which are used in profit calculations.
For example, a retailer has 5 units of item "X" in stock. He receives 10 more units but doesn't have time to record
the receipt. A customer walks in and buys all 15 units. Because the computer only knew about the original 5 units, it
only records the cost of 5 units. The quantity to adjust field on item X is changed from 0 to -10.
If he then records the receipt of 10 items, he now shows 10 units on-hand which he really doesn't have. The Cost of
Sales is off by the cost of 10 units and the quantity to adjust field still shows -10.
By using the "Record COS Adjustments" option, he can bring up the original detail for the invoice. The system will
show the number of units sold, the original cost of sales and the maximum adjustment amount. If "10" units are
entered as the adjustment quantity, the system will automatically update the Cost of Sales on the original transaction.
It will also record a withdrawal of 10 units from inventory and reduce the quantity to adjust field. Now everything is
back in order.
When using this option, the inventory item being adjusted MUST have a negative "quantity to adjust" and
inventory receipts, subsequent to the sale, must have been recorded. Additionally, you must have the original
transaction date and the invoice number when the sale was recorded. Otherwise, you will simply be returned to the
screen without any processing taking place.
When you select this option, the system will prompt you for a customer number. Enter the customer number used on
the original transaction. Next, the "Invoice Date" and "Invoice Number" from the original transaction must be
entered. <Click> on the "Find" button to have the system access this record. If this transaction is not currently
stored on the hard drive, you will receive an error message of > No Matching Invoice < and will not be allowed to
make your adjustments using this option.
If the transaction is found, the information from the original sale (Description, Salesman and Sale and Cost
Amounts) will appear on the screen. <Click> on the "Adjust" button and the system will now display a scrolling
window with the detail lines of the applicable transaction. Use the page up or page down keys to move to the
applicable line of the transaction and <click> on the check box in the "Adjust" field.
The cursor will move to the "Quantity" field and you should enter the quantity to adjust. The "Quantity to
Adjust" cannot exceed the lesser of the original invoice quantity, the quantity in the "Quantity to Adjust" field or
the quantity in the "On-Hand" field. The system will automatically retrieve the cost of these items from the
inventory records. As you will not be allowed to change this cost, be sure the adjustments are made as soon as
possible after the inventory is recorded as received.
You cannot adjust the cost of sales for an inventory item if there are no quantities in the "Quantity to Adjust" or
"On-Hand Quantity" fields. Therefore, you must have recorded the receipt of these inventory items prior to
executing this option. After all applicable line items have been adjusted, <click> on the "Save" button to validate
the transaction. The "Transaction Cost Adjustment Register" will then be printed.
Page 3-36
Enter Transactions
Chapter 3
Point of Sale User Manual
NOTE
A part of your normal processing cycle should be to go into Manufacturing
Inventory Management and print the Quantity Report; asking for only those
items with a "Quantity to Adjust" amount. This will immediately notify you
if this type of transaction has occurred. If so, then you should perform this
function as soon as possible to keep your information updated correctly.
Likewise, you may use the following "Automatic COS Adjustments" option in Point of Sale to determine the
specific transactions that need to be modified. When this option is run, even if no items are available for adjustment,
a register of transactions, by customer, will print with the customer number, transaction date, transaction number,
item number and its description, the Qty. Adjusted, and COS Adjusted fields. If no quantities were adjusted, the
message will print "On-hand Qty Not Available."
Even though no quantities were adjusted, this report conveniently tells you which items need to be adjusted and will
provide you with the specific information needed to make any necessary adjustments either automatically or through
this option, one transaction at a time.
Results:
coAR3dy.dbf - Transaction File
- Transaction Record is Added (optional)
coAR4dy.dbf - Transaction Detail File
- Transaction Detail Records Added (optional)
coAR7dy.dbf - Sales Code File
- Sales Code File is Adjusted
coIM1dy.dbf - Inventory Item File
- Adjustment Recorded
- Historical Information Updated
AUTOMATIC COS ADJUSTMENTS (AR0114)
This option allows you to record cost adjustments to previous Inventory sales on a date range of invoices. This
option is only available if Point of Sale is interactive with Manufacturing Inventory Management.
This option allows you to adjust the Cost of Sales on transactions you have already recorded. This option is designed
to allow this function to occur automatically, based on a specified date range of invoices, instead of on a
"transaction by transaction" basis. This would be required if inventory was sold before it was recorded as
"received" in the inventory system. When inventory items are sold that have not yet been recorded as "received,"
the system will record whatever costs are available to Cost of Sales.
However, the program has no idea what the costs of the remaining items are. The result is a negative number of units
in the "quantity to adjust" field for the affected inventory items, indicating that items have been sold for a cost
which has not been recorded. When the inventory receipt is recorded later, the cost will not be automatically
adjusted for previous sales. Additionally, the quantities in the "On-Hand" and "Available" fields will not be
correct because a portion of the items have already been sold.
This option allows you to adjust the Cost of Sales and to correct the inventory quantity fields "On-Hand," and
"Available." This is an important adjustment to make so that your sales journals and commission reports reflect
accurate Cost of Sales amounts, which are used in profit calculations.
For example, a retailer has 5 units of item "X" in stock. He receives 10 more units but doesn't have time to record
the receipt. A customer walks in and buys all 15 units. Because the computer only knew about the original 5 units, it
only records the cost of 5 units. The quantity to adjust field on item X is changed from 0 to -10.
If he then records the receipt of 10 items, he now shows 10 units on-hand which he really doesn't have. The Cost of
Sales is off by the cost of 10 units and the quantity to adjust field still shows -10. By using the option "Record COS
Adjustments," he can bring up the original detail on an invoice by invoice basis.
Chapter 3
Enter Transactions
Page 3-37
Point of Sale User Manual
If multiple invoices need adjustment, then the option "Automatic COS Adjustments" would prove to be a more
convenient mechanism to perform this task.
When this option is selected, a new screen will appear and a date range will be requested. This date range should
include the time period for invoices that need to be adjusted. This can be within a single fiscal period or month, or a
range of month. It can not, however, cross fiscal years.
Once the date range has been entered, <click> on the "Start" button to validate. The system will then begin the
search through the files to determine automatically which invoices need to be adjusted. If the system finds an
invoice that needs adjusted, it will first check to see if there have been additional receipts of inventory items since
the Qty. to Adjust amount was created during invoicing. This is required for any adjustments to be made.
Next, the system will print a register that will show, on an invoice by invoice basis, all of the detail of what is
occurring during the adjustment process. It will include the Customer Number and Name, transaction date,
transaction number, inventory item numbers, sales codes, description, the quantities that were adjusted and the dollar
amount of Cost of Sales adjustments.
Once this process has been completed, all files will have been updated and you will have a register for auditing
purposes of everything that transpired. If only a portion of the Qty. to Adjust amount has been received since the
transaction date, the system will only use the partial amount that is in inventory. When additional stock is received,
this option would pick up the remaining balances accordingly.
This option may be run as often as desired and should be part of your normal processing cycle.
NOTE
You may use this option to determine the specific transactions that need to be
modified. When this option is run, even if no items are available for
adjustment, a register of transactions, by customer, will print with the
customer number, transaction date, transaction number, item number and its
description, the Qty. Adjusted, and COS Adjusted fields. If no quantities were
adjusted, the message will print "On-hand Qty Not Available."
Even though no quantities were adjusted, this report conveniently tells you which items need to be adjusted and will
provide you with the specific information needed to make any necessary adjustments either automatically through
this option, or through the option "Record COS Adjustments" one transaction at a time.
Results:
coAR3dy.dbf - Transaction File
- Transaction Record is Added (optional)
coAR7dy.dbf - Sales Code File
- Sales Code File is Adjusted
coAR4dy.dbf - Transaction Detail File
- Transaction Detail Records Added (optional)
coIM1dy.dbf - Inventory Item File
- Adjustment Recorded
- Historical Information Updated
ENTER REGISTER BALANCES (PS0100)
This option allows you to input beginning and ending register balances for all existing registers. These balances are
used in addition to the daily sales figures to print the "Register Variance Report."
This option may be used at the start of each day to record the beginning balance placed in the register and at the end
of each day to count the ending balance of the register. Enter the Register Number or press the F2 key to review near
matches. You may use the up or down arrows to scroll through the register file to make your selection.
Enter an amount in the perspective column of the payment method. For the "Cash" payment method, you may
choose to <click> on the "Currency" button to enter the exact denominations of money.
Page 3-38
Enter Transactions
Chapter 3
Point of Sale User Manual
Currency
There are two columns of data items below the register number. The left column allows you to enter the dollar count
in units from Ones to One Hundreds.
The right column allows you to enter the coin count in units from Pennies to Dollars. You may use these fields to
help you count the money in the register at the same time you are entering the balance.
There is also an additional field for the entry of non-cash items in the cash drawer. This is where you would enter
any checks, credit card slips, traveler's checks, etc. which would contribute to the balance of the cash drawer. The
amount to be entered in this field is the total amount of these other items. The system will automatically perform the
necessary calculations and display the total balance as each figure is entered.
These fields for calculating the balance are only for your convenience and do not have to be used. Only the total
balance will be retained by the system. If you already know what the count is, you may use (Ones) and (Pennies) to
enter the balance directly.
<Click> on the "Save" button to update the beginning or ending balance you are defining.
Each time you validate this screen the system will prompt you for the next register number. After validating the last
register, <click> on the "Close" button to return to the menu. If you have multiple "shifts" using the system during
the course of the day with multiple cash drawers, it is not necessary to perform the procedure of closing out a drawer
before a new drawer can be inserted.
Simply make sure that each drawer/user logs into the Infinity POWER programs with a separate "register
number." All cash drawers are tracked by this number. Therefore, the first user/drawer simply exits the programs
and the next user/drawer logs in and enters their beginning drawer balances. The first user may then enter their
ending balances at any time they desire (end of day) from any terminal by logging in as their respective user
number.
NOTE
Each time you select a register, either beginning or ending balance, the system
will zero all of the counts and then replace the balance with the calculated
balance when you validate. If you select a register that has already been
entered and then <click> on the "Save" button, this will replace your
previously entered balance with the current screen total. When the register
number indicated is not the one you want, either change the register number to
the correct one or <click> on the "Cancel" button to exit without validating.
Results:
coARK.co - Register File
- Beginning or Ending Balances Updated
PERFORM DRAFT CAPTURE BATCH (PS0702)
This option allows you to perform the Draft Capture batch functions necessary to audit and close the daily draft
capture files. The Accounts Receivable module provides a series of options for processing with batches. Selecting
"Perform Draft Capture Batch" from your "Transactions" menu, will display eleven (11) functions you may
perform.
With the exception of "Audit Report," each option is a request to the credit card network to perform a specified
function. Each option is listed on the following pages, giving you a complete explanation of how and why you
choose and execute the various options.
Chapter 3
Enter Transactions
Page 3-39
Point of Sale User Manual
Audit Report
This option produces a report listing the EDC transactions completed for each
day. The information on this report is stored in a file that is automatically set
up each day by the Point of Sale module. This file is named PSA##.co,
where "##" is the current day of the month and "co" is the company name.
For example: The first day of the month's information would fall into the
PSA01.co file. The information for the fifteenth day of the month would be in
the PSA15.co file. This day is based on the computer date (not the Infinity
POWER system date.)
Therefore, you will have a PSA##.co file for each day of the month in the
data subdirectory. The system will re-use the file for each month. The
information in the file will be deleted as new information is added. It is
recommended that this report be printed at the end of each day to ensure that
a proper audit is available.
The report provides the following information for each transaction:
•
Credit card number.
•
Credit card expiration date.
•
Transaction type (either "Sale," "Credit," "Void," "Frc. Sale"
[forced sale], "Frc. Credit" [forced credit], "Post Auth." [post
authorization], or "Auth. Only" [authorization only]).
•
Transaction date.
•
Authorization number (does not appear for void or post authorization
transactions).
•
Reference number (prints "Auth. Only" for authorized, but noncaptured transactions).
•
Transaction amount.
•
In addition, an asterisk is appended to each "Auth. only" transaction
line to highlight transactions not captured by the network. These
items must be entered in through the "Post Authorization" option
for the batch to balance.
Post Authorization
This option is used to capture an authorized transaction which could not be
captured at the time of authorization. All items on the Daily Audit Report
with an asterisk (*) will need to be "Post Authorized."
Void Transaction
This option will cancel an existing transaction in a batch. This option should
only be executed if the transaction that is being voided is contained in a batch
that has not been closed. This procedure does not update the Point of Sale
data files.
Once you have voided the transaction utilizing this option, you must enter the
transaction through the "Record a Return/Refund" option. An EDC process
is not necessary, so the payment method chosen should NOT contain an
asterisk (*). This will update the Point of Sale data files.
Pre-Authorization
This option will allow you to get a pre-authorization on a credit card, prior to
shipment of the order. This will check the limit and verify credit availability
for the customer.
Batch Inquiry
The Batch Inquiry is used to inquire on the batch balance and transaction
count. This option will be helpful when reconciling the batch information sent
to the credit card network to the information in the Point of Sale module.
This transaction may also be utilized to view the Count and Total Amount for
specific card types for a requested batch.
Page 3-40
Enter Transactions
Chapter 3
Point of Sale User Manual
The system will prompt you for a "Card Code" number. You may choose
from the following list of proper code numbers:
099 or NULL = Visa/MasterCard Totals
001
= Visa Totals
002
= MasterCard Totals
005
= American Express Totals
009
= Discover Card Totals
010
= Diners Club/Carte Blanche Totals
012
= JCB Totals
Once this information has been given, the system will dial to the network and
return the following information:
Batch # - This is the number that was assigned to the batch when opened.
Status - This is the current status of the batch.
Trans. Cnt - This is the total number of transactions contained within the
batch.
Total - This is the total amount of money within the batch.
Batch Status
This option allows you to review the last four open or pended batches. If there
are more than four open and/or pended batches, you must reconcile and close
one or more batches in order to view the remaining batches. The system will
prompt you for a Card Code number. You may choose from the following list
of proper code numbers:
099 or NULL = Visa/MasterCard Totals
001
= Visa Totals
002
= MasterCard Totals
005
= American Express Totals
009
= Discover Card Totals
010
= Diners Club/Carte Blanche Totals
012
= JCB Totals
Once this information has been given, the system will dial to the network and
return the following information.
Batch Number - This is the batch number that was assigned to the batch
when opened.
Status - This is the current status of the batch.
Total - This is the total amount of money within the batch.
Batch Review
This option displays individual transactions, four at a time, in a batch. You
will be prompted for the "Transaction Sequence Number." This is a three
digit number representing the order in which the items were entered. This
allows you to begin your review on the tenth item entered vs. the first one. If
this item is left blank, the review will begin at the top of the batch. The
amount of money for each transaction is listed.
Transaction Inquiry
This option is used to retrieve missing data from the credit card network. You
will be prompted for the "Credit Card Number, Account Number and
Transaction Amount" to perform a search within the current batch. Entry of
only one field will allow the system to search the batch and find the nearest
match to the item specified. Entry of all three fields would make the search
exact. If a "NO DATA MATCH" response is received, you should verify
the data and re-enter the transaction. A second "NO DATA MATCH"
response indicates that a matching transaction for the entered data could not
be found.
Chapter 3
Enter Transactions
Page 3-41
Point of Sale User Manual
Open Batch
The process of Electronic Draft Capture (EDC) is initiated with the opening
of a daily "batch" to which credit card transactions are posted. There is no
limit to the number of transactions which can be stored in a batch. The
process of opening a batch requires entry of a three digit Batch Number (100
- 999.) If the batch number is not designated, a system generated batch
number will be opened and assigned as 1DD (where DD reflects the current
day of the month). The next item required will be the Batch Date in
MMDDYY format.
The date entered cannot be more than seven (7) days old or more that one (1)
day into the future. If the date field is left blank, the batch date will reflect the
current credit card network date based on Pacific Time.
Batches are typically closed and processed by the credit card network if left in
Open Status for more than three days. The response to a Batch Open
transaction may reflect ******* for the Batch Count. This is warning you that
the previous batch had not been closed and has been automatically
"pended."
Pend Batch
This allows you to deactivate the current active batch so that a new one may
be opened. Batches are pended if the transactions have not been reconciled
for the batch and there is a need to open a new batch for subsequent
transactions. Reconciliation will be completed at the beginning of the
following work day. A batch may be pended whether or not it contains
transactions. To reactivate a pended batch, a Batch Open option must be
performed using the original Batch Number used to initially open the batch.
The current batch that is being accessed will be pended.
Close Batch
This will complete all work with the batch and will allow the credit card
network to process the financial information. Once batches are in "closed"
status, they are flagged for transmission and settlement. Closed status batch
numbers may not be re-used for a period of five (5) days. Batches should
always be reconciled before closing. (This is recommended even if you are
on an "automatic closing" process.) To successfully perform a Batch Close
transaction, the operator must enter the three digit Batch Number and the
Total Draft Amount in the "Batch Amount" field. The Batch Amount field
is always reflected as an absolute value.
Batches which are automatically opened are generally automatically closed. The close process is performed
automatically by the EDC host every night at approximately 11:50 P.M. (PST). Operators who select the "AUTO
OPEN/CLOSE" option, must perform the reconciliation process prior to this time. Once the batch has been closed
the system will return the message "BATCH CLOSED, BATCH ###," where "###" is the actual batch number.
Results:
No Files are Updated.
Page 3-42
Enter Transactions
Chapter 3
Point of Sale User Manual
REGISTER LOGIN - CTRL + F9
This option allows you to "Log In" a new salesman to the Point of Sale module. This salesman is the default
salesman for all transactions being posted through the system, until he/she logs out and a new salesman is logged in.
If a new salesman wants to record a transaction on the system, you may simply CTRL F9 and select the salesman
that you wish to "Log In" to the system. The old salesman will automatically be "Logged Out" of the system.
REGISTER LOGOUT - CTRL + F10
This option allows you to "Log Out" the current salesman in the system. If you have several salesmen working on
the same cash drawer, you may want to make your transactions and then immediately "Log Out" so that no one else
may use your salesman password to gain access to the system.
The system will record a transaction register of each transaction posted through the system. Unless you specifically
"Log Out," the system will maintain the last "Logged In" salesman as the default salesman until you change it or
exit the program.
Chapter 3
Enter Transactions
Page 3-43
Point of Sale User Manual
This page intentionally left blank.
Page 3-44
Enter Transactions
Chapter 3
Point of Sale User Manual
CHAPTER 4
PRINT REPORTS
This section includes a description and sample of each report generated by the Point of Sale module. The equations
used to calculate the amounts on the reports; and how these reports are generated (through the use of various
questions asked by the system) are discussed here. Reports illustrate the results of transactions from the options
within this module or from another integrated module.
The reports included here reflect sample information input into the sample company and only reflect an example of
the way a company may utilize certain features within this module. All modules are designed to be extremely
flexible in the way you may organize data and print the corresponding reports accordingly.
Do not assume that these reports reflect the only way they may either be structured or the fashion in which they may
be printed. These reports may be used as a cross reference to determine which reports you should be using in your
daily activities or when trying to locate specific types of information.
STANDARD FEATURES FOR REPORTS
Here is a listing of some standard features, which can be utilized with all reports:
CTRL+O (Output Options)
Destination - Printer Choice, E-Mail or Display
Report Titles
E-mail Settings - Recipient and Subject
Font Attributes
Report Print Options
Displayed Report Options
Range of Accounts
Data Record Retrieval
Report Sorting Preference
Masking (Wildcards)
Period to Report On
Cancel the Print Job
CTRL+O (Output Options)
You are able to change your Output Options (printing preference) at any time when you are within the Infinity
POWER programs. By Pressing CTRL O, an overlay screen will appear with your available output options. You
may choose to print to a Printer, send the report as an e-mail, or display the report on the screen.
If you select “Printer,” this will cause the output to be generated to whichever printer device you currently have as
“active” in the Windows operating system. You may choose to change printers by clicking on the “Print Options”
button and select another printer that you have set up in your Windows program. Also, by choosing “Printer,” you
have the capability of changing the title of the report you will be printing. The standard report name will be shown,
however, if you wish to overwrite it with another title, you may do so.
If you select “E-Mail,” this will cause the output to generate an e-mail to a specific recipient. On the Output
Options screen, you will need to define the recipient of the e-mail in the “To” field. Make sure to enter their e-mail
address and not just their name. The “Subject” field is automatically assigned the name of the report you will be
generating, however, if you wish to overwrite it with another subject, you may do so.
NOTE
Be sure you have defined your “E-Mail Host” in the Output section of the
Configuration Settings, otherwise, this feature will not be operational. Your
name should be your e-mail address, not your actual name.
Chapter 4
Print Reports
Page 4-1
Point of Sale User Manual
If you select “Display,” this will cause the output to generate the report to the screen. All reports are generally
created in an 80 or 132 column format. You may size your output window both larger and smaller to allow you to
view as much of the report on the screen at once as possible.
If you are used to using the Windows Character-based or UNIX version of Infinity POWER, you realize that you
may also send reports to a “text” file for a myriad of uses. You may do the same in Windows, however, you must
set up a “printer” type in Windows that will direct the output to the file. Once this is done, any time you want to
direct reports to a file, you simply select the new printer definition under Windows.
This principal applies if you want to print any report or form as a FAX document. Define the FAX software as a
printer in Windows and simply redirect your output to that specific printer.
Font Attributes
Within the Output Options window, you can modify font attributes such as color, size, and styles for each report.
This allows you to be creative in your report styles whether formal, informal, or classic professional, depending on
the purpose of the report. You may choose a more informal style for internal reports, but select a more elegant style
for a customer. Selecting a font in the Printer Settings section affects printed reports only. If you select “Print” as
the output destination, this is the font that will be applied to the printed report.
You can also select a font style for the display destination, independent of the Print Settings font selection. In the
Display Settings section of the screen, click on the Fonts… button to open the Font window. From this window,
select different fonts, add special effects such as underlining, change the color, font style (bold, italics, bold italic,
etc), and the font size. When a report is selected in display output, this is the font that will be applied when the
report is displayed on the screen.
NOTE
If you send a report to print directly from the displayed output screen, (Send
menu option or the Send to another output destination toolbar options) the
font selected in the Printer Settings will be the font that is applied to the
printed report, regardless of what font settings are selected for the Display
Settings. Font attributes are unique for Printer Settings and Display settings
due to the fact that your printer and the Infinity POWER system may not
support all of the same fonts.
After selecting font attributes for either the Printer Settings or Display Settings, clicking the corresponding Save
button will make those current selections the default settings. If you select different attributes between
displaying/printing reports, you must click the Apply button for the new font attributes to be applied. Otherwise, the
selections made for the previous report (within the same session), will be applied to the current report. Once you log
out of the system, the last saved printer and display settings will be applied to the reports when you log back into the
system.
If E-Mail is selected as the report output destination, the actual report will be embedded within the e-mail message
as an HTML display in a fixed Courier font so that columns will automatically adjust to align properly.
Report Print Options
In the Printer Settings section, click on the Options… button to open the Print window. You can select the entire
report, the current page, or a range of pages, or a specific page to be printed. You can also custom adjust form sizes
by increasing or decreasing the horizontal and vertical offsets. The horizontal offset adjusts the alignment in
fractions of an inch. The default offset value is set to 0.00. A positive increase will adjust alignment to the right, a
negative value will adjust alignment to the left. The vertical offset adjusts the alignment in fractions of an inch.
The default offset value is set to 0.00. A positive increase will adjust alignment down, a negative value will adjust
alignment up.
Page 4-2
Print Reports
Chapter 4
Point of Sale User Manual
Displayed Report Options
If the report output is Display, you can also use the navigation toolbar buttons to jump to another page within the
displayed report, or click the # toolbar button to specify a particular page. This comes in handy to view specific
information in a long report, without having to navigate page by page.
From within a displayed report, you can also send the report (current page or all pages) to print or change the output
destination for the current page or the entire report without leaving the screen.
By clicking the search toolbar button, you can also search for specified text within the displayed report. This allows
you to search for any text, amounts, dates, etc, contained within the report.
Range of Orders
When asked to define the range of orders to report on, place your cursor on the “Beginning Order #” field and click
the Down Arrow (F2 by default) to gain access to the account listing. You may choose to search for orders by order
number, vendor number, vendor name or SO Ref #. Once you have selected the Beginning Account Number, click
on the Ending Account Number field and then click the Down Arrow (F2 by default) to gain access to the account
listing to choose your ending number.
Data Record Retrieval
This function can be done on any indexed field in the currently active system or a field the current system is
integrated with. When the right mouse button is clicked in the field, the system will display the choices of data
record retrieval.
This feature is available in most options throughout the Infinity POWER system. It will simplify your retrieval of
records when printing reports. The data record retrieval choices are listed below.
First Record
This option will allow you to select the first record in the requested
file.
Next Record
This option will allow you to retrieve the next sequential record in
the file, assuming you have already selected a record.
Current Record
This option will allow you to select the last record that was accessed.
Scroll View
This option will display a scrolling screen with all records in the
accessed file. You may scroll through the records and select the one
of your choice. You may also change the sorting preference and
search for the record in a variety of ways.
Previous Record
This option will allow you to retrieve the previous sequential record
in the file, assuming you have already selected a record.
Last Record
This option will allow you to select the last record in the requested
file.
Report Sorting Preference
This is the order in which items will print on reports. This is handled through the method in which you choose the
beginning and ending account range. For example, you will be given four choices when you select your beginning
and ending account number when clicking the Down Arrow (F2 by default):
You will be given four choices in the sort by field:
Chapter 4
•
Purchase Order Number
•
Vendor Number
Print Reports
Page 4-3
Point of Sale User Manual
•
Vendor Name
•
Vendor's S.O. Number
Instead of printing all reports in order of the account number, you may elect to print them in alphabetical order by
the description of the account number by selecting your account range by “Description.”
Masking (Wildcards)
The Purchase Order mask is a field which gives you the ability to set up a search with any range of purchase orders
specified and have the system also sort for only those items within the defined mask.
The fields being masked in the Purchase Order Entry module are the Vendor Number and the Project Number.
This gives you the ability to print either purchase orders or other reports and include only the vendor that you
specify in the vendor mask field.
A single vendor in the system may have many purchase orders in the file, but are scattered throughout the file. In
other words, they were not entered into the system in any consecutive order.
By being able to specify the vendor number as a mask when you perform any printing function, the system will
allow you to only print for the vendor desired, regardless of the order in which they may be found in the file.
The purchase order number mask field would appear on your screen as:
[
]
*12345678901234567890*
If you decide to print a report that should include only the information for vendor 31773, you would specify:
[31773
]
*1234567890*
The blank spaces may either be spaces or question marks. Question marks are the standard DOS wildcard format.
Period to Report On
If a report is a summary type report, the information contained in the report will be inclusive of all data input during
the date range specified at the time of selection of the report. This provides you the ability to do historical period
reporting as well as current period reporting.
Cancel the Print Job
Clicking on the “Cancel” button during the printing of a report will cancel the print job. However, keep in mind,
some of the report may still be in the printer buffer at the time of cancellation.
REGISTER SUMMARY BY SALES TYPE (PS0201)
This report prints a daily, weekly, monthly or annual summary of sales by sales type (cash, check, etc.). This report
is very useful for analyzing your sales by the payment method used. The payment methods will be summarized by
the types you have set up in the Master Configuration. This option will read the transaction file information for the
specified date range to arrive at the sales figures used on this report. You may print this report for any date range in
the current fiscal year.
The fields included in this report are:
Field Names:
- Register Number
- Ten categories of Payment Types
Page 4-4
Print Reports
Chapter 4
Point of Sale User Manual
- Total
- Grand Totals
Chapter 4
Print Reports
Page 4-5
Point of Sale User Manual
Register Summary by Sales Type
Page 4-6
Print Reports
Chapter 4
Point of Sale User Manual
REGISTER VARIANCE REPORT (PS0202)
This report prints a cash variance by register based on the following calculations:
+ Ending Balance
- Beginning Balance
- Day's Sales
= Variance
This report quickly analyzes the cash drawer variance for each of your registers for the day. A positive variance is
favorable, a negative variance is unfavorable. To use this report effectively, you must use the option "Enter
Register Balances" to enter the correct beginning and ending balances for each register. Also, use the option "Open
Register/NO SALE" to record any cash withdrawn or deposited during the day.
The fields included in this report are as follows:
Field Names:
- Register Number
- Beginning Balance
- Cash Sales
- Cash Refunds
- No Sale Withdrawal
- No Sales Deposit
- Ending Balance
- Variance
- Totals
Chapter 4
Print Reports
Page 4-7
Point of Sale User Manual
Register Variance Report
Page 4-8
Print Reports
Chapter 4
Point of Sale User Manual
SALES BY DAY OF THE WEEK (PS0203)
This report prints an average of sales by day of the week by register for a specified date range (automatic
adjustment in average for odd date ranges). This report may be a valuable tool in determining the days of the week
that are normally highest in sales. The sales are summarized for a date range that you specify, which may be any
range in the current accounting year. The sales during the date range specified will be averaged by day of week and
by payment method.
Therefore, if you wanted to print this report for a month which does not have the same number of Mondays as it
does Fridays, the report will automatically adjust the average for proper reporting. In addition, averages will be
provided by payment type as well as overall sales. This option will read the transaction file information for the
specified date range to arrive at the sales figures used on this report.
Field Names:
- Payment Type
Summary Information for each Day of the Week:
- Total Dollars
- Number of Transaction
- Percent by Day of Week
- Percent by Payment Type
- Totals
Chapter 4
Print Reports
Page 4-9
Point of Sale User Manual
Sales by Day of the Week
Page 4-10
Print Reports
Chapter 4
Point of Sale User Manual
SALES CODE SUMMARY (AR0220)
This option prints a summary of all sales and cost of sales by sales code as of the last time this report was printed. If
you are interactive with General Ledger and have specified in the Master Configuration NOT to "Post to GL in
Detail," this option will also post a sales journal entry.
This report can be used by management to review a summary of all sales and cost of sales for either the Current
unposted amounts, or the Month-To-Date amounts. If you have specified that Accounts Receivable will NOT post
in detail to the General Ledger, this report will also create a General Ledger Account Summary integration file.
When selecting the "Print Sales Code Summary" report for printing, you have the option of choosing between:
1) Current Amounts
2) Month to Date Amounts
3) Year to Date Amounts
The integration file is created by choosing the report for "current amounts." Once the report has printed, the
system will ask "Do you wish to clear the current Sales and Cost of Sales Amounts?" By clicking on the "Yes"
button, the system will zero (or clear) the amounts held in the current accumulator fields. This "clearing" of the
amounts is what creates a journal entry to the General Ledger Integration file that you will post to your General
Ledger module, (if you are running interactive.) All current amounts will also be zeroed. It is recommended that
this report be printed for the current amounts (and cleared) on a daily basis.
You may choose to "Post Integration Files" to General Ledger once a month. The integration file will accumulate
all of the daily clearings for a daily summary posting into General Ledger. By clicking on the "Cancel" button for
the question "Do you wish to clear the current Sale and Cost of Sale Amounts?" will retain the current amounts.
The amounts will remain for reporting purposes until you are ready to clear them. If you select the Month-To-Date
version of this report, it will include the total monthly sales code balances for the month of the current system date.
NOTE
If you are NOT "Posting in Detail to GL," it is required that the Sales Code
Summary report be printed and cleared for the current amounts. If you ARE
"Posting in Detail to GL," this report need not be printed for any posting
procedures to be completed in GL.
Field Names:
- Sales Code
- Description
- Current Sales
- Current Cost of Sales
- Total Sales:
- General Ledger Account
- Debit Amount
- Credit Amount
- Total Debits
- Total Credits
Chapter 4
Print Reports
Page 4-11
Point of Sale User Manual
Sales Code Summary (Month-to-Date)
Page 4-12
Print Reports
Chapter 4
Point of Sale User Manual
Chapter 4
Print Reports
Page 4-13
Point of Sale User Manual
Sales Code Summary (Year-to-Date)
Page 4-14
Print Reports
Chapter 4
Point of Sale User Manual
SALES JOURNAL (AR0204)
This report provides a detailed listing of all invoices, credit memos and other transactions for specified transaction
types and date ranges. This report may be used by management to review the detail of all transactions posted to the
Accounts Receivable system. It may also be used for auditing the sales, cost of sales, and gross profit amounts. You
will be allowed to select a date range that may include all transactions for the current accounting year. However, you
may be even more specific and request a listing of only invoices, payments, or any other transaction type. The
system will default to all transaction types in the current month. You may select or deselect transaction types by
clicking on or off the check boxes.
If you click on the Sales Code Detail check box, the system will print all sales code detail for each transaction and
also a sales code summary at the end of the report. As an option, you may choose to only print the sales code
summary, by clicking on its check box, for a quick look at totals for a specific period of time. You may also print the
sales journal for a specific AR Code or a specific Tax Rate. This will contain only those transactions that match the
AR Code or the Tax Rate entered.
Field Names:
-
Transaction Date
- Customer Number
- Customer Name
- Transaction Type
- Transaction Number
- Transaction Description
- Manager Number
- Transaction Amount
- Cost of Sales Amount
- Tax Amount
- Freight Amount
- Total Amount of the Transaction
- Gross Profit Amount
- Gross Profit Percentage
- Totals
- Optional Transaction Detail
- Sales Code
- Description
- Inventory Item Number
- Quantity
- Unit of Measure
- Unit Price
- Extended Price
- Cost
- Gross Profit
- Gross Profit Percent
- Summary by Sales Code
Chapter 4
Print Reports
Page 4-15
Point of Sale User Manual
Sales Journal
Page 4-16
Print Reports
Chapter 4
Point of Sale User Manual
Chapter 4
Print Reports
Page 4-17
Point of Sale User Manual
SALES JOURNAL BY CUSTOMER (AR0205)
This report provides a detailed listing of all invoices, credit memos and other transactions for specified transaction
types and date range by customer. This report may be used by management to review the detail of all transactions
posted to the Accounts Receivable system for each customer. It may also be used for auditing the sales, cost of sales,
and gross profit amounts. You may select a customer range and a date range that can include all transactions for the
current accounting year. However, you may be even more specific and request a listing of only invoices, payments
or any other transaction type. The system will default to all transaction types in the current month. You may select
or deselect transaction types by clicking on or off the check boxes.
If you click on the Sales Code Detail check box, the system will print all sales code detail for each transaction and
also a sales code summary at the end of the report. As an option, you may choose to only print the sales code
summary, by clicking on its check box, for a quick look at totals for a specific period of time. You may also print the
sales journal for a specific AR Code or a specific Tax Rate or a specific Region. This will contain only those
transactions that match the AR Code or the Tax Rate or the Region entered.
Field Names:
- Transaction Date
- Customer Number
- Customer Name
- Transaction Type
- Transaction Number
- Transaction Description
- Manager Number
- Transaction Amount
- Cost of Sales Amount
- Tax Amount
- Freight Amount
- Total Amount of the Transaction
- Gross Profit Amount
- Gross Profit Percentage
- Customer Totals
- Grand Totals
- Optional Transaction Detail
- Sales Code
- Description
- Inventory Item Number
- Quantity
- Unit of Measure
- Unit Price
- Extended Price
- Cost
- Gross Profit
- Gross Profit Percent
- Summary by Sales Code
Page 4-18
Print Reports
Chapter 4
Point of Sale User Manual
Sales Journal by Customer
Chapter 4
Print Reports
Page 4-19
Point of Sale User Manual
Page 4-20
Print Reports
Chapter 4
Point of Sale User Manual
SALES JOURNAL BY SALESMAN (AR0206)
This report provides a detailed listing of all invoices, credit memos and other transactions for specified transaction
types and date range by salesman. This report may be used by management to review the detail of all transactions
posted to the Accounts Receivable system for each salesman. It may be used for auditing the sales, cost of sales, and
gross profit amounts. You will be allowed to select a salesman range and a date range that may include all
transactions for the current fiscal year. However, you may be even more specific and request a listing of only
invoices, payments or any other transaction type. The system will default to all transaction types in the current
month. You may select or deselect transaction types by clicking on or off the check boxes.
If you click on the Sales Code Detail check box, the system will print all sales code detail for each transaction and
also a sales code summary at the end of the report. As an option, you may choose to only print the sales code
summary, by clicking on its check box, for a quick look at totals for a specific period of time. You may also print the
sales journal for a specific AR Code or a specific Tax Rate. This will contain only those transactions that match the
AR Code or the Tax Rate entered.
Field Names:
- Transaction Date
- Customer Number
- Customer Name
- Transaction Type
- Transaction Number
- Transaction Description
- Manager Number
- Transaction Amount
- Cost of Sales Amount
- Tax Amount
- Freight Amount
- Total Amount of the Transaction
- Gross Profit Amount
- Gross Profit Percentage
- Manager Totals
- Grand Totals
- Optional Transaction Detail
- Sales Code
- Description
- Inventory Item Number
- Quantity
- Unit of Measure
- Unit Price
- Extended Price
- Cost
- Gross Profit
- Gross Profit Percent
- Summary by Sales Code
Chapter 4
Print Reports
Page 4-21
Point of Sale User Manual
Sales Journal by Salesman
Page 4-22
Print Reports
Chapter 4
Point of Sale User Manual
Chapter 4
Print Reports
Page 4-23
Point of Sale User Manual
Page 4-24
Print Reports
Chapter 4
Point of Sale User Manual
SALES JOURNAL BY SALES CODE (AR0222)
This report provides a detailed listing of all invoices, credit memos and other transactions for the current period by
sales code. This report may be used by management to review the detail of all transactions posted to the Accounts
Receivable system for each sales code. It may be used for auditing the sales, cost of sales, and gross profit amounts.
You will be allowed to select a sales code range that may include all transactions for the current fiscal period.
The system will default to all transaction types in the fiscal period. This report provides great flexibility in verifying
all of the transactions in which a specific sales code was used. Therefore, auditing capabilities are greatly enhanced
by the use of this report.
Field Names:
- Sales Code
- Description
- Customer Number
- Transaction Date
- Transaction Number
- Transaction Type
- Transaction Description
- Sales Amount
- Cost of Sales Amount
- Totals by Sales Code
- Grand Totals
Chapter 4
Print Reports
Page 4-25
Point of Sale User Manual
Sales Journal by Sales Code
Page 4-26
Print Reports
Chapter 4
Point of Sale User Manual
SALES TAX REPORT (AR0207)
This report summarizes sales tax, taxable sales and non-taxable sales by tax rate and taxing entity. This report may
be used by management to report the sales tax charged and the taxable and non-taxable sales for the current
accounting period. When you select this option, you will be prompted for the range of tax rates to include. This
report reads through your sales journal transaction file and accumulates the total taxable and non-taxable sales by tax
rate. The following calculations are utilized to derive these printed fields:
1) Tax Charged. This is the total invoice amount of all tax collected for each tax rate.
2) Taxable Sales. This is the total Tax Charged divided by the tax percent established for
each rate. (This calculation automatically adjusts for any tax break points.)
3) Non-Taxable Sales. This is the total sales minus Taxable Sales.
As you may have noticed, the back calculation of taxable sales (#2 above) is subject to a very small amount of
variance. This variance is rarely more than a few pennies per month. However, the Tax Charged will always
properly match the Taxable Sales reported.
Example:
If your actual taxable sales are $100.58 and the tax rate is 5%, then your tax liability is $5.03 (rounded to the
nearest penny from $5.029). If you back calculated taxable sales by dividing $5.03 by 5%, then taxable sales
would be $100.60. This variance is acceptable for most sales tax liability reporting, however, if you are
uncertain about this, please contact your accountant to make sure.
Field Names:
- Tax Rate Number
- Tax Rate Description
- Entity #1
- Entity #2
- Entity #3
- Entity #4
- Entity #5
- Total
- Tax Charged
- Taxable Sales
- Non-Taxable Sales
- Total Sales
- Totals
Chapter 4
Print Reports
Page 4-27
Point of Sale User Manual
Sales Tax Report
Page 4-28
Print Reports
Chapter 4
Point of Sale User Manual
ANALYTICAL REPORTS
Seven reports are available by selecting the Analytical Reports menu option. They are categorized into four types:
1)Trend Reports
Customer Trend Report
Manager Trend Report
Sales Code Trend Report
2) Manager Reports
Commission Report
Salesman Ranking
3) Inventory Sales Detail
Detail by Customer
Detail by Salesman
4) Customer Ranking Report
Each report is discussed here.
Customer Trend Reports (AR0208)
This report summarizes monthly sales by customer for the entire year. This report can be used by management to
review the sales trends for each customer by month. This type of information may be useful in analyzing peak sales
periods versus slow seasons. This type of information would then be very useful for all elements of production,
planning, and personnel throughout the company.
You will be prompted for Customer Range, Salesman or all Salesmen, ad Region Mask.
Field Names:
- Customer Name
- Customer Number
- Sales for each month of the year
- Total
- Grand Totals
Chapter 4
Print Reports
Page 4-29
Point of Sale User Manual
Customer Trend Reports
Page 4-30
Print Reports
Chapter 4
Point of Sale User Manual
Salesman Trend Report (AR0209)
This report summarizes monthly sales by salesman for the entire year. This report can be used by management to
review the sales trends for each manager by month. This type of information may be useful in analyzing how well a
particular individual is performing throughout various periods of the year. As a tool for allowing them to gauge
themselves, this report would be very beneficial. By selecting specific ranges, you may see how well a single
individual is doing as well as a selective group or the whole sales staff.
Field Names:
- Manager Name
- Manager Number
- Sales for each month of the year
- Total
- Grand Totals
Chapter 4
Print Reports
Page 4-31
Point of Sale User Manual
Salesman Trend Report
Page 4-32
Print Reports
Chapter 4
Point of Sale User Manual
Sales Code Trend Report (AR0210)
This report summarizes monthly sales by sales code for the entire year. This report may be used by management to
review the sales trends for each sales code by month. This information is very useful for analyzing sales by various
product codes. Sales Codes allow you to selectively categorize various groups of products together to determine
sales by category. With this ability, very detailed analysis information may be available through these reports.
Field Names:
- Sales Code Description
- Sales Code Number
- Sales for each month of the year
- Total
- Grand Totals
Chapter 4
Print Reports
Page 4-33
Point of Sale User Manual
Sales Code Trend Report
Page 4-34
Print Reports
Chapter 4
Point of Sale User Manual
Commission Report (AR0211)
This report provides a detailed breakdown of commissions by manager. The commission calculation is based on the
method selected for each manager. This report may be used by management to review the detail of all transactions
posted to the Accounts Receivable system for each manager for verification of the commissions to be paid on those
sales. It may be used for auditing the sales, cost of sales, and gross profit amounts. You will be allowed to select a
salesman range and a date range that may include all transactions for the current fiscal year. You may select or
deselect transaction types by clicking on or off the check boxes.
By clicking on the Sales Code Detail check box, the system will print all sales code detail for each transaction and
also a sales code summary at the end of the report.
This report may be printed based on Gross Sales or on Net Sales. Different sales persons may fall into one or the
other classification. If your commission is specified to be paid on cash receipts, then this report will list only those
payments received from customers that are configured for the selected salesmen. This report is designed to print
separately for each salesman with the listing of all commission related transactions and a total commission
calculation at the end.
Field Names:
- Transaction Date
- Customer Number
- Customer Name
- Transaction Type
- Transaction Number
- Transaction Description
- Salesman Number
- Job Number
- Transaction Amount
- Cost of Sales Amount
- Tax Amount
- Freight Amount
- Total Amount of the Transaction
- Gross Profit Amount
- Gross Profit Percentage
- Salesman Totals
- Commission Calculations
- Optional Transaction Detail
- Sales Code
- Description
- Inventory Item Number
- Quantity
- Unit of Measure
- Unit Price
- Extended Price
- Cost
- Gross Profit
- Gross Profit Percent
Chapter 4
Print Reports
Page 4-35
Point of Sale User Manual
Commission Report
Page 4-36
Print Reports
Chapter 4
Point of Sale User Manual
Salesman Ranking (AR0212)
This report ranks up to 500 salesmen by either MTD or YTD gross or net sales. This report is a very valuable tool in
evaluating and comparing the manager's sales abilities. You may select a range of manager and then rank up to 500
on either Month-To-Date or Year-to-Date gross sales or net sales. This report will print in descending order with the
summary sales information printed for each manager.
Field Names:
- Salesman Number
- Salesman Name
- Month-To-Date Gross Sales
- Month-To-Date Net Sales
- Year-to-Date Gross Sales
- Year-to-Date Net Sales
- Ranking Number
- Grand Totals
Chapter 4
Print Reports
Page 4-37
Point of Sale User Manual
Salesman Ranking
Page 4-38
Print Reports
Chapter 4
Point of Sale User Manual
Inventory Detail by Salesman (AR0214)
This report provides a complete history of inventory sales and returns for specified salesmen.
NOTE
This report requires the maintaining of transaction detail in Manufacturing
Inventory Management.
This report can be used by management to evaluate each salesman’s history of sales by inventory item. This would
allow you to determine the areas where a particular salesman is performing best and where they may need
assistance. By verifying information in this report, you may also see at what price levels he or she is selling and
determine if those profit levels are satisfactory or not. This report may be printed for a specific date range and
transaction type (sales, returns or both).
Field Names:
- Customer Number
- Customer Name
- Salesman Number
- Salesman Name
- Inventory Item Number
- Inventory Item Description
- Transaction Type
- Quantity
- Unit of Measure
- Transaction Description
- Transaction Date
- Total Cost
- Total Price
- Totals
- Grand Totals
Chapter 4
Print Reports
Page 4-39
Point of Sale User Manual
Inventory Detail by Salesman
Page 4-40
Print Reports
Chapter 4
Point of Sale User Manual
Chapter 4
Print Reports
Page 4-41
Point of Sale User Manual
Sales Code Listing (AR0216)
This report provides a listing of all sales code information in either detailed or summarized form. You may print this
report in a simple format or a detailed listing for data input verification or archival purposes.
Field Names:
- Sales Code Number
- Sales Code Description
- Taxable (Yes or No)
- General Ledger Sales Account Number
- General Ledger Asset Account Number
- General Ledger Cost of Sales Account Number
- Current Sales
- Current Cost of Sales
- Period
- Checking Account
- Sales
- Cost of Sales
- Total Sales
- Total Cost of Sales
Page 4-42
Print Reports
Chapter 4
Point of Sale User Manual
Sales Code Listing (Non-Detailed)
Chapter 4
Print Reports
Page 4-43
Point of Sale User Manual
Page 4-44
Print Reports
Chapter 4
Point of Sale User Manual
Sales Code Listing (Detailed)
Chapter 4
Print Reports
Page 4-45
Point of Sale User Manual
Salesman Listing (AR0217)
This report provides a listing of all salesman information in either detailed or summarized form. This report is
designed to allow you a simple listing of your salesmen in summarized form, or a detailed listing for data input
verification or archival purposes.
Field Names:
- Manager Number
- Manager Name
- Password
- Commission
- Percent
- Tier Level
- Period
- Gross Sales
- Net Sales
- Total
Page 4-46
Print Reports
Chapter 4
Point of Sale User Manual
Salesman Listing (Non-Detailed)
Chapter 4
Print Reports
Page 4-47
Point of Sale User Manual
Salesman Listing (Detailed)
Page 4-48
Print Reports
Chapter 4
Point of Sale User Manual
Tax Rate Listing (AR0218)
This report provides a listing of all tax rate information in either detailed or summarized form. This report is
designed to allow you a simple listing of your tax rates in summarized form, or a detailed listing for data input
verification or archival purposes.
Field Names:
- Tax Number
- Tax Rate Description
- Rate 1
- Break Point
- Rate 2
- Entity #'s 1-5
Chapter 4
Print Reports
Page 4-49
Point of Sale User Manual
Tax Rate Listing (Non-Detailed)
Page 4-50
Print Reports
Chapter 4
Point of Sale User Manual
Tax Rate Listing (Detailed)
Chapter 4
Print Reports
Page 4-51
Point of Sale User Manual
CHAPTER 5
PERFORM ANALYTICAL GRAPHS
This section discusses all six types of Analytical Graphs utilized by the Point of Sale module. These graphs are
designed to give you an instant visualization of your sales by payment method, sales trends, sales codes and
salesman information. No other programs are required to execute this option. The system performs all graphics
functions from within its own programs. The ability to perform Analytical Graphs is currently not available with the
Linux versions.
After the graph has been displayed to your screen, printing is one simple step:
For Windows:
1.
Press ALT Print Screen and paste into a WORD document.
You may also paste this image into a document or an Excel spreadsheet for presentation purposes.
SALES BY PAYMENT METHOD (AR0300)
This option provides either a pie or bar chart comparing sales for a specified date range summarized by payment
method.
This graph allows you to quickly analyze and compare your sales based on different payment methods. You may
select any date range in the current accounting year and choose to display the graph in Pie Chart or Bar Graph
format.
This option will read the transaction file information for the specified date range to arrive at the sales figures used on
this graph. After the graph has been displayed, <click> OK to return to the menu.
Chapter 5
Perform Analytical Graphs
Page 5-1
Point of Sale User Manual
SALES TREND BY SALESMAN (AR0302)
This option provides a line graph displaying sales by month, for the current month during the current year, to include
up to four (4) specified salesmen.
This option is designed to chart the historical sales for a salesman for every month in the current accounting year.
This allows you to see very quickly the upward and downward trends of the salesman's performance. When you
execute this option, you should select the salesmen to include on the graph. After the graph has been displayed,
<click> OK to return to the menu.
Page 5-2
Perform Analytical Graphs
Chapter 5
Point of Sale User Manual
SALES TREND BY SALES CODE (AR0303)
This option provides a line graph displaying sales by month, for the current month, during the current year, to
include up to four (4) specified sales codes.
This option is designed to chart the historical sales for a sales code for every month in the current accounting year.
This allows you to see very quickly the upward and downward trends of sales by sales code. When you execute this
option, you should select the sales codes to include on the graph. After the graph has been displayed, <click> OK to
return to the menu.
SALESMAN COMPARISON (AR0305)
This option provides a bar or pie graph comparing either MTD or YTD sales, to include up to twelve (12) specified
salesmen.
This option will enable you to compare salesman sales based on either the current Month-To-date sales or Year-toDate sales.
You will be allowed to select up to twelve salesmen to compare and also the basis (MTD or YTD). After selecting
the salesmen and specifying the basis, you may display the graph in either a Bar Graph or Pie Chart format. After
the graph has been displayed, <click> OK to return to the menu.
Chapter 5
Perform Analytical Graphs
Page 5-3
Point of Sale User Manual
Page 5-4
Perform Analytical Graphs
Chapter 5
Point of Sale User Manual
SALES CODE COMPARISON (AR0306)
This option provides a bar or pie graph comparing either MTD or YTD sales, including up to twelve (12) specified
sales codes.
This option will enable you to compare the Sales Code sales amounts based on either the current Month-To-Date
sales or Year-to-Date sales. You will be allowed to select up to twelve Sales Codes to compare and also the basis
(MTD or YTD). After selecting the Sales Codes and specifying the basis, you may display the graph in either a Bar
Graph or Pie Chart format. After the graph has been displayed, <click> OK to return to the menu.
Chapter 5
Perform Analytical Graphs
Page 5-5
Point of Sale User Manual
SALESMAN RANKING (AR0307)
This option provides a bar or pie graph ranking the top twelve (12) salesmen based on MTD or YTD sales.
This graph is particularly useful in quickly determining your top twelve salesmen for either the current month or the
entire accounting year. You may select a range of salesmen to use in the ranking and also the basis (MTD or YTD).
You may then specify whether you would like a Bar Graph or Pie Chart format. The top twelve salesmen will be
displayed before the graph is generated so that you will be able to determine which salesman is which on the graph.
After the graph has been displayed, <click> OK to return to the menu.
Page 5-6
Perform Analytical Graphs
Chapter 5
Point of Sale User Manual
Chapter 5
Perform Analytical Graphs
Page 5-7
Point of Sale User Manual
This page intentionally left blank
Page 5-8
Perform Analytical Graphs
Chapter 5
Point of Sale User Manual
INDEX
A
ADD A MANAGER......................................................................................................................................................................2-9
ADD A TAX RATE .................................................................................................................................................................... 2-12
ADDITIONAL COST OF SALES ....................................................................................................................................3-14, 3-24
ALLOW DISCOUNT % BY LINE ......................................................................................................................................3-6, 3-17
ALLOW LINE ITEM PRICE CHANGES ...........................................................................................................................3-6, 3-17
ANALYTICAL GRAPHS .............................................................................................................................................................5-1
ANALYTICAL REPORTS ......................................................................................................................................................... 4-29
AUTOMATIC COS ADJUSTMENTS ................................................................................................................................... 3-37
B
BALANCE FORWARD.............................................................................................................................................................. 3-28
BAR CODE READER ..................................................................................................................................................................1-7
BATCH #..................................................................................................................................................................................... 3-39
BATCH NUMBER.............................................................................................................................................................3-41, 3-42
BATCH REVIEW ....................................................................................................................................................................... 3-41
BREAK POINT ..................................................................................................................................................................2-12, 2-13
C
CHANGE A MANAGER..............................................................................................................................................................2-9
CHANGE A TAX RATE ............................................................................................................................................................ 2-12
CHANGE MASTER CONFIGURATION ................................................................................................................................. 2-22
CHECK AMOUNT ..................................................................................................................................................................... 3-28
CHECK DATE ............................................................................................................................................................................ 3-28
CHECK NUMBER...................................................................................................................................................................... 3-28
CLEAR CURRENT SALES AND COST OF SALES AMOUNTS ........................................................................................... 4-11
CLOSE AN EXISTING BATCH ................................................................................................................................................ 3-39
COMMISSION RATES .......................................................................................................................................................2-9, 2-10
COMMISSION TYPE................................................................................................................................................................. 2-10
Type 0 .......................................................................................................................................................................................2-9
Type 1 .......................................................................................................................................................................................2-9
Type 2 .......................................................................................................................................................................................2-9
COPY AN EXISTING MANAGER..............................................................................................................................................2-9
COPY AN EXISTING TAX RATE ............................................................................................................................................ 2-12
COST OF SALES AMOUNT ..................................................................................................................................................... 3-35
CURRENT AMOUNT ................................................................................................................................................................ 4-11
CUSTOMER INQUIRY.......................................................................................................................................................2-9, 2-12
CUSTOMER TREND REPORTS ............................................................................................................................................... 4-29
D
DATA FILE DESCRIPTIONS......................................................................................................................................................1-5
DAY OF MONTH FOR EACH PAYMENT .............................................................................................................................. 3-14
DELETE A MANAGER ...............................................................................................................................................................2-9
DELETE A TAX RATE.............................................................................................................................................................. 2-12
DESCRIPTION ............................................................................................................. 3-7, 3-8, 3-9, 3-12, 3-19, 3-20, 3-21, 3-22
DEVICES .................................................................................................................................................................................... 2-30
DISCOUNT %...................................................................................................................................................................3-14, 3-24
E
ENTER REGISTER BALANCES .......................................................................................................................................... 3-38
Index
Page I-1
Point of Sale User Manual
ENTER REGISTER BALANCES FLOWCHART ..................................................................................................................... 1-19
ENTER TRANSACTIONS ...........................................................................................................................................................3-1
ENTRY SCREEN...............................................................................................................................................................2-25, 2-26
ERROR MESSAGES ....................................................................................................................................................................1-8
EXCLUDE ON ORDER ON QUANTITY CHECK ............................................................................................................3-6, 3-17
EXTENDED PRICE.............................................................................................................................3-13, 3-14, 3-17, 3-23, 3-24
F
FILE IMPORT MODULES OVERVIEW................................................................................................................................... 2-17
FIRST RATE............................................................................................................................................................................... 2-12
G
GENERAL OVERVIEW ..............................................................................................................................................................2-1
I
IMPORT TAX RATES .............................................................................................................................................................. 2-15
INQUIRY MODE [IM0100] ....................................................................................................................................................... 2-67
INVENTORY DETAIL BY SALESMAN .................................................................................................................................. 4-39
INVENTORY ITEM NUMBER .......................................................................................................................................3-10, 3-21
INVOICE DATE ......................................................................................................................................................................... 3-36
INVOICE FORMAT ................................................................................................................................................................... 2-27
J
JOB NUMBER ............................................................................................................................................................................ 3-28
L
LOT NUMBER .................................................................................................................................................................3-11, 3-22
M
MAINTAIN DATA FILES......................................................................................................................................................... 2-32
MASTER CONFIGURATION ................................................................................................................................................... 2-22
MONTH TO DATE AMOUNTS ................................................................................................................................................ 4-11
N
NAME ......................................................................................................................................................................................... 2-10
NAVIGATION TOOLS ................................................................................................................................................................2-4
NO DATA MATCH .................................................................................................................................................................... 3-39
NUMBER OF PAYMENTS TO SCHEDULE ..............................................................................................................................3-6
O
OPEN A NEW BATCH .............................................................................................................................................................. 3-42
OPEN ITEM DESCRIPTION ..................................................................................................................................................... 3-28
OPEN REGISTER FLOWCHART ............................................................................................................................................. 1-14
OPEN REGISTER/NO SALE ................................................................................................................................................. 3-27
P
PEND AN EXISTING BATCH .................................................................................................................................................. 3-39
PERFORM BATCH INQUIRY .................................................................................................................................................. 3-39
PERFORM DRAFT CAPTURE BATCH .............................................................................................................................. 3-39
POST AUTHORIZATION.......................................................................................................................................................... 3-40
POST TO GL IN DETAIL .......................................................................................................................................................... 4-11
Page I-2
Index
Point of Sale User Manual
PREPRINTED FORMS................................................................................................................................................................ 1-6
PRINT COMMISSION REPORT ............................................................................................................................................... 4-35
PRINT CUSTOMER TREND REPORTS................................................................................................................................... 4-29
PRINT DAILY AUDIT REPORT............................................................................................................................................... 3-39
PRINT DEPOSIT REGISTER .................................................................................................................................................... 3-33
PRINT DEPOSIT REGISTER FLOWCHART ........................................................................................................................... 1-16
PRINT MANAGER RANKING ................................................................................................................................................. 4-37
PRINT MANAGER TREND REPORT ...................................................................................................................................... 4-31
PRINT REPORTS .........................................................................................................................................................................4-1
PRINT SALES CODE SUMMARY ........................................................................................................................................... 4-11
PRINT SALES JOURNAL.................................................................................................................................................4-15, 4-18
PRINT SALES JOURNAL BY CUSTOMER............................................................................................................................. 4-18
PRINT SALES JOURNAL BY MANAGER .............................................................................................................................. 4-21
PRINT SALES JOURNAL BY SALES CODE .......................................................................................................................... 4-25
PRINT SALES TAX REPORT ................................................................................................................................................... 4-27
Q
QUANTITY.......................................................................................... 3-10, 3-11, 3-12, 3-13, 3-13, 3-17, 3-21, 3-22, 3-23, 3-24
QUANTITY AVAILABLE ..................................................................................................................................................3-6, 3-17
QUANTITY TO ADJUST..........................................................................................................................................3-6, 3-17, 3-36
R
RECORD A QUICK SALE...........................................................................................................................................................3-1
RECORD A QUICK SALE...........................................................................................................................................................3-1
RECORD A QUICK SALE FLOWCHART ............................................................................................................................... 1-13
RECORD A RETURN/REFUND............................................................................................................................................ 3-17
RECORD A SALE/PRINT RECEIPT...................................................................................................................................... 3-6
RECORD AUTOMATIC COS ADJUSTMENTS FLOWCHART ............................................................................................. 1-18
RECORD COS ADJUSTMENTS ........................................................................................................................................... 3-36
RECORD PAYMENTS............................................................................................................................................................ 3-28
RECORD PAYMENTS FLOWCHART ..................................................................................................................................... 1-15
RECORD SALES CODE ADJUSTMENTS........................................................................................................................... 3-35
RECORD SALES CODE ADJUSTMENTS FLOWCHART...................................................................................................... 1-17
RECORD SALES CODES ADJUSTMENTS............................................................................................................................. 3-35
REGISTER LOGIN..................................................................................................................................................................... 3-43
REGISTER LOGOUT................................................................................................................................................................. 3-43
REGISTER SUMMARY BY SALES TYPE ............................................................................................................................... 4-4
REGISTER VARIANCE REPORT.............................................................................................................................................. 4-7
RETRIEVE BATCH STATUS.................................................................................................................................................... 3-39
S
SALES AMOUNT....................................................................................................................................................................... 3-35
SALES BY DAY OF THE WEEK............................................................................................................................................... 4-9
SALES CODE .....................................................................3-8, 3-10, 3-11, 3-12, 3-14, 3-17, 3-19, 3-20, 3-21, 3-22, 3-24, 3-27
SALES CODE LISTING............................................................................................................................................................. 4-42
SALES CODE LISTING (DETAILED)...................................................................................................................................... 4-45
SALES CODE LISTING (NON-DETAILED)............................................................................................................................ 4-43
SALES CODE SUMMARY....................................................................................................................................................... 4-11
SALES CODE TREND REPORT............................................................................................................................................... 4-33
SALES JOURNAL ...................................................................................................................................................................... 4-15
SALES JOURNAL BY CUSTOMER ........................................................................................................................................ 4-18
SALES JOURNAL BY SALES CODE....................................................................................................................................... 4-25
SALES JOURNAL BY SALESMAN ........................................................................................................................................ 4-21
SALES RECEIPT SELECTION ...................................................................................................................................................1-3
SALES TAX REPORT............................................................................................................................................................... 4-27
SALESMAN................................................................................................................................................................................ 3-31
SALESMAN LISTING ............................................................................................................................................................... 4-46
Index
Page I-3
Point of Sale User Manual
SALESMAN LISTING (DETAILED) ........................................................................................................................................ 4-48
SALESMAN LISTING (NON-DETAILED) .............................................................................................................................. 4-47
SALESMAN TREND REPORT (AR0209) ................................................................................................................................ 4-31
SCHEDULED PAYMENT TYPE.................................................................................................................................................3-6
SECOND RATE.................................................................................................................................................................2-12, 2-13
SERIAL NUMBER .................................................................................................................................................3-11, 3-21, 3-22
SET UP CREDIT CARD PROCESSORS ................................................................................................................................... 2-37
SET UP CUSTOMERS
Customer Inquiry.................................................................................................................................................... 2-9, 2-12, 2-19
SET UP CUSTOMERS ............................................................................................................................................................... 2-45
SET UP INVENTORY ITEMS ................................................................................................................................................... 2-65
SET UP MANAGERS...................................................................................................................................................................2-9
SET UP PAYMENT TYPES....................................................................................................................................................... 2-33
SET UP REGISTERS................................................................................................................................................................. 2-19
SET UP SALES CODES...............................................................................................................................................................2-5
SET UP SALESMEN ....................................................................................................................................................................2-9
Add a Manager ..........................................................................................................................................................................2-9
Change a Manager.....................................................................................................................................................................2-9
Copy an Existing Manager ........................................................................................................................................................2-9
Delete a Manager ......................................................................................................................................................................2-9
SET UP TAX RATES ................................................................................................................................................................. 2-12
Add a Tax Rate........................................................................................................................................................................ 2-12
Change a Tax Rate .................................................................................................................................................................. 2-12
Copy an Existing Tax Rates .................................................................................................................................................... 2-12
Delete a Tax Rate .................................................................................................................................................................... 2-14
SPECIAL KEYS............................................................................................................................................................................1-6
STATUS ................................................................................................................................................................... 3-41, 3-41, 3-42
STOCKING UNIT OF MEASURE......................................................................................................................................3-6, 3-17
SYSTEM INTEGRATION...................................................................................................................................................1-3, 2-31
T
TAX................................................................................................................................................ 3-7, 3-9, 3-12, 3-19, 3-20, 3-22
TAX CHARGED......................................................................................................................................................................... 4-27
TAX RATE LISTING ................................................................................................................................................................. 4-49
TAX RATE LISTING (DETAILED) .......................................................................................................................................... 4-51
TAX RATE LISTING (NON-DETAILED) ................................................................................................................................ 4-50
TAXABLE................................................................................................................................................................................... 4-27
TAXABLE SALES ..................................................................................................................................................................... 4-27
TOTAL ............................................................................................................................................................ 3-40, 3-41, 3-41, 3-42
TRANSACTION COUNT (TRANS. CNT) ................................................................................................................................ 3-39
TRANSACTION DESCRIPTION .............................................................................................................................................. 3-35
TRANSACTION INQUIRY ....................................................................................................................................................... 3-41
TRANSACTION NUMBER ....................................................................................................................................................... 3-35
TRANSACTION PROCESSING FLOWCHARTS .................................................................................................................... 1-13
TRANSFER FROM SALES CODE............................................................................................................................................ 3-35
TRANSFER TO SALES CODE.................................................................................................................................................. 3-35
U
UNAPPLIED CASH ..........................................................................................................................................................3-31, 3-32
UNIT OF MEASURE........................................................................................................................... 3-10, 3-12, 3-13, 3-21, 3-23
UNIT OF MEASURE CONVERSION ..........................................................................................................3-10, 3-13, 3-21, 3-23
UNIT PRICE ............................................................................................................. 3-8, 3-11, 3-12, 3-13, 3-19, 3-22, 3-23, 3-24
V
VENDOR INQUIRY.................................................................................................................................................. 2-9, 2-12, 2-19
VERIFY QUANTITY AVAILABLE...................................................................................................................................3-6, 3-17
VOID TRANSACTION .............................................................................................................................................................. 3-40
Page I-4
Index
Point of Sale User Manual
Y
YEAR TO DATE AMOUNTS .................................................................................................................................................... 4-11
Z
ZERO PAYMENT....................................................................................................................................................................... 3-28
Index
Page I-5