1
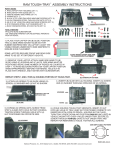
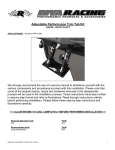
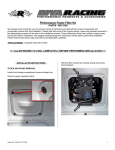
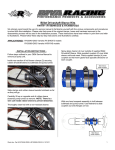
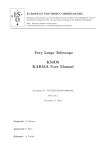
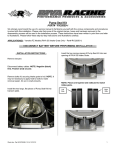
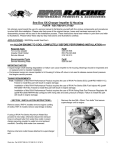
Valve Train Upgrade Kit
PART# - RY19040-VTU-1
APPLICATION(S): Yamaha FX-SHO, FZR & FZS
Please read the following completely prior to beginning installation.
A service manual is recommended when performing this installation. The following instructions were written based on
using our Valve Compression Tool (Part# RY19040-VCT). This tool allows you to install our Valve Train Upgrade Kit
without removing the cylinder head.
Required tools
RIVA Valve Compression Tool
Air Pressure Regulator
OEM Service Manual
Part#
RY19040-VCT
N/A
N/A
Recommended tools
Magnetic Pick-up Tool
Part#
N/A
- INSTALLATION INSTRUCTIONS Follow steps outlined in your OEM Service Manual for
removal of the following top end engine components:
Valve Cover, Camshaft Caps, and Timing Chain
Tensioner.
Install compression rod supports (2) over front and rear
spark plug holes using supplied hardware.
Carefully remove camshafts making sure to keep
tension on timing chain so it does not fall off of
crankshaft gear.
Use supplied hardware applicable to your brand
watercraft to secure supports to cylinder head. NOTE:
Do not over tighten bolts.
Remove spark plug and install supplied airline into
spark plug receiver for cylinder being serviced.
TIP: Using a coat hanger or heavy gauge welding rod wrap one
end around left hand grip and the other through timing chain to
keep adequate tension during tool installation.
Word doc. RY19040-VTU-1 © H1 8/26/10
Using a metered airline, pressurize cylinder to 80psi
maximum.
1
Remove bucket only from valve being serviced.
NOTE:
• Compression arm handle should be on same side
of motor as valve being serviced.
• Secure arm to receiver at # 14. Secure cup rod to
arm at # 8.
• Use supplied compression adapter applicable to
your brand watercraft.
• Hang timing chain on end of compression rod.
Center cup over retainer. Apply pressure to handle on
compression arm forcing retainer down until keepers
are exposed.
Use a magnet to remove bucket. Make contact at
center. This will remove bucket shim at same time.
Flip bucket over to verify shim was removed with
bucket. Do not lose shim!
Use a magnet to remove keepers.
Install supplied stainless steel compression rod1,
compression arm receiver2, compression arm3 and
compression adapter4 onto supports.
1
2
3
Slowly relieve pressure on compression arm.
4
Flip compression arm handle up and over to access
valve.
Word doc. RY19040-VTU-1 © H1 8/26/10
2
Remove stock retainer, stock valve spring(s) and stock
base spacer.
Apply grease to stock keepers and install into center of
supplied valve retainer. Add more grease.
Thoroughly clean supplied Valve Train Upgrade kit
components with a non-residual cleaner.
Place retainer on top of spring set (profile side towards
spring set).
RIVA Valve Train Upgrade Kit components
Install one base washer (profile side up) over valve
stem and seat against cylinder head.
Flip compression arm handle over and center cup over
retainer.
Center cup over retainer. Slowly apply pressure to
handle on compression arm until keepers begin to
move. Use a non-magnetic tool to guide keepers into
place on valve stem.
Install one spring set (inner & outer combined) over
valve stem.
Once keepers are properly seated on valve stem slowly
relieve pressure on compression arm until retainer locks
in place.
Word doc. RY19040-VTU-1 © H1 8/26/10
3
Slightly compress retainer several times to ensure
keepers are properly locked into place.
If retainer does not appear to be locked in place repeat
process.
Flip compression arm handle up and over to access
valve.
Thoroughly clean stock bucket and shim. Do not
remove grease from retainer.
Visually inspect to ensure retainer is properly locked in
place.
Place shim in center of retainer (on top of keepers)
number side up making sure it is seated evenly.
Replace bucket.
Repeat above steps for remaining valves working on
only one at a time only. Move to next cylinder and
repeat entire process.
Carefully follow steps outlined in your OEM Service
Manual for replacement of the following top end engine
components: Valve Cover, Camshaft Caps, and Timing
Chain Tensioner.
Remember, the water belongs to everyone.
Please ride responsibly and respect the environment!
Technical Support
For answers to questions regarding installation or trouble shooting RIVA Performance Products contact:
RIVA Technical Support directly at (954) 247-0705 or by e-mail at [email protected].
Limited Warranty
RIVA Valve Train Upgrade Kits carry a 30-day limited warranty to the original purchaser. They are warranted to be free of defects in materials and workmanship under
normal use and service. Customer modified components will be void of warranty. This warranty is limited to defects in the primary components only. Finish and/or wear
marks in or on primary components are not covered under this warranty.
RIVA Racing’s liability is expressly limited to the repair or replacement of the components contained within or associated with this kit. RIVA Racing agrees to repair or at
RIVA’s option, replace any defective unit without charge, if product is returned to RIVA Racing freight prepaid within the warranty period. Any equipment returned which, in
RIVA’s opinion, has been subjected to misuse, abuse, overheating or accident shall not be covered by this warranty.
RIVA Racing shall have no liability for special, incidental or consequential damages or injury to persons or property from any cause arising from the sale, installation or use
of this product.
No other warranty, express or implied, including, but not limited to the implied warranties of merchantability and fitness for a particular purpose, applies. Various states do
not allow for the limitation of incidental or consequential damages and therefore the above exclusion or limitation may not apply to you.
Warranty does not include the expenses related to freight or transportation of parts or compensation for any inconvenience or loss of use while being repaired. A copy of
the original invoice and a Return Authorization Number (RA#) must accompany all warranty claims.
Warranted replacement parts will be returned freight collect.
Word doc. RY19040-VTU-1 © H1 8/26/10
4