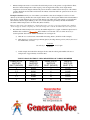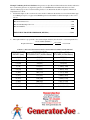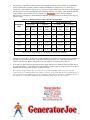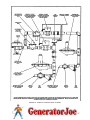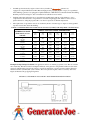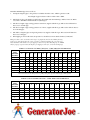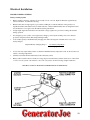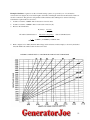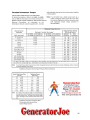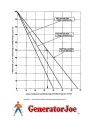
1
STANDBY GENERATOR SET
INSTALLATION, OPERATION, & MAINTENANCE MANUAL
INDEX
Introduction
(Pages 2-4 are blank)
Safety
Pages 6 – 15
Installation
Pages 16-18
Exhaust
Pages 19-24
Cooling System
Pages 25-39
Ventilation
Pages 40-43
Fuel System
Pages 44-49
Electrical Installation
Pages 50-60
Operation
Page 61
Maintenance & Service
Pages 62-63
Troubleshooting
Page 64
Warranty
Pages 65-66
5
SAFETY!
PLEASE REVIEW THE FOLLOWING BEFORE PROCEEDING WITH INSTALLATION OR
OPERATION OF YOUR GENERATORJOE GENERATOR SET.
Think Safety first at all times and when in doubt call GENERATORJOE and get additional information
before performing installation, operation, service or testing of the generator set. Each section of this manual will
have caution! and warning! information, which should be regarded with the utmost care. Repairs should only
be done by properly trained personnel and under no circumstances should anyone proceed with a repair when
they are not sure of proper procedure. This manual is not intended to be all that is required to properly operate
this unit but is merely an aid to performing basic service to keep the unit in proper operating condition. Included
with the unit should be an engine operator’s guide and a generator operators guide to assist a generator
technician in maintaining the unit.
Installation of the unit should be done in compliance with the installation section of this manual. Proper
installation in accordance with the National Electric Code, Occupational Safety and Health Administration
(OSHA) and local safety codes must be strictly complied with. Proper grounding is essential in preventing
possible electrical shock and even death. Remember, safety begins with the owner/operator of the unit. Make
sure to keep fingers, hair, jewelry and clothing away from the revolving parts of the generator set such as belts,
fan blade and generator rotor fan
Operation of the unit should be first done by GENERATORJOE authorized start up personnel so that they
make sure the unit was properly installed and is functioning properly with the load system being applied to the
unit. The start up personnel will instruct the owner on basic procedures and will answer any questions the owner
may have on general operation and maintenance.
Before performing routine maintenance, disconnect the unit from the load and disable the control system as
discussed in the maintenance section, Disabling the System. Proper maintenance is the primary method of
assuring the unit will operate when it is needed.
Review each of the sections before proceeding with installation or operation of the GENERATORJOE
generator set. The following page lists some of the safety dos and don’ts that everyone should
remember.
6
7
8
9
10
11
12
SAFETY DO’S AND DON’TS DO PRACTICE SAFETY; The life you save may be your own
DO
•
Do perform your tasks carefully,
without undue haste.
•
Do provide fire extinguishers
(rated ABC).
•
Do provide a First Aid Kit (for
burns and abrasions). Obtain
medical attention.
•
Do use the correct tools for the
job you are doing
•
Do make sure that all fasteners
are secure.
•
Do use extreme care while
making adjustments on the
generator set while it is running.
•
Do keep your hands away from
moving parts.
•
Do remember - Horseplay is for
horses! It has no place around
machinery
•
Do disconnect batteries before
starting work on generator set.
•
Do use screwdrivers, pliers,
diagonal pliers, etc. with
insulated handles.
•
Do remember to keep one hand
in your pocket if it is necessary
to work on live circuits. To do so
will prevent passage of electricity
into one hand and out the other,
which passes current across the
heart.
DON'T
•
Don’t allow inexperienced
personnel to work on the
generator or electrical equipment.
•
Don’t remove plastic guards or
protective devices.
•
Don’t wear loose clothing or
jewelry in the vicinity of moving
parts. These can get in
machinery, with disastrous
results. Don’t wear jewelry while
working on electrical equipment.
If your hair is long, wear a head
covering. Hair caught in a drill
press, fan belt, or other moving
parts can cause serious injury.
•
Don’t stand on a wet floor while
working on electrical equipment.
Use rubber insulated mats placed
on dry wood plat forms
•
Don’t lunge after a dropped tool.
To do so may place you in a
position of extreme danger.
•
Don’t commence any operation
until you have taken all the
necessary steps to ensure that
you are in complete safety.
13
Low Voltage
General Safety Precautions
Control circuits utilized by the generator
set are D.C. voltage. This voltage
potential is not considered dangerous,
but the large amount of current available
(over 300 amps) can cause severe burns
if shorted to ground.
1. Use extreme caution if holes are
drilled into the generator set. Holes
drilled into an electrical wire can
cause fire, explosion, or shock
hazard.
1. Disconnect the negative terminal of
the battery if possible when working
on the generator set. Disconnect the
cable end that is away from the
battery.
2. Be sure all mounting screws are light
and are the correct length.
3. Keep tools and equipment clean and
in good working condition.
Accidents occur when you attempt
procedures without the proper tools.
2. Do not wear jewelry, watches, or
rings. These items can short out and
cause severe burns to the wearer.
14
Safety Precautions
Rotating Hazards
Keep your hands, clothing and tools clear of the
fan and water pump belt when the generator set
is running.
If it’s necessary to run the generator with the end
cover removed, by very careful with tools or
meters being used in that area to avoid
contacting the rotor.
Battery Hazards
Few people realize just how dangerous a battery
can be.
The electrolyte in a lead acid battery is dilute
sulphuric acid (H2S04). During charge or
discharge functions of a battery, a chemical
change takes place within the individual cells
that causes the bubbling we see through the filler
hole. This gas bubbling is hydrogen and oxygen,
and it is EXPLOSIVE. If, during this gassing
action, a means of ignition is present, an
explosion could occur. A defective battery may
suddenly explode even while standing idle.
Added to this danger, consider a fall out of
highly corrosive sulphuric acid caused by the
explosion. A rubber blanket or other cover can
be used to reduce the risk from possible
explosion.
Precautions
Always wear eye protection when servicing
batteries. If electrolyte is splashed on the skin or
in the eyes, flush immediately under running
water. Obtain medical help as soon as possible.
When charging batteries, do not remove the vent
caps.
When disconnecting or reconnecting the
generator set battery, make sure the on-off
switch is in the off position to prevent an arc,
which could cause the battery to explode.
Disconnect the ground cable first, preferably at a
point away from the battery. Reconnect the
ground cable last, again away from the battery.
Electrical Hazards
High Voltage
When servicing or repairing a generator set, the
possibility of serious or even fatal injury from
electrical shock exists. Extreme care must be
used when working with an operating generator.
Lethal voltage potentials can exist on
connections that are in the exciter control box.
Precautions
When working on high voltage circuits on the
generator set, do not make any rapid moves. If a
tool drops do not grab for it. People do not
contact high voltage wires on purpose. It
normally occurs from an unplanned movement.
Make sure of your footing. If you slip you will
instinctively grab for support. This can be lethal
around a generator set. Work on rubber mats or
dry wood if possible.
Use tools with insulated handles that are in good
condition. Never hold metal tools in your hand if
exposed, energized conductors are within reach
Treat all wires and connections as high voltage
until a meter and wiring diagram show
otherwise.
IMMEDIATE action must be initiated after a
person has received an electric shock
Obtain expert medical assistance if available.
The source of shock must be immediately
removed by either shutting down the generator
power or removing the victim from the source. If
it is not possible to shut off the generator set, the
wire should be cut with either an insulated
instrument such as a wooden handled axe or
cable cutters with heavy insulated handles, or a
rescuer wearing insulated gloves. Whichever
method is used, do not look at the wire while it is
being cut. The ensuing flash can cause blindness.
Remember that insulated gloves are
manufactured for protection from liquids. If the
victim has to be removed from live circuitry,
knock him off. DO NOT TOUCH HIM, you
could receive a shock from current flowing
through his body. After separating the victim and
power source, check immediately for respiration
and presence of a pulse. If a pulse is present,
respiration can be restored by mouth-to-mouth
resuscitation.
15
Installation
MOUNTING
The foundation, floor or roof must be able to support the weight of the generator set and its
accessories (such as a sub-base fuel tank), resist dynamic loads and not transmit objectionable
noise and vibration. See the generator set Specification Sheet or outline drawing for the weight
of the generator set and its mounting points.
Vibration Isolators
Figure 19 illustrates a steel spring vibration isolator of the type required for mounting the larger
GENERATORJOE generator sets even those models which have rubber vibration isolators
between the skid and the engine-generator assembly. Steel spring isolators of this type can
provide up to 98 percent reduction in the force of the vibration transmitted. Locate the isolators
as shown on the generator set outline drawing referenced on the Specification Sheet. The outline
drawing may show configurations involving 4, 6, 8, or 12-point mounting. Also, when the
generator set is mounted on top of a sub-base fuel tank, the vibration isolators must be installed
between the generator set and the fuel tank.
Bolting these generator sets directly to the floor or foundation will result in excessive noise and
vibration and possible damage to the set, the floor, and other equipment.
Smaller GENERATORJOE generator sets have rubber vibration isolators located
between the skid and the engine-generator assembly. They may be bolted directly to the
foundation, floor or sub-structure.
FIGURE 19
TYPICAL STEEL SPRING VIBRATION ISOLATOR
16
Mounting on a Slab Floor
When a generator set is mounted on a concrete slab floor, a concrete pad should be poured on top of the floor. The
pad should be reinforced concrete with a 28 day compressive strength of at least 2500 psi (173 kPa). It should be at
least 6 inches (150 mm) deep and extend at least 6 inches (150 mm) beyond the skid on all sides. Type J or L bolts
should be used to anchor the skid or vibration isolators to the pad.
Mounting on a Sub-Base Fuel Tank
When a generator set is mounted on a sub-base fuel tank, the vibration isolators must be installed between the
generator set and the fuel tank. The fuel tank must be able to support the weight of the set and resist the dynamic
loads. It is recommended that the tank be mounted such that an air space is included between the bottom of the tank
and the floor underneath to reduce corrosion and permit visual inspections for leaks.
Mounting on a Vibration Isolating Foundation
When a generator set is mounted on a foundation to reduce the transmission of vibrations to the building, the weight
(W) of the foundation should be at least 2 times the weight of the set itself to resist dynamic loading. (The weight of
fuel in a sub-base fuel tank should not be considered as contributing to the weight required of a vibration isolating
foundation.) Figure 20 illustrates a typical vibration isolating foundation. Consider the following:
•
The foundation should extend at least 6 inches (150 mm) beyond the skid on all sides. This determines the
length (L) and width (W) of the foundation.
•
Calculate the height (H) of the foundation necessary to obtain the required weight (W) by using the following
formula:
H=
W
DxLxW
Where (D) is the density of concrete, typically 145 lbs / ft3 ( 2322 kg / m3 ).
•
The foundation should extend at least 6 inches (150 mm) above the floor to make service and maintenance of
the generator set easier.
•
The foundation must extend below the frost line to prevent heaving.
•
The foundation should be reinforced concrete with a 28 day compressive strength of at least 2500 psi (173 kPa).
•
The total weight (TW) of the generator set, fuel and foundation usually results in a soil bearing load (SBL) of
less than 2000 lbs/ft2 (96 kPa). Although this is within the load bearing capacity of most soils, always find out
the allowable soil bearing load by checking the local code and the soil analysis report for the building. Calculate
the soil bearing load by using the following formula:
SBL=
TW
LxW
Where L and W are the length and width of the foundation.
17
• Type J or L bolts should be used to anchor the skid or vibration isolators to the foundation.
FIGURE 20
TYPICAL VIBRATION ISOLATING FOUNDATION
18
EXHAUST SYSTEM
The function of the exhaust system is to convey engine exhaust safely to the out-of-doors and to disperse the exhaust
fumes, soot and noise away from people and buildings. See Figure 21. Consider the following (also review Location
and Noise under Application):
•
Flexible, corrugated stainless steel exhaust tubing at least 24 inches (610 mm) long must be connected to the
engine exhaust outlet(s) to take up thermal expansion and generator set movement and vibration whenever the
set is mounted on steel spring isolators of the type shown in Figure 19. Smaller sets that are bolted directly to
the floor must be connected by corrugated stainless steel exhaust tubing at least 18 inches (457 mm) long.
Flexible tubing must not be used to form bends or to compensate for misaligned piping.
•
To reduce corrosion due to condensate, a muffler should be installed as close as practical to the engine so that it
heats up quickly.
•
Mufflers and piping must be supported by non-combustible hangers or supports—not by the engine exhaust
outlet. Weight on the engine exhaust outlet can cause damage to the engine exhaust manifold or reduce the life
of a turbocharger.
•
Schedule 40 black iron pipe is recommended for exhaust piping.
FIGURE 21. TYPICAL EXHAUST SYSTEM
19
•
Pipe bend radii should be as long as practical.
•
It is recommended that, as far as is possible and consistent with the exhaust back pressure limitations of the
engine, exhaust tubing and piping of the same nominal diameter as the engine exhaust outlet be used throughout
the exhaust system. Piping of smaller diameter than the exhaust outlet must never be used. Piping that is
larger than necessary is more subject to corrosion due to condensate than smaller pipe and reduces the exhaust
gas velocity available for dispersing the exhaust gases up and into the outdoor wind stream. Also, as a rule, the
fewer pipe diameter changes in the exhaust system, the less friction loss.
•
It is recommended that all exhaust piping and mufflers be thermally insulated to prevent burns from accidental
contact, prevent activation of tire detection devices and sprinklers reduce corrosion due to condensate and
reduce the amount of heat radiated to the generator room. Engine exhaust manifolds and turbocharger
housings, unless water cooled, must never be insulated. Doing so can result in material temperatures that can
destroy the manifold and turbocharger.
•
Exhaust piping must be routed at least 9 inches (229 mm) from combustible construction. Use approved
thimbles where exhaust piping must pass through combustible walls or ceilings.
•
Exhaust pipe (steel) expands approximately 0.0076 inches per foot of pipe for every 100° F rise in exhaust gas
temperature above room temperature (1.14mm per meter per 100° C rise). It is recommended that flexible,
corrugated stainless steel tubing be used to take up expansion in long, straight runs of pipe.
•
Horizontal runs of exhaust piping should slope downwards, away from the engine, to the out-of-doors or to a
condensate trap.
•
A condensate drain trap and plug should be provided where piping turns to rise vertically.
•
The exhaust system must terminate out-of-doors at a location where engine exhaust will disperse away from
buildings and building air intakes and not blacken walls and windows with soot. It is highly recommended that
the exhaust system be carried up as high as practical on the downwind side of buildings and that it discharge
straight up to maximize dispersal.
Some codes specify that the exhaust outlet terminate at least 10 feet from the Property line, 3 feet from an
exterior wall or roof, 10 feet from openings into the building and at least 10 feet above the adjoining grade.
•
A rain cap should be provided if the exhaust outlet points up.
•
A generator set should not be connected to an exhaust system serving other equipment, including other
generator sets. Soot, corrosive condensate and high exhaust gas temperatures can damage idle equipment served
by a common exhaust system.
20
•
Exhaust backpressure must not exceed the allowable back pressure on the generator set Specification Sheet.
Excessive exhaust backpressure reduces engine power and engine life and may lead to high exhaust
temperatures and smoke. Engine exhaust back pressure should be estimated before the layout of the exhaust
system is finalized and it should be measured at the exhaust outlet under full-load operation before the set is
placed in service
Example Calculation: The layout of an exhaust system similar to that shown in Figure 21 calls for a 5-inch
diameter by 24-inch long flexible tube at the engine exhaust outlet, a critical grade muffler with a 6-inch diameter
inlet, 20 feet of 6-inch diameter pipe and one 6-inch diameter long radius elbow. The generator set Specification
Sheet indicates that the engine exhaust gas flow is 2,715 cfm (cubic feet per minute) and that the maximum
allowable exhaust backpressure is 41 inches WC (Water Column).
This procedure involves determining the exhaust backpressure caused by each element (flexible tubes, mufflers,
elbows and pipes) and then comparing the sum of the backpressures with the maximum allowable backpressure.
1.
Determine the exhaust backpressure caused by the muffler. Figure 22 is a graph of exhaust backpressures for
mufflers made available by GeneratorJoe. If the muffler is from another source, it will be necessary to
obtain equivalent data from the muffler manufacturer. To use Figure 22:
a)
Find the cross-sectional area of the muffler inlet using Table 7 (0.1963 ft2 in this example).
b) Find exhaust gas velocity in feet per minute (fpm) by dividing exhaust gas flow (cfm) by the area of
the muffler inlet, as follows:
2,715 cfm
Gas Velocity =
c)
0.1963 ft2
=13,831 fpm
In this example, the dashed lines in Figure 22 show that the critical grade muffler will cause a
backpressure of approximately 21.5 inches W.C.
TABLE 7.CROSS-SECTIONAL AREAS OF OPENINGS OF VARIOUS DIAMETER
DIAMETER OF
MUFFLER
INLET (INCHES)
2
AREA OF
MUFFLER
INLET (FT2)
0.0218
DIAMETER OF
MUFFLER
INLET (INCHES)
5
AREA OF
MUFFLER
INLET (FT2)
0.1363
2.5
0.0341
6
0.1963
3
0.0491
8
0.3491
3.5
0.0668
10
0.5454
4
0.0873
12
0.7854
21
FIGURE 22. TYPICAL MUFFLER EXHAUST BACK PRESSURE VS. GAS VELOCITY
22
2.
Find the equivalent lengths of all fittings and flexible tube sections by using Table 8.
TABLE 8. EQUIVALENT LENGTHS OF PIPE FITTINGS (FEET)
TYPE OF FITTING
NOMINAL DIAMETER (INCHES)
2
2.5
3
3.5
4
5
6
8
10
12
STANDARD ELBOW
5.3
6.4
8.1
9.6
11
14
16
21
26
32
MEDIUM RADIUS ELBOW
4.6
5.4
6.8
8
9
12
14
18
22
26
LONG RADIUS ELBOW
3.5
4.2
5.2
6
7
9
11
14
17
20
45° ELBOW
1.5
2
2.3
2.6
3
4
4.5
6
8
9
STANDARD TEE
13
14
17
19
22
27
34
44
56
67
18 INCH FLEXIBLE TUBE
3
3
3
3
3
3
3
3
3
3
24 INCH FLEXIBLE TUBE
4
4
4
4
4
4
4
4
4
4
3.
Find the backpressure at the given exhaust flow per unit length of pipe for each nominal pipe diameter used
in the system. In this example, 5 inch and 6 inch nominal pipe is used. Following the dashed lines in Figure
23, 5 inch pipe causes a backpressure of approximately 0.35 inches WC (Water Column) and 6 inch pipe
approximately 0.145 inches WC.
4.
Add the back pressures for all elements of the example, as follows:
Muffler ………………………………………………………………………………………………21.5
One 5 Inch Flexible Tube—O.35 x 4 ft……………………………………………………………….1.4
20 Feet of 6-Inch Pipe—0.145 x 20 ft………………………………………………………………...2.9
One 6-Inch, Long Radius Elbow—0.145 x 11 ft……………………………………………………...1.6
TOTAL EXHAUST BACK PRESSURE (Inches WC)…………………………………………...27.4
5.
The calculation indicates that the piping layout is adequate in terms of exhaust backpressure since the sum
of the backpressures is less than the maximum allowable backpressure of 41 Inches WC.
23
FIGURE 23. EXHAUST BACK PRESSURE IN NOMINAL INCH (mm) PIPE DIAMETERS
24
ENGINE COOLING
Liquid-cooled engines are cooled by pumping coolant (a mixture of water and anti-freeze) through passages in the
engine cylinder block and head(s) by means of an engine-driven pump. The engine, pump and radiator or liquid-toliquid heat exchanger form a closed, pressurized cooling system. The most common generator set configuration has
a mounted radiator and engine-driven fan to cool the coolant and ventilate the generator room. Alternative methods
for cooling the coolant include a mounted liquid-to-liquid heat exchanger, a remote radiator or a remote liquid-toliquid heat exchanger.
25
Factory-Mounted Radiator
A generator set with a factory-mounted radiator (Figure 24) is an integral cooling and ventilating system. This is the
recommended configuration involving the least amount of auxiliary equipment, piping, control wiring and coolant.
A primary consideration for installations of this type is the necessity of moving large quantities of air through the
generator room. See Ventilation in this section.
FIGURE 24. FACTORY-MOUNTED RADIATOR COOLING
26
Factory-Mounted Heat Exchanger
•
The engine, pump and liquid-to-liquid heat exchanger form a closed, pressurized cooling system. The engine
coolant and raw cooling water do not mix, Consider the following:
•
The installation will require a powered ventilating system. See Ventilation in this section.
•
To obtain the net power available from the generator set, add the fan load indicated on the generator set
Specification Sheet to the power rating of the set and subtract the power consumed by the remote radiator fan,
ventilating fans, coolant pumps and other accessories required for the set to run.
•
A pressure-reducing valve must be provided if water source pressure exceeds the heat exchanger pressure rating
on the generator set Specification Sheet.
•
The heat exchanger and water piping must be protected from freezing if the ambient temperature can fall below
32° F (0° C).
•
Recommended options include a thermostatic water valve (non-electrical) to modulate water flow in response to
coolant temperature and a normally closed (NC) battery-powered shut off valve to shut off the water when the
set is not running.
•
There must be sufficient raw water flow to remove the Heat Rejected To Coolant indicated on the generator set
Specification Sheet. Note that a gallon of water absorbs approximately 8 Btu each 1° F rise in temperature
(specific heat). Also, it is recommended that the raw water leaving the heat exchanger not exceed 140° F (60°
C). Therefore:
Heat Rejected (Btu/Min)
Raw Water Required (gpm)=
If a set
Temp. Rise (∆ ºF) x Specific Heat (8 Btu/ºF-Gallon)
19,200
minute and the raw water inlet temperature is 80° F, allowing a water temperature rise of 60° F:
Raw Water Required =
19,200
60 x 8
rejects
Btu per
=40gpm
Remote Heat Exchanger
Remote heat exchanger systems can become very complex, taking a variety of configurations, especially if a
secondary cooling system, such as a radiator, is used to cool the heat exchanger. Most of the considerations above
and on the following pages discussing remote radiator systems apply. Careful design is required to ensure reliable,
adequate cooling.
27
FIGURE 25. FACTORY-MOUNTED HEAT EXCHANGER COOLING
28
Remote Radiator
Application of a remote radiator to cool the engine requires careful design. Figures 26, 28 and 29 illustrate typical
applications. Consider the following:
•
It is recommended that the radiator and fan be sized on the basis of a maximum radiator top tank temperature of
200° F (93° C) and a 115 percent cooling capacity to allow for fouling. The generator set Specification Sheet
indicates the Heat Rejected To Cool ant and Coolant Flow Rate necessary for radiator sizing according to the
radiator manufacturer’s instructions.
•
The capacity of the radiator top tank or auxiliary tank must be equivalent to at least 15 percent of the total
volume of coolant in the system to provide a coolant “drawdown capacity” (10 percent) and space for thermal
expansion (5 percent). Drawdown capacity is the volume of coolant that can be lost by slow, undetected leaks
and the normal relieving of the pressure cap before air is drawn into the coolant pump. Space for thermal
expansion is created by the fill neck when a cold system is being filled. See Figure27.
•
To reduce radiator fin fouling, radiators having a more open fin spacing (nine fins or less per inch) should be
considered for dirty environments.
•
Coolant friction head external to the engine (pressure loss due to pipe, fitting and radiator friction) and coolant
static head (height of liquid column measured from crankshaft centerline) must not exceed the maximum
allowable values on the generator set Specification Sheet. See the example calculation below for a method of
calculating coolant friction head.
Excessive coolant static head (pressure) can cause the coolant pump shaft seal to leak.
Excessive coolant friction head (pressure loss) will result in insufficient engine cooling.
•
Radiator hose 6 to 18 inches (152 to 457mm) long, complying with SAE 20R1, or equivalent standards, should
be used to connect coolant piping to the engine to take up generator set movement and vibration.
•
It is highly recommended that the radiator hoses be clamped with two premium grade “constant-torque” hose
clamps at each end to reduce the risk of sudden loss of engine coolant due to a hose (which is under pressure)
slipping off. Major damage can occur to an engine if it is run without coolant in the block just a few seconds.
•
A drain valve should be located at the lowest part of the system
•
Depending on the amount of coolant in the system, ball or gate valves (globe valves are too restrictive) are
recommended to isolate the engine so that the entire system does not have to be drained before servicing the
engine.
•
To obtain the net power available from the generator set, add the fan load indicated on the generator set
Specification Sheet to the power rating of the set and subtract the power consumed by the remote radiator fan,
ventilating fans, coolant pumps and other accessories required for the set to run.
29
FIGURE 26. REMOTE RADIATOR COOLING (DEAERATION TYPE SYSTEM, SEE FIGURE 27)
30
Deaeration Type Remote Radiator System: A deaeration type of radiator top tank (also known as a sealed top
tank) or auxiliary tank must be provided for 150 kW and larger generator sets. In this system, a portion of the
coolant flow (approximately 5 percent) is routed to the radiator top tank, above the baffle plate, where air in the
coolant can separate from the coolant before the coolant returns to the system. Consider the following:
•
Engine and radiator vent lines must rise without any dips or traps that will collect coolant and prevent air from
venting when the system is being filled. Rigid steel or high density polystyrene tubing Is recommended for long
runs, especially If they are horizontal, to prevent sagging between supports.
•
The fill/makeup line should also rise without any dips from the lowest point in the piping system to the
connection at the radiator top tank or auxiliary tank. No other piping should be connected to it. This
arrangement allows the system to be filled from bottom up without trapping air and giving a false indication that
the system is full. With proper vent and fill line connections, it should be possible to fill the system at a rate of
at least 5 gpm (19 L/Min) (approximately the flow rate of a garden hose).
31
FIGURE 27. DEAERATION TYPE OF RADIATOR TOP TANK
32
Remote Radiator with Auxiliary Coolant Pump: A remote radiator with an auxiliary coolant pump (Figure 28)
can be used if coolant friction exceeds the allowable value on the generator set Specification Sheet. In addition to
the considerations under Remote Radiators, consider the following:
•
An auxiliary pump and motor must be sized for the coolant flow indicated on the generator set Specification
Sheet and develop enough head (pressure) to overcome the excess coolant friction head calculated by the
method shown in the example above.
One foot of pump head (pump manufacturer’s data) is equivalent to 0.43 PSI of coolant friction head (pressure
loss) or one foot of coolant static head (height of liquid column).
•
A bypass gate valve (globe valves are too restrictive) must be plumbed in parallel with the auxiliary pump, for
the following reasons:
•
To allow adjustment of the head developed by the auxiliary pump (the valve is adjusted to a partially-open
position to recirculate some of the flow back through the pump).
•
To allow operation of the generator set under partial load if the auxiliary pump fails (the valve is adjusted
to a fully open position).
•
Coolant pressure at the inlet to the engine coolant pump, measured while the engine is running at rated speed,
must not exceed the maximum allowable static head shown on the generator set Specification Sheet. Also, for
deaeration type cooling systems (150 kW and larger generator sets), auxiliary pump head must not force coolant
through the make-up line into the radiator top tank or auxiliary tank. In either case, the pump bypass valve must
be adjusted to reduce pump head to an acceptable level.
•
To obtain the net power available from the generator set, add the fan load Indicated on the generator set
Specification Sheet to the power rating of the set and subtract the power consumed by the remote radiator fan,
ventilating fans, coolant pumps and other accessories required for the set to run.
33
FIGURE 28. REMOTE RADIATOR WITH AUXILIARY COOLANT PUMP AND AUXILIARY TANK
34
Remote Radiator with Hot Well: A remote radiator with a hot well (Figure 29) can be used if the elevation of the
radiator above the crankshaft centerline exceeds the allowable coolant static head on the generator set Specification
Sheet. In a hot well system, the engine coolant pump circulates coolant between engine and hot well and an auxiliary
pump circulates coolant between hot well and radiator. A hot well system requires careful design. In addition to the
considerations under Remote Radiator, consider the following:
•
The bottom of the hot well should be above the engine coolant outlet.
•
Coolant flow through the hot well/radiator circuit should be approximately the same as coolant flow through the
engine. The radiator and the auxiliary pump must be sized accordingly. Pump head must be sufficient to
overcome the sum of the static and friction heads in the hot well/radiator circuit.
•
One foot of pump head (pump manufacturer’s data) is equivalent to 0.43 PSI of coolant friction head (pressure
loss) or one foot of coolant static head (height of liquid column).
•
The liquid holding capacity of the hot welt should not be less than the sum of the following volumes:
•
1/4 of the coolant volume pumped per minute through the engine (eg., 25 gallons if the flow is 100 gpm),
plus
•
1/4 of the coolant volume pumped per minute through the radiator (eg., 25 gallons if the flow is 100 gpm),
plus
Volume required to fill the radiator and piping, plus
Five percent of total system volume for thermal expansion
•
Careful design of the inlet and outlet connections and baffles is required to minimize coolant turbulence, allow
free deareation and maximize blending of engine and radiator coolant flows.
•
Coolant must be pumped to the bottom tank of the radiator and returned from the top tank otherwise the pump
will not be able to completely fill the radiator.
•
The auxiliary pump must be lower than the low level of coolant in the hot well so that it will always be primed.
•
The radiator should have a vacuum relief check valve to allow drain down to the hot well.
•
The hot well should have a high volume breather cap to allow the coolant level to fall as the auxiliary pump fills
the radiator and piping.
•
To obtain the net power available from the generator set, add the fan load indicated on the generator set
Specification Sheet to the power rating of the set and subtract the power consumed by the remote radiator fan,
ventilating fans, coolant pumps and other accessories required for the set to run.
35
FIGURE 29. REMOTE RADIATOR WITH HOT WELL AND AUXILIARY COOLANT PUMP
36
Example Pipe Sizing Calculations for Remote Radiator/Heat Exchanger Systems:
The preliminary layout of piping for a remote radiator cooling system similar to the one shown in Figure 26 calls for
60 feet of 3-inch diameter pipe, three long sweep elbows, two gate valves to isolate the radiator for engine servicing
and a tee to connect the fill/makeup line. The generator set Specification Sheet indicates that coolant flow is 123
GPM and that the allowable friction head is 5 PSI.
This procedure involves determining the pressure loss (friction head) caused by each element and then comparing
the sum of the pressure losses with the maximum allowable friction head.
1.
Determine the pressure loss in the radiator by referring to the radiator manufacturer’s data. For this example,
assume the pressure loss is 1 psi at a flow of 123 gpm.
2.
Find the equivalent lengths of all fittings and valves by using Table 9 and add to the total run of straight pipe.
Three Long Sweep Elbows-3 x 5.2 ………………………………………………………………….15.6
Two Gate Valves (Open)0-2 x 1.7……………………………………………………………………3.4
Tee (Straight Run)………………….………………………………………………………………....5.2
60 Feet Straight Pipe…………………………..……………………………………………………..60.0
EQUIVALENT LENGTH OF PIPE (FEET)………...…………………………………………...84.2
3.
Find the backpressure at the given flow per unit length of pipe for the nominal pipe diameter used in the system.
In this example, 3 inch nominal pipe is used. Following the dashed lines in Figure 30, 3 inch pipe causes a
pressure loss of approximately 1.65 psi per 100 foot of pipe.
4.
Calculate the pressure loss in the piping as follows:
Piping Loss = 84.2 feet x
5.
(
1.65 psi
100 feet
) = 1.39 psi
The total system loss is the sum of the piping and radiator losses:
Total Pressure Loss = 1.39 psi (piping) + 1.00 psi (radiator) = 2.39 psi
6.
The calculation for this example indicates that the layout of the remote radiator cooling system is adequate in
terms of coolant friction head since it is not greater than the allowable friction head. If a calculation indicates
excessive coolant friction head, repeat the calculation using the next larger pipe size. Compare the advantages
and disadvantages of using larger pipe with that of using an auxiliary coolant pump.
37
TABLE 9. EQUIVALENT LENGTHS OF PIPE FITTINGS AND VALVES (FEET)
TYPE OF FITTING
NOMINAL DIAMETER (INCHES)
1.5
2
2.5
3
4
5
6
90º ELBOW
4.4
5.5
6.5
8
11
14
16
45° ELBOW
-
2.5
3
3.8
5
6.3
7.5
LONG SWEEP ELBOW
2.8
3.5
4.2
5.2
7
9
11
CLOSE RETURN BEND
-
13
15
18
24
31
37
TEE, STRAIGHT RUN
-
3.5
4.2
5.2
7
9
11
TEE, SIDE INLET OR OUTLET
9.3
12
14
17
22
27
33
GLOBE VALVE, FULLY OPEN
-
55
67
82
110
140
-
ANGLE VALVE, FULLY OPEN
-
27
33
41
53
70
-
GATE VALVE, FULLY OPEN
-
1.2
1.4
1.7
2.3
2.9
3.5
GLOBE VALVE, HALF OPEN
-
27
33
41
53
70
100
FIGURE 30. FRICTIONAL PRESSURE LOSSES FOR INCH (mm) DIAMETER PIPES
38
Coolant Treatment
Antifreeze (ethylene or propylene glycol base) and water are mixed to lower the freezing point of the cooling system
and to raise the boiling point. Refer to Table 10 to determine the concentration of ethylene or propylene glycol
necessary for protection against the coldest ambient expected. Antifreeze/water mixture percentages in the range of
30/70 to 60/40 are recommended for most applications.
Propylene glycol based antifreeze is less toxic than ethylene based antifreeze, offers superior liner protection and
eliminates some fluid spillage and disposal reporting requirements.
Diesel generator sets may be equipped with replaceable coolant filtering and treating elements to minimize coolant
system fouling and corrosion. They are compatible with most antifreeze formulations. For smaller sets, the
antifreeze should contain a corrosion inhibitor.
TABLE 10. FREEZING AND BOILING POINTS VS. CONCENTRATION OF ANTIFREEZE
MIXTURE PERCENTAGES (ANTIFREEZE/WATER)
MIXTURE BASE
ETHYLENE GLYCOL
PROPYLENE GLYCOL
0/100
30/70
40/60
50/50
60/40
95/5
FREEZING
POINT
32º F
(0º C)
4º F
(-16º C)
-10º F
(-23º C)
-34º F
(-36º C)
-65º F
(-54º C)
8º F
(-13º C)
BOILING
POINT
212º F
(100º C)
220º F
(104º C)
222º F
(106º C)
226º F
(108º C)
230º F
(110º C)
345º F
(174º C)
FREEZING
POINT
32º F
(0º C)
10º F
(-12º C)
-6º F
(-21º C)
-27º F
(-33º C)
-56º F
(-49º C)
-70º F
(-57º C)
BOILING
POINT
212º F
(100º C)
216º F
(102º C)
219º F
(104º C)
222º F
(106º C)
225º F
(107º C)
320º F
(160º C)
Coolant Heaters
Thermostatically controlled engine coolant heaters are usually required for starting. For Level 1 emergency power
systems, NFPA 110 requires that engine coolant be kept at a minimum of 90°F (32°C).
Engine coolant heaters must be connected to the normal power source.
39
VENTILATION
Ventilation of the generator room is necessary to remove the heat and fumes dissipated by the engine, generator and
its accessories and to provide combustion air.
Factory-mounted Radiator Ventilation
In this configuration (Figure 31), the fan draws air over the set and pushes it through the radiator; which has flanges
for connecting a duct to the out-of-doors. Consider the following:
•
See the generator set Specification Sheet for the design airflow through the radiator, allowable airflow
restriction and minimum air inlet and outlet opening areas. The allowable airflow restriction must not be
exceeded. The static pressure (air flow restriction) should be measured as shown in Figures 31 and 32 to
confirm, before the set is placed in service, that the system is not too restrictive, especially when ventilating air
is supplied and discharged through long ducts, restrictive grilles, screens and louvers.
•
Refer to the ASHRAE (American Society of Heating, Refrigeration and Air Conditioning Engineers)
publications for recommendations on duct design if air ducts are required for the application. Note that the inlet
duct must handle combustion airflow (see the Specification Sheet) as well as ventilating airflow and must be
sized accordingly.
FIGURE 31. FACTORY-MOUNTED RADIATOR COOLING
40
•
Louvers and screens over air inlet and outlet openings restrict airflow and vary widely in performance. A louver
assembly with narrow vanes, for example, tends to be more restrictive than one with wide vanes. The effective
open area specified by the louver or screen manufacturer should be used.
•
The airflow through the radiator is usually sufficient for generator room ventilation. See the example calculation
for a method of determining the airflow required to meet room air temperature rise specifications, if any.
•
Because the radiator fan will cause a slight negative pressure in the generator room, it is highly recommended
that combustion equipment such as the building heating boilers not be located in the same room as the generator
set. If this is unavoidable, it will be necessary to determine whether there will be detrimental effects, such as
back draft, and to provide means (extra large room inlet openings and/or ducts, pressurizing fans, etc.) to reduce
the negative pressure to acceptable levels.
•
In colder climates, automatic dampers should be used to close off the inlet and outlet air openings to keep the
generator room warm when the set is not running. And, a thermostatic damper should be used to re-circulate a
portion of the radiator discharge air to reduce the volume of cold air that is pulled through the room when the
set is running. The inlet and outlet dampers must fully open when the set starts. The re-circulating damper
should close fully at 60°F (16°C).
•
Other than re-circulating radiator discharge air into the generator room in colder climates, all ventilating air
must be discharged directly to the out-of-doors. It must not be used to heat any space other than the generator
room.
•
A flexible duct connector must be provided at the radiator to take up generator set movement and vibration and
prevent transmission of noise.
•
Ventilating air inlet and discharge openings should be located or shielded to minimize fan noise and the effects
of wind on airflow.
FIGURE 32. RECOMMENDED INSTRUMENTATION FOR MEASURING AIR FLOW RESTRICTION
41
Heat Exchanger Or Remote Radiator Ventilation
A heat exchanger or remote radiator cooling system might be selected because of noise considerations or because
the airflow restriction through long ducts would be greater than that allowed for the engine-driven radiator fan.
Consider the following:
•
Ventilating fans must be provided for the generator room. The ventilating fans must have the capacity of
moving the required flow of ventilating air against the airflow restriction. See the following example calculation
for a method of determining the airflow required for ventilation.
•
A remote radiator fan must be sized primarily to cool the radiator. Depending on its location, it might also be
used to ventilate the generator room.
•
The fan and air inlet locations must be such that the ventilating air is drawn forward over the set.
•
To obtain the net power available from the generator set, add the fan load indicated on the generator set
Specification Sheet to the power rating of the set and subtract the power consumed by the remote radiator fan,
ventilating fans, coolant pumps and other accessories required for the set to run.
FIGURE 33. VENTILATION FOR A HEAT EXCHANGER COOLING SYSTEM
42
Example Ventilating Air flow Calculation: The generator set Specification Sheet indicates that the heat radiated to
the room from the generator set (engine and generator) is 4,100 BTU/min. The muffler and 10 feet of 5-inch
diameter exhaust pipe are also located inside the generator room. Determine the airflow required to limit the air
temperature rise to 30° F.
1.
Add the heat inputs to the room from all sources. Table 11 indicates that the heat loss from 5-inch exhaust pipe
is 132 BTU per m per foot of pipe and 2,500 BTU per m from the muffler. Add the heat inputs to the room as
follows:
Heat from Generator Set …………………………………………………………………………..4,100
Heat from Exhaust Pipe-10 x 132………………………………………………………………….1,320
Heat from Muffler………………….………………………………………………………………2,500
TOTAL HEAT TO GENERATOR ROOM (BTU/Min.)……………………………………...7,920
2.
The required airflow is proportional to the total heat input divided by the allowable room air temperature rise:
Required Air Flow=
58 x Total Heat (Btu/min.)
Temp. Rise (∆ ºF)
= 58 x 7,920
30
=15,312 cfm
TABLE 11. HEAT LOSSES FROM UNINSULATED EXHAUST PIPES AND MUFFLERS
PIPE DIAMETER
INCHES (mm)
1.5 (38)
HEAT FROM PIPE
BTU/MIN-FOOT (kJ/Min-Metre)
47 (162)
Heat From Muffler
BTU/MIN (kJ/Min-Metre)
297 (313)
2 (51)
57 (197)
490 (525)
2.5 (64)
70 (242)
785 (828)
3 (76)
84 (291)
1,100 (1,160)
3.5 (98)
96 (332)
1,408 (1,485)
4 (102)
108 (374)
1,767 (1,864)
5 (127)
132 (457)
2,500 (2,638)
6 (152)
156 (540)
3,550 (3,745)
8 (203)
200 (692)
5,467 (5,768)
10 (254)
249 (862)
8,500 (8,968)
12 (305)
293 (1,014)
10,083 (10,638)
43
FUEL SUPPLY
Diesel Fuel
The following should be considered when installing a diesel fuel supply system:
•
Fuel supply tank construction, location, installation, venting, piping, testing and inspection must comply with
applicable codes. See NFPA Standards No. 30 and No. 37.
•
Fuel supply tanks must be adequately vented to prevent pressurization, have provisions for manually draining or
pumping out water and sediment, and have at least a five percent expansion space to prevent fuel spillage when
the fuel heats up and expands.
•
The fuel lift pump, day tank transfer pump or float valve seat should be protected from fuel supply tank debris
by a pre-filter or sediment bowl with a 100 to 120 mesh element.
•
The supply tank must hold enough fuel to run the set for the prescribed number of hours (NFPA No. 110 Class
designation) without refueling. Tank sizing calculations can be based on the hourly fuel consumption rates on
the generator set Specification Sheet. Other considerations for tank sizing include the duration of expected
power outages vs. availability of fuel deliveries and the “shelf life” of the fuel. The shelf life for diesel fuel is 11/2 to 2 years.
•
For emergency power systems, codes might not permit the fuel supply to be used for any other purpose, or may
specify a draw-down level for other equipment that guarantees the fuel supply for emergency power use.
•
The Cetane rating of No. 2 heating oil is not high enough for dependable starting of diesel engines in cold
weather. Therefore, separate supply tanks for emergency power and building heating systems might have to be
provided.
•
Approved flexible fuel hose must be used for connections at the engine to take up generator set movement and
vibration.
•
Diesel fuel lines should be black iron pipe. Cast iron and aluminum pipe and fittings must not be used because
they are porous and can leak fuel. Galvanized fuel lines, fittings and tanks should not be used because the
galvanized coating is attacked by the sulfuric acid that forms when the sulfur in the fuel combines with tank
condensate, resulting in debris that can clog fuel pumps and filters. Although copper has been used for diesel
fuel lines for many years, black iron pipe is preferred. Diesel fuel polymerizes (thickens) in copper tubing
during long periods of standby, with the result that fuel injectors can clog.
44
•
The generator set Specification Sheet indicates the maximum fuel inlet and return restrictions, the maximum
fuel flow and the fuel consumption. Table 12 indicates minimum hose and pipe sizes for connections to a
supply tank or day tank that is relatively close to the set and at approximately the same elevation. Hose and pipe
size should be based on the maximum fuel flow rather than on the fuel consumption. (The maximum fuel flow
is approximately twice the full-load fuel consumption on GeneratorJoe generator sets rated 200/175
kW and larger.) It is highly recommended that the fuel Inlet and return restrictions be checked before the set is
placed in service.
TABLE 12. MINIMUM FUEL SUPPLY HOSE AND PIPE SIZES
FUEL SUPPLY LINE
FUEL RETURN LINE
0-10 FEET
(0-3 METRES)
PIPE I.D.
FLEX
INCHES
HOSE
(MM)
SIZE
10-50 FEET
(3-15 METRES)
FLEX
PIPE I.D.
HOSE
INCHES
SIZE
(MM)
0-10 FEET
(0-3 METRES)
FLEX
PIPE I.D.
HOSE
INCHES
SIZE
(MM)
10-50 FEET
(3-15 METRES)
FLEX
PIPE I.D.
HOSE
INCHES
SIZE
(MM)
0-15
NO. 6
5/16 (7.9)
NO. 6
13/32 (10.3)
NO. 4
3/16 (4.8)
NO. 6
5/16 (7.9)
15-20
NO. 8
13/32 (10.3)
NO. 8
1/2 (12.7)
NO. 4
3/16 (4.8)
NO. 6
5/16 (7.9)
20-80
NO. 10
1/2 (12.7)
NO. 10
5/8 (15.9)
NO. 8
13/32 (10.3)
NO. 10
1/2 (12.7)
80-100
NO. 12
5/8 (15.9)
NO. 16
7/8 (22.3)
NO. 8
13/32 (10.3)
NO. 10
1/2 (12.7)
100-160
NO. 16
7/8 (22.3)
NO. 16
7/8 (22.3)
NO. 10
1/2 (12.7)
NO. 12
5/8 (15.9)
160 >
NO. 16
7/8 (22.3)
NO. 16
7/8 (22.3)
NO. 12
5/8 (15.9)
NO. 12
5/8 (15.9)
MAXIMUM
GPH
Based on four straight fittings, two 90º fittings and minimal fuel lift height.
•
Separate fuel return lines to the day tank or supply tank must be provided for each generator set in a multiple-set
installation to prevent the return lines of idle sets from being pressurized. Also, a fuel return line must not
include a shutoff device. Engine damage will occur if the engine is run when the line is shut off.
•
A day tank is required whenever pipe friction and/or supply tank elevation, either below the fuel pump inlet or
above the fuel injectors, would cause an excessive fuel inlet or return restriction. Some generator set models are
available with an integral skid- mounted or sub-base day tank.
For critical start applications, where generator sets are paralleled or must satisfy emergency start-time
requirements, it is recommended that a fuel tank or reservoir be located such that the lowest possible fuel level
is not less than 6 inches (150mm) above the fuel pump inlet. This will prevent air from accumulating in the fuel
line while the set is in standby, eliminating the period during startup when it has to be purged.
45
•
Day tank fuel temperature might need to be considered in some high ambient applications when the warm fuel
from the engine is returned to the day tank. Call the GeneratorJoe distributor concerning inlet fuel
temperature limits for specific generator set models. As fuel temperature increases, fuel density and lubricity
decrease, reducing maximum power output and lubrication of fuel handling parts such as pumps and injectors.
One solution might be to pipe the fuel back to the supply tank rather than to the day tank.
•
The day tank fuel transfer pump capacity and supply piping should be sized on the basis of the maximum fuel
flow indicated on the generator set Specification Sheet.
Gaseous Fuel
Figure 34 illustrates the typical gas line components in an automatic-transfer, dual-fuel system (natural gas and
LPG). It is also representative of single fuel systems and the natural gas or LPG fuel components used when the
alternate fuel is gasoline. When natural gas or LPG Is used in combination with gasoline, the gas-air mixer is
mounted on the air horn of the gasoline carburetor. Not shown is the LPG vaporizer supplied with GeneratorJoe
generator sets equipped for liquid withdrawal of LPG (engine-mounted on outdoor sets only). The service
pressure regulator(s), dry gas filter(s) and manual shutoff valve(s) are typically provided by the installer.
Natural gas generator sets are tested and rated using natural gas having a heating value of approximately 1,000
Btu/ft3 (3724 MJ/m With proper fuel mixture adjustments (see the generator set Service Manual), fuel gases of
lower heating value can be used with good results but with lass maximum power output. Depending on the fuel,
deratings will be necessary.
The following should be considered when installing a natural gas and/or LPG fuel system:
•
Gaseous-fuel supply system design, materials, components, fabrication, assembly, installation, testing,
inspection, operation and maintenance must comply with the applicable codes. See NFPA Standards No. 30,
No. 37, No.54 and No. 58.
•
The layout and sizing of the gas supply piping must be adequate for supplying the volume of gas required at full
load as indicated on the generator set Specification Sheet while maintaining at least the minimum required
supply pressure, typically 10 Inches (254 mm) WC (water column). See the example pipe sizing calculation
below and associated pipe sizing tables (Tables 14 and 15). Final determination of pipe sizes must, however, be
based upon the method approved by the authority having jurisdiction (see NFPA No. 54).
•
Most installations will require a service gas pressure regulator. Typically gas supply pressure should not exceed
20 inches (508 mm) WC at the Inlet to the generator set. Depending on distribution gas pressure, more than one
stage of pressure regulation may be required. High-pressure gas piping is not permitted inside buildings. Gas
pressure regulators must be vented to the out-of-doors according to code.
•
Approved flexible fuel hose must be used for connections at the engine to take up generator set movement and
vibration. Some GeneratorJoe generator set models are equipped with flexible hoses that are connected
to bulkhead fittings on the skid where solid pipe connections can be made by the installer.
•
Most codes require both manual and electric (battery-powered) shutoff valves ahead of the flexible fuel hose(s).
The manual valve should be of the indicating type.
•
A dry fuel filter should be installed in each line as shown In Figure 34 to protect the sensitive pressure
regulating components and orifices downstream from harmful foreign substances carried along in the gas stream
(rust, scale, etc.).
•
An LPG fuel supply system must be dedicated for the emergency power system if it is the required alternate
fuel.
46
FIGURE 34. TYPICAL GASEOUS FUEL SYSTEM
47
•
An LPG vaporizer heated by engine coolant is factory installed on GeneratorJoe generator sets
equipped for a liquid-withdrawal of LPG. Because high pressure gas piping (liquid or vapor) is not permitted
inside buildings, generator sets equipped for liquid withdrawal of LPG must not be Installed inside the building.
Weather protective housings for outdoor installation are available for most models.
•
Ambient temperature affects the rate of vaporization in an LPG supply tank. In colder climates, a way to
compensate for the reduced rate of vaporization is to install a larger supply tank. Table 13 can be used as a
quick reference for sizing the propane tank to account for expected low ambient temperatures.
•
The required rate of vaporization can also be obtained by means of a burner-type or engine coolant-type LPG
vaporizer located Just outside the building.
TABLE 13. MINIMUM PROPANE TANK SIZE IN GALLONS (LITERS) FOR REQUIRED VAPORIZATION
WITHDRAWAL RATE
(Tank must be at least
half full)
100 cfh
(3 m3/hr)
200 cfh
(6 m3/hr)
300 cfh
(9 m3/hr)
400 cfh
(11 m3/hr)
500 cfh
(14 m3/hr)
600 cfh
(17 m3/hr)
700 cfh
(20 m3/hr)
LOWEST AVERAGE WINTER TEMPERATURE
32ºF
(0ºC)
20ºF
(-7ºC)
10ºF
(-12ºC)
0ºF
(-1ºC)
-10ºF
(-23ºC)
-20ºF
(-29ºC)
100
(378)
150
(568)
200
(757)
250
(946)
400
(1514)
650
(2461)
250
(946)
300
(1136)
400
(1514)
600
(2271)
1000
(3785)
2000
(7571)
400
(1514)
600
(2271)
700
(2650)
1100
(4164)
1800
(6814)
3600
(13,627)
600
(2271)
900
(3407)
1200
(4542)
1700
(6435)
2700
(10,221)
4500
(17,034)
900
(3407)
1300
(4921)
1600
(6057)
2500
(9464)
3600
(13,627)
7500
(28,931)
1100
(4164)
1600
(6057)
2000
(7571)
3000
(11,356)
5000
(18,927)
10,000
(37,854)
1500
(5678)
2000
(7571)
2500
(9464)
4000
(20,820)
6000
(22,712)
13,000
(49,210)
Example Gas Pipe Sizing Calculations: An application calls for two natural gas generator sets. The sets could be
run concurrently. The full-load fuel consumption indicated on the generator set Specification Sheet for the model
selected is 890 cfh (cubic feet per hour). The two sets will be supplied by a service pressure regulator adjusted to
maintain 14 inches (356 mm) WC (water column). The service pressure regulator wilt not serve any other load.
Figure 35 illustrates the gas piping arrangement.
FIGURE 35. GAS PIPING LAYOUT FOR A TWO-GENERATOR INSTALLATION
48
Determine minimum pipe sizes as follows:
1.
Add up the length of pipe to the generator set farthest from the source, which is generator set B.
Total length of pipe for Set B = 150 ft + 40 ft + 10 ft = 200 ft
2.
The length of pipe to the farthest set will be the only length used when referring to Tables 14 and 15. In this
case, refer to the 200 ft column in Table 14 (natural gas).
3.
The 50 foot length of pipe serving generator set B alone, supplies 890 cfh of gas. This section will therefore
have to be 2-1/2 inch pipe.
4.
The 10 foot length of pipe serving generator set A alone, supplies 890 cfh of gas. This section will also have to
be 2-112 inch pipe.
5.
The 150 foot length of pipe serving both generator sets supplies 1780 cfh of gas. This section will therefore
have to be 3 inch pipe.
6.
When piping is sized on this basis, the pressure loss should not be more than 0.5 inches (13 mm) WC.
This procedure can be used when other types of equipment, such as the building heating
boilers, are also supplied by the service pressure regulator supplying the generator sets.
Note that Tables 14 and l5 cover gas supply pressures not greater than l/2 psig. See NFPA
54 for gas pipe capacity tables for higher gas supply pressures (1, 5, 10, 20 and 50 psig).
TABLE 14. NATURAL GAS PIPE CAPACITY—CUBIC FEET OF GAS PER HOUR
NOMINAL
IRON
PIPE SIZE
(INCHES)
LENGTH OF PIPE IN FEET
10
20
30
40
50
60
70
80
90
100
125
150
175
200
3/4
360
250
200
170
151
138
125
118
110
103
93
84
77
72
1
680
465
375
320
285
260
240
220
205
195
175
160
145
135
1-1/4
1400
950
770
660
580
530
490
460
430
400
360
325
300
280
1-1/2
2100
1460
1180
990
900
810
750
690
650
620
550
500
460
430
2
3950
2750
2200
1900
1680
1520
1400
1300
1220
1150
1020
950
850
800
2-1/2
6300
4350
3520
3000
2650
2400
2250
2050
1950
1850
1650
1500
1370
1280
3
11000
7700
6250
5300
4750
4300
3900
3700
3450
3250
2950
2650
2450
2280
Based on 0.5 inch (13 mm) WC pressure drop, 0.60 specific gravity gas and nominal ½ psig (3.4 kPa) pressure
TABLE 15. LPG GAS PIPE CAPACITY—CUBIC FEET OF GAS PER HOUR
NOMINAL
IRON
PIPE SIZE
(INCHES)
LENGTH OF PIPE IN FEET
10
20
30
40
50
60
70
80
90
100
125
150
3/4
227
157
126
107
95
87
78
74
69
65
58
53
1
428
293
236
201
179
164
151
138
129
123
110
101
1-1/4
882
598
485
416
365
333
308
289
207
252
230
204
1-1/2
1323
920
743
624
567
570
472
434
409
390
346
315
2
2488
1732
1386
1197
1058
958
882
819
768
724
642
598
Based on 0.5 inch (13 mm) WC pressure drop and nominal 11 inch (280mm) WC pressure at inlet
49
Electrical Installation
ENGINE STARTING SYSTEMS
Battery Starting Systems
•
Battery starting systems for generator sets are usually 12 volt or 24 volt. Figure 36 illustrates typical batterystarter connections. Consider the following:
•
Batteries must have enough capacity to provide the cranking motor current indicated on the generator set
Specification Sheet. The batteries may be either lead-acid or nickel-cadmium. They must be designated for this
use and may have to be approved by the authority having jurisdiction.
•
A high output engine-driven alternator and automatic voltage regulator are provided to recharge the batteries
during operation.
•
For emergency power systems, a float-type battery charger, powered by the normal power source, must be
provided to keep the batteries fully charged during standby.
•
Codes usually specify a maximum battery charging time. The following rule-of-thumb can be used to size
battery chargers:
Required Battery Charging Amps =
1.2 x Battery Amp-Hours
Charging Hours
•
Local codes may require battery heaters to maintain a minimum battery temperature of 50° F (10º C) if the set is
subject to freezing temperatures.
•
Standard sets include skid mounted battery racks and battery cables.
•
Battery cable resistance must not result in a voltage drop between the battery and the starter motor of more than
1 volt for 12 volt systems or more than 2 volts for 24 volt systems. See the following example calculation.
FIGURE 36. TYPICAL ELECTRIC STARTER MOTOR CONNECTIONS
50
Example Calculation: A generator set has a 24 VDC starting system to be powered by two 12 volt batteries
connected in series (Figure 36). Total cable length is 375 inches, including the cable between the batteries. There are
six cable connections. The generator set Specification Sheet indicates that cranking motor current is 565 amps.
Calculate the required cable size as follows:
1.
Assume a resistance of 0.0002 ohms for the starter solenoid contact.
2.
Assume a resistance of 0.00001 ohms for each cable connection (six).
3.
Based on the formula that:
R (ohms)=
Allowable Cable Resistance=
= 2
565
4.
E (volts)
L (amperes)
Allowable Voltage Drop - Sum of Other Resistance
Cranking Amps
- (0.0002 + (6 x 0.00001)) = 0.00328 ohms
Refer to Figure 37 for AWG (American Wire Gauge) cable resistances. In this example, as shown by the dashed
lines, #0 AWG is the smallest cable size that can be used.
FIGURE 37. RESISTANCE vs. LENGTH FOR VARIOUS AWG CABLE SIZES
51
Air Starting Systems
Figure 38 shows a piping arrangement for a typical air starter. The following items should be considered when
installing an air starter system:
•
The engine manufacturer should be consulted for recommendations regarding air hose size and the minimum
tank volume required for each second of cranking. Tank size will depend on the minimum cranking time
required. All of the starters available from GeneratorJoe have a maximum pressure rating of 150 psig
(1035 kPa).
•
Air tanks (receivers) should be fitted with a drain valve of the screw-out, tapered-seat type (other types are
unreliable and a common source of air leaks). Moisture can damage starter components.
•
All valves and accessories in the system should be designed for diesel air starting service.
•
Pipe fittings should be of the dry seal type and should be made up with thread sealant Teflon tape is not
recommended as it does not prevent thread loosening and can be a source of debris that can clog valves.
FIGURE 38. TYPICAL PIPING ARRANGEMENT FOR AN AIR STARTER
52
ELECTRICAL CONNECTIONS
General
Installation of electrical wiring should follow the requirements of the applicable electrical code and be done by
qualified persons.
AC Power Conductors
If the generator set is not factory-supplied with a main-line circuit breaker, the ampacity of the field-installed AC
phase conductors from the generator output terminals to the first over- current device should be at least equal to 115
percent of the generator full-load current. See Table 16 and Schematics (a) and (b) in Figure 39. The length of run
for generator tap conductors to the first overcurrent device should be kept as short as possible (generally not more
than 25 feet).
If the generator is supplied with leads, the size of the leads may be smaller than required for field-installed
conductors because generator leads have type CCXL insulation rated 125° C.
If the generator set is factory-equipped with a main-line circuit breaker, the ampacity of the field-installed AC phase
conductors connected to the load terminals of the circuit breaker should be equal to or greater than the circuit
breaker rating. See Schematic (c) in Figure 39.
FIGURE 39. FEEDER AMPACITY
53
The ampacity of the neutral conductor is generally permitted to be equal to or greater than the calculated maximum
single-phase unbalance of the load. Where a significant portion of the load is non-linear, the neutral should be full
size.
The generator neutral supplied by GeneratorJoe is equal in ampacity to the phase conductors.
Flexible metal conduit and stranded conductors must be used for connections to the generator set to take up
generator set movement and vibration. The flexible conduit should be at least 18 inches (460 mm) long.
Medium voltage cable must be installed and terminated exactly as recommended by the cable manufacturer, by
persons who have learned the procedures through training and practice under close supervision.
TABLE 16. THREE-PHASE AC GENERATOR AMPERAGE AT 80 % POWER FACTOR
KW
KVA
208V 220V 240V 380V 440V 480V 600V 2400V 3300V
20
35
40
45
50
60
65
70
75
80
100
125
150
175
200
230
250
275
300
350
400
450
500
600
750
800
900
1000
1100
1200
1250
1500
25
44
50
56
63
75
81
88
94
100
125
156
188
219
250
288
313
344
375
438
400
563
625
750
938
1000
1125
1250
1375
1500
1563
1875
69
122
139
156
174
208
226
243
261
278
347
434
521
608
695
799
868
955
1042
1216
1390
1563
1737
2084
2605
2779
3126
3474
-
66
115
131
148
164
197
213
230
246
263
328
411
493
575
657
755
821
903
985
1150
1314
1478
1642
1971
2463
2627
2956
3283
-
60
105
120
135
151
181
196
211
226
241
301
376
452
527
602
692
753
828
903
1054
1204
1355
1505
1806
2258
2408
2710
3011
-
38
67
76
86
95
114
124
133
143
152
190
238
285
333
380
437
475
523
570
666
761
856
951
1141
1426
1521
1711
1901
2092
2282
2377
2852
33
57
66
74
82
99
107
115
123
131
164
205
246
287
328
378
411
452
493
575
657
739
821
985
1232
1314
1478
1642
1806
1971
2053
2463
30
53
60
68
75
90
98
105
113
120
151
188
226
263
301
346
376
414
452
527
602
677
753
903
1129
1204
1355
1505
1656
1806
1882
2258
24
42
48
54
60
72
78
84
90
96
120
151
181
211
241
277
301
331
361
421
482
542
602
723
903
963
1084
1204
1325
1445
1505
1806
151
181
226
241
271
301
331
361
376
452
109
131
164
175
197
219
241
263
274
328
4160V
87
104
130
139
156
174
191
208
217
261
54
55
56
Grounding
System Grounding: As shipped, the neutral terminal of a GeneratorJoe generator is not grounded. If the
generator is a separately-derived power source (i.e. 4-pole transfer switch) then the neutral will have to be connected
to a grounding electrode system by the installing electrician.
If the generator neutral Interconnects with a service-supplied grounded neutral, typically at the neutral block of a 3pole transfer switch, then the generator neutral should not be grounded at the generator. The electrical code may
require a sign to be placed at the service supply indicating that the generator neutral is grounded at that location.
Equipment Grounding: A grounding terminal is provided on the skid of the generator set. If a set-mounted circuit
breaker is provided, a grounding terminal may be provided inside the circuit breaker enclosure. The electrical code
may require a grounding conductor so that the section of flexible conduit (required because of vibration) is not relied
on as a means for equipment grounding.
Control Wiring
AC and DC control wiring (to the transfer switch and remote annunciators) must be run in separate conduit from the
power cables. Stranded conductors and a section of flexible conduit must be used for connections at the set.
Accessory Branch Circuits
Branch circuits must be provided for all accessory equipment necessary for operation of the generator set. These
circuits must be fed either from the load terminals of an automatic transfer switch or from the generator terminals.
Examples of accessories include the fuel transfer pump, coolant pumps for remote radiators, and motorized louvers
for ventilation.
Branch circuits, fed from the normal power panel board, must be provided for the battery charger and coolant
heaters, if used. See Figure 40.
57
FIGURE 40. TYPICAL GENERATOR SET CONTROL AND ACCESSORY WIRING
58
Allowable Single-Phase Load Unbalance
Single-phase loads should be distributed as evenly as possible between the three phases of a three-phase generator
set in order to fully utilize the rated capacity (kVA and kW) of the set and to limit voltage unbalance. Figure 41 can
be used to determine the maximum permissible percentage of unbalanced single-phase load, as illustrated by the
example calculation.
Single phase power can be taken up to 67 percent of the three-phase rating on GeneratorJoe generator sets
not larger than 175 kW. (Note that this will result in line currents for Y-connected generators that will exceed
nameplate ratings by approximately 15 percent.)
Generally, the larger the generator set, the lower the percentage of single-phase power that can be taken. Figure 41
includes single-phase percentage lines for GeneratorJoe intermediate- size Frame-4 and Frame-5
generators. Confirm the frame size by referring to the applicable Alternator Data Sheet referenced by the generator
set Specification Sheet. For generator sets rated more than 500kW, load unbalance should not exceed 10 percent.
Example Calculation: Find the maximum single-phase load that can be powered in conjunction with a total threephase load of 62 kVA by a generator set rated 100kW /125 kVA.
1.
Find the three-phase load as a percentage of the generator kVA rating:
Three Phase Load Percentage= 62 kVA
x 100% = 50%
125 kVA
2.
Find the percentage of allowable single-phase load, as shown by the arrows in Figure 41. In this case, it is
approximately 34 percent of the three-phase rating.
3.
Find the maximum single-phase load:
Maximum Single Phase Load= 125 kVA x 34% = 42.5kVA
100%
4.
Note, as follows, that the sum of the three-phase and maximum permissible single- phase loads is less than the
kVA rating of the generator set:
62 kVA (3 Phase Load) + 42.5 kVA (1 Phase Load) = 104.5 kVA
and
104.5 kVA < 125 kVA (Rating of the Generator Set)
Unbalanced loading of a generator set causes unbalanced phase voltages. The levels of load unbalance anticipated
by these guidelines should not result in harm to the generator set itself. The corresponding levels of voltage
unbalance, however, may not be acceptable for loads such as three-phase motors.
Because of unbalanced phase voltages, critical loads should be connected to the phase, which the voltage regulator
uses as the reference voltage (L1 –L2 as defined in the generator set schematic) when only one phase is used as a
reference. (All three phases are used for voltage reference on GeneratorJoe PMG-excited generators) with
3 phase sensing option.
59
FIGURE 41. ALLOWABLE UNBALANCED SINGLE-PHASE LOAD
60
OPERATION
WARNING! BE SURE PROPER START UP HAS BEEN PERFORMED ON YOUR GENERATORJOE
GENERATOR SET BEFORE ATTEMPTING TO OPERATE THE UNIT ON YOUR OWN.
If proper start up has taken place, then the following events have already occurred.
1) The start up technician has reviewed the installation and has tested the unit by applying the load and making
sure all generator installation requirements have been met.
2) The start up technician has reviewed the overall requirements for the SAFE operation of the unit with the
personnel assigned to the daily inspection and operation of the unit.
3) The warranty forms and documentation are being processed and the unit is ready for operation.
The following should occur before any witnessed start of the unit.
1) Check fluid levels such as radiator water level, engine oil level, fuel level and battery fluid level. Correct any
that may appear either too high or too low. Refer to the engine manufacturers guide for assistance in
determining these proper levels.
2) Inspect the unit for any noticeable loose connections or leaks. Refer to the applicable manual for remedy of the
problem or call GeneratorJoe service department for assistance.
The unit has a manual position that will start the unit as soon as the switch is placed in the manual position. There
will be a slight time delay through the control module and then the starter will engage and crank the engine over. If
everything is in proper running condition the engine will accelerate to rated no load speed and run until the switch is
returned to the ‘OFF’ position or the ‘AUTO’ position. The unit will not start in the ‘AUTO’ position unless the
automatic transfer switch is requiring it to start. If the unit starts when the control switch is placed in the ‘AUTO’
position then it means that the utility is no longer supplying the transfer switch. This is an unusual occurrence and
therefore will not likely happen on testing the unit. The unit, once running, will operate at rated speed, which is
generally 1800 RPM plus the droop setting if the unit load is not applied. Initial readings on oil pressure and water
temperature should be monitored to make sure they appear to be working properly. Also, monitor the frequency and
voltage on the AC meters to verify that the generator is producing voltage at the proper level. If any of the
observations appear abnormal according to the respective operator guides, then make note of the apparent
discrepancy and turn the unit to the ‘OFF’ position. Tag the unit as out of service and call GeneratorJoe
service department for assistance.
If the unit is operating satisfactorily, then you may apply the load if you wish in your normal prescribed
method. Some units may have a manual means of applying the load and some may have an automatic transfer switch
which may have a with or without load test Selector switch. The start up technician will have set the automatic
exercise clock if the unit was purchased with one. This feature starts the generator set and applies the load once a
month or sometimes once a week depending on the type of transfer switch ordered.
If the transfer switch has the test with load feature, witness of this test should be done periodically to verify the
exercise period is occurring and keeping the unit battery charged up. Some units may also have a battery charger
hooked up which is powered by the utility system to assist in maintaining the battery in a properly charged
condition. A battery charger is recommended in automatic standby operation of a GeneratorJoe generator
set. Always replace the control switch back in the automatic position when completing an inspection of the unit so
that the automatic transfer switch can start the unit if a utility power failure occurs. When an inspection of the unit
detects any unusual meter readings, noises or vibrations notify an authorized GeneratorJoe Dealer to
correct the problem.
For further information regarding the Generator Set Control Panel refer to the Generator Set Controller Instruction
Manual.
61
Maintenance and Service
GENERAL
A well-planned program of preventive maintenance and service should be integral to the design of an on-site power
system. Failure of a standby generator set to start and run could lead to loss of life, personal injury, property damage
and loss of business income. Failure to start and run due to low battery charge because of careless maintenance is the
most common type of failure. A comprehensive program carried out on a scheduled basis by qualified persons can
prevent such failures and their possible consequences. The maintenance and service programs most generator set
distributors offer on a contract basis should be considered. Typically, they include performance of scheduled
maintenance, repairs, parts replacement and service documentation.
SCHEDULED MAINTENANCE
The maintenance schedule for prime power sets should be on the basis of running time, as published by the
manufacturer. Since standby sets run infrequently, the maintenance schedule is usually in terms of daily, weekly,
monthly, semi-annual and annual tasks. See the manufacturer’s instructions for details; but scheduled maintenance
should include at least:
Daily
•
Checking for oil, coolant and fuel leaks.
•
Checking operation of the engine coolant heater(s). If the block is not warm, the heaters are not working and the
engine might not start.
•
Checking to see that the switchgear is in the AUTOMATIC position.
Weekly
•
Checking engine oil and coolant levels.
•
Checking the battery charging system.
Monthly
•
Checking for air cleaner restrictions.
•
Exercising the generator set by starting it and running it for at least 30 minutes under not less than one-half
rated load and checking for unusual vibrations, noises and exhaust, coolant and fuel leaks while the set is
running. (Regular exercising keeps engine parts lubricated, improves starting reliability, prevents oxidation of
electrical contacts and consumes fuel before It deteriorates and has to be disposed of.)
•
Checking for radiator restrictions, coolant leaks, deteriorating hoses, loose and deteriorating fan belts, nonfunctioning motorized-louvers and concentration of engine coolant conditioner.
•
Checking for holes, leaks and loose connections in the air cleaner.
•
Checking fuel level and fuel transfer pump operation.
•
Checking for exhaust system leaks and restrictions and draining the condensate trap.
•
Checking all meters, gauges and Indicator lamps for proper operation.
•
Checking the battery cable connections and recharging the batteries if specific gravity is less than 1.260.
•
Checking for ventilation restrictions in the inlet and outlet openings of the generator.
•
Checking that all required service tools are readily available.
Semi-Annually
•
Changing engine oil and the full-flow and the by-pass oil filters.
•
Changing the filter(s) in the coolant conditioner circuit
•
Cleaning or replacing the crankcase breather filter(s).
•
Changing the fuel filter(s), draining sediment from fuel tanks, checking flexible fuel hoses for cuts and
abrasions and checking the governor linkage.
62
•
Checking electrical safety controls and alarms.
•
Cleaning up accumulations of grease, oil and dirt on the set.
•
Checking power distribution wiring, connections, circuit breakers and transfer switches.
•
Simulating a utility power outage. This should test the ability of the set to start and assume rated load and check
operation of the automatic transfer switches, related switchgear and controls and all other components in the
standby power system.
Annually
•
Checking the fan hub, pulleys and water pump.
•
Changing the day tank breather.
•
Tightening the exhaust manifold and turbocharger capscrews.
•
Tightening the set mounting hardware.
•
Cleaning the generator power output and control boxes, checking for and tightening all loose wiring connectors,
measuring and recording generator winding Insulation resistances, checking operation of the generator heater
strips and greasing bearings.
•
Checking operation of the main generator circuit breaker (if used) by manually operating it and testing the trip
unit according to the manufacturer’s instructions.
•
Running the set for at least three hours, with one hour at near rated load, if the set is normally exercised at noload or carries only light loads.
•
Generator Insulation tests should be conducted annually throughout the life of a generator set. The initial tests
should be done before final load connections are made to serve as benchmarks for the annual tests. These tests
are mandatory for medium voltage generator sets. ANSI/IEEE Standard 43, Recommended Practice for Testing
Insulation Resistance of Rotating Machinery should be referenced.
63
TROUBLESHOOTING
What are some of the most often found reasons for a failure of a generator set to start? Below is a list of
some of the areas overlooked when maintaining a generator set.
1.
Battery Cables! A battery cable often looks as if it is in good condition but in fact may be the cause of a
non-start of the generator set. Corrosion often starts on the inside of the cable insulation and is not visible
from the outside without testing the resistance value from one end to the other. Battery cable checks are
listed in most operator guides and in order to keep the units running properly the cables must be kept clean
and free from corrosion.
2.
Bad Fuel! Fuel systems are the second highest cause for failure to start or fail during an outage without
being able to supply power for the full period of the outage. The major factor is usually algae or water in
the fuel tank, which develops from not exchanging the fuel regularly or not adding algae or water
preventive additives to prevent this contamination. There are test substances, which allow testing of the
tank to see if water is present and this should be performed quarterly.
3.
Corrosion! Electrical connections are subject to corrosion even though GeneratorJoe units are
treated at the factory to help prevent corrosion from occurring. Check terminal connections periodically.
4.
Operator adjustments- Often times there is a problem with personnel adjusting units without checking the
proper method in the operator guides which lead to an unsuccessful start attempt and damage to property or
worse injury or death to personnel. DO NOT adjust the generator set controls without the proper training in
performance of the work.
5.
Rodent/pest contamination- Insulation on electrical wires is often a treat for rodents which
can lead to a failure to start of the generator set. Another problem is rodent or pest nesting which can lead
to plugging of the air cleaner or radiator (cap left off!). Inspect the unit carefully for rodent or pest
contamination.
6.
Improperly maintained coolant heater- The coolant heater is an integral part of an automatic starting
system and is often overlooked when checking out a unit. Generally this occurs because the unit is turned
off in the summer time and is merely left off after winter comes. The diesel unit will not start properly
when the coolant heater is turned off and the air temperature falls below 80 degrees Fahrenheit.
7.
Dead battery- This is the most unfortunate reason for a failure to start and can be prevented if proper
maintenance is performed on a scheduled basis.
Other troubleshooting is provided in each of the operator guides supplied with the unit and should be reviewed
for other problem solving
64
GeneratorJoe Generator Sets
GeneratorJoe MANUFACTURER'S LIMITED WARRANTY extends to the original purchaser of goods for use,
the following warranty covering goods manufactured or supplied by GeneratorJoe, subject to the qualifications
indicated in this document.
There is no other express warranty. This document covers warranties on products only and any other matters
concerning sales or rentals of equipment or products supplied by GeneratorJoe shall be governed by
GeneratorJoe's polices as posted on www.generatorjoe.net, which is subject to change without notice at any time.
Implied warranties including merchantability and fitness for a particular purpose, are limited to periods of
warranty set forth below and to the extent permitted by law, any and all implied warranties are excluded.
In no event is GeneratorJoe liable for incidental or consequential damages.
NOTE: Some states do not allow limitations on how long an implied warranty lasts, so the above
limitations may not apply in every instance.
1. GeneratorJoe warrants to original purchaser for the period set forth below that goods manufactured
or supplied by it will be free from defects in workmanship and material, provided such goods are installed,
operated, and maintained in accordance with GeneratorJoe's instructions, and further provided, that
installation inspection and initial start-up on commercial-Industrial generator sets or installations are
conducted by a GeneratorJoe's authorized distributor or its designated service representative.
Warranty Periods
a) Emergency or Standby Duty
Standby generators must be permanently installed, properly enclosed and ventilated, or mobile
application and used as back up to the normal power source.
The warranty period is 60 months from the date of installation by the first owner/user, or 60
months after date of shipment by GeneratorJoe whichever is shorter, or 5000 hours of
operation, limited to a maximum of 1000 hours per year, for 5 years, whichever is shorter.
b) Continuous or Prime Duty
Continuous or prime power service describes operation in a permanent or mobile application
where no other source of power is generally available. Rental sets, and specific products for
irrigation and refrigeration meet this criteria. Cogeneration and peak shaving installations are
considered prime power.
The warranty period is 12 months from date of start-up by the first owner/user, or 18
months after date of shipment by GeneratorJoe or 3000 hours of operation.
To be covered by this warranty your purchase must be registered within (30) days of initial Start-up,
warranty registration form to be provided and completed by seller.
2. GeneratorJoe's liability and purchaser’s sole remedy for a failure of goods under this warranty
and for any and all other claims arising out of the purchase and use of goods, including negligence on
the part of the manufacturer, shall be limited to the repair of the product by the repair or replacement,
at GeneratorJoe's option, of parts that do not conform to this warranty, provided that the
product or parts are returned as requested to GeneratorJoe's factory as shown on the GeneratorJoe website
or to a GeneratorJoe's authorized distributor or its designated service representative, transportation pre-paid.
For generators that have been permanently mounted, travel shall be allowed up to a maximum of
300 miles round trip and a maximum of 7 hours travel time. In the event warranty repairs are not
performed by a GeneratorJoe authorized distributor or its designated service representative, said
warranty repair claim will be administered through GeneratorJoe's Warranty Department and
claimant will be reimbursed labor expenses at the rate of thirty (30) U.S. dollars per hour for the time
allowed for applicable repair or for the actual labor expense, whichever is less. Parts will be
reimbursed at GeneratorJoe's current list price, less the applicable discount from the parts
depot in the local geographic area, plus 5% for handling. GeneratorJoe will provide
replacement parts to claimant’s location within the continental United States. If claimant is located
outside the continental United States, all parts shipments are f.o.b. point of debarkation. In the event
warranty repairs are affected outside the boundaries of the United States of America, GeneratorJoe
is not responsible for any duties, taxes, or associated charges as may be applicable in
accordance with the regulations of the country where such warranty repair is performed.
3. All claims must be brought to the attention of GeneratorJoe or an authorized distributor or its
designated service representative within thirty (30) days after the discovery that goods or parts fail to
meet this warranty.
4. Engine manufacturers warranty
The engine manufacturer issues its own separate warranty covering the engines performance and
parts. In the event of an engine related failure, GeneratorJoe can refer you to an engine
authorized service center.
5. This warranty does not apply to:
a. Cost of maintenance, adjustments, installation and start-up.
b. Failures due to accident, misuse, abuse, negligence or improper replacement.
c. Damage due to faulty repairs not performed by an authorized service representative.
d. Products which are altered or modified in a manner not authorized by manufacturer in writing.
e. Failure of goods caused by defects in the system or application in which the goods are
installed.
f. Failure caused by operations at speeds, load or conditions contrary to published
specifications or recommendations.
g. Negligent maintenance such as:
1). Failure to perform scheduled maintenance.
2). Failure to provide sufficient lubricating oil.
3.) Failure to provide sufficient cooling.
4.) Failure to keep air intake and cooling fins clean.
5.) Failure to properly service air cleaner.
6.) Use of other than factory supplied or approved, repair parts and/or procedures.
h. Telephone, Telegraph, Teletype or other communication expenses.
i. Living and travel expenses of person performing service.
j. Rental equipment used while warranty repairs are being performed.
k. Overtime labor.
l. Batteries (Batteries are warranted by the battery manufacturer).
m. Starters and battery charging alternators (Warranted by Component Manufacturer).
n. Consumable items including, but not restricted to:
1). Engine oil
2). Grease and lubricants
3). Fuel
4). Filters and filter elements
5). Injector nozzles
6). Glow plugs
7). Cleaning materials
8). Belts
9). Light bulbs and fuses
10). Antifreeze coolant
No person is authorized to give any other warranties or to assure any other liabilities on GeneratorJoe's
behalf, unless made or assumed in writing by an officer of GeneratorJoe, and no person is authorized to
give any warranties or assume any other liability on behalf of seller unless made or assumed in writing
by seller.
6. This warranty gives the user specific rights, and the user may also have other rights which vary from
state to state.
7. Check component manufacturer’s warranties to determine if their coverage exceeds GeneratorJoe's
warranty coverage.
revised 1/01/2011