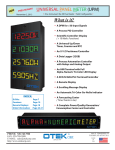
1
Service Manual – Renault System
C. Diagnosis and Repair.
1. Connect the open control module to the test kit.
2. Connect the 12.5 V power supplies to the test kit.
3. Compare the symptoms observed under A. Initial Inspection and Test with the symptoms
listed below to locate the components likely to be faulty and effect the necessary repairs.
Symptom
Media device such
as DVD or TV
missing from OSD
Menu
Media Device
Switching OFF/ON
continuously,
video signal
present
Audio Fault
No sound both
left and right
Investigation
Corrective Action
Check for <1 V at IC1
pin11,12
Power OFF supply for
5 Seconds
If OK go to next line
Check for <0.5 V
TR3 collector
If OK go to next line
Check TR3, D1, IC1, C3, C26,
C36, C37 in turn. Replace faulty
components.
Replace IC 11.
If OK go to next line
Replace faulty components.
Repower system and recheck fault.
IC11 defective
Check Audio route in
logical manner
IC7/19 > IC1 >
IC2/5 > IC3/4
Video OK?
Check as No Colour / poor /no image – NO audio OSD OK
– See "Image Faults" below.
If OK go to next line.
Check IC1, IC3, IC4.defect -
Symptom
Investigation
Replace IC1.
Replace defective components.
Corrective Action
Power Faults
No Power / No
LCD
30-900-00015 Issued 2002-11-28
Check 12 V on F1
If OK go to next line
F1 Defect - check for S/C on
output. Replace defective
components.
Check 5 V/12 V IC
If OK go to next line
IC 17/D3 Defective or S/C on
17
output. Replace defective
components.
Check IR sig. on
If OK go to next line
Check IC12/13/14. Replace
IC11 pin 8
defective components.
Check Xtal sig. on IC
If OK go to next line
XTAL or IC11 Defect. Replace
11pin 6, 7
defective components.
Check < 0.6 V IC
If OK go to next line
TR6 defect IC11 Defect. Replace
11tPin 2
defective components.
Check 5 V IC 16 Pin
If OK go to next line
TR6 defect, IC16. Replace
2
defective components.
Check for PCB damaged pins . Replace defective components.
Page 4 of 19
© Copyright Visteon 2002