1
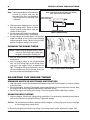
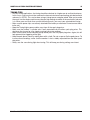
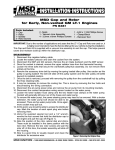
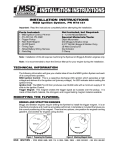
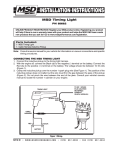
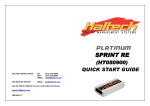
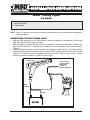
MSD Timing Light
PN 8990
Parts Included:
1 - MSD Timing Light
1 - Cable Harness
Note: Consult a service manual for your vehicle for information on vacuum connections and specific
timing procedures.
CONNECTING THE MSD TIMING LIGHT
1. Plug the 4-pin connector on the cable harness into the receptacle on the bottom of the timing
light. Note that it will only plug in one way.
2. With the engine off, connect the Black clip to the negative (-) terminal on the battery. Connect the
Red clip to the positive (+) terminal on the battery or to the main power wire on the alternator
(Figure 1).
3. Clamp the inductive pickup over the number 1 spark plug wire (See Figure 1). The position of the
inductive pickup does not matter but the wire must fit in the gap between the jaws of the pickup
(Figure 2). Do not pinch the wire between the end of the jaws. Consult your vehicle's service
manual to locate the number 1 cylinder on your engine.
TIMING LIGHT
TO NO.1 SPARK
PLUG LOCATION
ON VEHICLE
(CONSULT
VEHICLE MANUAL)
CABLE
HARNESS
RED
BLACK
Figure 1 Wiring.
MSD
IGNITION
• w w w . m s d i g n i t i o n . c o m • ( 9 1 5 ) 8 5 7 - 5 2 0 0 • FA X ( 9 1 5 ) 8 5 7 - 3 3 4 4
INSTALLATION INSTRUCTIONS
Note: The ferrite pole pieces in the inductive
pickup are fragile and may be
damaged if the jaws are allowed to
"snap" closed or if the pickup itself
is dropped.
NOTE: JAWS MUST CLOSE SO UPPER AND LOWER
POLE PIECES TOUCH EACH OTHER.
PLACE SPARK PLUG
WIRE IN THIS GAP
4. With the engine stopped, clean any dirt
from the timing marks. Figure 3 shows
several typical timing marks and the
rotation of the engine.
5. Set the engine idle speed according to
the service manual using a tachometer.
6. If the distributor has breaker points, set the dwell
angle according to the service manual before
checking engine timing. (When using an MSD
Ignition, the dwell setting is not critical.)
INDUCTIVE PICKUP
Figure 2 Inductive Pickup.
CHECKING THE ENGINE TIMING
Caution: When timing the engine, be very careful
not to let the Timing Light cables get
tangled in the engine's cooling fan.
1. Start the engine and let it warm up to operating
temperature.
2. With the engine idling at the recommended
rpm, aim the Timing Light at the timing marks
and press the trigger switch to operate the
light. The engine timing should be the same as
recommended in the service manual. If not, see
the next section on adjusting the timing.
Figure 3 Typical Engine Timing Marks.
ADJUSTING THE ENGINE TIMING
STANDARD POINTS OR ELECTRONIC DISTRIBUTORS
1. Stop the engine. Loosen the distributor hold-down clamp until the distributor is just loose enough
to turn by hand.
2. Restart the engine. Using the Timing light, rotate the distributor until the timing marks line up. Stop
the engine and securely tighten the distributor hold-down clamp.
3. Restart the engine and recheck the timing. If the timing needs further adjustment, repeat.
CRANK TRIGGER SYSTEMS
1. Stop the engine. Loosen the timing pickup and adjust it in the bracket, depending on whether
you want to advance or retard the timing. Tighten the pickup.
Caution: Do not attempt to move the pickup while the engine is running. Personal injury or damage
to the timing pickup could result.
2. Restart the engine and recheck the timing. If the timing needs further adjustment, repeat step.
MSD
IGNITION
• w w w . m s d i g n i t i o n . c o m • ( 9 1 5 ) 8 5 7 - 5 2 0 0 • FA X ( 9 1 5 ) 8 5 7 - 3 3 4 4
INSTALLATION INSTRUCTIONS
TIMING TIPS
• In many racing applications, the timing should be checked at a higher rpm to verify total advance.
In this case, a new mark must be made on the harmonic balancer representing your desired total
advance (i.e. BTDC). This can be done using a timing tape or a degree wheel. After you've made
the mark, start the engine and increase the rpm high enough to where all the mechanical advance
is in. When your new mark lines up with the timing marks, you are at your selected total timing.
• Make sure the power clips are securely attached to the battery or alternator. Do not connect these
to the coil.
• Keep the Timing Lights power cables away from all the spark plug wires.
• Make sure the number 1 cylinder wire is well separated from the other spark plug wires. This
minimizes the chance for stray signals causing inaccurate readings.
• Make sure the wires to the inductive pickup do not pass near any spark plug wires. Again, this will
help prevent false triggering of the light.
• Keep the pole pieces clean by wiping them with a cloth. Do not scrape or file the pole pieces. To
insure accurate readings, make sure the number 1 wire is widely separated from the other spark
plug wires.
• Always use the same timing light when tuning. This will keep your timing settings consistent.
MSD
IGNITION
• w w w . m s d i g n i t i o n . c o m • ( 9 1 5 ) 8 5 7 - 5 2 0 0 • FA X ( 9 1 5 ) 8 5 7 - 3 3 4 4
INSTALLATION INSTRUCTIONS
TECH NOTES
_________________________________________________________________________________________________________________________ _________________________________________________________________________________________________________________________
_________________________________________________________________________________________________________________________
_________________________________________________________________________________________________________________________
_________________________________________________________________________________________________________________________
_________________________________________________________________________________________________________________________
_________________________________________________________________________________________________________________________
_________________________________________________________________________________________________________________________
_________________________________________________________________________________________________________________________
_________________________________________________________________________________________________________________________ _________________________________________________________________________________________________________________________
_________________________________________________________________________________________________________________________
_________________________________________________________________________________________________________________________
_________________________________________________________________________________________________________________________ _________________________________________________________________________________________________________________________ _________________________________________________________________________________________________________________________ _________________________________________________________________________________________________________________________ _________________________________________________________________________________________________________________________
_________________________________________________________________________________________________________________________
Service
In case of malfunction, this MSD component will be repaired free of charge according to the terms of the warranty.
When returning MSD components for warranty service, Proof of Purchase must be supplied for verification. After
the warranty period has expired, repair service is based on a minimum and maximum fee.
All returns must have a Return Material Authorization (RMA) number issued to them before
being returned. To obtain an RMA number please contact MSD Customer Service at 1 (888) MSD-7859 or
visit our website at www.msdignition.com/rma to automatically obtain a number and shipping information.
When returning the unit for repair, leave all wires at the length in which you have them installed. Be sure to include
a detailed account of any problems experienced, and what components and accessories are installed on the vehicle.
The repaired unit will be returned as soon as possible using Ground shipping methods (ground shipping is covered
by warranty). For more information, call MSD Ignition at (915) 855-7123. MSD technicians are available from 7:00
a.m. to 6:00 p.m. Monday - Friday (mountain time).
Limited Warranty
MSD IGNITION warrants this product to be free from defects in material and workmanship under its intended normal
use*, when properly installed and purchased from an authorized MSD dealer, for a period of one year from the date
of the original purchase. This warranty is void for any products purchased through auction websites. If found to be
defective as mentioned above, it will be repaired or replaced at the option of MSD Ignition. Any item that is covered
under this warranty will be returned free of charge using Ground shipping methods.
This shall constitute the sole remedy of the purchaser and the sole liability of MSD Ignition. To the extent permitted
by law, the foregoing is exclusive and in lieu of all other warranties or representation whether expressed or implied,
including any implied warranty of merchantability or fitness. In no event shall MSD Ignition or its suppliers be liable
for special or consequential damages.
*Intended normal use means that this item is being used as was originally intended and for the original application
as sold by MSD Ignition. Any modifications to this item or if it is used on an application other than what MSD Ignition
markets the product, the warranty will be void. It is the sole responsibility of the customer to determine that this item
will work for the application they are intending. MSD Ignition will accept no liability for custom applications.
MSD
IGNITION
• w w w . m s d i g n i t i o n . c o m • ( 9 1 5 ) 8 5 7 - 5 2 0 0 • FA X ( 9 1 5 ) 8 5 7 - 3 3 4 4
© 2007 Autotronic Controls Corporation
FRM28651
Revised 05/07
Printed in U.S.A.