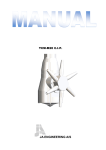
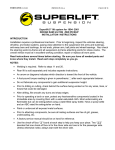
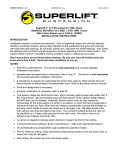
1
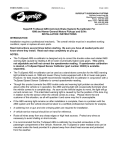
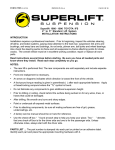
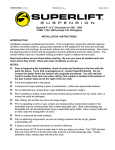
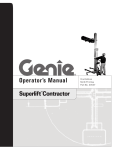
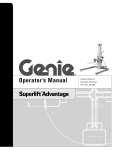
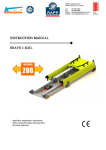
FORM #1054.03-11129
PRINTED IN U.S.A.
PAGE 1 OF 8
SUPERLIFT SUSPENSION SYSTEMS
300 Huey Lenard Loop Rd.
West Monroe, Louisiana 71292-9421
Phone: (318) 322-3458
Sales / Tech: 1-800-551-4955
FAX: (318) 323-5995
Web Site: www.superlift.com
#1054, #1064, & #1074 Superunner™ Replacement Steering Linkage
for 1980-1997 Gas and Diesel Ford 3/4 ton 4WD Trucks
INSTALLATION INSTRUCTIONS
INTRODUCTION
This product is designed to be used with Superlift’s 4” and 6” lift systems. It should be compatible
with other name brand 4” to 6” suspension lift systems, but we advise that you fit-check the
components prior to truck disassembly.
Your F-250 must be equipped with a Superlift brand “dropped” pitman arm (purchased
separately). Arm geometry is critical; do not attempt to use the Superunner steering system with
another brand pitman arm.
This product must not be used with any suspension lift that is less than 4” or more than 6”.
Installation requires a professional mechanic. Prior to beginning, carefully inspect the vehicles
steering and drive line systems paying close attention to the ball joints and wheel bearing preload.
Also, check the steering sector-to-frame and all suspension-to-frame attaching points for stress
cracks. The overall vehicle must be in excellent working condition; repair or replace all worn parts.
Read instructions several times before starting. Be sure you have all needed parts and
know where they install. Read each step completely as you go.
Verify that you have the correct Superunner™ Steering Kit.
• Part #1054 fits gas and diesel trucks built during or before January 1985 (01 / 85).
• Part #1064 fits gas engine trucks built during or after February 1985 (02 / 85).
• Part #1074 fits gas and diesel trucks built during on or after February 1985 (02/85).
You will find the truck’s production date (month / year) on the label located on the driver side
doorjamb. This label also contains information such as the truck’s serial number, load ratings, etc.
Look for “DATE: __ __ / __ __” at the upper left-hand corner of the label.
NOTES:
•
A factory service manual should be on hand for reference. The manual will contain fastener
torque specs, assembly techniques and / or special tool requirements that are unique to this
particular year and model vehicle.
•
Special tools are recommended to detach / attach the pitman arm and tie rod studs. Refer to
the factory service manual.
•
Prior to drilling or cutting, check behind the surface for any wires, lines or hoses.
•
After drilling or cutting, file smooth any burrs and sharp edges or stress cracks may develop.
•
Prior to attaching components, be sure all mating surfaces are free of grit, grease, under
coatings, etc.
•
Front-end realignment is necessary.
•
An arrow on diagrams indicates which direction is toward “front of vehicle.”
FORM #1054.03-11129
PRINTED IN U.S.A.
PAGE 2 OF 8
•
A foot pound reading ( ) is given after each appropriate fastener.
•
Use the check-off box “ ” found at each step to help you keep your place. Two “
that one check-off box is for the driver side and one is for passenger side.
” denotes
PARTS LIST
The part number is stamped into each component or printed on an adhesive label. Identify each
part and place the appropriate mounting hardware with it.
NOTE: All tie rod ends include a grease boot and fitting, cotter pin, and nut.
PART NO.
1-06-1054
DESCRIPTION
NEW ATTACHING HARDWARE
(Quantity - if more than one)
(Quantity)
(2) outer tie rod end for models manufactured from 1980 through January
1985
OR
1-06-1064.....................(2) outer tie rod end for models manufactured from February, 1985
through 1997
1-12-1024.....................(1) inner tie rod end,
passenger side, 19-3/4” long
1-13-1054.....................(1) inner tie rod end,
driver side, 22-1/2” long
1-10-1024.....................(2) sleeve, tie rod adjustment
55-03-1074...................centerlink
55-04-1024...................idler arm ...................................... (2) 9/16" x 4-1/2" bolt
(2) 9/16" Nyloc nut
(2) bushing sleeve
(4) bushing half
55-05-1074...................bracket, idler arm mounting ......... (3) 7/16" x 1-1/2" bolt
(3) 7/16", thick flat-washer
(3) 7/16" Nyloc nut
(1) 3/8” I.D. x 6” long Neoprene hose
(2) hose clamp
55-05-1074-1 ...............reinforcement plate
INSTALLATION PROCEDURES
1) PREPARE VEHICLE...
Put vehicle in park (or first gear for manual transmission), set emergency brake, and chock
rear wheels to prevent any possibility of movement. Installation can be performed with the
tires left on the truck and the suspension supporting it’s weight. The truck must be on level
ground.
FORM #1054.03-11129
PRINTED IN U.S.A.
PAGE 3 OF 8
2) REMOVE STOCK LINKAGE...
Remove the cotter pin and nut attaching the drag link to the pitman arm. Dislodge the drag
link with a puller tool and let the linkage hang.
Remove the nut attaching the pitman arm to the steering sector. Use a puller tool to remove
the arm, then discard the arm.
Use a puller tool to disconnect the tie rods from the steering knuckles, then remove and
discard the linkage assembly.
3) POWER STEERING COOLING LINE...
[DIAGRAM 1] The cooling line is attached to the front of the front crossmember. A section
of this line must be removed so the Superlift idler arm mounting bracket can be installed.
DIAGRAM 1 illustrates where to cut the line, and where to relocate the existing line retaining
clamp.
4) PITMAN ARM...
Install the new Superlift pitman arm, per separate instructions. Arm geometry is critical; do
not attempt to use the Superunner steering system with another brand pitman arm.
5) CENTERING the STEERING WHEEL and SECTOR...
Adjust both turning radius stop bolts all the way in, to allow maximum turning.
Rotate the steering wheel full-lock to the right. Now turn the wheel full-lock to the left,
counting the number of rotations. Turn the wheel back to the right, one half the number of
total rotations. The pitman arm / steering sector is now centered, and the steering wheel
crossbars should be properly positioned. Scribe an index line on the pitman arm and sector
housing for reference.
FORM #1054.03-11129
PRINTED IN U.S.A.
PAGE 4 OF 8
6) IDLER ARM #55-04-1024,
IDLER ARM BRACKET #55-05-1074...
Insert eye bushings into both ends of the idler arm. Prior to inserting the wear sleeves, coat
the sleeves’ O.D. with a water resistant Silicone based grease.
Connect idler to the “05” mounting bracket with a 9/16" x 4-1/2" bolt and Nyloc nut (60 lb-ft).
The idler grease fittings must face toward the passenger side.
7) CENTERLINK #55-03-1074...
Attach the idler assembly to the centerlink with a 9/16" x 4-1/2" bolt and Nyloc nut (60 lb-ft).
Connect the centerlink to the pitman arm. Lubricate the end, torque the nut (60 lb-ft) and
install the cotter pin.
8) IDLER ARM MOUNTING BRACKET - to - CROSSMEMBER...
NOTES:
• Be sure that the steering sector / wheel, centered in Step 6, is still centered.
• The idler mounting bracket has three bolt holes in it. These holes will not likely
match any existing holes in the crossmember once the idler is properly positioned,
so do not use the existing crossmember holes as a starting point. Instead, use a
clamp to attach the idler arm bracket to the crossmember while measuring and
determining the proper location for the bracket.
• Properly locating the idler mounting bracket is much simpler if you have an assistant.
FORM #1054.03-11129
PRINTED IN U.S.A.
PAGE 5 OF 8
[DIAGRAM 2] With the centerlink, idler, and idler mount assembled as shown, locate the
idler mounting bracket onto the crossmember. The goal is for measurements ‘A’ and ‘B’ to be
identical. When these measurements match, the pitman and idler arms are properly
“phased”, meaning they have the same arc of movement.
NOTE: It may be necessary to shift the idler bracket up or down, in or out slightly on the
crossmember to get the ‘A’ and ‘B’ dimensions equal. Again, the goal is proper phasing.
Once the proper location for the idler arm bracket is determined, clamp the bracket firmly to
the crossmember and use the bracket as a template to drill the three 15/32” holes for the
mounting bolts.
Position the idler bracket reinforcement plate (55-05-1074-1) on the backside of the
crossmember and install the three 7/16” x 1-1/2” bolts through the idler bracket,
crossmember, and reinforcement plate. Install the 7/16” flat washers and nyloc nuts and
tighten (37 lb-ft).
On some trucks equipped with automatic transmissions, there will be transmission fluid hard
lines routed on top of the crossmember or near the engine oil pan that will make contact with
the idler mount. If so, re-form these lines to prevent them from touching the idler mount.
9) TIE ROD PREASSEMBLY...
The driver and passenger tie rod assemblies consist of:
#1-13-1054 INNER TIE ROD END for DRIVER SIDE (22-1/2" LONG),
#1-12-1024 INNER TIE ROD END for PASSENGER SIDE (19-3/4" LONG),
#1-10-1024 TIE ROD ADJUSTMENT SLEEVE,
#1-06-1054 OR #1-06-1064 OUTER TIE ROD END
NOTE: Verify that you have the correct outer tie rod ends. Using the wrong ends can ultimately
cause steering failure. The #1054 series ends have either the letter “A” stamped into the tip of the
tapered stud, or “2126R” stamped into the end’s cap (next to the grease fitting).
The #1064 have an “O” on the tapered stud, or “2727R” on the end cap. Dimensionally, the only
difference between the two is that the #1054 series measures slightly larger at the base of its
taper. The difference is not detectable with the naked eye.
[DIAGRAM 3] The tie
rods must be assembled
and installed as shown,
with the long ends to the
inside. Inverted
installation can cause
end failure due to tie rod
stud over-extension.
Each assembly consists
of one long inner end and
a short outer end coupled
by an adjustment sleeve.
Pre-assemble each side
by screwing the ends into the adjustment sleeve for 4 to 5 full rotations.
FORM #1054.03-11129
PRINTED IN U.S.A.
PAGE 6 OF 8
Install the tie rod end grease fittings, then lubricate the ends.
10) TIE ROD INSTALLATION...
NOTE: The tie rods are installed with the vehicle weight on the suspension.
Perform a rough toe-in setting by equalizing the front-of-tire and rear-of-tire track width
measurements.
The remaining steps are performed one side at a time. Start on the driver side. Attach the
outer end of the tie rod assembly to the knuckle.
Hold the unsecured inner end stationary and rotate the adjustment sleeve until the inner end
reaches the centerlink attachment point. NOTE: Each end must have no less than 1-5/16" of
thread engagement into the adjustment sleeve.
Torque both inner and outer ends (60lb-ft) and install furnished cotter pins. If the ends are
correct, the castellated nuts will properly align with the cotter pin holes. Torque the
adjustment sleeve nuts (42 lb-ft). NOTE: Before tightening the adjustment sleeve bolts, be
sure the tie rod end bodies are in line with their studs, not rotated [DIAGRAM 4].
Repeat procedure on passenger side.
11) TURNING RADIUS
STOP ADJUSTMENT...
The stop bolts are located
at approximately the center
of the front axle knuckles.
Longer bolts may be
needed. If a tire makes
contact with the spring, tire
damage may occur. This
can also increase the
possibility of vehicle
rollover. If the steering
sector is at full lock and
receives a blow (rut, curb,
etc.), steering linkage and /
or steering sector main
shaft failure may occur.
Steps are performed one side at a time. Start at driver side.
The turning radius stop bolts were adjusted all the way in in step 5. Now, either the end of the
sector’s turning radius or tire-to-spring contact will stop the turning.
Adjust the stop bolt out until the bolt limits turning at least 1/2" before tire contact or the end
of the sector radius. Repeat procedure on the passenger side. The amount of adjustment
FORM #1054.03-11129
PRINTED IN U.S.A.
PAGE 7 OF 8
may differ slightly from side to side.
12) CLEARANCES and TORQUE CHECK...
Raise the front of the vehicle with a bumper jack and let the suspension hang. Cycle the
steering lock to lock, inspect the steering, suspension, and drive line systems for tightness,
proper operation, and adequate clearances.
Lower the truck to the floor and repeat the inspection procedure.
Re-torque all fasteners.
13) FRONT END ALIGNMENT...
If new, different size tires and wheels are going to be used, the new tires and wheels must be on
the vehicle when it is aligned. If you align the truck with one set of tires, then change to a
substantially different size tire, toe and camber alignment will be affected.
Set alignment to factory specifications.
IMPORTANT PRODUCT USE INFORMATION
As a general rule, the taller a vehicle is, the easier it will roll. Offset, as much as possible, what is
lost in rollover resistance by increasing tire track width. In other words, go “wide” as you go “tall”.
Many sportsmen remove their mud tires after winter / hunting season and install ones more
appropriate for street driving; always use as wide a tire and wheel combination as possible to
enhance vehicle stability.
We strongly recommend, because of rollover possibility, that the vehicle be equipped with a
functional roll-bar and cage system. Seat belts and shoulder harnesses should be worn at all
times. Avoid situations where a side rollover may occur.
Generally, braking performance and capabilities are decreased when significantly larger/ heavier
tires and wheels are used. Take this into consideration while driving.
Most states have some type of law limiting vehicle height. The amount of lift allowed, and how the
lift can be achieved, varies greatly. Several states offer exemptions for farm or commercial
registered vehicles. It is the owner’s responsibility to check state and local laws to ensure that
their vehicle will be in compliance.
Do not add, alter, or fabricate any factory or after-market parts to increase vehicle height over the
intended height of the Superlift product purchased. Mixing component brands is not
recommended.
Superlift makes no claims regarding lifting devices and excludes any and all implied claims.
Superlift will not be responsible for any altered product or any improper installation or use of our
products.
We will be happy to answer any questions concerning the design, function, and correct use of our
products.
FORM #1054.03-11129
PRINTED IN U.S.A.
PAGE 8 OF 8
IMPORTANT MAINTENANCE INFORMATION
It is the ultimate buyer’s responsibility to have all bolts/nuts checked for tightness after the first 100
miles and then every 1000 miles. Wheel alignment, steering system, suspension and driveline
systems must be inspected by a qualified professional mechanic at least every 3000 miles.
SUPERLIFT LIMITED LIFETIME WARRANTY
Suspension products bearing the Superlift (LKI Enterprises) name are warranted for as long as
the original purchaser owns the vehicle that the LKI product was originally installed on. This
warranty is non-transferable. Warranty covers only the product, no labor, time loss, or freight
incurred. Any product that has been abused, altered, incorrectly installed, or used in competition is
not covered. Product finish, spring bushings, Polyurethane products, and normal wear is not
covered. The LKI product is subject to replacement or repair. No other warranties are expressed
or implied.
An authorized Superlift dealer must inspect the part in question and confirm that the part is indeed
a Superlift product and eligible for warranty consideration. A copy of the sales invoice is required
for warranty consideration.