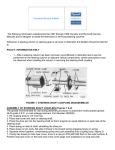
1
STEERING GEAR
GROUP
19-1
19
STEERING GEAR (PUMPS, STEERING GEAR ARM, IDLER ARM!
CONTENTS
PART 1 — M A N U A L STEERING
Page
10
33
1
Roller Tooth and Worm Adjustment
Service Diagnosis
Specifications
.
Steering Column
4
Page
Steering Gear
Steering Knuckles.
Steering Linkage
6
10
10
PART 2 — P O W E R STEERING
Final Test, Adjustment and Specifications.
Gear Shaft Adjustment
Power Steering Gear.
Power Train
22
11
11
19
Service Diagnosis
Specifications
Steering Gear
.
34
1
22
PART 3 — P O W E R STEERING PUMP
Belt Adjustment
Flow Control Valve
Fluid Level
Power Steering Pump
Power Steering Pump Discharge Fitting
Ferrule Replacement.
33
28
25
26
28
Pressure Test
Pump Flow Test
Service Diagnosis
Slipper Spring Replacement.
Specifications
25
26
37
29
1
SPECIFICATIONS
M A N U A L STEERING
Typ
Worm and Three Tooth Roller
e
Ratio..."
Gear Shaft Bearings
Worm Shaft Bearings.
High Point (Wheels Straight Ahead)
-
•
20.4 to 1
2 Needle Roller Bearings
Tapered Roller
Notch on Steering Column
Tube Straight Up
P O W E R STEERING
Ratio
Fluid Capacity of Hydraulic System
Type of Fluid.
..
...
16 to 1
2 Qts.
Power Steering Fluid
MoPar Part No. 2084329
P O W E R STEERING P U M P
7yp
Maximum Pump Pressure
e
Maximum Fluid Flow
Type of Fluid
TC-1, TC-2, TC-3
TY-1
-
.
.........
Constant Displacement
1000 to 1100 psi
1150 to 1300 psi
2VA gallons
Power Steering Fluid
MoPar Part No. 2084329
19-2
STEERING GEAR
TORQUE
MANUAL
REFERENCE
STEERING
Intermediate Steering Arm Pit Nut.
Steering Gear to Frame Bolt
Steering Gear Pitman Arm Nut
Steering Wheel Nut
.TC-1, TC-2, TC-3
TY-1
Steering Knuckle Tie Rod Clamp Bolt
Steering Knuckle Tie Rod End Ball Nut
Steering Idler Arm Bolt Nut. . . .
POWER
STEERING
Pressure Control Valve Body Screws
Pump Inlet Fitting
Reservoir to Pump Body Bolts
Steering Wheel Nut
Steering
Steering
Steering
Steering
Steering
Steering
Steering
.TC-1, TC-2, TC-3
TY-1
Arm Nut
Gear Housing to Frame Bolt
Valve End Plug
Valve Body Attaching Bolts
Column Support Nut
Gear Shaft Cover Nut.
Gear Shaft Adjusting Screw Lock Nut.
-
POWER
Foot-Founds
50
50
120
24
40
15
40
60
STEERING
10
30
10-15
24
40
120
50
25
15
110 to 200
20
50
PUMP
Pump Inlet Fitting
Pump to Pump Bracket Bolts
Reservoir to Pump Body Bolt
30
30
10-15
T 1
MANUAL STEERING
The manual steering (Fig. 1) incorporates a flexible
coupling (Fig. 2) which consists of a rubber-fabric
disc assembled between the two hubs installed between the steering gear worm shaft and the steering
tube which provides ahgnment of the steering gear
to the frame side rail and the vehicle body. The steering gear chuck has a stub worm shaft which extends
up a short distance above the gear housing. The flexible coupling attaches to the worm shaft by a serrated
connection and clamp bolt. The worm shaft has a
master serration that matches with the master serration in the lower hub of the flexible coupling. The
upper hub of the flexible coupling is integral with the
steering tube. The jacket tube is held in ahgnment
in the vehicle body by the lower jacket clamp assembly which attaches to the brake bracket and the
instrument panel clamp. The face of the steering
gear housing is machined flat to position the gear
flush to the frame.
NOTE: With an automatic transmission, a 1-1/4" x
7/16"
x 1/8" washer is added to the housing to the
frame side rail bolt to compensate for the omission
the clutch torque rod mounting bracket.
of
STEERING GEAR
SCREW
62 x 548A
Fig. i—Steering Gear (Disassembled View)
19-3
19-4
STEERING GEAR
SERVICE PROCEDURES
1.
STEERING
COLUMN
Removal
(1) Disconnect the negative (ground) cable from
the battery.
(2) Compress and turn the horn button % turn
counterclockwise to release the button from the retainer.
(3) Disconnect the horn wire at the horn blowing
switch.
(4) Remove the three (3) screws and insulators attaching the horn ring and horn blowing switch to the
steering column. Remove the horn ring and switch.
(5) Loosen the steering wheel nut several turns
and instal the steering wheel puler Tool C-3428 and
remove the steering wheel nut and steering wheel.
(6) Remove the screw attaching the directional
switch lever to the directional switch and remove the
lever.
(7) Disconnect the directional switch wiring at the
steering column jacket tube below the instrument
panel.
N O T E : Attach a piece of string or fine wire to the
directional switch wiring before removing the switch
from the steering column. When the switch is removed leave the string or wire in the steering column
jacket tube as an aid to replacement of the wiring.
(8) Remove the screws attaching the directional
switch to the steering column and remove the switch
from the top of the steering column.
(9) Remove the two bolts attaching the steering
jacket tube clamp at the instrument panel and remove
the clamp.
(10) Move the trim cap up on the steering jacket
tube and release the floor carpet to expose the floor
panel.
(11) Remove the screws attaching the dust pad to
thefloorpanel and shde the dust pad up on the jacket
tube.
(12) Remove the two nuts holding the lower jacket
tube clamp to the steering column jacket bracket.
(13) Remove the clamp bolt from the steering column shaft lower coupling.
(14) Carefuly lift the steering column toward the
dash, tapping the lower coupling lightly with a malet
until it is free of the worm shaft splines.
(15) Shde the steering gear jacket tube assembly
rearward and remove the complete assembly through
the driver's compartment.
Steering
Column
Disassembly
(1) Remove the turn signal lever retaining screw
and remove the lever. N O T E : Disassemble, repair
and assemble the steering column assembly on a
clean, padded bench to protect the finish on the column jacket and related parts.
(2) Remove the 3 recessed head switch retaining
screws, as shown in Figure 3, and pul the turn
signal switch and switch plate up and out, feeding
the wires and connectors through the steering column
jacket.
(3) Disengage the column jacket lower seal from
the hp on the jacket, and shde the seal down toward
the coupling.
(4) Exert an upward force on the steering shaft
SWITCH RETAINING
SCREWS (3)
Fig. 2—Steering Gear and Flexible Coupling
Fig. 3—View of Steering Column—Upper End
STEERING GEAR
Steering
BEARING
STEERING
PULLER
SHAFT
Fig. 4—Removing Steering Shaft Bearing
to force the steering column jacket upper bearing
and insulator up out of the counterbore in the bearing housing. Remove the insulator from the bearing.
(5) Using snap ring pliers, Tool C-3128, remove the
bearing upper snap ring from the upper groove in
the steering shaft.
(6) Using bearing puller Tool C-3891, remove the
steering column upper bearing, as shown in Figure 4.
(7) Remove the lower snap ring and shde the steering shaft and coupling assembly down, and out of the
steering column jacket assembly.
(8) Remove the column jacket lower seal from
the steering shaft.
LIP T Y P E
Column
19-5
Assembly
(1) Position the spring washer on the ledge provided in the top end of the steering column jacket.
(2) Place the two bearing housing retaining bolts
in position in the housing, and just start the nuts on
them.
(3) Stand the column assembly upright, and lower
the bearing housing into position, engaging the bolt
heads in the slots in the column jacket.
(4) Tighten the two retainer bolt nuts alternately
and evenly in steps to prevent unseating the bolt
heads from the slots. Tighten to 95 inch pounds
torque.
(5) Position the isolator in the inside diameter of
thefloorplate, and install thefloorplate on the steering column with the insulated side down.
NOTE: Before installing the floor plate and isolator
on the column jacket, lubricate the inside diameter
of the isolator with a soap solution or rubber lubricant. This will make it easier to slide the column up
or down for proper positioning in the vehicle when
centering the steering shaft coupling.
(6) Apply wheel bearing lubricant to the nylon
rings and hp of the jacket tube seal and position the
seal cup and nylon rings on the jacket tube large
diameter of the nylon rings butt and are retained by
the recess caused by the seal lip (Fig. 5).
(7) Shde the seal onto the steering shaft, and down
against the coupling, with the hp at the outside diameter facing upward, so the seal can be positioned
on the lower end of the column jacket during assembly.
(8) Shde the steering shaft into the column assembly, and install the horseshoe shaped lower snap ring
in the lower groove on the steering shaft.
(9) Place the steering column upper bearing on the
steering shaft.
SEAL
INSTALLING
61x311
Fig. 5—Nylon Rings and Lip Type Seal
(Disassembled View)
SLEEVE #C 3879
62x524
Fig. 6—Installing Steering Column Upper Bearing
(Tool C-3879)
19-6
STEERING GEAR
(10) Position the wavy upper snap ring against
the top of the bearing.
Place the bearing installing sleeve Tool C-3879 and
the steering wheel retaining washer and nut, on the
top end of the steering shaft in that order (Fig. 6).
NOTE: Never press the bearing into position with
a sleeve that exerts pressure against the outer race,
since this would damage the bearing. Do not drive
the bearing into place with a hammer, since damage
to the bearing and steering shaft coupling will occur.
(11) Turn the steering wheel retaining nut to exert
pressure on the installing sleeve, upper snap ring,
and bearing, pressing the bearing down onto the
knurled section of the steering tube and against the
lower snap ring.
NOTE: The steering column upper bearing has approximately .001" interference fit at the knurled sec*
tion of the steering shaft.
(12) Exert sufficient pressure against the upper
snap ring to flatten it against the bearing so it can
enter the groove in the steering tube. Be sure the
snap ring is firmly seated in the groove.
(13) Place the bearing insulator over the bearing
column upper bearing, and position the bearing and
insulator in the counterbore provided in the bearing
housing.
tion the directional switch in the steering column
jacket tube and install the attaching screws and connect all wire connections.
(9) Install the directional switch lever.
(10) Install the steering wheel and the steering
wheel nut, tighten to 24 foot-pounds torque. Test the
operation of the cancelling lever.
(11) Install the horn blowing switch, horn ring,
insulators and attaching screws. Connect the horn
wire.
(12) Install the horn button by compressing and
turning VA turn clockwise to lock the horn button on
the retainer.
(13) Connect the battery cable at the battery negative terminal.
(14) Inspect the steering gear shaft for ahgnment
in the steering column seal and steering jacket
alignment as outlined under "Steering Gear Alignment".
(15) Measure the up or down deflection of the
flexible disc as follows: If the deflection exceeds y >
inch, the column jacket should be moved up or down
to where the deflection of the disc is less than %fi
inch with the column jacket tube clamped in place.
Installation
(1) Disconnect the battery cable at the battery
negative terminal.
(2) Remove the steering arm nut and washer and
remove the steering arm from the steering gear cross
shaft with puller, Tool C-3646.
(3) Remove the bolt and washer attaching the
lower coupling to the steering gear worm shaft.
(4) Loosen the steering jacket clamp screw at the
instrument panel. Do Not Remove.
(5) Tap the couphng assembly upward and carefully lift the steering column and jacket up and off
the end of the worm shaft.
(6) Remove the three nuts, washers and bolts attaching the steering gear to the frame side rail.
(7) Remove the gear through the engine compartment by lowering the upper end of gear towards the
driver's compartment, then raise rear end of the
gear up and remove the gear.
(In
the
Vehicle)
(1) Enter the jacket tube and steering column
shaft assembly through the dash panel from the driver's side and index the lower coupling of the steering
gear shaft with the steering gear worm shaft.
(2) Index the master groove of the steering gear
worm shaft with the filed notch on the lower coupling. Tap the coupling down over the worm shaft
splines.
(3) Install and tighten the coupling clamp bolt
securely.
(4) Align the jacket tube at the instrument panel
and install the jacket tube clamp and attaching
screws. Tighten the screws finger tight.
(5) Install the two nuts attaching the lower jacket
tube clamp to the steering column jacket bracket. Be
sure the jacket tube clamp bolt is securely tightened.
(6) Shde the dust pad down into position on the
dash panel and install the attaching screws.
(7) Position the floor carpet under the dust pad
and position the trim cap.
(8) Attach the string or wire, that was left in the
steering column jacket tube during removal, to the
directional switch wiring and carefully pull the string
or wire down through the column jacket tube until
the directional switch wires can be connected. Posi-
lc
2. STEERING G E A R
Removal
Disassembly
(Fig.
I)
(1) Remove the gear shaft oil seal from the steering housing with puller, Tool C-3350. See "Gear Shaft
Oil Seal Replacement". If the shaft is corroded or
dirty, clean the portion between the oil seal and the
serrations to avoid binding in the bearings.
NOTE: Position gear shaft bearing remover and in-
STEERING GEAR
19-7
Fig. 7—Removing fhe Worm Shaft Oil Seal
Fig. 9—Installing the Worm Shaft Oil Seal
staller arbor Tool C-3786 over the gear shaft threads
and while withdrawing the gear shaft, follow with
the arbor. This arbor will keep the bearing rollers
from dropping out of their cages.
NOTE: Assemble parts without lubrication. Lubrication should be done after adjustments are completed. The needle bearings are grease-packed from
the factory.
(2) Remove the gear shaft adjusting screw lock
nut, cover gasket and the steering gear shaft assembly.
(3) Remove the cover and shim from the bottom
of the housing.
(4) Remove the steering shaft and worm assembly, bearings and cups.
(5) If it is necessary to remove the housing bearings, drive the bearings from the steering gear housing with the gear shaft bearing remover and installer
arbor, Tool C-3786.
Inspection
Clean all parts in a suitable solvent. Inspect all parts
for wear.
Fig. 8—installing fhe Oil Seal Protector
If either of the worm thrust roller bearings are
damaged, replace both bearings. Use new oil seals.
W o r m Shaft
Oil Seal
Replacement
(1) Thread Tool C-3819 far enough into the oil
seal to engage the metal portion of the seal (Fig. 7).
Turning the tool center screw while holding the tool
body will withdraw the seal assembly from the housing bore.
(2) Place the oil seal protector of Tool C-3821
over the splines of the steering worm shaft and shde
the oil seal over the protector with the hp of seal
toward the housing (Fig. 8).
(3) Drive the oil seal into the housing bore with
Tool C-3821 (Fig. 9).
Fig. 10—Removing the Gear Shaft Oil Seal
19-8
STEERING GEAR
G e a r Shaft Off Seal
Removal
(fig.
10}
Replacement
(1) Replace the gear shaft oil seal with Tool C3350 gear shaft oil seal removing and installing tool
set as follows:
(2) Shde the threaded portion of the adapter SP3056 over the end of the gear shaft and install the
threaded nut section of the tool on the gear shaft.
(3) Maintain the pressure on the adapter SP-3056
with the nut of tool, while turning the adapter SP3056, forcing it into the seal until it engages the
metal hp of the seal.
(4) Shde the retainer of Tool C-3350 over the
adapter, engage the grooves in the adapter and the
tool nut with the two half-rings of the tool set and
shde the retainer down to hold the half-rings in position.
(5) Turning the puller nut counter-clockwise will
pull the oil seal from the housing.
Installation
(fig.
11)
(1) Place the seal on the seal protector sleeve,
Tool SP-1601 and install the sleeve over the splines
on the gear shaft (hp of seal toward housing).
(2) Place the adapter, Tool SP-1934, over the protector sleeve and against the seal.
(3) Thread the tool nut on the threaded end of
the gear shaft and turn the tool nut until the shoulder
of the adapter tool contacts the housing.
K the gear shaft bearings have been removed, install the gear shaft outer bearing into the housing
with Tool C-3786 (Fig. 12). Drive the outer (lower)
bearing to within y inch or end of counterbore.
Drive the inner (upper) bearing (Fig. 13) flush with
the bore face with Tool C-3786.
1Q
Fig. 12—Installing fhe Gear Shaft Housing Outer Bearing
Steering
Gear
Assembly
(1) Insert the worm and the shaft into the housing with the bearings and cups.
(2) Install the shim and the lower housing cover,
making sure the bearings are seated.
NOTE: When tightening the cover, turn the worm
tube to be sure no bind exists.
(3) Final tightening of the cover screws should
cause the end play to disappear with torque of % to
% pound required to rotate the tube, when measured
with a pull scale applied at the rim of the steering
wheel. Add or remove shims in the event a bind or
excessive end play occurs. Shims are available in
.003, .006 and .011 inch.
(4) Install the gear shaft.
5) Before installing the cover, turn the adjusting
screw all the way out.
(6) Rotate the wormshaft in one direction to the
end of its travel. Rotate the wormshaft in the other
direction to the end of its travel, counting the turns.
Rotate the wormshaft back % of the full number of
turns.
60X803
Fig. 11—Installing the Gear Shaft Oil Seal
Fig. 13—Installing the Gear Shaft Housing Inner Bearing
STEERING GEAR
(7) Turn the adjusting screw (clockwise) until all
the end play in the gear shaft is gone. Rotate
the wormshaft to one end of its travel and apply a
torque wrench to rotate the wormshaft. Tension
should measure from 9 to 13 V2 inch pounds. The
greatest tension should be felt as the wheel is rotated
past the center position (high point). Adjust the
torque load by turning the adjusting screw in or out
as required.
(8) Install the lock nut and tighten while holding
the adjusting screw.
(9) Mil the gear housing with SAE 90 gear lubricant and test for leaks.
Installation
(In the
Vehicle)
(1) Inspect the steering gear from center by rotating the worm shaft from one end of its travel
to the other while counting the number of turns.
Turn the worm shaft back one half of the full number of turns. This is the exact center of travel.
(2) Locate the master sphne in the outer row of
serrations on the worm shaft. Mark the master
sphne.
(3) Enter the steering gear into the engine compartment.
(4) Align the index mark on the outside of the
flexible coupling hub with the master sphne on the
steering worm shaft (Fig. 14).
(5) Shde the coupling on the worm shaft and install the gear housing to frame side rail attaching
the bolts and nuts.
(6) Tighten the steering gear housing to frame
bolts evenly to 50 foot-pounds torque.
NOTE: Tightening should be done by alternately
tightening the rear and front mounting bolts gradually so that the gear alignment is not disturbed.
Fig. 14—Aligning the Steering Gear with the
Flexible Coupling
19-9
Fig. 15—Steering Gear Alignment
(7) Position the flexible coupling bolt hole in line
with the groove on the worm shaft and install the
bolt and lockwasher.
(8) Tighten the bolt 30 to 35 foot-pounds torque.
NOTE: The horn ground is attached to the underside of the coupling by two bolts to complete the circuit.
3 . STEERING G E A R A L I G N M E N T
(Fig. 1 5 )
Inspect the steering gear shaft for ahgnment in the
steering column seal as follows:
(1) Loosen the steering column clamp bolts at
the instrument panel.
(2) Loosen the lower column clamp bolt and the
support bracket at both the dash panel and at the
column clamp.
NOTE: A rubber lip type seal is positioned between
the upper hub of the flexible coupling and the jacket
tube. The outer groove of the seal must be firmly installed on the jacket tube and the two nylon rings
(Fig. 15) and the lip of the seal must be well lubricated with a wheel bearing grease.
(3) Hold the steering column so it is centered plus
or minus Vb inch on the tube while aligning the column support bracket to the dash panel and lower
column clamp.
(4) When the column is properly located, tighten
the support bracket stud nuts at the dash panel and
at the column clamp to 95 inch-pounds torque.
(5) Tighten the steering column to the instrument
panel clamp bolts to 15 foot-pounds torque.
(6) Tighten the lower steering column clamp bolt
nut to 200 inch-pounds torque.
(7) Reinstall the steering gear arm, washer and
nut. Tighten to 120 foot-pounds torque.
19-10
STEERING GEAR
4 . A D J U S T M E N T O F THE ROLLER
TOOTH AND W O R M (In the V e h i c l e )
(1) Disconnect the steering gear arm at the link.
(2) Rotate the steering wheel to mid-position and
then check for backlash by attempting to move the
steering gear arm back and forth.
(3) If backlash exists, loosen the gear shaft adjustment screw lock nut and tighten the adjusting
screw enough to eliminate free play. Be sure the
roller shaft and the worm do not bind. Recheck the
backlash.
(4) Tighten the adjusting screw lock nut while
holding the adjusting screw from turning.
(5) Connect the steering gear arm at the link.
5 . STEERING K N U C K L E S
Removal
(1) Place a jack under the lower control arm as
near to the wheel as possible. Remove the wheel, tire
and drum. Be sure fhe brake shoes are covered to
prevent dirt or grease from soiling the lining.
(2) Remove the cotter pins, nuts and lockwashers
that attach the steering arm and brake dust shield
to the steering knuckle. Remove the steering arm,
brake dust shield, brake supports and shoes from
the steering knuckle as an assembly but leaving the
brake hose attached. Do not allow the assembly to
hang by the brake hose.
(3) Remove the ball joint studs from the steering
knuckles. Lift the steering knuckle out and away
from the vehicle.
Installation
(1) Position the upper and lower ball joint studs
into the steering knuckle and install the lock washer
and nuts. Tighten the upper ball joint stud nut to
100 foot-pounds torque on Models TC-1 and TC-2 and
135 foot-pounds torque on Models TC-3 and TY-1.
Tighten the lower ball joint stud nut to 115 footpounds TC-1 and TC-2, 135 foot-pounds (TC-3 and
TY-1) and install the cotter pin.
(2) Shde the brake dust shield, support and shoe
assembly over the knuckle and into position. Install
the lockwashers and nuts on the upper rear and
lower front bolts.
(3) Install the upper front and lower rear bolts
through the dust shield and steering knuckle. Position the steering arm over the bolts. Install the lockwashers and nuts. Tighten the steering knuckle to
brake support bolts 55 foot-pounds torque and the
steering knuckle to steering knuckle arm bolts 80
foot-pounds torque. Install the cotter pins.
(4) Remove the covering from the brake shoes.
Install the wheel, tire and drum assembly. Adjust the
front wheel bearings. Refer to Paragraph "Front
Wheel Bearing Adjustment." in the "Front Suspension" Group 2.
6. S T E E R I N G L I N K A G E ( F i g u r e 1 6 )
Removal
When removing the tie rod ends, idler or steering gear arm, all seals should be closely inspected
for wear or damage. The tie rod ends are the permanently lubricated type. If the tie rod or steering
62x72
Fig. 16—Steering Linkage (Disassembled View)
STEERING GEAR
arm seals are damaged, replace the assembly.
The tie rod, seals and covers should be inspected
at all oil change periods. Damaged seals necessitate
replacement of the tie rod end assembly. The tie
rod end seal covers are serviced separately.
CAUTION: Removal of the tie rod ends from the
steering knuckle arm or center link by methods other
than using Tool C-3894 will damage the tie rod end
seal, necessitating replacement of the complete fie
rod end assembly.
(1) Remove the tie rod ends from the steering
knuckle arms using Tool C-3894. Use care not to
damage the seals.
(2) Using Tool C-3894 remove the inner tie rod
ends from the link.
(3) Remove the idler arm stud from the link using Tool C-3894.
(4) Remove the idler arm bolt from the crossmember.
19-11
(5) Remove the steering gear arm stud from the
link using Tool C-3894.
Installation
Replace all the tie rod and steering arm assembhes
that are damaged, worn, or may have damaged seals.
(1) Insert the idler arm and bushing assembly
into the bracket using care not to damage the bushing. Insert the bolt and tighten to 80 foot-pounds
torque.
(2) Insert the center link studs into the idler arm
and steering arm and tighten the nut to 40 footpounds torque. Insert the cotter pins.
(3) Connect the tie rod ends to the steering
knuckle arms. Tighten the nuts to 40 foot-pounds
torque. Shde the stone protector into position and install the cotter pins.
(4) Measure and adjust the front wheel toe-in.
See "Front Suspension", Group 2.
PART 2
POWER STEERING
The power steering gear consists of a gear housing
(Fig. 17) containing a gear shaft with sector gear, a
power piston with gear teeth milled into the side of
the piston is in constant mesh with the gear shaft
sector and a worm shaft connects the steering wheel
to the power piston. The worm shaft is geared to
the piston through a recirculating ball contact (Fig.
18).
SERVICE D I A G N O S I S
7.
G E A R S H A F T ADJUSTMENT
(In the Vehicle)
(1) With the gear shaft on center, loosen the gear
shaft adjusting screw lock nut V% turn and tighten
the adjusting screw until backlash just disappears.
Tighten the screw VA turns from this position and
while holding the adjusting screw in this position,
tighten the lock nut.
NOTE: This is a temporary adjustment to insure
that fhe piston rack and sector teeth are in full alignment.
(2) Operate the unit manually for a minimum of
180 degrees from the center in each direction, measured at the worm shaft.
(3) Start the engine and run at idle speed. With
hydrauhc power to the steering gear unit and with
the gear shaft on center plus or minus 2 degrees,
readjust the gear shaft backlash. This will require
loosening the adjusting screw until the backlash is
evident. Retighten the adjusting screw until the
backlash just disappears. Continue to tighten % to
% turn from this position and tighten the lock nut
50 foot-pounds torque to maintain this setting.
8 . P O W E R STEERING G E A R UNIT
Remove*/
POWER PISTON
58X198A
Fig. 17-—Steering Gear Housing (Sectional View!
(1) Disconnect the battery cable at the battery
negative post.
(2) On Models TC-1, TC-2, TC-3, perform steps (1)
19-12
STEERING GEAR
OIL OUT
OIL IN
59xl40A
Fig. 18—Steering Gear (Sectional View)
through (11) under "Manual Steering Column Removal".
(7) On Models TY-1 remove the two screws from the
underside of the steering wheel and remove the horn
blowing actuator and the steering wheel cover.
(8) Disconnect the horn wire at the horn blowing
switch.
(9) Remove the four screws and insulators and
remove the horn blowing switch (Fig. 19).
(10) Remove the four screws and remove the horn
blowing ring mounting plate (Fig. 20).
(11) Loosen the steering wheel nut several turns
and install the steering wheel puller Tool C-3428
(Fig. 21) and remove the steering wheel nut and the
steering wheel.
(12) Remove the directional switch lever (Fig. 22).
(13) Remove the steering column lower cover.
(14) Remove the two screws and disconnect the
switch wires at the connection and remove the directional switch and wires (Fig. 23).
(15) Remove the retainer snap ring (Fig. 24) from
the groove in the steering tube at the top of the
bearing using phers Tool C-3229.
(16) Remove the jacket tube shield to allow access to the column tube clamp and remove the screws
attaching the steering jacket tube clamp at the instrument panel and remove the clamp.
(17) Raise the carpet to expose the floor panel.
Move the rubber grommet up on the jacket column.
(18) Remove the screws attaching the rubber dust
boot at the firewall. (On TY-1 Models remove the
floor inspection panel.)
STEERING GEAR
19-13
Fig. 22—Directional Switch and L e v e r Steering Wheel Removed
Fig.
20—Horn Blowing Ring Mounting Plate
Fig. 21—Removing the
Steering Wheel
(19) On Chrysler and Imperial Models loosen the
jacket tube clamp at the steering gear housing.
(20) Remove the cotter key and nut at the cover
link and disconnect the link from the arm.
(21) Remove the arm nut and washer at the
steering gear shaft.
(22) Shde Tool C-3646 up on the arm and place
the shoe of the puller behind the steering arm (Fig.
25). Tightening the tool center screw against the gear
shaft, will pull the steering arm from the gear shaft.
CAUTION: Do not remove the steering arm by prying
with a lever or striking with a hammer as serious
steering gear internal damage will result.
(23) Disconnect the hydraulic brake hne at the
master cyhnder and the brake tee and remove the
hne (not necessary on Imperial Models).
(24) Disconnect the pressure and return hoses at
the steering gear. Fasten the ends of the hoses above
Fig. 23—Removing the Directional Switch
19-14
STEERING GEAR
WHEEL NUT
COLUMN
SUPPORT
GROUND STRIP (IF SO EQUIPPED)
/
^CLAMP
SEAL (IF SO EQUIPPED)
COLUMN TUBE
INSULATOR
STEERING TUBE
H
GROUND STRIP
(IF SO EQUIPPED)
WASHER
JACKET
INSERT
BEARING
PLASTIC (2)
SPACER
STEERING TUBE
SPRING
TUBE
INSULATOR
60x19
SNAP RING
60x13
Fig. 24—iceckef Tube
Installation
(Imperial)
the oil level in the reservoir. Cap the ends of the
hoses. Cap the fittings on the steering gear.
(25) Shde the jacket tube up and off the steering
gear through the driver's compartment. Remove the
jacket tube upper spring and retainer. Remove the
rubber insulator boot and horn ground strap.
(26) Remove the steering tube coupling pin, two
plastic inserts, horn ground strap (Fig. 26), rubber
insulator and the upper steering tube.
(27) Remove the gear housing to frame bolts,
washers and ahgnment wedge. Remove the nuts and
washers attaching the master cylinder to the brake
booster and shde the master cylinder off the studs
and towards the fender shield. Shde the steering
gear towards the rear of the vehicle and at the same
time, raise the lower end of the gear to remove the
gear at the engine compartment.
Disassembly
(Fig.
18)
Prior to disassembly, clean the gear assembly
thoroughly in a suitable solvent and install the unit
NOTE:
STEERING GEAR
Fig. 26—Jacket Tube and Column Tube (Cross Section)
fixture Tool C-3323.
When disassembling, each part should be placed in
a suitable solvent, washed, then dried by dry compressed air. Careful handling of the parts must be
exercised to avoid the occurrence of nicks and burrs.
Crocus cloth may be used to remove small nicks or
burrs provided it is used carefully. When used on
the steering gear valve, use extreme care not to
round off the sharp edge portions of the two lands
located between the valve drilled holes. The sharp
edge portion of these two lands is vitally important
to this type of valve.
Remove and discard all "0" seal rings and seals.
Use new ones lubricated with petrolatum when reassembling.
(1) Drain the steering gear through the pressure
and return connections by turning the steering tube
coupling from one extreme of travel to the other.
(2) Remove the coupling pin.
in the holding
CAUTION: Support the coupling when driving the pin
in or out to avoid damaging the worm shaft and bearings.
VALVE ASSEMBLY
VALVE LEVER
/
TOOL
58x231
Fig. 25—Removing the Steering Gear Arm
" O " RINGS
58x34 ^
Fig. 27—Removing the Valve Body Assembly
STEERING GEAR
19-15
Fig. 30—Removing the Power Train
Fig. 28—Removing the Gear Shaft Cover Nut
(3) Remove the valve body housing attaching Tool C-3634 (Fig. 29).
(9) Firmly install a suitable drift through the
screws and remove the valve body and the three " 0 "
hole
in the jacket support to engage the groove in
rings (Fig. 27).
the
worm
shaft, thereby locking these two parts to(4) Remove the valve lever and spring. Pry under gether (Fig.
30).
the spherical head with a screwdriver. Use care not
(10)
While
holding the drift, pry on the piston
to collapse fhe slotted end of the valve lever as this teeth with a screwdriver
using the gear shaft as a
will destroy the bearing tolerances of the spherical fulcrum and remove the complete
power train.
head.
NOTE:
By
this
procedure,
the
worm
will be all the
(5) Loosen the gear shaft adjusting screw lock- way info fhe piston and fhe power train
parts will
nut to facilitate removal and remove the gear shaft be resting against fhe piston flange. It is imperative
cover nut with Tool C-3633 (Fig. 28).
that the cylinder head, center race and spacer asCAUTION: Oil will be expelled when fhe gear shaft sembly and fhe jacket support be maintained in close
and cover are withdrawn from the housing.
contact with each other. This will prohibit the teflon
(6) Rotate the worm shaft to the full right turn sealing ring on the worm shaft from becoming disposition, then return the worm shaft to the center of engaged from its mating sleeve retained in the cylintravel. This will place the piston in the center posi- der head. It will also eliminate the possibility of fhe
tion (Fig. 17). Withdraw the gear shaft until the reaction rings becoming disengaged from their
sector teeth clear the housing. Rotate the shaft 180 grooves in both the cylinder head and fhe column
degrees and allow the ends of the teeth to rest on jacket support.
the housing.
(11) Remove the gear shaft assembly from the
(7) Turn the worm shaft to full right turn posi- housing and remove the steering gear housing from
tion to compress the power train parts and then the vise.
remove the coupling.
P o w e r Train
Disassembly
(1) Place the power train in a vise equipped with
(8) Remove the steering jacket support nut with
soft jaws to avoid damaging the piston assembly.
CAUTION: Do not turn the worm shaft more than
one-half turn during disassembly.
(2) Remove the column jacket support tang washer.
NOTE: The needle bearing in the support consists of
33 needles originally retained in the support by heavy
lubricant to facilitate assembly. This lubricant, however, will have become dissolved in fhe hot hydraulic
fluid with the unit in operation.
(3) To make sure the bearing needles do not drop
out when removing the support, place the arbor, Tool
C-3929 on the wormshaft and shde the support and
bearing up on the arbor tool.
Fig. 29—Removing fhe Steering Column Support Nut
(4) Hold the worm shaft from turning, then turn
If-16
STEERING GEAR
Fig. 33—Installing the Worm Shaft Upper Seal
Fig. 31—Removing the Worm Shoft Upper Seal
the nut with sufficient force to release the staked
portions from the knurled section and remove the nut.
NOTE: Wire brush the knurled section to remove
the chips, then blow out the nut and worm shaft to
remove any metal particles.
(5) Remove the upper thrust bearing race (thin)
and the upper thrust bearing.
(6) Remove the center bearing race.
(7) Remove the lower thrust bearing and the
lower thrust bearing race (thick).
(8) Remove the lower reaction ring and the reaction spring.
(9) Remove the cyhnder head assembly.
NOTE: The worm and piston assembly is furnished
as a complete assembly only.
Column
Jacket
Support
Disassembly
(1) Remove the worm shaft upper seal with puller
Tool C-3638 (Fig. 31).
CAUTION: Do not interchange the Imperial column
jacket support with that of any other models. The
machining on Imperial supports is different; resulting in a difference of reaction feel.
Fig. 32—Removing the Reaction Seal from the
Jacket Support
(2) Remove the large "0" ring from the groove
in the jacket support.
(3) Remove the reaction seal from the groove in
the face of the jacket support with air pressure directed into the ferrule chamber (Fig. 32).
(4) Inspect all the grooves for burrs. Make sure
the passage from the ferrule chamber to the upper
reaction chamber is unobstructed.
Assembly
(1) Install the worm shaft upper oil seal using
Tool C-3650 (Fig. 33) (with the hp of the seal toward the bearing).
(2) Lubricate and install the reaction seal in the
groove in the face of the column jacket support with
the flat side of the seal out (Fig. 34).
Cylinder
Head
Disassembly
(1) Remove the two "0" rings in the two outer
grooves in the cylinder head.
(2) Remove the lower reaction "0" ring in the
groove in the face of the cylinder head. Apply air
Fig. 34-—Installing the Reaction Seal into the
Jacket Support
STEERING GEAR
"O" RINGS
CYLINDER HEAD
•SCREW
CONTROL
VALVE
BODY
19-17
"O" RINGS
"O" RINGS
"O" RING
PIN
STEERING
VALVE BODY
SPRING \ S P R I N G ^ 0
PISTON
FITTING
CYLINDER HEAD
OIL SEAL
"\
REACTION " O " RING
SPOOL VALVE
SCREW
"O" RING
FERRULE
58x46
Fig. 35—Removing the Reaction Ring Seal from the
Cylinder Head
pressure into the oil hole located in the groove between the two "0" ring grooves (Fig. 35).
(3) Inspect the worm shaft seal in the cylinder
head counterbore for possible damage; replace the
cylinder head seal if necessary (Fig. 36).
Assembly
(1) Inspect the oil passage in the ferrule for obstruction and cylinder head lands for burrs, then
lubricate the two large "0" rings and install in the
grooves on the cylinder head.
(2) Install the cylinder head oil seal, back-up ring
and retainer (if removed). Make sure the retainer
is seated in the groove.
(3) Install the lower reaction seal in the cylinder
head groove.
NOTE: The small "O" ring for the ferrule groove
should be installed after the worm shaft bearing
preload has been established; otherwise, the small
FERRULE
CYLINDER HEAD
OIL SEAL
58x48A
£ - REACTION " O " RING
58x47
Fig. 36—Removing the Cylinder Head Seal
GASKETEND PLUG'
Fig. 37—Control Valve (Disassembled View)
"O" ring will be damaged by the reaction springs
and the center bearing spacer.
Steering
Valve
(Fig. 3 7 1
Assembly
Disassembly
(1) Remove the two screws attaching the pressure control valve body to the steering valve body
and remove the back pressure control valve assembly.
(2) Compress the pressure control valve spring
and remove the retainer pin, spring, pressure control
valve piston and back pressure valve cushion spring.
(3) Carefully shake out the steering valve piston.
Inspect the valve for nicks, burrs and scores.
NOTE: If the steering valve or valve housing is
damaged, replace the valve and housing assembly.
Do not remove the valve end plug unless inspection indicates a leak at the seal.
Small burrs and nicks may be removed with crocus
cloth, if extreme care is used not to round off the
sharp edge portion of the valve. The sharp edge
portion is vitally important to the operation of this
valve.
Clean the valve bodies and valve pistons thoroughly in clean solvent. Blow out all passages and
blow parts dry with dry compressed air. Lubricate
the pistons and bores with Power Steering Fluid
MoPar Part No. 2084329.
Assembly
RETAINER
GASKET
(1) Install the steering spool valve into the valve
housing so that the valve lever hole is aligned with
the lever opening in the valve body. The valve must
be perfectly free in the valve body without sticking
or binding.
(2) Install a new seal and end plug (if removed).
Tighten the plug to 25 foot-pounds torque.
(3) Install the back pressure valve cushion spring
19-18
STEERING GEAR
ADJUSTING SCREW
lubricant to facilitate assembly. This lubricant, however, will have become dissolved in the hot hydraulic
fluid with the unit in operation.
CAUTION: If for some reason, the cover assembly
must be removed from the gear shaft, the 51 needles
will fall out of the cover. If any needles (51) become
lost, it will be necessary to replace the cover and
bearing as an assembly. Use wheel bearing lubricant to retain the needle rollers in the cover when
reassembling.
Assembly
58x283
Fig. 38—Steering Gear Housing (Sectional View)
in the back pressure valve body. Lubricate the back
pressure valve piston and insert the nose end of the
piston into the body bore. Test for smooth operation. Be sure the lower spring is not cocked.
(4) Install the pressure control valve spring on
top of the valve piston. Compress the spring and install the retaining pin.
(5) Install the two "O" rings and assemble the
back pressure valve assembly to the control valve
body. Tighten the two attaching screws to 10 footpounds torque.
(6) If the pressure inlet fitting has been removed,
replace the copper gasket and retighten the fitting to
30 foot-pounds torque.
(1) Lubricate a new small "O" ring and install it
over the adjusting screw into position at the top of
the gear shaft cover.
(2) Lubricate an "0" ring and gear shaft cover
with petrolatum and install the "0" ring in the cover
groove.
(3) Install the adjusting screw lock nut, but do
not tighten.
Steering
Gear
Housing
Disassembly
(1) Attach the steering gear housing in the holding fixture Tool C-3323 and place the holding fixture
in a vise.
NOTE: The gear shaft oil seal should be removed
with the gear shaft installed in the housing.
(2) Remove the gear shaft outer oil seal with
adapter SP-3056 and Tool C-3350 (Fig. 39) as follows:
a. Shde the threaded position of adapter SP-3056
over the end of the gear shaft.
b. Install the nut section of Tool C-3350 on the
shaft.
G e a r Shaft
Disassembly
c Maintain pressure on adapter SP-3056 with the
(1) Remove the gear shaft adjusting screw lock
nut and remove the small "0" ring from the top of nut of Tool C-3350 while turning the adapter into
the cover and large "0" ring from the base of the the seal until it has bottomed in the seal.
cover (Fig. 38).
NOTE: The needle bearing in the cover consists of
51 needles originally retained in the cover by heavy
Fig. 39—Removing the Gear Shaft Oil Seal
Fig. 40—Removing the Housing Lower Bushing
STEERING GEAR
d. Install the two half-rings and retainer over both
portions of the tool.
e. Turn the nut counter-clockwise; as the hexagon
nut is removed from the shaft, the seal will be pulled
from the housing.
(3) Remove the oil seal snap ring and oil seal
back up washer and perform operation 2 to remove
the inner oil seal.
(4) If necessary to remove the housing bearings,
use puller, Tool C-3332 with adapter SP-3062 (Fig.
40) as follows:
a. Engage the jaws behind the bearing, hold the
center screw while turning the puller nut to pull the
lower (outer) needle bearing out of the housing.
b. Use puller, Tool C-3332, to remove the upper
(inner) needle bearing.
Assembly
(1) Install the gear shaft bearings into the housing with driver, Tool C-3333 (lettered end of the
bearings against the driver tool). Drive the bearings
to VB inch below the edge of the counterbore.
(2) Install the gear shaft oil seal into the housing
(lip of seal toward needle bearing) with adapter SP3052 and Tool C-3350 as follows:
a. Place the long hp of the adapter against the
seal and thread the tool nut on the threaded end of
the gear shaft (Fig. 41).
b. Turn the tool nut on the gear shaft until the
shoulder of the adapter tool contacts the housing.
c. Remove the tools and install the oil seal back-up
washer and snap ring.
CAUTION: Make sure the snap ring is properly seated
in the groove in the housing (Fig. 38).
d. Install the cross shaft outer seal.
9. POWER
Assembly
TRAIN
If the power piston ring was removed at disassembly, inspect the condition of the rubber seahng ring
and install a new cast iron ring with Tool C-3676,
Piston Ring Remover and Installer, as follows:
a. Position Tool C-3676 in the vise (Fig. 43).
b. Shde a new piston ring into place in the piston
groove.
c. Place the piston and ring assembly in Tool
C-3676 with the lower part of the piston and the ring
resting on the land of tool.
d. Press down on the piston to bottom the piston
ring in the piston groove, forcing the open ends of
the ring out for ease of locking the ring. The ring
should be positioned with ring hooks in hne with
the ball guide plug.
19-19
Fig. 41—Installing the Gear Shaft Oil Seal
(1) Place the piston assembly in a vertical position (worm shaft up) in a vise equipped with soft
jaws.
(2) Shde the cylinder head assembly (ferrule up)
on the worm shaft, inspect the worm shaft seal ring
making sure the gap is closed to avoid damaging the
ring as the cyhnder head moves against the piston
flange.
(3) Lubricate with Power Steering Fluid MoPar
Part No. 2084329 and install the following parts in
order:
a. Lower thrust bearing race (thick).
b. Lower thrust bearing.
c. Lower reaction spring (with small hole over
the ferrule).
d. Lower reaction ring (flange up so the ring
protrudes through the reaction spring and contacts
the reaction "0" ring in the cyhnder head).
e. Center bearing race.
f. Upper thrust bearing.
g. Upper thrust bearing race (thin).
h. Start the worm shaft thrust bearing nut (do
not tighten).
(4) Turn the worm shaft counter-clockwise onehalf turn. Hold the worm shaft in this position while
tightening the unit to 50 foot-pounds torque to prestretch the worm shaft threads.
CAUTION: If the worm shaft is turned more than onehalf turn, the cylinder head sleeve will clear the oil
seal ring on the worm shaft. Always position the
worm shaft oil seal ring
bottoming the cylinder head against the piston top flange to avoid damaging fhe oil seal ring.
before
(5) Loosen the adjusting nut. Place several rounds
of cord around the center bearing race (Fig. 44).
Make a loop in one end of the cord and hook the loop
of a distributor breaker arm spring scale Tool MTU36 in the cord loop. Pulling the cord will cause the
Fig, 42—Steering Gear (Disassembled View)
STEERING GEAR
19-21
ing operation, if can be corrected by striking the
nut a glancing blow in the direction required to regain proper pre-load.
c. After the proper pre-load, stake the nut at three
more locations 90 degrees apart around the upper
part of the nut.
d. To test the total staking, tighten the nut to 20
foot-pounds torque in either direction. If the nut does
not move, the staking operation is satisfactory.
IMPORTANT: Retest the pre-load adjustment, the
torque of 8-16 inch ounces must remain after the
adjusting nut is securely locked.
(7) Install the center bearing spacer assembly
over the center bearing race and engage the dowel
pin of the spacer in the slot of the race and the slot
of the spacer entered over the cylinder head ferrule.
Fig. 43—Removing fhe Pisfon Ring
NOTE: This will align fhe valve lever hole in fhe
bearing race to rotate. Retighten the worm bearing center bearing race with the valve lever hole in the
adjusting nut while pulling on the cord with the center bearing spacer assembly.
scale. If the adjusting nut is tightened properly,
(8) Install the upper reaction ring on the center
reading on the scale should be 8 to 16 ounces (12 bearing
spacer with the flange down against the
ounces preferred) while the bearing race, is turning. spacer.
CAUTION: Place a support under fhe adjusting nut
Install the upper reaction pressure spring over
during the staking operation to avoid brinelling the the(9)reaction
ring with the cyhnder head ferrule
piston and the worm bearings.
through
the
hole
in the spring.
(6) Stake the upper part of the worm shaft adthe reaction ring (without flange) injusting nut into the knurled area of the shaft as side(10)theInstall
upper reaction ring.
follows:
(11) Lubricate the ferrule "0" ring with petroa. Hold a VA inch flat end punch on the center hne
of the worm shaft and perpendicular to the worm latum and install it in the groove on the cyhnder
shaft and at a slight angle to the nut flange (Fig. ferrule.
45).
(12) Carefully install the jacket support over the
b. Strike the punch a sharp blow with a hammer worm shaft, engaging the cylinder head ferrule
and recheck the pre-load.
and the "0" ring and making sure the reaction rings
enter
the circular groove in the jacket support.
NOTE: If the adjusting nut moved during the stak-
Fig. 44—Adjusting the Center Bearing Race Preload
Fig. 45—Staking the Worm Shaft Bearing Adjusting Nut
19-22
STEERING GEAR
CAUTION: Form a .0015 inch feeler gauge into a
coil and insert with the jacket support to protect the
lip of the seal when installing over the worm shaft
serrations.
(13) Align the parts on the power train so that
the valve lever hole in the center bearing spacer
assembly is 90 degrees counter-clockwise from the
piston rack teeth and hold all the parts together.
1 0 . STEERING G E A R
Assembly
(1) With the steering gear housing in the holding
fixture Tool C-3323 in approximate car installed position; lubricate the bore of the housing with petrolatum and carefully install the power train assembly
(Fig. 18) with the center bearing spacer valve lever
hole in "UP" position to line up with the control valve
lever clearance hole in the steering gear housing.
NOTE: Place a feeler stock, .0015 inch, to cover the
aligning notch in the steering gear housing to protect the "O" ring seals when installing the gear train.
C A U T I O N : Make sure fhe cylinder head is bottomed
on the housing shoulder (Fig. 18). Do not release
pressure on the power train (Fig. 30) until all the
parts are positioned in the steering gear housing.
(2) Align the valve lever hole in the center bearing spacer exactly with the clearance hole in the
housing, using a suitable drift as an aligning tool.
NOTE: Tool should not be removed until the spanner
nut is securely tightened.
(3) Install the column support spanner nut and
tighten the nut 110 to 200 foot-pounds torque with
Tool C-3634 (Fig. 29).
(4) Set the piston at the center of travel and install the gear shaft and cover assembly so that the
sector teeth index with the piston rack teeth. Make
sure the "O" ring is properly positioned in the face
of the cover (Fig. 38).
(5) Install the cover spanner nut and tighten the
nut 110 to 200 foot-pounds torque with Tool C-3633
(Fig. 28).
(6) Install the valve lever (double bearing end
first) into the center bearing spacer through the hole
in the steering housing so that the slots in the valve
lever are parallel to the worm shaft in order to engage the anti-rotation pin in the center bearing race.
NOTE: Turn the worm until the piston bottoms in
both directions and observe the action of the lever.
It must return easily to its center position when the
worm torque is relieved.
(7) Install the valve body on the housing making
sure that the valve lever enters the hole in the piston
(Fig. 18). Be sure that the "O" ring seals are in place.
Tighten the valve mounting screws to 30 inch-pounds
torque.
11.
FINAL TEST, ADJUSTMENTS
SPECIFICATIONS
AND
(1) Remove the oil reservoir cover and fill the
reservoir to the bottom of the filler neck opening.
(2) Connect the test hoses, Tool C-3211 and Tool
C-3318, with the proper adapters to the hydrauhc
pump on the vehicle with pressure gauge Tool C3309B installed between the pump and the steering
gear to register the pressures.
(3) Start the engine and operate at idle to bring
the steering gear to normal operating temperature.
(4) Expel all the air from the unit by turning the
worm shaft several times to the right and then to
the left.
(5) Refill the reservoir before proceeding with the
following test and adjustments on the bench:
a. Tighten the steering valve body attaching
screws to 7 foot-pounds torque.
b. With the gear shaft on center, tighten the gear
shaft adjusting screw until the backlash just disappears. Tighten VA turns from this position and while
holding the adjusting screw in this position, tighten
the lock nut (Fig. 46).
NOTE: This will bring the piston rack and the sector teeth in full alignment.
c. Turn off the hydrauhc power to the unit. Operate the unit manually for a minimum of 180 degrees
from center in each direction, measured at the worm
shaft.
d. With the hydrauhc power applied to the unit
and with the gear shaft on center plus or minus 2 degrees, readjust the gear shaft backlash. This will require loosening the adjusting screw until the backlash is evident. Retighten the adjusting screw until
the backlash just disappears. Continue to tighten %
Fig. 46—Steering Gear Shaft Adjustment
STEERING GEAR
to V% turn from this position and tighten the lock nut
to 50 foot-pounds torque to maintain this setting.
e. Starting from a point at least one full turn of
the worm shaft either side of center, the torque at
the gear shaft required to turn the unit through cener at 2 rpm in each direction shall not exceed 25 footpounds or vary more than 5 foot-pounds from left to
right. Perform this operation carefully to prevent a
lockup in the steering gear.
f. Adjust the torque evenly by moving the steering
valve assembly by tapping gently on the back pressure valve body attaching screws to move the valve
body up on the steering housing and tap on the end
plug to move the valve body down the housing.
N O T E : If the torque is greater to the right, move
the control valve body " D o w n / If the torque is
greater to the left, move the valve body " U p . " After
positioning the valve to obtain equal torque, tighten
the valve body attaching screws to 15 foot-pounds
torque to maintain this setting.
COLUMN
SUPPORT
Eaurta
19-23
GROUND STRIP (IF SO EQUIPPED)
j
^CLAMP
/ fy
i i f .
.•>
ff
Yi
w it
SEAL (IF SO EQUIPPED)
J
COLUMN TUBE
mm
y
GROUND STRIP
INSULATOR
3OF SO EQUIPPED)
• INSERT
3
Zd
PLASTIC (2)
STEERING TUBE
INSULATOR
60x19
Fig. 47—Jacket Tube Installation
7
g. With the unit at or near the full turn in either
direction, attempt to return the unit to the center by
applying a torque wrench at the steering gear cross
shaft. Hold the worm shaft until the cross shaft
torque builds up to 50 foot-pounds torque. Release
the worm shaft and maintain a constant steady pull
on the cross shaft (turning cross shaft slowly). If
the cross shaft torque does not drop to 25 foot-pounds
torque maximum as the piston passes through the
center, check for too much interior drag; binding
valve lever, binding valve spool, or cross shaft adjustment is too tight.
(6) With the unit under power, but without any
load, the torque required to rotate the worm shaft
through an included angle of 180 degrees (90 degrees either side of center) shall be 6 to 9 inchpounds. Disconnect the test equipment and the mounting fixture and install the unit in the vehicle.
Steering
Gear
the
Vehicle)
(Installation
on
(1) Install the steering tube rubber insulator,
plastic insert, upper steering tube and coupling pin
and the horn ground strap.
(2) Enter the steering gear assembly into the
engine compartment and through the opening in the
floor panel. Install the housing attaching bolts, flat
washers, swivel washers and nuts, but do not tighten. The swivel washer permits alignment of the housing to the dash.
(3) On Imperial Models inspect the jacket bearing
snap ring in the steering tube lower groove. Install a
new ring if the old ring will not fully seat in the
groove. Install the spacer washer, spring and tapered
spacer on top of the snap ring.
(4) On Chrysler and Imperial Models assemble the
horn ground strap (copper) to the jacket tube support
rubber insulator boot and install this assembly into
the lower end of the jacket tube (Fig. 47).
(5) Lubricate (powder lubricant) the end of the
steering gear column jacket support and insulator
boot to facilitate insulation and shde the jacket
tube and insulator boot assembly down against the
shoulder on the jacket tube support. Tighten the
clamp bolts securely.
N O T E : There must be at least y inch clearance between the bottom face of the jacket tube clamp and
the column support spanner nut to avoid metal to
metal contact.
16
(6) Install the jacket tube support bracket clamp
at the instrument panel. Tighten the clamp bolts to
15 foot-pounds torque.
(7) Connect the directional signal wires and the
horn wire at the connectors.
(8) On Imperial Models pry the steering column
tube up with a wedge shaped tool or screw driver
far enough to install the truarc ring in the column
tube upper groove next to the bearing. Make sure
the lock ring seats in the groove (Fig. 24).
IMPORTANT: This lock ring places the upper column
tube in the proper relation with the worm shaft
coupling pin.
(9) Install the stationary plate, bushings, horn
ring and attaching screws. Connect the horn wire at
the stationary plate and install the steering wheel
ornament.
(10) Tighten the jacket tube to the instrument
panel clamp screws. Tighten the screws to 50 inchpounds torque. Install the jacket tube cover.
(11) Position the directional switch, install the
attaching screws and the wire connections.
19-24
STEERING GEAR
(12) Install the directional switch lever.
(13) Install the steering wheel and steering wheel
nut, tighten the nut to 40 foot-pounds torque. Test
the operation of the cancelling lever.
(14) Install the horn blowing switch mounting
plate and the four attaching screws (Fig. 20).
(15) Install the horn blowing switch, insulators
and attaching screws (Fig. 19). Connect the horn
wire.
(16) Install the horn blowing actuator, the steering wheel cover and attaching screws.
(17) On Models TC-1, TC-2, TC-3, install the steering column and jacket tube as outlined in Part 1,
"Manual Steering Column Installation".
(18) Tighten the jacket tube to the instrument
panel bracket screws. Tighten the screws to 50 inchpounds torque.
(19) Install the steering column lower cover.
(20) Tighten the front upper and the lower gear
housing to the frame attaching bolts to 24 footpounds torque.
(21) Install a wedge over the rear bolt (Fig. 48)
between the housing and the frame so that the tapered surfaces match, wedge lightly into place and
tighten the three attaching bolts to 50 foot-pounds
torque.
Fig. 48—Steering Gear Mounting
(22) Install the steering gear arm, washer and
nut. Tighten to 120 foot-pounds torque.
(23) Install the steering center hnk, nut and cotter pin.
(24) Connect the pressure and the return hoses.
(25) Install the hydrauhc brake hne at the master
cyhnder and brake tee. Bleed the brake as necessary.
(26) Refill the reservoir. Expel all the air from
the system by turning the steering wheel several
times to the right and left.
(27) Connect the battery cable at the battery negative post.
Fig. 49—Slipper Type Power Steering Pump
STEERING GEAR
19-25
PART 3
POWER STEERING PUMP
The power steering pump is a belt-driven constant
displacement pump.
In operation (Fig. 49) the spring-loaded shppers
in the pump rotor are in contact with the eccentric,
inside diameter of the housing. As a rotor revolves,
the shppers force the oil from the inlet side of the
pump to the flow control valve. Orifices in the valve
permit a flow of approximately two gallons per minute to the gear before the valve moves to the right
to allow the excess to flow back to the inlet side
of the pump. Maximum pressure in the system is
limited by the pressure rehef valve. The valve opens
into the reservoir when the pressure exceeds the
maximum pressure specified.
1 2 . FLUID LEVEL
(1) Start the engine, turn the steering wheel back
and forth several times to expel the air from the system, then shut off the engine.
(2) Remove the filler cap and visually inspect the
oil level in the reservoir:
Engine Cold—Oil lever should be at the bottom of
filler neck.
Engine Hot—Oil level should be one-half way up
in fill neck.
If necessary, add only MoPar Power Steering
Fluid Part No. 2084329 to the required level. Do not
overfill.
13.
PRESSURE TEST
(1) Measure the pump belt tension. See "Cooling
System".
(2) Disconnect the pump to the steering gear
pressure hose at the power steering pump. Connect
Fig. 50—Pressure Test (Typical)
the test hose Tool C-3388 with the proper adapter
between the power steering pump and pressure gauge
Tool C-3309B with a shut-off valve between the
pressure gauge and the pressure hose that you disconnected from the pump (Fig. 50). Make sure all
connections are tight and that the shut-off valve is
fully opened.
NOTE: The pressure gauge must be installed between
the pump and the shut-off valve, all connections must
be tight and the shut-off valve fully open.
(3) Remove the oil reservoir filler cap.
(4) Connect one lead of the tachometer to the
distributor terminal of coil and the other to a good
ground, start the engine and operate at 500 rpm
and fill the pump reservoir to the proper level.
(5) Expel all the air from the unit by turning the
steering wheel to the full right turn and back to the
full left turn several times and recheck oil level.
NOTE: To assist in heating the pump oil; slowly
turn the pressure gauge valve towards the closed
position until the gauge reads 400 psi and open fhe
valve fully when the oil temperature reaches 150
degrees F.
(6) With the engine operating at 500 rpm and no
steering effort applied, the oil temperature should be
between 150 and 170 degrees F. (measure with a
thermometer in the reservoir); the pressure gauge
should show a pressure of less than 100 psi. If the
pressure is higher, inspect the hoses and connections
for kinks and obstructions, or restrictions in the
steering gear.
(7) Increase the engine speed to 1000 rpm, then
slowly close the gauge shut-off valve. With the gauge
shut-off valve fully closed the pump pressure should
be as follows:
1000 to 1100 psi for Models TC-1, TC-2, TC-3;
1150 to 1300 psi for Models, TY-1.
CAUTION: Do not close the valve for more than a few
seconds, as this would abnormally increase the oil
temperature and cause undue oil pump wear.
a. If the pressure increases to more than 1100 psi
for the Chrysler Models and 1300 psi for the Imperial Models, the rehef valve is faulty or the pump
is equipped with the wrong rehef valve.
b. If the pressure is less than 1000 psi for the
Chrysler Models and 1150 psi for the Imperial Models, the rehef valve is faulty. Replace the rehef valve
with the correct rehef valve known to be in working
order and repeat the test in step (7). If the pressures
19-26
STEERING GEAR
are still below specifications, disassemble the pump
and test the low control valve for evidence of fouling or shpper spring breakage,
c. With the gauge shut-off valve fully open, operate steering unit through another cycle, this time
holding the unit at the extreme travel in each direction while watching the oil pressure gauge. The
gauge reading should be equal in each direction. If
not, it indicates excessive internal leakage in the
steering gear unit. Do not hold the worm shaft at
either extreme position for more than a few seconds.
d. If the pressures are within the ranges specified;
make a flow test as outlined in "Pump Flow Test".
1 4 . PUMP F L O W TEST
(1) Inspect the pump belt tension. See "Cooling
System".
(2) Disconnect the pump pressure hose at the
power steering pump and connect the test hose adapter tube and pressure gauge Tool C-3309B with the
proper adapters between the power steering pump
and the hose disconnected from the pump (Fig. 51).
NOTE: The pressure gauge must be installed between
the pump and the shut-off valve; all connections must
be tight and the shut-off valve fully open.
(3) Disconnect the return hose at the power steering pump.
NOTE: Remove the return hose screen; be sure
screen is cleaned and reinstalled after the tests.
(4) Install the flow checking gauge set Tool C3885 with the special hose between the power steering pump and the return hose disconnected from the
pump (Fig. 51).
CAUTION: The fitting that has the restriction, and
the arrow on the "tee" connector must be towards the
power steering pump. Use passenger car orifice only.
(5) Remove the oil reservoir cover and fill the reservoir to the proper level.
(6) Start the engine and operate at 500 engine rpm.
(7) Expel all the air from the unit by turning the
steering wheel to the full right turn and back to the
full left turn several times and recheck oil level.
(8) Increase the engine speed 1000 to 1200 rpm
and no steering effort applied, oil temperature between 150 and 170 degrees F. (Check the thermometer in the reservoir); the flow pressure gauge in the
pump return line should read between 16 and 25
psi. If correct measuring orifice is used for test, and
flow pressure gauge registers less than 16 psi inspect
to see if the restrictor is installed properly, if O.K.,
dirt may be restricting control valve movement or
blocking the orifice or flow valve spring may be
Fig. 51—Flow Test Gauge Connections (Typical)
weak. If the return pressure is greater than 25 psi,
the flow valve may be stuck in the closed position.
(9) Decrease the engine speed to 500 rpm, then
slowly turn the pressure gauge shut-off valve towards
the closed position to obtain 850 psi on the pressure
gauge at the pump discharge without fully closing
the shut-off valve.
CAUTION: Do not close the valve completely.
With the above value registered on the pressure
gauge, the flow measuring gauge should show a minimum pressure of 10 psi.
If the flow pressure reading is less than 10 psi; inspect the flow valve operation for sticking: if the
valve is operating satisfactorily the pump is worn
and should be replaced.
If the flow pressure reading is 10 psi or greater,
and the rehef valve is operating properly; inspect the
steering gear for malfunction.
When removing the test equipment, make sure the
pressure and return hoses are reinstalled properly.
There should be no interference of the hoses with the
components attached to the fender shield or the dash
panel. The return hose screen should be clean and reinstalled in the end of the return hose before reinstalling the return hose.
1 5 . P O W E R STEERING
PUMP
(1) Loosen the pump lower mounting bolt and re-
STEERING GEAR
19-27
Fig. 52—Removing the Pump Pulley
move the belt from the pulley.
(2) Place a container under the pump and disconnect both hoses at the pump. Cap ends of the hoses
and secure the hoses high enough to prevent loss of
fluid.
(3) Remove the bolts attaching the pump bracket
to the engine and remove the pump assembly.
Fig. 54—Installing the Pump Oil
Seal (Typical)
pulley hub.
b. Position the screw shaft and nut with the flange
section inside the half-collar.
c. Engage the other half-collar under the pulley
hub and over the flange of the screw shaft nut and
Off Seal
Replacement
install the retainer sleeve over both half-collars.
(1) Clean the exterior of the pump before disassemd. Hold the nut from turning and turn the screw
bly.
inward to remove the pulley.
(6) Remove pump shaft oil seal by threading Tool
(2) Remove the filler cap and drain the reservoir. C-3783
far enough into seal to engage the metal por(3) Remove the brackets, reservoir screws, gasket tion of the seal (Fig. 53).
and "0" ring.
the puller center screw while holding the
(4) Using spacer washers between the front brack- toolTurning
body
will
the seal assembly from the pump.
et and the pump, reinstall the front bracket for use CAUTION: Theforce
pulley
of the shaft should be exas a holding fixture. Clamp the bracket in a vise (Fig. amined for sharp burrsend
or
corners
and smoothed with
52).
a
stone
or
fine
emery
cloth.
This
will prevent seal
(5) Remove the pulley with Tool C-3615 as follows: damage when the new seal is installed.
Not stone
a. Engage one half-collar under the flange of the or emery fhe area on the shaft that fheDo
seal lip contacts.
63x665
Fig. 53—Removing Pump
Shaft Oil Seal (Typical)
Fig. 55—Installing the Pump Pulley
19-28
STEERING GEAR
(7) Install the new seal with the hp of the seal toward the pump. Use Tool C-3782 to drive the seal
flush with the insert (Fig. 54).
(8) Support the pump body on the holding fixture,
Tool C-3643, with the tool dowel pins in the pump
bolt holes so that the pressure will be absorbed by
the lower end of the pump shaft (Fig. 55).
CAUTION: The pump must be supported in a manner
in which all pressing force will be applied to the
pump
will
shaft only: otherwise, the
body and rotor be
damaged.
(9) Install the pulley with a heavy duty arbor press.
Press on the pulley hub only until the hub is flush
with the end of the pump shaft.
(10) Lubricate the large "0" ring and the reservoir cap screw gasket and install both on the pump
body.
. (11) Tighten the reservoir and the pump brackets.
Tighten the screws to 16 foot-pounds torque.
(123) Install the steering pump and test belt adjustment as outlined under "Cooling System".
1 6 . P O W E R STEERING P U M P DISCHARGE
FITTING FERRULE REPLACEMENT
(1) Wipe away all dirt around the discharge fitting
and tighten the high pressure hose tube nut to 24 foot
pounds torque.
(2) Restart the engine and steer car from stop to
stop to build-up pressure.
If the discharge fitting is leaking, remove the high
pressure hose from the pump and examine the tubing
flare for nicks, scratches, or other damage. If the flare
or nut is damaged, replace the high pressure hose.
(3) Examine the pump housing in the discharge
Fig. 57—Pump
Cut-Away View
area to be sure that the housing has not been damaged
by cross-threading or over-tightening the flare nut. If
the housing is cracked or if the threads are damaged;
the pump must be replaced.
(4) Remove the pump from the vehicle.
(5) Clamp the pump in a vise with the discharge
opening in the down position, this will prevent any
chips from falling into the pump.
(6) Use a No. 4 screw-extractor (E-Z Out). Turn
the extractor into the ferrule (Fig. 56), then rock the
extractor slightly to remove the ferrule. Perform this
operation carefully so as not to damage the threads
on the housing.
(7) Clean out the discharge bore of any foreign
material (brass chips, dirt, etc.).
(8) Center the new ferrule with the tapered end
up in the housing bore. The ferrule is pressed into
place by reinstalling the high pressure hose and tightening the flare nut to 24 foot-pounds torque. Figure
57 is a cutaway view to show the ferrule properly
seated in the housing.
CAUTION: Be sure that the ferrule is centered in the
housing bore before installing the high pressure
hose.
17. FLOW CONTROL
Removal
Fig. 56—Installing the Ferrule Extractor
VALVE
(1) With the pump reservoir removed, remove one
of the flow control valve end plug retaining rings and
end plug (Fig. 58).
STEERING GEAR 19-29
Fig. 58—Removing Flow Control Valve Retaining ling
(2) Depress the control valve against spring pressure and allow it to spring back. The valve should
pop out of the bore to a point where it can be removed. If the valve should stick, do not force it, but
repeat the spring back procedure several times. Gum
deposits will cause the control valve to stick in one
position and it will be necessary to break the valve
free by light tapping and repeat operation (2).
NOTE: Inspect the flow control valve and valve bore.
If fhe valve or valve bore in pump body are badly
scored, replace fhe pump assembly less pulley and
reservoir.
If the control valve and bore were fouled by gumming, foreign material, or burrs, the valve and valve
bore should be thoroughly cleaned and lushed and
reassembled.
Fig. 59—Center Punch Marks on Pump Body,
Spanner Nut and Front insert
(8) Install puley, (Fig. 55).
(9) Install a new pump body "0" ring, new reservoir gasket and reservoir and brackets.
1 8 . SLIPPER SPRING
REPLACEMENT
(1) Remove the bracket and reservoir.
(2) Remove the pump pulley (Fig. 52).
(3) Use a center punch to mark the position of
the spanner nut and front insert in the pump housing (Fig. 59), to insure that the front insert and spanner nut are returned to the exact same position at
reassembly.
Installation
(1) Install the control valve spring, seating the
spring in the spring socket.
(2) Remove any burrs with a fine hone or crocus
cloth but Do Not round the valve land corners.
(3) Lubricate with 2084329 power steering fluid
and install the control valve over the control valve
spring and into the bore. When all valve lands have
cleared the retaining ring groove area, work the
control valve back and forth against spring pressure
until the valve operates smooth and freely.
(4) Install a new " 0 " ring on the end plug.
(5) Lubricate the end plug and "0" ring and install
the end plug with the machined projection out.
(6) Install the plug retainer ring with the sharp
edge of ring up.
(7) Install the rehef valve.
Fig. 60—Removing the Spanner Nut
19-30
STEERING GEAR
Fig. 63—Installing the Slipper Springs (Typical)
63x675
Fig. 61—Removing the Shaft, Rotor and Front Insert
(4) Use a VA inch drift to loosen and remove the
spanner nut (Fig. 60).
(5) Support the pump housing so that the front insert is clear and use a smooth Vi inch diameter bar
(Fig. 81), press the shaft, rotor and front insert out
of the pump housing.
CAUTION: Be careful not to damage the pump rear
bearing.
(6) Examine the parts for broken edges or deep
scoring, especially on the rotor and shppers. If either
of these conditions are present, then the pump assembly less pulley and reservoir must be replaced.
Small nicks or burrs may be smoothed with a fine
hone.
NOTE: The cam insert has two machined notches
(one large and one small) on the inside surface; these
are not to be interpreted as deep scoring.
Fig. 62—Slipper Retainer Wire Retainer Tool
Installed on Rotor
(7) Smooth off burrs or corners on the pulley end
of the pump shaft, this will prevent shaft oil seal
damage when a new seal is installed.
CAUTION: Do not stone or emery the area on the
shaft that the seal lip contacts.
(8) If all parts are in a serviceable condition, discard all eight slipper springs even if they appear to
be in good condition.
(9) Thoroughly flush and clean all parts with clean
solvent.
NOTE: It is essential that cleanliness be observed
throughout the pump assembly.
(10) Using a piece of soft steel wire 25 inches long,
make three turns around the center of the rotor and
fasten the wire as shown in Figure 62. Bend the ends
of the wire towards the pulley end of shaft. Do not
make the wire coils too tight or the wire will be difficult to remove.
CAUTION: Use care when handling the rotor and
shaft since the corners of the rotor are extremely
sharp and must remain sharp for
pump operation. The oil seal and bearing surfaces of the shaft
must remain free of any nicks or burrs.
good
Fig. 64—Slippers Installed in Pump Rotor
STEERING GEAR
19-31
REAR INSERT
/
SUPPER S P R I N G S ( 8 )
WASHER
TOOL
WIRE T O O L ' S
Fig. 65—Slippers
and Spring installed
63x679
(11) Use an ordinary wood pencil with the point
broken to install the new springs. Enter the blunt
tapered end of the pencil in the spring and snap the
springs into the pockets in the rotor by turning the
pencil clockwise (Fig. 63). Install the springs and
shppers in one rotor slot at a time. Remove the pencil from the spring with a counter-clockwise rotation.
Either end of the spring may be inserted into the
rotor pocket.
NOTE: Make sure the proper springs are installed.
The springs for fhe .96 pump (small) are not interchangeable with fhe springs for the 1.2 pump (large).
(12) Install each shpper by sliding the slipper
between the two springs and the wire tool so that the
ends are flush with the rotor. The notched portion
of the shpper must be installed, as shown in Figure
64.
'^T^^^smm-
*1
63x683
Fig. 67—Installing the Shaft and Roto. Assembly
N O T E : Inspect the springs to make sure they are in
the pockets and in an upright position under the slipper, (Fig. 65).
(13) Using a washer of the dimensions shown in
Figure 66 drop it over the pulley end of the shaft.
This washer is used to keep the shppers flush with
the end of the rotor.
N O T E : It is important that fhe slippers remain flush
with the end of the rotor throughout the assembly
operation.
(14) Insert the shaft and rotor assembly with flat
washer tool and slipper retaining tool into the pump
cam insert so that the shppers and rotor are inside
the cam with the end of the shaft resting against the
back face in the housing (Fig. 67).
CAUTION: Do Not attempt to insert the pump shaft
into the bearing at this time.
(15) Hold the washer against the rotor with a
screw driver while removing the wire retaining tool,
making sure that the shppers remain flush with the
end of the rotor.
(16) Line the pump shaft with the lower bearing
and push the shaft, rotor and shppers all the way into
the housing until the rotor is flush with the end of the
cam insert.
N O T E : The slipper ends may hang up on fhe center
openings in the cam insert. If this should occur, rotate
the shaft while installing will overcome this condition.
LARGE P U M P
(1.2 CU. IN. DISPLACEMENT)
63x680
Fig. 66—Slipper Retainer Washer Tool Dimensions
1.2 Pump
(17) Remove the special flat washer. Make sure
that the springs are in place by rotating the pump
shaft and looking through the notch in each slipper.
(18) Lubricate the rotor and shppers with clean
power steering fluid and rotate the shaft to make
sure the shppers do not bend.
(19) Replace the shaft seal and "0" ring seal on
19-32
STEERING GEAR
Fig. 68—Pressing the Front Insert into Pump Housing
the front insert. Lubricate the shaft seal, "0" ring
and shaft with power steering fluid.
(20) After making sure the inner face on the front
insert is smooth and free of burrs, place the insert
assembly on the shaft with care so that the shaft seal
is not damaged by the end of the shaft.
(21) Support the pump housing in an arbor press,
and using a VA inch socket with Vz inch drive, ahgn
the center punch marks on the front insert and the
pump body, and press the insert into the pump hous-
Fig. 69—Loosening the Pump Bracket Mounting Screws
Fig. 70—Pump Belt Adjustment
ing. (Fig. 68).
(22) Install the spanner nut and tighten to the exact
original position in the housing as indicated by the
pin punch marks placed on the pump body and spanner nut at disassembly.
(23) Install the flow control valve as outlined under
"Flow Control Valve Installation".
(24) Install the pump pulley (Fig. 55).
(25) Install a new "0" ring on the pump body and
install the reservoir and pump brackets.
Fig. 71—Pump Bracket and Rubber Stop
STEERING GEAR
P o w e r Steering
Pump
(Installation in the
Vehicle}
(1) Position the pump on the engine and install the
attaching bolts.
(2) Install the drive belts and adjust. See Paragraph "Belt Adjustment".
(3) Connect the pressure and return hoses.
(4) Fill the pump reservoir with power steering
fluid MoPar Part No. 2084329.
(5) Start the engine, turn the steering wheel all
the way to the left and back all the way to the right
several times to expel the air from the system, then
turn off the ignition switch to stop the engine and
recheck the fluid in the reservoir.
19-33
ing bolts (Fig. 69).
(2) Install Tool C-3832 over the edge of the mounting bracket as close as possible to the outer edge of
bracket and insert torque wrench drive in square
hole of tool (Fig. 70).
(3) Tighten the pump belt until you get a reading
of 45 foot-pounds on the torque wrench.
(4) While holding the tension with torque wrench,
tighten the bracket mounting bolt nuts enough to
hold the adjustment, then use torque wrench to 30
foot-pounds torque.
When the belt is properly adjusted and normal
pump pressures are developed, the pump mounting
bracket will be resting against the rubber stop in
the adjustment bracket (Fig. 71).
1 9 . BELT ADJUSTMENT
(1) Losen the adjustment bracket to engine mount-
SERVICE D I A G N O S I S
MANUAL
Condition
20.
Hard Steering
21.
Pull to One Side
(Tendency of the
Vehicle to veer in
one direction only)
22.
Wheel Tramp
(Excessive Vertical
Motion of Wheels)
STEERING
Possible Cause
Correction
(a) Inflate the tires to recommended
(a) Low or uneven tire pressure.
pressures.
(b) Insufficient lubricant in the steering (b) Lubricate as necessary.
gear housing or in steering linkage.
(c) Steering gear shaft adjusted too tight. (c) Adjust according to instructions.
(d) Align the wheels. See "Front Sus(d) Front wheels out of line.
pension".
(e) See "Steering Gear Alignment".
(e) Steering column misaligned.
(a) Inflate the tires to recommended
(a) Incorrect tire pressure.
pressures.
(b)
See "Front Wheel Bearing Adjust(b) Wheel bearings improperly adjusted.
ment".
(c) Inspect for weak, or broken brake
(c) Dragging brakes.
shoe spring, binding pedal.
(d) Improper caster and camber.
(d) See "Front Wheel Alignment".
(e) Incorrect toe-in.
(e) See "Front Wheel Alignment".
(f) Grease, dirt, oil or brake fluid on brake (f) Inspect, replace and adjust as
linings.
necessary.
(g) Front and rear wheels out of alignment. (g) Align the front wheels. See "Front
Suspension".
(h) Broken or sagging rear springs.
(h) Replace the rear springs.
(i) Replace the parts necessary.
(i) Bent suspension parts.
(a) Inflate the tires to recommended
pressures.
(a) Incorrect tire pressure.
(b)
Balance as necessary. See "Wheels
(b) Improper balance of wheels, tires and
and
Tires".
brake drums.
19-34
STEERING GEAR
SERVICE D I A G N O S I S — ( C o n t i n u e d )
MANUAL
Condition
STEERING
Possible Cause
Correction
(c) Loose tie rod ends or steering
connections.
(d) Worn or inoperative shock absorbers.
23. Excessive Play or
Looseness i n the
Steering Wheel
(c) Inspect and repair as necessary.
(d) Replace the shock absorbers as
necessary.
(a) Steering gear shaft adjusted too loose (a) Replace worn parts and adjust
according to instructions.
or badly worn.
(b)
Replace worn parts. See "Front
•(b) Steering linkage loose or worn.
Wheel Alignment".
(c) Adjust according to instructions.
(c) Front wheel bearings improperly
adjusted.
(d) Inspect for damage to the gear
(d) Steering arm loose on steering gear
shaft and steering arm, replace
parts
as necessary.
shaft.
(e) Tighten the attaching bolts to 50
(e) Steering gear housing attaching bolts
foot-pounds torque.
loose.
(f) Tighten according to torque
(f) Steering arms loose at steering
specifications.
knuckles.
(g)
Replace
the ball joints as neces(g) Worn ball joints.
sary. See "Front Suspension".
P O W E R STEERING
24. Hard Steering
(a) Tires not properly inflated.
(b) Low oil level in pump reservoir (usually
accompanied by pump noise).
(c) Loose pump belt.
(d) Improper caster and camber.
(e) Faulty pump—power steering output
low.
(a) Inflate the tires to recommended
pressures.
(b) See "Fluid Level", Power Steering
Pump.
(c) See "Belt Adjustment".
(d) See "Front Wheel Alignment".
Front Suspension Section.
(e) Perform the "Pump Pressure and
Flow Tests". NOTE: When the
power steering pump fails to
give proper steering assist, the
trouble is usually caused by fouling of the flow control valve causing it to stick in the open or "by
pass" position. This fouling can
be caused by gum deposits, pieces
of broken shpper springs, burrs,
or foreign material (pieces of rubber, dirt or maching chips). If no
fouling of the flow control valve is
evident, or if the flow control valve
contains pieces of coiled wire
(broken slipper spring), the pump
should be disassembled for possible slipper spring replacement.
STEERING GEAR
19-35
SERVICE D I A G N O S I S — ( C o n t i n u e d )
POWER
Condition
STEERING
Possible Cause
Correction
(f) Repair and lubricate as necessary.
(g) Adjust or repair as follows:
1. See "Gear Shaft Adjustment".
2. Remove steering gear, repair as
necessary.
3. Inspect for leakage at the lower
sector shaft oil seal; the sector
shaft cover "0".
4. Remove the steering gear and
4. Excessive internal leakage.
repair as necessary.
25. Poor Recovery from (a) Tires not properly inflated.
(a) Inflate the tires to recommended
Turns
pressures.
(b)
Repair and lubricate as necessary.
(b) Steering hnkage binding.
(c) See "Front Wheel Alignment",
Front Suspension Section.
(c) Improper wheel alignment.
(d)
Remove
the jacket tube and re(d) Damaged or faulty steering tube
place
bearings.
bearing.
(e) See "Installation of Steering
(e) Steering wheel column jacket and
Gear".
steering nut improperly aligned.
(f)
Adjust or repair as follows:
ff) Steering gear malfunctions.
1. See "Gear Shaft Adjustment".
1. Improper gear shaft adjustment.
2.
Remove the steering gear, disas2. Column support spanner nut loose.
semble, inspect and reassemble as
outlined in this section.
3.
Remove the steering gear and
3. Faulty or damaged valve lever.
repair as necessary.
4. Remove the steering gear, dis4. Improper worm thrust bearing
assemble, inspect and reassemble.
adjustment.
See "Center Bearing Preload", Assembly of Power Train.
5. See "Steering Gear Removal,
5. Faulty or damaged cylinder head
Disassembly and Inspection", reworm seal ring or faulty worm piston
place parts as necessary. See "Disring.
assembly and Assembly of Power
Train".
6. Burrs or nicks in the reaction ring
6. Remove the steering gear and
repair as necessary.
grooves in the cylinder head or column
support.
7. Remove the steering gear, dis7. Dirt or chips in the steering gear
assemble completely, clean in a
unit.
clean solvent, inspect and make
repairs as necessary.
8. Replace the worm and piston as8. Rough or catchy worm in the piston
assembly.
sembly. See "Steering Gear Removal, Disassembly, Inspection and
Reassembly".
(a) Inflate the tires to recommended
26. Leads to Either
(a) Tires not properly inflated.
pressures; See "Wheels and Tires".
Side
(f) Steering linkage binding.
(g) Steering gear malfunctions.
1. Gear shaft adjustment too tight.
2. Faulty or damaged valve lever.
3. External leakage.
19-36
STEERING GEAR
SERVICE
DIAGNOSIS—(Continued)
POWER
Condition
Possible Cause
28. Lack of Assist
1. (One Direction)
29. (Both Directions)
30. Temporary
Increases in Effort
When Turning
Steering Wheel
to the Right or
Left
Improper wheel ahgnment.
Correction
(b) See "Front Suspension, Front
Wheel Ahgnment".
(c) Valve body out of adjustment.
(c) If vehicle steers to the left, move
the steering valve housing down
on the steering housing. If vehicle
steers to the right, move the steering valve housing up on the steering housing.
(d) Valve lever damaged.
(d) Remove the steering gear and replace or repair as necessary.
(e) Column support spanner nut loose.
(e) Remove the steering gear and repair as necessary.
(a) Improper gear shaft adjustment.
(a)
See "Gear Shaft Adjustment".
(b) Column support spanner nut loose.
(b) Remove the steering gear, disassemble, inspect, and reassemble as
outhned in Group 19.
(c) Improper worm thrust bearing
(c) Remove the steering gear, disasadjustment.
semble, inspect and reassemble,
see "Center Bearing Preload Assembly of Power Train".
(d) Coupling loose on the worm shaft.
(d) Inspect the wormshaft splines for
wear.
(a). Oil leaking past worm shaft oil seal
(a) Remove the steering gear, disasring.
semble, inspect and replace the
parts as necessary.
(b) Broken or worn ring on worm piston. (b) See "Assembly of the Power
Train".
(c) Piston end plug loose.
(c) Replace the worm and piston assembly.
(d) Reaction seal missing.
(d) Remove the steering gear and repair as necessary.
(a) Pump belt shpping.
(a) See "Pump Belt Adjustment".
(b) Faulty pump—pump output low.
(b) Perform the "Pump Pressure and
Flow Tests", also refer to correction (e) in Diagnosis under "Hard
Steering".
(c) Broken or worn ring on worm piston. (c) See "Assembly of Power Train".
(d) Piston end plug loose.
(d) Replace the worm and piston assembly.
(e) Internal leakage in the steering gear (e) Replace the steering gear valve
valve body.
body assembly.
(a) Oil level low in pump reservoir.
(a) See "Fluid Level".
(b) Loose pump belts.
(b) See "Pump Belt Adjustment".
(c) Oil on pump belt.
(c) Replace the belt and adjust.
(d) Binding steering linkage.
(d) Lubricate and repair as necessary.
(e) Engine idle too slow.
(e) See "Fuel Specifications".
(f) Air in the system.
(f) Work the steering wheel from
right to left until the air is
expelled.
(b)
27. Excessive Steering
Wheel Free-Play
STEERING
STEERING GEAR
19-37
SERVICE D I A G N O S I S — ( C o n t i n u e d )
POWER
Condition
STEERING
Correction
Possible Cause
(g) See Diagnosis "Hard Steering" correction (e).
(h) Adjust and repair as outlined under "Hard Steering"—condition
and correction (g).
(a) Buzzing noise in neutral and stops when (a) Noisy pump, make pressure test
and repair as necessary. Damaged
the steering wheel is turned.
hydraulic lines or interference of
the hoses with components attached to the fender shield. Air
in system; work steering wheel
from right to left until the air is
expelled.
(b) Correct as follows:
(b) Chuckling noise. Causes as foUows:
1. See "Gear Shaft Adjustment".
1. Improper gear shaft adjustment.
2. Remove steering gear, disas2. Improper worm shaft thrust bearing
semble, inspect and reassemble.
adjustment.
See "Center Bearing Preload".
3. Coupling loose on the worm shaft.
3. Inspect worm shaft splines for
wear. Also inspect retaining pin
for tighteness.
(c)
Replace the back pressure valve
(c) Metallic clatter or tapping noise.
cushion.
(d) Knocking condition at the bracket stop (d) Rubber stop worn or missing from
when the engine is running.
pump bracket.
(e) Loose pump belt
(e) Belt not properly adjusted or worn
to the extent that belt tension cannot be properly adjusted.
(g) Faulty power steering pump.
(h) Gear malfunction.
31. Noises
P O W E R STEERING
32. Low Oil Pump
Pressure
PUMP
(a) Pump belt loose.
(b) Pump pulley loose.
(c) Oil level low in pump reservoir.
(d) Pressure rehef valve spring weak, or
relief valve stuck in open position.
(e) Flow control valve stuck.
(f) Worn pump rotor, slippers, or broken
and distorted springs.
(a) See "Pump Belt Adjustment".
(b) Replace the pulley, measure the
pump diameters as follows: Shaft
diameter .8120-.8125 Pulley inside
diameter .8095-.8105. If shaft is
damaged, replace pump.
(c) See "Fluid Level".
(d) Replace the relief valve and perform "Pump Pressure Test".
(e) Repair as necessary. Refer to
"Flow Control Valve Removal and
Installation" and Correction under
"Hard Steering".
(f) Repair as necessary. See "Hard
Steering" Correction (e).
19-38
STEERING GEAR
SERVICE
DIAGNOSIS—(Continued)
P O W E R STEERING PUMP
Condition
33.
High Pomp Pressure
34. Leaks
Possible Cause
(a) Wrong relief valve.
(b) Relief valve clogged with foreign
matter (dirt, metal chips, etc.).
(a) Reservoir over-filled. NOTE: Operating
the steering gear manually when the
engine is not running will cause the
steering gear to displace the fluid from
the steering gear housing which will
then be forced out of the pump filler
cap vent, giving a false indication of
fluid leakage.
(b) Pressure and return hose connections
and fittings.
(c) Reservoir to-pump-body "0" ring or
mounting screws.
(d) Pump shaft oil seal.
Correction
(a) Replace relief valve and perform
"Pump Pressure Test".
(b) Replace rehef valve and perform
"Pump Pressure Test".
(a) See "Fluid Level".
(b) Tighten all fittings, check hose for
deterioration: replace any faulty
hoses. If the discharge fitting is
leaking; See "Power Steering
Pump Discharge Fitting Ferrule
Replacement".
(c) Replace the reservoir "0" ring
and tighten reservoir mounting
screws.
(d) Replace oil seal.