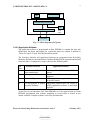
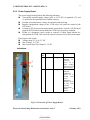
1
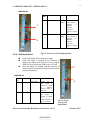
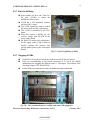
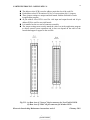
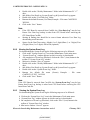
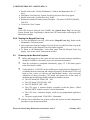
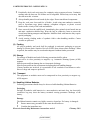
Hkkjr ljdkj &GOVERNMENT OF INDIA jsy ea=ky;& MINISTRY OF RAILWAYS ¼dk;kZy;hu iz;ksx gsrq½& (For official use only) ELECTRONIC INTERLOCKING MAINTENANCE INSTRUCTIONS SERIES – I MICROLOK II ELECTRONIC INTERLOCKING SYSTEM CAMTECH/S/PROJ/2013-14/HB-EI/1.0 FEBRUARY 2014 MAHARAJPUR, GWALIOR – 474 005 Click for Contents FOREWORD Railway signalling has come a long way from un-interlocked, mechanical and electro-mechanical interlocking. With the advent of electronics and computers, there have been revolutionary changes in the field of railway signalling. Electronic Interlocking system has several advantages over Electro-Mechanical or Conventional Panel Interlocking, such as reduced space requirements, self-diagnostic features, safety and reliability etc. Electronic Interlocking installations of different approved manufacturers have been commissioned on a number of stations on Indian Railways and are going to increase in future. CAMTECH has prepared this handbook on the subject to get the Signal personnel acquainted with the system. I am confident that this handbook apart from updating the knowledge will help the field staff in maintenance and troubleshooting of the system. CAMTECH Gwalior Date: 28.02.2014 A.R.TUPE Executive Director Click for Contents PREFACE Railway Signalling system plays a vital role in the movement of trains. Electronic Interlocking, an advanced signalling system used worldwide has been introduced on Indian Railways. At present the working installations of this system on Indian Railways are of different approved manufacturers. Although Electronic Interlocking system is supposed to give flawless performance, failure of this due to its safe shut down feature or any other reason may paralyze train movements. For ensuring the efficiency and reliability of the system, the staff installing or maintaining this should have fair knowledge about its components and working. Continuing its efforts in documentation and up-gradation of information on maintenance practices, CAMTECH has prepared this handbook. The topics have been covered to the point and concise, not going into details of circuitry. The purpose is to impart knowledge to Signal personnel about different manufacturer’s systems which will help them in installation, maintenance and troubleshooting of the same. Since technological up-gradation and learning is a continuous process, you may feel the need for some addition/modification in this handbook. If so, please feel free to write us. We shall highly appreciate your contribution. We are sincerely thankful to Shri P.S.Bhattacharyya, Dy.C.S.T.E./Con/VSKP/E.Co.Rly., maintenance personnel and approved firms who helped us in preparing this handbook. CAMTECH Gwalior Date: 28.02.2014 D.K.M.YADAV Jt. Director (S&T) Click for Contents CONTENTS Chapter Description Page No. Foreword Preface Contents Correction Slip Disclaimer IV VI VIII X XII 1.1 1.2 1.3 1.4 1.5 1.6 1.7 1.8 1.9 An Introduction to Electronic Interlocking System Introduction Advantages over conventional relay interlocking Frequently used terms in EI system System composition Working System Architecture EI systems of different available configuration RDSO approved firms Scope 1 1 1 2 7 7 7 8 8 2.1 2.2 2.3 2.4 2.5 2.6 2.7 2.8 2.9 2.10 2.11 2.12 2.13 2.14 2.15 MICROLOK II Electronic Interlocking System Introduction MLK II Hardware MLK II Software Configuration of MLK II Microlok II modes of operation Microlok II Development System 5.10 installation Microlok II Maintenance Tool Program Viewing the logged information Powering up the Microlok II system System Maintenance Preventive Maintenance Corrective Maintenance Precautions, Do’s & Don’ts References and Service information Abbreviations 9 9 17 18 18 19 19 23 25 26 27 28 28 31 31 1. 2. Click for Contents ISSUE OF CORRECTION SLIPS The correction slips to be issued in future for this handbook will be numbered as follows : CAMTECH/S/PROJ/2010-11/HB-EI-MIS/1.0/C.S. # XX date ---------------Where “XX” is the serial number of the concerned correction slip (starting from 01 onwards). CORRECTION SLIPS ISSUED Sr. No. of Date of issue Page No. and Item no. modified C.Slip Click for Contents Remarks DISCLAIMER It is clarified that the information given in this handbook does not supersede any existing provisions laid down in Signal Engineering Manual, Railway Board and RDSO publications. This document is not statutory and instructions given in it are for the purpose of guidance only. If at any point contradiction is observed, then Signal Engineering Manual, Railway Board/RDSO guidelines or Zonal Railway instructions may be followed. Click for Contents 1 CAMTECH/S/PROJ/2013-14/HB-EI-MIS/1. 0 Chapter I An Introduction to ELECTRONIC INTERLOCKING SYSTEM 1.1 Electronic Interlocking System Electronic Interlocking (EI) system is a microprocessor based interlocking equipment to read the yard and panel inputs; process them in a fail-safe manner as per selection table and generate required output. This system is the alternative to the conventional Relay Interlocking system (PI & RRI). On Indian Railways the Electronic Interlocking system shall comply with the RDSO specification No. RDSO/SPN/192/2005 (Draft). 1.2 Advantages over conventional relay interlocking 1.3 No relays are required for interlocking function. Only interface relays are required. Space requirement is reduced substantially. Reduction in power consumption. Reduction in wiring, interconnections and no. of fuses More reliability and safety due to less relays and accessories. Suitable for AC electrified area. No air –conditioning is required. Self-diagnostic features. Any failure in the system is located and enunciated. Faulty module can be immediately replaced by spare module hence the down time of installation is reduced. Less prone to short cut method, total system goes to shut down if even if wrong feed comes across. The conventional block and intermediate Block system circuit can be incorporated in the EI system circuitry. Alteration due to yard remodelling does not require any wiring change, only data of the CPU card is required to be changed. Hence, yard remodelling does not require large scale alterations and can be carried out in negligible time i.e. less manpower. Terms used in EI system CPU Central Processing Unit (Microprocessor or Microcontroller) RAM Random Access Memory (Used for vital data processing and event/error logs). EPROM Erasable Programmable Read Only Memory (Used for storing Executive and Application software). Electronic Interlocking Maintenance instructions series I Click for Contents February 2014 CAMTECH/S/PROJ/2013-14/HB-EI-MIS/1. 0 2 EEPROM Electrically Erasable Programmable Read Only Memory (Used for storing Executive and Application software) IC Integrated Circuit Hardware redundancy Availability of additional hardware identical to the normally working hardware for taking over at the time of failure. Software redundancy Availability of additional software identical to the normally working software for taking over at the time of failure. Warm standby In this arrangement only one system is in power on mode while the other is in power off mode. There is no communication between the two systems. Once powered on system is failed, the other system will be powered on after a time delay. Hot standby In this system the Main and standby systems are powered on. Both the systems take inputs, process it, communicate with each other and finally give one output. If any one of the two systems shuts down, there is no interruption in the output. The load is automatically taken over by the other equipment without any time delay. 1.4 System composition The EI System mainly comprises of two sections: Hardware and Software 1.4.1 Hardware The basic hardware structure of EI consists of the following: 1. CPU Chassis: Read Relay interface Card. Processor Card Relay Output Card 2. Control Cum Indication Panel (Operator’s panel) 3. Panel Processor 4. Maintenance Terminal 5. Object Controller. 1 to 4 above constitutes Central Interlocking Unit (CIU). Electronic Interlocking Maintenance instructions series I Click for Contents February 2014 CAMTECH/S/PROJ/2013-14/HB-EI-MIS/1. 0 3 1.4.1.1 Relay interface Card This card acts as an input interface to the system from the input relays. Total no. of inputs depends on yard layout. The input to the system comes from various fields relays like track circuits, point status relays, signal lamp proving relays, button inputs from the operator’s panel and read back of output relays. The inputs to the RI Cards consist of: Field inputs – ECRs, TPRs, NWKR/RWKR etc. Panel inputs – GNs (Signal buttons), UNs (Route buttons) etc. Read-back inputs – HRs, DRs, WNR/WRR etc. All the inputs are terminated on tag blocks, which in turn are connected to input cards. These cards read the conditions of inputs and pass the information to EI system. Opto-couplers are provided to isolate field optically from the system in input cards. Provision has been kept for testing of malfunctioning of the system in reading the status of the relays. 1.4.1.2 Processor Card This card is also called as CPU card of the system. It is provided with microprocessor chip consisting of RAM, ROM, EPROM, EEPROM memory ICs. EEPROMs or EPROMs are programmed with software required for executing the system commands. There are two types of EPROMs: System EPROMs Yard data EPROMs Executive software is loaded in the system EPROMs. System EPROMs are universal. Yard data EPROMs are loaded with Application software. These are yard specific. The function of this card is to execute the commands given by the user (Station Master/Panel Operator) on processing of relevant push buttons on the operating panel. The Processor card senses the operation of the panel through input cards. The output voltage generated by the CPU Card is connected to Relay Output Cards. It processes the input as per the program available in EPROMs and finally gives output if the conditions are favourable. 1.4.1.3 Relay Output Card RO card receives the output of CPU Card as input and gives output voltage to pick up relevant output relays through a tag block. Before connecting output voltage to output relays safety checks are done internally. Electronic Interlocking Maintenance instructions series I February 2014 Click for Contents 4 CAMTECH/S/PROJ/2013-14/HB-EI-MIS/1. 0 1.4.1.4 Control Cum Indication Panel (Operator’s panel) CCIP is provided with push buttons/control switches for individual operation of points, clearing of signals, releasing of crank handle interlocking/ground lever frame/gate controls, cancellation of routes and other functions including block signalling, auto signal, IB signal, adjacent yard layout, to facilitate indication or operation cum indication as per requirement. A control terminal with VDU in lieu of or in addition to conventional CCIP is provided as per requirement. It consists of: A latest PC, colour VDU monitor with minimum size of 17” (43 cm.) as specified by purchaser. A Key board and Mouse Suitable interface to continuously display the current position/status of various field equipment and track circuits. It is possible to display the complete yard layout including the section on the monitor. It also has facility for displaying a portion of the yard or section in an enlarged mode, if required. The control terminal works with 230 V +/-10%, 50 Hz AC power supply, for which a UPS of adequate capacity is provided. . The system have suitable interface like RS 232 or any other approved type to receive and process the information for displaying the status of field equipment on the control terminal. T A G I N P U T B L O C K S Inputs • • • C A R D S 50 Core cables Processor with memory chips EPROMS and RAM O U T P U T C A R D S Processor cards Field inputs – ECRs, TPRs, NWKRs, RWKRs etc. T A G B L O C K S Output relays HR,DR,WNR WRR CHKLR etc. Panel inputs – GN, UN, EWN etc. Read back inputs – HRs, DRs, WNRs, WPRs etc. Fig. 1.1 : Interconnection diagram of Input, Output & CPU cards in EI System 1.4.1.5 Panel processor A microprocessor based electronic device used as interface between control/indication panel and the EI system. This is also called as non-vital processor or panel processor. Electronic Interlocking Maintenance instructions series I Click for Contents February 2014 5 CAMTECH/S/PROJ/2013-14/HB-EI-MIS/1. 0 1.4.1.6 Maintenance Terminal (Data logger Maintainer’s terminal) Maintenance Terminal consists of a standard PC with printer. It performs the following operations: Display of the current status of points, signals controls etc. of the yard. Storage of minimum one month data or 10,00,000 events. Display of recorded events and Data transfer to floppy, CD, flash memory or any other storage media. Transfer of recorded events to external data logger. Result of the failure of any card/module in the system is clearly indicated. Control operation of yard functions is not possible from the maintenance terminal. In case of any module /card becoming faulty, this fact is displayed on MT with diagnostic facility to identify faulty module/card. 1.4.1.7 Object Controller Object Controller is a processor based system having similar architecture as of CIU. It works as a slave unit of Central Interlocking Unit (CIU) through duplicated serial communication and placed within 15 Km. radius from CIU. The OC drives the field gears (Points, Signals & Relays) and take feedback (Inputs) from various field gears. OC is normally placed in field locations. The medium of communication between CIU and OC is OFC provided on a ring basis. In case of communication failure between CIU and OC, all the outputs are brought to safe state whenever two consecutive telegrams are not received in stipulated time period. Occurrence of any error in any OC or hardware fault leading to unsafe condition immediately withdraws all output commands and removes the source supply to outputs. 1.4.2. Software The software of the system has two layers: Executive Software or System Software Application Software 1.4.2.1 Executive Software or System Software The Executive Software is programmed in system EPROMs. This Software defines what the system can do and how the various parts of the system operate together. It includes all start up and operational safety tests (including checking the Executive software itself) that are the parts of the processor for continual assurance of safety operation. Executive software pertains to ‘Principles of Interlocking’. Electronic Interlocking Maintenance instructions series I Click for Contents February 2014 6 CAMTECH/S/PROJ/2013-14/HB-EI-MIS/1. 0 OPTG VDU CONTROL PANEL SM’s Room ELECTRONIC INTERLOCKING SYSTEM MAINT VDU Relay Racks Relay Room FIELD GEARS Fig. 1.2 : Block diagram of EI System 1.4.2.2 Application Software The application software is programmed in Data EPROMs. It contains the logic that defines how the inputs and outputs for a particular station are related. It pertains to ‘Table of Control’ of yard. This shall be station specific. The Executive Software and Application Software are programmed into Read Only Memories (ROMs) by the manufacturer. Both the ROMs shall be separated and isolated from each other. A comparative study is shown in the following table: Sr. No. 1. 2. 3. 4. Executive software Application software Common to all EIs for the Yard specific. Different for different same manufacturer. station. Factory installed Can be installed at site by signal engineers. Performs all operations. Performs operations as per table of control of specific station. It is not possible to modify Application engineers have the facility to Executive Software. modify application software as and when required At the time of yard alteration work, Data EPROMs are to be replaced with new Data EPROMs programmed with software pertaining to revised table of control as per altered yard data. Compiler software is used for yard alteration. Electronic Interlocking Maintenance instructions series I Click for Contents February 2014 7 CAMTECH/S/PROJ/2013-14/HB-EI-MIS/1. 0 1.5. Working 1.6. Input cards give information to the CPU card via system bus. When any request is given by the panel operator (e.g. Signal and Route buttons pressed for taking OFF a signal) through operating panel, the information (Panel inputs along with field inputs) is processed at the Processor Card. The output of the Processor Card is taken on Relay Output/Relay Drive (RO) Card only when the conditions are safe. The output of RO Card is connected to the terminals of another tag block. The output voltages from the other side of the tag block pick up the relevant Output Relays. System Architecture One of the following architecture may be employed in the system: 1.6.1 Single hardware architecture with diverse software(s). 1.6.2 1.7. 1.7.1 In case of Warm standby the system starts functioning with a time delay of approximately 120 secs. of failure of main system without affecting train operation and safety. In case of hot standby system, train operation should not be affected. The fault, which affected the main processor/system, should not affect the hot standby processor/system. Two out of two hardware architecture with identical hardware and identical or diverse software. 1.6.3 In addition hot/warm standby processor(s)/ system may be provided with facility of automatic changeover. In addition, warm standby/hot standby processor(s) /system using 2 out of 2 hardware and software architecture may be provided with facility of automatic changeover. Two out of three hardware architecture with identical hardware and identical or diverse software. EI systems of different available configuration Single hardware with software redundancy (i) Single processor without any standby (ii) Single processor with standby (Two EIs connected in parallel) Electronic Interlocking Maintenance instructions series I Click for Contents February 2014 8 CAMTECH/S/PROJ/2013-14/HB-EI-MIS/1. 0 1.7.2 Dual hardware with hardware redundancy – 2 out of 2 system. (i) Dual hardware without standby (ii) Dual hardware with warm standby (iii) Dual hardware with hot standby (iv) Dual hardware with object controllers 1.7.3 Triple modular redundancy (TMR) – Hardware redundant – 2 out of 3 system (i)TMR with relay interface (ii) TMR with object controllers 1.8 RDSO Approved Firms At present the following firms are approved by RDSO for design, supply and installation of Electronic Interlocking Systems on Indian Railways: M/s Ansaldo STS Transportation Systems Pvt. Ltd., 35 SLV Complex, AVS Compound, 80 feet Road, 4th Block, Koramangala, Bangalore -560 034. M/s Invensys Rail Systems India Pvt. Ltd., 112 & 114, Raheja Chambers, No.12, Museum Road, Bangalore – 560 001. M/s GE Transportation Systems, AIFACS Building, 1, Rafi Marg, New Delhi – 110 001 M/s Medha Servo Devices Pvt. Ltd., P-4/5, IDA Nacharam, Hyderabad -500076. 1.9 Scope This handbook covers MICROLOK II Electronic Interlocking system of M/s Ansaldo to help the user in maintaining the system without going into circuitry details. Electronic Interlocking Maintenance instructions series I Click for Contents February 2014 9 CAMTECH/S/PROJ/2013-14/HB-EI-MIS/1. 0 Chapter II MICROLOK II ELECTRONIC INTERLOCKING SYSTEM 2.1 Introduction Microlok II is a microprocessor based electronic interlocking system developed by M/s US & S (P) Ltd. It is a Single Processor system with diverse (dual) software with extensive safety checks. 2.2 MLK II Hardware MLK II hardware consists of the following components: 2.2.1 Card File Slot No. 1 to 15 & 20 accommodate Non-Vital Input/Output or Vital Input or Vital Output boards. (Slot No. 20 is used to accommodate Coded System Interface Card or CSI Card for CTC. Slot No. 16 & 17 accommodate Power Supply Board. Slot 18 & 19 accommodate CPU board. 1 2 3 4 5 6 7 8 9 10 11 12 13 14 15 16 17 Power Supply Card 18 CPU Card 19 20 CSI Card Vital input, Vital output, non vital I/O cards Fig.2.1: Schematic diagram of MLK II Cardfile 2.2.2 CPU Board The CPU board is controlled by Motorola 68332 microprocessor and stores the Executive and Application software. It contains the central controlling logic and diagnostic monitoring for the Microlok II system, and provides five serial data ports to communicate with peripheral devices. Ports 1 and 2 (RS-485 type) – for communication with other MLK systems. Port 3 (RS-423/232 types) – for communication with non-vital control system such as operator’s PC/VDU Panel/CTC/Genesys. Electronic Interlocking Maintenance instructions series I Click for Contents February 2014 10 CAMTECH/S/PROJ/2013-14/HB-EI-MIS/1. 0 Port 4 (RS-232 type) – for communication with non-vital control system such as VDU panel/CTC/Genesys/Indication Panel. Port 5 (Debug port) (RS-232 type) - for communication with Maintenance PC for debugging. Indications and buttons are available on front side of the CPU card as shown in Fig. 2.2. 1 Fig. Ref Label Device Purpose 1,2 (None) 3 A,B,C,D,E 4-character alphanumeric displays Yellow LEDs 4 1,2,3,4,5,6,7,8 Red LEDs 5 ON LINE Green LED 6 VPP ON Yellow LED 7 RESET Green LED 8 RESET Momentary pushbutton 9 MENU L-R 10 MENU DOWN 11 ADJUST UPDOWN 12 ACTION ACCEPTREJECT 13 RS-232 DTE Diagnostic Link Connector 3-position (return-tocenter) toggle switch 3-position (return-tocenter) toggle switch 3-position (return-to center) toggle switch 3-position (returntocenter) toggle switch DB9, RS-232 Connector (DTE) On-site configuration programming menus and options. Reserved for serial link status. User-defined in application software When lit, indicates normal system operation (successful diagnostics). When lit, indicates FLASH +5V or +12V programming voltage enabled (via board jumper). When lit, indicates that the system is in reset mode. When pressed, resets the CPU. Also used to place the CPU in the reset mode. Used to search main program menu items shown on displays. 2 3 4 5 6 7 8 9 11 10 12 13 UP- Fig 2.2.: CPU PCB Electronic Interlocking Maintenance instructions series I Click for Contents Used to select main program menu items shown on displays. Used to cycle through configuration values to be selected with “ACTION” switch. Executes or cancels configuration value selected with “ADJUST” switch. Used for connection to Maintenance PC for System monitoring diagnosis. February 2014 11 CAMTECH/S/PROJ/2013-14/HB-EI-MIS/1. 0 2.2.3 Power Supply Board The power supply board performs the following functions: Converts the external supply voltage (9.8V to 16.2V DC) to regulated +12V and +5 needed for the operation of the cardfile circuitry. Provides an isolated source voltage for external contact sensing Supplies energisation voltage to the VCOR relay coil under the control of the CPU board. As long as CPU detect no internal/external system faults, it sends a 250 Hz check signal to PS PCB which in turn holds the VCOR relay in pick up condition. Failure of a diagnostic check results in removal of check signal thereby deenergisation of VCOR. This results in removal of power to all vital system output. Power input to the system Voltage range: 9.5 to 16.5 V DC Min. Voltage: 12 V DC Min. System Start-Up Voltage:11.5 V DC Indications Fig. Ref 1 Label Device Purpose 5V ON LED (green) 2 VCOR LED (green) When lit, indicates 5Voperating power on to other cardfile PCBs (If not lit refer to FigureWhen lit, indicates conditional power on to VCOR relay (CPU diagnostics normal). (If not lit refer “CPS CLEAR FUNCTION” details in Figure 1 2 Fig.2.3: Front view of Power Supply Board Electronic Interlocking Maintenance instructions series I Click for Contents February 2014 12 CAMTECH/S/PROJ/2013-14/HB-EI-MIS/1. 0 2.2.4 Non-Vital I /O Board The Non-Vital I/O board is designed to receive non-vital inputs (controls) and generate non-vital outputs (indications). Each PCB provides 32 inputs and 32 outputs through its rear 96 pin connector. Available in 12 V and 24 V DC applications. Non-vital inputs – Panel push buttons and keys. Non-vital outputs – Panel indication LEDs, counters and buzzers. LEDs are available on the front panel to show the status of non-vital input/output. Indications 1 Fig. Ref 1 Label Device Purpose INPUTS 1-32 Green LEDs 2 OUTPUTS (SWITCHED TO N12) 1-32 Yellow LEDs Monitors states of non-vital inputs 132. When LED is lit, respective input is on. Monitors states of non-vital outputs 132. When LED is lit, respective output is on. 2 Fig.2.4: Front view of Non-Vital I/O Board 2.2.5 Vital Output Board Each Vital Output PCB is having 16 independent 24 V outputs. Each output is assigned to the final relay which is driving the outdoor signalling gears such as HR, DR in case of signal & WNR, WRR in case of points. Since the output boards are driving outdoor gears, they are continuously monitored by the CPU and any abnormal voltage present in the output will lead to system reset / shutdown to ensure safety. Electronic Interlocking Maintenance instructions series I Click for Contents February 2014 13 CAMTECH/S/PROJ/2013-14/HB-EI-MIS/1. 0 Indications Fig. Ref. Label Device Purpose 1 OUT1-OUT8 Yellow LEDs 2 OUT9-OUT16 Yellow LEDs Monitor state of vital outputs 1 through 8. When lit, indicates respective output is turned on. Monitor state of vital outputs 9 through 16. When lit, indicates respective output is turned on. 1 2 2.2.6 Vital Input Board Fig.2.5: Front view of Vital Output Board Each Vital Output PCB is having 16 inputs. Each vital input is assigned to the detection of outdoor gear status such as ECRs in case of signal, WKR in case of points and TPR in case of Track. Since the inputs are dealing with the detection of outdoor gears they normally configured with double cutting arrangement. 1 Indications Fig. Ref 1 Label Device Purpose IN1 -IN8 Green LEDs 2 IN9 -IN16 Green LEDs Monitor state of vital inputs 1 through 8. When lit, indicates respective input is turned on. Monitor state of vital inputs 9 through 16. When lit, indicatesrespective input is turned on. Electronic Interlocking Maintenance instructions series I Click for Contents 2 Fig.2.6: Front view of Vital Input Board February 2014 14 CAMTECH/S/PROJ/2013-14/HB-EI-MIS/1. 0 2.2.7 Vital Cut-Off Relay Each cardfile will have one Vital Cutoff relay (VCOR) to ensure the healthiness of the system. VCOR has 6 F/B dependent contacts each rated for 3 Amps. The VCOR contacts are used to control the power to all card file vital outputs. The VCOR is controlled by the CPU board. When the system is healthy the coil receives voltage from PS PCB on the power supply board. On failure of a safety-critical diagnostic, the DC supply to the VCOR is removed thereby opening the contacts that provide battery power to the vital output boards. Fig.2.7: Vital Cut-Off Relay (VCOR) 2.2.7 Plugging of PCBs Each PCB is having 96 pin connector on the lower half of the rear portion. There are corresponding 96 pin female connectors (1 to 20) in the cardfile motherboard for plugging the different cards i.e Vital Input, Vital Output, Nonvital Input/Output, CPU and PS PCBs. All the PCBs can communicate with one another through motherboard. Fig. 2.8 : View of motherboard of a cardfile with some PCBs plugged in Electronic Interlocking Maintenance instructions series I Click for Contents February 2014 15 CAMTECH/S/PROJ/2013-14/HB-EI-MIS/1. 0 2.2.9 Keying plugs Each PCB requires 6 Nos. of keying plug adjacent to the 96 pin connector according to type of the board and corresponding female connectors on the motherboard slots. The purpose of the keying plug is to avoid insertion of wrong type of board in card file slot and it is similar to the code pin of a relay. Keying plug Keying plug sockets (Female connectors) Fig.2.9: Keying plugs on PCB and corresponding female connectors on motherboard 2.2.10 Connector Assembly Connector assemblies are used to connect MLK II cards with relays, relay contacts and panel with the help of pre-wired cables. Each connector assembly consists of connector receptacle (i.e. cover), guide pair to fix the connector on the card file and crimp contacts. The 48 pin connector assembly is used for Vital input and Output boards. The 96 pin connector assembly is used for Non-Vital I/O boards. 48 pin connector assembly is used for CPU and PS PCB. These connector assemblies are on top half potion on the back side of the PCB. A corresponding female connector is provided in the motherboard according to the type of card i.e. vital, non-vital, CPU or PS PCB. 2.2.11 Address Select PCB In order to allow communications between the CPU board and the other boards in the cardfile, each board must have its bus address configured in the hardware. Electronic Interlocking Maintenance instructions series I Click for Contents February 2014 16 CAMTECH/S/PROJ/2013-14/HB-EI-MIS/1. 0 The address select PCB is used to address particular slot of the card file. Each address select PCB consists of 6 Nos. of two position (0 & 1) jumpers. These jumper settings are unique and shall match with the definition of cards in application program. 48 pin address select PCB is used for vital input and output boards and 96 pin address PCB is used for non-vital boards. It is installed on the rear end of connector assembly. The jumper settings must exactly match the values set in the application program to ensure normal system operation and it does not depend on the order of the boards that happen to appear in the card file. Fig.2.11: (a) Rear view of “Narrow” 96 pin connector-for Non-Vital I/O PCBs (b) Rear view of “Wide” 48 pin connector-for all other PCBs Electronic Interlocking Maintenance instructions series I Click for Contents February 2014 17 CAMTECH/S/PROJ/2013-14/HB-EI-MIS/1. 0 2.2.12 EEPROM PCB EEPROM PCB which is provided on rear side of the CPU connector to configure various serial communication ports (see fig.2.10). Keying plugs are provided in the cardfile to ensure coding to each type of cards. Jumper settings EEPROM PCB Fig.2.10: Rear view of Cardfile - Address Select PCBs 2.3 MLK II Software Microlok II software components mainly consist of the Executive Software and the Application Software. Executive Software is actually the Microlok operating system software, while the application software is specific user written software. 2.3.1 Executive Software The US & S developed Executive Software (Operating system) is standard for all Microlok II systems. It is responsible for overall vital monitoring and control of the system. 2.3.2 Application Software The vital application program software is developed using US & S developed maintenance tools program which is also used to input Executive software version upgrades. In addition to this, site-specific configuration data is stored in the Card-file mounted EEPROM, and can be loaded using the CPU board front panel toggle switches and LED displays. This data can also be loaded using the Maintenance tools program on a laptop PC which is connected to the CPU board front panel serial port. Electronic Interlocking Maintenance instructions series I Click for Contents February 2014 18 CAMTECH/S/PROJ/2013-14/HB-EI-MIS/1. 0 2.4 Configuration of MLK-II The configuration of single MLK-II with VDU, Maintenance PC is shown in the Fig no. 2.12. OP VDU To Adjacent Station SM’s Room CONTROL PANEL To Adjacent Station P1 MLK-II UNIT -A P5 OPVDU Link NV P4 MLK- II UNIT - B P4 P3 P3 P5 Maint. VDI link NV Diagnostic link MAINT. VDU Double Deck Terminals (Phoenix Terminals) Relay Rack Cable Termination Rack Relay Room Fig.2.12: Configuration of MLK II 2.5 Microlok II modes of operation The Microlok II CPU board has the following four basic modes of operation. 2.5.1 On-line mode -It is the normal mode of CPU operation. This can be confirmed by observing the two 4 character displays and the LED indicators at top of the CPU board front panel. In “On-line mode” The phrase MICROLOK II scrolls across the upper display The application program name scrolls across the lower display and The ON LINE LED on the CPU board front panel illuminates. 2.5.2 CPS down mode - The CPU assumes the “CPS” (Conditional Power Supply) down mode whenever the processor detects the failure of an internal diagnostic check. The system is in “CPS down mode” can be confirmed by VCOR LED on the power supply front panel is OFF when the power supply board drops the VCOR relay. 2.5.3 Configuration mode - The system assumes the “CONFIGURATION mode” whenever a Maintenance PC is connected to the Microlok II CPU board diagnostic port and the configuration section of the Microlok II Maintenance Tools program is accessed. In this mode, application logic is not processed and also all control functions are inactive. Electronic Interlocking Maintenance instructions series I Click for Contents February 2014 19 CAMTECH/S/PROJ/2013-14/HB-EI-MIS/1. 0 2.5.4 Reset mode - The primary purpose of the “RESET mode” is to reset the VCOR relay and the Microlok II system software when the occurrence of a CPS trip. RESET LED on the CPU board front panel – ON when reset push button is pressed, OFF when the button is released. (i) To enter the Reset mode from CPU front panel (ii) Press and release the "RESET" push button on the CPU board front panel. Quickly operate any one of the four front panel toggle switches. Hold the switch in the toggled position. Release the toggle switch that was operated in step 2 after the CPU board 4character displays shows RES/MENU. To access this function Toggle the MENU UP-DOWN switch to the "DOWN" position. Toggle the MENU L-R switch to the "Right" position. Toggle the MENU L-R switch to the "Right" position with CLR / CPS shown on the CPU board displays, Toggle the Action ACCEPT-REJECT switch to the "ACCEPT" position. This action resets the CPU software & VCOR relay and returns the CPU to the on-line mode. 2.6 MICROLOK II Development System 5.10 installation The MICROLOK II Development System 5.10 is installed in the Maintenance PC by loading a CD containing the Development System installation software and following simple instructions. 2.7 Microlok II Maintenance Tools Program Maintenance personnel and application engineers can perform a wide range of Microlok II system maintenance, configuration and diagnostic functions using the tools provided in this Maintenance tools program. Following tasks can be performed with this program: Viewing the current status of the Microlok II equipment and related systems. Reviewing stored system event and error data. Reconfiguring and resetting the system when necessary. The Maintenance Tools program provides these tools as selections on the Microlok II Maintenance Tools main menu, as shown in Fig. Electronic Interlocking Maintenance instructions series I Click for Contents February 2014 CAMTECH/S/PROJ/2013-14/HB-EI-MIS/1. 0 20 The main menu displays the selection buttons that activate the primary functions of the program. These selection buttons are grouped into four categories: Run-time Monitor Historical Data System adjustment/Setup Other Tools The functions of various tools are explained in the following paragraphs. The Maintenance PC is linked to the Microlok II installation CPU board through an RS-232 serial connection. Fig. 2.13: Maintenance Tools main menu 2.7.1 Run-time Monitor This group of tools enables us to view the current status of operating Microlok II equipment and related systems. The following buttons are provided under this group: (a) System information It enables us to view system events. By clicking this button a display appears which shows the current version no. of the Executive software and an abbreviated “snap- Electronic Interlocking Maintenance instructions series I Click for Contents February 2014 CAMTECH/S/PROJ/2013-14/HB-EI-MIS/1. 0 21 shot” of the most recent system events. Where appropriate, the display defines the action taken in response to an event. The system information display lists the time and date when the following types of events last occurred: System resets System errors Unit configuration Cleaning of the system log clear Clearing of the user data log clear Time changes Clearing of additional power supply (CPS) trips. Since some of these events do not occur frequently, the displayed data also includes the year in which the associated event occurred. (b) Board information It displays the status information about input-output interface PCBs of a Microlok II or serial link. It displays the current status of each enabled PCB in the Microlok II cardfile. Each board type is dynamically updated. (c) Free-run variable display This tool lists the current values for selected variables and bits as well as a real-time list of changes. The free-run display presents the status information in a text mode. (d) Dynamic Bit/Variable display This tool provides the same information as that provided by Free-run variable display but in a different way. The Dynamic bit/Variable display represents the indications graphically in strip-chart view of bit and variable changes. 2.7.2 Historical data These buttons lead to views which display data which an operating Microlok II has collected and stored. The Microlok II system logs and reports information in three classifications. Critical errors Warnings Events This section contains the following four tools that enable the user to review the logged system information in several ways: Note : In the Maintenance PC, Weekly Maintenance folder to be maintained in which User Data Log, Event Log & Error Log backup to be done on weekly basis. (a) User data log The user data log records only those events that the user specifies. It displays changes of selected bit and numeric variables as requested by the application or configuration. This log is capable of recording upto 90,000 of the most recent specified Boolean changes, or at least 64,000 Boolean and/or numeric changes. Electronic Interlocking Maintenance instructions series I February 2014 Click for Contents 22 CAMTECH/S/PROJ/2013-14/HB-EI-MIS/1. 0 (b) System Event log The system event log records upto 5000 of the most recent critical errors, warnings, and events. Any system critical error or warning will be logged in the system log. Events are used to relay miscellaneous system information and may be limited by use of the configuration. (c) System Error log The system error log is limited to critical errors. Since the older events may be lost in the system event logger, the system error log contains a list of the last 50 time stamped critical system errors. (d) Merged Events log The merged events log enables us to view errors, warnings, and events as in the User data, System Event, System Error log and Dynamic variable changes merged onto the same time axis. This log also provides graphic displays of parameters and events as specified in the user data log. 2.7.3 System adjustment/Setup These buttons enable us to modify parameters of the Microlok II which are as under: (a) Set Time of Day Clock This function displays the date and time settings for both the Microlok II system CPU and the laptop computer and sets the Microlok II on-board clock. (b) Software upload This tool is used for uploading a custom-designed application software program from the laptop PC to the Microlok II CPU. This tool interacts with Windows-based files; therefore one should be familiar with application software and Windows file navigation to use this feature. (c) Reset Microlok II This tool enables the user to reset the Microlok II CPU from the laptop computer. The reset function is used mainly to clear system faults and return the system to normal operation. (d) System configuration This tool provides options for checking and modifying the configuration of the Microlok II system hardware and software. Three types of options are provided within this tool: System configuration options enable the user to modify the general system parameters and the user parameters, and to assign specific parameters to the user data log. Board configuration options enables the user to enable/disable and configure the individual Microlok II system PCBs. Link configuration optionsenable the user to configure the Microlok II system communication links. Electronic Interlocking Maintenance instructions series I Click for Contents February 2014 23 CAMTECH/S/PROJ/2013-14/HB-EI-MIS/1. 0 2.7.4 Other tools These buttons lead to views which allow special diagnostic functions to be performed. These are as under: (a) Systems Memory Dump Allows system personnel to provide specialized debugging assistance. The system memory dump tool enables system developers and maintainers to perform debugging operations when a customer encounters a software problem. (b) Program Settings The Program Settings dialog is used to modify the way in which the system stores and displays data. These options can also change the general appearance of the screens. (c) Serial message monitor This tool enables the user to monitor serial message traffic on a selected active serial link. (d) Save Comma Delimited download This tool lets the user download the user data log in a comma-delimited format. This file can be viewed in Microsoft Excel. The file can be saved via the diagnostic port link, or directly from the PCMCIA card in the card reader on the individual PC. (e) Application download This tool lets the user download the application image from the EEPROM on the Microlok II unit. As a default, the file is stored with a filename.mlp extension so that it can be easily uploaded to the system, if necessary. 2.8 Viewing the logged information Procedure for viewing the logged information is given in the following paragraphs: 2.8.1 Viewing the User Data Log For downloading the viewer data log the following steps are to be followed: Click on the “User Data Log” icon in the Maintenance Tools main menu. Mini active window “Select Start/End Time for Download” appears. Select (√) “Download Starting at”: Enter MM/DD/YY HH AM or PM (Example: 07/30/09 08AM). Select (√) “Download Ending at”: Enter MM/DD/YY HH AM or PM (Example: 07/30/09 09AM). Click on the “Get Log” button in the “Select Start/End Time for Download” dialog box. “User Data Log” window appears in which user data is downloaded (i.e. from the specified start time). On completion of User Data download (i.e. upto the specified end time), click on the “Save” (icon) button in the toolbar of User Data Log window. Mini active window “Save as” appears. Electronic Interlocking Maintenance instructions series I Click for Contents February 2014 24 CAMTECH/S/PROJ/2013-14/HB-EI-MIS/1. 0 Double click on the “Weekly Maintenance” folder in the Maintenance PC “C” drive. Sub-folders User Data Log, System Event Log & System Error Log appear. Double click on the “User Data Log” folder. Rename the default file name (User Data) Example – File name CAMTECH 30JUL09. Click on the “Save” button. Note: If the CPU Board is removed from Cardfile, the “User Data Log” may be lost. Ensure User Data Log backup is taken from CPU Board before removing the CPU Board from Cardfile. Starting & Ending time should be in correct format otherwise User Data Log downloading would not start. Syntax for the Date/Time string - Month (1 or 2 digits)/Date (1 or 2 digits)/Year (2 digits) Hour (1 or 2 digits) AM or PM (optional). 2.8.2 Viewing the System Event Log For downloading the System Event log the following steps are to be followed: Click on the “System Event Log” icon in the Maintenance Tools main menu. “System Event Log” window appears in which event log is downloaded.. On completion of Event Log download, click on the “Save” (icon) button in the toolbar of “System Event Log” window. Mini active window “Save as” appears. Double click on the “Weekly Maintenance” folder in the Maintenance PC “C” drive. Sub-folders User Data Log, System Event Log & System Error Log appear. Double click on the “System Event Log” folder. Rename the default file name (Events) Example – File name CAMTECH_EVENT_ 30JUL09. Click on the “Save” button. Note: If the CPU Board is removed from Card-file, the “System Event Log” may be lost. Ensure that Event Log backup is taken from CPU board before removing the CPU board from Card-file. 2.8.3 Viewing the System Error Log For downloading the System Event log the following steps are to be followed: Click on the “System Error Log” icon in the Maintenance Tools main menu. “System Error Log” window appears in which event log is downloaded. On completion of Event Log download, click on the “Save” (icon) button in the toolbar of “System Error Log” window. Mini active window “Save as” appears. Electronic Interlocking Maintenance instructions series I Click for Contents February 2014 CAMTECH/S/PROJ/2013-14/HB-EI-MIS/1. 0 25 Double click on the “Weekly Maintenance” folder in the Maintenance PC “C” drive. Sub-folders User Data Log, System Event Log & System Error Log appear. Double click on the “System Error Log” folder. Rename the default file name (Events) Example – File name CAMTECH_ERROR_ 30JUL09. Click on the “Save” button. Note If the CPU board is removed from Cardfile, the “System Error Log” may be lost. Ensure System Error Log Backup is taken from CPU board before removing the CPU Board from Cardfile. 2.8.4 Viewing the Merged Event Log To view the Merged Event Log, click on the “Merged Event Log” button on the Maintenance Tools main menu. After some time when the loading of System Event Log and User Data Log in the Merged Event Log the Merged Event Log window appears. To return to the Maintenance Tools main menu from the Merged Event Log display, click on the “Back” button on the tool bar. 2.9 Powering up the Microlok II system Before applying power to the system for first time, the entire hardware installation should be verified for correctness as per relevant instruction manual. Once the verification is completed satisfactorily, apply +12 V DC battery power to the Mocrolok II cardfile. Verify that the 5 V ON LED on the cardfile power supply board is illuminated. If everything has been connected and configured properly, the Microlok II CPU will begin to run a series of self-tests and initialization routines. After successful completion of above procedure, CPU board will assume the on-line mode of operation and the following cardfile indications should be present: The CPU board ON- LINE LED - ON. The CPU board VPP ON LED - OFF. The CPU RESEST LED – OFF. The CPU upper 4- character display repeatedly scrolls the phrase “US&S MICROLOK II” and the executive version information. The CPU lower 4-character display scrolls the pre-programmed application name. The power supply board VCOR LED – illuminated. If all the above indications are present, perform the System test and configutration procedures as per instruction manual. Electronic Interlocking Maintenance instructions series I Click for Contents February 2014 26 CAMTECH/S/PROJ/2013-14/HB-EI-MIS/1. 0 2.10 System Maintenance 2.10.1 Weekly Maintenance (a) Measuring Voltages (Performed by Signal Maintainer) S.No. Date 12 V DC MLK II Cardfile Supply At IPS At MLK II Rack 1 12.03.08 15.5 V 13.5 V Fuse Checking (Performed by Signal Maintainer) S. Date Fuse Checking No. MLK MLK Switching II II I/O Circuit Power Board Fuse Supply Fuses Board Fuses MLK MLK MLK II II II & Rack Rack Relay Racks 1 12.03.08 OK OK OK 24 V DC MLK II Observation I/O Supply At IPS At MLK II Rack 30 V 28 V Signature (b) Panel Converter Observation Signature Supply Cum Fuses isolator fuses Relay Rack MLK Rack OK OK II (c) Backup Schedules (Performed by Signal Engineer) The User Data Log, Event Log and Error Log backups are to be taken in Hard Disk as well as Floppy Disk for remote storage. S.No. Backup Date 1 12.03.08 User Log Event Log Error Log Observation Signature Backup Backup Backup Done Done Done 2.10.2 Monthly Maintenance (a) System Changeover (Performed by Signal Engineer) Sr.No. Date System Changeover Observation Signature A>B B>A 1 10.01.08 Done During Changeover, SGE block instrument must be kept in TOL condition. Ensure Synchronization Microlok II clock time with Maintenance PC time after changeover. Electronic Interlocking Maintenance instructions series I Click for Contents February 2014 27 CAMTECH/S/PROJ/2013-14/HB-EI-MIS/1. 0 (b) Measuring Earth Resistance Value (Performed by Signal Engineer) SR. 1 Date Earth Resistance value 10.01.08 Pit 1 0.3 Ohm Pit 2 0.8 Ohm Pit 3 0.5 Ohm Observation Pit 4 0.7 Ohm Pit 5 0.4 Ohm Pit 6 0.6 Ohm Pit 7 0.8 Ohm Sig Pit 8 0.2 Ohm Note: Earth Resistance value should be less than 1 Ohm. 2.10.4 Annual Maintenance (Performed by Signal Engineer) Replace the Lithium Battery. Check the Converter cum Isolator. Remove the VCOR relay from the installation and inspect it. Perform the inspection activities mentioned under Preventive Maintenance. 2.10.5 Five Years Maintenance (Performed by Signal Engineer) Inspect Surge Protection Devices (SPDs). Replace if found deteriorated. 2.10.6 System failure Register S. No . 1 Failure Type System reset Date Time 14.01.08 11.10 Hrs. Changeover Date Time Interlocking Down Time 14.01.08 04 min. 11.14 Hrs. Equipment or Component failed CPU-RAM error Corrective Action Descript Date ion CPU 14.01.08 replaced Time . 2.11 Preventive Maintenance The following checks should be performed at least on an annual basis: Clean the outside of the cardfile/enclosure using a soft clean cloth. Inspect the cardfile/enclosure for dents and scratches and internal damage. Ensure that the all cardfile modules are properly mounted and securely fastened. Remove all printed circuit boards from the cardfile. Inspect the cardfile back-plane for loose or damaged connectors. Also, thoroughly inspect each printed circuit board for physical damage, discoloured or damaged components and wiring insulation, cracked or broken component leads and copper traces. Questionable circuit boards should be replaced from the spares inventory. If necessary, vacuum-clean the interior of the cardfile without disturbing any wiring. Use a non-metallic, insulated vacuum head. Electronic Interlocking Maintenance instructions series I Click for Contents February 2014 By 28 CAMTECH/S/PROJ/2013-14/HB-EI-MIS/1. 0 Re-install the circuit boards into the cardfile. Tighten the board retaining screws finger tight. Check all power input and signal supply leads for frayed or discoloured insulation and loose connections. Also check all lightning arrestor/voltage suppressor devices for any signs of physical degradation. Visually examine all wire and cable harnesses for proper bundling and slack. Remove the VCOR relay from the installation and inspect it. Caution When handling any MICROLOK II circuit board or board component, observe all Electrostatic Discharge (ESD) Precautions. Improper handling of boards or components may result in damage to static sensitive circuitry. Do not install or remove any MICROLOK II printed circuit board with battery power applied to the cardfile. Damage to the circuit board or the cardfile backplane may result. 2.12 Corrective maintenance Corrective maintenance on the MICROLOK II system is limited to the correction of basic wiring and hardware problems and the replacement of modular system components. If a component has been determined faulty, return it to M/s Ansaldo for repair or replacement. STS Transportation Systems Pvt. Ltd. Warning Do not attempt to repair any MICROLOK II system Printed Circuit Board or peripheral device in the field. This equipment must be returned to M/s Ansaldo for repair or replacement. Any attempt to repair the MICROLOK II system may jeopardize the safety related functions of the system. 2.13 Precautions, do’s & don’ts (i) Electrostatic Discharge Precautions When working on the Electronic Interlocking System, contact with the system printed circuit boards cannot be avoided. Hence following guidelines to be observed: Always stand on an approved conductive floor mat when touching or handling printed circuit boards. Always wear a strap grounding device. The wrist strap should have a 1.0 megohm current limiting resistor. Connect the wrist strap grounding connector to suitable ground connection. Electronic Interlocking Maintenance instructions series I Click for Contents February 2014 29 CAMTECH/S/PROJ/2013-14/HB-EI-MIS/1. 0 Periodically check each wrist strap for continuity using an approved tester. Continuity readings must be between 500 k ohms and 10 megohms. Discard any wrist strap that does not meet this criterion. Always handle printed circuit boards by the edges. Do not touch board components. Keep the work area clean and free of debris. Avoid using non-conductive materials such as Styrofoam cups, plastic ashtrays, cellophane wrappers, or plastic covered binders in the vicinity of the cards and modules. Once removed from the cardfile/rack, immediately place printed circuit boards into an anti-static conductive-shielded bag. Wrap the bag in conductive foam to protect the circuit board during transport and shipment. Modules fitted with batteries may require special packaging. Avoid wearing clothing made of synthetic fabric when handling modules. Cotton overalls are preferred. (ii) Packing All plug-in modules and cards shall be packaged in anti-static packaging to prevent damage to Electro-Static Sensitive Devices (ESSD) from electro-static discharge. When so packed, the modules may be stored and transported without further precaution. (iii) Storage For storage of Modules and cards following precautions shall be taken: Must not be in close proximity to magnets, e.g. Automatic Warning System (AWS) magnets. Must be protected from damage due to electrostatic discharge. Must be protected from the environment including physical handling damage. If many modules are involved, it is permissible to use conductive card frames or racks. However bags and wraps are preferred. (iv) Transport The equipment or modules must not be transported in close proximity to magnets e.g. AWS magnets. (v) Handling Lithium Batteries Following precautions should always be observed while handling Lithium Batteries: Packaging Package all modules with batteries in a non-conductive anti-static bag. An electrically conductive bag may short the battery terminals causing premature discharge of the battery. Damage The lithium batteries contain very highly corrosive electrolyte. If a battery is damaged: Ensure unnecessary personnel do not enter the affected area. Ventilate the immediate area. Electronic Interlocking Maintenance instructions series I Click for Contents February 2014 30 CAMTECH/S/PROJ/2013-14/HB-EI-MIS/1. 0 Avoid contact with any liquid or internal components by wearing the appropriate safety equipment. Thoroughly wash the affected area with clean water and allow it to dry. Return the module that may have been in contact with the electrolyte to the firm for inspection duly packaged with an appropriate safety warning. Disposal Dispose of the battery according to the local regulations. Don’t (vi) Short the terminals together. Attempt to recharge. Crush. Disassemble. Incinerate or heat above 100 deg. C.(212 Deg F) Attempt to solder the cell. Do’s and Don’ts Do’s To avoid possible damage to the diagnostic computer when connected to the Electronic Interlocking equipment, if the power supply of the diagnostic computer is connected to an AC power source, isolate the power source from earth ground by way of a 3-prong to 2-prong adapter. Before powering up the Electronic Interlocking equipment, ensure that there is no train entering into the section in both Up and Down Direction. Observe all Electrostatic discharge precautions while handling any Printed Circuit Board or board component For repair or replacement if any, return the equipment to the firm Don’ts Do not use Radio equipment within the immediate vicinity of Electronic Interlocking system as Radio transmissions can affect electronic equipment. Do not make circuit alterations or repairs to the Electronic Interlocking system. Do not install or remove any printed circuit board with battery power applied to the system. Do not attempt to repair any Electronic Interlocking system printed circuit board or peripheral device in the field. Electronic Interlocking Maintenance instructions series I Click for Contents February 2014 31 CAMTECH/S/PROJ/2013-14/HB-EI-MIS/1. 0 2.14 References & service information RDSO specification No. RDSO/SPN/192/2005 (Draft). UM 6800A –Micolok II – Functional description. UM 6800C –Micolok II – Startup & Maintenance. For installation and troubleshooting of Mocrolok II System following Manuals may be referred : UM 6800B –Micolok II – Installation. UM 6800E –Micolok II – Troubleshooting and Recovery. For Error Codes - Service Manual 6800C Appendix A may be referred For service information contact: M/s Ansaldo STS Transportation Systems India Pvt. Ltd. 35 SLV Complex, AVS Compound, 80 feet Road, 4th Block, Koramangala, Bangalore -560 034 Tele: 080-25525737, 66949200 FAX: 080- 25525732 2.15 Abbreviations ABS Automatic Block Section AC Alternating Current AF Audio Frequency CCIP Control Cum Indication Panel CD Compact Disc CIU Central Interlocking Unit CLR Clear CPS Conditional Power Supply CPU Central Processing Unit CSI Coded System Interface CTC Centralized Traffic Control DC Direct Current DR Green aspect Controlling Relay ECR Lamp Proving Relay EPROM Erasable Programmable Read Only Memory EEPROM Electrically Erasable Programmable Read Only Memory EI Electronic Interlocking EMU Electrical Multiple Unit GN Signal Button HR Yellow aspect Controlling relay IBS Intermediate Block Signalling IC Integrated Circuit I/O Input/Output Electronic Interlocking Maintenance instructions series I Click for Contents February 2014 CAMTECH/S/PROJ/2013-14/HB-EI-MIS/1. 0 LED L-R LED L-R MB MLK II NWKR OC OFC PC PCB PI PS RAM RDSO RI RO ROM RRI RWKR SPD TMR TPR UN UPS US & S VCOR VDU VGA WKR WNR WRR WNR WRR 32 Light Emitting Diode Left - Right Light Emitting Diode Left - Right Mega Byte MICROLOK II Normal Point Indication Relay Object Controller Optical Fibre Cable Personal Computer Printed Circuit Board Panel Interlocking Power Supply Random Access Memory Research Design & Standards Organization Relay Input Relay Output Read Only Memory Route Relay Interlocking Reverse Point Indication Relay Surge Protection Device Triple Modular Redundancy Track Proving Relay Route Button Un-interrupted Power Supply Union Switch & Signal Vital Cut Off Relay Visual Display Unit Video Graphic Adapter Point Indication Relay Normal Point Control relay Reverse Point Control Relay Normal Point Control relay Reverse Point Control Relay Electronic Interlocking Maintenance instructions series I Click for Contents February 2014