1
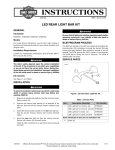
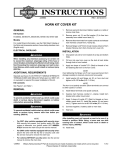
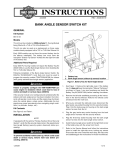
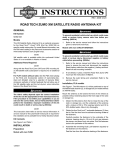
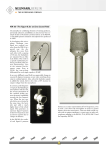
-J06214
REV. 2015-03-30
FAIRING MOUNT MIRRORS
GENERAL
3.
Kit Number
56000098, 56000099
Drill mirror mounting holes.
a.
See Figure 1. Locate drill points (1 and 2).
b.
Cover the finished surface opposite of the drill points
with masking tape to prevent damage to painted surfaces.
c.
Drill a 1/8 in pilot hole in the center of each drill point
(1 and 2).
d.
Drill a 13/32 hole at drill point (1) with a twist drill bit.
e.
Drill a 7/32 hole at drill point (2) with a twist drill bit.
f.
Remove tape.
g.
Repeat previous step on opposite side.
Models
For model fitment information, see the P&A Retail Catalog or
the Parts and Accessories section of www.harley-davidson.com
(English only).
Installation Requirements
The rider's safety depends upon the correct installation
of this kit. Use the appropriate service manual procedures.
If the procedure is not within your capabilities or you do
not have the correct tools, have a Harley-Davidson dealer
perform the installation. Improper installation of this kit
could result in death or serious injury. (00333a)
NOTE
Mirror assemblies and backplates are marked with an R or L
to indicate the left and right side assemblies.
4.
See Figure 2. Install mirror assembly (1).
For model fitment information, see the P&A Retail Catalog or
the Parts and Accessories section of www.harley-davidson.com
(English only).
a.
With the locating pin (A) of the mirror assembly (1)
inserting into the lower hole, install the mirror
assembly.
Kit Contents
b.
Install mirror base (2) and gasket (5).
See Figure 2 and Table 1.
c.
Install backplate (3) over mirror assembly, so that the
locating pin is secured in the small hole of the backplate.
d.
Install flange nut (4). Tighten to 20-30 in-lbs (2.3-3.4
Nm).
e.
Repeat previous step on opposite side.
INSTALLATION
Installing Mirrors
To prevent accidental vehicle start-up, which could cause
death or serious injury, remove main fuse before proceeding. (00251b)
1.
See the service manual. Remove main fuse.
5.
See the service manual. Install the outer fairing and
windshield.
6.
See the service manual. Install main fuse.
NOTE
Do not leave windshield in place with outer fairing removed.
Windshield could fall and be damaged.
2.
See the service manual. Remove windshield. Remove
outer fairing.
-J06214
Many Harley-Davidson® Parts & Accessories are made of plastics and metals which can be recycled.
Please dispose of materials responsibly.
1 of 2
is07560
Table 1. Service Parts
1
Item
1
Description (Quantity)
Part Number
Mirror assembly, left, black
Not Sold Separately
Mirror assembly, left, chrome
Not Sold Separately
Mirror assembly, right, black (not Not Sold Separately
shown)
2
2
Mirror assembly, left, chrome
(not shown)
Not Sold Separately
Mirror base mount, left, black
56000113
Mirror base mount, left, chrome 56000112
1. Upper drill point
2. Lower drill point
Mirror base mount, right, black
(not shown)
Figure 1. Drill Points (Left Side Shown)
56000105
Mirror base mount, left, chrome 56000103
(not shown)
SERVICE PARTS
3
Backing plate, left
56000015
Backing plate, right (not shown) 56000016
is08574
2
5
4
Flange nut (2)
7687
5
Gasket (2)
56000122
Items mentioned in text.
1
A
Locating pin
B
Small hole
4
A
3
B
Figure 2. Service Parts: Fairing Mount Mirrors
-J06214
2 of 2