1
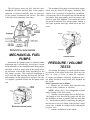
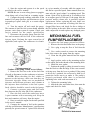
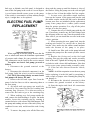
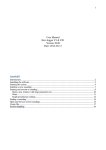
HOW - TO FUEL PUMPS Tool And Material Checklist Quart Container Service Manual Flare Nut Wrenches Open-end Wrenches Hand Air Pump Fuel Pressure Gauge Socket Wrenches Scraper Gasket Sealer Gasket Voltmeter Safety glasses or googles * This How-To Guide is designed as a general overview of a vehicle repair procedure. You should always refer to a service manual designed for your vehicle for detailed instructions. incorrect procedure. Parts Plus assumes no liability for an The fuel pump draws the fuel from the tank, through the fuel lines and fuel filter, to the engine’s carburetor or injectors. Basically, there are two types of fuel pumps: mechanical and electric. The latter is the type most commonly used today. The mechanical fuel pump is located on the engine block near the front of the engine. Naturally, this subjects it to a great deal of engine heat. In addition, a low-pressure area is developed in the fuel line during fuel intake. High temperatures and low pressure can lead to a vapor lock condition. To overcome this, most late-model mechanical fuel pump systems contain a fuel vapor separator and vapor return line to the fuel tank. MECHANICAL FUEL PUMPS Mechanical fuel pumps feature a synthetic rubber diaphragm that is actuated by an eccentric located on the camshaft. As the camshaft rotates during engine operation, a shaft or rocker arm in the pump moves up and down or back and forth, depending on the fuel pump’s position. This causes the diaphragm to move back and forth, drawing fuel from the fuel tank and sending it to the carburetor or injectors. On some V-8 engines, a pushrod actuates the fuel pump rocker arm. PRESSURE / VOLUME TESTS The modern fuel pump is a sealed unit that cannot be repaired. If the pump leaks from either the vent hole or from a seam, it must be replaced, if engine performance indicates inadequate fuel, the pump should be tested while still mounted on the engine. Make a pressure test as follows: 1. Remove the air cleaner, then disconnect the fuel line at the carburetor or injectors. NOTE: Always have a fire extinguisher on hand when working on the fuel system. 2. Connect a pressure gauge hose to the fuel line. The length of hose between the gauge and the fuel line should be as short as possible (and not more than 6”). An alternate method of connecting the gauge to the fuel line is to use a T-fitting. If the fuel has a vapor return line, it should be clamped before making the pressure test. 3. Attach a tachometer to the engine. 4. Start the engine and operate it at the speed specified in the service manual. NOTE: Be sure to wear safety glasses or goggles, when doing work of any kind on a running engine. 5. Compare the gauge readings with those in the manual. Fuel pump pressure specifications are given in pounds per square inch (psi) at a certain engine speed. 6. Turn the engine off and watch the gauge. The amount of time the fuel system should maintain pressure varies from system to system. Check your service manual for the proper specification. 7. Disconnect the pressure gauge from the fuel line and reconnect the fuel line to the carburetor injector input. Unclamp the vapor return line (if applicable) and replace the carburetor air cleaner. Conduct a fuel pump volume test as follows: 1. Remove the fuel line at the in-line fuel filter (if used) or disconnect it at the carburetor or injectors. NOTE: When checking for fuel volume or pressure at the injectors, make sure that they are electronic injectors. Many cars use mechanical injectors and different pressures and volumes at the injectors than elsewhere in the fuel system. Such vehicles should be tested at the fuel pump. 2. Connect a pressure gauge and fuel outlet hose between the fuel inlet line to the carburetor. 3. Place the fuel end of the outlet hose into a 1-quart container with a measuring seal. Keep the hose and container well away from the engine. 4. Run (or crank) the engine for the time specified in the service manual. 5. Compare the amount of fuel in the container with the specifications. Manufacturers’ specifications generally are given in terms of 1 pint of fuel delivered in a given number of seconds while the engine is at idle and at a specified speed. Some manuals, however, state only the “good volume” at cranking speed. This means 1 pint of fuel is delivered in 30 seconds or less at an engine speed of 500 rpm. If the pump fails the pressure and/or volume test, it generally requires replacement. Before replacing the unit, make sure that there are no restricted or leaking fuel lines or clogged filter hoses, and check for dirt or sludge at the fuel pickup in the tank. Blow out any restriction with compressed air and replace any damaged parts. MECHANICAL FUEL PUMP REPLACEMENT To replace the fuel pump, proceed as follows: 1. Remove the inlet and outlet lines at the pump. 2. Use a plug to stop the flow of fuel from the tank. 3. Use a socket wrench to remove the mounting bolts, then remove the pump from the engine. 4. Clean the old gasket material hem the engine block. 5. Apply gasket sealer to the mounting surface on the engine and to the threads of the mounting bolts. 6. Install the new gasket. 7. Position the pump by tilting it toward or away from the block so that the bulge in the cam eccentric is facing away from the lever or pushrod. If the pump is driven by a pushrod, the rod must be held up to permit the rocker arm to go under it. The pump is properly positioned when there is an internal squeaking noise with each movement of it. 8. Tighten the mounting bolts. 9. Attach the inlet and outlet lines, then start the engine and check for leaks. ELECTRIC FUEL PUMPS Electric fuel pumps offer important advantages over their mechanical counterparts. Because electric fuel pumps maintain constant fuel pressure, they aid in starting and reduce vapor lock problems. They are not mechanically attached to the engine; so fit problems are eliminated, making them especially useful when an exact replacement mechanical fuel pump is unavailable. Unlike mechanical fuel pumps, worn cams do not affect electric pumps. It is also easy to install a hidden on/off switch as an anti-theft precaution. The electric fuel pump can be inside or outside the fuel tank. There are four types: diaphragm, plunger, bellows, and impeller or rotary. The diaphragm, plunger, and bellows types are usually the demand style; that is, when the ignition is turned on, the pump begins operation and shuts off automatically when the carburetor bowl is full and the fuel line is pressurized. When the carburetor demands more fuel, the electric pump supplies more. When demand is lower, it pumps less. In this way, proper fuel flow and pressure are constantly maintained. In most installations, the rotary electric fuel pump is a continuous operated type. ELECTRIC FUEL PUMP CHECK If the engine fails to start because there is no fuel delivery, first check the fuel gauge. A needle that is well above EMPTY normally means there is plenty of fuel in the tank, but this is not always so. A defective sending unit or mis-calibrated gauge might be giving a false indication. Sticking a wire down the fuel tank filler pipe will determine whether or not there is really fuel in the tank. If the gauge is faulty, repair or replace it. Second, listen for pump noise. A buzzing sound should be heard when the key is on or while the engine is being cranked; if not, check to be sure that electric current is flowing to the pump. If the simple answers have been ruled out, perform the following test using a voltmeter: 1. With the ignition switch turned on, connect the voltmeter ground lead to a good ground on the car frame. 2. Touch the voltmeter positive lead to the electrical connections on the fuel pump while cranking the engine. 3. If a voltage reading of 12 is obtained and the pump does not operate, replace the pump. 4. No voltage indicates a faulty oil pressure switch, pump relay, or relay driver circuit in the computer; or a wiring problem, blown fuse, or bad or corroded connection. NOTE: Check the inertia safety switch as well. The switch, usually located in the trunk, under the back seat, or behind a rear kick panel, is designed to turn off the fuel pump in the event of a severe impact. A reset button should restore power to the pump. If the switch is oversensitive so that ordinary bumps trip it, it might have to be replaced. ELECTRIC FUEL PUMP REPLACEMENT When replacing an electric pump, be sure that the new or rebuilt unit meets the minimum requirements of pressure and volume for your particular vehicle. This information can be found in the service manual. To replace an electric fuel pump, proceed as follows: 1. Disconnect the ground terminal at the battery. 2. Disconnect the electrical connector(s) on the fuel pump. Label the wire(s) to aid in reassembly. CAUTION: Reversing polarity on most electric fuel pumps will destroy the unit. 3. Remove the fuel and vapor lines from the pump. Label the lines to aid in connecting them to the new pump. 4. An inside tank type pump can usually be removed by first removing the fuel sending unit retaining ring. However, it is often necessary to remove the fuel tank to get to the retaining ring. 5. When working on a fuel pump outside the tank, remove the bolts holding it in place. On intake models, loosen the retaining ring by rotating it counterclockwise with a brass drift and hammer. Pull the pump and sending unit out of the tank (if they are combined in one unit) and discard the tank O-ring seal. 6. To remove the pump, twist off the filter sock, then push the pump up until the bottom is clear of the bracket. Swing the pump out to the side and pull it down to free it from the rubber fuel line coupler. 7. In most cases, the rubber sound insulator between the bottom of the pump and bracket and the rubber coupler on the fuel line can be discarded because new ones are included with the replacement pump. Some pumps have a rubber jacket around them for quieter operation; if so, slip off the jacket and put it on the new pump. 8. Compare the new or rebuilt pump with the old one. If necessary, transfer any fuel line fittings from the old pump to the new one. Note the position of the filter sock so you can install the new one in the same relative position. 9. When inserting the new pump back into the sending unit bracket, be careful not to bend the bracket. Also, make sure the rubber sound insulator under the bottom of the pump is in place. 10. Install a new filter sock on the pump inlet and reconnect the pump wires. Be certain you have correct polarity. 11. Replace the O-ring seal on the fuel tank opening, then put the pump and sender assembly back in the tank. Tighten the locking ring by rotating it clockwise with a brass drift and hammer. Note that bolts secure some pump/sender assembly units. 12. If the fuel was removed from the vehicle, replace it. NOTE: Avoid the temptation to test the new pump before replacing it in the fuel tank by energizing it with a couple of jumper wires. Running the pump dry can damage it. 13. Reconnect the electrical connector(s), then re-connect the ground terminal at the battery. 14. Start the engine and check all connections for fuel leaks.