1
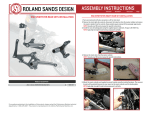
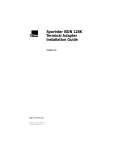
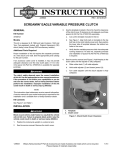
ASSEMBLY INSTRUCTIONS
0048-0972
REVISION A
05/07/2014
PAGE 1
RSD SPORTSTER RIGHT MID INSTALLATION
RSD SPORTSTER MID CONTROL INSTALLATION
1. Turn your motorcycle off, place securely on a lift or side stand.
2. Remove the stock right side controls, disconnect the brake line from the master cylinder and remove
the master cylinder from the controls.
NOTE: Consult your HD service manual for specific instructions.
3. Install the mid control backing plate using the supplied spacers and bolts. Torque to 90 - 100 in-lbs.
NOTE: Apply high strength thread locking compound to all bolts.
A
B
C
A
D
D
1.4”
1”
.889” .880” .760”
.760” spacer is used in place of the .880” spacer if
installing the RSD Pulley Cover
2004 - 2013 XL SPORTSTER RSD MID CONTROLS
0035-1134
For questions pertaining to the installation of this product, please contact the Performance Machine technical
department at 1-800-479-4037. This product is manufactured in the USA by Performance Machine LLC.
4. Remove the stock clevis from the master cylinder.
NOTE: Consult your HD service manual for specific instructions.
B
C
ASSEMBLY INSTRUCTIONS
0048-0972
RSD SPORTSTER RIGHT MID INSTALLATION
5. Mount the master cylinder and supplied reservoir bracket using the included hardware and spacers.
NOTE: Apply high strength thread locking compound to all bolts.
REVISION A
05/07/2014
RSD SPORTSTER LEFT MID INSTALLATION
If you have a forward control model bike you will need to purchase a HD mid control shift arm. PN 34660-04a
1. Remove the three derby cover bolts at 6, 8, 10 o’ clock positions.
6. Install the new clevis to the master cylinder and mount it to the brake pedal using the supplied hardware.
Torque to 17 - 22 ft-lbs
7. Mount the reservoir to the mount, run the hose to the master cylinder and trim to length. Install the rear
brake line and bleed the rear brake. Check clearance between the brake pedal and exhaust system.
Adjust height if needed
NOTE: Make sure the hose does not bind, kink or touch the exhaust system.
An aftermarket brake line is required when installing mid controls.
PAGE 2
2. Install the backing plate using the provided spacers and bolts. Torque to 90 - 100 in-lbs
NOTE: Apply medium strength thread locking compound to all bolts.
3. Adjust the shift lever height to your preference.