1
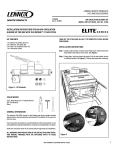
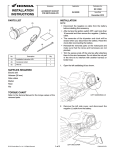
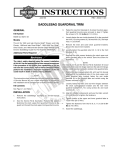
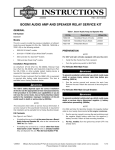
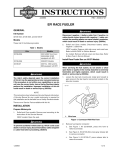
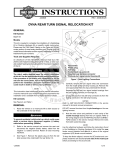
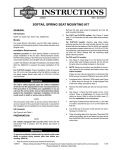
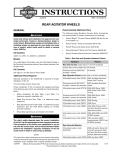
-J05743
REV. 2013-09-09
UNIVERSAL TAIL BAG
GENERAL
INSTALLATION
Kit Number
Sportster, Dyna and Softail Models
93300069A
1.
See Figure 1. Install rear mounting strap (2).
Models
a.
Remove the rear seat mounting screw (1).
For model fitment information, see the P&A retail catalog or
the Parts and Accessories section of www.harley-davidson.com
(English only).
b.
Slide the rear mounting strap (2) under the seat tab.
Align with mounting hole.
c.
Install seat mounting screw.
Installation Requirements
2.
A passenger pillion is required for proper installation.
The rider's safety depends upon the correct installation
of this kit. Use the appropriate service manual procedures.
If the procedure is not within your capabilities or you do
not have the correct tools, have a Harley-Davidson dealer
perform the installation. Improper installation of this kit
could result in death or serious injury. (00333a)
Improper loading of cargo or installation of accessories
can affect motorcycle stability and handling, which could
result in death or serious injury. (00121a)
Remove forward fender strut screw (1).
b.
Slide tie-down strap (2) between the fender strut and
the fender. Align with mounting hole.
Softail® and Dyna® models: Use tie-down strap
with large grommeted hole (Figure 5, Item 6).
c.
See the service manual. Install fender strut screw.
Tighten to specification.
d.
Repeat steps for the opposite side.
3.
See Figure 2. Place bag on passenger pillion. Install the
tail bag rear strap (3) through the strap installed in Step
1. Cinch the strap adjustment until the bag is in the desired
location.
4.
See Figure 3. Secure bag to front mounting locations.
Kit Contents
See Figure 5 and Table 1.
a.
Sportster® models: Use tie-down strap with small
grommeted hole (Figure 5, Item 7).
NOTE
This instruction sheet refers to service manual information. A
service manual for this year/model motorcycle is required for
this installation. One is available from a Harley-Davidson dealer.
See Figure 3. Install the front tie-down (2).
a.
Install one end of the front mounting strap to the
horizontal D-ring (3) on the tail bag.
b.
Install the other end of the strap onto the front tiedown (2).
•
Do not put more than 10 lbs (4.5 kg) in bag.
c.
Pull the strap until the bag is tight.
•
Distribute weight evenly on both sides of vehicle. Load
bulky items to front of bag.
d.
Secure extra strap length with the hook-and-loop tiedown strap (4).
•
Make sure that cargo is secure, and cannot shift while
riding. Periodically recheck load.
e.
Repeat steps for the opposite side.
•
Make sure that bag strap buckles are secure.
•
Secure straps. Keep straps away from rear wheel.
-J05743
Many Harley-Davidson® Parts & Accessories are made of plastics and metals which can be recycled.
Please dispose of materials responsibly.
1 of 3
is07536
is07533
3
4
2
1
2
1
1. Seat mounting screw
2. Rear mounting strap
Figure 1. Rear Mounting Strap Installation
1.
2.
3.
4.
is07534
2
Figure 4. Front Strap Installation (Touring)
Touring Models
3
1.
4
See Figure 1. Install rear mounting strap (2).
a.
Remove the rear seat mounting screw (1).
b.
Slide the rear mounting strap (2) under the seat tab.
Align with mounting hole.
c.
Install seat mounting screw.
1
1.
2.
3.
4.
Seat mounting screw
Rear mounting strap
Tail Bag rear strap
Tail Bag
2.
See Figure 4. Install the front tie-down (2).
a.
Remove forward saddlebag mounting fastener (1).
b.
Slide tie-down strap (2) without grommet (Figure 5,
Item 8) between the saddlebag and the motorcycle.
Align with saddlebag mounting holes.
c.
Install the saddlebag fastener.
d.
Repeat steps for the opposite side.
Figure 2. Tail Bag Rear Installation
is07535
3
2
4
1
1.
2.
3.
4.
Saddlebag mounting bracket
Tie-down strap
Horizontal D-ring
Hook-and-loop tie-down strap
3.
See Figure 2. Place bag on passenger pillion. Install the
tail bag rear mounting strap (3) through the strap installed
in Step 1. Cinch the strap adjustment until the bag is in
the desired location.
4.
See Figure 4. Secure bag to front mounting locations.
a.
Install one end of the front mounting strap to the
horizontal D-ring (3) on the tail bag.
b.
Install the other end of the strap onto the tie-down
(2).
c.
Pull the strap until the bag is tight.
d.
Secure extra strap length with the hook-and-loop tiedown strap (4).
e.
Repeat steps for the opposite side.
Fender strut bolt
Tie-down strap
Horizontal D-ring
Hook-and-loop tie-down strap
Figure 3. Front Strap Installation (Sportster, Dyna, Softail)
-J05743
2 of 3
SERVICE PARTS
is07537
1
8
7
4
3
6
5
2
Figure 5. Service Parts: Universal Tail Bag
Table 1. Service Parts
Item
Description (Quantity)
Part Number
1
Tail bag
Not sold separately
2
Strap kit (includes items 3-8)
93300091a
3
•
Rear strap
Not sold separately
4
•
Rear mounting strap
Not sold separately
5
•
Front mounting strap (2)
Not sold separately
6
•
Tie-down strap with large diameter hole (2)
Not sold separately
7
•
Tie-down strap with small diameter hole (2)
Not sold separately
8
•
Tie-down strap with no grommet (2)
Not sold separately
-J05743
3 of 3