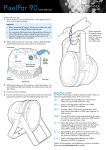
1
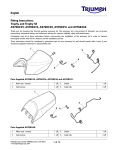
English
Fitting Instructions:
Thunderbird
A9750516
Thank you for choosing this Triumph genuine accessory kit. This accessory kit is the product of Triumph's use of proven
engineering, exhaustive testing, and continuous striving for superior reliability, safety and performance.
Completely read all of these instructions before commencing the installation of the accessory kit in order to become
thoroughly familiar with the kit’s features and the installation process.
These instructions should be considered a permanent part of your accessory kit, and should remain with it even if your
accessory-equipped motorcycle is subsequently sold.
Publication part number A9900416 issue 2, ADC 12976
© Triumph Designs Ltd. 2013
1 of 9
A9750516
1
4
2
3
7
6
5
8
14
9
9
12
12
10
13
11
cfrd
15
Parts Supplied:
1.
Sissy bar
1 off
9.
Plastic bush
2 off
2.
Mounting plate, right hand side
1 off
10. Large mounting
2 off
3.
Mounting plate, left hand side
1 off
11.
2 off
4.
Bolt, M8 x 30 mm
4 off
12. Small mounting
2 off
5.
Clamp plate
2 off
13. Spacer
2 off
6.
Bolt, M8 x 60 mm
2 off
14. Key
2 off
7.
Bolt, M10 x 60 mm
2 off
15. Gauge
1 off
8.
Finisher
2 off
2 of 9
Shouldered spacer
1.
Warning
Remove the seat, as described in the service manual.
Note:
This accessory kit is designed for use on
Triumph Thunderbird motorcycles only and should not be
fitted to any other manufacturer’s motorcycle. Fitting this
accessory kit to any other manufacturer’s motorcycle will
affect the performance, stability and handling of the
motorcycle. This may affect the rider’s ability to control the
motorcycle and could cause an accident.
•
For motorcycles with the pannier mounting kit A9528030 fitted, continue from step 2 to
step 15. Then continue from step 21.
For motorcycles without the pannier mounting
kit fitted continue from step 16.
•
Motorcycles Fitted with the Pannier Mounting Kit A9528030
2.
Warning
Remove the left hand pannier. Retain the bolts for
reuse.
Always have Triumph approved parts, accessories and
conversions fitted by a trained technician of an authorised
Triumph dealer. The fitment of parts, accessories and
conversions by a technician who is not of an authorised
Triumph dealer may affect the handling, stability or other
aspects of the motorcycle’s operation which may result in
loss of motorcycle control and an accident.
2
3
Warning
Throughout this operation, ensure that the motorcycle is
stabilised and adequately supported to prevent risk of
injury from the motorcycle falling.
2
cfql
Warning
A torque wrench of known accurate calibration must be
used when fitting this accessory kit. Failure to tighten any
of the fasteners to the correct torque specification may
result in loss of motorcycle control and an accident.
Note:
•
The gauge in this kit is used to align the large
and small mountings and should be considered a
permanent part of your accessory kit. It should
remain with the kit even if your accessoryequipped motorcycle is subsequently sold.
3 of 9
1. Pannier
2. Flanged sleeves
3. Bolts
1
3.
Remove the bolt, locknut and rubber dampers from
the pannier mounting assembly. Collect the following:
•
Locknut;
•
Bolt;
•
Spacer;
•
Two rubber dampers;
•
Sleeve;
•
Two washers;
•
M6 washer.
4.
Remove the two bolts and the pannier mounting
assembly.
2
1
3
1
2
cfqt_1
1. Bolt, M10
2. Bolt, M8
3. Pannier mounting assembly
7
6
9
3
5.
Remove all the spacers from the M8 and M10 bolts.
6.
Retain the spacers if the pannier mounting assembly is
to be returned to its original condition.
4
cfqu_1
1.
2.
3.
4.
5.
6.
7.
8.
9.
5
8
3
Inner pannier mounting
Outer pannier mounting
Bolt
Spacer
Rubber dampers
Sleeve
Washers
Washer, M6
Locknut
4
1
2
5
1.
2.
3.
4.
5.
4 of 9
M10 bolt
Spacer
M8 bolt
Tapered spacer
Spacer (if fitted)
7.
Fit the plastic bush into the larger recess in the large
mounting. Then invert the mounting and fit the
shouldered spacer into the mounting and plastic bush
as shown below.
9.
Fit the small mounting and the spacer to the M10 bolt,
as shown below.
1
1
2
3
2
cfra_2
1. Small mounting
2. M10 bolt
cfqs_1
1. Plastic bush
2. Large mounting
3. Shouldered spacer
8.
10. Fit the left hand pannier mounting to the motorcycle.
Do not fully tighten the bolts at this stage.
Fit the large mounting and a finisher to the M8 bolt as
shown below.
11.
Fit the gauge from the kit to the large and small
mountings.
Tighten the M10 bolt to 45 Nm.
Tighten the M8 bolt to 26 Nm.
2
2
1
3
1
3
cfra_1
cfyg
1. Finisher
2. Large mounting
3. M8 bolt
1. Gauge (shown with the pannier mounting removed)
2. Small mounting
3. Large mounting
12. Remove the gauge. Retain the gauge for re-use.
5 of 9
13. Fit the bolt, spacer, the two rubber dampers, the
sleeve, two washers, the M6 washer and the locknut to
the pannier mounting assembly, as shown below.
Motorcycles without the Pannier Mounting Kit A9528030 Fitted
17.
Working on the left hand side, remove the two front
bolts and washers securing the rear mudguard side
cover. Retain the bolts and washers if the motorcycle is
to be returned to its original condition.
1
2
2
7
6
9
3
4
cfqu_1
1.
2.
3.
4.
5.
6.
7.
8.
9.
5
1
8
Inner pannier mounting
Outer pannier mounting
Bolt
Spacer
Rubber dampers
Sleeve
Washers
Washer, M6
Locknut
cfqr
1. Side cover
2. Bolts
18. Fit the small mounting, spacer and M10 x 60 mm bolt
to the front mounting hole in the rear mudguard. Do
not fully tighten the bolt at this stage.
14. Tighten the locknut to 10 Nm.
15. Refit the pannier and tighten the bolts to 10 Nm.
1
16. Repeat steps 2 to 15 for the right hand side.
3
2
cfre_1
1. Bolt, M10 x 60 mm
2. Mounting, small
3. Spacer
6 of 9
19. Fit the plastic bush into the larger recess in the large
mounting. Then invert the mounting and fit the
shouldered spacer into the mounting and plastic bush
as shown below.
21.
Fit the gauge from the kit to the large and small
mountings.
Tighten the M10 bolt to 45 Nm.
Tighten the M8 bolt to 26 Nm.
1
2
2
1
3
3
cfyg
cfqs_1
1. Plastic bush
2. Large mounting
3. Shouldered spacer
1. Gauge
2. Small mounting
3. Large mounting
20. Fit the large mounting, M8 x 60 mm bolt and a
finisher to the centre mounting hole of the rear
mudguard. Do not fully tighten the bolt at this stage.
22. Remove the gauge. Retain the gauge for re-use.
23. Repeat steps 17 to 22 for the right hand side.
All Models
Note:
•
The left hand mounting plate has the key
operated lock fitted to it.
24. Unlock the left hand mounting plate.
2
25. To fit the mounting plates, locate the front slot in the
mounting plate to the front mounting.
3
1
cfre
1. Bolt, M8 x 60 mm
2. Large mounting, assembled
3. Finisher
7 of 9
26. Pull the latch lever on the mounting plate fully
rearwards and engage the rear slot onto the rear
mounting. Release the latch lever to lock the mounting
plate to the rear mounting.
30. With the key operated lock in the unlocked position,
pull both latch levers rearwards and simultaneously lift
the rear of the sissy bar off the rear mountings. Then
lift the sissy bar off the front mountings for complete
removal from the motorcycle.
3
1
2
1
cfrb
27. With the sweep in the bar towards the rear, locate the
sissy bar into the mounting plates.
28. Align the holes in the sissy bar and mounting plates.
Secure with the M8 x 30 mm bolts and clamp plates.
Do not fully tighten the bolts at this stage.
1
2
1. Latch lever, left hand side shown
2. Rear mounting
3. Front mounting
31.
If the sissy bar assembly can not be released and
removed, check the alignment of all components and
adjust as necessary.
32. Refit the sissy bar assembly into position on the
motorcycle, turn the key clockwise and remove. This
should lock the sissy bar onto the motorcycle.
33. Pull the left hand latch lever rearwards to confirm the
mechanism is locked. A small amount of movement in
the lever may be possible.
4
34. Refit the seat, as described in the service manual.
3
Adjustment
2
If the sissy bar is loose or excessively tight at the mountings,
check and, if necessary, adjust the mountings following the
procedure below.
1.
cfrc
1.
2.
3.
4.
3
cfrf
1. Front mounting
2. Rear mounting
3. Latch lever
Sissy bar
Mounting plate, left hand side
Bolts, M8 x 30 mm
Clamp plate
29. When satisfied that the sissy bar assembly is aligned
correctly on the motorcycle, tighten the four sissy bar
M8 bolts to 27 Nm.
8 of 9
Remove the sissy bar as described earlier.
2.
Fit the gauge from the kit to the large and small
mountings.
2
1
Warning
After fitting the accessory kit the motorcycle will exhibit
new handling characteristics. Operate the motorcycle in a
safe area free from traffic to gain familiarity with any new
characteristics. Operation of the motorcycle when not
familiar with any new handling characteristics may result in
loss of motorcycle control and an accident.
3
Warning
If, after fitment of this accessory kit, you have any doubt
about the performance of any aspect of the motorcycle,
contact an authorised Triumph dealer and do not ride the
motorcycle until the authorised dealer has declared it fit
for use. Riding a motorcycle when there is any doubt as to
any aspect of the performance of the motorcycle may
result in loss of control of the motorcycle leading to an
accident.
cfyg
1. Gauge (shown with the pannier mounting removed)
2. Small mounting
3. Large mounting
3.
If the gauge does not fit, adjust the mountings
following the steps below.
Motorcycles Fitted with the Pannier Mounting Kit A9528030
4.
Remove the pannier (see page 3).
5.
To access the mounting bolts, Remove the bolt, locknut
and dampers from the pannier mounting assembly
(see page 3).
All Models
6.
Loosen the bolts for both mountings and fit the gauge
from the kit.
7.
Tighten the M10 bolt to 45 Nm.
Tighten the M8 bolt to 26 Nm.
8.
Remove and store the gauge.
Warning
Never ride an accessory-equipped motorcycle at speeds
above 80 mph (130 km/h).
The presence of accessories will cause changes in the
stability and handling of the motorcycle. Failure to allow
for changes in motorcycle stability may lead to loss of
control or an accident.
Remember that the 80 mph (130 km/h) limit will be
reduced by the fitting of non-approved accessories,
incorrect loading, worn tyres, overall motorcycle condition
and poor road or weather conditions.
Warning
The motorcycle must not be operated above the legal
road speed limit except in closed course conditions.
Motorcycles Fitted with the Pannier Mounting Kit A9528030
9.
Refit the bolt, locknut and dampers to the pannier
mounting assembly. Tighten the locknut to 10 Nm.
10. Refit the pannier and tighten the bolts to 10 Nm.
All Models
11.
Fit the sissy bar and check that it is secure, repeat the
adjustment if necessary.
Warning
Only operate this Triumph motorcycle at high speed in
closed-course on road competition or on closed-course
racetracks. High speed operation should only be
attempted by riders who have been instructed in the
techniques necessary for high speed riding and are
familiar with the motorcycle’s characteristics in all
conditions.
High speed operation in any other circumstances is
dangerous and will lead to loss of motorcycle control and
an accident.
9 of 9