1
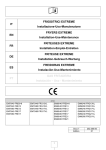
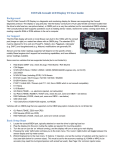
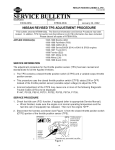
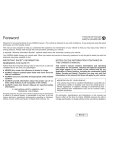
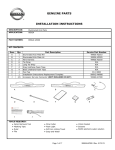
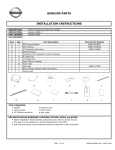
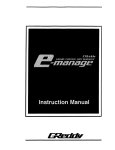
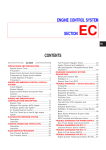
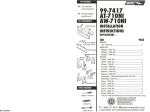
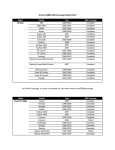
Classification:
Reference:
EM90-007
Date:
NTB90-086
October 25, 1990
ENGINE BLOCK HEATER INSTALLATION INSTRUCTIONS
All Models
APPLIED VEHICLE(S):
SERVICE INFORMATION
This Bulletin contains the engine block heater installation procedures for the following kits:
Description
Engine Block Heater Kit
Engine Block Heater Kit
Engine Block Heater Kit
Engine lower hose Heater Kit
Part Number
999M4-YA002
99998-10282CA
999M1-49000
99998-1024701
Part Number: 999M4-YA002
APPLICATION:
MODEL
Sentra
NX 2000
ENGINE TYPE
SR20DE
YEAR
1991
&
later
LOCATION
Rear side of the engine.
Threaded freeze plug on right
side of starter motor. (Fig. 1)
KIT CONTENTS:
Item No.
1
2
3
4
5
6
Qty.
1
1
1
1
3
1
Item
Engine block heater assembly
Gasket
Power cord
Power cord end protector cap
Tie wrap
Installation Instructions
TOOLS REQUIRED:
Phillips tip screwdriver
10mm socket and ratchet
12mm Hex bit w/universal joint
and extension
24mm combination wrench
24mm socket
Torque wrench
Cutting pliers
1/10
INSTALLATION PRECAUTIONS/NOTES:
•
Be careful not to damage engine block threads when removing freeze plug or installing
block heater.
•
Handle engine block heater with care to avoid damaging the threads.
•
Do not over-torque engine block heater.
•
Ensure that power cord doesn't contact exhaust pipes, sharp edges or vehicle moving
parts.
•
Torque removed vehicle parts to proper specifications
Figure 1
PROCEDURE
1. Remove engine undercover on right side only.
2. After the engine coolant and engine components have cooled down, drain engine
coolant from radiator and remove threaded freeze plug. (For plug location refer to
application chart on page 1.)
3. Apply a thin layer of gasket sealant (Nissan P/N 999MP-A7007) on both sides of the
gasket. Slide it over the engine block heater threads.
4. Install engine block heater to engine block being careful not to damage the threads.
Torque heater to 32 + 4 ft.lb (4.5 + 0.5 kg.m).
2/10
5. Connect power cord to engine block heater and route cord as follows:
A. From engine block heater route cord down, between drive shaft and engine block,
toward front of the vehicle between exhaust pipe and engine oil pan (Figure 2).
Attach cord to engine block ear on left side of compressor with a tie wrap. Continue
routing cord along the left side of the compressor and attach it to the compressor
high pressure hose (rubber portion) with a tie wrap.
NX: Route cord under radiator core support and out to the front of the vehicle
through right side opening of front lower grille. Secure cord to grille with tie wrap
(Figure 3).
Sentra: Route cord up and toward the right, through the opening behind right head
lamp, between the two legs securing the front grille to the radiator core support.
Secure cord to vertical member of front grille with a tie wrap (Figure 4).
CAUTION: Make sure that power cord is not routed close to or touching any
of the vehicle's moving parts or hot surfaces.
Figure 2
3/10
Figure 3
Figure 4
6. Refill cooling system; pressurize to radiator cap relief pressure and check for leaks.
Operate engine to check further for leaks. Refer to manufacturer's Service Manual
"Engine Cooling System" section.
NOTE: It is recommended that low phosphate anti-freeze be used and that a maximum
anti-freeze/water mixture ratio of 50/50 be used. Refer to Nissan Owner's Manual
"Engine Cooling System" section.
7. Reinstall engine undercover.
8. Use cable end protector cap when heater is not plugged into power source.
4/10
Part Number: 99998-10282CA
APPLICATION
MODEL
ENGINE TYPE
YEAR
300ZX
1986
& later
Maxima
VG30E
VG30DE
VG30ET (1)
VG30E (2)
200SX
VG30E
Stanza Wagon
CA20E
Stanza Sedan
CA20E
Sentra Pulsar
E16 (3)
1986
& later
1987
& later
1987
& later
1989
& later
1987-1988
Sentra
Pulsar NX
Pulsar
GA16i (3)
GA16DE (3)
CA16DE
CA18DE
1989
& later
1987
& later
LOCATION
Driver side, first plug
from the rear.
Front side, first plug
from driver side.
Driver side, first plug
from the rear.
Front side, second plug
from driver side.
Front side, first plug
from driver side.
Rear side, first plug
from passenger side.
Front side, first plug
from passenger side.
Front side, first plug
from driver side.
ELEMENT
DIRECTION
6 o'clock
6 o'clock
6 o'clock
7 o'clock
7 o'clock
8 o'clock
10 o'clock
5 o'clock
PROCEDURE
1. Remove exhaust pipe heat shield and steering column lower joint assembly for access
to indicated freeze plug.
Remove section of exhaust pipe connected to turbocharger if necessary.
2. Remove front section of exhaust pipe for access to indicated freeze plug.
3. Remove alternator for access to indicated freeze plug.
KIT CONTENTS:
Item No.
1
2
3
4
5
TOOLS REQUIRED:
Center punch
Hammer
Needle nose pliers
Qty.
1
1
1
3
1
Item
Heater assembly
Power cord
Power cord end protector cap
Tie wrap
Installation Instructions
Combination pliers
4mm hex wrench
Flat blade screwdriver
INSTALLATION PRECAUTIONS/NOTES:
• Do not over torque engine block heater.
• Ensure that power cord doesn’t contact exhaust pipes, sharp edges or vehicle moving
parts.
• Torque removed vehicle parts to proper specifications (refer to appropriate Nissan
Service Manual)
5/10
Part Number; 99M1-49000
APPLICATION
MODEL
ENGINE TYPE
240SX
KA24E
YEAR
LOCATION
ELEMENT
DIRECTION
12 o'clock
1989
Driver side of the engine, first
& later
plug from the rear.
Axxess
KA24E
1990
Front side of the engine, first
12 o'clock
Stanza
& later
plug from the driver side.
Truck (1)
KA24E
1990
Driver side of the engine, first
12 o'clock
(4cyl/2WD)
& later
plug from the rear.
(1) Remove section of exhaust pipe in front of indicated freeze plug to facilitate block heater
installation.
KIT CONTENTS:
Item No.
1
2
3
4
5
TOOLS REQUIRED:
Center punch
Hammer
Needle nose pliers
Qty.
1
1
1
3
1
Item
Heater assembly
Power cord
Power cord end protector cap
Tie wrap
Installation Instructions
Combination pliers
4mm hex wrench
Flat blade screwdriver
PROCEDURE
1. Drain coolant and remove specified core plug. (Do not use a screw type freeze plug
puller or similar tool to remove the plug as it may cause damage to the engine block.)
Remove freeze plug by positioning a flat blade screwdriver against the plug's recessed
area and hammering it repeatedly with very short strokes until the freeze plug is
loosened and turns. (Do not hammer freeze plug on the edges as this could damage
engine block.) Then remove plug with needle nose or combination pliers.
2. Thoroughly clean core plug hole, removing any burrs, compound, paint or rough spots.
(If necessary use fine emery paper being careful not to score surface.)
6/10
3. Apply a coating of grease to the heater "O" ring and machined surface of the engine
block hole to facilitate installation and prevent "O" ring damage.
NOTE: DO NOT USE GASKET GLUE - it hardens, preventing proper seal and
eventually causes leaks.
4. Refer to element direction shown in chart. Insert heater with element pointing in proper
direction and push flush to block.
5. Tighten screw to 14-19 in.lb.
6. Install the power cord and route it to the front grille, taping it and securing it with plastic
tie wraps where necessary, to insure that the cord does not touch any hot pipes, engine
components or moving parts.
7. Refill cooling system, pressurize to radiator cap relief pressure and check for leaks.
Operate engine to check further for leaks. Refer to manufacturer's Service Manual
"Engine Cooling System" section.
NOTE: It is recommended that low phosphate anti-freeze be used, and that a maximum
anti-freeze/water mixture ratio of 50/50 be used. Refer to the Nissan Owner’s Manual
"Engine Cooling System" section.
8. Use cable end protector cap when heater is not plugged into power source.
WARNING: Before connecting heater to power source, make sure that cooling
system is filled with recommended coolant (see appropriate Service Manual).
ENGINE LOWER HOSE HEATER INSTALLATION INSTRUCTIONS
Part Number: 99998-1024701
APPLICATION
MODEL
200SX
Stanza Sedan
Truck
Pathfinder
Truck (4Cyl 4WD
ENGINE TYPE
CA18ET
CA20E
CA20E
VG30i
VG30i
KA24E
YEAR
1984-1988
LOCATION
Lower radiator hose
1987-1988
1986.5 & later
1987 & later
1990 & later
Lower radiator hose
Lower radiator hose
Lower radiator hose
Lower radiator hose
7/10
KIT CONTENTS:
Item No.
1
2
Qty.
1
2
Item
Lower radiator hose heater
(with power cord and plug cap)
Hose clamp
TOOLS REQUIRED:
Phillips screwdriver
Flat blade screwdriver
Heavy duty utility knife
Masking tape or chalk
Electrical tape or wire tie
(plastic or wire)
Measuring tape or ruler
PROCEDURE:
1. Check the condition of the vehicle's lower radiator hose. (See Figures 5, 7, 9 and 11 for
identification.) If hose is cracked or softened, replace it. If it is in good condition,
proceed to Step 2.
2. Working from underneath the vehicle, remove the engine undercover and set it aside.
3. Drain coolant from the engine by opening the drain plug on the bottom of the radiator.
4. Loosen the clamps at both ends of the lower radiator hose. Observe how the hose fits
and its shape as installed in the vehicle. Mark the engine end of the hose with tape or
chalk. Remove the hose from the vehicle. (Stanza: remove end of hose connected to
radiator only.)
5. 200SX: Refer to Figures 5 and 6
Measure 15 inches from the engine end of the hose and make a mark. From this mark
measure 1-1/2" towards the radiator end and mark (Fig. 6). Using these two marks, cut
a 1-1/2" section from the hose. Be sure the cut piece is on a straight section of hose
and try to keep the hose in its original shape.
STANZA: Refer to Figures 7 and 8
Mark hose in the middle of lower section of hose inclined at a 45 angle (Fig. 8). From
this mark measure 3/8" toward the radiator end and toward the engine end and mark
both places. Using the last two marks, cut a 3/4" section from the hose. Be sure the cut
piece is on a straight section of hose and try to keep the hose in its original shape.
Truck/Pathfinder: Refer to Figures 9 and 10
Mark hose in the middle of straight section of hose connected to the engine (Fig. 10).
From this mark measure 3/8" to 1/2" toward the radiator end and toward the engine end
and mark both places. Using the last two marks cut a 3/4" to 1" section from the hose.
Be sure the cut piece is on a straight section of hose and try to keep the hose in its
original shape.
Truck (KA24E): Refer to Figures 11 and 12
Mark hose in the middle of lower half of the straight section (inclined portion of hose)
(Fig. 12). From this mark measure 1/2" toward radiator end and toward the engine end
and mark both places. Using the last two marks, cut a 1" section from the hose. Be
sure the cut piece is on a straight section of hose and try to keep the hose in its original
shape.
8/10
6. Insert the lower hose heater into the cut ends of the hose (see appropriate drawing).
Slide a hose clamp (provided in the kit) over the hose on each end and tighten over the
lower hose heater. Again try to keep the hose in its original shape. NOTE: Do not
remove electrical cord from heater.
7. Reinstall the lower radiator hose (with lower hose heater) into the vehicle using the
original clamps. Tighten all clamps. Make sure that the hose is installed in its original
position.
8. Route cord out around the radiator. Use plastic tie wraps to hold the wire away from hot
or moving parts.
9. Refill radiator with coolant fluid. Start engine and run to expel any air trapped in the
system. Check coolant level and add if required.
NOTE: It is recommended that low phosphate anti-freeze be used, and that a
maximum anti-freeze/water mixture ratio of 50/50 be used. Refer to the Nissan Owner’s
Manual "Engine Cooling System" section.
10. Check all hose connections for leaks. Tighten clamps if necessary. Reinstall engine
undercover.
11. Use cable end protector cap when heater is not plugged into power source.
9/10
10/10