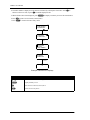
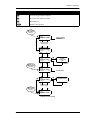
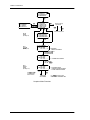
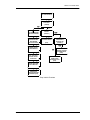
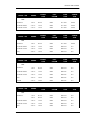
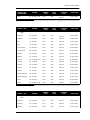
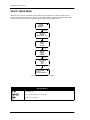
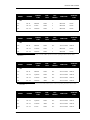
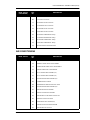
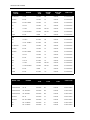
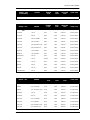
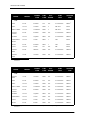
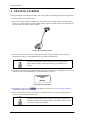
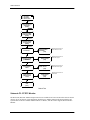
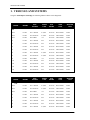
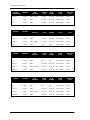
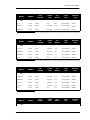
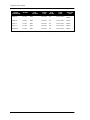
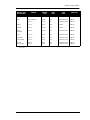
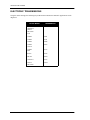
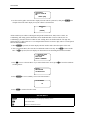
1
ASIAN IMPORTS APPLICATION Operator's Manual 3rd Edition Acura Chrysler Imports Daihatsu Honda Hyundai Infiniti Isuzu Kia Lexus Mazda Mitsubishi Nissan Subaru Suzuki Toyota SOME THINGS YOU SHOULD KNOW CAUTION! CAUTION CAUTION! CAUTION EXHAUST GAS When performing any checks with the engine running in an enclosed space such as a garage, be sure there is proper ventilation. Never inhale exhaust gases; they contain carbon monoxide, a colorless, odorless extremely dangerous gas which can cause unconsciousness or death. Always set the parking brake securely before performing any checks or repairs on the vehicle to help prevent vehicle movement that may cause injury. IMPORTANT-PLEASE READ The TECH 1, TECH 1A, and Mastertech are designed for use by authorized personnel only. They have been developed for the sole purpose of diagnosing and repairing automotive electronic systems. With the help of the information presented in this manual and the appropriate automotive service manual, qualified personnel should be able to diagnose and repair vehicle electronic control systems. DISCLAIMER Every attempt has been made to provide complete and accurate technical information based on service information available at the time of publication. However, the right is reserved to make changes at any time without notice. FCC CERTIFICATION "This equipment complies with the requirement in Part 15 of FCC rules for a Class A computing device. Operation of this equipment in a residential area may cause unacceptable interference to radio and TV reception requiring the operator to take whatever steps necessary to correct the interference." A NOTE ABOUT TECH 1 AND TECH 1A TESTERS The TECH 1 Series A is an updated version of the TECH 1. In addition to already proven TECH 1 diagnostic power, the TECH 1 Series A has on-board RS232, Instrumentation Port, and DC Power Jack capabilities. You can differentiate a TECH 1A from a TECH 1 by the phone-style jacks on both sides of the tester. All existing aftermarket TECH 1 application cartridges will run in the TECH 1A. Note that the TECH 1 and TECH 1A do not use the same DLC or DC Power cable, nor are the Adapters the same. On some vehicles power to the cigarette lighter is controlled by the ignition switch. When testing these vehicles with a TECH 1 or TECH1A, it is best to connect the tester directly to the battery with the optional Battery Adapter Cable (P/N 02001636), which is available from your TECH1A distributor. USING THIS CARTRIDGE WITH A TECH 1 OR TECH 1A TESTER When using the Asian Imports Software and a TECH 1A on OBD II compliant controllers, an OBD II interface cartridge and 16/14 pin adapter cable is required, or an OBD II Vehicle Interface Module (VIM) and 16/24 pin adapter cable can be used. When using the Asian Imports Software and a TECH 1 on Asian vehicles with OBD II compliant controllers, an OBD II Vehicle Interface Module (VIM) and 16/24 pin adapter cable will be required. When you are using this manual to diagnose a vehicle, take the time to determine the type of tester that you are working with and be sure you are using the correct cables and adapters. Doing so may prevent misuse of application cartridges and incorrect vehicle diagnosis. USING THIS CARTRIDGE WITH A MASTERTECH TESTER In addition to the TECH 1 and TECH 1A, this cartridge can also be used with the Mastertech tester. Refer to the Mastertech Operator's Manual for installing the cartridge and connecting the Mastertech to the vehicle. When using the Asian Imports Software cartridge and a MASTERTECH on Asian vehicles with OBD II compliant controllers, an OBD II compliant MASTERTECH and 16/14 pin adapter cable is required, or an OBD II Vehicle Interface Module (VIM) and 16/24 pin adapter cable can be used. When used alone in the Mastertech, the operation of the cartridge and the vehicle identification screens, test menus and data screens are as described in this manual. This cartridge can also be used with the Mastertech in conjunction with a program card, which allows viewing of vehicle identification screens, test menus, and diagnostic data parameters in full-screen Enhanced Mode displays. Refer to the Enhanced Mode operating instructions in the program card operator's manual for further detail. 3 ® ® Vetronix Corporation Copyright © 2002 Manual P/N 08002617 3rd Edition ® Tech 1 , Tech 1A , and Mastertech are registered trademarks of Vetronix Corporation Printed in USA 11/02 TABLE OF CONTENTS GENERAL INFORMATION. . . . . . . . . . . . . . . . . . . . . . . . . . . . . . . . Introduction . . . . . . . . . . . . . . . . . . . . . . . . . . . . . . . . . . . . . . . . . . . . . . . . . . . . . . . . . . . . . Common Test Modes Description . . . . . . . . . . . . . . . . . . . . . . . . . . . . . . . . . . . . . . . . . . . . . Manufacturer Specific Sections Description . . . . . . . . . . . . . . . . . . . . . . . . . . . . . . . . . . . . Flow Chart Description . . . . . . . . . . . . . . . . . . . . . . . . . . . . . . . . . . . . . . . . . . . . . . . . . . . . Test Selection Menu Description . . . . . . . . . . . . . . . . . . . . . . . . . . . . . . . . . . . . . . . . . . . . . OPERATING PRECAUTIONS 2 2 2 2 3 ............................................... 4 Connecting And Disconnecting the Tester While Ignition Key Is On . . . . . . . . . . . . . . . . . Removing the Cartridge While the Tester Is Powered On . . . . . . . . . . . . . . . . . . . . . . . . . . Vehicle Specific Precautions . . . . . . . . . . . . . . . . . . . . . . . . . . . . . . . . . . . . . . . . . . . . . . . . . 4 ASIAN IMPORTS CARTRIDGE KIT DESCRIPTION 4 4 .......................... 5 A Note About Tech 1 And Tech 1A Testers . . . . . . . . . . . . . . . . . . . . . . . . . . . . . . . . . . . . . . Asian Imports Cartridge Features . . . . . . . . . . . . . . . . . . . . . . . . . . . . . . . . . . . . . . . . . . . . Asian Imports Cartridge Kit Contents . . . . . . . . . . . . . . . . . . . . . . . . . . . . . . . . . . . . . . . . . Asian Imports Jumper Applications . . . . . . . . . . . . . . . . . . . . . . . . . . . . . . . . . . . . . . . . . . . Asian Imports Adapter Cable Applications . . . . . . . . . . . . . . . . . . . . . . . . . . . . . . . . . . . . . 5 VEHICLE COVERAGE 6 6 10 10 ..................................................... 11 Acura . . . . . . . . . . . . . . . . . . . . . . . . . . . . . . . . . . . . . . . . . . . . . . . . . . . . . . . . . . . . . . . . . . Chrysler Imports (Dodge) . . . . . . . . . . . . . . . . . . . . . . . . . . . . . . . . . . . . . . . . . . . . . . . . . . Chrysler Imports (Eagle) . . . . . . . . . . . . . . . . . . . . . . . . . . . . . . . . . . . . . . . . . . . . . . . . . . . Chrysler Imports (Plymouth) . . . . . . . . . . . . . . . . . . . . . . . . . . . . . . . . . . . . . . . . . . . . . . . . Daihatsu . . . . . . . . . . . . . . . . . . . . . . . . . . . . . . . . . . . . . . . . . . . . . . . . . . . . . . . . . . . . . . . . Honda . . . . . . . . . . . . . . . . . . . . . . . . . . . . . . . . . . . . . . . . . . . . . . . . . . . . . . . . . . . . . . . . . . Hyundai . . . . . . . . . . . . . . . . . . . . . . . . . . . . . . . . . . . . . . . . . . . . . . . . . . . . . . . . . . . . . . . . Infiniti . . . . . . . . . . . . . . . . . . . . . . . . . . . . . . . . . . . . . . . . . . . . . . . . . . . . . . . . . . . . . . . . . . Kia . . . . . . . . . . . . . . . . . . . . . . . . . . . . . . . . . . . . . . . . . . . . . . . . . . . . . . . . . . . . . . . . . . . . Lexus . . . . . . . . . . . . . . . . . . . . . . . . . . . . . . . . . . . . . . . . . . . . . . . . . . . . . . . . . . . . . . . . . . . Mazda . . . . . . . . . . . . . . . . . . . . . . . . . . . . . . . . . . . . . . . . . . . . . . . . . . . . . . . . . . . . . . . . . . Mitsubishi . . . . . . . . . . . . . . . . . . . . . . . . . . . . . . . . . . . . . . . . . . . . . . . . . . . . . . . . . . . . . . . Nissan . . . . . . . . . . . . . . . . . . . . . . . . . . . . . . . . . . . . . . . . . . . . . . . . . . . . . . . . . . . . . . . . . . Subaru . . . . . . . . . . . . . . . . . . . . . . . . . . . . . . . . . . . . . . . . . . . . . . . . . . . . . . . . . . . . . . . . . Toyota . . . . . . . . . . . . . . . . . . . . . . . . . . . . . . . . . . . . . . . . . . . . . . . . . . . . . . . . . . . . . . . . . . 11 TEST MODES AVAILABLE 11 12 13 13 13 14 15 15 15 15 17 18 19 20 ................................................. 22 Available Test Modes . . . . . . . . . . . . . . . . . . . . . . . . . . . . . . . . . . . . . . . . . . . . . . . . . . . . . . Test Modes Available . . . . . . . . . . . . . . . . . . . . . . . . . . . . . . . . . . . . . . . . . . . . . . . . . . . . . . System Tests Available . . . . . . . . . . . . . . . . . . . . . . . . . . . . . . . . . . . . . . . . . . . . . . . . . . . . . OBD Controls Available . . . . . . . . . . . . . . . . . . . . . . . . . . . . . . . . . . . . . . . . . . . . . . . . . . . . 22 GETTING STARTED ....................................................... COMMON TEST MODES I . . . . . . . . . . . . . . . . . . . . . . . . . . . . . . . . SELECTING TEST MODES MODE F0: DATA LIST Asian Imports 1 23 23 24 25 1 ................................................. 2 ..................................................... 3 TOC-1 MODE F1: DTC ENTRY ..................................................... 5 Submode F0: How To Read . . . . . . . . . . . . . . . . . . . . . . . . . . . . . . . . . . . . . . . . . . . . . . . . . Submode F1: Enter DTC(s) . . . . . . . . . . . . . . . . . . . . . . . . . . . . . . . . . . . . . . . . . . . . . . . . . Submode F2: DTC List . . . . . . . . . . . . . . . . . . . . . . . . . . . . . . . . . . . . . . . . . . . . . . . . . . . . . Submode F3: Review DTC . . . . . . . . . . . . . . . . . . . . . . . . . . . . . . . . . . . . . . . . . . . . . . . . . . Submode F4: Clear DTC(s) . . . . . . . . . . . . . . . . . . . . . . . . . . . . . . . . . . . . . . . . . . . . . . . . . 5 MODE F2: DTC(S) 8 9 11 .......................................................... 13 Submode F1: Read DTC(s) . . . . . . . . . . . . . . . . . . . . . . . . . . . . . . . . . . . . . . . . . . . . . . . . . . Submode F2: DTC List . . . . . . . . . . . . . . . . . . . . . . . . . . . . . . . . . . . . . . . . . . . . . . . . . . . . . Submode F3: Review DTC . . . . . . . . . . . . . . . . . . . . . . . . . . . . . . . . . . . . . . . . . . . . . . . . . . Submode F4: Clear DTC(s) . . . . . . . . . . . . . . . . . . . . . . . . . . . . . . . . . . . . . . . . . . . . . . . . . 13 MODE F3: SNAPSHOT 15 16 18 ...................................................... 20 Trigger Condition . . . . . . . . . . . . . . . . . . . . . . . . . . . . . . . . . . . . . . . . . . . . . . . . . . . . . . . . . Trigger Point . . . . . . . . . . . . . . . . . . . . . . . . . . . . . . . . . . . . . . . . . . . . . . . . . . . . . . . . . . . . . Viewing Captured Data . . . . . . . . . . . . . . . . . . . . . . . . . . . . . . . . . . . . . . . . . . . . . . . . . . . . . Printing Captured Data . . . . . . . . . . . . . . . . . . . . . . . . . . . . . . . . . . . . . . . . . . . . . . . . . . . . Operating Procedure . . . . . . . . . . . . . . . . . . . . . . . . . . . . . . . . . . . . . . . . . . . . . . . . . . . . . . 20 MODE F4: OBD CONTROLS MODE F5: SYSTEM TESTS Submode F0: Prep Vehicle MODE F8: INFORMATION ................................................ 20 20 20 20 27 ................................................. 28 .................................................. 28 ................................................. 30 Submode F1: DLC Location . . . . . . . . . . . . . . . . . . . . . . . . . . . . . . . . . . . . . . . . . . . . . . . . . Submode F2: SCC Location . . . . . . . . . . . . . . . . . . . . . . . . . . . . . . . . . . . . . . . . . . . . . . . . . Submode F3: ID Info . . . . . . . . . . . . . . . . . . . . . . . . . . . . . . . . . . . . . . . . . . . . . . . . . . . . . . Submode F4: DJC Location . . . . . . . . . . . . . . . . . . . . . . . . . . . . . . . . . . . . . . . . . . . . . . . . . Submode F5: ECU Location . . . . . . . . . . . . . . . . . . . . . . . . . . . . . . . . . . . . . . . . . . . . . . . . . 30 COMMON TEST MODES II. . . . . . . . . . . . . . . . . . . . . . . . . . . . . . . . TEST MODES AVAILABLE 31 32 33 34 1 ................................................. 3 ................................................... 4 Mastertech . . . . . . . . . . . . . . . . . . . . . . . . . . . . . . . . . . . . . . . . . . . . . . . . . . . . . . . . . . . . . . Tech 1A . . . . . . . . . . . . . . . . . . . . . . . . . . . . . . . . . . . . . . . . . . . . . . . . . . . . . . . . . . . . . . . . . Tech 1 . . . . . . . . . . . . . . . . . . . . . . . . . . . . . . . . . . . . . . . . . . . . . . . . . . . . . . . . . . . . . . . . . . Printing Capabilities . . . . . . . . . . . . . . . . . . . . . . . . . . . . . . . . . . . . . . . . . . . . . . . . . . . . . . . 4 HARDWARE REQUIRED GETTING STARTED 5 6 7 ........................................................ 8 Powering the Mastertech, Tech 1A, or Tech 1 . . . . . . . . . . . . . . . . . . . . . . . . . . . . . . . . . . . Establishing Communication . . . . . . . . . . . . . . . . . . . . . . . . . . . . . . . . . . . . . . . . . . . . . . . . Communication Failure . . . . . . . . . . . . . . . . . . . . . . . . . . . . . . . . . . . . . . . . . . . . . . . . . . . . 8 TEST MODES TOC-2 6 8 8 .............................................................. 9 Select Mode Menu . . . . . . . . . . . . . . . . . . . . . . . . . . . . . . . . . . . . . . . . . . . . . . . . . . . . . . . . . Mode F0: Data List . . . . . . . . . . . . . . . . . . . . . . . . . . . . . . . . . . . . . . . . . . . . . . . . . . . . . . . . Mode F1: Readiness . . . . . . . . . . . . . . . . . . . . . . . . . . . . . . . . . . . . . . . . . . . . . . . . . . . . . . . Mode F2: Diagnostic Trouble Codes (DTCs) . . . . . . . . . . . . . . . . . . . . . . . . . . . . . . . . . . . . Mode F3: Snapshot . . . . . . . . . . . . . . . . . . . . . . . . . . . . . . . . . . . . . . . . . . . . . . . . . . . . . . . . Mode F4: OBD Controls . . . . . . . . . . . . . . . . . . . . . . . . . . . . . . . . . . . . . . . . . . . . . . . . . . . Mode F5: System Tests . . . . . . . . . . . . . . . . . . . . . . . . . . . . . . . . . . . . . . . . . . . . . . . . . . . . . Mode F8: Information . . . . . . . . . . . . . . . . . . . . . . . . . . . . . . . . . . . . . . . . . . . . . . . . . . . . . Mode F9: OBD II Toolpak . . . . . . . . . . . . . . . . . . . . . . . . . . . . . . . . . . . . . . . . . . . . . . . . . . 9 9 14 16 20 23 24 27 28 Asian Imports ASIAN IMPORTS DIAGNOSTIC DATA PARAMETERS ....................... ACURA . . . . . . . . . . . . . . . . . . . . . . . . . . . . . . . . . . . . . . . . . . . . . . . . VEHICLES AND SYSTEMS ................................................. ACURA SPECIFIC INFORMATION 2 ......................................... 5 5 ................................................. 6 ....................................................... 7 TEST MODES AVAILABLE SELECTING THE VEHICLE ................................................ 8 Selecting the Manufacturer . . . . . . . . . . . . . . . . . . . . . . . . . . . . . . . . . . . . . . . . . . . . . . . . . Selecting the Model Year . . . . . . . . . . . . . . . . . . . . . . . . . . . . . . . . . . . . . . . . . . . . . . . . . . . Selecting the Model . . . . . . . . . . . . . . . . . . . . . . . . . . . . . . . . . . . . . . . . . . . . . . . . . . . . . . . Selecting the Engine . . . . . . . . . . . . . . . . . . . . . . . . . . . . . . . . . . . . . . . . . . . . . . . . . . . . . . . Vehicle Information Display . . . . . . . . . . . . . . . . . . . . . . . . . . . . . . . . . . . . . . . . . . . . . . . . . Select Mode Menu . . . . . . . . . . . . . . . . . . . . . . . . . . . . . . . . . . . . . . . . . . . . . . . . . . . . . . . . 8 TEST MODES .............................................................. Mode F1: DTC Entry ...................................................... ACURA DIAGNOSTIC TROUBLE CODES (DTCS) ........................... CHRYSLER IMPORTS . . . . . . . . . . . . . . . . . . . . . . . . . . . . . . . . . . . . VEHICLES AND SYSTEMS ................................................. CHRYSLER IMPORTS SPECIFIC INFORMATION GETTING STARTED 8 8 8 8 8 10 10 13 1 3 ............................ 11 ................................................. 12 ....................................................... 13 TEST MODES AVAILABLE SELECTING THE VEHICLE ................................................ 14 Selecting the Manufacturer . . . . . . . . . . . . . . . . . . . . . . . . . . . . . . . . . . . . . . . . . . . . . . . . . Selecting the Model Year . . . . . . . . . . . . . . . . . . . . . . . . . . . . . . . . . . . . . . . . . . . . . . . . . . . Selecting the Model . . . . . . . . . . . . . . . . . . . . . . . . . . . . . . . . . . . . . . . . . . . . . . . . . . . . . . . Selecting the Engine And Engine Type . . . . . . . . . . . . . . . . . . . . . . . . . . . . . . . . . . . . . . . . . Vehicle Information Display . . . . . . . . . . . . . . . . . . . . . . . . . . . . . . . . . . . . . . . . . . . . . . . . . Select Mode Menu . . . . . . . . . . . . . . . . . . . . . . . . . . . . . . . . . . . . . . . . . . . . . . . . . . . . . . . . 14 TEST MODES 14 14 14 14 14 .............................................................. 16 Reading Codes . . . . . . . . . . . . . . . . . . . . . . . . . . . . . . . . . . . . . . . . . . . . . . . . . . . . . . . . . . . Mode F1: DTC Entry . . . . . . . . . . . . . . . . . . . . . . . . . . . . . . . . . . . . . . . . . . . . . . . . . . . . . . Mode F2: DTC . . . . . . . . . . . . . . . . . . . . . . . . . . . . . . . . . . . . . . . . . . . . . . . . . . . . . . . . . . . 16 CHRYSLER IMPORTS DIAGNOSTIC TROUBLE CODES (DTCS) 16 22 ............. 24 OBD, OBD I Systems . . . . . . . . . . . . . . . . . . . . . . . . . . . . . . . . . . . . . . . . . . . . . . . . . . . . . . OBD II Systems . . . . . . . . . . . . . . . . . . . . . . . . . . . . . . . . . . . . . . . . . . . . . . . . . . . . . . . . . . 24 DAIHATSU . . . . . . . . . . . . . . . . . . . . . . . . . . . . . . . . . . . . . . . . . . . . . VEHICLES AND SYSTEMS ................................................. DAIHATSU SPECIFIC INFORMATION Asian Imports 1 ............................................... Two Ways To Diagnose Acura GETTING STARTED 41 ...................................... 33 1 2 3 TOC-3 TEST MODES AVAILABLE GETTING STARTED ................................................. 4 ........................................................ 5 SELECTING THE VEHICLE ................................................. 6 Selecting the Manufacturer . . . . . . . . . . . . . . . . . . . . . . . . . . . . . . . . . . . . . . . . . . . . . . . . . . Selecting the Model Year . . . . . . . . . . . . . . . . . . . . . . . . . . . . . . . . . . . . . . . . . . . . . . . . . . . Selecting the Model . . . . . . . . . . . . . . . . . . . . . . . . . . . . . . . . . . . . . . . . . . . . . . . . . . . . . . . . Selecting the Engine . . . . . . . . . . . . . . . . . . . . . . . . . . . . . . . . . . . . . . . . . . . . . . . . . . . . . . . Vehicle Information Display . . . . . . . . . . . . . . . . . . . . . . . . . . . . . . . . . . . . . . . . . . . . . . . . . Select Mode Menu . . . . . . . . . . . . . . . . . . . . . . . . . . . . . . . . . . . . . . . . . . . . . . . . . . . . . . . . . 6 TEST MODES 6 6 6 6 .............................................................. 8 Reading Codes . . . . . . . . . . . . . . . . . . . . . . . . . . . . . . . . . . . . . . . . . . . . . . . . . . . . . . . . . . . Mode F1: DTC Entry . . . . . . . . . . . . . . . . . . . . . . . . . . . . . . . . . . . . . . . . . . . . . . . . . . . . . . 8 DAIHATSU DIAGNOSTIC TROUBLE CODES (DTCS) ........................ HONDA. . . . . . . . . . . . . . . . . . . . . . . . . . . . . . . . . . . . . . . . . . . . . . . . VEHICLES AND SYSTEMS ................................................. HONDA SPECIFIC INFORMATION GETTING STARTED 8 11 1 2 .......................................... 6 ................................................. 7 ........................................................ 8 TEST MODES AVAILABLE SELECTING THE VEHICLE ................................................. 9 Selecting the Manufacturer . . . . . . . . . . . . . . . . . . . . . . . . . . . . . . . . . . . . . . . . . . . . . . . . . . Selecting the Model Year . . . . . . . . . . . . . . . . . . . . . . . . . . . . . . . . . . . . . . . . . . . . . . . . . . . Selecting the Model . . . . . . . . . . . . . . . . . . . . . . . . . . . . . . . . . . . . . . . . . . . . . . . . . . . . . . . . Selecting the Engine . . . . . . . . . . . . . . . . . . . . . . . . . . . . . . . . . . . . . . . . . . . . . . . . . . . . . . . Vehicle Information Display . . . . . . . . . . . . . . . . . . . . . . . . . . . . . . . . . . . . . . . . . . . . . . . . . Select Mode Menu . . . . . . . . . . . . . . . . . . . . . . . . . . . . . . . . . . . . . . . . . . . . . . . . . . . . . . . . . 9 TEST MODES 9 9 9 9 9 .............................................................. 11 Reading Codes . . . . . . . . . . . . . . . . . . . . . . . . . . . . . . . . . . . . . . . . . . . . . . . . . . . . . . . . . . . Mode F1: DTC Entry . . . . . . . . . . . . . . . . . . . . . . . . . . . . . . . . . . . . . . . . . . . . . . . . . . . . . . 11 HONDA DIAGNOSTIC TROUBLE CODES (DTCS) ........................... HYUNDAI . . . . . . . . . . . . . . . . . . . . . . . . . . . . . . . . . . . . . . . . . . . . . . VEHICLES AND SYSTEMS ................................................. HYUNDAI SPECIFIC INFORMATION GETTING STARTED 11 15 1 2 ....................................... 6 ................................................. 7 ........................................................ 8 TEST MODES AVAILABLE SELECTING THE VEHICLE TOC-4 6 ................................................. 9 Selecting the Manufacturer . . . . . . . . . . . . . . . . . . . . . . . . . . . . . . . . . . . . . . . . . . . . . . . . . . Selecting the Model Year . . . . . . . . . . . . . . . . . . . . . . . . . . . . . . . . . . . . . . . . . . . . . . . . . . . Selecting the Model . . . . . . . . . . . . . . . . . . . . . . . . . . . . . . . . . . . . . . . . . . . . . . . . . . . . . . . . Selecting the Engine And Engine Type . . . . . . . . . . . . . . . . . . . . . . . . . . . . . . . . . . . . . . . . . Vehicle Information Display . . . . . . . . . . . . . . . . . . . . . . . . . . . . . . . . . . . . . . . . . . . . . . . . . Select Mode Menu . . . . . . . . . . . . . . . . . . . . . . . . . . . . . . . . . . . . . . . . . . . . . . . . . . . . . . . . . 9 9 9 9 9 10 Asian Imports TEST MODES .............................................................. 11 Reading Codes . . . . . . . . . . . . . . . . . . . . . . . . . . . . . . . . . . . . . . . . . . . . . . . . . . . . . . . . . . . Mode F1: DTC Entry . . . . . . . . . . . . . . . . . . . . . . . . . . . . . . . . . . . . . . . . . . . . . . . . . . . . . . Manually Reading DTCs . . . . . . . . . . . . . . . . . . . . . . . . . . . . . . . . . . . . . . . . . . . . . . . . . . . Mode F2: DTC . . . . . . . . . . . . . . . . . . . . . . . . . . . . . . . . . . . . . . . . . . . . . . . . . . . . . . . . . . . 11 HYUNDAI DIAGNOSTIC TROUBLE CODES (DTCS) 11 15 ........................ 17 OBD I Systems . . . . . . . . . . . . . . . . . . . . . . . . . . . . . . . . . . . . . . . . . . . . . . . . . . . . . . . . . . . OBD II Systems . . . . . . . . . . . . . . . . . . . . . . . . . . . . . . . . . . . . . . . . . . . . . . . . . . . . . . . . . . 17 INFINITI. . . . . . . . . . . . . . . . . . . . . . . . . . . . . . . . . . . . . . . . . . . . . . . VEHICLES AND SYSTEMS ................................................. INFINITI SPECIFIC INFORMATION GETTING STARTED 25 1 2 ........................................ 5 ................................................. 6 ....................................................... 7 TEST MODES AVAILABLE SELECTING THE VEHICLE ................................................ 8 .............................................................. 10 Reading Codes . . . . . . . . . . . . . . . . . . . . . . . . . . . . . . . . . . . . . . . . . . . . . . . . . . . . . . . . . . . Mode F1: DTC Entry . . . . . . . . . . . . . . . . . . . . . . . . . . . . . . . . . . . . . . . . . . . . . . . . . . . . . . 10 TEST MODES INFINITI DIAGNOSTIC TROUBLE CODES (DTCS) 10 .......................... 13 OBD, OBD I Systems . . . . . . . . . . . . . . . . . . . . . . . . . . . . . . . . . . . . . . . . . . . . . . . . . . . . . . OBD II Systems . . . . . . . . . . . . . . . . . . . . . . . . . . . . . . . . . . . . . . . . . . . . . . . . . . . . . . . . . . 13 KIA . . . . . . . . . . . . . . . . . . . . . . . . . . . . . . . . . . . . . . . . . . . . . . . . . . . VEHICLES AND SYSTEMS ................................................. KIA SPECIFIC INFORMATION GETTING STARTED 18 1 2 ............................................. 3 ................................................. 4 ....................................................... 5 TEST MODES AVAILABLE SELECTING THE VEHICLE ................................................ 6 Selecting the Manufacturer . . . . . . . . . . . . . . . . . . . . . . . . . . . . . . . . . . . . . . . . . . . . . . . . . Selecting the Model Year . . . . . . . . . . . . . . . . . . . . . . . . . . . . . . . . . . . . . . . . . . . . . . . . . . . Selecting the Model . . . . . . . . . . . . . . . . . . . . . . . . . . . . . . . . . . . . . . . . . . . . . . . . . . . . . . . Selecting the Engine . . . . . . . . . . . . . . . . . . . . . . . . . . . . . . . . . . . . . . . . . . . . . . . . . . . . . . . Vehicle Information Display . . . . . . . . . . . . . . . . . . . . . . . . . . . . . . . . . . . . . . . . . . . . . . . . . Select Mode Menu . . . . . . . . . . . . . . . . . . . . . . . . . . . . . . . . . . . . . . . . . . . . . . . . . . . . . . . . 6 TEST MODES 6 6 6 6 6 .............................................................. 8 Reading Codes . . . . . . . . . . . . . . . . . . . . . . . . . . . . . . . . . . . . . . . . . . . . . . . . . . . . . . . . . . . Mode F1: DTC Entry . . . . . . . . . . . . . . . . . . . . . . . . . . . . . . . . . . . . . . . . . . . . . . . . . . . . . . 8 KIA DIAGNOSTIC TROUBLE CODES (DTCS) OBD I Systems 8 ............................... 12 ........................................................... 12 LEXUS . . . . . . . . . . . . . . . . . . . . . . . . . . . . . . . . . . . . . . . . . . . . . . . . VEHICLES AND SYSTEMS Asian Imports 11 ................................................. 1 2 TOC-5 Electronic Transmissions ................................................... LEXUS SPECIFIC INFORMATION Two Ways to Diagnose Lexus LEXUS OBD SYSTEMS .......................................... 4 ................................................ 4 ..................................................... 5 Engine Data List . . . . . . . . . . . . . . . . . . . . . . . . . . . . . . . . . . . . . . . . . . . . . . . . . . . . . . . . . . Engine DTCs . . . . . . . . . . . . . . . . . . . . . . . . . . . . . . . . . . . . . . . . . . . . . . . . . . . . . . . . . . . . . Electronically Controlled Transmission DTCs . . . . . . . . . . . . . . . . . . . . . . . . . . . . . . . . . . . Antilock Brake DTCs . . . . . . . . . . . . . . . . . . . . . . . . . . . . . . . . . . . . . . . . . . . . . . . . . . . . . . Cruise Control DTCs . . . . . . . . . . . . . . . . . . . . . . . . . . . . . . . . . . . . . . . . . . . . . . . . . . . . . . Air Conditioning DTCs . . . . . . . . . . . . . . . . . . . . . . . . . . . . . . . . . . . . . . . . . . . . . . . . . . . . . Air bag DTCs . . . . . . . . . . . . . . . . . . . . . . . . . . . . . . . . . . . . . . . . . . . . . . . . . . . . . . . . . . . . A note about the MIL . . . . . . . . . . . . . . . . . . . . . . . . . . . . . . . . . . . . . . . . . . . . . . . . . . . . . . systems covered by the software . . . . . . . . . . . . . . . . . . . . . . . . . . . . . . . . . . . . . . . . . . . . . . 5 TEST MODES AVAILABLE GETTING STARTED 5 5 5 6 6 6 6 6 ................................................. 8 ........................................................ 9 SELECTING THE VEHICLE ................................................. 11 Selecting the Manufacturer . . . . . . . . . . . . . . . . . . . . . . . . . . . . . . . . . . . . . . . . . . . . . . . . . . Replay Snapshot Data . . . . . . . . . . . . . . . . . . . . . . . . . . . . . . . . . . . . . . . . . . . . . . . . . . . . . . Selecting the Model Year . . . . . . . . . . . . . . . . . . . . . . . . . . . . . . . . . . . . . . . . . . . . . . . . . . . Selecting the Model . . . . . . . . . . . . . . . . . . . . . . . . . . . . . . . . . . . . . . . . . . . . . . . . . . . . . . . . Selecting the Engine . . . . . . . . . . . . . . . . . . . . . . . . . . . . . . . . . . . . . . . . . . . . . . . . . . . . . . . Vehicle Information Display . . . . . . . . . . . . . . . . . . . . . . . . . . . . . . . . . . . . . . . . . . . . . . . . . System Inquiry . . . . . . . . . . . . . . . . . . . . . . . . . . . . . . . . . . . . . . . . . . . . . . . . . . . . . . . . . . . . Possible Systems Supported Displays . . . . . . . . . . . . . . . . . . . . . . . . . . . . . . . . . . . . . . . . . . Select System Menu . . . . . . . . . . . . . . . . . . . . . . . . . . . . . . . . . . . . . . . . . . . . . . . . . . . . . . . . Inactive System Displays . . . . . . . . . . . . . . . . . . . . . . . . . . . . . . . . . . . . . . . . . . . . . . . . . . . Select Mode Menu . . . . . . . . . . . . . . . . . . . . . . . . . . . . . . . . . . . . . . . . . . . . . . . . . . . . . . . . . 11 TEST MODES Reading Codes Mode F2: DTC 11 11 11 11 11 13 14 15 15 16 .............................................................. 17 ........................................................... ........................................................... 17 LEXUS DIAGNOSTIC TROUBLE CODES (DTCS) 17 ............................ 21 Air Bag . . . . . . . . . . . . . . . . . . . . . . . . . . . . . . . . . . . . . . . . . . . . . . . . . . . . . . . . . . . . . . . . . Anti-Lock Brake System . . . . . . . . . . . . . . . . . . . . . . . . . . . . . . . . . . . . . . . . . . . . . . . . . . . . Air Conditioning ......................................................... Cruise Control System . . . . . . . . . . . . . . . . . . . . . . . . . . . . . . . . . . . . . . . . . . . . . . . . . . . . . Electronic Controlled transmission . . . . . . . . . . . . . . . . . . . . . . . . . . . . . . . . . . . . . . . . . . . Engine ................................................................. 21 DATA LIST PARAMETER DESCRIPTIONS ................................... MAZDA . . . . . . . . . . . . . . . . . . . . . . . . . . . . . . . . . . . . . . . . . . . . . . . . VEHICLES AND SYSTEMS ................................................. MAZDA SPECIFIC INFORMATION GETTING STARTED 21 23 24 24 25 27 1 3 ......................................... 11 ................................................. 12 ........................................................ 13 TEST MODES AVAILABLE SELECTING THE VEHICLE Selecting the Manufacturer TOC-6 3 ................................................. 14 .................................................. 14 Asian Imports Selecting the Model Year . . . . . . . . . . . . . . . . . . . . . . . . . . . . . . . . . . . . . . . . . . . . . . . . . . . Selecting the Model . . . . . . . . . . . . . . . . . . . . . . . . . . . . . . . . . . . . . . . . . . . . . . . . . . . . . . . Selecting the Engine And Engine Type . . . . . . . . . . . . . . . . . . . . . . . . . . . . . . . . . . . . . . . . . Vehicle Information Display . . . . . . . . . . . . . . . . . . . . . . . . . . . . . . . . . . . . . . . . . . . . . . . . . Select Mode Menu . . . . . . . . . . . . . . . . . . . . . . . . . . . . . . . . . . . . . . . . . . . . . . . . . . . . . . . . TEST MODES 14 14 14 14 .............................................................. 16 Reading Codes . . . . . . . . . . . . . . . . . . . . . . . . . . . . . . . . . . . . . . . . . . . . . . . . . . . . . . . . . . . Mode F1: DTC Entry . . . . . . . . . . . . . . . . . . . . . . . . . . . . . . . . . . . . . . . . . . . . . . . . . . . . . . Mode F2: DTC . . . . . . . . . . . . . . . . . . . . . . . . . . . . . . . . . . . . . . . . . . . . . . . . . . . . . . . . . . . 16 OBD CONTROLS .......................................................... Mode F4: OBD Controls ................................................... MAZDA DIAGNOSTIC TROUBLE CODES (DTCS) 16 21 24 24 .......................... 28 OBD, OBD I Systems . . . . . . . . . . . . . . . . . . . . . . . . . . . . . . . . . . . . . . . . . . . . . . . . . . . . . . OBD II Systems . . . . . . . . . . . . . . . . . . . . . . . . . . . . . . . . . . . . . . . . . . . . . . . . . . . . . . . . . . 28 MITSUBISHI . . . . . . . . . . . . . . . . . . . . . . . . . . . . . . . . . . . . . . . . . . . VEHICLES AND SYSTEMS ................................................. MITSUBISHI SPECIFIC INFORMATION GETTING STARTED 57 1 3 .................................... 12 ................................................. 13 ....................................................... 14 TEST MODES AVAILABLE SELECTING THE VEHICLE ................................................ 15 Selecting the Manufacturer . . . . . . . . . . . . . . . . . . . . . . . . . . . . . . . . . . . . . . . . . . . . . . . . . Selecting the Model Year . . . . . . . . . . . . . . . . . . . . . . . . . . . . . . . . . . . . . . . . . . . . . . . . . . . Selecting the Model . . . . . . . . . . . . . . . . . . . . . . . . . . . . . . . . . . . . . . . . . . . . . . . . . . . . . . . Selecting the Engine And Engine Type . . . . . . . . . . . . . . . . . . . . . . . . . . . . . . . . . . . . . . . . . Vehicle Information Display . . . . . . . . . . . . . . . . . . . . . . . . . . . . . . . . . . . . . . . . . . . . . . . . . Select Mode Menu . . . . . . . . . . . . . . . . . . . . . . . . . . . . . . . . . . . . . . . . . . . . . . . . . . . . . . . . 15 TEST MODES 15 15 15 15 16 .............................................................. 17 Reading Codes . . . . . . . . . . . . . . . . . . . . . . . . . . . . . . . . . . . . . . . . . . . . . . . . . . . . . . . . . . . Mode F1: DTC Entry . . . . . . . . . . . . . . . . . . . . . . . . . . . . . . . . . . . . . . . . . . . . . . . . . . . . . . Mode F2: DTC . . . . . . . . . . . . . . . . . . . . . . . . . . . . . . . . . . . . . . . . . . . . . . . . . . . . . . . . . . . 17 MITSUBISHI DIAGNOSTIC TROUBLE CODES (DTCS) 17 23 ...................... 25 OBD, OBD I Systems . . . . . . . . . . . . . . . . . . . . . . . . . . . . . . . . . . . . . . . . . . . . . . . . . . . . . . OBD II Systems . . . . . . . . . . . . . . . . . . . . . . . . . . . . . . . . . . . . . . . . . . . . . . . . . . . . . . . . . . 25 NISSAN. . . . . . . . . . . . . . . . . . . . . . . . . . . . . . . . . . . . . . . . . . . . . . . . VEHICLES AND SYSTEMS ................................................. NISSAN SPECIFIC INFORMATION GETTING STARTED 36 1 2 ......................................... 10 ................................................. 11 ....................................................... 12 TEST MODES AVAILABLE SELECTING THE VEHICLE Asian Imports 14 ................................................ 13 Selecting the Manufacturer . . . . . . . . . . . . . . . . . . . . . . . . . . . . . . . . . . . . . . . . . . . . . . . . . Selecting the Model Year . . . . . . . . . . . . . . . . . . . . . . . . . . . . . . . . . . . . . . . . . . . . . . . . . . . Selecting the Model . . . . . . . . . . . . . . . . . . . . . . . . . . . . . . . . . . . . . . . . . . . . . . . . . . . . . . . 13 13 13 TOC-7 Selecting the Engine And Engine Type . . . . . . . . . . . . . . . . . . . . . . . . . . . . . . . . . . . . . . . . . Vehicle Information Display . . . . . . . . . . . . . . . . . . . . . . . . . . . . . . . . . . . . . . . . . . . . . . . . . Select Mode Menu . . . . . . . . . . . . . . . . . . . . . . . . . . . . . . . . . . . . . . . . . . . . . . . . . . . . . . . . . TEST MODES 13 13 .............................................................. 15 Reading Codes . . . . . . . . . . . . . . . . . . . . . . . . . . . . . . . . . . . . . . . . . . . . . . . . . . . . . . . . . . . Mode F1: DTC Entry . . . . . . . . . . . . . . . . . . . . . . . . . . . . . . . . . . . . . . . . . . . . . . . . . . . . . . Mode F2: DTC . . . . . . . . . . . . . . . . . . . . . . . . . . . . . . . . . . . . . . . . . . . . . . . . . . . . . . . . . . . 15 OBD CONTROLS ........................................................... Mode F4: OBD Controls ................................................... NISSAN DIAGNOSTIC TROUBLE CODES (DTCS) 15 20 22 22 ........................... 28 OBD, OBD I Systems . . . . . . . . . . . . . . . . . . . . . . . . . . . . . . . . . . . . . . . . . . . . . . . . . . . . . . OBD II Systems . . . . . . . . . . . . . . . . . . . . . . . . . . . . . . . . . . . . . . . . . . . . . . . . . . . . . . . . . . . 28 SUBARU . . . . . . . . . . . . . . . . . . . . . . . . . . . . . . . . . . . . . . . . . . . . . . . VEHICLES AND SYSTEMS ................................................. SUBARU SPECIFIC INFORMATION GETTING STARTED 37 1 2 ......................................... 9 ................................................. 10 ........................................................ 11 TEST MODES AVAILABLE SELECTING THE VEHICLE ................................................. 12 Selecting the Manufacturer . . . . . . . . . . . . . . . . . . . . . . . . . . . . . . . . . . . . . . . . . . . . . . . . . . Selecting the Model Year . . . . . . . . . . . . . . . . . . . . . . . . . . . . . . . . . . . . . . . . . . . . . . . . . . . Selecting the Model . . . . . . . . . . . . . . . . . . . . . . . . . . . . . . . . . . . . . . . . . . . . . . . . . . . . . . . . Selecting the Engine . . . . . . . . . . . . . . . . . . . . . . . . . . . . . . . . . . . . . . . . . . . . . . . . . . . . . . . Selecting the Fuel System Type . . . . . . . . . . . . . . . . . . . . . . . . . . . . . . . . . . . . . . . . . . . . . . . Selecting the Transmission Type . . . . . . . . . . . . . . . . . . . . . . . . . . . . . . . . . . . . . . . . . . . . . . Selecting the Emission Type . . . . . . . . . . . . . . . . . . . . . . . . . . . . . . . . . . . . . . . . . . . . . . . . . Selecting the Drive Type . . . . . . . . . . . . . . . . . . . . . . . . . . . . . . . . . . . . . . . . . . . . . . . . . . . . Vehicle Information Display . . . . . . . . . . . . . . . . . . . . . . . . . . . . . . . . . . . . . . . . . . . . . . . . . Select Mode Menu . . . . . . . . . . . . . . . . . . . . . . . . . . . . . . . . . . . . . . . . . . . . . . . . . . . . . . . . . 12 TEST MODES 12 12 12 12 12 12 13 13 13 .............................................................. 14 Reading Codes . . . . . . . . . . . . . . . . . . . . . . . . . . . . . . . . . . . . . . . . . . . . . . . . . . . . . . . . . . . Mode F1: DTC Entry . . . . . . . . . . . . . . . . . . . . . . . . . . . . . . . . . . . . . . . . . . . . . . . . . . . . . . 14 SUBARU DIAGNOSTIC TROUBLE CODES (DTCS) 15 .......................... 22 OBD, OBD I Systems . . . . . . . . . . . . . . . . . . . . . . . . . . . . . . . . . . . . . . . . . . . . . . . . . . . . . . OBD II Systems . . . . . . . . . . . . . . . . . . . . . . . . . . . . . . . . . . . . . . . . . . . . . . . . . . . . . . . . . . . 22 TOYOTA . . . . . . . . . . . . . . . . . . . . . . . . . . . . . . . . . . . . . . . . . . . . . . . VEHICLES AND SYSTEMS Electronic Transmissions 1 ................................................. 2 10 Two Ways to Diagnose Toyota TOYOTA OBD SYSTEMS 42 ................................................... TOYOTA SPECIFIC INFORMATION TOC-8 13 ......................................... 11 ............................................... 11 ................................................... 12 Engine Data List . . . . . . . . . . . . . . . . . . . . . . . . . . . . . . . . . . . . . . . . . . . . . . . . . . . . . . . . . . Engine DTCs . . . . . . . . . . . . . . . . . . . . . . . . . . . . . . . . . . . . . . . . . . . . . . . . . . . . . . . . . . . . . Electronically Controlled Transmission DTCs . . . . . . . . . . . . . . . . . . . . . . . . . . . . . . . . . . . 12 12 12 Asian Imports Antilock Brake DTCs . . . . . . . . . . . . . . . . . . . . . . . . . . . . . . . . . . . . . . . . . . . . . . . . . . . . . . Cruise Control DTCs . . . . . . . . . . . . . . . . . . . . . . . . . . . . . . . . . . . . . . . . . . . . . . . . . . . . . . Air Conditioning DTCs . . . . . . . . . . . . . . . . . . . . . . . . . . . . . . . . . . . . . . . . . . . . . . . . . . . . Air bag DTCs . . . . . . . . . . . . . . . . . . . . . . . . . . . . . . . . . . . . . . . . . . . . . . . . . . . . . . . . . . . . A note about the MIL . . . . . . . . . . . . . . . . . . . . . . . . . . . . . . . . . . . . . . . . . . . . . . . . . . . . . . TEST MODES AVAILABLE GETTING STARTED 13 13 13 13 ................................................. 15 ....................................................... 16 SELECTING THE VEHICLE ................................................ 18 Selecting the Manufacturer . . . . . . . . . . . . . . . . . . . . . . . . . . . . . . . . . . . . . . . . . . . . . . . . . Replay Snapshot Data . . . . . . . . . . . . . . . . . . . . . . . . . . . . . . . . . . . . . . . . . . . . . . . . . . . . . Selecting the Model Year . . . . . . . . . . . . . . . . . . . . . . . . . . . . . . . . . . . . . . . . . . . . . . . . . . . Selecting the Model . . . . . . . . . . . . . . . . . . . . . . . . . . . . . . . . . . . . . . . . . . . . . . . . . . . . . . . Selecting the Engine . . . . . . . . . . . . . . . . . . . . . . . . . . . . . . . . . . . . . . . . . . . . . . . . . . . . . . . Vehicle Information Display . . . . . . . . . . . . . . . . . . . . . . . . . . . . . . . . . . . . . . . . . . . . . . . . . System Inquiry (1989-94 Vehicles Only) . . . . . . . . . . . . . . . . . . . . . . . . . . . . . . . . . . . . . . . Possible System Supported Displays (1989-94 Vehicles Only) . . . . . . . . . . . . . . . . . . . . . . Select System Menu . . . . . . . . . . . . . . . . . . . . . . . . . . . . . . . . . . . . . . . . . . . . . . . . . . . . . . . Inactive System Displays . . . . . . . . . . . . . . . . . . . . . . . . . . . . . . . . . . . . . . . . . . . . . . . . . . . Select Mode Menu . . . . . . . . . . . . . . . . . . . . . . . . . . . . . . . . . . . . . . . . . . . . . . . . . . . . . . . . 18 TEST MODES 18 18 18 18 18 19 20 21 22 22 .............................................................. 24 Reading Codes . . . . . . . . . . . . . . . . . . . . . . . . . . . . . . . . . . . . . . . . . . . . . . . . . . . . . . . . . . . Mode F1: DTC Entry . . . . . . . . . . . . . . . . . . . . . . . . . . . . . . . . . . . . . . . . . . . . . . . . . . . . . . Mode F2: DTC . . . . . . . . . . . . . . . . . . . . . . . . . . . . . . . . . . . . . . . . . . . . . . . . . . . . . . . . . . . 24 TOYOTA DIAGNOSTIC TROUBLE CODES (DTCS) 24 29 .......................... 33 Air Bag ................................................................ Anti-Lock Brake System . . . . . . . . . . . . . . . . . . . . . . . . . . . . . . . . . . . . . . . . . . . . . . . . . . . . Air Conditioning ......................................................... Cruise Control System . . . . . . . . . . . . . . . . . . . . . . . . . . . . . . . . . . . . . . . . . . . . . . . . . . . . . Electronic Controlled Transmission .......................................... Engine ................................................................. 40 DATA LIST PARAMETER DESCRIPTIONS .................................. APPENDICES . . . . . . . . . . . . . . . . . . . . . . . . . . . . . . . . . . . . . . . . . . What Is OBD II? . . . . . . . . . . . . . . . . . . . . . . . . . . . . . . . . . . . . . . . . . . . . . . . . . . . . . . . . . . OBD II Scan Tool . . . . . . . . . . . . . . . . . . . . . . . . . . . . . . . . . . . . . . . . . . . . . . . . . . . . . . . . . OBD II Communication Protocols . . . . . . . . . . . . . . . . . . . . . . . . . . . . . . . . . . . . . . . . . . . . OBD II Interface Circuitry Not Installed . . . . . . . . . . . . . . . . . . . . . . . . . . . . . . . . . . . . . . . Tester Is Unable to Communicate with the Vehicle . . . . . . . . . . . . . . . . . . . . . . . . . . . . . . . Tester Loses Communication with the Vehicle . . . . . . . . . . . . . . . . . . . . . . . . . . . . . . . . . . . Parameter Update Rate Is Slow . . . . . . . . . . . . . . . . . . . . . . . . . . . . . . . . . . . . . . . . . . . . . . Not All Parameters Displayed . . . . . . . . . . . . . . . . . . . . . . . . . . . . . . . . . . . . . . . . . . . . . . . Tester Displays “TEST RESULTS” Message . . . . . . . . . . . . . . . . . . . . . . . . . . . . . . . . . . . . Wrong Display after Power Is Applied . . . . . . . . . . . . . . . . . . . . . . . . . . . . . . . . . . . . . . . . . Asian Imports 12 40 43 43 44 45 47 1 2 2 3 7 7 8 8 9 9 9 TOC-9 TOC-10 Asian Imports GENERAL INFORMATION Introduction .......................................................................................................................................... 2 Common Test Modes Description .................................................................................................... 2 Manufacturer Specific Sections Description .................................................................................. 2 Flow Chart Description ...................................................................................................................... 2 Test Selection Menu Description...................................................................................................... 3 1. OPERATING PRECAUTIONS .................................................................................................................. 4 2. ASIAN IMPORTS CARTRIDGE KIT DESCRIPTION ........................................................................ 5 Asian Imports Cartridge Kit Contents ............................................................................................. 6 3. VEHICLE COVERAGE .............................................................................................................................11 4. TEST MODES AVAILABLE .................................................................................................................... 22 System Tests Available ..................................................................................................................... 23 OBD Controls Available .................................................................................................................. 24 5. GETTING STARTED ................................................................................................................................. 25 INTRODUCTION Reading through this manual before putting your Asian Imports Cartridge and TECH 1, TECH1A or Mastertech tester to work will introduce you to the diagnostic capabilities and tell you how to use them immediately. The application software is designed to reduce time-consuming reference to manuals as much as possible. Once you are familiar with the software and its operation, you'll be able to spend more time diagnosing and less time reading. Later, if questions arise, a quick glance at the flow chart for the test you are performing will probably be all you need. COMMON TEST MODES DESCRIPTION Operating Procedures for test modes that are common to two or more makes of vehicles are included in the Common Test Modes section. These test modes are listed below: MODE F0: Data List MODE F1: DTC Entry MODE F2: DTC(s) MODE F3: Snapshot MODE F4: OBD Controls MODE F5: System Tests MODE F8: Information MANUFACTURER SPECIFIC SECTIONS DESCRIPTION Information that is specific for the different makes of vehicles is included in the Manufacturer Specific sections. Each Manufacturer Specific section includes a chart of the years and models that can be tested, a chart of adapters required, instructions for connecting the tester to the vehicle, and operating procedures for the manufacturer specific test modes. Also included in the Manufacturer Specific section is a complete list of Diagnostic Trouble Codes (DTCs) for each vehicle. For vehicles capable of providing serial data to the tester, a list of the parameters available and a description of each parameter is provided. FLOW CHART DESCRIPTION The flow charts in this manual consist of screen displays enclosed in boxes. The displays are arranged in the order in which they appear while using the tester. If you are using a Mastertech tester, full screen displays are available when operating in Enhanced Mode. Refer to the Multi-Function Tester Program Card Operator's Manual for Enhanced Mode operating instructions. Keys on the tester keypad are shown in the manual as white letters in small black boxes. There is a list of the active tester keys and their functions at the end of each operating procedure. Some display screens, such as vehicle selection and test mode menus, require input from you. To respond when the tester asks for information, just press the appropriate key on the tester keypad. In the example below, pressing the Y key causes the tester to display the screen to the right and pressing N causes the lower screen to be displayed. Although there are exceptions, pressing the X key generally takes you back to the previous screen. 2 GENERAL INFORMATION WOULD YOU LIKE TO CLEAR THE DTCs? (YES/NO) Y CLEARING CODES N SELECT MODE: F0: DATA LIST F1: DTC ENTRY F2: DTC TEST SELECTION MENU DESCRIPTION The tester displays up to three test modes at a time. If other test modes are available, the tester automatically scrolls to the next menu display after three seconds. To stop the automatic scrolling, press the d key. The display may then be manually scrolled by pressing the u key. Regardless of which test modes are displayed, any test mode can be selected at any time from the menu. All menus of more than three items scroll in this way. SELECT MODE: F0: DATA LIST F1: DTC ENTRY F2: DTC d u SELECT MODE: F3: SNAPSHOT F4: OBD CONTROLS GENERAL INFORMATION 3 OPERATING PRECAUTIONS 1. OPERATING PRECAUTIONS CONNECTING AND DISCONNECTING THE TESTER WHILE IGNITION KEY IS ON Due to the possibility of voltage spikes that could damage the vehicle or tester electronics, you should not connect or disconnect the tester while the ignition key is ON or while the engine is running. REMOVING THE CARTRIDGE WHILE THE TESTER IS POWERED ON The cartridge should not be removed or installed from the tester while the tester is powered on. If after installing the cartridge the tester does not appear to be functioning properly, reset the tester by disconnecting the power plug from the vehicle and reconnecting it. VEHICLE SPECIFIC PRECAUTIONS For some vehicles, additional precautions are included in the Manufacturer Specific Sections. 4 GENERAL INFORMATION ASIAN IMPORTS CARTRIDGE KIT DESCRIPTION 2. ASIAN IMPORTS CARTRIDGE KIT DESCRIPTION The Asian Imports Cartridge is used with the TECH 1, TECH 1 Series A (TECH1A) or Mastertech tester to diagnose Asian Import vehicles manufactured by Acura, Chrysler Imports, Daihatsu, Honda, Hyundai, Infiniti, Isuzu, Kia, Lexus, Mazda, Mitsubishi, Nissan, Subaru, Suzuki, and Toyota (for Isuzu and Suzuki diagnostic test mode descriptions, please refer to the Isuzu and Suzuki Operator's Manuals). Depending on the vehicle being tested, the Asian Imports Cartridge can be used to test engine and transmission controllers, or powertrain controllers on vehicles with engine and transmission electronics. All tests and prompts are specific to the vehicle that you are testing, which reduces your dependency on shop manuals. For most Asian vehicles, the cartridge allows you to read system Data List parameters and Diagnostic Trouble Codes (DTCs), input the DTC for a description, command different Electronic Control Unit (ECU) operation modes, control idle speed, clear diagnostic trouble codes, and control various output actuators. To reduce the amount of time required to reach a diagnostic solution, output actuators can be controlled while Data List parameters are displayed. The Snapshot feature of the cartridge greatly simplifies the task of diagnosing difficult intermittent problems by "capturing" diagnostic parameters, either while you are in the service bay or during road testing. Data is collected both before and after an intermittent event and saved in the tester for later analysis. This data is retained in the tester memory for at least 24 hours, even if you remove your tester from the vehicle, or until it is replaced with newer data. Some vehicle systems support the use of OBD Controls which can be used to diagnose certain powertrain control system problems. For example, on some systems you can monitor air fuel ratio, determine oxygen sensor range of operation, and perform switch tests. In some cases, the OBD Controls allow you to command the ECU into a mode of operation that sets up an ideal environment for fuel or ignition system diagnostics. A NOTE ABOUT TECH 1 AND TECH 1A TESTERS The Asian Imports application cartridge is compatible with the TECH 1, TECH 1A, and MASTERTECH testers. However, if you are using the Asian Imports application cartridge with a TECH 1, a TECH 1 14/15 Pin Data Link Connector (DLC) cable (P/N 02001980) is required for connection to the Asian vehicle adapters. Also, when using a TECH1 tester on Toyota or Lexus vehicles, the number of available OBD systems will be reduced (see the Toyota or Lexus sections in this manual). When using a TECH 1 tester on Mazda vehicles, the Switch Test OBD Controls test will not function properly (see the Mazda section of this manual). The TECH 1A tester is an updated version of the TECH 1 tester. In addition to already proven TECH 1 diagnostic power, the TECH 1A has on-board RS232, Instrumentation Port, and DC Power Jack capabilities. You can identify a TECH 1A by the phone-style jacks on both sides of the tester. Note that the TECH1 and TECH 1A require a different DLC cable, DC Power cable, and vehicle adapters. When using this manual to diagnose a vehicle, take the time to determine the type of tester that you have, and be sure you are using the correct cables and adapters. Doing so may prevent misuse of application cartridges and incorrect vehicle diagnosis. GENERAL INFORMATION 5 ASIAN IMPORTS CARTRIDGE KIT DESCRIPTION With the built-in RS232C interface, the Mastertech and Tech1A testers both support host computer communications and printer capabilities. Using the optional VP-411 printer, you can print a hard copy of test results. This information is helpful for your reference records as well as customer consultation when you are describing test results. ASIAN IMPORTS CARTRIDGE FEATURES With the Asian Imports Cartridge you can: • Select a specific vehicle to test by make, model, model year and VIN code • Read engine and transmission diagnostic data parameters (if available from vehicle) • Read instructions for learning how to read DTCs from vehicles with ECU LED, analog voltmeter, or MIL output DTCs • Read instructions for clearing DTCs from selected vehicles • Display location of ECU diagnostic jumper connector (DJC), or Data Link connector (DLC) • Read pending DTCs from OBD II compliant vehicles • Read and display Diagnostic Trouble Codes, including manufacturer specific DTCs on OBD II compliant vehicles. • Read Freeze Frame DTC information for OBD II compliant vehicles. • Print diagnostic data and trouble codes • View Readiness Test Information for OBD II compliant vehicles • Diagnose intermittent problems by capturing and storing multiple samples of system data before and after the problem occurs, then examining the data to determine the problem. • Clear engine and transmission DTCs (not available on all vehicles) • Perform various engine running tests • Control engine and transmission actuators (not available on all vehicles) • Perform specialized tests on selected engine ECUs (not available on all vehicles) • Control engine idle speed (not available on all vehicles) • Read engine and transmission controller information (not available on all vehicles) • Reset engine and transmission memory parameters (not available on all vehicles) ASIAN IMPORTS CARTRIDGE KIT CONTENTS The Asian Imports Cartridge kit includes the Asian Imports Cartridge and this operator's manual. The following vehicle specific adapters and cables are used in conjunction with the Asian Imports Cartridge Kit. Type 3 Cable For OBD II Applications When testing OBDII compliant vehicles with a 16-pin DLC, the 16/14 Pin OBDII Type3 Adapter Cable (P/ N 02001969) must be connected to the end of the Mastertech/Tech 1A DLC Adapter Cable. 6 GENERAL INFORMATION ASIAN IMPORTS CARTRIDGE KIT DESCRIPTION Type 3 Cable Chrysler Imports/Hyundai/Mitsubishi Adapter The Chrysler Imports/Hyundai/Mitsubishi Adapter (P/N 02001921) must be connected to the end of the tester DLC Adapter Cable to perform certain tests on these vehicles. The tester informs you where to connect the adapter to the DLC connector on the vehicle. Chrysler Imports/Hyundai/Mitsubishi Adapter Cable (Yellow) Daihatsu Jumper To perform certain tests on Daihatsu vehicles, the Daihatsu 6 Pin Jumper (P/N 02002073) must be connected to the vehicle diagnostic connector. The tester informs you where to connect the jumper to the diagnostic connector on the vehicle. Daihatsu Jumper GENERAL INFORMATION 7 ASIAN IMPORTS CARTRIDGE KIT DESCRIPTION Mazda Adapter When testing Mazda vehicles, a 1, 6, 17/14 Pin DLC adapter cable (P/N 02001922) must be used. The appropriate orange end of the cable is then connected to the vehicle DLC. A chart at the beginning of the Mazda Specific Instructions indicates which adapter cable connector to use for the selected vehicle. Mazda Adapter Cable (Orange) Nissan Check Adapter To perform certain tests on Nissan vehicles, the Nissan 12/14 Pin Check adapter (P/N 02001897) must be connected to the end of the tester DLC Adapter Cable. The Red end of the cable is then connected to the vehicle DLC. The tester informs you where to connect the Check Adapter cable to the DLC, on the vehicle. Nissan Check Adapter Cable (Red) Honda/Acura SCC Jumper The Honda/Acura 2-Pin Service Check Connector (SCC) Jumper (P/N 02001935) is required for certain tests on Honda and Acura vehicles. The tester informs you where to connect the jumper to the SCC connector on the vehicle. 8 GENERAL INFORMATION ASIAN IMPORTS CARTRIDGE KIT DESCRIPTION Honda/Acura SCC Jumper Toyota/Lexus TDCL and Check Adapter Cables For Toyota and Lexus vehicles, certain tests require the green 17/14 Pin TDCL (P/N 02001895) or the blue 21/14 Pin Check (P/N 02001896) Adapter Cable to be connected to connects to the end of the tester DLC Cable. The color coded end of the adapter cable connects to the vehicle Check connector or TDCL connector. Toyota/Lexus Check Adapter Cable (Blue) Toyota/Lexus TDCL Adapter Cable (Green) Suzuki Adapter A GM 12/14 Pin DLC adapter is required for connecting the tester to Suzuki vehicles. GM 12/14 Pin DLC Adapter GENERAL INFORMATION 9 ASIAN IMPORTS CARTRIDGE KIT DESCRIPTION Isuzu 3-pin Adapters When testing some Isuzu vehicles, a 3-Pin DLC adapter must be used. The adapter required depends on the ECU manufacturer. A chart at the beginning of the Isuzu Specific Instructions indicates which adapter, the Isuzu/Delco (P/N 02001325) or the Isuzu/Hitachi (P/N 02001326) to use for the selected vehicle. Note that the adapter must be used in conjunction with the GM 12/14-Pin adapter (included in the MASTERTECH and TECH 1A kits). ISUZU/DELCO 3 PIN DLC ADAPTER ISUZU/HITACHI 3 PIN DLC ADAPTER P/N 02001325 P/N 02001326 Isuzu/Hitachi 3-Pin DLC Adapter Isuzu/Delco 3-Pin DLC Adapter ASIAN IMPORTS JUMPER APPLICATIONS MANUFACTURER P/N CONFIGURATION SINGLE WIRE Chrysler Import/Mitsubishi 02002106 2 pin (male) Yes Daihatsu 02002073 6 pin Yes, with shell Kia/Nissan/1986-88 Toyota 02002075 2 pin (male) Yes 1983-85 Toyota 02002076 2 pin (male) Yes Acura/Honda 02001935 2 pin Yes, with shell ASIAN IMPORTS ADAPTER CABLE APPLICATIONS MANUFACTURER SUPPORTED VTX P/N CONFIGURATION Chrysler Import Mitsubishi Hyundai 02001921 12/14 pin Mazda 02001922 1/6/17/14 pin Nissan 02001897 12/14 pin Toyota (Check) 02001896 21/14 pin Toyota (TDCL) 02001895 17/14 pin All Asian Manufacturers with OBD II Compliant Powertrain Systems 02001969 16/14 pin 10 GENERAL INFORMATION VEHICLE COVERAGE 3. VEHICLE COVERAGE Following is a list of vehicles that can be tested with the Asian Imports Cartridge. A more detailed chart is included in the Manufacturer Specific Sections. ACURA YEAR MODEL ENGINE 1986-90 Integra 1.6L I4 1991-94 Integra 1.8L I4 1992-94 Integra 1.7L I4 1986 Legend 2.5L V6 1987-90 Legend Coupe 2.7L V6 1991-94 Legend Coupe 3.2L V6 1987 Legend Sedan 2.5L V6 1988-90 Legend Sedan 2.7L V6 1991-94 Legend Sedan 3.2L V6 1991-94 NSX 3.0L V6 1992-94 Vigor 2.5L V6 CHRYSLER IMPORTS (DODGE) YEAR GENERAL INFORMATION MODEL ENGINE 1995-98 Avenger 2.0L DOHC I4 1995-98 Avenger 2.5L V6 SOHC 1984-89 Colt 1.6L I4 Turbo 1988-90 Colt 1.6L I4 1988-98 Colt 1.5L I4 1993-98 Colt 1.8L I4 1989 Colt 2000 1.6L I4 Turbo 1989-90 Colt 2000 1.6L I4 1989-92 Colt 2000 1.5L I4 1987-91 Colt Vista 2.0L I4 1992-95 Colt Vista 1.8L I4 1992-95 Colt Vista 2.4L I4 11 VEHICLE COVERAGE YEAR MODEL ENGINE 1989-90 Colt Wagon 1.5L I4 1989-90 Colt Wagon 1.8L I4 1985-89 Conquest 2.6L I4 Turbo 1990-93 Power Ram 50 2.4L I4 1990-93 Power Ram 50 3.0L V6 1990 Ram 50 3.0L V6 1990, 93 Ram 50 2.4L I4 1989 Ram Raider 3.0L V6 1995-98 Sebring 2.0L DOHC I4 1995-98 Sebring 2.5L V6 SOHC 1991-96 Stealth 3.0L SOHC V6 1991-96 Stealth 3.0L DOHC V6 1991-96 Stealth 3.0L DOHC Turbo V6 1989-90 Vista Wagon 2.0L I4 CHRYSLER IMPORTS (EAGLE) YEAR 12 MODEL ENGINE 1989-90 Summit 1.6L I4 1989-96 Summit 1.5L I4 1993-96 Summit 1.8L I4 1992-96 Summit Wagon 1.8L I4 1992-96 Summit Wagon 2.4L I4 1990-94 Talon 1.8L I4 1990-95 Talon 2.0L I4 1990-95 Talon 2.0L I4 Turbo 1996-98 Talon 2.0L I4 1996-98 Talon 2.0L I4 Turbo GENERAL INFORMATION VEHICLE COVERAGE CHRYSLER IMPORTS (PLYMOUTH) YEAR MODEL ENGINE 1990-94 Laser 1.8L I4 1990-94 Laser 2.0L I4 1990-94 Laser 2.0L I4 Turbo DAIHATSU YEAR MODEL ENGINE 1988-92 Charade 1.0L I4 1989-92 Charade 1.3L I4 1990-92 Rocky 1.6L I4 HONDA YEAR GENERAL INFORMATION MODEL ENGINE 1986-89 Accord 2.0L I4 1990-94 Accord 2.2L I4 1994 Accord 2.2L I4 VTEC 1986 Accord Lxi 2.0L I4 1985 Accord Sei 1.8L I4 1987-94 Civic 1.5L I4 1989-91 Civic 1.6L I4 1992-93 Civic 1.5L I4 VTEC-E 1992-94 Civic 1.6L I4 VTEC 1988 Civic CRX 1.5L I4 1985-87 Civic CRX Si 1.5L I4 1988 Civic CRX Si 1.6L I4 1993 Civic del Sol 1.5L I4 VTEC 1993-94 Civic del Sol 1.6L I4 VTEC 1994 Civic del Sol 1.5L I4 1994 Civic del Sol 1.6L I4 1986 Civic Si 1.3L I4 13 VEHICLE COVERAGE YEAR MODEL ENGINE 1989 Civic_Wagon 1.6L I4 1989 Civic_Wagon 1.5L I4 1989-91 CRX 1.5L I4 1989 CRX HF 1.5L I4 1989-91 CRX Si 1.6L I4 1986-91 Prelude 2.0L I4 1992-94 Prelude 2.2L I4 1992-94 Prelude 2.3L I4 1993-94 Prelude 2.2L I4 VTEC 1990-91 Prelude Si 2.0L I4 1990-91 Prelude Si 2.1L I4 HYUNDAI YEAR 14 MODEL ENGINE 1996-98 Accent 1.5L 1992-95 Elantra 1.6L I4 1993-98 Elantra 1.8L I4 1995 Elantra 1.5L 1990-94 Excel 1.5L I4 1991-95 Scoupe 1.5L I4 1989-91 Sonata 2.4L I4 1989-98 Sonata 3.0L V6 1992-93 Sonata 2.0L I4 1994-98 Sonata 2.0L I4 DOHC 1997-98 Tiburon 1.8L I4 1997-98 Tiburon 2.0L I4 GENERAL INFORMATION VEHICLE COVERAGE INFINITI YEAR MODEL ENGINE 1991-96 G20 2.0L I4 1996-98 I30 3.0L V6 1993-97 J30 3.0L V6 1990-92 M30 3.0L V6 1990-96 Q45 4.5L V8 1997-98 Q45 4.1L V8 1997-98 QX4 3.3L V6 KIA YEAR 1994 MODEL Sephia ENGINE 1.6L I4 LEXUS YEAR MODEL ENGINE 1990-91 ES250 2.5L V6 1992-94 ES300 3.0L V6 1993-94 GS300 3.0L I6 1990-94 LS400 4.0L V8 1992-94 SC300 3.0L I6 1992-94 SC400 4.0L V8 MAZDA YEAR GENERAL INFORMATION MODEL ENGINE 1986-89 323 1.6L I4 1988-89 323 1.6L I4 Turbo 1990-94 323 1.8L I4 DOHC 1990-94 323 1.8L I4 SOHC 1991-94 323 1.6L I4 SOHC 15 VEHICLE COVERAGE YEAR 16 MODEL ENGINE 1995 323 1.5L I4 1987-89 323 Wagon 1.6L I4 1983-87 626 2.0L I4 1986-87 626 2.0L I4 Turbo 1988-92 626 2.2L I4 1993-98 626 2.0L I4 1993-98 626 2.5L V6 1988-89 929 3.0L V6 1990-91 929 3.0L V6 DOHC 1990-91 929 3.0L V6 SOHC 1992-93 929 3.0L V6 1994-95 929 3.0L V6 DOHC 1994-97 B Series 2.3L I4 1994-98 B Series 3.0L V6 1994-98 B Series 4.0L V6 1995 B Series 2.5L I4 1986 B2000 2.0L I4 1987-93 B2200 2.2L I4 1987-93 B2600 2.6L I4 1983-85 GLC 1.5L I4 1990-93 Miata 1.6L I4 1994-97,99 Miata 1.8L I4 1996-98 Millenia 2.3L V6 1996-98 Millenia 2.5L V6 1989-95 MPV 2.6L I4 1989-98 MPV 3.0L V6 1992-95 MX3 1.6L I4 1992-95 MX3 1.8L I4 1990-93 MX5 1.6L I4 1994-97,99 MX5 1.8L I4 1988-92 MX6 2.2L I4 1993-97 MX6 2.0L I4 GENERAL INFORMATION VEHICLE COVERAGE YEAR MODEL ENGINE 1993-97 MX6 2.5L V6 1991-94 Navaho 4.0L V6 1988 Protegé 1.6L I4 1988 Protegé 1.6L I4 Turbo 1990-94 Protegé 1.8L I4 DOHC 1990-94 Protegé 1.8L I4 SOHC 1991-94 Protegé 1.6L I4 SOHC 1995-98 Protegé 1.5L I4 1996-98 Protegé 1.8L I4 1984-91 RX7 1.3L R2 1987-95 RX7 1.3L R2 Turbo MITSUBISHI YEAR GENERAL INFORMATION MODEL ENGINE 1991-98 3000GT 3.0L V6 DOHC 1991-98 3000GT 3.0L V6 DOHC Turbo 1984-88 Cordia 1.8L I4 Turbo 1992-96 Diamante 3.0L V6 SOHC 1992-96 Diamante 3.0L V6 DOHC 1997-98 Diamante 3.5L V6 SOHC 1993-95 Diamante Wagon 3.0L V6 1990-94 Eclipse 1.8L I4 SOHC 1990-98 Eclipse 2.0L I4 DOHC 1990-98 Eclipse 2.0L I4 DOHC Turbo 1996 Eclipse 2.4L I4 SOHC 1997-98 Eclipse Spyder 2.0L I4 DOHC Turbo 1997-98 Eclipse Spyder 2.4L_I4_SOHC 1992-96 Expo 2.4L I4 1992-96 Expo LRV 1.8L I4 1993-96 Expo LRV 2.4L I4 1985-87 Galant 2.4L I4 1989-93 Galant 2.0L I4 SOHC 17 VEHICLE COVERAGE YEAR MODEL ENGINE 1989-93 Galant 2.0L I4 DOHC 1990-92 Galant 2.0L I4 DOHC Turbo 1993 Galant 2.0L I4 SOHC 16V 1994-95 Galant 2.4L I4 DOHC 1994-98 Galant 2.4L I4 SOHC 1985-88 Mirage 1.6L I4Turbo 1987 Mirage 1.6L I4 1989-92 Mirage 1.6L I4 DOHC 1989-98 Mirage 1.5L I4 SOHC 1993-98 Mirage 1.8L I4 SOHC 1989-96 Montero 3.0L V6 1994-98 Montero 3.5L V6 DOHC 1997-98 Montero Sport 2.4L I4 SOHC 1997-98 Montero Sport 3.0L_V6_SOHC 1990-94 Precis 1.5L I4 1988 Sigma 3.0L V6 1984-87 Starion 2.6L I4 Turbo 1986-89 Starion 2.6L I4 Turbo-I 1984-88 Tredia 1.8L I4 Turbo 1990-95 Truck 2.4L I4 1990-95 Truck 3.0L V6 1987-90 Van/Wagon 2.4L I4 NISSAN YEAR 18 MODEL ENGINE 1984-88 200SX 1.8L I4 Turbo 1984-88 200SX 2.0L I4 1984-88 200SX 3.0L V6 1995-98 200SX 1.6L I4 1995-98 200SX 2.0L I4 1989-98 240SX 2.4L I4 1984-96 300ZX 3.0L V6 GENERAL INFORMATION VEHICLE COVERAGE YEAR MODEL ENGINE 1993-98 Altima 2.4L I4 1990 Axxess 2.4L I4 1998 Frontier 2.4L I4 1985-98 Maxima 3.0L V6 1991-94 NX Coupe 1.6L I4 1991-94 NX Coupe 2.0L I4 1986-93 Pathfinder 2.4L I4 1986-96 Pathfinder 3.0L V6 1997-98 Pathfinder 3.3L V6 1987-90 Pulsar NX 1.6L I4 1988-89 Pulsar NX 1.8L I4 1993-98 Quest 3.0L V6 1987-98 Sentra 1.6L I4 1991-98 Sentra 2.0L I4 1985-89 Stanza 2.0L I4 1990-92 Stanza 2.4L I4 1995-96 Stanza 2.4L I4 1986-93 Truck 2.4L I4 1986-95 Truck 3.0L V6 1995-97 Truck 2.4L I4 1989 Van 2.4L I4 SUBARU YEAR GENERAL INFORMATION MODEL ENGINE 1986-89 3-Door 1.8L 1983-84 BRAT 1.8L 1998 Forester 2.5L 1983-84 Hardtop 1.8L 1984 Hardtop 1.6L 1998-94 Hatchback 1.6L 1998-94 Hatchback 1.8L 1993-97 Impreza 1.8L 19 VEHICLE COVERAGE YEAR MODEL ENGINE 1996-98 Impreza 2.2L 1998 Impreza 2.5L 1987-90 Justy 1.2L 1990-98 Legacy 2.2L 1990-91 Loyale 1.8L 1983-84 Sedan 1.6L 1983-89 Sedan 1.8L 1992-97 SVX 2.5L 1983-89 Wagon 1.8L 1985-91 XT 1.8L 1988-91 XT6 2.7L TOYOTA YEAR 20 MODEL ENGINE 1985-94 4-Runner 2.4L I4 1985-94 4-Runner 3.0L V6 1983-91 Camry 2.0L I4 1989-91 Camry 2.5L V6 1992-94 Camry 2.2L I4 1992-94 Camry 3.0L V6 1983-85 Celica 2.4L I4 1986-93 Celica 2.0L I4 1990-93 Celica 1.6L I4 1990-94 Celica 2.2L I4 1994 Celica 1.8L I4 1985-94 Corolla 1.6L I4 1993-94 Corolla 1.8L I4 1983-88 Cressida 2.8L I6 1989-92 Cressida 3.0L I6 1988-92 Land Cruiser 4.0L I6 1993-94 Land Cruiser 4.5L I6 1986-90 MR2 1.6L I4 GENERAL INFORMATION VEHICLE COVERAGE YEAR GENERAL INFORMATION MODEL ENGINE 1991-94 MR2 2.0L I4 Turbo 1991-94 MR2 2.2L I4 1992-94 Paseo 1.5L I4 1991-94 Previa 2.4L I4 1983 Starlet 1.3L I4 1983-86 Supra 2.8L I6 1986-94 Supra 3.0 I6 Turbo 1986-94 Supra 3.0L I6 1993-94 T-100 3.0L V6 1989-94 Tercel 1.5L I4 1984-94 Truck 2.4L I4 1985-94 Truck 3.0L V6 1984-85 Van 2.0L I4 1986-89 Van 2.2L I4 21 TEST MODES AVAILABLE 4. TEST MODES AVAILABLE The Asian Imports Cartridge provides the following diagnostic test modes. Not all vehicles are equipped with electronic systems capable of using all of the test modes. Refer to the charts on the following pages for a list of tests available for each vehicle. Only test modes available for the selected vehicle system are displayed in the Select Mode menu. AVAILABLE TEST MODES F0: DATA LIST Displays diagnostic data parameters in pre-selected or user selected pairs. F1: DTC ENTRY The DTC Entry mode is designed for vehicles that have On Board Diagnostics (OBD) capability, but do not have a Data Link Connector (DLC). The DTC Entry mode has five submodes: Submode F0: HOW TO READ displays information about how to set the vehicle controller in the mode so you can manually read stored DTCs. Submode F1: ENTER DTC(s) allows you to input a DTC to the tester that was manually read from ECU LEDs, analog voltmeter, or the vehicle Malfunction Indicator Lamp (MIL). The DTC description is then displayed on the tester screen. Submode F2: DTC LIST allows you to scroll through a list of DTCs applicable to the vehicle being tested. Submode F3: REVIEW DTC allows you to review DTCs that have been selected or entered into the tester memory. Submode F4: CLEAR DTC(s) displays information about how to clear the DTCs from the vehicle being tested, or from the tester memory. F2: DTC The DTC mode is designed for vehicles that have On Board Diagnostics (OBD) capability, and have a Data Link Connector (DLC). The DTC mode has four submodes: Submode F1: READ DTCs reads and displays stored Diagnostic Trouble Codes stored in the ECU. (On Inactive Toyota or Lexus systems, this Submode is F1: READ/ENTER DTCs.) Submode F2: DTC LIST allows you to scroll through a list of DTCs applicable to the vehicle being tested. Submode F3: REVIEW DTC allows you to review DTCs that have been selected or entered into the tester memory. Submode F4: CLEAR DTC(s) automatically clears ECU DTCs or describes how to clear DTCs from the vehicle being tested, or clears DTCs from the tester memory. Submode F5: SENSITIVE DTC for Toyota and Lexus vehicles commands the engine ECU to check the system more frequently for the environment required to set DTCs. The increased sensitivity is more efficient for identifying intermittent problems. F3: SNAPSHOT Records data before and after the occurrence of an intermittent trouble condition. Trigger conditions are selectable and include trigger on a specific DTC, any DTC, or by a manual key press. F4: OBD CONTROLS Allows manufacturer dependent test for specialized diagnostics. Tests available for each vehicle are described in the manufacturer specific sections. F5: SYSTEM TESTS This mode is used to select a submenu for vehicle preparation prior to testing. 22 GENERAL INFORMATION TEST MODES AVAILABLE F8: INFORMATION This mode contains submodes with information about ECU, DLC, SCC and DJC locations. It also contains vehicle ID information. TEST MODES AVAILABLE Following is a list of test modes available for each manufacturer. Only test modes available for the selected vehicle are displayed in the test mode menus. The functions and operating procedures for each test mode are described in the Common Test Modes section. MAKE DATA LIST READINESS DTC ENTRY DTC SNAPSHOT OBD CONTROLS • ACURA CHRY IMP + + • •+ + + SYSTEM TESTS INFORMATION • • •+ •+ ENHANCD MODE* PRINT MODE** • + •+ DAIHATSU • • • • HONDA • • • • HYUNDAI + + • •+ + + •+ •+ + •+ INFINITI + + • + + + •+ •+ + •+ • • • • • • • KIA LEXUS • MAZDA + + MITSUBISHI + NISSAN • • • • •+ + •+ •+ •+ + •+ + • •+ + + •+ •+ + •+ + + • •+ + •+ •+ •+ + •+ SUBARU + + • + + + •+ •+ + •+ TOYOTA • • • • • • *The Enhanced Mode is a Mastertech function that provides expanded data list display capabilities. **Print Mode supports Data List, Snapshot and current or available DTCs, when using the optional VP-411 printer. • OBD & OBD I + OBD II NOTE Isuzu and Suzuki Test Modes are described in the Isuzu and Suzuki Operator's Manuals. SYSTEM TESTS AVAILABLE System Tests Mode is available for each make of vehicle. System Tests contains submode F0: Prep Vehicle. This submode gives instructions for proper vehicle preparation prior to testing to ensure accurate test results. GENERAL INFORMATION 23 TEST MODES AVAILABLE OBD CONTROLS AVAILABLE VEHICLE OBD CONTROLS SUBMODES Mazda F0: Switch Test F1: O2S Monitor Nissan F0: AFR Monitor A F1: AFR Monitor B F2: Switch Test F3: RT DTC Monitor All Asian Manufacturers with OBD II compliant Powertrain systems that support this control F0: EVAP Leak NOTE 24 Isuzu and Suzuki OBD Controls are described in the Isuzu and Suzuki Operator's Manuals. GENERAL INFORMATION GETTING STARTED 5. GETTING STARTED Before operating the ASIAN IMPORTS CARTRIDGE, do the following: 1a. TECH 1 OR TECH 1A TESTER Insert the cartridge into the Master Cartridge slot on the bottom of the tester. (Verify that no other "Master" cartridge is installed in the top slot). Refer to the TECH 1 or TECH 1A Operator's Manual for further information. 1b. MASTERTECH TESTER Insert the cartridge into the slot at the top of the tester. Refer to the Mastertech Operator's Manual for further information. Make sure the tester is turned OFF. When testing Lexus/Toyota and OBDII compliant vehicles, the Asian Imports Cartridge can also be operated in Enhanced Mode when a program card is installed in the Mastertech. Refer to the Program Card Operator's Manual for Enhanced Mode operating instructions. 2. Connect the DLC cable to the tester and tighten the screws. NOTE The DLC cable is not required when testing Acura, Daihatsu, and Honda vehicles. It is also not required when testing select vehicles by the following manufacturers: Chrysler Imports, Hyundai, Mitsubishi, Infiniti, Kia, Nissan, and Subaru. Refer to the manufacturer specific instruction sections for further details. 3. Connect the DC Power Cable to the end of the DLC cable. 4. Refer to the manufacturer's specific instructions section for the vehicle you are testing for the following information: • Installing the appropriate adapter(s) on the DLC cable • Connecting the tester to the vehicle, or setting up the ECU for manual DTC referral. • Powering up the tester • Selecting the vehicle you are testing 5. When the Select Mode menu is displayed, refer to the Common Test Modes section to select and operate the test modes. GENERAL INFORMATION 25 GETTING STARTED Mastertech Tester, Cartridge and Cables 26 GENERAL INFORMATION GETTING STARTED Tech 1A Tester, Cartridge and Cables GENERAL INFORMATION 27 GETTING STARTED Tech 1 Tester, Cartridge and Cables 28 GENERAL INFORMATION COMMON TEST MODES I OBD, OBD I SYSTEMS 1. Selecting Test Modes..................................................................................................................................... 2 2. Mode F0: Data List ........................................................................................................................................ 3 3. Mode F1: DTC Entry .................................................................................................................................... 5 Submode F0: How To Read .............................................................................................................. 5 Submode F1: Enter DTC(s) ............................................................................................................... 6 Submode F2: DTC List ...................................................................................................................... 8 Submode F3: Review DTC................................................................................................................ 9 Submode F4: Clear DTC(s) ..............................................................................................................11 4. Mode F2: DTC(s) ......................................................................................................................................... 13 Submode F1: Read DTC(s) ............................................................................................................. 13 Submode F2: DTC List .................................................................................................................... 15 Submode F3: Review DTC.............................................................................................................. 16 Submode F4: Clear DTC(s) ............................................................................................................. 18 5. Mode F3: Snapshot ...................................................................................................................................... 20 6. Mode F4: OBD Controls ............................................................................................................................ 27 7. Mode F5: System Tests ............................................................................................................................... 28 Submode F0: Prep Vehicle............................................................................................................... 28 8. Mode F8: Information ................................................................................................................................. 30 Submode F1: DLC Location ........................................................................................................... 30 Submode F2: SCC Location ............................................................................................................ 31 Submode F3: ID Info ........................................................................................................................ 32 Submode F4: DJC Location ............................................................................................................ 33 Submode F5: ECU Location ........................................................................................................... 34 SELECTING TEST MODES 1. SELECTING TEST MODES The Asian Imports Cartridge makes selecting a test mode easy by displaying a “Test Mode Menu.” To select a test mode, simply press the tester key listed to the left of the test mode on the menu. The tester automatically scrolls up to three test modes at a time. Pressing the d key turns off the automatic scrolling and “freezes” the menu. The menu may then be manually scrolled by pressing the U key. Regardless of which test modes are displayed, any available test mode can be selected at any time from the menu. SELECT MODE F0: DATA LIST F1: DTC ENTRY F2: DTC F0: to Data List display d F1: to DTC Entry display F2: to Trouble Codes display F3: to Snapshot mode F4: to OBD Controls menu F5: to System Tests menu F8: to Information menu u SELECT MODE F3: SNAPSHOT F4: OBD CONTROLS F5: SYSTEM TESTS d u SELECT MODE F8: INFORMATION When F4: OBD Controls mode is selected, a submenu of specific tests available for the selected vehicle is displayed. The tester displays only the test modes available for the selected vehicle. Once you have selected a test mode, operation begins. Detailed operating instructions for each test mode are provided in the following sections. ACTIVE KEYS 2 )-( Select test modes and submodes. u Scroll menu down. d “Freeze” menu. x Return to the Select Mode menu, or to the OBD Controls menu. COMMON TEST MODES I MODE F0: DATA LIST 2. MODE F0: DATA LIST The purpose of the Data List mode is to monitor engine or transmission data parameters. When Data List is selected, the tester displays ECU data parameters in pre-programmed pairs. You can also create your own pairs. If you are using a Mastertech tester and the Multi-Function Program Card is installed, the Enhanced mode is available when testing Lexus and Toyota vehicles. To select the Data List mode, do the following: 1. Press ) to select the Data List mode from the Select Mode menu. 2. To see the other pre-programmed data pairs available for the selected system, press either the Y or N key. The Y key will cause the tester to scroll forwards through the list of pre-programmed pairs. The N key will cause backwards scrolling. Holding either key will cause continuous scrolling. You can also create data parameter pairs different from the pre-programmed pairs, as explained in Create Your Own Data Pairs. A description of all engine and transmission data parameters available for each manufacturer that is capable of displaying data parameters is included in that Manufacturer's specific section. Not all data parameters are transmitted by every vehicle. 3. The data parameters can be printed if the tester is connected to a compatible serial printer. Refer to the tester operator's manual for instructions on connecting the printer to the tester and printing the data parameters. 4. You may return to the Select Mode menu at any time by pressing X. An example of the operation of the Data List mode is summarized in the following flow diagram. The data displayed may be different for the selected vehicle. SELECT MODE F0: DATA LIST F1: DTC ENTRY F2: DTC ) BAROMETRIC PRESS 100mmHg VEHICLE SPEED 0 KPH 0 MPH Y N COOLANT TEMP 40°C 104°F INTAKE AIR TEMP 40°C 104°F Y N DESIRED IDLE 797 RPM IDLE SWITCH ON Data List Mode Create Your Own Data Pairs You can create data parameter pairs different from the pre-programmed pairs. Any two parameters that can be monitored can be made into a pair. New data pairs are created simply by scrolling either the bottom or top display parameter, while the other display parameter is fixed. Pressing ) causes the top display parameter to be fixed, which is indicated with a “*” in the left column of the second line of the display, as shown in Figure A. Pressing ! causes the bottom display parameter to be fixed, as shown in Figure B. To “unfix” the top parameter, press !. Press COMMON TEST MODES I 3 MODE F0: DATA LIST ) to “unfix” the lower parameter. The tester won't allow both top and bottom parameters to be fixed at the same time. As an example, let's say you wish to create a pair with ENGINE SPEED and BARO. To do so, scroll through the pre-programmed pairs with the Y or N key until you find a pair with ENGINE SPEED. Fix ENGINE SPEED by pressing ) if ENGINE SPEED is the top parameter, ! if it is the bottom. Then scroll the other half of the display with either the Y or N key until BARO is displayed. ENGINE SPEED 2300 RPM BARO (kPa, in Hg) * 102 30.3 * FIXES TOP PARAMETER ENGINE SPEED * 2300 RPM * FIXES BOTTOM BARO (kPa, in Hg) 102 30.3 PARAMETER Figure B Figure A SELECT MODE F0: DATA LIST F1: PRINT DATA F2: TROUBLE CODE ) BAROMETRIC PRESS 100mmHg VEHICLE SPEED 0 KPH 0 MPH Y N COOLANT TEMP 40°C 104°F INTAKE AIR TEMP 40°C 104°F Y N DESIRED IDLE 797 RPM IDLE SWITCH ON ) COOLANT TEMP * 40°C 104°F VEHICLE SPEED 0 KPH 0 MPH Y N COOLANT TEMP * 40 °C 104 °F INTAKE AIR TEMP 40 °C 104 °F Y N COOLANT TEMP * 40°C 104°F DESIRED IDLE 797 RPM ! Pressed Twice VEHICLE SPEED 0 KPH 0 MPH INTAKE AIR TEMP * 40 °C 104 °F Y N COOLANT TEMP 40°C 104°F INTAKE AIR TEMP * 40°C 104°F Y N DESIRED IDLE 797 RPM INTAKE AIR TEMP * 40°C 104°F Data List Mode ACTIVE KEYS 4 y,n Scroll through displayed data parameters. ) Mark top displayed parameter as “fixed” for creating your own data pairs. ! Mark bottom displayed parameter as “fixed” for creating your own data pairs. x Return to test mode menu. COMMON TEST MODES I MODE F1: DTC ENTRY 3. MODE F1: DTC ENTRY The DTC Entry mode is designed for vehicles that are equipped with On Board Diagnostics, which require DTCs to be read from the ECU using a manual method. Up to five submodes are available when Mode F1: DTC Entry is selected. Only submodes available for the selected vehicle are displayed in the submode menu. A description of the submodes follows. Operating instructions for the submodes are on the following pages. How to select and operate the DTC Entry submodes is explained on the following pages. Detailed operating instructions for the selected vehicle are included in the Manufacturer Specific Instructions. The DTC Entry submodes include: Submode F0: How To Read On vehicles with no DLC, DTCs are displayed only after the ECU is put into a diagnostic state. This submode provides screen text information which explains how to setup the ECU for DTC retrieval. Submode F1: Enter DTC(s) Most early OBD systems do not have a DLC, so the codes must be manually read from the ECU LEDs, from an analog voltmeter, or from the dashboard mounted Malfunction Indicator Lamp (MIL). After codes are obtained using information provided in submode F0: HOW TO READ, the codes may be entered into the tester in Submode F2: ENTER DTCs, and the tester displays a description of the code. Submode F2: DTC List The tester displays a list of DTCs available for the selected vehicle. From this list the DTC obtained using F0: HOW TO READ can be selected (or deselected), using the Y and N keys without the need to enter the DTC numerically. Submode F3: Review DTC The REVIEW DTC submode displays DTCs that have been entered or selected and stored in the tester memory. Submode F4: Clear DTC(s) Clearing DTCs from ECUs on import vehicles sometimes requires special manual steps not related to the tester. The Clear DTC menu has a selection for clearing DTCs from the selected vehicle (e.g., removing a certain fuse or disconnecting the battery). The Clear DTC submode also contains a selection for clearing DTCs entered into the tester memory. SUBMODE F0: HOW TO READ The How To Read submode explains how to set up the selected vehicle to display stored DTCs on the dashboard Malfunction Indicator Lamp (MIL). Once the DTCs are displayed, you can enter the code numbers into the tester, as described in submode F1: ENTER DTC, for a description of the code. To select the How To Read submode, do the following: 1. Press ! to select DTC Entry from the Select Mode menu. 2. Press ) to select How To Read from the DTC Entry menu. 3. Use the u key to scroll through the How to Read DTC instructions. Press d to hold a display. 4. For some vehicles that require you to watch the flashing LEDs on the ECU, the tester gives you the option of displaying the location of the ECU. If you are in doubt about the location of the ECU press * to select Information from the Select Mode menu, then press % to select ECU Location. COMMON TEST MODES I 5 MODE F1: DTC ENTRY 5. The following diagram shows an example of How To Read DTC displays. Remember, the displays may be different for the vehicle you are testing. 6. Press X to return to the DTC Entry menu. DTC ENTRY F0: HOW TO READ F1: ENTER DTC(s) F2: DTC LIST ) SHORT THE 2P SERVICE CHECK CONNECTOR WITH THE SCC JUMPER. TURN IGN. KEY TO ON. THE MIL AND THE ECU LED WILL INDICATE DTCs BY THE NUMBER & LENGTH OF CODE BLINKS. 2-DIGIT CODES USE A LONG FLASH FOR 10s AND SHORT FLASH FOR 1s DIGIT. FIGURE 1-1. Example Of How To Read DTCs Displays ACTIVE KEYS u Scroll through displayed instructions. d Hold a displayed screen. x Return to DTC Entry menu. SUBMODE F1: ENTER DTC(S) The Enter DTC submode displays a description of DTCs entered into the tester memory. A list of DTC numbers available for the selected vehicle is available by using submode F2: DTC LIST. To select the Enter DTC(s) submode, do the following: 1. Press ! to select DTC Entry from the Select Mode menu. 2. Press ! to select Enter DTC(s) from the DTC Entry menu. 6 COMMON TEST MODES I MODE F1: DTC ENTRY 3. Use the tester keypad to enter the DTC displayed on the vehicle ECU, then press E. An example of the Enter DTC display screen is shown in the following figure. ENTER DTC ?? [ENTER] ECU LED Some Honda and Acura vehicles have a single ECU mounted LED that flashes DTCs. Refer to the Honda and Acura specific sections that describe how to read DTCs on ECU mounted LEDs. In addition, some Subaru vehicles use an ECU mounted single LED (O2S monitor lamp) to flash DTCs. 1985-86 model Honda vehicles have four ECU mounted LEDs that flash DTCs. When entering DTCs for these vehicles, the tester displays a flashing “?” where the state of the LED is to be entered. Press 1 if the LED is on or press 0 if the LED is off. Repeat this process until all four digits have been entered, then press E. ENTER STATE OF 4 LEDs. 1-ON 0-OFF ???? [ENTER] Some Nissan vehicles have two ECU mounted LEDs that flash DTCs and some Nissan and Infiniti vehicles have a single ECU mounted LED that flashes DTCs. Refer to the Nissan and Infiniti specific sections that describe how to read DTCs on ECU mounted LEDs. Malfunction Indicator Lamp (Check Engine Light) Late model Acura, Chrysler Imports, Honda, Hyundai, Infiniti, Nissan, Mitsubishi, and Subaru vehicles have an instrument panel malfunction indicator lamp (MIL) that flashes DTCs. In addition, all Daihatsu and Kia vehicles use a MIL for DTC output. Refer to the manufacturer specific section that describes how to read DTCs from the MIL. Analog Voltmeter Some Chrysler Imports, Mitsubishi, and Hyundai vehicles require the use of an analog voltmeter to read DTCs. In this case, the meter is set to the 20 volt scale and meter needle sweeps are counted. Refer to the manufacturer specific section that describes how to read DTCs using an analog voltmeter. Mastertech Oscilloscope For the automobile manufacturers that mention the use of an analog voltmeter to read manual DTCs, the Mastertech Oscilloscope may be used. Set up the single channel oscilloscope and make connections the same way as the analog voltmeter (above). Choose the 20v/division scale and a slow time/division (e.g., 1-2 sec/division) the DTCs will be shown as a waveform on the display. 4. When E is pressed, the tester displays the DTC number and a short description of the code. 5. After you enter the DTC, the tester asks for additional trouble code entry. Press Y to enter another DTC. If N is pressed, the tester displays an instruction screen describing the functions available. = ADVANCE CODE = HOLD CODE EXIT = QUIT ENTER = SUMMARY COMMON TEST MODES I 7 MODE F1: DTC ENTRY 6. Press u to move to the next DTC. If you wish to hold a DTC screen, press d to freeze the automatic scrolling feature. DTC 03 MAP SENSOR VOLTAGE FAULT 7. Press E to view a summary screen of all entered DTCs. DTC SUMMARY XX XX XX XX XX XX XX XX XX XX 8. Press X to return to the DTC Entry menu. ACTIVE KEYS e Enter the displayed DTC. y Enter another DTC. n Advance to instruction screen. )-( Enter DTC number. u Move to the next DTC. d Stop the automatic scrolling. x Return to DTC Entry menu. SUBMODE F2: DTC LIST The DTC List submode provides a list of all DTC numbers and a description of each DTC available for the selected vehicle. DTCs may be selected by pressing the Y key, or deselected by pressing the N key. The entire DTC list can be printed, if the tester is connected to a compatible serial printer. To select the DTC List submode, do the following: 1. Press ! to select DTC Entry from the Select Mode menu. 2. Press @ to select DTC List from the DTC Entry menu. 3. An instruction screen explains how to view, select, and deselect the DTCs. Press u to display the DTC List. 4. Use the u and d keys to scroll through the DTCs. 5. Press Y to select a displayed DTC. “SELECTED” is displayed at the bottom of the screen. To deselect a DTC, press N when the code is displayed. 6. Press * to print the entire DTC list. 7. Press X to return to the DTC Entry menu. 8 COMMON TEST MODES I MODE F1: DTC ENTRY SELECT MODE F1: DTC ENTRY F4: OBD CONTROLS F5: SYSTEM TESTS ! DTC ENTRY F0: HOW TO READ F1: ENTER DTC(s) F2: DTC LIST @ USE & TO GO THROUGH DTC LIST [YES] = SELECT [NO] DE-SELECT DTC 03 MAP SENSOR VOLTAGE FAULT Y N DTC 03 MAP SENSOR VOLTAGE FAULT **SELECTED** Example of DTC List Displays ACTIVE KEYS ud Scroll through displayed DTCs. y Select displayed DTC. n Deselect a selected DTC. * Print available DTC list. x Return to DTC Entry menu. SUBMODE F3: REVIEW DTC The Review DTC submode displays a list of DTCs stored in the tester memory. The list of DTCs can be printed, if the tester is connected to a compatible serial printer. To select Review DTC submode, do the following: 1. Press ! to select DTC Entry from the Select Mode menu. 2. Press # to select Review DTC from the DTC Entry menu. 3. An instruction screen explains how to view the DTCs. Press u to display the stored DTCs. COMMON TEST MODES I 9 MODE F1: DTC ENTRY 4. The DTC number is displayed on the first line, followed by a description of the DTC. Press u to advance to the next code, or press d to hold the displayed code. 5. When all DTCs have been displayed, press E to display a summary screen of all entered DTCs. 6. Press * to print a list of selected (current) DTCs. 7. Press X to return to the DTC Entry menu. SELECT MODE F1: DTC ENTRY F4: OBD CONTROLS F5: SYSTEM TESTS ! DTC ENTRY F3: REVIEW DTC F4: CLEAR DTC(S) # = ADVANCE CODE = HOLD CODE EXIT = QUIT ENTER = SUMMARY DTC 03 MAP SENSOR VOLTAGE FAULT E DTC SUMMARY 03 Example of Review DTC Displays ACTIVE KEYS u,d Advance to next DTC or hold displayed DTCs. e Display summary screen. * Print entered or selected (current) DTCs. x Return to DTC Entry menu. 10 COMMON TEST MODES I MODE F1: DTC ENTRY SUBMODE F4: CLEAR DTC(S) The Clear DTC submode allows you to clear all DTCs stored in the tester, and displays instructions for clearing active DTCs stored in the vehicle ECUs. To select Clear DTC(s) submode, do the following: 1. Press ! to select DTC Entry from the Select Mode menu. 2. Press $ to select Clear DTC from the DTC Entry menu. 3. For some vehicles, the tester will ask if you want to clear codes from the vehicle or from the tester. Press ) for information screens that describe how to clear ECU codes, or press ! to clear entered or selected codes that are stored in the tester memory. 4. When F0: FROM ECU is selected, one or more instruction screens explain how to clear the DTCs. The instructions are specific to the vehicle selected. Examples of Clear DTC instructions are shown on the following page. 5. When F1: FROM TESTER is selected, the DTCs stored in the tester are cleared. DTC DATA HAS BEEN CLEARED FROM TESTER [EXIT] 6. Press X to return to the DTC Entry menu. ACTIVE KEYS ) Display how to clear ECU codes information. ! Clear codes stored in tester memory. e Return to DTC Entry menu. x Return to DTC Entry menu. COMMON TEST MODES I 11 MODE F1: DTC ENTRY DTC ENTRY F3: REVIEW DTC F4: CLEAR DTC(s) $ ) CLEAR DTC(s) F0: FROM ECU F1: FROM TESTER TOYOTA/LEXUS VEHICLES TURN IGNITION OFF. REMOVE EFI FUSE FOR 60 SEC. [ENTER] NISSAN/INFINITI VEHICLES DISCONNECT THE NEGATIVE BATTERY TERMINAL. WAIT [ENTER] 15 SECONDS RECONNECT THE BATTERY TERMINAL [ENTER] RECHECK THE VEHICLE TROUBLE CODES [ENTER] HONDA/ACURA DISCONNECT THE NEGATIVE BATTERY TERMINAL FOR AT [ENTER] LEAST 10 SECONDS REMOVE THE CLOCK-RADIO FUSE (10A) FROM THE [ENTER] UNDER-HOOD FUSE RELAY BOX FOR 10 SECONDS [ENTER] TURN IGNITION OFF. REMOVE THE NO. 15 ACGS FUSE [ENTER] FROM THE UNDERDASH FUSE/RELAY BOX FOR 10 SEC. [ENTER] TURN IGNITION OFF. REMOVE THE ALTERNATOR SENSE [ENTER] FUSE FROM THE UNDER-HOOD FUSE/RELAY BOX [ENTER] [ENTER] FOR 10 SECONDS [ENTER] Examples of Clear DTC Instructions 12 COMMON TEST MODES I MODE F2: DTC(S) 4. MODE F2: DTC(S) The purpose of the F2: DTC test mode is to read DTCs stored in the ECU on supported vehicles equipped with a Data Link Connector (DLC). A list of the DTCs for each vehicle is included in the Manufacturer Specific sections. Up to four submodes are available when Mode F2: DTC is selected. Only submodes available for the selected vehicle are displayed in the submode menu. Below is a description of the submodes. Operating instructions for the submodes are on the following pages. The DTC Mode submodes include: Submode F1: Read DTC(s) The tester reads and displays DTCs stored in the ECU. (On Inactive Toyota or Lexus systems, this submode is F1: READ/ENTER DTCs. Refer to the Toyota or Lexus Specific Instructions.) Submode F2: DTC List The tester displays a list of DTCs available for the selected vehicle. From this list the DTC can be selected (or deselected), using the Y and N keys without the need to enter the DTC numerically. Submode F3: Review DTC REVIEW DTC displays all DTCs that have been selected or entered into the tester memory. Submode F4: Clear DTC(s) Clearing DTCs from ECUs on import vehicles sometimes requires special steps not related to the tester. This submode has a selection which automatically clears or describes how to clear ECU DTCs (e.g., removing a certain fuse or disconnecting the battery). This submode has a selection for clearing DTCs entered into the tester memory using DTC Entry. Submode F5: Sens DTC On certain Toyota and Lexus vehicles, the engine ECU can be commanded into a Sensitive DTC detection mode. This sub mode increases the chance of capturing an intermittent fault within the engine control system. SUBMODE F1: READ DTC(S) The purpose of the Read DTC submode is to read DTCs stored in the ECU on vehicles equipped with On Board Diagnostics (OBD) and a Data Link Connector (DLC). Lists of the DTCs for each vehicle are included in the Manufacturer Specific Sections of this manual. To select Read DTC(s) submode, do the following: 1. Press @ to select DTCs from the Select Mode menu. 2. Press ! to select Read DTCs from the DTC Menu. 3. The tester will display screens such as in the examples on the following page. The tester may display instruction screens to guide you to connect the appropriate adapter and to properly prepare the vehicle. 4. If no codes are present, the tester informs you. Press X to return to the Select Mode menu. 5. If DTCs are present, the tester displays an instruction screen for reading the DTCs. Press u to display the first code. COMMON TEST MODES I 13 MODE F2: DTC(S) 6. The tester automatically displays each code and a description for three seconds. An example is shown on the following page. Remember that the DTCs displayed will be different depending on the vehicle selected. 7. A DTC can be “held” by pressing the d key while the code is displayed. This gives you more time to record the code. Press the u key to resume display of the DTCs. 8. Press E to display a summary of the DTCs. 9. Press * to print a list of the DTCs read by the tester. 10. Press X to terminate the Read DTC mode and return to the Select Mode menu. 11. To clear the codes, select F4: Clear DTC(s) from the Select Mode menu. Refer to Submode F4 for instructions on clearing the DTC(s). Example 1 Example 2 RECEIVING FAULT CODE INFORMATION PLEASE WAIT. XX The asterisk flashes the same as the MIL. * START ENGINE AND WARM TO NORMAL OPERATING TEMP. [ENTER] E = ADVANCE CODE = HOLD CODE EXIT = QUIT ENTER = SUMMARY TURN IGNITION KEY OFF [ENTER] E U DTC 02 THROTTLE TEMP SENSOR FAULT TURN KEY TO RUN OR START ENGINE [ENTER] E 3 Seconds DTC REQUEST DTC 14 02 SENSOR VOLTAGE FAULT ** IN PROCESS ** e DTC SUMMARY 02 14 NO DTCs ARE ACTIVE [EXIT] Examples Of Read DTC(s) ACTIVE KEYS u Advance display to next DTC. d Holds presently displayed DTC. e Displays DTC summary. * Prints list of current DTCs. x Return to Select Mode menu. 14 COMMON TEST MODES I MODE F2: DTC(S) SUBMODE F2: DTC LIST The DTC List submode provides a list of all DTC numbers and a description of each DTC available for the selected vehicle. DTCs may be selected by pressing the Y key, or deselected by pressing the N key. The entire DTC list can be printed, if the tester is connected to a compatible serial printer. To select DTC List submode, do the following: 1. Press @ to select DTC from the Select Mode menu. 2. Press @ to select DTC List from the DTC menu. 3. An instruction screen explains how to view, select, and deselect the DTCs. Press u to display the DTC List. 4. Use the u and d keys to scroll through the DTCs. 5. Press Y to select a displayed DTC. “SELECTED” is displayed at the bottom of the screen. To deselect a DTC, press N when the code is displayed. 6. Press * to print the entire DTC list. 7. Press X to return to the DTC menu. SELECT MODE F1: DTC ENTRY F2: DTC F4: OBD CONTROLS @ DTC F1: READ DTC(s) F2: DTC LIST F3: REVIEW DTC @ USE & TO GO THROUGH DTC LIST [YES] = SELECT [NO] = DE-SELECT DTC 03 MAP SENSOR VOLTAGE FAULT Y N DTC 03 MAP SENSOR VOLTAGE FAULT **SELECTED** Example of DTC List Displays COMMON TEST MODES I 15 MODE F2: DTC(S) ACTIVE KEYS ud Scroll through displayed DTCs. y Select displayed DTC. n Deselect a selected DTC. * Print available DTC list. x Return to DTC Entry menu. SUBMODE F3: REVIEW DTC The Review DTC submode displays a list of DTCs that have been entered or selected. The DTCs can be printed, if the tester is connected to a compatible serial printer. To select Review DTC submode, do the following: 1. Press @ to select DTC Entry from the Select Mode menu. 2. Press # to select Review DTC from the DTC menu. 3. An instruction screen explains how to view the DTCs. Press u to display the stored DTCs. 4. The DTC number is displayed on the first line, followed by a description of the DTC. Press u to advance to the next code, or press d to hold the displayed code. 5. When all DTCs have been displayed, press E to display a summary screen of all entered DTCs. 6. Press * to print entered or selected (current) DTCs. 7. Press X to return to the DTC Entry menu. 16 COMMON TEST MODES I MODE F2: DTC(S) SELECT MODE F1: DTC ENTRY F2: DTC F3: SNAPSHOT @ DTC F1: READ DTC(s) F2: DTC LIST F3: REVIEW DTC # = ADVANCE CODE = HOLD CODE EXIT = QUIT ENTER = SUMMARY DTC 03 MAP SENSOR VOLTAGE FAULT E DTC SUMMARY 03 Example of Review DTC Instructions ACTIVE KEYS u Advance to next DTC. d Hold displayed DTC. e Display summary screen of entered DTCs. * Print entered or selected (current) DTCs. x Return to DTC Entry menu. COMMON TEST MODES I 17 MODE F2: DTC(S) SUBMODE F4: CLEAR DTC(S) The Clear DTC submode allows you to clear all DTCs stored in the tester, and provides instructions for clearing active DTCs stored in the vehicle ECU. To select Clear DTC(s) submode, do the following: 1. Press @ to select DTC from the Select Mode menu. 2. Press $ to select Clear DTC from the DTC menu. 3. For some vehicles, the tester asks if you want to clear codes from the vehicle or from the tester. Press ) for information screens that describe how to clear ECU codes, or press ! to clear entered or selected codes that are stored in the tester memory. 4. When F0: FROM ECU is selected, one or more instruction screens explain how to clear the DTCs. The instructions are specific to the vehicle selected. The illustration shows examples of Clear DTC instructions. 5. When F1: FROM TESTER is selected, the DTCs stored in the tester are cleared. 6. Press X to return to the DTC menu. 18 COMMON TEST MODES I MODE F2: DTC(S) SELECT MODE F1: DTC ENTRY F2: DTC F3: SNAPSHOT @ DTC F3: REVIEW DTC F4: CLEAR DTC(s) $ ) CLEAR DTC(s) F0: FROM ECU F1: FROM TESTER TURN IGNITION OFF. REMOVE EFI FUSE FOR 60 SEC. [ENTER] DISCONNECT THE NEGATIVE BATTERY TERMINAL. WAIT [ENTER] TOYOTA/LEXUS VEHICLES NISSAN VEHICLES E 15 SECONDS RECONNECT THE BATTERY TERMINAL [ENTER] E RECHECK THE VEHICLE TROUBLE CODES [ENTER] Examples of Clear DTC Instructions ACTIVE KEYS ) Display how to clear ECU codes information. ! Clear codes stored in tester memory. e Return to DTC menu. x Return to DTC menu. COMMON TEST MODES I 19 MODE F3: SNAPSHOT 5. MODE F3: SNAPSHOT The purpose of the Snapshot test mode is to help you isolate an intermittent or transient problem by storing engine data parameters before and/or after the problem occurs. The Snapshot test mode can be used in the service bay and during road testing. When the tester is operating in Snapshot mode, it is constantly storing diagnostic data parameter values and any available trouble codes. A time and position index for the stored information is also saved. When the tester memory is full, the oldest (earliest) data collected is erased to make room for new information. A “TRIGGER” tells the tester when to freeze collected data. You can specify a “TRIGGER CONDITION” and “TRIGGER POINT” so the tester collects data that will be most useful in diagnosing the current problem. TRIGGER CONDITION The trigger condition that you select defines the specific circumstances under which you want the trigger to be set. The various trigger conditions are explained fully in Step 2 of the operating procedures. TRIGGER POINT If F9: TRIG. POINT is selected from the Snapshot Options menu, a trigger point selection menu is displayed. Trigger Point allows you to specify which data to capture: data that occurs before, after, or both before and after the point at which the trigger occurs. If no trigger point is selected, the center trigger point will be used and a similar number of data samples before and after the trigger will be saved. Selecting a trigger point is fully explained in Step 2 of the operating procedures. VIEWING CAPTURED DATA By selecting F3: REPLAY DATA from the Snapshot menu you have the option of bypassing the Data Capture phase and displaying previously captured data. All data captured during Snapshot will be retained in the tester memory for up to 24 hours (even if the tester is unplugged from the vehicle), or until it is overwritten by a new Snapshot. PRINTING CAPTURED DATA In addition, you can print the captured data, providing a hard copy of any selected data sample. See Step 11 for more detail. OPERATING PROCEDURE The operation of Snapshot mode is divided into three phases: Set-Up (Steps 1-2), Data Capture (Steps 3-6), and Data Display (Steps 7-12). 20 COMMON TEST MODES I MODE F3: SNAPSHOT Setup Phase To select the setup phase of Snapshot mode, do the following: 1. Press # to select Snapshot mode from the Select Mode menu. The Snapshot functions are listed in the Snapshot Options menu. To bypass the Data Capture phase and review previously captured Snapshot data, press F3: REPLAY DATA. 2. To select a Snapshot option, press the key listed to the left of the desired function. The Snapshot functions are explained below: F0: ANY CODE A trigger occurs when any trouble code is set. An ( or X key press also causes a trigger. F1: SINGLE CODE You can select a specific trouble code that must be detected before the trigger will be set. When F1: SINGLE CODE is selected, the tester displays “SNAPSHOT MODE, ENTER TROUBLE CODE XX, (CODE + ENTER)”. Use numeric keys 0 - 9 to enter the trouble code number that you wish to cause the trigger, then press E. The tester continues to store data until the specified trouble code is detected. If the code you enter does not exist for the engine type being tested, an “INVALID CODE” message will be displayed and the code will have to be reentered. An ( or X key press will also cause a trigger. F2: MANUAL TRIGGER While operating the Snapshot mode, you can always cause the trigger to be set by pressing E, X or (. F3: REPLAY DATA To replay previously captured data, press #. All data captured during the Snapshot is retained in the tester memory for up to 24 hours, even if the tester is disconnected from the vehicle, or until it is overwritten by a new Snapshot. F9: TRIGGER POINT In addition to a trigger condition selection, you have the option of selecting a trigger point. F0: BEGINNING The trigger will be at the beginning of the captured data. After the trigger occurs, the tester continues capturing data until the memory is full, then the data is displayed. If not enough data samples have been collected to fill the tester memory (because X was pressed before the tester memory was full), some data samples captured before the trigger point will also be available for display. F1: CENTER If enough time has elapsed before and after the trigger point, a similar number of data samples that occurred before and after the trigger point are available for display. However, if the trigger occurs at or near the start of the Data Capture phase, there are fewer samples before the trigger point available for display. Also, if the X key is pressed after the trigger occurs, but before the tester memory is full, fewer data samples captured after the trigger point are available for display. F2: END OF DATA Data that occurred before the trigger is displayed. If the tester memory was not full when the trigger occurred, some data samples captured after the trigger point are also available for display. COMMON TEST MODES I 21 MODE F3: SNAPSHOT SELECT MODE F3: SNAPSHOT F5: SYSTEM TESTS # SELECT TRIGGER POINT SELECT SINGLE CODE TRIGGER POINT AT F0: BEGINNING F1: CENTER of F2: END of data. ( REPLAY PREVIOUSLY CAPTURED DATA COOLANT TEMP 40°C 104°F MANI AIR TEMP 40°C 104°C SNAPSHOT OPTIONS F0: ANY CODE F1: SINGLE CODE F2: MANUAL TRIG F3: REPLAY DATA F9: TRIG. POINT # ! SNAPSHOT MODE ENTER ECM CODE TO TRIGGER ON XX THEN PRESS ENTER Code, then E ) ,@ O DATA CAPTURE PHASE COOLANT TEMP 40°C 104°F MANI AIR TEMP 40°C 104°C W Y N More Data Parameters Snapshot Setup Phase SNAPSHOT DATA Trigger point at BEGINNING: data is collected after the snapshot trigger point. Trigger point at CENTER: data that occured before and after the snapshot trigger point. Trigger point at END: data that occured before the snapshot trigger point. ACTIVE KEYS )-( Select Snapshot Function. 0-9 Enter specific trouble code digits. ( Manual trigger. e Enter selected trouble code. Cause trigger during data capture. x Terminate Snapshot mode and return to Select Mode menu. Cause trigger during data capture and terminate further data capture. Terminate data capture after Snapshot trigger has occurred. 22 COMMON TEST MODES I MODE F3: SNAPSHOT Data Capture Phase To select the data capture phase of Snapshot mode, do the following: 3. Once you've specified the trigger condition, the tester starts saving data in its memory. During this time, you can examine all of the data in the same manner as you do in the F0: Data List mode. You can even create your own pairs during Snapshot. While the tester is waiting for the trigger condition to occur, a flashing “W” is displayed in the lower right-hand corner of the screen. BATTERY VOLTAGE 13.4V COOLANT TEMP. 83°C W Flashing W indicates the tester is waiting for a trigger 4. While the tester is waiting for the trigger, it is continuously storing data. The data is organized as a number of 'samples'. The value or state of each parameter as well as all trouble codes are saved for each sample. All data parameters available in F0: Data List mode are stored when saving a snapshot. 5. Once the trigger occurs, the tester continues to save data samples until its memory is full. The tester display indicates that the trigger has occurred by replacing the flashing “W” in the lower right-hand corner of the display with a solid “T”. As soon as the memory is full, the Data Capture phase terminates automatically, and the tester goes on to the Search for Trouble Code phase. BATTERY VOLTAGE 13.4V COOLANT TEMP. 83°C T Solid T indicates the trigger has occurred and the tester is collecting data 6. Pressing X terminates the Data Capture phase early. If the trigger occurred before X was pressed, the tester automatically goes to the Data Display phase. If the trigger had not occurred before X was pressed, the tester returns to the Snapshot Options menu. COOLANT TEMP 40ºC 104ºF MANI AIR TEMP 40ºC 104ºF W Waiting for Trigger COOLANT TEMP 40ºC 104ºF MANI AIR TEMP 40ºC 104ºF T Trigger Occurs COOLANT TEMP 40ºC 104ºF MANI AIR TEMP 40ºC 104ºF O Data Display Phase ACTIVE KEYS yn Scroll through displayed data parameter. ) Mark the top display parameter as “fixed” for creating your own pairs. ! Mark the bottom display parameter as “fixed” for creating your own pairs. ( Manual trigger. x Terminate data capture early. e Manual trigger. COMMON TEST MODES I 23 MODE F3: SNAPSHOT Data Display Phase To select the data display phase of Snapshot mode, do the following: 7. The Data Display phase is indicated with the number of the data sample in the lower right-hand corner of the display. Use the U and D keys to sequence through the data samples. Sample “0” corresponds to the trigger sample; sample “-1” is the sample immediately preceding the trigger; sample “+1” is the sample immediately after the trigger; and so on. Press $ to go to the earliest sample in memory, or ^ to go to the latest sample. Press % to display the trigger sample (0). 8. While in the data display phase, pressing E toggles between the sample index and the sample time. INJ PULSE WIDTH 3.245 MSEC ENGINE SPEED +16 900 RPM Sample Index e e INJ PULSE WIDTH 40 MSEC ENGINE SPEED 900 RPM +3.4 Sample Index The sample time and sample index displayed is relative to the trigger; samples before the trigger have a negative time, samples after the trigger have a positive time. 9. Select the data parameters to be displayed in the same manner as in the Data List mode. All Data List functions are available, such as the ability to create your own parameter pairs. 10. For most vehicles you can press @ to view the trouble codes present in any sample. 11. The currently displayed sample may be printed if the tester is connected to a printer. To print the data, press *. While the tester is sending data to the printer, the keyboard is disabled. Snapshot data can also be printed in a tabular format using the SCREEN PRINT feature. Refer to the tester operator's manual for setting up the tester to print. 12. When you are finished viewing the sampled data, press X to return to the Snapshot Options menu. Press X again to return to the Select Mode menu. ACTIVE KEYS y,n Scroll through displayed data parameters. ),! Fix the top or bottom display parameter respectively. @ Display trouble codes for current sample. u Go to the next data sample. d Go to the previous data sample. e Toggle between sample time and index. $ Go to the earliest sample in memory. 24 COMMON TEST MODES I MODE F3: SNAPSHOT ACTIVE KEYS (Continued) % Go to the trigger sample (sample 0). ^ Go to the latest sample in memory. * Print Data List. x Return to Set-Up Phase. ^ DISPLAYS LAST SAMPLE OF DATA BATTERY VOLTAGE 12.6 V BAROMETER SENSOR 0.81 bar +34 INDICATES SAMPLE NUMBER RELATIVE TO TRIGGER d All parameter pairs can be displayed. u ^ BATTERY VOLTAGE 12.3 V BAROMETER SENSOR 0.81 bar +12 d u BATTERY VOLTAGE 14.9 V BAROMETER SENSOR 0.81 bar +2 @ d % DISPLAYS TRIGGER SAMPLE OF DATA DTC 49: BATTERY VOLTAGE HIGH (YES) Code Display Complete u BATTERY VOLTAGE 14.8 V BAROMETER SENSOR 0.81 bar +0 TRIGGER SAMPLE d u $ BATTERY VOLTAGE 12.9 V BAROMETER SENSOR 0.81 bar –1 @ d NO TROUBLE CODES –1 4 Seconds All parameter pairs can be displayed. $ DISPLAYS FIRST SAMPLE OF DATA u BATTERY VOLTAGE 12.6 V BAROMETER SENSOR 0.81 bar –33 Snapshot Data Display COMMON TEST MODES I 25 MODE F3: SNAPSHOT SELECT MODE F3: SNAPSHOT F5: SYSTEM TESTS F8: INFORMATION # TRIGGER POINT AT F0: BEGINNING F1: CENTER or F2: END of data. ( )!@ SNAPSHOT OPTIONS F0: ANY CODE F1: SINGLE CODE F2: MANUAL TRIG F3: REPLAY DATA F9: TRIG POINT ) ! # Review previously captured data. Y N @ More Data Parameters SNAPSHOT MODE ENTER ECM CODE TO TRIGGER ON XX THEN PRESS ENTER SET-UP PHASE (See Steps 1-2) ENTER CODE COOLANT TEMP 40°C 104°F MANI AIR TEMP 40°C 104°F DATA CAPTURE PHASE (See Steps 3-6) W FLASHING W = WAITING FOR TRIGGER USE y AND n TO SELECT DIFFERENT DATA PARAMETERS COOLANT TEMP 40°C 104°F MANI AIR TEMP 40°C 104°F T T = TRIGGER HAS OCCURRED TECH 1 MEMORY FULL OR E DATA DISPLAY PHASE (See Steps 7-12) COOLANT TEMP 40°C 104°F MANI AIR TEMP 40°C 104°F 0 0 = TRIGGER POSITION – = BEFORE TRIGGER OCCURRED + = AFTER TRIGGER OCCURRED Y Use Y and N to view different Data Parameters. N OTHER DATA LIST SCREENS Use E to toggle between SAMPLE INDEX and SAMPLE TIME Snapshot Mode Flowchart 26 COMMON TEST MODES I MODE F4: OBD CONTROLS 6. MODE F4: OBD CONTROLS The OBD Controls mode is used to select a submenu of tests available for the selected vehicle. The tests vary according to vehicle manufacturer. Instructions for selecting and operating the OBD Controls are included in the Manufacturer Specific Instructions. To select OBD Controls mode, do the following: 1. Press $ to display a list of tests available for the selected vehicle. SELECT MODE: F4: OBD CONTROLS $ Manufacturer Specific OBD Controls 2. Refer to the Manufacturer Specific Instructions for the vehicle you are testing for operating instructions. 3. Press X to return to the Select Mode menu. COMMON TEST MODES I 27 MODE F5: SYSTEM TESTS 7. MODE F5: SYSTEM TESTS SUBMODE F0: PREP VEHICLE The System Tests submode ensures that the vehicle system is properly warmed and preconditioned in order to ensure accurate diagnosis. The Prepare Vehicle system test is available for all vehicles. The Prepare Vehicle System Test submode ensures that the vehicle system is properly warmed and preconditioned for accurate diagnosis. The Prepare Vehicle test also guides you through vehicle no-start diagnostics (the tester prompts you if the vehicle can start, if the engine can crank, or if spark is observed at the spark plug) which can help you in reviving a no-start vehicle, so diagnosis can be performed on a vehicle with possible engine control system problems. Performing the Prepare Vehicle System test should be done every time that you are performing diagnosis on the engine control system. Before performing the Prep Vehicle submode, select the type of vehicle being tested. NOTE When checking an engine for spark at the ignition coil, coil secondary wire, or spark plug secondary wire, use a suitable spark gap tester to prevent electrical shock and ignition system damage. Run the test in a well-ventilated area. To select Prep Vehicle submode, do the following: 1. Press ) to select Prep Vehicle from the System Tests menu. 2. Start the engine, if possible, then use the up and down keys to read the prepare vehicle screens. When the instructions on the screens have been completed, press X to return to the Select Mode menu. 3. If the engine will not start, follow the Engine No-Start instructions, then press X to return to the Select System Tests menu. ACTIVE KEYS u,d Used to scroll through the instruction displays. y,n Answer question on screen. x Return to Select Mode menu. 28 COMMON TEST MODES I MODE F5: SYSTEM TESTS SELECT MODE F0: PREP VEHICLE ) IS ENGINE A NO-START? [YES/NO] N Y USE KEYS TO VIEW PREPARE VEHICLE SCREENS D CHECK: VACUUM HOSES, ELEC WIRING, COOLANT LEVEL DOES ENGINE CRANK? [YES/NO?] Y N CHECK BATTERY OR STARTER CIRCUIT [EXIT] D SET PARKING BRAKE, BLOCK DRIVE WHEELS Y N D TURN ACCESSORIES OFF, PLACE A/T IN PARK OR M/T IN NEUTRAL D IS SPARK OBSERVED AT SPARK PLUG? [YES/NO?] CHECK FUEL DELIVERY SYSTEM OR ENGINE MECH. [EXIT] CHECK IGNITION PRIMARY AND SECONDARY CKTS [EXIT] WARM ENGINE, RUN AT 2000 RPM F0R 2 MINUTES D VEHICLE PREP. COMPLETED CONTINUE TESTING /DIAGNOSIS [EXIT] Prep Vehicle Flowchart COMMON TEST MODES I 29 MODE F8: INFORMATION 8. MODE F8: INFORMATION SUBMODE F1: DLC LOCATION Submode F1: DLC Location is available for select Chrysler Import and Nissan vehicles, and all Hyundai, Lexus, Mazda, Mitsubishi, and Toyota vehicles. The DLC Location test mode displays where the Data Link Connector (DLC) for the selected ECU is located on the vehicle. Depending on the vehicle being tested, there may be one or more different DLCs for the various ECUs. The tester informs you if the DLC location is not applicable for the selected system. To select DLC Location submode, do the following: 1. Press * to select Information from the Select Mode menu. 2. Press ! to select DLC Location from the Information menu. 3. The tester displays the location(s) of the DLC(s) and/or Check Connectors for the selected vehicle. For some Toyota and Lexus vehicles, you can select the DLC location of the TDCL or Check connector. Some examples of DLC Location displays are shown in the following figure. Remember, the displays for other vehicles will be different. SELECT MODE: F3: SNAPSHOT F5: SYSTEM TESTS F8: INFORMATION * SELECT MODE: F1: DLC LOCATION F2: SCC LOCATION F3: ID INFO ! NEXT TO NO. 2 FUSE/RELAY BLOCK ON THE PASSENGER SIDE WHEELWELL. 4. If no DLC or Check Connector link is necessary, the tester displays one of the following screens. THIS VEHICLE DOES NOT SUPPORT TDCL CONNECTOR [EXIT] NO CONECTOR IS NECESSARY ON VEHICLE [EXIT] 5. Press X to return to the Information menu. ACTIVE KEYS x 30 Return to Information menu. COMMON TEST MODES I MODE F8: INFORMATION SUBMODE F2: SCC LOCATION Submode F2: SCC Location is available for Acura and Honda vehicles only. The SCC Location test mode displays where the Service Check Connector (SCC) for the selected ECU is located on the vehicle. Depending on the vehicle being tested, there may be one or more different SCCs for the various ECUs. The tester informs you if the SCC location is not applicable for the selected system. To select SCC Location submode, do the following: 1. Press * to select Information from the Select Mode menu. 2. Press @ to select SCC Location from the Information menu. 3. The tester displays the SCC Location of the ECU being tested on the selected vehicle. Some examples of SCC Location displays are shown in the following figure. Remember, the displays for other vehicles will be different. SELECT MODE: F3: SNAPSHOT F5: SYSTEM TESTS F8: INFORMATION SCC Connector * SELECT MODE: F1: DLC LOCATION F2: SCC LOCATION F3: ID INFO Acura/Honda Service Check Connector Jumper @ UNDER THE PASSENGER SIDE DASHBOARD, RIGHT SIDE 4. The tester informs you if the SCC location is not required for the selected vehicle. SCC LOCATION NOT APPLICABLE, TO RETRIEVE DTCs FROM OBD SYSTEM, REFER TO F0: HOW TO READ DTCs ACTIVE KEYS x COMMON TEST MODES I Return to Information menu. 31 MODE F8: INFORMATION SUBMODE F3: ID INFO The Vehicle Information submode displays the currently selected year, vehicle manufacturer, model, engine displacement and type, and additional information such as fuel system and grade. To select ID Info submode, do the following: 1. Press * to select Information from the Select Mode menu. 2. Press # to select ID Info from the Information menu. 3. The currently selected vehicle information is displayed. An example is shown in the following figure. SELECT MODE: F3: SNAPSHOT F5: SYSTEM TESTS F8: INFORMATION * SELECT MODE: F1: DLC LOCATION F2: SCC LOCATION F3: ID INFO # Year and manufacturer Model Engine displacement and type Fuel system 1994 ACURA VIGOR 2.5L PGM-FI 4. If the information does not match the vehicle being tested, press X until the Asian Cartridge Powerup screen is displayed, then perform the vehicle selection procedure. 5. If the information matches the vehicle being tested, press X to return to the Information menu. ACTIVE KEYS x 32 Return to Information menu. Press repeatedly to return to Power-up display. COMMON TEST MODES I MODE F8: INFORMATION SUBMODE F4: DJC LOCATION Submode F4: DJC Location is available for select Chrysler Import and Nissan vehicles, and all Daihatsu, Hyundai, Kia, Mitsubishi, and Subaru vehicles. The DJC Location test mode displays where the Diagnostic Jumper Connector (DJC) for the selected ECU is located on the vehicle. Depending on the vehicle being tested, there may be one or more different DJCs for the various ECUs. The tester informs you if the DJC location is not applicable for the selected system. To select DJC Location submode, do the following: 1. Press * to select Information from the Select Mode menu. 2. Press $ to select DJC Location from the Information menu. 3. The tester displays the DJC Location of the ECU for the selected vehicle or system. Some examples of DJC Location displays are shown in the following figure. Remember, the displays for other vehicles will be different. SELECT MODE: F1: DTC ENTRY F5: SYSTEM TESTS F8: INFORMATION * SELECT MODE F4: DJC LOCATION F5: ECU LOCATION $ IN ENGINE COMPARTMENT BELOW THE MASS AIR FLOW SENSOR, ON BRACKET BOLTED TO THE TRANSAXLE. 4. Press X to return to the Information menu. ACTIVE KEYS x COMMON TEST MODES I Return to Information menu. 33 MODE F8: INFORMATION SUBMODE F5: ECU LOCATION Submode F5: ECU Location is available for select Nissan vehicles, and all Acura, Honda, Infiniti, Kia and Subaru vehicles. The ECU Location test mode displays where the selected Electronic Control Unit (ECU) is located on the vehicle. Depending on the vehicle being tested, there may be one or more different ECUs. The tester informs you if the ECU location is not applicable for the selected system. To select ECU Location submode, do the following: 1. Press * to select Information from the Select Mode menu. 2. Press % to select ECU Location from the Information menu. 3. The tester displays the location of the selected ECU on the selected vehicle. Some examples of ECU Location displays are shown in the following figure. Remember, the displays for other vehicles will be different. SELECT MODE: F1: DTC ENTRY F5: SYSTEM TESTS F8: INFORMATION * SELECT MODE F4: DJC LOCATION F5: ECU LOCATION % UNDER THE CARPET IN THE RT FRONT PASSENGER FOOTWELL. ACTIVE KEYS x 34 Return to Information menu. COMMON TEST MODES I COMMON TEST MODES II 1. TEST MODES AVAILABLE ...................................................................................................................... 3 2. HARDWARE REQUIRED .......................................................................................................................... 4 Mastertech............................................................................................................................................. 4 Tech 1A ................................................................................................................................................. 5 Tech 1..................................................................................................................................................... 6 3. GETTING STARTED ................................................................................................................................... 8 Powering the Mastertech, Tech 1A, or Tech 1 ............................................................................... 8 Establishing Communication ............................................................................................................ 8 Communication Failure ...................................................................................................................... 8 4. TEST MODES................................................................................................................................................ 9 Select Mode Menu .............................................................................................................................. 9 Mode F0: Data List ............................................................................................................................. 9 Submode F0: Display Data ...................................................................................................... 10 Submode F1: Data Setup ......................................................................................................... 10 Submode F0: All Parameters .......................................................................................... 10 Submode F1: User List Parameters ................................................................................11 Multiple ECUs ............................................................................................................................11 Mode F1: Readiness .......................................................................................................................... 14 Mode F2: Diagnostic Trouble Codes (DTCs) .............................................................................. 16 Submode F0: Read DTCs ........................................................................................................ 16 Submode F1: Freeze Data ........................................................................................................ 17 Submode F2: Clear Info ........................................................................................................... 18 Submode F3: Pending DTCs ................................................................................................... 19 Mode F3: Snapshot ........................................................................................................................... 20 Submode F4: Trigger Point ..................................................................................................... 21 Submode F3: Snapshot Replay ............................................................................................... 21 Mode F4: OBD Controls .................................................................................................................. 23 Submode F0: Evap Leak .......................................................................................................... 23 Mode F5: System Tests..................................................................................................................... 24 Submode F0: O2S Results ....................................................................................................... 24 Submode F1: Other Results ..................................................................................................... 26 Mode F8: Information....................................................................................................................... 27 Submode F0: VIN ..................................................................................................................... 27 Submode F1: S/W CALIB. ID ................................................................................................ 27 Submode F2: S/W VERIF ID. ................................................................................................ 28 Mode F9: OBD II Toolpak ............................................................................................................... 28 Submode F0: Diagnostics ........................................................................................................ 30 Submode F0: Prep Vehicle............................................................................................... 30 Submode F1: Procedure ................................................................................................... 31 Submode F9: Repair Verification ................................................................................... 32 Submode F1: Parameters.......................................................................................................... 32 Submode F0: Definitions ................................................................................................. 33 Submode F1: Ranges ........................................................................................................ 33 Submode F2: DTC Library .............................................................................................. 35 Submode F3: Readiness Information ..................................................................................... 35 Submode F4: O2S Information ............................................................................................... 36 Submode F0: Location ..................................................................................................... 36 Submode F1: Type ............................................................................................................ 37 Submode F2: Maintenance .............................................................................................. 38 5. ASIAN IMPORTS DIAGNOSTIC DATA PARAMETERS................................................................ 41 2 COMMON TEST MODES II TEST MODES AVAILABLE 1. TEST MODES AVAILABLE The OBD II Section defines available test modes, hardware requirements, and operating instructions for all OBD II compliant vehicles. All OBD II functions except OBD II Toolpak require communication with the vehicle ECU(s). Once the necessary hardware has been installed, communication between the tester and vehicle ECU(s) can be initialized.The following test modes are available when testing Asian Imports vehicles that are OBD II compliant. F0: DATALIST F0: Display Data F1: Data Setup F1: READINESS F2: DTCS F0: Read DTCs F1: Freeze Data F2: Clear Info F3: Pending DTCs F3: SNAPSHOT F4: OBD CONTROLS F5: SYSTEM TESTS F0: O2S Results F1: Other Results F8: INFORMATIONS F9: OBD II TOOLPAK NOTE COMMON TEST MODES II Not all models support OBD Controls or Information test modes. The tester will automatically determine whether the vehicle under test supports the test mode when the mode is selected. 3 HARDWARE REQUIRED 2. HARDWARE REQUIRED In order to be fully functional, the Asian imports Application cartridge requires that special OBD II Interface Circuitry be used with the Mastertech and Tech 1/1A testers. This circuitry can be installed in the following configurations: Mastertech, Tech 1A, and Tech 1. MASTERTECH To set up the Mastertech tester to test OBD II compliant vehicles, do the following: 1. Make sure the tester is OFF. Insert the Asian Imports application cartridge into the cartridge slot at the top of the OBD II compliant Mastertech. 2. Be sure the vehicle ignition switch is off. 3. Remove any adapters installed on the Data Link Connector (DLC) cable. 4. Connect the DLC cable to the tester and tighten the screws. 5. Connect the 16/14 Pin OBD II Adapter Cable to the DLC cable. 6. Connect the OBD II Adapter Cable to the vehicle DLC. 7. Turn the tester ON. Power and ground are provided through the DLC connector, so connecting the 12V power cable to the vehicle is not required. 8. Turn the vehicle ignition switch on to begin diagnostics. 9. Refer to this manual and the application cartridge operator's manual for software operating instructions. Application Cartridge Mastertech Tester DLC Cable 16/14 Pin OBD II Adapter (Type 3) Cable FIGURE 1-1. Mastertech Setup 4 COMMON TEST MODES II HARDWARE REQUIRED TECH 1A To setup the Tech 1A tester to test OBD II compliant vehicles, do the following: 1. Insert the OBD II Interface Cartridge into the Auxiliary cartridge slot at the top, rear of the tester. 2. Insert the Asian Imports application cartridge into the Master cartridge slot at the bottom, rear of the tester. 3. Be sure the vehicle ignition switch is off. 4. Remove any adapters installed on the Data Link Connector (DLC) cable. 5. Connect the DLC cable to the tester and tighten the screws. 6. Connect the 16/14 Pin OBD II Adapter Cable to the DLC cable. 7. Connect the OBD II Adapter Cable to the vehicle DLC. 8. Power and ground are provided through the DLC connector, so connecting the 12V power cable to the vehicle is not required. 9. Turn the vehicle ignition switch on to begin diagnostics. 10. Refer to this manual and the application cartridge operator's manual for software operating instructions . TECH 1A DLC Cable Application Cartridge 16/14 Pin OBD II Adapter Cable (P/N 02001969) FIGURE 1-2. Tech 1A Setup COMMON TEST MODES II 5 HARDWARE REQUIRED TECH 1 To set up the Tech 1 tester to test OBD II compliant vehicles, do the following: 1. 1. Insert the Asian Imports application cartridge into the Master cartridge slot at the bottom, rear of the tester. 2. Be sure the vehicle ignition switch is off. 3. Remove any adapters installed on the Data Link Connector (DLC) cable. 4. Connect the DLC cable to the tester and tighten the screws. 5. Connect the Tech 1 14/12 Pin VIM Adapter to the DLC cable. 6. Connect the Tech 1 OBD II Vehicle Interface Module (VIM) to the Tech 1 14/12 Pin VIM Adapter. 7. Connect the 16/24 Pin OBD II Adapter Cable to the VIM. 8. Connect the OBD II Adapter Cable to the vehicle DLC. 9. Connect the 12V power cable to the vehicle cigarette lighter. 10. Turn the vehicle ignition switch ON to begin diagnostics. 11. Refer to this manual and the application cartridge operator's manual for software operating instructions. DLC Cable TECH 1 Tech 1 14/12 Pin VIM Adapter (P/N 02001198) Application Cartridge DC Power Cable Tech 1 OBD II VIM (P/N 02001808) VIM 16/24 Pin Adapter Cable (P/N 02001744) FIGURE 1-3. Tech 1 Setup 6 COMMON TEST MODES II HARDWARE REQUIRED PRINTING CAPABILITIES The Asian Imports software supports printing data via a Tech 1 printer, VP-414 printer, or other compatible serial printer, connected to the tester. If you are using a Tech 1 tester, refer to the RS232 Operator's Manual for setup and printing instructions. If you are using a Tech 1A or Mastertech tester, refer to the tester Operator's Manual for setup and printing instructions. Two types of printing are supported by the OBD II software: • Pressing the * key in a Data Display mode (e.g., Data List or DTCs) causes the tester to print a list of data appropriate to the mode (a list of diagnostic data parameters or DTCs). • The tester can be setup to print an image of the tester's screen (referred to as Screen Print). For information on the VP-414 serial printer, contact your sales representative. COMMON TEST MODES II 7 GETTING STARTED 3. GETTING STARTED POWERING THE MASTERTECH, TECH 1A, OR TECH 1 The tester must be provided with an external power source (e.g., vehicle power or an AC/DC power supply). OBD II compliant vehicles provide power at the Data Link Connector (DLC), so when using a Mastertech or Tech 1A, the tester only needs to be connected to the vehicle DLC. With the Tech 1, you must connect the DC Power Cable to the vehicle cigarette lighter or to an AC/DC power supply. ESTABLISHING COMMUNICATION By selecting the vehicle for testing, you are now at the main menu. You can initialize communication between the tester and the vehicle's ECU(s) by selecting F0: Powertrain. The SELECT MODE menu will be displayed. SELECT MODE F0: Data List F1: Freeze Data F2: DTCs If a snapshot has been saved in the tester's memory, a menu will be displayed to allow the selection of F1: REPLAY DATA before initialization begins. Replay of snapshot data does not require communication with the vehicle and can be displayed with power to the tester. Main Menu F0: Powertrain F1: Replay Data F9: OBD II Toolpak If the vehicle you are testing contains more than one OBD II ECU, the tester will display a list of all ECUs which have responded during the initialization process. See Multiple ECUs on page 11. 2 ECUs RESPONDED $10 ENGINE $18 TRANS COMMUNICATION FAILURE If the tester fails to get a response from the vehicle, it will display a retry count and one of two error messages. At that point, it will continue to retry communication approximately every 3 seconds. If the communication problem is resolved (e.g., the ignition is switched to ON) and communication begins, the tester will automatically proceed to the next phase. If communication cannot be established, see Appendix D. 8 COMMON TEST MODES II TEST MODES 4. TEST MODES Once communication with the vehicle has been established, a select mode menu is displayed. (In some cases, a readiness tests warning message is displayed prior to the menu. See Mode F1: Readiness on page 14.) SELECT MODE MENU The Select Mode menu allows you to perform basic testing on the vehicle. You can select the desired function by pressing the key indicated to the left of the function. The menu automatically scrolls every 3 seconds until you press U or D, at which time scrolling stops. Pressing U or D will then cause the menu to manually scroll. SELECT MODE F0: Datalist F1: Readiness F2: DTCs SELECT MODE F3: Snapshot F4: OBD Controls F5: System Tests SELECT MODE F8: Information F9: OBD II Toolpak If the vehicle you are testing contains more than one ECU, the tester will display a list of all ECUs which have responded during the initialization process. See Multiple ECUs on page 11. MODE F0: DATA LIST The DATA LIST mode allows you to view the current state of diagnostic data parameters as reported by the vehicle's ECUs. DATA LIST MENU F0: Display Data F1: Data Setup When you select Data List from the OBD II Functions menu, the tester will display the DATA LIST menu. This menu allows you to either go directly to displaying data or to the Data List Setup mode to select the data you want to display. COMMON TEST MODES II 9 TEST MODES Submode F0: Display Data To select Display Data, do the following: F0: DATA LIST SELECT ECUDATA F1: DISPLAY Engine Speed 756 RPM ECT (º) 185ºF 1. Select F0: DATA LIST from the SELECT MODE menu. 2. Select F0: DISPLAY DATA from the DATA LIST menu. The tester will display either ALL PARAMETERS or USER DATA LIST PARAMETERS, depending on which selection was last made since the tester was powered up. Submode F1: Data Setup The DATA SETUP mode allows you to select the data you want to display. You can select either ALL PARAMETERS or USER LIST PARAMETERS which allows you to monitor any combination of parameters (from 1 parameter to all parameters). The update rate for the parameters depends on the number of parameters selected. A single parameter can be sampled as fast as 8 times per second. The more parameters that are selected, the slower the update rate will be. To select Data Setup, do the following: F0: DATA LIST SELECT F1: DATA ECU SETUP F0: ALL PARMS F1: USER LIST PARAMETERS Engine Speed 756 RPM ECT (º) 185ºF 1. Select F0: DATA LIST from the SELECT MODE menu. 2. Select F1: DATA SETUP from the DATA LIST menu. 3. Select F0: ALL PARMS. or F1: USER LIST PARAMETERS from the DATA LIST SETUP menu. The message “WAITING FOR DATA” will be displayed. The tester will display either ALL PARAMETERS or CUSTOM LIST PARAMETERS depending on which selection was made. Submode F0: All Parameters The selection of F0: ALL PARMS will monitor all of the information available from the ECU. Depending on the number of diagnostic data parameters in the data list, the update rate can be 3 seconds or longer. 10 COMMON TEST MODES II TEST MODES Submode F1: User List Parameters The selection of F1: USER LIST PARAMETERS will display a list of parameters from which to select. F1:USER LIST PARAMETERS allows you to select any combination to monitor (from 1 parameter to all parameters). Parameters are selected by scrolling through the list using the u and d keys and then pressing Y and n to select and deselect the listed parameter. When the parameters have been selected, press e to go to the display mode. The tester will remember the selected parameters (until the tester is turned OFF) so you won't have to re-select them every time. Engine Speed ***Selected*** YES: Select NO: De-Select 3 If there are multiple OBD II ECUs, and the DATA SETUP mode is selected, an additional DATA LIST SETUP menu is available. The F0: Select ECU menu allows you to select which ECU(s) will contribute to the data list. Once the ECU(s) that will contribute data are selected, press F1: DATA SETUP to choose all parameters available or a custom list of parameters from the chosen ECU(s). SELECT ECU F0: ALL ECUs F1: $10 ENGINE F2: $18 TRANS DATA LIST SETUP F0: Select ECU F1: Select D.L. Parameters Multiple ECUs Diagnostic parameter data can be selected from all ECUs or individual ECUs that the tester has identified. This mode should be set up before display data is selected to ensure your desired ECU data is being displayed. F0: DATA LIST F1: DATA SETUP SELECT ECU F0: SELECT ECU F0: ALL ECUs Fn: $XX n = User selected XX = ECU description To select multiple ECUs (vehicles with multiple ECUs only), do the following: 1. Select F0: DATA LIST from the SELECT MODE menu. 2. Select F1: DATA SETUP from the DATA LIST menu. 3. Select F0: SELECT ECU from the DATA LIST SETUP menu. COMMON TEST MODES II 11 TEST MODES 4. Select F0: ALL ECUs or Fn:XX (where n = user selected and XX = a description of the ECU from which you desire information). 5. After selecting the desired ECU, you are returned to the DATA LIST SETUP menu, where the displayed diagnostic data parameters can be selected, or you can exit the menu to the DATA LIST menu, where the selected data list will be displayed. Multiple ECU Display In some vehicles, diagnostic information can be sent to the tester by more than one OBD II ECU. For example, both an engine and a transmission controller may report engine speed and throttle position to the tester. The Asian Imports software provides support for multiple OBD II ECUs. If there are multiple OBD II ECUs, the software will inform you when establishing communication with the vehicle by displaying the following message: 2 ECUs RESPONDED $XX ENGINE $XX TRANS Multiple ECU Status Information When viewing multiple OBD II ECU diagnostic data parameters, the symbol = (equal) or > (not equal) before the parameter name indicates the parameter is being updated by multiple ECUs. The = symbol indicates the displayed parameter value is being reported as the same value by multiple ECUs. The > symbol indicates the displayed parameter value is not being reported as the same value by multiple ECUs. If there is no symbol before the parameter name, the parameter is being updated by a single ECU. Engine Speed $XX > 149 RPM Engine Speed $XX > 152 RPM CHARACTER STATUS = Indicates multiple controllers are reporting approximately the same value for the parameter. > Indicates multiple controllers are reporting different data values and the data values are exceeding the tolerance values for the parameter. “blank” Not a multiple ECU response. The following table lists the tolerances for the different parameters being labelled = or >. Multiple parameters that are within the tolerances are reported as being the same. Multiple parameters that are not within the tolerances are reported as being not the same . PARAMETER 12 TOLERANCE Engine Load 1.96% ECT 5 °C ST FT 1/ ST FT 2 3.91% COMMON TEST MODES II TEST MODES PARAMETER TOLERANCE LT FT 1/ LT FT 2 3.91% Fuel Pressure 15 kPaG MAP 5 kPa Engine Spd 2.5 RPM Vehicle Spd 5 kph Ign. Timing 2.5 ° IAT 5 °C MAF 0.1 gm/s TPS 1.96% O2S Bx Sx 0.025 V FT O2S Bx Sx 3.91% ACTIVE KEYS y/n Scroll through displayed data parameters, or for CUSTOM LIST SETUP, SELECT, or DESELECT PARAMETERS. U/D Scroll through parameters in CUSTOM LIST. ) Mark top displayed parameter as fixed for creating your own data pairs; unlock bottom parameter if fixed. ! Mark bottom displayed parameter as fixed for creating your own data pairs; unlock top parameter if fixed. # Toggle the data descriptor line with the Parameter Identification (PID) number and the ECU number. & Toggle unit conversions for applicable parameters, between English and metric. * Print data list (if equipped with serial printer). X Return to DATA LIST menu. COMMON TEST MODES II 13 TEST MODES MODE F1: READINESS The READINESS test mode allows you to display the status of the vehicle's on-board monitors, which monitor the operation of the emissions-related components. These READINESS tests must run in order for the DTC and test result displays to accurately reflect the conditions of the vehicle's emissions-related components. If the vehicle you are testing contains more than one OBD II ECU, you will be asked to select which ECU information you would like displayed. Not All Vehicle System Readiness Tests Have Been Completed If the tester determines that the ECU has not completed all of the readiness tests, it will display a warning message. You can then select the READINESS tests menu item from the SELECT MODE menu to examine the status of these tests. For information on how to complete any of the readiness tests, refer to service information from the vehicle manufacturer. F1: READINESS SELECTECU ECU SELECT *For vehicles with multiple ECUs only. READINESS TEST Misfire Monitoring SUPPORTED To display the status of the vehicle's on-board monitors, do the following: 1. Select F1: READINESS from the SELECT MODE menu. 2. Select the ECU from which you choose to monitor data (for vehicles with multiple ECUs only). The message “WAITING FOR DATA” is displayed, followed by the READINESS TEST information. 3. The first three items on the display indicate the vehicle's monitoring capability for continuously monitored systems: • Misfire monitoring. • Fuel system monitoring. • Comprehensive component monitoring. These are indicated as either being supported or NOT SUPPORTED (N/A), depending on the vehicle's ECU. The other 8 display items indicate the status of the tests which are performed at least “once per trip”. 14 • Catalyst monitoring. • Heated catalyst monitoring. • Evaporative system monitoring. • Secondary air system monitoring. • A/C system refrigerant monitoring. COMMON TEST MODES II TEST MODES • Oxygen sensor monitoring. • Oxygen sensor heater monitoring. • EGR system monitoring. These tests can be Completed, Not Completed, or Not Supported. Readiness Test Operation OBD II System and Vehicle Information The OBD II system is capable of identifying the likely area of a malfunction within the electronic engine control system. Observe the following before beginning diagnostic service: • MIL OPERATION. When excessive tailpipe emissions or powertrain component failure are detected by the OBD II system, the Malfunction Indicator Lamp (MIL) will illuminate. • LOW FUEL TANK LEVEL. Automobile manufacturers may disable READINESS tests which can be affected by running the vehicle out of fuel (e.g., a monitor may become disabled when fuel tank volume is below 15% of maximum fuel tank capacity). • ALTITUDE. Automobile manufacturers may disable READINESS tests which can be affected by altitude (e.g., a READINESS test may become disabled when vehicle is operated above 8,000 feet elevation). • AMBIENT TEMPERATURE. Automobile manufacturers may disable READINESS tests which can be affected by ambient temperature (e.g., a READINESS test may become disabled when a vehicle is started below 20°F ambient). • POWER TAKE-OFF UNIT. Automobile manufacturers may disable READINESS tests which can be affected by power take-off unit operation (e.g., a READINESS test may become disabled when a vehicle power take-off is engaged or active). All of the above are part of the California Air Resources Board OBD II regulation and are options available to the automobile manufacturer for vehicle Powertrain Control Module (PCM) development. In the case of some READINESS tests, per the above, a manufacturer may have determined that a READINESS test is unreliable or not complete when certain conditions exist, therefore not enabling proper operation. ACTIVE KEYS u Move marker. d Freeze menu scroll. * Print readiness test results. x Return to SELECT MODE menu. COMMON TEST MODES II 15 TEST MODES MODE F2: DIAGNOSTIC TROUBLE CODES (DTCS) Submode F0: Read DTCs When you select the F0: READ DTCs mode, the tester reads all DTCs which have been stored by the vehicle's controllers and then displays: • a two-column list of all DTCs. • the ID of the ECU reporting the DTCs. • how many codes have been reported by that ECU. If the vehicle you are testing contains more than one OBD II ECU, you will be asked to select which ECU information you would like displayed. SELECT ECU F1: $11 ENGINE F2: $22 CHASS. F2: DTCs F0: READ DTCs SELECTECU ECU SELECT *For vehicles with multiple ECUs only. ECU $10 DTCs:3 P0443f P0110 P0111 To read DTCs, do the following: 1. Select F2: DTCs from the SELECT MODE menu. 2. Select F0: READ DTCs for the DTC menu. 3. Select desired ECU from the SELECT ECU menu (for vehicles with multiple ECUs only). The DTC information will then be displayed. Generally, 6 DTCs can be displayed at one time. If more than 6 DTCs are reported by the ECU, the tester will display a ↓ prompt in the lower right-hand corner indicating that more DTCs are present but are not displayed. Use the u, d, l, and r keys to move through the list of DTCs. A DTC description can be displayed by moving the * next to the desired DTC and pressing e. The u and d keys will scroll through the DTC descriptions. A DTC will display an f after the DTC number to signify that there is freeze data available for that DTC. You can go directly to the FREEZE DATA display by pressing @. This performs exactly the same function as selecting FREEZE DATA from the SELECT MODE menu, but saves you a few key presses. 16 COMMON TEST MODES II TEST MODES ACTIVE KEYS e Display the description for the selected DTC. @ Go directly to FREEZE DATA. * Print freeze data list (if equipped with serial printer). u/d l/r Move through list of DTCs. x Return to previous menu. Submode F1: Freeze Data The vehicle's ECU stores diagnostic data information about the state of the vehicle when a Diagnostic Trouble Code (DTC) occurs. This data is referred to as Freeze Frame Data and can be read by the tester using the FREEZE DATA mode. You can select this mode from the SELECT MODE menu. If multiple ECUs are available, the SELECT ECU menu is displayed once FREEZE DATA is selected from the SELECT MODE menu. Only one ECU’s data can be displayed in Freeze Data mode. SELECT ECU F1: $10 ENGINE F2: $18 TRANS F2: DTCs SELECT ECU F1: FREEZE DATA SELECT ECU * For vehicles with multiple ECUs only. Trouble Code P0130 Engine Speed 1000 RPM To display Freeze Data, do the following: 1. Select F2: DTCs from the SELECT MODE menu 2. Select F1: FREEZE DATA from the menu. 3. Select the ECU from which you choose to monitor data (for vehicles with multiple ECUs only). The message “WAITING FOR DATA” will appear. The FREEZE DATA information will then be displayed. FREEZE DATA is only available for the first DTC which was detected by the vehicle. The first parameter in the list is the DTC which caused the FREEZE DATA to be saved. The FREEZE DATA is displayed in the same format as the data list in the DATA LIST mode. COMMON TEST MODES II 17 TEST MODES ACTIVE KEYS y/n Scroll through displayed data parameters. ) Mark top displayed parameter as fixed for creating your own data pairs; unlock bottom parameters if fixed. ! Mark bottom displayed parameter as fixed for creating your own data pairs; unlock top parameters if fixed. # Toggle the data descriptor line with the Parameter Identification (PID) number and the ECU number. & Toggle unit conversions for applicable parameters between English and metric. * Print freeze data list (if equipped with a serial printer). x Return to SELECT MODE menu. Submode F2: Clear Info The Clear Information mode is used to clear DTCs from all vehicle ECUs along with any other diagnostic information which the controller has saved, such as Freeze Data. NOTE Clearing diagnostic information also clears the status of readiness tests (making them incomplete). It can take 30 to 60 minutes of vehicle drive and engine run time (and in some cases longer) to complete all of these tests if they are cleared. Some inspection and maintenance programs require that the readiness tests be complete before the inspection can proceed. When you select F2: CLEAR INFO, you are first prompted with a warning message. This is to prevent inadvertent clearing of codes. If you press n or x in response to the prompt, the tester will return to the DTC menu. If you press y in response to the prompt, the tester will cause all OBD II controllers to clear all emissions-related DTCs, FREEZE DATA, and READINESS TEST results. When the function is complete, the tester will display the screen ALL DIAGNOSTIC INFORMATION CLEARED. F2: DTCs F2: CLEAR INFO Clear All Diagnostic Info? YES = Continue NO = Quit To clear DTCs, do the following: 1. Select F2: DTCs from the SELECT MODE menu. 2. Select F2: CLEAR INFO from the DTCs menu. 3. Press y to clear DTCs. A warning message will appear to prevent accidental clearing of codes. A screen will then appear to confirm deletion of diagnostic information stored in the vehicle controllers. 18 COMMON TEST MODES II TEST MODES Some vehicles will not allow DTCs to be cleared while the engine is running. In this case, the tester will display a prompt screen to turn off the engine, leaving the key in the ON position. For some vehicles, communication may be lost when the key is turned off and then back on. If a Communication Error screen is displayed, exit back to the MAIN menu and re-select Powertrain. You should now be able to clear the diagnostic information. Module(s) $10 Did Not Respond Try Again With Ignition ON And Eng. NOT Running [EXIT] ACTIVE KEYS y Clears all emissions-related information. n/x Return to SELECT MODE menu. Submode F3: Pending DTCs For PENDING DTCs mode, the vehicle's controller performs analysis similar to that used to determine if the equivalent DTC is present, but with less stringent requirements. For example, a DTC may require a condition to be present for several drive cycles, while the equivalent pending DTCs may be set with the first occurrence of the condition. Results of the pending DTCs request are displayed in a manner similar to the DTC display mode. They are displayed with the same Pxxxx DTC designations and the same descriptors as the DTCs. If the vehicle you are testing contains more than one OBD II ECU, you are asked to select which ECU information you would like displayed. F2: DTCs F3: PENDING DTCs SELECTECU ECU SELECT * For vehicles with multiple ECUs only. ECU $10 DTCs:4 * P0100 P0122 P0101 P0118 To display Pending DTCs, do the following: 1. Select F2: DTCs from the SELECT MODE menu. 2. Select F3: pending DTCs from the DTCs menu. COMMON TEST MODES II 19 TEST MODES 3. Select the ECU from which you choose to monitor data (for vehicles with multiple ECUs only). The message “Waiting For Data” is displayed, followed by the PENDING DTCs information. A detailed description can be displayed for any pending DTC by moving the * next to the desired code and pressing e. The * is moved by pressing the arrow keys. ECU $10 P0100 Mass or Volume Air Flow Circuit Malfunction ACTIVE KEYS e Displays description of the pending DTC. u/d Move marker. x Exits to SELECT MODE menu. MODE F3: SNAPSHOT Setup The SNAPSHOT mode helps you isolate an intermittent or transient problem by storing data parameters before or after the problem occurs. The information can be saved and used for a later replay or hardcopy print option. F3: SNAPSHOT F0: ANY DTC TRIGGER OR F1: SINGLE DTC TRIG. F2: MANUAL TRIGGER OR SELECTECU ECU SELECT F3: REPLAY SNAPSHOT Engine Speed 1052 RPM Ign. Timing 18.5° W F4: TRIGGER POINT F9: DATA SETUP F0: ALL PARMS F1: CUSTOM LIST *For vehicles with multiple ECUs only. To display Snapshot information, do the following: 1. Select F3: SNAPSHOT from the SELECT MODE menu. 2. Select any of the available trigger types from SNAPSHOT menu. 20 COMMON TEST MODES II TEST MODES 3. Data from only one ECU can be saved in tester memory. Therefore, if multiple ECUs are detected, you will be asked to select one of the ECUs. 4. To choose which snapshot parameters are displayed, press ( to select DATA SETUP from the SNAPSHOT menu. After selecting F9: DATA SETUP, refer to F0: ALL PARMS and F1: CUSTOM LIST PARAMETERS in the DATA LIST section for displaying all parameters or selecting a custom list of parameters. Submode F4: Trigger Point Trigger Types In the SNAPSHOT mode, data is saved in the tester while it is waiting for a trigger condition. Once the trigger occurs, data continues to be saved in the tester's memory until the memory is full. Snapshot menu allows you to start the snapshot process by selecting a trigger mode. Three types of triggers can be selected: KEYPRESS DESCRIPTION F0: ANY DTC Snapshot trigger on the occurrence of any DTC. F1: SINGLE DTC Snapshot trigger on the occurrence of a single DTC that you specify. F2: MANUAL TRIG. Snapshot trigger by an e, x, or ( key press. Trigger Point Setup The snapshot menu allows you to select how much data is saved after trigger occurs by selecting F4: TRIG. POINT from the SNAPSHOT menu screen. To change the trigger point, select the key next to the desired point. This trigger point is saved as long as the tester has power. SELECT TRIGGER F0: Beginning F1: Center F2: End Submode F3: Snapshot Replay Snapshot Data Capture When the trigger type is selected, the tester displays a status message in the form of a flashing W indicating that the tester is storing data and waiting for the trigger. While waiting for a trigger to occur, you can press the e, x, or ( key at any time to trigger the snapshot manually regardless of the trigger type selected. When a trigger has occurred, the flashing W will change to a constantly displayed T. When the tester memory is full, the tester displays an 0 to indicate that the snapshot is complete. Pressing x after a trigger has occurred will end the data capture phase. Once you have captured snapshot data, you can examine it by pressing # from the SNAPSHOT menu. Use the u and d keys to scroll through the samples. The last snapshot is retained in the tester unless: COMMON TEST MODES II 21 TEST MODES • It is overwritten by a new snapshot. • A new application is selected from the application menu. • A new master cartridge is installed in the tester. • The tester is unplugged from power for more than 24 hours. You can review the captured snapshot in one of two ways: • Replay a snapshot after communication is established by selecting F3: SNAPSHOT REPLAY from SNAPSHOT menu. • Without vehicle communications, select F1: Replay Snapshot Data from the MAIN menu (this menu option is only displayed if a snapshot has been taken). When the SNAPSHOT REPLAY mode is first entered, the tester displays information about the saved snapshot. The snapshot's trigger point (Beginning, Center, or End) and trigger type (Manual, Any DTC or Single DTC) are displayed for a couple seconds before the snapshot data is displayed. When replaying a saved snapshot, the sample at the time of the trigger is initially displayed. Samples before and/or after the trigger can be viewed by pressing the u and d keys to scroll through the samples. SNAPSHOT TRIGGER Point: Center Type: Manual Engine Speed 1024 RPM Ign. Timing 29.5° -2 The sample number of a snapshot is displayed in the lower right of the display screen. This index number will initially be a 0; samples after the trigger will be displayed as positive numbers and samples before the trigger will be displayed as negative numbers. While replaying a snapshot, pressing e will cause the software to toggle between the sample index and the sample time. The sample time display gives the time in seconds (relative to the trigger sample) at which the Tech 1 received the currently displayed sample. For example, a sample time of +3.4 means the sample was received 3.4 seconds after the trigger sample. A sample time of -2.6 seconds means the sample was received 2.6 seconds before the trigger. Engine Speed 1024 RPM Ign. Timing 29.5° -7.1 ACTIVE KEYS y/n Scroll through displayed data parameters. U/D Scroll through samples. ) Mark top displayed parameter as fixed for creating your own data pairs. 22 COMMON TEST MODES II TEST MODES ACTIVE KEYS (Continued) ! Mark bottom displayed parameter as fixed for creating your own data pairs. @ Display trouble codes for current sample. # Toggle the data descriptor line with the Parameter Identification (PID) number and the ECU number. $ Display first (earliest) sample. % Display trigger sample (0). ^ Display last (most recent) sample. & Toggle unit conversions for applicable parameters. * Print data list (if equipped with serial printer). X Return to SNAPSHOT menu. MODE F4: OBD CONTROLS The OBD CONTROLS mode allows you to perform individual output controls to check for proper vehicle component or system operation. The OBD CONTROLS that you can control depend on the vehicle under test. Submode F0: Evap Leak The EVAP LEAK test is used to enable the conditions required to conduct an evaporation system leak test. Selecting F0: EVAP LEAK does not actually run the test, but instead closes the system, preventing leakage. Off-board test equipment can then be used to test the vehicle's evaporative emission system. The vehicle manufacturer is responsible for automatically aborting the leak test when necessary. F4: OBD CONTROLS F0: EVAP LEAK EVAP LEAK TEST ENABLED [EXIT] If the conditions necessary to run the evaporative emissions system leak test are not correct, the vehicle ECU may respond with a manufacturer defined reason the test cannot be run or may not respond at all. If the vehicle PCM does not support OBD CONTROLS, the tester will display “No Control Tests Supported” when the OBD CONTROLS test mode is selected. COMMON TEST MODES II 23 TEST MODES MODE F5: SYSTEM TESTS Submode F0: O2S Results The Oxygen Sensor (O2S) Results mode allows the tester to display the results of the oxygen sensor testing performed by the vehicle's engine controller. These tests are “once per trip” tests and are performed after the ignition is turned on under conditions defined by the vehicle manufacturer. The O2S RESULTS mode is not available for all vehicles. Some vehicles use the other results test mode to report results of O2S testing. F5: SYSTEM TESTS F0: O2S RESULTS Fn: O2S BANK X Fn: SENSOR X R L n = User selected X = Vehicle dependent L Sw Tim O.16 Secs R Sw Tim 0.088 Secs To display O2S Results, do the following: 1. Select F5: SYSTEM TEST from the SELECT MODE menu. 2. Select F0: O2S RESULTS from the SELECT TEST menu. 3. Select the desired bank from SELECT BANK menu. 4. Select the desired oxygen sensor from the BANK and SENSOR menu. The message “WAITING FOR DATA” is displayed, followed by the Oxygen Sensor data display. If the tester displays the warning message indicating that the O2S MONITORING TEST RESULTS may not be valid, the vehicle ECU is reporting that the O2S tests have not been completed or that the selected ECU does not monitor the O2S tests. The status of the oxygen sensor tests can be monitored in F1: READINESS TEST MODE under the value of OXYGEN SENSOR MONITORING For some vehicles, O2S test results may not be available until all readiness tests have been completed. O2 Sensor Test Menu The vehicle can provide O2S test results for up to 8 oxygen sensors. When O2S RESULTS is selected, the tester queries the ECU to determine which oxygen sensors are present. It then displays a list of these sensors so that you can select which sensor's test results to examine. To select a bank or sensor, press the number listed on the left. Refer to Appendix B: OBD II OXYGEN SENSOR LOCATION INFORMATION for a discussion of oxygen sensor locations. If there is no response to the query, the tester displays a warning message indicating that the O2S Test results may not be supported. SELECT BANK F0: O2S BANK 1 F1: O2S BANK 2 ) BANK 1 SENSOR F0: SENSOR 1 F1: SENSOR 2 24 COMMON TEST MODES II TEST MODES O2S Data Display Once the sensor has been selected, the tester determines which O2 sensor data parameters are available for display. It then displays data for each of the parameters. The parameters vary depending on the vehicle manufacturer. Only parameters which are supported by the vehicle ECU are displayed. R L L Sw Tim O.16 Secs R Sw Tim 0.088 Secs The OXYGEN SENSOR MONITORING TEST RESULTS are reported as constants programmed in the vehicle ECU or calculated values by the vehicle ECU. See the following table for programmed and calculated data parameters . PARAMETER NOTE TID TYPE R>>L O2S V $01 Constant L>>R O2S V $02 Constant LOW SW V $03 Constant HIGH SW V $04 Constant R>>L SW TIM $05 Calculated L>>R SW TIM $06 Calculated MIN O2S V $07 Calculated MAX O2S V $08 Calculated O2S TRANS T $09 Calculated Parameter IDs greater than 9 are manufacturer-specific and are therefore defined only by an ID preceded by a $ (e.g., $70 and $71 for Chrysler O2S test results). Refer to the vehicle's service manual to determine how to interpret these parameters. Additional O2S Information Pressing % while the O2S RESULTS data is being displayed will cause the tester to display additional information about the displayed parameters. The tester displays the Test ID number (TID) along with hexadecimal displays of the current data value (Val), the ECU programmed minimum value (Min) and the maximum ECU programmed value (Max) for this parameter. Min and Max are values reported by the ECU. Val should be within those limits. TID $05 Min $0A TID $06 Min $0A COMMON TEST MODES II Val Max Val Max $29 $32 $16 $32 25 TEST MODES ACTIVE KEYS y/n Scroll through displayed data parameters. ) Mark top displayed parameter as fixed for creating your own data pairs; unlock bottom parameter if fixed. ! Mark bottom displayed parameter as fixed for creating your own data pairs; unlock top parameter if fixed. # Toggle the data descriptor line with the Parameter Identification (PID) number and the ECU number. $ Toggle the data descriptor line with the Test Identification (TID) number and the oxygen bank and sensor. % Toggle the data descriptor line with the Test Identification (TID) number and the hexadecimal equivalent of the received data. The calculated value line is toggled with the Min and Max values received from the ECU for that TID. * Print data list (if equipped with serial printer). X Return to SELECT MODE menu. Submode F1: Other Results The OTHER RESULTS test mode is similar to the O2 sensor test results. Some manufacturers use this mode as an alternate means of reporting O2 sensor test results. In this mode, the vehicle's ECU reports data for various Test IDs (TIDs) and Component IDs (CIDs) that are specified by the vehicle manufacturer. Descriptions for the TIDs and CIDs are available in the vehicle service manual or from the manufacturer. If the vehicle you are testing contains more than one OBD II ECU, you will be asked to select which ECU information you would like displayed. F5: SYSTEM TESTS F1: OTHER RESULTS SELECTECU ECU SELECT * For vehicles with multiple ECUs only. TID/CID RESULT * 01/01……Pass 01/02……Fail 02/01……Pass To display Other Results, do the following: 1. Select F5: SYSTEM TESTS from the SELECT MODE menu. 2. Select F1: other results from the SELECT TEST menu. 3. Select the ECU from which you choose to monitor data (for vehicles with multiple ECUs only). The message “Waiting For Data” is displayed, followed by the OTHER RESULTS test information. In addition to reporting data for these TIDs and CIDs, the vehicle reports test limits (minimum, maximum, or both) for acceptable operation. The tester compares the data with the test limits and displays a PASS or FAIL indication for each TID and CID. The actual received data can be viewed by moving the star cursor (*) 26 COMMON TEST MODES II TEST MODES with the arrow keys to the desired item and pressing e. If N/A (not available) is displayed for a limit, then the ECU did not send a value for that limit. 01/01 ECU Test Value Min Limit Max Limit $10 $0200 N/A $0300 Displays actual received data. e Displays actual received data. u/d Move marker. x Return to SYSTEM TESTS menu. MODE F8: INFORMATION The information mode is used to enable you to request vehicle specific information from the vehicle ECU, such as VIN, Software Calibration ID, or Software Verification Number. If the vehicle PCM does not support vehicle PCM information, the tester will display “No Vehicle Info Supported” when the INFORMATION mode is selected. Submode F0: VIN The VIN selection allows you to electronically read the Vehicle Identification Number that is stored in the vehicle's ECU. This mode is only selectable when it is supported by the vehicle ECU. F8: INFORMATION F0: VIN VIN XXXXXXXXXX XXXXXXX [ENTER] To display the VIN, do the following: 1. Select F8: INFORMATION from the SELECT MODE menu. 2. Select F0: VIN from the SELECT TYPE menu. Submode F1: S/W CALIB. ID The S/W CALIBRATION ID selection is used for identification of the software calibration contained within the vehicle ECU. Each software calibration ID uniquely identifies the software installed in the ECU. Multiple calibration IDs may be reported for a ECU, depending on software architecture. A calibration ID number will have at least one unique software verification number. This mode is only selectable when it is supported by the vehicle ECU. COMMON TEST MODES II 27 TEST MODES F8: INFORMATION F1: S/W CALIB. ID S/W CALIB. ID 1 XXXXXXXXXXXXXXX S/W CALIB. ID 2 XXXXXXXXXXXXXXX To display the Software Calibration ID, do the following: 1. Select F8: INFORMATION from the SELECT MODE menu. 2. Select F1: S/W CALIB. from the SELECT TYPE menu. Submode F2: S/W VERIF ID. The SOFTWARE VERIFICATION NUMBER selection is used for determining whether emission-related calibrations within the ECU software have been altered. Software Verification Numbers are calculated based on memory content at the time of the request. Any changes to calibration will be detected in the Software Verification Number. This mode is only selectable when it is supported by the vehicle. F8: INFORMATION F2: S/W VERIF NO. S/W VERIF NO. 1 $XX $XX $XX $XX S/W VERIF NO. 2 $XX $XX $XX $XX To display the Software Verification Number, do the following: 1. Select F8: INFORMATION from the SELECT MODE menu. 2. Select F2: S/W VERIF NO. from the SELECT TYPE menu. NOTE NOTE Multiple Software Verification Numbers may be reported by an ECU. Each Software Verification Number will correspond to a unique Software Calibration ID number. Turn the engine off when requesting the Software Verification Number from the vehicle ECU. Failure to turn the engine off may cause the ECU to require more time to calculate the calibration number and may therefore not respond to the request. MODE F9: OBD II TOOLPAK The OBD II Toolpak is used to help diagnose and troubleshoot OBD II compliant powertrain control systems. Using the OBD II Toolpak mode provides you with pertinent text and data so you can learn about and more efficiently diagnose the vehicle under test. Examples of data features contained within the program are: • 28 Vehicle preparation COMMON TEST MODES II TEST MODES • Diagnostic procedures • Repair verification • Diagnostic data parameter descriptions • Diagnostic data parameter common values • Diagnostic Trouble Code (DTC) Library • Readiness Test description • Oxygen sensor location information • Oxygen sensor type information • Oxygen sensor maintenance information When using this application cartridge on 1994 to current OBD II compliant PCM vehicles, the cartridge will display diagnostic data parameters based on Society of Automotive Engineers (SAE) recommended practice J1979. Additionally, the basic functions contained within this cartridge are required by California Air Resources Board (California ARB) as part of the On-Board Diagnostics level II (OBD II). Selecting OBD II Toolpak Mode The OBD II Toolpak functions can be entered in two ways: from the main menu or from the Select Mode menu. From the OBD II Menu Entering F9: OBD II Toolpak from the main menu is available any time power is applied to the tester. From the Select Mode Menu Entering F9: OBD II Toolpak from the Select Mode menu is only available after communication with the OBD II compliant vehicle has been initialized. COMMON TEST MODES II 29 TEST MODES OBD II communications initialized with vehicle. ) MAIN MENU F0: Powertrain F1: Replay Data F9: OBD II Toolpak ( No OBD II communications with vehicle SELECT MODE F8: Information F9: OBD II Toolpak ( OBD II TOOLPAK F0: Diagnostics F1: Parameters F2: DTC Library u d OBD II TOOLPAK F3: Monitor Info F4: O2S Info FIGURE 1-4. Selecting OBD II Toolpak from the Select Mode Menu Submode F0: Diagnostics The F0: Diagnostics mode provides the following information: • How to prepare a vehicle powertrain system for testing. • How to perform a diagnostic approach using each of the software modes on OBD II compliant vehicles. • How to verify a repair using the modes is contained in the F0: Diagnostics mode. Submode F0: Prep Vehicle The Prep Vehicle mode is used to properly prepare the vehicle powertrain for diagnostic procedures. Following the instructions in this mode will ensure that the vehicle system is preconditioned and ready for diagnostic testing. To prep the vehicle for diagnostic testing, do the following: 1. Press ( to select OBD II Toolpak from the Select Mode menu. 2. Press ) to select Diagnostics from the OBD II Toolpak menu. 3. Press ) to select Prep Vehicle from the Diagnostics menu. 4. Review and answer the prompts that are displayed on the screen using the y and n keys. Use u or d to advance through the text description screens. 5. Press x to return to the previous menu. 30 COMMON TEST MODES II TEST MODES ACTIVE KEYS u/d Scroll up and down. y/n Answer question or query. e Advance to the next menu. x Exit to the previous question. Submode F1: Procedure The OBD II system represents the latest in on-board failure detection strategies. Strategies such as misfire detection, component, and fuel system status are some examples of diagnostic data that can be obtained from the OBD II system. Along with the new, more stringent methods of failure detection came standardized diagnostic test modes. These standardized test modes are supported in the Asian Imports software program as modes F0 through F8. After using Asian Imports software modes F0-F8 you will notice new types of diagnostic data that are displayed on the tester. F1: Diagnostic Procedure is designed to assist you in learning how to diagnose an OBD II system fault or assess current system condition. While there are many approaches that can be used, there is no one right way to perform this task. This submode helps formalize a strategy and teaches you how, using a sensible approach, to use the Asian Imports software modes F0-F8 and determine a solution to a problem within the OBD II system. To select Procedure from the Diagnostics menu, do the following: 1. Press ( to select OBD II Toolpak from the Select Mode menu. 2. Press ) to select Diagnostics from the OBD II Toolpak menu. 3. Press ! to select Procedure from the Diagnostics menu. First time users: to ensure proper operation, this mode is best reviewed before actual testing on the vehicle is performed. Prior to the testing it will be to your advantage to know the answers to the following: • Is the MIL on? • Are DTCs present? If so, record the DTC numbers. • Is the fuel tank cap installed and is it tight (3 clicks)? • Is the fuel tank level greater than 15% of total volume? 4. Press u, d, y, n, or e to review and answer the prompts displayed on the screen, and to read any key help screens that may be displayed for navigation help. 5. Press x to return to the previous question or test menu. COMMON TEST MODES II 31 TEST MODES ACTIVE KEYS u/d Scroll up and down. y/n Answer question or query. e Advance to the next menu. x Exit to the previous question or test menu. Submode F9: Repair Verification After repairs are made to a vehicle powertrain system, the status of system DTCs and monitor tests should be checked. Using this submode will help determine the effectiveness of repairs just completed to the system using the test modes within the Asian Imports program, including the importance of manufacturer OBD II drive cycle and monitor completion after repairs. To verify the repairs, do the following: 1. Press ( to select OBD II Toolpak from the Select Mode menu. 2. Press ) to select Diagnostics from the OBD II Toolpak menu. The key help screen will be displayed. 3. Press ( to select Repair Verification from the Diagnostics menu. First time users: to ensure proper operation, this mode is best reviewed before actual testing on vehicle is performed. 4. Use the u and d keys to review the prompts that are displayed on the screen. Read any key help screens that may be displayed for navigation help. NOTE For automobile manufacturer drive cycle information, refer to the service manual for the vehicle that is currently being tested. 5. Press x to return to the previous question or test menu. ACTIVE KEYS u/d Scroll up and down. x Exit to the previous question or test menu. Submode F1: Parameters The Parameters submode displays text descriptions for each diagnostic data parameter displayed in the Asian Imports software application. Common high and low values for each diagnostic data parameter are also available for reference. NOTE 32 When the tester is connected to the vehicle and Data List is selected, the total number of displayed diagnostic data parameters will depend on the vehicle ECU calibration. This is not a function of the tester. COMMON TEST MODES II TEST MODES Submode F0: Definitions The text descriptions of each diagnostic data parameter are available when the tester is connected to a vehicle and a live data list is displayed, or during a shop or training review session and the tester is not connected to a vehicle. To display Parameter descriptions (Viewing on-vehicle live data list), do the following: 1. Set up and display a data list using F0: Data List. 2. Scroll through the Data List until the parameter for which you want information is displayed. Press ) to select the top parameter, or press ! to select the bottom parameter. An asterisk (*) will appear next to the selected parameter. 3. Press e to display the first text screen for the selected parameter. Press d to advance through the text description screens. Press u to view the previous text description screen. 4. To select a different parameter, press x to return to the Data List parameter pair screen. Press the opposite function key used to select the previous parameter () or !) to deselect the parameter. The asterisk (*) will disappear. Scroll through the Data List until a parameter for which you want information is displayed. Repeat Steps 2 and 3. 5. Press x to return to the Data List parameter pair screen or Select Mode menu. To display Parameter descriptions (Not viewing on-vehicle live data list), do the following: 1. Press ( to select OBD II Toolpak. 2. Press ! to select Parameters from the OBD II Toolpak menu. 3. Press ) to select Definitions from the Parameters menu. The key help screen will be displayed. 4. Press u or d to move the cursor to the desired diagnostic data parameter. 5. Press e to display the first text screen for the selected parameter. Press d to advance through the text description screens. Press u to view the previous text description screen. 6. Press x to return to the Parameter Definition list or the Parameters menu. ACTIVE KEYS ( Select OBD II Toolpak. u/d Scroll up and down. )/! Select or deselect a parameter. e View parameter description. x Exit to the previous test menu. Submode F1: Ranges Common high and low values for each diagnostic data parameter are available when connected to a vehicle and viewing a live data list, or during a shop or training review session. Current diagnostic data parameter values are available during connection to the vehicle powertrain system. The common high and low values were obtained by collecting data from actual OBD II certified I4, V6, and V8 powertrain systems operating with no faults detected. COMMON TEST MODES II 33 TEST MODES To view common high and low values for diagnostic parameters, do the following: 1. Press ( to select OBD II Toolpak from the Select Mode menu. 2. Press ! to select Parameters from the OBD II Toolpak menu. 3. Press ! to select Ranges from the Parameters menu. The key help screen will be displayed. 4. Press d, u, or E to advance through the text description screens. These text screens indicate that the displayed common high and low values are from actual OBD II certified systems. 5. Press u or d to move the cursor to the desired data parameter. 6. Press e to display the first data condition screen for the selected parameter. The data condition screen displays the condition for which the high/low data is valid. The data condition and parameter name will toggle on the first display line. The y or n keys can be used to toggle between the data condition and the parameter name. 7. Press u or d to advance through the data conditions. As before, The data condition and parameter name will toggle on the first display line. The y or n keys can be used to toggle between the data condition and the parameter name. The data conditions are listed in the following table: DATA CONDITION DISPLAY, LINE 1 key on, engine off Key On, Eng Off: key on, engine running at idle KOER, IDLE RPM: key on, engine running at 2500 RPM KOER, 2500 RPM: key on, engine running, in drive, 0 MPH KOER-DRV, 0MPH: key on, engine running, in drive, 15 MPH KOER-DRV, 15MPH: key on, engine running, in drive, 25 MPH KOER-DRV, 25MPH: key on, engine running, in drive, 35 MPH KOER-DRV, 35MPH: key on, engine running, in drive, 45 MPH KOER-DRV, 45MPH: key on, engine running, in drive 55 MPH KOER-DRV, 55 MPH: key on, engine running, in drive, wide open throttle acceleration KOER-DRV, WOT: key on, engine running, in drive, closed throttle deceleration KOER-DRV, CTD: 8. The actual value for the current parameter is displayed on line 2 (ONLY if the tester is connected to an OBD II system and F9: OBD II Toolpak is selected from the select mode menu). If the tester is not connected to an OBD II system and F9: OBD II Toolpak has not been selected from the select mode menu only the common high and low values are displayed. 9. Common high (hi) and low (lo) parameter values for the data condition are displayed on lines 3 and 4 (common high and low values were obtained from actual vehicle powertrain systems with OBD II certified systems). 10. Press x to return to the parameter list or Parameters menu. 34 COMMON TEST MODES II TEST MODES ACTIVE KEYS u/d Scroll up and down. e Select parameter to view. y&n Toggle display. x Exit to the previous test menu. Submode F2: DTC Library An OBD II ECU is capable of setting a DTC which indicates the failed circuit or component. In some cases, reading DTCs from the ECU may reveal multiple stored DTCs. However, the ECU is programmed to potentially store several hundred DTCs. F2: DTC Library enables you to obtain text description information for each powertrain DTC available for display. The DTC Library consists of a combination of DTCs defined by the manufacturer specifically for the vehicle under test and DTCs defined by the Society of Automotive Engineers (SAE). For any DTC number that is not defined by the manufacturer of the vehicle under test, a description defined by Society of Automotive Engineers (SAE) recommended practice J2012 will be displayed. A specific DTC may be entered individually or you can scroll through the entire DTC list. To display the DTC Library, do the following: 1. Press ( to select OBD II Toolpak from the Select Mode menu. 2. Press @ to select DTC Library from the OBD II Toolpak menu. The key help screen will be displayed. 3. Use the tester keys 0 - 9 to enter the four digit number of the DTC for which information is desired. 4. Press E to display the DTC number and text description. Use u or d to scroll through the DTC list. Holding the u or d key causes continuous scrolling. A text description of the code will be displayed. 5. Press x to return to the enter DTC number screen or the OBD II Toolpak menu. ACTIVE KEYS u/d Scroll up and down. 0-9 Enter DTC Number. e View DTC description. x Exit to the previous test menu. Submode F3: Readiness Information Readiness Tests represent a segment of new legislated diagnostic information that can be displayed by the tester. A Readiness Test is a specific test that the ECU performs. When the ECU runs a Readiness Test, it tests the particular portion of the electronic powertrain control system (Catalyst, O2S Sensor, etc.) for the respective monitor. Readiness Tests can reveal the status of the system and it is recommended that service technicians become familiar with Readiness Tests when working on OBD II compliant systems. COMMON TEST MODES II 35 TEST MODES To display Readiness Test information, do the following: 1. Press ( to select OBD II Toolpak from the Select Mode menu. 2. Press # to select Readiness Test from the OBD II Toolpak menu. The key help screen will be displayed. 3. Press u or d to move the cursor to the desired Readiness test. 4. Press e to display the first text screen for the selected Readiness test. Press d to advance through the text description screens. Press u to view the previous text description screen. 5. Press x to return to the select monitor list or the OBD II Toolpak menu. ACTIVE KEYS u/d Scroll up and down. e Select monitor to view. x Exit to the previous test menu. Submode F4: O2S Information On-Board Diagnostic (OBD) and On-Board Diagnostic generation I (OBD I) system's oxygen sensor (O2S) has been a major component within an electronic powertrain control system. In those systems, the upstream (ahead of catalytic converter) O2S sensor is used to detect air/fuel ratios ahead of the catalytic converter. With OBD II, the system now uses an additional oxygen sensor that is placed downstream of the catalytic converter. The addition of a downstream oxygen sensor enables the PCM to perform a catalytic converter efficiency test. As a result of OBD II's downstream oxygen sensors, vehicle equipment may include many oxygen sensors on a vehicle; for example, a vehicle with dual exhaust and two separate catalytic converters can have four O2 sensors. Using F4: O2S Information a text based description of expected O2S locations, nomenclature, type used, plus how to inspect, torque, and remove and replace O2Ss is displayed. Submode F0: Location This mode is used to obtain information on oxygen sensor identification (bank number and sensor number) for the vehicle under test. A sample of actual vehicles with OBD II was used to determine the unique types of exhaust type, number of catalytic converters and oxygen sensors. This information was then arranged in a way that you can select the configuration based on vehicle equipment. Using this mode can assist you in learning about the OBD II system's new oxygen sensor naming and location conventions. NOTE Use of this mode requires knowledge of the vehicle's emissions equipment configuration: exhaust type (dual, single, single with a “y” connection), number of catalytic converters, and number of oxygen sensors. Refer to the Appendix B for further OBD II Oxygen Sensor Location information. 36 COMMON TEST MODES II TEST MODES To obtain Oxygen Sensor information, do the following: 1. Press ( to select OBD II Toolpak from the Select Mode menu. 2. Press $ to select O2S Information from the OBD II Toolpak menu. 3. Press ) to select Location from the O2S Information menu. The key help screen will be displayed. Press e or wait to advance. 4. A series of information screens will appear. They remind you to review and obtain the following information from the vehicle configuration: • exhaust type (dual, single, single with a “y” connection) • total number of catalytic converters • total number of oxygen sensors Press E or wait to advance. 5. Using information obtained in step 4, select exhaust system type. 6. Using information obtained in step 4, select number of catalytic converters (if required). 7. Using information obtained in step 4, select number of oxygen sensors (if required). 8. A confirmation screen with your selected data is displayed. The key help screen will be displayed. Press e or wait to advance. 9. Press d to advance through the text description screens. Press u to back up through the text description screens. These text screens contain bank number and sensor number information that the OBD II system uses for its naming convention. Using this information will help your understanding of the OBD II system. 10. Press X to return to previous menu. ACTIVE KEYS u/d Scroll up and down. ) Select O2S location, exhaust system, number of catalytic converters, number of oxygen sensors. ! Select exhaust system, number of catalytic converters, number of oxygen sensors. @ Select exhaust system, number of oxygen sensors. $ Select O2S Information. e Advance program from current screen. x Exit to the previous test menu. Submode F1: Type Mode F1: Type provides text based information about how the electronic powertrain control system utilizes heated (upstream and downstream) and non-heated (upstream and downstream) oxygen sensors. Information on sensor signal, PCM use, and heater operation is provided. This mode can assist you in learning about the importance of an OBD II system's oxygen sensor based on the types of O2Ss that are currently used on vehicles. COMMON TEST MODES II 37 TEST MODES NOTE Use of this mode requires knowledge about the oxygen sensor type (upstream, downstream, heated, non-heated) for the current vehicle under test. To display information about how the electronic powertrain control system utilizes oxygen sensors, do the following: 1. Press ( to select OBD II Toolpak from the Select Mode menu. 2. Press $ to select O2S Info from the OBD II Toolpak menu. 3. Press ! to select Type from the O2S Information menu. The key help screen will be displayed. Press e or wait to advance. 4. Press ) to select upstream oxygen sensor or ! to select downstream oxygen sensor. 5. Press ) to select heated oxygen sensor or ! to select non-heated oxygen sensor. 6. Press d to advance through the text description screens. Press u to back up through the text description screens. These text screens contain oxygen sensor (O2S) signal information and O2S use information for each sensor type. Using this information will help your understanding of the OBD II system. 7. Press x to return to the previous menu. ACTIVE KEYS u/d Scroll up and down. ) Select upstream or heated O2S. ! Select downstream or non-heated O2S. e Advance program from current screen. x Exit to the previous test menu. Submode F2: Maintenance Mode F2: Maintenance provides three submodes of text based information on the inspection, torque specification, and standard removal & replacement description for oxygen sensors. Using F2: Maintenance can help you understand and review O2S sensor inspection, O2S sensor torque requirements, and guidelines for O2S sensor removal and replacement. • Submode F0: Inspection Mode F0: Inspection provides information about O2S contamination, how to check signal full range operation, and recommended O2S sensor change intervals. To display information about O2S contamination, do the following: 1. Press ( to select OBD II Toolpak from the Select Mode menu. 2. Press $ to select O2S Information from the OBD II Toolpak menu. 3. Press @ to select Maintenance from the O2S Information menu. 38 COMMON TEST MODES II TEST MODES 4. Press ) to select Inspection from the select maintenance menu. The key help screen will be displayed. Press e or wait to advance. 5. Press u to advance through the text description screens. Press d to back up through the text description screens. These text screens contain oxygen sensor (O2S) contamination information, how to check O2S sensor full range operation, and expected O2S sensor signal range. 6. Press x to return to the previous menu. ACTIVE KEYS • u/d Scroll up and down. ) Select Inspection. @ Select Maintenance. $ Select O2S Information. e Advance program from current screen. x Exit to the previous test menu. Submode F1: Torque Specification Mode F1: Torque Specification provides information about O2S installation and O2S Torque requirements. To display information about O2S installation and O2S Torque requirements, do the following: 1. Press ( to select OBD II Toolpak from the Select Mode menu. 2. Press $ to select O2S Information from the OBD II Toolpak menu. 3. Press @ to select Maintenance from the O2S Information menu. 4. Press ! to select Torque Specification from the select maintenance menu. The key help screen will be displayed. Press e or wait to advance. 5. Press d to advance through the text description screens. Press u to back up through the text description screens. These text screens contain oxygen sensor (O2S) installation information and O2S Torque requirements. 6. Press x to return to the previous menu. ACTIVE KEYS u/d Scroll up and down. ! Select Torque Specification. @ Select Maintenance. $ Select O2S Information. e Advance program from current screen. x Exit to the previous test menu. COMMON TEST MODES II 39 TEST MODES • Submode F2: Remove and Replace Mode F2: Remove and Replace provides standard O2S removal and replacement information. Removal information for O2 sensors describes a proper method of how to remove an O2S from the vehicle, and replacement information for O2 sensors describes a proper method of how to replace an O2S into the vehicle. This mode describes a sound method of O2S sensor removal and replacement based on automobile manufacturer procedures. To display O2S removal and replacement information, do the following: 1. Press ( to select OBD II Toolpak from the Select Mode menu. 2. Press $ to select O2S Information from the OBD II Toolpak menu. 3. Press @ to select Maintenance from the O2S Information menu. O2S Removal O2S Removal 4. Press ) to select Remove from the O2S R&R information menu. The key help screen will be displayed. Press e or wait to advance. 5. Press u to advance through the text description screens. Press d to back up through the text description screens. These text screens contain items to watch out for during oxygen sensor (O2S) removal from the vehicle exhaust pipe. 6. Press x to return to previous menu. O2S Replacement 7. Press ! to select Replace from the O2S R&R information menu. The key help screen will be displayed. Press e or wait to advance. 8. Press d to advance through the text description screens. Press u to back up through the text description screens. These text screens contain items to watch out for during oxygen sensor (O2S) installation into the vehicle exhaust pipe. 9. Press X to return to previous menu. ACTIVE KEYS u/d Scroll up and down. ) Select Remove O2S Info. ! Select Replace O2S Info. @ Select O2S Remove and Replace Info. $ Select O2S Information. e Advance program from current screen. x Exit to the previous test menu. 40 COMMON TEST MODES II ASIAN IMPORTS DIAGNOSTIC DATA PARAMETERS 5. ASIAN IMPORTS DIAGNOSTIC DATA PARAMETERS The following are the generic diagnostic data parameters defined by the SAE for OBD II vehicles. Not all parameters are displayed for all vehicles. Prior to displaying data, the tester queries the vehicle to determine which parameters are available for that vehicle. AIR STATUS STATES UPSTRM, DNSTRM, ATM/OFF,RSRVD Air Status displays information about the OBD II system's commanded secondary or auxiliary air injection diverter valve position. The possible states are diverting secondary air upstream of the first catalytic converter (UPSTRM), downstream of the first catalytic converter (DNSTRM), or venting to the atmosphere (ATM/OFF). RSRVD is applicable for future applications. ECT (°) UNITS °F °C RANGE -40 to +419 -40 to +215 Engine Coolant Temperature (ECT) is an analog input to the ECU. This parameter provides a temperature indication of engine coolant near the ECT sensor. ECT sensors can be located in the intake manifold, cylinder head, or water pump housing. Typical ECT is 200 °F (warm engine at idle). Note that the (°) in parenthesis indicates the parameter is temperature-related. ENGINE LOAD UNITS % RANGE 0 to 100 Engine Load is derived by the ECU from a measure of current engine airflow divided by engine peak airflow. Engine Load directly increases with throttle angle and drive conditions and is an indicator of percent engine capacity in any given operating mode. Engine Load is typically 5% at engine idle and 80% or greater during Wide Open Throttle (warm engine). ENGINE SPEED UNITS RPM RANGE 0 to 8000 Engine Speed is an indication of crankshaft revolutions per minute. The ECU uses input engine speed to make determinations about current engine operating conditions and the operation of various engine management system output components. FT-O2S B1 S1 FT-O2S B2 S1 FT-O2S B1 S2 FT-O2S B2 S2 FT-O2S B1 S3 FT-O2S B2 S3 FT-O2S B1 S4 FT-O2S B2 S4 UNITS % RANGE -100 to +100 Fuel Trim-Oxygen Sensor (FT-O2S) Bx Sx represents the short-term correction to fuel injection that may be adopted by the ECU. In this case, oxygen sensor fuel trim represents the ECU's determination of exhaust gas oxygen content and relates the data to a short-term adjustment to fuel strategy, based on information obtained from the applicable O2S. Associated with the OBD II system and the parameter label are Bx and COMMON TEST MODES II 41 ASIAN IMPORTS DIAGNOSTIC DATA PARAMETERS Sx. Bx refers to Bank 1 or 2 and Sx refers to the sensor in positions 1, 2, 3, or 4. Refer to Appendix B: OBD II Oxygen Sensor Location Information for a more complete description of the O2S naming convention. FUEL PRESSURE UNITS kPa psi RANGE 0 to 765 0 to 111 Fuel Pressure data parameter is a gauge measure of the engine fuel rail pressure. The fuel pressure parameter can be displayed in metric units (kPa) or in English units (psi). FUEL STATUS 1 FUEL STATUS 2 STATES OPEN LOOP/CLOSED LOOP OL-DRIVE/OL-FAULT/CL-FAULT/ RESERVED/UNUSED Fuel Status represents fuel control status of the feedback loop between the vehicle ECU and the oxygen sensor. Fuel Status can be displayed for both Bank 1 and Bank 2. If only Bank 1 is used for fuel control, FUEL STATUS 2 is displayed as UNUSED. The states of Fuel Status can be Open Loop, Closed Loop, Open Loop due to vehicle being driven at wide open throttle or coasting (OL-DRIVE), Open Loop due to a fault with the OBD II system (OL-FAULT), Closed Loop with only one oxygen sensor being used for fuel control and a fault with at least one oxygen sensor (CL-FAULT), or a display of a reserved status (RESERVED), which is used for future support. IAT (°) UNITS °F °C RANGE -40 to +419 -40 to +215 Intake Air Temperature (IAT) is an analog input to the ECU. This parameter provides a temperature indication of engine intake air temperature as it flows across the IAT sensor. IAT sensors can be located in the intake manifold, intake air plumbing, or airbox. Typical IAT is 140 °F (warm engine at idle). Note that the (°) in parenthesis indicates the parameter is temperature related. IGN. TIMING UNITS ° RANGE -64 to +64 Spark Advance (IGN. Timing) is the amount of ignition electronic spark advance that the ECU is currently commanding. The amount of ignition spark advance is based on several inputs to the ECU (engine load, throttle angle, engine temperature, etc.) and a lookup table in the ECU's memory. For OBD II systems, Spark Advance should be the timing advance for cylinder number 1 and does not include mechanical advance (if applicable). Spark Advance increases with engine RPM, and a typical value is 10-20 degrees at idle (warm engine). LT FT 1 LT FT 2 UNITS % RANGE -100 to +100 Long-Term Fuel Trim (LT FT) is the measure of adaptive or feedback fuel correction strategy for the injection of fuel into the engine. Long-Term Fuel Trim represents the ECU's steady long-term adjustment to fuel strategy determined from a lookup table in its memory. This parameter changes slowly over time (at a rate slower than Short-Term Fuel Trim) and varies with engine design and engine operating conditions. The numeric character in LT FT 1 and LT FT 2 define the cylinders that are grouped as a bank for fuel feedback 42 COMMON TEST MODES II ASIAN IMPORTS DIAGNOSTIC DATA PARAMETERS correction. Bank 1 is the bank which contains cylinder number 1. Expected values for this parameter are ±10.0% (warm engine at idle). MAF (R) UNITS lb/min gm/s RANGE 0 to 86 0 to 655 Mass Air Flow (MAF) sensor is an input to the ECU and represents the amount of air that the engine is taking into the manifold, displayed as a flow rate (pounds per minute or grams per second). MAF flow rate will increase with engine load and is typically 4-7 gm/sec at idle or 17-20 gm/sec at 2500 RPM (warm engine). Note that the (R) in parenthesis indicates the parameter is rate-related. MAP (P) UNITS kPa inHg RANGE 0 to 255 0 to 75 Manifold Absolute Pressure (MAP) sensor is a measure of the pressure within the intake manifold relative to atmospheric pressure. Depending on MAP sensor design, a frequency or analog output signal can be generated by a MAP sensor for input to the vehicle ECU. Atmospheric pressure equals the addition of manifold and vacuum pressures. MAP pressure increases with engine load and depending on altitude is typically 40 kPa at idle (warm engine, at sea level). Note that the (P) in parenthesis indicates the parameter is pressure-related. MIL STATUS STATES OFF/ON Malfunction Indicator Lamp (MIL) Status is an indication of the current MIL state. If no emission-related faults exist, the MIL will be OFF. If a DTC is stored in the ECU due to a system fault or the vehicle is operated in a condition that causes tailpipe emissions to exceed 1.5 times the allowed value for that vehicle, the MIL will be ON. In most cases, if a hard fault exists, the MIL will remain illuminated. Also, the MIL can illuminate then extinguish while driving the vehicle (which means the vehicle exceeded tailpipe emission standards). OBD CERT. STATES OBD II, OBD, OBD2/OBD, OBD I, NO OBD On-Board Diagnostics (OBD) Certification displays the level of OBD that the vehicle ECU is certified to. The states of OBD certification can be to OBD II (California Air Resources Board) requirements, OBD (federal) requirements, OBD II and OBD requirements, OBD I requirements, or No OBD requirements. This information can be helpful when determining certification and ordering parts. O2S B1 S1 O2S B2 S1 O2S B1 S2 O2S B2 S2 O2S B1 S3 O2S B2 S3 O2S B1 S4 O2S B2 S4 UNITS Volts RANGE 0 to 1.25 Oxygen Sensor (O2S) Bx Sx is the output voltage of the O2S that is input to the ECU. The O2S signal is a measure of the oxygen content in the exhaust emission gases that surround the sensor tip and is a primary input to the ECU. Once the O2S is warmed up (>500 °F), its output voltage will fluctuate above and below a threshold of 0.450 volts. Values greater than 0.450v indicate a rich condition, while values less than COMMON TEST MODES II 43 ASIAN IMPORTS DIAGNOSTIC DATA PARAMETERS 0.450v indicate a lean condition. If the O2S has not achieved its normal operating temperature, its value may remain at 0.450v. Associated with the OBD II system and the parameter label are Bx and Sx. Bx refers to Bank 1 or 2 and Sx refers to the sensor in positions 1, 2, 3, or 4. Refer to Appendix B: OBD II Oxygen Sensor Location Information for a more complete description of the O2S naming convention. ST FT 1 ST FT 2 UNITS % RANGE -100 to +100 Short-Term Fuel Trim (ST FT) is the measure of adaptive or feedback fuel correction strategy for the injection of fuel into the engine. Short-Term Fuel Trim represents the ECU's dynamic short-term adjustment to fuel strategy determined from a lookup table in its memory. This parameter is continually changing over time (at a rate faster than Long-Term Fuel Trim) and varies with engine design and engine operating conditions. The numeric character in ST FT1 and ST FT 2 defines the cylinders that are grouped as a bank for fuel feedback correction. Bank 1 is the bank which contains cylinder number 1. Expected values for this parameter can be ±2.0% (warm engine at idle). STORED DTCS UNITS none RANGE 0 to 127 Stored DTCs is the number of emission-related diagnostic trouble codes (DTCs) that have been stored in the reporting ECU. (For OBD II systems, there can be multiple OBD II-compliant ECUs. Also, more than one ECU can report more than one stored DTC.) Therefore, the number of stored DTCs refers to the ECU whose data is currently being displayed. Remember also that OBD II DTCs are 5 characters and are broken into system categories: System: Pxxxx = Powertrain Bxxxx = Body Cxxxx = Chassis Category: x0100 to x0999 = SAE-defined DTCs x1000 or greater = Manufacturer-defined DTCs TPS (%) UNITS % RANGE 0 to 100 Throttle Position Sensor (TPS) is an input to the ECU and provides information about throttle plate opening. For OBD II systems, TPS voltage is converted by the ECU and displayed as a relative or absolute throttle opening value. Therefore, this indicates how much the throttle is opened off its throttle stop and not in relation to a zero voltage level. TPS percentage changes with the movement of the accelerator pedal and should display 0-20% at idle to above 80% at Wide Open Throttle. VEHICLE SPEED UNITS MPH km/h RANGE 0 to 158 0 to 255 Vehicle Speed is an indication of vehicle speed in miles per hour or kilometers per hour. The ECU uses vehicle speed to make determinations about current engine operating conditions and the operation of various engine management system output components. 44 COMMON TEST MODES II ACURA 1. VEHICLES AND SYSTEMS ..................................................................................................................... 2 2. ACURA SPECIFIC INFORMATION ....................................................................................................... 5 3. TEST MODES AVAILABLE ...................................................................................................................... 6 4. GETTING STARTED ................................................................................................................................... 7 5. SELECTING THE VEHICLE .................................................................................................................... 8 6. TEST MODES.............................................................................................................................................. 10 Mode F1: DTC Entry ........................................................................................................................ 10 Submode F0: How To Read .....................................................................................................11 Submode F1: Enter DTC(s) ......................................................................................................11 Submode F2: DTC List ............................................................................................................ 12 Submode F3: Review DTC ..................................................................................................... 12 Submode F4: Clear DTC(s) ..................................................................................................... 12 7. ACURA DIAGNOSTIC TROUBLE CODES (DTCs) ........................................................................ 13 VEHICLES AND SYSTEMS 1. VEHICLES AND SYSTEMS Using the Asian Imports Cartridge, the following Acura vehicles can be diagnosed: MODEL:1986 ENGINE ENGINE TYPE FUEL SYSTEM CODE TYPE JUMPER TYPE 1986 INTEGRA 1.6L I4 D16A1 MPFI ECU LED NONE LEGEND 2.5L V6 C25A1 MPFI ECU LED NONE MODEL: 1987 ENGINE ENGINE TYPE FUEL SYSTEM CODE TYPE JUMPER TYPE 1987 INTEGRA 1.6L I4 D16A1 MPFI ECU LED NONE LEGEND SEDAN 2.5L V6 C25A1 MPFI ECU LED NONE LEGEND COUPE 2.7L V6 C27A1 MPFI ECU LED NONE MODEL:1988 ENGINE ENGINE TYPE FUEL SYSTEM CODE TYPE JUMPER TYPE 1988 INTEGRA 1.6L I4 D16A1 MPFI ECU LED NONE LEGEND SEDAN 2.7L V6 C27A1 MPFI ECU LED NONE LEGEND COUPE 2.7L V6 C27A1 MPFI ECU LED NONE MODEL: 1989 ENGINE ENGINE TYPE FUEL SYSTEM CODE TYPE JUMPER TYPE 1989 2 INTEGRA 1.6L I4 D16A1 MPFI ECU LED NONE LEGEND SEDAN 2.7L V6 C27A1 MPFI ECU LED NONE LEGEND COUPE 2.7L V6 C27A1 MPFI ECU LED NONE ACURA VEHICLES AND SYSTEMS MODEL: 1990 ENGINE ENGINE TYPE FUEL SYSTEM CODE TYPE JUMPER TYPE 1990 INTEGRA 1.6L I4 B18A1 MPFI ECU LED NONE LEGEND SEDAN 2.7L V6 C27A1 MPFI ECU LED NONE LEGEND COUPE 2.7L V6 C27A1 MPFI ECU LED NONE MODEL: 1991 ENGINE ENGINE TYPE FUEL SYSTEM CODE TYPE JUMPER TYPE 1991 INTEGRA 1.8L I4 B18A1 MPFI ECU LED NONE LEGEND SEDAN 3.2L V6 C32A1 MPFI MIL/LED SCC LEGEND COUPE 3.2L V6 C32A1 MPFI MIL/LED SCC NSX 3.0L V6 C30A1 MPFI MIL/LED SCC MODEL: 1992 ENGINE ENGINE TYPE FUEL SYSTEM CODE TYPE JUMPER TYPE 1992 INTEGRA 1.7L I4 1.8L I4 B17A1 B18A1 MPFI MPFI MIL/LED MIL/LED SCC SCC LEGEND SEDAN 3.2L V6 C32A1 MPFI MIL/LED SCC LEGEND COUPE 3.2L V6 C32A1 MPFI MIL/LED SCC NSX 3.0L V6 C30A1 MPFI MIL/LED SCC VIGOR 2.5L V6 G25A1 MPFI MIL/LED SCC MODEL: 1993 ENGINE ENGINE TYPE FUEL SYSTEM CODE TYPE JUMPER TYPE 1993 INTEGRA 1.7L I4 1.8L I4 B17A1 B18A1 MPFI MPFI MIL/LED MIL/LED SCC SCC LEGEND SEDAN 3.2L V6 C32A1 MPFI MIL/LED SCC LEGEND COUPE 3.2L V6 C32A1 MPFI MIL/LED SCC NSX 3.0L V6 C30A1 MPFI MIL/LED SCC ACURA 3 VEHICLES AND SYSTEMS MODEL: 1993 (CONTINUED) VIGOR ENGINE 2.5L V6 MODEL: 1994 ENGINE ENGINE TYPE G25A1 ENGINE TYPE FUEL SYSTEM MPFI FUEL SYSTEM CODE TYPE MIL/LED CODE TYPE JUMPER TYPE SCC JUMPER TYPE 1994 4 INTEGRA 1.7L I4 1.8L I4 B17A1 B18A1 MPFI MPFI MIL/LED MIL/LED SCC SCC LEGEND SEDAN 3.2L V6 C32A1 MPFI MIL/LED SCC LEGEND COUPE 3.2L V6 C32A1 MPFI MIL/LED SCC NSX 3.0L V6 C30A1 MPFI MIL/LED SCC VIGOR 2.5L V6 G25A1 MPFI MIL/LED SCC ACURA ACURA SPECIFIC INFORMATION 2. ACURA SPECIFIC INFORMATION TWO WAYS TO DIAGNOSE ACURA Acura powertrain diagnosis can be performed with the Asian Imports cartridge installed in a Tech 1, Tech 1A, or Mastertech tester. Additionally, Acura vehicles can be diagnosed with the aftermarket version of the Acura OEM level program card software using the Mastertech tester only. Operating instructions and test mode information are available for the OEM level software in the Acura/Honda Program Card Operator's Manual. If you do not have the necessary Program Card and Mastertech tester to perform OEM level diagnostics, you can use the Asian Imports Cartridge for reduced model year coverage. The following Acura section includes the test modes available, how to connect the tester to the vehicle, operating instructions for DTC entry, and the applicable DTCs for each model year. ACURA 5 TEST MODES AVAILABLE 3. TEST MODES AVAILABLE The following test modes are available when testing Acura vehicles. Operating instructions for test modes other than DTC entry are included in the Common Test Modes OBD, OBD I Systems section. There are also Acura specific instructions for operating the test modes. Refer to TEST MODES on page 10. A description for DTCs specific to Acura is included in ACURA DIAGNOSTIC TROUBLE CODES (DTCs) on page 13. MODE F1: DTC ENTRY SUBMODE F0: HOW TO READ SUBMODE F1: ENTER DTC(s) SUBMODE F2: DTC LIST SUBMODE F3: REVIEW DTC SUBMODE F4: CLEAR DTC(s) MODE F5: SYSTEM TESTS SUBMODE F0: PREP VEHICLE MODE F8: INFORMATION SUBMODE F2: SCC LOCATION* SUBMODE F3: ID INFO SUBMODE F5: ECU LOCATION* * Note that Submodes F2 or F5 are not available on certain vehicles. 6 ACURA GETTING STARTED 4. GETTING STARTED Before operating the Asian Imports Cartridge with an Acura vehicle, the following steps must be performed: 1. Make sure the vehicle ignition is OFF. 2. Plug the tester power cable into the vehicle cigarette lighter. The power cable may also be directly connected to the battery via the optional battery adapter cable (P/N 02001636). NOTE Since the cigarette lighter can be switched, some tests require that the power cable be directly connected to the battery via the optional battery adapter cable. 3. Turn on the tester and select the application software that you will be using. Verify that the correct screen is displayed. The tester should display a screen similar to the one below. ASIAN IMPORTS 83 - 98 <ENTER> Tester Stand-Alone Display 4. If the display is correct, press E. If the display is not correct, refer to Appendix D. 5. Follow the instructions on the following page to select the vehicle type you are testing by entering required vehicle information into the tester. 6. When the vehicle has been selected, refer to the Acura Test Modes section for information on how to set the vehicle up for retrieving DTCs. On some late model Acura vehicles, the Service Check Connector (SCC) jumper (P/N 02001935) is required to retrieve DTCs. If available, use submode F2: SCC LOCATION from the Information menu to locate the service check connector. Service Check Connector Jumper ACURA 7 SELECTING THE VEHICLE 5. SELECTING THE VEHICLE Once you've pressed e from the power-up screen, the following steps must be performed to select the manufacturer, model year, model and engine type of the vehicle being tested. Remember, if you make a mistake, you can always press X to go back to the previous menu. SELECTING THE MANUFACTURER A menu of manufacturers available for testing is displayed in a scrolling menu. You can scroll down one screen at a time by pressing Y, or up one screen at a time by pressing n. Press U or D to scroll one manufacturer at a time, until the → arrow is opposite the manufacturer you wish to select. Then press e to select. SELECTING THE MODEL YEAR Once the manufacturer is selected, the Select Model Year menu is displayed. Press the last two digits of the year model being tested; 9, 0 for 1990 models, 9, 1 for 1991 models, and so on. SELECTING THE MODEL The Model Select menu displays models available for testing. Press the N key until the model being tested is displayed, then press the Y key. SELECTING THE ENGINE Next, the Engine Select menu is displayed. Press N until the engine type of the vehicle is displayed, then press the Y key. VEHICLE INFORMATION DISPLAY After the vehicle type is selected the tester displays a summary screen of the selected vehicle. Information displayed includes the year, manufacturer, model, engine size and type, and additional information such as the type of fuel system. SELECT MODE MENU When the above steps are completed, the Select Mode menu displays the test modes available for the selected vehicle and system. Refer to TEST MODES on page 10, and the Common Test Modes OBD, OBD I Systems section for operating the test modes with Acura vehicles. 8 ACURA SELECTING THE VEHICLE MANUFACTURER TOYOTA ACURA CHRYSLER IMP E ACURA 1986 - 1994 SELECT MODEL YEAR: 19?? 9, 4 SELECT MODEL: INTEGRA (YES/NO) Y SELECT ENGINE: 1.7L 1.8L (YES/NO) Y 1994 ACURA INTEGRA 1.7, 1.8 PGM-FI U, or 5 sec. SELECT MODE F1: DTC ENTRY F5: SYSTEM TESTS F8: INFORMATION Acura Vehicle Selection ACTIVE KEYS 0-9 Enter model year. y,n Used to answer questions in tester display. e Confirm Power-up display. x Return to previous display. ACURA 9 TEST MODES 6. TEST MODES When the Select Mode menu is displayed, test modes available for Acura vehicles may be selected. You may select Mode F1: DTC ENTRY, Mode F5: SYSTEM TESTS or Mode F8: INFORMATION without connecting the tester to the vehicle. General operating instructions for these test modes are included in the Common Test Modes OBD, OBD I Systems section. Operating instructions for Mode F1: DTC ENTRY are included in this section. Note that early model Acura vehicles did not have a Service Check Connector (SCC). To obtain DTCs from these vehicles, it is not necessary to use the SCC jumper. The Information Mode Menu will display F5: ECU LOCATION if the SCC jumper is not required, or it will display F2: SCC LOCATION if the SCC jumper is required. Detailed operating instructions for using Mode F1: DTC ENTRY with Acura vehicles are included in the following procedure. When Mode F1: DTC ENTRY and F0: HOW TO READ are selected, the tester informs you if the Service Check Connector (SCC) jumper must be connected to the vehicle SCC. The location of the SCC is available by selecting Mode F2: SCC LOCATION from the Information menu. If necessary, connect the jumper to the SCC. Honda/Acura Service Check Connector Jumper Typical Acura ECU LED To read DTC codes on Acura vehicles you must locate the ECU and observe the flashing LEDs. If you are not sure where the ECU is located, select Submode F5: ECU LOCATION from the Information Mode menu. If necessary, refer to the Common Test Modes OBD, OBD I Systems section for further instructions. Follow the detailed instructions on the following pages to read the DTCs. Once the DTCs have been read, the tester can define the code. A complete list of Acura DTCs is also included in ACURA DIAGNOSTIC TROUBLE CODES (DTCs) on page 13. MODE F1: DTC ENTRY When Mode F1: DTC ENTRY is selected, the tester displays five submodes: F0: HOW TO READ F1: ENTER DTC(s) F2: DTC LIST 10 ACURA TEST MODES F3: REVIEW DTC F4: CLEAR DTC(s) Submode F0: How To Read This submode provides information on how to manually read DTCs from the vehicle. Step by step screen instructions provide information to correctly set up the vehicle ECU. This is performed by following the tester instruction screens. If you have trouble, additional DTC retrieval information is described below. If you refer to the Factory Service Manual for this information, make sure that you are following the correct steps for the system that you are working on. Submode F1: Enter DTC(s) This submode provides you with a text description of the numeric DTC that was entered into the tester. For Acura vehicles the DTCs are entered manually after reading the single LED mounted on the ECU. Acura service and repair information indicates that code 0 is supported for OBD systems. Code 0 refers to ECU related failures, and is valid when the engine MIL does not illuminate or will not illuminate for 2 seconds when the ignition is turned on. Refer to the service manual for the current vehicle for further explanation of code0. The Enter DTC(s) submode displays two question marks for entering the DTC. The tester screen prompts you to enter the DTCs read off the ECU LED or the Malfunction Indicator Light (MIL). Be careful when reading the DTC from the ECU LED or MIL, then enter the DTC into the tester. Incorrect ECU LED or MIL interpretation can cause the wrong DTC description to be displayed. Refer to the following procedure for manually reading 1-LED DTCs on the ECU. To manually read DTCs from late model Acura vehicles that use 1-LED on ECU, or 1-LED on ECU and dashboard MIL, do the following: 1. The MIL and the ECU mounted LED can be used to read DTCs from the ECU. 2. Use F2: SCC LOCATION from the Information menu for help in locating the Service Check Connector (SCC) or F5: ECU LOCATION for help in locating the engine electronic control module from the Information menu. 3. If required, connect the Honda/Acura SCC Jumper (P/N 02001935) into the Service Check Connector. 4. Turn the ignition key to run. 5. The MIL and the ECU LED will flash DTCs, if stored in ECU memory. 6. The 10's digit corresponds to a long pulse, and the 1's digit corresponds to a short pulse. 7. Use F1: ENTER DTCs and type manually read DTCs into the tester (or select the DTC from F2: DTC LIST). 8. The selected code(s) will appear on the tester, along with a brief description. 9. If used, remove the Honda/Acura SCC jumper from the Service Check Connector. 10. Use F4: CLEAR DTCs for DTC clear code information. 11. Turn ignition key off when diagnosis is finished. NOTE ACURA For further information, refer to the Factory Service Manual for the vehicle you are testing. 11 TEST MODES Submode F2: DTC List This submode provides you with a text description of the numeric DTC that was selected on the tester display screen. As you scroll through the available DTCs you can select the DTC that matches the DTC output by the ECU. After you perform this step, simply select the DTC on the tester screen for later review or printing. Submode F3: Review DTC This submode provides you with a review of the DTCs that you entered or selected in the tester. The description of the entered or selected DTC will be displayed, along with a numerical summary of the entered or selected DTC. Review DTC is intended to provide you with an electronic clipboard that keeps track of the DTCs that you have encountered during diagnosis. Submode F4: Clear DTC(s) This submode has two options for you to choose. Option F0 is to view text screens that provide information on how to clear the DTCs from ECU memory. This is performed by tester keypad presses. Option F1 clears the tester memory of DTCs that you entered or selected in the tester. 12 ACURA ACURA DIAGNOSTIC TROUBLE CODES (DTCS) 7. ACURA DIAGNOSTIC TROUBLE CODES (DTCs) DTCs available for Acura vehicles are listed in the following tables. Some code numbers have different descriptors depending on the selected vehicle. Only codes available for the selected vehicle are displayed by the tester. YEAR: 1986 DTC NO. 1986 0 FAULTY ECU OR ECU CKT FAILURE 1 O2 SENSOR OR O2S CKT FAILURE FRONT O2S OR O2S CKT FAILURE 2 REAR 02S OR O2S CKT FAILURE 3 MAP SENSOR OR MAP CKT FAILURE 5 MAP SENSOR OR MAP CKT FAILURE 6 ECT SENSOR OR ECT CKT FAILURE 7 TP SENSOR OR TPS CKT FAILURE 8 CRANK ANGLE SENSOR - (TDC) 9 CRANK ANGLE SENSOR - (CYL) 10 IAT SENSOR OR IAT CKT FAILURE 11 IDLE MIXTURE ADJ SENSOR/CKT FAIL 12 EGR SYSTEM OR EGR CKT FAILURE 13 BARO SENSOR OR BARO CKT FAILURE 14 ELECTRONIC IDLE CONTROL SENSOR DESCRIPTOR YEAR: 1987 DTC NO. 1987 0 FAULTY ECU OR ECU CKT FAILURE 1 O2 SENSOR OR O2S CKT FAILURE FRONT O2S OR O2S CKT FAILURE 2 FAULTY ECU OR ECU CKT FAILURE REAR O2S OR O2S CKT FAILURE 3 MAP SENSOR OR MAP CKT FAILURE 4 FAULTY ECU OR ECU CKT FAILURE 5 MAP SENSOR OR MAP CKT FAILURE ACURA DESCRIPTOR 13 ACURA DIAGNOSTIC TROUBLE CODES (DTCS) YEAR: 1987 (CONTINUED) 14 DTC NO. DESCRIPTOR 6 ECT SENSOR OR ECT CKT FAILURE 7 TP SENSOR OR TPS CKT FAILURE 8 CRANK ANGLE SENSOR - (TDC) 9 CRANK ANGLE SENSOR - (CYL) 10 IAT SENSOR OR IAT CKT FAILURE 11 FAULTY ECU OR ECU CKT FAILURE IDLE MIXTURE ADJ SENSOR/CKT FAIL 12 FAULTY ECU OR ECU CKT FAILURE EGR SYSTEM OR EGR CKT FAILURE 13 BARO SENSOR OR BARO CKT FAILURE 14 ELECTRONIC IDLE CONTROL SENSOR 15 FAULTY ECU OR ECU CKT FAILURE IGNITION OUTPUT SIG. OR CKT FAIL 17 VSS OR VSS CIRCUIT FAILURE 18 IGNITION TIMING CONTROL UNIT 19 FAULTY ECU OR ECU CKT FAILURE YEAR: 1988 DTC NO. 1988 0 FAULTY ECU OR ECU CKT FAILURE 1 O2 SENSOR OR O2S CKT FAILURE 1 FRONT O2S OR O2S CKT FAILURE 2 FAULTY ECU OR ECU CKT FAILURE 2 REAR O2S OR O2S CKT FAILURE 3 MAP SENSOR OR MAP CKT FAILURE 4 FAULTY ECU OR ECU CKT FAILURE CK ANGLE OR CK ANG. CKT FAILURE 5 MAP SENSOR OR MAP CKT FAILURE 6 ECT SENSOR OR ECT CKT FAILURE 7 TP SENSOR OR TPS CKT FAILURE 8 CRANK ANGLE SENSOR - (TDC) 9 CRANK ANGLE SENSOR - (CYL) 10 IAT SENSOR OR IAT CKT FAILURE DESCRIPTOR ACURA ACURA DIAGNOSTIC TROUBLE CODES (DTCS) YEAR: 1988 (CONTINUED) DTC NO. DESCRIPTOR 11 FAULTY ECU OR ECU CKT FAILURE 12 FAULTY ECU OR ECU CKT FAILURE EGR SYSTEM OR EGR CKT FAILURE 13 BARO SENSOR OR BARO CKT FAILURE 14 ELECTRONIC IDLE CONTROL SENSOR 15 FAULTY ECU OR ECU CKT FAILURE IGNITION OUTPUT SIG. OR CKT FAIL 17 VSS OR VSS CIRCUIT FAILURE 18 IGNITION TIMING CONTROL UNIT 19 FAULTY ECU OR ECU CKT FAILURE YEAR: 1989 DTC NO. 1989 0 FAULTY ECU OR ECU CKT FAILURE 1 O2 SENSOR OR 02S CKT FAILURE FRONT O2S OR O2S CKT FAILURE 2 REAR O2S OR O2S CKT FAILURE 3 MAP SENSOR OR MAP CKT FAILURE 4 CK ANGLE OR CK ANG. CKT FAILURE 5 MAP SENSOR OR MAP CKT FAILURE 6 ECT SENSOR OR ECT CKT FAILURE 7 TP SENSOR OR TPS CKT FAILURE 8 CRANK ANGLE SENSOR - (TDC) 9 CRANK ANGLE SENSOR - (CYL) 10 IAT SENSOR OR IAT CKT FAILURE 12 EGR SYSTEM OR EGR CKT FAILURE 13 BARO SENSOR OR BARO CKT FAILURE 14 ELECTRONIC IDLE CONTROL SENSOR 15 IGNITION OUTPUT SIG. OR CKT FAIL 16 FUEL INJECTOR FAILURE 17 VSS OR VSS CIRCUIT FAILURE 18 IGNITION TIMING CONTROL UNIT ACURA DESCRIPTOR 15 ACURA DIAGNOSTIC TROUBLE CODES (DTCS) YEAR: 1989 (CONTINUED) 16 DTC NO. DESCRIPTOR 19 LOCK-UP CONTROL SOL. VALVE FAIL FAULTY ECU OR ECU CKT FAILURE 20 ELECTRIC LOAD SENSOR FAILURE 21 FAULTY ECU OR ECU CKT FAILURE YEAR: 1990 DTC NO. 1990 0 0 FAULTY ECU OR ECU CKT FAILURE 1 O2 SENSOR OR O2S CKT FAILURE FRONT O2S OR O2S CKT FAILURE 2 FAULTY ECU OR ECU CKT FAILURE REAR O2S OR O2S CKT FAILURE 3 MAP SENSOR OR MAP CKT FAILURE 4 FAULTY ECU OR ECU CKT FAILURE CK ANGLE OR CK ANG. CKT FAILURE 5 MAP SENSOR OR MAP CKT FAILURE 6 ECT SENSOR OR ECT CKT FAILURE 7 TP SENSOR OR TPS CKT FAILURE 8 CRANK ANGLE SENSOR - (TDC) 9 CRANK ANGLE SENSOR - (CYL) 10 IAT SENSOR OR IAT CKT FAILURE 12 EGR SYSTEM OR EGR CKT FAILURE 13 BARO SENSOR OR BARO CKT FAILURE 14 ELECTRONIC IDLE CONTROL SENSOR 15 IGNITION OUTPUT SIG. OR CKT FAIL 16 FUEL INJECTOR FAILURE 17 VSS OR VSS CIRCUIT FAILURE 18 IGNITION TIMING CONTROL UNIT 19 FAULTY ECU OR ECU CKT FAILURE 30 A/T FI SIGNAL A 31 A/T FI SIGNAL B 43 FUEL SUPPLY SYSTEM DESCRIPTOR ACURA ACURA DIAGNOSTIC TROUBLE CODES (DTCS) YEAR: 1991 DTC NO. 1991 0 FAULTY ECU OR ECU CKT FAILURE 1 O2 SENSOR OR O2S CKT FAILURE LEFT O2S OR O2S CKT FAILURE FRONT O2S OR O2S CKT FAILURE 2 RIGHT O2S OR O2S CKT FAILURE REAR O2S OR O2S CKT FAILURE 3 MAP SENSOR OR MAP CKT FAILURE 4 CK ANGLE OR CK ANG. CKT FAILURE CRANK ANGLE SENSOR NO.1 CRANK ANGLE SENSOR A 5 MAP SENSOR OR MAP CKT FAILURE 6 ECT SENSOR OR ECT CKT FAILURE 7 TP SENSOR OR TPS CKT FAILURE 8 CRANK ANGLE SENSOR - (TDC) 9 CRANK ANGLE SENSOR - (CYL) CRANK ANGLE SENSOR - (CYL/A) 10 IAT SENSOR OR IAT CKT FAILURE 12 EGR SYSTEM OR EGR CKT FAILURE 13 BARO SENSOR OR BARO CKT FAILURE 14 ELECTRONIC AIR CONTROL SENSOR 15 IGNITION OUTPUT SIG. OR CKT FAIL 16 FUEL INJECTOR FAILURE 17 VSS OR VSS CIRCUIT FAILURE 18 IGNITION TIMING CONTROL UNIT 23 LEFT KS OR KS CIRCUIT FAILURE 23 FRONT KS OR KS CIRCUIT FAILURE 30 A/T FI SIGNAL A 31 A/T FI SIGNAL B 35 TC STB SIGNAL 36 TCFC SIGNAL 41 LEFT O2S HEATER OR CKT FAILURE FRONT O2S HEATER OR CKT FAILURE 42 RIGHT O2S HEATER OR CKT FAILURE REAR O2S HEATER OR CKT FAILURE ACURA DESCRIPTOR 17 ACURA DIAGNOSTIC TROUBLE CODES (DTCS) YEAR: 1991 (CONTINUED) 18 DTC NO. DESCRIPTOR 43 FUEL SUPPLY SYSTEM LEFT FUEL SUPPLY SYSTEM FRONT FUEL SUPPLY SYSTEM 44 RIGHT FUEL SUPPLY SYSTEM REAR FUEL SUPPLY SYSTEM 45 LEFT FUEL SUPPLY METERING FRONT FUEL SUPPLY METERING 46 RIGHT FUEL SUPPLY METERING REAR FUEL SUPPLY METERING 47 FAULTY FUEL PUMP OR CKT FAILURE 51 REAR SPOOL SOLENOID VALVE 53 RIGHT KS OR KS CIRCUIT FAILURE REAR KS OR KS CIRCUIT FAILURE 54 CRANK ANGLE SENSOR 2 CRANK ANGLE SENSOR B 59 CRANK ANGLE SENSOR - (CYL/2) CRANK ANGLE SENSOR - (CYL/B) YEAR: 1992 DTC NO. 1992 0 FAULTY ECU OR ECU CKT FAILURE 1 O2 SENSOR OR O2S CKT FAILURE LEFT O2S OR O2S CKT FAILURE FRONT O2S OR O2S CKT FAILURE 2 RIGHT O2S OR O2S CKT FAILURE REAR O2S OR O2S CKT FAILURE 3 MAP SENSOR OR MAP CKT FAILURE 4 CK ANGLE OR CK ANG. CKT FAILURE CRANK ANGLE SENSOR NO.1 CK ANGLE OR CK ANG. CKT FAILURE CRANK ANGLE SENSOR A 5 MAP SENSOR OR MAP CKT FAILURE 6 ECT SENSOR OR ECT CKT FAILURE 7 TP SENSOR OR TPS CKT FAILURE 8 CRANK ANGLE SENSOR - (TDC) 9 CRANK ANGLE SENSOR - (CYL) CRANK ANGLE SENSOR - (CYL/1) CRANK ANGLE SENSOR - (CYL/A) DESCRIPTOR ACURA ACURA DIAGNOSTIC TROUBLE CODES (DTCS) YEAR: 1992 (CONTINUED) ACURA DTC NO. DESCRIPTOR 10 IAT SENSOR OR IAT CKT FAILURE 12 EGR SYSTEM OR EGR CKT FAILURE 13 BARO SENSOR OR BARO CKT FAILURE 14 ELECTRONIC AIR CONTROL SENSOR 15 IGNITION OUTPUT SIG. OR CKT FAIL 16 FUEL INJECTOR FAILURE 17 VSS OR VSS CIRCUIT FAILURE 18 IGNITION TIMING CONTROL UNIT 20 ELECTRIC LOAD DETECTOR 21 SPOOL SOLENOID VALVE (1.7L) FRONT SPOOL SOLENOID VALVE 22 VALVE TIMING OIL PRESS. SW (1.7L) FRT VALVE TIMING OIL PRESSURE SW. 23 KS (1.7L) OR KS CIRCUIT FAILURE LEFT KS OR KS CIRCUIT FAILURE KS OR KS CIRCUIT FAILURE FRONT KS OR KS CIRCUIT FAILURE 30 A/T FI SIGNAL A 31 A/T FI SIGNAL B 35 TC STB SIGNAL 36 TCFC SIGNAL 41 O2S HEATER OR CIRCUIT FAILURE LEFT O2S HEATER OR CKT FAILURE FRONT O2S HEATER OR CKT FAILURE 42 RIGHT O2S HEATER OR CKT FAILURE REAR O2S HEATER OR CKT FAILURE 43 FUEL SUPPLY SYSTEM LEFT FUEL SUPPLY SYSTEM FRONT FUEL SUPPLY SYSTEM 44 RIGHT FUEL SUPPLY SYSTEM REAR FUEL SUPPLY SYSTEM 45 LEFT FUEL SUPPLY METERING FUEL SUPPLY METERING FRONT FUEL SUPPLY METERING 46 RIGHT FUEL SUPPLY METERING REAR FUEL SUPPLY METERING 47 FAULTY FUEL PUMP OR CKT FAILURE 51 REAR SPOOL SOLENOID VALVE 19 ACURA DIAGNOSTIC TROUBLE CODES (DTCS) YEAR: 1992 (CONTINUED) 20 DTC NO. DESCRIPTOR 52 RR VALVE TIMING OIL PRESSURE SW. 53 RIGHT KS OR KS CIRCUIT FAILURE KS OR KS CIRCUIT FAILURE REAR KS OR KS CIRCUIT FAILURE 54 CRANK ANGLE SENSOR 2 CRANK ANGLE SENSOR B 59 CRANK ANGLE SENSOR - (CYL/2) CRANK ANGLE SENSOR - (CYL/B) YEAR: 1993 DTC NO. 1993 0 FAULTY ECU OR ECU CKT FAILURE 1 HEATED O2S OR HO2S CKT FAILURE FRONT HO2S OR CIRCUIT FAILURE 2 REAR HO2S OR CIRCUIT FAILURE 3 MAP SENSOR OR MAP CKT FAILURE 4 CK ANGLE OR CK ANG. CKT FAILURE CRANK ANGLE SENSOR NO.1 CRANK ANGLE SENSOR A 5 MAP SENSOR OR MAP CKT FAILURE 6 ECT SENSOR OR ECT CKT FAILURE 7 TP SENSOR OR TPS CKT FAILURE 8 CRANK ANGLE SENSOR - (TDC) 9 CRANK ANGLE SENSOR - (CYL) CRANK ANGLE SENSOR NO. 1 CRANK ANGLE SENSOR - (CYL/A) 10 IAT SENSOR OR IAT CKT FAILURE 12 EGR SYSTEM (1.8L A/T) EGR SYSTEM OR EGR CKT FAILURE 13 BARO SENSOR OR BARO CKT FAILURE 14 IDLE AIR CONTROL VALVE 15 IGNITION OUTPUT SIG. OR CKT FAIL 16 FUEL INJECTOR FAILURE 17 VSS OR VSS CIRCUIT FAILURE 18 IGNITION TIMING CONTROL UNIT 20 ELECTRIC LOAD DETECTOR DESCRIPTOR ACURA ACURA DIAGNOSTIC TROUBLE CODES (DTCS) YEAR: 1993 (CONTINUED) ACURA DTC NO. DESCRIPTOR 21 SPOOL SOLENOID VALVE (1.7L) FRONT VTEC SOLENOID VALVE 22 VALVE TIMING OIL PRESS. SW (1.7L) FRONT VTEC PRESSURE SWITCH 23 KS (1.7L) OR KS CIRCUIT FAILURE LEFT KS OR KS CIRCUIT FAILURE KNOCK SENSOR NO.1 FRONT KS OR KS CIRCUIT FAILURE 30 A/T FI SIGNAL A 31 A/T FI SIGNAL B 35 TC STB SIGNAL 36 TCFC SIGNAL 41 HO2S HEATER OR CIRCUIT FAILURE LEFT HO2S HEATER OR CKT FAILURE FRNT HO2S HEATER OR CKT FAILURE 42 RT HO2S HEATER OR CKT FAILURE REAR HO2S HEATER OR CKT FAILURE 43 FUEL SUPPLY SYSTEM LEFT FUEL SUPPLY SYSTEM FRONT FUEL SUPPLY SYSTEM 44 RIGHT FUEL SUPPLY SYSTEM REAR FUEL SUPPLY SYSTEM 45 LEFT FUEL SUPPLY METERING FUEL SUPPLY METERING FRONT FUEL SUPPLY METERING 46 RIGHT FUEL SUPPLY METERING REAR FUEL SUPPLY METERING 47 FAULTY FUEL PUMP OR CKT FAILURE 51 REAR VTEC SOLENOID VALVE 52 REAR VTEC PRESSURE SWITCH 53 RIGHT KS OR KS CIRCUIT FAILURE KNOCK SENSOR NO.2 REAR KS OR KS CIRCUIT FAILURE 54 CRANK ANGLE SENSOR 2 CRANK ANGLE SENSOR B 59 CRANK ANGLE SENSOR - (CYL/2) CRANK ANGLE SENSOR - (CYL/B) 21 ACURA DIAGNOSTIC TROUBLE CODES (DTCS) 22 YEAR: 1994 DTC NO. 1994 0 FAULTY ECM OR ECM CIRCUIT FAILURE 1 HEATED O2 SENSOR OR CIRCUIT FAILURE (INTEGRA, VIGOR) 1 LEFT HO2 SENSOR OR CIRCUIT FAILURE (LEGEND) 1 FRONT HO2 SENSOR OR CIRCUIT FAILURE (NSX) 2 RIGHT HO2 SENSOR OR CIRCUIT FAILURE (LEGEND) 2 REAR HO2 SENSOR OR CIRCUIT FAILURE (NSX) 3 MAP SENSOR OR MAP CIRCUIT FAILURE 4 CRANK ANGLE OR CIRCUIT FAILURE (INTEGRA, VIGOR) 4 CRANK ANGLE SENSOR NO. 1 (LEGEND) 4 CRANK ANGLE SENSOR A (NSX) 5 MAP SENSOR OR MAP CIRCUIT FAILURE 6 ECT SENSOR OR ECT CIRCUIT FAILURE 7 TP SENSOR OR CIRCUIT FAILURE 8 CRANK ANGLE SENSOR-TDC 9 CRANK ANGLE SENSOR NO. 1 (INTEGRA, VIGOR) 9 CRANK ANGLE SENSOR-CYL. 1 (LEGEND) 9 CRANK ANGLE SENSOR-CYL. A (NSX) 10 IAT SENSOR OR CIRCUIT FAILURE 12 EGR SYSTEM OR CIRCUIT FAILURE (LEGEND, NSX) 12 EGR SYSTEM OR CIRCUIT FAILURE (VIGOR) 13 BARO SENSOR OR CIRCUIT FAILURE 14 IDLE AIR CONTROL VALVE 15 IGNITION OUTPUT SIGNAL OR CIRCIT FAILURE 16 FUEL INJECTOR FAILURE 17 VSS OR CIRCUIT FAILURE 18 IGNITION TIMING CONTROL UNIT 20 ELECTRIC LOAD DETECTOR 21 VTEC SOLENOID VALVE (INTEGRA) 21 FRONT VTEC SOLENOID VALVE (NSX) 22 VTEC PRESSURE SWITCH (INTEGRA) 22 FRONT VTEC PRESSURE SWITCH (NSX) DESCRIPTOR ACURA ACURA DIAGNOSTIC TROUBLE CODES (DTCS) YEAR: 1994 (CONTINUED) ACURA DTC NO. DESCRIPTOR 23 KNOCK SENSOR OR CIRCUIT FAILURE, B18C1 ENGINE (INTEGRA) 23 LEFT KNOCK SENSOR OR CIRCUIT FAILURE (LEGEND) 30 A/T FI SIGNAL A 31 A/T FI SIGNAL B 35 TC STB SIGNAL (LEGEND GS MODEL) 35 TC STB SIGNAL TCFC SIGNAL (NSX) 36 TCFC SIGNAL (LEGEND GS MODEL) 36 TCFC SIGNAL (NSX) 41 HO2 SENSOR HEATER OR CIRCUIT FAILURE (INTEGRA, VIGOR) 41 LEFT HO2 SENSOR HEATER OR CIRCUIT FAILURE (LEGEND) 41 FRONT HO2 SENSOR HEATER OR CIRCUIT FAILURE (NSX) 42 FIGHT HO2 SENSOR HEATER OR CIRCUIT FAILURE (LEGEND) 42 REAR HO2 SENSOR HEATER OR CIRCUIT FAILURE (NSX) 43 FUEL SUPPLY SYSTEM (INTEGRA, VIGOR) 43 LEFT FUEL SUPPLY SYSTEM (LEGEND) 43 FRONT FUEL SUPPLY SYSTEM (NSX) 44 RIGHT FUEL SUPPLY SYSTEM (LEGEND) 44 REAR FUEL SUPPLY SYSTEM (NSX) 45 LEFT FUEL SUPPLY METERING (LEGEND) 45 FRONT FUEL SUPPLY METERING (NSX) 45 FUEL SUPPLY METERING (VIGOR) 46 RIGHT FUEL SUPPLY METERING (LEGEND) 46 REAR FUEL SUPPLY METERING (NSX) 47 FAULTY FUEL PUMP OR CIRCUIT FAILURE 51 REAR VTEC SOLENOID VALVE 52 REAR VTEC PRESSURE SWITCH 53 RIGHT KNOCK SENSOR OR CIRCUIT FAILURE (LEGEND) 53 REAR KNOCK SENSOR OR CIRCUIT FAILURE (NSX, VIGOR) 54 CRANK ANGLE SENSOR 2 (LEGEND) 54 CRANK ANGLE SENSOR B (NSX) 59 CRANK ANGLE SENSOR-CYL. 2 (LEGEND) 59 CRANK ANGLE SENSOR-CYL. B (NSX) 23 ACURA DIAGNOSTIC TROUBLE CODES (DTCS) 24 ACURA CHRYSLER IMPORTS 1. VEHICLES AND SYSTEMS ..................................................................................................................... 3 2. CHRYSLER IMPORTS SPECIFIC INFORMATION ..........................................................................11 3. TEST MODES AVAILABLE .................................................................................................................... 12 4. GETTING STARTED ................................................................................................................................. 13 5. SELECTING THE VEHICLE .................................................................................................................. 14 6. TEST MODES.............................................................................................................................................. 16 Mode F1: DTC Entry ........................................................................................................................ 16 Submode F0: How To Read .................................................................................................... 17 Submode F1: Enter DTC(s) ..................................................................................................... 17 Submode F2: DTC List ............................................................................................................ 21 Submode F3: Review DTC ..................................................................................................... 22 Submode F4: Clear DTC(s) ..................................................................................................... 22 Mode F2: DTC ................................................................................................................................... 22 Submode F1: Read DTC(s) ..................................................................................................... 22 Submode F2: DTC List ............................................................................................................ 23 Submode F3: Review DTC ..................................................................................................... 23 Submode F4: Clear DTC(s) ..................................................................................................... 23 7. CHRYSLER IMPORTS DIAGNOSTIC TROUBLE CODES (DTCs) ............................................ 24 OBD, OBD I Systems ....................................................................................................................... 24 1984.............................................................................................................................................. 24 1985.............................................................................................................................................. 24 1986.............................................................................................................................................. 25 1987.............................................................................................................................................. 25 1988.............................................................................................................................................. 25 1989.............................................................................................................................................. 26 1990.............................................................................................................................................. 27 1991.............................................................................................................................................. 27 1992.............................................................................................................................................. 28 1993 .............................................................................................................................................. 29 1994 .............................................................................................................................................. 30 1995 .............................................................................................................................................. 31 OBD II Systems ................................................................................................................................. 33 1996-98 OBD II ......................................................................................................................... 33 2 CHRYSLER IMPORTS VEHICLES AND SYSTEMS 1. VEHICLES AND SYSTEMS Using the Asian cartridge, the following Chrysler Imports vehicles can be diagnosed. MODEL: 1984 ENGINE ENGINE TYPE FUEL TYPE ADAPTER TYPE CODE TYPE 1984 COLT 1.6L I4 SOHC TUR MODEL: 1985 ENGINE G32B ENGINE TYPE ECI EFI FUEL TYPE NONE ADAPTER TYPE MANCODES CODE TYPE 1985 COLT 1.6L I4 SOHC TUR G32B ECI EFI NONE MANCODES CONQUEST 2.6L I4 SOHC TUR G54B ECI EFI NONE MANCODES MODEL: 1986 ENGINE ENGINE TYPE FUEL TYPE ADAPTER TYPE CODE TYPE 1986 COLT 1.6L I4 SOHC TUR G32B ECI EFI NONE MANCODES CONQUEST 2.6L I4 SOHC TUR G54B ECI EFI NONE MANCODES CONQUEST 2.6L I4 TUR INT G54B ECI EFI NONE MANCODES MODEL: 1987 ENGINE ENGINE TYPE FUEL TYPE ADAPTER TYPE CODE TYPE 1987 COLT 1.6L I4 SOHC TUR G32B ECI EFI NONE MANCODES COLT VISTA 2.0L I4 SOHC G63B MPI CHECK AUTOCODES CONQUEST 2.6L I4 SOHC TUR G54B ECI EFI CHECK AUTOCODES CONQUEST 2.6L I4 TUR INT G54B ECI EFI CHECK AUTOCODES CHRYSLER IMPORTS 3 VEHICLES AND SYSTEMS MODEL: 1988 ENGINE ENGINE TYPE FUEL TYPE ADAPTER TYPE CODE TYPE 1988 COLT 1.5L 4G15 MPI CHECK AUTOCODES COLT 1.6L TURBO G32B MPI CHECK AUTOCODES COLT 1.6L TURBO G32B ECI NONE AUTOCODES COLT VISTA 2.0L I4 SOHC G63B MPI CHECK AUTOCODES CONQUEST 2.6L I4 TUR INT G54B ECI EFI CHECK AUTOCODES MODEL: 1989 ENGINE ENGINE TYPE FUEL TYPE ADAPTER TYPE CODE TYPE 1989 COLT 1.5L I4 SOHC 4G15 MPI CHECK AUTOCODES COLT 1.6L I4 DOHC 4G61 MPI CHECK AUTOCODES COLT 1.6L I4 DOHC TUR 4G61 MPI CHECK AUTOCODES COLT 2000 1.5L I4 SOHC 4G15 MPI CHECK AUTOCODES COLT 2000 1.6L I4 DOHC 4G61 MPI CHECK AUTOCODES COLT 2000 1.6L I4 DOHC TUR 4G61 MPI CHECK AUTOCODES COLT VISTA 2.0L I4 SOHC G63B MPI CHECK AUTOCODES COLT WAGON 1.5L I4 SOHC 4G15 MPI CHECK AUTOCODES COLT WAGON 1.8L I4 SOHC 4G37 MPI CHECK AUTOCODES CONQUEST 2.6L I4 SOHC TUR G54B ECI EFI CHECK AUTOCODES RAM RAIDER 3.0L V6 DOHC 6G72 MPI CHECK AUTOCODES SUMMIT 1.5L I4 SOHC 4G15 MPI CHECK AUTOCODES SUMMIT 1.6L I4 DOHC 4G61 MPI CHECK AUTOCODES VISTA WAGON 2.0L I4 SOHC G63B MPI CHECK AUTOCODES MODEL: 1990 ENGINE ENGINE TYPE FUEL TYPE ADAPTER TYPE CODE TYPE 1990 COLT 1.5L I4 SOHC 4G15 MPI CHECK AUTOCODES COLT 1.6L I4 DOHC 4G61 MPI CHECK AUTOCODES 4 CHRYSLER IMPORTS VEHICLES AND SYSTEMS MODEL: 1990 (CONTINUED) ENGINE ENGINE TYPE FUEL TYPE ADAPTER TYPE CODE TYPE COLT 200 1.5L I4 SOHC 4G15 MPI CHECK AUTOCODES COLT 200 1.6L I4 DOHC 4G61 MPI CHECK AUTOCODES COLT VISTA 2.0L I4 SOHC G63B MPI CHECK AUTOCODES COLT WAGON 1.5L I4 SOHC G15 MPI CHECK AUTOCODES COLT WAGON 1.8L I4 SOHC 4G37 MPI CHECK AUTOCODES LASER 1.8L I4 SOHC 4G37 MPI CHECK AUTOCODES LASER 2.0L I4 DOHC 4G63 MPI CHECK AUTOCODES LASER 2.0L I4 DOHC TUR 4G63 MPI CHECK AUTOCODES POWER RAM 50 2.4L I4 4G64 MPI CHECK AUTOCODES POWER RAM 50 3.0L V6 6G72 MPI CHECK AUTOCODES RAM 50 2.4L I4 4G64 MPI CHECK AUTOCODES RAM 50 3.0L V6 6G72 MPI CHECK AUTOCODES SUMMIT 1.5L I4 SOHC 4G15 MPI CHECK AUTOCODES SUMMIT 1.6L I4 DOHC 4G61 MPI CHECK AUTOCODES TALON 1.8L I4 SOHC 4G37 MPI CHECK AUTOCODES TALON 2.0L I4 DOHC 4G63 MPI CHECK AUTOCODES TALON 2.0L I4 DOHC TUR G63 MPI CHECK AUTOCODES VISTA WAGON 2.0L I4 SOHC G63B MPI CHECK AUTOCODES MODEL: 1991 ENGINE ENGINE TYPE FUEL TYPE ADAPTER TYPE CODE TYPE 1991 COLT 1.5L I4 SOHC 4G61 MPI CHECK AUTOCODES COLT 200 1.5L I4 SOHC 4G61 MPI CHECK AUTOCODES COLT VISTA 2.0L I4 SOHC G63B MPI CHECK AUTOCODES LASER 1.8L I4 SOHC 4G37 MPI CHECK AUTOCODES LASER 2.0L I4 DOHC 4G63 MPI CHECK AUTOCODES LASER 2.0L I4 DOHC TUR 4G63 MPI CHECK AUTOCODES POWER RAM 50 2.4L I4 4G64 MPI CHECK AUTOCODES POWER RAM 50 3.0L V6 6G72 MPI CHECK AUTOCODES RAM 50 2.4L I4 4G64 MPI CHECK AUTOCODES STEALTH 3.0L V6 DOHC 6G72 MPI CHECK AUTOCODES CHRYSLER IMPORTS 5 VEHICLES AND SYSTEMS MODEL: 1991 (CONTINUED) ENGINE ENGINE TYPE FUEL TYPE ADAPTER TYPE CODE TYPE STEALTH 3.0L V6 DOHC TUR 6G72 MPI CHECK AUTOCODES STEALTH 3.0L V6 SOHC 6G72 MPI CHECK AUTOCODES SUMMIT 1.5L I4 SOHC 4G61 MPI CHECK AUTOCODES TALON 1.8L I4 SOHC 4G37 MPI CHECK AUTOCODES TALON 2.0L I4 DOHC 4G63 MPI CHECK AUTOCODES TALON 2.0L I4 DOHC TUR 4G63 MPI CHECK AUTOCODES MODEL: 1992 ENGINE ENGINE TYPE FUEL TYPE ADAPTER TYPE CODE TYPE 1992 COLT 1.5L I4 SOHC 4G15 MPI CHECK AUTOCODES COLT 200 1.5L I4 SOHC 4G15 MPI CHECK AUTOCODES COLT VISTA 1.8L I4 SOHC 4G93 MPI CHECK AUTOCODES COLT VISTA 2.4L I4 SOHC 4G64 MPI CHECK AUTOCODES LASER 1.8L I4 SOHC 4G37 MPI CHECK AUTOCODES LASER 2.0L I4 DOHC 4G63 MPI CHECK AUTOCODES LASER 2.0L I4 DOHC TUR 4G63 MPI CHECK AUTOCODES POWER RAM 50 2.4L I4 4G64 MPI CHECK AUTOCODES POWER RAM 50 3.0L V6 6G72 MPI CHECK AUTOCODES RAM 50 2.4L I4 4G64 MPI CHECK AUTOCODES STEALTH 3.0L V6 DOHC 6G72 MPI CHECK AUTOCODES STEALTH 3.0L V6 DOHC TUR 6G72 MPI CHECK AUTOCODES STEALTH 3.0L V6 SOHC 6G72 MPI CHECK AUTOCODES SUMMIT 1.5L I4 SOHC 4G15 MPI CHECK AUTOCODES SUMMIT WAGON 1.8L I4 SOHC 4G93 MPI CHECK AUTOCODES SUMMIT WAGON 2.4L I4 SOHC 4G64 MPI CHECK AUTOCODES TALON 1.8L I4 SOHC 4G37 MPI CHECK AUTOCODES TALON 2.0L I4 DOHC 4G63 MPI CHECK AUTOCODES TALON 2.0L I4 DOHC TUR 4G63 MPI CHECK AUTOCODES 6 CHRYSLER IMPORTS VEHICLES AND SYSTEMS MODEL: 1993 ENGINE ENGINE TYPE FUEL TYPE ADAPTER TYPE CODE TYPE 1993 COLT 1.5L I4 SOHC 4G15 MFI CHECK AUTOCODES COLT 1.8L I4 SOHC 4G93 MFI CHECK AUTOCODES COLT VISTA 1.8L I4 SOHC 4G93 MFI CHECK AUTOCODES COLT VISTA 2.4L I4 SOHC 4G64 MFI CHECK AUTOCODES LASER 1.8L I4 SOHC 4G37 MFI CHECK AUTOCODES LASER 2.0L I4 DOHC 4G63 MFI CHECK AUTOCODES LASER 2.0L I4 DOHC TUR 4G63 MFI CHECK AUTOCODES POWER RAM 50 2.4L I4 SOHC 4G64 MFI CHECK AUTOCODES POWER RAM 50 3.0L V6 DOHC 6G72 MFI CHECK AUTOCODES RAM 50 2.4L I4 SOHC 4G64 MFI CHECK AUTOCODES STEALTH 3.0L V6 DOHC 6G72 MFI CHECK AUTOCODES STEALTH 3.0L V6 DOHC TUR 6G72 MFI CHECK AUTOCODES STEALTH 3.0L V6 SOHC 6G72 MFI CHECK AUTOCODES SUMMIT 1.5L I4 SOHC 4G15 MFI CHECK AUTOCODES SUMMIT 1.8L I4 SOHC 4G93 MFI CHECK AUTOCODES SUMMIT WAGON 1.8L I4 SOHC 4G93 MFI CHECK AUTOCODES SUMMIT WAGON 2.4L I4 SOHC 4G64 MFI CHECK AUTOCODES TALON 1.8L I4 SOHC 4G37 MFI CHECK AUTOCODES TALON 2.0L I4 DOHC 4G63 MFI CHECK AUTOCODES TALON 2.0L I4 DOHC TUR 4G63 MFI CHECK AUTOCODES MODEL: 1994 ENGINE ENGINE TYPE FUEL TYPE ADAPTER TYPE CODE TYPE 1994 COLT 1.5L I4 SOHC 4G15 MFI NONE MANCODES COLT 1.8L I4 SOHC 4G93 MFI JUMPER MILCODES COLT VISTA 1.8L I4 SOHC 4G93 MFI JUMPER MILCODES COLT VISTA 2.4L I4 SOHC 4G64 MFI JUMPER MILCODES LASER 1.8L I4 SOHC 4G37 MFI CHECK AUTOCODES LASER 2.0L I4 DOHC 4G63 MFI CHECK AUTOCODES CHRYSLER IMPORTS 7 VEHICLES AND SYSTEMS MODEL: 1994 (CONTINUED) ENGINE ENGINE TYPE FUEL TYPE ADAPTER TYPE CODE TYPE LASER 2.0L I4 DOHC TUR 4G63 MFI CHECK AUTOCODES STEALTH 3.0L V6 DOHC 6G72 MFI JUMPER MILCODES STEALTH 3.0L V6 DOHC TUR 6G72 MFI JUMPER MILCODES STEALTH 3.0L V6 SOHC 6G72 MFI JUMPER MILCODES SUMMIT 1.5L I4 SOHC 4G15 MFI NONE MANCODES SUMMIT 1.8L I4 SOHC 4G93 MFI JUMPER MILCODES SUMMIT WAGON 1.8L I4 SOHC 4G93 MFI JUMPER MILCODES SUMMIT WAGON 2.4L I4 SOHC 4G64 MFI JUMPER MILCODES TALON 1.8L I4 SOHC 4G37 MFI CHECK AUTOCODES TALON 2.0L I4 DOHC 4G63 MFI CHECK AUTOCODES TALON 2.0L I4 DOHC TUR 4G63 MFI CHECK AUTOCODES MODEL: 1995 ENGINE ENGINE TYPE FUEL TYPE ADAPTER TYPE CODE TYPE 1995 AVENGER 2.0L I4 DOHC 420A MFI NONE MILCODES AVENGER 2.5L V6 SOHC 6G73 MFI JUMPER MILCODES COLT 1.5L I4 SOHC 4G15 MFI JUMPER MILCODES COLT 1.8L I4 SOHC 4G93 MFI JUMPER MILCODES COLT VISTA 1.8L I4 SOHC 4G93 MFI JUMPER MILCODES COLT VISTA 2.4L I4 SOHC 4G64 MFI JUMPER MILCODES SEBRING 2.0L I4 DOHC 420A MFI JUMPER MILCODES SEBRING 2.5L V6 SOHC 6G73 MFI NONE MILCODES STEALTH 3.0L V6 DOHC 6G72 MFI JUMPER MILCODES STEALTH 3.0L V6 DOHC TUR 6G72 MFI JUMPER MILCODES STEALTH 3.0L V6 SOHC 6G72 MFI JUMPER MILCODES SUMMIT 1.5L I4 SOHC 4G93 MFI JUMPER MILCODES SUMMIT 1.8L I4 SOHC 4G93 MFI JUMPER MILCODES SUMMIT WAGON 1.8L I4 SOHC 4G64 MFI JUMPER MILCODES TALON 1.8L I4 SOHC 4G37 MFI CHECK AUTOCODES TALON 2.0L 14 DOHC 4G63 MFI CHECK AUTOCODES 8 CHRYSLER IMPORTS VEHICLES AND SYSTEMS MODEL: 1995 (CONTINUED) TALON * ENGINE 2.0L I4 DOHC TUR ENGINE TYPE 4G63 FUEL TYPE MFI ADAPTER TYPE OBD II* CODE TYPE AUTOCODES For OBD II Adapter Type use Common Test Modes OBD II Systems section for operating instructions and test mode information. MODEL: 1996 ENGINE ENGINE TYPE FUEL TYPE ADAPTER TYPE CODE TYPE 1996 AVENGER 2.0L I4 DOHC 420A MFI OBD II* AUTOCODES AVENGER 2.5L V6 SOHC 6G73 MFI OBD II* AUTOCODES COLT 1.5L I4 SOHC 4G15 MFI OBD II* AUTOCODES COLT 1.8L I4 SOHC 4G93 MFI OBD II* AUTOCODES COLT WAGON 1.8L I4 SOHC 4G93 MFI OBD II* AUTOCODES COLT WAGON 2.4L I4 SOHC 4G64 MFI OBD II* AUTOCODES SEBRING 2.0L I4 DOHC 420A MFI OBD II* AUTOCODES SEBRING 2.5L V6 SOHC 6G73 MFI OBD II* AUTOCODES STEALTH 3.0L V6 DOHC TUR 6G72 MFI OBD II* AUTOCODES STEALTH 3.0L V6 DOHC 6G72 MFI OBD II* AUTOCODES STEALTH 3.0L V6 SOHC 6G72 MFI OBD II* AUTOCODES SUMMIT 1.5L I4 SOHC 4G93 MFI OBD II* AUTOCODES SUMMIT 1.8L I4 SOHC 4G93 MFI OBD II* AUTOCODES SUMMIT WAGON 1.8L I4 SOHC 4G64 MFI OBD II* AUTOCODES SUMMIT WAGON 2.4L I4 SOHC 4G64 MFI OBD II* AUTOCODES TALON 2.0L I4 SOHC 4G63 MFI OBD II* AUTOCODES TALON 2.0L I4 SOHC TUR 4G63 MFI OBD II* AUTOCODES * For OBD II Adapter Type use Common Test Modes OBD II Systems section for operating instructions and test mode information. MODEL: 1997 ENGINE ENGINE TYPE FUEL TYPE ADAPTER TYPE CODE TYPE 1997 AVENGER 2.0L I4 DOHC 420A MFI OBD II* AUTOCODES AVENGER 2.5L V6 SOHC 4G73 MFI OBD II* AUTOCODES SEBRING 2.0L I4 DOHC 420A MFI OBD II* AUTOCODES CHRYSLER IMPORTS 9 VEHICLES AND SYSTEMS MODEL: 1997 (CONTINUED) ENGINE ENGINE TYPE FUEL TYPE ADAPTER TYPE CODE TYPE SEBRING 2.5L V6 SOHC 4G73 MFI OBD II* AUTOCODES TALON 2.0L I4 DOHC 420A MFI OBD II* AUTOCODES TALON 2.0L I4 DOHC TUR 4G63 MFI OBD II* AUTOCODES * For OBD II Adapter Type use Common Test Modes OBD II Systems section for operating instructions and test mode information. MODEL: 1998 ENGINE ENGINE TYPE FUEL TYPE ADAPTER TYPE CODE TYPE 1998 AVENGER 2.0L I4 DOHC 420A MFI OBD II* AUTOCODES AVENGER 2.5L V6 SOHC 4G73 MFI OBD II* AUTOCODES SEBRING 2.0L I4 DOHC 420A MFI OBD II* AUTOCODES SEBRING 2.5L V6 SOHC 4G73 MFI OBD II* AUTOCODES TALON 2.0L I4 DOHC 420A MFI OBD II* AUTOCODES TALON 2.0L I4 DOHC TUR 4G63 MFI OBD II* AUTOCODES * 10 For OBD II Adapter Type use Common Test Modes OBD II Systems section for operating instructions and test mode information. CHRYSLER IMPORTS CHRYSLER IMPORTS SPECIFIC INFORMATION 2. CHRYSLER IMPORTS SPECIFIC INFORMATION The Chrysler Imports vehicles covered by the Asian Imports Cartridge are separated into two different sections within the Asian Imports Operator's Manual. The vehicle's on-board system will determine which section of the Operator's Manual will need to be used. Vehicles that are OBD II certified have information about the operating test modes in the Common Test Modes OBD II Systems section of the Operator's Manual. Vehicles that have OBD or OBDI systems have test mode information in this section of the Operator's Manual. In these sections, you will find operating instructions, how to connect the tester to the vehicle, and test mode information. A complete list of Chrysler Imports Diagnostic Trouble Codes is included at the back of each section. To determine which section of the Operator's Manual to use for diagnostic information and instructions, look at Adapter Type of the Vehicles and Systems chart. If the vehicle you are testing has an OBD II adapter type, use the Common Test Modes OBD II Systems section of the Operator's Manual. If the vehicle you are testing does not have the OBD II Adapter Type, use this section to diagnose the vehicle under test. CHRYSLER IMPORTS 11 TEST MODES AVAILABLE 3. TEST MODES AVAILABLE The following test modes are available when testing Chrysler Imports vehicles that have OBD or OBD I systems. Operating instructions for test modes other than F1: DTC Entry and F2: DTCs are included in the Common Test Modes OBD, OBD I Systems section. There are specific instructions for operating the test modes. Refer to TEST MODES on page 16. MODE F1: DTC ENTRY SUBMODE F0: HOW TO READ SUBMODE F1: ENTER DTC(s) SUBMODE F2: DTC LIST SUBMODE F3: REVIEW DTC SUBMODE F4: CLEAR DTC(s) MODE F2: DTC SUBMODE F1: READ DTC(s) SUBMODE F2: DTC LIST SUBMODE F3: REVIEW DTC SUBMODE F4: CLEAR DTC(s) MODE F5: SYSTEM TESTS SUBMODE F0: PREP VEHICLE MODE F8: INFORMATION SUBMODE F1: DLC LOCATION* SUBMODE F3: ID INFO SUBMODE F4: DJC LOCATION* * Note that not all models support DJC, or DLC Location Test modes. The tester will automatically choose which test mode to display, depending on your vehicle selection. 12 CHRYSLER IMPORTS GETTING STARTED 4. GETTING STARTED Before operating the Asian Imports Cartridge with a Chrysler Imports vehicle, the following steps must be performed: 1. Make sure the vehicle ignition is OFF. 2. Refer to the chart in Section 1 to see if the vehicle you are testing requires the Check Adapter Cable. If so, connect the Chrysler Imports Check Adapter Cable to the end of the DLC cable, then connect the yellow connector end to the vehicle Check connector. CHRYSLER IMPORTS CHECK ADAPTER CABLE 3. Plug the tester power cable into the vehicle cigarette lighter. The power cable may also be directly connected to the battery via the optional battery clip adapter (P/N 02001636). NOTE Since the cigarette lighter can be switched, some tests require that the power cable be directly connected to the battery via the battery clip adapter. 4. Turn on the tester and select the application software that you will be using. Verify that the correct screen is displayed. The tester should display a screen similar to the one below. ASIAN IMPORTS 83-98 <ENTER> Tester stand-alone display 5. If the display is correct, press E. If the display is not correct, refer to Appendix D. 6. Follow the instructions on the following page to select the vehicle type you are testing by entering required vehicle information into the tester. CHRYSLER IMPORTS 13 SELECTING THE VEHICLE 5. SELECTING THE VEHICLE Once you've pressed E from the power-up screen, the following steps must be performed to select the manufacturer, model year, model and engine type of the vehicle being tested. Remember, if you make a mistake, you can always press X to go back to the previous menu. SELECTING THE MANUFACTURER A menu of manufacturers available for testing is displayed in a scrolling menu. You can scroll down one screen at a time by pressing Y, or up one screen at a time by pressing n. Press U or D to scroll one manufacturer at a time, until the → arrow is opposite CHRY IMPORTS. Then press e to select. SELECTING THE MODEL YEAR Once the manufacturer is selected, the Select Model Year menu is displayed. Press the last two digits of the year model being tested; 9, 0 for 1990 models, 9, 1 for 1991 models, and so on. SELECTING THE MODEL The Model Select menu displays models available for testing. Press the N key until the model being tested is displayed, then press the Y key. SELECTING THE ENGINE AND ENGINE TYPE Next, the Engine Select menu is displayed. Press N until the engine and engine type of the vehicle is displayed, then press Y. For some vehicles, you will also be asked to select the emissions type (CA or FED) and/or the drive type (AWD or FWD). VEHICLE INFORMATION DISPLAY After the vehicle type is selected the tester displays a summary screen of the selected vehicle. Information displayed includes the year, manufacturer, model, engine size, and additional information such as the type of fuel system. SELECT MODE MENU When the above steps are completed, the Select Mode menu displays the test modes available for the selected vehicle and system. Refer to Section 6 (Test Modes), and the Common Test Modes OBD, OBDI Systems sections for instructions on operating the test modes with Chrysler Imports vehicles. 14 CHRYSLER IMPORTS SELECTING THE VEHICLE MANUFACTURER ACURA CHRY IMPORTS DAIHATSU E CHRYSLER IMPORTS 1984 - 2002 SELECT MODEL YEAR: ???? SELECT MODEL: COLT (YES/NO) Y SELECT ENGINE: 1.5L I4 SOHC (YES/NO) Y SELECT TYPE: CA (YES/NO) Y 1991 CHRY IMPORT COLT 1.5L I4 SOHC CA U, or 5 sec. SELECT MODE F1: DTC ENTRY F2: DTC F5: SYSTEM TESTS CHRYSLER IMPORTS VEHICLE SELECTION ACTIVE KEYS 0-9 Enter model year. y,n Used to answer questions in tester display. x Return to previous display. CHRYSLER IMPORTS 15 TEST MODES 6. TEST MODES When the Select Mode menu is displayed, test modes available for Chrysler Imports vehicles may be selected. How to select Modes F1: DTC Entry, F2: DTC, F4: DJC Location, and F1: DLC Location are included in the Common Test Modes OBD, OBD I Systems section. You may select Mode F4: DJC Location or F1: DLC Location from the Information menu without connecting the tester to the vehicle. READING CODES Detailed operating instructions for using Modes F1: DTC Entry and F2: DTC with Chrysler Imports vehicles are included in the following procedure. F1: DTC Entry is automatically displayed, and F2: DTC is automatically displayed with Chrysler Imports vehicles that have “CHECK” as the adapter type listed in Section 1. NOTE Follow the Submode F0: Prepare Vehicle instructions to ensure proper vehicle preparation prior to testing. The vehicle must be completely warmed up in order for the tester to communicate properly with the vehicle. MODE F1: DTC ENTRY When Mode F1: DTC Entry is selected, the tester displays submodes which, after your selection, can provide information on how to read diagnostic trouble codes (DTCs) from the vehicle, how to clear DTCs from the vehicle (or tester memory buffer), obtain a text description of entered or selected DTCs, and review entered or selected DTCs as a result of manually retrieving codes from the ECU. DTC Entry Submodes F0: HOW TO READ F1: ENTER DTC(s) F2: DTC LIST F3: REVIEW DTC F4: CLEAR DTC(s) Manually Reading DTCs To manually read Diagnostic Trouble Codes (DTCs) on Chrysler Import vehicles from 1984-95, there are 2 methods that can be used. The most common method requires an analog voltmeter. Using the analog voltmeter set to a 20 volt scale and connected to the Data Link Connector (DLC), the DTC can be interpreted from the analog voltmeter needle flashes. The second method requires the 16 pin Mitsubishi/ Chrysler Imports jumper (P/N 02002095) which connects 2 pins of the 16 pin DLC. In a similar fashion, the DTCs are instead flashed out on the instrument panel mounted Malfunction Indicator Lamp (MIL). For the automobile manufacturers that mention the use of an analog voltmeter to read manual DTCs, the Mastertech Oscilloscope may be used. Set up the single channel oscilloscope and make connections the same way as the analog voltmeter (above). Choose the 20v/division scale and a slow time/division (e.g., 1-2 sec/division)—the DTCs will be shown as a waveform on the display. 16 CHRYSLER IMPORTS TEST MODES Note that manually retrieving DTCs from select 1995 Chrysler Import vehicles requires you to locate and jumper the 16 pin Diagnostic Connector. The vehicles that require the use of a jumper are noted in the column “Adapter Type” in the Chrysler Import coverage table (found at the beginning of this section). Refer to the section on manually reading DTCs from the 1995 Chrysler Import vehicles in this section. Follow the detailed instructions on the following pages to manually read the DTCs. Once the DTCs have been manually read from the ECU, the tester can define the code. A complete list of Chrysler Imports DTCs is also included in CHRYSLER IMPORTS DIAGNOSTIC TROUBLE CODES (DTCs) on page 24. Submode F0: How To Read This submode provides information on how to manually read DTCs from the vehicle. Step by step screen instructions provide information to correctly set up the vehicle ECU. This is performed by following the tester instruction screens. If you have trouble, additional DTC retrieval information is described below. If you refer to the manual for this information, make sure that you are following the correct steps for the system that you are working on. On Chrysler Imports vehicles, the Enter DTCs submode allows you to enter manually read DTCs. This submode provides you with a text description of the numeric DTC that was entered into the tester. Submode F1: Enter DTC(s) The Enter DTC Submode displays two question marks for DTC Entry. The tester screen prompts you to enter the DTCs read from the analog voltmeter or the Malfunction Indicator Light (MIL). Be careful when reading the DTC from the analog voltmeter or MIL. Incorrect analog voltmeter or MIL interpretation can cause the wrong DTC description to be displayed. Once all DTCs have been manually read and recorded, enter each DTC into the tester as described in the Common Test Modes OBD, OBD I Systems section. Refer to the appropriate procedure for manually reading analog voltmeter or MIL DTCs on the following pages. Chrysler Imports service and repair information indicates that code 0 is supported for OBD systems. Code 0 refers to ECU related failures, and is valid when the engine MIL does not illuminate or will not illuminate for 2 seconds when the ignition is turned on. Refer to the service manual for the current vehicle for further explanation of code 0. Instrument Panel Malfunction Indicator Lamp (MIL) CHRYSLER IMPORTS 17 TEST MODES To manually read DTCs from models that use 12 pin, 12 pin and 16 pin DLC and analog voltmeter, do the following: The DLC type is vehicle dependent; refer to the information displayed on the tester F0: HOW TO READ for the DLC type. 1. Locate the 12 pin or 12 pin and 16 pin Diagnostic Connector. Use F4: DJC Location from the Information menu for diagnostic connector location. 2a. 12 pin DLC only: Connect analog voltmeter red lead to pin 1 terminal and voltmeter black lead to pin 12 (ground) terminal of diagnosis connector. 2b. 12 pin and 16 pin DLC only: Connect analog voltmeter red lead to pin 25 of 12 pin DLC and black lead to pin 5 of 16 pin DLC. Pin 1 Pin 12 VEHICLES WITH 12 PIN DLC Pin 5 Pin 25 VEHICLES WITH 12 PIN AND 16 PIN DLC 3. Turn ignition switch to ON. 4. DTC indication will begin on voltmeter. Voltmeter will fluctuate 0 to 12 volts if DTCs are stored in ECU. If a DTC is stored in ECU, the first number of 12 volt, 1.5 second indications will equal the 10's digit of a 2-digit DTC. After a 2.0 second pause, the second number of 12 volt, 0.5 second indications will equal the 1's digit. DTCs are separated by 0 volt indication for 3.0 seconds. DTC SEPARATION DTC 12 12v Next DTC Indication 0v seconds 3 sec 1.5 sec 2 sec 3 sec 0.5 sec 5. If no malfunctions are present, meter will read 12 volts once per second. 6. After recording DTCs turn ignition switch off. 7. Disconnect voltmeter leads. 8. Erase DTCs when all repairs are completed. 18 CHRYSLER IMPORTS TEST MODES To manually read DTCs from 1987-88 Chrysler Imports Colt Vista with Digital Decimal output, do the following: The DLC type is vehicle dependent; refer to the information displayed on the tester F0: HOW TO READ for the DLC type. 1. Locate the 12 pin Diagnostic Connector. Use F4: DJC Location from the Information menu for diagnostic connector location. 2. Connect an analog voltmeter red lead to pin 1 diagnosis terminal and the voltmeter black lead to pin 12 (12 pin) or terminal of diagnosis connector. Pin 1 Pin 12 3. Turn the ignition switch to ON. Each single DTC output cycle takes 16 seconds. The first 12 volt deflection corresponds to a 3 second start indication, second 12 volt deflection corresponds to a decimal value of 1, third 12 volt deflection corresponds to a decimal value of 2, fourth 12 volt deflection corresponds to a decimal value of 4, fifth 12 volt deflection corresponds to a decimal value of 8, sixth 12 volt deflection corresponds to a decimal value of 16, followed by a 0 volt stop indication for 3 seconds. DTCs are decoded by interpreting the ON time of meter 12 volt deflections 2-6. If the meter displays 12 volts for 1.5 seconds, then that digital value is 1. If the meter displays 12 volts for 0.5 seconds, then that digital value is 0. To get the value of the DTC add the decimal value of digital 1's obtained in the meter deflection order. DTCs are separated by 12 volt, 3 second reading after the stop indication. SINGLE DTC CYCLE=16 SECONDS METER DEFLECTION ORDER 1st 2nd 3rd 4th 5th 6th 12v 0v seconds 3 1.5 .5 1.5 .5 .5 1.5 1.5 .5 1.5 .5 3 3 Next Indication of DTC 0 0 1 0 0 DIGITAL VALUE 1 2 4 8 16 DECIMAL VALUE = DTC 4 (1 Digital value corresponds with a 4 decimal value) 4. The normal DTC condition is indicated by meter indications 2-6, which are 12 volt, 1.5 second deflections separated by 0 volts for 0.5 seconds. 5. After recording DTCs turn ignition switch off. 6. Disconnect voltmeter leads. 7. Erase DTCs when all repairs are completed. CHRYSLER IMPORTS 19 TEST MODES To manually read DTCs from models that use 2 pin and 3 pin DLC and analog voltmeter, do the following: The DLC type is vehicle dependent; refer to the information displayed on the tester F0: HOW TO READ for the DLC type. 1. Locate the 2 pin or 3 pin Diagnostic Connector. Use F4: DJC Location from the Information menu for diagnostic connector location. 2a. For 2 pin diagnostic connector, connect analog voltmeter red lead to pin 1 diagnosis terminal and voltmeter black lead to pin 2 (ground) terminal of diagnosis connector. Pin 2 Pin 1 2b. For 3 pin diagnostic connector, connect analog voltmeter red lead to pin 2 diagnosis terminal and voltmeter black lead to pin 3 (ground) terminal of diagnosis connector. Pin 2 Pin 3 Pin 2 Pin 3 3. Turn ignition switch to ON. 4. DTC indication will begin on voltmeter. Voltmeter will fluctuate 0 to 12 volts if DTCs are stored in ECU. If a DTC is stored in ECU, the first number of 12 volt, 0.4 second indications will equal the 1's digit of a 1-digit DTC. DTC 12 volt pulses will be output every 0.4 seconds. DTCs are separated by 0 volts for 2 seconds. DTC 3 12v DTC SEPARATION DTC 4 Next DTC Indication 0v seconds 0.4 2 sec 0.4 2 sec 5. If no DTCs are in ECU, voltmeter will read constant 12 volts. 6. After recording DTCs turn ignition switch off. 7. Disconnect voltmeter leads. 8. Erase DTCs when all repairs are completed. 20 CHRYSLER IMPORTS TEST MODES To manually read DTCs from 1994-95 Chrysler Import Vehicles using the Instrument Panel Malfunction Indicator Lamp, do the following: The DLC type is vehicle dependent; refer to the information displayed on the tester F0: HOW TO READ for the DLC type. 1. Locate the 16 pin Diagnostic Connector. Use F4: DJC Location from the Information menu for diagnostic connector location. 2. Jumper the 16 pin diagnostic connector pins 1 and 5 with the single wire Mitsubishi/Chrysler Imports jumper (P/N 02002106). Use F4: DJC Location from the Information menu for diagnostic connector location. Pin 1 Pin 5 3. Turn ignition switch ON. 4. Observe the Malfunction Indicator Lamp (MIL) to read DTCs. MIL will turn ON/OFF if DTCs are stored in ECU. If a DTC is stored in ECU, the first number of MIL flashes indicates the 10's digit of a 2-digit DTC. After a 2.0 second pause, the second number of MIL flashes indicates the 1's digit. Each DTC is separated by MIL OFF for 3.0 seconds. DTC SEPARATION DTC 12 12v Next DTC Indication 0v seconds 3 sec 1.5 sec 2 sec 3 sec 0.5 sec 5. If no malfunctions are present, MIL will read ON once per second. 6. After recording DTCs turn ignition switch off. 7. Disconnect jumper leads. 8. Erase DTCs when all repairs are completed. Submode F2: DTC List This submode provides you with a way to view all possible ECU DTCs, including DTC numbers and descriptions. You can also select the DTCs obtained from the analog voltmeter or MIL as an alternative way of entering DTCs into the tester's memory. As you scroll through the available DTCs you can view a description of the DTC obtained from the analog voltmeter or MIL. You can “select” the DTC on the tester screen for later review or printing. Refer to the Common Test Modes OBD, OBD I Systems section for further information. CHRYSLER IMPORTS 21 TEST MODES Submode F3: Review DTC This submode provides you with a review of the DTCs that you entered or selected in the tester. The description of the entered or selected DTC will be displayed, along with a numerical summary of the entered or selected DTC. Review DTC is intended to provide you with an electronic clipboard that keeps track of the DTCs that you have encountered during diagnosis. Submode F4: Clear DTC(s) This submode has two options for you to chose. Option F0 is to view text screens that provide information on how to clear the DTCs from ECU memory. This is performed by tester keypad presses. Option F1 clears the tester memory from DTCs that you entered or selected in the tester. The clear DTC(s) mode is helpful and provides information that you would normally have to locate in a service manual. MODE F2: DTC To read DTCs on all 1988-93 and select 1987, 1994 and 1995 Chrysler Imports vehicles you will need to locate the vehicle DLC and connect the Chrysler Imports Check Adapter to the tester and vehicle. To locate the DLC, select F1: DLC Location from the Information menu. If necessary, refer to the Common Test Modes OBD, OBD I Systems section for further instructions. When Mode F2: DTC is selected, the tester displays four submodes: DTC Submodes F1: READ DTC(s) F2: DTC LIST F3: REVIEW DTC F4: CLEAR DTC(s) NOTE Follow the Submode F0: Prepare Vehicle instructions to ensure proper vehicle preparation prior to testing. The vehicle must be completely warmed up in order for the tester to communicate properly with the vehicle. When reading DTCs from Chrysler Imports vehicles make sure the engine is at normal operating temperature and testing is performed in a wellventilated area. Submode F1: Read DTC(s) This submode provides automated DTC retrieval from the vehicle ECU. Step by step screen instructions guide you to connect the YELLOW Chrysler Imports Check adapter to the vehicle DLC and start and warm the engine to normal operating temperature. This is performed by following the tester instruction screens. If you have trouble, additional F1: READ DTC(s) retrieval information is described below. This submode is available for all 1988-93 and select 1987, 1994 and 1995 Chrysler Imports vehicles. If you are unsure of the Read DTC test application, check the Code Type column in the Chrysler Imports Vehicle Coverage table (found at the beginning of this section). If the ECU Modes column indicates “Autocodes”, then the vehicle supports F1: READ DTC(s). 22 CHRYSLER IMPORTS TEST MODES To read DTCs from all 1988-93 and select 1987, 1994 and 1995 Chrysler Imports ECUs using the F1: Read DTCs mode in Asian Imports cartridge, do the following: 1. Insert Asian cartridge into MASTERTECH or TECH 1/TECH1A. 2. Connect Chrysler Imports Check adapter (Yellow) to DLC. 3. Connect the Check adapter to the vehicle DLC. Press F1: DLC location from the Information menu for Data Link Connector location assistance. 4. Power MASTERTECH or TECH 1/TECH 1A with 12v power cable. 5. Select Chrysler Imports vehicle to test. 6. Press F2: DTCs from Chrysler Imports test mode menu. 7. Press F1: READ DTCs submode from DTC test menu. Follow instructions on the tester display. 8. Tester will automatically command the vehicle ECU into the correct mode required to read DTCs, and will display all received DTCs on the tester display. Submode F2: DTC List This submode provides you with a way to view all possible ECU DTCs, including DTC numbers and descriptions. You can also select the DTCs obtained from the analog voltmeter or MIL as an alternative way of entering DTCs into the tester's memory. As you scroll through the available DTCs you can view a description of the DTC obtained from the analog voltmeter or MIL. You can “select” the DTC on the tester screen for later review or printing. Refer to the Common Test Modes OBD, OBD I Systems section for further information. Submode F3: Review DTC This submode provides you with a review of the DTCs that you entered or selected in the tester. The description of the entered or selected DTC will be displayed, along with a numerical summary of the entered or selected DTC. Review DTC is intended to provide you with an electronic clipboard that keeps track of the DTCs that you have encountered during diagnosis. Submode F4: Clear DTC(s) This submode has two options for you to chose. Option 1 is an automated function which the tester clears DTCs from the vehicle ECU memory. This is performed by tester keypad presses. Option 2 clears the tester memory from DTCs that you entered or selected in the tester. The clear DTC(s) mode is helpful and provides information that you would normally have to locate in a service manual. CHRYSLER IMPORTS 23 CHRYSLER IMPORTS DIAGNOSTIC TROUBLE CODES (DTCS) 7. CHRYSLER IMPORTS DIAGNOSTIC TROUBLE CODES (DTCS) DTCs available for Chrysler Imports vehicles are listed in the following charts. Some code numbers have different descriptors depending on the selected vehicle. Only codes available for the selected vehicle are displayed by the tester. OBD, OBD I SYSTEMS 24 YEAR: 1984 DTC NO. 1984 1 O2 SENSOR OR CKT FAILURE 2 IGNITION SIGNAL OR CKT FAILURE 3 AIR FLOW SENSOR OR CKT FAILURE 4 PRESSURE SNSR OR CKT FAILURE 5 TP SENSOR OR TPS CKT FAILURE 6 ISC MOTOR POS. SENSOR OR CKT 7 ENGINE COOLANT TEMP. SENSOR 8 SPEED SENSOR OR CKT FAILURE DESCRIPTOR YEAR:1985 DTC NO. 1985 1 O2 SENSOR OR CKT FAILURE 2 IGNITION SIGNAL OR CKT FAILURE 3 AIR FLOW SENSOR OR CKT FAILURE 4 PRESSURE SNSR OR CKT FAILURE 5 TP SENSOR OR TPS CKT FAILURE 6 ISC MOTOR POS. SENSOR OR CKT 7 ENGINE COOLANT TEMP. SENSOR 8 SPEED SENSOR OR CKT FAILURE DESCRIPTOR CHRYSLER IMPORTS CHRYSLER IMPORTS DIAGNOSTIC TROUBLE CODES YEAR:1986 DTC NO. 1986 1 O2 SENSOR OR CKT FAILURE 2 IGNITION SIGNAL OR CKT FAILURE 3 AIR FLOW SENSOR OR CKT FAILURE 4 PRESSURE SNSR OR CKT FAILURE 5 TP SENSOR OR TPS CKT FAILURE 6 ISC MOTOR POS. SENSOR OR CKT 7 ENGINE COOLANT TEMP. SENSOR 8 SPEED SENSOR OR CKT FAILURE DESCRIPTOR YEAR: 1987 DTC NO. 1987 1 O2 SENSOR OR CKT FAILURE 2 CRANK ANGLE SENSOR OR CKT FAILURE IGNITION PULSE OR CKT 3 AIR FLOW SENSOR OR CKT FAILURE 4 BARO SENSOR OR CKT FAILURE 5 TP SENSOR OR TPS CKT FAILURE 6 ISC MOTOR POS. SENSOR OR CKT MPS OR CIRCUIT FAILURE 7 ENGINE COOLANT TEMP. SENSOR 8 NO. 1 CYL. TDC SENSOR OR CKT DESCRIPTOR YEAR: 1988 DTC NO. 1988 1 O2 SENSOR OR CKT FAILURE 2 CRANK ANGLE SENSOR OR CKT IGNITION PULSE OR CKT FAILURE 3 AIR FLOW SENSOR OR CKT FAILURE 4 BARO SENSOR OR CKT FAILURE 5 TP SENSOR OR TPS CKT FAILURE 6 ISC MOTOR POS. SENSOR OR CKT MPS OR CIRCUIT FAILURE CHRYSLER IMPORTS DESCRIPTOR 25 CHRYSLER IMPORTS DIAGNOSTIC TROUBLE CODES (DTCS) YEAR: 1988 (CONTINUED) 26 DTC NO. DESCRIPTOR 7 ENGINE COOLANT TEMP. SENSOR 8 NO. 1 CYL. TDC SENSOR OR CKT YEAR: 1989 DTC NO. 1989 0 ECU OR CIRCUIT FAILURE 1 O2 SENSOR OR CKT FAILURE 2 IGNITION PULSE OR CKT FAILURE 3 AIR FLOW SENSOR OR CKT FAILURE 5 TP SENSOR OR TPS CKT FAILURE 6 ISC MOTOR POS. SENSOR OR CKT 7 ENGINE COOLANT TEMP. SENSOR 11 O2 SENSOR OR CKT FAILURE 12 AIR FLOW SENSOR OR CKT FAILURE 13 IAT SENSOR OR CKT FAILURE 14 TP SENSOR OR TPS CKT FAILURE 15 MPS OR CIRCUIT FAILURE 21 ENGINE COOLANT TEMP. SENSOR 22 CRANK ANGLE SENSOR OR CKT 23 TDC SENSOR OR CIRCUIT FAILURE NO. 1 CYL. TDC SENSOR OR CKT 24 SPEED SENSOR OR CKT FAILURE 25 BARO SENSOR OR CKT FAILURE 31 DETONATION SNSR. OR CKT FAILURE 41 INJECTOR OR CKT FAILURE 42 FUEL PUMP OR CKT FAILURE 43 EGR SYSTEM: VALVE, SOLENOID, VAC. OR TEMP. SENSOR 44 IGNITION COIL OR CKT FAILURE DESCRIPTOR CHRYSLER IMPORTS CHRYSLER IMPORTS DIAGNOSTIC TROUBLE CODES YEAR: 1990 DTC NO. 1990 0 ECU OR CIRCUIT FAILURE 11 O2 SENSOR OR CKT FAILURE 12 AIR FLOW SENSOR OR CKT FAILURE 13 IAT SENSOR OR CKT FAILURE 14 TP SENSOR OR TPS CKT FAILURE 15 MPS OR CIRCUIT FAILURE 21 ENGINE COOLANT TEMP. SENSOR 22 CRANK ANGLE SENSOR OR CKT 23 TDC SENSOR OR CIRCUIT FAILURE NO. 1 CYL. TDC SENSOR OR CKT NO. 1 & 4 CYL. TDC SENSOR OR CKT 24 SPEED SENSOR OR CKT FAILURE 25 BARO SENSOR OR CKT FAILURE 31 DETONATION SNSR. OR CKT FAILURE 41 INJECTOR OR CKT FAILURE 42 FUEL PUMP OR CKT FAILURE 43 EGR SYSTEM: VALVE, SOLENOID, VAC. OR TEMP. SENSOR 44 IGNITION COIL OR CKT FAILURE DESCRIPTOR YEAR: 1991 DTC NO. 1991 0 ECU OR CIRCUIT FAILURE 11 O2 SENSOR OR CKT FAILURE REAR O2 SENSOR OR CKT FAILURE 12 AIR FLOW SENSOR OR CKT FAILURE 13 IAT SENSOR OR CKT FAILURE 14 TP SENSOR OR TPS CKT FAILURE 15 MOTOR POSITION SENSOR OR CKT 21 ENGINE COOLANT TEMP. SENSOR 22 CRANK ANGLE SENSOR OR CKT 23 TDC SENSOR OR CIRCUIT FAILURE NO. 1 CYL TDC SENSOR OR CKT NO. 1 & 4 CYL. TDC SENSOR OR CKT CHRYSLER IMPORTS DESCRIPTOR 27 CHRYSLER IMPORTS DIAGNOSTIC TROUBLE CODES (DTCS) YEAR: 1991 (CONTINUED) 28 DTC NO. DESCRIPTOR 24 SPEED SENSOR OR CKT FAILURE 25 BARO SENSOR OR CKT FAILURE 31 DETONATION SNSR. OR CKT FAILURE 36 IGNITION TIMING ADJUSTMENT 39 FRONT O2 SENSOR OR CKT FAILURE 41 INJECTOR OR CKT FAILURE 42 FUEL PUMP OR CKT FAILURE 43 EGR SYSTEM: VALVE, SOLENOID, VAC. OR TEMP. SENSOR 44 IGNITION COIL OR CKT FAILURE IGN SIGNAL OR CKT (NO. 1 & 4 CYL) 52 IGN SIGNAL OR CKT (NO. 2 & 5 CYL) 53 IGN SIGNAL OR CKT (NO. 3 & 6 CYL) 61 TORQUE REDUCED SIGNAL (A/T) 62 INDUCTION CNTRL. VALVE POS. SNSR YEAR: 1992 DTC NO. 1992 0 ECU OR CIRCUIT FAILURE 11 O2 SENSOR OR CKT FAILURE REAR O2 SENSOR OR CKT FAILURE 12 AIR FLOW SENSOR OR CKT FAILURE 13 IAT SENSOR OR CKT FAILURE 14 TP SENSOR OR TPS CKT FAILURE 15 MOTOR POSITION SENSOR OR CKT 21 ENGINE COOLANT TEMP. SENSOR 22 CRANK ANGLE SENSOR OR CKT 23 NO. 1 & 4 CYL. TDC SENSOR OR CKT TDC SENSOR OR CIRCUIT FAILURE NO. 1 CYL TDC SENSOR OR CKT 24 SPEED SENSOR OR CKT FAILURE 25 BARO SENSOR OR CKT FAILURE 31 DETONATION SNSR. OR CKT FAILURE 36 IGNITION TIMING ADJUSTMENT DESCRIPTOR CHRYSLER IMPORTS CHRYSLER IMPORTS DIAGNOSTIC TROUBLE CODES YEAR: 1992 (CONTINUED) DTC NO. DESCRIPTOR 39 FRONT O2 SENSOR OR CKT. 41 INJECTOR OR CKT FAILURE 42 FUEL PUMP OR CKT FAILURE 43 EGR SYSTEM: VALVE, SOLENOID, VAC. OR TEMP. SENSOR 44 IGNITION COIL OR CKT FAILURE IGN SIGNAL OR CKT (NO. 1 & 4 CYL) 52 IGN SIGNAL OR CKT (NO. 2 & 5 CYL) 53 IGN SIGNAL OR CKT (NO. 3 & 6 CYL) 55 SERVO VALVE POS. SENSOR OR CKT 61 TORQUE REDUCED SIGNAL (A/T) 62 INDUCTION CNTRL. VALVE POS. SNSR YEAR: 1993 DTC NO. 1993 0 ECU OR CIRCUIT FAILURE 11 O2 SENSOR OR CKT FAILURE FRONT HEATED O2 SENSOR OR CKT HEATED O2 SENSOR OR CKT FAILURE REAR HEATED O2 SENSOR OR CKT 12 AIR FLOW SENSOR OR CKT FAILURE 13 IAT SENSOR OR CKT FAILURE 14 TP SENSOR OR TPS CKT FAILURE 15 ISC MOTOR POS. SWITCH OR CKT 21 ENGINE COOLANT TEMP. SENSOR 22 CRANK ANGLE SENSOR OR CKT 23 CAMSHAFT ANGLE SENSOR OR CKT 24 SPEED SENSOR OR CKT FAILURE 25 BARO SENSOR OR CKT FAILURE 31 KS OR KS CIRCUIT FAILURE 32 MAP SENSOR OR CKT FAILURE 36 IGNITION TIMING ADJUSTMENT 39 FRONT HEATED O2 SENSOR OR CKT 41 INJECTOR OR CKT FAILURE CHRYSLER IMPORTS DESCRIPTOR 29 CHRYSLER IMPORTS DIAGNOSTIC TROUBLE CODES (DTCS) YEAR: 1993 (CONTINUED) 30 DTC NO. DESCRIPTOR 42 FUEL PUMP OR CKT FAILURE 43 EGR SYSTEM: VALVE, SOLENOID, VAC. OR TEMP. SENSOR 44 IGNITION COIL OR CKT FAILURE IGN SIGNAL OR CKT (NO. 1 & 4 CYL) 52 IGN SIGNAL OR CKT (NO. 2 & 5 CYL) 53 IGN SIGNAL OR CKT (NO. 3 & 6 CYL) 55 IAC VALVE POS. SENSOR OR CKT 59 REAR HEATED O2 SENSOR OR CKT 61 TORQUE REDUCED SIGNAL (A/T) 62 INDUCTION CONT. VALVE POS. SNSR YEAR: 1994 DTC NO. 1994 0 ECU OR CIRCUIT FAILURE 11 FRONT HEATED O2 SENSOR OR CKT O2 SENSOR OR CKT FAILURE HEATED O2 SENSOR OR CKT FAILURE 12 AIR FLOW SENSOR OR CKT FAILURE 13 IAT SENSOR OR CKT FAILURE 14 TP SENSOR OR TPS CKT FAILURE 15 ISC MOTOR POS. SNSR OR CKT 21 ENGINE COOLANT TEMP. SENSOR 22 CRANK ANGLE SENSOR OR CKT 23 CAMSHAFT ANGLE SENSOR OR CKT 24 SPEED SENSOR OR CKT FAILURE 25 BARO SENSOR OR CKT FAILURE 31 KS OR KS CIRCUIT FAILURE 32 MAP SENSOR OR CKT FAILURE 36 IGNITION TIMING ADJUSTMENT 39 HEATED O2 SENSOR OR CKT FAILURE FRONT HEATED O2 SENSOR OR CKT 41 INJECTOR OR CKT FAILURE 42 FUEL PUMP OR CKT FAILURE DESCRIPTOR CHRYSLER IMPORTS CHRYSLER IMPORTS DIAGNOSTIC TROUBLE CODES YEAR: 1994 (CONTINUED) DTC NO. DESCRIPTOR 43 EGR SYSTEM: VALVE, SOLENOID, VAC. OR TEMP. SENSOR 44 IGNITION COIL OR CKT FAILURE IGN SIGNAL OR CKT (NO. 1 & 4 CYL) 52 IGN SIGNAL OR CKT (NO. 2 & 5 CYL) 53 IGN SIGNAL OR CKT (NO. 3 & 6 CYL) 55 IAC VALVE POS. SENSOR OR CKT 59 REAR HEATED O2 SENSOR OR CKT 61 TORQUE REDUCED SIGNAL OR CKT 62 INDUCTION CONT. VALVE POS. SNSR 69 REAR HEATED O2 SENSOR OR CKT YEAR: 1995 DTC NO. 1995 11 (FRONT) HO2 SENSOR CIRCUIT MALFUNCTION (I4) LEFT BANK HO2 SENSOR CIRCUIT MALFUNCTION (V6) CAM/CRANKSHAFT POSITION SENSOR SIGNAL MALFUNCTION (AVENGER/SEBRING) 12 VOLUME AIR FLOW CIRCUIT MALFUNCTION 13 IAT SENSOR CIRCUIT MALFUNCTION MAP SENSOR CIRCUIT, NO PRESSURE CHANGE (2.0L AVENGER/SEBRING) 14 TPS CIRCUIT MALFUNCTION MAP SENSOR CIRCUIT MALFUNCTION (AVENGER/SEBRING) 15 NO VSS SIGNAL TO PCM 16 KNOCK SENSOR NO. 1 CIRCUIT MALFUNCTION (2.0L AVENGER/SEBRING) 17 ENGINE TEMP. TOO LOW, NO CLOSED LOOP FUEL CONTROL 21 ECT SENSOR CIRCUIT MALFUNCTION (HEATED) O2 SENSOR SYSTEM MALFUNCTION (AVENGER/SEBRING) 22 CRANKSHAFT POSITION SENSOR CIRCUIT MALFUNCTION ECT SENSOR CIRCUIT MALFUNCTION (AVENGER/SEBRING) 23 CAMSHAFT POSITION SENSOR CIRCUIT MALFUNCTION IAT SENSOR CIRCUIT MALFUNCTION CHRYSLER IMPORTS DESCRIPTOR 31 CHRYSLER IMPORTS DIAGNOSTIC TROUBLE CODES (DTCS) YEAR: 1995 (CONTINUED) 32 DTC NO. DESCRIPTOR 24 VSS/REED SWITCH CIRCUIT MALFUNCTION TPS CIRCUIT MALFUNCTION (AVENGER/SEBRING) 25 BARO PRESSURE SENSOR CIRCUIT MALFUNCTION IAC CONTROL MOTOR CIRCUIT MALFUNCTION (AVENGER/SEBRING) 27 FUEL INJECTOR CONTROL CIRCUIT MALFUNCTION 31 EVAP PURGE SOLENOID CIRCUIT MALFUNCTION EVAP SYSTEM MALFUNCTION (2.0L AVENGER/SEBRING) KNOCK SENSOR CIRCUIT MALFUNCTION (STEALTH DOHC) 32 EGR SYSTEM MALFUNCTION (AVENGER/SEBRING) MAP SENSOR CIRCUIT MALFUNCTION (1.5L COLT/SUMMIT) 33 A/C CLUTCH RELAY CIRCUIT MALFUNCTION 35 FAN CONTROL RELAY CIRCUIT MALFUNCTION 36 IGNITION TIMING ADJUSTMENT SIGNAL CIRCUIT MALFUNCTION SECONDARY PULSED AIR SYSTEM MALFUNCTION (2.0L AVENGER/SEBRING) 37 PARK/NEUTRAL POSITION SWITCH A/T (2.0L AVENGER/SEBRING) 39 HO2 SENSOR CIRCUIT MALFUNCTION (RIGHT BANK, V6) 41 GENERATOR FIELD CIRCUIT MALFUNCTION (AVENGER/SEBRING) 42 ASD/FUEL PUMP RELAY CIRCUIT MALFUNCTION 43 EGR SYSTEM: VALVE, SOLENOID, VAC. OR TEMP. SENSOR IGNITION MISFIRE DETECTED (2.0L AVENGER/SEBRING) 44 IGNITION COIL/TRANSISTOR CYLINDERS 1/4 (STEALTH DOHC) BATTERY TEMP. SENSOR VOLTAGE OUT OF LIMITS 46 CHARGING SYSTEM VOLTAGE TOO HIGH 47 CHARGING SYSTEM VOLTAGE TOO LOW 51 FUEL SYSTEM LEAN 52 IGNITION COIL/TRANSISTOR CYLINDERS 2/5 FUEL SYSTEM RICH 53 IGNITION COIL/TRANSISTOR CYLINDERS 3/6 INTERNAL PCM FAILURE (2.0L AVENGER/SEBRING) CHRYSLER IMPORTS CHRYSLER IMPORTS DIAGNOSTIC TROUBLE CODES YEAR: 1995 (CONTINUED) DTC NO. DESCRIPTOR 54 NO CAMSHAFT SIGNAL AT PCM 55 IAC VALVE POSITION SENSOR CIRCUIT MALFUNCTION 59 REAR HO2 SENSOR CIRCUIT MALFUNCTION (LEFT BANK, V6) 61 TORQUE REDUCTION SIGNAL CIRCUIT MALFUNCTION 62 PCM FAILURE, SRI MILE NOT STORED INDUCTION CONTROL VALVE SYSTEM MALFUNCTION (STEALTH, DOHC NON-TURBO) 64 CATALYTIC CONV. EFFICIENCY FAILURE M/T (2.0L AVENGER/SEBRING) 65 PCM FAILURE, EEPROM WRITE DENIED POWER STEERING PRESS. SWITCH FAILURE M/T (2.0L AVENGER/SEBRING) 66 NO CCD MESSAGE FROM TCM (A/T) 69 HO2 SENSOR CIRCUIT MALFUNCTION (RIGHT BANK, V6) 71 LOW 5 VOLT SUPPLY TO TPS AND MAP OBD II SYSTEMS YEAR: 1996-98 DTC NO. 1996-98 OBD II P0100 Volume Air Flow Circuit Malfunction P0105 MAP Sensor Circuit Malfunction P0106 BARO Pressure Circuit Out of Range P0107 MAP Sensor Voltage Too High P0108 MAP Sensor Voltage Too Low P0110 IAT Sensor Circuit Malfunction P0112 IAT Sensor Voltage Too Low P0113 IAT Sensor Voltage Too High P0115 ECT Circuit Malfunction P0117 ECT Sensor Voltage Too Low P0118 ECT Sensor Voltage Too High P0120 TPS Circuit Malfunction CHRYSLER IMPORTS DESCRIPTOR 33 CHRYSLER IMPORTS DIAGNOSTIC TROUBLE CODES (DTCS) YEAR: 1996-98 (CONTINUED) 34 DTC NO. DESCRIPTOR P0121 TPS Voltage does not Agree with MAF P0122 TPS Voltage Too Low P0123 TPS Voltage Too High P0125 Excessive Time to Reach Closed Loop (Avenger/Sebring/non-turbo Talon) P0125 Coolant Temp. Too Low, No Closed Loop Operation P0130 HO2 Sensor, Bank 1 Sensor 1, Circuit Malfunction P0131 Upstream HO2 Sensor, Short to Ground P0132 Upstream HO2 Sensor, Short to Battery Voltage P0133 Upstream HO2 Sensor, Response Rate P0134 Upstream HO2 Sensor, not Switching P0135 Upstream HO2 Sensor, Heater Circuit Malfunction P0136 HO2 Sensor, Bank 1 Sensor 2, Circuit Malfunction P0137 Downstream HO2 Sensor, Short to Ground P0138 Downstream HO2 Sensor, Short to Battery Voltage P0139 Downstream HO2 Sensor, not Switching P0140 Downstream HO2 Sensor, not Switching P0141 Downstream HO2 Sensor, Heater Circuit Malfunction P0151 Upstream HO2 Sensor, Front Bank, Short to Ground P0152 Upstream HO2 Sensor, Front Bank, Short to Battery Voltage P0153 Upstream HO2 Sensor, Front Bank, Slow Response P0154 Upstream HO2 Sensor, Front Bank, no Switching P0155 HO2 Sensor, Bank 2 Sensor 1, Heater Circuit Malfunction P0156 O2 Sensor, Bank 2 sensor 2, Circuit Malfunction P0157 Downstream HO2 Sensor, Front Bank, Short to Ground P0158 Downstream HO2 Sensor, Front Bank, Short to Battery Voltage P0160 Downstream HO2 Sensor, Front Bank, not Switching P0161 HO2 Sensor, Bank 2 Sensor 2, Heater Circuit Malfunction P0170 Fuel Trim, Bank 1, System Malfunction P0171 Fuel System, Lean Condition P0172 Fuel System, Rich Condition P0173 Fuel Trim, Bank 2, System Malfunction P0174 Fuel System, Front Bank, Lean Condition CHRYSLER IMPORTS CHRYSLER IMPORTS DIAGNOSTIC TROUBLE CODES YEAR: 1996-98 (CONTINUED) CHRYSLER IMPORTS DTC NO. DESCRIPTOR P0175 Fuel System, Front Bank, Rich Condition P0201 Fuel Injector No. 1, Circuit Malfunction P0202 Fuel Injector No. 2, Circuit Malfunction P0203 Fuel Injector No. 3, Circuit Malfunction P0204 Fuel Injector No. 4, Circuit Malfunction P0205 Fuel Injector No. 5, Circuit Malfunction P0206 Fuel Injector No. 6, Circuit Malfunction P0220 Fuel Pump Relay Control Circuit Malfunction P0300 Random Misfire Detected P0301 Cylinder No. 1, Misfire Detected P0302 Cylinder No. 2, Misfire Detected P0303 Cylinder No. 3, Misfire Detected P0304 Cylinder No. 4, Misfire Detected P0305 Cylinder No. 5, Misfire Detected P0306 Cylinder No. 6, Misfire Detected P0325 Knock Sensor 1, Circuit Malfunction P0335 Crankshaft Position Sensor, Circuit Malfunction P0340 Camshaft Position Sensor, Circuit Malfunction P0351 Ignition Coil No. 1, Primary Circuit Malfunction P0352 Ignition Coil No. 2, Primary Circuit Malfunction P0400 EGR Flow System Malfunction P0401 EGR System Malfunction P0403 EGR Solenoid Circuit Malfunction P0420 Catalyst System, Bank 1, Below Efficiency Threshold P0421 Warm Up Catalyst, Bank 1, Below Efficiency Threshold P0422 Catalytic Converter Efficiency Failure P0431 Warm Up Catalyst, Bank 2, Below Efficiency Threshold P0432 Catalytic Converter, Front Bank, Efficiency Failure P0440 EVAP Control System Malfunction P0441 EVAP Purge Flow Monitor System Malfunction P0442 EVAP Control System, Leak Detected P0443 EVAP Purge System Control Valve, Circuit Malfunction 35 CHRYSLER IMPORTS DIAGNOSTIC TROUBLE CODES (DTCS) YEAR: 1996-98 (CONTINUED) 36 DTC NO. DESCRIPTOR P0446 EVAP Vent Control System Malfunction P0450 EVAP Control System Pressure Sensor Malfunction P0455 EVAP Control System, Large Leak Detected P0500 VSS Circuit Malfunction P0505 IAC System Malfunction P0510 Closed TP Switch, Circuit Malfunction P0551 Power Steering Pressure Sensor Circuit, Range/Performance P0600 PCM Malfunction, SPI Communication P0601 PCM Internal Malfunction P0605 Internal PCM Failure P0700 EATX Controller Detects DTC P0705 Transmission Range Sensor (PRNDL Input) Circuit Malfunction P0710 Transmission Temp. Sensor Circuit Malfunction P0715 Speed Error: Input Speed Sensor Circuit P0720 Speed Error: Output Speed Sensor Circuit P0725 A/T Engine Speed does Not match PCM Engine Speed P0731 1st Gear Incorrect Ratio P0732 2nd Gear Incorrect Ratio P0733 3rd Gear Incorrect Ratio P0734 4th Gear Incorrect Ratio P0736 Reverse Gear Incorrect Ratio P0740 TCC Lockup Control Out of Range P0750 LR Solenoid Circuit Error P0755 2-4 Solenoid Circuit Error P0760 OD Solenoid Circuit Error P0765 OD Solenoid Circuit Error P1100 Induction Control Motor Position Sensor Circuit Malfunction P1101 Traction Control Vacuum Solenoid Malfunction P1102 Traction control Ventilation solenoid Malfunction P1103 Turbo Waste Gate Actuator Malfunction P1104 Turbo Waste Gate Solenoid Malfunction P1105 Fuel Pressure Solenoid Circuit Malfunction CHRYSLER IMPORTS CHRYSLER IMPORTS DIAGNOSTIC TROUBLE CODES YEAR: 1996-98 (CONTINUED) CHRYSLER IMPORTS DTC NO. DESCRIPTOR P1294 IAC System, Target Idle not Reached P1295 TPS Circuit, no 5 Volt Supply P1296 MAP Circuit, no 5 Volt Supply P1297 No Change in MAP from Start to Run P1300 Ignition Timing Adjustment Circuit Malfunction P1390 Timing Belt Skipped One or More Teeth P1391 Intermittent Loss of Cam/Crankshaft Position Sensor P1400 MDP Sensor Circuit Malfunction P1443 EVAP Pure System Control Valve 2, Circuit Malfunction P1486 EVAP Leak Monitor Detects Pinched Hose P1487 High Speed Radiator Fan Control Relay, Circuit Malfunction P1489 High Speed Condenser Fan Control Relay, Circuit Malfunction P1490 Low Speed Fan Control Relay Circuit Malfunction P1492 Battery Temp. Sensor, Voltage Too High P1493 Battery Temp. Sensor, Voltage Too Low P1494 EVAP Vent Solenoid System Malfunction P1495 EVAP Vent Solenoid Circuit Malfunction P1496 PCM 5 Volt Supply to MAP and TPS Too Low P1498 High Speed Radiator Fan Ground Control Relay, Circuit Malfunction P1500 Generator FR Terminal Circuit Malfunction P1600 Serial Communication Link Malfunction P1696 PCM Failure, EEPROM Write Denied P1697 PCM Failure, SRI Mile not Stored P1698 No CCD Messages from EATX-ECM (A/T) P1715 PG Assembly Malfunction P1738 Transmission Overheat, High Temp. Operation Activated P1739 TCM Power-up While Vehicle Being Driven P1750 Shift Solenoid Assembly Malfunction P1765 TCM Senses Volts on Pressure Switch When Unexpected P1767 EATX Relay Always ON, Contacts Closed P1768 EATX Relay Always Off, Contacts Open P1770 Inadequate Element Volume: L/R 37 CHRYSLER IMPORTS DIAGNOSTIC TROUBLE CODES (DTCS) YEAR: 1996-98 (CONTINUED) 38 DTC NO. DESCRIPTOR P1771 Inadequate Element Volume: 2-4 P1772 Inadequate Element Volume: OD P1775 Solenoid Switch Valve Latched in LU Position P1776 Solenoid Switch Valve Latched in LR Position P1781 OD Pressure Switch Circuit P1782 2-4 Pressure Switch Circuit P1784 L/R Pressure Switch Circuit P1787 OD Hydraulic Pressure Switch Circuit P1788 2-4 Hydraulic Pressure Switch Circuit P1789 OD/2-4 Hydraulic Pressure Switch Circuit P1790 Error After Shift- Check Speed Code Error P1791 ECT Level Input to TCM, Trans. Slips/No Pressure, Check Fluid Level P1792 Battery Power Disconnected Since Last Power Down P1793 TRD Link Communication Error P1794 Speed Sensor Ground P1795 TCM Internal Control Module Malfunction P1798 Worn Transmission Fluid, Shudder Detected with A/C Clutch P1799 Calculated Transmission Fluid Temp. in Use P1899 Park/Neutral Switch Malfunction (A/T) CHRYSLER IMPORTS DAIHATSU 1. VEHICLES AND SYSTEMS ..................................................................................................................... 2 2. DAIHATSU SPECIFIC INFORMATION ................................................................................................ 3 3. TEST MODES AVAILABLE ...................................................................................................................... 4 4. GETTING STARTED ................................................................................................................................... 5 5. SELECTING THE VEHICLE .................................................................................................................... 6 6. TEST MODES................................................................................................................................................ 8 Mode F1: DTC Entry .......................................................................................................................... 8 Submode F0: How To Read ...................................................................................................... 9 Submode F1: Enter DTC(s) ....................................................................................................... 9 Submode F2: DTC List ............................................................................................................ 10 Submode F3: Review DTC ..................................................................................................... 10 Submode F4: Clear DTC(s) ..................................................................................................... 10 7. DAIHATSU DIAGNOSTIC TROUBLE CODES (DTCs)...................................................................11 1988...............................................................................................................................................11 1989...............................................................................................................................................11 1990.............................................................................................................................................. 12 1991.............................................................................................................................................. 12 1992.............................................................................................................................................. 13 VEHICLES AND SYSTEMS 1. VEHICLES AND SYSTEMS Using the Asian cartridge, the following Daihatsu vehicles can be diagnosed. YEAR 1988 YEAR 1989 YEAR 1990 YEAR 1991 YEAR 1992 2 MODEL CHARADE MODEL ENGINE 1.0L I3 ENGINE ENGINE TYPE G100 ENGINE TYPE FUEL TYPE MPI FUEL TYPE ADAPTER TYPE NONE ADAPTER TYPE CODE TYPE MILCODES CODE TYPE CHARADE 1.0L I3 G100 MPI NONE MILCODES CHARADE 1.3L I4 G102 MPI NONE MILCODES MODEL ENGINE ENGINE TYPE FUEL TYPE ADAPTER TYPE CODE TYPE CHARADE 1.0L I3 G100 MPI NONE MILCODES CHARADE 1.3L I4 G102 MPI NONE MILCODES ROCKY 1.6L I4 F300 MPI NONE MILCODES MODEL ENGINE ENGINE TYPE FUEL TYPE ADAPTER TYPE CODE TYPE CHARADE 1.0L I3 G100 MPI NONE MILCODES CHARADE 1.3L I4 G102 MPI NONE MILCODES ROCKY 1.6L I4 F300 MPI NONE MILCODES MODEL ENGINE ENGINE TYPE FUEL TYPE ADAPTER TYPE CODE TYPE CHARADE 1.0L I3 G100 MPI NONE MILCODES CHARADE 1.3L I4 G102 MPI NONE MILCODES ROCKY 1.6L I4 F300 MPI NONE MILCODES DAIHATSU DAIHATSU SPECIFIC INFORMATION 2. DAIHATSU SPECIFIC INFORMATION The Daihatsu Specific Information section defines the Daihatsu vehicles covered by the Asian Imports Cartridge, the test modes available, and operating instructions for DTC Entry. A complete list of Daihatsu Diagnostic Trouble Codes is also included in Chapter 7. DAIHATSU 3 TEST MODES AVAILABLE 3. TEST MODES AVAILABLE The following test modes are available when testing Daihatsu vehicles. Operating instructions for test modes other than Mode F1: DTC ENTRY are included in the Common Test Modes OBD, OBD I Systems section. MODE F1: DTC ENTRY SUBMODE F0: HOW TO READ SUBMODE F1: ENTER DTC(s) SUBMODE F2: DTC LIST SUBMODE F3: REVIEW DTC SUBMODE F4: CLEAR DTC(s) MODE F5: SYSTEM TESTS SUBMODE F0: PREP VEHICLE MODE F8: INFORMATION SUBMODE F3: ID INFO SUBMODE F4: DJC LOCATION 4 DAIHATSU GETTING STARTED 4. GETTING STARTED Before operating the Asian Imports Cartridge with a Daihatsu vehicle, the following steps must be performed: 1. Make sure the vehicle ignition is OFF. 2. Plug the tester power cable into the vehicle cigarette lighter. The power cable may also be directly connected to the battery via the optional battery adapter cable (P/N 02001636). NOTE Since the cigarette lighter can be switched, some tests require that the power cable be directly connected to the battery via the battery adapter cable. 3. Turn on the tester and select the application software that you will be using. Verify that the correct screen is displayed. The tester should display a screen similar to the one below. ASIAN IMPORTS 83-98 <ENTER> Tester Stand-alone Display 4. If the display is correct, press E. If the display is not correct, refer to Appendix D. 5. Follow the instructions on the following page to select the vehicle type you are testing by entering required vehicle information into the tester. DAIHATSU 5 SELECTING THE VEHICLE 5. SELECTING THE VEHICLE Once you've pressed E from the power-up screen, the following steps must be performed to select the manufacturer, model year, model and engine type of the vehicle being tested. Remember, if you make a mistake, you can always press X to go back to the previous menu. SELECTING THE MANUFACTURER A menu of manufacturers available for testing is displayed in a scrolling menu. You can scroll down one screen at a time by pressing Y, or up one screen at a time by pressing n. Press U or D to scroll one manufacturer at a time, until the → arrow is opposite Daihatsu. Then press e to select. SELECTING THE MODEL YEAR Once the manufacturer is selected, the Select Model Year menu is displayed. Press the last two digits of the year model being tested; 9, 0 for 1990 models, 9, 1 for 1991 models, and so on. SELECTING THE MODEL The Model Select menu displays models available for testing. Press the N key until the model being tested is displayed, then press the Y key. SELECTING THE ENGINE Next, the Engine Select menu is displayed. Press N until the engine type of the vehicle is displayed, then press Y. VEHICLE INFORMATION DISPLAY After the vehicle type is selected the tester displays a summary screen of the selected vehicle. Information displayed includes the year, manufacturer, model, engine size and type, and additional information such as the type of fuel system. SELECT MODE MENU When the above steps are completed, the Select Mode menu displays the test modes available for the selected vehicle and system. Refer to TEST MODES on page 8, and the Common Test Modes OBD, OBD I Systems sections for instructions on operating the test modes with Daihatsu vehicles. 6 DAIHATSU SELECTING THE VEHICLE MANUFACTURER ACURA CHRYSLER IMP. → DAIHATSU E DAIHATSU 1988 - 1992 SELECT MODEL YEAR: 19?? 9, 2 SELECT MODEL: CHARADE (YES/NO) Y SELECT ENGINE: 1.0L I3 (YES/NO) Y 1992 DAIHATSU CHARADE 1.0L I3 MPI U, or 5 sec. SELECT MODE F1: DTC ENTRY F2: SYSTEM TESTS F8: INFORMATION Daihatsu Vehicle Selection ACTIVE KEYS 0-9 Enter model year. YN Used to answer questions in tester display. E Confirm Power-up display. X Return to previous display. Ud Scrolls through instruction displays. DAIHATSU 7 TEST MODES 6. TEST MODES When the Select Mode menu is displayed, test modes available for Daihatsu vehicles may be selected. You may select Mode F1: DTC Entry, Mode F5: System Tests, or Mode F8: Information without connecting the tester to the vehicle. Operating instructions for Mode F1: DTC Entry are included in Submode F1: Enter DTC(s) on page 9. Operating instructions for the other test modes are included in the Common Test Modes OBD, OBD I Systems section. Detailed operating instructions for using Mode F1: DTC Entry with Daihatsu vehicles are included in the following procedure. READING CODES When Mode F1: DTC Entry is selected, the tester displays submodes which, after your selection, provide information on how to read diagnostic trouble codes (DTCs) from the vehicle, how to clear DTCs from the vehicle (or tester memory), obtain a text description of entered or selected DTCs, and review entered or selected DTCs as a result of manually retrieving codes from the ECU. To read DTC codes on Daihatsu vehicles you must connect the 6-pin Daihatsu jumper (P/N 02002073) to the Diagnostic Jumper Connector (DJC) and observe the flashing MIL. If you do not know where the DJC is located, select Mode F4: DJC Location from the Information menu. If necessary, refer to the Common Test Modes OBD, OBD I Systems section for further instructions. Follow the detailed instructions on the following pages to manually read the DTCs. Once the DTCs have been manually read from the ECU, you can input the DTC into the tester so the tester can define the code. A complete list of Daihatsu DTCs is also included in DAIHATSU DIAGNOSTIC TROUBLE CODES (DTCs) on page 11. MODE F1: DTC ENTRY When Mode F1: DTC ENTRY is selected, the tester displays five submodes: F0: HOW TO READ F1: ENTER DTC(s) F2: DTC LIST F3: REVIEW DTC F4: CLEAR DTC(s) Manually Reading DTCs To manually read Diagnostic Trouble Codes (DTCs) on Daihatsu vehicles from 1988-92, locate and jumper the Diagnostic Connector, then read the Malfunction Indicator Lamp (MIL). This method requires the 6-pin Daihatsu jumper (P/N 02002073) which connects 2 pins of the 6 pin DJC. The DTCs are flashed out on the dashboard mounted MIL. Refer to the section on manually reading DTCs from the 1988-92 Daihatsu vehicles in this section. 8 DAIHATSU TEST MODES Malfunction Indicator Lamp Submode F0: How To Read This submode provides information on how to manually read DTCs from the vehicle. Step by step screen instructions provide information to correctly set up the vehicle ECU. This is performed by following the tester instruction screens. If you have trouble, additional DTC retrieval information is described below. If you refer to the factory service manual for this information, make sure that you are following the correct steps for the system you are working on. Submode F1: Enter DTC(s) This submode provides you with a description of how to obtain DTC information from the ECU and how to enter this information into the tester. On Daihatsu vehicles, there is one method to enter manually read DTC's which is the Enter DTC submode. The Enter DTC submode has two question marks on the tester display for entering the DTC. The tester screen prompts you to enter the DTC(s) read off the Malfunction Indicator Light (MIL). Be careful when reading the DTC from the MIL. Incorrect MIL interpretation can cause the wrong DTC description to be displayed. Once all DTCs have been manually read and recorded, enter each DTC into the tester as described in the Common Test Modes OBD, OBD I Systems section. Diagnostic Jumper Connector Battery Hold Down Example: 1991 Rocky DAIHATSU 9 TEST MODES To read Daihatsu MIL DTCs manually, do the following: 1. Before testing, check the following initial conditions: Battery voltage of 11 volts or more, throttle valve fully closed, all accessory switches turned OFF. 2. Locate the 6 pin Diagnostic Jumper Connector (DJC). 3. Jump TEST (T) and GROUND terminals by connecting the 6 pin Daihatsu Jumper (P/N 02002073) to the vehicle's 6 pin diagnosis jumper connector. 4. Turn ignition switch to ON but do not start the engine. 5. Dashboard MIL will begin flashing DTCs. If DTCs are stored in the ECU, the MIL will begin indicating the DTCs 4.5 seconds after the ignition is switched ON. MIL flash is 0.5 seconds ON, and each flash is separated by 0.5 seconds. Each DTC is separated by a 2.5 second interval. DTC series is separated by a 4.5 second interval. If no DTCs are stored in ECU, the normal condition (DTC 1) will be flashed on the MIL. 6. The normal DTC condition is one MIL flash in 5 seconds. 7. Disconnect 6 pin Daihatsu Jumper when finished. 8. Erase DTCs when all repairs are completed. Submode F2: DTC List This submode provides you with a way to view all possible ECU DTCs, including DTC numbers and descriptions You can also select the DTCs obtained from the MIL as an alternative way of entering DTCs into the tester's memory. As you scroll through the available DTCs you can view a description of the DTC obtained from the MIL. You can "Select" the DTC on the tester screen for later review or printing. Refer to the Common Test Modes OBD, OBD I Systems section for further information. Submode F3: Review DTC This submode provides a way of reviewing DTCs that you selected or entered in the tester. The description of the entered or selected DTC will be displayed, along with a numerical summary of the entered or selected DTC. Review DTC is intended to provide you with an electronic clipboard that keeps track of the DTCs that you have encountered during diagnosis. Submode F4: Clear DTC(s) This submode has two options for you to choose. Option F0 is to view text screens that provide information on how to clear the DTCs from ECU memory. This is performed by tester keypad presses. Option F1 clears the tester memory of DTCs that you entered or selected in the tester. The clear DTC(s) mode is helpful and provides information that you would normally have to locate in a service manual. 10 DAIHATSU DAIHATSU DIAGNOSTIC TROUBLE CODES (DTCS) 7. DAIHATSU DIAGNOSTIC TROUBLE CODES (DTCS) DTCs available for Daihatsu vehicles are listed in the following charts. Some code numbers have different descriptors depending on the selected vehicle. Only codes available for the selected vehicle are displayed by the tester. YEAR: 1988 DTC NO. DESCRIPTOR 1988 1 NO DTCs-NORMAL OPERATION 2 PRESSURE SENSOR OR CKT FAILURE 3 IGNITION SIGNAL OR CKT FAILURE 4 ECT SENSOR OR CIRCUIT FAILURE 5 O2 SENSOR OR CIRCUIT FAILURE 6 CRANK ANGLE SENSOR OR CKT 7 TP SENSOR OR CIRCUIT FAILURE 8 IAT SENSOR OR CIRCUIT FAILURE 9 SPEED SENSOR OR CIRCUIT FAILURE 10 STARTER SIGNAL OR CKT FAILURE 11 SWITCH SIGNAL OR CKT FAILURE 12 EGR CIRCUIT FAILURE YEAR: 1989 DTC NO. 1989 1 NO DTCs-NORMAL OPERATION 2 PRESSURE SENSOR OR CKT FAILURE 3 IGNITION SIGNAL OR CKT FAILURE 4 ECT SENSOR OR CIRCUIT FAILURE 5 O2 SENSOR AND/OR FUEL SYSTEM CKT O2 SENSOR OR CIRCUIT FAILURE 6 CRANK ANGLE SENSOR OR CKT 7 TP SENSOR OR CIRCUIT FAILURE 8 IAT SENSOR OR CKT FAILURE 9 SPEED SENSOR OR CKT FAILURE 10 STARTER SIGNAL OR CKT FAILURE 11 SWITCH SIGNAL OR CKT FAILURE DAIHATSU DESCRIPTOR 11 DAIHATSU DIAGNOSTIC TROUBLE CODES (DTCS) YEAR: 1989 12 DTC NO. DESCRIPTOR 12 EGR CIRCUIT FAILURE 15 AIR/FUEL RATIO RICH FAILURE 16 AIR/FUEL RATIO LEAN FAILURE YEAR: 1990 DTC NO. DESCRIPTOR 1990 1 NO DTCs-NORMAL OPERATION 2 PRESSURE SENSOR OR CKT FAILURE 3 IGNITION SIGNAL OR CKT FAILURE 4 ECT SENSOR OR CIRCUIT FAILURE 5 O2 SENSOR AND/OR FUEL SYSTEM CKT O2 SENSOR OR CIRCUIT FAILURE 6 CRANK ANGLE SENSOR OR CKT 7 TP SENSOR OR TPS CKT FAILURE 8 IAT SENSOR OR CKT FAILURE 9 SPEED SENSOR OR CKT FAILURE 10 STARTER SIGNAL OR CKT FAILURE 11 SWITCH SIGNAL OR CKT FAILURE 12 EGR CIRCUIT FAILURE 15 AIR/FUEL RATIO RICH FAILURE 16 AIR/FUEL RATIO LEAN FAILURE YEAR: 1991 DTC NO. DESCRIPTOR 1991 1 NO DTCs-NORMAL OPERATION 2 PRESSURE SENSOR OR CKT FAILURE 3 IGNITION SIGNAL OR CKT FAILURE 4 ECT SENSOR OR CIRCUIT FAILURE 5 O2 SENSOR AND/OR FUEL SYSTEM CKT O2 SENSOR OR CIRCUIT FAILURE 6 CRANK ANGLE SENSOR OR CKT 7 TP SENSOR OR CIRCUIT FAILURE 8 IAT SENSOR OR CKT FAILURE 9 SPEED SENSOR OR CKT FAILURE DAIHATSU DAIHATSU DIAGNOSTIC TROUBLE CODES (DTCS) YEAR: 1991 DTC NO. DESCRIPTOR 10 STARTER SIGNAL OR CKT FAILURE 11 SWITCH SIGNAL OR CKT FAILURE 12 EGR CIRCUIT FAILURE 15 AIR/FUEL RATIO RICH FAILURE 16 AIR/FUEL RATIO LEAN FAILURE YEAR: 1992 DTC NO. 1992 1 NO DTCs-NORMAL OPERATION 2 PRESSURE SENSOR OR CKT FAILURE 3 IGNITION SIGNAL OR CKT FAILURE 4 ECT SENSOR OR CIRCUIT FAILURE 5 O2 SENSOR AND/OR FUEL SYSTEM CKT O2 SENSOR OR CIRCUIT FAILURE 6 CRANK ANGLE SENSOR OR CKT 7 TP SENSOR OR CIRCUIT FAILURE 8 IAT SENSOR OR CKT FAILURE 9 SPEED SENSOR OR CKT FAILURE 10 STARTER SIGNAL OR CKT FAILURE 11 SWITCH SIGNAL OR CKT FAILURE 12 EGR CIRCUIT FAILURE 15 AIR/FUEL RATIO RICH FAILURE 16 AIR/FUEL RATIO LEAN FAILURE DAIHATSU DESCRIPTOR 13 DAIHATSU DIAGNOSTIC TROUBLE CODES (DTCS) 14 DAIHATSU HONDA 1. VEHICLES AND SYSTEMS ..................................................................................................................... 2 2. HONDA SPECIFIC INFORMATION....................................................................................................... 6 3. TEST MODES AVAILABLE ...................................................................................................................... 7 4. GETTING STARTED ................................................................................................................................... 8 5. SELECTING THE VEHICLE .................................................................................................................... 9 6. TEST MODES...............................................................................................................................................11 Mode F1: DTC Entry .........................................................................................................................11 Submode F0: How to Read...................................................................................................... 12 Submode F1: Enter DTCs ........................................................................................................ 12 Submode F2: DTC List ............................................................................................................ 14 Submode F3: Review DTC ..................................................................................................... 14 Submode F4: Clear DTC(s) ..................................................................................................... 14 7. HONDA DIAGNOSTIC TROUBLE CODES (DTCs) ........................................................................ 15 VEHICLES AND SYSTEMS 1. VEHICLES AND SYSTEMS Using the Asian Imports Cartridge, the following Honda vehicles can be diagnosed. MODEL ENGINE ENGINE TYPE FUEL SYSTEM CODE TYPE JUMPER TYPE 1985 ACCORD SEI 1.8L I4 ES3 MPFI ECU LED NONE CIVIC CRX SI 1.5L I4 EW3 MPFI ECU LED NONE FUEL SYSTEM CODE TYPE MODEL ENGINE ENGINE TYPE JUMPER TYPE 1986 ACCORD 2.0L I4 BS 2V CARB ECU LED NONE ACCORD LXI 2.0L I4 BT MPFI ECU LED NONE CIVIC CRX SI 1.5L I4 EW3 MPFI ECU LED NONE CIVIC SI 1.3L I4 EV1 3V CARB ECU LED NONE PRELUDE 2.0L I4 BT MPFI ECU LED NONE FUEL SYSTEM CODE TYPE MODEL ENGINE ENGINE TYPE JUMPER TYPE 1987 ACCORD 2.0L I4 A20A3 MPFI ECU LED NONE CIVIC 1.5L I4 D15A3 MPFI ECU LED NONE CIVIC CRX SI 1.5L I4 D15A3 MPFI ECU LED NONE PRELUDE 2.0L I4 A20A3 MPFI ECU LED NONE FUEL SYSTEM CODE TYPE MODEL ENGINE ENGINE TYPE JUMPER TYPE 1988 2 ACCORD 2.0L I4 A20A3 MPFI ECU LED NONE CIVIC 1.5L I4 D15B2 TBI ECU LED NONE HONDA VEHICLES AND SYSTEMS MODEL ENGINE ENGINE TYPE FUEL SYSTEM CODE TYPE JUMPER TYPE CIVIC CRX 1.5L I4 D15B6, D15B2 MPFI TBI ECU LED ECU LED NONE NONE CIVIC CRX SI 1.6L I4 D16A6 MPFI ECU LED NONE PRELUDE 2.0L I4 B20A3 2-1V CARB ECU LED NONE PRELUDE 2.0L I4 B20A5 MPFI e CU LED NONE FUEL SYSTEM CODE TYPE MODEL ENGINE ENGINE TYPE JUMPER TYPE 1989 ACCORD 2.0L I4 A20A3 MPFI ECU LED NONE CIVIC 1.5L I4 D15B1 TBI ECU LED NONE CIVIC, CIVIC WAGON 1.6L I4 D16A6 MPFI ECU LED NONE CIVIC, CIVIC WAGON, CRX 1.5L I4 D15B2 TBI ECU LED NONE CRX HF 1.5L I4 D15B6 MPFI ECU LED NONE CRX SI 1.6L I4 D16A6 MPFI ECU LED NONE PRELUDE 2.0L I4 B20A3 2-1V CARB ECU LED NONE PRELUDE 2.0L I4 B20A5 MPFI MIL/LED SCC FUEL SYSTEM CODE TYPE MODEL ENGINE ENGINE TYPE JUMPER TYPE 1990 ACCORD 2.2L I4 F22A1, F22A4 MPFI MPFI MIL/LED MIL/LED SCC SCC CIVIC 1.5L I4 D15B1 TBI ECU LED NONE CIVIC 1.6L I4 D16A6 MPFI ECU LED NONE CRX 1.5L I4 D15B2, D15B6 MPFI MPFI ECU LED ECU LED NONE NONE CRX SI 1.6L I4 D16A6 MPFI ECU LED NONE PRELUDE 2.0L I4 B20A3 2-2V CARB ECU LED NONE PRELUDE SI 2.0L I4 B20A5 MPFI MIL/LED SCC PRELUDE SI 2.1L I4 B21A1 MPFI MIL/LED SCC HONDA 3 VEHICLES AND SYSTEMS MODEL ENGINE ENGINE TYPE FUEL SYSTEM CODE TYPE JUMPER TYPE 1991 ACCORD 2.2L I4 F22A1, F22A4 MPFI MPFI MIL/LED ECU LED SCC SCC CIVIC 1.5L I4 D15B1 MPFI ECU LED NONE CIVIC 1.6L I4 D16A6 MPFI ECU LED NONE CRX 1.5L I4 D15B2 D15B6 MPFI MPFI ECU LED ECU LED NONE NONE CRX SI 1.6L I4 D16A6 MPFI ECU LED NONE PRELUDE 2.0L I4 B20A3 2-1V CARB ECU LED NONE PRELUDE SI 2.0L I4 B20A5 MPFI MIL/LED SCC PRELUDE SI 2.1L I4 B21A1 MPFI MIL/LED SCC FUEL SYSTEM CODE TYPE MODEL ENGINE ENGINE TYPE JUMPER TYPE 1992 ACCORD 2.2L I4 F22A1, F22 A6 MPFI MPFI MIL/LED MIL/LED SCC SCC CIVIC 1.5L I4 D15B7, D15B8 MPFI MPFI MIL/LED MIL/LED SCC SCC CIVIC 1.5L I4 VTEC- E D15Z1 MPFI MIL/LED SCC 1.6L I4 VTEC D16Z6 MPFI MIL/LED SCC 2.2, 2.3L I4 F22A1 H23A1 MPFI MPFI MIL/LED MIL/LED SCC SCC FUEL SYSTEM CODE TYPE CIVIC PRELUDE MODEL ENGINE ENGINE TYPE JUMPER TYPE 1993 4 ACCORD 2.2L I4 F22A1, F22A6 MPFI MPFI MIL/LED MIL/LED SCC SCC CIVIC 1.5L I4 D15B7, D15B8 MPFI MPFI MIL/LED MIL/LED SCC SCC HONDA VEHICLES AND SYSTEMS MODEL CIVIC ENGINE ENGINE TYPE FUEL SYSTEM CODE TYPE JUMPER TYPE 1.5L I4 VTEC- E D15Z1 MPFI MIL/LED SCC 1.6L I4 VTEC D16Z6 MPFI MIL/LED SCC 1.5, 1.6L I4 VTEC D15B7 SMPFI MIL/LED SCC D16Z6 SMPFI MIL/LED SCC PRELUDE 2.2L I4 F22A1 SMPFI MIL/LED SCC PRELUDE 2.2L I4 VTEC H22A1 SMPFI MIL/LED SCC 2.3L I4 H23A1 SMPFI MIL/LED SCC FUEL SYSTEM CODE TYPE CIVIC CIVIC DEL SOL PRELUDE MODEL ENGINE ENGINE TYPE JUMPER TYPE 1994 ACCORD 2.2L I4 F22B2 SMPFI MIL/LED SCC ACCORD 2.2L I4 VTEC F22B1 SMPFI MIL/LED SCC D15B7, D15B8 SMPFI SMPFI MIL/LED MIL/LED SCC SCC CIVIC 1.5L I4 CIVIC 1.5L I4 VTEC D15Z1 SMPFI MIL/LED SCC 1.6L I4 VTEC D16Z6 SMPFI MIL/LED SCC CIVIC DEL SOL 1.5L I4 D15B7 SMPFI MIL/LED SCC CIVIC DEL SOL 1.6L I4 B16A3 SMPFI MIL/LED SCC CIVIC DEL SOL 1.6L I4 VTEC D16Z6 SMPFI MIL/LED SCC PRELUDE 2.2L I4 F22A1 SMPFI MIL/LED SCC PRELUDE 2.2L I4 VTEC H22A1 SMPFI MIL/LED SCC 2.3L I4 H23A1 SMPFI MIL/LED SCC CIVIC PRELUDE HONDA 5 HONDA SPECIFIC INFORMATION 2. HONDA SPECIFIC INFORMATION Two Ways to Diagnose Honda Honda powertrain diagnosis can be performed with the Asian Imports cartridge installed in a Tech 1, Tech 1A, or Mastertech tester. Additionally, Honda vehicles can be diagnosed with the aftermarket version of the Honda OEM level program card software using the Mastertech tester only. Operating instructions and test mode information are available for the OEM level software in the Acura/Honda Program Card Operator's Manual. If you do not have the necessary Program Card and Mastertech tester to perform OEM level diagnostics, you can use the Asian Imports Cartridge for limited model year coverage. The following Honda section includes the test modes available, how to connect the tester to the vehicle, operating instructions for DTC entry, and the applicable DTCs for each model year. 6 HONDA TEST MODES AVAILABLE 3. TEST MODES AVAILABLE The following test modes are available when testing Honda vehicles. Operating instructions for test modes other than DTC Entry are included in the Common Test Modes OBD, OBD I Systems section. There are also specific instructions for operating the test modes. See TEST MODES on page 11. MODE F1: DTC ENTRY SUBMODE F0: HOW TO READ SUBMODE F1: ENTER DTC(s) SUBMODE F2: DTC LIST SUBMODE F3: REVIEW DTC SUBMODE F4: CLEAR DTC(s) MODE F5: SYSTEM TESTS SUBMODE F0: PREP VEHICLE MODE F8: INFORMATION SUBMODE F2: SCC LOCATION* SUBMODE F3: ID INFO SUBMODE F5: ECU LOCATION* * Not available on certain Honda vehicles. HONDA 7 GETTING STARTED 4. GETTING STARTED Before operating the Asian Imports Cartridge with a Honda vehicle, the following steps must be performed: 1. Make sure the vehicle ignition is OFF. 2. Plug the tester power cable into the vehicle cigarette lighter. The power cable may also be directly connected to the battery via the optional battery adapter cable (P/N 02001636). NOTE Since the cigarette lighter can be switched, some tests require that the power cable be directly connected to the battery via the optional battery adapter cable. 3. Turn on the tester and select the application software that you will be using. Verify that the correct screen is displayed. The tester should display a screen similar to the one below. ASIAN IMPORTS 83 - 02 <ENTER> FIGURE 1-1. Tester stand-alone display 4. If the display is correct, press E. If the display is not correct, refer to Appendix D. 5. Follow the instructions on the following page to select the vehicle type you are testing by entering required vehicle information into the tester. 6. When the vehicle has been selected, refer to the Honda Test Modes section for information on how to prepare the vehicle to retrieve DTCs. On some late model Honda vehicles, the Service Check Connector (SCC) jumper (P/N 02001935) is required to retrieve DTCs. If available, use F2: SCC LOCATION from the Information menu to locate the service check connector. FIGURE 1-2. Service Check Connector Jumper 8 HONDA SELECTING THE VEHICLE 5. SELECTING THE VEHICLE Once you've pressed E from the power-up screen, the following steps must be performed to select the manufacturer, model year, model and engine type of the vehicle being tested. Remember, if you make a mistake, you can always press X to go back to the previous menu. SELECTING THE MANUFACTURER A menu of manufacturers available for testing is displayed in a scrolling menu. You can scroll down one screen at a time by pressing Y, or up one screen at a time by pressing n. Press U or D to scroll one manufacturer at a time, until the → arrow is opposite the manufacturer you wish to select. Then press e to select. SELECTING THE MODEL YEAR Once the manufacturer is selected, the Select Model Year menu is displayed. Press the last two digits of the year model being tested; 9, 0 for 1990 models, 9, 1 for 1991 models, and so on. SELECTING THE MODEL The Model Select menu displays models available for testing. Press the N key until the model being tested is displayed, then press the Y key. SELECTING THE ENGINE Next, the Engine Select menu is displayed. Press N until the engine type of the vehicle is displayed, then press Y. VEHICLE INFORMATION DISPLAY After the vehicle type is selected the tester displays a summary screen of the selected vehicle. Information displayed includes the year, manufacturer, model, engine size and type, and additional information such as the type of fuel system. SELECT MODE MENU When the above steps are completed, the Select Mode menu displays the test modes available for the selected vehicle and system. See TEST MODES on page 11, and the Common Test Modes OBD, OBD I Systems section for instructions on operating the test modes with Honda vehicles. HONDA 9 SELECTING THE VEHICLE MANUFACTURER DAIHATSU HONDA HYUNDAI E HONDA 1986 - 1994 SELECT MODEL YEAR: 19?? 9, 4 SELECT MODEL: ACCORD (YES/NO) Y SELECT ENGINE: 2.2L I4 (YES/NO) Y 1994 HONDA ACCORD 2.2L I4 SMPFI U, or 5 sec. SELECT MODE F1: DTC ENTRY F5: SYSTEM TESTS F8: INFORMATION FIGURE 1-3. Honda Vehicle Selection ACTIVE KEYS 0-9 Enter model year. YN Used to answer questions in tester display. E Confirm Power-up display. X Return to previous display. 10 HONDA TEST MODES 6. TEST MODES When the Select Mode menu is displayed, test modes available for Honda vehicles may be selected. You may select Mode F1: DTC ENTRY, Mode F5: SYSTEM TESTS or Mode F8: INFORMATION without connecting the tester to the vehicle. General operating instructions for the test modes are included in the Common Test Modes OBD, OBD I Systems section. Note that early model Honda vehicles did not have a Service Check Connector (SCC). To obtain DTCs from these vehicles, it is not necessary to use the SCC jumper. The Information menu will display F5: ECU LOCATION if the SCC jumper is not required, or it will display F2: SCC LOCATION if the SCC jumper is required. Detailed operating instructions for using Mode F1: DTC ENTRY with Honda vehicles are included in the following procedure. READING CODES When Mode F1: DTC ENTRY and F0: HOW TO READ are selected, the tester informs you if the Service Check Connector (SCC) jumper must be connected to the vehicle SCC. The location of the SCC is available by selecting Mode F2: SCC LOCATON from the Information menu. If necessary, connect the jumper to the SCC. To read DTC codes on Honda vehicles you must locate the ECU and observe the flashing LEDs. If you are not sure where the ECU is located, select Mode F5: ECU LOCATION from the Information menu. If necessary, refer to the Common Test Modes OBD, OBD I Systems section for further instructions. Follow the detailed instructions on the following pages to read the DTCs. Once the DTCs have been read, the tester can define the code. A complete list of Honda DTCs is also included in HONDA DIAGNOSTIC TROUBLE CODES (DTCs) on page 15. Typical Honda ECU LED Honda/Acura Service Check Connector Jumper MODE F1: DTC ENTRY When Mode F1: DTC ENTRY is selected, the tester displays five submodes: F0: HOW TO READ F1: ENTER DTC(s) F2: DTC LIST F3: REVIEW DTC F4: CLEAR DTC(s) HONDA 11 TEST MODES Submode F0: How to Read This submode provides information on how to manually read DTCs from the vehicle. Step by step screen instructions provide information to correctly set up the vehicle ECM. This is performed by following the tester instruction screens. If you have trouble, additional DTC retrieval information is described below. If you refer to the factory service manual for this information, make sure that you are following the correct steps for the system that you are working on. Submode F1: Enter DTCs This submode provides you with a text description of the numeric DTC that was entered into the tester. There can be two methods to manually read DTCs from the Honda ECUs. On early Honda ECUs there are 4 LEDs, and on later ECUs there is a single LED. Honda service and repair information indicates that code 0 is supported for OBD systems. Code 0 refers to ECU related failures, and is valid when the engine MIL does not illuminate or will not illuminate for 2 seconds when the ignition is turned on. Refer to the service manual for the current vehicle for further explanation of code 0. How to enter DTCs for both types is explained on the following pages. Four LEDs For Hondas with four LEDs, the Enter DTC(s) mode displays four question marks for entering the DTC. The full screen information tells you that if the LED is ON, then press 1. If the LED is OFF, then press 0. Be careful when entering the DTC so that the ECU LED pattern is the same on the tester screen as the ECU. Failure to do so will cause an incorrect DTC description to be displayed. Refer to the following procedure for manually reading 4-LED DTCs on the ECU and entering the number into the tester. DTC numbers can also be decoded from the LEDs. Each LED has a particular value associated with it. Reading from left to right on the ECU, the values are 8, 4, 2, and 1. If the second and fourth LEDs are ON, that represents a 4 and a 1. Total the values of the ON LEDs and you have the correct DTC. In the example, 4+1=5, so DTC number 5 is set in the engine ECU. Refer to HONDA DIAGNOSTIC TROUBLE CODES (DTCs) on page 15 for a definition of the DTC. ECU ENTER STATE OF 4 LEDs. 1-ON 0-OFF ???? [ENTER] LEDs To manually read DTCs from early model Honda vehicles that use 4-LEDs on ECU, do the following: 1. Use F5: ECU LOCATION from the Information menu for help in locating the engine ECU. 2. The ECU LEDs are numbered 8, 4, 2, and 1 as read from left to right. 3. Turn ignition key to ON. 4. Watch the LEDs on the ECU and note which LED is ON. 12 HONDA TEST MODES 5. Use F1: ENTER DTCs and if the LED is ON, press 1 on the tester keypad. If the LED is OFF, press 0 on the tester keypad. NOTE Reading the ECU LEDs from left to right, the LEDs indicate ON, OFF, ON, OFF. Press 0, 1, 0, and 1 into the tester, then press E. OFF ON OFF ON 6. The resulting code appears on the tester, along with a brief description. 7. Use F4: CLEAR DTCs for DTC clear code information. 8. Turn ignition key off when diagnosis is finished. One LED For Hondas with a single LED, the Enter DTC(s) submode displays two question marks for entering the DTC. The tester screen prompts you to enter the DTCs read off the ECU LED or the Malfunction Indicator Light (MIL). Be careful when reading the DTC from the ECU LED or MIL, then enter the DTC into the tester. Incorrect ECU LED or MIL interpretation can cause the wrong DTC description to be displayed. Refer to the following procedure for manually reading 1-LED DTCs on the ECU. ENTER DTC ?? Typical Honda ECU [ENTER] LED To manually read DTCs from late model Honda vehicles that use 1-LED on ECU, or 1-LED on ECU and dashboard MIL, do the following: 1. The MIL and the ECU mounted LED can be used to read DTCs from the ECU. 2. Use F2: SCC LOCATION from the Information menu for help in locating the Service Check Connector (SCC) or F5: ECU LOCATION from the Information menu for help in locating the engine electronic control module. 3. If required, connect the Honda/Acura Code jumper (P/N 02001935) into the SCC. 4. Turn the ignition key to RUN. 5. The MIL and the ECU LED will flash DTCs, if stored in ECU memory. 6. The 10's digit corresponds to a long pulse, and the 1's digit corresponds to a short pulse. 7. Use F1: ENTER DTCs and type manually read DTCs into the tester (or select it from F2: DTC LIST). 8. The resulting code will appear on the tester, along with a brief description. HONDA 13 TEST MODES 9. If used, remove the Honda/Acura Code jumper from the SCC. 10. Use F4: CLEAR DTCs for DTC clear code information. 11. Turn ignition key off when diagnosis is finished. NOTE For further information, refer to the Factory Service Manual for the vehicle you are testing. Submode F2: DTC List This submode provides you with a text description of the numeric DTC that was selected on the tester display screen. As you scroll through the available DTCs you can select the DTC that matches the DTC output by the ECU. After you perform this step, simply select the DTC on the tester screen for later review or printing. Submode F3: Review DTC This submode provides you with a review of the DTCs that you entered or selected in the tester. The description of the entered or selected DTC will be displayed, along with a numerical summary of the entered or selected DTC. Review DTC is intended to provide you with an electronic clipboard that keeps track of the DTCs that you have encountered during diagnosis. Submode F4: Clear DTC(s) This submode has two options for you to choose. Option F0 is to view text screens that provide information on how to clear the DTCs from ECU memory. This is performed by tester keypad presses. Option F1 clears the tester memory of DTCs that you entered or selected in the tester. 14 HONDA HONDA DIAGNOSTIC TROUBLE CODES (DTCS) 7. HONDA DIAGNOSTIC TROUBLE CODES (DTCS) DTCs available for Honda vehicles are listed in the following tables. Some code numbers have different descriptors depending on the selected vehicle. Only codes available for the selected vehicle are displayed by the tester. YEAR: 1995 DTC NO. 1985 0 FAULTY ECU OR MIL CIRCUIT 1 O2S OR O2S CIRCUIT FAILURE 2 FAULTY ECU 3 MAP SENSOR OR MAP CKT FAILURE 4 FAULTY ECU 5 MAP SENSOR OR MAP CKT FAILURE 6 ECT SENSOR OR ECT CKT FAILURE 7 TP SENSOR OR TPS CIRCUIT FAILURE 8 CKP SENSOR OR CKP CIRCUIT FAIL 9 CKP SENSOR OR CKP CIRCUIT FAIL 10 IAT SENSOR OR IAT CKT FAILURE 11 IDLE MIXTURE ADJ SENSOR/CKT FAIL 12 EGR SYSTEM OR EGR CKT FAILURE FAULTY ECU 13 BARO SENSOR OR BARO CKT FAILURE 14 FAULTY ECU 15 FAULTY ECU DESCRIPTOR YEAR: 1986 DTC NO. 1986 0 FAULTY ECU OR ECU CKT FAILURE 1 FAULTY O2S OR FAULTY FUEL SYS. O2S OR O2S CIRCUIT FAILURE 2 FAULTY ECU OR ECU CKT FAILURE 3 MAP SENSOR OR MAP CKT FAILURE 4 FAULTY ECU OR ECU CKT FAILURE HONDA DESCRIPTOR 15 HONDA DIAGNOSTIC TROUBLE CODES (DTCS) YEAR: 1986 DTC NO. DESCRIPTOR 5 MAP SENSOR OR MAP CKT FAILURE 6 ECT SENSOR OR ECT CKT FAILURE 7 TP SENSOR OR TPS CIRCUIT FAILURE 8 CKP SENSOR OR CKP CIRCUIT FAIL 9 CKP SENSOR OR CKP CIRCUIT FAIL 10 IAT SENSOR OR IAT CKT FAILURE 11 FAULTY ECU OR ECU CKT FAILURE IDLE MIXTURE ADJ SENSOR/CKT FAIL 12 EGR SYSTEM OR EGR CKT FAILURE FAULTY ECU OR ECU CKT FAILURE 13 BARO SENSOR OR BARO CKT FAILURE 14 FAULTY ECU OR ECU CKT FAILURE 15 FAULTY ECU OR ECU CKT FAILURE YEAR: 1987 DTC NO. 1987 0 FAULTY ECU OR ECU CKT FAILURE 1 O2S OR O2S CIRCUIT FAILURE SHT CKT IN FREQ SOLENOID VALVE B 2 FAULTY ECU OR ECU CKT FAILURE SHT CKT IN FREQ SOLENOID VALVE A 3 MAP SENSOR OR MAP CKT FAILURE 4 FAULTY ECU OR ECU CKT FAILURE IGNITION TIMING CONTROL UNIT 5 MAP SENSOR OR MAP CKT FAILURE 6 ECT SENSOR OR ECT CKT FAILURE 7 TP SENSOR OR TPS CIRCUIT FAILURE 8 CRANK ANGLE SENSOR - (TDC) CKP SENSOR OR CKP CIRCUIT FAIL CKT FAILURE IN IGNITION WIRE 9 CRANK ANGLE SENSOR - (CYL) CK ANGLE OR CK ANG. CKT FAILURE 10 IAT SENSOR OR IAT CKT FAILURE 11 FAULTY ECU OR ECU CKT FAILURE IDLE MIXTURE ADJ SENSOR/CKT FAIL 16 DESCRIPTOR HONDA HONDA DIAGNOSTIC TROUBLE CODES (DTCS) YEAR: 1987 DTC NO. DESCRIPTOR 12 EGR SYSTEM OR EGR CKT FAILURE FAULTY ECU OR ECU CKT FAILURE 13 BARO SENSOR OR BARO CKT FAILURE 14 FAULTY ECU OR ECU CKT FAILURE 15 FAULTY ECU OR ECU CKT FAILURE YEAR: 1988 DTC NO. 1988 0 FAULTY ECU OR ECU CKT FAILURE 1 O2 SENSOR A OR O2S A CKT FAIL O2S OR O2S CIRCUIT FAILURE 2 O2 SENSOR B OR O2S B CKT FAIL VSS OR VSS CIRCUIT FAILURE 3 MAP SENSOR OR MAP CKT FAILURE 4 CKP SENSOR OR CKP CIRCUIT FAIL VAC. SWITCH OR VAC. SWITCH CKT 5 MAP SENSOR OR MAP CKT FAILURE 6 ECT SENSOR OR ECT CKT FAILURE 7 TP SENSOR OR TPS CIRCUIT FAILURE 8 CRANK ANGLE SENSOR - (TDC) IGNITION COIL SYS. OR CKT FAIL 9 CRANK ANGLE SENSOR - (CYL) NO.1 CYLINDER POS. SENSOR 10 IAT SENSOR OR IAT CKT FAILURE 12 EGR SYSTEM OR EGR CKT FAILURE 13 BARO SENSOR OR BARO CKT FAILURE 14 ELECTRONIC IDLE CONTROL FAILURE 15 IGNITION OUTPUT SIG. OR CKT FAIL 16 FUEL INJECTOR FAILURE 17 VSS OR VSS CIRCUIT FAILURE 19 LOCK-UP CONTROL SOL. VALVE 20 ELECTRIC LOAD SENSOR HONDA DESCRIPTOR 17 HONDA DIAGNOSTIC TROUBLE CODES (DTCS) YEAR: 1989 DTC NO. 1989 0 ECU FAULTY OR ECU CKT FAILURE 1 O2 SENSOR A OR O2S A CKT FAIL O2S OR O2S CIRCUIT FAILURE 2 O2 SENSOR B OR O2S B CKT FAIL VSS OR VSS CIRCUIT FAILURE 3 MAP SENSOR OR MAP CKT FAILURE 4 CKP SENSOR OR CKP CIRCUIT FAIL VAC. SWITCH OR VAC. SWITCH CKT 5 MAP SENSOR OR MAP CKT FAILURE 6 ECT SENSOR OR ECT CKT FAILURE 7 TP SENSOR OR TPS CIRCUIT FAILURE 8 CRANK ANGLE SENSOR - (TDC) IGNITION COIL SYS. OR CKT FAIL 9 CRANK ANGLE SENSOR - (CYL) 10 IAT SENSOR OR IAT CKT FAILURE 11 FAULTY ECU OR ECU CKT FAILURE 12 EGR SENSOR OR EGR CKT FAILURE 13 BARO SENSOR OR BARO CKT FAILURE 14 ELECTRONIC IDLE CONTROL FAILURE 15 IGNITION OUTPUT SIG. OR CKT FAIL 16 FUEL INJECTOR FAILURE 17 VSS OR VSS CIRCUIT FAILURE 19 LOCK-UP CONTROL SOL. VALVE 20 ELECTRIC LOAD SENSOR 18 DESCRIPTOR HONDA HONDA DIAGNOSTIC TROUBLE CODES (DTCS) YEAR:1990 DTC NO. 1990 0 FAULTY ECU OR ECU CKT FAILURE 1 O2 SENSOR OR O2S CKT FAILURE O2 SENSOR A OR O2S A CKT FAIL 2 VSS OR VSS CIRCUIT FAILURE O2 SENSOR B OR O2S B CKT FAIL 3 MAP SENSOR OR MAP CKT FAILURE 4 CKP SENSOR OR CKP CIRCUIT FAIL VAC. SWITCH OR VAC. SWITCH CKT FAULTY ECU OR ECU CKT FAILURE 5 MAP SENSOR OR MAP CKT FAILURE 6 ECT SENSOR OR ECT CKT FAILURE 7 TP SENSOR OR TPS CIRCUIT FAILURE M/T-COOLANT SW. A/T-SHFT POS. SW 8 CRANK ANGLE SENSOR - (TDC) IGNITION COIL SYS. OR CKT FAIL 9 CRANK ANGLE SENSOR - (CYL) CK ANGLE SENSOR CYL (HF & Si) 10 IAT SENSOR OR IAT CKT FAILURE 11 ELECTRONIC IDLE CONTROL FAILURE 12 EGR SYSTEM OR EGR CKT FAILURE EGR SYSTEM FAIL (HF & Calif. AT) 13 BARO SENSOR OR BARO CKT FAILURE 14 ELECTRONIC IDLE CONTROL FAILURE 15 IGNITION OUTPUT SIG. OR CKT FAIL 16 FUEL INJECTOR FAILURE 17 VSS OR VSS CIRCUIT FAILURE 19 LOCK-UP CONTROL SOL. VALVE 20 ELECTRIC LOAD SENSOR 30 A/T FI SIGNAL A 31 A/T FI SIGNAL B 41 O2S HEATER OR O2S HEATER CKT 42 FUEL SUPPLY SYSTEM 43 FUEL SUPPLY SYSTEM HONDA DESCRIPTOR 19 HONDA DIAGNOSTIC TROUBLE CODES (DTCS) YEAR: 1991 DTC NO. 1991 0 FAULTY ECU OR ECU CKT FAILURE 1 O2S OR O2S CIRCUIT FAILURE O2 SENSOR A OR O2S A CKT FAIL 2 VSS OR VSS CIRCUIT FAILURE O2 SENSOR B OR O2S B CKT FAIL 3 MAP SENSOR OR MAP CKT FAILURE 4 CKP SENSOR OR CKP CIRCUIT FAIL VAC. SWITCH OR VAC. SWITCH CKT FAULTY ECU OR ECU CKT FAILURE 5 MAP SENSOR OR MAP CKT FAILURE 6 ECT SENSOR OR ECT CKT FAILURE 7 TP SENSOR OR TPS CIRCUIT FAILURE M/T-COOLANT SW. A/T-SHFT POS. SW 8 CRANK ANGLE SENSOR - (TDC) IGNITION COIL SYS. OR CKT FAIL 9 CRANK ANGLE SENSOR - (CYL) CK ANGLE SENSOR CYL (HF & Si) 10 IAT SENSOR OR IAT CKT FAILURE 11 ELECTRONIC IDLE CONTROL FAILURE 12 EGR SYSTEM OR EGR CKT FAILURE EGR SYSTEM FAIL (HF & Calif. AT) 13 BARO SENSOR OR BARO CKT FAILURE 14 ELECTRONIC IDLE CONTROL FAILURE 15 IGNITION OUTPUT SIG. OR CKT FAIL 16 FUEL INJECTOR FAILURE 17 VSS OR VSS CIRCUIT FAILURE 19 LOCK-UP CONTROL SOL. VALVE 20 ELECTRIC LOAD SENSOR 30 A/T FI SIGNAL A 31 A/T FI SIGNAL B 41 O2S HEATER OR O2S HEATER CKT 43 FUEL SUPPLY SYSTEM 20 DESCRIPTOR HONDA HONDA DIAGNOSTIC TROUBLE CODES (DTCS) YEAR: 1992 DTC NO. 1992 0 FAULTY ECU OR ECU CKT FAILURE 1 O2 SENSOR OR O2S CKT FAILURE 3 MAP SENSOR OR MAP CKT FAILURE 4 CKP SENSOR OR CKP CIRCUIT FAIL 5 MAP SENSOR OR MAP CKT FAILURE 6 ECT SENSOR OR ECT CKT FAILURE 7 TP SENSOR OR TPS CIRCUIT FAILURE 8 CRANK ANGLE SENSOR - (TDC) 9 CRANK ANGLE SENSOR - (CYL) 10 IAT SENSOR OR IAT CKT FAILURE 12 EGR SYSTEM OR EGR CKT FAILURE 13 BARO SENSOR OR BARO CKT FAIL 14 ELECTRONIC IDLE CONTROL FAILURE 15 IGNITION OUTPUT SIG. OR CKT FAIL 16 FUEL INJECTOR FAILURE 17 VSS OR VSS CIRCUIT FAILURE 19 A/T LOCK-UP SOL. VALVE A/B 20 ELECTRIC LOAD SENSOR 21 SPOOL SOLENOID VALVE 22 VALVE TIMING OIL PRESSURE SWITCH 23 KNOCK SENSOR OR KS CIRCUIT FAIL 30 A/T FI SIGNAL A 31 A/T FI SIGNAL B 41 O2S HEATER OR O2S HEATER CKT 43 FUEL SUPPLY SYSTEM 48 LAF SENSOR OR LAF CKT FAILURE HONDA DESCRIPTOR 21 HONDA DIAGNOSTIC TROUBLE CODES (DTCS) YEAR:1993 DTC NO. 1993 0 FAULTY ECU OR ECU CKT FAILURE 1 HO2S OR HO2S CIRCUIT FAILURE 3 MAP SENSOR OR MAP CKT FAILURE 4 CKP SENSOR OR CKP CIRCUIT FAIL 5 MAP SENSOR OR MAP CKT FAILURE 6 ECT SENSOR OR ECT CKT FAILURE 7 TP SENSOR OR TPS CIRCUIT FAILURE 8 CRANK ANGLE SENSOR - (TDC) 9 CRANK ANGLE SENSOR - (CYL) 10 IAT SENSOR OR IAT CKT FAILURE 12 EGR SYSTEM OR EGR CKT FAILURE 13 BARO SENSOR OR BARO CKT FAILURE 14 ELECTRONIC IDLE CONTROL FAILURE 15 IGNITION OUTPUT SIG. OR CKT FAIL 16 FUEL INJECTOR FAILURE 17 VSS OR VSS CIRCUIT FAILURE 19 A/T LOCK-UP SOL. VALVE A/B 20 ELECTRIC LOAD SENSOR 21 VTEC SOLENOID VALVE 22 VTEC PRESSURE SWITCH 23 KNOCK SENSOR OR KS CIRCUIT FAIL 30 A/T FI SIGNAL A 31 A/T FI SIGNAL B 41 HO2S HEATER OR CIRCUIT FAILURE 43 FUEL SUPPLY SYSTEM 48 HO2S [CIVIC D15Z1 (EXCEPT CA)] 22 DESCRIPTOR HONDA HONDA DIAGNOSTIC TROUBLE CODES (DTCS) YEAR:1994 DTC NO. 1994 0 FAULTY ECU OR ECU CKT FAILURE 1 HO2S OR HO2S CIRCUIT FAILURE 3 MAP SENSOR OR MAP CKT FAILURE 4 CKP SENSOR OR CKP CIRCUIT FAIL 5 MAP SENSOR OR MAP CKT FAILURE 6 ECT SENSOR OR ECT CKT FAILURE 7 TP SENSOR OR TPS CIRCUIT FAILURE 8 CRANK ANGLE SENSOR - (TDC) 9 CRANK ANGLE SENSOR - (CYL) 10 IAT SENSOR OR IAT CKT FAILURE 12 EGR SYSTEM OR EGR CKT FAILURE 13 BARO SENSOR OR BARO CKT FAILURE 14 ELECTRONIC IDLE CONTROL FAILURE 15 IGNITION OUTPUT SIG. OR CKT FAIL 16 FUEL INJECTOR FAILURE 17 VSS OR VSS CIRCUIT FAILURE 19 A/T LOCK-UP SOL. VALVE A/B 20 ELECTRIC LOAD SENSOR 21 VTEC SOLENOID VALVE 22 VTEC PRESSURE SWITCH 23 KNOCK SENSOR OR KS CIRCUIT FAIL 30 A/T FI SIGNAL A 31 A/T FI SIGNAL B 41 HO2S HEATER OR CIRCUIT FAILURE 43 FUEL SUPPLY SYSTEM 48 HO2S [CIVIC D15Z1 (EXCEPT CA)] HONDA DESCRIPTOR 23 HONDA DIAGNOSTIC TROUBLE CODES (DTCS) 24 HONDA HYUNDAI 1. VEHICLES AND SYSTEMS ..................................................................................................................... 2 2. HYUNDAI SPECIFIC INFORMATION .................................................................................................. 6 3. TEST MODES AVAILABLE ...................................................................................................................... 7 4. GETTING STARTED ................................................................................................................................... 8 5. SELECTING THE VEHICLE .................................................................................................................... 9 6. TEST MODES...............................................................................................................................................11 Mode F1: DTC Entry .........................................................................................................................11 Submode F0: How To Read .................................................................................................... 12 Submode F1: Enter DTC(s) ..................................................................................................... 12 Submode F2: DTC List ............................................................................................................ 14 Submode F3: Review DTC ..................................................................................................... 14 Submode F4: Clear DTC(s) ..................................................................................................... 14 Mode F2: DTC ................................................................................................................................... 15 Submode F1: Read DTC(s) ..................................................................................................... 15 Submode F2: DTC List ............................................................................................................ 16 Submode F3: Review DTC ..................................................................................................... 16 Submode F4: Clear DTC(s) ..................................................................................................... 16 7. HYUNDAI DIAGNOSTIC TROUBLE CODES (DTCs) ................................................................... 17 OBD I Systems .................................................................................................................................. 17 1989.............................................................................................................................................. 17 1990.............................................................................................................................................. 17 1991.............................................................................................................................................. 18 1992.............................................................................................................................................. 18 1993.............................................................................................................................................. 19 1994.............................................................................................................................................. 21 1995.............................................................................................................................................. 22 OBD II Systems ................................................................................................................................. 25 1996-98 OBD II ......................................................................................................................... 25 VEHICLES AND SYSTEMS 1. VEHICLES AND SYSTEMS Using the Asian cartridge, the following Hyundai vehicles can be diagnosed. MODEL ENGINE ENGINE TYPE FUEL TYPE ADAPTER TYPE CODE TYPE 1989 SONATA 2.4L I4 G4AS MPI CHECK AUTOCODES SONATA 3.0L V6 G6AT MPI CHECK AUTOCODES MODEL ENGINE ENGINE TYPE FUEL TYPE ADAPTER TYPE CODE TYPE 1990 EXCEL 1.5L I4 G4AJ MPI CHECK AUTOCODES SONATA 2.4L I4 G4AS MPI CHECK AUTOCODES SONATA 3.0L V6 G6AT MPI CHECK AUTOCODES MODEL ENGINE ENGINE TYPE FUEL TYPE ADAPTER TYPE CODE TYPE 1991 EXCEL 1.5L I4 G4AJ MPI CHECK AUTOCODES SCOUPE 1.5L I4 G4DJ MPI CHECK AUTOCODES SONATA 2.4L I4 G4AS MPI CHECK AUTOCODES SONATA 3.0L V6 G6AT MPI CHECK AUTOCODES MODEL ENGINE ENGINE TYPE FUEL TYPE ADAPTER TYPE CODE TYPE 1992 2 ELANTRA 1.6L I4 G4DR MPI CHECK AUTOCODES EXCEL 1.5L I4 G4AJ MPI CHECK AUTOCODES SCOUPE 1.5L I4 G4AJ MPI CHECK AUTOCODES SONATA 2.0L I4 G4AF MPI CHECK AUTOCODES SONATA 3.0L V6 G6AT MPI CHECK AUTOCODES HYUNDAI VEHICLES AND SYSTEMS MODEL ENGINE ENGINE TYPE FUEL TYPE ADAPTER TYPE CODE TYPE 1993 ELANTRA 1.6L I4 G4DR MPI CHECK AUTOCODES ELANTRA 1.8L I4 G4DM MPI CHECK AUTOCODES EXCEL 1.5L I4 G4AJ MPI CHECK AUTOCODES SCOUPE 1.5L I4 G4AE MPI NONE MIL CODES SONATA 2.0L I4 G4AP MPI CHECK AUTOCODES SONATA 3.0L V6 G6AT MPI CHECK AUTOCODES MODEL ENGINE ENGINE TYPE FUEL TYPE ADAPTER TYPE CODE TYPE 1994 ELANTRA 1.6L I4 G4DR MFI CHECK AUTOCODES ELANTRA 1.8L I4 G4DM MFI CHECK AUTOCODES EXCEL 1.5L I4 G4AJ MFI CHECK AUTOCODES SCOUPE 1.5L I4 G4AE MFI NONE MIL CODES SONATA 2.0L I4 DOHC G4AP MFI CHECK AUTOCODES SONATA 3.0L V6 G6AT MPI CHECK AUTOCODES MODEL ENGINE ENGINE TYPE FUEL TYPE ADAPTER TYPE CODE TYPE 1995 ACCENT 1.5L I4 G4EK MFI NONE MILCODES ELANTRA 1.5L I4 G4DJ MFI CHECK AUTOCODES ELANTRA 1.6L I6 G4DR MFI CHECK AUTOCODES ELANTRA 1.8L I4 G4DN MFI CHECK AUTOCODES SCOUPE 1.5L I4 G4AE MFI NONE MILCODES SONATA 2.0L I4 G4AP MFI CHECK AUTOCODES SONATA 3.0L V6 G6AT MFI CHECK AUTOCODES HYUNDAI 3 VEHICLES AND SYSTEMS MODEL ENGINE ENGINE TYPE FUEL TYPE ADAPTER TYPE CODE TYPE 1996 ACCENT 1.5L I4 G4EK MFI OBD II* AUTOCODES ELANTRA 1.8L I4 G4DM MFI OBD II* AUTOCODES SONATA 2.0L I4 G4AP MFI OBD II* AUTOCODES SONATA 3.0L V6 G6AT MFI OBD II* AUTOCODES * For OBD II Adapter Type use Common Test Modes OBD II Systems section for operating instructions and test mode information. MODEL ENGINE ENGINE TYPE FUEL TYPE ADAPTER TYPE CODE TYPE 1997 ACCENT 1.5L I4 SOHC G4EK MFI OBD II* AUTOCODES ACCENT 1.5L I4 DOHC G4EK MFI OBD II* AUTOCODES ELANTRA 1.8L I4 DOHC G4DM MFI OBD II* AUTOCODES SONATA 2.0L I4 DOHC G4AP MFI OBD II* AUTOCODES SONATA 3.0L V6 SOHC G6AT MFI OBD II* AUTOCODES TIBURON 1.8L I4 DOHC G4GM MFI OBD II* AUTOCODES TIBURON 2.0L I4 DOHC G4GF MFI OBD II* AUTOCODES * 4 For OBD II Adapter Type use Common Test Modes OBD II Systems section for operating instructions and test mode information. HYUNDAI VEHICLES AND SYSTEMS MODEL ENGINE ENGINE TYPE FUEL TYPE ADAPTER TYPE CODE TYPE 1998 ACCENT 1.5L I4 SOHC G4EK MFI OBD II* AUTOCODES ACCENT 1.5L I4 DOHC G4EK MFI OBD II* AUTOCODES ELANTRA 1.8L I4 DOHC G4GM MFI OBD II* AUTOCODES SONATA 2.0L I4 DOHC G4AP MFI OBD II* AUTOCODES SONATA 3.0L V6 SOHC G6AT MFI OBD II* AUTOCODES TIBURON 1.8L I4 DOHC G4GM MFI OBD II* AUTOCODES TIBURON 2.0L I4 DOHC G4GF MFI OBD II* AUTOCODES * For OBD II Adapter Type use Common Test Modes OBD II Systems section for operating instructions and test mode information. HYUNDAI 5 HYUNDAI SPECIFIC INFORMATION 2. HYUNDAI SPECIFIC INFORMATION The Hyundai vehicles covered by the Asian Imports Cartridge are separated into two different sections within the Asian Imports Operator's Manual. The vehicle's on-board system will determine which section of the Operator's Manual will need to be used. Vehicles that are OBD II certified have information about the operating test modes in the Common Test Modes OBD II Systems section of the Operator's Manual. Vehicles that have OBD or OBDI systems have test mode information described in this section of the Operator's Manual. In these sections, you will find information on test modes available, how to connect the tester to the vehicle, and operating instructions for the different test modes. A complete list of Hyundai Diagnostic Trouble Codes is included at the back of each section. To determine which section of the Operator's Manual to use for diagnostic information and instructions, look at Adapter Type of the Vehicle and Systems chart. If the vehicle you are testing has an OBD II adapter type, use the Common Test Modes OBD II Systems section of the Operator's Manual. If the vehicle you are testing does not have the OBD II Adapter Type, use this section to diagnose the vehicle under test. 6 HYUNDAI TEST MODES AVAILABLE 3. TEST MODES AVAILABLE The following test modes are available when testing Hyundai vehicles. Operating instructions for test modes other than F1: DTC Entry and F2: DTC are included in the Common Test Modes OBD, OBD I Systems section. There are Hyundai specific instructions for operating the test modes in Section 6 (Test Modes). MODE F1: DTC ENTRY SUBMODE F0: HOW TO READ SUBMODE F1: ENTER DTC(s) SUBMODE F2: DTC LIST SUBMODE F3: REVIEW DTC SUBMODE F4: CLEAR DTC(s) MODE F2: DTC SUBMODE F1: READ DTC(s) SUBMODE F2: DTC LIST SUBMODE F3: REVIEW DTC SUBMODE F4: CLEAR DTC(s) MODE F5: SYSTEM TESTS SUBMODE F0: PREP VEHICLE MODE F8: INFORMATION SUBMODE F1: DLC LOCATION1 SUBMODE F3: ID INFO SUBMODE F4: DJC LOCATION1 1. Note that not all models support DJC, or DLC Location test modes. The Tester will automatically choose which test mode to display, depending on your vehicle selection. HYUNDAI 7 GETTING STARTED 4. GETTING STARTED Before operating the Asian Imports Cartridge with a Hyundai vehicle, the following steps must be performed: 1. Make sure the vehicle ignition is OFF. 2. Refer to the chart in Section 1 to see if the vehicle you are testing requires the Check Adapter Cable. If so, connect the Mitsubishi/Chrysler Imports/Hyundai Check Adapter Cable to the end of the DLC cable, then connect the yellow connector end to the vehicle Check connector. Mitsubishi/Chrysler Imports/Hyundai CHECK ADAPTER CABLE 3. Plug the tester power cable into the vehicle cigarette lighter. The power cable may also be directly connected to the battery via the optional battery clip adapter (P/N 02001636). NOTE Since the cigarette lighter can be switched, some tests require that the power cable be directly connected to the battery via the battery clip adapter. 4. Turn on the tester and select the application software that you will be using. Verify that the correct screen is displayed. The tester should display a screen similar to the one below. ASIAN IMPORTS 83 - 02 <ENTER> Tester stand-alone display 5. If the display is correct, press E. If the display is not correct, refer to Appendix D. 6. Follow the instructions on the following page to select the vehicle type you are testing by entering required vehicle information into the tester. 8 HYUNDAI SELECTING THE VEHICLE 5. SELECTING THE VEHICLE Once you've pressed E from the power-up screen, the following steps must be performed to select the manufacturer, model year, model and engine type of the vehicle being tested. Remember, if you make a mistake, you can always press X to go back to the previous menu. SELECTING THE MANUFACTURER A menu of manufacturers available for testing is displayed in a scrolling menu. You can scroll down one screen at a time by pressing Y, or up one screen at a time by pressing n. Press U or D to scroll one manufacturer at a time, until the → arrow is opposite Hyundai. Then press e to select. SELECTING THE MODEL YEAR Once the manufacturer is selected, the Select Model Year menu is displayed. Press the last two digits of the year model being tested 9, 0 for 1990 models, 9, 1 for 1991 models, and so on. SELECTING THE MODEL The Select Model menu displays models available for testing. Press the N key until the model being tested is displayed, then press the Y key. SELECTING THE ENGINE AND ENGINE TYPE Next, the Select Engine menu is displayed. Press N until the engine and engine type of the vehicle is displayed, then press Y. VEHICLE INFORMATION DISPLAY After the vehicle type is selected the tester displays a summary screen of the selected vehicle. Information displayed includes the year, manufacturer, model, engine size, and additional information such as the type of fuel system. HYUNDAI 9 SELECTING THE VEHICLE SELECT MODE MENU When the above steps are completed, the Select Mode menu displays the test modes available for the selected vehicle and system. Refer to Section 6 (Test Modes) and the Common Test Modes OBD, OBD I Systems sections for instructions on operating the test modes with Hyundai vehicles. MANUFACTURER HONDA HYUNDAI INFINITI E HYUNDAI 1989 - 2002 SELECT MODEL YEAR: ???? SELECT MODEL: EXCEL (YES/NO) Y SELECT ENGINE: 1.5L I4 (YES/NO) Y 1991 HYUNDAI EXCEL 1.5L I4 MPI U, or 5 sec. SELECT MODE F1: DTC ENTRY F2: DTC F5: SYSTEM TESTS HYUNDAI VEHICLE SELECTION ACTIVE KEYS 0-9 Enter model year. yn Used to answer questions in tester display. x Return to previous display. 10 HYUNDAI TEST MODES 6. TEST MODES When the Select Mode menu is displayed, test modes available for Hyundai vehicles may be selected. You may select Modes F1: DTC Entry, F2: DTC, F5: System Tests, and F8: Information without connecting the tester to the vehicle. Operating instructions for Modes F1: DTC Entry and F2: DTCs are included in this section. READING CODES Detailed operating instructions for using Modes F1: DTC Entry and F2: DTC with Hyundai vehicles are included in the following procedure. F1: DTC Entry is displayed for all Hyundai vehicles, and F2: DTC is displayed for Hyundai vehicles that have "AUTOCODES" as the Code Type listed in the Vehicles and Systems table. NOTE Follow the Submode F0: Prepare Vehicle instructions to ensure proper vehicle preparation prior to testing. The vehicle must be completely warmed up in order for the tester to communicate properly with the vehicle. MODE F1: DTC ENTRY When Mode F1: DTC Entry is selected, the tester displays submodes which, after your selection, can provide information on how to read diagnostic trouble codes (DTCs) from the vehicle, how to clear DTCs from the vehicle (or tester memory), obtain a text description of entered or selected DTCs, and review entered or selected DTCs as a result of manually retrieving codes from the ECU. DTC ENTRY SUBMODES: F0: HOW TO READ F1: ENTER DTC(s) F2: DTC LIST F3: REVIEW DTC F4: CLEAR DTC(s) MANUALLY READING DTCS To manually read Diagnostic Trouble Codes (DTCs) on Hyundai vehicles from 1989-95, there are 2 methods that can be used. The most common method requires an analog voltmeter. Using the analog voltmeter set to a 20 volt scale and connected to the Data Link Connector (DLC), the DTC can be interpreted from the analog voltmeter needle flashes. The second method requires the use of a single wire jumper that is intermittently placed across one pin of the DLC and ground to flash DTCs out on the dashboard mounted Malfunction Indicator Lamp (MIL). For the automobile manufacturers that mention the use of an analog voltmeter to read manual DTCs, the Mastertech Oscilloscope may be used. Set up the single channel oscilloscope and make connections the same way as the analog voltmeter (above). Choose the 20v/division scale and a slow time/division (e.g. 1-2 sec/division). HYUNDAI 11 TEST MODES the DTCs will be shown as a waveform on the display. Note that manually retrieving DTCs from 1993-95 Hyundai Scoupe requires you to locate and jumper the Diagnostic Connector, then watch the instrument panel MIL. Refer to the section on manually reading DTCs from the 1993-95 Hyundai vehicles in this section. Follow the detailed instructions on the following pages to manually read the DTCs. Once the DTCs have been manually read from the ECU, the tester can define the code. A complete list of Hyundai DTCs is also included in Chapter 7. Submode F0: How To Read This submode provides information on how to manually read DTCs from the vehicle. Step by step screen instructions provide information to correctly set up the vehicle ECU. This is performed by following the tester instruction screens. If you have trouble, additional DTC retrieval information is described below. If you refer to the manual for this information, make sure that you are following the correct steps for the system that you are working on. Submode F1: Enter DTC(s) On Hyundai vehicles, the Enter DTCs submode allows you to enter manually read DTCs. This submode provides you with a text description of the numeric DTC that was entered into the tester. The Enter DTC Submode displays two question marks for DTC Entry. The tester screen prompts you to enter the DTCs read from the analog voltmeter. Be careful when reading DTCs from the analog voltmeter. Incorrect voltmeter needle interpretation can cause the wrong DTC description to be displayed. Once all DTCs have been manually read and recorded, enter each DTC into the tester as described in the Common Test Modes OBD, OBD I Systems section. Hyundai service and repair information indicates that code 0 is supported for OBD systems. Code 0 refers to ECU-related failures, and is valid when the engine MIL does not illuminate or will not illuminate for 2 seconds when turning ignition on. Refer to the service manual for the current vehicle for further explanation of code 0. Refer to the appropriate procedure for manually reading analog voltmeter and MIL ECU DTCs on the following pages. Manually reading DTCs from Hyundai vehicles that use 12 pin DLC and analog voltmeter: 1. Locate the 12 pin Diagnostic Connector. (Use F1: DLC Location, or F4: DJC Location from the Information menu for help on diagnostic connector location.) 2. Connect analog voltmeter red lead to pin 1 diagnosis terminal and voltmeter black lead to pin 12 (ground) terminal of diagnosis connector. Set analog voltmeter to 20 volt scale. PIN 12 PIN 1 3. Turn ignition switch to ON. 12 HYUNDAI TEST MODES 4. DTC indication will begin on voltmeter. Voltmeter will fluctuate 0 volts to 12 volts if DTCs are stored in the ECU. If a DTC is stored in the ECU, the first number of 12 volt, 1.5 second indications will equal the 10's digit of a 2-digit DTC. After a 2.0 second pause, the second number of 12 volt, 0.5 second indications will equal the 1's digit. DTCs are separated by 0 volt indication for 3.0 seconds. DTC SEPARATION DTC 12 12v Next DTC Indication 0v seconds 3 sec 1.5 sec 2 sec 3 sec 0.5 sec 5. If no malfunctions are present, meter will read 12 volts once per second. 6. After recording DTCs turn ignition switch off. 7. Disconnect voltmeter leads. 8. Erase DTCs when all repairs are completed. Manually reading DTCs from 1993-95 Hyundai Scoupe using instrument panel malfunction indicator lamp (MIL): 1. Locate the 12 pin Diagnostic Connector. (Use F4: DJC Location from the Information menu for help on diagnostic connector location.) 2. Turn ignition key ON, do not start engine. 3. Within 1 second of key ON, ground pin 10 of the diagnostic connector for 2.5 seconds (the jumper configuration best suited for this operation is a double-ended alligator type [with small jaw], about 3 feet long). PIN 10 4. Observe the Malfunction Indicator Lamp (MIL) to read DTCs. The first MIL output is either the stored DTC or the "no fault detected" DTC (MIL flashes 4-4-4-4). In the case of more than one DTC stored in ECU, each individual DTC is repeated infinitely until pin 10 is grounded again. MIL will turn ON/OFF if DTCs are stored in ECU after pin 10 is grounded. If a DTC is stored in ECU, MIL digit flashes are indicated by 0.5 second pulses. MIL digit flashes are separated by a MIL "off" 2.5 second pause. HYUNDAI 13 TEST MODES 1s Ground PIN 10 Within 1 second of ignition key "on" On IGNITION KEY Off DLC PIN 10 Ungrounded >2.5s Grounded 1 MIL 1 2 2 MIL MIL 2.5s seconds 0.5s 2.5s 2.5s 0.5s 2.5s 0.5s 2.5s 0.5s 2.5s 0.5s MIL DTC Repetition Loop of DTC 1122 5. Ground the pin 10 again for 2.5 seconds. The next DTC will be displayed on the MIL. Keep grounding pin 10 until all DTCs are read and the last output is "end of output" DTC (MIL flashes 3-3-3-3). 6. If no malfunctions are present, MIL will flash 4-4-4-4. 7. After recording DTCs turn ignition switch off. 8. Disconnect jumper leads. 9. Erase DTCs when all repairs are completed. NOTE On certain Hyundai vehicles, the instrument panel MIL will flash out fourdigit DTCs. When four-digit DTCs are manually read from the engine ECU, use F2: DTC LIST (instead of F1: ENTER DTC(s) to select DTCs flashed on the MIL. The F2: DTC LIST mode displays both the four-digit and the corresponding two-digit DTC. DTC 23 (3145) ECT SENSOR OR CKT FAILURE Submode F2: DTC List This submode provides you with a way to view all possible ECU DTCs, including DTC numbers and descriptions. You can also select the DTCs obtained from the analog voltmeter as an alternative to entering DTCs into the tester's memory. As you scroll through the available DTCs you can view a description of the DTC obtained from the analog voltmeter or MIL. You can "Select" the DTC on the tester screen for later review or printing. Refer to the Common Test Modes OBD, OBD I Systems section for further information. Submode F3: Review DTC This submode provides you with a review of the DTCs that you entered or selected in the tester. The description of the entered or selected DTC will be displayed, along with a numerical summary of the entered or selected DTC. Review DTC is intended to provide you with an electronic clipboard that keeps track of the DTCs that you have encountered during diagnosis. Submode F4: Clear DTC(s) This submode has two options for you to choose. Option F0 is a series of instructions screens which inform you how to clear DTC(s) from the ECU. This is performed by tester keypad presses. Option F1 clears DTCs 14 HYUNDAI TEST MODES from the tester's memory that you entered or selected. The clear DTC(s) mode is helpful and provides information that you would normally have to locate in a service manual. MODE F2: DTC To read DTCs on 1989-95 vehicles you will need to locate the vehicle DLC and connect the Hyundai Check Adapter to the tester and vehicle. To locate the DLC, select F1: DLC Location from the Information menu. If necessary, refer to the Common Test Modes OBD, OBD I Systems section for further instructions. When Mode F2: DTC is selected, the tester displays four submodes: DTC SUBMODES: F1: READ DTC(s) F2: DTC LIST F3: REVIEW DTC F4: CLEAR DTC(s) Submode F1: Read DTC(s) This submode provides automated DTC retrieval from the vehicle ECU. Step by step screen instructions guide you to connect the YELLOW Mitsubishi/Chrysler Imports/Hyundai Check adapter to the vehicle DLC and start and warm the engine to normal operating temperature. This is performed by following the tester instruction screens. If you have trouble, additional F1: READ DTC(s) retrieval information is described on the next page. This submode is available for all 1989-95 Hyundai vehicles, excluding 1993-95 Scoupe. If you are unsure of the Read DTC test application, check the code type column in the Hyundai Vehicle Coverage table (found at the beginning of this section). If the Code Type column indicates "Autocodes", then the vehicle supports F1: READ DTC(s). NOTE When reading DTCs from Hyundai vehicles make sure the engine is at normal operating temperature and testing is performed in a well-ventilated area. Reading DTCs from 1989-1995 Hyundai ECUs using the F1: Read DTCs mode in Asian Imports cartridge: 1. Insert Asian cartridge into MASTERTECH or TECH 1A, 2. Connect Hyundai Check adapter (Yellow) to DLC. 3. Connect the Check adapter to the vehicle DLC. Press F1: DLC location from the Information menu for Data Link Connector location assistance. 4. Power MASTERTECH or TECH 1A with 12v power cable. 5. Select Hyundai vehicle to test. 6. Press F2: DTCs from Hyundai test mode menu. 7. Press F1: READ DTCs submode from DTC test menu. Follow instructions on the tester display. HYUNDAI 15 TEST MODES 8. Tester will automatically command the vehicle ECU into the correct mode required to read DTCs, and will display all received DTCs on the tester display. On certain Hyundai vehicles, the instrument panel MIL flashes out fourdigit DTCs. When DTCs are automatically read from the engine ECU with the tester, DTCs are displayed on the tester as two digit. The DTC display screen using this method will have both the two digit and four digit DTCs (four digit DTC in parentheses). For more information on 2 and 4 digit DTCs, refer to the factory service manual. NOTE DTC 23 (3145) ECT SENSOR OR CKT FAILURE Follow the Submode F0: Prepare Vehicle instructions to ensure proper vehicle preparation prior to testing. The vehicle must be completely warmed up in order for the tester to communicate properly with the vehicle. Submode F2: DTC List This submode provides you with a way to view all possible ECU DTCs, including DTC numbers and descriptions. You can also select the DTCs obtained from the analog voltmeter or MIL as an alternative way of entering DTCs into the tester's memory. As you scroll through the available DTCs you can view a description of the DTC obtained from the analog voltmeter or MIL. You can "Select" the DTC on the tester screen for later review or printing. Refer to the Common Test Modes OBD, OBD I Systems section for further information. Submode F3: Review DTC This submode provides you with a review of the DTCs that you entered or selected in the tester. The description of the entered or selected DTC will be displayed, along with a numerical summary of the entered or selected DTC. Review DTC is intended to provide you with an electronic clipboard that keeps track of the DTC's that you have encountered during diagnosis. Submode F4: Clear DTC(s) This submode has two options for you to chose. Option 1 is to view text screens that provide information on how to clear the DTCs from ECU memory. Option 2 clears the tester memory from DTCs that you entered or selected in the tester. The clear DTC(s) mode is helpful and provides information that you would normally have to locate in a service manual. 16 HYUNDAI HYUNDAI DIAGNOSTIC TROUBLE CODES (DTCS) 7. HYUNDAI DIAGNOSTIC TROUBLE CODES (DTCS) DTCs available for Hyundai vehicles are listed in the following charts. Some code numbers have different descriptors depending on the selected vehicle. Only codes available for the selected vehicle are displayed by the tester. OBD I SYSTEMS YEAR: 1989 DTC NO. 1989 0 ECU OR CIRCUIT FAILURE 11 O2 SENSOR OR CKT FAILURE 12 AIR FLOW SENSOR OR CKT FAILURE 13 IAT SENSOR OR CKT FAILURE 14 TP SENSOR OR TPS CKT FAILURE 15 MOTOR POSITION SWITCH OR CKT 21 ECT SENSOR OR CKT FAILURE 22 CRANK ANGLE SENSOR OR CKT 23 NO.1 CYL DTC SENSOR OR CKT 24 VSS OR CKT FAILURE 25 BARO SENSOR OR CKT FAILURE 41 FUEL INJECTOR OR CKT FAILURE 42 FUEL PUMP OR CKT FAILURE 43 EGR SYSTEM: VALVE, SOLENOID, VAC, OR TEMP. SENSOR DESCRIPTOR YEAR: 1990 DTC NO. 1990 0 ECU OR CIRCUIT FAILURE 11 O2 SENSOR OR CKT FAILURE 12 AIR FLOW SENSOR OR CKT FAILURE 13 IAT SENSOR OR CKT FAILURE 14 TP SENSOR OR TPS CKT FAILURE 15 MOTOR POSITION SWITCH OR CKT HYUNDAI DESCRIPTOR 17 HYUNDAI DIAGNOSTIC TROUBLE CODES (DTCS) YEAR: 1990 (CONTINUED) 18 DTC NO. DESCRIPTOR 21 ECT SENSOR OR CKT FAILURE 22 CRANK ANGLE SENSOR OR CKT 23 NO.1 CYL TDC SENSOR OR CKT 24 VSS OR CKT FAILURE 25 BARO SENSOR OR CKT FAILURE 41 FUEL INJECTOR OR CKT FAILURE 42 FUEL PUMP OR CKT FAILURE 43 EGR SYSTEM: VALVE, SOLENOID, VAC, OR TEMP. SENSOR YEAR: 1991 DTC NO. 1991 0 ECU OR CIRCUIT FAILURE 11 O2 SENSOR OR CKT FAILURE 12 AIR FLOW SENSOR OR CKT FAILURE 13 IAT SENSOR OR CKT FAILURE 14 TP SENSOR OR TPS CKT FAILURE 15 MOTOR POSITION SWITCH OR CKT 21 ECT SENSOR OR CKT FAILURE 22 CRANK ANGLE SENSOR OR CKT 23 NO.1 CYL TDC SENSOR OR CKT 24 VSS OR CKT FAILURE 25 BARO SENSOR OR CKT FAILURE 41 FUEL INJECTOR OR CKT FAILURE 42 FUEL PUMP OR CKT FAILURE 43 EGR SYSTEM: VALVE, SOLENOID, VAC, OR TEMP. SENSOR DESCRIPTOR YEAR: 1992 DTC NO. 1992 0 ECU OR CIRCUIT FAILURE 11 O2 SENSOR OR CKT FAILURE 12 AIR FLOW SENSOR OR CKT FAILURE DESCRIPTOR HYUNDAI HYUNDAI DIAGNOSTIC TROUBLE CODES (DTCS) YEAR: 1992 (CONTINUED) DTC NO. DESCRIPTOR 13 IAT SENSOR OR CKT FAILURE 14 TP SENSOR OR TPS CKT FAILURE 15 MOTOR POSITION SWITCH OR CKT 21 ECT SENSOR OR CKT FAILURE 22 CRANK ANGLE SENSOR OR CKT 23 NO.1 CYL TDC SENSOR OR CKT TDC SENSOR OR CKT FAILURE 24 VSS OR CKT FAILURE 25 BARO SENSOR OR CKT FAILURE 41 FUEL INJECTOR OR CKT FAILURE 42 FUEL PUMP OR CKT FAILURE 43 EGR SYSTEM: VALVE, SOLENOID, VAC, OR TEMP. SENSOR 44 IGNITION SIGNAL OR CKT FAILURE YEAR: 1993 DTC NO. 1993 0 ECU OR CIRCUIT FAILURE 11 FRONT O2 SENSOR OR CKT FAILURE O2 SENSOR OR CKT FAILURE 12 AIR FLOW SENSOR OR CKT FAILURE 13 IAT SENSOR OR CKT FAILURE ECU OR CIRCUIT (ROM FAILURE) 14 TP SENSOR OR TPS CKT FAILURE ECU OR CIRCUIT (RAM FAILURE) 15 MOTOR POSITION SWITCH OR CKT 16 ECU OR CIRCUIT (ROM/RAM FAIL) 17 ECU FAILURE-KNOCK CONTROL 19 ECU FAILURE KNOCK EVAL CKT 21 ECT SENSOR OR CKT FAILURE O2 SENSOR OR CKT FAILURE 22 CRANK ANGLE SENSOR OR CKT MAF SENSOR OR CIRCUIT FAILURE 23 NO.1 CYL TDC SENSOR OR CKT TDC SENSOR OR CKT FAILURE ECT SENSOR OR CKT FAILURE HYUNDAI DESCRIPTOR 19 HYUNDAI DIAGNOSTIC TROUBLE CODES (DTCS) YEAR: 1993 (CONTINUED) 20 DTC NO. DESCRIPTOR 24 SPEED SENSOR OR CKT FAILURE CAMSHAFT POSIT. SENSOR OR CKT 25 BARO SENSOR OR CKT FAILURE CRANK ANGLE SENSOR OR CKT 26 TP SENSOR OR TPS CKT FAILURE 27 KS OR KS CIRCUIT FAILURE 29 SPEED SENSOR OR CKT FAILURE 31 BATTERY VOLTAGE OR ALTERNATOR 33 A/C COMPRESSOR OR CKT FAILURE 36 BOOST SENSOR FAILURE (HIGH) 37 BOOST SENSOR CNTRL DEV. FAULT 38 BOOST CONTROL VALVE FAILURE 39 BOOST PRESSURE SENSOR FAILURE 41 FUEL INJECTOR OR CKT FAILURE NO.1 INJECTOR OR CIRCUIT FAILURE 42 FUEL PUMP OR CKT FAILURE NO.2 INJECTOR OR CIRCUIT FAILURE 43 EGR SYSTEM: VALVE, SOLENOID, VAC, OR TEMP. SENSOR NO.3 INJECTOR OR CIRCUIT FAILURE 44 IGNITION SIGNAL OR CKT FAILURE NO.4 INJECTOR OR CIRCUIT FAILURE 45 PURGE CNTRL SOL. VALVE OR CKT 47 ISC ACTUATOR FAILURE(OPENING) 48 ISC ACTUATOR FAILURE(CLOSING) 53 FUEL PUMP OR CKT FAILURE 59 REAR O2 SENSOR OR CKT FAILURE 61 ECU FAILURE-INJ. OR PURGE SOL. 62 ECU FAILURE-IDLE ACT. OR A/C RLY 63 ECU FAILURE DRIVING CKT A 65 ECU FAILURE-INJ PCV ISA A/C RLY 69 ECU FAILURE DRIVING CKT B 81 AIR/FUEL CONTROL FAILURE 82 A/F ADAPTIVE FAILURE-MULTIP. 83 A/F ADAPTIVE FAILURE A/N HYUNDAI HYUNDAI DIAGNOSTIC TROUBLE CODES (DTCS) YEAR: 1993 (CONTINUED) DTC NO. 84 DESCRIPTOR A/F ADAPTIVE FAILURE-ADDITIVE YEAR: 1994 DTC NO. 1994 0 ECU OR CIRCUIT FAILURE 11 FRONT HEATED O2 SENSOR OR CKT HEATED O2 SENSOR OR CKT FAILURE O2 SENSOR OR CKT FAILURE 12 VOLUME AIR FLOW SENSOR OR CKT 13 IAT SENSOR OR CKT FAILURE ECU OR CIRCUIT (ROM FAILURE) 14 TP SENSOR OR TPS CKT FAILURE ECU OR CIRCUIT (RAM FAILURE) 15 MOTOR POSITION SENSOR OR CKT 16 ECU OR CIRCUIT (ROM/RAM FAIL) 17 ECU FAILURE-KNOCK CONTROL 19 ECU FAILURE KNOCK EVAL CKT 21 ECT SENSOR OR CKT FAILURE O2 SENSOR OR CKT FAILURE 22 CRANK ANGLE SENSOR OR CKT MAF SENSOR OR CIRCUIT FAILURE 23 CAMSHAFT POSIT. SENSOR OR CKT ECT SENSOR OR CKT FAILURE 24 VSS OR CIRCUIT FAILURE CAMSHAFT POSIT. SENSOR OR CKT 25 BARO SENSOR OR CKT FAILURE CRANK ANGLE SENSOR OR CKT 26 TP SENSOR OR TPS CKT FAILURE 27 KS OR KS CIRCUIT FAILURE 29 VEHICLE SPEED OR CIRCUIT 31 BATTERY VOLTAGE OR ALTERNATOR 33 A/C COMPRESSOR OR CKT FAILURE 36 ECM MAP SENSOR FAILURE (HIGH) 37 ECM MAP SENSOR CNTRL DEV. FAULT 38 ECM MAP SENSOR CNTRL VALVE HYUNDAI DESCRIPTOR 21 HYUNDAI DIAGNOSTIC TROUBLE CODES (DTCS) YEAR: 1994 (CONTINUED) 22 DTC NO. DESCRIPTOR 39 ECM MAP SENSOR PRESSURE SNSR 41 FUEL INJECTOR OR CKT FAILURE NO.1 INJECTOR OR CIRCUIT FAILURE 42 FUEL PUMP OR CKT FAILURE NO.2 INJECTOR OR CIRCUIT FAILURE 43 EGR SYSTEM: VALVE, SOLENOID, VAC, OR TEMP. SENSOR NO.3 INJECTOR OR CIRCUIT FAILURE 44 IGNITION SIGNAL OR CKT FAILURE NO.4 INJECTOR OR CIRCUIT FAILURE 45 PURGE CNTRL SOL. VALVE OR CKT 47 ISC ACTUATOR FAILURE(OPENING) 48 ISC ACTUATOR FAILURE(CLOSING) 53 FUEL PUMP OR CKT FAILURE 59 REAR HEATED O2 SENSOR OR CKT 61 ECU FAILURE-INJ. OR PURGE SOL. 62 ECU FAILURE-IDLE ACT. OR A/C RLY 63 ECU FAILURE DRIVING CKT A 65 ECU FAILURE-INJ PCV ISA A/C RLY 69 ECU FAILURE DRIVING CKT B 81 AIR/FUEL CONTROL FAILURE 82 A/F ADAPTIVE FAILURE-MULTIP. 83 A/F ADAPTIVE FAILURE A/N 84 A/F ADAPTIVE FAILURE-ADDITIVE YEAR: 1995 DTC NO. 1995 0 ECM INTERNAL FAILURE 11 FRONT HO2S OR CKT FAILURE 12 VOL. AIR FLOW SENSOR OR CKT FAILURE 13 IAT SENSOR OR CKT FAILURE (ALL EXCEPT ACCENT/SCOUPE) 13 ECM INTERNAL FAILURE (ACCENT/SCOUPE) 14 TPS OR CKT FAILURE 21 ECT OR CKT FAILURE (EXCEPT ACCENT/SCOUPE) DESCRIPTOR HYUNDAI HYUNDAI DIAGNOSTIC TROUBLE CODES (DTCS) YEAR: 1995 (CONTINUED) HYUNDAI DTC NO. DESCRIPTOR 21 HO2S OR CKT FAILURE (ACCENT/SCOUPE) 22 CRANK POSITION SENSOR OR CKT FAILURE (ALL EXCEPT ACCENT/SCOUPE) 22 MAF SENSOR OR CKT FAILURE (ACCENT/SCOUPE) 23 CAM POSITION SENSOR OR CKT FAILURE (ALL EXCEPT ACCENT/ SCOUPE) 23 ECT SENSOR OR CKT FAILURE (ACCENT/SCOUPE) 24 VSS/REED SWITCH OR CKT FAILURE (ALL EXCEPT ACCENT/ SCOUPE) 24 CAM POSITION SENSOR OR CKT FAILURE (ACCENT/SCOUPE) 25 BARO SENSOR OR CKT FAILURE (ALL EXCEPT ACCENT/SCOUPE) 25 CRANK POSITION SENSOR OR CKT FAILURE (ACCENT/SCOUPE) 26 TPS OR CKT FAILURE 27 KNOCK SENSOR OR CKT FAILURE 29 VSS OR CKT FAILURE 31 INCORRECT BATTERY VOLTAGE DETECTED 33 A/C SWITCH OR RELAY FAILURE 36 HI BOOST-CHECK WASTEGATE CONTROL SYSTEM 37 WASTE GATE CONTROL SOL/VAC FAILURE 38 WASTE GATE CONTROL SOL CKT FAILURE 41 FUEL INJECTOR OR CKT FAILURE 41 NO 1 INJECTOR FAILURE (ACCENT/SCOUPE) 42 FUEL PUMP OR CKT FAILURE 42 NO 2 INJECTOR FAILURE (ACCENT/SCOUPE) 43 EGR SYSTEM: VALVE, SOLENOID, VAC, OR TEMP. SENSOR (ALL EXCEPT ACCENT/SCOUPE) 43 NO 3 INJECTOR FAILURE (ACCENT/SCOUPE) 44 IGNITION COIL/TRANSISTOR OR CKT FAILURE (ALL EXCEPT ACCENT/SCOUPE) 44 NO 4 INJECTOR (ACCENT/SCOUPE) 45 EVAP PURGE VALVE OR CKT FAILURE 47 ISA OR CKT FAILURE 59 REAR HO2S OR CKT FAILURE (CAL ELANTRA/ALL SONATA) 81 A/F LEAN-LEAKING OR CLOGGED INJECTOR 23 HYUNDAI DIAGNOSTIC TROUBLE CODES (DTCS) YEAR: 1995 (CONTINUED) 24 DTC NO. DESCRIPTOR 82 A/F RICH-LEAKING OR CLOGGED INJECTOR 85 IAT SENSOR SHORT CKT HYUNDAI HYUNDAI DIAGNOSTIC TROUBLE CODES (DTCS) OBD II SYSTEMS YEAR: 1996-98 DTC NO. 1996-98 OBD II P0100 Mass or Volume Air Flow Circuit Malfunction P0102 MAF Sensor Circuit, Low Input P0103 MAF Sensor Circuit, High Input P0105 BARO Pressure Circuit Malfunction P0110 IAT Sensor Circuit Malfunction P0112 IAT Sensor Circuit, Low Input P0113 IAT Sensor Circuit, High Input P0115 ECT Circuit Malfunction P0116 ECT Circuit, Out of Range P0117 ECT Circuit, Low Input P0118 ECT Circuit, High Input P0120 TPS Circuit Malfunction P0121 TPS Circuit Range Does not Agree with MAF Sensor P0122 TPS Circuit, Low Input P0123 TPS Circuit, High Input P0125 Coolant Temp. Low, no Closed Loop Fuel Control P0130 O2S Circuit Malfunction, Bank 1 Sensor 1 P0131 O2S Circuit, Low Voltage, Bank 1 Sensor 1 P0132 O2S Circuit, High Voltage, Bank 1 Sensor 1 P0133 O2S Circuit, Slow Response, Bank 1 Sensor 1 P0134 O2S Circuit, no Activity Detected, Bank 1 Sensor 1 P0135 O2S Heater Circuit Malfunction, Bank 1 Sensor 1 P0136 O2S Circuit Malfunction, Bank 1 Sensor 2 P0137 O2S Circuit, Low Voltage, Bank 1 Sensor 2 P0138 O2S Circuit, High Voltage, Bank 1 Sensor 2 P0141 O2S Heater Circuit Malfunction, Bank 1 Sensor 2 P0170 Fuel Trim Malfunction P0201 Fuel Injector No. 1, Circuit Malfunction P0202 Fuel Injector No. 2, Circuit Malfunction P0203 Fuel Injector No. 3, Circuit Malfunction HYUNDAI DESCRIPTION 25 HYUNDAI DIAGNOSTIC TROUBLE CODES (DTCS) YEAR: 1996-98 (CONTINUED) 26 DTC NO. DESCRIPTION P0204 Fuel Injector No. 4, Circuit Malfunction P0205 Fuel Injector No. 5, Circuit Malfunction P0206 Fuel Injector No. 6, Circuit Malfunction P0300 Random Misfire Detected P0301 Cylinder No. 1, Misfire Detected P0302 Cylinder No. 2, Misfire Detected P0303 Cylinder No. 3, Misfire Detected P0304 Cylinder No. 4, Misfire Detected P0305 Cylinder No. 5, Misfire Detected P0306 Cylinder No. 6, Misfire Detected P0326 Knock Sensor Circuit, Out of Range P0335 Crankshaft Position Sensor Circuit, Malfunction P0336 Crankshaft Position Sensor, Circuit Out of Range P0340 Camshaft Position Sensor, Circuit Malfunction P0342 Camshaft Position Sensor Circuit, Low Input P0343 Camshaft Position Sensor Circuit, High Input P0400 EGR Flow, System Malfunction P0403 EGR Solenoid Circuit, Malfunction P0420 Catalyst Efficiency Below Threshold P0421 Warm Up Catalyst Efficiency Below Threshold P0422 Main Catalyst Efficiency Below Threshold P0440 EVAP Control System Malfunction P0441 EVAP Purge System, Incorrect Flow P0442 EVAP Control System, Small Leak Detected P0443 EVAP Purge Control Valve Circuit Malfunction P0444 Purge Control Valve, Circuit Open P0445 Purge Control Valve, Circuit Shorted P0446 EVAP Control System, Canister Close Valve, Stuck Closed P0447 EVAP Control System, Vent Control Valve, Short to Ground P0448 EVAP Control System, Vent Control Valve, Short to Battery Voltage P0450 EVAP Control System, Fuel Tank Differential Pressure Sensor Malfunction HYUNDAI HYUNDAI DIAGNOSTIC TROUBLE CODES (DTCS) YEAR: 1996-98 (CONTINUED) HYUNDAI DTC NO. DESCRIPTION P0451 EVAP Control System, Pressure Sensor Signal not Plausible P0452 EVAP Control System, Fuel Tank Pressure Sensor Signal Low P0453 EVAP Control System, Fuel Tank Pressure Sensor Signal High P0455 EVAP Control System, Incorrect Purge Flow P0500 Vehicle Speed Sensor Malfunction P0501 Vehicle Speed Sensor, Circuit Out of Range P0505 Idle Speed Control System Malfunction P0506 Idle RPM Lower than Expected P0507 Idle RPM Higher than Expected P0510 Closed Throttle Sensor Idle Switch Malfunction P0562 Power Supply System, Low Voltage P0563 Power Supply System, High Voltage P0605 Internal Control Module, ROM Error P0700 TCM to ECM Input Pulse Malfunction P0705 Inhibitor Switch Malfunction P0707 A/T Range Circuit, No Input Signal P0708 A/T Range Circuit, More than Two Input Signals P0712 Transmission Fluid Temp. Sensor, Open Circuit P0713 Transmission Fluid Temp. Sensor, Short Circuit P0715 Pulse Generator A or B, Open Circuit P0717 Pulse Generator A, Open Circuit P0722 Pulse Generator B, Open Circuit P0727 Ignition Pulse Pickup Circuit P0731 1st Gear shift Does Not Match Engine Speed P0732 2nd Gear shift Does Not Match Engine Speed P0733 3rd Gear shift Does Not Match Engine Speed P0734 4th Gear shift Does Not Match Engine Speed P0740 Damper Clutch System Malfunction P0742 Damper Clutch System Malfunction P0743 Damper Clutch System Malfunction P0747 Pressure Control Solenoid Valve, Open Circuit 27 HYUNDAI DIAGNOSTIC TROUBLE CODES (DTCS) YEAR: 1996-98 (CONTINUED) 28 DTC NO. DESCRIPTION P0748 Pressure Control Solenoid Valve, Short Circuit P0750 Shift Control Circuit Malfunction P0752 Shift Control Solenoid A, Open Circuit P0753 Shift Control Solenoid Valve A, Short Circuit P0757 Shift Control Solenoid Valve B, Open Circuit P0758 Shift Control Solenoid Valve B, Short Circuit P1123 Long Term Fuel Trim Additive Air, System Too Rich P1124 Long Term Fuel Trim Additive Air, System Too Lean P1127 Long Term Fuel Trim Multiplicative, System Too Rich P1128 Long Term Fuel Trim Multiplicative, System Too Lean P1140 Load Detection Sensor, TPS and MAF do not Match P1400 MDP Sensor Circuit Malfunction P1510 Idle Control Valve, Opening Coil Circuit Shorted P1513 Idle Control Valve, Opening Coil Circuit Open P1521 P/S Pressure Switch Signal, Malfunction P1552 Idle Control Valve, Closing Coil Circuit Shorted P1553 Idle Control Valve, Closing Coil Circuit Open P1586 MT/AT Encoding Circuit not Rational P1605 Acceleration Circuit Malfunction P1606 Acceleration Circuit not Rational P1611 MIL Request Signal Circuit, Low Input P1613 MIL Request Signal Circuit, High Input (Elantra/Tiburon) P1614 MIL Request Signal Circuit, High Input (Accent) P1624 TCM Component Malfunction P1665 Power Stage, Group A Malfunction P1670 Power Stage, Group B Malfunction P1701 Throttle Position Sensor, Open Circuit P1702 Throttle Position Sensor, Short Circuit P1704 TPS Malfunction or Improper Adjustment P1709 Kickdown Servo Switch Circuit P1714 Closed Throttle Position Switch Circuit P1715 Pulse Generator Assembly Malfunction HYUNDAI HYUNDAI DIAGNOSTIC TROUBLE CODES (DTCS) YEAR: 1996-98 (CONTINUED) HYUNDAI DTC NO. DESCRIPTION P1744 Damper Clutch System Malfunction P1750 Solenoid Assembly Malfunction 29 HYUNDAI DIAGNOSTIC TROUBLE CODES (DTCS) 30 HYUNDAI INFINITI 1. VEHICLES AND SYSTEMS ..................................................................................................................... 2 2. INFINITI SPECIFIC INFORMATION ..................................................................................................... 5 3. TEST MODES AVAILABLE ...................................................................................................................... 6 4. GETTING STARTED ................................................................................................................................... 7 5. SELECTING THE VEHICLE .................................................................................................................... 8 6. TEST MODES.............................................................................................................................................. 10 Mode F1: DTC Entry ........................................................................................................................ 10 Submode F0: How To Read .....................................................................................................11 Submode F1: Enter DTC(s) ......................................................................................................11 Submode F2: DTC List ............................................................................................................ 12 Submode F3: Review DTC(s) ................................................................................................. 12 Submode F4: Clear DTC(s) ..................................................................................................... 12 7. INFINITI DIAGNOSTIC TROUBLE CODES (DTCs) ...................................................................... 13 OBD, OBD I Systems ....................................................................................................................... 13 1990.............................................................................................................................................. 13 1991.............................................................................................................................................. 13 1992.............................................................................................................................................. 14 1993.............................................................................................................................................. 15 1994.............................................................................................................................................. 16 1995.............................................................................................................................................. 17 OBD II Systems ................................................................................................................................. 18 1996-98 OBD II ......................................................................................................................... 18 VEHICLES AND SYSTEMS 1. VEHICLES AND SYSTEMS Using the Asian cartridge, the following Chrysler Imports vehicles can be diagnosed. MODEL ENGINE ENGINE TYPE FUEL TYPE ECU MODES CODE TYPE ADAPTER TYPE 1990 M30 3.0L V6 VG30E EFI 2 MIL/LED NONE Q45 4.5L V8 VH45DE EFI 2 MIL/LED NONE MODEL ENGINE ENGINE TYPE FUEL TYPE ECU MODES CODE TYPE ADAPTER TYPE 1991 G20 2.0L I4 SR20DE EFI 2 MIL/LED NONE M30 3.0L V6 VG30E EFI 2 MIL/LED NONE Q45 4.5L V8 VH45DE EFI 2 MIL/LED NONE MODEL ENGINE ENGINE TYPE FUEL TYPE ECU MODES CODE TYPE ADAPTER TYPE 1992 G20 2.0L I4 SR20DE EFI 2 MIL/LED NONE M30 3.0L V6 VG30E EFI 2 MIL/LED NONE Q45 4.5L V8 VH45DE EFI 2 MIL/LED NONE MODEL ENGINE ENGINE TYPE FUEL TYPE ECU MODES CODE TYPE ADAPTER TYPE 1993 2 G20 2.0L I4 SR20DE SMPI 2 MIL/LED NONE J30 3.0L V6 VG30E SMPI 2 MIL/LED NONE Q45 4.5L V8 VH45DE SMPI 2 MIL/LED NONE INFINITI VEHICLES AND SYSTEMS MODEL ENGINE ENGINE TYPE FUEL TYPE ECU MODES CODE TYPE ADAPTER TYPE 1994 G20 2.0L I4 SR20DE SMPI 2 MIL/LED NONE J30 3.0L V6 VG30E SMPI 2 MIL/LED NONE Q45 4.5L V8 VH45DE SMPI 2 MIL/LED NONE MODEL ENGINE ENGINE TYPE FUEL TYPE ECU MODES CODE TYPE ADAPTER TYPE 1995 * G20 2.0L I4 SR20DE SMPI N/A AUTOCODES OBD II* J30 3.0L V6 VG30DE SMPI 2 MIL/LED NONE Q45 4.5L V8 VH45DE SMPI 2 MIL/LED NONE For Adapter Type OBD II see the Common Test Modes OBD II Systems section for operating instructions and test mode information. MODEL ENGINE ENGINE TYPE FUEL TYPE ECU MODES CODE TYPE ADAPTER TYPE 1996 G20 2.0L I4 SR20DE SMPI N/A AUTOCODES OBD II* I30 3.0L V6 VQ30DE SMPI N/A AUTOCODES OBD II* J30 3.0L V6 VG30DE SMPI N/A AUTOCODES OBD II* Q45 4.5L V8 VH45DE SMPI N/A AUTOCODES OBD II* * For Adapter Type OBD II see the Common Test Modes OBD II Systems section for operating instructions and test mode information. MODEL ENGINE ENGINE TYPE FUEL TYPE ECU MODES CODE TYPE ADAPTER TYPE 1997 I30 3.0L V6 VQ30DE SMPI N/A AUTOCODES OBD II* J30 3.0L V6 VG30DE SMPI N/A AUTOCODES OBD II* QX4 3.3L V6 VG33E SMPI N/A AUTOCODES OBD II* INFINITI 3 VEHICLES AND SYSTEMS MODEL Q45 ENGINE 4.1L V8 * ENGINE TYPE VH41DE FUEL TYPE SMPI ECU MODES N/A CODE TYPE AUTOCODES ADAPTER TYPE OBD II* For Adapter Type OBD II see the Common Test Modes OBD II Systems section for operating instructions and test mode information. MODEL ENGINE ENGINE TYPE FUEL TYPE ECU MODES CODE TYPE ADAPTER TYPE 1998 I30 3.0L V6 VQ30DE MFI N/A AUTOCODES OBD II* QX4 3.3L V6 VG33E MFI N/A AUTOCODES OBD II* Q45 4.1L V8 VH41DE MFI N/A AUTOCODES OBD II* * 4 For Adapter Type OBD II see the Common Test Modes OBD II Systems section for operating instructions and test mode information. INFINITI INFINITI SPECIFIC INFORMATION 2. INFINITI SPECIFIC INFORMATION The Infiniti vehicles covered by the Asian Imports Cartridge are separated into two different sections within the Asian Imports Operator’s Manual. The vehicle’s on-board system will determine which section of the Operator’s Manual will need to be used. Vehicles that are OBD II certified have information about the operating test modes in the Common Test Modes OBD II Systems section of the Operator’s Manual. Vehicles that have OBD or OBD I systems have test mode information in this section of the Operator’s Manual. In these sections, you will find information on test modes available, how to connect the tester to the vehicle, and operating instructions for the different test modes. A complete list of Infiniti Diagnostic Trouble Codes is included at the back of each section. To determine which section of the Operator’s Manual to use for diagnostic information and instructions, look at Adapter Type of the Vehicle and Systems chart. If the vehicle you are testing has an OBD II adapter type, use the Common Test Modes OBD II Systems section of the Operator’s Manual. If the vehicle you are testing does not have the OBD II Adapter Type, use this section to diagnose the vehicle under test. INFINITI 5 TEST MODES AVAILABLE 3. TEST MODES AVAILABLE The following test modes are available when testing Infiniti vehicles. General operating instructions for test modes other than DTC ENTRY are included in the Common Test Modes OBD, OBD I Systems section. There are also Infiniti specific instructions for operating the test modes in TEST MODES on page 10. MODE F1: DTC ENTRY SUBMODE F0: HOW TO READ SUBMODE F1: ENTER DTC(s) SUBMODE F2: DTC LIST SUBMODE F3: REVIEW DTC SUBMODE F4: CLEAR DTC(s) MODE F5: SYSTEM TESTS SUBMODE F0: PREP VEHICLE MODE F8: INFORMATION SUBMODE F3: ID INFO SUBMODE F5: ECU LOCATION 6 INFINITI GETTING STARTED 4. GETTING STARTED Before operating the Asian Imports Cartridge with an Infiniti vehicle, the following steps must be performed: 1. Make sure the vehicle ignition is OFF. 2. Plug the tester power cable into the vehicle cigarette lighter. The power cable may also be directly connected to the battery via the optional battery adapter cable (P/N 02001636). NOTE Since the cigarette lighter can be switched, some tests require that the power cable be directly connected to the battery via the battery adapter cable. 3. Turn on the tester and select the application software that you will be using. Verify that the correct screen is displayed. The tester should display a screen similar to Figure 1-1. ASIAN IMPORTS 83 - 02 <ENTER> FIGURE 1-1. Tester stand-alone display 4. If the display is correct, press E. If the display is not correct, refer to Appendix D 5. Follow the instructions on the following page to select the vehicle type you are testing by entering required vehicle information into the tester. INFINITI 7 SELECTING THE VEHICLE 5. SELECTING THE VEHICLE Once you've pressed E from the power-up screen, the following steps must be performed to select the manufacturer, model year, model and engine type of the vehicle being tested. Remember, if you make a mistake, you can always press X to go back to the previous menu. SELECTING THE MANUFACTURER A menu of manufacturers available for testing is displayed in a scrolling menu. You can scroll down one screen at a time by pressing Y, or up one screen at a time by pressing n. Press U or D to scroll one manufacturer at a time, until the → arrow is opposite the manufacturer you wish to select. Then press e to select. SELECTING THE MODEL YEAR Once the manufacturer is selected, the Select Model Year menu is displayed. Press the last two digits of the year model being tested; 9, 0 for 1990 models, 9, 1 for 1991 models, and so on. SELECTING THE MODEL The Model Select menu displays models available for testing. Press the N key until the model being tested is displayed, then press the Y key. SELECTING THE ENGINE Next, the Engine Select menu is displayed. Press N until the engine type of the vehicle is displayed, then press Y. VEHICLE INFORMATION DISPLAY After the vehicle type is selected the tester displays a summary screen of the selected vehicle. Information displayed includes the year, manufacturer, model, engine size and type, and additional information such as the type of fuel system. SELECT MODE MENU When the above steps are completed, the Select Mode menu displays the test modes available for the selected vehicle and system. Refer to TEST MODES on page 10, and the Common Test Modes OBD, OBD I Systems section for operating the test modes with Infiniti vehicles 8 INFINITI SELECTING THE VEHICLE . MANUFACTURER HONDA HYUNDAI INFINITI E INFINITI 1990 - 2002 SELECT MODEL YEAR: ???? 9,4 SELECT MODEL: G20 (YES/NO) Y SELECT ENGINE: 2.0L I4 (YES/NO) Y 1994 INFINITI G20 2.0L I4 SMPI U, or 5 sec. SELECT MODE F1: DTC ENTRY F5: SYSTEM TESTS F8: INFORMATION FIGURE 1-2. Infiniti Vehicle Selection ACTIVE KEYS 0-9 Enter model year. Y N Used to answer questions in tester display. E Confirm Power-up display. X Return to previous display INFINITI 9 TEST MODES 6. TEST MODES When the Select Mode menu is displayed, test modes available for Infiniti vehicles may be selected. You may select Mode F1: DTC ENTRY, Mode F5: SYSTEM TESTS, or Mode F8: INFORMATION without connecting the tester to the vehicle. General operating instructions for the test modes other than DTC Entry are included in the Common Test Modes OBD, OBD I Systems section. Detailed operating instructions for using Mode F1: DTC ENTRY with Infiniti vehicles are included in the following procedure. READING CODES When Mode F1: DTC ENTRY is selected, the tester displays submodes which provide information on how to read diagnostic trouble codes (DTCs) from the vehicle, how to clear DTCs from the vehicle (or tester memory buffer), obtain a text description of entered or selected DTCs, and review entered or selected DTCs as a result of manually retrieving codes from the ECU. To read DTC codes on Infiniti vehicles you must locate the ECU and observe the flashing LED or instrument panel MIL. If you do not know where the ECU is located, select Mode F5: ECU LOCATION from the Information menu. If necessary, refer to the Common Test Modes OBD, OBD I Systems section for further instructions. Follow the detailed instructions on the following pages to manually read the DTCs. Once the DTCs have been manually read from the ECU, you can input the DTC into the tester so the tester can define the code. A complete list of Infiniti DTCs is also included in INFINITI DIAGNOSTIC TROUBLE CODES (DTCs) on page 13. LED (1) Slide or rotary switch FIGURE 1-3. Typical ECU MODE F1: DTC ENTRY When Mode F1: DTC ENTRY is selected, the tester displays five submodes: F0: HOW TO READ F1: ENTER DTC(s) F2: DTC LIST 10 INFINITI TEST MODES F3: REVIEW DTC F4: CLEAR DTC(s) Submode F0: How To Read This submode provides information on how to manually read DTCs from the vehicle. Step by step screen instructions provide information to correctly set up the vehicle ECU. This is performed by following the tester instruction screens. If you have trouble, additional DTC retrieval information is described below. If you refer to the factory service manual for this information, make sure that you are following the correct steps for the system you are working on. Submode F1: Enter DTC(s) This submode provides you with a description of how to obtain DTC information from the ECU and how to enter this information into the tester. On Infiniti vehicles, there is one method to enter manually read DTCs which is the Enter DTC submode. The Enter DTC submode has two question marks on the tester display for entering the DTC. The tester screen prompts you to enter the DTCs read off the ECU LED(s) or the Malfunction Indicator Light (MIL). Be careful when reading the DTC from the ECU LED(s) or MIL. Incorrect ECU LED or MIL interpretation can cause the wrong DTC description to be displayed. Once all DTCs have been manually read and recorded, enter each DTC into the tester as described in the Common Test Modes OBD, OBD I Systems section. To manually read DTCs from 1990-95 Infiniti ECU’s, do the following: 1. Locate the Vehicle ECU. 2. Turn the ignition key to the ON position. 3. Turn the rotary diagnostic test mode selector on the ECU fully clockwise, or move the slide switch to the opposite position. 4. Wait at least 2 seconds. 5. Turn the diagnostic test mode selector fully counter-clockwise, or push the slide switch back to the original position. 6. The self-diagnostic system is now in the self-diagnostic code output mode (Key On, Engine Off, Mode 2). 7. The DTCs are indicated by a flashing red LED and the MIL lamp. 8. Count the flashes on the ECU LED or MIL. Long flashes are the 10’s digit and short flashes are the 1’s digit. 9. Write down all received DTCs. 10. When DTC recording is complete, turn the rotary diagnostic mode selector fully clockwise, or push the slide switch to the opposite position. 11. Wait at least 2 seconds and then turn the rotary diagnostic mode selector fully counter-clockwise, or push the slide switch back to the original position. NOTE INFINITI For further information, refer to the Factory Service Manual for the vehicle you are testing. 11 TEST MODES Submode F2: DTC List This submode provides you with a way to view all possible ECU DTCs, including DTC numbers and descriptions You can also select the DTCs obtained from the ECU LED or MIL as an alternative way of entering DTCs into the tester's memory. As you scroll through the available DTCs you can view a description of the DTC obtained from the ECU LED. You can "Select" the DTC on the tester screen for later review or printing. Refer to Common Test Modes OBD, OBD I Systems section for further information. Submode F3: Review DTC(s) This submode provides a way of reviewing DTCs that you selected or entered in the tester. The description of the entered or selected DTC will be displayed, along with a numerical summary of the entered or selected DTC. Review DTC is intended to provide you with an electronic clipboard that keeps track of the DTCs that you have encountered during diagnosis. Submode F4: Clear DTC(s) This submode has two options for you to chose. Option F0 is to view text screens that provide information on how to clear the DTCs from ECU memory. This is performed by tester keypad presses. Option F1 clears the tester memory of DTCs that you entered or selected in the tester. The clear DTC(s) mode is helpful and provides information that you would normally have to locate in a service manual. 12 INFINITI INFINITI DIAGNOSTIC TROUBLE CODES (DTCS) 7. INFINITI DIAGNOSTIC TROUBLE CODES (DTCS) DTCs available for Infiniti vehicles are listed in the following tables. Some code numbers have different descriptors depending on the selected vehicle. Only codes available for the selected vehicle are displayed by the tester. OBD, OBD I SYSTEMS YEAR:1990 DTC NO. 1990 11 CKP SENSOR OR CKP CIRCUIT FAIL 12 AIR FLOW METER CIRCUIT FAILURE 13 ECT SENSOR OR ECT CKT FAILURE 14 VSS OR VSS CIRCUIT FAILURE 16 TCS SIGNAL 21 IGNITION SIGNAL OR CKT FAILURE 31 FAULTY ECU OR ECU CKT FAILURE 32 EGR SENSOR OR EGR CKT FAILURE 33 O2S OR O2S CIRCUIT FAILURE 34 KNOCK SENSOR OR KS CKT FAILURE 35 EXHAUST GAS TEMP SENSOR CIRCUIT 43 TP SENSOR OR TPS CKT FAILURE 45 INJECTOR LEAK 46 SECONDARY TPS OR CKT FAILURE 51 FUEL INJECTOR OR CKT FAILURE 54 A/T CONTROLLER CIRCUIT FAILURE 55 NO DTCs DETECTED BY ECU DESCRIPTOR YEAR: 1991 DTC NO. 1991 11 CKP SENSOR OR CKP CIRCUIT FAIL 12 AIR FLOW METER CIRCUIT FAILURE 13 ECT SENSOR OR ECT CKT FAILURE INFINITI DESCRIPTOR 13 INFINITI DIAGNOSTIC TROUBLE CODES (DTCS) YEAR: 1991 14 DTC NO. DESCRIPTOR 14 VSS OR VSS CIRCUIT FAILURE 16 TCS SIGNAL 21 IGNITION SIGNAL OR CKT FAILURE 31 FAULTY ECU OR ECU CKT FAILURE 32 EGR SENSOR OR EGR CKT FAILURE 33 O2S OR O2S CIRCUIT FAILURE 34 KNOCK SENSOR OR KS CKT FAILURE 35 EXHAUST GAS TEMP SENSOR CIRCUIT 43 TP SENSOR OR TPS CKT FAILURE 45 INJECTOR LEAK 46 SECONDARY TPS OR CKT FAILURE 51 FUEL INJECTOR OR CKT FAILURE 54 A/T CONTROLLER CIRCUIT FAILURE 55 NO DTCs DETECTED BY ECU YEAR: 1992 DTC NO. 1992 11 CKP SENSOR OR CKP CIRCUIT FAIL 12 AIR FLOW METER CIRCUIT FAILURE 13 ECT SENSOR OR ECT CKT FAILURE 14 VSS OR VSS CIRCUIT FAILURE 16 TRACTION CONTROL SYSTEM FAILURE 21 IGNITION SIGNAL OR CKT FAILURE 22 FUEL PUMP OR FP CIRCUIT FAILURE 31 FAULTY ECU OR ECU CKT FAILURE 32 EGR SYSTEM FAIL (CA MODELS) 33 LEFT O2S OR CIRCUIT FAILURE 34 KNOCK SENSOR OR KS CKT FAILURE 35 EXHAUST GAS TEMP SENSOR (CA ONLY) 42 FUEL TEMP SENSOR OR CKT FAILURE DESCRIPTOR INFINITI INFINITI DIAGNOSTIC TROUBLE CODES (DTCS) YEAR: 1992 DTC NO. DESCRIPTOR 43 TP SENSOR OR TPS CKT FAILURE 45 INJECTOR LEAK (CA MODELS) 51 INJECTOR CIRCUIT (CA MODELS) 53 RIGHT O2S OR CIRCUIT FAILURE 54 TCM TO ECU CIRCUIT FAILURE 55 NO DTCs DETECTED BY ECU YEAR: 1993 DTC NO. 1993 11 CKP SENSOR OR CKP CIRCUIT FAIL 12 MAF SENSOR OR MAF CKT FAILURE 13 ECT SENSOR OR ECT CKT FAILURE 14 VSS OR VSS CIRCUIT FAILURE 16 TRACTION CONTROL SYSTEM FAILURE 21 IGNITION SIGNAL OR CKT FAILURE 31 FAULTY ECM OR ECM CKT FAILURE 32 EGR SYSTEM FAIL (CA MODELS) 33 HO2S OR HO2S CIRCUIT FAILURE LEFT HO2S OR HO2S CKT FAILURE 34 KNOCK SENSOR OR KS CKT FAILURE 35 EGR TEMP SENSOR (CA MODELS) 42 FUEL TEMP SENSOR OR CKT FAILURE 43 TP SENSOR OR TPS CKT FAILURE 45 INJECTOR LEAK (CA MODELS) 46 SECONDARY TPS (Q45 WITH TCS) 51 INJECTOR CIRCUIT (CA MODELS) 53 RIGHT HO2S OR HO2S CKT FAILURE 54 TCM TO ECU CIRCUIT FAILURE 55 NO DTCs DETECTED BY ECM INFINITI DESCRIPTOR 15 INFINITI DIAGNOSTIC TROUBLE CODES (DTCS) 16 YEAR: 1994 DTC NO. 1994 11 CAMSHAFT POS. OR CIRCUIT FAILURE 12 MAF SENSOR OR MAF CKT FAILURE 13 ECT SENSOR OR ECT CKT FAILURE 14 VSS OR VSS CIRCUIT FAILURE 16 TCS SIGNAL CIRCUIT FAILURE 21 IGNITION SIGNAL OR CKT FAILURE 25 IDLE SPD CONTROL FUNCTION 31 FAULTY ECM OR ECM CKT FAILURE 32 EGR SENSOR OR EGR CKT FAILURE 33 FRONT HO2S OR HO2S CKT FAILURE LEFT HO2S OR HO2S CKT FAILURE 34 KNOCK SENSOR OR KS CKT FAILURE 35 EGR TEMP SENSOR CIRCUIT FAILURE 36 EGRC-BPT VALVE FUNCTION 37 CLOSED LOOP CONTROL 41 IAT SENSOR OR IAT CKT FAILURE 42 FUEL TEMP SENSOR OR CKT FAILURE 43 TP SENSOR OR TPS CKT FAILURE 45 INJECTOR LEAK 46 SECONDARY TPS OR CKT FAILURE 51 FUEL INJECTOR OR CKT FAILURE 53 RIGHT HO2S OR HO2S CKT FAILURE 54 TCM TO ECM CIRCUIT FAILURE 55 NO DTCs DETECTED BY ECM 65 MISFIRE (NO.4 CYLINDER) 66 MISFIRE (NO.3 CYLINDER) 67 MISFIRE (NO.2 CYLINDER) 68 MISFIRE (NO.1 CYLINDER) 71 MISFIRE (MULTIPLE CYL) 72 THREE WAY CATALYST FUNC. 76 FUEL INJECTION SYSTEM FUNCTION DESCRIPTOR INFINITI INFINITI DIAGNOSTIC TROUBLE CODES (DTCS) YEAR: 1994 DTC NO. DESCRIPTOR 77 REAR HO2S OR HO2S CKT FAILURE 82 CKP SENSOR OR CKP CIRCUIT FAIL 84 A/T DIAGNOSIS COMM. LINE 91 FRONT HO2S OR HO2S CKT FAILURE 95 CKP SENSOR OR CKP CIRCUIT FAIL 98 ECT SENSOR OR ECT CKT FAILURE YEAR: 1995 DTC NO. 1995 11 CAM SENSOR CIRCUIT MALFUNCTION 12 MAF SENSOR CIRCUIT, OPEN OR SHORT 13 ECT SENSOR CIRCUIT, OPEN OR SHORT 14 VSS OR CIRCUIT, OPEN OR SHORT 16 TCS SIGNAL CIRCUIT, OPEN OR SHORT 21 IGNITION SIGNAL CIRCUIT MALFUNCTION 31 ECM MALFUNCTION 32 EGR VALVE OR SOLENOID MALFUNCTION 33 LEFT HO2 SENSOR CIRCUIT, OPEN OR SHORT 34 KNOCK SENSOR CIRCUIT, OPEN OR SHORT 35 EGR TEMP. SENSOR CIRCUIT, OPEN OR SHORT 43 TPS CIRCUIT, OPEN OR SHORT 45 FUEL INJECTOR LEAK 46 SECONDARY TPS CIRCUIT, OPEN OR SHORT 51 FUEL INJECTOR CIRCUIT, OPEN OR SHORT 53 RIGHT HO2 SENSOR CIRCUIT, OPEN OR SHORT 54 A/T COMMUNICATION LINE, OPEN OR SHORT 55 NO MALFUNCTION DETECTED BY ECM INFINITI DESCRIPTOR 17 INFINITI DIAGNOSTIC TROUBLE CODES (DTCS) OBD II SYSTEMS 18 YEAR: 1996-98 DTC NO. 1996-98 OBD II P0000 No Failures Indicated P0100 MAF Sensor Circuit P0105 Absolute Pressure Sensor Circuit P0110 IAT Sensor Circuit P0115 ECT Sensor Circuit P0120 TPS Circuit P0125 ECT Sensor Circuit, Excessive Time to Enter Closed Loop P0130 Front HO2 Sensor Malfunction, no Closed Loop (Right Bank) (Left Bank, Q45) P0131 Front HO2 Sensor, Lean Shift Monitor (Right Bank) (Left Bank, Q45) P0132 Front HO2 Sensor, Rich Shift Monitor (Right Bank) (Left Bank, Q45) P0133 Front HO2 Sensor, Response Monitor (Right Bank) (Left Bank, Q45) P0134 Front HO2 Sensor, High Voltage (Right Bank) (Left Bank, Q45) P0135 Front HO2 Sensor, Heater Circuit Malfunction (Right Bank) (Left Bank, Q45) P0136 Rear HO2 Sensor Circuit Malfunction (Right Bank) (Left Bank, Q45) P0137 Rear HO2 Sensor Minimum Voltage Monitor (Right Bank) (Left Bank, Q45) P0138 Rear HO2 Sensor Maximum Voltage Monitor (Right Bank) (Left Bank, Q45) P0139 Rear HO2 Sensor Response Monitor (Right Bank) (Left Bank, Q45) P0140 Rear HO2 Sensor, High Voltage (Right Bank) (Left Bank, Q45) P0141 Rear HO2 Sensor, Heater Circuit Malfunction (Right Bank) (Left Bank, Q45) P0150 Front HO2 Sensor Malfunction, no Closed Loop (Left Bank (Right Bank, Q45) P0151 Front HO2 Sensor, Lean Shift Monitor (Left Bank) (Right Bank, Q45) P0152 Front HO2 Sensor, Rich Shift Monitor (Left Bank) (Right Bank, Q45) DESCRIPTOR INFINITI INFINITI DIAGNOSTIC TROUBLE CODES (DTCS) YEAR: 1996-98 INFINITI DTC NO. DESCRIPTOR P0153 Front HO2 Sensor, Response Monitor (Left Bank) (Right Bank, Q45) P0154 Front HO2 Sensor, High Voltage (Left Bank) (Right Bank, Q45) P0155 Front HO2 Sensor, Heater Circuit Malfunction (Left Bank) (Right Bank, Q45) P0156 Rear HO2 Sensor Circuit Malfunction (Left Bank) (Right Bank, Q45) P0157 Rear HO2 Sensor Minimum Voltage Monitor (Left Bank) (Right Bank, Q45) P0158 Rear HO2 Sensor Maximum Voltage Monitor (Left Bank) (Right Bank, Q45) P0159 Rear HO2 Sensor Response Monitor (Left Bank) (Right Bank, Q45) P0160 Rear HO2 Sensor, High Voltage (Left Bank) (Right Bank, Q45) P0161 Rear HO2 Sensor, Heater Circuit Malfunction (Left Bank) (Right Bank, Q45) P0170 Fuel Injection System Function P0171 Fuel Injection System Lean (Right Bank) (Left Bank, Q45) P0172 Fuel Injection System Rich (Right Bank) (Left Bank, Q45) P0174 Fuel Injection System Lean (Left Bank) (Right Bank, Q45) P0175 Fuel Injection System Rich (Left Bank) (Right Bank, Q45) P0180 Temp. Sensor in Fuel Tank, Circuit Malfunction P0300 Multiple Cylinder Misfire P0301 Cylinder No. 1, Misfire P0302 Cylinder No. 2, Misfire P0303 Cylinder No. 3, Misfire P0304 Cylinder No. 4, Misfire P0305 Cylinder No. 5, Misfire P0306 Cylinder No. 6, Misfire P0325 Knock Sensor Circuit (Left Bank, Q45) P0330 Knock Sensor Circuit (Right Bank, Q45) 19 INFINITI DIAGNOSTIC TROUBLE CODES (DTCS) YEAR: 1996-98 20 DTC NO. DESCRIPTOR P0335 Crankshaft Position Sensor (OBD) Circuit Malfunction P0340 Camshaft Position Sensor Circuit Malfunction P0400 EGR System Malfunction P0402 EGR Control BPT Valve Function P0420 3-Way Catalyst Malfunction (Right Bank) (Left Bank, Q45) P0430 3-Way Catalyst Malfunction (Left Bank) (Right Bank, Q45) P0440 EVAP System, Small Leak Detected P0443 EVAP Purge Valve or Solenoid Valve Circuit Malfunction P0446 EVAP Vent Control Valve Circuit Malfunction P0450 EVAP System Pressure Sensor Malfunction P0500 VSS Circuit Malfunction P0505 IAC Valve Aux. Air Control Valve Malfunction P0510 Closed Throttle Position Switch Malfunction P0600 Signal Circuit from A/T to ECM Malfunction P0605 ECM Malfunction P0705 Park/Neutral Switch or Inhibitor Switch Circuit P0710 Trans. Fluid Temp. Sensor Circuit P0720 A/T VSS Circuit Malfunction P0725 Engine RPM Signal Malfunction P0731 A/T 1st Gear Shift Signal Malfunction P0732 A/T 2nd Gear Shift Signal Malfunction P0733 A/T 3rd Gear Shift Signal Malfunction P0734 A/T 4th Gear Shift Signal Malfunction P0740 TCC Valve Solenoid Malfunction P0744 A/T TCC Solenoid Valve, Improper Lock-Up Operation P0745 A/T Line Pressure Solenoid Valve Malfunction P0750 Shift Solenoid Valve A Malfunction P0755 Shift Solenoid Valve B Malfunction P1105 MAP/ BARO Switch Solenoid Valve Malfunction P1110 Intake Valve Timing Control (Left Bank, Q45) P1120 Secondary TPS Circuit Malfunction INFINITI INFINITI DIAGNOSTIC TROUBLE CODES (DTCS) YEAR: 1996-98 INFINITI DTC NO. DESCRIPTOR P1125 Tandem Throttle Position Sensor Circuit Malfunction P1135 Intake Valve Timing Control (Right Bank, Q45) P1140 Intake Valve Timing Position Sensor (Left Bank, Q45) P1145 Intake Valve Timing Position Sensor (Right Bank, Q45) P1148 Closed Loop Malfunction (Right Bank) (Left Bank, Q45) P1168 Closed Loop Malfunction (Left Bank) (Right Bank, Q45) P1220 Fuel Pump Control Module Circuit P1320 Ignition Signal Primary Circuit Malfunction P1335 Crankshaft Position Sensor (Reference) Circuit Malfunction P1336 Crankshaft Position Sensor (OBD) or Flywheel Malfunction P1400 EGR Control Solenoid Valve Malfunction P1401 EGR Temp. Sensor Circuit P1402 EGR System Malfunction P1440 EVAP System, Small Leak, Positive Pressure P1441 Vacuum Cut Bypass Valve, Circuit Malfunction P1443 Canister Control Vacuum Check Switch Circuit Malfunction P1444 EVAP Purge Volume Control Solenoid Valve P1445 EVAP Purge Volume Control Valve P1446 EVAP Vent Control Valve Closed P1447 EVAP Control System Purge Flow Monitoring P1448 EVAP Vent Control Valve Open P1490 Vacuum Cut Bypass Valve, Circuit Malfunction P1491 Vacuum Cut Bypass Valve Malfunction P1492 EVAP Purge Control Valve or Solenoid Valve P1493 EVAP Purge Control Valve and Solenoid Valve P1605 A/T Diagnosis Communication Line P1705 Throttle Position Sensor or Switch P1706 Park/Neutral Switch Circuit P1760 Overrun Clutch Solenoid Valve 21 INFINITI DIAGNOSTIC TROUBLE CODES (DTCS) 22 INFINITI KIA 1. VEHICLES AND SYSTEMS ..................................................................................................................... 2 2. KIA SPECIFIC INFORMATION ............................................................................................................... 3 3. TEST MODES AVAILABLE ...................................................................................................................... 4 4. GETTING STARTED ................................................................................................................................... 5 5. SELECTING THE VEHICLE .................................................................................................................... 6 6. TEST MODES................................................................................................................................................ 8 Mode F1: DTC Entry .......................................................................................................................... 8 Submode F0: How To Read ...................................................................................................... 9 Submode F1: Enter DTC(s) ....................................................................................................... 9 Submode F2: DTC List ............................................................................................................ 10 Submode F3: Review DTC(s) ................................................................................................. 10 Submode F4: Clear DTC(s) ......................................................................................................11 7. KIA DIAGNOSTIC TROUBLE CODES (DTCs) ................................................................................ 12 OBD I Systems .................................................................................................................................. 12 1994.............................................................................................................................................. 12 VEHICLES AND SYSTEMS 1. VEHICLES AND SYSTEMS Using the Asian Imports Cartridge, the following Kia vehicles can be diagnosed. MODEL ENGINE FUEL TYPE CODE TYPE ADAPTER TYPE 1994 SEPHIA 2 1.6L I4 MPI MILCODES NONE KIA KIA SPECIFIC INFORMATION 2. KIA SPECIFIC INFORMATION TWO WAYS TO DIAGNOSE KIA Kia powertrain diagnosis can be performed with the Asian Imports cartridge installed in a Tech 1, Tech 1A, or Mastertech tester. Additionally, Kia vehicles can be diagnosed with the aftermarket version of the Kia OEM level program card software using the Mastertech tester only. Operating instructions and test mode information are available for the OEM level software in the Kia Program Card Operator's Manual. If you do not have the necessary Program Card and Mastertech tester to perform OEM level diagnostics, you can use the Asian Imports Cartridge for limited model year coverage. The following Kia section includes the test modes available, how to connect the tester to the vehicle, operating instructions for DTC entry, and the applicable DTCs for each model year. KIA 3 TEST MODES AVAILABLE 3. TEST MODES AVAILABLE The following test modes are available when testing Kia vehicles. Operating instructions for test modes other than DTC Entry are included in the Common Test Modes OBD, OBD I Systems section. There are Kia specific instructions for operating the test modes. Refer to TEST MODES on page 8. MODE F1: DTC ENTRY SUBMODE F0: HOW TO READ SUBMODE F1: ENTER DTC(s) SUBMODE F2: DTC LIST SUBMODE F3: REVIEW DTC SUBMODE F4: CLEAR DTC(s) MODE F5: SYSTEM TESTS SUBMODE F0: PREP VEHICLE MODE F8: INFORMATION SUBMODE F3: ID INFO SUBMODE F4: DJC LOCATION SUBMODE F5: ECU LOCATION 4 KIA GETTING STARTED 4. GETTING STARTED Before operating the Asian Imports Cartridge with a Kia vehicle, the following steps must be performed: 1. Make sure the vehicle ignition is OFF. 2. Plug the tester power cable into the vehicle cigarette lighter. The power cable may also be directly connected to the battery via the optional battery adapter cable (P/N 02001636). NOTE Since the cigarette lighter can be switched, some tests require that the power cable be directly connected to the battery via the battery adapter cable. 3. Turn on the tester and select the application software that you will be using. Verify that the correct screen is displayed. The tester should display a screen similar to the one below. ASIAN IMPORTS 83-98 <ENTER> Tester stand-alone display 4. If the display is correct, press E. If the display is not correct, refer to Appendix D. 5. Follow the instructions on the following page to select the vehicle type you are testing by entering required vehicle information into the tester. KIA 5 SELECTING THE VEHICLE 5. SELECTING THE VEHICLE Once you've pressed E from the power-up screen, the following steps must be performed to select the manufacturer, model year, model and engine type of the vehicle being tested. Remember, if you make a mistake, you can always press X to go back to the previous menu. SELECTING THE MANUFACTURER A menu of manufacturers available for testing is displayed in a scrolling menu. You can scroll down one screen at a time by pressing Y, or up one screen at a time by pressing n. Press U or D to scroll one manufacturer at a time, until the → arrow is opposite KIA. Then press e to select. SELECTING THE MODEL YEAR Once the manufacturer is selected, the Select Model Year menu is displayed. Press the last two digits of the year model being tested; 9, 4, for 1994 models. SELECTING THE MODEL The Model Select menu displays models available for testing. Press the N key until the model being tested is displayed, then press the Y key. SELECTING THE ENGINE Next, the Engine Select menu is displayed. Press N until the engine type of the vehicle is displayed, then press Y. VEHICLE INFORMATION DISPLAY After the vehicle type is selected the tester displays a summary screen of the selected vehicle. Information displayed includes the year, manufacturer, model, engine size and type, and additional information such as the type of fuel system. SELECT MODE MENU When the above steps are completed, the Select Mode menu displays the test modes available for the selected vehicle and system. Refer to Section 6 (Test Modes), and the Common Test Modes OBD, OBD I Systems section for operating the test modes with Kia vehicles. 6 KIA SELECTING THE VEHICLE MANUFACTURER ISUZU KIA LEXUS E KIA 1994 SELECT MODEL YEAR: ???? SELECT MODEL: SEPHIA (YES/NO) Y SELECT ENGINE: 1.6L I4 (YES/NO) Y 1994 KIA SEPHIA 1.6L I4 MPI U, or 5 sec. SELECT MODE F1: DTC ENTRY F5: SYSTEM TESTS F8: INFORMATION KIA Vehicle Selection ACTIVE KEYS ud Scrolls through screen display. 0-9 Enter model year. yn Used to answer questions in tester display. e Confirm Power-up display. x Return to previous display. KIA 7 TEST MODES 6. TEST MODES When the Select Mode menu is displayed, test modes available for Kia vehicles may be selected. You may select Mode F1: DTC ENTRY, Mode F5: SYSTEM TESTS, or Mode F8: INFORMATION without connecting the tester to the vehicle. Operating instructions for the test modes other than DTC Entry are included in the Common Test Modes OBD, OBD I Systems section. Detailed operating instructions for using Mode F1: DTC ENTRY with Kia vehicles are included in the following procedure. READING CODES When Mode F1: DTC ENTRY is selected, the tester displays submodes which, after your selection, provide information on how to read diagnostic trouble codes (DTCs) from the vehicle, how to clear DTCs from the vehicle (or tester memory), obtain a text description of entered or selected DTCs, and review entered or selected DTCs as a result of manually retrieving codes from the ECU. To read DTC codes on Kia vehicles you must connect the single wire Kia jumper (P/N 02002075) to the data link connector (DLC) and observe the flashing MIL. If you do not know where the DLC is located, select Mode F1: DLC LOCATION from the Information menu. If necessary, refer to Common Test Modes OBD, OBD I Systems section for further instructions. Follow the detailed instructions on the following pages to manually read the DTCs. Once the DTCs have been manually read from the MIL, you can input the DTC into the tester so the tester can define the code. A complete list of Kia DTCs is also included in Section 7. MODE F1: DTC ENTRY When Mode F1: DTC ENTRY is selected, the tester displays five submodes: F0: HOW TO READ F1: ENTER DTC(s) F2: DTC LIST F3: REVIEW DTC F4: CLEAR DTC(s) Manually Reading DTCs In order to manually read Diagnostic Trouble Codes (DTCs) on Kia vehicles for 1994, you must locate and jumper the data link connector, then read the Malfunction Indicator Lamp (MIL). This method requires the single wire Kia jumper (P/N 02002075) that is placed across 2 pins of the 20 pin DLC. The DTCs are flashed out on the dashboard mounted MIL. Refer to the section on manually reading DTCs from the 1994 Kia vehicles in this section. 8 KIA TEST MODES Instrument Panel Malfunction Indicator Light (MIL) Submode F0: How To Read This submode provides information on how to manually read DTCs from the vehicle. Step by step screen instructions provide information to correctly set up the vehicle ECU. This is performed by following the tester instruction screens. If you have trouble, additional DTC retrieval information is described below. If you refer to the factory service manual for this information, make sure that you are following the correct steps for the system you are working on. This submode provides you with a description of how to obtain DTC information from the ECU and how to enter this information into the tester. On Kia vehicles, there is one method to enter manually read DTCs which is the Enter DTC submode. The Enter DTC submode has two question marks on the tester display for entering the DTC. The tester screen prompts you to enter the DTCs read off the Malfunction Indicator Light (MIL). Be careful when reading the DTC from the MIL. Incorrect MIL interpretation can cause the wrong DTC description to be displayed. Once all DTCs have been manually read and recorded, enter each DTC into the tester as described in the Common Test Modes OBD, OBD I Systems section. Submode F1: Enter DTC(s) To manually read DTCs from Kia Vehicles Using the Instrument Panel Malfunction Indicator Lamp, do the following: 1. Locate the 20 pin Data Link Connector (DLC). 2. Jump ENG. TEST and GROUND terminals by connecting the single wire Kia Jumper (P/N 02002075) to the vehicle's 20 pin diagnostic jumper connector. KIA 9 TEST MODES Ground Engine Test 3. Start and warm engine, running at 2000 rpm for 3 minutes. 4. Dashboard MIL will begin flashing DTCs. Long MIL flashes are 10's digits, short flash are 1's digits, with a 1.6 second delay. Each DTC is separated by a 4.0 second interval. The overall DTC series is separated by a 4.0 second interval. If no DTCs are stored in ECU, MIL will not flash. DTC 10 MIL 12v MIL 0v seconds 2s 1.25s DTC SEPARATION 4.0s DTC 16 Next DTC Indication 1.25s 1.6s 0.4s 5. The normal DTC condition is no MIL flash. 6. Disconnect Kia single wire jumper. 7. Erase DTCs when all repairs are completed. Submode F2: DTC List This submode provides you with a way to view all possible ECU DTCs, including DTC numbers and descriptions You can also select the DTCs obtained from the MIL as an alternative way of entering DTCs into the tester's memory. As you scroll through the available DTCs you can view a description of the DTC obtained from the MIL. You can “Select” the DTC on the tester screen for later review or printing. Refer to Common Test Modes OBD, OBD I Systems section for further information. Submode F3: Review DTC(s) This submode provides a way of reviewing DTCs that you selected or entered in the tester. The description of the entered or selected DTC will be displayed, along with a numerical summary of the entered or selected DTC. Review DTC is intended to provide you with an electronic clipboard that keeps track of the DTCs that you have encountered during diagnosis. 10 KIA TEST MODES Submode F4: Clear DTC(s) This submode has two options for you to choose. Option F0 is to view text screens that provide information on how to clear the DTCs from ECU memory. This is performed by tester keypad presses. Option F1 clears the tester memory of DTCs that you entered or selected in the tester. The clear DTC(s) mode is helpful and provides information that you would normally have to locate in a service manual. KIA 11 KIA DIAGNOSTIC TROUBLE CODES (DTCS) 7. KIA DIAGNOSTIC TROUBLE CODES (DTCS) DTCs available for Kia vehicles are listed in the following tables. Some code numbers have different descriptors depending on the selected vehicle. Only codes available for the selected vehicle are displayed by the tester. OBD I SYSTEMS 12 YEAR: 1994 DTC NO. 1994 2 NO DISTRIBUTOR NE SIGNAL/CKT 3 NO DISTRIBUTOR G SIGNAL-4V ONLY 8 MAF SENSOR/CKT-OPEN OR SHORTED 9 ECT SENSOR/CKT-OPEN OR SHORTED 10 IAT (MAF) SNSR/CKT-OPEN/SHORTED 12 TP SENSOR/CKT-OPEN OR SHORTED 14 AP (ECM) SENSOR/CKT-OPEN/SHORTED 15 O2 SENSOR/CKT-LESS THAN 0.55V 17 FDBK SYS-O2S NO CHANGE FOR 50s 25 FPRC SOL./CKT-OPEN OR SHORTED 26 EVAP SOL./CKT-OPEN OR SHORTED 34 ISC SOL./CKT-OPEN OR SHORTED DESCRIPTOR KIA LEXUS 1. VEHICLES AND SYSTEMS ..................................................................................................................... 2 2. LEXUS SPECIFIC INFORMATION ........................................................................................................ 4 3. LEXUS OBD SYSTEMS ............................................................................................................................. 5 4. TEST MODES AVAILABLE ...................................................................................................................... 8 5. GETTING STARTED ................................................................................................................................... 9 6. SELECTING THE VEHICLE ...................................................................................................................11 7. TEST MODES.............................................................................................................................................. 17 Mode F2: DTC ................................................................................................................................... 17 Submode F1: Read/Enter DTC(s) .......................................................................................... 17 Submode F5: Sens DTC ........................................................................................................... 19 8. LEXUS DIAGNOSTIC TROUBLE CODES (DTCs).......................................................................... 21 9. DATA LIST PARAMETER DESCRIPTIONS ...................................................................................... 27 VEHICLES AND SYSTEMS 1. VEHICLES AND SYSTEMS Using the Asian Imports Cartridge, the following Lexus vehicles can be diagnosed. MODEL: 1990 ENGINE ENGINE TYPE FUEL SYSTEM INFO TYPE ADAPTER TYPE 1990 ES250 2.5L V6 2VZ-FE SFI CODES & DATA CHECK, TDCL LS4000 4.0L V8 1UZ-FE MFI CODES & DATA CHECK, TDCL MODEL: 1991 ENGINE ENGINE TYPE FUEL SYSTEM INFO TYPE ADAPTER TYPE 1991 ES250 2.5L V6 2VZ-FE SFI CODES & DATA CHECK, TDCL LS400 4.0L V8 1UZ-FE MFI CODES & DATA CHECK, TDCL MODEL: 1992 ENGINE ENGINE TYPE FUEL SYSTEM INFO TYPE ADAPTER TYPE 1992 ES300 3.0L V6 3VZ-FE SFI CODES & DATA CHECK, TDCL SC300 3.0L I6 2JZ-GE SFI CODES & DATA CHECK, TDCL LS400 4.0L V8 1UZ-FE MFI CODES & DATA CHECK, TDCL SC400 4.0L V8 1UZ-FE MFI CODES & DATA CHECK, TDCL MODEL: 1993 ENGINE ENGINE TYPE FUEL SYSTEM INFO TYPE ADAPTER TYPE 1993 2 ES300 3.0L V6 3VZ-FE SFI CODES & DATA CHECK, TDCL GS300 3.0L I6 2JZ-GE SFI CODES & DATA CHECK, TDCL SC300 3.0L I6 2JZ-GE SFI CODES & DATA CHECK, TDCL LS400 4.0L V8 1UZ-FE MFI CODES & DATA CHECK, TDCL SC400 4.0L V8 1UZ-FE MFI CODES & DATA CHECK, TDCL LEXUS VEHICLES AND SYSTEMS MODEL: 1994 ENGINE TYPE ENGINE FUEL SYSTEM INFO TYPE ADAPTER TYPE 1994 ES300 3.0L V6 3VZ-FE SFI CODES & DATA OBD II* GS300 3.0L I6 2JZ-GE SFI CODES & DATA CHECK, TDCL SC300 3.0L I6 2JZ-GE SFI CODES & DATA CHECK, TDCL LS400 4.0L V8 1UZ-FE MFI CODES & DATA CHECK, TDCL SC400 4.0L V8 1UZ-FE MFI CODES & DATA CHECK, TDCL * For all Adapter Type OBD II use Common Test Modes OBD II Systems section for operating instructions and test mode information. ELECTRONIC TRANSMISSIONS Using the Asian Imports Cartridge, the following Lexus Electronic Transmission/Transaxle Applications can be diagnosed. LEXUS MODEL LEXUS TRANSMISSION SC400 SC300 GS300 A340E LS400 A341E ES300 A540E ES300 A541E 3 LEXUS SPECIFIC INFORMATION 2. LEXUS SPECIFIC INFORMATION TWO WAYS TO DIAGNOSE LEXUS Lexus powertrain diagnosis can be performed with the Asian Imports cartridge installed in a Tech 1, Tech 1A, or Mastertech tester. Additionally, Lexus vehicles can be diagnosed with the aftermarket version of the Lexus OEM level program card software using the Mastertech tester only. Operating instructions and test mode information are available for the OEM level software in the Lexus Program Card Operator's Manual. If you do not have the necessary Program Card and Mastertech tester to perform OEM level diagnostics, you can use the Asian Imports Software for limited model year coverage. The following Lexus section includes the test modes available, how to connect the tester to the vehicle, operating instructions for DTC entry, and the applicable DTCs for each model year. Parameters that can be displayed by Lexus vehicles, along with a description and states or units/range of each parameter are listed in DATA LIST PARAMETER DESCRIPTIONS on page 27. 4 LEXUS LEXUS OBD SYSTEMS 3. LEXUS OBD SYSTEMS Lexus vehicles are equipped with On-Board Diagnostic (OBD) systems that operate with engine fuel and emission systems. Lexus OBD systems include transmission (ECT), antilock brake (ABS), cruise control (CCS), air conditioning (A/C), and air bag (AB). For these systems, Lexus vehicles do not use a multiplexed vehicle network, and as a result the separated systems accompany engine OBD systems, with each additional system ECU having it's own diagnostic trouble code (DTC) output line. In addition, engine ECUs support serial data communications. Following is information about each Lexus OBD system. ENGINE DATA LIST Lexus engine serial data list is used to aid in diagnostics for the engine control system. Engine control module, input sensors, input switches, and output actuator data list parameters are provided to the tester by the ECU, via a serial data link. Lexus ECUs update this information at 1.3 seconds/update. Not all Lexus vehicles support data list, and in some cases where the tester has determined that a system is inactive and the data list selection is displayed, data list may still not be supported. If a vehicle has a TDCL and Check DLC, Data List may only be supported on the TDCL DLC. This is a function of the data link connector, so make sure that you are connected to the correct DLC for data list information. Review the Lexus application matrix, column titled Information Type, for the availability of serial data on the vehicle being tested. ENGINE DTCS Lexus engine DTCs are available on Lexus vehicles with electronic engine control. Engine DTCs are set by the engine ECU when problems with, but not limited to, the ECU, air- fuel ratio, throttle position, and air pump control are detected. In addition, Lexus engine ECUs can be commanded to a sensitive test mode, which is found in the Sensitive Test (this test triggers the engine ECU into a sensitive mode which detects engine DTCs using an environment that is less stringent to DTC detection). The Asian Imports application cartridge supports reading engine DTCs automatically or manually, depending on the state (active or inactive) of the engine system. ELECTRONICALLY CONTROLLED TRANSMISSION DTCS Lexus ECT DTCs are available on select Lexus vehicles with an ECT (refer to the factory service manual for the transmission type for the vehicle you are testing). ECT DTCs are set by the ECT ECU when problems with, but not limited to, the ECU, ATF temperature, accumulator control solenoid, and shift control solenoid(s) are detected. The Asian Imports application cartridge supports reading ECT DTCs automatically or manually, depending on the state (active or inactive) of the ECT system. ANTILOCK BRAKE DTCS Lexus ABS DTCs are available on select Lexus vehicles equipped with ABS. ABS DTCs are set by the ABS ECU when problems with, but not limited to, the ECU, shorted pump motor relay, low brake fluid level, and pressure sensor are detected. The Asian Imports application cartridge supports reading ABS DTCs automatically or manually, depending on the state (active or inactive) of the ABS system. LEXUS 5 LEXUS OBD SYSTEMS CRUISE CONTROL DTCS Lexus CCS DTCs are available on select Lexus vehicles with automatic cruise control. CCS DTCs are set by the CCS ECU when problems with, but not limited to, the ECU, actuator malfunction, and cruise control switch are detected. The Asian Imports application cartridge supports reading CCS DTCs automatically or manually, depending on the state (active or inactive) of the CCS system. AIR CONDITIONING DTCS Lexus A/C DTCs are available on select Lexus vehicles with automatic air conditioning. A/C DTCs are set by the A/C ECU when problems with, but not limited to, the ECU, room temperature sensor, and air mix door are detected. Note that on some Lexus vehicles the A/C system does not support a dashboard MIL. The Asian Imports application cartridge supports reading A/C DTCs automatically or manually, depending on the state (active or inactive) of the A/C system. AIR BAG DTCS Lexus AB DTCs are available on select late model Lexus vehicles equipped with the air bag system. AB DTCs are set by the AB ECU when problems with, but not limited to, the ECU, squib malfunction, and warning light circuit are detected. The Asian Imports application cartridge supports reading AB DTCs automatically or manually, depending on the state (active or inactive) of the AB system. A NOTE ABOUT THE MIL On some of the above systems, the DTC output line is routed to the dashboard mounted system MIL, which flashes out the DTC when the ECU is commanded to the diagnostic mode. In this case, the tester is connected to the vehicle DLC to command the ECU for the system under test into the diagnostic mode. When that process is started, the DTC can be read from the MIL. The DTC can then be entered into the tester for a description. Refer to System Inquiry on page 13 in for more information on inactive system detection. SYSTEMS COVERED BY THE SOFTWARE In order to take advantage of all possible systems available on the vehicle, the Asian Imports application cartridge incorporates an advanced system inquiry strategy that identifies the systems on the vehicle as active or inactive. Some Lexus vehicles can have a single active system, where others can have up to six. So the best possible way to identify the systems on your vehicle is to connect the tester to the Check and TDCL DLCs to determine the available active systems. Refer to System Inquiry on page 13 for more information on Inactive system detection. The following chart lists Lexus ECUs that can be tested using the Asian Imports Cartridge, the test modes available for each system, and the DLC Cable adapter required. Not all vehicles are equipped with every ECU. 6 LEXUS LEXUS OBD SYSTEMS ECU DATA LIST DTC(S) SNAPSHOT ADAPTER ENGINE • • • TDCL/CHECK ECT • TDCL ABS • TDCL CCS • TDCL A/C • TDCL AIR BAG • CHECK NOTE LEXUS If you are using the Asian Imports Cartridge with a TECH1 tester, the available Lexus OBD systems will be limited to Engine Data List, Engine DTCs, and Transmission DTCs. Also, you will need a different TECH 1 14/15 Pin DLC Cable (P/N 02001980) which can be used with the Toyota/ Lexus Check Adapter Cable (P/N 02001896) or the Toyota/Lexus TDCL Adapter Cable (P/N 02001895). 7 TEST MODES AVAILABLE 4. TEST MODES AVAILABLE The Select Mode menu displays test modes available for the selected vehicle and system. Operating instructions for modes F0: DATA LIST, F2: DTC, F3: SNAPSHOT, and F8: INFORMATION are included in the Common Test Modes OBD, OBD I Systems section. Instructions for selecting and operating mode F2: DTC, Submode F1: READ/ENTER DTCs, and Submode F5: SENSITIVE DTC are included in this section. MODE F0: DATA LIST (ENGINE ONLY) MODE F2: DTC SUBMODE F1: READ DTCs (IF SYSTEM IS ACTIVE) SUBMODE F1: READ/ENTER DTCs (IF SYSTEM IS INACTIVE) SUBMODE F2: DTC LIST SUBMODE F3: REVIEW DTC SUBMODE F4: CLEAR DTC(s) SUBMODE F5: SENSITIVE DTC (ENGINE ONLY) MODE F3: SNAPSHOT (ENGINE SYSTEM ONLY, IF ENGINE SYSTEM IS ACTIVE) MODE F5: SYSTEM TESTS SUBMODE F0: PREP VEHICLE MODE F8: INFORMATION SUBMODE F1: DLC LOCATION SUBMODE F3: ID INFO 8 LEXUS GETTING STARTED 5. GETTING STARTED Before operating the Asian Imports Cartridge with a Lexus vehicle, do the following: 1. Make sure the vehicle ignition is OFF. 2. If the vehicle you are testing is equipped with Overdrive, turn the O/D switch to the ON position. NOTE If the O/D switch is not in the ON position, the tester may not be able to read DTCs from the transmission ECU. 3. When testing a Lexus vehicle, either the Check Adapter Cable or the TDCL Adapter Cable is used to connect the tester to the vehicle DLC. Which adapter cable to use is determined by which system you wish to test. The following chart lists the systems that can be tested with each adapter cable. ADAPTER ACTIVE SYSTEMS THAT CAN BE TESTED CHECK ENGINE, AIR BAG TDCL ENGINE, ECT, ABS, CCS, A/C Attach the appropriate cable to the end of the tester DLC Cable, then connect the colored end of the cable to the vehicle DLC. Toyota/Lexus Check Connector Cable (Blue) Toyota/Lexus TDCL Connector Cable (Green) 4. If the Check connector cable is used, the tester may be powered through the Check connector and it might not be necessary to use the cigarette lighter plug. If the TDCL connector is used, plug the tester DC Power Cable into the vehicle cigarette lighter. NOTE LEXUS Since the cigarette lighter and Check DLC can be switched, some tests, such as the Sens. DTC Test, require that the power cable be directly connected to the battery via the optional battery adapter cable (P/N 02001636). 9 GETTING STARTED 5. Turn on the tester and select the application software that you will be using. Verify that the correct screen is displayed. The tester should display a screen similar to the one below. ASIAN IMPORTS 83 - 02 <ENTER> Tester Stand-Alone Display 6. If the display is correct, press E. If the display is not correct, refer to Appendix D. 7. Follow the instructions on the following pages to select the vehicle type you are testing. 10 LEXUS SELECTING THE VEHICLE 6. SELECTING THE VEHICLE Once you've pressed e from the power-up screen, the following steps must be performed to select the manufacturer, model year, model and engine type of the vehicle being tested. Remember, if you make a mistake, you can always press x to go back to the previous menu. SELECTING THE MANUFACTURER A menu of manufacturers available for testing is displayed in a scrolling menu. You can scroll down one screen at a time by pressing Y, or up one screen at a time by pressing n. Press U or D to scroll one manufacturer at a time, until the → arrow is opposite the manufacturer you wish to select. Then press e to select. REPLAY SNAPSHOT DATA If Snapshot data is stored in the tester memory, the tester asks if you wish to replay saved Snapshot data. Press Y to replay the saved data, or press N to proceed to the Vehicle Selection displays. SELECTING THE MODEL YEAR Once the manufacturer is selected, the Select Model Year menu is displayed. Press the last two digits of the year model being tested; 9, 0 for 1990 models, 9, 1 for 1991 models, and so on. SELECTING THE MODEL The Select Model menu displays models available for testing. Press the N key until the model being tested is displayed, then press the Y key. SELECTING THE ENGINE If more than one engine is available for the selected model, a Select Engine menu is displayed. Press N until the engine type of the vehicle is displayed, then press Y. VEHICLE INFORMATION DISPLAY After the vehicle type is selected the tester displays a summary screen of the selected vehicle. Information displayed includes the year, manufacturer, model, engine size and type. The tester displays the summary screen for three seconds, then automatically advances to the System Inquiry displays. If the summary screen is not correct, press X to go backward through the vehicle selection displays until you reach the information that needs to be changed. LEXUS 11 SELECTING THE VEHICLE MANUFACTURER ISUZU KIA LEXUS E LEXUS 1990-1994 SELECT MODEL YEAR: 19?? 9, 1 SELECT MODEL: ES250 (YES/NO) Y Displayed only if engine option or transmission option exists for selected vehicle SELECT ENGINE/TRANS: 2VZ-FE AT (YES/NO) Y 1991 LEXUS ES250 2VZ-FE SFI U, or 3 sec. TO SYSTEM INQUIRY Example of Lexus Vehicle Selection 12 LEXUS SELECTING THE VEHICLE SYSTEM INQUIRY Once the vehicle type is entered, the tester displays which adapter(s) can be used on the selected vehicle and then displays information screens which describe the operating differences between Active and Inactive Lexus OBD systems. Use the up and down arrows to scroll through the information displays. If a system is Active, the tester can read DTCs directly from the ECU and show the DTC number and description on the tester display. Active systems are identified in the Select System menu with “ok” or “ng” (no good). “ok” is displayed to indicate an active system that does not have DTCs stored in the ECU. “ng” (No Good) is displayed to indicate an active system that does have DTCs stored in the ECU (during the inquiry process the tester determines if the system ECU has stored DTCs or not). VEHICLE HAS CHECK AND TDCL DLC. USE BLUE OR GREEN ADAPTER VEHICLE HAS CHECK DLC. USE BLUE ADAPTER. OR U U ACTIVE SYSTEMS INDICATED BY ok OR ng. ok=NO DTC ng=DTCs IN ECU U INACTIVE SYS. (NO ok/ng DISP), TESTER CAN START DTC MIL FLASH U NOTE: VEHICLE MAY NOT SUPPORT ALL DISPLAYED INACTIVE SYSTEMS U TO POSSIBLE SYSTEMS SUPPORTED DISPLAYS If a system is Inactive, the tester cannot read DTCs directly from the ECU, so the DTCs must be manually read from the dashboard MIL and then entered into the tester using Mode F2, Submode F1: READ/ENTER DTCs. Note that some Inactive systems listed in the Possible System lists may not be supported by the vehicle under test. Inactive systems do not display “ok” or “ng” on the right-hand side of the page (see Select System Menu section). The System Inquiry information screens then display possible Active systems available using the Lexus Check or TDCL Data Link Connector(s) (DLCs). LEXUS 13 SELECTING THE VEHICLE POSSIBLE SYSTEMS SUPPORTED DISPLAYS When adapter cable and Active/Inactive information screens have been displayed, the tester instructs you to connect the adapter cable to the tester DLC cable and the vehicle DLC. If you are not sure where the vehicle DLC is located, press ( at any time during system inquiry for DLC Location information. When the tester is connected to the vehicle, turn the ignition key to the ON position, then press U or E to continue with the system inquiry. This portion of the system inquiry can take up to 30 seconds, depending on how many systems are available on the vehicle. The tester lists the systems that can be tested with the installed adapter. Press U or E to continue to the Select System displays. POSSIBLE ACTIVE SYSTEMS SUPPORTED BY CHECK DLC: U POS. CHECK SYS 1. ENGINE DTC 2. AIR BAG DTC U POSSIBLE ACTIVE SYSTEMS SUPPORTED BY TDCL DLC: CONNECT ADAPT. TO DLC. FOR HELP USE F9: DLC LOC. U TURN IGN. KEY ON TO PERFORM SYSTEM INQUIRY. [ENTER] E TDCL CONNECTOR SYSTEM INQUIRY: PLEASE WAIT U POS. TDCL SYS 1. ENGINE DATA 2. ENGINE DTC 3. ECT DTC TO SELECT SYSTEM MENU U POS. TDCL SYS 4. ABS DTC 5. CRUISE CTL DTC 6. A/C DTC U 14 LEXUS SELECTING THE VEHICLE SELECT SYSTEM MENU The Select System menu displays the systems available for testing on the selected vehicle. An “ok” or “ng” next to a system indicates that the system is Active, and no asterisk next to a system indicates it is Inactive. Press the function key listed to the left of the system you wish to test to advance to the Select Mode menu. E SELECT SYSTEM: F0: ENGINE F1: ECT F2: ABS ok ok ok Active systems, no DTCs stored. u Active systems, DTCs stored SELECT SYSTEM: F3: CRUISE CTL ng F4: A/C F5: AIR BAG Inactive systems TO SELECTED MODE MENU NOTE If an ECU is malfunctioning and does not communicate with the tester, the ECU will be listed as Inactive in the Select System menu. INACTIVE SYSTEM DISPLAYS If an inactive system has been selected from the Select System Menu, the tester will display information screens. These screens remind you that DTCs will be output on the System MIL Instrument Panel, and MIL flashes must be counted manually to read DTCs. INACTIVE SYSTEM HAS BEEN SELECTED FOR TESTING FOR INACTIVE SYSTEMS, TESTER INITIATES DTC FLASH ON SYS MIL MIL FLASHES MUST BE COUNTED TO DETERMINE DTC [ENTER] TO SELECT MODE MENU LEXUS 15 SELECTING THE VEHICLE SELECT MODE MENU When the above steps are completed, the Select Mode menu displays the test modes available for the selected vehicle and system. Refer to Section 7 (Test Modes) and the Common Test Modes OBD, OBD I Systems section for operating the test modes with Lexus vehicles. A list of Engine system test modes is shown below. E SELECT MODE F0: DATA LIST F2: DTC F3: SNAPSHOT D U SELECT MODE F5: SYSTEM TESTS F8: INFORMATION U TO SELECTED TEST MODE ACTIVE KEYS e Enter the displayed DTC. u Move to the next DTC. d Stop the automatic scrolling. ( DLC Location. 16 LEXUS TEST MODES 7. TEST MODES The Select Mode menu displays test modes available for the selected vehicle and system. Operating instructions for modes F0: DATA LIST, F2: DTC, F3: SNAPSHOT, and F8: INFORMATION are included in the Common Test Modes OBD, OBD I Systems section. READING CODES Instructions for selecting and operating mode F2: DTC, Submode F1: READ/ENTER DTCs, and Submode F5: SENSITIVE DTC are included in this section. MODE F2: DTC Submode F1: Read/Enter DTC(s) The purpose of the Read/Enter submode is to command the Inactive system ECU to flash DTCs on the dashboard MIL. After the DTC is read from the MIL, a description of the DTCs can then be displayed on the tester screen. If a Toyota or Lexus system is determined as Inactive, the tester will command the ECU to begin flashing the DTC on the system MIL. The F1:READ/ENTER DTC(s) submode displays a message informing you that the tester has initiated DTC flashing on the MIL, and will hold in that mode until you have read the DTC(s) on the MIL. After the DTC is read from the MIL, the tester screen changes to a DTC entry screen. Type in the DTC to obtain a description of the DTC. To select the Read/Enter DTC(s) submode, do the following: 1. Press @ to select DTCs from the select mode menu. 2. Press ! to select READ/ENTER DTC(s) from the DTCs menu. 3. The tester displays a message indicating DTCs are being flashed on the MIL. Look at the MIL to read the flashes and determine the DTC. When the DTC cycle is repeated on the MIL and you have recorded the DTC, press Y. DTCS BEING OUTPUT. READ ON MIL. DONE? [YES] 4. Use the tester keypad to enter the DTC displayed on the vehicle system ECU, then press E. An example of the ENTER DTC display for Lexus vehicles is shown below. ENTER DTC ?? [ENTER] LEXUS 17 TEST MODES All late model Lexus vehicles with Engine and optional Transmission, ABS, Cruise Control, Air Conditioning, and Air bag systems flash DTCs on the dashboard MIL. On select vehicles, the Air Conditioning system does not have a MIL for DTC reading. DTCs are flashed with the 10's digit first, followed by the 1's digit. There is a 1.5 second period between the 10's and 1's digit, and a 2.5 second period between individual DTCs. 5. When E is pressed, the tester displays the DTC number and a short description of the code. 6. After you enter the DTC, the tester asks for additional trouble code entry. Press Y to enter another DTC. If N is pressed, the tester displays an instruction screen describing the functions available. ↑ = ADVANCE CODE ↓ = HOLD CODE EXIT = QUIT ENTER = SUMMARY 7. Press U to move to the next DTC. If you wish to hold a DTC screen, press D to freeze the automatic scrolling feature. DTC 03 MAP SENSOR VOLTAGE FAULT 8. Press E to view a summary screen of all entered DTCs. DTC SUMMARY O3 9. Press X to return to the DTC menu. ACTIVE KEYS e Enter the displayed DTC. Also display summary screen. y Enter another DTC. n Advance to instruction screen. )-( Enter DTC number. u Move to the next DTC. d Stop the automatic scrolling. x Return to DTC menu. 18 LEXUS TEST MODES Submode F5: Sens DTC The Sensitive DTC test submode applies to Lexus engine controllers and is only available when the engine system is Active. Lexus engine ECUs have the capability to enter an increased sensitivity mode to detect fault code conditions. The SENS DTC submode is helpful for diagnosing intermittent problems. If you are using a TECH 1 or TECH 1A tester, power the tester directly from the battery via the optional battery adapter cable (P/N 02001636). To select Sensitive DTC submode, do the following: 1. Press @ to select DTCs from the Select Mode menu. 2. Press % to select SENS DTC from the DTC menu. 3. The tester displays instructions for preparing the vehicle to capture DTCs in the Sensitive Mode. Follow the instructions on each display, then press Y to continue. 4. When the vehicle preparations are complete, the tester checks for DTCs, then displays the codes on line four. 5. The tester displays instructions for viewing the DTCs. Press U to view the DTCs. 6. The tester displays the first DTC. Press U to scroll through the captured DTCs. A DTC can be held by pressing the D key while the code is displayed. Press the U key to resume display of the DTCs. An example of a DTC display is shown below. 7. Press E to display a summary of the captured DTCs. 8. Press X to return to the DTC menu. NOTE LEXUS In some cases, Lexus ECUs do not support Sensitive DTC Mode. If the tester cannot command the ECU into Sensitive DTC Mode, an information screen is displayed with test status or a message to retry the test. 19 TEST MODES DTC TEST MODE MENU TEST INCREASES ECU SENSITIVITY TO DTC DETECTION DONE? [YES] RECEIVE FAULT CODE INFORMATION PLEASE WAIT. XX y TURN A/C SW OFF, PUT TRANSMISSION IN NEUTRAL GEAR. DONE? [YES] RECEIVING FAULT CODE INFORMATION PLEASE WAIT. 24 y TURN IGNITION KEY OFF, CLOSE THROTTLE. DONE? [YES] Y U TURN IGN KEY TO ON. CONFIRM ENG. MIL FLASHING. DONE? [YES] DTC 24 INTAKE TEMP. SENSOR SIGNAL X TEST NOT SUPPORTED BY ECU OR RETRY TEST [EXIT] = ADVANCE CODE = HOLD CODE EXIT = QUIT ENTER = SUMMARY N Y START ENGINE AND ROADTEST ABOVE 6 MPH TO CHK DTCs DONE? [YES] E DTC SUMMARY 24 Y ROADTEST DONE. STOP VEHICLE AND PREPARE FOR DTCs DONE? [YES] X DTC F1: READ DTC(S) F3: REVIEW DTC(S) F4: CLEAR DTC(S) Y Example of Sensitive DTC Submode Instructions ACTIVE KEYS ud Advance to next DTC or hold displayed DTC. y Confirm instructions on display are completed. n Confirm MIL not flashing. e Display DTC Summary. x Return to DTC Entry menu. 20 LEXUS LEXUS DIAGNOSTIC TROUBLE CODES (DTCS) 8. LEXUS DIAGNOSTIC TROUBLE CODES (DTCS) DTCs available for Lexus vehicles are listed in the following charts. Some code numbers have different descriptors depending on the selected vehicle. Only codes available for the selected vehicle are displayed by the tester. AIR BAG YEAR: 1990-94 DTC NO. 1990-1994 11 SQUIB W/H GND OR FRNT SENS. SHORT 12 SQUIB W/H +B SHORT 13 SQUIB MALF. (SHORT) 14 SQUIB MALF. (OPEN) 15 FRONT SENSOR W/H OPEN 22 WARNING LIGHT CIRCUIT 24 AIR BAG SENSOR CONNECTION FAIL 31 SENSOR ASSEMBLY 41 MALF. RECORDED IN MEMORY 53 SQUIB SHORT 54 SQUIB OPEN 63 SQUIB SHORT (PRELOADER LEFT) 64 SQUIB OPEN (PRELOADER LEFT) 73 SQUIB SHORT (PRELOADER RT) 74 SQUIB OPEN (PRELOADER RT) DESCRIPTOR ANTI-LOCK BRAKE SYSTEM YEAR: 1990-94 DTC NO. 1990-1994 11 SOLENOID RELAY OPEN 12 SOLENOID RELAY SHORT 13 PUMP MOTOR RELAY OPEN 14 PUMP MOTOR RELAY SHORT 15 TRAC BRAKE MAIN RELAY OPEN LEXUS DESCRIPTOR 21 LEXUS DIAGNOSTIC TROUBLE CODES (DTCS) YEAR: 1990-94 (CONTINUED) 22 DTC NO. DESCRIPTOR 16 TRAC BRAKE MAIN RELAY SHORT 17 TRAC PUMP MOTOR RELAY OPEN 18 TRAC PUMP MOTOR RELAY SHORT 21 RF SOLENOID OPEN OR SHORT 22 LF SOLENOID OPEN OR SHORT 23 RR SOLENOID OPEN OR SHORT 24 LR SOLENOID OPEN OR SHORT 25 MASTER CYL. CUT SOL. OPEN/SHORT 26 ACCUMULATOR CUT SOL. OPEN/SHORT 27 RESERVOIR CUT SOL. OPEN/SHORT 31 RF SPEED SENSOR MALFUNCTION 32 LF SPEED SENSOR MALFUNCTION 33 RR SPEED SENSOR MALFUNCTION 34 LR SPEED SENSOR MALFUNCTION 35 LF/RR SPEED SENS MALFUNCTION 36 RF/LR SPEED SENS MALFUNCTION 37 SPD SENSOR ROTOR WHEEL FAILURE 38 RR SPEED SENSOR MALFUNCTION 39 LR SPEED SENSOR MALFUNCTION 41 VOLTAGE MALFUNCTION 42 HIGH VOLTAGE 43 TRAC SYS/DECEL. SENSOR MALF. 44 DECELERATION SENS. OPEN/SHORT 45 DECELERATION SENSOR MALF. 46 DECELERATION SENSOR MALF. 47 DECELERATION SENSOR MALF. 51 ACTUATOR PUMP MOTOR LOCKED 53 TRAC MOTOR OVER- OPERATING (DUR.) 54 TRAC MOTOR OVER- OPERATING (FREQ) 55 LOW BRAKE FLUID LEVEL 56 PRESSURE SENSOR OPEN OR SHORT 57 PRESSURE SENSOR STICKING LEXUS LEXUS DIAGNOSTIC TROUBLE CODES (DTCS) YEAR: 1990-94 (CONTINUED) DTC NO. DESCRIPTOR 61 TRAC ECU COM. LINE OPEN/SHORT 62 ECU MALFUNCTION 71 RF SENSOR LOW VOLTAGE 72 LF SENSOR LOW VOLTAGE 73 RR SENSOR LOW VOLTAGE 74 LR SENSOR LOW VOLTAGE 75 RF SENSOR ABNORMAL FREQ. 76 LF SENSOR ABNORMAL FREQ. 77 RR SENSOR ABNORMAL FREQ. 78 LR SENSOR ABNORMAL FREQ. 79 DECELERATION SENSOR MALF. AIR CONDITIONING YEAR: 1990-94 DTC NO. 1990-1994 11 ROOM TEMP SENSOR OPEN OR SHORT 12 AMBIENT TEMP. SENS. OPEN/SHORT 13 EVAPORATOR TEMP. SENS. OPEN/SHORT 14 WATER TEMP. SENS. OPEN/SHORT 15 DUCT SENSOR OPEN/SHORT (Dr) 16 DUCT SENSOR OPEN/SHORT (Pa) 21 SOLAR SENSOR OPEN/SHORT (Pa) 22 COMPRESSOR LOCKED 23 REFRIGERANT PRESS MALFUNCTION 24 SOLAR SENSOR OPEN/SHORT (Dr) 31 AIR MIX POSITION SENSOR 32 AIR INLET POSITION SENSOR 33 AIR MIX MALF. OR MODE POTEN. SIG. 34 AIR INLET MALFUNCTION 35 AIR BYPASS POS. SENSOR (Pr) 36 WATER VALVE POSITION SENSOR 41 AIR MIX MALFUNCTION LEXUS DESCRIPTOR 23 LEXUS DIAGNOSTIC TROUBLE CODES (DTCS) YEAR: 1990-94 (CONTINUED) DTC NO. DESCRIPTOR 42 AIR INLET MALFUNCTION 43 MODE MALFUNCTION 44 AIR BYPASS POS. SENSOR (Dr) 45 AIR BYPASS POS. SENSOR (Pa) 46 WATER VALVE POSITION SENSOR CRUISE CONTROL SYSTEM YEAR: 1990-94 DTC NO. 1990-1994 11 ACTUATOR MALF. (OPEN OR SHORT) 12 CC MAG. CLUTCH RELEASE VLV FAIL 13 POSITION SENSOR (OPEN OR SHORT) 14 ACTUATOR POS. SENSOR MALF. 21 VEHICLE SPD SENS SIGNAL (METER) 22 VEHICLE SPD SENS SIGNAL (T/M) 23 SPEED DECREASED 10 mph (16 Km/h) 31 RESUME SWITCH ALWAYS ON 32 CONTROL SWITCH GROUND SHORT 33 SET & RES SW. ON SIMULTANEOUSLY 34 CONTROL SWITCH OFF MALFUNCTION 41 MOTOR ACTUATE MALFUNCTION 42 SOURCE VOLTAGE DROP DESCRIPTOR ELECTRONIC CONTROLLED TRANSMISSION 24 YEAR: 1990-94 DTC NO. 1990-1994 37 DIRECT CLUTCH SPD SENSOR SIG. 38 ATF TEMP. SENSOR SIGNAL 41 THROTTLE POSITION SENSOR 42 SPD SENSOR SIGNAL (METER) 44 SPEED SENSOR REAR DESCRIPTOR LEXUS LEXUS DIAGNOSTIC TROUBLE CODES (DTCS) YEAR: 1990-94 (CONTINUED) DTC NO. DESCRIPTOR 46 ACCUMULATOR CONTROL SOLENOID 61 SPD SENSOR SIGNAL (T/M) 62 NO.1 SHIFT CONTROL SOLENOID 63 NO.2 SHIFT CONTROL SOLENOID 64 LOCK-UP CONTROL SOLENOID 65 TIMING SOLENOID 67 OD DIRECT CLUTCH SPD SENSOR SIG. 68 KICK-DOWN SWITCH 73 DIFF. LOCK SOLENOID OPEN 74 DIFF. LOCK SOLENOID OPEN 76 NO.3 SHIFT CONTROL SOLENOID 86 ENGINE SPEED SENSOR 88 COMMUNICATION ERROR (TCM-ECM) ENGINE YEAR: 1990-94 DTC NO. 1990-1994 11 ECU (B+) 12 RPM SIGNAL (CRANKING) 13 RPM SIGNAL OR PHASE MALF. 14 IGNITION SIGNAL (IGF1) 15 IGNITION SIGNAL (IGF2) 16 AT CONTROL SIGNAL 17 G1 SIGNAL 18 G2 SIGNAL 21 MAIN O2S SIGNAL (& HEATER) FAIL 22 COOLANT TEMP. SENSOR SIGNAL 23 INTAKE TEMP. SENSOR SIGNAL 24 INTAKE TEMP. SENSOR SIGNAL 25 AIR-FUEL RATIO LEAN MALFUNCTION 26 AIR-FUEL RATIO RICH MALFUNCTION 27 SUB LH O2S SIG. (& HEATER) FAIL LEXUS DESCRIPTOR 25 LEXUS DIAGNOSTIC TROUBLE CODES (DTCS) YEAR: 1990-94 (CONTINUED) 26 DTC NO. DESCRIPTOR 28 MAIN O2S SIGNAL (& HEATER) FAIL 29 SUB RH O2S SIG. (& HEATER) FAIL 31 VAF/MAF METER MAP SENSOR SIG. 32 VAF METER SIGNAL 33 IAC MALFUNCTION 34 TURBO PRESSURE MALFUNCTION 35 BARO/TURBO PRESS SENSOR SIGNAL 36 CPS SENSOR 41 THROTTLE POS. SENSOR SIGNAL 42 VEHICLE SPEED SENSOR SIGNAL 43 STARTER SIGNAL 47 SUB THROTTLE POS. SENSOR SIGNAL 48 AIR PUMP (EAP) MALFUNCTION 51 SWITCH CONDITION SIGNAL 52 KNOCK SENSOR SIGNAL 53 KNOCK CONTROL PART IN ECU 54 INTERCOOLER 55 KNOCK SENSOR SIGNAL 56 COOLING FAN PRESSURE SWITCH 71 EGR SYSTEM MALFUNCTION 72 AIR CONDITIONER RELAY OPEN 78 FUEL PUMP CONTROL SIGNAL 79 FUEL PUMP CONTROL SIGNAL 81 TCM COMM. (ECT1) 83 TCM COMM. (ESA1) 84 TCM COMM. (ESA2) 85 TCM COMM. (ESA3) LEXUS DATA LIST PARAMETER DESCRIPTIONS 9. DATA LIST PARAMETER DESCRIPTIONS The Asian Imports Cartridge is capable of displaying a wide variety of ECU parameters in Data List and Snapshot. This section provides a description of every parameter that can be displayed for Lexus vehicles. Remember, not all models are capable of displaying all parameters. Only parameters available for the selected vehicle are displayed by the tester. There are two basic types of ECM parameters: discrete and analog. Discrete parameters are 'bits' of information and can be in only one of two distinct states (on/off, open/closed, etc.). Switches and solenoids are examples of discrete parameters. Analog parameters are used to represent quantities and are displayed as a value with appropriate units. Examples of analog parameters include Engine Speed, Coolant Temperature, Oxygen Sensor Voltage, etc. A/C CLUTCH SIG. STATES ON/OFF Air Conditioning switch status as input to vehicle ECM; based on state of dashboard A/C switch position. ON=A/C commanded on, OFF= A/C commanded off. AFM OUTPUT A/F METER RATIO UNITS RANGE m3/h 0 – 255 m3/h Air Flow Meter (AFM) output signal sent as an input to vehicle ECM (from the Air Flow Meter) and calculated into cubic meter/hour by the ECM; based on the rate of air flow through the AFM. AFM OUTPUT A/F METER RATIO UNITS VOLTS RANGE 0 – 5V Air Flow Meter (AFM) output voltage signal sent to the vehicle ECM from the Air Flow Meter; based on the rate of air flow through the AFM. AFM SIG. PERIOD UNITS mS RANGE 0 – 66 Time period of Karman-Vortex airflow meter sent as an input to the vehicle ECM from the Karman-Vortex airflow meter; based on the rate of air flow through the KV-AFM CRANK SIGNAL STATES ON/OFF Crank (starter motor) signal input as sent to vehicle ECU during engine cranking. ON=crank switch on, OFF=crank switch off. LEXUS 27 DATA LIST PARAMETER DESCRIPTIONS DTC RESULT STATES SET/NOT SET Result of ECM diagnostic self-test which checks for malfunction codes. NOT SET=no diagnostic trouble codes, SET=ECM has detected and stored diagnostic trouble codes. ENG. COOLANT TMP (DEGREES) UNITS DEGREES F DEGREES C RANGE -58 – +260 -50 – +127 Engine Coolant Temperature input as sent to the vehicle ECM and calculated by the ECM; based on cooling system thermostat condition and engine operation mode. ENGINE SPEED UNITS RPM RANGE 0 – 10000 Engine Speed signal as input to the vehicle ECU and calculated by the ECU; based on the signal from the distributor pulse generator. IDLE SWITCH STATES ON/OFF Idle Switch signal status as sent to the vehicle ECM; based on idle switch state in throttle position sensor. ON=switch closed (engine idling), OFF=switch open (engine off-idle). NOTE: When testing the idle switch make sure the engine is running. INJECTOR P/W UNITS mS RANGE 0 – 33 Injector solenoid Pulse Width (on-time) based on output calculated by the vehicle ECU; based on engine load, engine RPM and Throttle Position. INTAKE AIR PRES. UNITS mmHg RANGE 0 – 1244 Intake Air Pressure/Vacuum signal sent as an input to the vehicle ECM from the MAP/VAC sensor; based on engine load. INTAKE AIR VOL. UNITS g/S RANGE 0 – 510 Intake Air Volume is a measure of engine intake air volume through the air Flow Meter in grams per second (g/s). The more throttle opening, the greater intake air volume into the engine. This parameter applies to AFM equipped engines only. ISC DUTY RATIO UNITS % RANGE 0 – 100 Idle Speed Control (ISC) valve percentage opening based on output calculated by the vehicle ECU; based on engine load, engine RPM and Throttle Position. 28 LEXUS DATA LIST PARAMETER DESCRIPTIONS ISC VALVE UNITS STEPS RANGE 0 – 215 Idle Speed Control (ISC) valve step based on output calculated by the vehicle ECU; based on engine load, engine RPM and Throttle Position. KNOCK SIGNAL STATES ON/OFF Knock sensor signal correction as commanded by vehicle ECM; based on engine load and indicates that the ECM advance/retard strategy is controlling ignition timing. ON=correction enabled, OFF= correction disabled. LEAN MIX SENSOR UNITS mA RANGE 0 – 72 Lean mixture sensor current as input to the vehicle ECM; based on air-fuel ratio (O2 content) of exhaust gases. LEFT A/F FB STATES ON/OFF Left side air-fuel feedback signal state as commanded by vehicle ECM; based on engine load and left O2 sensor signal inputs to ECM. ON=feedback enabled, OFF=feedback disabled. LEFT A/F TARGET UNITS VOLTS RANGE 0 – 5V Target (commanded) air fuel ratio in left-hand exhaust manifold as calculated by vehicle ECM. LEFT O2S SIGNAL STATES RICH/LEAN Left Oxygen Sensor state flag based on input to vehicle ECU; based on oxygen content in left exhaust stream, RICH=air fuel ratio above 14.7, LEAN=air fuel ratio below 14.7:1. NEUTRAL SWITCH STATES P-N--/-R-DL Neutral Safety switch status as input to vehicle ECM, based on the current gear selection of the transmission. P-N-- = current gear is PARK or NEUTRAL, -R-DL = current gear is REVERSE, DRIVE, or LOW. RIGHT A/F FB STATES ON/OFF Right side air-fuel feedback signal state as commanded by vehicle ECM; based on engine load and right O2 sensor signal inputs to ECM. ON=feedback enabled, OFF=feedback disabled. LEXUS 29 DATA LIST PARAMETER DESCRIPTIONS RIGHT A/F TARGET UNITS VOLTS RANGE 0 – 5V Target (commanded) air fuel ratio in right-hand exhaust manifold as calculated by vehicle ECM. RIGHT O2S SIGNAL STATES RICH/LEAN Right Oxygen Sensor state flag based on input to vehicle ECU; based on oxygen content in right exhaust stream, RICH=air fuel ratio above 14.7, LEAN=air fuel ratio below 14.7:1. SPARK ADVANCE UNITS DEGREES RANGE -30 – +90 Ignition timing Spark Advance or Retard signal based on output calculated by the vehicle ECU; based on engine load, engine RPM and Throttle Position. THROTTLE ANGLE UNITS DEGREES RANGE 0 – 125 Angle of throttle plate in throttle body as sent to the vehicle ECM and calculated by the ECM; based on current position of throttle position sensor. VEHICLE SPEED UNITS MPH RANGE 0 – 125 Vehicle speed signal as input to vehicle ECM and calculated by the ECM; based on vehicle speed sensor input. 30 LEXUS MAZDA 1. VEHICLES AND SYSTEMS ..................................................................................................................... 3 2. MAZDA SPECIFIC INFORMATION .....................................................................................................11 3. TEST MODES AVAILABLE .................................................................................................................... 12 4. GETTING STARTED ................................................................................................................................. 13 5. SELECTING THE VEHICLE .................................................................................................................. 14 6. TEST MODES.............................................................................................................................................. 16 Mode F1: DTC Entry ........................................................................................................................ 16 Submode F0: How To Read .................................................................................................... 17 Submode F1: Enter DTC(s) ..................................................................................................... 17 Submode F2: DTC List ............................................................................................................ 20 Submode F3: Review DTC ..................................................................................................... 20 Submode F4: Clear DTC(s) ..................................................................................................... 20 Mode F2: DTC ................................................................................................................................... 21 Submode F1: Read DTC(s) ..................................................................................................... 21 Submode F2: DTC List ............................................................................................................ 22 Submode F3: Review DTC ..................................................................................................... 22 Submode F4: Clear DTC(s) ..................................................................................................... 22 7. OBD CONTROLS ....................................................................................................................................... 24 Mode F4: OBD Controls .................................................................................................................. 24 Submode F0: Switch Test ........................................................................................................ 24 Submode F1: O2S Monitor ..................................................................................................... 26 8. MAZDA DIAGNOSTIC TROUBLE CODES (DTCs)........................................................................ 28 OBD, OBD I Systems ....................................................................................................................... 28 1983.............................................................................................................................................. 28 1984.............................................................................................................................................. 28 1985.............................................................................................................................................. 29 1986.............................................................................................................................................. 29 1987 .............................................................................................................................................. 30 1988 .............................................................................................................................................. 31 1989 .............................................................................................................................................. 32 1990 .............................................................................................................................................. 34 1991 .............................................................................................................................................. 37 1991 Navajo ................................................................................................................................ 40 1992 .............................................................................................................................................. 42 1993 .............................................................................................................................................. 44 1994 .............................................................................................................................................. 47 1992-1994 Navajo, .................................................................................................................... 50 1995 .............................................................................................................................................. 53 OBD II Systems ................................................................................................................................. 57 2 MAZDA VEHICLES AND SYSTEMS 1. VEHICLES AND SYSTEMS Using the Asian cartridge, the following Mazda vehicles can be diagnosed. MODEL: 1983-89 ENGINE FUEL TYPE ENGINE TYPE ADAPTER TYPE CODE TYPE 1983 GLC 1.5L I4 CARB E5 CHECK AUTOCODES 626 2.0L I4 CARB FE CHECK AUTOCODES GLC 1.5L I4 CARB E5 CHECK AUTOCODES 626 2.0L I4 CARB FE CHECK AUTOCODES RX7 1.3L R2 EGI EFI 13B CHECK AUTOCODES GLC 1.5L I4 CARB E5 CHECK AUTOCODES 626 2.0L I4 CARB FE CHECK AUTOCODES RX7 1.3L R2 EGI EFI 13B CHECK AUTOCODES 323 1.6L I4 EGI EFI B6 CHECK AUTOCODES 626 2.0L I4 EGI EFI FE CHECK AUTOCODES 626 2.0L I4 TURBO EGI EFI FE CHECK AUTOCODES RX7 1.3L R2 EGI EFI RE13B CHECK AUTOCODES B2000 2.0L I4 CARB FE CHECK AUTOCODES 323 1.6L I4 EGI EFI B6 CHECK AUTOCODES 323 WAGON 1.6L I4 EGI EFI B6 CHECK AUTOCODES 626 2.0L I4 EGI EFI FE CHECK AUTOCODES 626 2.0L I4 TURBO EGI EFI FE CHECK AUTOCODES RX7 1.3L R2 EGI EFI RE13B CHECK AUTOCODES RX7 1.3L R2 TURBO EGI EFI RE13B CHECK AUTOCODES B2200 2.2L I4 CARB F2 CHECK AUTOCODES 323/PROTEGÉ 1.6L I4 EGI EFI B6 CHECK AUTOCODES 323/PROTEGÉ 1.6L I4 TURBO EGI EFI B6 CHECK AUTOCODES 1984 1985 1986 1987 1988 MAZDA 3 VEHICLES AND SYSTEMS MODEL: 1983-89 ENGINE FUEL TYPE ENGINE TYPE ADAPTER TYPE CODE TYPE 323 WAGON 1.6L I4 EGI EFI B6 CHECK AUTOCODES 626/MX6 2.2L I4 EGI EFI F2 CHECK AUTOCODES 626/MX6 2.2L I4 TURBO EGI EFI F2 CHECK AUTOCODES 929 3.0L V6 EGI EFI JE CHECK AUTOCODES RX7 1.3L R2 EGI EFI RE13B CHECK AUTOCODES RX7 1.3L R2 TURBO EGI EFI RE13B CHECK AUTOCODES B2200 2.2L I4 CARB F2 CHECK AUTOCODES 323 1.6L I4 E EGI EFI B6 CHECK AUTOCODES 323 1.6L IL TURBO EGI EFI B6 CHECK AUTOCODES 323 WAGON 1.6L I4 EGI EFI B6 CHECK AUTOCODES 626/MX6 2.2L I4 EGI EFI F2 CHECK AUTOCODES 626/MX6 2.2L I4 TURBO EGI EFI F2 CHECK AUTOCODES 929 3.0L V6 EGI EFI JE CHECK AUTOCODES MPV 2.6L I4 EGI EFI G6 CHECK AUTOCODES MPV 3.0L V6 EGI EFI JE CHECK AUTOCODES RX7 1.3L R2 EGI EFI RE13B CHECK AUTOCODES RX7 1.3L R2 TURBO EGI EFI RE13B CHECK AUTOCODES B2200 2.2L I4 CARB F2 CHECK AUTOCODES B2600i 2.6L I4 EGI EFI G6 CHECK AUTOCODES 1989 MODEL: 1990 ENGINE FUEL TYPE ENGINE TYPE ADAPTER TYPE CODE TYPE 1990 4 323/PROTEGÉ 1.6L I4 EGI MFI B6 CHECK AUTOCODES 323/PROTEGÉ 1.8L I4 DOHC EGI MFI BP CHECK AUTOCODES 323/PROTEGÉ 1.8L I4 SOHC EGI MFI BP CHECK AUTOCODES 626/MX6 2.2L I4 EGI MFI F2 CHECK AUTOCODES 626/MX6 2.2L I4 TURBO EGI MFI F2 CHECK AUTOCODES 929 3.0L V6 DOHC EGI MFI JE CHECK AUTOCODES 929 3.0L V6 SOHC EGI MFI JE CHECK AUTOCODES MAZDA VEHICLES AND SYSTEMS MODEL: 1990 (CONTINUED) ENGINE FUEL TYPE ENGINE TYPE ADAPTER TYPE CODE TYPE MPV 3.0L V6 EGI MFI JE CHECK AUTOCODES MPV 2.6L I4 EGI MFI G6 CHECK AUTOCODES MX5/MIATA 1.6L I4 EGI MFI B6 CHECK AUTOCODES RX7 1.3L R2 EGI MFI RE13B CHECK AUTOCODES RX7 1.3L R2 TURBO EGI MFI RE13B CHECK AUTOCODES B2200 2.2L I4 E EGI MFI F2 CHECK AUTOCODES B2200 2.2L I4 CARB F2 CHECK AUTOCODES B2600i 2.6L I4 EGI MFI G6 CHECK AUTOCODES MODEL: 1991 ENGINE FUEL TYPE ENGINE TYPE ADAPTER TYPE CODE TYPE 1991 323/PROTEGÉ 1.6L I4 SOHC EGI MFI B6 CHECK AUTOCODES 323/PROTEGÉ 1.8L I4 SOHC EGI MFI BP CHECK AUTOCODES 323/PROTEGÉ 1.8L I4 DOHC EGI MFI BP CHECK AUTOCODES 626/MX6 2.2L I4 EGI MFI F2 CHECK AUTOCODES 626/MX6 2.2L I4 TURBO EGI MFI F2 CHECK AUTOCODES 929 3.0L V6 SOHC EGI MFI JE CHECK AUTOCODES 929 3.0L V6 DOHC EGI MFI JE CHECK AUTOCODES NAVAJO 4.0L V6 MFI X NONE FORDCODES MPV 3.0L V6 EGI MFI JE CHECK AUTOCODES MPV 2.6L I4 EGI MFI G6 CHECK AUTOCODES MX5/MIATA 1.6L I4 EGI MFI B6 CHECK AUTOCODES RX7 1.3L R2 EGI MFI RE13B CHECK AUTOCODES RX7 1.3L R2 TURBO EGI MFI RE13B CHECK AUTOCODES B2200 2.2L I4 EGI MFI F2 CHECK AUTOCODES B2200 2.2L I4 CARB F2 CHECK AUTOCODES B2600i 2.6L I4 EGI EFI G6 CHECK AUTOCODES MAZDA 5 VEHICLES AND SYSTEMS MODEL: 1992 ENGINE FUEL TYPE ENGINE TYPE ADAPTER TYPE CODE TYPE 1992 323/PROTEGÉ 1.6L I4 SOHC EGI MFI B6 CHECK AUTOCODES 323/PROTEGÉ 1.8L I4 SOHC EGI MFI BP CHECK AUTOCODES 323/PROTEGÉ 1.8L I4 DOHC EGI MFI BP CHECK AUTOCODES 626/MX6 2.2L I4 EGI MFI F2 CHECK AUTOCODES 626/MX6 2.2L I4 TURBO EGI MFI F2 CHECK AUTOCODES 929 3.0L V6 EGI MFI JE CHECK AUTOCODES NAVAJO 4.0L V6 MFI X NONE FORDCODES MX3 1.6L I4 SOHC EGI MFI B6 CHECK AUTOCODES MX3 1.8L I4 DOHC EGI MFI K8 CHECK AUTOCODES MPV 3.0L V6 EGI MFI JE CHECK AUTOCODES MPV 2.6L I4 EGI MFI G6 CHECK AUTOCODES MX5/MIATA 1.6L I4 EGI MFI B6 CHECK AUTOCODES B2200 2.2L I4 CARB F2 CHECK AUTOCODES B2200 2.2L I4 EGI MFI F2 CHECK AUTOCODES B2600i 2.6L I4 EGI MFI G6 CHECK AUTOCODES MODEL: 1993 ENGINE FUEL TYPE ENGINE TYPE ADAPTER TYPE CODE TYPE 1993 6 323/PROTEGÉ 1.6L I4 SOHC EGI MFI B6 CHECK AUTOCODES 323/PROTEGÉ 1.8L I4 SOHC EGI MFI BP CHECK AUTOCODES 323/PROTEGÉ 1.8L I4 DOHC EGI MFI BP CHECK AUTOCODES 626/MX6 2.0L I4 EGI MFI FS CHECK AUTOCODES 626/MX6 2.5L V6 EGI MFI KL CHECK AUTOCODES 929 3.0L V6 EGI MFI JE CHECK AUTOCODES NAVAJO 4.0L V6 MFI X NONE AUTOCODES MPV 3.0L V6 EGI MFI JE CHECK AUTOCODES MPV 2.6L I4 EGI MFI G6 CHECK AUTOCODES MX3 1.8L V6 EGI MFI K8 CHECK AUTOCODES MAZDA VEHICLES AND SYSTEMS MODEL: 1993 (CONTINUED) ENGINE FUEL TYPE ENGINE TYPE ADAPTER TYPE CODE TYPE MX3 1.6L I4 EGI MFI B6 CHECK AUTOCODES MX5/MIATA 1.6L I4 EGI MFI B6 CHECK AUTOCODES RX7 1.3L R2 TURBO EGI MFI 13B CHECK AUTOCODES B2200 2.2L I4 CARB F2 CHECK AUTOCODES B2200 2.2L I4 EGI MFI F2 CHECK AUTOCODES B2600i 2.6L I4 EGI MFI G6 CHECK AUTOCODES MODEL: 1994 ENGINE FUEL TYPE ENGINE TYPE ADAPTER TYPE CODE TYPE 1994 323/PROTEGÉ 1.6L I4 SOHC EGI MFI B6 CHECK AUTOCODES 323/PROTEGÉ 1.8L I4 SOHC EGI MFI BP CHECK AUTOCODES 323/PROTEGÉ 1.8L I4 DOHC EGI MFI BP CHECK AUTOCODES 626/MX6 (M/T) 2.0L I4 EGI MFI FS CHECK AUTOCODES 626/MX6 (A/T) 2.0L I4 MFI FS NONE FORDCODES 626/MX6 2.5L V6 EGI MFI KL CHECK AUTOCODES 929 3.0L V6 DOHC EGI MFI JE CHECK AUTOCODES NAVAJO 4.0L V6 MFI X NONE FORDCODES MPV 3.0L V6 EGI MFI JE CHECK AUTOCODES MPV 2.6L I4 EGI MFI G6 CHECK AUTOCODES MX3 1.6L I4 EGI MFI B6 CHECK AUTOCODES MX3 1.8L I4 DOHC EGI MFI K8 CHECK AUTOCODES MX5/MIATA 1.8L I4 DOHC EGI MFI BP CHECK AUTOCODES RX7 1.3L R2 TURBO EGI MFI 13B CHECK AUTOCODES B SERIES 2.3L I4 MFI A NONE FORDCODES B SERIES 3.0L V6 MFI U NONE FORDCODES B SERIES 4.0L V6 MFI X NONE FORDCODES MAZDA 7 VEHICLES AND SYSTEMS MODEL: 1995 ENGINE FUEL TYPE ENGINE TYPE ADAPTER TYPE CODE TYPE 1995 323/PROTEGÉ 1.8L I4 EFI BP OBD II* AUTOCODES 323/PROTEGÉ 1.5L I4 EFI Z5 OBD II* AUTOCODES 626/MX6 2.0L DOHC SFI FS CHECK AUTOCODES 626/MX6 2.5L DOHC SFI KL CHECK AUTOCODES 929 3.0L V6 DOHC SFI JE CHECK AUTOCODES MPV 3.0L V6 DOHC CIS JE CHECK AUTOCODES MPV 2.6L I4 MFI G6 CHECK AUTOCODES MX3 1.6L I4 SFI B6 CHECK AUTOCODES MX3 1.8L V6 SFI K8 CHECK AUTOCODES MX5/MIATA 1.8L I4 DOHC SFI BP CHECK AUTOCODES RX7 1.3L R2 TURBO SFI 13B CHECK AUTOCODES B SERIES 2.3L I4 EFI OBD II* AUTOCODES B SERIES 3.0L V6 EFI OBD II* AUTOCODES B SERIES 4.0L V6 EFI OBD II* AUTOCODES * For OBD II Adapter Type use Common Test Modes OBD II Systems section for operating instructions and test mode information. MODEL: 1996 ENGINE FUEL TYPE ENGINE TYPE ADAPTER TYPE CODE TYPE 1996 8 PROTEGÉ 1.5L I4 EFI Z5 OBD II* AUTOCODES PROTEGÉ 1.8L I4 EFI BP OBD II* AUTOCODES MILLENIA 2.5L V6 EFI KL OBD II* AUTOCODES MILLENIA 2.3L V6 EFIMILLER KJ OBD II* AUTOCODES MPV 3.0L V6 EFI JE OBD II* AUTOCODES MX5/MIATA 1.8L I4 SFI BP OBD II* AUTOCODES MX6 2.0L I4 SFI FS OBD II* AUTOCODES MX6 2.5L V6 SFI KL OBD II* AUTOCODES 626 2.0L I4 SFI FS OBD II* AUTOCODES MAZDA VEHICLES AND SYSTEMS MODEL: 1996 (CONTINUED) ENGINE FUEL TYPE 626 2.5L V6 SFI B SERIES 2.3L I4 B SERIES B SERIES * ENGINE TYPE KL ADAPTER TYPE CODE TYPE OBD II* AUTOCODES EFI OBD II* AUTOCODES 3.0L V6 EFI OBD II* AUTOCODES 4.0L V6 EFI OBD II* AUTOCODES For OBD II Adapter Type use Common Test Modes OBD II Systems section for operating instructions and test mode information. MODEL: 1997 ENGINE FUEL TYPE ENGINE TYPE ADAPTER TYPE CODE TYPE 1997 B SERIES 2.3L I4 EFI OBD II* AUTOCODES B SERIES 3.0L V6 EFI OBD II* AUTOCODES B SERIES 4.0L V6 EFI OBD II* AUTOCODES MILLENIA 2.3L V6 EFIMILLER KJ OBD II* AUTOCODES MILLENIA 2.5L V6 EFI KL OBD II* AUTOCODES MPV 3.0L V6 EFI JE OBD II* AUTOCODES MX5/MIATA 1.8L I4 SFI BP OBD II* AUTOCODES MX6 2.0L I4 SFI FS OBD II* AUTOCODES MX6 2.5LV6 SFI KL OBD II* AUTOCODES PROTEGÉ 1.5L I4 EFI Z5 OBD II* AUTOCODES PROTEGÉ 1.8L I4 EFI BP OBD II* AUTOCODES 626 2.0L I4 SFI FS OBD II* AUTOCODES 626 2.5LV6 SFI KL OBD II* AUTOCODES * For OBD II Adapter Type use Common Test Modes OBD II Systems section for operating instructions and test mode information. MODEL: 1998 ENGINE FUEL TYPE ENGINE TYPE ADAPTER TYPE CODE TYPE 1998 B SERIES 2.5L I4 EFI OBD II* AUTOCODES B SERIES 3.0L V6 EFI OBD II* AUTOCODES MAZDA 9 VEHICLES AND SYSTEMS MODEL: 1998 (CONTINUED) ENGINE FUEL TYPE B SERIES 4.0L V6 EFI MILLENIA 2.5L V6 MEFI MILLENIA 2.3L V6 MPV ENGINE TYPE ADAPTER TYPE CODE TYPE OBD II* AUTOCODES KL OBD II* AUTOCODES MEFIMILLER KJ OBD II* AUTOCODES 3.0L V6 MEFI JE OBD II* AUTOCODES MX5/MIATA 1.8L I4 MEFI BP OBD II* AUTOCODES PROTEGÉ 1.5L I4 MEFI Z5 OBD II* AUTOCODES PROTEGÉ 1.8L I4 MEFI BP OBD II* AUTOCODES 626 2.0L I4 MEFI FS OBD II* AUTOCODES 626 2.5L V6 MEFI KL OBD II* AUTOCODES * For OBD II Adapter Type use Common Test Modes OBD II Systems section for operating instructions and test mode information. MODEL: 1999 ENGINE FUEL TYPE ENGINE TYPE ADAPTER TYPE CODE TYPE 1999 MX5/MIATA * 10 1.82L I4 MEFI BP OBD II* AUTOCODES For OBD II Adapter Type use Common Test Modes OBD II Systems section for operating instructions and test mode information. MAZDA MAZDA SPECIFIC INFORMATION 2. MAZDA SPECIFIC INFORMATION The Mazda vehicles covered by the Asian Imports Cartridge are separated into two different sections within the Asian Imports Operator's Manual. The vehicle's on-board system will determine which section of the Operator's Manual will need to be used. Vehicles that are OBD II certified have information about the operating test modes in the Common Test Modes OBD II Systems section of the Operator's Manual. Vehicles that have OBD or OBDI systems have test mode information in this section of the Operator's Manual. In these sections, you will find information on test modes available, how to connect the tester to the vehicle, and operating instructions for the different test modes. A complete list of Mazda Diagnostic Trouble Codes is included at the back of each section. To determine which section of the Operator's Manual to use for diagnostic information and instructions, look at Adapter Type of the Vehicle and Systems chart. If the vehicle you are testing has an OBD II adapter type, use the Common Test Modes OBD II Systems section of the Operator's Manual. If the vehicle you are testing does not have the OBD II Adapter Type, use this section to diagnose the vehicle under test. MAZDA 11 TEST MODES AVAILABLE 3. TEST MODES AVAILABLE The following test modes are available when testing Mazda vehicles. Operating instructions for test modes other than the DTC Entry, DTCs, and OBD Controls are included in the Common Test Modes OBD, OBD I Systems section. There are Mazda specific instructions for operating the test modes in Mazda, Sections 6 and7. MODE F1: DTC ENTRY SUBMODE F0: HOW TO READ SUBMODE F1: ENTER DTC(s) SUBMODE F2: DTC LIST SUBMODE F3: REVIEW DTC SUBMODE F4: CLEAR DTC(s) MODE F2: DTC SUBMODE F1: READ DTC(s) SUBMODE F2: DTC LIST SUBMODE F3: REVIEW DTC SUBMODE F4: CLEAR DTC(s) MODE F4: OBD CONTROLS SUBMODE F0: SWITCH TEST SUBMODE F1: O2S MONITOR MODE F5: SYSTEM TESTS SUBMODE F0: PREP VEHICLE MODE F8: INFORMATION SUBMODE F1: DLC LOCATION SUBMODE F3: ID INFO 12 MAZDA GETTING STARTED 4. GETTING STARTED Before operating the Asian Imports Cartridge with a Mazda vehicle, the following steps must be performed: 1. Make sure the vehicle ignition is OFF. 2. Refer to the Vehicles and Systems table to see if the vehicle you are testing requires the Check Adapter Cable. If so, connect the Mazda Check Adapter Cable to the end of the DLC cable, then connect the orange connector end to the vehicle check connector. C B A Ground Mazda Check Adapter Cable 3. Plug the tester power cable into the vehicle cigarette lighter. The power cable may also be directly connected to the battery via the optional battery clip adapter (P/N 02001636). NOTE Since the cigarette lighter can be switched, some tests require that the power cable be directly connected to the battery via the battery clip adapter. 4. Turn on the tester and select the application software that you will be using. Verify that the correct screen is displayed. The tester should display a screen similar to the one below. ASIAN IMPORTS 83-98 <ENTER> Tester Stand-alone Diaplay 5. If the display is correct, press E. If the display is not correct, refer to Appendix D. 6. Follow the instructions on the following page to select the vehicle type you are testing by entering required vehicle information into the tester. CAUTION! CAUTION MAZDA When removing the Mazda Check Adapter Cable from the vehicle DLC, remember to depress the retaining tab on the vehicle DLC. Failure to do so could cause wiring harness damage. 13 SELECTING THE VEHICLE 5. SELECTING THE VEHICLE Once you've pressed E from the power-up screen, the following steps must be performed to select the manufacturer, model year, model and engine type of the vehicle being tested. Remember, if you make a mistake, you can always press X to go back to the previous menu. SELECTING THE MANUFACTURER A menu of manufacturers available for testing is displayed in a scrolling menu. You can scroll down one screen at a time by pressing Y, or up one screen at a time by pressing n. Press U or D to scroll one manufacturer at a time, until the → arrow is opposite Mazda. Then press e to select. SELECTING THE MODEL YEAR Once the manufacturer is selected, the Select Model Year menu is displayed. Press the last two digits of the year model being tested; 9, 0 for 1990 models, 9, 1 for 1991 models, and so on. SELECTING THE MODEL The Model Select menu displays models available for testing. Press the N key until the model being tested is displayed, then press the Y key. SELECTING THE ENGINE AND ENGINE TYPE Next, the Engine Select menu is displayed. For selected vehicles, you will also be asked to select the fuel type, such as EGI MFI. Press N until the engine and fuel type of the vehicle is displayed, then press Y. VEHICLE INFORMATION DISPLAY After the vehicle is selected, the tester displays a summary screen of the selected vehicle. Information displayed includes the year, manufacturer, model, engine size and type, and additional information such as the type of fuel system. SELECT MODE MENU When the above steps are completed, the Select Mode menu displays the test modes available for the selected vehicle and system. Refer to Sections 6 (Test Modes), 7 (OBD Controls), and the Common Test Modes OBD, OBD I Systems section for instructions on operating the test modes with Mazda vehicles. 14 MAZDA SELECTING THE VEHICLE MANUFACTURER MAZDA MITSUBISHI NISSAN E MAZDA 1983-2002 SELECT MODEL YEAR: ???? SELECT MODEL: 323/PROTEGE (YES/NO) Y SELECT ENGINE: 1.6L I4 SOHC (YES/NO) Y 1994 MAZDA 323/PROTEGE 1.6L I4 SOHC EGI MFI U, or 5 sec. SELECT MODE F1: DTC ENTRY F2: DTC F8: OBD CONTROLS Mazda Vehicle Selection ACTIVE KEYS 0-9 Enter model year. yn Used to answer questions in tester diaplay. x Return to previous display. MAZDA 15 TEST MODES 6. TEST MODES When the Select Mode menu is displayed, test modes available for Mazda vehicles may be selected. Operating instructions for test modes other than DTC ENTRY, DTCs, and OBD CONTROLS are included in the Common Test Modes OBD, OBD I Systems section. You may select Mode F1: DTC Entry, Mode F5: System Tests, and Mode F8: Information without connecting the tester to the vehicle. READING CODES Detailed operating instructions for using Modes F1: DTC Entry and F2: DTC with Mazda vehicles are included in the following procedure. Remember that F2: DTC is automatically displayed with Mazda vehicles that have "CHECK" as the adapter type listed in Section 1. Operating instructions for Mode F4: OBD Controls are included in Section 7. IMPORTANT Follow the Submode F0: Prepare Vehicle instructions to ensure proper vehicle preparation prior to testing. The vehicle must be completely warmed up in order for the tester to communicate properly with the vehicle. MODE F1: DTC ENTRY When Mode F1: DTC Entry is selected, the tester displays submodes which, after your selection, can provide information on how to read diagnostic trouble codes (DTCs) from the vehicle, how to clear DTCs from the vehicle (or tester memory ), obtain a text description of entered or selected DTCs, and review entered or selected DTCs as a result of manually retrieving codes from the ECU. DTC ENTRY SUBMODES F0: HOW TO READ F1: ENTER DTC(s) F2: DTC LIST F3: REVIEW DTC F4: CLEAR DTC(s) Manually Reading DTCs To manually read Diagnostic Trouble Codes (DTCs) on Mazda vehicles from 1983-95, there is a single method that should be used. This requires an analog voltmeter and a single wire jumper that is placed across a self test input pin to ground of the 1 pin or 17 pin DLC. Using the analog voltmeter set to a 20 volt scale and connected to the self test output pin of the Data Link Connector (DLC), the DTC can be interpreted from the analog voltmeter needle flashes. For the automobile manufacturers that mention the use of an analog voltmeter to read manual DTCs, the Mastertech Oscilloscope may be used. Set up the single channel oscilloscope and make connections the same way as the analog voltmeter (above). Choose the 20v/division scale and a slow time/division (e.g., 1-2 sec/division) the DTCs will be shown as a waveform on the display. 16 MAZDA TEST MODES Submode F0: How To Read This submode provides information on how to manually read DTCs from the vehicle. Step by step screen instructions provide information to correctly set up the vehicle ECU. This is performed by following the tester instruction screens. If you have trouble, additional DTC retrieval information is described below. If you refer to the manual for this information, make sure that you are following the correct steps for the system that you are working on. Submode F1: Enter DTC(s) On Mazda vehicles, the Enter DTCs submode allows you to enter manually read DTCs. This submode provides you with a text description of the numeric DTC that was entered into the tester. The Enter DTC Submode displays two question marks for DTC Entry. The tester screen prompts you to enter the DTCs read from the analog voltmeter. Be careful when reading the DTC from the analog voltmeter. Incorrect voltmeter needle interpretation can cause the wrong DTC description to be displayed. Once all DTCs have been manually read and recorded, enter each DTC into the tester as described in the Common Test Modes OBD, OBD I Systems section. Refer to the appropriate procedure for manually reading ECU DTCs on the following pages. Manually Reading DTCs from Mazda Vehicles using 6 Pin, 1 pin and 6 pin, 17pin DLCs and analog voltmeter: 1. Locate the 1 pin, 6 pin, and 17 pin Diagnostic Connector. 2a. 6 pin and 1 pin DLC only: Connect a suitable jumper wire from the self test input (STI) terminal 1 pin DLC (single lead, shell color sometimes green or black) to ground. Self-Test Input (STI) 2b. 17 pin DLC only: Connect a suitable jumper wire from the engine test input (TEN) terminal to ground. Ground Engine Test (TEN) 2c. On vehicles with only the 6 pin DLC, go to Step 3. 3. Connect analog voltmeter red lead to engine fault code output (FEN or STO) terminal in the 6 pin or 17 pin DLCs (refer to service manual for correct wire) and voltmeter black lead to ground. Set analog voltmeter to 20 volt scale. MAZDA 17 TEST MODES Engine Fault Code (FEN) Self-Test Output (STO) 4. Turn ignition switch to ON. 5. DTC indication will begin on voltmeter. Voltmeter will fluctuate 0 to 12 volts if DTCs are stored in ECU. If a DTC is stored in ECU, the STO line will first indicate 12 volts. The first number of 0 volt, 1.2 second indications will equal the 10's digit of a 2-digit DTC. After a 1.6 second pause, the second number of 0 volt, 0.4 second indications will equal the 1's digit. DTCs are separated by 12 volt indication for 4.0 seconds. DTC 10 MIL 12v MIL 0v seconds 2s 1.25s DTC SEPARATION 4.0s DTC 16 Next DTC Indication 1.25s 1.6s 0.4s 6. If no malfunctions are present, meter will read constant 12 volts. 7. After recording DTCs turn ignition switch off. 8. Disconnect voltmeter and jumper leads. 9. Erase DTCs when all repairs are completed. NOTE All connector views are tester side. Manually Reading DTCs from Mazda Vehicles using Ford EEC-IV engine control system and Ford's 6 pin plus 1 pin Data Link Connector: 1. Locate the 1pin and 6pin Diagnostic Link Connector. 18 MAZDA TEST MODES Data Link Connector (STO) Data Link Connector (STI) Mazda/Ford Diagnostic Link Connector 2. 6 pin and 1 pin DLC: connect a suitable jumper wire from the self test input (STI) terminal 1 pin DLC (single lead, shell color gray or black) to ground. 3. Reading Key On, Engine Off (KOEO) DTCs: Warm engine to normal operating temperature. Turn the ignition key off and wait 10 seconds. Now turn the ignition key to run. DTC indication will begin on dashboard MIL. The dashboard MIL will flash KOEO DTCs first, then a separator code, followed by Continuous DTCs (see Figure M-2). For 3-digit DTCs the first set of MIL flashes will equal the 100s digit. After a 2.0 second pause, the second set of flashes will equal the 10s digit. After another 2.0 second pause, the third set of flashes will equal the 1s digit. Then a 6.0-9.0 second pause between the separator code and KOEO or Continuous DTCs will occur. If there are 2 or more DTCs of the same type, there will be a 4.0 second pause between each DTC. After recording DTCs, turn off ignition switch and disconnect jumper lead from DLC. 4. Reading Key On, Engine Running (KOER) DTCs: Warm engine to normal operating temperature. Turn the ignition key off and wait 10 seconds. Now start the engine. 5. DTC indication will begin on dashboard MIL. Rotate steering wheel 1/2 turn, depress and release brake pedal. If a single MIL flash occurs, depress and release throttle pedal. Wait for PCM to exercise all outputs. The dashboard MIL will flash KOER DTCs. For 3-digit DTCs the first set of flashes will equal the 100s digit. After a 2.0 second pause, the second set of flashes will equal the 10s digit. After another 2.0 second pause, the third set of flashes will equal the 1s digit. If there are 2 or more DTCs, there will be a 4.0 second pause between each DTC. After recording DTCs, turn off ignition switch and disconnect jumper lead from DLC. 6. If no malfunctions are present, the MIL will flash DTC 111. 7. Disconnect jumper leads. 8. Erase all DTCs when all repairs are completed. Manually Clearing DTCs from Mazda Vehicles using Ford EEC-IV engine control system and Ford's 6 pin plus 1 pin Data Link Connector: 1. Turn ignition key off, wait 10 seconds. 2. Connect jumper from STI line in 1-pin DLC to ground. 3. Turn ignition key to run. 4. When MIL begins to flash DTCs, remove jumper from ground. Turn off ignition key, disconnect jumper lead from DLC. 5. Perform KOEO test to confirm that DTCs have been cleared and the system sends a pass DTC. If no malfunctions are present, the MIL will flash DTC 111. MAZDA 19 TEST MODES 6. Disconnect jumper leads. Example Of EEC-IV Fast And Slow KOEO and Continuous Codes Submode F2: DTC List This submode provides you with a way to view all possible ECU DTCs, including DTC numbers and descriptions. You can also select the DTCs obtained from the analog voltmeter as an alternative way of entering DTCs into the tester's memory. As you scroll through the available DTCs you can view a description of the DTC obtained from the analog voltmeter. You can "Select" the DTC on the tester screen for later review or printing. Refer to the Common Test Modes OBD, OBD I Systems section for further information. Submode F3: Review DTC This submode provides you with a review of the DTCs that you entered or selected in the tester. The description of the entered or selected DTC will be displayed, along with a numerical summary of the entered or selected DTC. Review DTC is intended to provide you with an electronic clipboard that keeps track of the DTCs that you have encountered during diagnosis. Submode F4: Clear DTC(s) This submode has two options for you to chose. Option F0 is to view text screens that provide information on how to clear the DTCs from ECU memory. This is performed by tester keypad presses. Option F1 clears the tester memory from DTCs that you entered or selected in the tester. The clear DTC(s) mode is helpful and provides information that you would normally have to locate in a service manual. 20 MAZDA TEST MODES MODE F2: DTC To read DTCs on all 1983-95 vehicles you will need to locate the vehicle DLC and connect the Mazda Check Adapter to the tester and vehicle. To locate the DLC, select F1: DLC Location from the Information menu. If necessary, refer to the Common Test Modes OBD, OBD I Systems section for further instructions. When Mode F2: DTC is selected, the tester displays four DTC submodes: F1: READ DTC(s) F2: DTC LIST F3: REVIEW DTC F4: CLEAR DTC(s) Submode F1: Read DTC(s) This submode provides automated DTC retrieval from the vehicle ECU. Step by step screen instructions guide you to connect the ORANGE Mazda Check adapter to the vehicle DLC and to start and warm the engine to normal operating temperature. This is performed by following the tester instruction screens. If you have trouble, additional F1: READ DTC(s) retrieval information is described below. This submode is available for all 1983-95 Mazda vehicles. NOTE The Orange Mazda CHECK adapter has three DLC connectors and a single ground lead. For engine diagnostics, there are three options to facilitate adapter cable connection. Single 6 pin DLC Use Connector A and ground lead 1 pin and 6 pin DLCs Use Connectors A and B and ground lead Single 17 pin DLC Use Connector C and ground lead (All views are vehicle side) MAZDA 21 TEST MODES NOTE When reading DTC's from Mazda vehicles make sure the engine is at normal operating temperature and testing is performed in a well-ventilated area. Reading DTCs from all 1983-95 Mazda ECU using the F1: Read DTCs mode in Asian Imports cartridge: 1. Insert Asian cartridge into MASTERTECH or TECH 1A, 2. Connect Mazda Check adapter (Orange) to data link cable. (Tester will display the correct adapter connection to use). 3. Connect the Check adapter to the vehicle DLC. Press F1: DLC location from the Information menu for Data Link Connector location assistance. 4. Connect ground clip to vehicle engine or chassis. 5. Power MASTERTECH or TECH 1A with 12v power cable. 6. Select Mazda vehicle to test. 7. Press F2: DTCs from Mazda test mode menu. 8. Press F1: READ DTCs submode from DTC test menu. Follow instructions on the tester display. 9. Tester will automatically command the vehicle ECU into the correct mode required to read DTCs, and will display all received DTCs on the tester display. Submode F2: DTC List This submode provides you with a way to view all possible ECU DTCs, including DTC numbers and descriptions. You can also select the DTCs obtained from the analog voltmeter as an alternative way of entering DTCs into the tester's memory. As you scroll through the available DTCs you can view a description of the DTC obtained from the analog voltmeter. You can "Select" the DTC on the tester screen for later review or printing. Refer to the Common Test Modes OBD, OBD I Systems section for further information. Submode F3: Review DTC This submode provides you with a review of the DTCs that you entered or selected in the tester. The description of the entered or selected DTC will be displayed, along with a numerical summary of the entered or selected DTC. Review DTC is intended to provide you with an electronic clipboard that keeps track of the DTCs that you have encountered during diagnosis. Submode F4: Clear DTC(s) This submode has two options for you to chose. Option 1 is an automated function which the tester clears DTCs from the vehicle ECU memory. This is performed by tester keypad presses. Option 2 clears the tester memory from DTCs that you entered or selected in the tester. The clear DTC(s) mode is helpful and provides information that you would normally have to locate in a service manual. 22 MAZDA TEST MODES IMPORTANT MAZDA Follow the Submode F0: Prepare Vehicle instructions to ensure proper vehicle preparation prior to testing. The vehicle must be completely warmed up in order for the tester to communicate properly with the vehicle. 23 OBD CONTROLS 7. OBD CONTROLS The OBD Controls mode is used to select a submenu of tests applicable to Mazda vehicles. Pressing $ from the Select Mode menu displays a list of tests available. To return to the Select Mode menu, press X. Once you have selected the test mode, operation begins. Detailed operating instructions for each OBD Control test are on the following pages. There are descriptions of two OBD Controls available in the Mazda specific section. Each output control test can provide you with enhanced diagnostic information which will help to pin-point Air-Fuel Ratio (AFR) problems and ECU switch input problems. Mazda output tests can guide you through ECU Switch Input tests and O2S Monitor tests. NOTE Test results may not be accurate when a Tech 1 is used. MODE F4: OBD CONTROLS Submode F0: Switch Test Available on selected 1988-95 Mazda passenger cars and trucks, switch tests can be used to monitor the switch inputs to the engine ECU. On Mazda vehicles, the switch monitor lamp circuit is monitored by the tester during certain test conditions so you can determine switch operation. When you select a vehicle the available switch tests will be listed in the OBD Controls menu under F0: SWITCH TESTS. Supported Mazda Switch Tests Air Conditioning Backup/5th gear Brake Cooling Fan Daytime Running Lamp (DRL) Headlamp Knock NO. 1 Thermo Rear Defrost TP-idle/power NOTE 24 A/T Hold Blower Motor Clutch Cooling Fan Relay Fog Lamp Inhibitor (A/T) Neutral (M/T) NO. 2 Thermo TP-idle TP-power When performing the Switch Test, make sure the vehicle is properly warmed up and is tested in a well-ventilated area. MAZDA OBD CONTROLS To perform the Switch Test, do the following: 1. Press ) to select Switch Tests from the OBD Controls menu. Press u or d until the → is opposite the desired Switch Test. Then press E. 2. The tester displays instructions for performing the Switch Test. Press E when each step has been completed. 3. Follow the instructions on the tester display. When each instruction is completed, the tester indicates if further action is necessary. If a problem is detected, press X to return to the OBD Controls menu. 4. As a result of following the steps on the display, the tester will monitor and display the switch state. Press X to return to the OBD Controls menu. 5. When finished, press X to return to the OBD Controls menu. SELECT MODE F0: SWITCH TEST F1: O2S MONITOR ) SELECT SC TEST TP-IDLE BRAKE AIR COND. E CONNECT CHECK ADAPTER (ORANGE-C) TO VEHICLE DLC (ENTER) E TURN ACCESSORIES OFF SET PARKING BRAKE (ENTER) E TURN IGNITION KEY ON ENGINE OFF, (ENTER) E DEPRESS/RELEASE THROTTLE TO CHANGE SW STATE (ENTER) E TP-IDLE SW TP-IDLE SW TP IDLE ON [EXIT] TP IDLE OFF [EXIT] Closed throttle Open throttle Switch Test ACTIVE KEYS ud Scroll Up or Down. e Used when each step has been completed. x Return to OBD Controls menu. MAZDA 25 OBD CONTROLS Notes on Switch Test operation: If a switch test fails, before replacing a component, check: - ECM/PCM - Relay - Wiring harness - Switch operation with continuity tester No. 1 Thermo Switch/No. 2 Thermo Switch requires shorting a terminal contained in the underhood electric fan check connector. See vehicle service manual for more information. TP idle/power Switch: This test checks the idle and power switches that are built into the throttle position sensor (TP). TP idle switch is ON (contacts closed) at idle, OFF (contacts open) with throttle pedal partially depressed. TP power switch is ON (contacts closed) at wide open throttle (WOT) and OFF (contacts open) with throttle pedal in any other position except fully depressed. Blower Switch: Note that in certain cases, blower fan switches change state only in the 3rd or 4th position. A/C Switch: When testing the A/C Switch, the blower switch should be in the 1st position. Inhibitor Switch: Remember to remove foot from brake pedal before changing gear selector position. CAUTION! CAUTION Make sure parking brake has been set and wheels have been blocked to prevent vehicle motion. Submode F1: O2S Monitor The O2S monitor is available on selected 1983-95 Mazda vehicles. To check test application, select the OBD Controls menu for F1: O2S MONITOR as a possible selection. On Mazda vehicles, the switch monitor lamp circuit is monitored with the engine running so you can determine Oxygen Sensor output (rich or lean) states. The O2S Monitor provides you with a guided procedure which tests the condition of the oxygen sensor (the oxygen sensor, known as O2S, is mounted in the engine exhaust system and is in direct contact with the exhaust gases. The O2S changes its output according to the rich or lean condition of the O2 present in the exhaust gases). NOTE When performing the O2S Monitor test, make sure the vehicle you are testing is properly warmed up and is tested in a well-ventilated area. To perform the O2S Monitor test, do the following: 1. Press ! to select O2S Monitor from the OBD Controls menu. 2. The tester displays instructions for performing the O2S Monitor Test. Press E when each step has been completed. 3. Follow the instructions on the tester display. When each instruction is completed, the tester indicates if further action is necessary. If a problem is detected, press X to return to the OBD Controls menu. 26 MAZDA OBD CONTROLS 4. Start the engine and warm to normal operating temperature. 5. The tester display informs you of the current O2S state. When the exhaust surrounding the O2S tip is lean, the tester will display EXHAUST LEAN. When the exhaust surrounding the O2S tip is rich, the tester will display EXHAUST RICH. 6. If the tester displays EXHAUST RICH or EXHAUST LEAN for a prolonged period of engine idling time, raise and hold the engine RPM above 2000 for 3 minutes. The tester display should begin to change rich or lean again. 7. When finished, press x to return to the OBD Controls menu. ACTIVE KEYS e Used when each step has been completed. x Return to OBD Controls menu. SELECT MODE F0: SWITCH TEST F1: O2S MONITOR ! CONNECT CHECK ADAPTER (ORANGE) TO VEHICLE DLC (ENTER) E TURN ACCESSORIES OFF, SET PARKING BRAKE, [ENTER] E PLACE A/T IN PARK OR M/T IN NEUTRAL, [ENTER] EW START ENGINE AND WARM TO NORMAL OPERATING TEMP. [ENTER] E RAISE/LOWER ENG. SPEED TO CHANGE O2S OUTPUT. [ENTER] E O2S MONITOR: EXHAUST RICH [EXIT] Rich exhaust condition O2S MONITOR: EXHAUST LEAN [EXIT] Lean exhaust condition Note on O2S Monitor operation: On some early 1983-84 Mazda vehicles, it is necessary to disconnect the throttle position sensor before O2S monitor can begin. Consult factory service manual for additional information. MAZDA 27 MAZDA DIAGNOSTIC TROUBLE CODES (DTCS) 8. MAZDA DIAGNOSTIC TROUBLE CODES (DTCS) DTCs available for Mazda vehicles are listed in the following charts. Some code numbers have different descriptors depending on the selected vehicle. Only codes available for the selected vehicle are displayed by the tester. OBD, OBD I SYSTEMS 28 YEAR: 1983 DTC NO. 1983 1 ENGINE SPEED (RPM SIGNAL) 2 WATER THERMO SENSOR 3 O2 SENSOR 4 VACUUM SENSOR 5 EGR POSITION SENSOR DESCRIPTOR YEAR: 1984 DTC NO. 1984 1 ENGINE SPEED (RPM SIGNAL) 2 WATER THERMO SENSOR AIR FLOW METER 3 O2 SENSOR WATER THERMO SENSOR 4 VACUUM SENSOR O2 SENSOR 5 EGR POSITION SENSOR THROTTLE SENSOR 6 ATMOSPHERIC PRESSURE SENSOR DESCRIPTOR MAZDA MAZDA DIAGNOSTIC TROUBLE CODES (DTCS) YEAR: 1985 DTC NO. 1985 1 ENGINE SPEED (RPM SIGNAL) 2 WATER THERMO SENSOR AIR FLOW METER 3 O2 SENSOR WATER THERMO SENSOR 4 VACUUM SENSOR O2 SENSOR 5 EGR POSITION SENSOR THROTTLE SENSOR 6 ATMOSPHERIC PRESSURE SENSOR DESCRIPTOR YEAR: 1986 DTC NO. 1986 1 ENGINE SPEED (RPM SIGNAL) CRANK ANGLE SENSOR IGNITION PULSE 2 WATER THERMO SENSOR AIR FLOW METER 3 FEEDBACK SYSTEM WATER THERMO SENSOR 4 VACUUM SENSOR INTAKE AIR TEMPERATURE SENSOR (AIR FLOW METER) TEMPERATURE SENSOR 5 EGR POSITION SENSOR O2 SENSOR FEEDBACK SYSTEM 6 THROTTLE SENSOR ATMOSPHERIC PRESSURE SENSOR 7 BOOST SENSOR 8 EGR POSITION SENSOR 9 ATMOSPHERIC PRESSURE SENSOR 12 COIL WITH IGNITER (TRAILING SIDE) 15 INTAKE AIR TEMPERATURE SENSOR (DYNAMIC CHAMBER) 22 NO.1 CYLINDER SENSOR MAZDA DESCRIPTOR 29 MAZDA DIAGNOSTIC TROUBLE CODES (DTCS) 30 YEAR: 1987 DTC NO. 1987 1 IGNITION PULSE IGNITION PULSE CIRCUIT CRANK ANGLE SENSOR 2 AIR FLOW METER 3 WATER THERMO SENSOR 4 TEMPERATURE SENSOR INTAKE AIR TEMPERATURE SENSOR 5 FEEDBACK SYSTEM O2 SENSOR 6 ATMOSPHERIC PRESSURE SENSOR THROTTLE SENSOR 7 BOOST SENSOR PRESSURE SENSOR 8 EGR POSITION SENSOR 9 ATMOSPHERIC PRESSURE SENSOR WATER THERMO SENSOR OR CIRCUIT 12 COIL WITH IGNITER (TRAILING SIDE) 13 VACUUM SENSOR OR CIRCUIT 14 ATMOSPHERIC PRESSURE SENSOR OR CIRCUIT 15 O2 SENSOR OR CIRCUIT INTAKE AIR TEMPERATURE SENSOR (DYNAMIC CHAMBER) INTAKE AIR TEMPERATURE SENSOR (INTAKE AIR PIPE) 16 EGR POSITION SENSOR OR CIRCUIT 17 FEEDBACK SYSTEM 18 A/F SOLENOID VALVE OR CIRCUIT 22 NO. 1 CYLINDER SENSOR SLOW FUEL CUT SOLENOID VALVE OR CIRCUIT 23 COASTING RICHER SOLENOID VALVE OR CIRCUIT 26 PURGE SOLENOID VALVE OR CIRCUIT 28 DUTY SOLENOID VACUUM VALVE OR CIRCUIT 29 DUTY SOLENOID VENT VALVE OR CIRCUIT 30 ACV SOLENOID VALVE OR CIRCUIT 35 IDLE UP SOLENOID VALVE (FOR A/T) OR CIRCUIT 45 VACUUM SOLENOID VALVE OR CIRCUIT DESCRIPTOR MAZDA MAZDA DIAGNOSTIC TROUBLE CODES (DTCS) YEAR: 1988 DTC NO. 1988 1 IGNITION COIL IGNITION PULSE CRANK ANGLE SENSOR IGNITION PULSE CIRCUIT 2 NE SIGNAL DISTRIBUTOR (NE SIGNAL) AIR FLOW METER 3 G1 SIGNAL DISTRIBUTOR (G1 SIGNAL) WATER THERMO SENSOR GROUP SENSOR (DISTRIBUTOR) 4 G2 SIGNAL DISTRIBUTOR (G2 SIGNAL) INTAKE AIR TEMPERATURE SENSOR (AIR FLOW METER) 5 KNOCK SENSOR OR KNOCK CONTROL UNIT O2 SENSOR 6 THROTTLE SENSOR 7 PRESSURE SENSOR BOOST SENSOR 8 AIR FLOW METER 9 WATER THERMO SENSOR ATMOSPHERIC PRESSURE SENSOR WATER THERMO SENSOR OR CIRCUIT 10 INTAKE AIR THERMO SENSOR (AIR FLOW METER) 11 INTAKE AIR THERMO SENSOR (DYNAMIC CHAMBER) 12 THROTTLE SENSOR COIL WITH IGNITER (TRAILING SIDE) THROTTLE SENSOR (VARIABLE RESISTOR TYPE) 13 VACUUM SENSOR OR CIRCUIT 14 ATMOSPHERIC PRESSURE SENSOR VACUUM SENSOR OR CIRCUIT 15 O2 SENSOR INTAKE AIR TEMPERATURE SENSOR (DYNAMIC CHAMBER) INTAKE AIR TEMPERATURE SENSOR (INTAKE AIR PIPE) O2 SENSOR OR CIRCUIT 16 EGR POSITION SENSOR EGR POSITION SENSOR OR CIRCUIT 17 FEEDBACK SYSTEM 18 A/F SOLENOID VALVE OR CIRCUIT 22 SLOW FUEL CUT SOLENOID VALVE OR CIRCUIT MAZDA DESCRIPTOR 31 MAZDA DIAGNOSTIC TROUBLE CODES (DTCS) YEAR: 1988 (CONTINUED) 32 DTC NO. DESCRIPTOR 23 COASTING RICHER SOLENOID VALVE OR CIRCUIT 25 SOLENOID VALVE (PRESSURE REGULATOR CONTROL) 26 SOLENOID VALVE (NO.1 PURGE CONTROL VALVE) SOLENOID VALVE (PURGE CONTROL) SOLENOID VALVE (NO.2 PURGE CONTROL VALVE) PURGE SOLENOID VALVE OR CIRCUIT 27 SOLENOID VALVE (VACUUM SWITCH VALVE) SOLENOID VALVE (NO.1 PURGE CONTROL) 28 SOLENOID VALVE (EGR) SOLENOID VALVE (EGR VACUUM) DUTY SOLENOID VACUUM VALVE OR CIRCUIT 29 SOLENOID VALVE (EGR-VENT) DUTY SOLENOID VENT VALVE OR CIRCUIT 30 ACV SOLENOID VALVE OR CIRCUIT 34 BAC VALVE (IDLE SPEED CONTROL) SOLENOID VALVE (IDLE SPEED CONTROL) IDLE-UP SOLENOID VALVE (FOR A/C) OR CIRCUIT 35 IDLE-UP SOLENOID VALVE (FOR A/T) OR CIRCUIT 40 SOLENOID VALVE (TRIPLE INDUCTION CONTROL SYSTEM) OR O2 SENSOR RELAY 41 SOLENOID VALVE (VARIABLE RESONANCE INDUCTION SYSTEM) 42 SOLENOID VALVE (WASTE GATE) 45 VACUUM SOLENOID VALVE OR CIRCUIT YEAR: 1989 DTC NO. 1989 1 IGNITION PULSE IGNITION PULSE (IGNITER, IGNITION COIL) IGNITION COIL (TRAILING SIDE) IGNITION PULSE CIRCUIT 2 NE SIGNAL DISTRIBUTOR (NE SIGNAL) CRANK ANGLE SENSOR (NE SIGNAL) 3 DISTRIBUTOR (G SIGNAL) G1 SIGNAL DISTRIBUTOR (G1 SIGNAL) G SIGNAL CRANK ANGLE SENSOR (G SIGNAL) 4 G2 SIGNAL DISTRIBUTOR (G2 SIGNAL) DESCRIPTOR MAZDA MAZDA DIAGNOSTIC TROUBLE CODES (DTCS) YEAR: 1989 (CONTINUED) MAZDA DTC NO. DESCRIPTOR 5 KNOCK SENSOR OR KNOCK CONTROL UNIT 8 AIRFLOW METER AIRFLOW SENSOR AIRFLOW METER (AFM) 9 WATER THERMOSENSOR WATER THERMOSENSOR OR CIRCUIT 10 INTAKE AIR THERMOSENSOR (AIRFLOW METER) INTAKE AIR THERMOSENSOR (AFM) 11 INTAKE AIR THERMOSENSOR (DYNAMIC CHAMBER) INTAKE AIR THERMOSENSOR (ENGINE) 12 THROTTLE SENSOR THROTTLE SENSOR (FULL RANGE) 13 PRESSURE SENSOR (INTAKE MANIFOLD PRESSURE) VACUUM SENSOR OR CIRCUIT 14 ATMOSPHERIC PRESSURE SENSOR ATMOSPHERIC PRESSURE SENSOR (WITHIN ECU) ATMOSPHERIC PRESSURE SENSOR (ATP) ATMOSPHERIC PRESSURE OR CIRCUIT 15 O2 SENSOR O2 SENSOR OR CIRCUIT 16 EGR POSITION SENSOR EGR POSITION SENSOR OR CIRCUIT 17 FEEDBACK SYSTEM 18 THROTTLE SENSOR (NARROW RANGE) AIR/FUEL SOLENOID VALVE OR CIRCUIT 20 METERING OIL PUMP POSITION SENSOR 22 SLOW FUEL CUT SOL. VALVE OR CKT. 23 COASTING RICHER SOL. VALVE OR CKT. 25 SOLENOID VALVE (PRESSURE REGULATOR CONTROL) 26 SOLENOID VALVE (NO. 1 PURGE CONTROL) SOLENOID VALVE (PURGE CONTROL) SOLENOID VALVE (NO. 2 PURGE CONTROL) STEP MOTOR (METERING OIL PUMP) 27 SOLENOID VALVE (NO. 2 PURGE CONTROL) SOLENOID VALVE (NO. 1 CONTROL) METERING OIL PUMP (MOP) 28 SOLENOID VALVE (EGR) SOLENOID VALVE (EGR-VACUUM) 29 SOLENOID VALVE (EGR VENT) 33 MAZDA DIAGNOSTIC TROUBLE CODES (DTCS) YEAR: 1989 (CONTINUED) 34 DTC NO. DESCRIPTOR 30 SPLIT AIR SOLENOID VALVE ACV SOLENOID VALVE OR CIRCUIT 31 SOLENOID VALVE (RELIEF) 32 SOLENOID VALVE (SWITCH) 33 PORT AIR SOLENOID VALVE 34 SOLENOID VALVE (IDLE SPEED CONTROL) IDLE SPEED CONTROL VALVE (ISC VALVE) IDLE SPEED CONTROL VALVE (BAC VALVE) SOLENOID VALVE (BYPASS AIR CONTROL ) 35 IDLE UP SOLENOID VALVE OR CIRCUIT 37 METERING OIL PUMP (MOP) 38 SOLENOID VALVE (ACCELERATED WARM-UP SYSTEM ) SOLENOID VALVE (ACCELERATED WARM- UP SYSTEM OR AIR SUPPLY VALVE (ASV)) 40 SOLENOID VALVE (TRIPLE INDUCTION CONTROL SYSTEM) OR O2 SENSOR RELAY AUXILIARY PORT VALVE 41 SOLENOID VALVE (VARIABLE RESONANCE INDUCTION SYSTEM) SOLENOID VALVE (VARIABLE DYNAMIC EFFECT INTAKE CONTROL ) 42 SOLENOID VALVE (WASTE GATE) DUTY SOLENOID (TURBO BOOST PRESSURE CONTROL) 45 VACUUM SOLENOID VALVE OR CIRCUIT 51 FUEL PUMP RESISTOR RELAY 71 INJECTOR (FRONT SECONDARY) 73 INJECTOR (REAR SECONDARY) YEAR: 1990 DTC NO. 1990 1 IGNITION PULSE IGNITION PULSE (IGNITER IGNITION COIL) IGNITION COIL (TRAILING SIDE) IGNITION PULSE CIRCUIT 2 NE SIGNAL DISTRIBUTOR (NE SIGNAL) CRANK ANGLE SENSOR (NE SIGNAL) DESCRIPTOR MAZDA MAZDA DIAGNOSTIC TROUBLE CODES (DTCS) YEAR: 1990 (CONTINUED) MAZDA DTC NO. DESCRIPTOR 3 G SIGNAL G1 SIGNAL DISTRIBUTOR (G1 SIGNAL) DISTRIBUTOR (G SIGNAL) CRANK ANGLE SENSOR (G SIGNAL) 4 G2 SIGNAL DISTRIBUTOR (G2 SIGNAL) 5 KNOCK SENSOR OR KNOCK CONTROL UNIT 8 AIRFLOW METER AIRFLOW SENSOR 9 WATER THERMOSENSOR WATER THERMOSENSOR OR CIRCUIT 10 INTAKE AIR THERMOSENSOR INTAKE AIR THERMOSENSOR (AIRFLOW METER) 11 INTAKE AIR THERMOSENSOR (DYNAMIC CHAMBER) INTAKE AIR THERMOSENSOR (ENGINE) 12 THROTTLE SENSOR THROTTLE SENSOR (FULL RANGE) 13 PRESSURE SENSOR (INTAKE MANIFOLD PRESSURE) VACUUM SENSOR OR CIRCUIT 14 ATMOSPHERIC PRESSURE SENSOR (IN ECU) ATMOSPHERIC PRESSURE SENSOR ATMOSPHERIC PRESSURE SENSOR (ATP) ATMOSPHERIC PRESSURE SENSOR OR CIRCUIT 15 O2 SENSOR LEFT SIDE O2 SENSOR O2 SENSOR OR CIRCUIT 16 EGR POSITION SENSOR (CALIFORNIA ONLY) EGR POSITION SENSOR EGR POSITION SENSOR OR CIRCUIT 17 FEEDBACK SYSTEM FEEDBACK SYSTEM (LEFT SIDE) 18 THROTTLE SENSOR (NARROW RANGE) AIR/FUEL SOLENOID VALVE OR CIRCUIT 20 METERING OIL PUMP POSITION SENSOR 22 SLOW FUEL CUT SOLENOID VALVE OR CIRCUIT 23 RIGHT SIDE O2 SENSOR COASTING RICHER SOLENOID VALVE OR CIRCUIT 24 FEEDBACK SYSTEM (RIGHT SIDE) 25 SOLENOID VALVE (PRESSURE REGULATOR) SOLENOID VALVE (PRESSURE REGULATOR CONTROL) 35 MAZDA DIAGNOSTIC TROUBLE CODES (DTCS) YEAR: 1990 (CONTINUED) 36 DTC NO. DESCRIPTOR 26 SOLENOID VALVE (PURGE CONTROL) STEP MOTOR (METERING OIL PUMP) PURGE SOLENOID VALVE OR CIRCUIT 27 METERING OIL PUMP (MOP) 28 SOLENOID VALVE (EGR) SOLENOID VALVE (EGR-VACUUM) DUTY SOLENOID VACUUM VALVE OR CIRCUIT 29 SOLENOID VALVE (EGR-VENT) DUTY SOLENOID VENT VALVE OR CIRCUIT 30 SPLIT AIR SOLENOID VALVE ACV SOLENOID VALVE OR CIRCUIT 31 SOLENOID VALVE (RELIEF) 32 SOLENOID VALVE (SWITCH) 33 PORT AIR SOLENOID VALVE 34 ISC VALVE IDLE SPEED CONTROL VALVE (BAC VALVE) SOLENOID VALVE (IDLE SPEED CONTROL) SOLENOID VALVE (BYPASS AIR CONTROL) IDLE-UP SOLENOID VALVE (FOR A/C) OR CIRCUIT 35 IDLE-UP SOLENOID VALVE (FOR A/T) OR CIRCUIT 36 O2 SENSOR HEATER RELAY 37 METERING OIL PUMP (MOP) 38 SOLENOID VALVE (ACCELERATED WARM- UP SYSTEM) SOLENOID VALVE (ACCELERATED WARM- UP SYSTEM OR AIR SUPPLY VALVE) 40 SOLENOID VALVE (TRIPLE INDUCTION CONTROL SYSTEM) OR O2 SENSOR HEATER AUXILIARY PORT VALVE 41 SOLENOID VALVE (VICS) SOLENOID VALVE (VARIABLE RESONANCE INDUCTION SYSTEM) SOLENOID VALVE (VARIABLE DYNAMIC EFFECT INTAKE CONTROL) 42 SOLENOID VALVE (WASTE GATE) DUTY SOLENOID (TURBO BOOST PRESSURE CONTROL) 45 VACUUM SOLENOID VALVE OR CIRCUIT 51 FUEL PUMP RESISTOR RELAY 71 INJECTOR (FRONT SECONDARY) 73 INJECTOR (REAR SECONDARY) MAZDA MAZDA DIAGNOSTIC TROUBLE CODES (DTCS) YEAR: 1991 DTC NO. DESCRIPTOR NOTE: For 1991 Navajo DTCs, see table beginning on page 40. 1991 MAZDA 1 IGNITION PULSE IGNITION PULSE (IGNITER, IGNITION COIL) IGNITION COIL (TRAILING SIDE) IG PULSE CIRCUIT 2 NE SIGNAL DISTRIBUTOR (NE SIGNAL) CRANK ANGLE SENSOR (NE SIGNAL) 3 G SIGNAL G1 SIGNAL DISTRIBUTOR (G1 SIGNAL) CRANK ANGLE SENSOR (G SIGNAL) 4 G2 SIGNAL DISTRIBUTOR (G2 SIGNAL) 5 KNOCK SENSOR OR KNOCK SENSOR CIRCUIT KNOCK SENSOR OR KNOCK SENSOR CONTROL UNIT KNOCK SENSOR 8 AIRFLOW METER AIRFLOW SENSOR 9 WATER THERMOSENSOR WATER THERMOSENSOR OR CIRCUIT 10 INTAKE AIR THERMOSENSOR INTAKE AIR THERMOSENSOR (AIRFLOW METER) 11 INTAKE AIR THERMOSENSOR (DYNAMIC CHAMBER) INTAKE AIR THERMOSENSOR (ENGINE) 12 THROTTLE SENSOR THROTTLE SENSOR (FULL RANGE) 13 PRESSURE SENSOR (INTAKE MANIFOLD PRESSURE) VACUUM SENSOR OR CIRCUIT 14 ATMOSPHERIC PRESSURE SENSOR (IN ECU) ATMOSPHERIC PRESSURE SENSOR ATMOSPHERIC PRESSURE SENSOR (ATP) ATMOSPHERIC PRESSURE SENSOR OR CIRCUIT 15 O2 SENSOR LEFT SIDE O2 SENSOR O2 SENSOR OR CIRCUIT 16 EGR POSITION SENSOR EGR POSITION SENSOR OR CIRCUIT 17 FEEDBACK SYSTEM FEEDBACK SYSTEM (LEFT SIDE) 37 MAZDA DIAGNOSTIC TROUBLE CODES (DTCS) YEAR: 1991 (CONTINUED) 38 DTC NO. DESCRIPTOR 18 THROTTLE SENSOR (NARROW RANGE) AIR/FUEL SOLENOID VALVE OR CIRCUIT 20 METERING OIL PUMP POSITION SENSOR 22 SLOW FUEL CUT SOLENOID VALVE OR CIRCUIT 23 RIGHT SIDE O2 SENSOR COASTING RICHER SOLENOID VALVE OR CIRCUIT 24 FEEDBACK SYSTEM (RIGHT SIDE) 25 SOLENOID VALVE (PRESSURE REGULATOR) SOLENOID VALVE (PRESSURE REGULATOR CONTROL) 26 SOLENOID VALVE (PURGE CONTROL) STEP MOTOR (METERING OIL PUMP) PURGE SOLENOID VALVE OR CIRCUIT 27 METERING OIL PUMP (MOP) 28 SOLENOID VALVE (EGR) SOLENOID VALVE (EGR VACUUM) DUTY SOLENOID VACUUM VALVE OR CIRCUIT 29 SOLENOID VALVE (EGR VENT) DUTY SOLENOID VENT VALVE OR CIRCUIT 30 SPLIT AIR SOLENOID VALVE ACV SOLENOID VALVE OR CIRCUIT 31 SOLENOID VALVE (RELIEF) 32 SOLENOID VALVE (SWITCH) 33 PORT AIR SOLENOID VALVE 34 ISC VALVE SOLENOID VALVE (BYPASS AIR CONTROL) IDLE-UP SOLENOID VALVE (FOR A/C) OR CIRCUIT SOLENOID VALVE (IDLE SPEED CONTROL) IDLE SPEED CONTROL VALVE (BAC VALVE) 35 IDLE-UP SOLENOID VALVE (FOR A/T) OR CIRCUIT 37 METERING OIL PUMP (MOP) 38 SOLENOID VALVE (ACCELERATED WARM- UP SYSTEM) SOLENOID VALVE (ACCELERATED WARM- UP SYSTEM) OR AIR SUPPLY VALVE 40 SOLENOID VALVE (TRIPLE INDUCTION CON- TROL SYSTEM) OR O2 SENSOR HEATER O2 SENSOR HEATER RELAY AUXILIARY PORT VALVE 41 SOLENOID VALVE (VICS) SOLENOID VALVE (VARIABLE RESONANCE INDUCTION SYSTEM) SOLENOID VALVE (VARIABLE DYNAMIC EFFECT INTAKE CONTROL) MAZDA MAZDA DIAGNOSTIC TROUBLE CODES (DTCS) YEAR: 1991 (CONTINUED) MAZDA DTC NO. DESCRIPTOR 42 SOLENOID VALVE (WASTE GATE) DUTY SOLENOID (TURBO BOOST PRES SURE CONTROL) 45 VACUUM SOLENOID VALVE OR CIRCUIT 51 FUEL PUMP RESISTOR RELAY 71 INJECTOR (FRONT SECONDARY) 73 INJECTOR (REAR SECONDARY) 39 MAZDA DIAGNOSTIC TROUBLE CODES (DTCS) Mazda DTCs (1991 Navajo) 40 YEAR: 1991 DTC NO. 1991 Navajo 11 SYSTEM PASS 12 CANNOT CONTROL RPM DURING SELF TEST HIGH RPM CHECK (ENGINE RUNNING) 13 CANNOT CONTROL RPM DURING SELF TEST LOW RPM CHECK (ENGINE RUNNING) 14 PIP CIRCUIT FAILURE (CONTINUOUS MEMORY) 15 ECA READ ONLY MEMORY (ROM) TEST FAILED (KOEO) 15 ECA KEEP ALIVE MEMORY (KAM) TEST FAILED (CONTINUOUS MEMORY) 16 IGNITION DIAGNOSTIC MONITOR (IDM) SIGNAL NOT RECEIVED (KOEO) 18 SAW CIRCUIT FAILURE (ENGINE RUNNING) 18 LOSS OF IDM INPUT TO PROCESSOR/IDM CIRCUIT FAILURE (CONTINUOUS MEMORY) 19 FAILURE IN ECA INTERNAL VOLTAGE (KOEO) 21 ECT OUT OF SELF TEST RANGE (KOEO/ENGINE RUNNING) 22 BP OUT OF SELF TEST RANGE (KOEO, ENGINE RUNNING, CONTINUOUS MEMORY) 23 TP OUT OF SELF TEST RANGE (KOEO, ENGINE RUNNING) 24 AIR CHARGE TEMP (ACT) OUT OF SELF TEST RANGE (KOEO, ENGINE RUNNING) 26 MAF OUT OF SELF TEST RANGE (KOEO, ENGINE RUNNING) 29 INSUFFICIENT INPUT FROM THE VEHICLE SPEED SENSOR (CONTINUOUS MEMORY) 41 HEGO SENSOR CIRCUIT INDICATES SYSTEM LEAN (ENGINE RUNNING) 41 NO HEGO SWITCH DETECTED (CONTINUOUS MEMORY) 42 HEGO SENSOR CIRCUIT INDICATES SYSTEM RICH (ENGINE RUNNING) 45 COIL 1, 2, OR 3 FAILURE (CONTINUOUS MEMORY) 51 ECT INDICATED -40°F/ CIRCUIT OPEN (KOEO, CONTINUOUS MEMORY) 53 TP CIRCUIT ABOVE MAXIMUM VOLTAGE (KOEO, CONTINUOUS MEMORY) 54 ACT INDICATED -40°F/ CIRCUIT OPEN (KOEO, CONTINUOUS MEMORY) DESCRIPTOR MAZDA MAZDA DIAGNOSTIC TROUBLE CODES (DTCS) YEAR: 1991 (CONTINUED) MAZDA DTC NO. DESCRIPTOR 56 MAF CIRCUIT ABOVE MAXIMUM VOLTAGE (KOEO, CONTINUOUS MEMORY) 61 ECT INDICATED 254°F/ CIRCUIT GROUNDED (KOEO, CONTINUOUS MEMORY) 63 TP CIRCUIT BELOW MINIMUM VOLTAGE (KOEO, CONTINUOUS MEMORY) 64 ACT INDICATED 254°F/ CIRCUIT GROUNDED (KOEO, CONTINUOUS MEMORY) 66 MAF CIRCUIT BELOW MINIMUM VOLTAGE (CONTINUOUS MEMORY) 67 NEUTRAL DRIVE SWITCH (NDS) CIRCUIT OPEN, A/C ON (KOEO) 67 CLUTCH SWITCH CIRCUIT FAILURE (CONTINUOUS MEMORY) 72 INSUFFICIENT MAF CHANGE DURING DYNAMIC RESPONSE TEST (ENGINE RUNNING) 73 INSUFFICIENT TP CHANGE DURING DYNAMIC RESPONSE TEST (ENGINE RUNNING) 74 BRAKE ON/OFF (BOO) CIRCUIT FAILURE, NOT ACTUATED (ENGINE RUNNING) 77 OPERATOR ERROR, DYNAMIC RESPONSE/CYLINDER BALANCE TESTS (ENGINE RUNNING) 79 A/C ON, DEFROST ON DURING SELF TEST 86 SHIFT SOLENOID CIRCUIT FAILURE (KOEO) 87 PRIMARY FUEL PUMP CIRCUIT FAILURE (KOEO, CONTINUOUS MEMORY) 89 CLUTCH CONVERTER OVERRIDE CIRCUIT FAILURE (KOEO) 95 FUEL PUMP CIRCUIT OPEN, ECA TO MOTOR GROUND (KOEO, CONTINUOUS MEMORY) 96 FUEL PUMP CIRCUIT OPEN, BATTERY TO ECA (KOEO, CONTINUOUS MEMORY) 98 HARD FAULT PRESENT (ENGINE RUNNING) 41 MAZDA DIAGNOSTIC TROUBLE CODES (DTCS) YEAR: 1992 DTC NO. DESCRIPTOR NOTE: For 1992 Navajo DTCs, see table beginning on page 50. 1992 42 1 IGNITION PULSE IGNITION PULSE (IGNITER, IGNITION COIL) IG PULSE CIRCUIT 2 NE SIGNAL NE2 SIGNAL NE2 SIGNAL CRANK ANGLE SENSOR 2 DISTRIBUTOR (NE SIGNAL) 3 G SIGNAL G1 SIGNAL G SIGNAL CRANK ANGLE SENSOR 1 DISTRIBUTOR (NE SIGNAL) 4 G2 SIGNAL NE1 SIGNAL NE1 SIGNAL CRANK ANGLE SENSOR DISTRIBUTOR (G2 SIGNAL) 5 KNOCK SENSOR OR KNOCK SENSOR CONTROL UNIT KNOCK SENSOR LEFT SIDE KNOCK SENSOR 6 VEHICLE SPEED SENSOR SPEED SIGNAL 7 RIGHT SIDE KNOCK SENSOR 8 AIRFLOW METER AIRFLOW SENSOR 9 WATER THERMOSENSOR WATER THERMOSENSOR OR CIRCUIT 10 INTAKE AIR THERMOSENSOR INTAKE AIR THERMOSENSOR (AIRFLOW METER) 11 INTAKE AIR THERMOSENSOR (DYNAMIC CHAMBER) 12 THROTTLE SENSOR 13 VACUUM SENSOR OR CIRCUIT 14 ATMOSPHERIC PRESSURE SENSOR (IN ECU) ATMOSPHERIC PRESSURE SENSOR ATMOSPHERIC PRESSURE SENSOR OR CIRCUIT 15 O2 SENSOR (INACTIVATION) O2 SENSOR LEFT SIDE O2 SENSOR O2 SENSOR OR CIRCUIT 16 EGR POSITION SENSOR (CALIFORNIA ONLY) EGR POSITION SENSOR EGR POSITION SENSOR OR CIRCUIT MAZDA MAZDA DIAGNOSTIC TROUBLE CODES (DTCS) YEAR: 1992 (CONTINUED) MAZDA DTC NO. DESCRIPTOR 17 O2 SENSOR (INVERSION) FEEDBACK SYSTEM LEFT SIDE FEEDBACK SYSTEM FEEDBACK SYSTEM (INVERSION) 18 AIR/FUEL SOLENOID VALVE OR CIRCUIT 22 SLOW FUEL CUT SOLENOID VALVE OR CIRCUIT 23 RIGHT SIDE O2 SENSOR COASTING RICHER SOLENOID VALVE OR CIRCUIT 24 RIGHT SIDE FEEDBACK SYSTEM 25 SOLENOID VALVE (PRESSURE REGULATOR) SOLENOID VALVE (PRESSURE REGULATOR CONTROL) 26 SOLENOID VALVE (PURGE CONTROL) PURGE SOLENOID VALVE OR CIRCUIT 28 SOLENOID VALVE (EGR) SOLENOID VALVE (EGR VACUUM) DUTY SOLENOID VACUUM VALVE OR CIRCUIT 29 SOLENOID VALVE (EGR VENT) DUTY SOLENOID VENT VALVE OR CIRCUIT 30 RELAY (COLD START INJECTOR) ACV SOLENOID VALVE OR CIRCUIT 34 ISC VALVE IDLE SPEED CONTROL VALVE (BAC VALVE) IDLE-UP SOLENOID VALVE (FOR A/C) OR CIRCUIT SOLENOID VALVE (IDLE SPEED CONTROL) 35 IDLE-UP SOLENOID VALVE (FOR A/T) OR CIRCUIT 36 RIGHT SIDE O2 SENSOR HEATER O2 SENSOR HEATER 37 LEFT SIDE O2 SENSOR HEATER 41 SOLENOID VALVE (VICS) SOLENOID VALVE (VRIS 1) 42 SOLENOID VALVE (WASTE GATE) 45 VACUUM SOLENOID VALVE OR CIRCUIT 46 SOLENOID VALVE (VRIS 2) 55 PULSE GENERATOR 60 1-2 SHIFT SOLENOID VALVE 61 2-3 SHIFT SOLENOID VALVE 62 3-4 SHIFT SOLENOID VALVE 63 LOCKUP SOLENOID VALVE 43 MAZDA DIAGNOSTIC TROUBLE CODES (DTCS) YEAR: 1992 (CONTINUED) YEAR: 1993 DTC NO. DESCRIPTOR 65 A/C SIGNAL (EC-AT CU) 67 ELECTRICAL COOLING FAN RELAY NO2 69 WATER THERMOSENSOR (FAN) DTC NO. DESCRIPTOR NOTE: For 1993 Navajo DTCs, see table beginning on page 50. 1993 44 1 IGNITION PULSE (IGNITER, IGNITION COIL) IGNITION PULSE IG PULSE CIRCUIT 2 NE SIGNAL NE SIGNAL (CRANKSHAFT POSITION SENSOR) NE2 SIGNAL, CRANKSHAFT POSITION SENSOR 2 NE2 SIGNAL DISTRIBUTOR (NE SIGNAL) NE2 SIGNAL CRANK ANGLE SENSOR 2 CRANK ANGLE SENSOR (NE SIGNAL) 3 G SIGNAL (DOHC AND CALIFORNIA B6) G SIGNAL (CRANKSHAFT POSITION SENSOR) G SIGNAL, CRANKSHAFT POSITION SENSOR 1 G SIGNAL DISTRIBUTOR (G1 SIGNAL) G SIGNAL CRANK ANGLE SENSOR 1 CRANK ANGLE SENSOR (G SIGNAL) 4 NE1 SIGNAL, CRANKSHAFT POSITION SENSOR NE1 SIGNAL DISTRIBUTOR (G2 SIGNAL) NE1 SIGNAL CRANK ANGLE SENSOR 5 KNOCK SENSOR LEFT SIDE KNOCK SENSOR 6 VEHICLE SPEED SENSOR SPEED SIGNAL SPEEDOMETER SENSOR 7 RIGHT SIDE KNOCK SENSOR 8 AIRFLOW METER AIRFLOW SENSOR 9 WATER THERMOSENSOR ENGINE COOLANT TEMPERATURE SENSOR (CIS) ENGINE COOLANT TEMPERATURE SENSOR ENGINE COOLANT TEMPERATURE SENSOR OR CIRCUIT MAZDA MAZDA DIAGNOSTIC TROUBLE CODES (DTCS) YEAR: 1993 (CONTINUED) MAZDA DTC NO. DESCRIPTOR 10 INTAKE AIR THERMOSENSOR INTAKE AIR TEMPERATURE SENSOR (IN AIR FLOW SENSOR) INTAKE AIR THERMOSENSOR (AIRFLOW METER) 11 INTAKE AIR TEMPERATURE SENSOR INTAKE AIR TEMPERATURE SENSOR (ON DYNAMIC CHAMBER) INTAKE AIR THERMOSENSOR 12 THROTTLE SENSOR THROTTLE POSITION SENSOR THROTTLE SENSOR (FULL RANGE) 13 PRESSURE SENSOR VACUUM SENSOR OR CIRCUIT 14 ATMOSPHERIC PRESSURE SENSOR (IN ECU) BAROMETRIC ABSOLUTE PRESSURE SENSOR BAROMETRIC ABSOLUTE PRESSURE SENSOR (IN PCME) ATMOSPHERIC PRESSURE SENSOR BAROMETRIC ABSOLUTE PRESSURE SENSOR OR CIRCUIT 15 O2 SENSOR (INACTIVATION) HEATED O2 SENSOR HEATED O2 SENSOR (LH) O2 SENSOR O2 SENSOR (LEFT SIDE) O2 SENSOR OR CIRCUIT 16 EGR FUNCTION SENSOR (CALIFORNIA) EGR FUNCTION SENSOR EGR POSITION SENSOR EGR SWITCH (CALIFORNIA ONLY) EGR POSITION SENSOR OR CIRCUIT 17 O2 SENSOR (INVERSION) CLOSED LOOP SYSTEM CLOSED LOOP SYSTEM (LH) FEEDBACK SYSTEM FEEDBACK SYSTEM (INVERSION) FEEDBACK SYSTEM (LEFT SIDE) 18 THROTTLE SENSOR (NARROW RANGE) MIXTURE CONTROL SOLENOID OR CIRCUIT 20 METERING OIL PUMP POSITION SENSOR 22 SLOW FUEL CUT SOLENOID VALVE OR CIRCUIT 23 HEATED O2 SENSOR (RH) O2 SENSOR (RIGHT SIDE) FUEL THERMOSENSOR COASTING RICHER SOLENOID VALVE OR CIRCUIT 24 CLOSED LOOP SYSTEM (RH) FEEDBACK SYSTEM (RIGHT SIDE) 25 SOLENOID VALVE (PRESSURE REGULATOR) SOLENOID VALVE (PRESSURE REGULATOR CONTROL) 45 MAZDA DIAGNOSTIC TROUBLE CODES (DTCS) YEAR: 1993 (CONTINUED) 46 DTC NO. DESCRIPTOR 26 SOLENOID VALVE (PURGE CONTROL) METERING OIL PUMP (STEPPING MOTOR) PURGE SOLENOID VALVE OR CIRCUIT 27 METERING OIL PUMP 28 SOLENOID VALVE (EGR CONTROL) SOLENOID VALVE (EGR VACUUM) SOLENOID VALVE (EGR) DUTY SOLENOID VACUUM VALVE OR CIRCUIT 29 SOLENOID VALVE (EGR VENT) DUTY SOLENOID VENT VALVE OR CIRCUIT 30 RELAY (COLD START INJECTOR) SOLENOID VALVE (SPLIT AIR BYPASS) ACV SOLENOID VALVE OR CIRCUIT 31 SOLENOID VALVE (RELIEF 1) 32 SOLENOID VALVE (SWITCHING) 33 SOLENOID VALVE (PORT AIR BYPASS) 34 ISC VALVE IDLE AIR CONTROL VALVE IDLE SPEED CONTROL VALVE (BAC VALVE) IDLE-UP SOLENOID VALVE (FOR A/C) OR CIRCUIT 35 IDLE-UP SOLENOID VALVE (FOR A/T) OR CIRCUIT 36 RIGHT SIDE O2 SENSOR HEATER O2 SENSOR HEATER 37 LEFT SIDE O2 SENSOR HEATER METERING OIL PUMP 38 SOLENOID VALVE (ACCELERATED WARM- UP SYSTEM) 39 SOLENOID VALVE (RELIEF 2) 40 SOLENOID VALVE (PURGE CONTROL) 41 SOLENOID VALVE (VICS) SOLENOID VALVE (VRIS 1) SOLENOID VALVE (VRIS) 42 SOLENOID VALVE (TURBO PRECONTROL) 43 SOLENOID VALVE (WASTEGATE CONTROL) 44 SOLENOID VALVE (TURBO CONTROL) 45 SOLENOID VALVE (CHARGE CONTROL) VACUUM SOLENOID VALVE OR CIRCUIT 46 SOLENOID VALVE (VRIS 2) SOLENOID VALVE (CHARGE RELIEF) 50 SOLENOID VALVE (DOUBLE THROTTLE CONTROL) MAZDA MAZDA DIAGNOSTIC TROUBLE CODES (DTCS) YEAR: 1993 (CONTINUED) YEAR: 1994 DTC NO. DESCRIPTOR 51 FUEL PUMP RELAY 52 AIR PUMP RELAY 55 VEHICLE SPEED PULSE GENERATOR VEHICLE SPEED PULSE GENERATOR (ATX) 56 ATF THERMOSENSOR (ATX) 60 1-2 SHIFT SOLENOID VALVE 61 2-3 SHIFT SOLENOID VALVE 62 3-4 SHIFT SOLENOID VALVE 63 LOCKUP SOLENOID VALVE 64 SOLENOID VALVE (3-2 TIMING) 65 SOLENOID VALVE (LOCKUP) A/C SIGNAL (PCMT) 66 SOLENOID VALVE (LINE PRESSURE) 67 COOLANT FAN RELAY (NO1) 68 COOLANT FAN RELAY (NO2, NO3) 69 ENGINE COOLANT TEMPERATURE SENSOR (FAN) WATER THERMOSENSOR (FAN) 71 INJECTOR (FRONT SECONDARY) 73 INJECTOR (REAR SECONDARY) 76 SLIP LOCK UP OFF SIGNAL (EC-AT CU) 77 TORQUE REDUCED SIGNAL (EC-AT CU) DTC NO. DESCRIPTOR NOTE: For 1994 B Series, Navajo, and 626/MX6 w/EEC-IV and ATX, see table beginning on page 50. 1994 MAZDA 1 IGF SIGNAL IGNITION PULSE (IGNITER IGNITION COIL) 2 NE SIGNAL NE2 SIGNAL CRANKSHAFT POSITION SENSOR NO2 NE2 SIGNAL 3 G SIGNAL G SIGNAL CRANKSHAFT POSITION SENSOR NO1 G1 SIGNAL SGC SIGNAL SGC SIGNAL CRANKSHAFT POSITION SENSOR 1 SGT SIGNAL 47 MAZDA DIAGNOSTIC TROUBLE CODES (DTCS) YEAR: 1994 (CONTINUED) 48 DTC NO. DESCRIPTOR 4 NE1 SIGNAL CRANKSHAFT POSITION SENSOR NO1 SGC SIGNAL SGT SIGNAL SGT SIGNAL CRANKSHAFT POSITION SENSOR G2 SIGNAL 5 KNOCK SENSOR LEFT SIDE KNOCK SENSOR 6 VEHICLE SPEED SENSOR 7 RIGHT SIDE KNOCK SENSOR 8 VOLUME AIRFLOW SENSOR MASS AIRFLOW SENSOR 9 ENGINE COOLANT TEMPERATURE SENSOR 10 INTAKE AIR TEMPERATURE SENSOR 11 INTAKE AIR TEMPERATURE SENSOR 12 THROTTLE POSITION SENSOR FUEL PUMP RELAY 13 MANIFOLD ABSOLUTE PRESSURE SENSOR 14 BAROMETRIC ABSOLUTE PRESSURE SENSOR (IN PCME) BAROMETRIC ABSOLUTE PRESSURE SENSOR 15 O2 SENSOR (INACTIVATION) HEATED O2 SENSOR (INACTIVATION) LEFT SIDE HEATED O2 SENSOR (INACTIVATION) HEATED O2 SENSOR (LEFT SIDE) 16 EGR FUNCTION SENSOR 17 O2 SENSOR (INVERSION) HEATED O2 SENSOR (INVERSION) LEFT SIDE HEATED O2 SENSOR (INVERSION) CLOSED LOOP SYSTEM (LEFT SIDE) 18 THROTTLE POSITION SENSOR (NARROW RANGE) 20 METERING OIL PUMP POSITION SENSOR 23 HEATED O2 SENSOR (RH) 23 RIGHT SIDE HEATED O2 SENSOR (INACTIVATION) FUEL THERMOSENSOR 24 CLOSED LOOP SYSTEM (RH) RIGHT SIDE HEATED O2 SENSOR (INVERSION) 25 SOLENOID VALVE (PRESSURE REGULATOR) PRC SOLENOID VALVE 26 SOLENOID VALVE (PURGE CONTROL) METERING OIL PUMP (STEPPING MOTOR) MAZDA MAZDA DIAGNOSTIC TROUBLE CODES (DTCS) YEAR: 1994 (CONTINUED) MAZDA DTC NO. DESCRIPTOR 27 METERING OIL PUMP 28 EGR SOLENOID VALVE EGR SOLENOID VACUUM 29 EGR SOLENOID VALVE (VENT) 30 COLD START INJECTOR RELAY SOLENOID VALVE (SPLIT AIR BYPASS) 31 SECONDARY AIR BYPASS VALVE 32 SECONDARY AIR SWITCHING VALVE 33 SOLENOID VALVE (PORT AIR BYPASS) 34 IAC VALVE 35 PRC SOLENOID VALVE NO2 36 RIGHT SIDE HEATED O2 SENSOR HEATER HEATED O2 SENSOR HEATER 37 LEFT SIDE HEATED O2 SENSOR HEATER METERING OIL PUMP 38 SOLENOID VALVE (ACCELERATED WARM- UP SYSTEM) 39 SOLENOID VALVE (RELIEF 2) 40 SOLENOID VALVE (PURGE CONTROL) 41 SOLENOID VALVE (VICS) VRIS SOLENOID VALVE NO1 VRIS SOLENOID VALVE 42 SOLENOID VALVE (TURBO PRECONTROL) 43 SOLENOID VALVE (WASTEGATE CONTROL) 44 SOLENOID VALVE (TURBO CONTROL) 45 SOLENOID VALVE (CHARGE CONTROL) 46 VRIS SOLENOID VALVE NO2 SOLENOID VALVE (CHARGE RELIEF) 50 SOLENOID VALVE (DOUBLE THROTTLE CONTROL) 51 FUEL PUMP RELAY (SPEED) 54 AIR PUMP RELAY 55 VEHICLE SPEED PULSE GENERATOR 60 1-2 SHIFT SOLENOID VALVE 61 2-3 SHIFT SOLENOID VALVE 62 3-4 SHIFT SOLENOID VALVE 63 LOCKUP SOLENOID VALVE 49 MAZDA DIAGNOSTIC TROUBLE CODES (DTCS) YEAR: 1994 (CONTINUED) DTC NO. DESCRIPTOR 65 A/C SIGNAL (PCMT) 67 COOLANT FAN RELAY 67 COOLANT FAN RELAY NO1 71 INJECTOR (FRONT SECONDARY) 73 INJECTOR (REAR SECONDARY) 76 SLIP LOCK UP OFF SIGNAL (PCMT) 77 TORQUE REDUCED SIGNAL (PCMT) Mazda DTCs (1992-1994 Navajo, 1994 B Series, 1994 626/MX6 W/EEC-IV and ATX) 50 YEAR: 1992-1994 DTC NO. 1992-1994 Navajo, 111 SYSTEM PASS 1994 B Series, 112 IAT SENSOR OUTPUT BELOW 0.2v/INDICATED 254°F 1994 626/MX6 113 IAT SENSOR OUTPUT ABOVE 4.6v/INDICATED -40°F w/EEC-IV and ATX 114 IDLE AIR TEMP. OUT OF EXPECTED RANGE 116 ECT OUT OF EXPECTED RANGE 117 ECT SENSOR OUTPUT BELOW 0.2v/INDICATED 254°F 118 ECT SENSOR OUTPUT ABOVE 4.6v/INDICATED -40°F 121 TP OUT OF EXPECTED RANGE (INCONSISTENT WITH MAF) 122 TPS OUTPUT BELOW 0.5v 123 TPS OUTPUT ABOVE 4.6v 124 TP SENSOR VOLTAGE HIGHER THAN EXPECTED 125 TP SENSOR VOLTAGE LOWER THAN EXPECTED 129 INSUFFICIENT MAF/MAP CHANGE DURING DYNAMIC RESPONSE TEST 136 LEFT BANK HO2 SENSOR OUTPUT CONTINUES LEAN CONDITION 137 LEFT BANK HO2 SENSOR OUTPUT CONTINUES RICH CONDITION 139 LEFT BANK HO2 SENSOR CIRCUIT, OPEN/SHORT 144 RIGHT BANK HO2 SENSOR CIRCUIT, OPEN/SHORT 157 MAF CIRCUIT BELOW 0.4v 158 MAF CIRCUIT ABOVE 4.5v 159 MAF OUT OF EXPECTED RANGE DESCRIPTOR MAZDA MAZDA DIAGNOSTIC TROUBLE CODES (DTCS) YEAR: 1992-1994 (CONTINUED) MAZDA DTC NO. DESCRIPTOR 167 INSUFFICIENT TP CHANGE DURING DYNAMIC RESPONSE TEST 171 RIGHT BANK ADAPTIVE FUEL CONTROL EXCEEDS LIMITS (HEGO UNABLE TO SWITCH) 172 RIGHT BANK HO2 SENSOR OUTPUT CONTINUES LEAN CONDITION 173 RIGHT BANK HO2 SENSOR OUTPUT CONTINUES RICH CONDITION 175 LEFT BANK HO2 SENSOR OUTPUT CONTINUES LEAN CONDITION 176 LEFT BANK HO2 SENSOR OUTPUT CONTINUES RICH CONDITION 177 LEFT BANK HO2 SENSOR OUTPUT CONTINUES RICH CONDITION 179 RIGHT BANK FUEL SYSTEM AT LEAN ADAPTIVE LIMIT AT PART THROTTLE/SYSTEM RICH 181 RIGHT BANK FUEL SYSTEM AT RICH ADAPTIVE LIMIT AT PART THROTTLE/SYSTEM LEAN 182 RIGHT BANK FUEL SYSTEM AT LEAN ADAPTIVE LIMIT AT IDLE/ SYSTEM RICH 183 RIGHT BANK FUEL SYSTEM AT RICH ADAPTIVE LIMIT AT IDLE/ SYSTEM LEAN 184 MAF HIGHER THAN EXPECTED 185 MAF LOWER THAN EXPECTED 186 INJECTOR PULSE WIDTH HIGHER THAN EXPECTED 187 INJECTOR PULSE WIDTH LOWER THAN EXPECTED 188 LEFT BANK FUEL SYSTEM AT LEAN ADAPTIVE LIMIT AT PART THROTTLE/SYSTEM RICH 189 LEFT BANK FUEL SYSTEM AT RICH ADAPTIVE LIMIT AT PART THROTTLE/SYSTEM LEAN 191 LEFT BANK FUEL SYSTEM AT LEAN ADAPTIVE LIMIT AT IDLE/ SYSTEM RICH 192 LEFT FUEL SYSTEM AT RICH ADAPTIVE LIMIT AT IDLE/SYSTEM LEAN 211 NO CAMSHAFT POSITION SIGNAL (PIP CIRCUIT FAILURE) 212 IGNITION DIAGNOSTIC MONITOR (IN IGNITION CONTROL MODULE) NO SIGNAL 213 SPARK OUTPUT OPEN (SAW/SPOUT CIRCUIT) 214 CAMSHAFT POSITION SIGNAL OPEN/SHORT 215 COIL 1 PRIMARY CIRCUIT OPEN/SHORT 216 COIL 2 PRIMARY CIRCUIT OPEN/SHORT 217 COIL 3 PRIMARY CIRCUIT OPEN/SHORT 51 MAZDA DIAGNOSTIC TROUBLE CODES (DTCS) YEAR: 1992-1994 (CONTINUED) 52 DTC NO. DESCRIPTOR 218 IGNITION DEAGNOSTIC MONITOR (LEFT) IN IGNITION CONTROL MODULE, NO SIGNAL 219 SPARK OUTPUT OPEN (SAW/SPOUT CIRCUIT) 222 INGITION DIAGNOSTIC MONITOR (RIGHT) IN IGNITION CONTROL MODULE, NO SIGNAL 223 NO DUAL PLUG OPERATION 224 COIL 1, 2, 3, OR 4 PRIMARY CIRCUIT OPEN 226 NO IGNITION DIAGNOSTIC MONITOR (IN IGNITION CONTROL MODULE), NO SIGNAL 232 COIL 1, 2, OR 3 PRIMARY CIRCUIT FAILURE 241 OCTANE ADJUST CIRCUIT OPEN 244 CYLINDER IDENTIFICATION DISPLAY CIRCUIT 326 DIFFERENTIAL PRESSURE FEEDBACK EGR SENSOR OUTPUT LESS THAN EXPECTED 327 DIFFERENTIAL PRESSURE FEEDBACK EGR SENSOR OUTPUT BELOW .02v 332 DIFFERENTIAL PRESSURE FEEDBACK EGR SENSOR, LOW FLOW 335 DIFFERENTIAL PRESSURE FEEDBACK EGR SENSOR OUT OF RANGE DURING KOEO 336 DIFFERENTIAL PRESSURE FEEDBACK EGR SENSOR, HIGH OUTPUT 337 DIFFERENTIAL PRESSURE FEEDBACK EGR SENSOR ABOVE 4.8v 341 OCTANE ADJUST CIRCUIT OPEN 411 IAC SOLENOID FAILED LOW RPM TEST DURING KOER 412 IAC SOLENOID FAILED HIGH RPM TEST DURING KOER 415 ADAPTIVE IAC AT MINIMUM LIMIT 416 ADAPTIVE IAC AT MAXIMUM LIMIT 452 NO VEHICLE SPEED SENSOR SIGNAL 511 PCM (ECA) READ ONLY MEMORY (ROM) TEST FAILED DURING KOEO 512 POWER TO PCM (ECA) KEEP ALIVE MEMORY (KAM) TEST FAILED 513 FAILURE IN PCM (ECA) INTERNAL VOLTAGE 519 STEERING PRESSURE SENSOR CIRCUIT IS CLOSED 519 POWER STEERING PRESSURE SWITCH OPEN DURING KOEO 521 POWER STEERING PRESSURE SWITCH OPEN DURING KOER 522 VEHICLE NOT IN PARK OR NEUTRAL DURING KOEO MAZDA MAZDA DIAGNOSTIC TROUBLE CODES (DTCS) YEAR: 1992-1994 (CONTINUED) DTC NO. DESCRIPTOR 525 A/C SWITCH ON DURING KOEO 528 CLUTCH SWITCH OR PARK/NEUTRAL POSITION OPEN/SHORT 528 CLUTCH PEDAL SWITCH/PARK NEUTRAL SWITCH OPEN/SHORT (M/ T) 536 STOPLIGHT SWITCH OPEN/SHORT OR NOT ACTUATED DURING SELF TEST 538 DYNAMIC RESPONSE TEST, INCORRECT RPM CHANGE (OPERATOR ERROR) 538 INVALID CYLINDER BALANCE TEST DUE TO THROTTLE MOVEMENT 539 A/C SWITCH ON DURING KOEO OR KOER 542 FUEL PUMP OPEN/SHORT 543 FUEL PUMP CIRCUIT OPEN 554 PRESSURE REGULATOR CONTROL CIRCUIT FAILURE 556 FUEL PUMP OPEN/SHORT 558 EGR VACUUM REGULATOR SOLENOID OPEN/SHORT 559 A/C RELAY CIRCUIT FAULT 563 HIGH FAN CONTROL CIRCUIT FAILURE 565 CANISTER PURGE SOLENOID VALVE OPEN/SHORT 566 3-4 SHIFT SOLENOID VALVE (A/T ONLY) OPEN/SHORT 571 EGR SOLENOID VALVE (VENT) OUTPUT CIRCUIT 572 EGR SOLENOID VALVE (VACUUM) OUTPUT CIRCUIT 629 TORQUE CONVERTER CLUTCH SOLENOID OPEN/SHORT 998 PCM IS IN FAIL SAFE MODE, HARD FAULT PRESENT YEAR: 1995 DTC NO. 1995 1 IGF SIGNAL NOT PRESENT 2 CRANKSHAFT SENSOR, NO NE SIGNAL (V6 626/MX6, V6 MX3, RX7) NE SIGNAL NOT PRESENT (929, 2WD MPV) CAMSHAFT SENSOR, NO SGT SIGNAL (2.0L 626/MX6) SGT SIGNAL NOT PRESENT (2.6L MPV) MAZDA DESCRIPTOR 53 MAZDA DIAGNOSTIC TROUBLE CODES (DTCS) YEAR: 1995 (CONTINUED) 54 DTC NO. DESCRIPTOR 3 CRANKSHAFT SENSOR, NO G SIGNAL (RX7) SGC SIGNAL NOT PRESENT (929/2.6L MPV, 1.6L MX3) CAMSHAFT SENSOR, NO SGC SIGNAL (V6 626/MX6) DISTRIBUTOR (G1) SHORT CIRCUIT (MPV V6) SGT SIGNAL NOT PRESENT (MX5/MIATA) 4 CAMSHAFT SENSOR, NO SGT SIGNAL (1.8L MX3) SGT SIGNAL NOT PRESENT (929/1.6L MX3) SGC SIGNAL NOT PRESENT (MX5/MIATA) DISTRIBUTOR (G2) SHORT CIRCUIT (3.0L MPV) 5 (LEFT) KNOCK SENSOR, OPEN/SHORT CIRCUIT 6 VSS, NO SIGNAL 7 RIGHT KNOCK SENSOR, OPEN/SHORT CIRCUIT 8 MAF/AIR FLOW SENSOR, OPEN/SHORT CIRCUIT 9 ECT SENSOR, OPEN/SHORT CIRCUIT 10 IAT SENSOR, OPEN/SHORT CIRCUIT 11 IAT SENSOR, OPEN/SHORT CIRCUIT 12 TPS, OPEN/SHORT CIRCUIT 13 MAP SENSOR, OPEN/SHORT CIRCUIT 14 BARO SENSOR, OPEN/SHORT CIRCUIT 15 O2 SENSOR INACTIVE (2.6L MPV, 1.6L MX3, RX7) LEFT HO2 SENSOR STUCK OVER 1500 RPM (2.5L 626/MX6, 929, 1.8L MX3) HO2 SENSOR INACTIVE (2.0L 626/MX6, 3.0L MPV, MX5/MIATA) 16 EGR SENSOR, OPEN/SHORT CIRCUIT OR STUCK VALVE 17 O2 SENSOR (INVERSION) INACTIVE (RX7, 2.6L MPV) HO2 SENSOR, STICKING (1.6 MX3, MX5/MIATA) LEFT CLOSED LOOP OPERATION STUCK OVER 1500 RPM (1.8L MX3) LEFT HO2 SENSOR INACTIVE (2.5L 626/MX6, 929) HO2 SENSOR (INVERSION) INACTIVE (2.0L 626/MX6, 3.0L MPV) 18 TPS (NARROW) OPEN/SHORT 20 OIL PUMP SENSOR, OPEN/SHORT CIRCUIT 23 FUEL THERMOSENSOR, OPEN/SHORT CIRCUIT (RX7) HO2 SENSOR INACTIVE, RIGHT BANK (2.5L 626/MX6, 929, 1.8L MX3) 24 RIGHT CLOSED LOOP OPERATION STUCK OVER 1500 RPM (1.8L MX3) RIGHT HO2 SENSOR INACTIVE (2.5L 626/MX6, 929) 25 PRC SOLENOID VALVE, OPEN/SHORT CIRCUIT 26 PURGE SOLENOID VALVE, OPEN/SHORT CIRCUIT OIL PUMP (STP MOTOR) OPEN/SHORT CIRCUIT (RX7) MAZDA MAZDA DIAGNOSTIC TROUBLE CODES (DTCS) YEAR: 1995 (CONTINUED) MAZDA DTC NO. DESCRIPTOR 27 METER OIL PUMP, OPEN/SHORT CIRCUIT 28 EGR VALVE (VAC), OPEN/SHORT CIRCUIT 29 EGR VALVE (VENT), OPEN/SHORT CIRCUIT 30 SPLIT AIR BYPASS VALVE, OPEN/SHORT CIRCUIT (RX7) 30 COLD-START RELAY, OPEN/SHORT (929) 31 SECONDARY AIR BYPASS VALVE, OPEN/SHORT CIRCUIT 32 SECONDARY AIR SWITCHING VALVE, OPEN/SHORT CIRCUIT 33 PORT AIR BYPASS SOLENOID, OPEN/SHORT CIRCUIT 34 IAC SOLENOID VALVE, OPEN/SHORT CIRCUIT 35 PRC SOLENOID VALVE 2, OPEN/SHORT CIRCUIT 36 (RIGHT) O2 SENSOR HEATER CIRCUIT, OPEN/SHORT 37 METER OIL PUMP, LOW BATTERY VOLTS (RX7) 37 LEFT O2 SENSOR, HEATER CIRCUIT OPEN/SHORT (929) 38 WARM-UP SYSTEM VALVE, OPEN/SHORT CIRCUIT 39 RELIEF 2 SOLENOID VALVE, OPEN/SHORT CIRCUIT 40 PURGE SOLENOID VALVE, OPEN/SHORT CIRCUIT 41 VICS SOLENOID VALVE, OPEN/SHORT CIRCUIT (929, 1.6LMX3) 41 VRIS VALVE 1, OPEN/SHORT (2.5L 626/MX6, 1.8L MX3) 42 TURBO PRECONTROL SOLENOID VALVE CIRCUIT 43 WASTEGATE VALVE, OPEN/SHORT CIRCUIT 44 TURBO CONTROL VALVE, OPEN/SHORT CIRCUIT 45 CHARGE CONTROL VALVE, OPEN/SHORT CIRCUIT 46 CHARGE RELIEF VALVE, OPEN/SHORT CIRCUIT (RX7) 46 VRIS VALVE 2, OPEN/SHORT CIRCUIT (2.5L 626/MX6, 1.8L MX3) 50 DOUBLE THROTTLE CONTROL SOLENOID VALVE, OPEN/SHORT CIRCUIT 51 FUEL PUMP RELAY (SPEED) 54 AIR PUMP RELAY, OPEN/SHORT CIRCUIT 65 A/C SIGNAL (TCM), OPEN/SHORT CIRCUIT 71 INJECTION (FRONT SECONDARY), OPEN/SHORT CIRCUIT 73 INJECTION (REAR SECONDARY), OPEN/SHORT CIRCUIT 76 SLIP TCC SIGNAL, OPEN/SHORT CIRCUIT 55 MAZDA DIAGNOSTIC TROUBLE CODES (DTCS) YEAR: 1995 (CONTINUED) DTC NO. 77 56 DESCRIPTOR TORQUE REDUCED SIGNAL, OPEN/SHORT CIRCUIT MAZDA MAZDA DIAGNOSTIC TROUBLE CODES (DTCS) OBD II SYSTEMS YEAR: 1995-1998 DTC NO. 1995-98 OBD II P0100 MAF/VAF Circuit Malfunction P0102 MAF Sensor Circuit, Low Input P0103 MAF Sensor Circuit, High Input P0105 MAP/BARO Circuit Malfunction P0106 BARO/EGR Boost Sensor Circuit Performance P0107 BARO/EGR Boost Sensor Circuit, Low Input P0108 BARO/EGR Boost Sensor Circuit, High Input P0110 IAT Circuit Malfunction P0111 IAT Circuit Performance Problem P0112 IAT Circuit, Low Input P0113 IAT Circuit, High Input P0115 ECT Circuit Malfunction P0117 ECT Sensor, Low Input P0118 ECT Sensor, High Input P0120 Throttle Position Circuit Malfunction P0121 TPS Circuit Malfunction P0122 TPS Circuit, Low Input P0123 TPS Circuit, High Input P0125 Coolant Temp. Low for Too Long, no Closed Loop Fuel Control P0126 ECT Sensor, Low Temp. P0130 O2 Sensor, Bank 1 Sensor 1, Circuit Malfunction P0131 Upstream HO2 Sensor Circuit, Bank 1, Low Voltage P0132 HO2 Sensor Circuit, Bank 1 Sensor 1, High Voltage P0133 Upstream HO2 Sensor, Bank 1, Slow Response P0134 HO2 Sensor , Bank 1 Sensor 1, no Activity P0135 Upstream HO2 Sensor, Bank 1, Circuit Malfunction P0136 Downstream HO2 Sensor Circuit Malfunction, Bank 1 P0137 Downstream HO2 Sensor, Low Voltage, Bank 1 P0138 Downstream HO2 Sensor Circuit, Bank 1, High Voltage P0140 HO2 Sensor Circuit, Bank 1 Sensor 2, no Activity MAZDA DESCRIPTOR 57 MAZDA DIAGNOSTIC TROUBLE CODES (DTCS) YEAR: 1995-1998 (CONTINUED) 58 DTC NO. DESCRIPTOR P0141 Downstream HO2 Sensor, Bank 1, Heater Circuit Malfunction P0142 HO2 Sensor, Bank 1 Sensor 3, Circuit Malfunction P0146 HO2 Sensor Circuit, Bank 1 Sensor 3, no Activity P0147 HO2 Sensor, Bank 1 Sensor 3, Heater Circuit Malfunction P0150 O2 Sensor, Bank 2 Sensor 1, Circuit Malfunction P0151 Upstream HO2 Sensor Circuit, Bank 2, Low Voltage P0152 HO2 Sensor, Bank 2 Sensor 1, High Voltage P0153 Upstream HO2 Sensor, Bank 2, Slow Response P0154 O2 Sensor Circuit, Bank 2 Sensor 1, no Activity P0155 Upstream HO2 Sensor, Bank 2, Heater Circuit Malfunction P0160 O2 Sensor Heater Circuit, Bank 2 Sensor 2, no Activity P0161 HO2 Sensor Heater, Bank 2 Sensor 2, Circuit Malfunction P0170 Bank 1 Fuel Trim Malfunction P0171 Fuel System, A/F Ratio Lean, Bank 1 P0172 Fuel System, A/F Ratio Rich, Bank 1 P0173 Bank 2 Fuel Trim Malfunction P0174 Fuel System, A/F Ratio Lean, Bank 2 P0175 Fuel System, A/F Ratio Rich, Bank 2 P0230 Fuel Pump Primary Circuit Malfunction P0231 Fuel Pump Secondary Circuit Low P0232 Fuel Pump Secondary Circuit High P0300 Random Misfire Detected P0301 Cylinder No. 1, Misfire Detected P0302 Cylinder No. 2, Misfire Detected P0303 Cylinder No. 3, Misfire Detected P0304 Cylinder No. 4, Misfire Detected P0305 Cylinder No. 5, Misfire Detected P0306 Cylinder No. 6, Misfire Detected P0320 PIP Sensor Circuit Malfunction P0325 Knock Sensor Circuit Malfunction P0335 Crankshaft Position Sensor Circuit Malfunction P0339 Crankshaft Position Sensor Circuit Intermittent MAZDA MAZDA DIAGNOSTIC TROUBLE CODES (DTCS) YEAR: 1995-1998 (CONTINUED) MAZDA DTC NO. DESCRIPTOR P0340 Camshaft Position Sensor, Circuit Malfunction P0350 Ignition Coil, Primary Circuit, Malfunction P0351 Ignition Coil A, Primary Circuit Malfunction P0352 Ignition Coil B, Primary Circuit Malfunction P0353 Ignition Coil C, Primary Circuit Malfunction P0354 Ignition Coil D, Primary Circuit Malfunction P0400 EGR Flow, System Malfunction P0401 EGR Flow Insufficient P0402 EGR Detection, Excessive Flow P0420 Catalyst Below Threshold, Bank 1 P0421 Warm-up Catalyst Efficiency Below Threshold P0422 EVAP Control System Malfunction (Leak Check) P0430 Catalyst, Bank 2, Below Threshold P0440 EVAP Control System Malfunction P0441 EVAP Purge Control Malfunction P0442 Small Leak Detected in EVAP System P0443 EVAP System Purge Control Valve Circuit Malfunction P0446 Excess Fuel Tank Pressure or a Vent Control Malfunction P0450 EVAP System Pressure Sensor Malfunction P0452 Fuel Tank Pressure Sensor, Low Input P0453 Fuel Tank Pressure Sensor, High Input P0455 EVAP Control System, Leak or Blockage P0460 Fuel Level Sensor Circuit Malfunction P0461 Fuel Level Sensor Circuit Range Performance P0462 Fuel Level Sensor Circuit, Low Input P0463 Fuel Level Sensor Circuit, High Input P0470 Exhaust Pressure Sensor Malfunction P0500 VSS Malfunction P0501 VSS Signal Intermittent P0503 VSS Circuit Intermittent P0505 IAC System Malfunction P0506 Idle Control System, RPM Lower than Expected 59 MAZDA DIAGNOSTIC TROUBLE CODES (DTCS) YEAR: 1995-1998 (CONTINUED) 60 DTC NO. DESCRIPTOR P0507 Idle Control System, RPM Higher than Expected P0510 Closed Throttle Position Switch Malfunction P0550 P/S Pressure Switch Circuit Malfunction P0603 ECM/PCM KAM Memory Test Error P0605 PCM ROM Test Error P0703 Brake ON/OFF Switch Input Error P0704 Clutch Pedal Position Switch Circuit Malfunction P0705 Transmission Range Sensor Circuit Failure P0706 Transmission Range Sensor, Short Circuit or Sensor Malfunction P0707 Transmission Range Sensor, Low Input P0708 Transmission Range Sensor, High Input P0710 Transmission Fluid Temp. Sensor Circuit Malfunction P0711 Transmission Fluid Temp. Sensor Circuit Malfunction P0712 Transmission Fluid Temp. Circuit, Low Input P0713 Transmission Fluid Temp. Circuit, High Input P0715 Turbine Shaft Speed Sensor Circuit (Signal Lost) P0720 Output Shaft Speed Sensor Signal Lost P0721 Output Shaft Speed Sensor, Erratic Signal P0725 Engine Speed Input Circuit Malfunction P0731 Gear 1, Incorrect Ratio P0732 Gear 2, Incorrect Ratio P0733 Gear 3, Incorrect Ratio P0734 Gear 4, Incorrect Ratio P0735 Gear 5, Incorrect Ratio P0736 Reverse Gear, Incorrect Ratio P0740 TCC System Malfunction P0741 TCC, Mechanical System Performance P0742 TCC Solenoid Valve Stuck ON P0743 Torque Converter Clutch System, Electrical Problem P0745 Pressure Control Solenoid Malfunction P0746 Electrical Pressure Control Solenoid Performance P0750 Shift Solenoid A, Malfunction MAZDA MAZDA DIAGNOSTIC TROUBLE CODES (DTCS) YEAR: 1995-1998 (CONTINUED) MAZDA DTC NO. DESCRIPTOR P0751 Shift Solenoid A, Performance P0752 Shift Solenoid 1, Stuck ON P0755 Shift Solenoid B, Malfunction P0756 Shift Solenoid B, Performance P0757 Shift Solenoid 2, Stuck ON P0760 Shift Solenoid C, Malfunction P0761 Shift Solenoid C, Performance P0765 Shift Solenoid 4, Open/Short or PCM Driver Failure P0781 1st to 2nd Shift Error P0782 2nd to 3rd Shift Error P0783 3rd to 4th Shift Error P0784 4th to 5th Shift Error P1000 OBDII Monitor Drive Cycle Incomplete P1001 KOER Self-Test not Complete P1100 MAF Sensor Intermittent P1101 MAF Sensor Out of Range P1102 MAF Inconsistent with TPS, Lower than Expected P1103 MAF Inconsistent with TPS, Greater than Expected P1110 IAT Sensor (Dynamic Chamber), Open or Short P1112 IAT Sensor Intermittent or Out of Range P1113 IAT Sensor Circuit (Lysholm Compressor), Open or Short P1116 ECT Sensor Out of Range P1117 ECT Sensor Intermittent P1120 TP Sensor Out of Range/Low P1121 TP Sensor, Inconsistent with MAF P1122 Throttle Position Closed Switch, Stuck P1124 TP Sensor Out of Range/Low P1125 TP Sensor, Circuit Intermittent P1127 Downstream HO2 Sensor not Tested P1128 Upstream HO2 Sensor, Swapped from Bank to Bank P1129 Downstream HO2 Sensor Swapped from Bank to Bank P1130 Upstream HO2 Sensor, no Switch-Limit, Bank 1 61 MAZDA DIAGNOSTIC TROUBLE CODES (DTCS) YEAR: 1995-1998 (CONTINUED) 62 DTC NO. DESCRIPTOR P1131 Upstream HO2 Sensor, no Switch-Lean, Bank 1 P1132 Upstream HO2 Sensor, no Switch-Rich, Bank 1 P1137 HO2 Sensor, Bank 1 Sensor 2, Lack of Sensor, Indicates Lean P1138 HO2 Sensor, Bank 1 Sensor 2, Lack of Sensor, Indicates Rich P1143 HO2 Sensor, Bank1 Sensor 3, Lack of Sensor, Indicates Lean P1144 HO2 Sensor, Bank 1 Sensor 3, Lack of Sensor, Indicates Rich P1150 Upstream HO2 Sensor, no Switch-Limit, Bank 2 P1151 Upstream HO2 Sensor, no Switch-Lean, Bank 2 P1152 Upstream HO2 Sensor, no Switch-Rich, Bank 2 P1169 HO2 Sensor, Bank 1 Sensor 2, Inversion P1170 HO2 Sensor, Bank 1 Sensor 1, Inversion P1173 HO2 Sensor, Bank 2 Sensor 1, Inversion P1195 EGR Barometric Pressure Sensor, Open or Short P1196 Ignition (Start) Switch Input Malfunction P1235 Fuel Pump Control Out of Range, Open or Short P1236 Fuel Pump Control Out of Range, Open or Short P1250 Fuel Pressure Circuit, Open or Short P1252 Pressure Regulator Control Solenoid Valve No. 2, Open or Short P1260 Theft Detected, Engine Disabled P1270 RPM/Vehicle Speed Limiter Reached P1309 Misfire Detection Monitor not Enabled P1345 No SGC Signal P1351 Ignition Diagnostic Monitor Circuit Malfunction P1352 Ignition Coil 1, Primary Circuit Malfunction P1353 Ignition Coil 2, Primary Circuit Malfunction P1354 Ignition Coil 3, Primary Circuit Malfunction P1358 Ignition Diagnostic Monitor Out of Range P1359 Spark Output Circuit Malfunction P1360 Ignition Coil A, Secondary Circuit Malfunction P1361 Ignition Coil B, Secondary Circuit Malfunction P1362 Ignition Coil C, Secondary Circuit Malfunction P1364 Ignition Coil Primary Circuit Malfunction MAZDA MAZDA DIAGNOSTIC TROUBLE CODES (DTCS) YEAR: 1995-1998 (CONTINUED) MAZDA DTC NO. DESCRIPTOR P1365 Ignition Coil Secondary Circuit malfunction P1390 Octane Adjust Out of Range P1400 Differential Pressure Feedback EGR Sensor Circuit, Low Voltage P1401 Differential Pressure Feedback EGR Sensor Circuit, High Voltage P1402 EGR Valve Position Sensor, Open or Short P1403 Differential Pressure Feedback EGR Sensor, Hoses Reversed P1405 Differential Pressure Feedback EGR Sensor, Upstream Hose Off/Plugged P1406 Differential Pressure Feedback EGR Sensor, Downstream Hose Off/Plugged P1407 EGR Valve, no Flow Detected P1408 EGR Flow, Out of Range P1409 EGR Vacuum Regulator, Circuit Malfunction P1410 EGR Boost Sensor or Solenoid Valve, Frozen P1443 EVAP Control System Circuit Malfunction P1444 Purge Flow Sensor Circuit, Low Input P1445 Purge Flow Sensor Circuit, High Input P1449 Canister Drain Cut Valve, Open or Short P1450 Fuel Tank, Unable to Bleed Vacuum P1451 EVAP Vent Valve Circuit Malfunction P1455 Fuel Tank Level Sensor, Open or Short P1457 Purge Solenoid Valve Control System Malfunction P1460 Wide-Open Throttle A/C Cut-Off Circuit Malfunction P1464 A/C Demand Out of Range P1474 Cooling Fan Control, Primary Circuit Malfunction P1479 Condenser Fan, Primary Control Circuit Malfunction P1485 EGR Solenoid Vacuum Valve, Open or Short P1486 EGR Vent Solenoid, Open or Short P1487 EGR Boost Solenoid Valve Circuit Open or Short P1496 EGR Valve Motor, Coil 1, Open or Short P1497 EGR Valve Motor, Coil 2, Open or Short P1498 EGR Valve Motor, Coil 3, Open or Short P1499 EGR Valve Motor, Coil 4, Open or Short P1500 VSS Circuit Intermittent 63 MAZDA DIAGNOSTIC TROUBLE CODES (DTCS) YEAR: 1995-1998 (CONTINUED) 64 DTC NO. DESCRIPTOR P1501 VSS Circuit Out of Range P1502 VSS Circuit, Signal Lost P1504 IAC Circuit Malfunction P1505 IAC Circuit at Adaptive Clip P1506 IAC Circuit, Overspeed Error P1507 IAC Circuit, Underspeed Error P1508 Bypass Air Solenoid Valve No. 1, Open or Short P1509 Bypass Air Solenoid Valve No. 2, Open or Short P1521 Variable Resonance Induction Solenoid 1, Open or Short P1522 Variable Resonance Induction Solenoid 2, Open or Short P1523 VICS Circuit Malfunction, Open or Short P1524 Charge Air Cooler Bypass Solenoid Valve Circuit, Open or Short P1525 ABV (Vacuum), Open or Short P1526 ABV (Vent), Open or Short P1527 Accelerate Warm-up, Open or Short P1540 ABV Control System, Open or Short P1566 Backup Power Supply, Circuit Malfunction P1601 Communication Line Error (A/T) P1602 Immobilizer Unit, PCM Communication Error P1603 Immobilizer System, Codeword not Registered (PCM) P1604 Immobilizer System, Key ID Number Unregistered (PCM) P1605 PCM KAM Power Circuit Test Error P1608 PCME (CPU) Malfunction P1609 PCM Knock I/C Damaged P1621 Immobilizer System, Codeword Problem After Engine Crank P1622 Immobilizer System, Key ID Number does not Match P1623 Immobilizer System, Codeword/Key ID, Read/Write Error (PCM) P1624 Immobilizer System, Communication Counter =0 P1627 ECM/TCS Line Communication Error P1628 ECM/TCS Line (ABV) Communication Error P1631 Generator Output Voltage Signal, no Electricity P1632 Battery Voltage Monitor Signal, Circuit Malfunction MAZDA MAZDA DIAGNOSTIC TROUBLE CODES (DTCS) YEAR: 1995-1998 (CONTINUED) MAZDA DTC NO. DESCRIPTOR P1633 Battery Voltage, Overcharge P1634 Generator Terminal B, Circuit Open P1650 PSP Switch Out of Range P1651 PSP Switch Input Error P1652 PSP Switch Failed ON P1701 Transmission Solenoid Malfunction P1702 Transmission Range Sensor Circuit, Intermittent Malfunction P1703 Brake On/Off Switch Out of Range P1704 Digital Transmission Range Sensor Malfunction P1705 Transmission Range Sensor, Out of Range P1709 KOEO Self-Test, PNP in Gear P1711 Transmission Fluid Temp. Circuit Out of Range P1713 No Transmission Fluid Temp. Change for Low Range Operation P1714 Shift Solenoid 1, Mechanical Failure P1715 Shift Solenoid 2, Mechanical Failure P1716 Shift Solenoid 3, Mechanical Failure P1717 Shift Solenoid 4, Mechanical Failure P1718 No Transmission Fluid Temp. Change for High Range Operation P1719 OD Drum Speed Signal Lost During Operation P1720 No VSS 2 Signal P1729 4x4 Low Switch Error P1740 TCC Solenoid, Mechanical Failure Detected P1741 TCC Control Error P1742 TCC Solenoid Failed ON P1743 TCC Solenoid Failed ON P1744 TCC System Stuck in OFF Position P1746 Electric Pressure Control Solenoid, Open Circuit P1747 Electric Pressure Control Solenoid, Short Circuit P1749 Electric Pressure Control Solenoid, Failed Low P1751 Shift Solenoid A Performance P1754 Coast Clutch Solenoid Malfunction P1756 Shift Solenoid B Performance 65 MAZDA DIAGNOSTIC TROUBLE CODES (DTCS) YEAR: 1995-1998 (CONTINUED) 66 DTC NO. DESCRIPTOR P1761 Shift Solenoid C Performance P1762 SS3/SS4/OD Band Failure P1765 3-2 Timing Valve, Open or Short P1770 Overrunning Clutch Solenoid, Open or Short P1780 Transmission Control Switch Circuit Out of Range P1781 4x4 Low Switch Out of Range P1783 Transmission Over Temp. Condition P1788 Var. Force Solenoid 2, Circuit Open P1789 Var. Force Solenoid 2, Circuit Shorted P1790 TPS, Open or Short P1792 BARO Circuit Malfunction P1794 Battery or Battery Circuit Failure P1795 Idle Switch, Open or Short P1797 Park/Neutral Signal, Open or Short P1804 4WD High Indicator Circuit P1806 4WD High Indicator Short to Voltage P1808 4WD Low Indicator Circuit P1810 4WD Low Indicator Short to Voltage P1812 4WD Mode Select Circuit P1815 4x4 Shift Control Switch Short to Ground P1820 Transfer Case Relay Module, CW Relay Circuit P1822 Transfer Case Relay Module, CW Relay Short to Battery Voltage P1824 Elec. Shift Relay Circuit P1826 Elec. Shift Relay, Short to Voltage P1828 Transfer Case Relay Module, CCW Relay Circuit P1830 Transfer Case Relay Module, CCW Relay Short to Battery Voltage P1846 Transfer Case Touch Drive Plate A Circuit P1848 Transfer Case Touch Drive Plate A, Short to Battery Voltage P1850 Transfer Case Touch Drive Plate B Circuit P1852 Transfer Case Touch Drive Plate B, Short to Battery Voltage P1854 Transfer Case Touch Drive Plate C Circuit P1856 Transfer Case Touch Drive Plate C, Short to Battery Voltage MAZDA MAZDA DIAGNOSTIC TROUBLE CODES (DTCS) YEAR: 1995-1998 (CONTINUED) MAZDA DTC NO. DESCRIPTOR P1858 Transfer Case Touch Drive Plate D Circuit P1860 Transfer Case Touch Drive Plate D, Short to Battery Voltage P1862 Transfer Case Touch Drive Plate (Y/W) P1864 Transfer Case Touch Drive Plate (Y/W) P1866 Transfer Case System Concern P1867 Transfer Case Contact Plate 67 MAZDA DIAGNOSTIC TROUBLE CODES (DTCS) 68 MAZDA MITSUBISHI 1. VEHICLES AND SYSTEMS ..................................................................................................................... 3 2. MITSUBISHI SPECIFIC INFORMATION ........................................................................................... 12 3. TEST MODES AVAILABLE .................................................................................................................... 13 4. GETTING STARTED ................................................................................................................................. 14 5. SELECTING THE VEHICLE .................................................................................................................. 15 6. TEST MODES.............................................................................................................................................. 17 Mode F1: DTC Entry ........................................................................................................................ 17 Submode F0: How To Read .................................................................................................... 18 Submode F1: Enter DTC(s) ..................................................................................................... 18 Submode F2: DTC List ............................................................................................................ 22 Submode F3: Review DTC ..................................................................................................... 22 Submode F4: Clear DTC(s) ..................................................................................................... 23 Mode F2: DTC ................................................................................................................................... 23 Submode F1: Read DTC(s) ..................................................................................................... 23 Submode F2: DTC List ............................................................................................................ 24 Submode F3: Review DTC ..................................................................................................... 24 Submode F4: Clear DTC(s) ..................................................................................................... 24 7. MITSUBISHI DIAGNOSTIC TROUBLE CODES (DTCs) .............................................................. 25 OBD, OBD I Systems ....................................................................................................................... 25 1984.............................................................................................................................................. 25 1985.............................................................................................................................................. 25 1986.............................................................................................................................................. 25 1987.............................................................................................................................................. 26 1988.............................................................................................................................................. 26 1989.............................................................................................................................................. 27 1990.............................................................................................................................................. 28 1991.............................................................................................................................................. 29 1992.............................................................................................................................................. 30 1993 .............................................................................................................................................. 31 1994 .............................................................................................................................................. 32 1995 .............................................................................................................................................. 33 Mitsubishi Eclipse Non-Turbo DTCs .................................................................................... 34 1995 .............................................................................................................................................. 34 OBD II Systems ................................................................................................................................. 36 1995-98 OBD II ......................................................................................................................... 36 2 MITSUBISHI VEHICLES AND SYSTEMS 1. VEHICLES AND SYSTEMS Using the Asian cartridge, the following Mitsubishi vehicles can be diagnosed. MODEL: 1984 ENGINE ENGINE TYPE FUEL TYPE ADAPTER TYPE CODE TYPE 1984 CORDIA 1.8L I4 TURBO G62B ECI EFI NONE MANCODE STARION 2.6L I4 TURBO G54B TBI NONE MANCODE TREDIA 1.8L I4 TURBO G62B ECI EFI NONE MANCODE MODEL: 1985 ENGINE ENGINE TYPE FUEL TYPE ADAPTER TYPE CODE TYPE 1985 CORDIA 1.8L I4 TURBO G62B ECI EFI NONE MANCODE GALANT 2.4L I4 G64B MPI NONE MANCODE MIRAGE 1.6L I4 TURBO G32B ECI EFI NONE MANCODE STARION 2.6L I4 TURBO G54B ECI EFI NONE MANCODE TREDIA 1.8L I4 TURBO G62B ECI EFI NONE MANCODE MODEL: 1986 ENGINE ENGINE TYPE FUEL TYPE ADAPTER TYPE CODE TYPE 1986 CORDIA 1.8L I4 TURBO G62B ECI EFI NONE MANCODE GALANT 2.4L I4 G64B MPI NONE MANCODE MIRAGE 1.6L I4 TURBO G32B ECI EFI NONE MANCODE STARION 2.6L I4 TUR INT G54B ECI EFI NONE MANCODE STARION 2.6L I4 TURBO G54B ECI EFI NONE MANCODE TREDIA 1.8L I4 TURBO G62B ECI EFI NONE MANCODE MITSUBISHI 3 VEHICLES AND SYSTEMS MODEL: 1987 ENGINE ENGINE TYPE FUEL TYPE ADAPTER TYPE CODE TYPE 1987 CORDIA 1.8L I4 TURBO G62B ECI EFI NONE MANCODE GALANT 2.4L I4 G64B MPI CHECK AUTOCODE MIRAGE 1.6L I4 G32B ECI EFI NONE MANCODE STARION 2.6L I4 TUR INT G54B ECI EFI CHECK AUTOCODES STARION 2.6L I4 TURBO G54B ECI EFI CHECK AUTOCODES TREDIA 1.8L I4 TURBO G62B ECI EFI NONE MANCODE VAN/WAGON 2.4L I4 G64B MPI CHECK AUTOCODES MODEL: 1988 ENGINE ENGINE TYPE FUEL TYPE ADAPTER TYPE CODE TYPE 1988 CORDIA 1.8L I4 TURBO G62B ECI EFI NONE MANCODE GALANT SIGMA 3.0L V6 6G72 MPI CHECK AUTOCODES MIRAGE 1.6L I4 TURBO G32B ECI EFI NONE MANCODE STARION 2.6L I4 TURBO G54B ECI EFI CHECK AUTOCODES TREDIA 1.8L I4 TURBO G62B ECI EFI NONE MANCODE VAN/WAGON 2.4L I4 G64B MPI CHECK AUTOCODES MODEL: 1989 ENGINE ENGINE TYPE FUEL TYPE ADAPTER TYPE CODE TYPE 1989 4 GALANT 2.0L I4 DOHC 4G63 MPI CHECK AUTOCODES GALANT 2.0L I4 SOHC-8V 4G63 MPI CHECK AUTOCODES MIRAGE 1.5L I4 SOHC 4G15 MPI CHECK AUTOCODES MIRAGE 1.6L I4 DOHC 4G61 MPI CHECK AUTOCODES MONTERO 3.0L V6 6G72 MPI CHECK AUTOCODES SIGMA 3.0L V6 6G72 MPI CHECK AUTOCODES STARION 2.6L I4 TUR INT G54B ECI EFI CHECK AUTOCODES MITSUBISHI VEHICLES AND SYSTEMS MODEL: 1989 (CONTINUED) VAN/WAGON MODEL: 1990 ENGINE 2.4L I4 ENGINE ENGINE TYPE 4G64 ENGINE TYPE FUEL TYPE MPI FUEL TYPE ADAPTER TYPE CHECK ADAPTER TYPE CODE TYPE AUTOCODES CODE TYPE 1990 ECLIPSE 1.8L I4 4G37 MPI CHECK AUTOCODES ECLIPSE 2.0L I4 4G63 MPI CHECK AUTOCODES ECLIPSE 2.0L I4 TURBO 4G63 MPI CHECK AUTOCODES GALANT 2.0L I4 DOHC 4G63 MPI CHECK AUTOCODES GALANT 2.0L I4 DOHC TUR 4G63 MPI CHECK AUTOCODES GALANT 2.0L I4 SOHC-8V 4G63 MPI CHECK AUTOCODES MIRAGE 1.5L I4 SOHC 4G15 MPI CHECK AUTOCODES MIRAGE 1.6L I4 DOHC 4G61 MPI CHECK AUTOCODES MONTERO 3.0L V6 6G72 MPI CHECK AUTOCODES PRECIS 1.5L I4 G4AM MPI CHECK AUTOCODES SIGMA 3.0L V6 6G72 MPI CHECK AUTOCODES TRUCK 2.4L I4 4G64 MPI CHECK AUTOCODES TRUCK 3.0L V6 6G72 MPI CHECK AUTOCODES VAN/WAGON 2.4L I4 4G64 MPI CHECK AUTOCODES MODEL: 1991 ENGINE ENGINE TYPE FUEL TYPE ADAPTER TYPE CODE TYPE 1991 3000GT 3.0L V6 DOHC 6G72 MPI CHECK AUTOCODES 3000GT 3.0L V6 DOHC TUR 6G72 MPI CHECK AUTOCODES ECLIPSE 1.8L I4 4G37 MPI CHECK AUTOCODES ECLIPSE 2.0L I4 4G63 MPI CHECK AUTOCODES ECLIPSE 2.0L I4 TURBO 4G63 MPI CHECK AUTOCODES GALANT 2.0L I4 DOHC 4G63 MPI CHECK AUTOCODES GALANT 2.0L I4 DOHC TUR 4G63 MPI CHECK AUTOCODES GALANT 2.0L I4 SOHC-8V 4G63 MPI CHECK AUTOCODES MITSUBISHI 5 VEHICLES AND SYSTEMS MODEL: 1991 (CONTINUED) ENGINE ENGINE TYPE FUEL TYPE ADAPTER TYPE CODE TYPE MIRAGE 1.5L I4 SOHC 4G15 MPI CHECK AUTOCODES MIRAGE 1.6L I4 DOHC 4G61 MPI CHECK AUTOCODES MONTERO 3.0L V6 6G72 MPI CHECK AUTOCODES PRECIS 1.5L I4 G4AJ MPI CHECK AUTOCODES TRUCK 2.4L I4 4G64 MPI CHECK AUTOCODES TRUCK 3.0L V6 6G72 MPI CHECK AUTOCODES MODEL: 1992 ENGINE ENGINE TYPE FUEL TYPE ADAPTER TYPE CODE TYPE 1992 6 3000GT 3.0L V6 DOHC 6G72 MPI CHECK AUTOCODES 3000GT 3.0L V6 DOHC TUR 6G72 MPI CHECK AUTOCODES DIAMANTE 3.0L V6 DOHC 6G72 MPI CHECK AUTOCODES DIAMANTE 3.0L V6 SOHC 6G72 MPI CHECK AUTOCODES ECLIPSE 1.8L I4 SOHC 4G37 MPI CHECK AUTOCODES ECLIPSE 2.0L I4 DOHC 4G63 MPI CHECK AUTOCODES ECLIPSE 2.0L I4 DOHC TUR 4G63 MPI CHECK AUTOCODES EXPO 2.4L I4 4G64 MPI CHECK AUTOCODES EXPO LRV 1.8L I4 4G93 MPI CHECK AUTOCODES GALANT 2.0L I4 DOHC 4G63 MPI CHECK AUTOCODES GALANT 2.0L I4 DOHC TUR 4G63 MPI CHECK AUTOCODES GALANT 2.0L I4 SOHC-8V 4G63 MPI CHECK AUTOCODES MIRAGE 1.5L I4 SOHC 4G15 MPI CHECK AUTOCODES MIRAGE 1.6L I4 DOHC 4G61 MPI CHECK AUTOCODES MONTERO 3.0L V6 6G72 MPI CHECK AUTOCODES TRUCK 2.4L I4 4G64 MPI CHECK AUTOCODES TRUCK 3.0L V6 6G72 MPI CHECK AUTOCODES MITSUBISHI VEHICLES AND SYSTEMS MODEL: 1993 ENGINE ENGINE TYPE FUEL TYPE ADAPTER TYPE CODE TYPE 1993 3000GT 3.0L V6 DOHC 6G72 MPI CHECK AUTOCODES 3000GT 3.0L V6 DOHC TUR 6G72 MPI CHECK AUTOCODES DIAMANTE 3.0L V6 DOHC 6G72 MPI CHECK AUTOCODES DIAMANTE 3.0L V6 SOHC 6G72 MPI CHECK AUTOCODES DIAMANTE WAGON 3.0L V6 SOHC 6G72 MPI CHECK AUTOCODES ECLIPSE 1.8L I4 SOHC 4G37 MPI CHECK AUTOCODES ECLIPSE 2.0L I4 DOHC 4G63 MPI CHECK AUTOCODES ECLIPSE 2.0L I4 DOHC TUR 4G63 MPI CHECK AUTOCODES EXPO 2.4L I4 4G64 MPI CHECK AUTOCODES EXPO LRV 1.8L I4 4G93 MPI CHECK AUTOCODES EXPO LRV 2.4L I4 4G64 MPI CHECK AUTOCODES GALANT 2.0L I4 DOHC 4G63 MPI CHECK AUTOCODES GALANT 2.0L I4 SOHC-16V 4G63 MPI CHECK AUTOCODES GALANT 2.0L I4 SOHC-8V 4G63 MPI CHECK AUTOCODES MIRAGE 1.5L I4 SOHC 4G15 MPI CHECK AUTOCODES MIRAGE 1.8L I4 SOHC 4G93 MPI CHECK AUTOCODES MONTERO 3.0L V6 6G72 MPI CHECK AUTOCODES PRECIS 1.5L I4 G4AJ MPI CHECK AUTOCODES TRUCK 2.4L I4 4G64 MPI CHECK AUTOCODES TRUCK 3.0L V6 6G72 MPI CHECK AUTOCODES MODEL: 1994 ENGINE ENGINE TYPE FUEL TYPE ADAPTER TYPE CODE TYPE 1994 DIAMANTE 3.0L V6 DOHC 6G72 MPI JUMPER MANCODE DIAMANTE 3.0L V6 SOHC 6G72 MPI JUMPER MANCODE DIAMANTE WAGON 3.0L V6 SOHC 6G72 MPI JUMPER MANCODE ECLIPSE 1.8L I4 SOHC 4G37 MPI CHECK AUTOCODES ECLIPSE 2.0L I4 DOHC 4G63 MPI CHECK AUTOCODES MITSUBISHI 7 VEHICLES AND SYSTEMS MODEL: 1994 (CONTINUED) ENGINE ENGINE TYPE FUEL TYPE ADAPTER TYPE CODE TYPE ECLIPSE 2.0L I4 DOHC TUR 4G63 MPI CHECK AUTOCODES EXPO 2.4L I4 SOHC 4G64 MPI JUMPER MANCODE EXPO LRV 1.8L I4 SOHC 4G93 MPI JUMPER MANCODE EXPO LRV 2.4L I4 SOHC 4G64 MPI JUMPER MANCODE GALANT 2.4L I4 DOHC 4G64 MPI JUMPER MANCODE GALANT 2.4L I4 SOHC 4G64 MPI JUMPER MANCODE MIRAGE 1.5L I4 SOHC 4G15 MPI NONE MANCODE MIRAGE 1.8L I4 SOHC 4G93 MPI NONE MANCODE MONTERO 3.0L V6 SOHC 6G72 MPI NONE MANCODE MONTERO 3.5L V6 DOHC 6G74 MPI JUMPER MANCODE PRECIS 1.5L I4 G4AJ MPI CHECK AUTOCODES TRUCK 2.4L I4 4G64 MPI CHECK AUTOCODES TRUCK 3.0L V6 6G72 MPI CHECK AUTOCODES ADAPTER TYPE CODE TYPE MODEL: 1995 ENGINE ENGINE TYPE FUEL TYPE 1995 8 3000GT 3.0L V6 6G72 MFI JUMPER MILCODES 3000GT 3.0L V6 TURBO 6G72 MFI JUMPER MILCODES DIAMANTE/WAGON 3.0L V6 SOHC 6G72 MFI NONE MANCODES DIAMANTE 3.0L V6 DOHC 6G72 MFI NONE MANCODES ECLIPSE 2.0L I4 420A MFI NONE MANCODES ECLIPSE 2.0L I4 TURBO 4G63 MFI OBD II* AUTOCODES GALANT 2.4L I4 SOHC 4G64 MFI NONE MANCODES GALANT 2.4L I4 DOHC 4G64 MFI NONE MANCODES MIRAGE 1.5L I4 4G15 MFI NONE MANCODES MIRAGE (CAL) 1.5L I4 4G15 MFI OBD II* AUTOCODES MIRAGE 1.8L I4 4G93 MFI NONE MANCODES MIRAGE (CAL) 1.8L I4 4G93 MFI OBD II* AUTOCODES EXPO LRV 1.8L I4 4G93 MFI JUMPER MANCODES EXPO LRV (CAL) 1.8L I4 4G93 MFI OBD II* AUTOCODES MITSUBISHI VEHICLES AND SYSTEMS MODEL: 1995 (CONTINUED) ENGINE TYPE ENGINE FUEL TYPE ADAPTER TYPE CODE TYPE EXPO LRV 2.4L I4 4G64 MFI NONE MANCODES EXPO LRV (CAL) 2.4L I4 4G64 MFI OBD II* AUTOCODES EXPO 2.4L I4 4G64 MFI NONE AUTOCODES EXPO (CAL FWD) 2.4L I4 4G64 MFI OBD II* AUTOCODES MONTERO 3.0L V6 12V 4G72 MFI NONE MANCODES MONTERO 3.0L V6 24V 4G72 MFI NONE MANCODES MONTERO 3.5L V6 4G74 MFI NONE MANCODES TRUCK 2.4L I4 4G64 MFI NONE MANCODES TRUCK 3.0L V6 4G72 MFI NONE MANCODES * For Adapter Type OBD II see COMMON MODEL: 1996 TEST MODES II section for operating instructions and test mode information. ENGINE TYPE ENGINE FUEL TYPE ADAPTER TYPE CODE TYPE 1996 3000GT 3.0L V6 6G72 MFI OBD II* AUTOCODES 3000GT 3.0L V6 TURBO 6G72 MFI OBD II* AUTOCODES DIAMANTE 3.0L V6 SOHC 6G72 MFI OBD II* AUTOCODES DIAMANTE 3.0L V6 DOHC 6G72 MFI OBD II* AUTOCODES ECLIPSE 2.0L I4 DOHC 420A MFI OBD II* AUTOCODES ECLIPSE 2.0L I4 DOHC TURBO 4G63 MFI OBD II* AUTOCODES ECLIPSE 2.4L I4 SOHC 4G64 MFI OBD II* AUTOCODES EXPO 2.4L I4 4G64 MFI OBD II* AUTOCODES EXPO LRV 2.4L I4 4G64 MFI OBD II* AUTOCODES EXPO LRV 1.8L I4 4G93 MFI OBD II* AUTOCODES GALANT 2.4L I4 4G64 MFI OBD II* AUTOCODES MIRAGE 1.5L I4 4G15 MFI OBD II* AUTOCODES MIRAGE 1.8L I4 4G93 MFI OBD II* AUTOCODES MONTERO 3.0L V6 12V 4G72 MFI OBD II* AUTOCODES MONTERO 3.0L V6 24V 4G72 MFI OBD II* AUTOCODES MONTERO 3.0L V6 DOHC 4G74 MFI OBD II* AUTOCODES * For Adapter Type OBD II see COMMON MITSUBISHI TEST MODES II section for operating instructions and test mode information. 9 VEHICLES AND SYSTEMS MODEL: 1997 ENGINE TYPE ENGINE FUEL TYPE ADAPTER TYPE CODE TYPE 1997 3000GT 3.0L V6 6G72 MFI OBD II* AUTOCODES 3000GT 3.0L V6 TURBO 6G72 MFI OBD II* AUTOCODES DIAMANTE 3.5L V6 6G74 MFI OBD II* AUTOCODES ECLIPSE 2.4L I4 420A MFI OBD II* AUTOCODES ECLIPSE 2.0L I4 TURBO 4G63 MFI OBD II* AUTOCODES ECLIPSE SPYDER 2.0L I4 TURBO 4G63 MFI OBD II* AUTOCODES ECLIPSE SPYDER 2.4L I4 4G64 MFI OBD II* AUTOCODES GALANT 2.4L I4 4G64 MFI OBD II* AUTOCODES MIRAGE 1.5L I4 4G15 MFI OBD II* AUTOCODES MIRAGE 1.8L I4 4G93 MFI OBD II* AUTOCODES MONTERO 3.5L V6 6G74 MFI OBD II* AUTOCODES MONTERO SPORT 2.4L I4 4G64 MFI OBD II* AUTOCODES MONTERO SPORT 3.0L V6 6G72 MFI OBD II* AUTOCODES * For Adapter Type OBD II see COMMON MODEL: 1998 TEST MODES II section for operating instructions and test mode information. ENGINE ENGINE TYPE FUEL TYPE ADAPTER TYPE CODE TYPE 1998 3000GT 3.0L V6 6G72 MFI OBD II* AUTOCODES 3000GT 3.0L V6 TURBO 6G72 MFI OBD II* AUTOCODES DIAMANTE 3.5L V6 6G74 MFI OBD II* AUTOCODES ECLIPSE 2.0L I4 420A MFI OBD II* AUTOCODES ECLIPSE 2.0L I4 TURBO 4G63 MFI OBD II* AUTOCODES ECLIPSE SPYDER 2.4L I4 4G64 MFI OBD II* AUTOCODES ECLIPSE SPYDER 2.0L I4 TURBO 4G63 MFI OBD II* AUTOCODES GALANT 2.4L I4 4G64 MFI OBD II* AUTOCODES MIRAGE 1.5L I4 4G15 MFI OBD II* AUTOCODES MIRAGE 1.8L I4 4G93 MFI OBD II* AUTOCODES MONTERO 3.5L V6 6G74 MFI OBD II* AUTOCODES 10 MITSUBISHI VEHICLES AND SYSTEMS MODEL: 1998 (CONTINUED) ENGINE ENGINE TYPE FUEL TYPE ADAPTER TYPE CODE TYPE MONTERO SPORT 2.4L I4 4G64 MFI OBD II* AUTOCODES MONTERO SPORT 3.0L V6 6G72 MFI OBD II* AUTOCODES * For Adapter Type OBD II see COMMON MITSUBISHI TEST MODES II section for operating instructions and test mode information. 11 MITSUBISHI SPECIFIC INFORMATION 2. MITSUBISHI SPECIFIC INFORMATION The Mitsubishi vehicles covered by the Asian Imports Cartridge are separated into two different sections within the Asian Imports Operator's Manual. The vehicle's on-board system will determine which section of the Operator's Manual will need to be used. Vehicles that are OBD II certified have information about the operating test modes in the COMMON TEST MODES II section of the Operator's Manual. Vehicles that have OBD or OBD I systems have test mode information in this section of the Operator's Manual. In these sections, you will find information on test modes available, how to connect the tester to the vehicle, and operating instructions for the different test modes. A complete list of Mitsubishi Diagnostic Trouble Codes is included at the back of each section. To determine which section of the Operator's Manual to use for diagnostic information and instructions, look at Adapter Type of the Vehicle and Systems chart. If the vehicle you are testing has an OBD II adapter type, use the COMMON TEST MODES II section of the Operator's Manual. If the vehicle you are testing does not have the OBD II Adapter Type, use this section to diagnose the vehicle under test. 12 MITSUBISHI TEST MODES AVAILABLE 3. TEST MODES AVAILABLE The following test modes are available when testing Mitsubishi vehicles. Operating instructions for test modes other than the DTC Entry and DTCs are included in the COMMON TEST MODES I section. There are also Mitsubishi specific instructions for operating the test modes. Refer to TEST MODES on page 17. MODE F1: DTC ENTRY Submode F0: How To Read Submode F1: Enter DTC(s) Submode F2: DTC List Submode F3: Review DTC Submode F4: Clear DTC(s) MODE F2: DTC Submode F1: Read DTC(s) Submode F2: DTC List Submode F3: Review DTC Submode F4: Clear DTC(s) MODE F5: SYSTEM TESTS Submode F0: Prep Vehicle MODE F8: INFORMATION Submode F1: DLC Location* Submode F3: ID Info Submode F4: DJC Location* * Note that not all models support DJC, or DLC Location Test modes. The tester will automatically choose which test mode to display, depending on your vehicle selection. MITSUBISHI 13 GETTING STARTED 4. GETTING STARTED Before operating the Asian Imports Cartridge with a Mitsubishi vehicle, the following steps must be performed: 1. Make sure the vehicle ignition is OFF. 2. Refer to the Vehicles and Systems table to see if the vehicle you are testing requires the Check Adapter Cable. If so, connect the Mitsubishi Check Adapter Cable to the end of the DLC cable, then connect the yellow connector end to the vehicle Check connector. FIGURE 1-1. Mitsubishi Check Adapter Cable 3. Plug the tester power cable into the vehicle cigarette lighter. The power cable may also be directly connected to the battery via the optional battery clip adapter (P/N 02001636). NOTE Since the cigarette lighter can be switched, some tests require that the power cable be directly connected to the battery via the battery clip adapter. 4. Turn on the tester and select the application software that you will be using. Verify that the correct screen is displayed. The tester should display a screen similar to the one below. ASIAN IMPORTS 83 - 02 <ENTER> FIGURE 1-2. Tester stand-alone display 5. If the display is correct, press E. If the display is not correct, refer to IF YOU'RE HAVING A PROBLEM on page 7 of APPENDICES. 6. Follow the instructions in SELECTING THE VEHICLE on page 15 to select the vehicle type you are testing by entering required vehicle information into the tester. 14 MITSUBISHI SELECTING THE VEHICLE 5. SELECTING THE VEHICLE Once you've pressed E from the power-up screen, the following steps must be performed to select the manufacturer, model year, model and engine type of the vehicle being tested. Remember, if you make a mistake, you can always press X to go back to the previous menu. SELECTING THE MANUFACTURER A menu of manufacturers available for testing is displayed in a scrolling menu. You can scroll down one screen at a time by pressing Y, or up one screen at a time by pressing n. Press U or D to scroll one manufacturer at a time, until the → arrow is opposite the manufacturer you wish to select. Press U or D to scroll to Mitsubishi. Then press e to select. SELECTING THE MODEL YEAR Once the manufacturer is selected, the Select Model Year menu is displayed. Press the last two digits of the year model being tested; 9, 0 for 1990 models; 9, 1 for 1991 models, and so on. SELECTING THE MODEL The Model Select menu displays models available for testing. Press the N key until the model being tested is displayed, then press the Y key. SELECTING THE ENGINE AND ENGINE TYPE Next, the Select Engine menu is displayed. Press N until the engine and fuel type of the vehicle is displayed, then press Y. VEHICLE INFORMATION DISPLAY After the vehicle type is selected the tester displays a summary screen of the selected vehicle. Information displayed includes the year, manufacturer, model, engine size, and additional information such as the type of fuel system. MITSUBISHI 15 SELECTING THE VEHICLE SELECT MODE MENU When the preceding steps are completed, the Select Mode menu displays the test modes available for the selected vehicle and system. Refer to TEST MODES on page 17, and the COMMON TEST MODES I section for instructions on operating the test modes with Mitsubishi vehicles. MANUFACTURER MAZDA MITSUBISHI NISSAN E MITSUBISHI 1994 - 2002 SELECT MODEL YEAR: ???? SELECT MODEL: 3000 GT (YES/NO) Y SELECT ENGINE: 3.0L V6 DOHC (YES/NO) Y 1991 MITSUBISHI 3000 GT 3.0L V6 DOHC MPI U, or 5 sec. SELECT MODE F1: DTC ENTRY F2: DTC F8: SYSTEM TESTS FIGURE 1-3. Mitsubishi Vehicle Selection ACTIVE KEYS 0-9 Enter model year. yn Used to answer questions in tester display. x Return to previous display. 16 MITSUBISHI TEST MODES 6. TEST MODES When the Select Mode menu is displayed, test modes available for Mitsubishi vehicles may be selected. Operating instructions for test modes other than DTC Entry and DTCs are included in the COMMON TEST MODES I section. You may select these modes without connecting the tester to the vehicle. READING CODES Detailed operating instructions for using Modes F1: DTC Entry and F2: DTC with Mitsubishi vehicles are included in the following procedure. F1: DTC Entry is displayed with all Mitsubishi vehicles, and F2: DTC is automatically displayed with Mitsubishi vehicles that have "CHECK" as the adapter type listed in Vehicles and Systems section. NOTE Follow the Submode F0: Prepare Vehicle instructions to ensure proper vehicle preparation prior to testing. The vehicle must be completely warmed up in order for the tester to communicate properly with the vehicle. MODE F1: DTC ENTRY When Mode F1: DTC Entry is selected, the tester displays submodes which, after your selection, can provide information on how to read diagnostic trouble codes (DTCs) from the vehicle, how to clear DTCs from the vehicle (or tester memory buffer), obtain a text description of entered or selected DTCs, and review entered or selected DTCs as a result of manually retrieving codes from the ECU. DTC ENTRY SUBMODES F0: HOW TO READ F1: ENTER DTC(s) F2: DTC LIST F3: REVIEW DTC F4: CLEAR DTC(s) Manually reading DTCs To manually read Diagnostic Trouble Codes (DTCs) on Mitsubishi vehicles from 1984-95, there are 2 methods that can be used. The most common method requires an analog voltmeter. Using the analog voltmeter set to a 20v scale and connected to the Data Link Connector (DLC), the DTC can be interpreted from the analog voltmeter needle flashes. The second method requires the 16 pin Mitsubishi Jumper (P/N 02002095) which connects 2 pins of the 16 pin DLC to flash DTCs on the instrument panel mounted Malfunction Indicator Lamp (MIL). For the automobile manufacturers that mention the use of an analog voltmeter to read manual DTCs, the Mastertech Oscilloscope may be used. Set up the single channel oscilloscope and make connections the same way as the analog voltmeter (above). Choose the 20v/division scale and a slow time/division (e.g., 1-2 sec/division)—the DTCs will be shown as a waveform on the display. Note that manually retrieving DTCs from select 1994-95 Mitsubishi vehicles requires you to locate and jumper the 16 pin Diagnostic Connector. The vehicles that require the use of a jumper are noted as "Jumper" in the Adapter Type column in the Mitsubishi coverage table (found at the beginning of this section). Refer to the section on manually reading DTCs from the 1994-95 Mitsubishi vehicles in this section. MITSUBISHI 17 TEST MODES To manually read DTCs on select 1994-95 Mitsubishi vehicles, locate the Malfunction Indicator Lamp (MIL) and observe the flashing MIL. Follow the detailed instructions on the following pages to manually read the DTCs. Once the DTCs have been manually read from the ECU, the tester can define the code. A complete list of Mitsubishi DTCs is also included in MITSUBISHI DIAGNOSTIC TROUBLE CODES (DTCs) on page 25. Submode F0: How To Read This submode provides information on how to manually read DTCs from the vehicle. Step by step screen instructions provide information to correctly set up the vehicle ECU. This is performed by following the tester instruction screens. If you have trouble, additional DTC retrieval information is described below. If you refer to the manual for this information, make sure that you are following the correct steps for the system that you are working on. Submode F1: Enter DTC(s) On Mitsubishi vehicles, the Enter DTCs submode allows you to enter manually read DTCs. This submode provides you with a text description of the numeric DTC that was entered into the tester. The Enter DTC Submode displays two question marks for DTC Entry. The tester screen prompts you to enter the DTCs read from an analog voltmeter or the Malfunction Indicator Light (MIL). Be careful when reading the DTC from the analog voltmeter or MIL. Incorrect voltmeter or MIL interpretation can cause the wrong DTC description to be displayed. Once all DTCs have been manually read and recorded, enter each DTC into the tester as described in the COMMON TEST MODES I section. Mitsubishi service and repair information indicates that Code 0 is supported for OBD systems. Code 0 refers to ECU-related failures, and is valid when the engine MIL does not illuminate or will not illuminate for 2 seconds when turning ignition on. Refer to the service manual for further explanation of Code 0. Refer to the appropriate procedure for manually reading ECU LED DTCs on the following pages. Malfunction Indicator Lamp FIGURE 1-4. Malfunction Indicator Lamp To manually read DTCs from models that use 12 pin or 12 pin and 16 pin DLC and analog voltmeter, do the following: DLC type is vehicle dependent; refer to information displayed on tester F0: HOW TO READ for DLC type. 1. Locate the 12 pin or 12 pin and 16 pin Diagnostic Connector. 18 MITSUBISHI TEST MODES 2a. 12 PIN DLC ONLY: Connect analog voltmeter red lead to pin 1 diagnostic terminal and voltmeter black lead to pin 12 (ground) terminal of diagnostic connector. PIN 1 PIN 12 FIGURE 1-5. Most Mitsubishi Vehicles 2b. 12 PIN and 16 PIN DLC ONLY: Connect analog voltmeter red lead to pin 25 of 12 pin DLC, and black lead to pin 5 of 16 pin DLC. PIN 5 PIN 25 3. Turn ignition switch to ON. 4. DTC indication will begin on voltmeter. Voltmeter will fluctuate 0v to 12v if DTCs are stored in ECU. If a DTC is stored in ECU, the first number of 12v, 1.5 sec. indications will equal the 10s digit of a 2-digit DTC. After a 2.0 second pause, the second number of 12v, 0.5 sec. indications will equal the 1s digit. DTCs are separated by 0v indication for 3.0 sec. 5. If no malfunctions are present, meter will read 12v once per second. 6. After recording DTCs turn ignition switch off. 7. Disconnect voltmeter leads. 8. Erase DTCswhen all repairs are completed. DTC SEPARATION DTC 12 12v Next DTC Indication 0v seconds 3 sec 1.5 sec 2 sec 3 sec 0.5 sec To manually read DTCs from 1985-87 Mitsubishi Galant, 1987-88 Mitsubishi Van/Wagon that use 9 pin or 12 pin DLC and Analog Voltmeter with Digital Decimal output, do the following: 1. Locate the 9 or 12 pin Diagnostic Connector. MITSUBISHI 19 TEST MODES 2a. Connect analog voltmeter red lead to pin 1 diagnostic terminal and voltmeter black lead to pin 12 (12 pin) or pin 9 (9 pin) terminal of diagnostic connector. PIN 1 PIN 12 2b. Same as in Step 2a, but use Pin 1 and Pin 9. PIN 1 PIN 9 3. Turn ignition switch to ON. Each DTC output cycle takes 16s. The first 12v deflection corresponds to a 3 sec. Start indication; second 12v deflection corresponds to a decimal value of 1; third 12v deflection corresponds to a decimal value of 2; fourth 12v deflection corresponds to a decimal value of 4; fifth 12v deflection corresponds to a decimal value of 8; sixth 12v deflection corresponds to a decimal value of 16, followed by a 0v Stop indication for 3s. DTCs are decoded by interpreting the ON time of meter 12v deflections 2-6. If the meter displays 12v for 1.5 sec., then that digital value is 1. If the meter displays 12v for 0.5 sec., then that digital value is 0. To get the value of the DTC add the decimal value of digital 1's obtained in the meter deflection order. DTCs are separated by 12v, 3 sec. reading after the Stop indication. 4. The normal DTC condition is indicated by meter indications 2-6, which are 12v, 1.5 sec. deflections separated by 0v, 0.5 sec. 5. After recording DTCs turn ignition switch off. 6. Disconnect voltmeter leads. 7. Erase DTCs when all repairs are completed. SINGLE DTC CYCLE=16 SECONDS METER DEFLECTION ORDER 1st 2nd 3rd 4th 5th 6th 12v 0v seconds 3 1.5 .5 1.5 .5 .5 1.5 1.5 .5 1.5 .5 3 3 Next Indication of DTC 0 0 1 0 0 DIGITAL VALUE 1 2 4 8 16 DECIMAL VALUE = DTC 4 (1 Digital value corresponds with a 4 decimal value) 20 MITSUBISHI TEST MODES To manually read DTCs from Models that use 2 pin or 3 pin DLC and analog voltmeter, do the following: DLC type is vehicle dependent; refer to information displayed on tester F0: HOW TO READ for DLC type. 1. Locate the 2 pin or 3 pin Diagnostic Connector. 2. For the 2 pin diagnostic connector, connect analog voltmeter red lead to pin 1 diagnostic terminal and voltmeter black lead to pin 2 (ground) terminal of diagnostic connector. For the 3 pin diagnostic connector, connect analog voltmeter red lead to pin 2 diagnostic terminal and voltmeter black lead to pin 3 (ground) terminal of diagnostic connector. PIN 2 PIN 1 PIN 2 PIN 3 PIN 2 PIN 3 3. Turn ignition switch to ON. 4. DTC indication will begin on voltmeter. Voltmeter will fluctuate 0v to 12v if DTCs are stored in ECU. If a DTC is stored in ECU, the first number of 12v, 0.4s indications will equal the 1s digit of a 1-digit DTC. DTC 12v pulses will be output every 0.4s. DTCs are separated by 0v for 2s indication. 5. If no DTCs are in ECU, voltmeter will read constant 12v. 6. After recording DTCs turn ignition switch off. 7. Disconnect voltmeter leads. 8. Erase DTCs when all repairs are completed. DTC 3 12v DTC SEPARATION DTC 4 Next DTC Indication 0v seconds 0.4 MITSUBISHI 2 sec 0.4 2 sec 21 TEST MODES To manually read DTCs from 1994-95 Mitsubishi Vehicles using the dashboard malfunction indicator lamp, do the following: DLC type is vehicle dependent; refer to information displayed on tester F0: HOW TO READ for DLC type. 1. Locate the 16 pin Diagnostic Connector. 2. Jumper the 16 pin diagnostic connector pins 1 and 5 with the single wire Mitsubishi/Chrysler Imports jumper (P/N 02002106). Use F4: DJC Location for diagnostic connector location. PIN 1 PIN 5 3. Turn ignition switch ON. 4. Observe the Malfunction Indicator Lamp (MIL) to read DTCs. MIL will turn ON/OFF if DTCs are stored in ECU. If a DTC is stored in ECU, the first number of MIL flashes indicates the 10s digit of a 2-digit DTC. After a 2.0 second pause, the second number of MIL flashes indicates the 1s digit. Each DTC is separated by MIL OFF for 3.0s. 5. If no malfunctions are present, MIL will read ON once per second. 6. After recording DTCs turn ignition switch off. 7. Disconnect jumper leads. 8. Erase DTCs when all repairs are completed. DTC SEPARATION DTC 12 12v Next DTC Indication 0v seconds 3 sec 1.5 sec 2 sec 3 sec 0.5 sec Submode F2: DTC List This submode provides you with a way to view all possible ECU DTCs, including DTC numbers and descriptions. You can also select the DTCs obtained from the analog voltmeter or MIL as an alternative way of entering DTCs into the tester's memory. As you scroll through the available DTCs you can view a description of the DTC obtained from the analog voltmeter or MIL. You can "Select" the DTC on the tester screen for later review or printing. Refer to the COMMON TEST MODES I section for further information. Submode F3: Review DTC This submode provides you with a review of the DTC(s) that you entered or selected in the tester. The description of the entered or selected DTC(s) will be displayed, along with a numerical summary of the entered or selected DTC(s). Review DTC is intended to provide you with an electronic clipboard that keeps track of the DTCs that you have encountered during diagnosis. 22 MITSUBISHI TEST MODES Submode F4: Clear DTC(s) This submode has two options for you to chose. Option F0 is to view text screens that provide information on how to clear the DTCs from ECU memory. This is performed by tester keypad presses. Option F1 clears the tester memory from DTCs that you entered or selected in the tester. The clear DTC(s) mode is helpful and provides information that you would normally have to locate in a service manual. MODE F2: DTC To read DTCs on all 1989-93 and select 1987-88 and 1994-95 Mitsubishi vehicles, you will need to locate the vehicle DLC and connect the Mitsubishi Check Adapter to the tester and vehicle. To locate the DLC, select F1: DLC LOCATION from the Information menu. If necessary, refer to the COMMON TEST MODES I section for further instructions. When Mode F2: DTC is selected, the tester displays four DTC submodes: F1: READ DTC(s) F2: DTC LIST F3: REVIEW DTC F4: CLEAR DTC(s) Submode F1: Read DTC(s) This submode provides automated DTC retrieval from the vehicle ECU. Step by step screen instructions guide you to connect the YELLOW Mitsubishi Check adapter to the vehicle DLC and to start and warm the engine to normal operating temperature. This is performed by following the tester instruction screens. If you have trouble, additional F1: READ DTC(s) retrieval information is described below. This submode is available for all 1989-93 and select 1987, 1988, and 1994-95 Mitsubishi vehicles. If you are unsure of the Read DTC test application, check the Code Type column in the Mitsubishi Vehicle Coverage table (found at the beginning of this section). If the ECU Modes column indicates "Autocodes", then the vehicle supports F1: READ DTC(s). NOTE When reading DTCs from Mitsubishi vehicles make sure the engine is at normal operating temperature and testing is performed in a well ventilated area. To read DTCs from all 1989-93 and selected 1987, 1988, and 1994-95 Mitsubishi ECUs using the F1: Read DTCs mode in Asian Imports cartridge, do the following: 1. Insert Asian cartridge into MASTERTECH or TECH 1/TECH 1A. 2. Connect Mitsubishi Check adapter (Yellow) to DLC. 3. Connect the Check adapter to the vehicle DLC. Press F1: DLC location from the Information menu for Data Link Connector location assistance. 4. Power MASTERTECH or TECH 1/TECH 1A with 12v power cable. 5. Select Mitsubishi vehicle to test. 6. Press F2: DTCs from Mitsubishi test mode menu. 7. Press F1: READ DTCs submode from DTC test menu. Follow instructions on the tester display. MITSUBISHI 23 TEST MODES 8. Tester will automatically command the vehicle ECU into the correct mode required to read DTCs, and will display all received DTCs on the tester display. Submode F2: DTC List This submode provides you with a way to view all possible ECU DTCs, including DTC numbers and descriptions. You can also select the DTCs obtained from the analog voltmeter or MIL. as an alternative way of entering DTCs into the tester's memory. As you scroll through the available DTCs you can view a description of the DTC obtained from the analog voltmeter or MIL. You can "Select" the DTC on the tester screen for later review or printing. Refer to the COMMON TEST MODES I section for further information. Submode F3: Review DTC This submode provides you with a review of the DTCs that you entered or selected in the tester. The description of the entered or selected DTC will be displayed, along with a numerical summary of the entered or selected DTC. Review DTC is intended to provide you with an electronic clipboard that keeps track of the DTCs that you have encountered during diagnosis. Submode F4: Clear DTC(s) This submode has two options for you to chose. Option 1 is a series of instructions which inform you how to clear DTCs from the ECU. Option 2 clears DTC's from the tester's memory that you entered or selected. The clear DTC(s) mode is helpful and provides information that you would normally have to locate in a service manual. NOTE 24 Follow the Submode F0: Prepare Vehicle instructions to ensure proper vehicle preparation prior to testing. The vehicle must be completely warmed up in order for the tester to communicate properly with the vehicle. MITSUBISHI MITSUBISHI DIAGNOSTIC TROUBLE CODES (DTCS) 7. MITSUBISHI DIAGNOSTIC TROUBLE CODES (DTCS) DTCs available for Mitsubishi vehicles are listed in the following tables. Some code numbers have different descriptors depending on the selected vehicle. Only codes available for the selected vehicle are displayed by the tester. OBD, OBD I SYSTEMS YEAR:1984 DTC NO. 1984 1 O2 SENSOR OR CKT FAILURE 2 IGNITION SIGNAL OR CKT FAILURE 3 AIR FLOW SENSOR OR CKT FAILURE 4 PRESSURE SENSOR OR CKT FAILURE 5 TP SENSOR OR TPS CKT FAILURE 6 ISC MOTOR POS. SWITCH OR CKT 7 ENGINE COOLANT TEMP. SENSOR 8 VEHICLE SPEED SENSOR OR CKT DESCRIPTOR YEAR: 1985 DTC NO. 1985 1 O2 SENSOR OR CKT FAILURE 2 IGNITION SIGNAL OR CKT FAILURE 3 AIR FLOW SENSOR OR CKT FAILURE 4 PRESSURE SENSOR OR CKT FAILURE 5 TP SENSOR OR TPS CKT FAILURE 6 ISC MOTOR POS. SWITCH OR CKT 7 ENGINE COOLANT TEMP. SENSOR DESCRIPTOR YEAR:1986 DTC NO. 1986 1 O2 SENSOR OR CKT FAILURE 2 IGNITION SIGNAL OR CKT FAILURE MITSUBISHI DESCRIPTOR 25 MITSUBISHI DIAGNOSTIC TROUBLE CODES (DTCS) YEAR:1986 26 DTC NO. DESCRIPTOR 3 AIR FLOW SENSOR OR CKT FAILURE 4 PRESSURE SENSOR OR CKT FAILURE BARO SENSOR OR CIRCUIT FAILURE 5 TP SENSOR OR TPS CKT FAILURE 6 ISC MOTOR POS. SWITCH OR CKT 7 ENGINE COOLANT TEMP. SENSOR 8 NO. 1 CYL SENSOR OR CKT FAILURE 9 NORMAL OPERATION YEAR:1987 DTC NO. 1987 1 O2 SENSOR OR CKT FAILURE 2 IGNITION SIGNAL OR CKT FAILURE CRANK ANGLE SENSOR OR CKT 3 AIR FLOW SENSOR OR CKT FAILURE 4 PRESSURE SENSOR OR CKT FAILURE BARO SENSOR OR CKT FAILURE 5 TP SENSOR OR TPS CKT FAILURE 6 ISC MOTOR POS. SWITCH OR CKT 7 ENGINE COOLANT TEMP. SENSOR 8 NO. 1 CYL TDC SENSOR OR CKT DESCRIPTOR YEAR:1988 DTC NO. 1988 1 O2 SENSOR OR CKT FAILURE 2 IGNITION SIGNAL OR CKT FAILURE CRANK ANGLE SENSOR OR CKT 3 AIR FLOW SENSOR OR CKT FAILURE 4 PRESSURE SENSOR OR CKT FAILURE BARO SENSOR OR CKT FAILURE 5 TP SENSOR OR TPS CKT FAILURE 6 ISC MOTOR POS. SWITCH OR CKT MOTOR POSITION SENSOR OR CKT 7 ENGINE COOLANT TEMP. SENSOR 8 NO. 1 CYL TDC SENSOR OR CKT 11 O2 SENSOR OR CKT FAILURE DESCRIPTOR MITSUBISHI MITSUBISHI DIAGNOSTIC TROUBLE CODES (DTCS) YEAR:1988 DTC NO. DESCRIPTOR 12 AIR FLOW SENSOR OR CKT FAILURE 13 IAT SENSOR OR CKT FAILURE 14 TP SENSOR OR TPS CKT FAILURE 21 ENGINE COOLANT TEMP. SENSOR 22 CRANK ANGLE SENSOR OR CKT 23 NO. 1 CYL TDC SENSOR OR CKT 24 SPEED SENSOR OR CKT FAILURE 25 BARO SENSOR OR CKT FAILURE 41 INJECTOR OR CKT FAILURE 42 FUEL PUMP OR CKT FAILURE 43 EGR SYSTEM: VALVE, SOLENOID, VAC, OR TEMP. SENSOR YEAR:1989 DTC NO. 1989 0 ECU OR CIRCUIT FAILURE 1 O2 SENSOR OR CKT FAILURE 2 IGNITION SIGNAL OR CKT FAILURE 3 AIR FLOW SENSOR OR CKT FAILURE 5 TP SENSOR OR TPS CKT FAILURE 6 ISC MOTOR POS. SWITCH OR CKT 7 ENGINE COOLANT TEMP. SENSOR 11 O2 SENSOR OR CKT FAILURE HEATED O2 SENSOR OR CKT FAILURE 12 AIR FLOW SENSOR OR CKT FAILURE 13 IAT SENSOR OR CKT FAILURE 14 TP SENSOR OR TPS CKT FAILURE 15 MOTOR POSITION SENSOR OR CKT ISC MOTOR POS. SENSOR OR CKT 21 ENGINE COOLANT TEMP. SENSOR 22 CRANK ANGLE SENSOR OR CKT 23 NO. 1 CYL TDC SENSOR OR CKT TDC SENSOR OR CIRCUIT FAILURE CAMSHAFT POS. SENSOR OR CKT 24 SPEED SENSOR OR CKT FAILURE MITSUBISHI DESCRIPTOR 27 MITSUBISHI DIAGNOSTIC TROUBLE CODES (DTCS) YEAR:1989 28 DTC NO. DESCRIPTOR 25 BARO SENSOR OR CKT FAILURE 31 KS OR KS CIRCUIT FAILURE 41 INJECTOR OR CKT FAILURE 42 FUEL PUMP OR CKT FAILURE 43 EGR SYSTEM: VALVE, SOLENOID, VAC, OR TEMP. SENSOR 44 IGNITION COIL OR CKT FAILURE IGNITION SIGNAL OR CKT FAILURE YEAR:1990 DTC NO. 1990 0 ECU OR CIRCUIT FAILURE 11 O2 SENSOR OR CKT FAILURE HEATED O2 SENSOR OR CKT FAILURE 12 AIR FLOW SENSOR OR CKT FAILURE 13 IAT SENSOR OR CKT FAILURE 14 TP SENSOR OR TPS CKT FAILURE 15 MOTOR POSITION SENSOR OR CKT ISC MOTOR POS. SENSOR OR CKT 21 ENGINE COOLANT TEMP. SENSOR 22 CRANK ANGLE SENSOR OR CKT 23 NO. 1 CYL TDC SENSOR OR CKT NO. 1 & 4 CYL. TDC SENSOR OR CKT TDC SENSOR OR CIRCUIT FAILURE CAMSHAFT POS. SENSOR OR CKT 24 SPEED SENSOR OR CKT FAILURE 25 BARO SENSOR OR CKT FAILURE 31 KS OR KS CIRCUIT FAILURE 41 INJECTOR OR CKT FAILURE 42 FUEL PUMP OR CKT FAILURE 43 EGR SYSTEM: VALVE, SOLENOID, VAC, OR TEMP. SENSOR 44 IGNITION COIL OR CKT FAILURE IGNITION SIGNAL OR CKT FAILURE DESCRIPTOR MITSUBISHI MITSUBISHI DIAGNOSTIC TROUBLE CODES (DTCS) YEAR:1991 DTC NO. 1991 0 ECU OR CIRCUIT FAILURE 11 O2 SENSOR OR CKT FAILURE REAR BANK O2 OR CKT FAILURE HEATED O2 SENSOR OR CKT FAILURE 12 AIR FLOW SENSOR OR CKT FAILURE 13 IAT SENSOR OR CKT FAILURE 14 TP SENSOR OR TPS CKT FAILURE 15 MOTOR POSITION SENSOR OR CKT ISC MOTOR POS. SENSOR OR CKT 21 ENGINE COOLANT TEMP. SENSOR 22 CRANK ANGLE SENSOR OR CKT 23 NO. 1 CYL TDC SENSOR OR CKT NO. 1 & 4 CYL. TDC SENSOR OR CKT TDC SENSOR OR CIRCUIT FAILURE CAMSHAFT POS. SENSOR OR CKT 24 SPEED SENSOR OR CKT FAILURE 25 BARO SENSOR OR CKT FAILURE 31 KS OR KS CIRCUIT FAILURE 36 IGNITION TIMING ADJUSTMENT 39 O2 SENSOR OR CKT FAILURE FRONT BANK O2 SENSOR OR CKT 41 INJECTOR OR CKT FAILURE 42 FUEL PUMP OR CKT FAILURE 43 EGR SYSTEM: VALVE, SOLENOID, VAC, OR TEMP. SENSOR 44 IGNITION COIL OR CKT FAILURE IGNITION SIGNAL OR CKT FAILURE IGN SIGNAL OR CKT (NO. 1 & 4 CYL) 52 IGN SIGNAL OR CKT (NO. 2 & 5 CYL) 53 IGN SIGNAL OR CKT (NO. 3 & 6 CYL) 61 TORQUE REDUCED SIGNAL OR CKT 62 INDUCTION CNTRL VALVE POS. SNSR MITSUBISHI DESCRIPTOR 29 MITSUBISHI DIAGNOSTIC TROUBLE CODES (DTCS) 30 YEAR: 1992 DTC NO. 1992 0 ECU OR CIRCUIT FAILURE 11 O2 SENSOR OR CKT FAILURE HEATED O2 SENSOR OR CKT FAILURE REAR BANK HEATED O2 SNSR OR CKT 12 AIR FLOW SENSOR OR CKT FAILURE 13 IAT SENSOR OR CKT FAILURE 14 TP SENSOR OR TPS CKT FAILURE 15 MOTOR POSITION SENSOR OR CKT 21 ENGINE COOLANT TEMP. SENSOR 22 CRANK ANGLE SENSOR OR CKT 23 TDC SENSOR OR CIRCUIT FAILURE NO.1 CYL TDC SENSOR OR CKT NO.1 & 4 CYL. TDC SENSOR OR CKT CAMSHAFT POS. SENSOR OR CKT 24 SPEED SENSOR OR CKT FAILURE 25 BARO SENSOR OR CKT FAILURE 31 KS OR KS CIRCUIT FAILURE 36 IGNITION TIMING ADJUSTMENT 39 FRONT BANK O2 SENSOR OR CKT 41 INJECTOR OR CKT FAILURE 42 FUEL PUMP OR CKT FAILURE 43 EGR SYSTEM: VALVE, SOLENOID, VAC, OR TEMP. SENSOR 44 IGN SIGNAL OR CKT (NO. 1 & 4 CYL) IGNITION SIGNAL OR CKT FAILURE 52 IGN SIGNAL OR CKT (NO. 2 & 5 CYL) 53 IGN SIGNAL OR CKT (NO. 3 & 6 CYL) 55 IAC VALVE POS. SENSOR OR CKT 61 TORQUE REDUCED SIGNAL OR CKT 62 INDUCTION CNTRL VALVE POS. SNSR 71 VACUUM CONTROL SOLENOID VALVE 72 VENT CONTROL SOLENOID VALVE DESCRIPTOR MITSUBISHI MITSUBISHI DIAGNOSTIC TROUBLE CODES (DTCS) YEAR: 1993 DTC NO. 1993 0 ECU OR CIRCUIT FAILURE 11 O2 SENSOR OR CKT FAILURE HEATED O2 SENSOR OR CKT FAILURE O2 SNSR OR FRONT HEATED O2 SNSR FRONT O2 SENSOR OR CKT FAILURE REAR BANK HEATED O2 SNSR OR CKT 12 VOLUME AIR FLOW SNSR OR CKT 13 IAT SENSOR OR CKT FAILURE 14 TP SENSOR OR TPS CKT FAILURE 15 ISC MOTOR POS. SENSOR OR CKT MOTOR POSITION SENSOR OR CKT 21 ENGINE COOLANT TEMP. SENSOR 22 CRANK ANGLE SENSOR OR CKT 23 CAMSHAFT POS. SENSOR OR CKT NO.1 CYL TDC SENSOR OR CKT 24 SPEED SENSOR OR CKT FAILURE 25 BARO SENSOR OR CKT FAILURE 31 KS OR KS CIRCUIT FAILURE 32 MAP SENSOR OR CKT FAILURE 36 IGNITION TIMING ADJUSTMENT 39 FRONT HEATED O2 SENSOR OR CKT 41 INJECTOR OR CKT FAILURE 42 FUEL PUMP OR CKT FAILURE 43 EGR SYSTEM: VALVE, SOLENOID, VAC, OR TEMP. SENSOR 44 IGNITION SIGNAL OR CKT FAILURE IGN SIGNAL OR CKT (NO. 1 & 4 CYL) 52 IGN SIGNAL OR CKT (NO. 2 & 5 CYL) 53 IGN SIGNAL OR CKT (NO. 3 & 6 CYL) 55 IAC VALVE POS. SENSOR OR CKT 59 REAR HEATED O2 SENSOR OR CKT 61 TORQUE REDUCED SIGNAL OR CKT 62 INDUCTION CNTRL VALVE POS. SNSR 71 TRACTION CONTROL VACUUM SOLENOID 72 TRACTION CONTROL VENT SOLENOID MITSUBISHI DESCRIPTOR 31 MITSUBISHI DIAGNOSTIC TROUBLE CODES (DTCS) 32 YEAR: 1994 DTC NO. 1994 0 ECU OR CIRCUIT FAILURE 11 HEATED O2 SENSOR OR CKT FAILURE O2 SENSOR OR CKT FAILURE FRONT HEATED O2 OR CKT FAILURE O2 SNSR OR FRONT HEATED O2 SNSR HTD O2 SNSR OR LF HTD O2 SNSR. 12 VOLUME AIR FLOW SNSR OR CKT 13 IAT SENSOR OR CKT FAILURE 14 TP SENSOR OR TPS CKT FAILURE 15 ISC MOTOR POS. SWITCH OR CKT MOTOR POSITION SENSOR OR CKT 21 ENGINE COOLANT TEMP. SENSOR 22 CRANK ANGLE SENSOR OR CKT 23 CAMSHAFT POS. SENSOR OR CKT 24 SPEED SENSOR OR CKT FAILURE 25 BARO SENSOR OR CKT FAILURE 31 KS OR KS CIRCUIT FAILURE 32 MAP SENSOR OR CKT FAILURE 36 IGNITION TIMING ADJUSTMENT 39 RF HEATED O2 SENSOR OR CKT 41 INJECTOR OR CKT FAILURE 42 FUEL PUMP OR CKT FAILURE 43 EGR SYSTEM: VALVE, SOLENOID, VAC, OR TEMP. SENSOR 44 IGN SIGNAL OR CKT (NO.1 & 4 CYL) IGNITION SIGNAL OR CKT FAILURE 52 IGN SIGNAL OR CKT (NO. 2 & 5 CYL) IGN SIGNAL OR CKT (NO. 2 & 3 CYL) 53 IGN SIGNAL OR CKT (NO. 3 & 6 CYL) 55 IAC VALVE POS. SENSOR OR CKT 59 LR HEATED O2 SENSOR OR CKT REAR HEATED O2 SENSOR OR CKT 61 TORQUE REDUCED SIGNAL OR CKT 62 INDUCTION CNTRL VALVE POS. SNSR 69 RR HEATED O2 SENSOR OR CKT 71 TRACTION CONTROL VACUUM SOLENOID 72 TRACTION CONTROL VENT SOLENOID DESCRIPTOR MITSUBISHI MITSUBISHI DIAGNOSTIC TROUBLE CODES (DTCS) YEAR:1995 DTC NO. 1995 11 (LEFT) FRONT HO2 SENSOR OR CIRCUIT 12 VOLUME AIR FLOW SENSOR OR CIRCUIT 13 IAT SENSOR OR CIRCUIT 14 TPS OR CIRCUIT 15 IDLE SPEED CONTROL SENSOR OR CIRCUIT 21 ECT SENSOR OR CIRCUIT 22 CRANKSHAFT POSITION SENSOR OR CIRCUIT 23 CAMSHAFT POSITION SENSOR OR CIRCUIT 24 VEHICLE SPEED SENSOR OR CIRCUIT 25 BARO PRESSURE SENSOR OR CIRCUIT 31 KNOCK SENSOR OR CIRCUIT 32 MAP SENSOR CIRCUIT 36 IGNITION TIMING ADJUSTMENT SIGNAL OR CIRCUIT 39 (RIGHT FRONT) HO2 SENSOR OR CIRCUIT 41 INJECTOR CIRCUIT 42 FUEL PUMP CIRCUIT 43 EGR SYSTEM: VALVE, SOLENOID, VAC, OR TEMP. SENSOR 44 IGNITION COIL OR POWER, CYLINDERS 1/4 52 IGNITION COIL OR POWER, CYLINDERS 2/3 (4 CYLINDER) 52 IGNITION COIL OR POWER, CYLINDERS 2/5 (6 CYLINDER) 53 IGNITION COIL OR POWER, CYLINDERS 3/6 55 IAC VALVE POSITION SENSOR OR CIRCUIT 59 (LEFT) REAR HO2 SENSOR OR CIRCUIT 61 TORQUE REDUCTION SIGNAL 62 INDUCTION VALVE POSITION SENSOR CIRCUIT 69 RIGHT REAR HO2 SENSOR OR CIRCUIT 71 TRACTION CONTROL (VACUUM) SOLENOID OR CIRCUIT 72 TRACTION CONTROL (VENT) SOLENOID OR CIRCUIT MITSUBISHI DESCRIPTOR 33 MITSUBISHI DIAGNOSTIC TROUBLE CODES (DTCS) Mitsubishi Eclipse Non-Turbo DTCs 34 YEAR DTC NO. 1995 11 LOSS OF CRANK SIGNAL AT PCM OR TIMING BELT SKIPPED 13 NO CHANGE IN MAP SENSOR FROM START TO RUN 14 MAP SENSOR VOLTAGE HIGH OR LOW 15 VSS SIGNAL NOT PRESENT 16 KNOCK SENSOR 1, CIRCUIT MALFUNCTION 17 ENGINE TEMP. TOO COLD TOO LONG, NO CLOSED LOOP FUEL CONTROL 21 HO2 SENSOR CIRCUIT MALFUNCTION 22 ECT VOLTAGE HIGH OR LOW 23 IAT VOLTAGE HIGH OR LOW 24 TPS VOLTAGE HIGH OR LOW, DOES NOT AGREE WITH MAP SENSOR 25 IAC MOTOR CIRCUIT MALFUNCTION, TARGET IDLE NOT REACHED 27 FUEL INJECTOR CONTROL CIRCUIT MALFUNCTION 31 EVAP SYSTEM MALFUNCTION 32 EGR SOLENOID OR CIRCUIT MALFUNCTION 33 A/C CLUTCH RELAY OR CIRCUIT MALFUNCTION 35 HIGH OR LOW FAN RELAY CIRCUIT MALFUNCTION 36 SECONDARY AIR INJECTION SYSTEM MALFUNCTION 37 PNP SWITCH FAILURE 41 GENERATOR FIELD NOT SWITCHING 42 ASD/FUEL PUMP RELAY CIRCUIT MALFUNCTION 43 IGNITION COIL PRIMARY CIRCUIT MALFUNCTION, CYLINDER MISFIRE 44 BATTERY TEMP. SENSOR OUT OF RANGE 46 CHARGING SYSTEM VOLTAGE HIGH 47 CHARGING SYSTEM VOLTAGE LOW 51 FUEL SYSTEM LEAN DESCRIPTOR MITSUBISHI MITSUBISHI DIAGNOSTIC TROUBLE CODES (DTCS) YEAR MITSUBISHI DTC NO. DESCRIPTOR 52 FUEL SYSTEM RICH 53 PCM FAILURE, SPI COMMUNICATIONS 54 NO CAM SIGNAL AT PCM 62 PCM FAILURE, SRI MILE NOT STORED 63 PCM FAILURE, EEPROM WRITE DENIED 64 CATALYTIC CONVERTER EFFICIENCY FAILURE 65 PSP SWITCH FAILURE 66 NO CCD MESSAGES FROM TCM 35 MITSUBISHI DIAGNOSTIC TROUBLE CODES (DTCS) OBD II SYSTEMS 36 YEAR: 1995-98 DTC NO. 1995-98 OBD II P0100 Volume Air Flow Circuit Malfunction P0105 BARO Pressure Circuit Malfunction P0106 BARO Pressure Sensor, Out of Range P0107 MAP Sensor, Low Voltage P0108 MAP Sensor, High Voltage P0110 IAT Sensor Circuit Malfunction P0112 IAT Sensor, Low Voltage P0113 IAT Sensor, High voltage P0115 ECT Circuit Malfunction P0117 ECT Sensor, Low voltage P0118 ECT Sensor, High Voltage P0120 TPS Circuit Malfunction P0121 TPS Voltage Does not Match MAP P0122 TPS, Low Voltage P0123 TPS, High Voltage P0125 Excessive Time to Enter Closed Loop P0130 (Right) Front O2 Sensor, Malfunction P0131 Upstream HO2 Sensor, Voltage Grounded P0132 Upstream HO2 Sensor, Shorted to Heater Circuit Voltage P0133 Upstream HO2 Sensor, Response P0134 Upstream HO2 Sensor, Stays at Center P0135 (Right) Front HO2 Sensor, Malfunction P0136 Right Rear O2 Sensor, Malfunction P0137 Downstream HO2 Sensor, Voltage Grounded P0138 Downstream HO2 Sensor, Shorted to Heater Circuit Voltage P0139 Downstream HO2 Sensor, Stays at Center P0140 Downstream HO2 Sensor, Stays at Center P0141 (Right) Rear HO2 Sensor Malfunction P0150 (Left) Rear O2 Sensor Malfunction P0155 (Left) Front HO2 Sensor Malfunction DESCRIPTOR MITSUBISHI MITSUBISHI DIAGNOSTIC TROUBLE CODES (DTCS) YEAR: 1995-98 (CONTINUED) MITSUBISHI DTC NO. DESCRIPTOR P0156 (Left) Rear O2 Sensor Malfunction P0161 HO2 Sensor Heater Circuit Malfunction, Bank 2 Sensor 2 P0170 Bank 1 Fuel Trim Malfunction P0171 Fuel System Lean P0172 Fuel System Rich P0173 Bank 2 Fuel Trim Malfunction P0201 Injector Circuit, Cylinder No. 1, Malfunction P0202 Injector Circuit, Cylinder No. 2, Malfunction P0203 Injector Circuit, Cylinder No. 3, Malfunction P0204 Injector Circuit, Cylinder No. 4, Malfunction P0205 Injector Circuit, Cylinder No. 5, Malfunction P0206 Injector Circuit, Cylinder No. 6, Malfunction P0220 Fuel Pump Relay Control Circuit P0300 Random Misfire Detected P0301 Cylinder No. 1, Misfire Detected P0302 Cylinder No. 2, Misfire Detected P0303 Cylinder No. 3, Misfire Detected P0304 Cylinder No. 4, Misfire Detected P0305 Cylinder No. 5, Misfire Detected P0306 Cylinder No. 6, Misfire Detected P0325 Knock Sensor 1, Circuit Malfunction P0335 Crankshft Position Sensor Circuit Malfunction P0340 Camshft Position Sensor Circuit Malfunction P0351 Ignition Coil No. 1 Primary Circuit Malfunction P0352 Ignition Coil No. 2 Primary Circuit Malfunction P0400 EGR Flow Malfunction P0401 EGR System Failure P0403 EGR Solenoid Malfunction P0420 Bank 1 Catalyst Efficiency Below Threshold P0421 Warm Up Catalyst, Bank 1, Efficiency Below Threshold P0422 Catalytic Converter Efficiency failure P0431 Warm Up Catalyst, Bank 2, Efficiency Below Threshold 37 MITSUBISHI DIAGNOSTIC TROUBLE CODES (DTCS) YEAR: 1995-98 (CONTINUED) 38 DTC NO. DESCRIPTOR P0440 EVAP Emission Control System Malfunction P0441 Evaporative Purge Flow Monitor Failure P0442 EVAP Control system, Small Leak Detected P0443 EVAP Control System, Purge Control Valve, Circuit Malfunction P0446 EVAP Control System, Vent Control Malfunction P0450 EVAP Control System Pressure Sensor Malfunction P0455 EVAP Control System, Large Leak Detected P0500 VSS Malfunction P0505 IAC Motor Circuit Malfunction P0510 Closed TPS Switch Malfunction P0551 PSP Sensor Circuit P0600 PCM Failure or CCD/PCM Communication P0601 Internal Controller Failure P0604 ICM RAM Checksum Failure P0605 ICM ROM Checksum Failure P0700 Transmission DTC ICM (Watchdog Circuit) P0705 TRS Sensor (PRNDL Input) Circuit Malfunction P0710 TFT Sensor Circuit Malfunction P0715 Speed Error: Input Speed Sensor Circuit P0720 Speed Error: Output speed Sensor Circuit P0725 Engine Speed Input Circuit Malfunction P0731 1st Gear, Incorrect Ratio P0732 2nd Gear, Incorrect Ratio P0733 3rd Gear, Incorrect Ratio P0734 4th Gear, Incorrect Ratio P0736 Reverse Gear, Incorrect Ratio P0740 TCC Lock Up Control, Out of Range P0750 Shift Solenoid A (Low Reverse) Malfunction P0755 Shift Solenoid B Malfunction P0760 Shift Solenoid C Malfunction P0765 Shift Solenoid D Malfunction P1100 Induction Control Motor Position Sensor, Circuit Malfunction MITSUBISHI MITSUBISHI DIAGNOSTIC TROUBLE CODES (DTCS) YEAR: 1995-98 (CONTINUED) MITSUBISHI DTC NO. DESCRIPTOR P1101 Traction Control Vacuum Solenoid Malfunction P1102 Traction Control Ventilation Solenoid Malfunction P1103 Turbo Waste Gate Actuator Malfunction P1104 Turbo Waste Gate Solenoid Malfunction P1105 Fuel Pressure Solenoid Malfunction P1294 Target Idle not Reached (+/- 200 RPM) P1295 No 5 Volt Signal to TPS P1296 No 5 Volt Signal to MAP Sensor P1297 No Change in MAP Sensor from Start to Run P1300 Ignition Timing Adjustment Circuit Malfunction P1390 Timing Belt Skipped 1 Tooth or More P1391 Intermittent Loss of CMP or CKP P1400 MDP Sensor Circuit Malfunction P1443 EVAP system Purge Control Valve 2, Circuit Malfunction P1486 EVAP Control System, Pinched Hose P1487 High Speed Radiator Fan Control Relay Circuit P1489 High Speed Condenser Fan Control Relay Circuit P1490 Low Speed Fan Control Relay Circuit Malfunction P1492 Battery Temp. Sensor, High Voltage P1493 Battery Temp. Sensor, Low Voltage P1494 EVAP Ventilation Solenoid Switch or Mechanical Fault P1495 EVAP Ventilation Solenoid Circuit P1496 5 Volt Output Supply Too Low P1500 Generator FR Terminal Circuit Malfunction P1600 Serial Communication Link Malfunction P1696 PCM Failure, EEPROM Write Denied P1697 PCM Failure, SRI Mile not stored P1698 No CCD Message from TCM P1715 Pulse Generator Assembly Malfunction P1738 Transmission Overheat High Temp. Operation Activated P1739 TCM Power-up While Vehicle Being Driven P1750 Transmission Solenoid Assembly Malfunction 39 MITSUBISHI DIAGNOSTIC TROUBLE CODES (DTCS) YEAR: 1995-98 (CONTINUED) 40 DTC NO. DESCRIPTOR P1765 TCM Sensed Volts on Pressure Switch When Unexpected P1767 EATX Relay Always ON, Contacts Closed P1768 EATX Relay Always OFF, Contacts Open P1770 Inadequate Element Volume: L/R P1771 Inadequate Element Volume: 2-4 P1772 Inadequate Element Volume: OD P1775 Solenoid Switch Valve Latched in LU Position P1776 Solenoid Switch Valve Latched in LR Position P1781 OD Pressure Switch Circuit P1782 2-4 Pressure Switch Circuit P1784 L/R Pressure Switch Circuit P1787 OD Hydraulic Pressure Switch Circuit P1788 2-4 Hydraulic Pressure Switch Circuit P1789 OD/2-4 Hydraulic Pressure Switch Circuit P1790 Error After Shift, Check Speed Code Error P1791 Engine: ECT Input to TCM P1791 Transmission: Slip or no Pressure P1792 Battery Power was Disconnected Since Power Down P1793 TRD Link communication Error P1794 Speed Sensor Ground P1795 PCM: TPS Circuit P1795 ICM: Malfunction P1798 Worn Transmission Fluid, Shudder Detected with A/C Clutch P1799 Calculated Transmission Fluid Temp. in Use P1899 PNP Switch (Trans Range Switch) Failure MITSUBISHI NISSAN 1. VEHICLES AND SYSTEMS ..................................................................................................................... 2 2. NISSAN SPECIFIC INFORMATION .................................................................................................... 10 3. TEST MODES AVAILABLE .....................................................................................................................11 4. GETTING STARTED ................................................................................................................................. 12 5. SELECTING THE VEHICLE .................................................................................................................. 13 6. TEST MODES.............................................................................................................................................. 15 Mode F1: DTC Entry ........................................................................................................................ 15 Submode F0: How To Read .................................................................................................... 16 Submode F1: Enter DTC(s) ..................................................................................................... 16 Submode F2: DTC List ............................................................................................................ 19 Submode F3: Review DTC(s) ................................................................................................. 19 Submode F4: Clear DTC(s) ..................................................................................................... 19 Mode F2: DTC ................................................................................................................................... 20 Submode F1: Read DTC(s) ..................................................................................................... 20 Submode F2: DTC List ............................................................................................................ 21 Submode F3: Review DTC ..................................................................................................... 21 Submode F4: Clear DTC(s) ..................................................................................................... 21 7. OBD CONTROLS ....................................................................................................................................... 22 Mode F4: OBD Controls .................................................................................................................. 22 Submode F0: AFR Monitor A ................................................................................................ 22 Submode F1: AFR Monitor B................................................................................................. 23 Submode F2: Switch Test ........................................................................................................ 25 Submode F3: RT DTC Monitor .............................................................................................. 26 8. NISSAN DIAGNOSTIC TROUBLE CODES (DTCs) ........................................................................ 28 OBD, OBD I Systems ....................................................................................................................... 28 OBD II Systems ................................................................................................................................. 37 VEHICLES AND SYSTEMS 1. VEHICLES AND SYSTEMS Using the Asian cartridge, the following Nissan vehicles can be diagnosed. MODEL ENGINE ENGINE TYPE FUEL TYPE ECU MODES CODE TYPE ADAPTER TYPE 1984 200SX 1.8L I4 TURBO CA18ET EFI 2 ECU LED NONE 200SX 2.0L CA20E EFI 2 ECU LED NONE 300ZX 3.0L VG30E EFI 2 ECU LED NONE 300ZX 3.0L V6 TURBO VG30ET EFI 2 ECU LED NONE FUEL TYPE ECU MODES MODEL ENGINE ENGINE TYPE CODE TYPE ADAPTER TYPE 1985 200SX 1.8L I4 TURBO CA18ET EFI 2 ECU LED NONE 200SX 2.0L I4 CA20E EFI 2 ECU LED NONE 300ZX 3.0L V6 VG30E PFI 2 ECU LED NONE 300ZX 3.0L V6 TURBO VG30ET PFI 2 ECU LED NONE MAXIMA 3.0L V6 VG30E PFI 2 ECU LED NONE STANZA 2.0L I4 CA20E EFI 2 ECU LED NONE FUEL TYPE ECU MODES MODEL ENGINE ENGINE TYPE CODE TYPE ADAPTER TYPE 1986 2 200SX 1.8L I4 TURBO CA18ET EFI 2 ECU LED NONE 200SX 2.0L I4 CA20E EFI 2 ECU LED NONE 300ZX 3.0L V6 VG30E PFI 2 ECU LED NONE 300ZX 3.0L V6 TURBO VG30ET PFI 2 ECU LED NONE MAXIMA 3.0L V6 VG30E PFI 2 ECU LED NONE STANZA WGN 2.0L I4 CA20E EFI 2 ECU LED NONE PICKUP D21 SERIES 2.4L I4 Z24I EFI 2 ECU LED NONE NISSAN VEHICLES AND SYSTEMS MODEL (CONTINUED) PICKUP D21 SERIES MODEL ENGINE 3.0L V6 ENGINE ENGINE TYPE VG30I ENGINE TYPE FUEL TYPE ECU MODES EFI 2 FUEL TYPE ECU MODES CODE TYPE ECU LED CODE TYPE ADAPTER TYPE NONE ADAPTER TYPE 1987 200SX 1.8L I4 TURBO CA18ET EFI 5 ECU LED CHECK 200SX 2.0L I4 CA20E EFI 5 ECU LED CHECK 200SX 3.0L V6 VG30E EFI 5 ECU LED CHECK 300ZX 3.0, 3.0L V6 TURBO VG30E VG30ET EFI 5 ECU LED CHECK MAXIMA 3.0L V6 VG30E EFI 5 ECU LED CHECK PULSAR NX 1.6L I4 E16I EFI 5 ECU LED CHECK PULSAR NX 1.6L I4 CA16DE EFI 5 ECU LED CHECK SENTRA 1.6L I4 E16I EFI 5 ECU LED CHECK STANZA 2.0L I4 CA20E EFI 5 ECU LED CHECK VAN 2.4L I4 Z24I TBI 5 ECU LED CHECK PATHFINDER 2.4L I4 Z24I TBI 5 ECU LED CHECK TRUCK 2.4L I4 Z24I TBI 5 ECU LED CHECK PATHFINDER 3.0L V6 VG30I TBI 5 ECU LED CHECK TRUCK 3.0L V6 VG30I TBI 5 ECU LED CHECK FUEL TYPE ECU MODES MODEL ENGINE ENGINE TYPE CODE TYPE ADAPTER TYPE 1988 200SX 1.8L I4 TURBO CA18ET EFI 5 CA: MIL/LED FED: ECU LED CHECK 200SX 2.0L I4 CA20E EFI 5 CA: MIL/LED FED: ECU LED CHECK 200SX 3.0L V6 VG30E EFI 5 CA: MIL/LED FED: ECU LED CHECK 300ZX 3.0, 3.0L V6 TURBO VG30E VG30ET EFI 5 CA: MIL/LED FED: ECU LED CHECK NISSAN 3 VEHICLES AND SYSTEMS MODEL (CONTINUED) ENGINE ENGINE TYPE FUEL TYPE ECU MODES CODE TYPE ADAPTER TYPE MAXIMA 3.0L V6 VG30E EFI 5 MIL/LED CHECK PULSAR NX 1.8L I4 CA18DE EFI 5 CA: MIL/LED FED: ECU LED CHECK SENTRA 1.6L I4 E16I EFI 5 CA: MIL/LED FED: ECU LED CHECK STANZA 2.0L I4 CA20E EFI 5 CA: MIL/LED FED: ECU LED CHECK VAN 2.4L I4 Z24I TBI 5 CA: MIL/LED FED: ECU LED CHECK PATHFINDER 2.4L I4 Z24I TBI 5 CA: MIL/LED FED: ECU LED CHECK TRUCK 2.4L I4 Z24I TBI 5 CA: MIL/LED FED: ECU LED CHECK PATHFINDER 3.0L V6 VG30I TBI 5 CA: MIL/LED FED: ECU LED CHECK TRUCK 3.0L V6 VG30I TBI 5 CA: MIL/LED FED: ECU LED CHECK FUEL TYPE ECU MODES MODEL ENGINE ENGINE TYPE CODE TYPE ADAPTER TYPE 1989 4 240SX 2.4L I4 KA24E EFI 5 CA: MIL/LED FED: ECU LED CHECK 300ZX 3.0, 3.0L V6 TURBO VG30E VG30ET EFI 5 CA: MIL/LED FED: ECU LED CHECK MAXIMA 3.0L V6 VG30E EFI 5 MIL/LED CHECK PULSAR NX 1.6L I4 GA16I TBI 5 CA: MIL/LED FED: ECU LED CHECK PULSAR NX 1.8L I4 CA18DE EFI 5 CA: MIL/LED FED: ECU LED CHECK SENTRA 1.6L I4 GA16I EFI 5 CA: MIL/LED FED: ECU LED CHECK STANZA 2.0L I4 CA20E EFI 5 CA: MIL/LED FED: ECU LED CHECK VAN 2.4L I4 Z24I TBI 5 CA: MIL/LED FED: ECU LED CHECK PATHFINDER 2.4L I4 Z24I TBI 5 CA: MIL/LED FED: ECU LED CHECK NISSAN VEHICLES AND SYSTEMS MODEL (CONTINUED) ENGINE ENGINE TYPE FUEL TYPE ECU MODES CODE TYPE ADAPTER TYPE TRUCK 2.4L I4 Z24I TBI 5 CA: MIL/LED FED: ECU LED CHECK PATHFINDER 3.0L V6 VG30I TBI 5 CA: MIL/LED FED: ECU LED CHECK TRUCK 3.0L V6 VG30I TBI 5 CA: MIL/LED FED: ECU LED CHECK FUEL TYPE ECU MODES MODEL ENGINE ENGINE TYPE CODE TYPE ADAPTER TYPE 1990 240SX 2.4L I4 KA24E EFI 5 CA: MIL/LED FED: ECU LED CHECK 300ZX 3.0L V6 VG30DE EFI 2 MIL/LED NONE MAXIMA 3.0L V6 VG30E EFI 5 MIL/LED CHECK PULSAR NX 1.6L I4 GA16I TBI 5 CA: MIL/LED FED: ECU LED CHECK SENTRA 1.6L I4 GA16I TBI 5 CA: MIL/LED FED: ECU LED CHECK STANZA 2.4L I4 KA24E EFI 2 CA: MIL/LED FED: ECU LED NONE AXXESS 2.4L I4 KA24E MPFI 5 CA: MIL/LED FED: ECU LED CHECK PATHFINDER/ TRUCK 2.4L I4 KA24E MPFI 5 CA: MIL/LED FED: ECU LED CHECK PATHFINDER/ TRUCK 3.0L V6 VG30E MPFI 5 MIL/LED CHECK ENGINE TYPE FUEL TYPE ECU MODES MODEL ENGINE CODE TYPE ADAPTER TYPE 1991 240SX 2.4L I4 KA24E EFI 2 MIL/LED NONE 300ZX 3.O, 3.0L V6 TURBO VG30DE VG30DETT EFI 2 MIL/LED NONE MAXIMA 3.0L V6 VG30E EFI 5 MIL/LED CHECK SENTRA 1.6, 2.0L I4 GA16DE, SR20DE EFI 2 MIL/LED NONE NISSAN 5 VEHICLES AND SYSTEMS MODEL (CONTINUED) ENGINE ENGINE TYPE FUEL TYPE ECU MODES CODE TYPE ADAPTER TYPE NX COUPE 1.6, 2.0L I4 GA16DE, SR20DE EFI 2 MIL/LED NONE STANZA 2.4L I4 KA24E EFI 2 MIL/LED NONE PATHFINDER 2.4L I4 KA24E MPFI 5 MIL/LED CHECK TRUCK 2.4L I4 KA24E MPFI 5 MIL/LED CHECK PATHFINDER 3.0L V6 VG30E MPFI 5 MIL/LED CHECK TRUCK 3.0L V6 VG30E MPFI 5 MIL/LED CHECK FUEL TYPE ECU MODES MODEL ENGINE ENGINE TYPE CODE TYPE ADAPTER TYPE 1992 240SX 2.4L I4 KA24DE SFI 2 MIL/LED NONE 300ZX 3.0, 3.0L V6 TURBO VG30DE VG30DETT SFI 2 MIL/LED NONE MAXIMA 3.0L V6 VG30E SFI 5 MIL/LED CHECK MAXIMA 3.0L V6 VE30DE SFI 2 MIL/LED NONE SENTRA 2.0L I4 SR20DE SFI 2 MIL/LED NONE SENTRA 1.6L I4 GA16DE SFI 2 MIL/LED NONE PATHFINDER/ PICKUP 3.0L V6 VG30E MFI 5 MIL/LED CHECK PATHFINDER/ PICKUP 2.4L I4 KA24E MFI 5 MIL/LED CHECK NX COUPE 2.0L I4 SR20DE SFI 2 MIL/LED NONE NX COUPE 1.6L I4 GA16DE SFI 2 MIL/LED NONE STANZA 2.4L I4 KA24E SFI 2 MIL/LED NONE FUEL TYPE ECU MODES MODEL ENGINE ENGINE TYPE CODE TYPE ADAPTER TYPE 1993 6 240SX 2.4 I4 KA24DE SFI 2 MIL/LED NONE 300ZX 3.0, 3.0L V6 TURBO VG30DE VG30DETT SFI 2 MIL/LED NONE ALTIMA 2.4L I4 KA24DE SFI 2 MIL/LED NONE NISSAN VEHICLES AND SYSTEMS MODEL (CONTINUED) ENGINE ENGINE TYPE FUEL TYPE ECU MODES CODE TYPE ADAPTER TYPE MAXIMA 3.0L V6 VG30E SFI 5 MIL/LED NONE MAXIMA 3.0L V6 VE30DE SFI 2 MIL/LED CHECK NX COUPE 2.0L I4 SR20DE SFI 2 MIL/LED NONE NX COUPE 1.6L I4 GA16DE SFI 2 MIL/LED NONE PATHFINDER/ TRUCK 3.0L V6 VG30E MFI 5 MIL/LED CHECK TRUCK 2.4L I4 KA24E MFI 5 MIL/LED CHECK QUEST 3.0L V6 VG30E SFI 2 MIL/LED JUMPER SENTRA 2.0L I4 SR20DE SFI 2 MIL/LED NONE SENTRA 1.6L I4 GA16DE SFI 2 MIL/LED NONE FUEL TYPE ECU MODES MODEL ENGINE ENGINE TYPE CODE TYPE ADAPTER TYPE 1994 240SX 2.4 I4 KA24DE SFI 2 MIL/LED NONE 300ZX 3.0, 3.0L V6 TURBO VG30DE VG30DETT SFI 2 MIL/LED NONE ALTIMA 2.4L I4 KA24DE SFI 2 MIL/LED NONE MAXIMA 3.0L V6 VG30E SFI 5 MIL/LED CHECK MAXIMA 3.0L V6 VE30DE SFI 2 MIL/LED NONE PATHFINDER/ TRUCK 3.0L V6 VG30E SFI 5 MIL/LED CHECK TRUCK 2.4L I4 KA24E SFI 5 MIL/LED CHECK QUEST 3.0L V6 VG30E SFI 2 MIL/LED JUMPER NX COUPE 1.6L I4 GA16DE SFI 2 MIL/LED NONE SENTRA 2.0L I4 SR20DE SFI 2 MIL/LED NONE SENTRA 1.6L I4 GA16DE SFI 2 MIL/LED NONE NISSAN 7 VEHICLES AND SYSTEMS MODEL ENGINE ENGINE TYPE FUEL TYPE ECU MODES CODE TYPE ADAPTER TYPE 1995 240SX 2.4L I4 KA24DE EGI N/A AUTOCODES OBD II* 300ZX 3.0L V6 VG30DE MPFI 2 MIL/LED NONE 300ZX TURBO 3.0L V6 VG30DETT MPFI 2 MIL/LED NONE STANZA/ ALTIMA 2.4L I4 KA24DE MPFI N/A AUTOCODES OBD II* MAXIMA 3.0L V6 VQ30DE MPFI N/A AUTOCODES OBD II* PATHFINDER/ TRUCK 3.0L V6 VG30E MPFI 3 LED NONE TRUCK 2.4L I4 KA24DE MPFI 3 LED NONE QUEST 3.0L V6 VG30E SFI N/A MIL NONE SENTRA/ 200SX 2.0L I4 SR20DE MPFI N/A AUTOCODES OBD II* SENTRA/ 200SX 1.6L I4 GA16DE MPFI N/A AUTOCODES OBD II* * For Adapter Type OBD II see Common Test Modes OBD II Systems section for operating instructions and test mode information. MODEL ENGINE ENGINE TYPE FUEL TYPE ECU MODES CODE TYPE ADAPTER TYPE 1996 SENTRA/ 200SX 1.6L I4 GA16DE MPFI N/A AUTOCODES OBD II* 240SX 2.4L I4 KA24DE EGI N/A AUTOCODES OBD II* 300ZX 3.0L V6 VG30DE MPFI N/A AUTOCODES OBD II* 300ZX TURBO 3.0L V6 VG30DETT MPFI N/A AUTOCODES OBD II* STANZA/ ALTIMA 2.4L I4 KA24DE MPFI N/A AUTOCODES OBD II* MAXIMA 3.0L V6 VQ30DE MPFI N/A AUTOCODES OBD II* PATHFINDER 3.0L V6 VG33E MPFI N/A AUTOCODES OBD II* QUEST 3.0L V6 VG30E SFI N/A AUTOCODES OBD II* TRUCK 2.4L I4 KA24E MPFI N/A AUTOCODES OBD II* * 8 For Adapter Type OBD II see Common Test Modes OBD II Systems section for operating instructions and test mode information. NISSAN VEHICLES AND SYSTEMS MODEL ENGINE ENGINE TYPE FUEL TYPE ECU MODES CODE TYPE ADAPTER TYPE 1997 SENTRA/ 200SX 1.6L I4 GA16DE MPFI N/A AUTOCODES OBD II* SENTRA/ 200SX 2.0L I4 SR20DE MPFI N/A AUTOCODES OBD II* 240SX 2.4L I4 KA24DE MPFI N/A AUTOCODES OBD II* ALTIMA 2.4L I4 KA24DE MPFI N/A AUTOCODES OBD II* MAXIMA 3.0L V6 VQ30DE MPFI N/A AUTOCODES OBD II* PATHFINDER 3.3L V6 VG33E MPFI N/A AUTOCODES OBD II* QUEST 3.0L V6 VG30E MPFI N/A AUTOCODES OBD II* TRUCK 2.4L I4 KA24E MPFI N/A AUTOCODES OBD II* * For Adapter Type OBD II see Common Test Modes OBD II Systems section for operating instructions and test mode information. MODEL ENGINE ENGINE TYPE FUEL TYPE ECU MODES CODE TYPE ADAPTER TYPE 1998 SENTRA/ 200SX 1.6L I4 GA16DE MPFI N/A AUTOCODES OBD II* SENTRA/ 200SX 2.0L I4 SR20DE MPFI N/A AUTOCODES OBD II* 240SX 2.4L I4 KA24DE MPFI N/A AUTOCODES OBD II* ALTIMA 2.4L I4 KA24DE MPFI N/A AUTOCODES OBD II* MAXIMA 3.0L V6 VQ30DE MPFI N/A AUTOCODES OBD II* PATHFINDER 3.3L V6 VG33E MPFI N/A AUTOCODES OBD II* QUEST 3.0L V6 VG30E MPFI N/A AUTOCODES OBD II* FRONTIER 2.4L I4 KA24DE MPFI N/A AUTOCODES OBD II* * For Adapter Type OBD II see Common Test Modes OBD II Systems section for operating instructions and test mode information. NISSAN 9 NISSAN SPECIFIC INFORMATION 2. NISSAN SPECIFIC INFORMATION The Nissan vehicles covered by the Asian Imports Cartridge are separated into two different sections within the Asian Imports Operator's Manual. The vehicle's on-board system will determine which section of the Operator's Manual will need to be used. Vehicles that are OBD II certified have information about the operating test modes in the Common Test Modes OBD II Systems section of the Operator's Manual. Vehicles that have OBD or OBD I systems have test mode information in this section of the Operator's Manual. In these sections, you will find information on test modes available, how to connect the tester to the vehicle, and operating instructions for the different test modes. A complete list of Nissan Diagnostic Trouble Codes is included at the back of each section. To determine which section of the Operator's Manual to use for diagnostic information and instructions, look at Adapter Type of the Vehicle and Systems chart. If the vehicle you are testing has an OBD II adapter type, use the Common Test Modes OBD II Systems section of the Operator's Manual. If the vehicle you are testing does not have the OBD II Adapter Type, use this section to diagnose the vehicle under test. 10 NISSAN TEST MODES AVAILABLE 3. TEST MODES AVAILABLE The following test modes are available when testing Nissan vehicles. Operating instructions for test modes other than DTC ENTRY, DTCs and OBD Controls are included in Common Test Modes OBD, OBD I Systems section. There are also Nissan specific instructions for operating the test modes in TEST MODES on page 15. A description and operating instructions for each Output Test is included in OBD CONTROLS on page 22. MODE F1: DTC ENTRY SUBMODE F0: HOW TO READ SUBMODE F1: ENTER DTC(s) SUBMODE F2: DTC LIST SUBMODE F3: REVIEW DTC SUBMODE F4: CLEAR DTC(s) MODE F2: DTC SUBMODE F1: READ DTC(s) SUBMODE F2: DTC LIST SUBMODE F3: REVIEW DTC SUBMODE F4: CLEAR DTC(s) MODE F4: OBD CONTROLS SUBMODE F0: AFR MONITOR A SUBMODE F1: AFR MONITOR B SUBMODE F2: SWITCH TEST SUBMODE F3: RT DTC MONITOR MODE F5: SYSTEM TESTS SUBMODE F0: PREP VEHICLE MODE F8: INFORMATION SUBMODE F1: DLC LOCATION* SUBMODE F3: ID INFO SUBMODE F4: DJC LOCATION* SUBMODE F5: ECU LOCATION* * Note that not all models support ECU, DJC, or DLC Location Test modes. The tester will automatically choose which test mode to display, depending on your vehicle selection. NISSAN 11 GETTING STARTED 4. GETTING STARTED Before operating the Asian Imports Cartridge with a Nissan vehicle, the following steps must be performed: 1. Make sure the vehicle ignition is OFF. 2. Refer to the Vehicle and Systems table to see if the vehicle you are testing requires the Check Adapter Cable. If so, connect the Nissan Check Adapter Cable to the end of the DLC cable, then connect the red connector end to the vehicle Check connector. Nissan Check Adapter Cable 3. Plug the tester power cable into the vehicle cigarette lighter. The power cable may also be directly connected to the battery via the optional battery clip adapter (P/N 02001636). NOTE Since the cigarette lighter can be switched, some tests require that the power cable be directly connected to the battery via the battery clip adapter. 4. Turn on the tester and select the application software that you will be using. Verify that the correct screen is displayed. The tester should display a screen similar to the one below. ASIAN IMPORTS 83-98 <ENTER> Tester Stand-Alone Display 5. If the display is correct, press E. If the display is not correct, refer to IF YOU'RE HAVING A PROBLEM on page 7 of APPENDICES. 6. Follow the instructions on the following page to select the vehicle type you are testing by entering required vehicle information into the tester. NOTE 12 When removing the Nissan Check Adapter Cable from the vehicle DLC, remember to depress the retaining tab on the vehicle DLC. Failure to do so could cause wiring harness damage. NISSAN SELECTING THE VEHICLE 5. SELECTING THE VEHICLE Once you've pressed E from the power-up screen, the following steps must be performed to select the manufacturer, model year, model and engine type of the vehicle being tested. Remember, if you make a mistake, you can always press X to go back to the previous menu. SELECTING THE MANUFACTURER A menu of manufacturers available for testing is displayed in a scrolling menu. You can scroll down one screen at a time by pressing Y, or up one screen at a time by pressing n. Press U or D to scroll one manufacturer at a time, until the → arrow is opposite Nissan. Then press e to select. SELECTING THE MODEL YEAR Once the manufacturer is selected, the Select Model Year menu is displayed. Press the last two digits of the model year being tested; 9, 0 for 1990 models, 9, 1 for 1991 models, and so on. SELECTING THE MODEL The Model Select menu displays models available for testing. Press the N key until the model being tested is displayed, then press the Y key. SELECTING THE ENGINE AND ENGINE TYPE Next, the Engine Select menu is displayed. For Maxima vehicles you will also be asked to select the engine type, such as VE30DE. Press N until the engine and engine type of the vehicle is displayed, then press Y. VEHICLE INFORMATION DISPLAY After the vehicle type is selected the tester displays a summary screen of the selected vehicle. Information displayed includes the year, manufacturer, model, engine size and type, and additional information such as the type of fuel system. SELECT MODE MENU When the preceding steps are completed, the Select Mode menu displays the test modes available for the selected vehicle and system. Refer to TEST MODES on page 15, OBD CONTROLS on page 22, and the Common Test Modes OBD, OBD I Systems section for instructions on operating the test modes with Nissan vehicles. NISSAN 13 SELECTING THE VEHICLE MANUFACTURER MAZDA MITSUBISHI NISSAN E NISSAN 1984 - 2002 SELECT MODEL YEAR: ???? SELECT MODEL: 240 SX (YES/NO) Y SELECT ENGINE: 2.4L I4 (YES/NO) Y 1994 NISSAN 240 SX 2.4L I4 KA24DE U, or 5 sec. SELECT MODE F1: DTC ENTRY F5: SYSTEM TESTS F8: INFORMATION Nissan Vehicle Selection ACTIVE KEYS 0-9 Enter model year. yn Used to answer questions in tester display. x Return to previous display. 14 NISSAN TEST MODES 6. TEST MODES When the Select Mode menu is displayed, test modes available for Nissan vehicles may be selected. Operating instructions for test modes other than DTC ENTRY, DTCs, and OBD Controls are included in Common Test Modes OBD, OBD I Systems section. You may select these modes without connecting the tester to the vehicle. READING CODES Detailed operating instructions for using Modes F1: DTC Entry and F2: DTC with Nissan vehicles are included in the following procedures. Remember that F1: DTC Entry is automatically displayed with Nissan vehicles that have “NONE” as the adapter type listed in the Vehicles and Systems table, and F2: DTC is automatically displayed with Nissan vehicles that have “CHECK” as the adapter type listed in the Vehicles and Systems table. Operating instructions for Mode F4: OBD Controls are included in OBD CONTROLS on page 22. NOTE Before testing, perform the System Test Submode F0: Prepare Vehicle instructions to ensure proper vehicle preparation prior to testing. The vehicle must be completely warmed up in order for the tester to communicate properly with the vehicle. MODE F1: DTC ENTRY When Mode F1: DTC Entry is selected, the tester displays submodes which can provide information on how to read diagnostic trouble codes (DTCs) from the vehicle, how to clear DTCs from the vehicle (or tester memory buffer), how to obtain a text description of entered or selected DTCs, and review entered or selected DTCs as a result of manually retrieving codes from the ECU. DTC ENTRY SUBMODES F0: HOW TO READ F1: ENTER DTC(s) F2: DTC LIST F3: REVIEW DTC F4: CLEAR DTC(s) Manually Reading DTCs To read DTCs on all 1984-86 and select 1990-95 Nissan vehicles you must locate the ECU and observe the flashing LEDs. If you do not know where the ECU is located, select Mode F5: ECU location from the Information menu. If necessary, refer to Common Test Modes OBD, OBD I Systems section for further instructions. Follow the detailed instructions on the following pages to manually read the DTCs. Once the DTCs have been manually read from the ECU, the tester can define the code. A complete list of Nissan DTCs is included in NISSAN DIAGNOSTIC TROUBLE CODES (DTCs) on page 28. Note that manually retrieving DTCs from the 1993-95 Nissan Quest requires you to locate, disconnect, and jumper the Diagnostic Connector. In this manual, the Diagnostic Connector is referred to as the Diagnostic NISSAN 15 TEST MODES Jumper Connector (DJC). Refer to the section on manually reading DTCs from the 1993-95 Nissan Quest in Mode F1, Submode F1. Submode F0: How To Read This submode provides information on how to manually read DTCs from the vehicle. Step-by-step screen instructions provide information to correctly set up the vehicle ECU. An example is provided in Common Test Modes section. If you have trouble, additional DTC retrieval information is described below. If you refer to the shop manual for this information, make sure that you are following the correct steps for the system that you are working on. Submode F1: Enter DTC(s) On Nissan vehicles, the Enter DTCs submode allows you to manually read DTCs. This submode provides you with a text description of the numeric DTC that was entered into the tester. The Enter DTC Submode displays two question marks for DTC Entry. The tester screen prompts you to enter the DTCs read from the ECU LED(s) or the Malfunction Indicator Light (MIL). Be careful when reading the DTC from the ECU LED(s) or MIL. Incorrect ECU LED or MIL interpretation can cause the wrong DTC description to be displayed. Once all DTCs have been manually read and recorded, enter each DTC into the tester as described in Common Test Modes OBD, OBD I Systems section. Refer to the appropriate procedure on the following pages for manually reading ECU LED DTCs. LEDs (1 or 2) Slide or Rotary Switch Typical ECU To Manually Read DTCs from 1984-86 Nissan ECUs with the 2 LED System, do the following: Non-turbocharged models: 1. Verify that the diagnostic mode selector is turned fully counterclockwise or diagnostic slide switch is in the OFF position. 2. Turn ignition switch to ON. 3. Check for LED lamp illumination on ECU (bulb check). 4. Turn the diagnostic mode selector fully clockwise or change the diagnostic slide switch to the ON position. 5. Observe the ECU LEDs for DTCs 23 and 31. The presence of these DTCs indicates that the ECU has not received input switch signals from the Accelerator and A/C and/or heater switch. 6. Depress and release accelerator pedal. 16 NISSAN TEST MODES 7. Observe the ECU LEDs for DTC 31. The presence of DTC 31 indicates that the ECU has not received an input switch signal from the A/C and/or heater switch. 8. If the vehicle has factory air conditioning, cycle the air conditioning/heater fan switch OFF, ON, OFF. 9. Observe the ECU LEDs for DTC 44. The presence of this DTC indicates that the ECU has not detected conditions to set a DTC and is not currently storing any DTCs. 10. Turn diagnostic mode selector fully counterclockwise or change the diagnostic slide switch to the OFF position, and turn the engine off. 11. If the ECU outputs any other DTCs than DTC 44, refer to factory service manuals for DTC decoding and diagnostics. Turbocharged models: 1. Verify that the diagnostic mode selector is turned fully counterclockwise or diagnostic slide switch is in the OFF position. 2. Turn ignition switch to ON. 3. Check for LED lamp illumination on ECU (bulb check). 4. Turn the diagnostic mode selector fully clockwise or change the diagnostic slide switch into the ON position. 5. Observe the ECU LEDs for DTCs 23, 24, and 31. The presence of these DTCs indicates that the ECU has not received input switch signals from the Accelerator, Park/Neutral, and A/C and/or heater switch. 6. Depress and release accelerator pedal. 7. Observe the ECU LEDs for DTCs 24 and 31. The presence of these DTCs indicates that the ECU has not received input switch signals from the Park/Neutral and A/C and/or heater switch. 8. Shift automatic transmission from neutral through drive gears and back to neutral, or shift manual transmission from neutral to all gear selections and back to neutral. 9. Observe the ECU LEDs for DTC 31. The presence of this DTC indicates that the ECU has not received an input switch signal, from the A/C and/or heater switch. 10. Start the engine. 11. Observe the ECU LEDs for DTCs 14 and 31. The presence of these DTCs indicates that the ECU has not received input switch signals from the vehicle speed and A/C and/or heater switch. 12. Drive the vehicle above 6 MPH. 13. Observe the ECU LEDs for DTC 31. The presence of this DTC indicates that the ECU has not received an input switch signal from the A/C and/or heater switch. 14. If the vehicle has factory air conditioning, cycle the air conditioner switch and heater fan switch OFF, ON, OFF. 15. Observe the ECU LEDs for DTC 44. The presence of this DTC indicates that the ECU has not detected conditions to set a DTC and is not currently storing any DO’s. 16. Turn diagnostic mode selector fully counterclockwise or change the diagnostic slide switch to the OFF position, and turn off the engine. NOTE NISSAN If the ECU has output any other DTCs than DTC 44, refer to factory service manuals for DTC decoding and diagnostics. 17 TEST MODES To manually read DTCs from all 1987-89 and select 1990-95 Nissan ECUs with the 2-LED, 5-mode system, do the following: NOTE This procedure is for reference only. Use Mode F1: Read DTC(s) to let the tester retrieve DTCs. 1. Locate the vehicle ECU. 2. Turn the ignition key to run (note ECU LEDs; they should light briefly for a bulb check). 3. Turn the diagnostic mode selector fully clockwise or change the diagnostic slide switch to the ON position. 4. Observe the ECU LEDs; when the LEDs flash three consecutive times, turn diagnostic mode selector fully counterclockwise or change the diagnostic slide switch to the OFF position. 5. Read the 2-digit DTCs from the ECU LEDs. Note that the RED LED is the 10's digit and the GREEN LED is the 1's digit. 6. Write down all received DTCs. The DTCs will be reported once, so if they are missed then the procedure must be repeated. Depending on the model year, DTC 44 or 55 indicates a pass DTC. 7. Turn ignition key off. To manually read DTCs from 1991-95 Nissan ECHO’s with the 1-LED, 2-mode system, do the following: 1. Use Mode F5: ECU Location from the Information menu, to locate the vehicle ECU. 2. Turn the ignition key to ON (ECU LED and MIL should illuminate briefly for a bulb check). 3. Turn the rotary diagnostic mode selector fully clockwise, or change the diagnostic slide switch to the ON position. 4. Wait at least 2 seconds. 5. Turn the rotary diagnostic mode selector fully counterclockwise, or push the slide switch back to the original position. 6. Count the flashes on the ECU LED or MIL. Long flashes are the 10's digit and short flashes are the 1's digit. 7. Write down all received DTCs. The DTCs will be reported once, so if they are missed then the procedure must be repeated. DTC 44 or 55 indicates a pass DTC. 8. Turn ignition key OFF. To manually read DTCs from 1993-95 Nissan Quest 3.0L, do the following: 1. Locate the Diagnostic Jumper Connector (under hood, below MAF sensor, on bracket bolted to transaxle). 2. Turn the ignition key to ON. 3. Disconnect the Diagnostic Jumper Connector (DJC). 4. Referring to the illustration, use the Nissan jumper wire (P/N 02002075) to short the Blue/White wire and Grey/Blue wire between the DJC halves. 18 NISSAN TEST MODES Diagnostic Jumper Connector 5. Wait 2 seconds. 6. Disconnect the jumper wire and reconnect the DJC. 7. Record the DTCs by reading the flashing dashboard MIL. To manually clear DTCs from 1993-95 Nissan Quest 3.0L, do the following: 1. Perform the manually reading DTCs function. 2. Referring to the illustration, use the Nissan jumper wire (P/N 02002075) to short the Blue/White wire and Grey/Blue wire between the DJC halves. 3. Wait 2 seconds. 4. Disconnect the jumper wire and reconnect the DJC. 5. The MIL will illuminate constantly, indicating the DTCs have been erased. Submode F2: DTC List This submode provides you with a way to view all possible ECU DTCs, including DTC numbers and descriptions. You can also select the DTCs obtained from the ECU LED or MIL as an alternative way of entering DTCs into the tester's memory. As you scroll through the available DTCs you can view a description of the DTC obtained from the ECU LED. You can “Select” the DTC on the tester screen for later review or printing. Refer to the Common Test Modes OBD, OBD I Systems section for further information. Submode F3: Review DTC(s) This submode provides you with a review of the DTCs that you entered or selected in the tester. The description of the entered or selected DTC will be displayed, along with a numerical summary of the entered or selected DTC. Review DTC is intended to provide you with an electronic clipboard that keeps track of the DTCs that you have encountered during diagnosis. Submode F4: Clear DTC(s) This submode has two options for you to chose. Option F0 is to view text screens that provide information on how to clear the DTCs from ECU memory. This is performed by tester keypad presses. Option F1 clears the tester memory of DTCs that you entered or selected in the tester. The clear DTC(s) mode is helpful and provides information that you would normally have to locate in a service manual. NISSAN 19 TEST MODES MODE F2: DTC To read DTCs on all 1987-89 and select 1990-95 Nissan vehicles you will need to locate the vehicle DLC and connect the Nissan Check Adapter to the tester and vehicle. To locate the DLC, select F1: DLC Location from the Information menu. If necessary, refer to the Common Test Modes OBD, OBD I Systems section for further instructions. When Mode F2: DTC is selected, the tester displays four submodes: DTC SUBMODES F1: READ DTC(s) F2: DTC LIST F3: REVIEW DTC F4: CLEAR DTC(s) Submode F1: Read DTC(s) This submode is available for all 1987-89 and select 1990-95 Nissan vehicles. If you are unsure of the Read DTC test application, check the ECU Modes column in the Nissan Vehicle Coverage table (found at the beginning of this section). If the ECU Modes column indicates “5 Modes”, then the vehicle supports F1: READ DTC(s). This submode provides automated DTC retrieval from the vehicle ECU. Step-by-step screen instructions guide you to connect the RED Nissan Check adapter to the vehicle DLC and start and warm the engine to normal operating temperature. This is performed by following the tester instruction screens. If you have trouble, additional F1: READ DTC(s) retrieval information is described below. NOTE When reading DTCs from Nissan vehicles make sure the engine is at normal operating temperature and testing is performed in a well-ventilated area. To read DTCs from all 1987-89 and select 1990-95 Nissan ECUs with the 2 LED, 5-mode system, do the following: 1. Insert Asian cartridge into MASTERTECH or TECH 1A, 2. Connect Nissan Check adapter (Red) to DLC cable. 3. Connect the Check adapter to the vehicle DLC. Press F1: DLC location from the Information menu for Data Link Connector location assistance. 4. Power MASTERTECH or TECH 1A with 12v power cable. 5. Select Nissan vehicle to test. 6. Turn ignition key to start the engine. 7. Press F2: DTCs from Nissan test mode menu. 8. Press F1: READ DTCs submode from DTC test menu. 9. Tester will automatically command the vehicle ECU into the correct mode required to read DTCs, and will display all received DTCs on the tester display. 20 NISSAN TEST MODES Submode F2: DTC List This submode provides you with a way to view all possible ECU DTCs, including DTC numbers and descriptions. You can also select the DTCs obtained from the ECU LED or MIL. as an alternative way of entering DTCs into the tester's memory. As you scroll through the available DTCs you can view a description of the DTC obtained from the ECU LED. You can “Select” the DTC on the tester screen for later review or printing. Refer to Common Test Modes OBD, OBD I Systems section for further information. Submode F3: Review DTC This submode provides you with a review of the DTCs that you entered or selected in the tester. The description of the entered or selected DTC will be displayed, along with a numerical summary of the entered or selected DTC. Review DTC is intended to provide you with an electronic clipboard that keeps track of the DTCs that you have encountered during diagnosis. Submode F4: Clear DTC(s) This submode has two options for you to choose. Option 1 is an automated function during which the tester clears DTCs from the vehicle ECU memory. This is performed by tester keypad presses. Option 2 clears the tester memory of DTCs that you entered or selected in the tester. The clear DTC(s) mode is helpful and provides information that you would normally have to locate in a service manual. NOTE NISSAN Follow the Submode F0: Prepare Vehicle instructions to ensure proper vehicle preparation prior to testing. The vehicle must be completely warmed up in order for the tester to communicate properly with the vehicle. 21 OBD CONTROLS 7. OBD CONTROLS The OBD Controls mode is used to select a submenu of output tests applicable to Nissan vehicles. Pressing $ from the Select Mode menu displays a list of tests available. To return to the Select Mode menu, press X. Once you have selected the test mode, operation begins. Detailed operating instructions for each output control test are on the following pages. There are descriptions of four output tests available in the Nissan specific section. Each OBD Control test can provide you with enhanced diagnostic information which will help to pinpoint Air-Fuel Ratio (AFR) problems, ECU switch input problems, and real time diagnostic trouble code monitoring for intermittent component failure. F0: AFR MONITOR A Monitors engine control system open/closed loop operation and exhaust emission rich/lean status. F1: AFR MONITOR B Monitors engine control system open/closed loop operation with indication of AFR greater than 5% lean, greater than 5% rich, or between 5% lean and 5% rich. F2: SWITCH TEST Monitors ECU idle, starter, and vehicle speed switch input. F3: RT DTC MONITOR Real Time Diagnostic Trouble Code monitors intermittent crank signal, ignition primary, and air flow meter component. MODE F4: OBD CONTROLS Submode F0: AFR Monitor A The AFR Monitor A miscellaneous test is available for all 1987-89 and select 1990-95 Nissan vehicles. If you are unsure of test application, check the ECU Modes column in the Nissan Vehicles and Systems table. If the ECU Modes column indicates “5 Modes”, then the vehicle supports AFR Monitor A. The AFR Monitor A test monitors and displays the ECU loop status and exhaust emission Rich/Lean content. The loop status can either be Open or Closed, depending on the commanded ECU state. And exhaust emission content can be Rich or Lean, depending on the level of oxygen present in exhaust emissions, which is detected by the oxygen sensor. Since this test monitors the operation of the green LED on the ECU, you can determine the operation of the green LED without locating and watching the ECU mounted LED. This test can help you to determine faulty fuel and emission system components in the service bay or on a road test. 22 NISSAN OBD CONTROLS NOTE When performing the AFR Monitor A test, make sure the vehicle is properly warmed up and is tested in a well-ventilated area. To perform the AFR Monitor A test, do the following: 1. Press ) to select AFR Monitor A from the OBD Controls menu. 2. The tester displays instructions for preparing the vehicle to perform the test. Press E when the instructions on each screen have been completed. CONNECT CHECK ADAPTER (RED) TO VEHICLE DLC [ENTER] E START ENGINE AND WARM TO NORMAL OPERATING TEMP. [ENTER] E INCREASE ENGINE RPM AND HOLD AT 2000 RPM. [ENTER] 3. When the preparations are complete the tester displays the status of the test. Press X to return to the OBD Controls menu. AFR MONITOR A OPEN LOOP CONDITION [EXIT] AFR MONITOR A CLOSED LOOP RICH [EXIT] AFR MONITOR A CLOSED LOOP LEAN [EXIT] 4. If the tester is unable to set the ECU to the selected mode, the following screen is displayed. Press X to return to the OBD Controls menu. UNABLE TO SET REQUESTED MISC. TEST MODE [EXIT] ACTIVE KEYS ) Select test. e Used when instructions on each screen have been completed. x Return to OBD Controls menu. Submode F1: AFR Monitor B The AFR Monitor B miscellaneous test is available for all 1987-89 and select 1990-95 Nissan vehicles. If you are unsure of test application, check the ECU Modes column in the Nissan Vehicles and Systems table. If the ECU Modes column indicates “5 Modes”, then the vehicle supports AFR Monitor B. The AFR Monitor B test monitors and displays the ECU loop status and the percent AFR mixture Rich/Lean content of the exhaust emissions. The loop status can either be Open or Closed, depending on the commanded ECU state. And the AFR Monitor B gives you information about the percent Lean or Rich of engine exhaust emissions. If the oxygen sensor detects exhaust emissions to be more than 5% lean of normal (normal being 14.7:1, the stoichiometric equivalent of 14.7 parts of air to 1 part of fuel, which is the ideal NISSAN 23 OBD CONTROLS air-fuel ratio), more than 5% Rich of normal, or between 5% lean and 5% rich of normal, then the tester will display an indication of the detected exhaust emission condition. NOTE When performing the AFR Monitor B test, make sure the vehicle is properly warmed up and is tested in a well-ventilated area. To perform the AFR Monitor B test, do the following: 1. Press ! to select AFR Monitor B from the OBD Controls Tests menu. 2. The tester displays instructions for preparing the vehicle to perform the test. Press E when the instructions on each screen have been completed. CONNECT CHECK ADAPTER (RED) TO VEHICLE DLC [ENTER] START ENGINE AND WARM TO NORMAL OPERATING TEMP. [ENTER] E E INCREASE ENGINE RPM AND HOLD AT 2000 RPM. [ENTER] 3. When the preparations are complete the tester displays the status of the test. Press X to return to the OBD Controls menu. AFR MONITOR B CLOSED LOOP AFR > 5% RICH [EXIT] AFR MONITOR B CLOSED LOOP AFR > 5% LEAN [EXIT] AFR MONITOR B OPEN LOOP CONDITION [EXIT] AFR MONITOR B CLOSED LOOP 5%ln <AFR< 5%RCH [EXIT] 4. If the tester is unable to set the ECU to the selected mode, the following screen is displayed. Press X to return to the OBD Controls menu. UNABLE TO SET REQUESTED MISC. TEST MODE [EXIT ACTIVE KEYS ! Select test. e Used when instructions on each screen have been completed. x Return to OBD Controls menu. 24 NISSAN OBD CONTROLS Submode F2: Switch Test The Switch Test is available for all 1987-89 and select 1990-95 Nissan vehicles. If you are unsure of test application, check the ECU Modes column in the Nissan Vehicle and Systems table. If the ECU Modes column indicates “5 Modes”, then the vehicle supports Switch Test. The Switch Test provides you with a guided procedure which tests the condition of the switched inputs to the ECU. The components that are tested are the idle switch (located in the TPS on some vehicles), starter switch (the crank signal from the ignition switch while in the crank position), and the vehicle speed switch (which indicates a speed of greater than 12MPH when the vehicle speed sensor contacts close). If, while performing the Switch test, the tester detects a fault with either switched input, it will display a message about which circuit to check. Or if the test is completed and the tester does not detect a failure, a pass message will be displayed. NOTE When performing the Switch Test, make sure the vehicle is properly warmed up and is tested in a well-ventilated area. To perform the Switch Test, do the following: 1. Press @ to select Switch Test from the OBD Controls menu. 2. The tester displays instructions for performing the Switch Test. Press E when each step has been completed. 3. Follow the instructions on the tester display. When each instruction is completed, the tester indicates if further action is necessary. If a problem is detected, press X to return to the OBD Controls menu. 4. The tester informs you if the switch passes the test. Press X to return to the OBD Controls menu. 5. If the tester is unable to set the ECU to the selected mode, the tester informs you. Press X to return to the OBD Controls menu. ACTIVE KEYS @ Select test. e Used when instructions on each screen have been completed. x Return to OBD Controls menu. NISSAN 25 OBD CONTROLS ACTIVE KEYS SELECT MODE F0: AFR MON A F1: AFR MON B F2: SWITCH TEST @ CONNECT CHECK ADAPTER (RED) TO VEHICLE DLC [ENTER] E START ENGINE AND WARM TO NORMAL OPERATING TEMP. [ENTER] E TURN ENGINE OFF, TURN IGN. SWITCH TO ON POSITION [ENTER] E SWITCH TEST IN PROCESS... MOMENTARILY TURN IGN SW TO CRANK (DO NOT START ENGINE) DEPRESS ACCELERATOR PEDAL START ENGINE, DRIVE VEHICLE GREATER THAN 12 MPH UNABLE TO SET REQUESTED MISC TEST MODE [EXIT] CHECK START SIGNAL CIRCUIT [EXIT] CHECK IDLE SIGNAL CIRCUIT Message if ECU does not enter switch test mode. Message if ECU does not detect start signal. Message if ECU does not detect idle switch signal. [EXIT] CHECK VEHICLE SPEED SENSOR CIRCUIT [EXIT] Message if ECU does not detect VSS. SWITCH TEST PASS [EXIT] Switch Test Submode F3: RT DTC Monitor The Real Time (RT) DTC Monitor output control test is available for all 1987-89 and select 1990-95 Nissan vehicles. If you are unsure of test application, check the ECU Modes column in the Nissan Vehicles and Systems table. If the ECU Modes column indicates “5 Modes”, then the vehicle supports Real Time DTC Monitor. 26 NISSAN OBD CONTROLS The Real Time DTC Monitor provides you with a guided procedure which monitors the condition of the crankshaft angle sensor, ignition primary signal, and the air flow meter output signal. If any component intermittently fails, the vehicle ECU will output a real-time diagnostic trouble code. The tester monitors this operation and changes from OK to NG (not good), signaling the real-time detection of a faulty component. In some cases, the detection of a real-time intermittent failure by the ECU will cause a DTC to be stored in ECU memory (do not confuse this with RT DTCs, as they cannot be stored into non- volatile ECU memory). After performing submode F3: RT DTC MONITOR, always check the ECU for DTCs using submode F1: READ DTC(s) in the F2: DTC test mode. NOTE When performing the Real Time DTC Monitor, make sure the vehicle is properly warmed up and is tested in a well-ventilated area. Also, driving the vehicle in this mode can be helpful in duplicating intermittent problem(s). To perform the Real Time DTC Monitor test, do the following: 1. Press # to select RT DTC Monitor from the OBD Controls menu. 2. The tester displays instructions for preparing the vehicle to perform the test. Press E when the instructions on each screen have been completed. CONNECT CHECK ADAPTER (RED) TO VEHICLE DLC [ENTER] E TURN IGNITION SWITCH TO ON POSITION [ENTER] To test results display E 3. The tester displays the results of the test. OK is displayed if the sensor is functioning properly, or NG (Not Good) is displayed if a fault is detected. Examples are shown below. CRANK SENSOR OK IGN SIGNAL OK AIRFLOW METER OK IN PROCESS... CRANK SENSOR NG IGN SIGNAL OK AIRFLOW METER NG IN PROCESS... 4. Press X to return to the OBD Controls menu. 5. If the tester is unable to set the ECU to the selected mode, the following screen is displayed. Press X to return to the OBD Controls menu. UNABLE TO SET REQUESTED MISC. TEST MODE [EXIT] ACTIVE KEYS # Select test. e Used when instructions on each screen have been completed. x Return to OBD Controls menu. NISSAN 27 NISSAN DIAGNOSTIC TROUBLE CODES (DTCS) 8. NISSAN DIAGNOSTIC TROUBLE CODES (DTCS) DTCs available for Nissan vehicles are listed in the following charts. Some code numbers have different descriptors depending on the selected vehicle. Only codes available for the selected vehicle are displayed by the tester. OBD, OBD I SYSTEMS 28 YEAR: 1984 DTC NO. 1984 11 CKP SENSOR OR CKP CIRCUIT FAIL 12 AIR FLOW METER CIRCUIT FAILURE 13 ECT SENSOR OR ECT CKT FAILURE CYL. HEAD TEMP SENSOR FAILURE 14 VSS OR VSS CIRCUIT FAILURE 21 IGNITION SWITCH OR CKT FAILURE 22 FUEL PUMP OR FP CIRCUIT FAILURE 23 THROTTLE IDLE SWITCH FAILURE 24 TRANS. SWITCH OR CIRCUIT FAILURE PARK/NEUTRAL SW. OR CKT FAILURE 31 A/C OR A/C CIRCUIT FAILURE 32 STARTER SIGNAL MALFUNCTION 34 KNOCK SENSOR OR KS CKT FAILURE 41 IAT SENSOR OR IAT CKT FAILURE FUEL TEMP SENSOR OR CKT FAILURE 44 NO DTCs DETECTED BY ECU DESCRIPTOR YEAR: 1985 DTC NO. 1985 11 CKP SENSOR OR CKP CIRCUIT FAIL 12 AIR FLOW METER CIRCUIT FAILURE 13 ECT SENSOR OR ECT CKT FAILURE CYL. HEAD TEMP SENSOR FAILURE 14 VSS OR VSS CIRCUIT FAILURE DESCRIPTOR NISSAN NISSAN DIAGNOSTIC TROUBLE CODES (DTCS) YEAR: 1985 (CONTINUED) DTC NO. DESCRIPTOR 21 IGNITION SIGNAL OR CKT FAILURE 22 FUEL PUMP OR FP CIRCUIT FAILURE 23 THROTTLE IDLE SWITCH FAILURE 24 TRANS. SWITCH OR CIRCUIT FAILURE PARK/NEUTRAL SW. OR CKT FAILURE 31 F.I.C.D SYSTEM MALFUNCTION LOAD SIGNAL OR CIRCUIT FAILURE A/C OR A/C CIRCUIT FAILURE 32 STARTER SIGNAL MALFUNCTION 34 KNOCK SENSOR OR KS CIRCUIT FAILURE 41 IAT SENSOR OR IAT CKT FAILURE DISREGARD IF DISPLAYED FUEL TEMP SENSOR OR CKT FAILURE 44 NO DTCs DETECTED BY ECU YEAR: 1986 DTC NO. 1986 11 CKP SENSOR OR CKP CIRCUIT FAILURE 12 AIR FLOW METER CIRCUIT FAILURE 13 ECT SENSOR OR ECT CKT FAILURE CYL. HEAD TEMP SENSOR FAILURE 14 VSS OR VSS CIRCUIT FAILURE 21 IGNITION SIGNAL OR CKT FAILURE 22 FUEL PUMP OR FP CIRCUIT FAILURE 23 THROTTLE IDLE SWITCH FAILURE 24 TRANS. SWITCH OR CIRCUIT FAILURE PARK/NEUTRAL SW. OR CKT FAILURE CLUTCH/NEUT. SW OR CKT FAILURE 31 IDLE CONTROL CIRCUIT FAILURE F.I.C.D SYSTEM MALFUNCTION LOAD SIGNAL OR CIRCUIT FAILURE 32 STARTER SIGNAL MALFUNCTION 33 O2S OR O2S CIRCUIT FAILURE 34 KNOCK SENSOR OR KS CKT FAILURE 41 IAT SENSOR OR IAT CKT FAILURE FUEL TEMP SENSOR OR CKT FAILURE NISSAN DESCRIPTOR 29 NISSAN DIAGNOSTIC TROUBLE CODES (DTCS) YEAR: 1986 (CONTINUED) 30 DTC NO. DESCRIPTOR 42 TP SENSOR OR TPS CKT FAILURE 43 FUEL INJECTOR OR CKT FAILURE 44 NO DTCs DETECTED BY ECU YEAR: 1987 DTC NO. 1987 11 CKP SENSOR OR CKP CIRCUIT FAIL 12 AIR FLOW METER CIRCUIT FAILURE 13 ECT SENSOR OR ECT CKT FAILURE CYL. HEAD TEMP SENSOR FAILURE 21 IGNITION SIGNAL OR CKT FAILURE 22 FUEL PUMP OR FP CIRCUIT FAILURE ERRATIC IDLE SPEED CONTROL 23 THROTTLE IDLE SWITCH FAILURE 31 A/C OR A/C CIRCUIT FAILURE 32 STARTER SIGNAL MALFUNCTION 33 O2S OR O2S CIRCUIT FAILURE 34 KNOCK SENSOR OR KS CKT FAILURE KS OR KS CKT FAILURE (VG30ET) 41 IAT SENSOR OR IAT CKT FAILURE FUEL TEMP SENSOR OR CKT FAILURE 42 TP SENSOR OR TPS CKT FAILURE 43 ERRATIC MIXTURE RATIO CONTROL FUEL INJECTOR OR CKT FAILURE 44 NO DTCs DETECTED BY ECU DESCRIPTOR YEAR: 1988 DTC NO. 1988 11 CKP SENSOR OR CKP CIRCUIT FAIL 12 AIR FLOW METER CIRCUIT FAILURE 13 ECT SENSOR OR ECT CKT FAILURE CYL. HEAD TEMP SENSOR FAILURE 14 VSS OR VSS CIRCUIT FAILURE DESCRIPTOR NISSAN NISSAN DIAGNOSTIC TROUBLE CODES (DTCS) YEAR: 1988 (CONTINUED) DTC NO. DESCRIPTOR 15 ERRATIC MIXTURE RATIO CONTROL 21 IGNITION SIGNAL OR CKT FAILURE 22 FUEL PUMP OR FP CIRCUIT FAILURE 23 THROTTLE IDLE SWITCH FAILURE 24 FULL THROTTLE SWITCH FAILURE 25 ERRATIC IDLE SPEED CONTROL 31 FAULTY ECU OR ECU CKT FAILURE 32 EGR CKT FAILURE (CA ONLY) EGR SENSOR OR EGR CKT FAILURE 33 O2S OR O2S CIRCUIT FAILURE 34 KNOCK SENSOR OR KS CKT FAILURE KS OR KS CKT FAILURE (VG30ET) 35 EXHAUST GAS TEMP CKT (CA ONLY) EXHAUST GAS TEMP SENSOR CIRCUIT 41 IAT SENSOR OR IAT CKT FAILURE 42 FUEL TEMP SENSOR OR CKT FAILURE TPS OR TPS CKT FAIL (CA ONLY) TP SENSOR OR TPS CKT FAILURE 44 NO DTCs DETECTED BY ECU 45 INJECTOR LEAK (CA ONLY) INJECTOR LEAK 51 FUEL INJECTOR OR CKT FAILURE 55 NO DTCs DETECTED BY ECU YEAR: 1989 DTC NO. 1989 11 CKP SENSOR OR CKP CIRCUIT FAIL 12 AIR FLOW METER CIRCUIT FAILURE 13 ECT SENSOR OR ECT CKT FAILURE 13 CYL. HEAD TEMP SENSOR FAILURE ECT SENSOR OR ECT CKT FAILURE 14 VSS OR VSS CIRCUIT FAILURE 21 IGNITION SIGNAL OR CKT FAILURE 22 FUEL PUMP OR FP CIRCUIT FAILURE NISSAN DESCRIPTOR 31 NISSAN DIAGNOSTIC TROUBLE CODES (DTCS) YEAR: 1989 (CONTINUED) 32 DTC NO. DESCRIPTOR 23 THROTTLE IDLE SWITCH FAILURE 24 FULL THROTTLE SWITCH FAILURE 25 A.A.C. VALVE CIRCUIT FAILURE 31 FAULTY ECU OR ECU CKT FAILURE 32 EGR SENSOR OR EGR CKT FAILURE 33 O2S OR O2S CIRCUIT FAILURE 34 KS OR KS CKT FAILURE (VG30ET) KNOCK SENSOR OR KS CKT FAILURE 35 EXHAUST GAS TEMP SENSOR CIRCUIT 41 IAT SENSOR OR IAT CKT FAILURE 42 FUEL TEMP SENSOR OR CKT FAILURE 43 TP SENSOR OR TPS CKT FAILURE 45 INJECTOR LEAK INJECTOR LEAK (CA ONLY) 51 FUEL INJECTOR OR CKT FAILURE 54 FAULTY A/T CONTROL UNIT 55 NO DTCs DETECTED BY ECU YEAR: 1990 DTC NO. 1990 11 CKP SENSOR OR CKP CIRCUIT FAIL 12 AIR FLOW METER CIRCUIT FAILURE 13 ECT SENSOR OR ECT CKT FAILURE 14 VSS OR VSS CIRCUIT FAILURE 21 IGNITION SIGNAL OR CKT FAILURE 22 FUEL PUMP OR FP CIRCUIT FAILURE 23 THROTTLE IDLE SWITCH FAILURE 25 A.A.C. VALVE CIRCUIT FAILURE 31 FAULTY ECU OR ECU CKT FAILURE 32 EGR SENSOR OR EGR CKT FAILURE 33 O2S OR O2S CIRCUIT FAILURE LEFT O2S OR CIRCUIT FAILURE 34 KNOCK SENSOR OR KS CKT FAILURE DESCRIPTOR NISSAN NISSAN DIAGNOSTIC TROUBLE CODES (DTCS) YEAR: 1990 (CONTINUED) DTC NO. DESCRIPTOR 35 EXHAUST GAS TEMP SENSOR CIRCUIT 41 IAT SENSOR OR IAT CKT FAILURE 42 FUEL TEMP SENSOR OR CKT FAILURE 43 TP SENSOR OR TPS CKT FAILURE 45 INJECTOR LEAK 51 FUEL INJECTOR OR CKT FAILURE 53 RIGHT O2S OR CIRCUIT FAILURE 54 TCM TO ECU CIRCUIT FAILURE FAULTY A/T CONTROL UNIT 55 NO DTCs DETECTED BY ECU YEAR: 1991 DTC NO. 1991 11 CKP SENSOR OR CKP CIRCUIT FAIL 12 AIR FLOW METER CIRCUIT FAILURE 13 ECT SENSOR OR ECT CKT FAILURE 14 VSS OR VSS CIRCUIT FAILURE 21 IGNITION SIGNAL OR CKT FAILURE 22 FUEL PUMP OR FP CIRCUIT FAILURE 31 FAULTY ECU OR ECU CKT FAILURE 32 EGR SENSOR OR EGR CKT FAILURE 33 O2S OR O2S CIRCUIT FAILURE LEFT O2S OR CIRCUIT FAILURE 34 KNOCK SENSOR OR KS CKT FAILURE KS OR KS CKT FAILURE (SR20DE) 35 EXHAUST GAS TEMP SENSOR CIRCUIT 41 IAT SENSOR OR IAT CKT FAILURE 42 FUEL TEMP SENSOR OR CKT FAILURE 43 TP SENSOR OR TPS CKT FAILURE 45 INJECTOR LEAK 51 FUEL INJECTOR OR CKT FAILURE 53 RIGHT O2S OR CIRCUIT FAILURE NISSAN DESCRIPTOR 33 NISSAN DIAGNOSTIC TROUBLE CODES (DTCS) YEAR: 1991 (CONTINUED) 34 DTC NO. DESCRIPTOR 54 TCM TO ECU CIRCUIT FAILURE FAULTY A/T CONTROL UNIT 55 NO DTCs DETECTED BY ECU YEAR: 1992 DTC NO. 1992 11 CKP SENSOR OR CKP CIRCUIT FAIL 12 AIR FLOW METER CIRCUIT FAILURE 13 ECT SENSOR OR ECT CKT FAILURE 14 VSS OR VSS CIRCUIT FAILURE 21 IGNITION SIGNAL OR CKT FAILURE 22 FUEL PUMP OR FP CIRCUIT FAILURE 31 FAULTY ECU OR ECU CKT FAILURE 32 EGR SENSOR OR EGR CKT FAILURE 33 O2S OR O2S CIRCUIT FAILURE LEFT O2S OR CIRCUIT FAILURE 34 KNOCK SENSOR OR KS CKT FAILURE 35 EXHAUST GAS TEMP SENSOR CIRCUIT 41 IAT SENSOR OR IAT CKT FAILURE 42 FUEL TEMP SENSOR OR CKT FAILURE TP SENSOR OR TPS CKT FAILURE 45 INJECTOR LEAK 51 FUEL INJECTOR OR CKT FAILURE 53 RIGHT O2S OR CIRCUIT FAILURE 54 TCM TO ECU CIRCUIT FAILURE FAULTY A/T CONTROL UNIT 55 NO DTCs DETECTED BY ECU DESCRIPTOR YEAR: 1993 DTC NO. 1993 11 CKP SENSOR OR CKP CIRCUIT FAIL 12 MAF SENSOR OR MAF CKT FAILURE DESCRIPTOR NISSAN NISSAN DIAGNOSTIC TROUBLE CODES (DTCS) YEAR: 1993 (CONTINUED) DTC NO. DESCRIPTOR 13 ECT SENSOR OR ECT CKT FAILURE 14 VSS OR VSS CIRCUIT FAILURE 21 IGNITION SIGNAL OR CKT FAILURE 22 FUEL PUMP OR FP CKT FAILURE 31 FAULTY ECM OR ECM CKT FAILURE 32 EGR SENSOR OR EGR CKT FAILURE 33 O2S OR O2S CIRCUIT FAILURE LEFT HO2S OR CIRCUIT FAILURE HO2S OR HO2S CIRCUIT FAILURE 34 KNOCK SENSOR OR KS CKT FAILURE 35 EGR TEMP SENSOR OR CKT FAILURE 41 IAT SENSOR OR IAT CKT FAILURE 42 FUEL TEMP SENSOR OR CKT FAILURE 43 TP SENSOR OR TPS CKT FAILURE 45 INJECTOR LEAK 51 FUEL INJECTOR OR CKT FAILURE 53 RIGHT HO2S OR CIRCUIT FAILURE 54 TCM TO ECU CIRCUIT FAILURE FAULTY A/T CONTROL UNIT 55 NO DTCs DETECTED BY ECM YEAR: 1994 DTC NO. 1994 11 CAMSHAFT POS. OR CIRCUIT FAILURE 12 MAF SENSOR OR MAF CKT FAILURE 13 ECT SENSOR OR ECT CKT FAILURE 14 VSS OR VSS CIRCUIT FAILURE 21 IGNITION SIGNAL OR CKT FAILURE 22 FUEL PUMP OR FP CIRCUIT FAILURE 31 FAULTY ECM OR ECM CKT FAILURE 32 EGR SENSOR OR EGR CKT FAILURE NISSAN DESCRIPTOR 35 NISSAN DIAGNOSTIC TROUBLE CODES (DTCS) YEAR: 1994 (CONTINUED) 36 DTC NO. DESCRIPTOR 33 LEFT HO2S OR CIRCUIT FAILURE O2S OR O2S CIRCUIT FAILURE HO2S OR HO2S CIRCUIT FAILURE 34 KNOCK SENSOR OR KS CKT FAILURE 35 EGR TEMP SENSOR OR CKT FAILURE 41 IAT SENSOR OR IAT CKT FAILURE 42 FUEL TEMP SENSOR OR CKT FAILURE 43 TP SENSOR OR TPS CKT FAILURE 45 INJECTOR LEAK 51 FUEL INJECTOR OR CKT FAILURE 53 RIGHT HO2S OR CIRCUIT FAILURE 54 TCM TO ECU CIRCUIT FAILURE FAULTY A/T CONTROL UNIT 55 NO DTCs DETECTED BY ECM YEAR: 1995 DTC NO. 1995 11 CAMSHAFT POSITION SENSOR 12 MAF SENSOR CIRCUIT 13 ECT SENSOR CIRCUIT 14 VSS CIRCUIT 21 IGNITION SIGNAL CIRCUIT 26 BOOST PRESSURE SENSOR 31 ECM 32 EGR MALFUNCTION 33 HO2 SENSOR CIRCUIT MALFUNCTION (LEFT BANK V6) 33 HO2 SENSOR CIRCUIT MALFUNCTION 33 O2 SENSOR CIRCUIT MALFUNCTION 34 KNOCK SENSOR CIRCUIT 35 EGR TEMP. SENSOR CIRCUIT 41 IAT SENSOR CIRCUIT 42 FUEL TEMP. SENSOR CIRCUIT DESCRIPTOR NISSAN NISSAN DIAGNOSTIC TROUBLE CODES (DTCS) YEAR: 1995 (CONTINUED) DTC NO. DESCRIPTOR 43 TPS CIRCUIT 45 INJECTOR LEAK 51 INJECTOR CIRCUIT 53 HO2 SENSOR CIRCUIT MALFUNCTION (RIGHT BANK V6) 54 SIGNAL CIRCUIT FROM A/T CONTROL TO ECM 55 NO FAILURE DETECTED OBD II SYSTEMS YEAR: 1995-98 DTC NO. 1995-98 OBD II P0000 No Failure Detected P0100 MAF Sensor Circuit Malfunction P0105 Absolute Pressure Sensor Malfunction P0110 IAT Sensor circuit malfunction P0115 ECT circuit malfunction P0120 TPS circuit malfunction P0125 Coolant temp. Sensor Circuit Malfunction, no Closed Loop Fuel Control P0130 Front (H)O2 Sensor Circuit Malfunction, no Closed Loop P0131 Front HO2 Sensor, Lean Shift Monitor P0132 Front HO2 Sensor, Rich Shift Monitor P0133 Front HO2 Sensor, Response Monitor P0134 Front HO2 Sensor, Excessively High Voltage P0135 Front HO2S Heater Circuit Malfunction (Right Bank) P0136 Rear HO2 Sensor Circuit Malfunction P0137 Rear HO2 Sensor, Minimum Voltage Monitor P0138 Rear HO2 Sensor, Maximum Voltage Monitor P0139 Rear HO2 Sensor, Response Monitor P0140 Rear HO2 Sensor, Excessively High Voltage NISSAN DESCRIPTION 37 NISSAN DIAGNOSTIC TROUBLE CODES (DTCS) YEAR: 1995-98 (CONTINUED) 38 DTC NO. DESCRIPTION P0141 Rear HO2 Sensor Heater Circuit Malfunction P0150 Front HO2 Sensor Circuit, No Closed Loop Control (Left Bank) P0151 Front HO2 Sensor, Lean Shift Monitor (Left Bank) P0152 Front HO2 Sensor, Rich Shift Monitor (Left Bank) P0153 Front HO2 Sensor, Response Monitor (Left Bank) P0154 Front HO2 Sensor, Excessively High Voltage (Left Bank) P0155 Front HO2 Sensor Heater Circuit Malfunction (Left Bank) P0156 Rear HO2 Sensor Circuit Malfunction (Left Bank) P0157 Rear HO2 Sensor, Minimum Voltage Monitor (Left Bank) P0158 Rear HO2 Sensor, Maximum Voltage Monitor (Left Bank) P0159 Rear HO2 Sensor, Response Monitor (Left Bank) P0160 Rear HO2 Sensor, Excessively High Voltage (Left Bank) P0161 Rear HO2 Sensor Heater Circuit Malfunction (Left Bank) P0170 Fuel Injection System Malfunction (Right Bank) P0171 Fuel System Malfunction, Lean Condition (Right Bank) P0172 Fuel System Malfunction, Rich Condition (Right Bank) P0173 Fuel Injection System Malfunction (Left Bank) P0174 Fuel System Malfunction, Lean Condition (Left Bank) P0175 Fuel System Malfunction, Rich Condition (Left Bank) P0180 Fuel Tank Temp. Sensor Circuit Malfunction P0300 Random Misfire Detected P0301 Cylinder No. 1, Misfire Detected P0302 Cylinder No. 2, Misfire Detected P0303 Cylinder No. 3, Misfire Detected P0304 Cylinder No. 4, Misfire Detected P0305 Cylinder No. 5, Misfire Detected P0306 Cylinder No. 6, Misfire Detected P0325 Knock Sensor Circuit Malfunction P0335 Crankshaft Position Sensor Circuit Malfunction P0340 Camshaft Position Sensor Circuit Malfunction P0400 EGR System Malfunction NISSAN NISSAN DIAGNOSTIC TROUBLE CODES (DTCS) YEAR: 1995-98 (CONTINUED) NISSAN DTC NO. DESCRIPTION P0402 EGRC-BPT Valve Malfunction P0420 Three-way Catalyst System Malfunction (Right Bank) P0430 Three-way Catalyst System Malfunction (Left Bank) P0440 EVAP System, Small Leak Detected P0443 EVAP Purge Control Valve Circuit Malfunction P0446 EVAP Vent Control Valve, Circuit Malfunction P0450 EVAP System, Pressure Sensor Malfunction P0500 Vehicle Speed Sensor Malfunction P0505 IAC Valve-AAC, System Malfunction P0510 Closed Throttle Sensor Idle Switch Malfunction P0600 Signal Circuit from A/T to ECM Malfunction P0605 ECM Malfunction P0705 Park/Neutral (Inhibitor) Switch Malfunction P0710 Trans. Fluid Temp. Sensor Out of Range P0720 A/T VSS Circuit Malfunction P0725 Engine RPM signal Malfunction P0731 A/T 1st Gear Shift Signal Malfunction P0732 A/T 2nd Gear Shift Signal Malfunction P0733 A/T 3rd Gear Shift Signal Malfunction P0734 A/T 4th Gear Signal or TCC Malfunction P0740 TCC Solenoid Valve Malfunction P0744 A/T TCC Signal, Improper Lock-Up Operation P0745 Line Pressure Solenoid Valve Malfunction P0750 Shift Solenoid A, Malfunction P0755 Shift Solenoid B, Malfunction P1105 MAP/BARO Switch Solenoid Valve Malfunction P1110 Valve Timing Control Valve System Malfunction P1130 Swirl Control Solenoid Valve Malfunction P1150 W/G Control Solenoid Valve (Right Bank) P1155 W/G Control Solenoid Valve (Left Bank) P1160 Turbo Boost Sensor Circuit Malfunction P1165 Swirl Control Valve Vacuum Check Switch Malfunction 39 NISSAN DIAGNOSTIC TROUBLE CODES (DTCS) YEAR: 1995-98 (CONTINUED) 40 DTC NO. DESCRIPTION P1168 Front HO2 Sensor Circuit Malfunction, no Closed Loop (Left Bank) P1220 Fuel Pump Control Module Circuit Malfunction P1320 Ignition Signal Primary Circuit Malfunction P1335 CKP Sensor (Reference) Circuit Malfunction P1336 CKP Sensor (OBD) or Flywheel Malfunction P1400 EGR Valve (and Canister) Control Solenoid Valve Malfunction P1401 EGR Temp. Sensor Circuit Malfunction P1402 EGR System Malfunction, High Flow P1440 EVAP Control System, Small Leak P1441 Vacuum Cut Valve Bypass Valve Malfunction P1443 Canister Control Vacuum Check Switch Malfunction P1444 Purge Control Valve or Solenoid Valve Malfunction P1445 Purge Volume Control Valve Malfunction P1446 EVAP Vent Control Valve Malfunction P1447 EVAP Purge Flow Monitoring Malfunction P1448 EVAP Vent Control System Malfunction P1550 TCC Solenoid Valve Malfunction P1605 A/T Diagnosis Communication Circuit Malfunction P1705 TPS Voltage Input to A/T Too High or Low P1706 Park/Neutral Switch Circuit Malfunction P1760 Overrun Clutch Solenoid Valve Malfunction P1775 TCC Solenoid Valve Circuit Malfunction P1776 A/T TCC Slip Detected During Lock-Up P1900 Cooling Fan Circuit Malfunction NISSAN SUBARU 1. VEHICLES AND SYSTEMS ..................................................................................................................... 2 2. SUBARU SPECIFIC INFORMATION .................................................................................................... 9 3. TEST MODES AVAILABLE .................................................................................................................... 10 4. GETTING STARTED ..................................................................................................................................11 5. SELECTING THE VEHICLE .................................................................................................................. 12 6. TEST MODES.............................................................................................................................................. 14 Mode F1: DTC Entry ........................................................................................................................ 15 Submode F0: How To Read .................................................................................................... 15 Submode F1: Enter DTC(s) ..................................................................................................... 16 Submode F2: DTC List ............................................................................................................ 21 Submode F3: Review DTC ..................................................................................................... 21 Submode F4: Clear DTC(s) ..................................................................................................... 21 7. SUBARU DIAGNOSTIC TROUBLE CODES (DTCs) ...................................................................... 22 OBD, OBD I Systems ....................................................................................................................... 22 OBD II Systems ................................................................................................................................. 42 VEHICLES AND SYSTEMS 1. VEHICLES AND SYSTEMS Using the Asian Imports Cartridge, the following Subaru vehicles can be diagnosed: MODEL ENGINE FUEL SYSTEM TRANS TYPE ECU MODES CODE TYPE ADAPTER TYPE 1983 BRAT 1.8L H4 ECC CARTER A/T,M/T ECULED MANCODES NONE BRAT 1.8L H4 ECC HITACHI A/T,M/T ECULED MANCODES NONE BRAT 1.8L H4 EFI TURBO A/T ECULED MANCODES NONE DL 1.6L H4 ECC CARTER M/T ECULED MANCODES NONE DL 1.6L H4 ECC HITACHI M/T ECULED MANCODES NONE DL 1.8L H4 ECC CARTER M/T ECULED MANCODES NONE DL 1.8L H4 ECC HITACHI M/T ECULED MANCODES NONE GL 1.8L H4 ECC CARTER A/T,M/T ECULED MANCODES NONE GL 1.8L H4 ECC HITACHI A/T,M/T ECULED MANCODES NONE GL 1.8L H4 EFI TURBO A/T ECULED MANCODES NONE STD 1.6L H4 ECC CARTER M/T ECULED MANCODES NONE STD 1.6L H4 ECC HITACHI M/T ECULED MANCODES NONE STD 1.8L H4 ECC CARTER M/T ECULED MANCODES NONE STD 1.8L H4 ECC HITACHI M/T ECULED MANCODES NONE MODEL ENGINE FUEL SYSTEM TRANS TYPE ECU MODES CODE TYPE ADAPTER TYPE 1984 2 BRAT 1.8L H4 ECC CARTER A/T,M/T ECULED MANCODES NONE BRAT 1.8L H4 ECC HITACHI A/T,M/T ECULED MANCODES NONE BRAT 1.8L H4 EFI TURBO A/T ECULED MANCODES NONE DL 1.6L H4 ECC CARTER M/T ECULED MANCODES NONE DL 1.6L H4 ECC HITACHI M/T ECULED MANCODES NONE DL 1.8L H4 ECC CARTER M/T ECULED MANCODES NONE DL 1.8L H4 ECC HITACHI M/T ECULED MANCODES NONE GL 1.8L H4 ECC CARTER A/T,M/T ECULED MANCODES NONE SUBARU VEHICLES AND SYSTEMS MODEL (CONTINUED) ENGINE GL 1.8L H4 ECC HITACHI A/T,M/T ECULED MANCODES NONE GL 1.8L H4 EFI TURBO A/T ECULED MANCODES NONE STD 1.6L H4 ECC CARTER M/T ECULED MANCODES NONE STD 1.6L H4 ECC HITACHI M/T ECULED MANCODES NONE MODEL ENGINE FUEL SYSTEM FUEL SYSTEM TRANS TYPE TRANS TYPE ECU MODES ECU MODES CODE TYPE CODE TYPE ADAPTER TYPE ADAPTER TYPE 1985 DL 1.8L H4 ECC M/T ECULED MANCODES NONE GL 1.8L H4 ECC A/T,M/T ECULED MANCODES NONE GL-10 1.8L H4 MPFI A/T,M/T ECULED MANCODES NONE RX SEDAN 1.8L H4 MPFI TURBO M/T ECULED MANCODES NONE SEDAN 1.8L H4 MPFI TURBO A/T,M/T ECULED MANCODES NONE XT COUPE 1.8L H4 MPFI A/T,M/T ECULED MANCODES NONE XT GL-10 COUPE 1.8L H4 MPFI TURBO A/T,M/T ECULED MANCODES NONE MODEL ENGINE FUEL SYSTEM TRANS TYPE ECU MODES CODE TYPE ADAPTER TYPE 1986 3-DOOR 1.8L H4 MPFI TURBO M/T ECULED MANCODES NONE DL 1.8L H4 ECC M/T ECULED MANCODES NONE GL 1.8L H4 ECC A/T,M/T ECULED MANCODES NONE GL 1.8L H4 MPFI A/T,M/T ECULED MANCODES NONE RX SEDAN 1.8L H4 MPFI TURBO M/T ECULED MANCODES NONE XT COUPE 1.8L H4 MPFI A/T,M/T ECULED MANCODES NONE XT GL-10 COUPE 1.8L H4 MPFI TURBO A/T,M/T ECULED MANCODES NONE SUBARU 3 VEHICLES AND SYSTEMS MODEL FUEL SYSTEM ENGINE TRANS TYPE ECU MODES CODE TYPE ADAPTER TYPE 1987 DL 3-DOOR 1.8L H4 SPFI M/T ECULED MANCODES NONE DL SEDAN/WAGON 1.8L H4 SPFI A/T,M/T ECULED MANCODES NONE GL 3-DOOR 1.8L H4 SPFI A/T,M/T ECULED MANCODES NONE GL 3-DOOR 1.8L H4 MPFI TURBO M/T ECULED MANCODES NONE GL 1.8L H4 SPFI A/T,M/T ECULED MANCODES NONE GL 1.8L H4 MPFI TURBO M/T ECULED MANCODES NONE GL-10 1.8L H4 SPFI A/T,M/T ECULED MANCODES NONE GL-10 1.8L H4 MPFI TURBO A/T,M/T ECULED MANCODES NONE JUSTY 1.2L I3 ECC M/T ECULED MANCODES NONE RX 1.8L H4 MPFI TURBO M/T ECULED MANCODES NONE XT 1.8L H4 MPFI A/T,M/T ECULED MANCODES NONE XT 1.8L H4 MPFI TURBO M/T ECULED MANCODES NONE XT GL-10 COUPE 1.8L H4 MPFI A/T,M/T ECULED MANCODES NONE XT GL-10 COUPE 1.8L H4 MPFI TURBO M/T ECULED MANCODES NONE MODEL ENGINE FUEL SYSTEM TRANS TYPE ECU MODES CODE TYPE ADAPTER TYPE 1988 4 DL 1.8L H4 SPFI A/T,M/T ECULED MANCODES NONE GL 1.8L H4 SPFI A/T,M/T ECULED MANCODES NONE GL 1.8L H4 MPFI TURBO M/T ECULED MANCODES NONE GL-10 1.8L H4 SPFI A/T ECULED MANCODES NONE GL-10 1.8L H4 MPFI TURBO A/T,M/T ECULED MANCODES NONE JUSTY 1.2L I3 ECC M/T ECULED MANCODES NONE RX 1.8L H4 MPFI TURBO M/T ECULED MANCODES NONE XT 1.8L H4 MPFI A/T,M/T ECULED MANCODES NONE XT6 2.7L H6 MPFI A/T,M/T ECULED MANCODES NONE SUBARU VEHICLES AND SYSTEMS MODEL ENGINE FUEL SYSTEM TRANS TYPE ECU MODES CODE TYPE ADAPTER TYPE 1989 DL 1.8L H4 SPFI A/T,M/T ECULED MANCODES NONE GL 1.8L H4 SPFI A/T,M/T ECULED MANCODES NONE GL 1.8L H4 MPFI TURBO A/T ECULED MANCODES NONE GL-10 1.8L H4 SPFI A/T ECULED MANCODES NONE GL-10 1.8L H4 MPFI TURBO A/T,M/T ECULED MANCODES NONE JUSTY 1.2L I3 ECC M/T ECULED MANCODES NONE RX 1.8L H4 MPFI TURBO M/T ECULED MANCODES NONE XT 1.8L H4 MPFI A/T,M/T ECULED MANCODES NONE XT6 2.7L H6 MPFI A/T,M/T ECULED MANCODES NONE MODEL ENGINE FUEL SYSTEM TRANS TYPE ECU MODES CODE TYPE ADAPTER TYPE 1990 JUSTY 1.2L I3 ECC M/T ECULED MANCODES NONE JUSTY 1.2L I3 MPFI M/T ECULED MANCODES NONE JUSTY 1.2L I3 MPFI ECVT ECULED MANCODES NONE LEGACY 2.2L H4 MPFI A/T,M/T ECULED MANCODES NONE LOYALE 1.8L H4 SPFI A/T,M/T ECULED MANCODES NONE LOYALE 1.8L H4 MPFI TURBO A/T,M/T ECULED MANCODES NONE XT 1.8L H4 MPFI A/T,M/T ECULED MANCODES NONE XT6 2.7L H6 MPFI 4AT/5MT ECULED MANCODES NONE TRANS TYPE ECU MODES MODEL ENGINE FUEL SYSTEM CODE TYPE ADAPTER TYPE 1991 LEGACY 2.2L H4 MPFI A/T,M/T ECULED MANCODES NONE LEGACY 2.2L H4 MPFI TURBO A/T,M/T ECULED MANCODES NONE LOYALE 1.8L H4 SPFI A/T,M/T ECULED MANCODES NONE SUBARU 5 VEHICLES AND SYSTEMS MODEL (CONTINUED) ENGINE LOYALE 1.8L H4 MPFI TURBO A/T,M/T ECULED MANCODES NONE XT 1.8L H4 MPFI A/T,M/T ECULED MANCODES NONE XT6 2.7L H6 MPFI A/T,M/T ECULED MANCODES NONE MODEL ENGINE FUEL SYSTEM FUEL SYSTEM TRANS TYPE TRANS TYPE ECU MODES ECU MODES CODE TYPE CODE TYPE ADAPTER TYPE ADAPTER TYPE 1992 LEGACY 2.2L H4 MPFI A/T,M/T ECULED MANCODES NONE LEGACY 2.2L H4 MPFI TURBO A/T,M/T ECULED MANCODES NONE SVX 3.3L H6 MPFI 4AT MIL MANCODES NONE MODEL ENGINE FUEL SYSTEM TRANS TYPE ECU MODES CODE TYPE ADAPTER TYPE 1993 SVX 3.3L H6 MPFI 4AT MIL MANCODES NONE LEGACY 2.2L H4 MPFI 4AT/5MT ECULED MANCODES NONE LEGACY 2.2L H4 MPFI TURBO 4AT/5MT ECULED MANCODES NONE IMPREZA 1.8L H4 MPFI 4AT/5MT ECULED MANCODES NONE TRANS TYPE ECU MODES MODEL ENGINE FUEL SYSTEM CODE TYPE ADAPTER TYPE 1994 6 SVX 3.3L H6 MPFI 4AT MIL MANCODES NONE LEGACY 2.2L H4 MPFI 4AT/5MT ECULED MANCODES NONE LEGACY 2.2L H4 MPFI TURBO 4AT/5MT ECULED MANCODES NONE IMPREZA 1.8L H4 MPFI 4AT/5MT ECULED MANCODES NONE SUBARU VEHICLES AND SYSTEMS MODEL ENGINE FUEL SYSTEM TRANS TYPE ECU MODES CODE TYPE ADAPTER TYPE 1995 SVX 3.3L H6 MPFI 4AT MIL MANCODES NONE LEGACY 2.2L H4 MPFI 4AT/5MT N/A AUTOCODES OBDII* IMPREZA 1.8L H4 MPFI 4AT/5MT ECULED MANCODES NONE * For Adapter Type OBD II see Common Tet Modes OBD II Systems section for operating instructions and test mode information. MODEL ENGINE FUEL SYSTEM TRANS TYPE ECU MODES CODE TYPE ADAPTER TYPE 1996 LEGACY 2.2L H4 MPFI 4AT/5MT N/A AUTOCODES OBDII* IMPREZA 1.8L H4 MPFI 4AT/5MT N/A AUTOCODES OBDII* IMPREZA 2.2L H4 MPFI 4AT/5MT N/A AUTOCODES OBDII* SVX 3.3L H6 MPFI 4AT N/A AUTOCODES OBDII* * For Adapter Type OBD II see Common Tet Modes OBD II Systems section for operating instructions and test mode information. MODEL ENGINE FUEL SYSTEM TRANS TYPE ECU MODES CODE TYPE ADAPTER TYPE 1997 IMPREZA 1.8L H4 MPFI 4AT/5MT N/A AUTOCODES OBDII* IMPREZA 2.2L H4 MPFI 4AT/5MT N/A AUTOCODES OBDII* LEGACY 2.2L H4 MPFI 4AT/5MT N/A AUTOCODES OBDII* LEGACY 2.5L H4 MPFI 4AT/5MT N/A AUTOCODES OBDII* SVX 3.3L H6 MPFI 4AT N/A AUTOCODES OBDII* * For Adapter Type OBD II see Common Tet Modes OBD II Systems section for operating instructions and test mode information. MODEL ENGINE FUEL SYSTEM TRANS TYPE ECU MODES CODE TYPE ADAPTER TYPE 1998 SUBARU 7 VEHICLES AND SYSTEMS MODEL (CONTINUED) ENGINE IMPREZA 2.2L H4 MPFI 4AT/5MT N/A AUTOCODES OBDII* IMPREZA 2.5L H4 MPFI 4AT/5MT N/A AUTOCODES OBDII* LEGACY 2.2L H4 MPFI 4AT/5MT N/A AUTOCODES OBDII* LEGACY 2.5L H4 MPFI 4AT/5MT N/A AUTOCODES OBDII* FORESTER 2.5L H4 MPFI 4AT/5MT N/A AUTOCODES OBDII* * 8 FUEL SYSTEM TRANS TYPE ECU MODES CODE TYPE ADAPTER TYPE For Adapter Type OBD II see Common Tet Modes OBD II Systems section for operating instructions and test mode information. SUBARU SUBARU SPECIFIC INFORMATION 2. SUBARU SPECIFIC INFORMATION The Subaru vehicles covered by the Asian Imports Cartridge are separated into two different sections within the Asian Imports Operator's Manual. The vehicle's on-board system will determine which section of the Operator's Manual will need to be used. Vehicles that are OBD II certified have information about the operating test modes in the Common Test Modes OBD II Systems section of the Operator's Manual. Vehicles that have OBD or OBDI systems have test mode information in this section of the Operator's Manual. In these sections, you will find information on test modes available, how to connect the tester to the vehicle, and operating instructions for the different test modes. A complete list of Subaru Diagnostic Trouble Codes is included at the back of each section. To determine which section of the Operator's Manual to use for diagnostic information and instructions, look at Adapter Type of the Vehicle and Systems chart. If the vehicle you are testing has an OBD II adapter type, use the Common Test Modes OBD II Systems section of the Operator's Manual. If the vehicle you are testing does not have the OBD II Adapter Type, use this section to diagnose the vehicle under test. TEST MODES AVAILABLE SUBARU 9 TEST MODES AVAILABLE 3. TEST MODES AVAILABLE The following test modes are available when testing Subaru vehicles. Operating instructions for test modes other than DTC Entry are included in the Common Test Modes OBD, OBD I Systems section. There are Subaru specific instructions for operating the test modes. Refer to TEST MODES on page 14. MODE F1: DTC ENTRY SUBMODE F0: HOW TO READ SUBMODE F0: U-CHECK SUBMODE F1: READ MEMORY SUBMODE F2: D-CHECK SUBMODE F1: ENTER DTC(s) SUBMODE F2: DTC LIST SUBMODE F3: REVIEW DTC SUBMODE F4: CLEAR DTC(s) MODE F5: SYSTEM TESTS SUBMODE F0: PREP VEHICLE MODE F8: INFORMATION SUBMODE F3: ID INFO SUBMODE F4: DJC LOCATION SUBMODE F5: ECU LOCATION 10 SUBARU GETTING STARTED 4. GETTING STARTED Before operating the Asian Imports Cartridge with a Subaru vehicle, the following steps must be performed: 1. Make sure the vehicle ignition is OFF. 2. Plug the tester power cable into the vehicle cigarette lighter. The power cable may also be directly connected to the battery via the optional battery adapter cable (P/N 02001636). NOTE Since the cigarette lighter can be switched, some tests require that the power cable be directly connected to the battery via the battery adapter cable. 3. Turn on the tester and select the application software that you will be using. Verify that the correct screen is displayed. The tester should display a screen similar to the one below. ASIAN IMPORTS 83-98 <ENTER> Tester Stand-Alone Display 4. If the display is correct, press E. If the display is not correct, refer to Appendix D. 5. Follow the instructions on the following page to select the vehicle type you are testing by entering required vehicle information into the tester. SUBARU 11 SELECTING THE VEHICLE 5. SELECTING THE VEHICLE Once you've pressed E from the power-up screen, the following steps must be performed to select the manufacturer, model year, model and engine type of the vehicle being tested. Remember, if you make a mistake, you can always press X to go back to the previous menu. SELECTING THE MANUFACTURER A menu of manufacturers available for testing is displayed in a scrolling menu. You can scroll down one screen at a time by pressing Y, or up one screen at a time by pressing n. Press U or D to scroll one manufacturer at a time, until the → arrow is opposite Subaru. Then press e to select. SELECTING THE MODEL YEAR Once the manufacturer is selected, the Select Model Year menu is displayed. Press the last two digits of the year model being tested; 8, 9 for 1989 models, 9, 0 for 1990 models, and so on. SELECTING THE MODEL The Model Select menu displays models available for testing. Press the N key until the model being tested is displayed, then press the Y key. SELECTING THE ENGINE Next, the Engine Select menu is displayed. Press N until the engine type of the vehicle is displayed, then press Y. SELECTING THE FUEL SYSTEM TYPE Next, the Fuel System select menu is displayed (selected models only). Press n until the fuel system type of the vehicle is displayed, then press Y. SELECTING THE TRANSMISSION TYPE Next, the Transmission select menu is displayed (selected models only). Press n until the transmission type of the vehicle is displayed, then press y. SELECTING THE EMISSION TYPE Next, the Emission select menu is displayed (selected models only). Press n until the emission type of the vehicle is displayed, then press y. 12 SUBARU SELECTING THE VEHICLE SELECTING THE DRIVE TYPE Next, the Drive select menu is displayed (selected models only). Press n until the drive system type (2WD or 4WD) of the vehicle is displayed, then press y. VEHICLE INFORMATION DISPLAY After the engine, transmission, emission and drive types are selected, the tester displays a summary screen of the selected vehicle. Information displayed includes the year, manufacturer, model, engine size and type, and additional information such as the type of fuel system. SELECT MODE MENU When the above steps are completed, the Select Mode menu displays the test modes available for the selected vehicle and system. Refer to Section 6 (Test Modes) Subaru Specific Instructions for operating the test modes with Subaru vehicles. MANUFACTURER SUBARU SUZUKI TOYOTA SELECT TYPE: A/T (YES/NO) E Y SUBARU 1983 - 2002 SELECT MODEL YEAR: ???? SELECT TYPE: 2WD (YES/NO) Y SELECT MODEL: LOYALE (YES/NO) 1990 SUBARU LOYALE 1.8L H4 MPFI TURBO U, or 5 sec. Y SELECT ENGINE: 1.8L H4 (YES/NO) SELECT MODE F1: DTC ENTRY F5: SYSTEM TESTS F8: INFORMATION Y SELECT TYPE: MPFI TURBO (YES/NO) Y SELECT TYPE: CA (YES/NO) Y Subaru Vehicle Selection ACTIVE KEYS 0-9 Enter model year. yn Used to answer questions in tester display. e Confirm Power-up display. x Return to previous display. SUBARU 13 TEST MODES 6. TEST MODES When the Select Mode menu is displayed, test modes available for Subaru vehicles may be selected. You may select Mode F1: DTC Entry, Mode F5: System Tests, or Mode F8: Information without connecting the tester to the vehicle. Operating instructions for the test modes other than DTC Entry are included in the Common Test Modes OBD, OBD I Systems section. Detailed operating instructions for using Mode F1: DTC Entry with Subaru vehicles are included in the following procedure. READING CODES When Mode F1: DTC Entry is selected, the tester displays submodes which, after your selection, provide information on how to read diagnostic trouble codes (DTCs) from the vehicle, how to clear DTCs from the vehicle (or tester memory), obtain a text description of entered or selected DTCs, and review entered or selected DTCs as a result of manually retrieving codes from the ECU. Typical ECU ECU LED (1) (O2 MONITOR LAMP) TEST CONNECTORS ECU ECU LED (O2 MONITOR LAMP) Manually Reading DTCs To read DTC codes on Subaru vehicles you must connect the "Read Memory" or "Test Mode" connectors on the vehicle, then observe the instrument panel ECS lamp. If the ECS lamp is on, locate the ECU and observe the flashing LED. If you do not know where the ECU is located, select Mode F5: ECU Location from the Information menu. If necessary, refer to the Common Test Modes OBD, OBD I Systems section for further instructions. Follow the detailed instructions on the following pages to manually read the DTCs. Once the DTCs have been manually read from the ECU, you can input the DTC into the tester so the tester can define the code. A 14 SUBARU TEST MODES complete list of Subaru DTCs is also included in SUBARU DIAGNOSTIC TROUBLE CODES (DTCs) on page 22. MALFUNCTION INDICATOR LAMP (MIL) MODE F1: DTC ENTRY When Mode F1: DTC ENTRY is selected, the tester displays five submodes: F0: HOW TO READ F1: ENTER DTC(s) F2: DTC LIST F3: REVIEW DTC F4: CLEAR DTC(s) Submode F0: How To Read This submode provides information on how to manually read DTCs from the vehicle. Step by step screen instructions provide information to correctly set up the vehicle ECU. This is performed by following the tester instruction screens. If you have trouble, additional DTC retrieval information is described below. If you refer to the factory service manual for this information, make sure that you are following the correct steps for the system you are working on. Submode F0: U-Check This mode is functioning during normal vehicle operation, as long as the check connectors are NOT connected. If a DTC is detected, the ECS Lamp will light up to indicate that inspection is necessary. This mode is a user-oriented mode which only diagnoses the necessary components for start-up and driveability. Submode F1: Read Memory To activate this submode, connect the Read Memory Connector while the Test Mode Connectors are disconnected. Use this mode to read past problems that have been stored in the vehicle ECU. Faults can be stored even when the monitor lamps are not lit. It effectively detects poor contact or loose connections of connectors, harnesses, etc. Step by step screen instructions provide information on DTC retrieval. Submode F2: D-Check To activate this mode, connect the Test Mode connector while the Read Memory Connector are disconnected. Use this mode to check the entire fuel system and to detect faulty parts. Step by step screen instructions provide information on DTC retrieval. SUBARU 15 TEST MODES Submode F1: Enter DTC(s) On Subaru vehicles, the Enter DTCs submode allows you to enter manually read DTCs. This submode provides you with a text description of the numeric DTC that was entered into the tester. The Enter DTC submode has two question marks on the tester display for entering the DTC. The tester screen prompts you to enter the DTCs read off the ECU LED or the Malfunction Indicator Light (MIL). Be careful when reading the DTC from the ECU LED or MIL. Incorrect ECU LED or MIL interpretation can cause the wrong DTC description to be displayed. Once all DTCs have been manually read and recorded, enter each DTC into the tester as described in the Common Test Modes OBD, OBD I Systems section. DTC SEP. DTC 32 LED 12v LED 0v seconds DTC 51 Next DTC Indication 1.2s 1.2s 1.2s 0.3s 0.3s 0.3s 0.3s 0.2s 1.8s 1.2s 1.2s 0.3s 1.2s 0.3s 1.2s 0.3s 1.2s 0.3s 0.2s 1.8s 0.3s 0.2s Example of DTC Display and Timing To manually read ECU Test Mode DTCs from 1983 Subaru vehicles using dashboard electronic control system (ECS) lamp and ECU LED (O2 Monitor LED), do the following: 1. Warm engine to normal operating temperature, turn all accessory switches OFF. 2. Turn OFF ignition key. 3. Connect the Test Mode connectors (black or clear). Use F4: DJC location from the Information menu for location information on the test mode connectors. 4. Start the engine and note the instrument panel ECS lamp (if engine will not start, read DTC from the O2 monitor ECU LED on the side of the ECU. 5a. If the ECS lamp is flashing ON/OFF in 1 second, then there are no Test Mode DTCs stored in the ECU. Disconnect Test Mode connectors and finish diagnosis. 5b. If the ECS lamp is ON while the engine is running, there are Test Mode DTCs stored in the ECU and the ECU LED will begin flashing DTCs. Use F5: ECU location from the Information menu for location information on the electronic control unit. If Test Mode DTCs are stored in ECU, the ECU LED will begin indicating the DTCs. ECU LED flashes 10's digit, then the 1's digit with a 0.3 second delay. Each DTC is separated by a 1.8 second interval. DTC series is separated by a 1.8 second interval. If no DTCs are stored in ECU, the normal condition will be flashed on the ECS lamp. The normal condition is one ECS lamp flash every 1 second. 5c. If ECS lamp is OFF while engine is running, idle engine for 1 minute, vary engine RPM by performing 5 brief wide open throttle openings, place transmission in gear and raise RPM to stall, place transmission back into park, and hold RPM at 2500 for 1 minute. After completion, go to 5a above. 6. The normal condition is one ECS lamp flash in 1 second. 7. Disconnect Test Mode connectors . 16 SUBARU TEST MODES 8. Erase DTCs when all repairs are completed. To manually read Test Mode DTCs from 1983-1986 carbureted Subaru vehicles using the Electronic Control System (ECS) Lamp and ECU LED (O2 Monitor LED), do the following: 1. Warm engine to normal operating temperature, turn all accessories switches OFF. 2. Turn key OFF. 3. Connect Test Mode connectors. Use F4: DJC LOCATION from the Information menu for test mode connectors location. 4. Turn key ON (Do not start engine). ECS Lamp should flash an identification DTC on the O2 Monitor Lamp. Use F5: ECU LOCATION from the Information menu for ECU location information. 5. Start engine. ECS Lamp should OFF. 6. Drive vehicle for over 60 feet then idle engine for 1 minute. 7. Perform 2 brief WOT and run engine at 2500 RPM until ECS Lamp turns ON. 8. If ECS Lamp stays ON, record DTC(s) that are flashed by the O2 Monitor Lamp. The long segment (1.2 seconds ON) represents the tens digit. The short segment (0.2 seconds ON) represents the ones digit. Each DTC is separated by a 1.8 second delay. If the ECS Lamp blinks, the system is normal. Turn the key OFF and disconnect the Test Mode Connectors. To manually read Test Mode DTCs from 1984 EFI Turbo Subaru vehicles using the Electronic Control System (ECS) Lamp and ECU LED (O2 Monitor LED), do the following: 1. Warm engine to normal operating temperature, turn all accessories switches OFF. 2. Turn key OFF. 3. Connect Test Mode connectors. Use F4: DJC LOCATION from the Information menu for test mode connectors location. 4. Turn key ON (Do not start engine). ECS Lamp should turn ON and the fuel pump should cycle every 1.5 seconds. 5. Start engine. If engine will not start, check for DTC(s) by observing the O2 Monitor Lamp. If engine starts and the ECS Lamp turns ON, check for DTC(s) by observing the O2 Monitor Lamp. If engine starts and the ECS Lamp turns OFF, run the engine at idle for 1 minute. 6. Perform 5 brief WOT, place the transmission in gear, and run the engine up to stall speed in order to operate the pressure switch. Run the engine at 2500 RPM until the ECS Lamp turns ON. 7. If ECS Lamp stays ON, record DTC(s) that are flashed by the O2 Monitor Lamp. The long segment (1.2 seconds ON) represents the tens digit. The short segment (0.2 seconds ON) represents the ones digit. Each DTC is separated by a 1.8 second delay. 8. If the ECS Lamp blinks, the system is normal. Turn the key OFF and disconnect the Test Mode Connectors. To manually read Test Mode DTCs from 1985-1986 MPFI Subaru vehicles using the Electronic Control System (ECS) Lamp and ECU LED (O2 Monitor LED), do the following: 1. Warm engine to normal operating temperature, turn all accessories switches OFF. 2. Turn key OFF. 3. Connect Test Mode connectors. Use F4: DJC LOCATION from the Information menu for test mode connectors location. SUBARU 17 TEST MODES 4. Turn key ON (Do not start engine). ECS Lamp should turn ON and the fuel pump should cycle every 1.5 seconds. 5. Start engine. If engine will not start, check for DTC(s) by observing the O2 Monitor Lamp. If engine starts and the ECS Lamp turns ON, check for DTC(s) by observing the O2 Monitor Lamp. If engine starts and the ECS Lamp turns OFF, run the engine at idle for 1 minute. 6. Perform 5 brief WOT, place the transmission in gear, and run the engine up to stall speed in order to operate the pressure switch. 7. Run the engine at 2500 RPM until the ECS Lamp turns ON. 8. If ECS Lamp stays ON, record DTC(s) that are flashed by the O2 Monitor Lamp. The long segment (1.2 seconds ON) represents the tens digit. The short segment (0.2 seconds ON) represents the ones digit. Each DTC is separated by a 1.8 second delay. 9. If the ECS Lamp blinks, the system is normal. Turn the key OFF and disconnect the Test Mode Connectors. To manually read Test Mode DTCs from 1986 SPFI Subaru vehicles using the Electronic Control System (ECS) Lamp and ECU LED (O2 Monitor LED), do the following: 1. Warm engine to normal operating temperature, turn all accessories switches OFF. 2. Turn key OFF. 3. Connect the green Test Mode connectors. Use F4: DJC LOCATION from the Information menu for test mode connectors location. 4. Connect the Clear Memory connectors. Use F4: DJC LOCATION from the Information menu for test mode connectors location. 5. Turn key ON (Do not start engine). ECS Lamp should turn ON. The DTC that is flashed should correctly identify the vehicle under test. DTC 11 identifies a California emissions vehicle. DTC 12 identifies a Federal emissions vehicle. Use F5: ECU LOCATION from the Information menu for ECU location. 6. Disconnect the Clear Memory connectors. 7. Start engine. The ECS Lamp should turn OFF. 8. Drive vehicle above 6 MPH for over 1 minute. 9. Run engine above 2500 RPM until the ECS Lamp turns ON. If the ECS Lamp stays ON, check for DTC(s) by observing the O2 Monitor Lamp mounted on the ECU. Use F5: ECU LOCATION from the Information menu for ECU location. The long segment (1.2 seconds ON) represents the tens digit. The short segment (0.2 seconds ON) represents the ones digit. Each DTC is separated by a 1.8 second delay. 10. If the ECS Lamp blinks, the system is normal. Turn the key OFF and disconnect the Test Mode Connectors. To manually read Test Mode DTCs from 1987-1995 SPFI and MPFI Subaru vehicles (except Justy and SVX) using the Malfunction Indicator Lamp (MIL) and ECU LED (O2 Monitor LED) do the following: 1. Warm engine to normal operating temperature, turn all accessories switches OFF. 2. Turn key OFF. 3. Connect Test Mode connectors. Use F4: DJC LOCATION from the Information menu for test mode connectors location. 4. Turn key ON (Do not start engine). The MIL should turn ON. 18 SUBARU TEST MODES 5. Depress accelerator pedal to WOT then return it to half-throttle and hold it for 2 seconds. Then release pedal completely. 6. Start engine. The MIL should turn OFF. If the MIL stays ON, note the DTC(s) and continue. 7. Perform brief WOT, then drive the vehicle greater than 7 MPH for at least 1 minute (and shift up to 4th gear for manual transmissions). 8. Run the engine above 2000 RPM until the MIL turns ON. If the MIL stays ON, record DTC(s) that are flashed by the MIL or O2 Monitor Lamp depending on the model being tested. Use F5: ECU LOCATION from the Information menu to observe the O2 Monitor Lamp located on the ECU. The long segment (1.2 seconds ON) represents the tens digit. The short segment (0.2 seconds ON) represents the ones digit. Each DTC is separated by a 1.8 second delay. If the MIL blinks, the system is normal. 9. Turn the key OFF and disconnect the Test Mode Connectors. 10. Erase DTC(s) when all repairs are completed. Use F4: CLEAR DTC(s) from the DTC Entry menu for instructions on how to clear the DTC(s) from the vehicle and the tester. To manually read Test Mode DTCs from 1987-1988 Subaru Justy vehicles using the Malfunction Indicator Lamp (MIL) and ECU LED (O2 Monitor LED), do the following: 1. Warm engine to normal operating temperature, turn all accessories switches OFF. 2. Turn key OFF. 3. Connect the green Test Mode connectors. Use F4: DJC LOCATION from the Information menu for test mode connectors location. 4. Turn key ON (Do not start engine). The MIL should turn ON. The DTC that is flashed should correctly identify the vehicle under test. Use F5: ECU LOCATION from the Information menu for ECU location. 5. Start engine. The MIL should turn OFF. 6. Drive vehicle above 3 MPH for more than 60 feet 7. Allow engine to idle for over 20 seconds. 8. Turn clearance lamps (parking lamps), rear defogger, radiator and heater fans ON and then all OFF. 9. Run engine above 2700 RPM until the MIL turns ON. If the MIL stays ON, check for DTC(s) by observing the O2 Monitor Lamp mounted on the ECU. Use F5: ECU LOCATION from the Information menu for ECU location. The long segment (1.2 seconds ON) represents the tens digit. The short segment (0.2 seconds ON) represents the ones digit. Each DTC is separated by a 1.8 second delay.If the MIL blinks, the system is normal. 10. Turn the key OFF and disconnect the Test Mode Connectors. 11. Erase DTC(s) when all repairs are completed. Use F4: CLEAR DTC(s) from the DTC Entry menu for instructions on how to clear the DTC(s) from the vehicle and the tester. To manually read Test Mode DTCs from 1989-1990 Subaru Justy vehicles using the Malfunction Indicator Lamp (MIL) and ECU LED (O2 Monitor LED), do the following: 1. Connect the green Test Mode connectors. Use F4: DJC LOCATION from the Information menu for test mode connectors location. 2. Turn key ON (Do not start engine). The MIL should turn ON. The DTC that is flashed should correctly identify the vehicle under test. Use F5: ECU LOCATION from the Information menu for ECU location. 3. Start engine. The MIL should turn OFF. 4. Warm engine to normal operating temperature. SUBARU 19 TEST MODES 5. Depress clutch pedal completely then slowly release pedal completely. 6. Turn clearance lamps (parking lamps), rear defogger, and heater fans ON and then all OFF. 7. Drive vehicle above 30 MPH and at engine speed over 2500 RPM. 8. Keep engine speed above 2700 RPM until the MIL turns ON. If the MIL stays ON, check for DTC(s) by observing the O2 Monitor Lamp mounted on the ECU. Use F5: ECU LOCATION from the Information menu for ECU location. The long segment (1.2 seconds ON) represents the tens digit. The short segment (0.2 seconds ON) represents the ones digit. Each DTC is separated by a 1.8 second delay. If the MIL blinks, the system is normal. 9. Turn the key OFF and disconnect the Test Mode Connectors. 10. Erase DTC(s) when all repairs are completed. Use F4: CLEAR DTC(s) from the DTC Entry menu for instructions on how to clear the DTC(s) from the vehicle and the tester. To manually read Test Mode DTCs from 1990 Subaru Justy MPFI vehicles using the Malfunction Indicator Lamp (MIL) and ECU LED (O2 Monitor LED), do the following: 1. Start the engine and warm to normal operating temperature. 2. Turn key OFF. 3. Connect the green Test Mode connectors. Use F4: DJC LOCATION from the Information menu for test mode connectors location. 4. Turn key ON (Do not start engine). The MIL should turn ON. The DTC that is flashed should correctly identify the vehicle under test. Use F5: ECU LOCATION from the Information menu for ECU location. 5. Depress accelerator pedal to floor and then slowly release. 6. Start engine. 7. Turn heater fan, headlamp, and rear defogger switches ON and then all OFF. 8. Drive vehicle above 7 MPH. 9. Operate the engine speed above 2000 RPM until the MIL turns ON. If the MIL stays ON, check for DTC(s) by observing the O2 Monitor Lamp mounted on the ECU. Use F5: ECU LOCATION from the Information menu for ECU location. The long segment (1.2 seconds ON) represents the tens digit. The short segment (0.2 seconds ON) represents the ones digit. Each DTC is separated by a 1.8 second delay. If the MIL blinks, the system is normal. 10. Turn the key OFF and disconnect the Test Mode Connectors. 11. Erase DTC(s) when all repairs are completed. Use F4: CLEAR DTC(s) from the DTC Entry menu for instructions on how to clear the DTC(s) from the vehicle and the tester. To manually read Test Mode DTCs from 1992-1995 SVX Subaru vehicles using the Malfunction Indicator Lamp (MIL) and ECU LED (O2 Monitor LED), do the following: 1. Warm engine to normal operating temperature, turn all accessories switches OFF. 2. Turn key OFF. 3. Connect either diagnostic lead to pin 1 of the black connector. Use F4: DJC LOCATION from the Information menu for test mode connectors location. 4. Turn key ON (Do not start engine). The MIL should turn ON. 5. Start engine. The MIL should turn OFF. If the MIL stays ON, note the DTC(s) and continue. 6. Drive the vehicle greater than 7 MPH for at least 1 minute. 20 SUBARU TEST MODES 7. Run the engine above 2000 RPM until the MIL turns ON. If the MIL flashes DTC(s), perform fix. The long segment (1.2 seconds ON) represents the tens digit. The short segment (0.2 seconds ON) represents the ones digit. Each DTC is separated by a 1.8 second delay. If the MIL blinks, the system is normal. 8. Turn key OFF and disconnect diagnostic leads. 9. Erase DTC(s) when all repairs are completed. Use F4: CLEAR DTC(s) from the DTC Entry menu for instructions on how to clear the DTC(s) from the vehicle and the tester. Submode F2: DTC List This submode provides you with a way to view all possible ECU DTCs, including DTC numbers and descriptions You can also select the DTCs obtained from the ECU LED as an alternative way of entering DTCs into the tester's memory. As you scroll through the available DTCs you can view a description of the DTC obtained from the ECU LED. You can "Select" the DTC on the tester screen for later review or printing. Refer to the Common Test Modes OBD, OBD I Systems section for further information. Submode F3: Review DTC This submode provides a way of reviewing DTCs that you selected or entered in the tester. The description of the entered or selected DTC will be displayed, along with a numerical summary of the entered or selected DTC. Review DTC is intended to provide you with an electronic clipboard that keeps track of the DTCs that you have encountered during diagnosis. Submode F4: Clear DTC(s) This helpful mode provides information on how to clear DTCs that the user would normally have to locate in the vehicle's service manual. Submode F0: From ECU This submode provides step by step text screen instructions on how to clear DTCs from the ECU memory. These instructions are specific to the vehicle under test and should be followed closely. The dealer uses this mode to clear the DTCs from the memory after the affected part is repaired. Submode F0: From Tester This submode clears the tester memory of all DTCs that the user has entered or selected from the tester. SUBARU 21 SUBARU DIAGNOSTIC TROUBLE CODES (DTCS) 7. SUBARU DIAGNOSTIC TROUBLE CODES (DTCs) DTCs available for Subaru vehicles are listed in the following tables. Some code numbers have different descriptors depending on the selected vehicle. Only codes available for the selected vehicle are displayed by the tester. OBD, OBD I SYSTEMS 22 YEAR: 1983 DTC NO. 1983 11 IGNITION PULSE FAILURE. IGN. PULSE SYS. (ENG OFF/CC/HA). 12 STARTER SWITCH IN OFF MODE. IGN. PULSE SYS. (ENG OFF/CC/SL). 13 STARTER SWITCH IN ON MODE. DUTY SOLENOID VLV REMAINS OFF. 14 AIR FLOW METER OR CKT FAILURE. VACUUM SW 1 OFF (TEST MODE ONLY) 15 SOLENOID VALVE 3 REMAINS OFF. 21 AIR FLOW METER FLAP SEIZED. IGN. PULSE SYS. (ENG OFF/HC/HA). 22 PRESSURE SWITCH FIXED ON/OFF POS IGN. PULSE SYS. (ENG OFF/HC/SL). 23 IDLE SW FIXED ON/OFF POSITION. O2 SENSOR OR CIRCUIT FAILURE. 24 FULL SW FIXED ON/OFF POSITION. VACUUM SW 2 OFF (TEST MODE ONLY) 25 SOLENOID VALVE 1 REMAINS OFF. 31 DUTY SOLENOID VLV REMAINS ON. 32 THERMO SENSOR OR CIRCUIT FAILURE. O2 SENSOR OR CIRCUIT FAILURE. 33 COOLANT THERMO SENSOR OR CKT. FDBK SYS FAILURE (TEST MODE ONLY) 34 ASP. AIR THERMO SNSR OR CIRCUIT. AUTO CHOKE POWER REMAINS OFF. 41 VACUUM SW 1 ON (TEST MODE ONLY) 42 INJ FIXED IN ON/OFF POSITION. VACUUM SW 2 ON (TEST MODE ONLY) DESCRIPTOR SUBARU SUBARU DIAGNOSTIC TROUBLE CODES (DTCS) YEAR: 1983 (CONTINUED) DTC NO. DESCRIPTOR 43 AUTO CHOKE POWER REMAINS ON. 51 SOLENOID VALVE 3 REMAINS ON. 52 SOLENOID VALVE 1 REMAINS ON. YEAR: 1984 DTC NO. 1984 11 IG PULSE FAILURE (OPEN/SHORT CKT) IGN. PULSE SYS. (ENG OFF/CC/MT). 12 STARTER SW OR CKT REMAINS OFF IGN. PULSE SYS. (ENG OFF/CC/AT). 13 STARTER SW OR CKT REMAINS ON IGN. PULSE SYS. (ENG OFF/HC/MT). 14 AIR FLOW METER OR CKT FAILURE. IGN. PULSE SYS. (ENG OFF/HC/AT). 15 IGN. PULSE SYS. (ENG OFF/CC/MT). 16 IGN. PULSE SYS. (ENG OFF/CC/AT). 17 IGN. PULSE SYS. (ENG OFF/HC/MT). 18 IGN. PULSE SYS. (ENG OFF/HC/AT). 21 AIR FLOW METER FLAP SEIZED. 22 PRESSURE SWITCH FIXED ON/OFF POS VSS FAIL. (AT IN TEST MODE ONLY). 23 IDLE SWITCH OR CIRCUIT FAILURE. O2 SENSOR OR CIRCUIT FAILURE. 24 WOT SWITCH OR CIRCUIT FAILURE. THERMO SNSR FAIL LESS THAN 68degF 25 THERMO SNSR FAIL ABOVE 230degF. 31 DUTY SOLENOID VLV REMAINS ON. 32 O2S OR CKT FAIL. (LOW OUTPUT). DUTY SOLENOID VLV REMAINS OFF. 33 COOLANT THERMO SENSOR OR CKT. FDBK SYS FAILURE (TEST MODE ONLY) 34 ASP. AIR THERMO SNSR OR CIRCUIT. BACKUP SYS FAIL. MEMORY NOT HIGH. 35 BACKUP SYS FAIL. MEMORY NOT LOW. 41 HIGH ALTITUDE SENSOR OR CKT. SUBARU DESCRIPTOR 23 SUBARU DIAGNOSTIC TROUBLE CODES (DTCS) YEAR: 1984 (CONTINUED) 24 DTC NO. DESCRIPTOR 42 FUEL INJ. OR CKT (OPEN OR SHORT) VACUUM SW 2 ON (TEST MODE ONLY) 43 VACUUM SW 2 OFF (TEST MODE ONLY) 44 VACUUM SW 1 ON (TEST MODE ONLY) 45 VACUUM SW 1 OFF (TEST MODE ONLY) 52 SOLENOID VALVE 1 REMAINS ON. 53 SOLENOID VALVE 1 REMAINS OFF. 54 AUTO CHOKE POWER REMAINS ON. 55 AUTO CHOKE POWER REMAINS OFF. 62 SOL VLV2 ON (AT/MT/FED/not 4WD). 63 SOL VLV2 OFF(AT/MT/FED/not 4WD). 73 IGN. PULSE SYS. (ENG OFF/HC/MT). 77 IGN. PULSE SYS. (ENG OFF/HC/MT). YEAR: 1985 DTC NO. 1985 11 IG PULSE OR CKT (NO IG PULSE) IG PULSE-ENG OFF (5MT/2WD/49ST) IGN SW SIGNAL OR CKT FAILURE 12 STARTER SW OR CKT-OFF MODE IG PULSE-ENG OFF (AT/FF/49ST) STARTER SW OR CKT-REMAINS OFF 13 STARTER SW OR CKT-IN ON MODE STARTER SW OR CKT-REMAINS ON 14 AIR FLOW METER OR CKT FAILURE AIR FLOW METER FLAP POSITION 15 IGN PULSE-ENG. OFF(4MT/FF/49ST) 21 AIR FLOW METER FLAP SEIZED 22 PRESSURE SWITCH IN ON/OFF POS. VEHICLE SPEED SNSR OR CIRCUIT PRESSURE SWITCH ON/OFF FAILURE VACUUM SWITCH ON/OFF FAILURE VACUUM SWITCH IN ON/OFF POS. 23 IDLE SWITCH IN ON/OFF POS. O2 SENSOR OR CIRCUIT FAILURE IDLE SWITCH ON/OFF FAILURE DESCRIPTOR SUBARU SUBARU DIAGNOSTIC TROUBLE CODES (DTCS) YEAR: 1985 (CONTINUED) SUBARU DTC NO. DESCRIPTOR 24 WOT SWITCH IN ON/OFF POS. THERMO SENSOR OR CKT FAILURE WOT SWITCH ON/OFF FAILURE 25 PRESSURE SENSOR OR CKT FAILURE 31 VEHICLE SPEED SNSR OR CIRCUIT SPEED SNSR FAIL ABOVE 6 MPH 32 O2 SENSOR OR CIRCUIT FAILURE DUTY SOLENOID VALVE OR CKT 33 COOLANT THERMO-SNSR OR CIRCUIT FEEDBACK SYSTEM (TEST MODE ONLY) 34 ASPIRATED AIR THERMOSENSOR BACK-UP SYSTEM OR CKT FAILURE 35 EGR SOL SWITCH ON/OFF OR CKT EGR SOL DRIVER CKT FAILURE 41 BARO SENSOR OR CIRCUIT FAILURE 42 FUEL INJ. FIXED IN ON/OFF POS. CLUTCH SW OR CKT (EXC. AT & 4WD) 43 KDLH RELAY FIXED IN ON/OFF POS. KDLH DRIVER CKT FAILURE 52 ASV SOL VALVE OR CIRCUIT FAILURE 53 FUEL PUMP OR CIRCUIT FAILURE 54 AUTO CHOKE CNTRL OR CKT FAILURE 55 SHIFT-UP CNTRL SYSTEM (AT ONLY) 62 EGR SOL VALVE OR CKT FAILURE 63 CANP SOL VALVE OR CKT FAILURE 64 VLC SOL VALVE OR CKT FAILURE 65 FCV SOL VALVE OR CKT FAILURE 71 IGN PULSE-ENG. OFF (5MT/FF/CA) 72 IGN PULSE-ENG. OFF (AT/FF/CA) 73 IGN PULSE-ENG. OFF (5MT/4WD/CA) 74 IGN PULSE-ENG. OFF (AT/4WD/CA) 25 SUBARU DIAGNOSTIC TROUBLE CODES (DTCS) 26 YEAR: 1986 DTC NO. 1986 11 IG PULSE OR CKT (NO IG PULSE) IG PULSE-ENG OFF (5MT/2WD/49ST) IGN SW SIGNAL OR CKT FAILURE 12 STARTER SW OR CKT-IN OFF MODE 13 STARTER SW OR CKT-IN ON MODE 14 AIR FLOW METER OR CKT FAILURE 15 PRESSURE SWITCH IN ON/OFF POS. 16 CKP SENSOR OR CIRCUIT FAILURE 17 STARTER SWITCH OR CKT FAILURE 21 AIR FLOW METER FLAP SEIZED 22 VEHICLE SPEED SNSR OR CIRCUIT PRESSURE SWITCH IN ON/OFF POS. VACUUM SWITCH IN ON/OFF POS. 23 O2 SENSOR OR CIRCUIT FAILURE IDLE SW OR CKT ON/OFF FAILURE 24 THERMO SENSOR OR CKT FAILURE WOT SW OR CKT ON/OFF FAILURE 25 PRESSURE SENSOR OR CKT FAILURE TPS IDLE SWITCH OR CKT FAILURE 31 VEHICLE SPEED SNSR OR CIRCUIT 32 DUTY SOLENOID VALVE OR CKT O2 SENSOR OR CIRCUIT FAILURE 33 FEEDBACK SYSTEM (TEST MODE ONLY) COOLANT THERMO-SNSR OR CIRCUIT 34 BACK-UP SYSTEM OR CKT FAILURE ASPIRATED AIR THERMOSENSOR 35 EGR SOL SWITCH ON/OFF OR CKT AIR FLOW METER OR CKT FAILURE 41 BARO SENSOR OR CIRCUIT FAILURE 42 CLUTCH SW OR CKT (EXC. AT & 4WD) FUEL INJ. FIXED IN ON/OFF POS. FUEL INJECTOR OR CIRCUIT FAILURE 43 KDLH RELAY FIXED IN ON/OFF POS. 46 NEUT/PARKING SW OR CKT FAILURE 52 ASV SOL VALVE OR CIRCUIT FAILURE 53 FUEL PUMP CNTRL OR CKT FAILURE FUEL PUMP OR CIRCUIT FAILURE DESCRIPTOR SUBARU SUBARU DIAGNOSTIC TROUBLE CODES (DTCS) YEAR: 1986 (CONTINUED) DTC NO. DESCRIPTOR 54 AUTO CHOKE CNTRL OR CKT FAILURE 55 SHIFT-UP CNTRL SYSTEM (AT ONLY) KDLH CONTROL SYSTEM OR CKT 57 CANP SOL VALVE OR CKT FAILURE 58 AIR CNTRL VALVE OR CKT FAILURE 62 EGR SOL VALVE OR CKT FAILURE 63 CANP SOL VALVE OR CKT FAILURE 64 VLC SOL VALVE OR CKT FAILURE 65 FCV SOL VALVE OR CKT FAILURE 71 IGN PULSE-ENG. OFF (5MT/2WD/CA) 73 IGN PULSE-ENG. OFF (5MT/4WD/CA) 74 IGN PULSE-ENG. OFF (AT/4WD/CA) 88 SPFI CONTROL UNIT FAILURE YEAR: 1987 DTC NO. 1987 1 SPEC CODE MT/49ST/CAN 2 SPEC CODE MT/CAL 3 SPEC CODE AT/49ST/CAN 4 SPEC CODE AT/CAL 5 SPEC CODE MT/FED 6 SPEC CODE MT/CAL/CAN 7 SPEC CODE AT/FED 8 SPEC CODE AT/CAL/CAN 11 CRANK ANGLE SNSR REF PULSE OR CKT IGN PULSE CKT FAULT (ENG OFF) 12 STARTER SW ON/ OFF (CRANKING) BACK-UP SYSTEM OR CKT FAILURE 13 CKP SENSOR OR CIRCUIT FAILURE 14 FUEL INJ. 1 & 2 OR CKT FAILURE DUTY SOLENOID VALVE OR CKT FUEL INJ. OUTPUT OR CKT FAILURE 15 FUEL INJ. 3 & 4 OR CKT FAILURE SUBARU DESCRIPTOR 27 SUBARU DIAGNOSTIC TROUBLE CODES (DTCS) YEAR: 1987 (CONTINUED) 28 DTC NO. DESCRIPTOR 21 WATER TEMP. SNSR SIGNAL OR CKT THERMO SENSOR OR CKT FAILURE 22 KS OR KS CIRCUIT FAILURE VLC SOLENOID VALVE OR CKT 23 AIR FLOW METER OR CKT FAILURE PRESSURE SENSOR OR CKT FAILURE 24 IDLE UP SOLENOID OR CKT FAILURE AIR CONTROL VLV OR CKT FAILURE 25 FCV SOLENOID OR CIRCUIT FAILURE 31 THROTTLE SENSOR OR CKT FAILURE 32 O2 SENSOR OR CIRCUIT FAILURE O2S SYSTEM OR CIRCUIT FAILURE 33 VEHICLE SPEED SENSOR SIGNAL VEHICLE SPEED SNSR OR CIRCUIT 34 EGR SOL VALVE ON/OFF OR CKT 35 PURGE SOL VALVE ON/OFF OR CKT PURGE SOLENOID CONTROL SYSTEM 41 SYSTEM LEAN CONDITION FEEDBACK SYSTEM OR CKT FAILURE 42 IDLE SWITCH OR CIRCUIT FAILURE 44 WASTEGATE SOL OR CKT FAILURE 45 KDWN CNTRL RLY (ON/OFF POS.) 51 NEUTRAL SW CKT (REMAINS ON) 52 CLUTCH SWITCH OR CKT FAILURE 61 PARKING SW CKT (REMAINS ON) 62 IDLE-UP SYS. OR CKT(CL/REAR DEF) 63 IDLE-UP SYS CKT (HTR/RAD FAN) YEAR: 1988 DTC NO. 1988 1 SPEC CODE FWD/49ST/CAN SPEC CODE MT/49ST/CAN 2 SPEC CODE FWD/CAL SPEC CODE MT/CAL 3 SPEC CODE AT/49ST/CAN DESCRIPTOR SUBARU SUBARU DIAGNOSTIC TROUBLE CODES (DTCS) YEAR: 1988 (CONTINUED) SUBARU DTC NO. DESCRIPTOR 4 SPEC CODE AT/CAL 5 SPEC CODE 4WD/49ST/CAN SPEC CODE MT/49ST/CAN 6 SPEC CODE 4WD/CA SPEC CODE MT/CAL 7 SPEC CODE AT/49ST/CAN 8 SPEC CODE AT/CAL 11 CRANK ANGLE SNSR REF PULSE OR CKT 12 STARTER SW ON/OFF (CRANKING) 13 CKP SENSOR OR CIRCUIT FAILURE 14 FUEL INJ. 1 & 2 OR CKT FAILURE FUEL INJ. 5 & 6 OR CKT FAILURE FUEL INJ. OUTPUT OR CKT FAILURE DUTY SOLENOID VALVE OR CKT 15 FUEL INJ. 3 & 4 OR CKT FAILURE FUEL INJ. 1 & 2 OR CKT FAILURE CFC SYSTEM OR CIRCUIT FAILURE 21 WATER TEMP. SNSR SIGNAL OR CKT 22 KS OR KS CIRCUIT FAILURE VLC SOLENOID VALVE OR CKT 23 AIR FLOW METER OR CKT FAILURE PRESSURE SENSOR OR CKT FAILURE 24 BYPASS AIR CONT. VALVE OR CIRCUIT AIR CONTROL VLV OR CKT FAILURE IDLE UP SOLENOID OR CKT FAILURE 25 FUEL INJ. 3 & 4 OR CKT FAILURE FCV SOLENOID OR CIRCUIT FAILURE 31 THROTTLE SENSOR OR CKT FAILURE 32 O2 SENSOR OR CIRCUIT FAILURE O2S SYSTEM OR CIRCUIT FAILURE 33 VEHICLE SPEED SENSOR SIGNAL VEHICLE SPEED SNSR OR CIRCUIT 34 EGR SOL VALVE ON/OFF OR CKT EGR LINE CLOGGED OR CKT (CA ONLY) 35 PURGE SOL VALVE ON/OFF OR CKT PURGE SOLENOID CONTROL SYSTEM 41 SYSTEM LEAN CONDITION 42 IDLE SWITCH OR CIRCUIT FAILURE 45 KDWN CNTRL RLY (ON/OFF POS.) 29 SUBARU DIAGNOSTIC TROUBLE CODES (DTCS) YEAR: 1988 (CONTINUED) 30 DTC NO. DESCRIPTOR 51 NEUT SWITCH OR CKT (NO SIGNAL) NEUTRAL SW CKT (REMAINS ON) 52 CLUTCH SW OR CKT FAIL (FWD ONLY) 55 EGR GAS TEMP. SENSOR (CA ONLY) 61 PARKING SW CKT (SW REMAINS ON) 62 IDLE-UP SYSTEM 1 OR CKT FAILURE 63 IDLE-UP SYSTEM 2 OR CKT FAILURE YEAR: 1989 DTC NO. 1989 1 SPEC CODE MT/49ST/CAN 2 SPEC CODE MT/CAL 3 SPEC CODE AT/49ST/CAN SPEC CODE AT/4WD/49ST/CAN 4 SPEC CODE AT/CAL SPEC CODE AT/4WD/CAL 5 SPEC CODE MT/FED/CAN 6 SPEC CODE MT/CAL 7 SPEC CODE AT/FWD/CAN/49ST SPEC CODE AT/FED/CAN 8 SPEC CODE AT/FWD/CAL SPEC CODE AT/CAL 11 CRANK ANGLE SNSR REF PULSE OR CKT 12 STARTER SW ON/OFF (CRANKING) 13 CKP SENSOR OR CIRCUIT FAILURE 14 FUEL INJ. 1 & 2 OR CIRCUIT FUEL INJ. 5 & 6 OR CIRCUIT FUEL INJ. OUTPUT OR CKT FAILURE DUTY SOL. VLV. OR CKT FAILURE 15 FUEL INJ. 3 & 4 OR CIRCUIT FUEL INJ. 1 & 2 OR CIRCUIT CFC SYSTEM OR CKT (MT ONLY) 16 FEEDBACK SYSTEM OR CKT FAILURE 17 FUEL PUMP AUTO CHOKE OR CKT 21 WATER TEMP. SNSR SIGNAL OR CKT THERMOSENSOR OR CIRCUIT FAILURE DESCRIPTOR SUBARU SUBARU DIAGNOSTIC TROUBLE CODES (DTCS) YEAR: 1989 (CONTINUED) SUBARU DTC NO. DESCRIPTOR 22 KS OR KS CIRCUIT FAILURE VLC SOLENOID VLV OR CKT FAILURE 23 AIR FLOW METER OR CKT FAILURE PRESSURE SENSOR OR CKT FAILURE 24 BYPASS AIR CONT. VALVE OR CKT IDLE UP SOLENOID OR CKT FAILURE AIR CONTROL VLV OR CKT FAILURE 25 FUEL INJ. 3 & 4 OR CIRCUIT FCV SOLENOID OR CIRCUIT FAILURE 31 THROTTLE SENSOR OR CKT FAILURE 32 O2 SENSOR OR CIRCUIT FAILURE 33 VEHICLE SPEED SENSOR SIGNAL 34 EGR SOL VALVE ON/OFF OR CKT EGR LINE CLOGGED OR CKT (CA ONLY) 35 PURGE SOL VALVE ON/OFF OR CKT CPC SOLENOID OR CIRCUIT FAILURE 41 SYSTEM LEAN CONDITION FEEDBACK SYSTEM FAIL (CA ONLY) 42 IDLE SWITCH OR CIRCUIT FAILURE 44 WASTEGATE CNTRL SOL OR CIRCUIT 45 KDWN CNTRL RLY (ON/OFF POS.) 46 RADIATOR FAN CONTROL SYSTEM 51 NEUTRAL SW OR CKT (NO SIGNAL) NEUTRAL SW CKT (REMAINS ON) 52 CLUTCH SW CKT (FWD w/MT ONLY) 53 HAC SOLENOID OR CIRCUIT FAILURE 55 EGR SENSOR OR CKT (CA ONLY) EGR GAS TEMP SNSR (CA ONLY) 56 EGR SYSTEM (CALIF ONLY) 61 PARKING SW CKT (SW REMAINS ON) 62 IDLE-UP SYSTEM 1 OR CKT FAILURE 63 IDLE-UP SYSTEM 2 OR CKT FAILURE 31 SUBARU DIAGNOSTIC TROUBLE CODES (DTCS) 32 YEAR: 1990 DTC NO. 1990 1 SPEC CODE MT/49ST/CAN SPEC CODE FWD/MT/49ST/CAN 2 SPEC CODE FWD/ECVT/49ST/CAN SPEC CODE MT/CAL 3 SPEC CODE 4WD/MT/49ST/CAN SPEC CODE AT/49ST/CAN 4 SPEC CODE 4WD/ECVT/49ST/CAN SPEC CODE AT/CAL 5 SPEC CODE MT/FED/CAN 6 SPEC CODE MT/CAL 7 SPEC CODE AT/FED/CAN 8 SPEC CODE AT/CAL 10 SPEC CODE FWD/MT/CAL 11 CRANK ANGLE SNSR REF PULSE OR CKT CKP SENSOR OR CKT (CAM SIG OK) CKP SNSR OR CKT (START SIG OK) 12 STARTER SW POS. ON/OFF FAILURE STARTER SWITCH IGN SIG FAILURE. STARTER SW ON/OFF (CRANKING) 13 CYL DISTINCTION SNSR(CKP SIG OK) CKP SNSR OR CKT (CRANK SIG OK) CKP SENSOR OR CIRCUIT FAILURE. 14 FUEL INJ. 1 OR CIRCUIT FAILURE FUEL INJ. OUTPUT OR CKT FAILURE DUTY SOLENOID VALVE OR CKT FUEL INJ. 1 & 2 OR CKT FAILURE 15 FUEL INJ. 2 OR CKT FAILURE CFC SYSTEM OR CIRCUIT FAILURE FUEL INJ. 3 & 4 OR CKT FAILURE 16 FUEL INJ. 3 OR CKT FAILURE FEEDBACK SYSTEM OR CKT FAILURE 17 FUEL INJ. 4 OR CKT FAILURE FUEL PUMP AUTO CHOKE OR CKT 20 SPEC CODE FWD/ECVT/CAL 21 WATER TEMP. SNSR SIGNAL OR CKT WATER TEMP. SNSR OR CKT FAILURE 22 KS SNSR MONITOR CKT VOLTAGE VLC SOLENOID VALVE OR CKT KS OR KS CIRCUIT FAILURE DESCRIPTOR SUBARU SUBARU DIAGNOSTIC TROUBLE CODES (DTCS) YEAR: 1990 (CONTINUED) SUBARU DTC NO. DESCRIPTOR 23 PRESSURE SENSOR OR CKT FAILURE AIR FLOW METER OR CKT FAILURE AIR FLOW SNSR. SIGNAL VOLTAGE 24 ISC SOL. VALVE CKT VOLTAGE AIR CONTROL VLV OR CKT FAILURE AIR CONTROL VLV MON CKT VOLTAGE IDLE UP SOLENOID OR CKT FAILURE 25 FCV SOLENOID OR CIRCUIT FAILURE 26 AIR TEMP. SENSOR OR CKT FAILURE 30 SPEC CODE 4WD/MT/CAL 31 THROTTLE SENSOR OR CKT FAILURE THROTTLE SENSOR VOLTAGE OR CKT 32 O2 SENSOR OR CIRCUIT FAILURE O2 SNSR VOLTAGE OR CKT FAILURE 33 VSS OR CIRCUIT (NO SIGNAL) VSS VOLTAGE OR CIRCUIT FAILURE 34 EGR SOL VALVE ON/OFF OR CKT EGR LINE CLOGGED OR EGR CKT (CA) 35 CPC SOL MONITOR CKT VOLTAGE PURGE SOL VALVE ON/OFF OR CKT PURGE SOL VALVE OR CKT FAILURE 36 IGNITER MONITOR CKT VOLTAGE 40 SPEC CODE 4WD/ECVT/CAL 41 AFR ADAPTIVE LEARN CONTROL SYSTEM LEAN CONDITION 42 IDLE SWITCH SIGNAL OR CKT IDLE SWITCH VOLTAGE SIGNAL IDLE SWITCH OR CIRCUIT FAILURE 43 POWER SWITCH SIGNAL OR CKT 44 WASTEGATE CONTRL SOL. OR CIRCUIT 45 BARO SENSOR OR CIRCUIT FAILURE BARO SENSOR FAILURE KDWN CONTROL RLY (ON/OFF POS.) 46 RADIATOR FAN CONTROL SYSTEM 49 AIR FLOW SENSOR OR CKT FAILURE 51 NEUTRAL SW CKT (REMAINS ON) NEUTRAL SW OR CKT (NO SIGNAL) AT INHIBITOR SWITCH OR CKT 52 CLUTCH SW CKT (FWD w/MT/ECVT) PARKING SWITCH OR CKT FAILURE 33 SUBARU DIAGNOSTIC TROUBLE CODES (DTCS) YEAR: 1990 (CONTINUED) 34 DTC NO. DESCRIPTOR 53 HAC SOLENOID OR CKT FAILURE 55 EGR GAS TEMP. SENSOR (CA ONLY) 61 PARKING SWITCH (REMAINS ON) 62 ELEC LOAD SIGNAL (HDLP/REAR DEF) IDLE-UP SYSTEM 1 OR CKT FAILURE 63 BLOWER FAN SW (REMAINS ON/OFF) IDLE-UP SYSTEM 2 OR CKT FAILURE 65 VACUUM PRESSURE SENSOR OR CKT YEAR: 1991 DTC NO. 1991 1 SPEC CODE MT/FED/2700cc SPEC CODE MT/FED/NON-TURBO 2 SPEC CODE MT/CA/2700cc SPEC CODE MT/CA/NON-TURBO 3 SPEC CODE AT/FED/CAN SPEC CODE AT/FED/2700cc SPEC CODE AT/FED/CAN/4WD/1800cc SPEC CODE AT/FED/NON-TURBO 4 SPEC CODE AT/CAL SPEC CODE AT/CA/2700cc SPEC CODE AT/CA/4WD/1800cc SPEC CODE AT/CA/NON-TURBO 5 SPEC CODE MT/FED/CAN SPEC CODE MT/FED/CAN/1800cc SPEC CODE MT/FED/TURBO 6 SPEC CODE MT/CAL SPEC CODE MT/CA/1800cc SPEC CODE MT/CA/TURBO 7 SPEC CODE AT/FED/CAN SPEC CODE AT/FED/FWD/1800cc SPEC CODE AT/FED/TURBO 8 SPEC CODE AT/CAL SPEC CODE AT/CA/FWD/1800cc SPEC CODE AT/CA TURBO 11 CRANK ANGLE SENSOR CIRCUIT FAILURE 12 STARTER SWITCH SIGNAL ABNORMAL 13 CAM ANGLE SENSOR CIRCUIT FAILURE DESCRIPTOR SUBARU SUBARU DIAGNOSTIC TROUBLE CODES (DTCS) YEAR: 1991 (CONTINUED) SUBARU DTC NO. DESCRIPTOR 14 FUEL INJECTOR NO. 1 INOPERATIVE (LEGACY) FUEL INJECTOR OUTPUT OR CIRCUIT FAILURE (LOYALE W/SPFI) FUEL INJECTORS NO. 1 & 2 OR CIRCUIT FAILURE (LOYALE W/MPFI) FUEL INJECTORS NO. 1 & 2, 1800cc (XT) FUEL INJECTORS NO. 5 & 6, 2700cc (XT6) 15 FUEL INJECTOR NO. 2 INOPERATIVE (LEGACY) FUEL INJECTORS NO. 3 & 4 CIRCUIT FAILURE (LOYALE W/SPFI) FUEL INJECTORS NO. 3 & 4, 1800cc (XT) FUEL INJECTORS NO. 1 & 2, 2700cc (XT6) 16 INJECTOR NO. 3, INOPERATIVE 17 INJECTOR NO. 4, INOPERATIVE 21 WATER TEMP. SENSOR CIRCUIT FAILURE 22 KNOCK SENSOR CIRCUIT FAILURE 23 AIR FLOW METER/SENSOR CIRCUIT FAILURE 24 (BYPASS) AIR CONTROL VALVE CIRCUIT FAILURE 25 FUEL INJECTORS NO. 3 & 4, CIRCUIT FAILURE 31 TPS CIRCUIT FAILURE 32 O2 SENSOR CIRCUIT FAILURE 33 VSS SIGNAL ABNORMAL 34 EGR SOLENOID VALVE CONTINUOUSLY ON OR OFF 35 CANISTER PURGE SYSTEM FAILURE 41 AIR/FUEL SYSTEM FAILURE 42 IDLE SWITCH CIRCUIT ABNORMAL 44 WASTEGATE CONTROL SYSTEM FAILURE 45 PRESSURE SENSOR/EXCHANGE SOLENOID VALVE FAILURE (LEGACY TURBO) ATMOSPHERIC PRESSURE SENSOR FAULTY (LEGACY NON-TURBO) KICK-DOWN CONTROL RELAY FAILURE, CONTINUOUSLY ON OR OFF (LOYALE W/SPFI) 49 AIR FLOW SENSOR: USE OF IMPROPER SENSOR 51 NEUTRAL/INHIBITOR SWITCH CIRCUIT FAILURE 52 PARKING SWITCH SIGNAL ABNORMAL 55 EGR GAS TEMP. SENSOR, OPEN OR SHORT 61 PARKING SWITCH CIRCUIT FAILURE, SWITCH CONTINUOUSLY ON 35 SUBARU DIAGNOSTIC TROUBLE CODES (DTCS) 36 YEAR: 1992 DTC NO. 1992 11 CRANK ANGLE SENSOR CIRCUIT FAILURE 12 STARTER SWITCH, ABNORMAL SIGNAL 13 CAM ANGLE SENSOR CIRCUIT FAILURE 14 INJECTOR NO. 1 INOPERATIVE 15 INJECTOR NO. 2 INOPERATIVE 16 INJECTOR NO. 3 INOPERATIVE 17 INJECTOR NO. 4 INOPERATIVE 18 INJECTOR NO. 5 INOPERATIVE 19 INJECTOR NO. 6 INOPERATIVE 21 WATER TEMP. SENSOR, ABNORMAL SIGNAL 22 KNOCK SENSOR, ABNORMAL VOLTAGE IN MONITOR CIRCUIT (LEGACY) KNOCK SENSOR 1, ABNORMAL VOLTAGE IN MONITOR CIRCUIT, RIGHT BANK (SVX) 23 AIR FLOW SENSOR, ABNORMAL VOLTAGE 24 BYPASS AIR CONTROL SOLENOID VALVE CIRCUIT FAILURE 28 KNOCK SENSOR 2, ABNORMAL VOLTAGE IN MONITOR CIRCUIT, LEFT BANK 29 CRANK ANGLE SENSOR 2, ABNORMAL VOLTAGE IN MONITOR CIRCUIT 31 THROTTLE SENSOR, ABNORMAL VOLTAGE IN CIRCUIT 32 O2 SENSOR INOPERATIVE (LEGACY) O2 SENSOR 2, INOPERATIVE, RIGHT BANK (SVX) 33 VSS 2, ABNORMAL VOLTAGE 34 EGR SOLENOID VALVE INOPERATIVE 35 PURGE CONTROL SOLENOID VALVE INOPERATIVE 37 O2 SENSOR 2, INOPERATIVE, LEFT BANK (SVX) 38 ENGINE TORQUE CONTROL CIRCUIT, SHORT CIRCUIT 41 A/F LEARNING CONTROL FAULTY 42 IDLE SWITCH, ABNORMAL VOLTAGE 44 WASTEGATE CONTROL SOLENOID VALVE INOPERATIVE DESCRIPTOR SUBARU SUBARU DIAGNOSTIC TROUBLE CODES (DTCS) YEAR: 1992 (CONTINUED) DTC NO. DESCRIPTOR 45 ATMOSPHERIC PRESSURE SENSOR FAULTY (LEGACY NON-TURBO) PRESSURE SENSOR/EXCHANGE SOLENOID VALVE FAULTY (LEGACY TURBO) ATMOSPHERIC PRESSURE SENSOR FAULTY, SENSOR IN ECU (SVX) 49 IMPROPER AIR FLOW SENSOR IN USE 51 NEUTRAL SWITCH, ABNORMAL SIGNAL (LEGACY M/T) INHIBITOR SWITCH, ABNORMAL SIGNAL (LEGACY A/T) NEUTRAL SWITCH, ABNORMAL SIGNAL FROM PARKING SWITCH (SVX) 52 PARKING SWITCH, ABNORMAL SIGNAL 55 EGR GAS TEMP. SENSOR, ABNORMAL SIGNAL 56 EGR SYSTEM FAILURE (CAL) YEAR: 1993 DTC NO. 1993 11 CRANK ANGLE SENSOR FAILURE 12 STARTER SWITCH, ABNORMAL SIGNAL (LEGACY) STARTER SWITCH, ABNORMAL SIGNAL FROM IGN. SWITCH (SVX) STARTER SWITCH, CIRCUIT FROM ECM TO SWITCH, OPEN OR SHORT (IMPREZA) 13 CAM ANGLE SENSOR SIGNAL FAILURE 14 INJECTOR NO. 1 INOPERATIVE 15 INJECTOR NO. 2 INOPERATIVE 16 INJECTOR NO. 3 INOPERATIVE 17 INJECTOR NO. 4 INOPERATIVE 18 INJECTOR NO. 5 INOPERATIVE 19 INJECTOR NO. 6 INOPERATIVE 21 ECT SENSOR, ABNORMAL SIGNAL 22 KNOCK SENSOR, ABNORMAL VOLTAGE IN MONITOR CIRCUIT (LEGACY) KNOCK SENSOR 1, ABNORMAL VOLTAGE IN MONITOR CIRCUIT, RIGHT BANK (SVX) 23 AIR FLOW SENSOR CIRCUIT FAILURE 24 (BYPASS) IDLE AIR CONTROL CIRCUIT FAILURE 28 KNOCK SENSOR 2, ABNORMAL VOLTAGE, LEFT BANK 29 CRANK ANGLE SENSOR 2, CIRCUIT FAILURE SUBARU DESCRIPTOR 37 SUBARU DIAGNOSTIC TROUBLE CODES (DTCS) YEAR: 1993 (CONTINUED) 38 DTC NO. DESCRIPTOR 31 THROTTLE SENSOR CIRCUIT FAILURE 32 O2 SENSOR INOPERATIVE (LEGACY) O2 SENSOR 1 INOPERATIVE, RIGHT BANK (SVX) O2 SENSOR OR CIRCUIT OPEN OR SHORT TO ECM (IMPREZA) 33 VSS CIRCUIT FAILURE 34 EGR SOLENOID VALVE OR CIRCUIT FAILURE 35 PURGE CONTROL VALVE OR CIRCUIT FAILURE 36 AIR SUCTION SOLENOID VALVE OR CIRCUIT FAILURE 37 O2 SENSOR 2 INOPERATIVE, LEFT BANK 38 ENGINE TORQUE CONTROL CIRCUIT, SHORT FROM ECU TO TCU 41 A/F LEARNING CONTROL FAULTY 42 IDLE SWITCH, ABNORMAL VOLTAGE 44 WASTEGATE CONTROL SOLENOID VALVE INOPERATIVE 45 ATMOSPHERIC PRESSURE SENSOR FAULTY (LEGACY NON-TURBO) PRESSURE SENSOR/EXCHANGE VALVE FAULTY (LEGACY TURBO) ATMOSPHERIC PRESSURE SENSOR FAULTY, SENSOR IN ECU (SVX) 49 IMPROPER AIR FLOW SENSOR IN USE 51 NEUTRAL SWITCH, ABNORMAL SIGNAL (SVX) INHIBITOR SWITCH, ABNORMAL SIGNAL (A/T) NEUTRAL POSITION SWITCH, ABNORMAL SIGNAL (M/T) 52 PARKING SWITCH, ABNORMAL SIGNAL 55 EGR GAS TEMP. SENSOR, ABNORMAL SIGNAL, SENSOR FAILURE 56 EGR SYSTEM, VALVE OR HOSE MALFUNCTION YEAR: 1994 DTC NO. 1994 11 NO CRANK ANGLE SENSOR SIGNAL ENTERED (LEGACY) CRANK SENSOR 1, NO SIGNAL FOR MORE THAN 3 SEC. W/START SWITCH ON (SVX) CRANK POSITION SENSOR, NO SIGNAL, BUT CAM SIGNAL PRESENT (IMPREZA) 12 STARTER SWITCH, ABNORMAL SIGNAL (LEGACY) STARTER SWITCH, ABNORMAL SIGNAL FROM IGNITION SWITCH (SVX) STARTER SWITCH, ABNORMAL SIGNAL, OR OPEN IN CIRCUIT (IMPREZA) DESCRIPTOR SUBARU SUBARU DIAGNOSTIC TROUBLE CODES (DTCS) YEAR: 1994 (CONTINUED) SUBARU DTC NO. DESCRIPTOR 13 NO CAM ANGLE SIGNAL, 2 REVOLUTION SIGNAL FROM CRANK SENSOR (LEGACY) NO CAM ANGLE SIGNAL, SIGNAL FROM CRANK SENSOR 1 (SVX) NO CAM POSITION SIGNAL, CRANK POSITION SIGNAL PRESENT (IMPREZA) 14 INJECTOR NO. 1 INOPERATIVE 15 INJECTOR NO. 2 INOPERATIVE 16 INJECTOR NO. 3 INOPERATIVE 17 INJECTOR NO. 4 INOPERATIVE 18 INJECTOR NO. 5 INOPERATIVE 19 INJECTOR NO. 6 INOPERATIVE 21 ECT SENSOR OR CIRCUIT FAILURE 22 KNOCK SENSOR, ABNORMAL VOLTAGE IN MONITOR CIRCUIT (LEGACY) KNOCK SENSOR 1, ABNORMAL VOLTAGE IN MONITOR CIRCUIT, RIGHT BANK (SVX) 23 AIR FLOW SENSOR, ABNORMAL VOLTAGE 24 (BYPASS) AIR CONTROL SOLENOID VALVE OR CIRCUIT FAILURE 28 KNOCK SENSOR 2, ABNORMAL VOLTAGE IN MONITOR CIRCUIT (LEFT BANK) 29 NO CRANK ANGLE SENSOR 2 SIGNAL, TWO SIGNALS ENTERED FROM CAM SENSOR 31 THROTTLE SENSOR, ABNORMAL VOLTAGE 32 O2 SENSOR INOPERATIVE (LEGACY) O2 SENSOR 1 INOPERATIVE, RIGHT BANK (SVX) O2 SENSOR OR CIRCUIT FAILURE (IMPREZA) 33 VSS 2 CIRCUIT FAILURE 34 EGR SOLENOID VALVE OR CIRCUIT FAILURE 35 PURGE CONTROL SOLENOID VALVE OR CIRCUIT FAILURE 36 AIR SUCTION SOLENOID VALVE FAILURE, OR CIRCUIT OPEN/ SHORT 37 O2 SENSOR 2 INOPERATIVE, LEFT BANK 38 ENGINE TORQUE CONTROL, SHORT BETWEEN ECU AND TCU 41 A/F LEARNING CONTROL FAULTY 42 IDLE SWITCH, ABNORMAL VOLTAGE 44 WASTEGATE CONTROL SOLENOID VALVE INOPERATIVE 39 SUBARU DIAGNOSTIC TROUBLE CODES (DTCS) YEAR: 1994 (CONTINUED) 40 DTC NO. DESCRIPTOR 45 ATMOSPHERIC PRESSURE SENSOR FAULTY (LEGACY NON-TURBO) PRESSURE SENSOR/EXCHANGE SOLENOID VALVE FAULTY (LEGACY TURBO) ATMOSPHERIC PRESSURE SENSOR FAULTY, SENSOR IN ECU (SVX) 49 IMPROPER AIR FLOW SENSOR IN USE 51 NEUTRAL SWITCH, ABNORMAL VOLTAGE FROM INHIBITOR SWITCH (SVX) INHIBITOR SWITCH, ABNORMAL SIGNAL (A/T) NEUTRAL POSITION SWITCH, ABNORMAL SIGNAL (M/T) 52 PARKING SWITCH, ABNORMAL SIGNAL 55 EGR GAS TEMP. SENSOR FAULTY 56 EGR SYSTEM FAILURE YEAR: 1995 DTC NO. 1995 11 CKP SENSOR OR CIRCUIT FAILURE (SENSOR 1,CAM SIGNAL OK) 12 STARTER SWITCH SIGNAL FAILURE 13 CAM ANGLE SENSOR FAILURE 14 FUEL INJECTOR NO. 1 OR CIRCUIT FAILURE 15 FUEL INJECTOR NO. 2 OR CIRCUIT FAILURE 16 FUEL INJECTOR NO. 3 OR CIRCUIT FAILURE 17 FUEL INJECTOR NO. 4 OR CIRCUIT FAILURE 18 FUEL INJECTOR NO. 5 OR CIRCUIT FAILURE 19 FUEL INJECTOR NO. 6 OR CIRCUIT FAILURE 21 ECT SENSOR OR CIRCUIT FAILURE 22 KNOCK SENSOR MONITOR CIRCUIT (RIGHT BANK) 23 AIR FLOW SENSOR SIGNAL VOLTAGE 24 BYPASS AIR VALVE/IAC CIRCUIT MALFUNCTION 28 KNOCK SENSOR MONITOR CIRCUIT (LEFT BANK) 29 CKP SENSOR 2 OR CIRCUIT FAILURE (CAM SIGNAL OK) DESCRIPTOR SUBARU SUBARU DIAGNOSTIC TROUBLE CODES (DTCS) YEAR: 1995 (CONTINUED) SUBARU DTC NO. DESCRIPTOR 31 TPS SIGNAL/VOLTAGE OR CIRCUIT FAILURE 32 O2 SENSOR (RIGHT BANK) INOPERATIVE 33 VSS 2 OR CIRCUIT FAILURE 34 EGR SOLENOID VALVE OR CIRCUIT FAILURE 35 PURGE SOLENOID VALVE OR CIRCUIT FAILURE 36 AIR SUCTION VALVE OR CIRCUIT FAILURE 37 O2 SENSOR (LEFT BANK) INOPERATIVE 38 ENGINE TORQUE CONTROL, ECM/TCM CIRCUIT 41 AIR/FUEL CONTROL, LEAN FAILURE 52 PARKING SWITCH SIGNAL 44 WASTEGATE SOLENOID CONTROL VALVE 45 BARO SENSOR OR CIRCUIT FAILURE 49 AIR FLOW SENSOR OR CIRCUIT FAILURE 51 NEUTRAL/INHIBIT SWITCH SIGNAL OR CIRCUIT FAILURE 52 PARKING SWITCH SIGNAL 55 EGR TEMP. SENSOR OR CIRCUIT 56 EGR SYSTEM MALFUNCTION 61 FUEL TANK PRESSURE SOLENOID VALVE OR CIRCUIT 62 FUEL TEMP. SENSOR OPEN/SHORT CIRCUIT 63 FUEL TANK PRESSURE SENSOR OR CIRCUIT 41 SUBARU DIAGNOSTIC TROUBLE CODES (DTCS) OBD II SYSTEMS 42 YEAR: 1995-98 DTC NO. 1995-98 OBD II P0100 MAF Sensor Circuit Malfunction P0101 MAF Sensor Range/Performance Problem P0102 MAF Sensor Circuit, Low Input P0103 MAF Sensor Circuit, High Input P0105 Pressure Sensor Circuit Malfunction P0106 Pressure Sensor Circuit Range/Performance Problem P0107 Pressure Sensor Circuit, Low Input P0108 Pressure Sensor Circuit, High Input P0115 ECT Sensor, Circuit Malfunction P0116 ECT Sensor, Low Input P0117 ECT Sensor, High Input P0117 ECT Sensor, Low Input (1998 Only) P0118 ECT Sensor, High Input P0120 TPS Circuit Malfunction P0121 TPS Circuit Range/Performance Problem P0122 TPS Circuit, Low Input P0123 TPS Circuit, High Input P0125 Coolant Temp. Low, No Closed Loop Fuel Control P0130 O2S Circuit Malfunction, Bank 1 Sensor 1 P0133 O2S Circuit, Slow Response, Bank 1 Sensor 1 P0135 Front O2 Sensor 1 Circuit, Slow Response P0136 Front HO2 Sensor 1, Circuit Malfunction P0139 Rear O2 Sensor, Slow Response P0141 Rear HO2 Sensor, Circuit Malfunction P0142 Front O2 Sensor 2, Circuit Malfunction P0145 Front O2 Sensor 2, Slow Response P0147 Front HO2 Sensor 2, Circuit Malfunction P0170 Fuel Trim Malfunction P0180 Fuel Temp. Sensor A, Circuit Malfunction DESCRIPTOR SUBARU SUBARU DIAGNOSTIC TROUBLE CODES (DTCS) YEAR: 1995-98 (CONTINUED) SUBARU DTC NO. DESCRIPTOR P0181 Fuel Temp. Sensor A, Circuit Range/Performance P0182 Fuel Temp. Sensor A Circuit, Low Input P0183 Fuel Temp. Sensor A Circuit, High Input P0201 Fuel Injector No. 1, Circuit Malfunction P0202 Fuel Injector No. 2, Circuit Malfunction P0203 Fuel Injector No. 3, Circuit Malfunction P0204 Fuel Injector No. 4, Circuit Malfunction P0205 Fuel Injector No. 5, Circuit Malfunction P0206 Fuel Injector No. 6, Circuit Malfunction P0261 Fuel Injector Circuit No. 1, Low Input P0262 Fuel Injector Circuit No. 1, High Input P0264 Fuel Injector Circuit No. 2, Low Input P0265 Fuel Injector Circuit No. 2, High Input P0267 Fuel Injector Circuit No. 3, Low Input P0268 Fuel Injector Circuit No. 3, High Input P0270 Fuel Injector Circuit No. 4, Low Input P0271 Fuel Injector Circuit No. 4, High Input P0301 Cylinder No. 1, Misfire Detected P0302 Cylinder No. 2, Misfire Detected P0303 Cylinder No. 3, Misfire Detected P0304 Cylinder No. 4, Misfire Detected P0305 Cylinder No. 5, Misfire Detected P0306 Cylinder No. 6, Misfire Detected P0325 Knock Sensor Circuit 1 P0335 Crankshaft Position Sensor No. 1, Circuit Malfunction P0336 Crankshaft Position Sensor, Circuit Out of Range P0340 Camshaft Position Sensor, Circuit Malfunction P0341 Camshaft Position Sensor Circuit, Range/Performance P0385 Crankshaft Position Sensor 2, Circuit Malfunction P0400 EGR Flow, System Malfunction P0403 EGR Solenoid Circuit, Malfunction P0410 Secondary Air Injection System Malfunction 43 SUBARU DIAGNOSTIC TROUBLE CODES (DTCS) YEAR: 1995-98 (CONTINUED) 44 DTC NO. DESCRIPTOR P0412 Secondary Air Injection Switching Valve Malfunction P0420 Catalyst Efficiency Below Threshold P0440 EVAP Control System Malfunction P0441 EVAP Purge System, Incorrect Flow P0443 EVAP System Purge Control Valve Malfunction P0446 EVAP System Vent Control Valve Malfunction P0450 EVAP System Pressure Sensor Malfunction P0451 EVAP System Pressure Sensor Range/Performance Problem P0452 EVAP System Pressure Sensor, Low Input P0453 EVAP System Pressure Sensor, High Input P0461 Fuel Level Sensor Circuit, Range/Performance Problem P0462 Fuel Level Sensor Circuit, Low Input P0463 Fuel Level Sensor Circuit, High Input P0480 Cooling Fan Relay 1 Circuit, Low Input P0483 Cooling Fan Function Problem P0500 VSS Malfunction P0505 Idle Control System Malfunction P0506 Idle Control System, RPM Lower Than Expected P0507 Idle Control System, RPM Higher Than Expected P0600 Serial Communication Link Malfunction P0601 Internal Control Module Memory Check Sum Error P0703 Brake Input Switch Malfunction P0705 Transmission Range Sensor Circuit Malfunction P0710 Transmission Fluid Temp. Sensor Malfunction P0720 Output Speed Sensor (VSS 1), Circuit Malfunction P0725 Engine Speed Input Circuit Malfunction P0731 Gear 1, Incorrect Ratio P0732 Gear 2, Incorrect Ratio P0733 Gear 3, Incorrect Ratio P0734 Gear 4, Incorrect Ratio P0740 Torque Converter Clutch System Malfunction P0743 Torque Converter Clutch System, Electrical Problem SUBARU SUBARU DIAGNOSTIC TROUBLE CODES (DTCS) YEAR: 1995-98 (CONTINUED) SUBARU DTC NO. DESCRIPTOR P0748 Pressure Control Solenoid, Electrical Problem P0753 Shift Solenoid A, Electrical Problem P0758 Shift Solenoid B, Electrical Problem P0760 Shift Solenoid C, Malfunction P0763 Shift solenoid C, Electrical Problem P1100 Starter Switch Circuit Malfunction P1101 Neutral Position Switch, Circuit Malfunction P1102 Pressure Sources Switching Solenoid Valve, Circuit Malfunction P1103 Engine Torque Control Signal Circuit Malfunction P1104 TCS signal Circuit Malfunction P1107 Air Injection System Diagnosis Solenoid Valve Circuit P1108 Induction Control Solenoid Valve Circuit P1120 Starter Switch Circuit, High Input P1121 Neutral Position Switch Circuit, Low Input P1122 Pressure Sources Switch Solenoid Valve, High Input P1124 TCS Signal Circuit, High Input P1141 MAF Sensor, Range/Performance Problem, High Input P1142 TPS Circuit, Range/Performance Problem, Low Input P1143 Pressure Sensor, Range/Performance Problem, Low Input P1144 Pressure sensor, Range/Performance Problem, High Input P1300 CKP Sensor 2, Circuit Malfunction P1400 Fuel Tank Pressure Control Solenoid Valve P1401 Fuel Tank Pressure Control System Problem P1402 Fuel Level Sensor Circuit Malfunction P1420 Fuel Tank Pressure Solenoid Valve, High Input P1421 EGR Circuit, High Input P1422 EVAP System, Purge Control Valve, High Input P1423 EVAP System, Vent Control, High Input P1440 Fuel Tank Pressure System, Low Input P1441 Fuel Tank Pressure System, High Input P1442 Fuel Level Sensor, Range/Performance Problem 2 45 SUBARU DIAGNOSTIC TROUBLE CODES (DTCS) YEAR: 1995-98 (CONTINUED) 46 DTC NO. DESCRIPTOR P1443 EVAP System, Vent Control Problem P1500 Radiator Fan Relay 1, Circuit Malfunction P1501 Radiator Fan Relay 2, Circuit Malfunction P1502 Radiator Fan Function Problem P1507 Idle Control System Malfunction (Fail-safe) P1520 Radiator Fan Relay 1, High Input P1540 VSS Sensor 2, Malfunction P1700 TPS Circuit Malfunction P1701 Cruise Control Set Signal Circuit P1702 A/T Diagnosis Input Signal Circuit, Low Input P1722 A/T Diagnosis Input Signal Circuit, High Input P1742 A/T Diagnosis Input Signal, Circuit Malfunction SUBARU TOYOTA 1. VEHICLES AND SYSTEMS ..................................................................................................................... 2 2. TOYOTA SPECIFIC INFORMATION ....................................................................................................11 3. TOYOTA OBD SYSTEMS ....................................................................................................................... 12 4. TEST MODES AVAILABLE .................................................................................................................... 15 5. GETTING STARTED ................................................................................................................................. 16 6. SELECTING THE VEHICLE .................................................................................................................. 18 7. TEST MODES.............................................................................................................................................. 24 Mode F1: DTC Entry ........................................................................................................................ 24 Submode F0: How To Read .................................................................................................... 25 Submode F1: Enter DTC(s) ..................................................................................................... 25 Submode F2: DTC List ............................................................................................................ 29 Submode F3: Review DTC(s) ................................................................................................. 29 Submode F4: Clear DTC(s) ..................................................................................................... 29 Mode F2: DTC ................................................................................................................................... 29 Submode F1: Read/Enter DTC(s) .......................................................................................... 29 Submode F5: Sens DTC ........................................................................................................... 31 8. TOYOTA DIAGNOSTIC TROUBLE CODES (DTCs) ...................................................................... 33 Air Bag ................................................................................................................................................ 40 Anti-Lock Brake System .................................................................................................................. 40 Air Conditioning ................................................................................................................................ 43 Cruise Control System ...................................................................................................................... 43 Electronic Controlled Transmission............................................................................................... 44 Engine .................................................................................................................................................. 45 9. DATA LIST PARAMETER DESCRIPTIONS ...................................................................................... 47 VEHICLES AND SYSTEMS 1. VEHICLES AND SYSTEMS Using the Asian Imports Cartridge, the Toyota vehicles on the following pages can be diagnosed. MODEL: 1983 ENGINE ENGINE TYPE FUEL SYST CODE TYPE ADAPTER 1983 CAMRY 2.0L I4 2S-E EFI MILCODES JUMPER STARLET 1.3L I4 4K-E EFI MILCODES JUMPER CELICA 2.4L I4 22R-E EFI MILCODES JUMPER CRESSIDA 2.8L I6 5M-GE EFI MANCODES JUMPER CELICA SUPRA 2.8L I6 5M-GE EFI MANCODES JUMPER MODEL: 1984 ENGINE ENGINE TYPE FUEL SYST CODE TYPE ADAPTER 1984 CAMRY 2.0L I4 2S-E EFI MILCODES JUMPER CELICA 2.4L I4 22R-E EFI MILCODES JUMPER CRESSIDA 2.8L I6 5M-GE EFI MANCODES JUMPER CELICA SUPRA 2.8L I6 5M-GE EFI MANCODES JUMPER STARLET 1.3L I4 4K-E EFI MILCODES JUMPER VAN 2.0L I4 3Y-EC EFI MILCODES JUMPER TRUCK 2.4L I4 22R-E EFI MILCODES JUMPER MODEL: 1985 ENGINE ENGINE TYPE FUEL SYST CODE TYPE ADAPTER 1985 2 CAMRY 2.0L I4 2S-E EFI MILCODES JUMPER CELICA 2.4L I4 22R-EC EFI MILCODES JUMPER COROLLA 1.6L I4 4A-GE EFI MILCODES JUMPER CRESSIDA 2.8L I6 5M-GE EFI MILCODES JUMPER CELICA SUPRA 2.8L I6 5M-GE EFI MILCODES JUMPER VAN 2.0L I4 3Y-EC EFI MILCODES JUMPER TRUCK 2.4L I4 22R-E EFI MILCODES JUMPER TOYOTA VEHICLES AND SYSTEMS MODEL: 1985 (CONTINUED) ENGINE ENGINE TYPE FUEL SYST CODE TYPE ADAPTER TRUCK 2.4L I4 22R-TE EFI TURBO MILCODES JUMPER 4 RUNNER 2.4L I4 22R-E EFI MILCODES JUMPER 4 RUNNER 2.4L I4 22R-TE EFI TURBO MILCODES JUMPER MODEL: 1986 ENGINE ENGINE TYPE FUEL SYST CODE TYPE ADAPTER 1986 CAMRY (USA) 2.0L I4 2S-EL EFI MILCODES JUMPER CAMRY (CANADA) 2.0L I4 2S-EL EFI MILCODES JUMPER CELICA 2.0L I4 2S-E EFI MILCODES JUMPER CELICA 2.0L I4 3S-GE EFI MILCODES JUMPER COROLLA 1.6L I4 4A-GE EFI MILCODES JUMPER CRESSIDA 2.8L I6 5M-GE EFI MILCODES JUMPER MR2 1.6L I4 4A-GE EFI MILCODES JUMPER CELICA SUPRA 2.8L I4 5M-GE EFI MILCODES JUMPER CELICA SUPRA* 3.0L I6 7M-GE EFI MILCODES JUMPER VAN 2.2L I4 4Y-EC EFI MILCODES JUMPER TRUCK 2.4L I4 22R-E EFI MILCODES JUMPER 4 RUNNER 2.4L I4 22R-E EFI MILCODES JUMPER TRUCK 2.4L I4 22R-TE EFI TURBO MILCODES JUMPER 4 RUNNER 2.4L I4 22R-TE EFI TURBO MILCODES JUMPER * Vehicle is a 1986. MODEL: 1987 ENGINE ENGINE TYPE FUEL SYST CODE TYPE ADAPTER 1987 CAMRY 2.0L I4 3S-FE EFI MILCODES JUMPER CELICA 2.0L I4 3S-FE EFI MILCODES JUMPER CELICA 2.0L I4 3S-GE EFI MILCODES JUMPER COROLLA 1.6L I4 4A-C CARB MILCODES JUMPER TOYOTA 3 VEHICLES AND SYSTEMS MODEL: 1987 (CONTINUED) ENGINE ENGINE TYPE FUEL SYST CODE TYPE ADAPTER COROLLA 1.6L I4 4A-GE EFI MILCODES JUMPER CRESSIDA 2.8L I6 5M-GE EFI MILCODES JUMPER MR2 1.6L I4 4A-GE EFI MILCODES JUMPER SUPRA 3.0L I6 7M-GE EFI MILCODES JUMPER SUPRA 3.0L I6 7M-GTE EFI TURBO MILCODES JUMPER VAN 2.2L I4 4Y-E EFI MILCODES JUMPER TRUCK 2.4L I4 22R CARB MILCODES JUMPER TRUCK 2.4L I4 22R-E EFI MILCODES JUMPER TRUCK 2.4L I4 22R-TE EFI TURBO MILCODES JUMPER 4 RUNNER 2.4L I4 22RE EFI MILCODES JUMPER MODEL: 1988 ENGINE ENGINE TYPE FUEL SYST CODE TYPE ADAPTER 1988 4 CAMRY 2.0L I4 3S-FE EFI MILCODES JUMPER CAMRY ALLTRAC 2.0L I4 3S-FE EFI MILCODES JUMPER CELICA 2.0L I4 3S-FE EFI MILCODES JUMPER CELICA 2.0L I4 3S-GE EFI MILCODES JUMPER CELICA 2.0L I4 3S-GTE EFI TURBO MILCODES JUMPER CELICA ALLTRAC 2.0L I4 3S-GTE EFI TURBO MILCODES JUMPER COROLLA 1.6L I4 4A-F CARB MILCODES JUMPER COROLLA 1.6L I4 4A-GE EFI MILCODES JUMPER COROLLA FX 1.6L I4 4A-GE EFI MILCODES JUMPER COROLLA FX16 1.6L I4 4A-GE EFI MILCODES JUMPER CRESSIDA 2.8L I6 5M-GE EFI MILCODES JUMPER MR2 1.6L I4 4A-GE EFI MILCODES JUMPER MR2 1.6L I4 4A-GZE EFI MILCODES JUMPER SUPRA 3.0L I6 7M-GE EFI MILCODES JUMPER SUPRA 3.0L I6 7M-GTE EFI TURBO MILCODES JUMPER VAN 2.2L I4 4Y-E EFI MILCODES JUMPER TOYOTA VEHICLES AND SYSTEMS MODEL: 1988 (CONTINUED) ENGINE ENGINE TYPE FUEL SYST CODE TYPE ADAPTER TRUCK 2.4L I4 22R-E EFI MILCODES JUMPER 4 RUNNER 2.4L I4 22R-E EFI MILCODES JUMPER TRUCK 2.4L I4 22R-TE EFI TURBO MILCODES JUMPER 4 RUNNER 2.4L I4 22R-TE EFI TURBO MILCODES JUMPER TRUCK 3.0L V6 3VZ-E EFI MILCODES JUMPER 4 RUNNER 3.0L V6 3VZ-E EFI MILCODES JUMPER LAND CRUISER 4.0L I6 3F-E EFI MILCODES JUMPER MODEL: 1989 ENGINE ENGINE TYPE FUEL SYST INFO TYPE ADAPTER 1989 CAMRY 2.0L I4 2.5L V6 3S-FE 2VZ-FE PFI PFI CODES CODES CHECK CHECK CELICA 2.0L I4 (ST, GT) 2.0L I4 (GTS) 2.0L TURBO I4 (ALL TRAC) 3S-FE 3S-GE 3S-GTE PFI PFI PFI CODES CODES CODES CHECK CHECK CHECK COROLLA 1.6L I4 (CA ONLY) 1.6L I4 1.6L I4 4A-F 4A-FE 4A-GE 2V CARB PFI PFI CODES CODES CODES CHECK CHECK CHECK CRESSIDA 3.0L I6 7M-GE PFI CODES & DATA CHECK, TDCL MR2 1.6L I4 1.6L IR (SC) 4A-GE 4A-GZE PFI PFI CODES CODES CHECK CHECK SUPRA 3.0L I6 3.0L TURBO I6 7M-GE 7M-GTE PFI PFI CODES CODES CHECK CHECK TERCEL 1.5L I4 (CA ONLY) 3E 1V CARB CODES CHECK LAND CRUISER 4.0L I6 3F-E PFI CODES CHECK VAN 2.2L I4 4Y-E PFI CODES CHECK 4RUNNER 2WD & 4WD 2.4L I4 3.0L V6 22R-E 3VZ-E PFI PFI CODES CODES CHECK CHECK TRUCK 2WD & 4WD 2.4L I4 (CA ONLY) 2.4L I4 3.0L V6 22R 22R-E 3VZ-E 2V CARB PFI PFI CODES CODES CODES CHECK CHECK CHECK TOYOTA 5 VEHICLES AND SYSTEMS MODEL: 1990 ENGINE ENGINE TYPE FUEL SYST INFO TYPE ADAPTER 1990 CAMRY 2.0L I4 2.5L V6 3S-FE 2VZ-FE PFI PFI CODES CODES CHECK CHECK CELICA 1.6L I4 2.0L TURBO I4 (ALL TRAC) 2.2L I4 4A-FE 3S-GTE PFI PFI CODES CODES CHECK CHECK 5S-FE PFI CODES CHECK COROLLA 1.6L I4 1.6L I4 4A-FE 4A-GE PFI PFI CODES CODES CHECK CHECK CRESSIDA 3.0L I6 7M-GE PFI CODES & DATA CHECK, TDCL MR2 1.6L I4 1.6L IR (SC) 4A-GE 4A-GZE PFI PFI CODES CODES CHECK CHECK SUPRA 3.0L I6 3.0L TURBO I6 7M-GE 7M-GTE PFI PFI CODES CODES CHECK CHECK TERCEL 1.5L I4 1.5L I4 (CA ONLY) 3E-E 3E PFI 1V CARB CODES CODES CHECK CHECK LAND CRUISER 4.0L I6 3F-E PFI CODES CHECK 4RUNNER 2WD & 4WD 2.4L I4 3.0L V6 22R-E 3VZ-E PFI PFI CODES CODES CHECK CHECK TRUCK 2WD & 4WD 2.4L I4 (CA ONLY) 2.4L I4 3.0L V6 22R 22R-E 3VZ-E 2V CARB PFI PFI CODES CODES CODES CHECK CHECK CHECK MODEL: 1991 ENGINE ENGINE TYPE FUEL SYST INFO TYPE ADAPTER 1991 6 CAMRY 2.0L I4 2.5L V6 3S-FE 2VZ-FE PFI PFI CODES CODES CHECK CHECK CELICA 1.6L I4 2.0L TURBO I4 (ALL TRAC) 2.2L I4 4A-FE 3S-GTE PFI PFI CODES CODES CHECK CHECK 5S-FE PFI CODES CHECK COROLLA 1.6L I4 1.6L I4 4A-FE 4A-GE PFI PFI CODES CODES CHECK CHECK CRESSIDA 3.0L V6 7M-GE PFI CODES & DATA CHECK, TDCL MR2 2.0L TURBO I4 2.2L I4 3S-GTE 5S-FE PFI PFI CODES CODES CHECK CHECK TOYOTA VEHICLES AND SYSTEMS MODEL: 1991 (CONTINUED) ENGINE ENGINE TYPE FUEL SYST INFO TYPE ADAPTER PREVIA 2.4L I4 2TZ-FE PFI CODES CHECK SUPRA 3.0L I6 3.0L TURBO I6 7M-GE 7M-GTE PFI PFI CODES CODES CHECK CHECK TERCEL 1.5L I4 3E-E PFI CODES CHECK LAND CRUISER 4.0L I6 3F-E PFI CODES CHECK 4RUNNER 2WD & 4WD 2.4L I4 3.0L V6 22R-E 3VZ-E PFI PFI CODES CODES CHECK CHECK TRUCK 2WD & 4WD 2.4L I4 3.0L V6 22R-E 3VZ-E PFI PFI CODES CODES CHECK CHECK MODEL: 1992 ENGINE ENGINE TYPE FUEL SYST INFO TYPE ADAPTER 1992 CAMRY 3.0L V6 2.2L I4 3VZ-FE 5S-FE PFI PFI CODES & DATA CODES & DATA CHECK, TCDL CHECK, TDCL CELICA 2.0L TURBO I4 (ALL TRAC) 1.6L I4 2.2L I4 3S-GTE PFI CODES & DATA CHECK 4A-FE 5S-FE PFI PFI CODES CODES & DATA CHECK CHECK COROLLA 1.6L I4 4A-FE PFI CODES CHECK CRESSIDA 3.0L V6 7M-GE PFI CODES & DATA CHECK, TDCL MR2 2.0L TURBO I4 2.2L I4 3S-GTE 5S-FE PFI PFI CODES CODES CHECK CHECK PASEO 1.5L I4 5E-FE PRI CODES CHECK PREVIA 2.4L I4 2TZ-FE PFI CODES CHECK SUPRA 3.0L I6 3.0L TURBO I6 7M-GE 7M-GTE PFI PFI CODES CODES CHECK CHECK TERCEL 1.5L I4 3E-E PFI CODES CHECK LAND CRUISER 4.0L I6 3F-E PFI CODES CHECK 4RUNNER 2WD & 4WD 2.4L I4 3.0L V6 22R-E 3VZ-E PFI PFI CODES CODES & DATA CHECK CHECK TRUCK 2WD & 4WD 2.4L I4 3.0L V6 22R-E 3VZ-E PFI PFI CODES CODES & DATA CHECK CHECK TOYOTA 7 VEHICLES AND SYSTEMS MODEL: 1993 ENGINE ENGINE TYPE FUEL SYST INFO TYPE ADAPTER 1993 CAMRY 3.0L V6 2.2L I4 3VZ-FE 5S-FE PFI PFI CODES & DATA CODES & DATA CHECK, TCDL CHECK, TDCL CELICA 2.0L TURBO I4 (ALL TRAC) 1.6L I4 2.2L I4 3S-GTE PFI CODES & DATA CHECK 4A-FE 5S-FE PFI PFI CODES & DATA CODES & DATA CHECK CHECK COROLLA 1.6L I4 1.8L I4 4A-FE 7A-FE PFI PFI CODES & DATA CODES & DATA CHECK CHECK CRESSIDA 3.0L V6 7M-GE PFI CODES & DATA CHECK, TDCL MR2 2.0L TURBO I4 2.2L I4 3S-GTE 5S-FE PFI PFI CODES & DATA CODES & DATA CHECK CHECK PASEO 1.5L I4 5E-E PRI CODES CHECK PREVIA 2.4L I4 2TZ-FE PFI CODES CHECK SUPRA 3.0L I6 3.0L TURBO I6 2JZ-GE 2JZ-GTE PFI PFI CODES & DATA CODES & DATA CHECK, TDCL CHECK, TDCL TERCEL 1.5L I4 3E-E PFI CODES CHECK LAND CRUISER 4.5L I6 1FZ-FE PFI CODES & DATA CHECK T100 3.0L V6 3VZ-E PFI CODES & DATA CHECK 4RUNNER 2WD & 4WD 2.4L I4 3.0L V6 22R-E 3VZ-E PFI PFI CODES & DATA CODES & DATA CHECK CHECK TRUCK 2WD & 4WD 2.4L I4 3.0L V6 22R-E 3VZ-E PFI PFI CODES & DATA CODES & DATA CHECK CHECK MODEL: 1994 ENGINE ENGINE TYPE FUEL SYST INFO TYPE ADAPTER 1994 8 SUPRA 3.0L I6 3.0L TURBO I6 2JZ-GE 2JZ-GTE PFI PFI CODES & DATA CODES & DATA CHECK, TDCL CHECK, TDCL CAMRY 3.0L V6 2.2L I4 1MZ-FE 5S-FE PFI PFI CODES & DATA CODES & DATA OBD II* CHECK, TDCL CELICA 2.2L I4 1.8L I4 5S-FE 7A-FE PFI PFI CODES & DATA CODES & DATA CHECK CHECK COROLLA 1.6L I4 1.8L I4 4A-FE 7A-FE PFI PFI CODES & DATA CODES & DATA CHECK CHECK TOYOTA VEHICLES AND SYSTEMS MODEL: 1994 (CONTINUED) ENGINE ENGINE TYPE FUEL SYST INFO TYPE ADAPTER TERCEL 1.5L I4 3E-E PFI CODES CHECK MR2 2.0L TURBO I4 2.2L I4 3S-GTE 5S-FE PFI PFI CODES & DATA CODES & DATA CHECK CHECK PASEO 1.5L I4 5E-FE PRI CODES CHECK PREVIA 2.4L I4 2TZ-FE PFI CODES CHECK LAND CRUISER 4.5L I6 1FZ-FE PFI CODES & DATA CHECK T100 3.0L V6 3VZ-E PFI CODES & DATA CHECK 4RUNNER 2WD & 4WD 2.4L I4 3.0L V6 22R-E 3VZ-E PFI PFI CODES & DATA CODES & DATA CHECK CHECK TRUCK 2WD & 4WD 2.4L I4 3.0L V6 22R-E 3VZ-E PFI PFI CODES & DATA CODES & DATA CHECK CHECK * For Adapter Type OBD II, use the Common Test Modes OBD II Systems section for operating instructions and test mode information. TOYOTA 9 VEHICLES AND SYSTEMS ELECTRONIC TRANSMISSIONS Using the Asian cartridge, the following Toyota Electronic Transmission/Transaxle Applications can be diagnosed. TOYOTA MODEL 10 TRANSMISSION SUPRA CRESSIDA TRUCK 4RUNNER T100 A340E CAMRY A540E CAMRY A541E CAMRY A540H CAMRY CELICA A240E CAMRY MR2 A241E PASEO A244E PREVIA A46DE COROLLA A245E TRUCK 4RUNNER A340H TOYOTA TOYOTA SPECIFIC INFORMATION 2. TOYOTA SPECIFIC INFORMATION TWO WAYS TO DIAGNOSE TOYOTA Toyota powertrain diagnosis can be performed with the Asian Imports cartridge installed in a Tech 1, Tech 1A, or Mastertech tester. Additionally, Toyota vehicles can be diagnosed with the aftermarket version of the Toyota OEM level program card software using the Mastertech tester only. Operating instructions and test mode information are available for the OEM level software in the Toyota/Lexus Program Card Operator's Manual. If you do not have the necessary Program Card and Mastertech tester to perform OEM level diagnostics, you can use the Asian Imports Cartridge for limited model year coverage. The following Toyota section includes the test modes available, how to connect the tester to the vehicle, operating instructions for DTC entry, and the applicable DTCs for each model year. Parameters that can be displayed by Toyota vehicles, along with a description and states or units/range of each parameter are listed in Section 9. TOYOTA 11 TOYOTA OBD SYSTEMS 3. TOYOTA OBD SYSTEMS Toyota passenger cars and trucks are equipped with On-Board Diagnostic (OBD) systems that operate with engine fuel and emission systems. Toyota OBD include transmission (ECT), antilock brake (ABS), cruise control (CCS), air conditioning (A/C), and airbag (AB). For these systems, Toyota vehicles do not use a multiplexed vehicle network, and as a result the separated systems accompany engine OBD systems, with each additional system ECU having its own diagnostic trouble code (DTC) output line. In addition, engine ECUs support serial data communications. Following is information about each Toyota OBD system. ENGINE DATA LIST Toyota engine serial data list is used to aid in diagnostics for the engine control system. Engine control module, input sensors, input switches, and output actuator data list parameters are provided to the tester by the ECU, via a serial data link. Toyota ECUs update this information at 1.3 seconds/update. Not all Toyota vehicles support data list, and in some cases where the tester has determined that a system is inactive and the data list selection is displayed, data list may still not be supported. If a vehicle has a TDCL and Check DLC, Data List may only be supported on the TDCL DLC. This is a function of the data link connector, so make sure that you are connected to the correct DLC for data list information. Review the Toyota application matrix, column titled Information Type, for the availability of serial data on the vehicle being tested. ENGINE DTCS Toyota engine DTCs are available on Toyota vehicles with electronic engine control. Engine DTCs are set by the engine ECU when problems with, but not limited to, the ECU, air- fuel ratio, throttle position, and air pump control are detected. In addition, Toyota engine ECUs can be commanded to a sensitive test mode, which is found in the Sensitive Test (this test triggers the engine ECU into a sensitive mode which detects engine DTCs using a test structure that is less stringent to DTC detection). The Asian Imports application cartridge supports reading engine DTCs automatically or manually, depending on the state (active or inactive) of the engine system. ELECTRONICALLY CONTROLLED TRANSMISSION DTCS Toyota ECT DTCs are available on select Toyota vehicles with an ECT (refer to the factory service manual for the transmission type for the vehicle you are testing). ECT DTCs are set by the ECT ECU when problems with, but not limited to, the ECU, ATF temperature, accumulator control solenoid, and shift control solenoid(s) are detected. The Asian Imports application cartridge supports reading ECT DTCs automatically or manually, depending on the state (active or inactive) of the ECT system. ANTILOCK BRAKE DTCS Toyota ABS DTCs are available on select Toyota vehicles equipped with ABS. ABS DTCs are set by the ABS ECU when problems with, but not limited to, the ECU, shorted pump motor relay, low brake fluid level, and pressure sensor problems are detected. The Asian Imports application cartridge supports reading ABS DTCs automatically or manually, depending on the state (active or inactive) of the ABS system. 12 TOYOTA TOYOTA OBD SYSTEMS CRUISE CONTROL DTCS Toyota CCS DTCs are available on select Toyota vehicles with automatic cruise control. CCS DTCs are set by the CCS ECU when problems with, but not limited to, the ECU, actuator malfunction, and cruise control switch problems are detected. The Asian Imports application cartridge supports reading CCS DTCs automatically or manually, depending on the state (active or inactive) of the CCS system. AIR CONDITIONING DTCS Toyota A/C DTCs are available on select Toyota vehicles with automatic air conditioning. A/C DTCs are set by the A/C ECU when problems with, but not limited to, the ECU, room temperature sensor, and air mix door problems are detected. Note that on some Toyota vehicles the A/C system does not support a dashboard MIL. The Asian Imports application cartridge supports reading A/C DTCs automatically or manually, depending on the state (active or inactive) of the A/C system. AIR BAG DTCS Toyota AB DTCs are available on select late model Toyota vehicles equipped with the airbag system. AB DTCs are set by the AB ECU when problems with, but not limited to, the ECU, squib malfunction, and warning light circuit problems are detected. The Asian Imports application cartridge supports reading AB DTCs automatically or manually, depending on the state (active or inactive) of the AB system. A NOTE ABOUT THE MIL On some of the above systems, the ECU DTC output line is routed to the dashboard mounted system MIL, which flashes out the DTC when the ECU is commanded to the diagnostic mode. In this case, the tester is connected to the vehicle DLC to command the ECU for the system under test into the diagnostic mode. When that process is started, the DTC can be read from the MIL. The DTC can then be entered into the tester for a description. Refer to Section 6, Selecting the Vehicle, System Inquiry, for more information on Inactive system detection. Which systems are covered by the Asian Imports application cartridge software on the vehicle you are testing? In order to take advantage of all possible systems available on the vehicle, the Asian Imports application cartridge incorporates an advanced system inquiry strategy that identifies the systems on the vehicle as active or inactive. Some Toyota vehicles can have a single active system, where others can have up to six. So the best possible way to identify the systems on your vehicle is to connect the tester to the Check and TDCL DLCs to determine the available active systems. Refer to Section 6, Selecting the Vehicle, System Inquiry, for more information on Inactive system detection. The following chart lists Toyota ECUs that can be tested using the Asian Imports Cartridge, the test modes available for each system, and the DLC Cable adapter required. Not all vehicles are equipped with every ECU. TOYOTA 13 TOYOTA OBD SYSTEMS ECU ENGINE DTC(S) SNAPSHOT ADAPTER * * * TDCL/CHECK ECT * TDCL ABS * TDCL CCS * TDCL A/C * TDCL AIRBAG * CHECK NOTE 14 DATA LIST If you are using the Asian Imports Cartridge with a TECH 1 tester, the available Toyota OBD systems will be limited to Engine Data List, Engine DTCs, and Transmission DTCs. Also, you will need a different TECH 1 14/15 Pin DLC Cable (P/N 02001980) which can be used with the Toyota/ Lexus Check Adapter Cable (P/N 02001896) or the Toyota/Lexus TDCL Adapter Cable (P/N 02001895). TOYOTA TEST MODES AVAILABLE 4. TEST MODES AVAILABLE The following test modes are available when testing Toyota vehicles. Operating instructions for test modes other than DTC ENTRY or DTCs are included in the Common Test Modes OBD, OBD I Systems section. There are also Toyota specific instructions for operating the test modes in Toyota, Section 7. Mode F0: Data List - (Engine System only, if Engine System is active) Mode F1: DTC Entry Submode F0: How To Read Submode F1: Enter DTC(s) Submode F2: DTC List Submode F3: Review DTC(s) Submode F4: Clear DTC(s) Mode F2: DTC Submode F0: How To Read Submode F1: Read/Enter DTCs (If System is inactive) Submode F3: Review DTC Submode F4: Clear DTC(s) Submode F5: Sensitive DTC (Engine only) Mode F3: Snapshot - (Engine System only, if Engine System is active) NOTE Some Toyota vehicles do not support the option to use “Any DTC” or “Single DTC” as a snapshot trigger. Mode F5: System Tests Submode F0: Prep Vehicle Mode F8: Information Submode F1: DLC Location Submode F3: ID Info Submode F4: DJC Location TOYOTA 15 GETTING STARTED 5. GETTING STARTED Before operating the Asian Imports Cartridge with a Toyota vehicle, do the following: 1. Make sure the vehicle ignition is OFF. 2. If the vehicle you are testing is equipped with Overdrive, turn the O/D switch to the ON position. NOTE If the O/D switch is not in the ON position, the tester may not be able to read DTCs from the transmission ECU. 3. When testing a 1989-94 Toyota vehicle, either the Check Adapter Cable or the TDLC Adapter Cable is used to connect the tester to the vehicle DLC. Which adapter cable to use is determined by which system you wish to test. The following chart lists the systems that can be tested with each adapter cable. ADAPTER ACTIVE SYSTEMS THAT CAN BE TESTED CHECK ENGINE, AIRBAG TDCL ENGINE, ECT, ABS, CCS, A/C Attach the appropriate adapter cable to the end of the tester DLC Cable, then connect the colored end of the cable to the vehicle DLC. Toyota/Lexus Check Connector Cable (Blue) Toyota/Lexus TDCL Connector Cable (Green) 4a. 1989-94 TOYOTA VEHICLES ONLY: If the Check connector cable is used, the tester may be powered through the Check connector and it might not be necessary to use the cigarette lighter plug. If the TDCL connector is used, plug the tester DC Power Cable into the vehicle cigarette lighter. NOTE 16 Since the cigarette lighter and Check DLC can be switched, some tests, such as the Sens. DTC Test, require that the power cable be directly connected to the battery via the optional battery adapter cable (P/N 02001636). TOYOTA GETTING STARTED 4b. 1983-88 TOYOTA VEHICLES ONLY: Plug the tester power cable into the vehicle cigarette lighter. The power cable may also be directly connected to the battery via the optional battery adapter cable (P/N 02001636). 5. Turn on the tester and select the application software that you will be using. Verify that the correct screen is displayed. The tester should display a screen similar to the one below. ASIAN IMPORTS 83 - 02 <ENTER> Tester stand-alone display 6. If the display is correct, press E. If the display is not correct, refer to Appendix D. 7. Follow the instructions on the following pages to select the vehicle type you are testing. TOYOTA 17 SELECTING THE VEHICLE 6. SELECTING THE VEHICLE Once you've pressed e from the power-up screen, the following steps must be performed to select the manufacturer, model year, model and engine type of the vehicle being tested. Remember, if you make a mistake, you can always press X to go back to the previous menu. SELECTING THE MANUFACTURER A menu of manufacturers available for testing is displayed in a self-scrolling menu. You can scroll down one screen at a time by pressing y, or up one screen at a time by pressing n. Press U or d to scroll one manufacturer at a time, until the → arrow is opposite Toyota. Then press e to select. REPLAY SNAPSHOT DATA If Snapshot data is stored in the tester memory, the tester asks if you wish to replay saved Snapshot data. Press Y to replay the saved data, or press N to proceed to the Vehicle Selection displays. SELECTING THE MODEL YEAR Once the manufacturer is selected, the Select Model Year menu is displayed. Press the last two digits of the year model being tested; 9, 0 for 1990 models, 9, 1 for 1991 models, and so on. SELECTING THE MODEL The Select Model menu displays models available for testing. Press the N key until the model being tested is displayed, then press the Y key. SELECTING THE ENGINE The Select Engine menu displays available engines for the selected model. Press N until the engine type of the vehicle is displayed, then press Y. VEHICLE INFORMATION DISPLAY After the vehicle type is selected the tester displays a summary screen of the selected vehicle. Information displayed includes the year, manufacturer, model, engine size and type. The tester displays the summary screen for three seconds, then automatically advances to the System Inquiry displays. If the summary screen is not correct, press X to go backward through the vehicle selection displays until you reach the information that needs to be changed. 18 TOYOTA SELECTING THE VEHICLE MANUFACTURER SUZUKI TOYOTA ACURA E LEXUS 1989-1994 SELECT MODEL YEAR: 19?? 9, 4 SELECT MODEL: 4RUNNER (YES/NO) Y Displayed only if engine option or transmission option exists for selected vehicle SELECT ENGINE/TRANS: 22R-E 2WD AT (YES/NO) Y 1994 TOYOTA 4RUNNER 22R-E 2WD AT PFI U, or 3 sec. Example of Toyota Vehicle Selection SYSTEM INQUIRY (1989-94 VEHICLES ONLY) Once the vehicle type is entered, the tester displays which adapter(s) can be used on the selected vehicle and then displays information screens which describe the operating differences between Active and Inactive Toyota OBD systems. Use the up and down arrows to scroll through the information displays. If a system is Active, the tester can read DTCs directly from the ECU and show the DTC number and description on the tester display. Active systems are identified in the Select System menu with an “ok”. It is displayed to indicate an active system that does not have DTCs stored in the ECU. “ng” (no good) is displayed to indicate an active system that does have DTCs stored in the ECU (during the inquiry process the tester determines if the system ECU has stored DTCs or not). If a system is Inactive, the tester cannot read DTCs directly from the ECU, so the DTCs must be manually read from the dashboard MIL and then entered into the tester using Mode F2, Submode F1: READ/ENTER DTCs. Note that some Inactive systems listed in the Possible System lists may not be supported by the vehicle under test. Inactive systems do not display “ok” or “ng” on the right hand side of the display (see Select System Menu section). The System Inquiry information screens then display possible Active systems available using the Toyota Check or TDCL Data Link Connector(s) (DLCs). TOYOTA 19 SELECTING THE VEHICLE VEHICLE HAS CHECK AND TDCL DLC. USE BLUE OR GREEN ADAPTER VEHICLE HAS CHECK DLC. USE BLUE ADAPTER. OR U U ACTIVE SYSTEMS INDICATED BY ok OR ng. ok=NO DTC ng=DTCs IN ECU U INACTIVE SYS. (NO ok/ng DISP), TESTER CAN START DTC MIL FLASH U NOTE: VEHICLE MAY NOT SUPPORT ALL DISPLAYED INACTIVE SYSTEMS U TO POSSIBLE SYSTEMS SUPPORTED DISPLAYS POSSIBLE SYSTEM SUPPORTED DISPLAYS (1989-94 VEHICLES ONLY) When adapter cable and Active/Inactive information screens have been displayed, the tester instructs you to connect the adapter cable to the tester DLC cable and the vehicle DLC. If you are not sure where the vehicle DLC is located, press ( at any time during system inquiry for DLC location information. When the tester is connected to the vehicle, turn the ignition key to the ON position, then press E to continue with the system inquiry. This portion of the system inquiry can take up to 30 seconds, depending on how many systems are available on the vehicle. The tester lists the systems that can be tested with the installed adapter. Press U or E to continue to the Select System displays. 20 TOYOTA SELECTING THE VEHICLE POSSIBLE ACTIVE SYSTEMS SUPPORTED BY CHECK DLC: CONNECT ADAPT. TO DLC. FOR HELP USE F9: DLC LOC. E E POS. CHECK SYS 1. ENGINE DATA 2. ENGINE DTC 3. AIR BAG DTC TURN IGN. KEY ON TO PERFORM SYSTEM INQUIRY. [ENTER] E E POSSIBLE ACTIVE SYSTEMS SUPPORTED BY TDCL DLC: TDCL CONNECTOR SYSTEM INQUIRY: PLEASE WAIT E TO SELECT SYSTEM MENU POS. TDCL SYS 1. ENGINE DATA 2. ENGINE DTC 3. ECT DTC E POS. TDCL SYS 4. ABS DTC 5. CRUISE CTL DTC 6. A/C DTC E SELECT SYSTEM MENU The Select System menu displays the systems available for testing on the selected vehicle. An “ok” next to a system indicates that the system is Active, an “ng” next to a system indicates it is Inactive. Press the function key listed to the left of the system you wish to test to advance to the Select Mode menu. SELECT SYSTEM: F0: ENGINE F1: ECT F2: ABS ok ok ok Active systems, no DTCs stored u Active systems, DTCs stored SELECT SYSTEM: F3: CRUISE CTL ng F4: A/C F5: AIR BAG Inactive systems TO SELECTED MODE MENU NOTE TOYOTA If an ECU is malfunctioning and does not communicate with the tester, the ECU will be listed as Inactive in the Select System menu. 21 SELECTING THE VEHICLE INACTIVE SYSTEM DISPLAYS If an inactive system has been selected from the Select System Menu, the tester will display information screens. These screens remind you that DTCs will be output on the System MIL (Instrument Panel), and MIL flashes must be counted manually to read DTCs. INACTIVE SYSTEM HAS BEEN SELECTED FOR TESTING FOR INACTIVE SYSTEMS, TESTER INITIATES DTC FLASH ON SYS MIL MIL FLASHES MUST BE COUNTED TO DETERMINE DTC [ENTER] TO SELECT MODE MENU SELECT MODE MENU When the above steps are completed, the Select Mode menu displays the test modes available for the selected vehicle and system. Refer to Section 7 (Test Modes) and the Common Test Modes OBD, OBDI Systems section for operating the test modes with Toyota vehicles. A list of Engine system test modes is shown below. 1983-88 VEHICLES 1989-94 VEHICLES SELECT MODE F1: DTC ENTRY F5: SYSTEM TESTS F8: INFORMATION SELECT MODE F0: DATA LIST F2: DTC F3: SNAPSHOT TO SELECTED TEST MODE SELECT MODE F5: SYSTEM TESTS F9: INFORMATION TO SELECTED TEST MODE NOTE 22 For 1989-94 Toyota vehicles, modes F0: Data List and F3:Snapshot are displayed for engine systems only. TOYOTA SELECTING THE VEHICLE ACTIVE KEYS e Select System displays. ud Scroll up or down display. x Return to DTC menu. ( Select Test Mode. TOYOTA 23 TEST MODES 7. TEST MODES The Select Mode menu displays test modes available for the selected vehicle and system. Operating instructions for modes F0: DATA LIST, F2: DTC, and F3: SNAPSHOT are included in the Common Test Modes OBD, OBD I Systems section. Instructions for selecting and operating mode F1: DTC ENTRY, F2: DTC, Submode F1: READ/ENTER DTCs, and Submode F5: SENSITIVE DTC are included in this section. Detailed operating instructions for using Mode F1: DTC ENTRY with Toyota vehicles are included in the following procedure. READING CODES When Mode F1: DTC ENTRY is selected, the tester displays submodes which, after your selection, provide information on how to read diagnostic trouble codes (DTCs) from the vehicle, how to clear DTCs from the vehicle (or tester memory), obtain a text description of entered or selected DTCs, and review entered or selected DTCs as a result of manually retrieving codes from the ECU. To read DTCs on 1983-85 Toyota vehicles you must connect the single wire Toyota jumper (P/N 02002076) to the diagnostic jumper connector (DJC), and observe the MIL or analog voltmeter sweeps. To read DTCs on 1986-88 Toyota vehicles you must connect the single wire Toyota jumper (P/N 02002075) to the DJC, and observe the flashing MIL. If you do not know where the DJC is located, select Mode F4: DJC LOCATION from the Information menu. If necessary, refer to Common Test Modes OBD, OBD I Systems section for further instructions. Follow the detailed instructions on the following pages to manually read the DTCs. Once the DTCs have been manually read from the MIL or analog voltmeter, you can input the DTC into the tester so the tester can define the code. A complete list of Toyota DTCs is also included in Section 8. MODE F1: DTC ENTRY This mode is available on 1983-88 Toyota vehicles. When Mode F1: DTC ENTRY is selected, the tester displays five submodes. Operating instructions for the submodes are on the following pages. F0: How To Read F1: Enter DTC(s) F2: DTC List F3: Review DTC F4: Clear DTC(s) Manually Reading DTCs To manually read Diagnostic Trouble Codes (DTCs) on Toyota vehicles from 1983-88, there are 2 methods that can be used. The first method is for the 1983-84 Cressida and Celica Supra, which requires an analog voltmeter. Using the analog voltmeter set to a 20 volt scale and connected to the EFI Service connector, and a single wire jumper placed on the Diagnostic Jumper Connector (Check DJC), the DTC can be interpreted from the analog voltmeter needle flashes. The second method requires the use of a single wire jumper that is 24 TOYOTA TEST MODES placed across 2 pins of the 2 or 17 pin DJC, depending on the model year. In a similar fashion, the DTCs are instead flashed out on the instrument panel mounted Malfunction Indicator Lamp (MIL). For the automobile manufacturers that mention the use of an analog voltmeter to read manual DTCs, the Mastertech Oscilloscope may be used. Set up the single channel oscilloscope and make connections the same way as the analog voltmeter (above). Choose the 20v/division scale and a slow time/division (e.g. 1-2 sec/division) the DTCs will be shown as a waveform on the display. Note that manually retrieving DTCs from 1983-88 Toyota vehicles requires you to locate and jumper the Diagnostic Connector. The vehicles that require the use of a jumper are noted in the column “Adapter Type” in the Toyota coverage table (found at the beginning of this section). Refer to the section on manually reading DTCs from the 1983-88 Toyota vehicles in this section. Submode F0: How To Read This submode provides information on how to manually read DTCs from the vehicle. Step by step screen instructions provide information to correctly set up the vehicle ECU. This is performed by following the tester instruction screens. If you have trouble, additional DTC retrieval information is described below. If you refer to the factory service manual for this information, make sure that you are following the correct steps for the system you are working on. Submode F1: Enter DTC(s) This submode provides you with a description of how to obtain DTC information from the ECU and how to enter this information into the tester. On Toyota vehicles, there is one method to enter manually read DTCs which is the Enter DTC submode. The Enter DTC submode has two question marks on the tester display for entering the DTC. The tester screen prompts you to enter the DTCs read off the analog voltmeter or the Malfunction Indicator Light (MIL). Be careful when reading the DTC from the analog voltmeter or MIL. Incorrect MIL interpretation can cause the wrong DTC description to be displayed. Once all DTCs have been manually read and recorded, enter each DTC into the tester as described in the Common Test Modes OBD, OBD I Systems section. Specific instructions for manually reading Toyota analog voltmeter or MIL DTCs are on the following page. To manually read DTCs From 1986-88 Toyota Vehicles using the Instrument Panel Malfunction Indicator Lamp, do the following: 1. Set the vehicle initial conditions by making sure that battery voltage is 11 volts or more, throttle valve fully closed (throttle position sensor IDL contacts closed), transmission or transaxle in Neutral position, accessories switched OFF engine at normal operating temperature. 2. Turn ignition key to ON, engine OFF. 3. Locate the 17 pin Diagnostic Jumper Connector (press F8: DJC LOCATION from the Information menu for help on DJC location). 4. Jumper T (or TE1) and E1 terminals by connecting the single wire Toyota Jumper (P/N 02002075) to the vehicle's 17 pin DJC. TOYOTA 25 TEST MODES E1 T or TE1 5. Dashboard MIL will begin flashing DTCs. The first number of MIL flashes will equal the 10's digit of a 2-digit DTC. After a 1.5 second pause, the second number of flashes will equal the 1's digit. If there are 2 or more codes, there will be a 2.5 second pause between each DTC. On a single digit DTC, the MIL will blink a number of times equal to the DTC. Single digit DTCs are separated by a 3.0 or 4.5 second pause. If no DTCs are stored in ECU, MIL will flash normal code. DTC SEPERATION DTC 32 MIL 12v MIL 0v seconds 0.5s 1.5s 2.5s 0.5s DTC SERIES SEPERATION DTC 41 3s 1.5s 0.5s Next DTC Indication 0.5s 6. For Toyota vehicles, there are three types of normal code conditions. One is 4 flashes in 1 second (late models), the second is 1 flash in 3.0 seconds, and the third is 1 flash in 4.5 seconds (late models). 7. Disconnect Toyota single wire jumper. 8. Erase DTCs when all repairs are completed. To manually read DTCs From 1983-85 Toyota Vehicles (except 1983-84 Celica Supra and Cressida) using the Instrument Panel Malfunction Indicator Lamp, do the following: 1. Set the vehicle initial conditions by making sure that battery voltage is 11 volts or more, throttle valve fully closed (throttle position sensor IDL contacts closed), transmission or transaxle in Neutral position, accessories switched OFF engine at normal operating temperature. 2. Turn ignition key to ON, engine OFF. 3. Locate the 2 pin Check Diagnostic Jumper Connector (press F8: DJC LOCATION from the Information menu for help on DJC location). 4. Jumper T and E1 terminals by connecting the single wire Toyota Jumper (P/N 02002076) to the vehicle's 2 pin DJC. ET 26 T TOYOTA TEST MODES 5. Dashboard MIL will begin flashing DTCs. The first number of MIL flashes will equal the 10's digit of a 2-digit DTC. After a 1.5 second pause, the second number of flashes will equal the 1's digit. If there are 2 or more codes, there will be a 2.5 second pause between each DTC. On a single digit DTC, the MIL will blink a number of times equal to the DTC. Single digit DTCs are separated by a 3.0 or 4.5 second pause. If no DTCs are stored in ECU, MIL will flash normal code. MIL 12v MIL 0v DTC 2 DTC SEPERATION. DTC 5 Next DTC Indication 3s seconds 0.33 0.33 0.66 0.33 0.33 0.33 0.33 0.33 0.66 0.66 0.66 0.66 All 1983-84 (exc. Cressida and Celica Supra) and selected 1985 vehicles only. Other 1985 have DTC output like that shown in the previous section. 6. For 1983-85 Toyota vehicles, there are two types of normal code conditions. One is 1 flash in 3.0 seconds, and the second is 1 flash in 4.5 seconds. 7. Disconnect Toyota single wire jumper. 8. Erase DTCs when all repairs are completed. To manually read DTCs From 1983-84 Toyota Cressida and Celica Supra Vehicles using an Analog Voltmeter or Mastertech Oscilloscope, do the following: 1. Set the vehicle initial conditions by making sure that battery voltage is 11 volts or more, throttle valve fully closed (throttle position sensor IDL contacts closed), transmission or transaxle in Neutral position, accessories switched OFF engine at normal operating temperature. 2. Turn ignition key to ON, engine OFF. 3. Locate the 2 pin Check Diagnostic Jumper Connector (press F4: DJC LOCATION from the Information menu for help on DJC location). 4. Jumper T and E1 terminals by connecting the single wire Toyota Jumper (P/N 02002076) to the vehicle's 2 pin DJC. ET TOYOTA T 27 TEST MODES 5. Install analog voltmeter to the EFI service connector. Place positive lead (+) on Vf terminal and negative lead (-) on E1 terminal. Set analog voltmeter to 20 volt scale. VF +B N/C E1 6. Analog voltmeter will begin flashing DTCs. If DTCs are stored in ECU, there will be a 5 volt indication for 2 seconds followed by a 2.5 volt indication for another 2 seconds. Thereafter, the number of times the needle deflects between 2.5 volts and 5 volts every 0.6 seconds is the first digit (10's) of a 2-digit code. Next, the number of times the needle deflects between 2.5 volts and 0 volts every 0.6 seconds is the second digit (1's) of a 2-digit code. If no DTCs are stored in ECU, MIL will flash normal code. START DTC 12 5v DTC SEP DTC 41 Next DTC Indication 2.5v 0v seconds 2 2 2 0.6s 0.6s 7. If no malfunctions are present, the voltmeter needle will deflect between 2.5 and 5 volts every 0.6 seconds. 8. Disconnect Toyota single wire jumper. 9. Erase DTCs when all repairs are completed. 28 TOYOTA TEST MODES Submode F2: DTC List This submode provides you with a way to view all possible ECU DTCs, including DTC numbers and descriptions You can also select the DTCs obtained from the analog voltmeter or MIL as an alternative way of entering DTCs into the tester's memory. As you scroll through the available DTCs you can view a description of the DTC obtained from the analog voltmeter or MIL. You can “Select” the DTC on the tester screen for later review or printing. Refer to Common Test Modes OBD, OBD I Systems section for further information. Submode F3: Review DTC(s) This submode provides a way of reviewing DTCs that you selected or entered into the tester. The description of the entered or selected DTC will be displayed, along with a numerical summary of the entered or selected DTC. Review DTC is intended to provide you with an electronic clipboard that keeps track of the DTCs that you have encountered during diagnosis. Submode F4: Clear DTC(s) This submode has two options for you to choose. Option F0 is to view text screens that provide information on how to clear the DTCs from ECU memory. This is performed by tester keypad presses. Option F1 clears the tester memory of DTCs that you entered or selected in the tester. The clear DTC(s) mode is helpful and provides information that you would normally have to locate in a service manual. MODE F2: DTC Submode F1: Read/Enter DTC(s) This submode is available on 1989-94 Toyota Vehicles. The purpose of the Read/Enter submode is to command the Inactive system ECU to flash DTCs on the dashboard MIL. After the DTC is read from the MIL, a description of the DTCs can then be displayed on the tester screen. If a Toyota or Lexus system is determined as Inactive, the tester will command the ECU to begin flashing the DTC on the system MIL. The F1:READ/ENTER DTC(s) submode displays a message informing you that the tester has initiated DTC flashing on the MIL, and will hold in that mode until you have read the DTC(s) on the MIL. After the DTC is read from the MIL, the tester screen will change to a DTC entry screen. At that screen, type in the DTC to obtain a description of the DTC. To access the Read/Enter DTC(s) submode, do the following: 1. Press @ to select DTCs from the select mode menu. 2. Press ! to select READ/ENTER DTC(s) from the DTCs menu. 3. The tester displays a message indicating DTCs are being flashed on the MIL. Look at the MIL to read the flashes and determine the DTC. When the DTC cycle is repeated on the MIL and you have recorded the DTC, press Y. TOYOTA 29 TEST MODES DTCS BEING OUTPUT. READ ON MIL. DONE? [YES] 4. Use the tester keypad to enter the DTC displayed on the vehicle system ECU, then press E. An example of the Enter DTC display for Toyota vehicles is shown below. ENTER DTC ?? [ENTER] All late model Toyota vehicles with Engine and optional Transmission, ABS, Cruise Control, Air Conditioning, and Airbag systems flash DTCs on the dashboard MIL. On select vehicles, the Air Conditioning system does not have a MIL for DTC reading. DTCs are flashed with the 10's digit first, followed by the 1's digit. There is a 1.5 second period between the 10's and 1's digit, and a 2.5 second period between individual DTCs. 5. When E is pressed, the tester displays the DTC number and a short description of the code. 6. After you enter the DTC, the tester asks for additional trouble code entry. Press Y to enter another DTC. If N is pressed, the tester displays an instruction screen describing the functions available. ↑ = ADVANCE CODE ↓ = HOLD CODE EXIT = QUIT ENTER = SUMMARY 7. Press u to move to the next DTC. If you wish to hold a DTC screen, press d to freeze the automatic scrolling feature. DTC 03 MAP SENSOR VOLTAGE FAULT 8. Press E to view a summary screen of all entered DTCs. DTC SUMMARY O3 9. Press X to return to the DTC menu. ACTIVE KEYS e Enter the displayed DTC and display summary screen. y Enter another DTC. N Advance to instruction screen. 30 TOYOTA TEST MODES ACTIVE KEYS (Continued) )-( Enter DTC number. u Move to the next DTC. d Stop the automatic scrolling. x Return to DTC menu. Submode F5: Sens DTC This submode is available for 1989-94 Toyota vehicles. The Sensitive DTC test submode applies to Toyota engine controllers, and is only available when the Engine system is Active. Toyota engine ECUs have the capability to enter an increased sensitivity mode to detect fault code conditions. The Sens DTC submode is helpful for diagnosing intermittent problems. If you are using a TECH 1 or TECH 1A tester, power the tester directly from the battery via the optional battery adapter cable (P/N 02001636). To access the Sens DTC submode, do the following: 1. Press @ to select DTCs from the Select Mode menu. 2. Press % to select SENS DTC from the DTC menu. 3. The tester displays instructions for preparing the vehicle to capture DTCs in the Sensitive Mode. Follow the instructions on each display, then press Y to continue. 4. When the vehicle preparations are complete, the tester checks for DTCs, then displays the codes on line four. 5. The tester displays instructions for viewing the DTCs. Press u to view the DTCs. 6. The tester displays the first DTC. Press u to scroll through the captured DTCs. A DTC can be held by pressing the d key while the code is displayed. Press the d key to resume display of the DTCs. 7. Press E to display a summary of the captured DTCs. 8. Press X to return to the DTC menu. NOTE TOYOTA In some cases, Toyota ECUs do not support Sensitive DTC Mode. If the tester cannot command the ECU into Sensitive DTC Mode, an information screen will be displayed with test status or retry test. 31 TEST MODES DTC TEST MODE MENU TEST INCREASES ECU SENSITIVITY TO DTC DETECTION DONE? [YES] RECEIVE FAULT CODE INFORMATION PLEASE WAIT. XX y TURN A/C SW OFF, PUT TRANSMISSION IN NEUTRAL GEAR. DONE? [YES] RECEIVING FAULT CODE INFORMATION PLEASE WAIT. 24 y TURN IGNITION KEY OFF, CLOSE THROTTLE. DONE? [YES] Y U TURN IGN KEY TO ON. CONFIRM ENG. MIL FLASHING. DONE? [YES] DTC 24 INTAKE TEMP. SENSOR SIGNAL X TEST NOT SUPPORTED BY ECU OR RETRY TEST [EXIT] = ADVANCE CODE = HOLD CODE EXIT = QUIT ENTER = SUMMARY N Y START ENGINE AND ROADTEST ABOVE 6 MPH TO CHK DTCs DONE? [YES] E DTC SUMMARY 24 Y ROADTEST DONE. STOP VEHICLE AND PREPARE FOR DTCs DONE? [YES] X DTC F1: READ DTC(S) F3: REVIEW DTC(S) F4: CLEAR DTC(S) Y Example of Sensitive DTC Submode Instructions ACTIVE KEYS ud Advance to next DTC or hold displayed DTC. y Confirm instructions on display are completed. n Confirm MIL not flashing. e Display DTC Summary. x Return to DTC Entry menu. 32 TOYOTA TOYOTA DIAGNOSTIC TROUBLE CODES (DTCS) 8. TOYOTA DIAGNOSTIC TROUBLE CODES (DTCS) DTCs available for Toyota vehicles are listed in the following charts. Some code numbers have different descriptors depending on the selected vehicle. Only codes available for the selected vehicle are displayed by the tester. YEAR: 1983 DTC NO. 1983 1 NO DTCs-NORMAL OPERATION 2 AIR FLOW METER OR CKT FAILURE 3 AIR FLOW METER OR CKT FAILURE 4 WATER THERMO SENSOR OR CKT 5 O2 SENSOR OR CKT FAILURE 6 IGNITION SIGNAL OR CKT FAILURE 7 TP SENSOR OR CKT FAILURE TP SENSOR SIG OR CKT (IDL/PSW) 11 ECU POWER SOURCE (B+) OR CKT 12 CRANK ANGLE SENSOR OR CKT 13 CRANK ANGLE SENSOR OR CKT 14 IGNITION SIGNAL OR CKT FAILURE 21 O2 SENSOR OR CKT FAILURE 22 ECT SENSOR OR CIRCUIT FAILURE 23 IAT SENSOR OR CKT FAILURE 31 AIR FLOW METER OR CKT FAILURE 32 AIR FLOW METER OR CKT FAILURE 41 TP SENSOR OR CKT FAILURE 42 VEHICLE SPEED SENSOR OR CKT 43 STARTER SIGNAL OR CKT FAILURE 51 A/C-ON N/S-OFF DURING DIAG. CK DESCRIPTOR YEAR: 1984 DTC NO. 1984 1 NO DTCs-NORMAL OPERATION 2 AIR FLOW METER OR CKT FAILURE TOYOTA DESCRIPTOR 33 TOYOTA DIAGNOSTIC TROUBLE CODES (DTCS) YEAR: 1984 (CONTINUED) 34 DTC NO. DESCRIPTOR 3 AIR FLOW METER OR CKT FAILURE 4 WATER THERMO SENSOR OR CKT 5 O2 SENSOR OR CKT FAILURE 6 IGNITION SIGNAL OR CKT FAILURE 7 TP SENSOR OR CKT FAILURE TP SENSOR SIG OR CKT (IDL/PSW) 11 ECU POWER SOURCE (B+) OR CKT 12 CRANK ANGLE SENSOR OR CKT 13 CRANK ANGLE SENSOR OR CKT 14 IGNITION SIGNAL OR CKT FAILURE 21 O2 SENSOR OR CKT FAILURE 22 ECT SENSOR OR CIRCUIT FAILURE 23 IAT SENSOR OR CKT FAILURE 31 AIR FLOW METER OR CKT FAILURE 32 AIR FLOW METER OR CKT FAILURE 41 TP SENSOR OR CKT FAILURE 42 VEHICLE SPEED SENSOR OR CKT 43 STARTER SIGNAL OR CKT FAILURE 51 A/C-ON N/S-OFF DURING DIAG. CK YEAR: 1985 DTC NO. 1985 1 NO DTCs-NORMAL OPERATION 2 AIR FLOW METER OR CKT FAILURE 3 AIR FLOW METER OR CKT FAILURE NO IGNITER PULSE (4x) OR CKT FAIL 4 WATER THERMO SENSOR OR CKT 5 O2 SENSOR OR CKT FAILURE 6 IGNITION SIGNAL OR CKT FAILURE NO RPM SIGNAL ABOVE 1000 RPM 7 TP SENSOR OR CKT FAILURE 8 IAT SENSOR OR CKT FAILURE 10 STARTER SIGNAL OR CKT FAILURE DESCRIPTOR TOYOTA TOYOTA DIAGNOSTIC TROUBLE CODES (DTCS) YEAR: 1985 (CONTINUED) DTC NO. DESCRIPTOR 11 A/C-ON TPS-OFF DURING DIAG. CK A/C SW-ON DURING DIAGNOSIS CK MAIN RELAY OR ECU CKT FAILURE 12 KS OR KS CKT FAILURE NO ECU RPM SIG. DURING CRANKING 13 KS OR KS CKT FAILURE NO ECU IGN SIG ABOVE 1000 RPM 14 NO IGNITER SIG. (6x) OR CKT FAIL 21 O2 SENSOR OR CKT FAILURE 22 ECT SENSOR OR CIRCUIT FAILURE 23 IAT SENSOR OR CKT FAILURE 31 AIR FLOW METER OR CKT FAILURE 32 AIR FLOW METER OR CKT FAILURE 41 TP SENSOR OR CKT FAILURE 42 VEHICLE SPEED SENSOR OR CKT 43 STARTER SIGNAL OR CKT FAILURE 51 A/C-ON N/S-OFF DURING DIAG. CK 52 KS OR KS CKT FAILURE 53 KS OR KS CKT FAILURE YEAR: 1986 DTC NO. 1986 1 NO DTCs-NORMAL OPERATION 2 AIR FLOW METER OR CKT FAILURE 3 NO IGNITER PULSE (4x) OR CKT FAIL AIR FLOW METER OR CKT FAILURE 4 WATER THERMO SENSOR OR CKT 5 O2 SENSOR OR CKT FAILURE 6 NO RPM SIGNAL ABOVE 1000 RPM IGNITION SIGNAL OR CKT FAILURE NO RPM SIGNAL ABOVE 1500 RPM ECU NE OR G SIG-IGN/START OR CKT 7 TP SENSOR OR CKT FAILURE 8 IAT SENSOR OR CKT FAILURE 9 VEHICLE SPEED SENSOR OR CKT TOYOTA DESCRIPTOR 35 TOYOTA DIAGNOSTIC TROUBLE CODES (DTCS) YEAR: 1986 (CONTINUED) 36 DTC NO. DESCRIPTOR 10 STARTER SIGNAL OR CKT FAILURE 11 A/C P/N-ON TPS-OFF DURING DIAG MAIN RELAY OR ECU CKT FAILURE TP SENSOR OR CKT FAILURE A/C-ON TPS-OFF DURING DIAG. CK 12 NO ECU RPM SIG. DURING CRANKING KS OR KS CKT FAILURE NO ECU NE/G SIG. DURING CRANKING 13 NO ECU IGN SIG ABOVE 1000 RPM KS OR KS CKT FAILURE NO ECU NE SIG. ABOVE 1000 RPM 14 NO IGNITER SIG. (6x) OR CKT FAIL ABNORMAL TURBO PRESS-TUR OR AFM 21 O2 SENSOR OR CKT FAILURE 22 ECT SENSOR OR CIRCUIT FAILURE 23 IAT SENSOR OR CKT FAILURE 24 IAT SENSOR OR CKT FAILURE 31 AIR FLOW METER OR CKT FAILURE 32 AIR FLOW METER OR CKT FAILURE 41 TP SENSOR OR CKT FAILURE 42 VEHICLE SPEED SENSOR OR CKT 43 STARTER SIGNAL OR CKT FAILURE 51 A/C P/N-ON TPS-OFF DURING DIAG A/C-ON N/S-OFF DURING DIAG. CK 52 KS OR KS CKT FAILURE 53 ECU OR KS CPU OR CIRCUIT FAILURE YEAR: 1987 DTC NO. 1987 1 NO DTCs-NORMAL OPERATION 2 AIR FLOW METER OR CKT FAILURE 3 NO IGNITER PULSE (4x) OR CKT FAIL 4 WATER THERMO SENSOR OR CKT 5 O2 SENSOR LEAN INDICATION 6 NO ECU NE SIGNAL DURING CRANK/RUN DESCRIPTOR TOYOTA TOYOTA DIAGNOSTIC TROUBLE CODES (DTCS) YEAR: 1987 (CONTINUED) TOYOTA DTC NO. DESCRIPTOR 7 TP SENSOR OR CKT FAILURE 8 IAT SENSOR OR CKT FAILURE 9 VEHICLE SPEED SENSOR OR CKT 10 STARTER SWITCH SIGNAL FAILURE 11 11 MAIN RELAY OR ECU CKT FAILURE A/C P/N-ON TPS-OFF DURING DIAG A/C-ON IDLE SW OFF DURING DIAG. TPS-OFF N/S-ON DURING DIAG. CK 12 NO ECU RPM SIG. DURING CRANKING NO ECU NE/G SIG. DURING CRANKING KS OR KS CKT FAILURE 13 NO RPM SIGNAL ABOVE 1000 RPM KS OR KS CKT FAILURE 14 14 NO IGNITER SIG. (4x) OR CKT FAIL NO IGNITER SIG. (4-11x) OR CKT NO IGNITER SIG. (6x) OR CKT FAIL ABNORMAL TURBO PRESS-TUR OR AFM 21 O2 SENSOR LEAN INDICATION O2 SENSOR OR CKT FAILURE 22 ECT SENSOR OR CIRCUIT FAILURE 23 IAT SENSOR OR CKT FAILURE 24 IAT SENSOR OR CKT FAILURE 31 AIR FLOW METER OR CKT FAILURE 32 AIR FLOW METER OR CKT FAILURE HAC SENSOR OR CIRCUIT FAILURE 34 TURBO PRESSURE MALFUNCTION 41 TP SENSOR OR CKT FAILURE 42 VEHICLE SPEED SENSOR OR CKT 43 STARTER SIGNAL OR CKT FAILURE 51 A/C P/N-ON TPS-OFF DURING DIAG A/C-ON N/S-OFF DURING DIAG. CK 52 KS OR KS CKT FAILURE 53 ECU OR CIRCUIT FAILURE 37 TOYOTA DIAGNOSTIC TROUBLE CODES (DTCS) 38 YEAR: 1988 DTC NO. 1988 1 NO DTCs-NORMAL OPERATION 2 AIR FLOW METER OR CKT FAILURE 3 NO IGNITER PULSE (4x) OR CKT FAIL 4 WATER THERMO SENSOR OR CKT 5 O2 SENSOR OR CKT FAILURE 6 NO ECU NE SIG. ABOVE 1500 RPM 7 TP SENSOR OR CKT FAILURE 8 IAT SENSOR OR CKT FAILURE 10 STARTER SWITCH SIGNAL FAILURE MAIN RELAY OR ECU CKT FAILURE ECU POWER SUPPLY INTERM. FAILURE A/C P/N-ON TPS-OFF DURING DIAG 12 NO ECU NE/G SIG. DURING CRANKING NO ECU TAC SIG. DURING CRANKING NO ECU NE/G SIG. DURING CRANK/RUN KS OR KS CKT FAILURE 13 NO ECU NE SIG. ABOVE 1000 RPM NO ECU NE SIG. ABOVE 1500 RPM KS OR KS CKT FAILURE 14 NO ECU IGF SIG (4-5x) OR CKT FUEL CUTOFF-HIGH TURBO BOOST NO IGNITER SIG. (4-11x) OR CKT NO IGNITER SIG. (8-11x) OR CKT NO IGNITER SIG. (4x) OR CKT FAIL NO IGNITER SIG. (6x) OR CKT FAIL NO ECU IGF SIG. (6-8x) OR CKT 21 O2 SENSOR LEAN INDICATION O2 SENSOR OR CKT FAILURE O2 SENSOR OR O2 SENSOR HEATER 22 ECT SENSOR OR CIRCUIT FAILURE ECT SW. TWS1 OR TWS2 CIRCUIT 23 IAT SENSOR OR CKT FAILURE 24 IAT SENSOR OR CKT FAILURE 25 AFR LEAN MALF. FB FREQ. HIGH AFR LEAN MALFUNCTION AFR LEAN MALF. FB COMP. HIGH AFR LEAN MALF.-O2S/FI/ECM/AFH O2 SENSOR LEAN INDICATION DESCRIPTOR TOYOTA TOYOTA DIAGNOSTIC TROUBLE CODES (DTCS) YEAR: 1988 (CONTINUED) TOYOTA DTC NO. DESCRIPTOR 26 AFR RICH MALF. FB FREQ. HIGH AFR RICH MALF. FB COMP. LOW AFR RICH MALF. FB COMP. HIGH O2 SENSOR RICH INDICATION AIR-FUEL RATIO RICH MALFUNCTION AFR RICH MALF. FB FREQ. HIGH AFR RICH MALF. FB COMP. LOW AFR RICH MALF. - EBCV SYSTEM 27 SUB-O2 SENSOR SIGNAL OR CKT SUB-O2 SENSOR HEATER OR SIGNAL 28 NO.2 O2 SENSOR/ HEATER OR CKT 32 AIR FLOW METER OR CKT FAILURE HAC SENSOR OR CIRCUIT FAILURE 34 TURBO PRESSURE SIG-FUEL CUTOFF 35 ALTITUDE SENSOR OR CKT FAILURE TURBO PRESSURE SENSOR OR CKT HAC SENSOR OR CIRCUIT FAILURE 41 TP SENSOR OR CKT (IDL/PSW) FAIL TP SENSOR OR CKT (VTA) FAILURE TP SENSOR OR CKT (THS) FAILURE TP SENSOR OR CKT FAILURE 42 VEHICLE SPEED SENSOR OR CKT 43 STARTER SIGNAL OR CKT FAILURE 51 A/C P/N-ON TPS-OFF DURING DIAG A/C-ON TPS-OFF DURING DIAG. CK A/C-ON IDL NSW-OFF DURING DIAG A/C-ON TPS-OFF DURING DIAG. CK A/C-ON N/S-OFF DURING DIAG. CK A/C-ON IDL+NSW NG DURING DIAG. 52 KS OR KS CKT FAILURE 53 ECU OR CIRCUIT FAILURE KS OR KS CKT FAILURE 54 INTERCOOLER OR SYSTEM FAILURE 71 EGR SYSTEM MALFUNCTION 72 FUEL CUT SOL. OR CIRCUIT FAILURE 39 TOYOTA DIAGNOSTIC TROUBLE CODES (DTCS) AIR BAG YEAR: 1989-94 DTC NO. 1989-1994 11 SQUIB W/H GND OR FRNT SENS. SHORT 12 SQUIB W/H +B SHORT 13 SQUIB MALF. (SHORT) 14 SQUIB MALF. (OPEN) 15 FRONT SENSOR W/H OPEN 22 WARNING LIGHT CIRCUIT 24 AIRBAG SENSOR CONNECTION FAIL 31 SENSOR ASSEMBLY 41 MALF. RECORDED IN MEMORY 53 SQUIB SHORT 54 SQUIB OPEN 63 SQUIB SHORT (PRELOADER LEFT) 64 SQUIB OPEN (PRELOADER LEFT) 73 SQUIB SHORT (PRELOADER RT) 74 SQUIB OPEN (PRELOADER RT) DESCRIPTOR ANTI-LOCK BRAKE SYSTEM 40 YEAR: 1989-94 DTC NO. 1989-1994 11 SOLENOID RELAY OPEN 12 SOLENOID RELAY SHORT 13 PUMP MOTOR RELAY OPEN 14 PUMP MOTOR RELAY SHORT 15 TRAC BRAKE MAIN RELAY OPEN 16 TRAC BRAKE MAIN RELAY SHORT 17 TRAC PUMP MOTOR RELAY OPEN 18 TRAC PUMP MOTOR RELAY SHORT 21 RF SOLENOID OPEN OR SHORT 22 LF SOLENOID OPEN OR SHORT 23 RR SOLENOID OPEN OR SHORT DESCRIPTOR TOYOTA TOYOTA DIAGNOSTIC TROUBLE CODES (DTCS) YEAR: 1989-94 (CONTINUED) TOYOTA DTC NO. DESCRIPTOR 24 LR SOLENOID OPEN OR SHORT 25 MASTER CYL. CUT SOL. OPEN/SHORT 26 ACCUMULATOR CUT SOL. OPEN/SHORT 27 RESERVOIR CUT SOL. OPEN/SHORT 31 RF SPEED SENSOR MALFUNCTION 32 LF SPEED SENSOR MALFUNCTION 33 RR SPEED SENSOR MALFUNCTION 34 LR SPEED SENSOR MALFUNCTION 35 LF/RR SPEED SENS MALFUNCTION 36 RF/LR SPEED SENS MALFUNCTION 37 SPD SENSOR ROTOR WHEEL FAILURE 38 RR SPEED SENSOR MALFUNCTION 39 LR SPEED SENSOR MALFUNCTION 41 VOLTAGE MALFUNCTION 42 HIGH VOLTAGE 43 TRAC SYS/DECEL. SENSOR MALF. 44 DECELERATION SENS. OPEN/SHORT 45 DECELERATION SENSOR MALF. 46 DECELERATION SENSOR MALF. 47 DECELERATION SENSOR MALF. 51 ACTUATOR PUMP MOTOR LOCKED 53 TRAC MOTOR OVER- OPERATING (DUR.) 54 TRAC MOTOR OVER- OPERATING (FREQ) 55 LOW BRAKE FLUID LEVEL 56 PRESSURE SENSOR OPEN OR SHORT 57 PRESSURE SENSOR STICKING 61 TRAC ECU COM. LINE OPEN/SHORT 62 ECU MALFUNCTION 71 RF SENSOR LOW VOLTAGE 72 LF SENSOR LOW VOLTAGE 73 RR SENSOR LOW VOLTAGE 74 LR SENSOR LOW VOLTAGE 41 TOYOTA DIAGNOSTIC TROUBLE CODES (DTCS) YEAR: 1989-94 (CONTINUED) 42 DTC NO. DESCRIPTOR 75 RF SENSOR ABNORMAL FREQ. 76 LF SENSOR ABNORMAL FREQ. 77 RR SENSOR ABNORMAL FREQ. 78 LR SENSOR ABNORMAL FREQ. 79 DECELERATION SENSOR MALF. TOYOTA TOYOTA DIAGNOSTIC TROUBLE CODES (DTCS) AIR CONDITIONING YEAR: 1989-94 DTC NO. 1989-1994 11 ROOM TEMP SENSOR OPEN OR SHORT 12 AMBIENT TEMP. SENS. OPEN/SHORT 13 EVAPORATOR TEMP. SENS. OPEN/SHORT 14 WATER TEMP. SENS. OPEN/SHORT 15 DUCT SENSOR OPEN/SHORT (Dr) 16 DUCT SENSOR OPEN/SHORT (Pa) 21 SOLAR SENSOR OPEN/SHORT (Pa) 22 COMPRESSOR LOCKED 23 REFRIGERANT PRESS MALFUNCTION 24 SOLAR SENSOR OPEN/SHORT (Dr) 31 AIR MIX POSITION SENSOR 32 AIR INLET POSITION SENSOR 33 AIR MIX MALF. OR MODE POTEN. SIG. 34 AIR INLET MALFUNCTION 35 AIR BYPASS POS. SENSOR (Pr) 36 WATER VALVE POSITION SENSOR 41 AIR MIX MALFUNCTION 42 AIR INLET MALFUNCTION 43 MODE MALFUNCTION 44 AIR BYPASS POS. SENSOR (Dr) 45 AIR BYPASS POS. SENSOR (Pa) 46 WATER VALVE POSITION SENSOR DESCRIPTOR CRUISE CONTROL SYSTEM YEAR: 1989-94 DTC NO. 1989-1994 11 ACTUATOR MALF. (OPEN OR SHORT) 12 CC MAG. CLUTCH RELEASE VLV FAIL 13 POSITION SENSOR (OPEN OR SHORT) 14 ACTUATOR POS. SENSOR MALF. TOYOTA DESCRIPTOR 43 TOYOTA DIAGNOSTIC TROUBLE CODES (DTCS) YEAR: 1989-94 (CONTINUED) DTC NO. DESCRIPTOR 21 VEHICLE SPD SENS SIGNAL (METER) 22 VEHICLE SPD SENS SIGNAL (T/M) 23 SPEED DECREASED 10 mph (16 Km/h) 31 RESUME SWITCH ALWAYS ON 32 CONTROL SWITCH GROUND SHORT 33 SET & RES SW. ON SIMULTANEOUSLY 34 CONTROL SWITCH OFF MALFUNCTION 41 MOTOR ACTUATE MALFUNCTION 42 SOURCE VOLTAGE DROP ELECTRONIC CONTROLLED TRANSMISSION 44 YEAR: 1989-94 DTC NO. 1989-1994 37 DIRECT CLUTCH SPD SENSOR SIG. 38 ATF TEMP. SENSOR SIGNAL 41 THROTTLE POSITION SENSOR 42 SPD SENSOR SIGNAL (METER) 44 SPEED SENSOR REAR 46 ACCUMULATOR CONTROL SOLENOID 61 SPD SENSOR SIGNAL (T/M) 62 NO.1 SHIFT CONTROL SOLENOID 63 NO.2 SHIFT CONTROL SOLENOID 64 LOCK-UP CONTROL SOLENOID 65 TIMING SOLENOID 67 OD DIRECT CLUTCH SPD SENSOR SIG. 68 KICK-DOWN SWITCH 73 DIFF. LOCK SOLENOID OPEN 74 DIFF. LOCK SOLENOID OPEN 76 NO.3 SHIFT CONTROL SOLENOID 86 ENGINE SPEED SENSOR 88 COMMUNICATION ERROR (TCM-ECM) DESCRIPTOR TOYOTA TOYOTA DIAGNOSTIC TROUBLE CODES (DTCS) ENGINE YEAR: 1989-94 DTC NO. 1989-1994 11 ECU (B+) 12 RPM SIGNAL (CRANKING) 13 RPM SIGNAL OR PHASE MALF. 14 IGNITION SIGNAL (IGF1) 15 IGNITION SIGNAL (IGF2) 16 AT CONTROL SIGNAL 17 G1 SIGNAL 18 G2 SIGNAL 21 MAIN O2S SIGNAL (& HEATER) FAIL 22 COOLANT TEMP. SENSOR SIGNAL 23 INTAKE TEMP. SENSOR SIGNAL 24 INTAKE TEMP. SENSOR SIGNAL 25 AIR-FUEL RATIO LEAN MALFUNCTION 26 AIR-FUEL RATIO RICH MALFUNCTION 27 SUB LH O2S SIG. (& HEATER) FAIL 28 MAIN O2S SIGNAL (& HEATER) FAIL 29 SUB RH O2S SIG. (& HEATER) FAIL 31 VAF/MAF METER MAP SENSOR SIG. 32 VAF METER SIGNAL 33 IAC MALFUNCTION 34 TURBO PRESSURE MALFUNCTION 35 BARO/TURBO PRESS SENSOR SIGNAL 36 CPS SENSOR 41 THROTTLE POS. SENSOR SIGNAL 42 VEHICLE SPEED SENSOR SIGNAL 43 STARTER SIGNAL 47 SUB THROTTLE POS. SENSOR SIGNAL 48 AIR PUMP (EAP) MALFUNCTION 51 SWITCH CONDITION SIGNAL 52 KNOCK SENSOR SIGNAL TOYOTA DESCRIPTOR 45 TOYOTA DIAGNOSTIC TROUBLE CODES (DTCS) YEAR: 1989-94 (CONTINUED) 46 DTC NO. DESCRIPTOR 53 KNOCK CONTROL PART IN ECU 54 INTERCOOLER 55 KNOCK SENSOR SIGNAL 56 COOLING FAN PRESSURE SWITCH 71 EGR SYSTEM MALFUNCTION 72 AIR CONDITIONER RELAY OPEN 78 FUEL PUMP CONTROL SIGNAL 79 FUEL PUMP CONTROL SIGNAL 81 TCM COMM. (ECT1) 83 TCM COMM. (ESA1) 84 TCM COMM. (ESA2) 85 TCM COMM. (ESA3) TOYOTA DATA LIST PARAMETER DESCRIPTIONS 9. DATA LIST PARAMETER DESCRIPTIONS The Asian Imports Cartridge is capable of displaying a wide variety of ECM parameters in Data List and Snapshot. This section provides a description of every parameter that can be displayed for Toyota vehicles. Remember, not all models are capable of displaying all parameters. Only parameters available for the selected vehicle are displayed by the tester. There are two basic types of ECM parameters: discrete and analog. Discrete parameters are 'bits' of information and can be in only one of two distinct states (on/off, open/closed, etc.). Switches and solenoids are examples of discrete parameters. Analog parameters are used to represent quantities and are displayed as a value with appropriate units. Examples of analog parameters include Engine Speed, Coolant Temperature, Oxygen Sensor Voltage, etc. A/C CLUTCH SIG. STATES ON/OFF Air Conditioning switch status as input to vehicle ECM; based on state of dashboard A/C switch position. ON=A/C commanded on, OFF= A/C commanded off. AFM OUTPUT A/F METER RATIO UNITS RANGE m3/h 0 – 255 m3/h Air Flow Meter (AFM) output signal sent as an input to vehicle ECM (from the Air Flow Meter) and calculated into cubic meter/hour by the ECM; based on the rate of air flow through the AFM. AFM OUTPUT A/F METER RATIO UNITS VOLTS RANGE 0 – 5V Air Flow Meter (AFM) output voltage signal sent to the vehicle ECM from the Air Flow Meter; based on the rate of air flow through the AFM. AFM SIG. PERIOD UNITS mS RANGE 0 – 66 Time period of Karman-Vortex airflow meter sent as an input to the vehicle ECM from the Karman-Vortex airflow meter; based on the rate of air flow through the KV-AFM CRANK SIGNAL STATES ON/OFF Crank (starter motor) signal input as sent to vehicle ECU during engine cranking. ON = crank switch on, OFF = crank switch off. TOYOTA 47 DATA LIST PARAMETER DESCRIPTIONS DTC RESULT STATES SET/NOT SET Result of ECM diagnostic self-test which checks for malfunction codes. NOT SET = no diagnostic trouble codes, SET = ECM has detected and stored diagnostic trouble codes. ENG. COOLANT TEMP (DEGREES) UNITS DEGREES F DEGREES C RANGE -58 – +260 -50 – +127 Engine Coolant Temperature input as sent to the vehicle ECM and calculated by the ECM; based on cooling system thermostat condition and engine operation mode. ENGINE SPEED UNITS RPM RANGE 0 – 10000 Engine Speed signal as input to the vehicle ECU and calculated by the ECU; based on the signal from the distributor pulse generator. IDLE SWITCH STATES ON/OFF Idle Switch signal status as sent to the vehicle ECM; based on idle switch state in throttle position sensor. ON = switch closed (engine idling), OFF = switch open (engine off-idle). NOTE: When testing the idle switch make sure the engine is running. INJECTOR P/W UNITS mSec RANGE 0 – 33 Injector solenoid Pulse Width (on-time) based on output calculated by the vehicle ECU; based on engine load, engine RPM and Throttle Position. INTAKE AIR PRES. UNITS mmHg RANGE 0 – 1244 Intake Air Pressure/Vacuum signal sent as an input to the vehicle ECM from the MAP/VAC sensor; based on engine load. INTAKE AIR VOL. UNITS g/S RANGE 0 – 510 Intake Air Volume is a measure of engine intake air volume through the air Flow Meter in grams per second (g/s). The more throttle opening, the greater intake air volume into the engine. This parameter applies to AFM equipped engines only. ISC DUTY CYCLE UNITS % RANGE 0 – 100 Idle Speed Control (ISC) valve percentage opening based on output calculated by the vehicle ECU; based on engine load, engine RPM and Throttle Position. 48 TOYOTA DATA LIST PARAMETER DESCRIPTIONS ISC VALVE UNITS STEPS RANGE 0 – 215 Idle Speed Control (ISC) valve step based on output calculated by the vehicle ECU; based on engine load, engine RPM and Throttle Position. KNOCK SIGNAL STATES ON/OFF Knock sensor signal correction as commanded by vehicle ECM; based on engine load and indicates that the ECM advance/retard strategy is controlling ignition timing. ON = correction enabled, OFF = correction disabled. LEAN MIX SENSOR UNITS mA RANGE 0 – 72 Lean mixture sensor current as input to the vehicle ECM; based on air-fuel ratio (O2 content) of exhaust gases. LEFT A/F FB STATES ON/OFF Left side air-fuel feedback signal state as commanded by vehicle ECM; based on engine load and left O2 sensor signal inputs to ECM. ON = feedback enabled, OFF = feedback disabled. LEFT A/F TARGET UNITS VOLTS RANGE 0 – 5V Target (commanded) air fuel ratio in left-hand exhaust manifold as calculated by vehicle ECM. LEFT O2S SIGNAL STATES RICH/LEAN Left Oxygen Sensor state flag based on input to vehicle ECU; based on oxygen content in left exhaust stream, RICH = air fuel ratio above 14.7, LEAN = air fuel ratio below 14.7:1. NEUTRAL SWITCH STATES P-N--/-R-DL Neutral Safety switch status as input to vehicle ECM, based on the current gear selection of the transmission. P-N-- = current gear is PARK or NEUTRAL, -R-DL = current gear is REVERSE, DRIVE, or LOW. RIGHT A/F FB STATES ON/OFF Right side air-fuel feedback signal state as commanded by vehicle ECM; based on engine load and right O2 sensor signal inputs to ECM. ON = feedback enabled, OFF = feedback disabled. TOYOTA 49 DATA LIST PARAMETER DESCRIPTIONS RIGHT A/F TARGET UNITS VOLTS RANGE 0 – 5V Target (commanded) air fuel ratio in right-hand exhaust manifold as calculated by vehicle ECM. RIGHT O2S SIGNAL STATES RICH/LEAN Right Oxygen Sensor state flag based on input to vehicle ECU; based on oxygen content in right exhaust stream, RICH = air fuel ratio above 14.7, LEAN = air fuel ratio below 14.7:1. SPARK ADVANCE UNITS DEGREES RANGE -30 – +90 Ignition timing Spark Advance or Retard signal based on output calculated by the vehicle ECU; based on engine load, engine RPM and Throttle Position. THROTTLE ANGLE UNITS DEGREES RANGE 0 – 125 Angle of throttle plate in throttle body as sent to the vehicle ECM and calculated by the ECM; based on current position of throttle position sensor. VEHICLE SPEED UNITS MPH RANGE 0 – 125 Vehicle speed signal as input to vehicle ECM and calculated by the ECM; based on vehicle speed sensor input. 50 TOYOTA APPENDICES A. UNDERSTANDING OBD II ..................................................................................................................... 2 B. OBD II OXYGEN SENSOR LOCATION INFORMATION ............................................................... 4 C. DEFINITION OF CODE TYPE ................................................................................................................ 6 D. IF YOU'RE HAVING A PROBLEM ........................................................................................................ 7 E. IF YOU ARE USING A TECH 1 TESTER ........................................................................................... 10 F. GLOSSARY OF TERMS, ACRONYMS, AND ABBREVIATIONS ...............................................11 UNDERSTANDING OBD II A. UNDERSTANDING OBD II WHAT IS OBD II? The California Air Resource Board (CARB) requires that, by model year 1996, all vehicles sold in California (under 8500 GVWR) contain a certain minimum “On-Board Diagnostic” capability to diagnose emissions-related failures of the engine control system. These diagnostic requirements have been designated as OBD II (On-Board Diagnostics, Phase II) with a goal of monitoring “all of the emissions-related components on-board the vehicle for proper operation.” CARB's intent with the OBD II program is to “permit the State's Inspection and Maintenance Program to evolve into a check of the on-board computer for the presence of Diagnostic Trouble Codes (DTCs); underhood and tailpipe inspections would no longer be required.” CARB has left the task of defining the Standards and Recommended Practices needed to implement their OBD II requirements to the Society of Automotive Engineers (SAE). The SAE committees that define these documents are made up of worldwide representatives from the vehicle manufacturers, tool manufacturers, service industry, and regulatory agencies, plus other related automotive disciplines. The glossary in Appendix D contains a brief description of the SAE “J” documents which provide these definitions. Part of the OBD II program is for the vehicle to provide a standard interface for off-board diagnostic test equipment. This standard interface includes a standard test connector (referred to as the J1962 connector), a standard communication protocol (SAE J1850 or ISO9141-2), and a standard set of diagnostic test modes (defined by SAE J1979). In addition to defining the California-mandated emissions testing requirements, OBD II satisfies the EPA's federal OBD testing requirements through 1998. Therefore, equipment used to access the vehicle's OBD II data can also be used to test vehicles under the federal OBD requirements which are in the process of being implemented in some states. OBD II SCAN TOOL Part of the intent of CARB's OBD II program is that a single diagnostic tester can be used to read the diagnostic information from any OBD II-compliant vehicle. A tester which satisfies this requirement can be designated as an OBD II Scan Tool and is defined by the SAE document J1978. One of the requirements of the OBD II Scan Tool is that it has to work with any OBD II-compliant vehicle and be able to automatically determine all information required to communicate with the vehicle. The operator does not enter any vehicle-specific information such as the vehicle manufacturer, model year, or engine. The OBD II Scan Tool determines what protocol the vehicle uses, what diagnostic parameters can be read from the vehicle, and what tests are supported by the vehicle. The SAE Recommended Practice J1978 defines the basic requirements for an OBD II Scan Tool. SAE Recommended Practice J1979 defines the test modes used by both the vehicle and the OBD II Scan Tool to access vehicle information and functions. The following test modes are required for a basic OBD II Scan Tool: • Display Current Diagnostic Data Parameters (J1979, Mode 1). • Display Diagnostic Trouble Codes, DTCs (J1979, Mode 3). • Display Freeze Frame Data captured by the vehicle along with a DTC (J1979, Mode 2). • Clear DTCs and Freeze Frame Data from the on-board controller's memory (J1979, Mode 4). 2 APPENDICES UNDERSTANDING OBD II • Display results of Oxygen Sensor Monitoring Tests (J1979, Mode 5). • Display status of the vehicle's on-board Readiness Tests. In addition to these required OBD II Scan Tool functions, the Vetronix testers provide a number of enhancements to the basic OBD II diagnostic functions: • Road test support through the capture of sequences of data parameters (Snapshot mode). • User-selectable parameter list allowing the user to trade off update rate for amount of data. • Display results of on-board monitoring tests, both Continuous and Non-Continuous (J1979, Modes 6 and 7). • Print data parameters. • Displays results for control of on-board system, test, or component (J1979, Mode 8) • Displays vehicle specific information such as VIN and calibration IDs (J1979, Mode 9) OBD II COMMUNICATION PROTOCOLS One of the OBD II requirements is that the vehicle contain a standard serial communication link to offboard test equipment. This “standard” communication link turns out to be three separate links, two defined by the SAE and one defined by ISO: J1850 10.4K VPW Protocol Uses a single-wire 7-volt bus communicating at 10,400 bits/second using Variable Pulse Width (VPW) data encoding. J1850 41.6K PWM Protocol Uses a two-wire 5-volt bus communicating at 41,600 bits/ second using Pulse Width Modulation (PWM) data encoding. ISO 9141-2 Protocol Uses a single-wire 12-volt bus communicating at 10,400 bits/second using UART data encoding. A vehicle manufacturer can satisfy the OBD II requirements by implementing any one of the three protocols. The OBD II Scan Tool must provide support for all three protocols in order to allow it to communicate with all OBD II vehicles. APPENDICES 3 OBD II OXYGEN SENSOR LOCATION INFORMATION B. OBD II OXYGEN SENSOR LOCATION INFORMATION OBD II compliant engine management systems use a new naming convention for oxygen sensors (O2S). The need for this sensor convention was required because of the OBD II system's use of a downstream O2S. O2S location information is divided into cylinder bank and O2S location. Bank 1 contains the sensor that is downstream from the engine cylinder bank which has number 1 cylinder. Bank 2 contains the sensor opposite the cylinder Bank 1. Additionally, O2S location is separated into upstream and downstream, relative to the catalytic converter. For in-line engines and V-configuration engines with Y exhaust systems and one O2S ahead of the catalytic converter, O2S 1 is the upstream sensor and O2S 2 is the downstream sensor. This results in the naming convention bank/location. Examples are: O2S B1 S1 = bank 1, upstream O2S B1 S2 = bank 1, downstream O2 Sensor 1/1 O2 Sensor 1/1 O2 Sensor 1/2 O2 Sensor 1/2 For V-configuration engines with dual exhaust systems, there may be a separate upstream and downstream O2S for each bank. This will result in the following naming convention: O2S B1 S1 = bank 1, upstream O2S B1 S2 = bank 1, downstream O2S B2 S1 = bank 2, upstream O2S B2 S2 = bank 2, downstream O2 Sensor 1/1 O2 Sensor 1/2 4 O2 Sensor 2/1 O2 Sensor 2/2 APPENDICES OBD II OXYGEN SENSOR LOCATION INFORMATION On some V-configuration engines with 2 upstream O2S, there may be an O2S 3. O2S 3 is the downstream O2S after the catalytic converter. This configuration may have a third O2S ahead of the catalytic converter and results in the following naming convention: O2S B1 S1 = bank 1, upstream O2S B1 S2 = bank 1, upstream O2S B2 S1 = bank 2, upstream O2S B1 S3 = bank 1, downstream O2 Sensor 1/1 O2 Sensor 2/1 O2 Sensor 1/2 O2 Sensor 1/3 Together, these conventions are all used to identify the O2S that may be causing a DTC or producing a faulty signal. The O2S naming conventions shown here are consistent with J1979. Please consult the appropriate service manual for more information on the vehicle that you are working on. APPENDICES 5 DEFINITION OF CODE TYPE C. DEFINITION OF CODE TYPE The Asian Imports application cartridge uses five description for code types, which are Auto, Manual, ECU LED, Malfunction Indicator Lamp (MIL) codes, or OBDII DTCs. 6 Autocodes Term used when tester can read codes from the vehicle ECU automatically, via the data link connector. Used when vehicle is supported with F2: DTC. Mancodes Term used when tester provides information on the tester display about how to read codes from vehicle ECU, and there is no connection to the vehicle via a diagnostic connector. Equipment used to manually read DTCs includes single wire jumper, analog voltmeter, ECU LED, or Mastertech oscilloscope function. Used when vehicle is supported with F1: DTC ENTRY. ECU LED Term used when tester provides information the on tester display about how to read ECU codes from vehicle ECU LED, and there is no connection to the vehicle via a diagnostic connector. Equipment used to manually read DTCs includes single wire jumper. Used when vehicle is supported with F1: DTC ENTRY. MILcodes Term used when tester provides information the on tester display about how to read ECU codes from vehicle MIL, and there is no connection to the vehicle via a diagnostic connector. Equipment used to manually read DTCs includes single wire jumper. Used when vehicle is supported with F1: DTC ENTRY. OBD II DTC Term used to describe a powertrain code that can be read from a vehicle ECU automatically, via the data link connector. The Society of Automotive Engineers (SAE) has defined a standardized set of five-character, alpha-numeric DTCs which can be read from an ECU by scan tool. These DTCs are only available on OBD II compliant vehicles. APPENDICES IF YOU'RE HAVING A PROBLEM D. IF YOU'RE HAVING A PROBLEM This appendix describes some of the possible problems which you might run into when you try to use the Asian Imports Software on an OBD II compliant vehicle. OBD II INTERFACE CIRCUITRY NOT INSTALLED OBD II Interface Circuitry Not Installed Possible Cause: • OBD II Interface Circuitry is not installed in the Tester. Recommendations: • Verify that the vehicle's ignition is on. • Remove power from the tester by unplugging the DLC cable and reconnecting the cable. • Verify that the OBD II Interface Circuitry is installed in your tester in one of the following configurations: • An OBD II Interface Cartridge is installed in the top slot of the Tech 1A. • A Vehicle Interface Module (VIM) is connected “in-line” with the serial data cable for either the TECH 1 or TECH 1A. • An OBD II compliant daughter board inside the Mastertech. NOTE The OBD II Interface Cartridge will not work with a TECH 1. An error message, OBD II Interface Circuitry Not Installed, will be displayed if you attempt to use the OBD II Interface Cartridge with a TECH 1. TESTER IS UNABLE TO COMMUNICATE WITH THE VEHICLE Check Cable Cable ON? Does Vehicle Support OBD II Possible Causes: • Vehicle's ignition is off. • Diagnostic cable is not plugged into vehicle's diagnostic connector. • Vehicle is not OBD II-compatible. APPENDICES 7 IF YOU'RE HAVING A PROBLEM Recommendations: • Verify that the vehicle's ignition is on. • Verify that cable is plugged into vehicle's diagnostic connector. • Check underhood decal for OBD II certification. TESTER LOSES COMMUNICATION WITH THE VEHICLE LOSS OF VEHICLE COMMUNICATIONS Possible Causes: • Vehicle's ignition was turned off. • Diagnostic cable came loose from vehicle's diagnostic connector. • Vehicle failed to respond to query from tester. Recommendations: • Verify that the vehicle's ignition is on. • Verify that cable is plugged into vehicle's diagnostic connector. • Turn tester and vehicle's ignition off. Then turn ignition to on, followed by turning on the tester and attempting to reestablish communication. • Some vehicles fail to respond properly to tester queries for certain tests. This is particularly true with oxygen sensor tests if all readiness tests have not been completed. If possible, drive the vehicle to complete the readiness tests and then rerun the tests. PARAMETER UPDATE RATE IS SLOW Possible Cause: • A slow update rate is characteristic of OBD II communications. A typical update rate is approximately 125 to 150 ms per parameter (7 or 8 updates per second for a single parameter). Therefore, a typical list of 20 parameters will only be updated approximately every 3 seconds. Recommendation: • If a faster update rate is needed, select fewer parameters using the CUSTOM LIST function. Select only the parameters needed for a test. For example, you can look at just an oxygen sensor signal and get an update of 7 or 8 times a second. 8 APPENDICES IF YOU'RE HAVING A PROBLEM NOT ALL PARAMETERS DISPLAYED Possible Cause: • The vehicle is not reporting all of the parameters. The Asian Imports software queries the vehicle's ECU to determine what parameters are supported by the ECU on OBD II compliant vehicles. The tester then creates a data list based on these parameters. If the vehicle contains a particular sensor, but does not tell the TESTER that it supports that parameter (e.g. a downstream oxygen sensor) the software will not display that parameter. Recommendation: • Diagnosis must be performed based on other diagnostic data or procedures. TESTER DISPLAYS “TEST RESULTS” MESSAGE NO ON-BOARD TEST RESULTS [ENTER] Possible Cause: • This mode is not supported by this vehicle. Recommendation: • Try a different test mode. This display can occur in the O2S Results mode if the vehicle manufacturer supports O2S testing via a different mode. Some manufacturers use the non-continuous version of the On-Board Tests mode to report the results of oxygen sensor testing. WRONG DISPLAY AFTER POWER IS APPLIED ALL 87-89 ECM 'PLUS' SELECT MOLDEL YEAR”: 198? FORD 81-89 ECA F0: STAR MODE F1: TECH 1 MODE Possible Causes: • Wrong master cartridge is installed. • Master cartridge is malfunctioning. • Tester is malfunctioning. Recommendations: • Verify that the cartridge is installed in the bottom slot of the tester and that there isn't a master cartridge (e.g. “E/K 86-87 SYSTEM”) in the top slot. • Try another cartridge. • Perform the Self-test as described in the Operator's Manual. APPENDICES 9 IF YOU ARE USING A TECH 1 TESTER E. IF YOU ARE USING A TECH 1 TESTER Using the Asian Imports application cartridge with a TECH 1 Tester When using a TECH 1 tester on Toyota or Lexus vehicles, the number of OBD systems that the tester can communicate with will be limited to Engine Data, Engine DTCs, and Transmission DTCs. OBD Systems available will depend on the vehicle (example: most Toyota and Lexus vehicles have engine diagnostics, but may or may not have transmission diagnostics). 10 APPENDICES F. GLOSSARY OF TERMS, ACRONYMS, AND ABBREVIATIONS The following is a list of terms, acronyms, and abbreviations which are applicable to, OBD, OBD I, and OBD II diagnosis and/or the operation of this software. 49ST 49 States BLM Block Learn A/C Air Conditioning BTDC Before Top Dead Center A/S AIR Solenoid CA California A/T Automatic Transmission CAL Calibration A.A.C. Auxiliary Air Control CAN Canada ABS Absolute CARB Carburetor ACCEL Accelerated, or Accelerator CARB ACV Air Control Valve ADJ Adjustment AFM Air Flow Meter AIR Secondary Air Injection ALDL Assembly Line Communication Link The California Air Resource Board. CARB is the regulatory agency which specifies vehicle emissions standards and testing programs. OBD II is CARB's latest program for on-board and off-board test requirements for new vehicles. CC Carter Carburetor ANG Angle CC Cruise Control AP Atmospheric Pressure CCP Charcoal Canister Purge ASP Aspirated C.E. Check Engine ASV Air Supply Valve CEL Check Engine Lamp AT Automatic Transmission CH Chamber ATF Automatic Transmission Fluid CID ATM Atmospheric Pressure AUX Auxiliary B+ Battery Plus Voltage BAC Bypass Air Control BARO Barometric Pressure/ Atmospheric Pressure Component Identifier. Used in the Non-Continuous Test Results mode of the On-Board Tests function to specify the component for which the test results are being reported. Refer to the service manual for the vehicle under test for a definition of the CIDs. CK Crankshaft BLK Block, or Black CKP Crankshaft Position CKT Circuit CL Clearance Light CLCC Closed Loop Carburetor Control CL-Fault Closed Loop with fault for FUEL STATUS parameter. Used to indicate that the fuel system is operating closed loop even though a fault with at least one oxygen sensor has been detected. The ECU may be using a single oxygen sensor for fuel control. CMP Camshaft Position CNTRL Control COM Communication COMM Communication CONT Control CONTR Control CONV Converter CTL Control CYL Cylinder Data List The Data List mode is used to examine the state of the current diagnostic data parameters (SAE J1979 mode 1). Drive Cycle A single key-on to key-off cycle where the engine has been started then shut down. DTC Diagnostic Trouble Codes (DTCs) indicate fault conditions found by the vehicle's on-board controller while it is monitoring the vehicle's operation. Refer to discussion of “Pxxxx.” DUR Duration ECM Engine Control Module ECT Engine Coolant Temperature ECT (°) Engine Coolant Temperature in degrees. The Unit Conversion function can be used to switch between °F and °C. ECU Electronic Control Unit. The module which performs the OBD II testing and communicates with the OBD II Scan Tool. ECU Engine, or Electronic Control Unit EFE Early Fuel Evaporation EFFI Efficiency EFI Electronic Fuel Injection EGR Exhaust Gas Recirculation EGRT Exhaust Gas Recirculation Temperature EL Electronic Ignition (ignition systems without a distributor or distributorless) ENG Engine ESC Electronic Spark Control DECEL Deceleration DEF Defroster DEG Degree DI Distributor Ignition (ignition systems with a distributor) DIFF Differential DJC Diagnostic Jumper Connector EVAP Evaporative Emission DLC The Data Link Connector provides the link between the tester and the vehicle. EVRV Electronic Vacuum Regulator Valve DLC Diagnostic Link Connector F/T Full Time DOHC Double Overhead Cam FAIL Failure FB Feed Back FUNC Function FXS Fixed Spark Mode GMP4 Microcomputer type used in High Speed ECMs Fast Idle Control Device GND Ground FLD Field HA High Altitude FNT Front HAC High Altitude Control FP Fuel Pump HC Hitachi Carburetor FPRC Fuel Pressure Regulator Control Hexadecimal ($) Freeze Frame An OBD II test mode where the tester displays diagnostic data parameters which were saved by the vehicle at the time a Diagnostic Trouble Code occurred. FREQ Frequency A number system used by computers consisting of 16 digits. Hexadecimal numbers are represented by the digits 0 through 9 plus “A” through “F” (representing values of 10 through 15). On the tester and in this manual, hexadecimal numbers are preceded with a “$” (e.g. $C4, $7F or $41). FRNT Front HF High Fuel FRT Front HO2S Heated Oxygen Sensor FT Fuel Trim HTD Heated FT-O2S B1 S1 Short-Term Fuel Trim for oxygen sensor 1 on Bank 1. This parameter indicates the amount of adjustment of the fuel injected into the engine based on feedback from this oxygen sensor. HTR Heater HVAC Heating, Ventilation, and Air Conditioning IAC Idle Air Control IAT Intake Air Temperature, or Intake Air Thermosensor IAT (°) Intake Air Temperature in degrees. The Unit Conversion function can be used to switch between °F and °C. ID Identification IDL Idle IG Ignition IGN Ignition IM240 IM240 is an enhanced inspection and maintenance test program legislated by the U.S. Environmental Protection Agency (EPA) to meet federal clean-air standards. FCC Federal Communications Commission FDBK Feedback FI Fuel Injection F.I.C.D FTP Federal Test Procedure. A test procedure used to determine compliance of light-duty motor vehicles with federal emissions standards. The FTP simulates on-road operation and includes cold start-up, idle operation, acceleration, deceleration, a variety of part throttle speed/load conditions, and hot start-up. FTR Fuel Trim FUEL STATUS 1 Fuel System Status for Bank 1. This parameter indicates whether the fuel control system for Bank 1 is operating Open Loop or Closed Loop (using feedback from one or more oxygen sensors). INJ Injector INT Intake ISC Idle Speed Control ISO International Organization for Standardization. The European organization which controls the ISO 9141 documents applicable to OBD II. ISO 9141 A European document defining a class of communications between vehicle ECUs and off-board test equipment. ISO 9141 provides the basis for a large number of different communications protocols. Most of these protocols are specific to various equipment or vehicle manufacturers. The title of this document is “Road Vehicles-Diagnostic Systems; Requirements for Interchange of Digital Information.” ISO 9141-2 A European document defining an ISO 9141 protocol to be used for support of CARB OBD II diagnostics. The title of this document is “Road Vehicles-Diagnostic Systems; Part 2: CARB Requirements for Interchange of Digital Information.” J1850 SAE Standard defining protocols which are used for OBD II communications. Two versions of this protocol are used for OBD II: the 10.4 Kbits/sec VPW protocol and the 41.6 Kbits/sec PWM protocol. The title of this document is “Class B Data Communication Network Interface.” J1930 SAE Recommended Practice defining standard terminology to be used for support of OBD II testing. The title of this document is “Electrical/ Electronic Systems Diagnostic Terms, Definitions, Abbreviations and Acronyms.” J1962 SAE Recommended Practice defining the industry standard connector used for OBD II. This connector contains 16 pins, 7 which are defined by the SAE and 9 which are available for manufacturerspecific uses. The title of this document is “Diagnostic Connector.” J1978 SAE Recommended Practice defining the requirements for a standard tester to be used for performing OBD II testing. The title of this document is “OBD II Scan Tool.” J1979 SAE Recommended Practice defining the operating modes to be used by an OBD II Scan Tool for accessing diagnostic data from an OBD IIcompliant vehicle. The title of this document is “E/E Diagnostic Test Modes.” J2012 SAE Recommended Practice defining the diagnostic trouble codes (DTCs) to be used by the vehicle's ECU for reporting the status of the onboard diagnostic tests. The title of this document is “Recommended Practice for Diagnostic Trouble Code Definitions.” J2190 SAE Recommended Practice defining possible methods for vehicle manufacturers to implement enhancements to OBD II. J2190 implementations are specific to the various manufacturers and are often referred to as “Enhanced OBD II.” The title of this document is “Enhanced E/E Diagnostic Test Modes.” J2205 SAE Recommended Practice defining a method of expanding an OBD II Scan Tool to support manufacturerspecific test modes. The title of this document is “Expanded Diagnostic Protocol for OBD II Scan Tools.” MIL Malfunction Indicator Lamp. Used to indicate that an emissions-related fault has been detected by the ECU and a DTC has been set. Typically, the MIL stays illuminated while the fault is present and for 3 ignition cycles after the fault has gone away. Generally, if the vehicle's onboard diagnosis has detected that the fault is not present for 3 consecutive ignition cycles, the MIL will be turned off. Even though the MIL is off, the DTC will still be present in the ECU's memory and can be read using the tester's DTCs function. Mass Air Flow MIN Minimum Air Flow Rate from Mass Air Flow (MAF) Sensor. The Unit Conversion function can be used to switch between gm/ sec and lb/min. mmHg Millimeters of Mercury MON Monitor MONIT Monitor MOP Metering Oil Pump MPFI Multi Port Fuel Injection MPH Miles Per Hour MPI Multi Port Fuel Injection MPS Motor Position Sensor MPU Micro Processing Unit ms An abbreviation for milliseconds. A millisecond is 1/1000th of a second. MSC Mass Storage Cartridge MT Manual Transmission MTR Motor mV Millivolts N/A Not Available. NEUT Neutral O2 Oxygen O2S Oxygen Sensor O2S B1 S1 Oxygen Sensor 1 for Bank 1 KPa Kilo-pascals KPH Kilometers per Hour KS Knock Sensor LAF Linear Air Fuel Ratio LED Light Emitting Diode LF Left Front LR Left Rear LT Light LT Long-Term LT FT 1 Long-Term Fuel Trim for Bank 1 M/T Manual Transmission MAF MAF (R) MAG Magnet MALF Malfunction MAN(I) Manifold MAP Manifold Absolute Pressure MAP (P) Intake Manifold Absolute Pressure in units of pressure. The Unit Conversion function can be used to switch between kPa, inHg and mmHg. MAT Manifold Air Temperature MFI Multiport Fuel Injection OBD On-Board Diagnostics. OBD is a general term used to refer to any self-diagnosis performed by the vehicle's ECUs. OBD is also used to refer to the EPA's federal OBD program. OBD I OBD I refers to California's first phase of on-board diagnostics. OBD I requires that the ECU diagnose some of the emissions-related components and that the DTCs resulting from that diagnosis be made available to the service technician. In many cases, OBD I codes are displayed via a flashing MIL light. OBD II The California Air Resource Board (CARB) requires that, by 1996, all vehicles sold in California contain a certain minimum “on-board diagnostic” capability to diagnose emissions-related failures of the engine control system. These diagnostic requirements have been designated as OBD II (OnBoard Diagnostics, Phase II) with a goal of monitoring “all of the emissions-related components on-board the vehicle for proper operation.” CARB's intent with the OBD II program is to “permit the State's Inspection and Maintenance Program to evolve into a check of the onboard computer for the presence of diagnostic trouble codes; underhood and tailpipe inspections would no longer be required.” OD Over Drive OHC Overhead Cam OL-Drive Open Loop due to driving conditions for FUEL STATUS parameter. Used to indicate that the fuel system is operating open loop due to such driving conditions as power enrichment or deceleration reduction. OL-Fault Open Loop due to fault condition for FUEL STATUS parameter. Used to indicate that the fuel system is operating open loop due to a detected system fault. Other Test Results A test mode where the results of the on-board tests are reported for tests which are run on non-continuously monitored systems. These tests are manufacturer-specific and are reported for manufacturer-assigned test IDs (TIDs) and component IDs (CIDs). Test values are reported by the ECU along with minimum and/or maximum acceptable limits for the test. The tester displays the PASS/FAIL status for each TID/CID combination. This test mode is not supported by all vehicles. P/B Passive Belt P/N Park or Neutral PCM Power Control Module PCM Powertrain Control Module. The module which controls vehicle engine and transmission operation and communicates diagnostic data information to the technician. PCS Pressure Control Solenoid Pending DTCs A test mode where the results are reported for tests which are run on continuously monitored systems. These test results are reported the same way DTCs are reported using code designations of the form “Pxxxx.” These test results can indicate a condition which could cause a DTC to be set if the condition persists. This test mode is not supported by all vehicles. PFI Port Fuel Injection PID Parameter Identifier. PIDs are hexadecimal numbers used to identify parameters used by the Data List, SNAPSHOT, and Freeze Frame modes. Pxxxx Powertrain Diagnostic Trouble Code (DTC) xxxx. The SAE has defined a standardized set of fivecharacter, alpha-numeric DTCs. At this time, only Powertrain (P) codes have been defined. In the future, DTCs will be defined for chassis faults (C codes), body faults (B codes), and vehicle network faults (U codes). The SAE-defined Powertrain DTCs are in the range P0100 to P0999. DTCs with designations of P1000 or greater are unique to the individual manufacturers. R Rear RAD Radiator Readiness Tests The Readiness Tests mode allows you to display the status of the vehicle's onboard monitors which monitor the operation of the emissionsrelated components. These monitors must be run in order for the DTC and Test Result displays to accurately reflect the condition of the vehicle's emissions-related components. RECIRC Recirculation PMP Pump POS Position POTEN Potentiometer PRC Pressure Regulator Control PREP Prepare PRESS Pressure PRNDL Park-Reverse-Neutral-DriveLow PROM Programmable Read Only Memory PS SV Power Steering Solenoid Vacuum Valve REF Reference REG Regulator PSM Pressure Switch Module RF Right Front PSP Power Steering Pressure R&R Remove and Replace PWM Pulse Width Module RR Right Rear PWM Pulse Width Modulation. The method used to encode the data in the 41.6 Kbit/sec version of the J1850 protocol. RS232 Standard Serial Communications interface RST Reset RT Right S/R Single Range SAE Society of Automotive Engineers. The organization which controls most of the documents defining the interface between the vehicle's OBD II controllers and offboard test equipment. TAMAX Throttle Angle Maximum TBI Throttle Body Fuel Injection TC Traction Control TCC Torque Converter Clutch TCM Transmission Control Module TCS Traction Control System TDC Top Dead Center TDCL Toyota Diagnostic Communication Link SCNDRY Secondary SDL Serial Data Link SEC Secondary SENS Sensor SEQ Sequential TEMP Temperature SFI Sequential Fuel Injection THROT Throttle SHFT Shift TICS SHT Short Triple Induction Control System SIG Signal TID SIR Supplemental Inflatable Restraint SMPFI Sequential Multi-Port Fuel Injection Snapshot The snapshot mode is used to capture data over a period of time. It can be used to support road testing as well as testing in the service bay. Test Identifier. The TID is used by the O2S Test Results mode and by the NonContinuous On-Board Test Results mode to identify manufacturer-specific tests. The service manual for the vehicle under test should be used to interpret the TID. TMP Temperature TP Throttle Position SNSR Sensor TPI Tuned Port Injection SOHC Single Overhead Cam TPS Throttle Position Sensor SOL Solenoid TPS (%) Absolute Throttle Position Sensor in percent. SPD Speed TRAC Traction SPEC Specification TRANS Transmission SPI Single Port Fuel Injection Trip SPV Solenoid Purge Valve SRV Service Vehicle operation following a key-off period which has at least one warm-up cycle and one drive cycle. S.T. Short Term UART STEP Stepper ST FT 1 Short-Term Fuel Trim for Bank 1 Universal Asynchronous Receiver/ Transmitter. A standard data-encoding technique used extensively for serial communication. SW Switch VAC Vacuum SYS System VAF Volume Air Flow VDEIC Variable Dynamic Effect Intake Control VEH Vehicle VICS Variable Inertia Charging System VIN Vehicle Identification Number VLV Valve VOLT Voltage VPW Variable Pulse Width Modulation. The method used to encode the data in the 10.4 Kbit/sec version of the J1850 protocol. VRIS Variable Resonance Induction System VSS Vehicle Speed Sensor VSV Vacuum Switching Valve VTEC Variable Timing Electronic Camshaft Warm-up Cycle Engine coolant temperature increase by at least 40°F since start-up that reaches a temperature of 160°F. WOT Wide Open Throttle WST Wastegate GLOSSARY OF TERMS, ACRONYMS, AND ABBREVIATIONS 20 APPENDICES