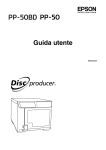
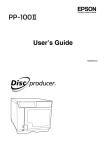
1
EPSON
PRODUCT INFORMATION GUIDE
UPDATE FOR SD PRODUCTS
1/10
This package provides a product section to be added to the EPSON System
Device Product Information Guide. The table of contents of this section is listed
below.
Epson Discproducer PP-100N/PP-100N Security Version
Operating Environment . . . . . . . . . . . . . . . . . . . . . . . . . . . . . . . . . . . . . . . . . . . . . . . . . . . . . . . . .1
Accessories . . . . . . . . . . . . . . . . . . . . . . . . . . . . . . . . . . . . . . . . . . . . . . . . . . . . . . . . . . . . . . . . . . .1
Ink cartridges . . . . . . . . . . . . . . . . . . . . . . . . . . . . . . . . . . . . . . . . . . . . . . . . . . . . . . . . . . . . . . .1
CD/DVD Specifications . . . . . . . . . . . . . . . . . . . . . . . . . . . . . . . . . . . . . . . . . . . . . . . . . . . . . .1
Connections . . . . . . . . . . . . . . . . . . . . . . . . . . . . . . . . . . . . . . . . . . . . . . . . . . . . . . . . . . . . . . .1
Safety . . . . . . . . . . . . . . . . . . . . . . . . . . . . . . . . . . . . . . . . . . . . . . . . . . . . . . . . . . . . . . . . . . . . . . . .1
Control Panel . . . . . . . . . . . . . . . . . . . . . . . . . . . . . . . . . . . . . . . . . . . . . . . . . . . . . . . . . . . . . . . . . .2
Print/Write Speed . . . . . . . . . . . . . . . . . . . . . . . . . . . . . . . . . . . . . . . . . . . . . . . . . . . . . . . . . . . . . .2
Reliability . . . . . . . . . . . . . . . . . . . . . . . . . . . . . . . . . . . . . . . . . . . . . . . . . . . . . . . . . . . . . . . . . . . . .2
Environmental Conditions . . . . . . . . . . . . . . . . . . . . . . . . . . . . . . . . . . . . . . . . . . . . . . . . . . . . . . .2
Size and Weight . . . . . . . . . . . . . . . . . . . . . . . . . . . . . . . . . . . . . . . . . . . . . . . . . . . . . . . . . . . . . . . .2
Locking the Disc Cover . . . . . . . . . . . . . . . . . . . . . . . . . . . . . . . . . . . . . . . . . . . . . . . . . . . . . . . . .3
Loading Discs . . . . . . . . . . . . . . . . . . . . . . . . . . . . . . . . . . . . . . . . . . . . . . . . . . . . . . . . . . . . . . . . . .3
Standard mode . . . . . . . . . . . . . . . . . . . . . . . . . . . . . . . . . . . . . . . . . . . . . . . . . . . . . . . . . . . .3
External output mode . . . . . . . . . . . . . . . . . . . . . . . . . . . . . . . . . . . . . . . . . . . . . . . . . . . . . . .3
Batch mode . . . . . . . . . . . . . . . . . . . . . . . . . . . . . . . . . . . . . . . . . . . . . . . . . . . . . . . . . . . . . . .3
Security Model Modes . . . . . . . . . . . . . . . . . . . . . . . . . . . . . . . . . . . . . . . . . . . . . . . . . . . . . . . . . .3
Loading Ink . . . . . . . . . . . . . . . . . . . . . . . . . . . . . . . . . . . . . . . . . . . . . . . . . . . . . . . . . . . . . . . . . . .4
Running the Nozzle Check . . . . . . . . . . . . . . . . . . . . . . . . . . . . . . . . . . . . . . . . . . . . . . . . . . . . . . .4
Using the utility . . . . . . . . . . . . . . . . . . . . . . . . . . . . . . . . . . . . . . . . . . . . . . . . . . . . . . . . . . . . .4
Using the control panel . . . . . . . . . . . . . . . . . . . . . . . . . . . . . . . . . . . . . . . . . . . . . . . . . . . . . .4
Cleaning the Print Head . . . . . . . . . . . . . . . . . . . . . . . . . . . . . . . . . . . . . . . . . . . . . . . . . . . . . . . . .4
Using the utility . . . . . . . . . . . . . . . . . . . . . . . . . . . . . . . . . . . . . . . . . . . . . . . . . . . . . . . . . . . . .4
Using the control panel . . . . . . . . . . . . . . . . . . . . . . . . . . . . . . . . . . . . . . . . . . . . . . . . . . . . . .4
Aligning the Print Head . . . . . . . . . . . . . . . . . . . . . . . . . . . . . . . . . . . . . . . . . . . . . . . . . . . . . . . . .5
Correcting the Print Position . . . . . . . . . . . . . . . . . . . . . . . . . . . . . . . . . . . . . . . . . . . . . . . . . . . . .5
Cleaning the Discproducer Exterior . . . . . . . . . . . . . . . . . . . . . . . . . . . . . . . . . . . . . . . . . . . . . . .5
Cleaning the Discproducer Interior . . . . . . . . . . . . . . . . . . . . . . . . . . . . . . . . . . . . . . . . . . . . . . .5
Cleaning the Filter . . . . . . . . . . . . . . . . . . . . . . . . . . . . . . . . . . . . . . . . . . . . . . . . . . . . . . . . . . . . . .5
Transporting the Discproducer . . . . . . . . . . . . . . . . . . . . . . . . . . . . . . . . . . . . . . . . . . . . . . . . . . .5
Discproducer LCD Messages . . . . . . . . . . . . . . . . . . . . . . . . . . . . . . . . . . . . . . . . . . . . . . . . . . . . .6
Checking Status . . . . . . . . . . . . . . . . . . . . . . . . . . . . . . . . . . . . . . . . . . . . . . . . . . . . . . . . . . . . . . .7
Related Documentation . . . . . . . . . . . . . . . . . . . . . . . . . . . . . . . . . . . . . . . . . . . . . . . . . . . . . . . .7
1/10
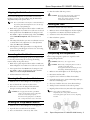
Epson Discproducer PP-100N/PP-100N Security
Operation panel
Ink cover
Ethernet connector
Disc cover
Accessories
USB ports
Air vents
AC inlet
Ink cartridges
Part number / Description
C13S020447 = Cyan
C13S020448 = Light Cyan
C13S020449 = Light Magenta
C13S020450 = Magenta
C13S020451 = Yellow
C13S020452 = Black
Dye-based ink
Disc cover lock
Main power switch
Rear printer cover
DVD drive 1
Picker arm
Reliability ≥ 1000 prints at 16.7%
coverage per color
Security slot
Life = 2 years after production (date
printed on label) or 6 months after
installation
Stacker 1
DVD drive 2
Dimensions =
1.65 x 3.27 x 104" (W x D x H)
{42 x 83 x 26.4 mm}
Security lock switch
Printer
Weight = 0.14 lb {64 g}
Purchase from your Discproducer dealer or visit:
http://www/discproducer.epson.com (U.S. and Canada).
Stacker 3
Tray 4
CD/DVD Specifications
Lock lever
Note:
Stacker 2
The Security Model has a keypad attached to the USB port on
the back of the unit.
CD/DVD
Description
Type
CD-R, DVD-R, DVD+R, DVD-R DL, DVD+R DL
Outer diameter 4.72" ± 0.012" {120 mm ± 0.3 mm}
Operating Environment
Inner diameter
0.59" + 0.004/-0" {15 mm + 0.1/- 0 mm}
Thickness
0.047" + 0.012"/-0.004" {1.2 mm + 0.3/- 0.1 mm}
Discproducer supports the following operating systems:
❏ Microsoft Windows 2000 SP4 or higher
❏ Microsoft Windows XP (32bit, SP2 or higher)
❏ Microsoft Windows Vista™ (32bit, SP1 or later)
❏ Microsoft Windows 7 (32bit)
Label side
Must be ink jet printable (thermal not supported).
Specified disc has a moisture-adhesive ink receptor
layer on the label surface.
Computer requirements
Discs may stick to each other if stacked in high
humidity or high temperatures.
Glossy labels other than specified type not supported.
After printing, let disc dry naturally. Touching or
splashing with water immediately after printing may
cause blurring or stickiness.
Pentium 4 or compatible
1.4 GHz or higher
(≥ 2.4 GHz
recommended)
Ethernet interface
1000Base-T or 100Base-TX
RAM
≥ 512MB
(≥ 1GB recommended)
Vista/Windows 7
≥ 1GB
HDD space
2000/XP
Vista
Windows 7
Printable area
Standard
2000/XP
≥ 10GB
≥ 25GB
≥ 26GB
HDD rotational speed
≥ 7200 rpm
Display
≥ XGA resolution, 65536 colors
Software preinstalled
Windows Media Player ≥ 6.4
Windows Internet Explorer 6 or 7
Wide
{1.77”}
45 mm
{1”}
25.5 mm
{4.57”} 116 mm
{4.57”} 116 mm
Connections
Connection Description
Sound (for music media) sound device and supported driver
must be installed
Ethernet
1000Base-T or 100Base-TX
Power
Input voltage
Frequency
Current
Power consumption (ave.)
100 - 240 V (rated)
50 - 60 Hz (rated)
1.5 A (rated)
86 W (operating), 55 W (idle)
Safety
EMI
FCC Part 15 Subpart B Class B
CAN/CSA-CEI/IEC CISPR 22 Class B
Safety standards UL60950-1/ CAN/CSA-C22.2 No. 60950-1
Note: Product may not function properly with third-party writing
software or anti-virus software installed.
Source drive should use MMC4-compliant or higher commands
and operations and be capable of reading sub-channels.
1/10
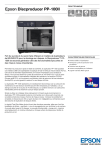
Epson Discproducer PP-100N/PP-100N Security - 1
Epson Discproducer PP-100N/PP-100N Security
Control Panel
PP-100N
Drive life
Light
Color
Description
Power
Green
On when product is on.
Flashes during initialization, shut down, ink
cartridge replacement, ink charging, or print
head cleaning.
Busy
Green
Flashes when jobs are processed. Flashes quickly
during disc ejection. Do not pull out tray 4 during
this time.
Error
Orange
On for error, such as disc cover or ink cartridge
cover open, arm failure to pick up disc, arm
loading multiple discs, disc error, or writing error.
Flashes when disc errors occur.
LCD
Function
* Approximate combined life of both burners.
8,000 = DVDs only.
30,000 = CDs only.
Ink pad
Function
EJECT
Do not use this button in Standard, External Output, or
Batch mode.
,
d
Confirms setting and runs processing.
u
/
Temperature
Cancels the selection.
l
Moves to a different digit when you change the IP address.
r
MENU
Operating
Storage
Transport
Humidity (no condensation)
Operating
Storage
50 to 95° F {10 to 35° C}
–4 to 104° F {–20 to 40° C}
–4 to 140° F {–20 to 60° C}
≤1 month at 104° F {40° C}
≤120 hours at 140° F {60° C}
20 to 80% RH
5 to 85% RH
Based on the following conditions
o
o
27 C (80.6 F)
Moves to different menus.
CANCEL
/
30,000 discs (at 2000 discs per month)
Environmental Conditions
Shows menus and messages.
Button
15,000 discs
(dpi resolution = 1440 × 1440 uni-di)
5 years at normal temperature
HDD = 5 years or 50,000 × on/off
Electrolytic capacitor ≥ 5 years
Lithium battery = 5 years (approx)
30,000 cycles — opening/closing operations
1000 hours — CD write time
1000 hours — DVD write time
8,000 - 30,000 discs — burner life*
Humidity
Displays the top menu
Print/Write Speed
CD (max.)
DVD (max.)
Print only
30 CD-R discs/hour writing/printing
(Epson-specified CD-Rs at 40x drive
speed for 600MB of data with speed/
bidirectional printing)
15 DVD-R discs/hour writing/printing
(Epson-specified DVD-Rs at 12x drive
speed for 3.8GB of data with speed/
bidirectional printing)
60 discs/hour maximum speed
40 discs/hour in quality mode
(50)
o
Size and Weight
(W × D × H)
Weight
14.8 × 20.2 × 13.7"
{377 × 514 × 348 mm})
55.1 lb {25 kg}
14.8”
(377 mm)
13.7”
(348 mm)
Reliability
30,000 discs
(dpi resolution = 1440 × 720 uni-d/bi-d
or 1440 × 1440 bi-d)
2 - Epson Discproducer PP-100N/PP-100N Security
(104)
o
Temperature C ( F)
Note: Excluding time to transfer job via network.
Write speed may become slower, depending on operating
environment and and disc used.
Life
Printing
(86)
(68)
1/10
20.2”
(514 mm)
Epson Discproducer PP-100N/PP-100N Security
In batch mode, stacker 1 and 2 are used for blank discs.
Stacker 2 and 3 are both for output discs. For instance, if 100
discs are to be published, first the 50 blank discs in stacker 2
are published and output to stacker 3. Then the 50 discs in
stacker 1 are published and output to stacker 2. Stacker 3 is
installed, and tray 4 is not used at all and is locked.
Locking the Disc Cover
You can set the disc cover so that it opens only with one of the
keys provided with the unit. The shipment position is
unlocked. To lock the disc cover, see the illustration below.
Note: When you install stacker 3, you must lock tray 4. See the
illustration below.
Loading Discs
There are 3 modes — standard, external output, and batch —
and stackers for each mode are loaded a different way.
Standard mode
Stacker 3
(removed)
Security Model Modes
Stacker 1
There are 2 modes for the Discproducer Security model —
pin-controlled and security. The basic operations are shown
below. For further information, see the PP-100N Security
Administrator’s Guide.
Stacker 2
Tray 4
PIN-Controlled Mode
User Submits Job
Standard mode uses stacker 1 as input source, and you can
select either stacker 2 or 4 for output. Tray 4 only holds 5
discs, but you can keep unloading it while a job runs until all
discs are published. Up to 1000 discs can be processed by
adding blank discs and removing published ones.
Authorized user —
Creates a disc using
Total Disc Maker
External output mode
Stacker 3
(removed)
Discproducer publishes disc.
User Picks Up Job
Stacker 1
Authorized user —
Enters a user number and PIN.
Stacker 2
Authorized user —
Retrieves the disc.
Tray 4
Security Mode
User Submits Job
External output mode uses stacker 1 and 2 as input sources.
Tray 4 is for output. A job is interruped when tray 4 fills to let
you empty it. Up to 1000 discs can be processed by empting
tray 4 and reloading the stackers. If automatic stacker is
selected, maximum discs per job is 50.
Authorized user —
Creates disc using
Total Disc Maker.
Sends request to
approve publishing disc.
Batch mode
Stacker 3
(installed)
Tray 4
(locked)
Job Released for Publishing
Discproducer publishes
Approver —
disc.
Approves disc publishing.
Notification of approval status
is sent automatically.
Stacker 1
User Picks Up Job
Stacker 2
Authorized user —
Enters a user number and PIN.
1/10
Authorized user —
Retrieves the disc.
Epson Discproducer PP-100N/PP-100N Security - 3
Epson Discproducer PP-100N/PP-100N Security
Using the control panel
Loading Ink
1. Make sure PC and printer are on, LCD and lights do not
indicate errors, and covers are closed.
CAUTION: Do not open package until ready to install ink cartridge.
Ink cartridge has green IC chip. Do not touch it.
Use only Epson ink cartridges. Others may damage unit
and void warranty.
To avoid leaks, do not drop the ink cartridge.
Keep ink cartridges out of the reach of children.
After installing cartridge, do not shut off power or
reopen ink cartridge cover. This can cause damage.
The first time ink is loaded, the printer charges ink
system. This uses more ink.
Unnecessarily turning unit on and off and frequent
cleanings use ink faster.
Keep ink cartridges installed during transport.
Remove cartridges only if empty or when necessary.
After removal, do not leave cartridge holder empty,
because nozzles may clog.
After removing cartridge, do not touch ink supply hole
or orient it downward, because ink may leak.
If ink gets on skin, wash with soap and water. If ink
gets in eyes, flush with water immediately. For vision
problems or discomfort, see a doctor.
Follow regulations to dispose of used cartridges.
2. Press Menu button. The top menu appears on LCD.
3. Use d
/
u to display Maintenance and then press ,.
4. Use d
/
u to display Nozzle Check and then press ,.
5. The
POWER LED flashes during checking. When
check finishes, the light stays on steadily.
CAUTION: While POWER LED flashes, never open covers,
reset, or turn off printer. This may damage unit.
See the example printouts below.
Nozzle check OK
Nozzle check no good
Cleaning the Print Head
1. Power light must be on, but not flashing.
If print is faint or dots are missing, clean print head. Use
printer driver’s head cleaning utility or the control panel.
2. Open ink cartridge cover as shown below.
CAUTION: Do not open ink cartridge cover during cleaning.
Frequent cleanings use ink faster.
You may not be able to clean print head if ink is low.
Replace the ink cartridge first.
Using the utility
1. Make sure unit is on, LCD and lights do not indicate errors,
and covers are closed.
3. If cartridge is out of ink (indicated by LCD), push it in until
it pops out. If no cartridges are installed, insert them in the
order shown by cartridge holder colors.
2. Access printer driver from Start menu, from Epson Total
Disc Maker, or Epson Total Disc Setup. Then, click Utility
tab and Head Cleaning. Follow instructions on the screen.
3. The
POWER LED flashes during cleaning. When
cleaning finishes, the light stays on steadily.
CAUTION: While POWER LED flashes, never open covers,
reset, or turn off printer. This may damage unit.
4. Close the ink cartridge door.
Using the control panel
Running the Nozzle Check
1. Make sure PC and printer are on, LCD and lights do not
indicate errors, and covers are closed.
If printing is faint or dots are missing, run a nozzle check to
identify problems. Follow the steps below.
2. Press the Menu button. The top menu appears on the LCD.
Using the utility
3. Use d
/
u to display Maintenance and then press ,.
1. With unit on, place unprinted disc in stacker 1. Make sure
LCD and lights do not indicate errors and covers are closed.
4. Use d
/
u to display Head Cleaning and then press ,.
5. The
POWER LED flashes during cleaning. When
cleaning finishes, the light stays on steadily.
2. Access printer driver from Start menu, from Epson Total
Disc Maker, or Epson Total Disc Setup.
CAUTION: While POWER LED flashes, never open covers,
reset, or turn off printer. This may damage printer.
3. Click Utility tab and then Nozzle Check button. Follow
instructions on the screen.
4 - Epson Discproducer PP-100N/PP-100N Security
1/10
Epson Discproducer PP-100N/PP-100N Security
4. Place the stackers back into position.
Aligning the Print Head
CAUTION: Keep water away from electronic components.
Do not spray inside unit with lubricants.
If dirty, wipe stackers clean with a soft cloth
moistened with a nutral detergent.
If you notice misalignment of vertical lines or horizontal
banding, you may solve the problem using the Print Head
Alignment utility in the printer driver.
Note: Discs vary in thickness, and using discs of different thicknesses
may result in print head misalignment. Use the same disc type
throughout a single publishing job.
Cleaning the Filter
Clean filter in back of unit every 6 months.
1. With unit on, place unprinted disc in stacker 1. Make sure
LCD and lights do not indicate errors and covers are closed.
1. Make sure unit is off and all lights are off; then unplug it.
2. Open filter cover. Remove the filter from filter cover.
2. Access printer driver from Start menu, from Epson Total
Disc Maker, or Epson Total Disc Setup. Then, click Utility
tab and Print Head Alignment. Follow instructions on
screen.
3. Vacuum to remove dust and dirt from filter.
4. Place it back into position.
3. The utility adds the value you enter in confirmation screen
to initial value for the adjustment. To clear adjustment
value, select Reset and click Exit.
Remove cover. Vacuum dust.
Replace cover.
4. After alignment, if label print surface is not aligned with
center of disc, print will appear off center. See “Correcting
the Print Position” below.
Transporting the Discproducer
Correcting the Print Position
Before transporting unit, repack it in original box with
original packing materials.
For misalignment of vertical print position, you may be able
to solve the problem using the Correcting the Printing
Position utility in the printer driver.
WARNING: Unit is heavy. Use 2 people to lift it.
1. With unit on, place unprinted disc in stacker 1. Make sure
LCD and lights do not indicate errors and covers are closed.
CAUTION: When storing or transporting unit, do not tilt, set
vertically, or turn upside down.
To keep print head nozzles from drying out, leave
ink cartridges installed during transport.
2. Access printer driver from Start menu, from Epson Total
Disc Maker, or Epson Total Disc Setup. Then, click the
Utility tab and Correcting the Print Position.
1. Make sure unit and all lights are off. Then unplug unit.
3. Follow instructions on the screen.
2. Disconnect interface cable.
3. Open disc cover and remove all discs from stackers.
Cleaning the Discproducer Exterior
4. Open ink cartridge cover. Secure ink cartridges with tape;
then close ink cartridge cover.
1. Make sure unit is off and all lights are off. Unplug unit.
5. Close tray 4 and the disc cover. Secure them with tape.
2. Use soft clean cloth to remove any dust or dirt.
6. Attach protective materials to both sides of product.
3. If dirt does not come off, dampen cloth with mild
detergent, and wipe unit dry with a soft cloth.
7. Repack product and accessory materials in the original box.
Note: Keep product level during transport.
Lift product by the correct positions shown below.
Before using product again, be sure to remove all packing
materials.
CAUTION: Do not apply alcohol, benzene, paint thinner,
toluene, or ketone-based solvents on the printer,
because these may damage the plastic.
Prevent water from getting in the case. Moisture,
dirt, or foreign material can cause a short circuit.
Cleaning the Discproducer Interior
1. Make sure unit is off and all lights are off. Unplug unit.
2. Open the disc cover and remove the stackers.
3. Use a soft clean cloth to remove any dust or dirt.
1/10
Epson Discproducer PP-100N/PP-100N Security - 5
Epson Discproducer PP-100N/PP-100N Security
Error Message
Discproducer LCD Messages
Invalid cartridge installed.
1. Replace indicated cartridge.
(C/LC/LM/M/Y/K)
LCD screen indicates conditions and errors listed below. If a
problem persists, contact customer support or check
http://epsonexpert.com for information.
Error Message
Corrective actions
Sound
Arm move
error
Arm cannot move.
1. Turn off power.
2. Open disc cover. Remove dust or obstruction.
3. Turn power back on.
If error persists, contact customer support.
—
Cannot unlock Press , or Cancel button. Try unlocking disc cover
again after LCD displays, “Disc cover can be
disc cover
opened.”
—
Disc cover
open
Close cover. During unit operation:
• Never open cover.
• Never insert your hands.
• Never move stacker if arm is operating.
Arm cannot pick up disc in printer tray. Turn power off
and on again. If message persists, contact customer
support.
Disc pickup
error
(ST1/2)
Arm cannot pick up disc in stacker. If stacker is an
input stacker, remove discs, separate, and reload. If
message persists, contact customer support.
Disc release
error
Arm cannot release disc. Do not remove disc by
hand. Turn unit off and back on. Initialization releases
arm. If error persists, contact customer support.
Discs ejected
from ST2?
1. Remove published discs from stacker 2.
2. Refill discs if necessary. Press , button.
Note: In batch mode, if stacker 2 is removed during
publishing, it is always recognized as input
stacker if loaded again.
Drive tray
open/close
error
If drive tray does not come out:
1. Turn power off and back on.
2. If tray still does not come out, see administrator.
(Check PP-100N Administrator’s Guide.)
3 If message persists, contact customer support.
If drive tray does not close:
1. Remove remaining discs.
2. Turn power off and back on.
3 If message persists, contact customer support.
Fan control
error
Turn unit off and on. If message persists, contact
customer support.
Ink cartridge
cover open
error
Close ink cartridge cover.
Indicated cartridge not installed or incorrectly
installed. Install correctly.
No stacker
Load indicated stacker and close disc cover.
(ST1/ST2/ST3)
Non-standard
ink Continue?
To use cartridge, press , button. To change to Epson
ink, press Cancel. Use of non-Epson ink is not
recommended and can result in:
• Problems not covered by warranty
• Quality and colors not guaranteed
• Damage not covered by warranty
Print tray
open/close
error
If printer tray does not come out:
• See administrator. (Check PP-100N
Administrator’s Guide.).
If printer tray does not close:
• Turn power off and back on.
If message persists, contact customer support.
Printer maint.
error
Contact customer support.
Replace ink
Indicated ink cartridge out. Replace.
—
(C/LC/LM/M/Y/K)
Job is paused.
1. Open disc cover, and remove disc from input
stacker 1 or 2.
2. Load correct disc type.
3. Close disc cover.
Processing restarts automatically.
Disc pickup
error
(PRN)
Turn unit off and on. If message persists, contact
customer support.
(C/LC/LM/M/Y/K)
Job is paused.
1. Open disc cover.
2. Remove unwritable disc from input stacker 1 or 2.
3. Load disc that can be written.
4. Close disc cover.
Processing restarts automatically.
Arm cannot pick up disc in drive tray. Turn power off
and on again. If message persists, contact customer
support.
Turn unit off and on. If message persists, contact
customer support.
No ink
cartridge
Disc feed error Disc not transferred to printer correctly.
PRN
1. Remove discs from printer tray.
2. Separate each disc and reload in input stacker.
3. Close disc cover.
Disc pickup
error
(DRV1/2)
Internal drive
error
Invalid state
error
Disc feed error Disc not transferred to drive correctly.
DRV1/2
1. Remove discs from drive tray.
2. Separate each disc and reload in input stacker.
3. Close disc cover.
Disc is wrong
type
1. Turn power off.
2. Open disc cover and check for dust or foreign
objects inside.
3. Turn power back on.
If message persists, contact customer support.
No disc (ST1/2) Load discs into input stacker (stacker 1 or 2)
Turn unit off and on. Product’s internal clock may not —
be working correctly. Check with administrator. If
message persists, contact customer support.
Disc is not
writable
Internal
autoloader
error
Internal printer Turn unit off and on. If message persists, contact
error
customer support.
CMOS
checksum
error
Disc drop error Arm dropped disc while transferring it. Remove
dropped disc. Turn power off and on.
Corrective actions
Ink problem
6 - Epson Discproducer PP-100N/PP-100N Security
Replace ink
pad
Contact customer support.
Stacker 3
installed
Remove stacker 3 and close disc cover.
Stacker 3 not
installed
Load stacker 3 and close disc cover.
Stacker 4 full
Initialization cannot be performed, becausetray 4 is
full. Remove discs from tray 4.
Stacker 4 open Closetray 4.
Stacker full
(ST2/ST3/ST4)
Disc could not be ejected because output stacker
full. Remove discs from filled stacker.
Too many discs Remove discs to keep height of discs below red line.
Close disc cover.
(ST1/ST2/ST3)
Transferred
Disc could not be detected after transfer to drive or
disc detection printer. Turn power off and then on. If message
error
persists, contact customer support.
1/10
Wait a
moment and
try again
Press , or Cancel button. Do not unlock disc cover
repeatedly in a short time period. Wait a moment
before unlocking.
Write error
Job paused. Make sure disc is not dirty or scratched.
Try another disc.
Sound
Epson Discproducer PP-100N/PP-100N Security
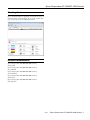
Checking Status
Epson Total Disc Monitor displays the screen below to let you
check the status of ink cartridges, drives, mode, stackers, disc
type, and job queue. See the illustration below.
Related Documentation
Epson Discproducer PP-100N/PP-100N Security
Setup Guide
Epson Discproducer PP-100N/PP-100N Security
User’s Manual
Epson Discproducer PP-100N/PP-100N Security
Service Manual
Epson Discproducer PP-100N/PP-100N Security
Specification
Epson Discproducer PP-100N/PP-100N Security
Parts Price List
1/10
Epson Discproducer PP-100N/PP-100N Security - 7