1
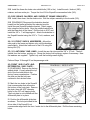
FORM #9600.01-082109 PRINTED IN U.S.A. PAGE 6 OF 12 12) CSS LINK… [DIAGRAM 3] Coat the CSS link bushings with a light coat of Lithium based grease, then insert the bushings and sleeves into the link eye. Position the centerlink in a centered position. Connect either end of the CSS link to the front crossmember with a 9/16” x 3” bolt, flat washer, and Nyloc nut (110). The link eye sets on top of the crossmember mounting point. Insert the bolt from the top, pointing down. Place the flat washer on the Nyloc nut side of the bushing. Connect the rear facing end of the CSS link to the centerlink using a 9/16” x 3” bolt, flat washer, and Nyloc nut (110). Again, insert the bolt from the top, pointing down, and place the flat washer on the nut side of the bushing. 13) AXLE TUBE BRACKETTO-FRAME…[DIAGRAM 4] Loosely attach the passenger side axle tube bracket to the frame. Use the stock bolt / nut, and be sure the bracket offset is as shown. 14) FRONT DIFFERENTIAL / AXLE ASSEMBLY…Raise the differential and loosely attach the differential cover bushings to the Superlift front crossmember; use the factory hardware. 15) CROSSMEMBER DROP BRACKETS AND REAR CROSSMEMBER TUBE… [DIAGRAM 2] Loosely attach one crossmember drop bracket to teach end of the rear crossmember tube using the supplied 7/16” x 1-1/4” bolts and Nyloc nuts. Use the jack to pivot the rear of the differential up so it will clear the rear crossmember. Loosely attach the Superlift rear crossmember assembly to the factory LCA frame mounts using the supplied factory LCA bolts. Install the bolts so they point forward; do not tighten. Be sure the two kicker brace attachment points face rearward, and the single attachment point for the differential faces forward. Tighten the 7/16” crossmember drop-to-tube bolts (50). The factory LCA hardware is tightened in a later step.