1
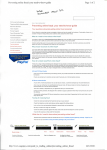
www.nissanlearningacademy.com.au
[email protected]
Foreword
The information in this Training Manual should not be interpreted as a basis for warranty
or goodwill claims against Nissan Motor Co. (Australia) Pty. Ltd. (NMA) unless so
designated.
This Technical Training Manual is intended for use by NMA & Nissan Dealership
Technical Personnel. It is not designed for the use by press or for customer distribution.
Before quoting any specifications be sure to check the relevant Service Manual and
Technical Bulletins.
Right for alteration to data and specifications at any time is reserved. Any such alterations
will be advised by Nissan through Technical and Sales Bulletins.
© 2012 Nissan Motor Company (Australia) Pty. Ltd.
Inc. Victoria
Ref: Technical Training Department.
PREPARATION OF THE PANASONIC TOUGHBOOK
Before commencing the installation of the new C-III+ software, please ensure that the Panasonic
Toughbook is properly prepared.
Most importantly – all non Nissan approved software must be un-installed. Otherwise errors & other
difficulties will occur. Do NOT un-install the original CONSULT III program.
At the launch of the original CONSULT III in September 2007, strict guidelines were outlined about the use,
care & maintenance & most importantly guidelines regarding the installation of software other then the
CONSULT III program were outlined in the following Service Technical Bulletin:
GI 07-009.
If these guidelines were not adhered to & as a result difficulties with the installation of the new C-III+
software occurs, any costs involved to have the issue rectified will have to be covered by the dealership &
not by Nissan.
If Technical assistance is required, please contact SPX Tech Support: (03) 8558 4994. Otherwise contact
TechLine via a non-vehicle related enquiry.
The 7th page of STB GI07-009 stated:
Do NOT…
• Load non Nissan approved software in the machine. It will more than likely corrupt the CONSULT III
software. Repair costs will be at the dealer‟s expense if this is the case.
• Load gimmick screen savers & mouse cursers onto the machine. It will more than likely corrupt the
CONSULT III software. Repair costs will be at the dealer‟s expense if this is the case.
• Load another vehicle manufacturer‟s scan tool software on the machine (including Renault). It will more
than likely corrupt the CONSULT III software. Repair costs will be at the dealer‟s expense if this is the case.
• Load on the Dealer Business system. It is for use in the Nissan workshop by Nissan Technicians servicing
& repairing Nissan vehicles only. It is NOT for the convenience of Service staff processing R/O‟s
• “Surf the net”. Bugs ultimately will find there way onto the machine & corrupt the CONSULT III software.
Repair costs will be at the dealer‟s expense if this is the case.
• Load “Windows VISTA” operating software on the machine. It is STRONGLY RECOMMENDED that the
machine be left running the Windows XP SP-2
• Leave the NATS security card in the machine. Once the NATS servicing / repair operation has been
carried out, remove the security card & store in a separate & secure location along with the CONSULT II
NATS card & Software Operation Manual
• Operate the machine in a WET environment / Operate the machine in an extremely HOT environment
• Touch the screen with a screw driver, pen or other sharp objects. ONLY use the stylus that is provided or
preferably avoid touching the screen at all. Use the mouse provided instead
• Use the stylus on the screen if it is dirty &/or dusty
• Expect that the machine is un-breakable. It can be easily DAMAGED. Please treat the machine carefully
1
1. INSTALLATION OF C-III + SOFTWARE
1. Ensure the Panasonic Toughbook is docked on the
station & connected to it‟s 240V power supply
Do NOT un-install the original CONSULT III program.
2. Open the DVD package which contains the C-III Plus
Ver 5.1 software & install the disc into the Panasonic
Toughbook‟s Disc Drive unit.
This Ver 5.1 software DVD must be installed for the very
1st time. Do NOT install the most current software from
the beginning. This step is detailed on page 5.
3. (Not shown) click on the Start button in the bottom left
of the screen & then select the “My Computer” option.
4. Double click the “C +” icon
5. Single click on the “English” button
6. Single click on the “CONSULT-III plus” button
2
1. INSTALLATION OF C-III + SOFTWARE
7. Single click on the “Install” button
8. Single click on the 1st “Run” button that appears
9. Single click on the 2nd “Run” button that appears
10. Single click on the "First Installation“ button & then
click the “Next” button on the bottom of the screen
11. Click next to the "I accept the terms of the license
agreement” & then click the “Next” button on the bottom
of the screen
3
1. INSTALLATION OF C-III + SOFTWARE
12. Single click next to “Oceania” & then click the
“Next” button on the bottom of the screen
13. (Not Shown) Single click next to “Australia” & then
click the “Next” button on the bottom of the screen
14. (Not Shown) Single click next to “English” & then
click the “Next” button on the bottom of the screen
15. Leave the “Units of Measurement” set to the metric
default settings & then click the “Next” button on the
bottom of the screen
16. Check the settings that have been chosen via this
summary screen. Click the Back button to make any
changes.
Otherwise click the “Next” button on the bottom of the
screen
17. Ignore this warning & click on the “Continue Anyway”
button on the bottom of the screen
4
1. INSTALLATION OF C-III + SOFTWARE
18. Once the screen that indicates that the software
installation has succeeded is displayed, click on the
“Finish” button & close all other windows.
You must now completely shut down the
PC & then re-start it.
Ensure that the new red coloured „C+‟ logo appears on
the desk top.
The most current C-III Plus Software CD must
now be installed
1. Install the most current CONSULT III Plus software.
As at December 2011 the most up-to-date C-III plus
software is as follows:
Ver. 13.1
As at January 2012 the most up-to-date C-III plus
software is as follows:
Ver. 14.1
There will be newer versions to follow. Therefore if a
newer version is readily available then this must be
installed instead of the above noted versions.
2. Install the CD into the Disc Drive
NOTE:
In this example, software version 11.1 is being installed.
3. Follow steps 3, 4 & 5 on page 2 of this document.
4. When the screen shown right appears, single click on
the “Installed” button.
NOTE:
The Ver. 5.1 original software DVD should already have
been installed by this stage.
5. Single click on the “Run” button‟s when each of the
screens appear
5
1. INSTALLATION OF C-III + SOFTWARE
6. Single click on the “Update Installation button
7. (Not shown) Single click the “Yes” button
8. (Not shown) Single click the “Continue Anyway” button
9. After 5 mins or so, the screen right will appear. Click
on the “Finish” button & then close all other windows that
are still open.
10. Double click on the red coloured „C+‟ icon on the
desktop to launch the C-III Plus program.
Once the screen opens up, look to the top left to confirm
that the most current level of software has been properly
installed.
NOTE:
Although the software version on the front of the disc
states “Ver 11.1”. The actual version is 11.12.00. The
same applies for the version 13.1 software & others that
follow.
6
2. INSTALLATION OF THE VI DRIVER SOFTWARE
NOTES:
- Ensure any windows that are opened are closed down.
- This is a 1-off operation
1. Connect the new VI to a Power supply (using the
original C-III VI‟s 240V power adapter).
2. Connect the powered VI to the PC via the already
supplied USB cable.
3. The window shown right may automatically appear.
(Continue with step 4 if not) Select the “No not this time”
option & then click the “Next” button on the bottom of the
screen.
4. Select the “Install the software automatically” option &
then click the “Next” button on the bottom of the screen.
5. Click on the “Continue Anyway‟ button when the
screen shown right appears
7
2. INSTALLATION OF THE VI DRIVER SOFTWARE
6. Once the “Completing the Found New Hardware
Wizard” screen appears, simply click on the “Finish”
button on the bottom of the screen.
DO NOT DISCONNECT THE USB & POWER
CONNECTION FROM THE VI.
Leave it connected as per step 1 of this process and
continue...
7. Close any windows that are open & then double click
on the red coloured „C+‟ icon which should now be on
the desktop. Start the CONSULT III Plus program.
8. The installation of software that the VI requires will
continue with this step. The screen right should appear.
9. The serial number of the VI should now be
automatically loaded into the C-III Plus. When the VI is
later used via the normal method (connected to vehicle &
paired to C-III Plus via Bluetooth) the VI will
automatically be recognised by the program & connect
again.
8
3. INSTALLATION OF THE C-III + OPERATION MANUAL
SPECIAL NOTE:
Use this same process for C3+ Operation Manual
Installation and Updating.
1. Place the most current version of C-III Plus software
CD that is available in the disc drive & then click on the
“My Computer” icon.
2. Double click the “C +” icon
3. Single click on the “English” button
4. Single click on the “CONSULT-III plus Operation
Manual & Start-up Guide” button
5. Single click on the “Install” button
NOTE:
If so desired, click on the “Check installation procedures
button for instructions on continuing from this point.
Otherwise the same information can be found over page.
9
3. INSTALLATION OF THE C-III + OPERATION MANUAL
6. Single click on the 1st “Run” button that appears
7. Single click on the 2nd “Run” button that appears
8. (Not shown) Select the English language option
(default) & then click OK
9. Single click on the “Install” button
10. Single click on the “Close” button
11. On the desktop there should now be 4 x new
“shortcuts” for the recently installed software as follows:
- CONSULT III plus
- CONSULT III plus Operation Manual
- CONSULT III plus Start-up Guide
- CONSULT III plus Data Folder (for recordings etc. )
NOTE:
Make sure the original CONSULT III icons remain on the
desktop as well.
10
The Original blue coloured CONSULT III icons
must also be displayed.
Do NOT un-install the CONSULT III program.
CONSULT III PLUS HOMEPAGE
The right country is set?
Look at ALL the systems in
the vehicle at the SAME TIME!
It’s VERY QUICK!
The vehicles BATTERY
VOLTAGE (at the DLC)
Indicating that the VI
is connected
This used to be the
“REPAIR” menu
(Ring O/E spanner symbol)
11
4. INSTALLATION OF THE SECURITY CARD DRIVERS
1. Insert the Security Card (NATS card) into the
Panasonic Toughbook in the usual manner
2. Place the most current version of C-III Plus software
that is available in the disc drive & then click on the “My
Computer” icon.
3. Double click the “C +” icon in the as described on
page 2 or 9 etc.
4. Single click on the “English” button
5. Single click on the “Security card adapter driver”
button
6. Single click on the “Install” button for the SD card type
NOTE:
If so desired, click on the “check Installation procedures
button for instructions on continuing from this point.
Otherwise the same information can be found over page.
12
4. INSTALLATION OF THE SECURITY CARD DRIVERS
7. Double click on the “DDSetup.exe” icon
8. As each of the 3 windows appear (individually) single
click on “OK”
9. Single click on “Continue Anyway”
10. The window shown right may automatically appear.
(Continue with step 11 if not) Select the “No not this
time” option & then click the “Next” button on the bottom
of the screen.
13
4. INSTALLATION OF THE SECURITY CARD DRIVERS
11. Select the “Install the software automatically” option
& then click the “Next” button on the bottom of the
screen.
12. Make sure that the 2nd line down is highlighted in
blue.
(Software is coming from the disc installed in the CD
drive.)
Single click on “Next”
D (D-drive)
13. Single click on “Continue Anyway”
14. Single click on “Finish”
14
5a. INSTALLATION OF CAMERA SOFTWARE
Panasonic Lumix Digital Camera Setup:
1. Open up the Panasonic Lumix DMC-FT10 box
2. Connect the battery charger to 240V and place the
battery on charge by following the instruction manual
provided with camera.
Loading Software:
1. Load DVD into the Panasonic Toughbook CD Driver.
2. Select (double click) “My Computer”
3. Double Click on Panasonic icon (D drive) to load the
software.
4. Select “Applications” on the next screen that appears.
NOTE:
Read the Operating Instructions before & then after the
installation of the Panasonic Software.
5. Select “QuickTime” and then follow the download
prompts to install software.
The installation of “Quicktime” will allow you to view and
edit any video recordings you have taken.
6. Select “PHOTOfunSTUDIO” and then follow the
download prompts to install the software.
This will enable viewing and downloading of the photos
you have taken.
15
5b. CAMERA SET-UP
Panasonic Camera Setting:
1. Turn the CAMERA power ON
(Press the “ON/OFF” switch).
2. Select “Menu / Set” button.
3. Select “Picture Size” using the directional arrows
within circle. Then press “Set”.
4. Select 640 x 480 4:3 – For e-mail attachments or WEB
photos.
NOTE:
This setting is required for TechLine Photos for iQ
contacts. If you require a higher resolution or size then
only adjust as required.
iQ attachments must be not more than 1MB or they
will not load on the system.
5. Select “Stabilizer” to AUTO when operating camera.
6. Select “CLOCK SET” and adjust to the current time.
16
6. MONITOR SET-UP
Monitor Settings
Once the Monitor has been powered up and is
connected to your CONSULT-III Toughbook through the
port replicator, a setting within the monitor needs to be
changed in order to maximize your workshop
productivity.
1. Depress the “MENU” button on the bottom right edge
of the Monitor (A).
2. Using the right arrow button, scroll through until the
“ECO” Tab is highlighted (B). Press “Enter” (C)
3. Scroll using the arrow button until “ECO Sensor” is
highlighted (D). Press “Enter” (E) to switch the ECO
Sensor OFF.
4. Exit the Menu by depressing MENU button (F).
17
A
F
B
D
C
E
6. MONITOR SET-UP
Display of Toughbook Screen on Monitor
1. From the desktop, right click the Intel GMA Driver icon
located in the bottom right hand corner of your screen.
2. Select Graphic Options from the Menu. Then select
Output to. Select Intel® Dual Display Clone.
3. Then select Notebook + Monitor. Your external
monitor should now have the laptop display.
Monitor Display Properties
If you find that icons or text is either too small or too big
on your Monitor, check the following setting.
1. From the Start Menu, Select Control Panel.
2. From the Control Panel window, select Display.
3. From the Display Properties Window, Select the
Settings tab.
4. Select the Advanced button from this tab as seen on
the right.
5. On the General Tab, select the DPI setting in the
display setting to Normal Size (96DPI).
18
7. KEYBOARD SET-UP
Mouse Pointer Optimisation Settings.
The Shintaro Wireless Keyboard device received as part
of the original CONSULT-III product launch is designated
as the primary user interface device. Due to installation
of the new LED monitor the pointer trackball on the
wireless keyboard may need adjusting. Follow the steps
below to adjust the trackball speed to your preference:
1. Select “START” from the bottom left hand corner of
the Desktop to open the menu window. From the menu
window select “Control Panel”.
2. From the new window that opened, select the “Mouse”
icon.
3. Select “Pointer Options” along the top menu tabs.
Adjust the trackball speed to your preference by
adjusting the sliding scale in the “Motion” section.
Click “Apply” & then “OK”.
19