1
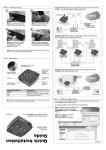
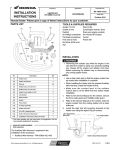
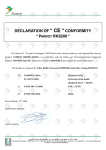
INSTALLATION
INSTRUCTIONS
Accessory
Application
BIMINI TOP (2P)
P/N 0SR85-HL3-322B
SXS700M2
Publication No.
MII 14607
Issue Date
August 2013
Honda Dealer: Please give a copy of these instructions to your customer.
PARTS LIST
USE AND CARE INFORMATION
(1)
(2)
• Completely read and understand the instructions
before installing this accessory.
• Do not tow the vehicle on an open trailer with
this accessory installed, as the accessory is not
designed for use at highway speeds.
• To clean, sponge with mild soap and cold water,
rinse with a hose and allow it to drip-dry.
• Do not machine wash or dry.
• Use mild detergent to remove stubborn stains.
(3)
(4)
(6)
(5)
Bimini Top Preparation for Installation with
a Poly Windscreen
• To prevent burns, wear gloves when using the torch
or handling hot tools.
No.
Description
Qty
(1)
6 mm flat washer
2
(2)
6 x 30 mm screw
2
(3)
6 mm locknut
2
(4)
Bar snap
4
(5)
Fiber rod
2
(6)
Bimini top
1
TOOLS REQUIRED
Hex wrench (4 mm)
Phillips screwdriver (# 2)
Propane torch
Fine tooth hand saw
Sanding block
1.
2.
3.
4.
Place the bimini top upside down on a flat surface
with the plastic windscreen insert facing up.
Support the bimini top so that it is two inches above
the work surface as shown.
Using a small propane torch, heat the end of a #2
phillips screwdriver for 15 seconds.
Using the plastic windscreen insert as a guide,
make two holes through the fabric by pushing the
screwdriver tip through the fabric.
BIMINI TOP
SCREWDRIVER
PLASTIC INSERT
TORQUE VALUES
Tighten all screws, bolts, and nuts to their specified
torque values. Refer to the Service Manual for the torque
values of the removed parts.
© 2013 American Honda Motor Co., Inc - All Rights Reserved.
0SR85-HL3-322B
1 of 3
Two-piece Poly Windscreen Preparation for
Installation with the Bimini Top
• To prevent eye injuries, wear eye protection when
using the saw.
NOTE
• Remove the poly windscreen from the vehicle if it
is already installed.
• Prepare a clean work area free of debris that may
scratch the windscreen.
1.
Place a strip of masking tape along the top three
inches of the outside surface of the windscreen.
2.
Use a straight edge and marker to mark a straight line
across the windscreen as indicated by the dotted line
on the diagram.
Make two marks, 9-1/4 inches from the centerline
and 1/2 inch below the cut line, as indicated by the
cross hairs in the diagram.
3.
4.
Use a fine tooth jig saw or fine tooth hand saw to
carefully cut the windscreen along the marked line.
INSTALLATION
• To prevent injury from splinters, wear protective
gloves when handling the fiber rods.
1. Install the bar snaps and fiber rods to the front and
rear cab frame cross bars.
REAR CROSS BAR
FIBER ROD
BAR SNAP
2.
3.
5.
Use a fine tooth file or sanding block to deburr the
edge of the windscreen.
6.
Drill a ¼ inch hole through the windscreen at each
mark made in Step 3.
4.
7.
Remove the masking tape. Clean and reinstall the
windscreen.
5.
Cut along the marked
line made in Step 2.
CENTERLINE
6.
½ in
9¼ in
FRONT CROSS BAR
F
Lay the bimini top over the cab frame.
If a poly windscreen is used, insert the supplied 6
mm screws through the bimini top, windscreen and
mounting brackets.
Install 6 mm flat washers and 6 mm locknuts onto
the screws and tighten them.
Remove the front straps (if installed) from the bimini
top and wrap them around the vertical bar, below the
front junction of the cab frame, and then through the
loop sewn in the end of the strap as shown.
Route the straps up along the cab frame and then
through the ladder locs. Do not tighten the straps at
this time.
FRONT STRAP
9¼ in
JJUNCTION
CROSS HAIRS
Drill 1/4 inch holes at
marks made in Step 3.
BEND
LOOP
VERTICAL BAR
2 of 3
0SR85-HL3-322B
© 2013 American Honda Motor Co., Inc - All Rights Reserved.
7.
8.
Release the buckle on the back of the bimini top.
Wrap the strap around the seat headrest frame as
shown and then fasten the buckle.
BUCKLE
SEAT HEADREST
FRAME
STRAP
9.
Tighten all the straps evenly to secure the bimini top
and align its seams with the cab frame.
LADDER LOC
STRAP
© 2013 American Honda Motor Co., Inc - All Rights Reserved.
0SR85-HL3-322B
3 of 3