1
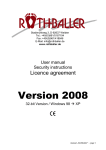
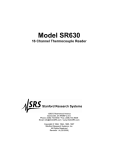
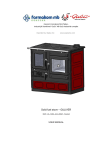
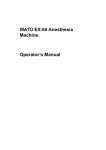
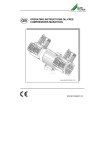
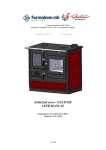
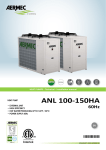
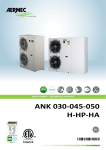
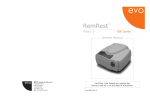
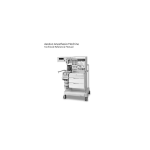
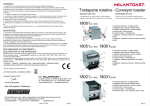
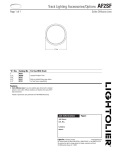
WATO EX-65 Anesthesia Machine Quick Guide Shenzhen Mindray Bio-Medical Electronics Co., Ltd. This guide contains the basics necessary to operate the product safely and quickly. For details, refer to the Operator's Manual. Notes: Observance of this guide is a prerequisite for proper product performance and correct operation and ensures patient and operator safety. This guide is based on the maximum configuration and therefore some contents may not apply to your product. If you have any question, please contact us. The product bears CE mark indicating its conformity with the provisions of the Council Directive 93/42/EEC concerning medical 0123 devices. © Copyright 2008-2009 Shenzhen Mindray Bio-Medical Electronics Co., Ltd. All rights reserved. Contents of this guide are subject to change without prior notice. Product Introduction 1.Brake 7.Control knob 12.Cylinder pressure gauge 2.Pipeline pressure gauge 8. Display 13.O2 flush button 3.Total flowmeter 9.Vaporizer 14.Auxiliary electrical outlet 4.Flow control 10.Gas supply connector 15.Drawer lock 5.Electronic flowmeter 11.System switch 6.Ventilator control panel 1 16.Worktable (with drawer) Product Introduction 1.O2 sensor connector 2.Inspiration connector 3.Expiration connector 4.Inspiratory check valve 5.Expiratory check valve 6.Bellows housing 7.Sample gas return port 8.Manual bag port 9.Bag/mechanical ventilation switch 2 10.APL (Airway Pressure Limit) valve 11.O2 sensor connector 12.Rotary handle 13.Sodalime canister Product Introduction 1.Cylinder connector 2.Equipotential stud 3.Fan 4.Mains inlet 5.Network connector 6.CIS 12 V power supply connector 7.Speaker 8.Auxiliary O2 supply 3 9.ACGO (Auxiliary Common Gas Outlet) switch 10.Module slot 11.AGSS outlet 12.AGSS Transfer and Receiving System Control Panel The control panel is located beneath the ventilator display, as shown below: 1 2 3 4 5 6 7 8 1. Battery LED 2. AC power LED 3. Operating state LED 4. Alarm silence key To set alarm silence state, push this key to enter 120 s alarm silenced and 120 s countdown time appear in status. The alarm silence symbol the upper right corner of the screen. To clear alarm silence, push this key again. 5. Standby key Push to enter or exit standby mode. 6. Normal screen key Push to clear all menus popping up on the screen and return to the normal screen. 7. MV&TVe alarm key In case of manual ventilation mode: Push the key to switch off MV and TVe overrange alarms and apnea alarm. Push the key again to switch on MV and TVe overrange alarms and apnea alarm. In case of mechanical ventilation mode: Push the key to switch off MV and TVe overrange alarms. Push the key again to switch on MV and TVe overrange alarms. 8. Control knob Push the control knob to select a menu option or confirm your setting. Turn the control knob clockwise or counterclockwise to scroll through the menu options or change your settings. 4 Display Screen This anesthesia machine adopts a high-resolution color TFT LCD to display various parameters, spirometry loops and waveforms (airway pressure, flow, volume, EtCO2, etc). The following is a standard display screen. For descriptions of other screens, refer to Operator's Manual. 1 2 3 4 5 6 7 8 9 10 11 12 18 13 14 15 17 16 1. Ventilation mode prompt area Displays the current ventilation mode. If manual ventilation is selected for the bag/mechanical ventilation switch, is displayed in this area. Otherwise, the currently selected mechanical ventilation mode is displayed. 2. Lung icon The icon is displayed when SIMV-VC or SIMV-PC mode is selected and inspiration triggering action is done currently. 5 Display Screen 3. 4. 5. 6. 7. 8. 9. MV&TVe alarm off icon Physiological alarm area Apnea alarm off icon Alarm silence icon area System time Technical alarm area Power supply state icon area is displayed when Displays power source or battery icon. The icon the anesthesia machine is powered by AC power source. The battery icon is displayed when the anesthesia machine is battery powered to indicate battery capacity. 10.[Vent Mode] shortcut key Used to select mechanical ventilation mode. 11.[Alarm Setup] shortcut key Used to change the alarm settings for the anesthetic ventilator, gas module or BIS module. 12.[Screens] shortcut key Used to set user screen. 13.[User Setup] shortcut key Used to change the settings for TV compensation, O2 monitoring source, gas module, BIS module, screen, sound etc. 14.[Maintenance] shortcut key Used to perform leak test, calibrate O2 sensor and flow sensor, view trend graph, trend table and alarm logbook, and set language, system time, pressure unit, IP address etc. 15. Timer Setup shortcut key 16. Parameter Setup shortcut keys area Used to set the parameters related to mechanical ventilation mode. Shortcut keys arrangement is subject to specific mechanical ventilation mode. 17. System prompt message area 18. Parameter & graph area Displays the parameters, waveforms, spirometry loops, or electronic flowmeter graphs which the anesthetic ventilator, gas module, or BIS module monitors. Different types of screens are displayed based on the actual system configuration or screen layout settings. 6 Inspect the System Make sure that: 1. The anesthesia machine is undamaged. 2. All components are correctly attached. 3. The breathing system is correctly connected, and the breathing tubes are undamaged. 4. The vaporizers are locked in position and contain sufficient agent. 5. The gas supplies are connected and the pressures are correct. 6. Cylinder valves are closed on models with cylinder supplies. 7. The necessary emergency equipment is available and in good condition. 8. Equipment for airway maintenance and tracheal intubation is available and in good condition. 9. Applicable anesthetic and emergency drugs are available. 10. The casters are not damaged or loose and the brake is set and prevents movement. 11. The breathing system is locked (in the position). 12. The AC mains indicator and the battery indicator come on when the power cord is connected to the AC power source. If the indicators are not on, the system does not have electrical power. 13. The anesthesia machine is switched on or off normally. NOTE: Make sure that the breathing system is correctly connected and not damaged. The top shelf weight limit is 30 kg. 7 Preoperative Test Test Intervals Perform the preoperative tests listed below at these events: 1.Before each patient. 2.When required after a maintenance or service procedure. The following table indicates when a test must be done. Test Item Test Intervals Pipeline tests Cylinder tests Every day before the first patient Flow control system tests Inspect the system Alarm tests Power failure alarm test Breathing system tests Before each patient O2 Flush Test Preoperative preparations NOTE: Read and understand the operation and maintenance of each component before using the anesthesia machine. Do not use the anesthesia machine if a test failure occurs. Contact us immediately. Within the warranty period, check the sealing condition only. When a great deviation occurs to the pressure value or the flow value that is measured, contact the authorized engineer for calibration service. 8 Turn on the System 1. Connect the power cord to the AC power source.Make sure that the AC power LED is illuminated. 2. Set the system switch to ON.Make sure that both the operating state LED and battery LED are illuminated (the battery is being charged or fully charged). 3. The alarm lamp flashes yellow and red once in turn and then a beep is given. 4. The display shows the start-up screen and then enters the standby screen after half a minute. WARNING: Do not use the anesthesia machine if it generates alarms when turned on, or can not operate normally. Contact your service personnel or us. Input Fresh Gas 1. Connect the gas supplies correctly and ensure adequate gas pressure. 2. You can control the O2, N2O and AIR flows in the fresh gas through the O2, N2O and AIR flow controls. Readings of the gas flows can be seen on the respective flowmeters. 3. If inspiratory anesthetic agent is used, ensure that the vaporizer is correctly mounted onto the anesthesia machine and the vaporizer conforms to the the anesthetic agent to be used. Fill the vaporizer with the anesthetic agent properly. 4. Push and turn the concentration control on the vaporizer to set the appropriate concentration of anesthetic agent. NOTE: This anesthesia machine can be mounted with vaporizers corresponding with halothane, enflurane, isoflurane, sevoflurane and desflurane. Only one of the five vaporizers can be opened at a time because the vaporizers are featured with interlock. 9 Mechanical Ventilation Mode Ventilation Mode 1. Make sure that the system is Standby. 2. Set the appropriate Plimit value in the parameter setup shortcut keys area. 3. Check the ACGO switch to make sure that it is OFF . 4. Set the bag/mechanical ventilation switch to the 5. Push the O2 flush button position. to inflate the bag if it collapses. 6. Select the [Vent Mode] shortcut key to open the [Vent Mode Setup] menu. Select ventilation mode. Set Ventilator Parameters Select the parameter setup shortcut key to set the parameters related to mechanical ventilation mode. Set Alarm Limits 1. 2. 3. 4. Select the [Alarm Setup] shortcut key and then [Ventilator >>]. Set [High Limit] and [Low Limit] respectively for each parameter. Select the [Alarm Setup] shortcut key and then [Gas Module >>]. Set [High Limit] and [Low Limit] respectively for each parameter. Start Mechanical Ventilation After settings of the related parameters are already made, you can enter mechanical ventilation mode by pushing the Standby key and then selecting [Ok] from the pop-up menu to exit the standby status. The system will work in the selected mechanical ventilation mode. NOTE: Before starting a new mechanical ventilation mode, make sure that all related parameters are set to the appropriate values. 10 Mechanical Ventilation Mode Stop Mechanical Ventilation 1. Make sure that the APL valve is set properly before stopping mechanical ventilation. The APL valve adjusts the breathing system pressure limit during manual ventilation. Its scale shows approximate pressure. 2. Set the bag/mechanical ventilation switch to the position. This selects manual ventilation and stops mechanical ventilation (ventilator). NOTE: Before applying mechanical ventilation, check the sodalime in the canister. If sodalime color changes significantly, replace the sodalime promptly. Manual Ventilation Mode Start Manual Ventilation 1. Turn the APL valve control to adjust the pressure in the breathing system within the appropriate range. 2. Set the bag/mechanical ventilation switch to the position. The ventilation mode prompt area displays the icon for manual ventilation mode. Besides, the system prompt message area displays [Manual Vent.]. 3. Press the O2 flush button to inflate the bag if necessary. Set Alarm Limits 1. 2. 3. 4. Select the [Alarm Setup] shortcut key and then [Ventilator >>]. Set [High Limit] and [Low Limit] respectively for each parameter. Select the [Alarm Setup] shortcut key and then [Gas Module >>]. Set [High Limit] and [Low Limit] respectively for each parameter. Turn off the System To turn off the system, do as follows: 1. Confirm that system use is finished. 2. Set the system switch to OFF. 11 Cleaning and Disinfection WARNING: Obey applicable safety precautions. Read the material safety data sheet for each cleaning agent. Read the operation and service manual for all disinfection equipment. Wear gloves and safety glasses. A damaged O2 sensor can leak and cause burns (contains potassium hydroxide). Reuse of undisinfected breathing system or reusable accessories may cause cross-contamination. Preoperative tests must be performed before patient use every time the anesthesia machine has been disassembled for cleaning and disinfection, or has been reassembled. To prevent leaks, avoid damaging any component in case of disassembling and reassembling the breathing system. Ensure the correct installation of the system, especially of the seal. Make sure of the applicability and correctness of the cleaning and disinfection methods. Disassemble and reassemble the breathing system as described in this guide. For further disassembly and reassembly, contact us. Improper disassembling and reassembling may cause breathing system leak and compromise normal system use. NOTE: To help prevent damage, refer to the manufacturer’s data if you have questions about a cleaning agent. Do not use organic, halogenated, or petroleum based solvents, anesthetic agents, glass cleaners, acetone, or other harsh cleaning agents. Do not use abrasive cleaning agents (such as steel wool, silver polish or cleaner). Keep all liquids away from electronic parts. Do not permit liquid to go into the equipment housings. Do not soak synthetic rubber parts for more than 15 minutes. Otherwise swelling or faster aging may occur. Only autoclave parts marked 134ºC. Cleaning solutions must have a pH of 7.0 to 10.5. 12 Cleaning and Disinfection All parts of the breathing system can be cleaned and disinfected. The cleaning and disinfection methods are different for different parts. You need to select the appropriate method to clean and disinfect the parts based on the actual situations to avoid cross-contamination. This table is our recommended cleaning and disinfection methods for all parts of the breathing system. Intermediate level High level disinfection disinfection Parts A* B* C* Breathing tubes and Y piece ★ ★ Breathing mask ★ ★ Flow sensor ★ Bellows assembly ★ ★ Inspiratory and expiratory check valves assembly ★ ★ Canister assembly ★ ★ Canister connection block assembly ★ ★ Water collection cup ★ ★ Bag arm ★ ★ BYPASS assembly ★ ★ Breathing System ★ ★ Manual bag ★ ★ ★ O2 sensor ★ AGSS assembly ★ Indicates that this disinfection method is applicable. A* Clean with a damp cloth soaked in mild detergent and then wipe off the remaining detergent with a dry lint free cloth. B* Flush with water first; then soak in water and cleaning solution (water temperature 40ºC recommended) for approximately three minutes and wipe with 70% ethanol. C* Steam autoclave at maximum 134ºC. 13 Cleaning and Disinfection Clean and Disinfect the Anesthesia Machine Housing 1. Clean the surface of the anesthesia machine housing with a damp cloth soaked in mild detergent (such as 70% ethanol). 2. After cleaning the housing, remove the remaining detergent by wiping with a dry lint free cloth. WARNING: Seeping liquid into the control assembly can damage the equipment or cause personal injury. When cleaning the housing, make sure that no liquid flows into the control assembly and always disconnect the equipment from the AC mains. Reconnect the AC mains after the cleaned parts are fully dry. NOTE: Use only soft dry and lint free cloth to clean the display. Do not use any liquid for display cleaning. Disassemble the Breathing System Cleanable Parts You need to disassemble the breathing system cleanable parts first before cleaning the system. O2 Sensor 1.Remove one end of the O2 sensor cable from the connector on the anesthesia machine. Unplug the other end of the cable from the O2 sensor. 2.Turn the O2 sensor counterclockwise to take it out. 14 Cleaning and Disinfection Breathing Tubes and Y Piece Remove the filter from the Y piece. Disconnect the breathing tubes from the inspiration/expiration connectors on the breathing system. WARNING: When installing the breathing tube, hold the tube connector at both ends of the tube to prevent damage of the tube. Do not reuse the filter to prevent cross-contamination. Follow local regulations regarding disposal of hospital waste when the filter is discarded. Install the filter as described in this guide to prevent dust and particles from entering the patient’s lungs and prevent cross-contamination. Flow Sensor 1.Turn the locking nuts counterclockwise. 2.Pull out the inspiration/expiration connectors and their locking nuts. WARNING: Tighten the locking nuts when installing the flow sensor. Failure to do so may result in invalid measurement. The end of inspiration/expiration connectors which connect the breathing tube shall be kept downward to prevent condensed water from entering the breathing system. 15 Cleaning and Disinfection 3.Pull out the flow sensors horizontally. Check Valve Assembly 1.Turn the check valve cover counterclockwise to remove it. 2.Pull out the check valve. WARNING: Do not separate the check valve diaphragm from the valve cover. When installing the check valve, depress the valve forcibly to make sure that it is installed in position. Water Collection Cup 2.Remove the water collection cup. 1.Hold the water collection cup and turn it clockwise. 16 Cleaning and Disinfection Sodalime Canister 1.Hold and pull up the rotary handle for 90 degrees. 2.Turn the rotary handle for 90 degrees counterclockwise. 3.Pull out the sodalime canister from the slot. WARNING: Sodalime is a caustic substance and is a strong irritant to eyes, skin and respiratory system. Affected parts should be flushed with water. If irritation continues after flushed by water, seek medical assistance immediately. Before installing the sodalime canister, inspect the canister mouth, canister support and seal for sodalime particles. If there is, clear it to prevent breathing system leakage. Clean the sodalime canister and change the sodalime canister sponge regularly. Otherwise, the sodalime powder built up inside the canister will go into the breathing system. The sodalime canister sponge must be in place Canister seal to prevent dust and particles from entering the breathing system. Canister support Do not reuse the sodalime canister sponge, which must be replaced every time the sodalime Canister mouth canister is replaced. 17 Cleaning and Disinfection Airway Pressure Gauge Pull off the airway pressure gauge as shown below. Manual Bag Remove the manual bag from the manual bag port on the breathing system as shown below. The anesthesia machine is not The anesthesia machine is configured configured with bag arm: with bag arm: Bag Arm 1.Loosen the locking nut counterclockwise. 2.Remove the bag arm from the breathing system. 18 Cleaning and Disinfection Bellows Assembly 1.Turn the bellows housing counterclockwise. 2.Remove the housing. 3.Remove the folding bag from the bellows base. NOTE: Before installing the bellows housing, check that the sealing component on the breathing system is in position. If not, you must install the sealing component properly before installing the bellows housing. When installing the bellows housing, align the bellows housing bayonet tabs with the slots on the breathing system and then lower the bellows housing. Make sure that the housing Incorrect installation causes the folding is depressing the seal evenly. Hold as shown in the figure, which leads to the the bellows housing tightly and turn it breathing system leakage. Reinstall the clockwise until it stops. Make sure that the side of the housing marked with bellows housing. scale is facing the operator. 19 Cleaning and Disinfection Breathing system 1.Remove the breathing system assembly 2.Remove the breathing system from according to the aforementioned the breathing system adapter with both procedures.Hold the breathing system hands. with one hand. Pull up the locking catches on the breathing system adapter with the other hand to unlock it. 3.Ensure that the breathing system assembly has been removed correctly. Disinfect the breathing system assembly. WARNING: Disassemble and reassemble the breathing system as described in this guide. For further disassembly and reassembly, contact us. Improper disassembling and reassembling may cause breathing system leak and compromise normal system use. After the breathing system assembly is cleaned and disinfected, reinstall the assembly when it is fully dry. 20 Maintenance Do not use malfunctioning anesthesia machine. Have all repairs and service done by an authorized service representative. Replacement and maintenance of tube parts listed in this manual may be undertaken by a competent, trained individual having experience in the repair of devices of this nature. After repair, test the anesthesia machine to ensure that it is functioning properly, in accordance with the specifications. WARNING: Only use lubricants approved for anesthesia or O2 equipment. Do not use lubricants that contain oil or grease. They burn or explode in high O2 concentrations. Obey infection control and safety procedures. Used equipment may contain blood and body fluids. Movable parts and removable components may present a pinch or a crush hazard. Use care when moving or replacing system parts and components. NOTE: No repair should ever be attempted by anyone not having experience in the repair of devices of this nature. Replace damaged parts with components manufactured or sold by us. Then test the unit to make sure that it complies with the manufacturer’s published specifications. Contact us for service assistance. 21 Maintenance NOTE: These schedules are the minimum frequency based on typical usage of 2000 hours per year. You should service the equipment more frequently if you use it more than the typical yearly usage. Maintenance Schedule: Minimum frequency Maintenance Daily Clean the external surfaces. 21% O2 calibration (O2 sensor in breathing system). Biweekly Drain the vaporizers and discard the agent. Monthly 100% O2 calibration (breathing system O2 sensor). Clear water built up inside the waterstraps of CO2 module and AG module. During cleaning and setup Inspect the parts and O-rings for damage. Replace or repair as necessary. Annually Replace the seal on the vaporizer manifold and that on the breathing system port. Contact us for details. CO2 module calibration. AG module calibration. Every three years Replace the built-in lithium-ion batteries. Contact us for details. As necessary Before installing the cylinder, use a new cylinder gasket on cylinder yoke. Empty the water collection cup If there is water built up in it. Replace the sodalime in the sodalime canister if sodalime color changes. Replace the breathing system O2 sensor if it is damaged (Under typical use the sensor meets specifications for one year.). Replace the flow sensor if it is damaged. Calibrate the flow sensor when any of the following occurs: 1) the flow sensor is changed; 2) the tidal volume set is not consistent with that displayed when no leakage occurs; 3) there is a great difference between the tidal volume measured and that displayed by the bellows scale when fresh gas is very small. 22 Flow Sensor Calibration NOTE: Do not perform calibration while the unit is connected to a patient. During calibration, do not operate the pneumatic parts. Do not move or press the breathing tubes especially. During calibration, the drive gas pressure must be kept above 0.3 MPa. Otherwise calibration failure may result. To calibrate the flow sensor, do as follows: 1.Before calibration, ensure that the supply gas pressure is normal. 2.Turn all flowmeter controls to 0. Turn off all fresh gas inputs. 3.Make sure that the bag/mechanical ventilation switch is set to the position. 4.Remove the folding bag from the bellows and reinstall the bellows housing. 5.Plug the Y piece into the leak test plug to close the breathing system. 7.Make sure that the system is Standby. If not, press the key and then select [Ok] from the pop-up menu to enter standby status. 8.Select the [Maintenance] shortcut key and then select [Flow Sensor Cal. >>] to open the [Flow Sensor Cal.] menu. Select [Start] from the menu to start to calibrate the flow sensor. The screen prompts [Calibrating]. 9.During calibration, if you select [Stop], calibration is stopped. Then the message [Calibration Stopped! Calibration is unfinished.] is displayed. This indicates invalid calibration instead of calibration failure. 10.After a successful calibration, the screen shows [Calibration Completed!]. Otherwise, the message [Calibration Failure! Please try again.] is displayed. In this case, you need to do the calibration again. 23 Flow Sensor Calibration In case of flow sensor calibration failure, refer to the following table for troubleshooting. Failure description Possible cause Recommended action 1. Check the supply pressure and ensure that it is not lower than 0.2 MPa. 1. The pipeline supply 2. Check the bag/mechanical pressure is too low. ventilation switch and ensure 2. The bag/mechanical that it is set to the mechanical After the calibration ventilation switch is not is started, the position. set to the mechanical message of 3. In case that the supply position. calibration failure pressure is normal but the alarm 3. The supply pressure [Drive Gas Pressure Low] is still is displayed before switch malfunctions. on, contact us. ventilation sound is 4. The bag/mechanical 4. Switch over the bag/ heard. ventilation switch mechanical ventilation switch but malfunctions. the ventilation status displayed in the screen upper left corner keeps unchanged. In this case, contact us. 1. Check the flow sensor and the related sealing components for 1. The flow sensor in improper installation. After the calibration the breathing system is 2. Check the check valve not installed properly. is started, the assembly and the related 2. The check valve message of sealing components for improper calibration failure assembly in the installation. is displayed shortly breathing system is not 3. Replace the flow sensor and installed properly. after ventilation calibrate again. sound is heard. 3. The flow sensor 4. If the problem persists malfunctions. after taking all the mentioned measures, contact us. After the calibration is started, the ventilation sound is heard. After the calibration lasts about 3 minutes, the system prompts calibration failure. During calibration, the gas supply or the breathing tubes are interfered so that the calibration data are not correct. 24 1. Remove the problem that the tubes are pressed. Calibrate the flow sensor again by following calibration procedures. 2. If the problem persists after multiple calibrations, contcact us. Commonly-encountered Problems Failure description Possible cause Recommended action The alarm [Check Flow Sensors] is displayed. In case of this problem, judge the actual gas delivery volume to the patient by observing the graduation on the bellows housing. If it is abnormal, apply manual ventilation. After the operation, take the measures below to remove the problem. 1. Clear water or other liquids built up inside the flow sensor in 1. The expiratory/ the breathing system. inspiratory check valve 2. Check if the flow sensor and its seal are not is installed properly and if its installed properly. sealing components are in good 2. The flow sensor is condition. installed improperly or 3. Recalibrate the flow sensor. damaged. 4. Check the membrane inside 3. Other part of the the flow sensor for distortion. If anesthesia machine there is, replace the flow sensor malfunctions. and calibrate again. 5. Check if the expiratory/ inspiratory check valve and its seal are installed properly. If necessary, use a new one and reinstall it. 6. If the problem persists after taking all the mentioned measures, apply manual ventilation and contact us promptly. The alarm [Volume Monitoring Disabled] occurs. 1.ACGO is switched on. 2. The flow sensor malfunctions. 25 1. Switch off ACGO. 2. If the sensor malfunction related alarm is detected, apply manual ventilation and contact us promptly. Commonly-encountered Problems Failure description Possible cause Recommended action 1 Check if the breathing tubes are pressed or bent. Check if the filter connected to the Y-piece is filled with patient secretions and replace it if necessary. 2 Check if the patient tracheal intubation is in good condition. If necessary, clear excessive patient secretions in the airway. 3 Increase Paw high alarm setting or Plimit setting. 4 Re-set the ventilation parameters. 5 Compare the Ppeak displayed on the screen with the reading on the airway pressure gauge. If the Ppeak is significantly different from the maximum reading on the airway pressure gauge, apply manual ventilation and contact us promptly. 1 Check for tube leakage, especially when the disposable breathing tubes are used. Replace 1 The breathing tubes leak. them promptly in case of leakage. 2 Paw low alarm limit is set 2 Set Paw low alarm limit to a too high. lower value. 3 The breathing system is not 3 Check if the breathing system installed properly. The alarm is installed properly. If necessary, 4 The value measured by the [Paw Too Low] reinstall it. pressure sensor is a bit low. occurs. 4 Compare the Ppeak displayed Any of the above reasons may on the screen with the reading cause the Paw to be lower on the airway pressure gauge. If than the Paw low alarm limit the Ppeak is significantly different for consecutive 20 seconds. from the maximum reading on the airway pressure gauge, apply manual ventilation and contact us promptly. 1 The breathing tubes are occluded. 2 Patient airway is occluded. 3 Paw high alarm setting is too low or Plimit setting is too low. 4 Ventilation parameters are The alarm [Paw Too High] changed. 5 The value measured by or [Pressure the airway pressure sensor Limiting] is a bit high. occurs. Any of the above reasons may cause Paw to be higher than Paw high alarm limit so that the alarm [Paw Too High] is triggered, or cause Paw to exceed the Plimit setting so that the alarm [Pressure Limiting] is triggered. 26 Commonly-encountered Problems Failure description Possible cause Recommended action 1. TV is set too high. Rate or I:E setting is too high, which disables complete expiration and results in sustained airway pressure. 2. The airway resistance inside the patient The alarm expiratory pipeline in the [Sustained Airway breathing system is too Pressure] occurs. high. 3. The airway resistance inside the AGSS is so high that the expiratory pressure cannot be released timely. The alarm [Pinsp Not Achieved] occurs. 1. In the PCV mode, Pinsp is set too high or RR is too high. 2. Patient complicance is too high. 3. The folding bag collapses or does not reach the top of the bellows housing. 4. The breathing system or patient tracheal intubation leaks. 27 1 Decrease TV or the respective settings for Rate and I:E to lengthen expiratory duration. 2. Check if the expiratory pipeline is pressed or distorted. Check if the filter connected to the Y-piece is filled with patient secretions and replace it if necessary. 3. Check if the AGSS is blocked. 4. If the problem persists after taking all the mentioned measures, apply manual ventilation and contact us promptly. 1. Adjust pressure control parameters. 2. If the acutal gas delivery volume detected is too high, switch to VCV. 3. Push the O2 flush button to fill the folding bag. Increase the fresh gas flow appropriately to ensure the folding bag reaches the top of the bellows housing each time. 4. Check the breathing system and patient tracheal intubation for leakage. 5. If the problem persists after taking all the mentioned measures, apply manual ventilation and contact us promptly. Commonly-encountered Problems Failure description Possible cause Recommended action 1.Check if the patient is in good condition. According to patient physiological status, increase TV delivery or fresh gas flow, or 1 Patient spontaneous check if patient tracheal intubation breathing is so strong that is in good condition. The alarm [Paw Paw is less than -10 cmH2O. 2. Compare the value measured < -10cmH2O] 2 The value measured by by the pressure sensor with occurs the pressure sensor is not the reading on the airway correct. pressure gauge. If the difference is significant, apply manual ventilation and contact us promptly. 1 TV is set too high, RR too high or PEEP too high. 2. Paw is higher than Plimit so that gas delilvery stops in The alarm [TV advance. Not Achieved] 3. The folding bag collapses occurs. or does not reach the top of the bellows housing. 4. The breathing system or patient tracheal intubation leaks. 28 1. Adjust the breathing parameter settings. 2. Change the Plimit setting and check if the breathing tubes are blocked. 3.Push the O2 flush button to fill the folding bag. Increase the fresh gas flow appropriately to ensure the folding bag reaches the top of the bellows housing each time. 4.Check the breathing system and patient tracheal intubation for leakage. 5.If the problem persists after taking all the mentioned measures, apply manual ventilation and contact us promptly. Commonly-encountered Problems Failure description Possible cause Recommended action 1. TV compensation is switched off. 2. The flow of fresh air is too high. 3. There is significant The alarm [TV Comp Disabled] leakage in the breathing occurs. system. 4. The measured value by the flow sensor in the breathing system is inaccurate. The alarm [Pressure Monitoring Channel Failure] occurs. 1. The measured value by the pressure sensor exceeds the range. 2. The pressure sensor malfunctions. 29 1. Switch on TV compensation. 2. Decrease the fresh gas flow appropriately. 3. Check the breathing system and patient tracheal intubation for leakage. 4. During ventilation, observe the graduation on the bellows housing and the fresh gas volume. If necessary, change the parameter setting to ensure that the gas delivery volume meets the patient requirements or apply manual ventilation. After the operation, check the sensor measurement and perform calibration at the user-end. If necessary, replace the flow sensor and calibrate again. 5.If the problem persists after taking all the mentioned measures, apply manual ventilation and contact us promptly. 1. Observe if the anesthesia machine operates normally. If yes, switch it to VCV. If not, apply manual ventilation and restart the machine. 2. If the measured value is significantly different from the reading on the airway pressure gauge, contact us promptly. Commonly-encountered Problems Failure description Possible cause Recommended action 1 The ventilator fails to detect changes of flow and presssure. 2 If the backup The alarm ventilation time in PSV [Apnea Alarm] mode is set to be longer occurs than 20 s, this alarm occurs when the backup ventilation mode is started. The alarm [TVe>TVi] occurs. 1. Check if the breathing system is installed properly or leaks significantly. Check if the flow sensor is in good condition or installed properly. In case that parts are damaged or failures cannot be removed, apply manual ventilation and contact us promptly. 2. Set the backup ventilation time to be shorter than 20 s in PSV mode if necessary. In case of this problem, judge the actual gas delivery volume to the patient by observing the graduation on the bellows housing. If it is abnormal, apply manual ventilation. After the operation, take the measures below to remove the problem: 1. Clear water or other liquids built up 1. The value measured inside the flow sensor in the breathing by the expiratory flow system. sensor is a bit high or 2. Check if the flow sensor is installed that meausred by the properly and if its sealing components inspiratory flow sensor is are in good condition. a bit low. 3. Re-calibrate the flow sensor. 2. The expiratory valve 4. Check the membrane inside the assembly is not installed flow sensor for distortion. If there is, properly. replace the flow sensor and calibrate again. 5. Check if the expiratory/inspiratory check valve and its seal are installed properly. If necessary, use a new one and reinstall it. 6. If the problem persists after taking all the mentioned measures, apply manual ventilation and contact us promptly. 30 Commonly-encountered Problems Failure description Possible cause The alarm [O2 sensor Unconnected] occurs. 1. Connect the O2 sensor. If it is not configured, select [User Maintenance >>] → [Set O2 Sensor Monitoring >>]. Then select [OFF] from the pop-up 1. The O2 sensor is not menu. connected. 2. Check if the O2 sensor cable 2. The O2 sensor cable is is connected properly. If not, not connected properly. reconnect the O2 sensor and its cable. 3. If the problem persists after taking all the mentioned measures, contact us promptly. The alarm[Low Battery Voltage!] occurs. 1. Reconnect the AC mains. In case of power failure, use manual ventilation mode. 2. Reconnect the AC mains The battery voltage is too low. and charge the battery. After 30 minutes, disconnect the AC mains. If this alarm is still on, the battery has been damaged. Contact us promptly. The alarm[XX Comm Error] or [XX Comm Stop] ocurs (XX represents Power System, Auxi Ctrl Module, Flowmeter, CO2, AG or BIS). 1. Software occasional error. 2. Ventilator hardware error. Recommended action 1. The heating voltage The alarm of the heathing module [Heating module malfunctions. Failure] occurs. 2. The temperature test malfunctions. 31 1. Apply manual ventilation and restart the machine. 2. If the problem persists after taking all the mentioned measures, contact us promptly. Contact us. Commonly-encountered Problems Failure description Possible cause Recommended action 1. Loose connections between the breathing tubes and the connectors occur. Patient tracheal intubation leaks. 2. The POP valve and its seal inside the bellows assembly are installed improperly or damaged. The folding bag is improperly installed, aged or distorted. The bellows The breathing housing is improperly system leaks, installed. or the leak test 3. The expiratory/ of the breathing inspiratory check valve system is not assembly is not installed passed. properly. 4. The sodalime canister assembly and its sealing components are not installed properly. Soda powder falls into the breathing system. 5. The breathing system is not installed properly. 6. APL valve pressure is insuffient or APL valve malfunctions (in manual ventilation mode). 1. Check for loose connections between the breathing tubes and the connectors. If the disposable tubes are used, replace them timely. During an operation, check patient tracheal intubation for leakage. 2. Check the POP valve, folding bag, the bellows housing and the sealing components for improper installation. If necessary, use a new seal and install it. If the folding bag aging or distortion is detected, apply manual ventilation and contact us promptly. 3. Check the expiratory/inspiratory check valve cover and its seal for improper installation. If necessary, use a new seal and install it. 4. Check the sodalime canister and its seal for improper installation. If necessary, use a new seal and install it. If soda powder falls into the breathing system, remove it. Follow the procedures specified in the Operator's Manual to change the sodalime. 5 Check if the breathing system is installed properly. If necessary, reinstall it. 6. Increase the APL valve pressure. 7.If the problem persists after taking all the mentioned measures, apply manual ventilation and contact us promptly. 32 Commonly-encountered Problems Failure description Possible cause Recommended action 1. Switch on the ACGO. 2. TV or pressure level is set too low, which causes In mechanical low gas delivery flow. TV ventilation mode, setting is not high but the the folding bag fresh gas is set too high, of the bellows which causes fresh gas is basically volume to reach the TV disabled. setting and the folding bag The machine to remain unmoved. seemingly stops 3. The sensor or the valve operation. malflunctions, or other software/hardware system malfunctions. 1. Switch off the ACGO. 2. Decrease the fresh gas and increase the TV appropriately to increase Rate. 3. Apply manual ventilation and restart the machine. 4. If the problem persists after taking all the mentioned measures, contact us promptly. Refer to other O2 concentration monitoring when adjusting O2 The alarm [O2- The O2-N2O cut-off valve flow and N2O flow. Ensure that N2O Ratio Error] or the O2-N2O chain the O2-N2O ratio meets the actual occurs. linkage malfunctions. patient requirement. Contact us promptly. 33 www.mindray.com Shenzhen Mindray Bio-Medical Electronics Co., Ltd. Mindray Building, Keji 12th Road South, Hi-tech Industrial Park, Nanshan, Shenzhen 518057 P.R. China Tel: +86 755 26582888 Fax: +86 755 26582680