1
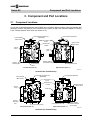
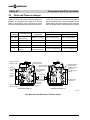
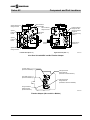
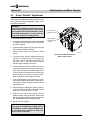
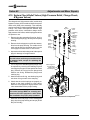
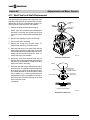
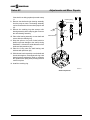
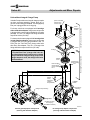
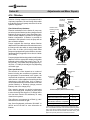
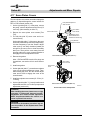
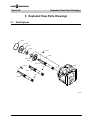
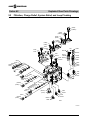
saue
Series 42
Axial Piston
Pumps
Service Instructions
saue
Series 42
Introduction
1. Introduction
1.1
Using This Manual
The Adjustment and Minor Repair procedures detailed herein may be performed by trained personnel
without voiding the unit warranty.
placed. Lightly lubricate all O-rings with clean petroleum jelly prior to assembly. All gasket sealing surfaces must be cleaned prior to installing new gaskets.
Cleanliness is a primary means of assuring satisfactory transmission life. Cleaning parts by using a clean
solvent wash and air drying is usually adequate. As
with any precision equipment, all parts must be kept
free of foreign materials and chemicals. When performing service activities, protect all exposed sealing
surfaces and open cavities from damage and foreign
material.
All exploded view drawings depict the 28cc frame
size. For variances in the 41cc frame size, see the
outline drawings in section 3. Differences in wrench
size and torquing for the two frame sizes are noted in
the text. Note that exterior housing screws are mostly
Torx-type T30 or T45.
Whenever removing a service component, it is recommended that any gaskets and O-rings be re-
1.2
These symbols are used within drawings:
Apply petroleum jelly.
Lubricate with clean hydraulic oil.
Safety Precautions
Always consider safety precautions before beginning a service procedure. Protect yourself and others from injury.
The following general precautions should be taken into consideration whenever servicing a hydrostatic system.
Loss of Hydrostatic Braking Ability
WARNING
When Series 42 units are used in vehicular
hydrostatic drive systems, the loss of hydrostatic drive line power in any mode of operation (e.g. acceleration, deceleration or “neutral” mode) may cause a loss of hydrostatic
braking capacity. A braking system which is
independent of the hydrostatic transmission
must, therefore, be provided which is adequate
to stop and hold the system should the condition develop.
Disable Work Function
WARNING
Certain service procedures may require the
vehicle/machine to be disabled (wheels raised
off the ground, work function disconnected,
etc.) while performing them in order to prevent
injury to the technician and bystanders.
F100003
2
Fluid Under High Pressure
WARNING
Use caution when dealing with hydraulic fluid
under pressure. Escaping hydraulic fluid under pressure can have sufficient force to penetrate your skin causing serious injury. This
fluid may also be hot enough to burn. Serious
infection or reactions can develop if proper
medical treatment is not administered immediately.
Flammable Cleaning Solvents
WARNING
Some cleaning solvents are flammable. To
avoid possible fire, do not use cleaning solvents in an area where a source of ignition may
be present.
Copyright 1996, Sauer-Sundstrand Company.
All rights reserved. Contents subject to change. Printed in U.S.A.
saue
Series 42
Introduction
Contents
1. Introduction ................................................................................................................................ 2
1.1
Using This Manual .................................................................................................................................. 2
1.2
Safety Precautions .................................................................................................................................. 2
2. Model Code ................................................................................................................................. 4
3. Component and Port Locations ................................................................................................ 5
3.1
Component Locations .............................................................................................................................5
3.2
Ports and Pressure Gauges .................................................................................................................... 6
4. Adjustment and Minor Repair Instructions.............................................................................. 8
4.1
Size and Torque for Plugs and Fittings ................................................................................................... 8
4.2
Pump “Neutral” Adjustment ..................................................................................................................... 9
4.3
Control “Neutral” Adjustment for MDC/EDC Controls ........................................................................... 10
4.4
MDC Control Module ............................................................................................................................ 11
4.5
EDC Control Module .............................................................................................................................12
4.6
MDC/EDC Control Spool, Control Linkage, and Control Neutral Adjustment Screw ............................ 13
4.7
MDC Neutral Start/Backup Alarm Switch .............................................................................................. 14
4.8
MDC Solenoid Override Valve .............................................................................................................. 16
4.9
FNR, NFPE, and NFPH Controls .......................................................................................................... 17
4.10 System Check Relief Valves (High Pressure Relief, Charge Check, & Bypass Valves) ....................... 18
4.11 Charge Relief Valve .............................................................................................................................. 19
4.12 Loop Flushing Valve .............................................................................................................................. 21
4.13 Shaft Seal and Shaft Replacement ....................................................................................................... 22
4.14 Auxiliary Mounting Pads ....................................................................................................................... 24
4.15 Charge Pump ........................................................................................................................................ 25
4.16 Filtration ................................................................................................................................................ 28
4.17 Servo Piston Covers .............................................................................................................................29
4.18 Displacement Limiter Adjustment.......................................................................................................... 30
5. Exploded View Parts Drawings ............................................................................................... 31
5.1
Shaft Options ........................................................................................................................................ 31
5.2
Filtration, Charge Relief, System Relief, and Loop Flushing ................................................................ 32
5.3
Charge Pump, Auxiliary Pads, and Servo Covers ................................................................................ 33
5.4
Control Options ..................................................................................................................................... 34
3
saue
Series 42
Model Code
2. Model Code
Refer to the model code exhibited on the unit's name plate for information regarding the configuration of the unit.
saue
Ames, Iowa, U.S.A.
Model Code
Note: Some options listed here may not currently
be available. Some options on your unit may not
be listed here. This is not an order code. See the
Series 42 Price Book for up-to-date ordering
information.
Neumünster, Germany
Typ
42L28 - C - ANN1 - 01 ANA - 2CNB - NN - NN - N N - N - NNN - NNN
Model No.
Model Code
Ident Nr
428 2051
A 93 23 67890
Serial No.
Serial No.
Fabr Nr
X
XX
XX
XXXXX
Location
Year
Week
Sequence No.
MADE IN U.S.A.
A
B
C
1 2
A
B
D
12 34
Series
1 Rotation
2 Displacement
C
D
Input Shaft Configurations
1 Control Type
2
NSS for MDC
or PCP for EDC
or Connector for FNR
or Style for NFP
Solenoid Override with MDC
3 or EDC Input
or Inching/Braking for NFP
Handle for MDC
4 or Connector for EDC
or Connector for NFP
4
E
F
G
H
123
1 2 34
J
K
L M
42
L = CCW
R = CW
28 = 28 cm3 (1.71 in3)
41 = 41 cm3 (2.50 in3)
C
D
E
G
K
= 13T 16/32P Spline
= 15T 16/32P Spline
= 19T 16/32P Spline
= 1.000 in. O.D. Straight Keyed
= 1.000 in. O.D. Tapered (1.5 in/ft)
N
A
C
E
F
G
= None
= MDC, Linear, Low Force
= MDC, Non-Linear, Low Force
= EDC (Electric Displacmt Contrl)
= FNR (3-Pos Forwrd-Neut-Revrs)
= NFP (Non-Feedback Proport'l)
N = None or Not Applicable
1 = NSS / Weatherpack for MDC,
or PCP Style for EDC
or 12V Electric for NFP
2 = 12 V DIN for FNR
3 = NSS+BAS / CW Handle Rot.
/ Weatherpack for MDC
or Hydraulic for NFP
5 = NSS+BAS / CCW Handle Rot.
/ Weatherpack for MDC
N = None or Not Applicable
A = 12V Override / Weather Pack,
or EDC Input = 14-85 mA
or 400 - 1200 mA or 5-20 bar
for NFP
E = 12V Override / Brake Port
N = None or Not Applicable
1,6 = Standard Handle fpr MDC
or M/S Connector for EDC
or Amp Connector for NFP
2,5 = Clevis Handle for MDC
or Weather Pack for EDC
E
F
Control Response Time
1 Port Style
2 Loop Flushing/Cooling
G
N
P
x1 = Fast
x2 = Medium
x3 = Slow
A,J,P = SAE Threaded O-Ring Boss
N = None
2,3 = Loop Flushing/Cooling Shuttle
3 Filtration
N
A
C
G
1 Charge Pump
N = None
2 = 11 cm3/rev (0.67 in3/rev)
2 Charge Relief Setting
C = 14 bar (205 psi)
F = 20 bar (280 psi)
3 Special Drive Features
N = None
1 = NFP
4 Rear Auxilliary Mounting Pad
N
A
B
T
H
High Pressure Relief Setting Port "A"
J
High Pressure Relief Setting Port "B"
K
Loop Bypass Valve
L
Displacement Limiters - Side 1
M
Displacement Limiters - Side 2
NN
14
17
19
21
23
25
28
30
34
00
= None (Ext. Charge Supply)
= Suction (No Adapter Plate)
= Remote Pressure (Partial Flow)
= Suction (Adapter Plate)
= None
= SAE-A, 9 Tooth
= SAE-B, 13 Tooth
= SAE-A Special, 11 Tooth
= Check Valve only, No HPRV
= 140 bar (2030 psi)
= 175 bar (2450 psi)
= 190 bar (2755 psi)
= 210 bar (3045 psi)
= 230 bar (3330 psi)
= 250 bar (3625 psi)
= 280 bar (4060 psi)
= 300 bar (4350 psi)
= 345 bar (5000 psi)
= No HPRV, No Check Valves
N = None
B = Yes
N, 0 = None
A, 1 = Yes, Set at Max Disp
N
Special Hardware Features
NNN = None
P
Special Non-Hardware Features
NNN = None
saue
Series 42
Component and Port Locations
3. Component and Port Locations
3.1
Component Locations
A pump with a manual displacement control (MDC) and no filtration adapter is shown. With non-feedback and
automotive controls, the positions of the case drains vary (shown in gray). With a filtration adapter, the porting
in the "Filtration Options" area varies (see section 4.16).
Control Neutral Adjustment
(MDC/EDC)
Control Module
(MDC Shown)
Pump Neutral Adjustment
Servo Piston
Covers
System Check
Relief Valves
Displacement
Limiters
Charge
Pump
Shaft
Seal
Filtration Options
(No Filtration Adapter Shown Here)
Auxiliary
Mounting Pad
(Loop Flushing
Valve)
Left Side View (Side "2")
Charge Relief Valve
Right Side View (Side "1")
P100101 E
Series 42 28cc Variable Pump
Control Neutral Adjustment
(MDC/EDC)
Control Module
(MDC Shown)
Pump Neutral Adjustment
Servo Piston
Covers
Displacement
Limiters
Charge
Pump
Auxiliary
Mounting
Pad
System Check
Relief Valves
Shaft Seal
(Loop Flushing Valve)
Left Side View (Side "2")
Charge Relief Valve
Filtration Options
(No Filtration Adapter
Shown Here)
Right Side View (Side "1")
P100102 E
Series 42 41cc Variable Pump
5
saue
Series 42
3.2
Component and Port Locations
Ports and Pressure Gauges
Proper servicing of pumps and motors requires that
pressure be measured and monitored at various
points in the hydraulic circuit. The Series 42 pump
has several locations at which to take these measure-
Gauge
Pressure Measured
Port Name
M1 & M2
M3
M4 & M5
L1 & L2
S
ments. The following outlines show the locations of
the various gauge ports. The tables show the recommended gauge size and the fitting size for each port.
Refer to this page when installing pressure gauges.
Fitting
Recommended
Gauge Size
028
041
System Pressure for
600 bar or 10,000 psi 9/16–18 O-Ring Fitting
Ports A and B
9/16–18 O-Ring Fitting
Charge Pressure
60 bar or 1000 psi
3/4–16 O-Ring Fitting
3/4–16 O-Ring Fitting
Servo Pressure
60 bar or 1000 psi
9/16–18 O-Ring Fitting
9/16–18 O-Ring Fitting
Case Pressure
35 bar or 500 psi
1-1/16–12 O-Ring Fitting
1-5/16–12 O-Ring Fitting
Charge Pump Inlet
Vacuum
1 bar, absolute
or 30 in Hg Vacuum
1-1/16–12 O-Ring Fitting
1-5/16–12 O-Ring Fitting
System Pressure
Gauge Port M2
Servo Pressure
Gauge Port M5
Servo Pressure
Gauge Port M4
System
Pressure
Port B
Charge Pressure
Gauge Port M3
(Charge Pressure
Supply For
No Charge Pump
Option)
Case Drain Port L2
(Non-Feedback
Controls)
System
Pressure
Port A
Case Drain
Port L1
Case Drain Port L1
(Non-Feedback
Controls)
Charge Pump
Inlet Port S
Case Drain
Port L2
System Pressure
Gauge Port M1
Left Side View (Side "2")
Right Side View (Side "1")
P100103 E
28cc Base Unit with MDC and No Filtration Adapter
6
saue
Series 42
Component and Port Locations
Servo Pressure
Gauge Port M5
Servo Pressure
Gauge Port M4
System Pressure
Gauge Port M2
System
Pressure
Port B
Charge Pressure
Gauge Port M3
(Charge Pressure
Supply For
No Charge Pump
Option)
Case Drain
Port L2
System
Pressure
Port A
Charge Pump
Inlet Port S
Case Drain
Port L1
System Pressure
Gauge Port M1
Left Side View (Side "2")
Right Side View (Side "1")
P100104 E
41cc Base Unit with MDC and No Filtration Adapter
To Filter, Port D
(Pressure Filtration)
Charge Pressure
Gauge Port M3
(Full Flow Pressure Filtration)
From Filter, Port E
(Pressure Filtration)
Charge Pressure
Gauge Port M3
(Partial Flow Pressure Filtration)
Charge Pressure
Gauge Port M3
(Suction Filtration)
P100105 E
Filtration Adapter (28cc and 41cc Models)
7
saue
Series 42
Adjustments and Minor Repairs
4. Adjustment and Minor Repair Instructions
4.1
Size and Torque for Plugs and Fittings
Plug and fitting sizes are given here. Place a fresh O-ring, lightly lubricated with petroleum jelly, whenever a plug
is removed. Each should be torqued as indicated. A 28cc unit with manual displacement control (MDC) is shown.
Servo Gage
Port M4
11/16 in Hex
27-47 Nm
(20-35 ft•lbf)
28cc: 9/16 in Int. Hex
95-135 Nm
(70-100 ft•lbf)
41cc: 5/8 in Int. Hex
125-250 Nm
(90-190 ft•lbf)
Case Drain
Port L1
Charge Pressure Gage
Port M3 (Position Varies,
Refer to Filtration Options)
Case Drain
Port L2
Port N
(Unused)
System Gage
Ports M1 and M2
Charge Pump Inlet
Port S
Torque: 115 Nm (85 ft•lbf)
11/16 in Hex
27-47 Nm
(20-35 ft•lbf)
Servo Gage
Port M5
11/16 in Hex
27-47 Nm
(20-35 ft•lbf)
28cc: 9/16 in Int. Hex
95-135 Nm
(70-100 ft•lbf)
41cc: 5/8 in Int. Hex
125-250 Nm
(90-190 ft•lbf)
System Ports
A and B
115 Nm (85 ft•lbf)
11/16 in Hex
27-47 Nm
(20-35 ft•lbf)
E100001 E
8
saue
Series 42
4.2
Adjustments and Minor Repairs
Pump “Neutral” Adjustment
The pump neutral adjustment sets the position of the
servo piston and pump swashplate relative to the
controlling mechanism.
WARNING
The following procedure requires the vehicle /
machine to be disabled (wheels raised off the
ground, work function disconnected, etc.) while
performing the procedure in order to prevent
injury to the technician and bystanders.
1. Disconnect machine function.
2. Connect a hose between gauge ports M4 and M5
to equalize the pressures on both ends of the
pump servo piston.
Pump "Neutral"
Adjustment Screw
Pump "Neutral"
Adjustment Seal
Lock Nut
3. Install pressure gauges in gauge ports M1 and
M2 to measure system pressure.
4. Start the prime mover and operate at normal
speed.
5. Loosen the pump "neutral" adjustment seal lock
nut [28cc⇒13 mm Hex; 41cc⇒17 mm Hex]. Turn
the pump "neutral" adjustment screw [28cc⇒5
mm Hex; 41cc⇒7 mm Hex] until the system
pressure gauge readings are equal.
E100002 E
Pump Neutral Adjustment Screw
(MDC Control Shown)
6. Turn the adjustment screw clockwise until one of
the gauges registers an increase in system pressure. Note the position of the adjustment screw.
Turn the screw counterclockwise until the other
gauge registers an increase in system pressure.
Note the position of the adjustment screw.
7. Turn the adjustment screw clockwise to a position halfway between the positions noted above.
The system pressure gauges should indicate
equal pressures.
8. While holding the adjustment screw in position,
torque the seal lock nut [28cc⇒20-26 Nm (15-19
ft•lbf); 41cc⇒28-51 Nm (21-37 ft•lbf)] .
9. Stop the prime mover and remove the hose
between gauge ports M4 and M5. Remove the
pressure gauges installed in gauge ports M1 and
M2. Reinstall the plugs in the gauge ports.
10. Reconnect work function.
IMPORTANT
If the pump is equipped with an MDC or EDC,
the CONTROL "neutral" adjustment MUST also
be performed before putting the pump into
service (see next section).
9
saue
Series 42
4.3
Adjustments and Minor Repairs
Control “Neutral” Adjustment for MDC/EDC Controls
The control neutral adjustment aligns the pump swashplate and the control spool so that a zero angle control
setting provides a zero degree swashplate setting.
This adjustment should be performed whenever any
part of the control or swashplate mechanisms is
adjusted or removed or after the pump neutral setting
(previous section) is adjusted.
MDC / EDC Control
"Neutral" Adjustment Screw
WARNING
The following procedure requires the vehicle /
machine to be disabled (wheels raised off the
ground, work function disconnected, etc.) while
performing the procedure in order to prevent
injury to the technician and bystanders.
1. Disconnect the work function. Disconnect the
external control linkage (for MDC) or control
signal input (for EDC) from the pump.
2. Install pressure gauges in gauge ports M4 and
M5 to measure pressure on the pump servo
piston.
3. Start the prime mover and operate at normal
speed.
4. Loosen the CONTROL "neutral" adjustment seal
lock nut (see drawing) [17 mm Hex] . Turn the
control "neutral" adjustment screw [5 mm Int.
Hex] until the servo piston pressure gauge readings are as close to equal as possible.
5. Turn the adjustment screw clockwise until one of
the gauges registers an increase in pressure on
the servo piston. Note the position of the adjustment screw.
Turn the screw counterclockwise until the other
gauge registers an increase in pressure on the
servo piston. Note the position of the adjustment
screw.
6. Turn the adjustment screw clockwise to a position halfway between the positions noted above.
The servo piston pressure gauges should indicate nearly equal pressures.
7. While holding the adjustment screw in position,
torque the seal lock nut [14-24 Nm (10-18 ft•lbf)].
8. Stop the prime mover and remove the pressure
gauges installed in gauge ports M4 and M5.
Reinstall the plugs in the gauge ports.
9. Reconnect the external control linkage (for MDC)
or control signal input (for EDC) to the pump.
Reconnect the work function.
10
MDC / EDC Control "Neutral"
Adjustment Seal Lock Nut
E100003 E
Control Neutral Adjustment Screw
(EDC Control Shown)
saue
Series 42
4.4
Adjustments and Minor Repairs
MDC Control Module
The manual displacement control (MDC) module
provides control of the pump servo piston through a
connection to the summing link pin within the pump
housing. The following procedure shows how to
remove and install the control housing. Section 4.6
explains how to remove and install the control spool
and linkage.
1. Clean the external surfaces of the pump. If necessary, remove the MDC handle.
2. Remove the seven (7) control retaining screws
[Torx T30] that secure the control to the pump
housing. Remove the control and control gasket
from the pump.
Plug for
Visual
Inspection
Nut
Lock Washer
MDC Handle
Control
Retaining
Screws
Control
Gasket
Hold summing link
(and control spool)
in position
Note: See section 4.6 for instructions on removing/installing the control spool and linkage.
3. Clean the sealing surfaces of the control and the
pump housing. Place a new gasket in position on
the housing.
CAUTION
The control orifices are part of the control
gasket. Refer to the appropriate Service Parts
List to determine the correct gasket.
4. Hold the summing link pin in position while installing the control. (The spring on the control spool
will tend to push the link to an extreme position.)
The link pin MUST engage the slot in the control
cam. A plug is provided on the MDC housing to
permit visual inspection of linkage pin engagement.
Note: It may be easiest to lay the servo piston
side of the control down first, then watch the link
pin engage from the charge pump side of the
pump.
E100004 E
MDC Control Module Assembly
Summing
link pin
MUST enter
the slot in
the control
cam!
E100005 E
Link Pin Into Cam Slot
5. Install and torque the control screws [15-17 Nm
(11-13 ft•lbf)]. Perform Control Neutral Adjustment (Section 4.3).
WARNING
Failure to properly engage the link pin with the
control cam will result in incorrect control
operation, which may lead to loss of control of
the vehicle / machine.
Link Pin Into Cam Slot
F100201
11
saue
Series 42
4.5
Adjustments and Minor Repairs
EDC Control Module
The Electric Displacement Control (EDC) provides a
control function through connections to the summing
link pin within the pump housing. The following procedure shows how to remove and install the control
housings. The next section explains how to remove
and install the control spool and linkage.
1. Clean the external surfaces of the pump. If necessary, remove control input signal.
EDC Control
Pressure Gauge
Port X1
2. Remove the seven (7) control retaining screws
[Torx T30] that secure the control to the pump
housing. Note the position of the different length
screws. Remove the control and control gasket
from the pump.
Note: See next section for instructions on removing/installing the control spool and linkage.
3. Clean the sealing surfaces of the control and the
pump housing. Place a new gasket in position on
the housing.
EDC Control
Pressure Gauge
Port X2
EDC Module Showing Port Locations
CAUTION
The control orifices are part of the control
gasket. Refer to the appropriate Service Parts
List to determine the correct gasket.
4. Hold the summing link pin in position while installing the control. (The spring on the control spool
will tend to push the link to an extreme position.)
The link pin MUST engage the hole in the control
piston fork.
Note: It may be easiest to lay the servo piston
side of the control down first, then watch the link
pin engage from the charge pump side of the
pump.
5. Install and torque the control screws [15-17 Nm
(11-13 ft•lbf)]. Perform Control Neutral Adjustment (Section 4.3).
WARNING
Failure to properly engage the link pin with
control piston fork will result in incorrect control operation, which may lead to loss of control of the vehicle / machine.
12
P100106 E
Control Retaining
Screws (note different sizes)
Control
Gasket
Hold summing
link (and control
spool) in
position
Summing
link pin
MUST enter
the hole in
the control
piston fork!
E100006 E
EDC Control Module Assembly
saue
Series 42
4.6
Adjustments and Minor Repairs
MDC/EDC Control Spool, Control Linkage, and Control Neutral
Adjustment Screw
The control spool, control linkage, and control neutral
adjustment screw can be removed for cleaning and to
change the O-rings or the seal lock nut.
Summing Link
Linkage Pivot Screw
Removal of Spool, Linkage, and Adjustment
Screw
1. Clean the external surfaces of the pump.
Neutral
Adjustment
Link
2. Remove the MDC or EDC module and the control
gasket from the pump housing (see previous two
sections).
Feedback Link
Control Neutral
Adjust Screw
Seal Lock
Nut
Control
Spool
and Spring
Note
orientation!
3. Remove the summing link.
4. Remove the control spool bore plug [5/16 in Int.
Hex] or screws [Torx T30], cover, and gasket.
Remove the opposite bore plug [5/16 in Int. Hex],
and remove the control spool and spring.
5. Remove the linkage pivot screw [4 mm Int. Hex],
feedback link, and neutral adjustment link.
Opposite
Bore Plug
Housing without
Filtration Adapter
Control Spool
Bore Plug
6. Remove the seal lock nut [17 mm Hex] and the
control neutral adjustment screw [5 mm Int. Hex].
Installation of Spool, Linkage, and Adjustment
Screw
1. Install the control neutral adjustment screw and
seal lock nut. Do not tighten the nut.
2. Assemble the "neutral" adjustment link and feedback link, and install as shown. Install and torque
the linkage pivot screw [8-15 Nm (6-11 ft•lbf)].
Housing with
Filtration Adapter
Gasket
Control Spool
Bore Cover
3. Lubricate and install the control spool and spring
assembly noting proper orientation.
WARNING
The control spool and spring assembly MUST
be oriented in the housing as shown for proper
control operation.
4. Install and torque the control spool bore plug [4194 Nm (30-70 ft•lbf)]. Or install the control spool
cover (with a new gasket) or plug, and torque the
screws [15-17 Nm (11-13 ft•lbf)].
5. Install the summing link. Hold the control spool in
position while engaging the fork on the summing
link with the flats on the spool. If necessary, rotate
the spool to engage the summing link.
E100007 E
MDC/EDC Control Spool and Linkage
Feedback link
must enter slot in
servo piston
Pivot screw
Slot in "neutral" adjust link
must engage groove in
adjusting screw
Fork on summing link
must engage flats on
control spool
E100008 E
Servo Piston Linkage and Control Spool
(Internal Parts Shown with Housing Removed)
6. Install a new control gasket. Hold the summing
link and control spool in position while reinstalling
the MDC or EDC (see section 4.4 or 4.5). Perform
Control Neutral Adjustment (section 4.3).
13
saue
Series 42
4.7
Adjustments and Minor Repairs
MDC Neutral Start/Backup Alarm Switch
The Neutral Start Switch (NSS) prevents the engine
and pump from being started when the pump is out of
neutral. The NSS should be wired in series with the
engine starting circuit. The switch contact is closed at
the control handle's neutral position and opens when
the control handle is rotated 1.5 to 2° from neutral.
NSS Cover
NSS Control Nut
NSS Cam
The Backup Alarm Switch (BUA) outputs an electronic signal when the control handle is in a reverse
position. This switch is normally wired in series with
an audio output. The switch contact is open until the
control handle is rotated 2.6 to 3.75° in the reverse
direction.
NSS Cavity
NSS with
Weatherpack
CAUTION
The control handle's neutral position must
agree with the pump's neutral position for the
NSS/BUA to work effectively (see section 4.3).
NSS with Screw
Terminals
E100009 E
The Neutral Start / Backup Alarm Switch assembly
can be configured for three different settings.
i.
NSS Assembly on MDC
A Neutral Start Switch only.
ii. A Neutral Start Switch with Backup Alarm for
units where clockwise (CW) handle rotation results in "reverse" motion.
iii. A Neutral Start Switch with Backup Alarm for
units where counterclockwise (CCW) handle rotation results in "reverse" motion.
The setting must be in accordance with the configuration of the unit. See the model code (section 2) if
uncertain of the type of NSS you have.
Alignment of the NSS requires a special alignment
tool. Dimensions are given at right.
Yolk
NSS only
NSS with BUA
(CW = Reverse)
Control
Cam
NSS with BUA
(CCW = Reverse)
P100107 E
Top View of NSS Showing Cam Positions
(continued)
9/16 -18UNF 2A THD
.04 x 45° Chamfer
R.125
ø .236–.030
Knurl
35.0°
1.250
.306
.354
2.000
Material: .75 DIA x 3 ETD150
(All Dimensions in inches)
P100108 E
Alignment Tool
14
saue
Series 42
Adjustments and Minor Repairs
Adjustment is performed by setting the cam position
within the NSS assembly.
1. The MDC module must be removed from the
pump housing. Refer to section 4.4.
2. Remove NSS [7/8 in Hex].
NSS Cover
NSS
NSS Control Nut
NSS Cam
3. Remove the NSS cover by inserting a screwdriver into the NSS cavity and popping off the
cover with a hammer. Be careful not to damage
the internal hardware.
P100109 E
4. Remove the control nut [8 mm Hex].
Side View of NSS and NSS Cavity
5. Use a screwdriver to pop off the cam.
6. Set cam in proper orientation according to the
unit's configuration (i, ii, or iii above).
7. Screw special alignment tool in NSS cavity to
hold cam in place.
8. On the underside of the MDC module, clamp a
pair of locking pliers around the spring contacts of
the control cam. The pliers should hold the nub on
the control cam to the pin underneath. This will
hold the control cam in neutral position.
9. Screw control nut on cam [4.1-6.8 Nm (3-5 ft•lbf)].
10. Press new cover on top of cam cavity. This
requires either an arbor press or a full-sized
punch (punch depth = 1.06 mm (0.0417 in),
punch width = 23.3 mm (0.916 in)).
F100202
11. Remove the alignment tool and the locking pliers.
Underside of MDC Module Showing Where to Clamp
Locking Pliers
12. Place a new lubricated O-ring on NSS.
13. Reconnect the NSS [25-29 Nm (18-22 ft•lbf)] to
the MDC.
14. Reinstall MDC module onto pump housing (refer
to section 4.4).
15
saue
Series 42
4.8
Adjustments and Minor Repairs
MDC Solenoid Override Valve
The solenoid override valve is a safety feature that
connects both ends of the servo control piston together when the solenoid is de-energized. Thus the
pump can be put into stroke only when the solenoid
is energized.
Port L4
Port X7
The solenoid override with brake release includes
hydraulic control of a safety brake. When de-energized, a spring-applied, hydraulically-released brake
is drained through port X7. For conditions where case
back-pressure on the spring-applied brake is critical,
an external drain to the reservoir can be connected
through port L4.
The solenoid override valve can be removed to
inspect and remove foreign matter.
Removal
1. Remove retaining nut [9/16 in Hex].
Solenoid Override Valve
Assembly
E100010 E
Solenoid Override Valve Assembly
2. Remove solenoid housing.
3. Remove retaining ring at base of solenoid.
Retaining Nut
4. Remove solenoid. This should be connected to
internal spool.
Solenoid
Housing
Installation
1. Replace O-ring.
Washer
2. Place spring and plunger inside of solenoid.
3. Attach spool (male notch) to plunger (female
notch).
4. Insert solenoid/spool assembly in solenoid override bore.
Retaining Ring
Solenoid
O-Ring
Spring
Plunger
5. Snap retaining ring over base of solenoid.
Spool
6. Place washer at base of solenoid.
7. Install housing and retaining nut [2-4 Nm (1.5-3.5
ft•lbf)].
E100011 E
Exploded View of Solenoid Override Assembly
16
saue
Series 42
4.9
Adjustments and Minor Repairs
FNR, NFPE, and NFPH Controls
The 3-position FNR control and the electric and
hydraulic non-feedback proportional (NFPE and
NFPH) controls are non-feedback type controls. The
FNR and NFPE controls consist of modules mounted
on the pump housing. The hydraulic input for NFPH
is received through ports on the top of the pump
[9/16–18 SAE O-ring fitting].
NFPH Ports
(Ports X1 and X2)
The non-feedback controls are set at the factory. The
control modules can be removed to clean the ports
and change the O-rings.
The orifice plugs for the FNR and NFPE are located
inside the servo piston covers. The orifice plugs for
the NFPH are located in the NFPH ports. Orifice
plugs may be cleaned or replaced.
E100012 E
Position of NFPH Ports
Note: Future models may contain orifice plate
between module and pump housing.
Control Solenoid
Control Module
Removal and Installation of FNR and NFPE
Modules
1. Clean pump and module housings.
2. Remove four (4) screws retaining module to
housing [4 mm Int. Hex], and remove module
from pump housing.
Control Ports
Locator Pin
3. Remove O-rings from the control ports. Examine
ports for cleanliness.
4. Clean sealing surfaces.
5. Replace locator pin.
6. Install new O-rings.
7. Replace screws [4.7-6.1 Nm (3.5-4.5 ft•lbf].
E100013 E
Removal and Installation of FNR and NFPE
Control Orifices
Note: Future models may contain an orifice plate
between module and pump housing. This will
take the place of the orifice plugs beneath the
servo piston cover.
NFPE Assembly (FNR Similar)
Non-Feedback
Control Orifice
1. Remove servo piston cover (see section 4.17).
2. Remove orifice plug [1/8 in Int. Hex].
3. Examine orifice and port for cleanliness.
4. Install orifice plug [2.0-3.4 Nm (1.5-2.5 ft•lbf)].
E100014 E
Location of Non-Feedback Control Orifice
17
saue
Series 42
Adjustments and Minor Repairs
4.10 System Check Relief Valves (High Pressure Relief, Charge Check,
& Bypass Valves)
The charge check, high pressure relief, and the loop
bypass functions are all contained within the system
check relief (SCR) valve assembly. This assembly
may be removed for cleaning and installation of fresh
O-rings. The model code specifies whether high
pressure relief valves, combination charge check/
high pressure relief valves, and/or loop bypass valves
are present or not.
1. Remove the valve seat plugs [9 mm Int. Hex] or
valve seat/bypass plugs [1 in Hex] from the pump
housing.
2. Remove the check poppet or relief valve assemblies from the pump housing. The smaller end of
each conical spring is crimped to retain it on the
check poppet or relief valve. Do not remove.
With
Bypass
Without
Bypass
Valve
Seat
Plug
Outer
O-Ring
Backup
Ring
Inner
O-Ring
Valve
Seat
Retaining
Ring
Standard
Bypass
Plunger
O-Ring
Valve
Seat
Plug
Outer
O-Ring
Backup
Ring
Inner
O-Ring
3. Inspect the valves and mating seats in the special
plugs for damage or foreign material.
CAUTION
The relief valves are factory set and should not
be tampered with, except for replacing the
entire valve.
4. The O-ring on the standard bypass plunger may
be replaced by removing the retaining ring and
removing the plunger from the special valve seat
plug. Remove the O-ring from the plunger and
install a new O-ring. Reinstall the plunger and
retaining ring.
Check Poppet or
High Pressure
Relief Valve
Conical Spring
5. Install a new outer O-ring, new backup ring, and
new inner O-ring on each valve seat plug.
6. Check that the conical springs are properly retained on the check poppets or relief valves.
Install the check poppet or high pressure relief
valve assemblies into the pump housing .
CAUTION
The conical springs MUST be correctly positioned on the check poppets or relief valves
after installation for proper pump operation.
E100015 E
System Check Relief Valve Components
7. Install the valve seat plugs or valve seat/bypass
plugs into the pump housing and torque [40-95
Nm (30-70 ft•lbf)].
18
saue
Series 42
Adjustments and Minor Repairs
4.11 Charge Relief Valve
The charge relief valve may be removed for cleaning
and installation of fresh O-rings. The pressure setting
may be changed. However, note that the setting will
vary for different charge flows which depends on
charge pump size and pump speed. The factory
setting is set relative to case pressure at 1800 rpm.
The actual charge pressure will vary at different
speeds.
Shim Adjustable Style
1. Remove the shim adjustable charge relief valve
plug [1 in Hex] from the pump housing. Remove
the O-ring from the plug.
Shim Adjustable
Charge Relief Valve Plug
O-Ring
Shims
2. Remove the spring and poppet from the housing.
Spring
Poppet
3. Do not alter the shims which may be installed
between the spring and valve plug, or interchange parts with another valve. Inspect the
poppet and mating seat in the housing for damage or foreign material.
4. If desired, the charge relief valve setting can be
changed. An approximate rule of thumb is 4 bar
/ 1.25 mm (58 psi / 0.050 in). The effective setting
will vary.
To confirm the charge relief valve setting, measure charge pressure (port M3) with the pump in
stroke. The charge pressure should level off
when the relief setting is reached.
5. Install a new O-ring on the valve plug. Reinstall
the poppet, spring, and plug (with shims and Oring) into the pump housing [55-135 Nm (40-100
ft•lbf)].
E100016 E
Shim Adjustable Charge Relief Valve Components
Approximate Relief Setting vs Shim Thickness
4 bar / 1.25 mm
(58 psi / 0.050 in)
(continued)
19
saue
Series 42
Adjustments and Minor Repairs
Screw Adjustable Style
Charge Relief Lock Nut
1. Before removing the screw adjustable relief valve
plug, mark the plug, lock nut, and housing so as
to approximately maintain the original adjustment when assembling, Remove the screw adjustable charge relief valve plug by loosening the
lock nut [1-1/16 in Hex] and unscrewing the plug
[8 mm Int. Hex]. Remove the O-ring from the plug.
O-Ring
Screw Adjustable
Charge Relief Valve Plug
Spring
Poppet
2. Remove the spring and poppet from the housing.
3. Inspect the poppet and mating seat in the housing for damage or foreign material.
4. Install a new O-ring on the valve plug. Reinstall
the poppet and spring. Reinstall the plug with its
lock nut [47-57 Nm (34-42 ft•lbf)], aligning the
marks made at disassembly.
5. Check and adjust, if necessary, the charge pressure. For screw adjustable "anti-stall" charge
relief valves, an approximate rule of thumb is 2.8
bar / quarter turn (40 psi / quarter turn).
To confirm the charge relief valve setting, measure charge pressure (port M3) with the pump in
stroke. The charge pressure should level off
when the relief setting is reached.
20
E100017 E
Screw Adjustable Charge Relief Valve Components
Approximate Relief Setting vs Screw Revolution
2.8 bar / 1⁄4 turn
(40 psi / 1⁄4 turn)
saue
Series 42
Adjustments and Minor Repairs
4.12 Loop Flushing Valve
The loop flushing function consists of the loop flushing shuttle valve and the loop flushing relief valve. The
assemblies may be removed for cleaning and installation of new O-rings. The relief valve poppet may be
exchanged for one with a different flow rating, but the
relief valve shims should not be changed out unless
specifically instructed so by Sauer-Sundstrand. The
function also can be defeated.
Loop Flushing
Relief Plug
Loop Flushing Relief
Plug (Defeat)
O-Ring
O-Ring
Shims
Spring
Poppet
Loop Flushing Valve
1. Remove the loop flushing valve plug from the
pump housing [11/16 in Hex]. Remove the O-ring
from the plug.
2. Remove the loop flushing valve spool assembly
from the housing.
3. Inspect the parts for damage or foreign material.
The centering spring must be securely retained to
the spool by the washer.
Loop Flushing
Plug (Defeat)
O-Ring
Defeat
Spool
Loop
Flushing
Plug
O-Ring
Loop
Flushing
Spool
Assembly
4. Install the loop flushing valve spool assembly into
its bore. Install a new O-ring on the loop flushing
plug and install [27-47 Nm (20-35 ft•lbf)].
Loop Flushing Relief Valve
1. Remove the loop flushing relief valve internal hex
plug [5/8 in Hex] from the pump housing. Remove
the O-ring from the plug.
2. Remove the spring and poppet from the housing.
3. Do not alter the shims which are installed between the spring and valve plug, or interchange
parts with another valve. Inspect the poppet and
mating seat in the housing for damage or foreign
material. Inspect the orifice in the valve poppet.
4. Install a new O-ring on the valve plug. Reinstall
the poppet, spring, shims, and plug (with O-ring)
into the pump housing [15-34 Nm (15-25 ft•lbf)].
E100018 E
Loop Flushing Valve and Loop Flushing Defeat
Components
Defeating Loop Flushing
1. Remove the loop flushing valve from the pump
housing.
2. Install the defeat spool into the spool bore in the
housing. Install the plain plug with O-ring into the
housing [11/16 in Hex], and torque [27-47 Nm
(20-35 ft•lbf)].
3. Remove the charge relief valve (these parts are
not necessary).
4. Install the plain hex plug with O-ring into the end
cap [5/8 in Hex], and torque [15-34 Nm (15-25
ft•lbf)].
21
saue
Series 42
Adjustments and Minor Repairs
4.13 Shaft Seal and Shaft Replacement
A lip type shaft seal is used in Series 42 pumps. This
seal and/or the shaft can be replaced without major
disassembly of the unit. Replacement generally requires removal of the pump from the machine.
Retaining
Ring
Seal Carrier
Assembly
1. Position the pump with the shaft facing up.
NOTE: If the unit is positioned horizontally when
the shaft is removed, the cylinder block could
move out of place, making shaft installation difficult.
2. Remove the retaining ring from the housing.
3. Pull out seal carrier assembly.
4. Remove the O-ring from the seal carrier. To
install a new shaft only, proceed to step 8.
5. Place the seal carrier in an arbor press with the
shaft bearing side down, and press out the old
seal. An appropriately sized pipe spacer or socket
wrench can be used as a press tool. Once removed, the seal is not reusable.
6. Inspect the seal carrier and the new seal for
damage. Inspect the sealing area on the shaft for
rust, wear, or contamination. Polish the sealing
area on the shaft if necessary.
7. Press the new seal into the shaft bearing side of
the seal carrier. The seal lip must face the outside
of the pump. Be careful not to damage the seal.
The outside diameter of the seal may be coated
with a sealant (e.g. Loctite High Performance
Sealant #59231) prior to installation. This aids in
preventing leaks caused by damage to the seal
bore in the seal carrier.
E100019 E
Shaft Seal Components
O-Ring
Seal
Sealant may
be used on
outside diameter
Seal Carrier
Inside Lip
(face down)
(continued)
Press Seal
to bottom of Seal Carrier
E100020 E
Installation of Shaft Seal
22
saue
Series 42
Adjustments and Minor Repairs
If the shaft is not being replaced proceed to step
11.
Retaining Ring
8. Remove the shaft and roller bearing assembly
from the pump or motor. The bearing assembly
can be transferred to the new shaft (steps 9 and
10).
9. Remove the retaining ring that secures roller
bearing assembly with a snap ring plier. Remove
the roller bearing assembly.
10. Place roller bearing assembly on new shaft and
secure with the retaining ring.
Roller Bearing
Key
Shaft
OR
Shaft Assembly
OR
11. Wrap the spline or key end of shaft with thin
plastic to prevent damage to the seal lip during
installation. Lubricate the inside diameter of the
shaft seal with petroleum jelly.
12. Place the O-ring onto the shaft bearing and
lubricate with petroleum jelly.
13. Slide the seal carrier assembly over the shaft and
into the housing bore. Press against O-ring. Hold
inward pressure against the shaft to compress
the cylinder block spring while pressing the seal
carrier into place.
14. Install the retaining ring.
E100021 E
Shaft Components
23
saue
Series 42
Adjustments and Minor Repairs
4.14 Auxiliary Mounting Pads
The following procedure can be used to remove and
install a new auxiliary mounting pad or to install a
fresh O-ring for the current auxiliary mounting pad.
Several auxiliary mounting pads are available.
Auxiliary mounting pads are integrated into the charge
pump cover. When nothing is mounted on the pads,
a flange cover is attached to protect the mounting
flange. This cover is removed when mounting a
pump.
Removal of Auxiliary Mounting Pad
1. Remove the auxiliary pump or remove the two
screws retaining the flange cover ["A" Pad⇒9/16
in Hex; "B" Pad⇒3/4 in Hex]. Remove the O-ring.
Pad Cover Screws
Charge
Pump
Cover
Aux Mount Pad Cover
Retaining
Screws
O-Ring
2. Orient pump so that charge pump cover (auxiliary
pad) is facing up.
3. Remove the charge pump cover. The auxiliary
pad is integrated into the charge pump cover.
Use a Torx T45 male driver to remove the screws.
Note: If a different auxiliary pad is being installed,
then a new drive coupling must be installed. To do
this follow the instructions in the section on removing and installing the charge pump (next
section).
Note: If the charge pump components come out
with the charge pump cover refer to section 4.15
on how to properly reinstall them.
4. Install a new charge pump cover gasket.
OR
OR
Auxiliary
Mounting
Pad "A"
Gasket
Auxiliary
Mounting
Pad "B"
No Charge
Pump Defeat
Locating
Pin 1
Charge Pump
Components
5. Install the charge pump cover (auxiliary pump
mounting pad is integrated in cover).
NOTE: The threaded screw holes in the auxiliary
pump mounting pad used on very early production pumps with the SAE "A" pad option are drilled
through into the area between the gerotor cover
and charge pump cover. Any of these holes
which are not used to attach the flange cover or
auxiliary pump should be plugged with internal
hex set screws installed hand tight to prevent the
entrance of water or dirt into this area.
6. Attach the auxiliary pump. If no pump is to be
attached on an auxiliary mounting pad, the pad
should be protected with a flange cover and Oring to prevent leakage.
24
Locating
Pin 2
E100022 E
Auxiliary Pad Options and Components
saue
Series 42
Adjustments and Minor Repairs
4.15 Charge Pump
(Screw used with
"No Pad" and
"A Pad" Only)
Cover
Retaining
Screws
1. Remove auxiliary pump, if necessary.
Charge Pump Cover or Auxiliary Pad
Note: For units without integral charge pumps
see the last page of this section for additional
information.
2. Remove the screws retaining the charge pump
cover to the pump housing [Torx T45] (seven (7)
screws are used with the "no pad" or SAE "A"
auxiliary mounting pad charge pump cover, while
six (6) screws are used with the SAE "B" auxiliary
mounting pad charge pump cover). Remove the
charge pump cover, gasket, and the cover locating pins.
3. Remove the gerotor cover assembly from the
charge pump cover or the back of the pump
housing. Remove the gerotor cover O-rings. Two
(2) O-rings are used on the gerotor cover of all
pumps. (An additional O-ring was used on the
gerotor cover of very early production pumps with
the SAE "A" pad option.)
Gasket
O-Rings
Geroter
Cover
4. Remove the gerotor assembly from the gerotor
cover or pump housing.
5. Remove the gerotor drive pin and drive coupling.
Remove the gerotor cover locating pin from the
pump housing.
6. Each part should be inspected separately if they
are to be reused. If either of the gerotor assembly
parts needs to be replaced, they must both be
replaced. Always replace the O-rings and charge
pump cover gasket. Inspect the journal bearing in
the gerotor cover for excessive wear.
Geroter
Assembly
Drive Coupling
Geroter Cover
Locating Pin
Charge Pump
Cover
Locating
Pin
Geroter Drive Pin
Charge Pump
Cover Locating
Pin
Charge Pump Components
The charge pump may be disassembled to inspect
and clean, or to change the auxiliary shaft drive
coupling.
7. Prior to assembly, lubricate the gerotor assembly
with clean hydraulic oil.
8. Install the gerotor drive pin into the hole in the
drive coupling, and retain with grease or petroleum jelly.
9. Install the drive coupling onto the pump shaft with
the smaller outside diameter oriented away from
the pump shaft. Different couplings are used
with the different auxiliary pad options.
E100023 E
Charge Pump Components
10. Install the gerotor assembly onto the coupling.
(continued)
25
saue
Series 42
Adjustments and Minor Repairs
11. Install the gerotor cover locating pin into the
pump housing. Install the gerotor cover assembly
over the gerotor. The locating pin must engage
the slot in the gerotor cover.
NOTE: The charge pump rotation is determined
by the location of the gerotor recess and pressure
balance hole in the gerotor cover. Different
gerotor covers are used for clockwise and
counterclockwise rotation pumps.
12. Install new pressure balance O-rings onto the
gerotor cover and retain with petroleum jelly or
grease. (An additional O-ring was used on the
gerotor cover of very early production pumps with
the SAE "A" pad option.)
13. Install the charge pump cover locating pins and a
new charge pump cover gasket.
14. Install the charge pump cover. The cover must
engage the gerotor cover and the locating pins.
Install the charge pump cover screws and torque
evenly [36-43 Nm (26-32 ft•lbf)].
15. If necessary, reinstall auxiliary pump.
For units without an integral charge pump see the
next section.
(continued)
26
CW
CCW
P100110 E
Determining Charge Pump Orientation Looking
Inside of Gerotor Pump Cover
saue
Series 42
Adjustments and Minor Repairs
Units without Integral Charge Pump
Variable Pumps without an integral charge pump do
not have a gerotor assembly, gerotor drive pin, or
gerotor cover locating pin installed. The charge pump
inlet port is plugged with an O-ring plug.
Cover
Retaining
Screws
For these units that are equipped with housings
without filtration adapters, the gerotor cavity outlet
is plugged with a special plug installed in a housing
passage. The 3/4—16 charge inlet fitting should be
torqued to 68 Nm (50 ft•lbf).
For these units that are equipped with housings that
include filtration adapters, the gerotor cavity outlet
is plugged with an O-ring plug installed in the "To
Filter" port of a "Full Filter Flow" (charge relief valve
after filter) filter adapter. The 7/8—14 charge inlet
fitting should be torqued to 95 Nm (70 ft•lbf).
Gasket
Charge Pump Cover or Auxiliary Pad
(Screw used with
"No Pad" and
"A Pad" Only)
Geroter
Cover
Drive Coupling
Charge Pump
Cover Locating
Pin 2
Geroter
Cavity
Outlet Plug
(Charge
Pump Defeat)
Charge Pump
Cover Locating
Pin 1
"No Charge Pump" Components
O-Rings
CAUTION
A "Partial Filter Flow" (charge relief valve before filter) adapter must not be used on variable
pumps without an integral charge pump. If this
design adapter is used, the charge relief valve
will be defeated.
Charge
Inlet
Charge Pump
Inlet Plug
Charge Pump Inlet Plug
Charge Inlet
(For Wrench Sizes
and Torquing
See Filtration Section)
E100024 E
No Charge Pump Option Components
(Housing with Filtration Adapter)
No Charge Pump Option Components
(Housing without Filtration Adapter)
27
saue
Series 42
Adjustments and Minor Repairs
4.16 Filtration
Filtration of foreign matter from the hydraulic fluid is
of primary importance. Dirt and foreign fluids within
the hydraulic circuit will greatly reduce the life of the
hydraulic equipment.
Filter-Related Pump Hardware
Filtration mechanisms for the Series 42 pump may
be before (suction filtration) or after (charge pressure
filtration) the charge pump. Sauer-Sundstrand provides a filtration adapter to provide for each type of
filtration configuration. If filtration is provided for
elsewhere in the hydraulic circuit, the pump will not
have a filtration adapter.
M3 Gauge
Port Plug
Filtration Plate
Retaining Screws
Partial Flow
Pressure
Filtration
Full Flow
Pressure
Filtration
Suction
Filtration
Pumps equipped with housings without filtration
adapters have an additional construction bore next to
the charge relief valve which is unused and plugged
[5/8 in Hex, 21-33 Nm (15-25 ft•lbf)]. When these
pumps are equipped with suction filtration, the external charge inlet is plugged [5/16 in Int. Hex, 41-94 Nm
(30-70 ft•lbf)].
Pumps equipped with housings that include filtration
adapters have the appropriate adapter and gasket
fastened to the housing with screws [Torx T30, 16
Nm (12 ft•lbf)]. The position of the M3 gauge port [11/
16 in Hex, 11-13 Nm (8-10 ft•lbf)] will vary depending
on filtration type.
Filter Specifications
The selection of a filter depends on a number of
factors including the contaminant ingression rate,
the generation of contaminants in the system, the
required fluid cleanliness, and the desired maintenance interval. A filter capable of controlling the fluid
cleanliness to ISO 4406 Class 18/13 or better is
recommended and may be located either on the inlet
(suction filtration) or discharge (charge pressure
filtration) side of the charge pump.
Filter capacity depends on desired maintenance
levels. As a rough guide, a capacity in grams equal
to twice the charge flow in gpm or 1/2 charge flow in
l/min has been found to be satisfactory for many
closed circuit systems.
Filter efficiency as measured by a "Beta" (β) ratio*
should be as in the table at right.
See Sauer-Sundstrand publication BLN-9887 or
697581 and ATI-E 9201 for more information on
filtration.
28
Housing with
Filtration Adapter
Charge Inlet
Plug
Construction
Bore Plug
Plug
E100025 E
Housing without
Filtration Adapter (Suction Filtration Only)
Filtration Type
Closed Circuit Suction Filtration or
Open Circuit Return Line Filtration
Systems Sharing a Reservoir with
Other Gears, Clutches, or Cylinders
Charge Pressure Filtration
β-ratio
β10 ≥ 2
β10 ≥ 10
β10 ≥ 10
* Filter ß x-ratio is a measure of filter efficiency defined by ISO
4572. It is defined as the ratio of the number of particles greater
than a given size (x) upstream of the filter to number of particles
greater than the same size downstream of the filter. The ßx-ratio
applies to a specific particle size, measured in microns.
saue
Series 42
Adjustments and Minor Repairs
4.17 Servo Piston Covers
The servo piston cover can be removed to change the
gasket or to inspect/change the control orifices for
NFP or FNR controls (section 4.9).
Pump Neutral Ajustment
Seal Lock Nut
1. On the right side (side “1”) of the pump, remove
the pump “neutral” adjustment seal lock nut [13
mm Hex]. (Not necessary on side "2")
2. Remove the servo piston cover screws [Torx
T30].
Servo Piston
Cover Screw
Servo Piston Cover
Servo Piston Cover
(Non-Feedback and
Automotive controls only)
3. The left side (side "2") servo cover can be removed directly.
Pump "Neutral"
Adjustment Screw
On the right side (side “1”) of the pump, the cover
should be pushed away from the pump housing.
It is then necessary to turn the “neutral” adjustment screw [5 mm Hex] clockwise (inward) far
enough for the servo cover to clear the nearby
drain port. Then pull the cover away from the
housing and turn the cover counterclockwise to
disengage it from the adjustment screw.
4. Remove the gasket.
Servo Piston Cover – Right Side (Side "1")
Note: FNR and NFPE control orifice plugs are
located here, see section 4.9 for more information.
5. Install new gasket.
6. On the right side (side "1"), screw the servo piston
cover on the neutral adjustment screw. Then,
while holding the cover, turn the neutral adjustment screw CCW to engage the cover to the
screw threads.
Servo Piston
Cover Screws
Servo Piston
Cover
7. Install servo piston cover screws (15-17 Nm (1113 ft•lbf)].
8. On the right side (side "1"), loosely install neutral
adjustment seal lock nut. Perform pump neutral
adjustment (section 4.2).
Servo Piston Cover – Left Side (Side "2")
E100026 E
Servo Piston Cover Components
WARNING
After installing the servo piston cover on right
side (side “1”) of the pump, the pump “neutral”
adjustment and control neutral adjustment
MUST be performed before the vehicle / machine is put back into service.
CAUTION
Performance of the above procedure may adjust the position of the displacement limiter
somewhat.
29
saue
Series 42
Adjustments and Minor Repairs
4.18 Displacement Limiter Adjustment
Displacement limiters can limit the maximum swashplate position. For Series 42 pumps, displacement
limiters are available on one or both sides of the servo
piston.
Displacement Limiter
Seal Lock Nut
Displacement Limiter
Servo Piston
Cover
Adjustment of the displacement limiters should be
performed on a test stand.
WARNING
Care should be taken in adjusting displacement limiters to avoid undesirable speed conditions. The limiter screw must have full thread
engagement in the servo piston cover, and the
seal lock nut must be retorqued after every
adjustment to prevent unexpected changes in
operating conditions and external leakage during unit operation.
Displacement Limiter – Right Side (Side "1")
(Exploded View, No Need to Remove Limiter or Nut)
1. Mount pump on test stand.
2. Loosen displacement limiter seal lock nut [13 mm
Hex]. Do not remove.
3. Adjust displacement limiter [4 mm Int. Hex].
Tighten the seal lock nut every time the pump
is to be tested [20-26 Nm (15-19 ft•lbf)].
One full turn of the displacement limiter adjustment screw will change the displacement of the
pump approximately as follows.
28cc
3.6 cc/rev
0.22 in3/rev
41cc
5.0 cc/rev
0.31 in3/rev
4. After reaching proper displacement tighten the
seal lock nut [20-26 Nm (15-19 ft•lbf)].
If necessary, repeat procedure for displacement limiter on other side.
30
Displacement Limiter
Seal Lock Nut
Displacement
Limiter
Servo Piston
Cover
Displacement Limiter – Left Side (Side "2")
(Exploded View, No Need to Remove Limiter or Nut)
E100027 E
Displacement Limiters
saue
Series 42
Exploded View Parts Drawings
5. Exploded View Parts Drawings
5.1
Shaft Options
F096
C020
C017
C018
C015
C005
C002
C003
C001
C015
F001
OR
C001
OR
C001
E100028
31
saue
Series 42
5.2
Exploded View Parts Drawings
Filtration, Charge Relief, System Relief, and Loop Flushing
(F086)
(F086A)
(F043)
(F043A)
(F040)
(F042)
(F040)
(F042)
(F043)
(F043A)
OR
F043
F043A
OR
F040
F042
K001
OR
K001
K005
F091
F091A
G040
G040A
G041
G043
G042
K001A
K001B
F030 K001C
F030A
K002
K006
K007
F041
K008
K009
K010
G043
G042
G041
G040A
G040
OR
045A
G045
F062
F061
F063
F060A
F060
(F060A)
(F060)
F051
OR
F0511
F0512
F0513
F0514
F0515
F050A
F050
OR
(F051)
(F050A)
(F050)
H005
H002
H003
J005
J002
J003
(F091A)
F093
(F091)
F093A
F093
F093A
N002A
N002
F077
E100029
32
saue
Series 42
5.3
Exploded View Parts Drawings
Charge Pump, Auxiliary Pads, and Servo Covers
L010
L010A
F020
F020A
G005
(G075)
G010
G015
G002
G020
(G021)
G022
G065
G075
G030
F009
G023
G001
M001
OR
(M001)
OR
(G001)
M005
M010A
(M005)
(M010A)
G036
M010
OR
(G080)
(M010)
M020
M025
(G001)
(G036)
G085
G090
(G090)
(G036)
(G080)
(G085)
E100030
33
saue
Series 42
5.4
Exploded View Parts Drawings
Control Options
D039
D038
D037
D081
D003
D003A
(D017)
D080
D082
D019
D016
D002
OR
OR
D017
D056
D040
D010
D012
F035
E001
F035A
D070
OR
OR
D011
D013
F036
D004
F035
F034
D081
D081
OR
(F010)
D060
F010
D090
D014
D015
D032A
D032
34
E100031
saue
Series 42
Exploded View Parts Drawings
Notes
35
saue
Hydraulic Power Systems
SAUER-SUNDSTRAND Hydraulic Power Systems - Market Leaders Worldwide
SAUER-SUNDSTRAND is a world leader in the design and
manufacture of Hydraulic Power Systems. Research and
development resources in both North America and Europe
enable SAUER-SUNDSTRAND to offer a wide range of
design solutions utilizing hydraulic power system
technology.
SAUER-SUNDSTRAND specializes in integrating a full
range of system components to provide vehicle designers
with the most advanced total-design system.
SAUER-SUNDSTRAND is Your World Source for
Controlled Hydraulic Power Systems.
Heavy Duty Axial Piston
Pumps and Motors
Heavy Duty Bent Axis
Variable Motors
Cartridge Motors/
Compact Wheel Drives
Medium Duty Axial Piston
Pumps and Motors
Microcontrollers and
Electrohydraulic Controls
Hydrostatic Transmission
Packages
Open Circuit Axial Piston Pumps
Gear Pumps and Motors
Genuine Service Parts
Worldwide Service Support
SAUER-SUNDSTRAND provides comprehensive worldwide service for its
products through an extensive network of Authorized Service Centers
strategically located in all parts of the world.
Look to SAUER-SUNDSTRAND for the best in WORLDWIDE SERVICE.
saue
SI-SPV42 E • 06/96 • 300093A
BLN-10093 • Rev A • June 1996
SAUER-SUNDSTRAND COMPANY
2800 East 13th Street
Ames IA 50010 • U.S.A.
Phone: (515) 239-6000 • FAX: (515) 239-6618
SAUER-SUNDSTRAND GMBH & CO.
Postfach 2460 • D-24531 Neumünster
Krokamp 35 • D-24539 Neumünster • Germany
Phone: (04321) 871-0 • Fax: (04321) 871 122