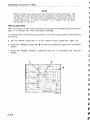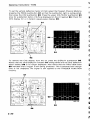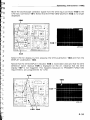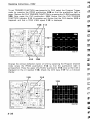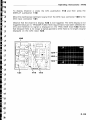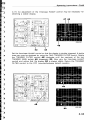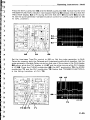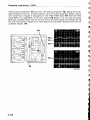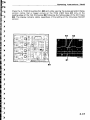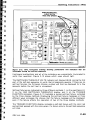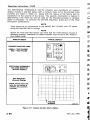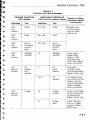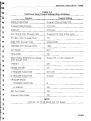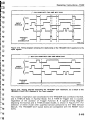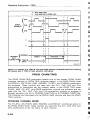
1
TEK
OPERATORS
MANUAL
7A42
PRODUCT GROUP 42
070-4285-00
Logic Triggered
Vertical Amplifier
Please check for change information
at the rear of this manual.
I -
i'
i-4
,-
First Printing APRIL 1983
Revised JuL 1984
DIGITALY REMASTERED
OUT OF PRINT- MANUAL SCANS
By
Artek Media
18265 200th St.
Welch, MN 55089
www.artekmedia.com
“High resolution scans of obsolete technical manuals”
If your looking for a quality scanned technical manual in PDF format please visit
our WEB site at www.artekmedia.com or drop us an email at
[email protected] and we will be happy to email you a current list of the
manuals we have available.
If you don’t see the manual you need on the list drop us a line anyway we may
still be able to point you to other sources. If you have an existing manual you
would like scanned please write for details. This can often be done very
reasonably in consideration for adding your manual to our library.
Typically the scans in our manuals are done as follows;
1) Typed text pages are typically scanned in black and white at 300 dpi.
2) Photo pages are typically scanned in gray scale mode at 600 dpi
3) Schematic diagram pages are typically scanned in black and white at 600
dpi unless the original manual had colored high lighting (as is the case for
some 70’s vintage Tektronix manuals).
4) Most manuals are text searchable
5) All manuals are fully bookmarked
All data is guaranteed for life (yours or mine … which ever is shorter). If for ANY
REASON your file becomes corrupted, deleted or lost, Artek Media will replace
the file for the price of shipping, or free via FTP download.
Thanks
Dave & Lynn Henderson
Artek Media
7A42 Operators
K
=
TABLE OF CONTENTS
i'
i'
i'
i'
i'
i"
Page
OPERATORS SAFETY SUMMARY . . . . . . . . . . . . . . . . . . . . . . . . . . . . . . . . . . . . . . . . . . .vi
DESCRIPTION . . . . . . . . . . . . . . . . . . . . . . . . . . . . . . . . . . . . . . . . . . . . . . . . . . . . . . . . . . . . VIII
. ...
GENERAL INFORMATION
COLOR USED IN THIS MANUAL . . . . . . . . . . . . . . . . . . . . . . . . . . . . . . .1.1
TECHNICAL MANUALS . . . . . . . . . . . . . . . . . . . . . . . . . . . . . . . . . . . . . . .1.1
OPERATORS MANUAL . . . . . . . . . . . . . . . . . . . . . . . . . . . . . . . . . . . . .1-1
SERVICE MANUAL . . . . . . . . . . . . . . . . . . . . . . . . . . . . . . . . . . . . . . . .1.1
INSTALLATION . . . . . . . . . . . . . . . . . . . . . . . . . . . . . . . . . . . . . . . . . . . . . . . . . .1-2
.
INITIAL INSPECTION . . . . . . . . . . . . . . . . . . . . . . . . . . . . . . . . . . . . . . . . . 1-2
.
OPERATING TEMPERATURE . . . . . . . . . . . . . . . . . . . . . . . . . . . . . . . . . .1.3
INSTALLING THE 7A42 IN THE MAINFRAME . . . . . . . . . . . . . . . . . . .1.3
MAINFRAME COMPATIBILITY . . . . . . . . . . . . . . . . . . . . . . . . . . . . . . . .1.4
PACKAGING FOR SHIPMENT . . . . . . . . . . . . . . . . . . . . . . . . . . . . . . . . . .15
.
..6.
SPECIFICATION . . . . . . . . . . . . . . . . . . . . . . . . . . . . . . . . . . . . . . . . . . . . . . . . . . . 1
.
STANDARD ACCESSORIES . . . . . . . . . . . . . . . . . . . . . . . . . . . . . . . . . . . . . . .1-24
OPTIONAL ACCESSORIES . . . . . . . . . . . . . . . . . . . . . . . . . . . . . . . . . . . . . . . . .1-24
PROBES . . . . . . . . . . . . . . . . . . . . . . . . . . . . . . . . . . . . . . . . . . . . . . . . . . . . . . . .1-24
1
is
i"
.
I
m
1i 3
i'
i"
i"
i"
i"
ig
k '7
i
.
'
2
OPERATING INSTRUCTIONS
OPERATION . . . . . . . . . . . . . . . . . . . . . . . . . . . . . . . . . . . . . . . . . . . . . . . . .2.1
..
SIMPLIFIED BLOCK DIAGRAM OF 7A42 . . . . . . . . . . . . . . . . . . . . . . . . . . . . . 2
..1
BOOLEAN ALGEBRA FOR 7A42 USE . . . . . . . . . . . . . . . . . . . . . . . . . . . . . . . 2..3.
CONTROLS. CONNECTORS. AND INDICATORS . . . . . . . . . . . . . . . . . . . . 2
..9
GET-ACQUAINTED EXERCISES . . . . . . . . . . . . . . . . . . . . . . . . . . . . . . . . . . . . 2-13
EXERCISE 1-PRELIMINARY SET UP AND INITIALIZATION . . . . . 2-13
PRELIMINARY SET UP . . . . . . . . . . . . . . . . . . . . . . . . . . . . . . . . . . . . . . .2-13
INITIALIZATION . . . . . . . . . . . . . . . . . . . . . . . . . . . . . . . . . . . . . . . . . . . . .2-14
EXERCISE 2-OBTAINING A TRIGGERED DISPLAY . . . . . . . . . . . . . 2-16
EXERCISE 3-LOGIC TRIGGERING . . . . . . . . . . . . . . . . . . . . . . . . . . . . . 2-36
DETAILED OPERATING INFORMATION . . . . . . . . . . . . . . . . . . . . . . . . . . . . 2-48
SELF.TEST . . . . . . . . . . . . . . . . . . . . . . . . . . . . . . . . . . . . . . . . . . . . . . . . . . . .2-48
.
FRONT-PANEL INITIALIZATION . . . . . . . . . . . . . . . . . . . . . . . . . . . . . . . .2-52
BATTERY BACKUP . . . . . . . . . . . . . . . . . . . . . . . . . . . . . . . . . . . . . . . . . . . . .2-52
OPERATOR MESSAGES . . . . . . . . . . . . . . . . . . . . . . . . . . . . . . . . . . . . . . . .2-54
SIGNAL CONNECTIONS . . . . . . . . . . . . . . . . . . . . . . . . . . . . . . . . . . . . . . .2-56
.
RECOMMENDED PROBES . . . . . . . . . . . . . . . . . . . . . . . . . . . . . . . . . . .2-57
PROBE COMPENSATION . . . . . . . . . . . . . . . . . . . . . . . . . . . . . . . . .2-57
COAXIAL CABLES . . . . . . . . . . . . . . . . . . . . . . . . . . . . . . . . . . . . . . . . . . . 2-57
CRT READOUT . . . . . . . . . . . . . . . . . . . . . . . . . . . . . . . . . . . . . . . . . . . . . . . . 2-57
.
POSITION . . . . . . . . . . . . . . . . . . . . . . . . . . . . . . . . . . . . . . . . . . . . . . . . . . . . . .2-59
GAIN . . . . . . . . . . . . . . . . . . . . . . . . . . . . . . . . . . . . . . . . . . . . . . . . . . . . . . . . . . . 2-59
i
TABLE OF CONTENTS (CONT)
OPERATING INSTRUCTIONS (CONT)
Page
STATUS INDICATORS (CHI. CH2. CH3. CH4) . . . . . . . . . . . . . . . . . . . 2-59
DISPLAY . . . . . . . . . . . . . . . . . . . . . . . . . . . . . . . . . . . . . . . . . . . . . 2-59
ECLATL . . . . . . . . . . . . . . . . . . . . . . . . . . . . . . . . . . . . . . . . . . . . . . . . . . . . 2-59
GND . . . . . . . . . . . . . . . . . . . . . . . . . . . . . . . . . . . . . . . . . . . . . . . . . . . . . . . . 2-59
5 0 W l M f I . . . . . . . . . . . . . . . . . . . . . . . . . . . . . . . . . . . . . . . . . . . . . . . . . . . . 2-59
ALT/CHOP . . . . . . . . . . . . . . . . . . . . . . . . . . . . . . . . . . . . . . . . . . . . . . . . . . . . . 2-60
TRIGGER FUNCTION . . . . . . . . . . . . . . . . . . . . . . . . . . . . . . . . . . . . . . . . . . . 2-60
A TRIGGER FUNCTION AND B TRIGGER FUNCTION ........ 2-60
A THEN B NESTED TRIGGERING . . . . . . . . . . . . . . . . . . . . . . . . . . . . 2-60
TRIG VIEW . . . . . . . . . . . . . . . . . . . . . . . . . . . . . . . . . . . . . . . . . . . . . . . . . . . . . 2-61
TRIGGER FILTER . . . . . . . . . . . . . . . . . . . . . . . . . . . . . . . . . . . . . . . . . . . . . . . 2-61
EXT CLOCK SYNC . . . . . . . . . . . . . . . . . . . . . . . . . . . . . . . . . . . . . . . . . . . . . . 2-61
SLOPE SELECT . . . . . . . . . . . . . . . . . . . . . . . . . . . . . . . . . . . . . . . . . . . . . 2-61
EXT CLOCK INPUT . . . . . . . . . . . . . . . . . . . . . . . . . . . . . . . . . . . . . . . . . . 2-62
RESET INPUT . . . . . . . . . . . . . . . . . . . . . . . . . . . . . . . . . . . . . . . . . . . . . . . . . . 2-62
TRIGGER OUT . . . . . . . . . . . . . . . . . . . . . . . . . . . . . . . . . . . . . . . . . . . . . . . . . 2-62
PROG CHANARIG . . . . . . . . . . . . . . . . . . . . . . . . . . . . . . . . . . . . . . . . . . . . . 2-64
PROGRAM CHANNEL MODE . . . . . . . . . . . . . . . . . . . . . . . . . . . . . . . . 2-64
C H I . CH2. CH3. CH4 . . . . . . . . . . . . . . . . . . . . . . . . . . . . . . . . . . . . . . 2-65
DISPLAY . . . . . . . . . . . . . . . . . . . . . . . . . . . . . . . . . . . . . . . . . . . . . . 2-65
TTL/ECL . . . . . . . . . . . . . . . . . . . . . . . . . . . . . . . . . . . . . . . . . . . . . . . . . 2-65
VOLTS/DIV . . . . . . . . . . . . . . . . . . . . . . . . . . . . . . . . . . . . . . . . . . . . . . . 2-65
GND . . . . . . . . . . . . . . . . . . . . . . . . . . . . . . . . . . . . . . . . . . . . . . . . . . . . . 2-65
l M W 5 0 f l . . . . . . . . . . . . . . . . . . . . . . . . . . . . . . . . . . . . . . . . . . . . . . . . . 2-65
THRESH . . . . . . . . . . . . . . . . . . . . . . . . . . . . . . . . . . . . . . . . . . . . . . . . . . 2-65
PROBE OFFSET . . . . . . . . . . . . . . . . . . . . . . . . . . . . . . . . . . . . . . . . . . 2-66
LEVEL . . . . . . . . . . . . . . . . . . . . . . . . . . . . . . . . . . . . . . . . . . . . . . . . . . . . 2-66
PROGRAM TRIGGER MODE . . . . . . . . . . . . . . . . . . . . . . . . . . . . . . . . . 2-67
CHI. CH2. CH3 AND CH4 . . . . . . . . . . . . . . . . . . . . . . . . . . . . . . . . . 2-67
AND . . . . . . . . . . . . . . . . . . . . . . . . . . . . . . . . . . . . . . . . . . . . . . . . . . . . . . 2-67
OR . . . . . . . . . . . . . . . . . . . . . . . . . . . . . . . . . . . . . . . . . . . . . . . . . . . . . . . 2-67
CLEAR . . . . . . . . . . . . . . . . . . . . . . . . . . . . . . . . . . . . . . . . . . . . . . . . . . . 2-67
NOT . . . . . . . . . . . . . . . . . . . . . . . . . . . . . . . . . . . . . . . . . . . . . . . . . . . . . . 2-67
EDGE . . . . . . . . . . . . . . . . . . . . . . . . . . . . . . . . . . . . . . . . . . . . . . . . . . . . 2-67
3
APPLICATIONS
APPLICATION 1-DISPLAYING FOUR CHANNELS OF DATA
WITH THE 7A42 . . . . . . . . . . . . . . . . . . . . . . . . . . . . . . . . . . . . . . . . . . . . . . . . . . 3.1
MEASUREMENT TECHNIQUE . . . . . . . . . . . . . . . . . . . . . . . . . . . . . . . . . .3.1
VIEWING THE MASTER CLOCK LINE . . . . . . . . . . . . . . . . . . . . . . .3.2
APPLICATION 2-SOLVING ABNORMAL PULSE PROBLEMS
WITH THE 7A42 . . . . . . . . . . . . . . . . . . . . . . . . . . . . . . . . . . . . . . . . . . . . . . . . . .3.4
MEASUREMENT TECHNIQUE . . . . . . . . . . . . . . . . . . . . . . . . . . . . . . . . . . 3-4
REV JUL 1984
TABLE OF CONTENTS (CONT)
APPLICATIONS (CONT)
Page
APPLICATION 3-ADDING EDGE SENSITIVITY TO YOUR
TRIGGER FUNCTION . . . . . . . . . . . . . . . . . . . . . . . . . . . . . . . . . . . . . . . . . ..3-6
..
.
MEASUREMENT TECHNIQUE.. . . . . . . . . . . . . . . . . . . . . . . . . . . . . . . .3-6
APPLICATION 4-DETECTING AND DISPLAYING BUS
CONTENTION . . . . . . . . . . . . . . . . . . . . . . . . . . . . . . . . . . . . . . . . . . . . . . . . .3-9
...
MEASUREMENT TECHNIQUE . . . . . . . . . . . . . . . . . . . . . . . . . . . . . . . . 3-9
..
APPLICATION 5-ENHANCED NESTED TRIGGERING USING
THE 7D15 225 MHz UNIVERSAL COUNTER/TIMER . . . . . . . . . . . . . . 3-11
EVENTS COUNTING . . . . . . . . . . . . . . . . . . . . . . . . . . . . . . . . . . . . . . . . .3-11
COUNTING CLOCK CYCLES BETWEEN EVENTS.. . . . . . . . . . . . 3-12
MEASURING TIME FROM FUNCTION A TO FUNCTION B . . . . 3-12
APPLICATION 6-OFFSET PROBING TECHNIQUES FOR
HIGH SPEED LOGIC SYSTEMS . . . . . . . . . . . . . . . . . . . . . . . . . . . . . . . . 3-14
.
.
PROBING ECL CIRCUITS.. . . . . . . . . . . . . . . . . . . . . . . . . . . . . . . . . . 3-15
7A42 PROBE OFFSET FEATURE . . . . . . . . . . . . . . . . . . . . . . . . . . . . 3-16
.
APPLICATION 7-USING THE 7A42 WITH THE 7854.. . . . . . . . . . . . 3-17
APPLICATION 8-USING THE 7A42 WITH THE 7104.. . . . . . . . . . . . 3-18
4
INSTRUMENT OPTIONS
INDEX
CHANGE INFORMATION
RELATED DOCUMENTATION
For information on related 7A42 documentation refer to General Information, Section
1 of this manual under Technical Manuals and Standard Accessories.
iii
7A42 Operators
LIST OF ILLUSTRATIONS
Figure
No.
1-1
1-2
2-1
2-2
Page
7A42 release latch . . . . . . . . . . . . . . . . . . . . . . . . . . . . . . . . . . . . . . . . . . . . . . 1-3
..
7A42 dimensional drawing . . . . . . . . . . . . . . . . . . . . . . . . . . . . . . . . . . . . . . . 1-23
Simplified block diagram of the 7A42 . . . . . . . . . . . . . . . . . . . . . . . . . . . . . . 2-2
Definition of the Boolean AND OR . NOT and XOR (EXCLUSIVE-OR)
logic functions . . . . . . . . . . . . . . . . . . . . . . . . . . . . . . . . . . . . . . . . . . . . . . . . . . . . 2-3
Examples of products of Channel 1 through 4 . . . . . . . . . . . . . . . . . . . . .2-5
.
Function .f and g OR'ed together . . . . . . . . . . . . . . . . . . . . . . . . . . . . . . . . . . . 2-6
Example of EDGE Qualified TRIGGER FUNCTION . . . . . . . . . . . . . . . . 2-7
.
Example of A THEN B Nested Triggering . . . . . . . . . . . . . . . . . . . . . . . . . . .2-8
7A42 controls. connectors. and indicators . . . . . . . . . . . . . . . . . . . . . . . . 2-10
Self-test in progress . . . . . . . . . . . . . . . . . . . . . . . . . . . . . . . . . . . . . . . . . . . . .2-48
Self-test finished . . . . . . . . . . . . . . . . . . . . . . . . . . . . . . . . . . . . . . . . . . . . . . . . 2-48
7A42 front-panel drawing showing pushbuttons and indicators
that are illuminated during the self-test sequence . . . . . . . . . . . . . . . . . 2-49
Typical self-test failure display . . . . . . . . . . . . . . . . . . . . . . . . . . . . . . . . . . . 2-50
7A42 front-panel control lights when initialized . . . . . . . . . . . . . . . . . . . 2-54
Channel readout display . . . . . . . . . . . . . . . . . . . . . . . . . . . . . . . . . . . . . . . . 2-58
.
Channel readout display with 10X probes attached to inputs
of C H I . CH2. CH3. and CH4 . . . . . . . . . . . . . . . . . . . . . . . . . . . . . . . . . . . . . 2-58
Timing diagram showing the relationship of the TRIGGER OUT
waveform to the input signals . . . . . . . . . . . . . . . . . . . . . . . . . . . . . . . . . . . . 2-63
Timing diagram depicting the TRIGGER OUT waveform. as a
result of the TRIGGER FUNCTION reacting to the input signals . . . 2-63
Example of A THEN €3. level and EDGE sensitive TRIGGER FUNCTION.
showing the Normal and A THEN B Gate waveform alternatives . . . 2-64
Triggering on the decimal "10" event . . . . . . . . . . . . . . . . . . . . . . . . . . . . . . .3-2
Display of four channels with TRIG VIEW trace . . . . . . . . . . . . . . . . . . . . .3-3
Four channel display with an external clock signal displayed on the
TRIG VIEW trace . . . . . . . . . . . . . . . . . . . . . . . . . . . . . . . . . . . . . . . . . . . . . . . . . 3-3
.
.
Triggering on a low-amplitude pulse . . . . . . . . . . . . . . . . . . . . . . . . . . . . . . 3-5
Timing diagram of a typical microprocessor read cycle . . . . . . . . . . . . .3-6
Set up to monitor invalid data transitions . . . . . . . . . . . . . . . . . . . . . . . . . . .3-8
The 7A42 captures a positive transition of data during the time data
should be stable . . . . . . . . . . . . . . . . . . . . . . . . . . . . . . . . . . . . . . . . . . . . . . . . . 3..8
Bus contention measurement set up . . . . . . . . . . . . . . . . . . . . . . . . . . . . . 3-10
Standard 500-ohm probe forms voltage divider with termination
resistor . . . . . . . . . . . . . . . . . . . . . . . . . . . . . . . . . . . . . . . . . . . . . . . . . . . . . . . . . 3-14
Simplified diagram of the P6230 Variable Bias/Offset probe . . . . . . . 3-15
Two ECL level waveforms A without bias offset. B with a -2 volt
bias offset . . . . . . . . . . . . . . . . . . . . . . . . . . . . . . . . . . . . . . . . . . . . . . . . . . . . . . 3-16
.
.
LIST OF TABLES
Table
No.
1-1
1-2
1-3
1-4
2-1
2-2
2-3
2-4
Page
Shipping Carton Test Strength.. . . . . . . . . . . . . . . . . . . . . . . . . . . . . . . . . . . l - 5
.
Electrical Characteristics . . . . . . . . . . . . . . . . . . . . . . . . . . . . . . . . . . . . . . . ..1-6
Environmental Characteristics ................................... 1-21
Physical Characteristics . . . . . . . . . . . . . . . . . . . . . . . . . . . . . . . . . . . . . . . . . 1-22
7A42 Self-Test Failure Messages.. . . . . . . . . . . . . . . . . . . . . . . . . . . . . . . . 2-51
7A42 Front-Panel Control Settings When Initialized . . . . . . . . . . . . . . . 2-53
7A42 Operator Message Summary . . . . . . . . . . . . . . . . . . . . . . . . . . . . . . . 2-55
Channel Volts/Division Ranges . . . . . . . . . . . . . . . . . . . . . . . . . . . . . . . . . .2-65
7A42 Operators
--
OPERATORS SAFETY SUMMARY
The general safety information in this part of the summary is for both operating
and sevicing personnel. Specific warnings and cautions will be found throughout
the manual where they apply, but may not appear in this summary.
TERMS
IN THlS MANUAL
CAUTION statements identify conditions or practices that could result in damage
to the equipment or other property.
WARNING statements identify conditions or practices that could result in personal
injury or loss of life.
AS MARKED ON EQUIPMENT
CAUTION indicates a personal injury hazard not immediately accessible as one
reads the marking, or a hazard to property including the equipment itself.
DANGER indicates a personal injury hazard immediately accessible as one reads
the marking.
SYMBOLS
IN THlS MANUAL
@ Static-Sensitive
Devices
a
!
This symbol indicates where applicable cautionary or other information
is to be found.
AS MARKED ON EQUIPMENT
DANGER-High
@
Protective ground (earth) terminal.
a
!
voltage
ATTENTION-refer
to manual.
WARNINGS
POWER SOURCE
This product is intended to operate in a mainframe connected to a power source
that will not apply more than 250 volts rms between the supply conductors or
between either supply conductor and ground. A protective ground connection by
way of the grounding conductor in the mainframe power cord is essential for safe
operation.
GROUNDING THE PRODUCT
This product is grounded through the grounding connector of the mainframe
power cord. To avoid electrical shock, plug the mainframe power cord into a
properly wired receptacle before connecting to the product input or output
terminals. A protective-ground connection by way of the grounding conductor in
the mainframe power cord is essential for safe operation.
DANGER ARISING FROM LOSS OF GROUND
Upon loss of the protective-ground connection, all accessible conductive parts
(including knobs and controls that may appear to be insulating), can render an
electrical shock.
DO NOT OPERATE IN EXPLOSIVE ATMOSPHERES
To avoid explosion, do not operate this product in an atmosphere of explosive
gasses.
DO NOT OPERATE PLUG-IN UNIT WITHOUT COVERS
To avoid personal injury, do not operate this product without covers or panels
installed. Do not apply power to the plug-in via a plug-in extender.
vii
7 A 4 2 Operators
The 7A42 Logic Triggered Vertical Amplifier is a four channel, wide bandwidth,
plug-in unit, compatible with Tektronix 7000-series Oscilloscopes. It was
specifically designed to display and make measurements on digital logic signals in
the TTL. ECL and CMOS logic families. While the display output from the 7A42 is
analog, the trigger output is digital and is comprised of a user selectable Boolean
function of the four input channels. A fifth TRIGGER VIEW trace depicts either the
trigger function output or the external clock input.
viii
SECTION 1 CONTENTS
COLOR USED IN THIS MANUAL . . . . . . . . . . . . . . . . . . . . . . . . . . . . . . . . ...l - 1
TECHNICAL MANUALS . . . . . . . . . . . . . . . . . . . . . . . . . . . . . . . . . . . . . . . . . . . l.- 1
OPERATORS MANUAL . . . . . . . . . . . . . . . . . . . . . . . . . . . . . . . . . . . . . . . . .. .l - 1
SERVICE MANUAL . . . . . . . . . . . . . . . . . . . . . . . . . . . . . . . . . . . . . . . . . . . . .1-1
..
INSTALLATION.. . . . . . . . . . . . . . . . . . . . . . . . . . . . . . . . . . . . . . . . . . . . . . . . . . . . . . .l - 2
INITIAL INSPECTION . . . . . . . . . . . . . . . . . . . . . . . . . . . . . . . . . . . . . . . . . . . . .. .l - 2
OPERATING TEMPERATURE . . . . . . . . . . . . . . . . . . . . . . . . . . . . . . . . . . . . . .. .l - 3
INSTALLING THE 7A42 IN THE MAINFRAME . . . . . . . . . . . . . . . . . . . . . . l - 3
.
MAINFRAME COMPATIBILITY . . . . . . . . . . . . . . . . . . . . . . . . . . . . . . . . . . . . . .1-4
PACKAGING FOR SHIPMENT . . . . . . . . . . . . . . . . . . . . . . . . . . . . . . . . . . . . . .1-5
.
SPECIFICATION . . . . . . . . . . . . . . . . . . . . . . . . . . . . . . . . . . . . . . . . . . . . . . . . . . . . . . . ..l-6
..
STANDARD ACCESSORIES . . . . . . . . . . . . . . . . . . . . . . . . . . . . . . . . . . . . . . . . . . . .1-24
.
OPTIONAL ACCESSORIES . . . . . . . . . . . . . . . . . . . . . . . . . . . . . . . . . . . . . . . . . . . . .1-24
.
..
PROBES.. . . . . . . . . . . . . . . . . . . . . . . . . . . . . . . . . . . . . . . . . . . . . . . . . . . . . . . . . . . 1-24
GENERAL INFORMATION
This section contains a basic content description of both the Operators and
Service manuals, information on instrument installation, power requirements,
packaging for shipment, Standard Accessories, Optional Accessories,
Specifications and a dimensional drawing of the 7A42. The specification portion
consists of three tables: Electrical, Environmental, and Physical Characteristics.
COLOR USED IN THIS MANUAL
Red, green and yellow color is used in this manual to visually correlate the frontpanel indicators and markings to the descriptions of the text.
TECHNICAL MANUALS
An operators and two service manuals are supplied with your 7A42 as standard
accessories. The following information outlines the content of these manuals.
Operators Manual
The Operators Manual is divided into the following four sections:
Section 1-GENERAL INFORMATION contains content descriptions of the
Operators and Service manuals, instrument description, mainframe and plug-in
compatibility, packaging instructions and instrument specifications.
Section 2-OPERATING
INSTRUCTIONS contains a block diagram
description, a front-panel drawing and brief description of controls, connectors
and indicators. Get-Acquainted Exercises provide a bask operating procedure
for the first-time user followed by a systematic demonstration of all front-panel
controls. A detailed description of all front-panel controls is also given in this
section.
Section 3-APPLICATIONS gives examples of how to use the 7A42 to make
some difficult. measurements.
Section 4-INSTRUMENT
options.
Service Manual
OPTIONS contains a description of available
-
1
I
7
WARNING
The following service instructions are for use by qualified personnel
only. To avoid personal injury, do not perform any service other than
that contained i n the operating instructions unless you are qualified
to do so. Refer to Operators Safety Summary and Service Safety
Summary prior to performing any service.
General Information-7A42
The service manual is divided into 2 volumes. Volume 1 contains the following:
Section 1-GENERAL INFORMATION contains content descriptions of the
Operators and Service manuals, mainframe and plug-in compatibility,
packaging instructions and instrument specifications.
Section 2-THEORY
OF OPERATION contains basic and general circuit
analysis that is useful for servicing the instrument.
Section 3-MAINTENANCE describes preventive maintenance procedures,
conventional troubleshooting and diagnostic troubleshooting procedures with
detailed instructions for replacing assemblies, subassemblies, and individual
components.
Section 4-CHECKS AND ADJUSTMENT contains procedures to check the
operational performance and electrical characteristics of the instrument.
Procedures also include methods for adjustment of the instrument to meet
specifications.
Section 5-INSTRUMENT
options.
OPTIONS contains a description
of available
Section 6-REPLACEABLE
ELECTRICAL PARTS contains information
necessary to order replaceable parts and assemblies related to the electrical
functions of the instrument.
Section 7-DIAGRAMS
AND CIRCUIT BOARD ILLUSTRATIONS includes
detailed circuit schematics, locations of assembled boards within the
instrument, voltage and waveform information and circuit board component
locators.
Section 8-REPLACEABLE
MECHANICAL PARTS includes information
necessary to order replaceable mechanical parts and shows exploded drawings
which identify assemblies.
Volume 2 of the service manual contains signature analysis tables to be used with
the diagnostic information provided in the Maintenance section of the Volume 1
service manual.
INSTALLATION
INITIAL INSPECTION
This instrument was inspected both mechanically and electrically before shipment.
It should be free of mars or scratches and should meet or exceed all electrical
specifications. To confirm this, inspect the instrument for physical damage
incurred in transit and check the basic instrument functions by performing the
Get-Acquainted Exercises in Section 2, Operating Instructions. Qualified service
personnel can verify Performance Requirements by referring to the Checks and
Adjustment section of the service manual. If there is damage or deficiency, contact
your local Tektronix Field Office or representative.
I
,
t:
E Y!:
-
General Information-7A42
-
OPERATING TEMPERATURE
The 7A42 can be operated where the amb~entalr temperature is from O D to +50° C
and can be stored in ambient temperatures from -55O to +75O C. After storage at
temperatures outside the operat~nglimits, allow the chass~stemperature to reach
operating limits before apply~ngpower.
i.a'
INSTALI-ING THE 7A42 IN THE MAINFRAME
The 7A42 is designed to operate in the two center or the two left most plug-in
compartments of a Tektronjx 7000-series oscilloscope mainframe.
NOTE
Switch off the mainframe power before installing or removing the
7A 42.
To install the 7A42 in the mainframe, align the grooves in the top and bottom of
the instrument with the guides at the top and bottom of the plug-in compartment.
Then push the 7A42 in until its front panel is flush with the front panel of the
mainframe.
i '3
To remove the 7A42from its host mainframe, pull the release latch (see Fig. 1-1) to
disengage the unit from the mainframe, then pull the 7A42 straight out from the
plug-in compartment leaving the mainframe on the bench.
,
,.
, ;;"*'
RELEASE
LATCH
4285-1 02
Figure 1-1. 7A42 release latch.
General Information-7A42
MAINFRAME COMPATIBILITY
The 7A42 is compatible with all Tektronix 7000 series mainframes. In four-wide
plug-in compartment mainframes, it can be installed in either the two leftmost or
two centermost plug-in compartments. When used in the two leftmost
compartments, select the Left Vertical Mode to display the analog signals. The
associated time base plug-in Trigger Source should be Left Vertical with the timebase trigger controls set to Auto or Norm, Dc. Internal, Slope to +, with the Level
control centered. The A Then B Gate Output can be picked off from the RIGHT
VERTICAL TRIGGER SOURCE by a 7D11 or 7D15 from either horizontal
compartment. In three-wide plug-in compartment mainframes, the 7A42 must be
used in the two leftmost compartments in a similar way.
When the 7A42 is installed In the center two plug-in compartments of a four
compartment mainframe; set the mainframe Vertical Mode and Trigger Source to
Right Vertical. The mainframe A Then B Gate Output can not be used in this
configuration, however, the A Then B Gate is still available at the front-panel
TRIGGER OUT bnc connector.
Since all analog channels are sent out the 7A42's left interface connector, it cannot
use the full capabilities of a dual beam oscilloscope such as the 7844, R7844, and
the 7612D. However, it has full compatibility with these mainframes in a single
beam configuration.
Since the 7A42 uses the mainframe crt readout to display the channel volts per
division and error warning messages, the 7A42 is not recommended for use in
mainframes without readout.
If the 7A42 is used with two time-base units in a four compartment mainframe
where Chop has been selected as the Horizontal Mode, and if exactly four traces
are to be displayed by the 7A42, two of the traces may synchronize to one time
base while the other two traces synchronize to the other time base. To prevent this
from happening, one trace should be removed, or a fifth trace should be added to
the mainframe crt display (even if it is positioned off screen so it cannot be seen).
With one, two, three, or five traces, the channel display will not synchronize to the
horizontal chop frequency.
The 7A42 is compatible with the 7854 Oscilloscope mainframe when the 7854 is
operated in real-time. However, when the 7854 is operated in digital storage, and
waveform and readout acquisition is desired, the 7A42-7854 mode should be
selected, via an internal jumper; refer qualified service personnel to the 7A42
Service manual. Once the 7A42-7854 mode has been selected. proper readout and
waveform acquisition can be guaranteed with the following 7A42 display
conditions:
1. Any single channel displayed alone ( C H I . CH2. CH3, CH4, or TRIG VIEW).
2.
Channels 1 and 2 only displayed together, ALT display mode selected
3.
Channels 3 and 4 only displayed together, ALT display mode selected
Refer to the Applications sect~onin this manual for further information
L
"
L
i'
i'
i'
i'
i
il
i'
i'
ir
! :J
C
-
r 3
I
1
8
General Information-7A42
PACKAGING FOR SHIPMENT
If this instrument is to be shipped by commercial transportation, we recommend
that the instrument be packaged in the original manner. The carton and packaging
material in which your instrument was shipped should be saved and used for this
purpose.
NOTE
Package and ship Plug-Ins and Mainframes separately.
If this instrument is to be shipped to a Tektronix Service Center for service or
repair, attach a tag to the instrument showing the following: Owner of the
instrument (with address), the name of a person at your firm who can be
contacted, complete instrument type and serial number, and a description of the
service required.
If the original package is unfit for use or not available, package the instrument as
follows:
1. Obtain a corrugated cardboard shipping carton having inside dimensions at
least six inches greater than the instrument dimensions; refer to Table 1-1 for
carton test strength requirements.
2. Enclose the instrument with polyethylene sheeting or equivalent to protect
the finish of the instrument.
3. Cushion the instrument on all sides by tightly packaging dunnage or urethane
foam between the carton and the instrument, allowing three inches of
packaging on each side.
P
A
4.
Seal the carton with shipping tape or with an industrial stapler
-
r
i.'r
5. Mark the address of the Tektronix Service Center and your return address on
the carton in one or more prominent locations.
TABLE 1-1
Shipping Carton Test Strength
I
Gross Weight (Ib)
I
Carton Test Strength (Ib)
-
0
--
200
General Information-7A42
SPECIFICATION
The electrical characteristics listed in Table 1-2 apply when the following
conditions are met: (1) Adjustment of the instrument must have taken place at an
ambient temperature between +20° and +30° C, (2) the instrument is allowed a 20minute warm-up period, (3) specifications are valid at an ambient temperature of
O0 to +50° C, unless otherwise stated, (4) the instrument must be in an
environment that meets the limits described in Table 1-3, (5) the instrument must
be operated in a calibrated 7000-series mainframe.
Any applicable conditions not listed above may be stated as part of the
characteristic. Environmental characteristics are listed in Table 1-3 and Physical
characteristics are listed in Table 1-4.
TABLE 1-2
Electrical Characteristics
Characteristic
Supplemental
Information
Performance
Requirement
DISPLAY
Deflection Factor
Calibrated Range at
Input BNC Connector
TTL (CMOS)
Family
ECL Family
1
20. 50. 100 mV/div
I
Calibrated Range
through a 10X Probe
TTL (CMOS)
Family
1
ECL Family
Gain Match
Logic Family, 20 mV/
div. 1 Megohm
0.2. 0 5 , 1 V/div.
General Information-7A42
TABLE 1-2 (CONT)
Electrical Characterlstlcs
Characteristic
Supplemental
Information
Performance
Requlrement
DISPLAY (CONT)
Deflection Factor (cont)
Gain Ratio Accuracy
within the same
Channel
Within 2% of indicated deflection
factor relative to
ECL Logic Family,
20 mV/div, 1 Megohm
input impedance.
I
I
GAIN Range
Permits adjustment of
deflection factor for calibrated operation with any
calibrated 7000-series
mainframe. Adjustable at
least +4% to -4% from
calibrated setting.
Frequency Response
350 MHz in 7104, 0"
- 35°C mainframe ambient temperature.
Refer to Tektronix
Product Catalog 7000Series
Oscilloscope
System Specification
for system bandwidths.
Bandwidth
I
Input Signal Dynamic
Range
Maximum Signal
Voltage at tip of
10X Probe
TTL (CMOS)
Family
ECL Family
output Dynamic Range
REV JUL 1984
I
1pv.
Limited to the CRT
display area. Mainframe
Vertical Trace Separation
should not be used to
bring an off-screen
signal onto screen.
1-7
General Information-7A42
TABLE 1-2 (CONT)
Electrical Characteristics
Characteristic
Performance
Requirement
Supplemental
Information
DISPLAY (CONT)
Maximum lnput Voltage
1 Megohm
25 V (dc + peak ac)
36 MHz or less, derated
linearly to 3 V (peak
ac) at 300 Mhz.
50 Ohm
5 V RMS during any
1 ms time interval. Active
internal protection opens
all inputs if overvoltage
is applied to any channel.
50-Ohm lnput Protection Reaction Time
Maximum time to ope1
input with applied
overvoltage of:
10 seconds.
1 second
0.5 second.
lnput Characteristics
lnput Coupling
Incoming signal is dccoupled to the amplifier
GND
A grounded input is
actually open at the
input BNC, (i.e.,
1 Megohm or 50 Ohm
termination is disconnected). Internally,
the amplifier input
is grounded to provide
a zero-volt input
reference.
General Information-7A42
En
F
i?
i'
i'
is
i'
TABLE 1-2 (CONT)
Electrical Characterlstlcs
Characterlstlc
Performance
Requirement
Supplemental
lnformatlon
DISPLAY (CONT)
Input Characteristics (cont)
H ~ g hImpedance
LOWImpedance
1 Megohm ?I%, in
parallel with approximately 15 pF.
50 ohms +1 ohm at dc.
<1.15:1, dc to 300 MHz.
VSWR
VOLTS/DIV Shift
0.2 divisions or less
shift when VOLTS/DIV
IS changed in either
TTL or ECL Families
or between Families.
POSITION Range
At least +7 divisions
to -7 divisions but
less than +9 divisions
to -9 divisions from
graticule center with
gain calibrated.
Displayed Noise
Grounded input at
maximum sensitivity,
7A42 triggered on
another channel,
tested at 1 ms/div and
10 ns/div, not more
than 0.02 divisions
RMS, as measured In
a 7854.
DC Drift
Drift with Time
REV JUL 1984
Not more than 0.2
divisions in any 10
minutes after twenty
minute warm-up
(ambient temperature
and line voltage
constant).
1-9
General Information-7A42
TABLE 1-2 (CONT)
Electrical Characteristics
Characteristic
Performance
Requirement
Supplemental
Information
DISPLAY (CONT)
DC Drift (cont)
Not more than 0.2
divisions for 10' C
ambient change (line
voltage constant).
Drift with Temperature
200 ps maximum.
Differential Delay
Between Any Two
Channels, set to
Same Logic Family
and VOLTS/DIV
Plug-in Delay Time
1
Typically 25 ns from
channel input to A1 1
and B11 of mainframe
interface connector.
Channel to Channel
Crosstalk
Typically less than
0.05 divisions with
logic signal inputs
applied through a
10X probe.
Chop Frequency
See mainframe manual
for specifications.
TRIG VIEW or External
Clock View
Amplitude
Position
0.35 divs k0.1 div
Baseline to be set
3 divisions (k0.5
divisions) below graticule center. Internally
adjustable approximately +4 divisions
from graticule center.
Refer qualified service
personnel to service
manual.
General Information-7A42
TABLE 1-2 (CONT)
Electrical Characteristics
I
I
Characteristic
Performance
Requirement
Supplemental
Information
DISPLAY (CONT)
I
I
TRIG VlEW or External
Clock View (cont)
Risetime
Time Coincidence
with Channel Display
TRIG VIEW
1
I
2 ns or less.
1 Within 3 ns.
Within 5 ns.
External Clock
View
Displayed on crt, see
detailed operating
information.
Readout
TRIGGER
SWITCHING THRESHOLD
Voltage Range
At Input BNC
TTL (CMOS)
Family
ECL Family
At tip of 10X
probe with readout
compensation
TTL (CMOS)
Family
ECL Family
1
k
-
General Information-7A42
ETABLE 1-2 (CONT)
Electrical Characterlstlcs
Cheracterlstlc
Performance
Requirement
Supplemental
lnformatlon
'TRIGGER (CONT)
SWITCHING
THRESHOLD (cont)
Resolution
At tip of 10X
probe with readout
compensation
100 mV.
TTL (CMOS)
Family
ECL Family
,
20 mV.
Accuracy, at Center
Value of Hysteresis
Window
At lnput BNC
TTL (CMOS)
Family
ECL Family
L..
'-r
f 5 mV t2O/0 of setting.
1
7
+1 mV k2% of setting.
At tip of 10X
probe with readout
compensation
TTL (CMOS)
Family
f50 mV +2% of setting.
ECL Family
f10 mV f2% of setting.
Hysteresis, Centered
at Threshold, 50kzAt lnput BNC
TTL (CMOS)
Family
ECL Family
REV JUL 1984
General Information-7A42
TABLE 1-2 (CONT)
Electrical Characterlrtlcr
Characterlrtlc
I
Performance
Requirement
Supplemental
lnformatlon
I
TRIGGER (CONT)
SWITCHING
THRESHOLD (cont)
Hysteresis, Centered
at Threshold (cont)
At tip of 10X
probe with readout
compensation
TTL (CMOS)
Family
ECL Family
Presets
At tip of 10X
probe with readout
compensation
TTL (CMOS)
Family
ECL Family
-1.30 V.
PROBE OFFSET
Activated
0 V.
TIP (PROBE
OFFSET) lnput
Maximum Voltage
Range
+5.10 V to -5.10 V,
dc only.
lnput Resistance
DVM Resolution
DVM Accuracy
REV JUL 1984
220 mV 22% of reading.
General Information-7A42
TABLE 1-2 (CONT)
Electrical Characteristics
Characteristic
)performance
Requirement
Supplemental
Information
TRIGGER (CQNT)
TRIGGER FILTER
Range
Off, or adjustable from
< I 5 ns to >300ns.
Match, Function A
to Function El
Within 20%, at
maximum setting
A
The trigger filter cannot be activated if
the EXT CLOCK is
turned on, nor will it
operate with any
trigger function that
contains an edge
sensitive channel.
EXT CLOCK Input
1 +5V to -5V (DC + peak AC)
Maximum Voltage
Range
I
Two EXT CLOCK INPUT
modes are available,
TTL or ECL; for selection of either mode
refer qualified service
personnel to 7A42
Service Manual.
Threshold
TTL Level
Logic Zero
Logic One
ECL Level
Logic Zero
5-1.5 V.
Logic One
2-1.1 V.
General Information-7A42
TABLE 1-2 (CONT)
Electrical Characteristics
Characteristic
Performance
Supplemental
TRIGGER (CONT)
EXT CLOCK lnput (cont)
lnput Impedance
The EXT CLOCK INPUT
may be connected
directly to the clock
source, or through a 1X
probe (TTL only). The
EXT CLOCK lnput is not
compatible with a 10X
probe.
TTL Level
Approximately 10K ohm
in parallel with
approximately 55 pF,
terminated to +5 V.
ECL Level
Approximately 50 ohms,
terminated to -2 V.
Minimum lnput
Slew Rate
TTL Level
None.
ECL Level
100 mV/ns.
Pulse Width
20 ns minimum
TTL Level
n
Set-UPTime
n
s minimum.
Either pulse transition
selected.
Leading pulse transition
selected.
10 ns minimum.
Trailing pulse transition
selected.
10 ns minimum
Time that level
sensitive channels
must be valid before
EXT CLOCK INPUT
transition.
General Information-7A42
TABLE 1-2 (CONT)
Electrical Characteristics
Characteristic
Performance
Requirement
Supplemental
TRIGGER (CONT)
--
- -
-
EXT CLOCK Input (cont)
Hold Time
10 ns minimum.
Time that level
sensitive channels
must remain valid after
EXT CLOCK INPUT
transition.
Set-up Time,
Channel to Channel
5 ns minimum.
Time that level
sensitive portion of
trigger function must
be true before EDGE
sensitive channel
transition.
Hold Time,
Channel to Channel
5 ns minimum
Time that level
sensitive portion of
trigger function must
remain true after
EDGE sensitive channel
transition.
Set-up Time. EDGE
Sensitive Channel
10 ns minimum.
Time that level of EDGE
sensitive channel must
be stable before
transition.
Channel EDGE
Sensitivity
Hold Time, EDGE
Sensitive Channel
)
5 ns minimum.
(
Time that level of EDGE
sensitive channel must
remain stable after
transition.
Mainframe Trigger
Output
Amplitude, 1 MHz
square wave
300 mV ?50 mV p-p
differential, into A13
and 813 of main interface
connection on left
side of plug-in.
General Information-7A42
TABLE 1-2 (CONT)
Electrical Characteristics
Supplemental
Information
Performance
Requirement
Characteristlc
TRIGGER (CONT)
Mainframe Trigger
Output (cont)
Mean value of square
wave within one division
of graticule center.
Centering, 1 MHz
square wave
Risetime, 10?/0to 60%
I
I
2 ns klns.
Falltime, 90% to 40%
n
TRIGGER OUT
Connector
Output Voltage
Logic Zero
Logic One
Output Impedance
Toggle Frequency
50.2 V into 50 ohm load.
1 20.8 V into 50 ohm load. I
1
1
125 MHz maximum
Approximately 50 ohms.
A Mode or B Mode,
w ~ t hdisplayed input
signal of 60mV p-p
in ECL or 300mV p-p
in TTL Logic Family,
centered at threshold
Propagation Delay
Channel lnput to
Trigger Output
25 ns or less.
Differential Propaga.
tion Delay from
Channel lnput to
Trigger Output
through any
Trigger Function
5 ns or less.
General Information-7A42
TABLE 1-2 (CONT)
Electrical Characteristics
Performance
Requirement
Characteristic
~I
Supplemental
Information
TRIGGER (CONT)
TRIGGER OUT
Connector (cont)
Propagation ~ e l a ~ ( c o n t ) ~
A THEN B Mode
Time Between
A and B
Time From
B to A
1
5 ns minimum
I
Minimum set-up time
from event A to event B
to insure that trigger
output occurs with
event B.
Minimum time after
event B to next event
A to insure proper
arming.
5 ns minimum
Minimum time to insure
proper arming and
triggering.
Event Duration
Event A
15 ns minimum.
Event B
5 ns minimum
The front-panel A
THEN B Gate Output
is act~veonly if selected and in the A
THEN B mode; refer
qualified service
personnel to 7A42
Service Manual for
selection.
Front-Panel
A THEN B
Gate Output
Voltage
Logic Zero
1
50.2 V into 50 ohm load.
...
-
Logic One
Output Impedance
20.8 V into 50 ohm load.
Approximately 50 ohms.
pi:
General Information-7A42
TABLE 1-2 (CONT)
Electrical Characteristics
Supplemental
Information
Performance
Requirement
Characteristic
TRIGGER (CONT)
TRIGGER OUT
Connector (cont)
A THEN B GATE
TRIGGER OUT (cont)
I 25 ns or less
Timing
Time from Event
A Recognition to
Rising Edge of
Gate
I
Active only in A
THEN B Mode.
Mainframe A THEN B
Gate Output
Amplitude. 1 MHz
Square Wave
300 mV +50 mV p-p
differential, into A13
and 813 of main interface connector on
right side of
plug-in.
Centering, 1 MHz
Square Wave
Mean value of square
wave within one
division of graticule
center.
I
2 ns t 1 ns.
Risetime, 10% to 60%
Falltime, 90% to 40%
Timing
Time from Event A
Recognition to Rising Edge (50% point)
of Gate Output
Approximately 15 ns.
Time from Event B
Recognition to Falling Edge (50% point)
of Gate Output
Approximately 15 ns
~
,-r
General Information-7A42
TABLE 1-2 (CONT)
Electrical Characteristics
Characteristic
Supplemental
Information
Performance
Requirement
TRIGGER (CONT)
Mainframe A THEN B
Gate Output (cont)
Pulse Width
Greater than the time
between event A and
event B by 5 ns t2 ns.
Gate Output width,
Measured at the
50% Points
RESET lnput
Maximum lnput Voltage1
+5 v to -5 V (DC
AC).
Input Impedance
Approximately 50 ohms.
+
peak
Levels
Logic Zero
1
S0.2 V.
I
Logic One
Pulse Width
100 ns minimum
Timing, Post-RESET
Inhibit Time to
Next Trigger
10 ns minimum
Response Time
RESET pulse must
lead or be coincident
w ~ t hevent recognition.
to inhibit trlgger output. Event recognition
must lead the RESET
pulse by 10 ns to
guarantee trigger output
Time from falling
edge of RESET to next
recognizable event.
General Information-7A42
TABLE 1-2 (CONT)
Electrical Characteristics
Supplemental
Information
Performance
Requirement
Characterlstlc
BATTERY BACK-UP
Provides power to
preserve front-panel
control status a
minimum of 200 hours
while main power is
off. Battery requires
about 24 hours to
fully charge from
discharged condition.
Ni-Cad Battery (3.75 V)
TABLE 1-3
Environmental Characterlstlcs
lnformatlon
Characterlstlcs
Temperature (External Ambient
Mainframe) Temperature
Operating
Storage
1
0 to +40° C in 7403N/7603 without fan
(fan kit is available).
0 to +50° C in other 7000-series mainframes.
-55O C to +75O C.
Altitude
Operating
15,000 feet (4.6 Km).
Nonoperating
To 50,000 feet (15.2 Km).
EMC
Tested to M IL-T-28800C, MIL-STD-461A
(excluding RE-01).
Vibration
Operating and Nonoperating
Shock
Tested to MIL-T-28800C, SECT. 4.5.5.3.1
Type II I. Class 5.
Tested to MIL-T-28800C, SECT. 4.5.5.4.1
Type Ill, Class 5.
General Information-7A42
TABLE 1-3 (CONT)
Environmental Characteristics
Information
Characteristics
Bench Handling
Tested to MIL-T-28800C, SECT. 4.5.5.4.3
Type Ill, Class 5.
Transportation
National Safe Transit Association,
Preshipment Test Procedure.
Vibration and Bounce
(packaged product)
1
Drop (packaged product)
NSTA, PROJECT 1 A-8-1
NSTA, PROJECT 1 A-8-2.
TABLE 1-4
Physical Characteristics
Characteristics
Net Weight
Dimensions
I
1
1
Information
Approximately 5.2 lb, 2.8 Kg
See dimensional drawing Figure 1-2.
General Information-7A42
LZ~
i
-
13.9
'
353
7
L
NOTE: DIMENSIONS ARE GIVEN WITH TOP
FIGURE IN INCHES AND BOTTOM
FIGURE IN MILLIMETERS.
4285-101
Figure 1-2. 7A42 dimensional drawing.
General Information-7A42
STANDARD ACCESSORIES
1
1
1
1
e a . . . . . . . . . . . . . . . . . . . . . . . . . . . . . . . . . . . . . . . . . . Operators
..
Manual
e a . . . . . . . . . . . . . . . . . . . . . . . . . . . . . . . . . Service
.
Manual (Volume 1)
e a . . . . . . . . . . . . . . . . . . . . . . . . . . . . . . . . . Service
.
Manual (Volume 2)
ea.. . . . . . . . . . . . . . . . . . . . . . . . . . . . . . . . . . . . . . ..SMB
.
to BNC Cable
For part numbers, refer to the tabbed Accessories page at the rear of the 7A42
Service (Volume 1) manual.
OPTIONAL ACCESSORIES
(not included)
The following accessories have been selected from our catalog specifically for
your instrument. They are listed as a convenience to help you meet your
measurement needs. For detailed information and prices, refer to a Tektronix
Products Catalog or contact your local Tektronix Field Representatives.
PROBES
The P6131 10X passive probe (10 Megohm. 10.8 pF) has a 1.3 meter cable, a
narrow barrel and variety of probe tips (hooks. IC grabbers, and ground leads)
available.
The P6230 is an active 450 ohm variable bias/offset probe, which is an excellent
ECL logic probe due to its low capacitances and minimal loading (because of the
variable bias/offset feature). The 7A42's PROBE OFFSET feature is designed to
work with the P6230. The P6131 accessories will also fit the P6230. (See ECL
Probing Techniques in the Application section of this manual.)
Passive probes such as the P6131, require low-frequency compensation into the
inputs of the 7A42, as with any vertical amplifier. The mainframe calibrator
provides a signal suitable for making this adjustment. For optimum high-frequency
performance, the probe high-frequency compensation should also be adjusted
directly into the 7A42 inputs. See the probe manual for instructions to perform this
adjustment.
SECTION 2 CONTENTS
---
SIMPLIFIED BLOCK DIAGRAM OF THE 7A42. . . . . . . . . . . . . . . . . . . . . . . . . . ...2-1
BOOLEAN ALGEBRA FOR 7A42 USE . . . . . . . . . . . . . . . . . . . . . . . . . . . . . . . . . . ..2-3
.
CONTROLS, CONNECTORS AND INDICATORS.. . . . . . . . . . . . . . . . . . . . . . . ..2-9
.
GET ACQUAINTED EXERCISES.. . . . . . . . . . . . . . . . . . . . . . . . . . . . . . . . . . . . . . . .2-13
EXERCISE 1-PRELIMINARY SET UP AND INITIALIZATION . . . . . . . . . 2-13
EXERCISE 2-OBTAINING A TRIGGERED DISPLAY . . . . . . . . . . . . . . . . . 2-16
EXERCISE 3-LOGIC TRIGGERING . . . . . . . . . . . . . . . . . . . . . . . . . . . . . . . . . .2-36
DETAILED OPERATING INFORMATION . . . . . . . . . . . . . . . . . . . . . . . . . . . . . . . . .2-48
SELF-TEST.. . . . . . . . . . . . . . . . . . . . . . . . . . . . . . . . . . . . . . . . . . . . . . . . . . . . . . . 2-48
...
FRONT-PANEL INITIALIZATION.. . . . . . . . . . . . . . . . . . . . . . . . . . . . . . . . . . . . . 2-52
BATTERY BACKUP . . . . . . . . . . . . . . . . . . . . . . . . . . . . . . . . . . . . . . . . . . . . . . . . . 2-52
..
OPERATOR MESSAGES.. . . . . . . . . . . . . . . . . . . . . . . . . . . . . . . . . . . . . . . . . . . .2-54
.
.
SIGNAL CONNECTIONS . . . . . . . . . . . . . . . . . . . . . . . . . . . . . . . . . . . . . . . . . . . . 2-56
.
CRT READOUT . . . . . . . . . . . . . . . . . . . . . . . . . . . . . . . . . . . . . . . . . . . . . . . . . . . . .2-57
.
POSITION.. . . . . . . . . . . . . . . . . . . . . . . . . . . . . . . . . . . . . . . . . . . . . . . . . . . . . . . . . .2-59
G A I N . . . . . . . . . . . . . . . . . . . . . . . . . . . . . . . . . . . . . . . . . . . . . . . . . . . . . . . . . . . . . . .2-59
..
STATUS INDICATORS (CHI. CH2, CH3, CH4.. . . . . . . . . . . . . . . . . . . . . . .2-59
ALT/CHOP . . . . . . . . . . . . . . . . . . . . . . . . . . . . . . . . . . . . . . . . . . . . . . . . . . . . . . . . . 2-60
..
.
TRIGGER FUNCTION . . . . . . . . . . . . . . . . . . . . . . . . . . . . . . . . . . . . . . . . . . . . . . .2-60
TRIG VIEW.. . . . . . . . . . . . . . . . . . . . . . . . . . . . . . . . . . . . . . . . . . . . . . . . . . . . . . . . .2-61
.
TRIGGER FILTER . . . . . . . . . . . . . . . . . . . . . . . . . . . . . . . . . . . . . . . . . . . . . . . . . . .2-61
.
EXT CLOCK SYNC.. . . . . . . . . . . . . . . . . . . . . . . . . . . . . . . . . . . . . . . . . . . . . . . . .2-61
.
RESET INPUT.. . . . . . . . . . . . . . . . . . . . . . . . . . . . . . . . . . . . . . . . . . . . . . . . . . . . . .2-62
.
TRIGGER OUT . . . . . . . . . . . . . . . . . . . . . . . . . . . . . . . . . . . . . . . . . . . . . . . . . . . . . 2-62
..
.
PROG CHAN/TRIG.. . . . . . . . . . . . . . . . . . . . . . . . . . . . . . . . . . . . . . . . . . . . . . . . .2-64
Kg
F3
K~
i"
i"
i"
5"
i"
i"
i3
i'
iJ
L~
E
i
i"
ig
i'
"
i
i
i"
13
C-,
OPERATING INSTRUCTIONS
This section will familiarize you with the capabilities and operation of the 7A42. A
thorough understanding of this information will remove later uncertainty when
operating your 7A42.
OPERATION
For operation, your 7A42 Logic Triggered Vertical Amplifier must be properly
installed in a Tektronix 7000-series mainframe. Installation is explained in the
General Information section of this manual.
SIMPLIFIED BLOCK DIAGRAM
OF THE 7A42
The 7A42 has six basic functional blocks of circuitry: Attenuators, Amplifiers,
Channel Switching, Trigger Threshold Generators, Trigger Comparators and
Trigger Logic (see Fig. 2-1).
Each channel (CHI through CH4) has its own Attenuator, Amplifier, Trigger
Threshold Generator, and Trigger Comparator. Impedance matching (50fl/lMfl)
and gain switching (VOLTS/DIV) are accomplished by the Attenuator. There are
two signal outputs from each Attenuator, one signal is applied to the Trigger
Comparator and the other to the Amplifier, for each channel.
The Amplifiers provide the signal gain necessary to drive the vertical amplifiers
within the host oscilloscope mainframe. The Channel Switching stage provides
vertical signal processing to display the channel traces and the Trigger View trace
on the mainframe crt. This is accomplished by either chopping between the
channels selected for display or by displaying them alternately after each sweep of
the time base.
The Trigger Comparator compares the signal from the Attenuator with the voltage
of the Trigger Threshold Generator. When the signal from the Attenuator exceeds
the Threshold Voltage, the Trigger Comparator produces an output which is
appl~edto the Trigger Logic stage.
The Trigger Logic stage accepts logic levels from the Comparator and compares
them with the programmed logic level, of each channel. When the applied input
signal(s) conform to the programmed trigger logic conditions, a trigger pulse is
produced. The Trigger Logic conditions are user programmed from the frontpanel.
2-1
Operating Instructions-7A42
CHANNEL
SWITCHING
(ALTICHOP)
!I
TO
MAINFRAME
DISPLAY
(CRT)
b
SIGNAL
TRIGGER
THRESHOLD
GENERATORS
TRIGGER
TO
MAINFRAME
(TIME
BASE)
b
4285-214
Flgure 2-1. Slmpllfled block dlagram of the 7A42.
L-I
BOOLEAN ALGEBRA FOR 7A42 USE
The basis of digital electronics is the binary number system; ones and zeroes.
highs and lows. The most common digital circuit components, inverters and gates,
operate on the principles of Boolean algebra. Boolean algebra is a binary algebra
with many characteristics similar or analogous to the ordinary algebra we use.
Expressions in both algebras consist of variables, constants, and operators.
The 7A42 provides oscilloscope triggering on Boolean or logical combinations of
the input signals. The input channels are the variables in the Boolean trigger
equation, and the 7A42 supplies the operators as programmed by the user.
i"
The following is a brief review of the basics of Boolean algebra and an
introduction to how they apply to the 7A42.
Definition of Boolean logic functions:
i -3'
D
I
i"
;;I
1-
K
i"
i'
i'
id
i '.
1. The dot (*) is used to indicate the AND logical operator. The AND function of
two or more variables is sometimes referred to as a product. It is the Boolean
equivalent of ordinary multiplication. In some Boolean expressions the dot
may be omitted, i.e.. A*B=AB.
2. The plus sign (+), indicates the OR logical operator, which is sometimes
referred to as a sum (the Boolean equivalent of addition). The AND function
has mathematical hierarchy over the OR function as multiplication has over
addition, thus the expression W*X+Y*Z would be evaluated as if it were
written (W*X)+(Y*Z).
3. A bar over a constant or variable is used to indicate the NOT logical operator.
Other words that are sometimes used to describe this operation are invert or
complement; X is the inverse or complement of X.
4. A common Boolean function comprised of AND, OR, and invert operators is
the EXCLUSIVE-OR function, symbolized by a plus sign with a circle around
it (@). The EXCLUSIVE-OR of variables X and Y is x*Y+X*Y.
The AND. OR. NOT, and XOR (EXCLUSIVE-OR) logic functions are defined in
Figure 2-1 for the constants 0 (false) and 1 (true).
i"
i!
i"
i"
3
rn
Flgure 2 - 2 Deilnitlon 01 the Boolean AND, OR, N O T and x o R (EXCLUSIVE-OR) logtc
iunctlons.
2-3
Operating Instructions-7A42
5. The following two expressions, known as DeMorgan's Theorem, shows the
relationship of the AND, OR and NOT (invert) logic functions to one another.
With the use of the invert function, the AND function can be expressed in
terms of OR function, and vise versa.
6. AND functions and OR functions can be combined together in one of two
equivalent notations, called sum of products and product of sums. The 7A42
trigger function uses the sum of products notation, that is, the OR of two AND
functions. DeMorgan's Theorem can be used to convert from one notation to
another. An example of the sum of products notation as it relates to the 7A42
is:
where C H I , CH2, CH3, and CH4 are the Boolean variables, the two quantities
in parantheses (AND functions) are called products, and the two products are
"ORed" together to form a sum. Each 7A42 trigger function can consist of up
to two products of the four input channels summed together. The products
may be formed in any combination from one or all of the input channels. The
analog channel input signals become Boolean variables when they are
compared to a threshold voltage. If the signal is higher than the threshold, it is
true; if lower, it is false. The Boolean variables may be programmed into the
trigger function in either their non-inverted (high) or inverted (low) form. A
channel input which is not part of the trigger function is considered a "don't
care".
Figure 2-3 shows two examples of a user programmed trigger function. In each
example, the trigger function is comprised of a logical contribution of input
channels 1 through 4.
NOTE
Logic symbols used in the following functional tables are of the
positive logic convention and are defined as follows:
H = high level (true or logic " 1 ")
L = low level (false or logic "0")
I = transition from low to high level
I = transition from high to low level
X = irrelevant (any input, including transitions)
n = one high-level pulse
Operating Instructions-7A42
Function f = CHI.CH2.CH3.CH4
Keystroke sequence: C H I AND C H 2 AND CH3 AND CH4
Functlon
f
CHI
CH2
CH3
CH4
L
L
L
L
L
L
L
L
L
L
H
H
L
H
L
H
L
L
L
L
L
L
L
L
H
H
H
H
L
L
H
H
L
H
L
H
L
L
L
L
H
H
H
H
L
L
L
L
L
L
H
H
L
H
L
H
L
L
L
L
H
H
H
H
H
H
L
L
L
H
L
L
L
H
Front-panel
TRIGGER FUNCTION dlrplay.
L
IHHIHHX
--
Function g = CHI.CH2.CH3.CH4
Keystroke sequence: NOT C H I AND NOT CH2 AND CH3 AND CH4
Functlon
CHI
CH2
CH3
CH4
R
L
L
L
L
L
L
L
L
H
L
L
L
LHL-
Front-panel
TRIGGER FUNCTION dlrplay.
=LHHH1
L
L
L
L
H
H
H
H
L
L
H
H
L
H
L
H
L
L
L
L
H
H
H
H
L
L
L
L
L
L
H
H
L
H
L
H
L
L
L
L
H
H
H
H
H
H
H
H
L
L
H
H
L
H
L
H
L
L
L
L
4285 207
Flgure 2-3. Exampler of products of Channel 1 through 4.
Function
f
= CHIeCH2CH3eCH4
Function g = cTICT~CHBCH~
Function
Function
CHl
CH2
CH3
CH4
f
CHI
CH2
CH3
CH4
L
L
L
L
L
L
L
L
L
L
H
L
H
L
H
L
L
L
L
L
L
L
L
L
L
L
L
L
L
H
H
L
H
L
H
L
L
L
I+
L
L
L
L
H
H
H
H
L
L
H
H
L
H
L
H
L
L
L
L
L
L
L
L
H
H
H
H
L
L
H
H
L
H
L
H
L
L
L
L
H
H
H
H
L
L
L
L
L
L
H
H
L
H
L
H
L
L
L
L
H
H
H
H
L
L
L
L
L
L
H
H
L
H
L
H
L
L
L
L
H
H
H
H
H
H
H
H
L
L
H
H
L
H
L
H
L
L
L
H
H
H
H
H
H
H
H
H
L
L
H
H
L
H
L
H
L
L
L
L
n
--
g
Functlon f + g = (CHl.CH2.CH3.CH4)
+ (CHl.CH2CH3.CH4)
Keystroke sequence: CHI AND CH2 AND CH3 AND CH4 OR
NOT CHI AND NOT CH2 AND CH3 AND CH4
-
Front-panel
TRIGGER FUNCTION display.
Functlon
H
Function
Function
H
RESET
4285-208
Flgure 2-4. Function
f and g
OR'ed together.
If the first example of Figure 2-3 (function / ' ) were programmed into the first
column (product) of the 7A42 TRIGGER FUNCTION display and the second
example of Figure 2-3 (function g ) into the second, the TRIGGER FUNCTION
would be the sum of the two products as shown in Figure 2-4.
The 7A42 has a feature called EDGE sensitivity. Though a departure from pure
Boolean logic, this feature adds additional triggering flexibility by allowing the
synthesis of additional digital circuit components such as flip-flops. Any product
(AND function) in the trigger function can be programmed to have a single rising
or falling EDGE-sensitive channel. That EDGE-sensitive channel will then qualify
the product only at the selected (rising or falling) EDGE-sensitive channel
transition. Figure 2-5 shows a simple example of a product consisting of C H I and
CH2, where CH2 IS selected to be rising-edge sensitive.
Function / = CHI. lCH2
Keystroke sequence: C H I AND EDGE CH2
Front-panel
TRIGGER FUNCTION dlsplay.
Fundlon
.f
CH1
CH2
L
L
L
L
f
L
L
H
L
L
I
H
L
Flashing
L
n
f
n
H
H
L
H
1
L
4285-209
Figure 2-5. Example of EDGE Qualified TRIGGER FUNCTION.
Another 7A42 feature is nested triggering. One Boolean function programmed into
the 7A42's "function A" can be set to arm the trigger circuitry, after which another
Boolean function programmed into "function B" can become the trigger event.
Without being previously armed by function A going true, an occurrence of
function B will not cause a trigger output pulse. Figure 2-6 illustrates the A THEN
B nested triggering mode.
Operating Instructions-7A42
TRIGGER FUNCTION A
fo = CHl.CH2
Keystroke sequence:
C H I AND CH2
TRIGGERFUNCTION B
fb = CH3.CH4
Keystroke sequence:
N O T CH3 AND CH4
Front-panel
TRIGGER FUNCTION A dlsplay.
Front-panel
TRIGGER FUNCTION B dlsplay.
TRIGGER FUNCTION
RESET
--RETURN
X
X
H
X
X
H
H
NESTED TRIGGER Out
4285-205
Flgure 2-6. Example 01 A THEN B Nested Trlggerlng.
CON'TROLS, CONNECTORS,
AND INDICATORS
All controls, connectors, and indicators required for the normal operation of the
7A42 Logic Triggered Vertical Amplifer unit are located on the front panel. Figure
2-7 shows an exploded front panel and gives a brief functional description of each
control, connector, and indicator.
Foldout for
Front-panel controls, connectors, and lndlcators
Flgure 2-7
Operating Instructions-7 A42
CD
D
SWITCHING THRESHOLO
/
/
/
/
// /
D
LEVEL
[blJ
/
ID
....
PROS E 0 fFS ET
ct
Vpk
.:55v
VOLTS
TIP
PROG CHAN or TRIG-Pushbutton selects one of two modes; when
light is on, those controls associated with programming the TRIGGER
FUNCTION are operable (see 8, 7 and 10). When light is out, those
controls associated with CH1, CH2, CH3, CH4 setup conditions are
operable (see 8 and 2).
~
CD
ID
DISPLAY-Pushbutton turns on or off the display of the incoming
signal selected by controls listed under number 8'. Nondisplayed
channels may still contribute to the TRIGGER FUNCTION.
VOLTS/DIV-Two pushbutton switches increase or decrease vertical
deflection factor of the channel selected by controls listed under
number 8'.
ro
too
TRIGGER FUNCTION
~
• x
• LO
~
;
~
~
S
~
~
~
FLASHING
LIGHT
INOIC ATE S
EDGE
QU'ALIFIED
i- - --.
I
(])
CH2
GND-Pushbutton grounds the selected channel amplifier input and
disconnects the incoming signal, of the channel selected by controls
listed under number 8' .
[blJ
Q Q
1MO/500-Pushbutton switch selects input impedance to be either
one megohm or 50 ohms of the channel selected by controls listed
under number 8'.
ANO
CH4
[blJ
RESET
Vp k .:55V
Q (])
TTl/ECl-Pushbutton switch selects the deflection factor range and
preset threshold to be compatible with either TTL or ECl logic
families of the channel selected by controls listed under number 8'.
50n
@)
~R':r"
CLEAR
[blJ
THRESH-Pushbutton switch activates the lEVEL pushbuttons and
SWITCHING THRESHOLD VOLTS display, allowing operator to set
the threshold voltage of the channel selected by controls listed under
number 8'.
ANO
[blJ
OR
g
EXT CLOCK
SYNC
fEJ
!C
[blJ
TRIGGER FILTER
OffQ
NOT
c
.:::./~.,
6.
EDGE
g
1
.:5 5V
~
300 OS
TRIGGER OUT
EXT CLOCK IN PUT
-
~."
ffi
I
CD
Al T/CHOP-Pushbutton switch, determines whether the displayed
channel(s) are displayed alternately, after each sweep of the time
base, or are displayed simultaneously in a chopped mode.
fROM
50n
TRIG VIEW-Pushbutton to display TRIGGER FUNCTION output
signal or EXT CLOCK signal on crt.
Tektronix 7A42 ~~~~~C1~1~~EpRLW'ER
Figure 2-7. 7A42 controls, connectors, and Indicators.
'PROG CHANITRIG must be set to CHAN.
-
~
2-10
Operating Instructions-7A42
@
The following controls, connectors, and indicators are common to
CHI, CH2. CH3, and CH4.
Input Connector-Bnc
for signal connection
POSITION-Vertically
positions the incoming
Clockwise rotation moves displayed trace upward.
signal.
DISPLAY-When
DISPLAY indicator light is on, channel is
selected for display.
ECLmL-When
indicator light is on the preset threshold
voltage and range of deflection factors are compatible with TTL
logic levels; when off they are compatible with ECL Logic
levels.
GND-When
indicator light is on, the amplifier input is
grounded and the input signal is electrically disconnected from
the amplifier.
SOC2/lMC2-When indicator light is on, the input impedance is
one megohm, 15 picofarads; when off, input impedance is 50C2.
GAIN-Screwdriver control adjusts display gain of channels CHI,
CH2, CH3, and CH4.
CHI, CH2, CH3, and CH4-Operate in either the PROG CHAN or the
PROG TRIG modes. In the PROG CHAN mode the self-cancelling
pushbutton switches determine which channel is affected by the
controls listed under number 2'. In the PROG TRIG mode the C H I
through CH4 pushbutton switches determine which channel is
programmed into the TRIGGER FUNCTION, as selected by the
controls listed under number l o 2 .
CLEAR-Pushbutton
switch clears the programmed TRIGGER
FUNCTION selected by the controls listed under 10'.
AND, OR, NOT-Pushbutton switches used with controls listed under
number 6 to program the 'TRIGGER FUNCTION selected by the
controls listed under 102.
EDGE-Pushbutton selects edge sensitivity for the channel being
programmed into the TRIGGER FUNCTION'.
'PROG CHANfTRIG must be set to CHAN.
'PROG CHANfTRIG must be set to TRIG.
Operating Instructions-7A42
TRIGGER FILTER-Variable
control sets minimum duration of
TRIGGER FUNCTION output before it is sent to the time base or
TRIGGER OUTput connector.
TRIGGER OUT-Provides
@
a front-panel output of the trigger signal.
EXT CLOCK INPUT-Provides external clock input for synchronizing
triggers to an external clock signal source (EXT CLOCK SYNC light
must be on).
EXT CLOCK SYNC-Pushbutton switch allows an external clock to
qualify the TRIGGER FUNCTION.
1
0-Pushbutton
switch selects positive going or negative going
edge of the external clock signal which qualifies TRIGGER
FUNCTION.
@
A, B, A THEN B-Two independent TRIGGER FUNCTION programs
are available (A and 8). The A THEN B is a nested combination where
A must occur to arm triggering before B is allowed to produce a
trigger output.
RESET-External input to disable the TRIGGER FUNCTION output
and disarm the A THEN B nested triggering; no arming or triggering
can occur while a high level is applied.
@
TRIGGER FUNCTION-LED display indicates the Boolean function
which will produce a TRIGGER FUNCTION output. Number 6, 7 ,and
10 controls are used to program TRIGGER FUNCTION lights2.
@
SWITCHING THRESHOLD VOLTS-LED display indicates threshold
voltage of the channel selected by controls listed under number 6 or
displays probe offset3.
LEVEL-Two pushbutton switches set threshold voltage of channel
selected by the controls listed under number e3.
PROBE OFFSET-Measures offset voltage of probe connected to the
channel selected by controls listed under number e3.
'PROG CHANmRIG must be set to CHAN.
'PROG CHANmRIG must be set to TRIG.
3 ~ ~ O
CHANmRIG
G
must be set to CHAN, and THRESH must be active.
GET-ACQUAINTED EXERCISES
These Get-Acquainted Exercises will help you become familiar with the operation
o f your 7A42 and at the same time, check basic instrument operation. The GetAcquainted Exercises are divided into three parts: Exercise 1-Preliminary Set Up
and Initialization, Exercise 2-Obtaining a Triggered Display, and Exercise 3Logic Triggering.
NOTE
When power is applied to the 7A42 an automatic self test will be
performed. After the self test is complete the display 7A42 TEST
COMPLETE will appear o n the crt for approximately 1 second. If a
7A42 TEST BUSY message remains i n the crt display, see the
discussion Self-Test Failure Messages, i n this section under Detailed
Operating Information.
EXERCISE 1
PRELIMINARY SET UP AND INITIALIZATION
This exercise describes proper installation of the 7A42 into a compatible
oscilloscope mainframe, exercises the self-test sequence and initializes the frontpanel control settings.
PRELIMINARY SET U P
Perform the following procedure to install and power up the 7A42
a. Install the 7A42 in the left two vertical compartments of a Tektronix 7000-series
oscilloscope mainframe (e.g., 7104, 7904A).
b. Set the oscilloscope Vertical Mode to Left
c. lnsrall a time-base unit in one of the two horizontal compartments and set the
oscilloscope mainframe Horizontal Mode for the appropriate time base (A or
B).
d. Set the time-base triggering to +Slope. Auto Mode with DC Coupling from the
Internal Source and the Level control to midrange.
e. Set the time-base Time/Division to 1 millisecond
f. Set the appropriate oscilloscope mainframe Trigger Source (A or B) to Left
Vert.
g. Turn the oscillsocope mainframe Power on
Operating Instructions-7A42
NOTE
Bold numbers are used as an aid to perform these exercises. The
number refers an instruction to an illustration. The same numbers can
be found in both the text and corresponding illustrations, with an
arrow pointing to a control, indicator or crt display that has been
mentioned in the text.
INITIALIZATION
After completion of the 7A42 installation and power-up self-test sequence the next
step is to initialize the 7A42 front-panel settings.
T o initialize the 7A42 front-panel controls t o a known state, perform the following
procedure:
a. Set the PROG pushbutton 1 to the CHAN mode (pushbutton light out)
b. Press the THRESH pushbutton 2 so that the pushbutton light is on (Threshold
Mode).
c. Press the PROBE OFFSET pushbutton 3 until it illuminates red (Acquire
Mode).
EXERCISE 2
OBTAINING A TRIGGERED DISPLAY
This exercise demonstrates basic triggering from a single oscilloscope calibrator
signal. A demonstration of the 7A42 front-panel GAIN adjustment and how to
obtain a triggered display on each of the four channels is also given.
NOTE
I f continuing from Exercise 1, proceed with Exercise 2. I f not, first
perform Exercise 1 then proceed.
Now that the 7A42 is properly installed and initialized, begin this exercise by
performing the setup conditions as shown below:
COAXIAL
TlME
CALIBRATOR . . . . . . . . . . . . . . . . . . . . . . . . . . . . . . . . . . . . . . . . . . . .
0 4 V lkHz
TlME BASE
TIMEIDIV . . . . . . . . . . . . . . . . . . . . . . . . . . . . . . . . . . . . . . . . . . . . . . . . . . . 1 mS
TRIGGERING
MODE . . . . . . . . . . . . . . . . . . . . . . . . . . . . . . . . . . . . . . . . . . . . . . . . . . . . A U T O
COUPLING . . . . . . . . . . . . . . . . . . . . . . . . . . . . . . . . . . . . . . . . . . . . . . . . . . .
DC
SOURCE . . . . . . . . . . . . . . . . . . . . . . . . . . . . . . . . . . . . . . . . . . . . . I N T
SLOPE . . . . . . . . . . . . . . . . . . . . . . . . . . . . . . . . . . . . . . . . . . . . . .
POSITIVE
LEVEL . . . . . . . . . . . . . . . . . . . . . . . . . . . . . . . . . . . . . . . . . . CENTERED
B DELAY MODE . . . . . . . . . . . . . . . . . . . . . . . . . . . . . . . . . . . . . INDEPENDENT
MAG . . . . . . . . . . . . . . . . . . . . . . . . . . . . . . . . . . . . . . . . . . . . . . . . . . . . . . . . . . . . . . X I
HOLDOFF . . . . . . . . . . . . . . . . . . . . . . . . . . . . . . . . . . . . . . . . . . . . . . . . M I N
4285-220
Operating Instructions-7A42
As can be seen from the C H I status indicators, C H I has been previously initialized
to TTL 1 and 1 M f l 15 pf input 2. Observe that the TRIGGER FUNCTION has
been set to trigger on a HI level of C H I 3.
Rotate the C H I POSITION control 4 to move the triggered display to the center of
the crt.
Press the upper VOLTS/DIV pushbutton 5 once to obtain a 0.2 V deflection factor
as displayed on the crt readout 6. Note that the C H I waveform amplitude
increased 7 .
Operating Instructions-7A42
Now press the DISPLAY pushbutton 8, note that the C H I DISPLAY indicator 0
extinguishes and that the channel 1 waveform 10 is no longer displayed on the
crt. The trigger view trace 11 is now displayed at the bottom of the crt (TRIG
VIEW pushbutton is illuminated 12). Rotate the C H I POSITION control 13 and
notice that it has no affect on the trigger view display 11. Set the C H I POSITION
control 13 to midrange.
CJ
Wtronix 7A42::;a.:'%::F..
Press the DISPLAY pushbutton 14 and observe that the C H I trace 15 is again
displayed and that the TRIG VIEW trace 16 remains displayed at the bottom of the
crt.
I I b j
-
Mtronix 7A421%kci?:"'Ycm
-
Operating Instructions-7A42
-
Press the GND pushbutton 17. Notice that the C H I GND indicator 18 is
illuminated and that the C H I waveform 19 and TRIG VIEW waveform 20 are
replaced by a baseline trace (the C H I input is now referenced to ground).
Press the GND pushbutton 21 again. The C H I GND indicator 22 is now
extinguished and the baseline traces are replaced by the C H I waveform 23 and
the trigger view waveform 24.
Ooeratina Instructions-7A42
Press the PROG pushbutton 25. The pushbutton light is now green which
indicates that the PROG TRIG (Program Trigger) mode has been selected.
Press the CLEAR pushbutton 26 and notice that the C H I TRIGGER FUNCTION
indicator 27 extinguishes, the C H I display 28 free-runs (is not triggered), and
the TRIG VIEW waveform 29 disappears. This happens because there is no
trigger function programmed so the time-base unit does not receive a trigger
signal.
Operating Instructions-7A42
L-
Press the CHI pushbutton 30.The CHI TRIGGER FUNCTION indicator 31 is
now red (indicating an active HI trigger level). Both the C H I waveform 32 and the
TRlG VlEW waveform 33 are again triggered.
31
30
Press the NOT pushbutton 34.Notice that the CHI TRIGGER FUNCTION light
35 is now green, and that the CHI display 36 is triggered on the LO level of the
CHI signal. The TRIG VlEW display is HI (true) when CHI is LO (false).
4285-230
REV JUL 1984
Press the NOT pushbutton 37.Notice that the display is triggered on the C H I HI
level 38, and the C H I TRIGGER FUNCTION indicator is red 39 (two presses of
the NOT pushbutton cancel each other).
Set the time-base Time/Division to 100 ns and rotate the oscilloscope Intensity
control clockwise to view the trace. Press the EDGE pushbutton 40. Notice that
the C H I TRIGGER FUNCTION light is flashing (to indicate edge qualified
triggering) and that the display is triggered on the rising edge of C H I 41. A slight
adjustment of the time-base Trigger Level control may be necessary to obtain a
triggered display. Notice that a narrow TRIG VIEW pulse 42 corresponding to the
rising edge of the C H I waveform can be observed with the time-base Time/Div
control set to 100 ns/div 43.
Operating Instructions-7A42
Press the NOT pushbutton 44, the display is now triggered on the falling edge of
C H I 45 and the C H I TRIGGER FUNCTION indicator 46 is now flashing green.
Press the EDGE pushbutton 47, the display is now triggered on the LO level of
C H I 48. The C H I TRIGGER FUNCTION indicator 49 is no longer flashing (two
presses of the EDGE pushbutton cancel one another).
Ooeratina Instructions-7A42
Press the NOT pushbutton 50 to return the display triggering to the HI level of
C H I 51. Set the time-base Time/Div control to 500 ps 52.
-
I
Press the AND pushbutton 53, then press the CH2 pushbutton 54 and notice that
the CH2 TRIGGER FUNCTION indicator 55 illuminates red ( C H I 56 remains
red). Notice also that the C H I display is not triggered 57. This is because the
TRIGGER FUNCTION requirements ( C H I AND CH2 simultaneously HI) are not
met and therefore the time-base unit does not receive a trigger signal.
Press the CLEAR pushbutton 58 (the C H I and CH2 TRIGGER FUNCTION
indicators 59 extinguish).
Press the C H I pushbutton 60.
The TRIGGER FUNCTION requirements are now met and the C H I display is again
triggered 61.
Operating Instructions-7A42
Press the PROG pushbutton 62 for the PROG CHAN mode (pushbutton light
out). Check the C H I display for a 2 division square-wave signal 63. If necessary
adjust the 7A42 GAIN 64 (front-panel screwdriver adjustment) for exactly 2
divisions of display (position display as necessary).
Select CH2 for display by first pressing the CH2 pushbutton 65 and then pressing
the DISPLAY pushbutton 66. Observe the CH2 base-line trace 67 (position as
necessary). The CH2 DISPLAY indicator 68 is illuminated red.
-
Operating Instructions-7A42
Move the oscilloscope calibrator signal from the C H I input connector 69 to the
CH2 input connector 70.
Notice that the square-wave display 71 is free-running (not triggered). Rotate the
CH2 POSITION control 72 and notice that the square wave is displayed on CH2.
The CH2 display 72 is free-running because there is no TRIGGER FUNCTION 73
selected for CH2 and therefore the time-base unit does not receive a trigger signal.
A base-line trace is now displayed 74 for C H I . The base-line trace is displayed on
the crt because there is no longer a signal applied to the C H I input connector.
Observe that the TRIG VIEW trace waveform is no longer displayed 75, because
there is no longer a true TRIGGER FUNCTION, and therefore the time-base unit
does not receive a trigger signal.
r
ii
Operating Instructions-7A42
To remove the C H I trace from the crt display first press the C H I pushbutton 76
and then press the DISPLAY pushbutton 77. Observe that the C H I trace and
deflection factor readout 78 are n o longer displayed.
To set the TRIGGER FUNCTION requirements for CH2 first, select the Program
Trigger mode by pressing the PROG pushbutton 79 so that it is lit green. Press
the CLEAR pushbutton 80, and then the CH2 pushbutton 81
Notice that the only TRIGGER FUNCTION indicator illuminated is CH2 82 and
that the CH2 display 83 is triggered. The TRIG VIEW waveform is also displayed
84.
ArtekMedia
Digitally signed by ArtekMedia
DN: cn=ArtekMedia, o=ArtekMedia.com, ou, [email protected], c=US
Date: 2010.03.27 21:22:56 -05'00'
Operating Instructions-7A42
Press the NOT pushbutton 85 and notice that the TRIGGER FUNCTION CH2
indicator 86 is green (green TRIGGER FUNCTION indicator denotes an active LO
trigger level). Notice that the CH2 display 87 is triggered on the LO level of the
calibrator signal.
Press the NOT pushbutton 88 again and observe that the TRIGGER FUNCTION
CH2 indicator 89 is red and that the channel 2 display 90 is triggered on the H I
level of the calibrator signal.
Operating Instructions-7A42
To set the vertical deflection factor of CH2, select the Program Channel Mode by
pressing the PROG pushbutton 91 so that the pushbutton light is extinguished,
then press the CH2 pushbutton 92. Press the upper VOLTS/DIV pushbutton 93
once for a deflection factor of 0.2V as displayed on the crt readout 94. Check the
CH2 display for a 2 division square-wave display 95.
To remove the CH2 display from the crt press the DISPLAY pushbutton 96.
Notice that the CH2 DISPLAY indicator 97 extinguishes and the CH2 deflection
factor readout 98 is no longer displayed. Also notice that the TRIG VIEW trace
99 indicates that a trigger is still being produced. This is because even though
CH2 is not displayed, the signal is still applied to the TRIGGER FUNCTION
circuitry.
Move the oscilloscope calibrator signal from the CH2 input connector 100 to the
CH3 input connector 101. Notice that the TRIG VIEW waveform I 0 2 is no longer
displayed.
Select CH3 for display by first pressing the CH3 pushbutton 103 and then the
DISPLAY pushbutton 104.
Notice that the CH3 DISPLAY indicator 105 is illuminated (red) and that the CH3
deflection factor readout 106 is displayed on the crt. Observe that the CH3
display 107 is not triggered. This happens because no TRIGGER FUNCTION
requirements are programmed for CH3.
Operating Instructions-7A42
To set TRIGGER FUNCTION requirements for CH3, select the Program Trigger
mode by pressing the PROG pushbutton 108 so that the pushbutton light is
green. Remove the CH2 TRIGGER FUNCTION by pressing the CLEAR pushbutton
109. Now, press the CH3 pushbutton 110. Notice that the CH3 TRIGGER
FUNCTION indicator 11 1 illuminates red. Notice that the CH3 display 112 is
triggered, and that a TRIG VIEW signal 113 is displayed.
Change the vertical deflection factor of CH3 by selecting the Program Channel
mode (press the PROG pushbutton 114 so that the pushbutton light is
extinguished). Press the upper VOLTS/DIV pushbutton 115 once so that 0.2V is
displayed on the crt readout 116. Check the CH3 trace 117 for a 2 division
display.
Operating Instructions-7A42
-
To display Channel 4, press the CH4 pushbutton 118 and then press the
DISPLAY pushbutton 1 19.
Move the oscilloscope calibrator signal from the CH3 input connector 120 to the
CH4 input connector 121.
Observe that the channel 4 display 122 is not triggered. The CH4 display is not
triggered because no TRIGGER FUNCTION requirements have been selected for
CH4 and therefore no signal is displayed on the TRIG VIEW trace 123. Notice
that because there is no longer a signal applied to CH3, there is no longer a signal
displayed on the CH3 trace 124.
120
1241221234285-249
121
118
119
Operating Instructions-7A42
To remove the CH3 trace 124 from the crt display, first press the CH3 pushbutton
125 and then press the DISPLAY pushbutton 126.
To set TRIGGER FUNCTION requirements for CH4 press the PROG pushbutton
127 (Program Trigger mode). Then remove the CH3 TRIGGER FUNCTION by
pressing the CLEAR pushbutton 128. Now press the CH4 pushbutton 129.
Notice the the CH4 TRIGGER FUNCTION indicator 130 is red (HI) and that the
CH4 square-wave display is triggered 131.
Operating Instructions-7A42
To change the CH4 vertical deflection factor 132, press the PROG pushbutton
133 so that the light is extinguished. Press the CH4 pushbutton 134, and then
press the upper VOLTS/DIV pushbutton 135 once for 0.2V as displayed on the crt
readout 132. Check the CH4 display 136 for a waveform 2 divisions in
amplitude.
Ooeratina Instructions-7A42
EXERCISE 3
LOGIC 'TRIGGERING
Exercise 3 demonstrates the use of the 7A42 TRIGGER FUNCTION feature, using
two of the four input channels (CHI and CH4). C H I and CH4 were arbitrarily
selected; we could have selected any two of the four input channels.
The equipment listed below was used to develop this exercise. Other equipment
may be substituted, for instance: any Tektronix 7000-series time base or
oscilloscope; any Tektronix 10X voltage probe; and any pulse generator with both
a trigger output and a delayable pulse output, capable of producing zero to 2 volts
from the trigger out and 5 volts from the pulse out.
Oscilloscope . . . . . . . . . . . . . . . . . . . . . . . . .Tektronix 7904A, one required.
Time Base.. . . . . . . . . . . . . . . . . . . . . . . . . . .Tektronix 7810, one required.
Subminiature probe
tip-to-bnc adapter.. . . . . . . . Tektronix Part 013-0195-00, two required.
Probe.. . . . . . . . . . . . . . . . . . . . . . . . . . . . . . .Tektronix P6131, two required.
Pulse Generator.. . . . . . . . . . . . . . . . . . . . .Tektronix PG508 installed in a
Tektronix TM503, one each required.
NOTE
First repeat Exercise 1 , then proceed.
Operating Instructions-7A42
Perform the following setup:
OSCILLOSCOPE
TIME-BASE
PULSE
PROBE-
\
BNC-TO-PROBE
TIP ADAPTOR
OSClLLOSCOPE
POWER . . . . . . . . . . . . . . . . . . . . . . . . . . . . . . . . . . . . . . . . . . . . . . . . . . . . . . . . ON
.
.
VERTICAL M O D E . . . . . . . . . . . . . . . . . . . . . . . . . . . . . . . . . . . . . . . . . . . . .LEFT
HORIZONTAL MODE . . . . . . . . . . . . . . . . . . . . . . . . . . . . . . . . . . . . . . . . . . .B.
B TRIGGER S O U R C E . . . . . . . . . . . . . . . . . . . . . . . . . . . . . . . . . . . . LEFT
..
VERT
PULSE GENERATOR
PERIOD . . . . . . . . . . . . . . . . . . . . . . . . . . . . . . . . . . . . . . . . . . . . . . . . . . . . . . 2. PS
DELAY . . . . . . . . . . . . . . . . . . . . . . . . . . . . . . . . . . . . . . . . . . . . . . . . . . . . . . . . 0 . 1 pS
VARIABLE DELAY . . . . . . . . . . . . . . . . . . . . . . . . . . . . . . . . . . . . . . . . . . . . . .CAL
DURATION . . . . . . . . . . . . . . . . . . . . . . . . . . . . . . . . . . . . . . . . . . . . . . .:O.1
. pS
VARIABLE DURATION . . . . . . . . . . . . . . . . . . . . . . . . . . . . . . . . . . . . . . . . . . CAL
TRANSITION TIME . . . . . . . . . . . . . . . . . . . . . . . . . . . . . . . . . . . . . . . . . . . . . . 5. nS
TRIGGERING.. . . . . . . . . . . . . . . . . . . . . . . . . . . . . . . . . . . . . . . . . . . .FREERUN
MODE . . . . . . . . . . . . . . . . . . . . . . . . . . . . . . . . . . . . . . . . . . . . . . . . . . . .DELAYED
.
TlME BASE
TIME/DIV . . . . . . . . . . . . . . . . . . . . . . . . . . . . . . . . . . . . . . . . . . . . . . . . .5.0 0 nS/DIV
TRIGGERING
MODE . . . . . . . . . . . . . . . . . . . . . . . . . . . . . . . . . . . . . . . . . . . . . . . . . . ..AUTO
.
C O U P L I N G . . . . . . . . . . . . . . . . . . . . . . . . . . . . . . . . . . . . . . . . . . . . . . DC
..
SOURCE . . . . . . . . . . . . . . . . . . . . . . . . . . . . . . . . . . . . . . . . . . . . .INTERNAL
LEVEL . . . . . . . . . . . . . . . . . . . . . . . . . . . . . . . . . . . . . . . . . . . . . . . . . .CENTERED
SLOPE . . . . . . . . . . . . . . . . . . . . . . . . . . . . . . . . . . . . . . . . . . . . . . . . . .POSITIVE
.
B DELAY M O D E . . . . . . . . . . . . . . . . . . . . . . . . . . . . . . . . . INDEPENDENT
MAG . . . . . . . . . . . . . . . . . . . . . . . . . . . . . . . .. . . . .. ..
. . . . . . . . . . . . . . X1
HOLDOFF . . . . . . . . . . . . . . . . . . . . . . . . . . . . . . . . . . . . . . . . . . . . . . . . . . .MIN
..
4285.~252
Operating Instructions-7A42
Press the 7A42 upper VOLTS/DIV pushbutton 1 twice for a 1V per division
deflection factor, as shown on the Channel 1 crt readout 2.
Use the C H I POSITION control 4 as necessary to move the square wave 3
(approximately 2.5 divisions in amplitude) so that it can be viewed on the crt,
Press the GND pushbutton 5 and notice that the C H I GND indicator 6 is now
illuminated. Use the C H I POSITION control 7 to move the displayed trace to the
graticule center line 8.
Operating Instructions-7A42
Press the C H I GND pushbutton 9 and notice that the 2.5 division square wave 10
is displayed with its LO level near the ground reference 1 1 .
Press the THRESH pushbutton 1 2 (pushbutton light on)
Press and hold the 7A42 ULEVEL control 13 and notice that the SWITCHING
THRESHOLD display 14 increases from the default setting of 1.4 V. Notice that
when the SWITCHING THRESHOLD display reaches about 2.5 volts (the
amplitude of the displayed square-wave signal 1 5 ) the displayed signal free-runs
(is not triggered).
Press and hold the ULEVEL pushbutton 16 until the display is again triggered.
Press the TTL/ECL pushbutton 17 twice and notice that the SWITCHING
THRESHOLD display 18 defaults to 1.4 V. The C H I deflection factor also defaults
to 5 V/division 19 (the minimum display size available).
Press the CH4 pushbutton 20, then press the DISPLAY pushbutton 21. Notice
that the CH4 pushbutton 20 and the CH4 DISPLAY status lights 22 are now
illuminated red. Notice that the CH4 deflection factor readout 23 is now
displayed.
Operating Instructions-7A42
Press the GND pushbutton 24 and notice that the CH4 GND indicator 25 is
illuminated and that a baseline trace is displayed for CH4. Use the CH4 POSITION
control 26 to move the CH4 trace to the second horizontal graticule line up from
the bottom of the crt 27. This is the CH4 ground reference.
Press the GND pushbutton 2 8 again and notice that the CH4 waveform is again
displayed 29. Notice that CH4 is set for 5 V/div 30.
Set the pulse generator amplitude controls so that the most positive output level is
1 division 31 above the ground reference and the most negative level is at the
ground reference 29.
Operating Instructions-7A42
Set the pulse generator Variable Duration control to display a 500 ns wide pulse on
the CH4 display 32.
Press the PROG pushbutton 33 so that it is illuminated green (Program Trigger
mode). Now press the AND pushbutton 34 then the CH4 pushbutton 35 and
notice that the CH4 TRIGGER FUNCTION indicator 36 is red, indicating active HI
level sensitivity for CH4.
Press the TRlG VlEW pushbutton 37 and notice that the TRlG VlEW trace 3 8 is
now displayed at the bottom of the crt.
Change the timing relationship of the C H I and CH4 displays by varying the pulse
generator Variable Delay control. Notice that during the time that the C H I 39 and
the CH4 40 displayed waveforms are both HI, that the TRlG VlEW display is HI
41. Set the pulse generator Variable Delay control so the falling edge of the C H I
signal occurs while the CH4 signal is HI 42.
Press the NOT pushbutton 43 and notice that the CH4 TRIGGER FUNCTION
indicator 44 changes to green (active LO). Now the 7A42 will produce a trigger
when C H I IS HI and CH4 is LO.
Observe that the TRlG VlEW trace is HI 45 when the C H I display is HI 46 and
the CH4 display is LO 47. Now adjust the pulse generator Variable Delay control
so the HI level of the CH4 signal occurs entirely within the time that the C H I signal
is HI. An adjustment of the time-base Holdoff control may be necessary for
obtaining a stable display.
Set the time-base Holdoff control so that the display is double triggered. A stable
trace can now be obtained by using the 7A42 TRIGGER FILTER control. Rotate
the TRIGGER FILTER control 48 clockwise until the narrower of the two
TRIGGER VIEW pulses 49 disappears 50. Now vary the time-base Holdoff
control and notice that the display 50 is always stable. Return the TRIGGER
FILTER control to the OFF (counterclockwise detent) position.
Operating instructions-7A42
Press the NOT pushbutton 51 and notice that the CH4 TRIGGER FUNCTION
indicator 52 is red (active HI).
Press the EDGE pushbutton 53. Notice that the CH4 TRIGGER FUNCTION
indicator 52 is flashing to indicate EDGE qualified triggering. Set the time-base
Time/Div to 100 ns 54. Notice that the TRIG VlEW display has a narrow pulse 55
coincident with the rising edge 56 of the CH4 display.
Press the NOT pushbutton 57. Observe that the displayed TRIG VlEW pulse 58
now corresponds with the falling edge of the CH4 waveform 59. Adjust the pulse
generator Variable Duration control and notice that the CH4 display becomes
untriggered when the programmed trigger condition no longer exists (CHI AND
NOT CH4 EDGE).
t
L-a
Operating Instructions-7A42
Press the NOT pushbutton 60 and the EDGE pushbutton 61. Notice that the CH4
TRIGGER FUNCTION indicator has stopped flashing 62 (steady red) and that the
TRIG VIEW display 63 is HI during the time that C H I 64 and CH4 65 are both
HI. Set the pulse generator Variable Duration control for a CH4 pulse width of 100
ns (CAL position).
m
L
i,'
1-
Set the time-base Time/Div control to 500 ns. Set the pulse generator to Both
Paired by pressing both the Delayed and Undelayed pushbuttons together. Set the
pulse generator Variable Delay control so that one of the pulses in the CH4 display
66 occurs while the C H I display is HI 67 and the other occurs while C H I display
is LO 68. Press the CLEAR pushbutton 69, the NOT pushbutton 70, the EDGE
pushbutton 71 and the C H I pushbutton 72. Notice that TRIGGER FUNCTION A
is the falling transition of C H I 73.
Press the B pushbutton 74 and then the CH4 pushbutton 75. Adjust the timebase Holdoff control for a stable display. Vary the pulse generator Delay control
and notice that a trigger is displayed on the TRIG VIEW trace 7 6 while the CH4
pulse 77 is HI, regardless of the C H I signal 78 being HI or LO. Set the pulse
generator Variable Delay control so that one of the CH4 pulses is centered during
the time that the C H I signal is LO. Now adjust the time-base Holdoff control for an
unstable display 79.
Operating Instructions-7A42
Press the A THEN B pushbutton 80 and while varying the pulse generator Delay
control, notice that a trigger occurs on the TRIG VIEW trace 81 only on the
leading edge of the first CH4 pulse 82 following the falling edge of the C H I trace
83. The display remains stable regardless of the setting of the time-base Holdoff
control.
L-
i'
i"
i?
i'
i'
i"
i'
J
i
i."
Operating Instructions-7A42
DETAILED OPERATING INFORMATION
Detailed information concerning the controls and operation of the 7A42 is given in
the following pages.
SELF-TEST
NOTE
Disconnect any cables from the RESET, EXT CLOCK, and TIP inputs
while Self Test is in progress (an external impedance on these
connectors may cause a Self Test failure).
When power is applied to the 7A42 an internal self-test sequence is automatically
performed. While the self-test sequence is in progress the mainframe crt readout
shows 7A42 TEST BUSY, see Figure 2-8. When the self-test sequence is finished,
the message 7A42 TEST COMPLETE appears momentarily on the mainframe
oscilloscope crt, 3s shown in Figure 2-9. During the self-test sequence some of the
Flgure 2-8. Self-teat In progrerr.
Figure 2-9. Self-test finished.
REV JUL 1984
Operating Instructions-7A42
INDICATORS WILL
LIGHT BOTH
iy
i"
is
E3
is
i'
i'
E~
E
i"
i~
'
is
i"
i'
A
4285-290
Figure 2-10. 7A42 front-panel drawing showing pushbuttons and indicators that are
illuminated during the self-test sequence.
front-panel pushbuttons and all of the indicators are momentarily illuminated to
verify their operation. Figure 2-10 shows which ones should light.
4
s
r:
The SWITCHING THESHOLD VOLTS indicator will display 8.8.8.8. during the first
part of the self-test sequence to verify that all segments operate. If there are no
self test failures, the Firmware Version number will then be displayed for a few
seconds before the self test is completed.
Self-test failures are indicated by three different methods: 1. on the mainframe crt,
2. on the 7A42 SWITCHING THRESHOLD display, and 3. on the TRIGGER
FUNCTION indicators. Figure 2-11 illustrates a typical self-test failure, indicated
by the three display methods. Displaying the self-test failure messages in three
different ways increases the chance that the failure message will be displayed,
even if the failure affects the operation of two of the three display methods.
The TRIGGER FUNCTION display indicates a self-test failure with the color red
and self-test passed with the color green. If a failure occurs, the self-test sequence
will stop.
REV JUL 1984
2-49
The SWITCHING THRESHOLD VOLTS indicator and mainframe crt readout
display indicate a self-test failure with a numeric code. All of the self-test code
numbers are listed in Table 2-1, along with the nature of the failure and an
explanation of the severity of the failure. The severity information is helpful in
determining if the 7A42 can still be used for the intended purpose or whether
repair is necessary. To continue the self-test sequence, press any of the 7A42
front-panel pushbuttons.
NOTE
There should be no connections to the RESET EXT CLOCK, and TIP inputs
during the time Self Test is running.
NOTE
Before the 7A42 Self Test feature can verify that the 7A42 readout circuitry is
operating properly, mainframe crt readout system must be set to the "Freerun"
(non-Gated) mode.
I
I
DISPLAY MEDIA
I
I
TYPICAL DISPLAY
TRIGGER FUNCTION LEDS
GREEN = TEST PASSED
RED = TEST FAILED
0
SWITCHING THRESHOLD
VOLTAGE MONITOR
(Numerlc Dlsplq)
LEVEL
Q
SWITCHING THRESHOLD
VOLTS
CRT READOUT
(Numerlc Dlsplq)
NOTE: Durlng some self
tests, the crt reedout Is
unstable; this condltlon
Is normal.
'
FAILURE
NUMBER
Flgure 2-11. Typlcal self-test fallure display.
2-50
REV JUL 1984
t:
Operating Instructions-7A42
TABLE 2-1
7A42 Self-Test Fallure Messages
r
z"
i'
m
.El
TRIGGER FUNCTION
(LED display)
CHI,
first
column
VOLTS and crt readout display
01 to 04
ROM
/
ROM
,
05 to 06
I
RAM
first
07 to 09
first
column
first
column.
CHI,
second
column
processor
control
logic.
I
Severity of failure;
functional usablllty
of Instrument
Possible loss
of front-panel
control; repair
before use.
Microprocessor
control
logic.
7
PROBE
OFFSET
PROBE
OFFSET
Crt
display
and
readout
trace
display.
Avoid use of
probe offset
feature. 7A42
otherwise fully
functional. Repair
when convenient.
Channels 1
through 4 may
not be displayable.
Repair before use.
Crt readout may
not be functioning.
Cause could be
lack of mainframe
readout. Repair
when convenient.
CH2,
second
column.
Trigger
1
l4
Trigger
control.
Some or all trigger
functions may not
be operational.
Repair before use.
Trigger
logic.
Some channels
may not trigger
properly. Repair
before use.
k
Operating Instructions-7A42
L2
TABLE 2-1 (CONT)
7A42 Self-Test Failure Messages
TRIGGER FUNCTION
(LED display)
lndlcation
CH2,
second
column
(cont)
Test
Trigger
(cont)
SWITCHING THRESHOLD
VOLTS and crt readout display
Indication
severity of failure;
usability
of instrument
Test
Boolean
logic.
Some trigger
functions may not
be operational.
Repair before use.
A THEN B
Avoid use of
A THEN B mode
Repair when
convenient.
CH3,
second
column
Edge
detectors
Edge
detectors
Avoid use of
Edge-qualified
triggering mode
and external
clock. Repair
when convenient.
CH4,
second
column.
EXT
CLOCK
EXT
CLOCK
Avoid use of
external clock
Repair when
convenient.
FRONT-PANEL INITIALIZATION
While getting acquainted with the 7A42, it might be desirable to begin operation
with the front-panel controls set to a known state (initialized). The front panel will
initialize to the control settings listed in Table 2-2 and as shown in Figure 2-12. To
initialize the 7A42 front-panel control settings, see Exercise 1 in the GetAcquainted Exercises of this section.
BATTERY BACKUP
Upon completion of the self-test sequence, the 7A42 battery backup feature
restores the 7A42 front-panel control settings to the same settings that were
present when the power was turned off.
Operating Instructions-7A42
TABLE 2-2
7A42 Front-Panel Control Settings When Initialized
Control
Control Setting
I
I
PROG CHANnRIG
Programmable Channel
Program Channel (light off)
C H I only
DISPLAY
C H I only
I
VOLTS/DIV (CHI through CH4)
Preset to 0.5 V/Div at bnc input
TTL/ECL ( C H I through CH4)
TTL
1
GND ( C H I through CH4)
Ungrounded
1Mn/50n (CHI through CH4)
1Mn
ALT/CHOP
ALT
~
~p
TRIG VIEW
Off
I
I
SWITCHING THRESHOLD voltage
( C H I though CH4)
Preset TTL (+1.4V); display off
----
THRESH
Off
I
+--
PROBE OFFSET
A TRIGGER FUNCTION
B
TRIGGER FUNCTION
Off
I
C H I (HI)
Cleared
TRIGGER MODE
TRIGGER FUNCTION
A THEN B
I
-
1
I
EXT CLK SYNC
External Clock Slope
--
Off
Off
Off
NOTE
Controls not listed above are not preset.
Operating Instructions-7A42
The battery-backup feature can be defeated if so desired; refer qualified service
personnel to the 7A42 Service Manual. If the battery-backup feature has been
disabled, the 7A42 front-panel control settings will return, at power up, to the
settings listed i n Table 2-2, and as shown in Figure 2-12.
Flgure 2-12. 7A42 front-panel control lights when initialized.
OPERATOR MESSAGES
Operator Messages occur under several operating conditions and are
accompanied by an audible beep. When they occur, the mainframe readout will
display a mnemonic at the top of the crt and a number code at the bottom. The
mnemonic is an abbreviated explanation of the operating condition which caused
the message to be displayed. The code number references the message t o Table
2-3 which gives a more complete explanation of the operating condition.
NOTE
The audible beep can be turned off; refer qualified service personnel
to the 7A42 Service Manual (Volume 1).
Operating Instructions-7A42
TABLE 2-3
7A42 Operator Message Summary
Code
Mnemonic
I
1
Description and Correctlve Action
I
OVERLOAD
A channel input is overloaded. Remove the overvoltage
and unground the channels to continue operation.
OFFSET ACQ
A key was pressed while Probe Offset acquisition was
in progress. Push PROBE OFFSET once to lock in
acquired value, or twice to turn PROBE OFFSET off,
before continuing operation.
3
PUSH PROG
Key(s) pressed is/are active only in PROG CHAN
mode. To use key, first press PROG CHAN.
4
PUSH PROG
Key(s) pressed is/are active only in PROG TRIG
mode. To use key, first press PROG TRIG.
While programming a trigger function, a C H I ,
CH2, CH3, CH4, NOT, or EDGE was pressed when
an AND or an OR key was expected.
7
1
CH KEY REQ
While programming a trigger function, two Boolean
operator keys (AND or OR) were pressed without
pressing a channel key (CHI, CH2, CH3, or CH4) in
between. Channel keys and Boolean operator keys
should be pressed alternately, e.g., C H I AND NOT
CH2 OR CH3 EDGE.
OR IS FULL
The OR key was pressed again. Only one TRIGGER
FUNCTION OR is allowed.
EXTCLK ON
The EDGE key was pressed while in the EXT CLOCK
SYNC mode. The selection of an EDGE sensitive
channel and the EXT CLOCK SYNC mode are mutually
exclusive. If EDGE sensitivity is desired, first turn
off the EXT CLOCK SYNC mode.
EXTCLK REQ
The EXT CLOCK slope key was pressed when the EXT
CLOCK SYNC button was turned off. The EXT CLOCK
SYNC slope key is operational only when the EXT
CLOCK SYNC button is turned on.
EDGE IS ON
The EXT CLOCK SYNC key was pressed when one of
the trigger functions (either A, B, or both) already
have an EDGE sensitive channel. Channel EDGE
sensitivity and EXT CLOCK are mutually exclusive.
If EXT CLOCK SYNC operation is desired, first CLEAR
the channel EDGE sensitive trigger function.
Operating instructions-7A42
TABLE 2-3 (CONT)
7A42 Operator Message Summary
Code
Mnemonic
THRESH R E 0
+I NO F U N C A
13
Description and Corrective Action
1
I
NO FUNC B
Either a LEVEL key or the PROBE OFFSET key was
pressed without pressing the THRESH key first.
The THRESH key must be lit to change a threshold
level or acquire a probe offset.
The A THEN B key was pressed without having
programmed function A; or while in A THEN I3 mode
function A was CLEARed. Both trigger functions
(A and B) must be programmed for proper A THEN B
operation. Program function A; then proceed.
The A THEN B button was pressed without having
programmed function B; or while in A THEN B mode
function B was CLEARed. Both trigger functions
(A and B) must be programmed for proper A THEN B
operation. Program function B; then continue.
WARNING BEEPS: Although no messages are displayed, short warning beeps are
issued to indicate "out of range." A beep will sound when the
VOLTS/DIV keys are pushed beyond the availableselectionsor
when the variable threshold level reaches its limits.
NOTE
The audible beep can be turned off; refer qualified Service Personnel
to the 7A42 Service Manual (Volume 1).
SIGNAL CONNECTIONS
Generally, probes offer the most convenient means of connecting input signals to
the instrument. They are shielded to prevent electromagnetic interference. The
10X probe offers a high input impedance to minimize circuit loading when
measurements are made; signal amplitude is attenuated by a factor of 10 by the
probe, so the scale-factor readout is switched to indicate the correct scale factor.
The limited TTL/ECL VOLTS/DIV ranges require that attenuation be used to
obtain useful signal levels at the 7A42 channel inputs. Ten times probes are
recommended on the channel inputs to attenuate TTL and ECL signals; otherwise
10X attenuators should be used. When 10X probes are used the VOLTS/DIV and
SWITCHING THRESHOLD are automatically compensated to reflect the
characteristics at the probe tip.
Operating Instructions-7A42
RECOMMENDED PROBES
The Tektronix P6131 and P6230 probes are recommended for use with the 7A42.
The Tektronix P6131 is a 10X passive probe with 10 megohm at 10.8 picofarads. A
variety of probe tips (hooks, IC grabber and ground leads) are available with this
probe.
The Tektronix P6230 is an active 450 ohm bias/offset probe which is especially
useful with ECL logic circuits due to its minimal circuit loading characteristics. For
information on how to use the P6230 probe, refer to the Application section in this
manual.
Probe Compensation
Maladjustment of probe compensation is one source of measurement error. Most
10X passive high impedance probes are equipped with a compensation
adjustment. To ensure optimum measurement accuracy, always compensate the
oscilloscope probe before making measurements. Refer to the probe instruction
manual for probe adjustment procedure.
For optimum 7A42/P6131 performance the P6131 should be high-frequency
compensated while connected to the 7A42; see the P6131 probe manual for highfrequency compensation adjustment procedure.
COAXIAL CABLES
Although the 7A42 input channel VOLT/DIV ranges are intended to be used with
10X probes, coaxial cables may be used for signal connections. When coaxial
cables are used a 10X attenuator must be used t o reduce TTL/ECL signals to
usable levels. When 10X attenuators are used the VOLTS/DIV and SWITCHING
THRESHOLD readings are not automatically compensated and will indicate values
a factor of 10 lower than actual.
Cables also may be used to connect signals to the input connectors, but they may
have considerable effect on the accuracy of the displayed waveform. To maintain
the original frequency characteristics of an applied signal, use only low-loss, 50
ohm, high-quality coaxial cable. Cables should be terminated into 50 ohms. The
7A42 has an internal 50 ohm termination for each input channel which can be
selected from the front-panel.
CRT READOUT
Figures 2-13 and 2-14 show the 7A42 scale factor readout location. Figure 2-14
was taken with XI0 probes attached to the channel inputs. Figure 2-13 was taken
without probes attached to the channel inputs and without changing the channel
VOLTS/DIV settings from those of Figure 2-14.
Operating Instructions-7A42
CHI
CH3
Tri frrL
CH2
ECL .
CH4
ECL
4285-204
Figure 2-13. Channel readout display.
CHI
TTL
CH3
TTL
CH2
ECL
CH4
ECL
4285-218
Figure 2-14. Channel readout display with 10X probes attached to Inputs of CHI, CH2, CH3,
and CH4.
2-58
REV JUL 1984
Operating Instructions-7A42
NOTE
/
L--
The front-panel controls, indicators and connectors drawing, Figure
2-7 in this section of the manual, can be unfolded and referred to
while reading the following text.
i"
i?
i'
POSITION
i"
i'
A POSITION control is provided for each of the four channels. The control
vertically positions the displayed trace on the host mainframe crt (clockwise
rotation moves the trace upward).
This screwdriver control adjusts the 7A42 display output (of all four channels) to
match the vertical gain tolerance of any Tektronix 7000-series mainframe.
I xi
1:
i'
i'
STATUS INDICATORS (CHI, CH2, CH3, CH4)
Each channel has four status indicators (DISPLAY, E c L n T L , GND and 5 o n / l M n ) .
These indicators show the status of each individual channel. A description of each
indicator is given below.
DISPLAY
When the DISPLAY indicator is lit, the associated channel is displayed on the
mainframe crt. If the indicator is extinguished, any signal applied to the channel
input will still be routed to the TRIGGER FUNCTION circuitry, providing the GND
indicator is not lit.
ECL/TTL
When the ECLTTTL indicator is lit, the channel threshold voltage range and
deflection factors match the voltage levels and signal amplitudes of the TTL logic
family. When the indicator is extinguished the threshold voltage range and
deflection factors are in accord with the ECL logic family.
GND
When the GND indicator is lit, the input to the selected channel amplifier is
grounded and the signal path from the front-panel bnc connector to the amplifier
is open. An external signal applied to this channel is not terminated (it is open).
Grounded channel traces are still displayed to enable the ground reference
position to be established.
When the 5 0 f l / l M f l indicator is lit, the input impedance of the associated channel
is one megohm. When the indicator is extinguished the input impedance is 50
Operating Instructions-7A42
The ALT/CHOP pushbutton selects either alternate or chopped as the display
mode (for all channels). When the ALT/CHOP indicator is lit, the channels
selected for display are alternately displayed on the mainframe oscilloscope crt
after each sweep of the time base. When the ALT/CHOP indicator is extinguished,
the display is electronically switched between channels at about a one-megahertz
rate. In general, the ALT mode provides the best display at sweep rates of 100
microseconds/division and faster while the CHOP mode provides the best display
at sweep rates slower than about 200 microseconds/division or whenever multiple
single-shot signals are to be photographed.
TRIGGER FUNCTION
The two-color TRIGGER FUNCTION indicators display the Boolean trigger
function. The color red indicates a HI (logic 1, or higher than threshold voltage)
condition. Green indicates LO (logic 0, or lower than threshold voltage) condition.
An indicator that is not lit represents the X (don't care) condition. A red flashing or
green flashing indicator signifies that the channel is edge sensitive (rising, red; or
falling, green) as opposed to being level sensitive.
The TRIGGER FUNCTION indicators are arranged in two columns of four each.
Each column represents a logical AND function, (a Boolean product of the four
input channels). After the AND functions are performed, the columns are ORed
together to form the complete Boolean TRIGGER FUNCTION. Thus each
TRIGGER FUNCTION is equivalent to two four-bit word recognizers ORed
together.
There is one exception to this convention. While an extinguished indicator
represents the "don't care" condition, an entire column that is not lit is considered
to be inactive. If an unlit column were interpreted as a don't care, that column
ORed with any other column would always be true.
A TRIGGER FUNCTION AND B TRIGGER FUNCTION
There are two separate TRIGGER FUNCTIONS available, A and B. They are
identical; either may be used. One pushbutton will always be lit to indicate which
function is displayed by the TRIGGER FUNCTION indicators and therefore, the
function that will produce the trigger output. The other function is stored in
memory and may be called up by pressing that pushbutton. The programming or
clearing of the function displayed will not affect the other function.
A THEN B NESTED TRIGGERING
One level of nested triggering is available when this mode is used. The trigger
output to the mainframe time base occurs only after the triggering is first armed by
the occurrence of function A. The trigger output then takes place with the next
occurrence of function B. After this cycle, the 7A42 will begin to look for another
occurrence of function A, to begin the next nested trigger cycle.
Operating Instructions-7A42
-
TRlG VlEW
The TRlG VlEW trace provides a visible replica of the trigger output signal as it is
processed by the 7A42 according to the programmed TRIGGER FUNCTION. This
trigger signal is also sent to the time base. When the EXT CLOCK SYNC
pushbutton switch is lit, the TRlG VlEW trace displays the external clock input
signal.
The TRlG VlEW trace is normally located near the bottom of the crt display. There
is an internal provision for repositioning the trace; to reposition the TRlG VlEW
trace refer qualified service personnel to the 7A42 Service Manual. If all of the
channel displays are turned off the TRlG VlEW trace will be on and cannot be
turned off.
TRIGGER FILTER
The TRIGGER FILTER control provides a selectable amount of delay between the
time that the TRIGGER FUNCTION is recognized as true, and the time that the
Trigger Output is sent to the time base to trigger the sweep. Thus the TRIGGER
FILTER will inhibit trigger events that are shorter in duration than those for which
the control is set. A longer trigger event will pass through the TRIGGER FILTER
and can cause a triggered sweep as well as a signal at the front-panel TRlG OUT
connector. The TRIGGER FILTER control can be used only with level-sensitive
trigger functions (it is inactive with any TRIGGER FUNCTION that contains an
edge-sensitive channel). The TRIGGER FILTER operates independently on
TRIGGER FUNCTION A and TRIGGER FUNCTION B. In the A THEN B mode, the
TRIGGER FILTER may be inactive on function A because of an edge sensitive
channel, while at the same time be active on function 6 . The TRIGGER FILTER is
not active when in the EXT CLOCK SYNC mode or when the control is in the
counterclockwise detent (OFF) position.
EXT CLOCK SYNC
The EXT CLK SYNC pushbutton allows the 7A42 to be used in a synchronous
mode of operation. The trigger output (in either A. B, or A THEN B mode) will
occur only on the selected edge of an external clock signal, providing the
TRIGGER FUNCTION is also true at that time. If TRlG VlEW is selected, a replica
of the external clock input signal having a fixed amplitude and position will be
displayed on the TRlG VlEW trace.
SLOPE SELECT
Either the rising or falling edge of an external clock signal can be used to qualify
the TRIGGER FUNCTION. When the Slope Select pushbutton is lit the TRIGGER
FUNCTION is qualified on the rising transition of the external clock signal.
Operating Instructions-7A42
EXT CLOCK INPUT
The EXT CLOCK INPUT is directly compatible with either TTL or ECL logic
families. The instrument is shipped from the factory in the TTL mode. To
determine which mode is selected (ECL or TTL), proceed as follows:
1. Remove any input signal from the EXT CLOCK INPUT
2.
Press the PROG pushbutton so that it is lit green.
3. Press the CLEAR pushbutton, to eliminate any existing TRIGGER
FUNCTION.
4. Press the TRIG VIEW pushbutton so that the pushbutton light is on and the
trigger view trace is displayed on the mainframe crt.
5. Observe the trigger view trace as the EXT CLOCK SYNC pushbutton is
pressed.
If the trigger view trace moves upward approximately half a division (when the
EXT CLOCK SYNC push-button is lit) the selected mode is TTL. If the trigger View
trace does not shift, the mode is ECL. To select the ECL mode refer qualified
service personnel to the 7A42 Service Manual. The EXT CLOCK INPUT can be
used with a 1X probe in TTL mode, or can be directly connected to the logic
circuit in either TTL or ECL mode; 10X probes should not be used with this input.
RESET INPUT
The RESET INPUT allows the operator to apply a signal to inhibit the trigger
output. Applying a positive 0.8 volt level to the RESET input will prevent the
programmed TRIGGER FUNCTION from being recognized as true. The result is
that no trigger output signal will occur until the reset voltage is removed.
If the A THEN B nested-trigger mode is selected, TRIGGER FUNCTION A has
occurred, and TRIGGER FUNCTION B has not occurred; the RESET s~gnalwill
reset function A (the armed condition) as well as inhibit function 8. Therefore, the
RESET input can be used to enhance the A THEN B nested trigger operation by
providing an "A THEN B unless RESET" feature.
TRIGGER OUT
The TRIGGER OUT bnc connector is a trigger output signal source. This signal
can be used to synchronize other equipment with the 7A42 TRIGGER FUNCTION.
The output of the TRIGGER FUNCTION is determined by the setting of the A, B.
or A THEN B pushbuttons, the programming of the A and B functions, and the
channel input signals. Timing diagrams for a typical set of conditions are shown in
Figures 2-15 and 2-16.
*
I
f =CHI AND NOT CH2 AND NOT CH3
I
I
I I
I 1
I I
CHI
I I
I I
I I
INPUT
SIGNALS
I I
CH3
OUT
CONNECTOR
I
II
I
I
II
II
1
I I
I I
I1
II
II
II
I
11
11
I I
I
II
4285-210
Figure 2-15. Tlmlng dlagram showing the relatlonshlp of the TRIGGER OUT waveform to the
lnput slgnals.
--
-
-
f = NOT CHI AND NOT CH2 AND EDGE CH3
I
C H 3 1
I
I
CONNECTOR
I
m4285-21 1
Flgure 2-16. Tlmlng dlagram depectlng the TRIGGER OUT waveform, as a result of the
TRIGGER FUNCTION reactlng to the Input signals.
Two modes of operation can be selected for the TRIGGER Out connector; Normal,
and A THEN B Gate. In Normal Mode, the A THEN B Trigger Out is a pulse,
regardless of the duration of Trigger Function B. A typical timing diagram
depicting the Normal and A THEN B Gate modes, is shown in Figure 2-17. For
selection of either mode refer qualified service personnel to the 7A42 Service
Manual. The TRIGGER OUT signal levels are compatible with the RESET input
levels.
Operating Instructions-7A42
fa
= C H I AND CH2
CH2 AND NOT EDGE CH3
fh =
CHI
I '
I
I
'
I1 I
I
1
I
I
SIGNALS
I
I l
I
CH3
I
I
.b
TRIGGER
I
1
I I I
I1 1
1
I
I
I I
I
I
I
I1 I
I I I
I I I
ARMD
+
1
I
I
1 1
I
I
I
I
I
I
I
I
I
I
n n
rRMAL
CONNECTOR A THEN B
GATE
OUT
1
I
1
I
I I
I
1
TRIGGER*
I
I
4285-212
Figure 2-17. Example of A THEN 8, level and EDGE sensitive TRIGGER FUNCTION, showlng
the Normal and A THEN B Gate waveform alternatives.
PROG CHANITRIG
The PROG CHAN/TRIG pushbutton selects one of two modes, PROG CHAN
(program channel) or PROG TRIG (program trigger). In the PROG CHAN mode
the DISPLAY, VOLTS/DIV, GND, 1Mf2/50f2, TTL/ECL, and THRESH pushbuttons
are activated. These controls are used with the CHI, CH2. CH3 and CH4
pushbuttons to individually set the channel status. In the PROG TRIG mode
CLEAR, AND, OR, NOT, and EDGE pushbutton controls are activated and are
used with the CHI, CH2, CH3, and CH4 pushbutton controls to program a
Boolean equation into the A TRIGGER FUNCTION or B TRIGGER FUNCTION.
The following text discusses first the PROG CHAN controls and then the PROG
TRlG controls.
PROGRAM CHANNEL MODE
The TTL/ECL, VOLTS/DIV, GND. 1Mf2/50f2, and DISPLAY, controls are active in
the PROG CHAN mode. These controls are used with the CHI, CH2, CH3, and
CH4 pushbuttons to set the status of each channel.
Ooeratina Instructions-7A42
CHI, CH2, CH3, CH4. In the PROG CHAN mode the C H I , CH2, CH3, and CH4
pushbuttons are used to select and indicate the channel which will respond to the
TTL/ECL, VOLTS/DIV, GND, 1Mfl/50n, DISPLAY and THRESH pushbutton
controls.
DISPLAY. The DISPLAY pushbutton turns the selected channel display on or off.
In the off position the trace is removed from the crt display. However, the signal
applied to that channel is still routed to the TRIGGER FUNCTION circuitry.
providing the channel GND indicator is not lit.
TTL/ECL. The TTL/ECL pushbutton offers a threshold range and selection of
display sensitivities appropriate for either TTL or ECL logic families.
VOLTS/DIV. The VOLTS/DIV pushbuttons set the scale factor of the selected
channel. The scale factor is displayed on the mainframe crt readout; refer to CRT
Readout in this section. Three sensitivities are available in each logic family; see
Table 2-4. To increase the sensitivity (display size) press the upper button.
TABLE 2-4
Channel Volts/Dlvislon Ranges
Logic Family
1
Through a 10X Probe
At The BNC
I
I
ECL
1. 2, 5 V/Div
. l , .2. .5 V/Div
TTL (CMOS)
1
I
20, 50, 100 mV/Div
1
.2, .5, 1 V/Div
GND. The GND pushbutton connects the selected channel amplifier input t o
ground as a reference for trace positioning. However, the incoming signal is not
grounded; it is disconnected from the amplifier input.
lMn/50n. The l M W 5 0 f l pushbutton selects the input impedance of the selected
channel. The available impedances are 1 megohm in parallel with about 15 pF, or
50 ohms.
THRESH. Each of the four input channels have two possible preset threshold
voltages, +1.4 volts for the TTL mode and -1.30 volts for the ECL mode. In
addition, these threshold voltages can be altered using the LEVEL0 or LEVEL0
pushbuttons. The SWITCHING THRESHOLD VOLTS display will indicate the
threshold voltage present at each of the channel inputs. To turn the SWITCHING
THRESHOLD VOLTS display on, press the THRESH pushbutton (the light should
be on).
The SWITCHING THRESHOLD VOLTS display corresponds to the channel
pushbutton that is lit (CHI, CH2. CH3, or CH4). While the button is lit, the actual
threshold voltage for the channel is indicated in the seven-segment LED display.
For each logic family there are internally preset thresholds that can be altered by
pressing either the LEVELO or LEVELO button. A single push changes the
threshold by one increment. When either LEVEL button is held down the rate
Operating Instructions-7A42
accelerates. Each channel's threshold level is maintained when THRESH is pushed
again to turn off the seven-segment display and button light. However, for a
particular channel, the variable setting (if any) will be cancelled (reverts to the
preset value) when the TTL/ECL selection is changed.
PROBE OFFSET. The PROBE OFFSET control provides a means of acquiring
the offset voltage introduced into the signal path by the P6230 (450 ohm) active
probe. In order to minimize circuit loading, it is desirable to set the probe
offset/bias near the logic zero level or the termination voltage of the ECL circuit
being probed. To acquire the PROBE OFFSET, THRESH must be selected and the
channel (1 through 4) to which the P6230 is connected must be selected. When the
PROBE OFFSET pushbutton is pressed it will light red, and the SWITCHING
THRESHOLD VOLTS display becomes a DVM that reads the amount of probe
offset. To measure and acquire the probe offset voltage, touch the probe tip t o the
front-panel jack labeled TIP, then set the offset adjustment on the probe case to
the voltage desired. While still holding the probe tip to the TIP jack, push the
PROBE OFFSET button once again to acquire this offset measurement into the
7A42. The probe offset button will now light green and the probe tip may now be
removed. The offset measurement remains in the display which is again indicating
the SWITCHING THRESHOLD voltage. At this point, the SWITCHING
THRESHOLD can be adjusted to any other value (independent of the probe offset)
by using the LEVEL buttons. Pressing the PROBE OFFSET button once more
turns off the lit button, clears the acquired offset measurement, and reestablishes
the preset threshold. The 7A42 PROBE OFFSET feature is appropriate for use only
with the P6230 probe.
The acquired PROBE OFFSET voltage, whether zero or otherwise, is maintained
when the THRESH button is turned off or while threshold information of another
channel is being displayed. That value is also maintained if the logic family is
changed; the switching threshold reverts to the probe offset voltage. If a channel
has a non-zero offset, the PROBE OFFSET button will be lit green when that
channel is selected (PROG CHAN mode) as a reminder of the offset status.
LEVEL. The LEVEL0 and LEVELO controls are used to set the threshold voltage
of each channel to a value other than the preset threshold voltage. These controls
are active only in the PROG CHAN mode and when the THRESH pushbutton
switch is lit.
When either the LEVEL0 or LEVELO button is held, the variable threshold
changes at an accelerating rate, pausing momentarily at the preset value. (There
will be no pause if a probe offset has been acquired for the channel.)
The SWITCHING THRESHOLD VOLTS display indicates the preset threshold
voltage or the variable threshold voltage set by the LEVEL
and LEVEL
controls, The CHI, CH2, CH3, and CH4 pushbuttons indicate which channel's
threshold voltage is being monitored.
When using the P6230, remember the first step is to acquire the probe offset value
into the 7A42. Next set the Switching Threshold Voltage with the LEVEL buttons to
REV JUL 1984
a value appropriate for the logic family under test. The Switching Threshold
Voltage at the probe tip is indicated in the numerical display.
PROGRAM TRIGGER MODE
The CHI, CH2, CH3, CH4, CLEAR, AND, OR, NOT, and EDGE pushbuttons are
active in the PROG TRIG mode. These controls are explained next.
CHI, CH2, CH3, and CH4. The CHI, CH2. CH3, and CH4 pushbutton switches
are used with the AND, OR and NOT pushbuttons to program the TRIGGER
FUNCTION, (e.g., keystroke sequence; CHI AND CH2 AND CH3 OR CH4).
AND. The AND pushbutton enters the logical AND operator into the Boolean
TRIGGER FUNCTION. AND serves as a delimiter for the CHI through CH4, NOT,
and EDGE pushbuttons.
OR. The OR pushbutton enters the logical OR operator into the Boolean
TRIGGER FUNCTION. OR also serves as a delimiter for the C H I through CH4,
NOT, and EDGE pushbuttons.
CLEAR. The CLEAR pushbutton erases the TRIGGER FUNCTION program
currently displayed by the TRIGGER !=UNCTION indicators. The other stored
TRIGGER FUNCTION program remains unaffected by the CLEAR operation (see
A, B and A THEN B).
NOT. The NOT pushbutton is used to negate a variable in the Boolean TRIGGER
FUNCTION. For example, if CHI is entered into the TRIGGER FUNCTION display
(that is, CHI is an active HI, red), pressing the NOT key will change it to an active
LO (green). Successively pressing the NOT key will alternately change the CHI
indicator from HI to LO; this sequence will continue until a delimiter is entered
(AND or OR).
EDGE. The EDGE pushbutton is used t o change a level sensitive variable in a
Boolean TRIGGER FUNCTION from level to edge sensitive. The NOT pushbutton
is used with the EDGE pushbutton to select falling edge sensitivity. For example,
the keystroke sequence CHI EDGE programs the 7A42 to trigger on the rising
transition of CHI; the keystroke sequence CH3 NOT EDGE sets it to trigger on the
falling transition of CH3. Pressing the EDGE key twice charges the channel to
edge-sensitive and back to level-sensitive, similar to the operation of the NOT key.
The 7A42 allows one independent EDGE-sensitive channel per product in each
TRIGGER FUNCTION (A and B).
NOTE
The channel ( C H I , CH2, CH3 or CH4), EDGE, and NOT keys can be
entered in any order. For instance, the keystroke sequences C H I
NOT EDGE, NOT C H I EDGE,'and EDGE NOT C H I are equivalent.
If the product already contains one edge-sensitivechannelat the time a secondedgesensitive channel is entered into the same product, the last entered channel will
REV JUL 1984
2-67
Operating Instructions-7A42
d
.
J
9
receive the edge-sensitive status. The previous edge-sensitive channel will become
level-sensitive only. This is because only one edge-sensitive channel per product is
allowed. If the last entered channel is converted back to level-sensitive, the previous
edge-sensitive channel will again become edge-sensitive.
ADD JUL 1984
5
4
g
SECTION 3 CONTENTS
APPLICATION 1-DISPLAYING FOUR CHANNELS OF DATA
WITH THE 7A42 . . . . . . . . . . . . . . . . . . . . . . . . . . . . . . . . . . ..3-1
.
APPLICATION 2-SOLVING ABNORMAL PULSE PROBLEMS
WITH THE 7A42 . . . . . . . . . . . . . . . . . . . . . . . . . . . . . . . . . . .3-4
..
APPLICATION 3-ADDING EDGE SENSITIVITY TO YOUR
.
TRIGGER FUNCTION . . . . . . . . . . . . . . . . . . . . . . . . . . . . . ..3-6
APPLICATION 4-DETECTING AND DISPLAYING BUS
.
CONTENTION . . . . . . . . . . . . . . . . . . . . . . . . . . . . . . . . . . . . . ..3-9
APPLICATION 5-ENHANCED NESTED TRIGGERING USING THE
7D15 225 MHz UNIVERSAL COUNTER/I-IMER . . . . . 3-1 1
APPLICATION 6-OFFSET PROBING TECHNIQUES FOR
HIGH SPEED LOGIC SYSTEMS.. . . . . . . . . . . . . . . . . . . 3-14
APPLICATION 7-USING THE 7A42 WITH THE 7854 . . . . . . . . . . . . . . . . 3-17
APPLICATION 8-USING THE 7A42 WITH THE 7104 . . . . . . . . . . . . . . . . 3-18
APPLICATIONS
In this section we give some examples of how your 7A42 Logic Triggered Vertical
Amplifier can be used in specific applications. These applications provide
sufficient detail for you to adapt them to other related applications. Contact your
Tektronix Field Office or representative for assistance in making measurements
that are not described in this manual.
APPLICATION 1
DISPLAYING FOUR CHANNELS OF DATA
WITH THE 7A42
High-speed delay comparisons and timing measurements on data lines are often
difficult to accomplish with a high degree of accuracy. However, with less than 200
picoseconds time delay between any of the four input channels, the 7A42 makes
these measurements with ease and confidence.
For example, the combinational triggering functions provided on the 7A42 front
panel make it a simple matter to look at any count of a four-bit counter. A master
clock signal can be connected to the 7A42 EXT CLOCK INPUT and displayed on
the Trigger View trace.
MEASUREMENT TECHNIQUE
Figure 3-1 illustrates an example of viewing the output of a counter when the
countdown reaches a value of decimal "10," where the LSB is displayed on the
C H I trace and the MSB is displayed on the CH4 trace. To accomplish this, enter
the 7A42 Trigger Function: NOT C H I AND CH2 AND NOT CH3 AND CH4.
The 7A42 can store and recall two independent trigger functions; function "A" and
function "8." To enter these two trigger functions press the A pushbutton, enter
the first Boolean trigger function equation, push the B pushbutton and enter the
second Boolean trigger function equation. Either function may be recalled by
merely selecting Trigger Function A or Trigger Function B. When the input signals
satisfy the programmed logic function, the 7A42 will generate a trigger. The trigger
can be routed externally to other measurement devices and/or internally through
the 7000-series mainframe trigger path to a time base or special-purpose plug-in
unit, in either horizontal compartment. No external connection to the time base is
necessary to provide a triggered display on the oscilloscope crt.
The Trigger View trace enables you to see the state of the programmed trigger
function in addition to the selected channel displays; see Figure 3-2. The Trigger
View trace is a representation of the trigger signal output, in the form of a small
signal at the bottom of the crt. This signal is sent to the time base and to the frontpanel TRIGGER OUT connector (if the External Clock Sync mode is no: in use).
The time registration accuracy of the Trigger View trace with the channel
display(s) makes it useful in verifying when the programmed trigger condition
indeed exists. The Trigger View trace can also be used to measure how long the
trigger function is true.
Viewing The Master Clock Line
The Trigger View trace can display a fifth channel of data such as the master
clock; see Figure 3-3.Applying the master clock signal to the EXT CLOCK INPUT
OSCILLOSCOPE
Dl
TIME-BASE
UNIT
7A42
TRIGGER
Keystroke sequence: NOT C H I AND CH2 AND NOT CH3 AND CH4
4285-302
Flgure 3-1. Triggerlng on the decimal " 1 0 event.
enables the user to: 1) Qualify the Trigger Function on a positive or negative
transition of the external clock input signal and 2) display that clock signal by
selecting the Trigger View trace.
TRIGGER FUNCTION = C H ~ * C H ~ * C H ~ * C H ~
Keystroke sequence: NOT CHI AND CH2 AND NOT CH3 AND CH4
CHI
CH2-
-
CH4-
4285-303
Figure 3-2. Display of four channels with TRIG VlEW trace.
TRIGGER FUNCTION =
cT*cH~*cH~*cH~
Keystroke sequence: NOT CHI AND CH2 AND NOT CH3 AND CH4
CHI
CH2
-
CH3
CH4
TRIGGER VIEWTRACE
(EXTERNAL CLOCK
SIGNAL)
4285-304
Figure 3-3. Four channel display with an external clock signal displayed on the TRIG VlEW
trace.
3-3
APPLICATION 2
SOLVING ABNORMAL PULSE PROBLEMS
WITH THE 7A42
Defective gates or timing errors in a logic system can produce low amplitude
pulses which are not recognizable as valid logic levels. These abnormalities can
introduce errors in the performance of a digital system which are very difficult-to
trace and locate.
To an ordinary oscilloscope triggering system, one pulse in a pulse train looks like
any other. The oscilloscope can only recognize a pulse which has a higher-thannormal amplitude. A low-amplitude pulse can be difficult, if not impossible, to
detect. Low amplitude pulses, or half-logic levels, can be detected by means of the
7A42 variable threshold feature. Each of the four channels can have a distinct
threshold recognition level for a high- or low-logic level.
The 7A42 features an automatic preset TTL or ECL threshold level. If a variable
threshold is needed, enter the Program Channel mode, turn the threshold monitor
on, and select the channel whose threshold is to be varied. The LEVEL0 and
LEVELG controls can then be used to set the desired threshold voltage. The
threshold voltage for each channel can, in turn, be set individually in this manner.
MEASUREMENT TECHNIQUE
When one wants to trigger on a pulse that is somewhere i n the TTL threshold
region (+0.8V and +2.OV), a problem arises because the pulse is too low to be
recognized as a TTL high level and too high to be recognized as a TTL low level;
see Figure 3-4.
To locate and trigger on a TTL low amplitude pulse, connect the C H I and CH2
probes to the same point on the signal under test and establish a dual threshold to
bracket the suspected ampl~tudeof the pulse as follows:
1. Set the C H I SWITCHING THRESHOLD voltage for +2.OV and the CH2
SWITCHING THRESHOLD readout voltage for t0.8V.
2.
Enter keystroke sequence NOT C H I AND CH2. The 7A42 will monitor the
data l ~ n elooking for a pulse which is less than +2.OV (NOT C H I ) and greater
than +0.8V (AND CH2) in amplitude.
The time base should be set to Auto trigger and +Slope so that it will trigger on the
positive slope of the signal from the dc coupled internal source. Because the same
signal is present on C H I and CH2, only one channel need be displayed. Even
though only one channel is displayed, both C H I and CH2 will contribute to the
trigger function.
Because valid logic slgnal transitions also cross the voltage window between the
C H I and CH2 thresholds, trigger outputs may occur when the signals pass
through this transition region. The 7A42 TRIGGER FILTER control can be used to
L
il
i'
i:
i'
i:
i'
i'
i'
.3
Applications-7A42
700WSERIES
OSCILLOSCOPE
0
TIME-BASE
UNIT
OCH3
OCH4
1
i'
L5
2
L5=
4285 305
Figure 3-4. Triggerlng on a low-amplitude pulse.
r
LA
L'
Ci
L
C
r
prevent t r ~ g g e r ~ non
g these normal trans~t~ons,
and at the same t ~ m eallow the low
ampl~tudepulse of a sl~ghtlylonger durat~onto be detected
APPLICATION 3
ADDING EDGE SENSITIVITY
TO YOUR TRIGGER FUNCTION
When developing a microprocessor based system, it is important to ensure that
data being "read" from or "written" into memory remains stable at specified times.
The 7A42 Logic Triggered Vertical Amplifier can monitor these data lines and
trigger on an error condition by means of its level and edge sensitive Trigger
Function features.
In addition to recognizing logic high and low levels, the 7A42 can incorporate one
edge sensitive channel into each product (AND function). Because each Trigger
Function (A or B) can contain two products, two independent Edge operators per
Trigger Function are available. Edge-sensitive trigger~ngcan monitor data l ~ n e s
and check to ensure that the data remains stable.
MEASUREMENT TECHNIQUE
Figure 3-5 illustrates the timing requirements of a typical microprocessor read
cycle. The Data bus may change states during the first 200 nanoseconds of the
cycle but must remain stable during the final 100 nanoseconds while the
I.
DATA
7 D l l DELAYED
TRIGGER OUT
AT 7A42
RESET INPUT
.
DATA CAN
CHANGE
I
A THEN B GATE
AT 7 D l l
TRIGGER I N
DATA MUST
BE STABLE
I
7A42 TRIGGER
FILTER TIME
TRIGGER
RESET
I
FUNCTION B
CAN TRIGGER
Figure 3-5. Tlming diagram of a typical microprocessor read cycle.
microprocessor is actually latching the data in. The 7A42's A THEN B mode will be
used to create a "nested" trigger function. Trigger Function A must first arm the
7A42 before the next occurrence of Trigger Function B will generate a trigger
output signal. In this application, Trigger Function A looks for a low level on the
read strobe, but will not arm the trigger until the time selected by the TRIGGER
FILTER control has elapsed. Trigger Function B will then await any transition on
the data line during the remainder of the strobe pulse. The 7D11 Digital Delay unit
can be used to reset the Trigger Function if the error condition does not occur on
a given read cycle.
For this measurement, only two of the 7A42 input channels need be used. C H I can
be connected to the memory "Read" line and CH2 can monitor the "Data" line. The
7A42 will "babysit" these lines and trigger on any occurrence of either an invalid
positive or negative transition on the Data line during a Read operation. If the 7A42
produces no trigger signal the stability of the design can be assured. If a trigger
does occur, the 7A42 will display the error condition. Timing problems that recur
at very slow repetition rates, and happen rarely or at random can be viewed using
a storage oscilloscope. A fast-writing-rate real-time oscilloscope can also be used
with a camera to record the event.
Figure 3-6 shows how to set u p the measurement and Figure 3-7 shows the
display. The 7A42 has captured a data line transition 10 nanoseconds before the
end of the read cycle during the time that data should remain stable. Notice that
no trigger pulse (TRIG VIEW) corresponds to the falling data transition that
occurrs 140 nanoseconds into the next read cycle, because that data transition
falls within the time that the data may still change. Trigger Function A arms when
a low level Read strobe occurs after the TRIGGER FILTER control time has
elapsed. Trigger Function B causes a trigger if, during the remainder of the low
level Read strobe, either a positive or a negative transition of the data line occurs.
The variable TRIGGER FILTER control should be used to prevent arming before
the time window of the actual "Read" operation. The TRIGGER FILTER control
can be set to prevent arming of the 7A42 for up to 300 nanoseconds. For example,
with the TRIGGER FILTER control set for approximately 200 nanoseconds, the
"Read" line must remain low longer than 200 nanoseconds in order for Trigger
Function A to be armed. To set the TRIGGER FILTER control for 200
nanoseconds, select Trigger Function A with the TRIGGER FILTER control turned
off (fully counterclockwise). Note the pulse width of the Read strobe. Now turn the
TRIGGER FILTER control clockwise until the width of the Read strobe is
shortened by 200 nanoseconds. The triggering is now at that point of the Read
cycle after which the Data lines must remain stable. The TRIGGER FILTER control
will operate only on Function A, because Function B will contain an edge sensitive
channel. (The Trigger Filter responds only to level-sensitive Trigger Functions.)
The 7D11 is used in the delay by time mode. It begins counting when Function A is
recognized and times out shortly after the end of the Read strobe. A positive
transition on the 7A42's A THEN B Gate out will start the 7 D l l ' s count. The 7D11
receives this gate signal internally through the 7000-series main interface. At the
end of its programmed time interval, the 7 D l l resets the 7A42. This enables the
7A42 to prepare for the next event even if Trigger Function B is never recognized.
7000-SERIES
OSCILLOSCOPE
7A42
TRIGGER FUNCTION
. .T C H 1
A . . . . . . . . . . . . . . . . . . . . . . . . . . . . . . . . . . . . . . . . . . . . . . . . . . . . .N. O
B . . . . .NOT C H I AND EDGE CH2 OR NOT C H I AND NOT EDGE CH2
. .N ( = 200 nS)
TRIGGER FILTER.. . . . . . . . . . . . . . . . . . . . . . . . . . . . . . . . . . . . . O
OSCILLOSCOPE
..
VERTICAL M O D E . . . . . . . . . . . . . . . . . . . . . . . . . . . . . . . . . . . . . . . . . . . . . LEFT
HORIZONTAL MODE . . . . . . . . . . . . . . . . . . . . . . . . . . . . . . . . . . . . . . . . . . . . . . B
...
A TRIGGER SOURCE . . . . . . . . . . . . . . . . . . . . . . . . . . . . . . . . . . . . . . . .RIGHT
..
B TRIGGER SOURCE . . . . . . . . . . . . . . . . . . . . . . . . . . . . . . . . . . . . . . . . . .LEFT
..
7D11
B DELAY MODE . . . . . . . . . . . . . . . . . . . . . . . . . . . . . . . . . . . . . . .INDEPENDENT
.
COUNTER M O D E . . . . . . . . . . . . . . . . . . . . . . . . . . . . . . . . . . . . . . . . . . . . . . .TIME
.
TRIGGER
SLOPE . . . . . . . . . . . . . . . . . . . . . . . . . . . . . . . . . . . . . . . . . . . . . . . . . . . . . . . . . . . +
COUPLING.. . . . . . . . . . . . . . . . . . . . . . . . . . . . . . . . . . . . . . . . . . . . . . . . . . . . DC
S O U R C E . . . . . . . . . . . . . . . . . . . . . . . . . . . . . . . . . . . . . . . . . . . . . . INTERNAL
TIME DELAY . . . . . . . . . . . . . . . . . . . . . . . . . . . . . . . . . . . . . . . . . . . . . 200
. . nS
7810
TRIGGER
MODE . . . . . . . . . . . . . . . . . . . . . . . . . . . . . . . . . . . . . . . . . . . . . . . . . . NORM
COUPLING . . . . . . . . . . . . . . . . . . . ..
. . . . . . . . . . . . . . . . . . . . . . . . . DC
SOURCE . . . . . . . . . . . . . . . . . . . . . . . . . . . . . . . . . . . . . . . . . . . . . . . . . . . .INT
SLOPE . . . . . . . . . . . . . . . . . . . . . . . . . . . . . . . . . . . . . . . . . . . . . . . . . . . . . . . . . . +
4285-307
Figure 3-6. Set up to monitor invalid data transitions.
TRIGGER-
Figure 3-7. The 7A42 captures a positive transition of data during the time data should be
stable.
APPLICATION 4
DETECTING AND DISPLAYING
BUS CONTENTION
In bus-oriented systems, one problem which is difficult to detect with either an
oscilloscope or a logic analyzer is that of bus contention. Bus contention arises
when more than one component attempts to drive a common bus at the same time.
Consider the simple circuit shown below. Three-state bus drivers A and B both
connect to the same line of a data bus. If both drivers are enabled at the same
time, due to a circuit fault or poor design, their outputs will contend with each
other if they are attempting to establish high and low levels simultaneously. In this
situation, an invalid logic level could exist and improper data could be transferred.
Bus contention can also create a substantial power supply glitch. This fault
condition is very difficult to detect with an ordinary oscilloscope due to the
aperiodic nature of bus activity. Also, the level and slope triggering system of a
conventional oscilloscope provides no way of recognizing this type of condition.
MEASUREMENT TECHNIQUE
The 7A42 enables one to easily detect and trigger on a bus contention condition in
order to trace the source of the error and isolate the problem. When driver A is
enabled ( C H I low) the signal at the input of driver A (CH2) should match the
signal on the bus line (CH3) except for an instant of time equal to driver A's
propagation delay.
Set the 7A42 to trigger when the above condition is not met; that is, when the input
and output do not match. At this time some other driver on the bus is
overpowering driver A's output. The drivers propagation delay causes a mismatch
that can be ignored by using the TRIGGER FILTER Control.
Driver A is
enabled.
Driver A's
input and output
do not match.
Connect channels 1, 2, and 3 to a suspected bus driver as shown in Figure 3-8.
--
TRIGGER FUNCTION = (CHI mCH2eCH3) + ( C X ~ C H ~ ~ C H ~ )
Keystroke sequence: NOT C H I AND NOT CH2 AND CH3
OR NOT CHI AND CH2 AND NOT CH3
~OO~-SER,ES
OSCILLOSCOPE
ENABLE
I
INPUT
OUTPUT1f E C H 3
,I
LINE OF DATA BUS
MAINFRAME
VERTICAL M O D E . . . . . . . . . . . . . . . . . . . . . . . . . . . . . . . . . . . . . . . . . . . . . . . . . LEFT
HORIZONTAL MODE . . . . . . . . . . . . . . . . . . . . . . . . . . . . . . . . . . . . . . . . . . . . . . B
..
B TRIGGER S O U R C E . . . . . . . . . . . . . . . . . . . . . . . . . . . . . . . . . . . . . . . . . . . . LEFT
7815
TRIGGER
MODE . . . . . . . . . . . . . . . . . . . . . . . . . . . . . . . . . . . . . . . . . . . . . . . . . . . .NORMAL
..
SOURCE.. . . . . . . . . . . . . . . . . . . . . . . . . . . . . . . . . . . . . . . . . . . . . . . . . . . INT
COUPLING . . . . . . . . . . . . . . . . . . . . . . . . . . . . . . . . . . . . . . . . . . . . . . . . . . . . .DC
SLOPE . . . . . . . . . . . . . . . . . . . . . . . . . . . . . . . . . . . . . . . . . . . . . . . . .POSITIVE
.
7A42
TRIGGER FILTER.. . . . . . . . . . . . . . . . . . . . . . . . . . . . . . . . . . . . .. O n
9 o'clock
=
INPUT
BUFFER
TRACE
4285-309
Figure 3-8. Bus contention measurement set up.
APPLICATION 5
ENHANCED NESTED TRIGGERING USING THE
7D15 225 MHz UNIVERSAL COUNTERITIMER
The use of an oscilloscope to trigger on (and display) an event is helpful when
trying to solve a problem. Sometimes, however, a visual representation does not
provide enough information to deal with the problem. Additional data showing
how much time has elapsed between occurrences of the event, how many clock
cycles separate the events, and how many repetitions of the event occur in a given
time interval can aid troubleshooting and reduce design time.
Combining the nested triggering ability of the 7A42 with time, frequency, and
events measurement capabilities of the 7D15 225 MHz Universal Counterflimer,
provides a powerful design evaluation and troubleshooting tool. Using the 7A42's
A THEN B Gate signal to gate the counting and timing system in the 7D15 allows a
variety of difficult measurements. The 7D15 can measure the width of the 7A42's A
THEN B Gate to determine how much time elapsed between Trigger Function A
and Trigger Function B. The 7D15 will also function as a gated-events counter
capable of counting the number of cycles between Trigger Function A and Trigger
Function B, or as an events counter to provide a total count of trigger events over
an extended period of time (e.g., reliability testing).
EVENTS COUNTING
No matter what mode of operation the 7A42 is in, the 7D15 can count the number
of triggers generated by the 7A42 over a predefined period. No external
connections are necessary to accomplish this. With the 7A42 occupying the two
leftmost compartments and the 7D15 occupying the horizontal "A" compartment.
7A42 trigger signals are sent directly to the counter along the 7000-Series
mainframe trigger path. To count the number of errors occurring in a digital
system, make the necessary connections of the data lines to the 7A42's input
channels, program the trigger function to recognize the error condition, and set
the 7D15 as follows:
7D15 Settings:
Mode . . . . . . . . . . . . . . . . . . . . . . . . . . . . . . . . . . . . . . . . . . . . . . . Frequency B
Storage . . . . . . . . . . . . . . . . . . . . . . . . . . . . . . . . . . . . . . . . . . . . . . . . . . . . . . . Off
G a t e . . . . . . . . . . . . . . . . . . . . . . . . . . . . . . . . . . . . . . . . . . . . . . . . . . . . . . . . . . On
Trigger B
Source.. . . . . . . . . . . . . . . . . . . . . . . . . . . . . . . . . . . . . . . .Trigger Source
Slope . . . . . . . . . . . . . . . . . . . . . . . . . . . . . . . . . . . . . . . . . . . . . . . . . . . . . . . . +
Coupljng . . . . . . . . . . . . . . . . . . . . . . . . . . . . . . . . . . . . . . . . . . . . . . . . . . . DC
Level.. . . . . . . . . . . . . . . . . . . . . . . . . . . . . . . . . . . . . . . . . . . . . . . . . . . Preset
Mainframe Settings:
A Trigger Source . . . . . . . . . . . . . . . . . . . . . . . . . . . . . . . . . . . . Left Vertical
The 7D15 will keep a running count of the number of triggers generated by the
7A42 and display the total on the mainframe crt.
COUNTING CLOCK CYCLES BETWEEN EVENTS
The 7A42's Trigger Function A and Trigger Function B can be programmed to
recognize two independent events, and the 7D15 will count the number of clock
cycles occurring between the two events. The 7A42's A THEN B Gate out is sent to
the 7D15 via the 7000-series mainframe trigger path. This gate tells the 7D15 to
count clocks on its "B" input while the A THEN B Gate is high. To begin, you must
program the 7A42's Trigger Function. Start with Function A which will arm the
7A42 and cause the A THEN B Gate to go high when recognized. Then enter
Function B which, when recognized, will cause the 7A42 to generate a trigger and
send the A THEN B Gate low. Make the proper connections from the unit under
test to the 7A42's input channels, set each channel for the desired logic family,
impedance, threshold, and display characteristics, and enter the following 7D15
and mainframe settings:
7D15 Settings:
Connect clock signal from the unit under test to the 7015 B input
Gate . . . . . . . . . . . . . . . . . . . . . . . . . . . . . . . . . . . . . . . . . . . . . . . . . . C H A Gate
Mode . . . . . . . . . . . . . . . . . . . . . . . . . . . . . . . . . . . . . . . . . . . . . . . . . . . . . Freq B
Display Time.. . . . . . . . . . . . . . . . . . . . . . . . . . . . . . . . . . . . . . . . . . . . .0.1 sec
Storage . . . . . . . . . . . . . . . . . . . . . . . . . . . . . . .
.. . . . . . . . . . . . . . . . . . . . . . Off
Trigger A
Source.. . . . . . . . . . . . . . . . . . . . . . . . . . . . . . . . . . . . . . . . Trigger Source
Slope . . . . . . . . . . . . . . . . . . . . . . . . . . . . . . . . . . . . . . . . . . . . . . . . . . . . . . . .+
Coupling.. . . . . . . . . . . . . . . . . . . . . . . . . . . . . . . . . . . . . . . . . . . . . . . . . . DC
Level . . . . . . . . . . . . . . . . . . . . . . . . . . . . . . . . . . . . . . . . . . . . . . . . . . . . Preset
Trigger B
Source.. . . . . . . . . . . . . . . . . . . . . . . . . . . . . . . . . . . . . . . . . . . . . . . Input B
Slope . . . . . . . . . . . . . . . . . . . . . . . . . . . . . . As needed (clock polarity)
Coupling.. . . . . . . . . . . . . . . . . . . . . . . . . . . . . . . . . . . . . . . . . . As needed
Level. . . . . . . . . . . . . . . . . . . . . . . . . . . . . .As needed (clock threshold)
Sensitivity.. . . . . . . . . . . . . . . . . . . . . . . . . . . . . . . . . . . . . . . . . As needed
Mainframe Settings:
Set the Trigger Source for the compartment containing the 7015 to
Right Vertical.
MEASURING TIME FROM FUNCTION A TO FUNCTION B
The 7015's accurate internal clock can be used to determine the elapsed time from
recognition of Function A to recognition of Function B. The width of the 7A42's A
THEN B gate out represents this time and can be measured by the 7015 with no
external connections. The 7015 will receive this gate from the mainframe's trigger
path, measure its width, and display the results of the measurement o n the crt
readout. For further information, refer to Mainframe A THEN B Gate Out Pulse
Width in section 1 of this manual under specifications.
7D15 Settings:
.
Gate . . . . . . . . . . . . . . . . . . . . . . . . . . . . . . . . . . . . . . . . . . . . . . . . . . . . .Normal
.
Mode . . . . . . . . . . . . . . . . . . . . . . . . . . . . . . . . . . . . . . . . . . . . . . TIM
Width A
Averg . . . . . . . . . . . . . . . . . . . . . . . . . . . . . . . . . . . . . . . . . . . . . . . . . . . . . .X. I. 0
... . . . . . ..... 10 ns
Clock . . . . . . . . . . . . . . . . . . . . . . . . . . . . . . . . . . . . . . . ..
Trigger A
Source.. . . . . . . . . . . . . . . ..
.. . . . . . . . . . . . . . . . . . . . Trigger Source
Slope . . . . . . . . . . . . . . . . . . . . . . . . . . . . . . . . . . . . . . . . . . . . . . . . . . . . . . +. .
Coupling.. . . . . . . . . . . . . . . . . . . . . . . . . . . . . . . . . . . . . . . . . . . . . . . . .DC
.
Level.. . . . . . . . . . . . . . . . . . . . . . . . . . . . . . . . . . . . . . . . . . . . . . . . .Preset
..
Mainframe Settings:
Set the Trigger Source for the compartment containing the 7D15 to
Right Vertical.
APPLICATION 6
OFFSET PROBING TECHNIQUES FOR
HIGH SPEED LOGIC SYSTEMS
Probing high-speed circuits with high impedance probes can cause ringing at high
frequencies and significant degradation of rise and fall times. The 7A42 Logic
Triggered Vertical Amplifier - P6230 Variable Bias/Offset Probe combination
enables probing high-speed ECL logic with minimum circuit loading.
The P6230 Variable Bias/Offset Probe is a l o x , 450 ohm device. The bias voltage
at the probe tip is continuously variable from -5V to +5V. It also features a built-in,
50-ohm termination resistor that can be switched in for use with 1 megohm
amplifiers. This 50-ohm termination will be switched out in this application in favor
of the 7A42's internal 50 ohm terminator. A variety of grounding schemes are
possible with the P6230, including a low-inductance ground lead, and a printedcircuit-board adaptor. Ground leads should be as short as possible to minimize
ringing. The low capacitance of the probe makes it advantageous for probing
transmission line circuits. A high-fidelity signal representation is possible with less
sensitivity to the length of the ground lead than with higher capacitance probes.
STANDARD PROBE
P6230
VARIABLE-BIAS PROBE
PROBE
RESISTANCE
OUTPUT
OF ECL GATE
RESISTANCE
(50,75. OR l o o n )
-2
0
v
v
1
-2
0
v
.
.
/
.
.
v
450 n
v
1
TERMINATION
RESISTANCE
(50,75, OR l o o n )
v
.
.
. . . . .
-2 v
A. OUTPUT SIGNAL WITH
STANDARD PROBE
6.
OUTPUT SIGNAL
WITH P6230 PROBE
4285-300
Figure 3-9. Standard 500-ohm probe forms voltage divider with terrninatlon resistor.
3-14
PROBING ECL CIRCUITS
ECL circuits are commonly operated with a -5.2 V and zero-volt Vee and Vcc
supplies. For this configuration, a high logic level becomes -0.8V and a low logic
level becomes -1.7V. The output of an ECL gate is the emitter of an NPN transistor
(emitter follower stage) whose collector is connected to ground. The output of the
gate must be pulled down to a negative supply with an external resistor to enable
proper logic levels to exist. Transmission lines are often used to connect gates; the
pull-down resistor can also terminate the transmission lines which often connect
gates. This termination is usually 50, 75, or 100 ohms connected to a -2V supply.
To probe ECL, a 500 fl 10X passive probe would be an attractive choice because
of its very low input capacitance. However this probe's resistance, 500 fl to
ground, would form a voltage divider with the gate's output termination resistor.
Figure 3-9 shows an ECL emitter-follower output stage being probed a) by a
standard 500 fl probe. and b) by the P6230 Variable Bias/Offset Probe. The divider
can shift the ECL output signal levels with the low level affected most. The dc
operating point of the gate output transistor is substantially altered when the
standard probe is part of the circuit, as illustrated in Figure 3-9.
The P6230 solves this problem by provid~nga bias voltage at the probe tip (see
Fig. 3-10). For ECL circuit probing, set the probe tip offset to the ECL low level or
to the -2V termination voltage. The effect of the probe's resistance on the gate's
termination resistance will be minimized. Figure 3-11 shows two superimposed
waveforms. Waveform 6 was taken using a -2 volt bias offset. Waveform A was
taken with no offset. Notice the reduced level shift and faster negative transition of
waveform 6.
P6230
PROBE
TIP
7A42
VARIABLE
50n
I
I
I
4285-301
Figure 3-10. Simplified diagram of the P6230 Variable BiasIOttset probe.
3-15
0 VOLTS
A
B
-2 VOLTS
4285-310
Flgure 3-11. Two ECL level waveforms, A wlthout blas offset, B with a -2 volt blas offset.
7A42 PROBE OFFSET FEATURE
The 7A42 features a built-in digital voltmeter which was designed to accommodate
the P6230 Variable Bias/Offset Probe. Pressing the 7A42's PROBE OFFSET
pushbutton while in the program channel mode with the SWITCHING
THRESHOLD VOLTS monitor turned on, will cause the button to light red. This
red light indicates that the digital voltmeter is enabled and ready to measure the
probe offset. Place the tip of the probe into the 7A42's PROBE TIP jack and set the
probe offset to the desired voltage. While holding the probe tip in the jack, push
the PROBE OFFSET button again until it lights green. The offset for that particular
channel has now been measured, acquired, and will be compensated for
automatically when setting the threshold for that channel. In other words, the user,
having acquired the probe offset for a particular channel, need not take that offset
into account when setting the logic threshold for that channel.
When using the P6230, remember the first step is to acquire the probe offset value
into the 7A42. Next set the Switching Threshold Voltage with the LEVEL buttons to
a value appropriate for the logic family under test. The Switching Threshold
Voltage at the probe tip is indicated in the numerical display.
REV JUL 1984
APPLICATION 7
USING THE 7A42 WITH THE 7854
The TEKTRONIX 7854 is a waveform-processing oscilloscope. It combines the
high performance of a 7000-series real-time mainframe with digital storage and
extensive processing capability.
7A42 measurements with the 7854 are more accurate and faster than with a
conventional oscilloscope. The 7854 digitizes signals in up to 1,024 point records
with 10 bit (0.01 division) vertical resolution. Single and dual cursors enable
precise time and amplitude measurements. Single keystrokes instantly calculate
the most common waveform and pulse parameters (e.g., risetime, delay, peak-topeak, etc). Signal averaging will recover the true signal from noisy obscurity.
Up to 16 waveforms (40 with Option 2D) can be stored and recalled for later
measurement or comparison.
To digitize with the 7854 and 7A42, first ensure that the 7A42 is in the proper
operational mode for the 7854. There is an internal jumper that must be properly
positioned by qualified service personnel as detailed in the 7A42 Service Manual.
This ensures that readout and waveform acquisition will be consistent.
Valid display conditions for. digitizing are:
1. Any single channel displayed alone (CHI, CH2, CH3, CH4, or TRIG VIEW).
2. Channels 1 and 2 only displayed together, ALT display mode selected
3. Channels 3 and 4 only displayed together, ALT display mode selected
Other channel combinations should be avoided for 7854 acquisitions. Only a
single channel can be displayed when signal averaging. Single channels displayed
alone will always be acquired as the OWFM. Channels 1 and 2 (or 3 and 4) will
always be acquired as OWFM and 1WFM respectively. Trigger view may be
acquired alone, but it will be assigned the default vertical deflection factor of unity
(l/division).
You may notice the readout format change as channels are displayed or removed
from the display. For example, . l V may become 100 mV. This is normal for a 7A42
in the "7854 operational mode," and does not affect measurements.
APPLICATION 8
USING THE 7A42 WITH THE 7104
The TEKTRONIX 7104 Oscilloscope is a one gigahertz mainframe that is an ideal
companion to the 7A42 Logic Triggered Vertical Amplifier. The bandwidth of the
7104 accommodates the full specified 7A42 system bandwidth of 350 MHz for high
speed logic.
An equally impressive capability is the fast writing rate of the 7104 microchannel
plate crt. At fast sweep rates the 7104 trace is much brighter than conventional
oscilloscopes. High transition pulses at low-speed duty cycles can be easily seen
under normal lighting conditions without the annoying baseline blooming as on
conventional oscilloscopes.
The 7104's crt brightness is particularly useful with the 7A42. High-speed pulses
are immediately apparent. Trigger combinations that are seldom realized will still
result in a bright, usable display.
Additionally, the 7104 is useful in conjunction with the 7A42 trigger view feature,
where conventional oscilloscopes would have difficulty displaying an "EdgeQualified" trigger function at slow speeds.
T
SECTION FOUR
INSTRUMENT OPTIONS
3
(--1
*.-i
No options existed for the 7A42 at the time of this printing.
Information about any subsequent options will be included
in the CHANGE INFORMATION section at the back of this
manual.
Index-7A42
CABLES: 2-57
CHARACTERISTICS: See Specificalions, 1-6
CHI, CH2, CH3, CH4: 2-10, 2-64, 2-67
CHOP: 2-$0, 2-60
CLEAR: 2-10, 2-67
CLOCK CYCLES BETWEEN EVENTS: 3-12
CODES:
Operator Error Summary: 2-50, 2-51. 2-52
COLOR USED IN THIS MANUAL: 1-1
COMPATIBILITY: 1-3
COMPENSATION OF PROBES: 2-57
CONTROLS, CONNECTORS AND INDICATORS:
Description and Illustration of: 2-10, 2-11, 2-12
CONTROLS:
Front-Panel: 2-10
CRT READOUT: 2-57
1
i
E
D
ii
DEFLECTION FACTOR: 2-65
DELIMITER: 2-67
DeMORGAN'S THEOREM: 2-4
DISPLAY: 2-10, 2-59,, 2-65
Specification of: 1-6
DOCUMENTATION, RELATED: 1-1
DVM: 2-66
-
.
E
.
a
g
a
,
+i
d
ECL: 2-10, 2-59
EDGE: 2-10, 2-67
Sensitivity: 2-7, 3-6
ERROR CODES: 2-50, 2-51, 2-52
ELECTRICAL CHARACTERISTICS: See Specifications, 16
ENVIRONMENTAL CHARACTERISTICS: See Specifications, 4-6
EVENTS COUNTING: 3-10
EXAMPLES OF PRODUCTS: 2-5, 2-7
EXERCISES: 2-13-2-47
EXCLUSIVE-OR: 2-3
EXT CLOCK INPVT: 2-125 2-62, 3-2
EXT CLOCK SYNC: 2-12
EXT CLOCK SYNC (SLOPE SELECT): 2-61
2
-
FALLING EDGE SENSITIVITY: 2-67
FIRMWARE VERSION NUMBER: 2-49
FUNCTION A 2-12
'FUNCTION B: 2-12
FUNCTJON A THEN 8: 2-12
FUNCTIONAL CIRCUIT BLOCKS: 2-1
,,
I
;:
GET-ACQUAINTED EXERCISES: 2-18
.1Mn: 2-10, 2-59, 2-65
son: 2-10, ?-&, 2-65
INSTALLATION: 2-13
INTlALltATION: 2-T4,, 2-52
Control SeUings: 2-53
3
\
'"
' ,
,
*-
-
e!
q
Index-7M2
I
0
@
OPERATING TEMPERATURE: 1-3
OPERATOR MESSAGES: 2-54
OPTIONAL ACCESSORIES: 1-24
OPTIONS: See Section 4
OR: 2-3, 2-10, 2-67
d
@!
a
P
IiS
PACKAGING FOR SHIPMENT: 1-5
PHYSICAL, CHARACTERISTICS: 1-21
POSITION: 2-10, 2-59
PRESET THRESHOLD: 2-65
PROBE OFFSET: 2-66, 3-16
PROBES: 1-3, 2-56, 2-57, 2-62
PROBE COMPENSATION: 2-57
PROBING ECL: 3-15
PRODUCT: 2-3, 2-67
PROG CHAN: 2-10
PROG CHANITRIG: 2-10. 2-64
PROG TRIG: 2-10
PROGRAM CHANNEL MODE: 2-10, 2-64
PROGRAM TRIGGER MODE: 2-10, 2-66
P6131: 1-24, 2-57
P6230: 1-24, 2-57, 2-66, 3-14, 3-15
P6230 VARIABLE BIAWOFFSET: 3-14
s
6
!i
B
@
@
s
R
E%!
READOUT; CRT: 2-57
RESET: 2-12, 2-63, 3-7
RESET INPUT (armed, A THEN B, reset): 2-62
RELATED DOCUMENTATION: 1-1
mil
S
a
I
SAFETY, OPERATORS: #.
SELF-TEST: 2-14, 2-48
SELF-TEST FAILURE MESSAGES:
Illustration of: 2-50
Table of: 2-51
SELF-TEST FAILURE CODE: 2-50
SHIPMENT, PACKAGING FOR: 1-5
SLOPE: 2-12
SLOPE SELECT: 2-61
SOFTWARE PERFORMANCE REPORT: See front of manual
r r
5
a
le
4
4
-
-
-.-
L
Index-7A42
S
(cont)
SPEcIFIcATION: 1 4
ELECTRICAL: 1-6
EN~IR~NMENTAL:3-21
PHYSICAL: 1-22
STANDARD ACCESSORIES: 1-24
STATUS INDICATQRS, CHANNEL: 2-59
SUM OF PRODUCTS NOTATION: 2-5
SUM: 2-3
SWITCHING THRESHOLD VOLTS display: 2-65
6,
L
>
I
THRESH: 2-10, 2-6s 2-w
TIME-BASE PLUG-IN: 1-4
TIME BETWEEN EVENTS: 3-12
TlME FROM FUNCTION A TO FUNCTION B: 3-12
TIP, PROBE OFFSET: i-M
TRIG VIEW: 2-10, 3-2
TRIGGER FILTER: 2-12, 2-61. 3-7
Application of: 3-4
TRIGGER FUNCTION: 2-12
Color: red H i green LO: %60
TRIGGEERING, NESTED: 3-2, 3-10
TRIGGER OUT: 2-32, 243
illustration of: 2-84
TRIGGER, SPECIFICATIONS: 1-11
TTL: 2-10, 2-59
TTL/ECL: 2-10, 2-65
'
CP
+
I
5
E V
$
V A R I A ~ L E BIAS/OFFSET: 3-14
VARlAQLE THRESHOLD: 2-66, 3-4
VOLTSI'DIV: 2-10, 2-85
OTHER
.
,
,
7104:
Applkation of: 3-18
-
Application of: 3-17
7 D l l DIG'ITAL DELAY:
Application of: 3-7
-
?
.
)
$
-
7A42 O~eratorMessaaes
I
Descrlptlon and Correctlve Actlon
Code I Mnemonic
I
OVERLOAD
I
A channel input is overloaded. Remove the overvoltage
and unoround the channels to continue ooeration.
2
OFFSET ACQ
A key was pressed while Probe Offset acquisition was
in progress. Push PROBE OFFSET once to lock in
acquired value, or twice to turn PROBE OFFSET off,
before continuing operation.
3
PUSH PROG
Key@) pressed is/are active only in PROG CHAN
mode. To use key, first press PROG CHAN.
4
PUSH PROG
Key@) pressed Ware active only in PROG TRIG
mode. To use key, first press PROG TRIG.
5
AND/OR RE0
While programming a trigger function, a C H I ,
CH2, CH3, CH4, NOT, or EDGE was pressed when
an AND or an OR key was expected.
CH KEY RE0
While programming a trigger function, two Boolean
operator keys (AND or OR) were pressed without
pressing a channel key (CHI, CH2, CH3, or CH4) in
between. Channel keys and Boolean operator keys
should be pressed alternately, e.g., C H I AND NOT
CH2 OR CH3 EDGE.
OR IS FULL
The OR key was pressed again. Only one TRIGGER
FUNCTION OR is allowed.
EXTCLK ON
The EDGE key was pressed while in the EXT CLOCK
SYNC mode. The selection of an EDGE sensitive
channel and the EXT CLOCK SYNC mode are mutually
exclusive. If EDGE sensitivity is desired, first turn
off the EXT CLOCK SYNC mode.
EXTCLK RE0
The EXT CLOCK slope key was pressed when the EXT
CLOCK SYNC button was turned off. The EXT CLOCK
SYNC slope key is operational only when the EXT
CLOCK SYNC button is turned on.
10
EDGE IS ON
The EXT CLOCK SYNC key was pressed when one of
the trigger functions (either A. B, or both) already
have an EDGE sensitive channel. Channel EDGE
sensitivity and EXT CLOCK are mutually exclusive.
If EXT CLOCK SYNC operation is desired, first CLEAR
the channel EDGE sensitive trigger
function.
- -
11
THRESH RE0
Either a LEVEL key or the PROBE OFFSET key was
pressed without pressing the THRESH key first.
The THRESH key must be lit to change a threshold
level or acauire a ~ r 0 b eoffset.
12
NO FUNC A
The A THEN B key was pressed without having
programmed function A; or while in A THEN B mode
function A was CLEARed. Both trigger functions
(A and 8) must be programmed for proper A THEN B
operation. Program function A; then proceed.
13
NOFUNCB
The A THEN B button was pressed without having
programmed function 8; or while in A THEN B mode
function B was CLEARed. Both trigger functions
(A and 8 ) must be programmed for proper A THEN B
operation. Program function B; then continue.
WARNING BEEPS:
Although no messages are displayed, short warning beeps are issued
to indicate "out of range." A beep will sound when the VOLTSIDIV
keys are pushed beyond the available selections or when the variable
threshold level reaches its limits.
NOTE
The audible beep cen be turned off; refer qualified Service Personnel to the 7A42
Service Menual (Volume 1).
REV JUL 1984