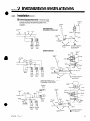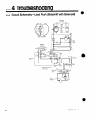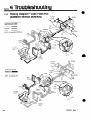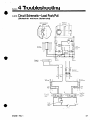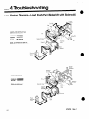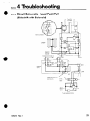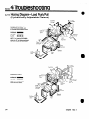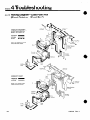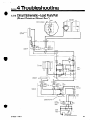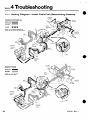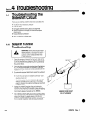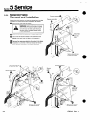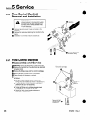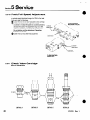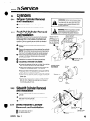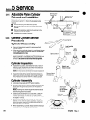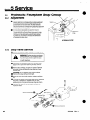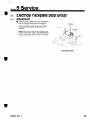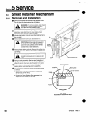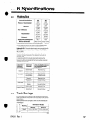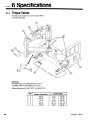
1
Service
Manual
30C, 45C
Load Push and Load Push/Pull
Serial Numbers 673290 through 679295
Manual Number 674219 R-1
cascade”
Cascade IS a RegIstered Trademark ot Cascade Corporaton
Contents
Page
Introduction, Section 1 ...........................
Installation Instructions, Section 2 ....................
Truck Requirements ............................
Installation - Non-Sideshifting ......................
Prior to Installation ............................
Installation ................................
Prior to Operation ............................
Installation - Sideshifting .........................
Prior to Installation ............................
Installation ................................
Prior to Operation ............................
Periodic Maintenance, Section 3 .....................
Troubleshooting, Section 4 ........................
General Procedures ............................
Truck System Requirements. ......................
Tools Required ..............................
Get All The Facts ............................
Plumbing. .................................
Hosing Diagrams ............................
Circuit Schematics ............................
Troubleshooting the Push/Pull Circuit ...................
Electrical Troubleshooting - Solenoid Equipped Attachments .....
Push Hydraulic Function. ........................
Pull Hydraulic Function .........................
Gripper Function Troubleshooting ....................
Troubleshooting the Sideshift Circuit ...................
Troubleshooting the Hydraulically Adjustable Platen Circuit .......
Troubleshooting the Sheet Retainer Circuit ................
Troubleshooting the Electrical Faceplate Stop Groups .........
Service, Section 5 .............................
Attachment Removal and Installation. ..................
Faceplate and Pantograph Arms .....................
Disassembly ...............................
Service and Reassembly ........................
Gripper Mechanism Service ......................
Gripper Hose Installation ........................
Valves ...................................
Load Push and Load Push/Pull Valve Removal and Installation ....
Load Push Valve Disassembly and Service ..............
Load Push/Pull Valve Disassembly and Service ............
Solenoid Valve Removal and Installation ................
Solenoid Valve Disassembly and Service ...............
Flow Control Manifold Removal and Installation ............
Flow control Manifold Disassembly and Service ............
High Volume Bypass Adjustment ....................
Flow Control Manifold Port Reversal ..................
Push/Pull Speed Adjustment ......................
Check Valve Cartridge Seal Details ...................
Cylinders. .................................
Removal and Installation ........................
General Cylinder Service Procedures .................
Cylinder Service .............................
Platens ...................................
Platen Removal and Installation .....................
Platen Shims ...............................
Inspection ................................
Hydraulic Faceplate Stop Group .....................
Adjustment ................................
Stop Valve Service ............................
Electrical Faceplate Stop Group .....................
Adjustment ................................
Sheet Retainer Mechanism ........................
Removal and Installation ........................
Specifications, Section 6. .........................
Hydraulic. .................................
Truck Carriage. ..............................
Torque Values ...............................
i
1
1
1
2
2
3
4
5
5
6
11
12
13
13
13
13
14
15
15-28
15-29
30
30
31
32
33
34
35
36
37
38
38
39
39
40
40
41
42
42
42
43
44
45
46
46
47
47
48
48
49
49-50
50
51-52
53
53
53
53
54
54
54
55
55
56
56
57
57
57
58
,
..
674219
Rev. 1
Section
1 Introduction
This manual provides the installation instructions, periodic
maintenance requirements, troubleshooting procedures
and service guides, for 30C and 45C Load Push and Load
Push/Pulls. Note that all specifications are shown in US and
(Metric) units where applicable.
1.1
Special Instruction
Definitions
A
WARNING
A statement preceded by A WARNINGis information that :
should be acted upon to prevent bodily injury. A
WARNING is always inside a ruled box.
CAUTION
A statement preceded by CAUTION is information that
should be acted upon to prevent Machine Damage.
IMPORTANT
A statement preceded by IMPORTANT is information that
posseses special significance.
NOTE
A statement preceded by NOTE is information that is handy
to know and may make your job easier.
InstallationInstructions
Section2
,
WARNING:
truck/attachment combination is a responsibility of the original truck manufacturer and
may be less than that shown on the attachment nameplate. Consult the truck
Hydraulic Specifications
Pressure - Recommended
3oc
4%
2000
2000
(140
(160
2.1
(140 bar)
I
2300
bar)
(160
bar)
Truck Requirements
l
Truck Relief Valve Setting: 2000 psi recommended.
2300 psi maximum.
l
Hydraulic flow should fall within the volume range shown
in the table.
l
The truck hydraulic system must supply oil to the attachment that meets the specifications shown in the table.
l
Recommended
hose and fitting size:
No. 6 with minimum fitting orifices of 9/32 in. (7mm).
e Truck carriage must conform to IS0 dimensional standard
2328, equivalent to Industrial Truck Association (ITA)
dimensions shown in Section 6.1-2.
674219
bar)
2300
l
Make sure the truck carriage is clean and the notches are
undamaged.
l
In order to conform to industry standard practice, the
hoses should be connected to the truck auxiliary valve as
indicated by the chart in Section 6.1-1.
Rev. 1
Maximum@
Supply Hose and Fitting Size
Minimum Orifice Size
15 GPM
(56Umin)
IO GPM
(37Umin)
No. 6
9/32in. (7mm)
No. 6
9132in. (7mm)
0
Flow less than minimum will result I” slow faceplate speed.
0
Flow greater than maximum can result in excessive faceplate speed,
reduced system performance and short hydraulic system life
Hydraulic Oil-Cascade
attachments are compatible
with SAE 1OWpetroleum base oil per Mil. Spec. MIL-O5606 or MIL-O-2104B.
Use of synthetic or aqueous base hydraulic oil is not
recommended. Contact Cascade if fire resistant hydraulic
oil must be used.
Section
2.2
2 Installation Instructions
Installation
Non-Sideshifting
NOTE: Sideshifting Load Push and Load
Push/Pull Installation begins with section 2.3
A
2.2-1
WARNING: Rated capacity of the
truck/attachment combination is a
responsibility of the original truck
manufacturer and may be less than
shown on the attachment nameplate
Consult the truck nameplate.
Prior to Installation
1 Install the Quick Change lower mounting hooks. For
Bolt-On type hooks, proceed to Section 2.2-2.
Quick Change Type A- Install the components as
shown. Tighten the capscrews to a torque of 105-115
ft.-lbs. (140-155 N.m).
(Right side shown)
Quick ChangeType Ba. install the guides to the baseplate mounting holes with
the guide hole offset in the upward position- 5/8 in.
(16mm) from top of guide to hole center. Tighten the
capscrews to a torque of 105-115 ft.-lbs.
b. Slide the hooks over the top of the guides. Install each
locking pin through the hook lower hole.
ook
Licking
Pin
674219
Rev. 1
Section
2.2-2
2 Installation.lnstrUctions
Installation
REVERSING THE PUSH/PULL PORTS
Units equipped with a flow control manifold have the option
of turning the manifold over to reverse the location of the
Push/Pull ports. This will accommodate trucks already
plumbed with Push/Pull supply hoses on the left side of the
truck. See Section 5.3-9.
1
Center the lift truck behind the attachment. Tilt the mast
forward. Engage the upper hook locating tab with the
closest upper carriage bar notch and raise the truck
carriage into position behind the attachment. Lift the
attachment 2 in. (5 cm) off the pallet.
NOTE: The attachment may not be perfectly centered
on the carriage bar when the locating tab is engaged in
the upper carriage bar notch.
A
WARNING: The upper mounting
hook must be properly engaged
with the upper carriage bar. The
locating tab must be engaged in the
mating notch on the upper carriage
bar.
Lower carriage bar
NOTE: The lower hooks cannot be properly installed if
the locating tab is not engaged in the carriage notch.
2 Engage
d
the lower hooks with the truck lower carriage
(Right side shown)
Bolt On Type-Install the hooks and capscrews.
Tighten the capscrews finger tight. Tap the end of the
hooks with a hammer in the direction of the adjust
arrow for maximum engagement with the carriage bar.
Tighten the capscrews to a torque of 105-115 ft.-lbs.
(140-155 N.m).
Quick Change Type A -Turn both hooks up and
reinstall the pin. The maximum allowable clearance
between the hooks and carriage bar is 1/8 in. (4mm)
as shown.
-
Truck Lower
Carriage bar
Type B
Quick Change Type B-Remove the locking pins.
Slide the hooks up to engage with the carriage bar.
Install the locking pins through the upper holes.
CAUTION: If the clearance between the carriage
bar and the hooks exceeds 3/16 in. (6mm), the
guides (refer to Section 2.2-1, step 1) should be
inverted and installed with the hole offset downward
(5/8 in./l6mm from bottom of guide to hole center)
to minimize the gap.
674219
Rev. 1
(Left side shown)
lower hook
Lower
Carriage
Bar
a.
2 Installation Instructions
Section
Installation (Continued)
2.2-2
3
Measure the hydraulic hose length required to connect
the hoses to the hose terminal. Remove the hoses and
cut to length as required.
Manifold or bracket
CAUTION: Flush the hoses as follows to prevent damage
to the attachment hydraulic components,
2.2-3
4
Connect the hoses to the truck hose terminal. Connect
the hoses together using a union fitting. Start the truck
and actuate the truck control valve in both directions for
about 30 seconds to carry any debris in the hoses to the
truck hydraulic tank and filter.
5
Remove the union fitting and connect the hoses to the
attachment fittings as shown.
Prior to operation
Remove air from the system by extending the faceplate fully,
and keeping it there for 10-20 seconds with the control valve
actuated.
NOTE: This should correct an irregularly extending faceplate. If it does not, retract the faceplate and repeat the
process a second time.
Operate the unit through several complete cycles and make
sure all functions operate smoothly and correctly.
PUSH/PULL UNITS:
l
The gripper jaw should open prior to the faceplate extension when the control handle is pushed forward.
l
The gripper jaw should close completely prior to faceplate
retraction when the control handle is pulled back.
PUSH/PULL UNITS with FLOW CONTROL MANIFOLD:
. SPEED ADJUSTMENT
The flow control manifold has a separate speed adjustment range of ± 30% for the load push and load pull
functions. See Section 5.3-10 for adjustment procedures.
l
HIGH VOLUME BY-PASS ADJUSTMENT
The flow control manifold has an adjustable by-pass
orifice for use with high volume truck applications. The
by-pass should be adjusted open for high volume trucks
to reduce engine stall during actuation of the attachment.
See Section 5.3-8 for adjustment procedures
4
FLOW CONTROL MANIFOLD
674219
Rev. 1
I,?
,
.
2 Installation Instructions
Section
2.3
Installation- Sideshifting
2.3-1
Prior to Installation
on center notch
Skip Steps 1 through 4 if the unit is equipped
with Quick Disconnect mounting hooks.
TO ATTACH THE SIDESHIFT CYLINDER ANCHOR
BRACKET:
1
Position the cardboard template* in the center notch of
the truck carriage.
2
Mark the two lines shown and remove the template.
*3
If the template is not available use the dimensions
shown to locate the bracket. Template part no.'s are
listed below.
4
Position the cylinder anchor bracket on the marks and
weld the bracket in place using AWS E7018 rod
Preheat to 300-350°F. (150-175°C.), and weld the
bottom and sides of the bracket with a 0.40 inch (10mm)
fillet weld.
All Class II models except
Sheet Sav®
All Class Ill models
TEMPLATE 667382
TEMPLATE 671174
If template is missing,
use these dimensions
to locate bracket.
Sheet Sav®
TEMPLATE 673253
If template is missing,
use these dimensions
to locate bracket.
DO NOT weld here.
DO NOT weld here.
If template is missing,
use these dimensions
to locate bracket.
\3003.6‘5
in..
(92.7mm)
4504.40
in.
(111.7mm)
flif-d
--Q
I
XxXxXxX
+
T
30C-1.75
in.
(44.4mm)
4503.18
in.
(80.7 “I”’
e
Preheat to 300°-356OF
300°-350°F
(I 50-175°C).
0.40 inch
(10mm) fillet welds,
bottom and sides.
Use AWS E7018 rod.
Preheat to 300°-35O’F
(150-175°Cl,
0.40 inch
(10mm) fillet welds,
bottom and sides.
(IOmm) fillet welds.
bottom and sides.
Locate a bearing segment
on each side of the carriage
side plates as near as the
notches permit.
ALL UNITS PERFORM THE FOLLOWING:
5
Place the sideshifting bearing segments in the notches
of the truck carriage as shown. Apply a liberal coating of
graphite base grease to the bearing segments.
l--t-A4
674219
Rev. 1
32 in.(812mm)
carriage:
A = 14 in. (355mm)
16 in. (406mm)
MIN.
MAX.
36 in (914mm)
carriage:
A = 14 in. (355mm) MIN.
17 in. (431 mm) MAX.
5
Section
2.3-1
2 Installation Instructions
Prior To Installation (Cont.)
6
Install the two lower bearing strips on the attachment
and coat them with a graphite base grease.
7
Install the Quick Change lower mounting hooks, For
attachments with bolt-on type hooks, proceed to step 8.
Quick Change Type A- Install the components as
shown. Tighten the capscrews to a torque of 105-115
ft.-lbs. (140-155 N.m).
Quick Change Type Ba. Install the guides to the baseplate mounting holes
with the guide hole offset in the upward position- 5/8
in. (16mm) from top of guide to hole center. Tighten
the capscrews to a torque of 105-115 ft.-lbs.
b. Slide the hooks over the top of the guides. Install each
locking pin through the hook lower hole.
Type
B
Type
A
(Right side shown)
5/8 in. (16mm)
(Left side shown)
F-PY
I
h
Locking
Pin
TO INSTALL THE CONTROL KNOB (Solenoid Units Only):
8
Remove the existing knob from the auxiliary valve control
handle and install the new knob as shown. If the control
handle is not threaded, weld on the adapter supplied
with the new knob.
NOTE: It may be necessary to saw off a portion of the
control handle to achieve a comfortable length.
3/8-16
UNC
threads
Jam Nut
(tighten
to
secure knob)
CAUTION: Secure the cable assembly to the control
handle so the cable will not be pinched at the truck cowl
when the handle is actuated.
Install control
9
If the control knob has 1 button, then the two-function
side of the control knob placard should be showing.
When the control knob has 2 buttons, then the threefunction side of the placard should be showing. Fit the
dimple on the placard into the recess on the knob and
install the snap ring.
Auxiliary
Truck
674219
Rev. 1
Section
m
2.3-2
2 Installation Instructions
Installation
1
Center the lift truck behind the attachment. Tilt the mast
forward. Engage the attachment upper hook centering
tab with the closest truck upper carriage bar notch and
raise the truck carriage
into position
behind the
attachment. Lift the attachment 2 in. (5cm) off the pallet.
NOTE: The attachment may not be perfectly centered on
the carriage bar when the centering tab is engaged in
the upper carriage bar notch.
WARNING
hook must be properly engaged with
tab must be engaged in the mating
notch on the upper carriage bar.
On Type
NOTE: The lower hooks cannot be properly installed if
the locating tab is not engaged in the carriage notch.
2
Engage the lower hooks with the truck lower carriage bar.
Bolt On Type-Install
the hooks and capscrews.
Tighten the capscrews finger tight. Tap the end of the
hooks with a hammer in the direction of the adjust
arrow for maximum engagement with the carriage bar.
Tighten the capscrews to a torque of 105-115 ft.-lbs.
(140-155 N.m).
Quick Change Type A-Turn both hooks up and
reinstall the pin. The maximum allowable clearance
between the hooks and carriage bar is 1/8 in. (4mm) as
shown.
\\
1
-
Truck lower
carriage bar
Inspect
lower hook
Quick Change Type B - Remove the locking pins.
Slide the hooks up to engage with the carriage bar.
Install the locking pins through the upper holes.
CAUTION: If the clearance between the carriage
bar and the hooks exceeds 3/16 in. (6mm), the
guides (refer to Section 2.2-1, step 1) should be
inverted and installed with the hole offset downward
(5/8 in./l6mm from bottom of guide to hole center) to
minimize the gap.
Type B
(Left side shown)
Remove cylinder
3 Remove the push/pull cylinder rod end pins. Manually
pull the faceplate away from the frame.
674219
dev. 1
Section
2.3-2
2 Installation Instructions
Installation
4
(cont.)
Install the sideshift cylinder rod to the anchor bracket.
Push the faceplate back against the frame and reinstall
the push/pull cylinder rod end pins.
Reversing the Sideshift and Push/Pull ports (Flow
Control Manifold equipped units only).
Units equipped with a flow control manifold have the option
of turning the manifold over to reverse the location of the
Push/Pull and Sideshift ports. This will accommodate trucks
already plumbed with Push/Pull supply hoses on the left side
and Sideshift supply hoses on the right side of the truck. See
Section 5.3-9.
5
Position the attachment 4 in./10cm (4 in./10cm = ½
sideshift cylinder stroke) to one side of center.
NOTE: Open both fittings on the sideshift cylinder to
allow the rod to move easily.
6
FLOW CONTROL
MANI FOLD
Measure the hydraulic hose length required to connect
the hoses to the hose terminal. Remove the hoses and
cut to length as required.
CAUTION: Flush the hoses as follows to prevent damage to
the attachment hydraulic components.
7
Connect the hoses to the truck hose terminal. Connect
the hoses together using a union fitting. Start the truck
and actuate the truck control valve in both directions for
about 30 seconds to carry any debris in the hoses to the
truck hydraulic tank and filter.
8
Remove the union fittings and connect the hoses to the
attachment fittings as shown. Position the hose guards to
prevent the hoses from being scuffed by the frame.
SOLENOID
VALUES
PushSSL
Pul ISSR
I
T-BRACKET
MANIFOLD
SSR
Pull
sh
ush
8
674219
Rev. 1
Section
2.3-2
2 Installation Instructions
Installation (Cont.)
9
Solenoid Equipped Attachments -The electric cable
leading from the attachment should be tied to the hoses
to prevent scuffing of the cable during attachment
sideshifting. See the electrical schematic to complete
installation.
Diode
Solenoid
Valve
/
7.5 Amp.
Fuse
White
-Black
-----Sideshift
(N.0.)
sv3
Owner-supplied
Wiring
Push/Pull
(N.C.1
sv2
C omplete installation
of the cable and
control knob.
THREE-FUNCTION
(Two button control knob)
Diode
Solenoid
Vajve
Control
Knob
Diode
Green
Black
II
Green
1
SyNT;i;t
sv3’
I
T
I
I
Push/Pull
(N.C.)
sv2
Platen
1N.C.)
sv2
Wiring
THREE-FUNCTION
W/Sheet
(Two-button control knob)
control knob.
Se@
I
Retainer
IN.0.)
sv3
I
Diode A-Green
Control
Knob
\
Fuse
syNT;i)ft
sv3
P$l/Py
II
sv2
wvner-supprreo
..,.
vvrrrng
674219
Rev. 1
control knob.
9
Section
2.3-2
2 Installation Instructions
Installation
(Cont.)
tWO-FUNCTION
W/Electric
(Two button control knob)
Limit switch opens to
stop faceplate movement,
7.5 Amp.
Fuse,
A-
Solenoid
Valve
Diode.
Control
/
Kno:
1 l-Y&!!
+-h--J-Jr7 (
Stap Group
.
.
L3laCK
Diode
White
Blue
Black
Sreen
1
Bleck
P?E!3
SCPA
Sideshift
(N.0.)
sv3
Push/Pull
(N.C.)
sv2
Owner-supplied
CompleteTxtallation
of the cable and
control knob.
THREE-FUNCTION
W/Electric
(Three button control knob)
White
\
Solenoid
Valve
Stop Group
Red
Limit switch opens to
stop faceplate movement.
Control
\
it
ch
S$yh!:t
sV3
Push/Pull
(N.C.)
sv2
Platen
(N.C.1
sv2
Owner-supplied
Wiring
Complete installation
of the cable and
control knob.
..”
10
674219
Rev, 1
.
‘,
I
Section
a
2 lnstallath
Instructions
Prior to Operation
2.3-3
Remove air from the system by extending the faceplate fully,
and keeping it there for 10-20 seconds with the control valve
actuated. Sideshift the attachment several times to force air
from the sideshift cylinder to the truck reservoir.
NOTE: This should correct an irregularly extending
faceplate. If it does not, retract the faceplate and repeat the
process.
Operate the unit through several complete cycles and make
sure all functions operate smoothly and correctly.
PUSH/PULL UNITS:
l
The gripper jaw should open prior to the faceplate
extension when the control handle is pushed forward.
0 The gripper jaw should close completely prior to faceplate
retraction when the control handle is pulled back.
PUSH/PULL UNITS WITH FLOW CONTROL
MANIFOLD OR SOLENOIDVALVE:
. SPEED ADJUSTMENT
The flow control manifold and solenoid valve have a separate
speed adjustment range of ± 30% for the load push and
load pull functions. See Section 5.3-10 for adjustment procedures.
. HIGH VOLUME BYPASS ADJUSTMENT
The flow control manifold and solenoid valve have a bypass
orifice for use with high volume truck applications. The
bypass should be adjusted open for high volume trucks to
reduce engine stall during actuation of the attachment. See
Section 5.3-8 for adjustment procedures.
PUSH/PULL UNITS WITH MANUAL OR ELECTRIC
STOP GROUPS:
The optional faceplate stop groups control the amount of
faceplate retraction to prevent the platens from extending
beyond the end of the unit load being carried, and possibly
damaging adjacent loads already stacked. To adjust a
manual or electric stop group, See Section 5.6 or 5.7.
FLOW CONTROL
MAN IFOLD
PUSH/PULL UNITS WITH ADJUSTABLE PLATENS
The platens can be adjusted to a wider or narrower profile
without tools to accommodate different size loads or for
pallet handling. See Section 5.5-1 for adjustment procedures.
674219
Rev. 1
11
Section
3 Periodic Maintenance
3.1
100 Hour Maintenance
Every time the lift truck is serviced or every 100 hours of truck
operation, whichever comes first, complete the following
maintenance procedures:
0 Inspect the platen shims at the bottom of the frame.
Tighten the bolts and readjust the shims as shown in
Section 5.5, if necessary.
After completing any service procedure, always test each
function through 5 complete cycles. First test the clamp
test each function with a load to make sure the attachment
0 Inspect the faceplate rollers and related parts for sufficient lubrication. If necessary, lubricate with Dubois
FGG-2 food industry grease, Cascade Part No. 669306.
q Inspect the hoses mounted in the pantograph arms. They
should be mounted securely and without hose droop.
Check for hose wear and kinking at the primary and
secondary arm connections. Replace kinked or worn
hoses.
3.2
500 Hour Maintenance
After each 500 hours of lift truck operation, in addition to the
100-hour maintenance procedure, perform the following:
0 Inspect all bearings and shims at the pivot points for
excessive wear. Replace if necessary.
0 Tighten the capscrews that secure the arm pivot pins to a
torque of 14-16 ft.-lb. (19-22 N.m).
0 Lubricate the faceplate rollers and guides with Dubois
FGG-2 food industry grease, Cascade Part No. 669306.
0 Inspect the bolts securing the gripper pad. Tighten if
necessary.
IA
WARNING: Tighten the platen hook
capscrews to a torque of 200-210 ft.-lbs.
(270-285 N.m).
0 Tighten the lower mounting hook capscrews to a torque
of 105-115 ft.-lbs. (140-155 N.m).
3.3
1000 Hour Maintenance
After each 1000 hours of lift truck operation, in addition to the
100-hour and 500-hour maintenance procedures, perform
the following.
0 Check the sideshift bearing strips and segments for
excessive wear. Replace if necessary. Keep the bearing
strips and segments well lubricated with Dubois FGG-2
food industry grease, Cascade Part No. 669306.
0 On sheet retainer models check the carrier assembly
bearing segments for excessive wear. Replace if necessary. Keep the bearing strips and segments well lubricated with Dubois FGG-2 food industry grease, Cascade
Part No. 669306
3.4
2000 Hour Maintenance
After each 2000 hours of lift truck operation, in addition to the
100-hour, 500-hour, and1000-hour maintenance procedures,
perform the following procedure.
0 Replace all arm bushings and thrust washers
12
674219
Rev. 1
,
Section
e
4 Troubleshooting
General Procedures
4.1
A
WARNING: Before servicing any hydraulic component, relieve pressure in
the system. Extend the faceplate 18 to
24 in. (46-61 cm), turn the truck off, and
open the truck auxiliary valves several
times in both directions.
Hydraulic Specifications
Pressure-
After completing any service procedure,
always test the function through several
cycles. First test the attachment empty
to bleed air trapped in the system to the
truck tank. Then test the attachment
with a load to be sure it operates correctly before returning it to the job.
Recommended
Flow- Minimuma
Recommended
7
Stay clear of the load while testing. Do
not raise the load more than 3 in.
(75mm) off floor while testing.
3oc
45c
2000
(140 bar)
2000
(140 bar)
2300
(160 bar)
2300
(160 bar)
3 GPM
(11Umin)
3GPM
(11Umin)
9 GPM
(34Umin)
6 GPM
(22Umin)
9/32in. (7mm)
9/32in. (7mm)
5) Flow less than minimum will result in slow faceplate speed.
2
4.1-1
4.1-2
Truck System Requirements
Flow greater than maximum can result in excessive faceplate speed,
reduced system performance and short hydraulic system life.
Hydraulic Oil -Cascade attachments are compatible
with SAE 1OWpetroleum base oil per Mil. Spec. MIL-O5606 or MIL-O-2104B.
l
The lift truck must supply sufficient hydraulic pressure to
handle the heaviest load. PRESSURE MUST NOT
EXCEED 2300 PSI (160 BAR).
l
Hydraulic flow should fall within the volume range shown in
the table.
l
The truck hydraulic system must supply hydraulic oil to the
attachment that meets the specification shown in the table.
Use of synthetic or aqueous base hydraulic oil is not
recommended. Contact Cascade if fire resistant hydraulic
oil must be used.
2659W151'5
Tools Required
In addition to a normal selection of hand tools, you will need:
0 Two No. 6 hoses with No. 6 female fittings.
0 A pressure gauge capable of measuring pressure to 2500
psi (175 bar), Cascade P/N 671212.
l
An inline flow meter capable of measuring hydraulic flow
to 20 GPM (80 L/min.), Cascade PIN 671477.
l
A No. 6 swivel nut run tee (37° JIC) suitable for mounting
the gauge.
0 A metal plug and cap (No. 6, 37° JIC) for plugging hoses
and capping fittings.
l
A needle shutoff valve, rated for 2500 psi (175 bar),
Cascade P/N 673681.
l
Voltmeter (or test light) for solenoid equipped attachments.
l
Ohmmeter for solenoid equipped attachments.
Assemble the hydraulic test instruments as shown.
No. 6 Swivel
Needle
Shut-off
Valve
Pressure
Gauge
Nut Run Tee
\
\
674219
Rev. 1
No. 6, 37O Flared
Female Fitting
NOTE: Make sure
the arrow points in
this direction.
D&in
Hose
13
Section
4 Troubleshooting
4.1-3 Get All The Facts Before You
Begin Working On The
Attachment
It is important that you gather all the facts regarding the
problem before you begin service procedures. The best
way is to talk with the operator. Ask for a complete
description of the malfunction. The following guidelines will
help you decide where to begin your troubleshooting
procedures.
A. Push/Pull Circuit
l
Attachment will not pull load.
l
Faceplate will not extend or retract.
0 Faceplate operates slowly.
l
Gripper bar will not lower or raise.
l
Gripper bar is not sequenced with the push/pull function.
l
Gripper bar will not hold the slip sheet when pulling load
onto platens.
If you encounter one of these problems, refer to section 4.3.
B. Sideshift Circuit
l
Attachment will not sideshift.
l
Attachment sideshifts slowly.
If you encounter one of these problems, refer to section 4.4.
C. Adjustable
Platen Circuit
0 Platens will not move.
0 Platens move very slowly.
If you encounter one of these problems refer to section 4.5.
0. Sheet Retainer Circuit
0 Sheet retainer bar will not move.
0 Sheet retainer will not hold slip sheet when pushing load
off platens.
0 Sheet retainer bar moves slowly.
If you encounter one of these problems refer to section 4.6.
E. Sideshifting
Platen Circuit
@ Platen will not sideshift.
l
Platen sideshifts slowly.
If you encounter one of these problems refer to section 4.4
F. Electrical Faceplate Stop Circuit
0 Faceplate will not stop.
l
Faceplate will not stop in correct position.
If you encounter one of these problems refer to section 4.7.
14
674219
Rev. 1
Section
4 Troubleshooting
e
4.2
Plumbing
4.2-1
Hosing Diagram-Load
Push (Non-Sideshifting)
FACEPLATERETRACT
PRESSURE
R ET u RN
Push
Valve
.~~~:~~~;~~~~;:~:.:~~:~~~!:pD
SLAVE
Hose
Terminal
NOTE:
For faceplate EXTEND,
reverse the colors shown.
4.2-2
Push/Pull
Cylinder
Circuit Schematic
Both Cylinders
lnRE+-i-------ti’nEXT
Hose
Reel
Truck
Auxiliary
Valve
r-’
Truck
Relief Valve
-es@
Truck
674219
Rev. 1
Hydraulic
Pump
15
Section
4.2-3
4 Troubleshooting
.:
Hosing Diagram -Load
Push (Sideshift without Solenoid)
SIDESHIFT RIGHTand
FACEPLATE RETRACT
NOTE: For sideshift LEFT and
faceplate EXTEND, reverse
the colors shown.
MANIFOLD
4.2-4
or BRACKET
Circuit Schematic
Truck Hydraulic Pump
16
674219
Rev.
1
Section
a
4.2-5
4 Troubleshooting
Hosing Diagram- Load Push (Sideshift with Solenoid)
FACEPLATE RETRACT
In EXT
PRESSURE
RETURN
Solenoid
Valve
SLAVE
NOTE:
For faceplate EXTEND,
reverse the colors shown.
Hose
Terminal
Truck
Auxiliarv
PushiPull
SIDESHIFT
RIGHT
PRESSURE
-
RETURN
-
NOTE:
For sideshift LEFT,
Solenoid
reverse the colors shown.
Valve
Push/Pull
C:ylinder
Truck
Auxiliary
17
674219
Rev. 1
Section
4.2-6
4 Troubleshoot’
Circuit Schematic-Load
Push (Sideshift with Solenoid)
Push/Pull
Cylinders
m
Load
Push
Valve
Sideshift
Hose
Terminal
Solenoid
Valve
Hose
Reel
Valves with Flow
Control only
‘s
II
Truck
Auxiliary
Valve
Truck
18
Hydraulic
Pump
674219
Rev. 1
Section
a
4.2-7
4 Troubleshooting
Hosing Diagram-Load
Push/Pull (Non-Si eshifting)
Push/Pull
Cylinder
FACEPLATE
RETRACT
GRIPPER BAR DOWN
PRESSURE
and
-
RETURN
SLAVE
Al
MAN,Fom,
bamm
BRACKET
or
NOTE:
For faceplate EXTEND and
gripper bar UP, ravarsa the colors shown.
Push/Pull
Auxiliary
Valve
m
4.2-8
Circuit Schematic
(Both Cylinders)
Gripper
Cylinders
Load
Push/Pull
Valve
L
I
I
:..
c3L
E@-
a
_-_a,---
i
i
------In RET
(
ln EXT
Hose
Terminal
Hose
Reel
Truck
Auxiliary
Valve
Truck
Relief
Valve
e
Truck
674219
Rev. 1
Hydraulic
Pump
19
Section
4 Troubleshooting
4.2-9
Hosing Diagram-Load Push/Pull
(Sideshift without Solenoid
Gripper
Cvlindec
FACEPLATE RETRACT and
GRIPPER BAR DOWN
Load
Push/Pull
Valve
PRESSURE
RETURN
SLAVE
NOTE: For faceplate EXTEND and
gripper bar UP, reverse the colors shown.
I/
MANIFOLD
or BRACKET
In SSL Push/Pull
AUXlllt3ry
Valve
Push/Full
SIDESHIFT
RIGHT
PRESSURE
RETURN
NOTE: For sideshift LEFT
reverse the colors shown.
MANIFOLD
or
Push/Pull
Auxiliary
Valve
Valve
20
674219
Rev. 1
Section
4.2-10
4 Troubleshooting
Circuit Schematic-Load
Push/Pull
(Sideshift without Solenoid)
(Both
Cylinders)
Gripper I I I I
I I II I
Load
Push/Pull
Valve
Cylinders
Sideshift
Cylinder
c4
4,
7
--
In
SSR
I
I
1
r--iHose
! , 1 jTerminal
Sideshift
Auxiliary
Valve
Truck
Relief
Valve
L-1
Truck
674219
Rev. 1
Hydraulic
Pump
21
t
Section
4 Troubleshooting
4.2-l
Hosing Diagram-
Load Push/Pull (Sideshift with Solenoid)
FACEPLATE RETRACT and
GRIPPER BAR DOWN
PRESSURE
RETURN
Solenoid
SLAVE
Valve
NOTE: For faceplate EXTEND and
gripper bar UP. reverse the colors shown.
Truck
Auxiliary
Valve
SIDESHIFT
RIGHT
PRESSURE
RETURN
NOTE:
For sideshift LEFT
reverse the colors shown.
Truck
Auxiliary
Valve
22
674219
Rev. 1
a
Section
a
4.2-12
4 Troubleshooting
Circuit Schematic-Load
Push/Pull
(Sideshift with Solenoid)
R
Push/Pull
Cylinders
~
(Both Cyl
Gripper
Cylinders
VW -.
I I c\n- -
I I
I $\I7--II”
Solenoid
Valve
Valves with Flow /
Control only
I
I
Truck
Auxiliary
Valve
Truck
Relief
Valve
Truck
674219
Rev. 1
Hydraulic
Pump
23
4 Troubleshooting
Section
4.2-13
Hosing Diagram-Load Push/Pull
(Hydraulically Adjustable Platens)
Push/Full
Cylinder
1
FACEPLATE RETRACT,
GRIPPER BAR DOWN, and
PLATENS POSITIONED WIDE
PRESSURE
RETURN
tsh/Pull
flincler
SLAVE
NOTE: For faceplate EXTENDED,
gripper bar UP, and platens positioned
NARROW, reverse the colors shown.
Push/Pull
Truck
Auxiliary
Valve
,er
ders
SIMSHIFT
RIGHT
PRESSURE
RETURN
NOTE:
ush/Pull
ylinder
For sideshift LEFT,
reverse the colors shown.
Truck
Auxiliar
Valve
24
29 -
Hose
674219
Rev. 1
Section
4.2-14
4 Troubleshooting
Circuit Schematic-Load
Push/Pull
(Hydraulically Adjustable Platens)
(Both
Cylinders)
Push/Pull
Gripper
Cylinders
Load
Push/Pull
Valve
L
Platen
Positioner
Cylinder
1
Sideshift
Cylinder
1
(
--
Hose
Terminal
Hose
Reel
Solenoid
Valve
Valves
-__...with Flow
Control only
Truck
Relief
Valve
9+cJTruck
674219
Rev. 1
Hydraulic
Pump
25
Section
4.2-15
4 Troubleshooting
Hosing Diagram-Load Push/Pull
(Sheet Retainer-Sheet Sav®)
FACEPLATE RETRACT,
GRIPPER BAR DOWN and
SHEET RETAINER UP
PRESSURE
RETURN
SLAVE
m-l
Push/Pull
Cylinder
Note: For faceplate EXTEND,
reverse the colors shown.
In
EXT
Sheet Retainer
Sideshift
Cvllnder
Truck
Auxiliary
Valve
SIDESHIFT
RIGHT
PRESSURE
RETURN
NOTE: For sideshift LEFT,
reverse the colors shown.
Push/Pull
Cvlinder
In
EXT
Sideshift
Cylinder
Truck
Auxiliary
Valve
26
674219
Rev. 1
Section
4.2-16
4 Troubleshooting
Circuit Schematic-Load
Push/Pull
(Sheet Retainer/Sheet Sav®)
:Both
Sheet Retainer
Cylinder
Solenoid
Valve
Gripper
Cylinders
I
I
Load
Push/Pull
Valve
Sideshift
Cylinder
Solenoid
Valve
Valve with Flow
Control only
/
Truck
A&iliary
Valve
IA
’ ” 1 I
I I
1IJ.L
1 1v I m
I I
Truck
Relief
Valve
674219
Rev. 1
27
4 Troubleshooting
Section
Hosing Diagram-Load
4.2-17
Push/Pull (Sideshifting Platens)
Push/Pull
R
FACEPLATE RETRACT and
GRIPPER BAR DOWN
PRESSURE
Gripper
Cylinder
I
RETURN
SLAVE
-
NOTE: For faceplate EXTEND and
gripper bar UP, reverse the colors shown.
MANIFOLD
or BRACKET
Push/Pull
Auxiliary
Valve
,
SIDESHIFT
RIGHT
PRESSURE
L
RETURN
Load
Push/Pull
NOTE: For sideshift LEFT
reverse the colors shown
\
/
/
-----JY
/a
clL”“u7
Push/Pull
Cylinder
ANIFOLD
or BR
Hose
Reel
Push/Pull
Auxlllary
Valve
1
28
-u
674219
Rev. 1
Section
a
4.2-18
4 Troubleshooting
Circuit Schematic-Load
(Sideshifting Platens)
Push/Pull
Push/Pull
Cylinders
n
[Both
n
Cylinders)
Gripper
Cylinders
IY.I..
Sideshift
Cylinder
Load
Push/Pull
Valve
I
1’
I
I’
c3
c4
_
c-c-
c2
I(
I
InSSL
In
SSR
--
Cl
)rl
In
RET
, Manifold
, (if equipped)
In EXT
--
!$Fiinal[
- ]
Ll
Hose
Terminal
7-w
Hos
Push/Pull
Gripper
Auxiliar)
Valve
Sideshift
Auxilary
Valve
Truck
Relief
Valve
Truck
674219
Rev. 1
Hydraulic
Pump
29
Section
4.3
4 Troubleshooting
Push/Pull Circuit
There are seven potential problems that could affect
push/pull operation.
l
Insufficient hydraulic pressure
l
External leaks
0 Faulty electrical connection
l
Defective solenoid coil or cartridge (on solenoidequipped attachments)
l
Worn or defective cylinder seals
l
Valve assembly malfunction
l
Kinked supply hoses
Before proceeding with a test, determine whether the push
function, pull function, or the gripper function is at fault.
Then follow the check list under the problem function
(Section 4.3-1, 4.3-2, 4.3-3 or 4.3-4) to isolate the problem
area.
4.3-1
Electrical TroubleshootingSolenoid Equipped Attachments
See the wire diagrams and schematics shown in Section
2.3-2 step 11, Use the proper schematic while following
the steps below.
1, Check the control knob circuit fuse. Replace if
necessary.
2. Check for loose electrical connections at the truck
ignition switch, control knob button(s), solenoid coil
terminals and diodes.
3.
DIODES
Remove the diode(s) from the solenoid coil terminal(s).
Test with an ohmmeter for high resistance in one
direction and no resistance in the other direction. If
there is no resistance in both directions, replace the
diode.
0
0
4. Three Function Attachments - Remove the three
electrical leads from the frame mounted diode. Test
for high resistance in one direction and no resistance
in the other direction between the center terminal and
each of the outer terminals. If there is no resistance in
both directions between the center terminal and either
of the outer terminals, replace the diode.
5.
0
+
%
i
I-I
0
+
I
+
0
0
P/N 672535
SCPA
pJ%El~g50
Disconnect the electrical leads from the solenoid coil
terminals. Use a voltmeter or test light to take a
current reading at the electrical leads from the control
knob button when the button is depressed.
l
If there is no current to the solenoid, troubleshoot
the electrical circuit for shorts.
a If there is current to the solenoid, test for coil
continuity.
6. To test for coil continuity, place an ohmmeter test lead
on each solenoid coil terminal.
0 If there is an ohmmeter reading, the coil is good.
Check the resistance against the resistance values
in the chart to determine if the coil voltage is
properly matched to the truck voltage.
COIL
VOLTAGE
COIL PART
NUMBER
0 If the coil is good and the coil voltage is correct,
but the solenoid does not “click” when the control
button is depressed, the solenoid cartridge is
jammed and should be replaced.
12v
24V
36V
48V
667327
667328
667329
667330
l
30
If there is no ohmmeter reading shown, the solenoid
coil is defective and should be replaced.
APPROXIMATE
RESISTANCE
6+1
28+1
70fl
10851
Ohms
Ohms
Ohms
Ohms
NOTE: Ohm readings are for Cascade Coils,
not Racine or Waterman vpe.
674219
Rev. 1
“. g
*, ’
Section
4.3-2
4 Troubleshooting
Push Hydraulic Function
A
WARNING: Before removing any
hoses, relieve pressure in the hydraulic
system. Turn the truck off; then open the
truck auxiliary control valve(s) several
times in both directions.
Pluo This Hose
Right
Hand
Cylinder
/
1. Check the pressure delivered by the truck. Refer to the
truck service manual. The pressure must be within 100 psi
(7 bar) of specified truck pressure. TRUCK PRESSURE
MUST NOT EXCEED 2300 PSI (160 BAR), measured at the
hose terminal.
2. Check the flow volume at the hose terminal. See Section
6.1-1 for the recommended flow volumes. If the truck
pressure and flow volume are correct, proceed with the
troubleshooting.
3. At the attachment valve assembly, disconnect the supply
hose that leads to the base end of the right-hand push/pull
cylinder (as viewed from the driver’s seat). Plug the cylinder supply hose with a No. 6 metal plug.
PUSH FUNCTION
Push/Pull
TEST
Cylinders
4. Connect a pressure gauge with a needle shutoff valve and
drain line to the valve fitting (refer to Section 4.1-2 for an
illustration of the gauge arrangement). Put the drain line in
an empty container.
5. Open the needle valve no more than ½ to 1 full turn. Start
the truck and let it idle.
6. Operate the truck “push” lever for 4 to 5 seconds, then
close the needle valve tightly. Allow the gauge to reach
and hold full truck relief pressure for 2 or 3 seconds, then
release the “push” lever. Observe the pressure gauge and
note the following:
l
Valve Assembly
If the gauge does not reach the specific truck pressure
(a 100 psi/7 bar loss is OK), one of the following is
responsible.
Internal Or External Leaks
Refer to the accompanying diagram and check all
areas that could have external leaks. Repair as
required and operate the attachment to determine if
the problem has been solved.
Sideshift
Cylinder
Defective Push/Pull Solenoid (on attachments so
equipped) Refer to Section 4.3-1, for solenoid tests.
Shuttle In The Valve Assembly Is Not Shifting
Refer to Section 5.3 for valve inspection and servicing procedures.
Truck
The Piloted Check Valve Or Relief Valve In The
Valve Assembly Is Defective
Refer to Section 5.3 for valve inspection and servicing procedures.
Valve
Suspect Left Cylinder
o If the gauge does reach truck pressure (a 100 psi/7 bar
loss is OK), the following is responsible for a malfunctioning “push” circuit.
Push/Pull Cylinder Is Defective
When the faceplate extends unevenly with the right
side out further than the left, suspect the left-hand
cylinder; vice versa for the right-hand cylinder. To
further check the cylinders individually, install a drain
line to the base end port and apply pressure to
retract the cylinder. A steady oil stream after full
retraction indicates a bypass of oil at the piston inner
or outer seals or compensator valve. Refer to Section
5.4 for cylinder inspection and servicing procedures.
674219 Rev. 1
Right Side extends
DEFECTIVE
farther
PUSH/PULL CYLINDER
31
’
Section
4.3-3
4 Troubleshooting
Pull Hydraulic Function
WARNING
hoses, relieve pressure in the hydraulic
system. Turn the truck off, then open the
truck auxiliary control valve(s) several
1. Check the pressure delivered by the truck. Refer to the
truck service manual. The pressure must be within 100 psi
(7 bar) of specified truck pressure. TRUCK PRESSURE
MUST NOT EXCEED 2300 PSI (160 BAR), measured at the
hose terminal.
2. Check the flow volume at the hose terminal. See Section
6.1-1 for the recommended flow volumes. If the truck
pressure and flow volume are correct, proceed with the
troubleshooting.
Install
3. At the valve assembly, disconnect the supply hose that
leads to the rod end of the left-hand push/pull cylinder (as
viewed from the driver’s seat). Plug the cylinder supply
hose with a No. 6 metal plug.
Pressure
PULL FUNCTION
4. Connect a pressure gauge with a needle shutoff valve and
drain line to the valve fitting (refer to Section 4.1-2 for an
illustration of the gauge arrangement). Put the drain line in
an empty container.
5. Open the needle valve no more than ½ to 1 full turn. Start
the truck and let it idle.
TEST
Push/Pull
Gripper
Cylinders
Cylinders
6. Operate the truck “pull” lever for 4 to 5 seconds, then
close the needle valve tightly. Allow the gauge to reach
and hold full truck relief pressure for 2 or 3 seconds, then
release the “pull” lever. Observe the pressure gauge and
note the following:
l
Assembly
If the gauge does not reach the specific truck pressure
(a 100 psi/7 bar loss is OK), one of the following is
responsible.
Internal Or External Leaks
Refer to the accompanying diagram and check all
areas that could have external leaks. Repair as
required and operate the attachment to determine if
the problem has been solved.
Sideshift
Cylinder
Solenoid
Valve
Defective Push/Pull Solenoid (on attachments so
equipped) Refer to Section 4.3-1, for solenoid tests.
Shuttle In The Valve Assembly Is Not Shifting
Refer to Section 5.3 for valve inspection and servicing procedures.
The Piloted Check Valve Or Relief Valve In The
Valve Assembly Is Defective
Refer to Section 5.3 for valve inspection and servicing procedures.
l
\
\
J
Suspect Left Cylinder
/
If the gauge does reach truck pressure (a 100 psi/7 bar
loss is OK), the following is responsible for a malfunctioning “pull” circuit.
Push/Pull Cylinder Is Defective
When the faceplate extends unevenly with the right
side out further than the left, suspect the left-hand
cylinder; vice versa for the right-hand cylinder. To
further check the cylinders individually, install a drain
line to the base end port and apply pressure to
retract the cylinder. A steady oil stream after full
retraction indicates a bypass of oil at the piston inner
or outer seals or compensator valve. Refer to Section
5.4 for cylinder inspection and servicing procedures.
32
I
Right Side extends
farther
DEFECTIVE PUSH/PULL CYLINDER
674219
Rev. 1
I’
’ .”
Section
4.3-4
4 Troubleshooting
Gripper Function Troubleshooting
WARNING: Before removing any hoses
relieve pressure in the hydraulic system.
Turn the truck off, then open the truck
auxiliary control valve(s) several times
1. Inspect the gripper bar for mechanical jamming caused
by bent or broken components.
2. Inspect the hoses from the Load Push/Pull valve to
gripper cylinder. Replace the hoses if either is kinked.
3.
Extend the faceplate. Disconnect the hose at the left
hand push/pull cylinder rod end. Plug or cap the open
ports and hoses with metal fittings.
Disconnect the hose connected between the rod end
ports of the gripper cylinders, Install a drain hose to each
of the cylinder rod end fittings. Operate the attachment in
the pull function to extend the gripper cylinders.
l
If oil is present as a steady stream after full extension,
the cylinders require inspection and service as
described in Section 5.4.
0 If oil is not present after full extension, continue
troubleshooting.
4.
Remove the hose from the Load Push/Pull valve C4 port
fitting. Install the pressure gauge, shut off valve and drain
hose to the fitting. Operate the attachment in the pull
function.
l
If the gauge does not register a pressure reading,
remove and service the Load Push/Pull valve. See
Section 5.3 for service procedures.
l
If the gauge registers a low pressure reading, check for
kinked hoses.
Remove hose from
valve C4 port fitting.
674219
Rev. 1
Connect the pressure gauge,
shutoff valve and drain hose
to the valve C4 port fitting.
Section
4.4
4 Troubleshooting
Troubleshooting the
Sideshift Circuit
There are six potential problem areas that
sideshift operation.
l
Insufficient truck hydraulic pressure
l
External Leaks
could
affect the
l
Damaged sideshift bearing strips and segments
l
Defective solenoid cartridge (on solenoid-equipped
attachments)
a Faulty electrical connection
l
4.4-1
Worn or defective cylinder seals
Sideshift Function
Troubleshooting
/
A
WARNING: Before removing any hoses
relieve pressure in the hydraulic system.
Turn the truck off, then open the truck
auxiliary control valve(s) several times
in both directions.
1
1. Check the pressure delivered by the truck. Refer to the
truck service manual. The pressure must be within 100 psi
(7 bar) of specified truck pressure. TRUCK PRESSURE
MUST NOT EXCEED 2000 PSI (140 bar), measured at
the junction block.
Install drain
2. Check the flow volume at the junction block. See Section
6.1-l for the recommended flow volumes. If the truck
pressure and flow volume are correct, proceed with the
troubleshooting.
3. On solenoid equipped attachments press the push/pull
button.
4.
l
If both the push/pull and sideshift solenoids “click”,
the valve is working correctly. Continue the troubleshooting check list.
l
If only the push/pull solenoid “clicks”, the sideshift
solenoid cartridge spool is jammed in the closed
position. Replace the solenoid cartridge as described
in Section 5.3-5.
Inspect the sideshift bearing strips and segments
between the truck carriage and attachment frame for
excessive wear. Replace if necessary. Keep the bearing
strips and segments well lubricated with Dubois FGG-2
food industry grease. Cascade part no. 669306.
5. The sideshift cylinder seals may be worn. Install a drain
line in the base end of the cylinder and apply pressure to
retract the cylinder. A steady stream of oil after full
retraction indicates a bypass at the seals. Refer to Section
5.4 for cylinder inspection and servicing procedures.
34
VIEWED FROM FRONT
OF ATTACHMENT
674219
Rev. 1
Section
4.5
4 Troubleshooting
Troubleshooting the
Hydraulically
Adjustable Platen
Circuit
There are five potential problem areas that could affect the
adjustable platen operation.
Insufficient truck hydraulic pressure
l
0 Defective solenoid coil or cartridge
0 Worn or defective cylinder seals
0 Defective Diode
Faulty electrical connection
l
4.5-1
Adjustable Platen Function
Troubleshooting
A
WARNING: Before removing any hoses
relieve pressure in the hydraulic system.
Turn the truck off, then open the truck
auxiliary control valve(s) several times
in both directions.
1. Check the pressure delivered by the truck. Refer to the
truck service manual. The pressure must be within 100
psi (7 bar) of specified truck pressure. TRUCK
PRESSURE MUST NOT EXCEED 2000 PSI (140 bar),
measured at the junction block.
THREE-FUNCTION
(Two-button control knob)
2. Check the flow volume at the junction block. See
Section 6.1-1 for the recommended flow volumes. If
the truck pressure and flow volume are correct,
proceed with the pressure test.
3.
Troubleshoot the adjustable platen electrical circuit
as described in Section 4.3-1.
4. The adjustable platen cylinder seals may be worn. Extend
the faceplate. Disconnect the hose at the left hand
push/pull cylinder rod end. Plug or cap the open ports
and hoses. Install a drain line as shown in the illustration
and apply pressure to extend the cylinder. A steady
stream of oil after full extension indicates a bypass at the
seals. Refer to Section 5.4 for cylinder inspection and
servicing procedures.
U
674219
Rev. 1
VIEWED FROM FRONT
OF ATTACHMENT
35
Section
4.6
4 Troubleshooting
Troubleshooting the
Sheet Retainer Circuit
There are five potential problem areas that could affect the
sheet retainer operations.
0 Insufficient truck hydraulic pressure
Defective solenoid coil or cartridge
l
0 Worn or defective cylinder seals
0 Defective Diode
0 Faulty electrical connection
4.6-l
Sheet Retainer Function
Troubleshooting
A
WARNING: Before removing any hoses
relieve pressure in the hydraulic system.
Turn the truck off, then open the truck
auxiliary control valve(s) several times
in both directions.
1. Check the pressure delivered by the truck. Refer to the
truck service manual. The pressure must be within 100
psi (7 bar) of specified truck pressure. TRUCK
PRESSURE MUST NOT EXCEED 2000 PSI (140 bar),
measured at the junction block.
THREE-FUNCTION
(Twmbutton control knob)
2. Check the flow volume at the junction block. See
Section 6.1-1 for the recommended flow volumes. If
the truck pressure and flow volume are correct,
proceed with the pressure test.
3. Troubleshoot the sheet retainer electrical circuit as
described in Section 4.3-1.
4.
The sheet retainer cylinder seals may be worn. Extend
the faceplate. Disconnect the hose at the left hand
push/pull cylinder rod end. Plug or cap the open ports
and hoses. Install a drain line as shown in the illustration
and apply pressure to extend the cylinder. A steady
stream of oil after full extension indicates a bypass at the
seals. Refer to Section 5.4 for cylinder inspection and
servicing procedures.
VIEWED
FROM FRONT
OF ATTACHMENT
36
674219
Rev. 1
-_ 1
‘I
’
Section
4.7
4 Troubleshooting
Troubleshooting the
Electrical Faceplate
Stop Groups
There are three potential areas that could effect the electrical
faceplate stop operations.
Defective limit switch
l
.o Improper limit switch actuator adjustment
Faulty electrical connection
l
4.7-1
Electrical Faceplate Stop
Function Troubleshooting
1. Adjust the limit switch actuator as described in Section
5.7-1
2. Operate the attachment in the push/pull function
without the stop button depressed.
3.
l
If the push/pull function is working properly,
continue the troubleshooting check list.
l
If the push/pull function is not working properly,
troubleshoot the push/pull electrical circuit as
described in Section 4.3-1.
THREE-FUNCTION
(Three-button control knob)
Disconnect the electrical leads at the limit switch. See
the wire diagrams and schematics shown in Section
2.3-2 step 11. Use a voltmeter or test light to take a
current reading at the electrical leads from the control
knob button when the button is depressed.
0 If there is no current to the limit switch electrical
leads, troubleshoot the electrical circuit for shorts.
l
If there is current to the limit switch electrical leads,
test the limit switch.
4. To test the limit switch, place the ohmmeter leads
across the limit switch leads. With the switch in the
neutral position, the ohmmeter should register a
reading. The ohmmeter should not show a reading
when the limit switch is activated.
l
674219
THREE-FUNCTION
(Three-button control knob)
If the limit switch fails either of these tests, replace
and adjust the switch as described in Section 5.7-1
Rev. 1
37
Section
5.1
5 Service
Attachment Removal
and Installation
1 Fully extend the faceplate.
2
Lower the attachment onto a pallet bar.
3 Disconnect the Lower Hooks.
Bolt On Type-Remove
the lower mounting hooks. For
reassembly, tighten the capscrews to a torque of
105-115 ft.-lbs. (140-155 N.m).
Quick Change Type A - Pull out the retaining pin and
rotate the hooks to the position shown. For reassembly,
turn both hooks up and reinstall the pin.
Quick Change TypeB-Pull out the locking pins, slide
the hooks down and reinstall the pins in the lower
holes. For reassembly, slide the hooks up and install
the pins in the top holes.
WARNING
hoses, relilve pressure in the hydraulic system. Turn the truck off, then
open the truck auxtltary control
valve(s) several times in both direc-
4
Hook
Disconnect, tag, and cap the attachment hoses at the
carriage hose terminals.
5 Disconnect the sideshift cylinder, if equipped, from the
truck carriage anchor bracket.
Locking
6
Pin
Disconnect the electrical connection at the truck, on
solenoid mounted attachments.
7 Lower the truck carriage and back away from the attachment.
8 For reinstallation, reverse the above procedures, making
sure the locating tab in the upper hook properly engages
the notch in the upper truck carriage bar.
and Back Away
38
674219
Rev. 1
*, ’
:
l
Section
*
5.2
5.2-1
5 Service
Faceplate and
Pantograph Arms
Disassembly
1
Remove the cotter pin and pin from the link on the
backside of the faceplate.
2
Remove the cotter pin and castellated nut that join the
secondary arms together. Remove the pin.
3
Disconnect, cap, and tag the two gripper cylinder hoses
at the gripper cylinder.
4
Attach a hoist chain to the faceplate.
5
Remove the capscrews and pins which hold the
secondary arms to the primary arms.
6
Twist each secondary arm towards the faceplate center
to remove them from the channels on the backside of
the faceplate.
7
Attach a hoist to the frame assembly if the attachment
was removed from the truck.
8
Remove the capscrews and pins from the rod end of the
push/pull cylinders.
9
Remove the frame capscrews and pins that hold the
pantograph arms to the frame.
Attach a hoist chain
if attachment
was
removed from truck
Remove
capscrews
ch hoist
Remove cotter
and castellated
chain
pin
nut
Torque Capscrews
to 14-16 ft.-lbs.
Primary
Arm
1
Remove capscrews
and pins
Secondary
Arm
toward
cent
Remove cotter pin
and pin from link
674219
Rev. 1
39
Section
5 Service
PRIMARY ARM
Shim primary arm-
5.2-2
Service and Reassembly
1
Inspect all shims, and washers and replace any that are
scored or worn unevenly.
2
Inspect the Telflon bushings for wear. Replace the bushings if the coating is scored or worn through.
3
Reassembly is the reverse of the disassembly procedures except as follows:
*Apply chassis lube to the arm pivot pins prior to reassembly.
l
Install and adjust the gripper hoses as described in
Section 5.2-4.
CAUTION: Shim the primary arms at the bottom to
position each clevis as shown. Shim the top of the primary arms to provide .030 inch (.75mm) maximum
clearance as shown. Shim the secondary arm at the
bottom to provide .030 inch (.75mm) maximum clearance as shown.
4
After reassembly and installation on the truck, extend
and retract the faceplate 5 times to bleed excess air that
may be trapped in the system. If the faceplate extends at
an angle after bleeding excess air, and the cylinders are
not defective (see Section 4.3-2 and 4.3-3) use the
following procedure to correct the misalignment.
NOTE: If any major component (frame, faceplate pantograph arm, etc.) has been replaced, use this procedure
to correct the misalignment.
a.
Fully extend the faceplate with the eccentric pin at a
neutral position (the letter ‘N’ should be next to the
capscrew).
:, SECONDARY ARM
lmary arms provide
j
ement shown.
+
!===
\
b. Measure the distance between the faceplate and
the frame on both sides. The measurements should
be equal within ½ inch (13mm).
M
Shim sedondary afins
at bottom to provide
max. clearance shown. I
If measurements differ by more than ½ inch (13mm)
the pin opposite the longest measurement should
be moved to the ‘R’ (Retract) position as follows.
C.
Remove the capscrew and eyebolt. Insert a metal
rod and slowly turn the pin around until the ‘R’ is
near the capscrew.
d. insert the eyebolt and tighten the capscrew to a
torque of 35-39 ft.-lbs. (47-53 N,m).
e. If still misaligned beyond ½ inch (13mm), turn pin
opposite shortest measurement to ‘E (extend)
position, near the capscrew.
5.2-3
Gripper Mechanism Service
1
Remove the cotter pins and pins retaining the gripper
cylinder rods to the gripper bar.
2
Remove all the capscrews holding the gripper jaw to the
faceplate. The channel is now free.
1 *
NEUTRAL
CAM POSITION
Remove, tag, and
plug the hoses
WARNING: Before removing any hoses,
relieve pressure in the hydraulic system.
Turn the truck off then open the truck
auxiliary control valve(s) several times in
both directions. ’
1
3
Remove, tag, and plug hoses at the gripper cylinders.
4
Remove the nut retaining the cylinder to the faceplate
and pull out the cylinder.
5
Reassembly is the reverse of disassembly except as
follows:
*Tighten the cylinder anchor nuts until rigid, then back
off one turn.
40
674219
Rev. 1
:
*
I
‘
Section
0
5.2-4
5 Service
Gripper Hose Installation
Has*@
The gripper hoses must be installed as described below for
the hoses to properly track with the arms during faceplate
extension and retraction. Replacement hoses should be
marked as shown at right.
Hose
PIN 672994
P/N 672991
0
2
CAUTION: If Cascade replacement hoses are not used,
the hoses must meet the following specifications:
o
l
Meets SAE 100 R7 specifications.
0
Seamless nylon inner tube, wrapped with a single
synthetic fiber braid.
l
Polyurethane cover.
1
674219
No. 4 Hoses with No. 4 fittings.
94.5”
1240cm)
Hose 1 is marked at 25.5” (65 cm) and 26.5” (67 cm)
from one end. Attach that hose end to the gripper
cylinder base end tee fitting.
2
Hose 2 is marked at 30.5” (78 cm) and 31.5” (80.0 cm)
from one end. Attach that hose end to the gripper
cylinder rod end tee fitting.
3
Route the pair of hoses through the secondary and
primary arm to the valve as shown.
4
Position hose markings at clamping locations A and D.
Take slack out of hoses where attached to the arms.
5
Fully extend the faceplate. Position hoses between
clamps B and C to be tight but not stretched.
6
Tighten the six clamp capscrews to a torque of 7-8
ft.-lbs. (10-1 1 N,m).
7
Extend and retract the faceplate noting any areas
where the hose is being stretched or pinched. Adjust
as required.
Rev, 1
45c
I-L
3oc
1015”
(258cml
ii
Route the hoses
to the valve.
41
Section
5..3
5.3-1
5 Service
Valves
Load Push and Load Push/Pull Valve
Removal and Installation
1
Extend the faceplate.
A
5.3-2
WARNING: Before removing any hoses
relieve pressure in the hydraulic system.
Turn the truck off, then open the truck
auxiliary control valve(s) several times
In both directions.
2
Remove, tag and plug all hoses and tubing from the
valve.
3
Remove the two capscrews and lockwashers retaining
the valve to the attachment frame. For reassembly,
tighten the capsrews to a torque of 7-8 ft.-lbs.
(10-11 N.m).
4
For reassembly, reverse the above procedures.
Remove,tag. and
Load Push/Pull
Valve shown
1”;
/
Load Push Valve
Disassembly and Service
IMPORTANT:
Service the Valve in a clean work area.
1
Remove the valve from the attachment as described in
Section 5.3-1.
2
Remove fittings and plugs.
3
Remove the check valve cartridges.
4
Clean all parts with kerosene or solvent.
5
For reassembly, reverse the above procedures except
as follows:
l
The check valve cartridge back-up rings and O-rings
must be installed as shown in Section 5.3-11.
l
Lubricate the check valve cartridges with STP or
petroleum jelly prior to reassembly.
l
Tighten all fittings and cartridges (except plugs) to a
torque of 10-15 ft.-lbs. (13-19 N.m).
See Section
Detail A
5.3-11
i
See Section
Detail B
5.3-l 1
\
\
See Section
42
5.3-l 1
674219
Rev. 1
Section
5.3-3
5 Service
Load Push/Pull Valve
Disassembly and Service
IMPORTANT:
Service the Valve in a clean work area.
1
Remove the valve from the attachment as described in
Section 5.3-1.
2
Remove fittings and plugs.
See Section
Detail A
5.3-l 1
3 Remove the check valve cartridges.
4 Clean all parts with kerosene or solvent.
5 For reassembly, reverse the above procedures except
as follows:
l
The check valve cartridge back-up rings and O-rings
must be installed as shown in Section 5.3-11.
See Section
5.3-l
0 Lubricate the check valve cartridges with STP or
petroleum jelly prior to reassembly.
a Tighten all fittings and cartridges (except plugs) to a
torque of 10-15 ft.-lbs. (13-19 N.m).
LOAD PUSH/PULL VALVE
See Section
Detail A
See Section
Detail B
See Section
5.3-l 1
5.3-l 1
5.3-l 1
See Section
5.
~e~a~~~lOfl
! 5.511
See Section
Detail
5.3-l 1
B
LOAD PUSH/PULL VALVE
WITH SIDESHIFTING PLATENS
674219
Rev. 1
43
Section
5.3-4
5 Service
Solenoid Valve
Removal and Installation
Remove capscrews
’
_,’
Remove cover plate
Determine which version you have (as shown) and use that
illustration for valve removal and installation as follows.
1
Remove the cover plate as shown.
Before removing any hoses
relieve pressure in the hydraulic system.
Turn the truck off, then open the truck
auxiliary control valve(s) several times
in both directions.
2
Remove, tag and plug all hoses or tubes at the valve.
3
Disconnect all electrical leads at the solenoid coils.
D
,;
fj
.’
.;
d
9/4tb
I
-
NOTE: Mark each lead for ease in reinstallation.
4
Remove the capscrews retaining the valve to the frame.
5
Installation is a reverse of removal except as follows:
l
See Section 2.3-2 step 11 for wiring diagrams.
Remove, tag, and plug
Disconnect and tag
all electrical leads
Remove capscrews
Rem0
44
674219
Rev. 1
5 Service
Section
a
Solenoid Valve
Disassembly and Service
5.3-5
NOTE: The Solenoid Valve you are servicing may differ
from the assemblies shown. Seal placement and coil
assembly is typical for all valves.
IMPORTANT:
area.
1
Service the Solenoid Valve in a clean work
Remove check valves
and solenoid cartridges
Remove the valve from the attachment as described in
Section 5.3-4.
2
Remove fittings and plugs.
3
Remove the solenoid coils.
CAUTION: Always replace the coils with a coil of the
same voltage.
4
Remove the check valve and solenoid cartridges.
5
Remove the high volume bypass components
equipped.
6
Clean all parts with kerosene or solvent.
7
For reassembly, reverse the above procedures except
as follows:
if
l
The check valve and solenoid cartridge back-up
rings and O-rings must be installed as shown in
Section 5.3-11.
l
Lubricate the check valve and solenoid cartridges
with STP or petroleum jelly prior to reassembly.
l
Tight all fittings and cartridges (except plugs) to a
torque of 10-15 ft.-lbs. (13-19 N.m).
l
Adjust the high volume bypass setscrew as
described in Section 5.3-8.
Remove check valves
and solenoid
TWO FUNCTION SOLENOID VALVE - SHEET SAV@
Remove
solenoid
coils
See Set :tio
5.3-l 1
Detail C
Remove the
high volume
by-pass
Q
components
THREE FUNCTION SOLENOID
VALVE WITH FLOW CONTROL
a
674219
Rev. 1
45
l
Section
5 Service
5.3-6 Flow
Control Manifold
Removal and Installation
A
WARNING: Before removing any hoses
relieve pressure in the hydraulic system.
Turn the truck off, then open the truck
auxiliary control valve(s) several times
in both directions.
1
Remove. tag and plug all hoses and tubes to the
manifold.
2
Remove the capscrews fastening the manifold to the
frame.
3
Installation is a reverse of above procedures.
Remove, tag, and plug
all hoses or tubing.
5.3-7
Flow Control Manifold
Disassembly and Service
IMPORTANT:
Service the Manifold in a clean work area.
1
Remove the manifold from the attachment as described
in Section 5.3-6.
2
Remove the fittings, plugs and flow control cartridges.
3
Remove the high volume bypass components.
4
Clean all parts with kerosene or solvent.
5
For reassembly, reverse the above procedures except
as follows:
l
The flow control cartridge back-up rings and
O-rings must be installed as shown in Section 5.3-11.
l
Lubricate the flow control cartridges with STP or
petroleum jelly prior to reassembly.
Remove fittings, plugs, and
flow control cartridges.
0 Tighten all fittings and cartridges (except plugs)
to a torque of 10-15 ft.-lbs. (13-19 N.m).
a Adjust the high volume bypass setscrew as
described in Section 5.3-8.
Remove the high
volume bypass
components.
46
674219
Rev. 1
.
.
’
’
.
*
.
Section
5.3-8
5 Service
High Volume Bypass Adjustment
The flow control manifold and solenoid valve have a bypass
orifice for use with high volume truck applications over 16
GPM (60L/min). The bypass can be adjusted to reduce
truck engine stall during actuation of the attachment.
SOLENOID
NOTE: The bypass orifice setscrew is adjusted closed at
the factory.
1
Remove the plug fitting.
2
Turn the setscrew counterclockwise one turn with a
screwdriver. Tighten the jam nut. Replace the plug
fitting.
3
Start the truck and actuate the attachment
l
If the truck continues to stall, repeat steps 1
through 3.
l
If the truck does not stall, adjustment is complete.
CONTROL
MANIFOLD
5.3-9
Flow Control Manifold
Port Reversal
Remove
capscrews
and
fittings.
plug
The flow control manifold can be turned over to reverse
the location of the Sideshift and Push/Pull ports.
WARNING: Before removing any hoses
relieve pressure in the hydraulic system.
Turn the truck off, then open the truck
auxiliary control valve(s) several times
674219
1
Remove the capscrews fastening the manifold to the
frame. Remove the two plug fittings from the top of the
manifold.
2
Disconnect the elbow fittings from the connector
fittings. Remove the connector fittings.
3
Disconnect the sideshift hoses from the elbow fittings
if equipped.
4
Turn the manifold over, then reassemble.
Rev. 1
fwrrgs
and remet:
connector
fitllngs.
47
Section
5.3-10
5 Service
Push/Pull Speed Adjustment
The optional flow control manifold and solenoid valve have
a separate speed adjustment range of ± 30° for the Load
Push and Load Pull functions.
1
Loosen the lock nut on each adjustable valve cartridge.
2
Turn the adjustment screw, with a hex wrench,
clockwise to increase the speed or counterclockwise to
decrease the speed. The adjustment range is ± 30%.
Adjust as necessary while operating the attachment.
Do not bottom out the adjustment.
pressure will be lost.
3 Tighten
FLOWCONTROL
SOLENOID VALVE
Operating
the lock nuts after final adjustment.
speed adjust
speed adjust
FLOW CONTROL
MANIFOLD
5.3-11
Check Valve Cartridge
Seal Details
O-rings
,ings
Back-up
Rings
DETAIL A
48
DETAIL B
DETAIL C
DETAIL D
674219
Rev. 1
.
5 Service
Section
5.4
5.4-1
5.4-2
Cylinders
Gripper Cylinder Removal
and Installation
1
See Section 5.2-3 to remove the cylinder.
2
Reverse the procedures to install the cylinder.
Push/Pull Cylinder Removal
and Installation
CAUTION: If theattachment is equipped with adjustable
retainer cylinders as shown below, the retainers must
be adjusted prior to hose installation and attachment
operation. Service procedures are similiar to standard
cylinders. See step 5 for adjustment procedures.
1
Remove, tag and plug the hoses at the push/pull
cylinder.
2
Remove the capscrews and pins retaining the rod ends.
A
WARNING: Before removing any tubes,
relieve pressure in the hydraulic system.
Turn the truck off, then open the truck
auxiliary control valve(s) several times
in both directions.
A
WARNING: Remove push/pull cylinder
rod end pins to avoid possible injury
due to inadvertant faceplate retraction.
1
Remove capscrew
and pin
Remove capscrew,
eyebolt, and pin
135-39 ft.-lbs.
t 1147-53 N.m)
1
I
’
NOTE: The cylinder may be swung out and serviced at
this time. To completely remove the cylinder proceed.
3
Remove the capscrews, eyebolt and pin holding the
cylinderto the frame. (Note position of eccentric
pin for reassembly)
4
Installation is a reverse of the above procedures.
5
ADJUSTABLE
Remove, tag, and
RETAINER CYLINDERS
0 Loosen the setscrew in the jam nut ring. Back off the
jam nut ring to the end of the inner retainer.
0 Adjust inner retainer out to the end of its travel. The
threads will be exposed about 1 inch (25cm).
ADJUSTABLE
RETAINER
CYLINDER
0 Manually extend the faceplate to set square with the
platen tips at the desired extension.
5.4-3
5.4-4
674219
l
Adjust the inner retainer inward to contact the cylinder
piston. The faceplate must remain square with the
platen tips.
l
Tighten the jam nut ring to a torque of 75-100 ft.-lbs.
(98-130 N.m). Tighten the setscrew to a torque of
16-18 ft.-lbs. (20-24 N.m).
Setscrew
inner
Retainer
Sideshift Cylinder Removal
and Installation
1
Remove, tag and plug the hoses at the sideshift
cylinder.
2
Remove the cotter pins and pins at the rod and base
ends and lift out the cylinder.
3
Installation is a reverse of the above procedures.
Sheet Retainer Cylinder
Removal and Installation
1
Use same steps as 5.4-3
2
For service see 5.4-9.
Rev. 1
Remove cotter pin
.
Section
5.4-5
5 Service
Adjustable Platen Cylinder
Removal and Installation
Remove Cotter
Pins and Pins
Remove the attachment from the truck according to the
procedures in section 5.1. Extend the faceplate before
removal.
5.4-6
1
Remove and plug the tubes at the cylinder,
2
Remove the cotter pins and pins at both ends of the
cylinder.
3
Remove the capscrews retaining the cylinder to the
frame and lift out the cylinder.
4
Installation is a reverse of removal.
a
capscrewsto
7-Q ft.-lbs.
General Cylinder Service
Procedures
Cylinder Disassembly
Use a pin type spanner wrench to remove push/pull
cylinder retainer.
When servicing a cylinder, clamp it in a soft-jawed vise as
shown. Never clamp the cylinder shell or the cylinder
rod sealing area in a vise.
To remove the seal from a piston or a retainer, put the
piston or retainer in a soft-jawed vise. Pry the seal up with
a blunt tool such as a screwdriver, then cut the seal to
remove it. Be careful not to scratch the seal groove.
Clamp cylinder in
soft-jawed vise
Cylinder Inspection
Inspect the rod, piston, and retainer for nicks or burrs. If
deeply gouged, replace the part. Minor nicks and burrs
can be removed with an emery cloth.
Sideshift and
Gripper Cylinder
NOTE: A minor nick is one that will not cause a bypass of
oil when the cylinder is operating.
Inspect the inside of the cylinder shell and remove any
minor nicks and burrs (see Note, above) with a butterfly
hone. Replace the cylinder shell if it is deeply gouged.
Clamp cylinder in
soft-jawed vise
Cylinder Assembly
Lubricate all new seals with STP before installing.
To install a new seal on a piston or retainer, hook one side
of the seal in the groove and push it over the piston or
retainer.
Remove
frnm
..-...
seal
nistnq,
C.-.“.
CAUTION:
Do not scratch
the groove
NOTE: Polishing the chamfer angle will allow the seal to
slide into the groove much easier.
Carefully note the direction of U-cup seals. If they are
installed backwards, the seals will not seal properly.
Refer to the illustration of the cylinder you are servicing
on pages 51 and 52.
Polish this
Always reassemble the rod assembly by sliding the
retainer on first, then the piston assembly. Install and
torque the piston retaining nut before sliding the rod
assembly back into the shell.
When reassembling a cylinder, always observe all torque
values as shown in the appropriate illustration.
Install
50
new seals as shown
674219
Rev. 1
.
L
*
*
I
,
.
5 Service
Section
5.4-7
Gripper
Cylin
rvice
/Tap
screwdrwer
Read the General Service Procedures, paragraph 5.4-6
before proceeding.
1
Remove the snap ring.
2
Remove the retainer ring by first tapping the retainer into
shell bore.Then place a screwdriver on one side of the ring
and tap the screwdriver gently with a hammer. Take care
not to gouge shell bore with screwdnver. The retainer ring
should compress at the split and turn sideways as shown
at right. Grasp the ring and pull it out.
3
Pull the rod assembly out of the shell.
4
Remove the nut securing the piston to the rod
5
Slide the piston and retainer off the rod.
6
Remove and replace all seals.
7
Perform the inspection and reassembly procedures
listed In paragraph 5.4-6.
0
Replace all seals
Remove snap ring
Q
piigzgg
t
Remove
5.4-8
the nut
Push/Pull Cylinder Service
Pull rod
assembly
and retainer
Read the General Service Procedures, paragraph 5.4-6
before proceeding.
1
Use a pin type spanner wrench to remove the retainer.
2
Pull the rod assembly out of the shell.
3
Remove the nut securing the piston to the rod.
CAUTION: The 45C piston nut should
be removed and replaced with piston
nut 674002.
4
out
Slide the piston and retainer from the rod.
Q
Remove and replace
all seals including
compensator valve seal
CAUTION: On units equipped
with platens shorter than 48
inches (122 cm), split spacers
and shims must be installed in
the push/pull cylinders. If your
unit was factory ordered with
platens shorter than 48 inches
(122 cm), the spacers and
shims are factory installed. If
you are installing the shorter
platens, the spacers and shims
are supplied with the platens
for field Installation.
For reassembly
tighten to a
torque of
3oc _ 450-500 fr:lbs.
(610-675 N m)
45c _ 550.600
(740.810
d
ft.-lbs
N.m)
Pull rod assembly
out of shell
To install the spacers and
shims you need only remove
the retainer and slip the shims
and split spacers into place.
Torque the capscrews to 9 ft.-lbs.
(12 N.m). Reinstall the retainer.
5
Remove and replace all seals including the
compensator valve seals.
6
Perform the inspection and reassembly procedures in
paragraph 5.4-6.
674219
Rev.
1
51
Section
5.4-9
5 Service
Sideshift Cylinder Service
Read the General Service Procedures, paragraph 5.4-6
before proceeding.
1
Remove the capscrews securing the washer to the
retainer. Partially extend rod (approx. 4”) and slide
washer away from retainer.
2
Remove the retainer ring by first tapping the retainer in.
Then place a screwdriver on one side of the ring near
the split and tap the screwdriver gently with a hammer.
The retainer ring should compress at the split and turn
sideways. Grasp the ring and pull it out.
3
Pull the rod assembly out of the shell.
4
Remove the nut securing the piston to the rod.
5
Slide the piston and retainer off the rod.
6
Remove and replace all seals.
7
Perform the inspection and reassembly procedures
listed in paragraph 5.4-6.
‘\
‘----I
1wiggt$.Q
nemave
meplsIUn
3nd retainer
5.4-10
6
Pull rod assembly
out of shell
Adjustable Platen Cylinder
Service
Read the General Service Procedures, paragraph 5.4-6
before proceeding.
1
Remove the cotter pin, pin and link at both ends of the
cylinder.
Use wrench to unthread the retainers.
2
3
Pull the rod assemblies out of the shell.
4
Remove and replace all seals.
5
Perform the inspection and reassembly procedures
listed in paragraph 5.4-6.
Remove and replace all seals,
s, and backup rings
52
674219
Rev. 1
Section
5 Service
5.5
Platens
5.5-1
Removal and Installation (with unit mounted on truck)
CAUTION: If you are removing your 48 inch (122 cm)
platens to install shorter platens, you must also install
the spacers and shims (supplied with the platens) in the
push/pull cylinders. See Section 5.4-8 for spacer
installation procedures.
5.5-2
1
Extend the faceplate fully.
2
With the platens flat on the floor remove the capscrews
securing the hooks to the platens,
3
Back the truck and attachment away from the platens.
4
To install, reverse the above procedures. Tighten the
capscrews to a torque of 200-210 ft.-lbs. (270-285 N.m).
Platen Shims
NOTE: Platen tips should align within ¼’ (6mm). With
faceplate extended 36 inches (91cm) from frame, the
platens should make contact with the gripper jaw. Add
shims to lower the platen tips or remove shims to raise
platen tips.
1
Extend the faceplate approximately
36 inches (91cm
2
With the platens off the floor a few
inches, slowly loosen the platen
capscrews.
3
Back the capscrews out until the platens no longer
touch the gripper jaw. Tighten capscrews slowly until
the platens contact the gripper jaw and platen tips
are aligned. Either add or remove shims an appropriate
amount to maintain platens in this position.
NOTE: To add or remove shims the platens must be
removed from the attachment.
4
Set platens flat on floor.
5
Disengage platen lock pin spring clips.
6
Remove platen retaining capscrews.
7 Tilt truck mast back. Raiseattachment about ½and back
away from platens only enough to allow space to
insert/remove shims.
8
0
Platen tips must be even or within
l/4” (6mm) of each other.
Add shims to raise platen tips.
Remove shims to lower tips.
Install capscrews into platen&add or remove appropriate
amount of shims. (If needed, apply a piece of strong tape
to hold shims in place).
9
Return truck/attachment to original position, engage
platens and return the mast to upright position.
10
Reinstall platen capscrews. Tighten to a torque of
200-210 ft.-lbs. (270-285 N.m).
1
-fiY-
--
1
11 Engage platen lock pins.
5.5-3
674219
Inspection
1
Check the platen tips for nicks. Flatten out nicks with a
hammer and smooth the edges with a file or grinder.
2
An application of wax or paraffin on the top of the
platens will reduce friction between the platens and slip
sheets, Use a piece of steel wool to remove excess wax.
Rev.
1
53
Section
5 Service
5.6
Hydraulic Faceplate stop Group
5.6-l
Adjustment
StoP-val”e\
1
Extend faceplate to expose stop mechanism. Depress
selector and turn to corresponding number (stamped
in selector) of inches (0, 3, 6 or 9) faceplate is to be
positioned to for full back travel. Number selected
should be turned so corresponding adjusting capscrew
will contact lever on stop valve.
2
A more precise faceplate stop position may be
attained by adjusting the capscrews on the selector.
/
,,
Loosen the lock nut and turn the capscrew (counterclockwise to decrease the dimension of faceplate
to platen tips, clockwise to increase the dimension
of faceplate to platen tips).
5.6-2
Stop Valve Service
1
Extend the faceplate to gain access to the stop valve.
1
A
WARNING: Before removing any hoses
relieve pressure in the hydraulic system.
Turn the truck off then open the truck
auxiliary control valve(s) several times
in both directions.
2
Disconnect the hydraulic tubes from the stop valve.
Remove the capscrews fastening the stop valve to
frame.
3
Remove the cartridge, plunger and spacer. Remove
the small O-ring and back-up ring using an O-ring
removal tool.
CAUTION:
Do not damage inner valve surfaces.
4
Remove the plug, spring and plunger.
5
Wash the valve body with cleaning solvent and blow
dry.
Lubricate all internal components with STP or petroleum
jelly prior to reassembly. Reassemble the valve
positioning the O-rings and back-up rings as shown.
6
7
Reinstall the valve on the frame and connect the
hydraulic tubes.
Remove components
4
Remove components
54
674219
Rev. 1
Section
5 Service
5.7
Electrical Faceplate Stop Group
5.7-1
Adjustment
1
Extend faceplate to expose stop switch. Adjustment is
made by loosening the capscrew and rotating the
actuator wire. Rotate actuator counter-clockwise to
decrease faceplate to platen tip dimension. Rotate
clockwise to increase the faceplate to platen tip
dimension.
NOTE: When the arm contacts the actuator wire, the
normally closed switch opens to stop faceplate travel.
Wiring is connected to terminals 1 and 2 for normally
closed operation.
ELECTRICAL STOP
674219
Rev. 1
55
l
Section
5 Service
5.8
Sheet Retainer Mechanism
5.8-1l
Removal and Installation
1 Extend the faceplate and actuate sheet release mode.
This will raise the sheet retainer bar off platens.
A
To remove platens, prop sheet
retainer bar in raised position and turn
truck OFF to avoid possible injury
WARNING:
2 Set attachment and platens on floor. Remove platen
capscrews, raise attachment to clear platens, back
attachment away and set on floor or pallet.
3 Actuate
sheet retain mode to lower sheet retainer bar to
floor or pallet.
4 Remove attachment from truck. See Section 5.1.
Before removing any hoses,
relieve pressure that might by present in
WARNING:
open the truck auxiliary control valve(s)
several times in both directions.
5 Remove sheet retainer cylinder. Remove the cotter pins
and both clevis pins. Remove the tubes to cylinder and
cap fittings.
A
Carrier assembly is heavy and
should be removed and or replaced with
care.
WARNING:
Sheet Retainer
Bar
Bar
6 Remove carrier assembly. See top view illustration at
right. Remove 6 capscrews from guide bars. Make sure
sideshift cylinder has been disconnected form carrier.
7 Replace damaged or worn bearing segments or
bearing strips. Lube bearings prior to assembly.
Bearing Segment
8 For reassembly, reverse the above procedures except
as follows:
l
Carrier Assembly
Tighten the guide bar capscrews to a torque of
56-60 ft.-lbs. (77-81 N.m).
0 Tighten the Sheet Retainer Bar capscrews to a
torque of 23-25 ft.-lbs. (31-34 N.m).
(Assembled
56
TOP VIEW
Frame/Carrier
Assy.)
674219
Rev. 1
’
b’
Section
l
61-1
6 Spe cifications
Hydraulics
3oc
45c
2000
2000
(140 bar)
(140 bar)
Hydraulic Specifications
Pressure-
Recommended
Maximum
2300
2300
(160 bar)
(160 bar)
3GPM
3GPM
(11 Umin)
(11Umin)
Recommended
9GPM
(34Umin)
(22L/min)
Maximum@
15 GPM
(56Umin)
(37L/min)
Flow-Minimum@
Supply Hose and Fitting Size
Minimum Orifice Size
6GPM
10 GPM
No. 6
9/32in. (7mm)
No. 6
9/32in. (7mm)
2659w15615
0
Flow less than minimum will result in slow faceplate speed.
0
Flow grealer than maximum can result in excessive faceplate speed,
reduced system performance and short hydraulic system life.
Hydraulic Oil-Cascade attachments are compatible with
SAE 10W petroleum base oil per Mil. Spec. MIL-0-5606 or
MIL-O-2104B.
Use of synthetic or aqueous base hydraulic oil is not recommended. Contact Cascade if fire resistant hydraulic oil
must be used.
In order to conform to industry standard practice, the
hoses should be connected to the truck auxiliary valve as
indicated by the chart.
Function, in
sequence of
location to
the operator.
Sideshift
Push/Pull
Attachment
Movement
Motion of the operator’s hand
when actuating the truck auxiliary control handle while
facmg the load.
Srdeshift Rrght
Rearward or Up
Sideshrft Left
Forward or Down
Pull (rearward)
Rearward or Up
Push (forward)
Forward or Down
Platens In
Rearward or Up
Platens Out
Forward or Down
Retain
Rearward or Up
Ad)ust Platens
Sheet Retain
Release
Forward or Down
Sideshift Right
Rearward or Up
Sideshift Left
Forward or Down
Sideshift Platens
2.559)
6.1-2
Truck Carriage
Truck carriage must conform to IS0 dimensional standard
2328, equivalent to Industrial Truck Association (ITA) dimensions shown.
Make sure the truck carriage is clean and the notches are
undamaged.
Dimension A-ITA (ISO)
Mounting
Minimum
Class II
Class Ill
,
14.94 in. (380.0mm)
18 68 in (474.5mm)
Maximum
I
1 15.00 in. (381.0 mm)
18.74 in. (476.0mm)
2659x
674219
Rev. 1
57
Section
6.1-3
6 Specifications
Torque Values
Note that all specifications
units where applicable.
are shown in US and (Metric)
Not Shown
All cylinder piston nuts - See Sections 5.5-7, 8, 9, 10.
All cylinder retainers - See Sections 5.4-7, 8, 9, 10.
Valve fittings and cartridges - 10-15 ft.-lbs. (13-99 N.m).
Additional equipment for SHEET SAV® - See Section 5.8-1.
Ref.
No.
1
58
Fastener Thread Size
318 NC
Torque Val
Ft.-Lbs.
1
(N-m)
14-16
1 119-221
674219
Rev. 1
AMERICAS
Cascade Corporation
U.S. Headquarters
2201 NE 201st
Fairview, OR 97024-9718
Tel: 800-CASCADE (227-2233)
Fax: 888-329-8207
Cascade Canada Inc.
5570 Timberlea Blvd.
Mississauga, Ontario
Canada L4W-4M6
Tel: 905-629-7777
Fax: 905-629-7785
Cascade do Brasil
Rua João Guerra, 134
Macuco, Santos - SP
Brasil 11015-130
Tel: 55-13-2105-8800
Fax: 55-13-2105-8899
EUROPE-AFRICA
Cascade Italia S.R.L.
European Headquarters
Via Dell’Artigianato 1
37030 Vago di Lavagno (VR)
Italy
Tel: 39-045-8989111
Fax: 39-045-8989160
Cascade (Africa) Pty. Ltd.
PO Box 625, Isando 1600
60A Steel Road
Sparton, Kempton Park
South Africa
Tel: 27-11-975-9240
Fax: 27-11-394-1147
ASIA-PACIFIC
Cascade Japan Ltd.
2-23, 2-Chome,
Kukuchi Nishimachi
Amagasaki, Hyogo
Japan, 661-0978
Tel: 81-6-6420-9771
Fax: 81-6-6420-9777
Cascade Korea
121B 9L Namdong Ind.
Complex, 691-8 Gojan-Dong
Namdong-Ku
Inchon, Korea
Tel: +82-32-821-2051
Fax: +82-32-821-2055
Cascade-Xiamen
No. 668 Yangguang Rd.
Xinyang Industrial Zone
Haicang, Xiamen City
Fujian Province
P.R. China 361026
Tel: 86-592-651-2500
Fax: 86-592-651-2571
Cascade Australia Pty. Ltd.
1445 Ipswich Road
Rocklea, QLD 4107
Australia
Tel: 1-800-227-223
Fax: +61 7 3373-7333
Cascade New Zealand
15 Ra Ora Drive
East Tamaki, Auckland
New Zealand
Tel: +64-9-273-9136
Fax: +64-9-273-9137
Sunstream Industries
Pte. Ltd.
18 Tuas South Street 5
Singapore 637796
Tel: +65-6795-7555
Fax: +65-6863-1368
Cascade India Material
Handling Private Limited
No 34, Global Trade Centre
1/1 Rambaugh Colony
Lal Bahadur Shastri Road,
Navi Peth, Pune 411 030
(Maharashtra) India
Phone: +91 020 2432 5490
Fax: +91 020 2433 0881