1
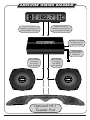
rev 200SG KIT-AA
REV
High Performance Front Speaker and Amplifier Kit
For Use On 1998-2013 “batwing” model bikes with factory radios
installation Manual
Thank you for choosing the Hogtunes REV 200SG Kit-AA for 1998-2013
“Batwing” Model Bikes. Since positive word of mouth is the best way to grow
our business, we want your new system to work as well as it was designed to.
If you have any questions or concerns, we are here to help.
The REV 200-AA Amplifier is a Class D design. We chose this design because
it yields plenty of power, is easy on the bikes charging system and produces
little heat. It should be understood that ALL Class D amplifiers may cause a
reduction in FM reception. Nothing is affected when playing CD, MP3,
Satellite radio or any other music device. FM reception will differ and depend
on the condition and type of antenna that you are using and, although every
effort has been made to minimize any loss, we strongly advise against the use
of in-fairing or hidden antennas with Class D amplifiers for best FM reception.
To help protect your bike’s electrical system and battery, the amp has a built in
feature where it will turn itself off if it sees less than 10.5 volts whether the bike
is running or not. If you’re listening to your stereo while not riding, this feature
can help protect your battery so the bike can still start. If you’re riding and the
amp shuts off, this could be showing a potential issue with your charging
system. If this feature is activated and the amp shuts off, it will turn the amp
back on again if the voltage exceeds the 10.5 volt threshold.
A video version of this manual is available at
www.hogtunes.com If you still need
assistance, please consider a professional
installation by your motorcycle dealer.
Hogtunes Contact Information
Email: [email protected]
Tel: 705-719-6361
2
getting started
Step #1: Remove the seat and both wires (+ and -) from the battery.
Step #2: Remove the outer fairing/headlamp assembly and set it aside. Refer
to a service manual if you need help with this. NOTE: A towel on the
front fender can help prevent scratches or “dings” from dropped tools or
fasteners etc. Expletives will also be kept to a minimum!
Step #3: Take the 2 wires off each front speaker by gently pulling one at a time.
Undo the screws that attach each speaker/grill assembly to the inner
fairing and remove. Pull the stock speaker out of each grill assembly.
Step #4: “Clip” the Hogtunes speaker into each grill assembly. Position your new
speaker/grill assembly onto the inner fairing and re-attach each one
using the OE screws. Although a hand driven tool is suggested for this,
the screws need to be tight enough so the speaker/grill assembly will not
rattle during riding and potentially cause a false warranty claim.
Diagram 1.1
Standard, Street Glide, EG Classic.
No CB/XM Module Present
Diagram 1.2
Ultra Classic. Shown mounted
on top of CB Module
The amplifier gets mounted to the top of the factory radio using the supplied “hook
and loop” adhesive and must sit so you can read the badge on top of the
amplifier as in diagram 1.1. The amplifier needs to mount as far back on the radio
as possible so the fairing can go back on. The minimum distance from the back of
the radio to the most forward edge of the amplifier is 5/8” (15mm). On pre-2006
model bikes, it is a tight fit--but will go. 2006-2013 (Advanced Audio) radios have
a “bump” on top of the radio that runs from front to back down the center of the
radio. Cut the adhesive in half and apply each piece on either side of this bump.
The amp will then mount flush. Most adhesives work best at room temperature or
higher. NOTE: 2006-2013 Ultras have the CB module on top of the radio. The
amp will adhere on top of the CB module so it is “half on/half off” this module as
shown in Diagram 1.2. The supplied adhesive is plenty strong for this! The amp
can adhere on top of the CB and one other module without issue.
3
Amplifier wiring diagram
Brake-side factory
speaker wire plugs into
green/black on amp
Clutch-side factory
speaker wire plugs into
yellow/black on amp
Orange wire goes
to center pin on
cigarette lighter
Power and
ground DIRECT
to battery
Blue/Black
wire plugs
into Brake
side speaker
Brown/Black
wire plugs
into clutchside speaker
Optional HF-1
Tweeter Pod
4
Wiring the Amplifier
Step #1: Locate the main power harness and plug it into the matching connector
on the amplifier. Locate the 8 pin harness and plug it into “Audio Input”
on the side of the amp.
Step #2: • On the audio input harness, locate the yellow/black pair of wires
with the male connectors.
• Unplug the factory speaker wires on the clutch side of the bike and
plug the yellow/black wires in to those. They will only go in one way.
• Also on the audio input harness, locate the green/black pair of wires
with the male connectors. Unplug the factory speaker wires on the
brake side of the bike and plug the green/black wires in to those.
NOTE: The blue 4 pin plug with black wires on the input harness is an
“expansion port” which is used to send music to a second amp or is
used to send radio power to run other speakers on the bike. You can
see how the expansion port can be used in the system upgrade section
of this manual.
Step #3: • On the opposite side of the amp are 3” (75mm) wires ending with a
4 pin black connector. This plug sends amplified power to your
speakers. Locate 4 pin black plug wire harness with brown/black
and blue/black wires and plug it into the amplified output plug.
• The blue/black wires will plug directly to the speaker on the brake
side of the bike. The brown/black wires will plug directly to the
speaker on the clutch side of the bike.
Step #4: • The orange wire is the “remote turn on lead” and tells the amp to turn
on whenever it sees +12v (.5 amp min.). Unplug the factory center
wire (+) on the cigarette lighter.
• Plug the orange lead from the amplifier directly onto the lighter using
the female connector.
• Plug the factory lighter wire to the male “take off” connector which
is part of the amps orange turn on lead.
Important: If you do not attach the orange wire from
the amp to the center wire at the cigarette lighter, the
amplifier will not turn on. If the factory fuse for your
cigarette lighter is blown and your cigarette lighter
does not work, your amplifier will not turn on.
5
Routing the power harness
For ‘98-’06 bikes, the power harness will pass under the inner fairing where
the throttle and idle cables pass through on the brake side of the bike. The harness
is designed to be routed between the frame backbone and gas tank on the brake
side of the bike and come out just behind the gas tank. You MAY need to undo
the back bolt of the gas tank and pivot the tank up to allow the harness to pass
through at the back of the gas tank. Be sure to re-install this bolt and torque to
factory specs!
For 2007-2013 bikes, the balance of the main wire harness will pass under
the inner fairing where the main wire harness passes through on the brake side
of the bike. Loosen the tank console and run wires up and over the gas tank, but
under the tank console. There is a provision on the front of the tank console for
wires to pass. Secure the amplifiers harness to the bikes factory harness using zip
ties. When correctly installed, the power and ground wires are the right length to
connect onto the battery.
• Attach the red wire to the positive (+) battery terminal and the black wire to
the negative (-) battery terminal. The factory battery wires are also re-installed
at this point. Turn the ignition of the bike to the “on” position and play the
stereo at low volume to verify the amplifier is working fine.
IMPORTANT: With all wires secured, turn the front
wheel to each extreme side making sure that any wires
cannot bind or impede the steering of the motorcycle.
Failure to do so can cause an accident resulting
in serious injury or death!
On the brake side of the amplifier is the amp level switch. The switch has 3
positions labeled -3, 0 and +3.
• If the expansion port has been used to power additional speakers, use the
switch to set the “balance” between the amplified fairing speakers and
additional speaker powered by the radios built in power.
• If you have a dual amp system, you can use the switches on each amp to
balance the level of sound to each set of speakers as a means to tailor the
sound to your liking. In a multi amplifier system, this gives you AWESOME
flexibility! Diagrams of bigger systems are shown on pages 7, 8 and 9 of
this manual.
6
system upgrade #1
This system is an easy way to add rear speakers to your bike if you’ve added a
King Tour-Pak®. Hogtunes rear speaker pods come with a wire harness set up for
quick detach tour paks that will plug right into the expansion port on the amp.
Important: Since the RADIO power will be used to power the rear speakers, you
must use rear speakers specific to your year of bike!
Use expansion port to send
radio’s built in power to a
second set of speakers
(rears on Non-Ultra Models)
Optional HF-1
Tweeter Pod
7
system upgrade #2
This system has the incredible power of 2 REV 200-AA Amplifiers to your bike!
The first amp will run the 5.25” fairing speakers and HF-1 Tweeter Pod (if
present). The second amplifier is used to power a set of 692.2/Lids, FL-7W fairing
lower woofers or rear tour pak speakers.
For all Standard/Classic/Ultra/Street Glide models, the purchase of Hogtunes
2CHSP adaptor kit is required! The metal plate in that kit is used to bolt the
second amplifier into your fairing between the brake side speaker and radio.
Use supplied blue
plug to send signal
from expansion port
of first amp to input of
second amp
Optional HF-1
Tweeter Pod
8
system upgrade #3
This system adds a Hogtunes 4 channel amp; where 2 of its channels would
power the front speakers (and tweeter pod if present) and the other 2 channels
would power rear speakers or fairing lower woofers. The original 2 channel amp
would power 692.2/lids or lower speakers. You can literally build the system the
way you want based on the body work you have on your bike. This can be done
at any time, all bolt in, all plug and play! Hogtunes 2CHSP mounting plate is
required to bolt the REV 200-AA into your fairing.
Use supplied blue
plug to send signal
from expansion port
of first amp to input of
second amp
“Saddle bag lid
6”x9” speakers or
7” fairing lower
glove box woofers”
9
Adjusting Your System-Please Read!
In order to make your new system perform as good as it was designed,
please take a minute to understand and follow these tips:
1) S
et your “Automatic Volume Control” (AVC) to 3 bars. After extensive
on-road testing, we found that this AVC position works and sounds best.
Your new amplifier has been specifically set-up for this radio setting.
2) Y
our Hogtunes system is designed specifically for a motorcycle at speed.
Exhaust noise and wind noise have been taken into careful consideration
in how your system performs. How your new system sounds in a driveway
or garage is radically different from how it will sound at highway speeds.
Although your system was set-up with a factory radio, with its bass and
treble controls in the middle position, if you feel the need to make
adjustments please do so (carefully) at your normal cruising speed.
3) If you have an aftermarket car radio on your bike, everything will work
fine. Please remember that car radios are designed to work in an environment with little or no exhaust or wind noise. Many car radios have
features such as equalizers, loudness contours, surround effects, etc., all
designed for a quiet environment and all of which will hurt your ability to
hear your motorcycle system at speed if left on. Please take a minute and
turn as much of these “features” off. With a car radio in your bike, the
only adjustments you should be able to access for best performance are
volume, bass, treble, balance and fader.
4) If you’re using an external device to supply music through the radios AUX
port, we have an article on our website that can help make your
peripheral audio device sound as good as it can. The article is at:
http://www.hogtunes.com/techzone_files/Level_matching.pdf
10
Technical Specifications
Hogtunes REV 200-AA Amplifier
RMS Power at 2 Ohms:................100 watts x 2
Freq. Response:..........................30hz-25khz
Fuse at Amp:..............................15 amp
Hogtunes 352F-AA Front Speakers
Power Handling: ........................100 RMS-150 Peak
Frequency Response: ..................55hz-25Khz
Sensitivity: .................................92 db 1watt/1meter
Nominal Impedance: ..................2.0 Ohms
Cool Factor:...............................EXTREME
Warranty Information
Please Record Your Amplifier’s Serial # Here_________________________
Hogtunes speakers are warranted for a period of 20 years. The REV 200-AA
Amplifier is warranted for 3 years from original purchase date. Proof of
purchase is required for all warranty claims. The warranty applies to the
original retail customer and is not transferable. Please contact Hogtunes for
all warranty claims. Products found to be defective during the warranty
period will be repaired or replaced (with a product deemed to be equivalent)
at Hogtunes sole discretion. Hogtunes complete warranty policy is available
on our website at www.hogtunes.com/warranty.html
What Is Not Covered:
1)
2)
3)
4)
5)
6)
7)
8)
9)
Any expense related to the removal or re-installation of Hogtunes products.
Repairs to these products performed by anyone other than Hogtunes.
Subsequent damage to any other components.
Any product purchased from a non-authorized Hogtunes dealer.
Damage to Hogtunes products due to an accident or collision.
Hogtunes Amplifiers with broken or removed “warranty void” stickers.
Damage due to water from custom installations.
Damage from incorrect installation, improper use, abuse or modifications.
Damage to inbound product due to improper packing.
Harley-Davidson, Electra Glide, Road Glide, Street Glide, Ultra Classic, Tri Glide, CVO, Screamin
Eagle and Tour-Pak® are Trademarks, and/or Registered Trademarks of Harley-Davidson, Inc.,
Milwaukee, Wisconsin, USA, and if Used or Implied are for Reference Only. There is No Affiliation
Between Harley-Davidson, Inc., and Hogtunes Inc.
11
Hogtunes products will play much louder than the
Original Equipment, which can be a distraction to
the rider and/or passenger. Please use caution
when adjusting, or playing your stereo
at high volume, especially in traffic.
You are a valued customer so please:
Ride Alert
Arrive Alive!
www.hogtunes.com