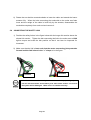
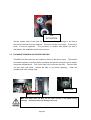
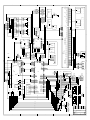
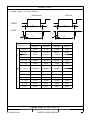
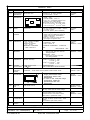
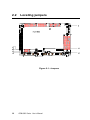
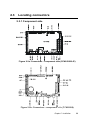
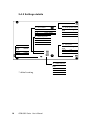
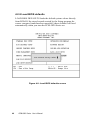
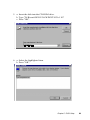
1
420-6601-ENG
REV1
INSTALLATION & USER MANUAL
To use this machine safely and correctly, read this manual carefully.
After reading this manual, be sure to keep it available nearby the
product or somewhere convenient so that it can be referred to
whenever necessary.
When transporting or reselling this product, be sure to attach this
manual to the product.
© 2003, Simuline. Inc
Page 1
BEFORE USING THIS PRODUCT
Thank you for purchasing our arcade use simulator equipment “CYCRAFT” game
machine.
Safety notes:
To ensure the safe usage of the product, be sure to read the following before using this
product. The following instructions are intended for the users, operators and the personnel
in charge of the operation of the product.
After carefully reading and sufficiently understanding the warning displays and cautions,
handle the product appropriately. Be sure to keep this manual available nearby the
product or somewhere convenient so that it can be referred to whenever necessary.
In this manual, explanations which require special attention are enclosed with dual lines.
Depending on the degree of potential hazards, the terms of DANGER, WARNING,
CAUTION, etc. are used.
Be sure to understand the contents of the displays before reading the text.
Indicates that mishandling the
product by disregarding the
instructions can cause severe
injury.
Indicates that mishandling the
product
by
disregarding
the
instructions can cause a slightly
hazardous situation that can result
in light personal injury and or
material damage.
Indicates that mishandling the
product by disregarding the
instructions can cause a
potentially hazardous situation
which can result in serious
injury.
For the safe usage of the product, the following pictographs are used:
Indicates “HANDLE WITH CARE”. In order to protect personnel and equipment,
this display is attached to places where the Owner’s manual and or Service
Manual should be referred to.
Indicates a “Protective Earth Terminal”. Before operating the equipment, be sure
to connect it to the Earth line.
Page 2
Perform work in accordance with the instruction herein stated.
Follow instructions carefully paying special attention from the standpoint of accident
prevention. Failure to follow instructions can cause accidents. Instructions will point out
those jobs requiring trained technicians or servicemen.
Before installing the product, check for the electrical specification sticker.
SIMULINE products have a sticker on which the electrical specifications are detailed.
Ensure that the product is compatible with the power supply voltage and frequency
requirements of the location in which the machine is to be installed.
Install and operate the product only in places where appropriate and sufficient
lighting is available such that warning stickers can be clearly read.
Be sure to turn off power before working on the machine.
To prevent electric shock, be sure to turn off power before starting any work in which the
worker is exposed to the interior of the product.
Exercise great care when handling the monitor.
Some of the monitor parts are subjected to high-tension voltage. Even after turning the
power off, some components retain high-tension voltage. Only qualified service engineers
should perform monitor repair and replacement.
Be sure to adjust the monitor properly.
Do not operate the product with on-screen flickering or blurring unadjusted. Using the
product with the monitor not properly adjusted may cause dizziness or a headache to an
operator, a player, or the customers.
Specification changes, removal of equipment, conversion and/or additions not
designated by SIMULINE are not allowed.
Do not make any engineering changes by alterations, unauthorized parts replacements or
other modifications under any circumstances. Should doors, lids and protective parts be
damaged or lost, refrain from operating the product, and contact the office where the
product was purchased from or the office of Simuline given in this manual.
SIMULINE shall not be held responsible for any accidents, compensation for damage to a
third party, resulting from unauthorized changes and modifications to the product.
When transporting or reselling this product, be sure to attach this manual to the
product.
*Description herein contained may be subjected to improvements and changes without notice
**The contents described herein are fully prepared with due care. However, should any question arise or
errors be found, please contact SIMULINE.
Page 3
INTRODUCTION OF THIS INSTALLATION & SERVICE MANUAL
This manual is intended to provide detailed descriptions together with all the necessary
information covering the general operation of electronic assemblies, electromechanicals,
servicing control, spare parts, etc. for the product, CYCRAFT.
This manual is intended for the owners, personnel and managers in charge of operation
of the product. Operate the product after carefully reading and sufficiently understanding
the instructions. If the product fails to function satisfactorily, non-technical personnel
should under no circumstances touch the internal system. Please contact office where the
product was purchased from.
Use of this product is unlikely to cause physical injuries or damages to property. However,
where special attention is required “IMPORTANT” symbol and message is given in the
manual as follows:
Indicates that mishandling the product by disregarding this message can cause
performance degradation or malfunctions.
DEFINITION OF PERSONNEL IN THIS MANUAL:
Non-technical personnel who do not have technical knowledge and expertise
should refrain from performing such work that this manual requires the arcade
maintenance personnel or a serviceman to carry out, or work which is not explained
in this manual. Failing to comply with this instruction can cause severe accidents
such as electric shock.
Ensure that parts replacement, servicing & inspections, and troubleshooting are
performed by the arcade maintenance personnel or a serviceman. It is instructed herein
that particularly hazardous work should be performed by the serviceman who has
technical expertise and professional knowledge in the field.
The following definitions for personnel are used in this manual:
Arcade maintenance personnel
Those who have experience in the maintenance of amusement equipment and
vending machines, etc. and also participate in the servicing and control of the
equipment through such routine work as equipment assembly and installation,
inspections, and replacement of parts and consumables, etc. within the amusement
facilities and or locations under the management of the owner and owner’s operators
of the product.
Page 4
Serviceman:
Those who carry out inspections and maintenance services of the equipment under
authorization of the amusement equipment manufacturer. Serviceman shall have
technical expertise equivalent to that of technical high school graduates in the fields
of electricity, electronics and or mechanics.
Player
Persons who play games at facilities and shops where arcade amusement game
machines are installed.
Gallery
Persons who are onlookers near the games at facilities and shops where arcade
amusement game machines are installed.
REVISION RECORDS:
Language : English
Rev : 1.0
Modified Date: May. 24, 2003
O/S Version : 1.58
Game Version: BGD0
PLACE TO BE CONTACTED:
To present repairs and parts, contact the dealer from whom you purchased your machine.
SIMULINE, INC / CUSTOMER SERVICE
461-28
Jeon-Min-Dong
Yu-Sung-Gu
Deajeon
Korea
305-811
Phone:
Fax:
E-mail:
Web-Site:
+82-42-610-1010
+82-42-862-0795
[email protected]
www.simuline.com
Page 5
TABLE OF CONTENTS
BEFORE USING THE PRODUCT.
1. PRODUCT SPECIFICATION
1.1
GENERAL SPECIFICATION
1.2
MOTION SYSTEM DESCRIPTION
1.3
SAFETY SYSTEM DESCRIPTION
2. INITIAL INSPECTION
3. NAMES OF MAJOR PARTS
4. TRANSPORTING AND MOVING
4.1
EQUIPMENT REQUIRED FOR UNLOADING AND TRANSPORT
4.2
UNLOADING AND OPENING THE CRATE
4.3
UNPACKING AND INSTALLING REAR CASTER WHEELS
4.4
MOVING THE MACHINE
5. INSTALLATION INSTRUCTION.
5.1
LOCATION REQUIREMENTS
5.1.1
ENVIRONMENT REQUIREMENTS
5.1.2
ELECTRICAL REQUIREMENTS
5.2
EQUIPMENT REQUIRED FOR INSTALLATION
5.3
STEPS FOR INSTALLATION
5.4
SECURING IN PLACE (LEG ADJUSTER ADJUSTMENT)
5.5
CONNECTING THE HEAVE ACTUATOR
5.6
CONNECTING THE SAFETY LINK
5.7
ASSEMBLING THE FLOOR SENSOR PLATES
5.8
SETTING THE PHOTO SENSORS
5.9
COIN MECHANISM INSTALLATION
5.10 CONNECTING THE ELECTRIC POWER SOURCE
5.11 POST INSTALLATION TESTING AND INSPECTION
5.11.1 TESTING AND ALIGNING THE PHOTO SENSORS
5.11.2 TESTING AND ADJUSTING THE FLOOR PRESSURE SENSOR
5.12 ASSEMBLING THE FENCE
5.13 FIGURE OF CYCRAFT AFTER FINISHING THE INSTALLATION WORK
Page 6
6. OPERATION & ADJUSTMENT INSTRUCTION
6.1
DESCRIPTION OF INDICATORS AND SWITCHES ON THE OPERATION
PANEL
6.2
TURNING THE POWER ON AND OFF
6.3
ADJUSTMENT OF THE SPEAKER VOLUMES
6.4
SETTING VIDEO MONITOR PARAMETERS
6.5
USING THE LCD PANEL TO SET CONFIGURATIONS
6.5.1
SETTING THE SAFETY SENSOR PARAMETERS
6.5.2
SETTING TCP/IP CONFIGURATION
6.5.3
VIEWING THE TOTAL COIN COUNT (STATISTICS)
6.6
SETTING THE COIN AND CREDIT CONFIGURATION
6.7
GAME PLAY OPERATION
7. MAINTENANCE & INSPECTION INSTRUCTION
7.1 ROUTINE MAINTENANCE
7.2 INSPECTION OF CRITICAL BOLTS AND CONNECTIONS
7.3 VERIFICATION OF SNAP RINGS
7.4 CHECKING WELD CONDITION
7.5 CHECKING THE ACTUATOR DRIVE BELT
7.6 CLEANING THE MSCU AIR FILTERS AND FAN
7.7 LUBRICATING THE ACTUATORS
7.8 LUBRICATING THE JOINTS
8. SERVICE & REPLACEMENT INSTRUCTION
8.1 EXCHANGING THE COMPACT FLASH CARD
8.2 REPLACEMENT OF SERVO CONTROLLER BOARD
9. TROUBLE SHOOTING
9.1 TROUBLESHOOTING TABLE
9.2 CONTROLLER ERROR MESSAGE TABLE
10. ELECTRIC SCHEMATICS
10.1 SCU SCHEMATIC
10.2 CABIN SCHEMATIC
10.3 MCU SCHEMATIC
Page 7
1.
PRODUCT SPECIFICATIONS
1.1 GENERAL SPECIFICATIONS
When the cabin is at the power-on position
Approximately
2200 mm
2150 mm
2870 mm
1000 mm
3800 mm
2600 mm
Page 8
Category
Coin-op interactive motion simulator
Play type
Main Machine Dimensions
(at the power-on position.)
Main Machine Dimensions
(transport dimensions)
Fence Dimensions
Weight
Arcade game
2870 mm (L) × 2150 mm (W) × ~ 2200 mm (H)
2850 mm (L) × 1530 mm (W) × 1950 mm (H)
3800 mm (L) × 2600 mm (W) × 1000 mm (H)
Main Machine : (Approximately) 880 kg
Fence : (Approximately) 105 kg
Single phase AC 200/208/220/230/240 V,
50/60 Hz, (Max) 8A
Single Player
120 Kg
Semi-enclosed with seat belt
Go-Kart racing game
Electric Power
No.of Passenger
Passenger Weight Limit
Compartment
Game
1.2 MOTION SYSTEM DESCRIPTION
The motion actuation system used in Cycraft is a very unique, high tech system that
distinguishes Cycraft from other simulator products.
The motion system has the
following special features:
Fully electric motion system: The actuators are fully electrical (no hydraulics),
making it superior in terms of maintainability and transportability.
Patented “inverted” configuration (virtual 5 DOF system):
The motion
actuators are configured such that pitch and roll rotational motions have their center of
rotations above the passenger.
This patented technology enables the simulator to
produce the effects of a 5 DOF (degrees of freedom) motion system although it has
only 3 DOF mechanically.
Therefore, fast and accurate motion cueing is made
possible without increasing costs.
Page 9
3DOF Motion system
The heave actuator produces up/down heave motion by rocking the rocker arm which
holds the passenger cabin.
The two suspended actuators on the rocker arm
assembly produce the relative pitch and roll motions
Separate controllers inside the MSCU control each of the linear actuators.
controllers are in turn connected to the motion
The
board which generates the
commands for each actuator via high speed industrial CAN network cable.
During the game, the game computer regularly sends the attitude data and other
dynamic properties data in real time to the motion control computer.
The motion
board then calculates in real time, the motion necessary to give the passenger the
best feeling of reality and converts this motion to commands for the motion controllers
and actuators.
Page 10
Servo Control
Board #3
Motion Board
Servo Control
Board #2
TCPIP
CAN NETWORK
Game Board
(NAOMI2,etc.)
Servo Control
Board #1
Handle
Pedal
SYSTEM DIAGRAM OF CYCRAFT
Page 11
Game
Audio
Monitor
System
1.3
SAFETY SYSTEM FEATURES
Operators of Cycraft should familiarize themselves with the safety features of Cycraft
to ensure that they are functioning properly for safe and proper operation.
Cycraft
incorporates a number of safety features to ensure that accidents and injury will not be
caused to passengers and on-lookers due to the motion of the simulator.
Following
is a description of each safety feature.
Fence:
A sturdy metal fence with an entrance door is provided with Cycraft.
It
will ensure that on-lookers and waiting players will be kept a safe distance from the
moving cabin.
The fence will also prevent on-lookers from approaching too closely
and unnecessarily tripping the photo sensors during play.
Warning signs and
regulation signs are attached to the fence and door to inform customers and onlookers.
Side Photo Sensor:
Two photo sensors attached on each side of the outer
frame of Cycraft cause the motion to stop if any obstacle obstructs the line between
the sensor and the reflective plate during play.
Therefore, even if people enter the
fence and approach Cycraft when it is moving, safety is ensured since the photo
sensor will be tripped and motion stopped.
Motion resumes 3 seconds after the
obstacle is removed.
Floor Sensor:
The floor plate beneath the cabin is a pressure sensor which
activates when stepped on.
It is guaranteed to detect pressures above 20 kg.
Activation of the floor sensor will stop the Cycraft motion as with the photo sensors
described above.
Motion will re-activate 3 seconds after the pressure is removed.
The floor sensor guarantees safety even in the case when people somehow approach
Cycraft without tripping the photo sensor and also in the case when the passenger
falls from the cabin during play for any reason.
Seat Belt Sensor:
The seat belt buckle in Cycraft is equipped with a sensor that
detects when the seat belt is fastened or not.
the seat belt is fastened properly.
Cycraft will not start the game unless
Also, if the seat belt is unfastened during the game,
the motion will stop until it is re-fastened.
Game Stop Button: This button, located inside the cabin allows the player to
stop the game anytime during play.
Pressing this button will terminate the game and
lower the cabin to the initial position.
Motion Stop Switch: The motion stop button located behind the coin chute case
stops the motion when pressed.
Motion restarts 3 seconds after the button is
Page 12
released. This button can be pressed by outside on-lookers or by the operator in
case the photo or floor sensors cannot be activated or the motion must be stopped for
safety reasons.
Power Cutoff Switch:
This button located inside the operator panel but
accessible through a sliding door on the operator panel cover shuts off the main power
to the system.
Pressing this switch will stop the ongoing motion of the system but will
not stop and hold the position of the cabin as with the other buttons and safety
features.
Instead, the cabin will slowly pitch forward (nose down) and glide down to
its lowest position due to its own weight.
Therefore, this switch should NOT be
pressed when the motion needs to be stopped.
This switch should only be used
in the rare emergency case when power must be cut off such as when a fire is ignited.
NEVER press the power cutoff switch when there is a person or obstacle
UNDER the cabin. The cabin will glide down after the switch is pressed and
can cause serious injury to anybody under the cabin.
Safety Link and Safety Oriented Mechanical Design: The safety link located
on the rear part of the rocker arm functions to prevent a free fall of the cabin in case
the heave actuator is broken off from the rocker arm.
The two rocker arm bearings
and center shaft of the rocker arm is designed such that even if one of the bearings
comes loose, the shaft will be held up by the frame to prevent a fall.
The cabin is
suspended by three universal joints (central joint and two joints connecting to the
actuators).
Therefore, even if one of the joints fail, the other two will support the
cabin to prevent a complete free fall.
Other Safety Features:
Cycraft is equipped with an uninterruptible power supply
(UPS) to supply critical parts in case of power outages so that the cabin does not fall
abruptly.
In case of power outages (and also when the power cutoff switch is
pressed), the control circuits powered by the UPS will use the power generated by the
free turning motors to actively brake and decelerate the fall.
The system will come to
rest softly when this feature operates properly.
Safe Inherent Design:
The basic configuration of the inverted motion system
allows for the cabin to be suspended much lower from the ground than conventional
motion simulators.
Also, it is dynamically much more stable by making it very difficult
to tip the cabin over to it’s side.
Thus, the Cycraft structural design is inherently
much safer than conventional motion simulators.
Page 13
2.
INITIAL INSPECTION
2.1 PACKING LIST
Page 14
2.2 GENERAL RECEIVING INSPECTION
Only QUALIFIED SERVICE PERSONNEL should carry out inspection.
Normally all Simuline products are manufactured so that operation is possible immediately
after proper installation.
However, it can be possible that an irregular situation occurs
during transport and delivery to prevent this. To verify that transport and delivery has be
carried out without irregularity, a proper general receiving inspection should be made as
follows:
Are then any dented parts or defects (cuts, etc.) on the external surfaces of the product?
Are castors and leg adjusters present and undamaged?
Do the power supply voltage and frequency requirements match with the local supply?
Are all wiring connectors correctly and securely connected?
Unless connected in the
correct direction, connector connections cannot be made successfully. Do not insert
connectors forcibly.
Are all IC’s of each IC board firmly inserted?
Does the power cord have any cuts or dents?
Do fuses meet the specified rating?
Are such units such as monitors, control equipment, IC boards, etc. firmly secured?
Are all earth wires connected?
Are all accessories available?
Can all doors and lids be opened with the accessory keys and/or tools?
Page 15
3. NAMES OF MAJOR PARTS
18
17
16
28
12
15
13
14
11
Page 16
26
22
27
21
19
20
23
29
25
No.
1
2
3
4
5
6
7
Item
Cabin
Main Frame
24
Description
Carries the player and moves during operation.
Holds the cabin, actuator system and
electronics.
Actuators
Three electric linear actuators that move the
cabin in 3 DOF (degrees of freedom). The two
actuators on top of the cabin creates pitch and
roll motions. The actuator behind the cabin
creates heave motion.
Motion System Cabinet Houses all the control electronics and electrical
Unit (MSCU)
components.
Coin Chute Tower
Carries the coin chute mechanism.
Motion Stop Switch
Pressing this button will stop the simulator
motion but game play will continue. Motion
resumes 3 seconds after the switch is released.
This button can be used in case of emergency
when motion must be stopped.
Operator Panel
Houses indicators and switches to set and
control Cycraft. Refer to Chapter 2 for details.
Page 17
8,9
16
There are 2 photo sensors on each side of the
outer frame. If any of the sensor lines are
obstructed, the simulator will stop in its current
orientation until 3 seconds after the removal of
the obstruction.
Safety Floor Sensor
The metal floor plate underneath the cabin is a
pressure sensor that stops the simulators
motion when stepped on. The simulator will
begin to move again 3 seconds after the
removal of the pressure.
Safety Floor Sensor Plate
11 = A type, 12 = B type, 13 = C type,
14 = D type
Floor Sensor Indicator Lamp(Green) goes off when the floor sensor is
Lamp
activated.
Safety Link
Safety link connected to the rocker arm.
17
Heave Actuator Joint
18
Rocker Arm
Tilts up and down to create heave motion.
19
Start Button
Begins the game after coin is inserted.
20
View Button
21
Game Stop Button
22
Video Control Buttons
23
Steering Wheel
Changes the driver’s view perspective during
play.
Terminates the game and lowers the cabin to
the initial position.
Removing this cover exposes the control
buttons to adjust video screen parameters.
Refer to Chapter 2 for details.
Produces steering input for the game.
24
Accelerator Pedal
Produces accelerator input for the game.
25
Brake Pedal
Produces braking input for the game.
26
Monitor
Displays game graphics.
27
Front Speakers
Produces audio effects.
28
Rear Speakers
Produces audio effects.
29
Subwoofer
Produces audio effects with low frequency
10
11~
14
15
Safety Photo Sensors
Page 18
4. TRANSPORTING AND MOVING
4.1 EQUIPMENT REQUIRED FOR UNLOADING AND TRANSPORT
No
1
Equipment
Description
Fork Lift
Capacity
over 1500 kg
Q’ty
Purpose
1
Lift and transport out of
Boom attached fork
2
Wood block
10 cm x 10 cm x 100 cm
packing crate.
4
Set under the base
frame so that fork can
be inserted and
removed easily.
3
Rear caster
2
(supplied)
Used together with front
casters (already
installed) to roll the
machine to destination
location.
4
Socket wrench
1
Attaching the rear
casters.
5
1
Wrench
Adjusting the level of
casters.
6
Philips
1
type
truss bolts
screwdriver
7
Bolt
Loosening and securing
Hexahead M12 x 35 L
6
Attaching the casters
4.2 UNLOADING AND OPENING THE CRATE
1) When unloading the crate from the container or truck, it is recommended to insert
the forklift from the heavier rear side of the crate.
2) The crate should not be opened from the front.
sides when opening the crate.
Page 19
Open the rear and/or one of the
4.3 UNPACKING AND INSTALLING REAR CASTER WHEELS
1) After the crate is opened, unpack the separate accessories and components so
that the main simulator body is accessible.
2) Insert forklift from the rear of Cycraft or from the side.
DO NOT INSERT FORKS
FROM THE FRONT SIDE. When inserting forks from the side, make sure the
forks are positioned to enter the cutoff sections in order to ensure Cycraft does not
tip over.
Insert forks fully until the tips are visible on the other side.
Fork Lift Insert Mark
DO NOT INSERT FORKS FROM THE FRONT SIDE
Page 20
3) After CAREFULLY taking Cycraft out of the crate, install the rear two wheels by
first removing the MSCU cover as shown in the figure below.
Note that the front
two wheels are already installed.
3 x Hexahead Bolt M12 x 35L
Tool : Socket wrench
Be careful not to step on and damage the floor pressure sensor springs and
switches installed on the frame beneath the cabin
4) Adjust the heights of the wheels by rotating the nut on top of each wheel using 19
mm wrench or socket until Cycraft is raised sufficiently for transport.
carefully roll Cycraft to its destination location.
Then,
After Cycraft is positioned in it’s
installation location, lower Cycraft by turning the wheel height adjustment nuts
counterclockwise and disassemble each of the wheel assembly.
Page 21
4.4 MOVING THE MACHINE
Only QUALIFIED SERVICE PERSONNEL should carry out this operation.
Cycraft simulator is a complex delicate machine.
Special care must always be taken
when handling Cycraft.
When moving Cycraft within a facility, it is recommended to utilize the casters provided
with the product.
link.
It is not necessary to disassemble the heave actuator and/or the safety
Only the fence and boarding step with coin chute need to be disassembled.
When Cycraft must be moved long distances by truck, it is recommended that the heave
actuator and safety link be disassembled such that the cabin is set securely on the base
of the outer frame.
Trucking Cycraft without the heave actuator disassembled can cause
mechanical damage to the actuator due to shock and vibration during transport.
Be sure
to lay the wooden plate between the cabin and the base frame as when Cycraft was
delivered.
This plate protects the floor sensors and switches during transport.
When moving the machine, be sure to remove the power cord and plug from
the power supply. Moving the machine with the power cord inserted can cause
the power cord to be damaged, resulting in a fire or electric shock when
installed in a new location.
When moving the machine, with the heave actuator in the assembled state,
make sure that the machine is not exposed to high vibrations and shock.
Mechanical and structural damage can result.
Page 22
5. INSTALLATION INSTRUCTION
5.1 LOCATION REQUIREMENTS
5.1.1 ENVIRONMENT REQUIREMENTS
Cycraft is designed for indoor use and should never be installed outdoors.
Environment and facility requirements are as follows:
Installation location
Ambient temperature
Humidity
Min. Entrance
dimensions
Min. Ceiling Height
Min. Footprint
(incl. Fence)
Min. Floor Loading
Cleanliness
Indoor use only
5 to 40℃
10 to 70 % (no condensing)
1530 mm (L) x 1950 mm (H)
2380 mm (H)
3800 mm (L) x 2600 mm (W)
310 kg/m2
Free of dust and debris
Never install the game machine outdoors
Also avoid the following locations even though they are indoors.
Near a leaky roof, close to any kind of dripping water, or any place with high
humidity that can condense
Close to an indoor pool or showers
Exposed to direct sunlight
Exposed to direct heat, such as close to a heater vent, or in a highly heated room
Close to flammable or volatile chemicals, or dangerous materials
Avoid floors that slope(any slope more than 2 degrees)
Avoid strong vibrations
Avoid dusty locations
Avoid any location that does not allow enough space around the machine
Page 23
5.1.2 ELECTRICAL REQUIREMENTS
The facility should provide the following electrical power outputs for Cycraft:
Input Voltage
Single Phase
AC 200V, 208V, 220V, 230V, 240V
Frequency
50 / 60 Hz
Rated Current (Max)
8 Amp
Peak Current
12 Amp
Building Circuit Breaker
15 Amp
(Recommended)
Note:
The average power requirement is measured power consumption during
normal operation.
Peak power requirement is theoretical short term peak power
possible for short times during special driving conditions.
Therefore, it is
recommended that facility power be based on peak power requirements for best
results.
5.2 EQUIPMENT REQUIRED FOR INSTALLATION
No
Tools
1
Philips
Description
type
Q’ty Purpose
1
screwdriver
2
Loosening and securing
truss bolts
Wrench
1
Adjusting the levers.
1
Boarding step,
(19 mm ~ 27 mm)
3
Hex Key
Coin Chute Tower
( 6mm)
4
Hex Key
1
Fence
1
Photo sensor, mirror
2
Heave actuator
( 5mm )
5
Hex Key
(2.5 mm)
6
Spanner (19 mm)
Turnbuckle
Page 24
7
Spanner (17 mm)
1
8
Spanner (13 mm)
1
Floor sensor plate
9
Spanner (10 mm)
1
Fence mesh
5.3 STEPS FOR INSTALLATION
Installation should be carried out according to the following steps.
STEP 1
STEP 2
STEP 3
STEP 4
STEP 5
STEP 6
STEP 7
STEP 8
STEP 9
STEP 10
SECURING IN PLACE (LEG ADJUSTER ADJUSTMENT)
CONNECTING THE HEAVE ACTUATOR
CONNECTING THE SAFETY LINK
ASSEMBLING THE FLOOR SENSOR PLATE
SETTING THE PHOTO SENSORS
COIN MECHANISM INSTALLATION
CONNECTING THE POWER CORD
TESTING AND ALIGNING THE PHOTO SENSORS
TESTING AND ADJUSTING THE FLOOR SENSOR
FENCE ASSEMBLY
5.4 SECURING IN PLACE (LEG ADJUSTER ADJUSTMENT)
After Cycraft is placed in location, the level pads must be adjusted correctly to prevent
Cycraft from moving about the floor due to its own motion.
Cycraft has 3 stationary
rubber pads and 4 adjustable level pads as shown.
POSITION OF 3 PCS RUBBER
Front side of CYCRAFT
PADS & 4 LEVERS
(TOP VIEW)
RUBBER
LEG
PAD
LEVELER
Page 25
The process to place and adjust the level pads correctly is as follows:
1) Make sure that all of the four adjustable pads are not touching the ground.
raise it so that only the three rubber pads touch the ground.
of Cycraft is very near the central rear rubber pad.
If it is,
The center of mass
Therefore, it is advisable to
have two people stand on top of the front two rubber pads to make sure the three
pads are touching the ground securely.
2) Lower the 4 adjustable level pads so that they touch the ground and partially hold
the weight of Cycraft.
Do not extend them so much that the central rubber pad is
raised from the floor.
Adjusting Nut
Level Pad
3) After you are satisfied that the pads are set correctly, you can proceed to
assemble Cycraft.
However, after assembly, the pads should be observed during
the test runs and adjusted further if there seems to be excessive movement or
uneven loading and lifting of the pads.
5.5 CONNECTING THE HEAVE ACTUATOR
At no time during the installation and assembly process should personnel
place body parts or go beneath the cabin. Take note that there is always the
danger of the cabin falling.
1) Install the turnbuckle firmly between the frame and rocker arm as shown.
Page 26
2) Lower the rear end of the rocker arm by rotating the turnbuckle counterclockwise
as seen from the rear.
Use a crowbar or rod as shown in the photo and rotate the
turnbuckle almost to its limit.
During this process the cabin will be lifted up.
As it lifts up it will simultaneously
tip towards the front and slide backwards
3) Disassemble the heave actuator holding bracket and free the heave actuator.
Make sure the actuator is supported so that it does not fall over to one side when
the holding bracket is disassembled.
4) Rotate the actuator piston counterclockwise as seen from the top to extend the
actuator.
Match the 4 bolt holes of the flange and rocker arm mating part close
enough so that bolts can be inserted.
It is not necessary to have the flange
mated exactly to the rocker arm at this stage.
5) Tighten the four bolts evenly one at a time.
as the bolts are tightened.
The heave actuator piston will extend
Tighten all four bolts to 1200 kgf cm torque. Mark the
bolt and relative side of the flange as in the figure so that it can later be inspected
easily for looseness.
Page 27
6) Rotate the turn-buckle counterclockwise to lower the cabin and extend the heave
actuator fully.
When the bolts connecting the turnbuckle to the rocker arm feels
loose and the weight of the cabin is held fully by the actuator, disassemble the
turnbuckle completely from each end and remove it.
5.6 CONNECTING THE SAFETY LINK
1) Position the safety link as in the figure below with the longer link section above the
shorter link section.
Tighten the bolt connecting the link to the rocker arm to 1200
kgf cm torque and mark the bolt position so that it can later be inspected for
looseness.
2) Make sure that the link is bent such that the center connecting joint protrudes
forward and the link is bent in the “<” shape as in the figure.
Incorrect
Correct
If the link is installed incorrectly in the reverse “L” shape (see figure), the
link will hit the actuator and actuator joint when heave motion occurs and
the system will be damaged. Make sure it is installed correctly.
Page 28
Figure
of
assembling
cycraft
the
after
heave
actuator and safety link
5.7 ASSEMBLING THE FLOOR SENSOR PLATE
NEVER go under the cabin to install or service the floor pressure sensor
system when the main power is ON. Serious injury can result if the system
malfunctions. Always place a structure to support the cabin in case it falls.
Turn the main power off when it is necessary to go under the cabin.
Be careful not to damage the springs and micro switches on the bottom
frame when assembling the floor sensor plates
1) Make sure there are no objects or debris on top of the lower frame structure where
the floor plates must be installed.
2) 2 or more people should lift each of the 4 sections of the floor plate and place
them in the specified position.
Be careful not to damage the springs and micro
switches.
3) There are two guide holes in each of the floor plate sections as in the figure.
Insert the provided spacer, washer, and bolt assembly into each of the guide holes
and tighten securely.
Page 29
Hexa bolt M8 x 30L
Spring Washer
Flat Washer
Rubber Washer(11*20*3t)
DU Bush 10*15
4) After assembly, make sure each floor plate section moves about 1/2 inches up and
down freely.
Page 30
5.8 ASSEMBLING THE BOARDING STEP AND COIN CHUTE TOWER
The boarding tower and coin chute tower should be assembled at this stage so that
electrical connections to the coin mechanism can be made and functional testing of
Cycraft can be performed before final assembly of the fence.
To assemble the
boarding step and coin chute tower, follow the next procedure.
1)
Attach the coin chute tower on the boarding step.
Coin Chute Tower
Boarding Step
Flat Washer
Spring
Washer
Page 31
2)
Then attach two boarding step joint bracket to the boarding step.
Hexahead Bolt M8
Spring Washer
Boarding Step Joint
Flat Washer
Bracket
3)
Position the assembled boarding step and secure it to the base of Cycraft as
shown.
Hexahead Bolt M8 x 30L
Spring Washer
Flat Washer
Page 32
5.9 SETTING THE PHOTO SENSORS
There is a set of photo sensor and reflective plate on each side of Cycraft.
Set the
photo sensor system as follows:
1) Loosen the set screws of the reflective plate arms and rotate the arms so that the
reflective plates point backwards at 90 degree angles from the sides of Cycraft
and tighten the set screws.
Tool : HEX KEY 2.5 mm
2) Loosen the set screws of the photo sensor arms and unfold them so that the arms
point outward and the photo sensor lens points toward the reflective plate.
Sensor Lens
Set Screw
3) Tighten the set screws to secure the arms.
Remove the clear protective plastic
on the photo sensor lens if it is still intact.
4) It may be necessary to adjust the photo sensor alignment later on.
is described in the Chapter 5.12.
Page 33
This process
5.9 COIN MECHANISM INSTALLATION
Only Qualified Service Personnel should carry out this operation.
Cycraft uses the standard coin box face plate provided by Happs Controls and Sega
Enterprise.
The compatible model numbers are,
HAPPS:
Frame 42-3272-00
Lower Door 42-3245-16
Upper Door 42-7201-00
SEGA:
ASAHI Standard
The coin chute door and coin mechanism to be used must physically match the above
coin chute frame. When fitting the coin mechanism to the door please refer to the
specific manufacturers installation instructions for that coin mechanism.
To mechanically assemble the coin chute frame and cash door,
1) Loosen all of the bolts on the frame that secure the clips.
2) Turn all clips in towards the door.
3) Position the door into the aperture in the coin chute tower.
4) Turn the clips around so that they will hold the door in the machine.
5) Tighten all of the bolts.
Page 34
5.9.1 WIRING CONNECTION
1)
Route the bundle of cables into the coin chute tower. Be sure to use the supplied
Insert the cables through
this hole and tighten the end
of bellows with cable tie
rubber bellows and cable tie
2)
There are 4 electric connectors, the KET 10P, two KET 2P and the 4P connectors.
The pin assignments for each connector are:
KET 10P ( for coin selector)
KET2P #1
1 ---------- GND
KET2P #2
2 ---------- +12V
7 -----------
COIN SW1 in NAOMI I/O BD
8 -----------
COIN SW2 in NAOMI I/O BD
4P ( for bill acceptor power, 12V lamp)
1------------
110V AC(R)
2-------------
110V AC(T)
3-------------
+12V
4-------------
GND
KET 2P #1 (for coin meter #1)
1------------
COIN METER 1 in NAOMI I/O BD
2-------------
+5V
KET 2P #1 (for coin meter #2)
1------------ COIN METER 2 in NAOMI I/O BD
2-------------
+5V
Page 35
KET10P
4P
3)
Attach the coin chute door and coin selector. Then, perform the wiring referring to
the electric schematic #1 of the SCU provided in session 10.1 to determine the
correct connection method.
5.10 CONNECTING THE POWER CORD
Before supplying power to the power cord, make sure that the system is
properly configured inside the MSCU for your facility power supply voltage.
Improper configuration can damage your system permanently.
Cycraft is designed to accept the single phase 200V, 208V, 220V, 230V, and 240 VAC,
50/60 Hz power sources to support the different electric power systems in different
parts of the world.
However, the system must be configured correctly for each power
supply voltage by connecting an electric line to one of three available terminals inside
the MSCU.
To connect and/or verify the power cord voltage setting,
1) Open the MSCU cover in the rear of the simulator.
Before opening the MSCU cover, make sure the power line is NOT
connected to the building power source and that there is no electrical
power supplied to the system to prevent injury from electrical shock.
2) Locate the input voltage selection terminal block and the voltage selection wire
Page 36
shown in the picture below.
3) Connect the voltage selection wire to the terminal that matches your facility supply
voltage according to the input voltage selection terminal wiring instruction.
4) Locate the power cord connection terminal and connect the two power lines and
the earth line of the power cord as shown below.
Make especially sure that the
earth line is properly connected for safe and proper operation.
T0
R0
Primary
Earth
Point
5) Verify that all connections are correct.
Then, connect the power cord to the
facility voltage source.
6) Go to the Operator Panel and verify that the red LED labeled “Main Power” is
lighted.
Before proceeding to start the power up sequence of Cycraft, operators
should familiarize themselves with the switches and controls on the Operator
Panel.
Page 37
5.11 POST INSTALLATION TESTING AND INSPECTION
After the mechanical and electrical installation is complete, it is necessary to carry out
a final checking procedure and make some adjustments if necessary.
To carry out
the final tests and adjustments, you must power UP Cycraft.
Carry out the Power-UP sequence according the procedure outlined in section 6.2.
Before you power-up Cycraft, make sure of the following:
(a) The power cord is connected to the correct voltage outlet and the green main
power LED is lighted.
(b) The emergency power off switch and motion stop switch (behind the coin chute
box) are released.
Make sure there are no personnel or objects under or in the area of the cabin
before switching the power on. The power up sequence will move the cabin
and personnel can be injured.
Make sure there are no passengers in the cabin when power is turned on.
The extra weight of the passenger can cause a fault in the power ON
sequence.
After successful power UP, it is possible that a beeping sound is heard and the red
LED labeled “Safety Sensor” on the Operator Panel is lighted.
This indicates that
adjustments on the safety sensors (floor sensor and/or photo sensors) are needed.
Even if the beeping sound is not made, read the following sections and verify that the
sensors are in the best operating conditions.
5.11.1 TESTING AND ALIGNING THE PHOTO SENSORS
1) Make sure that the Yellow LED on top of the photo sensor is lighted when there is
no obstacle between the photo sensor and the reflective mirror.
2) Tap and slightly shake the photo sensor bar and the reflective mirror bar.
Page 38
Make
sure that small vibrations and motion of the photo sensor and the reflective plate
does not cause the Yellow LED to instantaneously turn off.
3) Make sure that the Yellow LED turns off when an obstacle is placed between the
sensor and reflective plate.
4) If any of the above tests fail, carry out the following to align the sensor and mirror:
A. Remove the steel cover of the photo sensor and expose the sensor holding
bracket and screws as shown below.
Bolts For Photosensor
Position Adjustment
B. Loosen the screws as necessary to align the photo sensor correctly.
Adjust
the reflective plate alignment by loosening the set screws shown below.
C. Align the reflective mirror and the photo sensor correctly by observing the
Yellow LED on top of the photo sensor.
Tighten all set screws when complete.
D. Carry out the tests described in steps 1), 2), and 3) above.
Page 39
5.11.2 TESTING AND ADJUSTING THE FLOOR PRESSURE SENSOR
NEVER go under the cabin to install or service the floor pressure sensor
system when the main power is ON. Serious injury can result if the system
malfunctions. If it is necessary to work under the cabin, turn the power off
and support the cabin by a strong structure if it is necessary to raise it.
1) Verify that the two green floor sensor LED’s on each side of the MSCU front side
cover (see figure) is turned on when nothing is on top of the floor plates.
If the
green LED is OFF, the floor sensor system must be adjusted.
2) Verify that stepping on different parts of the floor sensor lightly turns the Green
LED off.
If the LED does not turn off, the floor sensor system must be adjusted
(note that a 20kg weight on any part of the floor sensor must activate the sensor).
3) If any of the above tests do not pass, it is possible that the springs or sensors have
been damaged or slightly bent out of shape during transport and installation.
To
adjust the floor sensor carry out the following steps on the floor plate section(s)
that do not operate properly:
A. Each floor plate has 4 sets of springs and switches under it.
Lift the plate off
to expose them.
B. With the plate lifted, the Green floor sensor LED must be ON.
indicates a defective sensor switch or wiring.
If not, this
Refer to the service manual for
instructions on how to replace the floor sensor switch.
C. Press each sensor lightly and verify that it clicks when pressed within its stroke.
Verify operation of the Green LED.
D. The suspected switch’s sensitivity can be increased or decreased by slightly
bending the sensor contact lever up or down (see figure below).
more than 1 or 2 millimeters.
Page 40
Do not bend
Micro Switch
Spring
E. Note that making the sensor too sensitive (i.e. bending the lever up too much)
will cause the sensor to activate due to the own weight of the floor plate or
make it so sensitive that slight motions or vibrations during play will trip the
sensor.
Making the sensor too insensitive (i.e. bending the lever down too
much) will cause the sensor to not activate even when the floor plate if fully
pressed down.
F. You can find the micro switch’s number on the wiring diagram using the sensor
arrangement sticker beside the floor sensor LED as shown below.
Page 41
5.12 ASSEMBLING THE FENCE
1) Confirm that boarding step is fitting to the base frame of main machine with no gap
to the ground and locate the 9 fence poles around Cycraft as shown.
Pole
Pole
Wire Mesh 1600 mm
Wire Mesh 1200 mm
Boarding Step
2) Assemble the pole and mesh from the pole no.1 to the pole no.9 in the order of
clockwise. It is needed to be aware that there are 3 kinds of pole. Type A are the
corner poles ( pole no. 2,4,6,8) with base plate. Type B are the gate door poles
with lower the junction ring other than poles. Type C are the middle poles without
base plate.
3) The fence U bracket assembling work is as shown below. Perform total 32
assembling of U bracket and 4 door gate bolt fixings.
Page 42
Wire Mesh
Pole
U Bracket
Tool : Hexa Key 5 mm
5.14 FIGURE OF CYCRAFT AFTER FINISHING THE INSTALLATION WORK
Figure of Power-ON position
Page 43
6. OPERATING & ADJUSTMENT
6.1 DESCRIPTION OF INDICATORS AND SWITCHES ON THE OPERATION PANEL
6
5
SOURCE
UPS OFF
8
POWER
NORMAL DRIVING
MSCU
CONTROL SAFETY
ERROR SENSOR
R-VOL
L-VOL
4
CABIN
SEAT
BELT
MAINTENANCE
W-VOL
SPEAKER
13
POWER CUTOFF
SWITCH
RUN
DISPLAY
BUZZER
14
ESC MENU/SET UP
DOWN
12
1
7
2
SYSTEM ON
SYSTEM
SHUTDOWN
CABIN
SERVICE
TEST
ON
OFF
3
Simuline
11
9
10
No
Item
Description
1
Power Cutoff
This push button switch cuts off the main power to the
Cycraft.
It should be used in such emergency
situations as when a fire breaks out in the system.
Note that pressing this switch will cause the cabin to
glide down to the un-powered rest position.
Therefore, the space under the cabin must be free
from objects and personnel to prevent damage and
injury.
These buttons are used to power up the simulator norm
ally. Press the buttons for 3 seconds or longer to activ
ate.
These buttons are used to power down the simulator
normally. Press the buttons for 3 seconds or longer to
activate
This switch is for use by trained maintenance personnel
only. The switch allows the computer systems to boot
up without starting the simulator operation for special
maintenance and troubleshooting purposes.
This
switch should always be in the down position when the
Switch
2
System ON Button
3
System Shutdown
Button
4
Maintenance Switch
Page 44
5
Supply Power LEDs
6
Condition LEDs
7
Menu, Set,Up,
Down, LCD Panel
8
UPS OFF Switch
9
Service Button
10
Test Button
11
Cabin Power Switch
12
Buzzer
13
Sound Volume
Knobs
14
Motion Stop Switch
simulator is being operated normally.
These LEDs light respectively, when the main power,
power to the actuator controllers, and the cabin power
are supplied.
These LEDs light according to the status of the
simulator as follows:
NORMAL LED: Lights(Green) when in normal
operating condition.
DRIVING LED: Lights(Green) when simulator is in
driving condition.
CONTROL ERROR LED: Lights(Red) when an
error condition in the motion system is detected.
System will automatically power down.
SAFETY SENSOR LED: Lights(Red) when either
the photo sensor or floor pressure sensor is
activated.
SEAT BELT LED: Lights(Red) when the seat belt is
released during the game.
These buttons and the LCD panel are used to configure
the simulator settings and show the current status of
the simulator. They are explained in a separate
section below in this manual.
This switch forces the UPS to turn off manually.
This button increments the credit. It has the same effe
ct as inserting a coin in the coin selector. But there is
no change of coin meter.
This button is used to configure the game computer.
Refer to the game computer manual for further
information.
This switch turns on and off the power supply to the 29”
monitor and speaker amp. and other components
inside the Cabin. Power can be turned on only if the
Main AC power is on.
Activates when a system error occurs or when the
safety sensors are activated.
Cabin interior speaker volume knobs for the front
speakers, back speakers and the subwoofer.
Pressing the Motion Stop Switch will stop the cabin
motion and hold it in its current position. Motion will
resume normally 3 seconds after the switch is released.
The game will continue without motion even when the
switch is pressed.
Page 45
6.2 TURNING THE POWER ON AND OFF
Before you power-up Cycraft, make sure of the following:
1) The power cord is connected to the correct voltage outlet and the green main
power LED is lighted.
2) The power cutoff switch and motion stop switch (behind the coin chute tower) are
released.
Make sure there are no personnel or objects near or under the cabin before
switching the power on in order to prevent damage and injury.
Make sure there are not passengers in the cabin when power is turned on.
The extra weight of the passenger can cause a fault in the power ON
sequence.
To power ON Cycraft, switch the cabin power switch ON and press the green
“SYSTEM ON” button on the operator panel for about 3 seconds. The power up
sequence will proceed automatically according to the following sequence:
1) The main power contacts will close with a few clicking sounds and the MCU power
LED, cabin power LED, and the LCD panel will light up.
2) The monitor screen inside the cabin will show the start-up sequence of NAOMI2
game board.
3) The cabin will pitch down fully and slowly put itself to the horizontal initial position.
Also, the steering wheel will rotate slowly to the right and left limits and then come
to rest in the neutral position.
Make sure the steering wheel is not obstructed
during this process.
4) When the “SYSTEM ON” sequence is complete, the cabin monitor will show the
game’s graphics screen with the message “Insert Coin to Start”.
Upon successful SYSTEM ON, the Operator Panel LED’s and the LCD display will
indicate as follows:
Page 46
INDICATOR
Dwg.
CONDITION
REMARK
No.
Power Pilot Lamps
5
All 4 lamps ON (Gree
n)
Normal LED
6-1
ON (Green)
Will turn off when
driving starts
Driving LED
6-2
OFF
Will turn on when
driving starts
Control Error LED
6-3
OFF
Safety Sensor LED
6-4
OFF/ON
Will turn on if photo
sensor or floor sensor is
activated.
Seat Belt LED
6-5
OFF/ON
Will turn on if seat belt
is not locked.
LCD Display
CAN
1) 8043
7
TCP
Refer to lower figure
NOR
2) 8043
3) 8043
LCD Display After Proper Power ON
The SYSTEM OFF sequence can be initiated at any time by pressing the red
“SYSTEM OFF” button for about 3 seconds. The cabin monitor will turn off and the
cabin will glide down to the nose down rest position.
Then, the main powers to the
computers and other components will shut off automatically.
Before turning off the power, MAKE SURE THERE IS NO PERSON OR
OBSTACLE NEAR OR UNDER THE CABIN. The cabin will glide down upon
power off and can cause serious damage or injury.
UPS POWER OFF SWITCH:
Sometimes, due to a malfunction or other reasons, the
main power may not shut down properly and the UPS will make a continuous beeping
sound.
In this case it will be necessary to force a complete shutoff of the power
manually.
To do this, press the UPS Power OFF switch for about 3 seconds. The
UPS will shutdown forcefully and the beeping sound will disappear.
Page 47
Turing off the UPS before allowing the cabin to come to the rest position will
cause the cabin to drop abruptly. This will subject unnecessary shock and
vibration to the system. Make sure the cabin is in the rest position before
shutting the UPS power off manually.
6.3 ADJUSTMENT OF THE SPEAKER VOLUMES
Cycraft has 5 speakers installed in the cabin – 2 front stereo speakers on each side of
the monitor, 2 rear stereo speakers in the chair shoulder area, and 1 woofer speaker
located behind the brake and accelerator pedals. Three knobs are provided on the
Operator Panel to set the front, rear, and woofer speaker volumes independently.
6.4 SETTING VIDEO MONITOR PARAMETERS
VIDEO
CONTROLLER
VIDEO
LOCATION IN CABIN
CONTROLLER
VIDEO CONTROLLER BUTTON FUNCTIONS
BUTTON
FUNCTION
MENU(SELECTION)
In the beginning, starts the VIDEO controls.
In a sub menu, moves the control to the higher level.
EXIT(DEGAUSSING)
In the main menu, exits the VIDEO controls.
UP
In the beginning, proceeds to the contrast adjustment.
In the main menu, moves the control menu to the right.
Page 48
In a sub menu, increase the adjustment.
DOWN
In the main menu, moves the control menu to the left.
In a sub menu, decrease the adjustment
.
VIDEO Control Menu Set
The brightness, contrast, color, alignment, sharpness, and degaussing settings for the
cabin graphics monitor can be adjusted by using the monitor setting panel located in
the upper left had side of the front monitor panel.
the two screws on the panel cover.
To access the panel, first remove
Instructions for adjustment will display on the
monitor during the adjustment process.
6.5 USING THE LCD PANEL TO SET CONFIGURATIONS
The LCD display and the 4 buttons below it inside the Operator Panel can be used to
set different configurations.
Operation method and functions of the LCD buttons are
as described in the table below.
BUTTON
FUNCTION
ESC
Returns the menu to the upper level
MENU/SET
When pressed for 1 seconds the first time, it puts the display
in the setting mode and brings up the configuration main
menu.
Once inside the setting mode, it will set the
highlighted menu item.
Page 49
UP
Highlights the upper menu item.
DOWN
Highlights the lower menu item.
[ Menu ]
=>1. DIOTEST
2. MOTION TEST
3. SETUP TCP/IP
4. SENSOR USAGE
5. STATISTICS
Configuration of LCD Main
Menu
All settings through the LCD panel can be made only when the system is powered up
in the “maintenance mode”.
This mode is entered by first putting the Maintenance
Switch in the operation panel in the “Maintenance” position and powering up the
system.
After the maintenance mode is entered, configuration and settings can be
made as described in the following sub-sections.
6.5.1
1)
SETTING THE SAFETY SENSOR PARAMETERS
Bring up the configuration main menu by pressing the MENU/SET button for 2
seconds.
2)
Highlight the “4. Sensor Usage” item by using the UP and DOWN buttons.
The
highlighted item is indicated by the “=>” sign.
3)
Press MENU/SET button to bring up the Sensor Usage sub-menu.
=> 1. Safety sensor
2. Seat belt
3. Motion stop
4. Exit
Sensor Usage Sub-Menu
Each of the items in the above list can be enabled or disabled.
For example, to
disable the floor and photo sensors, highlight item 1, press the MENU/SET button,
and use the UP and DOWN switches to toggle to the “OFF” setting.
4) After setting the sensor, press the ESC button to go to the previous upper level
menu until the main menu is displayed.
5) Highlight “4. Exit” and press MENU/ESC for three seconds to fix the settings and
Page 50
exit the menu.
The safety sensors, motion stop switch and seat belt sensor should always
be enabled (in the “ON” setting) during all normal situations. The feature to
disable the safety settings should be used only in special situations, for
example when an attendant is present near the machine, solely under the
discretion and responsibility of the operator. Simuline Inc. will not be liable
for any accidents or damages resulting from operation of Cycraft with any of
the safety features disabled.
6.5.2
SETTING TCP/IP CONFIGURATION
This function allows the TCP/IP setting of the motion
boardto be set.
computer and the game computer are connected via TCP/IP.
The motion
All settings are preset
in the factory but for future upgrades and maintenance, it may be necessary to adjust
settings.
1) Bring up the configuration main menu by pressing the MENU/SET button for 2
seconds.
2) Highlight the “3. SETUP TCP/IP” item by using the UP and DOWN buttons.
The
highlighted item is indicated by the “=>” sign.
3) Press MENU/SET button to bring up the TCP/IP setting sub-menu.
[SET TCP/IP]
=> 1. IP ADDRESS
2. SUBNET MASK
3. GATEWAY ADDR
4. EXIT
4) Highlight and select the desired parameter and use the UP and DOWN buttons to
change the values.
The following are the factory pre-set values for the ClubKart game.
IP ADDRESS : 192.168.1.1
SUBNET MASK : 255.255.255.0
Page 51
GATEWAY ADDR: 192.168.1.1
6.5.3
VIEWING THE TOTAL COIN COUNT (STATISTICS)
The total number of coins accepted by Cycraft after production can be viewed by
selecting the “5. Statistics” item from the configuration main menu.
6.5.4
TESTING THE DIGITAL INPUT/OUTPUT CHANNELS
The digital input/output (DIO) channels in Cycraft can be tested for functionality by
using the LCD panel on the Operator Panel.
To carry out DIO test,
1) Bring up the configuration main menu by pressing the MENU/SET button for 2
seconds.
2) Highlight the “1. DIO TEST” item by using the UP and DOWN buttons.
The
highlighted item is indicated by the “=>” sign.
3) Press MENU/SET button.
This will display the first DIO channel.
Pressing the
UP and DOWN buttons will navigate through the different DIO items.
4) Press the MENU/SET button when the desired channel appears.
If it is an input
channel, the state of the channel (either ON or OFF) will appear on the screen.
Proper operation can be checked by physically activating the channel and
verifying that the state shown changes accordingly.
current output command will be indicated.
If it is an output channel, the
Use the UP and DOWN arrows to
change the command state and verify that the output is physically activated (i.e.
lamp turns on and off).
5) When finished, press the ESC switch repeatedly until main screen appears.
6.5.5 MOTION TEST
This menu item runs the motion system of Cycraft through a series of pre-recorded
slow speed motion.
It can be used to verify that the actuators are operating properly.
6.6 SETTING THE COIN AND CREDIT CONFIGURATION
The coin and credit configuration (i.e. cost per game) must be set directly on the game
Page 52
computer (NAOMI2) by using the “Service” and “Test” buttons on the Operator Panel.
Refer to the NAOMI2 service manual for instruction on how to change the coin and
credit configuration.
6.7 GAME PLAY OPERATION
The operator must make sure that all the safety features are functioning
correctly before accepting passengers.
Manufacturer shall not be held
liable for damages and claims due to operation of Cycraft without all safety
features operating properly.
Make sure that all safety sensor functions are operating properly.
To start the game,
player must first insert the correct amount of coins, enter the cabin and put on the seat
belt.
The screen will then show the “Press Start Button” sign.
Pressing the Start
button will raise the cabin to the neutral position and the game will start, beginning
from the car and course selection process.
During play, the GAME STOP button can be pressed to stop the game at any time.
Players who feel nauseous from the motion or need to terminate the game for any
other reason can use this button to discontinue the game and exit the simulator.
The View button is used to toggle the graphics viewpoint between the driver’s seat
view and tail following view.
It is recommended that players use the driver’s seat
view for best virtual reality effects.
After the game is finished, the cabin will come down to the initial position and the
player may exit.
Page 53
7. MAINTENANCE AND REPLACEMENT
7.1
ROUTINE MAINTENANCE
Maintenance and repair shall be performed only by qualified mechanical and
electrical maintenance personnel in accordance with instructions provided in
the manuals.
Routine maintenance and inspection of Cycraft should be carried out to ensure safe
operation and longevity of the machine.
Contact your distributor or the manufacturer
for any instructions beyond those given in the manuals and for any questions
regarding maintenance and repair procedures.
Routine Maintenance and Frequency:
Frequency
Maintenance Activity
Daily
Verify that all the safety sensors (floor sensor, photo sensor, motion
stop switch) are working properly. If any malfunction is found, repair
it before accepting players.
Daily
Check the system for abnormal noise and vibrations. There should
not be screeching, grinding, or rattling noises which can indicate
loose bolts or abnormally rubbing of parts. If such suspected noises
are heard, verify the source and repair or replace as necessary.
Inspect bolts and connections and the integrity of the mechanical
system as described below.
Weekly
Verify that all the bolts connecting the outer frame, actuators and
cabin are not loose according to the procedure described in the next
section. Tighten if necessary.
Weekly
Verify that the snap rings in each of the universal joints are lodged in
their grooves correctly according to the procedure described in the
next section. The snap ring must be set securely in place.
Monthly
Check all weld areas of the frame and actuator described in the next
section for cracks or other damage. None is acceptable.
Monthly
Check the actuator drive belt for indication of tears, cracks, or other
damage. Exchange immediately if any damage is found.
Monthly
Clean the MSCU air filters and fan.
Every 6 Months Lubricate the actuators with grease provided by manufacturer or
equivalent.
Every
18 Lubricate the joints with grease provided by manufacturer or
Months
equivalent
Every 2 Years
Replace the batteries of the UPS.
Page 54
All inspections described below must be performed with all electrical POWER
OFF. Attempting to carry out the processes with the power ON can cause
serious injury to personnel due to abrupt motion and electrical shock.
7.2 INSPECTION OF CRITICAL BOLTS AND CONNECTIONS
The above figures indicate the location of critical bolts on Cycraft.
These bolts hold
up the cabin and can cause the cabin to drop if they come loose.
They are marked
with a white line after assembly so that misaligned marking lines can identify loose
bolts easily.
D
C
E
F
A
B
Page 55
Inspection
Part Picture
How to check
Point
A
Hexahead bolt M12 x 8 points
B
Lower joint of heave actuator is inside of
MSCU so in order to inspect the bolts, the
MSCU cover must be removed.
Hexahead bolt M12 x 8 points
C
Hexahead bolt M12 x 4 points
D
Hexahead bolt M10 x 8 points
E
Hexahead bolt M10 x 4 points (Lower)
Hexahead nut M10 x 4 points (Upper)
F
Page 56
7.3 VERIFICATION OF SNAP RINGS
The universal bearings have two snap rings each which prevent the actual bearing
SNAP RING
from popping out of its cage.
respective grooves.
Verify that the snap rings are lodged securely in their
If any appear to be loose, push them back in place using a
screw driver or other sharp object and check daily to make sure the problem does not
repeat.
If the problem persists, contact your distributor or manufacturer for a
replacement part.
7.4 CHECKING WELD CONDITION
Visually check all the weld areas of the outer frame for signs of cracks or failure.
None is acceptable.
If any problems are found, contact your distributor or the
manufacturer.
7.5 CHECKING THE ACTUATOR DRIVE BELT
The actuator drive belt can be accessed by removing the belt cover as shown in the
figure below.
Page 57
TOP
ACTUATOR
Visually inspect both of the belts for wear or tear.
discovered, the belt must be replaced.
loose, it must be tightened.
If any damage to the belt is
Check the tension of the belt.
If the belt is
The procedure to replace and tighten the belt is
described in the Installation and Service manual.
7.6 CLEANING THE MSCU AIR FILTERS AND FAN
The MSCU air filters and fans are located as shown in the above figure.
They should
be cleaned regularly to ensure proper ventilation and prevent excessive rise in electric
component temperatures.
out and clean with water.
Pull out the filter cover to access the filter. Take the filter
Ensure the filter is dry before replacing.
Clean the
ventilation fan with a damp cloth.
MSCU FAN
MSCU AIR FILTER
Make sure water does not drip into the open circuitry in the MSCU during
cleaning. Permanent electrical damage can occur.
Page 58
7.7 LUBRICATING THE ACTUATORS
This maintenance work should be performed every 6 months.
1) Prepare grease gun with grease specified as below or equivalent:
KLUBER HIMONAX WS433
2) Take off the actuator bellows and bearing covers and identify the grease nipples
as shown in the figure below:
2
3
4
1
5
ACTUATOR GREASE
NIPPLE POSITIONS
3) Inject grease in the amounts given in the table below for each of the components:
Page 59
No.
Part
Picture
Amount of
Grease
1
Heave
Actuator Cylinder
60 grams
2,4
Top
Actuators Cylinder
30 grams
3,5
Top
Actuators Bearing
10 grams
4) Wipe away any excessive grease.
5) Play the game for at least three games and wipe away all excessive grease.
6) Replace all covers and bellows.
7.8 LUBRICATING THE JOINTS
This maintenance work should be performed every 18 months.
1)
Prepare grease gun with grease specified as below or equivalent:
KLUBER HIMONAX WS433
2) Identify the grease nipples as shown in the figure below.
Page 60
5
6
7
3
8
1
4
2
JOINT GREASE
NIPPLE POSITIONS
3) Inject grease in the amounts given in the table below for each of the components
:
No.
Part
1
H e a v e Actuator
Picture
Amount of Grease
5 grams
Universal joint
(Upper)
2
5 grams
H e a v e Actuator
Universal Joint
(Lower)
3,4
Rocker Arm Joint
5 grams
Page 61
5,6
5 grams
Top Actuator Gi
mbal Joint
7,8
5 grams
Top Actuator Uni
versal Joint
9
5 grams
Central Universal
Joint
4) Wipe away any excessive grease.
5) Play the game for at least three games and wipe away all excessive grease.
6) Replace all covers and bellows.
Page 62
8. REPLACEMENT OF SERVICE PARTS.
Only Qualified Service Personnel must carry out maintenance. Ensure that the
main power is switched OFF and disconnected before attempting any work.
8.1 EXCHANGING THE COMPACT FLASH CARD
Cycraft’s motion
board inside the MSCU is programmed to log any occurrence of
errors with relevant system status data onto a compact flash card.
In case of
unidentifiable problems, it can be recommended that the compact flash card be
replaced by a duplicate (provided by the distributor) and the original one be returned
to the manufacturer for analysis.
Or, if the operator is capable, the error log file can
be accessed from the compact flash card and sent to the manufacturer by the
operator.
Also, future program upgrades may require exchanging the compact flash
card.
To remove the compact flash card,
1) Make sure all electrical power is OFF.
2) Locate the motion control computer in the MSCU and disassemble it from the floor
plate by loosening the 4 screws in the corner of the computer board as shown in
the figure.
Location of Motion Board
in MSCU
3) Expose the underside of the computer board where the compact flash card is locat
ed and pull the compact flash card out.
Page 63
Compact
Flash Card
To re-install the compact flash card, follow the above process in reverse.
Once the compact flash card is removed, it can be sent to the manufacturer for
analysis. Another way is to plug the compact flash card into a compact flash card
reader connected to a PC and copy the file named MCUErr.log.
This file can then
be sent to the manufacturer for analysis.
Do not attempt to take out or access the compact flash card unless instructed to do so
by the distributor or manufacturer.
8.2 REPLACEMENT MSCU COMPONENTS AND BOARDS
Turn off the power and disconnect the supply power before servicing.
This unit is to be serviced by trained personnel only.
1) The following pictures show the location of major modules, components and
boards in the MSCU.
Main power must be disconnected before any part is
accessed or replaced.
Only qualified maintenance personnel or serviceman
should carry out replacement work.
Replacement procedures of components and
parts are mostly straight forward.
However, if any questions arise or additional
information is required, contact your distributor or Simuline Inc.
Page 64
SCU Session
MCU Session
SERVO CONTROL BOARD 2
SERVO CONTROL BOARD 3
SERVO CONTROL BOARD 1
POWER BOARD
SW REGU 15V FOR MCU
SW REGU 5V FOR MCU
NOISE FILTER
MAIN AC POWER INLET TB
MAIN BREAKER
Page 65
INPUT VOLTAGE SELECTION TB
NAOMI2 BD
SW REGU FOR JVS
GD-ROM DRIVER
AUDIO AMP
I/O BD FOR JVS
MOTION BD
MAIN TERMINAL BLOCK
POWER SUPPLY
FOR AMP
SRIP BD
Page 66
9. TROUBLESHOOTING
9.1 TROUBLESHOOTING TABLE
No
1
Symptom
Probable Cause
Remedy
The simulator does not move
The CAN communication
Make sure that the CAN line
properly and the LCD screen on
line from the motion board
is plugged in correctly on
the MSCU front panel does not
to the MCU is not working
both the motion board and
show “CAN” and it shows an
properly.
MCU sides
The simulator does not initialize or
Main power is not supplied
Check the lamp labeled
move properly and the LCD
because either the line is
“Power” on the MCU and the
screen shows an error message
not live or because the
SCU. If the lamp on the
as following. Also, the “Power”
emergency button is in the
MCU is off, check if the main
LED on the SCU front panel does
pressed position.
power line live. If the MCU
Another probable cause
lamp is on and the SCU lamp
may have controller error.
is off, check E-Stop button is
Try Can Comm ..
Waiting host(TCP)..
error message as
2
ERR
Controller Error
released by rotating it
(1) NOP (2)NOP(3)NOP
counterclockwise.
Open the MCU box and check
not light up.
the circuit board was visibly
damaged.
3
During initialization, the simulator
The actuators are
Press the E-Stop button and
continuously jerks slightly and
encountering a load too
remove whoever, or whatever
makes a ticking sound without
large for initialization.
is in the cabin. Power down
initializing.
Either there is someone or
the system and start again.
something heavy inside the
If there is an obstruction,
cabin or something is
remove it.
obstructing the motion.
4
There is no sound.
Speaker lines are
Check that there are no loose
disconnected or switched
connections or switched off
off or the volume is not set
behind the speaker.
properly.
Rotate the volume knob on
Page 67
the rear of the right speaker.
5
The LCD screen on the SCU does
Motion Board boot-up
Open the door on the rear of
not show any message after
failure.
the SCU.
power up.
Hook up the extra monitor,
Motion base does not
Keyboard, mouse to the
initialize( when initializing, cabin
connectors labeled “Motion
moves slightly with jerks).
Board”. Check if the Motion
Board boots up normally.
If Motion Board has problem ,
contact technical support
center for replacement.
6
The simulator does not initialize.
Controller module may have Check the error message
malfunction
appeared on the LCD of the
SCU.
Refer to the controller error
message list
7
Some area on the cabin monitor
The monitor may be
Press the degaussing switch
has strange color
magnetized.
on the monitor adjustment
The display is out of position or
The monitor may not be
control pad inside the cabin
distorted.
adjusted properly.
front beside monitor.
Adjust the monitor as the
screen instructions with the
control panel.
8
Sound is too loud or low
The sound level is not
Change the volume setting on
Vibration level on the seat is too
adjusted properly.
the back side of the operator
panel.
high or low
9
Steering wheel turns either to the
The Steering potentiometer
Contact technical support
left or to the right and then locks
may malfunction
center and ask for
replacement.
10
Coins is rejected
Coins may be jammed
Reset the machine by
powering down and up.
Page 68
9.2 CONTROLLER ERROR MESSAGE TABLE
MCU Error
Message
Meaning
Remedy
(LCD display)
NOP
No motor power
Verify that the ‘Emergency Power Shutoff Switch’ button
on the SCU is released.
Verify that circuit breaker inside the MSCU is switched
off caused by an error
Check the main power source in the building.
ECD
FLT
No Encoder
Check the encoder line connections to the actuators and
Signal
servo controllers
Fault
Motor controller module may have a fatal damage if this
happens repeatedly.
Replace the controller module, if necessary.
OVC
Over Current
This error occurs when excessive current flows through
the controller and motor.
It can occur due to the
following reasons:
a. the actuators are overloaded because of excessive
movement.
b. The actuator has a mechanical problem causing
excessive friction and/or abnormal vibration.
c. too much grease is put in.
Replace the controller module or actuator as deemed
necessary.
OVT
Over
This error appears when the temperature of the power
Temperature
module on the controller is too high.
Replace the controller module, if necessary.
OVV
Over Voltage
This error appears when output voltage from the
Rectifier on the controller exceeds the standard voltage.
Check the input voltage value.
Replace the controller module, if necessary.
BLS
TLS
Bottom Sensor
The actuator is extending or retracting beyond it’s normal
Error
range of motion and is tripping the
Limit Sensors on
Top Sensor Error
the upper and bottom stroke limits of each actuator.
Verify that the sensors are functioning properly.
Page 69
10. ELECTRIC SCHEMATICS
The following pages contain the electrical schematic for this machine.
10.1 SCU SCHEMATIC
SCHEMATIC 1 HERE
Page 70
10.2 Cabin Schematic
SCHEMATIC 2 HERE
Page 71
10.3
MCU Schematic
SCHEMATIC 3 HERE
[DOCUMENT END]
Page 72
2
1
GND
GND
White
LEFT
WHITE
1 Pink
2 Purple
3 Brown
4 Blue
5 Yellow
6 Red
7 White
8 Black
1
2
3
4
5
6
7
8
9
Shield
OUT
E
1
2
3
4
AMP1
W+
W-
1
2
+
W+
W+
1
2
B+
BL.IN
R.IN
Purple
Pink
LO.SP
G
G
RO.SP
1
2
3
4
FL+
FLFRFR+
CASE +
AMP
Shield
400-5397-01
LO.SP
G
G
RO.SP
1
2
3
4
RL+
RLRRRR+
AC
OUT
IN
1
2
1
2
R-0
100T
PS2 AC IN (2)
+5V
+5V
+12V
+12V
GND
GND
GND
GND
PS3
POWER SUPPLY
ST300-BLP
Black
+
LC8
LS3
FRONT RIGHT
DC
-
Green
OUT
Short
AC
PS1 AC IN
IN
NICN7
UPS1-
+5V
+5V
GND
GND
(MCU)
LC14
1
2
3
4
5
6
STB3
AMP3
AMP3
DC
LC7
UP4
LC13
B+
BL.IN
R.IN
LS2
FRONT LEFT
POWER SUPPLY
GND
GND
GND
-
FL+
FLFRFR+
1
2
3
4
1
2
3
4
5
6
7
8
GND
GND
GND
GND
LC12
1
2
3
4
LC6
1
2
3
4
5
6
7
8
AVCC
AVCC
(HANDLE) A/D 0CH
A/D 4CH
AGND
AGND
AVCC
AVCC
(ACCEL) A/D 1CH
A/D 5CH
AGND
AGND
AVCC
AVCC
(BRAKE) A/D 2CH
A/D 6CH
AGND
AGND
AVCC
AVCC
A/D 3CH
A/D 7CH
AGND
AGND
N.C
N.C
PS4
STB2
AMP2
AMP2
Blue
Brown
LS1
WOOFER
+
LC11
Pink
Purple
Brown
Blue
Yellow
Red
White
Black
LC5
+5V
+5V
+12V
+12V
-
STB1
AMP1
SP1
D-SUB 9P
ASP1
GND
GND
GND
+3.3V
+5.0V
+12.0V
+
RL+
RL-
1
2
3
4
5
6
LS4
REAR LEFT
CNH6P
LS5
REAR RIGHT
-
GND
GND
Power
CABIN
PART
IN
CN7
NH 4P
XLT-0833
1
2
3
4
5
6
+5.0V
NICN1
GD-ROM1
+12V
+12V
DRIVE
DIMM BD
1
2
3
4
5
GND
GND
CN1
NH 5P
24V.G
NCN5
+24V
MCN13
(3)
(1)
3
7
2
CH1
CAN
3
7
2
CH2
CAN
NLP
+12V
GND
GND
+5V
1
2
3
4
J3(PORT1)
FLAT 50P
CN9
CN2
1
CN4
USB
NCN9
LP
LAN
1
MJ3
(2)
1P START
2P START
(VIEW3) 1P RIGHT
(SHIFT3) 2P RIGHT
(VIEW2) 1P LEFT
(SHIFT2) 2P LEFT
(VIEW0) 1P UP
(SHIFT0) 2P UP
(VIEW1) 1P DOWN
(SHIFT1) 2P DOWN
(BOOST) 1P SW1
2P S/W1
1P S/W2
2P S/W2
1P S/W3
2P S/W3
1P S/W4
2P S/W4
1P S/W5
2P S/W5
1P S/W6
2P S/W6
1P S/W7
2P S/W7
1P SERVICE
2P SERVICE
TEST SW
TILT SW
COIN SW1
COIN SW2
N.C
N.C
COIN METER1
COIN METER2
(START) OUTPUT1
(VIEW1) OUTPUT4
(BOOST) OUTPUT2
(VIEW2) OUTPUT2
(VIEW0) OUTPUT3
(VIEW3) OUTPUT6
+12V
+12V
+12V
+12V
1
1
Red(1)
White(2)
1
2
3
4
5
6
7
CN1
1
2
3
4
5
6
7
8
(1)
MCH2
CN9
1
2
CN3
VGA
NAOMI 2
NCN1
JP5
1
NCN3
WHITE LEFT
MCN9
(3)
CN5
USB
DIMM BD
1
(3)
1
2
3
4
5
6
CN16
D-SUB 9P
MCH1
3
5
CN4
RED RIGHT
NCN2
MCN16
C
CN13
LAN
Motion
Board(1,2,3)
1
AMP POWER (1)
CN503 / CN802
Red(4)
White(5)
Shield(6)
MONITOR BD
2
1
2
3
4
Yellow
KEYPAD
4 Blue
Blue
6 Red
Red
Brown
LED
OP
PANEL
3
3 Brown
R3
VOL2(REAR)
100Kx2
2
GND
GND
GND
+12V
GND
GND
+5V
1
2
3
4
5
6
1
2
3
4
1
2
3
4
5
J2
OP PNL
J1
FLAT 50P
+12V
GND
GND
+5V
TB4 1/2
TB4 3/4
BR(re)
WH(wh)
GR(gr)
YE(bk)
J7
R12
T11
R-0
100T
J7-1
J7-2
GND
+12V
LED1
LED2
LED3
LED4
LED5
J11
Naomi I/O
GND
GND
1
2
3
4
5
6
J5
OP PNL
DGND
Naomi_Coin1
Naomi_Coin2
BR(re)
WH(wh)
GR(gr)
YE(bk)
J7-1
J7-2
GND
+12V
1
2
3
4
Seat Belt
GND
+12V
SJ5
LED1
LED2
LED3
LED4
LED5
Black
SJ3
J3-1
GND
/MAINTENANCE
J3-1
L
CABIN PART
SJ13
S3
3
3
S4
SYSTEM ON
R4
VOL3(FRONT)
100Kx2
2
1
OP
PNL2
J13-1
J13-2
J13-3
J13-4
J13-1
J13-2
Shield
Black
DGND
GND_12V
SW2
Stop/Resume
J13-3
J13-4
SJ12
J9-1
S5
System Shutdown
J9-2
GND
UPS
D-SUB 9P
UPS1
SW1
Emergency Power Off
S6
CABIN
B
DC-
R21
DC+
LP4
CABIN
LP3
MSCU
LP2
POWER
LP1
SOURCE
J6-1
24V.G
Emergency Stop/ Resume
System ShutDown
GND_12V
System ShutDown
GND_12V
UPS_GND
J12-1
UPS_GND
J12-3
J12
UPS_GND
1
2
3
BROWN
WHITE
YELLOW
R-0
110T
+12V
GND
TB3
SCU TB
L
T
GND
+12V
T
J9-4
GND
24V.G
+24V
24V.G
+24V
J8-1
J9-1
J9-2
GND
J9-4
GND
1
2
3
4
5
SJ6
BUZZER_1
J8
CON_Safety
CON_Emergency
Control_VCC
1
2
3
SJ8
1
2
3
T
T
GND
PS2 AC IN (2)
Safety Sensor
+12V
GND_12V
T
+12V
UPS_GND
J15
DRIVER3
T
T
J8-1
+12V
GND
Driver1
GND
J9-2
J9-1
R-0
100T
110T
220R0
220T0
220R
220T
R20
R21
T20
R11
R12
T11
R12
220T
220R
T20
R20
T11
R12
T11
J6-1
24V.G
ECY-D-C01
LC31
CN6 RA26P
20P
1
USH-7SW-F-20P
1
18
18
21
22
19
20
CONNECTION (40P)
C6-21
C6-22
J1 40P
USH-7SW-F-40P
C3-1
1
2
3
4
5
6
7
8
9
10
11
12
13
14
15
16
17
18
19
20
21
22
23
24
25
26
27
28
29
30
31
32
33
34
35
36
37
38
39
40
41
42
43
44
45
46
47
48
49
50
51
52
53
54
55
56
57
58
59
60
J1
J1 20P
CABIN PART
C3-3
C3-4
C3-5
C3-7
C3-8
C3-9
C3-10
C3-11
C3-12
C3-13
C3-14
C3-15
C3-16
C3-17
C3-18
C3-19
C3-20
C3-21
C3-22
C3-23
C3-24
C3-25
C3-26
C3-27
C3-28
C3-29
C3-30
C3-31
C3-32
C3-33
C3-34
C3-35
C3-36
C3-37
C3-38
C3-39
C3-40
C3-41
C3-15
C3-41
C3-43
C3-43
CN3
J1
RA60P
40P
7
1
14
8
17
9
40
32
51
33
58
40
D
C
OP PANEL
LC45
LC46
1
2
3
4
S2
SERVICE
C3-15
C3-41
C3-15
C3-43
1
2
3
4
S7
TEST
C3-45
C3-46
C3-49
C3-50
C3-51
C3-52
C3-53
C3-54
C3-55
C3-56
C3-57
C3-58
COIN BOX
LC16
C3-4
C3-49
LC15
2
1
LC47
C3-5
C3-50
2
1
C3-4
C3-49
(RE)
(BK)
C3-5
C3-50
(RE)
(BK)
COIN
METER
1
LC48
2
1
2
1
COIN
METER
2
J16-2
J16-3
GND
+12V
J9-4
GND
7
8
1
2
10P
10P
MCU
MCU
24V.G
+24V
24V.G
+24V
J8-1
J8-1a
J8-1b
J8-1b
+12V
L8-9
L8-9
GND
3mm Y-Term
Multi-Mech
PHOTO1
C120,SR3
PHOTO2
(LEFT)
AMP POWER (1)
+24V
24V.G
J8-1
(BR)
(WH)
(YE)
J8-1a
(GR)
PH2
POWER
POWER
N.O
N.C
COM
3
5
1
2
4
B
(RIGHT)
PH1
+24V
24V.G
J8-1a
(BR)
(WH)
(YE)
J8-1b
(GR)
3
5
1
2
4
POWER
POWER
N.O
N.C
COM
T
T
J8-1a
T
J8-1b
J8-1b
+12V
T
LP8
LEFT
T
+12V
L8-9
R-0
100T
110T
220R0
220T0
220R
220T
R20
R21
T20
R11
R12
T11 T
R12
T11 T
LC32
7
8
1
2
R
1
2
3
4
5
6
7
8
9
10
11
12
13
14
15
16
17
18
19
20
21
22
23
24
25
26
27
28
29
30
31
32
33
34
35
36
J6-1
+24V
1
2
+24VDC
J16-2
J16-3
GND
+12V
J16-2
J16-3
SJ9
J6
UPS_OFF
UPS_GND
UPS_ON
1
2
3
4
SJ15
BZ1
BUZZER
R20
R12
8
9
5
4
J4
DRIVER1
R11
J9
UPS_OFF
UPS_GND
UPS_ON
MCU
A
BOX
SJ16
1
2
3
4
J13
1
2
3
4
CONNECTION (20P)
C6-1
C6-2
C6-3
C6-4
C6-5
C6-6
C6-7
C6-8
C6-9
C6-10
C6-11
C6-12
C6-13
C6-14
C6-15
C6-16
C6-17
C6-18
LC41
1
2
3
4
5
6
Coin S/W1
Coin S/W2
+12V
UPS OFF
2
J16
1
2
3
4
5
6
7
8
9
10
11
12
13
14
15
16
17
18
19
20
21
22
23
24
25
26
C3-16
C3-45
C3-46
COIN
Test
R
SJ11
1
2
3
4
SRIP
J3
1
2
3
4
GND
Pink
1
2
3
4
5
6
7
8
9
10
SJ7
Cabin Stop
J14
Naomi
LC38
1
2
3
4
I/O Control
BD
+3.3V
+5.0V
+12.0V
LC37
+12V
GND
GND
+5V
1
2
3
4
Keypad1
Keypad2
Keypad3
Keypad4
GND
Purple
1
GND
GND
+3.3V
+5.0V
5
4
3
1
2
3
4
1
2
1
1
2
3
4
SJ2
Keypad1
Keypad2
Keypad3
Keypad4
GND
1
2
3
4
5
S1
RUN
B
2 Purple
1 Pink
+12V
GND
GND
+5V
LJ1
J1
LED PCB
1
Black
DRIVER1
TB4
CABIN TB
3
8 Black
R2
VOL1(WOOFER)
100K
2
CAN
LC36
SJ1
1
2
3
GND
ERX
J1
KEYPAD
J1
Power
LCD
PCB
5 Yellow
DRIVER1
J6
KJ1
White
3
7 White
LC35
1
LCJ1
3
100K
GND
+5V
(MCU)
GND
+5V
1
0K
1
2
3
4
838-14174
1
2
3
4
5
SJ14
R2 / R3 / R4
LC34
DRIVER BD MIDI
GND
+5V
+12V
GND
LC33
CAN-GND
(BR) CAN-H
(WH) CAN-L
(BR) CAN-H
(WH) CAN-L
4
3
CN2 MIDI
(BR)
(WH)
+EXV
+EXV
+5V
+5V
+5V
+5V
+5V
+5V
GND
GND
GND
GND
GND
GND
GND
GND
1
2
3
4
NH6P
+12.0V
+
RRRR+
CN3
RA60P
837-13551-92
B+
E
IN
Black
Yellow
1
2
3
4
5
6
7
8
1
D
GND
GND
LC9 LC10
Red
RED
RIGHT
1
2
3
4
5
6
7
8
+3.3V
+5.0V
+12.0V
~
+3.3V
+5.0V
+3.3V
+5.0V
~
1
2
3
4
5
6
LC2
~
1
2
3
4
5
6
LC1
~
LC4
~
CN6
RA26P
LC3
~
3
~
4
~
5
J8-1b
L4-5
L14-15
J8-1b
L1
L4
L14
L16
L1-2
L3-4
L13-14
L15-16
L2
L3
L13
L15
GND
LP9
RIGHT
L8-9
T
T
MCU
MCU
MCU
MCU
MCU
MCU
TB4 3 / 4
MCU
MCU
L8-9
L4-5
LC27
L2-3
LC29
MCU
MCU
MCU
LC30
1
2
3
4
MCU
T
1
2
3
4
L12-13
L4-5
TB4 1 / 2
MCU EARTH
LC28
1
2
L8-9
L8-9
1
2
L12-13
L8-9
L10-11
L5
L8
L10
L12
L5-6
L7-8
L9-10
L11-12
L6
L7
L9
L11
A
A
220R0
220T0
3mm Y-Term
220R0
220T0
FAN2
L6-7
220R
220T
T2
+24V/DC
220R
220T
+24V
T
R20
R21
T20
R11
R12
T11
LC44
R12
L8-9
1
2
T
R20
R21
T20
1
2
DESIGN
24V.G
T
DC+
LC43
T
DC-
KANG
FAN3
T11
R11
R12
T11
MODEL
KIM
CYCRAFT
PRODUCT
CYCRAFT SCU CIRCUIT DIAGRAM
4mm Y-Term
Size
A3
Date:
4
APPROVAL
CHOI
Title
4mm Y-Term
5
CHECK
3
2
Document Number
ECY-D-SE003
Rev
4
Monday, May 12, 2003
Sheet
1
1
of
3
4
J1
40P
C3-7
C3-8
C3-9
C3-10
C3-11
C3-12
C3-13
C3-14
C3-17
C3-18
C3-19
C3-20
C3-21
C3-22
C3-23
C3-24
C3-25
C3-26
C3-27
C3-28
C3-29
C3-30
C3-31
C3-32
C3-33
C3-34
C3-35
C3-36
C3-37
C3-38
C3-39
C3-40
C3-51
C3-52
C3-53
C3-54
C3-55
C3-56
C3-57
C3-58
J1 40P
D
C
1
2
3
4
5
6
7
8
9
10
11
12
13
14
15
16
17
18
19
20
21
22
23
24
25
26
27
28
29
30
31
32
33
34
35
36
37
38
39
40
3
2
TB 40P
LC9 LC10
W+
W-
A1
+5V
+5V
GND
GND
GND
GND
GND
GND
1P START
2P START
(VIEW3) 1P RIGHT
(SHIFT3) 2P RIGHT
(VIEW2) 1P LEFT
(SHIFT2) 2P LEFT
(VIEW0) 1P UP
(SHIFT0) 2P UP
(VIEW1) 1P DOWN
(SHIFT1) 2P DOWN
(BOOST) 1P SW1
2P S/W1
1P S/W2
2P S/W2
1P S/W3
2P S/W3
1P S/W4
2P S/W4
1P S/W5
2P S/W5
1P S/W6
2P S/W6
1P S/W7
2P S/W7
(START) OUTPUT1
(VIEW1) OUTPUT4
(BOOST) OUTPUT2
(VIEW2) OUTPUT2
(VIEW0) OUTPUT3
(VIEW3) OUTPUT6
+12V
+12V
(A1)
(B1)
(A2)
(B2)
(A3)
(B3)
(A4)
(B4)
(A5)
(B5)
(A6)
(B6)
(A7)
(B7)
(A8)
(B8)
(A9)
(B9)
(A10)
(B10)
(A11)
(B11)
(A12)
(B12)
(A13)
(B13)
(A14)
(B14)
(A15)
(B15)
(A16)
(B16)
(A17)
(B17)
(A18)
(B18)
(A19)
(B19)
(A20)
(B20)
1
2
3
4
5
6
7
8
9
(A1)
(B1)
(A2)
(B2)
(A3)
(B3)
(A4)
(B4)
(A5)
10 (B5)
11 (A6)
12 (B6)
13 (A7)
14 (B7)
15 (A8)
16 (B8)
17 (A9)
18 (B9)
19 (A10)
20 (B10)
21 (A11)
22 (B11)
23 (A12)
24 (B12)
25 (A13)
26 (B13)
27 (A14)
28 (B14)
29 (A15)
30 (B15)
31 (A16)
32 (B16)
33 (A17)
34 (B17)
35 (A18)
36 (B18)
37 (A19)
38 (B19)
39 (A20)
40 (B20)
A5
LC11
FL+
FLFRFR+
A2
A5
T
A8
LC13
LP5
START
A1
B
A17
A17
B18
LC14
1
2
3
4
5
6
+
LS4
REAR LEFT
RRRR+
+
LS5
REAR RIGHT
-
H-SYNC1
V-SYNC1
SEF-RASTER
DDC-SCL
DDC-SDA
SG
MONITOR
RED
Shield
GREEN
Shield
BLUE
Shield
C
IN
CN103
1
2
1
2
3
C2
AC
LC26
1
2
3
2
C1
C2
C3
1
2
3
4
5
6
BD
R
SG
G
SG
B
SG
1
R12
T11
3
C3
LC21
C4
C5
R7
STEERING
LC22
DCN2
C4
C5
C6
1
2
3
C6
1
2
3
Shield(3)
1
3
C7
LC23
C8
C7
C8
C9
C9
LC24
1
2
3
White(2)
Red(1)
White(5)
Red(4)
R5
ACCEL
1
2
3
DCN1
SG
80%
SG
60%
1
2
3
4
5
6
7
8
TXD
TXD-R
RXD
RXD-R
CN2
MIDI
1
+5V
A
/A
B
/B
Z
/Z
SERMO S1
SERMO S1
SG
DRIVER BD MIDI
DCN5
1
2
3
4
5
6
7
R-0
100T
J7-1
J7-2
GND
White
Green
White
Black
White
SH
B
AC110V(R)
AC110V(R)
AC110V(T)
AC110V(T)
CN4
MOTOR POWER
DCN4
MOTOR(U)
MOTOR(V)
SAG
LC19
LC20
Green
1
2
3
4
5
6
7
8
SAG
MOTOR(W)
FG
1
2
3
R12
T11
Black
White
SH
PI
Red
White
Blue
1
2
3
4
5
6
7
8
9
10
CN5
R-0
TB4
CABIN TB
White
Green
White
LC18
1
2
3
4
5
6
7
8
9
10
CN1
Encoder
838-14174
R6
BRAKE
LC17
PI
Red
White
Blue
1
2
3
4
5
6
7
8
9
10
3
CN11
L
RL+
RL-
1
2
3
4
5
6
CN2 MIDI
BR(re)
WH(wh)
GR(gr)
YE(bk)
D
CN802
SAG
TB4 3/4
LS3
FRONT RIGHT
-
CN503
Orange
White
Gray
Red
Yellow
Black
CN503 / 802
1
2
3
4
5
6
7
8
9
10
+
LP6
VIEW
100T
TB4 1/2
-
A1
B18
USH-7SW-F-20P
R12
T11
R-0
100T
J7-1
J7-2
GND
+12V
FL+
FLFRFR+
1
2
3
4
1
2
3
4
5
6
T
C1
(C1)
(D1)
(C2)
(D2)
(C3)
(D3)
(C4)
(D4)
(C5)
10 (D5)
11 (C6)
12 (D6)
13 (C7)
14 (D7)
15 (C8)
16 (D8)
17 (C9)
18 (D9)
19 (C10)
20 (D10)
LS2
FRONT LEFT
LC12
1
2
3
4
RL+
RLRRRR+
LC25
1
2
3
4
5
6
7
8
9
LS1
WOOFER
-
A2
A8
TB 20P
AVCC
AVCC
(HANDLE) A/D 0CH
A/D 4CH
AGND
AGND
AVCC
AVCC
(ACCEL) A/D 1CH
A/D 5CH
AGND
AGND
AVCC
AVCC
(BRAKE) A/D 2CH
A/D 6CH
AGND
AGND
A/D 3CH
A/D 7CH
+
S9
VIEW
2
J1 20P
1 (C1)
2 (D1)
3 (C2)
4 (D2)
5 (C3)
6 (D3)
7 (C4)
8 (D4)
9 (C5)
10 (D5)
11 (C6)
12 (D6)
13 (C7)
14 (D7)
15 (C8)
16 (D8)
17 (C9)
18 (D9)
19 (C10)
20 (D10)
W+
W+
1
2
+
S8
START
2
C6-1
C6-2
C6-3
C6-4
C6-5
C6-6
C6-7
C6-8
C6-9
C6-10
C6-11
C6-12
C6-13
C6-14
C6-15
C6-16
C6-17
C6-18
C6-21
C6-22
1
2
A2
USH-7SW-F-40P
J1
20P
1
ENCODER
5
MOTOR(FG)
MOTOR(FG)
White
Black
1
2
3
4
U
V
W
FG
1
2
3
4
M
10K
S10
CABIN STOP
J7-1
GND
T
LC39
J7-2
GND
R
LC40
J7-2
1
2
1
2
GND
S11
SEAT BELT
A
A
TB5
EXT TB
L
DESIGN
APPROVAL
CHOI
KIM
MODEL
PRODUCT
CYCRAFT
START, VIEW
Title
Power +12V
CYCRAFT CABIN CIRCUIT DIAGRAM
R
Size
A3
SCU EARTH
Date:
5
CHECK
KANG
1
2
3
4
5
4
3
2
Document Number
ECY-D-SE004
Rev
4
Saturday, April 26, 2003
Sheet
1
2
of
3
5
4
T1
MAIN TRANS 4.5KVA
0V
0+
230V
100V+
240V
110V+
MC2
GMC12
220T0
4mm
T20
R21
100R0
R-0
100T0
100T
110T0
110T
Ring-Term
UP1
4mm Ring-Term
EARTH
220R0
220T0
P1
MAIN INPUT
220R0
220T0
(WITH EARTH)
T
UP2
J9-4
GND
1
2
3
11
3
K1
POWER
Board
4
5
9
8
3mm Y-Term
FL2 / 6A
PS1
PS2
SMPS CS15-05
SMPS CS30-15
J3
T11
3
T11
4
OUT1
E
IN1
OUT2
IN2
1
220R
2
220T
T
POWER SUPPLY
+5V
PJ3
+15V
ST300-BLS
(SCU)
WH(wh)
BR(re)
GR(gr)
YE(bk)
R11
J6
J5
J4
PS1 AC IN
RS1
R11
D
4mm Y-Term
1
2
3
D-SUB 9P
System Shutdown
T S R E
PGND
+15VP
P4
OUTPUT AC220V
R20
T20
T
P2
J1
R20
T20
DGND
+5V
4mm Y-Term
220R0
220T0
T
R20
T20
1
2
3
OUTPUT AC220V
INPUT AC220V
POWER SOURCE
UP3
P3
UPS1
1
2
3
U-GND
ON
U-GND
OFF
D
220V+
220V
DC+
PRIMARY
208V
DC-
AC32
3
1
2
OUT1
220T
DC+
IN1
200V
208V
220V
230V
240V
DC-
1
220R
220T
1
2
AC22
CF9
4mm Ring-Term
220R
220R0
200V
DC+
AC12
0V+
0V
DC-
1
2
3
4
5
6
7
1
2
0V
4
1
2
3
4
OUT2
1
2
3
4
5
6
IN2
YE(bk)
WH(wh)
GR(gr)
BR(re)
PI(ye)
BL(bl)
2
E
AC02
AC21
5
4
3
2
1
AC11
1
2
3
T20
R21
TB2
TRANS TB
FL1 / 15A
AC01
MC1
GMC32
1
PGND
+15V
CB1
MAIN NFB
2
5
4
3
DGND 2
1
+5V
TB1
MAIN TB
3
DC+
DC4mm
4mm
4mm
Ring-Term
Ring-Term
Ring-Term
T
YE(bk)
GR(gr)
BR(re)
WH(wh)
J12-1
U-GND
J12-3
U-GND
CF10
R-0
100T
110T
J12
1
2
3
4
SRIP
CON
220R
220T
TB3
SCU TB
C
SCU
SCU
SCU
SCU
SCU
SCU
SCU
SCU
SCU
SCU
SCU
SCU
R-0
100T
110T
220R0
220T0
220R
220T
R20
R21
T20
R11
T11
DCDC+
Ring-Term
J8
J9
W V U E E
4mm
2RedT
1YellowT
3BlueT
Green
CF3
4mm
Ring-Term
J8
DC-
DC+
4mm
DCDC+
Ring-Term
Ring-Term
1
2
4mm
1
2
3
4
5
CF6
Ring-Term
1
2
4mm
J9-4
GND
2RedT
1YellowT
3BlueT
Green
J9-4
GND
R21
R20
T20
1
2
3
4
5
SCU
SCU
1
2
3
4
5
6
7
8
9
10
11
12
13
14
15
16
17
18
19
20
21
22
23
24
25
26
27
28
29
30
31
32
33
34
35
36
J9
W V U E E
DC-
D1J5
BL(bl)
PI(ye)
BR(re)
GR(gr)
WH(wh)
YE(bk)
DC+
4mm
FAN1
Ring-Term
J5
DCDC+
J13
DC+
BR
1
2
J11
Y-Term
Y-Term
E
T20
Green
3BlueT
1YellowT
2RedT
J10
D3J10
PGND
D3P1
GR(gr)
GY(gy)
BL(bl)
WH(wh)
RE(or)
BR(re)
YE(bk)
PI(ye)
RE(or)
SCU TERMINAL
BLOCK
P1
/B
/C
/A
ENC_GND
ENC_CHK
B
1
2
3
4
5
6
7
8
9
10
+15VP
PGND
DRIVER
3
+15VP
Safety
Emergency
VCC
J7
1
2
3
4
D2P1
GR(gr)
GY(gy)
BL(bl)
WH(wh)
RE(or)
BR(re)
YE(bk)
PI(ye)
RE(or)
J3
Safety
Emergency
VCC
Shield
D3J7
YE(bk)
GR(gr)
BR(re)
WH(wh)
BR(re)
WH(wh)
YE(bk)
1
2
3
VCC
BLS
TLS
VCC
1
2
3
VCC
DGND
VCC
DGND
JP2
1
2
B
P1
/B
/C
/A
ENC_GND
ENC_CHK
B
1
2
3
4
5
6
7
8
9
10
DRIVER
2
+15VP
J4
Safety
Emergency
VCC
C
A
VCC
VCC
D2J7
YE(bk)
GR(gr)
BR(re)
WH(wh)
1
2
3
4
VCC
BLS
TLS
VCC
1
2
3
J10
PU(pu)
YE(bk)
BR(re)
BK(br)
RE(or)
GR(gr)
WH(wh)
BL(bl)
RE(or)
+15VP
D2J4
BR(re)
WH(wh)
YE(bk)
D2J3
BR(re)
WH(wh)
YE(bk)
J9
SERVO
/B
/C
/A
ENC_GND
ENC_CHK
B
1
2
3
4
5
6
7
8
9
10
PGND
1
2
3
4
5
6
+15VP
PGND
DRIVER
1
+15VP
J4
Safety
Emergency
VCC
C
A
VCC
VCC
1
2
3
J3
D1J8
YE(bk)
GR(gr)
BR(re)
WH(wh)
J8
Safety
Emergency
VCC
VCC
BLS
TLS
VCC
1
2
3
4
1
2
3
VCC
DGND
VCC
DGND
+15VP
PGND
+15VP
D1J4
BR(re)
WH(wh)
YE(bk)
D1J3
BR(re)
WH(wh)
YE(bk)
D1J2
J2
+5V
DGND
+5V
DGND
1
2
3
4
D1J10
PGND
D2J2
J2
VCC
DGND
VCC
DGND
R1 x 2
35 Ohm / 300W
U
V
W
D1J9
+15VP
PGND
Shield
J3
Safety
Emergency
VCC
J7
1
2
3
4
1
2
3
5
4
3
2
1
CF1
PGND
1
2
3
4
5
6
+15VP
PGND
Shield
D3J2
J2
D2J10
PGND
SERVO
+15VP
D3J4
J4
C
A
VCC
VCC
J10
PGND
1
2
3
4
5
6
SERVO
T11
3mm
C
Ring-Term
1
2
R20
R-0
100T
110T
220R0
220T0
220R
220T
R20
R21
T20
R11
3mm
4mm
J12
VCC
DGND
Start_ON2
Start_ON1
Power_ON2
Power_ON1
6
5
4
3
2
1
+5V
DGND
+5V
DGND
1
2
3
4
B
JUMPER ON
T20
R20
AC2
J6
J5
AC1
4mm
D3J5
1
2
T20
R20
AC2
J7
J6
1
2
AC1
T20
R20
1
2
3
4
5
1
2
J5
1
2
3
4
5
J6
BR(re)
WH(wh)
YE(bk)
J1
1
2
3
4
5
1
2
3
1
2
3
4
5
J15
J1
1
2
3
4
5
SAFETY
Emergency
VCC
J1
1
2
3
4
5
SRIP
CON
4mm
D2J6
Y-Term
D2J5
D1J7
Y-Term
D1J6
CAN-GND
CAN-L
CAN-H
4mm Y-Term
CAN-GND
CAN-L
CAN-H
(WH)
(BR)
CH1
1
2
3
4
5
6
7
8
9
10
MOTION
BOARD
3 CAN-L (WH)
5 CAN-GND
CF7
DE3
4 CAN-H
GR(gr)
GY(gy)
BL(bl)
BR(re)
YE(bk)
PI(ye)
(BR)
CAN
WH(wh)
RE(or)
CH2
A
1
2
3
4
5
6
7
8
9
10
3 CAN-L
(WH)
Shield
1
2
3
4
5
6
7
8
9
10
GND
VCC
DL3
4 CAN-H
(BR)
YE(bk)
GR(gr)
BR(re)
WH(wh)
1
2
3
4
5
A
B
C
D
DE2
Purple
Yellow
Brown
Green
White
Blue
1
2
3
4
5
6
7
8
9
10
MOTOR
3
GR(gr)
GY(gy)
BL(bl)
BR(re)
YE(bk)
PI(ye)
Black
Red
WH(wh)
RE(or)
Shield
Shield
ML3
VCC
BLS
TLS
VCC
DP3
1YellowT
2RedT
3BlueT
Green
CF4
ME3
/B
/C
/A
B
C
A
ME2
/B
/C
/A
B
C
A
GND
VCC
DL2
YE(bk)
GR(gr)
BR(re)
WH(wh)
1
2
3
4
5
CF8
YE(bk)
GR(gr)
BR(re)
WH(wh)
MP3
V
W
U
E
1
2
3
4
5
6
7
8
9
10
1
2
3
4
5
1YellowT
2RedT
3BlueT
Green
A
B
C
D
Purple
Yellow
Brown
Green
White
Blue
CF2
DE1
BL(bl)
GR(gr)
BR(re)
PU(pu)
WH(wh)
YE(bk)
MOTOR
2
Black
Red
Shield
RE(or)
BK(br)
Shield
A
B
D
E
F
G
H
J
N
MOTOR
1
WIRE COLOR
WHITE
BROWN
GREEN
YELLOW
GRAY
PINK
BLUE
RED
BLACK
PURPLE
ORANGE
ML2
VCC
BLS
TLS
VCC
DP2
White
Red
Black
Green
A
B
C
D
1
2
3
4
5
6
7
8
9
10
1
2
3
4
5
YE(bk)
GR(gr)
BR(re)
WH(wh)
CF5
YE(bk)
GR(gr)
BR(re)
WH(wh)
WH
BR
GR
YE
GY
PI
BL
RE
BK
PU
OR
A
MP2
V
W
U
E
A
B
C
D
White
Red
Black
Green
2RedT
1YellowT
3BlueT
Green
DP1
DESIGN
CHECK
D
E
F
H
KANG
CHOI
APPROVAL
KIM
MODEL
PRODUCT
CYCRAFT
Title
CYCRAFT MCU CIRCUIT DIAGRAM
MOTOR
MOTOR
CONNECTOR PANEL
CONNECTOR PANEL
Size
A3
Date:
5
4
3
2
Document Number
ECY-D-SE002
Rev
4
Tuesday, May 13, 2003
Sheet
1
3
of
3
KORTEK 2938DF
Game Monitor
Service Manual
Warning!
Only qualified service personnel should carry out maintenance
on the product.
(KTA 0402 - 02 – 01)
PRODUCT SPEC
CONTENTS 1. SCOPE -------------------------------------------- 3
2. RELATED DOCUMENTS --------------------------------- 3 3. EXTERNAL REFERENCE SPEC. -------------------------- 3 4. REGULATORY INFORMATION ---------------------------- 4 5. GENERAL CHARACTERISTICS --------------------------5 6. MECHANICAL CHARACTERISTICS -----------------------9 7. ELECTRICAL CHARACTERISTICS ------------------------ 10 8. ADJUSTMENTS --------------------------------------- 15 9. DISPLAY REQUIREMENTS ------------------------------ 18
10. OPERATION OF CIRCUIT ------------------------------ 25
11. PCB INFORMATION ----------------------------------- 28
12. RELIABILITY TEST SPEC. ---------------------------- 30
13. PICTURES ------------------------------------------ 31
KORTEK CORP. (All Rights Reserved)
DOCUMENT NO : 2938DF(BASIC)
KTA-0402-02-01
REV. NO : 0
KORTEK CORPORATION
Page
2 Of 25
PRODUCT SPEC
1.SCOPE The monitor described in the followings is based on a 29" diagonal tri-color shadow mask CRT
utilizing an in-line electron gun assembly. This display device is composed of the CRT with deflection yoke,the small PCB containing
the CRT socket and the large PCB containing the deflections,the micom circuits,the power supply
and the video amplifier circuit.
This specification defines a high resolution 29" color monitor to be operated in
analog drive mode input.
2.RELATED DOCUMENTS 2.1 Parts list.
2.2 Service manual
2.3 Product outgoing inspection specification.
2.4 Schematic & waveform of circuit.
3.EXTERNAL REFERENCE SPEC. 4.REGULATORY INFORMATION 4.1 SAFETY APPROVAL. The system will be certified according to the following international
safety standards. * UL : UL1950
* CSA : CSA C22.2 NO1
* CE(LVD) : EN60950
4.2. ELECTROMAGNETIC INTERFERENCE.
The system will be certified according to the following international
radiation standards.
* CE(EMC) : EN55022:97
* FCC : PART 15 CLASS A VERIFICATION
4.3 X-RADIATION. The X-radiation emitted from this picture tube will not exceed 0.5mR/h for anode current combination. X-radiation at a constant anode voltage varies linearly with anode current. 4.3.1 The system will comply with the following international standards. * DHHS 21 CFR SUB CH J KORTEK CORP. (All Rights Reserved)
DOCUMENT NO : 2938DF(BASIC)
KTA-0402-02-01
REV. NO : 0
KORTEK CORPORATION
Page
3 Of 25
PRODUCT SPEC
5.GENERAL CHARACTERISTICS 5.1 OPERATION OF CONTROL PART.
5.1.1 CONTROL BOARD MENU(SELLECT)
: In the beginning, starts the OSD controls.
In a sub menu, moves the control to the higher level.
EXIT(DEGAUSSING) : In the main menu, exits the OSD controls.
UP
: In the beginning, proceeds to the contrast adjustment.
In the main menu, moves the control menu to the right.
In a sub menu, increase the adjustment.
DOWN
: In the main menu, moves the control menu to the left.
In a sub menu, decrease the adjustment.
UP
DOWN
MENU (SELLECT)
EXIT (DEGAUSSING)
LED
5.1.2 OSD MANUAL
1.BRIGHTNESS
2.CONTARST
3.H-POSITION
4.H-SIZE
5.V-POSITION
6.V-SIZE
7.SIDE-PINCUSHIN
8.PIN-BALANCE
9.TRAPEZOIDE
10.PARALOGRAM
11.ROTATION
12.TOP-CORNER
13.BOTTOM-CORN
ER
14.H-MOIRE
15.V-MOIRE
16.LANGUAIGE
17.COLOR-TEMP
18.DEGAUSSING
19.RECALL
20.ZOOM
◑
BRIGHTNESS
31.4KHz
60Hz
KORTEK CORP. (All Rights Reserved)
DOCUMENT NO : 2938DF(BASIC)
KTA-0402-02-01
REV. NO : 0
KORTEK CORPORATION
Page
4 Of 25
PRODUCT SPEC
5.3.1. CRT DIMENSION.(SAMSUNG): KT-2938DF
KORTEK CORP. (All Rights Reserved)
DOCUMENT NO : 2938DF(BASIC)
KTA-0402-02-01
REV. NO : 0
KORTEK CORPORATION
Page
5 Of 25
PRODUCT SPEC
5.3.2. CRT DIMENSION.(SAMSUNG) : KT-2938F
KORTEK CORP. (All Rights Reserved)
DOCUMENT NO : 2938DF(BASIC)
KTA-0402-02-01
REV. NO : 0
Page
KORTEK CORPORATION
6 Of 25
PRODUCT SPEC
5.4 SIGNAL CABLE & CONNECTION. 5.4.1 Signal cable A shield signal interface cable must be intended as a part of the monitor. The cable length shall be 1500 mm with a tolerance of ±50mm . This cable shall be of a suitable type in order to comply with any specification item , and shall be terminated in a 15 pin D-shell male connector type FOXCONN D973292-8 or equivalent,with pin assignment as follows. 5.4.2 SIGNAL CABLE PIN CONNECTION (15 PIN D-SUB MINIATURE SIGNAL CONNECTOR WITH
CABLE)
CONNECTION
D-SUB 15PIN
IBM PC
WIRE COLOR
6P CONN 6P CONN
1
RED
RED COAX-IN
6P CONN-1
2
GREEN
GREEN COAX-IN
6P CONN-3
3
BLUE
BLUE COAX-IN
6P CONN-5
4
N.C
-
-
5
GND
BLACK COAX-GND
6
RED-GND
RED COAX-GND
6P CONN-2
7
GREEN-GND
GREEN COAX-GND
6P CONN-4
8
BLUE-GND
BLUE COAX-GND
6P CONN-6
9
N.C
-
-
10
ID
GRAY
6P CONN-3
11
N.C
-
-
12
SDA
YELLOW
6P CONN-5
13
H-SYNC
ORANGE
6P CONN-1
14
V-SYNC
WHITE
6P CONN-2
15
SCL
RED
6P CONN-4
SHELL
GND
BLACK
6P CONN-6
5.4.3 BUYER CONNECTOR PIN CONNECTION ( OPTION )
KORTEK CORP. (All Rights Reserved)
DOCUMENT NO : 2938DF(BASIC)
KTA-0402-02-01
REV. NO : 0
KORTEK CORPORATION
Page 7 Of 25
REMARK
PRODUCT SPEC
6.MECHANICAL CHARACTERISTICS. 6.1 PRODUCT DIMENSION.(unit : mm) Description
With Frame
Packaging
Width
650
627
Height
540
575
Length
6.2 WEIGHT :
565
NET
595
36 kg
GROSS
44 kg
6.3 MECHANICAL MATERIALS. 6.3.1 INTERNAL METAL PARTS. * PCB GUIDE CHASSIS DIMENSION
REV. NO
DATE
ECO NO
DESCRIPTION OF CHANGE
DRAWN
APPROVAL
248
75
75
50
1
6 1111 20
%%c4
248
75
12
9
5
3
164
%%c2.5
4
1
7
2
7
4
8
1
4
1
1
7
1
1
8
4
%%c2.5 5
4
9
6
7
12
3
%%c4
2
2
4
7
7
9
4
1
%%c3
3
4
5
36
24 4124
87
4124
34
61
4 22
4
124
4 22 4
30
248
0
248
12
65
2
95
0
8
9
12
9
0
248
64
1
9
%%c4
20 22.5
6
9
0
9
9
APPROVALS DATE
KORTEK CORPORATION
UNLESS OTHERWISE
DRAWN
2
PRESS:APPLY TO KSB-0413( )
9
MOLD:APPLY TO ( ) RESIN
BY DIN 16901
TITLE
REVIEWED
APPROVAL
REV.NO
REF
9
2
CUSHION:APPLY TO KSA-1513
9
9
6
248
0
151
9
3
HOLE 7x3
48.5
OTHER
THILRD ANGLE PROJECTION
DWG.NO
SHEET
MATERIAL SCALE
UNIT
SHEET
0
Q'TY
(주) 코
텍
.
KORTEK CORP. (All Rights Reserved)
Page
8
Of 25
8
KORTEK CORPORATION
8
3
8
.
KTA-0402-02-01
REV. NO : 0
8
2
DOCUMENT NO : 2938DF(BASIC)
PRODUCT SPEC
6.3.1 FRAME METAL PARTS.(BUYER OPTION) FRONT ( STANDARD FRAME )
* MAIN FRAME CHASSIS ( KORTEK STANDARD )
KORTEK CORP. (All Rights Reserved)
DOCUMENT NO : 2938DF(BASIC)
KTA-0402-02-01
REV. NO : 0
KORTEK CORPORATION
Page
9
Of 25
PRODUCT SPEC
7.ELECTRICAL CHARACTERSISTICS.
7.1 BLOCK DIAGRAM
AC
INLET
SOCKET
SWITCHING
IC ( 6S1265 )
5V
6.3V
12V
14V
-14V
80V
220V
SWITCHING
MODE
LINE
FILTER
BRIDGE
DIODE
POWER
SUPPLY
FEEDBACK
CONTROL
DEGAUSSING
SIGNAL
INPUT
VIDEO AMP
( KA2506 )
OSD
PROCESSOR
( WT6802 )
I²C
VIDEO
OUTPUT
(LM2405 )
CRT
CUT-OFF
CONTROL
I²C
I²C
DPMS OUTPUT
- SUSP END
- OFF
MICRO
LED
CONTROL
H/V SYNC
INPUT
ADJUS
T KEY
TLIT
TLIT
CONTROL
TILT COIL
CONTROLL
I²C
VERTICAL
OUTPUT
( KA2142 )
SYNC
PROCESSOR
( TDA9113 )
ER
- HIGH
V OLTAGE
- H.FOCUS
- V.FOCUS
- SCREE N
HORIZO NTAL
UNIT
DRIV E
CIRCUIT
( WT62P1 )
I²C
DDC 2BI
- H/V SIZE
- H/V POSI
- S-PIN
- TRAP
- PARA
- PIN BAL
- ACL
- TILT
- DEG
DEFLECTION YOKE
S-CORRECTI
ON CIRCUIT
(S1~S4)
HIGH V OLTAGE
P RO TECTIO N CIRCUIT
FLYBACK
OUTPUT
STAGE
DEFLECTION
TRANS
B RIGHT
CONTROL
HIGH V OLTAGE
DRIV E CIRCUIT
HIGH
VOLTAGE
OUTPUT
STAGE
HIGH
VOLTAGE
REGULATION
KORTEK CORP.. (All Rights Reserved)
DOCUMENT NO : 2938DF(BASIC)
KTA-0402-02-01
DYNAMIC
FOCUS
CIRCUIT
REV. NO : 0
Page : 10 Of 25
KORTEK CORPORATION
PRODUCT SPEC
7.2 INPUT POWER. The display device shall maintain the specified performances in the range described below. DESCRIPTION
NOMINAL
REMARKS
NO
1
Power
Source
AC
100V
~
240V
Universal
Power
2
Frequency
50 ~ 60Hz
3
Power Consumption
MAX. 140W
7.3 SIGNAL & SYNS.TIMING The input signals shall be applied to the display device through the signal cable which must be intended as part of the monitor. SECTION
DESCRIPTION
NOMINAL
REMARKS
VIDEO SIGNAL
RED
GREEN
BLUE
VIDEO INPUT
0.0 to 0.714Vp-p ANALOG
POLARITY
POSITIVE
PIXEL RATE
MAX. 40MHz
MAX.
RESOLUTION
INPUT
IMPEDANCE
TYPE
SYNC SIGNAL
800 × 600 / 60Hz
75 ohms
SEPARATE H/V
COMPOSITE H/V
POLARITY
POSITIVE OR NEGATIVE
FREQUENCY
HOR.: 30 ~ 40KHz
VER.: 50 ~ 160 Hz
LEVEL
SEPARATE SYNC
: HIGH ≥2.0V, LOW ≤0.8V
KORTEK CORP. (All Rights Reserved)
DOCUMENT NO : 2938DF(BASIC)
KTA-0402-02-01
REV. NO : 0
KORTEK CORPORATION
Page
11 Of 25
PRODUCT SPEC
7.4 TIMING CHART ( FACTORY MODE ) HORIZONTAL
VERTICAL
VIDEO
C
D
E
Q
R
S
SYNC
B
P
A
O
I.B.M
DESCRPTION
H
720*400
640*480
640*480
800*600
f KHz
31.469
31.469
37.860
37.88
A
uS
31.778
31.778
26.413
26.40
B
uS
3.813
3.813
1.270
3.20
C
uS
1.907
1.907
4.603
2.20
D
uS
25.422
25.422
20.317
20.00
E
uS
0.636
0.636
0.762
1.00
NEG
NEG
POS
POS
POL.
V
VESA
f
Hz
70.087
59.940
72.809
60.317
O
mS
14.268
16.683
13.735
16.58
P
mS
0.064
0.064
0.079
0.11
Q
mS
1.080
1.048
0.740
0.61
R mS
12.711
15.253
12.678
15.84
0.413
0.318
0.238
0.03
POS
NEG
POS
POS
S
mS
POL.
KORTEK CORP. (All Rights Reserved)
DOCUMENT NO : 2938DF(BASIC)
KTA-0402-02-01
REV. NO : 0
KORTEK CORPORATION
Page
12 Of 25
PRODUCT SPEC
8.ADJUSTMENTS 8.1 DEFLECTION CIRCUIT ADJUSTMENT 8.1.1 Screen position adjustment. (H-SHIFT,V-SHIFT)
* Receive a cross-hatch pattern signal of all factory preset mode.
* Adjust H-SHIFT,V-SHIFT for the screen position to center.
※ NOTE : All of the user control functions are adjustable when the OSD
appears on the screen. 8.1.2 Horizontal size adjustment. (H-SIZE)
* Adjust contrast and brightness controls to maximum.
* Receive a cross-hatch pattern signal of all modes. * Adjust H-SIZE for the horizontal size equal to 400±3.0 mm.
8.1.3 Vertical size adjustment. (V-SIZE)
* Adjust contrast and brightness controls to maximum .
* Receive a cross-hatch pattern signal of all modes. * Adjust V-SIZE for the vertical size equal to 295 ±3.0 mm.
8.1.4 Pincushion adjustment. (Pincushion)
* Receive a cross-hatch pattern signal of all modes. * Adjust Pincushion for compensation of the east/west distortion.
8.1.5 Trapezoidal adjustment
* Receive a cross-hatch pattern signal of all modes. * Adjust TRAPEZOIDAL for compensation of the geometric distortion..
8.1.6 Parallelogram adjustment
* Receive a cross-hatch pattern signal of all modes. * Adjust PARALLELOGRAM for compensation of the geometric distortion.
8.1.7 Pin Balance adjustment
*Receive a cross-hatch pattern signal of all modes.
*Adjust PIN BALANCE for compensation of the geometric distortion.
KORTEK CORP. (All Rights Reserved)
DOCUMENT NO : 1982(BASIC)
KTA-0402-02-01
REV. NO : 0
KORTEK CORPORATION
Page
13 Of 25
PRODUCT SPEC
8.2 VIDEO CIRCUIT ADJUSTMENT.
8.2.1 Control function.
* Contrast control
This function controls the contrast of the screen, and determines the gain of the video
amplifier.
* R,G,B-GAIN controls.
These controls are used for adjusting the gain of RED,GREEN,BLUE video signals.
* R,G,B-BIAS controls.
These controls are used for adjusting the RED,GREEN,BLUE bias-voltage of Cathode.
* Focus control. (On the FBT)
This controls determines the optimum focus of the screen.
8.3 THE ADJUSTMENT OF WHITE BALANCE.
* Adjust the screen V/R control slowly so that voltage of G2 is equal to 500 ~ 600 volt.
* Operate the monitor for 15 minutes in order to warm up the CRT and circuits.
* Degauss the CRT face fully with degaussing tool.
* Adjust brightness and contrast to the 80% value.
* Receive a raster pattern of 800*600 38KHz,60Hz mode.
* Adjust R,G,B-BIAS controls so that the raster becomes white and luminance is
0.5(F/L) and for the specified color coordinate.
* Receive a one ball white pattern of 800*600 38KHz,60Hz mode.
* Adjust R,G,B-GAIN controls for the specified white color with the color analyzer.
* Receive a full white screen of 800*600 38KHz,60Hz mode.
* Adjust ACL controls for the specified luminance with the color analyzer.
KORTEK CORP. (All Rights Reserved)
DOCUMENT NO : 2938DF(BASIC)
KTA-0402-02-01
REV. NO : 0
KORTEK CORPORATION
Page
14 Of 25
PRODUCT SPEC
◆ SPECIFICATIONS.
※ Standard color coordinate.(BRT,CONT; 80%)
* 6500 °K ; X=0.313 ± 0.02
Y=0.329 ± 0.02
* 9300 。K ; X=0.281 ± 0.02
Y=0.311 ± 0.02
※ Maximum brightness : BRT,CONT ;MAX
・With full white pattern ; 25 ~ 30 F/L (9300&6500。K) ☞ BUYER OPTION
・With one ball white pattern ; 45 ~ 50 F/L (9300&6500。K) ☞ BUYER OPTION
・Checking area : Center of display.
9.DISPLAY REQUIREMENTS 9.1 Engineering check and test equipment 9.1.1 Engineering check This specification defines a high resolution 29" color monitor to be operated in analog drive mode.
This procedure defines test & inspection requirements, and acceptance criteria for visual and functional characteristics. 9.1.2 Test equipment. 1.Personal computer or signal generator, test program(software) for color monitor.
2.Color-Analyzer (CA-100).
3.Display template for screen adjustment.
9.2 Engineering check point. 9.2.1 Packaging.
Check the packaging to make sure the unit is in a shippable condition. The following items shall be verified.
* BOX.
* LABEL
9.2.2 Enclosure The monitor,intended as a finished product,shall comply with any ergonomic and safety specification contained in box.
KORTEK CORP. (All Rights Reserved)
DOCUMENT NO : 2938DF(BASIC)
KTA-0402-02-01
REV. NO : 0
KORTEK CORPORATION
Page
15 Of 25
PRODUCT SPEC
NO
ITEM
1
VISUAL
1-1
SPECIFICATION
REQUIREMENT
Pattern
Standard direction : N/E (all items)
510㎜
DISPLAY
SIZE
(Standard)
A.Display the cross hatch pattern.
Cross-
B.The size must be adjustable to
hatch
the followings by using user's
390㎜
(640/60Hz)
control for all specified mode.
* Horizontal size : 510±3 ㎜.
* Vertical size : 390 ±3㎜ .
1-2
LINEARITY
Linearity
16 ×12 square
A.The linearity of screen must be
Lmax-Lmin
× 100%
Lmax+Lmin
displayed on the CRT within the
pattern
spec.(Horizontal and vertical)
(640/60Hz)
* Ver : ≤ 5%
Hor : ≤ 5%
1-3
TILT
A.The tilt must be within the
Cross-
limit of the spec.
hatch pattern
A
(640/60Hz)
* A = ± 2mm MAX.
1-4
DISTORTION
1)PINCUSHION
C
* Maximum allowable error;
A
B
D
"
A,B : Lessthan 3.0 mm
C,D
: Lessthan 3.0 mm
2)BARREL
* Maximum allowable error;
C
A
B
a
A
"
C,D : Lessthan 2.0 mm
D
3)TRAPEZOID
A,B : Lessthan 2.0 mm
* ┃ A-B ┃ ≤2.0 mm
b
"
* ┃ C-D ┃ ≤3.0 mm
* a,b,c,d ≤ 3.0 mm
B
c
D
C
d
KORTEK CORPORATION. (All Rights Reserved)
DOCUMENT NO : 2938DF(BASIC)
KTA-0402-02-01
REV. NO : 0
KORTEK CORPORATION
Page
16 Of 25
PRODUCT SPEC
NO
ITEM
1-4
4)PARALLELOGR
AM
SPECIFICATION
REQUIREMENT
Pattern
Cross-
* A,B ≤ 3.0 mm
hatch
(640/60Hz)
B
A
5)"S"
CURVE
A
* A ≤ 3.0 mm
"
1-5
* ┃ A-B ┃ ≤6 mm
DISPLAY-CENTE
R
C
* ┃ C-D ┃ ≤4 mm
A
B
"
* The maximum variation of the
display center have to be
within the spec.
D
1-6
FOCUS
* Visual test
* Cut off the back raster. (0.07F/L)
* Adjust contrast maximum or 45F/L
at one ball white pattern.
* Change pattern to "windows-me
pattern".
* Check the focus of the dots,bars,
and characters.
* Visual test
1-7
JITTERING
1-8
MIS
* A zone(Φ390mm
CONVER-GENCE circle):0.25mm MAX
* B zone
:0.35 mm max.
* Measure the distance between red,
green and blue lines with a microscope after the proper adjustment
of white balance.
1-9
ACOUSTIC
NOISE
* Not any audible
sound
* During the display operating, it
has not to be any audible sound.
1-10
WHITE
BALANCE
* 6500。K
X=0.313 ± 0.02
Y=0.329 ± 0.02
* 9300。K
X=0.281 ± 0.02
Y=0.311 ± 0.02
* 6500。K
X = 0.313±0.02
Y = 0.329±0.02
* 9300。K
X = 0.281±0.02
Y = 0.311±0.02
* 10 F/L and MAX
* The white color coordinates in the
center of the surface of CRT after
proper adjustment of white balance
1-11
WHITE
COLOR
TRACKING
Windows-me
pattern
(640/60Hz)
* There shall be no jitter when the
screen is viewed from 45 Cm
Cross-hatch
"
Full white pattern
(0.7V Level)
* Cont; 80% (DEFULT VALUE)
"
* Set contrast control at 10 and MAX
* Measure it in the center of CRT.
* No one color shall achieve dominance,when the standard white color
is displayed at all the allowed
settings of the contrast control.
1-12
PURITY
* Visual test
* After degaussing,it has not to be
any perceptible color shift in the
scanning area while viewing a
primary color field at 30 cm's
distance.
R,G,B
Primary
color
pattern
1-13
RASTER
REGULATION
* Less than 2.0 mm
at one side
* Measure it from minimum to maximum
luminance at full white screen.
Full white
pattern
(640/60Hz)
KORTEK CORP. (All Rights Reserved)
DOCUMENT NO : 2938DF(BASIC)
KTA-0402-02-01
REV. NO : 0
KORTEK CORPORATION
Page
17 Of 25
PRODUCT SPEC
NO
ITEM
1-14
BRIGHTNESS
UNIFORMITY
1-15
WHITE
UNIFORMITY
SPECIFICATION
REQUIREMENT
* More than 75%
* Measure it at center contrast
to 25 F/L,BRT : cut-off
L0
L3
Full white
pattern
* BRT ; max
CONT ; max.
* COLOR MODE ; 9300。 K
* The X or Y coordinate between any
position in the entire display
area shall not vary more than 0.015
* X of L1,L2,L3,L4 ≤ X of L0± 0.015
Y of L1,L2,L3,L4 ≤ Y of L0 ±0.015
L2
L1
Pattern
L4
"
1-16
MOIRE
* Visual test
* No any visible moire at 20F/L, "A"Zone
( ψ350mm circle)
* Full white pattern (800 ×600/60Hz)
Full white
pattern
1-17
MODE
CHANGE
* Visual test
* Upon changing modes,the display
image must be stable and meet all
image performance specifications
within 1.0 second.
* Mute time must be longer than the
input signal recognition time.
all modes
1-18
LUMINANCE
* FULL WHITE PATTERN
: 25 ~ 27 F/L
* ONE BALL WHITE
; 45 ~ 50 F/L
* MINIMUM LUMINANCE
: LESS THAN 3F/L
Full white
pattern
(800X600 / 60Hz)
* CONTRAST : MAX
* 9300 。K,6500 。K
* MINIMUM LUMINANCE : CONTRAST :
MIN.
BRIGHTNESS : MIN.
1-19
GRAY SCALE
LINEARITY
* VISUAL TEST
*CONTRAST : MAX.
;The 16 step gray bars shall be
distinguishable.
*CONTRAST : MAX.
;More than 15 step gray bars
are distinguishable.
16 gray pattern
(800X600 / 60Hz)
1-20
RASTER
LUMINANCE
* 0.5 F/L
(BUYER OPTION)
* CONTRAST ; MAX.
* 6500 °K; X=0.313 ±
Y=0.329 ±
* 9300 °K; X=0.281 ±
Y=0.311 ±
800X600 / 60Hz
1-21
DYNAMIC
REGULATION
* LESS THAN 1.0mm
ONE SIDE
*CONTRAST:MAX.
*USE HORIZONTAL BAR PATTERN
1-22
SIZE
CONTROL
RANGE
* HORIZONTAL : LESS THAN 450mm,MORE THAN OVER SCAN
* VERTICAL : LESS THAN 350mm,MORE THAN OVER SCAN
1-23
TOTAL
DISTORTION
A
B
A,B ≤3.0 mm
0.02
0.02
0.02
0.02
800X600 / 60Hz
CROSS-HATCH
800X600 / 60Hz
* In case of factory preset mode,the
image performance meets
specification without user
adjustments.
* In case of user mode,the image
performance meets the
specifications with user
adjustments.
CROSSHATCH
(800X600 / 60Hz)
1-24
BENT ON
TOP
LESS THAN 0.5mm
CROSS-HATCH
(800X600 / 60Hz)
1-25
SPOT
VISUAL TEST
*No any visible spot at power-off
*No any visible spot at mode change
1-26
RINGING
VISUAL TEST
*Ringing, vertical black bar shall
not be visible to the eye when
viewed at 50cm from CRT surface
and video is positioned center.
FULL
WHITE
(800X600 / 60Hz)
1-27
OSD
VISUAL TEST
Color&Position
*No discolor
*In case of factory preset mode, OSD
display
is located at just center position.
All modes
1-28
OSD NOISE&
distorion
*No visible OSD distortion &Noise
All modes
VISUAL TEST
"
KORTEK CORP. (All Rights Reserved)
DOCUMENT NO : 2938DF(BASIC)
KTA-0402-02-01
REV. NO : 0
KORTEK CORPORATION
Page
18 Of 25
PRODUCT SPEC
9.2.4 CRT SPECIFICATIONS
1) Screen and faceplate blemishes
Set up the tube as described in section2 and adjust each gun to provide approx.
8 feet lamberts of 9300 °
K+MPCD.or 6550°
K+MPCD. light at the center of the
screen.The screen should be viewed with blanked raster at a distance of 2 feet.
Defects not visible at this viewing distance are considered acceptable.
Ambient light level at the tube face should be approx. 0.1 foot candle
① Quality zones:The screen quality area is divided into two quality zones.
Zone A ………… The central rectangle of the screen horizontal 270mm
by vertical 213mm on the screen.
Zone B ………… Out side of zone A on the screen.
2) Degree of contrast
The degree of contrast of blemishes is determined by using a set of neutral
A
0.4
B
0.1
C
0.2
Clear
Clear slide mount
density filter mounted as described below.
spot conrast comparater
A(0.4) filter:Kodak wratten gelatin filter N0.96 N,D.0.4
B(0.1) filter:Kodak wratten gelatin filter N0.96 N,D.0.1
C(0.2) filter:Kodak wratten gelatin filter N0.96 N,D.0.2
The filter is held at arm's length(2 feet min.)against the tube which is
moved laterally so that the spot in question may be viewed in sucessively
denser filters.
The degree of contrast is determined as indicated below:
*High contrast spot :Spots which are visible through an 0.1 filter are
immediately visible upon entering an adjacent 0.4
filter.
*Medium contrast spot:Spots which are visible through an 0.1 filter but
disappear momentarily upon entering an adjacent 0.4
filter.
*Low contrast spot
:Spots which are visible through an 0.1 filter but
disappear momentarily upon entering an adjacent 0.2
filter.
KORTEK CORP. (All Rights Reserved)
DOCUMENT NO : 2938DF(BASIC)
KTA-0402-02-01
REV. NO : 0
KORTEK CORPORATION
Page 19 Of 25
PRODUCT SPEC
3) Blemish size
① Blemish size:
The size of a round blemish is equal to its diameter.
The size of an irregularly shaped blemish is equal to its equivalent diameter
defined as the average of the major and minor axes.
A blemish shall be defined as a visible spot or flaw occuring on the screen
or glass.
② Defect classification
Medium and high contrast screen and faceplate blemishes are measured and
defined as being in one of the following size classes.
Size class
Equivalent diameter of blemish
1
over
0.96mm
2
0.76 through 0.95mm
3
0.46 through 0.75mm
4
0.26 through 0.45mm
5
0.25 or less
③ Limit acceptability
The following limits of acceptability are applied for unlighted green
phosphor dots or trios and high contrast blemishes on the screen and
in the glass when viewed with a white raster.
Blemish size
(mm)
over
0.81
0.51
0.28
0.27
Zone A
1
2
3
6
lgnore
1.21
- 1.20
- 0.80
- 0.50
or less
Zone B
2
4
6
8
lgnore
Minimum
seperation
lgnore
4) Elongated blisters
Within the limits elongated blisters shall be defined in the table and not
subject to the equivalent diameter test of a.
5) Scratches
The following rejection criteria apply for scratches on the faceplate.
*Allowable maximum scratche size
Width(mm)
0.05 or less
0.0. - 0.12
0.13 - 0.20
over
0.20
Length of single scratch(mm)
Ignore
50
30
None allowed
KORTEK CORP. (All Rights Reserved)
DOCUMENT NO : 2938DF(BASIC)
KTA-0402-02-01
REV. NO : 0
KORTEK CORPORATION
Page
20 Of
25
PRODUCT SPEC
10.OPERATION OF CIRCUIT 10.1 POWER CIRCUIT.
The switching mode power supply is adopted for universal power supply. The chassis (secondary side) is isolated from the power source (primary side) by the transformer T101.
By the winding of the transformer T101 connected to the drain of IC106 and the other winding connected to the control circuit, the IC106 is submitted to feed back by sync trans T102.
When the voltage of power source or load current is varied, it is detected by T102
and the voltage is applied to PIN 3 of IC106. When the voltage applied to PIN 3 is varied,the conducting time of IC106 is varied
to compensate output voltage for the change, which makes output voltage of T101 stabilized. 10.2 DPMS CIRCUIT 10.2.1 SUSPEND MODE If the H or V sync input is inactive, the output of IC501 pin14 becomes high, and the
output voltage of IC103 will be down.
Therefore the deflection circuit and the video amp circuit can not operate.
At this suspend mode, the LED on the front of this unit indicates Blinking.
The power consumption at suspend mode is less than 15W.
10.3 Interface circuit
This is composed of IC501. IC101 circuit detects frequency and polarity and controls the displayed image.
IC101 performs functions as follows.
※ DPMS function
※ VIDEO MODE selection
※ G/D correction control
※ OSD control
※ IMAGE SIZE,POSITION CONTROL
※ IMAGE DATA MEMORY.
KORTEK CORP. (All Rights Reserved)
DOCUMENT NO : 2938DF(BASIC)
KTA-0402-02-01
REV. NO : 0
KORTEK CORPORATION
Page
21 Of 25
PRODUCT SPEC
10.4 VIDEO DRIVE CIRCUIT. The R, G and B input signals with analog level are applied to the pre-amplifier KA2506.
This section amplifies the output signal of a generator enough to drive a video
output circuit and video of OSD buffering.
Video gain is controlled by the DC voltage of PIN 12. Clamping pulse is applied to PIN 18 of IC201.(BACK PORCH CLAMP) 10.5 VIDEO OUTPUT CIRCUIT.
The pre-amplified R, G and B video signals are applied to the amplifier IC803(LM2405)
And then, these video signals are drived to the cathodes of CRT.
The CRT bias for accurate white balance is obtained by R, G and B bias controls circuit.
That circuit composed IC803. 10.6 DEFLECTION CIRCUIT.
This circuit has two ICs. IC301(TDA9113) is a monolithic IC for horizontal and vertical
sync. processing. And IC201 is a monolithic IC for vertical power amplifier.
10.6.1 Vertical Deflection Circuit.
The vertical sync signal is applied to PIN 13,23 of IC301.
The vertical frequency of the oscillator can be varied by the RC constant at PIN 6,8.
Vertical screen size can be controlled by the current at PIN 13 of IC301.
IC201 is the vertical power amplifier that drives vertical DY.
10.6.2 Horizontal Deflection Circuit. The horizontal sync signal is applied to PIN 1 of IC301. The IC301 has the autosync detection function of frequency-locked loop that can
look the H-oscillator over a wide frequency range.
※ Trapezium (by DC voltage applied at pin11)
※ Side-pin (by DC voltage applied at pin11)
※ H-size (by DC voltage applied at pin11)
KORTEK CORP. (All Rights Reserved)
DOCUMENT NO : 2938DF(BASIC)
KTA-0402-02-01
REV. NO : 0
KORTEK CORPORATION
Page
22 Of 25
PRODUCT SPEC
11.PCB INFORMATION 11.1 MAIN PCB
: MJ29 DXXH50
11.2 SOCKET PCB
: SM29 38DSH0
12.RELIABILITY TEST SPEC. 12.1 Environmental Test
The monitor unit must not be degradiated and damaged by operating over the specified
range and will meet specifications when returned to the operating environment. KORTEK will perform these tests on the monitor prior to its release.
The monitor is required to pass these tests before mass production.
These tests are detailed in KORTEK environment specification. 12.2 Temperature test
* Operating : 0℃ To 45℃ * Storage
: -20 ℃ To +60 ℃ 12.3 Humidity test * Operating : 15% To 80% (Non condensing) * Storage : Maximum 90% 12.4 Drop test : Refer to KORTEK's ENVIRONMENTAL TESTS MANUAL. 12.5 Leakage current test : Refer to KORTEK's ENVIRONMENTAL TESTS MANUAL. 12.6 ESD test : Refer to KORTEK's ENVIRONMENTAL TESTS MANUAL.
12.7 Long life test.(MTBF) The monitor shall have 50,000hrs MTBF when operated under any combination of conditions as detailed specification. 12.8. Altitude. * Operating : 0 ~ 10,000 ft * Non operating : 0 ~ 15,000 ft KORTEK CORP. (All Rights Reserved)
DOCUMENT NO : 2938DF(BASIC)
KTA-0402-02-01
REV. NO : 0
KORTEK CORPORATION
Page
23
Of 25
PRODUCT SPEC
13.PICTURES. 13-1. PCB ASS'Y 13-2. PCB & GUIDE CHASSIS ASS'Y
KORTEK CORP. (All Rights Reserved)
DOCUMENT NO : 2938DF(BASIC)
KTA-0402-02-01
REV. NO : 0
KORTEK CORPORATION
Page
24 Of 25
PRODUCT SPEC
13-3. SIDE ( STANDARD FRAME ) 13-4. REAR ( STANDARD FRAME )
KORTEK CORP. (All Rights Reserved)
DOCUMENT NO : 2938DF(BASIC)
KTA-0402-02-01
REV. NO : 0
KORTEK CORPORATION
Page
25 Of 25
C129
220P,2K
12
C121
0.1U,275V
C125
0.1U,M
D116
1N4148
DDC-SCL
SCT-82
D556
1N4148
D553
5.6V
D117
1N4148
D555
1N4148
R517
220
V-FLY
R202
3.3K
D201
V_SYNC-O
4.7K
R203
8.2K
D- 42
2 PWM2
V-S-I 41
3 BRIGHT
H-S-I 40
4 PWM0
PWM3 39
5 RESET
PWM4 38
9 VCC(H)
8 NC
10 V_IN(+)
7 NC
6 V-O
5 GND
4 FG
SDA
C202
1U,50V
SCL
1 1
2 2
R207
220,1/2W
D202
UF4004
+
C207
470U,35V
C208
0.0047,M
10K,F
V-OUT2
R215
27K,F
4.7K
4.7K
4.7K
R509
R510
R511
R529
100
14 SUSPEND
PWM10 29
15 LED
PWM9 28
16 GND
PWM8 27
100
R514
2.2K
IC501
KT2138DF :1,1/2WF
KT2938F :0.68,1/2WF 1 A0
VCC 8
2 A1
NC 7
R213
3 A2
SCL 6
0.68,1/2W,F
4 GND SDA 5
KS24C04
+
C508
33P,50V
100
R353
100K,1W
SDA1 25
R536
56
10mm
C343
0.2U,250V(MPP)
DDC-SDA
5
220V
C515
10U,50V
C345
1000P,500V
H-SIZE
+
C513
0.1U,50V
C517
22P,50V
5 PLL2C
R306
7 HGND
8 RO
10 H-POS
V-OUT 23
KT2138DF :20K,F
KT2938F :8.2K,F
+
+
V-OUT2
11 H/V-FOCUS
V-CAP 22
+
VGND 21
13 H-REF
VGA-CAP 20
16 I-SENSE
R324
100
H-DRIVE
Q305
A733YC
C330
0.0022U,M
R329
18K
C324
10U,50V
T302
HDT-82
1
6
7
R325
47
Q302
2SC5584
UF4004
R321
1.2,3W
R322
10,1/2W
D313
D309
D306
1N4148
C322
+
R319
18K
L302
BD
C332
1000P,500V
C336
0.22U,63V(MP)
R330
1,3W
+
VRB 19
C314
47U,50V
VEHT 18
R310
2.7K
HEHT 17
R311
2.7K
TDA9113
R350
6.8K
R360
1,1W(FUSE)
T301
GTT-82
4
C328
0.0047,1.6K(PP)
6
R327
2.4K
2 VFB
C323
0.047U,M
C334
330P,50V
D304
1N4148
D305
1N4148
R360
KT2138DF :2.2,1W(FUSE)
KT2938F :1,1W(FUSE)
R326
VI 7
4.7,1/4W
GND 5
C333
0.1U,50V
KA3883C
C335
100V,472J(PP)
FUSEABLE
12V
1 COMP VREF 8
4 RT/CT
R331
3.3K
R361
22,1/2W
0.01U,M
R316
6.8K
KT2138DF :0.047,M
KT2938F :0.1,M
IC302
C326
680P,50V
C327
D311
UF4004
1
R312
5.6K
C318
D303
UF1G
D310
1N4148
3 ISENSE OUT 6
L303
BD
3
R318
330K
0.0039,1.6K(PP)
C329
0.027U,M
C344
47U,250V
KT2138DF :11N40
KT2938F :IRF840
L309
BD
R315
R320
75K
+
Q314
IRF840
+
Q301
A733YC
15*10*30
C313
0.47U,63V(MP)
C315
15 REG-IN
120P,50V
Q304
4N20
H-SIZE
V-OUT1
C311
12 H-FLY
14 COMP
L301
150UH
80V
8
R308
8.2K,F
0.15U,M
R309
2.7K
Q303
C945YC
3.3U,50V(BP)
0.47U,63V(MP)
C312
1U,50V
H-FLY
D302
1N4148
D307
12V
X-RAY 25
R359
270
C316
10U,50V
C321
H-OUT
EW-OUT 24
L308
BD
C347
0.01U,500V
12V
KT2138DF :0.0033,M
KT2938F :0.0068,M
C320
0.47U,63V(MP)
C308
9 PLL1F
9
1N4148
R305
4.7K
GND 27
KT2138DF :SCT-82C
KT2938F :SCT-82D
D301
C317
0.0068U,M
R314
15,3W
SCL
H-OUT 26
5.1K,F
C309
100
R304
560,1/4W
+
8
C346
0.047U,M
C319
0.47U,63V(MP)
H-DRIVE1
C303
470U,16V
D316
6
BAV21
H-FLY
12V
SDA
VCC 29
B-OUT 28
T303
SCT-82D
C310
330P,1K
R358
3.3K,F
C348
100P,1K
+
0.01U,M
6 CO
C305
100V,102J(PP)
R303
100
R356
27K,1/4W,F
R355
12K,F
R357
47K,F
C511
0.1U,50V
DTV56F
C304
0.01U,M
2
KT2138DF :20K,1/4W,F
KT2938F :30K,1/4W,F
220U,16V
4 FC1
C504
100P,50V
3
KT2138DF :0.33U,250V(MPP)
KT2938F :0.27U,250V(MPP)
V-FOCUS
R302
SCL 30
H-DY
DDC-SCL
A-B-B 24
C325
C302
0.1U,M
3 H-UNLOCK
CN301
D315
UF4004
10U,50V
R307
1.2K
1
V_SYNC-O
DTV56F
SDA 31
3
H_SYNC-O
100
C301
V-FOCUS 32
2 V-S-I
C306
4.7U,50V
R714
TILT
S3
12MHz
C516
22P,50V
H-LIN-F
H_LIN
+
IC301
1 H-S-I
V_SYNC-I
C307
700P,1.6K
LINEARITY COIL
R352
220,3W
D312
1N4007GP
X501
SCL
SDA
10U,50V
R313
10K
8
4
L304
8.0UH
H-SIZE
WT62P1
C507
33P,50V
C514
+12V
H_SYNC-I
KT2138DF :0.15U,250V(MPP)
KT2938F :0.15U,250V(MPP)
H-LIN-S
+5V
R214
0.68,1/2W,F
E C B
A733
C945
R732
47,3W
S4
18 B-G-SEL
A-B-R 23
E B C
2N3904
C1008
KSP44
2N3906
2N6520
A1273
C722
220P,2K
R733
390,1/4W
H/V-ADJ
56
A-B-G 22
D714
1N4148
CLAMP
R535
21 KEY
R723
22K
R727
10K,1W
R339
1.2K
Q309
C945YC
1.8K,1/4W
SCL1 26
20 X-RAY
ACL_IN
R532
17 UN-LOCK
19 V_MUTE
MUTE
R729
H_SYNC-I
R301
1,1/2W
UN-LOCK
C712
220P,2K
0.1U,50V
C702
4.7K
R527
UN-LOCK
KT2138DF :1,1/2WF
KT2938F :0.68,1/2WF
R216
10K,F
R512
3.9K
V-S-O 33
X-RAY
R212
3.3K,F
4.7K
4.7K
R526
H-S-O 34
KEY
C210
100P,50V
R513
R525
PWM7 35
PWM13 32
R534
R726
100
R724
15K
Q705
KSP44
R731
2.2K
SELF-RASTER
11 SCL2
8mm
R208
C209
1.,1/2W
1U,63V(MP)
R211
3.3K,F
R210
10K
27K,F
10 SDA2
R537
R209
V-OUT1
R522
PWM8 36
PWM11 30
1N4148
D713
10K,1/2W
100
8 OSC0
PWM12 31
C728
100U,16V
R730
22K
R523
56
LED
V-DY
3.9K
7 GND
13 POWER_OFF
R728
10K,1/2W
R349
330,2W
1K
PWM5 37
12 DEGAUSS
SG701
1.5KV
V_SYNC-I
R520
56
SUSPEND
CN201
ACL
+
C724
0.033U,250V
R530
DEGAUSS
C720
220P,2K
R518
1K
R521
R722
330
Q707
A733YC
C342
R528
R206
100
C203
220U,35V
R739
1M,1/2W
T702
DFT-82
6 VDD
9 OSC1
3 NC
1 V_IN(-)
2 VCC
IC201
KA2142
R205
1.2,1/2W
C206
C505
1U,50V
V-BLK
+
0.1U,50V
+
1N4148
1 D+
C506
100P,50V
IC502
R502
+
C205
470U,16V
C339
Q308
19N20
0.022U,M
R204
D721
UF4007
D722
UF4007
12V
12V
C503
1000P,50V
R508
R507
R506
R501
C502
0.1U,50V
V-FLY
R725
C338
0.1U,250V(MPP)
R338
100K
ACL
15*10*30
+
R336
1.2K
R340
1.2K
2.2K
Q201
C945YC
9
FQM19A002
Q306
19N20
H-LIN-F
C100
3.3U,50V,BP
C501
10U,50V
+
R217
15K
10
7
BEAM-PROTECTION
R335
1.2K
Q307
C945YC
S4
S3
R201
22K
C204
0.1U,50V
CN100
TILT
H-FLY
4.7K
CN502
C715
47U,50V
R334
100K
1
2
3
H-LIN-S
+5V
G1
4.7K
LED
KEY
12V
UF4004
+
KT2138DF :0.15U,250V(MPP)
KT2938F :0.15U,250V(MPP)
12V
R333
18K
R337
18K
4.7K
4 4
3 3
2 2
1 1
C714
220U,100V
C718
3.3U,50V,BP
15*10*30
CLAMP
ACL
SCL
SDA
4.7K
4 4
3 3
2 2
1 1
1
2
3
4
5
6
7
8
9
10
11
12
13
CN13
+14V
D712
R740
27K
R721
3.9K,1/4W,F
R133
33,1/2W
C128
TILT_IN
80V
-14V
R703
5.6K
L110
33UH
6.3V 80V
D401
LED
2.4K
L706
BD
V-FOCUS
33,1/2W
4.7K
CN401
R404
330
R406
220V
R134
R504
R405
L705
BD
0.1U,100V(MP)
R720
200K,1/4W,F
+
IC105
AN5452
C126
0.0047U,M
2.2K
1
2
3
4
5
6
7
8
9
10
11
12
13
11
C716
R719
C717
10K,1/4W,F
4.7U,50V
C134
0.1U,M
H-LIN_IN
1K
SW404
+
R127
330
R503
470
SW403
R402
1K
R403
12
D711
8
R708
470
R710
5.1K
1000P,250VAC
12V 5V
R738
56K,1/4W
G2
6
CN120
5V
R401
100
+
R128
270,1/4W
D550
5.6V
D552
5.6V
UF4007
+
+
5
Q703
2N3906
R709
1K
H-DRIVE1
DDC-SDA
SW402
R125
47U,250V
T102
V_SYNC-I
SEF-RASTER
E1 9
KA7500B
12V
C124
H_SYNC-I
SIGNAL-IN
SW401
31GF6
31GF6
D119
UF4007
+
1
2
3
4
5
6
C2 10
8 C1
13
MPP
C719
3.3U,50V,BP
CN503
C707
220U,16V
1
C131
1U,50V
C135
100U,100V
R126
220K,1/2W
D554
1N4148
D121
220K,1/2W
D551
1N4148
7 GND
D709
GUR460
R716
0.33,1W
R737
270K,1/4W
H/V_ADJ
R137
33K,1/2W
D115
SPT-82
C708
R715
6.8,1/4W
L112
BD
11
10
R136
6.8K
3W
C2 11
VF
4
75,1/4W
2 2
1 1
7
5V
+
80V
D120
31GF6
CN103
10mm
1
2
3
4
5
6
D703
1N4148
-14V
VCC 12
6 RT
D710
1000P,500V
D114
UF4004
L109
BD
OUT 13
5 CT
C713
2.2U,450V
1U,50V
R131
4.7,1/4W
33U,50V
C119
470U,35V
13
4 DEAD
V-FLY
BAV21
HF
80V
150K,1/2W
8
R707
7.5K
1N4148
D719
2
1500P,2K
D708
GUR460
1
G1
C726
0.1U,250V(MP)
14
KT2138DF :0.1U,250V(MPP)
KT2938F :0.047U,250V(MPP)
L108
BD
VS/S 5
6S1265R
D702
Q702
2N3904
D707
1N4148
R706
1K
VR701
100K
2
HV
0.047U,250V(MPP)
3 VCC
+C123
C704
0.22U,100V(MP)
C705
0.056U,M
C118
470U,16V
VREF 14
T701
1
C709
Q704
SSS10N60
Q701
2N3904
- 15
3 COMP
R718
C122
0.1U,50V
KT2138DF: 1.8,3W
KT2938F: 0.33,3W
+
D112
UF1G
14
Á
ö
Á
(
10K,3W
6
+ 16
2 -
L703
6.8UH
W
7
,
3
3
C703
47U,50V
1 +
R734
1K
R736
39K
)
ë
´
ö
R713
2.2K
15*10*30
MUTE
1N4148
1N4148
IC702/B
KA358
UF4007
GND 2
DRAIN 1
D701
1N4148
H-FLY
1N4148
D716
Q706
2N6520
D717
X-RAY
R712
12K,F
D706
C701
22U,50V
IC701
C706
0.01U,M
4
D111
UF4007
D110
UF5404
15
4 VFB
R121
200K,1/2W
R711
1.5K
R118
0.33,3W
16
C120
470P,1K
R702
5.1K
R704 R705
1K
390K
8
R117
200K,1/2W
C130
0.1U,275VAC
KT2138DF : UF1G
KT2938F : UF5404
3
100K,1/2W
6.3V
6
3
IC106
C113
+ 1000U,16V
5
15*10*30
+
C115
330U,400V
+1000U,16V
L103
BD
17
4
R115
T103
LF-82
AC-IN
R701
6.2K
H/V
FOCUS-V
FOCUS-H
G2
L702
BD
R113
4.7K
2
D105
UF5404
R120
330K,1/2W
SUSPEND
7
6 -
L701
47UH
7
R116
120K,1/2W
C117
0.01U,500V
80V
R735
2.2K
5 +
470U,16V
3
L106
BD
12V
+ C106
2
1
D715
4.7V
IC702/A
KA358
14V-1
L105
BD
2
4
R744
100
+
5V
C114
D106
GBU6K
0.15U,275VAC
C710
10U,50V
12V
C711
D107
UF4004
18
12V
R717
10K,3W
R114
1.5K
3
15*10*30
2
T101
4
Q103
C945YC
14V
C108
0.022U,M
D104
4.7V
C112
C116
F101
53S250V3.15A
2
IC102
KA431
2
3
R110
820K
1
2
1N4148
12
C107
D102
12V
TH102
8D13
1000P,250VAC
C111
1
IC104
LTV817
0.01U,M
RL101
HR-CR7
3
4
1
+
1000P,250VAC(Y1)
9
R109
390,1/2W
IC103
KA78R12
14V
1
2 -
3
R107
R108
2K,1/4W,F 240
C109
0.01U,M
C110
0.22U,M
6.3V
D704
3 +
+
+
C105
100U,16V
D101
1N4148
9
11
DEGAUSS
9
9
8mm
DE-COIL
R742
27K,F
BEAM-PROTECTION
0.01U,500V
C104
0.015U,M
0.01U,50V
R106
10K
R743
4.7K
220U,16V
10
Q101
KSC1008
+ C103
9
R102
47,1/4W
5V
5V
OUT 3
C727
10U,250V
IC101
KA7805
C102
8
14V-1
2 GND
CN101
R105
6.8K
4
220V
1 IN
R104
220K
+
R101
180K,1W
15*10*30
R103
1K
+
C101
0.01U,M
14V
TH101
9OHM,CASE
R332
27K
+
C331
220U,16V
C337
0.01U,50V
DRAWN
CHECKED
APPROVAL
+12V
+5V
+6.3V +80V
CN801
13
12
11
10
9
8
7
6
5
4
3
2
1
CLAMP
ACL
SCL
SDA
G1
H_FLY
+5V
+5V
V_FLY
R801
1K
+5V
R802
680
R805
10K
2
2
Q802
2N3904
3
1
Q808
KSP44
BD804
R816
R-CUT
100
R_OUT 26
R828
390
4 OSD_BK
G_CLP 25
VCC3 23
100
R836
7 GND
GND3 22
R837
75
R852
R851
R850
D819
D818
D817
9 G_IN
G_OUT 3
11 B_IN
B_OUT 1
8 G_VO
B_OUT 21
9 VCC2
B_CLP 20
R843
75
10 B_VO
BLANK 19
11 GND2
CLAMP 18
12 ABL
R_CUT 17
R-CUT
13 SCL
G_CUT 16
G-CUT
LM2405
L803
R831
C824
1U,100V,BP
3
D804
BAV21
R827
560P*3
L805
5
R
3
G
8
B
100,1/2W
C814
1U,100V,BP
BAV21*3
R832
0.47UH
R834
140*30*35
BAV21
R822
220K,1/4W
0.47UH
100,1/2W
C830
1U,100V,BP
R835
0.47UH
47,1/4W
C832
BAV21*3
L802
R826
47,1/4W
R841
47,1/4W
C831
0.1U/50V
C833
0.1U/50V
75*3
R830
BD809
0.1U/50V
1N4148*3
R_OUT 5
47,1/4W
100
L806
8 R_IN
D814
1
2
3
4
5
6
6 VCC1
BD808
R846
CN802
R833
IC803
D803
220K,1/4W
47,1/4W
R845
C827
0.1U/50V
G_OUT 24
47,1/4W
C825
0.1U/50V
R844
75
L804
5 R_VO
R825
C821
0.01U/500V
100,1/2W
+6.3V
BAV21*3
200V*3
FOCUS-H
C822
0.1U/50V
D802
BAV21
FOCUS-V
D810
D809
D808
3 B_OSD
R829
1N4148*3
1
2
3
4
5
6
390
R819
220K,1/4W
R821
C818
220U/16V
BD802
R824
C820
47U/100V
C817
0.1U/50V
G2
R_CLP 27
R815
2.2K
8
2 G_OSD
100
C812
0.1U/M
C804
0.1U/M
7
390
R818
B-CUT
4
R823
R814
2.2K
G1
BU-IN 28
D805
L801
+12V
1 R_OSD
B_I 10
P-U 6
IC802
390
100
C811
0.1U/M
C803
0.1U/M
+80V
BD807
R820
R817
G-CUT
HT
GND
+12V
C813
220U/16V
R813
2.2K
2
C815
220U/16V
WT6802
7 GND
VSS 16
4 GND
R 15
8 SCL
2 GND
7 SDA
C810
0.1U/M
C802
0.1U/M
7
1
G 14
SP803
B 13
6 NC
2
1
Q807
KSP44
SP802
5 HS
Q805
KSP92
1
1
D807
R812
680
R811
82K,1/4W
Q804
KSP92
1
3
+12V
Q803
KSP92
Q806
KSP44
BLANK 12
D806
4 VDDA
D816
0.0047,M
+80V
R810
82K,1/4W
2
1
TEST 11
2
3 VCO
+80V
R809
82K,1/4W
2
VS 10
3
+80V
VDD 9
2 NC
C808
0.22U,M
C807
C809
220U/16V
2
C805
IC801
100U/16V 1 VSSA
BD803
D801
1N4148
SP801
R807
1K
3
C806
0.1U/50V
R808
1K
+12V
V_FLY
2
R803
3.9K
1
3
L807
Q801
2N3904
3
1
H_FLY
3
BD801
D815
13
12
11
10
9
8
7
6
5
4
3
2
1
BD806
390*3
R806
CLAMP
100
R855
R854
12K
SCL
R848
G1
D823
UF4004
100
14 SDA
SDA
C834
3.3U/50V
R860
100
BD805
1
B-CUT
C838
0.1U/50V
C840
100P,50V
2
CN804
G2
KA2506
ACL
C839
100P,50V
B_CUT 15
220,1/2W
SP804
400V
C836
0.01U,500V
SP805
1.5KV
C837
1000P,2K
G2
Re-adjustment of Back Raster
1. A power source should be supplied on the pressed "UP" key on control PCB before suppling
power source.
2. After as the above action, OSD mode will be switched to Factory mode as below a picture.
For your reference, there are difference color on OSD menu Factory mode and User mode.
3. As the below a picture, If you select "Color Temp" to use "UP","DOWN" key, you can see
"USER","6500","6900" on OSD menu.
4. If you select "9300"(double click), Color Adjudtment menu will be appeared on the top of
screen as the below a picture.
5. If you select contrast mode, Cotrast Icon will flicker. As the state, you adjust contrast value to
Maximum.
6. And after you find and adjust VR701 on the main PCB until Back Raster will be disappeared
just before
FACTORY MODE
①
②
③
④
⑤
⑥
⑦
⑧
⑨
◑
HV AC
⑩
⑪
OSD
⑫
BRIGHTNESS
31.4K
VF
i
70Hz
RB GB BB RG
USER MODE
GG BG AC ◑
VR701
◑
BRIGHTNESS
31.4K
OSD
⑬
70Hz
•
•
Takes a 4 KB address space, 40 base address
adjustable in steps from C800H up to EF00H
•
Optical isolation protection of 1000 VDC ensures
system reliability
•
Wide IRQ selection for each port includes:
IRQ 3, 4, 5, 6,7, 9, 10, 11, 12, 15
•
LED indicates Transmit/Receive status on each port
•
Direct memory mapping enables speedy access to
the CAN controllers
•
C library and examples included
Jumper & Switch Locations
Signal support: CAN-L, CAN-H
•
Memory address: From C800H to EF00H
•
IRQ: 3, 4, 5, 6, 7, 9, 10, 11, 12, 15
•
Isolation voltage: 1000 VDC
•
Power consumption: +5 V @ 400 mA typical,
950 mA max.
•
Connectors: Dual DB-9 male connectors
•
Operating temperature: 32 to 122° F (0 to 50° C)
•
PC/104 form factor: 3.6" x 3.8"
(90 mm x 96 mm)
•
Shipping weight: 0.9 lb (0.4 kg)
PCM-3680 User's Manual
PC/104 and the PC/104 logo are trademarks of the PC/104 Consortium
CH#1
CH#2
3
4
5
6
7
9
10
11
12
15
JP6
TR2
CAN transceiver: 82C250
•
CH#1
TR1
DIPSW
IRQ
JP5
A17
A16
A15
•
A14
CAN controller: 82C200
RX1 TX2 RX2
CH#1
TX1
A13
A12
Ports: 2
•
E S
16 MHz CAN controller frequency
On-board optical isolators protect your PC and
equipment against damage from ground loops,
increasing system reliability in harsh environments.
•
L
High speed transmission up to 1 Mbps
•
Optical Isolation Protection
Specifications
E
Operates 2 separate CAN networks at the same time
•
Direct Memory Mapping
The PCM-3680 is assigned with memory address,
which allows direct access to the CAN controller. This
is the simplest and fastest way of programming any
board in a PC because the board is regarded as
standard RAM.
EM B
Features
Control Area Network
The CAN (Control Area Network) is a serial bus
system especially suited for networking "intelligent"
I/O devices as well as sensors and actuators within a
machine or plant. Characterized by its multi-master
protocol, real-time capability, error correction, high
noise immunity, and the existence of many different
silicon components, the CAN serial bus system,
originally developed by Bosch for use in automobiles,
is increasingly being used in industrial automation.
M O DU
CH#2
The PCM-3680 is a special purpose communication
card that brings the Control Area Network to your PC.
With the built-in CAN controller, the PCM-3680
provides bus arbitration and error detection with
automatic transmission repeat function. This drastically
avoids data loss and ensures system reliability. The
on-board CAN controllers are located at different
positions in the memory. You can run both CAN
controllers at the same time, independently. The
PCM-3680 operates at baud rates up to 1 Mbps and
can be installed directly into the expansion slot of your
PC.
04
CH#2
IJumper Settingntroduction
P
1
C/
B1
A1
PCM-3680 PC/104 Dual Port CAN Interface Module
PCM-3680 PC/104
Dual Port CAN Interface Module
ED-PC
DD
B32
A32
C20
D20
C1
D1
PCM-3680 REV. A1
1
Part no. 2000368000 1st Edition Printed in Taiwan May 1996
Memory Base Address (SW1)
Initial Inspection
In addition to this user’s manual, your shipping box should
contain the following items:
• PCM-3680 Dual-port CAN Interface Card
• C Driver and DataMonitor Utility Diskette
WARNING!
Discharge your body’s static electric
charge by touching the back of the
grounded chassis of the system unit
(metal) before handling the board. You
should avoid contact with materials that
hold a static charge such as plastic,
vinyl, and styrofoam. The board should
be handled only by its edges to avoid
static damage to its integrated circuits.
Avoid touching the exposed circuit
connectors.
The memory base address for the PCM-3680, which
requires 4 KB of address space, is made up of the memory
segment and its associated offset. The address for the
memory segment is set through SW1, a six-position DIP
switch. You can choose any base address from C800 to
EF00. The following table shows the DIP switch settings
and the corresponding base addresses.
Memory address configuration (SW1)
Address/DIP switch
C800H
A12
on
A13
on
A14
on
A15 A16
off on
A17
on
C900H
off
on
on
off
on
on
CA00H
on
off
on
off
on
on
CB00H
off
off
on
off
on
on
CC00H
on
on
off
off
on
on
CD00H
off
on
off
off
on
on
CE00H
on
off
off
off
on
on
CF00H
off
off
off
off
on
on
D000H
on
on
on
on
off
on
D100H
off
on
on
on
off
on
D200H
on
off
on
on
off
on
D300H
off
off
on
on
off
on
D400H
on
on
off
on
off
on
D500H
off
on
off
on
off
on
D600H
on
off
off
on
off
on
D700H
off
off
off
on
off
on
Switch and jumper functions
D800H
on
on
on
off
off
on
IRQ Setup
D900H
off
on
on
off
off
on
Installation
Card Configuration
The PCM-3680 has two ports, each with one jumper. The
jumpers set the IRQ for the ports, which can be configured
separately. A DIP switch sets the memory base address for
each port. The following chart shows the function of the
jumper and the switch (see the previous page for jumper
and switch locations).
JP1
Port 1
DA00H
on
off
on
off
off
on
JP2
Port 2
DB00H
off
off
on
off
off
on
DC00H
on
on
off
off
off
on
DD00H
off
on
off
off
off
on
Memory base address
SW1
Port 1, Port 2
Default Settings
DE00H
on
off
off
off
off
on
DF00H
off
off
off
off
off
on
•
Port 1 is set for COM1 (IRQ=12, Memory address =
DA00:0000).
E000H
on
on
on
on
on
off
•
Port 2 is set for COM2 (IRQ=15, Memory address =
DA00:0200).
E100H
off
on
on
on
on
off
E200H
on
off
on
on
on
off
If you need to change these settings, see the following
sections. Otherwise, you can simply install the card. Note
that you will need to disable your CPU card's on-board
COM ports, if any, or set them to alternate addresses/IRQs.
E300H
off
off
on
on
on
off
E400H
on
on
off
on
on
off
E500H
off
on
off
on
on
off
E600H
on
off
off
on
on
off
Jumpers and Switches
E700H
off
off
off
on
on
off
Jumpers JP1 and JP2 set the interrupts for Port 1 and Port
2, respectively. You can choose any IRQ from 3 to 15,
except 8, 13 and 14. When you choose IRQs, make sure
they are not used for other cards in the system. The
following figures show the card's default settings.
E800H
on
on
on
off
on
off
E900H
off
on
on
off
on
off
EA00H
on
off
on
off
on
off
EB00H
off
off
on
off
on
off
JP1: Port 1 IRQ Default
EC00H
on
on
off
off
on
off
ED00H
off
on
off
off
on
off
EE00H
on
off
off
off
on
off
EF00H
off
off
off
off
on
off
IRQ Ch.1
3 ¡¡
4 ¡¡
5 ¡¡
6 ¡¡
7 ¡¡
9 ¡¡
10 ¡ ¡
11 ¡ ¡
12 ¡ ¡
15 ¡ ¡
2
JP2: Port 2 IRQ Default
IRQ Ch.2
3 ¡¡
4 ¡¡
5 ¡¡
6 ¡¡
7 ¡¡
9 ¡¡
10 ¡ ¡
11 ¡ ¡
12 ¡ ¡
15 ¡ ¡
PCM-3680 User's Manual
Memory Area
Function 2
Once the memory segment for the base address is
selected, the offset will be automatically assigned for Port
1, Port 2, and hardware reset. The following table shows the
base addresses of the CAN controllers.
Releases all settings of the CAN card.
Base address (hex)
CAN controller
base:0000h - base:00FFh
Basic- Port 1
base:0100h - base:01FFh
HW reset Basic - Port 1
base:0200h - base:02FFh
Basic- Port 2
base:0300h - base:03FFh
HW reset Basic - Port 2
base:0400h - base:0FFFh
Not used
å
Command
canExitHW()
å
Argument
None
å
Response
1=successful
0=fail
å Example
#include "can841.h"
main()
{
if (canExitHW()==0)
printf ("CAN RELEASE FAIL!\n");
}
Software Programming
Function 3
Resets CAN port and flushes the TX/RX buffers.
Quick Reference Table
The following table lists the available functions and their
corresponding syntax and descriptions.
Library functions
Function
1
Syntax (in C)
canInitHW()
Description
Sets IRQs
2
canExitHW()
Releases settings
3
canReset()
Resets CAN port
4
canConfig()
Controls CAN port settings
5
canNormalRun()
Sets mode
6
canSendMsg()
Sends message
7
canReceiveMsg()
Reads data
Complete Function Description
å
Command
int canReset (BYTE port);
å
Argument
BYTE port; port= port number (0 or 1)
å
Response
1=successful
0=fail
å Example
#include "can841.h"
main()
{
if (canReset (0)==0)
printf ("RESET PORT 1 FAIL!\n");
}
Function 4
Controls the setting of the CAN port's acceptance code,
acceptance mask, and bus timing register.
Function 1
å
Command
canConfig (BYTE port, CAN_STRUCT can);
Sets an IRQ number for Port1 and Port 2.
å
Argument
BYTE port, CAN_STRUCT can;
port= port number (0 or 1)
can= CAN struct pointer
å
Response
1=successful
0=fail
å
Command
canInitHW (UI segment, BYTE
IRQ1, BYTE IRQ2)
å
Argument
UI segment, BYTE IRQ1, BYTE IRQ2
segment=c000-df00 step 0x100
IRQ1=Port 1 IRQ number 0 (polling),
3, 4, 5, 6, 7, 8, 9, 10, 11, 12, 14, 15
IRQ2=Port 2 IRQ number 0 (polling),
, 4, 5, 6, 7, 8, 9, 10, 11, 12, 14, 15
0: polling
å
Response
å
Example
#include "can841.h"
main()
{
UI gSegment=0xDA00;
BYTE CAN1_IRQ, CAN2_IRQ;
CAN1_IRQ=12;
CAN2_IRQ=15;
if (canInitHW (gSegment, CAN1_IRQ, CAN2_IRQ)==0)
printf ("HARDWARE INITIALIZATION ERROR!\n");
}
1=successful
0=fail
PCM-3680 User's Manual
å Example
#include "can841.h"
main()
{
CAN_STRUCT can1, can2;
can1.acc_code=0;
can1.acc_mask=0xff;
can1.bt0=0;
can1.bt1=0x1c;
if (canConfig(0,can1)==0)
printf ("CAN PORT 1 CONFIGURE ERROR!\n");
}
3
Function 5
Example Program
Sets a CAN port to normal mode for normal operation.
å
Command
canNormalRun (BYTE port);
å
Argument
BYTE port;port= port number (0 or 1)
å
Response
1=successful
0=fail
å Example
#include "can841.h"
main()
{
if (canNormalRun(0)==0)
printf ("CAN Port 1 can't change to Normal Mode!\n");
}
Function 6
Tells the CAN port to send a message.
å
Command
canSendMsg (BYTE port,
MSG_STRUCT send_msg);
å
Argument
BYTE port, MSG_STRUCT send_msg;
port= port number (0 or 1) send_msg=
send buffer pointer
å
Response
1=successful
0=fail
å Example
#include "can841.h"
main()
{
MSG_STRUCT smsg1;
UI i;
smsg1.id=0x015;
smsg1.rtr=0;
smsg1.dlen=8;
for(i=0; i<smsg1.dlen; i++)
smsg1.data[i]=i;
if (canSendMsg(0,smsg1)==1)
printf ("TRANSMISSION SUCCESSFUL!\n");
}
Function 7
Read data from CAN port input buffer.
å
Command
int canReceiveMsg (BYTE port,
MSG_STRUCT *msg_ptr);
å
Argument
BYTE port, MSG_STRUCT *msg_ptr;
port= port number (0 or 1) *msg_ptr=
input buffer pointer
å
Response
1=message received
0=no message received
å Example
#include "can841.h"
main()
{
MSG_STRUCT rmsg2;
if (canReceiveMSG, *rmsg2)==1)
{
printf ("Port2 receive: ID=%3X RTR=%ld
Length=%ld", rmsg2.id, rmsg2.rtr, rmsg2.dlen);
for (i=0; i<rmsg2.dlen; i++)
cprintf (" %2X", rmsg2.data[i]);
}
}
4
The following example program, can841.lib, implements the
sending and receiving of messages over the CAN
controller. The program is written in C.
#include “can841.h” /*Library function declaration*/
/*---------------------------------------*/
/* CAN controller interrupt connection */
#define CAN1_IRQ 12 /* 0 means polling */
#define CAN2_IRQ 15 /* 0 means polling */
#define PORT1
0
#define PORT2
1
#define FAIL
0
#define SUCCESS 1
void main(void)
{
/* Declare the CAN card segment address. */
UI gSegment=0xDA00;
CAN_STRUCT can1, can2;
MSG_STRUCT smsg1, smsg2;
MSG_STRUCT rmsg1, rmsg2;
UI i;
if(canInitHW(gSegment,CAN1_IRQ,CAN2_IRQ)==FAIL)
{
clrscr();
cprintf("\n\n Hardware Initializa
tion Error");
return;
}
/* Reset CAN controller */
canReset(PORT1);
canReset(PORT2);
can1.acc_code=0;
/*
*/
can1.acc_mask=0xff;
/*
*/
can1.bt0=03;
/*baud rate 1Mbps*/
can1.bt1=0x1c;
if(canConfig(PORT1,can1)==FAIL)
{
clrscr();
cprintf("\n\n CAN Port %d Configuration
Error",1);
return;
}
memcpy(&can2, &can1, sizeof(CAN_STRUCT));
if(canConfig(PORT2,can2)==FAIL)
{
clrscr();
cprintf("\n\n CAN Port %d Configuration
Error", 2);
return;
}
canNormalRun(PORT1); /*Put CAN1 into normal mode.*/
canNormalRun(PORT2); /*Put CAN2 into normal mode.*/
clrscr();
smsg1.id = 0x015;
/* Set ID =8
*/
smsg1.rtr=1;
/* Data lengths =8 */
smsg1.dlen=8;
for(i=0; i<smsg1.dlen; i++)
smsg1.data[i] =i;
while(1)
{
canSendMsg(PORT1, smsg1); /*Send to CAN1*/
if(canReceiveMsg(PORT2, &rmsg2)==1)
{
cprintf("PORT2 receive:ID=%3X
RTR=%1d Length=%1d",
rmsg2.id,rmsg2.rtr, rmsg2.dlen);
PCM-3680 User's Manual
for(i=0; i< rmsg2.dlen; i++)
cprintf(" %2X",rmsg2.data[i]);
printf("\n");
The port configuration window is shown below.
}
if (kbhit())
{
getch();
break;
}
}
/* Reset CAN controller. */
canReset(PORT1);
canReset(PORT2);
canExitHW();
clrscr();
The parameters below need to be configured for each CAN
controller:
}
Address segment: The base address (address segment)
of the PCM-3680 is normally adjusted during the installation
process. The selection of the address segment needs to be
the same as that of the hardware configuration.
DataMonitor Utility
Software Overview
Port: Select the port you want to configure.
The PCM-3680 comes with a utility disk with the following
software capabilities:
• CAN controller configuration
• CAN transmission monitoring
Baud rate: The baud rate must be coordinated with the
CAN network. Choose the appropriate one from the list of
baud rates.
Acceptance code: Specifies the value of the 8 most
significant bits of the identifier (ID10 ... ID 3)
• Terminal emulation
Acceptance mask: Specifies the bit positions which are
"relevant" for acceptance filtering.
Main Menu
Run DataMonitor at the DOS prompt. DataMonitor's main
menu screen will appear as shown below:
A
Note: The acceptance code and acceptance mask are
configured through eight digits (1 digit per bit) using 0 or 1.
Value
C
B
Definition
0
This bit position will accept only a "relevant"
message.
1
This bit position will not screen messages.
C
C
C
D
The main screen consists of:
A. Menu bar: Lists the available functions. From the main
menu you can select Configuration, Monitoring, and
Terminal.
B. Monitor screen: Shows monitored data, including
message index, CAN device ID, data length, and data.
C. Status fields: Display the status of the two ports and
the status register of the CAN controllers.
D. On-line help/message bar: Shows various key
commands and states the function of the currently
highlighted item.
Configuration
Example:
Acc Code = 11111111
Acc Mask =11111111
The shown acceptance filter will accept every received
message.
Interrupt: Sets the interrupt forCeach port. Be sure that
this setting matches the IRQ already selected for the PCM3860, which accepts values between IRQ3 to IRQ15,
except 8 and 13.
Running mode: During the normal configuration and
communication process, select Normal Mode. When the
system fails, you can hit <Enter> to reset the CAN
controller. Hit <Enter> again to return
to Normal Mode to
C
further execute your configuration.
Monitor
Select the port to be monitored from the <Monitor> pulldown menu. Press F3 to start and stop the monitoring
process.
Before you transmit a CAN object, you must configure the
CAN controller by selecting the <Config> menu with the
cursor keys and pressing <Enter>. The Configuration
function determines the ports to be used and their
communication parameters.
PCM-3680 User's Manual
5
Monitor Screen
The monitored data for a selected port appears in the
monitor screen (see area B in the diagram under Main
Menu section.)
If the CAN controller is configured correctly and the
transmission has been successfully completed, every CAN
object will be shown in order of appearance.
Status Fields
Status fields at the right of the screen display the status of
the two ports:
Transmitting Data
To transmit data, the PCM-3680 must be connected to a
CAN network with at least one node and the configuration
for the card must be complete.
First, select <Terminal> to edit the data. Enter the port, the
object ID and the data bytes as hexadecimal value. Press
<Enter> to begin data transmission. If the CAN controller is
configured correctly and the transmission has been
successfully completed, every CAN object will be shown in
order of appearance at the left side of the screen.
Testing Data Transmission
The status fields show information including the Mode
(Normal or Reset), Acceptance Code, Acceptance Mask,
BTR0, BTR1, Output Control Register, and Status Register.
The normal value of the Status Register is:
00001100
Receive Buffer Status
Data Overrun Status
Transmit Buffer Access
Transmission Complete Status
Receive Status
Transmit Status
Error Status
Bus Status
To test CAN transmission without actually sending, connect
Port 1 to Port 2 on the PCM-3680. Select <Terminal> and
enter port 1 as transmitting port. Port 2 will therefore be
designated as receiving port.
Note: To send Data Frame (Transmit), enter "0" for RTR. If
you want to send Remote Frame (Request), enter "1" for
RTR.
The registers can only be read if the CAN controller is in
Normal mode. If the CAN controller operates correctly and
the transmission has been completed successfully, the
status register will show as the normal value: 00001100. If
the Error Status and/or the Bus Status is 1, you have
selected the wrong baud rate or the CAN cable is damaged.
Also check the correct bus terminator.
Terminal
This function provides a direct way to:
1. Send data over the CAN network.
2. Test CAN transmission.
Select <Terminal> from the menu bar for the following
screen:
6
PCM-3680 User's Manual
Wiring
Register Structure
Pin Assignments
P5 pin assignments for the
The following figure shows the
card's DB-9 connectors.
Termination Resistor Setup
Termination restistors are factory-installed to allow for
impedance matching. TheseP6
resistors can be enabled by
using jumpers number 5 and 6 (shown below). Jumper 5
enables the terminal resistor for port 1, while jumper 6
enables the terminal resistor for port 2. The value of the
resistor equals the characteristic impedence of the signal
wires (approximately 120 Ω)
The following figure shows resistor placements. Port TR1
enables jumper JP5, and TR2 enables jumper JP6
TR1
120Ω
JP5
TR2
120Ω
JP6
CAN termination resistor installation
CAN signal wiring
The CAN standard supports half-duplex communication.
This means that just two wires are used to transmit and
receive data.
D.T.E
CAN
Transceiver
D.T.E
CAN
Transceiver
CAN-H
CAN-H
CAN Controller Address Allocation
Philips PCX82C200 CAN Controller
ADDRESS
Register address map
0
CONTROL
1
COMMAND
2
STATUS
3
INTERRUPT
4
ACCEPTANCE CODE
5
ACCEPTANCE MASK
6
BUS TIMING 0
7
BUS TIMING 1
8
OUTPUT CONTROL
9
TEST
10
IDENTIFIER
11
RTR BIT, DATA LENGTH CODE
12
BYTE 1
13
BYTE 2
14
BYTE 3
15
BYTE 4
16
BYTE 5
17
BYTE 6
18
BYTE 7
19
BYTE 8
20
IDENTIFIER
21
RTR BIT, DATA LENGTH CODE
22
BYTE 1
23
BYTE 2
24
BYTE 3
25
BYTE 4
26
BYTE 5
27
BYTE 6
28
BYTE 7
29
BYTE 8
D.T.E
CAN
Transceiver
CAN-L
CAN-H
120 ohms
120 ohms
CAN-L
CAN-L
Wiring topograhpy
Wiring connections are as follows:
PCM-3860
DTE (male DB-9)
Terminal DTE
Pin
7
Signal
CAN-H
Signal
CAN-H
3
GND
GND
2
CAN-L
CAN-L
PCM-3680 User's Manual
This appendix gives a brief description of the CAN
controller registers. For more detailed information, please
refer to the Stand-alone CAN-controller Data Book from
Philips Semiconductors Microcontroller Products. (You may
also find the information on the enclosed disk under the
"Manual" directory, in the Word 6.0 file: REGISTER.DOC.)
}
control
segment
}
} }
} descriptor
}
datadata
ffield
buffertransmit
buffer}}}
} descriptor
data
field
receivereceive
buffers
7
#
TITLE
ADDRESS
7
6
5
4
3
2
1
0
Error
Interrupt
Enable
Transmit
Interrupt
Enable
Receive
Interrupt
Enable
Reset
Request
Clear
Overrun
Status
Release
Abort
Transmission
Receive
Transmission Request
Buffer
Control Segment
1
Control
Register
0
2
Command
Register
1
3
Status
Register
2
4
Interrupt
Register
3
5
Acceptance
Code
Register
4
AC.7
AC.6
6
Acceptance
Mask
Register
5
AM.7
7
Bus Timing
Register 0
6
SJW.1
8
Bus Timing
Register 1
7
SAM
9
Output
Control
Register
8
OCTP1
10
Test Register
(note 1)
9
Test
Mode
Sync
Overrun
Reserved Interrupt
Enable
Reserved Reserved Reserved
Bus
Status
Error
Status
Go to
Sleep
Transmission Transmit
Receive
Complete
Buffer Data Overrun
Buffer Status
Status
Access
Transmit
Status
Receive
Status
Reserved Reserved Reserved
Wake-Up
Interrupt
Overrun
Interrupt
Error
Interrupt
Transmit
Interrupt
Receive
Interrupt
AC.5
AC.4
AC.3
AC.2
AC.1
AC.0
AM.6
AM.5
AM.4
AM.3
AM.2
AM.1
AM.0
SJW.0
BRP.5
BRP.4
BRP.3
BRP.2
BRP.1
BRP.0
TSEG1.3
TSEG1.2
TSEG1.1
TSEG1.0
OCTN0
OCPOL0
OCMODE1
OCMODE0
TSEG2.2 TSEG2.1 TSEG2.0
OCTN1
OCPOL1
Map
Reserved Reserved Internal
Register
OCTP0
Connect
RX
Connect TX
Buffer 0 Buffer CPU
CPU
Access
Normal RAM Float Output
Internal
Conncet
Driver
Bus
Transmit Buffer
Identifier
RTR, Data
11
Length Code
Bytes 1-8
10
ID.10
ID.9
ID.8
ID.7
ID.6
ID.5
ID.4
ID.3
11
ID.2
ID.1
ID.0
RTR
DLC.3
DLC.2
DLC.1
DLC.0
12-19
Data
Data
Data
Data
Data
Data
Data
Data
Receive Buffer 0/1
Identifier
RTR, Data
12
Length Code
Bytes 1-8
8
20
ID.10
ID.9
ID.8
ID.7
ID.6
ID.5
ID.4
ID.3
21
ID.2
ID.1
ID.0
RTR
DLC.3
DLC.2
DLC.1
DLC.0
22-29
Data
Data
Data
Data
Data
Data
Data
Data
PCM-3680 User's Manual
Register descriptions
Bus Timing Register 0 (BTR0)
Control Register (CR)
The Bus Timing Register 0 defines the values of the Baud
Rate Prescaler (BRP) and the Synchronization Jump Width
(SJW). This register can be accessed (read/write) if the
Reset Request bit is set HIGH (present).
The Control Register is used to change the behavior of the
PCX82C200. Control bits may be set or reset by the
attatched microcontroller, which uses the Control Register
as a read/write memory.
Command Register (CMR)
A command bit initiates an action within the transfer layer of
the PCX82C200. If a read access is performed to this
address, the byte 11111111 (binary) is returned.
Status Register (SR)
Bus Timing Register 1 (BTR1)
The Bus Timing Register 1 defines the length of the bit
period, the location of the sample point, and the number of
samples to be taken at each sample point. This register can
be accessed (read/write) if the Reset Request bit is set
HIGH (present).
Output Control Register (OCR)
The Status Register reflects the status of the PCX82C200
bus controller. The Status Register appears to the
microcontroller as a read-only memory.
The Output Control Register allows, under software control,
the setup of different driver configurations. This register may
be accessed (read/write) if the Reset Request bit is set
HIGH (present).
Interrupt Register (IR)
Test Register (TR)
The Interrupt Register allows identification of an interrupt
source. When one or more of this register's bits are set, the
INT pin is activated. All bits are reset by the PCX82C200
after this register is read by the microcontroller. This register
appears to the microcontoller as a read-only memory.
The Test Register is used only for production testing.
Acceptance Code Register (ACR)
The Acceptance Code Register is part of the acceptance
filter of the PCX82C200. This register can be accessed
(read/write) if the Reset Request bit is set HIGH (present).
When a message which passes the acceptance test is
received and if there is an empty Receive Buffer, then the
respective Descriptor and Data Field are sequentially
stored in this empty buffer. In the case that there is no
empty Receive Buffer, the Data Overrun bit is set HIGH
(overrun).
Transmit Buffer
The Transmit Buffer stores a message from the microcontroller to be transmitted by the PCX82C200. It is subdivided
into the Descriptor and Data Field. The Transmit Buffer can
be written to and read from by the microcontroller.
Receive Buffer
The layout of the Receive Buffer and the individual bytes
correspond to the definitions given for the Transmit Buffer
layout, except that the addresses start at 20 instead of 10.
Acceptance Mask Register (AMR)
The Acceptance Mask Register is part of the acceptance
filter of the PCX82C200. This register can be accessed
(read/write) if the Reset Request bit is set HIGH (present).
The Acceptance Mask Register classifies the corresponding bits of the acceptance code as "relevant" or "don't care"
for acceptance filtering.
PCM-3680 User's Manual
9
10
PCM-3680 User's Manual
PCM-5820 Series
(PCM-5820/5820L/5820E/5822)
NS GXM Single Board
Computer with CPU SVGA/LCD,
Ethernet, Audio and TV-out
Interface
Copyright Notice
This document is copyrighted, 2000. All rights are reserved. The
original manufacturer reserves the right to make improvements to
the products described in this manual at any time without notice.
No part of this manual may be reproduced, copied, translated or
transmitted in any form or by any means without the prior written
permission of the original manufacturer. Information provided in
this manual is intended to be accurate and reliable. However, the
original manufacturer assumes no responsibility for its use, nor for
any infringements upon the rights of third parties which may result
from its use.
Acknowledgements
AMD is a trademark of Advanced Micro Devices, Inc.
Award is a trademark of Award Software International, Inc.
IBM, PC/AT, PS/2 and VGA are trademarks of International
Business Machines Corporation.
Intel and Pentium are trademarks of Intel Corporation.
Microsoft Windows® is a registered trademark of Microsoft Corp.
RTL is a trademark of Realtek Semi-Conductor Co., Ltd.
C&T is a trademark of Chips and Technologies, Inc.
UMC is a trademark of United Microelectronics Corporation.
Winbond is a trademark of WinbondElectronics Corp.
NS is a trademark of National Semiconductor Inc.
CHRONTEL is a trademark of Chrontel Inc.
For more information on this and other Advantech products please
visit our website at: http://www.advantech.com
http://www.advantech.com/epc
For technical support and service for please visit our support
website at: http://support.advantech.com
This manual is for the PCM-5820/5820L Rev. A104 or higher.
PCM-5820E Rev. A101 or higher, PCM-5822 Rev. A101
Part No. 2006582006
4th Edition Printed in Taiwan March 2000
Packing list
Before you begin installing your card, please make sure that the
following materials have been shipped:
• 1 PCM-5820 Series all-in-one single board computer
• 1 startup manual
• 1 utility disk/CD, driver, and manual (in PDF format)
• 1 2.5" IDE flat cable, 44-pin to 44-pin (part no. 1701440351)
• 1 keyboard / PS2 mouse cable (part no. 1700060201)
• 1 secondary serial port cable (part no. 1701140201)
• 1 parallel cable (part no. 1700260650)
• 1 floppy cable, for 3.5" FDD only (part no. 1701340602)
• 1 audio cable (part no. 1700160160)
• 1 USB cable (part no. 1703100260)
If any of these items are missing or damaged, contact your
distributor or sales representative immediately.
The PCM-5820 Series’ Model Comparison Table
GXM-233 GXM-200 Ethernet
PCM-5820
x
PCM-5820L
x
x
PCM-5820E
x
x
PCM-5822
x
x
LVDS
TV-Out
LCD
x
x
x
x
x
x
x
x
Contents
CHAPTER 1 General Information ............................... 1
1.1
1.2
1.3
1.4
Introduction .................................................................. 2
Features ......................................................................... 3
Specifications ................................................................ 4
1.3.1 Standard SBC functions ........................................ 4
1.3.2 Local-bus flat panel/VGA interface ...................... 5
1.3.3 LVDS (Low Voltage Differential Signal) interface
(PCM-5820, PCM-5820L, PCM-5820E) ....................... 5
1.3.4 Audio function ...................................................... 5
1.3.5 Ethernet interface (PCM-5820/5820E/5822 only) 5
1.3.6 Mechanical and environmental ............................. 6
1.3.7 Solid state disk ...................................................... 6
1.3.8 TV-out function (PCM-5822 only) ....................... 6
Board layout and dimensions ...................................... 7
CHAPTER 2 Installation ................................................... 9
2.1
2.2
2.3
2.4
2.5
2.6
2.7
2.8
Jumpers and connectors ............................................ 10
Locating jumpers ....................................................... 12
Locating connectors ................................................... 13
2.3.1 Component side .................................................. 13
2.3.2 Solder side ........................................................... 14
Setting jumpers .......................................................... 15
2.4.1 Introduction ......................................................... 15
2.4.2 Settings details .................................................... 16
Safety precautions ...................................................... 17
Installing DRAM (SODIMMs) ................................. 18
2.6.1 Introduction ......................................................... 18
2.6.2 Installing SODIMMs .......................................... 18
IDE hard drive connector (CN11) ............................ 19
2.7.1 Connecting the hard drive ................................... 19
CompactFlash™ disk (CN19) ................................... 20
2.9
2.10
2.11
2.12
2.13
2.14
2.15
2.16
2.17
2.18
2.19
2.20
2.21
2.22
2.23
Floppy drive connector (CN2) .................................. 20
2.9.1 Connecting the floppy drive................................ 20
Parallel port connector (CN3) ................................... 21
Keyboard and PS/2 mouse connector (CN17) ......... 22
Power connectors ....................................................... 22
2.12.1 Main power connector +5 V, +12 V (CN9) ...... 22
2.12.2 Auxilary power connector (CN10) ................... 22
2.12.3 CPU fan power connector (CN6) ...................... 22
IR connector (CN7) .................................................... 22
Audio interfaces (CN5, CN1) .................................... 23
2.14.1 Audio connector (CN5) ..................................... 23
2.14.2 CD audio input connector (CN1) ...................... 23
2.14.3 Audio power source setting (J1) ....................... 23
Serial ports (CN16, CN14)......................................... 24
2.15.1 COM1 RS-232 port (CN16) .............................. 24
2.15.2 COM2 RS-232/422/485 selection (CN14)........ 24
VGA interface connections ........................................ 25
2.16.1 CRT display connector (CN18) ........................ 25
2.16.2 Flat panel display connector (CN12) ................ 25
2.16.3 LCD power setting (J6) ..................................... 26
LVDS interface (CN15) ............................................. 26
Ethernet interface connections ................................. 27
2.18.1 100Base-T RJ-45 connector (CN13) ................ 27
2.18.2 Ethernet power select (J7) ................................. 27
Ethernet LED and HDD/power LEDs ..................... 28
2.19.1 LED1 (Ethernet LED) ....................................... 28
2.19.2 LED2 (Power and HDD LED) .......................... 28
Watchdog timer configuration ................................. 28
2.20.1 Watchdog timer action (J3) ............................... 29
USB connectors (CN4) ............................................... 29
TV-out connector (CN21,CN22) ............................... 29
ATX power control conn. (CN23, CN24) ................. 30
2.23.1 ATX feature connector (CN23) and power button
(CN 24)) ....................................................................... 30
Chapter 3 Software Configuration ......................... 31
3.1
3.2
3.3
3.4
3.5
Introduction ................................................................ 32
Utility CD disk ............................................................ 32
VGA display software configuration ........................ 33
Connections for two standard LCDs ........................ 35
3.4.1 Connections for Toshiba LTM10C042
(640 x 480 TFT color LCD) ................................ 35
3.4.2 Connections for Toshiba LTM12C275A
(800 x 600 TFT color LCD)................................ 36
Ethernet interface configuration .............................. 37
Chapter 4 Award BIOS Setup ................................. 39
4.1
4.2
System test and initialization .................................... 40
4.1.1 System configuration verification ....................... 40
Award BIOS setup ..................................................... 41
4.2.1 Entering setup ..................................................... 41
4.2.2 Standard CMOS setup ......................................... 42
4.2.3 BIOS features setup ............................................ 43
4.2.4 Chipset features setup ......................................... 44
4.2.5 Power management setup ................................... 45
4.2.6 PnP/PCI configuration ........................................ 46
4.2.7 Integrated peripherals ......................................... 47
4.2.8 Load BIOS defaults ............................................. 48
4.2.9 Change password ................................................ 49
4.2.10 Auto detect hard disk ........................................ 50
4.2.11 Save & exit setup .............................................. 50
4.2.12 Exit without saving ........................................... 50
Chapter 5 SVGA Setup............................................ 51
5.1
5.2
Introduction ................................................................ 52
5.1.1 Chipset ................................................................ 52
5.1.2 Display memory .................................................. 52
Installation of SVGA driver ...................................... 53
5.2.1 Installation for Windows 3.1 .............................. 54
5.3
5.2.2 Installation for Cyrix MediaGX Certified drivers
for Windows 95/980. Insert the disk into the CD-ROM
drive. ............................................................................ 57
5.2.3 Installation for Windows NT .............................. 61
Further information ................................................... 66
Chapter 6 Audio....................................................... 67
6.1
6.2
Introduction ................................................................ 68
Installation of audio driver ....................................... 68
6.2.1 Installation for Windows 95/98 .......................... 69
6.2.2 Installation for Windows NT .............................. 72
Chapter 7 PCI Bus Ethernet Interface ................... 75
7.1
7.2
7.3
Introduction ................................................................ 76
Installation of Ethernet driver .................................. 76
7.2.1 Installation for MS-DOS and Windows 3.1 ........ 76
7.2.2 Installation for Windows 95/98 .......................... 77
7.2.3 Installation for Windows NT .............................. 79
Further information ................................................... 81
Appendix A Pin Assignments ................................ 83
CRT display connector (CN18) ........................................... 84
Flat panel display connector (CN12) .................................. 84
COM2 RS-232/422/485 serial port (CN14) ........................ 85
Keyboard and mouse connnector (CN17) .......................... 85
Main power connector (CN9) .............................................. 86
IDE hard drive connector (CN11) ...................................... 86
COM1 RS-232 serial port (CN16)....................................... 87
Ethernet 100Base-T connector (CN13) .............................. 87
Auxilary power connector (CN10) ...................................... 88
Floppy drive connector (CN2) ............................................. 88
Parallel port connector (CN3) ............................................. 89
IR connector (CN7) .............................................................. 90
USB connector (CN4) ........................................................... 90
Audio connector (CN5) ........................................................ 90
CD audio connector (CN1) .................................................. 91
LVDS connector (CN15) ...................................................... 91
CPU fan power connector (CN6) ........................................ 91
S-Video connector (CN21) ................................................... 92
RCA (composite) connector (CN22) ................................... 92
ATX power feature connector (CN23) ............................... 93
ATX power button & power LED connector (CN24) ....... 93
Appendix B System Assignments ......................... 95
B.1
B.2
B.3
B.4
System I/O ports .........................................................
DMA channel assignments ........................................
Interrupt assignments ................................................
1st MB memory map .................................................
96
97
98
99
Appendix C LCD Services .................................... 101
C.1
LCD services ............................................................. 102
Appendix D Installing PC/104 Modules ............... 103
D.1
Installing PC/104 modules ....................................... 104
Appendix E Programming the Watchdog Timer . 107
E.1
Programming the watchdog timer ......................... 108
Appendix F Mechanical Drawings ....................... 111
F.1
F.2
F.3
Component side ........................................................ 112
Component side (PCM-5822) .................................. 113
Solder side ................................................................. 114
Tables
Table 2-1: Jumpers ....................................................................... 10
Table 2-2: Connectors .................................................................. 11
Table 2-3: Audio power source setting ........................................ 23
Table 2-4: COM2 selection (J4) ................................................... 24
Table 2-5: Serial port default settings .......................................... 24
Table 2-6: LCD power setting ...................................................... 26
Table 2-7: Ethernet power select .................................................. 27
Table 2-8: Ethernet LED setup ..................................................... 28
Table 2-9: HDD/power LED setup ............................................... 28
Table 2-10: Watchdog timer action .............................................. 29
Table A-1: CRT display connector .............................................. 84
Table A-2: Flat panel display connector ...................................... 84
Table A-3: COM2 RS-232/422/485 series port ........................... 85
Table A-4: Keyboard and mouse connector ................................. 85
Table A-5: Main power connector ............................................... 86
Table A-6: IDE hard drive connector ........................................... 86
Table A-7: COM1 RS-232 serial port .......................................... 87
Table A-8: Ethernet 100Base-T connector ................................... 87
Table A-9: Peripheral power connector ....................................... 88
Table A-10: Floppy drive connector ............................................ 88
Table A-11: Parallel port connector ............................................. 89
Table A-12: IR connector ............................................................. 90
Table A-13: USB connector ......................................................... 90
Table A-14: Audio connector ....................................................... 90
Table A-15: CD audio connector ................................................. 91
Table A-16: LVDS connector ...................................................... 91
Table A-17: CPU fan power connector ........................................ 91
Table A-18: S-Video connector ................................................... 92
Table A-19: SCART Mode (optional) ......................................... 92
Table A-20: ATX power feature connector (CN23) .................... 93
Table A-21: ATX power button & power LED connecto (CN24) 93
Table B-1: System I/O ports ......................................................... 96
Table B-2: DMA channel assignments ........................................ 97
Table B-3: Interrupt assignments ................................................. 98
Table B-4: 1st MB memory map .................................................. 99
Table D-1: PC/104 connectors (CN8) ........................................ 106
Figures
Figure 1-1: PCM-5820 Series dimensions ..................................... 7
Figure 2-1: Jumpers ...................................................................... 12
Figure 2-2a: Connectors - component side (PCM-5820/L/E) ...... 13
Figure 2-2b: Connectors - component side (PCM-5822) ............. 13
Figure 2-3: Connectors - solder side (PCM-5820 Series) ............ 14
Figure 3-1: Contents of the PCM-5820 Series utility disk ........... 32
Figure 3-2: BIOS VGA setup screen ............................................ 33
Figure 4-1: BIOS setup program initial screen ............................ 41
Figure 4-2: CMOS setup screen ................................................... 42
Figure 4-3: BIOS features setup ................................................... 43
Figure 4-4: Chipset features setup ................................................ 44
Figure 4-5: Power management setup .......................................... 45
Figure 4-6: PnP/PCI configuration ............................................... 46
Figure 4-7: Integrated peripherals ................................................ 47
Figure 4-8: Load BIOS defaults screen ........................................ 48
Figure 4-9: IDE HDD auto detection screen ................................ 50
Figure D-1: PC/104 module mounting diagram ......................... 105
Figure D-2: PC/104 module dimensions (mm) (±0.1) ............... 105
Figure F1 Component side ........................................................ 112
Figure F2 Component side (PCM-5822) ................................... 113
Figure F3 Solder side ................................................................ 114
CHAPTER
1
General Information
This chapter gives background information on the PCM-5820 Series.
Sections include:
• Board specifications
• Board layout and dimensions
1.1
Introduction
The PCM-5820 Series is the ultimate cost-effective solution for
limited space applications. It offers all the functions of an
AT-compatible industrial computer on a single board and only
occupies the space of a 3½" hard drive. The PCM-5820/5820L
comes with an embedded high-performance GXM-233 processor
on-board. The PCM-5820E and PCM-5822 come with a low
power GXM-200 processor on-board. For maximum performance,
the PCM-5820 Series also support an SDRAM SODIMM socket
that can accept up to 128 MB memory.
On-board features include an Ethernet interface, audio interface,
socket for Compact Flash Card, Enhanced IDE interface with up to
Ultra DMA transfer protocol, one parallel port, two serial ports
(RS-232 and RS-232/422/485) with DB-9 connector as COM1,
and a mini-DIN PS/2 keyboard/mouse interface. An SVGA/LCD
display controller (LCD, and CRT displays) allows LCD screen
resolutions up to 1024 x 768 and CRT resolutions up to 1280 x
1024 @ 16 colors. Supports LVDS interface (PCM-5820L and
PCM-5820E only) for long distance LCD panel signal transmission and EMI protection add-ons. Also provided is a TV-out
function (PCM-5822 only) for NTSC and PAL TV format that
supports composite, S-video and SCART (optional) outputs.
The PCM-5820 Series complies with the "Green Function"
standard and supports three types of power saving features:
Normal, Doze, and Sleep modes.
The display type configuration is done through software. A single
Flash chip holds the system BIOS and the VGA BIOS. This
minimizes the number of chips and eases configuration. You can
change the display BIOS simply by programming the Flash chip.
If you need any additional functions, the PCM-5820 Series has a
PC/104 connector for future upgrades.
2
PCM-5820 Series User's Manual
1.2
Features
• Ultra-compact size single board computer as small as a 3 1/2"
hard disk drive (145 mm x 102 mm)
• On-board NS GXM-233/200 CPU
• Up to 128 MB system memory by SODIMM (SDRAM)
• On-board VGA/LCD controller
• On-board LVDS interface (PCM-5820L and PCM-5820E only)
• On-board 100Base-T Ethernet interface (PCM-5820/5820E/
PCM-5822 only)
• On-board TV-out function, NTSC and PAL format (PCM-5822)
• Supports CompactFlash card
• Built-in Enhanced IDE (AT bus) hard disk drive interface
• On-board mini-DIN PS/2 keyboard/mouse connector
• Two serial ports: one RS-232, one RS-232/422/485 or infared
selectable (uses 16C550 UARTs with 16 byte FIFO)
• Upgradeable through PC/104 module
• Green engine with sleep mode and low power consumption
• Single +5 V power supply
Chapter 1 General Information
3
1.3
Specifications
1.3.1 Standard SBC functions
• CPU:
- Embedded NS GXM-233 / 2.9 V (for PCM-5820/L)
- Embedded NS GXM-200 / 2.2 V (for PCM-5820E/
PCM-5822)
• BIOS: AWARD 256 KB Flash memory
• Chipset: NS CX5530
• System memory: One 144-pin SODIMM socket accepts up to
128 MB SDRAM
• Enhanced IDE interface: Supports up to two EIDE devices.
BIOS auto-detect, PIO Mode 3 or Mode 4 transfer, Ultra
DMA33 mode (ATA-4) up to 33 MB/sec.
• FDD interface: Supports up to two FDDs
• Serial ports: One serial RS-232 port, one serial RS-232/422/485
port
• Parallel port: One parallel port, supports SPP/EPP/ECP mode
• Infrared port: Shared with COM2. Transfer rate up to 115
kbps.
• Keyboard/mouse connector: Mini-DIN connector supports
standard PC/AT keyboard and a PS/2 mouse
• USB interface: two USB ports, USB 1.0 compliant
• Power management: Supports power saving modes including
Normal/Doze/Sleep modes. APM 1.1 compliant
• Watchdog timer: 1.6 sec. intervals
4
PCM-5820 Series User's Manual
1.3.2 Local-bus flat panel/VGA interface
• Chipset: NS CX5530
• Display memory: 1 ~ 4 MB share memory, set in BIOS
• Display type: Supports CRT and TFT LCD displays. Can
display CRT and flat panel simultaneously
• Flat panel display mode: Panel resolution supports up to 1024
x 768 @ 18 bpp. Supports 18-bit TFT LCD panel
• CRT display mode: Non-interlaced CRT monitors resolutions
up to 1280 x 1024 @ 256 colors or 1024 x 768 @ 16 bpp
1.3.3 LVDS (Low Voltage Differential Signal) interface
(PCM-5820, PCM-5820L, PCM-5820E)
• Chipset: TI SN75LVDS84 or compatible chipset
• Performance: 18 low-voltage TTL data channels plus clock-in
and 3 low-voltage differential data channels plus clock-out.
3.3 Volt and 250 mW (typ.). Meets ANSI/EIA/TIA-644
1.3.4 Audio function
• Chipset: NS CX5530
• Audio controller: AC97 version 2.0 compliant interface
• Audio interface: Microphone in, Line in, CD audio in, Line out,
Speaker L, Speaker R.
• Power: Accepts +12 V source for improved audio quality
1.3.5 Ethernet interface (PCM-5820/5820E/5822 only)
• Chipset: RTL 8139
• Ethernet interface: PCI 10/100 Mbps Ethernet. IEEE 802.3 u
protocol compatible
• Connection: On-board RJ-45 connector
• I/O address switchless setting
• Built-in boot ROM
Chapter 1 General Information
5
1.3.6 Mechanical and environmental
• Dimensions (L x W): 145 mm x 102 mm (5.9" x 4.2")
• Power supply voltage: +5 V (4.75 ~ 5.25 V)
• Power consumption (typical) :
- +5 V @ 3.0 A with GXM-233, 64 MB SODIMM and 40 MB
CFC (PCM-5820)
- +5 V @ 1.9 A with GXM-233, 64 MB SODIMM and 40 MB
CFC (PCM-5820 Rev. A104 or higher
- +5 V @ 1.5 A with GXM-200, 64 MB SODIMM and 40 MB
CFC (PCM-5820E, PCM-5822)
• Operating temperature: 0 ~ 60° C (32 ~ 140° F)
• Weight: 0.77 kg (weight of total package)
1.3.7 Solid state disk
• Supports one 50-pin socket for CompactFlash™ card
1.3.8 TV-out function (PCM-5822 only)
• Chipset: CHRONTEL CH7003C
• Supports NTSC, NTSC-EIA (Japan) and PAL TV formats
• Provides Composite, S-video, and SCART (optional) outputs via
RCA (composite) connector and S-video connector
• Supports 640 x 480 and 800 x 600 input resolutions
• Supports Windows 95/98 and Windows NT driver
• Over-scan, under-scan, and position adjustable (Windows 95/98
only)
• Auto-detection of TV presence
6
PCM-5820 Series User's Manual
1.4
Board layout and dimensions
Figure 1-1: PCM-5820 Series dimensions
Chapter 1 General Information
7
8
PCM-5820 Series User's Manual
CHAPTER
2
Installation
This chapter tells how to set up the
PCM-5820 Series hardware, including
instructions on setting jumpers and
connecting peripherals, switches and
indicators. Be sure to read all the safety
precautions before you begin the installation procedure.
2.1
Jumpers and connectors
Connectors on the board link it to external devices such as hard
disk drives, a keyboard or expansion bus connectors. In addition,
the board has a number of jumpers that allow you to configure
your system to suit your application.
The table below lists the function of each of the board jumpers and
connectors:
Table 2-1: Jumpers
Label
J1
J2
J3
J4
J5
J6
J7
10
Function
Audio power source setting
Clear CMOS
Watchdog timer action
COM2 selector
Buzzer setting
LCD power selector
Ethernet power select (PCM-5822)
PCM-5820 Series User's Manual
Table 2-2: Connectors
Label
CN1
CN2
CN3
CN4
CN5
CN6
CN7
CN8
CN9
CN10
CN11
CN12
CN13
CN14
CN15
CN16
CN17
CN18
CN19
CN20
CN21
CN22
CN23
CN24
LED1
LED2
SW1
Function
CD audio input connector
Floppy disk connector
Parallel port connector
USB connector
Audio connector
CPU fan power connnector (+5 V)
IR connector (infrared)
PC/104 connector
Main power connector (+5 V, +12 V)
Auxilary power connector (-5 V, -12 V)
IDE Hard disk connector
LCD connector
Ethernet connector
COM2 connector
LVDS connector
COM1 connector
PS/2 keyboard + PS/2 mouse
CRT display connector
CompactFlash™ socket
SODIMM socket
S-Video connector (PCM-5822 only)
RCA (composite) connector
(PCM-5822 only)
ATX feature connector (PCM-5822)
ATX power button & power LED connector
Ethernet LED (PCM-5820/5820E/5822)
Power & HDD LED
(PCM-5820/5820L/5820E)
Reset button (PCM-5820/5820L/5820E)
Chapter 2 Installation
11
2.2
Locating jumpers
Figure 2-1: Jumpers
12
PCM-5820 Series User's Manual
2.3
Locating connectors
2.3.1 Component side
Figure 2-2a: Connectors - component side (PCM-5820/L/E)
Figure 2-2b: Connectors - component side (PCM-5822)
Chapter 2 Installation
13
2.3.2 Solder side
Figure 2-3: Connectors - solder side (PCM-5820 Series)
14
PCM-5820 Series User's Manual
2.4
Setting jumpers
2.4.1 Introduction
You may configure your card to match the needs of your application by setting jumpers. A jumper is the simplest kind of electrical
switch. It consists of two metal pins and a small metal clip (often
protected by a plastic cover) that slides over the pins to connect
them. To "close" a jumper, you connect the pins with the clip. To
"open” a jumper you remove the clip. Sometimes a jumper will
have three pins, labeled 1, 2, and 3. In this case you would connect
either pins 1 and 2 or 2 and 3.
1
Open
Closed
2
3
Closed 2-3
The jumper settings are schematically depicted in this manual as
follows:
1 2 3
Open
Closed
Closed 2-3
A pair of needle-nose pliers may be helpful when working with
jumpers.
If you have any doubts about the best hardware configuration for
your application, contact your local distributor or sales representative before you make any changes.
Generally, you simply need a standard cable to make most
connections.
Chapter 2 Installation
15
2.4.2 Settings details
1
J2: clear CMOS
J1: Audio power source
Closed Pins
*1 - 2
2-3
Closed
Pins
*1 - 2
2-3
Result
3 V battery on
Clear CMOS
Voltage
5V
12 V
J3: Watchdog timer
Closed Pins
*1 - 2
2-3
Result
Reset
IRQ11
J6: LCD power
J5: Buzzer
Pins
1-2
*Closed
Open
Closed
Pins
*1 - 2
2-3
Result
1
Enable
Disable
1
1
1
16
PCM-5820 Series User's Manual
5V
3.3 V
1
5
J4: COM2 Selector
* default setting
Voltage
Closed
Pins
*1 - 2
3-4
5-6
Result
RS-232
RS-422
RS-485
2.5
Safety precautions
Warning! Always completely disconnect the power cord
from your board whenever you are working on it.
Do not make connections while the power is on
because sensitive electronic components can be
damaged by the sudden rush of power.
Caution!
Always ground yourself to remove any static
charge before touching the board. Modern
electronic devices are very sensitive to static
electric charges. Use a grounding wrist strap at
all times. Place all electronic components on a
static-dissipative surface or in a static-shielded
bag when they are not in the chassis.
Chapter 2 Installation
17
2.6
Installing DRAM (SODIMMs)
2.6.1 Introduction
You can install anywhere from 16 MB to 128 MB of on-board
DRAM memory using 16, 32, 64 or 128 MB 144-pin SODIMMs
(Small Outline Dual In-line Memory Modules).
2.6.2 Installing SODIMMs
Note:
The modules can only fit into a socket one way
and their gold pins must point down into the
SODIMM socket.
The procedure for installing SODIMMs appears below. Please
follow these steps carefully.
1. Ensure that all power supplies to the system are switched Off.
2. Install the SODIMM card. Install the SODIMM so that its gold
pins point down into the SODIMM socket.
3. Slip the SODIMM into the socket at a 45 degree angle and
carefully fit the bottom of the card against the connectors.
4. Gently push the SODIMM into a perpendicular position until
the clips on the ends of the SODIMM sockets snap into place.
5. Check to ensure that the SODIMM is correctly seated and all
connector contacts touch. The SODIMM should not move
around in its socket.
18
PCM-5820 Series User's Manual
2.7
IDE hard drive connector (CN11)
The built-in Enhanced IDE (Integrated Device Electronics)
controller supports up to two IDE devices, including CD-ROM
drives, tape backup drives, a large hard disk drive and other IDE
devices. It also supports faster data transfer, PIO mode 3, mode 4,
and Ultra DMA 33 mode.
2.7.1 Connecting the hard drive
Connecting drives is done in a daisy-chain fashion and requires
one or two cables, depending on the drive size. All required cables
are included in your PCM-5820 Series package. 1.8" and 2.5"
drives need a 1 x 44-pin to 2 x 44-pin flat-cable connector. 3.5"
drives use a 1 x 44-pin to 2 x 40-pin connector. However, the
required connectors are not included in the PCM-5820 Series
package.
Wire number 1 on the cable is red or blue, and the other wires are
gray.
1. Connect one end of the cable to CN11. Make sure that the red
(or blue) wire corresponds to pin 1 on the connector, which is
labeled on the board (on the right side).
2. Plug the other end of the cable to the Enhanced IDE hard drive,
with pin 1 on the cable corresponding to pin 1 on the hard
drive. (See your hard drive's documentation for the location of
the connector.)
Connect a second drive as described above.
Unlike floppy drives, IDE hard drives can connect to either end of
the cable. If you install two drives, you will need to set one as the
master and one as the slave by using jumpers on the drives. If you
install just one drive, set it as the master.
Chapter 2 Installation
19
2.8
CompactFlash™ disk (CN19)
The PCM-5820 Series is equipped with a CompactFlash disk
socket on the solder side and it supports the IDE interface CompactFlash disk card. The socket itself is especially designed to
prevent any incorrect installation of the CompactFlash disk card.
When installing or removing the CompactFlash disk card, please
make sure that the system power is off.
The CompactFlash disk card is defaulted as the E: disk drive in
your PC system.
2.9
Floppy drive connector (CN2)
You can attach up to two floppy drives to the the PCM-5820
Series' on-board controller. Any combination of 5¼” (360 KB and
1.2 MB) and/or 3½” (720 KB, 1.44 MB, and 2.88 MB) drives is
possible.
A 34-pin daisy-chain drive connector cable is required for a dualdrive system. A 34-pin flat-cable connector is fitted on one end of
the cable while the other end sports two sets of floppy disk drive
connectors. Each set consists of a 34-pin flat-cable connector (for
the 3½” drives) and a printed-circuit board connector (for the 5¼”
drives).
2.9.1 Connecting the floppy drive
1. Plug in the 34-pin flat-cable connector into CN2. Make sure
that the red wire corresponds to pin 1 on the connector.
2. Attach the appropriate conector at the other end of the cable to
the floppy drive(s). You can use only one connector in the set.
The set at the other end (after the twist in the cable) connects to
the A: drive. The set in the middle connects to the B: drive.
3. If you are connecting a 5¼” floppy drive, line up the slot in the
printed circuit board with the blocked-off part of the cable
connector.
20
PCM-5820 Series User's Manual
When connecting a 3½” floppy drive, you may have some
difficulties in determining which pin is pin number one. Look for a
number on the circuit board indicating pin number one. In addition, you should check if the connector on the floppy drive has an
extra slot. If the slot is up, pin number one should be on the right.
Please refer to any documentation that came with the drive for
more information.
If needed, connect the B: drive to the connectors in the middle of
the cable as described as above.
If your cable needs to be custom made, you can find the pin
assignments for the board's connector in Appendix A.
2.10 Parallel port connector (CN3)
Normally, the parallel port is used to connect the card to a printer.
The PCM-5820 Series includes a multi-mode (ECP/EPP/SPP)
parallel port, accessed through CN3 - a 26-pin flat-cable connector.
You will need an adapter cable if you use a traditional DB-25
connector. The adpater cable should have a 26-pin connector on
one end and a 25-DB connector on the other.
The parallel port is designated as LPT1 and can be disabled or
changed to LPT2 or LPT3 in the system BIOS setup.
The parallel port interrupt channel is designated as IRQ7.
The proper ECP/EPP DMA channel can be selected via the BIOS
setup.
Chapter 2 Installation
21
2.11 Keyboard and PS/2 mouse connector
(CN17)
The PCM-5820 Series board provides a mini-DIN keyboard
connector, which supports both a keyboard and a PS/2 style
mouse. In most cases, especially in embedded applications, a
keyboard is not used. If the keyboard is not present, the standard
PC/AT BIOS will report an error or failure during the power-on
self test (POST) after resetting the PC. The PCM-5820 Series
board's BIOS standard setup menu allows you to select "All, But
Keyboard" under the "Halt On" selection. This allows nonkeyboard operation in embedded system applications without the
system halting during the POST.
2.12 Power connectors
2.12.1 Main power connector +5 V, +12 V (CN9)
Supplies main power to the PCM-5820 Series (+5 V) and devices
that require +12 V.
2.12.2 Auxilary power connector (CN10)
Supplies secondary power to peripherals that require -5 V and
-12 V.
2.12.3 CPU fan power connector (CN6)
This connector is reserved for an optional fan, which facilitates a
better working environment for the CPU.
2.13 IR connector (CN7)
The PCM-5820 Series provides an IrDA port for transfer rates of
115 kbps. This connector supports the optional wireless infrared
transmitting and receiving module, which is mounted on the
system case. Configuration of the module is done through BIOS
setup.
22
PCM-5820 Series User's Manual
2.14 Audio interfaces (CN5, CN1)
The PCM-5820 Series is equipped with a high quality audio
interface, which provides 16-bit CD quality recording and playback as well as OPL3 compatible FM music. It is supported by all
major operating systems and is completely compatible with Sound
Blaster Pro.
2.14.1 Audio connector (CN5)
The PCM-5820 Series provides all major signals on a 16-pin
flat-cable connector (CN5). These audio signals include Microphone in (mono), Line in (stereo) and Speaker out (stereo). An
adapter cable is needed if traditional telephone jack connectors are
used for these audio signals.
2.14.2 CD audio input connector (CN1)
All CD-ROM drives can provide analog audio signal output when
used as a music CD player. The CN1 is a connector to input CD
audio signals into the audio controller. The audio cable of your
CD-ROM drive is suitable for connection to CN1.
2.14.3 Audio power source setting (J1)
The PCM-5820 Series is designed to work with a single +5 V
power supply as audio interfaces usually function under +5 V.
However, most audio controllers require an independant +12 V
power source since this avoids noise interference from other
digital circuits. By using J1, the PCM-5820 Series' audio interface
can also accept +12 V power sources for improved audio quality.
Table 2-3: Audio power source setting
* +5 V
J1
1
2
+12 V
3
1
2
3
* default setting
Chapter 2 Installation
23
Configuration of the audio interface is done completely via
software utilities.You don't have to set any jumpers. For furhter
information, please refer to Chapter 6 for audio setup details.
2.15 Serial ports (CN16, CN14)
The PCM-5820 Series offers two serial ports: one RS-232 and one
RS-232/422/485. These ports allow you to connect to any serial
device (a mouse, printers, etc.) or communication network.
2.15.1 COM1 RS-232 port (CN16)
The serial port connectors are mounted on the bottom edge of the
card. The 9-pin D-SUB connector to the left of the card is the
RS-232 port.
2.15.2 COM2 RS-232/422/485 selection (CN14)
The secondary port located above COM1, consists of a 14-pin,
dual-in-line, male header and can be configured to operate in
RS-232, RS-422, or RS-485 mode. This is done via J4.
Table 2-4: COM2 selection (J4)
*RS-232
RS-422
RS-485
1
3
5
1
3
5
1
3
5
2
4
6
2
4
6
2
4
6
J4
* default setting
The IRQ and address range for both ports are fixed. However, if
you wish to disable the port or change these parameters later, you
can do this in the system BIOS setup. The table below shows the
settings for the PCM-5820 Series board's ports.
Table 2-5: Serial port default settings
Port
COM1
COM2
24
Address
3E8, 3F8
2E8, 2F8
PCM-5820 Series User's Manual
Interrupt
IRQ4
IRQ3
Default
3F8
2F8
2.16 VGA interface connections
The PCM-5820 Series board's SVGA interface can facilitates
conventional CRT displays as well as active LCD displays. The
card has two connectors to support these displays, one for standard
CRT VGA monitors and one for flat panel displays.
2.16.1 CRT display connector (CN18)
CN18 is a 15-pin, D-SUB connector commonly used for conventional CRT displays.
Detailed information on pin assignments for CRT display connector CN18 is given in Appendix A.
2.16.2 Flat panel display connector (CN12)
CN12 consists of a 44-pin, dual-in-line header.
The power supply (+12 V) for CN12 is dependant on the supply
connected to the board. Therefore make sure that CN9 is connected to a +12 V power supply.
The PCM-5820 Series provides a bias control signal on CN12
which can be used to control the LCD bias voltage. It is recommended that the LCD bias voltage not be applied to the panel until
the logic supply voltage (+5 V or +3.3 V) and panel video signals
are stable. Under normal operation the control signal (ENAVEE)
is active high. When the PCM-5820 Series board's power is
applied, the control signal is low until just after the relevant flat
panel signals are present.
Chapter 2 Installation
25
2.16.3 LCD power setting (J6)
The PCM-5820 Series' PCI SVGA interface supports 5 V and 3.3
V LCD displays. By changing the setting of J6, you can select the
panel video signal level to be 5 V or 3.3 V.
Table 2-6: LCD power setting
*5 V
1
2
3.3 V
3
J6
1
2
3
* default setting
Configuration of the LCD type is done completely via the software
utility. You do not have to set any jumpers. Refer to Chapter 3 for
software setup details.
Refer to Chapter 3 for details on connecting the two standard
LCDs: Toshiba LTM10C042 and LTM 12C275A.
2.17 LVDS interface (CN15)
The user can use this interface for long distance connections to an
LCD panel. Data can be tranfserred over distances up to 5 meters.
The PCM-5820 Series supports an 18-bit LVDS TFT LCD panel
via an LVDS interface (CN15). It consists of a 20-pin dual in-line
header.
26
PCM-5820 Series User's Manual
2.18 Ethernet interface connections
The PCM-5820 Series is equipped with a high performance 32-bit
PCI Ethernet interface which is fully compliant with IEEE 802.3u
10/100 Mbps CSMA/CD standards.
2.18.1 100Base-T RJ-45 connector (CN13)
100Base-T connections are made via the on-board RJ-45 connector.
2.18.2 Ethernet power select (J7)
PCM-5820 Series supports (WOL) wake up on LAN function, to
activate this function, select "standby 5V" mode on J7.
Table 2-7: Ethernet power select
*+5 V
1
2
Standby 5 V
3
1
2
3
J3
* default setting
Chapter 2 Installation
27
2.19 Ethernet LED and HDD/power LEDs
2.19.1 LED1 (Ethernet LED)
Table 2-8: Ethernet LED setup
LED
Green lamp
Yellow lamp
Setting
Tx
Link
The LED should be set so that when the cable is connected, the
yellow lamp is activated; and when data is transmitted, the green
lamp is activated.
2.19.2 LED2 (Power and HDD LED)
Table 2-9: HDD/power LED setup
LED
Green lamp
Yellow lamp
Setting
Power
HDD
The LED should be set so when the HDD is accessed the yellow
lamp is activated, and when the power is on the green lamp is
activated.
2.20 Watchdog timer configuration
An on-board watchdog timer reduces the chance of disruptions
which EMP (electro-magnetic pulse) interference can cause. This
is an invaluable protective device for standalone or unmanned
applications. Setup involves one jumper and running the control
software (refer to Appendix C).
28
PCM-5820 Series User's Manual
2.20.1 Watchdog timer action (J3)
When the watchdog timer activates (CPU processing has come to a
halt), it can reset the system or generate an interrupt on IRQ11.
This can be set via J3 as shown below:
Table 2-10: Watchdog timer action
*System reset
1
2
3
IRQ11
1
2
3
J3
* default setting
2.21 USB connectors (CN4)
The PCM-5820 Series board provides two USB (Universal Serial
Bus) interfaces which gives complete Plug and Play, and hot
swaps for up to 127 external devices. The USB interfaces comply
with USB specification Rev. 1.0 and are fuse protected.
The USB interfaces are accessed through two 10-pin flat-cable
connectors, CN4. You will need an adapter cable if you use a
standard USB connector.
The USB interfaces can be disabled in the system BIOS setup.
2.22 TV-out connector (CN21,CN22)
The PCM-5822 board provides on- board TV-out function through
its RCA (composite) connector and S-Video connector, which
support the composite and S-Video outputs. PCM-5822 also
provides an optional SCART output.
The PCM-5822 TV-out function uses a CHRONTEL CH7003 C
TV Encoder chip.
Chapter 2 Installation
29
2.23 ATX power control conn. (CN23, CN24)
The PCM-5820 Series offers two serial ports: one RS-232 and one
RS-232/422/485. These ports allow you to connect to any serial
device (a mouse, printers, etc.) or communication network.
2.23.1 ATX feature connector (CN23) and power
button (CN 24))
The PCM-5822 can support an advanced power button if an ATX
power supply is used. To enable the power button:
1. Take the specially designed ATX-to-PS/2 power cable
2. Connect the 3-pin plug of the cable to the CN23 (ATX feature
connector).
3. Connect the power on/off button to pin 2,4 of CN 24. (A
momentary contact type of button should be used.)
Important: Be sure that the ATX power supply can take at least a
10 mA load on the 5 V standby lead (5VSB). If not, you may have
difficulty powering up your system.
30
PCM-5820 Series User's Manual
CHAPTER
3
Software Configuration
This chapter details the software configuration information. It shows you how to
configure the card to match your application requirements. Award system BIOS is
covered in Chapter 4.
Sections include:
• LCD display configuration
• Connections for two standard LCDs
3.1
Introduction
The PCM-5820 Series system BIOS and custom drivers are located in
a 256 KB, 32-pin Flash ROM device, designated U14. A single Flash
chip holds the system BIOS and VGA BIOS. The display type can be
configured via software. This method minimizes the number of chips
and eases configuration. You can change the display BIOS simply by
reprogramming the Flash chip.
3.2
Utility CD disk
The PCM-5820 Series is supplied with a software utility on CD-ROM.
This disk contains the necessary file for setting up the VGA display.
Directories and files on the disk are as follows:
AWDFLASH.EXE
CBROM.EXE
RSET8139.EXE
5822Vxxx.BIN
Figure 3-1: Contents of the PCM-5820 Series utility disk
AWDFLASH.EXE
This program allows you to update the BIOS Flash ROM.
5820V110.BIN
This binary file contains the system BIOS.
CBROM.EXE
This program allows you to combine your own VGA BIOS with
system BIOS (5820V110.BIN).
RSET8139.EXE
This program enables you to view the current Ethernet configuration,
reconfigure the Ethernet interface (medium type, etc.), and execute
useful diagnostic functions.
32
PCM-5820 Series User's Manual
3.3
VGA display software configuration
The PCM-5820 Series on-board VGA/LCD interface supports an
18-bit TFT LCD, flat panel displays and traditional analog CRT
monitors. The interface can drive CRT displays with resolutions up to
1024 x 768 in 16 bpp. It is also capable of driving color panel displays
with resolutions of 1024 x 768 in 18 bpp. The LCD type is configured
completely via the software utility, so you do not have to set any
jumpers. Configure the LCD type as follows:
1. Apply power to the PCM-5820 Series with a color TFT display
attached. This is the default setting for the PCM-5820 Series.
Make sure that the AWDFLASH.EXE and *.BIN files are located
in the working drive.
Note:
Make sure that you do not run AWDFLASH.EXE
while your system is operating in EMM386 mode.
2. At the prompt, type AWDFLASH.EXE and press <Enter>. The
VGA configuration program will then display the following:
Figure 3-2: BIOS VGA setup screen
Chapter 3 Software Configuration
33
3. At the prompt, type in the BIN file which supports your display.
When you are sure that you have entered the file name correctly
press <Enter>. The screen will ask “Do you want to save?” If you
wish to continue press Y. If you change your mind or have made a
mistake press N.
4. If you decide to continue, the screen will issue a prompt which
will then ask “Are you sure to program (Y/N)?” If you wish to
continue, press Y. Press N to exit the program.
The new VGA configuration will then write to the ROM BIOS chip.
This configuration will remain the same until you run the
AWDFLASH.EXE program and change the settings.
34
PCM-5820 Series User's Manual
3.4
Connections for two standard LCDs
3.4.1 Connections for Toshiba LTM10C042
(640 x 480 TFT color LCD)
Table 3-1: Connections for Toshiba LTM10C042
LTM10C042
Pin
Name
1
GND
2
CLK
3
GND
4
R0
5
R1
6
R2
7
GND
8
R3
9
R4
10
R5
11
GND
12
G0
13
G1
14
G2
15
GND
16
G3
17
G4
18
G5
19
GND
20
ENAB
21
GND
22
B0
23
B1
24
B2
25
GND
26
B3
27
B4
28
B5
29
GND
30
VDD
31
VDD
PCM-5820 Series CN12
Pin
Name
3
GND
35
SHFCLK
4
GND
27
PD12
28
PD13
29
PD14
8
GND
30
PD15
31
PD16
32
PD17
33
GND
19
PD6
20
PD7
21
PD8
33
GND
22
PD9
23
PD10
24
PD11
34
GND
37
M
34
GND
11
PD0
12
PD1
13
PD2
39
GND
14
PD3
15
PD4
16
PD5
39
GND
5
+5 V
6
+5 V
Chapter 3 Software Configuration
35
3.4.2 Connections for Toshiba LTM12C275A
(800 x 600 TFT color LCD)
Table 3-2: Connections for Toshiba LTM12C275A
36
LTM12C275A
Pin
Name
PCM-5820 Series CN12
Pin
Name
1
GND
3
GND
2
NCLK
35
SHFCLK
3
NC
-
NC
4
NC
-
NC
5
GND
4
GND
6
R0
27
PD12
7
R1
28
PD13
8
R2
29
PD14
9
R3
30
PD15
10
R4
31
PD16
11
R5
32
PD17
12
GND
8
GND
13
G0
19
PD6
14
G1
20
PD7
15
G2
21
PD8
16
G3
22
PD9
17
G4
23
PD10
18
G5
24
PD11
19
GND
33
GND
20
B0
11
PD0
21
B1
12
PD1
22
B2
13
PD2
23
B3
14
PD3
24
B4
15
PD4
25
B5
16
PD5
26
ENAB
37
M/DE
27
GND
34
GND
28
VCC
5
+5 V
29
VCC
6
+5 V
30
GND
39
GND
PCM-5820 Series User's Manual
3.5
Ethernet interface configuration
The PCM-5820 Series' on-board Ethernet interface supports all major
network operating systems. To configure the medium type, to view
the current configuration, or to run diagnostics, do the following:
1. Power the PCM-5820 Series on. Make sure that the
RSET8139.EXE file is located in the working drive.
2. At the prompt, type RSET8139.EXE and press <Enter>. The
Ethernet configuration program will then be displayed.
3. This simple screen shows all the available options for the Ethernet
interface. Just highlight the option you wish to change by using the
Up and Down keys. To change a selected item, press <Enter>, and
a screen will appear with the available options. Highlight your
option and press <Enter>. Each highlighted option has a helpful
message guide displayed at the bottom of the screen for additional
information.
4. After you have made your selections and are sure this is the
configuration you want, press ESC. A prompt will appear asking if
you want to save the configuration. Press Y if you want to save.
The Ethernet Setup Menu also offers three very useful diagnostic
functions. These are:
1. Run EEPROM test
2. Run Diagnostics on Board
3. Run Diagnostics on Network
Each option has its own display screen that shows the format and
result of any diagnostic tests undertaken.
Chapter 3 Software Configuration
37
38
PCM-5820 Series User's Manual
CHAPTER
4
Award BIOS Setup
This chapter describes how to set BIOS
configuration data.
4.1
System test and initialization
These routines test and initialize board hardware. If the routines
encounter an error during the tests, you will either hear a few short
beeps or see an error message on the screen. There are two kinds of
errors: fatal and non-fatal. The system can usually continue the boot
up sequence with non-fatal errors. Non-fatal error messages usually
appear on the screen along with the following instructions:
press <F1> to RESUME
Write down the message and press the F1 key to continue the bootup
sequence.
4.1.1 System configuration verification
These routines check the current system configuration against the
values stored in the board’s CMOS memory. If they do not match, the
program outputs an error message. You will then need to run the
BIOS setup program to set the configuration information in memory.
There are three situations in which you will need to change the CMOS
settings:
1. You are starting your system for the first time
2. You have changed the hardware attached to your system
3. The CMOS memory has lost power and the configuration information has been erased.
The PCM-5820 Series' CMOS memory has an integral lithium battery
backup. The battery backup should last ten years in normal service,
but when it finally runs down, you will need to replace the complete
unit.
40
PCM-5820 Series User's Manual
4.2
Award BIOS setup
Award’s BIOS ROM has a built-in Setup program that allows users to
modify the basic system configuration. This type of information is
stored in battery-backed CMOS RAM so that it retains the Setup
information when the power is turned off.
4.2.1 Entering setup
Power on the computer and press <Del> immediately. This will allow
you to enter Setup.
Figure 4-1: BIOS setup program initial screen
Chapter 4 Award BIOS Setup
41
4.2.2 Standard CMOS setup
When you choose the STANDARD CMOS SETUP option from the
INITIAL SETUP SCREEN menu, the screen shown below is displayed. This standard Setup Menu allows users to configure system
components such as date, time, hard disk drive, floppy drive and
display. Once a field is highlighted, on-line help information is
displayed in the left bottom of the Menu screen.
Figure 4-2: CMOS setup screen
42
PCM-5820 Series User's Manual
4.2.3 BIOS features setup
By choosing the BIOS FEATURES SETUP option from the INITIAL
SETUP SCREEN menu, the screen below is displayed. This sample
screen contains the manufacturer’s default values for the PCM-5820
Series.
Figure 4-3: BIOS features setup
Chapter 4 Award BIOS Setup
43
4.2.4 Chipset features setup
By choosing the CHIPSET FEATURES SETUP option from the
INITIAL SETUP SCREEN menu, the screen below is displayed.
This sample screen contains the manufacturer’s default values for the
PCM-5820 Series.
Figure 4-4: Chipset features setup
44
PCM-5820 Series User's Manual
4.2.5 Power management setup
By choosing the POWER MANAGEMENT SETUP option from the
INITIAL SETUP SCREEN menu, the screen below is displayed. This
sample screen contains the manufacturer’s default values for the PCM5820 Series.
Figure 4-5: Power management setup
Chapter 4 Award BIOS Setup
45
4.2.6 PnP/PCI configuration
By choosing the PnP/PCI CONFIGURATION option from the Initial
Setup Screen menu, the screen below is displayed. This sample screen
contains the manufacturer’s default values for the PCM-5820 Series.
Figure 4-6: PnP/PCI configuration
46
PCM-5820 Series User's Manual
4.2.7 Integrated peripherals
By choosing the INTEGRATED PERIPHERALS option from the
INITIAL SETUP SCREEN menu, the screen below is displayed. This
sample screen contains the manufacturer’s default values for the
PCM-5820 Series. The PANEL TYPE by default supports a 18-bit
640 x 480 TFT LCD panel display.
Figure 4-7: Integrated peripherals
Chapter 4 Award BIOS Setup
47
4.2.8 Load BIOS defaults
LOAD BIOS DEFAULTS loads the default system values directly
from ROM. If the stored record created by the Setup program becomes corrupted (and therefore unusable), these defaults will load
automatically when you turn the PCM-5820 Series on.
Confirm Password:
Figure 4-8: Load BIOS defaults screen
48
PCM-5820 Series User's Manual
4.2.9 Change password
To change the password, choose the PASSWORD SETTING option
form the Setup main menu and press <Enter>.
1. If the CMOS is bad or this option has never been used, a default
password is stored in the ROM. The screen will display the
following messages:
Enter Password:
Press <Enter>.
2. If the CMOS is good or this option has been used to change the
default password, the user is asked for the password stored in the
CMOS. The screen will display the following message:
Confirm Password:
Enter the current password and press <Enter>.
3. After pressing <Enter> (ROM password) or the current password
(user-defined), you can change the password stored in the CMOS.
The password can be at most eight (8) characters long.
Remember - to enable this feature, you must first select either Setup or
System in the BIOS FEATURES SETUP.
Chapter 4 Award BIOS Setup
49
4.2.10 Auto detect hard disk
The IDE HDD AUTO DETECTION utility can automatically detect
the IDE hard disk installed in your system. You can use it to selfdetect and/or correct the hard disk type configuration.
ROM ISA BIOS
CMOS SETUP UTILITY
AWARD SOFTWARE, INC.
HARD DISK TYPE
SIZE
CYLS.
HEADS
PRECOMP
LANDZ
SECTORS MODE
Primary master:
(MB)
790
15
65535
789
57
Select Secondary Slave Option (N=Skip): N
ESC = SKIP
Figure 4-9: IDE HDD auto detection screen
4.2.11 Save & exit setup
If you select this option and press <Enter>, the values entered in the
setup utilities will be recorded in the chipset’s CMOS memory. The
microprocessor will check this every time you turn your system on
and compare this to what it finds as it checks the system. This record
is required for the system to operate.
4.2.12 Exit without saving
Selecting this option and pressing <Enter> lets you exit the Setup
program without recording any new values or changing old ones.
50
PCM-5820 Series User's Manual
CHAPTER
5
SVGA Setup
• Introduction
• Installation of SVGA driver for
Windows 95/98/NT
5.1
Introduction
The PCM-5820 Series has an on-board LCD/VGA interface. The
specifications and features are described as follows:
5.1.1 Chipset
The PCM-5820 Series uses a Cyrix CX5530 chipset for its SVGA
controller. It supports many popular 18-bit LCD displays and conventional analog CRT monitors. The VGA BIOS supports LCD. In
addition, it also supports interlaced and non-interlaced analog monitors (color and monochrome VGA) in high-resolution modes while
maintaining complete IBM VGA compatibility. Digital monitors (i.e.
MDA, CGA, and EGA) are NOT supported. Multiple frequency
(multisync) monitors are handled as if they were analog monitors.
5.1.2 Display memory
With 2 ~ 5 MB share memory, the VGA controller can drive CRT
displays or color panel displays with resolutions up to 1024 x 768 at
64 K colors. The display memory can be expanded to 4 MB in BIOS
for true-color resolution of 1024 x 768.
52
PCM-5820 Series User's Manual
5.2
Installation of SVGA driver
Complete the following steps to install the SVGA driver. Follow the
procedures in the flow chart that apply to the operating system that
you are using within your PCM-5820 Series.
Important: The following windows illustrations are examples
only. You must follow the flow chart instructions and
pay attention to the instructions which then appear
on your screen.
Note 1:
The CD-ROM drive is designated as "D:" throughout
this chapter.
Note 2:
<Enter> means pressing the “Enter” key on the
keyboard.
Note 3:
When you are using a CRT display, please make
sure that your flat panel resolution settings (in the
BIOS setup) are the same as your VGA resolution
settings (in Windows). Otherwise your display may
behave strangely.
Chapter 5 SVGA Setup
53
5.2.1 Installation for Windows 3.1
1. In the Windows 3.1 Main screen, click on the "Windows Setup"
icon.
2. In the "Windows Setup" window, choose "Options", then select
"Change System Settings".
54
PCM-5820 Series User's Manual
3. In the "Change System Settings" window, select the "Display" item.
In the dropdown selection, select "Other display (Requires disk from
OEM)".
4. Type in the correct path like the window below, where drive "D" is
the CD ROM drive. For example,
D:\ Biscuit\ 5820 \ VGA.100 \ Win31
Chapter 5 SVGA Setup
55
5. Select the display type and preferred resolution, then click "OK".
6. Choose "Restart Windows"
56
PCM-5820 Series User's Manual
5.2.2 Installation for Cyrix MediaGX Certified drivers for
Windows 95/980. Insert the disk into the CD-ROM drive.
1. Select "Start" then "Run".
Type the correct path for the driver (like the example below)
"D:\BISCUIT\5820\VGA\Win9xc_40"
Click "OK"
Chapter 5 SVGA Setup
57
2. Click "Finish" to continue.
3. Click "Next" to proceed to the next step. Click "Yes" after you read the
license agreement.
58
PCM-5820 Series User's Manual
4. Follow the instructions which appear on the screen.
5. Insert the Win95/ 98 CD-ROM into the CD-ROM drive. Type the correct
path for the Win9 x source file.
Chapter 5 SVGA Setup
59
6. Choose "Yes", then click "Finish" to restart the computer.
60
PCM-5820 Series User's Manual
5.2.3 Installation for Windows NT
1. a. Select "Start", "Settings" then "Control Panel" to get to the screen
below.
b. Double click on the "Display" icon.
2. a. Choose the "Settings" selection.
b. Click the "Display Type" button.
Chapter 5 SVGA Setup
61
3. Press the "Change..." button.
4. Click on the "Have Disk..." button
62
PCM-5820 Series User's Manual
5. a. Insert the disk into the CD-ROM drive.
b. Type "D:\Biscuit\5820\VGA\WINNT\VGA.110\"
c. Press "OK".
6. a. Select the highlighted item.
b. Press "OK".
Chapter 5 SVGA Setup
63
7. Press "Yes" to proceed.
8. Press "OK" to reboot.
64
PCM-5820 Series User's Manual
9. a. Repeat Step 1 in this manual, select the "Settings" label.
b. Adjust the resolution and color.
c. Click "Test" to see the results.
d. Click "OK" to save the settings.
Chapter 5 SVGA Setup
65
5.3 Further information
For further information about the PCI/SVGA installation in your
PCM-5820, including driver updates, troubleshooting guides and FAQ lists,
visit the following web resources:
Cyrix web site: www.national.com
Advantech web sites: www.advantech.com
www.advantech.com.tw
66
PCM-5820 Series User's Manual
CHAPTER
Audio
• Introduction
• Installation of audio driver for
Windows 95/98/NT
6
6.1
Introduction
The PCM-5820 Series' on-board audio interface provides high-quality
stereo sound and FM music synthesis (ESFM) by using the CX5530
audio controller from Cyrix Corporation. The audio interface can
record, compress, and play back voice, sound, and music with a builtin mixer control. The PCM-5820 Series' on-board audio interface also
supports the Plug and Play (PnP) standard and provides PnP configuration for audio, FM, and MPU-104 logical devices. It is compatible
with AC97 version 2.0, voice, and music functions. The ESFM
synthesizer is register compatible with the OPL3 and has extended
capabilities.
6.2
Installation of audio driver
Before installing the audio driver, please take note of the procedures
detailed below. You must know which operating system you are using
in your PCM-5820 Series, and then refer to the corresponding
installation flow chart. Just follow the steps in the flow chart. You can
quickly and successfully complete the installation, even though you
are not familiar with instructions for Windows.
Note:
68
The CD-ROM drive is designated as "D" throughout
this chapter.
PCM-5820 Series User's Manual
6.2.1 Installation for Windows 95/98
1.
a. Select "Start",
"Settings", "Control
Panel", "System",
"Device Manager".
b. Click the "Other
Devices" item.
c. Remove items related
to ESS
1869.
CX 5530.
2.
a. Select "Add new
hardware".
b. Click "Next".
3.
a. Choose "No", click
"Next".
4.
a. Select "Sound,
video...".
b. Click "Next".
Chapter 6 Audio
69
5.
a. Click "Have Disk".
6.
a. Insert the disc into the
CD-ROM drive.
b. Type the correct path
"D:\5820\VGA\Win9X\
Audio" and click the
click the "OK" button.
7.
a. Select "ES1869
Control interface".
8.
a. Click "Finish" to
complete.
70
PCM-5820 Series User's Manual
D:\5820\VGA.100\Win9X\Audio\
9.
10.
a. Click "OK".
a. Insert Windows 95
CD.
b. Type the path of your
Windows 95 disc and
click "OK".
D:\5820\VGA.100\Win9X\Audio
11.
a. Click "Yes" to restart.
END
Chapter 6 Audio
71
6.2.2 Installation for Windows NT
1.
a. Select "Start",
"Settings", "Control
Panel".
b. Double click
"Multimedia".
2.
a. Select the "Devices"
item.
b. Click "Add".
3.
a. Select the "Unlisted..."
item.
b. Click "OK".
4.
72
a. Insert the disc into the
CD-ROM drive.
b. Type "D:Biscuit\5820\
VGA\Winn\Audio"
and click "OK"
PCM-5820 Series User's Manual
D:\5820\VGA.100\Winnt\Audio
5.
a . C h o o s e th e h ig h lig h te d
ite m .
b . C lic k th e "O K " b u tto n .
6.
a . S e t th e I/O a d d re s s .
b . C lic k "C on tin u e ".
7.
a . Set Xpress Audio
c o n fig u ratio n .
b . C lic k "O K " to re s ta rt.
END
Chapter 6 Audio
73
74
PCM-5820 Series User's Manual
CHAPTER
7
PCI Bus Ethernet
Interface
This chapter provides information on
Ethernet configuration.
• Introduction
• Installation of Ethernet driver for
Windows 95/98/NT
• Further information
7.1
Introduction
The PCM-5820 Series is equipped with a high performance 32-bit
Ethernet chipset which is fully compliant with IEEE 802.3 100 Mbps
CSMA/CD standards. It is supported by major network operating
systems. It is also both 100Base-T and 10Base-T compatible. The
medium type can be configured via the RSET8139.exe program
included on the utility disk.
The Ethernet port provides a standard RJ-45 jack on board. The
network boot feature can be utilized by incorporating the boot ROM
image files for the appropriate network operating system. The boot
ROM BIOS files are combined with system BIOS, which can be
enabled/disabled in the BIOS setup.
7.2
Installation of Ethernet driver
Before installing the Ethernet driver, note the procedures below. You
must know which operating system you are using in your PCM-5820
Series, and then refer to the corresponding installation flow chart.
Then just follow the steps described in the flow chart. You will
quickly and successfully complete the installation, even if you are not
familiar with instructions for MS-DOS or Windows.
Note:
The windows illustrations in this chapter are examples only. You must follow the flow chart instructions
and pay attention to the instructions which then
appear on your screen.
7.2.1 Installation for MS-DOS and Windows 3.1
If you want to set up your Ethernet connection under the MS-DOS or
Windows 3.1 environment, you should first check your server system
model. For example, MS-NT, IBM-LAN server, and so on.
Then choose the correct driver to install in your panel PC.
The installation procedures for various servers can be found on CDROM; the correct path being "D:\5820\Ethernet.100\wfw311".
76
PCM-5820 Series User's Manual
7.2.2 Installation for Windows 95/98
1.
a. Select "Start",
"Settings",
"Control Panel".
b. Double click
"Network".
2.
a. Click "Add" and
prepare to install
network functions.
3.
a. Select the
"Adapter" item to
add the Ethernet
card.
4.
a. Click "Have Disk"
to install the driver.
Chapter 7 PCI Bus Ethernet Interface
77
5.
a. Insert the disc
CD
labeled
into
the"RTL8139A
D:\ drive.
Driver #2" into drive
b. Fill
A:. in "D:\5820\
b. Fill in the correct
Ethernet.100\Win95\".
path.
c. Click "OK".
6.
a. Choose the
"Realtek" item.
b. Click "OK".
7.
a. Make sure the
configurations of
relative items are
set correctly.
b. Click "OK" to
reboot.
A:\Win95\
D:\5820\Ethernet.100\Win95\
END
Note:
78
The correct path for Windows 98 is:
"D:\5820\Ethernet.100\Win98"
PCM-5820 Series User's Manual
7.2.3 Installation for Windows NT
1.
a. Select "Start",
"Settings",
"Control Panel".
b. Double click
"Network".
2.
a. Choose the
"Adapters" label.
b. Click the "Add"
button.
3.
a. Press "Have
Disk".
4.
a. Type "A:".
D
b. Press "OK".
A:
D:
Chapter 7 PCI Bus Ethernet Interface
79
5.
disc
a. Insert theCD
labeled
into the"RTL8139A
D:\ drive.
Driver #2" into drive
b. A:.
Fill in "D:\5820\
Ethernet.100\Winnt\".
b. Fill in the correct
path.
c. Click "OK".
6.
a. Choose the
"Realtek" item.
b. Click "OK".
7.
a. Make sure the
configurations of
relative items are
set correctly.
b. Click "OK" to
reboot.
END
80
PCM-5820 Series User's Manual
A:\Winnt\
D:\5820\Ethernet.100\Winnt\
7.3
Further information
Realtek website: www.realtek.com
Advantech websites: www.advantech.com
www.advantech.com.tw
Chapter 7 PCI Bus Ethernet Interface
81
82
PCM-5820 Series User's Manual
APPENDIX
Pin Assignments
A
This appendix contains information of a
detailed or specialized nature. It includes:
• CRT display connector
• Flat panel display connector
• COM2 RS-232/422/485 serial port
connector
•
•
•
•
•
•
•
•
•
•
•
•
•
•
•
•
•
•
Keyboard and mouse connector
Main power connector
IDE hard drive connector
COM1 RS-232 serial port
Ethernet 10Base-T connector
Auxilary power connector
Floppy drive connector
Parallel port connector
IR connector
USB connector
Audio connector
CD audio connector
LVDS connector
CPU fan power connector
RCA (composite) connector
S-Video connector
ATX power feature connector
ATX power button & power LED
connector
CRT display connector (CN18)
Table A-1: CRT display connector
Pin
1
2
3
4
5
6
7
8
Signal
RED
GREEN
BLUE
N/C
GND
GND
GND
GND
Pin
9
10
11
12
13
14
15
Signal
VDDC
GND
N/C
DDCSDA
H-SYNC
V-SYNC
DDCSCL
Flat panel display connector (CN12)
Table A-2: Flat panel display connector
Pin
1
3
5
7
9
11
13
15
17
19
21
23
25
27
29
31
33
35
37
39
41
43
84
Function
+12 V
GND
Vcc_LCD
N/C
N/C
PD0
PD2
PD4
N/C
PD6
PD8
PD10
N/C
PD12
PD14
PD16
GND
SHFCLK
DE (M)
GND
N/C
VSAFE (ENAVDD)
PCM-5820 Series User's Manual
Pin
2
4
6
8
10
12
14
16
18
20
22
24
26
28
30
32
34
36
38
40
42
44
Function
+12 V
GND
Vcc_LCD
GND
N/C
PD1
PD3
PD5
N/C
PD7
PD9
PD11
N/C
PD13
PD15
PD17
GND
FLM
LP
ENABKL
N/C
Vcc_LCD
44
43
42
41
4
3
2
1
COM2 RS-232/422/485 serial port (CN14)
2
14
1
13
Table A-3: COM2 RS-232/422/485 series port
Pin
1
2
3
4
5
6
7
8
9
10
11
12
13
14
RS-232 port
DCD
DSR
RxD
RTS
TxD
CTS
DTR
RI
GND
N/C
N/C
N/C
N/C
N/C
RS-422 port
N/C
N/C
N/C
N/C
N/C
N/C
N/C
N/C
N/C
N/C
TxD+
TxDRxD+
RxD-
RS-485 port
N/C
N/C
N/C
N/C
N/C
N/C
N/C
N/C
N/C
N/C
DATA+
DATAN/C
N/C
Keyboard and mouse connnector (CN17)
Table A-4: Keyboard and mouse connector
Pin
1
2
3
4
5
6
Signal
KB DATA
MS DATA
GND
V CC
KB CLOCK
MS CLOCK
Appendix A Pin Assignments
85
Main power connector (CN9)
Table A-5: Main power connector
Pin
1
2
3
4
1
Signal
+12 V
GND
GND
+5 V
2
3
4
IDE hard drive connector (CN11)
Table A-6: IDE hard drive connector
Pin
1
3
5
7
9
11
13
15
17
19
21
23
25
27
29
31
33
35
37
39
41
43
Signal
IDE RESET*
DATA 7
DATA 6
DATA 5
DATA 4
DATA 3
DATA 2
DATA 1
DATA 0
SIGNAL GND
DRQ*
IO WRITE*
IO READ*
IO CHANNEL READY
ACK
IRQ14 (IDE IRQ)
ADDR 1
ADDR 0
HARD DISK
SELECT 0
IDE ACTIVE*
VCC
GND
* low active
86
PCM-5820 Series User's Manual
Pin
2
4
6
8
10
12
14
16
18
20
22
24
26
28
30
32
34
36
38
40
42
44
Signal
GND
DATA 8
DATA 9
DATA 10
DATA 11
DATA 12
DATA 13
DATA 14
DATA 15
N/C
GND
GND
GND
N/C
GND
IOCS16*
N/C
ADDR 2
HARD DISK
SELECT 1
GND
VCC
N/C
44
43
42
41
4
3
2
1
COM1 RS-232 serial port (CN16)
Table A-7: COM1 RS-232 serial port
Pin
1
2
3
4
5
6
7
8
9
Signal
DCD
RxD
TxD
DTR
GND
DSR
RTS
CTS
RI
Ethernet 100Base-T connector (CN13)
Table A-8: Ethernet 100Base-T connector
Pin
1
2
3
4
5
6
7
8
Signal
XMT+
XMTRCV+
N/C
N/C
RCVN/C
N/C
Appendix A Pin Assignments
87
Auxilary power connector (CN10)
3
2
1
Table A-9: Peripheral power connector
Pin
3
2
1
Signal
-12 V
GND
-5 V
Floppy drive connector (CN2)
33
31
3
1
34
32
4
2
Table A-10: Floppy drive connector
Pin
1
3
5
7
9
11
13
15
17
19
21
23
25
27
29
31
33
Signal
GND
GND
GND
GND
GND
GND
GND
GND
GND
GND
GND
GND
GND
GND
GND
GND
GND
* low active
88
PCM-5820 Series User's Manual
Pin
2
4
6
8
10
12
14
16
18
20
22
24
26
28
30
32
34
Signal
DENSITY SELECT*
N/C
N/C
INDEX*
MOTOR 0*
DRIVE SELECT 1*
DRIVE SELECT 0*
MOTOR 1*
DIRECTION*
STEP*
WRITE DATA*
WRITE GATE*
TRACK 0*
WRITE PROTECT*
READ DATA*
HEAD SELECT*
DISK CHANGE*
Parallel port connector (CN3)
25
23
3
1
26
24
4
2
Table A-11: Parallel port connector
Pin
1
2
3
4
5
6
7
8
9
10
11
12
13
14
15
16
17
18
19
20
21
22
23
24
25
26
Signal
STROBE*
AUTOFD*
D0
ERROR*
D1
INIT*
D2
SLCTINI*
D3
GND
D4
GND
D5
GND
D6
GND
D7
GND
ACK*
GND
BUSY
GND
PE
GND
SLCT
GND
* low active
Appendix A Pin Assignments
89
IR connector (CN7)
Table A-12: IR connector
Pin
1
2
3
4
5
5
Signal
+5 V (VCC)
N/C
IR_RX
GND
IR_TX
4
3
2
1
USB connector (CN4)
9
7
5
3
1
10
8
6
4
2
Table A-13: USB connector
Pin
1
3
5
7
9
Signal
USBVCC (5 V)
DATA 0DATA 0+
GND
GND
Pin
2
4
6
8
10
Signal
USB VCC (5 V)
DATA 1DATA 1+
GND
N/C
Audio connector (CN5)
15
13
3
1
16
14
4
2
Table A-14: Audio connector
Pin
1
3
5
7
9
11
13
15
90
Signal
SPEAKER OUT R+
SPEAKER OUT L+
LINE OUT R
GND
LINE IN R
GND
NC
MIC IN
PCM-5820 Series User's Manual
Pin
2
4
6
8
10
12
14
16
Signal
SPEAKER OUT RSPEAKER OUT LLINE OUT L
GND
LINE IN L
GND
NC
GND
CD audio connector (CN1)
1
2
3
4
Table A-15: CD audio connector
Pin
4
3
2
1
Signal
GND
CD audio control R
GND
CD audio control L
LVDS connector (CN15)
19
17
3
1
20
18
4
2
Table A-16: LVDS connector
Pin
1
3
5
7
9
11
13
15
17
19
Signal
VDD
VDD
GND
GND
TX0GND
TX1+
TX2GND
TXCK+
Pin
2
4
6
8
10
12
14
16
18
20
Signal
VDD
VDD
GND
GND
TX0+
TX1GND
TX2+
TXCKGND
CPU fan power connector (CN6)
Table A-17: CPU fan power connector
Pin
1
2
3
3
Signal
+5 V
GND
+12 V
2
1
Appendix A Pin Assignments
91
S-Video connector (CN21)
4
3
2
1
Table A-18: S-Video connector
Pin
1
2
3
4
Signal
GND
GND
Luminance output (brightness)
Chrominance output (color)
Table A-19: SCART Mode (optional)
Pin
1
2
3
4
Signal
Blue
CSYNC
Red
Green
RCA (composite) connector (CN22)
C om posite
G ND
92
PCM-5820 Series User's Manual
ATX power feature connector (CN23)
3
2
1
Table A-20: ATX power feature connector (CN23)
Pin
1
2
3
Signal
5VSB (Stand-by voltage)
NC
VPSON
ATX power button & power LED connector
(CN24)
4
3
2
1
Table A-21: ATX power button & power LED connector (CN24)
Pin
1
2
3
4
Signal
LED+
Button+
LED- (GND)
Button- (GND)
Appendix A Pin Assignments
93
94
PCM-5820 Series User's Manual
APPENDIX
B
System Assignments
• System I/O ports
• DMA channel assignments
• Interrupt assignments
• 1st MB memory map
B.1
System I/O ports
Table B-1: System I/O ports
Addr. range
(Hex)
000-01F
020-021
022-023
040-05F
060-06F
070-07F
080-09F
0A0-0BF
0C0-0DF
0F0
0F1
0F8-0FF
170- 178
1F0-1F8
200-207
278-27F
2F8-2FF
300-31F
360-36F
378-37F
380-38F
3A0-3AF
3B0-3BF
3C0-3CF
3D0-3DF
3F0-3F7
3F8-3FF
443
Device
DMA controller
Interrupt controller 1, master
Chipset address
8254 timer
8042 (keyboard controller)
Real-time clock, non-maskable interrupt (NMI) mask
DMA page register,
Interrupt controller 2
DMA controller
Clear math co-processor
Reset math co-processor
Math co-processor
2nd fixed disk for CompactFlash
1st fixed disk
Game I/O
Reserved
Serial port 2
Ethernet**
Reserved
Parallel printer port 1 (LPT2)
SDLC, bisynchronous 2
Bisynchronous 1
Monochrome display and printer adapter (LPT1)
Reserved
Color/graphics monitor adapter
Diskette controller
Serial port 1
Watchdog timer
* PNP audio I/O map range from 220 ~ 250H (16 bytes)
MPU-401 select from 300 ~ 330H (2 bytes)
** default setting
96
PCM-5820 Series User's Manual
B.2
DMA channel assignments
Table B-2: DMA channel assignments
Channel
0
1
2
3
4
5
6
7
Function
Available
Audio*
Floppy disk (8-bit transfer)
Parallel**
Cascade for DMA controller 1
Audio*
Available
Available
* Audio DMA default setting: DMA 1.5
Audio High DMA select: DMA 1.3
Audio Low DMA select: DMA 5.6.7
** Parallel port DMA default setting: DMA 3
Parallel port DMA select: DMA 1.3
Appendix B System Assignments
97
B.3
Interrupt assignments
Table B-3: Interrupt assignments
Interrupt#
NMI
IRQ 0
IRQ 1
IRQ 2
IRQ 8
IRQ 9
IRQ 10
IRQ 11
IRQ 12
IRQ 13
IRQ 14
IRQ 15
IRQ 3
IRQ 4
IRQ 5
IRQ 6
IRQ 7
Interrupt source
Parity error detected
Interval timer
Keyboard
Interrupt from controller 2 (cascade)
Real-time clock
Reserve
Available
Reserved for watchdog timer
PS/2 mouse
INT from co-processor
Preliminary IDE
Secondary IDE for CompactFlash
Serial communication port 2
Serial communication port 1
Audio*
Diskette controller (FDC)
Parallel port 1 (print port)
* Audio default setting: IRQ5
USB and Ethernet IRQ is automatically set by the system
98
PCM-5820 Series User's Manual
B.4
1st MB memory map
Table B-4: 1st MB memory map
Addr. range (Hex)
F000h - FFFFh
D800h - EFFFh
D000 - D400H
C800h - D7FFh
C000h - C7FFh
B800h - BFFFh
B000h - B7FFh
A000h - AFFFh
0000h - 9FFFh
Device
System ROM
Unused
Available
Ethernet ROM*
VGA BIOS
CGA/EGA/VGA text
Reserved for graphic mode usage
EGA/VGA graphics
Base memory
* default setting
Appendix B System Assignments
99
100
PCM-5820 Series User's Manual
APPENDIX
C
LCD Services
This appendix contains information of a
detailed or specialized nature. It includes
information about 18-bit TFT LCD
interfaces.
C.1
LCD services
LCD screens are very popular on Advantech's CPU cards, biscuit
PCs and POS series products, such as the PCA-6135/6145/6153,
and PCA-6751/PCA-6751V. "Lighting" LCDs is virtually
impossible without technical expertise. Advantech provides LCD
lighting and integration services to assist our customers in setting
up their systems. Advantech's LCD lighting guide explains how to
make connections between LCD interfaces and LCD panels, as
well as how to control contrast, brightness, VEE source, LCD
inverter and all other factors that affect the successful installation
of LCD panels.
The following information details our LCD lighting services:
a) This policy is only valid for Advantech products that include
LCD support
b) The customer should send the following LCD components for
service:
• DC-AC inverter and cable (i.e. connector with/without wires)
and data sheet
• LCD flat panel and cable (connector with/without wires) and
complete data sheet
c) Advantech will normally charge the customer a deposit. The
deposit will be refunded when servicing exceeds a minimum
volume
d) The customer must sign the agreement and fax it to us prior to
sending the LCD package. Advantech reserves the right to
refuse service if the customer cannot provide the required
documents and auxiliary parts
e) Advantech will supply a BIOS file and connection cable to the
customer upon completing the service
f) A minimum of seven working days is required for completion
of service, starting from receipt of the LCD package by
Advantech
For the 18-bit TFT display support list, please contact our customer service department for more detailed information and service
files. See our web site at: http://support.advantech.com/
102
PCM-5820 Series User's Manual
APPENDIX
D
Installing PC/104
Modules
This appendix gives instructions for
installing PC/104 modules.
D.1
Installing PC/104 modules
The PCM-5820 Series' PC/104 connectors give you the flexibility
to attach PC/104 modules.
Installing these modules on the PCM-5820 Series is quick and simple.
The following steps show how to mount the PC/104 modules:
1. Remove the PCM-5820 Series from your system, paying
particular attention to the safety instructions already mentioned
above.
2. Make any jumper or link changes required to the CPU card
now. Once the PC/104 module is mounted you may have
difficulty in accessing these.
3. Normal PC/104 modules have male connectors and mount
directly onto the main card. (Refer to the diagram on the
following page.)
4. Mount the PC/104 module onto the CPU card by pressing the
module firmly but carefully onto the mounting connectors.
5. Secure the PC/104 module onto the CPU card using the four
mounting spacers and screws.
104
PCM-5820 Series User's Manual
P C /1 0 4
M o u n tin g S u p p o rt
F e m a le
M a le
P C /1 0 4 m o d u le
P C M -5 8 20 S e rie s
Figure D-1: PC/104 module mounting diagram
8 .9
8 2.5
9 5 .9
9 0 .8
9 0.8
5 .1
5 .1
0
5 .1
0
8 5 .1
9 0 .2
Figure D-2: PC/104 module dimensions (mm) (±0.1)
Appendix D Installing PC/104 Modules
105
Table D-1: PC/104 connectors (CN8)
Pin
Number
0
1
2
3
4
5
6
7
8
9
10
11
12
13
14
15
16
17
18
19
20
21
22
23
24
25
26
27
28
29
30
31
32
Signal
Row A
—
IOCHCHK*
SD7
SD6
SD5
SD4
SD3
SD2
SD1
SD0
IOCHRDY
AEN
SA19
SA18
SA17
SA16
SA15
SA14
SA13
SA12
SA11
SA10
SA9
SA8
SA7
SA6
SA5
SA4
SA3
SA2
SA1
SA0
0V
Row B
—
0V
RESETDRV
+5 V
IRQ9
-5 V
DRQ2
-12 V
ENDXFR*
+12 V
N/C
SMEMW*
SMEMR*
IOW*
IOR*
DACK3*
DRQ3
DACK1*
DRQ1
REFRESH*
SYSCLK
IRQ7
IRQ6
IRQ5
IRQ4
IRQ3
DACK2*
TC
BALE
+5 V
OSC
0V
0V
* active low
106
PCM-5820 Series User's Manual
Signal
Row C
0V
SBHE*
LA23
LA22
LA21
LA20
LA19
LA18
LA17
MEMR*
MEMW*
SD8
SD9
SD10
SD11
SD12
SD13
SD14
SD15
KEY
—
—
—
—
—
—
—
—
—
—
—
—
—
Row D
0V
MEMCS16*
IOCS16*
IRQ10
IRQ11
IRQ12
IRQ15
IRQ14
DACK0*
DRQ0
DACK5*
DRQ5
DACK6*
DRQ6
DACK7*
DRQ7
+5 V
MASTER*
0V
0V
—
—
—
—
—
—
—
—
—
—
—
—
—
APPENDIX
E
Programming the
Watchdog Timer
The PCM-5820 Series is equipped with a
watchdog timer that resets the CPU or
generates an interrupt if processing comes
to a standstill for whatever reason. This
feature ensures system reliability in
industrial standalone or unmanned
environments.
E.1
Programming the watchdog timer
Jumper J3 controls the watchdog settings. The default configuration of the timer is enabled via a system reset.
To enable the watchdog timer, you must write a program which
writes 1 to I/O port address 443 (hex) at regular intervals. The first
time your program reads the port, it enables the watchdog timer.
After that, your program must write 1 to the port at time interval of
less than 1.6 seconds, otherwise the watchdog timer will activate
and reset the CPU or generate an interrupt on IRQ11. When you
want to disable the watchdog timer, your program should write 0
to I/O port 443.
If CPU processing comes to a standstill because of EMI or a
software bug, your program's signals to I/O port 443 to the timer
will be interrupted. The timer will then automatically reset the
CPU or invoke an IRQ, and data processing will continue normally.
You must write your program so that it writes 1 to I/O port 443 at
an interval shorter than the timer's preset interval. The timer's
intervals have a tolerance of ± 30%, so you should program an
instruction that will refresh the timer about every second.
108
PCM-5820 Series User's Manual
The following program shows how you might program the
watchdog timer in BASIC:
10
REM
Watchdog timer example program
20
X=Out &H443, 1 REM
watchdog
30
GOSUB 1000 REM
complete
40
X=Out &H443, 1 REM
50
GOSUB 2000 REM
complete
60
X=Out &H443, 0 REM
70
END
1000
REM Subroutine #1, takes 1 second to
complete
Enable and refresh the
Task #1, takes 1 second to
Refresh the watchdog
Task #2, takes 1 second to
Disable the watchdog
.
.
.
1070
RETURN
2000
REM Subroutine #2, takes 1 second to
complete
.
.
.
2090
RETURN
Appendix E Programming the Watchdog Timer
109
110
PCM-5820 Series User's Manual
APPENDIX
F
Mechanical Drawings
F.1
Component side
Figure F-1: Board Dimensions component side (PCM-5820,
PCM-5820L, PCM-5820E only)
112
PCM-5820 Series User's Manual
F.2
Component side (PCM-5822)
Figure F-2: Board Dimensions component side (PCM-5822 only)
Appendix F Mechanical Drawings
113
F.3
Solder side
Figure F-3: Board Dimensions solder side (PCM-5820 Series)
114
PCM-5820 Series User's Manual
n KaVTZWZTReZ`_-?> a`hVc.
87 `_gUby G_\YT cdQdU _ed`ed
IBHLH@E@>LJC> K@GKHJ
-2 1.0/.1
F
<
G
M
A_TU\
GdQ^TQbT di`U
6eY\dzY^ HY]Ub
8UdUSdY^W TYcdQ^SU
<
BDB _ed`ed di`U
FUdb_bUV\USdYfUuw~v
Hi`U
E
8UdUSdY^W dQbWUd
<icdUbUcYc
FUc`_^cU dY]U
D_gUb ce``\i
7ebbU^d S_^ce]`dY_^
@YWXd c_ebSU
GU^cYdYfYdi
C`UbQdY_^ ]_TU
7_^db_\ _ed`ed
HXb_eWXzRUQ]
=P37F0L?L
=P7F0F?L
=P5F0I?LuKYdX `_\QbYjY^W VY\dUbv
=P7F0F?L0L =P5F0I?L0LuKYdX `_\QbYjY^W VY\dUbv
}{~ d_ *] uAGz* ]Ybb_bv
}{~ d_ -]
}{~ d_ +] uAGz+ ]Ybb_bv
uAGz* ]Ybb_bv
n >RfeZ`_ W`c i`fc dRWVei
pD\UQcU [UU` dXUcU Y^cdbeSdY_^c Q^T bUfYUg dXU] RUV_bU ecY^W dXYc e^Yd{
pD\UQcU _RcUbfU dXU SQedY_^c dXQd V_\\_g3
+
ORc_Z_X
GUbY_ec Y^Zebi ]Qi bUce\d YV Y^cdbeSdY_^c QbU ^_d V_\\_gUT{
+
>RfeZ`_
Db_TeSd ]Qi RU TQ]QWUTy _b Y^Zebi ]Qi bUce\d YV Y^cdbeSdY_^c QbU ^_d V_\\_gUT{
pHXU V_\\_gY^W Yc Q^ Uh`\Q^QdY_^ _V dXU ci]R_\c ecUT Y^ dXU _`UbQdY_^ ]Q^eQ\{
+ 2=^Zebi _b TQ^WUb ]Qi _SSeb e^TUb c`USYQ\ S_^TYdY_^c{
+
ORc_Z_X
~-]
31 C_ TRdV `W fdZ_X eYZd f_Ze hZeY ^RTYZ_VcZVd-GfT]VRc a`hVc T`_ec`]/ ^VUZTR] VbfZa^V_e/
gVYZT]V/ ecRZ_/ RZca]R_V/ T`^SfdeZ`_ RaaRcRefd/ V_eVceRZ_^V_e `c dRWVei UVgZTV VeT./ Ze
cVbfZcVd Z_deR]]Z_X WRZ]0dRWV UVgZTV/ `c T`_eRTe fd W`c Z_W`c^ReZ`_ `_ eiaV cVbfZcVU1
=d ]Qi bUce\d Y^ cUbY_ec TQ]QWUy VYbU _b Xe]Q^ Y^Zebi{
41 ?` _`e UZdRddV^S]V R_U ^`UZWi eYZd f_Ze/ hYV_ Ze cVbfZcVd1 CW _VVUd/ a]VRdV T`_eRTe fd1
=d ]Qi WYfU Q^ U\USdbYS cX_S[ Q^T SQecU Q VYbU{
51 ?` _`e T`__VTe R eVc^Z_R] hYV_ a`hVc `_1
=d ]Qi WYfU Q^ U\USdbYS cX_S[{
+
>RfeZ`_
31 LYZd f_Ze dYR]] _`e SV fdVU `feU``cd1
=d ]YWXd cX_bdU^ dXU \YVU SiS\U _V dXU `b_TeSd _b WYfU Q^ U\USdbYS cX_S[{
41 LYZd f_Ze ^fde SV fdVU hYV_ eYV ac`eVTeZ`_ T`gVc Zd Z_deR]]VU1
=d ]Qi cX_bdU^ dXU \YVU SiS\U _V dXYc e^Yd{ =d ]Qi WYfU U\USdbYS cX_S[{
51 I]VRdV `SdVcgV daVTZWZTReZ`_ cReZ_X1
=d ]YWXd cX_bdU^ dXU \YVU SiS\U _V dXU `b_TeSd Q^T SQecU Q VYbU{
61 OYV_ hZcV T`__VTeZ`_/ dTcVh S`]e `_ eVc^Z_R] S]`T\ hZeY 21: G3^ decV_XeY1
=d ]Qi SQecU Q VYbU{
71 ?` _`e fdV eYZd f_Ze Z_ a]RTV hYVcV eYVcV RcV SZX gZScReZ`_1
=d ]Qi SQecU Q VYbU{
81 C_ T]VR_Z_X eYV f_Ze/ U` _`e fdV hReVc `c R_ `Z]0SRdVU UVeVcXV_e1
=d ]Qi WYfU Q^ U\USdbYS cX_S[ Q^T SQecU Q VYbU{
n HcUVcZ_X Z_W`c^ReZ`_
=P 37F
L ? L
Db_dUSdY_^ SYbSeYd
HY]Ub Ve^SdY_^
=^TYSQdY_^
7_^^USdY_^
=^ce\QdY_^ bUcYcdQ^SU
B_YcU cdbU^WdX
8YU\USdbYS cdbU^WdX
JYRbQdY_^
GX_S[
5]RYU^d Y\\e]Y^QdY_^
5]RYU^d dU]`UbQdebU
5]RYU^d Xe]YTYdi
5]RYU^d `b_dUSdY_^
AQdUbYQ\
=^TYfYTeQ\
5SSUcc_bi
7_]]_^
KUYWXd
7_^db_\ _ed`ed
5``UQbQ^SUc
D DBD _`U^ S_\\USd_b _ed`ed
H 6eY\d Y^ dY]Ub Ve^SdY_^
BDB _`U^ S_\\USd_b _ed`ed
~ 9]YddUb
* FUSUYfUb
GY^W\U R_Ti di`Uu9]YdUb Q^T FUSUYfUbv
Ced`ed
D_gUb ce``\i
8UdUSdY^W di`U
F FU\Qi _ed`ed
H G_\YT cdQdU _ed`eduHFv
: :bUU `_gUb
8 87 `_gUb
H
A
D
8
HXb_eWX RUQ]
FUdb_bUV\USdYfU
FUdb_bUV\USdYfU gYdX `_\QbYjY^W VY\dUb
8YVVecU bUV\USdYfU
A I^Yd2]
8UdUSdY^W TYcdQ^SU
I^Yd2]]
DX_d_U\USdbYS cU^c_b 6L GUbYUc ^Q]U
lLYV RS`gV daVTZWZTReZ`_d RcV TYR_XVRS]V hZeY`fe _`eZTV R_ieZ^V1
=P37F0L?L0I
=P7F0F?L0I
8YVVecU bUV\USdYfU
=P5F0I?L0IuKYdX `_\QbYjY^W VY\dUbv
3BDB _`U^ S_\\USd_b _ed`ed s @_QT f_\dQWU 2 AQh{ +}J87y @_QT SebbU^d 2 AQh{ -}]5y
FUcYTeQ\ f_\dQWU 2 AQh{ ~J Qd -}]5y AQh{ }{,J Qd ~.]5
;bUU^ @98 deb^c _^ Qd e^cdQR\U _`UbQdY_^ Q^T _ed`ed udbQ^cYcd_b _ed`edv deb^c _^
FUfUbcU `_\QbYdi `b_dUSdY_^y cX_bdzSYbSeYd `b_dUSdY_^
GU\USdQR\U CB 8U\Qiy C:: 8U\Qiy C^U GX_d 8U\Qi Ri c\YTU cgYdSXy 8U\Qi HY]U2}{~ d_ -cUSuJF QTZecdQR\Uv
C`UbQdY_^ Y^TYSQd_b 2 MU\\_g @98y GU\VzTYQW^_cYc Y^TYSQd_b 2 ;bUU^ @98
HUb]Y^Q\ S_^^USdY_^
AY^{ *}Auu-}}J87v
l*,}J dXU caeQbU gQfU ^_YcUu`e\cU gYTdX2~tv Ri dXU ^_YcU cY]e\Qd_b
~y}}}J57 -}|.}<j V_b ~]Y^edU
~{-]] Q]`\YdeTU Qd VbUaeU^Si _V ~} d_ --<j Y^ UQSX _V Ly My N TYbUSdY_^c V_b * X_ebc
-}}]|c*u-};v Y^ Ly My N TYbUSdY_^c V_b + dY]Uc
Ge^\YWXd 2 AQh{ ~~y}}} y =^SQ^TUcSU^d \Q]` 2 AQh{ +y}}}
C`UbQdY^W 2 z*} d_ x.-ou^_^zVbUUjY^W S_^TYdY_^vy Gd_bQWU 2 z*- d_ x/}o
+- d_ 0-rF<y Gd_bQWU 2 +- d_ 0-rF<
4D..u497 c`USYVYSQdY_^v
7QcU 2 56Gy @U^c S_fUb 2 D7y @U^c 2 5Sbi\
AYbb_buAGz+v
AYbb_buAGz+v
AYbb_buAGz*v
8bYfUby A_e^dY^W RbQS[Udy 6_\dc|^edc
A8HzD 2
H8HzD 2
5``b_h{ ~~}Wy
D8HzD 2 5``b_h{ ~~,Wy
5``b_h{ ~0+Wy
88H 2 5``b_h{ 1-Wy
D8H 2 5``b_h{ ~~,Wy
A8HzHD 2
D8HzHD 2 5``b_h{ ~~1W
H8HzHD
2
88HzH 2 5``b_h{ ~}}W
D8HzH 2 5``b_h{ ~~1W
5``b_h{ ~~-W
5``b_h{ ~00W
AYbb_buAGz*v
H8H 2 5``b_h{ ~0+Wy
H8HzH 2 5``b_h{ ~00W
A8H 2
5``b_h{ ~~}Wy
A8HzH 2
5``b_h{ ~~-W
=P9220??L0I
88HzD 2 5``b_h{ 1-Wy
88HzHD 2 5``b_h{ ~}}W
5``b_fQ\
puw~vHXU cU^cY^W bQ^WU Q^T dXU cU^cY^W _RZUSd _V dXU bUdb_bUV\USdYfU cU^c_b QbU c`USYVYUT gYdX ecY^W dXU AGz*uAGz+v bUV\USd_b{ HXU cU^cY^W bQ^WUc _V dXU bUdb_bUV\USdYfU cU^c_b Y^ dXU QR_fU dQR\U QbU Y^TU^dYVYUT Qc dXU `_ccYR\U cUddY^W bQ^WUc
_V dXU AGz*uAGz+v bUV\USd_b{ HXU cU^c_b SQ^ TUdUSd _^ _RZUSd e^TUb }{~] Q`Qbd{
n KaVTZWZTReZ`_-AcVV a`hVc.
Hi`U
GdQ^TQbT di`U
6eY\dzY^ HY]Ub
8UdUSdY^W TYcdQ^SU
8UdUSdY^W dQbWUd
<icdUbUcYc
FUc`_^cU dY]U
D_gUb ce``\i
D_gUb S_^ce]`dY_^
@YWXd c_ebSU
GU^cYdYfYdi
C`UbQdY_^ ]_TU
A_TU\
HXb_eWXzRUQ]
=P37F0LAJ
=P37F0LAJ0L
~-]
C`QaeU ]QdUbYQ\c _V AY^{ ~~-]]
=P7F0FAJ
=P7F0FAJ0L
}{~ d_ -]uAGz*v
:bUU `_gUby FU\Qi S_^dQSd _ed`ed
FUdb_bUV\USdYfU
=P5F0IAJuKYdX `_\QbYjY^W VY\dUbv
=P5F0IAJ0LuKYdX `_\QbYjY^W VY\dUbv
}{~ d_ *]uAGz*vy }{~ d_ +]uAGz+v
C`QaeU ]QdUbYQ\c _V AY^{ ~.}]]
AQh{ *}]c
*,z*,}J57 l~}r -}|.}<jy *,z*,}J87 l~}ruFY``\U DzD2AQh{ ~}rv
AQh{ +J5
FUT @98uA_Te\QdUT2..}^]v
=^VbQbUT @98uA_Te\QdUTv
5TZecdQR\U Ri JF
GU\USdQR\U @YWXd CB _b 8Qb[ CB Ri c\YTU cgYdSX
3FU\Qi S_^dQSd _ed`ed 5 FU\Qi S_^dQSd SQ`QSYdi 2 +}J87 +5 Qd bUcYcdYfU \_QTy *-}J57 +5 Qd bUcYcdYfU \_QT
FU\Qi S_^dQSd S_]`_cYdY_^2 ~SuGD8Hv
;bUU^ @98 Y^TYSQd_b
;bUU^ @98 deb^c _^ Qd e^cdQR\U _`UbQdY_^
3GU\USdQR\U CB 8U\Qiy C:: 8U\Qiy C^U GX_d 8U\Qi Ri c\YTU cgYdSX
38U\Qi HY]U 2 }{~ d_ -cUSuJF QTZecdQR\Uv
C`UbQdY_^ Y^TYSQd_b 2 MU\\_g @98y GU\VzTYQW^_cYc Y^TYSQd_b 2 ;bUU^ @98
HUb]Y^Q\ S_^^USdY_^
AY^{ *}Auu-}}J87v
7_^db_\ _ed`ed
GU\VzTYQW^_cYc
_ed`ed
HY]Ub Ve^SdY_^
LI
DBD _ed`ed di`U
FUdb_bUV\USdYfUuw~v
HXb_eWX RUQ]
=P37F0L?L0LI =P7F0F?L0LI =P5F0I?L0LIuKYdX `_\QbYjY^W VY\dUbv
=P9220??L0LI
=P9220??L0L
}{~ d_ -]
/}}]]u*}}m*}}]]
}{~ d_ *]uAGz* ]Ybb_bv
/}}]]u*}}m*}}]]
~-]
uAGz* ]Ybb_bv
^_^zW\_cci gXYdU `Q`Ubv
}{~ d_ +]uAGz+ ]Ybb_bv
^_^zW\_cci gXYdU `Q`Ubv
C`QaeU ]QdUbYQ\c _V
HbQ^c`QbU^dy HbQ^c\eSU^dy
C`QaeU ]QdUbYQ\c _V
HbQ^c`QbU^dy HbQ^c\eSU^dy
C`QaeU ]QdUbYQ\c _V AY^{ ~.}]]
C`QaeU ]QdUbYQ\c _V AY^{ ~.}]]
AY^{ ~~-]]
C`QaeU ]QdUbYQ\
AY^{ ~~-]]
C`QaeU ]QdUbYQ\
AQh{ *}r Qd bQdUT cUddY^W TYcdQ^SU
AQh{ *}r Qd bQdUT cUddY^W TYcdQ^SU
AQh{ ~]c
~*z*,J87 l~}ruFY``\U DzD2AQh{ ~}rv
AQh{ +}]5
AQh{ ,}]5
AQh{ +}]5
AQh{ ,}]5
=^VbQbUT @98uA_Te\QdUTv
=^VbQbUT @98uA_Te\QdUTv
FUT @98uA_Te\QdUT2..}^]v
FUT @98uA_Te\QdUT2..}^]v
=^VbQbUT @98uA_Te\QdUTv
5TZecdQR\U Ri JF
GU\USdQR\U @YWXd CB _b 8Qb[ CB Ri c\YTU cgYdSX
3DBD _ed`ed s Ced`ed f_\dQWU 2 AY^{ `_gUb ce``\iz*{-J
3BDB _`U^ S_\\USd_b _ed`ed s @_QT f_\dQWU 2 AQh{ +}J87y @_QT SebbU^d 2 AQh{ *}}]5
@_QT SebbU^d 2 AQh{ *}}]5
FUcYTeQ\ f_\dQWU 2 AQh{ ~J Qd *}}]5y AQh{ }{,J Qd ~.]5
=P37F0L?L0L
GU\VzTYQW^_cYc
_ed`ed
HXQ^[ i_e fUbi ]eSX V_b cU\USdY^W 5ed_^YSc `b_TeSdc{
A`c i`fc dRWVei/ a]VRdV cVRU eYV W`]]`hZ_X SVW`cV fdZ_X1
8YVVecU bUV\USdYfU
=P9220??L
=^TYSQdY_^
7_^^USdY_^
=^ce\QdY_^ bUcYcdQ^SU
8YVVecU bUV\USdYfU
=P9220?AJ
=P9220?AJ0L
/}}]]u*}}m*}}]] ^_^zW\_cci gXYdU `Q`Ubv
HbQ^c`QbU^dy HbQ^c\eSU^dy C`QaeU ]QdUbYQ\
AQh{ *}r Qd bQdUT cUddY^W TYcdQ^SU
=^VbQbUT @98uA_Te\QdUTv
=^ce\QdY_^ di`Uuw*v
B_YcU cdbU^WdX
8YU\USdbYS cdbU^WdX
=]`e\cU f_\dQWU
gYdXcdQ^T
AUSXQ^YSQ\
JYRbQdY_^
AQ\Ve^dY_^
AUSXQ^YSQ\
GX_S[
AQ\Ve^dY_^
5]RYU^d Y\\e]Y^QdY_^
5]RYU^d dU]`UbQdebU
5]RYU^d Xe]YTYdi
Db_dUSdY_^
AQdUbYQ\
=^TYfYTeQ\
5SSUcc_bi
7_]]_^
KUYWXd
l~y}}}J dXU caeQbU gQfU ^_YcUu`e\cU gYTdX2~tv Ri dXU ^_YcU cY]e\Qd_b
~y-}}J57 -}|.}<j V_b ~]Y^edU
~[Ju;U^UbQd_b2~{*|-}ty G_ebSU Y]`UTU^SU2-}}uy G_ebSU U^UbWi2}{->v
H:F 2 5``b_h{ ~10Wy
H:FzH 2 5``b_h{ *}+W
~{-]] Q]`\YdeTU Qd VbUaeU^Si _V ~} d_ --<j Y^ UQSX _V Ly My N TYbUSdY_^c V_b * X_ebc
~{-]] Q]`\YdeTU Qd VbUaeU^Si _V ~} d_ --<j Y^ UQSX _V Ly My N TYbUSdY_^c V_b ~} ]Y^edUc
-}}]|c*u-};v Y^ Ly My N TYbUSdY_^c V_b + dY]Uc
~}}]|c*u~};v Y^ Ly My N TYbUSdY_^c V_b + dY]Uc
Ge^\YWXd 2 AQh{ ~~y}}} y =^SQ^TUcSU^d \Q]` 2 AQh{ +y}}}
C`UbQdY^W 2 z*} d_ x.-ou^_^zVbUUjY^W S_^TYdY_^vy Gd_bQWU 2 z*- d_ x/}o
+- d_ 0-rF<y Gd_bQWU 2 +- d_ 0-rF<
4D..u497 c`USYVYSQdY_^v
7QcU 2 56Gy @U^c S_fUb 2 D7y @U^c 2 5Sbi\
AYbb_buAGz*v
AYbb_buAGz+v
8bYfUby A_e^dY^W RbQS[Udy 6_\dc|^edc
A:F 2 5``b_h{ ~*.Wy
D:F 2 5``b_h{ ~+}Wy
A:FzH 2 5``b_h{ ~+~W
D:FzH 2 5``b_h{ ~+,W
8:F 2 5``b_h{ ~~}Wy
8:FzH 2 5``b_h{ ~~-W
5``b_fQ\
puw~vHXU cU^cY^W bQ^WU Q^T dXU cU^cY^W _RZUSd _V dXU bUdb_bUV\USdYfU cU^c_b QbU c`USYVYUT gYdX ecY^W dXU AGz*uAGz+v bUV\USd_b{ HXU cU^cY^W bQ^WUc _V dXU bUdb_bUV\USdYfU cU^c_b Y^ dXU QR_fU dQR\U QbU Y^TU^dYVYUT Qc dXU `_ccYR\U cUddY^W bQ^WUc
_V dXU AGz*uAGz+v bUV\USd_b{ HXU cU^c_b SQ^ TUdUSd _^ _RZUSd e^TUb }{~] Q`Qbd{
puw*vq q AQb[ Y^TYSQdUT dXQd UaeY`]U^d `b_dUSdUT dXb_eWX_ed Ri T_eR\U Y^ce\QdY_^ _b bUY^V_bSUT Y^ce\QdY_^{
V6L~-AzH:F*
V6L~-AzH:F*zH
u7_^dQSd Ced`edv
83CB|@3CB Ri c\YTU cgYdSX
+1{+
~{.
7_^^USdY_^
@_QT
@_QT
~
~{-u
-
AQY^ SYbSeYd
AQY^ SYbSeYd
AQh{ -}]5
uGU\VzTYQW^_cYc
_ed`edv
CfUb SebbU^d
`b_dUSdY_^
*
@_QT
x
~*z*,J87
l~}r
z
AQh{ -}]5
uGU\VzTYQW^_cYc
x
_ed`edv
~{-u
CfUb SebbU^d
`b_dUSdY_^
AQh{ *}}]5
u7_^db_\ _ed`edv
~
AQh{ *}}]5
u7_^db_\ _ed`edv
~*z*,J87
l~}r
z
-
:bUU `_gUbuFU\Qi S_^dQSd _ed`edv
DX_d_U\USdbYS cU^c_b SYbSeYd
+
D_gUb
B{C
C::
8Qb[ CB
@YWXd CB
C::
CB
8Qb[ CB
@YWXd CB
C:: 8U\Qi
A_TU
C::
C::
pH 2 HY]U cUd Ri dY]Ub JF{
8Qb[ CB
CB
C::
H
CB
H
C::
CB
C::
C::
CB
C::
C::
H
H
H
H
CB
CB
H
H
H
H
H
H
H
H
KL<=1
CB
C::
m?ZWWfdV cVW]VTeZgV eiaV
~{ 9fU^ dX_eWX dXU TYVVecU bUV\USdYfU di`U Yc cUd Qd AQh{ cU^cYdYfU
`_cYdY_^y dXU cU^cYdYfYdi _V dXU cU^c_b ]ecd RU QTZecdUT QSS_bTY^W
dXU UhYcdU^SU _V dXU bUV\USdYfU ]QdUbYQ\ Y^ RQS[Wb_e^T{
*{ GUd dXU dQbWUd Qd TUdUSdY^W `_cYdY_^ Q^T deb^ cU^cYdYfYdi f_\e]U
Vb_] ]Y^Y]e] cU^cYdYfYdi `_cYdY_^ c\_g\iy S_^VYb] w `_cYdY_^
gXUbU Y^TYSQd_buMU\\_g @98v Yc CB Q^T cU\VzTYQW^_cYc Y^TYSQd_b
u;bUU^ @98v Yc C::{
+{ =V deb^ f_\e]U XYWXUb c\_g\i Y^ cdQdU _V bU]_fUT dQbWUdy dXU
_`UbQdY_^ Y^TYSQd_buMU\\_g @98v gY\\ RU C:: Q^T cU\VzTYQW^_cYc
Y^TYSQd_bu;bUU^ @9Tv gY\\ RU CB{ 7_^VYb] dXYc `_cYdY_^ Qc x{
OKXU^ cU\VzTYQW^_cYc Y^TYSQd_bu;bUU^ @98v Q^T _`UbQdY_^ Y^TYSQd_b
uMU\\_g @98v QbU C::y dXU AQh{ cU^cYdYfYdi `_cYdY_^ gY\\ RU x{P
,{ GUd dXU QTZecdUb Qd dXU SU^dUb _V dg_ cgYdSXY^W `_Y^d wy x{
p5R_fU cU^cYdYfYdi QTZecd]U^d Yc gXU^ Yd Yc dXU cdQdU _V @YWXd CB
]_TU{ =V Yd Yc dXU cdQdU _V 8Qb[ CB ]_TUy _`UbQdY_^ Y^TYSQd_b
uMU\\_g @98v gY\\ RU _``_cYdU{
pHXU TUdUSdY^W TYcdQ^SU Y^TYSQdUT _^ c`USYVYSQdY_^ SXQbd Yc
QWQY^cd *}}m*}}]] _V ^_^zW\_cci gXYdU `Q`Uby ]Qi RU
SXQ^WUT Ri dXU cYjU _V dXU dQbWUdy bUV\USdQ^SU _V dXU dQbWUd{
x
5TZecd I`|8_g^
TYbUSdY_^
@
8UdUSdY^W
dQbWUd
AYbb_b
uAGz*v
JUbdYSQ\
TYbUSdY_^
`_\QbYjY^W
VY\dUb
FUSUYfUboo
-}
DHJ@<
5=262=
V=P9220??L0I
V=P9220??L0LI
uDBD C37 Ced`edv
KL<=1 HML
;9= ;:<
K@GK 1
;9=
LCF@J
DHJ@<
5=293=
B{7uB_d S_^^USdUTv
AQh{ ~}
AY^{ +{.
AQh{ ~}
AQh{ ~1
7_fUb
=P5F0IAJ0L
KQcXUb
;:<
AY^{ +{.
AQh{ ~1
KYbU X_\TUb
CIH
?kHG
y
|
uI^Yd2]]v
,-
GH56{uBDB C37 Ced`edv
K3 K4
FH?@
HG HG GHJF<E
HG HAA HkK ?@E<Q
HAA HG HG ?@E<Q
HAA HAA HAA ?@E<Q
VDbUccebU dUb]Y^Q\ cYjU
8UdUSdY^W
dQbWUd
K3 K4
KQdUb `b__V
beRRUb
HG
KL<=1
HML
EkHG
?kHG
K3 K4
FH?@
HG HG GHF<E
HG HAA 2kK ?@E<Q
HAA HG HG ?@E<Q
HAA HAA HAA ?@E<Q
F<P FCG
FCG
K@GK1
F<P
LCF@J
DHJ@<
5=25:<
~{ C^ cUbfYSY^W gYbUy S_^^USd gYbU _^ dUb]Y^Q\ Qc QR_fU VYWebU{
M_e cXQ\\ cU\USd dXU b_e^T gYbU gYdX dXU cYjU _V ~. d_ ~}]] Q^T dYWXdU^ dXU SQR\U
X_\TUb Ri d_baeU _V ~{} d_ ~{-B3]{
*{ C^ cUbfYSY^W gYbUy dYWXdU^ cSbUg _V dUb]Y^Q\c Vb_] B_ ~y *y +y , Q^T - Ri d_baeU
_V }{0B3]{
n >RfeZ`_ W`c fdZ_X
HML
@YWXd CB
CB
=P5F0F?L
8Qb[ CB
RMQUQLOLKUSNK TLPTQS
CB
C::
;9=
LCF@J
8UdUSdY^W
dQbWUd
=P9220??L0LI
+} d_ ,DHJ@<
CB
CB
z
~*z*,J87
AGz*
Gk>
@YWXd CB
4^dUbbe`dUT \YWXd
Q\
C`dYSYc
Qh
\USdbYS
DX_d_Ub
cU^c_
5=256=
CB 8U\Qi
A_TU
C`UbQdY_^ ]_TU
b
YSQ\
C`d Yc
Qh
7
C^U GX_d
8U\Qi
A_TU
GK*
FUSUYfU
5TZecd FYWXd|@UVd
TYbUSdY_^
6
B_b]Q\
A_TU
GK~
mJVec`cVW]VTeZgV eiaV-OZeY a`]RcZjZ_X WZ]eVc.
KXU^ dXU RUQ] `QccUc dXb_eWX `_\QbYjY^W VY\dUb Vb_] U]YddUby Yd gY\\
RU S_^fUbdUT Qc X_bYj_^dQ\ dbQ^cfUbcU RUQ] Q^T bUQSXUc d_ ]Ybb_b
AGz*uAGz+vy QVdUbgQbTc Yd Yc S_^fUbdUT Ri ]Ybb_b Ve^SdY_^ Qc
fUbdYSQ\ RUQ] Q^T bUQSXUc d_ bUSUYfUb dXb_eWX `_\QbYjY^W VY\dUb{
9fU^ Yd SQ^ TUdUSd ^_b]Q\ ]Ybb_b{
FUSUYfUT \YWXd
K@GK 1
V=P9220??L
V=P9220??L0L
uBDB C37 Ced`edv
5TZecd I`|8_g^
TYbUSdY_^
34046N?>
HY]Ub ]_TU
GdQdec _V TUdUSdY_^
GK `_cYdY_^
;9= ;:<
;:<
DHJ@<
=962=
.}
KL<=1 HML
?kHG
K3 K4 EkHG
5
n LZ^Vc ^`UV
z
}
{
B_b]Q\ _`U^
HG
4
k
*-}J57 +5
+}J87 +5
b
9]YddU
3
7CA
,
CIH
5TZecd FYWXd|@UVd
TYbUSdY_^
HML;GIG Hk>
F<P422^<
KL<=1;GIG Hk>
F<P72^<
B{7
*
Ced`ed
bU\Qi
AYbb_b
;9=
LCF@J
HUb]Y^Q\
B_{
B_b]Q\ S\_cU
K3 K4
FH?@
HG HG GHJF<E
HG HAA HkK ?@E<Q
HAA HG HG ?@E<Q
HAA HAA HAA ?@E<Q
;9= ;:<
K@GK 1
B{7uB_d S_^^USdUTv
~. d_ ~}]]
=P5F0F?L0L
;:<
AQh{ /
DCK9F
*,z*,}J57
*,z*,}J87
?kHG
K3 K4
FH?@
HG HG GHJF<E
HG HAA HkK ?@E<Q
HAA HG HG ?@E<Q
HAA HAA HAA ?@E<Q
uBDB C37
Ced`edv
V=P9220?AJ
V=P9220?AJ0L
u7_^dQSd Ced`edv
7CA
HML
~
*,z*,}J57 l~}r
*,z*,}J87 l~}r
HG
GH56{
K3 K4 EkHG
KL<=1
AQY^ SYbSeYd
:bUU
`_gUb SYbSeYd
7_^^USdY_^
CIH
AQh{ /
C::
pC`UbQdY_^ V_b 8Qb[ CB ]_TU Yc _``_cUT d_ QR_fU SXQbd Y^TYSQdY_^ V_b @YWXd CB ]_TU{
pH_ `bUfU^d Vb_] dXU ]Yc_`UbQdY_^y _ed`ed _V e^Ydc [UU`c dXU cdQdU _V C:: V_b }{-cUS{ QVdUb
`_gUb CB{
p=V dXU S_^db_\ _ed`ed dUb]Y^Q\ Yc cX_bdzSYbSeYd _b _fUb SebbU^d dXQ^ dXU bQdUT SebbU^d V\_gc Y^ dXU
e^Ydy dXU cU^c_b T_Uc ^_d _`UbQdU ^_b]Q\\i Ri `b_dUSdY_^ SYbSeYd{
mJVec`cVW]VTeZgV eiaV
~{ Ge``\i dXU `_gUb d_ dXU `X_d_U\USdbYS cU^c_by QVdUb cUddY^W dXU
`X_d_U\USdbYS cU^c_b Q^T dXU AYbb_buAGz*v Y^ VQSU d_ VQSU{
*{ GUd dXU `X_d_U\USdbYS cU^c_b Y^ dXU `_cYdY_^ gXYSX Y^TYSQd_b deb^c
_^y Qc QTZecdY^W dXU ]Ybb_b _b dXU cU^c_b bYWXd Q^T \UVdy e` Q^T
T_g^{
+{ :Yh R_dX e^Ydc dYWXd\i QVdUb SXUS[Y^W dXQd dXU e^Ydc TUdUSd dXU dQbWUd{
p=V ecU ]_bU dXQ^ * `X_d_ cU^c_bc Y^ `QbQ\\U\y dXU c`QSU RUdgUU^
dXU] cX_e\T RU ]_bU dXQ^ +}S]{
p=V bUV\USdQ^SU _V dQbWUd Yc XYWXUb dXQ^ ^_^zW\_cci gXYdU `Q`Uby Yd
]YWXd SQecU ]Q\Ve^SdY_^ Ri bUV\USdY_^ Vb_] dXU dQbWUd gXU^ dXU
dQbWUd Yc ^UQb d_ `X_d_ cU^c_b{ HXUbUV_bU `ed U^_eWX c`QSU
RUdgUU^ dXU dQbWUd Q^T `X_d_U\USdbYS cU^c_b _b dXU cebVQSU _V
dQbWUd cX_e\T RU Y^cdQ\\UT Qd Q^ Q^W\U _V +}nd_ ,-nQWQY^cd
_`dYSQ\ QhYc{ uKXU^ TUdUSd dQbWUd gYdX XYWX bUV\USdQ^SU ^UQb Riy
`X_d_U\USdbYS cU^c_b gYdX dXU `_\QbYjY^W VY\dUb cX_e\T RU ecUT{v
pGU^cYdYfYdi QTZecd]U^d 2 D\UQcU cUU dXU TYVVecU bUV\USdYfU di`U{
@_QT
8UdUSdY^W
dQbWUd
8YVVecU bUV\USdYfU
~ ,
* +
*
=P7F0F?L0L
KL<=1 HML
AQh{ /
CB
mLYc`fXY0=VR^ eiaV
~{ Ge``\i dXU `_gUb d_ dXU `X_d_U\USdbYS cU^c_by QVdUb cUddY^W dXU
U]YddUb Q^T dXU bUSUYfUb Y^ VQSU d_ VQSU{
*{ GUd dXU bUSUYfUb Y^ SU^dUb _V `_cYdY_^ gXUbU Y^TYSQd_b deb^c _^y Qc
QTZecdY^W dXU bUSUYfUb _b dXU U]YddUb bYWXd Q^T \UVdy e` Q^T T_g^{
+{ :Yh R_dX e^Ydc e` dYWXd\i QVdUb SXUS[Y^W dXQd dXU e^Ydc TUdUSdc dXU
dQbWUd{
p=V dXU TUdUSdY^W dQbWUd Yc dbQ^c\eSU^d R_Ti _b c]Q\\Ub dXQ^
~~.]]y Yd ]YWXd ^_d TUdUSd dXU dQbWUd SQecU \YWXd `QccUT{
pGU^cYdYfYdi QTZecd]U^d 2 D\UQcU cUU dXU TYVVecU bUV\USdYfU di`U{
8UdUSdY^W
dQbWUd
CIH
~*z*,J87
~ ,
* +
+
+
7CA
K3 K4 EkHG
~ ,
* +
DX_d_U\USdbYS cU^c_b SYbSeYd
=95:=
B{7uB_d S_^^USdUTv
n F`f_eZ_X , <U[fde^V_e
87 `_gUbuDBD _`U^ S_\\USd_b _ed`edv
DX_d_U\USdbYS cU^c_b SYbSeYd
7_^^USdY_^
=965=
AQh{ /
-*
.}{-
-*
.}{-
~+
DHJ@<
HG
n >`_ec`] `feafe TZcTfZe UZRXcR^
~ ,
* +
+z.{0
*-{-
~+
F<P
HML
/{*0
uI^Yd2]]v
LJ<GKFCLL@J
AYbb_b
;9=
V6L-AzA8H
V6L+AzD8H
V6L-AzA8HzD V6L+AzD8HzD
V6L-AzA8HzH V6L+AzD8HzH V6L-AzA8HzHD V6L+AzD8HzHD
uBDB C37 Ced`edv
uDBD C 37 Ced`edv
GH56{uBDB C37 Ced`edv
z
x
~ ,
* +
.-
~ ,
* +
/{0
;9=
*z~+{.
87 `_gUbuBDB _`U^ S_\\USd_b _ed`edv
DHJ@<
5=295=
LCF@J
C`UbQdY_^ Y^TYSQd_b CB
uMU\\_g @98vo
C::
;9= ;:<
LCF@J
F<P FCG
KL<=1
7QR\U 2 ~. d_ ~~}
-}{-
HI@J
K@GK 1
pFUSUYfUT
\YWXd
KL<=1 HML
;:<
K@GK 1
B_b]Q\ S\_cU
x
B{7 z
uB_d S_^^USdUTv ~*z*,J87
KL<=1 HML
DUbV_bQdU
Bedu**]]v
,}
=P37F0L?L3
?kHG
K3 K4 EkHG
0{,
FU\Qi s Ced`ed HF
.{-
B{7uB_d S_^^USdUTv
8UdUSdY^W
dQbWUd
EkHG
~ ,
* +
,z~+{.
+,
x
~ ,
* +
0
+,
z
~*z*,J87
B_b]Q\ _`U^
=P7F0FAJ
V6L~-AzH8H*zD
V6L~-AzH8H*zHD
uDBD C37 Ced`edv
;:<
C::
0~{.
,}{-
B_b]Q\ _`U^
V6L~-AzH8H*
V6L~-AzH8H*zH
uBDB C37 Ced`edv
?k HG
qAYbb_buAGz+v
qAYbb_buAGz*v
CB
=^TYSQd_b s
GU\V TYQW^_cYc _ed`ed
B_b]Q\ S\_cU
DHJ@<
K3 K4
FH?@
HG HG GHJF<E
HG HAA HkK ?@E<Q
HAA HG HG ?@E<Q
HAA HAA HAA ?@E<Q
DHJ@<
5=25:<
K@GK 1
FCG
E1HG
/+{-
GU\VzTYQW^_cYcu;bUU^ @98v
DCK9F
*,z*,}J57
*,z*,}J87
=P37F0L?L0LI4
A, 6_\d
=967=
B{7uB_d S_^^USdUTv
V6L~-AzH8H~
0}
KL<=1 HML
GdQR\U 4^dUbbe`dUT \YWXd QbUQ
,.{-
LJ<GKFCLL@J
DHJ@<
DCK9F
*,z*,}J57
*,z*,}J87
EkHG
K3 K4
+*{-
;9=
?kHG
HG
+z,{*
HI@J
K@GK 1
K3 K4
FH?@
HG HG GHF<E
HG HAA 2kK ?@E<Q
HAA HG HG ?@E<Q
HAA HAA HAA ?@E<Q
=P5F0IAJ0L
0 ~.
=P37F0LAJ3
=966=
HY]Ub ]_TU
cU\USdY_^ cgYdSX
GU\VzTYQW^_cYc
Y^TYSQd_b
*zA,m+}
7CA
~ ,
* +
HUb]Y^Q\
I^cdQR\U _`UbQdY^W QbUQ
~ ,
* +
C`UbQdY_^
Y^TYSQd_b
B{7uB_d S_^^USdUTv
DCK9F
*,z*,}J57
8UdUSdY^W
*,z*,}J87
dQbWUd
C`dYSQ\ QhYc
V6L-AzA:F
V6L+AzD:F
V6L-AzA:FzH
V6L+AzD:FzH
u7_^dQSd Ced`edv
HG
GdQR\U FUSUYfUT \YWXd QbUQ
V6L~-AzH:F~
=P37F0LAJ4
5TZecdY^W JF
FUdb_bUV\USdYfU
HXb_eWXzRUQ]
C`UbQdY^W \UfU\
@YWXd bUSUYfY^W
;:<
-
n >`__VTeZ`_
?kHG
HY]Ub JF
n HaVcReZ`_ ^`UV
C`UbQdY_^
Y^TYSQd_b
DHJ@<
n ?Z^V_dZ`_
~{ =^dUbSU`d Q cdb_^W c_ebSU _V \YWXd Qc \Y[U ce^\YWXdy c`_d\YWXd gYdXY^ Y^S\Y^QdY_^ Q^W\U bQ^WU _V `X_d_U\USdbYS cU^c_b{
*{ KXU^ Yd Yc ecUT ]_bU dXQ^ * cUdc _V HXb_eWXzRUQ] di`Uy Yd SQ^ RU _SSebbUT ]edeQ\ Y^dUbVUbU^SU Ri U]YddUb RUQ]{
=^ dXYc SQcUy `\UQcU SXQ^WU `_cYdY_^ _V dXU U]YddUb Q^T dXU bUSUYfUb _V dXU _dXUb Y^ _bTUb d_ UcSQ`U ]edeQ\
Y^dUbVUbU^SU{
+{ KXU^ ]_bU dXQ^ * cUdc _V TYVVecU bUV\USdY_^ di`Uc QbU Y^cdQ\\UT QTZQSU^d\iy Yd ]Qi SQecU ]Q\Ve^SdY_^ Ri \YWXd RUQ]
Vb_] dXU _dXUb dQbWUd{ G_ Yd ]ecd RU Y^cdQ\\UT Qd Q^ U^_eWX Y^dUbfQ\{
,{ KXU^ dXU `X_d_U\USdbYS cU^c_b Yc Y^cdQ\\UT _^ Q V\Qd `Qbd dXQd XQc XYWX bUV\USdQ^SUy Yd SQ^ RU _SSebbUT ]Q\Ve^SdY_^
Ri \YWXd RUQ] Vb_] Q V\Qd `Qbd{ HXU cU^c_b ]ecd RU Y^cdQ\\UT Qc `b_`Ub Y^dUbfQ\ RUdgUU^ dXU `X_d_U\USdbYS cU^c_b
Q^T Q V\Qd `Qbd{
-{ KXU^ gYbU dXU `X_d_U\USdbYS cU^c_b gYdX XYWX f_\dQWU \Y^Uy `_gUb \Y^U Y^ dXU cQ]U S_^TeYdy Yd ]Qi SQecU ]Q\Ve^SdY_^
_b ]USXQ^YSQ\ db_eR\U{ HXUbUV_bU `\UQcU gYbU cU`UbQdU\i _b ecU TYVVUbU^d S_^TeYd{
.{ 5f_YT Y^cdQ\\Y^W dXU e^Yd Qc V_\\_gY^W `\QSU{
7_bb_cYfU WQcy _Y\ _b Tecdy cdb_^W V\ehy ^_YcUy ce^^iy cdb_^W Q\[Q\Yy QSYT{
/{ =^ SQcU _V S_^^USdY^W Y^TeSdYfU \_QT Qc 87 bU\Qi Qd \_QTy ecU cXYU\TUT SQR\Uy TY_TU Q^T fQbYcd_b Y^ _bTUb d_ bU]_fU
^_YcU{
0{ HXU `X_d_U\USdbYS cU^c_b SQR\U cXQ\\ RU ecUT Qc cX_bd Qc `_ccYR\Uy RUSQecU Yd ]Qi SQecU ]Q\Ve^SdY_^ Ri ^_YcU
dXb_eWX dXU SQR\U{
1{ KXU^ Yd Yc cdQY^UT Ri TYbd Qd \U^cy `\UQcU S\UQ^ dXU \U^c gYdX Tbi S\_dXy Red T_^td ecU Q^ _bWQ^YS ]QdUbYQ\c ceSX
Qc Q\[Q\Yy QSYTy SXb_]YS QSYT{
~}{ KXU^ gYbU S_^^USdY_^y dXU gYbU cX_e\T RU _fUb dXQ^ 5K; B_{ *} Q^T \U^WdX cX_e\T RU e^TUb dXQ^ ~}}]{
~~{ 6U cebU d_ cSbUg R_\d gYdX }{+B3] d_ }{-B3] d_baeU{
~*{ KXU^ dXU e^Yd Yc ce``\YUT `_gUb c_ebSU Vb_] cgYdSXY^W `_gUb ce``\i e^Ydy `\UQcU UQbdX :bQ]U Wb_e^Tu:{;v
dUb]Y^Q\y Q^T S_^^USd S_^TU^cUb RUdgUU^ :{; dUb]Y^Q\ Q^T dUb]Y^Q\u}Jv d_ bU]_fU ^_YcU{
GgYdSXY^W
`_gUb ce``i
uGADGv
AGz*
AYbb_buAGz+v
9]YddUb
<_bYj_^dQ\ TYbUSdY_^
`_\QbYjY^W VY\dUb
xJ
xJ
}J
:3;
7u}{}}~ d_ }{~v|,}}Jv
2 7_^TU^cUb V_b bU]_fY^W
^_YcU
}J
DX_d_U\USdbYS
cU^c_b
:bQ]U
lCe ^Ri TRfdV ^R]Wf_TeZ`_ ZW RS`gV Z_decfTeZ`_d RcV _`e W`]]`hVU1
\USdbYS
DX_d_U
cU^c_b
n FRZ_ ac`UfTed
8UdUSdY^W
dQbWUd
w
C`dY]Q\ `_cYdY_^
x
A=B
A5L
r
r
r
r
r
r
r
r
r
r
r
r
r
r
r
7CIBH9F
H=A9F
H9AD9F5HIF9 7CBHFC@@9F
D5B9@ A9H9F
H57<CA9H9F
@=B9 GD998 A9H9F
8=GD@5M IB=H
DFCL=A=HM GK=H7<
D<CHC9@97HF=7 G9BGCF
:=69F CDH=7 G9BGCF
DF9GGIF9 G9BGCF
FCH5FM 9B7C89F
G9BGCF 7CBHFC@@9F
DCK9F 7CBHFC@@9F
GH9DD=B; ACHCF s 8F=J9F s 7CBHFC@@9F
W[]\[]X^Y[Z
AGGE877III6>HGDCB?F6C@G
r<958 EI5FH9F 2
,~z-y M_^WTQ^WzFYy I^WcQ^WzI`y MQ^WcQ^zGXYy
?ie^WzBQ]y ?_bUQ .*.z0,/{
rHF589 89D5FHA9BH 2
-~~ 5^ce^W 6|8y ,~}z~+y GXY^T_\Y]z8_^Wy
?eb_z;ey GU_e\y ?_bUQ ~-*z}/}
H9@20*z*z./1z.-0- | :5L20*z*z./1z.--.
r9z]QY\ 2 cQ\Uc4Qed_^YSc{^Ud
BC*}}*}.~0z9Dz9z}0z}}1}9