1
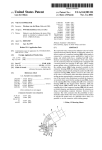
Manitowoc Boom Trucks
Radio Remote - Tecnord Actuators
For C-Series Cranes
•Installation
•Service
Manitowoc Boom Trucks, Inc.
3000 S. Austin Ave
Georgetown, TX 78627-1609
Sales:
(512) 942-3000
Sales Fax:
(512) 863-3776
Service:
(512) 942-3000
Service Fax:
(512) 942-3094
Web Site: www.manitowocbt.com
Tecnord C-Series
A
Company
February 2002
TECNORD
SERVOCOMANDI E REGOLAZIONE
MULTIDROM MLT/CEY-FBK Multi-function, electro-hydraulic proportional control system.
Special configuration for installation on the trasmission rods of truck-mounted cranes
22.0 mm / 0.86’’ – Long stroke version
CEY
Installation and Service Manual
MANITOWOC “C” series
TECNORD
Via Decorati al Valor Militare, 3 – 41040 Baggiovara (Modena) Italy
Tel: +39 – 059 – 51 00 01
Fax: +39 – 059 – 51 13 57
E-mail: [email protected]
TECNORD
INDEX
Page
1.
Introduction
2
2.
Parts description
3
3.
System layout
Principle of operation
4.
Installation
5
5.
System start-up procedures
8
6.
Inspection and maintenance procedures
9
7.
Hydraulic schematics
16
8.
Electrical schematics
17
TECNORD
Tab. I
4
Via Decorati al Valor Militare 3 - 41040 Baggiovara (Modena) - Italy
- 1 -
TECNORD
1. INTRODUCTION
This Manual has been compiled by TECNORD to provide the basic information on how to
use Mod. MLT/CEY-FBK Electro Hydraulic remote Control System and how to proceed
with its maintenance.
Before using this equipment, carefully read this Manual with particular reference to
Paragraph 5 (SYSTEM START-UP PROCEDURES).
- The User of the Remote Control must be properly trained on how to use the equipment.
- The Manufacturer warrants that at the time of delivery, the REMOTE CONTROL is free
of defects in material and manufacture and will conform substancially to the Manufacturer's
specifications.
- It is the Purchaser's responsibility to determine the suitaility of the REMOTE CONTROL
for an specific application and to insure that it is installed and guarded in accordance
with all State, Local, Private Safety and Health Regulations, Codes and Standards.
- If the Remote Control will be used in a safety critical applications, the Customer must
undertake appropriate testing and evaluation to prevent injury of the Final user.
- Changes or modifications not expressely approved by the Manufacturer, could void the
User's authority to operate the equipment.
- The Manufacturer is constantly aiming at the improvement of the System for what concerns
its efficiency, eprformances and durability. Therefore, it is possible that some parts or
components are changed without notice.
TECNORD
Via Decorati al Valor Militare 3 - 41040 Baggiovara (Modena) - Italy
- 2 -
TECNORD
2. PARTS DESCRIPTION
Mod. MLT/CEY has been designed to remotely control the functions of Truck-Mounted
Cranes and other types of Machines equipped with directional, hydraulic control valves.
Mod. MLT/CEY can be attached to the transmission rods of the Crane manual control
lonkage without inhibiting the manual controllability of the equipment.
The system consists of ELECTRO-HYDRAULIC PARTS to install on the original hydraulic
equipment suitable to be controlled with cable and radio systems.
ELECTRO-HYDRAULIC PARTS
These parts are common to both CABLE and RADIO versions (see Tab.I)
A - Inlet section with pressure maintenance valve VCP, solenoid-operated
dump valve EV49, pressure reducing valve VRP and solenoid-operated
pilot pressure cut-off valve EV49.
B - Electro-hydraulic proportional actuator with closed-loop control of the servo
piston stroke and built-in electronic circuit board and mounting flange
C - Connecting adaptor between ACTUATOR and TRANSMISSION ROD.
ELECTICAL JUNCTION BOX
D - Base-connector with pre-wired output harness to valves, battery and accessories.
TECNORD
Via Decorati al Valor Militare 3 - 41040 Baggiovara (Modena) - Italy
- 3 -
TECNORD
3. PRINCIPLE OF OPERATION (Tab. I )
PRESSURE MAINTENANCE VALVE (A) AND PILOT PRESSURE SPECIFICATIONS
TECNORD Mod. MLT/CE Electro-hydraulic Remote control requires a pilot pressure
of 18 bar (250 psi). In most cases, where used with fixed displacement pumps and
open center valves, this pilot pressure is attained by directing oil through a spring-loaded
pressure maintenance valve VCP lodged in manifold (A) to insure 18 bar (250 psi) at all times.
Manifold (A) also carries a 2-WAY, NORMALLY OPEN VENTING VALVE EV49 whose
function is to dump oil to tank when no machine function is activated, either for safety
purposes and for eliminating any flow restriction through the VCP valve when all the
electro-hydraulic remote control actuators are disengaged.
As soon as one of the directionsl control valves is partially shifted to move the applied
load, pressure builds up in the system: in order to limit the maximum working pressure
of the actuators to 250 psi, a PRESSURE REDUCING VALVE VRP is provided.
Safety first of all: the INLET SECTION (a) incorporates a SOLENOID-OPERATED 3-WAY
VALVE EV49 to cut off the pilot pressure any time the remote control joysticks are disengaged.
PROPORTIONAL ACTUATOR (B) CONTROL FUNCTIONS
The pilot pressure Pp coming from the INLET SECTION (A) feeds the PROPORTIONAL
VALVES VPA and VPB. The function of these valves is to generate a variable pressure
in response to a pulse-width modulated (PWM) current signal alternatively fed to the coils
via the electronic circuit board (ECB). This variable pressure is active on the ends of the
servo piston (SP) connected to the spool of each sectional valve: as the servo piston moves,
the position trnsducer (TP) generates a feed-back signal to provide the desired control
characteristic in response to a given deflection angle of the remote control joystick.
TECNORD
Via Decorati al Valor Militare 3 - 41040 Baggiovara (Modena) - Italy
- 4 -
TECNORD
4. INSTALLATION (Tab. I )
A.
INSTALLATION OF ELECTRO-HYDRAULIC PARTS
- Fix manifold (A) on the chassis, leaving room around it for hoses connection
- Fix the actuators block (B) in the crane arranged point (see Tab.I )
- Connect the forks at the end of the servo-piston rods.
- If co-axial mechanical connections between servo-pistons and transmission rods can be
adopted, these must be done leaving enough clearance for self-alignment of matching parts.
- After that, move the Crane's manual levers back and forth, and check for their free return
to neutral, as a result of a good alignment between matching parts. Correct every deficiency
that may cause mechanical drag.
WARNING: do not attempt to connect the actuators block directly to the Crane's manual
levers, as this would limit the stroke of the directional valve spool and cause
problems of slow return to neutral.
TECNORD
Via Decorati al Valor Militare 3 - 41040 Baggiovara (Modena) - Italy
- 5 -
TECNORD
B.
HYDRAULIC CONNECTIONS (Tab. I )
Connections at block (A):
REF.
DESIGNATION
SIZE
REMARKS
E:
Pump line inlet port
1/2" - BSP
High pressure hose
S:
Return line to tank
1/2" - BSP
Low pressure hose
To the P port of
directional control valve
1/2" - BSP
High pressure hose
To the P port of inlet
section B
1/4" - BSP
High pressure hose
ML
Pump pressure gauge port
1/4" - BSP
High pressure gauge
(300 bar - 4500 psi)
MP
Pilot pressure gauge port
1/4" - BSP
Low pressure gauge
(60 bar - 1000psi)
DIS:
Pp:
Connections at manifold (B):
Pp
Pilot pressure inlet line
1/4" - BSp
High pressure hose
Max. 2 mt (6 ft) long
Sp
pilot pressure return line
1/4" - BSP
The line must be driven
to tank separately in order to
avoid back-pressure effects
on the servo-pistons
MPR
Pilot pressure (reduced)
gauge port
1/4" - BSP
Low pressure gauge
(0-60 bar / 0 - 1000psi)
TECNORD
Via Decorati al Valor Militare 3 - 41040 Baggiovara (Modena) - Italy
- 6 -
TECNORD
C.
ELECTRICAL CONNECTIONS (Tab. I )
- Install the JUNCTION BOX (D) max. 1.5 mt (5 ft) away from the actuators block.
- make sure that the open end of the black sheath grouping all the output cables is placed
upside down to prevent water from entering the junction box.
- Make sure that the output DIN connectors are properly tightened with rubber seals installed
between the plug and the socket.
- Do not leave DIN plugs hanging disconnected, to prevent water and moisture from oxidating
contacts and wires.
REF.
COLOUR
DESIGNATION
(+)
Blue
Positive (12 VDC)
(-)
Brown
Negative
49
DIN Plug
Dump valve EV49 at block (A)
9
DIN Plug
Pilot pressure cut-off valve at block
1…4
REMARKS
This wire must be connected
to the negative pole of the
battery. DO NOT USE THE
VEHICLE FRAME AS (-)
Proportional actuators
Radio Remote Control
- The RECEIVER UNT will be connected to the junction box (D) through a multi-core cable
with MALE/FEMALE plugs.
- The wiring schematic of the junction box (D) corresponds to the flying MALE connector
of the RECEIVER INTERCONNECTING CABLE.
TECNORD
Via Decorati al Valor Militare 3 - 41040 Baggiovara (Modena) - Italy
- 7 -
TECNORD
5. SYSTEM START-UP
- Place a low pressure gauge (60 bar / 1000psi) on the MP port at thee inlet section (A)
of the actuator block.
- Start the engine and engage the PTO
- Fold out the crane by means of its manual control levers in order to prevent hazardous
movements in case of erratic start-up operation of the remote control.
- Turn on the remote control system:
. Radio configuration: - turn the key-switch on the command switch to REMOTE
- turn on the power switch of the transmitter unit ( see original radio instr.)
- Turn one of the remote control levers slightly off the centre (approx. 10°): the pressure
reading on the Pressure Gauge at Port MPR must fail between 16 and 20 bar (230 to 285 psi).
- Turn the control lever to its maximum rotation angle: the manual lever of the directional
valve must proportionally reach the end of its stroke. Make sure that the pressure reading
on the Pressure Gauge at Port MPR does not exceed 21 bar (300 psi).
WARNING: before moving away to operate the machine from a remote post,
stand in front of the manual control levers of the directional control
valve and check if the commands excerted on the levers of the remote
control box are correctly executed by the electr-hydraulic proportional
actuators with respect to the following working conditions:
- the position control characteristics of the actuators must be smooth, stable
and repeatable
- when one function at a time is engaged, only the corresponding manual control
lever must respond, while all the other levers must steadily remain at rest
- when two or more functions are engaged at the same time, no mutual interaction
must esult in the position control characteristics of the corresponding manual control
levers
- EMERGENCY PUSH-BUTTON: push the red palm button on the control box in
order to stop the electrical power to the circuit
TECNORD
Via Decorati al Valor Militare 3 - 41040 Baggiovara (Modena) - Italy
- 8 -
TECNORD
6.
INSPECTION AND MAINTENANCE PROCEDURES
A - Inspection of pressure maintenance valve A (see dwrg. 15.0202.056)
VCP
PRESSURE MAINTENANCE CARTRIDGE VALVE
Remove the hex. cap (34 mm / 1.5/16" hex) and remove the 2 co-axial springs.
Make sure that at least one shim is placed underneath the springs.
In order to INCREASE / DECREASE the pilot pressure by 2 bar (30 psi) at
a time, ADD / ELIMINATE one shim at a time.
Check for free movement of the valves spool in its cage.
EV49
NORMALLY OPEN, SOLENOID OPERATED VENTING VALVE
Remove the nut and the coil (19 mm / 3/4" hex).
Remove the cartridge valve from its cavity (26 mm / 1" hex)
Check the correct perpendicularity of the cylindrical tube ass.y: deflections or
distortions of the tube prevent the internal plunger from sliding fre in response
to electrical signals.
Install the oil on the tube ass.y again and insert the DIN connector marked 49
on the coil terminal. Energize the coil by activating any lever of the control box:
- the internal poppet must shift with an audible "click"
- blowing air from the lower bottom, there must be no free passage
through the side holes of the cage
VRP
PRESSURE REDUCING VALVE
Remove the cartridge from its cavity (26 mm / 1" hex).
Push the internal spool upwards with the tip of a plastic stick to override the
internal spring force and check if it slides free along the cage.
Inspect the O-RINGs and the BK-UPs.
TECNORD
Via Decorati al Valor Militare 3 - 41040 Baggiovara (Modena) - Italy
- 9 -
TECNORD
A - Inspection of pressure maintenance valve A (see dwrg. 15.0202.056)
EV49
SOLENOID-OPERATED PILOT PRESSURE CUT-OFF VALVE
- Remove the nut and the coil (19 mm / 3/4" hex).
- Remve the cartridge valve from its cavity (26 mm / 1" hex).
- Check for correct perpendicularity of the cylindrical tube ass.y: deflections or
distortions of the tube prevent the internal plunger from sliding free in response
to electrical signals.
- Install the coil on the tube ass.y again and insert the DIN connector marked 9
on the coil terminal. Energize the coil by activating any lever of the control box:
the internal spool must shift with an audible "click".
TECNORD
Via Decorati al Valor Militare 3 - 41040 Baggiovara (Modena) - Italy
- 10 -
TECNORD
C - Disassembly procedure of the Electro-hydraulic proportional Actuator (see dwrg. 15.1002.013/B)
- Loosen the 2 screws (32) to remove the plastic cover (28).
- Remove the 2 locking nuts (29) (6 mm / 1/4" hex).
- Lift up the electronic cicuit board (33) and free the flying connector of the position transducer
- Loosen the 2 nuts (26).
- Lift up the plastic casing, holding the 2 coils (25) and the electronic circuit board (33) in place.
- Remove the 2 proportional cartridge valve (22) from their cavities (29 mm / 1.1/8" hex).
- Remove the plug (42) and the spring (43) to inspect the by-pass valve (21).
D - Disassembly procedure of Position Transducer (9)
(see dwrg. 15.1002.013/B)
- Loosen the 2 mounting bolts (13) to remove the servo-piston kit.
- Loosen the 4 set screws (6) to remove the cover plate (7) and the gasket (8)
- Remove the press. transducer (9) by sliding the electrical cable along the cavity in the manifold.
WARNING:
to reassembly, make sure that the driving pin of the transducer
matches the circular groove on the free end of shaft.
E - Inspection and cleaning procedure of Proportional Valves (22)
(see dwrg. 15.1002.013/B)
- Check for correct perpendicularity of the cylindrical tube ass.y: deflections or distortions of
the tube ass.y will prevent the internal plunger from sliding free in response to electrical signals.
- The internal POPPET/SEAT arrangement must be free from contamination particles.
F - Inspection and cleaning procedure of orifices (S) and by-pass valve (21) (see dwrg. 15.1002.013/B)
- Inspect the orifices (S) ( 0,8 mm - 0,031 dia.)visible on the middle step of prop.valve cavities.
Remove contaminants by means of a needle or compressed air.
- Inspect the PILOT OPERATED BY-PASS VALVE ( 21 ) by sliding the poppet in its cavity.
TECNORD
Via Decorati al Valor Militare 3 - 41040 Baggiovara (Modena) - Italy
- 11 -
TECNORD
G - Inspection of electrical connections
(see dwrg. 15.1002.013/B)
- Inspect the soldered terminals on coils (25)
- Inspect the three MALE/FEMALE connectors on the electronic circuit board ( 33 )
- Inspect the three soldered connections on the position transducer ( 9 )
H - Check the Input signal from the cable or radio joystick control lever
( Tab.II -Page#14)
- If available,insert the special test-connector between the DIN flying plug and the fixed
socket of the actuator and connect a volt-meter in scale 'DURING VOLTAGE' to test:
- With the joystick at rest,the reading must be 0,00 Volt.
- By rotating the corresponding joystick slightly off of center,the reading should change
from 0,00 to 6,00Volt (nominal value +/-10%) in one direction and from 0,00 to 2,00Volt
in the other direction.
I - Adjusting the maximum stroke of the servo-piston by means of trimmers T2 and T4
( Tab.II -Page#14)
- The optimum calibration of max. stroke is attained when the maximum deflection angle of
the joystick control lever corresponds to the maximum stroke of the directional valve spool
driven by the servo-piston of the proportional actuator. This condition is monitored by the
YELLOW LED called LG, which should TURN ON one at a time when the servo-piston reaches
the end of its stroke in one direction ( to insure the full flow condition ) ,and then TURN OFF
by releasing the joystick lever just a few degrees ( to insure that dead-band around the
maximum stroke is limited ).
- The trimmer T2 is provided for EXTEND direction.
- The trimmer T4 is provided for RETRACT direction.
- Turn trimmer T2-T4 clockwise to increase the actuator stroke for a given joystick angle.
- Turn trimmer T2-T4 counter-clockwise to decrease the actuator stroke.
TECNORD
Via Decorati al Valor Militare 3 - 41040 Baggiovara (Modena) - Italy
- 12 -
TECNORD
L - Adjusting the symmetry of the neutral position dead band by means of trimmer T5
( Tab.II -Page#14)
- Because the overall mechanical and electrical tolerances,the dead band across the ' 0 '
position of the control lever might not be symmetrical.
The symmetry of the dead band can be adjusted by means of trimmer T5 according to the
following logic :
- if the symmetry error causes the actuator to RETRACT as soon as the joystick lever
is moved off of center, then trimmer T5 must be rotated COUNTER-CLOCKWISE
- if the symmetry error causes the actuator to EXTEND as soon as the joystick lever
is moved off of center, then trimmer T5 must be rotated CLOCKWISE
- the optimum calibration is reached when the deflection angles of the joystick lever
required to turn on the GREEN LED LV are equal on both sides of the NEUTRAL
position.
TECNORD
Via Decorati al Valor Militare 3 - 41040 Baggiovara (Modena) - Italy
- 13 -
TECNORD
7.
HYDRAULIC SCHEMATIC
- Tab. IX
8.
- Hydraulic schematic
ELECTRICAL SCHEMATIC
- Tab. XI
TECNORD
- Junction box
Via Decorati al Valor Militare 3 - 41040 Baggiovara (Modena) - Italy
- 14 -