1
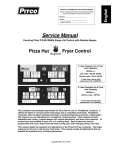
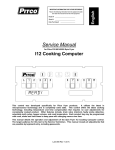
Model #: __________________________ Serial #: __________________________ Date Purchased: ___________________ English IMPORTANT INFORMATION FOR FUTURE REFERENCE Record the following information from the appliance ID plate and retain this manual for the life of the equipment: Operations Manual Covering Pitco P/N 60126803 Single Vat Control With Set-Back and Lane Selection Options Pizza Hut Fryer Control This control was developed specifically for Pizza Hut for use on “WingStreet” products. It utilizes the latest in microprocessor technology and is completely solid state. WingStreet controls offer the latest cooking technology, including temperature and time compensation that requires no user adjustment for consistently cooked product. Other features include selectable melt cycles, and a drain valve interlock. 10 product keys are available to each of 3 or 4 cooking lanes. Each product key may be programmed with cook, shake and hold times to keep pace with changing menus over time. This manual details the operation and adjustment of the Pizza Hut Fryer Control. The target audience for this text is the Store Manager. This manual reveals all non service adjustments that can be made by keyboard entry, including passwords. L20-260 Rev 2 (10/4/07) I12 Cooking Computer: Pizza Hut WingStreet w/ Setback & Lanes Selection Features Pitco P/N 60126803 Key Locations and Functions: ................................................................................................................. 3 1.1 To turn the appliance ON:______________________________________________________ 3 1.2 To turn the appliance OFF: _____________________________________________________ 3 To start a cook: _____________________________________________________________________ 3 1.4 To cancel a cook: ____________________________________________________________ 4 1.5 To view Vat temperature: ______________________________________________________ 4 1.6 To view Cooking Set temperature: _______________________________________________ 4 1.7 To view Set Back temperature: __________________________________________________ 4 1.8 To View Current Settings for Cook, Sake, Hold, and Hold Pre-Alarm: ____________________ 4 To perform a Boil Out operation: ________________________________________________________ 5 1.9.1 1.9.2 Automatic Boil Entry (Water Detection): .................................................................................................................... 5 Manual Boil Entry:...................................................................................................................................................... 5 1.10 Set back Operation: __________________________________________________________ 5 2 To Enter Programming Level 1 (for the Store Manager): ............................................................... 6 2.1 To Set Cook Temperature: _____________________________________________________ 6 2.2 To Change a Product Key–Cook, Shake, Hold, and Hold Pre-Alarm Times: _______________ 6 2.2.1 2.2.2 2.2.3 2.2.4 Cook Time.................................................................................................................................................................. 6 Shake Time................................................................................................................................................................ 7 Hold Time................................................................................................................................................................... 7 Hold Pre-Alarm .......................................................................................................................................................... 7 2.3 To Exit Level 1 programming: ___________________________________________________ 7 3 To Change Options Level 2 ( for the Store Manager):.................................................................... 8 3.1 Fahrenheit or Celsius Display: __________________________________________________ 8 3.2 Password Change or Required? _________________________________________________ 8 3.3 Beeper Volume and Tone: _____________________________________________________ 9 3.4 Language Selection: __________________________________________________________ 9 3.5 Melt Cycle Type: _____________________________________________________________ 9 3.6 Recovery Test Value: ________________________________________________________ 10 3.7 Control or Timer Selection: ____________________________________________________ 10 3.8 Lane Selection: _____________________________________________________________ 10 3.9 Seback Time and Temperature settings: _________________________________________ 11 3.10 To Exit Programming Level 2 __________________________________________________ 11 L20-260 Rev 2 Page 2 of 12 I12 Cooking Computer: Pizza Hut WingStreet w/ Setback & Lane Selection Features Pitco P/N 60126803 1 Key Locations and Functions: 10 Product Keys with Indicators Heat Demand Indicator 3 Basket Keys Yellow Lane Blue Lane Red Lane ON/OFF 1 2 Bone In Wings Bone Out Wings 3 5 4 6 7 8 Taters Pies Cheese Stick 9 0 Clock Key Displays show current operation. Throughout this text, a left only display will be printed as [RED 4]. When both left and right displays should be interpreted together, this text will be show them as [RED 4] [1:07]. 1.1 Thermometer Key To turn the appliance ON: If power is applied to the appliance, the displays will show . Press the key. Displays will show one of the following: ; ; or . Some messages may show in both left and right displays. Wait for the appliance to heat up to the [READY] condition before cooking. 1.2 To turn the appliance OFF: Press the key. Display will momentarily show the software version number, and then . 1.3 To start a cook: 4 When the display is showing the appliance OR OR + Typical has reached set temperature and is ready to cook. Press a Product INDICATOR FLASHES WHEN SET Key basket key then the desired product key. and place product into the vat The left display will show the basket color and the product key, while the right display shows the time remaining in the cook. In the example above, RED lane is cooking product 4 (left display) with 1 minute and 7seconds remaining (right display). Up to three cooks may run together. While cooks are running, the displays will always show the cook with the least time remaining. Longer running cooks will flash their indicators at a slower rate. Cook time remaining on these keys may be checked by momentarily pressing the basket keys. Page 3 of 12 L20-260 Rev 2 I12 Cooking Computer: Pizza Hut WingStreet w/ Setback & Lanes Selection Features Pitco P/N 60126803 1.4 To cancel a cook: 4 Press and hold the basket key to cancel a cook. The indicator above the product key will turn off, indicating a canceled cook. If no other cooks are pending, controller . displays will return to 1.5 To view Vat temperature: To view the actual vat temperature, press the key. The display will show or , where “F’ is Fahrenheit, and “C” is Celsius. After a few moments, the display will return to [READY], [MELT], [HEATING] or [NOTREADY]-[SET BACK] if no cooks are running. 1.6 To view Cooking Set temperature: To view the set temperature, press the key twice. The display will show or , where “F’ is Fahrenheit, and “C” is Celsius. After a few moments, the display will return to [READY], [MELT ], [HEATING] or [NOTREADY]-[SET BACK] if no cooks are running. 1.7 To view Set Back temperature: To view the set temperature, press the key three times. The display will show or , where “F’ is Fahrenheit, and “C” is Celsius. After a few moments, the display will return to [READY], [MELT ], [HEATING] or [NOTREADY]-[SET BACK] if no cooks are running. 1.8 To View Current Settings for Cook, Sake, Hold, and Hold Pre-Alarm: To view the current settings for any product key, press the key, followed by the desired product key. The display will show [nCK mm:ss], followed by [nSH mm:ss], then [nHD mm:ss], ending with [nPA mm:ss]. Where “n” is the key number, and “mm:ss” is the time setting. ; After a few moments, the display will return to , , or when no cooks are running. If cooks are running, the least time remaining will be displayed. Typical displays using key 4 as an example: + Key 4 Cook Time [4CK] is set for 3 minutes and 28 seconds. Key 4 Shake Time [4SH] is set for 2 minutes and :00 seconds before the end of the Cook. Default value is 00:00, or inactive. Key 4 Hold Time [4HD] is set for 15:00 minutes. This is the amount of time cooked product may sit in holding bins before a new batch is started. Default value is 00:00, or inactive. Key 4 Hold Pre-Alarm [4PA] is set for 00:00 and is inactive (default setting). When activated his alarm warns the operators that the Hold Time is about to run out. In a few moments, the display to , L20-260 Rev 2 ; , or Page 4 of 12 4 I12 Cooking Computer: Pizza Hut WingStreet w/ Setback & Lane Selections Features Pitco P/N 60126803 1.9 To perform a Boil Out operation: Normal maintenance of a fryer requires regular tank cleaning. This process involves draining the vat of oil and filling with water. Cleaning solution is added, and the control is set to boil by one of the following methods: 1.9.1 Automatic Boil Entry (Water Detection): Fill the appliance with water and turn the appliance on. Heat will be applied to the vat warming the water. This control will detect the presence of water by temperatures not rising above the boiling point of water; 212°F (100°C). After a time at this temperature, displays will show Heat will be disabled until the operator responds to this prompt. Pressing the [0] key is a YES response to the boil prompt. If pressed, display will show . Heat will maintain vat temperature at 185°F (85°C) for cleaning as long as the control remains on. To exit boil mode control must be turned off. Warning: Pressing any other key at the [PRESS 0 ] [TO BOIL ] prompt is regarded by the control as a NO response. With this response, the control will apply heat to the vat as if oil were present in the vat. With water in the vat, a rolling boil will result. This will cause undesirable foam over conditions. And, a potential steam burn hazards to operators performing cleaning operations. 1.9.2 Manual Boil Entry: After filling an empty vat with water, turn the appliance on. Press the key and enter key sequence [2], [1], [2]. If control is set to display in the Celsius scale, press [1], [0], [0] keys to manually enter boil mode. The display will show to indicate entry into boil mode. To exit boil mode, control must be turned off. 2 1 2 1 0 0 1.10 Set back Operation: Operation of the setback features requires set up values be entered (refer to service manual section 3.8). Factory default settings are with this feature inactive. Operation: Each time a cook is performed, the setback timer is reset. When no cooks occur for the duration of the setback time, the control will enter a setback state and maintain a reduced vat temperature. Both time and temperature of this setback feature are adjustable by the store manager. 1. When the control is in the setback state, the display will show 2. Press any colored basket key or product key to exit setback. 3. If the vat temperature is below the READY band, a rapidly pulsing alarm will sound to warn the operator. Display will show . The m:ss display will show the approximate time needed for the vat temperature to rise to cooking temperature. condition before lowering basket into the Wait for the temperature to return to the fryer. Page 5 of 12 L20-260 Rev 2 I12 Cooking Computer: Pizza Hut WingStreet w/ Setback & Lanes Selection Features Pitco P/N 60126803 2 To Enter Programming Level 1 (for the Store Manager): Note: The factory default setting for this control does not require a password to be entered. However, the password requirement and value may be changed in section 3.2. Entry of a password when NOT required will not interfere with the programming process. With no cook timers running, displays will show one of the following displays: , , or , . Press the key. If display shows: If display shows: ; you do not need , a password is required. to enter a password. Level 1 & 2 Password 6 6 8 4 using the product keys as Enter password a numeric keypad for entry. With correct password entry, display . will show display, continue with this section or go to section 3, or 4. From the 2.1 To Set Cook Temperature: Press the key once. The display will show [SET xxxF] [TEMP] or [SET xxxC] [TEMP], where “xxx” is the current temperature setting. Use the product keys for numeric entry to adjust the current setting. Press the setting. Display now shows 2.2 . To exit here, press key to save again, or continue. To Change a Product Key–Cook, Shake, Hold, and Hold Pre-Alarm Times: For each product key, Cook, Shake, Hold, and Hold Pre-alarm times are set in this section. With display showing , continue with the following section for each product key to change. 2.2.1 Cook Time Cook Time may be set for each product key. To deactivate any product key enter a zero value for cook time. Press the Display will show key. . Press the desired product key to change. The display is now showing [nCK mm:ss] [TIME] where “n” is the key number, “CK” means Cook, and “mm:ss” is minutes and seconds. Use the product keys for numeric entry to adjust the current setting. Press the to save cook time and continue setup for this product key. L20-260 Rev 2 Page 6 of 12 key I12 Cooking Computer: Pizza Hut WingStreet w/ Setback & Lane Selection Features Pitco P/N 60126803 2.2.2 Shake Time Shake time is an alarm that sounds during Cook Time to prompt operators to shake the basket. Default for this value is zero, meaning the Shake Time is inactive. To use Shake Time, the time value must be a non-zero value, and, must be set to a value less than cook time. Display shows [nSH mm:ss] [TIME] where “n” is the key number, “SH” means Shake, and “mm:ss” is time in minutes and seconds. Use the product keys for numeric entry to adjust the current setting. Press the key to save shake time and continue setup for this product key. Note: The value entered for shake time is the time from the end of the cook. 2.2.3 Hold Time Cooked product may stand in holding bins for a period of time. This timer produces an alarm to inform operators to discard old product and start a new cook. Default for this value is zero, meaning the Hold Time is inactive. Display is showing [nHD mm:ss] [TIME], where “n” is the key number, “HD means HOLD, and “mm:ss” is minutes and seconds. Use the product keys for numeric entry to adjust the current setting. Press the key to save hold time and continue setup for this product key. 2.2.4 Hold Pre-Alarm Hold Pre-Alarm is a timer setting that is used to warn operators that the Hold Time is about to expire. To use Hold Pre-Alarm, the time value must be a non-zero value, and, must be set to a value less than Hold Time. Default value is zero, meaning the Hold Pre-Alarm is inactive. Display is showing [nPA mm:ss] [TIME] where “n” is the key number, PA means Pre-Alarm, and “mm:ss” is minutes and seconds. Use the product keys for numeric entry to adjust the current setting. Press the key to save pre-alarm time. Note: Value entered for hold pre-alarm time is the time from the end of the hold period. . Repeat steps from section 2.2 Display will again return to to make changes to any other product keys or continue. 2.3 To Exit Level 1 programming: Display shows Press the . key. Display shows . Continue to section 3 “To Change Options”, or, exit here in the next step. To exit Level 1 programming, press the Displays will show are running. key again. ; Page 7 of 12 , or , when no active cooks L20-260 Rev 2 I12 Cooking Computer: Pizza Hut WingStreet w/ Setback & Lanes Selection Features Pitco P/N 60126803 3 To Change Options Level 2 ( for the Store Manager): The display must show from section 2 to change these options. When the 0 product key [0] is pressed, the display will show . Indicator lights above product keys will illuminate to represent options that may be changed. Each option listed below uses the product key [0] to toggle or scroll through available choices in the display. When the correct value is displayed, press the for another option selection. display will again return to 3.1 key to save choice. The Fahrenheit or Celsius Display: The Controller will display temperatures in the Fahrenheit or Celsius scales. The default scale is °F. With display showing , press the product key [0]. Display shows . Press product key 1, display shows [DEGREE n] [F OR C], where “n” is the current setting. Use the product key [0] to scroll through choices (F or C). Press 1 key to save choice. 3.2 Display shows . Password Change or Required? With factory settings, an operator password is not required to enter programming Levels 1 and 2. The password may be activated or changed in these steps. With display showing , press the product key [0]. Display will show . Press product key 2, display shows [SET PAS] [NEW PASS]. Use the product key 2 [0] to scroll through choices [NO PASS] or [PASS REQ]. Press key to save choice. If [NO PASS] is selected Display returns to If [PASS REQ]. is selected, display will show [PASSnnnn] [NEW PASS] to prompt for new password. Displayed value “nnnn” is the current password. Use the product keys for numeric entry to change password. Press Display then shows . key to save choice. . Note: The factory default password (6684) will always work even if a different password is selected here. L20-260 Rev 2 Page 8 of 12 I12 Cooking Computer: Pizza Hut WingStreet w/ Setback & Lane Selection Features Pitco P/N 60126803 3.3 Beeper Volume and Tone: Volume and Tone of the beeper alarm may be changed in this section. Volume ranges are 1,2, and 3, where 3 is the loudest setting. This model also has a selection for tone. With display showing , press the product key [0]. Display will show shows [VOLUME n] [BEEPER]. Use the product key [0] to scroll through choices (n= 1,2,3, or T). Beeper volume will change as each selection is made. If “T” is selected an additional display is shown, [TONE n] [BEEPER]. Use the product key [0] to scroll through choices (n= 1,2,3). Beeper tone will change as each selection is made. Press 3.4 3 . Press product key 3, display key to save choice. Display shows . Language Selection: With display showing , press the product key [0]. 4 Display will show Press product key 4, display shows [ENGLISH] [LANGUAGE]. Use the product key [0] to scroll through choices (ENGLISH, ESPANOL, FRANCAIS, DEUTSCH, HOLLAND). Press 3.5 . key to save choice. Display shows . Melt Cycle Type: This adjustment allows selection of the melt cycle type and requirement when starting the appliance from a cold start. With display showing , press the product key [0]. 5 Display will show . Press product key 5, display shows [LIQUID], the default setting. Use the product key [0] to scroll through choices (liquid, solid, or, no melt). Press key to save choice. Display will again return to Page 9 of 12 . L20-260 Rev 2 I12 Cooking Computer: Pizza Hut WingStreet w/ Setback & Lanes Selection Features Pitco P/N 60126803 3.6 Recovery Test Value: This controller maintains a record of heat up times for the appliance. A poorly running appliance will have increased recovery times stored in this display. There is no selection done here, just the display of recovery time values. With display showing , press the product key [0]. 6 Display will show . Press product key 6; display will show [RECOVERY] [TEST]. Press the product key [0]. Display will show [FnnnLyyy], where nnn is the factory recovery value, and yyy is the last warm- up recovery value. After recording these values, press the key. Display will again return to . 3.7 Control or Timer Selection: With display showing , press the product key [0]. Display will show . Press product key 7; display will show [CONTROL]. Use the product key [0] to scroll through choices; Control or Timer. Press key to save choice. Display shows 7 . Note: If timer is selected, heat control outputs are disabled, leaving only the timer functions active. Do not make this selection on Solstice fryer models. 3.8 Lane Selection: This control offer a selection between the Active cook lanes. In the three lane mode, the control responds to basket key location shown on the cover of this manual. Lanes are defined as Yellow, Blue, and Red. After September 2007, conversion to a 4 lane cooking control is possible. In the four lane setting, lane colors are Yellow, Blue, Red, and Green. To change to four lane mode follow these steps. With display showing , press the product key [0]. Display will show . Press product key 8; display will show [LANES n] [ 3 or 4 ], where n is the current setting. Use the product key [0] to scroll through choices. Press key to save choice. Display shows Factory default setting is for 3 Lane Control. L20-260 Rev 2 Page 10 of 12 . 8 I12 Cooking Computer: Pizza Hut WingStreet w/ Setback & Lane Selection Features Pitco P/N 60126803 3.9 Seback Time and Temperature settings: With display showing , press the product key [0]. Display will show . Press key [9]. Display shows, [TIME nn] [SET BACK], where nn is the time the control must be idle (not cooking) to enter the setback state. The default setting is 00, meaning that the setback feature is disabled. Entry on any non-zero value will activate this feature. Enter the number of minutes [nn] using the numbered keys 9 0 … . The valid range of time entry is 0 to 99 minutes. Entering 00 will disable the setback feature. Typical values are 30 minutes. Press key to save. Display shows Enter a new setback temperature using the numbered keys . 9 0 … . The valid range of temperature entry is 225 to (SP-15) °F. Factory default value is 250°F. Press key to save setting. Display shows . 3.10 To Exit Programming Level 2 With display showing , press the key. , Display will return one of the normal displays: , or , . Page 11 of 12 L20-260 Rev 2 9 In the event of problems with or questions about your order, please contact the Pitco Frialator factory at (800) 258-3708 US and Canada only (603) 225-6684 World Wide In the event of problems with or questions about your equipment, please contact the Pitco Frialator Authorized Service and Parts representative (ASAP) covering your area, or contact Pitco at the numbers listed to the left. MAILING ADDRESS – P.O. BOX 501, CONCORD, NH 03302-0501 SHIPPING ADDRESS – 10 FERRY ST., CONCORD, NH 03301 L20-260 Rev 2 (10/4/07)