1
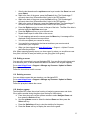
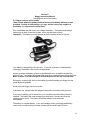
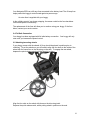
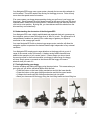
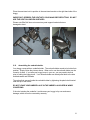
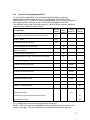
NAVIGATOR GPS MAINTENANCE/SERVICE MANUAL INSTRUCTION MANUAL 1 Up arrow & mark ball key On/off key Left soft key Centre soft key Right soft key Left, right & down keys Scroll within Buggy Mode Speed control dial, stop/go Menu key Sureshot/Buggy Remote dock Mode toggle Navigating around your Sureshot Homepage Play Golf > Select Play Course Resume Map Course > Start Mapping > Edit Course > Delete Course Analyze Game > Select Game Score Statistics Back 9/ Front 9 Features > Setup > Status Units Scoring Backlight Date/Time GPS Information >Demo Capacity Registration Reset Unit View GPS Signal Navigation Battery Status The Sureshotgps™ part of the NavigatorGPS is extremely easy to use. Most operations can be performed with the press of one or two keys. The soft keys change their function depending on the screen display. The function of each soft key is shown in the green bar at the bottom of the display. The menu key is used to display the main menu or exit from sub-menus. 2 Welcome to your NavigatorGPS, golf course green and hazard distance finder and buggy controls. Please read the following information in this booklet to ensure you gain the full benefit of all the features on your NavigatorGPS remote control caddy. Section 1. Top Box Instruction Manual 1.1 Charging your remote control 1.2 Registering online 1.3 Upgrading membership 1.4 How to download a course map 1.5 Understanding GPS 1.6 Checking for GPS Signal 1.7 Navigation 1.8 Setting the date format and time 1.9 Setting the measurement unit - Metres or Yards 1.10 Scoring 1.11 Registration – Check for ownership 1.12 Reset unit 1.13 Pair Remote 1.14 Competition Mode 1.15 Buggy Mode 1.16 Playing Golf 1.17 Understanding the icons 1.18 Scoring 1.19 Mapping a course 1.20 Editing a course 1.21 Deleting a course 1.22 Analyse Game 1.23 Demo Section 2. Buggy Instruction Manual 2.1 Charging and care of the battery 2.2 Fitting the battery 2.3 Battery lead fuse 2.4 Fail safe connection 2.5 Attaching/Removing wheels 2.6 Understanding the electronics of the NavigatorGPS 2.7 Folding/Unfolding your buggy 2.8 Fitting your golf bag 2.9 Positioning the seat 2.10 Assembling the umbrella holder 2.11 Sand bottle and holder th 2.12 Engaging the 4 wheel 2.13 The front wheel and suspension system 2.14 Top handle control box features 2.15 Remote control features 2.16 The Navigation System – how it works 2.17 Cart tracking 2.18 Useful hints when using the NavigatorGPS 2.19 Understanding your buggy and suggestions for dealing with unusual situations 2.20 Frequently asked questions and answers Section 3. Maintenance service manual 3.1 Important information about your NavigatorGPS 3.2 Warranty Registration Page 5 5 5 6 6 6 6 7 7 7 7 7 7 7 8 8 10 11 11 12 12 12 13 14 15 15 16 16 17 17 18 18 19 20 20 20 21 22 23 23 24 24 25 28 28 3 3.3 Warranty Service problem 3.4 Warranty policy 3.5 Warranty exclusions 3.6 Parts installed during warranty 3.7 Preventative maintenance program 3.8 Cleaning your motorised buggy 3.9 Rear wheel axles 3.10 Upper and lower bag straps 3.11 Correcting the alignment of your NavigatorGPS 3.12 NavigatorGPS top handle protection 3.13 Charging and caring for your remote control lithium ion battery 3.14 Service Schedule 3.15 Service record for your NavigatorGPS 3.16 Technical and product support 3.17 Frequently asked questions 3.18 Who can help me with technical questions and support? 3.19 Declaration of conformity 3.20 Software licensing 28 28 28 29 29 29 29 29 30 30 31 3.21 Website information 36 32 34 35 35 35 35 36 4 Section 1 Top Box Instruction Manual 1.1 Charging your remote control Before you start using your NavigatorGPS buggy you must fully charge the remote control internal lithium ion battery for approximately 6 hours or overnight with the AC charger. The Nav On key will flash during charging. Connect the AC world charger to a suitable power source, using the compatible AC pin plug. Plug the USB cable from the AC charger into the remote control. The USB connector is located on the bottom of the remote control. Ensure that the orientation of the plug matches the socket in the remote control unit. Turn on the power to the AC adapter. You should allow six hours to fully charge the battery. You cannot over-charge the battery so you can leave it charging in between use. You can also charge the remote control using the supplied USB cable and connecting it to a computer. Note that you should not charge a completely flat battery using this method. You should use the AC charger. The battery will take longer to charge when using the USB cord. *Locking the remote control: To lock the remote, press “STOP” and then two presses of the “Nav Off” button within one second. The locking is verified with three quick flashes of the red l.e.d. in the top right hand white button. To unlock the remote, press the “Nav On” button two times within a second. Unlocking is verified with three quick flashes of the green l.e.d. in the top left hand white button. 1.2 Registering Online Prior to using your NavigatorGPS, the product must be registered online. Registering will activate your warranty period and enable course map downloads. DO NOT CONNECT YOUR REMOTE CONTROL TO YOUR PC UNTIL PROMPTED. Ensure you have an internet connection with web browser Go to www.bilagolf.com Click on the Download Software (PC or Mac) Click on the Support button Click on Register your cart and follow the prompts 1.3 Upgrading your membership Your purchase of a GPS Series buggy entitles you to a 12 month Silver Membership and you can upgrade to a Gold, Platinum or Platinum Plus Membership detailed below. Silver Membership A Silver Membership entitles you to download up to 3 golf courses for the year. Gold Membership A Gold Membership entitles you to unlimited uploads and downloads and your NavigatorGPS can hold up to 10 golf courses at any time. Platinum Membership 5 A Platinum Membership entitles you to unlimited uploads and downloads and your NavigatorGPS can hold up to 20 golf courses at any time. Platinum Plus Membership A Platinum Plus Membership entitles you to unlimited uploads and downloads and your NavigatorGPS can hold up to 40 golf courses at any time. You can purchase a Gold, Platinum or Platinum Plus Membership for one, two or three years. 1.4 How to download a course map You need to be connected to the internet You need to have your Remote Control connected to your PC via the USB cable Go to www.bilagolf.com Click on Support > Download courses A screen will open up and at the top it will allow you to download/upload courses Follow the prompts and download the courses required. Depending on your level of membership you will be able to download up to 40 courses. 1.5 Understanding GPS What is GPS and how does it work? The Sureshotgps™ function of the buggy uses the Global Positioning System [GPS] to work out how far you are from the green or hazard. The system relies on the buggy receiving signals from orbiting GPS satellites. How long does it take to gain reception from the satellites? Ensure your buggy has been turned on outside for at least five minutes before you wish to use it. Can I use my NavigatorGPS inside the home or office? The Sureshotgps™ function will not generally gain reception inside. For best accuracy, your NavigatorGPS unit should have an unimpeded view of the sky. 1.6 Checking for GPS Signal Before checking the status of your GPS signal, ensure you have clear sky above your buggy and the NavigatorGPS unit has been on for at least five minutes. You can check the status of GPS reception by going to: Sureshot Homepage > Features > Status > GPS Information > GPS Signal It will display the satellite number and signal strength for each satellite. A blue bar indicates that the satellite is being used in the position calculation. A red bar indicates that the satellite signal is being received but it is not used in the position calculation. The latitude and longitude of the current position is also displayed. The GPS signal strength is also displayed via a five column bar graph on the main menu page. Once again, a blue bar indicates that the satellite is being used in the position 6 calculation. A red bar indicates that the satellite signal is being received but it is not used in the position calculation. 1.7 Navigation Displays velocity, heading and odometer. Sureshot Homepage > Features > Status > GPS Information > Navigator 1.8 Setting the date format and time Go to Sureshot Homepage > Features > Setup > Date/Time > Set Local Time Choose dd/mm/yy or mm/dd/yy The Navigator GPS unit has a real time clock and receives the time from satellites. To adjust the time for daylight saving use the up/down arrows to change the hours displayed time to the correct time. Use the left/right arrows to move between hours and minutes. Press the Save soft key to save the correct time. Press the Menu Key to go to the main menu 1.9 Setting the measurement unit – metres or yards Go to Sureshot Homepage > Features > Setup > Metres/Yards Choose Metres or Yards. Press the Menu Key to go to the main menu 1.10 Scoring Go to Sureshot Homepage > Features > Setup > Scoring Choose On or Off. Press the Menu Key to go to the main menu 1.11 Registration – Check for ownership Go to Sureshot Homepage > Features > Status > Registration Displays the software version, unique electronic serial number, registration date, model and owner details. 1.12 Reset Unit Go to Sureshot Homepage > Features > Status > Reset Unit This enables you to reset your NavigatorGPS to the factory settings. It will delete all loaded courses, saved games and reset features to their default values. It does not reset the registration details. 1.13 Pair Remote Go to Sureshot Homepage > Features > Buggy/Remote > Synchronise 7 1.14 Competition Mode You can enable Competition Mode which disables the GPS signal, the Play Golf functions and it does not display any distances under Buggy Mode. Go to Sureshot Homepage > Features > Buggy/Remote > Competition Mode 1.15 Buggy Mode Buggy mode displays statistics. View buggy mode by selecting the “Mode” key. To view all statistics scroll through the menu using the “Scroll” key. Buggy mode displays: Distance travelled in time and kilometres Life and round time of the buggy Shot measuring distance Remote control and buggy remote control capacities Speed in km/h or mph, and selected speed level between 1 – 9 Servicing schedule reminders in kilometres You can reset these statistics except for the life of the buggy and servicing schedule reminders. 1.16 Playing Golf To begin using your Sureshotgps™ mode on the golf course, you must map or download a course first (unit must be registered). See how to download courses under How to download a course map. a. Ensure that your NavigatorGPS has been turned on for at least five minutes with clear access to the sky before you begin playing your game of golf. b. From the Sureshot Homepage use the up/down arrows to select Play Golf and then press the Select soft key. c. Use the up/down arrows to select the desired course and then press the Select soft key. d. Details of the chosen course will be displayed. Press the Play soft key. e. One of two viewing screens will be displayed. To switch between the two screens press the View soft key. f. Details of the chosen course will be displayed. Press the Play soft key. g. If hazards have been mapped for the hole, the Hazard Screen will be displayed. If there are no hazards for the hole the Green Screen will be displayed. h. Press the View soft key to change between the Green Screen and the Hazard Screen. 8 i. j. k. l. m. n. o. p. q. r. s. Press and hold the Mark Ball (up arrow key) key to mark the position of the ball at the beginning of a drive. Press the Back soft key to return to the Play Screen. Press and hold the Mark Ball (up arrow key) key to view the drive distance. Press the Save soft key to save the drive distance or the Remark soft key to remark a ball position. Press the Back soft key to return to the play screen. The Green Screen will show the distance to the front, centre and back of the green. The status bar at the bottom of the display shows the soft key scoring options if scoring is enabled. If scoring is enabled, on the Green Screen press the Putt soft key to increment the putt count. Hold down the Putt soft key to decrement the putt count. Press the Sand soft key to set sand saves. The Hazard Screen shows the distance to the centre of the green and for each hazard the distance to the front and the carry distance. Each hazard is labelled L – Left, C – Centre or R – Right. If there are more than three hazards a red arrow will be displayed. Use the up/down arrows to scroll through the mapped hazards. If scoring is enabled, on the Hazard Screen press the Fairway soft key to set fairway hit. Press the Green soft key to set greens in regulation. If there are no hazards mapped for a hole and scoring is enabled, the View soft key is used only for the scoring options. If scoring is enabled, press and hold the View soft key to display penalties and green up/downs on both the Green and the Hazard Screens. Press the Pens soft key to increment the penalty count. Hold down the Pens soft key to decrement the penalty count. Press the up/down soft key to set greenside up and downs. If scoring is enabled, press the right arrow key to go to the display Score Screen. If scoring is not enabled the next hole will be displayed. The score defaults to the par of the hole. Use the up/down arrows to increment/decrement the score. Press the right arrow key to go to the next hole. Press the left arrow key to display the previous hole. If scoring is enabled, at any time during the game, press and hold down the down arrow key to display the current score. Press the Done soft key to return to the game. Press the Menu key at the end of the game. If scoring is enabled press the Yes soft key to save the score. Press No to discard the score and return to the Main Menu. First View The first viewing screen, to the left, displays the distance to the hazards to the carry of the hazards for each hole on the right side. A red arrow is displayed on the screen when there are more than three hazards per hole. Use the up/down arrows to scroll through the mapped hazards. The distance from you to the centre of the green is shown on the left side. 9 Second View The second viewing screen, to the left, displays the distance from you to the front, centre and back of the green. These measurements are displayed in metres or yards depending on your preference (see instructions under Setup). 1.17 Understanding the Icons The greens and hazards are all represented in easy to read icons: The distances are displayed in the following format: 10 1.18 Scoring This feature is switched On or Off from the: Sureshot Homepage > Features > Setup > Scoring To begin scoring first select the hole you are hitting off from. If hitting from the 5th hole press the left arrow key until Hole 5 is displayed then follow the following steps: If scoring is switched Off the Fairway, Green, Putts and Sand soft keys are not displayed. 1.19 Mapping a course When mapping a course it is ideal to map all the hazards as well as the greens. Good mapping involves taking account of relevant hazards and all greens in sequence. There is no need to map tee off areas as your NavigatorGPS will always tell you how far you [the NavigatorGPS] are to those hazards and greens that you have mapped. a. Turn on your NavigatorGPS. You will need to wait up to five minutes for the Sureshotgps™ to lock in to the available satellites. b. Press the Menu key. c. Select Map Course using the down arrow. d. Select Start Mapping and enter the full course name, for example, Commonwealth Golf Club. Select the desired letters using the up/down and left/right arrow keys. Press Save once complete. e. Press the Map soft key to map the course or the Back soft key to return to the previous display. f. Using the up/down arrow keys select the hazard type of the first hazard which appears on the first hole. Press the Select soft key. g. Select from Left, Centre or Right to indicate where on the fairway the hazard appears. h. Walk to the front of the hazard, press the Front soft key. The Sureshotgps™ will count down from 10 seconds while it locks in the GPS position. i. Walk to the Carry (back) of the hazard, press the Carry soft key. The Sureshotgps™ will count down from 10sec while it locks in the GPS position. j. Once complete, press the Done soft key. k. Repeat this process for each hazard. 11 l. After the last hazard use the up/down arrow keys to select the Green icon and press Select. m. Walk to the front of the green, press the Front soft key. The Sureshotgps™ will count down from 10 seconds while it locks in the GPS position. n. Walk to the back of the green, press the Back soft key. The Sureshotgps™ will count down from 10 seconds while it locks in the GPS position. o. Walk to the centre of the green, press the Centre soft key. The Sureshotgps™ will count down from 10 seconds while it locks in the GPS position. p. Press the Right arrow key to move to the par of the hole. The Par of the hole is selected using the Up/Down arrow keys. q. Press the Right arrow key to go to the next hole. r. Repeat these steps for each hole on the course. s. To exit mapping and save the course press the Menu key. A message will be displayed noting the saved course number. t. You can now upload your course for saving. u. You need to be connected to the internet and have your remote control connected to your computer. v. When you have logged onto www.bilagolf.com -> Support -> Upload Courses and follow the prompts. Hint: When mapping hazards ensure you have regard to where you would have come from [that is the tee off area] and where you are going [that is the green]. 1.20 Editing a course You can edit a course that is on your NavigatorGPS. You may like to add a layup point or a reference point, or add a hazard that was not included in the original mapping. Go to www.bilagolf.com > Support > Manage my Courses > Upload or Delete Courses Follow the instructions to edit a course. 1.21 Deleting a course You can delete courses that are stored on your NavigatorGPS. Go to www.bilagolf.com > Support > Manage my Courses > Upload or Delete Courses Follow the prompts to delete the course. 1.22 Analyse a game The NavigatorGPS offers the unique function of analysing game scores and shots if they were recorded during the game (see Scoring for instructions). a. From the main menu use the up/down arrows to select Analyse Game and then press the Select soft key. b. Use the up/down arrows to select the desired Game and then press the Select soft key. c. Press the Statistics soft key to view the statistics for the game. d. Press the Score soft key to display the score for the game. 12 e. Press the Back 9/Front 9 soft key to toggle between the front 9 and back 9 scores. f. Press the Done key to go back to the Select Game display. g. To delete a game use the up/down arrows to select the desired Game and then press the Delete soft key. When prompted press the Yes soft key to delete the game or the No soft key to return to the game list without deleting the game. 13 Section 2 Buggy Instruction Manual Charging and care of the battery 2.1 Charge and care of the battery *Note: Please attach the battery leads to the top of the battery with the screws provided. Positive is indicated by a (+) sign, and the colour red; negative is marked by a (-) sign and the colour black. Prior to the first, and after every use, charge the battery. The battery and charger comes with an easy connection system, red to red and black to black. Important: - The battery must be charged at least overnight before its first use. Your battery is designed for 18 holes only. If you play more than 18 holes before recharging, the battery‟s life could be compromised. Always recharge the battery as soon as possible after use, no matter how short the period of use. Your battery will charge best lying flat in a warm location with and air flow. Note: In winter, it is best charged in a warm location and off any concrete floor. During play, minimize the drain on the battery by avoiding taking your buggy into the rough whenever possible. Avoid using the buggy to pull you up hills. In between use, always leave the charger connected to the battery with power on. If you are not playing golf for some time, you may disconnect the battery once it is charged. The battery will need recharging at least every 3 months and must be recharged prior to use. The battery should be stored in a dry and warm environment. The battery is a sealed battery. If you are intending to take your buggy and battery on air travel, we advise that you make contact with your airline prior to travel. 14 Be very careful not to drop your battery. The battery casing is easily cracked and the battery‟s life will be severely compromised. 2.2 Fitting the battery Once charged, the battery can be fitted to the buggy. The battery comes with a battery cover, carry handle and battery leads. a. Place your battery in the tray with the leads facing to the front of the buggy. b. The battery tray has a battery securing strap. c. The securing strap is to be used at all times as it protects your battery against damage from falling out. d. The battery lead can now be connected to the battery tray. Connect red to red and black to black. 2.3 Battery lead fuse 15 Your NavigatorGPS has a 40 amp fuse connected to the battery lead. The 40 amp fuse helps protect the buggy‟s control board against a power surge. An extra fuse is supplied with your buggy. In the unlikely event of your buggy stopping, the reason could be the fuse has blown. Check and replace if necessary. The replacement of the fuse will allow you to continue using your buggy. If the fuse blows, contact your service centre. 2.4 Fail Safe Connection Your buggy has been equipped with fail safe battery connection. Your buggy will only start once you increase the speed control. 2.5 Attaching/removing wheels If your buggy comes with the wheels off, they should be placed in position prior to unfolding. To put the wheels on you will need to align the four slots on the inside of the wheel with the same four on the drive dog on the axle. To engage the rear wheel, depress the quick release catch until the wheel is in place. Align the four slots on the wheel with those on the drive dog teeth. Depress the quick release catch, whilst putting wheel in position on the axle 16 Your NavigatorGPS buggy uses a gear system, whereby the two rear drive wheels do not free wheel. The motor needs to be running for the buggy to move. Drive will only occur when the speed control is turned on. If for some reason your buggy stops operating during your golf round, your buggy can free wheel. Simply depress the quick release tag and at the same time move the wheel outwards about 10mm from its current position. Release the tag and allow the wheel to click into its outer position. By doing this, you have disconnected the wheels from the drive and they can rotate freely. 2.6 Understanding the electronics of the NavigatorGPS Your NavigatorGPS uses a highly sophisticated and patented electronic gyroscope as the navigation system to steer the buggy when in „Nav On‟ mode. The gyroscope is tilt compensated to enable true steering over a wide range of grades you expect to encounter on the average golf course. Your new NavigatorGPS with an electronic gyroscope motor controller will allow the navigation system to operate at the desired handle height independent of any external conditions. Your NavigatorGPS employs auto range detection so the buggy will not go out of range of the remote control (80 metres). A battery saving feature has also been added to the operation of your remote control. If some reason you do not touch the remote control for three minutes whilst your buggy is within range, the buggy will stop. Simply press a command on the remote and the buggy will resume whatever task you seek of it. 2.7 Folding/Unfolding your buggy Practice unfolding and folding the buggy using the steps below. This means when you go to play golf you will be somewhat familiar with this task. Press the button on the lower folding mechanism and fold the lower handle Press the button on the upper folding mechanism and fold the upper handle Collapse the handle until both folding mechanisms lock into place Bend your knees and lift the buggy using the front lifting handle and rear lifting bar 17 The following order of steps is suggested when folding your buggy down: Seat and stem off Golf bag off Battery off and directly into the trunk of the car. This will save double handling Sand bottle and holder off Disengage 4th wheel after having removed and wiped it down Fold down buggy and place into the trunk of the car 2.8 Fitting your golf bag Separate the clip located on the top bag support Expand the strap so it fits around the golf bag Place your golf bag on the buggy Clip the top bag support strap in place Pull the top bag support strap tight The bottom strap should not be removed from its position and can be pulled over the bag by holding the webbed section of the strap and pulling it over the base of the golf bag 2.9 Positioning the seat 18 Place the seat stem into its position in the seat stem bracket on the right hand side of the buggy. IMPORTANT: DEPRESS THE SEAT WITH YOUR HAND BEFORE SITTING. DO NOT USE THE SEAT ON UNEVEN SURFACES. Please note Bila Golf does not warrant any seat support brackets that are damaged or bent. 2.10 Assembling the umbrella holder Your buggy comes with an umbrella holder. The umbrella holder needs to be bolted into position. Simply follow the pictures above. When not in use the umbrella holder can be turned to its side. If you take your buggy home in your car, you may need to do that prior to folding the buggy down. Your umbrella holder can be adjusted both to the side and backwards and forwards. The umbrella is secured inside the umbrella holder by tightening the plastic bolt located near the top of the holder. DO NOT LEAVE YOUR UMBRELLA UP IN THE UMBRELLA HOLDER IN WINDY CONDITIONS. If the wind catches the umbrella, it could cause your buggy to tip over and cause damage, which will not be covered by warranty. 19 20 2.11 Sand bottle and holder Your buggy comes with a sand bottle and holder, place this in position at the rear of the buggy. 2.12 Engaging the 4th wheel Important: To avoid damage to your buggy always engage the 4th wheel prior to playing golf, regardless of the terrain you are playing on. To engage the 4th wheel, pull on the spring loaded locking pin, begin to slide the 4th wheel back, release the locking pin and continue sliding the 4th wheel back until the locking pin locates itself into position. The 4th wheel should be cleaned regularly. Remove the 4th wheel by pulling on the spring loaded locking pin and slide the 4th wheel all the way out of its housing. The 4th wheel can then be cleaned with a cloth. Then reinsert the 4th wheel into its housing and pull on the spring loaded locking pin. 2.13 The front wheel and suspension system Your buggy has a unique front wheel system. The front wheel can swivel 360 degrees. The main advantage of this is that your buggy is highly manoeuvrable. You only need to turn the buggy handle and your buggy will turn. The suspension helps reduce the amount of shock the buggy will take when going over hills, bumps, ruts, etc. 21 2.14 Top box control features On/Off Speed Control On/Off – Press the on/off button to turn the buggy on and off Speed Control – Turn speed control clockwise to set the desired speed [S1 to S9 – the higher the number the higher the speed] and press the speed control to start the buggy. To accelerate speed, turn the speed control clockwise. To slow the buggy down, turn the speed control anti-clockwise. To stop the buggy press the speed control. The speed setting is red when the buggy is stopped and white when the buggy is moving. Buggy Navigation – The buggy navigation mode [Nav Off or Nav On] is identified by a coloured bar below the speed setting. The coloured bar is red for Nav Off and green for Nav On. The navigation mode is changed using the remote control – see next section. When you touch any of the buttons on the top handle control box, the buggy senses that you want to take personal control over it and will change the buggy status to Nav Off. When you use the remote control the navigation mode will change to Nav On. 22 2.15 Remote control features Forward Arrow Indicator Lights (Nav On/Nav Off) Left and Right Arrows Stop Down Arrow Forward Arrow - Press to accelerate the buggy. The longer you depress the button, the faster the buggy travels. Please note: If you wish to regain the speed you were travelling at prior to the last stop, simply press the forward button twice in succession. The buggy will accelerate to the last speed setting. This feature works only when you press the stop button to stop the buggy rather than pressing the down arrow. Down Arrow - Decreases the speed and provides for reverse. If you are moving forward, the down arrow can be used to decrease speed, the longer the pressure, the slower the speed until it stops. To operate the Reverse mode you must stop the buggy first. Press the down arrow and the buggy will reverse. The buggy will move in the backward direction only whilst you keep the down arrow depressed. If you take your finger off the down arrow the buggy will stop [safety feature]. Left and Right Arrows - Press the appropriate turn command and keep pressed until the degree of turn is achieved. Momentary pressure will make a small adjustment to the direction, whilst prolonged will increase the amount of turn. Soft Braking - The Navigator GPS is equipped with electronic soft braking. This means when you apply a left or right turn for less than a second, braking will be soft. This is most useful when you are using your buggy to make small or part turns. If you press either turn button for more than one second, your buggy will sense you want a sharp turn. At this point full braking is applied. Indicator Light (Nav On/Nav Off) - Each time you press a command using the remote, the Nav On or Nav Off button will light up. The green light indicates the Navigation system is on and the red light indicates the Navigation system is off. Transmitter range and heart beat: The range of the NavigatorGPS is up to 80 metres. Your NavigatorGPS also has a heart beat interaction between the transmitter and receiver. This means they stay in contact with each other at all times. If the buggy goes out of range of the transmitter your NavigatorGPS will stop automatically. 23 2.16 The Navigation System – How it works Navigation on [Nav On] – By pressing Nav On the navigation system is turned on. The indicator light under the Nav On button will illuminate green each time you use a command whilst navigation is on. The navigation system ensures the buggy maintains its direction regardless of the terrain. The buggy will automatically brake or accelerate either wheel to maintain its direction. Useful hint: On a steep incline, the gradient may force the buggy off line. You do not need to adjust the buggy. The buggy will work its way back on course. In addition, if the buggy hits a tuft of grass or other object, the buggy will momentarily be forced off course. Do not be concerned. The buggy knows where to go and will get back on track quickly. Navigation off [Nav Off] - By pressing “Nav Off”, the navigation system is turned off. The indicator light under the Nav Off button will illuminate red each time you use a command whilst navigation is off. Important: When you use the controls on the buggy‟s handlebar, the navigation system turns off automatically. This will enable you to manoeuvre the buggy. The mode light on the handlebar will turn red when navigation turns off. When you switch between using the handlebar controls and the remote control, the buggy remembers if the remote was in “Nav On” or “Nav Off”. If the last command on the remote was “Nav On”, the first command using the remote will also be “Nav On”. You can change this by pressing “Nav Off“ to switch off the navigation system. When your buggy is turned on, the remote control can be used in the same way as the controls on the handlebar. 2.17 Cart tracking Your NavigatorGPS is designed to track straight on level ground in the Nav On mode. The twin motors are synchronized with your buggy at production. If your buggy does not track straight (for example your golf bag is not evenly weighted), adopt the following procedure. Go to Sureshot Homepage > Features > Buggy/Remote > Maintenance > Motor Trimming Using your remote: Press the forward arrow. The cart will now move forward. Watch how straight the buggy goes. If the cart moves to the left it means that the R/H motor is running quicker than the L/H motor. 24 You then need to adjust the speed of the R/H motor by pushing the right arrow a number of times. Conversely, the same operates if the buggy moves to the right. Simply press the left arrow a number of times until the buggy tracks straight. Once the buggy is tracking correctly press STOP on the remote control. Please note if you are unhappy with the outcome you will need to repeat the entire process. 2.18 Useful hints when using your NavigatorGPS Your NavigatorGPS has sophisticated electronics onboard. Avoid guiding your NavigatorGPS through puddles of water. The electronics are designed to handle all types of bad weather, but not to be immersed in water. Use handlebar controls in car parks. The navigation system may be affected around steel products. Use handlebar control in confined spaces. To maintain maximum control in confined spaces such as pathways it is recommended that the remote is not used. Your NavigatorGPS has a range of up to 80 metres. Golf etiquette is essential at all times. Do not operate your Navigator GPS in the vicinity of people playing their shots. Trust your NavigatorGPS – When operating in “Nav On” mode, you do not need to constantly adjust the NavigatorGPS‟s direction. If the NavigatorGPS is diverted from its course by uneven surfaces or steep inclines, the NavigatorGPS will quickly correct itself to return to the former course. 2.19 Understanding your buggy and suggestions for dealing with unusual situations Your NavigatorGPS is the result of many years of research, development and many years of evolution on the golf course. We have listed some unusual buggy behaviours and given suggestions to check and correct. This is not a step-by-step list. Situation 1: The NavigatorGPS stops responding to its remote control. What to do: If the buggy battery has not been charged for a long time, then this could be the cause of the transmitter not working. Charge the battery. The battery should be charged every five to six rounds. Ensure you are using YOUR remote control, not one from another NavigatorGPS 25 Check that the LED on the top right of the remote changes colour when you press “Nav Off” [red] and “Nav On” [green]. If there is no colour or the colour does not change, charge the battery. Check that the buggy‟s wheels are properly engaged with the drive dogs on the axles. If the rear wheels are not properly engaged, the NavigatorGPS will not move. Check that the buggy has not been accidentally turned off at the “ON/OFF” button. Check that the main battery is properly connected. Disconnect the battery lead from the battery tray and then reconnect. Check the battery capacity under the Buggy Mode Main Menu. Ask yourself, was the main battery charged after its last use? Check to see if the NavigatorGPS responds normally to the operation of the top box buttons. If not, disconnect the buggy battery and check both battery connector parts for dirt or damaged contacts. If OK, re-connect the battery and check the buggy‟s operation again. If the remote still does not operate, contact your Bila Golf service agent. Situation 2: The buggy remote range is not up to expectation or has reduced over time. . Check the remote‟s battery. It could be near flat and requires replacement. If you have not replaced for some time it should be replaced. Each six months it should be replaced. If you play a lot of golf, it may need replacing more often. Important: The NavigatorGPS‟s remote uses radio frequency (RF) transmissions to control the buggy. On some occasions, it is possible to experience RF propagation problems which can temporarily reduce the control range. In addition, the buggy can be „deafened‟ by nearby RF interference. 2.20 Frequently Asked Questions and Answers Question: Answer: Is it important to register my purchase for warranty purposes? You will be required to register your buggy prior to use which will begin your warranty period. This is done online at www.bilagolf.com You must register your purchase as soon as possible with Bila Golf. You can register online at www.bilagolf.com. Your buggy must be registered before you can begin downloading courses. Question: Answer: How often should my battery be charged? Your battery should be left charging between uses. After playing, put your battery back on charge as soon as possible. Leaving your battery in a discharged state will shorten its life. Question: Should I discharge my battery fully to remove memory? 26 Answer: No – Gel batteries do not have memory issues. Fully discharging the battery will damage it and the charger will not be able to recharge the battery. Question: Answer: Where can I take my buggy to be serviced? Bila Golf is working to develop a network of service centres. Please visit our website or contact us at [email protected] or 1.877.345.BILA to find a service centre near you. Question: Answer: My buggy does not track in a straight line. a) Ensure that the cart is in the “Nav On” mode. See “Using your Navigation System”. b) See Cart Tracking Adjustment Procedure. c) If problem persists please contact the service centre. Question: Answer: My buggy turns in circles. a) Ensure that each rear wheel is locked in position. b) If the wheels are locked in position then the drive pin on the drive dog may be broken. c) Check the status of your main battery. Your buggy will go in circles when the battery is nearly flat. d) If problem persists please contact the service centre. Question: Answer: My buggy does not respond to my remote. a) The remote battery may need charging. b) If the battery is OK and your buggy works in the manual mode please contact the service centre. If you have any concerns relating to the use of your motorized golf buggy do not hesitate to call us Bila Golf at 1.877.345.BILA. Thank you for your assistance and continued support. Most importantly please provide us with your email address so that we can forward to you technical updates and other information. Please email Bila Golf at [email protected] 27 Section 3 Maintenance Service Schedule 3.1 Important information about your NavigatorGPS If operating in conditions such as those mentioned below, the speed controls, clutches, frame alignment, adjustment, tightening and axle alignment should be serviced at more frequent intervals than specified in this booklet: playing more than twice a week damp or wet conditions rough, dusty or sandy conditions hilly conditions 3.2 Warranty registration Warranty registration can only be done online at www.bilagolf.com. 3.3 Warranty service problem Purchase date of the motorized buggy must be given before warranty is accepted for processing. In the event of a need for warranty service, either refer to the list of authorized service centres or call 905.595.4452 or 1.877.345.BILA. 3.4 Warranty policy NavigatorGPS - For a period of 12 months or 1000kms, whichever comes first, in respect of the electronics, remote control, wheels, clutches, drive dogs, axles, battery, charger, frame, motor and gearbox, Bila Golf or an authorized service centre or person will repair or replace free of charge any parts found to be defective in materials or workmanship under normal use provided that: The NavigatorGPS has been properly used, maintained and regularly serviced At 6 months or 500km, whichever comes first, the NavigatorGPS has been serviced by an authorized Bila Golf service centre. The replacement or repair is performed by an authorized Bila Golf service centre or the owner with Bila Golf approval. 3.5 Warranty exclusions The following events void warranty Any defect caused by misuse, negligence, accident or failure to carry out proper maintenance procedures. Any alteration performed by non authorized companies or people. Fitting of parts or accessories not recommended by MGI or Bila Golf. 28 Any damage caused by continued operation of the motorized buggy after it is known to be defective. Damaged seat support bracket on buggy chassis. Failure to have the NavigatorGPS serviced at 6 months, or 500km, whichever comes first. All implied warranties [save those preserved by statute] are excluded. Liability for consequential damages under any and all warranties are excluded to the extent exclusion is permitted by law. 3.6 Parts installed during warranty Warranty coverage for components installed during a motorized buggy‟s warranty period shall consist of the duration of the buggy‟s warranty period, provided the warranty installation is performed by MGI, Bila Golf, an authorized service centre or the buggy owner on approval. 3.7 Preventative Maintenance Program To properly provide for the continued operation of your motorized buggy, MGI and Bila Golf have introduced its Preventative Maintenance Program [PMP]. The PMP consists of work to be carried out by both the owner and authorized service centres. To properly maintain the warranty of your motorized buggy, it is essential that this work is carried out. If the work carried out by the authorized service centre is to replace parts that are part of the maintenance schedule, the owner will be charged for the parts and labour. If the work to be carried out is part of warranty, MGI and Bila Golf will bear the cost. 3.8 Cleaning your motorized buggy [See Maintenance Schedule] To maintain good operation your buggy requires care and attention. Keep your buggy clean by using a cloth with warm water and a mild detergent. Do not hose down your buggy under any circumstance as your buggy has electronic components. Ensure that the seat stem bracket and sand bottle holder are cleaned to remove dirt and sand. In addition remove and clean the 4th wheel tube. 3.9 Rear wheel axis [See Maintenance Schedule] The rear wheel stub axles need to be lubricated regularly. Remove the rear wheels by depressing the spring clip and at the same time pull off the wheel. Apply petroleum jelly or light grease to the stub axles. Use a very small amount as the grease can attract sand. If you play in sandy conditions you should clean your axle and regrease fortnightly. To refit the rear wheels you will need to align the wheel‟s four sided slot to its equivalent on the buggy to ensure the wheels are properly engaged. Ensure that the wheels are put on the correct side „L‟ and „R‟. 3.10 Upper and lower bag straps [See Maintenance Schedule] The upper and lower bag straps should be replaced as per the Service Schedule. The upper bag strap can be replaced by: 29 Removing the left and right hand straps from the upper bag support. Undo and remove the screws holding the strap in position on the bag support. Remove and replace both bag straps. Insert bag strap securing screws. The lower bag strap can be replaced by unclipping it from the bag support and installing the new bag strap. 3.11 Correcting the alignment of your NavigatorGPS [See Maintenance Schedule] If during use you find that the buggy veers to the right or left, please follow the instructions to correct the alignment: 1. If the buggy veers to the left, face the front wheel of the buggy and use the Allen key provided to screw the right bolt clockwise or the left bolt anti-clockwise. 2. If the buggy veers to the right, face the front wheel of the buggy and use the Allen key provided to screw the left bolt clockwise or the right bolt anti clockwise. Test run the buggy and repeat the process until the buggy runs straight. 3.12 NavigatorGPS top handle protection Keep your top handle dry. Rain, humidity and all types of liquids or moisture can contain minerals that will corrode electronic circuits. If your top handle does get wet, dry with a soft cloth and place in an area which will allow for it to dry. Do not use or store your NavigatorGPS in dusty, dirty areas. Its moving parts and electronic components can be damaged. 30 Do not store your NavigatorGPS in hot areas. High temperatures can shorten the life of electronic components, damage the battery and warp or melt plastics. Do not store your NavigatorGPS in cold areas. When your NavigatorGPS returns to normal temperature, moisture can form inside and damage electronic circuit boards. Do not use chemicals, cleaning solvents or detergents to clean the device. Use a soft, clean, dry cloth to clean your top handle. Rough handling can break internal boards and fine mechanics. Dropping the buggy on its top box control housing can permanently damage the electronics and is not covered under the terms of the limited warranty. 3.13 Charging and caring for your remote control lithium ion battery There are two ways to charge the lithium ion battery inside the remote control. Both methods connected to the remote control via the USB port on the base of the unit: AC World charger with USB cable (provided) USB cord via the PC (provided) DO NOT USE ANY OTHER CHARGERS You can check the status of the remote battery capacity by going to Buggy Mode. The “Nav On” soft key will light up when charging. It is recommended to leave the remote control on charge all the time when not in use. You cannot over charge the lithium battery. If the remote control is not being used for extensive periods of time, you may choose to take the unit off charge. It will require charging again prior to use. 31 3.14 Service Schedule [NavigatorGPS] It is the owner‟s responsibility to ensure that all periodical checks, necessary adjustments and services are carried out. If in doubt please contact Bila Golf at 905.595.4522 or 1.877.345.BILA or email [email protected]. Any work performed on your buggy should be recorded on your service record regardless of the work. Your warranty is only valid if servicing occurs at 6 month or 500km intervals, whichever come first, at an authorized service centre. NavigatorGPS Wipe down the buggy with warm cloth after each use th Monthly/ 100kms Six Mthly/ 500kms Yearly/ 1000kms 3 Years/ 3000kms BO Clean 4 wheel BO Lubricate rear wheel stub axles BO Check and tighten all nuts and bolts SC Check grub screws on bearing collars on axle bearings tighten as required SC Check and tighten handle pivots SC Check alignment of buggy - ensure that it runs straight SC Replace handle grips BO/SC Replace rear wheel drive dogs BO/SC Replace rear wheel spring latches BO/SC Replace rear wheel drive hubs BO/SC Replace seat bracket & sand bottle loop plastic inserts BO/SC Replace fused battery leads BO/SC Replace rear and front wheels BO th Replace 4 Wheel Assembly BO Replace Upper & Lower Bag Straps BO Replace stem cable SC Replace key mats on top box and remote control SC Replace speed control SC BO = Buggy owner can carry out this work SC = Charged work to be carried by approved service centre BO/SC = This service can be completed by either an authorised service centre or the owner of the buggy. The tools to tighten all nuts and bolts are provided with your 32 maintenance/service and instruction manual. As part of MGI and Bila Golf‟s Preventative Maintenance Program, the six monthly services are carried out by an authorised service centre and you will be charged for that service. Each yearly service should also include the six monthly service. It is important for your warranty and the life of your buggy that the service record be observed and maintained. Monthly cleaning and lubrication need not be recorded on the service record. 33 3.15 Service record for NavigatorGPS SIX MONTH INSPECTION ONE YEAR INSPECTION 1½ YEAR INSPECTION TWO YEAR INSPECTION 2½ YEAR INSPECTION THREE YEAR INSPECTION 3½ YEAR INSPECTION FOUR YEAR INSPECTION DATE: . INVOICE NO: DATE: . INVOICE NO: DATE: . INVOICE NO: DATE: . INVOICE NO: DATE: . INVOICE NO: DATE: . INVOICE NO: DATE: . INVOICE NO: DATE: . INVOICE NO: 4½ YEAR INSPECTION DATE: . INVOICE NO: FIVE YEAR INSPECTION DATE: . INVOICE NO: 5½ YEAR INSPECTION SIX YEAR INSPECTION ADDITIONAL SERVICE ADDITIONAL SERVICE ADDITIONAL SERVICE DATE: . INVOICE NO: DATE: . INVOICE NO: DATE: . INVOICE NO: DATE: . INVOICE NO: DATE: . INVOICE NO: SERVICED BY: SIGNATURE: SERVICED BY: SIGNATURE: SERVICED BY: SIGNATURE: SERVICED BY: SIGNATURE: SERVICED BY: SIGNATURE: SERVICED BY: SIGNATURE: SERVICED BY: SIGNATURE: SERVICED BY: SIGNATURE: SERVICED BY: SIGNATURE: SERVICED BY: SIGNATURE: SERVICED BY: SIGNATURE: SERVICED BY: SIGNATURE: SERVICED BY: SIGNATURE: SERVICED BY: SIGNATURE: SERVICED BY: SIGNATURE: 34 3.16 Technical and product support For prompt response to all technical support and advice, please contact Bila Golf directly rather than returning to the place of purchase. For all technical support email:[email protected] 3.17 Frequently Asked Questions – Top Box Is the top box component easy to use? The NavigatorGPS has been designed specifically for the golfer and is therefore simple in its operation. There are multiple levels of operation and the player decides on the level required. The simplest level gives distances to the green or recorded hazards and requires the press of one button at the start of each hole. If more information is required or recorded then the player can choose a higher level of operation and this can require the pressing of additional easy-to-use function keys. Does my local club allow the use of measuring devices such as the Sureshotgps™? The R&A Rule of Golf 2008-2011 states that measuring devices are permitted in the game of golf, providing a local rule has been passed by the Golf Club. Bila Golf encourages you to ask prior the club prior to using your NavigatorGPS. What do I do if my course is not on the database? We designed the NavigatorGPS with a simple–to-use mapping capability. A course can be mapped while it is being played or simply by walking the course prior to a round and mapping the required coordinates. Mapping with the Sureshot allows the golfer to map not only the front, rear and the centre of the green but also up to 15 hazards and a lay up position for each hole. If you do not want to map the course yourself, then contact [email protected] and we will get the course professionally mapped for you. 3.18 Who can help me with technical questions & support? Our friendly team is available on email at [email protected] It is recommended you email your request rather than returning to the place of purchase for the fastest response to your enquiry. 3.19 Declaration of Conformity Bila Golf and MGI Pty. Ltd. operates a policy of continuous development. Bila Golf and MGI Pty. Ltd. reserves the right to make changes and improvements to the NavigatorGPS and any other of its products without prior notice. The contents of this document are provided “as is”. Except as required by applicable law, no warranties of any kind, either express or implied, including, but 35 not limited to, the implied warranties of merchantability and fitness for a particular purpose, are made in relation to the accuracy, reliability or contents of this document. Sureshotgps™ Pty. Ltd reserves the right to revise or withdraw it at anytime without prior notice. 3.20 Software Licensing This product contains embedded software. You have a non-exclusive, non-transferable right to use the software only as embedded in the hardware and may not copy, disassemble or attempt to reverse engineer the software or use it on any other hardware. The software includes software supplied to SS by third parties (“Suppliers”) which is provided without warranty by such Suppliers. The software is owned by SS or its Suppliers and is protected by copyright laws and laws protecting trade secrets, intellectual property and confidential information. 3.21 Website information Visit www.bilagolf.com for all the information you need about your Navigator GPS or you can review the manufacturer website at www.mgikaddy.com 36 37