1
ROTATION
21/2",
Pump rotation for the
LD3 and HD3 is counterclockwise
when viewed from the back of the motor. Whereas the rotation is clockwise when views from the back of the motor for
the PD35, PD37, PD38, and PD40 pumps. An arrow is provided to show the rotational direction.
The system should be drained by opening the boiler drain valve
and the vent near the top of the system. If a Flo-Control valve
is installed and there are balance valves on the returns, then
the balance valves may be closed to isolate the boiler from the
system. The Flo-Control valve will act as a check valve on the
supply and only the boiler will need to be drained. Open a vent
between the boiler and the system.
PRIMING AND STARTING
CAUTION: SEAL DAMAGE HAZARD
Do not run the pump dry – seal damage may occur.
Failure to follow these instructions could result in moderate
personal injury and/or property damage.
WARNING: HIGH PRESSURE HAZARD
Pressure may be present in the pump body. This
pressure can be relieved by loosening the volute capscrews and shifting the bearing assembly slightly to allow
the pressurized water to escape. Failure to follow these
instructions could result in serious personal injury or death.
Do not run B&G circulator pumps dry. Before starting, the
pump must be filled with water. Air should be vented from the
system by means of a system air vent at a high point in the
system or by an alternate method. The system must be completely vented prior to pump operation.
Separate the bearing assembly and motor from the pump body
by removing the volute capscrews from the bearing bracket or
cover plate (see diagrams at right).
DETERMINE THE SEAL TYPE
WARNING: HOT WATER LEAKAGE HAZARD
Pressurize the pump body slowly while checking for
leaks at all joints with gaskets. Failure to follow these
instructions could result in serious personal injury and/or
property damage.
The pump should be started with the discharge valve closed
and the suction valve fully open. After the pump is at operating speed, the discharge valve should be opened gradually.
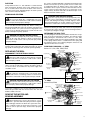
Cut away diagrams have been provided to illustrate the components of the booster bearing assemblies. The primary feature
distinguishing the mechanical seals of the 21/2", LD3, HD3,
PD35, and PD37 pumps from the PD38 and PD40 is the shape
of the spring retainer which is seated between the spring and
the impeller. Refer to the following diagrams whenever seal
replacement becomes necessary.
PUMP BODY DIAGRAM – 1/2" SEAL
Series 21/2", LD3, HD3, PD35, PD37
Discharge Gage Tapping
(on side opposite)
REPLACING THE SEAL
DISCONNECT THE ELECTRICAL SUPPLY
WARNING: ELECTRICAL SHOCK HAZARD
Disconnect and lockout the power before servicing.
Failure to follow these instructions could result in serious
personal injury or death.
9 Seal Assembly
10 Volute Gasket
Coupler Assembly
3 Impeller (Enclosed)
8 Shaft Sleeve
4 Impeller Key
6 Impeller Lock Nut
7 Pump Shaft
1 Volute
5 Impeller Lock Washer
The electrical supply must be turned off and the pump service
valves must be closed before servicing procedures begin. If
no service valves are installed, the city water supply valve
should be closed.
Motor Bracket
Assembly
Bearing Bracket
Assembly
2 Face Plate
Rear Bearing
Front Bearing
Volute Capscrews
12 Companion Flange
(included)
Suction Gage
Tapping
WARNING: ELECTRICAL SHOCK HAZARD
Be certain the electrical power is not present at the
motor leads before continuing. Failure to follow these
instructions could result in serious personal injury or death.
WARNING: UNEXPECTED START-UP HAZARD
Disconnect and lockout power before servicing.
Failure to follow these instructions could result in serious
personal injury, death and/or property damage.
9A Seal Housing
9E Seat Insert
9F Seat Gasket
PUMP BODY DIAGRAM –
SEAL
Series PD38, PD40
3/4"
Discharge Gage Tapping
(on side opposite)
Coupler Assembly
Loosen the conduit box cover screws and remove the cover.
Follow this procedure with the removal of the wire nuts and
flexible conduit connector.
10 Volute Gasket
Rear Bearing Lip Seal
9D Spring
9C Seal Ring
Mechanical Seal
9 Seal Assembly
3 Impeller (Enclosed)
4 Impeller Key
7 Pump Shaft
6 Impeller Lock Nut
REMOVE THE MOTOR AND
BEARING ASSEMBLY
WARNING: HOT WATER HAZARD
Before draining the system, allow water to cool to
100ºF max., open the drain valve (take precautions against
water damage) and leave the drain valve open until servicing is complete. Failure to follow these instructions could
result in serious personal injury, death and/or property
damage.
9B Bellows
5 Impeller Lock Washer
Motor Bracket
Assembly
Bearing Bracket
Assembly
Front Bearing
Volute Capscrews
11 Cover Plate
Suction Gage Tapping
1 Volute
8 Shaft Sleeve
12 Companion Flange
(included)
except 2-1/2"
5