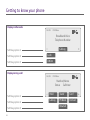
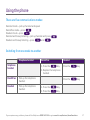
1
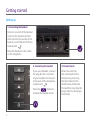
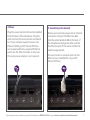
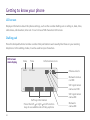
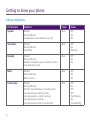
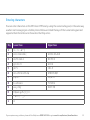
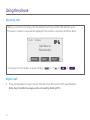
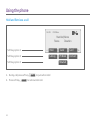
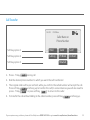
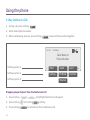
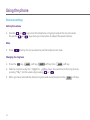
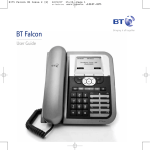
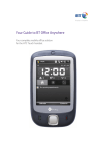
BT Falcon Mk 2 IP Phone
User Guide
Bringing it all together
IT • communications • support
Welcome…
to your BT Falcon Mk 2 IP Phone
Features:
•6-Line LCD display
• Integrated 2 port 10/100 Ethernet switch
•Phone services:
Call Forward, Call Transfer, Call Hold, Redial
Group listening, Handsfree
Speed dial, Conference call
Phone Book, Call logs
Caller Display
• Headset port (refer to compatible headsets section)
•Multiple power options: power over Ethernet 802.3af
and external power supply adapter.
This User Guide provides you with all the
information you need to get the most from
your phone. You must first set up your phone
before you can use it. This doesn’t take long
as it is easy to do. Just follow the simple
instructions on the next few pages.
Got everything?
•BT Falcon Mk 2 IP
telephone
• Handset
• Handset cord
• Ethernet cable
Need help?
If you have any problems setting up or using your BT Falcon
IP Phone, contact the Helpline on 0800 169 1146 or go to
www.bt.com/business/broadbandvoice
• Mains power adapter
• Desk mounting plinth.
Emergency Calls – important information please note
Access to Emergency Services is provided but calls including
emergency calls to 999 or 112, made via the BT Broadband
Voice service may not work in the event of power or broadband
connection failure. These failures may be caused by reasons
outside our control. Location information, provided to the
emergency services, is limited to the location details associated
with your primary Business PSTN billing address, this may not be
where the call was originated.
If you experience any problems, please call the Helpline on 0800 169 1146 or go to www.bt.com/business/broadbandvoice
3
In this guide
Getting started
Setting up...................................................... 6
Connecting the handset . ............................... 6
Connecting the headset................................. 6
Connect stand................................................ 6
Power............................................................ 7
Connecting to the network............................. 7
Provisioning .................................................. 8
Getting to know your phone
Buttons......................................................... 9
LCD screen................................................... 10
Soft keys...................................................... 11
Indicator definitions..................................... 14
Entering characters...................................... 15
Display in idle mode..................................... 16
Display during a call..................................... 16
Using the phone
Switch from one mode to another................. 17
Secrecy........................................................ 18
Make a call................................................... 18
Make a call using handsfree.......................... 18
Making a call with the headset...................... 18
Entering details into the Phone Book............ 19
Making a call using the Phone Book.............. 20
4
Making a call to one of the last 30 numbers
you called or received................................... 20
Programming F1 to F10 Function Keys ........ 21
Making a call using Short Code dialling
(Speed dialling)............................................ 21
Receiving calls.............................................22
Reject a call..................................................22
Missed calls.................................................. 23
Hold and Retrieve a call................................. 24
Call Transfer.................................................. 25
3-Way Conference Call.................................. 26
Dropping one participant
from the Conference Call............................... 26
Option Menu................................................ 27
Dial Subscribe............................................... 27
Call Waiting.................................................. 27
Auto Answer................................................. 28
Auto Reject.................................................. 29
Auto Stop..................................................... 29
Do Not Disturb............................................. 30
Phone Lock.................................................. 31
Reboot......................................................... 32
Calling features............................................. 32
Selfcare........................................................ 32
Webcare....................................................... 33
Personal settings
Setting the volume....................................... 34
Mute............................................................ 34
Changing the ring tone................................. 34
Config menu list........................................... 35
Changing the date format............................. 36
Changing the time format............................. 36
Changing the language................................. 36
Changing the key beep (key echo).................. 37
Turning the alarm on/off............................... 37
Setting the alarm time.................................. 37
Setting the alarm periodicity......................... 38
Setting the alarm tone.................................. 38
Setting the contrast...................................... 38
Changing the PIN (password setting).............. 39
Setting the password to lock the phone.......... 39
Setting new shortcuts................................... 40
Programming the memory keys F1 – F10....... 40
Viewing the status of the BT Falcon IP Phone.. 40
General information
Headset Compatibility................................... 41
Safety information........................................ 41
Cleaning....................................................... 41
Environmental.............................................. 41
Product disposal instructions......................... 42
Guarantee ................................................... 42
If you experience any problems, please call the Helpline on 0800 169 1146 or go to www.bt.com/business/broadbandvoice
5
Getting started
Setting up
1. Connecting the handset
Connect one end of the handset
cord into the handset and the
other end into the socket at the
back of your BT Falcon IP Phone
marked with
.
Place the handset in the cradle
on the telephone.
2. Connecting the headset
3. Connect stand
If you use a headset, connect
the plug (RJ-45 connector)
of your headset into the port
at the back of the telephone
marked with
.
Attach the stand to
the underneath of the
telephone by inserting
the short tabs into the
smaller holes at the back
first and then inserting the
longer tabs into the larger,
front holes.
Press the
button to
activate the headset mode.
6
4. Power
5. Connecting to the network
Plug the power lead into the socket labelled
DC at the back of the telephone. Plug the
other end into the mains socket and switch
on. If your network supports power over
Ethernet (PoE) your BT Falcon IP Phone
can be powered from a powered Ethernet
switch via the Ethernet cable. In this case
the mains power adapter is not required.
Ensure your router has power and an internet
connection. Connect the Ethernet cable
into the socket labelled LAN at the back of
the telephone and plug the other end into
the Ethernet port of the router or Ethernet
switch as appropriate.
You can connect a network device to the
Ethernet port, labelled PC, of your BT
Falcon IP Phone.
If you experience any problems, please call the Helpline on 0800 169 1146 or go to www.bt.com/business/broadbandvoice
7
Getting started
Setting up
M6. sed
al Log
Provisioning
When
the power
a e Call
og and Ethernet connections
made
Dare
l te
Al togyour BT Falcon IP Phone it will
automatically connect to the BT Business
Edit
ect on the phone
lay will
VoIP
service. TheSelights
flash and the display will show...
ct
Your
BT09Falcon IP Phone is registering with
the BT Business
VoIPning
service, which may take
Provisi
several minutes.
Pl
When completed successfully the phone will
display the idle screen.
Oct 01
09:00am
Provisioning…
Please Wait…
09:00
Config
Oct 01
Admin
09:00am
Broadband Voice
Telephone Number
CallLog
You are now ready to make calls using your BT Falcon IP Phone
Pr i
8
i
Option
Getting to know your phone
Buttons
3 soft keys: Activate the
features described by
the text message directly
above on the LCD screen
Navigation: Use to browse
the setting options, display
the last 30 called numbers
in standby mode and
to navigate the soft key
options in editing mode
LCD screen: Displays information
about the phone settings, such as
the number dialling out or calling
in, date, time, calls status, call
duration, timer etc. It is a 6-lines
of 20 characters LCD screen
F1
F2
F3
F4
Menu: Enables menu access
F5
F6
F7
Confirmation key
Handset: Makes and
receives calls
Dialling pad: Press the
dial pad buttons to
dial a number. Dial pad
buttons work exactly like
those on your existing
telephone. In the editing
mode, it can be used to
input characters
F8
OK
ENU
2
1
C
ABC
3
DEF
4
GHI
5
JKL
6
MNO
7
PQ
RS
8
TUV
9
WX
YZ
Clear: Clear characters
in editing mode or exit
to standby display (long
click) or return back to the
previous page
Memory keys (F1 – F10):
Are used as speed dial keys
Phone Book: Enables you
to access the Phone Book
and view the names and
numbers the user wants
to dial
F9
F10
0
Redial: Calls the last
number dialled
Mute: Activates/
deactivates mute function
Headset: Activates
headset mode during a call
Speaker: Activates/disables handsfree
or group-listening function and
switches the microphone on/off
Volume + / –: Adjusts the
volume of the handset,
headset, speaker phone,
ringer phone
If you experience any problems, please call the Helpline on 0800 169 1146 or go to www.bt.com/business/broadbandvoice
9
Getting to know your phone
LCD screen
Displays information about the phone settings, such as the number dialling out or calling in, date, time,
calls status, call duration, timer etc. It is a 6-lines of 20 characters LCD screen.
Dialling pad
Press the dial pad buttons to dial a number. Dial pad buttons work exactly like those on your existing
telephone. In the editing mode, it can be used to input characters.
LCD screen
main display
Date
Time
Oct 01
09:00am
Information icons
Phone unlock
Network status
not OK
SIP registration
status not OK
Soft key information
Press the left or right scroll function
keys to see additional soft key options
10
SIP registration
status OK
Network
status OK
Soft keys
Soft Key
Brief Description
A>a>1
Input mode switch in edit state
Active
Activate option/service
Admin
Enter to administration sub-menu
Answer
Answer an incoming call
Anym
Shortcut to “Anonymous”
Autoan
Shortcut to “Auto Answer”
Back
Return to previous menu
CallLog
Shortcut to Call log
Cancel
Cancel an action or exit to previous menu without applying changes
CBack
Perform Callback function
CBlock
Shortcut to “Call Block”
CFwd
Shortcut to “Call Forwarding”
CidDis
Shortcut to “Number Display”
Change
Change phone password
Config
Create a conference call. During a call/conference and another call is coming,
pressing the soft key will join a conference
DelChr
Delete character in edit mode
Delete
Delete specific entry
If you experience any problems, please call the Helpline on 0800 169 1146 or go to www.bt.com/business/broadbandvoice
11
Getting to know your phone
Soft Key
Brief Description
Detail
Show detailed information
Dial
Dial an entered phone number
DNDst
Do Not Disturb
Down
Contrast adjustment
Dsub
Shortcut to “Dial Subscriber”
EndCall
Terminate active call
Edit
Edit parameter content
Exit
Return to previous menu
Format
Change display format of specific parameter, such like Date and Time etc.
Hold
Hold current active line
Join
Join several connected calls to create a conference call
Lock
Shortcut to lock phone
Mail
Dial to voice mail server
MsCall
Shortcut to missed call list
NewCall
Make a new call
OFF
Set specific service OFF
OK
Confirm setting
ON
Set specific service ON
Option
Shortcut to phone services
12
Soft Key
Brief Description
Park
Store a call using Call Park
PhBook
Shortcut to Phone Book
PickUp
Answer a call on another phone
Play
Play music or melody
Reject
Reject a call
Remove
Remove a conference participant
Resume
Resume to original call from call transfer
RtPark
Retrieve Park
Save
Save the chosen setting
Select
Select current item on the screen
Stop
Stop music or melody
Transf
Transfer a call
TrMail
Transfer call to voice mail system
UnHold
Unhold a held line
Up
Contrast adjustment
User
Enter to user sub-menu
View
Show details when data item content is more than LCD can display in one line
If you experience any problems, please call the Helpline on 0800 169 1146 or go to www.bt.com/business/broadbandvoice
13
Getting to know your phone
Indicator definitions
LED Indicator
Condition
Colour
Status
Speaker
Default
During FW boot
Loudspeaker is activated during a call
Blue
Off
On
On
Voice Mail
Default
During FW boot
Voice Mail
Blue
Off
On
Blinking
Headset
Default
During FW boot
Headset or Headset group-listening mode is
activated during call
Blue
Off
On
On Mute
Default
During FW boot
Mute is active
Blue
Off
On
On
Feature keys
Default
During FW boot
Used for speed dial keys in standby mode
Line appearance: standby mode
Line appearance: a call is incoming
Line appearance: is active
Line appearance: hold or remote hold
Blue
Off
On
Off
Off
Fast blinking
On
Slow blinking
14
Entering characters
You can enter characters on the BT Falcon IP Phone by using the numerical keypad, in the same way
as when text messaging on a mobile phone. Below are listed the keys of the numerical keypad and
opposite them the letters and characters that they enter.
Key
Lower Case
Upper Case
1
1.,=+-&^|
2
abc2àáåãâç
ABC2ÃÄÅÆ
3
def3èéêë
DEF3É
4
ghi4ìíîï
GHI4
5
jkl5
JKL5
6
mno6ñòóôõöø
MNO6ÑØ
7
p q r s 7
PQRS7
8
tuv8ùúû
TUV8Ü
9
wxyz9ÿ
WXYZ9
0
0 Space @ % ( ) [ ] < >
*
*#?!:;'“_/
#
#
If you experience any problems, please call the Helpline on 0800 169 1146 or go to www.bt.com/business/broadbandvoice
15
Getting to know your phone
Display in idle mode
Oct 01
09:00am
Broadband Voice
B db d ic
Telephone Number
l h
N b
CallLog
llL g
Soft key option 1
Soft key option 2
Soft key option 3
Display during a call
Lock
L k
DNDst
DND
Oct 01
09:00am
Number/Name
Status Call timer
Soft key option 1
Soft key option 2
Soft key option 3
16
Hold
Transf
Conf
CallLog
PhBook
EndCall
NewCall
Using the phone
There are five communications modes:
Handset mode – pick up handset and speak
Handsfree mode – press
Headset mode – press
Handset and Group listening – pick up handset and press
Headset and Group listening – press
and
.
Switching from one mode to another
Telephone handset
Telephone
handset
Handsfree
1. Press the
Headset
key
Press the
key
Press the
key
2. R
eplace the telephone
handset
Handsfree
Pick up the telephone
handset
Headset
Pick up the telephone
handset
1. Press the
key
2. Press the
key
If you experience any problems, please call the Helpline on 0800 169 1146 or go to www.bt.com/business/broadbandvoice
17
Using the phone
Secrecy
At any time you can press
to prevent the caller hearing you.
Make a call
Lift handset, listen for dial tone and key in number using dialling pad.
Or enter the number using the dialling pad and then lift the handset.
Make a call using handsfree
Press handsfree function key
, listen for dial tone and key in number using dialling pad.
Or enter number using the dialling pad and press
.
Making a call with the headset
Press
, listen for the dial tone and key in the number using the dialling pad.
Or enter the number using the dialling pad and press
.
18
Entering details into the Phone Book
To enter a space press
the 0
DN
key twice
1. Press the function key
Oct 01
09:00am
Soft key option 1
View
Soft key option 2
Add
2. Use scroll function key
3. Press soft key
0Add
4. Press soft key
ed
EditCa
Dial
Back
to go to soft key option 2
09 0 m
Oct 0
5. Enter name (alphanumeric 20 characters max length) and press
g
Pl ase W it
6. Use scroll function
7. Press soft key
Delete
key to move down onto
<Null>
OK
line
Edit
8. Enter telephone number (numeric length 24 characters max length) and press
n
ow
p
OK
.
0
If you experience any problems, 1please call the Helpline on 0800 169 1146 or go to www.bt.com/business/broadbandvoice
19
Using the phone
n …
to move down lea
onto
e W it Default line
g
9eE i Use
scrolll function key
S
10. Press the soft key
0
0am
O
to change the ring tone allocated to the entry
Edit
00am
11. Use scroll function key
or
i
S ve
Play
press
to
a sample
Plea ehear
Wait
O t 01
to choose a ring tone and
0 00am
e
P ay
Dia
12.
Press
soft key
Save
.
D led C
Making a call using the Phone Book
D e eA
O
1. Press Phone Book function key
P v
to search list
P aseand
Wait highlight the required name
2. Use scroll function keys
Ot
09 00am
lea e ait…
t
Sa e soft
Play key
3. As required, pick
up handset, or
press
or press function
.
ay
Di l
S ve keyP
ait
or function key
Dial
,
a dV
Making a call to one
30 numbers you called or received
Tele of
hon the
Numb last
r
ng…
ait
Ot
9 0am
D ale
og
ti n
Cal Log
1.Press
and
from list,
M esoft
C l o key
D l choose
AlL g
g
Edit
Select
or Dialed Call Log . Press soft key
:00
Ca1l
O t0
0
0am
Missed Call Log
2. You can view the Dialled Call Log by pressing the
,
g
Received Call Log
key
3.Choose the required name/number from the list then, as required, pick up handset, or press
soft key Dial or function key
, or function key
.
20
Programming F1 to F10 Function Keys
1. Press required
on
eW
2. Press soft key
e
P ay
Dia
3.
soft key
Press
to
Ple
F1
sion
Edit
W
Save
nF10
ng
Wi
key
and enter number
to store entry.
Oct 01
09:00am
Soft key option 1
Edit
Back
Soft key option 2
Save
f
Delchr
A>a>1
F8
Ca ler Name
Making a call using Short Code dialling
(Speed dialling)
1. Press appropriate
F1
to
F10
memory
key
e Wa t
Play key
2.As required, pick up handset, or press soft
or function key
.
E t
Sa e
Dial
or function key
,
DNDs Foreve
AutoAn1146
Off or go to www.bt.com/business/broadbandvoice
If you experience any problemsDND
please
call the Helpline onD ub
0800 169
17 1 (A)
21
Using the phone
Receiving calls
When you receive an incomingC call,
the telephone will ring
and
the LED will flash green.
ak
C l
L
The caller's number or name
will be displayed if the number is stored in the Phone Book.
Loc
Oct 01
09:00am
Caller Name or
Phone Number
Answer
Reject
View
ete
1. As required: Lift handset,
orD pressD soft
key
Answer
Transf
, or
F1
, or
, or
.
Reject a call
1.Press soft key Reject to reject the call. The call is then diverted to 1571 Voice Mailbox.
Note: Any Voice Mail messages can be retrieved by dialling 1571.
22
Missed calls
Oct 01
09:00am
Caller Name or
Phone Number
Answer
Reject
Transf
1. Green LED on phone flashing
N
al Hold
Have # missed c l s
2. LCD screen indicates
number of missed
calls
Ca
ce
mb
3. Click soft key
MsCall
4. Click soft key
View
B
and use
to
search list
r
lr
<N lldate andPC one
to verify called number,
time
of call
Num er
V ew
l
D le
e
5. To return the call: Lift handset,
orD press
soft
key
Answer
, or
F1
, or
, or
ck
If youB experience
any problems, please call the Helpline on 0800 169 1146 or go to www.bt.com/business/broadbandvoice
U
.
23
Using the phone
Hold and Retrieve a call
Oct 01
09:00am
Number/Name
Status
Duration
Soft key option 1
Hold
Transf
Conf
Soft key option 2
CallLog
PhBook
EndCall
NewCall
Soft key option 3
b
…
1.
During
call press softD akey
Format soft key
2. Press
24
Unhold
…
Hold
to put call on hold
9 held call.
to retrieve
Call Transfer
Oct 01
09:00am
Caller Name or
Phone Number
Soft key option 1
Hold
Transf
Conf
Soft key option 2
CallLog
PhBook
EndCall
NewCall
Soft key option 3
P o
C
Ho d
Transf
1. Press
sock ft bin
key
during
call
i lS bscr
Hol
2. Dial the desired phone number to which you want the call transferred
F5
F7
O t 01
Oc 1
0 00 m
09 0 a
F
0
m
NewC lwill accept the call.
3.The original caller will be put on hold, while you confirm the called number
Press Hold
soft key
(in dsome instances
you will
also need to
o tand hang up to transfer the call
U ho
R move
hange
Tra
Confl
t
L ft
g key
PhBo
EndCa
press salHold
) or pressE soft
key Back
to return to the callerPC
F2
F9
D Phon
ati n Numbe
mbe N m
tatus
im r
Ho
d
Transf
Trans
Co f
S atus
F6
F7
O t 01
09 0 am
Ho d
4. To transfer the call without talking to the called number,
Oct 01 press
09 0 soft
am key
Transf
and hang up.
g
Oct 01 09: am Dsub
AutoRe
eattme
ut Anect
Off call the Helpline on 0800 169 1146 Dsub
If
you experience
any problems,
please
or go to www.bt.com/business/broadbandvoice
AutoAn
Off
25
Using the phone
3-Way Conference Call
N m
09
m
1
ld
Transf
1. During call, press Hsoft
key
F
Conf
2. Enter desired phone number
2
Hold
ransf
3. When called party answers, press
F5 soft key
F4
Conf
CallLog
Book together.
ndCa
to
join all three parties
Oct 01
09:00am
Caller Name or
Phone Number
Soft key option 1
F
Ho d 2
Soft key option
F
Hold
Transf
Conf
CallLog
PhBook
EndCall
Soft key option 3
F
NewCall
Dropping one participant
from
the Conference Call
CallLo
P Boo
ndC
1. Use scrollng key
Forma
2. Use scroll key
rm
Unhol
3.
Press soft key
e26
tm
i
…
to
highlight the line to be dropped
Unho
to find the
cr b g…
Remove
Remove
soft key
to remove line from conference call.
Option Menu
O t0
: 02
O 0
0
DialHSubscribe
T f
5
n a
By turningN on Dial Subscribe your BT Falcon IP Phone will automatically dial a Hopreset
number
d
an
o f
at a preset time.
Oc
F7
3
:0 a
O
09 00 m
Oct 1
0 0 m
O
F1 0 09 0 a
F8
bs
1. Press the
F10
Press Remove
2. Unhold
the
Admin
key
T
…
MENU
onfig
Option
f
Nw
Edit
soft key then the
g
Missed C key
l Log
soft
o
Select
okF
ng te ll Lo
De
C ll r Name r
soft key and enter
the number you wish
to dial, press the
Ph
Change
…
soft
key
ia Su
OK
r/ m
Fo mat
Unho d
emo e C ange
H d
Trans keypad,
Conf
3.Enter the hours and minutes, using
the
of the time
St s that
D a oyou want to make the call and
lSu c
g
press the OK soft key
O 0
1
0 00 m
Oc
F2
1
00 m
Oct 0
0
0 m
t
Ca l P ay
F
t
Ed on or
S v off
Dial
Save
4.
Use
the
keys to turn the Dial Subscr gbsebe
and press Athe
A oRe
lut ti e
e/
a
od
sf
Dsub
DialSubscribing…
D
S
bscr
ng
Statu idle
D screen
rat n
soft key. The
displays
Or, if you have
added
the
soft key
DND t:17 10
(A
a
ng
(see
Setting
page 40)
M s ed Ca new
LTga sf shortcuts,
A CoA f r
e
Ho
Oct
F
0
F4
0 :
O
er
5. Press
theDe
A
Dst
st
: 0 m
og
Dsub
Cl
soft key and follow 2 to 4 above.
0
Call Waiting
F8
g
o
By turning on
CallT Waiting
you will be notified when another call is received while you are already
H ld
C f
di
av
y
y
on a call. If Call
is off,
the second caller will automatically be transferred to 1571 Voice
C lL g Waiting
PhB ok
End
ll
N
wCall
Mailbox to leave a message.
o g
00
0
1. Press the
DialS
MENU
onfig
c
g
Admin
key,
Unhol of Remov
2. Each press
the
Option
Change
0
at
keyor to
F
soft key,
Re
Ca lWaiting
then Remov
the
nhold
Change
soft key
soft key turns the service on and off.
g
t
12h /24hr
Oct 01 any
09:00 problems,
m
Enter Password
If you experience
please call the Helpline
on 0800 169 1146
or go to www.bt.com/business/broadbandvoice
A toStop
27
Using the phone
Auto Answer
ct 0
09 00a F8
C
d
e
C
Plea e Wait…
ait Phone
r NamePlease IP
By
BTb Falcon
will answer anSt Nincoming
call after
H turning
Tr n f on
C nAuto Answer your Nu
s
D rt
al Log
PhBook
a preset
timeEn
9 0 m
1
2
P
g
To turn on Auto Answer:
P aD lSub
i c ib
t 01
0 0 am
1.Press the
d
R
key
O
F
01
MENU
nfig
Admin
key,
d
R
O
Option
key twice to
Rece
soft key,
ia
:00am
O t0
F
09:00
Oct 1
Oct
01 09:00
AutoAnswer
09:0
N
b
N
Ed t
then the
t 1
Select
soft
9
e
i
C lW
C
Hol
Tran
d#t mi
e ct
PlayE the
t
Sa e
Pl ydelay Press
D al
2
Edit
soft
key
and
enter
the onf
time
seconds
for
answer
dit
SeA
B oadband
Ha ein
sed cal
ns PeVoice
ve i Press
ing
Ca lW the
C llLo
PhB k
EEn CCal
N
od
an
Conf
keyA to
oRe confirm
t St tus
O 0
0
0am
O
Nu
neLo
g
ct 01
EdPlt
key and the
ng
, by pressing
D al
…
Oc
or
Su00am
c b
09
Handsfree
1
0 0 m
Save
P
soft
00a
Hold
NewC
3 Press the
:00am
4
0 00am
edDND
Ca
N
d
O t0
9 0 mOct
00am
HeadsetP
soft key Wto change the method
of…accepting the call,
al r Nam o
Phone
er
aor
e
D
al
Save
. Press
soft key to confirm.
t
F8
g
To turn
offT Auto
Ca l rAnswer:
N mesorW t
H
F8
C
h
1.Press the
H ld
1
eMENU
onfig
l
ovisioni
Ad in
W
key,
Option
9 00am
ndCall
b
A
toA
2.To turn Auto Answer off press
the
D
al
01
:00
key twice to
Wa ng P
soft
A o key
e
lL gorev B
DNDs
CallLoga e PhB ok
m
P y
ND : Edit
: ( )
Sa
Off
O 01
AutoAnswer
A>a>1
soft key.
el yh
Pl
g
To edit the Auto
Answer
crib ng W t settings:
Di lS b
1.Press the
0
09: 0
uo
2.Press the
toR
Dsub
AutoAn
the
0
09
Dsub
3.Press the
28
MENU
onfig
Admin
key,
Option
soft key,
key twice to
AutoAnswer
soft key and change the settings as shown in 2 & 3. Or, if you have added
Wai ng
soft
key
(see Setting new shortcuts, page 40)
oAn e
View
AutoAn
soft key and follow the instructions above.
Auto Reject
t
er/ eme
Diale Call g
o
Cb ng…
scrNum
Dia Su Voice
Dia
Sub
c ib n …
Pleas Reject
Wait…
Wai
…will
By turning on Auto
all incomingP easealls
be transferred to 1571
after
all L preset
D
g
a s N Mailbox
bat o
g
time if not answered.
ecei
ed
Call
L
Ed
S e
O t0
O t0
09
am
0 :0 O
a t0
0 00 m
O t0
9 0 am
t 01
09 0 m
F
F9
d
S
a
Pro
g…
To turn on Auto Reject:
Tele h
Pl a e W
1.Press the
ial b
key,W
MENU
Prov
fig
A msio
lOpt
Logon
…
P
F8
u
Edit
g…
Save
Pl ydelay. Press
D al
2. Enter the time in seconds
for the
OK
P ay
Di required
S ve
Play
e C
Rec dvedDND
Ca L Save
i
g
e timeBack
key
three times
Plea e W to
t
soft keyPl
F
O t0
00 m
AutoReject
C
09 0
then the
Edit
soft key
D a
soft key to confirm.
Save
T
e
Pro isioning
To turn off Auto Reject:
lease Wa t
o
1. Press the
ela i e
1
MENU
nfig
key,
ovision
Ad i
W
at g
A to s er
soft key,rl
Option
:F v
Ds
DNDs :17 Edit
0 A) allLo ave PhBookl y EndCall
2. To turn Auto Reject off press AutoAn
the
Di
Off
key three times to
olute ime
t0
0 :00a
0
AutoReject
8
De
A>a
soft
Plachr key.
P i
g
To edit the Auto Reject
lease Wa t delay setting:
M
1. Press the
Rece v
aMENU
Log
nfig
2. Press theEd
Admi
key,
View
S
Option
soft key,
0 0 am
key three times to
olute ime
o
0 00
AutoReject
soft
key and change the settings as shown in 2.
Pl
Auto Stop
Sa e
y
Dia
Save
utoRe ect
AbsP aute t me
By turning ondi Auto
StopP all
outgoing
Dial d Ca l L calls will be cancelled after a preset time.
D
v
g
Pr
To turn on Auto Stop:
P e se Wa t
1. Press the
figNU
M
Admin
key,
Option
soft keyPl
Prov sion ng
key
four times
to
k
Pl as Wa
it
Save
Pl ydelay. Press
D al
2. Enter the time in seconds for Ethe
required
Save
AutoStop
then the
Edit
soft key to confirm.
Voice
Provis oning
Sho t 169
ut
If you experienceC any problems,
please call the Helpline
onL 0800
1146 or go Bro
to dband
www.bt.com/business/broadbandvoice
Conf g
Ad
O i
P
soft key
29
Using the phone
i
ee
01
t
rov oni
To turn offb Auto
Stop
e Wa
A A l a Of
Foreve
1. PressR the
ai t
9
2. To turn
DND :
MENU
nfig
key,
ovision
A
W
off press the
eAutoSto
i Call
4
key
four times to
ock
Ho
EN
al Waitin
P
soft
toA
rkey,l
Option
hBo k Ds End
b all A toAD
0
AutoStop
T
key four times to
Un
C
AutoStop
N b
Oct 1
R t
Delchr
soft
lute A>
m
P Abs
y key.
Off
r
g
Tos edit the Auto Stop
setting:
l a e Wdelay
t
1. Press the
Mis
MENU
dnfig
C ll L
De
2. Press the
Admi
key,
4
ock
ormat
soft key,
0
Option
t0
0F1:
am
umb /
S
u on
soft key and change the settings
as shown
in
2.
S at s
Du a io
og
View
F3
F2
c 0
a sf
Conf
Do
Not
DisturbP
it
e
Rb
Cal e Nam r
Phon
Hea Numbe
et
Mi s Not
d Call o Disturb all incoming calls will
By turning on Do
1571 Voice
12h
/24h
al b
N m immediately
C ll r N m
Pho e N mb rtransferred to your
C l N
C
d
H
a
Ph rne Number
D al Call L g
Mailbox.
You can Prpreset
Dion turb
to remain active
rast
D Hubld
u
Tel phon for
Nu B Do
r db Not
bs ib n
dV
is ning time periods
Oc
1
0 00am
F8
I
Book
EndCal
scribe
key five times
NewC to
Oct 0
cri in
or
soft key and press
rovi
soft key to confirm
ormas
P
Subs ribi g…
OK
3.Press
and then the
Forever
period. Options are
,
c
9 0
Edit
O 0
9 00
0 00am
Absolute time
or
Fo ev –
r
. Option
4. Press
OK
soft key to confirm. The idle screen displays
5. Press
OK
soft key to confirm. Press the
30
PhBo
t
then the
C l Log
DoNotDisturb
Dia ubsc
ibin …
to
turn
the service
re er
soft key.
Press
R
Relative time
F8
F8
F9
M e
oA
Edit
2
toR Press the
Off
. Press
t
09 00a F9
F10
eive Ca
e
Change the MENU
nfig
Admi
Option
1.
Press
key,
softRe key,
ll
ision
Dele e A l og
DNDst
soft key. Or, pressP othe
soft
key
eas W
09:0 a
Oct
0
F9
DNDst:Forever
c 01
g
EndCa
Select
ia Su
or
bsc
On
Log
to
change
Format the time
9
Forever
. Option –
key then press the
Edit
ovis
o ng…
time
Relative
W
soft key
am
hon umber
g…
D a S scr b Do
bing keypad, that you require
C D a Subs rthe
6.Enter the number of days, hours and minutes, using
Not Disturb
M
L
n
Co
Rece ve Hold
Cthe
l Log service
Numb
an f
Co
f
will
to be active (e.g. 00, 00:10 will keep Do Not Disturb on for 10 minutes then
automatically turn off)
9
F3
01
0 0 am
Ot
1
er
lLog
PhBook
7.Press OK soft key to confirm. The idle screenC displaysF eDNDst:00,
00:10 (R)CallWait
andn the aday,
hour,
a l eNumb
ib n
minute will decline until they reach zero Option – ADPhone
O 01
:00 m
O 0
0a
F50 :0 m
c
F
8. Press
soft key to confirm. Press the
OK
ns
key then
press
the
orm t
F
/N m
soft
R Dm key
e
atio
EditF
NewC l
Hold
Tran f
9.Enter the time, using the keypad, that you require Do Not
Disturb to be deactivated
tive ime five)
(e.g. 17:10 will automatically turn off Do Not Disturb at tenRe past
O
1
:0 am
4
O
1
09 0 am
9 0a
Oc
1
09 00 m
Oc 0
5
0 :0 m
l
10 Press
2
soft key to confirm. The idle screen displays
gbe N
l tL sg
D atio
OK
D le
DNDst:17:10 (A)
Phone Lock
C Lo
Oc 01
F
ll
DNDst:
rev made
By turning on Phone
your
BT
IP Phone. WhenNea Ccall
is
i
Sav Lock
Pla no calls can
Dia be
ve
P from
y
D ub
A t AFalcon
Off
C
a
Wrong Numbe ! . Phone Lock can be password
t me
Re at v protected
attempted the display
and
Pho e Numb rwill show
t
r a
oc
P
g
ubscr b
c b g…
D Dst:Fo ver
will require Ha PIN to
clear (see Setting
the
Te e h
N mb
r password to lock the phone, page 39).
Ple set
e Wa t and
f
O 01
F9
:0 am
t 01
9 0
Oc 01
09:00 m
0
a
O t 01
0 :0 am
F1
s
1.Press the
soft key
g
ENU
nfig
B
Admi
key,
l
C
Option
soft key,
Fo mat
key six times
to
PhoneLock
then Remov
the
nhold
alSubscribi g…
enter your password/PIN (default is 0000) and press
2. If password protected,
3. Each press of the
Unhol
Remov
Change
OK
Change
soft key
soft key turns the service on and off.
Dsub
AutoAn
ff
If you experience
any problems,
please call the Helpline on 0800 169 1146 or go to www.bt.com/business/broadbandvoice
31
Using the phone
Reboot
Absol and
e ime will only be
This option forces your BT Falcon IP Phone to carry out a full system reboot
Br adban Vo ce
Pro io ing
required if requested
by
the
BT
Helpdesk
or
your
system
administrator.
ele h
N b
Plea e Wai …
O t0
1.Press the
soft key
2. Press the
09: 0
nfig
MENU
O
Admi
key,
OK
Option
1
0 :0 am
soft key,
O t 01
key seven times to
Reboot
0 :0
Ed t
then the
g
Select
soft key to confirm.
Calling features
Webcare is a web based facility that allows you to manage calling features on the line connected
to your BT Falcon IP Phone. Before Webcare can be used the Administrator must first set up a
password for each line. This is managed using Selfcare. For more information on using Webcare,
Selfcare and BT Hosted VoIP consult the User Guide available at www.btbroadbandoffice.com/help/
Selfcare
For Administrator use only.
By using Selfcare the Administrator can add more lines, add geographic numbers and change the
calling plan.
1.Log into Selfcare using https://service.btbroadbandvoice.bt.com/selfcare,
businessYourAccount with the password that was emailed to you.
32
2.Click on the Manage your lines link and then select each line in turn, making the following changes:
a. Select Password and enter a new password for each of the lines, this is the password that
will be used to access Webcare. The 056nnnnnnnn number will be the username. Ensure you
keep a record of this information
b. Select Line name to change the display name of each line, this will normally be the user of the line
c. Select Administrator privileges to give a user advanced Webcare privileges.
Webcare
1. Contact your Administrator and request the password allocated to you
2.Log into Webcare using https://www.bbv-youraccount.com/Login.jsp
3.Enter your telephone number (typically starting 056) in the Directory number field, and your
password and click on Login
4.Use the navigation panel on the left to manage your calling features. A full description of the
options is provided on the Service manual link
5. The Administrator can also manage additional calling features and is able to configure:
a. The lines included in the Multi Access Directory Number (MADN)
b. The lines included in the Multiline Hunt Group (MLHG).
If you experience any problems, please call the Helpline on 0800 169 1146 or go to www.bt.com/business/broadbandvoice
33
Using the phone
Personal settings
Setting the volume
1.Use the
Or use the
or
or
NU
keys when the telephone is ringing to adjust theM ring
tone level.
keys during a conversation to adjust the speech volume.
Mute
1. Press
te A l Log
during the conversation to put the telephone onDe mute.
Changing the ring tone
N b /
F1
1. Press the
F
Hold
M NU
T an
key,
Conf
Ed t
soft key,
g
Select
or
2. Select a ring tone using the
pressing "Play". Set the volume by pressing
le e All Lo
soft
keye then
Edit
soft key
keys. You can listen to the ring tone by
orP
0am
Oct 1
0 0 m
Ed t
ave
Pla
Dia
3. When you have selected the desired ring tone and
sound
level
press the
34
ot
Save
soft key.
Config menu list
Ringer
Date
Time
Language
Key Echo
Status
Time
Type
Bell
Menu
Config
Personalize
Alarm Clock
Contrast
PIN Setting
Shortcut
Memory Key
Information
Sample text: AB...H
Sample text: 1...8
Enter Password
Shortcut 1
Shortcut 2
Memory Key F1
Memory Key F2 – 9
Memory Key F10
APP Version
HW Version
IP
MAC
GW
Mask
If you experience any problems, please call the Helpline on 0800 169 1146 or go to www.bt.com/business/broadbandvoice
35
Using the phone
9
m
Lock
Changing the date format
N
F1
1. Press the
F4
Hold
M NU
2. Each press of
ng
T an
key,
ConfF6
g
Ed t
soft key,
r
l
soft key,
s
wCall
Select
Edit
C
key then
Format
soft key
F
…
changes the date
style
Ca le Name
o
Num er/Name
F8
t s Ca l t m
Format
Oc
di
3. When you have selected the desired format press
the
C
o
Hold TeF 0phone
T a umberC nf
H ld
Back
ng
soft
key C
Lock
Changing the timeN format
b N
F1
1. Press the
4
Hold
MENU
2. Each press of
ng
Trans
key,
Conf
C
Format
EWro
i g
soft key,
P
changes
Numbe /Name
S at s Ca l t m
17
c
ber!ct
Sel
P
soft key,
key twice then
Oct 01
Format
soft key
12hr/24hr
Hold
Trans desired
C nf
di
3. When you have selected
the
format press
the
Back
soft key.
0
09 0am
Changing the language
N be N
F1
0
1.Press the
soft key
F4
Hold
M NU
Tran
key,
Conf
P o s oni g…
2. Select a language
Plea e W t… using the
la
Dia
3.
Press the
time
36
Save
P
Edit
soft key,
g
Select
or
soft key to confirm.
P
soft key,
keys
key three times then
Edit
0
Log
PhBo k
EndC
C l echo)
Changing theC key
beep
N be (key
a
5 F1
0
09 0am
1.Press the
soft key
O tOc
0
8 F4
Hold
M
NU
09:00a
key
T an
er Name
Conf
Ed t
soft key,
g
Select
er
Nam
soft key,
DialSub
key four times
then
Dia Subscribin
Edit
9
er
2.
Select
(A
or
g…
to n
B
ub
O
Ad
llL
la
3.
Press the
L g
R ce ved Dia
ll Log
Save
P
Off
EB
using the
or
keys
soft key to confirm.
Turning the alarm on/off
N b N
F1
Oc
1
09 00
T an
M NU key,
1.Press the Hold
Edit
soft key
A t A
O tOc
0
F4
er
Select
2.
(A
Conf
09:00a
or
g…
to n
sub
O
P
la
Dia
3.
Press the
Save
P
Off
ME
ase W
soft
key,
using the
M
key to
or
0
Alarm Clock
,
g
Select
soft key then
B
keys
soft key to confirm
4. When the alarm is On an icon will flash in the display
a i g
e
i
og
5. When the alarm
is reached an audible alert will be heard
Rece v d C time
Log
Auto the
n wer
Rela ive meturn off by pressing
C
key.
c
0 :00 m
Setting the alarm time
N m /
F1
t 01
1.Press the
key then
F
t
Pe
T an
Conf
key,
soft key,
Edit
soft key
Hold
M NU
key to
Alarm Clock
,
g
Select
soft key,
g
2. Using the keypad
Pleas Wait enter the hours then the minutes
la
Dia
3.
Press the
w
you
NIf ode
Op
ion
Save
P
soft key to confirm.
g
i
Op
1 0 00am
experience any
problems,
please call the Helpline on 0800 169 1146 or go to www.bt.com/business/broadbandvoice
CallLog
og
37
Using the phone
c
0 :00 m
CallLog periodicity
Cal Log
Setting the alarm
N b
F1
t 01
T an
M NU key,
1.Press the Hold
Edit
key twice then
F4
be
e Nu
e
Conf
soft key,
soft key
W
DialS
key
to
m
Select
lSuH ld
softD key,
keys
Coned all Log
t
Edi
ecei
soft key
toE confirm.
C
ns
H d
Save
c
g
or
isi n ng
2.Select One
or Periodic (daily) using the
Status Sh
timSt (once)
tus C ll timer
le Ca
s lW
ldDia
la
3.
PressH the
,
ing…
A arm Clock
nP ansf
0
Setting the alarm tone
N
F1
T an
M NU key,
1.Press the Hold
key three times then
F4
Conf
Edit
s Calle
a
N
soft
key
P eN
soft key
a
key to
Ad an alarm
d
Back
Back the
or
2.Select
tone
using
pressing "Play". Set the volume by pressing
,
0 a
Alarm Clock
g
Select
soft key,
at
keys. You can listen to the tone by
Oc
O t 01
09 00am
g
or
Wa
O
E t
Save
Play
Da
3. When you have selected the desired tone and
sound
level
pressAbsolute
the
soft key.
Save
Add contrast
D alAdd
D
Setting the
N
F1
1. Press the
F4
Hold
M NU
T an
key,
Conf
soft key,
key twice to
Contrast
Ed
then
On
Down
O
U and
Down
Up
2.Use the
soft keys to change the contrast and press the
when the desired level is reached.
N38
Co
g
Select
OK
soft key
soft key
0 F4
9 0a
DNDst:F re
er PIN (password) setting
Changing
the
A Ank
Of
PhB
En
N
N D lLb
DN 17
F1
Reb ot
1.Press
the
Alar key
Clock
soft
F4
Tran
key,
7 NU
Hold
M
soft key,
Conf
09:00
key three times
to
Dsub
Aut
Ed
then
PIN Setting
Off
g
Select
o
1
Head t
12 r/24 using
r
Hold enter
T ansf your
Con password
2. ChEnter Password
is displayed,
the keypad (the
default is 0000) and press
A S
PIN C d
the OK soft key
O t 01
ct 01
09 0
On
3 Use the
00 m
Down
U
soft key to highlight
Oc 0
09 00am
Change PIN Code
0 :00am
Edit
. Press the
t0
g
Select
Statu a new
Duratio four digit PIN using the keypad and confirm with the
4.Enter
Re-enter
the
new PIN
the
OK soft key.
F
rm
t
Unh and
ld
R press
mo e
ange
H ld
T sf
Con
P
9 0a
soft key
OK
soft key.
New password
l
Wa ng
ver
SettingelaForthe
to lock Cal
the
phone
N
d
utoA
L
N mb r Name
Dst:17:1
A)
24hr unlock
Rec i e the
C l Log phone
If theD Flag
is set to ON you will need to enter your PIN to lock1 hrand
P on (password)
Numbe
S
A
# i
O
9 0
F2
d Reb Transf
o
1.HoPress
the
/
og
A a mkey
Clock
soft
e
4
Con
Ho
d
MENU
Trans
key,
Conf
soft key,
sfre
dset
key three times to
E
PIN Setting
P
d
Edi
then
g
Select
2. Enter Password is displayed, enter your password using the keypad (the default is 0000)
andD press gthe OK soft key
09 00am
3. Unhold
Press Remove
the
Change
soft key, each press turns the Flag on/off
dit
4. Press
the
Back
soft key.
ever
If
you experience
any
call the Helpline on 0800 169 1146 or go to www.bt.com/business/broadbandvoice
DoNotD s urb
Dsubproblems,
AutoAn please
Off
A
39
Using the phone
Setting new shortcuts
Uog
sub
C llLog
m
AutoAnO
key twice.
P B ok
ontrast
ll Log
En er P screen
ssw rdMiss d that
You can add two new soft keys to the idle
are available by Npressing
the
mAutoAnswer
R lativ time
The
two options are
and Dial Subscribe
.
C
a s
O 0
0 : 0 m
Oct 0
O 0
0 :0 am
09
2
d
Tran f
1.Press the HoENU
key,
F
Conf
soft key,
key four times to
Edi
then
Sh t utim
bsolute
2.Use the
or
keys to highlight one of the options and p ess the
3.Use the
or
it
Save
Play
D12hr/
a
keys to displayE the
options
and press the
rov o ing…
Pl ase Wa
Select
F8
ov sioning…
Wrong Number!
Plea e Wa F10
oA
on ng…
A toR ect
Wll N
r
soft key
soft key
EditO
:00am
HP Bookt
C l Log
soft key
to confirm.
A St p
Save
0
Dia ed Call Log
Programming
the memory
keys F1 – F10
mbe / m
F1
1.Press the
F
O t 01
Hold
ENU
:00am
Tran f
key,
or
2.Use the
Edit
ConfO
soft key,
: 0am
keyd five times to
De e e A l Log
Edi
then
Memory
Key
Fo ma
Select
U
soft keyC
P Remo e
keys to select the required F1 - F10 memory and press the
se Wa t…
O t0
0 : 0am
O t0
0 a
0 : 0 m
soft key
DND
t: 7 the
0D A)
Ed t
Sav confirm
lay
al
3. Enter the required phone number using the keypad
and
with
b
soft
key.
Save
Viewing the status of the BT Falcon IP Phone
as word
This information may be requested by the BT Helpdesk if you require nter
support
for your BT Falcon
PN
IP Phone.
c 01
Oct 1
0 00am
9 0a
0
2
1.Press the
soft key
Hold
M NU
T ans
key,
Conf
soft key,
key six times to
2. Information on the status of the phone is displayed.
t40
Information
Ed
then
g
Select
9 00 m
General information
Important
ccess to emergency services is provided but
A
calls, including emergency calls to 999, made via
BT Broadband Voice may not work in the event
of power or broadband connection failure. These
failures may be caused by reasons outside our
control. Location information, provided to the
emergency services, is limited to the address of
the associated telephone line where applicable.
Headset Compatibility
•The BT Falcon Mk 2 IP Phone supports the
following Jabra and Plantronic headsets
Note: Your headset must have an RJ-45
connector.
•Professional wireless headsets with electronic
hook switch cable.
Safety information
•D
o not open the handset or the base. This
could expose you to high voltages or other
risks. Contact the Helpline on 0800 169 1146
for all repairs.
Cleaning
• Clean the handset and base with a damp
(not wet) cloth, or an anti-static wipe. Never
use household polish as this will damage the
product. Never use a dry cloth as this may cause
a static shock.
Jabra/Netcom:
Environmental
•With GN1900, GN2000, Biz2400… headset
you have to use the cable 8800-00-88 on an
RJ-45 headset plug (Called DHSG headset
plug by Jabra)
• Do not expose to direct sunlight
Plantronics:
• Do not stand your product on carpets or other
surfaces which generate fibres, or place it in
locations preventing the free flow of air over
its surfaces
•Professional Corded H-Top headsets with
Quick Disconnect plug and U10P-S19 RJ-45
bottom cable:
• Do not submerge any part of your product
in water and do not use it in damp or humid
conditions, such as bathrooms
If you experience any problems, please call the Helpline on 0800 169 1146 or go to www.bt.com/business/broadbandvoice
41
Using the phone
• Do not expose your product to fire, explosive or
other hazardous conditions
• T here is a slight chance your phone could be
damaged by an electrical storm.
Product disposal instructions
The symbol shown here and on the product
means that the product is classed as Electrical
or Electronic Equipment and should not be
disposed with other household or commercial
waste at the end of its working life.
The Waste of Electrical and Electronic
Equipment (WEEE) Directive (2002/96/EC)
has been put in place to recycle products
using best available recovery and recycling
techniques to minimize the impact on the
environment, treat any hazardous substances
and avoid the increasing landfill.
Product disposal instructions for
business users
Business users should contact their suppliers and
check the terms and conditions of the purchase
contract and ensure that this product is not
mixed with other commercial waste for disposal.
42
Guarantee
Your BT Falcon IP Phone is guaranteed for a
period of 12 months from the date of purchase.
Subject to the terms listed below, the
guarantee will provide for the repair of, or
at BT’s or its agent’s discretion, the option
to replace the BT Falcon IP Phone or any
component thereof, (other than batteries),
which is identified as faulty or below standard,
or as a result of inferior workmanship or
materials. Products over 28 days old from
the date of purchase may be replaced with a
refurbished or repaired product.
The conditions of this guarantee are:
• The guarantee shall only apply to defects that
occur within the 12-month guarantee period
• P
roof of purchase is provided
• T he equipment is returned to BT or its agent
as instructed
• This guarantee does not cover any faults
or defects caused by accidents, misuse, fair
wear and tear, neglect, tampering with the
equipment, or any attempt at adjustment or
repair other than through approved agents
• This guarantee does not affect your
statutory rights.
For your records
Date of purchase:
Place of purchase:
Serial number:
For guarantee purposes proof of purchase
is required so please keep your receipt.
Within the 12-month guarantee period:
Prior to returning your product, please read
the user guide or contact the BT Broadband
Voice Helpdesk on 0800 169 1446 or go
to www.bt.com/business/broadbandvoice
for assistance. In the unlikely event of a
defect occurring, please follow the Helpline’s
instructions for replacement or repair.
Returning your phone
If the Helpline is unable to remedy your problem
they will ask you to return the product. Where
possible, pack the product in its original
packaging. Please remember to include all parts.
(Please note that we cannot take responsibility
for goods damaged in transit). Please obtain and
keep proof of posting from the Post Office.
If you experience any problems, please call the Helpline on 0800 169 1146 or go to www.bt.com/business/broadbandvoice
43
Offices Worldwide
The services described in this publication are subject
to availability and may be modified from time to
time. Services and equipment are provided subject
to British Telecommunications plc’s respective
standard conditions of contract. Nothing in this
publication forms any part of any contract.
© British Telecommunications plc 2010.
Registered office: 81 Newgate Street, London
EC1A 7AJ. Registered in England No. 1800000.
Printed in the UK.
IT • communications • support
Bringing it all together