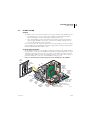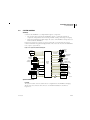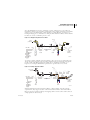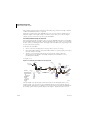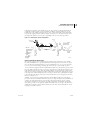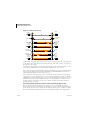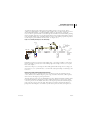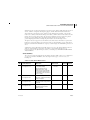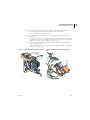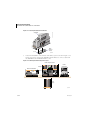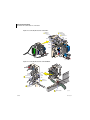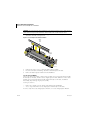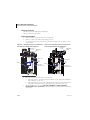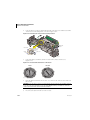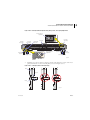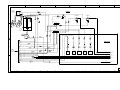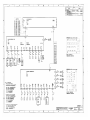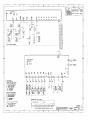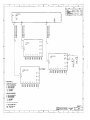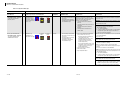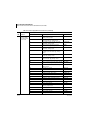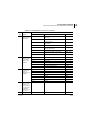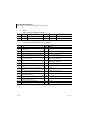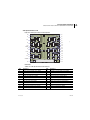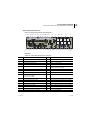
1
COULTER® Slide Making Modules
Service Manual
®
TM
PN 4276985A (August 2000)
COULTER CORPORATION
A Beckman Coulter Company
Miami, Florida 33196-2500 USA
GEN S SM
LEGAL NOTICES
Beckman Coulter, Inc. makes no representation that, upon furnishing this service manual, the holder of the manual will have
the necessary technical capabilities and know-how to properly troubleshoot and repair any of the equipment specified in the
manual. Beckman Coulter, Inc. assumes no liability whatsoever, including consequential and incidental damages, resulting
from improper operation of Beckman Coulter instruments after maintenance of Beckman Coulter instruments has been
performed by persons not employed by Beckman Coulter, Inc. Furthermore, Beckman Coulter, Inc. assumes no liability
whatsoever for any personal injury or property damage resulting from maintenance and/or repair of Beckman Coulter
instruments performed by persons not employed by Beckman Coulter, Inc.
READ ALL PRODUCT MANUALS AND CONSULT WITH BECKMAN COULTER-TRAINED PERSONNEL
BEFORE ATTEMPTING TO OPERATE INSTRUMENT.
HAZARDS AND OPERATIONAL PRECAUTIONS AND LIMITATIONS
WARNINGS, CAUTIONS, and IMPORTANTS alert you as follows:
WARNING
CAUTION
IMPORTANT -
Might cause injury.
Might cause damage to the instrument.
Might cause misleading results.
Beckman Coulter, Inc. urges its customers to comply with all national health and safety standards such as the use of barrier
protection. This may include, but it is not limited to, protective eyewear, gloves, and suitable laboratory attire when
operating or maintaining this or any other automated laboratory analyzer.
"This Service Manual contains confidential information of Beckman Coulter, Inc. and its receipt or possession does not
convey any rights to reproduce, disclose its contents, or to manufacture, use, or sell anything it may describe.
Reproduction, disclosure, or use without specific written authorization of Beckman Coulter, Inc. is strictly forbidden."
Copyright © Beckman Coulter, Inc. 2000
All rights reserved.
REVISION STATUS
8/00
Released by CN 030150-0685
Software Version: SlideMaker,16.5; Workstation, 3A
This document applies to the latest software listed and higher versions. When a subsequent software version affects the
information in this document, the changes will be included on minor revision change pages or summarized on a Notice of
Information Update form and will be released by service memo.
PN 4276985A
iii
REVISION STATUS
iv
PN 4276985A
CONTENTS
LEGAL NOTICES
REVISION STATUS, iii
1
2
PN 4276985A
INTRODUCTION, 1.1-1
1.1
MANUAL DESCRIPTION, 1.1-1
Scope, 1.1-1
Intended Audience, 1.1-1
Organization, 1.1-2
Numbering Format, 1.1-3
Special Headings, 1.1-3
Warning, 1.1-3
Caution, 1.1-3
Important, 1.1-3
Attention, 1.1-3
Note, 1.1-3
Conventions, 1.1-4
1.2
SAFETY PRECAUTIONS, 1.2-1
Electronic, 1.2-1
Biological, 1.2-1
Troubleshooting, 1.2-2
INSTRUMENT DESCRIPTION, 2.1-1
2.1
INTRODUCTION TO THE GEN•S SM™ SLIDEMAKER, 2.1-1
Summary, 2.1-1
Function, 2.1-1
Description, 2.1-1
Overview, 2.1-1
Systems, 2.1-1
Modules, 2.1-1
Diagnostic Products, 2.1-2
Physical Specifications, 2.1-2
Performance Specifications and Characteristics, 2.1-3
Leakage Current Specifications, 2.1-4
Operation, 2.1-4
Operating Procedures, 2.1-4
2.2
ELECTRONIC POWER SYSTEM, 2.2-1
Summary, 2.2-1
Electronic Power System Overview, 2.2-1
Electronic Power System Hazard Reduction, 2.2-1
Power Input, 2.2-2
Power Cable, 2.2-2
Line Voltage Input Protection, 2.2-2
Fuses, 2.2-3
Power Supply, 2.2-3
Function, 2.2-3
Input, 2.2-4
Outputs, 2.2-4
v
CONTENTS
Power Supply Monitor Card, 2.2-4
Function, 2.2-4
LEDs, 2.2-4
Test Points, 2.2-5
Connectors, 2.2-5
Main Distribution Card, 2.2-5
Function, 2.2-5
Connectors and Test Points, 2.2-6
Power System Interconnections, 2.2-6
Power Failure, 2.2-6
vi
2.3
FLUIDIC SYSTEM, 2.3-1
Summary, 2.3-1
Pneumatic Power Acquisition, 2.3-1
Pneumatic Enable Valves, 2.3-2
Pressure Regulation and Distribution, 2.3-2
30 Psi, 2.3-2
5 Psi, 2.3-3
Vacuum Regulation and Distribution, 2.3-3
High Vacuum, 2.3-4
17.5 In. Hg Vacuum, 2.3-4
6.5 In. Hg Vacuum, 2.3-4
Vacuum Accumulator Tank, 2.3-4
Color Coding, 2.3-5
Pneumatic Supply Monitor Cards, 2.3-5
Reagent Acquisition, 2.3-6
Reagent Distribution, 2.3-6
Waste Collection, 2.3-6
Main Fluidics Module, 2.3-7
Main Fluidics Interface Card, 2.3-8
Solenoids, 2.3-8
Sensor Summary, 2.3-8
2.4
SYSTEM CONTROL, 2.4-1
Summary, 2.4-1
System Control Card, 2.4-1
Function, 2.4-1
Processor “A” and Processor “B”, 2.4-2
SlideMaker Software, 2.4-2
LEDs, 2.4-5
Jumpers, 2.4-5
Connectors, 2.4-5
Test Points, 2.4-5
Keypad and Display Module, 2.4-5
System Reset, 2.4-6
Initiating a Reset, 2.4-6
Boot Mode, 2.4-6
Normal Mode, 2.4-6
System Initialization, 2.4-6
PN 4276985A
CONTENTS
PN 4276985A
2.5
SAMPLE ACQUISITION SYSTEM, 2.5-1
Summary, 2.5-1
Function, 2.5-1
Aspirating a Blood Sample, 2.5-1
Transferring the Blood Sample to a Reservoir, 2.5-4
Holding and Mixing the Blood Sample, 2.5-5
Transferring the Blood Sample to the Dispense Probe and Priming the
Dispense Line, 2.5-6
Dispensing a Drop of Blood Sample onto the Slide, 2.5-7
Rinsing and Drying the Aspiration and Dispense Lines, 2.5-8
Sample Access and Reservoir Module, 2.5-11
Dispense Module, 2.5-11
Dispense Pump, 2.5-12
Dispense Probe Mechanism, 2.5-12
Rinse Block, 2.5-13
Dispense 1 Manifold and Dispense 2 Manifold Cards, 2.5-13
Fluid Detectors, 2.5-13
Function Summary, 2.5-14
Error Conditions, 2.5-15
Sensor Summary, 2.5-16
2.6
SMEAR PROCESSING SYSTEM: CASSETTE TRANSPORT MODULE, 2.6-1
Summary, 2.6-1
Description, 2.6-1
Preparing the Slide Cassettes for Processing, 2.6-1
Cassette Input Queue Module, 2.6-1
Slide Ejector Module, 2.6-4
Upper Cassette Transfer Mechanism, 2.6-5
Cassette Output Queue Module, 2.6-6
Slide Ejector Interface Card, 2.6-7
Function, 2.6-7
Connectors and Test Points, 2.6-7
Sensors Summary, 2.6-7
2.7
SMEAR PROCESSING SYSTEM: SLIDE AND SMEAR MODULE, 2.7-1
Summary, 2.7-1
Description, 2.7-1
Slide Transport Module, 2.7-1
Function, 2.7-1
Smear Module, 2.7-4
Alignment, 2.7-7
Voltage and High Vacuum Inputs, 2.7-7
Smear/Transport Interface Card, 2.7-7
Function, 2.7-7
Connectors and Test Points, 2.7-8
Calibration of the Slide Positions in the Slide and Smear Module, 2.7-8
Calibrating the Shuttle Positions, 2.7-8
Calibrating the Smear Truck Positions, 2.7-8
Sensor Summary, 2.7-8
vii
CONTENTS
2.8
SMEAR PROCESSING SYSTEM: LABEL PRINTER MODULE, 2.8-1
Summary, 2.8-1
Description, 2.8-1
Field Adjustments, 2.8-3
Sensor Summary, 2.8-3
2.9
SMEAR PROCESSING SYSTEM: DRYER MODULE, 2.9-1
Summary, 2.9-1
Description, 2.9-1
Dryer Interface Card, 2.9-2
Function, 2.9-2
Connectors and Test Points, 2.9-3
Sensor Summary, 2.9-3
2.10 SMEAR PROCESSING SYSTEM: SLIDE ELEVATOR MODULE, 2.10-1
Summary, 2.10-1
Description, 2.10-1
Sensor Summary, 2.10-3
2.11 SMEAR PROCESSING SYSTEM: BASKET QUEUE MODULE, 2.11-1
Summary, 2.11-1
Description, 2.11-1
Basket Transport Interface Card, 2.11-3
Function, 2.11-3
Connectors and Test Points, 2.11-3
Sensor Summary, 2.11-3
3
viii
INSTALLATION PROCEDURES, 3.1-1
3.1
PREINSTALLATION CHECKLIST, 3.1-1
Space and Accessibility, 3.1-1
Electrical Requirements, 3.1-1
GEN•S™ System Requirements, 3.1-1
3.2
UPGRADING THE GEN•S™ SYSTEM, 3.2-1
Tools/Supplies Needed, 3.2-1
Procedure, 3.2-1
3.3
MODIFYING THE GEN•S SYSTEM, 3.3-1
Tools/Supplies Needed, 3.3-1
Procedure, 3.3-1
3.4
UNPACKING AND CONNECTING THE SLIDEMAKER, 3.4-1
Tools/Supplies Needed, 3.4-1
Unpacking and Positioning the SlideMaker, 3.4-1
Connecting the System Interconnect Cable, 3.4-3
Securing the SlideMaker to the Diluter, 3.4-4
Leveling the SlideMaker, 3.4-4
Removing the Deactivator Clips, 3.4-4
Removing Shipping Brackets from the Dispense and Main Fluidics Modules, 3.4-4
Installing the Main Fluidics Module Cover, 3.4-5
PN 4276985A
CONTENTS
Installing the Sample Reservoirs, 3.4-5
Installing the Splash Shields, 3.4-8
Connecting the Hydraulic and Pneumatic Lines, 3.4-8
Removing the Shipping Bracket from the System Control Card, 3.4-10
Connecting the Main Power Cable, 3.4-10
Preparing the SlideMaker for Operation, 3.4-10
3.5
4
PN 4276985A
TESTING THE SYSTEM, 3.5-1
SERVICE AND REPAIR PROCEDURES, 4.1-1
4.1
GUIDELINES FOR SERVICING THE SLIDEMAKER, 4.1-1
General, 4.1-1
Accessing the Main Compartments in the SlideMaker, 4.1-1
Opening the Main Cover, 4.1-2
Closing the Main Cover, 4.1-3
Accessing and Removing the SlideMaker Modules, 4.1-3
Basket Queue Module, 4.1-3
Cassette Transport Module, 4.1-4
Cassette Output Queue Module, 4.1-7
Dispense Module, 4.1-8
Dryer and Slide Elevator Modules, 4.1-9
Keypad and Display Module, 4.1-10
Label Printer Module, 4.1-10
Main Fluidics Module, 4.1-11
Sample Access and Reservoir Module, 4.1-12
Slide and Smear Module, 4.1-13
4.2
USING THE SLIDEMAKER SERVICE FUNCTIONS, 4.2-1
Purpose, 4.2-1
Procedure, 4.2-1
Dry Cycle Sequence Summary, 4.2-6
Slide Pickup Process, 4.2-6
Smear Making Process, 4.2-6
Slide Ejection Process, 4.2-7
Slide Placement Process, 4.2-7
4.3
HOME, PRINTER AND DISPENSE OFFSET SHUTTLE POSITION
ADJUSTMENTS, 4.3-1
Purpose, 4.3-1
Setting the Home Offset, 4.3-1
Setting the Printer Offset, 4.3-2
Purpose, 4.3-2
Procedure, 4.3-2
Verification, 4.3-3
Setting the Dispense Offset, 4.3-3
Purpose, 4.3-3
Tools/Supplies Needed, 4.3-3
Procedure, 4.3-3
Verification, 4.3-5
ix
CONTENTS
4.4
PICK AND WICK SLIDE POSITION ADJUSTMENTS, 4.4-1
Purpose, 4.4-1
Procedure, 4.4-1
Verification, 4.4-3
4.5
PRINTER ADJUSTMENTS, 4.5-1
Purpose, 4.5-1
Printer Height above the Slide Adjustment, 4.5-1
Tools/Supplies Needed, 4.5-1
Procedure, 4.5-1
Label Position in the Y-Dimension Adjustment, 4.5-3
4.6
SLIDE ELEVATOR PLATEN ADJUSTMENTS, 4.6-1
Purpose, 4.6-1
Tools/Supplies Needed, 4.6-1
Preliminary Platen Checks and Adjustments, 4.6-1
Slide Placement Adjustments, 4.6-2
Verification, 4.6-3
4.7
DISPENSE PUMP ADJUSTMENT, 4.7-1
Purpose, 4.7-1
Tools/Supplies Needed, 4.7-1
Procedure, 4.7-1
Verification, 4.7-2
4.8
CIRCUIT CARD REPLACEMENT, 4.8-1
Purpose, 4.8-1
Procedure, 4.8-1
4.9
FLUID DETECTOR CALIBRATION, 4.9-1
Purpose, 4.9-1
Tools/Supplies Needed, 4.9-1
Procedure, 4.9-1
Verification, 4.9-2
4.10 SOFTWARE INSTALLATION USING A LAPTOP COMPUTER, 4.10-1
Purpose, 4.10-1
Tools/Supplies Needed, 4.10-1
Procedure, 4.10-1
4.11 SEN41 (VERTICAL SLIDE SENSOR) ALIGNMENT, 4.11-1
Purpose, 4.11-1
Tools/Supplies Needed, 4.11-1
Procedure, 4.11-1
Verification, 4.11-2
4.12 PRINTHEAD CLEANING, 4.12-1
Purpose, 4.12-1
Tools/Supplies Needed, 4.12-1
Procedure, 4.12-1
Verification, 4.12-3
x
PN 4276985A
CONTENTS
4.13 EXTENDED AND LONG-TERM SHUTDOWN, 4.13-1
Purpose, 4.13-1
Tools/Supplies Needed, 4.13-1
Procedure, 4.13-1
4.14 DISPENSE PROBE CLEANING/REPLACEMENT, 4.14-1
Purpose, 4.14-1
Tools/Supplies Needed, 4.14-1
Procedure, 4.14-1
Verification, 4.14-2
4.15 SLIDE EJECTOR ADJUSTMENTS/ALIGNMENT, 4.15-1
Purpose, 4.15-1
Tools/Supplies Needed, 4.15-2
Slide Pusher Adjustment, 4.15-2
Slide Ejector Alignment, 4.15-3
Verification, 4.15-6
4.16 SLIDE PUSHER BARS AND SHUTTLE BRUSH ADJUSTMENTS, 4.16-1
Purpose, 4.16-1
Slide Pusher Bars Adjustment, 4.16-1
Shuttle Brush Adjustment, 4.16-2
Verification, 4.16-3
4.17 SLIDE STRIPPER PLATE ADJUSTMENT, 4.17-1
Purpose, 4.17-1
Procedure, 4.17-1
Verification, 4.17-2
4.18 SMEAR TRUCK ALIGNMENT CHECKS AND ADJUSTMENTS, 4.18-1
Purpose, 4.18-1
Tools/Supplies Needed, 4.18-1
Smear Truck Pickup, Tilt, and Sensor Position Adjustments, 4.18-2
Verification, 4.18-5
Smear Edge Adjustment, 4.18-6
4.19 SMEAR TRUCK AND SHUTTLE GUIDE RODS CLEANING, 4.19-1
Purpose, 4.19-1
Tools/Supplies Needed, 4.19-1
Procedure, 4.19-1
4.20 SMEAR TRUCK AND SHUTTLE O-RING REPLACEMENT, 4.20-1
Purpose, 4.20-1
Smear Truck O-Ring Installation, 4.20-1
Shuttle O-Ring Installation, 4.20-2
Verification, 4.20-2
4.21 TOP-OF-FORM SENSOR CHECKS AND ADJUSTMENTS, 4.21-1
Purpose, 4.21-1
Procedure, 4.21-1
Verification, 4.21-4
PN 4276985A
xi
CONTENTS
4.22 Z-AXIS REGISTER SUBASSEMBLY COMPONENT REPLACEMENT, 4.22-1
Purpose, 4.22-1
Procedure, 4.22-1
Verification, 4.22-2
4.23 SEN46 (GRIPPER OVEREXTENDED SENSOR) ALIGNMENT AND FLAG
REPLACEMENT, 4.23-1
Purpose, 4.23-1
SEN46 Alignment, 4.23-1
Procedure, 4.23-1
Verification, 4.23-2
SEN46 Flag Replacement, 4.23-2
Tools/Supplies Needed, 4.23-2
Removal, 4.23-2
Installation, 4.23-3
Verification, 4.23-3
4.24 ENCODER REPLACEMENT, 4.24-1
Purpose, 4.24-1
Tools/Supplies Needed, 4.24-1
Preliminary Checks, 4.24-1
Removal, 4.24-1
Installation, 4.24-3
Verification, 4.24-3
4.25 BASKET QUEUE MODULE CHECKS AND ADJUSTMENTS, 4.25-1
Purpose, 4.25-1
Tools/Supplies Needed, 4.25-1
Preliminary Checks, 4.25-1
Pulley/Motor/Coupling/Position Sensor Adjustment Procedures, 4.25-2
Preliminary, 4.25-2
Rear Belt, 4.25-2
Front Belt, 4.25-4
Belt Tension, 4.25-5
Verification, 4.25-5
4.26 SEN37 (BASKET INDEX SENSOR) REPLACEMENT, 4.26-1
Purpose, 4.26-1
Removal, 4.26-1
Installation, 4.26-1
Verification, 4.26-2
4.27 30 PSI SUPPLY CHECKS AND TRANSDUCER ADJUSTMENT, 4.27-1
Purpose, 4.27-1
Tools/Supplies Needed, 4.27-1
Procedure, 4.27-1
5
MAINTENANCE PROCEDURES, 5.1-1
5.1
xii
SYSTEM VERIFICATION PROCEDURE, 5.1-1
Purpose, 5.1-1
PN 4276985A
CONTENTS
Tools/Supplies Needed, 5.1-1
Procedure, 5.1-1
5.2
6
SCHEMATICS, 6.1-1
6.1
7
8
A
SCHEMATICS INCLUDED, 6.1-1
TROUBLESHOOTING, 7.1-1
7.1
SLIDEMAKER MESSAGES, 7.1-1
About the Tables in Heading 7.2, TABLES OF SLIDEMAKER MESSAGES, 7.1-1
Icons and Traffic Lights Displayed on the Workstation with System Messages, 7.1-2
7.2
TABLES OF SLIDEMAKER MESSAGES, 7.2-1
7.3
TROUBLESHOOTING TIPS FOR THE SLIDE AND SMEAR MODULE, 7.3-1
Troubleshooting Blood Smear Quality Problems, 7.3-1
Troubleshooting Smear Module Alignment Problems, 7.3-1
Troubleshooting the Servo System, 7.3-1
7.4
SOFTWARE INSTALLATION ERRORS, 7.4-1
PARTS LISTS, 8.1-1
8.1
MASTER PARTS LIST, 8.1-1
8.2
ILLUSTRATED PARTS, 8.2-1
QUICK REFERENCE INFORMATION, A.1-1
A.1
PN 4276985A
SLIDEMAKER FUNCTIONALITY CHECKLIST, 5.2-1
Purpose, 5.2-1
Tools/Supplies Needed, 5.2-1
Preliminary Checks, 5.2-1
Dry Cycle Checks, 5.2-3
Blood Cycle Checks, 5.2-4
TOLERANCES AND LIMITS, A.1-1
Fluid Detector Voltage Specifications, A.1-1
Label Printer Module Adjustments, A.1-1
Printer Height above the Slide Specification, A.1-1
Top-of-Form Sensor Voltage Settings, A.1-1
Pressure and Vacuum Tolerances, A.1-1
Shuttle Position Settings, A.1-1
Dispense Position Specifications, A.1-1
Shuttle Offset Settings, A.1-2
Smear Module Input Tolerances, A.1-2
Voltage Inputs, A.1-2
Unregulated Vacuum Input, A.1-2
Tubing Length Specifications, A.1-2
Voltage Tolerances, A.1-2
Ac Input Line Voltages, A.1-2
Power Supply, A.1-2
xiii
CONTENTS
B
A.2
CIRCUIT CARD LAYOUTS WITH KEY COMPONENT DESCRIPTIONS, A.2-1
Basket Transport Interface Card, A.2-1
Connectors, A.2-1
Test Points, A.2-1
Dryer Interface Card, A.2-2
Connectors, A.2-2
Test Points, A.2-2
Main Distribution Card, A.2-3
Connectors, A.2-3
Test Points, A.2-4
Main Fluidics Interface Card, A.2-5
Connectors, A.2-5
Power Supply Monitor Card, A.2-6
Connectors, A.2-6
LEDs, A.2-10
Test Points, A.2-10
Slide Ejector Interface Card, A.2-11
Connectors, A.2-11
Test Points, A.2-12
Smear/Transport Interface Card, A.2-13
Connectors, A.2-13
Test Points, A.2-14
System Control Card, A.2-15
Connectors, A.2-15
Jumpers, A.2-15
LEDs, A.2-16
Test Points, A.2-16
A.3
SOLENOID FUNCTIONS, A.3-1
A.4
SENSOR FUNCTI0NS AND TYPES, A.4-1
Sensor Table, A.4-1
Types and Requirements of Sensors Used, A.4-6
Encoder Sensors, A.4-6
Infrared Interrupting Sensors, A.4-7
Logic Sensors, A.4-7
Magnetic Reed Switch Sensors, A.4-7
Manually Activated Switch Sensors, A.4-8
Pulsed Infrared Reflective Sensors, A.4-8
Reflective Infrared Sensors, A.4-8
Temperature Sensor, A.4-8
Vacuum-Activated Switch Sensors, A.4-8
A.5
MENU TREE, A.5-1
VENT LINE SENSING (VLS), B.1-1
B.1
xiv
VLS FUNCTION, CALIBRATION, AND TROUBLESHOOTING, B.1-1
Function, B.1-1
VLS Diluent Error, B.1-1
VLS Air Error, B.1-1
PN 4276985A
CONTENTS
Calibration, B.1-1
Diluent Prime and Calibration, B.1-1
Diluent and Air Checking, B.1-1
Calibration and Diluent and Air Checking Retry, B.1-2
Troubleshooting and Servicing, B.1-2
ABBREVIATIONS, ABBREVIATIONS-1
INDEX, INDEX-1
TRADEMARKS
PN 4276985A
xv
CONTENTS
ILLUSTRATIONS
1.2-1
2.1-1
2.1-2
2.2-1
2.2-2
2.2-3
2.3-1
2.3-2
2.3-3
2.4-1
2.4-2
2.4-3
2.5-1
2.5-2
2.5-3
2.5-4
2.5-5
2.5-6
2.5-7
2.5-8
2.5-9
2.5-10
2.5-11
2.5-12
2.5-13
2.5-14
2.5-15
2.6-1
2.6-2
2.6-3
2.6-4
2.6-5
2.6-6
2.7-1
2.7-2
2.7-3
2.7-4
2.7-5
2.7-6
2.7-7
2.8-1
2.8-2
2.8-3
xvi
Warning Label, 1.2-2
SlideMaker Modules Not Under the SlideMaker Cover, 2.1-3
SlideMaker Modules Under the SlideMaker Cover, 2.1-3
Electronic Power Supply Overview, 2.2-1
Electronic Power Distribution, 2.2-2
Electronic Power System Components, 2.2-3
Pneumatic Power System Components in the Rear and Right Side of the
SlideMaker, 2.3-1
Main Fluidics Module, Front View, 2.3-3
Main Fluidics Module, Rear View, 2.3-7
System Control Block Diagram, 2.4-1
System Control Card, Processor “A” Block Diagram, 2.4-3
System Control Card, Processor “B” Block Diagram, 2.4-4
Sample Access and Reservoir Module Components, 2.5-2
Dispense Module Components, 2.5-2
Drying the Aspiration Line for RES1, 2.5-3
Sample Aspiration to RES1, 2.5-3
Introducing an Air Bubble into the Sample Line, 2.5-4
Advancing the Sample Through RES1, 2.5-5
Mixing the Blood Sample, 2.5-6
Priming the Dispense Line with Sample, 2.5-7
Dispensing a Blood Drop onto the Slide, 2.5-8
GEN•S System/SlideMaker Synchronized Rinse, 2.5-9
Drying the Lines to the Vent Chamber, 2.5-9
Drying the Needle Vent Lines, 2.5-9
Backwashing the Sample Reservoir and Dispense Line, 2.5-10
Drying the Sample Reservoir and Dispense Lines, 2.5-10
Dispense Probe Mechanism and Rinse Block, 2.5-12
Cassette Input Queue and Slide Ejector Modules’ Components, Old
Configuration, Front View, 2.6-2
Cassette Input Queue and Slide Ejector Modules’ Components, Old
Configuration, Rear View, 2.6-2
Cassette Input Queue and Slide Ejector Modules’ Components, New
Configuration, Front View, 2.6-3
Cassette Input Queue and Slide Ejector Modules’ Components, New
Configuration, Rear View, 2.6-3
Upper Cassette Transfer Mechanism Components, 2.6-5
Cassette Output Queue Module Components, 2.6-6
Slide and Smear Module Components, 2.7-2
Shuttle Velocity Profile, 2.7-2
Correct Position of the Slide on the Shuttle, 2.7-3
Correct Position of the Label from the End of the Slide, 2.7-3
Correct Position of the Blood Drop on the Slide, 2.7-4
Smear Truck Assembly, Old Configuration, 2.7-5
Smear Truck Assembly New Configuration, 2.7-6
Label Printer Module Components, 2.8-1
Printhead Cylinder Solenoid, 2.8-2
Correct Position of the Label on the Slide, 2.8-3
PN 4276985A
CONTENTS
2.9-1
2.10-1
2.10-2
2.11-1
3.1-1
3.3-1
3.3-2
3.3-3
3.3-4
3.3-5
3.3-6
3.3-7
3.3-8
3.3-9
3.3-10
3.3-11
3.3-12
3.3-13
3.3-14
3.3-15
3.4-1
3.4-2
3.4-3
3.4-4
3.4-5
3.4-6
3.4-7
3.4-8
3.4-9
3.4-10
3.4-11
3.4-12
4.1-1
4.1-2
4.1-3
4.1-4
4.1-5
4.1-6
4.1-7
4.1-8
4.1-9
4.1-10
4.1-11
4.1-12
4.1-13
PN 4276985A
Dryer Module Components, 2.9-1
Slide Elevator Module Components, 2.10-1
Dryer Module and Slide Elevator Module Component Interaction, 2.10-2
Basket Queue Module Components, 2.11-2
Space and Accessibility Requirements for the SlideMaker, 3.1-1
Making Space for the Sample Access and Reservoir Module, 3.3-2
Inserting and Securing the Sample Access and Reservoir Module, 3.3-3
Installing the Sample Access and Reservoir Module to SlideMaker Interface Card
Cables, 3.3-4
Connecting MF6 in the Sample Access and Reservoir Module to MF13, 3.3-4
Interface Bracket, 3.3-5
Locating VL25, 3.3-5
Connecting Actuator Tubing to VL116, 3.3-6
Installing the Interface Bracket, 3.3-6
Connecting Tubing from VL115 to Y-Fitting, 3.3-7
Removing Tubing from Needle Vent to VC19, 3.3-7
Connecting Pinch Tubing from VL25 to Y-Fitting, 3.3-8
Attaching Pinch Tubing to Y-Fitting, 3.3-8
Routing Pinch Tubing through VL116 to VC19, 3.3-9
Connecting Tubing from VL114 to Needle Vent Fitting, 3.3-9
Installing the Housing Interface Bracket, 3.3-9
Installing the Guide Interface Bracket, 3.4-2
GEN•S System Main Components Layout, 3.4-2
Connecting the Diluter 3 SlideMaker Interface Card to SlideMaker Service Port
Cable, 3.4-3
Reinstalling the Ground Shield Wires and the Cover Plate, 3.4-3
Pinch Valve Deactivator Clip Locations, 3.4-4
Connecting the Reservoirs to the Diluter, 3.4-6
Connecting the Reservoirs to the SlideMaker, 3.4-6
Routing the Fluid-Detector Cables to the Smear/Transport Interface Card, 3.4-7
Installing a Splash Shield on the Dispense Module, 3.4-8
Installing Splash Shields on SOL120 and the Sample Access and Reservoir
Module, 3.4-8
Connecting Fluidic Lines to the Back of the SlideMaker, 3.4-9
Connecting the SlideMaker Fluidic Lines to the GEN•S System Fluidic
Lines, 3.4-9
Latches Securing the Main Cover, 4.1-2
Opening the Main Cover, 4.1-2
Closing the Main Cover, 4.1-3
Removing the Basket Queue Module, 4.1-4
Captive Screws Securing the Upper Cassette Transfer Mechanism, 4.1-5
Screws Securing the Cassette Transport Module, 4.1-6
Removing the Cassette Output Queue Module from the Cassette Transport
Module, 4.1-6
Thumbscrews Securing the Dispense Module Splash Shield, 4.1-7
Captive Screws Securing the Dispense Module, 4.1-7
Captive Screws Securing the Cassette Output Queue Module, 4.1-8
Captive Screws Securing the Dryer Module, 4.1-9
Captive Screws Securing the Slide Elevator Module to the Dryer Module, 4.1-10
Screws Securing the Label Printer Module, 4.1-11
xvii
CONTENTS
4.1-14 Captive Screws Securing the Main Fluidics Module, 4.1-12
4.1-15 Captive Screws Securing MF4 and MF13, 4.1-12
4.1-16 Thumbscrews Securing the Sample Access and Reservoir Module Splash
Shield, 4.1-13
4.1-17 Captive Screws Securing the Sample Access and Reservoir Module, 4.1-13
4.1-18 Captive Screws Securing the Slide and Smear Module, 4.1-14
4.3-1 Verifying the Home Position, 4.3-1
4.3-2 Checking the Label Positions in the X-Dimension, 4.3-2
4.3-3 Checking the Smear Position on the Slide in the X-Dimension, 4.3-3
4.3-4 Verifying the Dispense Position, 4.3-4
4.3-5 Correct Position of the Slide on the Shuttle, 4.3-5
4.4-1 Defining the Pick Position, 4.4-2
4.4-2 Defining the Wick Position, 4.4-2
4.5-1 Correct Position of the Label on the Slide, 4.5-1
4.5-2 Printer Module Adjustments, 4.5-2
4.5-3 Checking the Label Position in the X-Dimension, 4.5-2
4.5-4 Checking the Label Position in the Y-Dimension, 4.5-2
4.6-1 Preliminary Platen Checks and Adjustments, 4.6-1
4.6-2 Slide Elevator Platen Adjustments, 4.6-3
4.7-1 Dispense Pump Adjustments, 4.7-1
4.8-1 System Control Card Hold-Down Bracket and Card Guides, 4.8-3
4.11-1 Aligning the Vertical Slide Sensor, SEN41, 4.11-1
4.12-1 Removing the Printhead Assembly, 4.12-1
4.12-2 Printhead and Printhead Flag Location, 4.12-2
4.12-3 Printhead Microswitch Arm Location, 4.12-2
4.14-1 Removing the Dispense Probe, 4.14-1
4.15-1 Checking the Smear Position on the Slide in the Y-Dimension, 4.15-1
4.15-2 Acceptable Blood Drop and Smear Placement, 4.15-1
4.15-3 Verifying the Position of the Slide Pusher in the Slide Ejector Module, Old
Configuration, 4.15-2
4.15-4 Verifying the Position of the Slide Pusher in the Slide Ejector Module, New
Configuration, 4.15-2
4.15-5 Loosening the Slide Ejector Module, 4.15-4
4.15-6 Slide Centered on Shuttle Correctly, 4.15-6
4.16-1 Slide Pusher Bars and Shuttle Brush Adjustments, 4.16-1
4.17-1 Slide Stripper Plate and Screws, 4.17-2
4.18-1 Gear for Manually Moving the Smear Truck, 4.18-1
4.18-2 Smear Truck Assembly Adjustments, Old Configuration, 4.18-2
4.18-3 Smear Truck Assembly Adjustments, New Configuration, 4.18-2
4.18-4 Truck Lift Sensor Locking Screws, 4.18-5
4.18-5 Checking the Smears, 4.18-6
4.18-6 Checking the Smear Edge Setscrew Setting, 4.18-6
4.20-1 Tilt Locking Lever Location and Locking Screw Assembly, 4.20-1
4.21-1 Label Printer Module, Front and Left Side Views, 4.21-1
4.21-2 Label Printer Module Securing Screws, 4.21-2
4.21-3 Label Printer Module, Rear View with Cover Removed, 4.21-3
4.22-1 Register Z-Assembly Components, 4.22-1
4.23-1 SEN46 with Bracket and Flag Detail, 4.23-2
4.24-1 Encoder Configuration at Shipment, 4.24-1
xviii
PN 4276985A
CONTENTS
4.24-2 Positioning the Lead Screw for Encoder Replacement, 4.24-2
4.24-3 Locked and Unlocked Positions of the Encoder, 4.24-2
4.25-1 Movement of the Profiles (Basket Pushers) through the Belt Position
Sensors, 4.25-2
4.25-2 Basket Queue Module (Bottom View) Pulley, Motor, and Coupling
Adjustments, 4.25-3
4.25-3 Centering the Belt on the Motor Pulley, 4.25-3
4.26-1 Removing SEN37, 4.26-1
4.27-1 Pneumatic Supply Monitor, 30 PSI Card Transducer Adjustment, 4.27-2
5.1-1 Using the Smear Template, 5.1-2
5.1-2 Checking the Smear Location on the Slide, 5.1-3
8.2-1 Main SlideMaker Modules Illustrated, 8.2-1
8.2-2 Basket Queue Module (See Table 8.2-2), 8.2-2
8.2-3 Cassette Input Queue Module and Slide Ejector Module (See Table 8.2-3), 8.2-4
8.2-4 Cassette Output Queue Module 2 (See Table 8.2-4), 8.2-6
8.2-5 Dispense Module (See Table 8.2-5), 8.2-8
8.2-6 Dryer Module (See Table 8.2-6), 8.2-10
8.2-7 Main Fluidics (See Table 8.2-7), 8.2-12
8.2-8 Rear Compartment (See Table 8.2-8), 8.2-14
8.2-9 Rear Door (See Table 8.2-9), 8.2-16
8.2-10 Sample Access and Reservoir Module (See Table 8.2-10), 8.2-18
8.2-11 Slide Elevator Module (See Table 8.2-11), 8.2-20
8.2-12 Slide and Smear Module (See Table 8.2-12), 8.2-22
8.2-13 Upper Cassette Transfer Mechanism and Encoder (See Table 8.2-13), 8.2-24
8.2-14 Dispense Probe Mechanism and Rinse Block (See Table 8.2-14), 8.2-25
8.2-15 Smear Truck Assembly (See Table 8.2-15), 8.2-26
8.2-16 Chokes and Fittings (See Table 8.2-16), 8.2-27
A.2-1 Basket Interface Card Components, A.2-1
A.2-2 Dryer Interface Card Components, A.2-2
A.2-3 Main Distribution Card Components, A.2-3
A.2-4 Power Supply Monitor Card Components, A.2-6
A.2-5 Slide Ejector Interface Card Components, A.2-11
A.2-6 Smear/Transport Interface Card Components, A.2-13
A.2-7 System Control Card Components, A.2-15
A.5-1 SlideMaker Menu Summary, A.5-1
PN 4276985A
xix
CONTENTS
TABLES
2.1-1
2.3-1
2.5-1
2.5-2
2.6-1
2.7-1
2.9-1
2.10-1
2.11-1
4.2-1
4.2-2
4.2-3
4.2-4
4.2-5
4.2-6
4.2-7
4.2-8
4.8-1
7.2-1
7.2-2
7.2-3
7.2-4
7.2-5
7.2-6
7.2-7
7.2-8
7.2-9
7.2-10
7.2-11
7.2-12
7.2-13
7.2-14
7.4-1
8.1-1
8.1-2
8.1-3
8.1-4
8.1-5
8.1-6
8.1-7
8.1-8
8.1-9
8.1-10
8.2-1
8.2-2
8.2-3
8.2-4
xx
SlideMaker Modules, 2.1-2
Fluidic System Sensors, 2.3-8
SlideMaker Fluid Detectors, 2.5-14
Sample Acquisition System Sensors, 2.5-16
Cassette Transport Assembly Sensors, 2.6-7
Slide and Smear Module Sensors, 2.7-8
Dryer Module Sensors, 2.9-3
Slide Elevator Module Sensors, 2.10-3
Basket Queue Module Sensor, 2.11-3
SlideMaker SERVICE FUNCTIONS Options, 4.2-1
SlideMaker CASSETTE/SHUTTLE/BASKET Options, 4.2-2
SlideMaker SERVO SYSTEM Options, 4.2-3
SlideMaker PERFORM SLIDE CYCLE Options, 4.2-3
SlideMaker MONITOR/ADJUST FLUID DETECTORS Options, 4.2-4
SlideMaker BASKET TEST Options, 4.2-4
SlideMaker DEFINE SHUTTLE REFERENCE POS Options, 4.2-5
SlideMaker DEFINE SERVO OFFSETS Options, 4.2-5
Accessing the SlideMaker Circuit Cards, 4.8-1
Miscellaneous System Messages, 7.2-1
Basket Error Messages, 7.2-4
Cassette Error Messages, 7.2-8
Communication Error Messages, 7.2-11
Dispense Error Messages, 7.2-14
Dryer Error Messages, 7.2-16
Ejector Error Messages, 7.2-21
Fluidics Error Messages, 7.2-24
Pneumatics Error Messages, 7.2-26
Power Error Messages, 7.2-32
Printer Error Messages, 7.2-36
Reagent Error Messages, 7.2-38
Shuttle Error Messages, 7.2-39
Truck Error Messages, 7.2-41
Software Installation Errors, 7.4-1
Common Categories Used in Master Parts List, 8.1-1
Master Parts List, A and B, 8.1-2
Master Parts List, C, 8.1-3
Master Parts List, D through F, 8.1-6
Master Parts List, G through L, 8.1-8
Master Parts List, M, 8.1-9
Master Parts List, N through P, 8.1-10
Master Parts List, R and S, 8.1-11
Master Parts List, T and U, 8.1-12
Master Parts List, V through Z, 8.1-14
SlideMaker Modules and Components Illustrated but Not Referenced in
Figure 8.2-1, 8.2-1
Basket Queue Module (See Figure 8.2-2), 8.2-3
Cassette Input Queue Module and Slide Ejector Module (See Figure 8.2-3), 8.2-5
Cassette Output Queue Module (See Figure 8.2-4), 8.2-7
PN 4276985A
CONTENTS
8.2-5
8.2-6
8.2-7
8.2-8
8.2-9
8.2-10
8.2-11
8.2-12
8.2-13
8.2-14
8.2-15
8.2-16
A.1-1
A.1-2
A.1-3
A.1-4
A.2-1
A.2-2
A.2-3
A.2-4
A.2-5
A.2-6
A.2-7
A.2-8
A.2-9
A.2-10
A.2-11
A.2-12
A.2-13
A.2-14
A.2-15
A.2-16
A.2-17
A.3-1
A.4-1
A.4-2
PN 4276985A
Dispense Module (See Figure 8.2-5), 8.2-9
Dryer Module (See Figure 8.2-6), 8.2-11
Main Fluidics Module (See Figure 8.2-7), 8.2-13
Rear Compartment (See Figure 8.2-8), 8.2-15
Rear Door (See Figure 8.2-9), 8.2-17
Sample Access and Reservoir Module (See Figure 8.2-10), 8.2-19
Slide Elevator Module (See Figure 8.2-11), 8.2-21
Slide and Smear Module (See Figure 8.2-12), 8.2-23
Upper Cassette Transfer Mechanism (See Figure 8.2-13), 8.2-24
Dispense Probe Mechanism and Rinse Block (See Figure 8.2-14), 8.2-25
Smear Truck Assembly (See Figure 8.2-15), 8.2-26
Chokes and Fittings (See Figure 8.2-16), 8.2-27
Top of Form Sensor Voltage Settings, A.1-1
Pressure and Vacuum Tolerances, A.1-1
Shuttle Position Nominal Settings, A.1-2
Power Supply Voltage Tolerances, A.1-2
Basket Transport Interface Card Connectors, A.2-1
Basket Transport Interface Card Test Points, A.2-1
Dryer Interface Card Connectors, A.2-2
Dryer Interface Card Test Points, A.2-2
Main Distribution Card Connectors, A.2-3
Main Distribution Card Test Points, A.2-4
Main Fluidics Interface Card Connectors, A.2-5
Power Supply Monitor Card Connectors, A.2-6
Power Supply Monitor Card LEDs, A.2-10
Power Supply Monitor Card Test Point Signals, A.2-10
Slide Ejector Interface Card Connectors, A.2-11
Slide Ejector Interface Card Test Points, A.2-12
Smear/Transport Interface Card Connectors, A.2-13
Smear/Transport Interface Card Test Points, A.2-14
System Control Card Connectors, A.2-15
System Control Card LEDs, A.2-16
System control Card Test Points, A.2-16
Solenoid Functions, A.3-1
Sensor Functions, A.4-1
SEN8 (CASSETTE XFER HOME) and SEN30 (CASS TRANSIT)
Functionality, A.4-6
xxi
CONTENTS
xxii
PN 4276985A
CONTENTS
1
INTRODUCTION, 1.1-1
1.1
MANUAL DESCRIPTION, 1.1-1
Scope, 1.1-1
Intended Audience, 1.1-1
Organization, 1.1-2
Numbering Format, 1.1-3
Special Headings, 1.1-3
Warning, 1.1-3
Caution, 1.1-3
Important, 1.1-3
Attention, 1.1-3
Note, 1.1-3
Conventions, 1.1-4
1.2
SAFETY PRECAUTIONS, 1.2-1
Electronic, 1.2-1
Biological, 1.2-1
Troubleshooting, 1.2-2
Diluent and Air Checking, B.1-1
Calibration and Diluent and Air Checking Retry, B.1-2
Troubleshooting and Servicing, B.1-2
ILLUSTRATIONS
1.2-1
PN 4276985A
Warning Label, 1.2-2
1-i
1
CONTENTS
1-ii
PN 4276985A
1INTRODUCTION 1
1.1
MANUAL DESCRIPTION
Scope
This manual provides the reference information and procedures needed for repairing and
maintaining the COULTER® GEN•S SM™ SlideMaker. It is available both online and in hard
copy. The online manual is released on the Service Resource Kit CD-ROM, PN 6417471.
This manual does not cover information and procedures for the SlideMaker already covered
in the GEN•S Online Help System and/or in the following COULTER GEN•S™ System
customer documents:
r
Getting Started, PN 4237304
r
SlideMaker User’s Guide, PN 4237212
r
Master Index, PN 4237224
r
Host Transmission Specification, PN 4237306
Any service memo that affects the information in this manual will include either minor
revision change pages or a Notice of Information Update form for this manual. A Notice of
Information Update form will summarize the changes and will list the specific headings,
figures, and tables affected.
Intended Audience
To use this manual effectively, you need the following:
r
An operator’s knowledge of the GEN•S System, including the SlideMaker option
r
Service training on the SlideMaker
r
A thorough understanding of -
r
PN 4276985A
t
Basic electronic and pneumatic principles and devices
t
Hematology terms and concepts
t
Troubleshooting techniques
The ability to t
Read pneumatic/hydraulic schematics and understand related terminology
t
Read electronic schematics and understand related terminology
t
Use a digital multimeter and an oscilloscope
t
Use basic mechanical tools and understand related terminology
1.1-1
INTRODUCTION
MANUAL DESCRIPTION
Organization
The information in this manual is organized into 10 chapters. To make it easier to access the
information:
r
r
In the online manual, each page or screen has t
A Contents button linked to a master table of contents.
t
An Illustrations button linked to a master list of illustrations.
t
A Tables button linked to a master list of tables.
t
An Index button linked to an alphabetic index.
In the printed manual, there is a master table of contents (including master lists of the
illustrations and the tables) at the beginning of the manual, a chapter-specific table of
contents at the beginning of each chapter, and an alphabetic index at the end of the
manual.
Chapter 1, INTRODUCTION, includes a brief description of this manual, a list of supporting
documents, and essential safety information.
CHAPTER 2, INSTRUMENT DESCRIPTION, includes the function and location of each
major SlideMaker module and an explanation of the instrument’s operation by system.
CHAPTER 3, INSTALLATION PROCEDURES, contains the procedures used to install the
SlideMaker.
CHAPTER 4, SERVICE AND REPAIR PROCEDURES, contains the procedures used to
service and repair the SlideMaker. Each procedure includes a purpose statement and a list of
any special tools or equipment needed in addition to the standard tool kit.
CHAPTER 5, MAINTENANCE PROCEDURES, contains the procedures used to maintain
the SlideMaker and to verify the system is operating correctly.
CHAPTER 6, SCHEMATICS, is provided for the insertion of SlideMaker schematics.
CHAPTER 7, TROUBLESHOOTING, contains problem descriptions, including a complete
list of error messages, with troubleshooting actions and tips. Use the information in this
chapter in conjunction with the procedures in Chapter 4 to locate and correct instrument
problems.
CHAPTER 8, PARTS LISTS, includes a master list of the SlideMaker field replaceable
components (FRC) and field replaceable units (FRU), and illustrations of these components.
CHAPTER 9, APPENDICES, is provided for the addition of reference material. Appendix A,
QUICK REFERENCE INFORMATION, contains instrument specifications and tolerances,
jumper and switch settings, test point and connector locations, function tables, and software
menu trees.
CHAPTER 10, ABBREVIATIONS, contains a list of abbreviations used in this manual.
1.1-2
PN 4276985A
INTRODUCTION
MANUAL DESCRIPTION
Numbering Format
Each chapter of this manual is further divided into topics that are numbered sequentially,
beginning at one. The numbering format for the topic heading, which is called the primary
heading, is chapter number, decimal point, topic number. For example, the primary heading
number for the fifth topic covered in Chapter 2 is 2.5.
The page, figure and table numbers are tied directly to the primary heading number. For
example, Heading 2.5 begins on page 2.5-1, the first figure under Heading 2.5 is Figure 2.5-1
and the first table under Heading 2.5 is Table 2.5-1.
Note: In the printed manual, primary headings always begin on the top of a right-hand page.
Special Headings
Throughout this manual WARNING, CAUTION, IMPORTANT, ATTENTION and Note
headings are used to indicate potentially hazardous situations and important or helpful
information.
Warning
A WARNING indicates a situation or procedure that, if ignored, can cause serious personal
injury. The word WARNING is in bold-faced text in the printed manual and is red in the
online manual.
Caution
A CAUTION indicates a situation or procedure that, if ignored, can cause damage to
equipment. The word CAUTION is in bold-faced text in the printed manual and is red in the
online manual.
Important
An IMPORTANT indicates a situation or procedure that, if ignored can result in erroneous
test results. The word IMPORTANT is in bold-faced text in the printed manual and is red in
the online manual.
Attention
An ATTENTION contains information that is critical for the successful completion of a
procedure and/or operation of the instrument. The word ATTENTION is in bold-faced text in
the printed manual and is red in the online manual.
Note
A Note contains information that is important to remember or helpful in performing a
procedure. The word Note is in bold-faced text.
PN 4276985A
1.1-3
1
INTRODUCTION
MANUAL DESCRIPTION
Conventions
This manual uses the following conventions to make the material clearer and more concise,
or to enhance access speed in the electronic version. An example is given below each
explanation.
1.
Messages that appear on a screen are in italics.
When the Coulter Communications screen displays, Select any key to continue, press any
key.
2.
Selections that appear on a screen are boldfaced.
From the MAIN MENU, select ROUTINE FUNCTIONS tt SYSTEM SETTINGS.
3.
Information that is to be typed is in Courier font.
Insert the software disk into your laptop computer, type A:\INSTALL, and press Û.
4.
Keys on the Workstation or on a laptop computer are boxed.
Press Þ+x to exit.
5.
Keys that are to be pressed simultaneously are printed with a plus sign between the keys.
When the Command Menu appears, press Ü+2 to select Download ‘A’ and ‘B.’
6.
The software path to a specific function or screen appears with the double solid-right
triangle ( tt ) symbol between succeeding screen options.
From the MAIN MENU, select SERVICE FUNCTIONS tt SERVO SYSTEM tt RESET SERVO
SYSTEM.
7.
When the word "select" is used in conjunction with the screen and its associated keys,
you are to press the key or keys necessary to display the desired screen or to initiate the
desired function.
At the MAIN MENU of the SlideMaker, select SERVICE FUNCTIONS. (In this case you press
one button, the button next to the SERVICE FUNCTIONS prompt, to display the screen.)
From the MAIN MENU, select SERVICE FUNCTIONS tt SERVO SYSTEM tt RESET SERVO
SYSTEM. (In this case you press three buttons in succession to display the RESET SERVO
SYSTEM screen.)
8.
In the electronic version of the manual:
a.
Links to additional information are in blue and are underlined.
Remove the Cassette Output Queue module to access the shuttle. See the Cassette
Output Queue Module removal procedure under Heading 4.1.
To access the linked information, select the blue, underlined text.
b.
The material is divided into many small sections (electronic files).
r
Every primary heading is a separate file and whenever possible the amount of
material contained within one primary heading is limited to four to ten pages.
r
If a primary heading must be large, such as the illustrated parts list, invisible
breaks are added to the electronic file to further divide it.
To move from one section (electronic file) to the next in an HTML version of the
manual, use the right and left arrows on the navigation bars displayed at the top and
bottom of each section.
1.1-4
PN 4276985A
INTRODUCTION
SAFETY PRECAUTIONS
1.2
SAFETY PRECAUTIONS
This section covers safety precautions that you must take whenever you are working on the
GEN•S SM SlideMaker. In addition, when following a procedure in this manual, always
follow any safety precautions included in that procedure.
Electronic
WARNING Risk of personal injury. Rings or jewelry can contact exposed electronic components, causing
personal injury from electric shock. Remove rings and other metallic jewelry before performing
maintenance or service on the electronic components of the instrument.
WARNING Risk of personal injury. Contacting exposed electronic components while the instrument is
attached to power can cause personal injury from electric shock. Power down completely before removing
covers to access electronic components.
CAUTION Risk of damage to electronic components. Connecting or disconnecting a circuit card, solenoid,
or any other electronic component while the power is ON can damage the component or the circuitry for the
component. Power down the SlideMaker before connecting or disconnecting an electronic component.
CAUTION Risk of damage to driver circuitry. Connecting or disconnecting a solenoid while the power is ON
can damage the driver circuitry. Turn OFF the power before connecting or disconnecting a solenoid.
CAUTION Risk of damage to electronic components. Electrostatic discharge (ESD) can damage disk drives,
add-in circuit cards and other electronic components. Perform any procedures where there is a possibility
of ESD damage at an ESD workstation or wear an antistatic wrist strap attached to a metallic part of the
chassis connected to an earth ground.
CAUTION Risk of fire hazard. Replacing a fuse or fuse holder with the incorrect type or rating can overheat
the wiring, causing a fire. Always replace a fuse or fuse holder with the type and rating specified for that
circuit.
Biological
WARNING Risk of personal injury or contamination. If you do not properly shield yourself before servicing
the GEN•S SM SlideMaker with the door open, you can be injured or contaminated. To prevent possible
injury or contamination, always wear gloves, a lab coat, and eye protection when servicing the instrument
with the doors open.
WARNING Risk of contamination. Biohazardous contamination can occur from contact with the waste
container and its associated tubing if not handled with care. Wear protective gear. Avoid skin contact. Clean
up spills immediately. Dispose of the contents of the waste container in accordance with the local
regulations and acceptable laboratory procedures.
WARNING Risk of personal injury and contamination. Some slide processing areas are movable and can
contain prepared smears and/or broken glass with biohazardous material. Handle with care and avoid skin
contact. Wait for moving parts to stop.
PN 4276985A
1.2-1
1
INTRODUCTION
SAFETY PRECAUTIONS
Use care when working with pathogenic materials. Means must be available to decontaminate
the instrument, provide ventilation and to dispose of waste liquid. Refer to the following
publications for further guidance on decontamination.
r
Biohazards Safety Guide, 1974, National Institute of Health
r
Classifications of Etiological Agents on the Basis of Hazards, 3d ed., June 1974, Center
for Disease Control, U.S. Public Health Service.
Troubleshooting
Bring the following warning to the customer’s attention before advising that customer to
perform any service, maintenance or troubleshooting procedures on the instrument.
WARNING Risk of personal injury or contamination. If you do not properly shield yourself while performing
service, maintenance and troubleshooting procedures, residual fluids in the instrument can injure or
contaminate you. Coulter recommends barrier protection, such as appropriate safety glasses, lab coat, and
gloves, be worn throughout the performance of service, maintenance and troubleshooting procedures to
avoid contact with cleaners and residual fluids in the instrument.
Also make sure the customer is aware of the Warning label shown in Figure 1.2-1.
Figure 1.2-1 Warning Label
!
Cover open
7334173B
1.2-2
PN 4276985A
CONTENTS
2
PN 4276985A
INSTRUMENT DESCRIPTION, 2.1-1
2.1
INTRODUCTION TO THE GEN•S SM™ SLIDEMAKER, 2.1-1
Summary, 2.1-1
Function, 2.1-1
Description, 2.1-1
Overview, 2.1-1
Systems, 2.1-1
Modules, 2.1-1
Diagnostic Products, 2.1-2
Physical Specifications, 2.1-2
Performance Specifications and Characteristics, 2.1-3
Leakage Current Specifications, 2.1-4
Operation, 2.1-4
Operating Procedures, 2.1-4
2.2
ELECTRONIC POWER SYSTEM, 2.2-1
Summary, 2.2-1
Electronic Power System Overview, 2.2-1
Electronic Power System Hazard Reduction, 2.2-1
Power Input, 2.2-2
Power Cable, 2.2-2
Line Voltage Input Protection, 2.2-2
Fuses, 2.2-3
Power Supply, 2.2-3
Function, 2.2-3
Input, 2.2-4
Outputs, 2.2-4
Power Supply Monitor Card, 2.2-4
Function, 2.2-4
LEDs, 2.2-4
Test Points, 2.2-5
Connectors, 2.2-5
Main Distribution Card, 2.2-5
Function, 2.2-5
Connectors and Test Points, 2.2-6
Power System Interconnections, 2.2-6
Power Failure, 2.2-6
2.3
FLUIDIC SYSTEM, 2.3-1
Summary, 2.3-1
Pneumatic Power Acquisition, 2.3-1
Pneumatic Enable Valves, 2.3-2
Pressure Regulation and Distribution, 2.3-2
30 Psi, 2.3-2
5 Psi, 2.3-3
Vacuum Regulation and Distribution, 2.3-3
High Vacuum, 2.3-4
17.5 In. Hg Vacuum, 2.3-4
6.5 In. Hg Vacuum, 2.3-4
Vacuum Accumulator Tank, 2.3-4
2-i
2
CONTENTS
Color Coding, 2.3-5
Pneumatic Supply Monitor Cards, 2.3-5
Reagent Acquisition, 2.3-6
Reagent Distribution, 2.3-6
Waste Collection, 2.3-6
Main Fluidics Module, 2.3-7
Main Fluidics Interface Card, 2.3-8
Solenoids, 2.3-8
Sensor Summary, 2.3-8
2-ii
2.4
SYSTEM CONTROL, 2.4-1
Summary, 2.4-1
System Control Card, 2.4-1
Function, 2.4-1
Processor “A” and Processor “B”, 2.4-2
SlideMaker Software, 2.4-2
LEDs, 2.4-5
Jumpers, 2.4-5
Connectors, 2.4-5
Test Points, 2.4-5
Keypad and Display Module, 2.4-5
System Reset, 2.4-6
Initiating a Reset, 2.4-6
Boot Mode, 2.4-6
Normal Mode, 2.4-6
System Initialization, 2.4-6
2.5
SAMPLE ACQUISITION SYSTEM, 2.5-1
Summary, 2.5-1
Function, 2.5-1
Aspirating a Blood Sample, 2.5-1
Transferring the Blood Sample to a Reservoir, 2.5-4
Holding and Mixing the Blood Sample, 2.5-5
Transferring the Blood Sample to the Dispense Probe and Priming the
Dispense Line, 2.5-6
Dispensing a Drop of Blood Sample onto the Slide, 2.5-7
Rinsing and Drying the Aspiration and Dispense Lines, 2.5-8
Sample Access and Reservoir Module, 2.5-11
Dispense Module, 2.5-11
Dispense Pump, 2.5-12
Dispense Probe Mechanism, 2.5-12
Rinse Block, 2.5-13
Dispense 1 Manifold and Dispense 2 Manifold Cards, 2.5-13
Fluid Detectors, 2.5-13
Function Summary, 2.5-14
Error Conditions, 2.5-15
Sensor Summary, 2.5-16
PN 4276985A
CONTENTS
2.6
SMEAR PROCESSING SYSTEM: CASSETTE TRANSPORT MODULE, 2.6-1
Summary, 2.6-1
Description, 2.6-1
Preparing the Slide Cassettes for Processing, 2.6-1
Cassette Input Queue Module, 2.6-1
Slide Ejector Module, 2.6-4
Upper Cassette Transfer Mechanism, 2.6-5
Cassette Output Queue Module, 2.6-6
Slide Ejector Interface Card, 2.6-7
Function, 2.6-7
Connectors and Test Points, 2.6-7
Sensors Summary, 2.6-7
2.7
SMEAR PROCESSING SYSTEM: SLIDE AND SMEAR MODULE, 2.7-1
Summary, 2.7-1
Description, 2.7-1
Slide Transport Module, 2.7-1
Function, 2.7-1
Smear Module, 2.7-4
Alignment, 2.7-7
Voltage and High Vacuum Inputs, 2.7-7
Smear/Transport Interface Card, 2.7-7
Function, 2.7-7
Connectors and Test Points, 2.7-8
Calibration of the Slide Positions in the Slide and Smear Module, 2.7-8
Calibrating the Shuttle Positions, 2.7-8
Calibrating the Smear Truck Positions, 2.7-8
Sensor Summary, 2.7-8
2.8
SMEAR PROCESSING SYSTEM: LABEL PRINTER MODULE, 2.8-1
Summary, 2.8-1
Description, 2.8-1
Field Adjustments, 2.8-3
Sensor Summary, 2.8-3
2.9
SMEAR PROCESSING SYSTEM: DRYER MODULE, 2.9-1
Summary, 2.9-1
Description, 2.9-1
Dryer Interface Card, 2.9-2
Function, 2.9-2
Connectors and Test Points, 2.9-3
Sensor Summary, 2.9-3
2.10 SMEAR PROCESSING SYSTEM: SLIDE ELEVATOR MODULE, 2.10-1
Summary, 2.10-1
Description, 2.10-1
Sensor Summary, 2.10-3
PN 4276985A
2-iii
2
CONTENTS
2.11 SMEAR PROCESSING SYSTEM: BASKET QUEUE MODULE, 2.11-1
Summary, 2.11-1
Description, 2.11-1
Basket Transport Interface Card, 2.11-3
Function, 2.11-3
Connectors and Test Points, 2.11-3
Sensor Summary, 2.11-3
ILLUSTRATIONS
2.1-1
2.1-2
SlideMaker Modules Not Under the SlideMaker Cover, 2.1-3
SlideMaker Modules Under the SlideMaker Cover, 2.1-3
2.2-1
2.2-2
2.2-3
Electronic Power Supply Overview, 2.2-1
Electronic Power Distribution, 2.2-2
Electronic Power System Components, 2.2-3
2.3-1
2.3-2
2.3-3
Pneumatic Power System Components in the Rear and Right Side of the
SlideMaker, 2.3-1
Main Fluidics Module, Front View, 2.3-3
Main Fluidics Module, Rear View, 2.3-7
2.4-1
2.4-2
2.4-3
System Control Block Diagram, 2.4-1
System Control Card, Processor “A” Block Diagram, 2.4-3
System Control Card, Processor “B” Block Diagram, 2.4-4
2.5-1
2.5-2
2.5-3
2.5-4
2.5-5
2.5-6
2.5-7
2.5-8
2.5-9
2.5-10
2.5-11
2.5-12
2.5-13
2.5-14
2.5-15
Sample Access and Reservoir Module Components, 2.5-2
Dispense Module Components, 2.5-2
Drying the Aspiration Line for RES1, 2.5-3
Sample Aspiration to RES1, 2.5-3
Introducing an Air Bubble into the Sample Line, 2.5-4
Advancing the Sample Through RES1, 2.5-5
Mixing the Blood Sample, 2.5-6
Priming the Dispense Line with Sample, 2.5-7
Dispensing a Blood Drop onto the Slide, 2.5-8
GEN•S System/SlideMaker Synchronized Rinse, 2.5-9
Drying the Lines to the Vent Chamber, 2.5-9
Drying the Needle Vent Lines, 2.5-9
Backwashing the Sample Reservoir and Dispense Line, 2.5-10
Drying the Sample Reservoir and Dispense Lines, 2.5-10
Dispense Probe Mechanism and Rinse Block, 2.5-12
2.6-1
Cassette Input Queue and Slide Ejector Modules’ Components, Old
Configuration, Front View, 2.6-2
Cassette Input Queue and Slide Ejector Modules’ Components, Old
Configuration, Rear View, 2.6-2
Cassette Input Queue and Slide Ejector Modules’ Components, New
Configuration, Front View, 2.6-3
Cassette Input Queue and Slide Ejector Modules’ Components, New
Configuration, Rear View, 2.6-3
2.6-2
2.6-3
2.6-4
2-iv
PN 4276985A
CONTENTS
2.6-5
2.6-6
Upper Cassette Transfer Mechanism Components, 2.6-5
Cassette Output Queue Module Components, 2.6-6
2.7-1
2.7-2
2.7-3
2.7-4
2.7-5
2.7-6
2.7-7
Slide and Smear Module Components, 2.7-2
Shuttle Velocity Profile, 2.7-2
Correct Position of the Slide on the Shuttle, 2.7-3
Correct Position of the Label from the End of the Slide, 2.7-3
Correct Position of the Blood Drop on the Slide, 2.7-4
Smear Truck Assembly, Old Configuration, 2.7-5
Smear Truck Assembly New Configuration, 2.7-6
2.8-1
2.8-2
2.8-3
Label Printer Module Components, 2.8-1
Printhead Cylinder Solenoid, 2.8-2
Correct Position of the Label on the Slide, 2.8-3
2.9-1
Dryer Module Components, 2.9-1
2.10-1 Slide Elevator Module Components, 2.10-1
2.10-2 Dryer Module and Slide Elevator Module Component Interaction, 2.10-2
2.11-1 Basket Queue Module Components, 2.11-2
TABLES
2.1-1
SlideMaker Modules, 2.1-2
2.3-1
Fluidic System Sensors, 2.3-8
2.5-1
2.5-2
SlideMaker Fluid Detectors, 2.5-14
Sample Acquisition System Sensors, 2.5-16
2.6-1
Cassette Transport Assembly Sensors, 2.6-7
2.7-1
Slide and Smear Module Sensors, 2.7-8
2.9-1
Dryer Module Sensors, 2.9-3
2.10-1 Slide Elevator Module Sensors, 2.10-3
2.11-1 Basket Queue Module Sensor, 2.11-3
PN 4276985A
2-v
2
CONTENTS
2-vi
PN 4276985A
2INSTRUMENT DESCRIPTION 2
2.1
INTRODUCTION TO THE GEN•S SM™ SLIDEMAKER
Summary
This section briefly describes the GEN•S SM SlideMaker - its function, systems and modules and references the appropriate customer documents and/or headings within this document
for details.
Function
The SlideMaker creates a blood smear on a clean microscopic slide using a segment of a blood
sample aspirated by the GEN•S System.
Description
Overview
The SlideMaker is an optional peripheral unit for the GEN•S System which interfaces with
four units in the GEN•S System:
r
Power Supply - Provides the pneumatic power for the SlideMaker.
r
Analyzer - Controls cycle timing and instrument status.
r
Diluter - Allows acquisition of whole-blood samples for the SlideMaker via the needle.
r
Workstation - Allows customers to select which whole-blood samples are processed for
slides.
Systems
The SlideMaker comprises several systems, each performing a specific function. This chapter
includes a description of the following systems:
r
Electronic Power - Develops, monitors and distributes dc voltages. (See Heading 2.2.)
r
Fluidic- Acquires, regulates, monitors, and distributes vacuums and pressures; monitors
and distributes diluent and cleaning agent; and collects waste. (See Heading 2.3.)
r
System Control - Controls the operation of the SlideMaker. (See Heading 2.4.)
r
Sample Acquisition - Acquires and dispenses whole-blood samples from the specimens
being processed by the GEN•S System. (See Heading 2.5.)
r
Smear Processing - Prepares stain-ready, whole-blood smears. (See Headings 2.6, 2.7, 2.8,
2.9, 2.10 and 2.11.)
Modules
Many of the components in the SlideMaker are grouped physically, by function, into modules
that are easily removed for repair or replacement. Table 2.1-1 lists these modules, briefly
describes their functions, and references the appropriate headings within this chapter for
detailed information.
With the exception of the Sample Access and Reservoir module, these modules are located in
the SlideMaker as shown in Figures 2.1-1 and 2.1-2. The Sample Access and Reservoir
module is located in the Diluter of the GEN•S System. See Figure 2.1-1.
To remove the SlideMaker modules, refer to Accessing and Removing the SlideMaker
Modules under Heading 4.1, GUIDELINES FOR SERVICING THE SLIDEMAKER.
PN 4276985A
2.1-1
INSTRUMENT DESCRIPTION
INTRODUCTION TO THE GEN•S SM™ SLIDEMAKER
Table 2.1-1 SlideMaker Modules
Module Name
Function
For Details See
Basket Queue
Moves empty slide baskets to the Slide Elevator module to receive the
dried slides, and then moves the filled slide baskets away from the
Slide Elevator module for retrieval by the operator or the GEN•S ST™
SlideStainer.
Heading 2.11
Cassette Transport - consists
of three modules -
Moves filled slide cassettes into position for retrieval of the slides,
retrieves the slides from the slide cassettes, and then moves the
empty slide cassettes into position for retrieval by the operator.
Heading 2.6
Dispense
Provides the hardware for measuring the drop of blood used for a
smear and, in conjunction with the Sample Access and Reservoir
module, controls the volume, separation and positioning of the blood
sample, and the rinsing and drying of the sample transport lines.
Heading 2.5
Dryer
Receives a labeled, wet, smear slide from the Slide and Smear
module, dries the smear, and moves the smear to the Slide Elevator
module.
Heading 2.9
Keypad and Display
Displays the SlideMaker status and error messages, and provides
buttons and screens for operator interface with the SlideMaker.
Heading 2.4
Label Printer
A dedicated label printer that prints labels and applies the labels to the
slides.
Heading 2.8
Main Fluidics
A centralized source of pneumatic power, reagents, and waste
collection for the Dispense module.
Heading 2.3
r Cassette Input Queue
r Cassette Output Queue
r Slide Ejector.
Sample Access and Reservoir Provides the pathway for sample aspiration from the Analytical Station Heading 2.5
to the SlideMaker and, in conjunction with the Dispense module,
controls the volume, separation and positioning of the blood sample,
and the rinsing and drying of the sample transport lines.
Slide and Smear - consists of
two modules
r
Slide Transport
r
Smear.
Slide Elevator
Transports and precisely positions the slide at the various locations in
the SlideMaker for preparing the slide and makes a wedge blood
smear on the slide.
Heading 2.7
Receives dried smear slides from the Dryer module and inserts the
slides into slide baskets in the Basket Queue module.
Heading 2.10
Diagnostic Products
Refer to the Reference section of the User’s Manual or the Online Help System for the
diagnostic products used on the GEN•S SM SlideMaker.
Physical Specifications
See Heading 3.1, Preinstallation Checklist, for the physical specifications needed to install the
SlideMaker. For any other physical specifications, refer to the Reference section of the
SlideMaker User’s Manual or the Online Help System.
2.1-2
PN 4276985A
INSTRUMENT DESCRIPTION
INTRODUCTION TO THE GEN•S SM™ SLIDEMAKER
Figure 2.1-1 SlideMaker Modules Not Under the SlideMaker Cover
GEN S
TM
* SYSTEM RUN *
05/03/95
Sample Access
and Reservoir
module
0000
COPYRIGHT 1989 - 1995
COULTER CORPORATION
STATUS : READY
ALERT:
MAIN
Keypad and
Display module
BP CBC
®
TM
DIFF
RETICS
GEN S SM
7334080A
Figure 2.1-2 SlideMaker Modules Under the SlideMaker Cover
Label
Printer
module
Slide
Transport
module
Main
Fluidics
module
Slide
Ejector
module
Smear
module
Cassette
Input Queue
module
Basket
Queue
module
Cassette
Output Queue
module
Dryer
module
Dispense
module
Slide Elevator
7334114A
module
Performance Specifications and Characteristics
See Appendix A, Quick Reference Information, for the performance specifications needed to
service the SlideMaker. For any other performance specifications or performance
characteristics, refer to the Reference section of the User’s Manual or the Online Help System.
PN 4276985A
2.1-3
2
INSTRUMENT DESCRIPTION
INTRODUCTION TO THE GEN•S SM™ SLIDEMAKER
Leakage Current Specifications
Coulter instruments are evaluated and approved to Underwriters Laboratories Standard 1262,
Laboratory Equipment. Testing was performed by Electrical Testing Laboratories (ETL).
Leakage current is tested per Section 6.7 - EXCEPTION:
Equipment required to have primary circuit filtering to meet Electromagnetic
Compatibility (EMC) regulations may have a Leakage Current at accessible parts of more
than 500 µA, but must not exceed 5.0 mA.
Coulter instruments such as the GEN•S System and its peripherals incorporate primary
circuit filtering to meet EMC requirements, therefore the exception in UL Standard 1262,
Section 6.7 is applicable and allows a leakage current as high as 5.0 mA.
Computer systems, such as the GEN•S Workstation, and their peripherals are evaluated and
approved to Underwriters Laboratories Standard 478, Information Processing and Business
Equipment, prior to being approved for use with Coulter instruments. Leakage current is
tested per Section 28 A, paragraph 28 A.3, EXCEPTION:
A unit that requires electromagnetic interference filters or filtering capacitors or both for
functional performance or to meet EMC regulations (for example FCC regulations) may
have Leakage Current in excess of 500 µA but must not exceed 3.5 mA.
Computers and their peripherals used with the GEN•S System employ EMC filtering devices
as described in UL 478 Section 28 A, paragraph 28 A.3, EXCEPTION; therefore the maximum
allowable leakage current is 3.5 mA.
Operation
Operating Procedures
Refer to the Operating section of the SlideMaker User’s Guide or the Online Help System for
the operating procedures.
2.1-4
PN 4276985A
INSTRUMENT DESCRIPTION
ELECTRONIC POWER SYSTEM
2.2
ELECTRONIC POWER SYSTEM
Summary
The electronic power system converts the ac input line voltage to the dc voltages needed in
the SlideMaker, monitors the power and distributes the power. This section describes the
components responsible for performing these functions, including the Power Supply, the
Power Supply Monitor Card and the Main Distribution Card.
Electronic Power System Overview
Refer to the block diagram of the electronic power supply, Figure 2.2-1, as you read this
section.
Figure 2.2-1 Electronic Power Supply Overview
Line
filter
Ac
input
S1
Transient
voltage
suppressor
Power
supply
+5
+24
+15
-15
Power
Supply
Monitor
card
SWITCH
BIAS RETURN
+5 V SWITCH BIAS
+5
+24
+15
-15
SWITCH
BIAS RETURN
+5 V SWITCH
BIAS
+5 V
SWITCH
BIAS
Main
Distribution
card
S2
SWITCH
BIAS
RETURN
7334090A
Pressing the main power switch, S1, on the rear of the SlideMaker routes the ac input voltage
through the line filter to the power supply. The power supply generates a +5 V switch bias
voltage and routes the voltage, via the Power Supply Monitor card and Main Distribution
card, to the power on/off switch, S2, on the front panel. When the power on/off switch is in its
off state, the +5 V switch bias voltage is routed back to the power supply.
Pressing the power on/off switch, S2, opens the switch circuit. The power supply detects the
drop in return voltage and enables the main power voltages: +24 V, +5 V, +15 V and -15 V.
The power supply routes the main power voltages to the Power Supply Monitor card for
monitoring and for distribution. The Power Supply Monitor card distributes the voltages as
shown in Figure 2.2-2.
Electronic Power System Hazard Reduction
To minimize the risk to anyone servicing the SlideMaker:
PN 4276985A
r
The ac power is confined to the rear panel, concentrating and reducing the number of
energized components in an enclosed area.
r
Protective sleeving and covers are provided to those components that remain "live" when
power is turned off, the ac receptacle, transient suppressor, fuses, and power switch.
2.2-1
2
INSTRUMENT DESCRIPTION
ELECTRONIC POWER SYSTEM
WARNING Risk of personal injury. Contacting exposed electronic components while the instrument is
attached to power can cause personal injury from electric shock. Power down completely (that is, turn off
the main power switch on the rear of the SlideMaker and unplug the main power cable from the ac outlet)
before removing covers to access electronic components.
In spite of the fail-safes implemented, it is highly recommended that you always disconnect
the power cable from the wall outlet when servicing the SlideMaker.
Figure 2.2-2 Electronic Power Distribution
LEDS
+15 V +24 V +5 V -15 V
Power
Supply
Monitor
card
Label
Printer
module
+5 V
+24 V
Reset
switch
+24 V
+15 V
+15 V
-15 V
+15 V
+5 V
+24 V
-15 V
Power on
switch
+5 V
+5 V
+24 V
+5 V
+24 V
Main
Distribution
+15 V
card
-15 V
+24 V
+24 V
30 Psi
30 psi
+5 V
Servo
High
vacuum
+5 V
System
Control
card
+5 V
High
Vacuum
17.5 in. Hg
Slide
Ejector
Interface
card
+24 V
-15 V
Fan
6.5 in. Hg
Keypad
Pneumatic
enable valves
Dryer
Interface
card
Smear/
Transport
Interface
card
Display
5 Psi
Pneumatic
Supply
Monitor
cards
Basket
Interface
card
Vacuum
accumulator
tank
Dispense 2
Manifold
card
Dispense 1
Manifold
card
Main
Fluidics
Interface
card
7334082A
Power Input
Power Cable
The power cable connects the SlideMaker to a standard ac wall outlet. Two power cables are
available in the Service Installation kit:
r
The American-style power connector conforms to the Underwriters Laboratory (UL)
specifications.
r
The European-style power connector conforms to most agencies governing in Europe.
Line Voltage Input Protection
Primary ac input to the SlideMaker is protected by a transient voltage suppressor and two ac
filters to prevent damage and performance degradation from line voltage variations (nominal
value exceeded by 10%), line spikes, or random power line interruptions. These components
are located on the rear access panel. See Figure 2.2-3.
2.2-2
PN 4276985A
INSTRUMENT DESCRIPTION
ELECTRONIC POWER SYSTEM
The transient voltage suppressor eliminates high voltage spikes, such as caused by lightning
strikes, avoiding damage to the power supply.
The two ac filters, an ac receptacle and a line filter, isolate noise and protect both the
SlideMaker and the ac input line.
Fuses
Both ac lines (live and neutral) are fused providing protection for applications where two
"live" lines are used. The fuses are located on the rear panel of the SlideMaker and can be
replaced by the customer.
Power Supply
Function
The power supply is a self-contained unit located on the rear door of the SlideMaker. See
Figure 2.2-3.
Figure 2.2-3 Electronic Power System Components
Keypad and
Display
module
System
Control
card
Main
fan
TM
®
GE
N
SS
M
Main
Distribution
card
Housing for transient
voltage suppressor,
ac line filters and fuses
Power Supply
Monitor card
Power
supply
7334073B
The power supply senses and compensates automatically for the ac line voltage as specified
for Voltage Tolerances, Ac Input Line Voltages, under Heading A.1, TOLERANCES AND
LIMITS, allowing the instrument to operate at different line voltages without the need for
manual configuration.
PN 4276985A
2.2-3
2
INSTRUMENT DESCRIPTION
ELECTRONIC POWER SYSTEM
The power supply transforms the ac voltage to the dc voltages and currents needed by the
SlideMaker, independent from the GEN•S System’s power, and maintains the output
regulation even with a line input variation of +10% from nominal. The absolute maximum
continuous power required by the SlideMaker is:
r
+5 V +5% at 5 A
r
+24 V +5% at 8 A
r
+15 V +5% at 2 A
r
-15 V +5% at 2 A.
Input
90 - 264 Vac
Outputs
+5 Vdc, +24 Vdc, +15 Vdc and -15 Vdc to the Power Supply Monitor card
Power Supply Monitor Card
Function
The Power Supply Monitor card is located on the rear access panel of the SlideMaker. See
Figure 2.2-3.
The Power Supply Monitor card:
r
Monitors the dc voltages from the power supply and provides LEDs to indicate the
voltage status.
r
Provides test points for the dc voltages and all critical signals.
r
Provides an audible alarm to indicate a SlideMaker error condition.
r
Routes scaled dc voltage signals to the System Control card via the Main Distribution
card.
r
Routes dc voltages to the Main Distribution card for distribution.
r
Buffers pneumatic enable signals (PRES_EN\ and VAC_EN\) from the System Control
card via the Main Distribution card.
r
Provides the power drivers that control the two pneumatic enable valves, SOL65 and
SOL66, used to isolate the SlideMaker pneumatic system from the GEN•S System
pneumatic system.
r
Routes pneumatic monitoring signals from the Pneumatic Supply Monitor cards to the
System Control card via the Main Distribution card without processing the signals.
LEDs
The Power Supply Monitor card has four LEDs, one for each dc voltage supply. These LEDs
are lit when the dc voltage is within acceptable limits, indicating the power supply has no
gross defect or failure. See Figure A.2-4 for the location of the LEDs. See Table A.2-9 for the
acceptable voltage limits.
2.2-4
PN 4276985A
INSTRUMENT DESCRIPTION
ELECTRONIC POWER SYSTEM
Test Points
The Power Supply Monitor card provides test points for the dc voltages and all critical signals.
See Figure A.2-4 for the location of the test points. See Table A.2-10 for the test point signals.
Connectors
See Figure A.2-4 for the location of the connectors on the Power Supply Monitor card. See
Table A.2-8 for the connector signals by pin.
Main Distribution Card
Function
The Main Distribution card is located in the rear compartment of the SlideMaker. Refer to
Figure 2.2-3.
The Main Distribution card acts much like a backplane for the SlideMaker modules,
distributing the majority of the electronic signals and power. Refer to Figure 2.2-2 for an
overview of the power distribution.
The Main Distribution card incorporates an analog and digital ground plane layer and a
power plane layer to reduce voltage drops and noise. Grounding for the Main Distribution
card is provided by conductive mountings and by two wired connections in the power cable
from the power supply to the card. The mountings provide RF shielding to external cable
shields.
The System Control card plugs directly into the Main Distribution card; all other physical
assemblies or modules are connected to the Main Distribution card by cable. Modules that
require numerous signals and power use a single ribbon cable for the primary connection.
Refer to the GEN•S SM SlideMaker Interconnect Block Diagram, DCN 6323239, in Chapter 6
for an overview of the interconnection between the Main Distribution card and the rest of the
electrical system. For details, refer to the GEN•S SM SlideMaker Interconnect Diagram,
DCN 6321624, in Chapter 6.
The Main Distribution card:
PN 4276985A
r
Provides the control and data connection to the power supply via the Power Supply
Monitor card.
r
Routes PRES_EN\ and VAC_EN\ signals from the System Control card to the Power
Supply Monitor card for control of the pneumatic enable valves.
r
Routes power to and receives signals from the:
t
Power Supply Monitor card.
t
System Control card.
t
Smear/Transport Interface card.
t
Dryer Interface card.
t
Slide Ejector Interface card.
t
Basket Transport Interface card.
2.2-5
2
INSTRUMENT DESCRIPTION
ELECTRONIC POWER SYSTEM
r
r
Routes power to the:
t
Main fan.
t
Main Fluidics Interface card.
t
Dispense 1 Manifold card.
t
Dispense 2 Manifold card.
Receives signals from the:
t
Power on/off switch, a logic level control for the output of the power supply.
t
Reset switch used to reset the instrument.
t
Main cover interlock switch.
r
Monitors the status of the float sensor in the vacuum accumulator tank, TK3, and
energizes SOL63 to drain the vacuum accumulator tank as needed.
r
Provides control signals and dc voltages to the Label Printer module.
r
Provides the only direct electrical interface between the SlideMaker and the GEN•S
System through connector J1 on the rear panel of the SlideMaker.
This interface routes all control and data signals to and from the GEN•S System. It
supports both opto-isolated GEN•S System bidirectional serial data and opto-isolated
Workstation bidirectional serial data interface signals.
r
Provides a serial data connection for the auxiliary service terminal through connector J2
on the rear panel of the SlideMaker. This interface supports incoming RXD signals from
the System Control card and outgoing TXD signals.
Note: The Auxiliary Service Terminal is used for service and development activities, and
for communication with the optional SlideStainer.
Connectors and Test Points
The connectors and test points for the Main Distribution card are shown in Figure A.2-3 and
described in Tables A.2-5 and A.2-6, respectively.
Power System Interconnections
For an overview of how the components within the electronic power system are
interconnected, refer to the GEN•S SM SlideMaker Interconnect Block Diagram,
DCN 6323239, in Chapter 6. For more detail, refer to the GEN•S SM SlideMaker
Interconnect Diagram, DCN 6321624, in Chapter 6.
Power Failure
In the case of a power failure, the PWR_FAIL\ signal from the Power Supply Monitor card
warns the system at least 20 milliseconds before the power failure affects it. (A logic LOW
indicates ac power to the system has failed.) This provides sufficient time for the system to
save the information needed to recover from a power outage.
2.2-6
PN 4276985A
INSTRUMENT DESCRIPTION
FLUIDIC SYSTEM
2.3
FLUIDIC SYSTEM
Summary
The fluidic system consists of the pneumatic power system and the reagent handling system.
r
The pneumatic power system acquires 30 psi and high vacuum from the Analytical
Station and regulates, monitors and distributes the pneumatic power.
r
The reagent handling system acquires diluent and cleaning agent from the Analytical
Station’s supply, distributes the reagents, collects the waste liquids, and dispenses the
waste into the Analytical Station’s waste lines.
This section describes the components and functions of the pneumatic power system and the
reagent handling system, including the Pneumatic Supply Monitor Cards, the Main Fluidics
Module and the Main Fluidics Interface Card.
Pneumatic Power Acquisition
The SlideMaker acquires its 30 psi and high, unregulated vacuum from the Analytical Station;
the pneumatic access lines for the SlideMaker are attached to T-fittings tapped into the 30-psi
and high-vacuum supply lines from the Power Supply to the Diluter. The other ends of the
30-psi and high-vacuum access lines are attached to “push to connect/disconnect” fittings on
pneumatic enable valves at the rear of the SlideMaker. See Figure 2.3-1.
Figure 2.3-1 Pneumatic Power System Components in the Rear and Right Side of the SlideMaker
5-psi
regulator,
REG1
Vacuum
accumulator
tank,
TK3
VC6
VC5
Pneumatic
Supply
Monitor,
30-Psi card
Pneumatic
Supply
Monitor,
5-Psi card
SOL63
SEN51
30-psi
manifold,
MF7
PN 4276985A
5-psi
manifold,
MF8
Pneumatic Supply
Monitor, High
Vacuum card
30-psi
enable valve,
SOL65
High-vacuum
enable valve,
SOL66
Pneumatic Supply
Monitor, 17.5-in. Hg card
Pneumatic Supply
Monitor, 6.5-in. Hg card
7334074B
2.3-1
2
INSTRUMENT DESCRIPTION
FLUIDIC SYSTEM
Pneumatic Enable Valves
The pneumatic enable valves, SOL65 and SOL66, are three-way solenoid valves used to
control the acquisition of 30 psi and high vacuum, respectively, from the Analytical Station.
In the de-energized state, the pneumatic enable valves block the pneumatic input from the
Analytical Station and vent the distribution lines. In the energized state, the pneumatic enable
valves route the 30 psi and high vacuum into the SlideMaker system.
To ensure the Analytical Station is not affected by the powerup of the SlideMaker, the
SlideMaker only energizes the pneumatic enable valves when the Analytical Station is idle.
To prevent pneumatic power surges to the Analytical Station, you should only power down
the SlideMaker when the Analytical Station is idle.
The Power Supply Monitor card contains the drivers for the pneumatic enable valves. To
energize the pneumatic enable valves, the System Control card places the PRES_EN\ and
VAC_EN\ signals to the Power Supply Monitor card to a logic LOW level. Initially full power
is applied to the pneumatic enable valves; then, about 100 milliseconds later, the power is
reduced to a nominal 70%.
Note: The driver numbers for SOL65 and SOL66 are 79 and 80, respectively.
If a pneumatic leak develops in the SlideMaker, you can use the Solenoid Test screen (MAIN
MENU tt SERVICE FUNCTIONS tt SOLENOID TEST) to remove power from the pneumatic enable
valves, allowing the Analytical Station to continue processing.
Pressure Regulation and Distribution
The SlideMaker uses two pressures in its system, 30 psi and 5 psi. An adjustable regulator,
REG1 (Figure 2.3-1), regulates the 30 psi to 5 psi. Two pressure distribution manifolds, MF7
and MF8 (Figure 2.3-1), route the 30 psi and 5 psi via fluidic quick disconnects to the
SlideMaker modules.
30 Psi
The 30 psi is routed from the 30-psi enable valve, SOL65, to:
r
Pneumatic Supply Monitor, 30-Psi card for monitoring.
r
30-psi distribution manifold, MF7, for distribution to the:
t
5-psi regulator, REG1.
t
Main Fluidics module, Cassette Input Queue module, Slide Ejector module,
Cassette Output Queue module, Slide and Smear module, Dispense module, and
Basket Queue module.
Note: The Sample Access and Reservoir module acquires its 30 psi from the Diluter.
30 psi is used to:
2.3-2
r
Move mechanical components such as cylinders and pinch valves.
r
Dispense diluent and cleaning agent from the reagent tank.
r
Dry the aspiration and reservoir lines.
PN 4276985A
INSTRUMENT DESCRIPTION
FLUIDIC SYSTEM
5 Psi
The 5-psi regulator, REG1, regulates 30 psi to 5 psi and routes the 5 psi to the 5-psi
distribution manifold, MF8, for distribution to the:
r
Pneumatic Supply Monitor, 5-Psi card for monitoring.
r
High vacuum enable valve, SOL66.
r
Main Fluidics module and Dispense module.
5 psi is used to:
r
Push waste from the SlideMaker to the Analytical Station’s waste container.
r
Push blood samples from the reservoirs to the dispense line.
Vacuum Regulation and Distribution
The SlideMaker uses three vacuums in its system: high (unregulated), 17.5 in. Hg, and
6.5 in. Hg. Two adjustable regulators in the Main Fluidics module, REG1 and REG2
(Figure 2.3-2), regulate the high vacuum to 17.5 in. Hg and 6.5 in. Hg, respectively.
Figure 2.3-2 Main Fluidics Module, Front View
VL28A VL27
VL28B
VL29
Vent
chamber
VC4
VL30
VL23
VL31
VL32
VL33
VL34A
VL34B
VL35
VL36A
SEN47
Reagent
tank, TK1
6.5-in. Hg vacuum
regulator, REG2
17.5-in. Hg vacuum
regulator, REG1
PN 4276985A
Foam
trap
VC1
Waste
chamber
VC2
VL36B
RVac
chamber
VC3
7334058C
2.3-3
2
INSTRUMENT DESCRIPTION
FLUIDIC SYSTEM
High Vacuum
The high vacuum is routed from the high-vacuum enable valve, SOL66, to:
r
Pneumatic Supply Monitor, Vacuum card for monitoring.
r
Vacuum accumulator tank, TK3, for vacuum accumulation and distribution via VC5,
VC6, and fluidic quick disconnects to the:
t
Main Fluidics module
t
Slide and Smear module
High vacuum is used to:
r
Fill the reagent tanks.
r
Collect waste liquids.
r
Dry the dispense probe.
r
Pick up the slide from the Slide Ejector module
r
Hold the slides in place during travel in the SlideMaker.
17.5 In. Hg Vacuum
The 17.5-in. Hg vacuum regulator, REG1, regulates the high vacuum to 17.5 in. and routes
the 17.5-in. Hg vacuum to the:
r
Pneumatic Supply Monitor, 17.5-in. Hg card for monitoring.
r
RVac chamber, VC3, for accumulating the vacuum and maintaining its stability during
use. The RVac chamber routes the 17.5 in. Hg to the Dispense module.
The 17.5 in. Hg vacuum is used to aspirate blood samples from the specimen tubes.
6.5 In. Hg Vacuum
The 6.5-in. Hg vacuum regulator, REG2, regulates the high vacuum to 6.5 in. and routes the
6.5 in. Hg vacuum to the:
r
Pneumatic Supply Monitor, 6.5-in. Hg card for monitoring.
r
RVac chamber, VC3, for accumulating the vacuum and maintaining its stability during
use. The RVac chamber routes the 6.5 in. Hg to the Dispense module.
The 6.5 in. Hg vacuum is used:
r
To pull the leading edge of the blood sample toward the reservoir during generation of a
bubble in the middle of the sample.
r
To advance the blood sample through the reservoir.
r
In tandem with atmospheric pressure to mix the blood sample in the reservoir.
Vacuum Accumulator Tank
The vacuum accumulator tank, TK3 (Figure 2.3-1), accumulates high vacuum to reduce peak
consumption load on the Analytical Station’s Pneumatic Power Supply and traps any liquid
pulled into the vacuum lines.
2.3-4
PN 4276985A
INSTRUMENT DESCRIPTION
FLUIDIC SYSTEM
The vacuum accumulator tank houses a float sensor, the vacuum reservoir full sensor, SEN51,
which detects any liquid pulled into the vacuum accumulator tank as the result of a fault
condition such as a:
r
Plugged waste chamber.
r
Defective reagent reservoir level sensor.
r
Stuck refill solenoid. (Solenoid fails to close and remove vacuum when level sensor
indicates a full reservoir.)
If liquid enters the vacuum accumulator tank and the vacuum reservoir full sensor fails, a
mechanical float valve in the tank rises with the liquid and seals off the vacuum supply port,
preventing liquid from entering the vacuum isolation supply valve and ultimately the
Analytical Station’s Pneumatic Power Supply. The pneumatic monitoring system of the
SlideMaker detects the resultant loss of vacuum.
To remove liquid from the vacuum accumulator tank, the vacuum enable valve is
de-energized, blocking the high vacuum input and routing 5 psi to the top of the vacuum
accumulator tank. At the same time, SOL63 is energized, opening the path from the vacuum
accumulator tank to the Analytical Station’s waste container. To ensure the Analytical Station
is not affected, the vacuum accumulator tank is only emptied when the Analytical Station is
idle.
Color Coding
To make it easier to follow pneumatic lines when servicing the SlideMaker, the pneumatic
tubings and connectors are color coded.
r
Green = 30 psi
r
Red = 5 psi
r
Yellow = high vacuum
r
Blue = 17.5 in. Hg
r
Black = 6.5 in. Hg.
Pneumatic Supply Monitor Cards
The SlideMaker uses five Pneumatic Supply Monitor cards to monitor the pneumatic outputs,
one for each vacuum and pressure used in the system. The Pneumatic Supply Monitor cards
are located on the rear door of the SlideMaker. See Figure 2.3-1.
The Pneumatic Supply Monitor cards use a solid-state differential pressure transducer, U2 (a
diaphragm activated Wheatstone four-arm bridge sensor), connected to an instrumentation
amplifier, U1, with trimming circuits to adjust zero and span values. The pressure differential
unbalances the bridge causing a small output voltage differential proportional to the pressure
differential. A voltage reference circuit is employed to ensure that power supply variations do
not affect the output levels. A sensor zero trimmer circuit allows calibration to remove initial
offset. This trimmer is powered by the voltage reference device to ensure that power supply
variations do not affect the calibration. The instrumentation amplifier amplifies the
differential voltage and outputs a ground referenced voltage proportional to the voltage
differential.
PN 4276985A
2.3-5
2
INSTRUMENT DESCRIPTION
FLUIDIC SYSTEM
The System Control card quantifies the scaled voltages and routes the information to the
Display module for display on the Pneumatic Power Supplies screen. If any of the vacuums or
pressures fall outside an acceptable range, the System Control card also generates an error
message.
Reagent Acquisition
The SlideMaker acquires its diluent and cleaning agent from the Analytical Station’s supply;
the reagent access lines for the SlideMaker are attached to pickup tubes in the diluent and
cleaning agent containers for the GEN•S System. The other ends of the diluent and cleaning
reagent access lines are attached to “push to connect/disconnect” fittings on the rear of the
SlideMaker.
Reagent Distribution
From the rear of the SlideMaker, the diluent and cleaning agent are routed to the reagent
tank, TK1 (Figure 2.3-2), in the Main Fluidics module. High vacuum pulls diluent into the
reagent tank for the Startup cycle and normal operations, and pulls cleaning agent into the
reagent tank for the Shutdown cycle. During the SlideMaker cycles, 30 psi dispenses reagent
from the reagent tank to backwash the aspiration lines and the inside of the dispense probe,
and to rinse the outside of the dispense probe.
The reagent tank contains a float sensor for monitoring the level of reagent. When the diluent
level in the reagent tank is low, SOL28 is energized, activating VL28A to supply vacuum for
refilling the tank and VL28B to route diluent to the reagent tank. If the reagent full sensor,
SEN47, continues to indicate the reagent tank is not full for a given length of time, the System
Control card generates an error message.
For the Shutdown cycle, SOL29 is energized, activating VL29 to switch the reagent source for
the reagent tank from diluent to cleaning agent, and SOL28 is energized to supply vacuum for
filling the reagent tank. If the reagent full sensor, SEN47, indicates the reagent tank is not full
of cleaning agent for a given length of time, the System Control card generates an error
message.
To decontaminate the SlideMaker, a bleach solution is connected to the disinfect port at the
rear of the slideMaker. In the Decontamination cycle, SOL30 is energized, activating VL30 to
switch the reagent source for the reagent tank from cleaning agent to bleach solution, and
SOL28 is energized to supply vacuum for filling the reagent tank.
Waste Collection
The waste chamber in the Main Fluidics module uses high vacuum to collect waste from the
rinse block, RB1; the RVac chamber, VC3; and the vent chamber, VC4; and uses 5 psi to
dispense the waste out the waste tubing at the rear of the SlideMaker into the Analytical
Station’s waste line to the waste container. The waste tubing is attached to “push to
connect/disconnect” fittings on the rear of the SlideMaker.
If the waste chamber overflows, the liquid is collected in the foam trap. If the foam trap
overflows, the liquid is collected in the vacuum accumulator tank, TK3, and then dispensed
into the Analytical Station’s waste line. Refer to Vacuum Accumulator Tank in this section.
2.3-6
PN 4276985A
INSTRUMENT DESCRIPTION
FLUIDIC SYSTEM
Main Fluidics Module
The Main Fluidics module is located on the left side of the SlideMaker, in front of the Printer
module and behind the Basket Queue module. Refer to Figure 2.1-2.
The Main Fluidics module is a centralized source of pneumatic power, reagents, and waste
collection for the Dispense module. The functions of the Main Fluidics module components
(Figures 2.3-2 and 2.3-3), excluding the solenoids, pinch valves, and associated fittings and
tubing, are:
r
REG1 - Regulates high vacuum to 17.5 in. Hg.
r
REG2 - Regulates high vacuum to 6.5 in. Hg.
r
RVac chamber, VC3 - Accumulates and stores the regulated vacuum during use.
r
Reagent tank, TK1 - Stores and dispenses diluent during normal operation and cleaning
agent during the shutdown cycle.
r
Waste chamber, VC2 - Collects and dispenses waste.
r
Foam trap, VC1 - Collects overflow from waste chamber.
r
Vent chamber, VC4 - Provides an enclosed source of atmospheric pressure.
For a list of the functions of the solenoids and associated pinch valves, refer to Table A.3-1.
Figure 2.3-3 Main Fluidics Module, Rear View
SOL27 SOL28 SOL29 SOL30 SOL31 SOL32 SOL33 SOL34 SOL35
SOL36
Main
Fludics
Interface
card
7334072A
PN 4276985A
2.3-7
2
INSTRUMENT DESCRIPTION
FLUIDIC SYSTEM
Main Fluidics Interface Card
The Main Fluidics Interface card is located on the Main Fluidics module. Refer to
Figure 2.3-3.
The Main Fluidics Interface card is an interface between the electrical components in the
Main Fluidics module and the Main Distribution card. The Main Fluidics Interface card
routes, via the Main Distribution card:
r
Power from the Power Supply Monitor card.
r
Control signals from the System Control card.
r
Data signals to the System Control card.
The solenoids in the Main Fluidics module are mounted directly on the Main Fluidics
Interface card and are changed as an assembly.
Solenoids
Solenoid valves are used throughout the SlideMaker to activate mechanical components, such
as pinch valves and cylinders, and to route liquids, vacuums and pressures. See Table A.3-1
for a list of the solenoids, with their functions and location figure references.
You can test the solenoids, using the Solenoid Test screen (MAIN MENU tt SERVICE FUNCTIONS tt
SOLENOID TEST). For details about the Solenoid Test screen, refer to Table 4.2-1.
CAUTION Risk of damage to driver circuitry. Connecting or disconnecting a solenoid while the power is ON
can damage the driver circuitry. Power down the SlideMaker before connecting or disconnecting a solenoid.
The drivers for the solenoids can be damaged by power fluctuations. If you need to
disconnect a solenoid to check it further, or to replace it, always power down the SlideMaker
first.
Sensor Summary
The fluidic system uses five Pneumatic Supply Monitor cards to monitor the pneumatic
power (refer to Pneumatic Supply Monitor Cards in this section) and two float sensors to
monitor the liquid levels. The float sensors used by the fluidic system are listed in
Table 2.3-1. For a complete list of sensors used in the SlideMaker, and a description of the
types of sensors used, see Heading A.4.
Table 2.3-1 Fluidic System Sensors
SEN
No.
Name/
Location Reference
Type/
Active State
47
Reagent full
Magnetic reed switch
See Figure 2.3-2
51
Vacuum reservoir full
See Figure 2.3-1
2.3-8
.
Input
Connector
Output
Plug, Pin
A19J3
J12, 13
Open = reservoir full of liquid
Main Fluidics
Interface
Magnetic reed switch
Main Distribution
J18
N/A
Interface Card
Open = reservoir full of liquid
PN 4276985A
INSTRUMENT DESCRIPTION
SYSTEM CONTROL
2.4
SYSTEM CONTROL
Summary
Control of the SlideMaker is accomplished through two components:
r
The System Control card runs the SlideMaker software, controls the mechanical
components and quantifies the monitored pneumatic readings and voltages for display.
r
The Keypad and Display module displays the status of the SlideMaker and provides user
interface with the SlideMaker.
Figure 2.4-1 provides an overview of system control. This section describes the System
Control Card and the Keypad and Display Module. This section also describes the SlideMaker
reset sequence (System Reset).
Figure 2.4-1 System Control Block Diagram
Graphic
display
Brushless
DC motor
Keypad
Stepper
motors
(6 each)
Quadrature
encoder
Fluid
detectors
(8 each)
Solenoids
(64 each)
Voltage
Analog
monitors
Pressure
Temperature
PWR FAIL
Ext reset
Alarm
Vacuum enable
Pressure enable
Reg
power
input
Digital sensor
inputs (60 each)
System
Control
card
Workstation
Host
Aux
Serial
interface
Label printer
PRT CNTL
SlideMaker Host
data out
parallel
Host data in interface
Heat source
assembly
7334042A
System Control Card
Function
The System Control card is located in the rear compartment of the SlideMaker and plugs
directly into two board-to-board connectors on the Main Distribution card. Refer to
Figure 2.2-3.
PN 4276985A
2.4-1
2
INSTRUMENT DESCRIPTION
SYSTEM CONTROL
The System Control card:
r
Executes the software program residing in the SlideMaker.
r
Provides serial and parallel communications with the GEN•S System.
r
Controls and interrogates the mechanical components within the SlideMaker, such as the
sensors, solenoids, motors, fluid detectors and label printer.
r
Measures the ambient temperature and controls the heat generated by the heatsink
assembly to dry the smeared slides.
r
Quantifies scaled system voltages and pressures monitored within the SlideMaker.
r
Maintains non-volatile time, date and calibration parameters within the SlideMaker.
r
Generates error messages.
Processor “A” and Processor “B”
The System Control card uses two micro-control subsystems, processor “A” and
processor “B,” to control various functions of the SlideMaker. Each processor includes
program and data memory plus functionally specific hardware. Communications between the
two subsystems is implemented via a bidirectional serial interface.
The functions of the System Control card can be grouped into three categories: functions
performed by processor “A” (Figure 2.4-2), functions performed by processor “B”
(Figure 2.4-3), and functions performed independently of the processors.
r
r
r
Processor “A” functions
t
Provides serial and parallel communications with the GEN•S System
t
Controls and interrogates the mechanical components within the SlideMaker, such
as the sensors, solenoids, motors, fluid detectors and label printer
t
Maintains non-volatile time, date and calibration parameters within the SlideMaker
t
Generates error messages.
Processor “B” functions
t
Provides all screen displays
t
Quantifies scaled system voltages, pressures, and temperatures monitored within
the SlideMaker
t
Generates error messages.
Processor independent functions
t
Measures the ambient temperature and controls the heat generated by the heatsink
assembly to dry the smeared slides
t
Generates reference voltages
t
Controls system reset.
SlideMaker Software
The software program for the SlideMaker is contained as reprogrammable flash memory on
two EPROMs on the System Control card, U45 and U72. The software program is transferred
to processor”A” and processor “B” during system reset.
2.4-2
PN 4276985A
INSTRUMENT DESCRIPTION
SYSTEM CONTROL
PRN_CW AND PRN_CLK
Analog
Condit
Prn
Cntl
EXTINT_A
Hall Sen
ENC[58..60]
Digital
Interface
VP_A
PWM_M AND
PWM_S
A_AO
D_A [0..7]
Reset
S_21R
A_A [8..15]
Reset
S_A29
CONTROL
S_A28
RESET\
INST
CONTROL
+10 V Ref
SM_INT1
Int
Cntlr
Fluid Detector
Interface
D_A[0..7]
Ready
CPU_RST\
D_A [0..7]
SYSCLK_A
A_A [8..15]
SYSCLK_A
Dly
Servo
Controller
SEN[13..14]
Motor
629 INT
"A" Status
Indicators
PWR FAIL
CB[7..14]
IORST/
STATA [0..2]
5.00 V Ref
CB[1..6]
Step Drivers
(6 ea)
PRN_RST\
Buf
ENC58
HSO_A[1..4]
RESET
80C 196KC
Processor "A"
Servo
Interface
Enc
ENC_SEL
Inter Processor
Communication
X5.02
+10 V Ref
12
MHz
CLK_PGA
INHIB\ BRAKE
Host Parallel
Interface
Enc[58..60]
S_A24W
VCC
Filt
A16
SEN[56..57]
SEN [1..2]
CS_PGA
A_A [0..7]
SM_MA3
Decoder
0
ADDR_A13,15
To / From Processor "B" and Subsystem Independent Functions
Stepper
Interface
3 Phase
Driver
SOL_OE\
Fluid
Detector
Interface
P_A[0..7]
Servo
Commutator
Pneu
Enables
Figure 2.4-2 System Control Card, Processor “A” Block Diagram
S_A27
A_A
[8..12],14
H_I[4..7]
RD\
CSRAM_A\
Sensor
Input
128K
S_A27W
Opto Isol
I/O
FA_A [12..16]
RESET\
RAM
"A"
S_A22
S_A25
CSROM_A\
VPP
Reg
S_A26
D_
INT1
VP A
SEN[1..2]
128K
RTC_
INT
RESET\
SEN[13..14]
S_A24
Flash
"A"
Digital In
(40 ea)
S_A23
A_A [8..11]
S_A23W
RESET\
SOL_OE\
D_INT2
S_A2A
3.6864
MHZ
Serial I/O
CSRTC
RESET\
PN 4276985A
DUART
2
Workstation
/Host
Solenoid
Output
DUART
1
Workstation
/PRT
O.C. Shft Reg
(64 ea)
Serial I/O
S_A22W
NV
RAM
and
RTC
RESET\
A_A2B
7334044A
2.4-3
2
INSTRUMENT DESCRIPTION
SYSTEM CONTROL
Figure 2.4-3 System Control Card, Processor “B” Block Diagram
ALARM\
Diagnos
Header
80C 196KC
Processor "B"
P_B [0..7]
KEY_INT
SYSCLK_A
CPU_RST\
+5.00 V Ref
HTR_ON/
Analog
Condit
A_MX
[0..2]
VP_A
CONTROL
A_B [8..15]
Reset
Heat
Source
Cntl
RESET\
X1
CS_ACH
CUP RST\
CLK_ACH
X2
SM_MB3
Decoder
CS_PGB
CLK_PGB
A_B [0..7]
A_B
[8..11]
128K
CSRAM_B\
Flash
"B"
A_B
[8..11]
128K
CSROM_B\
VPP
Reg
VP B
V Out
RA_B [12..16]
RESET\
RAM
"B"
5.00 V
Ext
Reset
FA_B [12..16]
RESET\
Reset
Switch
+10 V Ref
X1
Reset
VCC
VP_A
VP_B
HTR_ON\
D_B [0..7]
RESET_IN\
Analog
Mux
Ready
+10 V Ref
D_B [8..15]
5.00 V
Ref
SEN [56..57]
Alarm
"B" Status
Indicators
Analog Inputs
STATB [0..2]
PWR FAIL
A_B [8..15]
To/From Processor "A"
PWR FAIL
Inter Processor
Communication
Enc [58..60]
Heat Source
Level
Select
REG_CV
PWR FAIL
Control
Volt
Graphic
Display
D_D(0..7)
7334043A
2.4-4
D_RD\. D_WR\. D_RES\
D_C/D\
D_CS\
RESET\
DSPL &
KEYP BUFF
SM_DSP1
S_B24
S_B25
S_B21R
S_B22
S_B23
Keypad
D/A
Keypad
Controller
KEY_INT
PN 4276985A
INSTRUMENT DESCRIPTION
SYSTEM CONTROL
LEDs
The LEDs for the System Control card are shown in Figure A.2-7 and described in
Table A.2-16.
Jumpers
The control for processor “B”, whose flash chip only contains screen information, comes from
the flash chip for processor “A.” Two jumpers on the System Control card enable this
communication from processor “A” to processor “B.” The jumper locations are shown in
Figure A.2-7. For normal operation, set the jumpers as described for System Control card,
Jumpers, under Heading A.2.
Connectors
All power and most signals to the System Control card are transferred to and from the System
Control card from the Main Distribution card through the two board-to-board connectors,
P1/J1 and P2/J2. The exceptions to this are the servo motor and the fluid detector signals:
r
The servo motor is connected directly to the System Control card to avoid the generation
of additional system noise from the high switched currents required by the motor.
r
The signals from the eight fluid detectors pass through the Smear/Transport Interface
card without modification and are routed to the System Control card on a dedicated
cable. Separating the fluid data signals from all other signals enables high quality signal
transfer with minimum noise pickup.
A ground strap from the Display module is attached to the conductive inner surface of the
main SlideMaker cover to provide EMI and RFI shielding as well as antistatic protection to
the System Control card.
The connectors for the System Control card are shown in Figure A.2-7 and described in
Table A.2-15.
Test Points
The test points used for troubleshooting the System Control card are shown in Figure A.2-7
and described in Table A.2-17.
Keypad and Display Module
The Keypad and Display module is mounted on the front cover of the SlideMaker
(Figure 2.1-1). The bottom of this module is secured to the front cover with latching pins so
you can unlatch the module and swing it down for viewing when the cover is open.
The Keypad and Display module is the interface between the SlideMaker and the operator. It
houses a 240 x 128 dot graphic, backlighted panel with eight pressure sensitive switches that:
r
Displays messages and information about the SlideMaker.
r
Allows the operator to t
Respond to instrument messages.
t
Request menu options. For a summary of the menu options available, refer to
Figure A.5-1. For a description of the service options, refer to Heading 4.2.
The Keypad and Display module is connected to the System Control card (Figure 2.2-3).
PN 4276985A
2.4-5
2
INSTRUMENT DESCRIPTION
SYSTEM CONTROL
System Reset
Initiating a Reset
Note: The SlideMaker can only to do a complete reset when the GEN•S System is in the
READY state.
You can initiate a complete reset of the SlideMaker by:
r
Using the power on/off switch, S2, on the front of the SlideMaker to turn the power off
and on.
r
Leaving the power on/off switch, S2, on, and using the main power switch, S1, on the
rear of the SlideMaker to turn the power off and on.
r
Pressing the RESET button on the System Control card.
Pressing the reset button on the front of the SlideMaker either clears pending errors following
operator intervention or initiates a complete reset, depending on the state of the SlideMaker
when the button is pressed.
Boot Mode
Resetting the SlideMaker initializes the hardware, setting it to a default state; checks the
memory paths; and allows processor “A” and processor “B” to execute the program from the
“boot block” of memory, about 8 KB of noneraseable flash memory in the flash memory chips
(EPROMs U45 and U72).
The primary purpose of this condition, known as the Boot mode, is to allow processor “A”
and processor “B” to transfer the “boot handler software” from flash memory to RAM
memory. After transferring the boot handler software, the SlideMaker returns to the Normal
mode.
Normal Mode
In the Normal mode, the SlideMaker uses the boot handler software to:
1.
Transfer part of the remaining 128 K of code (operating software) from processor "A"s
flash memory chip, through processor "A" and processor "B," to the RAM memory chip
for processor "B."
Note: The operating software for processor "B" is stored on the flash memory chip for
processor "A." The flash memory chip for processor "B" contains screen information
only.
2.
Transfer part of the remaining 128 K of code (operating software) from processor "A"s
flash memory chip, through processor "A," to the RAM memory chip for processor "A."
In the Normal mode, processor "A" has direct access to 56 K of RAM together with an
additional 48 K of overlay and data only RAM, and processor "B" has direct access to 56 K of
RAM plus indirect access to an additional 72 K of RAM.
System Initialization
After transferring the operating software from flash memory to RAM memory, the SlideMaker
uses the operating software to reset the instrument functions as defined in the software
program.
2.4-6
PN 4276985A
INSTRUMENT DESCRIPTION
SAMPLE ACQUISITION SYSTEM
2.5
SAMPLE ACQUISITION SYSTEM
Summary
The sample acquisition system:
1.
Aspirates a blood from the specimen tube through the vent side of the needle in the
Analytical Station.
2.
Transfers the sample to one of two reservoirs.
3.
Holds and mixes the sample.
4.
Transfers the sample from the reservoir to the dispense probe, priming the dispense line
with a portion of the sample.
5.
Dispenses a measured drop of the blood sample onto a slide for processing.
The sample acquisition system also rinses and dries the aspiration and dispense lines between
samples to limit dilution and carryover.
Two modules, working in tandem, perform the functions of the sample acquisition system:
the Sample Access and Reservoir module and the Dispense module.
This section describes the components and functions of the sample acquisition system,
including the Sample Access and Reservoir Module, Dispense Module, Dispense Probe
Mechanism, Rinse Block, Fluid Detectors and the Dispense 1 Manifold and Dispense 2
Manifold Cards.
Function
As you read this section, refer to the Pneumatic/Hydraulic Schematic, DCN 6323138, in
Chapter 6, to follow the fluidic flow, and to Figures 2.5-1 and 2.5-2 to locate the discussed
components in the Sample Access and Reservoir module and in the Dispense module,
respectively.
Aspirating a Blood Sample
To generate a slide, the SlideMaker needs the following information from the Analytical
Station: the decision to make a slide, verification of the patient ID, and the sample analysis
results for determining the appropriate smear velocity and wicking time. To accommodate the
situation where the Analytical Station starts sampling a blood before the results of a previous
blood are available, the SlideMaker uses two reservoirs alternately to draw, hold and mix the
samples. While the first sample is held and mixed in one reservoir until the SlideMaker
receives the needed information from the Analytical Station, the other reservoir is cleaned
and dried in preparation for a blood sample from the specimen tube currently in the Sampling
Station of the Diluter.
For the aspiration process to begin, the Analytical Station:
1.
Confirms that aspiration from the specimen tube into the Diluter was acceptable.
2.
Sends a command to the SlideMaker to aspirate a sample.
Note: The Analytical Station does not send a command to the SlideMaker to aspirate
when it is processing calibrator or control material.
PN 4276985A
2.5-1
2
INSTRUMENT DESCRIPTION
SAMPLE ACQUISITION SYSTEM
Figure 2.5-1 Sample Access and Reservoir Module Components
RES2
RES1
FD2
VL3A
VL115
FD4
VL114
VL117
VL4A
VL120
VL1
SOL114
VL2
SOL115
SOL116
SOL118
SOL117
FD7
SOL120
VL5
7334059B
Figure 2.5-2 Dispense Module Components
SOL1
FD6
Dispense 2
Manifold
card
SOL2
VL8 FD8 DP1
DP2 VL7 VL6
SOL24
SOL3
SOL4
SOL6
Dispense 1
Manifold
card
SOL14
SOL7
SOL15
SOL5
SOL8
VL14
VL15
VL16
SOL16
VL17
SOL17
VL18
SOL9
SOL18
SOL10
SOL19
VL19
SOL20
VL20
SOL21
SOL22
SOL23
FD5
VL4B
FD3
VL3B
2.5-2
7334066A
PN 4276985A
INSTRUMENT DESCRIPTION
SAMPLE ACQUISITION SYSTEM
Once the SlideMaker receives the command to aspirate, SOL22 routes 30 psi (reduced)
through the sample reservoir and the aspiration line to the Analytical Station’s vent chamber,
VC19, to remove any diluent that could contribute to sample dilution. See Figure 2.5-3.
During this drying process, fluid detectors FD8 plus FD2 and FD3 for RES1, or FD4 and FD5
for RES2, are used to confirm the presence of air.
Figure 2.5-3 Drying the Aspiration Line for RES1
30 psi
(reduced)
FD
FD
VC19
FD
FD
RES1
DP2 DP1
FD
FD
FD
FD
RES2
Path
closed
Dispense
probe
Lee
valve
Rinse
block
GEN•S System
needle
bellows
Path
closed
Lee
valve
7334116B
To aspirate a sample, SOL118 opens the pathway to the correct reservoir, and VL14 routes
17.5 in. Hg to the prepared reservoir to draw sample from the specimen tube, through the
needle, out the vent tubing and into the Sample Access and Reservoir module. See
Figure 2.5-4. During the SlideMaker’s aspiration, the specimen tube is not vented.
Figure 2.5-4 Sample Aspiration to RES1
FD
FD
17.5-in. Hg
vacuum
VC19
FD
FD
RES1
DP2 DP1
FD
FD
FD
FD
RES2
GEN•S System
needle
bellows
Dispense
probe
Rinse
block
Lee
valve
Lee
valve
7334117A
When the fluid detector FD1 and, FD2 for RES1, or FD4 for RES2, detect blood in the
aspiration line, they trigger activation of VL3A and VL3B for RES1or VL4A and VL4B for
RES2, closing the aspiration pathway and stopping the flow of blood. The volume of blood
sample aspirated is about 250 µL.
PN 4276985A
2.5-3
2
INSTRUMENT DESCRIPTION
SAMPLE ACQUISITION SYSTEM
Note: During aspiration, FD2 or FD4 detects the leading edge of the blood sample, and FD1
confirms the minimum volume is aspirated.
During the aspiration time, if the SlideMaker does not sense blood in the aspiration line, it
marks the sample as incomplete and does not make a smear. Three successive incomplete
samples generate an error message and stop the SlideMaker.
Transferring the Blood Sample to a Reservoir
Before transferring the blood sample to the reservoir, the SlideMaker introduces an air bubble
into the middle of the blood sample, effectively dividing it into two samples, one for priming
the lines and one for making the smear. The length of the air bubble varies, depending on the
viscosity of the blood specimen.
To introduce the air bubble:
1.
VL32 is activated, switching the 17.5 in. Hg at the reservoir to 6.5 in. Hg.
2.
VL3A and VL3B for RES1 or VL4A and VL4B for RES2 is reopened, putting 6.5 in. Hg at
the front of the blood sample.
3.
VL115 is opened, releasing atmospheric pressure into the sample at FT2. The
atmospheric pressure displaces the sample forward at FT2 toward the reservoir,
producing the air bubble.
See Figure 2.5-5.
Figure 2.5-5 Introducing an Air Bubble into the Sample Line
FD
FD
6.5-in. Hg
vacuum
Path
closed
VC19
FD
FD
Open
RES1
DP2 DP1
FD
FD
FD
FD
RES2
Bubble
Dispense
probe
Rinse
block
Lee
valve
Atmospheric
pressure
GEN•S System
needle
bellows
Lee
valve
7334118A
After the bubble is produced, high vacuum (from VL33 via the Analytical Station’s vent
chamber, VC19) is used to remove any residual atmospheric pressure in the line between
VL115 and FT2. Removing the residual pressure prevents it from generating small bubbles in
the trailing segment of the aspirated sample as the sample is advanced into the reservoir.
2.5-4
PN 4276985A
INSTRUMENT DESCRIPTION
SAMPLE ACQUISITION SYSTEM
Following the formation of the bubble, the 6.5 in. Hg continues to pull the divided blood
sample into and through the reservoir until FD3 for RES1, or FD5 for RES2, detects the
leading edge of the sample and triggers the closing of VL3A and VL3B or VL4A and VL4B,
respectively, stopping the flow of blood sample. See Figure 2.5-6. The time needed to move
the sample through the reservoir varies, depending on the viscosity of the specimen.
Figure 2.5-6 Advancing the Sample Through RES1
FD
FD
6.5-in. Hg
vacuum
VC19
FD
FD
RES1
DP2 DP1
FD
FD
FD
FD
RES2
GEN•S System
needle
bellows
Dispense
probe
Rinse
block
Lee
valve
Lee
valve
7334119A
Holding and Mixing the Blood Sample
The capacity of the reservoir is larger than the volume of blood drawn into it. To mix the
blood, the SlideMaker uses a pressure differential of atmospheric pressure and 6.5 in. Hg to
move the blood back and forth in the reservoir, and fluid detectors, one on each end of the
reservoir, to detect the leading or trailing edge of the blood to control sample position.
To move the blood sample from left to right in RES1, VL3B routes atmospheric pressure to the
left side of RES1 and VL3A routes 6.5 in. Hg to the right side to pull the blood sample to the
right. When the blood reaches FD2, VL3A and VL3B are closed, stopping movement to the
right. To move the blood sample from right to left in RES1, VL3A routes atmospheric pressure
to the right side of RES1 and VL3B routes 6.5 in. Hg to the left side to pull the blood sample
to the left. When the blood reaches FD3, VL3A and VL3B are closed, stopping movement to
the left. See Figure 2.5-7.
Similarly, to move the blood sample from left to right in RES2, VL4B routes atmospheric
pressure to the left side of RES2 and VL4A routes 6.5 in. Hg to the right side to pull the blood
sample to the right. When the blood reaches FD4, VL4A and VL4B are closed, stopping
movement to the right. To move the blood sample from right to left in RES2, VL4A routes
atmospheric pressure to the right side of RES2 and VL4B routes 6.5 in. Hg to the left side to
pull the blood sample to the left. When the blood reaches FD5, VL4A and VL4B are closed,
stopping movement to the left.
PN 4276985A
2.5-5
2
INSTRUMENT DESCRIPTION
SAMPLE ACQUISITION SYSTEM
Figure 2.5-7 Mixing the Blood Sample
Path
closed
Path
closed
FD
FD
FD
FD
6.5-in. Hg
vacuum
FD
FD
FD
FD
6.5-in. Hg
vacuum
Path
closed
6.5-in. Hg
vacuum
FD
FD
6.5-in. Hg
vacuum
FD
Vent
Vent
Path
closed
Path
closed
FD
FD
FD
Vent
Vent
Path
closed
7334081A
VL16 and VL17 route the atmospheric pressure and 6.5 in. Hg, respectively, to the right side
of the sample; VL15 and VL14 route the atmospheric pressure and 6.5 in. Hg, respectively, to
the left side of the sample.
The duration of the mixing cycle depends on the duration of the Analytical Station’s “count”
cycle, but at a minimum it is 2.2 seconds and at a maximum it is 15.0 seconds.
Note: Only samples analyzed in the CBC ONLY or CBC/DIFF test modes are held and mixed
in the reservoir. Samples analyzed in the CBC/RETIC or CBC/DIFF/RETIC test modes are
simply pulled through the reservoir and processed.
After completion of the mixing cycle, the reservoir lines are left pinched to hold the blood
sample in the reservoir while the other reservoir is rinsed and dried. For details, see Rinsing
and Drying the Aspiration and Dispense Lines. The blood sample is held in the reservoir for a
minimum of 17 seconds and a maximum of 21.0 seconds, depending on conditions in the
Analytical Station. The duration of this cycle could be extended if the Analytical Station
performs two bar code reads.
Transferring the Blood Sample to the Dispense Probe and Priming the Dispense Line
Before transferring the blood sample to the dispense probe, the SlideMaker ensures the
dispense probe is down in the rinse block, and then uses 30 psi to dry the dispense line and
probe. The probe down sensor, SEN12, detects when the dispense probe is down. The fluid
detectors FD6 and FD8 confirm the presence of air during the drying of the dispense lines.
2.5-6
PN 4276985A
INSTRUMENT DESCRIPTION
SAMPLE ACQUISITION SYSTEM
To prime the dispense line, SOL24 opens the pathway for the correct reservoir; VL8 is
activated, opening the line to the dispense probe; and the valves on either end of the reservoir,
VL3A and VL3B for RES1, or VL4A and VL4B for RES2, are deactivated, opening the
reservoir. Then 5 psi from VL18 is routed through VL3A for RES1 or VL4A for RES2, pushing
the blood sample from the reservoir, through the dispense line, and then through the dispense
probe until the leading edge, air bubble and front section of the trailing segment are pushed
out the dispense probe and into the rinse block. See Figure 2.5-8.
Figure 2.5-8 Priming the Dispense Line with Sample
FD
FD
5 psi
VC19
FD
FD
RES1
DP2 DP1
FD
FD
FD
FD
RES2
GEN•S System
needle
bellows
Dispense
probe
Rinse
block
Lee
valve
Lee
valve
7334120A
Fluid detector FD6 is used to detect the trailing edge, a “not blood condition" at the end of
the blood sample. Upon detection of the trailing edge of the sample, VL8 closes to stop the
flow of the sample.
At the end of the process, the dispense line is fully primed with sample. In an overlap cycle
mode, this process is synchronized to occur when the subsequent sample is advancing to the
reservoir.
Dispensing a Drop of Blood Sample onto the Slide
After the dispense line is primed, CL10 moves the dispense probe up until the probe up
sensor, SEN11, senses that the dispense probe is up, out of the rinse block. SOL42 operates
CL10 to move the dispense probe up and down.
After the dispense probe is up, the SlideMaker moves the shuttle with a labeled slide from the
Label Printer module to the dispense position. When the dispense position sensor, SEN7,
senses the presence of the shuttle, CL10 moves the dispense probe down until the dispense
probe is about 0.040 in. above the slide. Then SOL9 is energized, activating the dispense
pump, DP1, which displaces a nominal 4.0 µL blood drop onto the slide. See Figure 2.5-9.
PN 4276985A
2.5-7
2
INSTRUMENT DESCRIPTION
SAMPLE ACQUISITION SYSTEM
Figure 2.5-9 Dispensing a Blood Drop onto the Slide
FD
VC19
FD
Pump
activated
DP2 DP1
FD
RES1
FD
FD
FD
FD
RES2
GEN•S System
needle
bellows
Dispense
probe
Shuttle
Lee
valve
Lee
valve
7334121A
After the drop is dispensed, CL10 moves the dispense probe back to its up position. When the
probe up sensor, SEN11, senses the dispense probe in the up position, the shuttle moves the
labeled slide with the blood drop to the smear position for smearing.
In overlap cycle single-slide mode, the dispensing of the drop of blood occurs simultaneously
with the backwashing and drying of the aspiration lines of the subsequent sample.
Rinsing and Drying the Aspiration and Dispense Lines
While the sample is in the reservoir, the sample aspiration lines are rinsed in preparation for
aspirating the next sample. The backwashing and drying of the aspiration lines consists of
three processes:
r
The SlideMaker and the Analytical Station’s synchronized rinsing of the SlideMaker’s
aspiration line to the needle vent chamber, VC19 and the needle bellows. See
Figure 2.5-10.
r
The SlideMaker’s pressurized air drying of its aspirate line to the vent chamber, VC19.
See Figure 2.5-11.
r
The Analytical Station’s vacuum drying of the needle vent line to VC19. See
Figure 2.5-12
Fluid detectors, FD6 and FD8 are used to detect and confirm the presence of air in the
dispense lines prior to aspiration of the next sample.
Blood detector BD3 is used to confirm the correct rinsing and drying of the needle-vent line.
2.5-8
PN 4276985A
INSTRUMENT DESCRIPTION
SAMPLE ACQUISITION SYSTEM
Figure 2.5-10 GEN•S System/SlideMaker Synchronized Rinse
FD
Backwash
diluent
FD
FD
Diluent
Path
closed
VC19
FD
RES1
DP2 DP1
FD
FD
FD
FD
RES2
Dispense
probe
Lee
valve
Rinse
block
GEN•S System
needle
bellows
Path
closed
Lee
valve
7334122B
Figure 2.5-11 Drying the Lines to the Vent Chamber
FD
30 psi
FD
VC19
FD
FD
RES1
DP2 DP1
FD
FD
FD
FD
RES2
GEN•S System
needle
bellows
Dispense
probe
Lee
valve
Rinse
block
Lee
valve
7334123B
Figure 2.5-12 Drying the Needle Vent Lines
High
vacuum
FD
FD
VC19
FD
FD
RES1
DP2 DP1
FD
FD
FD
FD
RES2
GEN•S System
needle
bellows
Dispense
probe
Rinse
block
Lee
valve
Lee
valve
7334124B
PN 4276985A
2.5-9
2
INSTRUMENT DESCRIPTION
SAMPLE ACQUISITION SYSTEM
After the drop of blood is dispensed, the SlideMaker backwashes the reservoir and the
dispense line. Backwashing and drying the reservoir and dispense lines consists of five
processes:
r
Diluent rinsing of the appropriate sample reservoir and dispense lines. See Figure 2.5-13.
r
30 psi drying of the reservoir and dispense line through the dispense probe and rinse
block to waste. See Figure 2.5-14.
r
Refilling the reagent tank, TK1.
r
Draining the vent chamber, VC4, and the RVac chamber, VC3, into the waste chamber,
VC2.
r
Draining the waste chamber, VC2, to the Analytical Station’s waste container.
Figure 2.5-13 Backwashing the Sample Reservoir and Dispense Line
Backwash
diluent
FD
Backwash
diluent
FD
VC19
FD
FD
RES1
DP2 DP1
FD
FD
FD
FD
RES2
Path
closed
Dispense
probe
Rinse
block
GEN•S System
needle
bellows
Path
closed
Lee
valve
Lee
valve
To waste
7334125A
Figure 2.5-14 Drying the Sample Reservoir and Dispense Lines
FD
FD
30 psi
VC19
FD
FD
RES1
DP2 DP1
FD
FD
FD
FD
RES2
Path
closed
Dispense
probe
Rinse
block
Lee
valve
To waste
chamber
GEN•S System
needle
bellows
Path
closed
Lee
valve
7334126A
At the appropriate times during the rinsing and the drying of the reservoir and dispense lines,
the fluid detectors FD2, FD3, FD6, FD7, and FD8 detect and confirm the presence of diluent
and air.
2.5-10
PN 4276985A
INSTRUMENT DESCRIPTION
SAMPLE ACQUISITION SYSTEM
At the appropriate times during the rinsing and the drying of the aspiration paths, the fluid
detectors FD7, FD1, and BD3 detect and confirm the presence of diluent and air.
Sample Access and Reservoir Module
The Sample Access and Reservoir module is located in the lower compartment of the Diluter.
Refer to Figure 2.1-1.
The Sample Access and Reservoir module provides the pathway for sample aspiration from
the Analytical Station to the SlideMaker and, in conjunction with the Dispense module,
controls the volume, separation and positioning of the blood sample, and the rinsing and
drying of the sample transport lines.
The Sample Access and Reservoir module also provides the interfaces with the Analytical
Station needed for the Analytical Station to backwash the SlideMaker’s aspiration line when
the SlideMaker is powered down or inoperable. These interfaces consist of the T-fitting
tapped into the vent line of the needle, and the electrical connection to the four- station
pneumatic manifold, MF6. The Diluter 3 card in the Analytical Station powers and drives the
solenoids on MF6.
The functions of the Sample Access and Reservoir module components (Figure 2.5-1),
excluding the pneumatic solenoids, pinch valves, and associated fittings and tubing, are:
r
Fluid detectors FD1, FD2 and FD4 - Detect and identify the aspirated sample.
r
Fluid detector FD7 - Detects diluent and air in the aspiration lines during backwashing.
r
SOL118 - Controls the routing of the aspirated sample to the correct reservoir.
r
RES1 and RES2 - Hold and then transfer the blood sample to the SlideMaker.
For a list of the functions of the solenoids and associated pinch valves, refer to Table A.3-1.
Dispense Module
The Dispense module is located on the right side of the SlideMaker. Refer to Figure 2.1-2.
The Dispense module provides the hardware for measuring the drop of blood used for a
smear and, in conjunction with the Sample Access and Reservoir module, controls the
volume, separation and positioning of the blood sample, and the rinsing and drying of the
sample transport lines. The functions of the Dispense module components (Figure 2.5-2),
excluding the pneumatic solenoids, pinch valves, and associated fittings and tubing, are:
r
r
r
PN 4276985A
Fluid detectors FD3 and FD5 t
Control the position of the blood sample in RES1 or RES2, respectively.
t
Detect the presence of blood during mixing of the sample in RES1 or RES2,
respectively, determining when to stop right to left movement.
Fluid detector FD6 t
Detects the trailing edge of the blood during the dispensing of the prime sample and
stops the flow.
t
Confirms the presence of air during drying of the dispense line.
Fluid detector FD8 - Detects diluent and air during backwashing and drying of the
dispense line and the reservoirs.
2.5-11
2
INSTRUMENT DESCRIPTION
SAMPLE ACQUISITION SYSTEM
r
Dispense pump, DP1 - Measures and dispenses the blood drop for the smear in the
single-slide mode.
r
Dispense pump, DP2 - Measures and dispenses the blood drop for the smear in the
dual-slide mode. (Not currently in operation.)
r
SOL24 - Controls routing of the sample from the correct reservoir to the dispense line.
For a list of the functions of the solenoids and associated pinch valves, refer to Table A.3-1.
Dispense Pump
The SlideMaker uses a special pinch valve design, called a dispense pump, to control the
volume of the drop of sample dispensed onto the slide. The dispense pump, designed for use
with 0.023 in. ±0.002 in. i.d., I-beam tubing, has a controlled pinching length that displaces a
nominal 4.0 µL sample when the valve is activated, pinching the tubing. The target volume is
4.0 µL ±0.5 µL. To compensate for the tolerance extremes of the internal diameter of the
tubing and still meet the dispensed volume requirement, the dispense pump has four
selectable pinching surfaces. Refer to Heading 4.7, DISPENSE PUMP ADJUSTMENT.
Dispense Probe Mechanism
While the dispense probe mechanism is functionally part of the Dispense module, it is
physically part of the Slide and Smear module. See Figure 2.5-15.
Figure 2.5-15 Dispense Probe Mechanism and Rinse Block
SEN11
CL10
Dispense
probe
Dispense probe
sensors' flag
SEN12
Locking
lever
SOL42
Rinse
block, RB1
7334077B
The dispense probe mechanism consists of the dispense probe and its holder; the cylinder for
operating the dispense probe, CL10; two sensors for sensing the position of the dispense
probe, the probe up sensor, SEN11, and the probe down sensor, SEN12; and the dispense
probe sensor flag.
2.5-12
PN 4276985A
INSTRUMENT DESCRIPTION
SAMPLE ACQUISITION SYSTEM
The two sensors, in conjunction with the dispense probe sensors’ flag, determine the position
of the dispense probe in each of its three positions:
r
Retracted. SOL42 is de-energized retracting CL10 which retracts the dispense probe.
r
Extended into the rinse block. SOL42 is energized, extending CL10.
r
Extended to the dispense position above the slide on the shuttle. SOL42 is energized,
extending CL10. It works in conjunction with the dispense position sensor, SEN7.
Rinse Block
While the rinse block, RB1, is functionally part of the Dispense module, it is physically part of
the Slide and Smear module. Refer to Figure 2.5-15.
During the SlideMaker cycle, the rinse cup:
r
Collects the prime sample and backwash diluent from the dispense probe and routes it to
the waste chamber, VC2.
r
Provides vacuum for drying the outside of the dispense probe.
The rinse block is a floating design to allow for slight misalignment with the dispense probe.
It comprises:
r
A threaded hole into which the dispense probe engages.
r
Two side ports, a diluent/cleaning agent port for the backwashing and a vacuum port for
the vacuum drying of the dispense probe.
r
One bottom port for the routing of waste from the dispense probe.
Dispense 1 Manifold and Dispense 2 Manifold Cards
The Dispense 1 Manifold and Dispense 2 Manifold cards are located in the Dispense module.
Refer to Figure 2.5-2.
The Dispense 1 Manifold and Dispense 2 Manifold cards are an interface between the
solenoids in the Dispense module and the Main Distribution card. The Main Fluidics
Interface card routes, via the Main Distribution card:
r
Power from the Power Supply Monitor card.
r
Control signals from the System Control card.
The solenoids in the Dispense module are mounted directly on the Dispense 1 Manifold and
Dispense 2 Manifold cards and are changed as an assembly.
Fluid Detectors
The fluid detectors for the SlideMaker are located in the Sample Access and Reservoir module
(Figure 2.5-1) and the Dispense module (Figure 2.5-2).
The SlideMaker uses information from the fluid detectors, in conjunction with regulated
vacuum or pressure, to determine the volume and positioning of the blood sample. The
SlideMaker also uses fluid detectors to detect and confirm rinsing and drying of the blood
sample lines.
PN 4276985A
2.5-13
2
INSTRUMENT DESCRIPTION
SAMPLE ACQUISITION SYSTEM
The fluid detectors are designed to detect three distinct fluids: diluent, air and blood. The
fluid detectors are calibrated with diluent. The output voltage ranges for the various fluids
and the calibration tolerances are listed in Heading A.1, TOLERANCES AND LIMITS, under
Fluid Detector Voltage Specifications.
To confirm the presence of a particular fluid, blood, air or diluent, several readings are taken
at defined intervals.
With the exception of BD3, the fluid detectors are connected to the Smear/Transport Interface
card which routes the signals from the fluid detectors, without modification, directly to the
System Control card. BD3 is connected to the Diluter 2 card in the Diluter.
Function Summary
Table 2.5-1 summarizes the functions of the fluid detectors used by the SlideMaker, and lists
the module location and the connector on the interface card for each fluid detector.
Table 2.5-1 SlideMaker Fluid Detectors
FD
Functions
Module
Interface Card
Connector
FD1
Identifies blood in the aspiration line during
aspiration to ensure the minimum volume is
acquired.
Sample Access and
Smear/Transport J25
Reservoir (outside module, Interface
near needle)
Identifies diluent and air in the aspiration line
during rinsing and drying of the aspiration lines.
FD2
Identifies the leading edge of the aspirated sample
for RES1, determining when to stop aspiration.
Sample Access and
Reservoir
Smear/Transport J26
Interface
Dispense
Smear/Transport J27
Interface
Sample Access and
Reservoir
Smear/Transport J28
Interface
Detects the presence of blood during mixing in
RES1, determining when to stop the left-to-right
movement.
Confirms the presence of diluent and air during the
rinsing and drying of RES1 and the aspiration lines.
FD3
Controls the positioning of blood in RES1.
Detects the presence of blood during mixing in
RES1, determining when to stop the right-to-left
movement.
Confirms the presence of diluent and air during the
rinsing and drying of RES1 and the aspiration lines.
FD4
Identifies the leading edge of the aspirated sample
for RES2, determining when to stop aspiration.
Detects the presence of blood during mixing in
RES2, determining when to stop the left-to-right
movement.
Confirms the presence of diluent and air during the
rinsing and drying of RES2 and the aspiration lines.
2.5-14
PN 4276985A
INSTRUMENT DESCRIPTION
SAMPLE ACQUISITION SYSTEM
Table 2.5-1 SlideMaker Fluid Detectors (Continued)
FD
Functions
Module
Interface Card
FD5
Controls the positioning of blood in RES2.
Dispense
Smear/Transport J29
Interface
Dispense
Smear/Transport J30
Interface
Detects the presence of blood during mixing in
RES2, determining when to stop the right-to-left
movement.
Connector
Confirms the presence of diluent and air during the
rinsing and drying of RES2 and the aspiration lines.
FD6
Detects the trailing edge of the blood during the
dispensing of the prime sample, determining when
to stop dispensing sample.
Confirms the presence of diluent and air during the
rinsing and drying of the dispense line.
FD7
Detects diluent and air during the backwashing and
drying of the aspiration lines.
Sample Access and
Reservoir
Smear/Transport J31
Interface
FD8
Detects diluent and air during the rinsing and
drying of the reservoirs and the dispense line.
Dispense
Smear/Transport J32
Interface
Confirms the presence of air during the drying of
the aspiration lines.
BD3
Identifies diluent and air in the aspiration line
Diluter 2
Sample Access and
during the rinsing and drying of the aspiration lines. Reservoir (outside module,
near needle)
Note: BD3 is installed in GEN•S Systems with a
J9
SlideMaker. While FD1 only checks the aspiration
line for diluent and air if the SlideMaker is on, BD3
checks this line whether the SlideMaker is on or off.
Since the aspiration line for the SlideMaker is also
the needle-vent line for the GEN•S System, it is
important to verify that this line is cleaned and dried
during GEN•S System operation.
Error Conditions
If fluid detectors FD1 through FD6 sense a problem while aspirating or dispensing the blood
sample, the SlideMaker discards the sample and warns the operator. If the same problem
occurs three times in a row, the SlideMaker generates an error message and stops.
If fluid detectors FD1 through FD8 sense a problem while rinsing or drying the lines, the
SlideMaker generates an error message and stops.
If blood detector BD3 senses a problem while rinsing or drying the needle-vent line, the
GEN•S System generates a VLS error and disables the Automatic mode. For more details
about the VLS (vent-line sensing) function, see Heading B.1, VLS FUNCTION,
CALIBRATION, AND TROUBLESHOOTING.
If an error message occurs for any of the fluid detectors, FD1 through FD8, refer to
Table 7.2-8, Fluidics Error Messages. If a VLS error occurs, refer to the error message tables in
Chapter 7 of the service manual for the GEN•S System Analytical Station.
PN 4276985A
2.5-15
2
INSTRUMENT DESCRIPTION
SAMPLE ACQUISITION SYSTEM
Sensor Summary
In addition to the eight fluid detectors and the blood detector discussed in this section (Fluid
Detectors), the sample acquisition system uses the three sensors listed in Table 2.5-2 to
monitor its activities. For a complete list of sensors used in the SlideMaker, and a description
of the types of sensors used, see Heading A.4.
Table 2.5-2 Sample Acquisition System Sensors
SEN
No.
Name/
Location Reference
Type/
Active State
7
Dispense position
Infrared interrupting
See Figure 2.7-1
11
Probe up
See Figure 2.5-15
12
Probe down
See Figure 2.5-15
2.5-16
Blocked = Shuttle at dispense
position
Infrared interrupting
Blocked = probe up
Infrared interrupting
Blocked = probe down
Input
Connector
Output
Plug, Pin
Smear/Transport
Interface
J16
J6, 13
Smear/Transport
Interface
J20
J6, 17
Smear/Transport
Interface
J21
J6, 18
Interface Card
PN 4276985A
INSTRUMENT DESCRIPTION
SMEAR PROCESSING SYSTEM: CASSETTE TRANSPORT MODULE
2.6
SMEAR PROCESSING SYSTEM: CASSETTE TRANSPORT MODULE
Summary
The smear processing system comprises six modules that process the smear from retrieval of a
clean, microscopic slide to collection of a stain ready, whole-blood smear.
This section describes the Cassette Transport module. The Cassette Transport module:
1.
Moves filled slide cassettes into position for retrieval of the slides.
2.
Retrieves the slides from the slide cassettes.
3.
Moves the empty slide cassettes into position for retrieval by the operator.
This section also describes the Slide Ejector Interface card.
For more information on the smear processing system, see the Slide and Smear module
(Heading 2.7), the Label Printer module (Heading 2.8), the Dryer module (Heading 2.9), the
Slide Elevator module (Heading 2.10), and the Basket Queue module (Heading 2.11).
Description
The Cassette Transport module comprises three modules and an assembly:
r
Cassette Input Queue module
r
Slide Ejector module
r
Upper cassette transfer mechanism
r
Cassette Output Queue module
The components that comprise the Cassette Transport module are located to the left and on
top of the Dryer module. Refer to Figure 2.1-2.
Preparing the Slide Cassettes for Processing
The operator:
r
Opens the slide cassette cover and inserts up to 100 microscopic slides into the slide
cassette.
r
Slides the cover to the closed position.
r
Ensures the bottom slide is correctly located inside the slide cassette.
r
Places the slide cassettes, up to a maximum of four, in the Cassette Input Queue module.
Cassette Input Queue Module
The Cassette Input Queue module automatically advances the filled slide cassettes to the slide
ejection station as needed. Refer to Figures 2.6-1 and 2.6-2 or Figures 2.6-3 and 2.6-4 to
locate the components in the Cassette Input Queue module. (Figures 2.6-1 and 2.6-2 show
the old configuration of the Slide Ejector module, Figures 2.6-3 and 2.6-4 show the new
configuration. The Cassette Input Queue module has not changed.)
When a slide cassette is needed in the slide ejection station, SOL50 is energized, extending
CL6. CL6 operates the input cassette transfer mechanism, which pushes the slide cassettes to
the slide ejection station.
PN 4276985A
2.6-1
2
INSTRUMENT DESCRIPTION
SMEAR PROCESSING SYSTEM: CASSETTE TRANSPORT MODULE
Figure 2.6-1 Cassette Input Queue and Slide Ejector Modules’ Components, Old Configuration,
Front View
Slide Ejector
Interface card
Slide Ejector
module
SEN20
SEN17
Cassette lifter
Cassette
lockdown arm
Cassette
Input Queue
module
CL14
M6
B
A
B
A
SOL47
SOL55
SOL48
7334076B
SOL49
SOL50
Figure 2.6-2 Cassette Input Queue and Slide Ejector Modules’ Components, Old Configuration, Rear View
SEN23
Slide
pusher
SEN24
Input
cassette
transfer
mechanism
SEN26
SEN28
Register-X
arm
SEN27
CL11
Z-button
SEN21
CL3
SEN22
CL5
7334067B
2.6-2
SEN25
CL6
PN 4276985A
INSTRUMENT DESCRIPTION
SMEAR PROCESSING SYSTEM: CASSETTE TRANSPORT MODULE
Figure 2.6-3 Cassette Input Queue and Slide Ejector Modules’ Components, New Configuration,
Front View
Slide Ejector
Interface card
Slide Ejector
module
SEN20
SEN17
SEN25
Cassette lifter
Cassette
lockdown arm
Cassette
Input Queue
module
CL14
M6
B
A
B
A
SOL47
SOL55
SOL48
SOL49
SOL50
7334196C
Figure 2.6-4 Cassette Input Queue and Slide Ejector Modules’ Components, New Configuration, Rear View
SEN23
Slide
pusher
SEN24
Input
cassette
transfer
mechanism
SEN26
SEN28
Register-X arm
SEN27
CL11
Z-button
SEN21
CL3
SEN22
CL5
7334197C
PN 4276985A
CL6
2.6-3
2
INSTRUMENT DESCRIPTION
SMEAR PROCESSING SYSTEM: CASSETTE TRANSPORT MODULE
When the cassette present sensor, SEN26, senses a slide cassette is present at the slide ejection
station:
1.
SOL50 is de-energized, and CL6 retracts, returning the input cassette transfer
mechanism to its home position. The input cassette retracted sensor, SEN27, senses
when the input cassette transfer mechanism is at home (CL6 is fully retracted).
2.
SOL55 is energized, retracting the cassette lifter cylinder, CL14, which lowers the slide
cassette. After the slide cassette is lowered, SOL 47 is energized to extend CL5. CL5
operates two lockdown arms that lock the front of the slide cassette in position for slide
ejection. The cassette locked sensor, SEN21, senses when the slide cassette is locked
down.
Slide Ejector Module
The Slide Ejector module removes the slides from the slide cassette for processing. Refer to
Figures 2.6-1 and 2.6-2 (old configuration) or Figures 2.6-3 and 2.6-4 (new configuration) to
locate the components in the Slide Ejector module.
When the slide cassette is locked into position for ejecting a slide, if the slide pickup bridge is
empty:
1.
The slide pusher stepper motor, M6, retracts the slide pusher. As the slide pusher retracts
from under the slide cassette, the bottom slide in the cassette drops into position for
ejection. When the slide pusher retracted sensor, SEN23, senses the slide pusher is fully
retracted, the slide pusher mechanism stops.
2.
SOL49 is energized, extending the register-X cylinder, CL11. CL11 pushes the register-X
arm down to make room for the next slide. The register-X (cleared) sensor, SEN17,
senses when the register-X arm is down, out of the way.
3.
M6 extends the slide pusher, pushing the bottom slide in the slide cassette forward, onto
the slide pickup bridge. When the slide pusher extended sensor, SEN24, senses the slide
pusher is fully extended, the slide pusher mechanism stops.
Note: A slide on the slide pickup bridge deactivates the register-Z forward sensor,
SEN20. If SEN20 is not deactivated, the Slide Ejector module retries ejecting a slide.
4.
SOL48 is energized, extending the Z-button cylinder, CL3. CL3 retracts the Z-button,
releasing the force applied by the button on the slide.
5.
SOL49 is de-energized, releasing the pressure on CL11. The spring mechanism in the
register-X arm pushes the arm up onto the right edge of the slide and pushes the slide
against the left wall of the slide pickup bridge, registering the slide on the X-axis. The
slide registered sensor, SEN25, senses when the slide is registered against the left wall.
Note: Proper registration of the slide is critical, as the position of the slide affects the
ability of the smear truck to pick up the slide and move it into position for making a
smear.
2.6-4
6.
SOL48 is de-energized, releasing pressure on CL3. The spring in CL3 retracts the
cylinder rod, extending the Z-button. The Z-button pushes the slide firmly against the
front edge of the slide pusher, registering the slide on the Z-axis.
7.
SOL49 is energized, extending CL11. CL11 pushes the register-X arm down, making
room for the smear truck to pick up the slide. The register-X (cleared) sensor, SEN17,
senses when the register-X arm is down, out of the smear truck’s path.
PN 4276985A
INSTRUMENT DESCRIPTION
SMEAR PROCESSING SYSTEM: CASSETTE TRANSPORT MODULE
8.
The smear truck moves to the slide pickup bridge and applies vacuum to the slide.
9.
SOL48 is energized to retract the Z-button, removing the pressure applied by the
Z-button on the slide.
10. The smear truck picks up the slide. Removing the slide from the slide pickup bridge
deactivates the slide registered sensor, SEN25.
11. SOL48 is de-energized, releasing pressure on CL3. Since the slide pickup bridge is empty,
CL3 extends the Z-button all the way to the slide pickup bridge, activating the register-Z
forward sensor, SEN20.
12. Deactivating SEN25 and activating SEN20 signals that the slide pickup bridge is empty.
The process begins again.
The Slide Ejector module continues to eject slides until the cassette empty sensor, SEN28,
senses the slide cassette is empty. At that time two to four slides remain in the slide cassette,
allowing the SlideMaker to make smears from any samples already in progress. Then SOL47 is
de-energized, retracting CL5, which unlocks the slide cassette. After the cassette unlocked
sensor, SEN22, senses the slide cassette is unlocked, SOL55 is de-energized extending, CL14.
CL14 lifts the empty slide cassette into position for transfer to the Cassette Output Queue
module.
Upper Cassette Transfer Mechanism
The upper cassette transfer mechanism moves the empty slide cassettes from the Cassette
Input Queue module to the Cassette Output Queue module. While the upper cassette transfer
mechanism is functionally part of the Cassette Transport module, it is physically part of the
Slide and Smear module. Refer to Figure 2.6-5.
Figure 2.6-5 Upper Cassette Transfer Mechanism Components
SOL45
SEN8
Upper
cassette
transfer
mechanism
SEN30
CL9
7334075B
PN 4276985A
2.6-5
2
INSTRUMENT DESCRIPTION
SMEAR PROCESSING SYSTEM: CASSETTE TRANSPORT MODULE
Before the upper cassette transfer assembly moves a slide cassette, the output cassette transfer
mechanism is moved to the rear of the Cassette Output Queue module, positioning the
output transfer cassette mechanism behind the incoming slide cassette (see Cassette Output
Queue Module).
After the Cassette Output Queue module is prepared to accept the slide cassette, SOL45 is
energized, extending CL9. CL9 operates the upper cassette transfer mechanism, which
pushes the slide cassette from the Cassette Input Queue module to the Cassette Output
Queue module. The cassette transit sensor, SEN30, senses when the slide cassette reaches the
Cassette Output Queue module (CL9 is fully extended).
Once the slide cassette is at the Cassette Output Queue module, SOL45 is de-energized,
retracting CL9. Retracting CL9 moves the upper cassette transfer mechanism back to its
home position at the slide ejection station. The cassette transfer home sensor, SEN8, senses
when the upper cassette transfer mechanism is at the home position (CL9 is fully retracted).
Cassette Output Queue Module
The Cassette Output Queue module advances the emptied or rejected slide cassettes to the
front of the Cassette Output Queue module for storage until retrieved by the operator. The
Cassette Output Queue holds up to four slide cassettes. Refer to Figure 2.6-6 to locate the
components in the Cassette Output Queue module.
Before the upper cassette transfer mechanism moves a slide cassette from the Cassette Input
Queue module to the Cassette Output Queue module, SOL53 is energized, extending CL7.
CL7 operates the output cassette transfer mechanism. When CL7 is extended, it moves the
output cassette transfer mechanism to the rear of the Cassette Output Queue module in
preparation for receipt of a slide cassette. The output cassette extended sensor, SEN16, senses
when the output cassette transfer mechanism is at the rear of the module.
Figure 2.6-6 Cassette Output Queue Module Components
Output cassette
transfer mechanism
SEN16
SEN15
SOL53
CL7
7334060A
2.6-6
PN 4276985A
INSTRUMENT DESCRIPTION
SMEAR PROCESSING SYSTEM: CASSETTE TRANSPORT MODULE
SOL53 remains energized until the cassette transfer assembly moves the slide cassette into the
Cassette Output Queue module (see Cassette Output Queue Module).
After the slide cassette reaches the Cassette Output Queue module, SOL53 is de-energized,
retracting CL7. As CL7 retracts it moves the output cassette transfer mechanism arm, pulling
the slide cassette toward the front of the Cassette Output Queue module. The output cassette
retracted sensor, SEN15, senses when the output cassette transfer mechanism is back in its
home position.
Slide Ejector Interface Card
Function
The Slide Ejector Interface card is located on the front of the Cassette Input Queue module.
Refer to Figure 2.6-2.
The Slide Ejector Interface card is an interface between the electrical components in the
Cassette Transport module and the Main Distribution card. The Slide Ejector Interface card
routes, via the Main Distribution card:
r
Power from the Power Supply Monitor card.
r
Control signals from the System Control card.
r
Data signals to the System Control card
Connectors and Test Points
The locations of the connectors and test points on the Slide Ejector Interface card are shown
in Figure A.2-4 and described in Tables A.2-11 and A.2-12, respectively.
Sensors Summary
The sensors used by the Cassette Transport module are listed in Table 2.6-1. For a complete
list of sensors used in the SlideMaker, and a description of the types of sensors used, see
Heading A.4.
Table 2.6-1 Cassette Transport Assembly Sensors
SEN
No.
Name/
Location Reference
Type/
Active State
8
Cassette transfer home
Infrared interrupting
See Figure 2.6-5
15
Output cassette retracted
See Figure 2.6-6
16
Output cassette extended
See Figure 2.6-6
PN 4276985A
.
Blocked = Upper cassette
mechanism at home position
Infrared interrupting
Interface Card
Smear/Transport
Interface
Input
Output
Connector Plug, Pin
J17
J6, 14
Slide Ejector Interface J1
J9, 5
Slide Ejector Interface J2
J9, 6
Blocked = output cassette
transfer mechanism retracted (in
home or rest position)
Infrared interrupting
Blocked = output cassette
transfer mechanism extended
2.6-7
2
INSTRUMENT DESCRIPTION
SMEAR PROCESSING SYSTEM: CASSETTE TRANSPORT MODULE
Table 2.6-1 Cassette Transport Assembly Sensors (Continued)
SEN
No.
Name/
Location Reference
Type/
Active State
Interface Card
17
Register X (cleared)
Infrared interrupting
Slide Ejector Interface J20
J9, 17
Slide Ejector Interface J21
J9, 4
Slide Ejector Interface J3
J9, 7
Slide Ejector Interface J4
J9, 8
Slide Ejector Interface J5
J9, 9
Slide Ejector Interface J6
J9, 10
Slide Ejector Interface J7
J9, 11
Slide Ejector Interface J8
J9, 12
Slide Ejector Interface J10
J9, 13
Slide Ejector Interface J11
J9, 14
Smear/Transport
Interface
J6, 5
See Figure 2.6-1 or
Figure 2.6-3
20
Register Z forward
See Figure 2.6-1 or
Figure 2.6-3
21
Cassette locked
See Figure 2.6-2 or
Figure 2.6-4
22
Cassette unlocked
See Figure 2.6-2 or
Figure 2.6-4
23
Slide pusher retracted
See Figure 2.6-2 or
Figure 2.6-4
24
Slide pusher extended
See Figure 2.6-2 or
Figure 2.6-4
25
Slide registered
See Figure 2.6-2 or
Figure 2.6-3
26
Cassette present
See Figure 2.6-2 or
Figure 2.6-4
27
Input cassette retracted
See Figure 2.6-2 or
Figure 2.6-4
28
Cassette Empty Sensor card
See Figure 2.6-2 or
Figure 2.6-4
30
Cassette transit
See Figure 2.6-5
2.6-8
Input
Output
Connector Plug, Pin
Blocked = register X arm fully
cleared the truck path
Infrared interrupting
Blocked = register Z arm is fully
forward (no slide is available for
pickup)
Infrared interrupting
Blocked = cassette locked
Infrared interrupting
Blocked = cassette unlocked
Infrared interrupting
Blocked = slide ejector retracted
Infrared interrupting
Blocked = slide ejector extended
Infrared interrupting
Blocked = left side of slide
registered correctly
Reflective infrared
Reflection = cassette present in
ejection position
Reflective infrared
Reflection = input cassette
transfer mechanism in home
position
Reflective infrared (mounted on
PCB)
Reflection = cassette present and
empty
Infrared interrupting
Blocked = upper cassette
mechanism in transit between
home and fully extended
J23
PN 4276985A
INSTRUMENT DESCRIPTION
SMEAR PROCESSING SYSTEM: SLIDE AND SMEAR MODULE
2.7
SMEAR PROCESSING SYSTEM: SLIDE AND SMEAR MODULE
Summary
The smear processing system comprises six modules that process the smear from retrieval of a
clean, microscopic slide to collection of a stain ready, whole-blood smear.
This section describes the Slide and Smear module. The Slide and Smear module:
r
Transports and precisely positions the slide at the various locations in the SlideMaker for
preparing the slide.
r
Makes a wedge blood smear on the slide.
This section also describes the Smear/Transport Interface Card.
For more information on the smear processing system, see the Cassette Transport module
(Heading 2.6), the Label Printer module (Heading 2.8), the Dryer module (Heading 2.9), the
Slide Elevator module (Heading 2.10), and the Basket Queue module (Heading 2.11).
Description
The Slide and Smear module comprises two modules:
r
Slide Transport module
r
Smear module
The Slide and Smear module spans the area from the Label Printer module to the Dispense
module. See Figure 2.1-2.
Slide Transport Module
Function
The Slide Transport module uses a moving platform, called a shuttle, to transport a slide
between three positions:
r
The smear (home) position for access by the Smear module and the Dryer module
r
The print (labeling) position for access by the Label Printer module
r
The dispense position for access by the Dispense module.
The shuttle stepper motor, M1, and a pulley mechanism drive the shuttle along two guide
bars. See Figure 2.7-1. Vacuum via VL44 is applied to the bottom of the shuttle to hold the
slide in place during transport. The shuttle vacuum switch sensor, SEN4, monitors the
vacuum to ensure a slide is present (no vacuum leak).
PN 4276985A
2.7-1
2
INSTRUMENT DESCRIPTION
SMEAR PROCESSING SYSTEM: SLIDE AND SMEAR MODULE
Figure 2.7-1 Slide and Smear Module Components
SOL46
SOL44
SOL43
SEN4
SEN3
3
4
5
SOL41
SOL45
SOL56
SOL61
Encoder
(SEN58,
SEN59,
SEN60)
SEN2
SEN1
SEN10
CL8
SEN9
Smear/
Transport
Interface
card
VL43
VL44
Shuttle
stepper
motor M1 SEN5
SEN8
Shuttle
SEN30
CL9
Servo
motor
M7
SOL42
Smear
SEN6
truck
CL10
SEN11
SEN7
SEN12
7334063B
The SlideMaker software controls and varies the speed of the shuttle as needed to perform the
necessary functions. See Figure 2.7-2. In general, however:
r
As the shuttle moves toward a destination (position) it accelerates until it reaches a
constant velocity.
r
Before the shuttle reaches its destination it decelerates until it stops.
Figure 2.7-2 Shuttle Velocity Profile
Label
applied
Velocity
Print
position
Travel
2.7-2
Dispense
position
Home
position
7334052A
PN 4276985A
INSTRUMENT DESCRIPTION
SMEAR PROCESSING SYSTEM: SLIDE AND SMEAR MODULE
At the beginning of the cycle, the shuttle is in the smear (home) position. Before moving the
shuttle, the SlideMaker checks the shuttle for the presence of a slide. Normally the spreader
slide used to make the previous smear is on the shuttle. If no slide is present, the smear truck
in the Smear module moves to the Slide Ejector module, picks up a slide, and deposits the
slide on the shuttle.
The smear truck is adjusted so that when it places the slide on the shuttle, the right side of
the slide is centered on the shuttle support wall as shown in Figure 2.7-3.
Figure 2.7-3 Correct Position of the Slide on the Shuttle
Top view
Side view
Center right
edge of slide
on wall
Center right
edge of slide
on wall
Shuttle
support
wall
Shuttle
support
wall
7334166B
The shuttle moves the slide from the smear position to the print position at the Label Printer
module. At the print position, the print position sensor, SEN5, senses the presence of the
shuttle. The shuttle travels the additional steps set for the printer offset and stops. Then the
shuttle reverses direction and starts moving at the same speed as the label dispenser in the
Label Printer module, which applies a label to the slide using the “peel” technique. The
printer offset is calibrated to ensure the label is positioned near the end of the slide, but not
over the edge of the slide, as shown in Figure 2.7-4.
Figure 2.7-4 Correct Position of the Label from the End of the Slide
Label
0.069 in. ±0.030
7334069A
From the print position, the shuttle carries the slide to the dispense position. When the
shuttle reaches the dispense position, the dispense position sensor, SEN7, senses the presence
of the shuttle. The shuttle travels the additional steps set for the dispense offset and stops.
The Dispense module dispenses a 4 µL drop of blood onto the slide. The dispense offset is
calibrated to ensure the drop of blood is positioned in from the right edge of the slide as
shown in Figure 2.7-5.
PN 4276985A
2.7-3
2
INSTRUMENT DESCRIPTION
SMEAR PROCESSING SYSTEM: SLIDE AND SMEAR MODULE
Figure 2.7-5 Correct Position of the Blood Drop on the Slide
25 mm (1 in.)
Dispense
probe
Slide
Blood
drop
25 mm
(1 in.)
Shuttle
7334068A
From the dispense position, the shuttle moves the slide back to the smear position for
preparation of the smear by the Smear module. The smear position sensor, SEN6, senses the
presence of the shuttle in the smear position. The shuttle travels the additional steps set for
the home offset and stops. The home offset is calibrated to ensure that when the shuttle is in
the smear position, it is aligned with the Smear module and the Dryer module.
Smear Module
Function
The Smear module uses a precisely controlled slide carrier, called a smear truck, to make the
wedge blood smear and to place the spreader slide on the shuttle in preparation for the next
smear. The smear truck is part of the servo system, which includes:
r
The smear truck assembly
r
The servo motor, M7, and gear train assembly
r
A leadscrew guide assembly
r
A quadrature encoder.
See Figure 2.7-1.
The servo motor drives the leadscrew guide assembly which converts rotation into the guided
linear motion of the smear truck. The leadscrew drives the encoder which provides positional
feedback from the encoder sensors, SEN58, SEN59 and SEN60, to the motor controller.
Two limit sensors, the servo forward sensor, SEN2, and the servo reverse limit sensor, SEN1,
sense when the smear truck reaches a travel limit and brake the servo motor.
The SlideMaker software controls the direction, position, velocity and acceleration of the
smear truck. The design features of the servo system allow very precise, accurate control of
the smear truck’s movement with quick response to changing conditions.
Two configurations of the smear truck assembly are currently in use. See Figures 2.7-6
and 2.7-7. Refer to these illustrations as you read the following description of operation.
2.7-4
PN 4276985A
INSTRUMENT DESCRIPTION
SMEAR PROCESSING SYSTEM: SLIDE AND SMEAR MODULE
The truck lift, which comprises a cylinder, CL12, a spring, and associated hardware, moves
the smear truck vertically.
r
When the smear truck is idle or is picking up a slide from the Slide Ejector module, the
smear truck is raised and fully horizontal. In this state, SOL61 is de-energized, routing
pressure to the bottom of the truck lift cylinder, CL12
r
To pickup a slide, SOL61 is energized to release the pressure on the bottom of CL12, and
SOL56 is energized to route pressure to the top of CL12. This action pushes the smear
truck down and compresses the truck lift spring. When the smear truck contacts the
slide, it pivots the smear truck into the fully horizontal position.
r
To make a smear, the smear truck tilts down into the smearing position. To accomplish
this position, SOL61 is energized, removing pressure from the bottom of CL12. Gravity
tilts the smear truck down.
r
After the smear is made, SOL61 is de-energized, routing pressure to the bottom of CL12
which pushes the smear truck back to the horizontal position.
r
To lower the spreader slide onto the shuttle, SOL61 is energized to release the pressure
on the bottom of CL12, then SOL56 is energized, routing pressure to the top of CL12.
This action pushes the smear truck down and compresses the truck lift spring. When the
slide contacts the shuttle, it pivots the smear truck up into the fully horizontal position.
r
To raise the smear truck back to the raised, fully horizontal position, SOL56 is
de-energized, removing pressure from the top of CL12. The truck lift spring expands,
lifting the smear truck to the tilted down position. Then SOL61 is de-energized, routing
pressure to the bottom of CL12. As CL12 retracts, it moves a lever that pivots the smear
truck up.
Figure 2.7-6 Smear Truck Assembly, Old Configuration
SEN18
Truck lift
spring
CL12
Lift up
setscrew
Truck
lift
SEN19
Tilt lever
driving nut
Tilt lever
Smear
truck
Tilt up
setscrew
Front view
PN 4276985A
Tilt down
setscrew
Rear view
7334162B
2.7-5
2
INSTRUMENT DESCRIPTION
SMEAR PROCESSING SYSTEM: SLIDE AND SMEAR MODULE
Figure 2.7-7 Smear Truck Assembly New Configuration
Front view
SEN18
Rear view
Truck lift
spring
CL12
Lift up
screw
Truck
lift
SEN19
Smear edge
setscrew
Tilt lever
driving nut
Tilt lever
Smear
truck
Tilt up
setscrew Pick up
position
screw
Tilt down
setscrew
7334187C
Two sensors, the truck lift down sensor, SEN19, and the truck lift up sensor, SEN18, monitor
the position of the truck lift and generate error messages when the truck lift is not in the
correct position.
Adjustments on the smear truck assembly allow you to adjust the positions of the smear
truck. See Figures 2.7-6 and 2.7-7. For the procedure, see Heading 4.18, SMEAR TRUCK
ALIGNMENT CHECKS AND ADJUSTMENTS.
To remove the smear truck assembly, a hole in the frame above the smear truck path provides
screwdriver access to the three screws securing the assembly to the lead nut support housing.
The smear truck uses unregulated vacuum via VL43 to pick up and securely hold the slides.
The truck vacuum switch sensor, SEN3, monitors the smear truck vacuum.
When a slide with a drop of blood is in the smear position, the smear truck moves to the Slide
Ejector module and picks up a slide. The pick offset is calibrated to ensure the smear truck
goes to the correct location to pick up the slide.
Holding the slide in position for making a wedge smear, the smear truck places the left edge
of this spreader slide on the smear slide, moves the spreader slide through the drop of blood,
and stops, allowing the blood to wick along the edge of the spreader slide. The wick offset is
calibrated to ensure the smear truck stops at the correct location on the slide.
Then the smear truck pushes the spreader slide across the long direction of the smear slide,
producing a wedge blood smear. The SlideMaker software varies the wicking time and the
acceleration and velocity of the spreader slide, depending on the viscosity of the specimen.
The wicking time, the acceleration, and the velocity can be adjusted to produce a thinner or
2.7-6
PN 4276985A
INSTRUMENT DESCRIPTION
SMEAR PROCESSING SYSTEM: SLIDE AND SMEAR MODULE
thicker smear, depending on customer preference. The adjustments are explained in the
Online Help system topic, Define Smear Speed. The default settings are 5, 5, and 5. Changes
to these settings are made at the discretion of the customer and are entirely their
responsibility.
After making the smear, the Smear module transfers the labeled, wet slide to the Dryer
module for drying. To move the slide from the shuttle to the Dryer module, SOL44 is
de-energized to release the shuttle vacuum holding the slide on the shuttle, and SOL41 is
energized, extending CL8. CL8 operates the slide pusher bars in the Smear module. The slide
pusher bars push the wet slide from the shuttle onto the conveyer belts of the Dryer module.
The slide transfer extended sensor, SEN10, senses when the pusher bars are fully extended.
After the wet slide is transferred to the Dryer module, SOL41 is de-energized, retracting CL8
and the slide pusher bars. The slide transfer retracted sensor, SEN9, senses when the slide
pusher bars are retracted. Then the smear truck deposits the spreader slide on the shuttle.
(The truck lift lowers the smear truck and SOL43 is de-energized, releasing the smear truck
vacuum.) This spreader slide becomes the smear slide for the next sample of blood.
Alignment
The Smear module is integrated with the Slide Ejector module, the Dryer module and the
Dispense module into one slide transport frame. Each module must be mounted accurately
for the Smear module to perform correctly. For additional troubleshooting information, refer
to Heading 7.3.
Voltage and High Vacuum Inputs
See Smear Module Input Tolerances under Heading A.1 for the acceptable ranges for the
voltage and high vacuum inputs to the Smear module.
Smear/Transport Interface Card
Function
The Smear/Transport Interface card is located on the top, right side of the Slide and Smear
module. Refer to Figure 2.7-1.
The Smear/Transport Interface card is an interface between all of the electrical components in
the Slide and Smear module, except the servo motor, and the Main Distribution card. The
Smear/Transport Interface card routes, via the Main Distribution card:
r
Power from the Power Supply Monitor card.
r
Control signals from the System Control card.
r
Data signals to the System Control card.
Note: The servo motor, which requires high switched currents, is connected directly to the
System Control card to avoid additional system noise.
In addition, the Smear/Transport Interface card routes signals from the eight fluid detectors,
without modification, to the System Control card, via a dedicated cable. The fluid data signals
are separated from all other signals to enable high quality signal transfer with minimum noise
pickup.
PN 4276985A
2.7-7
2
INSTRUMENT DESCRIPTION
SMEAR PROCESSING SYSTEM: SLIDE AND SMEAR MODULE
Connectors and Test Points
The locations of the connectors and test points on the Smear/Transport Interface card are
shown in Figure A.2-6 and described in Tables A.2-13 and A.2-14, respectively.
Calibration of the Slide Positions in the Slide and Smear Module
Calibrating the Shuttle Positions
The home, printer, and dispense offsets are used to adjust the smear, printer, and dispense
positions of the shuttle, respectively. To verify and adjust these shuttle positions, see
Heading 4.3.
Calibrating the Smear Truck Positions
The pick and wick offsets are used to adjust the pick and wick positions of the smear truck,
respectively. To verify and adjust these smear truck positions, see Heading 4.4.
Sensor Summary
The sensors used by the Slide and Smear module are listed in Table 2.7-1. For a complete list
of sensors used in the SlideMaker, and a description of the types of sensors used, see
Heading A.4
Table 2.7-1 Slide and Smear Module Sensors
SEN
No.
Name/
Location Reference
Type/
Active State
1
Servo reverse limit
Infrared interrupting
See Figure 2.7-1
2
Servo forward limit
See Figure 2.7-1
3
Truck vacuum
See Figure 2.7-1
4
Shuttle vacuum
See Figure 2.7-1
5
Print position
See Figure 2.7-1
6
Smear position
See Figure 2.7-1
7
Dispense position
See Figure 2.7-1
9
Slide transfer retracted
See Figure 2.7-1
2.7-8
.
Blocked = truck at reverse limit
Infrared interrupting
Blocked = truck at forward limit
Vacuum-activated switch
Closed = vacuum
Vacuum-activated switch
Closed = vacuum
Infrared interrupting
Blocked = shuttle at print
position
Infrared interrupting
Blocked = shuttle at smear
position
Infrared interrupting
Blocked = shuttle at dispense
position
Infrared interrupting
Blocked = slide transfer
mechanism retracted
Interface Card
Input
Output
Connector Plug, Pin
Smear/Transport
Interface
J10
J6, 7
Smear/Transport
Interface
J11
J6, 8
Smear/Transport
Interface
J12
J6, 9
Smear/Transport
Interface
J13
J6, 10
Smear/Transport
Interface
J14
J6, 11
Smear/Transport
Interface
J15
J6, 12
Smear/Transport
Interface
J16
J6, 13
Smear/Transport
Interface
J18
J6, 15
PN 4276985A
INSTRUMENT DESCRIPTION
SMEAR PROCESSING SYSTEM: SLIDE AND SMEAR MODULE
Table 2.7-1 Slide and Smear Module Sensors (Continued)
SEN
No.
Name/
Location Reference
Type/
Active State
10
Slide transfer extended
Infrared interrupting
See Figure 2.7-1
18
Truck lift up
See Figure 2.7-6 or
Figure 2.7-7
19
Truck lift down
See Figure 2.7-6 or
Figure 2.7-7
58
Encoder A
Encoder B
J19
J6, 16
Smear/Transport
Interface
J22
J6, 23
Smear/Transport
Interface
J22
J6, 5
Encoder
Smear/Transport
Interface
J9
J6, 19
Encoder
Smear/Transport
Interface
J9
J6, 20
Encoder
Smear/Transport
Interface
J9
J6, 21
Blocked = slide transfer
mechanism extended
Magnetic switch
Closed = truck lift up
Magnetic switch
Closed = truck lift down
See Figure 2.7-1
60
Encoder I
See Figure 2.7-1
PN 4276985A
Input
Output
Connector Plug, Pin
Smear/Transport
Interface
See Figure 2.7-1
59
Interface Card
2.7-9
2
INSTRUMENT DESCRIPTION
SMEAR PROCESSING SYSTEM: SLIDE AND SMEAR MODULE
2.7-10
PN 4276985A
INSTRUMENT DESCRIPTION
SMEAR PROCESSING SYSTEM: LABEL PRINTER MODULE
2.8
SMEAR PROCESSING SYSTEM: LABEL PRINTER MODULE
Summary
The smear processing system comprises six modules that process the smear from retrieval of a
clean, microscopic slide to collection of a stain ready, whole-blood smear.
This section describes the Label Printer module. The Label Printer module is a dedicated label
printer that prints labels and applies the labels to the slides.
For more information on the smear processing system, see the Cassette Transport module
(Heading 2.6), the Slide and Smear module (Heading 2.7), the Dryer module (Heading 2.9),
the Slide Elevator module (Heading 2.10), and the Basket Queue module (Heading 2.11).
Description
The Label Printer module is mounted by screws to the Slide and Smear module. Refer to
Figure 2.1-2.
The Label Printer module is supplied by an outside manufacturer as a complete assembly. See
Figure 2.8-1. The Power Supply Monitor card supplies power directly to the Label Printer
module. A ground strap connecting the Label Printer module chassis and a nearby chassis
ground stud provide EMI and RFI shielding as well as antistatic protection. The Main
Distribution card is the interface between the Label Printer module and the System Control
card, routing the control and data signals to and from the Label Printer module via a serial
data interface cable.
Figure 2.8-1 Label Printer Module Components
Ribbon out
sensor
Label
roll
Top-of-form
sensor
Ribbon
roll
Height
adjustment
screw
Printhead
CL4
Y-position
adjustment
screw
PN 4276985A
6985016A
2.8-1
2
INSTRUMENT DESCRIPTION
SMEAR PROCESSING SYSTEM: LABEL PRINTER MODULE
The Label Printer module:
1.
Receives label data from the Workstation.
2.
Uses the thermal transfer printing process to print the information onto a label received
from a supply roll.
3.
Peels the label from its backing and applies the label in proper orientation to the
appropriate microscope slide. To apply a label to the slide:
a.
The shuttle moves the slide to the printer position, where the shuttle stops
momentarily.
b.
The label dispenser advances, pulling the label over a sharp edge which starts
peeling the label off the backing.
c.
The peeling end of the label sticks onto the slide.
d.
The shuttle reverses directions and starts moving at the same speed as the label
dispenser. The label continues to unpeel, sticking onto the slide.
During initialization of the SlideMaker:
1.
The Power Supply Monitor card applies power to the Label Printer module to turn the
printer on and initialize the printer’s electronics.
2.
The printhead cylinder, CL4 (Figure 2.8-1), is extended, closing the printhead onto the
label roll. SOL46, which is mounted on the Slide and Smear module (Figure 2.8-2),
operates CL4.
3.
The label roll advances and the top-of form-sensor (Figure 2.8-1) checks for labels. The
label roll advances past three labels. The first is blank and the second and third are
printed dummy labels.
4.
The label roll stops with a label in position for printing.
Figure 2.8-2 Printhead Cylinder Solenoid
SOL46
3
4
5
7334078B
2.8-2
PN 4276985A
INSTRUMENT DESCRIPTION
SMEAR PROCESSING SYSTEM: LABEL PRINTER MODULE
Field Adjustments
You can make four adjustments to the Label Printer module in the field:
r
Change the print intensity level. This is done by the operator via software control (MAIN
MENU tt ROUTINE FUNCTIONS tt PRINTER LABEL FUNCTIONS.)
r
Increase or decrease the clearance between the slide and the label and ribbon rolls. This
is accomplished by adjusting the height adjustment screw to raise or lower the Label
Printer module. See Printer Height above the Slide Adjustment under Heading 4.5.
r
Move the location of the label on the slide in the Y-dimension. See Figure 2.8-3. This is
accomplished by adjusting the Y-adjustment screw to reposition the Label Printer
module. See Label Position in the Y-Dimension Adjustment under Heading 4.5.
Figure 2.8-3 Correct Position of the Label on the Slide
Label
X
0.069 in. ±0.030
0.06 in. ±0.030
7334070A
r
Y
Move the location of the label on the slide in the X-dimension. See Figure 2.8-3. This is
accomplished by adjusting the printer offset. See Setting the Printer Offset under
Heading 4.3.
Sensor Summary
Three sensors affect the operation of the Label Printer module:
PN 4276985A
r
Two sensors on the Label Printer module, the top-of-form sensor and the ribbon out
sensor, monitor the label and ribbon supplies, respectively.
r
A sensor on the Slide and Smear module, the print position sensor, SEN5, affects where
the shuttle stops at the Label Printer module, and therefore the placement of the label on
the slide. The print position sensor is discussed in more detail under Heading 2.7,
SMEAR PROCESSING SYSTEM: SLIDE AND SMEAR MODULE, and is listed in
Table A.4-1.
2.8-3
2
INSTRUMENT DESCRIPTION
SMEAR PROCESSING SYSTEM: LABEL PRINTER MODULE
2.8-4
PN 4276985A
INSTRUMENT DESCRIPTION
SMEAR PROCESSING SYSTEM: DRYER MODULE
2.9
SMEAR PROCESSING SYSTEM: DRYER MODULE
Summary
The smear processing system comprises six modules that process the smear from retrieval of a
clean, microscopic slide to collection of a stain ready, whole-blood smear.
This section describes the Dryer module. The Dryer module:
1.
Receives a labeled, wet, smear slide from the Slide and Smear module.
2.
Dries the smear.
3.
Moves the smear to the Slide Elevator module.
This section also describes the Dryer Interface card.
For more information on the smear processing system, see the Cassette Transport module
(Heading 2.6), the Slide and Smear module (Heading 2.7), the Label Printer module
(Heading 2.8), the Slide Elevator module (Heading 2.10), and the Basket Queue module
(Heading 2.11).
Description
The Dryer module is mounted to the Slide and Smear module between the Cassette Transport
module and the Dispense module. See Figure 2.1-2.
The Dryer module has two chambers, a lower chamber and an upper chamber. See
Figure 2.9-1.
Figure 2.9-1 Dryer Module Components
Stripper
plate
Conveyer
belts
Upper
chamber
Temperture
Sensor card
SEN49
Exit
wheels
Dryer
stepper
motor
M5
SEN46
Dryer
Interface
card
Lower
chamber
Heatsink
assembly
Fan
PN 4276985A
6985023A
2.9-1
2
INSTRUMENT DESCRIPTION
SMEAR PROCESSING SYSTEM: DRYER MODULE
A fan pulls air into the lower chamber through a filter which prevents dust particles from
contacting the smear. In the lower chamber, the air passes through six choking holes to
restrict the air flow and then through a heatsink assembly to heat the air. From the heatsink
assembly, the warm air makes a U-turn and flows vertically through twelve holes on the top
surface of the lower chamber into the upper chamber.
The upper chamber of the Dryer module is permanently sealed across the top and along both
long sides, forming a slide-drying chamber with a gentle, hot air flow.
Two heat sensors in the Dryer module monitor the temperature:
r
One heat sensor senses the temperature in the heatsink and is an integral part of the
heatsink assembly. Refer to Figure 2.9-1.
r
The other heat sensor senses the temperature in the upper chamber and is mounted on
the Temperature Sensor card. Refer to Figure 2.9-1.
The ambient temperature thermistor and the circuitry for controlling the Dryer module
temperature are on the System Control card. At powerup, sufficient current is supplied to the
heatsink assembly to raise the heatsink temperature to about 20°C above the ambient
temperature in a maximum of 3 minutes. During operation, the System Control card regulates
the current to the heatsink assembly to maintain the drying temperature in the upper
chamber at about 10°C above ambient temperature.
Slide pusher bars in the Smear module push the wet, smeared slide off the shuttle onto
conveyor belts in the upper chamber of the Dryer module. The conveyor belts, belt/pulley
mechanisms driven by the dryer stepper motor, M5, move the slide through the upper
chamber at a constant, slow speed while maintaining the correct orientation of the slide. The
warm air from the lower chamber contacts the underside of the slide, drying the smear as the
slide moves through the upper chamber.
As the dried slide nears the exit of the Dryer module, the Dryer Exit Sensor card, SEN49
(Figure 2.9-1), senses the exiting slide. From this information, the SlideMaker calculates
when the slide will drop onto the platen, determining when to close the gripper.
In addition, the SlideMaker counts the number of steps that the dryer stepper motor takes for
each slide. If the motor takes too many steps before the SlideMaker senses an exiting slide,
the SlideMaker considers the slide lost or fallen in the Dryer module and generates an error.
Dryer Interface Card
Function
The Dryer Interface card is located on the left side of the Dryer module. Refer to Figure 2.9-1.
2.9-2
PN 4276985A
INSTRUMENT DESCRIPTION
SMEAR PROCESSING SYSTEM: DRYER MODULE
The Dryer Interface card is an interface between the electrical components in the Dryer and
the Slide Elevator modules and the Main Distribution card. The Dryer Interface card routes,
via the Main Distribution card:
r
Power from the Power Supply Monitor card.
r
Control signals from the System Control card
r
Data signals to the System Control card.
Connectors and Test Points
The locations of the connectors and test points on the Dryer Interface card are shown in
Figure A.2-2 and described in Tables A.2-3 and A.2-4, respectively.
Sensor Summary
The sensors used by the Dryer module are listed in Table 2.9-1. For a complete list of sensors
used in the SlideMaker, and a description of the types of sensors used, see Heading A.4.
Table 2.9-1 Dryer Module Sensors
SEN
No.
Name/
Location Reference
Type/
Active State
49
Dryer Exit Sensor card
Pulsed infrared reflective
(mounted on PCB)
See Figure 2.9-1
Interface Card
Input
Output
Connector Plug, Pin
Dryer Interface
J3
J8, 11
Reflection = slide at exit position
Temperature Sensor card
Temperature (mounted on PCB)
See Figure 2.9-1
PN 4276985A
2.9-3
2
INSTRUMENT DESCRIPTION
SMEAR PROCESSING SYSTEM: DRYER MODULE
2.9-4
PN 4276985A
INSTRUMENT DESCRIPTION
SMEAR PROCESSING SYSTEM: SLIDE ELEVATOR MODULE
2.10
SMEAR PROCESSING SYSTEM: SLIDE ELEVATOR MODULE
Summary
The smear processing system comprises six modules that process the smear from retrieval of a
clean, microscopic slide to collection of a stain ready, whole-blood smear.
This section describes the Slide Elevator module. The Slide Elevator module:
1.
Receives dried smear slides from the Dryer module.
2.
Inserts the slides into slide baskets in the Basket Queue module.
For more information on the smear processing system, see the Cassette Transport module
(Heading 2.6), the Slide and Smear module (Heading 2.7), the Label Printer module
(Heading 2.8), the Dryer module (Heading 2.9), and the Basket Queue module
(Heading 2.11).
Description
The Slide Elevator module is mounted on the right side of the Dryer module. See
Figure 2.1-2.
The Slide Elevator module consists of a guided slider driven by a stepper motor for moving
the platen of the elevator up and down and a gear/rack/spring mechanism for rotating the
platen. See Figure 2.10-1.
Figure 2.10-1 Slide Elevator Module Components
Platen
adjustments
Platen
SEN44
Gear/rack/
spring
mechanism
SOL60
SEN45
Elevator
SEN41
7334062B
PN 4276985A
Platen elevator
stepper motor , M2
2.10-1
2
INSTRUMENT DESCRIPTION
SMEAR PROCESSING SYSTEM: SLIDE ELEVATOR MODULE
A gripper (slide retaining arm) secures the slide to the platen. See Figure 2.10-2.
Figure 2.10-2 Dryer Module and Slide Elevator Module Component Interaction
Lever
Gripper
SEN46
Dryer
module
Slide Elevator
module
Gripper cylinder,
PL1
Platen
6985024A
Force from the moving conveyer belts in the Dryer module and friction between the slide and
the slide exit wheels move the slide from the belts onto the slide exit wheels which in turn
drop the slide onto the platen of the Slide Elevator module. The platen is in the horizontal
position with the gripper open, ready to receive a slide. SOL60 (Figure 2.10-1), which is
normally energized, extends PL1 (Figure 2.10-2) to hold the gripper open.
When enough time has elapsed since SEN49 sensed a slide exiting the Dryer module for the
slide to be on the platen, SOL60 is de-energized, PL1 retracts, and the spring in the gripper
assembly closes the gripper on the slide. (For details about the function of SEN49, see
Description under Heading 2.9, SMEAR PROCESSING SYSTEM: DRYER MODULE.)
The gripper overextended sensor, SEN46, monitors the position of the gripper to ensure a
slide is on the platen. SEN46 is an infrared sensor and lever (flag) assembly mounted on the
Dryer module but activated by movement of the gripper on the Slide Elevator module
(Figure 2.10-2).
r
When the gripper is fully closed, that is SOL60 is de-energized but no slide is on the
platen, the lever just touches the back of the gripper and SEN46 is blocked.
Note: SEN46 is adjusted so that the lever just touches the back of the gripper in this
position.
r
When the gripper is either fully open waiting for a slide, or partially closed holding a
slide, the gripper moves the lever of SEN46, unblocking the sensor.
The gripper is activated up to three times to grip a slide. If after the third try SEN46 is still
blocked, indicating no slide is on the platen, an error message is generated.
When a slide is on the platen, the platen elevator stepper motor, M2, moves the elevator
down to the slide releasing position. As the elevator moves, the spring in the gear/rack/spring
mechanism releases, rotating the platen 90 degrees.
2.10-2
PN 4276985A
INSTRUMENT DESCRIPTION
SMEAR PROCESSING SYSTEM: SLIDE ELEVATOR MODULE
When the elevator reaches the platen elevator down sensor, SEN45 (indicating the elevator is
down), SOL60 is energized, releasing the gripper, and the slide falls into the basket slot.
After either the vertical slide sensor, SEN41, on the Slide Elevator module, or the basket
index sensor, SEN37, in the Basket Transport module, confirm a slide is in the basket slot, the
platen elevator stepper motor drives the elevator up until the elevator reaches the platen
elevator up sensor, SEN44. The upward movement stretches the spring in the
gear/rack/spring mechanism, rotating the platen back to the horizontal position.
The platen elevator stepper motor should move the slide elevator from the low point to the
high point, or from the high point to the low point, in a fixed number of steps. If the motor
takes more than that fixed number of steps by a certain margin, the SlideMaker generates an
error.
Adjustments on the Slide Elevator module allow you to move the platen until the released
slides are perpendicular to the basket slots and are centered in the basket slot. See
Figure 2.10-1. For the adjustment procedure, see Heading 4.6, SLIDE ELEVATOR PLATEN
ADJUSTMENTS.
Sensor Summary
The sensors used by the Slide Elevator module are listed in Table 2.10-1. For a complete list
of sensors used in the SlideMaker, and a description of the types of sensors used, see
Heading A.4.
Table 2.10-1 Slide Elevator Module Sensors
SEN
NO.
Name/
Location Reference
Type/
Active State
Interface Card
37
Basket index
Infrared interrupting, 2 piece
(mounted on PCB)
Basket Transport
Interface
J8
J7, 13
Dryer Interface
J5
J8, 5
Dryer Interface
J11
J8, 8
Dryer Interface
J10
J8, 9
See Figure 2.11-1
Input
Output
Connector Plug, Pin
Blocked (blocked < 2.1 V,
unblocked >3.4 V) = slide
insertion space occupied (Slide
is in the basket at this position,
or the basket is not in position to
receive a slide.)
41
Vertical slide
See Figure 2.10-1
44
Platen elevator up
See Figure 2.10-1
45
Platen elevator down
See Figure 2.10-1
PN 4276985A
Reflective infrared
Reflection = slide present in drop
position of basket
Infrared interrupting
Blocked = elevator is up, platen is
horizontal
Infrared interrupting
Blocked = elevator is down,
platen is vertical
2.10-3
2
INSTRUMENT DESCRIPTION
SMEAR PROCESSING SYSTEM: SLIDE ELEVATOR MODULE
Table 2.10-1 Slide Elevator Module Sensors
SEN
NO.
Name/
Location Reference
Type/
Active State
Interface Card
Input
Output
Connector Plug, Pin
46
Gripper overextended
Infrared interrupting
Dryer Interface
J9
J8, 10
Dryer Interface
J3
J8, 11
See Figure 2.10-2
49
Dryer Exit Sensor card
See Figure 2.9-1
Blocked = gripper fully closed
indicating either no slide at
platen or slide improperly placed
at platen
Pulsed infrared reflective
(mounted on PCB)
Reflection = slide at exit position
2.10-4
PN 4276985A
INSTRUMENT DESCRIPTION
SMEAR PROCESSING SYSTEM: BASKET QUEUE MODULE
2.11
SMEAR PROCESSING SYSTEM: BASKET QUEUE MODULE
Summary
The smear processing system comprises six modules that process the smear from retrieval of a
clean, microscopic slide to collection of a stain ready, whole-blood smear.
This section describes the Basket Queue module. The Basket Queue module:
1.
Moves empty slide baskets to the Slide Elevator module to receive the dried slides (up to
12 per basket).
2.
Moves the filled slide baskets (or in the case of a stat, the slide basket containing the stat
slide) away from the Slide Elevator module.
The Basket Queue module can hold up to 12 slide baskets at any one time.
This section also describes the Basket Transport Interface card.
For more information on the smear processing system, see the Cassette Transport module
(Heading 2.6), the Slide and Smear module (Heading 2.7), the Label Printer module
(Heading 2.8), the Dryer module (Heading 2.9), and the Slide Elevator module
(Heading 2.10).
Description
The Basket Queue module is located across the inside front of the SlideMaker. Refer to
Figure 2.1-2
The Basket Queue module uses two independent belt/pulley tracks to move the slide baskets.
See Figure 2.11-1. The rear (input) track, driven by the rear stepper motor, M4, advances the
slide baskets from left to right, one basket slot at a time. The front (output) track, driven by
the front stepper motor, M3, advances the slide baskets from right to left, a complete basket at
a time. Cylinder operated crossover arms mounted on each end of the tracks transfer the slide
baskets from one track to the other, so the baskets can continue to cycle within the module.
To move slide baskets from the rear (input) track to the front (output) track:
PN 4276985A
1.
The rear belt position sensor, SEN31, identifies the home position of the rear track,
determining if the rear track is aligned for transferring a slide basket. See Figure 2.11-1.
2.
The front belt position sensor, SEN32, identifies the home position of the front track,
determining if the front track is aligned for receiving a slide basket.
3.
The basket rear right sensor, SEN33, senses a slide basket is present in the right corner of
the rear track, ready for transfer. See Figure 2.11-1
4.
The basket front right sensor, SEN34, senses when the right corner of the front track is
empty.
5.
SOL57 is energized, extending CL2. See Figure 2.11-1
6.
CL2 operates the crossover arm, pushing the slide basket from the right corner of the
rear track to the right corner of the front track.
7.
The basket front right sensor, SEN34, senses when the slide basket is in the right corner
of the front track.
2.11-1
2
INSTRUMENT DESCRIPTION
SMEAR PROCESSING SYSTEM: BASKET QUEUE MODULE
8.
SOL57 is de-energized, retracting CL2.
9.
The right crossover home sensor, SEN40, senses when CL2 is fully retracted (at home).
Figure 2.11-1 Basket Queue Module Components
SEN39
CL1
SEN35
SEN37
SEN36
Front
stepper
motor, M3
SEN31
SEN32
Front
belt
SEN34
(Under
cover)
Rear belt
SEN33 (Under cover)
CL2
Basket
Transport
Interface
card
Rear
stepper
motor, M4
SOL58
SOL57 Front
track
Rear
track
SEN40
6985026A
To move slide baskets from the front (output) track to the rear (input) track:
1.
The rear belt position sensor, SEN31, identifies the home position of the rear track,
determining if the rear track is aligned for receiving a slide basket.
2.
The front belt position sensor, SEN32, identifies the home position of the front track,
determining if the front track is aligned for transferring a slide basket. See Figure 2.11-1.
3.
The basket front left sensor, SEN36, senses a slide basket is present in the left corner of
the front track, ready for transfer. See Figure 2.11-1.
4.
The basket rear left sensor, SEN35, senses when the left corner of the rear track is empty.
5.
SOL58 is energized, extending CL1. See Figure 2.11-1.
6.
CL1 operates the crossover arm, pushing the slide basket from the left corner of the front
track to the left corner of the rear track.
7.
The basket rear left sensor, SEN35, senses when the slide basket is in the left corner of
the rear track.
8.
SOL58 is de-energized, retracting CL1
9.
The left crossover home sensor, SEN39, senses when CL1 is fully retracted (at home).
The rear track advances the slide baskets until the basket index sensor, SEN37, senses that an
empty slot is positioned under the point where the platen of the slide elevator is vertical. The
Slide Elevator module inserts the next slide into the empty slot.
2.11-2
PN 4276985A
INSTRUMENT DESCRIPTION
SMEAR PROCESSING SYSTEM: BASKET QUEUE MODULE
After either the basket index sensor, SEN37, in the Basket Queue, or the vertical slide sensor,
SEN41, in the Slide Elevator module, confirm a slide is in the slot, the rear track advances the
slide baskets until the next empty slot is in position for receiving a slide. During initialization,
the rear track also advances the slide baskets until the basket index sensor finds the next
empty slot.
The operator can insert or remove slide baskets from any position on the tracks except
immediately under the Slide Elevator module. When the operator opens the basket cover, the
basket cover interlock, SEN54, is activated and movement of the tracks is decelerated.
Service can readjust the basket cover interlock switch as necessary by loosening the hardware
and moving the switch to the required position.
Basket Transport Interface Card
Function
The Basket Transport Interface card is located on the front of the Basket Queue module. Refer
to Figure 2.11-1.
The Basket Transport Interface card is an interface between the electrical components in the
Basket Queue module and the Main Distribution card. The Basket Transport Interface card
routes, via the Main Distribution card:
r
Power from the Power Supply Monitor card.
r
Control signals from and data signals to the System Control card.
r
Data signals to the System Control card.
In addition, a comparator circuit on the Basket Transport Interface card precisely locates the
threshold for the basket/slide index sensor, SEN37.
Connectors and Test Points
The locations of the connectors and test points on the Basket Transport Interface card are
shown in Figure A.2-1 and described in Tables A.2-1 and A.2-2, respectively.
Sensor Summary
The sensors used by the Basket Queue module are listed in Table 2.11-1. For a complete list
of sensors used in the SlideMaker, and a description of the types of sensors used, see
Heading A.4.
Table 2.11-1 Basket Queue Module Sensor
SEN
NO.
Name/
Location Reference
Type/
Active State
Interface Card
31
Rear belt position
Infrared interrupting, 4 piece,
(mounted on PCB)
Basket Transport
Interface
See Figure 2.11-1
Input
Connector
Output
Plug, Pin
J1
J7, 7
Blocked = rear belt profile in
center of sensor
PN 4276985A
2.11-3
2
INSTRUMENT DESCRIPTION
SMEAR PROCESSING SYSTEM: BASKET QUEUE MODULE
Table 2.11-1 Basket Queue Module Sensor (Continued)
SEN
NO.
Name/
Location Reference
Type/
Active State
Interface Card
32
Front belt position
Infrared interrupting, 4 piece,
(mounted on PCB)
See Figure 2.11-1
Input
Connector
Output
Plug, Pin
Basket Transport
Interface
J2
J7, 8
Basket Transport
Interface
J3
J7, 9
Basket Transport
Interface
J4
J7, 10
Basket Transport
Interface
J5
J7, 11
Basket Transport
Interface
J6
J7, 12
Basket Transport
Interface
J8
J7, 13
Basket Transport
Interface
J10
J7, 15
Basket Transport
Interface
J11
J7, 16
Dryer Interface
J5
J8, 5
Basket Transport
Interface
J14
J7, 5
Blocked = front belt profile in
center of sensor
33
Basket rear right
See Figure 2.11-1
Infrared interrupting, 2 piece,
(mounted on PCB)
Blocked = basket present at right
rear position
34
Basket front right
See Figure 2.11-1
Infrared interrupting, 2 piece,
mounted on PCB
Blocked = basket present at right
front position
35
Basket rear left
See Figure 2.11-1
Infrared interrupting, 2 piece,
mounted on PCB
Blocked = basket present at left
rear position
36
Basket front left
See Figure 2.11-1
Infrared interrupting, 2 piece,
mounted on PCB
Blocked = basket present at left
front position
37
Basket index
See Figure 2.11-1
Infrared interrupting, 2 piece,
mounted on PCB
Blocked = slide insertion space
occupied (slide is in the basket at
this position, or the basket is not
in position to receive a slide.)
Blocked <2.1 V, unblocked >3.4 V
39
Left crossover home
See Figure 2.11-1
40
Right crossover home
See Figure 2.11-1
41
Vertical slide
See Figure 2.10-1
54
Basket cover interlock
Infrared interrupting
Not blocked = left crossover
cylinder at home position
Infrared interrupting
Not blocked = right crossover
cylinder at home position
Reflective infrared
Reflection = slide present in drop
position of basket
Magnetic reed switch
Open = basket cover open
2.11-4
PN 4276985A
CONTENTS
3
INSTALLATION PROCEDURES, 3.1-1
3.1
PREINSTALLATION CHECKLIST, 3.1-1
Space and Accessibility, 3.1-1
Electrical Requirements, 3.1-1
GEN•S™ System Requirements, 3.1-1
3.2
UPGRADING THE GEN•S™ SYSTEM, 3.2-1
Tools/Supplies Needed, 3.2-1
Procedure, 3.2-1
3.3
MODIFYING THE GEN•S SYSTEM, 3.3-1
Tools/Supplies Needed, 3.3-1
Procedure, 3.3-1
3.4
UNPACKING AND CONNECTING THE SLIDEMAKER, 3.4-1
Tools/Supplies Needed, 3.4-1
Unpacking and Positioning the SlideMaker, 3.4-1
Connecting the System Interconnect Cable, 3.4-3
Securing the SlideMaker to the Diluter, 3.4-4
Leveling the SlideMaker, 3.4-4
Removing the Deactivator Clips, 3.4-4
Removing Shipping Brackets from the Dispense and Main Fluidics Modules, 3.4-4
Installing the Main Fluidics Module Cover, 3.4-5
Installing the Sample Reservoirs, 3.4-5
Installing the Splash Shields, 3.4-8
Connecting the Hydraulic and Pneumatic Lines, 3.4-8
Removing the Shipping Bracket from the System Control Card, 3.4-10
Connecting the Main Power Cable, 3.4-10
Preparing the SlideMaker for Operation, 3.4-10
3.5
TESTING THE SYSTEM, 3.5-1
ILLUSTRATIONS
3.1-1
Space and Accessibility Requirements for the SlideMaker, 3.1-1
3.3-1
3.3-2
3.3-3
Making Space for the Sample Access and Reservoir Module, 3.3-2
Inserting and Securing the Sample Access and Reservoir Module, 3.3-3
Installing the Sample Access and Reservoir Module to SlideMaker Interface Card
Cables, 3.3-4
Connecting MF6 in the Sample Access and Reservoir Module to MF13, 3.3-4
Interface Bracket, 3.3-5
Locating VL25, 3.3-5
Connecting Actuator Tubing to VL116, 3.3-6
Installing the Interface Bracket, 3.3-6
Connecting Tubing from VL115 to Y-Fitting, 3.3-7
Removing Tubing from Needle Vent to VC19, 3.3-7
Connecting Pinch Tubing from VL25 to Y-Fitting, 3.3-8
Attaching Pinch Tubing to Y-Fitting, 3.3-8
Routing Pinch Tubing through VL116 to VC19, 3.3-9
Connecting Tubing from VL114 to Needle Vent Fitting, 3.3-9
3.3-4
3.3-5
3.3-6
3.3-7
3.3-8
3.3-9
3.3-10
3.3-11
3.3-12
3.3-13
3.3-14
PN 4276985A
3-i
3
CONTENTS
3.3-15 Installing the Housing Interface Bracket, 3.3-9
3.4-1
3.4-2
3.4-3
Installing the Guide Interface Bracket, 3.4-2
GEN•S System Main Components Layout, 3.4-2
Connecting the Diluter 3 SlideMaker Interface Card to SlideMaker Service Port
Cable, 3.4-3
3.4-4 Reinstalling the Ground Shield Wires and the Cover Plate, 3.4-3
3.4-5 Pinch Valve Deactivator Clip Locations, 3.4-4
3.4-6 Connecting the Reservoirs to the Diluter, 3.4-6
3.4-7 Connecting the Reservoirs to the SlideMaker, 3.4-6
3.4-8 Routing the Fluid-Detector Cables to the Smear/Transport Interface Card, 3.4-7
3.4-9 Installing a Splash Shield on the Dispense Module, 3.4-8
3.4-10 Installing Splash Shields on SOL120 and the Sample Access and Reservoir
Module, 3.4-8
3.4-11 Connecting Fluidic Lines to the Back of the SlideMaker, 3.4-9
3.4-12 Connecting the SlideMaker Fluidic Lines to the GEN•S System Fluidic
Lines, 3.4-9
3-ii
PN 4276985A
3INSTALLATION PROCEDURES 3
3.1
PREINSTALLATION CHECKLIST
Before you install the instrument, verify the following conditions are met. Report any
discrepancies on the Installation Report.
Space and Accessibility
c The space is sufficient for the SlideMaker. The dimensions and requirements for
accessibility are shown in Figure 3.1-1.
Figure 3.1-1 Space and Accessibility Requirements for the SlideMaker
38 cm (15 in.)
38 cm (15 in.)
38.1 cm
(15 in.)
61 cm
(24 in.)
15 cm (6 in.)
GEN S
TM
* SYSTEM RUN *
05/03/95
86.4 cm
(34 in.)
®
TM
0000
COPYRIGHT 1989 - 1995
COULTER CORPORATION
STATUS : READY
ALERT:
MAIN
BP CBC
DIFF
RETICS
30 cm (12 in.)
GEN S SM
45.7 cm
(18 in.)
63.5 cm
(25 in.)
CLEARANCE
R
POWER
TM
CLEARANCE
TURBO
RESET
GEN• S
30 cm
(12 in.)
68.9 cm (27 in.)
99.1 cm (39 in.)
43 cm (17 in.)
60.96 cm
(24 in.)
®
TM
61 cm
(24 in.)
GEN S
25 cm (10 in.)
25 cm (10 in.)
CLEARANCE
CLEARANCE
63.5 cm
(25 in.)
38.1 cm
(15 in.)
66 cm
(26 in.)
7334030A
Electrical Requirements
c An ac outlet is within 1.2 m (4 ft) of the area designated for the SlideMaker.
GEN•S™ System Requirements
c The following components are installed in the GEN•S System:
r
Diluter Processor card, PN 6705943, rev B
r
Diluter 2 card, PN 6706632, rev A
r
Diluter 3 SlideMaker Interface card, PN 6706591, rev A
r
Diluter lower front cover with a cutout on the left for connecting the SlideMaker
r
GEN•S System Analytical Station software, rev 2B or higher
r
GEN•S System Workstation software, rev 2B or higher
c The following universal pickup tubes are installed in the reagent containers:
PN 4276985A
r
Diluent pickup tube, PN 6706295
r
Cleaning agent pickup tube, PN 6706295 or 6706296
3.1-1
INSTALLATION PROCEDURES
PREINSTALLATION CHECKLIST
3.1-2
PN 4276985A
INSTALLATION PROCEDURES
UPGRADING THE GEN•S™ SYSTEM
3.2
UPGRADING THE GEN•S™ SYSTEM
Tools/Supplies Needed
B Any components needed to meet the GEN•S™ System Requirements listed in
Heading 3.1, PREINSTALLATION CHECKLIST.
Procedure
1.
If the Diluter Processor card, Diluter 2 card, or Diluter 3 SlideMaker Interface card in the
GEN•S System is not the correct version for using a SlideMaker, install the correct
versions of those cards:
r
To replace the Diluter Processor card, refer to Heading 4.6, Analyzer Card and Scope
Module Replacement, in the service manual for the GEN•S System
Analytical Station.
ATTENTION: If you replace the Diluter 2 card, adjust the bubble/blood detectors in the
Diluter now, while you can still access the left side of the Diluter. Refer to Heading 4.56,
Bubble/Blood Detector Replacement and Adjustment, in the service manual for the
GEN•S System Analytical Station.
r
2.
3.
PN 4276985A
To replace the Diluter 2 card or the Diluter 3 SlideMaker Interface card, refer to
Heading 4.7, Diluter Card Replacement, in the service manual for the
GEN•S System Analytical Station.
If the lower front cover of the Diluter does not have a cutout for the connection to a
SlideMaker:
a.
Power down the GEN•S System. Refer to Heading 4.1, Power Up/Power Down, in
the service manual for the GEN•S System Analytical Station.
b.
Remove the current lower front cover of the Diluter, retaining all the captive
hardware.
c.
Install a new cover, ensuring all the captive hardware is transferred to the new cover.
If the diluent and cleaning agent pickup tubes for the GEN•S System do not have ports
for the SlideMaker reagent lines, replace the pickup tubes.
3.2-1
3
INSTALLATION PROCEDURES
UPGRADING THE GEN•S™ SYSTEM
3.2-2
PN 4276985A
INSTALLATION PROCEDURES
MODIFYING THE GEN•S SYSTEM
3.3
MODIFYING THE GEN•S SYSTEM
Tools/Supplies Needed
Unpack the Integration Kit, PN 6605418, and verify the contents against the packing list. For
this section, you need the following items from the kit:
B Bridge cover, PN 1023565
B 1.2 m (4 ft) of green/black-striped, polyurethane tubing, PN 3202217 (for lengthening
tubing from MF13 to QD5 and for connecting SOL116 to VL116.)
B 8 cm (3 in.) of brown-striped, silicone tubing, PN 3213163 (for lengthening tubing from
CV45 to FT13D)
B Sample Access and Reservoir module without the reservoir rod, PN 6805565
B One Sample Access and Reservoir module to SlideMaker Interface card cable,
PN 6028773
B One SOL120 to SlideMaker Interface cable, PN 6806194
B One interface bracket, PN 6806095, assembled with:
r
One black, mini pinch valve, PN 6857096 (VL116 for retubing the vent chamber,
VC19)
r
Two fluid detector mounts, PN 1023417
r
Two fluid detectors, PN 6805569 (BD3 and FD1 for aspirate line at needle vent)
r
One cable clamp, PN 6028733
r
One pinch valve locking ring, PN 6232382
B One Y-fitting, 0.062 i.d., PN 9909059 (for retubing the vent chamber, VC19)
B 10 cm (4 in.) green-striped, silicone tubing, PN 3203026 (for retubing the vent chamber,
VC19)
B One union fitting, 0.125 i.d. to 0.093 i.d., PN 6232352 (reducer for connecting green
striped tubing to vent chamber, VC19)
B 0.69 cm (0.27 in.) of yellow-striped, silicone tubing, PN 3213176 (sleeve for tubing on
needle vent)
B One housing interface bracket, PN 6806035
B One low pierce cartridge needle, PN 6806229
B One white nylon, female Luer fitting, PN 6232382 (for connecting SOL116 on the
Sample Access and Reservoir module to VL116 on the interface bracket)
Procedure
PN 4276985A
1.
Install the bridge cover on the lower front cover of the Diluter.
2.
Make space in the Diluter for installation of the Sample Access and Reservoir module:
a.
Unfasten the captive screws for MF4 and move MF4 as needed for easier access to
the area. See Figure 3.3-1
b.
Remove the cable clamp and the mounting screw securing the grey, Diluter 4 card to
stain and diff heaters cable to the bottom of the Diluter, and dress the cable out of
the way.
3.3-1
3
INSTALLATION PROCEDURES
MODIFYING THE GEN•S SYSTEM
Figure 3.3-1 Making Space for the Sample Access and Reservoir Module
MF4
MF13
1
Unfasten
captive
MF4 QD4 QD5
screws
MF13
2
Remove
clamp and
mounting
screw
3
Unfasten
captive
screws
7334028A
Top view
c.
Unfasten the captive screws for MF13.
d.
If this is a field retrofit, lengthen the tubing from MF13 to QD5, if necessary 1)
Disconnect QD5. See Figure 3.3-1.
2)
Remove MF13 and replace all of the green and black striped tubing with the
same color tubing cut to 13 cm (5 in.) lengths.
Note: Applying a small amount of cleaning agent on the fittings as a lubricant
will aid tubing installation.
3)
3.3-2
Reconnect QD5, but leave MF13 loose.
3.
Remove the red pinch valve deactivator clip from the pinch valve in the Sample Access
and Reservoir module.
4.
Insert the Sample Access and Reservoir module in the space provided in front of QD5,
routing the QD8 connector between MF4 and QD4 for later connection to the
SlideMaker. See Figure 3.3-2.
PN 4276985A
INSTALLATION PROCEDURES
MODIFYING THE GEN•S SYSTEM
Figure 3.3-2 Inserting and Securing the Sample Access and Reservoir Module
Sample
Access and
Reservoir
module
QD5
Fasten
1
QD4
QD8
Fasten
2
Fasten
3
7334029B
5.
Ensure no tubing is trapped under or around the Sample Access and Reservoir module,
then fasten the captive screws on the module.
6.
Fasten the captive screws on MF4 and MF13.
ATTENTION: Later in this procedure you will install a splash shield over the Sample Access and
Reservoir module. For that shield to fit correctly, you must route the cables as described in
step 7, below.
7.
PN 4276985A
Connect the Sample and Access and Reservoir module to SlideMaker Interface card
cable:
a.
Connect the 10-pin ribbon cable (the Sample Access and Reservoir module to
SlideMaker Interface card cable), connector P6, to J1/MF6 on the Sample Access
and Reservoir module. See Figure 3.3-3.
b.
Route the ribbon cable to the left around MF4, between QD4 and the left body of
the Diluter, and through the slot at the left bottom of the Diluter.
c.
Connect the other end of the ribbon cable, connector P17, to J17 on the SlideMaker
Interface card. See Figure 3.3-3.
d.
Route the cable from SOL120 (Figure 3.3-3) to the left around MF4, between QD4
and the left body of the Diluter, and through the slot at the left bottom of the
Diluter.
e.
Connect the cable from SOL120 to J19 on the SlideMaker Interface card. See
Figure 3.3-3.
3.3-3
3
INSTALLATION PROCEDURES
MODIFYING THE GEN•S SYSTEM
Figure 3.3-3 Installing the Sample Access and Reservoir Module to SlideMaker Interface Card Cables
2 Connect
cable to J17
QD4
Sample Access
and Reservoir
module
1
Connect
cable
to J1
SlideMaker
Interface
card
3 Connect
cable to J19
Slot on
rear of
panel
MF4
8.
7334020B
SOL120
Remove the tubing from the top of MF13 and replace the tubing with the green-striped
tubing from MF6, port 1 in the Sample Access and Reservoir module. See Figure 3.3-4.
Figure 3.3-4 Connecting MF6 in the Sample Access and Reservoir Module to MF13
Sample Access
and Reservoir
module
MF13
3.3-4
1
Remove from
MF13
MF6
2
Attach to
MF13
7334107C
PN 4276985A
INSTALLATION PROCEDURES
MODIFYING THE GEN•S SYSTEM
9.
Install VL116 and the mounts for BD3 and FD1 on the interface bracket if necessary.
ATTENTION: Notice that the mini pinch valve and the fluid detectors have locating tabs.
a.
Using the hardware provided, install the black mini pinch in the position shown in
Figure 3.3-5. This pinch valve is VL116.
b.
Using the screws provided, install the two fluid detector mounts for BD3 and FD1.
Note: The fluid detectors are not installed in the mounts until after they are tubed.
10. Install VL25 on the interface bracket.
a.
Locate VL25, the unsecured black, mini pinch valve near the needle vent chamber,
VC19. See Figure 3.3-6.
b.
Disconnect the green striped tubing from the bottom of VL25.
c.
If this is a field retrofit, replace the brown-striped tubing between CV45 and the
T-fitting FT13D with a longer piece (about 8 cm [3 in.]) of the same type tubing.
For location of the tubing, see Figure 3.3-6.
.
Figure 3.3-5 Interface Bracket
Figure 3.3-6 Locating VL25
CV45
Captive
screws
VL57C
VC19
VL116
BD3
FT13D
FD1
7334108A
VL25
6985037A
d.
Install VL25 in the open position on the interface bracket (Figure 3.3-5) using the
locking ring provided.
e.
Replace the green striped tubing originally connected to the bottom of VL25 with a
longer piece (19 cm [7.5 in.]) of the same type tubing, and connect the tubing to
the bottom of VL25.
11. Attach 19.05 cm (7.5 in.) of green/black striped tubing to the white, female Luer fitting
in the Integration Kit, and connect the fitting to the male Luer fitting in the tubing from
the Sample Access and Reservoir module, MF6, SOL116, port 6.
PN 4276985A
3.3-5
3
INSTALLATION PROCEDURES
MODIFYING THE GEN•S SYSTEM
12. Feed the tubing from SOL116, port 6, through one of the openings in the BSV module to
the interface bracket, and connect the tubing to the bottom of VL116. See Figure 3.3-7.
Figure 3.3-7 Connecting Actuator Tubing to VL116
Attach
tubing
from SOL116
VL116
Interface
bracket
VC19
MF6
Sample Access
and Reservoir
module
SOL116
BSV module
6985038A
13. Install the interface bracket on the BSV module as shown in Figure 3.3-8.
Figure 3.3-8 Installing the Interface Bracket
Captive
screws
Interface
bracket
BSV module
3.3-6
7334109B
PN 4276985A
INSTALLATION PROCEDURES
MODIFYING THE GEN•S SYSTEM
14. Remove the needle and replace it with the needle supplied in the Integration Kit.
r
Connect the waste and aspiration lines in the correct orientation.
r
Leave the needle vent line disconnected.
15. Connect the tubing from the Sample Access and Reservoir module to the needle
assembly area:
a.
Connect the 13 cm (5 in.) tubing from VL115 on the Sample Access and Reservoir
module to the support leg of a Y-fitting using 0.64 cm (0.25 in.) of yellow-striped
tubing as a sleeve to secure the tubing. See Figure 3.3-9.
b.
Remove the tubing and Y-fitting previously connecting the needle vent fitting to
VC19. See Figure 3.3-10.
Note: This step leaves the green-striped silicone tubing through VL25 unattached
and a port on VC19 open.
Figure 3.3-9 Connecting Tubing from VL115 to Y-Fitting
Figure 3.3-10 Removing Tubing from Needle Vent to
VC19
Sample Access and
Reservoir module
VL114
VL25
Attach
Y-fitting
VL115
VL116
Vent/
vacuum
line
Needle
vent
fitting
Remove
tubing
VC19
7334031A
Remove
Y-fitting
From
VL115
PN 4276985A
Remove
tubing
6985039A
3.3-7
3
INSTALLATION PROCEDURES
MODIFYING THE GEN•S SYSTEM
c.
Connect the green-striped tubing from VL25 to the second leg of the Y-fitting as
shown in Figure 3.3-11, ensuring the red critical length tubing marker is positioned
between the Y-fitting and VL25.
d.
Connect a 10 cm (4 in.) length of green-striped, silicone tubing to the third leg of
the Y-fitting. See Figure 3.3-12.
Figure 3.3-11 Connecting Pinch Tubing from VL25 to
Y-Fitting
Figure 3.3-12 Attaching Pinch Tubing to Y-Fitting
VL25
VL25
Critical
length
tubing
marker
VL116
VL116
VC19
VC19
From
VL115
From
VL115
Connect tubing
from VL25
Y-fitting
6985040A
Attach 10 cm (4 in.)
pinch tubing
Y-fitting
6985041A
e.
Route the other end of the 10 cm (4 in.) green-striped, silicone tubing through the
new pinch valve, VL116, to the open port on VC19 via a reducer (union) fitting and
25 mm (1 in.) of green/black-striped polyurethane tubing as shown in
Figure 3.3-13.
f.
Route the 23 cm (9 in.) tubing from VL114 on the Sample Access and Reservoir
module through BD3 and then FD1, leaving about 8.9 cm (3.5 in.) of tubing
extending from FD1.
Note: If the interface bracket came preassembled, the fluid detectors are already
installed on their mounts and must be removed for tubing.
g.
Install the two fluid detectors into their mounts on the interface bracket.
h.
Connect the tubing extending from FD1 to the open vent port of the needle, using
8.3 cm (3.25 in.) of yellow-striped tubing as a protective sleeve to secure the tubing.
See Figure 3.3-14. Ensure that both the tubing and its sleeve are pushed onto the
needle vent port.
Note: The tubing sleeve ensures the correct distance is maintained between FD1
and the needle vent port and prevents the aspirator tubing from kinking on the
needle vent port.
3.3-8
PN 4276985A
INSTALLATION PROCEDURES
MODIFYING THE GEN•S SYSTEM
.
Figure 3.3-13 Routing Pinch Tubing through VL116 to
VC19
Figure 3.3-14 Connecting Tubing from VL114 to Needle Vent
Fitting
1
VL25
Attach tubing
2 from VL116
BD3
Route tubing
from VL114
through BD3
1 Route tubing
through VL116
FD1
Sleeve
From
VL114
Vent/
vacuum line
2
Route tubing
from BD3
through FD1
Reducer
VC19
VC19
3 Attach
From
VL115
From
VL115
tubing
from FD1
Needle
vent
fitting
6985043A
6985042A
16. Secure the cables of the fluid detectors to the interface bracket as shown in
Figure 3.3-14.
17. Route the cable for BD3 to the Diluter 2 card and connect the cable to J9.
18. Using the hardware provided, install the housing interface bracket on the left side of the
Diluter. See Figure 3.3-15.
Figure 3.3-15 Installing the Housing Interface Bracket
Housing
interface
bracket
Diluter
7334110A
PN 4276985A
3.3-9
3
INSTALLATION PROCEDURES
MODIFYING THE GEN•S SYSTEM
3.3-10
PN 4276985A
INSTALLATION PROCEDURES
UNPACKING AND CONNECTING THE SLIDEMAKER
3.4
UNPACKING AND CONNECTING THE SLIDEMAKER
Tools/Supplies Needed
From the Integration Kit, PN 6605418, you need these components for this section.
B One guide interface bracket, PN 6806036
B One system interconnect cable, PN 6028728
B One clamp interface bracket, PN 6806037
B Level, PN 2523155
B Main Fluidics module cover, PN 1023913
B One reservoir rod assembly, PN 6806096
B Four plastic collars, PN 1023662
B Four small male plugs, PN 6232883 (for connecting diluent, cleaning agent and
pneumatic input lines)
B One large male plug, PN 6232882 (for connecting for waste output line)
B Shielded diluent line, PN 6806193
B Shielded cleaning agent line, PN 6806195
B Shielded waste line, PN 6806197
B One T-fitting, 0.250 o.d., PN 6232584 (for interconnecting SlideMaker and GEN•S
System waste line)
B 2.1 m (7 ft) of polyurethane tubing, 0.114 i.d., PN 3202039 (pressure/vacuum input
lines to SlideMaker)
B Two T-fittings, 0.125 i.d., white, PN 6216354 (for interconnecting SlideMaker and
GEN•S System pneumatic lines)
B One main power cable, PN 6011023
B One Sample Access Module Splash Shield Kit, PN 6807024
B One Dispense Module Splash Shield Kit, PN 6807025
Unpacking and Positioning the SlideMaker
PN 4276985A
1.
Unpack the SlideMaker, making sure it is intact with no visible defective parts.
2.
Install the guide interface bracket on the SlideMaker as shown in Figure 3.4-1.
3.4-1
3
INSTALLATION PROCEDURES
UNPACKING AND CONNECTING THE SLIDEMAKER
Figure 3.4-1 Installing the Guide Interface Bracket
SlideMaker
Guide
interface
bracket
Screw
7334111B
3.
Position the SlideMaker on the left side of the GEN•S System as shown in Figure 3.4-2,
leaving enough space between the SlideMaker and the Diluter to connect a cable from
the SlideMaker to the SlideMaker Interface card.
Figure 3.4-2 GEN•S System Main Components Layout
GEN•S Analytical Station
GEN S
TM
GEN•S
Workstation
* SYSTEM RUN *
05/03/95
0000
COPYRIGHT 1989 - 1995
COULTER CORPORATION
Analyzer
STATUS : READY
ALERT:
MAIN
BP CBC
DIFF
RETICS
GEN•S SM SlideMaker
®
TM
GEN S SM
Diluter
R
POWER
TM
TURBO
RESET
GEN• S
PNEU
TEMP
60 PSI
30 PSI
5 PSI
VACUUM
AC LINE
60 30.0 4.9 28 115
®
TM
AC
DC
GEN S
Power
Supply
7334024B
3.4-2
PN 4276985A
INSTALLATION PROCEDURES
UNPACKING AND CONNECTING THE SLIDEMAKER
Connecting the System Interconnect Cable
1.
Connect the system interconnect cable to the service port on the bottom, right rear of the
SlideMaker as shown in Figure 3.4-3.
Note: Install the connector so that the cable points toward the GEN•S System.
2.
Ensure the GEN•S System is powered down.
3.
Remove the cover plate on the rear corner of the Diluter.
4.
Feed the other end of the system interconnect cable through the opening as shown in
Figure 3.4-3 and connect the cable to J2 on the Diluter 3 SlideMaker Interface card.
Figure 3.4-3 Connecting the Diluter 3 SlideMaker Interface Card to SlideMaker Service Port Cable
Diluter 3
SlideMaker
Interface
card
J2
SlideMaker
7334025B
5.
Connect the shield grounds for the dc power cable and IBUS cable to the screw on the
cover plate at the rear of the Diluter and secure the cover plate to the rear corner of the
Diluter as shown in Figure 3.4-4
Figure 3.4-4 Reinstalling the Ground Shield Wires and the Cover Plate
Cover plate
screw
Shield
ground
System
interconnec
IBUS
Main
power
7334026A
PN 4276985A
3.4-3
3
INSTALLATION PROCEDURES
UNPACKING AND CONNECTING THE SLIDEMAKER
Securing the SlideMaker to the Diluter
1.
Align the threaded standoffs on the SlideMaker’s guide interface bracket with the slots in
the Diluter’s housing interface bracket, and move the SlideMaker until the standoffs slip
through the slots and the two brackets are flush.
2.
Install the clamp interface bracket to secure the housing interface bracket to the guide
interface bracket.
Leveling the SlideMaker
1.
Place the level on the shuttle.
2.
Adjust the four SlideMaker feet until the shuttle is level.
Removing the Deactivator Clips
Open the front cover of the SlideMaker and remove the red deactivator clips from the pinch
valves on the Main Fluidics module, the Dispense module, and the Slide and Smear module.
See Figure 3.4-5 for pinch valve locations.
Figure 3.4-5 Pinch Valve Deactivator Clip Locations
®
TM
GEN S SM
7334027B
Removing Shipping Brackets from the Dispense and Main Fluidics Modules
ATTENTION: All shipping brackets that must be removed are colored red.
1.
3.4-4
At the Dispense module, remove and discard the upper shipping bracket protruding
from the Dispense module into the Cassette Output Queue.
PN 4276985A
INSTALLATION PROCEDURES
UNPACKING AND CONNECTING THE SLIDEMAKER
2.
On the lower (non-red) shipping bracket securing the Dispense module to the Cassette
Output Queue module, remove the screw securing the shipping bracket to the Dispense
module, but do not remove the bracket.
Note: This shipping bracket will be repositioned and used to secure the splash shield for
the Dispense module.
3.
At the Main Fluidics module, remove the four screws securing the left shipping bracket
(two on the bottom and two on the upper left side), and discard the shipping bracket.
4.
Remove the four screws securing the right shipping bracket (two on the bottom and two
on the upper right side), and remove the right shipping bracket and the Main Fluidics
module cover support bracket secured by the shipping bracket screws.
5.
Discard the right shipping bracket and reinstall the cover support bracket.
Installing the Main Fluidics Module Cover
Position the plastic cover on the Main Fluidics module, and secure the upper left side and the
right top of the cover with screws.
Installing the Sample Reservoirs
1.
Wrap the reservoir tubing around the reservoir support rod, if necessary:
a.
Mark both ends of the tubing before wrapping the tubing to ensure the ends will be
attached to the correct fittings.
b.
Look at the progressive pitch design of the reservoir support rod to determine which
end has the tighter pitch. The end with the tighter pitch belongs on the Diluter.
IMPORTANT Aspiration problems. Crossing the tubings on the reservoir support rod creates pressure on
the tubings which can affect aspiration. Be careful to wrap the two tubings around the reservoir support rod
without crossing one tubing over the other.
2.
c.
Wrap the tubings parallel to each other around the reservoir support rod, leaving
sufficient tubing extending on the Diluter end of the reservoir support rod (about
10 cm [4 in.]) for routing the tubing through a fluid detector and a pinch valve.
d.
Wrap tape around the end of the reservoir support rod to secure the tubings on the
rod.
Designating the right-hand tubing as reservoir #1, connect the two reservoirs to the
Diluter as shown in Figure 3.4-6.
a.
Route the Diluter end of the reservoir #1 tubing through FD2 and VL3A, and
connect the tubing to FT4, using a plastic collar to secure and protect the tubing.
Note: FT4 is connected to VL3A, VL1 and the normally open line of SOL118.
b.
Route the Diluter end of the reservoir #2 tubing through FD4 and VL4A, and
connect the tubing to FT3, using a plastic collar to secure and protect the tubing.
Note: FT3 is connected to VL4A, VL2 and the normally closed line of SOL118.
3.
PN 4276985A
Connect the ball ends of the reservoir support rod to the rod support clamps on the
Diluter and the SlideMaker. See Figures 3.4-6 and 3.4-7.
3.4-5
3
INSTALLATION PROCEDURES
UNPACKING AND CONNECTING THE SLIDEMAKER
Figure 3.4-6 Connecting the Reservoirs to the Diluter
2 Connect
reservoir #2
1 Connect
reservoir #1
3 Connect
support
rod
FD2
VL3A
FT4
FD4
VL4A
FT3
7334037A
Figure 3.4-7 Connecting the Reservoirs to the SlideMaker
3
FT9
FD5
Connect
reservoir #2
VL4B
FT8
VL3B
FD3
2 Connect
reservoir #1
1 Connect
support rod
4
3.4-6
Connect QD8
6985025A
PN 4276985A
INSTALLATION PROCEDURES
UNPACKING AND CONNECTING THE SLIDEMAKER
4.
Adjust the ball fitting on the SlideMaker for the correct length, if necessary.
5.
Connect the two reservoirs to the SlideMaker as shown in Figure 3.4-7.
a.
Route the SlideMaker end of the reservoir #1 tubing through FD3 and VL3B, and
connect the tubing to FT8, using a plastic collar to secure and protect the tubing.
Note: FT8 is connected to VL3B, VL6 and the normally open line of SOL24.
b.
Route the SlideMaker end of the reservoir #2 tubing through FD5 and VL4B, and
connect the tubing to FT9, using a plastic collar to secure and protect the tubing.
Note: FT9 is connected to VL4B, VL7 and the normally closed line of SOL24.
6.
Connect the Diluter side of QD8 connector to the SlideMaker. See Figure 3.4-7.
7.
Using Figure 3.4-8 as a guide, route the fluid detector cables from the Sample Access and
Reservoir module to the Smear/Transport Interface card as follows:
Fluid detector cable for -
Connects to -
FD1
J25
FD2
J26
FD4
J28
FD7
J31
Note: For the location and function of all the connectors on the Smear/Transport
Interface card, see Figure A.2-6 and Table A.2-13.
Figure 3.4-8 Routing the Fluid-Detector Cables to the Smear/Transport Interface Card
Smear/Transport
Interface card
J25
J26
J28
J31
7334021B
PN 4276985A
3.4-7
3
INSTALLATION PROCEDURES
UNPACKING AND CONNECTING THE SLIDEMAKER
Installing the Splash Shields
1.
Slide the splash shield for the Dispense module onto the module. See Figure 3.4-9.
2.
Reposition the shipping bracket on the Cassette Output Queue module until the hole in
the bracket aligns with the hole in the upper left side of the splash shield.
3.
Secure the splash shield with two thumbscrews. See Figure 3.4-9.
4.
Position the splash shield for SOL120 over the solenoid. See Figure 3.4-10.
5.
Position the splash shield for the Sample Access and Reservoir module over the module,
and secure it to the Diluter frame with two thumbscrews. See Figure 3.4-10.
Note: The right thumbscrew for the Sample Access and Reservoir module’s splash shield
also secures the splash shield for SOL120.
Figure 3.4-9 Installing a Splash Shield on the
Dispense Module
Figure 3.4-10 Installing Splash Shields on SOL120
and the Sample Access and Reservoir Module
Splash shield
Splash shield
Splash shield
6985021A
6985022A
Connecting the Hydraulic and Pneumatic Lines
3.4-8
1.
Connect the shielded diluent, cleaning agent and waste tubing to the back of the
SlideMaker and attach the ground wires to E11 as shown in Figure 3.4-11.
2.
Connect the other end of the diluent and cleaning agent lines to their respective pickup
tubes in the reagent containers.
3.
Install a T-fitting in the waste collection line at the rear of the Diluter and connect the
waste tubing from the SlideMaker to the T-fitting as shown in Figure 3.4-12
4.
Connect the 30 psi and vacuum tubing to the back of the SlideMaker as shown in
Figure 3.4-11.
5.
Install T-fittings in the 30 psi and high vacuum supply lines at the rear of the Diluter and
attach the 30 psi and vacuum tubings from the SlideMaker to the T-fittings as shown in
Figure 3.4-12).
PN 4276985A
INSTALLATION PROCEDURES
UNPACKING AND CONNECTING THE SLIDEMAKER
Figure 3.4-11 Connecting Fluidic Lines to the Back of the SlideMaker
To diluent
pickup tube
To cleaning agent
pickup tube
7334019A
Figure 3.4-12 Connecting the SlideMaker Fluidic Lines to the GEN•S System Fluidic Lines
Back of
Diluter
Vacuum
30 psi
Waste
To
Power
Supply
To
SlideMaker
7334014B
PN 4276985A
3.4-9
3
INSTALLATION PROCEDURES
UNPACKING AND CONNECTING THE SLIDEMAKER
Removing the Shipping Bracket from the System Control Card
ATTENTION: All shipping brackets that must be removed are colored red.
1.
Unfasten the four captive screws securing the top cover of the rear compartment, lift off
the cover, and pull down the rear door.
2.
Remove the five screws securing the shipping bracket to the front of the System Control
card, and discard the shipping bracket.
3.
Close the rear door and reinstall the top cover of the rear compartment.
Connecting the Main Power Cable
Connect the main power cable to the remaining port on the bottom, right rear of the
SlideMaker and plug the other end of the main power cable into the ac wall outlet.
Preparing the SlideMaker for Operation
3.4-10
1.
Load slides into a slide cassette and place the cassette in the Cassette Input Queue.
2.
Place empty slide baskets in the Basket Queue module.
3.
Install the label roll in the Label Printer module.
4.
Install the printer ribbon in the Label Printer module.
PN 4276985A
INSTALLATION PROCEDURES
TESTING THE SYSTEM
3.5
TESTING THE SYSTEM
1.
Ensure the GEN•S System is powered down as instructed under Heading 4.1 in the
service manual for the GEN•S System Analytical Station.
2.
At the Analyzer:
a.
Remove the AMC and change switch SW1, position 2, to ON (the option to use
when the SlideMaker is present).
b.
Reinstall the AMC card.
c.
Remove the DILUTER PROCESSOR card and change switch SW1, positions 6
and 7, to ON (the options to use when the SlideMaker is present).
d.
Reinstall the DILUTER PROCESSOR card.
3.
Power up the GEN•S System and let the System reset.
4.
At the Workstation:
a.
Turn on the Workstation.
b.
Log on as a Service user.
c.
Select
d.
Select the Instruments tab.
e.
In the Instrument Detail box, select SlideMaker.
f.
In the System Revisions box, enter the SlideMaker information and select
g.
Select
h.
In the Enable System Functions box, check SlideMaker and select
tt
.
.
.
.
5.
Turn on the SlideMaker.
6.
Calibrate BD3 using the F79 function on the Diluter keypad.
7.
Ensure the 30 psi readout on the PNEUMATIC /POWER SUPPLIES screen is correct.
a.
On the SlideMaker screen, select PNEUMATIC /POWER SUPPLIES (MAIN MENU tt
ROUTINE FUNCTIONS tt PNEUMATIC/POWER SUPPLIES).
b.
Verify the 30 psi reads 30 psi±0.5.
c.
If it does not, do Heading 4.27, 30 PSI SUPPLY CHECKS AND TRANSDUCER
ADJUSTMENT.
8.
Do the GEN•S System Verification Procedure as instructed under Heading 5.1 in the
service manual for the GEN•S System Analytical Station.
9.
Do the SlideMaker System Verification Procedure as instructed under Heading 5.1.
10. Complete the installation reports as directed in Report Completion under Heading 3.8 in
the service manual for the GEN•S System Analytical Station.
PN 4276985A
3.5-1
3
INSTALLATION PROCEDURES
TESTING THE SYSTEM
3.5-2
PN 4276985A
CONTENTS
4
PN 4276985A
SERVICE AND REPAIR PROCEDURES, 4.1-1
4.1
GUIDELINES FOR SERVICING THE SLIDEMAKER, 4.1-1
General, 4.1-1
Accessing the Main Compartments in the SlideMaker, 4.1-1
Opening the Main Cover, 4.1-2
Closing the Main Cover, 4.1-3
Accessing and Removing the SlideMaker Modules, 4.1-3
Basket Queue Module, 4.1-3
Cassette Transport Module, 4.1-4
Cassette Output Queue Module, 4.1-7
Dispense Module, 4.1-8
Dryer and Slide Elevator Modules, 4.1-9
Keypad and Display Module, 4.1-10
Label Printer Module, 4.1-10
Main Fluidics Module, 4.1-11
Sample Access and Reservoir Module, 4.1-12
Slide and Smear Module, 4.1-13
4.2
USING THE SLIDEMAKER SERVICE FUNCTIONS, 4.2-1
Purpose, 4.2-1
Procedure, 4.2-1
Dry Cycle Sequence Summary, 4.2-6
Slide Pickup Process, 4.2-6
Smear Making Process, 4.2-6
Slide Ejection Process, 4.2-7
Slide Placement Process, 4.2-7
4.3
HOME, PRINTER AND DISPENSE OFFSET SHUTTLE POSITION
ADJUSTMENTS, 4.3-1
Purpose, 4.3-1
Setting the Home Offset, 4.3-1
Setting the Printer Offset, 4.3-2
Purpose, 4.3-2
Procedure, 4.3-2
Verification, 4.3-3
Setting the Dispense Offset, 4.3-3
Purpose, 4.3-3
Tools/Supplies Needed, 4.3-3
Procedure, 4.3-3
Verification, 4.3-5
4.4
PICK AND WICK SLIDE POSITION ADJUSTMENTS, 4.4-1
Purpose, 4.4-1
Procedure, 4.4-1
Verification, 4.4-3
4-i
4
CONTENTS
4.5
PRINTER ADJUSTMENTS, 4.5-1
Purpose, 4.5-1
Printer Height above the Slide Adjustment, 4.5-1
Tools/Supplies Needed, 4.5-1
Procedure, 4.5-1
Label Position in the Y-Dimension Adjustment, 4.5-3
4.6
SLIDE ELEVATOR PLATEN ADJUSTMENTS, 4.6-1
Purpose, 4.6-1
Tools/Supplies Needed, 4.6-1
Preliminary Platen Checks and Adjustments, 4.6-1
Slide Placement Adjustments, 4.6-2
Verification, 4.6-3
4.7
DISPENSE PUMP ADJUSTMENT, 4.7-1
Purpose, 4.7-1
Tools/Supplies Needed, 4.7-1
Procedure, 4.7-1
Verification, 4.7-2
4.8
CIRCUIT CARD REPLACEMENT, 4.8-1
Purpose, 4.8-1
Procedure, 4.8-1
4.9
FLUID DETECTOR CALIBRATION, 4.9-1
Purpose, 4.9-1
Tools/Supplies Needed, 4.9-1
Procedure, 4.9-1
Verification, 4.9-2
4.10 SOFTWARE INSTALLATION USING A LAPTOP COMPUTER, 4.10-1
Purpose, 4.10-1
Tools/Supplies Needed, 4.10-1
Procedure, 4.10-1
4.11 SEN41 (VERTICAL SLIDE SENSOR) ALIGNMENT, 4.11-1
Purpose, 4.11-1
Tools/Supplies Needed, 4.11-1
Procedure, 4.11-1
Verification, 4.11-2
4.12 PRINTHEAD CLEANING, 4.12-1
Purpose, 4.12-1
Tools/Supplies Needed, 4.12-1
Procedure, 4.12-1
Verification, 4.12-3
4.13 EXTENDED AND LONG-TERM SHUTDOWN, 4.13-1
Purpose, 4.13-1
Tools/Supplies Needed, 4.13-1
Procedure, 4.13-1
4-ii
PN 4276985A
CONTENTS
4.14 DISPENSE PROBE CLEANING/REPLACEMENT, 4.14-1
Purpose, 4.14-1
Tools/Supplies Needed, 4.14-1
Procedure, 4.14-1
Verification, 4.14-2
4.15 SLIDE EJECTOR ADJUSTMENTS/ALIGNMENT, 4.15-1
Purpose, 4.15-1
Tools/Supplies Needed, 4.15-2
Slide Pusher Adjustment, 4.15-2
Slide Ejector Alignment, 4.15-3
Verification, 4.15-6
4.16 SLIDE PUSHER BARS AND SHUTTLE BRUSH ADJUSTMENTS, 4.16-1
Purpose, 4.16-1
Slide Pusher Bars Adjustment, 4.16-1
Shuttle Brush Adjustment, 4.16-2
Verification, 4.16-3
4.17 SLIDE STRIPPER PLATE ADJUSTMENT, 4.17-1
Purpose, 4.17-1
Procedure, 4.17-1
Verification, 4.17-2
4.18 SMEAR TRUCK ALIGNMENT CHECKS AND ADJUSTMENTS, 4.18-1
Purpose, 4.18-1
Tools/Supplies Needed, 4.18-1
Smear Truck Pickup, Tilt, and Sensor Position Adjustments, 4.18-2
Verification, 4.18-5
Smear Edge Adjustment, 4.18-6
4.19 SMEAR TRUCK AND SHUTTLE GUIDE RODS CLEANING, 4.19-1
Purpose, 4.19-1
Tools/Supplies Needed, 4.19-1
Procedure, 4.19-1
4.20 SMEAR TRUCK AND SHUTTLE O-RING REPLACEMENT, 4.20-1
Purpose, 4.20-1
Smear Truck O-Ring Installation, 4.20-1
Shuttle O-Ring Installation, 4.20-2
Verification, 4.20-2
4.21 TOP-OF-FORM SENSOR CHECKS AND ADJUSTMENTS, 4.21-1
Purpose, 4.21-1
Procedure, 4.21-1
Verification, 4.21-4
4.22 Z-AXIS REGISTER SUBASSEMBLY COMPONENT REPLACEMENT, 4.22-1
Purpose, 4.22-1
Procedure, 4.22-1
Verification, 4.22-2
PN 4276985A
4-iii
4
CONTENTS
4.23 SEN46 (GRIPPER OVEREXTENDED SENSOR) ALIGNMENT AND FLAG
REPLACEMENT, 4.23-1
Purpose, 4.23-1
SEN46 Alignment, 4.23-1
Procedure, 4.23-1
Verification, 4.23-2
SEN46 Flag Replacement, 4.23-2
Tools/Supplies Needed, 4.23-2
Removal, 4.23-2
Installation, 4.23-3
Verification, 4.23-3
4.24 ENCODER REPLACEMENT, 4.24-1
Purpose, 4.24-1
Tools/Supplies Needed, 4.24-1
Preliminary Checks, 4.24-1
Removal, 4.24-1
Installation, 4.24-3
Verification, 4.24-3
4.25 BASKET QUEUE MODULE CHECKS AND ADJUSTMENTS, 4.25-1
Purpose, 4.25-1
Tools/Supplies Needed, 4.25-1
Preliminary Checks, 4.25-1
Pulley/Motor/Coupling/Position Sensor Adjustment Procedures, 4.25-2
Preliminary, 4.25-2
Rear Belt, 4.25-2
Front Belt, 4.25-4
Belt Tension, 4.25-5
Verification, 4.25-5
4.26 SEN37 (BASKET INDEX SENSOR) REPLACEMENT, 4.26-1
Purpose, 4.26-1
Removal, 4.26-1
Installation, 4.26-1
Verification, 4.26-2
4.27 30 PSI SUPPLY CHECKS AND TRANSDUCER ADJUSTMENT, 4.27-1
Purpose, 4.27-1
Tools/Supplies Needed, 4.27-1
Procedure, 4.27-1
ILLUSTRATIONS
4.1-1
4.1-2
4.1-3
4.1-4
4.1-5
4.1-6
4-iv
Latches Securing the Main Cover, 4.1-2
Opening the Main Cover, 4.1-2
Closing the Main Cover, 4.1-3
Removing the Basket Queue Module, 4.1-4
Captive Screws Securing the Upper Cassette Transfer Mechanism, 4.1-5
Screws Securing the Cassette Transport Module, 4.1-6
PN 4276985A
CONTENTS
4.1-7
4.1-17
4.1-18
Removing the Cassette Output Queue Module from the Cassette Transport
Module, 4.1-6
Thumbscrews Securing the Dispense Module Splash Shield, 4.1-7
Captive Screws Securing the Dispense Module, 4.1-7
Captive Screws Securing the Cassette Output Queue Module, 4.1-8
Captive Screws Securing the Dryer Module, 4.1-9
Captive Screws Securing the Slide Elevator Module to the Dryer Module, 4.1-10
Screws Securing the Label Printer Module, 4.1-11
Captive Screws Securing the Main Fluidics Module, 4.1-12
Captive Screws Securing MF4 and MF13, 4.1-12
Thumbscrews Securing the Sample Access and Reservoir Module Splash
Shield, 4.1-13
Captive Screws Securing the Sample Access and Reservoir Module, 4.1-13
Captive Screws Securing the Slide and Smear Module, 4.1-14
4.3-1
4.3-2
4.3-3
4.3-4
4.3-5
Verifying the Home Position, 4.3-1
Checking the Label Positions in the X-Dimension, 4.3-2
Checking the Smear Position on the Slide in the X-Dimension, 4.3-3
Verifying the Dispense Position, 4.3-4
Correct Position of the Slide on the Shuttle, 4.3-5
4.4-1
4.4-2
Defining the Pick Position, 4.4-2
Defining the Wick Position, 4.4-2
4.5-1
4.5-2
4.5-3
4.5-4
Correct Position of the Label on the Slide, 4.5-1
Printer Module Adjustments, 4.5-2
Checking the Label Position in the X-Dimension, 4.5-2
Checking the Label Position in the Y-Dimension, 4.5-2
4.6-1
4.6-2
Preliminary Platen Checks and Adjustments, 4.6-1
Slide Elevator Platen Adjustments, 4.6-3
4.7-1
Dispense Pump Adjustments, 4.7-1
4.8-1
System Control Card Hold-Down Bracket and Card Guides, 4.8-3
4.1-8
4.1-9
4.1-10
4.1-11
4.1-12
4.1-13
4.1-14
4.1-15
4.1-16
4.11-1 Aligning the Vertical Slide Sensor, SEN41, 4.11-1
4.12-1 Removing the Printhead Assembly, 4.12-1
4.12-2 Printhead and Printhead Flag Location, 4.12-2
4.12-3 Printhead Microswitch Arm Location, 4.12-2
4.14-1 Removing the Dispense Probe, 4.14-1
4.15-1 Checking the Smear Position on the Slide in the Y-Dimension, 4.15-1
4.15-2 Acceptable Blood Drop and Smear Placement, 4.15-1
4.15-3 Verifying the Position of the Slide Pusher in the Slide Ejector Module, Old
Configuration, 4.15-2
4.15-4 Verifying the Position of the Slide Pusher in the Slide Ejector Module, New
Configuration, 4.15-2
PN 4276985A
4-v
4
CONTENTS
4.15-5 Loosening the Slide Ejector Module, 4.15-4
4.15-6 Slide Centered on Shuttle Correctly, 4.15-6
4.16-1 Slide Pusher Bars and Shuttle Brush Adjustments, 4.16-1
4.17-1 Slide Stripper Plate and Screws, 4.17-2
4.18-1
4.18-2
4.18-3
4.18-4
4.18-5
4.18-6
Gear for Manually Moving the Smear Truck, 4.18-1
Smear Truck Assembly Adjustments, Old Configuration, 4.18-2
Smear Truck Assembly Adjustments, New Configuration, 4.18-2
Truck Lift Sensor Locking Screws, 4.18-5
Checking the Smears, 4.18-6
Checking the Smear Edge Setscrew Setting, 4.18-6
4.20-1 Tilt Locking Lever Location and Locking Screw Assembly, 4.20-1
4.21-1 Label Printer Module, Front and Left Side Views, 4.21-1
4.21-2 Label Printer Module Securing Screws, 4.21-2
4.21-3 Label Printer Module, Rear View with Cover Removed, 4.21-3
4.22-1 Register Z-Assembly Components, 4.22-1
4.23-1 SEN46 with Bracket and Flag Detail, 4.23-2
4.24-1 Encoder Configuration at Shipment, 4.24-1
4.24-2 Positioning the Lead Screw for Encoder Replacement, 4.24-2
4.24-3 Locked and Unlocked Positions of the Encoder, 4.24-2
4.25-1 Movement of the Profiles (Basket Pushers) through the Belt Position
Sensors, 4.25-2
4.25-2 Basket Queue Module (Bottom View) Pulley, Motor, and Coupling
Adjustments, 4.25-3
4.25-3 Centering the Belt on the Motor Pulley, 4.25-3
4.26-1 Removing SEN37, 4.26-1
4.27-1 Pneumatic Supply Monitor, 30 PSI Card Transducer Adjustment, 4.27-2
TABLES
4-vi
4.2-1
4.2-2
4.2-3
4.2-4
4.2-5
4.2-6
4.2-7
4.2-8
SlideMaker SERVICE FUNCTIONS Options, 4.2-1
SlideMaker CASSETTE/SHUTTLE/BASKET Options, 4.2-2
SlideMaker SERVO SYSTEM Options, 4.2-3
SlideMaker PERFORM SLIDE CYCLE Options, 4.2-3
SlideMaker MONITOR/ADJUST FLUID DETECTORS Options, 4.2-4
SlideMaker BASKET TEST Options, 4.2-4
SlideMaker DEFINE SHUTTLE REFERENCE POS Options, 4.2-5
SlideMaker DEFINE SERVO OFFSETS Options, 4.2-5
4.8-1
Accessing the SlideMaker Circuit Cards, 4.8-1
PN 4276985A
4SERVICE AND REPAIR PROCEDURES 4
4.1
GUIDELINES FOR SERVICING THE SLIDEMAKER
General
1.
Review and heed the general safety warnings and cautions listed under Heading 1.2,
SAFETY PRECAUTIONS.
2.
Ensure there is adequate space to work and to access the instrument components safely.
Remember that most of the modules can be removed from the SlideMaker to more easily
access the components. Refer to Accessing and Removing the SlideMaker Modules in
this section.
3.
Before disconnecting or reconnecting the cables on any electronic components
(including solenoid valves), power down (that is, turn off the main power switch on the
rear of the SlideMaker and unplug the main power cable from the ac outlet).
Note: Early SlideMakers have black bodied solenoids which WILL damage the solenoid
drivers on the System Control card if disconnected with the SlideMaker power on.
4.
If using a specific procedure in this chapter, review the procedure:
r
Determine if you need any special tools, equipment or supplies. You can do most of
the procedures in this chapter using the tools in a standard Service Tool Kit, a digital
voltmeter, and an oscilloscope. Any special tools or equipment and any supplies
needed are listed under “Tools/Supplies Needed” at the beginning of the procedure.
r
Determine if any special safety warnings or cautions apply to the procedure.
r
Check any steps listed under “Verification.” If you are referenced to another
procedure for verification, review that procedure also.
5.
When reinstalling modules, mount the modules accurately to ensure the modules align
with each other correctly.
6.
When you have finished servicing the SlideMaker, always verify instrument performance
by doing the System Verification Procedure as directed under Heading 5.1.
Accessing the Main Compartments in the SlideMaker
PN 4276985A
r
Front compartment. See the procedures for Opening the Main Cover and Closing the
Main Cover below.
r
Rear compartment and the rear door. Unfasten the four captive screws securing the top
cover of the rear compartment, lift off the cover, and pull down the rear door.
r
Side compartments. Lift up and latch the main cover, then firmly grasp the side door at
the top and pull the door down.
4.1-1
SERVICE AND REPAIR PROCEDURES
GUIDELINES FOR SERVICING THE SLIDEMAKER
Opening the Main Cover
Figure 4.1-1 Latches Securing the Main Cover
TM
®
G
E N
S S
1.
Using both hands, raise the cover
to release the lower latches. See
Figure 4.1-1.
M
6985045A
Latches
Figure 4.1-2 Opening the Main Cover
WARNING Risk of personal injury. Injury can
result if the cover support latch is not
engaged securely and the cover falls. Ensure
the support latch is engaged securely before
releasing the cover.
2
2.
1
6985046A
4.1-2
3 Engages
Push the cover all the way back as
shown in Figure 4.1-2, and then
pull it forward slightly until the
cover support latch engages.
Note: To view the Keypad and
Display module while the cover is
open, pull on the latching pins
securing the bottom of the Keypad
and Display module to the cover
and let the module swing down.
PN 4276985A
SERVICE AND REPAIR PROCEDURES
GUIDELINES FOR SERVICING THE SLIDEMAKER
Closing the Main Cover
Figure 4.1-3 Closing the Main Cover
Move the cover back slightly.
WARNING Risk of personal injury. Injury can
result if the cover falls while you are
disengaging the cover support latch. Be sure
to steady the cover with one hand while
disengaging the support latch with the other.
3
1
6985044A
1.
2.
While holding the cover with one
hand, disengage the cover support
latch.
3.
Close the cover and ensure the
lower latches (Figure 4.1-1) are
engaged.
2 Disengage
Accessing and Removing the SlideMaker Modules
This section contains procedures for removing the:
r
Basket Queue Module
r
Cassette Transport Module
r
Cassette Output Queue Module
r
Dispense Module
r
Dryer and Slide Elevator Modules
r
Keypad and Display Module
r
Label Printer Module
r
Main Fluidics Module
r
Sample Access and Reservoir Module
r
Slide and Smear Module.
Basket Queue Module
CAUTION Risk of damage to electronic components. Connecting or disconnecting a circuit card, solenoid,
or any other electronic component while the power is ON can damage the component or the circuitry for the
component. Power down the SlideMaker before connecting or disconnecting an electronic component.
PN 4276985A
1.
Turn off the main power switch on the rear of the SlideMaker and unplug the main
power cable from the ac outlet.
2.
Open the main cover. For directions, see Opening the Main Cover in this section.
4.1-3
4
SERVICE AND REPAIR PROCEDURES
GUIDELINES FOR SERVICING THE SLIDEMAKER
WARNING Risk of personal injury and contamination. Some slide processing areas can contain prepared
smears and/or broken glass with biohazardous material. Handle with care and avoid skin contact.
3.
Unfasten the captive screws securing the upper rear wall of the Basket Queue module
and remove the wall. See Figure 4.1-4.
Figure 4.1-4 Removing the Basket Queue Module
Upper
rear
wall
Dryer
module
7334106A
4.
Unfasten the captive screws securing the Basket Queue module.
5.
Disconnect the cables and tubings attached to the Basket Queue module.
6.
Remove the Basket Queue module from the SlideMaker.
Cassette Transport Module
The Cassette Transport module comprises three modules: the Cassette Input Queue module,
the Slide Ejector module, and the Cassette Output Queue module. While two of these three
modules, the Cassette Input Queue module and the Slide Ejector module, are different
functionally, they make up one physical assembly.
Use this procedure to:
r
Remove the complete Cassette Transport module from the SlideMaker.
r
Access components in the Cassette Input Queue and Slide Ejector modules.
To remove only the Cassette Output Queue module, see Cassette Output Queue Module.
4.1-4
PN 4276985A
SERVICE AND REPAIR PROCEDURES
GUIDELINES FOR SERVICING THE SLIDEMAKER
CAUTION Risk of damage to electronic components. Connecting or disconnecting a circuit card, solenoid,
or any other electronic component while the power is ON can damage the component or the circuitry for the
component. Power down the SlideMaker before connecting or disconnecting an electronic component.
1.
Turn off the main power switch on the rear of the SlideMaker and unplug the main
power cable from the ac outlet.
2.
Open the main cover. For directions, see Opening the Main Cover in this section.
WARNING Risk of personal injury and contamination. Some slide processing areas can contain prepared
smears and/or broken glass with biohazardous material. Handle with care and avoid skin contact.
3.
Unfasten the captive screws securing the upper rear wall of the Basket Queue module
and remove the wall as shown in Figure 4.1-4.
4.
Unfasten the captive screws securing the upper cassette transfer mechanism and set the
mechanism aside. See Figure 4.1-5.
Note: After you reinstall the upper cassette transfer mechanism, ensure the back of the
slide cassette does not contact the arm of the upper cassette transfer mechanism.
Figure 4.1-5 Captive Screws Securing the Upper Cassette Transfer Mechanism
7334103B
PN 4276985A
4.1-5
4
SERVICE AND REPAIR PROCEDURES
GUIDELINES FOR SERVICING THE SLIDEMAKER
5.
Depending on the configuration of the Slide Ejector module, loosen the setscrews or
unfasten the captive screws securing the Slide Ejector module. See Figure 4.1-6.
6.
Remove the screws securing the front of the Cassette Input Queue module and unfasten
the captive screws securing the Cassette Output Queue module. See Figure 4.1-6.
Figure 4.1-6 Screws Securing the Cassette Transport Module
Setscrews
Captive
screws
7334188C
7.
Disconnect the cables and tubings attached to the Cassette Transport module.
8.
Remove the Cassette Transport module from the SlideMaker.
9.
To remove the Cassette Output Queue module from the Cassette Transport module:
a.
On the output queue support (Figure 4.1-7), push back the clip securing the rear of
the Cassette Output Queue module.
b.
Lift the Cassette Output Queue module up, off the pins on the right side of the
Cassette Input Queue and Slide Ejector modules. See Figure 4.1-7.
Figure 4.1-7 Removing the Cassette Output Queue Module from the Cassette Transport Module
Output
queue
support
7334094B
4.1-6
PN 4276985A
SERVICE AND REPAIR PROCEDURES
GUIDELINES FOR SERVICING THE SLIDEMAKER
Cassette Output Queue Module
Use this procedure to remove the Cassette Output Queue module from the Cassette Transport
module while the Cassette Transport module is still in the SlideMaker.
Note: For troubleshooting purposes, you can operate the SlideMaker with the Cassette
Output Queue module removed from the Cassette Transport module but still connected to
the SlideMaker.
WARNING Risk of personal injury and contamination. Some slide processing areas can contain prepared
smears and/or broken glass with biohazardous material. Handle with care and avoid skin contact.
Figure 4.1-8 Thumbscrews Securing the Dispense 1.
Module Splash Shield
Open the main cover. For directions,
see Opening the Main Cover in this
section.
2.
Remove the two thumbscrews securing
the splash shield for the Dispense
module, and slide off the splash shield.
See Figure 4.1-8.
3.
Unfasten the captive screws securing
the Dispense module, but do not
remove the module. See Figure 4.1-9.
Splash shield
6985022A
Figure 4.1-9 Captive Screws Securing the
Dispense Module
7334096A
PN 4276985A
4.1-7
4
SERVICE AND REPAIR PROCEDURES
GUIDELINES FOR SERVICING THE SLIDEMAKER
Figure 4.1-10 Captive Screws Securing the
Cassette Output Queue Module
Output
queue
support
4.
Unfasten the two captive screws
securing the Cassette Output Queue
module. See Figure 4.1-10.
5.
On the output queue support
(Figure 4.1-10), push back the clip
securing the rear of the Cassette Output
Queue module.
6.
Move the Dispense module until the
cylinder on the right side of the Cassette
Output Queue module can clear the
pinch valve on the Dispense module,
then lift the Cassette Output Queue
module up, off the pins on the left side.
Refer to Figure 4.1-7.
7334095B
CAUTION Instrument damage. If you operate or troubleshoot the SlideMaker with the Cassette Output
Queue module removed from the Cassette Transport module but still connected to the SlideMaker, and the
Cassette Output Queue module falls, the module and its associated wires and connectors can be damaged.
To prevent the Cassette Output Queue module from falling, place the module in a stable location and use
due care when working around it.
7.
To continue operating the SlideMaker with the Cassette Output Queue module removed
from the Cassette Transport module, place the Cassette Output Queue module in a stable
location.
8.
To completely remove the Cassette Output Queue module from the SlideMaker:
CAUTION Risk of damage to electronic components. Connecting or disconnecting a circuit card, solenoid,
or any other electronic component while the power is ON can damage the component or the circuitry for the
component. Power down the SlideMaker before connecting or disconnecting an electronic component.
a.
Turn off the main power switch on the rear of the SlideMaker and unplug the main
power cable from the ac outlet.
b.
Disconnect the cables and tubings attached to the Cassette Output Queue module.
c.
Remove the Cassette Output Queue module from the SlideMaker.
Dispense Module
CAUTION Risk of damage to electronic components. Connecting or disconnecting a circuit card, solenoid,
or any other electronic component while the power is ON can damage the component or the circuitry for the
component. Power down the SlideMaker before connecting or disconnecting an electronic component.
4.1-8
1.
Turn off the main power switch on the rear of the SlideMaker and unplug the main
power cable from the ac outlet.
2.
Open the main cover. For directions, see Opening the Main Cover in this section.
PN 4276985A
SERVICE AND REPAIR PROCEDURES
GUIDELINES FOR SERVICING THE SLIDEMAKER
WARNING Risk of personal injury and contamination. Some slide processing areas can contain prepared
smears and/or broken glass with biohazardous material. Handle with care and avoid skin contact.
3.
Remove the two thumbscrews securing the splash shield for the Dispense module, and
slide off the splash shield. Refer to Figure 4.1-8.
4.
Unfasten the captive screws securing the Dispense module. Refer to Figure 4.1-9.
5.
Disconnect the cables and tubings attached to the Dispense module.
6.
Remove the Dispense module from the SlideMaker.
Dryer and Slide Elevator Modules
CAUTION Risk of damage to electronic components. Connecting or disconnecting a circuit card, solenoid,
or any other electronic component while the power is ON can damage the component or the circuitry for the
component. Power down the SlideMaker before connecting or disconnecting an electronic component.
1.
Turn off the main power switch on the rear of the SlideMaker and unplug the main
power cable from the ac outlet.
2.
Open the main cover. For directions, see Opening the Main Cover in this section.
WARNING Risk of personal injury and contamination. Some slide processing areas can contain prepared
smears and/or broken glass with biohazardous material. Handle with care and avoid skin contact.
3.
Remove the Cassette Output Queue module and set it aside; it is not necessary to
completely disconnect the Cassette Output Queue module. Refer to the Cassette Output
Queue Module removal procedure, and do steps 1 through 7.
4.
Unfasten the captive screws securing the upper rear wall of the Basket Queue module
and remove the wall as shown in Figure 4.1-4.
5.
Unfasten the two captive screws securing the Dryer module. See Figure 4.1-11.
Figure 4.1-11 Captive Screws Securing the Dryer Module
7334097B
PN 4276985A
6.
Lift the Dryer module up, off the alignment pins mounted on the Basket Queue module.
Refer to Figure 4.1-11.
7.
Pull the Dryer module forward, disengaging the hooks at the back of the Dryer module
from their alignment grooves.
4.1-9
4
SERVICE AND REPAIR PROCEDURES
GUIDELINES FOR SERVICING THE SLIDEMAKER
8.
Disconnect the cables and tubings attached to the Dryer and the Slide Elevator modules.
9.
Remove the Dryer module from the SlideMaker.
10. To remove the Slide Elevator module from the Dryer module, unfasten the captive screws
securing the Slide Elevator module to the right side of the Dryer module. See
Figure 4.1-12.
Figure 4.1-12 Captive Screws Securing the Slide Elevator Module to the Dryer Module
7334101B
Keypad and Display Module
CAUTION Risk of damage to electronic components. Connecting or disconnecting a circuit card, solenoid,
or any other electronic component while the power is ON can damage the component or the circuitry for the
component. Power down the SlideMaker before connecting or disconnecting an electronic component.
1.
Turn off the main power switch on the rear of the SlideMaker and unplug the main
power cable from the ac outlet.
2.
Open the main cover. For directions, see Opening the Main Cover in this section.
3.
Pull on the latching pins securing the bottom of the Keypad and Display module to the
cover.
4.
Remove the Phillips-head screws securing the Keypad and Display module bracket to the
cover.
5.
Disconnect the cables attached to the Keypad and Display module, and remove the
Keypad and Display module from the SlideMaker.
Label Printer Module
CAUTION Risk of damage to electronic components. Connecting or disconnecting a circuit card, solenoid,
or any other electronic component while the power is ON can damage the component or the circuitry for the
component. Power down the SlideMaker before connecting or disconnecting an electronic component.
4.1-10
1.
Turn off the main power switch on the rear of the SlideMaker and unplug the main
power cable from the ac outlet.
2.
Open the main cover. For directions, see Opening the Main Cover in this section.
PN 4276985A
SERVICE AND REPAIR PROCEDURES
GUIDELINES FOR SERVICING THE SLIDEMAKER
WARNING Risk of personal injury and contamination. Some slide processing areas can contain prepared
smears and/or broken glass with biohazardous material. Handle with care and avoid skin contact.
3.
Remove the screws securing the Label Printer module to the Slide and Smear module.
See Figure 4.1-13.
Figure 4.1-13 Screws Securing the Label Printer Module
6985017A
4.
Disconnect the cables, ground strap, and tubing attached to the Label Printer module.
5.
Remove the Label Printer module from the SlideMaker.
Main Fluidics Module
CAUTION Risk of damage to electronic components. Connecting or disconnecting a circuit card, solenoid,
or any other electronic component while the power is ON can damage the electronic component or the
circuitry for the component. Power down the SlideMaker before connecting or disconnecting an electronic
component.
1.
Turn off the main power switch on the rear of the SlideMaker and unplug the main
power cable from the ac outlet.
2.
Open the main cover. For directions, see Opening the Main Cover in this section.
WARNING Risk of personal injury and contamination. Some slide processing areas can contain prepared
smears and/or broken glass with biohazardous material. Handle with care and avoid skin contact.
PN 4276985A
3.
Remove the two screws securing the Main Fluidics module cover, and remove the cover.
4.
If shipping brackets are still installed on the Main Fluidics module, remove the four
screws (two per shipping bracket) securing the shipping brackets to the main frame.
5.
Unfasten the four captive screws securing the Main Fluidics module. See Figure 4.1-14.
4.1-11
4
SERVICE AND REPAIR PROCEDURES
GUIDELINES FOR SERVICING THE SLIDEMAKER
Figure 4.1-14 Captive Screws Securing the Main Fluidics Module
7334099A
6.
Disconnect the cables and tubings attached to the Main Fluidics module.
7.
Remove the Main Fluidics module from the SlideMaker.
8.
If shipping brackets are attached to the Main Fluidics module, remove the shipping
brackets before reinstalling the module.
Sample Access and Reservoir Module
CAUTION Risk of damage to electronic components. Connecting or disconnecting a circuit card, solenoid,
or any other electronic component while the power is ON can damage the component or the circuitry for the
component. Power down the GEN•S System before connecting or disconnecting an electronic component.
1.
Power down the GEN•System. Refer to Heading 4.1, Power Up/Power Down, in the
service manual for the GEN•S System Analytical Station.
2.
Open the lower front cover of the Diluter.
3.
Unfasten the captive screws for MF4 and MF13 and move MF4 and MF13 as needed to
access the Sample Access and Reservoir module. See Figure 4.1-15.
Figure 4.1-15 Captive Screws Securing MF4 and MF13
7334165B
4.1-12
PN 4276985A
SERVICE AND REPAIR PROCEDURES
GUIDELINES FOR SERVICING THE SLIDEMAKER
4.
Remove the two thumbscrews securing the splash shield for the Sample Access and
Reservoir module, and lift out the splash shield. See Figure 4.1-16.
5.
Unfasten the captive screws securing the Sample Access and Reservoir module. See
Figure 4.1-17.
Figure 4.1-16 Thumbscrews Securing the Sample
Access and Reservoir Module Splash Shield
Figure 4.1-17 Captive Screws Securing the
Sample Access and Reservoir Module
Splash shield
Splash shield
6985021A
7334100A
6.
Disconnect the cables and tubings attached to the Sample Access and Reservoir module.
7.
Remove the Sample Access and Reservoir module from the Diluter.
Slide and Smear Module
The Slide and Smear module comprises two modules, the Slide Transport module and the
Smear module. While the Slide Transport module and the Smear module are different
modules functionally, physically they make up one assembly.
CAUTION Risk of damage to electronic components. Connecting or disconnecting a circuit card, solenoid,
or any other electronic component while the power is ON can damage the component or the circuitry for the
component. Power down the SlideMaker before connecting or disconnecting an electronic component.
PN 4276985A
1.
Turn off the main power switch on the rear of the SlideMaker and unplug the main
power cable from the ac outlet.
2.
Open the main cover. For directions, see Opening the Main Cover in this section.
3.
Remove the following modules to access the Slide and Smear Module:
a.
Dispense module. Do the Dispense Module removal procedure, beginning at step 4.
b.
Cassette Transport module. Do the Cassette Transport Module removal procedure,
steps 3 through 8.
4.1-13
4
SERVICE AND REPAIR PROCEDURES
GUIDELINES FOR SERVICING THE SLIDEMAKER
c.
Dryer module. Do the Dryer and Slide Elevator Modules removal procedure, steps 5
through 9.
d.
Main Fluidics module. Do the Main Fluidics Module removal procedure, steps 5
through 7.
WARNING Risk of personal injury and contamination. Some slide processing areas can contain prepared
smears and/or broken glass with biohazardous material. Handle with care and avoid skin contact.
4.
Unfasten the captive screws securing the Slide and Smear module. See Figure 4.1-18.
Note: The Label Printer module is mounted on the Slide and Smear module. You can
remove it, if necessary, either before or after you remove the Slide and Smear module
from the SlideMaker. Refer to the Label Printer Module procedure, steps 3 through 5.
Figure 4.1-18 Captive Screws Securing the Slide and Smear Module
3
4
5
7334102B
4.1-14
5.
Disconnect the cables and tubings attached to the Slide and Smear module.
6.
Remove the Slide and Smear module from the SlideMaker.
PN 4276985A
SERVICE AND REPAIR PROCEDURES
USING THE SLIDEMAKER SERVICE FUNCTIONS
4.2
USING THE SLIDEMAKER SERVICE FUNCTIONS
Purpose
Use this procedure to perform any of the service routines available from the SlideMaker
SERVICE FUNCTIONS menu. These routines are described in the tables in this section. Refer
to Figure A.5-1 for the menu tree of all the SlideMaker options, both customer and service.
Procedure
1.
Log in as service.
a.
At the MAIN MENU of the SlideMaker, select SPECIAL FUNCTIONS tt KEYPAD TEST.
b.
Enter the current service code. Use the buttons on the left as numbers 1 through 4,
top to bottom, and the buttons on the right as numbers 5 through 8, top to bottom.
Note: Exiting the service screens automatically logs you out of the service functions.
2.
At the MAIN MENU, select SERVICE FUNCTIONS. See Table 4.2-1 for a description of the
options on the SERVICE FUNCTIONS menu.
3.
Press the keys next to the relevant prompts until the required service routine appears.
4.
To exit a service function, select EXIT as often as necessary to return to the desired screen.
Table 4.2-1 SlideMaker SERVICE FUNCTIONS Options
Options
Descriptions
CASSETTE/SHUTTLE/BASKET
Allows access to the ADVANCE CASSETTES, LOCK CASSETTE, UNLOCK
CASSETTE, BASKET TEST, HOME SHUTTLE, EXERCISE SHUTTLE PATH, and
DEFINE SHUTTLE REFERENCE POS. options to test the movements of the slide
cassettes, the slide baskets and the shuttle. See Table 4.2-2.
SERVO SYSTEM
Allows access to the RESET SERVO SYSTEM, DEFINE SERVO OFFSETS,
EXERCISE SERVO PATH, PERFORM SERVO PROFILE, and ADV SERVO TO
CLEARANCE POS options. See Table 4.2-3.
PERFORM SLIDE CYCLE
Allows access to SLIDE CYCLE, SLIDE EJECT, STOP CYCLE and DRY CYCLE
options. See Table 4.2-4.
RUN SERVICE
Allows access to the:
r VIEW PRINTER STATUS screen which displays the current Printer status for
printer hardware and software revisions, label missing, label position, label
limit, total label count, print head status, temperature and temperature
exceeded, motor status and speed, ribbon, stock, TOF, cold reset, and
printer intensity.
r PNEUMATICS/POWER SUPPLIES screen which displays the current
readings for the pneumatic and electronic supplies and the acceptable
tolerances.
r SCAN SENSOR TEST screen which displays a list of the sensor numbers
and the current state of each sensor. Use the arrow prompts to select a
sensor. The name of the selected sensor is displayed on the bottom of the
screen.
PN 4276985A
4.2-1
4
SERVICE AND REPAIR PROCEDURES
USING THE SLIDEMAKER SERVICE FUNCTIONS
Table 4.2-1 SlideMaker SERVICE FUNCTIONS Options (Continued)
Options
Descriptions
SOLENOID TEST
Displays a list of the solenoid numbers and allows you to turn individual
solenoids on and off.
1. Use the arrow prompts to move the prompt to the desired solenoid. The
name of the selected solenoid is displayed on the bottom of the screen.
2. Use the ON and OFF prompts to turn the selected solenoid on or off. When a
solenoid is ON, an asterisk is displayed next to the solenoid number.
MONITOR/ADJUST FLUID DETECTORS Allows access to the FILL DILUENT, CHANNEL SELECTION, INCREASE
VOLTAGE, DECREASE VOLTAGE, and DRY SYSTEM options. See Table 4.2-5.
Table 4.2-2 SlideMaker CASSETTE/SHUTTLE/BASKET Options
Options
Descriptions
ADVANCE CASSETTES
Moves the slide cassette in each station to the next slide cassette station:
1. If a slide cassette is in the slide ejection station, this function overrides the
locked cassette feature and moves the slide cassette from the slide ejection
station to the Cassette Output Queue module.
2. Moves a slide cassette from the Cassette Input Queue module to the slide
ejection station.
LOCK CASSETTE
Locks the slide cassette in place.
UNLOCK CASSETTE
Unlocks the slide cassette.
BASKET TEST
Allows access to the FRONT BELT, REAR BELT, FRONT/REAR BELT, POSITION,
ELEVATOR and STOP MOTION options to test the slide basket movements
along the entire slide basket path. See Table 4.2-6.
HOME SHUTTLE
Moves the shuttle to the blood dispense position (the location of the dispense
position sensor), back to the home position (the location of the smear position
sensor) and then an additional number of steps past home position to ensure
the entire sensing zone is blocked by the shuttle flag.
EXERCISE SHUTTLE PATH
Displays the EXERCISE SHUTTLE PATH screen with the following options:
r START CYCLE - Moves the shuttle to the home position, then to the printer
position, then to the blood dispense position and finally back to the home
position, verifying all the motions and sensors.
r STOP CYCLE - Stops the function at the end of the current cycle.
r CYCLE - Switches between SINGLE and CONTINUOUS.
DEFINE SHUTTLE REFERENCE POS
4.2-2
Allows access to the HOME OFFSET, DISPENSE OFFSET, PRINTER OFFSET,
SHUTTLE VACUUM, STEP LEFT, STEP RIGHT, and RESET SHUTTLE OFFSET
options to ensure correct alignment of the shuttle with the printer, the dispense
probe and the Dryer module. See Table 4.2-7.
PN 4276985A
SERVICE AND REPAIR PROCEDURES
USING THE SLIDEMAKER SERVICE FUNCTIONS
Table 4.2-3 SlideMaker SERVO SYSTEM Options
Options
Descriptions
RESET SERVO SYSTEM
Initializes the servo controller chip; the truck proceeds to the servo reverse limit
sensor, the servo forward limit sensor, and the index position.
DEFINE SERVO OFFSETS
Allows access to START PICK SEQUENCE, DEFINE PICK OFFSET, MOVE LEFT,
MOVE RIGHT, START WICK SEQUENCE, DEFINE WICK OFFSET and MOVE
SPEED. See Table 4.2-8.
EXERCISE SERVO PATH
Moves the truck in the Smear Transport module as follows to check the
functioning of the servo path sensors: to the clearance position, then to the pick
position, then to the clearance position, then to the wick position to do a slow
default servo trajectory profile, and finally to the clearance position.
PERFORM SERVO PROFILE
Displays the SERVO PROFILE screen with the following options:
r SERVO PROFILE - Switches between the SLOW and FAST default servo
trajectory (acceleration and velocity) profiles.
r RUN PROFILE -Moves the truck in the Smear Transport module to the wick
position, moves the spreader slide the fixed length determined by the
SERVO PROFILE selection, collects the position data during the trajectory
movement and compares the data to expected position data.
ADV SERVO TO CLEARANCE POS
Moves the truck in the Smear Transport module to the absolute clearance
position, a fixed default distance from the pick position.
Table 4.2-4 SlideMaker PERFORM SLIDE CYCLE Options
Options
Descriptions
SLIDE CYCLE
Switches between SINGLE and CONTINUOUS slide cycle.
SLIDE EJECT
Ejects the slide.
STOP CYCLE
Stops the selected slide cycle at the end of its sequence.
DRY CYCLE
Performs a complete slide preparation sequence without putting a drop of
blood on the slide. The Dry cycle can be divided into four processes:
1. Slide pickup.
2. Smear making.
3. Slide ejection.
4. Slide placement.
For a summary of these processes, refer to the Dry Cycle Sequence Summary
at the end of this section.
For more details, refer to Slide Ejector Module under Heading 2.6, SMEAR
PROCESSING SYSTEM: CASSETTE TRANSPORT MODULE and to Slide
Transport Module and Smear Module under Heading 2.7, SMEAR PROCESSING
SYSTEM: SLIDE AND SMEAR MODULE.
PN 4276985A
4.2-3
4
SERVICE AND REPAIR PROCEDURES
USING THE SLIDEMAKER SERVICE FUNCTIONS
Table 4.2-5 SlideMaker MONITOR/ADJUST FLUID DETECTORS Options
Options
Descriptions
FILL DILUENT
CAUTION Using the FILL DILUENT function overlong fills the vacuum
overflow tank in the GEN•S System. Perform the fluid detector calibration
promptly. If a delay is unavoidable, select DRY SYSTEM to drain the lines.
Drains the local waste chamber drains, prepares the fluid detectors to sense
diluent, delivers diluent to the SlideMaker blood lines, and displays the voltage
for the fluid detector in real time.
CHANNEL SELECTION
Increments the fluid detector numbers by one until the option ALL is reached at
which time it restarts at 1.
Note: ALL is the default setting.
INCREASE VOLTAGE
Increments the voltage for the fluid detector selected by CHANNEL SELECTION.
Exiting this screen saves the new voltage setting.
DECREASE VOLTAGE
Decrements the voltage for the fluid detector selected by CHANNEL
SELECTION. Exiting this screen saves the new voltage setting.
DRY SYSTEM
Drains the local waste chamber drains, prepares the fluid detectors to sense air,
delivers air to the SlideMaker blood lines, and displays the voltage for the fluid
detector in real time.
Table 4.2-6 SlideMaker BASKET TEST Options
Options
Descriptions
FRONT BELT
Exercises the front belt in the Basket Queue module for the extent determined
by the POSITION selected.
REAR BELT
Exercises the rear belt in the Basket Queue module for the extent determined by
the POSITION selected.
FRONT/REAR BELT
Simultaneously exercises the front and rear belts in the Basket Queue module
for the extent determined by the POSITION selected.
POSITION
Used in conjunction with FRONT BELT, REAR BELT, FRONT/REAR BELT, and
ELEVATOR to determine the extent of movement. Switches between three
options:
r STEP - Moves one software step
r CONTINUOUS - Moves continuously until operator selects STOP MOTION
r SINGLE - Moves a single basket’s activity.
ELEVATOR
Exercises the elevator mechanism in the Slide Elevator module for the extent
determined by the POSITION selected.
STOP MOTION
Stops any continuous movement of the belts or elevator testing.
4.2-4
PN 4276985A
SERVICE AND REPAIR PROCEDURES
USING THE SLIDEMAKER SERVICE FUNCTIONS
Table 4.2-7 SlideMaker DEFINE SHUTTLE REFERENCE POS Options
Options
Descriptions
HOME OFFSET XX
Moves the shuttle in the Smear Transport module to the home position (a
predefined number of steps inside the smear position sensor) and displays the
number of steps inside the sensor. See for the nominal setting.
DISPENSE OFFSET XX
Moves the shuttle in the Smear Transport module to the dispense position (a
predefined number of steps inside the dispense position sensor) and displays
the number of steps inside the sensor. See Table A.1-3 for the nominal setting.
PRINTER OFFSET XX
Moves the shuttle in the Smear Transport module to the printer position (a
predefined number of steps inside the print position sensor) and displays the
number of steps inside the sensor. See Table A.1-3 for the nominal setting.
SHUTTLE VACUUM
Opens [ENABLE] or closes [DISABLE] the vacuum supply line to the shuttle in
the Smear Transport module.
STEP LEFT
When HOME OFFSET, DISPENSE OFFSET, or PRINTER OFFSET are selected,
moves the shuttle a step to the left. Exiting this screen saves the new offset
value.
STEP RIGHT
When HOME OFFSET, DISPENSE OFFSET, or PRINTER OFFSET are selected,
moves the shuttle a step to the right. Exiting this screen saves the new offset
value.
RESET SHUTTLE OFFSET
Returns the home, dispense and print offset values to their default values.
Table 4.2-8 SlideMaker DEFINE SERVO OFFSETS Options
Options
Descriptions
START PICK SEQUENCE
Moves the truck in the Smear Transport module to the pick position and
displays the current pick offset value. Allows you to move the truck to a new
pick position using the MOVE LEFT and MOVE RIGHT options.
DEFINE PICK OFFSET
Stores the new pick offset value in memory.
MOVE LEFT
When the START PICK SEQUENCE or START WICK SEQUENCE are selected,
moves the truck to the left.
MOVE RIGHT
When the START PICK SEQUENCE or START WICK SEQUENCE are selected,
moves the truck to the right.
START WICK SEQUENCE
Ejects a slide, moves the truck in the Smear Transport module to the pick
position to retrieve the slide, and then moves the slide to the wick position and
displays the current wick offset value. Allows you to move the truck to a new
wick position using the MOVE LEFT and MOVE RIGHT options.
DEFINE WICK OFFSET
Stores the new wick offset value in memory.
MOVE SPEED
Determines the speed (the distance covered by the truck) each time MOVE LEFT
or MOVE RIGHT is selected. The options are SLOW, MEDIUM, and FAST.
PN 4276985A
4.2-5
4
SERVICE AND REPAIR PROCEDURES
USING THE SLIDEMAKER SERVICE FUNCTIONS
Dry Cycle Sequence Summary
A Dry cycle is the same as a slide preparation cycle except a drop of blood is not placed on the
slide. At the beginning of a dry cycle, the software checks:
1.
SEN20 and SEN25 to determine if a slide is on the slide pickup bridge. If not, the Slide
Ejector module ejects a slide.
2.
SEN4 to determine if a slide is on the shuttle. If not, the smear truck picks up a slide
from the slide pickup bridge and places it on the shuttle.
Assuming both the slide pickup bridge and the shuttle have a slide, the Dry cycle sequence is
as follows:
Slide Pickup Process
1.
SOL49 is energized, extending the register-X cylinder, CL11. CL11 pushes down the
register-X arm, clearing the path for the smear truck.
2.
The smear truck moves to the pick position.
3.
SOL61 and SOL56 are energized to extend CL12 which lowers the smear truck onto the
slide.
4.
SOL43 is energized to apply vacuum to the truck.
5.
SOL48 is energized, extending the Z-button cylinder, CL3, to separate (retract) the
Z-button from the slide.
6.
SOL56 is de-energized and then SOL61 is de-energized to raise the smear truck and the
slide from the slide pickup bridge.
7.
The smear truck (with the slide) moves to the clearance position.
8.
A new slide is ejected. Refer to the Slide Ejection Process below.
Smear Making Process
1.
The shuttle moves to the print position where a label is applied to the smear slide.
2.
While the smear truck picks up a spreader slide from the slide pickup bridge (refer to the
Slide Pickup Process above), the shuttle moves to the dispense position and then back to
the smear (home) position.
3.
SOL61 is energized to tilt the smear truck.
Note: Energizing SOL61 removes pressure from the bottom of CL12. Gravity tilts the
smear truck down.
4.2-6
4.
The smear truck (with the spreader slide) moves to the wick position, and then
accelerates forward as though making a smear.
5.
SOL61 is de-energized to retract CL12 which returns the smear truck to the horizontal
position.
6.
SOL44 is de-energized to remove vacuum from the shuttle.
7.
SOL41 is energized to transfer the smeared slide to the Dryer module.
8.
While the "smear" is being made, a new slide is ejected onto the slide pickup bridge.
PN 4276985A
SERVICE AND REPAIR PROCEDURES
USING THE SLIDEMAKER SERVICE FUNCTIONS
Slide Ejection Process
1.
SOL49 is energized, extending the register-X cylinder, CL11. CL11 pushes down the
register-X arm, clearing the path for the slide.
2.
The slide pusher is retracted until SEN23 is activated, allowing the bottom slide in the
slide cassette to drop down, ready to be ejected.
3.
The slide pusher is extended until SEN24 is activated, ejecting the bottom slide from the
slide cassette onto the slide pickup bridge.
4.
As the slide is ejected, it pushes the Z-button to move the flag out of SEN20.
5.
SOL48 is energized, extending the Z-button cylinder, CL3, to separate (retract) the
Z-button from the slide.
6.
SOL49 is de-energized, retracting the register-X cylinder, CL11, which pulls up the
register-X arm. The register-X arm pushes the ejected slide against the left wall of the
slide pickup bridge.
7.
SOL48 is de-energized, and the Z-button cylinder, CL3, retracts, extending the Z-button.
The Z-button holds the slide firmly in place.
Slide Placement Process
PN 4276985A
1.
The smear truck (with the slide) moves to the smear position.
2.
SOL61 is energized and then SOL56 is energized to extend CL12 which lowers the
smear truck onto the shuttle.
3.
SOL44 is energized to apply vacuum to the shuttle.
4.
SOL43 is de-energized to remove vacuum from the smear truck, releasing the slide from
the smear truck.
5.
SOL56 and SOL61 are de-energized to retract CL12 which raises the smear truck to its
normal horizontal position.
6.
If you are doing continuous Dry cycles, the process begins again.
4.2-7
4
SERVICE AND REPAIR PROCEDURES
USING THE SLIDEMAKER SERVICE FUNCTIONS
4.2-8
PN 4276985A
SERVICE AND REPAIR PROCEDURES
HOME, PRINTER AND DISPENSE OFFSET SHUTTLE POSITION ADJUSTMENTS
4.3
HOME, PRINTER AND DISPENSE OFFSET SHUTTLE POSITION ADJUSTMENTS
Purpose
The home (smear), dispense and printer offsets are preset at the factory and should only need
adjustment after component replacement.
Use this procedure to verify the home, dispense and print shuttle positions are set correctly
and to adjust these positions if necessary.
Setting the Home Offset
1.
On the SlideMaker screen, select HOME OFFSET (MAIN MENU tt SERVICE FUNCTIONS tt
CASSETTE/SHUTTLE/BASKET tt DEFINE SHUTTLE REFERENCE POS tt HOME OFFSET).
2.
Ensure the home offset is within the tolerance of the nominal setting specified in
Table A.1-3 and the left and right sides of the slide pusher bars do not touch the shuttle
as the bars pass through the shuttle. See Figure 4.3-1.
Note: The home offset setting determines the horizontal (left to right) position of the
slide pusher bars within the shuttle; the slide pusher bars adjustment (Heading 4.16,
SLIDE PUSHER BARS AND SHUTTLE BRUSH ADJUSTMENTS) determines the vertical
(up and down) position of the slide pusher bars within the shuttle.
Figure 4.3-1 Verifying the Home Position
Slide
pusher bar
Slide
pusher bar
Shuttle
Shuttle
7334046A
PN 4276985A
3.
If the home position is not correct, use the STEP LEFT and STEP RIGHT options to change
the home position.
4.
Ensure the home offset is within the tolerance of the nominal setting specified in
Table A.1-3.
4.3-1
4
SERVICE AND REPAIR PROCEDURES
HOME, PRINTER AND DISPENSE OFFSET SHUTTLE POSITION ADJUSTMENTS
ATTENTION: The home position (smear position) is the reference position for making the
smear. If you adjust the home position, you must verify the pick and wick positions are still
correct.
5.
If you changed the home offset, check the pick and wick positions. Go to Heading 4.4,
PICK AND WICK SLIDE POSITION ADJUSTMENTS.
Setting the Printer Offset
Purpose
The printer offset ensures the label is positioned correctly in the X-dimension, near the right
edge of the slide but not over the end. See Figure 4.3-2.
Check the print position if a laboratory changes its source of glass slides, as the length of the
new slides may be different.
Figure 4.3-2 Checking the Label Positions in the X-Dimension
7334089A
Procedure
ATTENTION: The pick and wick adjustments affect the placement of the slide on the shuttle and
therefore can affect the location of the slide in the print position.
1.
Before checking the print position, verify the pick and wick positions are correct. See
Heading 4.4, PICK AND WICK SLIDE POSITION ADJUSTMENTS.
ATTENTION: The height of the Label Printer module affects the position of the labels on the
slide and should be checked before adjusting the printer offset.
2.
Ensure the height of the Label Printer module is correct. See Printer Height above the
Slide Adjustment under Heading 4.5, PRINTER ADJUSTMENTS.
3.
On the SlideMaker screen, select DRY CYCLE (MAIN MENU tt SERVICE FUNCTIONS tt
PERFORM SLIDE CYCLE tt DRY CYCLE) and ensure the printer label is located on the slide as
shown in Figure 4.3-2.
r
If the label is in the correct location, you do not need to adjust the printer offset. Go
to Verification.
r
If the label extends into the smear area or over the end of the slide, adjust the
printer offset. Go to step 4.
4.
Return to the SERVICE FUNCTIONS screen.
5.
Select PRINTER OFFSET (MAIN MENU tt SERVICE FUNCTIONS tt CASSETTE/SHUTTLE/BASKET tt
DEFINE SHUTTLE REFERENCE POS tt PRINTER OFFSET).
Note: The shuttle moves a slide to the print position.
4.3-2
PN 4276985A
SERVICE AND REPAIR PROCEDURES
HOME, PRINTER AND DISPENSE OFFSET SHUTTLE POSITION ADJUSTMENTS
6.
Use the STEP LEFT and STEP RIGHT options to change the shuttle position at the printer.
Note: The higher the printer offset number the closer the label will be to the end of the
slide. See Table A.1-3 for the nominal printer offset value.
7.
Verify the SlideMaker is working correctly. Go to Verification.
Verification
1.
Return to the SERVICE FUNCTIONS screen.
2.
Select DRY CYCLE (MAIN MENU tt SERVICE FUNCTIONS tt PERFORM SLIDE CYCLE tt DRY
CYCLE).
3.
Do 12 dry cycles and ensure the label position on the slide is correct. Refer to
Figure 4.3-2.
Note: Following a printer adjustment, it normally takes four or five cycles for the
changes to take affect.
Setting the Dispense Offset
Purpose
The dispense offset ensures the blood drop is positioned correctly in the X-dimension, 25 mm
(1 in.) from the right edge of the slide. See Figure 4.3-3. If the blood drop is placed too far to
the left, the smear extends over the left edge of the slide. If the blood drop is placed too far to
the right, the blood is pulled onto the label.
Check the dispense position if a laboratory changes its source of glass slides, as the length of
the new slides may be different.
Figure 4.3-3 Checking the Smear Position on the Slide in the X-Dimension
25 mm
(1 in.)
7334167B
Tools/Supplies Needed
B Felt tip marker with medium or fine point
B Ruler
Procedure
ATTENTION: The pick and wick adjustments affect the placement of the slide on the shuttle and
therefore can affect the location of the slide in the dispense position.
1.
PN 4276985A
Before checking the dispense position, verify the pick and wick positions are correct. See
Heading 4.4, PICK AND WICK SLIDE POSITION ADJUSTMENTS.
4.3-3
4
SERVICE AND REPAIR PROCEDURES
HOME, PRINTER AND DISPENSE OFFSET SHUTTLE POSITION ADJUSTMENTS
2.
From the home position, exercise the shuttle all the way left and then all the way right:
a.
On the SlideMaker screen, select HOME OFFSET (MAIN MENU tt SERVICE FUNCTIONS tt
CASSETTE/SHUTTLE/BASKET tt DEFINE SHUTTLE REFERENCE POS tt HOME OFFSET). The
shuttle moves to the home position.
3.
4.
b.
Select PRINTER OFFSET. The shuttle moves to the left to the print position.
c.
Select DISPENSE OFFSET. The shuttle moves to the right to the dispense position.
Determine the current location of the shuttle in the dispense position:
a.
Unlatch the locking lever on the dispense probe (pull the lever out and turn the
lever up or down) as shown in Figure 4.3-4.
b.
Manually move the dispense probe down until it touches the slide.
c.
Using a felt tip marker, mark the position of the dispense probe on the slide.
Remove the marked slide from the shuttle:
a.
Latch the locking lever on the dispense probe (Figure 4.3-4), then pull the dispense
probe up until the locking lever drops into the groove on the probe.
b.
Select HOME OFFSET to return the shuttle to the home (smear) position.
c.
Select SHUTTLE VACUUM to disable the vacuum.
d.
Lift the marked slide off the shuttle.
Figure 4.3-4 Verifying the Dispense Position
Dispense
probe
Locking
lever
Latched
Unlatched
Glass slide
Dispense
probe
Slide
25 mm
(1 in.)
Shuttle
7334047A
4.3-4
PN 4276985A
SERVICE AND REPAIR PROCEDURES
HOME, PRINTER AND DISPENSE OFFSET SHUTTLE POSITION ADJUSTMENTS
5.
6.
Measure the distance from the right edge of the slide to the estimated middle of the
dispense probe position on the slide.
r
If the distance is 25 mm (1 in.), no adjustment is required. Re-enable the vacuum
and go to Verification.
r
If the distance is not 25 mm (1 in.), adjust the dispense position. Go to step 6.
Adjust the shuttle dispense position:
a.
Place a clean glass slide on the shuttle, centering the right edge of the slide on the
shuttle support as shown in Figure 4.3-5.
Figure 4.3-5 Correct Position of the Slide on the Shuttle
Top view
Center right
edge of slide
on wall
Side view
Shuttle
support
wall
Center right
edge of slide
on wall
Shuttle
support
wall
7334166B
b.
Enable the shuttle vacuum.
c.
Exercise the shuttle all the way left and then all the way right:
d.
1)
Select PRINTER OFFSET to move the shuttle to the left to the print position.
2)
Select DISPENSE OFFSET to move the shuttle to the right to the dispense
position.
Use the STEP LEFT and STEP RIGHT options to change the shuttle position at the
dispense probe.
Note: See Table A.1-3 for the nominal dispense offset value.
7.
Repeat steps 3 through 6 until the distance from the right edge of the slide to the
estimated middle of the dispense probe position on the slide is 25 mm (1 in.).
8.
Go to Verification.
Verification
PN 4276985A
1.
Return to the MAIN MENU screen.
2.
Run blood cycles and verify the blood drop for the smear is in the correct position on
each slide. Refer to Figure 4.3-3.
4.3-5
4
SERVICE AND REPAIR PROCEDURES
HOME, PRINTER AND DISPENSE OFFSET SHUTTLE POSITION ADJUSTMENTS
4.3-6
PN 4276985A
SERVICE AND REPAIR PROCEDURES
PICK AND WICK SLIDE POSITION ADJUSTMENTS
4.4
PICK AND WICK SLIDE POSITION ADJUSTMENTS
Purpose
Use this procedure to set the pick and wick positions of the slide any time you change the
home offset. Also use this procedure to check the pick and wick positions if a laboratory
changes its source of glass slides, as the length of the new slides may be different.
r
r
The pick position is the location where the smear truck picks up the slide from the Slide
Ejector module. Check the pick position and reset the offset value if necessary whenever
you replace:
t
A servo sensor.
t
The servo motor.
t
An encoder.
The wick position is the location where the spreader slide sits in the drop of blood on the
smear slide until the blood is wicked across the smear slide. Check the wick position and
reset the offset value if necessary whenever you replace:
t
A shuttle belt.
t
A servo sensor.
t
The servo motor.
t
An encoder.
Procedure
ATTENTION: The shuttle must be in the home position when setting the pick position.
1.
Reset the SlideMaker to ensure the shuttle is in the home position.
2.
On the SlideMaker screen, select SERVO SYSTEM (MAIN MENU tt SERVICE FUNCTIONS tt
SERVO SYSTEM).
3.
On the Servo System Functions screen:
4.
PN 4276985A
a.
Select RESET SERVO SYSTEM.
b.
Select DEFINE SERVO OFFSETS.
Set the pick position:
a.
Select START PICK SEQUENCE.
b.
For better viewing, remove the slide cassette from the slide ejector station.
c.
Using the MOVE LEFT option and the appropriate MOVE SPEED (SLOW, MEDIUM, or
FAST), move the smear truck until the right-hand edge of the truck is flush with the
right end of the glass slide as shown in Figure 4.4-1.
d.
Select DEFINE PICK OFFSET to save the pick offset value.
4.4-1
4
SERVICE AND REPAIR PROCEDURES
PICK AND WICK SLIDE POSITION ADJUSTMENTS
Figure 4.4-1 Defining the Pick Position
Align
edges
Truck
Glass slide
7334050A
.
5.
Check the wick position:
a.
Insert a filled slide cassette into the Cassette Input Queue module.
b.
Select START WICK SEQUENCE. A slide is ejected, picked up by the smear truck, and
moved over the slide on the shuttle.
c.
Select DEFINE WICK OFFSET to save the wick offset value. The slide pusher bars push
the slide from the shuttle to the dryer and the smear truck places the glass slide on
the shuttle.
d.
Verify that the right edge of the slide is centered on the shuttle support wall as
shown in Figure 4.4-2.
r
If the slide is positioned correctly, no adjustment is needed. Go to Verification.
r
If the slide is not positioned correctly, adjust the smear truck. Go to step 6.
Figure 4.4-2 Defining the Wick Position
Right edge
of slide
Right edge
of slide
Right edge
of slide
7334172A
6.
4.4-2
Reset the wick position:
a.
Select START WICK SEQUENCE.
b.
Using the MOVE RIGHT option and the appropriate MOVE SPEED (SLOW, MEDIUM, or
FAST), move the smear truck in the correct direction to center the right edge of the
slide on the shuttle support wall.
c.
Select DEFINE WICK OFFSET and check the position of the slide on the shuttle support
wall.
PN 4276985A
SERVICE AND REPAIR PROCEDURES
PICK AND WICK SLIDE POSITION ADJUSTMENTS
d.
7.
Repeat steps a through c until the right edge of the slide is centered on the shuttle
support wall as shown in Figure 4.4-2.
Verify the SlideMaker is working correctly. Go to Verification.
Verification
1.
Return to the SERVICE FUNCTIONS menu.
2.
Select DRY CYCLE (MAIN MENU tt SERVICE FUNCTIONS tt PERFORM SLIDE CYCLE tt DRY
CYCLE) and ensure the slide is picked up from the slide ejector correctly and is moved to
the correct wicking position (to the left of the label position).
ATTENTION: The pick and wick adjustments affect the placement of the slide on the shuttle and
therefore can affect the location of the slide in the print and dispense positions.
3.
PN 4276985A
If you reset the pick and wick positions, check the print and dispense shuttle positions.
Go to Setting the Printer Offset and Setting the Dispense Offset under Heading 4.3,
HOME, PRINTER AND DISPENSE OFFSET SHUTTLE POSITION ADJUSTMENTS.
4.4-3
4
SERVICE AND REPAIR PROCEDURES
PICK AND WICK SLIDE POSITION ADJUSTMENTS
4.4-4
PN 4276985A
SERVICE AND REPAIR PROCEDURES
PRINTER ADJUSTMENTS
4.5
PRINTER ADJUSTMENTS
Purpose
Use these procedures to:
r
Increase or decrease the clearance between the slide and the label and ribbon rolls. This
is accomplished by adjusting the height adjustment screw to raise or lower the Label
Printer module. See Printer Height above the Slide Adjustment.
Note: The height of the Label Printer module can affect the position of the labels on the
slide.
r
Move the location of the label on the slide in the Y-dimension. See Figure 4.5-1. This is
accomplished by adjusting the Y-adjustment screw. See Label Position in the
Y-Dimension Adjustment
To move the location of the label on the slide in the X-dimension, as shown in Figure 4.5-1,
see Setting the Printer Offset under Heading 4.3.
Figure 4.5-1 Correct Position of the Label on the Slide
Label
X
0.069 in. ±0.030
0.06 in. ±0.030
7334070A
Y
Printer Height above the Slide Adjustment
Tools/Supplies Needed
B Glass slide
Procedure
1.
Place a glass slide on the shuttle and manually move the shuttle to the printer position.
2.
Verify the clearance between the printhead and the slide is 1 mm (0.04 in.), the thickness
of a glass slide.
Note: The correct clearance is the thickness of one glass slide between the printhead and
a slide on the shuttle or two glass slides between the printhead and the shuttle itself.
3.
PN 4276985A
If the clearance is not correct, adjust the height position of the Printer module:
a.
Loosen the locking screw. See Figure 4.5-2.
b.
Loosen the setscrew for the height adjustment screw. See Figure 4.5-2.
c.
Turn the height adjustment screw in the required direction, as shown in
Figure 4.5-2.
4.5-1
4
SERVICE AND REPAIR PROCEDURES
PRINTER ADJUSTMENTS
d.
Tighten the setscrew for the height adjustment screw.
e.
Tighten the locking screw.
Figure 4.5-2 Printer Module Adjustments
Locking
screw
Setscrew
Height
adjustment
screw
Lower
Raise
4.
Y-position
adjustment
screw
6985018A
If you adjusted the height adjustment screw, select DRY CYCLE (MAIN MENU tt SERVICE
FUNCTIONS tt PERFORM SLIDE CYCLE tt DRY CYCLE).
5.
Do 12 dry cycles and ensure the label position on the slide is correct. See Figures 4.5-3
and 4.5-4.
Note: Following a printer adjustment, it normally takes four or five cycles for the
changes to take affect.
Figure 4.5-3 Checking the Label Position in the X-Dimension
7334089A
Figure 4.5-4 Checking the Label Position in the Y-Dimension
7334088A
4.5-2
PN 4276985AB
SERVICE AND REPAIR PROCEDURES
PRINTER ADJUSTMENTS
6.
If the clearance between the label roll and the slide is correct, but the labels are not
located in the correct position on the slides:
r
If the label is mislocated in the X-dimension, adjust the printer offset. Go to Setting
the Printer Offset under Heading 4.3, and begin at step 4.
r
If the label is mislocated in the Y-dimension, adjust the Y-adjustment screw. Go to
Label Position in the Y-Dimension Adjustment, and begin at step 3.
Label Position in the Y-Dimension Adjustment
ATTENTION: The height of the Label Printer module affects the position of the labels on the
slide and should be checked before adjusting the Y-adjustment screw.
1.
Ensure the height of the Label Printer module is correct. See Printer Height above the
Slide Adjustment.
2.
On the SlideMaker screen, select DRY CYCLE (MAIN MENU tt SERVICE FUNCTIONS tt
PERFORM SLIDE CYCLE tt DRY CYCLE) and ensure the printer label is located correctly
within the frosted area of the slide. Refer to Figures 4.5-3 and 4.5-4.
3.
r
If the label is mislocated in the X-dimension, go to Setting the Printer Offset under
Heading 4.3, and begin at step 4.
r
If the label is mislocated in the Y-dimension, go to step 3.
Adjust the Y-adjustment screw (Figure 4.5-2), then do 12 dry cycles to ensure correct
label placement.
Note: Following a printer adjustment, it normally takes four or five cycles for the
changes to take affect.
4.
PN 4276985AB
Repeat step 3 until the label is positioned correctly.
4.5-3
4
SERVICE AND REPAIR PROCEDURES
PRINTER ADJUSTMENTS
4.5-4
PN 4276985AB
SERVICE AND REPAIR PROCEDURES
SLIDE ELEVATOR PLATEN ADJUSTMENTS
4.6
SLIDE ELEVATOR PLATEN ADJUSTMENTS
Purpose
Adjust the slide elevator platen to ensure that when the platen reaches its vertical position
and releases the slide, the slide is aligned with the slot in the slide basket.
Tools/Supplies Needed
B Glass slide
Preliminary Platen Checks and Adjustments
1.
On the SlideMaker screen, select BASKET TEST (MAIN MENU tt SERVICE FUNCTIONS tt
CASSETTE/SHUTTLE/BASKET tt BASKET TEST).
2.
Set POSITION to SINGLE.
3.
Select ELEVATOR to move the slide elevator down.
4.
While the slide elevator is moving down, select STOP MOTION. The slide elevator stops
when it reaches the bottom limit of its travel.
Note: If you do not select STOP MOTION, the slide elevator completes its downward travel
and immediately begins its upward travel.
5.
Check the rack and gear assembly and ensure:
r
The top of the rack is aligned with the top alignment mark. See Figure 4.6-1a.
r
The setscrew securing the gear is horizontal and aligned with the bottom alignment
mark.
Figure 4.6-1 Preliminary Platen Checks and Adjustments
Platen horizontal
adjustment screw
Center
alignment
mark
Platen vertical
adjustment screw
Top
alignment
mark
Rack
Bottom
alignment
mark
Setscrew
a. Slide elevator down
PN 4276985A
b. Slide elevator up
7334180B
4.6-1
4
SERVICE AND REPAIR PROCEDURES
SLIDE ELEVATOR PLATEN ADJUSTMENTS
6.
If the top of the rack is not aligned with the top alignment mark, adjust the platen
vertical adjustment screw to achieve alignment. Refer to Figure 4.6-1a.
7.
If the setscrew securing the gear is not horizontal and aligned with the bottom alignment
mark:
a.
Remove the setscrew and the gear.
b.
Reinstall the gear in a position that aligns the hole for the setscrew with the bottom
alignment mark.
c.
Reinstall the setscrew and ensure it is aligned with the bottom alignment mark.
8.
Select ELEVATOR to move the slide elevator up.
9.
While the slide elevator is moving up, select STOP MOTION. The slide elevator stops when
it reaches the top limit of its travel.
10. Check the rack and gear assembly and ensure the top of the rack is aligned with the
center alignment mark. Refer to Figure 4.6-1b.
11. If the top of the rack is not aligned with the center alignment mark, adjust the platen
horizontal adjustment screw to achieve alignment. Refer to Figure 4.6-1b.
Note: When the horizontal position of the platen is set correctly, the right side is about
10 to 15 degrees lower than the left. This tilt assures correct registration of the slide
when it drops from the Dryer module onto the platen.
12. Verify the platen deposits slides in the slide baskets correctly. Go to Slide Placement
Adjustments.
Slide Placement Adjustments
1.
2.
Place a glass slide on the platen.
Return to the SERVICE FUNCTIONS screen and select SOLENOID TEST (MAIN MENU tt
SERVICE FUNCTIONS tt SOLENOID TEST).
3.
De-energize SOL60 to close the gripper on the slide.
4.
In the Basket Queue module, place a slide basket under the slide elevator.
5.
Return to the SERVICE FUNCTIONS screen and select BASKET TEST (MAIN MENU tt
SERVICE FUNCTIONS tt CASSETTE/SHUTTLE/BASKET tt BASKET TEST).
6.
Set POSITION to SINGLE.
7.
Select ELEVATOR to move the slide elevator down.
8.
While the slide elevator is moving down, select STOP MOTION. The slide elevator stops
when it reaches the bottom limit of its travel.
Note: If you do not select STOP MOTION, the slide elevator completes its downward travel
and immediately begins its upward travel.
9.
4.6-2
When the slide elevator stops, check the position of the slide in the slide basket and
ensure the slide is:
a.
Perpendicular to the bottom of the slide basket. If it is not, adjust the setscrew
shown in Figure 4.6-2, item 1.
b.
Centered from side to side within the basket slot. If it is not, loosen the screw shown
in Figure 4.6-2, item 2, and move the plate.
PN 4276985A
SERVICE AND REPAIR PROCEDURES
SLIDE ELEVATOR PLATEN ADJUSTMENTS
c.
Centered from front to back within the basket slot. If it is not, loosen the screw
shown in Figure 4.6-2, item 3, and move the bracket.
Note: Adjusting this bracket could affect the alignment of SEN46.
d.
Parallel to the long sides of the basket slot. If it is not, loosen the screw shown in
Figure 4.6-2, item 4, and adjust the platen.
10. Select ELEVATOR to move the slide elevator up.
11. While the slide elevator is moving up, select STOP MOTION. The slide elevator stops when
it reaches the top limit of its travel and the gripper opens.
12. Remove the slide from the platen.
13. Verify SEN46 is aligned correctly. See Removal under Heading 4.26, SEN37 (BASKET
INDEX SENSOR) REPLACEMENT.
14. Verify slides are deposited correctly in the slide baskets. Go to Verification.
Figure 4.6-2 Slide Elevator Platen Adjustments
4
1
2
3
7334159B
Verification
PN 4276985A
1.
On the SlideMaker screen, select DRY CYCLE (MAIN MENU tt SERVICE FUNCTIONS tt
PERFORM SLIDE CYCLE tt DRY CYCLE).
2.
Do five dry cycles and ensure the slides are positioned correctly in the slide basket.
4.6-3
4
SERVICE AND REPAIR PROCEDURES
SLIDE ELEVATOR PLATEN ADJUSTMENTS
4.6-4
PN 4276985A
SERVICE AND REPAIR PROCEDURES
DISPENSE PUMP ADJUSTMENT
4.7
DISPENSE PUMP ADJUSTMENT
Purpose
The volume of blood dispensed by the dispense pumps affects the quality of the blood smears.
If a dispense pump dispenses too little blood, the smears are too short; if a dispense pump
dispenses too much blood, the smears are too long. The position of the barrel in the dispense
pump determines the volume dispensed. Use this procedure to adjust the dispense pumps as
necessary to improve smear quality.
Tools/Supplies Needed
B Five whole-blood specimens
Procedure
1.
Disconnect the I-beam tubing from the top of the dispense probe.
2.
Slide the cap off of the dispense pump needing adjustment. See Figure 4.7-1.
Note: DP1 dispenses the blood in the single-slide mode and for the first slide in the
dual-slide mode. DP2 dispenses the blood for the second slide in the dual-slide mode.
3.
Note the number written on the side of the dispense pump barrel facing away from the
I-beam tubing. See Figure 4.7-1.
Figure 4.7-1 Dispense Pump Adjustments
DP2
Record number on
this side of barrel
Remove
cap
DP1
Insert I-beam
tubing here
7334091B
PN 4276985A
4.7-1
4
SERVICE AND REPAIR PROCEDURES
DISPENSE PUMP ADJUSTMENT
4.
Slide the barrel out of the dispense pump and off the I-beam tubing.
5.
Turn the barrel of the dispense pump to change the volume dispensed. To increase the
volume dispensed, go up a number; to decrease the volume dispensed, go down a
number.
6.
Thread the I-beam tubing back through the barrel of the pump and reinstall the barrel in
the pump body, ensuring the I-beam tubing remains in both channels as shown in
Figure 4.7-1.
7.
Reinstall the cap on the dispense pump and reconnect the I-beam tubing on the dispense
probe.
8.
Ensure the SlideMaker is working correctly. Go to Verification.
Verification
Cycle five whole-blood specimens with the SlideMaker in the appropriate blood mode for the
dispense pump adjusted (single- slide or dual-slide) and ensure the SlideMaker is making
good quality blood smears.
4.7-2
PN 4276985A
SERVICE AND REPAIR PROCEDURES
CIRCUIT CARD REPLACEMENT
4.8
CIRCUIT CARD REPLACEMENT
Purpose
Use this procedure as a guide for accessing and replacing the circuit cards in the SlideMaker.
Procedure
CAUTION Risk of damage to electronic components. Removing or replacing a circuit card while the power
is ON can damage the circuit card. Power down the SlideMaker before removing or replacing a circuit card.
1.
Turn off the main power switch on the back of the SlideMaker and unplug the main
power cable from the ac wall outlet.
2.
Access the circuit card as described in Table 4.8-1.
Table 4.8-1 Accessing the SlideMaker Circuit Cards
Card Name
Location Figure Special Instructions
Basket Corner Sensor (4) SEN33, SEN34, SEN35, and
SEN36
Figure 2.11-1
Remove the cover for the appropriate Basket Corner Sensor card
(SEN33 and SEN34 are under the right corner cover, SEN35 and
SEN36 are under the left).
Basket Transport Interface
Figure 2.11-1
Remove the cover for the Basket Transport Interface card.
Basket Index - SEN37
Figure 2.11-1
Refer to Heading 4.26, SEN37 (BASKET INDEX SENSOR)
REPLACEMENT.
Belt Profile Sensor (2) - SEN32 Figure 2.11-1
and SEN39
Cassette Empty Sensor SEN28
Figure 2.6-2
Dispense 1 Manifold
Figure 2.5-2
Remove the Dispense module. Refer to Dispense Module under
Heading 4.1.
Dispense 2 Manifold
Figure 2.5-2
Remove the Dispense module. Refer to Dispense Module under
Heading 4.1.
Dryer Exit Sensor - SEN49
Figure 2.9-1
Remove the Dryer module. Refer to Dryer and Slide Elevator Modules
under Heading 4.1.
Dryer Interface
Figure 2.9-1
Remove the Dryer module. Refer to Dryer and Slide Elevator Modules
under Heading 4.1.
Main Distribution
Figure 2.2-3
1. Unfasten the two captive screws securing the top cover of the rear
compartment, lift off the cover, and pull down the rear door.
2. Remove the System Control card:
a. Disconnect the four connectors on the System Control card.
b. Unfasten the thumbscrew on the hold-down bracket for the
System Control card and pull the System Control card up, out
of the card guides.
Main Fluidics Interface
Figure 2.3-3
Remove the Main Fluidics module. Refer to Main Fluidics Module
under Heading 4.1.
Pneumatic Supply Monitor,
5 Psi
Figure 2.3-1
Unfasten the two captive screws securing the top cover of the rear
compartment, lift off the cover, and pull down the rear door.
PN 4276985A
4.8-1
4
SERVICE AND REPAIR PROCEDURES
CIRCUIT CARD REPLACEMENT
Table 4.8-1 Accessing the SlideMaker Circuit Cards (Continued)
Card Name
Location Figure Special Instructions
Pneumatic Supply Monitor,
6.5 in. Hg
Figure 2.3-1
Unfasten the two captive screws securing the top cover of the rear
compartment, lift off the cover, and pull down the rear door.
Pneumatic Supply Monitor,
17.5 in. Hg
Figure 2.3-1
Unfasten the two captive screws securing the top cover of the rear
compartment, lift off the cover, and pull down the rear door.
Pneumatic Supply Monitor,
30 Psi
Figure 2.3-1
Unfasten the two captive screws securing the top cover of the rear
compartment, lift off the cover, and pull down the rear door.
Pneumatic Supply Monitor,
High Vacuum
Figure 2.3-1
Unfasten the two captive screws securing the top cover of the rear
compartment, lift off the cover, and pull down the rear door.
Power Supply Monitor
Figure 2.2-3
Unfasten the two captive screws securing the top cover of the rear
compartment, lift off the cover, and pull down the rear door.
Slide Ejected Sensor - SEN25
Figure 2.6-1
Remove the Cassette Input Queue and Slide Ejector modules. Refer to
Cassette Transport Module under Heading 4.1.
Slide Ejector Interface
Figure 2.6-2
Remove the Cassette Input Queue and Slide Ejector modules. Refer to
Cassette Transport Module under Heading 4.1.
Smear/Transport Interface
Figure 2.7-1
Remove the plate in front of the Smear/Transport Interface card.
System Control
Figure 2.2-3
To remove the card from the front of the SlideMaker:
1. Unfasten the captive screws securing the top cover for the rear
compartment and lift off the cover.
2. Disconnect the four cables from the System Control card.
3. Unfasten the thumbscrew on the System Control card hold-down
bracket. See Figure 4.8-1.
Note: Unfastening this thumbscrew disengages the two System
Control card to Main Distribution card connectors, P1/J1 and
P2/J2.
4. Pull the System Control card up, out of the card guides.
To install the card from the front of the SlideMaker:
1. Position the replacement card in the card guides and push the
card down into the connectors on the Main Distribution card.
2. Fasten the thumbscrew on the top of the hold-down bracket to
seat the System Control card and lock it in place.
Temperature Sensor
4.8-2
Figure 2.9-1
Lift the plastic cover on the Dryer module and pull up the
Temperature Sensor card.
PN 4276985A
SERVICE AND REPAIR PROCEDURES
CIRCUIT CARD REPLACEMENT
Figure 4.8-1 System Control Card Hold-Down Bracket and Card Guides
Card
guide
System Control card
hold-down bracket
Thumbscrew
Card
guide
7334104A
3.
Disconnect all cables connected to the card.
4.
Remove the hardware securing the card, retaining the hardware, and remove the card.
For the System Control card, see Table 4.8-1 for special removal instructions.
5.
Ensure the revision level of the replacement card is correct.
6.
Ensure any jumpers or switches on the replacement card are set correctly. See the
appropriate circuit card under Heading A.2, CIRCUIT CARD LAYOUTS WITH KEY
COMPONENT DESCRIPTIONS.
7.
Install the replacement card, securing the card with the retained hardware. For the
System Control card, see Table 4.8-1 for special installation instructions.
8.
Connect the disconnected cables to the replacement card. Refer to the appropriate circuit
card under Heading A.2, CIRCUIT CARD LAYOUTS WITH KEY COMPONENT
DESCRIPTIONS for the correct connector locations.
9.
Reinstall any covers removed or opened to access the card.
10. Plug in the main power cable and turn on the SlideMaker.
PN 4276985A
4.8-3
4
SERVICE AND REPAIR PROCEDURES
CIRCUIT CARD REPLACEMENT
4.8-4
PN 4276985A
SERVICE AND REPAIR PROCEDURES
FLUID DETECTOR CALIBRATION
4.9
FLUID DETECTOR CALIBRATION
Purpose
Calibrate the fluid detectors whenever:
r
The SlideMaker displays an excessive number of fluid detector error messages.
r
You move or replace the tubing in any of the fluid detectors.
r
You replace a fluid detector.
Tools/Supplies Needed
B 12 whole-blood specimens
Procedure
1.
On the SlideMaker screen, select MONITOR/ADJUST FLUID DETECTORS (MAIN MENU tt
SERVICE FUNCTIONS tt MONITOR/ADJUST FLUID DETECTORS.
Note: You can calibrate all the fluid detectors at once, or a single fluid detector. The
default setting for CHANNEL SELECTION is ALL. To calibrate a single fluid detector,
increment the CHANNEL SELECTION setting until the number of the fluid detector you want
to calibrate is displayed.
CAUTION Using the FILL DILUENT function overlong fills the vacuum overflow tank in the GEN•S System.
Do the fluid detector calibration promptly. If a delay is unavoidable, select DRY SYSTEM to drain the lines.
2.
On the Monitor/Adjust Fluid Detectors screen, select FILL DILUENT to prime all the
aspirate lines and both sample reservoirs with diluent.
Note: The fluid detectors are calibrated with diluent.
3.
Select INCREASE VOLTAGE to enable calibration of the fluid detectors.
4.
Verify that the readings for all the fluid detectors are within the voltage tolerance listed
for diluent calibration in the Fluid Detector Voltage Specifications under Heading A.1,
TOLERANCES AND LIMITS.
5.
r
If all of the fluid detectors are within tolerance, go to step 6.
r
If any of the fluid detectors are outside the tolerance, or a message appears
indicating the calibration failed, go to step 5.
If one or more fluid detectors failed calibration:
a.
Select EXIT to leave the Monitor/Adjust Fluid Detectors screen, then select
MONITOR/ADJUST FLUID DETECTORS to re-enter the screen.
Note: Using the INCREASE VOLTAGE option locks up the Monitor/Adjust Fluid
Detectors screen. Exiting the screen unlocks the screen functions.
PN 4276985A
b.
If exiting and entering the Monitor/Adjust Fluid Detectors screen does not unlock
the screen functions, reset the SlideMaker and repeat from step 1.
c.
Monitoring the voltage for the fluid detector that failed, try to correct the problem.
d.
After correcting the problem, repeat from step 3.
4.9-1
4
SERVICE AND REPAIR PROCEDURES
FLUID DETECTOR CALIBRATION
6.
Select EXIT to leave the Monitor/Adjust Fluid Detectors screen, then select
MONITOR/ADJUST FLUID DETECTORS to re-enter the screen.
Note: Using the INCREASE VOLTAGE option locks up the Monitor/Adjust Fluid Detectors
screen. Exiting the screen unlocks the screen functions.
7.
On the Monitor/Adjust Fluid Detectors screen, select DRY SYSTEM to remove the diluent
from the aspirate lines and both sample reservoirs.
8.
After drying the aspirate lines and sample reservoirs, verify that the readings for all the
fluid detectors are within the voltage tolerance listed for air in the Fluid Detector
Voltage Specifications under Heading A.1, TOLERANCES AND LIMITS.
r
If all of the fluid detectors are within tolerance, exit this function and ensure the
SlideMaker is working correctly. Go to Verification.
r
If any of the fluid detectors are outside the tolerance, repeat this procedure.
Verification
Cycle 12 whole-blood specimens with SlideMaker smears requested on the GEN•S System,
and ensure the SlideMaker does not display any fluid detector messages.
4.9-2
PN 4276985A
SERVICE AND REPAIR PROCEDURES
SOFTWARE INSTALLATION USING A LAPTOP COMPUTER
4.10
SOFTWARE INSTALLATION USING A LAPTOP COMPUTER
Purpose
Use this procedure to install new software on the SlideMaker using a laptop computer instead
of the GEN•S System Workstation.
Tools/Supplies Needed
B Laptop computer
B Computer disk with new software
B Cable for connecting laptop computer to SlideMaker
Procedure
1.
Connect the laptop to SlideMaker cable to the COM1 port on your laptop computer and
place the laptop near the SlideMaker.
2.
Turn off the SlideMaker.
3.
Open the rear door of the SlideMaker and reconfigure the jumpers on the System Control
card:
a.
Remove the jumpers from E3-E5 and E4-E6 (the normal opto configuration).
b.
Install the jumpers on E1-E3 and E2-E4 (the RS232 configuration needed for the
laptop).
4.
At the rear of the SlideMaker, disconnect the cable from the GEN•S System and replace it
with the cable from the laptop.
5.
Insert the software disk into your laptop computer, type A:\INSTALL, and press Û.
6.
When the Coulter Communications screen displays, Select any key to continue, press any key.
7.
When the Command Menu appears, press Ü+2 to select Download ‘A’ and ‘B.’
8.
While the Download ‘A’ and ‘B’ option is highlighted, turn on the SlideMaker. The
Download Simulator screen appears, displaying the status of the software installation.
9.
After the SlideMaker initializes, indicating the download is finished, press Þ+x to exit.
10. Turn off the SlideMaker.
11. At the rear of the SlideMaker, disconnect the cable from the laptop and replace it with
the cable from the GEN•S System.
12. Reconfigure the jumpers on the System Control card:
a.
Remove the jumpers from E1-E3 and E2-E4.
b.
Install the jumpers on E3-E5 and E4-E6 (the normal opto configuration).
13. Turn on the SlideMaker.
14. Verify the SlideMaker screen displays the correct versions of software:
PN 4276985A
a.
From the MAIN MENU, select ROUTINE FUNCTIONS tt SYSTEM SETTINGS.
b.
Ensure the software versions displayed on the screen match the versions listed for
the software you installed.
4.10-1
4
SERVICE AND REPAIR PROCEDURES
SOFTWARE INSTALLATION USING A LAPTOP COMPUTER
4.10-2
PN 4276985A
SERVICE AND REPAIR PROCEDURES
SEN41 (VERTICAL SLIDE SENSOR) ALIGNMENT
4.11
SEN41 (VERTICAL SLIDE SENSOR) ALIGNMENT
Purpose
Adjust the vertical slide sensor, SEN41, to ensure it senses a slide in the basket correctly
whenever:
r
The SlideMaker generates excessive basket sensor errors.
r
You replace the vertical slide sensor, SEN 41.
r
You replace the basket index sensor, SEN37.
Tools/Supplies Needed
B Clean glass slides
Procedure
1.
In the Basket Queue module, remove any slide basket in front of SEN41.
2.
Holding a glass slide with its long edge oriented vertically, place the flat side of the slide
against the rear wall of the Basket Queue module and the bottom edge on the base of the
module as shown in Figure 4.11-1a.
Figure 4.11-1 Aligning the Vertical Slide Sensor, SEN41
Slide
Elevator
module
Loosen screws
to adjust SEN41
Glass
slide
SEN41
Basket
Queue
module
SEN37
Glass
slide
SEN41
6985010A
a. Positioning slide
PN 4276985A
b. Checking alignment
3.
Move the slide until the right edge of the slide is aligned with the center of the SEN37
housing. See Figure 4.11-1a.
4.
Verify that the right edge of the slide is now aligned with the center of the three LEDs on
SEN41 as shown in Figure 4.11-1b.
4.11-1
4
SERVICE AND REPAIR PROCEDURES
SEN41 (VERTICAL SLIDE SENSOR) ALIGNMENT
5.
If the slide is not aligned correctly with SEN41:
a.
Loosen the screws securing the vertical slide sensor’s bracket. Refer to
Figure 4.11-1b.
b.
Move the sensor horizontally until it is in the correct position.
Note: Ensure that SEN41 remains vertical (not skewed) during this alignment.
c.
Tighten the screws and verify operation. Go to Verification.
Verification
4.11-2
1.
Place a glass slide in a slide basket and place the basket on the rear track of the Basket
Queue module.
2.
On the SlideMaker screen, select BASKET TEST (MAIN MENU tt SERVICE FUNCTIONS tt
CASSETTE/SHUTTLE/BASKET tt BASKET TEST) and advance the rear belt until the slide is in
front of SEN37.
3.
Select SENSOR STATUS (MAIN MENU tt SPECIAL FUNCTIONS tt SENSOR STATUS), and verify
that both SEN37 and SEN41 are active. If either sensor is inactive, readjust SEN41 until
it is aligned with SEN37.
4.
Remove the slide from the basket and verify SEN37 and SEN41 are inactive.
5.
Select DRY CYCLE (MAIN MENU tt SERVICE FUNCTIONS tt PERFORM SLIDE CYCLE tt DRY
CYCLE).
6.
Do five dry cycles and ensure the platen releases the slide into the slide basket correctly.
7.
If the platen is not releasing slides into the slide basket correctly, check the platen
adjustments. See Heading 4.6, SLIDE ELEVATOR PLATEN ADJUSTMENTS.
PN 4276985A
SERVICE AND REPAIR PROCEDURES
PRINTHEAD CLEANING
4.12
PRINTHEAD CLEANING
Purpose
Use this procedure to clean the printhead whenever:
r
The Label Printer module fails to advance the label roll correctly.
r
The print quality of the labels is poor.
r
The Label Printer module fails to print a label.
r
A label is stuck on the printer drive roller.
Tools/Supplies Needed
B Isopropyl alcohol and a cotton swab
or
B An alcohol pad
Procedure
1.
Turn off the main power switch on the rear of the SlideMaker and unplug the main
power cable from the ac outlet.
2.
Unscrew and remove the knurled thumbscrew securing the printhead assembly to the
front panel of the Label Printer module. See Figure 4.12-1. Set the thumbscrew and its
associated washer aside.
Figure 4.12-1 Removing the Printhead Assembly
1
Remove
thumbscrew
and washer
CL4
7334146B
PN 4276985A
3
Disconnect
cable
Printhead cable
connector
Printer
drive
roller
2
Remove
elbow
fitting
4.12-1
4
SERVICE AND REPAIR PROCEDURES
PRINTHEAD CLEANING
3.
Unscrew and set aside the elbow fitting on CL4. Refer to Figure 4.12-1. It is not
necessary to disconnect the tubing from the fitting.
4.
Carefully pull the printhead assembly toward you until the printhead cable connector is
accessible. Refer to Figure 4.12-1.
5.
Disconnect the printhead cable and remove the printhead assembly from the instrument.
6.
Remove any stuck labels from the printer drive roller (Figure 4.12-1).
7.
Clean the printer drive roller and the printhead (Figure 4.12-2) with a cotton swab
moistened with isopropyl alcohol or an alcohol pad, ensuring all residual adhesive is
removed.
Figure 4.12-2 Printhead and Printhead Flag Location
Printhead
flag
Printhead
7334144B
8.
Reinstall the printhead, ensuring the printhead flag (Figure 4.12-2) is positioned above
the printhead microswitch arm (Figure 4.12-3), and the ribbon is positioned correctly.
Figure 4.12-3 Printhead Microswitch Arm Location
7334145A
4.12-2
Printhead
microswitch arm
PN 4276985A
SERVICE AND REPAIR PROCEDURES
PRINTHEAD CLEANING
9.
Reinstall the elbow fitting on CL4.
10. Plug in the main power cable and turn on the SlideMaker.
11. Go to Verification.
Verification
PN 4276985A
1.
On the SlideMaker screen, select DRY CYCLE (MAIN MENU tt SERVICE FUNCTIONS tt
PERFORM SLIDE CYCLE tt DRY CYCLE).
2.
Do five dry cycles and ensure the Label Printer module is working correctly and the print
quality of the labels is acceptable.
4.12-3
4
SERVICE AND REPAIR PROCEDURES
PRINTHEAD CLEANING
4.12-4
PN 4276985A
SERVICE AND REPAIR PROCEDURES
EXTENDED AND LONG-TERM SHUTDOWN
4.13
EXTENDED AND LONG-TERM SHUTDOWN
Purpose
If the SlideMaker is not operated for 48 hours or more, the reagents can dry out and
precipitate. Use the following shutdown procedure to prevent this problem.
Tools/Supplies Needed
B 1 L deionized or distilled water in a container
B Empty container (for long-term shutdown only)
B Red pinch valve deactivator clips (for long-term shutdown only)
Procedure
1.
Clean the SlideMaker before shutting it down:
r
If the SlideMaker will remain in the laboratory, on the SlideMaker screen select RUN
SHUT DOWN (MAIN MENU tt ROUTINE FUNCTIONS tt ROUTINE FLUIDICS tt RUN SHUT
DOWN). Let the cleaning reagent remain in the instrument for at least 30 minutes.
r
If the SlideMaker will be transported, do the flush procedure. Refer to the Flush
procedure for the SlideMaker in the Online Help system.
ATTENTION: Do not remove the waste pickup tube.
2.
Remove the diluent and cleaning reagent pickup tubes from their reagent containers and
place the tubes in a container of deionized water.
Note: The SlideMaker reagent lines are connected to the same pickup tubes as the
GEN•S System reagent lines.
3.
a.
Select RUN SHUT DOWN (MAIN MENU tt ROUTINE FUNCTIONS tt ROUTINE FLUIDICS tt RUN
SHUT DOWN) four times.
b.
Select RUN START UP (MAIN MENU tt ROUTINE FUNCTIONS tt ROUTINE FLUIDICS tt RUN
START UP) four times.
4.
If the SlideMaker will be shut down for less than seven days, it is acceptable to leave the
deionized water in the SlideMaker. Go to step 7.
5.
If the SlideMaker will be shut down for seven days or longer, remove the deionized
water. Go to step 6.
6.
Cycle air through the reagent lines:
7.
PN 4276985A
Cycle deionized water through the reagent lines:
a.
Remove the reagent pickup tubes from the container of deionized water and place
them in an empty container.
b.
Disconnect the cable for SEN47, the level sensor for the reagent tank, from the Main
Fluidics Interface card.
c.
Select RUN SHUT DOWN (MAIN MENU tt ROUTINE FUNCTIONS tt ROUTINE FLUIDICS tt RUN
SHUT DOWN) four times.
d.
Select RUN START UP (MAIN MENU tt ROUTINE FUNCTIONS tt ROUTINE FLUIDICS tt RUN
START UP) four times.
Power down the SlideMaker.
4.13-1
4
SERVICE AND REPAIR PROCEDURES
EXTENDED AND LONG-TERM SHUTDOWN
8.
9.
4.13-2
If the SlideMaker will be transported:
a.
Remove the label roll and ribbon from the Label Printer module.
b.
Remove the slide cassettes and any slides in the slide ejector, shuttle, dryer, or slide
elevator areas.
c.
Remove any slide baskets from the Basket Queue module.
d.
Disconnect and disassemble the SlideMaker as necessary.
If the SlideMaker will be shut down for seven days or longer, install red pinch valve
deactivator clips on the pinch valves. Refer to Figure 3.4-5 for pinch valve locations.
PN 4276985A
DISPENSE PROBE CLEANING/REPLACEMENT
4.14
DISPENSE PROBE CLEANING/REPLACEMENT
Purpose
Use this procedure to clean or replace the dispense probe.
Tools/Supplies Needed
B A hypochlorite solution with 5% available chlorine (for cleaning the dispense probe)
Procedure
1.
Unlatch the locking lever on the dispense probe (pull the lever out and turn the lever up
or down) as shown in Figure 4.14-1.
Figure 4.14-1 Removing the Dispense Probe
Dispense
probe
Latched
Unlatched
Locking
lever
7334168A
PN 4276985A
2.
Lift the dispense probe up out of the dispense probe mechanism and disconnect the
tubing from the probe.
3.
Clean the dispense probe with the hypochlorite solution and rinse it with water, or
replace the dispense probe, as necessary.
4.
Connect the tubing to the cleaned or new dispense probe and push the probe through
the clearance hole in the dispense probe mechanism.
5.
Latch the locking lever on the dispense probe (Figure 4.14-1).
6.
Manually slide the dispense probe up and down until the locking lever drops into the
groove on the probe.
7.
Verify the dispense probe mechanism is working correctly. Go to Verification.
4.14-1
DISPENSE PROBE CLEANING/REPLACEMENT
Verification
Do five whole blood cycles and ensure the dispense probe mechanism is working correctly.
4.14-2
PN 4276985A
SERVICE AND REPAIR PROCEDURES
SLIDE EJECTOR ADJUSTMENTS/ALIGNMENT
4.15
SLIDE EJECTOR ADJUSTMENTS/ALIGNMENT
Purpose
This section contains two procedures, one for adjusting the slide pusher and one for aligning
the slide ejector.
r
Use the Slide Pusher Adjustment procedure to ensure the slide pusher ejects the slides
smoothly and straight. Do the slide pusher adjustment procedure whenever:
t
t
r
You remove and reinstall the slide pusher.
You have slide registration errors you are unable to resolve.
Use the Slide Ejector Alignment procedure on instruments with the old configuration of
the smear truck (see Figure 4.18-2) to ensure that when the smear truck picks up the
slide, the slide is centered on the truck. Centering the slide on the smear truck ensures
the slide is centered on the shuttle and ultimately that the smear is centered on the slide
correctly in the Y-dimension as shown in Figure 4.15-1.
Figure 4.15-1 Checking the Smear Position on the Slide in the Y-Dimension
7334186C
Do the slide ejector alignment on instruments with this old configuration whenever:
t
t
t
t
r
The smear is not centered on the slide in the Y-dimension.
The slide is not centered on the smear truck, creating a vacuum leak.
You have adjusted the slide pusher.
Blood smears are skewed.
Use the Slide Ejector Alignment procedure on instruments with the new configuration
of the smear truck (see Figure 4.18-3) to ensure that the slide is centered on the shuttle.
Note: The new configuration of the smear truck includes an adjustment for centering the
slide on the smear truck at the slide pickup position.
Figure 4.15-2 Acceptable Blood
Drop and Smear Placement
7334199C
In a perfectly aligned system, the blood drop is placed
on the imaginary center line of a slide and the smear is
centered between the long edges of the slide as shown
in Figure 4.15-2.
This alignment is achieved by a combination of slide
ejector and smear truck alignments.
Do the slide ejector alignment on instruments with this new configuration whenever:
t
t
t
PN 4276985A
You have adjusted the slide pusher.
Blood smears are skewed.
The slide is not centered on the shuttle.
4.15-1
4
SERVICE AND REPAIR PROCEDURES
SLIDE EJECTOR ADJUSTMENTS/ALIGNMENT
Tools/Supplies Needed
B 6 in. rule (for the Slide Pusher Adjustment)
B Five whole-blood specimens
Slide Pusher Adjustment
1.
Remove all slide cassettes in the Cassette Input Queue.
2.
If there is a slide on the slide pickup bridge, remove it.
3.
Loosen the four mounting screws for the slide pusher (Figure 4.15-3 or Figure 4.15-4)
about 1/8 turn.
Figure 4.15-3 Verifying the Position of the Slide Pusher
in the Slide Ejector Module, Old Configuration
Check here
for gap
Figure 4.15-4 Verifying the Position of the Slide Pusher
in the Slide Ejector Module, New Configuration
Check here
for gap
Slide pickup
bridge
Slide pickup
bridge
Cassette stop
Cassette stop
Slide
pusher
SEN24
Slide
pusher
SEN24
Slide pusher
mounting screws
7334170B
4.
5.
Slide pusher
mounting screws
7334194C
Place a 6 in. metal rule in the slide ejection station:
a.
If the slide pusher is extended, place the metal rule on the slide pusher, butting the
rule against the cassette stop.
b.
If the slide pusher is retracted, place the metal rule on the exposed rails between the
slide pusher and the cassette stop, butting the rule against the cassette stop.
On the SlideMaker screen, select SLIDE EJECT (MAIN MENU tt SERVICE FUNCTIONS tt
PERFORM SLIDE CYCLE tt SLIDE EJECT). The slide pusher is retracted and then extended to
eject a slide.
4.15-2
PN 4276985A
SERVICE AND REPAIR PROCEDURES
SLIDE EJECTOR ADJUSTMENTS/ALIGNMENT
WARNING Personal injury. The motor for the slide pusher is very strong and will pinch your fingers if they
are caught between the slide pusher and the rule. While holding the rule, be careful not to place your fingers
in the path of the slide pusher.
6.
Hold the metal rule in place. If the rule is on top of the slide pusher, as the slide pusher is
retracted, hold the rule against the cassette stop and allow it to seat on the exposed rails.
7.
As the slide pusher is extended, continue to hold the rule in place until the slide pusher
reaches the rule and holds it against the cassette stop.
8.
While the motor is stalling and the slide pusher is holding the rule, tighten the two
mounting screws closest to the cassette stop.
9.
Repeat steps 5 through 7. While the motor is stalling and the slide pusher is holding the
rule, tighten the other two mounting screws for the slide pusher.
10. Repeat steps 5 through 7. While the slide pusher is holding the rule, verify the entire
edge of the slide pusher is contacting the rule. If the slide pusher is skewed, leaving a gap
between the slide pusher and the rule, repeat from step 3 to readjust the slide pusher.
11. Ensure the slide ejector is still aligned correctly. Go to Slide Ejector Alignment.
Slide Ejector Alignment
1.
2.
3.
In the Slide Ejector module, verify the slide pusher is extended all the way to the slide
pickup bridge. Refer to Figure 4.15-3 or Figure 4.15-4.
r
If there is a gap between the slide pusher and the bridge, reposition the slide pusher
extended sensor, SEN24. Go to step 2.
r
If the slide pusher is in the correct position, the slide pusher extended sensor,
SEN24, is adjusted correctly. Go to step 3.
Reposition SEN24.
a.
Loosen the securing screw for SEN24. Refer to Figure 4.15-3 or Figure 4.15-4.
b.
Move SEN24 closer to the pickup station platform and tighten the screw.
c.
On the SlideMaker screen, select DRY CYCLE (MAIN MENU tt SERVICE FUNCTIONS tt
PERFORM SLIDE CYCLE tt DRY CYCLE) and check the position of the slide pusher.
d.
Repeat steps a though c until the slide pusher is extended all the way to the pickup
station platform.
e.
Ensure the slide ejector is aligned correctly. Go to Verification.
Remove the Cassette Transport module’s securing screws, and unfasten the captive
screws on the right side. See Figure 4.15-5.
Note: For better access to the Slide Ejector module, lift out and set aside the Cassette
Output Queue module.
4.
Determine the configuration of the Slide Ejector module. See Figure 4.15-5.
Note: Two configurations of the Slide Ejector module are currently in the field. Earlier
models have setscrews securing the back of the Slide Ejector module. In later models the
setscrews are eliminated and the adjustment screws are relocated.
PN 4276985A
r
If this model of the Slide Ejector module has setscrews securing the back, go to
step 5.
r
If this model of the Slide Ejector module does not have setscrews, go to step 6.
4.15-3
4
SERVICE AND REPAIR PROCEDURES
SLIDE EJECTOR ADJUSTMENTS/ALIGNMENT
Figure 4.15-5 Loosening the Slide Ejector Module
Setscrews
Adjustment
screws
Adjustment
screws
Captive
screws
Module
securing
screws
Locking
screws
7334195C
5.
4.15-4
To reposition a Slide Ejector module with setscrews securing the back:
a.
Ensure the module securing screws (Figure 4.15-5) are removed.
b.
Unfasten the captive screws securing the upper cassette transfer mechanism and
move the mechanism to access the Slide Ejector module’s adjustment screws. Refer
to step 4 of the Cassette Output Queue Module removal procedure under
Heading 4.1.
c.
Loosen the setscrews securing the back of the Slide Ejector module. Refer to
Figure 4.15-5.
d.
To move the Slide Ejector module straight forward or backward, adjust both
adjustment screws:
r
To move the Slide Ejector module toward the back of the SlideMaker, turn the
adjustment screws counterclockwise, then push the module.
r
To move the Slide Ejector module toward the front of the SlideMaker, turn the
adjustment screws clockwise.
PN 4276985A
SERVICE AND REPAIR PROCEDURES
SLIDE EJECTOR ADJUSTMENTS/ALIGNMENT
ATTENTION: Rotate the Slide Ejector module if the spreader slide edge does not remain
parallel to the smear slide edge (the blood smears are skewed).
e.
6.
To rotate the Slide Ejector module, adjust only one of the adjustment screws:
r
If the near corner of the spreader slide is not making contact with the smear
slide, rotate the Slide Ejector module clockwise (as viewed from above) by
turning the right adjustment screw clockwise or the left adjustment screw
counterclockwise.
r
If the far corner of the spreader slide is not making contact with the smear
slide, rotate the Slide Ejector module counterclockwise (as viewed from above)
by turning the right adjustment screw counterclockwise or the left adjustment
screw clockwise.
f.
Tighten the setscrews.
g.
Reinstall the upper cassette transfer mechanism.
h.
Go to step 7.
To reposition a Slide Ejector module without setscrews:
a.
Ensure the module securing screws (Figure 4.15-5) are removed.
b.
Loosen the two locking screws. Refer to Figure 4.15-5.
c.
To move the Slide Ejector module straight forward or backward, adjust both
adjustment screws:
r
To move the Slide Ejector module toward the back of the SlideMaker, turn the
adjustment screws clockwise.
r
To move the Slide Ejector module toward the front of the SlideMaker, turn the
adjustment screws counterclockwise.
ATTENTION: Rotate the Slide Ejector module if the spreader slide edge does not remain
parallel to the smear slide edge (the blood smears are skewed).
d.
e.
PN 4276985A
To rotate the Slide Ejector module, adjust only one of the adjustment screws:
r
If the near corner of the spreader slide is not making contact with the smear
slide, rotate the Slide Ejector module clockwise (as viewed from above) by
turning the right adjustment screw counterclockwise or the left adjustment
screw clockwise.
r
If the far corner of the spreader slide is not making contact with the smear
slide, rotate the Slide Ejector module counterclockwise (as viewed from above)
by turning the right adjustment screw clockwise or the left adjustment screw
counterclockwise.
Tighten the two locking screws.
7.
Reinstall the screws in the front of the Cassette Transport module, and fasten the captive
screws on the right side. Refer to Figure 4.15-5.
8.
Ensure the slide ejector is aligned correctly. Go to Verification.
4.15-5
4
SERVICE AND REPAIR PROCEDURES
SLIDE EJECTOR ADJUSTMENTS/ALIGNMENT
Verification
1.
Ensure the back of the slide cassette does not contact the arm of the upper cassette
transfer mechanism.
2.
On the SlideMaker screen, select DRY CYCLE (MAIN MENU tt SERVICE FUNCTIONS tt
PERFORM SLIDE CYCLE tt DRY CYCLE).
3.
Do five dry cycles and ensure the O-ring in the shuttle makes a complete seal with the
slide and the slide is centered on the shuttle as shown in Figure 4.15-6.
Figure 4.15-6 Slide Centered on Shuttle Correctly
6985004A
4.
5.
4.15-6
Do five whole blood cycles and ensure:
r
On instruments with the old configuration of the smear truck, the smear is
centered on the slide as shown in Figure 4.15-1.
r
On instruments with the new configuration of the smear truck, the blood drop and
smear are centered on the slide as shown in Figure 4.15-2.
If the SlideMaker does not meet these criteria, align the smear truck as directed under
Heading 4.18, SMEAR TRUCK ALIGNMENT CHECKS AND ADJUSTMENTS.
PN 4276985A
SERVICE AND REPAIR PROCEDURES
SLIDE PUSHER BARS AND SHUTTLE BRUSH ADJUSTMENTS
4.16
SLIDE PUSHER BARS AND SHUTTLE BRUSH ADJUSTMENTS
Purpose
The slide pusher bars transfer the slides from the shuttle to the dryer. The shuttle brush is
attached to the slide pusher bar mechanism and is used to brush debris off the shuttle.
r
Use the slide pusher bars adjustment to ensure the bottom surfaces of the slide pusher
bars do not touch the shuttle when transferring a slide to the dryer and that the slide
does not contact the conveyer belts during the transfer.
r
Use the shuttle brush adjustment to ensure the shuttle brush is at the correct height
above the shuttle whenever:
t
You adjust the slide pusher bars.
t
Debris remains on the shuttle, causing shuttle vacuum errors.
Slide Pusher Bars Adjustment
1.
2.
Remove the Cassette Output Queue module to access the slide pusher bar mechanism.
See the Cassette Output Queue Module removal procedure under Heading 4.1.
On the SlideMaker screen, select SOLENOID TEST (MAIN MENU tt SERVICE FUNCTIONS tt
SOLENOID TEST).
3.
De-energize SOL44 to disable the shuttle vacuum.
4.
Remove the slide from the shuttle.
5.
Energize and de-energize SOL41 to exercise the slide pusher bars and ensure the slide
pusher bars do not touch the shuttle. See Figure 4.16-1.
Note: The slide pusher bars adjustment determines the vertical (up and down) position
of the slide pusher bars within the shuttle; the home offset setting determines the
horizontal (left to right) position of the slide pusher bars within the shuttle.
Figure 4.16-1 Slide Pusher Bars and Shuttle Brush Adjustments
Pusher bar height
adjustment screws
Slide
pusher bar
Slide
pusher bar
Shuttle
Shuttle
brush
Shuttle
Shuttle brush
adjustment screws
PN 4276985A
7334174B
4.16-1
4
SERVICE AND REPAIR PROCEDURES
SLIDE PUSHER BARS AND SHUTTLE BRUSH ADJUSTMENTS
6.
r
If the slide pusher bars do not touch the shuttle, check the slide transfer to the
conveyer belts. Go to step 6.
r
If the bottom surfaces of the slide pusher bars do not touch the shuttle, but the left
or right sides do, check the home offset setting. Go to Setting the Home Offset
under Heading 4.3, HOME, PRINTER AND DISPENSE OFFSET SHUTTLE
POSITION ADJUSTMENTS.
r
If the bottom surfaces of the slide pusher bars touch the shuttle, adjust the slide
pusher bars. Go to step 7.
With the slide pusher bars extended, manually place a glass slide on the bars and verify
the slide does not touch the conveyer belts.
r
If the slide does do not touch the conveyer belts, no adjustment is needed. Reinstall
the Cassette Output Queue module and go to Verification.
r
If the slide is touching the conveyer belts, adjust the slide pusher bars. Go to step 7.
CAUTION If the slide pusher bars are too high, they can interfere with movement of the smear truck. When
adjusting the slide pusher bars, ensure they are low enough for the smear truck to clear them.
7.
8.
Adjust the slide pusher bars:
a.
Remove the Cassette Input Queue and Slide Ejector modules to access the left
height adjustment screw. See the Cassette Transport Module removal procedure
under Heading 4.1.
b.
Loosen the pusher bar height adjustment screws. Refer to Figure 4.16-1.
c.
Adjust the height of the pusher bar mechanism until the slide pusher bars do not
touch the shuttle and the slide does not contact the conveyer belts.
d.
Tighten the screws.
e.
Reinstall the Cassette Input Queue and Slide Ejector modules.
Re-adjust the height of the shuttle brush. Go to Shuttle Brush Adjustment and begin at
step 5.
Shuttle Brush Adjustment
1.
2.
Remove the Cassette Output Queue module to access the smear truck. See the Cassette
Output Queue Module removal procedure under Heading 4.1.
On the SlideMaker screen, select SOLENOID TEST (MAIN MENU tt SERVICE FUNCTIONS tt
SOLENOID TEST).
4.16-2
3.
De-energize SOL44 to disable the shuttle vacuum.
4.
Remove the slide from the shuttle.
5.
Energize and de-energize SOL41 to exercise the shuttle brush. As the brush moves over
the shuttle, ensure the brush just touches the surface of the shuttle.
r
If the shuttle brush is at the correct height, no adjustment is needed. Go to
Verification.
r
If the shuttle brush is not at the correct height, adjust the height. Go to step 6.
PN 4276985A
SERVICE AND REPAIR PROCEDURES
SLIDE PUSHER BARS AND SHUTTLE BRUSH ADJUSTMENTS
CAUTION Removing the shuttle brush adjustment screws will release the two compression springs under
the shuttle brush that maintain the adjustment setting. If you remove the adjustment screws, be careful not
to lose the springs.
6.
With SOL41 energized, adjust the shuttle brush adjustment screws (Figure 4.16-1):
r
Clockwise to lower the shuttle brush.
r
Counterclockwise to raise the shuttle brush.
7.
Repeat steps 5 and 6 until the shuttle brush is at the correct height.
8.
Reinstall the Cassette Output Queue module.
9.
Verify the shuttle brush is operating correctly. Go to Verification.
Verification
PN 4276985A
1.
On the SlideMaker screen, select DRY CYCLE (MAIN MENU tt SERVICE FUNCTIONS tt
PERFORM SLIDE CYCLE tt DRY CYCLE)
2.
Do five dry cycles and ensure the slide pusher bars and shuttle brush are working
correctly.
4.16-3
4
SERVICE AND REPAIR PROCEDURES
SLIDE PUSHER BARS AND SHUTTLE BRUSH ADJUSTMENTS
4.16-4
PN 4276985A
SERVICE AND REPAIR PROCEDURES
SLIDE STRIPPER PLATE ADJUSTMENT
4.17
SLIDE STRIPPER PLATE ADJUSTMENT
Purpose
The slide stripper plate strips the slide off the slide pusher bars. Use the slide stripper plate
adjustment to ensure that when the slide pusher bars transfer a slide from the shuttle to the
dryer, the slide:
r
Is removed from the pusher bars by the stripper plate.
r
Is deposited on the conveyer belts straight, not at an angle.
r
Remains on the conveyer belts. It is not pulled back onto the shuttle.
Procedure
1.
2.
Remove the Cassette Output Queue module to access the slide stripper plate. See the
Cassette Output Queue Module removal procedure under Heading 4.1.
On the SlideMaker screen, select SOLENOID TEST (MAIN MENU tt SERVICE FUNCTIONS tt
SOLENOID TEST).
3.
De-energize SOL44 to disable the shuttle vacuum.
4.
Energize SOL41. The slide pusher bars extend, pushing the slide from the shuttle to the
dryer.
5.
De-energize SOL41 and verify that as the slide pusher bars retract, the slide is stripped
off the slide pusher bars and aligned correctly on the conveyer belts in the Dryer module.
6.
PN 4276985A
r
If the slide is deposited in the Dryer module correctly, no adjustment is needed. Go
to step 8.
r
If the slide remains on the shuttle or is deposited on the conveyer belts at an angle,
adjust the slide stripper plate. Go to step 6.
Adjust the location (front/back) of the slide stripper plate:
a.
Manually place a slide on the shuttle.
b.
Energize SOL41 to push the slide into the dryer.
c.
Ensure the slide stripper plate is located behind the rear edge of the slide and is
parallel to the slide.
r
If the slide stripper plate is positioned correctly, go to step 7.
r
If the slide stripper plate is not positioned correctly, go to d.
d.
Loosen the stripper plate bracket screws. See Figure 4.17-1.
e.
Move the stripper plate bracket to the correct position and tighten the bracket
screws.
f.
De-energize SOL41 and verify that as the slide pusher bars retract the slide is
stripped off the slide pusher bars.
r
If the slide stripper plate is stripping the slide correctly, no further adjustment
is needed. Go to Verification.
r
If the slide stripper plate is not stripping the slide correctly, adjust the height of
the stripper plate. Go to step 7.
4.17-1
4
SERVICE AND REPAIR PROCEDURES
SLIDE STRIPPER PLATE ADJUSTMENT
Figure 4.17-1 Slide Stripper Plate and Screws
Slide
stripper plate
Slide stripper
plate screws
Stripper
plate bracket
screws
Conveyer
belts
Stripper
plate bracket
6985003A
7.
Adjust the height of the slide stripper plate:
a.
Loosen the slide stripper plate screws. Refer to Figure 4.17-1.
b.
Adjust the slide stripper plate up or down as necessary.
c.
Tighten the screws just enough to hold the adjustment.
d.
Manually place a slide on the shuttle, and energize and de-energize SOL41 to check
the operation of the slide stripper plate.
e.
Repeat from step a until the slide stripper plate is stripping slides correctly.
f.
Fully tighten the slide stripper plate screws.
8.
Reinstall the Cassette Output Queue module.
9.
Ensure the slide stripper plate is working correctly. Go to Verification.
Verification
4.17-2
1.
On the SlideMaker screen, select DRY CYCLE (MAIN MENU tt SERVICE FUNCTIONS tt
PERFORM SLIDE CYCLE tt DRY CYCLE).
2.
Do five dry cycles and ensure the slides are transferred from the shuttle to the dryer
correctly.
PN 4276985A
SERVICE AND REPAIR PROCEDURES
SMEAR TRUCK ALIGNMENT CHECKS AND ADJUSTMENTS
4.18
SMEAR TRUCK ALIGNMENT CHECKS AND ADJUSTMENTS
Purpose
The smear truck adjustments are critical because they affect how the slide is picked up from
the slide pickup bridge, how the slide is deposited on the shuttle, and how the smear is made.
Adjustments on the smear truck assembly allow you to:
r
Reposition the tilt lever driving nut.
r
Adjust the degree of tilt when the smear truck is in the fully raised position.
Note: This adjustment affects the degree of rotation from the horizontal plane along the
short edge of the slide.
r
Adjust the height of the smear truck in the fully raised position.
r
Adjust the degree of tilt when the smear truck tilts down.
r
Adjust the horizontal position of the truck (new smear truck configuration only).
Note: This adjustment affects the degree of rotation from the horizontal plane along the
long edge of the slide.
r
Adjust the slide pickup position of the truck (new smear truck configuration only).
r
Reposition the truck lift sensors, SEN18 and SEN19.
Use this procedure after you have disassembled the smear truck or its associated components
to check the alignment of the smear truck assembly, and to adjust the assembly if necessary.
Figure 4.18-1 Gear for Manually Moving the Smear Truck
TIP: To more easily access
the smear truck adjustment
screws, turn the white gear
wheel on the right end of
the Slide and Smear
module (Figure 4.18-1) to
manually move the smear
truck to a more accessible
location.
Clockwise rotation moves
the smear truck toward the
dispense probe.
White gear
wheel
6985001A
Two configurations of the smear truck assembly are currently in use. Compare Figures 4.18-2
and 4.18-3.
Tools/Supplies Needed
B Five whole-blood specimens
PN 4276985A
4.18-1
4
SERVICE AND REPAIR PROCEDURES
SMEAR TRUCK ALIGNMENT CHECKS AND ADJUSTMENTS
Figure 4.18-2 Smear Truck Assembly Adjustments, Old Configuration
Gap
Lift up
setscrew
Setscrew
Tilt lever
driving nut
Tilt lever
Smear
truck
Tilt down
setscrew
Tilt up
setscrew
7334176B
Figure 4.18-3 Smear Truck Assembly Adjustments, New Configuration
Tilt lever
securing
screw
Gap
Lift up
setscrew
Setscrew
Tilt lever
driving nut
Tilt lever
Smear edge
setscrew
Smear
truck
Tilt up
setscrew
Pick up
position
screw
Tilt down
setscrew
7334189C
Smear Truck Pickup, Tilt, and Sensor Position Adjustments
1.
4.18-2
Remove the Cassette Output Queue module to access the smear truck. See the Cassette
Output Queue Module removal procedure under Heading 4.1.
PN 4276985A
SERVICE AND REPAIR PROCEDURES
SMEAR TRUCK ALIGNMENT CHECKS AND ADJUSTMENTS
2.
Ensure the SlideMaker is on, holding the smear truck in the raised, fully horizontal
position.
3.
Check the position of the tilt lever within the tilt lever driving mechanism and verify the
gap between the top of the tilt lever and the cylinder body is about 1 mm (1/32 in.).
Refer to Figure 4.18-2 or 4.18-3.
Note: One millimeter is about the thickness of a glass slide.
4.
If the distance between the top of the tilt lever and the cylinder body is not correct,
adjust the position of the tilt lever driving nut:
a.
Loosen the setscrew for the tilt lever driving nut. Refer to Figure 4.18-2 or 4.18-3.
b.
Turn the nut until you achieve the correct distance.
c.
Tighten the setscrew.
5.
Check the position of the smear truck and verify that it is fully horizontal.
6.
If the smear truck is not fully horizontal, adjust the tilt up and lift up setscrews. Refer to
Figure 4.18-2 or 4.18-3.
a.
Manually hold the smear truck in contact with the tilt up setscrew and adjust the tilt
up setscrew until the smear truck is fully horizontal.
b.
Release the smear truck.
c.
On instruments with the old smear truck configuration, loosen the locking nut
securing the lift up setscrew.
ATTENTION: Over-adjusting the lift up setscrew will lower the height of the smear truck.
d.
Adjust the lift up setscrew until the smear truck is fully horizontal and at its
maximum height.
e.
Tighten the locking nut (old smear truck configuration only).
f.
Check the position of the tilt lever within the tilt lever driving mechanism and
verify the gap between the top of the tilt lever and the cylinder body is about 1 mm
(1/32 in.). Refer to Figure 4.18-2 or 4.18-3.
g.
If the distance between the top of the tilt lever and the cylinder body is not correct,
adjust the position of the tilt lever driving nut. Go back to step 4.
7.
On the SlideMaker screen, select DRY CYCLE (MAIN MENU tt SERVICE FUNCTIONS tt
PERFORM SLIDE CYCLE tt DRY CYCLE).
8.
Do several dry cycles, checking the smear truck, and verify:
9.
a.
On instruments with the new smear truck configuration, when the smear truck
picks up a slide, the slide is centered on the smear truck. If it is not, go to step 9.
b.
When the smear truck drops to the tilted position, the spreader slide lightly touches
the slide on the shuttle. If it does not, go to step 10.
c.
As the smear truck moves the spreader slide to the wick position, the spreader slide
skims over the surface of the smear slide. If it does not, go to step 10.
d.
If the smear truck meets the critieria in steps a through c, go to step 11.
If the slide is not centered on the truck and the smear truck is the new configuration,
adjust the pickup position:
a.
PN 4276985A
Unscrew the tilt lever securing screw and remove the tilt lever. Refer to
Figure 4.18-2 or 4.18-3.
4.18-3
4
SERVICE AND REPAIR PROCEDURES
SMEAR TRUCK ALIGNMENT CHECKS AND ADJUSTMENTS
b.
Completely loosen but do not remove the smear edge setscrew. Refer to
Figure 4.18-2 or 4.18-3.
c.
Manually rotate the smear truck to access the pickup position screw, and loosen the
pickup position screw. Refer to Figure 4.18-2 or 4.18-3.
d.
Remove the slide cassette from the Slide Ejector module.
e.
Manually lift the smear truck, and using the white gear wheel move the smear truck
over the slide on the slide pickup bridge.
f.
Move the smear truck in or out to center it on the slide.
g.
Screw in the smear edge setscrew being careful not to change the smear truck’s
position on the slide.
Note: The smear edge setscrew ensures the truck bracket remains parallel to the
slide. At the completion of the smear truck adjustments, this setscrew’s setting is
verified and adjusted if necessary using the Smear Edge Adjustment procedure.
h.
Using the white gear wheel, manually move the smear truck off the slide pickup
bridge.
i.
Manually rotate the smear truck and tighten the pickup position setscrew.
j.
Reinstall the tilt lever.
k.
Repeat step 8.
10. If the spreader slide hits the slide on the shuttle too hard, or if the spreader slide does not
contact the surface of the smear slide, adjust the tilt down setscrew. Refer to
Figure 4.18-2 or 4.18-3.
r
Adjust the tilt down setscrew clockwise to reduce the tilt.
r
Adjust the tilt down setscrew counterclockwise to increase the tilt.
11. Check the position of the truck lift sensors, SEN18 and SEN19:
a.
On the SlideMaker screen, select SCAN SENSOR TEST (MAIN MENU tt SERVICE
FUNCTIONS tt RUN SERVICE tt SCAN SENSOR TEST).
b.
With the smear truck in the raised, fully horizontal position, verify SEN18 is
activated and SEN19 is de-activated.
ATTENTION: Two glass slides must be on the shuttle when checking SEN18 and SEN19
with the smear truck in the down, fully horizontal position.
c.
Ensure two glass slides are on the shuttle.
d.
Manually push the smear truck assembly down, all the way to the glass slides on the
shuttle, and verify SEN18 is de-activated and SEN19 is activated.
12. If SEN18 or SEN19 is not activated and de-activated correctly, adjust the position of
the sensor:
4.18-4
a.
Unfasten the captive screws securing the upper cassette transfer mechanism and set
the mechanism aside. Refer to step 4 of the Cassette Output Queue Module removal
procedure under Heading 4.1.
b.
Loosen the locking screw for the appropriate sensor. See Figure 4.18-4.
c.
Adjust the sensor as necessary and tighten the locking screw.
d.
Repeat steps b and c until the sensor is activated and de-activated correctly.
PN 4276985A
SERVICE AND REPAIR PROCEDURES
SMEAR TRUCK ALIGNMENT CHECKS AND ADJUSTMENTS
Figure 4.18-4 Truck Lift Sensor Locking Screws
SEN18
SEN18
Locking
screw
SEN19
Locking
screw
Front view
7334190C
Rear view
13. Reinstall the upper cassette transport mechanism and the Cassette Output Queue
module.
14. Verify the smear truck is operating correctly. Go to Verification.
Verification
1.
Ensure the back of the slide cassette does not contact the arm of the upper cassette
transfer mechanism.
2.
On the SlideMaker screen, select DRY CYCLE (MAIN MENU tt SERVICE FUNCTIONS tt
PERFORM SLIDE CYCLE tt DRY CYCLE).
3.
Do five dry cycles and ensure:
r
r
4.
t
Picks up the slide at the Slide Ejector module correctly.
t
Places the slide on the shuttle correctly.
No truck vacuum errors occur. If truck vacuum errors occur, repeat steps 5 and 6,
the horizontal position checks under Smear Truck Pickup, Tilt, and Sensor Position
Adjustments.
Run five whole blood cycles and ensure the blood smears are acceptable. See
Figure 4.18-5.
r
PN 4276985A
The smear truck:
If the edges of the smear are not centered between the long edges of the slide as
shown in Figure 4.18-5 a and b, the slide is not centered on the shuttle. To center
the slide on the smear truck so that the slide will be centered on the shuttle:
t
For the old configuration of the smear truck, go to Slide Ejector Alignment
under Heading 4.15, SLIDE EJECTOR ADJUSTMENTS/ALIGNMENT.
t
For the new configuration of the smear truck, go back to step 9 under Smear
Truck Pickup, Tilt, and Sensor Position Adjustments.
4.18-5
4
SERVICE AND REPAIR PROCEDURES
SMEAR TRUCK ALIGNMENT CHECKS AND ADJUSTMENTS
r
If the blood is not wicked completely across the slide as shown in Figure 4.18-5 c
and d, the slide is rotated from the horizontal plane along the long edge of the slide.
To rotate the slide to the horizontal position, go to Smear Edge Adjustment below.
Figure 4.18-5 Checking the Smears
a
b
c
d
7334193C
Smear Edge Adjustment
1.
If the blood is not fully wicked across the slide as shown in Figure 4.18-5 c and d, adjust
the smear edge setscrew.
a.
If the smear looks like Figure 4.18-5 c, tighten the smear edge setscrew.
b.
If the smear looks like Figure 4.18-5 d:
1)
Loosen the smear edge setscrew.
2)
Push on the tilt lever securing screw to close the resulting gap.
Note: Refer to Figure 4.18-6 for the correct setting of the smear edge setscrew.
Figure 4.18-6 Checking the Smear Edge Setscrew Setting
YES
NO
Smear
edge
setscrew
6985005A
4.18-6
2.
Run five whole blood cycles and check the blood smears. Refer to Figure 4.18-5.
3.
Repeats steps 1 and 2 until the blood smears are acceptable.
PN 4276985A
SERVICE AND REPAIR PROCEDURES
SMEAR TRUCK AND SHUTTLE GUIDE RODS CLEANING
4.19
SMEAR TRUCK AND SHUTTLE GUIDE RODS CLEANING
Purpose
Use this procedure periodically to remove dirt buildup on the two smear truck and shuttle
guide rods.
Tools/Supplies Needed
B Clean cloth
Procedure
1.
Wipe the smear truck and shuttle guide rods with a clean cloth.
CAUTION Damage to bearings. Do not wipe the smear truck and shuttle guide rods with Teflon® or silicone
sprays/lubricants, such as WD-40® lubricant. Use water to remove stubborn dirt buildup.
2.
PN 4276985A
If the guide rods are still dirty, dampen the cloth with water and wipe the guide rods with
the damp cloth.
4.19-1
4
SERVICE AND REPAIR PROCEDURES
SMEAR TRUCK AND SHUTTLE GUIDE RODS CLEANING
4.19-2
PN 4276985A
SERVICE AND REPAIR PROCEDURES
SMEAR TRUCK AND SHUTTLE O-RING REPLACEMENT
4.20
SMEAR TRUCK AND SHUTTLE O-RING REPLACEMENT
Purpose
Use these procedure to reinstall dislodged O-rings, or to replace damaged O-rings, in the
smear truck or the shuttle.
Smear Truck O-Ring Installation
1.
Remove the Cassette Output Queue module to access the smear truck. See the Cassette
Output Queue Module removal procedure under Heading 4.1.
2.
Unscrew the tilt lever securing screw and remove the tilt lever. See Figure 4.20-1.
Figure 4.20-1 Tilt Locking Lever Location and Locking Screw Assembly
Tilt lever
Tilt lever
driving nut
Tilt lever
Tilt lever
securing screw
Smear
truck
O-ring
7334191C
3.
Tilt the smear truck toward you.
4.
If an O-ring is in place but damaged, remove the O-ring.
5.
Install the new or dislodged O-ring.
6.
Reinstall the tilt lever, ensuring the tilt lever is located correctly in the tilt lever driving
nut mechanism as shown in Figure 4.20-1.
Note: For ease of replacement, on the SlideMaker screen select SOLENOID TEST (MAIN
MENU tt SERVICE FUNCTIONS tt SOLENOID TEST) and energize SOL61, releasing the pressure
on the truck lift mechanism.
PN 4276985A
7.
Reinstall the Cassette Output Queue module.
8.
Ensure the smear truck picks up and deposits the slides correctly. Go to Verification.
4.20-1
4
SERVICE AND REPAIR PROCEDURES
SMEAR TRUCK AND SHUTTLE O-RING REPLACEMENT
Shuttle O-Ring Installation
1.
Remove the Cassette Output Queue module to access the shuttle. See the Cassette
Output Queue Module removal procedure under Heading 4.1.
2.
On the slideMaker screen, select SOLENOID TEST (MAIN MENU tt SERVICE FUNCTIONS tt
SOLENOID TEST).
3.
De-energize SOL44 to disable the shuttle vacuum.
4.
Remove the slide from the shuttle.
5.
If an O-ring (vacuum chuck) is in place but damaged, remove the O-ring.
6.
Install the new or dislodged O-ring.
7.
Run a flat-blade screwdriver around the entire perimeter of the O-ring to ensure a good
vacuum seal.
8.
Reinstall the Cassette Output Queue module.
9.
Ensure the O-ring (vacuum chuck) makes a good seal between the slide and the shuttle.
Go to Verification.
Verification
1.
On the SlideSmaker screen, select DRY CYCLE (MAIN MENU tt SERVICE FUNCTIONS tt
PERFORM SLIDE CYCLE tt DRY CYCLE).
2.
If you installed an O-ring in the smear truck, do five dry cycles and ensure:
r
r
3.
4.20-2
The smear truck:
t
Picks up the slide from the Slide Ejector module correctly.
t
Places the slide on the shuttle correctly.
No truck vacuum errors occur. If truck vacuum errors occur, repeat Smear Truck
O-Ring Installation.
If you installed an O-ring in the shuttle, do five dry cycles and ensure no shuttle vacuum
errors occur. If shuttle vacuum errors occur, repeat Shuttle O-Ring Installation.
PN 4276985A
SERVICE AND REPAIR PROCEDURES
TOP-OF-FORM SENSOR CHECKS AND ADJUSTMENTS
4.21
TOP-OF-FORM SENSOR CHECKS AND ADJUSTMENTS
Purpose
Use this procedure to check the top-of-form sensor, and to adjust the sensor if necessary,
whenever the label printer cannot find the top of the label. Possible symptoms include:
r
The printer prints too high or too low on the labels.
r
After a label is printed, the next label is protruding from the printhead.
r
The SlideMaker generates a printer error message after printing three or four consecutive
labels.
Procedure
1.
Using a flashlight, check the top of form sensor and the printer drive roller
(Figure 4.21-1) for stuck labels.
a.
b.
If labels are stuck in the top of form sensor:
1)
Remove the labels.
2)
Verify the printer is working correctly. Go to Verification.
If labels are stuck on the printer drive roller, clean the printer drive roller and the
printhead. Go to Heading 4.12, PRINTHEAD CLEANING.
Figure 4.21-1 Label Printer Module, Front and Left Side Views
Left Side
TOP OF
FORM SENSOR
DATA
GROUND
POWER
POWER
Printer drive
roller
2.
PN 4276985A
6985020A
Remove the Label Printer module from the SlideMaker. See the Label Printer Module
removal procedure under Heading 4.1.
4.21-1
4
SERVICE AND REPAIR PROCEDURES
TOP-OF-FORM SENSOR CHECKS AND ADJUSTMENTS
3.
Remove the five screws securing the Label Printer module cover and remove the cover.
See Figure 4.21-2.
Figure 4.21-2 Label Printer Module Securing Screws
7334183B
4.
Position the Label Printer module so that it is close enough for you to reconnect its
power cable to the SlideMaker (Figure 4.21-1), but it will not damage any SlideMaker
components or fall over.
5.
Unclamp the cable clamp holding the printer power cable to the frame of the SlideMaker.
WARNING Risk of personal injury. Contacting exposed electronic components while the Label Printer
module is uncovered and attached to power can cause electric shock. Avoid handling the components
inside the uncovered Label Printer module when the module is attached to power.
6.
Reconnect the printer power cable to the Label Printer module and power up the
SlideMaker.
7.
Manually advance the label roll until a label is blocking the top of form sensor.
8.
Measure the voltage at T2 on the Printer Controller card. See Figure 4.21-3. Connect the
ground probe to TGND.
9.
Verify the voltage at T2 is within the acceptable limits specified for T2 in Table A.1-1,
Top of Form Sensor Voltage Settings. If it is not, adjust R10 as necessary to obtain this
value.
10. Measure the voltage at T1 on the Printer Controller card and verify the voltage is within
the acceptable limit specified for T1 (with a label blocking the sensor) in Table A.1-1,
Top of Form Sensor Voltage Settings. If it is not, adjust R1 as necessary to obtain this
value.
4.21-2
PN 4276985A
SERVICE AND REPAIR PROCEDURES
TOP-OF-FORM SENSOR CHECKS AND ADJUSTMENTS
Figure 4.21-3 Label Printer Module, Rear View with Cover Removed
R1
R10
T1
T2
TVCC
TGND
TGND
T1
T2
T3
Printer
Controller
card
7334185B
11. Manually advance the label roll until only the label liner is blocking the top of form
sensor.
12. Measure the voltage at T1 and verify the voltage is within the acceptable limit specified
for T1 (with the label liner blocking the sensor) in Table A.1-1, Top of Form Sensor
Voltage Settings. If it is not, adjust R1 as necessary to obtain this value.
13. Manually advance the label roll until a label is blocking the top of form sensor again.
14. Repeat from step 10, adjusting R1 as necessary, until the value is within acceptable limits
both when the label is blocking the sensor and when the liner is blocking the sensor.
15. Power down the SlideMaker.
16. Disconnect the printer power cable from the Label Printer module and reinstall the cable
in the cable clamp on the SlideMaker frame.
17. Reinstall the Label Printer module’s cover.
18. Reinstall the Label Printer module in the SlideMaker, connecting its cables, ground wire,
and tubing.
19. Power up the SlideMaker.
20. Ensure the printer is printing labels correctly. Go to Verification.
PN 4276985A
4.21-3
4
SERVICE AND REPAIR PROCEDURES
TOP-OF-FORM SENSOR CHECKS AND ADJUSTMENTS
Verification
4.21-4
1.
On the SlideMaker screen, select DRY CYCLE (MAIN MENU tt SERVICE FUNCTIONS tt
PERFORM SLIDE CYCLE tt DRY CYCLE).
2.
Do 10 dry cycles and ensure:
r
The printing on the labels is in the correct position.
r
The SlideMaker does not generate any printer error messages.
PN 4276985A
SERVICE AND REPAIR PROCEDURES
Z-AXIS REGISTER SUBASSEMBLY COMPONENT REPLACEMENT
4.22
Z-AXIS REGISTER SUBASSEMBLY COMPONENT REPLACEMENT
Purpose
Use this procedure to replace any of the following components in the register-Z assembly:
r
Register Z-forward sensor
r
Register Z-forward sensor flag
r
Z-button
r
Z-button cylinder
Procedure
1.
Remove the Slide Ejector module. Refer to Cassette Transport Module under Accessing
the Main Compartments in the SlideMaker in Heading 4.1.
2.
Remove the register Z-forward sensor flag to replace the flag or to access the Z-button,
the register Z-forward sensor, or the Z-button cylinder:
a.
Loosen the two setscrews securing the top and bottom of the collar and slide the
collar off the Z-button. See Figure 4.22-1.
b.
Loosen the setscrew in the bottom of the sensor flag and slide the flag off the
Z-button and the shaft of the Z-button cylinder.
c.
Loosen the setscrew securing the collar/guide and slide the collar/guide off the
Z-button and the Z-button cylinder.
d.
To replace the sensor flag only, go to step 8. To replace the Z-button, go to step 3. To
replace the register Z-forward sensor or the Z-button cylinder, go to step 4.
Figure 4.22-1 Register Z-Assembly Components
Slide pickup
bridge
Top View
Z-button
Pressure
line
Slide
pickup
bridge
securing
screws
SEN24
Top collar
setscrew
Collar/
guide
setscrew
Z-button Collar/
cylinder guide
Slide
pusher
Collar
Bottom
collar
setscrew
Z-button
Slide
Ejector
Interface
card
Sensor flag
Registor
setscrew
Z-forward
sensor Sensor
flag
Side View
6985027A
PN 4276985A
4.22-1
4
SERVICE AND REPAIR PROCEDURES
Z-AXIS REGISTER SUBASSEMBLY COMPONENT REPLACEMENT
3.
4.
5.
Replace the Z-button:
a.
Remove the two screws securing the slide pickup bridge. See Figure 4.22-1.
b.
Remove the bridge.
c.
Push out the Z-button.
d.
Install the new Z-button.
e.
Reinstall the slide pickup bridge.
f.
If you are also replacing the register Z-forward sensor or the Z-button cylinder, go to
step 4. If not, go to step 8.
Remove the register Z-forward sensor to replace the sensor or to access the Z-button
cylinder:
a.
Remove the screw securing the register Z-forward sensor. See Figure 4.22-1.
b.
If you are replacing the Z-button cylinder, set the sensor aside and go to step 5.
c.
If you are only replacing the register-Z forward sensor, go to step 6.
Replace the Z-button cylinder:
a.
Disconnect the pressure line from the Z-button cylinder. See Figure 4.22-1.
b.
With a needle nose pliers, unscrew the cylinder and remove it.
c.
Screw in the new cylinder and connect the pressure line.
d.
If you are also replacing the register Z-forward sensor, go to step 6. If not, go to
step 7.
6.
Disconnect the register Z-forward sensor from the Slide Ejector Interface card
(Figure 4.22-1) and remove the sensor.
7.
Install the register Z-forward sensor, being careful not to pinch any wires. If this is a new
sensor, connect the sensor to the Slide Ejector Interface card.
8.
Install the register-Z forward sensor flag:
9.
a.
Slide the collar/guide onto the Z-button and its cylinder, and push the collar/guide
as far toward the slide pickup bridge as possible. DO NOT tighten the setscrew.
b.
Slide the sensor flag onto the Z-button and its cylinder shaft, and push the flag as far
toward the slide pickup bridge as possible.
c.
Tighten the setscrew on the bottom of the sensor flag.
d.
Manually hold the Z-button against the slide pickup bridge, and slide the collar/
guide until it just touches the sensor flag.
e.
Tighten the setscrew for the collar/guide.
f.
Slide the collar onto the Z-button until it just touches the sensor flag.
g.
Tighten the two setscrews for the collar.
Reinstall the Slide Ejector module.
10. Ensure the register Z-assembly is working correctly. Go to Verification.
Verification
On the SlideMaker screen, select DRY CYCLE (MAIN MENU tt SERVICE FUNCTIONS tt PERFORM
SLIDE CYCLE tt DRY CYCLE) and ensure the smear truck picks up the slide.
4.22-2
PN 4276985A
SERVICE AND REPAIR PROCEDURES
SEN46 (GRIPPER OVEREXTENDED SENSOR) ALIGNMENT AND FLAG REPLACEMENT
4.23
SEN46 (GRIPPER OVEREXTENDED SENSOR) ALIGNMENT AND FLAG
REPLACEMENT
Purpose
This section contains two procedures.
r
r
Use the SEN46 Alignment procedure whenever you have:
t
Replaced SEN46 or its flag.
t
Adjusted the Slide Elevator module.
Use the SEN46 Flag Replacement procedure to replace a broken flag.
SEN46 Alignment
Procedure
1.
On the SlideMaker screen, select SOLENOID TEST (MAIN MENU tt SERVICE FUNCTIONS tt
SOLENOID TEST).
PN 4276985A
2.
De-energize SOL60 to close the gripper on the platen.
3.
Select SENSOR STATUS (MAIN MENU tt SPECIAL FUNCTIONS tt SENSOR STATUS).
4.
Verify SEN46 is inactive. If the sensor is active the flag is out of the sensor and the sensor
needs to be adjusted. Go to step 9.
5.
Carefully place a glass slide on the platen, ensuring the gripper secures the slide.
6.
Verify SEN46 is active. If the sensor is inactive the flag is still in the sensor and the sensor
needs to be adjusted. Go to step 9.
7.
Select SOLENOID TEST (MAIN MENU tt SERVICE FUNCTIONS tt SOLENOID TEST) and energize
SOL60 to open the gripper.
8.
Select SENSOR STATUS (MAIN MENU tt SPECIAL FUNCTIONS tt SENSOR STATUS) and verify
SEN46 is still active. If it is, SEN46 does not require adjustment.
9.
To adjust SEN46:
a.
Remove the Cassette Output Queue module to access the gripper overextended
sensor, SEN46. See the Cassette Output Queue Module removal procedure under
Heading 4.1.
b.
Slide back the dryer exit sensor, SEN49, to access the bracket for SEN46. See
Figure 4.23-1.
c.
Loosen the two cross-head screws securing the SEN46 bracket to the Dryer module.
See Figure 4.23-1.
d.
Move the SEN46 bracket until the sensor’s flag just contacts the gripper.
e.
Tighten the bracket’s securing screws.
f.
Repeat from step 1 above until SEN46 is adjusted correctly.
g.
Reinstall SEN49.
h.
Reinstall the Cassette Output Queue module.
4.23-1
4
SERVICE AND REPAIR PROCEDURES
SEN46 (GRIPPER OVEREXTENDED SENSOR) ALIGNMENT AND FLAG REPLACEMENT
Figure 4.23-1 SEN46 with Bracket and Flag Detail
SEN49
SEN46
Securing
screws
(2)
Bracket
Dryer
module
SEN46
Flag
Retaining
groove
6985002A
Torsion
spring
Verification
1.
On the SlideMaker screen, select DRY CYCLE (MAIN MENU tt SERVICE FUNCTIONS tt
PERFORM SLIDE CYCLE tt DRY CYCLE).
2.
Do five dry cycles and ensure the platen operates correctly.
SEN46 Flag Replacement
Tools/Supplies Needed
B A pointed object such as a ball-point pen
Removal
1.
Move the slide elevator platen to access the flag for SEN46:
a.
Select BASKET TEST (MAIN MENU tt SERVICE FUNCTIONS tt CASSETTE/SHUTTLE/BASKET tt
BASKET TEST).
b.
Set POSITION to SINGLE.
c.
Select ELEVATOR to move the slide elevator down.
d.
While the slide elevator is moving down, select STOP MOTION. The slide elevator
stops when it reaches the bottom limit of its travel, holding the platen in the veritcal
position.
Note: If you do not select STOP MOTION, the slide elevator completes its downward
travel and immediately begins its upward travel.
2.
4.23-2
If the dryer exit sensor, SEN49, is covering the flag for the gripper overextended sensor,
SEN46, slide SEN49 back out of the way.
PN 4276985A
SERVICE AND REPAIR PROCEDURES
SEN46 (GRIPPER OVEREXTENDED SENSOR) ALIGNMENT AND FLAG REPLACEMENT
3.
Before removing the flag, note the placement of its torsion spring. The torsion spring leg
is positioned in a retaining groove on the sensor’s body. Refer to Figure 4.23-1.
4.
Manually move the flag toward the Dryer module and hold its position.
5.
At the location where the flag attaches to the sensor body, press down on the top nipple
of the flag with a pointed object to disengage the flag from the sensor body, and remove
the flag.
Installation
1.
At the sensor body, position the leg of the flag’s torsion spring in its retaining groove and
the bottom nipple of the flag in its retaining hole, and push in the flag until its top nipple
engages with the sensor body.
2.
Manually move the flag toward the Dryer module and then release it to verify correct
spring action.
3.
Select ELEVATOR to move the slide elevator up.
4.
While the slide elevator is moving up, select STOP MOTION. The slide elevator stops when
it reaches the top limit of its travel.
5.
If you removed SEN49, reinstall it.
6.
Verify the platen is working correctly. Go to Verification below.
Verification
PN 4276985A
1.
On the SlideMaker screen, select DRY CYCLE (MAIN MENU tt SERVICE FUNCTIONS tt
PERFORM SLIDE CYCLE tt DRY CYCLE).
2.
Do five dry cycles and ensure the platen functions correctly.
4.23-3
4
SERVICE AND REPAIR PROCEDURES
SEN46 (GRIPPER OVEREXTENDED SENSOR) ALIGNMENT AND FLAG REPLACEMENT
4.23-4
PN 4276985A
SERVICE AND REPAIR PROCEDURES
ENCODER REPLACEMENT
4.24
ENCODER REPLACEMENT
Purpose
Use this procedure to replace the encoder when the SlideMaker is generating excessive:
r
Truck position errors related to the left/right movement of the truck.
r
Excessive SEN58, SEN59, or SEN60 errors.
Tools/Supplies Needed
B 0.035-in. Allen wrench, PN 5402022
Note: An Allen wrench is shipped with each encoder.
Preliminary Checks
Before replacing the encoder, do these checks to help ascertain the encoder is the problem.
1.
2.
Using the white gear wheel on the right end of the Slide and Smear module, move the
truck through its entire length of travel, verifying the movement is smooth and
unobstructed.
On the SlideMaker screen, select SENSOR STATUS (MAIN MENU tt SPECIAL FUNCTIONS tt
SENSOR STATUS).
3.
Using the white gear wheel, move the truck very slowly while monitoring SEN58,
SEN59, and SEN60.
Note: When operating correctly, SEN58 and SEN59 are activated and de-activated very
rapidly. SEN60, on the other hand, is only activated once throughout the entire length of
travel and it is easy to miss it.
4.
If the encoder appears to be defective, or if you are unable to eliminate the encoder as the
cause of the problem, go to the Removal procedure below.
ATTENTION: The new encoder is shipped with the Allen wrench
already positioned in the setscrew that secures the collar to the
lead screw as shown in Figure 4.24-1.
Figure 4.24-1 Encoder
Configuration at Shipment
If you need to use the Allen wrench to remove the old encoder, it
is strongly recommended that you refit the Allen wrench into the
setscrew of the new encoder before installing it.
6985006A
Removal
1.
PN 4276985A
Power down the SlideMaker and remove the Label Printer and Slide Ejector modules to
access the encoder. See Label Printer Module and Cassette Transport Module removal
procedures under Heading 4.1.
4.24-1
4
SERVICE AND REPAIR PROCEDURES
ENCODER REPLACEMENT
2.
Using the white gear wheel, align the black mark on the lead screw with the etched line
on the lead screw mounting frame as shown in Figure 4.24-2.
Figure 4.24-2 Positioning the Lead Screw for Encoder Replacement
White gear
wheel
Black mark
Lead screw
mounting
frame
Lead screw
Etched
line
6985008A
3.
Using a flat-blade screwdriver, turn the encoder from locked to unlocked. See
Figure 4.24-3.
Figure 4.24-3 Locked and Unlocked Positions of the Encoder
Locked
Unlocked
6985007A
4.
Insert the Allen wrench into the encoder’s access hole for the collar setscrew and loosen
the setscrew.
CAUTION The encoder base is a factory set component and cannot be replaced in the field. When replacing
the encoder, only remove and replace the encoder body. DO NOT, under any circumstances, remove the
encoder base from the frame of the Slide and Smear module.
4.24-2
5.
Carefully pry the encoder body from the encoder base.
6.
Disconnect the cable from the rear of the encoder.
PN 4276985A
SERVICE AND REPAIR PROCEDURES
ENCODER REPLACEMENT
Installation
1.
If an encoder base was shipped with the new encoder, remove the base from the body
and discard the base.
2.
If you removed the Allen wrench from the new encoder, reinstall it. Insert the Allen
wrench through the new encoder’s access hole for the collar setscrew and ensure it
engages with the setscrew.
3.
Holding the Allen wrench in place, carefully install the encoder body onto the encoder
base.
4.
Ensure the mark on the lead screw is still aligned with the etched line on the lead screw
mounting frame.
5.
Tighten the collar setscrew, securing the encoder to the lead screw.
6.
Remove the Allen wrench from the encoder.
7.
Turn the encoder to the locked position. Refer to Figure 4.24-3.
8.
Connect the cable to the rear of the encoder.
9.
Reinstall the Slide Ejector module and the Label Printer module.
Verification
PN 4276985A
1.
Power up the SlideMaker and verify the SlideMaker resets without generating any truck
position errors.
2.
On the SlideMaker screen, select DRY CYCLE (MAIN MENU tt SERVICE FUNCTIONS tt
PERFORM SLIDE CYCLE tt DRY CYCLE).
3.
Do five dry cycles and ensure no truck position errors occur.
4.24-3
4
SERVICE AND REPAIR PROCEDURES
ENCODER REPLACEMENT
4.24-4
PN 4276985A
SERVICE AND REPAIR PROCEDURES
BASKET QUEUE MODULE CHECKS AND ADJUSTMENTS
4.25
BASKET QUEUE MODULE CHECKS AND ADJUSTMENTS
Purpose
Use this procedure to ensure:
r
The front and rear belts in the Basket Queue module are operating correctly.
r
The front and rear belt motors and sensors are aligned correctly.
Tools/Supplies Needed
B LOCTITE® 222 thread lock, PN 1601065
B A set of metric Allen wrenches
Preliminary Checks
1.
Remove all slide baskets from the front and rear tracks of the Basket Queue module.
2.
Manually move the front and rear belts by gripping a profile (basket pusher) and pulling
the belt left and right, to verify the resistance to movement is even.
Note: Uneven resistance (slack in the motion) can be caused by loose screws on the drive
pulleys or the pulley drive coupling.
3.
On the SlideMaker screen, select BASKET TEST (MAIN MENU tt SERVICE FUNCTIONS tt
CASSETTE/SHUTTLE/BASKET tt BASKET TEST).
4.
Set POSITION to CONTINUOUS.
5.
Select FRONT/REAR BELT to move the the belts in the Basket Queue module.
6.
As the belts advance, visually monitor the travel of the profiles through the belt position
sensors, SEN31 and SEN32. See Figure 4.25-1.
7.
Verify the profiles clear the sensors without interference, and that the profiles are
straight, not slanted. For examples, see Figure 4.25-1.
Note: Insufficient clearance between the profiles and the belt position sensors, or slanted
profiles, can be caused by a misadjusted belt and/or belt position sensor.
8.
Select STOP MOTION to stop the belt movment.
9.
If both belts passed the criteria in step 2 and step 7, no further adjustment is needed.
10. If either belt failed the criteria in step 2 or in step 7, do all of the
Pulley/Motor/Coupling/Position Sensor Adjustment Procedures below.
PN 4276985A
4.25-1
4
SERVICE AND REPAIR PROCEDURES
BASKET QUEUE MODULE CHECKS AND ADJUSTMENTS
Figure 4.25-1 Movement of the Profiles (Basket Pushers) through the Belt Position Sensors
SEN31
Adjustment
screw
Belt profile
Rear Belt
No
clearance
SEN32
Adjustment
screw
Slanted
Belt profile
Front Belt
6985011A
Pulley/Motor/Coupling/Position Sensor Adjustment Procedures
ATTENTION: For greater clarity, these adjustments have been divided into several smaller
procedures. Do them in the order presented and do not skip any.
Preliminary
Power off the SlideMaker and remove the Basket Queue module to access the pulley and
coupling adjustments. See the Basket Queue Module removal procedure under Heading 4.1.
Rear Belt
4.25-2
1.
Turn the Basket Queue module over.
2.
Loosen the setscrew on the motor pulley for the rear belt. See Figure 4.25-2.
PN 4276985A
SERVICE AND REPAIR PROCEDURES
BASKET QUEUE MODULE CHECKS AND ADJUSTMENTS
Figure 4.25-2 Basket Queue Module (Bottom View) Pulley, Motor, and Coupling Adjustments
Front belt tension
adjustment
Front belt
idler pulley
Front belt
Rear belt
idler pulley
Front belt
motor pulley
Motor shaft
setscrews
Side view
Rear belt
Pulley shaft
setscrews
Rear belt tension
adjustment
M3
(Front stepper motor)
Setscrew
M4
(Rear stepper motor)
6985012A
Side view
3.
Rear belt
motor pulley
Manually move the rear belt (by gripping a profile) and adjust the position of the motor
pulley until the belt is centered on the pulley as shown in Figure 4.25-3.
Figure 4.25-3 Centering the Belt on the Motor Pulley
Motor
Setscrew
Belt
Pulley
6985013A
PN 4276985A
4.25-3
4
SERVICE AND REPAIR PROCEDURES
BASKET QUEUE MODULE CHECKS AND ADJUSTMENTS
4.
Apply LOCTITE thread lock to the setscrew on the motor pulley and tighten the
setscrew, ensuring the setscrew is engaged on the flat edge of the motor shaft.
5.
Turn the Basket Queue module right side up and adjust the rear belt position sensor,
SEN31.
a.
Manually move the rear belt (by gripping a profile) until a profile is positioned
inside SEN31.
b.
Loosen the sensor adjustment screw. Refer to Figure 4.25-1.
c.
Move the sensor until there is clearance between the sensor and the outer edges of
the profile as shown in Figure 4.25-1.
d.
Tighten the adjustment screw.
Front Belt
1.
Turn the Basket Queue module over.
2.
Using a metric Allen wrench, loosen the two pulley shaft setscrews (Figure 4.25-2)
securing the coupling to the motor pulley shaft for the front belt.
3.
Remove the two motor securing screws (Figure 4.25-2), and remove the motor with the
coupling attached to the shaft.
4.
Using a metric Allen wrench, loosen the two motor shaft setscrews (Figure 4.25-2)
securing the coupling to the motor shaft.
5.
Ensure the coupling is pushed fully onto the motor shaft and retighten the motor shaft
setscrews.
6.
Reposition the motor and coupling in the Basket Queue module and reinstall the motor
securing screws.
7.
Center the front belt on the motor pulley and tighten the pulley shaft setscrews.
8.
Manually move the front belt (by gripping a profile) and verify the belt is centered on the
motor pulley.
9.
If the front belt is not centered on the motor pulley, loosen the coupling to pulley
setscrews and repeat from step 7.
10. Turn the Basket Queue module right side up and adjust the front belt position sensor,
SEN31.
4.25-4
a.
Manually move the front belt (by gripping a profile) until a profile is positioned
inside SEN32.
b.
Loosen the sensor adjustment screw. Refer to Figure 4.25-1.
c.
Move the sensor until there is clearance between the sensor and the outer edges of
the profile as shown in Figure 4.25-1.
d.
Tighten the adjustment screw.
PN 4276985A
SERVICE AND REPAIR PROCEDURES
BASKET QUEUE MODULE CHECKS AND ADJUSTMENTS
Belt Tension
1.
Loosen the adjustment screw in the front belt idler pulley. Refer to Figure 4.25-2.
CAUTION Overtightening a belt can break the belt or overload the motor. When adjusting the belt tension,
remove the slack in the belt but DO NOT overtighten the belt.
2.
Adjust the position of the pulley until the front belt is just taut. Do not overtighten
the belt.
3.
Tighten the adjustment screw.
4.
Repeat from step 1 for the rear belt.
Verification
1.
Reinstall the Basket Queue module, place a slide basket in the Basket Queue module, and
power up the SlideMaker.
Note: If you turn on the SlideMaker without a slide basket in the Basket Queue module,
the SlideMaker generates slide basket errors.
PN 4276985A
2.
Repeat the Preliminary Checks to verify the front and rear belts and position sensors are
adjusted correctly. Repeat the adjustments if necessary.
3.
Install three empty slide baskets randomly on the front belt in the Basket Queue module,
and three on the rear belt.
4.
On the SlideMaker screen, select DRY CYCLE (MAIN MENU tt SERVICE FUNCTIONS tt
PERFORM SLIDE CYCLE tt DRY CYCLE).
5.
Do five dry cycles and ensure the slide basket under the Slide Elevator module advances
correctly.
6.
On the SlideMaker screen, select ADVANCE BASKET (MAIN MENU tt ROUTINE FUNCTIONS tt
PERFORM SLIDE CYCLE tt DRY CYCLE) and ensure:
r
The slide basket under the Slide Elevator module transfers smoothly to the
front belt.
r
The slide basket in the left corner of the front belt transfers smoothly from the front
belt to the rear belt.
4.25-5
4
SERVICE AND REPAIR PROCEDURES
BASKET QUEUE MODULE CHECKS AND ADJUSTMENTS
4.25-6
PN 4276985A
SERVICE AND REPAIR PROCEDURES
SEN37 (BASKET INDEX SENSOR) REPLACEMENT
4.26
SEN37 (BASKET INDEX SENSOR) REPLACEMENT
Purpose
Use this procedure to replace a defective basket index sensor, SEN37.
Removal
1.
Turn off the main power switch on the rear of the SlideMaker and unplug the main
power cable from the ac outlet.
2.
Disconnect cable P1 from SEN37.
3.
Remove the mounting bracket securing screw. See Figure 4.26-1.
Figure 4.26-1 Removing SEN37
Divider wall
Adjustment
screw
Spacer
Mounting
screw
P1
4.
6985014A
Lower and carefully pull the SEN37 assembly out of the Basket Queue module.
Installation
PN 4276985A
1.
Carefully insert the new SEN37 assembly into its slot in the Basket Queue module until
the spacer on the assembly clears the center hole between the front and rear tracks.
2.
Evenly lift the sensor assembly to the top of the slot.
3.
While supporting the sensor assembly, align the pins on the left side of the mounting
bracket with their retaining holes in the Basket Queue module, and insert the pins into
the holes.
4.
Install the mounting bracket screw.
4.26-1
4
SERVICE AND REPAIR PROCEDURES
SEN37 (BASKET INDEX SENSOR) REPLACEMENT
5.
Adjust the position of the SEN37 circuit card as necessary.
a.
Loosen the circuit card adjustment screw. Refer to Figure 4.26-1.
b.
Move the card until the spacer is located centrally in the divider wall between the
front and rear tracks and does not protrude from either side.
c.
Tighten the adjustment screw.
6.
Reconnect cable P1.
7.
Plug in the main power cable and turn on the SlideMaker.
8.
Verify the SlideMaker is working correctly. Go to Verification.
Verification
4.26-2
1.
Verify SEN41 is aligned with SEN37. See Heading 4.11, SEN41 (VERTICAL SLIDE
SENSOR) ALIGNMENT.
2.
On the SlideMaker screen, select DRY CYCLE (MAIN MENU tt SERVICE FUNCTIONS tt
PERFORM SLIDE CYCLE tt DRY CYCLE).
3.
Do five dry cycles and ensure the platen releases the slide into the slide basket correctly.
PN 4276985A
SERVICE AND REPAIR PROCEDURES
30 PSI SUPPLY CHECKS AND TRANSDUCER ADJUSTMENT
4.27
30 PSI SUPPLY CHECKS AND TRANSDUCER ADJUSTMENT
Purpose
Use this procedure to check the 30 psi supply, and to adjust the transducer on the Pneumatic
Supply Monitor, 30 PSI card if necessary, whenever:
r
The 30 psi reading on the SlideMaker is low.
r
The SlideMaker has unexplained lockups.
r
The SlideMaker generates 30 psi out-of-range error messages.
r
The 30 psi transducer is not calibrated correctly.
r
The Pneumatic Supply Monitor, 30 Psi card is replaced.
Tools/Supplies Needed
B Digital pressure meter, such as a Marsh meter, PN 2906639
Procedure
1.
On the rear of the Diluter, disconnect the 30 psi supply line and connect it directly to the
Marsh meter.
2.
On the rear of the SlideMaker, disconnect the 30 psi supply line and leave it
disconnected.
3.
On the GEN•S System Power Supply, adjust the 30 psi regulator until the readout on the
Marsh meter is 30.0 psi.
4.
Verify the readout on the Power Supply is 30 psi ±0.1.
If it is not, it could indicate a problem in the Power Supply. Correct the problem.
5.
Disconnect the 30 psi line from the Marsh meter and reconnect it to the rear of the
Diluter.
6.
Connect the 30 psi supply line for the SlideMaker directly to the Marsh meter.
7.
Verify the readout on the Marsh meter is 30.0 psi.
If it is not, it could indicate a problem in the Diluter, such as an internal leak. Correct the
problem.
8.
Disconnect the 30 psi line from the Marsh meter and reconnect it to the rear of the
SlideMaker.
9.
Open the rear door of the SlideMaker to access the Pneumatic Supply Monitor, 30 Psi
card. See Figure 4.27-1.
10. Disconnect the pressure input line from the Pneumatic Supply Monitor, 30 Psi card (the
silicone tubing on the transducer) and connect the tubing to the Marsh meter.
11. Verify the readout on the Marsh meter is 30.0 psi.
If it is not, it could indicate a problem between the rear of the SlideMaker and the
Pneumatic Supply Monitor, 30 Psi card, such as a leaky quick-disconnect fitting. Correct
the problem.
12. Disconnect the 30 psi line from the Marsh meter and reconnect it to the transducer.
PN 4276985A
4.27-1
4
SERVICE AND REPAIR PROCEDURES
30 PSI SUPPLY CHECKS AND TRANSDUCER ADJUSTMENT
Figure 4.27-1 Pneumatic Supply Monitor, 30 PSI Card Transducer Adjustment
Rear of SlideMaker
30 psi
input port
Transducer
Pneumatic Supply
Monitor 30 PSI card
R3
6985009A
13. Adjust the 30 psi transducer.
a.
On the SlideMaker screen, select PNEUMATIC /POWER SUPPLIES (MAIN MENU tt
ROUTINE FUNCTIONS tt PNEUMATIC/POWER SUPPLIES).
b.
On the Pneumatic Supply Monitor, 30 Psi card (Figure 4.27-1), adjust R3 until the
readout on the PNEUMATIC /POWER SUPPLIES screen is 30.0 psi.
14. Close the rear door of the SlideMaker.
4.27-2
PN 4276985A
CONTENTS
5
MAINTENANCE PROCEDURES, 5.1-1
5.1
SYSTEM VERIFICATION PROCEDURE, 5.1-1
Purpose, 5.1-1
Tools/Supplies Needed, 5.1-1
Procedure, 5.1-1
5.2
SLIDEMAKER FUNCTIONALITY CHECKLIST, 5.2-1
Purpose, 5.2-1
Tools/Supplies Needed, 5.2-1
Preliminary Checks, 5.2-1
Dry Cycle Checks, 5.2-3
Blood Cycle Checks, 5.2-4
ILLUSTRATIONS
5.1-1
5.1-2
PN 4276985A
Using the Smear Template, 5.1-2
Checking the Smear Location on the Slide, 5.1-3
5-i
5
CONTENTS
5-ii
PN 4276985A
5MAINTENANCE PROCEDURES 5
5.1
SYSTEM VERIFICATION PROCEDURE
Purpose
Use this procedure at the end of each service call for the SlideMaker to ensure the SlideMaker
is operating and aligned correctly.
Tools/Supplies Needed
B Several whole-blood specimens
B Smear Template, PN 5450459 (A copy of this template is provided at the end of this
chapter for your use.)
Procedure
1.
On the SlideMaker screen, select DRY CYCLE (MAIN MENU tt SERVICE FUNCTIONS tt
PERFORM SLIDE CYCLE tt DRY CYCLE).
2.
Do a minimum of 12 dry cycles and monitor movement of the slides through the
SlideMaker.
a.
3.
PN 4276985A
At the slide ejector station, ensure:
r
The slide is ejected from the slide cassette and is registered correctly.
r
The slide is picked up by the smear truck and the right-hand edge of the smear
truck is about flush with the slide’s edge.
b.
At the home position of the shuttle, ensure the smear truck places the slide correctly
onto the shuttle.
c.
At the printer position of the shuttle, ensure the label is positioned correctly on the
slide.
d.
From the printer position, ensure the shuttle moves correctly to the dispense
position and then to the smear position.
e.
At the Dryer module, ensure the slide is pushed onto the conveyer belt correctly.
f.
At the Basket Queue module, ensure:
r
The slide is dropped from the Slide Elevator module into the slide basket
correctly.
r
The slide baskets advance incrementally.
r
The slide baskets are transferred from the rear track to the front track and from
the front track to the rear track correctly.
Correct any problems detected in step 2.
r
If the problems pertain to the movement or positioning of the shuttle, adjust the
shuttle positions as instructed under Heading 4.3, HOME, PRINTER AND
DISPENSE OFFSET SHUTTLE POSITION ADJUSTMENTS.
r
If the problems pertain to the movement or positioning of the smear truck, adjust
the smear truck positions as instructed under Heading 4.4, PICK AND WICK
SLIDE POSITION ADJUSTMENTS.
r
If the problems pertain to the alignment of the slide with the slide basket, adjust the
platen as instructed under Heading 4.6, SLIDE ELEVATOR PLATEN
ADJUSTMENTS.
5.1-1
MAINTENANCE PROCEDURES
SYSTEM VERIFICATION PROCEDURE
4.
Do a Shutdown cycle (MAIN MENU tt ROUTINE FUNCTIONS tt ROUTINE FLUIDICS tt RUN
SHUT DOWN) to prime the cleaning agent line.
5.
Do a Startup cycle (MAIN MENU tt ROUTINE FUNCTIONS tt ROUTINE FLUIDICS tt RUN
START UP) to replace the cleaning agent in the SlideMaker with diluent.
6.
Calibrate the fluid detectors as instructed under Heading 4.9.
7.
Cycle whole-blood specimens with SlideMaker smears requested through the GEN•S
System, using any test mode.
a.
b.
As the blood samples are processed, ensure:
1)
The Sample Access and Reservoir module aspirates, transfers, mixes, and
dispenses the blood samples from both reservoirs, correctly.
2)
The slides exiting the Dryer module are not chipped at the corners or on the
edges.
Using the Smear Template, analyze the macroscopic quality of the smears on the
slides exiting the Dryer module:
1)
Compare the length of each smear to the measured lines on the Smear Template
and ensure the end of the smear is between 1.50 in. and 2.25 in. See
Figure 5.1-1a.
Note: This smear length criterion is only applicable when the smear definition
settings (MAIN MENU tt SPECIAL FUNCTIONS tt DEFINE SMEAR SPEED) are at their
default settings of 5.
2)
Place the feathered edge of each smear against the curved line on the Smear
Template and examine the three working areas. See Figure 5.1-1b. Ensure that
at least two adjoining working areas (1 and 2 or 2 and 3) have no vacuoles,
streaks, gaps, ridges or waves.
Figure 5.1-1 Using the Smear Template
a.
1.50
1.65
1.80
1.95
2.10
2.25
3
2
Working
areas
1
Acceptable
lengths
b.
7334181B
5.1-2
PN 4276985A
MAINTENANCE PROCEDURES
SYSTEM VERIFICATION PROCEDURE
c.
If using Coulter slides with cut corners, ensure the smears are centered on the slide
with margins on both sides as shown in Figure 5.1-2.
Figure 5.1-2 Checking the Smear Location on the Slide
7334186B
8.
PN 4276985A
If the SlideMaker meets the conditions in step 7, have a laboratory technician or an
Applications Specialist verify the microscopic quality of the smears.
5.1-3
5
MAINTENANCE PROCEDURES
SYSTEM VERIFICATION PROCEDURE
5.1-4
PN 4276985A
MAINTENANCE PROCEDURES
SLIDEMAKER FUNCTIONALITY CHECKLIST
5.2
SLIDEMAKER FUNCTIONALITY CHECKLIST
Purpose
Use this procedure to check all the functions of the SlideMaker. You will do:
r
Preliminary Checks to eliminate any known problems before cycling the SlideMaker.
r
Dry Cycle Checks to observe the mechanical movements of the SlideMaker.
r
Blood Cycle Checks to observe aspiration, smear making, and smear quality.
Tools/Supplies Needed
B Twelve whole-blood specimens
Preliminary Checks
1.
2.
3.
At the Workstation, look at the SlideMaker error log and note any persistent or recurring
SlideMaker errors.
r
If you know the cause of an error, correct it before proceeding.
r
If you do not know the cause of an error, use the following checks as a
troubleshooting aid for locating the problem.
Obtain previously made smears from the customer and check the quality of the smears.
r
If the smear quality is not acceptable and you know why, correct the problem before
proceeding.
r
If the smear quality is not acceptable and you do not know why, use the following
checks as a troubleshooting aid for locating the problem.
At the Analytical Station, open the lower front cover of the Diluter and ensure:
a.
The SlideMaker aspiration tubing attached to the needle vent port of the needle has
a yellow-striped tubing sleeve installed.
If it does not, install one as directed in step 15, h, under Heading 3.3, MODIFYING
THE GEN•S SYSTEM.
b.
The SlideMaker aspiration tubing is routed so that during piercing the needle
cartridge bracket does not pinch the tubing.
4.
Open the SlideMaker cover.
5.
At the Cassette Transport assembly, ensure the Cassette Output Queue tubing is routed
under the Slide Ejector module to prevent the input cassette transfer mechanism from
pinching it.
6.
At the Label Printer module:
a.
Verify the ribbon and label rolls are routed correctly.
If not, correct the routing and show the customer how to do it correctly.
b.
Using the shuttle drive belt, manually move the shuttle under the printhead and
verify the clearance is the thickness of one glass slide between the printhead and a
slide on the shuttle or two glass slides between the printhead and the shuttle itself.
If not, do the Printer Height above the Slide Adjustment procedure under
Heading 4.5, PRINTER ADJUSTMENTS.
PN 4276985A
5.2-1
5
MAINTENANCE PROCEDURES
SLIDEMAKER FUNCTIONALITY CHECKLIST
c.
Examine the top-of-form sensor, printhead, and printer drive roller for stuck labels
or evidence of glue.
If labels or glue are present, clean the area as directed in Heading 4.12, PRINTHEAD
CLEANING.
7.
At the Dispense module, verify the dispense probe and the rinse cup are clean.
If not, clean the dispense probe and rinse cup with a cotton swab dipped in 4% bleach
and rinse with water as directed in the online help topic, Cleaning the Dispense Probe
and Rinse Cup.
Ensure the customer knows the dispense probe and rinse cup should be cleaned
whenever there is evidence of blood build-up on the outside of the dispense probe or the
inside of the rinse cup or at least once a week.
8.
At the Cassette Transport assembly, observe the transfer of slide cassettes.
a.
Insert two slide cassettes into the Cassette Input Queue module.
b.
On the SlideMaker screen, select ADVANCE CASSETTES (MAIN MENU tt SERVICE
FUNCTIONS tt CASSETTE/SHUTTLE/BASKET tt ADVANCE CASSETTES).
c.
Do several Advance Cassettes cycles to verify smooth, error- free transfer of the slide
cassettes.
Note: As a slide cassette is transferred into the Cassette Output Queue module,
remove the slide cassette and reinsert it into the Cassette Input Queue module.
9.
At the Basket Queue module, observe the operation of the crossover cylinders.
a.
Gripping a profile (basket pusher) on the rear belt, manually move the rear belt
until a profile is located inside the rear belt position sensor, SEN31.
b.
On the SlideMaker screen, select SOLENOID TEST (MAIN MENU tt SERVICE FUNCTIONS tt
SOLENOID TEST).
c.
d.
e.
f.
5.2-2
Energize and de-energize SOL57 and verify:
r
The motion of the right crossover cylinder, CL2, is smooth.
r
When the right crossover arm is retracted, the arm is parallel with the frame of
the Basket Queue module.
If you encounter problems, ensure the following for the right crossover arm
and CL2.
r
The screws on the crossover arm are tight.
r
The cables and tubing do not interfering with the crossover arm flag.
r
A choke fitting is installed on the crossover cylinder.
r
The special nut on the cylinder shaft is tight and has a flat washer and a lock
washer.
r
The bracket for the cylinder is not bending and the cylinder nuts are tight.
r
If the motion is jerky, ensure the guiding slot is free of burrs from molding.
Energize and de-energize SOL58 and verify:
r
The motion of the left crossover cylinder, CL1, is smooth.
r
When the left crossover arm is retracted, the arm is parallel with the frame of
the Basket Queue module.
If you encounter problems, repeat step d above, for the left crossover arm and CL1.
PN 4276985A
MAINTENANCE PROCEDURES
SLIDEMAKER FUNCTIONALITY CHECKLIST
Dry Cycle Checks
Note: For a review of the Dry cycle sequence, see Dry Cycle Sequence Summary under
Heading 4.2, USING THE SLIDEMAKER SERVICE FUNCTIONS.
1.
2.
Set up the SlideMaker for continuous Dry cycles.
a.
Ensure the Cassette Input Queue module has a fully loaded slide cassette and the
Basket Queue module has empty slide baskets.
b.
On the SlideMaker screen, select PERFORM SLIDE CYCLE (MAIN MENU tt SERVICE
FUNCTIONS tt PERFORM SLIDE CYCLE).
c.
Set SLIDE CYCLE to CONTINUOUS.
d.
Select DRY CYCLE to start the function.
At the Slide Ejector module, verify the slide is ejected correctly and is registered correctly
on the slide pickup bridge.
If not, do the Slide Pusher Adjustment under Heading 4.15, SLIDE EJECTOR
ADJUSTMENTS/ALIGNMENT.
3.
4.
Verify the slide is centered on the smear truck.
r
If not, and the smear truck is the OLD configuration, do the Slide Ejector Alignment
procedure under Heading 4.15, SLIDE EJECTOR ADJUSTMENTS/ALIGNMENT.
r
If not, and the smear truck is the NEW configuration, do Heading 4.18, SMEAR
TRUCK ALIGNMENT CHECKS AND ADJUSTMENTS.
Verify that when the smear truck places a slide on the shuttle, the slide is centered from
front to back on the shuttle so that the O-ring provides a good seal.
If not, do the Slide Ejector Alignment procedure under Heading 4.15, SLIDE EJECTOR
ADJUSTMENTS/ALIGNMENT.
5.
Verify the pick and the wick positions of the shuttle are set correctly.
If not, do Heading 4.4, PICK AND WICK SLIDE POSITION ADJUSTMENTS.
6.
At the Dryer module, verify the slide is transferred from the shuttle to the module
correctly and that the slide is straight, not angled, on the conveyor belts.
If not, do Heading 4.17, SLIDE STRIPPER PLATE ADJUSTMENT.
7.
At the Slide Elevator module, verify the slide is dropped into the slide basket correctly.
If not, ensure:
8.
r
The platen is adjusted correctly. Do Heading 4.6, SLIDE ELEVATOR PLATEN
ADJUSTMENTS.
r
SEN46 is aligned correctly. Do Heading 4.26, SEN37 (BASKET INDEX SENSOR)
REPLACEMENT.
On the SlideMaker screen, select SENSOR STATUS (MAIN MENU tt SPECIAL FUNCTIONS tt
SENSOR STATUS) and verify that when the slide drops into the slide basket both SEN37
and SEN41 are active.
If not, do Heading 4.11, SEN41 (VERTICAL SLIDE SENSOR) ALIGNMENT.
9.
At the Basket Queue module, verify the slide baskets are advancing correctly.
If not, do Heading 4.25, BASKET QUEUE MODULE CHECKS AND ADJUSTMENTS.
PN 4276985A
5.2-3
5
MAINTENANCE PROCEDURES
SLIDEMAKER FUNCTIONALITY CHECKLIST
10. Remove the dry cycle slides from the slide baskets and verify the labels are positioned
correctly.
If not, do the Setting the Printer Offset procedure under Heading 4.3, HOME, PRINTER
AND DISPENSE OFFSET SHUTTLE POSITION ADJUSTMENTS.
11. Stop the Dry cycles.
Blood Cycle Checks
1.
Do Heading 4.9, FLUID DETECTOR CALIBRATION, to ensure the fluid detectors are
calibrated correctly.
2.
At the Workstation:
tt SlideMaker tab.
a.
Select
b.
In the Patients Samples box, note the current setting, then select All Samples.
3.
Run 12 whole-blood specimens on the GEN•S System.
4.
Verify that blood is aspirated for the SlideMaker and is dispensed onto the slide correctly.
5.
After the slides have exited the Dryer module, verify the smear quality.
a.
Using the Smear Template, analyze the macroscopic quality of the smears on the
slides exiting the Dryer module:
1)
Compare the length of each smear to the measured lines on the Smear Template
and ensure the end of the smear is between 1.50 in. and 2.25 in. Refer to
Figure 5.1-1a.
Note: This smear length criterion is only applicable when the smear definition
settings (MAIN MENU tt SPECIAL FUNCTIONS tt DEFINE SMEAR SPEED) are at their
default settings of 5.
2)
b.
6.
5.2-4
Place the feathered edge of each smear against the curved line on the Smear
Template and examine the three working areas. Refer to Figure 5.1-1b. Ensure
that at least two adjoining working areas (1 and 2 or 2 and 3) have no vacuoles,
streaks, gaps, ridges or waves.
If using Coulter slides with cut corners, ensure the smears are centered on the slide
with margins on both sides. For an example, refer to Figure 5.1-2.
At the Workstation, select
tt SlideMaker tab, and return the setting in the Patients
Samples box to the original setting.
PN 4276985A
CONTENTS
6
SCHEMATICS, 6.1-1
6.1
PN 4276985A
SCHEMATICS INCLUDED, 6.1-1
6-i
6
CONTENTS
6-ii
PN 4276985A
6SCHEMATICS 6
6.1
SCHEMATICS INCLUDED
This chapter contains the engineering schematics you need for troubleshooting the
SlideMaker. The schematic revision levels were current on the date this revision of the manual
was released. The schematics will be updated again to the latest revision level whenever this
manual is revised.
Because the engineering schematics are simply inserted into the document and are not
assigned page numbers or figure numbers, they are not included in the table of contents or
the index. In the text the engineering schematics are referenced by their name and document
control number (DCN).
The schematics are inserted into this chapter in the following order:
.
PN 4276985A
Name
DCN
Pneumatic/Hydraulic Schematic
6323138
GEN•S SM Integrated SlideMaker Interconnect Block Diagram
6323239
GEN•S SM Integrated SlideMaker Interconnect Diagram
6321624
6.1-1
SCHEMATICS
SCHEMATICS INCLUDED
6.1-2
PN 4276985A
8
7
6
5
3
4
2
1
REVISION
SOLENOID FUNCTIONS
SOL.
NO.
D
C
B
FUNCTION
COMPONENTS
1
2
3
4
5
6
7
8
9
10
RESERVOIR 1; 1ST 'T' ISOLATION
RESERVOIR 2; 1ST 'T' ISOLATION
RESERVOIR 1; ISOLATION VL3A, VL3B
RESEVOIR 2; ISOLATION
BACKWASH # 1
RESERVOIR 1; 2nd 'T' ISOLATION
RESERVOIR 2; 2nd 'T' ISOLATION
PRIMED SAMPLE ISOLATION
DISPENSE PUMP # 1
DISPENSE PUMP # 2
VL1
VL2
VL4A, VL4B
VL5
VL6
VL7
VL8
DP1
DP2
14
15
16
17
18
19
20
21
22
23
24
RVAC # 2
VENT # 2
VENT # 1
RVAC # 1
PRIME PRESSURE
BACKWASH PROBE
BACKWASH # 2
30 PSI # 1
30 PSI # 2
VACUUM ACCUM. RINSE
RESERVOIR SW2 (N.0) RES1
VL14
VL15
VL16
VL17
VL18
VL19
VL20
VL21
VL22
VL23
VL24
1
BACKWASH PRESSURE
VL27
ISOTON REFILL
VL28A, VL28B
CLENZ INPUT
VL29
BLEACH INPUT
VL30
WASTE CHAMBER VACUUM
VL31
RVAC SWITCH
VL32
RINSE BLOCK DRAIN
VL33
LOW VAC/VENT CHAMBER DRAIN
VL34A, VL34B
DRY PROBE
VL35
WASTE CHAMBER DRAIN VL36A, VL36B
41
42
43
44
45
46
47
48
49
50
SLIDE TRANSFER
PROBE DOWN
TRUCK VACUUM
SHUTTLE VACUUM
UPPER CASSETTE TRANSFER
PRINT HEAD CYL.
CASSETTE LOCK
SLIDE EJECT
CL3
SLIDE EJECT RELEASE
INPUT CASSETTE TRANSFER
OUTPUT CASSETTE TRANSFER
TRUCK DOWN
SPARE
TRUCK LIFT RELEASE
RIGHT CROSS OVER CYLINDER
LEFT CROSS OVER CYLINDER
SPARE
GRIPPER RELEASE
TRUCK TILT/DWN
SPARE
VACUUM ACCUM. DRAIN
114
115
116
117
118
NEEDLE VENT ISLATION VL114
NEEDLE VENT CHAM. ISOL. # 1
NEEDLE VENT CHAM. ISOL. # 2
1ST ASPIRATION LINE ISOL.
RESERVOIR SW1 (N.O. RES1)
120
2ND ASPIRATION LINE ISOL.
3202203
DESCRIPTION
BLK
a) CHOKES:
.082 ID X .031 W
2
3202204
BRN
3
3202205
RED
4
3202206
ORN
5
3202207
YEL
6
3202208
GRN
7
3202209
BLU
8
3202210
VIO
9
3202211
GRY
10
3202212
WHT
11
3202213
BRN/BLK
12
3202214
RED/BLK
13
3202215
ORN/BLK
14
3202216
YEL/BLK
15
3202217
GRN/BLK
2
b) CHECK VALVES:
1
1
c) PLUGGED PORT:
FLOW
FLOW
d) PINCH VALVES:
SINGLE
ACTING
REFER TO CPDM
MILTON SWABY
CPDM APPROVAL
APPROVED
B
ADDED FE SYMBOL
REFER TO CPDM
MILTON SWABY
CPDM APPROVAL
C
REVISED AND REDRAWN
REFER TO CPDM
WARREN WINTER
CPDM APPROVAL
D
REVISED AND REDRAWN
REFER TO CPDM
WARREN WINTER
CPDM APPROVAL
E
REVISED AND REDRAWN
REFER TO CPDM
WARREN WINTER
CPDM APPROVAL
F
UPDATED SHT(S) 1, 3, 4, 5 & 6
REFER TO CPDM
WARREN WINTER
CPDM APPROVAL
G
UPDATED SHT(S) 2, 3 & 4
REFER TO CPDM
MILTON SWABY
CPDM APPROVAL
H
UPDATED SHT 2
REFER TO CPDM
MILTON SWABY
CPDM APPROVAL
D
DOUBLE ACTING
PILOT ACTUATOR
e) SOLENOID VALVES:
xx
3-WAY
4-WAY
f) FITTINGS:
2
16
3202218
BLU/BLK
.082 ID X .031 W
17
3202035
CLEAR
.187 ID X .094 W
CL8
CL10
VL43
VL44
CL9
CL4
CL5
18
3202036
CLEAR
.082 ID X .031 W
19
3202038
CLEAR
.113 ID X .062 W
20
3202039
CLEAR
.145 ID X .053 W
21
3202243
CLEAR
.082 ID X .031 W
CL11
CL6
22
3202244
CLEAR
.082 ID X .031 W
23
3213062
CLEAR
.040 ID X .031 W
24
3213063
CLEAR
.062 ID X .031 W
CL12
CL2
CL1
25
3202277
BLK
.082 ID X .144 OD
26
3213153
CLEAR
.023 ID X .030 W
PL1
CL12
27
3202221
CLEAR
.062 ID X .030 W
28
3213159
CLEAR
.030 ID X .030 W
29
3202037
CLEAR
.082 ID X .062 W
30
3230068
RIBBON
.082 ID X .144 OD
CL7
VL115
VL116
VL117
VL118
CN
RELEASED
2
2-WAY
27
28
29
30
31
32
33
34
35
36
53
54
55
56
57
58
59
60
61
62
63
PART
NUMBER
DESCRIPTION
A
SYMBOLS:
TUBING DESIGNATIONS
ITEM
REV
C
3
2
1
3
1
1
FY
FT
2
FRONT SIDE
BACKSIDE
2
1
FF
FE
g) CYLINDERS:
SPRING RETURN
DOUBLE-ACTING
h) MISC.
PRES. / VAC.
SENSOR
FLUID FLOW
FLUID
DETECTOR
TUBING LENGTH
IN INCHES
B
AIR FLOW
NOTES:
1.
2.
3.
4.
FF DENOTES FEEDTHRU FITTINGS
FY DENOTES "Y" FITTINGS
FT DENOTES "T" FITTINGS
FE DENOTES ELBOW FITTINGS
31
3230060
RIBBON
.113 ID X .237 OD
1
3213136
BLK
.062 ID X .031 W
2
3213137
BLU
3
3203026
GRN
.040 ID X .031 W
4
3213139
RED
.023 ID X .040 W
5
3213080
SIL
.062 ID X .062 W
6
3213163
BRN
.062 ID X .047 W
7
3213176
YEL
.079 ID X .039 W
6323389 T/L, Elevator Module, See Sht 6
11
3210004
SIL.
.010 ID X .035 W
6323003 T/L, Frame Assy, See Sht 7
12
3230057
SIL.
.030 ID X .050 W
6323186 T/L, Rear Door, See Sht 7
6323311 T/L, GEN*S SM Final
VL120
SIL "I"
.079 ID X .031 W
REFERENCE TUBING LISTS:
6326184 T/L, Sample Access & Reservoir, See Sht 2
6323006 T/L, Dispense, See Sht 3
6323313 T/L, Main Fluidics, See Sht 4
6323422 T/L, Smear Transport, See Sht 5
6323412 T/L, Slide Ejector, See Sht 5
6323187 T/L, Output Queue, See Sht 5
A
A
6323188 T/L, Basket Queue, See Sht 6
8
7
13
3230059
SIL.
.030 ID X .0175 W
14
3203016
BLUE SIL.
.079 ID X .031 W
15
3213073
RED SIL. ROUND
.023 ID X .040 W
16
3203015
BLK SIL.
.062 ID X .031 W
6
5
THIS DRAWING AND/ OR SPECIFICATIONS IS THE PROPERTY OF COULTER CORPORATION,
INC., IT IS ISSUED IN STRICT CONFIDENCE, AND SHALL NOT BE REPRODUCED, COPIED, OR
USED AS THE BASIS FOR THE MANUFACTURE OR SALE OF APPARATUS, WITHOUT PRIOR
WRITTEN PERMISSION.
4
COULTER CORPORATION
MIAMI, FLORIDA
ORIGINATOR:
MILTON SWABY
E. ECHEVARRIA
3
U.S.A
PNEU/HYDR LAYOUT;
Gen*S SM
6706547
0301
NEXT ASSY
MODEL
USED ON
SIZE
PART/DRAWING NO.
B
2
CLASS
SCALE:NONE
CODE
REV
6323138
SHEET 1 OF 8
H
8
7
6
5
3
4
2
1
S/A; SAMPLE ACCESS & RESERVOIR
TUBING LIST 6323184
D
D
16 TURNS;
PROGRESSIVE
PITCH
RESERVOIR
ROD MOUNT
RESERVOIR
TUBING SUPPORT
ROD
RES 2
RES 1
FD4
Sol 25
FD2
25
VL4A
TO SHEET 3,
S/A; DISPENSE
A-3
1
NOT USED
2
NOT USED
SOL 1
3
C
QD-8
4
SOL 2
5
SOL 3
6
SOL 4
7
8
9
10
30
VL25A
VL3A
4
15
3
3
SOL 1; ISOTON/VACUUM SOURCE
30 13.5
30
15
VL1
C
3
1
QD1; VENT/VACUUM
3
SOL 5
30 PSI/5PSI/VENT/RVAC
30
ISOTON/CLENZ/BLEACH
13.5
NOT USED
2
3
FT3
2
1
VL2
VL116
13
3
FT4
2
1
13
2
1.75
5
13
13
30
1.25
11
VL115
SOL118
118
1.25
FD7
TO WASTE
PIERCE NEEDLE
FT5
1
3
3
FY71
1
2
2
VC19,
VENT
CHAM
116
1.75
3
1
13
115
13
2
FF1
NC
2
B
COM
FF2
1
1.75
13
VL120
18
120
3.5
FT1
15
3
2
ELECTRIC LEAD WIRE
1
BD3
1
NO
2
3
2
FT2
13
13
VL117
VL114
117
114
15
NEEDLE BELLOWS WASTE
10.5
30
J2
2.75
2
SOL 114
2
1
4.5
2
1
3.5
15
114
3.75
3
MF6
FF3
HOST GEN*S
J1
6
1
5
11
J3
1
VL5
ASPIRATION LINE
15
FE1
30
B
15
10
3.75
1
6.5
FD1
9
4
SOL115
FF4
115
6
5
5.5
6
HOST GEN*S
SOL116
116
FT5
7
1
6
.75
3
2
6
.75
SOL117
A
Port 3
To GEN*S
MF13
GEN*S
8
A
117
Port 4
9
10
6
3
15
7
120
SIZE
SOL 120
PART/DRAWING NO.
B
6323138
SCALE
NONE
8
7
6
5
4
3
2
CLASS
CODE
REV
H
SHEET 2 OF 8
8
7
6
5
3
4
2
1
DISPENSE
TUBING LIST 6323006
8.25
D
19
4
DP1
MF3
J3
1
J4
10
9
VL8
J5
J3
15 11.5
J2
2
15
SOL 1
VL14
MF5
8
J6
1
J4
J5
15
12
15
10
14
2
5
1
SOL 3
5
COM
SOL24
15 9.5
FT5 3
1
2
17
2
13
SOL 6
2
3
13
2.75
15
12
FT11
2.75
18
5
3.5
3
FT9
7
1
2
VL7
SOL 8
2
7
8
15
17
7
15
SOL 9
15
4
2
13
15
21
4
2
1
FY3
15
2
FY1
1
8
1
SOL22
2.25
2.25
VL3B
15
.75
1
2
2
15 5.75
15
23
.75
.75
1
2
15
2
5
1
15
4
CV3
22
FD5
5
FF6
21
FD3
9
9
SOL23
26
1
FF7
20
7
B
CV2
19
13
3 FT1
15
3
2
6
20
2.5
9
2.5
2
FT7
1
VL20
15
9
1.5
3
4.5
17
2
18
3
26
1
1
3
22
1
3 FT2
SOL 10
19
2.5
21
11.5
20
10
15
SOL21
VL4B
2
C
FT3
2
CV1
16
13
6
18
19
4
15
FT8
2
RES 2
FY5
RES 1
15
4.75
8
8
3
9.5
6.5
5
9
30 PSI
1
5 PSI
2
RVAC
3
ISOTON/CLENZ/BLEACH
1
4
QD-12, PLUG
BLUE
1
20
1
VL6
16
9
3
FF3
1
3
3
.75
VL19
SOL20
13
15
9
FR1
13
2
2
2
SOL 7
QD-11, PLUG
BLACK
4.5
FY4
1
14
14
3.5
18
9
CK1
1
13
18
1
2
1
19
2
1
FF5
2
SOL19
6
2
FT4
1
D06
1
7.25
VL18
11
3
2
6.5
4.5
RESERVOIR
TUBING
SUPPORT ROD
A
16 TURNS;
PROGRESSIVE
PITCH
5
VENT
6
NOT USED
7
PROBE VACUUM
8
NOT USED
NOT USED
1
NOT USED
2
SOL1
3
SOL2
4
SOL3
5
SOL4
6
SOL5
7
30PSI/5PSI/RVAC/VENT
ISOTON/CLENZ/BLEACH
NOT USED
QD8
QD9
9
10
FROM SHEET 2,
S/A; SAMPLE
ACCESS
&
RESERVOIR
C-7
A
8
9
SIZE
PART/DRAWING NO.
B
10
6323138
SCALE
NONE
7
6
5
4
TO SHEET
8;
MAIN
PNEU/HYDR
HARNESS
C/B-2
4
SOL23
RINSE BLK WASTE
8
TO SHEET 5;
SLIDE
PROCESSING
SYSTEM
B-1
3
SOL18
1
11
6.25
2.5
1
10
FD8
6
29
8
DP
QD-10, PLUG
RED
14 9.25
VL17
15
1
FF4
8
18
12
2
7
9
2.25
TO DISPENSE PROBE, DPR-1
18 9.25
1.75
3
17
5
19
1
SOL17
9
SOL 5
2
15
16
2
2
1
FF2
15 4.75
4
22
VL16
15
16
NO
FT10 3
1
SOL16
24
NC
10
FT6
3
6
8
7
SOL 4
2
1
3.25
5
3
8
1
15
13 2.75
18
15
15
2
SOL15
FU1
6
B
VL15
15
4
FD6
2
C
2
3
4
1
4.5
3
SOL 2
14
J2
SOL14
1
2.5
15
J6
15 11.5
11
D
11
DP2
3
2
CLASS
CODE
REV
H
SHEET 3 OF 8
8
10
QD1
3
4
1
TUBING LIST 6323313
19
22
10
1
HIVAC
6
2
S/A; MAIN FLUIDICS
RVACHI
7
J4
BLEACH PORT
5
J3
CLENZ
4
J2
ISOTON
3
J5
16
15
14
13
12
11
10
9
8
7
6
27
5
4
D
J6
3
MF2
2
15
10
14
13
10
10
10
1
14
7.5
16
18
18 7.5
15
10
15
5
5
4
FT1
FF29
2
1
3
13
FY13
4
FT7
3
1
18
4
1
19
1
13
2
18
5
5
13.5
1
1
2
2
FF30
2
15
14
7.5
10
15
5
3
C
28
15
5
2
29
SOL 27
17
30
SOL 28
18
31
SOL 29
19
32
SOL 30
7
20
33
SOL 31
21
9.5
34
SOL 33
35
SOL 34
36
30 PSI
SOL 35
1
SOL 36
5 PSI
SOL 32
HIVAC
2
19
5
RVACLOW
8
D
6
WASTE
9
TO SHEET 8;
MAIN
PNEU/HYDR
HARNESS
B-7
7
14
3
2
2
C
2
1
1
1
CV3
2
18
FT5 3
2
CV2
5
.75
BACKSIDE
FF25
FRONTSIDE
15
15
10
15
8
2
2
2
FF24
1
2
FF23
1
1
1
2
2
FF18
FF19
1
2
2
1
2
FF16
FF17
1
2
FF15
1
2
1
2
1
2
FF12
FF13
FF14
1
2
FF11
1
FF10
1
1
2
2
2
FF8
FF9
1
2
FF7
1
2
FF6
1
2
FF5
1
FF4
1
2
2
1
1
FF3
1
10
15
10
10
1
6
FY10
15
3
4
15
15
1.5
36
3
FRONTSIDE
15
15
5
FY11
BACKSIDE
FF2
10
15
15
1
FF20
1
1
2
4
FF21
2
15
15
2
2
FF22
4.0
1.5
35
34
34
1
6
6
33
13.5
4
4
31
23
6
6
6
3
1
4.5
4
4
32
2
FT8
1
15
30
29
15
15
10
12
1.5
4
3.5
27
28
28
1
1
2
VL34A
VL34B
VL35
VL33
REG 2
-6.5 inHg
24
FT11
3
.75
2
3
2
VL32
FY2
3
1
1
VL31
VL23
FY3
3
FY4
FY5
4
2
VL30
3
18
1
1
2
5
5
18
4.5
3
2
1
18
3
FY1 2
4
3
2
15
3
36
6
3.75
7
5
A
RVAC
REG
1
0
FT9
2
2
5
4
1
18
6
18
2
.75
3
5
2
1
VC4
RVAC
CHAMBER
9
10
18
2
CV1
11
6806997
18
TK-1
3
11
1
2
ISOTON/CLENZ/
BLEACH
A
18
6807015
4
4
10
BACKSIDE
2
BACKSIDE
1
VENT
CHAMBER
6
5
FT10
FRONTSIDE
18
2
.5
24
3
FRONTSIDE
1
REG 1
-17.5 inHg
16
3
3
24
8
6.5
FF27
VC3
WASTE
CHAMBER
1
2
4.5
18
1
2
1
FF28
2
10
10
18
VC2
1
VL27
18
2
FU1
24
VL36B
FY7
FF26
4
2
3
1
.75
18 .75
4.5
1
2
VL28A
4
4.5
8
B
3.5
3
FY6
1
1
1
2
FY9
3
1
24 .75
VL28B
VL29
1
.5
6 1
1
10
11
18
7.5
1
2
2
3
4
9.5
4
8
6323138
NONE
5
7
PART/DRAWING NO.
SCALE
6
6
9
10
QD2
TO SHEET 8;
MAIN PNEU/HYDR HARNESS
B-6
B
7
5
10 2.25
8
SIZE
8
NOT USED
VL36A
VC1
FOAM
TRAP
24
2
6
3.5
3.5
3.5
2
1
1
3.5
RINSE BLK WASTE
1
3
FT12
1
1
0
6
1
PROBE VACUUM
RVAC
REG
2
.75
6
1
3.5
8.5
24
1
VENT
1
NOT USED
1
24
SOL23
1
RVAC
6
NOT USED
3.5
1
B
NOT USED
FU2
2
3
2
CLASS
CODE
REV
H
SHEET 4 OF 8
8
7
6
5
4
3
2
1
SMEAR TRANSPORT
8 LIST 6323422
TUBING
1
6
2
3
20
FT1
5
1
6
2
FT6
3
39
6
6
2
4
D
2.5
R
R
5
6P
39
6
FLT-1
FF11
1
2
MF1
14
10.5
1
2
1
0.75
2
FT12
3
1
FF
14
3
CK5
1
8
PRINTER
2
P
A
SOL 41
B
R
1
FF8
2
CL8
1
FT 11
3
14
TRANSFER ARM
6
3
6
TRUCK
VACUUM
SENSOR
S4
2
3.5
3
14
2
.5
3
14
1
0.75
SOL 61
2
14
10
1
P
R
DISPENSE PROBE
CK1
.010
2
2
6
6
2.5
0.75
FF10
2
1023707
2
1
6
2
DP
1
EJECTOR MODULE
2.5
3B
CL11
2
2
1
1
CK 2
15
1
.006 R2
1
X REGISTER
2
A
B
SOL 49
15
2
R1
1
R
15
15
6A
15
4
CL 14
INPUT
QUEUE
CL 5
DRYER MODULE
SHEET6
R
B
SOL 48
1
2
R
R1
7B
15
R
P
CASSETTE
TRANSFER
MECHANISM
4
1
A
B
8A
A
B
SOL 47
9B
15
15
CL7
50
5
R
3
1
2
1
R
R1
P
15
6
R
2
7
1
R2
10
6
4
FT11
A
QD-3, PLUG
BLK
12
QD-6, PLUG
GRN
4
27
R
15 6.5
15
4
B
SOL 53
OUTPUT
QUEUE
TUBING LIST 6323187
A
2
1
CL6
6
15
SIZE
PART/DRAWING NO.
B
6323138
SCALE
NONE
7
FROM SHT 8;
MAIN FRAME
PNEU/HYDR
HARNESS
B-8
3
2
8
B
SLIDE LOAD &
BASKET
TRANSPORT
MODULE
SHEET6
2
2 15
.008
2
.008
QD-12, JACK
BLUE
R
R
P
47
.008
2
SOL 50
A
3.5
FROM SHT 3;
S/A; DISPENSE
C-1
53
48
.008
P
12
A
A
B
6
15
R
P
QD-11, JACK
BLK
6
49
.004
SOL 45
CASSETTE
LOCKING
MECHANISM
5B
4.5
45
2
1
4A
3
7
P
R
LIFT TABLE
MECHANISM
9
15
R
P
QD-10, JACK
RED
3
CASSETTE TRANSFER
CL9
SOL 55
15 4.5
RB-1
Z REGISTER
CL 3
TUBING LIST 6323412
55
R
C
1
FF9
SHUTTLE
VACUUM
SENSOR
2A
R1
15
1
FLT-2
1
.006
15 6.5
DPR-1
2
B
6
SHUTTLE
DRIVE BELT
FF12
FT9
FT10
B
15
CL10
2
0.75
6
A
1
1
1
1
6
2
15 2.5
B
FT4
3
SOL 42
B
61
R
FT13
1
4
FF16
4
A
SOL 56
1
2
1.25
1
5.25
2.5
15
R
P
LABEL TAKE-UP ROLL
3
FT7
S3
B
2
R
42
A
1
SMEAR TRUCK
CL12
56
RIBBON TAKE-UP
ROLL
6
2
44
2
.5
A
1
R
VL44
1 FF15
2
2
19.75
.5
6
1
FT8
1
15 1.5
15
CL4
1
3
1
2
2
.008
CK4
P
.75
15
2
FF17
1024058
19
RIBBON ROLL
3
5.75
15
TRUCK
4
16
LABEL ROLL
C
3.25
41
.75
2
6
R
15
14
3
1
R
.008
VL43
FT3
2
15
15
15
2
2
FF
13
3
10
6
7
MF15
QD7
15
43
6
12
1024310
0.75
TO SHEET 7;
SYSTEM
PNEU/HYDR
DISTRIBUTION
D-8
QD-14, PLUG
GRN
FT5
6
6
2
1
2
1
FF5
15 21
4
10
2
1
5
1
13
46
2
44
1
SOL46
SOL44
SOL43
43
14
3
D
QD-27, PLUG
WHT
QD-13, PLUG
YEL
P2
6
5
4
3
2
CLASS
CODE
REV
H
SHEET 5 OF 8
8
7
6
5
3
4
2
1
ELEVATOR MODULE
TUBING LIST 6323389
D
D
DRYER SHOWN FOR
REFERENCE
QD26, PLUG
BLUE
6
6
31
28
TO SHEET 8;
MAIN
PNEU/HYDR
HARNESS
B-8
QD4, PLUG
RED
P
SOL 60
60
A
3
1
DRYER BELTS
FT2
SLIDE LOAD & BASKET TRANSPORT MODULE
6
15
.75
.75
P
CK 1
.004
R
C
58
A
15
CL2
.010
B
SOL 57
C
19
26
23
CL1
15
R
.010
8.5
15
P
57
A
23
LOADED SLIDE
SOL 58
B
R
2
GRIPPER
1
PLATEN
R
2
1
26
.010
CL 1
SLIDE LOADING
MECHANISM
2.75
1
2
FE1
15
19
.010
LEFT CROSS OVER
CYLINDER
PROCESSED SLIDES
B
B
REAR BELT DRIVE
BASKET QUEUE
TUBING LIST 6323188
FRONT BELT DRIVE
A
A
6
2.75
SIZE
PART/DRAWING NO.
B
6323138
SCALE
NONE
8
7
6
5
4
3
2
CLASS
CODE
REV
H
SHEET 6 OF 8
8
7
6
4
5
3
2
1
SYSTEM PNEUMATIC/HYDRAULIC DISTRIBUTION
D
FROM SHEET 5;
SLIDE
POCESSING
SYSTEM
D-1
QD-14, JACK,
GRN
30 PSI
6
FRAME
10.5
TUBING LIST 6323003
QD-13, JACK, HIVAC
YEL
QD-27, JACK
WHT
5
5
19 28.5
D
8.5
11
20.5
5
19
21.5
7
6
5
4
3
2
CK
10
19
31
38.5
38.5
5 PSI REGULATOR
REG1
1
2
2
1
1
1
35
HIVAC
PNEUMATIC
ISOLATION VALVE
VL-2
30 PSI PNEUMATIC
ISOLATION VALVE
VL-1
1
1
2
2
5
2
5
5
9
2
5
5
2
5
19
38.5
1
2
3
4
5
1
2
3
4
5
8
6
VC6
5
6
8
17.5
26
3
3
1 5 PSI MANIFOLD 6
2
5
19
6
MF-8
3
4
5
19
17
VC5
TK3
VACUUM
ACCUMULATOR
C
C
MF-7
8
8
19
30 PSI MANIFOLD
7
6
5
4
3
1
2
15
SOL 63
63
CV-1
19
6
A
B
C
D
B
1
13
2
19
31
7
27.25
30
2
6.25
13
46.5
5
6
7
43.5
39.5
43.5
HIVAC
REAR DOOR
5 PSI
TUBING LIST 6323186
QD-21
30 PSI
30 PSI
6
30 PSI
6
2
38
QD-23
QD-22
19 15.5
QD-24
QD-25
37
1
E
14
44
7
3
6
FT1
3.5
7
7
3.5
3.5
7
3.5
7
B
3.5
1.5
1
TO SHEET 8;
MAIN
HYDR/PNEU
HARNESS
D/C-2
P
F
G
H
I
30 PSI
6
30 PSI
[GRN]
5 PSI
[BLU]
HIVAC
[CLR]
ISOTON
[WHT]
CLENZ
[BLU]
31
31
K
M
N
O
BLEACH
[CLR]
2
3
6
FT2
1.5
27
-6.5 INHG
VACUUM
MONITOR
31
J
36
-17.5 INHG
VACUUM
MONITOR
HIVAC
MONITOR
5 PSIG
MONITOR
30 PSIG
MONITOR
HI VAC
QD-16, JACK
30 PSI
QD-17, JACK
DILUENT
29.25
CLENZ
28.13
BLEACH
31 29.5
QD-20, JACK
QD-19, JACK
QD-15, JACK
RVAC HI
RVAC LOW
WASTE
3
19 20.5
WASTE
1
A
2
QD-18, JACK
A
FY1
SIZE
PART/DRAWING NO.
B
6323138
SCALE
NONE
8
7
6
5
4
3
2
CLASS
CODE
REV
H
SHEET 7 OF 8
8
7
6
5
3
4
2
1
MAIN FRAME PNEUMATIC/HYDRAULIC HARNESS
D
D
HIVAC
5 PSI
30 PSI
30 PSI
30 PSI
30 PSI
30 PSI
5 PSI
HIVAC
ISOTON
A
B
C
D
E
P
FROM SHEET 7
SYSTEM PNEU/HYDR
DISTRIBUTION
A/B-8
F
G
H
I
CLENZ
BLEACH
RVAC
RVAC LOW
WASTE
C
3
30 PSI
1
FT3
5 PSI
2
[CLR]
30
23
[WHT/CLR]
30
[BLU/CLR]
6
30
[CLR]
1
QD3
JACK
BLK
QD6
JACK
GRN
2
3
4
6
8
9
1
10
QD1
D-8
2
3
4
5
6
7
8
NOT USED
9
23
23
30
19
23
ISOTON/CLENZ/BLEACH
SOL23
VENT
NOT USED
PROBE VACUUM
NOT USED
RINSE BLK WASTE
K
M
N
C
O
1
2
3
4
5
6
QD9
FROM SHEET3
S/A; DISPENSE
A/B-1
7
8
9
10
RINSE BLK WASTE
PROBE VACUUM
VENT
NOT USED
SOL23
ISOTON/CLENZ/BLEACH
NOT USED
RVAC
NOT USED
WASTE
RVAC
7
RVAC LOW
HIVAC
CLENZ
5
BLEACH
ISOTON
5 PSI
30 PSI
B
HIVAC
3
QD26
JACK
BLUE
30
30
23
23
[WHT/CLR]
[BLU/CLR]
23
25
30
[CLR]
6
QD4
JACK
RED
30
[GRN/CLR]
1.5
RVAC
J
B
10
QD2
A-1
FR SHEET 4
S/A; MAIN
FLUIDICS
FROM
FROM SHEET
SHEET 6;
5;
DRYER
SLIDE
&
PROCESSING
BASKET
SYSTEM
TRANSPORT
B-1
MODULE
D-1
A
A
SIZE
PART/DRAWING NO.
B
6323138
SCALE
NONE
8
7
6
5
4
3
2
CLASS
CODE
REV
H
SHEET 8 OF 8
CONTENTS
7
TROUBLESHOOTING, 7.1-1
7.1
SLIDEMAKER MESSAGES, 7.1-1
About the Tables in Heading 7.2, TABLES OF SLIDEMAKER MESSAGES, 7.1-1
Icons and Traffic Lights Displayed on the Workstation with System Messages, 7.1-2
7.2
TABLES OF SLIDEMAKER MESSAGES, 7.2-1
7.3
TROUBLESHOOTING TIPS FOR THE SLIDE AND SMEAR MODULE, 7.3-1
Troubleshooting Blood Smear Quality Problems, 7.3-1
Troubleshooting Smear Module Alignment Problems, 7.3-1
Troubleshooting the Servo System, 7.3-1
7.4
SOFTWARE INSTALLATION ERRORS, 7.4-1
TABLES
PN 4276985A
7.2-1
7.2-2
7.2-3
7.2-4
7.2-5
7.2-6
7.2-7
7.2-8
7.2-9
7.2-10
7.2-11
7.2-12
7.2-13
7.2-14
Miscellaneous System Messages, 7.2-1
Basket Error Messages, 7.2-4
Cassette Error Messages, 7.2-8
Communication Error Messages, 7.2-11
Dispense Error Messages, 7.2-14
Dryer Error Messages, 7.2-16
Ejector Error Messages, 7.2-21
Fluidics Error Messages, 7.2-24
Pneumatics Error Messages, 7.2-26
Power Error Messages, 7.2-32
Printer Error Messages, 7.2-36
Reagent Error Messages, 7.2-38
Shuttle Error Messages, 7.2-39
Truck Error Messages, 7.2-41
7.4-1
Software Installation Errors, 7.4-1
7-i
7
CONTENTS
7-ii
PN 4276985A
7TROUBLESHOOTING 7
7.1
SLIDEMAKER MESSAGES
The SlideMaker automatically monitors many of its activities and conditions, tries to recover
when the system does not respond as expected, and generates a message to alert the operator
when it is unable to recover from the error condition. For most error conditions, a message is
displayed on both the SlideMaker screen and at the Workstation.
Any messages that are logged at the Workstation appear in the following format: date, time,
instrument name, operator name, message.
The tables under Heading 7.2, describe the SlideMaker error messages. The information in
these tables is based on revision N of the GEN•S System Messages, PN 0300120.
About the Tables in Heading 7.2, TABLES OF SLIDEMAKER MESSAGES
The SlideMaker messages are divided into tables by category, and within each table are
arranged alphabetically by SlideMaker message. Any message that does not fall into one of the
following thirteen categories is in Table 7.2-1, Miscellaneous System Messages.
Categories
Tables
Basket Error Messages
Table 7.2-2
Cassette Error Messages
Table 7.2-3
Communication Error Messages
Table 7.2-4
Dispense Error Messages
Table 7.2-5
Dryer Error Messages
Table 7.2-6
Ejector Error Messages
Table 7.2-7
Fluidics Error Messages
Table 7.2-8
Pneumatics Error Messages
Table 7.2-9
Power Error Messages
Table 7.2-10
Printer Error Messages
Table 7.2-11
Reagent Error Messages
Table 7.2-12
Shuttle Error Messages
Table 7.2-13
Truck Error Messages
Table 7.2-14
For each message, these tables list the probable causes and corrective actions; the messages
displayed in the Workstation log, with the applicable icons; and the conditions under which
an RAS call is placed.
For ease of access to the troubleshooting information, all the error messages are also listed in
the index.
PN 4276985A
7.1-1
TROUBLESHOOTING
SLIDEMAKER MESSAGES
Icons and Traffic Lights Displayed on the Workstation with System Messages
The SlideMaker icon is displayed on the Command Center when the SlideMaker is
stopped.
A red traffic light is displayed on the Command Center when immediate action is
required.
Double-clicking on the red traffic light displays the error message and a button for
clearing the error. Double-clicking on the error message displays the Help topic for
that message.
A yellow traffic light is displayed on the Command Center when caution is
required. However, a red light supersedes a yellow light. (For example, if another
condition occurs that triggers a red light, the red light is displayed until that
condition is resolved, then the yellow light appears.)
Double-clicking on the yellow traffic light displays the warning message.
Double-clicking on the warning message displays the Help topic for that message.
7.1-2
PN 4276985A
TROUBLESHOOTING
TABLES OF SLIDEMAKER MESSAGES
7.2
TABLES OF SLIDEMAKER MESSAGES
Table 7.2-1 Miscellaneous System Messages
SLIDEMAKER
WORKSTATION
View Error
Screen Message
Alarm Log Message and Icons on Command Center
N/A
No
N/A
No
No
No
No
Internal Message No. and Code:
XXX, SM FAULT
SlideMaker Log
No
Event Log
Event Log
SlideMaker Needs To
Download The New
Software. Please Start
Download Procedure
From The SlideMaker
Setup Screen.
Internal Message No. and Code:
EV_SM_DOWNLOAD_NEEDED
N/A
Event Log
SlideMaker Download
Unsuccessful. Turn
Off/on SlideMaker,
Then Re-initiate
Download.
Internal Message No. and Code:
EV_SM_DOWNLOAD FAILED
N/A
If AutoStop
is ON
SlideMaker Status
N/A
Ready
r The SlideMaker is off.
r The SlideMaker is disconnected.
1. Verify the SlideMaker is connected and on.
2. Reset the SlideMaker.
3. If the message persists, call your Coulter Representative.
5/24 hours
N/A
r The SlideMaker is off.
r The SlideMaker is disconnected.
1. Verify the SlideMaker is connected and on.
2. Reset the SlideMaker.
3. If the message persists, call your Coulter Representative.
N/A
N/A
Ready
N/A
N/A
Probable Cause
Corrective Action
SlideMaker Download
Successful.
Internal Message No. and Code:
EV_SM_DOWNLOAD_OK
N/A
If AutoStop
is OFF
RCS™ Application
Call Msg/Time
SlideMaker Did Not
Respond. RESET
SlideMaker. Verify
Connections.
Internal Message No. and Code:
EV_SM_NO_RESPOND
N/A
SlideMaker Log
SlideMaker
Communication
Problem
Internal Message No. and Code:
EV_SM_COMM_PROBLEM
RECOVERY
N/A
SlideMaker Log
Unknown Error Code
Received From
SlideMaker: <Error
Code>.
N/A
If AutoStop
is OFF
If AutoStop
is ON
N/A
N/A
Download initiated by customer failed.
1. Turn the SlideMaker off and then on.
2. Reinitiate the download.
3. If the message persists, call your Coulter Representative.
If AutoStop
is OFF
If AutoStop
is ON
N/A
Ready
Revision level mismatch.
Initiate download.
N/A
No known problems identified, so
continues operation.
Workstation received an unknown error code
from the SlideMaker
If the message persists:
1. Wait until the last slide in the Dryer module is deposited in a slide basket.
2. Turn the SlideMaker off and then on.
3. If the message persists:
a. Turn off the SlideMaker.
b. If AutoStop is ON, turn AutoStop OFF to resume GEN•S System operation.
Samples that require slides appear in the Slide List..
WARNING Risk of contamination. The prepared smears can contain biohazardous
material. Handle with care and avoid skin contact.
c. Open the cover and remove the slides from the pusher bars area, Dryer module,
and platen, and place them in a slide basket for staining.
Note: You may not be able to retrieve all the slides.
If the dryer belts had stopped motion, review the slides that were within the dryer
area as they may have excessive heat damage.
d. Call your Coulter Representative.
PN 4276985A
7.2-1
7
TROUBLESHOOTING
TABLES OF SLIDEMAKER MESSAGES
Table 7.2-1 Miscellaneous System Messages (Continued)
SLIDEMAKER
View Error
Screen Message
WORKSTATION
RECOVERY
RCS™ Application
Call Msg/Time
Alarm Log Message and Icons on Command Center
AUTO SLIDE
No
Internal Message No. and Code:
127, AUTO SLIDE
SlideMaker Log
N/A
SlideMaker
Automatically Made
A Slide Using
Default Parameters.
BUSY
No
Internal Message No. and Code:
00FF, BUSY
N/A
MAIN COVER OPEN (SENSOR 53) Yes if
Internal Message No. and Code: busy
01, MAIN COVER OPEN, SEN53
No if
idle
SlideMaker Log
No
SlideMaker Main
Cover Open (Sensor
53). Please Close The
Cover And Press The
RESET Button.
N/A
N/A
N/A
If AutoStop
is OFF
If AutoStop
is ON
N/A
SlideMaker Status
SlideMaker printed Auto Slide on
the label and automatically created
a slide using default parameters.
r SlideMaker is running a sample.
r SlideMaker is in the Service
mode.
If in the Service mode, the
SlideMaker continues operating
normally.
Probable Cause
Corrective Action
r Analytical Station performed an Auto
Clear cycle.
r Delay in the Workstation.
No action necessary.
r SlideMaker is running a sample.
r SlideMaker is in the Service mode.
No action necessary
1. Operator opened the main cover.
2. Main cover interlock (SEN53) is
obstructed or defective.
If in the Normal mode:
1. Any servo operation in progress
continues.
2. The Label Printer continues (if
operating).
3. Any sample already aspirated is
processed until its smear is
dried and deposited in a slide
basket. Two slides may be
completed before the
SlideMaker stops.
4. No new samples are aspirated.
5. If the Printer is out of labels or
ribbon, CL4 is retracted,
releasing the printhead, so you
can insert the new label or
ribbon roll.
Note: Press any key on the SlideMaker screen to reset the alarm.
1. If the cover appears closed, open the cover and close it again.
2. Reset the SlideMaker to resume normal operation.
3. If the message persists:
a. Ensure SEN53 is unobstructed.
b. Close the cover and reset the SlideMaker.
4. If the message still persists:
a. Turn off the SlideMaker.
b. If AutoStop is ON, turn AutoStop OFF to resume GEN•S System operation.
Samples that require slides appear in the Slide List.
WARNING Risk of contamination. The prepared smears can contain biohazardous
material. Handle with care and avoid skin contact.
c. Open the cover and remove the slides from the pusher bars area, Dryer module,
and platen, and place them in a slide basket for staining.
Note: You may not be able to retrieve all the slides.
d. Close the cover and call your Coulter Representative.
Note: The printhead is closed
again when, with the cover
closed, you reset the
SlideMaker.
6. The SlideMaker stops.
NOT READY
No
Internal Message No. and Code:
0055, READY
N/A
No
N/A
N/A
READY
No
Internal Message No. and Code:
0000, READY
N/A
No
N/A
N/A
7.2-2
r SlideMaker is not enabled for
making slides.
r SlideMaker is waiting to
initialize.
Ready
r SlideMaker is waiting to initialize.
r SlideMaker is not enabled for making
slides.
N/A
7.2-2
1. If the SlideMaker is waiting to initialize, wait until initialization has completed.
2. If the Slide Maker is not enabled for making slides, enable the SlideMaker at the
Workstation. Refer to the Online Help procedure, Ensuring the SlideMaker Is
Enabled.s
No action necessary.
PN 4276985A
TROUBLESHOOTING
TABLES OF SLIDEMAKER MESSAGES
Table 7.2-1 Miscellaneous System Messages (Continued)
SLIDEMAKER
View Error
Screen Message
WORKSTATION
Alarm Log Message and Icons on Command Center
WARNING RESET PRESSED
Yes
Internal Message No. and Code:
123, RESET BUTTON PRESSED
N/A
WARNING: SLIDE FELL FROM
Yes
DRYER
Internal Message No. and Code:
84, SLIDE MISPLACED-DRYER
AREA
SlideMaker Log
PN 4276985A
This Is A Waning Only.
A Slide Entered The
Dryer Area And Has
Not Made It Out Of
The Dryer.
N/A
N/A
RECOVERY
RCS™ Application
Call Msg/Time
N/A
SlideMaker Status
Probable Cause
Corrective Action
1. The reset request is held
pending until the end of the
current cycle or until
120 seconds have elapsed
since the last aspiration.
During the pending state the
reset request message is
displayed and the reset light is
lit.
2. When the reset command is
executed, the message is
removed and the reset light
goes out.
Operator pressed reset button.
No action necessary.
Warning only. The SlideMaker
continues operating normally.
r The operator manually removed a slide
from the dryer.
r The slide pusher bars did not transfer the
slide from the shuttle to the dryer belts.
r The dryer motor is not operating
correctly.
r The dryer exit sensor, SEN49, failed.
r One or both of the dryer conveyer belts
broke and the slides fell somewhere
within the Dryer module or between the
shuttle and the Dryer module.
Note: Press any key on the SlideMaker screen to reset the alarm.
1. If an operator manually removed a slide from the Dryer module, ignore this
warning.
2. If no-one manually removed a slide from the Dryer module:
a. Open the cover..
WARNING Risk of personal injury and contamination. The slide processing areas can
contain prepared smears and/or broken glass with biohazardous material. Handle with
care and avoid skin contact.
b. Ensure the dryer belts are moving.
c. Check inside the dryer for fallen slides. Retrieve and inspect any fallen slides for
possible heat damage.
d. Check the entrance to the Dryer module for fallen slides. Retrieve and place any
fallen slides in a slide basket for staining.
e. Close the cover and reset the SlideMaker.
3. If the message persists:
a. Turn off the SlideMaker.
b. If AutoStop is ON, turn AutoStop OFF to resume GEN•S System operation.
Samples that require slides appear in the Slide List.
c. Call your Coulter Representative.
7.2-3
7
TROUBLESHOOTING
TABLES OF SLIDEMAKER MESSAGES
Table 7.2-2 Basket Error Messages
SLIDEMAKER
View Error
Screen Message
WORKSTATION
BASKET (CORNERS FULL)
Yes
Internal Message No. and Code:
101, BASKET MOVE
IMPOSSIBLE
7.2-4
RCS™ Application
Call Msg/Time
Alarm Log Message and Icons on Command Center
BASKET (ALL BASKETS FULL)
Yes
Internal Message No. and Code:
104, NO EMPTY BASKET
SlideMaker Log
SlideMaker: No Empty
Basket Available.
SlideMaker Log
SlideMaker Basket
Track Full.
If AutoStop
is OFF
If AutoStop
is OFF
RECOVERY
If AutoStop
is ON
If AutoStop
is ON
N/A
5/24 hours
SlideMaker Status
Probable Cause
Corrective Action
1. No new samples are aspirated.
2. Any sample in a reservoir is
processed.
3. The last completed smear is
transferred to the Dryer
module.
4. The Dryer module continues to
operate until a slide is ready to
exit from the module.
5. The SlideMaker stops all
mechanical activity and the
Dryer module heater is turned
off.
After a slide is deposited in a slide basket, the
slide baskets are advanced to prepare for the
next slide. Not detecting an open position
after testing all the basket positions could
indicate:
Note: Press any key on the SlideMaker screen to reset the alarm
1. No new samples are aspirated.
2. Any sample in a reservoir is
processed.
3. The last completed smear is
transferred to the Dryer
module.
4. The Dryer module continues to
operate until a slide is ready to
exit from the module.
5. The SlideMaker stops all
mechanical activity and the
Dryer module heater is turned
off.
Note: This condition can also generate a
SlideMaker: Transfer Of Basket Between Belts
Not Possible error at the Workstation.
r All the slide baskets are full.
r The basket index sensor, SEN37, is not
working correctly.
1. If all the slide baskets are full, replace the full baskets with empty baskets.
2. Reset the SlideMaker.
3. If the message persists:
a. Turn off the SlideMaker.
b. If AutoStop is ON, turn AutoStop OFF to resume GEN•S System operation.
Samples that require slides appear in the Slide List..
WARNING Risk of personal injury and contamination. The slide processing areas can
contain prepared smears and/or broken glass with biohazardous material. Handle with
care and avoid skin contact.
c. Open the cover and remove the slides from the pusher bars area, Dryer module,
and platen, and place them in a slide basket for staining.
Note: You may not be able to retrieve all the slides.
d. Inspect the area under the smear truck for a fallen slide and retrieve if possible.
e. Close the cover and call your Coulter Representative
r Each of the four corners of the Basket
Queue module has a slide basket so a
slide basket cannot be transferred from
one track to the other.
r Only one track is moving and the end of
that track has a slide basket.
r One of these basket or belt position
sensors is blocked:
t Rear belt position, SEN31
t Front belt position, SEN32
t Basket present rear right, SEN33
t Basket present front right, SEN34
t Basket present rear left, SEN35
t Basket present front left, SEN36
r SEN31, SEN32, SEN33, SEN34, SEN35 or
SEN36 failed, indicating a corner has a
slide basket when it does not.
r The track belts are misaligned; a basket is
not actually at the corner.
7.2-4
Note: Press any key on the SlideMaker screen to reset the alarm
1. If all four corners are occupied, or if the slide basket position at the end of a track is
occupied, remove the filled slide baskets.
2. If the corners of the Basket Queue module are not occupied, wait until the dryer belts
stop moving.
3. Reset the SlideMaker.
Note: Depending on how long the dryer was off, there may be a delay before the
dryer reaches full temperature and completely dries the slides.
4. If the message persists:
a. Turn off the SlideMaker.
b. If AutoStop is ON, turn AutoStop OFF to resume GEN•S System operation.
Samples that require slides appear in the Slide List.
WARNING Risk of contamination. The prepared smears can contain biohazardous
material. Handle with care and avoid skin contact.
c. Open the cover and remove the slides from the pusher bars area, Dryer module,
and platen, and place them in a slide basket for staining.
Note: You may not be able to retrieve all the slides.
d. Close the cover and call your Coulter Representative.
PN 4276985A
TROUBLESHOOTING
TABLES OF SLIDEMAKER MESSAGES
Table 7.2-2 Basket Error Messages (Continued)
SLIDEMAKER
View Error
Screen Message
WORKSTATION
BASKET (MOVE POSITION)
Yes
Internal Message No. and Code:
103, BASKET MOVE POS ERROR
PN 4276985A
RCS™ Application
Call Msg/Time
Alarm Log Message and Icons on Command Center
BASKET (CORNERS FULL)
Yes
Internal Message No. and Code:
99, BASKET XFER IMPOSSIBLE
SlideMaker Log
SlideMaker: Transfer
Of Basket Between
Belts Not Possible.
SlideMaker Log
SlideMaker Basket
Move Position Failure.
If AutoStop
is OFF
If AutoStop
is OFF
RECOVERY
If AutoStop
is ON
If AutoStop
is ON
5/24 hours
5/24 hours
SlideMaker Status
Probable Cause
Corrective Action
1. No new samples are aspirated.
2. Any sample in a reservoir is
processed.
3. The last completed smear is
transferred to the Dryer
module.
4. The Dryer module continues to
operate until a slide is ready to
exit from the module.
5. The SlideMaker stops all
mechanical activity and the
Dryer module heater is turned
off.
Note: This condition can also generate a
SlideMaker Basket Track Full. error at the
Workstation.
Note: Press any key on the SlideMaker screen to reset the alarm
1. No new samples are aspirated.
2. Any sample in a reservoir is
processed.
3. The last completed smear is
transferred to the Dryer
module.
4. The Dryer module continues to
operate until a slide is ready to
exit from the module.
5. The SlideMaker stops all
mechanical activity and the
Dryer module heater is turned
off.
r Each of the four corners of the Basket
Queue module has a slide basket so a
slide basket cannot be transferred from
one track to the other.
r One of these basket or belt position
sensors is blocked:
t Rear belt position, SEN31
t Front belt position, SEN32
t Basket present rear right, SEN33
t Basket present front right, SEN34
t Basket present rear left, SEN35
t Basket present front left, SEN36
r SEN31, SEN32, SEN33, SEN34, SEN35 or
SEN36 failed, indicating a corner has a
slide basket when it does not.
r The track belts are misaligned; a basket is
not actually at the corner.
The slide basket did not reach the desired
position after the number of steps required.
This could indicate:
r The slide basket is jammed.
r The rear belt position, SEN31, or the front
belt position, SEN32, failed.
1. If all four corners of the Basket Queue module are occupied, remove the filled slide
baskets.
2. If the corners of the Basket Queue module are not occupied, wait until the dryer belts
stop moving.
3. Reset the SlideMaker.
Note: Depending on how long the dryer was off, there may be a delay before the
dryer reaches full temperature and completely dries the slides.
4. If the message persists:
a. Turn off the SlideMaker.
b. If AutoStop is ON, turn AutoStop OFF to resume GEN•S System operation.
Samples that require slides appear in the Slide List.
WARNING Risk of contamination. The prepared smears can contain biohazardous
material. Handle with care and avoid skin contact.
c. Open the cover and remove the slides from the pusher bars area, Dryer module,
and platen, and place them in a slide basket for staining.
Note: You may not be able to retrieve all the slides.
d. Close the cover and call your Coulter Representative.
Note: Press any key on the SlideMaker screen to reset the alarm
1. Remove the jammed slide basket.
WARNING Risk of personal injury and contamination. The slide processing areas can
contain prepared smears and/or broken glass with biohazardous material. Handle with
care and avoid skin contact.
2. Open the cover and inspect the area under the smear truck for a fallen slide and
retrieve if possible.
3. Close the cover and reset the SlideMaker.
4. If the message persists:
a. Turn off the SlideMaker.
b. If AutoStop is ON, turn AutoStop OFF to resume GEN•S System operation.
Samples that require slides appear in the Slide List.
c. Open the cover and remove the slides from the pusher bars area, Dryer module,
and platen, and place them in a slide basket for staining.
Note: You may not be able to retrieve all the slides.
d. Close the cover and call your Coulter Representative.
7.2-5
7
TROUBLESHOOTING
TABLES OF SLIDEMAKER MESSAGES
Table 7.2-2 Basket Error Messages (Continued)
SLIDEMAKER
View Error
Screen Message
WORKSTATION
RCS™ Application
Call Msg/Time
Alarm Log Message and Icons on Command Center
BASKET (MOVE TIMEOUT)
Yes
Internal Message No. and Code:
102, TIMEOUT- BASKET MOVE
SlideMaker Log
SlideMaker Basket
Move Timeout.
If AutoStop
is OFF
RECOVERY
If AutoStop
is ON
5/24 hours
SlideMaker Status
Probable Cause
Corrective Action
1. No new samples are aspirated.
2. Any sample in a reservoir is
processed.
3. The last completed smear is
transferred to the Dryer
module.
4. The Dryer module continues to
operate until a slide is ready to
exit from the module.
5. The SlideMaker stops all
mechanical activity and the
Dryer module heater is turned
off.
The slide basket exceeded the maximum time
allotted to finish its motion. This could
indicate:
Note: Press any key on the SlideMaker screen to reset the alarm
r An obstruction in the Basket Queue
module.
r Stepper motor MF3 or MF4 failed.
r One of these basket or belt position
sensors failed.
t Rear belt position, SEN31
t Front belt position, SEN32
t Basket present rear right, SEN33
t Basket present front right, SEN34
t Basket present rear left, SEN35
t Basket present front left, SEN36
1. Inspect both tracks in the Basket Queue module for obstructions..
WARNING Risk of personal injury and contamination. The slide processing areas can
contain prepared smears and/or broken glass with biohazardous material. Handle with
care and avoid skin contact.
2. Open the cover and inspect the area under the smear truck for a fallen slide and
retrieve if possible.
3. Close the cover and reset the SlideMaker.
4. If the message persists:
a. Turn off the SlideMaker.
b. If AutoStop is ON, turn AutoStop OFF to resume GEN•S System operation.
Samples that require slides appear in the Slide List.
c. Open the cover and remove the slides from the pusher bars area, Dryer module,
and platen, and place them in a slide basket for staining.
Note: You may not be able to retrieve all the slides.
d. Close the cover and call your Coulter Representative.
BASKET (TRACK JAM)
Yes
Internal Message No. and Code:
100, TIMEOUT-BASKET XFER
7.2-6
SlideMaker Log
SlideMaker Basket
Transfer Timeout.
If AutoStop
is OFF
If AutoStop
is ON
5/24 hours
1. No new samples are aspirated.
2. Any sample in a reservoir is
processed.
3. The last completed smear is
transferred to the Dryer
module.
4. The Dryer module continues to
operate until a slide is ready to
exit from the module.
5. The SlideMaker stops all
mechanical activity and the
Dryer module heater is turned
off.
r A jam prevented completion of the slide
basket transfer.
r When you turned the SlideMaker on, a
basket was in a corner but not at a belt
position sensor.
r One of the sensors monitoring the
extension and retraction of the cylinder
that transfers the slide baskets from one
track to the other is blocked.
Extension is detected by the corner
sensor opposite the slide basket. The
corner sensors are:
t Basket present rear right, SEN33
t Basket present front right, SEN34
t Basket present rear left, SEN35
t Basket present front left, SEN36
Retraction is detected by sensors on the
cylinders:
t Left crossover home, SEN39
t Right crossover home, SEN40
r SEN33, SEN34, SEN35, SEN36, SEN39,
or SEN40 failed.
7.2-6
Note: Press any key on the SlideMaker screen to reset the alarm
1. Wait until the dryer belts stop moving.
2. Remove any jammed slide baskets.
3. Reset the SlideMaker.
Note: Depending on how long the dryer was off, there may be a delay before the
dryer reaches full temperature and completely dries the slides.
4. If the message persists:
a. Turn off the SlideMaker.
b. If AutoStop is ON, turn AutoStop OFF to resume GEN•S System operation.
Samples that require slides appear in the Slide List.
WARNING Risk of contamination. The prepared smears can contain biohazardous
material. Handle with care and avoid skin contact.
c. Open the cover and remove the slides from the pusher bars area, Dryer module,
and platen, and place them in a slide basket for staining.
Note: You may not be able to retrieve all the slides.
d. Close the cover and call your Coulter Representative.
PN 4276985A
TROUBLESHOOTING
TABLES OF SLIDEMAKER MESSAGES
Table 7.2-2 Basket Error Messages (Continued)
SLIDEMAKER
View Error
Screen Message
WORKSTATION
Alarm Log Message and Icons on Command Center
BASKET COVER OPEN (SENSOR
No
54)
Internal Message No. and Code:
02, BASKET COVER OPEN,
SEN54
PN 4276985A
SlideMaker Log
SlideMaker Basket
Cover Open (Sensor
54). Close Cover And
Press RESET Button
To Resume.
RECOVERY
RCS™ Application
Call Msg/Time
N/A
SlideMaker Status
Probable Cause
Corrective Action
If in the Service mode, the
SlideMaker continues operating
normally.
1. Operator opened the basket cover or left
the basket cover open.
2. Basket cover interlock (SEN54) is
obstructed or malfunctioning.
Note: Press any key on the SlideMaker screen to reset the alarm.
If in the Normal mode:
r The Basket Queue module
continues operating, but at a
slow speed.
r All other operations continue
normally.
1. If the cover appears closed, open the cover and close it again.
2. Reset the SlideMaker to resume normal operation.
3. If the message persists:
a. Ensure SEN54 is unobstructed.
b. Close the cover.
4. If the message still persists, call your Coulter Representative.
7.2-7
7
TROUBLESHOOTING
TABLES OF SLIDEMAKER MESSAGES
Table 7.2-3 Cassette Error Messages
SLIDEMAKER
View Error
Screen Message
WORKSTATION
RCS™ Application
Call Msg/Time
Alarm Log Message and Icons on Command Center
CASSETTE (CYLINDER SENSORS) Yes
Internal Message No. and Code:
59, CASSETTE XFER PUSHER
SENSOR FAILURE
SlideMaker Log
SlideMaker Cassette
Output Queue Is
Obstructed Or Sensor
Failed.
If AutoStop
is OFF
RECOVERY
If AutoStop
is ON
5/24 hours
SlideMaker Status
Probable Cause
Corrective Action
1. No new samples are aspirated.
2. If the smear truck cannot pick
up a slide to make a smear, the
sample is not used.
The sensors for the output cassette transfer
mechanism (the mechanism that advances
the slide cassettes in the Cassette Output
Queue module) indicate that the cylinder is
both extended and retracted at the same time
because:
Note: Press any key on the SlideMaker screen to reset the alarm.
Note: Unused samples are
discarded following reset.
3. Completed smears are dried
and deposited in a slide basket.
4. The SlideMaker stops.
CASSETTE (EXTEND TIMEOUT)
Yes
Internal Message No. and Code:
60, TIMEOUT-CASSETTE XFER
TO OUTPUT
SlideMaker Log
SlideMaker Cassette
Transfer To Output
Queue Timeout.
If AutoStop
is OFF
IIf AutoStop
is ON
5/24 hours
1. No new samples are aspirated.
2. If the smear truck cannot pick
up a slide to make a smear, the
sample is not used.
Note: Unused samples are
discarded following reset.
3. Completed smears are dried
and deposited in a slide basket.
4. The SlideMaker stops.
CASSETTE (LOCK SENSOR)
Yes
Internal Message No. and Code:
54, SLIDE CASSETTE LOCK
SENSOR ERROR
SlideMaker Log
SlideMaker Cassette
Lock Sensor Failure.
If AutoStop
is OFF
If AutoStop
is ON
5/24 hours
The upper cassette transfer mechanism (the
mechanism that advances the empty cassette
from the Cassette Input Queue module to the
Cassette Output Queue module) did not
extend within the allowable time, or the
sensor did not detect its extension because:
r The upper cassette transfer mechanism
is jammed.
r The cylinder, CL9, failed.
r The cassette transit sensor, SEN30, is
blocked or failed.
1. No new samples are aspirated.
2. If the smear truck cannot pick
up a slide to make a smear, the
sample is not used.
The cassette locked sensor, SEN21, and
cassette unlocked sensor, SEN22, indicate
that the cassette is both locked and unlocked
at the same time because:
Note: Unused samples are
r SEN21 or SEN22 failed.
r SEN21 or SEN22 is blocked (not a likely
cause).
discarded following reset.
3. Completed smears are dried
and deposited in a slide basket.
4. The SlideMaker stops.
7.2-8
r The output cassette retracted sensor,
SEN15, or the output cassette extended
sensor, SEN16, is blocked.
r SEN15 or SEN16 failed.
7.2-8
1. Wait until the last slide in the Dryer module is deposited in a slide basket.
2. Turn off the SlideMaker.
3. Remove all the slide cassettes from the Cassette Input Queue and Cassette Output
Queue modules.
4. Manually push the output cassette transfer mechanism back to the retracted
position.
5. Put a full slide cassette in the Cassette Input Queue module.
6. Turn on the SlideMaker.
7. If the message persists:
a. Turn off the SlideMaker.
b. If AutoStop is ON, turn AutoStop OFF to resume GEN•S System operation.
Samples that require slides appear in the Slide List.
c. Call your Coulter Representative.
Note: Press any key on the SlideMaker screen to reset the alarm.
1. Wait until the last slide in the Dryer module is deposited in a slide basket.
2. Turn off the SlideMaker.
3. Remove all the slide cassettes from the Cassette Input Queue and Cassette Output
Queue modules.
4. Manually push the upper cassette transfer mechanism back to the retracted
position.
5. Put a full slide cassette in the Cassette Input Queue module.
6. Turn on the SlideMaker.
7. If the message persists:
a. Turn off the SlideMaker.
b. If AutoStop is ON, turn AutoStop OFF to resume GEN•S System operation.
Samples that require slides appear in the Slide List.
c. Call your Coulter Representative.
Note: Press any key on the SlideMaker screen to reset the alarm.
1.
2.
3.
4.
5.
Wait until the last slide in the Dryer module is deposited in a slide basket.
Turn off the SlideMaker.
Remove and reinstall the slide cassette that is in the slide ejector station.
Turn on the SlideMaker.
If the message persists:
a. Turn off the SlideMaker.
b. If AutoStop is ON, turn AutoStop OFF to resume GEN•S System operation.
Samples that require slides appear in the Slide List.
c. Call your Coulter Representative.
PN 4276985A
TROUBLESHOOTING
TABLES OF SLIDEMAKER MESSAGES
Table 7.2-3 Cassette Error Messages (Continued)
SLIDEMAKER
View Error
Screen Message
WORKSTATION
RCS™ Application
Call Msg/Time
Alarm Log Message and Icons on Command Center
CASSETTE (LOCKED, SENSOR 21) Yes
Internal Message No. and Code:
56, SLIDE CASSETTE LOCKED,
SEN21
SlideMaker Log
SlideMaker Cassette
Locked (Sensor 21).
If AutoStop
is OFF
RECOVERY
If AutoStop
is ON
5/24 hours
SlideMaker Status
Probable Cause
Corrective Action
1. No new samples are aspirated.
2. If the smear truck cannot pick
up a slide to make a smear, the
sample is not used.
A timeout occurred in attempting to unlock
the slide cassette at the slide ejection station.
A locked empty slide cassette cannot be
transferred to the Cassette Output Queue
module.
Note: Press any key on the SlideMaker screen to reset the alarm.
Note: Unused samples are
discarded following reset.
3. Completed smears are dried
and deposited in a slide basket.
4. The SlideMaker stops.
CASSETTE (NO CASSETTE)
Yes
Internal Message No. and Code:
63, NO CASSETTE IN INPUT
QUEUE, SEN28
SlideMaker Log
N/A
If No Cassette Is
Present In The Input
Queue Then Add
Loaded Cassette.
1. No new samples are aspirated.
2. If the smear truck cannot pick
up a slide to make a smear, the
sample is not used.
Note: Unused samples are
r The locking mechanism did not unlock
the slide cassette.
r The cassette locked sensor, SEN21,
failed.
r No slide cassette is available at the
Cassette Input Queue module.
r The cassette present sensor, SEN26,
indicates no slide cassette is present, but
a slide cassette is present.
discarded following reset.
3. Completed smears are dried
and deposited in a slide basket.
4. The SlideMaker stops.
CASSETTE (NOT LOCKED,
Yes
SENSOR 22)
Internal Message No. and Code:
55, SLIDE CASSETTE NOT
LOCKED, SEN22
SlideMaker Log
SlideMaker Cassette
Not Locked (Sensor
22).
If AutoStop
is OFF
If AutoStop
is ON
5/24 hours
1. No new samples are aspirated.
2. If the smear truck cannot pick
up a slide to make a smear, the
sample is not used.
Note: Unused samples are
discarded following reset.
3. Completed smears are dried
and deposited in a slide basket.
4. The SlideMaker stops.
PN 4276985A
1.
2.
3.
4.
5.
Wait until the last slide in the Dryer module is deposited in a slide basket.
Turn off the SlideMaker.
Remove and reinstall the slide cassette that is in the slide ejector station.
Turn on the SlideMaker.
If the message persists:
a. Turn off the SlideMaker.
b. If AutoStop is ON, turn AutoStop OFF to resume GEN•S System operation.
Samples that require slides appear in the Slide List.
c. Call your Coulter Representative.
Note: Press any key on the SlideMaker screen to reset the alarm.
1. If the Cassette Input Queue module is empty:
a. Place a full slide cassette in the Cassette Input Queue module.
b. Reset the SlideMaker.
2. If a full slide cassette is in the Cassette Input Queue module:
a. Wait until the last slide in the Dryer module is deposited in a slide basket.
b. At the MAIN MENU, select ROUTINE FUNCTIONS tt UNLOCK CASSETTE to
unlock the cassette.
c. Remove and reinstall the slide cassette that is in the slide ejector station.
d. Reset the SlideMaker.
3. If the message persists:
a. Turn off the SlideMaker.
b. If AutoStop is ON, turn AutoStop OFF to resume GEN•S System operation.
Samples that require slides appear in the Slide List.
c. Call your Coulter Representative.:
A timeout occurred in attempting to lock a
slide cassette in place for drawing slides.
Slide cannot be ejected from an unlocked
slide cassette.
r The locking mechanism did not lock the
slide cassette in place.
r The cassette unlocked sensor, SEN22,
failed.
Note: Press any key on the SlideMaker screen to reset the alarm.
1.
2.
3.
4.
5.
Wait until the last slide in the Dryer module is deposited in a slide basket.
Turn off the SlideMaker.
Remove and reinstall the slide cassette that is in the slide ejector station.
Turn on the SlideMaker.
If the message persists:
a. Turn off the SlideMaker.
b. If AutoStop is ON, turn AutoStop OFF to resume GEN•S System operation.
Samples that require slides appear in the Slide List.
c. Call your Coulter Representative.
7.2-9
7
TROUBLESHOOTING
TABLES OF SLIDEMAKER MESSAGES
Table 7.2-3 Cassette Error Messages (Continued)
SLIDEMAKER
View Error
Screen Message
WORKSTATION
RCS™ Application
Call Msg/Time
Alarm Log Message and Icons on Command Center
CASSETTE (OUTPUT QUEUE FULL) Yes
Internal Message No. and Code:
57, SLIDE CASSETTE OUTPUT
QUEUE FULL
RECOVERY
SlideMaker Log
N/A
SlideMaker Cassette
Output Queue Full.
SlideMaker Status
Probable Cause
Corrective Action
1. No new samples are aspirated.
2. If the smear truck cannot pick
up a slide to make a smear, the
sample is not used.
The output cassette transfer mechanism (the
mechanism that advances the slide cassettes
in the Cassette Output Queue module) did not
advance to its retracted state, or the sensor
did not detect its advancement, because:
Note: Press any key on the SlideMaker screen to reset the alarm.
Note: Unused samples are
discarded following reset.
3. Completed smears are dried
and deposited in a slide basket.
4. The SlideMaker stops.
CASSETTE (RETRACT TIMEOUT)
Yes
Internal Message No. and Code:
61, TIMEOUT-XFER MECH BACK
FROM OUTPUT
SlideMaker Log
SlideMaker Cassette
Transfer Retract
Timeout.
If AutoStop
is OFF
If AutoStop
is ON
5/24 hours
1. No new samples are aspirated.
2. If the smear truck cannot pick
up a slide to make a smear, the
sample is not used.
Note: Unused samples are
discarded following reset.
3. Completed smears are dried
and deposited in a slide basket.
4. The SlideMaker stops.
CASSETTE (TRANSFER TIMEOUT) Yes
Internal Message No. and Code:
58, TIMEOUT-CASSSETTE XFER
PUSHER
SlideMaker Log
SlideMaker Cassette
Output Queue Cylinder
Did Not Retract On
Time.
If AutoStop
is OFF
If AutoStop
is ON
5/24 hours
1. No new samples are aspirated.
2. If the smear truck cannot pick
up a slide to make a smear, the
sample is not used.
Note: Unused samples are
discarded following reset.
3. Completed smears are dried
and deposited in a slide basket.
4. The SlideMaker stops.
7.2-10
r The Cassette Output Queue module is
full.
r The cylinder, CL7, failed.
r The output cassette retracted sensor,
SEN15, failed.
The upper cassette transfer mechanism (the
mechanism that advances the empty cassette
from the Cassette Input Queue module to the
Cassette Output Queue module) did not
retract within the allowable time, or the
sensor did not detect its retraction because:
r The upper cassette transfer mechanism
is jammed.
r The cylinder, CL9, failed.
r The cassette transfer home sensor, SEN8,
is blocked or failed.
The cylinder in the output cassette transfer
mechanism (the mechanism that advances
the slide cassettes in the Cassette Output
Queue module) did not extend in time, or the
sensor did not detect its extension, because:
r The cylinder, CL7, failed.
r The output cassette extended sensor,
SEN16, failed.
7.2-10
1. If the Cassette Output Queue module is full:
a. Remove the empty slide cassettes.
b. Reset the SlideMaker to resume normal operation.
2. If the Cassette Output Queue module is not full:
a. Wait until the last slide in the Dryer module is deposited in a slide basket.
b. Reset the SlideMaker.
3. If the message persists:
a. Turn off the SlideMaker.
b. If AutoStop is ON, turn AutoStop OFF to resume GEN•S System operation.
Samples that require slides appear in the Slide List.
c. Call your Coulter Representative.
Note: Press any key on the SlideMaker screen to reset the alarm.
1. Wait until the last slide in the Dryer module is deposited in a slide basket.
2. Turn off the SlideMaker.
3. Remove all the slide cassettes from the Cassette Input Queue and Cassette Output
Queue modules.
4. Manually push the upper cassette transfer mechanism back to the retracted
position.
5. Put a full slide cassette in the Cassette Input Queue module.
6. Turn on the SlideMaker.
7. If the message persists:
a. Turn off the SlideMaker.
b. If AutoStop is ON, turn AutoStop OFF to resume GEN•S System operation.
Samples that require slides appear in the Slide List.
c. Call your Coulter Representative.
Note: Press any key on the SlideMaker screen to reset the alarm.
1. Wait until the last slide in the Dryer module is deposited in a slide basket.
2. Turn off the SlideMaker.
3. Remove all the slide cassettes from the Cassette Input Queue and Cassette Output
Queue modules.
4. Manually push the output cassette transfer mechanism back to the retracted
position.
5. Put a full slide cassette in the Cassette Input Queue module.
6. Turn on the SlideMaker.
7. If the message persists:
a. Turn off the SlideMaker.
b. If AutoStop is ON, turn AutoStop OFF to resume GEN•S System operation.
Samples that require slides appear in the Slide List.
c. Call your Coulter Representative.
PN 4276985A
TROUBLESHOOTING
TABLES OF SLIDEMAKER MESSAGES
Table 7.2-4 Communication Error Messages
SLIDEMAKER
View Error
Screen Message
WORKSTATION
RCS™ Application
Call Msg/Time
Alarm Log Message and Icons on Command Center
COMMUNICATION (ANALYZER
Yes
BUSY)
Internal Message No. and Code:
11, ANALYTICAL STATION NOT
IDLE
COMMUNICATION (ANALYZER
Yes
CRC)
Internal Message No. and Code:
05, ANALYTICAL STATION
COMM ERROR
COMMUNICATION (ANALYZER
No
TIMEOUT)
Internal Message No. and Code:
06, NO ANALYTICAL STATION
COMM
COMMUNICATION (FLASH
Yes
MEMORY)
Internal Message No. and Code:
13, FLASH WRITE ERROR
RECOVERY
SlideMaker Log
5/24 hours
SlideMaker Reports
Analytical Station Not
Ready.
SlideMaker Log
SlideMaker To
Analytical Station
Communication Lost
(CRC Check Failed).
SlideMaker Log
SlideMaker To
Analytical Station
Communication
Timeout.
SlideMaker Log
SlideMaker FLASH
MEMORY
Communication
Failure. FATAL ERROR.
SlideMaker Status
Probable Cause
Corrective Action
1. The SlideMaker waits until the
Analytical Station is idle to retry
the operation.
2. Completed smears are dried
and deposited in a slide basket,
except if a reset was requested.
The operator requested an operation
requiring the Analytical Station to be in the
READY state, while the Analytical Station was
not ready. Such requests include reset,
shutdown, and startup.
Note: Press any key on the SlideMaker screen to reset the alarm.
1. No new samples are aspirated.
2. If this error occurred after a
sample was ready to be
dispensed onto the slide, a
smear is made for that sample.
3. Any other sample in a reservoir
is discarded.
4. Completed smears are dried
and deposited in a slide basket.
Five consecutive messages from the
SlideMaker to the Analytical Station were not
acknowledged.
Note: Press any key on the SlideMaker screen to reset the alarm.
1. Wait until the requested operation is completed and the Analyzer and SlideMaker
screens display READY.
2. Press START/CONT to restart the GEN•S System.
3. If the message persists:
a. Turn off the SlideMaker.
b. If AutoStop is ON, turn AutoStop OFF to resume GEN•S System operation.
Samples that require slides appear in the Slide List.
c. Call your Coulter Representative.
If AutoStop
is OFF
If AutoStop
is ON
5/24 hours
If AutoStop
is OFF
If AutoStop
is ON
5/24 hours
1. No new samples are aspirated.
2. If this error occurred after a
sample was ready to be
dispensed onto the slide, a
smear is made for that sample.
3. Any other sample in a reservoir
is discarded.
4. Completed smears are dried
and deposited in a slide basket.
No response from the Analytical Station.
1. Check if the Analytical Station is working correctly. If necessary, reset the Analyzer.
2. If the message persists, wait until the last slide in the Dryer module is deposited in a
slide basket, then reset the SlideMaker.
3. If the message still persists:
a. Turn off the SlideMaker.
b. If AutoStop is ON, turn AutoStop OFF to resume GEN•S System operation.
Samples that require slides appear in the Slide List.
c. Call your Coulter Representative.
If AutoStop
is OFF
If AutoStop
is ON
5/24 hours
The SlideMaker stops. A fatal error
occurred during:
Erase error, write error or verify memory
error when placing parameters in the flash
memory.
Note: Press any key on the SlideMaker screen to reset the alarm.
r Download from the
Workstation. The flash memory
has unknown or unreliable
information.
r Service mode changes to the
flash memory contents.
1. Check if the Analytical Station is working correctly. If necessary, reset the Analyzer.
2. If the message persists, wait until the last slide in the Dryer module is deposited in a
slide basket, then reset the SlideMaker.
3. If the message still persists:
a. Turn off the SlideMaker.
b. If AutoStop is ON, turn AutoStop OFF to resume GEN•S System operation.
Samples that require slides appear in the Slide List.
c. Call your Coulter Representative.
1. Turn off the SlideMaker.
2. If AutoStop is ON, turn AutoStop OFF to resume GEN•S System operation. Samples
that require slides appear in the Slide List.
WARNING Risk of contamination. The prepared smears can contain
biohazardous material. Handle with care and avoid skin contact.
3. Open the cover and remove the slides from the pusher bars area, Dryer module, and
platen, and place them in a slide basket for staining.
Note: You may not be able to retrieve all the slides.
4. Close the cover and call your Coulter Representative.
COMMUNICATION (ID MISMATCH) No
Internal Message No. and Code:
122, SAMPLE ID MISMATCH
PN 4276985A
SlideMaker Log
SlideMaker Sample ID
Mismatch. Sample
Discarded <Sample
ID>. Prepare slide
manually, or re-run on
Analytical Station.
If AutoStop
is OFF
If AutoStop
is ON
5/24 hours
1. The sample which could not be
matched with the correct ID is
discarded.
2. The SlideMaker continues
operating normally.
Sample ID from Analyzer does not match
sample ID from Workstation.
1. Check the identification of the sample.
2. Rerun the specimen or prepare a slide manually.
7.2-11
7
TROUBLESHOOTING
TABLES OF SLIDEMAKER MESSAGES
Table 7.2-4 Communication Error Messages (Continued)
SLIDEMAKER
View Error
Screen Message
WORKSTATION
RCS™ Application
Call Msg/Time
Alarm Log Message and Icons on Command Center
COMMUNICATION (PC CRC)
Yes
Internal Message No. and Code:
03, WORKSTATION COMM
ERROR
COMMUNICATION (PC TIMEOUT) Yes
Internal Message No. and Code:
04, NO WORKSTATION COMM
COMMUNICATION (PROC A/B)
Yes
Internal Message No. and Code:
10, PROCESSOR A & B COMM
ERROR
N/A
No
RECOVERY
N/A
N/A
Workstation
communications CRC
error. If necessary
reset the Workstation.
SlideMaker Log
SlideMaker To
Workstation
Communication
Timeout.
SlideMaker Log
SlideMaker Inter
Processor
Communication
Failure. Reset The
SlideMaker.
If AutoStop
is OFF
If AutoStop
is ON
N/A
If AutoStop
is OFF
If AutoStop
is ON
5/24 hours
SlideMaker Status
Probable Cause
Corrective Action
1. The sample for which the
communication error occurred
is discarded.
2. No new samples are aspirated.
3. Completed smears are dried
and deposited in a slide basket.
Five consecutive messages from the
Workstation to the SlideMaker failed the CRC
verification.
Note: Press any key on the SlideMaker screen to reset the alarm.
1. No new samples are aspirated.
2. Any sample in a reservoir is
discarded.
3. Completed smears are dried
and deposited in a slide basket.
1. No response from the Workstation.
2. Handshake signals absent when
information is required.
Note: Press any key on the SlideMaker screen to reset the alarm.
1. No new samples are aspirated.
2. If a sample was in a reservoir
before this error occurred, a
smear is made for that sample.
3. Completed smears are dried
and deposited in a slide basket.
Unrecognizable or unexpected messages.
Note: Press any key on the SlideMaker screen to reset the alarm.
1. Check if the Workstation is working correctly. If necessary, shutdown and restart the
Workstation.
2. If the message persists, wait until the last slide in the Dryer module is deposited in a
slide basket, then reset the SlideMaker.
3. If the message still persists:
a. Turn off the SlideMaker.
b. If AutoStop is ON, turn AutoStop OFF to resume GEN•S System operation.
Samples that require slides appear in the Slide List.
c. Call your Coulter Representative.
1. Wait until the last slide in the Dryer module is deposited in a slide basket.
2. Reset the SlideMaker.
3. If the message persists:
a. Turn off the SlideMaker.
b. If AutoStop is ON, turn AutoStop OFF to resume GEN•S System operation.
Samples that require slides appear in the Slide List.
c. Call your Coulter Representative.
Service Only: Since error
messages/commands are not
transferred from processor "B" to
"A," processor "A" is unable to verify
voltages, pressures and
temperatures.
7.2-12
1. Check if the Workstation is working correctly. If necessary, shutdown and restart the
Workstation.
2. If the message persists, wait until the last slide in the Dryer module is deposited in a
slide basket, then reset the SlideMaker.
3. If the message still persists:
a. Turn off the SlideMaker.
b. If AutoStop is ON, turn AutoStop OFF to resume GEN•S System operation.
Samples that require slides appear in the Slide List.
c. Call your Coulter Representative.
7.2-12
PN 4276985A
TROUBLESHOOTING
TABLES OF SLIDEMAKER MESSAGES
Table 7.2-4 Communication Error Messages (Continued)
SLIDEMAKER
View Error
Screen Message
WORKSTATION
RCS™ Application
Call Msg/Time
Alarm Log Message and Icons on Command Center
COMMUNICATION (RAM ERROR) Yes
Internal Message No. and Code:
14, BATTERY BACKED RAM
ERROR
SlideMaker Log
SlideMaker BATTERY
BACKED RAM Failure.
Turn Off/On
SlideMaker.
If AutoStop
is OFF
RECOVERY
If AutoStop
is ON
5/24 hours
SlideMaker Status
Probable Cause
Corrective Action
The SlideMaker stops all
mechanical activity.
Failure in reading or writing the parameters to
the battery-backed RAM.
Note: Press any key on the SlideMaker screen to reset the alarm.
1. Turn off the SlideMaker.
2. Open the cover.
WARNING Risk of personal injury and contamination. The slide processing areas can
contain prepared smears and/or broken glass with biohazardous material. Handle with
care and avoid skin contact.
3. Check the area below the smear truck for fallen slides and retrieve the slides if
possible.
4. Close the cover and turn on the SlideMaker.
5. If the message persists:
a. Turn off the SlideMaker.
b. If AutoStop is ON, turn AutoStop OFF to resume GEN•S System operation.
Samples that require slides appear in the Slide List.
c. Open the cover and remove the slides from the pusher bars area, Dryer module,
and platen, and place them in a slide basket for staining.
Note: You may not be able to retrieve all the slides.
d. Close the cover and call your Coulter Representative.
PN 4276985A
7.2-13
7
TROUBLESHOOTING
TABLES OF SLIDEMAKER MESSAGES
Table 7.2-5 Dispense Error Messages
SLIDEMAKER
View Error
Screen Message
WORKSTATION
RCS™ Application
Call Msg/Time
Alarm Log Message and Icons on Command Center
DISPENSE (INCOMPLETE
Yes
ASPIRATION)
Internal Message No. and Code:
82, INCOMPLETE ASPIRATION
SlideMaker Log
SlideMaker
Incomplete Aspiration.
For the first
two
incomplete
aspirations
in a row.
RECOVERY
For the third
incomplete
aspiration in
a row.
5/24 hours
SlideMaker Status
Probable Cause
Corrective Action
The incomplete sample is
discarded.
Blood is not sensed by the correct fluid
detector during aspiration because:
Note: Press any key on the SlideMaker screen to reset the alarm.
If three consecutive incomplete
aspirations occur:
1. No new samples are aspirated.
2. Completed smears are dried
and deposited in a slide basket.
3. The SlideMaker stops and an
error is sent to the Workstation.
r The blood is too viscous and did not
reach the detector in time.
r The specimen tube has insufficient blood
sample.
r The vacuum for advancing the blood is
insufficient.
r The fluid detector failed.
r A solenoid failed.
1. If this message only appears for one sample, check the specimen condition and
volume.
2. If this message appears for three consecutive samples:
a. Ensure the last three specimen tubes had enough blood. (The SlideMaker needs
250 µL).
b. If there is sufficient blood in the specimen tubes, clean the aspiration lines:
1) From the MAIN MENU, select ROUTINE FUNCTIONS tt ROUTINE
FLUIDICS tt RUN SHUT DOWN to flush the lines with cleaning agent.
2) From the MAIN MENU, select ROUTINE FUNCTIONS tt ROUTINE
FLUIDICS tt RUN START UP to rinse the lines with diluent.
3. Resume normal operation. If the message persists:
a. Wait until the last slide in the Dryer module is deposited in a slide basket.
b. Turn off the SlideMaker.
c. If AutoStop is ON, turn AutoStop OFF to resume GEN•S System operation.
Samples that require slides appear in the Slide List.
d. Call your Coulter Representative.
DISPENSE (PROBE NOT DOWN,
Yes
SEN 12)
Internal Message No. and Code:
80, DISPENSE PROBE NOT
DOWN, SEN12
SlideMaker Log
SlideMaker Dispense
Probe Not Down
(Sensor 12).
If AutoStop
is OFF
If AutoStop
is ON
5/24 hours
1. No new samples are aspirated.
2. Any sample in a reservoir is not
processed.
3. Completed smears are dried
and deposited in a slide basket.
4. The SlideMaker stops.
The dispense probe must be down to discard
the front part of the blood, to deposit a drop
on the slide, and to backwash.
The dispense probe is not down at the correct
times in the cycle, or the sensor does not
detect the probe is down, because:
r The dispense probe is stuck.
r The mechanism that pushes the dispense
probe down is not receiving sufficient
pressure.
r Probe down sensor, SEN12, failed.
7.2-14
7.2-14
Note: Press any key on the SlideMaker screen to reset the alarm.
1. Wait until the last slide in the Dryer module is deposited in a slide basket.
2. Open the cover.
WARNING Risk of personal injury and contamination. The slide processing areas can
contain prepared smears and/or broken glass with biohazardous material. Handle with
care and avoid skin contact.
3. If a slide is on the shuttle or has fallen, remove the slide.
4. Check the area below the smear truck for fallen slides and retrieve the slides if
possible.
5. Close the cover and reset the SlideMaker.
6. If the message persists:
a. Turn off the SlideMaker.
b. If AutoStop is ON, turn AutoStop OFF to resume GEN•S System operation.
Samples that require slides appear in the Slide List.
c. Call your Coulter Representative.
PN 4276985A
TROUBLESHOOTING
TABLES OF SLIDEMAKER MESSAGES
Table 7.2-5 Dispense Error Messages (Continued)
SLIDEMAKER
View Error
Screen Message
WORKSTATION
RCS™ Application
Call Msg/Time
Alarm Log Message and Icons on Command Center
DISPENSE (PROBE NOT UP,
Yes
SENSOR 11)
Internal Message No. and Code:
79, DISPENSE PROBE NOT UP,
SEN11
SlideMaker Log
SlideMaker Dispense
Probe Not Up (Sensor
11).
If AutoStop
is OFF
RECOVERY
If AutoStop
is ON
5/24 hours
SlideMaker Status
Probable Cause
Corrective Action
1. No new samples are aspirated.
2. Any sample in a reservoir is not
processed.
3. Completed smears are dried
and deposited in a slide basket.
4. The SlideMaker stops.
The dispense probe must be up for the
shuttle to bring a slide to the dispense
position.
Note: Press any key on the SlideMaker screen to reset the alarm.
The dispense probe is not up at the correct
time in the cycle, or the sensor did not detect
the probe is up, because:
1. Wait until the last slide in the Dryer module is deposited in a slide basket.
2. Open the cover.
WARNING Risk of personal injury and contamination. The slide processing areas can
contain prepared smears and/or broken glass with biohazardous material. Handle with
care and avoid skin contact.
r The dispense probe is stuck.
r The mechanism that lifts the dispense
3. If a slide is on the shuttle or has fallen, remove the slide.
probe is not receiving sufficient pressure.
4. Close the cover and reset the SlideMaker.
r The probe up sensor, SEN11, failed.
5. If the message persists:
a. Turn off the SlideMaker.
b. If AutoStop is ON, turn AutoStop OFF to resume GEN•S System operation.
Samples that require slides appear in the Slide List.
c. Call your Coulter Representative.
DISPENSE (SENSORS)
Yes
Internal Message No. and Code:
81, DISPENSE PROBE SENSOR
FAILURE
SlideMaker Log
SlideMaker Dispense
Probe Sensor Failure.
If AutoStop
is OFF
If AutoStop
is ON
5/24 hours
1. No new samples are aspirated.
2. Any sample in a reservoir is not
processed.
3. Completed smears are dried
and deposited in a slide basket.
4. The SlideMaker stops.
The probe up sensor, SEN11, and the probe
down sensor, SEN12, indicate the dispense
probe is both up and down at the same time
because:
r SEN11 or SEN12 is blocked.
r SEN11 or SEN12 failed.
Note: Press any key on the SlideMaker screen to reset the alarm.
1. Wait until the last slide in the Dryer module is deposited in a slide basket.
2. Turn off the SlideMaker and open the cover.
WARNING Risk of personal injury and contamination. The slide processing areas can
contain prepared smears and/or broken glass with biohazardous material. Handle with
care and avoid skin contact.
3.
4.
5.
6.
PN 4276985A
If a slide is on the shuttle or has fallen, remove the slide.
Check the area below the smear truck for fallen slides and retrieve if possible.
Close the cover and turn on the SlideMaker.
If the message persists:
a. Turn off the SlideMaker.
b. If AutoStop is ON, turn AutoStop OFF to resume GEN•S System operation.
Samples that require slides appear in the Slide List.
c. Call your Coulter Representative.
7.2-15
7
TROUBLESHOOTING
TABLES OF SLIDEMAKER MESSAGES
Table 7.2-6 Dryer Error Messages
SLIDEMAKER
View Error
Screen Message
WORKSTATION
RCS™ Application
Call Msg/Time
Alarm Log Message and Icons on Command Center
DRYER (EXTEND, SENSOR 10)
Yes
Internal Message No. and Code:
75, DRYER XFER-EXTEND
FAILURE, SEN10
DRYER (HIGH TEMPERATURE)
Yes
Internal Message No. and Code:
126, DRYER HEATER OVER
TEMPERATURE FAILURE
SlideMaker Log
SlideMaker Reports
Slide Dryer Transfer
Mechanism (Shuttle to
Dryer) Did Not Extend
(Sensor 10).
SlideMaker Log
SlideMaker Dryer
Temperature Too High.
If AutoStop
is OFF
If AutoStop
is OFF
RECOVERY
If AutoStop
is ON
If AutoStop
is ON
5/24 hours
5/24 hours
SlideMaker Status
Probable Cause
Corrective Action
1. No new samples are aspirated.
2. Any sample in a reservoir is not
processed.
3. Completed smears are dried
and deposited in a slide basket.
4. The SlideMaker stops.
The slide pusher bars (the mechanism that
transfers the slide from the shuttle to the
Dryer module) did not extend to transfer the
slide, or the sensor did not detect the
extension. This could indicate:
Note: Press any key on the SlideMaker screen to reset the alarm.
1. No new samples are aspirated.
2. Any sample in a reservoir is not
processed.
3. The dryer heater is turned off.
4. Completed smears are
deposited in a slide basket.
5. The SlideMaker stops.
r The slide pusher bars mechanism is
jammed.
r The shuttle and the slide pusher bars are
misaligned.
r The slide pusher bars mechanism is
defective.
r The slide transfer extended sensor,
SEN10, failed.
r Error in one of these three temperature
sensors and/or the servo loop:
t Ambient temperature thermistor on
the System Control card.
t Heatsink temperature sensor in the
heatsink assembly in the Dryer
module. (See Figure 2.9-1, Dryer
Module Components.)
t Hot air path temperature sensor on the
Temperature Sensor card in the Dryer
module. (See Figure 2.9-1, Dryer
Module Components.)
r Short circuit in dryer controller
r A/D converter failure.
r Dryer module fan failure.
1. Wait until the last slide in the Dryer module is deposited in a slide basket.
2. Open the cover.
WARNING Risk of personal injury and contamination. The slide processing areas can
contain prepared smears and/or broken glass with biohazardous material. Handle with
care and avoid skin contact.
3. If a slide is on the shuttle or has fallen, remove the slide.
4. Close the cover and reset the Slidemaker.
5. If the message persists:
a. Turn off the SlideMaker.
b. If AutoStop is ON, turn AutoStop OFF to resume GEN•S System operation.
Samples that require slides appear in the Slide List.
c. Call your Coulter Representative.
Note: Press any key on the SlideMaker screen to reset the alarm.
1. Turn off the SlideMaker.
2. Open the cover.
WARNING Risk of contamination. The prepared smears can contain biohazardous
material. Handle with care and avoid skin contact.
3. Remove the slides from the pusher bars area, Dryer module, and platen, and place
the slides in a basket for staining.
Note: You may not be able to retrieve all the slides.
Review the slides that were within the dryer area as they may have excessive heat
damage.
4. Close the cover and turn on the SlideMaker.
Note: Depending on how long the dryer was off, there may be a delay before the
dryer reaches full temperature and completely dries the slides.
5. If the message persists:
a. Turn off the SlideMaker.
b. If AutoStop is ON, turn AutoStop OFF to resume GEN•S System operation.
Samples that require slides appear in the Slide List.
WARNING Risk of contamination. The prepared smears can contain biohazardous
material. Handle with care and avoid skin contact.
c. Open the cover and remove the slides from the pusher bars area, Dryer module,
and platen, and place them in a slide basket for staining.
Note: You may not be able to retrieve all the slides.
d. Close the cover and call your Coulter Representative.
7.2-16
7.2-16
PN 4276985A
TROUBLESHOOTING
TABLES OF SLIDEMAKER MESSAGES
Table 7.2-6 Dryer Error Messages (Continued)
SLIDEMAKER
View Error
Screen Message
WORKSTATION
RCS™ Application
Call Msg/Time
Alarm Log Message and Icons on Command Center
DRYER (NO SLIDE IN BASKET)
Yes
Internal Message No. and Code:
105, NO SLIDE IN BASKET
DRYER (PLATEN)
Yes
Internal Message No. and Code:
98, NO SLIDE ON PLATEN
SlideMaker Log
SlideMaker: Slide Fell
From Platen.
SlideMaker Log
SlideMaker Platen: No
Slide.
If AutoStop
is OFF
If AutoStop
is OFF
RECOVERY
If AutoStop
is ON
If AutoStop
is ON
5/24 hours
5/24 hours
SlideMaker Status
Probable Cause
Corrective Action
1. No new samples are aspirated.
2. Any sample in a reservoir is
processed.
3. The last completed smear is
transferred to the Dryer
module.
4. The Dryer module continues to
operate until a slide is ready to
exit from the module.
5. The SlideMaker stops all
mechanical activity and the
Dryer module heater is turned
off.
The gripper detected a slide when the slide
exited the Dryer module, but neither the
basket index sensor, SEN37, nor the vertical
slide sensor, SEN41, detected a slide in the
slide basket. This could indicate:
Note: Press any key on the SlideMaker screen to reset the alarm.
1. No new samples are aspirated.
2. Any sample in a reservoir is not
processed.
3. The last completed smear is
transferred to the Dryer
module.
4. The SlideMaker stops all
mechanical activity and the
Dryer module heater is turned
off.
The slide was lost sometime between when
the dryer exit sensor, SEN49, detected its
trailing edge, and when the gripper
overextended sensor, SEN46, detected it was
not present on the platen.
r The slide fell from the Slide Elevator
module into the slide basket at an angle
which did not interrupt the beam of the
basket index sensor.
r The basket index sensor, SEN37, and the
vertical slide sensor, SEN41, are
misaligned.
r The slide did not fall on the platen.
r The gripper overextended sensor, SEN46,
is blocked.
r The gripper overextended sensor, SEN46,
failed.
Note: If SEN46 is blocked or defective, the
slide could be stuck on the platen.
WARNING Risk of contamination. The prepared smears contain biohazardous
material. Handle with care and avoid skin contact.
1. Retrieve the slide that fell, and place it in a slide basket for staining.
2. Open the cover and inspect the area under the smear truck for a fallen slide.
Retrieve the slide if possible.
3. Close the cover and reset the SlideMaker.
4. If the message persists:
a. Turn off the SlideMaker.
b. If AutoStop is ON, turn AutoStop OFF to resume GEN•S System operation.
Samples that require slides appear in the Slide List.
c. Open the cover and remove the slides from the pusher bars area, Dryer module,
and platen, and place them in a slide basket for staining.
Note: You may not be able to retrieve all the slides.
d. Close the cover and call your Coulter Representative.
Note: Press any key on the SlideMaker screen to reset the alarm
1. Open the cover..
WARNING Risk of contamination. The prepared smears can contain biohazardous
material. Handle with care and avoid skin contact.
2. Remove the slides from the pusher bars area, Dryer module, and platen, and place
the slides in a basket for staining.
Note: You may not be able to retrieve all the slides.
3. Check the gripper overextended sensor, SEN46, for blockage.
4. If the platen is empty, check the area below the platen and in the rear track of the
Basket Queue module for a fallen slide. Retrieve and place the fallen slide in a slide
basket for staining.
5. Close the cover and reset the SlideMaker.
Note: Depending on how long the dryer was off, there may be a delay before the
dryer reaches full temperature and completely dries the slides.
6. If the message persists:
a. Turn off the SlideMaker.
b. If AutoStop is ON, turn AutoStop OFF to resume GEN•S System operation.
Samples that require slides appear in the Slide List.
WARNING Risk of contamination. The prepared smears can contain biohazardous
material. Handle with care and avoid skin contact.
c. Open the cover and remove the slides from the pusher bars area, Dryer module,
and platen, and place them in a slide basket for staining.
Note: You may not be able to retrieve all the slides.
d. Close the cover and call your Coulter Representative.
PN 4276985A
7.2-17
7
TROUBLESHOOTING
TABLES OF SLIDEMAKER MESSAGES
Table 7.2-6 Dryer Error Messages (Continued)
SLIDEMAKER
View Error
Screen Message
WORKSTATION
RCS™ Application
Call Msg/Time
Alarm Log Message and Icons on Command Center
DRYER (PLATEN SENSORS)
Yes
Internal Message No. and Code:
97, SLIDE ELEVATOR SENSORS
FAILURE
SlideMaker Log
SlideMaker Elevator
Sensors Failure.
If AutoStop
is OFF
RECOVERY
If AutoStop
is ON
5/24 hours
SlideMaker Status
Probable Cause
Corrective Action
1. No new samples are aspirated.
2. Any sample in a reservoir is
processed.
3. The last completed smear is
transferred to the Dryer
module.
4. The SlideMaker stops all
mechanical activity and the
Dryer module heater is turned
off.
The platen elevator up sensor, SEN44, or the
platen elevator down sensor, SEN45, indicate
that the elevator is both at its high point and
at its low point at the same time because:
Note: Press any key on the SlideMaker screen to reset the alarm.
r SEN44 or SEN45 is blocked.
r SEN44 or SEN45 failed.
1. Open the cover.
WARNING Risk of contamination. The prepared smears can contain biohazardous
material. Handle with care and avoid skin contact.
2. Check SEN44 and SEN45 for blockage.
3. Remove the slides from the pusher bars area, Dryer module, and platen, and place
the slides in a basket for staining.
Note: You may not be able to retrieve all the slides.
4. Close the cover and reset the SlideMaker.
Note: Depending on how long the dryer was off, there may be a delay before the
dryer reaches full temperature and completely dries the slides.
5. If the message persists:
a. Turn off the SlideMaker.
b. If AutoStop is ON, turn AutoStop OFF to resume GEN•S System operation.
Samples that require slides appear in the Slide List.
WARNING Risk of contamination. The prepared smears can contain biohazardous
material. Handle with care and avoid skin contact.
c. Open the cover and remove the slides from the pusher bars area, Dryer module,
and platen, and place them in a slide basket for staining.
Note: You may not be able to retrieve all the slides.
d. Close the cover and call your Coulter Representative.
7.2-18
7.2-18
PN 4276985A
TROUBLESHOOTING
TABLES OF SLIDEMAKER MESSAGES
Table 7.2-6 Dryer Error Messages (Continued)
SLIDEMAKER
View Error
Screen Message
WORKSTATION
RCS™ Application
Call Msg/Time
Alarm Log Message and Icons on Command Center
DRYER (PLATEN TIMEOUT)
Yes
Internal Message No. and Code:
96, TIMEOUT-SLIDE ELEVATOR
PLATEN
SlideMaker Log
SlideMaker Elevator
Platen Timeout.
If AutoStop
is OFF
RECOVERY
If AutoStop
is ON
5/24 hours
SlideMaker Status
Probable Cause
Corrective Action
1. No new samples are aspirated.
2. Any sample in a reservoir is
processed
3. The last completed smear is
transferred to the Dryer
module.
4. The SlideMaker stops all
mechanical activity and the
Dryer module heater is turned
off.
The elevator should take a fixed number of
steps go from the low point to the high point,
or from the high point to the low point.
Exceeding this number of steps (by a certain
margin) could indicate:
Note: Press any key on the SlideMaker screen to reset the alarm.
r Interference in the elevator’s path.
r The platen elevator up sensor, SEN44, or
the platen elevator down sensor, SEN45,
is blocked.
r SEN44 or SEN45 failed.
WARNING Risk of contamination. The prepared smears can contain biohazardous
material. Handle with care and avoid skin contact.
1. Open the cover and check the Slide Elevator module:
a. Check the platen and the elevator for jammed slides or any other interference in
the elevator’s path.
b. Check the platen elevator up sensor, SEN44, and the platen elevator down sensor,
SEN45, for blockage.
2. Remove the slides from the pusher bars area, Dryer module, and platen, and place
the slides in a basket to dry for staining.
Note: You may not be able to retrieve all the slides.
3. Close the cover and reset the SlideMaker.
Note: Depending on how long the dryer was off, there may be a delay before the
dryer reaches full temperature and completely dries the slides.
4. If the message persists:
a. Turn off the SlideMaker.
b. If AutoStop is ON, turn AutoStop OFF to resume GEN•S System operation.
Samples that require slides appear in the Slide List.
WARNING Risk of contamination. The prepared smears can contain biohazardous
material. Handle with care and avoid skin contact.
c. Open the cover and remove the slides from the pusher bars area, Dryer module,
and platen, and place them in a slide basket for staining.
Note: You may not be able to retrieve all the slides.
d. Close the cover and call your Coulter Representative.
PN 4276985A
7.2-19
7
TROUBLESHOOTING
TABLES OF SLIDEMAKER MESSAGES
Table 7.2-6 Dryer Error Messages (Continued)
SLIDEMAKER
View Error
Screen Message
WORKSTATION
DRYER (SENSORS)
Yes
Internal Message No. and Code:
76, DRYER XFER-SENSOR
FAILURE
7.2-20
RCS™ Application
Call Msg/Time
Alarm Log Message and Icons on Command Center
DRYER (RETRACT, SENSOR 9)
Yes
Internal Message No. and Code:
74, DRYER XFER-RETRACT
FAILURE, SEN9
SlideMaker Log
SlideMaker Reports
Slide Dryer Transfer
Mechanism (Shuttle to
Dryer) Did Not Retract
(Sensor 9).
SlideMaker Log
SlideMaker Slide
Transfer Sensors
Obstructed Or Failed.
If AutoStop
is OFF
If AutoStop
is OFF
RECOVERY
If AutoStop
is ON
If AutoStop
is ON
5/24 hours
5/24 hours
SlideMaker Status
Probable Cause
Corrective Action
1. No new samples are aspirated.
2. Any sample in a reservoir is not
processed.
3. Completed smears are dried
and deposited in a slide basket.
4. The SlideMaker stops.
The slide pusher bars (the mechanism that
transfers the slide from the shuttle to the
Dryer module) did not retract after
transferring the slide, or the sensor did not
detect the retraction. This could indicate:
Note: Press any key on the SlideMaker screen to reset the alarm.
1. No new samples are aspirated.
2. Any sample in a reservoir is not
processed.
3. Completed smears within the
Dryer module are dried and
deposited in a slide basket.
4. The slide on the shuttle may not
have been transferred to the
Dryer module.
5. The SlideMaker stops.
r The slide pusher bars mechanism is
defective.
r The slide transfer retracted sensor, SEN9,
failed.
The sensors indicate that the slide pusher
bars are both retracted and extended at the
same time because:
r The slide transfer retracted sensor, SEN9,
or the slide transfer extended sensor,
SEN10, is blocked.
r The slide transfer retracted sensor, SEN9,
or the slide transfer extended sensor,
SEN10, failed.
7.2-20
1. Wait until the last slide in the Dryer module is deposited in a slide basket.
2. Open the cover.
WARNING Risk of personal injury and contamination. The slide processing areas can
contain prepared smears and/or broken glass with biohazardous material. Handle with
care and avoid skin contact.
3. If a slide is on the shuttle or has fallen, remove the slide.
4. Close the cover and reset the SlideMaker.
5. If the message persists:
a. Turn off the SlideMaker.
b. If AutoStop is ON, turn AutoStop OFF to resume GEN•S System operation.
Samples that require slides appear in the Slide List.
c. Call your Coulter Representative.
Note: Press any key on the SlideMaker screen to reset the alarm.
1. Wait until the last slide in the Dryer module is deposited in a slide basket.
2. Open the cover.
WARNING Risk of personal injury and contamination. The slide processing areas can
contain prepared smears and/or broken glass with biohazardous material. Handle with
care and avoid skin contact.
3. If a slide is on the shuttle or has fallen, remove the slide.
4. Close the cover and reset the SlideMaker.
5. If the message persists:
a. Turn off the SlideMaker.
b. If AutoStop is ON, turn AutoStop OFF to resume GEN•S System operation.
Samples that require slides appear in the Slide List.
c. Call your Coulter Representative.
PN 4276985A
TROUBLESHOOTING
TABLES OF SLIDEMAKER MESSAGES
Table 7.2-7 Ejector Error Messages
SLIDEMAKER
View Error
Screen Message
EJECTOR (REGISTER X RETRACT
ERROR)
WORKSTATION
RCS™ Application
Call Msg/Time
Alarm Log Message and Icons on Command Center
Yes
Internal Message No. and
Code:
SlideMaker Log
SlideMaker Slide
Ejector (Register
Retract) Failure.
If AutoStop
is OFF
RECOVERY
If AutoStop
is ON
5/24 hours
112, EJECTOR REGISTER X
RETRACT ERROR
SlideMaker Status
Probable Cause
Corrective Action
1. No new samples are aspirated.
2. The slide pusher is retracted.
3. If the smear truck cannot pick
up a slide to make a smear, the
sample is not used.
The register X cylinder did not retract or did
not retract far enough to engage the register
X (cleared) sensor, SEN17, or SEN17 did not
detect the retraction. This could indicate:
Note: Press any key on the SlideMaker screen to reset the alarm.
Note: Unused samples are
discarded following reset.
4. Any further sample in a
reservoir is not processed.
5. Completed smears are dried
and deposited in a slide basket.
6. The SlideMaker stops.
EJECTOR (RETRACT, SENSOR 23) Yes
Internal Message No. and Code:
114, SLIDE EJECT-BACK ERROR,
SEN23
SlideMaker Log
SlideMaker Slide
Ejector Did Not
Retract (Sensor 23).
If AutoStop
is OFF
If AutoStop
is ON
5/24 hours
1. No new samples are aspirated.
2. The slide pusher is left
extended.
3. If the smear truck cannot pick
up a slide to make a smear, the
sample is not used.
Note: Unused samples are
discarded following reset.
4. Any further sample in a
reservoir is not processed.
5. Completed smears are dried
and deposited in a slide basket.
6. The SlideMaker stops.
PN 4276985A
r The register mechanism is jammed or
binding
r Register X (cleared) sensor, SEN17,
failed.
The slide pusher did not retract, or the sensor
did not detect the retraction. This could
indicate:
r The slide pusher is jammed
r The motor is defective
r The slide pusher retracted sensor,
SEN23, is blocked or failed.
1. Wait until the last slide in the Dryer module is deposited in a slide basket.
2. Open the cover.
3. At the MAIN MENU, select ROUTINE FUNCTIONS tt UNLOCK CASSETTE to
unlock the cassette.
4. Remove the slide cassette that is in the slide ejector station.
5. Manually remove any slides from the slide ejector mechanism.
6. Close the cover.
7. Reinstall the slide cassette in the Cassette Input Queue module.
8. Reset the SlideMaker.
9. If the message persists:
a. Turn off the SlideMaker.
b. If AutoStop is ON, turn AutoStop OFF to resume GEN•S System operation.
Samples that require slides appear in the Slide List.
c. Call your Coulter Representative.
Note: Press any key on the SlideMaker screen to reset the alarm.
1. Wait until the last slide in the Dryer module is deposited in a slide basket.
2. Open the cover.
3. At the MAIN MENU, select ROUTINE FUNCTIONS tt UNLOCK CASSETTE to
unlock the cassette.
4. Remove the slide cassette that is in the slide ejector station.
5. Manually remove any slides from the slide ejector mechanism.
6. Close the cover.
7. Reinstall the slide cassette in the Cassette Input Queue module.
8. Reset the SlideMaker.
9. If the message persists:
a. Turn off the SlideMaker.
b. If AutoStop is ON, turn AutoStop OFF to resume GEN•S System operation.
Samples that require slides appear in the Slide List.
c. Call your Coulter Representative.
7.2-21
7
TROUBLESHOOTING
TABLES OF SLIDEMAKER MESSAGES
Table 7.2-7 Ejector Error Messages (Continued)
SLIDEMAKER
View Error
Screen Message
WORKSTATION
RCS™ Application
Call Msg/Time
Alarm Log Message and Icons on Command Center
EJECTOR (RETRY ERROR)
Yes
Internal Message No. and Code:
113, EJECTOR RETRY ERROR
SlideMaker Log
SlideMaker Slide
Ejector (Retry) Failure.
If AutoStop
is OFF
RECOVERY
If AutoStop
is ON
5/24 hours
SlideMaker Status
Probable Cause
Corrective Action
1. No new samples are aspirated.
2. The slide pusher is left
retracted.
3. If the smear truck cannot pick
up a slide to make a smear, the
sample is not used.
The slide pusher attempts to dispense a slide
twice before generating this error: the first
attempt at high speed, the second at low.
Note: Press any key on the SlideMaker screen to reset the alarm.
Note: Unused samples are
discarded following reset.
4. Any further sample in a
reservoir is not processed.
5. Completed smears are dried
and deposited in a slide basket.
6. The SlideMaker stops.
EJECTOR (SENSOR ERROR)
Yes
Internal Message No. and Code:
118, EJECTOR SENSOR ERROR
SlideMaker Log
SlideMaker Reports
Slide Ejector Sensor
Failure.
If AutoStop
is OFF
If AutoStop
is ON
5/24 hours
1. No new samples are aspirated.
2. The slide pusher is left in the
last known good position.
3. If the smear truck cannot pick
up a slide to make a smear, the
sample is not used.
Note: Unused samples are
discarded following reset.
r The slide pusher is jammed. Slides may
be stuck together due to humidity or a
broken slide may be preventing a slide
from being dispensed.
r The slide pusher extended sensor,
SEN24, is blocked or failed.
The slide pusher retracted sensor, SEN23,
and the slide pusher extended sensor, SEN24,
indicate that the slide pusher is both retracted
and extended because:.
r The slide pusher retracted sensor,
SEN23, or the slide pusher extended
sensor, SEN24, is blocked.
r SEN23 or SEN24 failed.
4. Any further sample in a
reservoir is not processed.
5. Completed smears are dried
and deposited in a slide basket.
6. The SlideMaker stops.
7.2-22
7.2-22
1. Wait until the last slide in the Dryer module is deposited in a slide basket.
2. Open the cover.
3. At the MAIN MENU, select ROUTINE FUNCTIONS tt UNLOCK CASSETTE to
unlock the cassette.
4. Remove the slide cassette that is in the slide ejector station.
5. Manually remove any slides from the slide ejector mechanism.
6. Close the cover.
7. Reinstall the slide cassette in the Cassette Input Queue module.
8. Reset the SlideMaker.
9. If the message persists:
a. Turn off the SlideMaker.
b. If AutoStop is ON, turn AutoStop OFF to resume GEN•S System operation.
Samples that require slides appear in the Slide List.
c. Call your Coulter Representative.
Note: Press any key on the SlideMaker screen to reset the alarm.
1. Wait until the last slide in the Dryer module is deposited in a slide basket.
2. Open the cover.
3. At the MAIN MENU, select ROUTINE FUNCTIONS tt UNLOCK CASSETTE to
unlock the cassette.
4. Remove the slide cassette that is in the slide ejector station.
5. Manually remove any slides from the slide ejector mechanism.
6. Close the cover.
7. Reinstall the slide cassette in the Cassette Input Queue module.
8. Reset the SlideMaker.
9. If the message persists:
a. Turn off the SlideMaker.
b. If AutoStop is ON, turn AutoStop OFF to resume GEN•S System operation.
Samples that require slides appear in the Slide List.
c. Call your Coulter Representative.
PN 4276985A
TROUBLESHOOTING
TABLES OF SLIDEMAKER MESSAGES
Table 7.2-7 Ejector Error Messages (Continued)
SLIDEMAKER
View Error
Screen Message
WORKSTATION
RCS™ Application
Call Msg/Time
Alarm Log Message and Icons on Command Center
EJECTOR (SLIDE NOT X
Yes
REGISTERED)
Internal Message No. and Code:
116, SLIDE NOT X REGISTERED
ERROR
SlideMaker Log
SlideMaker Slide
Ejector (Register
Extend) Failure.
If AutoStop
is OFF
RECOVERY
If AutoStop
is ON
5/24 hours
SlideMaker Status
Probable Cause
Corrective Action
1. No new samples are aspirated.
2. The slide pusher is left
extended.
3. If the smear truck cannot pick
up a slide to make a smear, the
sample is not used.
The X-register mechanism did not push the
slide to the left wall or the slide registered
sensor, SEN25, did not sense the slide at the
left wall because:
Note: Press any key on the SlideMaker screen to reset the alarm.
Note: Unused samples are
discarded following reset.
4. Any further sample in a
reservoir is not processed.
5. Completed smears are dried
and deposited in a slide basket.
6. The SlideMaker stops.
PN 4276985A
r The X-register mechanism is jammed.
r The slide is broken, and is too short to
push the flag into the slide registered
sensor, SEN25.
r The flag for SEN25 is stuck.
r The Z-register arm is not forceful enough
to prevent the X-register arm from
pushing the slide past the sensor flag
spring for SEN25.
r The slide registered sensor, SEN25,
failed.
1. Wait until the last slide in the Dryer module is deposited in a slide basket.
2. Open the cover.
3. At the MAIN MENU, select ROUTINE FUNCTIONS tt UNLOCK CASSETTE to
unlock the cassette.
4. Remove the slide cassette that is in the slide ejector station.
5. Manually remove any slides from the slide ejector mechanism.
6. Close the cover.
7. Reinstall the slide cassette in the Cassette Input Queue module.
8. Reset the SlideMaker.
9. If the message persists:
a. Turn off the SlideMaker.
b. If AutoStop is ON, turn AutoStop OFF to resume GEN•S System operation.
Samples that require slides appear in the Slide List.
c. Call your Coulter Representative.
7.2-23
7
TROUBLESHOOTING
TABLES OF SLIDEMAKER MESSAGES
Table 7.2-8 Fluidics Error Messages
SLIDEMAKER
View Error
Screen Message
WORKSTATION
FLUIDICS (DETECTOR 1)
Yes
Internal Message No. and Code:
87, FLUID DETECTOR 1 FAILURE
FLUIDICS (DETECTOR 2)
Yes
Internal Message No. and Code:
88, FLUID DETECTOR 2 FAILURE
FLUIDICS (DETECTOR 3)
Yes
Internal Message No. and Code:
89, FLUID DETECTOR 3 FAILURE
7.2-24
RCS™ Application
Call Msg/Time
Alarm Log Message and Icons on Command Center
FLUIDICS (CALIBRATE)
Yes
Internal Message No. and Code:
86, CALIBRATE FLUID
DETECTORS
SlideMaker Log
SlideMaker Fluid
Detector Calibration Is
Required. Reset the
SlideMaker.
SlideMaker Log
SlideMaker Fluid
Detector 1 Failure.
Reset the SlideMaker.
SlideMaker Log
SlideMaker Fluid
Detector 2 Failure.
Reset the SlideMaker.
SlideMaker Log
SlideMaker Fluid
Detector 3 Failure.
Reset the SlideMaker.
RECOVERY
If AutoStop
is OFF
If AutoStop
is ON
For the first
two failures
during
blood flow
For the third
failure in a
row during
blood flow,
or the first
failure during
backwash
N/A
For the third
failure in a
row during
blood flow,
or the first
failure during
backwash
N/A
For the third
failure in a
row during
blood flow,
or the first
failure during
backwash
N/A
For the first
two failures
during
blood flow
For the first
two failures
during
blood flow
SlideMaker Status
Probable Cause
Corrective Action
The SlideMaker stops all
mechanical activity except when in
Service mode.
At initialization time, the table containing the
calibration value (gain) for the fluid detectors
contains invalid values.
Note: Press any key on the SlideMaker screen to reset the alarm.
The sample is discarded.
If three consecutive failures occur
during aspiration, or if this failure
occurs during backwash:
r Fluid detector FD1 is defective.
r A fluidics problem
Note: Press any key on the SlideMaker screen to reset the alarm.
r Fluid detector FD2 is defective.
r A fluidics problem
Note: Press any key on the SlideMaker screen to reset the alarm.
r Fluid detector FD3 is defective.
r A fluidics problem
Note: Press any key on the SlideMaker screen to reset the alarm.
1. No new samples are aspirated.
2. A smear may be made on one
of the samples in a reservoir.
3. Completed smears are dried
and deposited in a slide basket.
4. The SlideMaker stops.
The sample is discarded.
If three consecutive failures occur
during aspiration, or if this failure
occurs during backwash:
1. Reset the SlideMaker.
2. If the message persists:
a. Turn off the SlideMaker.
b. If AutoStop is ON, turn AutoStop OFF to resume GEN•S System operation.
Samples that require slides appear in the Slide List.
c. Call your Coulter Representative.
3. Service Only: Recalibrate the fluid detectors as instructed under Heading 4.9.
1. No new samples are aspirated.
2. A smear may be made on one
of the samples in a reservoir.
3. Completed smears are dried
and deposited in a slide basket.
4. The SlideMaker stops.
7.2-24
1. Reset the SlideMaker.
2. If the message persists:
a. Turn off the SlideMaker.
b. If AutoStop is ON, turn AutoStop OFF to resume GEN•S System operation.
Samples that require slides appear in the Slide List.
c. Call your Coulter Representative.
1. Reset the SlideMaker.
2. If the message persists:
a. Turn off the SlideMaker.
b. If AutoStop is ON, turn AutoStop OFF to resume GEN•S System operation.
Samples that require slides appear in the Slide List.
c. Call your Coulter Representative.
1. Reset the SlideMaker.
2. If the message persists:
a. Turn off the SlideMaker.
b. If AutoStop is ON, turn AutoStop OFF to resume GEN•S System operation.
Samples that require slides appear in the Slide List.
c. Call your Coulter Representative.
PN 4276985A
TROUBLESHOOTING
TABLES OF SLIDEMAKER MESSAGES
Table 7.2-8 Fluidics Error Messages (Continued)
SLIDEMAKER
View Error
Screen Message
WORKSTATION
FLUIDICS (DETECTOR 5)
Yes
Internal Message No. and Code:
91, FLUID DETECTOR 5 FAILURE
FLUIDICS (DETECTOR 6)
Yes
Internal Message No. and Code:
92, FLUID DETECTOR 6 FAILURE
Yes
FLUIDICS (DETECTOR 7)
Internal Message No. and Code:
93, FLUID DETECTOR 7 FAILURE
FLUIDICS (DETECTOR 8)
Yes
Internal Message No. and Code:
94, FLUID DETECTOR 8 FAILURE
PN 4276985A
RCS™ Application
Call Msg/Time
SlideMaker Status
For the third
failure in a
row during
blood flow,
or the first
failure during
backwash
N/A
The sample is discarded.
For the third
failure in a
row during
blood flow,
or the first
failure during
backwash
N/A
For the third
failure in a
row during
blood flow,
or the first
failure during
backwash
N/A
If AutoStop
is OFF
If AutoStop
is ON
N/A
If AutoStop
is OFF
If AutoStop
is ON
N/A
Alarm Log Message and Icons on Command Center
FLUIDICS (DETECTOR 4)
Yes
Internal Message No. and Code:
90, FLUID DETECTOR 4 FAILURE
SlideMaker Log
SlideMaker Fluid
Detector 4 Failure.
Reset the SlideMaker.
SlideMaker Log
SlideMaker Fluid
Detector 5 Failure.
Reset the SlideMaker.
SlideMaker Log
SlideMaker Fluid
Detector 6 Failure.
Reset the SlideMaker.
SlideMaker Log
SlideMaker Fluid
Detector 7 Failure.
Reset the SlideMaker.
SlideMaker Log
SlideMaker Fluid
Detector 8 Failure.
Reset the SlideMaker.
RECOVERY
For the first
two failures
during
blood flow
For the first
two failures
during
blood flow
For the first
two failures
during
blood flow
Probable Cause
Corrective Action
r Fluid detector FD4 is defective.
r A fluidics problem
Note: Press any key on the SlideMaker screen to reset the alarm.
r Fluid detector FD5 is defective.
r A fluidics problem
Note: Press any key on the SlideMaker screen to reset the alarm.
r Fluid detector FD6 is defective.
r A fluidics problem
Note: Press any key on the SlideMaker screen to reset the alarm.
1. No new samples are aspirated.
2. A smear may be made on one
of the samples in a reservoir.
3. Completed smears are dried
and deposited in a slide basket.
4. The SlideMaker stops.
r Fluid detector FD7 is defective.
r A fluidics problem
Note: Press any key on the SlideMaker screen to reset the alarm.
1. No new samples are aspirated.
2. A smear may be made on one
of the samples in a reservoir.
3. Completed smears are dried
and deposited in a slide basket.
4. The SlideMaker stops.
r Fluid detector FD8 is defective.
r A fluidics problem
Note: Press any key on the SlideMaker screen to reset the alarm.
If three consecutive failures occur
during aspiration, or if this failure
occurs during backwash:
1. No new samples are aspirated.
2. A smear may be made on one
of the samples in a reservoir.
3. Completed smears are dried
and deposited in a slide basket.
4. The SlideMaker stops.
The sample is discarded.
If three consecutive failures occur
during aspiration, or if this failure
occurs during backwash:
1. No new samples are aspirated.
2. A smear may be made on one
of the samples in a reservoir.
3. Completed smears are dried
and deposited in a slide basket.
4. The SlideMaker stops.
1. Reset the SlideMaker.
2. If the message persists:
a. Turn off the SlideMaker.
b. If AutoStop is ON, turn AutoStop OFF to resume GEN•S System operation.
Samples that require slides appear in the Slide List.
c. Call your Coulter Representative.
1. Reset the SlideMaker.
2. If the message persists:
a. Turn off the SlideMaker.
b. If AutoStop is ON, turn AutoStop OFF to resume GEN•S System operation.
Samples that require slides appear in the Slide List.
c. Call your Coulter Representative.
1. Reset the SlideMaker.
2. If the message persists:
a. Turn off the SlideMaker.
b. If AutoStop is ON, turn AutoStop OFF to resume GEN•S System operation.
Samples that require slides appear in the Slide List.
c. Call your Coulter Representative.
1. Reset the SlideMaker.
2. If the message persists:
a. Turn off the SlideMaker.
b. If AutoStop is ON, turn AutoStop OFF to resume GEN•S System operation.
Samples that require slides appear in the Slide List.
c. Call your Coulter Representative.
1. Reset the SlideMaker.
2. If the message persists:
a. Turn off the SlideMaker.
b. If AutoStop is ON, turn AutoStop OFF to resume GEN•S System operation.
Samples that require slides appear in the Slide List.
c. Call your Coulter Representative.
7.2-25
7
TROUBLESHOOTING
TABLES OF SLIDEMAKER MESSAGES
Table 7.2-9 Pneumatics Error Messages
SLIDEMAKER
View Error
Screen Message
WORKSTATION
RCS™ Application
Call Msg/Time
Alarm Log Message and Icons on Command Center
PNEUMATICS (5 PSI SUPPLY)
Yes
Internal Message No. and Code:
23, 5 PSI SUPPLY FAILURE
SlideMaker Log
SlideMaker 5 PSI Out
Of Range Or Not
Present. Turn Off/On
SlideMaker.
If AutoStop
is OFF
RECOVERY
If AutoStop
is ON
SlideMaker Status
Probable Cause
Corrective Action
The SlideMaker stops all
mechanical activity.
1. 5 psi regulator is misadjusted. If it was
set too high, it could have ruptured the
diaphragm.
2. Pressure leak, most likely from a
disconnected line.
3. Pneumatic Supply Monitor, 5-Psi card
failure
4. A/D converter error or failure
Note: Press any key on the SlideMaker screen to reset the alarm.
1. Check the 5 psi:
a. From the MAIN MENU, select ROUTINE FUNCTIONS tt
PNEUMATIC/POWER SUPPLIES.
b. While monitoring the 5-psi reading on the screen, adjust the 5-psi regulator,
REG1.
c. If the message persists, check for a 5-psi leak.
2. If the message persists:
a. Turn off the SlideMaker and open the cover.
WARNING Risk of personal injury and contamination. The slide processing areas can
contain prepared smears and/or broken glass with biohazardous material. Handle with
care and avoid skin contact.
b. Check the area below the smear truck for fallen slides and retrieve the slides if
possible.
c. Close the cover and turn on the SlideMaker.
3. If the message still persists:
a. Turn off the SlideMaker.
b. If AutoStop is ON, turn AutoStop OFF to resume GEN•S System operation.
Samples that require slides appear in the Slide List.
WARNING Risk of contamination. The prepared smears can contain biohazardous
material. Handle with care and avoid skin contact.
c. Open the cover and remove the slides from the pusher bars area, Dryer module,
and platen, and place them in a slide basket for staining.
Note: You may not be able to retrieve all the slides.
d. Close the cover and call your Coulter Representative.
7.2-26
7.2-26
PN 4276985A
TROUBLESHOOTING
TABLES OF SLIDEMAKER MESSAGES
Table 7.2-9 Pneumatics Error Messages (Continued)
SLIDEMAKER
View Error
Screen Message
WORKSTATION
RCS™ Application
Call Msg/Time
Alarm Log Message and Icons on Command Center
PNEUMATICS (30 PSI SUPPLY)
Yes
Internal Message No. and Code:
24, 30 PSI SUPPLY FAILURE
SlideMaker Log
SlideMaker 30 PSI Out
Of Range Or Not
Present. Turn Off/On
SlideMaker.
If AutoStop
is OFFF
RECOVERY
If AutoStop
is ON
SlideMaker Status
Probable Cause
Corrective Action
The SlideMaker stops all
mechanical activity.
1. 30 psi out of range: either loss of
Note: Press any key on the SlideMaker screen to reset the alarm.
pressure or excessive pressure from the 1. Check the 30 psi:
pneumatic pump (PM1) in the Analytical
a. From the MAIN MENU, select ROUTINE FUNCTIONS tt
Station’s Power Supply.
PNEUMATIC/POWER SUPPLIES.
r Loss of pressure occurs if the 30 psi
b. While monitoring the 30- psi reading on the screen, check for a 30-psi leak.
line to the SlideMaker is disconnected
2. If the message persists:
or if the pneumatic pump fails.
a. Turn off the SlideMaker and open the cover.
r Excessive pressure occurs if the 30
psi regulator (RG1) in the Power
WARNING Risk of personal injury and contamination. The slide processing areas can
Supply is set too high or if the
contain prepared smears and/or broken glass with biohazardous material. Handle with
diaphragm in RG1 is ruptured.
care and avoid skin contact.
2. Pneumatic Supply Monitor, 30-Psi card
failure
b. Check the area below the smear truck for fallen slides and retrieve the slides if
3. A/D converter error or failure
possible.
c. Close the cover and turn on the SlideMaker.
3. If the message still persists:
a. Turn off the SlideMaker.
b. If AutoStop is ON, turn AutoStop OFF to resume GEN•S System operation.
Samples that require slides appear in the Slide List.
WARNING Risk of contamination. The prepared smears can contain biohazardous
material. Handle with care and avoid skin contact.
c. Open the cover and remove the slides from the pusher bars area, Dryer module,
and platen, and place them in a slide basket for staining.
Note: You may not be able to retrieve all the slides.
d. Close the cover and call your Coulter Representative.
PN 4276985A
7.2-27
7
TROUBLESHOOTING
TABLES OF SLIDEMAKER MESSAGES
Table 7.2-9 Pneumatics Error Messages (Continued)
SLIDEMAKER
View Error
Screen Message
WORKSTATION
RCS™ Application
Call Msg/Time
Alarm Log Message and Icons on Command Center
PNEUMATICS (LOW VACUUM 1)
Yes
Internal Message No. and Code:
25, LOW VACUUM 1 SUPPLY
FAILURE
SlideMaker Log
SlideMaker Low
Vacuum Out Of Range
Or Not Present. Turn
Off/On SlideMaker.
If AutoStop
is OFF
RECOVERY
If AutoStop
is ON
N/A
SlideMaker Status
Probable Cause
Corrective Action
The SlideMaker stops all
mechanical activity.
1. 17.5 in. Hg vacuum misadjusted
2. Vacuum leak
3. Pneumatic Supply Monitor, 17.5-in. Hg
card failure
4. A/D converter failure or error
Note: Press any key on the SlideMaker screen to reset the alarm.
1. Check the 17.5 in. Hg vacuum:
a. From the MAIN MENU, select ROUTINE FUNCTIONS tt
PNEUMATIC/POWER SUPPLIES.
b. While monitoring the 17.5-in. Hg vacuum reading on the screen, adjust the
17.5-in. Hg vacuum regulator, REG1.
c. If the message persists, check for a vacuum leak.
2. If the message persists:
a. Turn off the SlideMaker and open the cover.
WARNING Risk of personal injury and contamination. The slide processing areas can
contain prepared smears and/or broken glass with biohazardous material. Handle with
care and avoid skin contact.
b. Check the area below the smear truck for fallen slides and retrieve the slides if
possible.
c. Close the cover and turn on the SlideMaker.
3. If the message still persists:
a. Turn off the SlideMaker.
b. If AutoStop is ON, turn AutoStop OFF to resume GEN•S System operation.
Samples that require slides appear in the Slide List.
WARNING Risk of contamination. The prepared smears can contain biohazardous
material. Handle with care and avoid skin contact.
c. Open the cover and remove the slides from the pusher bars area, Dryer module,
and platen, and place them in a slide basket for staining.
Note: You may not be able to retrieve all the slides.
d. Close the cover and call your Coulter Representative.
7.2-28
7.2-28
PN 4276985A
TROUBLESHOOTING
TABLES OF SLIDEMAKER MESSAGES
Table 7.2-9 Pneumatics Error Messages (Continued)
SLIDEMAKER
View Error
Screen Message
WORKSTATION
RCS™ Application
Call Msg/Time
Alarm Log Message and Icons on Command Center
PNEUMATICS (LOW VACUUM 2)
Yes
Internal Message No. and Code:
26, LOW VACUUM 2 SUPPLY
FAILURE
SlideMaker Log
SlideMaker Low
Vacuum Out Of Range
Or Not Present. Turn
Off/On SlideMaker.
If AutoStop
is OFFF
RECOVERY
If AutoStop
is ON
N/A
SlideMaker Status
Probable Cause
Corrective Action
The SlideMaker stops all
mechanical activity.
1. 6.5 in. Hg vacuum misadjusted
2. Vacuum leak
3. Pneumatic Supply Monitor, 6.5-in. Hg
card failure
4. A/D converter failure or error
Note: Press any key on the SlideMaker screen to reset the alarm.
1. Check the 6.5 in. Hg vacuum:
a. From the MAIN MENU, select ROUTINE FUNCTIONS tt
PNEUMATIC/POWER SUPPLIES.
b. While monitoring the 6.5-in. Hg vacuum reading on the screen, adjust the 6.5-in.
Hg vacuum regulator, REG2.
c. If the message persists, check for a vacuum leak.
2. If the message persists:
a. Turn off the SlideMaker and open the cover.
WARNING Risk of personal injury and contamination. The slide processing areas can
contain prepared smears and/or broken glass with biohazardous material. Handle with
care and avoid skin contact.
b. Check the area below the smear truck for fallen slides and retrieve the slides if
possible.
c. Close the cover and turn on the SlideMaker.
3. If the message still persists:
a. Turn off the SlideMaker.
b. If AutoStop is ON, turn AutoStop OFF to resume GEN•S System operation.
Samples that require slides appear in the Slide List.
WARNING Risk of contamination. The prepared smears contain biohazardous
material. Handle with care and avoid skin contact.
c. Open the cover and remove the slides from the pusher bars area, Dryer module,
and platen, and place them in a slide basket for staining.
Note: You may not be able to retrieve all the slides.
d. Close the cover and call your Coulter Representative.
PN 4276985A
7.2-29
7
TROUBLESHOOTING
TABLES OF SLIDEMAKER MESSAGES
Table 7.2-9 Pneumatics Error Messages (Continued)
SLIDEMAKER
View Error
Screen Message
WORKSTATION
RCS™ Application
Call Msg/Time
Alarm Log Message and Icons on Command Center
PNEUMATICS (NO HIGH VACUUM) Yes
Internal Message No. and Code:
27, HIGH VACUUM SUPPLY
FAILURE
SlideMaker Log
SlideMaker High
Vacuum Out Of
Tolerance Or Not
Present.
If AutoStop
is OFF
RECOVERY
If AutoStop
is ON
N/A
SlideMaker Status
Probable Cause
Corrective Action
The SlideMaker stops all
mechanical activity
1. Vacuum leak
2. Loss of vacuum from the pneumatic
pump (PM1) in the Analytical Station’s
Power Supply
3. Pneumatic Supply Monitor, Vacuum card
failure
4. A/D converter failure or error
Note: Press any key on the SlideMaker screen to reset the alarm.
1. Check the high, unregulated vacuum:
a. From the MAIN MENU, select ROUTINE FUNCTIONS tt
PNEUMATIC/POWER SUPPLIES.
b. While monitoring the high vacuum reading on the screen, check for a high
vacuum leak.
2. If the message persists:
a. Turn off the SlideMaker and open the cover.
WARNING Risk of personal injury and contamination. The slide processing areas can
contain prepared smears and/or broken glass with biohazardous material. Handle with
care and avoid skin contact.
b. Check the area below the smear truck for fallen slides and retrieve the slides if
possible.
c. Close the cover and turn on the SlideMaker.
3. If the message still persists:
a. Turn off the SlideMaker.
b. If AutoStop is ON, turn AutoStop OFF to resume GEN•S System operation.
Samples that require slides appear in the Slide List.
WARNING Risk of contamination. The prepared smears contain biohazardous
material. Handle with care and avoid skin contact.
c. Open the cover and remove the slides from the pusher bars area, Dryer module,
and platen, and place them in a slide basket for staining.
Note: You may not be able to retrieve all the slides.
d. Close the cover and call your Coulter Representative.
7.2-30
7.2-30
PN 4276985A
TROUBLESHOOTING
TABLES OF SLIDEMAKER MESSAGES
Table 7.2-9 Pneumatics Error Messages (Continued)
SLIDEMAKER
View Error
Screen Message
WORKSTATION
RCS™ Application
Call Msg/Time
Alarm Log Message and Icons on Command Center
PNEUMATICS (VACUUM
Yes
ACCUMULATOR FULL OF
LIQUID)
Internal Message No. and Code:
78, VACUUM ACCUMULATOR
FULL
SlideMaker Log
SlideMaker Vacuum
Accumulator Full Of
Liquid
If AutoStop
is OFF
RECOVERY
If AutoStop
is ON
5/24 hours
SlideMaker Status
Probable Cause
Corrective Action
1. No new samples are aspirated.
2. Any sample in a reservoir is
discarded.
3. Completed smears are dried
and deposited in a slide basket.
4. The SlideMaker stops all
mechanical activity and the
Dryer module heater is turned
off.
This error should not occur during normal
operation because the vacuum accumulator
is emptied during the Startup cycle and any
time the SlideMaker is turned off and on.
Note: Press any key on the SlideMaker screen to reset the alarm.
To clear this error:
1. The Analyzer grants the SlideMaker
permission to empty the vacuum
accumulator.
2. The SlideMaker empties the vacuum
accumulator until the vacuum reservoir
sensor, SEN51, indicates the reservoir is
not full or until 30 seconds has elapsed.
1. If AutoStop is OFF, press STOP on the Diluter keypad to stop the GEN•S System.
2. After the Diluter goes to an idle state, wait until the SlideMaker empties the vacuum
accumulator and the SlideMaker screen displays READY.
3. Press START/CONT on the GEN•S System to resume normal operation.
4. If the message persists
a. Turn off the SlideMaker.
b. If AutoStop is ON, turn AutoStop OFF to resume GEN•S System operation.
Samples that require slides appear in the Slide List.
c. Call your Coulter Representative.
Note: The vacuum accumulator is then
completely emptied over a fixed time
period.
If the 30 second timeout occurs, it could
indicate:
r The vacuum reservoir sensor, SEN51, is
defective.
r The vacuum accumulator drain solenoid,
SOL63, is defective.
PN 4276985A
7.2-31
7
TROUBLESHOOTING
TABLES OF SLIDEMAKER MESSAGES
Table 7.2-10 Power Error Messages
SLIDEMAKER
View Error
Screen Message
WORKSTATION
RCS™ Application
Call Msg/Time
Alarm Log Message and Icons on Command Center
POWER (2.5V SUPPLY)
Yes
Internal Message No. and Code:
15, 2.5V SUPPLY FAILURE
SlideMaker Log
SlideMaker 2.5V
Supply Out Of
Tolerance Or Not
Present. Turn Off/On
SlideMaker.
If AutoStop
is OFF
RECOVERY
If AutoStop
is ON
5/24 hours
SlideMaker Status
The SlideMaker stops all
mechanical activity.
Probable Cause
r Power supply failure or short circuit
r A/D converter error
Corrective Action
Note: Press any key on the SlideMaker screen to reset the alarm.
1. Turn off the SlideMaker.
2. Open the cover.
WARNING Risk of personal injury and contamination. The slide processing areas can
contain prepared smears and/or broken glass with biohazardous material. Handle with
care and avoid skin contact.
3. Check the area below the smear truck for fallen slides and retrieve the slides if
possible.
4. Close the cover and turn on the SlideMaker.
5. If the message persists:
a. Turn off the SlideMaker.
b. If AutoStop is ON, turn AutoStop OFF to resume GEN•S System operation.
Samples that require slides appear in the Slide List.
c. Open the cover and remove the slides from the pusher bars area, Dryer module,
and platen, and place them in a slide basket for staining.
Note: You may not be able to retrieve all the slides.
d. Close the cover and call your Coulter Representative.
POWER (5V SUPPLY)
Internal Message No. and
Code:
16, 5V SUPPLY FAILURE
Note: If event severe, this
message may not appear.
7.2-32
No
SlideMaker Log
SlideMaker 5V Supply
Out Of Tolerance Or
Not Present. Turn
Off/On SlideMaker.
If AutoStop
is OFF
If AutoStop
is ON
5/24 hours
r If the 5 V supply is out of
tolerance but >4.5 V minimum
reset threshold, the SlideMaker
stops all mechanical activity
and displays a message.
r If the 5 V supply is less than the
minimum reset thresholds, the
SlideMaker presents no signs
of operation to the operator.
r Power supply failure or short circuit
r A/D converter failure
1. Turn off the SlideMaker.
2. Open the cover.
WARNING Risk of personal injury and contamination. The slide processing areas can
contain prepared smears and/or broken glass with biohazardous material. Handle with
care and avoid skin contact.
3. Check the area below the smear truck for fallen slides and retrieve the slides if
possible.
4. Close the cover and turn on the SlideMaker.
5. If the message persists:
a. Turn off the SlideMaker.
b. If AutoStop is ON, turn AutoStop OFF to resume GEN•S System operation.
Samples that require slides appear in the Slide List.
c. Open the cover and remove the slides from the pusher bars area, Dryer module,
and platen, and place them in a slide basket for staining.
Note: You may not be able to retrieve all the slides.
d. Close the cover and call your Coulter Representative.
7.2-32
PN 4276985A
TROUBLESHOOTING
TABLES OF SLIDEMAKER MESSAGES
Table 7.2-10 Power Error Messages (Continued)
SLIDEMAKER
View Error
Screen Message
WORKSTATION
RCS™ Application
Call Msg/Time
Alarm Log Message and Icons on Command Center
POWER (10V REFERENCE)
Yes
Internal Message No. and Code:
17, 10V REFERENCE FAILURE
SlideMaker Log
SlideMaker 10V
Supply Out Of
Tolerance Or Not
Present. Turn Off/On
SlideMaker.
If AutoStop
is OFF
RECOVERY
If AutoStop
is ON
5/24 hours
SlideMaker Status
The SlideMaker stops all
mechanical activity.
Probable Cause
r Power supply failure or short circuit
r A/D converter error
Corrective Action
Note: Press any key on the SlideMaker screen to reset the alarm.
1. Turn off the SlideMaker.
2. Open the cover.
WARNING Risk of personal injury and contamination. The slide processing areas can
contain prepared smears and/or broken glass with biohazardous material. Handle with
care and avoid skin contact.
3. Check the area below the smear truck for fallen slides and retrieve the slides if
possible.
4. Close the cover and turn on the SlideMaker.
5. If the message persists:
a. Turn off the SlideMaker.
b. If AutoStop is ON, turn AutoStop OFF to resume GEN•S System operation.
Samples that require slides appear in the Slide List.
c. Open the cover and remove the slides from the pusher bars area, Dryer module,
and platen, and place them in a slide basket for staining.
Note: You may not be able to retrieve all the slides.
d. Close the cover and call your Coulter Representative.
POWER (-15V SUPPLY)
Yes
Internal Message No. and Code:
20, -15V SUPPLY FAILURE
SlideMaker Log
SlideMaker -15V
Supply Out Of
Tolerance Or Not
Present. Turn Off/On
SlideMaker.
If AutoStop
is OFF
If AutoStop
is ON
5/24 hours
The SlideMaker stops all
mechanical activity.
r Power supply failure or short circuit
r A/D converter error
Note: Press any key on the SlideMaker screen to reset the alarm.
1. Turn off the SlideMaker.
2. Open the cover.
WARNING Risk of personal injury and contamination. The slide processing areas can
contain prepared smears and/or broken glass with biohazardous material. Handle with
care and avoid skin contact.
3. Check the area below the smear truck for fallen slides and retrieve the slides if
possible.
4. Close the cover and turn on the SlideMaker.
5. If the message persists:
a. Turn off the SlideMaker.
b. If AutoStop is ON, turn AutoStop OFF to resume GEN•S System operation.
Samples that require slides appear in the Slide List.
c. Open the cover and remove the slides from the pusher bars area, Dryer module,
and platen, and place them in a slide basket for staining.
Note: You may not be able to retrieve all the slides.
d. Close the cover and call your Coulter Representative.
PN 4276985A
7.2-33
7
TROUBLESHOOTING
TABLES OF SLIDEMAKER MESSAGES
Table 7.2-10 Power Error Messages (Continued)
SLIDEMAKER
View Error
Screen Message
WORKSTATION
RCS™ Application
Call Msg/Time
Alarm Log Message and Icons on Command Center
POWER (15V SUPPLY)
Yes
Internal Message No. and Code:
18, 15V SUPPLY FAILURE
SlideMaker Log
SlideMaker 15V
Supply Out Of
Tolerance Or Not
Present. Turn Off/On
SlideMaker.
If AutoStop
is OFF
RECOVERY
If AutoStop
is ON
5/24 hours
SlideMaker Status
The SlideMaker stops all
mechanical activity.
Probable Cause
r Power supply failure or short circuit
r A/D converter error
Corrective Action
Note: Press any key on the SlideMaker screen to reset the alarm.
1. Turn off the SlideMaker.
2. Open the cover.
WARNING Risk of personal injury and contamination. The slide processing areas can
contain prepared smears and/or broken glass with biohazardous material. Handle with
care and avoid skin contact.
3. Check the area below the smear truck for fallen slides and retrieve the slides if
possible.
4. Close the cover and turn on the SlideMaker.
5. If the message persists:
a. Turn off the SlideMaker.
b. If AutoStop is ON, turn AutoStop OFF to resume GEN•S System operation.
Samples that require slides appear in the Slide List.
c. Open the cover and remove the slides from the pusher bars area, Dryer module,
and platen, and place them in a slide basket for staining.
Note: You may not be able to retrieve all the slides.
d. Close the cover and call your Coulter Representative.
POWER (24V SUPPLY)
Yes
Internal Message No. and Code:
19, 24V SUPPLY FAILURE
SlideMaker Log
SlideMaker 24V
Supply Out Of
Tolerance Or Not
Present. Turn Off/On
SlideMaker.
If AutoStop
is OFF
If AutoStop
is ON
5/24 hours
The SlideMaker stops all
mechanical activity.
r Power supply failure or short circuit
r A/D converter error
Service Only: Since +24 V supply
powers all of the solenoids, all of
the solenoids are turned off.
Note: If the alarm sounds, press any key on the SlideMaker screen to reset it.
1. Turn off the SlideMaker.
2. Open the cover.
WARNING Risk of personal injury and contamination. The slide processing areas can
contain prepared smears and/or broken glass with biohazardous material. Handle with
care and avoid skin contact.
3. Check the area below the smear truck for fallen slides and retrieve the slides if
possible.
4. Close the cover and turn on the SlideMaker.
5. If the message persists:
a. Turn off the SlideMaker.
b. If AutoStop is ON, turn AutoStop OFF to resume GEN•S System operation.
Samples that require slides appear in the Slide List.
c. Open the cover and remove the slides from the pusher bars area, Dryer module,
and platen, and place them in a slide basket for staining.
Note: You may not be able to retrieve all the slides.
d. Close the cover and call your Coulter Representative.
7.2-34
7.2-34
PN 4276985A
TROUBLESHOOTING
TABLES OF SLIDEMAKER MESSAGES
Table 7.2-10 Power Error Messages (Continued)
SLIDEMAKER
View Error
Screen Message
WORKSTATION
RCS™ Application
Call Msg/Time
Alarm Log Message and Icons on Command Center
POWER (PROCESSOR A)
Yes
Internal Message No. and Code:
21, PROCESSOR ‘A’ VPP
FAILURE
POWER (PROCESSOR B)
Yes
Internal Message No. and Code:
22, PROCESSOR ‘B’ VPP
FAILURE
SlideMaker Log
SlideMaker Reports
Processor ‘A’ VPP
Failure. Turn Off/On
SlideMaker.
SlideMaker Log
SlideMaker Reports
Processor ‘B’ VPP
Failure. Turn Off/On
SlideMaker.
If AutoStop
is OFF
RECOVERY
If AutoStop
is ON
5/24 hours
SlideMaker Status
Probable Cause
Corrective Action
The SlideMaker stops all
mechanical activity.
Power supply failure or short circuit
Note: Press any key on the SlideMaker screen to reset the alarm.
1. Turn off the SlideMaker.
Service Only: Processor "A" writes
to the flash memory when a new
version is being downloaded, or
when calibration parameters are to
be stored.
If AutoStop
is OFF
If AutoStop
is ON
5/24 hours
The SlideMaker stops all
mechanical activity.
Service Only: Processor "B" writes
to the flash memory when a new
version is being downloaded.
WARNING Risk of personal injury and contamination. The slide processing areas can
contain prepared smears and/or broken glass with biohazardous material. Handle with
care and avoid skin contact.
2. Open the cover.
3. Check the area below the smear truck for fallen slides and retrieve the slides if
possible.
4. Close the cover and turn on the SlideMaker.
5. If the message persists:
a. Turn off the SlideMaker.
b. If AutoStop is ON, turn AutoStop OFF to resume GEN•S System operation.
Samples that require slides appear in the Slide List.
c. Open the cover and remove the slides from the pusher bars area, Dryer module,
and platen, and place them in a slide basket for staining.
Note: You may not be able to retrieve all the slides.
d. Close the cover and call your Coulter Representative.
Power supply failure or short circuit
Note: Press any key on the SlideMaker screen to reset the alarm.
1. Turn off the SlideMaker.
2. Open the cover.
WARNING Risk of personal injury and contamination. The slide processing areas can
contain prepared smears and/or broken glass with biohazardous material. Handle with
care and avoid skin contact.
3. Check the area below the smear truck for fallen slides and retrieve the slides if
possible.
4. Close the cover and turn on the SlideMaker.
5. If the message persists:
a. Turn off the SlideMaker.
b. If AutoStop is ON, turn AutoStop OFF to resume GEN•S System operation.
Samples that require slides appear in the Slide List.
c. Open the cover and remove the slides from the pusher bars area, Dryer module,
and platen, and place them in a slide basket for staining.
Note: You may not be able to retrieve all the slides.
d. Close the cover and call your Coulter Representative.
PN 4276985A
7.2-35
7
TROUBLESHOOTING
TABLES OF SLIDEMAKER MESSAGES
Table 7.2-11 Printer Error Messages
SLIDEMAKER
View Error
Screen Message
WORKSTATION
RCS™ Application
Call Msg/Time
Alarm Log Message and Icons on Command Center
PRINTER (CRC)
Yes
Internal Message No. and Code:
07, LABEL PRINTER COMM
ERROR
Yes
PRINTER (FAILURE)
Internal Message No. and Code:
31, LABEL PRINTER FAILURE
PRINTER (INITIALIZATION)
Yes
Internal Message No. and Code:
37, LABEL PRINTER-RESET
ERROR
SlideMaker Log
SlideMaker Label
Printer
Communication Lost
(CRC Check).
SlideMaker Log
SlideMaker Label
Printer Failure. Turn
Off/On SlideMaker.
SlideMaker Log
SlideMaker Label
Printer Initialization
Failure. Reset The
SlideMaker.
PRINTER (NO COMMUNICATION) No
Internal Message No. and Code:
08 NO LABEL PRINTER COMM
SlideMaker Log
PRINTER (OUT OF LABELS)
Yes
Internal Message No. and Code:
33, LABEL PRINTER-OUT OF
LABELS
SlideMaker Log
Label Printer
Communication
Timeout. If necessary
reset the SlideMaker.
SlideMaker Label
Printer Out Of Labels.
Refer to the Online
Help For The
Procedure.
RECOVERY
If AutoStop
is OFF
If AutoStop
is ON
5/24 hours
If AutoStop
is OFF
If AutoStop
is ON
5/24 hours
If AutoStop
is OFF
If AutoStop
is ON
5/24 hours
SlideMaker Status
Probable Cause
Corrective Action
1. No new samples are aspirated.
2. If a sample’s label is not
printed, the sample is not used.
3. Completed smears are dried
and deposited in a slide basket.
Three consecutive failures to communicate
with the Label Printer.
Note: Press any key on the SlideMaker screen to reset the alarm.
1. No new samples are aspirated.
2. If a sample’s label is not
printed, the sample is not used.
3. Completed smears are dried
and deposited in a slide basket.
4. The SlideMaker stops.
Label Printer module detected a failure in
operation.
Note: Press any key on the SlideMaker screen to reset the alarm.
The SlideMaker stops all
mechanical activity.
Problem with the Label Printer module at
initialization due to:
Note: Press any key on the SlideMaker screen to reset the alarm.
r Memory checksum failure.
r RAM memory failure.
If AutoStop
is OFF
If AutoStop
is ON
1. Wait until the last slide in the Dryer module is deposited in a slide basket.
2. Turn the SlideMaker off and then on.
3. If the message persists:
a. Turn off the SlideMaker.
b. If AutoStop is ON, turn AutoStop OFF to resume GEN•S System operation.
Samples that require slides appear in the Slide List.
c. Call your Coulter Representative.
1. Reset the SlideMaker.
2. If the message persists
a. Turn off the SlideMaker.
b. If AutoStop is ON, turn AutoStop OFF to resume GEN•S System operation.
Samples that require slides appear in the Slide List.
c. Call your Coulter Representative.
5/24 hours
1. No new samples are aspirated.
2. If a sample’s label is not
printed, the sample is not used.
3. Completed smears are dried
and deposited in a slide basket.
No response from the Label Printer module,
or handshake signals are absent for too long.
1. Wait until the last slide in the Dryer module is deposited in a slide basket.
2. Turn the SlideMaker off and then on.
3. If the message persists:
a. Turn off the SlideMaker.
b. If AutoStop is ON, turn AutoStop OFF to resume GEN•S System operation.
Samples that require slides appear in the Slide List.
c. Call your Coulter Representative.
N/A
1. No new samples are aspirated.
2. Any sample in a reservoir is
processed to a smear.
Label Printer module detected two successive
missing labels.
Note: Press any key on the SlideMaker screen to reset the alarm.
Note: The Label Printer module
r The label roll is empty.
r Labels are missing from the label roll.
has up to two labels available
when it senses the roll is out of
labels.
3. Completed smears are dried
and deposited in a slide basket.
4. The SlideMaker stops all
mechanical activity.
7.2-36
1. Wait until the last slide in the Dryer module is deposited in a slide basket.
2. Turn the SlideMaker off and then on.
3. If the message persists:
a. Turn off the SlideMaker.
b. If AutoStop is ON, turn AutoStop OFF to resume GEN•S System operation.
Samples that require slides appear in the Slide List.
c. Call your Coulter Representative.
7.2-36
1. Wait until the last slide in the Dryer module is deposited in a slide basket.
2. Open the cover and check the label roll:
r If the label roll is missing a few labels, move the label dispenser until more labels are
available.
r If the label roll is empty, replace the roll. Refer to the Replacing the SlideMaker Label
Roll procedure in the Online Help system.
3. Close the cover and reset the SlideMaker to resume normal operation.
PN 4276985A
TROUBLESHOOTING
TABLES OF SLIDEMAKER MESSAGES
Table 7.2-11 Printer Error Messages (Continued)
SLIDEMAKER
View Error
Screen Message
WORKSTATION
RCS™ Application
Call Msg/Time
Alarm Log Message and Icons on Command Center
PRINTER (OUT OF RIBBON)
Yes
Internal Message No. and Code:
34, LABEL PRINTER-RIBBON
OUT
RECOVERY
N/A
SlideMaker Log
SlideMaker Label
Printer Out Of Ribbon.
Refer to the Online
Help For The
Procedure.
SlideMaker Status
Probable Cause
Corrective Action
1. No new samples are aspirated.
2. Any sample in a reservoir is
processed to a smear.
Label Printer module detected that ribbon is
out.
Note: Press any key on the SlideMaker screen to reset the alarm.
1. No new samples are aspirated.
2. If a sample’s label is not
printed, the sample is not used.
3. Completed smears are dried
and deposited in a slide basket.
4. The SlideMaker stops all
mechanical activity.
Elevated printhead temperature.
Note: Press any key on the SlideMaker screen to reset the alarm.
Service Only: Continuous operation may
elevate the printhead temperature.
1. Wait until the last slide in the Dryer module is deposited in a slide basket.
2. Turn the SlideMaker off, wait approximately 30 minutes, then turn the SlideMaker
on.
3. If the message persists:
a. Turn off the SlideMaker.
b. If AutoStop is ON, turn AutoStop OFF to resume GEN•S System operation.
Samples that require slides appear in the Slide List.
c. Call your Coulter Representative.
1. No new samples are aspirated.
2. Any sample in a reservoir is not
processed.
3. Completed smears are dried
and deposited in a slide basket.
4. The SlideMaker stops all
mechanical activity.
1. Top-of-form is not within allowable
distance. Most likely caused by labels
jammed in the top-of-form sensor.
2. Three consecutive labels not found
during initialization of the Printer.
3. Printer motor failure
Note: Press any key on the SlideMaker screen to reset the alarm.
Note: The Label Printer module
still has printing capacity for up
to two labels when it senses the
ribbon is out.
1. Wait until the last slide in the Dryer module is deposited in a slide basket.
2. Open the cover and replace the printer ribbon. Refer to the Replacing the SlideMaker
Printer Ribbon procedure in the Online Help system.
3. Close the cover and reset the SlideMaker to resume normal operation.
3. Completed smears are dried
and deposited in a slide basket.
4. The SlideMaker stops all
mechanical activity
PRINTER (TEMPERATURE)
Yes
Internal Message No. and Code:
35, LABEL PRINTER-TEMP
EXCEEDED
PRINTER (TOP OF FORM)
Yes
Internal Message No. and Code:
36, LABEL PRINTER-TOP OF
FORM ERROR
PN 4276985A
SlideMaker Log
SlideMaker Label
Printer Temperature
Exceeded. Turn Off
SlideMaker.
SlideMaker Log
SlideMaker Label
Printer Top Of Form
Not Detected.
If AutoStop
is OFF
If AutoStop
is ON
5/24 hour
If AutoStop
is OFF
If AutoStop
is ON
N/A
1.
2.
3.
4.
5.
Wait until the last slide in the Dryer module is deposited in a slide basket.
Turn off the SlideMaker and open the cover,
Check the top-of-form sensor and remove any labels stuck on the sensor.
Close the cover and turn on the SlideMaker.
If the message persists:
a. Turn off the SlideMaker.
b. If AutoStop is ON, turn AutoStop OFF to resume GEN•S System operation.
Samples that require slides appear in the Slide List.
c. Call your Coulter Representative.
7.2-37
7
TROUBLESHOOTING
TABLES OF SLIDEMAKER MESSAGES
Table 7.2-12 Reagent Error Messages
SLIDEMAKER
View Error
Screen Message
WORKSTATION
RCS™ Application
Call Msg/Time
Alarm Log Message and Icons on Command Center
REAGENT (OUT OF DILUENT)
No
Internal Message No. and Code:
29, ANALYTICAL STATION
DILUENT OUT
REAGENT (REAGENT TANK NOT
Yes
FULL)
Internal Message No. and Code:
77, REAGENT TANK NOT FULL
SlideMaker Log
RECOVERY
N/A
N/A
Analytical Station Out
Of Diluent. Replace
Diluent Container,
Prime The Slidemaker
With Diluent.
If AutoStop
is OFF
SlideMaker Log
SlideMaker Reagent
Tank Not Full.
If AutoStop
is ON
SlideMaker Status
Probable Cause
Corrective Action
1. No new samples are aspirated.
2. Any sample in a reservoir is
processed to a smear.
3. Completed smears are dried
and deposited in a slide basket.
4. The SlideMaker is ready.
Analytical Station detected empty diluent
container.
1. Replace the reagent container. Follow the Replacing Reagent Containers procedure
in the Online Help system for the message that appears on the Analytical Station.
2. If the message persists, prime the SlideMaker with diluent.
If this error appears when the
reagent tank is pulling diluent:
After trying to fill the reagent tank for 15
seconds, the reagent full sensor, SEN47,
indicates the tank is not full because:
Note: Press any key on the SlideMaker screen to reset the alarm.
1. No new samples are aspirated.
2. Any sample in a reservoir is
processed.
3. Backwashing may fail
(depending on amount of
diluent in the tank).
4. Completed smears are dried
and deposited in a slide basket.
5. The SlideMaker stops all
mechanical activity because the
SlideMaker cannot run without
diluent.
r No reagent is being pulled into the tank.
Note: Since the diluent and cleaning
agent share the same reservoir, the
reservoir sensor only reports on the level
of the reagent in the reservoir, not on the
kind of reagent.
r The reagent full sensor, SEN47, failed.
r All operations except shutdown
continue normally.
r Shutdown cannot be done until
the reagent tank can fill with
cleaning agent.
7.2-38
SlideMaker Log
Analytical Station
Waste Full. Empty Or
Replace Waste
Container.
N/A
N/A
1. No new samples are aspirated.
2. Any sample in a reservoir is
processed to a smear.
3. Completed smears are dried
and deposited in a slide basket.
4. The SlideMaker is ready.
b. Do a SlideMaker Startup cycle to prime the diluent lines. Select MAIN MENU tt
ROUTINE FUNCTIONS tt ROUTINE FLUIDICS tt RUN START UP.
3. If the message occurs during a Shutdown cycle, the cleaning agent is low.
a. Replace the cleaning agent container. Follow the Replacing Reagent Containers
procedure in the Online Help system for the message that appears on the
Analytical Station.
b. Do a SlideMaker Shutdown cycle to prime the cleaning agent lines. Select MAIN
MENU tt ROUTINE FUNCTIONS tt ROUTINE FLUIDICS tt RUN SHUT
DOWN.
4. If the message persists, call your Coulter Representative.
If this error appears when the
reagent tank is pulling cleaning
agent:
REAGENT (WASTE FULL)
No
Internal Message No. and Code:
30, ANALYTICAL STATION
WASTE FULL
1. Ensure the reagent lines are connected to the reagent containers.
2. If the message occurs during a Startup or a normal operating cycle, the diluent
supply is low.
a. Replace the diluent container. Follow the Replacing Reagent Containers
procedure in the Online Help system for the message that appears on the
Analytical Station.
Analytical Station detected full waste
container.
7.2-38
Replace the waste container at the Analytical Station. Follow the Replacing Waste
Container procedure in the Online Help system for the message that appears on the
Analytical Station.
PN 4276985A
TROUBLESHOOTING
TABLES OF SLIDEMAKER MESSAGES
Table 7.2-13 Shuttle Error Messages
SLIDEMAKER
View Error
Screen Message
WORKSTATION
RCS™ Application
Call Msg/Time
Alarm Log Message and Icons on Command Center
SHUTTLE (CALIBRATE)
Yes
Internal Message No. and Code:
67, CALIBRATE SHUTTLE
SHUTTLE (DISPENSE, SENSOR 7) Yes
Internal Message No. and Code:
69, SHUTTLE-DISPENSE POS
NOT FOUND, SEN7
SlideMaker Log
SlideMaker Shuttle
Calibration Required.
Reset the SlideMaker
SlideMaker Log
SlideMaker Shuttle
Not At Dispense
Position (Sensor 7).
RECOVERY
If AutoStop
is OFF
If AutoStop
is ON
5/24 hours
If AutoStop
is OFF
If AutoStop
is ON
5/24 hours
SlideMaker Status
Probable Cause
Corrective Action
The SlideMaker stops all
mechanical activity, except for
Service mode.
At initialization, either the shuttle has never
been calibrated (a new flash memory chip) or
the values are lost.
Note: Press any key on the SlideMaker screen to reset the alarm.
r A jam in the shuttle prevents the shuttle
from reaching the dispense position.
r The dispense position sensor, SEN7,
failed.
Note: Press any key on the SlideMaker screen to reset the alarm.
1. No new samples are aspirated.
2. Any sample in a reservoir is not
processed.
3. Completed smears are dried
and deposited in a slide basket.
4. The SlideMaker stops.
1. Reset the SlideMaker.
2. If the message persists:
a. Turn off the SlideMaker.
b. If AutoStop is ON, turn AutoStop OFF to resume GEN•S System operation.
Samples that require slides appear in the Slide List.
c. Call your Coulter Representative.
3. Service Only: Set the home, printer and dispense offset values as instructed under
Heading 4.3.
1. Wait until the last slide in the Dryer module is deposited in a slide basket.
2. Open the cover.
WARNING Risk of personal injury and contamination. The slide processing areas can
contain prepared smears and/or broken glass with biohazardous material. Handle with
care and avoid skin contact.
3.
4.
5.
6.
SHUTTLE (PRINTER, SENSOR 5)
Yes
Internal Message No. and Code:
68, SHUTTLE-PRINTER POS
NOT FOUND, SEN5
SlideMaker Log
SlideMaker Shuttle
Not At Label Printer
Position (Sensor 5).
If AutoStop
is OFF
If AutoStop
is ON
5/24 hours
1. No new samples are aspirated.
2. Any sample in a reservoir is not
processed.
3. Completed smears are dried
and deposited in a slide basket.
4. The SlideMaker stops.
r A jam in the shuttle prevents the shuttle
from reaching the printer position.
r The printer position sensor, SEN5, failed.
Note: Press any key on the SlideMaker screen to reset the alarm.
1. Wait until the last slide in the Dryer module is deposited in a slide basket.
2. Open the cover.
WARNING Risk of personal injury and contamination. The slide processing areas can
contain prepared smears and/or broken glass with biohazardous material. Handle with
care and avoid skin contact.
3.
4.
5.
6.
PN 4276985A
Check the slide on the shuttle and remove the slide if it is labeled or has blood on it.
Remove any slides that have fallen or are jamming the shuttle.
Close the cover and reset the SlideMaker.
If the message persists:
a. Turn off the SlideMaker.
b. If AutoStop is ON, turn AutoStop OFF to resume GEN•S System operation.
Samples that require slides appear in the Slide List.
c. Call your Coulter Representative.
7.2-39
7
TROUBLESHOOTING
TABLES OF SLIDEMAKER MESSAGES
Table 7.2-13 Shuttle Error Messages (Continued)
SLIDEMAKER
View Error
Screen Message
WORKSTATION
RCS™ Application
Call Msg/Time
Alarm Log Message and Icons on Command Center
SHUTTLE (SENSORS)
Yes
Internal Message No. and Code:
71, SHUTTLE-POS SENSOR
FAILURE
SlideMaker Log
SlideMaker Shuttle
Position Sensors
Failure. Turn the
SlideMaker Off/On.
If AutoStop
is OFF
RECOVERY
If AutoStop
is ON
5/24 hours
SlideMaker Status
Probable Cause
Corrective Action
1. No new samples are aspirated.
2. Any sample in a reservoir is not
processed.
3. Completed smears are dried
and deposited in a slide basket.
4. The SlideMaker stops.
More than one shuttle position sensor
(printer position sensor, SEN5; dispense
position sensor, SEN7; or smear position
sensor, SEN6) is active at a time because:
Note: Press any key on the SlideMaker screen to reset the alarm.
r A sensor is blocked.
r A sensor failed.
The most likely condition is that when the
shuttle is near the printer position or the
dispense position, the shuttle belt swings
through the smear position sensor.
SHUTTLE (SMEAR, SENSOR 6)
Yes
Internal Message No. and Code:
70, SHUTTLE-SMEAR POS NOT
FOUND, SEN6
SlideMaker Log
SlideMaker Shuttle
Not At Smear Position
(Sensor 6).
If AutoStop
is OFF
If AutoStop
is ON
5/24 hours
1. No new samples are aspirated.
2. Any sample in a reservoir is not
processed.
3. Completed smears are dried
and deposited in a slide basket.
4. The SlideMaker stops.
r A jam in the shuttle prevents the shuttle
from reaching the home (smear)
position.
r The smear position sensor, SEN6, failed.
1. Wait until the last slide in the Dryer module is deposited in a slide basket.
2. Turn the SlideMaker off and then on.
3. If the message persists:
a. Turn off the SlideMaker.
b. If AutoStop is ON, turn AutoStop OFF to resume GEN•S System operation.
Samples that require slides appear in the Slide List.
c. Call your Coulter Representative.
Note: Press any key on the SlideMaker screen to reset the alarm.
1. Wait until the last slide in the Dryer module is deposited in a slide basket.
2. Open the cover.
WARNING Risk of personal injury and contamination. The slide processing areas can
contain prepared smears and/or broken glass with biohazardous material. Handle with
care and avoid skin contact.
3.
4.
5.
6.
SHUTTLE (VACUUM, SENSOR 4)
Yes
Internal Message No. and Code:
72, SHUTTLE-VACUUM
FAILURE, SEN4
SlideMaker Log
SlideMaker Shuttle
Bed Vacuum Failure
(Sensor 4).
If AutoStop
is OFF
If AutoStop
is ON
5/24 hours
1. No new samples are aspirated.
2. Any sample in a reservoir is not
processed.
3. Completed smears are dried
and deposited in a slide basket.
4. The SlideMaker stops.
Failure to detect vacuum when passing a slide
from the smear truck to the shuttle could
indicate:
r An improperly placed slide or debris on
the shuttle prevents the necessary seal.
r The shuttle vacuum sensor, SEN4, is
defective.
r The shuttle vacuum supply solenoid is
defective.
Failure to release the vacuum to transfer the
slide to the Dryer module could indicate the
shuttle vacuum supply solenoid is defective.
7.2-40
7.2-40
Check the slide on the shuttle and remove the slide if it is labeled or has blood on it.
Remove any slides that have fallen or are jamming the shuttle.
Close the cover and reset the SlideMaker.
If the message persists:
a. Turn off the SlideMaker.
b. If AutoStop is ON, turn AutoStop OFF to resume GEN•S System operation.
Samples that require slides appear in the Slide List.
c. Call your Coulter Representative.
Note: Press any key on the SlideMaker screen to reset the alarm.
1. Wait until the last slide in the Dryer module is deposited in a slide basket.
2. Open the cover.
WARNING Risk of personal injury and contamination. The slide processing areas can
contain prepared smears and/or broken glass with biohazardous material. Handle with
care and avoid skin contact.
3. If a slide is on the shuttle, remove the slide. If the slide is a labeled smear, set it aside
for staining.
4. Carefully wipe the shuttle with a lint-free tissue.
5. Remove any fallen slides.
6. Close the cover and reset the SlideMaker.
7. If the message persists:
a. Turn off the SlideMaker.
b. If AutoStop is ON, turn AutoStop OFF to resume GEN•S System operation.
Samples that require slides appear in the Slide List.
c. Call your Coulter Representative.
PN 4276985A
TROUBLESHOOTING
TABLES OF SLIDEMAKER MESSAGES
Table 7.2-14 Truck Error Messages
SLIDEMAKER
View Error
Screen Message
WORKSTATION
RCS™ Application
Call Msg/Time
Alarm Log Message and Icons on Command Center
TRUCK (CALIBRATE)
Yes
Internal Message No. and Code:
39, CALIBRATE SERVO
TRUCK (CLEARANCE POSITION)
Yes
Internal Message No. and Code:
51, SERVO-CLEARANCE POS
NOT FOUND
SlideMaker Log
SlideMaker Truck
Calibration Required.
Reset the SlideMaker.
SlideMaker Log
SlideMaker Truck
Clearance Position
Timeout.
RECOVERY
If AutoStop
is OFF
If AutoStop
is ON
N/A
If AutoStop
is OFF
If AutoStop
is ON
5/24 hours
SlideMaker Status
Probable Cause
Corrective Action
The SlideMaker stops all
mechanical activity except when in
the Service mode.
The servo calibration values for the pick and
wick locations are missing at initialization.
Note: Press any key on the SlideMaker screen to reset the alarm.
1. No new samples are aspirated.
2. Any sample in a reservoir is
discarded.
3. Completed smears are dried
and deposited in a slide basket.
4. The SlideMaker stops all
mechanical activity.
When traveling to the clearance position, the
smear truck ended at a position greater than
±0.050 in.of the desired position.
Note: Press any key on the SlideMaker screen to reset the alarm.
The first time this occurs, the smear truck
tries again. If it fails on the second attempt,
this error is generated.
Cause unknown.
1. Reset the SlideMaker.
2. If the message persists:
a. Turn off the SlideMaker.
b. If AutoStop is ON, turn AutoStop OFF to resume GEN•S System operation.
Samples that require slides appear in the Slide List.
c. Call your Coulter Representative.
3. Service Only: Reset the pick and wick positions as instructed under Heading 4.4.
1. Wait until the last slide in the Dryer module is deposited in a slide basket.
2. Open the cover.
WARNING Risk of personal injury and contamination. The slide processing areas can
contain prepared smears and/or broken glass with biohazardous material. Handle with
care and avoid skin contact.
3. Check the slide on the shuttle and remove that slide if it is labeled or has blood on it.
4. Check the area below the smear truck for fallen slides and retrieve the slides if
possible.
5. Close the cover and reset the SlideMaker.
6. If the message persists
a. Turn off the SlideMaker.
b. If AutoStop is ON, turn AutoStop OFF to resume GEN•S System operation.
Samples that require slides appear in the Slide List.
c. Call your Coulter Representative.
TRUCK (NOT DOWN ERROR)
Yes
Internal Message No. and Code:
120, TRUCK DOWN ERROR
SlideMaker Log
SlideMaker Reports
Slide Truck Down
Position Error.
If AutoStop
is OFF
If AutoStop
is ON
5/24 hours
1. No new samples are aspirated.
2. Any sample in a reservoir is
discarded.
3. Completed smears are dried
and deposited in a slide basket.
4. The SlideMaker stops.
The truck position is checked when the slide
is placed on the shuttle. This error is
generated if the truck lift down sensor,
SEN19, does not indicate the truck lift is up.
r Truck lift cylinder failed
r Truck lift down sensor, SEN19, failed
Note: Press any key on the SlideMaker screen to reset the alarm.
1. Wait until the last slide in the Dryer module is deposited in a slide basket.
2. Open the cover.
WARNING Risk of personal injury and contamination. The slide processing areas can
contain prepared smears and/or broken glass with biohazardous material. Handle with
care and avoid skin contact.
3. Check the slide on the shuttle and remove that slide if it is labeled or has blood on it.
4. Check the area below the smear truck for fallen slides and retrieve the slides if
possible.
5. Close the cover and reset the SlideMaker.
6. If the message persists
a. Turn off the SlideMaker.
b. If AutoStop is ON, turn AutoStop OFF to resume GEN•S System operation.
Samples that require slides appear in the Slide List.
c. Call your Coulter Representative
PN 4276985A
7.2-41
7
TROUBLESHOOTING
TABLES OF SLIDEMAKER MESSAGES
Table 7.2-14 Truck Error Messages (Continued)
SLIDEMAKER
View Error
Screen Message
WORKSTATION
RCS™ Application
Call Msg/Time
Alarm Log Message and Icons on Command Center
TRUCK (FORWARD, SENSOR 2)
Yes
Internal Message No. and Code:
41, SERVO-FORWARD LIMIT
NOT FOUND, SEN2
TRUCK (INDEX NOT FOUND)
Yes
Internal Message No. and Code:
43, SERVO-INDEX POS NOT
FOUND
SlideMaker Log
SlideMaker Truck
Forward Motion
(Sensor 2). Reset the
SlideMaker.
SlideMaker Log
SlideMaker Truck
Index Position Not
Found. Reset the
SlideMaker.
RECOVERY
If AutoStop
is OFF
If AutoStop
is ON
5/24 hours
If AutoStop
is OFF
If AutoStop
is ON
5/24 hours
SlideMaker Status
Probable Cause
Corrective Action
The SlideMaker stops all
mechanical activity.
At servo initialization:
Note: Press any key on the SlideMaker screen to reset the alarm.
The SlideMaker stops all
mechanical activity.
At initialization, both polarities of the encoder
are tried in an effort to find the index position.
This error is generated if trying both polarities
of the encoder does not find the index
position, possibly indicating:
r
r
r
r
Servo is jammed or binding
Encoder failed
Servo motor failed.
Servo forward limit sensor, SEN2, failed.
r An encoder failed.
r The servo motor failed.
TRUCK (INITIALIZATION)
Yes
Internal Message No. and Code:
48, SERVO-RESET ERROR
SlideMaker Log
SlideMaker Truck
Initialization Failure.
If AutoStop
is OFF
If AutoStop
is ON
5/24 hours
The SlideMaker stops all
mechanical activity.
When initializing the servo, three successive
attempts were made to perform a hardware
and software initialization of the servo
controller chip and all three attempts failed.
This could indicate the System Control card
failed.
TRUCK (INVALID COMMAND)
Yes
Internal Message No. and Code:
46, SERVO-COMMAND ERROR
SlideMaker Log
SlideMaker Truck
Received An Invalid
Command.
If AutoStop
is OFF
If AutoStop
is ON
5/24 hours
1. No new samples are aspirated.
2. The sample in the reservoir is
not used.
Note: Unused samples are
discarded following reset.
3. Completed smears are dried
and deposited in a slide basket.
An invalid command was sent by processor
“A” to the servo controller. This indicates an
error in:
r Processor “A.”
r Outputs of processor “A.”
r Servo controller.
1. Reset the SlideMaker.
2. If the message persists:
a. Turn off the SlideMaker.
b. If AutoStop is ON, turn AutoStop OFF to resume GEN•S System operation.
Samples that require slides appear in the Slide List.
c. Call your Coulter Representative.
Note: Press any key on the SlideMaker screen to reset the alarm.
1. Reset the SlideMaker.
2. If the message persists
a. Turn off the SlideMaker.
b. If AutoStop is ON, turn AutoStop OFF to resume GEN•S System operation.
Samples that require slides appear in the Slide List.
c. Call your Coulter Representative.
Note: Press any key on the SlideMaker screen to reset the alarm.
1. Wait until the last slide in the Dryer module is deposited in a slide basket.
2. Open the cover.
WARNING Risk of personal injury and contamination. The slide processing areas can
contain prepared smears and/or broken glass with biohazardous material. Handle with
care and avoid skin contact.
3. Check the slide on the shuttle and remove that slide if it is labeled or has blood on it.
4. Check the area below the smear truck for fallen slides and retrieve the slides if
possible.
5. Check the smear truck for a slide.
a. If the smear truck is holding a slide:
1)
Turn off the SlideMaker. The smear truck drops the slide.
2)
Retrieve the fallen slide.
3)
Close the cover and turn on the SlideMaker.
b. If the smear truck is empty, close the cover and reset the SlideMaker.
6. If the message persists
a. Turn off the SlideMaker.
b. If AutoStop is ON, turn AutoStop OFF to resume GEN•S System operation.
Samples that require slides appear in the Slide List.
c. Call your Coulter Representative.
7.2-42
7.2-42
PN 4276985A
TROUBLESHOOTING
TABLES OF SLIDEMAKER MESSAGES
Table 7.2-14 Truck Error Messages (Continued)
SLIDEMAKER
View Error
Screen Message
WORKSTATION
RCS™ Application
Call Msg/Time
Alarm Log Message and Icons on Command Center
TRUCK (LIMIT SENSOR)
Yes
Internal Message No. and Code:
42, SERVO-LIMIT SENSOR
ERROR
SlideMaker Log
SlideMaker Truck
Sensor Failure. Reset
the SlideMaker.
If AutoStop
is OFF
RECOVERY
If AutoStop
is ON
5/24 hours
SlideMaker Status
Probable Cause
Corrective Action
The SlideMaker stops all
mechanical activity.
When either the servo reverse or the servo
forward limit sensor was reached, the other
sensor also indicated it was blocked,
probably indicating:
Note: Press any key on the SlideMaker screen to reset the alarm.
r Servo reverse limit sensor, SEN1, failed.
r Servo forward limit sensor, SEN2, failed.
TRUCK (NOT UP ERROR)
Yes
Internal Message No. and Code:
119, TRUCK NOT UP ERROR
SlideMaker Log
SlideMaker Reports
Slide Truck Up
Position Failure.
If AutoStop
is OFF
If AutoStop
is ON
5/24 hours
1. No new samples are aspirated.
2. Any sample in a reservoir is
discarded.
3. Completed smears are dried
and deposited in a slide basket.
4. The SlideMaker stops.
The truck position is checked after the slide is
placed on the shuttle. This error is generated
if the truck lift up sensor, SEN18, does not
indicate the truck lift is up.
r Truck lift cylinder failed
r Truck lift up sensor, SEN18, failed
1. Reset the SlideMaker.
2. If the message persists:
a. Turn off the SlideMaker.
b. If AutoStop is ON, turn AutoStop OFF to resume GEN•S System operation.
Samples that require slides appear in the Slide List.
c. Call your Coulter Representative.
Note: Press any key on the SlideMaker screen to reset the alarm.
1. Wait until the last slide in the Dryer module is deposited in a slide basket.
2. Open the cover.
WARNING Risk of personal injury and contamination. The slide processing areas can
contain prepared smears and/or broken glass with biohazardous material. Handle with
care and avoid skin contact.
3. Check the slide on the shuttle and remove that slide if it is labeled or has blood on it.
4. Check the area below the smear truck for fallen slides and retrieve the slides if
possible.
5. Close the cover and reset the SlideMaker.
6. If the message persists
a. Turn off the SlideMaker.
b. If AutoStop is ON, turn AutoStop OFF to resume GEN•S System operation.
Samples that require slides appear in the Slide List.
c. Call your Coulter Representative
TRUCK (PICK POSITION)
Yes
Internal Message No. and Code:
50, SERVO-PICK POS NOT
FOUND
SlideMaker Log
SlideMaker Truck Pick
Position Timeout.
If AutoStop
is OFF
If AutoStop
is ON
5/24 hours
1. No new samples are aspirated.
2. Any sample in a reservoir is
discarded.
3. Completed smears are dried
and deposited in a slide basket.
4. The SlideMaker stops all
mechanical activity.
When traveling to the pick position, the smear
truck ended at a position greater than
±0.050 in. of the desired position.
The first time this occurs, the smear truck
moves to the clearance position and tries
again. If it fails on the second attempt, this
error is generated.
Cause unknown.
PN 4276985A
Note: Press any key on the SlideMaker screen to reset the alarm.
1. Wait until the last slide in the Dryer module is deposited in a slide basket.
2. Open the cover.
WARNING Risk of personal injury and contamination. The slide processing areas can
contain prepared smears and/or broken glass with biohazardous material. Handle with
care and avoid skin contact.
3. Check the slide on the shuttle. Discard that slide if it is labeled or has blood on it.
4. Close the cover and reset the SlideMaker.
5. If the message persists
a. Turn off the SlideMaker.
b. If AutoStop is ON, turn AutoStop OFF to resume GEN•S System operation.
Samples that require slides appear in the Slide List.
c. Call your Coulter Representative.
7.2-43
7
TROUBLESHOOTING
TABLES OF SLIDEMAKER MESSAGES
Table 7.2-14 Truck Error Messages (Continued)
SLIDEMAKER
View Error
Screen Message
WORKSTATION
RCS™ Application
Call Msg/Time
Alarm Log Message and Icons on Command Center
TRUCK (PLACEMENT POSITION)
Yes
Internal Message No. and Code:
52, SERVO-PLACEMENT POS
NOT FOUND
Yes
TRUCK (POSITION, SENSORS
58,59,60)
Internal Message No. and Code:
44, SERVO-EXCESSIVE POS
ERROR, SEN58,59,60
SlideMaker Log
SlideMaker Truck
Placement Position
Timeout.
SlideMaker Log
SlideMaker Truck At
Improper Position
(Sensors 58, 59, 60).
If AutoStop
is OFF
If AutoStop
is OFF
RECOVERY
If AutoStop
is ON
If AutoStop
is ON
5/24 hours
5/24 hours
SlideMaker Status
Probable Cause
Corrective Action
1. No new samples are aspirated.
2. Any sample in a reservoir is
discarded.
3. Completed smears are dried
and deposited in a slide basket.
4. The SlideMaker stops all
mechanical activity.
When traveling to the placement position, the
smear truck ended at a position greater than
±0.050 in.of the desired position.
Note: Press any key on the SlideMaker screen to reset the alarm.
1. No new samples are aspirated.
2. The sample in the reservoir is
not used.
Note: Unused samples are
discarded following reset.
The first time this occurs, the smear truck
moves to the clearance position and tries
again. If it fails on the second attempt, this
error is generated.
1. Wait until the last slide in the Dryer module is deposited in a slide basket.
2. Open the cover.
WARNING Risk of personal injury and contamination. The slide processing areas can
contain prepared smears and/or broken glass with biohazardous material. Handle with
care and avoid skin contact.
Cause unknown.
3. Check the slide on the shuttle and remove that slide if it is labeled or has blood on it.
4. Check the area below the smear truck for fallen slides and retrieve the slides if
possible.
5. Close the cover and reset the SlideMaker.
6. If the message persists
a. Turn off the SlideMaker.
b. If AutoStop is ON, turn AutoStop OFF to resume GEN•S System operation.
Samples that require slides appear in the Slide List.
c. Call your Coulter Representative.
The actual position of the servo differs from
the desired position more than ±0.25 in. This
can be caused by:
Note: Press any key on the SlideMaker screen to reset the alarm.
r Interference with servo motion.
r Encoder failure.
3. Completed smears are dried
and deposited in a slide basket.
1. Wait until the last slide in the Dryer module is deposited in a slide basket.
2. Open the cover.
WARNING Risk of personal injury and contamination. The slide processing areas can
contain prepared smears and/or broken glass with biohazardous material. Handle with
care and avoid skin contact.
3. Check the slide on the shuttle and discard that slide if it is labeled or has blood on it.
4. Check the area below the smear truck for fallen slides and retrieve the slides if
possible.
5. Check the smear truck for a slide.
a. If the smear truck is holding a slide:
1)
Turn off the SlideMaker. The smear truck drops the slide.
2)
Retrieve the fallen slide.
3)
Close the cover and turn on the SlideMaker.
b. If the smear truck is empty, close the cover and reset the SlideMaker.
6. If the message persists
a. Turn off the SlideMaker.
b. If AutoStop is ON, turn AutoStop OFF to resume GEN•S System operation.
Samples that require slides appear in the Slide List.
c. Call your Coulter Representative.
7.2-44
7.2-44
PN 4276985A
TROUBLESHOOTING
TABLES OF SLIDEMAKER MESSAGES
Table 7.2-14 Truck Error Messages (Continued)
SLIDEMAKER
View Error
Screen Message
WORKSTATION
RCS™ Application
Call Msg/Time
Alarm Log Message and Icons on Command Center
TRUCK (REVERSE, SENSOR 1)
Yes
Internal Message No. and Code:
40, SERVO-REVERSE LIMIT NOT
FOUND, SEN1
TRUCK (SENSOR ERROR)
Yes
Internal Message No. and Code:
121, TRUCK LIFT SENSOR
ERROR
TRUCK (TIMEOUT)
Yes
Internal Message No. and Code:
47, SERVO-TIMEOUT
SlideMaker Log
SlideMaker Truck
Reverse Motion
(Sensor 1). Reset the
SlideMaker.
SlideMaker Log
SlideMaker Reports
Slide Truck Sensor
Failure.
SlideMaker Log
SlideMaker Truck
Operation Timeout.
RECOVERY
If AutoStop
is OFF
If AutoStop
is ON
5/24 hours
If AutoStop
is OFF
If AutoStop
is ON
5/24 hours
If AutoStop
is OFF
If AutoStop
is ON
5/24 hours
SlideMaker Status
Probable Cause
Corrective Action
The SlideMaker stops all
mechanical activity.
At servo initialization:
Note: Press any key on the SlideMaker screen to reset the alarm.
1. No new samples are aspirated.
2. Any sample in a reservoir is
discarded.
3. Completed smears are dried
and deposited in a slide basket.
4. The SlideMaker stops.
The truck lift up sensor, SEN18, and the truck
lift down sensor, SEN19, indicate the smear
truck is both up and down.
1. No new samples are aspirated.
2. The sample in the reservoir is
not used.
Every servo operation has a 6 second timeout
value that is greater than the time required to
perform the operation. If the operation is not
completed within the allocated time, a
timeout error occurs.
Note: Press any key on the SlideMaker screen to reset the alarm.
This could indicate the servo motor:
contain prepared smears and/or broken glass with biohazardous material. Handle with
care and avoid skin contact.
Note: Unused samples are
discarded following reset.
3. Completed smears are dried
and deposited in a slide basket.
PN 4276985A
r
r
r
r
Servo is jammed or binding
Encoder failed
Servo motor failed.
Servo reverse limit sensor, SEN1, failed.
SEN18 or SEN19 failed.
r Slipped.
r Jammed.
r Failed.
1. Reset the SlideMaker.
2. If the message persists:
a. Turn off the SlideMaker.
b. If AutoStop is ON, turn AutoStop OFF to resume GEN•S System operation.
Samples that require slides appear in the Slide List.
c. Call your Coulter Representative.
Note: Press any key on the SlideMaker screen to reset the alarm.
1. Wait until the last slide in the Dryer module is deposited in a slide basket.
2. Reset the SlideMaker.
3. If the message persists:
a. Turn off the SlideMaker.
b. If AutoStop is ON, turn AutoStop OFF to resume GEN•S System operation.
Samples that require slides appear in the Slide List.
c. Call your Coulter Representative.
1. Wait until the last slide in the Dryer module is deposited in a slide basket.
2. Open the cover.
WARNING Risk of personal injury and contamination. The slide processing areas can
3. Check the slide on the shuttle and remove that slide if it is labeled or has blood on it.
4. Check the area below the smear truck for fallen slides and retrieve the slides if
possible.
5. Close the cover and reset the SlideMaker.
6. If the message persists
a. Turn off the SlideMaker.
b. If AutoStop is ON, turn AutoStop OFF to resume GEN•S System operation.
Samples that require slides appear in the Slide List.
c. Call your Coulter Representative.
7.2-45
7
TROUBLESHOOTING
TABLES OF SLIDEMAKER MESSAGES
Table 7.2-14 Truck Error Messages (Continued)
SLIDEMAKER
View Error
Screen Message
WORKSTATION
RCS™ Application
Call Msg/Time
Alarm Log Message and Icons on Command Center
TRUCK (VACUUM, SENSOR 3)
Yes
Internal Message No. and Code:
49, SERVO-TRUCK VACUUM
FAILURE, SEN3
SlideMaker Log
SlideMaker Truck
Vacuum Out Of
Tolerance (Sensor 3).
If AutoStop
is OFF
RECOVERY
If AutoStop
is ON
N/A
SlideMaker Status
1. No new samples are aspirated.
2. Any sample in a reservoir is
discarded.
3. Completed smears are dried
and deposited in a slide basket.
Probable Cause
r The smear truck is not properly located
over a slide.
r Vacuum has not been applied.
r Vacuum is too low.
r The truck vacuum sensor, SEN3, failed.
r Debris is impeding the establishment of
vacuum.
Corrective Action
Note: Press any key on the SlideMaker screen to reset the alarm.
1. Wait until the last slide in the Dryer module is deposited in a slide basket.
2. Turn off the SlideMaker and open the cover.
WARNING Risk of personal injury and contamination. The slide processing areas can
contain prepared smears and/or broken glass with biohazardous material. Handle with
care and avoid skin contact.
3. Remove the slide cassette from the slide ejector station
4. Remove any glass slides in the slide ejector mechanism.
5. Remove any slide on the shuttle and wipe the shuttle with a clean tissue to remove
any debris.
6. Check the area below the smear truck for fallen slides and retrieve the slides if
possible.
7. Place the slide cassette back in the Cassette Input Queue module.
8. Close the cover and turn on the SlideMaker.
9. If the message persists:
a. Turn off the SlideMaker.
b. If AutoStop is ON, turn AutoStop OFF to resume GEN•S System operation.
Samples that require slides appear in the Slide List. Call your Coulter
Representative.
TRUCK (WICK POSITION)
Yes
Internal Message No. and Code:
53, SERVO-WICK POS NOT
FOUND
SlideMaker Log
SlideMaker Truck Wick
Position Timeout.
If AutoStop
is OFF
If AutoStop
is ON
5/24 hours
1. No new samples are aspirated.
2. Any sample in a reservoir is
discarded.
3. Completed smears are dried
and deposited in a slide basket.
4. The SlideMaker stops all
mechanical activity.
When traveling to the wick position, the
smear truck ended at a position greater than
±0.050 in.of the desired position.
Note: Press any key on the SlideMaker screen to reset the alarm.
1. Wait until the last slide in the Dryer module is deposited in a slide basket
2. Open the cover.
Cause unknown.
WARNING Risk of personal injury and contamination. The slide processing areas can
contain prepared smears and/or broken glass with biohazardous material. Handle with
care and avoid skin contact.
3.
4.
5.
6.
7.2-46
7.2-46
Check the slide on the shuttle and remove that slide if it is labeled or has blood on it.
Check the area below the smear truck for fallen slides and retrieve if possible.
Close the cover and reset the SlideMaker.
If the message persists
a. Turn off the SlideMaker.
b. If AutoStop is ON, turn AutoStop OFF to resume GEN•S System operation.
Samples that require slides appear in the Slide List.
c. Call your Coulter Representative.
PN 4276985A
TROUBLESHOOTING
TROUBLESHOOTING TIPS FOR THE SLIDE AND SMEAR MODULE
7.3
TROUBLESHOOTING TIPS FOR THE SLIDE AND SMEAR MODULE
Troubleshooting Blood Smear Quality Problems
The quality of the blood smear is determined by:
r
Surface conditions of the slide.
r
Performance of the Smear, Sample Access and Reservoir, and Dryer modules.
For the smear specifications, refer to the User’s manual or the Online Help System.
Troubleshooting Smear Module Alignment Problems
The Smear module is integrated with the Slide Ejector module, the Dryer module and the
Dispense module into one slide transport frame. Each module must be mounted accurately
for the Smear module to perform correctly. The mounting of the:
r
Slide Ejector module affects the position of the ejected slide which affects:
t
The ability of the smear truck to pick up the slide.
t
The alignment between the spreader slide and the smear slide.
r
Dispense module affects the positioning of the blood drop on the slide.
r
Dryer module affects the positioning of the smeared slide on the conveyer belt in the
Dryer module.
Troubleshooting the Servo System
Two test points are available on the System Control card to assist in troubleshooting the servo
system.
r
Ground the test point TP64 to inhibit all servo motor operation.
WARNING Operator injury and/or instrument damage may result from very high smear truck speeds and
no braking input. Remove the motor from the smear assembly before grounding TP65 and the limit sensors
to troubleshoot the servo system.
r
PN 4276985A
Ground the test point TP65 to run the motor in an open loop mode to verify motor
commutation and drive circuitry functions. Note that you must also ground the limit
sensor inputs to disable braking.
7.3-1
7
TROUBLESHOOTING
TROUBLESHOOTING TIPS FOR THE SLIDE AND SMEAR MODULE
7.3-2
PN 4276985A
TROUBLESHOOTING
SOFTWARE INSTALLATION ERRORS
7.4
SOFTWARE INSTALLATION ERRORS
Table 7.4-1 lists the errors messages and recommended actions for problems encountered
while installing SlideMaker software.
Table 7.4-1 Software Installation Errors
Error Message
Description
Corrective Action
LANGUAGE SUPPORT TOOL Flash memory "B" data file version was
VERSION IS INCOMPATIBLE incompatible with processor "B" software.
WITH SYSTEM SOFTWARE
Flash memory "B" screen and message data
compressed format was not recognized by
the decode task.
Download the SlideMaker software from
the Workstation.
ERROR: XY BAD CRC
1. Download the SlideMaker software
from the Workstation.
Flash memory CRC check error.
r A non-zero "X" indicates flash memory
"A" has an error condition. Bit 0, 1, and 2
indicate table "A," code "A," and code "B"
CRC check sum results. (1= fail)
2. If error recurs, replace the System card
and the flash memory device.
r A non-zero "Y" indicates flash memory
"B" has an error condition. Bit 0 and 1
indicate "B" screen data and "B" message
data CRC check sum results. (1= fail)
PLEASE DOWNLOAD LST
OUTPUT FILE(S) THERE IS
NO SCREEN INFORMATION
IN MEMORY
"B" flash memory is blank, or loaded data
was not screen information.
Download the SlideMaker software "B"
flash memory screens data and "B" flash
memory messages data from the
Workstation.
SELF TESTING
Normally displayed for about 3 seconds
during the self test, then the SlideMaker
initializes itself and begins running.
Check the LEDs on the System card. If the
left three are blinking at the same time,
ensure the jumpers on J7 System card are
set correctly. See System Control Card,
Jumpers, under Heading A.2.
If this message remains on the screen
indefinitely, it indicates a problem.
PN 4276985A
7.4-1
7
TROUBLESHOOTING
SOFTWARE INSTALLATION ERRORS
7.4-2
PN 4276985A
CONTENTS
8
PARTS LISTS, 8.1-1
8.1
MASTER PARTS LIST, 8.1-1
8.2
ILLUSTRATED PARTS, 8.2-1
ILLUSTRATIONS
8.2-1
8.2-2
8.2-3
8.2-4
8.2-5
8.2-6
8.2-7
8.2-8
8.2-9
8.2-10
8.2-11
8.2-12
8.2-13
8.2-14
8.2-15
8.2-16
Main SlideMaker Modules Illustrated, 8.2-1
Basket Queue Module (See Table 8.2-2), 8.2-2
Cassette Input Queue Module and Slide Ejector Module (See Table 8.2-3), 8.2-4
Cassette Output Queue Module 2 (See Table 8.2-4), 8.2-6
Dispense Module (See Table 8.2-5), 8.2-8
Dryer Module (See Table 8.2-6), 8.2-10
Main Fluidics (See Table 8.2-7), 8.2-12
Rear Compartment (See Table 8.2-8), 8.2-14
Rear Door (See Table 8.2-9), 8.2-16
Sample Access and Reservoir Module (See Table 8.2-10), 8.2-18
Slide Elevator Module (See Table 8.2-11), 8.2-20
Slide and Smear Module (See Table 8.2-12), 8.2-22
Upper Cassette Transfer Mechanism and Encoder (See Table 8.2-13), 8.2-24
Dispense Probe Mechanism and Rinse Block (See Table 8.2-14), 8.2-25
Smear Truck Assembly (See Table 8.2-15), 8.2-26
Chokes and Fittings (See Table 8.2-16), 8.2-27
TABLES
8.1-1
8.1-2
8.1-3
8.1-4
8.1-5
8.1-6
8.1-7
8.1-8
8.1-9
8.1-10
Common Categories Used in Master Parts List, 8.1-1
Master Parts List, A and B, 8.1-2
Master Parts List, C, 8.1-3
Master Parts List, D through F, 8.1-6
Master Parts List, G through L, 8.1-8
Master Parts List, M, 8.1-9
Master Parts List, N through P, 8.1-10
Master Parts List, R and S, 8.1-11
Master Parts List, T and U, 8.1-12
Master Parts List, V through Z, 8.1-14
8.2-1
SlideMaker Modules and Components Illustrated but Not Referenced in
Figure 8.2-1, 8.2-1
Basket Queue Module (See Figure 8.2-2), 8.2-3
Cassette Input Queue Module and Slide Ejector Module (See Figure 8.2-3), 8.2-5
Cassette Output Queue Module (See Figure 8.2-4), 8.2-7
Dispense Module (See Figure 8.2-5), 8.2-9
Dryer Module (See Figure 8.2-6), 8.2-11
Main Fluidics Module (See Figure 8.2-7), 8.2-13
Rear Compartment (See Figure 8.2-8), 8.2-15
Rear Door (See Figure 8.2-9), 8.2-17
Sample Access and Reservoir Module (See Figure 8.2-10), 8.2-19
Slide Elevator Module (See Figure 8.2-11), 8.2-21
Slide and Smear Module (See Figure 8.2-12), 8.2-23
Upper Cassette Transfer Mechanism (See Figure 8.2-13), 8.2-24
8.2-2
8.2-3
8.2-4
8.2-5
8.2-6
8.2-7
8.2-8
8.2-9
8.2-10
8.2-11
8.2-12
8.2-13
PN 4276985A Draft Review
8-i
8
CONTENTS
8.2-14 Dispense Probe Mechanism and Rinse Block (See Figure 8.2-14), 8.2-25
8.2-15 Smear Truck Assembly (See Figure 8.2-15), 8.2-26
8.2-16 Chokes and Fittings (See Figure 8.2-16), 8.2-27
8-ii
PN 4276985A Draft Review
8PARTS LISTS 8
8.1
MASTER PARTS LIST
The components in the master parts list are listed alphabetically by common name or generic
category. Table 8.1-1 further defines the categories used, and references the table in this
section where those components appear. Where applicable, a component is cross referenced
to its illustration in Heading 8.2.
Table 8.1-1 Common Categories Used in Master Parts List
Category
Category Includes
Table
Cable
All electrical wiring.
8.1-3
Chamber
All liquid, vacuum, and pressure chambers, including tanks and foam traps.
8.1-3
Chokes
Any liquid or air-flow restrictor except tubing restrictors (categorized under tubing) and
choke fittings (categorized under fittings).
8.1-3
Consumable
All customer billable parts such as adhesives, alcohol, slide cassettes, grease, and tape.
8.1-3
Cover
All non-hinged panels, circuit card covers, and component covers.
8.1-3
Custom Part
Miscellaneous components not easily categorized by a common name. On the SlideMaker
this includes the slide-retaining arm on the platen, and the finger (hammer) on the
X-register arm.
8.1-3
Cylinder
All cylinders, air or oil.
8.1-3
Display
Any display screen.
8.1-4
Door
All hinged panels.
8.1-4
Fan
Fan guards and fans.
8.1-4
Filter
Air fluid barrier, air water separators, and air filters.
8.1-4
Fitting
Includes choke, elbow, feed-thru, muffler, plug, quick-disconnect, T-, union and Y-fittings. 8.1-4
Fuse
Fuse holder and fuses.
Hardware
Miscellaneous hardware including brackets, guides, clips, hinges, knobs, latches, mounts, 8.1-6
plates, standoffs and studs. Does not include fittings, nuts, screws, and washers which
are listed as separate categories.
Module
Assemblies that contain all of the components for performing a specific instrument
function and that are designed to be removed as a unit for servicing.
8.1-6
PCB
All printed circuit cards.
8.1-7
Pump
All liquid pumps and dispensers.
8.1-7
Regulator
All pressure and vacuum regulators.
8.1-8
Screw
All screws, including thumbscrews and setscrews.
8.1-8
Switch
All types including button, float, magnetic, micro and opto.
8.1-8
Tie wrap
Nylon, loop and clamp tie wraps and tie wrap adhesives.
8.1-9
Tool
Tool box and all tools needed for servicing the SlideMaker.
8.1-9
Tubing
All tubing, including standard, custom, I-beam, restrictor, and shielded input lines; and
tubing collars and sleeves.
8.1-9
Valve
All valves, including check, pinch, and solenoid; and valve deactivator clips.
8.1-10
Washer
Washers and spacers.
8.1-10
PN 4276985A
8.1-5
8.1-1
PARTS LISTS
MASTER PARTS LIST
Table 8.1-2 Master Parts List, A and B
Description
Part Number Figure
Item
Actuator, valve, pilot piston, pneumatic, 11.6 lb, brass
6232447
8.2-5
6
Actuator, valve, pilot, 7/16 bore, nickel plated
6211015
8.2-5
8.2-7
8.2-10
8.2-12
3
1
7
25
Basket, slide, molded (compatible with the SlideStainer)
6806894
Bearing, roller, assembly
2523625
8.2-6
4
Belt, conveyer, CP
1023108
8.2-6
1
Belt, drive inner basket transport
2527696
8.2-2
5
Belt, outer drive basket transport
2527695
8.2-2
9
Belt, timing 40 DP, 97.828 cm (38.515 in.) L
2527726
8.2-12
19
Bridge, slide pickup
1024095
8.2-3
8
Brush assembly
6806079
8.2-12
18
Bumper, foot
3908015
Bushing (two each)
2527850
8.2-3
9
8.1-2
PN 4276985A
PARTS LISTS
MASTER PARTS LIST
Table 8.1-3 Master Parts List, C
Description
Part Number Figure
Cable assembly, 6-position, 51 cm (20 in.) L
6028862
Cable assembly, basket cover interlock sensor, SEN54
6028835
8.2-2
7
Cable assembly, Basket Queue module sensor, SEN37
6028841
8.2-2
12
Cable assembly, Basket Queue module sensor, SEN39
6028842
8.2-2
17
Cable assembly, Basket Queue module sensor, SEN40
6028843
8.2-2
8
Cable assembly, Basket Queue module sensors
6028840
8.2-2
13
Cable assembly, emergency stop switch, SEN13-
6028836
Cable assembly, flat flexible
6028488
Cable assembly, main cover open sensor, SEN53
6028834
Cable assembly, power on/off switch
6028837
Cable assembly, pressure and vacuum enable solenoids
6028913
8.2-9
28
Cable assembly, PS Mon/Distribution
6028765
8.2-9
25
Cable assembly, PS Mon/Printer power
6028755
8.2-9
27
Cable assembly, ribbon/flat, Basket Transport Interface card, 34 position, 68.6 cm
(27 in.) L
6028779
Cable assembly, ribbon/flat, Dispense 1 Manifold card, 16 position, 76 cm (30 in.) L
6028777
Cable assembly, ribbon/flat, Dispense 2 Manifold card, 16 position, 76 cm (30 in.) L
6028856
Cable assembly, ribbon/flat, Dryer Interface card, 40 position, 76 cm (30 in.) L
6028776
Cable assembly, ribbon/flat, fluid detector data, 20 position, 17.8 cm (7 in.) L
6028778
Cable assembly, ribbon/flat, Main Fluidics Interface card, 16 position, 64.8 cm
(25.5 in.) L
6028772
Cable assembly, ribbon/flat, printer data, 9 position, 61 cm (24 in.) L
6028771
Cable assembly, ribbon/flat, PS Mon data, 26 position, 38 cm (15 in.) L
6028775
8.2-9
26
Cable assembly, ribbon/flat, Slide Ejector Interface card, 26 position, 94 cm (37 in.) L
6028774
Cable assembly, ribbon/flat, Smear/Transport Interface card, 34 position, 63.5 cm
(25 in.) L
6028770
Cable assembly, sensor 26
6028790
8.2-3
5
Cable assembly, sensor 27
6028832
8.2-3
2
Cable assembly, sensor, 25.4 cm (10.0 in.)
6028748
8.2-13
8.2-14
6
1
Cable assembly, sensor, 38 cm (15.0 in.)
6028749
8.2-3
8.2-4
8.2-11
8.2-12
1
2
4
14
Cable assembly, sensor, 53 cm (21.0 in.)
6028747
8.2-3
8.2-12
10, 20
9
Cable assembly, smear truck sensors, SEN18 and SEN19
6028907
8.2-15
3
Cable assembly, vacuum drain, SOL63
6028763
PN 4276985A
Item
8.1-3
8
PARTS LISTS
MASTER PARTS LIST
Table 8.1-3 Master Parts List, C (Continued)
Description
Part Number Figure
Cable assembly, vacuum waste
6028753
Cable, harness, Pneumatic Monitor cards, S/A
6805671
Cable, main power
6011023
Cable, SOL120 to SlideMaker Interface card
6806194
Cassette, slide, molded
6806470
Chamber, foam trap, S/A
Item
8.2-9
2
8.2-10
9
6859138
8.2-7
7
Chamber, isolator, S/A
6858601
8.2-7
6
Chamber, plastic
6854732
8.2-8
4
Chamber, rinse housing vacuum, S/A;
6854848
8.2-7
5
Chamber, sheath tank, S/A
6805574
8.2-7
4
Chamber, vacuum/waste, S/A
6232825
8.2-8
9
Choke, pneumatic, orange, 0.006 orifice, 0.062 i.d. barbed ends
6232158
8.2-16
3
Consumable, LOCTITE™ adhesive/sealant
1601065
Cover, basket, S/A
6806043
Cover, Main Fluidics module
1023913
Cover, panel, left side, S/A
6805796
Cover, panel, right side, mount, S/A
6805804
Cover, panel, right side, S/A
6805797
Cover, panel, top rear, electronics, S/A
6805795
Cover, splash shield, Dispense module
6806855
Cover, splash shield, Sample Access and Reservoir module
6806874
Cover, splash shield, solenoid 120, CP
1025048
Cover, unicover, molded, latch sleeve, CP
1023879
Cover, unicover, molded, latch, CP
1023878
Cover, unicover, molded, S/A
6806070
Custom Part, alignment pin, front cover, CP
1021433
Custom Part, arm, cassette lockdown, left
6806305
8.2-3
19
Custom Part, arm, cassette lockdown, right
6806217
8.2-3
24
Custom Part, arm, slide retaining (gripper), CP
1024016
8.2-11
1
Custom Part, finger (hammer), slide accessible (part of X-register arm)
1024574
8.2-3
9
Cylinder, air, 1.5 stroke, 0.5 bore, double acting, aluminum
6232755
8.2-14
5
Cylinder, air, 1.63 stroke, 5/8 bore
6232889
8.2-2
8.2-4
2
1
Cylinder, air, 2.00 stroke, 0.50 bore, double acting, guided
6232833
8.2-12
6
Cylinder, air, 4.5 stroke, 3/8 bore, double acting, 125 psi max
6232747
8.2-13
5
Cylinder, air, double acting, 1 3/4 stroke, 1 1/16 stroke
6232901
8.2-3
4
8.1-4
PN 4276985A
PARTS LISTS
MASTER PARTS LIST
Table 8.1-3 Master Parts List, C (Continued)
Description
Part Number Figure
Item
Cylinder, air, double acting, 1/2 stroke, 1/2 bore
6232896
8.2-3
11
Cylinder, air, double acting, 1/2 stroke, 5/8 bore
6232900
8.2-3
3
Cylinder, air, single acting, spring return, 0.156 bore, 0.25 stroke
6232937
8.2-3
21
Cylinder, air, X-registration, S/A
6806358
8.2-3
22
Cylinder, lift, truck, CP
1024369
8.2-15
4
Cylinder, slide retaining, CP
1023783
8.2-11
3
PN 4276985A
8.1-5
8
PARTS LISTS
MASTER PARTS LIST
Table 8.1-4 Master Parts List, D through F
Description
Part Number Figure
Item
Fan, 24 Vdc, S/A
6805679
8.2-8
2
Fan/blower, cfm, 24 Vdc
6028741
8.2-6
6
Filter, air
6232865
8.2-12
20
Filter, fan air
2603047
Filter, line, 6 A, 220 V/50 Hz, 2 µA leakage
2707013
8.2-9
21
Filter, line, 6 A, 250 Vac/400 Hz, 190 µA max
2707014
8.2-9
19
Fitting, choke, pneumatic, black, 0.010 orifice, 0.063 i.d. barb to 10-32 thd, brass
6232695
8.2-2
1
Fitting, choke, pneumatic, brown, 0.006 orifice, 0.063 i.d.barb to 10-32 thd, brass
6232697
8.2-3
13
Fitting, choke, pneumatic, red, 0.008 orifice, 0.063 i.d.barb to 10-32 thd, brass
6232696
8.2-3
15
Fitting, choke, pneumatic, yellow, 0.004 orifice, 0.063 i.d.barb to 10-32 thd, brass
6232698
8.2-3
14
Fitting, elbow, miniature, adjustable, 2 mm (5/64) i.d. hose barb to 10-32 thd, brass
6232829
8.2-5
8.2-10
4
8
Fitting, feed-thru, small i.d. tubing
6806993
8.2-5
8.2-10
7
13
Fitting, internal to 0.094 hose
6232503
Fitting, Luer, 0.094 i.d, male
6232435
8.2-12
4
Fitting, Luer, external to 0.094 i.d., hose barb, plastic
6232436
8.2-12
3
Fitting, Luer, female, 0.093 hose barb
6232852
8.2-12
15
Fitting, Luer, internal to 0.063 hose barb
6232827
8.2-12
16
Fitting, Luer, locknut,1/4-28, bulkhead to Luer, white nylon
6232382
8.2-10
8.2-12
5
16
Fitting, Luer, male, lock ring, black nylon
6232666
8.2-9
12
Fitting, Luer, male, lock ring, blue nylon
6232663
8.2-9
10
Fitting, Luer, male, lock ring, green nylon
6232664
8.2-9
8.2-12
4
11
Fitting, Luer, male, lock ring, red nylon
6232665
8.2-9
6
Fitting, Luer, male, lock ring, white nylon (use with PN 6232436 and PN 6232435)
6232434
8.2-12
3
Fitting, Luer, male, lock ring, yellow nylon
6232662
8.2-9
8.2-12
8
17
Fitting, Luer, male, to 0.094 i.d. hose barb, polypropylene
6232660
8.2-9
8.2-12
3
11,
17
Fitting, quick disconnect, body, female, 10-tube
6232855
Fitting, quick disconnect, body, male, 10-tube
6232853
Fitting, quick disconnect, elbow insert, 1/4 hose barb
6232882
Fitting, quick disconnect, elbow insert, 1/8 hose barb
6232883
Fitting, quick disconnect, flex arms/joint, socket, 0.25 ball
2523743
8.2-10
1
8.1-6
PN 4276985A
PARTS LISTS
MASTER PARTS LIST
Table 8.1-4 Master Parts List, D through F (Continued)
Description
Part Number Figure
Item
Fitting, quick disconnect, flex arms/joints, socket
2523743
8.2-5
10
Fitting, quick disconnect, internal connector, panel, 0.125 hose barb
6232644
8.2-9
16
Fitting, T, 0.0114 i.d., white
6216354
Fitting, T, clear
6805067
8.2-16
2
Fitting, T, hose barb, plastic
6232051
Fitting, union, clear, for 0.03 tubing
6805272
8.2-16
1
Fitting, union, plastic, 0.062 i.d. (reducer)
6232352
8.2-16
4
Fitting, Y, 0.085 i.d.
1018245
Fluid detector, S/A
6805569
8.2-5
8.2-10
11
3
Frame, S/A
6805728
Fuse holder
9921373
8.2-9
20
Fuse, 6.0 A, 250 V, 0.25 x 1.25, glass, sloblo
5120175
8.2-9
22
PN 4276985A
8.1-7
8
PARTS LISTS
MASTER PARTS LIST
Table 8.1-5 Master Parts List, G through L
Description
Part Number Figure
Item
Gear, spur, 48 pitch, 120 teeth
2527729
8.2-12
12
Hardware, bracket, door holder (right door hinge), CP
1023626
Hardware, clip, 5-way solenoid valve, CP
1021414
8.2-2
8.2-4
8.2-12
8.2-13
11
4
10
1
Hardware, coupling, flexible, 0.197 i.d. x 0.500 o.d., aluminum
2527763
8.2-3
16
Hardware, hinge, display panel, CP
6805857
Hardware, hinge, hidden, zinc plate
2523647
Hardware, latch, concealed, 3 lb pull up, 1.9 x 1.3 in. ABS, black
2852019
8.2-9
14
Hardware, mount, fluid detector, CP
1023417
8.2-5
8.2-10
9
2
Hardware, mount, pinch valve, CP
1017501
8.2-5
8.2-7
2
2
Hardware, plate, catch mount, S/A
6805820
Hardware, plate, catch mount, S/A
6805821
Hardware, plate, nut, side panel, S/A
6805768
Hardware, plate, pusher (slide ejector)
7000658
8.2-3
23
Hardware, support, dispense backwash trough, S/A
6805062
8.2-14
2
Heat source assembly
6706225
8.2-6
7
Housing, S/A
6805776
Lever and spring assembly (for SEN46)
6807184
8.2-6
5
Lever, tilt (on smear truck)
6806635
8.2-15
7
8.1-8
PN 4276985A
PARTS LISTS
MASTER PARTS LIST
Table 8.1-6 Master Parts List, M
Description
Part Number Figure
Item
Manifold, 5 psi, CP
1007924
8.2-8
6
Manifold, CP, MF7
1006763
8.2-8
7
Manifold, solenoid valve, 4-position
6232850
8.2-10
6
Manifold, solenoid valves, pneumatic, 10-position, 24 Vdc
6232748
8.2-5
8.2-7
12
10
Manifold, w/ four solenoid valves
6232836
8.2-3
12
Module, Keypad and Display
4837349
Module, Upper Cassette Transfer Mechanism, S/A
6806011
8.2-13
Motor, ejector pusher
6806347
8.2-3
17
Motor, dc, brushless, 24 Vdc, 10 K rpm, 3.86 oz-in.
3505050
8.2-12
8
Motor, linear, digital, 12 Vdc
3533110
8.2-11
6
Motor, stepper, 1.8 degree, 6 Vdc, 3000 rpm, 36.1 oz-in.
3505055
8.2-12
24
Motor, stepper, 9.6 Vdc, 0.1 degree/step, 111 oz-in.
3505056
8.2-2
3
Motor, stepper, w/ offset 300:1
3505053
8.2-6
9
PN 4276985A
8.1-9
8
PARTS LISTS
MASTER PARTS LIST
Table 8.1-7 Master Parts List, N through P
Description
Part Number Figure
Needle, low pierce cartridge
6806229
O-ring, shuttle
2527822
O-ring, smear truck
2512026
PCB, Basket Corner Sensor
Item
8.2-12
22
6706563
8.2-2
6
PCB, Basket Index
6706669
8.2-2
4
PCB, Basket Transport Interface
6706417
8.2-2
15
PCB, Belt Profile Sensor
6706667
8.2-2
14
PCB, Cassette Empty Sensor (SEN28)
6706415
8.2-3
6
PCB, Dryer Interface
6706403
8.2-6
8
PCB, Main Distribution
6706742
8.2-8
3
PCB, Pneumatic Monitor, 17.5 in. Hg
6706514
8.2-9
11
PCB, Pneumatic Monitor, 30 PSI
6706511
8.2-9
5
PCB, Pneumatic Monitor, 6 PSI
6706512
8.2-9
7
PCB, Pneumatic Monitor, 6.5 in. Hg
6706513
8.2-9
13
PCB, Pneumatic Monitor, Vacuum
6706515
8.2-9
9
PCB, Power Supply Monitor
6706561
8.2-9
1
PCB, Slide Accessible (contains SEN17 and SEN25)
6706915
8.2-3
10
PCB, Slide Detector (Dryer Exit Sensor card)
6706665
8.2-6
3
PCB, Slide Ejector Interface
6706743
8.2-3
18
PCB, Smear/Transport Interface
6706744
8.2-13
4
PCB, System Control
6706687
8.2-8
1
PCB, Temperature Sensor
6706083
8.2-6
2
Platen, S/A
6806156
8.2-11
11
Power supply
4004091
8.2-9
18
Printer assembly
2016756
Printhead, thermal transfer
2016912
Probe, dispense
1022962
8.2-14
4
Pump, pinch, S/A
6805571
8.2-5
5
8.1-10
PN 4276985A
PARTS LISTS
MASTER PARTS LIST
Table 8.1-8 Master Parts List, R and S
Screw
Description
Part Number Figure
Item
Regulator and flow meter, pressure, 1-10 psi, miniature
6232847
8.2-8
8
Regulator and flow meter, vacuum, 7 in. Hg
6232628
8.2-7
9
Regulator, vacuum, 0-25 in. Hg, S/A
6232840
8.2-7
8
Rinse block, dispense, self aligning, S/A
6805063
8.2-14
3
Screw, setscrew, 4-40 x 0.50, self-locking
2852343
8.2-11
10
Screw, setscrew, 6-32 x 0.125
2807004
8.2-12
13
Screw, setscrew, 4-40 x 0.38, self-locking (lift-up setscrew)
2852395
8.2-15
6
Screw, shoulder, 4-40 x 0.28, 0.125 l
2851227
8.2-11
8
Screw, shoulder, 4-40, 0.125 diameter (tilt-lever screw)
1024366
8.2-15
8
Screw, thumbscrew, 6-32, knurled shoulder (for securing splash shields)
2815022
Sensor, encoder, optical, three-channel
4837095
8.2-14
2
Shuttle, S/A
1024338
8.2-12
23
Software, Printer EPROM, version 2.8
2016819
Spring, compression, 0.300 o.d. x 2.50 l x 0.22 w (for smear truck)
2527784
8.2-15
2
Spring, extension
2527787
8.2-11
9
Spring, torsion spring, slide, CP
1024308
8.2-11
2
Suppressor, transient voltage, assembly 2
6706401
8.2-9
24
Switch and lever assembly
6805693
8.2-6
5
Switch, accessories, magnet actuator, use with PN 5116004
5111192
Switch, light modulation, CP
1024087
8.2-11
7
Switch, push button, 0.5 A at 250 Vac, green LED (1 A at 30 Vdc)
5120239
Switch, push button, 0.5 A at 250 Vac, red LED (1 A at 30 Vdc)
5104100
Switch, rocker, dpst, 16 A at 250 Vac, lighted, green neon
5105001
8.2-9
23
Switch, vacuum/pressure, high vacuum
5115016
8.2-12
2
PN 4276985A
8.1-11
8
PARTS LISTS
MASTER PARTS LIST
Table 8.1-9 Master Parts List, T and U
Description
Part Number Figure
Tray, vacuum formed, left, CP
1023608
Tray, vacuum formed, right, CP
1023609
Trim, decorative, PVC, black
3202044
Truck, smear, assembly
6806362
8.2-15
Truck, smear, with ball bearings, S/A
1024596
8.2-15
9
Tubing, collar, silicone
1023662
Tubing, flex (coiled), truck, CP
1024310
8.2-12
8.2-15
7
1
Tubing, polyurethane, 0.062 i.d.
3213063
Tubing, polyurethane, 0.082 i.d.
3202037
Tubing, polyurethane, 0.082 i.d., blue stripe
3202209
Tubing, polyurethane, 0.082 i.d., clear
3202036
Tubing, polyurethane, 0.082 i.d., green stripe
3202208
Tubing, polyurethane, 0.082 i.d., green/black stripe
3202217
Tubing, polyurethane, 0.082 i.d., grey stripe
3202211
Tubing, polyurethane, 0.082 i.d., grey/black stripe
3202244
Tubing, polyurethane, 0.082 i.d., purple stripe
3202210
Tubing, polyurethane, 0.082 i.d., red stripe
3202205
Tubing, polyurethane, 0.082 i.d., red/black stripe
3202214
Tubing, polyurethane, 0.082 i.d., yellow stripe
3202207
Tubing, polyurethane, 0.082 i.d., yellow/black stripe
3202216
Tubing, polyurethane, 0.113 i.d.
3202038
Tubing, restrictor line, vacuum, 15"
6807015
Tubing, restrictor line, vacuum, 4"
6806997
Tubing, ribbon (double coiled), CP
1024058
8.2-12
8.2-15
7
5
Tubing, ribbon, six-tubed, 0.113 i.d./0.237 o.d., striped, polyurethane
1023716
Tubing, shielded cleaning agent
6806197
Tubing, shielded diluent
6806195
Tubing, shielded waste
6806193
Tubing, silicone, 0.062, black stripe, pull apart
3213136
Tubing, silicone, brown stripe
3213163
Tubing, silicone, red stripe, pull apart
3213139
Tubing, silicone, yellow stripe
3213176
Tubing, sleeve, for mini pinch valve
1024575
Tubing, special, 50 durometer hardness
3230059
8.1-12
Item
PN 4276985A
PARTS LISTS
MASTER PARTS LIST
Table 8.1-9 Master Parts List, T and U (Continued)
Description
Part Number Figure
Tubing, special, 8 ribbon
3230068
Tubing, special, coiled, 0.38 i.d. x 1.25 cm (0.49 in.) L, CP
1023707
PN 4276985A
8.2-12
Item
23
8.1-13
8
PARTS LISTS
MASTER PARTS LIST
Table 8.1-10 Master Parts List, V through Z
Description
Part Number Figure
Valve, check
6232080
Valve, pinch valve, single tube, black, S/A
6857096
8.2-10
4
Valve, pinch valve, single tube, grey, S/A
6806850
8.2-5
8.2-10
8
13
Valve, pinch, standard, pull apart, assembly
6855763
8.2-5
8.2-7
8.2-12
1
3
26
Valve, solenoid, hydraulic, 3-way NC, ppt, 30 psi
6232856
8.2-5
8.2-10
13
12
Valve, solenoid, pneumatic, 3-way NC, 0-50 psi
6214112
8.2-10
10
Valve, solenoid, pneumatic, 3-way NC, 0-57 psi
6214109
8.2-11
5
Valve, solenoid, pneumatic, 5-way NO, spool, 100 psi, 10 cfm, 24 Vdc
6232958
8.2-2
8.2-3
8.2-4
8.2-12
8.2-13
10
16
3
9
3
Valve, solenoid, pressure enable, 3-way, NC, 24 Vdc
6232844
8.2-9
15
Valve, solenoid, three on a partitioned manifold, S/A
6232837
8.2-12
1
Valve, solenoid, vacuum enable, 3-way, NC, 24 Vdc
6232845
8.2-9
17
Valve, solenoid, waste
6232839
8.2-8
5
Z-axis register S/A
7000680
8.2-3
7
8.1-14
Item
PN 4276985A
PARTS LISTS
ILLUSTRATED PARTS
8.2
ILLUSTRATED PARTS
On the illustrations in this section, a number is used to identify the part in the associated
parts list, a letter to indicate detailed illustrations are available for the component or assembly.
Figure 8.2-1 Main SlideMaker Modules Illustrated
Figure References
A Figure 8.2-3, Slide
Ejector module
B Figure 8.2-12, Smear
module
J
C Figure 8.2-5, Dispense
module
D Figure 8.2-11, Slide
Elevator module
A
I
E Figure 8.2-6, Dryer
module
B
F Figure 8.2-4, Cassette
Output Queue module
H
G Figure 8.2-2, Basket
Queue module
G
F
C
E
H Figure 8.2-3, Cassette
Input Queue module
I
Figure 8.2-7, Main
Fluidics module
J
Figure 8.2-12, Slide
Transport module
D
6985028A
Table 8.2-1 SlideMaker Modules and Components Illustrated but Not Referenced in Figure 8.2-1
PN 4276985A
Figure Title
Figure Number
Rear Compartment Components
Figure 8.2-8
Rear Door Components
Figure 8.2-9
Sample Access and Reservoirs Module Components
Figure 8.2-10
Chokes and Fittings
Figure 8.2-16
8.2-1
8
PARTS LISTS
ILLUSTRATED PARTS
Figure 8.2-2 Basket Queue Module (See Table 8.2-2)
1
17
6
2
3
4
5
16
6
2
15
14
1
13
3
12
7
8
10
11 10
9
8.2-2
6985033A
PN 4276985A
PARTS LISTS
ILLUSTRATED PARTS
Table 8.2-2 Basket Queue Module (See Figure 8.2-2)
Item
Part Number
Description
1
6232695
Fitting, choke, pneumatic, black, 0.010 orifice, 0.063 i.d. barb to 10-32 thd, brass
2
6232889
Cylinder, air, 1.63 stroke, 5/8 bore
3
3505056
Motor, stepper, 9.6 Vdc, 0.1 degree/step, 111 oz-in.
4
6706669
PCB, Basket Index
5
2527696
Belt, drive inner basket transport
6
6706563
PCB, Basket Corner Sensor
7
6028835
Cable assembly, basket cover interlock sensor, SEN54
8
6028843
Cable assembly, Basket Queue module sensor, SEN40
9
2527695
Belt, outer drive basket transport
10
6232958
Valve, solenoid, pneumatic, 5-way NO, spool, 100 psi, 10 cfm, 24 Vdc
11
1021414
Hardware, clip, 5-way solenoid valve, CP
12
6028841
Cable assembly, Basket Queue module sensor, SEN37
13
6028840
Cable assembly, Basket Queue module sensors
14
6706667
PCB, Belt Profile Sensor
15
6706417
PCB, Basket Transport Interface
16
2527763
Hardware, coupling, flexible, 0.197 i.d. x 0.500 o.d., aluminum
17
6028842
Cable assembly, Basket Queue module sensor, SEN39
PN 4276985A
8.2-3
8
PARTS LISTS
ILLUSTRATED PARTS
Figure 8.2-3 Cassette Input Queue Module and Slide Ejector Module (See Table 8.2-3)
1
24
23
22
2
21
1
20
3
19
4
5
6
7
8
18
9
10
11
12
17
14
15
13
B
A
B
A
6985032A
16
8.2-4
PN 4276985A
PARTS LISTS
ILLUSTRATED PARTS
Table 8.2-3 Cassette Input Queue Module and Slide Ejector Module (See Figure 8.2-3)
Item
Part Number
Description
1
6028749
Cable assembly, sensor, 38 cm (15.0 in.)
2
6028832
Cable assembly, sensor 27
3
6232900
Cylinder, air, double acting, 1/2 stroke, 5/8 bore
4
6232901
Cylinder, air, double acting, 1 3/4 stroke, 1 1/16 stroke
5
6028790
Cable assembly, sensor 26
6
6706415
PCB, Cassette Empty Sensor (SEN28)
7
7000680
Z-axis register S/A
8
1024095
Bridge, slide pickup
9
1024574
2527850
Custom Part, finger (hammer), slide accessible (part of X-register arm)
Bushing (two each)
10
6706915
6028747
PCB, Slide Accessible (contains SEN17 and SEN25)
Cable assembly, sensor, 53 cm (21.0 in.)
11
6232896
Cylinder, air, double acting, 1/2 stroke, 1/2 bore
12
6232836
Manifold, w/ four solenoid valves
13
6232697
Fitting, choke, pneumatic, brown, 0.006 orifice, 0.063 i.d.barb to 10-32 thd, brass
14
6232698
Fitting, choke, pneumatic, yellow, 0.004 orifice, 0.063 i.d.barb to 10-32 thd, brass
15
6232696
Fitting, choke, pneumatic, red, 0.008 orifice, 0.063 i.d.barb to 10-32 thd, brass
16
6232958
Valve, solenoid, pneumatic, 5-way NO, spool, 100 psi, 10 cfm, 24 Vdc (SOL50)
17
6806347
Motor, ejector pusher
18
6706743
PCB, Slide Ejector Interface
19
6806305
Custom Part, arm, cassette lockdown, left
20
6028747
Cable assembly, sensor, 53 cm (21.0 in.)
21
6232937
Cylinder, air, single acting, spring return, 0.156 bore, 0.25 stroke
22
6806358
Cylinder, air, X-registration, S/A
23
7000658
Hardware, plate, pusher (slide ejector)
24
6806217
Custom Part, arm, cassette lockdown, right
PN 4276985A
8.2-5
8
PARTS LISTS
ILLUSTRATED PARTS
Figure 8.2-4 Cassette Output Queue Module 2 (See Table 8.2-4)
2
4
3
1
7334004B
8.2-6
PN 4276985A
PARTS LISTS
ILLUSTRATED PARTS
Table 8.2-4 Cassette Output Queue Module (See Figure 8.2-4)
Item
Part Number
Description
1
6232889
Cylinder, air, 1.63 stroke, 5/8 bore
2
6028749
Cable assembly, sensor, 38 cm (15.0 in.)
3
6232958
Valve, solenoid, pneumatic,5-way NO, spool, 100 psi, 10 cfm, 24 Vdc
4
1021414
Hardware, clip, 5-way solenoid valve, CP
PN 4276985A
8.2-7
8
PARTS LISTS
ILLUSTRATED PARTS
Figure 8.2-5 Dispense Module (See Table 8.2-5)
5
12
6
1
2
7
3
4
11
8
10
9
6985031A
8.2-8
PN 4276985A
PARTS LISTS
ILLUSTRATED PARTS
Table 8.2-5 Dispense Module (See Figure 8.2-5)
Item
Part Number
Description
Components Illustrated
1
6855763
Valve, pinch, standard, pull apart, assy
2
1017501
Hardware, mount, pinch valve, CP
3
6211015
Actuator, valve, pilot, 7/16 bore, nickel plated
4
6232829
Fitting, elbow, miniature, adjustable, 2 mm (5/64) i.d. hose barb to 10-32 thd, brass
5
6805571
Pump, pinch, S/A
6
6232447
Actuator, valve, pilot piston, pneumatic, 11.6 lb, brass
7
6806993
Fitting, feed-thru, small i.d. tubing
8
6806850
Valve, pinch, single tube, grey, S/A
9
1023417
Hardware, mount, fluid detector, CP
10
2523743
Fitting, quick disconnect, flex arms/joints, socket
11
6805569
Fluid detector, S/A
12
6232748
Manifold, solenoid valves, pneumatic, 10 position, 24 Vdc
13
6232856
Valve, solenoid, hydraulic, 3-way NC, ppt, 30 psi
Components Not Illustrated
N/A
1023662
Collar, silicone tubing
N/A
1024575
Sleeve, for mini pinch valve
N/A
3230059
Tubing, special, 50 durometer hardness
N/A
6232158
Choke, pneumatic, orange (See Figure 8.2-16, item 3.)
N/A
6232352
Fitting, union, plastic, 0.062 i.d. (See Figure 8.2-16, item 4.)
N/A
6805067
Fitting, T, yellow (See Figure 8.2-16, item 2.)
N/A
6805272
Fitting, union, for 0.03, yellow I-beam tubing (See Figure 8.2-16, item 1.)
PN 4276985A
8.2-9
8
PARTS LISTS
ILLUSTRATED PARTS
Figure 8.2-6 Dryer Module (See Table 8.2-6)
4
4
1
4
4
2
3
5
9
8
6
7
6985034A
8.2-10
PN 4276985A
PARTS LISTS
ILLUSTRATED PARTS
Table 8.2-6 Dryer Module (See Figure 8.2-6)
Item
Part Number
Description
1
1023108
Belt, conveyor, CP
2
6706083
PCB, Temperature Sensor
3
6706665
PCB, Slide Detector (Dryer Exit Sensor card)
4
2523625
Bearing, roller, assembly
5
6805693
6807184
Switch and lever assembly
Lever and spring assembly
6
6028741
Fan/blower, cfm, 24 Vdc
7
6706225
Heat source assembly
8
6706403
PCB, Dryer Interface
9
3505053
Motor, stepper, w/ offset 300:1
PN 4276985A
8.2-11
8
PARTS LISTS
ILLUSTRATED PARTS
Figure 8.2-7 Main Fluidics (See Table 8.2-7)
1
2
9
3
8
4
5
6
7
10
8
9
8.2-12
7334001A
PN 4276985A
PARTS LISTS
ILLUSTRATED PARTS
Table 8.2-7 Main Fluidics Module (See Figure 8.2-7)
Item
Part Number
Description
Components Illustrated
1
6211015
Actuator, valve, pilot, 7/16 bore, nickel plated
2
1017501
Hardware, mount, pinch valve, CP
3
6855763
Valve, pinch valve, standard, pull apart, assy
4
6805574
Chamber, sheath tank, S/A
5
6854848
Chamber, rinse housing vacuum, S/A;
6
6858601
Chamber, isolator, S/A
7
6859138
Chamber, foam trap, S/A
8
6232840
Regulator, vacuum, 0-25 in. Hg, S/A
9
6232628
Regulator and flow meter, vacuum, 7 in. Hg
10
6232748
Manifold, solenoid valve, pneumatic, 10 position, 24 Vdc
Components Not Illustrated
N/A
1023913
Cover, Main Fluidics module
N/A
6232352
Fitting, union, plastic, 0.062 i.d. (See Figure 8.2-16, item 4.)
N/A
6807015
Tubing, restrictor line, vacuum, 15"
N/A
6806997
Tubing, restrictor line, vacuum, 4"
PN 4276985A
8.2-13
8
PARTS LISTS
ILLUSTRATED PARTS
Figure 8.2-8 Rear Compartment (See Table 8.2-8)
1
2
9
8
3
4
5
6
7
8.2-14
7334039B
PN 4276985A
PARTS LISTS
ILLUSTRATED PARTS
Table 8.2-8 Rear Compartment (See Figure 8.2-8)
Item
Part Number
Description
1
6706687
PCB, System Control
2
6805679
Fan, 24 Vdc, S/A
3
6706742
PCB, Main Distribution
4
6854732
Chamber, plastic
5
6232839
Valve, solenoid, waste
6
1007924
Manifold, 5 psi, CP
7
1006763
Manifold, CP, MF7
8
6232847
Regulator and flow meter, pressure, 1-10 psi, miniature
9
6232825
Chamber, vacuum/waste, S/A
PN 4276985A
8.2-15
8
PARTS LISTS
ILLUSTRATED PARTS
Figure 8.2-9 Rear Door (See Table 8.2-9)
3
1
4 5
3
6
7
3
28
8
9
2
3
10
11
3
27
12
13
14
26
25
24
18
23
22
19
17
16
20
21
8.2-16
15
7334013C
PN 4276985A
PARTS LISTS
ILLUSTRATED PARTS
Table 8.2-9 Rear Door (See Figure 8.2-9)
Item
Part Number
Description
1
6706561
PCB, Power Supply Monitor
2
6805671
Cable, harness, Pneumatic Monitor cards, S/A
3
6232660
Fitting, Luer, male, to 0.094 i.d. hose barb, polypropylene
4
6232664
Fitting, Luer, male, lock ring, green nylon
5
6706511
PCB, Pneumatic Monitor, 30 PSI
6
6232665
Fitting, Luer, male, lock ring, red nylon
7
6706512
PCB, Pneumatic Monitor, 6 PSI
8
6232662
Fitting, Luer, male, lock ring, yellow nylon
9
6706515
PCB, Pneumatic Monitor, Vacuum
10
6232663
Fitting, Luer, male, lock ring, blue nylon
11
6706514
PCB, Pneumatic Monitor, 17.5 in. Hg
12
6232666
Fitting, Luer, male, lock ring, black nylon
13
6706513
PCB, Pneumatic Monitor, 6.5 in. Hg
14
2852019
Hardware, latch, concealed, 3 lb pull up, 1.9 x 1.3 in. ABS, black
15
6232844
Valve, solenoid, pressure enable, 3-way, NC, 24 Vdc
16
6232644
Fitting, quick disconnect, internal connector, panel, 0.125 hose barb
17
6232845
Valve, solenoid, vacuum enable, 3-way, NC, 24 Vdc
18
4004091
Power supply
19
2707014
Filter, line, 6 A, 250 Vac/400 Hz, 190 µA max
20
9921373
Fuse holder
21
2707013
Filter, line, 6 A, 220 V/50 Hz, 2 µA leakage
22
5120175
Fuse, 6.0 A, 250 V, 0.25 x 1.25, glass, sloblo
23
5105001
Switch, rocker, dpst, 16 A at 250 Vac, lighted, green neon
24
6706401
Suppressor, transient voltage, assembly 2
25
6028765
Cable assembly, PS Mon/Distribution
26
6028775
Cable assembly, ribbon/flat, PS Mon data, 26 position, 38 cm (15 in.) L
27
6028755
Cable assembly, PS Mon/Printer power
28
6028913
Cable assembly, pressure and vacuum enable solenoids
PN 4276985A
8.2-17
8
PARTS LISTS
ILLUSTRATED PARTS
Figure 8.2-10 Sample Access and Reservoir Module (See Table 8.2-10)
1
2, 3
4, 5
13
12
6
7
11
8
9
6985029A
8.2-18
10
PN 4276985A
PARTS LISTS
ILLUSTRATED PARTS
Table 8.2-10 Sample Access and Reservoir Module (See Figure 8.2-10)
Item
Part Number
Description
Components Illustrated
1
2508013
Fitting, quick disconnect, flex arms/joint socket, 0.25 ball
2
1023417
Hardware, mount, fluid detector, CP
3
6805569
Fluid detector, S/A
4
6857096
Valve, pinch, single tube, black, S/A
5
6232382
Fitting, Luer, locknut,1/4-28, bulkhead to Luer, white nylon
6
6232850
Manifold, solenoid valve, 4 position
7
6211015
Actuator, valve, pilot, 7/16 bore, nickel plated
8
6232829
Fitting, elbow, miniature, adjustable, 2 mm (5/64) i.d. hose barb to 10-32 thd, brass
9
6806194
Cable, SOL120 to SlideMaker Interface card
10
6214112
Valve, solenoid, pneumatic, 3-way NC, 0-50 psi
11
6806993
Fitting, feed-thru, small i.d. tubing
12
6232856
Valve, solenoid, hydraulic, 3-way NC, ppt, 30 psi
13
6806850
Valve, pinch valve, single tube, grey, S/A
Components Not Illustrated
N/A
1023662
Tubing, collar, silicone
N/A
1024575
Tubing, sleeve, for mini pinch valve
N/A
3230059
Tubing, special, 50 durometer hardness
N/A
3230068
Tubing, special, 8 ribbon
N/A
6805067
Fitting, T, yellow
N/A
6855763
Valve, pinch, standard, pull apart, assembly
PN 4276985A
8.2-19
8
PARTS LISTS
ILLUSTRATED PARTS
Figure 8.2-11 Slide Elevator Module (See Table 8.2-11)
1
2
3
11
4
10
5
9
8
7334007A
8.2-20
7
6
PN 4276985A
PARTS LISTS
ILLUSTRATED PARTS
Table 8.2-11 Slide Elevator Module (See Figure 8.2-11)
Item
Part Number
Description
Components Illustrated
1
1024016
Custom Part, arm, slide retaining (gripper), CP
2
1024308
Spring, torsion, slide, CP
3
1023783
Cylinder, slide retaining, CP
4
6028749
Cable assembly, 38 cm (15.0 in.)
5
6214109
Valve, solenoid, pneumatic, 3-way NC, 0-57 psi, 24 Vdc
6
3533110
Motor, linear, digital, 12 Vdc
7
1024087
Switch, light modulation, CP
8
2851227
Screw, shoulder, 4-40 x 0.28, 0.125 l
9
2527787
Spring, extension
10
2852343
Screw, setscrew, 4-40 x 0.50, self-locking
11
6806156
Plaren, S/A
Components Not Illustrated
N/A
6214112
Valve, solenoid valve, pneumatic, 3-way NC, 0-50 psi, 24 Vdc
N/A
6232159
Choke, pneumatic, 0.004, yellow
N/A
6232352
Fitting, union, plastic, 0.062 i.d. (See Figure 8.2-16, item 4.)
N/A
6232381
Fitting, elbow, hose, barb
N/A
6805693
Switch and lever extension assembly (See Figure 8.2-6, item 5.)
PN 4276985A
8.2-21
8
PARTS LISTS
ILLUSTRATED PARTS
Figure 8.2-12 Slide and Smear Module (See Table 8.2-12)
Figure References
A Figure 8.2-13,
Upper cassette
transfer
mechanism and
encoder
B Figure 8.2-14,
Dispense probe
mechanism and
rinse block
3
4
5
5
1
6
2
3
C Figure 8.2-15,
Smear truck
5
4
5
A
7
8
26
25
24
9
5
10
11
23
22
21
12
20
C
13
19
18
5
14
B
16
17
8.2-22
15
6985035A
PN 4276985A
PARTS LISTS
ILLUSTRATED PARTS
Table 8.2-12 Slide and Smear Module (See Figure 8.2-12)
Item
Part Number
Description
1
6232837
Valve, solenoid, three on a partitioned manifold, S/A
2
5115016
Switch, vacuum/pressure, high vacuum
3
6232434
6232436
Fitting, Luer, male, lock ring, white nylon (use with PN 6232436 and PN 6232435)
Fitting, Luer, external to 0.094 i.d., hose barb, plastic
4
6232435
Fitting, Luer, 0.094 i.d, male
5
6028747
Cable assembly, sensor, 53 cm (21.0 in.)
6
6232833
Cylinder, air, 2.00 stroke, 0.50 bore, double acting, guided
7
1024058
1024310
Tubing, ribbon (double coiled), CP (See Figure 8.2-14, item 4)
Tubing, flex (coiled), truck, CP (See Figure 8.2-14, item 1)
8
3505050
Motor, dc, brushless, 24 Vdc, 10 K rpm, 3.86 oz-in.
9
6232958
Valve, solenoid valve, pneumatic, 5-way NO, spool, 100 psi, 10 cfm, 24 Vdc
10
1021414
Hardware, clip, 5-way solenoid valve, CP
11
6232660
6232664
Fitting, Luer, male, to 0.094 i.d. hose barb, polypropylene
Fitting, Luer, male, lock ring, green nylon
12
2527729
Gear, spur, 48 pitch, 120 teeth
13
2807004
Screw, setscrew, 6-32 x 0.125
14
6028749
Cable assembly, sensor, 38 cm (15.0 in.)
15
6232852
Fitting, Luer, internal to 0.094 hose barb
16
6232827
6232382
Fitting, Luer, internal to 0.063 hose barb
Fitting, Luer, locknut, 1/4-28, bulkhead to Luer, white nylon
17
6232660
6232662
Fitting, Luer, male, to 0.094 i.d. hose barb, polypropylene
Fitting, Luer, male, lock ring, yellow nylon
18
6806079
Brush assembly
19
2527726
Belt, timing 40 DP, 97.828 cm (38.515 in.) L
20
6232865
Filter, air
21
1024338
Shuttle, S/A
22
2527822
O-ring, shuttle
23
1023707
Tubing, special, coiled, 0.38 i.d. x 1.25 cm (0.49 in.) L, CP
24
3505055
Motor, stepper, 1.8 degree, 6 Vdc, 3000 rpm, 36.1 oz-in.
25
6211015
Actuator, valve, pilot, 7/16 bore, nickel plated
26
6855763
Valve, pinch, standard, pull apart, assembly
PN 4276985A
8.2-23
8
PARTS LISTS
ILLUSTRATED PARTS
Figure 8.2-13 Upper Cassette Transfer Mechanism and Encoder (See Table 8.2-13)
3
4
1
2
6
5
6985030A
Table 8.2-13 Upper Cassette Transfer Mechanism (See Figure 8.2-13)
Item
Part Number
Description
1
1021414
Hardware, clip, 5-way solenoid valve, CP
2
4837095
Sensor, encoder, optical, three-channel
3
6232958
Valve, solenoid, pneumatic, 5-way NO, spool, 100 psi, 10 cfm, 24 Vdc
4
6706744
PCB, Smear/Transport Interface
5
6232747
Cylinder, air, 4.5 stroke, 3/8 bore, double acting, 125 psi max
6
6028748
Cable assembly, sensor, 25.4 cm (10.0 in.)
8.2-24
PN 4276985A
PARTS LISTS
ILLUSTRATED PARTS
Figure 8.2-14 Dispense Probe Mechanism and Rinse Block (See Table 8.2-14)
5
1
4
2
3
6985015A
Table 8.2-14 Dispense Probe Mechanism and Rinse Block (See Figure 8.2-14)
Item
Part Number
Description
1
6028748
Cable assembly, sensor, 25.4 cm (10.0 in.)
2
6805062
Hardware, support, dispense backwash trough, S/A
3
6805063
Rinse block, dispense, self aligning, S/A
4
1022962
Probe, dispense
5
6232755
Cylinder, air, 1.5 stroke, 0.5 bore, double acting, aluminum
PN 4276985A
8.2-25
8
PARTS LISTS
ILLUSTRATED PARTS
Figure 8.2-15 Smear Truck Assembly (See Table 8.2-15)
3
1
4
2
5
6
9
7
8
Front view
6985019A
Rear view
Table 8.2-15 Smear Truck Assembly (See Figure 8.2-15)
Item
Part Number
Description
Components Illustrated
6806362
Truck, smear, assembly
1
1024310
Tubing, flex (coiled), truck, CP
2
2527784
Spring, compression, 0.300 o.d. x 2.50 l x 0.22 w (for smear truck)
3
6028907
Cable assembly, smear truck sensors, SEN18 and SEN19
4
1024369
Cylinder, lift, truck, CP
5
1024058
Tubing, ribbon (double coiled), CP
6
2852395
Screw, setscrew, 4-40 x 0.38, self-locking (lift-up setscrew)
7
6806635
Custom Part, tilt lever
8
1024366
Screw, shoulder, 4-40, 0.125 diameter (tilt-lever screw)
9
1024596
Truck, smear, with ball bearings, S/A
Components Not Illustrated
2512026
8.2-26
O-ring, smear truck
PN 4276985A
PARTS LISTS
ILLUSTRATED PARTS
Figure 8.2-16 Chokes and Fittings (See Table 8.2-16)
1
2
4
3
7334158A
Table 8.2-16 Chokes and Fittings (See Figure 8.2-16)
Item
Part Number
Description
1
6805272
Fitting, union, clear, for 0.03 tubing
2
6805067
Fitting, T, clear
3
6232158
Choke, pneumatic, orange, 0.006 orifice, 0.062 i.d. barbed ends
4
6232352
Fitting, union, plastic, 0.062 i.d. (reducer)
PN 4276985A
8.2-27
8
PARTS LISTS
ILLUSTRATED PARTS
8.2-28
PN 4276985A
CONTENTS
A
PN 4276985A
QUICK REFERENCE INFORMATION, A.1-1
A.1
TOLERANCES AND LIMITS, A.1-1
Fluid Detector Voltage Specifications, A.1-1
Label Printer Module Adjustments, A.1-1
Printer Height above the Slide Specification, A.1-1
Top-of-Form Sensor Voltage Settings, A.1-1
Pressure and Vacuum Tolerances, A.1-1
Shuttle Position Settings, A.1-1
Dispense Position Specifications, A.1-1
Shuttle Offset Settings, A.1-2
Smear Module Input Tolerances, A.1-2
Voltage Inputs, A.1-2
Unregulated Vacuum Input, A.1-2
Tubing Length Specifications, A.1-2
Voltage Tolerances, A.1-2
Ac Input Line Voltages, A.1-2
Power Supply, A.1-2
A.2
CIRCUIT CARD LAYOUTS WITH KEY COMPONENT DESCRIPTIONS, A.2-1
Basket Transport Interface Card, A.2-1
Connectors, A.2-1
Test Points, A.2-1
Dryer Interface Card, A.2-2
Connectors, A.2-2
Test Points, A.2-2
Main Distribution Card, A.2-3
Connectors, A.2-3
Test Points, A.2-4
Main Fluidics Interface Card, A.2-5
Connectors, A.2-5
Power Supply Monitor Card, A.2-6
Connectors, A.2-6
LEDs, A.2-10
Test Points, A.2-10
Slide Ejector Interface Card, A.2-11
Connectors, A.2-11
Test Points, A.2-12
Smear/Transport Interface Card, A.2-13
Connectors, A.2-13
Test Points, A.2-14
System Control Card, A.2-15
Connectors, A.2-15
Jumpers, A.2-15
LEDs, A.2-16
Test Points, A.2-16
A.3
SOLENOID FUNCTIONS, A.3-1
A.4
SENSOR FUNCTI0NS AND TYPES, A.4-1
Sensor Table, A.4-1
9-i
9
CONTENTS
Types and Requirements of Sensors Used, A.4-6
Encoder Sensors, A.4-6
Infrared Interrupting Sensors, A.4-7
Logic Sensors, A.4-7
Magnetic Reed Switch Sensors, A.4-7
Manually Activated Switch Sensors, A.4-8
Pulsed Infrared Reflective Sensors, A.4-8
Reflective Infrared Sensors, A.4-8
Temperature Sensor, A.4-8
Vacuum-Activated Switch Sensors, A.4-8
A.5
B
MENU TREE, A.5-1
VENT LINE SENSING (VLS), B.1-1
B.1
VLS FUNCTION, CALIBRATION, AND TROUBLESHOOTING, B.1-1
Function, B.1-1
VLS Diluent Error, B.1-1
VLS Air Error, B.1-1
Calibration, B.1-1
Diluent Prime and Calibration, B.1-1
Diluent and Air Checking, B.1-1
Calibration and Diluent and Air Checking Retry, B.1-2
Troubleshooting and Servicing, B.1-2
ILLUSTRATIONS
A.2-1
A.2-2
A.2-3
A.2-4
A.2-5
A.2-6
A.2-7
A.5-1
Basket Interface Card Components, A.2-1
Dryer Interface Card Components, A.2-2
Main Distribution Card Components, A.2-3
Power Supply Monitor Card Components, A.2-6
Slide Ejector Interface Card Components, A.2-11
Smear/Transport Interface Card Components, A.2-13
System Control Card Components, A.2-15
SlideMaker Menu Summary, A.5-1
TABLES
A.1-1
A.1-2
A.1-3
A.1-4
A.2-1
A.2-2
A.2-3
A.2-4
A.2-5
A.2-6
A.2-7
A.2-8
A.2-9
9-ii
Top of Form Sensor Voltage Settings, A.1-1
Pressure and Vacuum Tolerances, A.1-1
Shuttle Position Nominal Settings, A.1-2
Power Supply Voltage Tolerances, A.1-2
Basket Transport Interface Card Connectors, A.2-1
Basket Transport Interface Card Test Points, A.2-1
Dryer Interface Card Connectors, A.2-2
Dryer Interface Card Test Points, A.2-2
Main Distribution Card Connectors, A.2-3
Main Distribution Card Test Points, A.2-4
Main Fluidics Interface Card Connectors, A.2-5
Power Supply Monitor Card Connectors, A.2-6
Power Supply Monitor Card LEDs, A.2-10
PN 4276985A
CONTENTS
A.2-10
A.2-11
A.2-12
A.2-13
A.2-14
A.2-15
A.2-16
A.2-17
A.3-1
A.4-1
A.4-2
PN 4276985A
Power Supply Monitor Card Test Point Signals, A.2-10
Slide Ejector Interface Card Connectors, A.2-11
Slide Ejector Interface Card Test Points, A.2-12
Smear/Transport Interface Card Connectors, A.2-13
Smear/Transport Interface Card Test Points, A.2-14
System Control Card Connectors, A.2-15
System Control Card LEDs, A.2-16
System control Card Test Points, A.2-16
Solenoid Functions, A.3-1
Sensor Functions, A.4-1
SEN8 (CASSETTE XFER HOME) and SEN30 (CASS TRANSIT)
Functionality, A.4-6
9-iii
9
CONTENTS
9-iv
PN 4276985A
AQUICK REFERENCE INFORMATION A
A.1
TOLERANCES AND LIMITS
Fluid Detector Voltage Specifications
The fluid detector output voltage ranges for the various fluids are:
r
≤200 mV = blood
r
300 mV to 500 mV = air
r
700 mV to 1000 mV = diluent
During calibration, all of the fluid detectors must read >0.920 V but <0.980 V on diluent.
Label Printer Module Adjustments
Printer Height above the Slide Specification
At the printer position, the clearance between the slide on the shuttle and the label and
printer rolls should be 1 mm (0.04 in.), the thickness of a glass slide.
Top-of-Form Sensor Voltage Settings
Table A.1-1 Top of Form Sensor Voltage Settings
Test Point
Ground
Testing Conditions
Adjustment
Acceptable Votage
T2
TGND
Label blocking top of form sensor
R10
2.5 Vdc ±0.1
T1
TGND
Label blocking top of form sensor
R1
>3.25 Vdc
T1
TGND
Label liner blocking top of form sensor
R1
<1.9 Vdc
Pressure and Vacuum Tolerances
Table A.1-2 Pressure and Vacuum Tolerances
Pneumatics Measured and Displayed
Tolerance Range
5 psi
4.80 to 5.20 psi
30 psi
27.00 to 33.00 psi
Raw (unregulated, high) vacuum
17.00 to 32.00 in. Hg
Regulated (low) vacuum 1
17.00 to 18.00 in. Hg
Regulated (low) vacuum 2
6.30 to 6.70 in. Hg
Shuttle Position Settings
Dispense Position Specifications
The dispense position of the shuttle should be set so that the blood drop is dispensed 25 mm
(1 in.) from the right edge of the slide.
PN 4276985A
A.1-1
QUICK REFERENCE INFORMATION
TOLERANCES AND LIMITS
Shuttle Offset Settings
Table A.1-3 Shuttle Position Nominal Settings
Shuttle Position
Nominal Setting
Tolerance
Dispense
09
N/A
Home (smear)
09
±1
Print
29
N/A
Smear Module Input Tolerances
Voltage Inputs
+24 Vdc ±1.20, I = 3 A maximum
+5 Vdc ±0.25
Unregulated Vacuum Input
15 in. Hg to 29 in. Hg
Tubing Length Specifications
The tubing from FU1 to VL8 must measure 3.81 to 4.45 cm (1.50 to 1.75 in.).
Voltage Tolerances
Ac Input Line Voltages
90 - 264 V, 48 - 62 Hz
Power Supply
Table A.1-4 Power Supply Voltage Tolerances
A.1-2
Voltages Measured and Displayed
Tolerance Range
+5 V
4.75 to 5.25 V
+24 V
22.80 to 25.20 V
+15 V
14.25 to 16.75 V
-15 V
-15.75 to -14.75 V
PN 4276985A
QUICK REFERENCE INFORMATION
CIRCUIT CARD LAYOUTS WITH KEY COMPONENT DESCRIPTIONS
A.2
CIRCUIT CARD LAYOUTS WITH KEY COMPONENT DESCRIPTIONS
Basket Transport Interface Card
Figure A.2-1 Basket Interface Card Components
+24 V
HNGND
PWB NO. 1713431C
J7 +5 V DGND J12 J10 J5
J6 J14 J15 J1
J2 J9
J8
J4 J3 J11 J13
J19 J18 J17 J16
7334049A
Connectors
Table A.2-1 Basket Transport Interface Card Connectors
J No.
Connects to:
J No.
Connects to:
J1
Rear belt position sensor, SEN31
J11
Right crossover home sensor, SEN40
J2
Front belt position sensor, SEN32
J12
Front stepper motor, M3
J3
Basket present rear right sensor, SEN33
J13
Rear stepper motor, M4
J4
Basket present front right sensor, SEN34
J14
Basket cover interlock sensor, SEN54
J5
Basket present rear left sensor, SEN35
J15
Spare sensor, SEN55
J6
Basket present front left sensor, SEN36
J16
Right crossover cylinder solenoid, SOL57
J7
Basket/Transport Interface card, J7
J17
Left crossover cylinder solenoid, SOL58
J8
Basket index sensor, SEN37
J18
Not used. Wired to receive signals for SOL61, but
SOL61 is now connected to the Smear/Transport
Interface card.
J9
Spare sensor, SEN38. Do not plug a sensor into
this port.
J19
Spare solenoid, SOL62
J10
Left crossover home sensor, SEN39
Test Points
Table A.2-2 Basket Transport Interface Card Test Points
TP
Signal Name
TP
Signal Name
HNGND
HIGH NOISE GROUND
+5V
POWER SUPPLY VOLTAGE
+24V
POWER SUPPLY VOLTAGE
DGND
DIGITAL GROUND
PN 4276985A
A.2-1
A
QUICK REFERENCE INFORMATION
CIRCUIT CARD LAYOUTS WITH KEY COMPONENT DESCRIPTIONS
Dryer Interface Card
Figure A.2-2 Dryer Interface Card Components
J1
J4
J2
J5
J6
J3
J7
J8
DGND
+5 V
HNGND
+24 V
PWB NO. 1713421
J12
J9
J13
J14
J10
J15
J11
7334054A
Connectors
Table A.2-3 Dryer Interface Card Connectors
J No.
Connects to:
J No.
Connects to:
J1
Heatsink assembly (on Heat Source card)
J9
Gripper overextended sensor, SEN46
J2
Temperature Sensor card
J10
Platen elevator down, SEN45
J3
Dryer Exit Sensor card, SEN49
J11
Platen elevator up sensor, SEN44
J4
Spare sensor, SEN42
J12
Dryer stepper motor, M5
J5
Vertical slide sensor, SEN41
J13
Spare solenoid, SOL59
J6
Platen elevator stepper motor, M2
J14
Gripper release solenoid, SOL60
J7
Dryer fan
J15
Spare sensor, SEN43
J8
Main Distribution card, J8
Test Points
Table A.2-4 Dryer Interface Card Test Points
TP
Signal Name
TP
Signal Name
HNGND HIGH NOISE GROUND
+5V
POWER SUPPLY VOLTAGE
+24V
DGND
DIGITAL GROUND
A.2-2
POWER SUPPLY VOLTAGE
PN 4276985A
QUICK REFERENCE INFORMATION
CIRCUIT CARD LAYOUTS WITH KEY COMPONENT DESCRIPTIONS
Main Distribution Card
Figure A.2-3 Main Distribution Card Components
TP6
J27 J26 J17 J22 TP7 J21
P1
P2
J5
TP11
TP13
TP10 TP19
J11
TP2
J6
TP5
J9
TP1
PWB NO. 1713566A
TP3
J18
J10 J13 TP4 J28
J14
J20
+24V HGND J4 +5V DGND J2 TP8 J1 TP9 J3 TP14
TP12
J8
TP18
TP17
J7
TP16
J9
TP15
J16
J19
J12
7334083A
Connectors
Table A.2-5 Main Distribution Card Connectors
J No.
Connects to:
J No.
Connects to:
P1
System Control card, J1
J12
Main Fluidics Interface card, J1
P2
System Control card, J2
J13
Spare manifold interface, SOL37-SOL40, SOL51,
SOL64
J1
GEN•S System, Diluter 3 card, J2
J14
Reset switch sensor, SEN13 (S13)
J2
Auxiliary connector for auxiliary service terminal
J16
Main cover interlock switch, SEN53 (S53)
J3
Label Printer module (data)
J17
Ejector stepper motor, M6
J4
Power Supply Monitor card (power), J4
J18
Vacuum reservoir full sensor, SEN51, and vacuum
drain solenoid, SOL63
J5
Power Supply Monitor card (data), J5
J19
Main fan
J6
Smear/Transport Interface card, J6
J20
Spare sensor, SEN56
J7
Basket Transport Interface card, J7
J21
Spare sensor, SEN57
J8
Dryer Interface card, J8
J22
Spare sensor, SEN52
J9
Slide Ejector Interface card, J9
J26
Spare solenoid, SOL40 (SOL40 is not physically
used. The SOL40 signal is used to control SOL117
in the Diluter.)
J10
Dispense 2 Manifold card, J1
J27
Spare solenoid, SOL39 (SOL39 is not physically
used. The SOL39 signal is used to control SOL116
in the Diluter.)
J11
Dispense 1 Manifold card, J1
J28
Power enable switch, S2
PN 4276985A
A.2-3
A
QUICK REFERENCE INFORMATION
CIRCUIT CARD LAYOUTS WITH KEY COMPONENT DESCRIPTIONS
Test Points
Table A.2-6 Main Distribution Card Test Points
TP
Signal Name
TP
Signal Name
TP1
+5VST
TP13
+5VD1
TP2
+24VST
TP14
+24VJ12
TP3
+24VJ10
TP15
+5VDIST
TP4
+24VJ13
TP16
+24VBT
TP5
+24VJ10
TP17
+24VDRY1
TP6
+24VJ11
TP18
+24VD3
TP7
+5VDIST
TP19
+15VDRY
TP8
SM_PWR
+24V
POWER SUPPLY VOLTAGE
TP9
HST_PWR
HNGND
HIGH NOISE GROUND
TP10
+5VSE
+5V
POWER SUPPLY VOLTAGE
TP11
-5VBT
DGND
DIGITAL GROUND
TP12
+24VDRY2
AGND
ANALOG GROUND
A.2-4
PN 4276985A
QUICK REFERENCE INFORMATION
CIRCUIT CARD LAYOUTS WITH KEY COMPONENT DESCRIPTIONS
Main Fluidics Interface Card
Connectors
Table A.2-7 Main Fluidics Interface Card Connectors
PN 4276985A
J No.
Connects to:
J1
Main Distribution card, J12
J3
Diluent full sensor, SEN47
J4
Cleaning agent full sensor, SEN48
J5
Not used
J6
Not used
A.2-5
A
QUICK REFERENCE INFORMATION
CIRCUIT CARD LAYOUTS WITH KEY COMPONENT DESCRIPTIONS
Power Supply Monitor Card
Figure A.2-4 Power Supply Monitor Card Components
TP30 TP31 TP26 TP27 TP20 J7 CR7 CR8
CR9 CR10
TP36
PWB NO. 1713491A
TP28
TP24
TP23
J2
TP17
TP14
TP13
TP21
TP25
TP18
TP15
TP9
J6
J5
J1
J9
J8
J10
TP22
TP4 TP3 TP11 TP10 J3 TP12
TP5 J4 TP6 TP7 TP8
7334071A
Connectors
Table A.2-8 Power Supply Monitor Card Connectors
Signals by Pin
J No. Function
Pin No.
Signal/Type/Direction
Reference
J1
1
5V
+5V
2
Ground
GROUND
3
Label direction
PRN_CW
4
+24 V (switched)
+24VSW
5
Ground
GROUND
6
Printer clock
PRN_CLK
A.2-6
Provides power
and signals to
Printer Label
module.
PN 4276985A
QUICK REFERENCE INFORMATION
CIRCUIT CARD LAYOUTS WITH KEY COMPONENT DESCRIPTIONS
Table A.2-8 Power Supply Monitor Card Connectors (Continued)
Signals by Pin
J No. Function
J2
Pin No.
Signal/Type/Direction
Reference
+24 V (switched)
+24VSW
17.5” vacuum proportional voltage (5.0 Vdc
represents 20.00” Hg), analog, in/out
LOW_VAC2
5 psi proportional voltage (5.0 Vdc
represents 8.0 psi), analog, in/out
5PSI
4, 5, 12, 13, 20, 23, 28
+15 V
+15V
6, 7, 14, 15, 21, 22, 30
-15 V
-15V
Provides power to 1
and analog signals
2
from Pneumatic
Power Supply
3
Monitor cards.
8, 9, 16, 17, 24, 25, 27, 29 Ground
GROUND
10
6.5” vacuum proportional voltage (5.0 Vdc
represents 8.0” Hg), analog, in/out
LOW-VAC1
11
30 psi proportional voltage (5.0 Vdc
represents 35.0 psi), analog, in/out
+30PSI
18
Unregulated vacuum proportional voltage
HIGH_VAC
(5.0 Vdc represents 32” Hg), analog, in/out
19
Analog channel input #17
SPARE #1
26
Analog channel input #18
SPARE #2
J3
NOT USED - An
option to interface
to an EVR. The
transducer output
would replace the
LOW_VAC1 signal
from J2.
N/A
N/A
N/A
J4
Provides the
SlideMaker with
conditioned and
control power
supplies.
1, 3, 4, 8, 9, 11, 12, 16
Ground
GROUND
2, 10
+24 V (switched)
+24VSW
5, 13
+5 V
+5V
6, 14
+15 V
+15V
7, 15
-15 V
-15V
PN 4276985A
A.2-7
A
QUICK REFERENCE INFORMATION
CIRCUIT CARD LAYOUTS WITH KEY COMPONENT DESCRIPTIONS
Table A.2-8 Power Supply Monitor Card Connectors (Continued)
Signals by Pin
J No. Function
Pin No.
Signal/Type/Direction
Reference
J5
1
Scaled 5 V supply (4.0 Vdc represents
5 Vdc), analog, output
+5VSCALED
2
5 psi proportional voltage (5.0 Vdc
represents 8.0 psi), analog, in/out
5PSI
3
Scaled 24 V supply (4.0 Vdc represents
24.0 Vdc), analog, output
+24VSCALED
4
30 psi proportional voltage (5.0 Vdc
represents 35 psi), analog, in/out
+30PSI
5
Scaled 15 V supply (4.0 Vdc represents
15.0 Vdc), analog, output
+15VSCALED
6
Unregulated vacuum proportional voltage
(5.0 Vdc represents 32.0” Hg), analog,
in/out
HIGH_VAC
7
Scaled -15 V supply (4.0 Vdc represents
-15.0 Vdc), analog, output
-15VSCALED
8
6.5 in. vacuum proportional voltage (5 Vdc
represents 8.0” Hg), analog, in/out
LOW_VAC1
9
Buffered 2.5 V reference
+2.5VSCALED
10
17.5” vacuum proportional voltage (5.0 Vdc
represents 20.0” Hg), analog, in/out
LOW_VAC2
11
Ac line fail (logic LOW = power failed),
POWER_FAIL\
Provides and
receives signals
from the System
Control card.
digital, output
A.2-8
12
Reset due to 5 V fail
RESET_IN\
13
Printer clock
PRN_CLK
14
Label direction
PRN_CW
15
Control to disable 24 V supply
+24VSW_DIS
16
Alarm control
ALARM\
17
Control for future EVR
REG_CV
18
Control to enable pneumatic pressure
PRES_EN\
19
Analog channel input #18
SPARE #2
20
Control to enable vacuum supply
VAC_EN\
21
-15 V supply monitor
-15V_OK
22
Dc outputs disable (logic LOW disables dc
outputs), digital, input
INHIBIT_PWR\
23
+15 V supply monitor
+15V_OK
24
NOT USED (Analog channel input #16)
ACH_B16
25
+24 V supply monitor
+24V_OK
26
Analog channel input #17
SPARE #1
PN 4276985A
QUICK REFERENCE INFORMATION
CIRCUIT CARD LAYOUTS WITH KEY COMPONENT DESCRIPTIONS
Table A.2-8 Power Supply Monitor Card Connectors (Continued)
Signals by Pin
J No. Function
Pin No.
Signal/Type/Direction
Reference
J6
1
N/A
+SENSE_V2
Provides power
supply’s control
and reference.
+24 V sense
2
N/A
-SENSE_V2
24 V sense return
J7
J8
Provides the
control to enable
the pneumatic
supplies for the
SlideMaker.
Receives power
from the power
supply for
distribution to the
SlideMaker.
J9
NOT USED - An
option to mount
the alarm at a
remote location if
the sound level is
not adequate
when the covers
are in place.
J10
Identical to J1.
PN 4276985A
3
+5 V sense (remote sense for +5 V supply),
analog, input
+SENSE_V1
4
5 V sense return
-SENSE_V1
5
Dc outputs disable (logic LOW disables dc
outputs), digital, input
INHIBIT_PWR\
6
Output disable return
INHIB_RET
7
Ac line fail (logic LOW = power failed),
digital, output
POWER_FAIL\
8
Line fail return
POWER_FAIL_R
ET
1
Vacuum solenoid power
VAC_PWR
2
Vacuum enable driver
VAC_EN
3, 6, 9
NOT USED
4
Pressure (1) solenoid power
P1_PWR
5
Pressure enable driver
P_EN
7
Pressure (2) solenoid power
P2_PWR
8
Pressure enable driver
P_EN
1, 5
+24 V
24VIN+
2, 6
+5 V
5VIN+
3
+15 V
15AVIN+
4
-15 V
15BVIN-
7
Ground
15AVIN-
8
Ground
15BVIN+
9, 10
Ground
24VIN-
11, 12
Ground
5VIN_
A.2-9
A
QUICK REFERENCE INFORMATION
CIRCUIT CARD LAYOUTS WITH KEY COMPONENT DESCRIPTIONS
LEDs
Table A.2-9 Power Supply Monitor Card LEDs
LED
Dc Supply
ON Indicates
LED
Dc Supply
ON Indicates:
CR7
+15 V
+13.2 V to +16.9 V present
CR9
+5 V
+4.4 V to +5.6 V present
CR8
+24 V
+21.6 V to +28.1 V present
CR10
-15 V
-16.8 V to -13.2 V present
Test Points
Table A.2-10 Power Supply Monitor Card Test Point Signals
TP
Signals
TP
Signals
TP3
+5VDC
TP21
+24VDC
TP4
PRN_CW (Label Printer module’s stepper motor
direction control)
TP22
BUFFERED 2.5 VOLTS REFERENCE
TP5
+5VSCALED (+4.0 Vdc represents 5.0 Vdc)
TP23
2.50 VDC COMPARATOR REFERENCE VOLTAGE
TP6
+15VSCALED (+4.0 Vdc represents 15.0 Vdc)
TP24
5.0 VDC INTERNAL CONTROL VOLTAGE
TP7
PRN_CLK\ (Label Printer module’s stepper motor
clock)
TP25
INVERTED -15V (supply)
TP8
POWER_FAIL\ (HIGH signal = good; logic LOW
signal = power failed)
TP26
When present System Control card may disable
+24 V supply to SlideMaker.
TP9
INHIBIT_PWR\ (LOW signal = power inhibit)
TP27
When present System Control card may disable
+24 V supply to SlideMaker.
TP10
+24VSCALED (+4.0 Vdc represents 24.0 Vdc)
TP28
INVERTED -15 VDC (+4 Vdc represents -15 Vdc)
TP11
5PSI pneumatic monitor (+5 Vdc represents
35.0 psi)
TP30
+15VDC
TP12
30PSI pneumatic monitor (+5 Vdc represents
35.0 psi)
TP31
-15VDC
TP13
HIGH_VAC (RAW_VAC) pneumatic monitor
(+5.0 Vdc represents 32” Hg)
TP32
+24VDC (through 1K resistor)
TP14
LOW_VAC1 (REG_VAC1) pneumatic monitor
(+5 Vdc represents 20“ Hg)
TP33
-15VDC (through 1K resistor)
TP15
Spare #1 analog channel (ACH_B17)
TP34
+5VDC (through 1K resistor)
TP17
LOW_VAC2 (REG_VAC2) pneumatic monitor
(+5.0 Vdc represents 8.0” Hg)
TP35
+15VDC (through 1K resistor)
TP18
Spare #2 analog channel (ACH_B18)
TP36
GROUND
TP20
5VBAD\ (LOW = bad)
A.2-10
PN 4276985A
QUICK REFERENCE INFORMATION
CIRCUIT CARD LAYOUTS WITH KEY COMPONENT DESCRIPTIONS
Slide Ejector Interface Card
Figure A.2-5 Slide Ejector Interface Card Components
J5
J4
PWB NO. 1713567A
J3
J6
J1
J13
J2
J8
J22
J10
+5 V
J12
DGND
J21
J7
J20
+24 V
J14
J15
C5
J18
J11
J16
J19
HNGND
J17
J9
7334055A
Connectors
Table A.2-11 Slide Ejector Interface Card Connectors
J No.
Connects to:
J No.
Connects to:
J1
Output cassette retracted sensor, SEN15
J12
Reserved for cassette lifted sensor, SEN29
J2
Output cassette extended sensor, SEN16
J13
Spare sensor, SEN50
J3
Cassette locked sensor, SEN21
J14
Cassette lock solenoid, SOL47
J4
Cassette unlocked sensor, SEN22
J15
Registered Z release solenoid, SOL48
J5
Slide pusher retracted sensor, SEN23
J16
Registered X release solenoid, SOL49
J6
Slide pusher extended sensor, SEN24
J17
Input cassette transfer solenoid, SOL50
J7
Slide registered sensor, SEN25
J18
Output cassette transfer solenoid, SOL53
J8
Cassette present sensor, SEN26
J19
Cassette lift solenoid, SOL55
J9
Main Distribution card, J9
J20
Register X (cleared) sensor, SEN17
J10
Input cassette retracted sensor, SEN27
J21
Register Z forward sensor, SEN20
J11
Cassette Empty Sensor card, SEN28
J22
Spare sensor, SEN14
PN 4276985A
A.2-11
A
QUICK REFERENCE INFORMATION
CIRCUIT CARD LAYOUTS WITH KEY COMPONENT DESCRIPTIONS
Test Points
Table A.2-12 Slide Ejector Interface Card Test Points
TP
Signal Name
TP
Signal Name
HGND
High noise ground
+5V
Power supply voltage
+24V
Power supply voltage
DGND Digital ground
A.2-12
PN 4276985A
QUICK REFERENCE INFORMATION
CIRCUIT CARD LAYOUTS WITH KEY COMPONENT DESCRIPTIONS
Smear/Transport Interface Card
Figure A.2-6 Smear/Transport Interface Card Components
J8 J2 J5 J3 AGND +15 V J4 J7 J24 J33 J6 J34 J17 J23
J22
J25
J26
J31
J28
PWB NO. 1713568A
+5 V
J12
J9
J13 J14
J15
J16 J1
J18 J11
J19 DGND
J20 J27 J21 J29 J10 J30 J35 J32
7334056A
Connectors
Table A.2-13 Smear/Transport Interface Card Connectors
J No.
Connects to:
J No.
Connects to:
J1
Shuttle stepper motor, M1
J18
Slide transfer retracted sensor, SEN9
J2
Probe down solenoid, SOL42
J19
Slide transfer extended sensor, SEN10
J3
Slide transfer solenoid, SOL41
J20
Probe up sensor, SEN11
J4
Truck vacuum solenoid, SOL43
J21
Probe down sensor, SEN12
J5
System Control card, J5 (fluid-detector signals)
J22
Truck lift up sensor, SEN18
Truck lift down sesnor, SEN19
J6
Main Distribution card, J6
J23
Cassette transit sensor, SEN30
J7
Shuttle vacuum solenoid, SOL44
J24
Upper cassette transfer solenoid, SOL45
J8
Printhead release solenoid, SOL46
J25
FD1 (near needle in GEN•S System Diluter)
J9
Encoder A sensor, SEN58;
Encoder B sensor, SEN59;
Encoder I sensor, SEN60
J26
FD2 (in Sample Access and Reservoir module)
J10
Servo reverse limit sensor, SEN1
J27
FD3 (in Dispense module)
J11
Servo forward limit sensor, SEN2
J28
FD4 (in Sample Access and Reservoir module)
J12
Truck vacuum sensor, SEN3
J29
FD5 (in Dispense module)
J13
Shuttle vacuum sensor, SEN4
J30
FD6 (in Dispense module)
J14
Print position sensor, SEN5
J31
FD7 (in Sample Access and Reservoir module)
J15
Smear position sensor, SEN6
J32
FD8 (in Dispense module)
J16
Dispense position sensor, SEN7
J33
Truck lift solenoid, SOL56
J17
Cassette transfer home sensor, SEN8
J34
Spare solenoid, SOL57
PN 4276985A
A.2-13
A
QUICK REFERENCE INFORMATION
CIRCUIT CARD LAYOUTS WITH KEY COMPONENT DESCRIPTIONS
Test Points
Table A.2-14 Smear/Transport Interface Card Test Points
TP
Signal Name
TP
Signal Name
AGND
Analog ground
+5V
Power supply voltage
+15V
Power supply voltage
DGND
Digital ground
A.2-14
PN 4276985A
QUICK REFERENCE INFORMATION
CIRCUIT CARD LAYOUTS WITH KEY COMPONENT DESCRIPTIONS
System Control Card
Figure A.2-7 System Control Card Components
CR10 CR11 CR12 CR13 CR14 CR15 RESET, S1 J4 J3
TP45
TP51
TP49
TP50
J5
J6
J7
TP42
Processor A
Processor B
TP10
U45
TP27
U72
TP64
TP65
Jumpers
J1
J2
PWB NO. 1713548A
7334084A
Connectors
Table A.2-15 System Control Card Connectors
J No.
Connects to:
J No.
Connects to:
J1
Main Distribution card, P1
J5
Smear/Transport Interface card, J5 (fluid-detector
signals)
J2
Main Distribution card, P2
J6
Servo motor, M7
J3
LCD
J7
Not connected. Used with jumpers for normal operation.
J4
Keypad
Jumpers
On J7, jumper 2-4 and 7-8 for normal operation.
On E1 through E6, jumper:
PN 4276985A
r
E3-E5 and E4-E6 for normal operation.
r
E1-E3 and E2-E4 to download software using the laptop computer.
A.2-15
A
QUICK REFERENCE INFORMATION
CIRCUIT CARD LAYOUTS WITH KEY COMPONENT DESCRIPTIONS
LEDs
Table A.2-16 System Control Card LEDs
LED No.
LED Name In the Boot mode, all LEDs are lit and then:
In the Normal mode:
Processor "A" Checks*
CR10
STATA2
Goes out when the DUART port check passes.
Not lit
CR11
STATA1
Goes out when the RAM test passes.
Not lit or lit.†
CR12
STATA0
Goes out when the CPU A register test passes.
Blinks, indicating Processor "B" is being
checked for pneumatic and power supply
readings.
Processor "B" Checks*
CR13
STATB2
Not used. Goes out after the RAM and CPU B
register tests pass.
Not lit.
CR14
STATB1
Goes out when the RAM test passes.
Blinks, indicating Processor "B" is being
checked for pneumatic and power supply
readings.
CR15
STATB0
Goes out when the CPU B register test passes.
Not lit.
* If any test for this processor fails, all three of its LEDs are relit.
† This LED is used during testing. Its state is not significant during normal day-to-day operations.
Test Points
Table A.2-17 System control Card Test Points
TP
Signal Name
TP
Signal Name
TP10
+24 V
TP49
+15 V
TP27
+5.6 V reference (stepper motor driver reference)
TP50
Analog ground
TP42
+5 V
TP51
-15 V
TP45
Digital ground
A.2-16
PN 4276985A
QUICK REFERENCE INFORMATION
SOLENOID FUNCTIONS
A.3
SOLENOID FUNCTIONS
Solenoids in the SlideMaker and the Sample Access and Reservoir module in the Diluter are
energized or de-energized to perform a SlideMaker function or to activate other components
to perform the function. Table A.3-1 lists each of these solenoids, in numerical order, and
includes the name of the solenoid, the components the solenoid activates, and the functions
of the components. Notice that valves are always assigned the same number as the solenoid
used to activate them.
Use the figures referenced in Table A.3-1 to locate the solenoids and the components
activated by the solenoids.
To test a solenoid, use the Solenoid Test screen (MAIN MENU tt SERVICE FUNCTIONS tt SOLENOID
TEST). For details about the Solenoid Test screen, refer to Table 4.2-1.
.
CAUTION Risk of damage to driver circuitry. Connecting or disconnecting a solenoid while the power is ON
can damage the driver circuitry. Power down the SlideMaker before connecting or disconnecting a solenoid.
If you need to disconnect the solenoid to check it further, or to replace it, always power down
the SlideMaker first.
Note: Early SlideMakers have black bodied solenoids which WILL damage the solenoid
drivers on the System Control card if they are disconnected with the SlideMaker power on.
Table A.3-1 Solenoid Functions
SOL Solenoid Name/
No. Location Reference
Components Activated/
Location Reference
Components’ Function
1
VL1
Closes line on first T-fitting in RES1 (FT4, port 1).
Res1 1st Tee Isol
See Figure 2.5-2
2
Res2 1st Tee Isol
See Figure 2.5-2
3
Res1 Isol
See Figure 2.5-2
See Figure 2.5-1
VL2
Closes line on first T-fitting in RES2 (FT3, port 1).
See Figure 2.5-1
VL3A
See Figure 2.5-1
Closes blood transport line to isolate sample in
RES1.
VL3B
See Figure 2.5-2
4
Res2 Isol
See Figure 2.5-2
VL4A
See Figure 2.5-1
Closes blood transport line to isolate sample in
RES2.
VL4B
See Figure 2.5-2
5
Bwsh #1
See Figure 2.5-2
6
Res1 2nd Tee Isol
See Figure 2.5-2
7
Res2 2nd Tee Isol
See Figure 2.5-2
PN 4276985A
VL5
See Figure 2.5-1
VL6
See Figure 2.5-2
VL7
See Figure 2.5-2
Provides pressurized (30 psi) diluent to rinse the
aspiration and reservoir lines.
Closes line on second T-fitting in RES1 (FT8,
port 1).
Closes line on second T-fitting in RES2 (FT9,
port 1).
A.3-1
A
QUICK REFERENCE INFORMATION
SOLENOID FUNCTIONS
Table A.3-1 Solenoid Functions (Continued)
SOL Solenoid Name/
No. Location Reference
Components Activated/
Location Reference
8
VL8
Primed Sample Isol
See Figure 2.5-2
9
Dispense pump #1
See Figure 2.5-2
10
Dispense pump #2
See Figure 2.5-2
See Figure 2.5-2
DP1
See Figure 2.5-2
DP2
See Figure 2.5-2
Components’ Function
Closes dispense line to isolate sample after
priming.
Dispenses a 4.0 µL blood drop for single-slide
mode and first slide in dual-slide mode.
Dispenses a 4.0 µL blood drop for second slide in
dual-slide mode.
11
N/A - spare
Unassigned
N/A
12
N/A - spare
Unassigned
N/A
13
N/A - spare
Unassigned
N/A
14
RVAC #2
VL14
Provides 6.5 in. Hg/17.5 in. Hg vacuum to second
T-fitting in reservoirs (FT8 and FT9).
See Figure 2.5-2
15
Vent #2
See Figure 2.5-2
16
Vent #1
See Figure 2.5-2
17
RVAC #1
See Figure 2.5-2
18
5 PSI Prime Pressure
See Figure 2.5-2
19
Backwash Probe
See Figure 2.5-2
20
Backwash #2
See Figure 2.5-2
21
30 PSI #1
See Figure 2.5-2
VL15
See Figure 2.5-2
VL16
See Figure 2.5-2
VL17
See Figure 2.5-2
VL18
See Figure 2.5-2
VL19
See Figure 2.5-2
VL20
See Figure 2.5-2
30 psi #2
Vacuum Accum. Rinse
See Figure 2.3-1
24
Res SW2 (RES1 normally
open)
Provides 6.5 in. Hg/17.5 in. Hg vacuum to first
T-fitting in reservoirs (FT4 and FT3).
Provides 5 psi to push sample from reservoir to
dispense line.
Provides pressurized (30 psi) diluent at the rinse
block to rinse the dispense probe.
Provides pressurized (30 psi) diluent to rinse the
reservoirs and dispense lines.
Solenoid provides 30 psi to first T-fitting in
reservoirs (FT4 and FT3) to dry aspiration and
reservoir lines.
None
Solenoid provides 30 psi to second T-fitting in
reservoirs (FT8 and FT9) to dry reservoir and
dispense lines.
VL23
Rinses vacuum accumulator tank, TK3.
See Figure 2.5-2
23
Provides vent (atmospheric pressure) to first
T-fitting in reservoirs (FT4 and FT3).
None
See Figure 2.5-2
22
Provides vent (atmospheric pressure) to second
T-fitting in reservoirs (FT8 and FT9).
See Figure 2.3-2
None
Solenoid switches sample dispense path from
RES1 to RES2.
See Figure 2.5-2
25
N/A - spare
Unassigned
N/A
26
N/A - spare
Unassigned
N/A
A.3-2
PN 4276985A
QUICK REFERENCE INFORMATION
SOLENOID FUNCTIONS
Table A.3-1 Solenoid Functions (Continued)
SOL Solenoid Name/
No. Location Reference
Components Activated/
Location Reference
27
VL27
Backwash pressure
See Figure 2.3-3
28
Diluent Refill
See Figure 2.3-3
See Figure 2.3-2
VL28A
See Figure 2.3-2
Components’ Function
Provides 30 psi to the reagent tank, TK1, to
backwash the sample lines.
Refills reagent tank, TK1, with diluent.
r
VL28A provides vacuum to the reagent tank
to pull in the reagent.
r
VL28B routes diluent to the reagent tank.
VL28B
See Figure 2.3-2
29
Cleaning Agent Input
See Figure 2.3-3
VL29
See Figure 2.3-2
Switches input to reagent tank, TK1, from diluent
to cleaning agent. The diluent line is normally
open.
Note: SOL28 is energized with SOL29, to apply
vacuum, via VL28B, to the reagent tank.
30
Bleach Input
See Figure 2.3-3
VL30
See Figure 2.3-2
Switches input to reagent tank, TK1, from
cleaning agent to bleach.
Note: SOL28 is energized with SOL30, to apply
vacuum, via VL28B, to the reagent tank.
31
Waste Chamber Vacuum
See Figure 2.3-3
32
RVAC Switch
See Figure 2.3-3
33
Rinse Block Drain
See Figure 2.3-3
34
Low Vac/Vent Chamber
Drain
See Figure 2.3-3
VL31
See Figure 2.3-2
VL32
See Figure 2.3-2
VL33
See Figure 2.3-2
VL34A
See Figure 2.3-2
VL34B
See Figure 2.3-2
35
Dry Probe
See Figure 2.3-3
36
Waste Chamber Drain
See Figure 2.3-3
Provides high vacuum to the waste chamber.
VL35
See Figure 2.3-2
VL36A
See Figure 2.3-2
Switches regulated vacuum from 17.5 in. Hg to
6.5 in. Hg.
Opens pathway for draining the rinse block to the
main waste chamber.
Drains low vacuum and vent chambers to the
main waste chamber.
Note: The high vacuum input to REG1 is routed
through VL34B.
Opens pathway for vacuum from the waste
chamber to dry the dispense probe.
Drains waste chamber to Analytical Station’s
waste container using 5 psi.
VL36B
See Figure 2.3-2
37
See SOL114.
See S0L114
See S0L114.
38
See SOL115
See SOL115
See SOL115.
39
See SOL116
See SOL116
See SOL116.
40
See SOL117
See SOL117
See SOL117.
PN 4276985A
A.3-3
A
QUICK REFERENCE INFORMATION
SOLENOID FUNCTIONS
Table A.3-1 Solenoid Functions (Continued)
SOL Solenoid Name/
No. Location Reference
Components Activated/
Location Reference
41
CL8
Slide Transfer
See Figure 2.7-1
42
Probe Down
See Figure 2.5-15
43
Truck Vacuum
See Figure 2.7-1
44
Shuttle Vacuum
See Figure 2.7-1
45
Upper Cassette Transfer
See Figure 2.6-5
46
Print Head Lock
See Figure 2.8-2
47
Cassette Lock
See Figure 2.6-1 or
Figure 2.6-3
48
Register Z Rel Solenoid
See Figure 2.6-1 or
Figure 2.6-3
49
Register X Rel Solenoid
See Figure 2.6-1 or
Figure 2.6-3
50
Input Cassette Transfer
See Figure 2.6-1 or
Figure 2.6-3
See Figure 2.7-1
CL10
See Figure 2.5-15
VL43
See Figure 2.7-1
VL44
See Figure 2.7-1
CL9
See Figure 2.6-5
CL4
See Figure 2.8-1
CL5
Components’ Function
Transfers the slide from the shuttle bed to the
Dryer module.
Moves the dispense probe down into the rinse
block.
Routes high vacuum from VC6 to the smear truck
to hold the slide.
Routes high vacuum from VC5 to the shuttle bed
to hold the slide.
Moves the slide cassette from slide ejector station
to Cassette Output Queue module.
Locks the printhead to apply pressure to label
dispenser roll.
Locks the slide cassette.
See Figure 2.6-2
CL3
See Figure 2.6-2
CL11
See Figure 2.6-2
CL6
See Figure 2.6-2
Aligns the ejected slide along the Z-axis, the axis
from the front to the back of the SlideMaker.
Aligns the ejected slide along the X-axis, the axis
from the left to the right of the SlideMaker.
Advances the slide cassettes in the Cassette Input
Queue module to the slide ejector station.
51
N/A - spare
Unassigned
N/A
52
See SOL119
See SOL119
See SOL119.
53
Output Cassette Transfer
CL7
Advances the slide cassettes in the Cassette
Output Queue module to the operator retrieval
position.
See Figure 2.6-6
See Figure 2.6-6
54
N/A -spare
Unassigned
N/A
55
Cass Lift Solenoid
CL14
Lifts the slide cassette from the ejection position
for transfer to the Cassette Output Queue.
See Figure 2.6-1 or
Figure 2.6-3
56
Truck Lift Release
See Figure 2.7-1
See Figure 2.6-1
CL12
See Figure 2.7-6
When de-energized, holds the smear truck in the
raised, horizontal position; when energized,
releases the truck lift, tilting the smear truck.
Note: Works in conjunction with SOL61.
A.3-4
PN 4276985A
QUICK REFERENCE INFORMATION
SOLENOID FUNCTIONS
Table A.3-1 Solenoid Functions (Continued)
SOL Solenoid Name/
No. Location Reference
Components Activated/
Location Reference
57
CL2
Right Xover Cylinder
See Figure 2.11-1
58
Left Xover Cylinder
See Figure 2.11-1
See Figure 2.11-1
CL1
See Figure 2.11-1
Components’ Function
Moves the slide baskets from the input (rear)
track to the output (front) track.
Moves the slide baskets from the output (front)
track to the input (rear) track.
59
N/A - spare
Unassigned
N/A
60
Gripper Rel Solenoid
Gripper
Activates gripper on platen to hold slide when
transferring slide to basket.
See Figure 2.10-1
61
Truck Tilt/DWN
See Figure 2.7-1
See Figure 2.10-2
CL12
See Figure 2.7-6
Lowers the smear truck to the shuttle position.
Note: Works in conjunction with SOL56.
62
N/A - spare
Unassigned
N/A
63
Vac Accum Drain
None
Solenoid drains the vacuum accumulator, TK3, to
the Analytical Station’s waste container.
See Figure 2.3-1
64
See SOL118
See SOL118
See SOL118.
65
30 psi enable
None
Controls the acquisition of 30 psi from the
Analytical Station.
None
Controls the acquisition of high vacuum from the
Analytical Station.
See Figure 2.3-1
66
High vacuum enable
See Figure 2.3-1
114
SlideMaker Ndl Ventside Isol VL114
See Figure 2.5-1
115
SlideMaker Ndl Vent Cham
Isol 1
See Figure 2.5-1
VL115
See Figure 2.5-1
See Figure 2.5-1
116
SlideMaker Ndl Vent Cham
Isol 2
1st Aspiratation Line Isol
See Figure 2.5-1
118
Reservoir SW1 (RES1
normally open)
See Figure 2.5-1
PN 4276985A
Note: To test SOL114, use the F05 function on the
GEN•S System’s Diluter keypad.
Closes pathway to Analytical Stations’s vent
chamber, VC19, and to diluent supply.
Note: To test SOL115, use the F05 function on the
GEN•S System’s Diluter keypad.
VL116
See Figure 3.3-13
See Figure 2.5-1
117
Isolates Analytical Station’s needle vent side.
Closes pathway to Analytical station’s vent
chamber, VC19.
Note: To test SOL116, use the F05 function on the
GEN•S System’s Diluter keypad.
VL117
See Figure 2.5-1
None
Closes SlideMaker aspiration line.
Note: To test SOL117, use the F05 function on the
GEN•S System’s Diluter keypad.
Solenoid switches sample aspiration pathway
from RES1 to RES2.
Note: To test SOL118, use the F05 function on the
GEN•S System’s Diluter keypad.
A.3-5
A
QUICK REFERENCE INFORMATION
SOLENOID FUNCTIONS
Table A.3-1 Solenoid Functions (Continued)
SOL Solenoid Name/
No. Location Reference
Components Activated/
Location Reference
Components’ Function
119
N/A - spare
Unassigned
N/A
120
2nd Aspiration Line Isol
VL120
Closes SlideMaker aspiration line. VL120 is a
fail-safe for VL117, in case the driver for SOL117
fails. VL120 is in line with VL117 and opens and
closes at the same time as VL117.
See Figure 2.5-1
See Figure 2.5-1
Note: To test SOL120, use the F05 function on the
GEN•S System’s Diluter keypad.
A.3-6
PN 4276985A
QUICK REFERENCE INFORMATION
SENSOR FUNCTI0NS AND TYPES
A.4
SENSOR FUNCTI0NS AND TYPES
Sensor Table
The SlideMaker uses over 60 sensors to monitor its functions. Table A.4-1 lists the number
and electrical mnemonic of each sensor (in numeric order), the type of sensor used and its
active state, the interface card the sensor is connected to, and the location of its output signal
from that interface card.
For more information about the types of sensors used in the SlideMaker and their current and
voltage requirements, see Types and Requirements of Sensors Used at the end of this section.
The active state of a sensor is the state when the sensor is performing its intended function.
The active state is indicated by an asterisk on the Sensor Status screen (MAIN MENU tt SPECIAL
FUNCTIONS tt SENSOR STATUS) or (MAIN MENU tt SERVICE FUNCTIONS tt RUN SERVICE tt SCAN
SENSOR TEST).
Table A.4-1 Sensor Functions
SEN
No.
Electrical Mnemonic/
Location Reference
Type/
Active State
1
SERVO REVERSE LIMIT
Infrared interrupting
See Figure 2.7-1
2
SERVO FORWARD LIMIT
See Figure 2.7-1
3
4
5
TRUCK VACUUM
Vacuum-activated switch
See Figure 2.7-1
Closed = vacuum present
PRINT POSITION
SMEAR POSITION
DISPENSE POSITION
CASSETTE XFER HOME
See Figure 2.6-5
9
Vacuum-activated switch
SHUTTLE VACUUM
See Figure 2.7-1
8
Blocked = truck at forward limit
Closed = vacuum present
See Figure 2.7-1
7
Infrared interrupting
See Figure 2.7-1
See Figure 2.7-1
6
Blocked = truck at reverse limit
SLIDE XFER RETR
See Figure 2.7-1
PN 4276985A
Infrared interrupting
Blocked = shuttle at printer
position
Infrared interrupting
Blocked = shuttle at smear
position
Infrared interrupting
Blocked = shuttle at dispense
position
Infrared interrupting
Blocked = Upper cassette
transfer mechanism at home
position. For details, see
Table A.4-2.
Infrared interrupting
Blocked = slide transfer
mechanism retracted
Input
Connector
Output
Plug, Pin
Smear/Transport
Interface
J10
J6, 7
Smear/Transport
Interface
J11
J6, 8
Smear/Transport
Interface
J12
J6, 9
Smear/Transport
Interface
J13
J6, 10
Smear/Transport
Interface
J14
J6, 11
Smear/Transport
Interface
J15
J6, 12
Smear/Transport
Interface
J16
J6, 13
Smear/Transport
Interface
J17
J6, 14
Smear/Transport
Interface
J18
J6, 15
Interface Card
A.4-1
A
QUICK REFERENCE INFORMATION
SENSOR FUNCTI0NS AND TYPES
Table A.4-1 Sensor Functions (Continued)
SEN
No.
Electrical Mnemonic/
Location Reference
Type/
Active State
10
SLIDE XFER EXTD
Infrared interrupting
See Figure 2.7-1
11
PROBE UP
See Figure 2.5-15
12
PROBE DOWN
See Figure 2.5-15
13
RESET
Input
Connector
Output
Plug, Pin
Smear/Transport
Interface
J19
J6, 16
Smear/Transport
Interface
J20
J6, 17
J21
J6, 18
Blocked = probe down
Smear/Transport
Interface
Manually activated switch
Main Distribution
J14
N/A
Blocked = slide transfer
mechanism extended
Infrared interrupting
Blocked = probe up
Infrared interrupting
Interface Card
Closed =initiates software
controlled reset (closed
momentarily, open normally)
14
Spare interlock
N/A
Slide Ejector Interface J22
J9, 1
15
OUTPUT CASS RETR
Infrared interrupting
Slide Ejector Interface J1
J9, 5
Slide Ejector Interface J2
J9, 6
Slide Ejector Interface J20
J9, 17
Smear/Transport
Interface
J22
J6,3
J22
J6, 5
Closed = truck lift down
Smear/Transport
Interface
Infrared interrupting
Slide Ejector Interface J21
J9, 4
Slide Ejector Interface J3
J9, 7
See Figure 2.6-6
16
OUTPUT CASS EXTD
See Figure 2.6-6
17
REGISTER X (cleard)
See Figure 2.6-1 or
Figure 2.6-3
18
TRUCK LIFT UP
See Figure 2.7-6 or
Figure 2.7-7
19
TRUCK LIFT DOWN
See Figure 2.7-6 or
Figure 2.7-7
20
REGISTER Z FORWARD
See Figure 2.6-1 or
Figure 2.6-3
21
CASS LOCKED
See Figure 2.6-2 or
Figure 2.6-4
A.4-2
Blocked = output cassette
transfer mechanism retracted
(cassette in home or rest
position)
Infrared interrupting
Blocked = output cassette
transfer mechanism extended
(cassette fully pushed to output
position)
Infrared interrupting
Blocked = register X arm fully
cleared the truck path
Magnetic switch
Closed = truck lift up
Magnetic switch
Blocked = register Z arm is fully
forward (no slide is available for
pickup)
Infrared interrupting
Blocked = cassette locked
PN 4276985A
QUICK REFERENCE INFORMATION
SENSOR FUNCTI0NS AND TYPES
Table A.4-1 Sensor Functions (Continued)
SEN
No.
Electrical Mnemonic/
Location Reference
Type/
Active State
Interface Card
22
CASS UNLOCKED
Infrared interrupting
Slide Ejector Interface J4
J9, 8
Slide Ejector Interface J5
J9, 9
Slide Ejector Interface J6
J9, 10
Slide Ejector Interface J7
J9, 11
Slide Ejector Interface J8
J9, 12
Slide Ejector Interface J10
J9, 13
Slide Ejector Interface J11
J9, 14
See Figure 2.6-2 or
Figure 2.6-4
23
SLIDE PUSHER RETR
See Figure 2.6-2 or
Figure 2.6-4
24
SLIDE PUSHER EXTD
See Figure 2.6-2 or
Figure 2.6-4
25
SLIDE REGISTERED
See Figure 2.6-2 or
Figure 2.6-3
26
CASS PRESENT
See Figure 2.6-2 or
Figure 2.6-4
27
INPUT CASS RETR
See Figure 2.6-2 or
Figure 2.6-4
28
CASS EMPTY
See Figure 2.6-2 or
Figure 2.6-4
Input
Connector
Output
Plug, Pin
Blocked = cassette unlocked
Infrared interrupting
Blocked = slide ejector retracted
Infrared interrupting
Blocked = slide ejector extended
(slide has been ejected)
Infrared interrupting
Blocked = left side of slide
registered correctly
Reflective infrared
Reflection = slide cassette
present in ejection position
Reflective infrared
Reflection = input cassette
transfer mechanism in home
position
Reflective infrared (mounted on
PCB)
Reflection = slide cassette
present and empty
29
CASS LIFTED (reserved)
N/A
Slide Ejector Interface J12
J9, 15
30
CASS TRANSIT
Infrared interrupting
Smear/Transport
Interface
J23
J6, 6
Basket Transport
Interface
J1
J7, 7
Basket Transport
Interface
J2
J7, 8
See Figure 2.6-5
31
REAR BELT POS
See Figure 2.11-1
Blocked = upper cassette
transfer mechanism in transit
between home and fully
extended. For details, see
Table A.4-2.
Infrared interrupting, 4 piece
(mounted on PCB)
Blocked = rear belt profile in
center of sensor
32
FRONT BELT POS
See Figure 2.11-1
Infrared interrupting, 4 piece
(mounted on PCB)
Blocked = front belt profile in
center of sensor
PN 4276985A
A.4-3
A
QUICK REFERENCE INFORMATION
SENSOR FUNCTI0NS AND TYPES
Table A.4-1 Sensor Functions (Continued)
SEN
No.
Electrical Mnemonic/
Location Reference
Type/
Active State
Interface Card
33
BASKET PRESENT REAR
RIGHT
Infrared interrupting, 2 piece
(mounted on PCB)
See Figure 2.11-1
34
BASKET PRESENT FRONT
RIGHT
See Figure 2.11-1
35
BASKET PRESENT REAR
LEFT
See Figure 2.11-1
36
BASKET PRESENT FRONT
LEFT
See Figure 2.11-1
37
BASKET INDEX
See Figure 2.11-1
Input
Connector
Output
Plug, Pin
Basket Transport
Interface
J3
J7, 9
Basket Transport
Interface
J4
J7, 10
Basket Transport
Interface
J5
J7, 11
Basket Transport
Interface
J6
J7, 12
Basket Transport
Interface
J8
J7, 13
Smear/Transport
Interface
J35
J6, 1
Basket Transport
Interface
J9
J7, 14
Basket Transport
Interface
J10
J7, 15
Basket Transport
Interface
J11
J7, 16
Dryer Interface
J5
J8, 5
Blocked = basket present at right
rear position
Infrared interrupting, 2 piece
(mounted on PCB)
Blocked = basket present at right
front position
Infrared interrupting, 2 piece
(mounted on PCB)
Blocked = basket present at left
rear position
Infrared interrupting, 2 piece
(mounted on PCB)
Blocked = basket present at left
front position
Infrared interrupting, 2 piece
(mounted on PCB)
Blocked (blocked < 2.1 V,
unblocked >3.4 V) = slide
insertion space occupied (Slide
is in the basket at this position,
or the basket is not in position to
receive a slide.)
38
39
Spare
LEFT XOVER HOME
See Figure 2.11-1
40
RIGHT XOVER HOME
See Figure 2.11-1
41
VERTICAL SLIDE
See Figure 2.10-1
N/A
Infrared interrupting
Not blocked = left crossover
cylinder at home position
Infrared interrupting
Not blocked = right crossover
cylinder at home position
Reflective infrared
Reflection = slide present in drop
position of basket
42
Spare
N/A
Dryer Interface
J4
J8, 6
43
Spare
N/A
Dryer Interface
J15
J8, 7
A.4-4
PN 4276985A
QUICK REFERENCE INFORMATION
SENSOR FUNCTI0NS AND TYPES
Table A.4-1 Sensor Functions (Continued)
SEN
No.
Electrical Mnemonic/
Location Reference
Type/
Active State
Interface Card
Input
Connector
Output
Plug, Pin
44
PLATEN ELEV UP
Infrared interrupting
Dryer Interface
J11
J8, 8
Dryer Interface
J10
J8, 9
Dryer Interface
J9
J8, 10
Main Fluidics
Interface
J3
J12, 13
See Figure 2.10-1
45
PLATEN ELEV DOWN
See Figure 2.10-1
46
GRIPPER OVEREXTENDED
See Figure 2.10-2
47
REAGENT FULL
See Figure 2.3-2
Blocked = elevator is up, platen is
horizontal
Infrared interrupting
Blocked = elevator is down,
platen is vertical
Infrared interrupting
Blocked = gripper fully closed
indicating either no slide at
platen or slide improperly placed
at platen
Magnetic reed switch
Open = reagent tank full
48
Spare
N/A
Main Fluidics
Interface
J4
J12, 14
49
DRYER EXIT
Pulsed infrared reflective
(mounted on PCB)
Dryer Interface
J3
J8, 11
See Figure 2.9-1
Reflection = slide present at exit
position of Dryer module
50
Spare
N/A
Slide Ejector Interface J13
J9, 16
51
VACUUM RESERVOIR FULL
Magnetic reed switch
Main Distribution
J18
N/A
See Figure 2.3-1
Closed = vacuum chamber full of
liquid
52
Spare
N/A
Main Distribution
J22
J6, 6
53
MAIN COVER INTERLOCK
Magnetic reed switch
Main Distribution
J16
N/A
Basket Transport
Interface
J14
J7, 5
Open = main cover open
54
BASKET COVER INTERLOCK Magnetic reed switch
Open = basket cover open
55
Spare
N/A
Basket Transport
Interface
J15
J7, 6
56
Spare
N/A
Main Distribution
J20
N/A
57
Spare
N/A
Main Distribution
J21
N/A
58
ENCODER A ENCIN58
Encoder
Smear/Transport
Interface
J9
J6, 19
Smear/Transport
Interface
J9
J6, 20
Smear/Transport
Interface
J9
J6, 21
See Figure 2.7-1
59
ENCODER B ENCIN59
See Figure 2.7-1
60
ENCODER I ENCIN60
See Figure 2.7-1
PN 4276985A
Phase A of quadrature encoder
Encoder
Phase B of quadrature encoder
Encoder
Index position of quadrature
encoder
A.4-5
A
QUICK REFERENCE INFORMATION
SENSOR FUNCTI0NS AND TYPES
Table A.4-1 Sensor Functions (Continued)
SEN
No.
Electrical Mnemonic/
Location Reference
Type/
Active State
61
Printer direction
Logic
Interface Card
Input
Connector
Output
Plug, Pin
Not used
62
Serial 1 cts
Logic
N/A
63
Serial 2 cts
Logic
N/A
Temperature Sensor card
Temperature (mounted on PCB)
See Figure 2.9-1
Table A.4-2 SEN8 (CASSETTE XFER HOME) and SEN30 (CASS TRANSIT) Functionality
SEN8
SEN30
Functional Meaning
0
0
Upper cassette transfer mechanism is fully extended.
0
1
Upper cassette transfer mechanism is in transit.
1
0
Upper cassette transfer mechanism is in home position.
1
1
Upper cassette transfer mechanism is in transit.
Types and Requirements of Sensors Used
This section gives the general functions, and where applicable, the voltage and current
requirements of the types of sensors used in the SlideMaker.
Encoder Sensors
The encoder sensors are part of a rotary quadrature encoder used to monitor the revolutions
of the servo motor, allowing the SlideMaker to calculate precise information on the position
of the smear truck. Two of the encoder sensors, SEN58 and SEN59, are used to count the slots
on the encoder disk. The third encoder sensor, SEN60, indicates the zero index position of
the disk.
As the encoder disk rotates, one of the two quadrature signals leads the other. The direction
of rotation, clockwise or counterclockwise, is determined from which of the signals is leading.
The rotational position is determined by counting the number of steps from the last known
zero index position. The zero index position sensor is only observed once, during
initialization of the smear truck transport. Thereafter the quadrature signals are counted to
determine the position of the smear truck relative to the saved zero index position.
A.4-6
PN 4276985A
QUICK REFERENCE INFORMATION
SENSOR FUNCTI0NS AND TYPES
Infrared Interrupting Sensors
Infrared interrupting sensors are used to detect the presence of a flag, which determines the
position of a movable mechanism. The voltage and current requirements for the infrared
interrupting sensors are:
r
r
r
CC standard 0.200 in. gap-interrupting sensors
t
LED anode supplied by 150 ohm ±5%, 1/4 W resistor to +5 V, cathode to ground
t
Phototransistor emitter supplied by 10 Kohm ±5%, 1/4 W resistor to ground,
collector to +5 V.
Coulter assembled (2 piece) large gap-interrupting sensors
t
LED anode supplied by 150 ohm ±5%, 1/4 W resistor to +5 V, cathode to ground
t
Phototransistor emitter supplied by 39 Kohm ±5%, 1/4 W resistor to ground,
collector to +5 V.
Coulter assembled (4 piece) large gap-interrupting sensors
t
LED anodes (47 ohms in series with each anode) supplied by 47 ohm ±5%, 1/4 W
resistor to +5 V, cathodes to ground.
t
Phototransistor emitters supplied by one 47 Kohm ±5%, 1/4 W resistor to ground,
collectors to +5 V.
Logic Sensors
The logic sensors are software monitors, not physical sensors. The serial 1 cts (clear to send)
and serial 2 cts sensors monitor handshake signal from the Workstation and the service port.
Magnetic Reed Switch Sensors
Magnetic reed switch sensors are used:
r
With magnetic floats in the reagent reservoirs to sense reagent levels.
r
To sense the position of the smear truck lift.
r
To sense the interlock conditions of the outer SlideMaker covers.
These switches have minimum current requirements to guarantee contact cleaning.
The voltage and current requirements for the float sensors are:
r
Switch armature connected with current limit to +5 V.
r
Normally CLOSED (when not full) contact supplied by 10 Kohm ±5%, 1/4 W resistor to
ground.
The voltage and current requirements for the interlock switches are:
PN 4276985A
r
Switch armature connected with current limit to +5 V.
r
Normally CLOSED (when door closed) contact supplied by 10 Kohm ±5%, 1/4 W
resistor to ground.
A.4-7
A
QUICK REFERENCE INFORMATION
SENSOR FUNCTI0NS AND TYPES
Manually Activated Switch Sensors
A manually activated switch sensor is used to stop the SlideMaker. The voltage and current
requirements for the manually-activated switch sensor are:
r
Switch armature connected with current limit to +5 V.
r
Normally OPEN contact supplied by 10 Kohm ±5%, 1/4 W resistor to ground.
Pulsed Infrared Reflective Sensors
Pulsed infrared reflective sensors are used to detect glass surfaces where high sensitivity
and/or immunity to ambient light is required. The voltage and current requirements for the
Coulter-assembled pulsed infrared reflective sensors are:
r
LED supplied by +5 V, cathode to sensor IC.
r
Sensor IC supplied by +5 V, output supplied by 10 Kohm ±5%, 1/4 W resistor to +5 V, IC
common to ground.
Reflective Infrared Sensors
Reflective infrared sensors are used to detect a reflective surface on objects moved within the
SlideMaker. The voltage and current requirements for the reflective infrared sensors are:
r
r
CC standard “arrowhead” 0.38 cm (0.15 in.) target reflective sensors
t
LED anode supplied by 150 ohm ±5%, 1/4 W resistor to +5 V, cathode to ground.
t
Phototransistor emitter supplied by 39 Kohm ±5%, 1/4 W resistor to ground,
collector to +5 V.
CC standard “sidelooker” 0.38 cm (0.15 in.) target reflective sensors
t
LED anode supplied by 150 ohm ±5%, 1/4 W resistor to +5 V, cathode to ground.
t
Phototransistor emitter supplied by 39 Kohm ±5%, 1/4 W resistor to ground,
collector to +5 V.
Temperature Sensor
A temperature sensor is used to measure the air temperature in the slide path in the Dryer
module. The voltage and current requirements for the temperature sensor are:
r
The Temperature Sensor Integrated circuit power input is through a 1 Kohm ±5%, 1/4 W
resistor on the Temperature Sensor card from +15 V, with a common lead to analog
ground.
r
The output is 10 mV/°C.
Vacuum-Activated Switch Sensors
Vacuum-activated switch sensors are used to detect vacuum in the pneumatic lines to the
truck and shuttle. The voltage and current requirements for the vacuum-activated switch
sensors are:
A.4-8
r
Switch armature connected with current limit to +5 V.
r
Normally OPEN contact supplied by 10 Kohm ±5%, 1/4 W resistor to ground with
capacitor to increase closing current.
PN 4276985A
QUICK REFERENCE INFORMATION
MENU TREE
A.5
MENU TREE
Figure A.5-1 SlideMaker Menu Summary
*L1
ROUTINE
FUNCTIONS
L1
L2
PNEUMATIC/POWER SUPPLIES
ADVANCE BASKET
L3
L4
R1
R2
UNLOCK CASSETTE
LOCK CASSETTE
PRINTER LABEL FUNCTIONS
SYSTEM SETTING
R3
R4
L2
SERVICE
FUNCTIONS
EXIT
DEFINE SMEAR SPEED
L1
L2
L3
L4
R1
R2
R3
R4
R3
R4
DISPLAY TEST
L4
R1
DRYER FUNCTION TEST
REBOOT PRINTER
R2
RUN MODE
R4
R3
SPECIAL
CYCLES
PRINT LABEL
L3
R4
BLEACH SYSTEM
EXIT
CASSETTE/SHUTTLE/BASKET
R4
SERVO SYSTEM
SERVICE
FUNCTIONS
L1
L2
L3
R1
ADVANCE CASSETTES
LOCK CASSETTE
UNLOCK CASSETTE
BASKET TEST
HOME SHUTTLE
EXERCISE SHUTTLE PATH
DEFINE SHUTTLE
REFERENCE POS
EXIT (TO SERVICE
FUNCTIONS SCREEN)
L1
L2
L3
R1
R2
R4
RESET SERVO SYSTEM
DEFINE SERVO OFFSETS
EXERCISE SERVO PATH
PERFORM SERVO PROFILE
ADV SERVO TO CLEARANCE POS
EXIT (TO SERVICE
FUNCTION SCREEN)
L1
SLIDE CYCLE
[SINGLE/CONTINUOUS]
SLIDE EJECT
STOP CYCLE
DRY CYCLE
EXIT (TO SERVICE
FUNCTIONS SCREEN)
R2
R3
R4
L1
L2
R1
R4
L1
R1
R4
FRONT BELT
REAR BELT
FRONT/REAR BELT
POSITION [STEP/
CONTINUOUS/SINGLE]
ELEVATOR
STOP MOTION
EXIT (TO BASKET
TEST SCREEN)
L1
L2
L3
L4
START CYCLE
STOP CYCLE
CYCLE [SINGLE/CONTINUOUS]
EXIT (TO CASSETTE/SHUTTLE/
BASKET SCREEN)
SERVO PROFILE
[SLOW/FAST]
RUN PROFILE
EXIT (TO SERVO SYSTEM
FUNCTION SCREEN)
R1
R2
R3
R4
L1
L2
L3
L4
R1
R2
R3
R4
L3
PERFORM SLIDE CYCLE
L2
L3
R1
R4
EXIT (TO SPECIAL
FUNCTIONS screen)
EXIT (TO SPECIAL
FUNCTIONS SCREEN)
L1
L2
R1
L4
R2
R4
EXIT
L1
L1
L2
L3
R4
L1
L2
L3
L4
R1
R2
R3
DRYER TEMPERATURE
STATUS screen
R4
VIEW ERROR
SAVE PRINTER LABEL
INTENSITY [XX]
INCREMENT INTENSITY
DECREMENT INTENSITY
EXIT
SPEED 1
SPEED 2
WICK TIME
SAVE VALUE
SPEED 1
SPEED2
WICK TIME
EXIT
DISPLAY TEST
SCREEN
L3
R1
L2
L3
R4
PRIME REAGENT
RESERVOIRS
DRAIN
RUN START UP
BACKWASH TUBING
DRAIN VACUUM
ACCUMULATOR
RUN SHUT DOWN
EXIT
SPECIAL
FUNCTIONS
SENSOR STATUS
KEYPAD TEST
EXIT
SYSTEM SETTINGS
screen
L1
DRYER TEMPERATURE
R2
R3
R4
L1
EXIT
R4
*R1
EXIT
R4
L2
L3
R1
R2
MAIN
MENU
L2
R4
ROUTINE FLUIDICS
Service functions are only available when
logged in at the SlideMaker as service.
L1
PNEUMATIC/POWER
SUPPLIES screen
L1
L2
R1
R2
R4
Name of sensor
selected is displayed
at bottom of screen.
DRYER MOTOR ON
DRYER MOTOR OFF
HEATER ON
HEATER OFF
L4
L1
L2
VIEW PRINTER STATUS
SCAN SENSOR TEST
R1
R2
R4
PNEUMATIC/POWER SUPPLIES
INITIALIZE MECHANISM
EXIT (TO SERVICE
FUNCTION SCREEN)
EXIT (TO SPECIAL
FUNCTIONS SCREEN)
R4
EXIT (TO RUN SERVICE
SCREEN)
L1
L2
L3
L1
L2
R2
SOLENOID TEST
L3
EXIT (TO RUN
MODE SCREEN)
Name of solenoid
selected is displayed
at bottom of screen.
START PICK SEQUENCE
DEFINE PICK OFFSET
MOVE LEFT
MOVE RIGHT
START WICK SEQUENCE
DEFINE WICK OFFSET
MOVE SPEED
[SLOW/MEDIUM/FAST]
EXIT (TO SERVO SYSTEM
FUNCTIONS SCREEN)
VIEW PRINTER
STATUS screen
RUN SERVICE
EXIT (TO SPECIAL
FUNCTIONS SCREEN)
HOME OFFSET XX
DISPENSE OFFSET XX
PRINTER OFFSET XX
SHUTTLE VACUUM
[ENABLE/DISABLE]
STEP LEFT
STEP RIGHT
RESET SHUTTLE OFFSET
EXIT (TO CASSETTE/
SHUTTLE/BASKET SCREEN)
R4
PNEUMATIC/POWER
SUPPLIES screen
L4
EXIT
R4
Name of sensor
selected is displayed
at bottom of screen.
EXIT (TO RUN SERVICE SCREEN)
L4
R3
MONITOR/ADJUST
FLUID DETECTORS
R4
EXIT (TO MAIN MENU SCREEN)
*L = Left side of screen
R = Right side of screen
R1
R2
R4
ON
OFF
EXIT (TO SERVICE
FUNCTIONS screen)
L1
L2
L3
L4
R1
R4
FILL DILUENT
CHANNEL SELECTION [XX]
INCREASE VOLTAGE
DECREASE VOLTAGE
DRY SYSTEM
EXIT (TO SERVICE
FUNCTIONS screen)
6985036A
PN 4276985A
A.5-1
QUICK REFERENCE INFORMATION
MENU TREE
A.5-2
A.5-2
PN 4276985A
BVENT LINE SENSING (VLS) B
B.1
VLS FUNCTION, CALIBRATION, AND TROUBLESHOOTING
Function
On GEN•S Systems with a SlideMaker, the needle-vent line for the GEN•System is also the
aspiration line for the SlideMaker. The vent-line sensing (VLS) function is used when the
GEN•S System is operating in the Automatic mode to confirm the needle-vent/aspiration line
is rinsed and dried correctly at the end of each cycle.
Note: The VLS function is only available on GEN•S Systems with a SlideMaker attached. It is
enabled by setting the DILUTER PROCESSOR card switch, SW1, position 7, to ON. Once it is
enabled, it is used whether the SlideMaker is on or off. It is used for all Test modes
(CBC/DIFF/RETIC, CBC/DIFF, CBC ONLY, CBC/RETIC, and RETIC ONLY), but only in the
Automatic aspiration mode.
Blood detector BD3 is the detector used for the VLS function. BD3 is located on the interface
bracket installed on the BSV module. For location, refer to Figure 3.3-8.
VLS Diluent Error
During the vent-line backwashing process (controlled by SL1 in the GEN•S System), BD3 is
used to detect the presence of diluent. If diluent is not detected, a VLS Diluent error is
generated, and the Automatic mode is disabled because insufficient rinsing of the vent line
can lead to carryover problems.
A VLS Diluent error indicates a problem in the vent-line backwashing process that requires
further troubleshooting. See Troubleshooting and Servicing below.
VLS Air Error
During the vent-line drying process (controlled by SL33 in the GEN•S System), BD3 is used
to detect the presence of air. If air is not detected, a VLS Air error is generated, and the
Automatic mode is disabled because inadequate drying of the vent line can lead to dilution of
the specimen in the tube.
A VLS Air error indicates a problem in the vent-line vacuum drying process that requires
further troubleshooting. See Troubleshooting and Servicing below.
Calibration
BD3 is calibrated automatically whenever the GEN•S System is powered up or reset. You can
also initiate a calibration of BD3 by using the F79 function on the Diluter keypad. The
software routine for the automatic calibration and for calibration using F79 is the same, so
you can use F79 as a troubleshooting function in the event of a VLS failure.
Diluent Prime and Calibration
Diluent is dispensed from the backwash tank via SL1 to prime the needle vent-line for
3 seconds. At the completion of the priming process, BD3 is automatically calibrated on the
diluent. That is, the gain for BD3 is adjusted to a reference voltage of about 1 V.
Diluent and Air Checking
After the calibration routine, the vent line is primed with diluent for an additional
2.5 seconds during which BD3 is checked for diluent. The check is considered successful if
the diluent value is between 70% and 100% of the calibration value or 0.7 to 1.0 V.
PN 4276985A
B.1-1
VENT LINE SENSING (VLS)
VLS FUNCTION, CALIBRATION, AND TROUBLESHOOTING
Immediately after the diluent check, SL33 is energized to vacuum dry the vent line for
9.5 seconds during which BD3 is checked for air. The check is considered successful if the air
value is between 30% and 50% of the calibration value or 0.3 to 0.5 V.
Calibration and Diluent and Air Checking Retry
If the diluent or air checking routine fails, the System performs the calibration routine a
second time. If the system fails to recover the correct diluent or air value a second time, a VLS
Diluent or VLS Air error is generated and the GEN•S System Automatic mode is disabled.
Troubleshooting and Servicing
ATTENTION: You must reset the GEN•S System to return it to the Automatic mode after a VLS
error. However, F79 can be done continually.
Most VLS errors occur at installation and are usually caused by tubing kinks at the feed-thru
or Y-fittings in the needle-vent/aspiration line. Under normal conditions, the diluent rinse
flows very rapidly through the vent line, followed by a very rapid air dry.
After servicing the needle vent-line:
B.1-2
r
Always do the F79 function to recalibrate BD3 prior to running cycles. This is necessary
because any movement of the tubing within BD3 can affect the calibration value.
r
If you moved or replaced the tubing in FD1, recalibrate all the SlideMaker fluid
detectors. Refer to Heading 4.9, FLUID DETECTOR CALIBRATION.
PN 4276985A
CONTENTS
ABBREVIATIONS, ABBREVIATIONS-1
PN 4276985A
10-i
10
CONTENTS
10-ii
PN 4276985A
ABBREVIATIONS
The following list is a composite of the abbreviations, acronyms and reference designators used in this
manual. When the same abbreviation (or reference designator) is used for more than one word (or type of
component), all meanings relevant to this manual are included, separated by a semicolon.
SYMBOLS
C
° - degrees
C - Celsius
= - equals
cass - cassette
> - greater than
CD-ROM - compact disc read only memory
≥ - greater than or equal to
cfm - cubic feet per minute
< - less than
cham - chamber
µA - micro-amperes
CL - cylinder
µL - microliter
cleard - cleared
- - minus
clk - clock
# - number
cm - centimeter
% - percent
cntl - control
+ - plus
cntlr - controller
± - plus or minus
comm - communication
® - registered
CP - custom part
CPU - central processing unit
NUMBERS
CR - current regulator (semi-conductor device)
1st - first
CRC - cyclic redundancy check
2nd - second
cts - clear to send
A
CV - check valve
CW - clockwise
A - ampere
ABS - acrylonitrile butadiene styrene resin
D
ac - alternating current
D/A - digital to analog converter
acc - accumulator
dc - direct current
accum - accumulator
DCN - document control number
ACK - acknowledge
det - detector
adj - adjustment
DGND - digital ground
adv - advance
dly - delay
AGND - analog ground
DP - diametrical pitch; dispense pump
assy - assembly
dpst - double pole, single throw
aux - auxiliary
DUART - dual universal asynchronous receiver
transmitter
B
DWN - down
BD - blood detector
BSV - blood sampling valve
buf - buffer
PN 4276985A
ABBREVIATIONS-1
ABBREVIATIONS
E
IC - integrated circuit
ea - each
i.d. - internal diameter
ed. - edition
ID - identification
elev - elevator
IEC - International Electrical Commission
EMC - electromagnetic capability
in. - inches
EMI - electromagnetic shield
inhib - inhibit
en - enable
INST - instruction
enc - encoder
int - interior
ESD - electrostatic discharge
I/O - input/output
ETL - Electrical Testing Laboratories
isol - isolation; isolator
EVR - electronic vacuum regulator
ext - external
J
extd - extended
J - receptacle connector
F
K
F - Fahrenheit
K - thousand
FCC - Federal Communication Commission
FD - fluid detector
FF - feed-thru fitting
filt - filter
FR - reducer fitting
FRC - field replaceable component
FRU - field replaceable unit
ft - feet
FT - T-fitting
FU - union fitting
FY - Y-fitting
G
GND - ground
L
L - left; long
lb - pound
LCD - liquid crystal display
LED - light emitting diode
LST - language support tool
M
m - meter
M - motor
mA - milli-amperes
max - maximum
mech - mechanism
MF - manifold
H
MHz - mega Hertz
Hg - mercury
mm - millimeter
Hi - high
mon - monitor
HNGND - high noise ground
MUX - multiplexer
Hz - Hertz
mV - millivolts
I
N
IBUS - instrument bus
N/A - not applicable
2-ABBREVIATIONS
PN 4276985A
ABBREVIATIONS
NAK - not acknowledged
rev - revision
NC (nc) - normally closed
RFI - radio-frequency interference
NO - normally open
ROM - read only memory
rst - reset
O
RVac - regulated vacuum
o.d. - outer diameter
RXD - received
oz - ounces
P
S
S - switch
P - plug connector
S/A - subassembly
PC - personal computer (GEN•S Workstation)
SEN - sensor
PCB - printed circuit board (card)
SOL - solenoid
PL - plunger (a type of cylinder)
SVP - system verification procedure
PN - part number
SW - switch
pneu - pneumatics
sys - system
pos - position
pres - pressure
T
prn - printer
temp - temperature
PS - power supply
thd - thread
PS MON (card) - Power Supply Monitor
thk - thick
psi - pounds per square inch
TK - tank
PVC - polyvinyl chloride
TM - trademark
PWR - power
TOF - top-of-form
TP - test point
Q
TXD - transmitted
QD - quick disconnect
R
R - resistor; right
U
U - integrated circuit package
UL - Underwriters Laboratory
RAM - random access memory
RAS - remote access services
V
RB - rinse block
V - volts
ref - reference
Vac - volts alternating current
REG - regulator
vac - vacuum
rel - release
VC - vacuum chamber
RES - reservoir
VCC - logic voltage
RET - return
Vdc - volts direct current
Retic - reticulocytes
VL - valve
retr - retracted
VPP - programming voltage
PN 4276985A
ABBREVIATIONS-3
ABBREVIATIONS
W
W - watt; wide
w/ - with
X
xfer - transfer
xover - crossover
4-ABBREVIATIONS
PN 4276985A
INDEX
Numerics
5 psi manifold, MF8
function, 2.3-3
location, 2.3-1
5 psi regulator, REG1
function, 2.3-2
location, 2.3-1
6.5 in. Hg vacuum regulator, REG2
function, 2.3-4
location, 2.3-3
17.5 in. Hg vacuum regulator, REG1
function, 2.3-4
location, 2.3-3
30 psi enable valve, SOL65
function, 2.3-2
location, 2.3-1
30 psi manifold, MF7
function, 2.3-2
location, 2.3-1
30 psi supply
checking, 4.27-1
A
abbreviations, used in manual, ABBREVIATIONS-1
acronyms, used in manual, ABBREVIATIONS-1
adjustment procedures. See procedures
alignment procedures. See procedures
AMC card
switch position for SlideMaker, 3.5-1
Analytical Station
modifying for compatibility with
SlideMaker, 3.3-1
Analytical Station Out Of Diluent, 7.2-38
Analytical Station Waste Full, 7.2-38
attention
definition, 1.1-3
AUTO SLIDE, 7.2-2
basket index sensor. See SEN37
Basket Queue module
checks and adjustments, 4.25-1
components, illustration, 2.11-2
description, 2.11-1
function, 2.1-2, 2.11-1
location, 2.1-3
removing, 4.1-3
replaceable parts, illustration, 8.2-2
replaceable parts, table of part numbers, 8.2-3
securing screws, location, 4.1-4
sensor summary, 2.11-3
Basket Transport Interface card
component locations, illustration, A.2-1
connectors, table of, A.2-1
function, 2.11-3
location, 2.11-2
replacement, 4.8-1
test points, table of, A.2-1
BD3
error conditions, 2.5-15
function, 2.5-15
location, 3.3-9
Belt Profile Sensor card
replacement, 4.8-1
biological hazards
safety precautions, 1.2-1
block diagrams
electronic power distribution, 2.2-2
electronic power supply overview, 2.2-1
processor "A", 2.4-3
processor "B", 2.4-4
system control, 2.4-1
blood detectors
BD3. See BD3
See also fluid detectors
BUSY, 7.2-2
C
B
BASKET (ALL BASKETS FULL), 7.2-4
BASKET (CORNERS FULL), 7.2-4, 7.2-5
BASKET (MOVE POSITION), 7.2-5
BASKET (MOVE TIMEOUT), 7.2-6
BASKET (TRACK JAM), 7.2-6
Basket Corner Sensor card
replacement, 4.8-1
BASKET COVER OPEN (SENSOR 54), 7.2-7
Basket Index card. See SEN37
PN 4276985A
calibration procedures. See procedures
CASSETTE (CYLINDER SENSORS), 7.2-8
CASSETTE (EXTEND TIMEOUT), 7.2-8
CASSETTE (LOCK SENSOR), 7.2-8
CASSETTE (LOCKED, SENSOR 21), 7.2-9
CASSETTE (NO CASSETTE), 7.2-9
CASSETTE (NOT LOCKED, SENSOR 22), 7.2-9
CASSETTE (OUTPUT QUEUE FULL), 7.2-10
CASSETTE (RETRACT TIMEOUT), 7.2-10
CASSETTE (TRANSFER TIMEOUT), 7.2-10
INDEX-1
INDEX
Cassette Empty Sensor card
function, A.4-3
replacement, 4.8-1
Cassette Input Queue module
components, illustration of left rear
view, 2.6-2, 2.6-3
components, illustration of right front
view, 2.6-2, 2.6-3
function, 2.1-2, 2.6-1
location, 2.1-3
removing, 4.1-4
replaceable parts, illustration, 8.2-4
replaceable parts, table of part numbers, 8.2-5
Cassette Output Queue module
components, illustration, 2.6-6
function, 2.1-2, 2.6-6
location, 2.1-3
removing, 4.1-7
removing from the Cassette Transport module,
illustration, 4.1-6
replaceable parts, illustration, 8.2-6
replaceable parts, table of part
numbers, 8.2-7, 8.2-9
securing captive screws, location, 4.1-8
Cassette Transport module
Cassette Input Queue module, 2.6-1
Cassette Output Queue module, 2.6-6
description, 2.6-1
function, 2.1-2, 2.6-1
removing, 4.1-4
sensor summary, 2.6-7
Slide Ejector Interface card, 2.6-7
Slide Ejector module, 2.6-4
upper cassette transfer mechanism, 2.6-5
caution
definition, 1.1-3
circuit cards
Basket Corner Sensor. See Basket Corner Sensor
card
Basket Index. See Basket Index card
Basket Transport Interface. See Basket Transport
Interface card
Belt Profile Sensor. See Belt Profile Sensor card
Cassette Empty Sensor. See Cassette Empty
Sensor card
Dispense 1 Manifold. See Dispense 1 Manifold
card
Dispense 2 Manifold. See Dispense 2 Manifold
card
2-INDEX
Dryer Exit Sensor. See Dryer Exit Sensor card
Dryer Interface. See Dryer Interface card
Main Distribution. See Main Distribution card
Main Fluidics Interface. See Main Fluidics
Interface card
part numbers, 8.1-10
Pneumatic Supply Monitor, 5 Psi. See Pneumatic
Supply Monitor, 5 Psi card
Pneumatic Supply Monitor, 6.5 in. Hg. See
Pneumatic Supply Monitor, 6.5 in. Hg card
Pneumatic Supply Monitor, 17.5 in. Hg. See
Pneumatic Supply Monitor, 17.5 in. Hg card
Pneumatic Supply Monitor, 30 Psi. See
Pneumatic Supply Monitor, 30 Psi card
Pneumatic Supply Monitor, High Vacuum. See
Pneumatic Supply Monitor, High Vacuum
card
Power Supply Monitor. See Power Supply
Monitor card
replacement procedure, 4.8-1
Slide Ejected Sensor. See Slide Ejected Sensor
card
Slide Ejector Interface. See Slide Ejector Interface
card
Smear/Transport Interface. See Smear/Transport
Interface card
System Control. See System Control card
Temperature Sensor. See Temperature Sensor
card
CL1
function, 2.11-2
location, 2.11-2
CL2
function, 2.11-1
location, 2.11-2
CL3
function, 2.6-4
location, 2.6-2, 2.6-3
CL4
function, 2.8-2
location, 2.8-1
CL5
function, 2.6-5
location, 2.6-2, 2.6-3
CL6
function, 2.6-4
location, 2.6-2, 2.6-3
PN 4276985A
INDEX
CL7
function, 2.6-6
location, 2.6-6
CL8
location, 2.7-2
CL9
function, 2.6-6
location, 2.6-5, 2.7-2
CL10
function, 2.5-7
location, 2.5-12, 2.7-2
CL11
function, 2.6-4
location, 2.6-2, 2.6-3
CL12
function, 2.7-5
location, 2.7-5, 2.7-6
CL14
function, 2.6-4
location, 2.6-2, 2.6-3
cleaning agent
connection to instrument, illustration, 3.4-9
function, 2.3-6
See also reagent handling system
cleaning procedures. See procedures
clearance position
definition, 4.2-3
COMMUNICATION (ANALYZER BUSY), 7.2-11
COMMUNICATION (ANALYZER CRC), 7.2-11
COMMUNICATION (ANALYZER
TIMEOUT), 7.2-11
COMMUNICATION (FLASH MEMORY), 7.2-11
COMMUNICATION (ID MISMATCH), 7.2-11
COMMUNICATION (PC CRC), 7.2-12
COMMUNICATION (PC TIMEOUT), 7.2-12
COMMUNICATION (PROC A/B), 7.2-12
COMMUNICATION (RAM ERROR), 7.2-13
connections
electrical, main power cable, 3.4-10
electrical, system interconnect cable, 3.4-3
hydraulic, 3.4-8
pneumatic, 3.4-8
to circuit cards. See specific circuit card
cycles, Dry
description, 4.2-3
sequence summary, 4.2-6
PN 4276985A
D
diluent
connection to instrument, illustration, 3.4-9
function, 2.3-6
See also reagent handling system
Diluter
installing the housing interface bracket,
illustration, 3.3-9
DILUTER PROCESSOR card
switch position for SlideMaker, 3.5-1
DISPENSE (INCOMPLETE ASPIRATION), 7.2-14
DISPENSE (PROBE NOT DOWN, SEN 12), 7.2-14
DISPENSE (PROBE NOT UP, SENSOR 11), 7.2-15
DISPENSE (SENSORS), 7.2-15
Dispense 1 Manifold card
function, 2.5-13
location, 2.5-2
replacement, 4.8-1
Dispense 2 Manifold card
function, 2.5-13
location, 2.5-2
replacement, 4.8-1
Dispense module
cleaning or replacing the dispense probe, 4.14-1
components, illustration, 2.5-2
function, 2.1-2, 2.5-11
removing, 4.1-8
replaceable parts, illustration, 8.2-8
replaceable parts, table of part numbers, 8.2-9
securing captive screws, location, 4.1-7
splash shield thumbscrews, location, 4.1-7
dispense position
definition, 2.7-1
nominal setting, A.1-2
setting, 4.3-3
specifications, A.1-1
dispense probe mechanism
components, illustration, 2.5-12
function, 2.5-12
location, 2.5-12
replaceable parts, illustration, 8.2-25
replaceable parts, table of part numbers, 8.2-25
dispense pump, DP1
adjustment, 4.7-1
function, 2.5-12
location, 2.5-2
INDEX-3
INDEX
dispense pump, DP2
adjustment, 4.7-1
function, 2.5-12
location, 2.5-2
DP1. See dispense pump, DP1
DP2. See dispense pump, DP2
Dry cycles. See cycles, Dry
DRYER (EXTEND, SENSOR 10), 7.2-16
DRYER (HIGH TEMPERATURE), 7.2-16
DRYER (NO SLIDE IN BASKET), 7.2-17
DRYER (PLATEN SENSORS), 7.2-18
DRYER (PLATEN TIMEOUT), 7.2-19
DRYER (PLATEN), 7.2-17
DRYER (RETRACT, SENSOR 9), 7.2-20
DRYER (SENSORS), 7.2-20
Dryer Exit Sensor card
function, A.4-5
replacement, 4.8-1
Dryer Interface card
component locations, illustration, A.2-2
connectors, table of, A.2-2
function, 2.9-2
location, 2.9-1
replacement, 4.8-1
test points, table of, A.2-2
Dryer module
components, illustration, 2.9-1
description, 2.9-1
function, 2.1-2, 2.9-1
removing, 4.1-9
replaceable parts, illustration, 8.2-10
replaceable parts, table of part numbers, 8.2-11
securing captive screws, location, 4.1-9
sensor summary, 2.9-3
dryer motor, M5
location, 2.9-1
E
EJECTOR (REGISTER RETRACT X ERROR), 7.2-21
EJECTOR (RETRACT, SENSOR 23), 7.2-21
EJECTOR (RETRY ERROR), 7.2-22
EJECTOR (SENSOR ERROR), 7.2-22
EJECTOR (SLIDE NOT X REGISTERED), 7.2-23
electronic hazards
safety precautions, 1.2-1
electronic power supply. See power supply
electronic power system
component locations, 2.2-3
function, 2.1-1, 2.2-1
4-INDEX
hazard reduction, 2.2-1
Main Distribution card, 2.2-5
overview, 2.2-1
power distribution, block diagram, 2.2-2
power failure condition, 2.2-6
power input, 2.2-2
power supply, 2.2-3
power supply block diagram, 2.2-1
Power Supply Monitor card, 2.2-4
system interconnection references, 2.2-6
voltage tolerances, A.1-2
encoder sensors
configuration at shipment, illustration, 4.24-1
function, A.4-6
locked and unlocked positions,
illustration, 4.24-2
replacing, 4.24-1
error messages
icons, when displayed, 7.1-2
purpose, 7.1-1
SlideMaker, tables of, 7.2-1
Workstation, tables of, 7.2-1
See also individual messages
ERROR: XY BAD CRC, 7.4-1
F
fan
main, location, 2.2-3
FD1
function, 2.5-14
location, 3.3-9
See also fluid detectors
FD2
function, 2.5-14
location, 2.5-2
See also fluid detectors
FD3
function, 2.5-14
location, 2.5-2
See also fluid detectors
FD4
function, 2.5-14
location, 2.5-2
See also fluid detectors
FD5
function, 2.5-15
location, 2.5-2
See also fluid detectors
PN 4276985A
INDEX
FD6
function, 2.5-15
location, 2.5-2
See also fluid detectors
FD7
function, 2.5-15
location, 2.5-2
See also fluid detectors
FD8
function, 2.5-15
location, 2.5-2
See also fluid detectors
fluid detectors
calibrating, 4.9-1
calibration tolerances, A.1-1
error conditions, 2.5-15
functions, general, 2.5-13
locations, 2.5-2
table of specific functions and
connectors, 2.5-14
fluidic system
component locations, 2.3-1, 2.3-3
function, 2.1-1, 2.3-1
sensor summary, 2.3-8
solenoids, 2.3-8
See also pneumatic power system and reagent
handling system
FLUIDICS (CALIBRATE), 7.2-24
FLUIDICS (DETECTOR 1), 7.2-24
FLUIDICS (DETECTOR 2), 7.2-24
FLUIDICS (DETECTOR 3), 7.2-24
FLUIDICS (DETECTOR 4), 7.2-25
FLUIDICS (DETECTOR 5), 7.2-25
FLUIDICS (DETECTOR 6), 7.2-25
FLUIDICS (DETECTOR 7), 7.2-25
FLUIDICS (DETECTOR 8), 7.2-25
foam trap, VC1
location, 2.3-3
forms
Notice of Information Update, when used, 1.1-1
front motor, M3
location, 2.11-2
G
gear wheel, for manually moving the smear truck
location, 4.18-1
tip on using, 4.18-1
PN 4276985A
GEN•S System
main component layout with SlideMaker
installed, 3.4-2
modifying for compatibility with
SlideMaker, 3.3-1
space and accessibility requirements with
SlideMaker installed, 3.1-1
glass slide. See slide
gripper overextended sensor. See SEN46 (gripper
overextended sensor)
guidelines
for servicing the SlideMaker, 4.1-1
H
hazards
biological, 1.2-1
electronic, 1.2-1
electronic power system, 2.2-1
high vacuum
function, 2.3-4
high vacuum enable valve, SOL66
function, 2.3-2
location, 2.3-1
home position. See smear position
I
If No Cassette Is Present In The Input Queue Then Add
Loaded Cassette, 7.2-9
important
definition, 1.1-3
infrared interrupting sensors
function, A.4-7
voltage and current requirements, A.4-7
installation, instrument
modifying the GEN•S System, 3.3-1
preinstallation checklist, 3.1-1
preparing the system for operation, 3.4-10
testing the system, 3.5-1
unpacking and connecting the SlideMaker, 3.4-1
upgrading GEN•S System for compatibility with
SlideMaker, 3.2-1
installation, software
error messages, 7.4-1
using a laptop computer, 4.10-1
instrument. See SlideMaker
INDEX-5
INDEX
J
jumper settings. See specific circuit card
K
Keypad and Display module
function, 2.1-2, 2.4-5
location, 2.1-3
removing, 4.1-10
L
Label Printer Communication Timeout, 7.2-36
Label Printer module
adjustment procedures, 4.5-1
cleaning the printhead, 4.12-1
components, illustration, 2.8-1
description, 2.8-1
field adjustments, 2.8-3
function, 2.1-2, 2.8-1
printhead cylinder location, 2.8-2
removing, 4.1-10
securing captive screws, location, 4.1-10, 4.1-11
sensor summary, 2.8-3
labeling position. See print position
LANGUAGE SUPPORT TOOL VERSION IS
INCOMPATIBLE WITH SYSTEM
SOFTWARE, 7.4-1
leakage current specifications
SlideMaker, 2.1-4
LEDs, locations and functions. See specific circuit
card
logic sensors
function, A.4-7
M
M1
location, 2.7-2
M2
location, 2.10-1
M3
location, 2.11-2
M4
location, 2.11-2
M5
location, 2.9-1
M6
location, 2.6-2, 2.6-3
6-INDEX
M7
location, 2.7-2
magnetic reed switch sensors
function, A.4-7
voltage and current requirements, A.4-7
MAIN COVER OPEN (SENSOR 53), 7.2-2
Main Distribution card
component locations, illustration, A.2-3
connectors, table of, A.2-3
function, 2.2-5
location, 2.2-3
replacement, 4.8-1
test points, table of, A.2-4
Main Fluidics Interface card
connectors, table of, A.2-5
function, 2.3-8
location, 2.3-7
replacement, 4.8-1
Main Fluidics module
components illustration, front view, 2.3-3
components illustration, rear view, 2.3-7
function, 2.1-2, 2.3-7
location, 2.1-3
removing, 4.1-11
replaceable parts, illustration, 8.2-12
replaceable parts, table of part numbers, 8.2-13
securing captive screws, location, 4.1-12
manifolds
MF7. See 30 psi manifold, MF7
MF8. See 5 psi manifold, MF8
manual
conventions, 1.1-4
intended audience, 1.1-1
list of abbreviations used, ABBREVIATIONS-1
numbering format, 1.1-3
organization, 1.1-2
scope, 1.1-1
special headings, 1.1-3
trademarks used, list follows index
manually-activated switch sensors
function, A.4-8
voltage and current requirements, A.4-8
manuals, customer
part numbers, 1.1-1
manuals, service
online version, part number, 1.1-1
messages, error. See error messages
MF7. See 30 psi manifold, MF7
MF8. See 5 psi manifold, MF8
PN 4276985A
INDEX
microscopic slide. See slide
modes
Boot, function, 2.4-6
Normal, function during reset, 2.4-6
modules
Basket Queue. See Basket Queue module
Cassette Input Queue. See Cassette Input Queue
module
Cassette Output Queue. See Cassette Output
Queue module
Cassette Transport. See Cassette Transport
module, Cassette Input Queue module,
Cassette Output Queue module, and Slide
Ejector module
Dispense. See Dispense module
Dryer. See Dryer module
Keypad and Display. See Keypad and Display
module
Label Printer. See Label Printer module
Main Fluidics. See Main Fluidics module
Sample Access and Reservoir. See Sample Access
and Reservoir module
Slide and Smear. See Slide and Smear module,
Slide Transport module, and Smear module
Slide Ejector. See Slide Ejector module
Slide Elevator. See Slide Elevator module
Slide Transport. See Slide Transport module
Smear. See Smear module
N
NOT READY, 7.2-2
note
definition, 1.1-3
Notice of Information Update form
when used, 1.1-1
P
part numbers
cables, 8.1-3
circuit cards, 8.1-10
customer documents, 1.1-1
engineering schematics, 6.1-1
Service Resource Kit, 1.1-1
parts
common names and categories used in parts list,
table of, 8.1-1
parts, replacement
Basket Queue module, illustration, 8.2-2
PN 4276985A
Basket Queue module, table of part
numbers, 8.2-3
Cassette Input Queue module, illustration, 8.2-4
Cassette Input Queue module, table of part
numbers, 8.2-5
Cassette Output Queue module,
illustration, 8.2-6
Cassette Output Queue module, table of part
numbers, 8.2-7, 8.2-9
chokes and fittings, illustration, 8.2-27
chokes and fittings, table of part
numbers, 8.2-27
Dispense module, illustration, 8.2-8
Dispense module, table of part numbers, 8.2-9
dispense probe mechanism and rinse block,
illustration, 8.2-25
dispense probe mechanism and rinse block,
table of part numbers, 8.2-25
Dryer module, illustration, 8.2-10
Dryer module, table of part numbers, 8.2-11
Main Fluidics module, illustration, 8.2-12
Main Fluidics module, table of part
numbers, 8.2-13
rear compartment, illustration, 8.2-14
rear compartment, table of part numbers, 8.2-15
rear door, illustration, 8.2-16
rear door, table of part numbers, 8.2-17
Sample Access and Reservoir module,
illustration, 8.2-18
Sample Access and Reservoir module, table of
part numbers, 8.2-19
Slide and Smear module, illustration, 8.2-22
Slide and Smear module, table of part
numbers, 8.2-23
Slide Ejector module, illustration, 8.2-4
Slide Ejector module, table of part
numbers, 8.2-5
Slide Elevator module, illustration, 8.2-20
Slide Elevator module, table of part
numbers, 8.2-21
smear truck assembly, illustration, 8.2-26
smear truck assembly, table of part
numbers, 8.2-26, 8.2-27
upper cassette transfer mechanism,
illustration, 8.2-24
upper cassette transfer mechanism, table of part
numbers, 8.2-24
pick position
defined, 2.7-6, 4.4-1
setting, 4.4-1
INDEX-7
INDEX
PL1
function, 2.10-2
location, 2.10-2
platen elevator motor, M2
location, 2.10-1
PLEASE DOWNLOAD LST OUTPUT FILE(S)
THERE IS NO SCREEN INFORMATION IN
MEMORY, 7.4-1
pneumatic enable valves. See 30 psi enable valve,
SOL65, and high vacuum enable valve,
SOL66
pneumatic power system
color coding used, 2.3-5
component locations, 2.3-1
components, 2.3-3
function, 2.3-1
pneumatic power acquisition, 2.3-1
Pneumatic Supply Monitor cards, 2.3-5
pressure regulation and distribution, 2.3-2
tolerances, A.1-1
vacuum accumulator tank, TK3, 2.3-4
vacuum regulation and distribution, 2.3-3
Pneumatic Supply Monitor, 5 Psi card
function, 2.3-5
location, 2.3-1
replacement, 4.8-1
Pneumatic Supply Monitor, 6.5 in. Hg card
replacement, 4.8-1
function, 2.3-5
location, 2.3-1
Pneumatic Supply Monitor, 17.5 in. Hg card
replacement, 4.8-1
function, 2.3-5
location, 2.3-1
Pneumatic Supply Monitor, 30 Psi card
function, 2.3-5
location, 2.3-1
replacement, 4.8-1
Pneumatic Supply Monitor, High Vacuum card
function, 2.3-5
location, 2.3-1
replacement, 4.8-1
PNEUMATICS (5 PSI SUPPLY), 7.2-26
PNEUMATICS (30 PSI SUPPLY), 7.2-27
PNEUMATICS (LOW VACUUM 1), 7.2-28
PNEUMATICS (LOW VACUUM 2), 7.2-29
PNEUMATICS (NO HIGH VACUUM), 7.2-30
PNEUMATICS (VACUUM ACCUMULATOR FULL
OF LIQUID), 7.2-31
8-INDEX
POWER (2.5V SUPPLY), 7.2-32
POWER (5V SUPPLY), 7.2-32
POWER (10V REFERENCE), 7.2-33
POWER (-15V SUPPLY), 7.2-33
POWER (15V SUPPLY), 7.2-34
POWER (24V SUPPLY), 7.2-34
POWER (PROCESSOR A), 7.2-35
POWER (PROCESSOR B), 7.2-35
power supply
function, 2.2-3
location, 2.2-3
outputs, 2.2-4
overview, block diagram, 2.2-1
voltage tolerances, A.1-2
Power Supply Monitor card
component locations, illustration, A.2-6
connectors, table of, A.2-6
function, 2.2-4
LEDs, general function, 2.2-4
LEDs, table of, A.2-10
location, 2.2-3
replacement, 4.8-1
test points, 2.2-5
test points, table of, A.2-10
precautions, safety. See safety precautions
pressure
tolerances, A.1-1
print position
definition, 2.7-1
nominal setting, A.1-2
setting, 4.3-2
PRINTER (CRC), 7.2-36
PRINTER (FAILURE), 7.2-36
PRINTER (INITIALIZATION), 7.2-36
PRINTER (NO COMMUNICATION), 7.2-36
PRINTER (OUT OF LABELS), 7.2-36
PRINTER (OUT OF RIBBON), 7.2-37
PRINTER (TEMPERATURE), 7.2-37
PRINTER (TOP OF FORM), 7.2-37
Printer module. See Label Printer module
printer position. See print position
procedures
30 psi, checking supply and adjusting
transducer, 4.27-1
Basket Queue module checks and
adjustments, 4.25-1
Basket Queue module, removing, 4.1-3
Cassette Input Queue module, removing, 4.1-4
Cassette Output Queue module, removing, 4.1-7
PN 4276985A
INDEX
Cassette Transport module, removing, 4.1-4
circuit cards, replacing, 4.8-1
Dispense module, removing, 4.1-8
dispense probe, cleaning or replacing, 4.14-1
dispense pump, adjusting volume, 4.7-1
Dryer module, removing, 4.1-9
encoder, replacing, 4.24-1
fluid detectors, calibrating, 4.9-1
general guidelines, 4.1-1
Keypad and Display module, removing, 4.1-10
Keypad and Display module, unlatching for
viewing, 4.1-2
label position on the slide, adjusting in the
X-dimension, 4.3-2
label position on the slide, adjusting in the
Y-dimension, 4.5-3
Label Printer module, adjusting the height, 4.5-1
Label Printer module, removing, 4.1-10
main cover, closing, 4.1-3
main cover, opening, 4.1-2
Main Fluidics module, removing, 4.1-11
printhead, cleaning, 4.12-1
Sample Access and Reservoir module,
removing, 4.1-12
SEN24 (slide pusher extended sensor),
adjusting, 4.15-3
SEN37 (basket index sensor), replacing, 4.26-1
SEN41 (vertical slide sensor), adjusting, 4.11-1
SEN46 (gripper overextended sensor) flag,
replacing, 4.23-1
SEN46 (gripper overextended sensor),
aligning, 4.23-1
shuttle brush, adjusting the height, 4.16-2
shuttle O-ring, replacing, 4.20-2
shuttle, setting the dispense position, 4.3-4
shuttle, setting the home (smear) position, 4.3-1
shuttle, setting the printer position, 4.3-2
Slide and Smear module, removing, 4.1-13
Slide Ejector module, removing, 4.1-4
slide ejector, aligning, 4.15-3
Slide Elevator module, removing, 4.1-9
slide elevator platen, adjusting the
position, 4.6-1
slide pusher bars, adjusting the vertical
position, 4.16-1
slide pusher, adjusting, 4.15-2
slide stripper plate, adjusting the
position, 4.17-1
SlideMaker main compartments,
accessing, 4.1-1
PN 4276985A
SlideMaker securing to the Diluter, 3.4-4
SlideMaker service functions, accessing and
using, 4.2-1
SlideMaker service functions, entering the
service password, 4.2-1
SlideMaker, installing, 3.1-1
SlideMaker, leveling, 3.4-4
SlideMaker, powering down, 4.1-1
SlideMaker, shutting down for more than 48
hours, 4.13-1
SlideMaker, shutting down for transport, 4.13-1
smear truck and shuttle guide rods,
cleaning, 4.19-1
smear truck O-ring, replacing, 4.20-1
smear truck, checking and adjusting
alignment, 4.18-2
smear truck, setting the pick and wick
positions, 4.4-1
software installation using a laptop
computer, 4.10-1
system performance, verifying, 5.1-1
upper cassette transfer mechanism,
removing, 4.1-5
Z-axis register subassembly, replacing
components, 4.22-1
pulsed infrared reflective sensors
function, A.4-8
voltage and current requirements, A.4-8
pumps, dispense. See dispense pump, DP1; dispense
pump, DP2
R
RB1. See rinse block, RB1
REAGENT (OUT OF DILUENT), 7.2-38
REAGENT (REAGENT TANK NOT FULL), 7.2-38
REAGENT (WASTE FULL), 7.2-38
reagent handling system
function, 2.3-1
reagent acquisition, 2.3-6
reagent distribution, 2.3-6
vacuum accumulator tank, TK3, 2.3-4
waste collection, 2.3-6
reagent tank, TK1
function, 2.3-6
location, 2.3-3
rear motor, M4
location, 2.11-2
reference designators, used in
manual, ABBREVIATIONS-1
INDEX-9
INDEX
reflective infrared sensors
function, A.4-8
voltage and current requirements, A.4-8
REG1. See 5 psi regulator, REG1, or 17.5 in. Hg
vacuum regulator, REG1
REG2. See 6.5 in. Hg vacuum regulator, REG2
regulators
REG1. See 5 psi regulator, REG1, or 17.5 in. Hg
vacuum regulator, REG1
REG2. See 6.5 in. Hg vacuum regulator, REG2
removal procedures. See procedures
replacement procedures. See procedures
RES1
location, 2.5-2
RES2
location, 2.5-2
reset
Boot mode, function, 2.4-6
initiating, 2.4-6
Label Printer module initialization, 2.8-2
Normal mode, function during reset, 2.4-6
system (SlideMaker) initialization, 2.4-6
rinse block, RB1
function, 2.5-13
location, 2.5-12
RVac chamber, VC3
function, 2.3-4, 2.3-7
location, 2.3-3
RVac chamber, VC4
function, 2.3-4
S
safety precautions
biological, 1.2-1
electronic, 1.2-1
troubleshooting, 1.2-2
Sample Access and Reservoir module
components, illustration, 2.5-2
function, 2.1-2, 2.5-11
location, 2.1-3
removing, 4.1-12
replaceable parts, illustration, 8.2-18
replaceable parts, table of part numbers, 8.2-19
securing captive screws, location, 4.1-13
sample acquisition system
Dispense 1 Manifold card, 2.5-13
Dispense 2 Manifold card, 2.5-13
dispense probe mechanism, 2.5-12
dispense pump, 2.5-12
10-INDEX
fluid detector functions, table of, 2.5-14
fluid detectors, 2.5-13
function, 2.1-1, 2.5-1
rinse block, 2.5-13
sensor summary, 2.5-16
schematics, engineering
included in Chapter 6, list of, 6.1-1
when updated in manual, 6.1-1
SELF TESTING, 7.4-1
SEN24 (slide pusher extended sensor)
adjusting, 4.15-3
See also. sensors
SEN37 (basket index sensor)
removing, illustration, 4.26-1
replacing, 4.26-1
See also. sensors
SEN41 (vertical slide sensor)
adjustment, 4.11-1
aligning, illustration, 4.11-1
See also. sensors
SEN46 (gripper overextended sensor)
aligning, 4.23-1
correct adjustment of lever, 2.10-2
replacing the flag, 4.23-2
sensor and flag detail, illustration, 4.23-2
See also. sensors
sensors
active state defined, A.4-1
encoder, function, A.4-6
functions, table of, A.4-1
infrared interrupting sensors, function, A.4-7
locations, figure references, A.4-1
logic, function, A.4-7
magnetic reed switch, function, A.4-7
manually-activated switch, function, A.4-8
pulsed infrared reflective, function, A.4-8
reflective infrared, function, A.4-8
SEN24 (slide pusher extended). See SEN24
(slide pusher extended)
SEN37 (basket index). See SEN37 (basket index
sensor)
SEN41 (vertical slide). See SEN41 (vertical slide
sensor)
SEN46 (gripper overextended). See gripper
overextended sensor, SEN46
temperature, function, A.4-8
types used on SlideMaker, A.4-6
vacuum-activated switch, function, A.4-8
voltage and current requirements, A.4-7
PN 4276985A
INDEX
service function options
accessing and using, 4.2-1
BASKET TEST options, description, 4.2-4
CASSETTE/SHUTTLE/BASKET options,
description, 4.2-2
DEFINE SERVO OFFSETS options,
description, 4.2-5
DEFINE SHUTTLE REFERENCE POS options,
description, 4.2-5
MONITOR/ADJUST BLOOD DETECTORS
options, description, 4.2-4
PERFORM SLIDE CYCLE options,
description, 4.2-3
SERVO SYSTEM options, description, 4.2-3
SOLENOID TEST options, description, 4.2-2
servo motor, M1
location, 2.7-2
servo system
troubleshooting, 7.3-1
servo truck. See smear truck
shipping materials
deactivator clip locations, illustration, 3.4-4
shipping brackets, removing, 3.4-4
shutdown
procedure for extended or long term, 4.13-1
shuttle
cleaning the guide rods, 4.19-1
function, 2.7-1
location, general, 2.7-2
position settings and tolerances, A.1-2
positions defined, 2.7-1
replacing the O-ring, 4.20-2
service testing and adjusting options, 4.2-5
setting the home, printer and dispense
positions, 4.3-1
velocity profile, 2.7-2
SHUTTLE (CALIBRATE), 7.2-39
SHUTTLE (DISPENSE, SENSOR 7), 7.2-39
SHUTTLE (PRINTER, SENSOR 5), 7.2-39
SHUTTLE (SENSORS), 7.2-40
SHUTTLE (SMEAR, SENSOR 6), 7.2-40
SHUTTLE (VACUUM, SENSOR 4), 7.2-40
shuttle motor, M7
location, 2.7-2
slide
adjusting the label position in the
X-dimension, 4.3-2
adjusting the label position in the
Y-dimension, 4.5-3
PN 4276985A
label position affected by Label Printer module
height, 4.5-1
Slide and Smear module
alignment considerations, 7.3-1
calibration required, 2.7-8
components, illustration, 2.7-2
description, 2.7-1
function, 2.1-2, 2.7-1
input tolerances, A.1-2
removing, 4.1-13
replaceable parts, illustration, 8.2-22
replaceable parts, table of part numbers, 8.2-23
securing captive screws, location, 4.1-14
sensor summary, 2.7-8
shuttle brush adjustment, 4.16-2
slide pusher bars adjustment, 4.16-1
slide stripper plate adjustment, 4.17-1
Slide Transport module, 2.7-1
Smear module, 2.7-4
smear truck alignment checks and
adjustments, 4.18-2
smear truck and shuttle guide rods’
cleaning, 4.19-1
smear truck and shuttle O-ring
replacement, 4.20-1
Smear/Transport Interface card, 2.7-7
Slide Ejected Sensor card
replacement, 4.8-1
Slide Ejector Interface card
component locations, illustration, A.2-11
connectors, table of, A.2-11
function, 2.6-7
location, 2.6-2, 2.6-3
replacement, 4.8-1
test points, table of, A.2-12
Slide Ejector module
adjusting SEN24 (slide pusher extended
sensor), 4.15-3
adjusting the slide pusher, 4.15-2
aligning the slide ejector, 4.15-3
components, new configuration, illustration of
left rear view, 2.6-3
components, new configuration, illustration
right front view, 2.6-3
components, old configuration, illustration of
left rear view, 2.6-2
components, old configuration, illustration right
front view, 2.6-2
function, 2.1-2, 2.6-4
removing, 4.1-4
INDEX-11
INDEX
replaceable parts, illustration, 8.2-4
replaceable parts, table of part numbers, 8.2-5
replacing the components in the Z-axis register
subassembly, 4.22-1
Slide Elevator module
components, illustration, 2.10-1
description, 2.10-1
function, 2.1-2, 2.10-1
platen adjustments, 4.6-1
removing, 4.1-9
replaceable parts, illustration, 8.2-20
replacement parts, table of part numbers, 8.2-21
securing captive screws, location, 4.1-10
sensor summary, 2.10-3
slide pusher motor, M6
location, 2.6-2, 2.6-3
slide requirements
correct positioning of blood drop,
illustration, 2.7-3
correct positioning of label, illustration, 2.8-3
correct positioning on the shuttle,
illustration, 2.7-3, 4.3-5
specification reference, 7.3-1
Slide Transport module
components, illustration, 2.7-2
function, 2.1-2, 2.7-1
location, 2.1-3
shuttle velocity profile, 2.7-2
slide truck. See smear truck
SlideMaker
accessing the main compartments, 4.1-1
description, 2.1-1
fluidic supply line connections, 3.4-9
function, 2.1-1
installation procedures, 3.2-1
installing software using a laptop
computer, 4.10-1
installing the guide interface bracket, 3.4-2
leakage current specifications, 2.1-4
leveling, 3.4-4
modules, locations, 2.1-3
modules, table of functions, 2.1-2
power down, 4.1-1
preinstallation requirements, 3.1-1
preparing for transport, 4.13-1
removing the modules, 4.1-1
reset function, 2.4-6
securing to the Diluter, 3.4-4
service function options, 4.2-1
12-INDEX
software menu tree, A.5-1
software program location, 2.4-2
systems, list of, 2.1-1
See also modules, systems, and specific modules
or systems
SlideMaker 2.5V Supply Out Of Tolerance Or Not
Present, 7.2-32
SlideMaker 5 PSI Out Of Range Or Not
Present, 7.2-26
SlideMaker 5V Supply Out Of Tolerance Or Not
Present, 7.2-32
SlideMaker 10V Supply Out Of Tolerance Or Not
Present, 7.2-33
SlideMaker -15V Supply Out Of Tolerance Or Not
Present, 7.2-33
SlideMaker 15V Supply Out Of Tolerance Or Not
Present, 7.2-34
SlideMaker 24V Supply Out Of Tolerance Or Not
Present, 7.2-34
SlideMaker 30 PSI Out Of Range Or Not
Present, 7.2-27
SlideMaker Automatically Made A Slide Using Default
Parameters, 7.2-2
SlideMaker Basket Cover Open (Sensor 54), 7.2-7
SlideMaker Basket Move Position Failure, 7.2-5
SlideMaker Basket Move Timeout, 7.2-6
SlideMaker Basket Track Full, 7.2-4
SlideMaker Basket Transfer Timeout, 7.2-6
SlideMaker BATTERY BACKED RAM Failure, 7.2-13
SlideMaker Cassette Lock Sensor Failure, 7.2-8
SlideMaker Cassette Locked (Sensor 21), 7.2-9
SlideMaker Cassette Not Locked (Sensor 22), 7.2-9
SlideMaker Cassette Output Queue Cylinder Did Not
Retract On Time, 7.2-10
SlideMaker Cassette Output Queue Full, 7.2-10
SlideMaker Cassette Output Queue Is Obstructed Or
Sensor Failed, 7.2-8
SlideMaker Cassette Transfer Retract Timeout, 7.2-10
SlideMaker Cassette Transfer To Output Queue
Timeout, 7.2-8
SlideMaker Communication Problem, 7.2-1
SlideMaker Did Not Respond, 7.2-1
SlideMaker Dispense Probe Not Down (Sensor
12), 7.2-14
SlideMaker Dispense Probe Not Up (Sensor
11), 7.2-15
SlideMaker Dispense Probe Sensor Failure, 7.2-15
SlideMaker Download Successful, 7.2-1
SlideMaker Download Unsuccessful, 7.2-1
PN 4276985A
INDEX
SlideMaker Dryer Temperature Too High, 7.2-16
SlideMaker Elevator Platen Timeout, 7.2-19
SlideMaker Elevator Sensors Failure, 7.2-18
SlideMaker FLASH MEMORY Communication
Failure, 7.2-11
SlideMaker Fluid Detector 1 Failure, 7.2-24
SlideMaker Fluid Detector 2 Failure, 7.2-24
SlideMaker Fluid Detector 3 Failure, 7.2-24
SlideMaker Fluid Detector 4 Failure, 7.2-25
SlideMaker Fluid Detector 5 Failure, 7.2-25
SlideMaker Fluid Detector 6 Failure, 7.2-25
SlideMaker Fluid Detector 7 Failure, 7.2-25
SlideMaker Fluid Detector 8 Failure, 7.2-25
SlideMaker Fluid Detector Calibration Is
Required, 7.2-24
SlideMaker High Vacuum Out Of Tolerance Or Not
Present, 7.2-30
SlideMaker Incomplete Aspiration, 7.2-14
SlideMaker Inter Processor Communication
Failure, 7.2-12
SlideMaker Is BUSY, 7.2-2
SlideMaker Label Printer Communication Lost (CRC
Check), 7.2-36
SlideMaker Label Printer Failure, 7.2-36
SlideMaker Label Printer Initialization
Failure, 7.2-36
SlideMaker Label Printer Out Of Labels, 7.2-36
SlideMaker Label Printer Out Of Ribbon, 7.2-37
SlideMaker Label Printer Temperature
Exceeded, 7.2-37
SlideMaker Label Printer Top Of Form Not
Detected, 7.2-37
SlideMaker Low Vacuum Out Of Range Or Not
Present, 7.2-28, 7.2-29
SlideMaker Main Cover Open (Sensor 53), 7.2-2
SlideMaker messages
tables of, 7.2-1
See also individual messages
SlideMaker Needs To Download The New
Software, 7.2-1
SlideMaker Platen: No Slide, 7.2-17
SlideMaker Reagent Tank Not Full, 7.2-38
SlideMaker Reports Analytical Station Not
Ready, 7.2-11
SlideMaker Reports Processor ‘A’ VPP Failure, 7.2-35
SlideMaker Reports Processor ‘B’ VPP Failure, 7.2-35
SlideMaker Reports Slide Dryer Transfer Mechanism
(Shuttle to Dryer) Did Not Extend (Sensor
10), 7.2-16
PN 4276985A
SlideMaker Reports Slide Dryer Transfer Mechanism
(Shuttle to Dryer) Did Not Retract (Sensor
9), 7.2-20
SlideMaker Reports Slide Ejector Sensor
Failure, 7.2-22
SlideMaker Reports Slide Truck Down Position
Error, 7.2-41
SlideMaker Reports Slide Truck Sensor
Failure, 7.2-45
SlideMaker Reports Slide Truck Up Position
Failure, 7.2-43
SlideMaker Sample ID Mismatch, 7.2-11
SlideMaker Shuttle Bed Vacuum Failure (Sensor
4), 7.2-40
SlideMaker Shuttle Calibration Required, 7.2-39
SlideMaker Shuttle Not At Dispense Position (Sensor
7), 7.2-39
SlideMaker Shuttle Not At Label Printer Position
(Sensor 5), 7.2-39
SlideMaker Shuttle Not At Smear Position (Sensor
6), 7.2-40
SlideMaker Shuttle Position Sensors Failure, 7.2-40
SlideMaker Slide Ejector (Register Extend)
Failure, 7.2-23
SlideMaker Slide Ejector (Register Retract)
Failure, 7.2-21
SlideMaker Slide Ejector (Retry) Failure, 7.2-22
SlideMaker Slide Ejector Did Not Retract (Sensor
23), 7.2-21
SlideMaker Slide Transfer Sensors Obstructed Or
Failed, 7.2-20
SlideMaker To Analytical Station Communication
Lost (CRC Check Failed), 7.2-11
SlideMaker To Analytical Station Communication
Timeout, 7.2-11
SlideMaker To Workstation Communication
Timeout, 7.2-12
SlideMaker Truck At Improper Position (Sensors 58,
59, 60), 7.2-44
SlideMaker Truck Calibration Required, 7.2-41
SlideMaker Truck Clearance Position
Timeout, 7.2-41
SlideMaker Truck Forward Motion (Sensor 2), 7.2-42
SlideMaker Truck Index Position Not Found, 7.2-42
SlideMaker Truck Initialization Failure, 7.2-42
SlideMaker Truck Operation Timeout, 7.2-45
SlideMaker Truck Pick Position Timeout, 7.2-43
SlideMaker Truck Placement Position
Timeout, 7.2-44
INDEX-13
INDEX
SlideMaker Truck Received An Invalid
Command, 7.2-42
SlideMaker Truck Reverse Motion (Sensor 1), 7.2-45
SlideMaker Truck Sensor Failure, 7.2-43
SlideMaker Truck Vacuum Out Of Tolerance (Sensor
3), 7.2-46
SlideMaker Truck Wick Position Timeout, 7.2-46
SlideMaker Vacuum Accumulator Full Of
Liquid, 7.2-31
SlideMaker: No Empty Basket Available, 7.2-4
SlideMaker: Slide Fell From Platen, 7.2-17
SlideMaker: Transfer Of Basket Between Belts Not
Possible, 7.2-5
Smear module
alignment considerations, 2.7-7
components, illustration, 2.7-2
function, 2.1-2, 2.7-4
smear position
definition, 2.7-1
nominal setting, A.1-2
setting, 4.3-1
smear processing system
function, 2.1-1
See also Basket Queue module, Cassette
Transport module, Dryer module, Label
Printer module, Slide and Smear module, and
Slide Elevator module
smear quality
affected by volume of blood drop, 4.7-1
conditions affecting, 7.3-1
smear truck
adjustments, illustration, new
configuration, 4.18-2, 4.18-5
adjustments, illustration, old
configuration, 4.18-2, 4.18-5
alignment check and adjustments,
procedure, 4.18-1
cleaning the guide rods, 4.19-1
components, new configuration,
illustration, 2.7-6
components, old configuration,
illustration, 2.7-5
defining the pick position, illustration, 4.4-2
defining the wick position, illustration, 4.4-2
function, 2.7-4
location, general, 2.7-2
moving manually, procedure, 4.18-1
positions, 2.7-6
replacing the O-ring, 4.20-1
14-INDEX
service testing and adjusting options, 4.2-5
setting the pick and wick positions, 4.4-1
See also smear truck assembly
smear truck assembly
replaceable parts, illustration, 8.2-26
replaceable parts, table of part
numbers, 8.2-26, 8.2-27
Smear/Transport Interface card
component locations, illustration, A.2-13
connectors, table of, A.2-13
function, 2.7-7
location, 2.7-2
replacement, 4.8-1
test points, table of, A.2-14
software
installation using a laptop computer, 4.10-1
menu options, summary, A.5-1
solenoids
function, general, 2.3-8
location references, A.3-1
service testing option, 4.2-2
specific functions, table of, A.3-1
special headings
attention, 1.1-3
caution, 1.1-3
important, 1.1-3
note, 1.1-3
SVP, 5.1-1
symbols, used in manual, ABBREVIATIONS-1
System Control card
component locations, illustration, A.2-15
connectors, 2.4-5
connectors, table of, A.2-15
function, 2.4-1
hold-down bracket and card guide
locations, 4.8-3
jumper settings, A.2-15
jumpers, general function, 2.4-5
LEDs, table of, A.2-16
location, 2.2-3
processor "A" block diagram, 2.4-3
processor "B" block diagram, 2.4-4
replacement, 4.8-1
reset function, 2.4-6
test points, general function, 2.4-5
test points, table of, A.2-16
use of microprocessors, processor "A" and
processor "B", 2.4-2
PN 4276985A
INDEX
system control system
block diagram, 2.4-1
function, 2.1-1, 2.4-1
Keypad and Display module, 2.4-5
System Control card, 2.4-1
system reset. See reset
system verification procedure, 5.1-1
systems
electronic power. See electronic power system
fluidic. See fluidic system, pneumatic power
system, and reagent handling system
sample acquisition. See sample acquisition
system
smear processing. See smear processing system
system control. See system control system
T
tanks
reagent. See reagent tank, TK1
vacuum accumulator. See vacuum accumulator
tank, TK3
Temperature Sensor card
function, 2.9-2
location, 2.9-1
replacement, 4.8-1
temperature sensors
function, A.4-8
voltage and current requirements, A.4-8
test points, locations and functions. See specific
circuit card
This Is A Waning Only. A Slide Entered The Dryer
Area And Has Not Made It Out Of The
Dryer, 7.2-3
TK1. See reagent tank, TK1
TK3. See vacuum accumulator tank, TK3
trademarks, used in manual
list follows index
troubleshooting
servo system, 7.3-1
Slide and Smear module alignment
problems, 7.3-1
smear quality, 7.3-1
using the error message table, 7.1-1
TRUCK (CALIBRATE), 7.2-41
TRUCK (CLEARANCE POSITION), 7.2-41
TRUCK (FORWARD, SENSOR 2), 7.2-42
TRUCK (INDEX NOT FOUND), 7.2-42
TRUCK (INITIALIZATION), 7.2-42
TRUCK (INVALID COMMAND), 7.2-42
PN 4276985A
TRUCK (LIMIT SENSOR), 7.2-43
TRUCK (NOT DOWN ERROR), 7.2-41
TRUCK (NOT UP ERROR), 7.2-43
TRUCK (PICK POSITION), 7.2-43
TRUCK (PLACEMENT POSITION), 7.2-44
TRUCK (POSITION, SENSORS 58,59,60), 7.2-44
TRUCK (REVERSE, SENSOR 1), 7.2-45
TRUCK (SENSOR ERROR), 7.2-45
TRUCK (TIMEOUT), 7.2-45
TRUCK (VACUUM, SENSOR 3), 7.2-46
TRUCK (WICK POSITION), 7.2-46
truck. See smear truck
U
Unknown Error Code Received From SlideMaker:
<Error Code>, 7.2-1
upper cassette transfer mechanism
components, illustration, 2.6-5
function, 2.6-5
location, 2.6-5
removing, 4.1-5
replaceable parts, illustration, 8.2-24
replaceable parts, table of part numbers, 8.2-24
securing captive screws, location, 4.1-5
V
vacuum
tolerances, A.1-1
vacuum accumulator tank, TK3
function, 2.3-4
location, 2.3-1
vacuum-activated switch sensors
function, A.4-8
vacuum, high
function, 2.3-4
vacuum reservoir. See vacuum accumulator tank,
TK3
vacuum-activated switch sensors
voltage and current requirements, A.4-8
valves
pinch, deactivator clip locations, 3.4-4
pneumatic enable. See 30 psi enable valve,
SOL65, and high vacuum enable valve,
SOL66
VC1. See foam trap, VC1
VC2. See waste chamber, VC2
VC3. See RVac chamber, VC3
VC4. See vent chamber, VC4
INDEX-15
INDEX
vent chamber, VC4
function, 2.3-7
location, 2.3-3
W
WARNING
SLIDE FELL FROM DRYER, 7.2-3
warning
definition, 1.1-3
WARNING RESET PRESSED, 7.2-3
waste chamber, VC2
location, 2.3-3
waste collection
description, 2.3-6
wick position
defined, 2.7-6, 4.4-1
setting, 4.4-1
Workstation communications CRC error, 7.2-12
Workstation messages
tables of, 7.2-1
See also individual messages
16-INDEX
PN 4276985A
TRADEMARKS
The BECKMAN COULTER logo, GEN•S, GEN•S SM, and ISOTON are trademarks of Beckman Coulter, Inc.
All other trademarks, service marks, products, or services are trademarks or registered
trademarks of their respective holders.
PN 4276985A