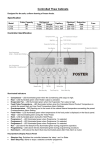
1
Service Manual
Premier & Pro
Cabinets & Counters
Environmental Management Pollcy.
Product Support and Installation Contractors
Foster Refrigerator recognises that its activities, products and services can have an adverse impact upon the environment. The organisation is committed to implementing systems and controls to manage, reduce and eliminate its
adverse environmental impacts wherever possible, and has formulated an Environmental Policy outlining our core
aims. A copy of the Environmental Policy is available to all contractors and suppliers upon request.
The organisation is committed to working with suppliers and contractors where their activities have the potential to
impact upon the environment. To achieve the aims stated in the Environmental Policy we require that all suppliers and
contractors operate in compliance with the law and are committed to best practice in environmental management.
Product Support and Installation contractors are required to:
1.
Ensure that wherever possible waste is removed from the client’s site, where arrangements are in place all
waste should be returned to Foster Refrigerator’s premises. In certain circumstances waste may be disposed
of on the clients site; if permission is given, if the client has arrangements in place for the type of waste.
2.
If arranging for the disposal of your waste, handle, store and dispose of it in such a way as to prevent its
escape into the environment, harm to human health, and to ensure the compliance with the environmental
law. Guidance is available from the Environment Agency on how to comply with the waste management ‘duty
of care’.
3.
The following waste must be stored of separately from other wastes, as they are hazardous to the
environment: refrigerants, polyurethane foam, oils.
4.
When arranging for disposal of waste, ensure a waste transfer note or consignment note is completed as
appropriate. Ensure that all waste is correctly described on the waste note and include the appropriate sixdigit code from the European Waste Catalogue. Your waste contractor or Foster can provide further
information if necessary.
5.
Ensure that all waste is removed by a registered waste carrier, a carrier in possession of a waste management
licence, or a carrier holding an appropriate exemption. Ensure the person receiving the waste at
its ultimate destination is in receipt of a waste management licence or valid exemption.
6.
Handle and store refrigerants in such a way as to prevent their emission to atmosphere, and ensure
they are disposed of safely and in accordance with environmental law.
7.
Make arrangements to ensure all staff who handle refrigerants do so at a level of competence
consistent with the City Guilds 2078 Handling Refrigerants qualification or equivalent qualification.
8.
Ensure all liquid substances are securely stored to prevent leaks and spill, and are not disposed of
to storm drains, foul drain, surface water to soil.
DISPOSAL REQUIREMENTS
If not disposed of properly all refrigerators have components that can be harmful to the environment.
All old refrigerators must be disposed of by appropriately registered and licensed waste contractors, and in
accordance with UK laws and regulations.
Premier & Pro Cabinets & Counters
CONTENTS
Page
1.0
2.0
3.0
INTRODUCTION
1.1
Premier Cabinet
4
1.2
Premier Counter
4
1.3
Pro Cabinets
4
1.4
Pro Counter
4
PREMIER CABINET & COUNTER - Controller Operating Instructions
2.1
Foster Premier Controller (FPC)
5
2.2
Basic ‘User’ Functions
6
2.3
Basic ‘User’ Adjustments
7
2.4
Controller Display Messages
8
2.5
Operating Modes
9-11
2.6
Additional Features (Standard and Optional)
11-12
2.7
‘Standard’ Alarms and Warnings
12-14
2.8
‘Optional’ Alarms and Warnings
2.9
‘Advanced’ Alarms and Warnings
15-17
2.10
Service Adjustments
17-19
2.11
Parameter Definitions
19-22
2.12
Premier Controller (FPC) Default Values/Model Table
23
2.13
Conversion Tables
24
14
PRO CABINET & COUNTER - Controller Operating Instructions
3.1
Foster Standard Controller
25-27
3.2
Controller Adjustment
27
3.3
‘User’ Functions
28
3.4
‘User’ Adjustments
28
3.5
‘Service’ Adjustments
3.6
Model Selection
3.7
Parameter Adjustment
29-30
3.8
Alarms and Warnings
30-32
3.9
Parameter Definitions
32-34
3.10
Standard Controller Model/Default Value Table
35
3.11
Standard Controller Electric Defrost Model/Value Table
36
28-29
29
4.0
PRO B 600 HW & LW Parameter Settings
37
5.0
TECHNICAL DATA - Prem & Pro Cabinets
38
6.0
TECHNICAL DATA - Prem & Pro Counters
39
7.0
TECHNICAL DATA - Prem & Pro Cabinets with Hydrocarbon R290 Gas
40
8.0
TECHNICAL DATA - Prem & Pro Counters with Hydrocarbon R290 Gas
41
9.0
BAKERY CABINET PARAMETER SETTINGS PREMIER
42
BAKERY CABINET PARAMETER SETTINGS PRO
43
3
1.0 INTRODUCTION
1.1
1.2
1.3
1.4
PREMIER CABINET
The Premier range consist of 54 (48) models available in full Gastronorm (650 x 530 shelf) and the Non Gastronorm
(530x 550 shelf) formats, 39 top mount and 9 bottom mount refrigeration system versions.
There are 6 storage temperature’s models available all designed to operate in Climate Class 5 ambient
conditions.
The storage temperatures are controlled by an easy to use menu driven intelligent microprocessor displaying
both storage temperatures and text diagnostic alarm messages.
The cabinets are manufactured as a “one piece” shell having 60mm Zero ODP foam insulation.
Top mount cabinets are fitted with a unique “plug “ refrigeration system (except dual temperature cabinets)
allowing easy removal on site.
In addition the “lid” of the plug box can easily be removed allowing access to internal component parts
The refrigeration systems use zero ODP HFC refrigerants however Hydrocarbon refrigerant can be supplied to
most top mount models as an option.
Coated evaporator coils are fitted to prevent corrosion and prolong refrigeration life.
The “thermal break” is fitted with a removable cover strip allowing easy access to replace or fit a door frame
heater. The magnetic gasket provides a positive door seal against the thermal break.
All cabinets are fitted with a “special” door lock, which will not damage the door if closed in the locked
position.
PREMIER COUNTER
The Premier range consist of a wide choice of storage options catering for gastronorm series 1 & 2 shelves/trays
in both drawer and door combinations, all with a robust stainless steel worktop.
The construction is a one piece foamed shell manufactured externally in optisheen 304 stainless steel whilst
the interior is either aluminium or stainless steel.
The zero ODP refrigeration system is end mounted with the condensing unit mounted on a “slide out” base plate
for ease of service.
The coated evaporator assembly is mounted on a removable plate within the cabinet.
There are four storage temperatures available operating in an ambient temperature up to 43°C, climate class
5.
To control the temperature an intelligent microprocessor controller is fitted which not only controls and displays
temperature, and other functions, but also provides diagnostic information to assist the service engineer.
For mobility multiple castors are fitted however legs are available on request.
PRO CABINETS
The Pro range consists of 18 models available in full Gastronorm (650 x 530 shelf) and Non Gastronorm (530
x 550 shelf) formats, 12 top mount models and 6 bottom mount refrigeration system versions
There are 3 storage temperatures models available all designed to operate in Climate Class 5 ambient
conditions.
The storage temperatures are controlled by an intelligent microprocessor displaying both storage temperatures
and alarm conditions should they occur.
The cabinets are manufactured as a “one piece” foam shell having 60mm Zero ODP foam insulation.
Top mount refrigeration systems are fitted with a unique “plug” refrigeration system (except dual temperature
cabinet) allowing easy removal on site. In addition the “lid” of the plug box can easily be removed allowing access
to internal component parts.
The refrigeration systems use Zero ODP HFC refrigerants however Hydrocarbon refrigerant can be supplied to
most top mount models as an option.
Coated evaporator coils are fitted to prevent corrosion and prolong refrigeration life.
The “thermal break” is fitted with a removable cover strip allowing easy access to replace or fit a door frame
heater. The magnetic gasket provides a positive door seal against the thermal break.
All cabinets are fitted with a “special” door lock, which will not damage the door if closed in the locked
position.
PRO COUNTER
The Pro range is based on the Premier Range basic cabinet shell and refrigeration system however the door,
drawer and microprocessor differ.
There are three storage temperatures available operating in an ambient temperature up to 43°C, climate class
5.
The temperature is controlled by a multi function micropressor controller complete with digital display and function
operation.
For full specification details please see the respective literature.
4
2.0 PREMIER CABINET & COUNTER
CONTROLLER OPERATING INSTRUCTIONS
2.1
2.1.1
FOSTER PREMIER CONTROLLER (FPC)
Foster Part Numbers: 00-554476 & 00-554564
FPC Module Description.
A premier version temperature controller, called the Foster Premier Controller (FPC) with Bespoke Foster
styling and operating features. The primary purpose of this controller is to maintain a pre-determined
temperature in Foster storage products, and automatically indicates defrost routines as required. The
operating parameters can be adjusted to provide optimum flexibility across the Foster cabinet and counter
model and temperature ranges. The controller is the Man/Machine Interface (MMI) and as such has
been designed to be as ‘user friendly’ as possible. The FPC is connected via a ribbon cable to the Power
Switching Unit (PSU), which is common to all models (both Premier and Pro). The controller contains
all of the pre-set information necessary to operate a cabinet or counter model in standard configuration,
dependant upon which model is selected during the controller installation set-up. The choice of the operating
configuration is set in ‘Model Selection’. Particular changes to allow for local conditions can then be made
via the ‘Service Parameters’.
There are two displays. The primary temperature display is made up of three green ‘7 segment’ LED’s, each
with a decimal point. The LED’s are capable of showing all numerical figures to enable clear operating in
conjunction with the energising of the relays - compressor, evaporator fans and defrost. Secondarily, a LCM
display is used to provide detailed operating and service instructions in the form of consecutive menus. This
display can show a maximum of 16 characters in a line, and has two lines. The display shows illuminated
yellow characters on a dark background. The MMI works by pressing the button adjacent to the required
option displayed. Due to the use of the text to describe certain functions or options, the additional feature
of being able to select alternative language options has been included. The translations for the terms and
phrases used are included later in this section, however basically due to the number of language versions
there are two variants of the FPC.
Dutch.
Italian.
00-554476
FPC Version 1A
English, French, German and
00-554564
FPC Version 1B
English, Spanish, Danish and
The front of the controller is covered with a membrane, which provides a seal of at least IP54. This
membrane covers all four operating buttons, which can then be used singularly, or in conjunction with each
other to change operating parameters, acknowledge alarms, select model variants and change individual
operating parameters.
2.1.2
FPC Inputs/outputs
Outputs from the controller are:
i)
two ribbon cable connections to the PSU (10 and 16 way).
ii)
three green 7 segment with decimal LED displays.
iii)
one 16 character by 2 line LCM display (yellow on blue).
iiii)
an audible sounder to provide alarms and warnings.
Inputs to the controller are via the four operating buttons on the fascia.
All other Inputs and Outputs are via the PSU.
5
Button 1
Button 2
•
Button 4
Button 3
2.2
BASIC ‘USER’ FUNCTIONS
2.2.1
Set Unit To Standby
•
Typical Normal Operating Mode Display
Off
Defrost
Service
Temp.
Press any button (1, 2, 3, or 4).
Press button 1 (Off).
All relay outputs fall low.
2.2.2
Display will show:
On
•
•
•
•
•
•
•
•
•
•
•
•
•
•
•
•
•
•
•
•
POWER OFF
Set Unit To Run
Off
Defrost
Service
Temp.
Press button 4.
System will restart
2.2.3
Check Set Point (Low Point of Temperature Band)
Off
Defrost
Service
Temp.
- Temp. Set +
<< -21°C OK
Press any button (1, 2, 3, or 4)
Press button 3. (Temp.)
Press button 4 (<<) to exit to ‘User Main Menu’.
2.2.4
Off
Defrost
Service
Temp.
View Ancillary Temperatures (If Relevant Probes are Fitted)
Off
Defrost
Service
Temp.
Press any button (1, 2, 3, or 4)
Press button 4 for ‘Service’ menu.
Info
<<
Press button 1 for ‘Info’ menu.
Use buttons 1 (← ) and 2 ( →) to view
temperatures.
←
<<
(Air ↔ Evaporator ↔ Condenser ↔ Food ↔ Air).
(If relevant probe not fitted display shows ---).
Press button 4 (<<) to exit to ‘User Main Menu’.
6
←
<<
Alarms
Settings
Air
→
-20°C Text
Cond.
→
--- Text
Off
Defrost
Service
Temp.
2.3
BASIC ‘USER’ ADJUSTMENTS
2.3.1
Increase Set Point. (Low Point of Temperature Band)
Off
Defrost
Service
Temp.
Press any button (1, 2, 3, or 4).
Press button 3 for ‘Temp. Set’ menu.
Use button 2 (+) to adjust setting to required value.
Press button 3 (OK) to save and exit.
Press button 4 (<<) to exit without saving.
Display will return to ‘User Main Menu’.
Note: Maximum value dependant upon Maximum Temperature
Set-point parameter setting.
2.3.2
- Temp.Set +
<<
-18°C
OK
Off
Defrost
Service
Temp.
Off
Defrost
Service
Temp.
Press button 3 for ‘Temp. Set’ menu.
Use button 1 (-) to adjust setting to required value.
Press button 3 (OK) to save and exit.
Press button 4 (<<) to exit without saving.
Display will return to ‘User Main Menu’.
Note: Maximum value dependant upon Maximum Temperature
Set-point parameter setting.
•
•
•
•
•
•
•
•
- Temp.Set +
<<
-21°C
OK
•
•
- Temp.Set +
<<
-25°C
OK
•
•
Off
Defrost
Service
Temp.
•
•
•
•
•
•
•
•
•
•
•
•
•
•
•
•
•
•
Initiate Manual Defrost
Off
Defrost
Service
Temp.
Press any button (1, 2, 3 or 4).
Press button 2 for ‘Defrost’ initiation.
Defrost On
0:03
A defrost and Recovery Program will occur.
On completion unit will return to normal operation.
Note: Not available on Heated (Xt.) variants.
2.3.4
•
Decrease Set Point. (Low Point of Temperature Band)
Press any button (1, 2, 3 or 4).
2.3.3
- Temp.Set +
<<
-21°C
OK
•
Off
Defrost
Service
Temp.
Change Display Text Language
Off
Defrost
Service
Temp.
Press any button (1, 2, 3 or 4).
Press button 4 for ‘Service’ menu.
Info
<<
Press button 1 for ‘Info’ menu.
Press button 3 for ‘Text’ menu.
Use buttons 1 (-) and 2 (+) to select language.
Press button 3 (OK) to save and exit.
Press button 4 (<<) to exit without saving.
Display will return to ‘User Main Menu’
Alarms
Setting
←
<<
Air
20°C
<<
English
→
Text
+
OK
Off
Defrost
Service
Temp.
7
2.4
2.4.1
2.4.2
2.4.3
CONTROLLER DISPLAY MESSAGES
FOSTER Ltd. 1A
Low Temp-G
Start Up and Self Test Indication
This indication is only displayed during the first 3 seconds following mains electrical power being applied to
the cabinet. During this period the controller performs a self-check and a check of the operating system,
prior to commencing the ‘normal operating mode’. The text on the ‘Start Up’ message confirms the cabinet
operating temperature and the software version.
On
POWER OFF
Stand-by Indication
This indication is displayed while the unit is not operating but with mains electrical power still applied.
This mode may be used for internal cleaning regimes and short period when the unit is not required. For
extended periods of inactivity the mains supply should be isolated.
Defrost On
0:03
•
Defrost Indication
This indication is displayed during the automatic defrost cycle or following a manual initiation. Dependant
upon the prevailing conditions and the parameter settings the defrost will continue until it is terminated by
either time or temperature. A recovery period will then automatically occur to ensure the evaporator coil
is at the correct operating temperature before commencing the ‘Normal Operating Mode’.
•
2.4.4
2.4.5
2.4.6
•
•
‘Normal Operating Mode’
In normal operation the LED display shows the internal air temperature. Above this temperature readout
the three-function icon LED’s indicate when the condensing unit, evaporator fans or defrost outputs are
energised. Routinely the temperature display will go blank during defrost periods as shown above.
Off
Defrost
Service
Temp.
•
•
‘User Main Menu’
This menu is accessed by pressing any button when in the ‘Normal Operating Mode’. Pressing button 1
(Off) will cause the unit to enter the ‘Stand-by Mode’ and the output relays to fall low. Pressing button 2
(Defrost) will cause a manual initiation of the defrost cycle, except in heated cabinet variants where this
option is not available. Pressing button 3 (Temp.) will allow fine adjustment of the operating temperature
setpoint. Pressing button 4 (Service) allows access to the ‘Supervisor Main Menu’.
Info
<<
Alarms
Settings
•
•
‘Supervisor Main Menu’
Accessed from the ‘User Main Menu’ by pressing button 4 (Service). This allows the operator to view further
temperature information, and change the language of the text; by pressing button 1 (Info). Any alarms or
warnings present can be viewed (and some can be cleared) by pressing button 2 (Alarms). Pressing button
3 (Settings) will lead to a menu where an access code needs to be entered. This is for use by maintenance
and service personnel only. To return to the ‘User Main Menu’ button 4 (<<) should be pressed.
8
2.5
OPERATING MODES
2.5.1
Normal Operation
When mains power is initially applied the LCM text display will show the start up message; (including the
software version and the base model operating range), for a period of three seconds, during which time
the controller performs a ‘self check’. The LED display will not illuminate during this time. After 3 seconds
the text display will then extinguish and the LED display will show the temperature measured by Probe
1 (T1) - the internal air temperature probe. The function LED’s will also illuminate to show which output
relays are energised. Therefore, if the measured temperature is not within the pre-set temperature range
the controller will activate the condensing or heating system. All timings (i.e. defrost intervals) will be taken
from power up.
The evaporator coil temperature, measured by Probe 2 (T2) may be temporarily viewed by entering the
‘Supervisor Main Menu’ and pressing button 1 (Info); (this facility is only available if the evaporator probe
is selected by virtue of model or as an addition in the parameters). The Condenser Coil and Food probe
temperature may also be viewed from this menu if they are fitted by scrolling through the menu using button
1 (←) and button 2 ( →) . If no buttons are pressed for a period of one (1) minute the LCM display will be
extinguished.
2.5.2
Electrical Isolation
If mains electrical power is removed from the controller with the until operational, the entire system will
cease all relay outputs will fall low, the LCM and LED displays will be extinguished. When mains power is
re-established the controller will carry out the initial self-test routine and then the system will re-start and
carry on in the ‘Normal Operating Mode’. However, if the controller is set to ‘Stand-by’ mode when the
mains fails or is removed, on re-connection the controller will return to the ‘Stand-by’ mode.
2.5.3
Defrost Routine
Defrosts will occur automatically in refrigerated equipment upon a pre-determined time based cycle, or if
required they can be initiated manually. The number of defrosts that occur in any one 24-hour period is
determined by the ‘Defrost/Day’ parameter. For each model type there is a standard default value set;
usually 4 (one every six hours). The number of defrosts per day can be varied by access into the ‘Service
Parameters’ from 24 (one defrost every hour), to none (0). The defrost interval clock only operates when
the unit is in the ‘Normal Operating Mode’, therefore in ‘Stand-by’ mode the defrost clock is stopped. When
the controller is restarted the defrost clock will also resume from the point it stopped. This can occasionally
lead to a defrost occurring shortly after the unit has been restarted.
Dependant upon the refrigeration application and model type the defrost will vary in type (hot gas, electric
or off cycle), and duration. The type of defrost performed will be determined by the setting of parameter
‘Defr.Type’. The selection of the type of defrost will depend upon the particular refrigeration system and
will effect exactly how each operates, however the sequence of operation (for hot gas or electric) will be
as follows:
Defrost On
0:03
•
•
Defrost Initiated
The LED temperature display is extinguished, although the function indicators will remain illuminated
(dependant upon type of defrost). The LCM text display will show ‘Defrost On’ and time elapsed
clock will start. The defrost will continue until either the Defrost termination time or temperature
are reached, at which time the defrost relay will be de-energised. A drain down period is then
commenced during which time no relays will be energised (the duration of this is determined by
parameter ‘Drain Time’). This is to allow the evaporator melt water to drain from the evaporator
coil. On completion of the drain down period the condensing until will restart; this is the ‘Fan
Delay Period’.
Defrost On
10:13
•
•
Fan Delay Period
This period is to allow the evaporator to cool before the evaporator fans restart (this does not
apply to ‘Off cycle’ defrost type). This prevents any warm air remaining from the defrost being
distributed throughout the product.
9
During the fan delay period (determined by the parameter ‘Fan.Dly.Tp’) the LED temperature
display remains extinguished, although the condenser function indicator will be illuminated. The
lCM text display will still show ‘Defrost On’ and the time elapsed clock will continue. The fan delay
period will continue until the temperature determined by the fan delay temperature parameter has
been achieved. The evaporator fans will then restart and the unit will enter the recovery period.
Temp. Recovery
12:33
•
•
Temperature Recovery Period
This period allows the unit to cool the load area back to the normal operating temperature range
following the defrost period. The internal air temperature may have risen out of the normal
temperature ranges during the defrost period due to the doors being opened for loading/unloading
or a slight transfer of warm air from the evaporator to the air temperature probe. During the
temperature recovery period (which is a fixed period totalling 5 minutes after the evaporator fans
restart), the LCM text display will change to show ‘Temp. Recovery’ (to prevent undue concern if
the internal air temperature is slightly high) as well as the time elapsed clock continuing. During
the first two minutes of the temperature recovery period the LED temperature display will only
show the function indicators, however for the final three minutes of the temperature recovery
period the internal air temperature will be shown as well.
•
•
Normal Operating Mode
Five minutes after the evaporator fans have restarted the LCM text display will be extinguished
and the unit will enter the normal operating mode - the defrost mode will have been completed.
For each different type of defrost there are slight variations on the general operation detailed above.
Therefore the following section gives specific defrost details for each type.
If ‘Defr.Type’ parameter is set as ‘Off Cycle’ an Off Cycle defrost will occur. This means that at defrost
initiation the evaporator fan will continue to run (even if the doors are opened), however the condensing
system will stop (the defrost relay will not be energised). The period of the defrost will solely be determined
by the value set in parameter ‘Defr.EndTm’ the ‘Defrost Termination Time’. On completion of the defrost
there will be a drain down period. The length of this will be determined by the parameter ‘Drain Time’,
although during this period the evaporator fans will continue to run. The controller will then cause the
system to enter the temperature recovery period; this will cause the condensing unit to restart as well as
the evaporator fans running (although now the fans will stop if the doors are opened). After two minutes
of the temperature recovery the LED display will display the internal air temperature, and after a further
three the LCM display will be extinguished. The system has now re-entered the normal operating mode.
If the defrost type (‘Defr.Type’) is set as ‘Electric’, and Electric Defrost will occur. At initiation only the defrost
relay will be energised, therefore the condensing unit and evaporator fans will cease. Once again the
period of the defrost will be determined by the value set in parameter ‘Defr.EndTm’ the Defrost Termination
Time’. However if an evaporator probe is fitted; (parameter ‘Evap. Probe’ set to ‘Yes’), the defrost may be
terminated once the evaporator coil has reached the temperature as determined by the parameter ‘Defr.
EndTp’ the ‘Defrost Termination Temperature’. The defrost will end on time or temperature depending
on which occurs first. On completion of the defrost there will be a drain down period. The length of this
will be determined by the parameter ‘Drain Time’, and during this period none of the output relays will be
energised. The controller will then cause the system to enter the temperature recovery period; this will cause
the condensing unit and evaporator fans to restart (although the fans will stop if the doors are opened).
After two minutes of the temperature recovery the LED display will display the internal air temperature,
and after a further three the LCM display will be extinguished. The system has now re-entered the normal
operating mode.
Finally, if the defrost type (‘Defr.Type’) is set as ‘Hot Gas’, a Hot Gas will occur. At initiation both the defrost
and condensing system relay will be energised, therefore the evaporator fans will cease. The period of the
defrost will be determined by the value set in parameter ‘Defr.EndTm’ the ‘Defrost Termination Time’. Usually
with a hot gas defrost and evaporator probe is fitted; (parameter ‘Evap. probe’ set to ‘Yes’), therefore
10
The defrost may be terminated once the evaporator coil has reached the temperature as determined
by parameter ‘Defr.EndTp’ the ‘Defrost Termination Temperature’. The defrost will end on either time or
temperature, depending on which occurs first. On completion of the defrost there will be a drain down
period. The length of this will be determined by the parameter ‘Drain Time’, and during this period none
of the output relays will be energised. The controller will then cause the system to enter the temperature
recovery period; this will cause the condensing unit and evaporator fans to restart (although the fans will
stop if the doors are opened). After two minutes of the temperature recovery the LED display will display
the internal air temperature, and after a further three the LCM display will be extinguished. The system
has now re-entered the normal operating mode.
A defrost can be initiated manually if required. The procedure for this is detailed in the ‘User Functions’
section, but the defrost operation and display will be the same as for an automatic defrost. Should a manual
defrost be initiated the automatic defrost clock will be reset, and therefore subsequent defrosts will follow
the normal time interval.
Notes:
i)
ii)
iii)
The Defrost period is defined as the time from initialisation to the recommencing of the refrigeration
cycle. This includes the defrost, fan delay and temperature recovery periods.
Defrosts do not occur and are not available on heated (Xt.) variants.
If any buttons are pressed during the defrost period the display will show the ‘User Main Menu’,
and access to all normal functions will be available. The display will revert to showing the defrost
status and time elapsed if no further buttons are pressed for 1 minute.
2.6
ADDITIONAL FEATURES (STANDARD AND OPTIONAL)
2.6.1
Diagnostic System
The FSC controller has the capability to diagnose certain operational faults. Some basic faults such as high
temperature, door open and probe failure alarms are standard on all models. If a Food probe is fitted the
controller will diagnose the failure of this probe should it occur. If an air, evaporator and condenser probe
are fitted and enabled the controller can also monitor and determine other component failures. These
include an evaporator fan failure, defrost system fail, blocked evaporator (SP010), condenser fan failure,
condenser blocked (SP020), and compressor failure, low gas level or gas leak (SP030). To enable this
facility the ‘Diagnostics’ parameter must be set to ‘Yes’. For further details of the diagnostic outputs refer
to the information in the ‘Advanced Alarms and Warnings’ section.
Note: If this function is utilised it is only intended as a quick guide to failure modes. Although accurate
it should be used in conjunction with established fault techniques to correctly identify problems
and causes.
2.6.2
Food Probe
In normal operation an algorithm calculates the product temperature, and therefore the value for the
‘Food’
probe normally given is an estimate. However, in conjunction with the PSU, the FPC has the facility to
show actual product temperature using an optional Food probe. If this option is required the ‘Food Probe’
parameter should be changed to ‘Yes’ (standard is ‘No’). This will cause the controller to disregard the
product simulation value parameter (‘Food Sim’), and when the ‘Info’ menu is selected, the Food temperature
value displayed will be the actual value rather than a calculated value. For this option a food probe is
required with the same thermistor operating characteristics as the KTY81-121, which is connected to the
PSU by a two-way clip in clamp. No Foster part number has yet been allocated for this optional food probe
component.
2.6.3
Auxiliary Alarm
In conjunction with the PSU, the facility is available for the controller to cause the cabinet to react to external
events usually beyond the system’s control. The standard settings will not cause the controller to be able
to be influenced by any other device. However depending upon the setting in the ‘Aux. Alarm’ parameter
having been adjusted to the appropriate value, the controller is able to either cause the system
11
to alarm and continue running, or to alarm and cause all outputs to fall low. This will only occur when the
appropriate value has been selected in the parameter settings, and the input device wired into the Aux.
Alarm terminal on the PSU is caused to close circuit. For further details of the ‘Auxiliary Alarm’ refer to the
information in The ‘optional Alarms and Warnings’ section.
2.6.4
Remote Display
If required as an optional extra, a remote display module (Foster Part Number 00-554479) can be operated
with the FPC controller. It is connected via a ‘4-way Amp’ plug into the PSU, and is solely used to provide
a mimic of the FPC LED readout. A further detailed description of this module and its operation is given
in the section of the Technical Specification relating to the Remote Display Module.
2.6.5
Out-Put Relay Test
To assist with operational testing and fault diagnosis the FPC controller has the facility to enable each
output relay to be energised; either individually or collectively. From the ‘Service Main Menu’ button 1 ‘Test’
is depressed and the controller will enter the relay test mode. At the same time all relays will de-energise,
although the temperature measured by the air probe (T1) will still be shown in the LED window. Depressing
button 1 (‘Relay1’) will cause the condensing system relay to attempt to energise and the appropriate
function icon LED will illuminate. Similarly, depressing button 2 and 3 (‘Relay2’ and ‘Relay3’ respectively)
will cause the evaporator fan and defrost system relays to attempt to energise and the appropriate function
icon LED’s will illuminate. The buttons can be depressed singularly or in combination, and the outputs will
remain energised for two seconds once the button has been released.
On exiting back to the ‘Service Main Menu’ (by pressing button 4 - <<), or if no button is pressed for one
minute the controller will revert to operating mode and therefore the relays will be energised in the normal
way.
Note: When this function is used, any energised relay will allow current to all services connected to the
output. Caution should therefore be exercised when repeatedly switching relay outputs.
2.6.6
Time Run Counter
The ‘Time Run Counter’ (TRC) will only operate when mains power is supplied to the controller via the PSU.
The counter will then automatically increment equivalent to the hours (it will not matter if the controller is in
the operating or ‘sleep’ mode). The counter value will not increase if mains electrical power is removed.
Therefore the time run counter will provide a total ‘power-on’ value. The Counter will operate between 0
and 60,000 hours, (which equates to 2,500 days, 357 weeks or 6.8 years). Once the Counter has reached
60,000 it will not reset, but the controller will continue to operate normally. Should the ‘Time Run Counter’
then be viewed at a later time the only information that could be established is that the controller had been
supplied with mains power for longer than 60,000 hours. The operation of the counter clock will not effect
or be effected by the operation of the condenser clean or service due clocks.
Viewing Time Run - The total time run can only be viewed using a PC and a version of the ‘TAB’ software.
The controller will be connected to the PC via the PSU, and by interrogating the ‘TAB’ software using the
menu system the total time run will be able to be viewed. It is not possible to view the Counter without this
software. It is not possible to reset the ‘Time Run Counter’.
2.7
‘STANDARD’ ALARMS AND WARNINGS
2.7.1
Condenser Cleaning Warning
To maintain the efficient operation of the equipment, the condenser filter must be cleaned at regular
intervals. The controller automatically triggers a warning when this cleaning is due (dependant upon the
value set in the ‘Clean Filter’ parameter). At this time the message shown above will appear, there will be
no audible alarm. The warning can be acknowledged by pressing any button (1, 2, 3 or 4). This will cause
the message to stop flashing. During this time the controller will continue to operate normally, as well as
display other messages; such as Defrost cycles and the ‘User Main Menu’.
Once the condenser Filter has been cleaned the controller can be reset from the Supervisor Menu by
pressing button 2 (Alarms) and then button 3 (Clear). The timing for this function is associated with the
compressor run time, and is not based upon power supply available or the unit being in the operating
mode.
12
CLEAN FILTER
2.7.2
2.7.3
2.7.4
2.7.5
2.7.6
DOOR
OPEN⌦ALARM !
Door Opening Warning
Display shows door opening warning. The controller siren sounds, but can be muted by pressing any
button. Display will continue to show until cancelled by shutting the door. If the door open warning is
muted and the door left open, the warning will eventually become a temperature related problem and then
the appropriate alarm would be generated (described below). The door open alarm will sound after the
period determined from the ‘Door Stop’ plus the ‘Door Alarm’ parameters. This will only occur if the door
switch (‘Door Switch’) parameter is set to ‘Yes’.
SERVICE DUE
CALL SERVICE
Service Due Warning
To maintain the optimum operating capability of the equipment it is recommended that regular servicing be
carried out. The type of maintenance and inspection required to do this should only be carried out by trained
personnel. The periodicity of this function is determined by the ‘Service Due’ parameter. The controller
automatically triggers a warning when this cleaning is due. At this time the message shown above will
appear, there will be no audible alarm. The warning can be acknowledged by pressing any button (1, 2, 3
or 4). This will cause the message to stop flashing. During this time the controller will continue to operate
normally, as well as display other messages; such as Defrost cycles and the ‘User Main Menu’. The timing
for this function is associated with the compressor run time, and is not based upon power supply available
or the unit being in the operating mode. Once the service has been completed access the parameter
settings (as described in 2.10.1), go to service due (set at 36) reset to 0. Exit the programme and return
to main menu. Re-enter the same programme and set service due back to 36. Exit programme and return
to main menu. If the service due warning is not required leave setting at 0.
HIGH TEMP.
ALARM !
High Temperature Alarm
This alarm occurs if the internal air temperature rises above the set point, plus the hysteresis value, plus the
high alarm temperature differential for the period determined by the alarm delay period. If this alarm occurs,
the LCM display will flash the alarm message above. The alarm siren will sound, but can be muted for a
period of one hour by pressing any button. The LCM display will continue to flash throughout this alarm.
The LED display will show the internal air temperature and the function icons. If the temperature has not
returned to within the operating limits after one hour the alarm will resound for one minute. This process
will continue until automatically cancelled by system returning to its normal operating temperatures.
LOW TEMP.
ALARM !
Low Temperature Alarm
This alarm occurs if the internal air temperature falls below the set point minus the low alarm temperature
differential for the period determined by the alarm delay period. If this alarm occurs, the LCM display will
flash the alarm message above. The alarm siren will sound, but can be muted for a period of one hour
by pressing any button. The LCM display will continue to flash throughout this alarm. The LED display
will show the internal air temperature and the function icons. If the temperature has not returned to within
the operating limits after one hour the alarm will resound for one minute. This process will continue until
automatically cancelled by the system returning to its normal operating temperatures.
Probe 1
CALL SERVICE
Air Temperature Probe Failure
LCM Display flashes ‘Probe 1’ failure indicating an air probe (T1) failure, LED display shows function icons
only. Alarm siren sounds, but can be temporarily muted by pressing any button (1, 2, 3 or 4). Following
this the alarm will resound for one minute after one hour. The LCM display will continue to show the alarm
message until it is reset. If the temperatures from the ‘Supervisor Main Menu’ (info) are viewed, the ‘Air’
temperature readout will show ‘?’, the ‘Food’ temperature readout will not be available (unless the food
probe option is utilised and the ‘Food Probe’ parameter is selected as ‘YES’). During this period the unit will
continue to operate (as determined by the ‘Compr.Cycle’ parameter), but will have a reduced performance.
There is no action that can be taken by the user in this instance to remedy the problem; the only solution
is to replace the faulty air probe. This can be done without removing the mains power supply, although if
at all possible the supply should be isolated, but as a minimum the controller should be set to ‘Off’. Once
a new probe has been fitted the supply should be restored and the unit set to ‘On’. The alarm will then
automatically be reset and the unit should function normally.
13
Probe 2
CALL SERVICE
2.7.7
Evaporator Temperature Probe Failure
LCM Display flashes ‘Probe 2’ failure indicating an evaporator probe (T2) failure, the LED display continues
to show the internal air temperature and the function icon indicators. Alarm siren sounds, but can be
temporarily muted by pressing any button (1, 2, 3 or 4). Following this the alarm will resound for one
minute after one hour. The LCM display will continue to show the alarm message until it is reset. If the
temperatures from the ‘Supervisor Main Menu’ (info) are viewed, the ‘Evap.’ temperature readout will show
‘?’, all other temperatures will be able to be viewed normally. During this period the unit will continue to
operate, but this failure will have an effect on defrost and therefore efficiency if allowed to remain unfixed.
There is no action that can be taken by the user in this instance to remedy the problem; the only solution
is to replace the faulty evaporator probe. This can be done without removing the mains power supply;
although if at all possible the supply should be isolated, but as a minimum the controller should be set to
‘Off’. Once a new probe has been fitted the supply should be restored and the unit set to ‘On’. The alarm
will then automatically be reset and the unit should then function normally. (This probe is not fitted to heated
temperature models).
2.8
‘OPTIONAL’ ALARMS AND WARNINGS
2.8.1
Food Probe Failure Warning
This alarm message will only appear if the option of a food probe has been initialised in the parameters,
and a food probe is fitted into the PSU, with the ‘Food Probe’ parameter set to ‘YES’. This means that
actual product temperature reading can be viewed in the supervisor menu (via the ‘info’ menu) instead of
the algorithmic value which would normally be displayed. LCM Display shows ‘Probe 4’ failure indicating
a food probe (T4) failure, the LED display continues to show the internal air temperature and the function
icon indicators. Alarm siren sounds, but can be permanently muted by pressing any button (1, 2, 3 or 4),
although the LCM display will continue to show/flash the alarm message until it is reset. If the temperatures
from the ‘Supervisor Main Menu’ (Info) are viewed, the ‘Food’ temperature readout will show ‘?’, all other
temperatures will be able to be viewed normally. During this period the unit will continue to operate, and
this failure will have no effect on product operation. There is however no action that can be taken by the
user in this instance to remedy the failure, the only solution is to replace the faulty food probe. This can be
done without removing the mains power supply; although if at all possible the supply should be isolated,
but as a minimum the controller should be set to ‘Off’. Once a new food probe has been fitted the supply
should be restored and the unit set to ‘On’. The alarm will then automatically be reset and the unit should
then function normally.
2.8.2
CALL SERVICE
Auxiliary Alarm Condition Warning
Dependent upon the setting of the ‘Aux. Alarm’ parameter the following alarms will occur:
‘Aux. Alarm’ set to 0 (standard setting) - nothing will happen if auxiliary input is open or closed circuit.
‘Aux. Alarm’ set to 1 - if the auxiliary input remains open circuit nothing will happen. If however the
auxiliary input is caused to close circuit the LCM flashes the alarm message above. The alarm siren will
sound, but the system will continue to operate as normal and the LED display will continue to show the
internal temperature as measured by the air probe (T1) and the function icons. The alarm sounder can be
permanently muted by pressing any of the buttons (1, 2, 3 or 4). The LCM display will continue to flash the
alarm message until it is reset. This is done by causing the auxiliary input to open circuit, mainly rectifying
the cause of the external input close circuit to the PSU.
‘Aux. Alarm’ set to 2 - if the auxiliary input remains open circuit nothing will happen. If however the auxiliary
input is caused to close circuit the LCM flashes the alarm message above. The alarm siren will sound
and the controller will de-energise all relays, although the LED display will continue to show the internal
temperature as measured by the air probe (T1). The alarm sounder can be permanently muted by pressing
any of the buttons (1, 2, 3 or 4). The LCM display will continue to flash the alarm message until it is reset.
This is done by causing the auxiliary input circuit, meaning rectifying the cause of the external input close
circuit to the PSU.
Probe 4
CALL SERVICE
AUX ALARM
14
2.9
‘ADVANCED’ ALARMS AND WARNINGS
2.9.1
Condenser Probe Failure Warning
This alarm message will only appear if a condenser probe is fitted into the PSU, with the ‘Cond. Probe
parameter set to ‘YES’. Used primarily as part of the optional diagnostics package to assist in the diagnosis
of refrigeration system problems, this fault condition will not occur as standard. LCM Display shows ‘Probe
3’ failure indicating a condenser probe (T3) failure, the LED display continues to show the internal air
temperature and the function icon indicators. The alarm siren will not sound, (unless in conjunction with
another alarm), although the LCM display will continue to show/flash the alarm message until it is reset. If
the temperatures from the ‘Supervisor Main Menu’ (Info) are viewed all other temperatures will be able to
be viewed normally, except ‘Cond.’ which will show ‘?’. During this period the unit will continue to operate,
and this failure will have no effect on product operation. There is however no action that can be taken by
the user in this instance to remedy the failure, the only solution is to replace the faulty condenser probe.
This can be done without removing the mains power supply; although if at all possible the supply should
be isolated, but as a minimum the controller should be set to ‘Off’. Once a new condenser probe has been
fitted the supply should be restored and the unit set to ‘On’. The alarm will then automatically reset and
the unit should then function normally. (This probe would not be fitted to heated temperature models).
2.9.2
Probe 3
CALL SERVICE
SF 010
CALL SERVICE
SF 010 Alarm Warning
SF 010 is an advanced diagnostic warning pertaining to the evaporating system. This alarm will only
be accurately generated if the ‘Diagnostics’ parameter is selected as ‘YES’ a condenser probe is fitted.
This works by the controller taking temperature measurement readings over a period of time from the air,
evaporator and condenser probes. These readings are then compared to a pre-determined algorithm and
an operating pattern generated by the individual operating characteristics of the particular product. If these
readings vary dramatically from the expected range; either instantaneously or over an extended period of
time, the controller will highlight this in the form of an alarm. The LCM display flashes the alarm message
above and the siren will sound. During this time the system will continue to attempt to operate as normal.
The LED display will continue to show the internal temperature as measured by the air probe (T1) and
the function icons. The alarm sounder can be temporarily muted by pressing any of the operating buttons
(1, 2, 3 or 4), although following this the alarm will resound for one minute after one hour until the fault is
rectified. The LCM display will continue to flash the alarm message until it is reset. If the controller is set
to ‘Off’ with this alarm and then set to ‘On’ the alarm message will be removed, although this will only be
temporary if the cause still exists as the controller will re-diagnose the problem.
It is unlikely that the operator could carry out any actions to correct the problem without some intervention
from suitable trained service personnel (except check for loading problems or blockages). The major
possible causes for this alarm are outlined below (this list is not intended to be exhaustive, but to cover
the primary expected causes of this alarm). Due to the nature and various types of refrigeration system it
is not practically possible to pin point each fault exactly, however with some basic fault finding techniques,
this alarm should assist in the diagnostic process.
i)
ii)
iii)
iv)
v)
vi)
vii)
viii)
ix)
x)
Evaporator fan failure.
Evaporator coil blocked.
Evaporator compartment inlet blocked.
Evaporator coil blocked due to ice – defrost problem.
Standard defrost parameters unsuitable for product application (defrost time, drain time etc.)
Defrost heater failure (remote models).
Drip tray heater failure / operation.
Drain line blocked.
Drain line heater failure.
Evaporator probe dislodged / misplaced.
Once the fault cause has been rectified, the controller should be switched ‘Off’ and then ‘On’. This will
reset the diagnostic algorithm and remove the alarm messages.
15
2.9.3
SF 020
CALL SERVICE
SF 020 Alarm Warning
SF 020 is an advanced diagnostic warning pertaining to the condensing system. This alarm will only be
accurately generated if the ‘Diagnostics’ parameter is selected as ‘YES’ and a condenser probe is fitted.
This works by the controller taking temperature measurement readings over a period of time from the air,
evaporator and condenser probes. These readings are then compared to a pre-determined algorithm and
an operating pattern generated by the individual operating characteristics of the particular product. If these
readings vary dramatically from the expected range; either instantaneously or over an extended period of
time, the controller will highlight this in the form of an alarm. The LCM display flashes the alarm message
above and the siren will sound. During this time the system will continue to attempt to operate as normal.
The LED display will continue to show the internal temperature as measured by the air probe (T1) and
the function icons. The alarm sound can be temporarily muted by pressing any of the operating buttons
(1, 2, 3 or 4), although following this the alarm will resound for one minute after one hour until the fault is
rectified. The LCM display will continue to flash the alarm message until it is reset. If the controller is set
to ‘Off’ with this alarm and then set to ‘On’, the alarm message will be removed, although this will only be
temporary, if the cause still exists as the controller will re-diagnose the problem.
It is unlikely that the operator could carry out any actions to correct the problem without some intervention
from suitably trained service personnel (except checking for condenser cleanliness or blockages). The
major possible causes for this alarm are outlined below (this list is not intended to be exhaustive, but to
cover the primary expected causes of this alarm). Due to the nature and various types of refrigeration
system it is not practically possible to pinpoint each fault exactly, however with some basic fault finding
techniques, this alarm should assist in the diagnostic process.
i)
ii)
iii)
Condenser coil blocked / dirty.
Condenser coil obstructed.
Condenser fan failure.
Once the fault cause has been rectified, the controller should be switched to ‘Off’ and then ‘On’. This will
reset the diagnostic algorithm and remove the alarm messages.
2.9.4
SF 030
CALL SERVICE
SF 030 Alarm Warning
SF 030 is an advanced diagnostic warning pertaining to the compressor and refrigerant gas system. This
alarm will only be accurately generated if the ‘Diagnostics’ parameter is selected as ‘YES’ and a condenser
probe is fitted. This works by the controller taking temperature measurement readings over a period of time
from the air. evaporator and condenser probes. These readings are then compared to a pre-determined
algorithm and an operating pattern generated by the individual operating characteristics of the particular
product. If these readings vary dramatically from the expected range; either instantaneously or over an
extended period of time, the controller will highlight this in the form of an alarm. The LCM display flashes
the alarm message above and the siren will sound. During this time the system will continue to attempt to
operate as normal. The LED display will continue to show the internal temperature as measured by the
air probe (T1) and the function icons. The alarm sounder can be temporarily muted by pressing any of the
operating buttons (1, 2, 3 or 4), although following this the alarm will resound for one minute after one hour
until the fault is rectified. The LCM display will continue to flash the alarm message until it is reset. If the
controller is set to ‘Off’ with this alarm and then set to ‘On’ the alarm message will be removed, although
this will only be temporary if the cause still exists as the controller will re-diagnose the problem.
It is unlikely that the operator could carry out any actions to correct the problem without intervention from
suitably trained service personnel. The major possible causes for this alarm are outlined below (this list is
not intended to be exhaustive, but to cover the primary expected causes of this alarm). Due to the nature
and various types of refrigeration system it is not practically possible to pinpoint each fault exactly, however
with some basic fault finding techniques, this alarm should assist in the diagnostic process.
i)
ii)
iii)
Refrigerant gas leak.
Incorrect gas charge.
Compressor failure.
16
iv)
v)
Pipe work blockage / restriction.
Extreme operating conditions.
Once the fault cause has been rectified, the controller should be switched to ‘Off’ and then ‘On’. This will
reset the diagnostic algorithm and remove the alarm messages.
2.10
SERVICE ADJUSTMENTS
The FPC has three ‘Service’ modes - the Output Replay Test function, the Model Selection function, and
the individual Parameter Adjustment. These features are accessible only from the ‘Service Main Menu’.
2.10.1
Service Main Menu
Off
Defrost
Service
Temp.
Press any button (1, 2, 3 or 4).
Info
<<
Press button 4 for ‘Service Menu’.
Press button 3 for ‘Settings Menu’.
Press buttons 1 (-) and 2 (+) to set ‘Code’ value of ‘131’.
Alarms
Settings
<<
Code
0
+
OK
<<
Code
131
+
OK
Test
Model
<<
Parameters
Press button 3 (OK) to enter ‘Service Main Menu’.
From ‘Service Main Menu’ press button 4 (<<) to exit to ‘User Main Menu’. If no further buttons are depressed
for one minute the controller will also revert to the ‘Normal Operating Mode’.
2.10.2
Out-Put Relay Test
From ‘Service Main Menu’ depress button 1 (Test).
All relays will de-energise.
Relay1
<<
Relay2
Relay3
To test relay 1 (condensing unit) press button 1.
Relay 1 will energise.
Relay1
<<
Relay2
Relay3
To test relay 2 (evaporator fan) press button 2.
Relay 2 will energise.
Relay1
<<
Relay2
Relay3
To test relay 3 (defrost system) press button 3.
relay 3 will energise.
Relay1
<<
Relay2
Relay3
Relay1
<<
Relay2
Relay3
To test all three-relay outputs press buttons 1, 2
and 3 together. All three relays will energise.
•
•
•
•
•
•
•
•
•
•
From ‘Output Relay Test Menu’ pressing button 4 (<<) will cause the controller to return to the ‘Service
Main Menu’. If no buttons are depressed for one minute the controller will revert to the ‘Normal Operating
Mode’.
2.10.3
Model Selection Function
The Model Selection function allows the controller to be set during manufacturing (or replacement) to
17
most appropriate model temperature range, with the accompanying ‘default setting’ values. There are ten
temperature default models, which are: - high temperature (High Temp.), low temperature with hot gas
defrost (Low Temp-G), low temperature with electric defrost (Low Temp-E), meat temperature with hot gas
defrost (Meat-G), meat temperature with electric defrost (Meat-E), chill temperature with hot gas defrost
(Chill-G), chill temperature with electric defrost (Chill-E), wine temperature (Wine), fish temperature (Fish)
and a heated temperature (Heated).
All FPC controllers arrive from the manufacturer with pre-set default values of a standard high temperature
model. If any other model is required; (for example ‘Wine’ temperature settings), the following model setting
procedure should be followed.
Test
Model
<< Parameters
From ‘Service Main Menu’ depress button 2 (Model).
Use button 1 (-) or button 2 (+) to select required model
(in this case ‘Wine’).
Depress button 3 (OK) to select new model. Controller will
reset parameter values and return to ‘Service Main Menu’.
Model
+
<< High Temp. OK
<<
Model
Wine
+
OK
Test
Model
<< Parameters
If during the model selection button 4 (<<) is pressed, the controller will revert to the ‘Service Main Menu’
without making any changes to the default model or parameter settings. Similarly if no buttons are depressed
for a period of one (1) minute the controller will revert to the ‘Normal Operating Mode’ without saving any
changes.
Note:
2.10.4
When the model change mode is entered on an FPC controller, any previously made ‘User’
or ‘Service’ parameter changes that have been saved will be lost, and the controller will
revert to the default settings for the model selected (this includes re-selecting the same
model).
Parameter Adjustment
The individual Parameter Adjustment allows the controller’s standard individual operating parameters (set
automatically by model selection default) to be altered for a particular application. This will allow adjustment
for a specific customer requirement, an engineering requirement, or to overcome an operating problem.
If any parameters require adjusting; for example if the standard number of defrosts in any given 24 hour
period requires to be increased from four (4) to six (6), the following parameter adjustment procedure
should be followed:
Test
Model
<< Parameters
From ‘Service Main Menu’ depress button 3 (Parameters).
Use button 2 (→) to scroll through to the required parameter
heading (Defrost/Day).
- Min Temp. +
<<
Set
←Defrost/Day→
<<
Set
(If the required parameter is missed, button 1 (←) can be used to scroll backwards through the parameters).
Depress button 3 (SET) to enable adjustment of the
parameter value.
18
←Defrost/Day→
<<
4
Set
Use button 1 (-) and button 2 (+) to adjust the value to the
required setting (in this case ‘6’).
- Defrost/Day +
<<
6
OK
Depress button 3 (OK) to save new value. Controller updates
settings and display shows next parameter heading.
← Defr.End TP →
<<
Set
If no further changes are required press button 4 to return to
the ‘Service Main Menu’.
Test
Model
<< Parameters
If during the model selection button 4 (<<) is pressed, the controller will revert to the ‘Service Main Menu’
without making any changes to the default model or parameter settings. Similarly if no buttons are depressed
for a period of one (1) minute the controller will revert to the ‘Normal Operating Mode’ without saving any
changes.
2.11
PARAMETER DEFINITIONS
Min Temp.
Minimum Temperature Set Point (°C).
The minimum value that the temperature set point can be adjusted to in the operator
functions. (Variation - maximum value 40°C, maximum determined by value of ‘Max.
Temp’ parameter).
Max. Temp.
Maximum Temperature Set Point (°C).
The maximum value that the temperature set point can be adjusted to in the operator
functions. (Variation - minimum value determined by ‘Min Temp’ parameter, maximum
of +120°C).
Temp. Set
Standard Temperature Set Point (°C).
The standard (default) internal air temperature to be achieved before the condensing unit
switches off. The value is dependent upon the model selected - see Parameter Table.
Temp. Hyst.
Temperature Hysteresis (°K).
Allowable temperature increase from Temperature Set Point before switching on
refrigeration system.
-01 to -15 - Used for heating control.
00
- Excludes the thermostat, condensing system output falls low, system does
not run.
01 to 15 - Used for cooling control.
Defr. Type
Defrost Type
Identifies the type of defrost cycle to be performed.
Off Cycle = Off cycle defrost. Electric = Electric heater defrost.
defrost.
Fan Dly.Tp
Hot Gas = Hot gas
Fan Delay Temperature (°C)
The temperature the evaporator coil must reach following a defrost before the evaporator
fans are allowed to restart. Only active if an evaporator probe is fitted (‘Evap. Probe’ =
YES). Range -20°C to +20°C.
19
Fan Defr.Op
Fan Operation During Defrost.
Selects the evaporator fan operating mode during a defrost. Selecting ‘End’ causes the
evaporator fans to stop at defrost initiation, and restart when the evaporator temperature
is less than or equal to the fan delay temperature. Selecting ‘Max’ will not allow the
evaporator fans to stop until the evaporator coil temperature is greater than the fan delay
temperature setting. The evaporator fans will restart once the coil temperature is below
or equal to the fan delay temperature. If ‘Cont.’ is selected the evaporator fans will run
continuously throughout the defrost period. Range End / Max / Cont.
Defrost/Day
Number of Defrosts / Day.
The number of Defrosts performed in a 24-hour period.
Range 0 (no defrosts occur) to 24 (1 defrost cycle in every hour).
Defr.EndTm
Defrost Termination Time (Mins.).
The period of time that the defrost relay will be energised. On models with no evaporator
probe this is the only method of causing a defrost to cease. On models with an evaporator
probe this acts as a probe-fail back up. Once the time set as elapsed the defrost will
cease, independent of wether an evaporator probe is fitted or not. Range 01 to 120
mins.
Drain Time
Drain Down Time (mins.).
The period of time following the defrost termination (either by temperature; Defr.EndTp,
or time Defr.EndTm) that is allowed for ‘Ice Melt’ to drain from the evaporator coil before
the condensing system restarts.
00 - No drain down time
01 to 15 - Drain down
period.
Fan Cycle
Evaporator Fan Control.
Determines the evaporator fan-operating mode. Selecting ‘Cycle’ causes the fan to
cycle with the compressor can be used to produce a higher internal humidity.
NO = Continuous operation (excepting door switch).
YES = Cycle on / off with
compressor.
Lo Alarm dt
Low-Alarm Temperature Differential (°C).
The temperature at which the alarm will sound (after the appropriate delay period) to
warn that the measured temperature value is too low. As this value is a differential it
will move automatically, so adjusting the low alarm temperature when the set point is
adjusted. (Set Point - Lo Alarm dt = Alarm Warning). Range = -15°C to -1°C.
Hi Alarm dt
High-Alarm Temperature Differential (°C).
The temperature at which the alarm will sound (after the appropriate delay period) to
warn that the measured temperature value is too high. As this value is a differential
it will move automatically, so adjusting the high alarm temperature when the set point
is adjusted. (Set Point + Temp. Hyst. + Hi Alarm dt = Alarm Warning). Range 1°C to
15°C.
Alarm Delay
Temperature Alarm Delay (mins.).
The delay period between a temperature alarm condition occurring and the internal siren
sounding with the appropriate LED alarm message appearing.
-1 = Excludes the Temperature Alarm
00 = Instantaneous audible alarm.
01 to 120 = Period of delay (min.).
Alarm Probe
Alarm Probe Selection.
Determine which probe is used as the temperature sensing alarm probe.
1 = Air Probe
2 = Evaporator Probe.
20
Door Stop
Door Stop (mins.).
The delay period between the door being opened and the condensing unit stopping.
(Only active if ‘Door Switch’ = YES).
00 = Condensing unit stops instantaneously.
01 to 120 = Delay before unit stops
(min.).
Door Alarm
Door Alarm Delay (mins.).
The delay (if any) following the ‘Door Stop’ period before the door open alarm sounds.
Therefore if the ‘Door Stop’ is set to 3 minutes, and the ‘Door Alarm’ is set to 5 minutes,
the door open alarm will sound 8 minutes after the door was first opened. (Only active
if ‘Door Switch’ = YES).
00 = Instantaneous door alarm.
01 to 30 = Delay before alarm sounds (min.).
Aux. Alarm
Auxiliary Alarm (mins.).
Determines wether the auxiliary input socket is active, and the actions taken by the
controller if the auxiliary device is open circuit.
0 = Off - Nothing Happens.
1 = Alarm/Run - Controller Alarms/Unit runs.
2 = Alarm/Off - Controller Alarms/Switches unit off.
Compr.Rest
Compressor Rest.
The forced rest period between successive compressor run cycles.
00 = Excludes compressor rest period
01 to 10 = Compressor rest period (mins.).
Compr.Cycle
Condenser Duty Cycle.
Condensing system on duration during a ten minute period (if with ‘Compr.Cycle’ set to
06, the condensing system will run for 6 minutes, then switch off for 4 minutes). The
Cooler Duty Cycle is only active during ‘Probe 1’ (air probe) fault conditions. Range 0
(Condenser Duty Cycle inactive) to 10 (Condensing system constantly running).
Service Due
Service Due Interval Warning
Determines the time interval between service due clean warnings.
00 = Excludes Service Due Warnings.
01 to 200 = Interval period in weeks.
Clean Filter
Condenser Clean Interval Warning
Determines the time interval between condenser clean warnings.
00 = Excludes Condenser Clean Warnings.
01 to 200 = Interval period in weeks.
Air o/s
Display Offset (°K).
Allows the air probe and LED temperature display (and hence the operating characteristics)
to be adjusted up or down to allow for system variations and tolerances.
Range
-15°C to +15°C.
Evap. o/s
Evaporator Probe Offset (°K).
Allows the evaporator probe value to be offset, thus changing the operating characteristics
relating to the defrost routine.
Range -15°C to +15°C.
Cond. o/s
Condenser Probe Offset (°K).
Allows the condenser probe value to be offset, thus allowing the condenser temperature
used for diagnostic purposes to be accurately measured.
Range -15°C to +15°C.
Food o/s
Food Probe Offset (°K).
Allows the food probe value (where fitted) to be offset, thus allowing the product
temperature to be accurately measured.
Range -15°C to +15°C.
21
Evap. Probe
Evaporator Probe.
Identifies whether an Evaporator Probe is fitted - dependent upon model requirement
for diagnostic function.
No = No Evaporator Probe Fitted.
Yes = Evaporator Probe Fitted.
Cond. Probe
Condenser Probe.
Identifies whether a Condenser Probe fitted - dependent upon requirement for diagnostic
function.
No = No Condenser Probe Fitted.
Yes = Condenser Probe Fitted.
Food Probe
Food Probe.
Identifies whether a Food Probe is fitted - dependent upon requirement for accurate
product measurement.
No = No Food Probe Fitted.
Yes = Food Probe Fitted.
Door Switch
Door Switch.
Determines if a door switch is fitted or not and consequently dictates whether the
Evaporator Fan relay is controlled by the door switch. If active, the Evaporator Fan relay
would be de-energised (therefore off) when the door is opened. Also determines if the
‘Door Stop’ and ‘Door Alarm’ functions are enabled.
No = No door switch fitted.
Yes = Door Switch Fitted.
Diagnostics
Diagnostic System.
Determines whether the advanced diagnostic system is operational or not. For the
diagnostics to function a Condenser probe is required to be fitted.
No = Diagnostics system off.
Yes = Diagnostic system on.
Food Sim.
Thermal Mass Simulation (°K)
Controls the thermal mass volume simulated by the controller and displayed on the fascia.
The greater the value the greater the resulting slow down. The controlling functions
continue to operate directly on the actual air temperature.
00 = Instantaneous air temperature displayed.
01 to 200 = Thermal mass simulation / slow down rate.
Disp. Contr.
Display Contrast.
Darkens or lightens the characters on the LCM display to provide better contrast to read
the display in varying light conditions.
00 = Maximum character / background contrast.
01 to 100 - Varying character / background contrast.
Address
Address.
The controller peripheral number. This is only necessary when controllers are linked
via a network to a computer management and data recording system (such as with the
TAB or ARGO systems). Range 00 to 255.
22
Drain Down Time
Evaporator Fan Cycle
Low Alarm Temperature Differential
High Alarm Temperature Differential
Temperature Alarm Delay
Alarm Probe Selection
Door Stop
Door Alarm Delay
Drain Time
Fan Cycle
Lo Alarm dt
Hi Alarm dt
Alarm Delay
Alarm Probe
Door Stop
Door Alarm
23
NO
Disp. Contr.
0
0
0
NO
NO
NO
-15
Max.
Electric
255
100
200
YES
YES
YES
YES
YES
15
15
15
15
200
200
10
10
2
30
120
2
120
15
-1
YES
15
120
45
24
Cont.
20
Hot Gas
15
120
Max. Temp
Maximum
Value (+)
1
0
10
NO
YES
NO
NO
NO
0
0
0
0
18
36
6
0
0
5
3
1
90
3
-3
NO
0
15
30
4
Cont.
5
Off Cycle
3
1
8
0
High
Temp.
1
0
10
NO
YES
NO
NO
YES
0
0
0
0
18
36
6
0
0
5
3
1
90
3
-3
NO
3
10
30
4
End
-5
Hot Gas
3
-21
-15
-25
Low
Temp.-G
1
0
10
NO
YES
NO
NO
YES
0
0
0
0
18
36
6
0
0
5
3
1
90
3
-3
NO
3
15
30
4
End
-5
Electric
3
-21
-15
-25
Low
Temp.-E
1
0
10
NO
YES
NO
NO
YES
0
0
0
0
18
36
6
0
0
5
3
1
90
3
-3
NO
3
5
30
4
End
+8
Hot Gas
3
-2
2
-3
Meat
Temp.-G
1
0
10
NO
YES
NO
NO
YES
0
0
0
0
18
36
6
0
0
5
3
1
90
3
-3
NO
3
15
30
4
End
+8
Electric
3
-2
2
-3
Meat
Temp.-E
NOTE:
It is important to note that on the Premier counter range no door switches are fitted and therefore the door switch should be set to NO.
Failure to do so will result in the counter switching off after eight minutes.
Heated Temp. not available in the Counter Range.
Address
Display Contrast
Food Sim.
Address
Diagnostics System
Thermal Mass Simulation
Diagnostics
Food Probe
Door Switch
Condenser Probe
Cond. Probe
Food Probe
Evaporator Probe
Evap. Probe
Door Switch
NO
Food Probe Offset
Food o/s
-15
Condenser Probe Offset
Cond. o/s
-15
-15
Evaporator Probe Offset
Display Offset
0
0
0
0
0
0
0
1
-1
1
-15
NO
0
1
0
0
End
-20
Central
Value
Individual Values
Off Cycle
-15
Min. Temp.
-40
Minimum
Value (-)
Evap. o/s
Air o/s
Service Due Interval Warning
Defrost Termination Time
Defr. End Tm
Condenser Clean Inteval Warning
Defrost Termination Temperature
Defr. End Tp
Clean Filter
Number of Defrost/Day
Defrost/Day
Service Due
Fan Operation During Defrost
Fan Defr. Op.
Condenser Duty Cycle
Fan Delay Temperature
Fan Dly. Tp
Compr. Cycle
Defrost Type
Defr. Type
Compressor Rest
Temperature Hysteresis
Temp. Hyst.
Compr. Rest
Standard Temperature Set Point
Temp. Set
Auxiliary Alarm
Maximum Temperature Set Point
Aux. Alarm
Maximum Temperature Set Point
Max. Temp.
Parameter Description
Min. Temp.
Title
1
0
10
NO
YES
NO
NO
YES
0
0
0
0
18
36
6
0
0
5
3
1
90
3
-3
NO
3
5
30
4
End
+8
Hot Gas
3
0
3
0
Chill
Temp.-G
1
0
10
NO
YES
NO
NO
YES
0
0
0
0
18
36
6
0
0
5
3
1
90
3
-3
NO
3
15
30
4
End
+8
Electric
3
0
3
0
Chill
Temp.-E
1
0
10
NO
YES
NO
NO
NO
0
0
0
0
18
36
6
0
0
5
3
1
90
3
-3
NO
0
15
30
4
Cont.
5
Off Cycle
3
10
15
5
Wine
Temp.
1
0
10
NO
YES
NO
NO
NO
0
0
0
0
18
36
6
0
0
5
3
1
90
3
-3
NO
0
15
30
4
Cont.
5
Off Cycle
3
-1
1
-3
Fish
Temp.
1
0
10
NO
YES
NO
NO
NO
0
0
0
0
18
36
6
0
0
5
3
1
90
3
-3
NO
0
15
30
4
Count.
5
Off Cycle
-3
87
91
83
Heated
Temp.
2.12
PREMIER CONTROLLER (FPC) DEFAULT VALUES/MODEL TABLE
2.13
CONVERSION TABLES
FPC Language Version 1A Conversion Table
Foster Part Number 00-554476
Item
English
French
1
2
3
4
5
6
7
8
9
10
11
12
13
14
15
16
17
18
19
20
21
22
23
24
25
26
27
28
29
30
31
32
33
34
35
36
37
38
39
40
41
42
43
44
45
46
47
48
49
50
51
52
53
54
55
56
57
58
59
60
61
62
63
64
65
66
67
68
69
70
71
72
73
74
75
76
77
78
79
80
81
82
83
84
85
86
87
88
89
90
91
92
93
94
95
96
97
98
99
100
101
Temp
Service
Defrost
Info
Alarms
Settings
Text
Test
Model
Parameter
POWER OFF
Defrost On
Air
Evap.
Cond.
Food
Temp. Recovery
CALL SERVICE
ALARM!
no alarm
Probe 1
Probe 2
Probe 3
Probe 4
HIGH TEMP.
LOW TEMP.
AUX ALARM
SF010
SF020
SF030
DOOR OPEN
SERVICE DUE
CLEAN FILTER
Off Cycle
Electric
Hot Gas
End
Max
Cont.
High Temp.
Low Temp-G
Low Temp-E
Meat-G
Meat-E
Chill-G
Chill-E
Wine
Fish
Heated
English
min
hrs
wks
Off
On
NO
Yes
OK
Set
Clear
Relay 1
Relay 2
Relay 3
Foster Ltd. 1A
Code
Model
Min. Temp.
Max. Temp.
Temp. Set.
Temp. Hyst
Defr. Type
Fan DIy. Tp
Fan Defr. Op
Defrst/Day
Defr. End Tp
Defr. End Tm
Drain Time
Fan Cycle
Lo Alarm dt
Hi Alarm dt
Alarm Delay
Alarm Probe
Door Stop
Dor Alarm
Aux. Alarm
Compr. Rest
Compr. Cycle
Service Due
Clean Filter
Air o/s
Evap. o/s
Cond. o/s
Food o/s
Evap. Probe
Cond. Probe
Food Probe
Door Switch
Diagnostics
Food Sim.
Disp. Contr
Address
Consig
Service
Dégivrage
Info
Alarmes
Program.
Lang
Test
Modéle
Param.
ETEINT
Dégivrage
Air
Evap.
Conden
Alimen
Repr.Temp.
APPEL.SERV.
ALARME!
Pas alarme
Sonde 1
Sonde 2
Sonde 3
Sonde 4
Temp.HAUTE
Temp.BASSE
ALARME AUX
SF010
SF020
SF030
PORTE OUV.
MAINTENANCE
NETT.FILTRE
Dég nature
Elec.
Gaz Chaud
Fin
Max.
Cont.
Temp. +
Temp neg-G
Temp neg-E
Viande-G
Viande-E
Temp0/+2-G
Temp0/+2-E
Vin
Poisson
Chauffe
Francais
min
hrs
wks
Off
On
NO
Yes
OK
Set
Clear
Relay 1
Relay 2
Relay 3
Foster Ltd. 1A
Code
Modéle
P.Cons.mini
P.Cons.maxi
Pnt.Cosigne
Différentiel
type dégiv
ret.ventil
opt.ventil
dégiv √jour
Tp.fin dégiv
durée dégiv
Ruissellem
cycle vent.
DT alrm.BAS
DT alrm.HAU
ret.alarme
Alarme sonde
arrét porte
alarme porte
alarme aux
pause compr
cycle compr
interv.serv.
nett filtre
corr. Air
corr. Evap
corr. Cond
corr. Aliment
sonde évap.
sonde cond.
Sonde Alimen
Inter.Porte
Diagnostic
sim.produit
contr.LCM
Adresse
German
Soll
Service
Abtauung
Info
Alarm
Programm
Spra
Test
Modell
Parameter
Strom aus
Taut ab
Luft-T
Verd-T
Komd-T
Prod-T
Wiederherst
Service rufen
ALARM!
Kein Alarm
Fühler 1
Fühler 2
Fühler 3
Fühler 4
Temp. hoch
Temp. tief
Zus.-Alarm
SF010
SF020
SF030
Tür auf
Wartung
Filter rein
Komp.Still
Elektrisch
Heissgas
Ende
Max.
Kont.
Kühlschr.
TK-Heissg.
TK-Elektr.
Flei-Heiss
Flei-Elekt
Schck-Heis
Schck-Elek
Wein
Fisch
Wärmeschr.
Deutsch
min
hrs
wks
Off
On
NO
YES
OK
Set
Clear
Relay 1
Relay 2
Relay 3
Foster Ltd. 1A
Code
Modell
Min. Soll
Max. Soll
Std. Soll
Temp.-Hyst
Abt.Typ
Vent.-Verz.
Vent.-Opt.
Abtau./Tag
Abt.-Endtemp.
Abtauzeit
Abtropfzeit
Vent.-Zykl.
DT AL. hoch
DT AL. tief
Alarmverz.
Alarmfühler
Kompr.-Verz.
Türalarmverz
Hilfsalarm
Komp.-pause
Komp.-Zykl.
Wartung erf.
Kond.-Filter
Luftkorr.
Verd.-Korr.
Kond.-Korr.
Kernt.-Korr.
Verd.-Fühler
Kond.-Fühler
Prod.-Fühler
Türschalter
Diagnostik
Prod.Simul.
Kontrast
Adresse
FPC Language Version 1B Conversion Table
Foster Part Number 00-554564
Dutch
Temp
Service
Ontdooien
Info
Alarm
Programm
NL
Test
Model
Basis
Uit
Dooi aan
Lucht
Verd.
Cond.
Eten
Herstel
Service!
Alarm
Geen alarm
Voeler 1
Voeler 2
Voeler 3
Voeler 4
Temp.Hoog
Temp.Laag
Alarm opt.
SF010
SF020
SF030
Deur open
Onderhoud!
Filter
Dooi na
Elektrisch
Heet Gas
Klar
Max.
Cont.
Temp.Hoog
Temp.LaagG
Temp.LaagE
Vlees (G)
Vlees (E)
Koeling (G)
Koeling (E)
Wijn
Vis
Verwarmd
Nederlands
min
hrs
wks
Off
On
NO
YES
OK
Set
Clear
Relay 1
Relay 2
Relay 3
Foster Ltd. 1A
Code
Model
Mini. Temp.
Maxi. Temp.
Stand. Temp.
Temp. Afw.
Ontdooier
Vertr. Vent.
Dooivt. Aan
Dooi/Dag
Dooi tot
Ontdooien na
Dooiwtr. Afv
Vent. Int.
Alarm Koud
Alarm hoog
Alarmvertr.
Alarmvoeler
Deur open
Deur open!
Res.Alarm
Compr.Pauze
Serv.Compr
Serv. Interv
Filter!
Offs.Lucht
Offs.Verd
Offs.Cond.
Offs.Prod
Verd.Voeler
Cond.Voeler
Prod.Voeler
Deurschak.
Diagnose
Productsim
Contr. Displ
Syst.reg.nr
24
Item
English
1
2
3
4
5
6
7
8
9
10
11
12
13
14
15
16
17
18
19
20
21
22
23
24
25
26
27
28
29
30
31
32
33
34
35
36
37
38
39
40
41
42
43
44
45
46
47
48
49
50
51
52
53
54
55
56
57
58
59
60
61
62
63
64
65
66
67
68
69
70
71
72
73
74
75
76
77
78
79
80
81
82
83
84
85
86
87
88
89
90
91
92
93
94
95
96
97
98
99
100
101
Temp
Service
Defrost
Info
Alarms
Settings
Text
Test
Model
Parameter
POWER OFF
Defrost On
Air
Evap.
Cond.
Food
Temp. Recovery
CALL SERVICE
ALARM!
no alarm
Probe 1
Probe 2
Probe 3
Probe 4
HIGH TEMP.
LOW TEMP.
AUX ALARM
SF010
SF020
SF030
DOOR OPEN
SERVICE DUE
CLEAN FILTER
Off Cycle
Electric
Hot Gas
End
Max
Cont.
High Temp.
Low Temp-G
Low Temp-E
Meat-G
Meat-E
Chill-G
Chill-E
Wine
Fish
Heated
English
min
hrs
wks
Off
On
NO
Yes
OK
Set
Clear
Relay 1
Relay 2
Relay 3
Foster Ltd. 1B
Code
Model
Min. Temp.
Max. Temp.
Temp. Set.
Temp. Hyst
Defr. Type
Fan DIy. Tp
Fan Defr. Op
Defrst/Day
Defr. End Tp
Defr. End Tm
Drain Time
Fan Cycle
Lo Alarm dt
Hi Alarm dt
Alarm Delay
Alarm Probe
Door Stop
Dor Alarm
Aux. Alarm
Compr. Rest
Compr. Cycle
Service Due
Clean Filter
Air o/s
Evap. o/s
Cond. o/s
Food o/s
Evap. Probe
Cond. Probe
Food Probe
Door Switch
Diagnostics
Food Sim.
Disp. Contr
Address
Spanish
Danish
Aiuste
Servicio
Descarche
Info
Alarms
Program.
Texto
Prueba
Modelo
Parametros
PARADO
Desesc. on
Aire
Evap.
Cond.
Prod.
Tiempo recupe
LLAMAR SERV.
ALARMA!
no alarma
Sonda 1
Sonda 2
Sonda 3
Sonda 4
Alta Temp.
Baja Temp.
ALARMA AUX
SF 010
SF 020
SF 030
PUERTA ABIER
MANTEN.
LIMP. FILTRO
Parada
Elec.
Gas Calien
Fin
Max.
Cont.
Alta Temp.
Baja T-Gas
Baja T-Ele
Came-Gas
Came-Ele
Fresca-Gas
Fresca-Ele
Vino
Pescado
Calentado
Español
min
hrs
wks
Off
On
NO
YES
OK
Set
Clear
Relay 1
Relay 2
Relay 3
Foster Ltd. 1B
Código
modelo
ajuste min.
ajuste máx.
ajuste
hist.Temp
tipo desesc
Tp ret.vent.
opc.ventil.
desesc./dia
TP fin des.
limit.des.
tiempo goteo
ciclo vent.
DT alrm.BA
DT alrm.SU
ret.alarma
alarma sonda
stop puerta
alrm.puerta
alrm.aux.
parada cmpr.
ciclo cmpr.
interv.srvc.
limp.filtro
corr. aire.
corr. evap.
corr. cond.
corr. prod.
sonda evap.
sonda cond.
sonda prod.
Inter.Puerta
diagnósticos
simul.prod.
contr.LCM
dirección
Temp.
Service
Afrimning
Info
Alarmer
Prog.
Tekst
Test
Model
Parameter
Slukket
Afrimg til
Luft
Ford.
Kond.
Mad
Nedkøler
Kald service
Alarm
- Alarm
Føler 1
Føler 2
Føler 3
Føler 4
Høj temp.
Lav temp.
AUX alarm
SF 010
SF 020
SF 030
Dør àben
Tid service
Rens filter
Afrimning
Elektrisk
Varm gas
Slut
Max
Cont.
Høj temp.
Lav temp. G
Lav temp. E
Kød - G
Kød - E
Køl - G
Køl - E
Vin
Fisk
Varme
Dansk
min
hrs
wks
Off
On
NO
YES
OK
Set
Clear
Relay 1
Relay 2
Relay 3
Foster Ltd. 1B
Kode
Model
Min. Temp.
Max. Temp.
Temp. Juster
Temp Hyst.
Afrimg. Type
Fan Fs Temp.
Fan. Afrim.
Afrimg/dag
Max. Afrimg
Afrimgs tid
Dryp tid
Vent. cyklus
Lav alarm
Hoj alarm
Alarm fors.
Føler fejl
Dør stop
Dør alarm
Alarm AUX
Komp.
Komp. cyklus
Service
Rens filter
Luft offset
Ford. offset
Kond. offset
Spyd offset
Ford. foler
Kond foler
Spyd foler
Dør kontakt
Fejl søgning
mad simul.
LCM contrast
Adresse
Italian
min
hrs
wks
Off
On
NO
YES
OK
Set
Clear
Relay 1
Relay 2
Relay 3
Foster Ltd. 1B
3.0 CONTROLLER OPERATING INSTRUCTIONS
3.1
FOSTER STANDARD CONTROLLER (FSC)
Foster Part Number: 00-554477
by
7.1.1
FSC Module Description.
An economy version temperature controller; called the Foster Standard Controller (FSC) with bespoke
Foster styled bezel and membrane features. The primary purpose of this controller is to maintain a predetermined temperature in Foster storage products, and automatically initiates defrost routines as required.
The operating parameters can be adjusted to provide optimum flexibility across the Foster cabinet and
counter model and temperature ranges. The controller is the Man/ Machine Interface (MMI), and is
connected via two ribbon cables to the Power Switching Unit (PSU), which is common to all models (both
Premier and Economy). The controller contains all pre-set information necessary to operate a cabinet or
counter model in standard configuration, dependant upon which model is selected during the controller
installation set-up. The choice of the operating configuration is set in ‘Model Selection’. Particular changes
to allow for local conditions can then be made via the “Service Parameters”.
The display is made up of three green ‘7 segment’ LED’s, each with a decimal point. The LED’s will be
capable of showing all numerical figures and several alphabetical characters to enable clear operating
temperature information, and assist with model and individual parameter programming. The decimal point
of each character will show refrigeration component operation in conjunction with the energising of the
relays-compressor, evaporator fans and defrost.
The front of the controller is covered with a membrane, which provides a seal of at least IP54. This membrane
will cover all four operating buttons, which can then be used singularly, or in conjunction with each other to
change operating parameters, acknowledge alarms, select model variants and change individual operating
parameters.
A ‘mimic’ of the FSC controller display will be available; called the Remote Display Unit (RDU) with a Foster
Part Number 00-554479. This unit is used primarily to facilitate the display of the internal air temperature
from a remote location. This unit is used with the FSC, but having been primarily designed for the FPC
the way some information is displayed will not be exactly the same as in the FSC ‘master display’. No
programming will be able to be carried out from the RDU, this unit will be used for temperature information
only.
3.1.2
FSC Inputs/Outputs.
Outputs from the controller are:
i)
two ribbon cable connections to the PSU
ii)
three green 7 segment the decimal LED displays
iii)
an audible sounder to provide alarms and warnings
Inputs to the controller are via the four operating buttons on the fascia.
All other Inputs and Outputs are via the PSU.
25
3.1.3
Normal Operation.
When mains power is applied the display will show
(one dash, in the middle of the display) for
a period of three seconds, during which the controller performs a ‘self check’. The display will then show
the temperature measured by probe T1 - the air temperature probe. If the measured temperature is not
within the pre-set temperature range the controller will activate the refrigeration system. All timings (i.e.
defrost intervals) will be taken from the power up.
The evaporator coil temperature, measured by Probe 2 may be temporarily viewed by pressing button 3;
(this facility is only available if the evaporator probe is selected by virtue of model or as an addition in the
parameters). When the button is released the display reverts to showing the air probe temperature.
If mains electrical power is removed from the controller with the unit operational, the refrigeration system will
cease. When mains power is re-connected the controller will then cause the system to re-start. However,
If the controller is set to ‘stand-by’ model when the mains fails, on re-connection the controller will return
to the ‘Stand-by” mode.
3.1.4
Defrost Routine.
Defrosts will occur automatically in refrigerated equipment upon a pre-determined time based cycle, or they
can be initiated manually. The number of defrosts that occur in any one 24 hour period is determined by
Parameter ‘PO8’ - the number of defrosts per day. For each appropriate model version this has a standard
default value set. The number of defrosts per day can be varied from 24 (one every hour) which would
only be required in very exceptional circumstances to none (used in the heated temperature variant for
example). The defrost clock is reset and started from the controller being in operating mode. Therefore
in standby mode the defrost clock is stopped, and when the controller is restarted from the defrost clock
will be reset.
Dependant upon the refrigeration application and model type the defrost will vary in type (hot gas, electric
or off cycle), and duration. The type of defrost performed will be determined by the setting of parameter
‘PO7’. The selection of the type of defrost will depend upon the particular product, however in general the
different types of defrost operation will be as follows:
If ‘PO7’ is set as ‘00’ an Off Cycle defrost will occur. At initiation the evaporator fans will continue to run
(even if the doors are opened), however the condensing unit will cease. The period of the defrost will be
determined by the value set in parameter ‘P11’ the Defrost Termination Time, or if an evaporator probe is
fitted, the defrost may be terminated once the evaporator coil reached the Defrost Termination Temperature
as determined by parameter ‘P10’ - which ever occurs first. For the Off Cycle defrost, once this time or
temperature has been reached the defrost cycle is complete, the condensing system then continues to
operate normally (if ‘P12” = 0).
If the defrost type (‘PO7’) is set as ‘01’, an Electric Defrost will occur. At initiation only the defrost relay will
be energised, therefore the condensing unit and evaporator fans will cease. Once again the period of the
defrost will be determined by the value set in parameter ‘P11’ the Defrost Determination Time. However if an
evaporator probe is fitted, the defrost may be terminated once the evaporator coil has reached the Defrost
Termination Temperature as determined by parameter ‘P10’. The defrost will end on time or temperature
depending on which occurs first.
Finally if the defrost type (‘PO7’) is set as ‘02’, a Hot Gas Defrost will be initiated. Both the defrost relay
and the condensing relay will be energised, but the evaporator fans will cease. Again the period of the
defrost will be determined by the value set in parameter ‘P11’, but where an evaporator probe is fitted the
defrost may be terminated by temperature (parameter ‘P10’). The defrost will end on which ever happens
first, the defrost time being elapsed or evaporator coil temperature being achieved.
Following a defrost (electric, Hot Gas or Off Cycle) a Drain Down Period will occur. This is a period when
no relays are energised. This is to allow all the water that has melted to drain from the coil before beginning
the recovery period. The length of the Drain Down period is variable and is determined by the value set
in parameter ‘P12’. Once the Drain Down period is complete the refrigeration system goes into recovery.
This is the time when the evaporator coil temperature is reduced. During this time only the condensing unit
relay is energised. Once recovery is complete, the evaporator fans will re-commence operation (subject
26
to the door switch - if fitted). The recovery period is 3 minutes for all models, however if an evaporator
probe is fitted, the evaporator fans may start to operate if the “Fan Delay Temperature” is achieved prior to
this time. This basically means that if the evaporator coil is cold enough before the 3 minutes has passed
the evaporator fans will re-start. The Fan Delay Temperature is determined by the value associated with
parameter ‘P13”.
(‘P09’=01 standard) or the internal air
When a defrost is initiated the display will show either
temperature throughout the defrost cycle (the time from defrost initiation through to ‘normal’ operation).
The actual display during defrost is controlled by the setting of parameter ‘P09’. if ‘P09’ is set to ‘00’ the
internal air temperature will be displayed throughout defrost cycle. If a value of Set Point + Hysteresis
(‘P03’ + ‘P04’). If a value 02 is set for ‘P09’, ‘ddd’ will be displayed from defrost initiation through until the
time evaporator fans should restart (Drain Down Time (‘P12’) + 3 minutes for no evaporator probe models,
or Fan Delay Temperature (‘P13’) is achieved on models with an evaporator probe fitted. The display will
then revert to displaying internal air temperature.
A defrost can be initiated manually if required. The procedure for this is detailed in the ‘User Functions’
section, but the defrost operation and display will be the same as for an automatic defrost. Should a manual
defrost be initiated the automatic defrost clock will reset, and therefore subsequent defrosts will follow at
the normal time interval.
3.2
CONTROLLER ADJUSTMENT
A
B
C
1
2
Stand-by / On Button
Temperature Button
by
by
4
3
by
Mute / Increment Button
Defrost / Decrement Button
by
3.2.1
by
by
by
Operating Buttons
1
Stand-by / On Button
2
Temperature Button
3
Defrost / Decrement Button
4
Mute / Increment Button
3.2.2
Function Indicator LED’s
A
Defrost LED
B
Evaporator Fan LED
C
Condensing Unit LED
by
by
by
27
by
3.3
‘USER’ FUNCTIONS
3.3.1
Set unit to standby
1. Press button 1
3.3.2
All relay outputs fall low, display shows
Set unit to run
1. Press button 1
Controller will display air temperature and recommence operation.
Function LED’s will also illuminate as appropriate.
by
3.3.3
Check Set Point (Low Point of Temperature Band)
by
1. Press button 2
7.3.4
Display temporarily shows ‘Temperature Set Point’.
View Evaporator Temperature (If Evaporator Probe Fitted)
1. Press button 3
Display temporarily shows Evaporator temperature.
(If no Evaporator Probe is fitted display temporarily shows
)
by
by
3.4
‘USER’ ADJUSTMENTS
3.4.1
Increase Set Point. (Low Point of Temperature Band)
1. Press and hold button 2
2. Press button 4
until required temperature is displayed *1.
3. Release both buttons.
by
3.4.2
by
Decrease Set Point. (Low Point of Temperature Band)
1. Press and hold button 2
2. Press button 3
until required temperature is displayed *2.
3. Release both buttons.
3.4.3
by
by
Initiate Manual Defrost.
1. Press and hold button 3
2. Press button 1
*1
*2
by
A timed/temperature determined defrost will then follow.
- Maximum value dependant upon Maximum Temperature Set-point parameter setting (P02).
- Minimum value dependant upon Minimum Temperature Set-point parameter setting (P01).
by
3.5
‘SERVICE’ ADJUSTMENTS
The FSC will have two ‘Service’ adjustable modes - the Model Selection function, and the individual
Parameter Adjustment.
The Model Selection function allows the controller to be set during manufacturing to the most appropriate
model, with the accompanying ‘default setting’ values. There are seven temperature default models, which
are High temperature (Ht), Low temperature (Lt), Meat temperature (Mt), Chill temperature (Ct), Wine
temperature (Wt), Fish temperature (Ft) and a Heated temperature (Hot).
28
The individual Parameter Adjustment allows the controller’s standard individual operating parameters (set
automatically by model selection default) to be altered for a particular application. This will allow adjustment
for a specific customer requirement, an engineering requirement, or to overcome an operating problem.
All FSC controllers will arrive from the manufacturer with pre-set default values of a standard high temperature
model.
3.6
MODEL SELECTION
Put controller to ‘Stand-by” mode (Press and release button 1
).
Press and hold button 3
and button 1
for 3 seconds then release both buttons.
The LED Display will show the model currently set. If no further buttons are pressed for 30 seconds the
controller reverts to the ‘Stand-by” mode, and no changes are saved.
by
by
. The LED display will cycle through the
To change the Model Selection press and release button 4
model selection each time button 4 is pressed as shown below:
by
by
High Temperature (Ht)
Low Temperature (Lt)
Meat temperature (Mt)
by
Chill temperature (Ct)
by
by
Wine temperature (Wt)
by
Fish temperature (Ft)
by
Heated temperature (Hot)
by
(it is only possible to cycle through the model ranges in one direction)
If no buttons are pressed for 30 seconds, no changes are saved.
To save and exit model selection press button 1.
Note: When the model change mode is entered on an FSC controller, any previously made ‘User’
or ‘Service’ parameter changed that have been saved will be lost, and the controller will revert to
the default settings for the model selected (this includes re-selecting the same model).
3.7
PARAMETER ADJUSTMENT
Put controller to ‘Stand-by’ mode (Press and release button 1
).
Press and hold button 2
and button 1
for 3 seconds then release both buttons.
The controller will enter the parameters. If no buttons are pressed for 30 seconds the controller reverts to
the ‘Stand-by’ mode, and no changes are saved.
by
by
by
29
To select the parameter requiring adjustment use either the increment button 4
to move upwards
(the LED display will show the appropriate parameter ‘P01’, ‘P02’, ‘P03’ etc.) or the decrement button, 3
by
, to move downwards (the LED display will show ‘P01’, ‘P26’, ‘P25’ etc.). If no buttons are pressed
for 30 seconds, the controller will revert to the ‘sleep state’.
by
To adjust the selected parameter value (i.e. ‘P04’) use the above procedure to show ‘P04’ on the LED
display. Press and hold button 2
. The LED display will show the value associated with parameter
‘P04’. The value can then be adjusted (within the limits given in the Parameter Table on Page 65) by using
button 4
to increase the value, and button 3
to decrease the value.
by
by
by
Once the required value parameter ‘P04’ has been set, releasing button 2
and the display shows the next parameter identification number (i.e. ‘P05’).
saves the new value,
This same procedure is used to adjust all the parameter values as required. Then, when all the changes
by
have been made the ‘Parameter Adjustment’ mode is exited by pressing button 1
will return to the ‘sleep state’.
. The controller
If at any stage during the ‘Parameter Adjustment’ procedure no buttons are pressed for 30 seconds, the
controller will revert to the ‘sleep state.
by
3.8
ALARMS AND WARNINGS
3.8.1
High Temperature Alarm.
The ‘High Temperature Alarm’ will occur if the internal air temperature measured by the air probe (T1)
increases above the Set Point (standard ‘P03’, but this can be altered in User Adjustments) plus the
Hysteresis value ‘P04’, plus the High Temperature Alarm differential ‘P16’, and is maintained for a period
of time equal to the ‘Alarm Delay’ parameter setting (‘P17’). If a High Temperature Alarm occurs the
(‘⇑⇑⇑‘ on a one second cycle with the internal air
LED display alternates between showing
temperature, and the audible alarm will sound. The audible alarm can be temporarily muted for one hour
. The alarm can only be reset once the normal operating temperature range
by pressing button 4
has been achieved, and when this happens the display and alarm will automatically be cancelled and
reset. The High Temperature Alarm value in parameter ‘P16’ is a differential value. This means that if a
Set Point value of +1°C is set, with a Hysteresis value of 3°K and a High Temperature Alarm differential of
4°C, a High Temperature Alarm will occur (once the Alarm Delay Period ‘P17’ has passed) if the internal
air temperature rises above 8°C. If the Set Point is then changed to +3°C, with no other changes, the High
Temperature Alarm will occur if the internal air temperature rises above 10°C. Therefore Setpoint + ‘P16’
= High Temperature Alarm. The purpose of the Alarm Delay ‘P17’ is to allow for system variations which
may occur, such as the initial switch on and pull down, large load changes, and defrosts. If there is no
delay period set, a high temperature alarm may be initiated too early, before the refrigeration system has
an opportunity to react to imposed changes. Typical causes of a High Temperature Alarm could be, too
hot a product load introduced, faulty refrigeration equipment or a door being left open (with no door switch
fitted). If a door switch is fitted the Door Open Alarm will typically sound before the High Temperature
Alarm. (If the door is left open for a period such that a High Temperature Alarm then occurs, this will not
be displayed and the alarm will not be able to be muted until the Door Open Alarm is cleared). (Parameter
‘P04’ is summed to parameter ‘P16’ to obtain the High Temperature Alarm, if only it’s greater that 0, cooling
mode. In addition, this alarm is inhibited during the defrost period).
by
30
3.8.2
Low Temperature Alarm.
The ‘Low Temperature Alarm’ will occur if the internal air temperature measured by the air probe (T1)
decreases below the Set Point (standard ‘P03’) plus the Low Temperature Alarm differential ‘P15’, after
the period determined by the ‘Alarm Delay’ parameter (‘P17’). Should a Low Temperature Alarm occur
the LED display alternates between showing
(‘⇓⇓⇓‘ on a one second cycle with the internal air
temperature, and the audible alarm will sound. The audible alarm can be temporarily muted for one hour
. The alarm will only be reset once the normal operating temperature range has
by pressing button 4
been achieved, and when this happens the display and alarm will automatically be cancelled and reset.
The Low Temperature Alarm value in parameter ‘P15’ is a differential value. This means that if a Set Point
value of +1°C is set and a Low Temperature Alarm differential of 4°C, a Low Temperature Alarm will occur
if the internal air temperature decreases below -3°C. If the Set Point is then changed to +3°C, with no
other changes the Low Temperature Alarm will occur if the internal air temperature decreases below -1°C.
Therefore Setpoint - ‘P15’ = Low Temperature Alarm. The purpose of the Alarm Delay ‘P17’ is to allow for
system variations which may occur, such as the initial switch on and pull down, large load changes and
defrosts. If there is no delay period set, a low temperature alarm may be initiated too early, before the
refrigeration system has an opportunity to react to imposed changes. Typical causes of a Low Temperature
Alarm are generally restricted to faulty refrigeration equipment. (Parameter ‘P04’ is summed to parameter
‘P15’ to obtain the Low Temperature Alarm, if only its lower than 0, heating mode. In addition, this alarm
is inhibited when the heated model is chosen).
by
3.8.3
Door Open Alarm.
This alarm will only be operational if parameter ‘P18’ is set to ‘01’, that is that a door switch is fitted and
the function is enabled. When the door is opened the door switch goes ‘open circuit’. This immediately
causes the Evaporator Fan relay to de-energise, and hence the fans to stop. The condensing unit will
continue to operate until the period of time set in the ‘Door Stop’ parameter ‘P19’ has lapsed. At this time
the condensing unit relay will de-energise and the refrigeration system will stop. A further period of time
(defined in the ‘Door Open Alarm Delay’ parameter ‘P20’) must pass before the door open alarm will sound.
Therefore for the door open alarm to sound the total period of time defined in parameters ‘P19’ + ‘P20’
must have elapsed. Once initiated, an audible alarm will sound. The LED display will alternately show
(‘ooo’) and the internal air temperature in a one-second cycle. The ‘Door Open Alarm’ can be
. The alarm can be silenced and reset by shutting the
muted (permanently) by pressing button 4
door. Shutting the door will also cause the refrigeration system to restart.
by
3.8.4
Condenser Clean Warning.
This warning will only be operational if parameter ‘P25’ is set to ‘01’ or above; that is the warning function
is enabled. If parameter ‘P25’ is set to 00 the warning is disabled and will not occur. The value set in
parameter ‘P25’ relates to the interval period in weeks between the condenser clean warning being given.
The clock counting this period is only active (when the condensing unit is operating). Therefore if the unit
is left without mains power or in the ‘stand-by’ the condenser clean clock will not be active. When the
pre-set period has elapsed the ‘Condenser Clean Warning’ will be initiated. The internal siren will sound
and the LED display will show
(‘ccc’) alternating on a one second cycle with the internal air
. The display
temperature. The siren
can be permanently silenced by pressing button 4
will continue to alternate between ‘ccc’ and the internal air temperature until the controller is put into the
‘Stand-by’ mode. This will cancel and reset the Condenser Clean Warning.
by
3.8.5
Air Temperature Probe Failure.
This alarm is caused by a failure of the
internal air probe (T1). The air probe is a fundamental part of all
by
refrigerated products, and therefore if thebyair probe fails the LED display will flash
31
(‘PF1’). An
audible alarm will also sound, which may be permanently muted by pressing button 4
. The effects
of this probe failing on the operation of the system will be that the refrigeration system will operate on a
duty cycle basis only, as determined by parameter ‘P05’. Defrosts will occur as normal. The internal air
temperature will not be able to be viewed. ‘PF1’ will continue to be displayed while the probe fail condition
exists, and the only remedy to extinguish this alarm is the replacement of this probe. Once a new probe
has been fitted the controller will once again operate normally, allowing the internal air temperature to be
displayed and the operation of the refrigeration system by the electronic thermostatic control rather than
the duty cycle. Although not a critical failure it is important that the problem is noticed and rectified as soon
as practicable, and so an audible alarm initially accompanies the warning. There is no Alarm Delay with
this failure.
by
3.8.6
Evaporator Temperature Probe Failure.
This alarm is caused by a failure of the evaporator probe (T2). The evaporator probe must have been
enabled by setting parameter ‘P06’ to ‘01’. If the evaporator probe fails the LED display will show
‘PF2’, alternating on a one second cycle with the internal air temperature. The effects of this probe failing
on the operation of the system will be that defrost termination will only take place on time, not temperature
(also the fan delay temperature will not operate). The evaporator probe temperature will not be able to be
viewed by pressing button 3
. ‘PF2’ will continue to be displayed while the probe fail condition exists,
and the only remedy to extinguish this alarm is the replacement of this probe. Once a new probe has been
fitted the controller will once again operate normally, allowing defrost terminations on temperature. (This
is not a critical failure but an audible alarm accompanies the warning). There is no Alarm Delay with this
failure.
by
3.9
PARAMETER DEFINITIONS
P01
Minimum Temperature Set Point (°C).
The minimum value that the temperature set point can be adjusted to in the operator functions.
(Variation maximum of -20°C from standard Set Point for the particular model selected).
P02
Maximum Temperature Set Point (°C).
The maximum value that the temperature set point can be adjusted to in the operator functions.
(Variations maximum of +20°C from standard Set Point for the particular model).
P03
Standard Temperature Set Point (°C).
The standard (default) internal air temperature to be achieved before the condensing unit
switches off. The value is dependant upon the model selected - see Parameter Table (Page
65).
P04
Temperature Hysteresis (°K).
Allowable temperature increase from Temperature Set Point before switching on refrigeration
system.
-01 to -15 - Used for heating control.
00 - Excludes the thermostat, condensing system output falls low, system does not run.
01 to 15 - Used for cooling control.
P05
Condenser Duty Cycle.
Condensing system on duration during a ten-minute period (i.e.) with P05 set to 06, the
condensing system will run for 6 minutes, then switch off for 4 minutes. The Cooler Duty
Cycle is only active during PF1 (air probe fault) conditions. Range 0 (Condenser Duty Cycle
inactive) to 10 (Condensing system constantly running).
P06
Evaporator Probe.
Identifies whether an Evaporator Probe is fitted - dependent upon model.
00 = No Evaporator Probe fitted.
01 = Evaporator Probe fitted.
32
P07
Defrost Type.
Identifies the type of defrost cycle to be performed.
00 = off cycle defrost.
01 = electric heater defrost.
02 = hot gas defrost.
P08
Number of Defrosts / Day.
The number of Defrosts performed in a 24-hour period.
Range 0 (no defrost occur) to 24 (1 defrost cycle in every hour).
P09
Display During Defrost.
The information shown on the LED display during the defrost cycle.
00 = Air temperature displayed throughout defrost cycle.
01 = ‘ddd’ displayed throughout defrost cycle until air temperature falls below the value of Set
Point + Hysteresis (P03 + P04).
02 = ‘ddd’ displayed throughout defrost cycle until evaporator fan should restart (either Drain
Down Time (P12) + 3 minutes elapsed on non-evaporator probe models, or the Fan Delay
Temperature (P13) is achieved on evaporator probe models).
P10
Defrost Termination Temperature (°C).
The temperature at which the defrost relay is de-energised to stop a defrost routine. This
can only be used if an evaporator probe is fitted, otherwise the defrost will terminate on time
(P11).
01 to 45 - Defrost termination temperature.
P11
Defrost Termination Time (mins.).
The period of time that the defrost relay will be energised. On models with no evaporator
probe this is the only method of causing a defrost to cease. On models with an evaporator
probe this acts as a probe fail back up. Once the time set has elapsed the defrost will cease
- independent of whether an evaporator probe is fitted or not. Range 01 to 59.
P12
Drain Down Time (mins.).
The period of time following the defrost termination (either by temperature; P10, or time P11)
that is allowed for ‘Ice Melt’ to drain from the evaporator coil before the condensing system
restarts.
00 - No drain down time.
01 to 15 - Drain down period.
P13
Fan Delay Temperature (°C).
The temperature the evaporator coil must reach following a defrost before the evaporator fans
are allowed to re-start. Only active if an evaporator probe is fitted (P06 = 01). Range -10°C
to +10°C.
P14
Evaporator Fan Control.
Determines the evaporator fan operating mode. Selecting 01 and thus causing the fan to cycle
with the compressor can be used to produce a higher internal humidity.
00 = Continuous operation (excepting door switch).
01 = Cycle on / of with
compressor.
P15
Low-Alarm Temperature Differential (°C).
The temperature at which the alarm will sound (after the appropriate delay period) to warn
that the measured temperature value is too low. As this value is a differential it will move
automatically, so adjusting the low alarm temperature when the set point is adjusted. (Set
Point - P15 = Alarm Warning). Range 0°C to -15°C. (Value of ‘0’ excludes the Low Temperature
Alarm. (The actual value depends on the sign of ‘P04’.
P16
High-Alarm Temperature Differential (°C).
The temperature at which the alarm will sound (after the appropriate delay period) to warn
that the measured temperature value is too high. As this value is a differential it will move
automatically, so adjusting the high alarm temperature when the set point is adjusted. (Set Point
+ P4 + P16 = Alarm Warning). Range 0°C to 15°C (Value of ‘0’ excludes the High Temperature
Alarm).
33
P17
Temperature Alarm Delay (mins.).
The delay period between a temperature alarm condition occurring and the internal siren
sounding with the appropriate LED alarm message appearing.
00 = Instantaneous audible alarm.
01 to 90 = Period of delay (min.).
P18
Door Switch.
Determines if a door switch is fitted or not, and consequently dictates whether the Evaporator
Fan relay is controlled by the door switch. If active, the Evaporator Fan relay would be deenergised (therefore off) when the door is opened. Also determines if the Door Stop (P19)
and Door Open Alarm Functions are enabled.
00 = No door switch fitted.
01 = Door switch fitted.
P19
Door Stop (mins.).
The delay period between the door being opened and the condensing unit stopping. (Only
active if P18 = 01).
00 = Condensing unit stops instantaneous.
01 to 90 = Delay before unit stops (min.).
P20
Door Alarm Delay (mins.).
The delay (if any) following the Door Stop period before the door open alarm sounds. Therefore
if the door stop (P19) is set to 3 minutes, and the door alarm delay (P20) is set to 5 minutes,
the door open alarm will sound 8 minutes after the door was first opened. (Only active is P18
= 01).
00 = Instantaneous door alarm.
01 to 90 = Delay before alarm sounds (min.).
P21
Display Offset (°K).
Allows the air probe and LED temperature display (and hence the operating characteristics)
to be adjusted up or down to allow for system variations and tolerances. Range -10°C to
+10°C.
P22
Evaporator Probe Offset (°K).
Allows the evaporator probe value to be offset, thus changing the operating characteristics
relating to the defrost routine. Range -10°C to +10°C.
P23
Thermal Mass Simulation (°K).
Controls the thermal mass volume simulated by the controller and displayed on the fascia.
The greater the value the greater the resulting slow down. The controlling functions continue
to operate directly on the actual air temperature.
00 = Instantaneous air temperature displayed.
01 to 100 = Thermal mass simulation / slow down rate.
P24
Condensing System Minimum Time Off (mins.).
Determines the minimum time the condensing system must be off before it is able to restart.
00 = No minimum time off.
01 to 30 = Period of condensing time off.
P25
Condenser Clean Interval Warning.
Determines the time interval between condenser clean warnings.
00 = Excludes Condenser Clean Warning.
01 to 104 = Interval period in weeks.
P26
Address.
The controller peripheral number. This is only necessary when controllers are linked via a
network to a computer management and data recording system (such as with the TAB or ARGO
systems). Range 01 to 100.
34
Number Of Defrost/Day
Display During Defrost
Defrost Termination Temperature
Defrost Termination Time
P07
P08
P09
P10
P11
35
Door Stop
Door Alarm Delay
Display Offset
P20
P21
Address
P25
P26
120
0
0
0
0
-10
-10
0
0
0
0
0
0
0
-10
0
1
1
0
0
0
0
0
255
104
30
100
10
10
90
90
1
90
15
-15
1
10
15
60
45
2
24
2
1
10
15
‘P02’
-40
‘P01’
-15
Maximum
Value
Minimum
Value
1
0
0
0
0
0
5
3
1
90
3
-3
0
5
0
15
30
2
4
0
0
6
3
1
8
0
High
Temp.
(ht)
1
0
0
0
0
0
5
3
1
90
3
-3
0
-5
3
15
30
2
4
2
1
6
3
-21
-15
-25
Low
Temp.
(Lt)
1
0
0
0
0
0
5
3
1
90
3
-3
0
-2
3
5
30
2
4
2
1
6
2
-2
2
-3
Meat
Temp.
(Mt)
NOTE:
It is important to note that on the Pro counter range no door switches are fitted and therefore P18 door switch should be set to 0.
Failure to do so will result in the counter switching off after eight minutes.
Heated Temp. not available in the Counter Range.
Condensing System Min. Time Off
Condenser Clean Interval Warning
P24
Evaporator Probe Offset
Door Switch
P18
P19
Thermal Mass Simulation
Alarm Delay
P17
P23
High Alarm Temperature Differential
P16
P22
Evaporator Fan Control
Low Alarm Temperature Differential
P14
P15
Drain Down Time
Defrost Type
P06
Fan Delay Temperature
Evaporator Probe
P05
P13
Condenser Duty Cycle
P04
P12
Temperature Set Point
Temperature Hysteresis
P03
Minimum Temperature Set Point
Maximum Temperature Set Point
P01
Parameter Description
P02
Parameter
No:
1
0
0
0
0
0
5
3
1
90
3
-3
0
-2
3
5
30
2
4
2
1
6
3
0
3
0
Chill
Temp.
(ct)
1
0
0
0
0
0
5
3
1
90
3
-3
0
5
0
15
30
2
4
0
0
6
2
10
15
5
Wine
Temp.
(Wt)
1
0
0
0
0
0
5
3
1
90
3
-3
0
5
0
15
30
2
4
0
0
6
2
-1
1
-3
Fish
Temp.
(Ft)
1
0
0
0
0
0
5
3
1
90
3
-5
0
5
0
15
30
2
4
0
0
6
-3
87
91
83
Heated
Temp.
(Hot)
3.10
STANDARD CONTROLLER MODEL/DEFAULT VALUE TABLE
3.11
STANDARD CONTROLLER ELECTRIC DEFROST MODEL/VALUE TABLE
Parameter
No:
Parameter Description
Minimum
Value
Maximum
Value
Low
Temp.
(Lt)
Meat
Temp.
(Mt)
Chill
Temp.
(ct)
P01
Minimum Temperature Set Point
-40
‘P02’
-25
-3
0
‘P01’
120
-15
2
3
-21
-2
0
P02
Maximum Temperature Set Point
P03
Temperature Set Point
P04
Temperature Hysteresis
-15
15
3
2
3
P05
Condenser Duty Cycle
0
10
6
6
6
P06
Evaporator Probe
0
1
1
1
1
P07
Defrost Type
0
2
1
1
1
P08
Number Of Defrost/Day
0
24
4
4
4
P09
Display During Defrost
0
2
2
2
2
P10
Defrost Termination Temperature
1
45
30
30
30
P11
Defrost Termination Time
1
60
20
15
15
P12
Drain Down Time
0
15
3
3
3
P13
Fan Delay Temperature
-10
10
-5
-2
-2
P14
Evaporator Fan Control
0
1
0
0
0
P15
Low Alarm Temperature Differential
0
-15
-3
-3
-3
P16
High Alarm Temperature Differential
0
15
3
3
3
P17
Alarm Delay
0
90
90
90
90
P18
Door Switch
0
1
1
1
1
P19
Door Stop
0
90
3
3
3
P20
Door Alarm Delay
0
90
5
5
5
P21
Display Offset
-10
10
0
0
0
P22
Evaporator Probe Offset
-10
10
0
0
0
P23
Thermal Mass Simulation
0
100
0
0
0
P24
Condensing System Min. Time Off
0
30
0
0
0
P25
Condenser Clean Interval Warning
0
104
0
0
0
P26
Address
0
255
1
1
1
NOTE:
Door switch not fitted to the Counter Range so P18 door switch should be set to 0.
If not changed the counter will switch off after eight minutes.
36
4.0 PRO B 600 HW & LW PARAMETER SETTINGS
Set the controller to the standard Meat Temp and Low Temp Settings and then change the individual settings
as shown in the table below.
Item
Parameter Description
Standard
Mt Value
PRO. B
600MW
Standard
Lt Value
PRO B
600LW
P01
Minimum Temperature Set Point
-03
-03
-25
-25
P02
Maximum Temperature Set Point
02
02
-15
-15
P03
Temperature Set Point
-02
-02
-21
-21
P04
Temperature Hysteresis
02
02
03
03
P05
Condenser Duty Cycle
06
06
06
06
P06
Evaporator Probe
01
01
01
01
P07
Defrost Type
02
01
02
01
P08
Number Of Defrost/Day
04
04
04
04
P09
Display During Defrost
02
02
02
02
P10
Defrost Termination Temperature
30
30
30
30
P11
Defrost Termination Time
05
20
20
10
P12
Drain Down Time
03
03
03
03
P13
Fan Delay Temperature
-02
08
-05
-05
P14
Evaporator Fan Control
00
00
00
00
P15
Low Alarm Temperature Differential
-03
-03
-03
-03
P16
High Alarm Temperature Differential
03
05
03
05
P17
Alarm Delay
90
90
90
90
P18
Door Switch
00
01
00
01
P19
Door Stop
03
03
03
03
P20
Door Alarm Delay
05
05
05
05
P21
Display Offset
0
0
0
0
P22
Evaporator Probe Offset
0
0
0
0
P23
Thermal Mass Simulation
0
0
0
0
P24
Condensing System Min. Time Off
0
0
0
0
P25
Condenser Clean Interval Warning
0
0
0
0
P26
Address
1
1
1
1
37
38
PREM & PRO G
300/300 HL
PREM S 400F
PREM G 600F
PREM G 1300F
PRO B 600MW
PRO B 600LW
PREM & PRO S 400H
PREM & PRO S 400M
PREM & PRO S 400L
PREM S 450H
PREM S 450M
PREM S 450L
PREM & PRO G 500H
PREM & PRO G 500M
PREM & PRO G 500L
PREM S 525H
PREM S 525M
PREM S 525L
PREM G 550H
PREM G 550M
PREM G 550L
PREM & PRO G 600H
PREM & PRO G 600M
PREM & PRO G 600L
PREM & PRO S 900H
PREM & PRO S 900M
PREM & PRO G 900L
PREM S 1000H
PREM S 1000M
PREM S 1000L
PREM & PRO G 1100H
PREM & PRO G 1100M
PREM & PRO G 1100L
PREM S 1150H
PREM S 1150M
PREM S 1150L
PREM G 1200H
PREM G 1200M
PREM G 1200L
PREM & PRO G 1350H
PREM & PRO G 1350M
PREM & PRO G 1350L
PREM S 250/250 HL
Model
R134A
R134A
R404A
R134A
R134A
R404A
R134A
R134A
R404A
R134A
R134A
R404A
R134A
R134A
R404A
R134A
R134A
R404A
R134A
R134A
R404A
R134A
R134A
R404A
R134A
R134A
R404A
R134A
R134A
R404A
R134A
R134A
R404A
R134A
R134A
R404A
R134A
R404A
R134A
R404A
R134A
R134A
R134A
R 404A
R404A
Gas
350 grms
350 grms
420 grms
320 grms
320 grms
300 grms
350 grms
350 grms
420 grms
350 grms
350 grms
420 grms
350 grms
350 grms
400 grms
350 grms
350 grms
420 grms
400 grms
400 grms
660 grms
450 grms
450 grms
450 grms
400 grms
400 grms
660 grms
450 grms
450 grms
660 grms
450 grms
450 grms
450 grms
450 grms
450 grms
660 grms
210 grms
310 grms
210 grms
310 grms
210 grms
210 grms
225 grms
480 grms
440 grms
Gas Charge
AEZ 4425Y
AEZ 4425Y
CAE 2424Z
AEZ 4425Y
AEZ 4425Y
CAE 2424Z
AEZ 4425Y
AEZ 4425Y
CAE 2424Z
AEZ 4425Y
AEZ 4425Y
CAJ 2424Z
AEZ 4430Y
AEZ 4430Y
CAJ 2432Z
AEZ 4430Y
AEZ 4430Y
CAJ 2432Z
CAE 4448Y
CAE 4448Y
CAJ 2446Z
CAE 4456Y
CAE 4456Y
CAJ 2446Z
CAE 4448Y
CAE 4448Y
CAJ 2446Z
CAE 4456Y
CAE 4456Y
CAJ 2446Z
CAE 4456Y
CAE 4456Y
CAJ 2446Z
CAE 4456Y
CAE 4456Y
CAJ 2446Z
AEZ 4425Y
CAE 2424Z
AEZ 4425Y
CAE 2424Z
AEZ 4430Y
AEZ 4430Y
CAE 4448Y
CAE9460Z
CAJ2432Z
Compressor
00-879864
00-879864
00-879864
00-879864
00-879864
00-879864
00-879864
00-879864
00-879864
00-879864
00-879864
00-879864
00-879864
00-879864
00-879866
00-879864
00-879864
00-879866
00-879867
00-879867
00-879867
00-879867
00-879867
00-879867
00-879867
00-879867
00-879867
00-879867
00-879867
00-879867
00-879867
00-879867
00-879867
00-879867
00-879867
00-879867
00-879864
00-879864
00-879864
00-879864
00-879864
00-879864
00-879867
00-879867
00-879867
Condenser Filter
3.0m x 0.042
3.0m x 0.042
3.0m x 0.042
3.0m x 0.042
3.0m x 0.042
3.0m x 0.042
3.0m x 0.042
3.0m x 0.042
3.0m x 0.042
3.0m x 0.042
3.0m x 0.042
3.0m x 0.042
3.0m x 0.042
3.0m x 0.042
3.0m x 0.054
3.0m x 0.042
3.0m x 0.042
3.0m x 0.054
3.0m x 0.054
3.0m x 0.054
3.0m x 0.054
3.0m x 0.054
3.0m x 0.054
3.0m x 0.054
3.0m x 0.054
3.0m x 0.054
3.0m x 0.054
3.0m x 0.054
3.0m x 0.054
3.0m x 0.054
3.0m x 0.054
3.0m x 0.054
3.0m x 0.054
3.0m x 0.054
3.0m x 0.054
3.0m x 0.054
3.0m x0.042
3.0m x0.042
3.0m x0.042
3.0m x0.042
3.0m x 0.054
3.0m x 0.054
2.5m x 0.054
3.0m x 0.064
3.0m x 0.054
Capillary
Timed Off Cycle
Hot Gas
Hot Gas
Timed Off Cycle
Electric
Electric
Timed Off Cycle
Hot Gas
Hot Gas
Timed Off Cycle
Hot Gas
Hot Gas
Timed Off Cycle
Electric
Electric
Timed Off Cycle
Hot Gas
Hot Gas
Timed Off Cycle
Hot Gas
Hot Gas
Timed Off Cycle
Electric
Electric
Timed Off Cycle
Hot Gas
Hot Gas
Timed Off Cycle
Hot Gas
Hot Gas
Timed Off Cycle
Electric
Hot Gas
Timed Off Cycle
Hot Gas
Hot Gas
Timed Off Cycle
Electric
Timed Off Cycle
Electric
Timed Off Cycle
Timed Off Cycle
Timed Off Cycle
Hot Gas & Electric
Hot Gas & Electric
Defrost Type
230-1-50
230-1-50
230-1-50
230-1-50
230-1-50
230-1-50
230-1-50
230-1-50
230-1-50
230-1-50
230-1-50
230-1-50
230-1-50
230-1-50
230-1-50
230-1-50
230-1-50
230-1-50
230-1-50
230-1-50
230-1-50
230-1-50
230-1-50
230-1-50
230-1-50
230-1-50
230-1-50
230-1-50
230-1-50
230-1-50
230-1-50
230-1-50
230-1-50
230-1-50
230-1-50
230-1-50
230-1-50
230-1-50
230-1-50
230-1-50
230-1-50
230-1-50
230-1-50
230-1-50
230-1-50
Voltage
5.1
1.9
2.4
658
4.6
4.9
289
349
1328
855
1023
5.1
936
936
2.1
2.2
3.1
2.1
2.2
3.1
2.1
2.2
3.1
2.1
2.3
3.1
2.5
2.7
3.4
2.5
2.7
3.4
3.8
4.1
4.5
4.7
5.0
4.5
3.8
4.1
4.5
4.7
5.0
4.6
4.7
5.0
4.6
4.7
5.0
4.6
295
329
641
295
329
641
295
329
641
295
336
648
349
389
709
349
389
709
567
638
920
655
724
920
567
638
920
655
738
934
655
738
934
655
738
934
Power Consumption
Watts
Amps
10 Amp
10 Amp
10 Amp
10 Amp
10 Amp
13 Amp
10 Amp
10 Amp
10 Amp
10 Amp
10 Amp
10 Amp
10 Amp
10 Amp
13 Amp
10 Amp
10 Amp
13 Amp
10 Amp
10 Amp
13 Amp
10 Amp
10 Amp
13 Amp
10 Amp
10 Amp
13 Amp
10 Amp
10 Amp
13 Amp
10 Amp
10 Amp
13 Amp
10 Amp
10 Amp
13 Amp
10 Amp
13 Amp
10 Amp
13 Amp
10 Amp
10 Amp
10 Amp
13 Amp
13 Amp
Fuse Rating
5.0 TECHNICAL DATA - PREM & PRO CABINETS
R404A
R134A
R134A
R404A
R134A
R134A
R404A
R134A
R134A
R404A
PREM & PRO 2/1H
PREM & PRO 2/1MC
PREM & PRO 2/1L
PREM & PRO 2/2H
PREM & PRO 2/2MC
PREM & PRO 2/2L
PREM & PRO 2/3H
PREM & PRO 2/3MC
PREM & PRO 2/3L
R134A
PREM & PRO 1/3MC
PREM & PRO 1/4L
R134A
PREM & PRO 1/3HP
R134A
R134A
PREM & PRO 1/3H
R134A
R134A
PREM & PRO 1/2F
PREM & PRO 1/4MC
R404A
PREM & PRO 1/2L
PREM & PRO 1/4HP
R134A
PREM & PRO 1/2MC
R134A
R134A
PREM & PRO 1/2HP
R134A
R134A
PREM & PRO 1/2H
PREM & PRO 1/4H
R404A
PREM & PRO 1/1L
PREM & PRO 1/3F
R134A
PREM & PRO 1/1MC
R404A
R134A
PREM & PRO 1/3L
R134A
PREM & PRO 1/1HP
Gas
PREM & PRO 1/1H
Model
39
500 grms
380 grms
380 grms
360 grms
365 grms
365 grms
335 grms
360 grms
360 grms
375 grms
370 grms
370 grms
370 grms
260 grms
360 grms
315 grms
315 grms
315 grms
210 grms
335 grms
360 grms
360 grms
360 grms
335 grms
360 grms
360 grms
360 grms
Gas Charge
SC 21CLX
CAE4448Y
CAE4448Y
SC 15CLX
AEZ4430Y
AEZ4430Y
SC 15CLX
AEZ4425Y
AEZ4425Y
SC 21CLX
CAE4448Y
CAE4448Y
CAE4448Y
AEZ4430Y
SC 15CLX
AEZ4430Y
AEZ4425Y
AEZ4430Y
AEZ4425Y
SC 15CLX
AEZ4425Y
AEZ 4425Y
AEZ4425Y
SC 15CLX
AEZ4425Y
AEZ 4425Y
AEZ4425Y
Compressor
01-231098-01
01-231098-01
01-231098-01
01-231098-01
01-231098-01
01-231098-01
01-231098-01
01-231098-01
01-231098-01
01-231098-01
01-231098-01
01-231098-01
01-231098-01
01-231098-01
01-231098-01
01-231098-01
01-231098-01
01-231098-01
01-231098-01
01-231098-01
01-231098-01
01-231098-01
01-231098-01
01-231098-01
01-231098-01
01-231098-01
01-231098-01
Condenser Filter
3m x 0.054
3m x 0.054
3m x 0.054
2.5m x 0.042
3m x 0.042
3m x 0.042
2.5m x 0.042
3m x 0.042
3m x 0.042
3m x 0.054
3m x 0.054
3m x 0.054
3m x 0.054
3m x 0.042
2.5m x 0.042
3m x 0.042
3m x 0.042
3m x 0.042
3m x 0.042
3m x 0.042
3m x 0.042
3m x 0.042
3m x 0.042
3m x 0.042
3m x 0.042
3m x 0.042
3m x 0.042
Capillary
Hot Gas
Hot Gas
Timed Off Cycle
Hot Gas
Hot Gas
Timed Off Cycle
Hot Gas
Hot Gas
Timed Off Cycle
Hot Gas
Hot Gas
Timed Off Cycle
Timed Off Cycle
Manual
Hot Gas
Hot Gas
Timed Off Cycle
Timed Off Cycle
Manual
Hot Gas
Hot Gas
Timed Off Cycle
Timed Off Cycle
Hot Gas
Hot Gas
Timed Off Cycle
Timed Off Cycle
Defrost Type
230/50/1
230/50/1
230/50/1
230/50/1
230/50/1
230/50/1
230/50/1
230/50/1
230/50/1
230/50/1
230/50/1
230/50/1
230/50/1
230/50/1
230/50/1
230/50/1
230/50/1
230/50/1
230/50/1
230/50/1
230/50/1
230/50/1
230/50/1
230/50/1
230/50/1
230/50/1
230/50/1
Voltage
840
620
550
710
420
380
650
310
290
810
600
520
520
370
690
400
340
340
350
670
330
290
290
640
300
290
290
Watts
4
3.9
3.6
3.4
2.8
2.6
3.1
2.1
2
3.8
3.7
3.4
3.4
2.4
3.3
2.6
2.4
2.4
2.3
3.2
2.1
2
2
3.1
2
2
2
Amps
Power Consumption
13
10
10
10
10
10
10
10
10
13
10
10
10
10
10
10
10
10
10
10
10
10
10
10
10
10
10
Fuse Rating
6.0 TECHNICAL DATA - PREM & PRO COUNTERS
7.0 TECHNICAL DATA - PREM & PRO CABINETS
WITH HYDROCARBON R290 GAS
MODEL
PREM & PRO B600H
PREM & PRO B600L
PREM & PRO B600M
PREM & PRO G1100H
PREM & PRO G1100L
PREM & PRO G1100M
PREM G 1200H
PREM G 1200L
PREM G 1200M
PREM & PRO G 1350F
PREM & PRO G 1350H
PREM & PRO G 1350HP
PREM & PRO G 1350L
PREM & PRO G 1350M
PREM & PRO G 300/300HH
PREM & PRO G 300/300 HL
PREM & PRO G 500H
PREM & PRO G 500L
PREM & PRO G 500M
PREM G 550H
PREM G 550L
PREM G 550 M
PREM G 600/600 HL
PREM & PRO G 600F
PREM & PRO G 600H
PREM & PRO G 600HB
PREM & PRO G 600HP
PREM & PRO G 600L
PREM & PRO G 600LB
PREM & PRO G 600M
PREM S 1000H
PREM S 1000L
PREM S 1000M
PREM & PRO S 1150H
PREM & PRO S 1150L
PREM & PRO S 1150 M
PREM & PRO S 250/250 HL
PREM & PRO S 400F
PREM & PRO S 400H
PREM & PRO S 400L
PREM & PRO S 400M
PREM & PRO S 525H
PREM & PRO S 525L
PREM & PRO S 525M
PREM & PRO S 900H
PREM & PRO S 900L
PREM & PRO S 900M
PREM S 450H
PREM S 450L
PREM S 450M
R290
Gas Charge
Compressor
Compressor
Part Number
Voltage
Overload
Relay
165 grms
170 grms
165 grms
175 grms
200 grms
175 grms
195 grms
200 grms
195 grms
175 grms
195 grms
195 grms
200 grms
195 grms
150 grms
150 grms
150 grms
170 grms
150 grms
170 grms
150 grms
165 grms
170 grms
165 grms
170 grms
165 grms
165 grms
165 grms
165 grms
165 grms
170 grms
170 grms
165 grms
195 grms
200 grms
195 grms
195 grms
200 grms
195 grms
150 grms
170 grms
165 grms
150 grms
170 grms
150 grms
150 grms
170 grms
150 grms
175 grms
200 grms
175 grms
150 grms
170 grms
150 grms
AEZ4430Z
SC15CNX
AEZ4430Z
CAE9450Z
CAJ2446Z
CAE9450Z
CAE 9406Z
CAJ2446Z
CAE 9460Z
CAE9450Z
CAE9460Z
CAE9460Z
CAJ2446Z
CAE9460Z
(High Temp) AEZ4425Z
(High Temp) AEZ4425Z
(High Temp) AEZ4425Z
(Low Temp) SC15CNX
AEZ4425Z
SC15CNX
AEZ4425Z
AEZ4430Z
CAJ2432Z
AEZ4430Z
(Low Temp) CAJ2432Z
(High Temp) AEZ4430Z
AEZ4430Z
AEZ4430Z
AEZ4430Z
AEZ4430Z
CAJ2432Z
CAJ2432Z
AEZ4430Z
CAE 9460Z
CAJ2446Z
CAE9460Z
CAE9460Z
CAJ2446Z
CAE9460Z
(High Temp) AEZ4425Z
(Low Temp) SC15CNX
AEZ4430Z
AEZ4425Z
SC15CNX
AEZ4425Z
AEZ4425Z
SC15CNX
AEZ4425Z
CAE9450Z
CAJ2446Z
CAE9450
AEZ4425Z
SC15CNX
AEZ4425Z
00-599646
00-555016
00-599646
00-554398
15422049
00-554398
00-554688
00-554688
00-554688
00-554398
00-554688
00-554688
00-554688
00-554688
00-599637
00-599637
00-599637
00-555016
15422012
00-555016
15422012
00-599646
00-554685
00-599646
00-554685
00-599646
00-599646
00-599646
00-599646
00-599646
00-554685
00-554685
00-599646
00-554688
00-554688
00-554688
00-554688
00-554688
00-554688
15422012
00-555016
00-599646
15422012
00-555016
15422012
15422012
00-555016
15422012
00-554398
00-554688
00-554398
15422012
00-555016
15422012
230-50-1
230-50-1
230-50-1
230-50-1
230-50-1
230-50-1
230-50-1
230-50-1
230-50-1
230-50-1
230-50-1
230-50-1
230-50-1
230-50-1
230-50-1
230-50-1
230-50-1
230-50-1
230-50-1
230-50-1
230-50-1
230-50-1
230-50-1
230-50-1
230-50-1
230-50-1
230-50-1
230-50-1
230-50-1
230-50-1
230-50-1
230-50-1
230-50-1
230-50-1
230-50-1
230-50-1
230-50-1
230-50-1
230-50-1
230-50-1
230-50-1
230-50-1
230-50-1
230-50-1
230-50-1
230-50-1
230-50-1
230-50-1
230-50-1
230-50-1
230-50-1
230-50-1
230-50-1
230-50-1
00-554426
N/A
00-554426
00-554804
00-554802
00-554804
00-554427
00-554427
00-554427
00-554804
00-554427
00-554427
00-554427
00-554427
00554428
00554428
00554428
N/A
00-599637
N/A
00-599637
00-554426
00-554427
00-554426
00-554427
00-554426
00-554426
00-554426
00-554426
00-554426
00-554427
00-554427
00-554426
00-554427
00-554427
00-554427
00-554427
00-554427
00-554427
00-599637
N/A
00-554426
N/A
N/A
00-554802
00-554804
00-554427
00-554804
00-599637
N/A
00-599637
00-554317
N/A
00-554317
00-554319
00-554319
00-554319
00-554319
00-554319
00-554319
00-554319
00-554319
00-554319
00-554319
00-554319
00-554317
00-554317
00-554317
N/A
00-554428
N/A
00-554428
00-554317
00554319
00-554317
00-554319
00-554317
00-554317
00-554317
00-554317
00-554317
00-554319
00-554319
00-554317
00-554319
00-554319
00-554319
00-554319
00-554319
00-554319
00-554428
N/A
00-554317
N/A
N/A
00-554319
00-554319
00-554319
00-554319
00-554428
N/A
00-554428
40
8.0 TECHNICAL DATA - PREM & PRO COUNTERS
WITH HYDROCARBON R290 GAS
MODEL
PREM & PRO1/1H
PREM & PRO1/1HP
PREM & PRO1/1L
PREM & PRO1/1M
PREM & PRO1/2F
PREM & PRO1/2H
PREM & PRO1/2HP
PREM & PRO1/2L
PREM & PRO1/2M
PREM & PRO1/3F
PREM & PRO1/3H
PREM & PRO1/3HP
PREM & PRO1/3L
PREM & PRO1/3M
PREM & PRO1/4H
PREM & PRO1/4HP
PREM & PRO1/4L
PREM & PRO1/4M
PREM & PRO2/1H
PREM & PRO2/1L
PREM & PRO2/1M
PREM & PRO2/2H
PREM & PRO2/2L
PREM & PRO2/2M
PREM & PRO2/3H
PREM & PRO2/3L
PREM & PRO2/3M
R290
Gas Charge
Compressor
Compressor
Part Number
Voltage
Overload
Relay
150grms
150grms
170 grms
150grms
150grms
150grms
150grms
170 grms
150grms
165 grms
165 grms
165 grms
170 grms
165 grms
175 grms
175 grms
N/A
175 grms
150grms
170 grms
150grms
165 grms
170 grms
165 grms
175 grms
N/A
175 grms
AEZ4425Z
AEZ4425Z
SC15CNX
AEZ4425Z
AEZ4425Z
AEZ4425Z
AEZ4425Z
SC15CNX
AEZ4425Z
AEZ4430Z
AEZ4430Z
AEZ4430Z
SC15CNX
AEZ4430Z
CAE9450Z
CAE9450Z
SC21CNX
CAE9450Z
AEZ4425Z
SC15CNX
AEZ4425Z
AEZ4430Z
SC15CNX
AEZ4430Z
CAE9450Z
SC21CNX
CAE9450Z
15422012
15422012
00-555016
15422012
15422012
15422012
15422012
00-555016
15422012
00-599646
00-599646
00-599646
00-555016
00-599646
00-554398
00-554398
N/A
00-554398
15422012
00-555016
15422012
00-599646
00-555016
00-599646
00-554398
N/A
00-554398
230-50-1
230-50-1
230-50-1
230-50-1
230-50-1
230-50-1
230-50-1
230-50-1
230-50-1
230-50-1
230-50-1
230-50-1
230-50-1
230-50-1
230-50-1
230-50-1
230-50-1
230-50-1
230-50-1
230-50-1
230-50-1
230-50-1
230-50-1
230-50-1
230-50-1
230-50-1
230-50-1
00-554428
00-554428
N/A
00-554428
00-554428
00-554428
00-554428
N/A
00-554426
00-554426
00-554426
00-554426
N/A
00-554426
00-554804
00-554804
N/A
00-554804
N/A
00-554426
00-554426
N/A
00-554426
00-554804
N/A
00-554804
00-554317
00-554317
N/A
00-554317
00-554317
00-554317
00-554317
N/A
00-554317
00-554317
00-554317
00-554317
N/A
00-554317
00-554319
00-554319
N/A
00-554319
N/A
00-554317
00-554317
N/A
00-554317
00-554319
N/A
00-554319
41
9.0 BAKERY CABINET PARAMETER SETTINGS
The standard parameter settings for each model are as follows:
PREM. 20 / 40 BSR & GREGGS BAKERY CABINET
PREM. 20 / 40 BSF & GREGGS BAKERY CABINET
PREM. 20 / 40 DR BAKERY CABINET
Title:
Parameter Description:
Min. Temp.
Max. Temp.
Temp. Set
Temp. Hyst.
Defr.Type
Fan Dly.Tp
Fan Defr.Op
Defrost/Day
Defr.End Tp
Defr.End Tm
Drain Time
Fan Cycle
Lo Alarm dt
Hi Alarm dt
Alarm Delay
Alarm Probe
Door Stop
Door Alarm
Aux.Alarm
Compr.Rest
Compr.Cycle
Service Due
Clean Filter
Air o/s
Evap. o/s
Cond. o/s
Food o/s
Evap. Probe
Cond. Probe
Food Probe
Door Switch
Diagnostics
Food Sim.
Disp.Contr.
Address
Minimum Temperature Set Point
Maximum Temperature Set Point
Standard Temperature Set Point
Temperature Hysteresis
Defrost Type
Fan Delay Temperature
Fan Operation During Defrost
Number of Defrost / Day
Defrost Termination Temperature
Defrost Termination Time
Drain Down Time
Evaporator Fan Control
Low Alarm Temperature Differential
High Alarm Temperature Differential
Temperature Alarm Delay
Alarm Probe Selection
Door Stop
Door Alarm Delay
Auxiliary Alarm
Compressor Rest
Condenser Duty Cycle
Service Due Interval Warning
Condenser Clean Interval Warning
Display Offset
Evaporator Probe Offset
Condenser Probe Offset
Food Probe Offset
Evaporator Probe
Condenser Probe
Food Probe
Door Switch
Diagnostics System
Thermal Mass Simulation
Display Contrast
Address
Minimum
Value (-):
-40
‘Min. Temp.’
-
Model setting ‘High Temp’
Model setting ‘Low Temp. – G’
Model setting ‘Meat Temp. – G’
Mid.
Value:
Maximum
Value (+):
‘Max. Temp.’
120
Individual Values
-15
15
Off Cycle
Electric
Hot Gas
-20
20
End
Max.
Cont.
0
24
0
45
1
120
0
15
NO
YES
-15
-1
1
15
-1
120
1
2
0
120
0
30
0
2
0
10
0
10
0
200
0
200
-15
15
-15
15
-15
15
-15
15
NO
YES
NO
YES
NO
YES
NO
YES
NO
YES
0
200
0
100
0
255
Adjust parameters to value indicated for individual models.
42
Prem.
20 40 BSR
0
8
1
3
Off Cycle
5
Cont.
4
30
15
0
NO
-3
3
90
1
3
5
0
0
6
36
18
0
0
0
0
NO
YES
NO
YES
YES
10
0
1
Prem.
20 / 40 BSF
-25
-15
-21
3
Hot Gas
-5
End
4
30
15
3
NO
-3
3
90
1
3
5
0
0
6
36
18
0
0
0
0
YES
YES
NO
YES
YES
10
0
1
Prem.
20 / 40 DR
-5
10
-4
2
Hot Gas
-2
End
4
30
15
1
NO
-3
3
90
1
3
5
0
0
6
36
18
0
0
0
0
YES
YES
NO
YES
YES
10
0
1
43
Tel: 01553 691122
Fax: 01553 691447
Website: www.fosterrefrigerator.co.uk
E-mail: [email protected]
a Division of ITW (UK) Ltd.
PREMPRO/SM/10/04
Service Manual
Foster Refrigerator
Oldmedow Road, King’s Lynn,
Norfolk PE30 4JU
England