1
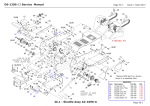
DS-1200 G3 Service Manual
Page 3-30
Issue 1 Sep 2013
OMR/Barcode Reader Setup
Setup Procedure
The procedure is different for OMR and barcode.With OMR, a calibration
sheet must be used, and the machine must be OMR calibrated when
setup is complete. With barcode no calibration sheet or procedure is
required. Instructions for creating a calibration sheet can be found in
C:\Program Files\PFE\AutoMailer 5\Documentation\Other Documentation \Test Documents\Calibration Sheets. Note that ideally, the calibration sheet should be printed from the same printer as the stationery.
OMR calibration is described on the following page.
Ensure all covers are closed and the unit is switched on.
Select the job on which the reader is to be set up and load a calibration
sheet into the feed tray (OMR) or paper with label printed (barcode). In
the Run screen, press the unit which has the reader fitted, to display the
fine-tuning screen. Press ‘Load to reader’ and follow the instructions to
feed a calibration sheet under the reader.
Assuming the selected unit has OMR or Barcode reading enabled, the
Reader Setup tab will be present. The setup procedure must be followed
before reading can be used.
On the screen, select whether OMR or barcode. If OMR is selected, press
the ‘Number of Marks’ button and enter the required number.
Select the ‘Percent Read Test’ button and then ‘Start align test’ to test
the head alignment. The black screen area will show a graphical readout
of the results - all peaks should be above, or close to the red line. The
status line below the screen will indicate the percentage success. Run
the test for at least 10 seconds, then click the ‘Stop align test’ button.
Now click the ‘Decodes/Sec Test’ button and observe the same procedure as for the Percent Read Test.
If either test results in excessively low readings, the angular alignment
of the read head, or its closeness to the paper may require adjustment.
Observe the position of the red beam through the perspex cover over
the read head - the side to side postion should be centrally placed on
the marks or barcode. If necessary, slacken the lock screws and adjust
the head to suit (it will be necessary to close the cover after each small
adjustment, as the beam switches off when the cover is raised). Note:
OMR Reading - Depending on paper orientation, and whether the Gate
mark is the first or last mark past the head, the head must be physically
positioned according to the chart on the following page. To change position, slacken the lock screws and position the head on the other side of
the sliding bracket. (See following page).
Page 3-30