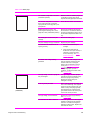
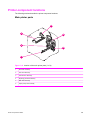
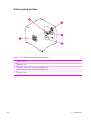
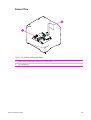
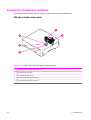
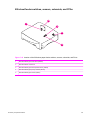
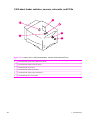
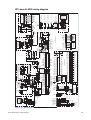
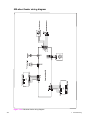
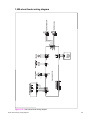
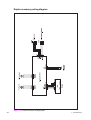
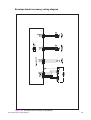
1
7
Troubleshooting
Chapter contents
●
Introduction
●
Troubleshooting process
●
Troubleshooting tools
●
Control-panel menus
●
Printer resets and power-on modes
●
Test pages
●
Interface troubleshooting
●
Display-message troubleshooting
●
Paper-path troubleshooting
●
Media transport problems
●
Image-formation troubleshooting
●
Troubleshooting the stacker and the stapler/stacker
●
Printer-component locations
●
Accessory component locations
●
Printer and accessory wiring diagrams
●
General timing diagrams
Chapter contents
301
Introduction
In order to use the information in this chapter, you should have a basic understanding of the laserjet
printing process. Explanations of each mechanical assembly, the printer systems, and the basic
theory of operation are contained in chapter 5 of this manual. Do not perform any of these
troubleshooting processes unless you understand the function of each printer component.
This chapter contains the following sections:
302
■
Troubleshooting process This section includes an initial troubleshooting checklist and a
troubleshooting flowchart. These contain information about common printer errors that can inhibit
operation or create print-quality problems. They also include recommendations for resolving the
cause of the problem. See Troubleshooting process.
■
Troubleshooting tools This section contains information that helps to isolate the cause of
printer failures. This section contains information about printing information and test pages,
resetting printer options, using the diagnostics and service menus, and using the embedded Web
server. See Troubleshooting tools.
■
Interface troubleshooting This section provides techniques for isolating the source of
communication problems to the printer hardware, the printer configuration, the network
configuration, or the software program. See Interface troubleshooting.
■
Display-message troubleshooting This section explains each control-panel-display message
and suggests recommendations for resolving the cause of each message. When the printer
message indicates a failure for which the root cause is not obvious, use the troubleshooting
process section and the troubleshooting tools section in this chapter to solve the problem. See
Display-message troubleshooting.
■
Paper-path troubleshooting This section provides information to help solve feed problems,
including print media checks, jam troubleshooting checks, and information about media-caused
and printer-caused jams. See Paper-path troubleshooting.
■
Image-formation troubleshooting This section explains methods for solving print-quality
problems. See Image-formation troubleshooting.
■
Stacker and stapler/stacker troubleshooting This section provides information about solving
stacker and stapler/stacker problems. See Troubleshooting the stacker and the stapler/stacker.
■
Printer and accessory components This section contains illustrations and tables that list the
printer and accessory internal components. See Printer-component locations and Accessory
component locations.
■
Printer and accessory wiring diagrams This section contains wiring diagrams for the printers
and accessories. See Printer and accessory wiring diagrams.
■
General timing diagrams This section contains timing diagrams for the printer. See General
timing diagrams.
7
Troubleshooting
Troubleshooting process
When the printer malfunctions or encounters an unexpected situation, information on the printer
control panel alerts you to the situation. This section contains an initial troubleshooting checklist that
helps to eliminate many possible causes of the problem. The subsequent troubleshooting flowchart
helps you to diagnose the cause of the problem. The remainder of the chapter provides steps for
correcting the problems that have been identified.
■
Use the initial troubleshooting checklist to evaluate the source of the problem and to reduce the
number of steps that are required to fix the problem.
■
Use the troubleshooting flowchart to pinpoint the cause of malfunctions. The flowchart lists the
section within this chapter that provides steps for correcting the malfunction.
Before beginning any troubleshooting procedure, check the following:
■
Are supply items (for example, the print cartridge, fuser, and rollers) within their rated life?
■
Does the configuration page reveal any configuration problems? See Configuration page.
NOTE The customer is responsible for checking and maintaining supplies, and for using
supplies that are in good condition. The customer is responsible for media and print-cartridge
supplies. The customer is also responsible for replacing the fuser, transfer roller, and all paper
pickup, feed, and separation rollers (tray 1 has a separation pad instead of a roller) that are at
or near the end of their 200,000-page rated life.
Initial troubleshooting checklist
The following checklist contains basic questions that you can ask the customer in order to help
define the problem(s) quickly. For more information about printer and media specifications, see
Model and serial numbers and Media specifications.
Table 7-1 Initial troubleshooting checklist
Environment
Media
Troubleshooting process
■
Is the printer installed in a suitable environment? See Model and serial numbers.
■
Is the printer installed on a solid, level surface?
■
Is the supply voltage (from the wall receptacle) within ± 10% of the printer's rated voltage (see
Model and serial numbers)?
■
Is the power cord fully seated into both the printer and the electrical receptacle in the wall?
■
Is the operating environment (for example, the temperature and humidity levels) within the
specified parameters that are listed in chapter 1 (see Model and serial numbers)?
■
Is the printer exposed to ammonia gas, such as that produced by diazo copiers or office-cleaning
materials?
■
Is the printer exposed to direct sunlight?
■
Is suitable media being used in the printer? See Supported media weights and sizes and Paper
and print media.
■
Does the customer use only supported print media?
■
Is the media in good condition (no curl, folds, or other flaws)?
303
Table 7-1 Initial troubleshooting checklist (continued)
■
Is the media stored correctly and within environmental limits?
■
Is the correct side of the page printed on first?
■
Is long-grain paper being used?
■
Is the correct amount of media loaded in the tray (not stacked above the arrows embossed in the
tray)?
■
Is the media placed in the tray correctly?
■
Are the paper guides aligned with the stack?
■
Is the tray cassette installed correctly in the printer?
Print cartridge
■
Is the print cartridge installed correctly?
Fuser
■
Is the fuser installed correctly? See Fuser.
Covers
■
Is the top cover closed?
Condensation
■
Does condensation occur following a temperature change (particularly in winter following cold
storage)? If so, wipe off the affected parts or leave the printer on for 10 to 20 minutes and then
attempt to resume printing.
■
Was a print cartridge opened soon after it was moved from a cold room to a warm one? If so, allow
the print cartridge and the printer to acclimate to room temperature for one to two hours.
■
Are any non-HP components installed? Check for any non-HP components (print cartridges,
memory modules, and EIO cards) installed in the printer and remove them. Hewlett-Packard
recommends the use of HP components in its printers.
■
Remove the printer from the network, and make sure that the failure is associated with the printer
before beginning troubleshooting.
Input trays
Miscellaneous
304
7
Troubleshooting
Troubleshooting flowchart
The flowchart highlights the general processes that you can use to isolate and solve printer hardware
problems quickly. Each heading depicts a major troubleshooting step. Proceed to the next major step
or perform additional testing depending on "yes" or "no" answers.
Figure 7-1 Troubleshooting flowchart
1
When you perform a test print, select the same input tray and delivery method that were used when the malfunction
occurred. If you don't know which trays and bins were used when the malfunction occurred, then perform several test
prints using all combinations of tray and delivery method.
2
Image defects that occurred at the user site might not re-occur in test prints. Try printing from a computer to replicate
the image defect.
Troubleshooting process
305
Power-on checks
The basic printer functions should start up as soon as the printer is plugged into an electrical
receptacle and the power switch is pushed to the on position.
Overview
Turn on the printer power. If the control-panel display remains blank, random patterns appear, or
asterisks remain on the display, perform power-on checks to locate the cause of the problem.
During normal printer operation, the main cooling fan begins to spin briefly after the printer power is
turned on. Place your hand over the holes in the left-side cover. If the fan is operating, you will feel a
slight vibration and feel air passing into the printer. You can also lean close to the printer and hear
the fan operating. When this fan is operational, the dc side of the power supply is functioning correctly.
After the fan is operating, the main motor turns on (unless the top cover is open, a jam condition is
sensed, or the paper path sensors are damaged). You should be able to visually and audibly
determine if the main motor is turned on.
If the fan and main motor are operating correctly, the next troubleshooting step is to separate print
engine, formatter, and control-panel problems. Perform an engine test (see Engine-test page). If the
formatter is damaged, it might interfere with the engine test. If the engine test page does not print, try
removing the formatter and then performing the engine test again. If the engine test is then
successful, the problem is almost certainly with the formatter, the control panel, or the cable that
connects them.
If the printer control panel is blank when you turn on the printer, check the following items.
1
Make sure that the printer is plugged into an active electrical outlet receptacle that delivers the
correct voltage.
2
Make sure that the on/off switch is in the on position.
3
Make sure that the fan runs briefly, which indicates that the power supply is operational.
4
Make sure that the control-panel display wire-harness is connected. See the hint in the
procedure for Top cover.
5
(HP LaserJet 4200 and 4300 Series printers only) Make sure that the firmware DIMM and the
formatter are seated and operating correctly. See Firmware DIMM (LJ 4200/4300 only).
6
Remove any HP Jetdirect or other EIO cards, and then try to turn the printer on again.
NOTE If the printer control-panel display is blank, but the main cooling fan runs briefly after
the printer power is turned on, try printing an engine test page to determine whether the
problem is with the control-panel display, formatter, or other printer components. See Enginetest page.
If the main cooling fan is not operating, check the following items.
306
1
Check the fuse on the power supply (location FU2; near the power switch) to make sure that it is
not open.
2
If necessary, replace the power-supply assembly. See Power supply.
3
If necessary, replace the dc controller PCA. See Dc controller PCA.
7
Troubleshooting
NOTE It is important to have the printer control panel functional as soon as possible in the
troubleshooting process so that the control-panel display can be used to help locate printer
errors.
If problems with the power-on check perisist refer to table Table 7-2 Power-on defect or blank display.
Table 7-2 Power-on defect or blank display
Problem
Action
The power cord is not plugged into the
wall receptacle and connected to the
printer.
Make sure that the power cord is firmly plugged into the wall receptacle and
connected to the printer.
The correct voltage (power) is not
available.
Measure the voltage at the outlet. If necessary, plug the power cord into another
circuit outlet.
The power switch is off.
Set the switch to the on position. You should hear the switch toggle. If the front
right-side cover has been removed recently, make sure that the rod connecting
the power-supply switch moves as you toggle the switch. See the reinstall note in
Right-side cover.
If the printer still does not turn on, the power switch might be defective.
1
Remove the power supply.
2
Measure the resistance between the two terminals of the power switch (SW1)
by applying the tester probes to the terminals. The resistance must be low
(under 1 KW) when the power is turned on, and high (over 6 MW) when the
switch is turned off.
3
Replace the power-supply assembly, if necessary.
The overcurrent/overvoltage detection
circuit is activated.
Wait for more than two minutes before turning the printer back on.
A fuse is blown.
1
Check the fuses (FU1 and FU2) on the power supply.
2
Replace the power-supply assembly if necessary.
The main cooling fan (located on the
left side of the printer) does not turn on
when the printer is started.
An operational fan indicates the following conditions:
■
The ac power is present in the printer.
■
The dc power supply is functional (24 V, 5 V, and 3.3 V are being generated).
■
The dc controller's microprocessor is functional.
If the fan is not working:
1
Turn the printer off and remove the formatter. Disconnect the optional
accessories.
2
Turn the printer on and check the fan again.
If the fan is still not working:
Troubleshooting process
1
Verify that the fan is connected to the power supply.
2
Replace the fan. See Main cooling fan (left side).
307
Table 7-2 Power-on defect or blank display (continued)
Problem
Action
3
Replace the power-supply assembly. See Power supply.
4
Replace the dc controller. See Dc controller PCA.
Note:
The fan only operates during the initial startup and while printing, and when the
temperature inside the printer is too high. If the temperature is too high, the fan
turns on to cool the inside of the printer.
The fan works, but the control-panel
display is blank.
1
Print an engine test. Engine-test page.
2
If the engine test is successful, perform the following steps, in order.
3
308
●
Reseat the control panel and formatter connector. See Control-panel
assembly and Formatter assembly .
●
Replace the control-panel cable. See Control-panel assembly.
●
Replace the control-panel assembly. See Control-panel assembly.
●
(HP Laserjet 4200 and 4300 Series printers only) Replace the
firmware DIMM. See Firmware DIMM (LJ 4200/4300 only).
●
Replace the formatter. See Formatter assembly .
If the engine test is not successful, remove the formatter and attempt to
perform the engine test again. If the engine test is successful with the
formatter removed, replace the formatter. See Formatter assembly . If the test
is not successful with the formatter removed, replace the dc controller PCA.
See Dc controller PCA.
7
Troubleshooting
Troubleshooting tools
Press (SELECT button) or the MENU button to open the menus. Use (UP ARROW button) or (DOWN
ARROW button) to scroll through the menus that appear. For more information about control-panel
menus, see Control-panel menus. The high-level menus appear in the following order:
■
RETRIEVE JOB
■
INFORMATION
■
PAPER HANDLING
■
CONFIGURE DEVICE
■
DIAGNOSTICS
■
SERVICE
Troubleshooting tools
309
Information pages
1
Press
(SELECT button) or the MENU button to open the menus.
2
Press
(DOWN ARROW button) to scroll to INFORMATION.
3
Press
to select INFORMATION.
4
Press
to scroll to a listed information page. The following pages are available:
5
●
Menu map
●
Usage page
●
Configuration
●
PCL font list
●
Supplies status
●
PS font list
●
File directory
Press
to select and print the selected information page.
The informational pages for the printer are also available in the embedded Web server. Not all
information pages are discussed in detail in this manual. For more information, see the
HP LaserJet 4200/4300 Use Guide or the HP LaserJet 4250/4350 Use Guide. The following are
the information pages.
310
●
Menu map: A menu map shows how individual items are configured within the high-level
(user-set values) menus. The last page of the menu map series contains instructions about
how to use the control-panel buttons. Print a menu map before changing printer settings or
before replacing the formatter assembly.
●
Configuration page: The configuration page lists printer configuration information. For
example, the printer serial number and tray size settings appear on the configuration page.
Print a configuration page before servicing the printer to help restore values after servicing
the printer.
●
Supplies status: This page shows the levels of the printer supplies, a calculation of the
number of pages that can be printed before the supplies are replaced, and cartridge-usage
information.
●
File directory: This page provides information about files on the RAM disk or installed EIO
disk drives and flash DIMMs if those memory accessories are installed.
●
Usage page: The usage page is only available if an optional hard disk is installed. It
provides useful accounting information (for example, the number of pages of various paper
sizes that have been used and data that can be used to calculate toner usage).
●
PCL font list: This page lists the PCL fonts that are installed in the printer memory. This
page also lists fonts on an optional hard-disk accessory or flash DIMM if those memory
accessories are installed.
●
PS font list: This page lists the PS fonts that are installed in the printer memory. This page
also lists fonts on an optional hard-disk accessory or flash DIMM if those memory
accessories are installed.
7
Troubleshooting
Menu map
Use the menu map to help navigate the printer submenus and select configuration settings. Printing
a menu map is very helpful when you are changing numerous printer settings.
1
Press
2
Use
.
(UP ARROW button) or
3
Use
or
(SELECT button) or the MENU button to open the menus.
(DOWN ARROW button) to scroll to INFORMATION, and then press
to scroll to MENU MAP, and then press
.
Figure 7-2 Sample menu map page (HP LaserJet 4300 Series printer menu map page is shown)
Troubleshooting tools
311
Configuration page
Use the configuration page to view current printer settings, to help troubleshoot printer problems, or
to verify installation of optional accessories, such as memory (DIMMs), trays, and printer languages.
The content of the configuration page varies, depending on the options currently installed in the
printer. To decode the service identification information on the configuration page, see Converting
the Service ID to an actual date.
NOTE If an HP Jetdirect print server is installed, a network configuration page also prints.
HP LaserJet 4200n/tn/dtn/dtns/dtnsL, 4250n/tn/dtn/dtnd/dtnsL, 4300n/tn/dtn/dtns/dtnsL, and
4350n/tn/dtn/dtns/dtnsL printers come with a print server installed.
1
Press
2
Use
).
(UP ARROW button) or
3
Use
or
(SELECT button) or the MENU button to open the menus.
(DOWN ARROW button) to scroll to INFORMATION, and then press
to scroll to PRINT CONFIGURATION, and then press
hp LaserJet
.
4250/4350 series
1
1
4
2
5
3
6
Figure 7-3 Configuration page (HP LaserJet 4250/4350 Series printer configuration page is shown)
312
1
Printer Information Lists the serial number, page counts, printer number (dc controller revision), service ID (see
Service ID), and other printer information
2
Event log Lists the three most recent event log entries (numeric codes for printer events)
3
Personalities and options Lists installed personalities and options (such as PS and PCL languages) and installed
optional DIMM(s) or EIO accessories
7
Troubleshooting
4
Memory Lists the printer memory and I/O buffering and resource saving information
5
Security Lists the status of the control-panel lock, control-panel password, and any disk drives
6
Paper trays and options Lists the size and type settings for all trays and lists optional paper-handling accessories
that are installed
Troubleshooting tools
313
Supplies status page
Use the supplies status page to obtain information about the print cartridge that is installed in the
printer, the amount of life left in the print cartridge, and the number of pages and jobs that have been
processed. The page also lets you know when you should perform the next preventive maintenance.
1
Press
2
Use
.
(UP ARROW button) or
3
Use
or
(SELECT button) or the MENU button to open the menus.
(DOWN ARROW button) to scroll to INFORMATION, and then press
to scroll to PRINT SUPPLIES STATUS PAGE, and then press
hp LaserJet
.
4250/4350 series
5
1
2
3
4
Figure 7-4 Supplies status page (HP LaserJet 4200/4300 supplies status page is shown)
314
1
Supplies Web site Lists the Web site for ordering supplies over the Internet
2
Cartridge information Provides information about the amount of toner available in the print cartridge, and shows the
print-cartridge part number and estimated pages that can be printed for the amount of toner in the cartridge
3
Printing statistics Lists statistics about the total number of pages and jobs that have been processed using this print
cartridge, the first and last use date for the cartridge, and the print cartridge serial number
4
Recycle Web site Lists the Web site for information about returning used HP print cartridges
5
Maintenance kit gauge Shows a gauge to let you know the remaining life of the maintenance kit components
7
Troubleshooting
Embedded Web server
When the printer is directly connected to a computer, the embedded Web server is supported for
Windows 95 and later. In order to use the embedded Web server with a direct connection, you must
select the Custom installation option when you install the printer driver. Select the option to load
Printer Status and Alerts. The proxy server is installed as part of the Printer Status and Alerts
software.
When the printer is connected to the network (by using a HP Jetdirect print server EIO card), the
embedded Web server is automatically available.
Use the embedded Web server to view printer and network status and to manage printing functions
from your computer instead of from the printer control panel. The following are examples of what you
can do through the embedded Web server:
■
View printer status information.
■
Specify the type of media that is loaded in each tray.
■
Determine the remaining life for all supplies and order new supplies.
■
View and change tray configurations.
■
View and change the printer control-panel menu configurations.
■
View and print internal pages.
■
Receive notification of printer and supplies events.
■
View and change the network configuration.
To use the embedded Web server, you must have Microsoft Internet Explorer 4 or later or Netscape
Navigator 4 or later. The embedded Web server works when the printer is connected to an IP-based
network. The embedded Web server does not support IPX-based printer connections. You do not
have to have Internet access to open and use the embedded Web server.
Gaining access to the embedded Web server
In a supported Web browser on your computer, type the IP address for the printer. (To find the
IP address, print a configuration page.)
NOTE After you navigate to the URL, you can bookmark it so that you can return to it quickly
in the future.
The embedded Web server has three tabs that contain settings for and information about the printer:
the Information tab, the Settings tab, and the Network tab. Click the tab that you want to view. See
the following sections for more information about each tab.
Information tab
The Information tab contains the following pages:
■
Device Status. Shows the printer status and the life that remains in HP supplies (0% represents
that a supply is empty). This page also shows the type and size of print media set for each tray.
To change the default settings, click Change Settings.
■
Configuration page. Shows the information that is contained on the printer Configuration page.
Troubleshooting tools
315
■
Supplies Status. Shows the life that remains in HP supplies (0% represents that a supply is
empty). This page also provides supplies part numbers. To order new supplies, click Order
Supplies in the Other Links area on the left side of the window. To visit this or any Web site,
you must have Internet access.
■
Event log. Shows a list of all printer events and errors.
■
Usage page. Shows a summary of the number of pages the printer has printed, grouped by size
and type (this page is only available if an optional hard disk is installed).
■
Device Information. Shows the printer network name, address, and model information. To
change these entries, click Device Information on the Settings tab.
Settings tab
Use the Settings tab to configure the printer from your computer. The Settings tab can be password
protected. If the printer is on a network, always consult with the network administrator before
changing settings on this tab.
The Settings tab contains the following pages.
■
Configure Device. Use this page to configure all of the printer settings. This page contains the
traditional printer menus: Information, Paper Handling, Configure Device, and Diagnostics.
■
Alerts. (On networks only.) Use this page to establish e-mail alerts for various printer and
supplies events.
■
E-mail. (On networks only.) Use this page in conjunction with the Alerts page to set up incoming
and outgoing e-mail, as well as to establish e-mail alerts.
■
Security. Use this page to set a password that must be typed to gain access to the Settings and
Networking tabs. Also use it to enable and disable certain features of the embedded Web server.
■
Other Links. Use this page to add or customize a link to another Web site. The link you
establish appears in the Other Links area on all embedded Web server pages. The following
permanent links always appear in the Other Links area: HP Instant Support, Order Supplies,
and Product Support.
■
Device Information. Use this page to name the printer and assign an asset number to it. Use
the name and e-mail address for the primary contact who will receive information about the
printer.
■
Language. Use this page to specify the language in which the embedded Web server
information appears.
Networking tab
The network administrator uses this tab to control network-related settings for the printer when it is
connected to an IP-based network. This tab does not appear if the printer is directly connected to a
computer, or if the printer is connected to a network with anything other than an HP Jetdirect print
server.
316
7
Troubleshooting
Other links
This section of the embedded Web server contains links that connect you to the Internet. You must
have Internet access in order to use any of these links. If you use a dial-up connection and did not
connect when you first opened the embedded Web server, you must connect before you can visit
these Web sites. Connecting to the Internet might require that you close your Web browser and
reopen it.
■
HP Instant Support connects to the HP Web site to help you find solutions. This service
analyzes your printer error log and configuration information to provide diagnostic and support
information that is specific to your printer.
■
Order Supplies connects to the HP Web site so you can order genuine HP supplies, such as
print cartridges and paper.
■
Product Support connects to the support site for the HP LaserJet 4200/4250/4300/4350 printer,
where you can search for help regarding general topics.
Printer Status and Alerts software
Printer Status and Alerts is supported only for Windows 95 and later versions.
The Printer Status and Alerts software is available to users of both networked and directly connected
printers. To use Printer Status and Alerts software with a directly connected computer, you must
select the Custom installation option when you install the printer driver, and then select the option to
install Printer Status and Alerts. For network connections, Printer Status and Alerts is installed
automatically with the Typical software installation option.
Use this software to view the embedded Web server information for a particular printer. Printer
Status and Alerts also generates messages on the computer that explain the status of the printer and
print jobs. Depending on how the printer is connected, you can receive different messages.
■
Networked printers. You can receive regular job-status messages that appear every time a
print job is sent to the printer or every time the print job is complete. You can also receive alert
messages. These messages appear when you are printing to a particular printer if that printer
experiences a problem. In some cases, the printer can continue to print (such as when a tray that
is not being used is open, or a print cartridge is low). In other cases, a problem might prevent the
printer from printing (such as when paper is out, or a print cartridge is empty).
■
Directly connected printers. You can receive alert messages that appear when the printer
experiences a problem but can continue printing or a problem that prevents it from printing. You
can also receive messages that indicate that the print cartridge is low.
You can set alert options for a single printer that supports Printer Status and Alerts, or you can set
alert options for all printers that support Printer Status and Alerts. For networked printers, these
alerts only appear for your jobs.
Even if you set alert options for all printers, not all of the selected options will apply to all printers. For
example, when you select the option to notify you when the print cartridges are low, directly
connected printers that support Printer Status and Alerts generate a message when the print
cartridges are low. However, none of the networked printers generate this message unless the alert
affects a user-specific job.
Troubleshooting tools
317
To select status messages
1
Open Printer Status and Alerts in one of these ways:
●
Double-click the Printer Status and Alerts tray icon, which is near the clock in the Tray
Manager.
●
On the Start menu, click Programs, click Printer Status and Alerts, and then click Printer
Status and Alerts.
2
Click the Options icon on the left side of the window.
3
In the For field, select the printer driver for this printer, or select All Printers.
4
Clear the options for the messages that you do not want to appear, and select the options for the
messages that you do want to appear.
5
In Status check rate, select how frequently you want the software to update the printer-status
information that the software uses to generate the messages. The status check rate might not be
available if the network administrator has restricted the rights to this function.
To view status messages and information
On the left side of the window, select the printer for which you want to see information. The
information that is provided includes status messages, supplies status, and printer capabilities. You
can also click the job history (clock) icon at the top of the window to view a list of previous jobs that
were sent to the printer from your computer.
318
7
Troubleshooting
Control-panel menus
Use the control-panel menus to control various printer functions. For example, you can use the
RESETS submenu to quickly reset and restore most of the factory default printer settings. Not all of
the available menus are described in this manual. For more information about control-panel menus,
see Control-panel menus.
Using control-panel menus
1
Press
2
Use ( UP ARROW button) or
then press .
3
Some menus might have several submenus. Use
want, and then press .
4
Use or to scroll to the setting, and then press . An asterisk (*) appears next to the selection
on the display, indicating that it is now the default. Some settings change rapidly if or is held
down.
5
Press PAUSE/RESUME to close the menu.
Control-panel menus
(SELECT button) or the MENU button to open the menus.
( DOWN ARROW button) to scroll to the menu that you want, and
or
to scroll to the submenu item that you
319
Resets submenu
To find the RESETS submenu, use the control panel to open the CONFIGURE DEVICE menu (see
Using the control panel. Items on the Resets submenu are used to return settings to the defaults and
to change settings such as PowerSave/Sleep.
The following section lists the settings and their possible values in the RESETS submenu. The
default value for each setting is the one that has an asterisk (*) next to it.
Table 7-3 Resets submenu
Item
Values
Explanation
RESTORE FACTORY SETTINGS
No values available
Performs a simple reset and restores
most of the factory (default) settings.
This item also clears the input buffer
for the active I/O. Restoring factory
settings does not affect the network
parameter settings on the optional
HP Jetdirect print server.
CAUTION Restoring memory
during a print job cancels the
print job.
POWERSAVE
(HP LaserJet 4200/4200L/4300 only)
OFF* ON
Turns the PowerSave/Sleep mode on
or off. The PowerSave/Sleep mode
affects the printer in two ways:
SLEEP (HP LaserJet 4250/4350 only)
■
Minimizes the amount of power
that the printer consumes when it
is idle.
■
Reduces wear on the electronic
components in the printer (for
example, it turns off the display
backlight, although the display can
still be read).
The printer automatically leaves the
PowerSave/Sleep mode when you
send a print job, press a printer control
panel button, open a tray, or open the
top cover.
You can set the amount of time that the
printer remains idle before it enters the
PowerSave/Sleep mode. For more
information see System Setup submenu.
320
7
Troubleshooting
Diagnostics menu
Administrators can use this menu to isolate parts and to troubleshoot jam and print-quality issues.
The following section lists the settings and their possible values in the DIAGNOSTICS menu. The
default value for each setting is the one that has an asterisk (*) next to it.
Table 7-4 Diagnostics menu
Item
Values
Explanation
PRINT EVENT LOG
No values available
Press
(SELECT button) to generate a
list of the 50 most recent entries in the
event log. The printed event log shows
the error number, page count, error
code, and description or personality
that was in use when the event
occurred.
SHOW EVENT LOG
No values available
Use (UP ARROW button) or (DOWN
ARROW button) to scroll through the
event log contents.
PAPER PATH TEST
No values available
Generate a test page, which is useful
for testing the paper-handling features
of the printer.
■
PRINT TEST PAGE
Press
(the SELECT button) to start
the paper-path test that uses the
source (tray), destination (output bin),
duplex, and number of copies settings
that you set in the other items on the
Paper Path Test menu. Set the other
items before selecting PRINT TEST
PAGE.
■
SOURCE
Select the tray for the paper path that
you want to test. You can select any
tray that is installed. Select
ALL_TRAYS to test the paper path for
every tray. (Paper must be loaded in
the selected trays.)
■
PRINT TEST PAGE
■
SOURCE
■
DESTINATION
■
DUPLEX
■
COPIES
■
Control-panel menus
■
ALL_TRAYS
■
TRAY 1
■
*TRAY 2
■
TRAY <N>
DESTINATION
■
ALL BINS
■
*STANDARD
■
OUTPUT
■
OPTIONAL BIN 1
Select the output bin for the paper path
that you want to test. You can select
any output bin that is installed. Optional
bins (stacker or stapler/stacker bin)
must also be correctly configured.
Select ALL BINS to test the paper path
for every bin.
321
Table 7-4 Diagnostics menu (continued)
Item
Values
Explanation
■
Determine whether or not the paper
goes through the duplexer during the
paper path test. This item is available
only if the duplexer is installed.
■
322
DUPLEX
■
*OFF
■
ON
COPIES
■
*1
■
10
■
50
■
100
■
500
Set how many sheets of paper are
used from each tray during the paperpath test. If you are testing the stapling
function of the optional stapler/stacker
(DESTINATION item OPTIONAL BIN
1), you must select 10 copies.
7
Troubleshooting
Service menu (service PIN codes)
Authorized HP service technicians can use this menu to gain access to printer settings that are
reserved for service personnel. The service menu is protected by use of a personal identification
number (PIN). When you select SERVICE from the list of menus, you are prompted to type an eightdigit PIN code.
NOTE The printer automatically exits the service menu after about one minute if no menu
items are selected or changed.
Use the PIN codes provided in the table Table 7-5 Service PIN codes
Table 7-5 Service PIN codes
Printer model
PIN code
HP LaserJet 4200 Series printer
11420002
HP LaserJet 4250 Series printer
09425004
HP LaserJet 4300 Series printer
11430002
HP LaserJet 4350 Series printer
09435004
1
Press
2
Use
3
Press or until the first digit of the PIN code appears. Press to save that digit. Repeat this
selection procedure until you have typed the entire eight-digit PIN code. You can use (BACK
ARROW button) to return to a PIN digit. When the last digit is saved, the service submenu appears
on the control-panel display.
4
Use
■
Clear event log. Select this item to clear (reset to zero) the internal event log.
■
Total page count. Select this item to set the total number of pages that have been printed todate. Typically this is only required when a new formatter is installed.
■
Maintenance count. Select this item to set the number of pages that have been printed since
the last maintenance kit was installed or the total number of pages that have been printed on this
printer if a maintenance kit has not yet been installed (during the first 200,000 pages).
■
Maintenance interval. Select this item to specify the number of pages that can be printed before
a maintenance-kit-required message appears on the control-panel display to indicate that a
maintenance kit is required.
■
Serial number. Select this item to update the serial number if you replace the formatter.
■
Service ID. Select this item to specify the date when the printer was first used, rather than the
date that a replacement formatter is installed. See Restoring the Service ID.
■
Cold reset. Select this item to reset the default paper size when you replace the formatter or
restore factory settings (see Resets submenu). When you replace a formatter or restore factory
settings in a country/region that uses A4 as the standard paper size, use this item to reset the
default paper size to A4 (see Cold reset). Letter and A4 are the only cold-reset values available.
Control-panel menus
(SELECT button) or the MENU button to open the menus.
(UP ARROW button) or
or
(DOWN ARROW button) to scroll to SERVICE, and then press
to scroll to the service-menu item that you want, and then press
.
.
323
Service ID
When printing from an HP LaserJet 4200 and 4300 Series printer this information appears on the
configuration page (see Configuration page), which eliminates the need for customers to keep paper
receipts for proof of the warranty. Because the printer does not have an internal clock, the availability
of the service ID date depends on the printer being connected to a source that can provide the date,
in this case a time server on the same network as the printer. When the printer is not connected to a
date source, the service ID is not available, and 00000 appears on the configuration page.
Converting the Service ID to an actual date
You can use the printer Service ID number to determine whether the printer is still under warranty.
Use the following procedure to convert the Service ID into the installation date.
1
Add 1990 to YY to determine the actual year that the printer was installed.
2
Divide DDD by 30 (and, if there is a remainder,add 1 to the quotient) to determine the month the
printer was installed.
3
The remainder from the calculation in step 2 is the day of the month. If there was no reminder
from the calculation in step 2, then the day of the month is the 30th.
Using the Service ID 12287 as an example, the date conversion is as follows:
■
12 + 1990 = 2002, so the year is 2002.
■
287 divided by 30 = 9 with a remainder of 17. Add 1 to 9 to get 10, so the month is October.
■
The remainder (from the above calculation) is 17, so that is the day of the month.
■
The complete date is 17-October-2002.
A 6-day grace period is built into the date system.
Restoring the Service ID
If you replace the formatter, the Service ID is lost and must be restored. Use this menu item to reset
the Service ID, which is calculated based on the date the printer was first used. The date format
is YYDDD. Use the following procedure to calculate the Service ID.
1
To calculate YY, subtract 1990 from the calendar year.
2
To calculate DDD, use the following formula: 30 * (calendar month - 1) + calendar day = DDD. (If
the calendar day is 31, use 30 instead.)
Using October 17, 2002, as the date the printer was first used, the service ID conversion is as follows:
324
■
2002 minus 1990 = 12, so YY = 12.
■
10 minus 1 (calendar month minus 1) = 9.
■
9 times 30 = 270
■
270 plus 17 (the calendar day) = 287, so DDD = 287.
■
The complete service ID number is 12287.
7
Troubleshooting
Printer resets and power-on modes
The following sections describe the types of printer resets and power-on modes.
Cold reset
A cold reset unlocks menus that have been previously locked and returns all of the control panel
menu items (including EIO settings) to the factory defaults. However, it does not clear the values in
the service menu (such as the serial number and page counts).
NOTE Before performing a cold reset, print a menu map and a configuration page (see
Menu map and Configuration page). Use the information on the configuration page to reset
any customer-set printer configuration values that the cold reset procedure changes.
To perform a cold reset
1
Turn the printer power off.
2
For HP Laserjet 4200/4300 Series printers: Hold down
printer power on.
( SELECT button), and then turn the
For HP Laserjet 4250/4350 Series printers: Turn the printer power on, and then hold down
(SELECT button) when the memory count begins.
3
Continue holding down until all three printer control-panel lights flash once and then remain
on. This might take up to 10 seconds.
4
After the message SELECT LANGUAGE appears on the display, press
(DOWN ARROW button) until COLD RESET is highlighted.
5
Press
6
Check all I/O settings and reset any customer-set printer configuration values.
(UP ARROW button) or
. The printer performs a cold reset and then continues its power-on sequence.
Printer resets and power-on modes
325
NVRAM initialization
CAUTION Initializing the NVRAM resets the serial number, the event log, the page counts,
the EIO card, and the embedded print server. Initializing the NVRAM also resets service-menu
values to factory defaults. Use the service menu to restore the serial number and page
counts. Also reconfigure any computers that print to this printer so that the computers can
recognize the printer. Initialize the NVRAM only when absolutely necessary. In most
situations, use a cold reset rather than a NVRAM initialization to reset printer settings (this will
retain the values in the service menu).
NOTE Before performing a NVRAM initialization, print a menu map and a configuration page
(see Menu map and Configuration page). Use the information on the configuration page to
reset any customer-set printer configuration values that the NVRAM initialization procedure
changes. Make note of the total page count, maintenance count, and the serial number.
To initialize NVRAM
1
Turn the printer power off.
2
Remove any installed accessories (for example, a stapler/stacker).
3
For HP Laserjet 4200/4300 Series printers: Hold down
printer power on.
( SELECT button), and then turn the
For HP Laserjet 4250/4350 Series printers: Turn the printer power on, and then hold down
(SELECT button) when the memory count begins.
326
4
Continue holding down until all three printer control-panel lights flash once and then remain
on. This might take up to 10 seconds.
5
Press
6
Press the PAUSE/RESUME button (LJ 4200/4300) or the MENU button (LJ 4250/4350). The display
should show SKIP DISK LOAD.
7
Press
until NVRAM INIT is highlighted.
8
Press
. The printer initializes NVRAM and then continues its power-on sequence.
( UP ARROW button).
7
Troubleshooting
Hard-disk initialization
CAUTION A hard-disk initialization erases and reformats the printer hard disk. Perform a
hard-disk initialization only if an error code on the control panel indicates an EIO disk error.
Always try initializing the hard disk before replacing it.
NOTE Before performing a hard-disk initialization, print a menu map and a configuration
page (see Menu map and Configuration page). Use the information on the configuration page
to reset any customer-set printer configuration values that the hard-disk initialization
procedure changes.
To initialize the hard disk
1
Turn the printer power off.
2
For HP Laserjet 4200/4300 Series printers: Hold down the PAUSE/RESUME button, and then turn
the printer power on.
For HP Laserjet 4250/4350 Series printers: Turn the printer power on, and then hold down the
MENU button when the memory count begins.
3
Continue holding down the button until all three printer control-panel lights flash once and then
remain on. This might take up to 10 seconds.
4
Press
( BACK ARROW button). The display should show INITIALIZE DISK.
5
Press
. The printer initializes the hard disk and continues its power-on sequence.
Printer resets and power-on modes
327
Power-on bypass
When the power is turned on the printer begins the power-on sequence. By performing a power-on
bypass, you can cause the printer to resume the power-on sequence but not to recognize any
installed EIO hard disk (skip-disk load procedure). This can be helpful in isolating EIO hard-disk
errors.
When using the HP LaserJet 4200 and 4300 Series printers you can also resume the power-on
sequence but make the printer continuously print configuration pages until the PAUSE/RESUME button
is pressed (self-test procedure). This can be helpful if you need to verify the printer components that
are installed by reviewing the information on the configuration page, but you cannot open the menus
to print a configuration page.
Skip disk-load
1
Turn the printer power off.
2
For HP Laserjet 4200/4300 Series printers: Hold down
printer power on.
( SELECT button), and then turn the
For HP Laserjet 4250/4350 Series printers: Turn the printer power on, and then hold down
(SELECT button) when the memory count begins.
3
Continue holding down until all three printer control-panel lights flash once and then remain
on. This might take up to 10 seconds.
4
Press
(UP ARROW button) followed by the PAUSE/RESUME button.
5
Press
or
6
Press
. The printer continues the power-on sequence but ignores an installed EIO hard disk.
until SKIP DISK LOAD is highlighted.
Self-test
1
Turn the printer power off.
2
For HP Laserjet 4200/4300 Series printers: Hold down
printer power on.
( SELECT button), and then turn the
For HP Laserjet 4250/4350 Series printers: Turn the printer power on, and then hold down
(SELECT button) when the memory count begins.
328
3
Continue holding down until all three printer control-panel lights flash once and then remain
on. This might take up to 10 seconds.
4
Press
5
Press . The printer continues the power-on sequence and begins to continuously printing
configuration pages.
6
Press the PAUSE/RESUME button (LJ 4200/4300) or the MENU button (LJ 4250/4350) to exit the selftest.
(UP ARROW button) or
(DOWN ARROW button) until SELF TEST is highlighted.
7
Troubleshooting
Test pages
Printing test pages helps you determine whether or not the printer engine and the formatter are
functioning.
Engine-test page
To verify that the printer engine (all printer components except the formatter, formatter DIMMs,
EIO products, and the stacker or stapler/stacker) is functioning, print an engine-test page. Use a
small, non-metallic, pointed object to depress the test-page switch, which is located on the right side
of the printer (callout 1).
Figure 7-5 Engine-test-page switch
The test page should have a series of vertical lines. The test page prints from the last tray that you
printed from. However, if the printer has been turned off and then on again since the most recent
print job, the page will print from tray 2. The printer will continuously print test pages as long as the
test-page switch is depressed. The printer will not print a test page if it is in PowerSave or Sleep
mode.
NOTE A damaged formatter might interfere with the engine test. If the engine-test page does
not print, try removing the formatter and performing the engine test again. If the engine test is
then successful, the problem is almost certainly with the formatter, the control panel, or the
cable that connects them.
Test pages
329
Formatter test page
To verify that the formatter is functioning, print a configuration.
330
1
Press
( SELECT button) or the MENU button to open the menus.
2
Press
( DOWN ARROW button) to scroll to INFORMATION.
3
Press
to select INFORMATION.
4
Press
to scroll to PRINT CONFIGURATION.
5
Press
to select PRINT CONFIGURATION.
7
Troubleshooting
Interface troubleshooting
The following sections provide instructions for interface troubleshooting.
Communications checks
NOTE Communication problems are normally the customer's responsibility. Time spent
attempting to resolve these problems might not be covered by the Hewlett-Packard product
warranty. Refer the customer to the network administrator for assistance in troubleshooting
network problems.
If the printer is not connected directly to a Windows or MS-DOS-based host, see EIO troubleshooting.
CAUTION HP LaserJet printers are not designed to work with mechanical switch-box
products that do not have the correct surge protection. These devices generate high transient
voltages that cause permanent damage to the formatter PCA. This circumstance is not
covered by the HP product warranty.
Computer direct connect (parallel) test
After the printer is insalled, verify communications by bypassing the Windows driver between the
printer and the IBM-compatible computer. Type the following information at the MS-DOS prompt:
C:\DIR>LPT1 Enter (for printing to parallel port #1)
The printer should print a directory listing of the C:\ directory. You might need to press
MENU button) on the control panel to print the data that is in the buffer.
(SELECT or
EIO troubleshooting
If the printer contains an optional HP Jetdirect print server, and you cannot communicate with the
printer over the network, verify that the print server is operating. Print a configuration page (see
Configuration page). If the Jetdirect card does not appear under "Installed personalities and options"
on the configuration page, reseat or replace the Jetdirect EIO card. See the troubleshooting section
of the HP Jetdirect Print Server Software Administrators Guide.
When the HP Jetdirect print server is installed correctly, print a Jetdirect page (this page
automatically prints when a Jetdirect print server is installed and a configuration page is printed). See
Jetdirect page/Embedded Jetdirect page (HP LaserJet 4250/4350 Series printers). The Jetdirect
page contains valuable network-related information about the printer.
If the host system and printer are still not communicating, replace the formatter and/or the EIO card
and reconfigure the printer. If the host system and printer continue to not communicate replace the
entire formatter.
The following illustration shows the contents of the Jetdirect page.
Interface troubleshooting
331
Jetdirect page/Embedded Jetdirect page (HP LaserJet 4250/4350 Series
printers)
hp LaserJet
4250/4350 series
1
1
2
5
6
3
7
4
8
Figure 7-6 Jetdirect page/Embedded Jetdirect page (HP LaserJet 4250/4350 Series printers)
332
1
HP Jetdirect Configuration indicates I/O card status status, model number, hardware firmware version, port select,
port configuration, auto negotiation, manufacturing identification, and manufactured date.
2
Security Settings information
3
Network Statistics indicates the total packets received, unicast packets received, bad packets received, framing
errors received, total packets transmitted, unsendable packets, transmit collisions, and transmit late collisions.
4
TCP/IP information, including the IP address
5
IPX/SPX information
6
Novell/NetWare information
7
Appletalk information
8
DLC/LLC information
7
Troubleshooting
Display-message troubleshooting
The following tables explain the messages that might appear on the control-panel display or in the
event log. Alphabetical printer messages and their meanings are listed in Alphabetical printer
messages, and numerical printer messages are listed in Numerical printer messages.
NOTE Not all messages are described in the tables; the messages that are not listed are
self-explanatory.
Status messages
Status messages reflect the current state of the printer. They inform you of normal printer operation
and require no interaction to clear them. They change as the state of the printer changes. Whenever
the printer is ready, is not busy, and has no pending warning messages, the status message Ready
appears if the printer is online.
Warning messages
Warning messages inform you of data and print errors. These messages typically alternate with
Ready or with status messages and continue to appear until (SELECT button) is pressed. If
CLEARABLE WARNINGS is set to JOB in the configuration menu, these messages are cleared
when the next print job is sent to the printer.
Error messages
Error messages inform you that an action must be performed, such as adding paper or clearing a
paper jam.
Some error messages are auto-continuable (these are not critical errors and the printer will continue
to function). If the printer setting AUTO CONTINUE is used, the error message will continue to
appear for about 10 seconds and then the printer will resume printing.
NOTE Pressing any button while an auto-continuable error message appears on the controlpanel display overrides the auto-continue feature, and the button function takes precedence.
For example, pressing the CANCEL JOB button cancels the job.
Critical-error messages
Critical-error messages inform you of a device failure. Some of these messages can be cleared by
turning the printer off and then on. These messages are not affected by the auto-continue setting. If a
critical error persists, then service is required.
Alphabetical printer messages
When resolving printer messages, perform all listed actions in the order until the message is resolved.
NOTE Not all messages are described in the tables; the messages that are not listed are
self-explanatory.
Display-message troubleshooting
333
Alphabetical printer messages
Table 7-6 Alphabetical printer messages
Control panel message
Description
Recommended action
Access denied
An attempt has been made to modify a
printer menu item, but the network systems
administrator has enabled the control-panel
security mechanism. The message will
disappear shortly, and the printer will return
to the ready state.
Contact the network system administrator
to change settings.
The duplexer is not functioning.
1
Turn off the printer.
2
Remove and then reinstall the
accessory.
3
Turn on the printer.
4
Check the rear accessory power
connector.
5
If the error persists, replace the
duplexer.
1
Turn off the printer.
2
Remove and then reinstall the
accessory.
3
Turn on the printer.
4
Check the front accessory power
connector.
5
If the problem persists, replace the
envelope feeder.
1
Close the face-up bin before sending a
duplex print job.
2
Replace the duplexer.
3
Replace the dc controller PCA. See
Dc controller PCA.
1
Try to remove the sealing tape.
2
If the sealing tape cannot be removed,
insert a new print cartridge and return
the faulty print cartridge for replacement.
MENUS LOCKED
BAD DUPLEXER
CONNECTION
BAD ENV FEEDER
The envelope feeder is not functioning.
CONNECTION
CANNOT DUPLEX Check rear bin
The printer cannot perform the duplexing
function.
or
CANNOT DUPLEX Check paper
CARTRIDGE FAILURE
For help press
The print cartridge contains part of the
sealing tape.
alternates with
RETURN FOR REPLACEMENT
For help press
334
7
Troubleshooting
Table 7-6 Alphabetical printer messages (continued)
Control panel message
Description
Recommended action
CHOSEN PERSONALITY
The printer job language (PJL) encountered
a request for a personality that did not exist
in the printer. The job is aborted and no
pages print.
1
Press ( HELP button) for detailed
information.
2
Press ( UP ARROW button) and
(DOWN ARROW button) to step through
the instructions.
The top cover is open or the top-cover
switch (SW101) is defective.
1
Press
2
Close the top cover.
3
Replace the top-cover switch (SW101).
See Printer switches and sensors.
NOT AVAILABLE
For help press
alternates with
CHOSEN PERSONALITY
NOT AVAILABLE
To continue press
CLOSE TOP COVER
For help press
DATA RECEIVED
( HELP button) for information.
The printer received data and is waiting for
a form feed. When the printer receives
another file, the message should disappear.
Press
A tray has been loaded with media that is a
standard size and the switch in the tray is
set to "custom."
1
Press ( HELP button) for detailed
information.
2
Press ( UP ARROW button) and
(DOWN ARROW button) to step through
the instructions.
1
Printing can continue for jobs that do
not require access to the disk drive.
2
Press
alternates with
3
If the message persists, remove and
reinstall the EIO disk drive.
Ready
4
Reinitialize the EIO disk.
For menus press
5
If the message persists, replace the
EIO disk drive.
To print last page press
DETECTABLE SIZE
IN TRAY XX
For help press
(SELECT button) to continue.
alternates with
DETECTABLE SIZE IN TRAY XX
Recommend move
switch to STANDARD
DISK DEVICE
A device failure has occurred on the
specified drive.
FAILURE
DISK FILE
OPERATION FAILED
Display-message troubleshooting
The printer received a PJL file system
1
command that attempted to perform an
illogical operation (for example, a command 2
to download a file to a nonexistent directory).
3
(SELECT button) to continue.
Printing can continue.
Press
(SELECT button) to continue.
If the message reappears, then a
problem might exist with the software
application.
335
Table 7-6 Alphabetical printer messages (continued)
Control panel message
Description
Recommended action
The printer received a PJL file system
command that attempted to store
something on the file system. The attempt
was unsuccessful because the file system
is full.
1
Use the device storage manager in the
HP Web Jetadmin software to delete
files from the EIO disk drive and then
try again.
2
Press
1
To enable writing to the disk, turn off
the write protection by using the device
storage manager in HP Web Jetadmin.
2
(SELECT or MENU button) to
Press
continue.
1
Remove the EIO disk from the
indicated slot and reinstall it.
2
If the error persists, replace the
EIO disk drive
1
Refill the envelope feeder.
2
Turn off the printer.
3
Remove and then reinstall the
accessory. Turn the printer on.
4
If the error persists, replace the
envelope feeder.
1
Printing can continue for jobs that do
not require the flash DIMM.
2
Press
3
If the message persists, remove and
reinstall the flash DIMM. See Firmware
DIMM (LJ 4200/4300 only).
4
If the message persists, replace the
flash DIMM. See Firmware DIMM
(LJ 4200/4300 only).
alternates with
Ready
For menus press
DISK FILE
SYSTEM IS FULL
alternates with
(SELECT button) to continue.
Ready
For menus press
DISK IS
The file system device is protected and no
new files can be written to it.
WRITE PROTECTED
alternates with
Ready
For menus press
EIO X DISK
The EIO disk in slot X is not working
correctly.
NOT FUNCTIONAL
For help press
ENVELOPE FEEDER
The envelope feeder is empty.
EMPTY
FLASH DEVICE
A flash DIMM is installed in one of the
formatter slots.
FAILURE
alternates with
Ready
For menus press
336
(SELECT button) to continue.
7
Troubleshooting
Table 7-6 Alphabetical printer messages (continued)
Control panel message
Description
Recommended action
FLASH FILE
The printer received a PJL file system
command that attempted to perform an
illogical operation (for example, a command
to download a file to a non-existent
directory).
1
Printing can continue.
2
Turn the printer off and then on to
delete the message from the display.
3
If the message reappears, a problem
might exist with the software program.
The printer received a PJL file system
command that attempted to store
something on the file system. The attempt
was unsuccessful because the file system
is full.
1
Use HP Web Jetadmin Device Storage
Manager software to delete files from
the flash memory, and then try again.
2
Press
The file-system device is protected and no
new files can be written to it.
1
To enable writing to the flash memory,
turn off the write protection by using the
device storage manager in HP Web
Jetadmin.
2
Press
OPERATION FAILED
alternates with
Ready
For menus press
FLASH FILE
SYSTEM IS FULL
alternates with
(SELECT button) to continue.
Ready
For menus press
FLASH IS
WRITE PROTECTED
alternates with
(SELECT button) to continue.
Ready
For menus press
Incorrect
The wrong personal identification number
(PIN) was typed.
Type the correct PIN code. After three
incorrect PIN entries, the printer returns to
the Ready state.
INSERT OR CLOSE
Tray XX must be inserted or closed before
the current job can be printed.
1
Press (HELP button) for detailed
information.
2
Press ( UP ARROW button) and
(DOWN ARROW button) to step through
the instructions.
3
If the error persists, verify that the
media-size sensor (PS102, SW801, or
SW1) is operating correctly for the
indicated tray. See Printer switches
and sensors, 500-sheet feeder
switches, sensors, solenoids,
and PCAs, or 1,500-sheet feeder
switches, sensors, solenoids,
and PCAs. Verify that the sensor
"fingers" inside the tray are engaging
the tray sensor correctly.
4
Print a configuration page. See
Configuration page.
TRAY XX
For help press
Display-message troubleshooting
337
Table 7-6 Alphabetical printer messages (continued)
Control panel message
Description
Recommended action
5
If the tray settings on the configuration
page are correct, verify that the tray
paper-out sensor is operating. See
Printer switches and sensors, 500sheet feeder switches, sensors,
solenoids, and PCAs or 1,500-sheet
feeder switches, sensors, solenoids,
and PCAs.
1
Insert the cartridge, or make sure that
the cartridge is fully seated.
alternates with
2
Press ( HELP button) for detailed
information.
For help press
3
Press ( UP ARROW button) and
(DOWN ARROW button) to step through
the instructions.
4
If the error persists, replace the
cartridge.
5
Verify that the connectors between the
power supply and transfer assembly
are not damaged.
6
Replace the power-supply assembly.
See Power supply.
1
The fuser is not fully seated or has
been removed and must be reinstalled
for printing to continue. See Fuser.
INSTALL CARTRIDGE
INSTALL FUSER
The cartridge is either not installed or not
correctly installed in the printer.
The fuser is either not installed or not
correctly installed in the printer.
For help press
338
●
If the fuser is in the printer, remove
and reinstall it.
●
If the fuser is not in the printer,
install it.
2
Push the fuser firmly into the printer
until the blue levers on both sides click
into place.
3
Press ( HELP button) for detailed
information.
4
Press ( UP ARROW button) and
(DOWN ARROW button) to step through
the instructions.
5
If the error persists, replace the fuser
assembly. See Fuser.
6
Replace the dc controller PCA. See
Dc controller PCA.
7
Replace the power-supply assembly.
See Power supply.
7
Troubleshooting
Table 7-6 Alphabetical printer messages (continued)
Control panel message
Description
Recommended action
LOAD TRAY XX
Tray XX is either empty (based on the
operation of the paper sensor) or
configured for a type and size other than
that specified in the job.
1
Press ( HELP button) for detailed
information.
2
Press ( UP ARROW button) and
(DOWN ARROW button) to step through
the instructions.
3
Print a configuration page and verify
that the tray settings are correctly set.
See Configuration page.
4
If the tray settings on the configuration
page do not match the actual tray
setting, verify that the paper width
switch (SW102, SW801, or SW1) is
operating correctly for the indicated
tray. See Printer switches and sensors,
500-sheet feeder switches, sensors,
solenoids, and PCAs, or 1,500-sheet
feeder switches, sensors, solenoids,
and PCAs.
1
Press ( HELP button) for detailed
information.
2
Press ( UP ARROW button) and
(DOWN ARROW button) to step through
the instructions.
3
Print a configuration page and verify
that the tray settings are correctly set.
See Configuration page.
4
If the tray settings on the configuration
page do not match the actual tray
setting, verify that the paper width
switch (PS106, SW801, or SW1) is
operating correctly for the indicated
tray. See Printer switches and sensors,
500-sheet feeder switches, sensors,
solenoids, and PCAs, or 1,500-sheet
feeder switches, sensors, solenoids,
and PCAs.
1
Lower the output bin.
2
If this error persists, replace the stacker
or stapler/stacker.
1
Press ( HELP button) for detailed
information.
2
Press (UP ARROW button) and
(DOWN ARROW button) to step through
the instructions.
3
If the requested paper size and type is
installed in one of the trays, print a
<TYPE> <SIZE>
For help press
alternates with
LOAD TRAY XX
<TYPE> <SIZE>
To use another
tray press
LOAD TRAY XX
<TYPE> <SIZE>
For help press
Lower the optional bin
Tray XX is either empty (based on the
operation of the paper sensor) or
configured for a type and size other than
that specified in the job. No other tray is
available.
The stacker or stapler/stacker output bin is
in the raised position.
Note: The stacker or stapler/stacker LED
blinks in amber.
MANUALLY FEED
<TYPE> <SIZE>
A job was sent that requires a specific
paper type and size that is not currently
available.
For help press
alternates with
Display-message troubleshooting
339
Table 7-6 Alphabetical printer messages (continued)
Control panel message
Description
Recommended action
MANUALLY FEED
configuration page (see Configuration
page) to see if the printer tray setting
differs from the paper size and type in
the tray.
<TYPE> <SIZE>
To continue press
NON HP CARTRIDGE DETECTED
The printer has detected that a nonHP print cartridge is currently installed.
4
Check the tray size sensor switches if
the configuration page indicates a
different size than that in the tray.
Verify that the sensor "fingers" inside
the tray are engaging the tray sensor
correctly. See Tray 2, 500-sheet
feeder, and 1,500-sheet feeder mediasize detection.
1
If the print cartridge appears to be an
authentic HP cartridge, try installing
another HP print cartridge that has the
same shipment lot number. If this
clears the error message, return the
print cartridge that you removed to the
supplier as defective.
2
If the error message persists, the print
cartridge might be a fraudulent cartridge.
3
If the error message persists, the
memory chip on the print cartridge
(location J600) might be defective or
the connector might be defective.
4
The dc controller PCA might be
defective. Replace the
dc controller PCA. See
Dc controller PCA.
(If a new HP cartridge has been installed,
this message appears for about 20 seconds
and then is replaced by the Ready
message.)
NOTE Printer repairs that are
required as a result of using nonHP print cartridges are not covered
under the HP warranty.
NON HP CARTRIDGE
The printer has detected that a nonHP print cartridge is currently installed.
1
If the print cartridge appears to be an
authentic HP cartridge, try installing
another HP print cartridge that has the
same shipment lot number. If this
clears the error message, return the
print cartridge that you removed to the
supplier and report that it is defective.
2
If the error message persists, the print
cartridge might be a fraudulent cartridge.
3
If the error message persists, the
memory chip on the print cartridge or
the connector (location J600) might be
defective.
4
The dc controller PCA might be
defective. Replace the
dc controller PCA. See
Dc controller PCA.
DETECTED
alternates with
Ready
For menus press
340
7
Troubleshooting
Table 7-6 Alphabetical printer messages (continued)
Control panel message
Description
Recommended action
NOTE Printer repairs that are
required as a result of using nonHP print cartridges are not covered
under the HP warranty.
OUTPUT BIN 1 FULL
Remove all paper
The stacker or stapler/stacker output bin is
full and must be emptied in order to
continue printing.
1
Remove the media from the output bin.
2
If the error persists, verify that the
output bin flapper (the four plastic
paddles hanging down in front of the
output bin rollers) can move freely.
3
Replace the stacker or stapler/stacker.
1
Press ( HELP button) for detailed
information.
2
Press ( UP ARROW button) and
(DOWN ARROW button) to step through
the instructions.
3
Close the open door.
4
If this message persists, replace the
stacker or stapler/stacker.
from bin
NOTE: The stacker or stapler/stacker LED
blinks in amber.
OUTPUT PAPER PATH
The jam-access door or the staple-cartridge
door is open.
OPEN
NOTE: The stacker or stapler/stacker LED
blinks in amber.
PERFORM PRINTER MAINTENANCE
alternates with
To ensure optimum print quality, the printer
prompts you to perform routine
maintenance every 200,000 pages (default
setting).
Install an HP LaserJet
4200/4250/4300/4350 printer maintenance
kit. See the instructions that come with the
kit.
-or-
Ready
Continue printing and order a printer
maintenance kit.
For menus press
For information about how to order a
maintenance kit, see Parts and diagrams.
Performing
A firmware upgrade is in progress.
CAUTION Do not turn the printer
off until the printer returns to the
Ready state. The printer will be
damaged if the power is turned off
during a firmware upgrade.
upgrade
Printing...
REGISTRATION PAGE
RAM DISK DEVICE
The printer is generating the registration
page. The printer will return to the Ready
state when the page is completed.
Follow the instructions on the printed pages.
The RAM disk had a critical failure and can
no longer be used.
1
Turn the printer power off, and then on
again.
2
If this error persists, a defective
memory DIMM might be installed in the
printer (on the formatter). Replace the
memory DIMM. The procedure for
replacing a memory DIMM is the same
as replacing a firmware DIMM. See
Firmware DIMM (LJ 4200/4300 only).
FAILURE
alternates with
Ready
For menus press
Display-message troubleshooting
341
Table 7-6 Alphabetical printer messages (continued)
Control panel message
Description
RAM DISK FILE
The printer received a PJL file system
1
command that attempted to perform an
illogical operation (for example, a command 2
to download a file to a nonexistent directory).
OPERATION FAILED
alternates with
Recommended action
Printing can continue.
Turn the printer off and then on to
delete the message from the display.
3
If this error persists, a problem might
exist with the software program.
1
Delete files and then try again, or turn
the printer off and then on to delete all
the files on the RAM disk.
2
If the message persists, increase the
size of the RAM disk by adding
additional memory DIMMs.
Ready
For menus press
RAM DISK FILE
The RAM disk is full.
SYSTEM IS FULL
alternates with
Ready
For menus press
RAM DISK IS
The file system device is protected and no
new files can be written to it.
WRITE PROTECTED
To enable writing to the RAM disk, turn off
the write protection by using the device
storage manager in the HP Web Jetadmin
software.
alternates with
Ready
For menus press
RECEIVING
A firmware upgrade is in progress.
CAUTION Do not turn the printer
off until the printer returns to the
ready state. The printer will be
damaged if the power is turned off
during a firmware upgrade.
UPGRADE
REINSERT DUPLEXER
REPLACE CARTRIDGE
alternates with
The duplexer is not functioning.
The print cartridge is almost empty. Printing
can continue until the toner supply is
depleted.
1
Turn off the printer.
2
Remove and then reinstall the
accessory.
3
Turn on the printer.
4
Check the rear accessory power
connector.
5
If the error persists, replace the
duplexer.
1
Replace the print cartridge to continue
printing.
2
Press ( HELP button) for detailed
information.
For help press
342
7
Troubleshooting
Table 7-6 Alphabetical printer messages (continued)
Control panel message
Resend
Description
Recommended action
3
Press (UP ARROW button) and
(DOWN ARROW button) to step through
the instructions.
4
Supplies-ordering information is also
available from the
embedded Web server.
5
If this error persists, replace the powersupply assembly. See Power supply.
The firmware upgrade was not completed
successfully.
Attempt the upgrade again.
The tray is loaded with media that is longer
or shorter in the feed direction than the size
setting for the tray.
1
Adjust the side and rear paper guides
against the stack. From the control
panel, set the tray 1 paper size to the
media size that is in tray 1.
2
If the media being used is Letter, A4,
Executive, B5 JIS, A5, or Legal size,
the tray switch should be set to
standard. Set the tray switch to custom
for all other media sizes. The custom
size switch must be set before the size
can be selected at the control panel.
3
Print a configuration page and verify
that the tray size settings match the
actual tray settings. If the settings do
not match, verify that the tray size
sensors are correctly functioning. If
they are not, replace the media-size
sensors (SW102, SW801, or SW1).
See Printer switches and sensors, 500sheet feeder switches, sensors,
solenoids, and PCAs, or 1,500-sheet
feeder switches, sensors, solenoids,
and PCAs. . Verify that the sensor
"fingers" inside the tray are engaging
the tray sensor correctly. See Tray 2,
500-sheet feeder, and 1,500-sheet
feeder media-size detection.
4
Replace the indicated feeder-control
PCA. For the 500-sheet feeder, see
500-sheet feeder control PCA. For the
1,500-sheet feeder, see 1,500-sheet
feeder control PCA.
5
Replace the dc controller PCA. See
Dc controller PCA.
1
Empty the top output bin.
2
If the error persists, verify that the
output-bin sensor (PS104) is operating
and that the sensor arm can freely
move. See Printer switches and sensors.
upgrade
SIZE MISMATCH IN
TRAY XX
For help press
alternates with
Ready
For menus press
Standard output bin full
Remove all paper from bin
Display-message troubleshooting
The top (standard) output bin is full and
must be emptied.
343
Table 7-6 Alphabetical printer messages (continued)
Control panel message
Description
Recommended action
STAPLER LOW ON STAPLES
Fewer than 70 staples remain in the
optional stapler/stacker staple cartridge.
Printing will continue until the STAPLER
OUT OF STAPLES message appears on
the printer control-panel display.
1
Press ( HELP button) for detailed
information.
2
Press ( UP ARROW button) and
(DOWN ARROW button) to step through
the instructions.
3
If, after following these instructions, this
error persists, replace the staple unit.
See To remove and replace the stapler
unit.
For help press
NOTE: The stapler/stacker LED is
continuously illuminated green (this error
applies to the stapler/stacker only).
NOTE The customer is
responsible for ordering
replacement staple cartridges.
STAPLER OUT OF STAPLES
For help press
NOTE: The stapler/stacker LED blinks in
amber (this error applies to the stapler/
stacker only).
Fewer than 15 staples remain in the
optional stapler/stacker. The printer
behavior depends on how the STAPLES
OUT setting is configured.
If STAPLES OUT=STOP, the printer stops
printing until you refill the stapler or press
( SELECT button). This is the default
setting.
1
Press ( HELP button) for detailed
information.
2
Press ( UP ARROW button) and
(DOWN ARROW button) to step through
the instructions.
3
Replace the staple cartridge.
4
If this error persists, Replace the
stapler unit (see To remove and
replace the stapler unit) followed by the
stapler/stacker if necessary.
If STAPLES OUT=CONTINUE, printing
continues but the jobs will not be stapled.
TOO MANY PAGES IN JOB TO STAPLE
NOTE: The stapler/stacker LED is
continuously illuminated in green (this error
applies to the stapler/stacker only).
TOO MANY INSTALLED
Turn power off and unistall a tray.
TRAY XX CONTAINS
The maximum number of sheets the stapler
can staple is 15. The print job finishes
printing but is not stapled.
Reduce the number of pages in the print
job, or print and staple in batches of 15 or
fewer pages.
Too many optional input trays are installed.
The printer accommodates a maximum of
two optional trays.
Turn off the printer power and remove a tray.
The printer cannot determine the media
type or size in the specified tray.
1
To change the media type, press
(SELECT button). Use (UP ARROW
button) and (DOWN ARROW button) to
scroll to the type, and then press
to
select it.
2
To change the media size to Letter, A4,
Executive, B5 JIS, A5, or Legal, leave
the tray switch in the Standard position.
3
To change the media size to other
sizes, move the tray switch to Custom,
adjust the paper guides against the
paper, and close the tray. Use and
to scroll to the media size, and then
to select it.
press
UNKNOWN MEDIA
344
7
Troubleshooting
Table 7-6 Alphabetical printer messages (continued)
Control panel message
Description
Recommended action
TRAY XX EMPTY
The specified tray is empty, but the current
job does not require this tray in order to
print correctly.
1
Refill the indicated tray.
2
If the error persists, verify that the
paper-out sensor (PS105,PS101,
PS801, or SR3) for the indicated tray is
functioning correctly. See Printer
switches and sensors, 500-sheet
feeder switches, sensors, solenoids,
and PCAs, or 1,500-sheet feeder
switches, sensors, solenoids,
and PCAs. .
The specified tray is open or not closed
completely.
1
Close the tray.
2
If this error persists, verify that the
media-size sensors (SW102, SW801,
or SW1) for the indicated tray is
functioning correctly. See Printer
switches and sensors, 500-sheet
feeder switches, sensors, solenoids,
and PCAs, or 1,500-sheet feeder
switches, sensors, solenoids,
and PCAs. . Verify that the sensor
"fingers" inside the tray are engaging
the tray sensor correctly. See Tray 2,
500-sheet feeder, and 1,500-sheet
feeder media-size detection.
1
Use the control panel to select the
appropriate custom paper size. Press
( SELECT button).
2
If the media used is Letter, A4,
Executive, B5 JIS, A5, or Legal sized,
the tray switch should be set to
Standard. Set the tray switch to
Custom for all other media sizes. The
tray switch must be set to custom
before the size can be selected at the
control panel.
3
Print a configuration page and verify
that the tray size settings match the
actual tray settings. If the settings do
not match, verify that the tray size
sensors are functioning correctly. If
they are not, replace the media-size
sensors (SW102, SW801, or SW1).
See Printer switches and sensors, 500sheet feeder switches, sensors,
solenoids, and PCAs, or 1,500-sheet
feeder switches, sensors, solenoids,
and PCAs. Verify that the sensor
"fingers" inside the tray are engaging
the tray sensor correctly. See Tray 2,
500-sheet feeder, and 1,500-sheet
feeder media-size detection.
<TYPE> <SIZE>
alternates with
Ready
For help press
TRAY XX OPEN
For help press
alternates with
Ready
For menus press
TRAY XX SIZE=
<XXXX SIZE>
For help press
Display-message troubleshooting
A tray was installed with the standard/
custom switch set to Custom, or with the
paper guides in a non-standard
configuration. The printer is prompting you
to use the control panel to specify a
predefined non-standard paper size, a
"custom" paper size, or an "any custom" or
an "any" size setting. (The user's software
program defines the "any custom" and
"any" size settings.)
345
Table 7-6 Alphabetical printer messages (continued)
Control panel message
Description
Recommended action
TRAY XX
The printer is reporting the current
configuration of tray XX. The tray switch is
in the Standard position.
1
To change the media type, press
(SELECT button). Use (UP ARROW
button) and (DOWN ARROW button) to
to
scroll to the type, and then press
select it.
2
To change the media size to Letter, A4,
Executive, B5 JIS, A5, or Legal, leave
the tray switch in the Standard position
and adjust the media guides to the
correct positions.
3
To change the media size to other
sizes, move the tray switch to Custom,
adjust the paper guides against the
stack, and close the tray.
4
Use and to scroll to the media
to select it.
size, and then press
Repeat this procedure to select the
media type.
5
If the size that appears on the controlpanel display is incorrect and the tray
paper guides are correctly adjusted,
verify that the media-size sensor
(SW102, SW801, or SW1) for the
indicated tray is operating. See Printer
switches and sensors, 500-sheet
feeder switches, sensors, solenoids,
and PCAs, or 1,500-sheet feeder
switches, sensors, solenoids,
and PCAs. Verify that the sensor
"fingers" inside the tray are engaging
the tray sensor correctly. See Tray 2,
500-sheet feeder, and 1,500-sheet
feeder media-size detection.
1
(
To change the media type, press
SELECT button). Use (UP ARROW
button) and (DOWN ARROW button_ to
scroll to the type, and then press
to
select it.
2
To change the media size to Letter, A4,
Executive, B5 JIS, A5, or Legal, set the
tray switch to the Standard position and
adjust the media guides to the correct
positions.
3
To change the media size to other
sizes, leave the tray switch in the
Custom position, adjust the media
guides against the stack, and close the
tray.
4
Select the Paper Handling menu from
the control panel. Configure the size
and media type for the tray.
<TYPE> <SIZE>
To change type
press
alternates with
TRAY XX
<TYPE> <SIZE>
Size detected by tray
TRAY XX
<TYPE> <SIZE>
The printer is reporting the current
configuration of tray XX. The tray switch is
in the Custom position.
Size specified by user
alternates with
TRAY XX
<TYPE> <SIZE>
To change type
press
346
7
Troubleshooting
Table 7-6 Alphabetical printer messages (continued)
Control panel message
Description
Recommended action
Unable to store job
A job cannot be stored because of a
memory, disk, or configuration problem.
1
Install additional memory in the printer,
or install a disk drive in the printer. See
Firmware DIMM (LJ 4200/4300 only).
2
If a disk drive is installed, delete the
previously stored print jobs to increase
the disk storage space.
3
If this error persists, check the printer
driver and program settings.
<JOBNAME>
USE INSTEAD?
TRAY X: <TYPE>
<SIZE>
Display-message troubleshooting
The printer is offering an alternative for the
print job.
(SELECT
To use the alternative, press
button). Or use (UP ARROW button) and
(DOWN ARROW button) to scroll to any
to
alternative selection, and then press
select it.
347
Numerical printer messages
When resolving printer messages, perform all listed actions in the order until the message is resolved.
Numerical printer messages
Table 7-7 Numerical printer messages
Control panel message
Description
Recommended action
10.XX.YY SUPPLY10.XX.YY SUPPLY
The printer canot read the electronic
information (e-label) on the print cartridge in
order to keep track of the page count for
the print cartridge.
1
Open the top cover, remove the print
cartridge, and then reinstall it. See Print
cartridge.
2
Install a new HP print cartridge.
3
Check the connection between the
dc controller PCA (location J97) and
the memory chip on the print cartridge
(location J600).
4
Replace the memory chip cable and
contact assembly.
5
Replace the dc controller PCA. See
Dc controller PCA.
1
Press ( HELP button) for more
information.
2
Remove the specified number of pages
from the output bin.
3
Press
(SELECT button) to continue
printing.
4
Replace the duplexer.
5
Replace the dc controller PCA. See
Dc controller PCA.
MEMORY ERROR
or
XX Description
10.XX.YY SUPPLY
00 memory error on the cartridge
MEMORY ERROR
10 memory device not found
For help press
YY Description
00 black print cartridge
13.XX.YY
DUPLEX JOB INTERRUPTED
For help press
A duplex job was physically interrupted as
the paper was momentarily routed to the
output bin during duplexing. This error is
usually caused by a user who is attempting
to grasp the edge of the page as it exits the
top output bin during the duplexing process.
alternates with
13.XX.YY
DUPLEX JOB INTERRUPTED
Discard top sheet and press
NOTE If JAM RECOVERY =
OFF some pages will not be
reprinted. Resend the missing
pages.
or
13.XX.YY
DUPLEX JOB INTERRUPTED
Discard top two sheets and press
13.XX.YY
A jam exists in the media path.
1
Press ( HELP button) for detailed
information about clearing the jam.
2
Press ( UP ARROW button) and
(DOWN ARROW button) to step through
the instructions.
3
If the media is folding into an accordion
shape, make sure that the shutter on
JAM For help press
348
7
Troubleshooting
Table 7-7 Numerical printer messages (continued)
Control panel message
Description
Recommended action
the print cartridge opens as you insert
the cartridge. Replace any defective
print cartridge.
4
For information about how to resolve a
jam, see the specific numerical error
codes in this table.
5
See Paper-path troubleshooting in this
chapter.
13.01.00. or 13.03.00JAM IN TRAY x
A page is jammed in tray X.
1
For help press
A 13.01.00 error message indicates that
the media did not arrive at the pre-feed
sensor (PS102) within the specified time.
Press ( HELP button) for detailed
information about clearing the jam.
2
A 13.03.00 error message indicates that the
media did not arrive at the top-of-page
sensor (PS103) within the specified time.
Press ( UP ARROW button) and
(DOWN ARROW button) to step through
the instructions.
3
Check that the paper-out sensor in the
specified tray is functioning correctly.
4
Clean the pickup roller. If it is worn or
damaged, replace it.
5
Clean the feed and separation rollers. If
any of the rollers are worn or damaged,
replace them (always replace both
rollers at the same time).
6
Verify that the pre-feed sensor (PS102)
is installed correctly. See Paper-feed
assembly.
or
13.03.00
Paper JAM open input trays then open
and close top cover
NOTE The 13.01.00 error can
also be caused by the failure of the
paper-level sensor (PS107). If this
sensor fails, the lifter motor does
not rotate to lift the paper tray plate.
This error can also be caused
when the printer attempts to pick
up media from a tray that is empty,
but the paper-out sensing
mechanism for that tray has failed
and the printer senses that the tray
appears to be loaded.
13.01.00. or 13.03.00JAM IN TRAY x
A page is jammed in tray X.
For help press
A 13.01.00 error message indicates that
the media did not arrive at the pre-feed
sensor (PS102) within the specified time.
If the actions listed above do not resolve
the issue, continue with the following:
1
Open and close the specified tray while
watching the control-panel display. A
short delay should occur between
when the tray closes and the tray-size
message appears on the control-panel
display. If there is no delay and you do
not hear the tray-lift motor lift the tray
plate into place, replace the stack
position sensor (PS107, PS802,
or SR2) in the tray. See Printer
switches and sensors, 500-sheet
feeder switches, sensors, solenoids,
and PCAs, or 1,500-sheet feeder
switches, sensors, solenoids, and PCAs.
2
Replace the tray X pickup solenoid.
3
Replace the tray 1 paper-pickup
assembly. See Tray 1 paper-pickup
assembly .
or
13.03.00
A 13.03.00 error message indicates that the
media did not arrive at the top-of-page
sensor (PS103) within the specified time.
Paper JAM open input trays then open
and close top cover
Display-message troubleshooting
349
Table 7-7 Numerical printer messages (continued)
Control panel message
Description
4
Replace the paper-feed assembly. See
Paper-feed assembly.
5
Verify that the top-of-page
sensor (PS103) is operating correctly
and that the sensor flag can freely
move. Replace the sensor if it is not
operating correctly. See Printer
switches and sensors.
6
Replace the dc controller PCA. See
Dc controller PCA.
A jam exists in the top-cover area.
1
A 13.02.00 error message indicates that the
media did not pass the top-of-page
sensor (PS103) within the specified time.
Press ( HELP button) for detailed
information about clearing the jam.
2
A 13.05.00 error message indicates that the
media did not arrive at the fuser delivery
sensor (PS108) within the specified time.
Press ( UP ARROW button) and
(DOWN ARROW button to step through
the instructions.
3
Check the pre-feed, top-of-page, and
fuser assembly sensors (PS102,
PS103, and PS 108) and verify that the
sensor arms move freely. (See Printer
switches and sensors.)
4
If the paper-feed assembly has been
replaced, verify that the pre-feed
sensor (PS102) is installed correctly.
See Paper-feed assembly.
5
Replace the top-of-page
sensor (PS103). See Printer switches
and sensors.
6
Replace the top-cover-open switch
(SW101). See Printer switches and
sensors.
7
Replace the fuser. See Fuser.
8
Replace the dc controller PCA. See
Dc controller PCA.
9
If this error message appears
frequently, see Paper-path
troubleshooting.
1
Press ( HELP button) for detailed
information about clearing the jam.
2
Press ( UP ARROW button) and
(DOWN ARROW button) to step through
the instructions.
3
Check the paper-width and fuser
delivery sensors (PS106, PS108) and
NOTE The 13.01.00 error can
also be caused by the failure of the
paper-level sensor (PS107). If this
sensor fails, the lifter motor does
not rotate to lift the paper tray plate.
This error can also be caused
when the printer attempts to pick
up media from a tray that is empty,
but the paper-out sensing
mechanism for that tray has failed
and the printer senses that the tray
appears to be loaded.
13.02.00 or 13.05.00 or 13.20.00 or
13.21.00JAM IN TOP
COVER AREA
Recommended action
For help press
A 13.20.00 error message indicates that the
printer power was turned on or that the
printer attempted to initialize while the prefeed sensor (PS102), the top-of-page
sensor (PS103) or the fuser delivery
sensor (PS108) was detecting media.
A 13.21.00 error message indicates that the
top-cover-open switch (SW101) was
activated while a print job was printing (the
top cover was opened or the switch is
defective).
13.06.00 and 13.12.00 JAM INSIDE REAR
DOOR
For help press
350
A page is jammed near the rear output door.
7
Troubleshooting
Table 7-7 Numerical printer messages (continued)
Control panel message
Description
Recommended action
verify that the sensor arms move freely.
(See Printer switches and sensors.)
13.12.07
jam in stapler
A jam exists in the staple cartridge (the
stapler did not finish stapling but was able
to return to its home position).
NOTE: The stapler/stacker LED blinks in
amber (this error applies to the stapler/
stacker only).
4
Check the inside of the duplexer for
scraps of media that might have torn
off when a jam was cleared.
5
Replace the media-size
sensor (PS106) and fuser. See Printer
switches and sensors and Fuser.
6
Turn the power off. Remove the
duplexer and turn the power on. If the
error message persists, replace the
dc controller PCA. See
Dc controller PCA.
7
If the error message appears
frequently, see Paper-path
troubleshooting.
1
Press ( HELP button for detailed
information.
2
Press ( UP ARROW button) and
(DOWN ARROW button) to step through
the instructions.
3
Remove any jammed paper from the
stapler/stacker.
4
Remove the staple cartridge from the
stapler unit.
5
Push the green door on the end of the
staple cartridge up (in the direction of
the arrows).
6
Remove the jammed staple.
7
Close the staple cartridge door.
Replace the cartridge in the stapler unit.
8
Close the staple unit.
9
If the error persists, replace the staple
cartridge.
10 If the error persists, replace the stapler
unit. See To remove and replace the
stapler unit.
13.12.08
jam in output device
NOTE: The stapler/stacker LED blinks in
amber (this error applies to the stapler/
stacker only).
Display-message troubleshooting
The output bin page-detection sensor has
been active for longer than the specified
time.
1
Press ( HELP button) for detailed
information.
2
Press ( UP ARROW button) and
(DOWN ARROW button) to step through
the instructions.
351
Table 7-7 Numerical printer messages (continued)
Control panel message
Description
Recommended action
3
Remove all of the pages from the
output bin.
4
Open the jam-access door and remove
all of the pages. Close the access door.
5
If this error message persists, replace
the stapler/stacker.
1
Press ( HELP button) for detailed
information.
2
Press ( UP ARROW button) and
(DOWN ARROW button) to step through
the instructions.
3
Open the jam-access door and remove
all of the pages. Close the access door.
4
If this error message persists, replace
the stacker or stapler/stacker.
1
Press ( HELP button) for detailed
information.
2
NOTE: The event log records this error
message as 13.12.0A.
Press ( UP ARROW button) and
(DOWN ARROW button) to step through
the instructions.
3
NOTE: The stacker or stapler/stacker LED
blinks in amber.
Open the jam-access door and remove
all of the pages. Close the access door.
4
Verify that the output bin deflector (in
the printer) is operating correctly.
5
If this error message persists, replace
the stacker or stapler/stacker.
1
Press ( HELP button) for detailed
information.
2
NOTE: The event log records this error
message as 13.12.0B.
Press ( UP ARROW button) and
(DOWN ARROW button) to step through
the instructions.
3
NOTE: The stacker or stapler/stacker LED
blinks in amber.
Remove all of the pages from the
output bin.
4
Open the jam-access door and remove
all of the pages. Close the access door.
5
If this error persists, replace the stacker
or the stapler/stacker.
13.12.09
jam in output device
The stacker or stapler/stacker paper-inlet
sensor has been active for longer than a
specified time.
For help press
NOTE: The stacker or stapler/stacker LED
blinks in amber.
13.12.10
jam in output device
A page did not arrive at the stacker or
stapler/stacker paper-inlet sensor in the
specified time.
For help press
13.12.11
A jam was detected when the stacker or
stapler/stacker power was turned on.
jam in output device
For help press
352
7
Troubleshooting
Table 7-7 Numerical printer messages (continued)
Control panel message
Description
Recommended action
13.13.00
A page is jammed inside of the duplexer.
1
Press ( HELP button) for detailed
information about clearing the jam.
2
Press ( UP ARROW button) and
(DOWN ARROW button) to step through
the instructions.
3
Check the inside of the duplexer for
scraps of media that might have been
torn off when a jam was cleared.
4
Turn the power off. Remove the
duplexer and turn the power on. If this
error persists, replace the
dc controller PCA. See
Dc controller PCA.
5
Replace the duplexer.
1
Remove the fuser.
2
Turn the blue knob to remove the
jammed media.
3
If necessary, replace the fuser. See
Fuser.
1
Remove any jammed media from the
paper path.
JAM INSIDE DUPLEXER
For help press
13.1C.00
A jam exists in the fuser area. The media is
probably wrapped around the fuser roller.
FUSER JAM
For help press
13.98.00 open input trays then open and
close top cover
The face-up tray was opened when the
printer was attempting to send a page to
the duplexer.
2
Open and close the top cover.
A page shorter than 200 mm (7.87 inches)
was sent to the duplexer.
3
Disconnect all optional paper-handling
accessories.
A page less than 120 mm (4.72 inches) in
width was sent to the duplexer.
4
Replace the feed and separation
rollers. See Tray 2 feed rollers (this
procedure includes the separation
roller).
5
Replace the dc controller PCA. See
Dc controller PCA.
1
( SELECT button) to resume
Press
printing.
A multi-feed paper jam has occurred.
20
INSUFFICIENT MEMORY
The printer has received more data from
the computer than fits in the available
memory.
NOTE A loss of data will
occur.
For help press
alternates with
2
Reduce the complexity of the print job
to avoid this error.
20 INSUFFICIENT
3
You might be able to print pages that
are more complex if you add memory
to the printer.
MEMORY
To continue press
Display-message troubleshooting
353
Table 7-7 Numerical printer messages (continued)
Control panel message
Description
Recommended action
21 PAGE TOO COMPLEX
The printer cannot process the page quickly
enough.
1
( SELECT button) to process
Press
the page.
For help press
NOTE
occur.
alternates with
A loss of data will
2
Make the page contents less complex
and re-send the print job.
1
( SELECT button) to resume
Press
printing.
21 PAGE TOO COMPLEX
To continue press
22 EIO X
The printer's EIO card in slot X has
overflowed its I/O buffer during a busy state.
BUFFER OVERFLOW
NOTE
occur.
To continue press
22 PARALLEL I/O
The parallel buffer has overflowed during a
busy state.
2
Check the configuration of the EIO card
and the host computer.
3
If this error message persists, replace
the EIO card.
1
( SELECT button) to resume
Press
printing.
BUFFER OVERFLOW
NOTE
occur.
For help press
alternates with
A loss of data will
A loss of data will
2
Check the parallel I/O configuration.
Set HIGH SPEED to NO and
ADVANCED FUNCTIONS to OFF.
3
Replace the formatter PCA. See
Formatter assembly .
1
( SELECT button) to resume
Press
printing.
22 PARALLEL I/O
BUFFER OVERFLOW
To continue press
40 EIO X BAD
A connection with the card in EIO slot X
has been broken abnormally.
TRANSMISSION
NOTE
occur.
To continue press
354
A loss of data will
2
Check that all of the cables are
connected to the EIO ports and that the
EIO board is seated properly.
3
If possible, print to another network
printer to verify that the network is
working properly.
4
Check the configuration of the EIO card.
5
If this error message persists, replace
the EIO card.
7
Troubleshooting
Table 7-7 Numerical printer messages (continued)
Control panel message
Description
Recommended action
41.3 UNEXPECTED
The media that is loaded is longer or
shorter in the feed direction than the size
that is configured for the tray.
1
If the incorrect size was selected,
cancel the job or press ( HELP button)
to gain access to help.
2
Press ( UP ARROW button) and
(DOWN ARROW button to step through
the instructions.
3
Print a configuration page and verify
that the tray settings match the media
in the tray. See Configuration page.
4
Verify that the pre-feed, top-of-page,
and fuser delivery sensors
(PS102, PS103, PS108) are operating
and the sensor flags can move freely.
See Printer switches and sensors.
5
Replace the dc controller PCA. See
Dc controller PCA.
1
Press
( SELECT button) to continue or
press ( HELP button) for more
information.
2
If the message persists, turn the printer
power off and then on again.
3
If these errors becomes a frequent
problem, replace the dc controller PCA.
See Dc controller PCA.
1
Press CANCEL JOB to clear the print job
from the printer memory.
2
Turn the printer off and then on.
3
Go to www.hp.com/go/lj4200_software,
www.hp.com/go/lj4250_software,
www.hp.com/go/lj4300_software, or
www.hp.com/go/lj4350_software.
Select Download Drivers and
Software. Check for the latest firmware
image version at the bottom of the
page. If this firmware image is newer
than the one installed on the printer
and the printer can receive a firmware
update, download the newer firmware
upgrade. Not all
HP LaserJet 4200/4300 printers can
receive firmware upgrades.
4
Try printing a job from a different
software program. If the job prints, go
back to the first program and try
printing a different file. If the message
SIZE IN TRAY XX
For help press
alternates with
41.3 UNEXPECTED
SIZE IN TRAY XX: [TYPE] [SIZE]
For help press
41.X
A printer error has occurred.
PRINTER ERROR
X Description
For help press
alternates with
1 unknown misprint error
2 beam-detect misprint error
4 no VSYNC error
41.X
7 feed-delay error
PRINTER ERROR
9 signal-noise error
To continue press
49.XXXX
PRINTER ERROR
To continue turn off then on
A critical firmware error has occurred that
caused the processor on the formatter to
abort the operation.
This type of error can be caused by invalid
print commands, corrupt data, or invalid
operations.
In some instances, electrical noise in the
cable can corrupt data during transmission
to the printer. Other causes include poorquality parallel cables, poor connections, or
specific software programs.
Sometimes, the formatter itself is at fault,
which is usually indicated by a 79 Service
Error.
Display-message troubleshooting
355
Table 7-7 Numerical printer messages (continued)
Control panel message
Description
Recommended action
appears only with a certain software
program or print job, contact the
software vendor for assistance.
49.XXXX
PRINTER ERROR
To continue turn off then on
A critical firmware error has occurred that
caused the processor on the formatter to
abort the operation.
This type of error can be caused by invalid
print commands, corrupt data, or invalid
operations.
5
If the message persists when using
different software programs and
attempting specific print jobs,
disconnect all cables that connect the
printer to the network or a computer.
6
Turn the printer off.
7
Remove all memory DIMMs or thirdparty DIMMs from the printer. (Do not
remove the firmware DIMM in slot J1.)
See Firmware DIMM (LJ 4200/4300
only).
8
Remove all of the EIO devices from the
printer.
After performing the actions above,
procede with the following:
1
Turn the printer on.
2
If the error message disappears,
reinstall each DIMM and EIO device
individually, making sure to turn the
printer power off and then on again as
you install each device. To replace
a DIMM, see Firmware DIMM
(LJ 4200/4300 only).
3
Replace the DIMM or EIO device that
caused the error message.
4
Remember to reconnect all of the
cables that connect the printer to the
network or computer.
5
If this error message persists, replace
the firmware DIMM. See Firmware
DIMM (LJ 4200/4300 only).
6
Replace the formatter assembly. See
Formatter assembly .
1
Verify that the ribbon cables are fully
seated in the connectors on the
dc controller PCA.
2
Replace the power-supply assembly.
See Power supply.
3
Replace the dc controller PCA. See
Dc controller PCA.
4
Replace the formatter assembly. See
Formatter assembly .
In some instances, electrical noise in the
cable can corrupt data during transmission
to the printer. Other causes include poorquality parallel cables, poor connections, or
specific software programs.
Sometimes, the formatter itself is at fault,
which is usually indicated by a 79 Service
Error.
49.24.02
The printer has experienced a critical error.
printer error
356
7
Troubleshooting
Table 7-7 Numerical printer messages (continued)
Control panel message
Description
Recommended action
50.X FUSER ERROR
A fuser error has occurred.
1
Turn the printer off and allow it to cool
down.
X Description
2
Verify that the correct model of fuser is
installed.
3
Verify that the correct voltage fuser is
installed.
4
Reinstall the fuser, and check the
connection between the fuser and the
printer. Replace the connector if it is
damaged.
5
Replace the fuser.
6
Replace the dc controller PCA. See
Dc controller PCA.
7
Replace the power-supply assembly.
See Power supply.
1
Press
2
Turn the printer off and then on.
3
Reseat the connectors between the
laser/scanner and dc controller
PCA (J83 and J84).
4
Replace the laser/scanner assembly.
See Laser/scanner assembly.
5
Replace the dc controller PCA. See
Dc controller PCA.
1
Press
2
Turn the printer off and then on.
3
Reseat the connectors between the
laser/scanner and
dc controller PCA (J83 and J84).
4
Replace the laser/scanner assembly.
See Laser/scanner assembly.
5
Replace the dc controller PCA. See
Dc controller PCA.
For help press
1 low fuser temperature
2 fuser warmup service
3 fuser over temperature
4 faulty fuser
5 incorrect fuser is installed
6 open fuser circuit
51.XY
A printer error has occurred.
PRINTER ERROR
X Description
For help press
alternates with
1 beam-detect error
2 laser error
51.XY
PRINTER ERROR
( SELECT button) to continue.
To continue turn off then on
52.XY
A printer error has occurred.
PRINTER ERROR
X Description
For help press
alternates with
0 scanner error
1 scanner startup error
2 scanner rotation error
52.XY
PRINTER ERROR
( SELECT button) to continue.
To continue turn off then on
53.XY.ZZ
An error occurred in the printer memory.
PRINTER ERROR
Press CANCEL JOB. If the problem persists,
replace the DIMM card in the specific slot.
See Firmware DIMM (LJ 4200/4300 only).
X DIMM Type
To continue press cancel job
0 ROM (firmware DIMM)
1 RAM
Display-message troubleshooting
357
Table 7-7 Numerical printer messages (continued)
Control panel message
Description
Recommended action
Y Device Location
1 DIMM Slot 1
2 DIMM Slot 2
3 DIMM Slot 3
4 DIMM Slot 4
ZZ Error Number
0 unsupported memory
1 unrecognized memory
2 unsupported memory size
3 failed RAM test
4 exceeded maximum RAM size
6 invalid DIMM speed
54.1
The print cartridge was installed with the
sealing tape in place.
1
Remove the sealing tape from the print
cartridge.
2
Replace the print cartridge.
1
Press
2
Turn the printer off and then on.
For help press
3
Reseat the connectors between the
dc controller PCA and the formatter.
alternates with
4
If the problem persists, replace the
dc controller PCA. See
Dc controller PCA.
5
Replace the formatter. See Formatter
assembly .
1
Turn the power off and then on.
2
Reinstall all input trays.
3
Remove all non-HP paper-handling
devices.
1
Turn the power off and then on.
2
Reinstall the stacker or stapler/stacker.
3
Remove all non-HP paper-handling
devices.
Remove the sealing tape from toner
cartridge
55.X
PRINTER ERROR
The dc controller is not communicating with
the formatter. The problem could be caused
by a timing error or an intermittent
connection.
55.X
PRINTER ERROR
( SELECT button) to continue.
To continue press
56.1 printer error To continue turn off
then on
56.2 printer error To continue turn off
then on
57.X
358
An unknown input device is installed.
An unknown output device is installed.
A printer fan is not functioning.
Turn the printer off and then on.
7
Troubleshooting
Table 7-7 Numerical printer messages (continued)
Control panel message
Description
Recommended action
PRINTER ERROR
X Description
57.3 Cartridge fan error (F2)
To continue turn off then on
3 Cooling fan, right side
(LJ 4250/4300/4350 only)
1
Reconnect the connector between the
fan and the dc controller PCA
(location J78).
or
4 Main cooling fan, left side
2
Replace the fan. See Cooling fan, right
side (HP LaserJet 4250/4300/4350
Series printers only).
3
Replace the dc controller PCA. See
Dc controller PCA.
57.3 EP fan failure
or
57.4 Main fan error (F1)
57.4 main fan failure
57.7 duplex fan failure
58.X
The cooling fan in the optional duplexer is
not functioning.
A memory error has been detected.
1
Reconnect the connector between the
fan and the power supply.
2
Verify that the ribbon cables are fully
seated in the connectors on the
dc controller PCA.
3
Replace the fan. See Main cooling fan
(left side).
4
Replace the power-supply assembly.
See Power supply.
5
Replace the dc controller PCA. See
Dc controller PCA.
1
Turn the printer off and then on.
2
Replace the duplexer.
Turn the printer off and then on.
58.2 Air-temperature sensor
PRINTER ERROR
X Description
For help press
alternates with
1
Turn the printer off and then on.
2
Reconnect the connector between the
air-temperature sensor (the bar
mounted across the main cooling fan
on the left side of the printer) and the
power supply (location J63).
3
Replace the air-temperature sensor.
See Main cooling fan (left side).
4
Replace the power-supply assembly.
See Power supply.
2 air-temperature sensor
3 Dc controller
4 power supply
58.X
PRINTER ERROR
To continue turn off then on
58.3 Dc controller
1
Replace the dc controller PCA. See
Dc controller PCA.
58.4 Power supply
1
Display-message troubleshooting
Replace the power-supply assembly.
See Power supply.
359
Table 7-7 Numerical printer messages (continued)
Control panel message
Description
Recommended action
59.XY
A printer-motor error has occurred.
59.00, 59.10, 59.20 Motor failure
PRINTER ERROR
1
Turn the printer off and then on.
2
Reconnect the main-motor wireharness on the dc controller PCA
(location J98)
3
Replace the main motor. See Main
motor.
4 print-cartridge-motor error (LJ 4250,
4300, 4350 only)
4
Replace the dc controller PCA. See
Dc controller PCA.
A print-cartridge-motor error (LJ 4250,
4300, 4350 only)
59.A or 59.4 print-cartridge-motor failure
(LJ 4250, 4300, 4350 only)
X Description
For help press
alternates with
0 main-motor error
1 motor startup error
2 motor rotation error
59.XY
PRINTER ERROR
To continue turn off then on
1
Turn the printer off and then on.
2
Reconnect the print-cartridge-motor
wire-harness on the dc controller PCA
(location J86).
3
Replace the print-cartridge motor. See
Print-cartridge motor
(HP LaserJet 4250/4300/4350 series
printer only).
4
Replace the dc controller PCA. See
Dc controller PCA.
1
Turn the printer off and then on.
2
Reconnect the main-motor wireharness on the dc controller PCA
(location J98)
3
Replace the main motor. See Main
motor.
4
Replace the dc controller PCA. See
Dc controller PCA.
1
Turn the printer off and then on.
Print-cartridge-motor rotation error
2
Replace the print cartridge.
(LJ 4250, 4300, 4350 only)
3
Reconnect the print-cartridge-motor
wire-harness on the dc controller PCA
(location J86).
4
Replace the print-cartridge-motor. See
Print-cartridge motor
(HP LaserJet 4250/4300/4350 series
printer only).
5
Replace the dc controller PCA. See
Dc controller PCA.
Y Description
Y=0
59.2
The main motor is not functioning correctly.
Main motor Rotation error
59.4
360
The print-cartridge drive motor (LJ 4250,
4300, 4350 only) is not functioning properly.
7
Troubleshooting
Table 7-7 Numerical printer messages (continued)
Control panel message
Description
Recommended action
60.2
The tray 2 lifter-motor is not functioning.
1
Turn the printer off and then on.
2
If the error persists, turn the printer off.
3
Verify that the tray 2 lifter wire-harness
is full seated in its connector on the
dc controller PCA (location J93).
4
Replace the tray 2 lifter-driver
assembly. See Tray 2 lifter-drive
assembly.
5
Replace the dc controller PCA. See
Dc controller PCA.
printer error
60.3
The tray 3 lifter-motor is not functioning.
1
Turn the printer off and then on.
Tray 3 lifter motor failure
Tray 3 can be a 500-sheet feeder or 1,500sheet feeder accessory.
2
If the error persists, turn the printer off.
3
Verify that the tray 3 lifter wire-harness
is fully seated in its connector on the
sheet feeder PCA.
4
Replace the tray 3 lifter-driver
assembly. See 500-sheet feeder lifterdrive assembly or 1,500-sheet feeder
lifter-drive assembly.
5
Replace the tray 3 feeder
controller PCA. See 500-sheet feeder
control PCA or 1,500-sheet feeder
control PCA.
1
Turn the printer off and then on.
2
If the error persists, turn the printer off.
3
Verify that the tray 4 lifter wire-harness
is fully seated in its connector on the
sheet feeder PCA.
4
Replace the tray 4 lifter assembly. See
500-sheet feeder lifter-drive assembly
or 1,500-sheet feeder lifter-drive
assembly.
5
Replace the tray 4 feeder controller
PCA. See 500-sheet feeder
control PCA or 1,500-sheet feeder
control PCA.
1
Turn the printer off and then on.
2
Reseat the firmware DIMM, in slot J1.
See Firmware DIMM (LJ 4200/4300
only).
3
Replace the firmware DIMM. See
Firmware DIMM (LJ 4200/4300 only).
60.4
The tray 4 lifter-motor is not functioning.
Tray 4 lifter motor failure
Tray 4 can be a 500-sheet feeder or 1,500sheet feeder accessory.
62
NO SYSTEM
No system (firmware image) was found.
To continue turn off then on
Display-message troubleshooting
361
Table 7-7 Numerical printer messages (continued)
Control panel message
64
Description
A scan-buffer error has occurred.
PRINTER ERROR
Recommended action
4
Replace the formatter assembly. See
Formatter assembly .
1
Turn the printer off and then on.
2
If the message persists, replace the
formatter assembly. See Formatter
assembly .
1
Turn the printer power off.
2
Verify that the stacker or stapler/
stacker is installed correctly.
3
Turn the printer power on.
1
Press ( HELP button) for detailed
information.
2
Press ( UP ARROW button) and
(DOWN ARROW button) to step through
the instructions.
3
Turn the power off.
4
Verify that the stapler/stacker is
installed correctly and that its electrical
connector is seated in the connector on
the printer.
5
Turn the power on.
6
If the error 66.12.03 persists, replace
the stapler unit. See To remove and
replace the stapler unit.
7
If other errors messages persist,
replace the stacker or stapler/stacker.
1
Press
2
Turn the printer off and then on.
3
Check the printer settings to determine
which settings have been changed.
See Settings and defaults and Controlpanel menus.
4
Perform a NVRAM initialization. See
NVRAM initialization.
For help press
alternates with
64
PRINTER ERROR
To continue turn off then on
66.00.15
EXTERNAL DEVICE FAILURE
The stacker or stapler/stacker was removed
and then replaced while the printer power
was on.
NOTE: The stacker or stapler/stacker LED
is off.
66.12.XX
A stacker or stapler/stacker error has
occurred.
output device failure
For help press
XX Description
NOTE: The stacker or stapler/stacker LED
is continuously illuminated in amber.
01 output-lift roller or paddle motor error
02 jogger-motor error
03 stapler-motor error
68.X
PERMANENT STORAGE ERROR
For help press
alternates with
68.X
362
One or more printer settings that were
saved in the nonvolatile storage device are
invalid and have been reset to the factory
( SELECT button) should
default. Pressing
clear the message. Printing can continue,
but the printer might behave unexpectedly
in response to the changed settings.
X Description
( SELECT button) to continue.
7
Troubleshooting
Table 7-7 Numerical printer messages (continued)
Control panel message
Description
Recommended action
PERMANENT STORAGE ERROR
0 onboard NVRAM
5
Replace the formatter assembly. See
Formatter assembly .
To continue press
1 flash DIMM or hard drive
68.X PERMANENT
A nonvolatile storage device is full.
(SELECT button) should clear
Pressing
the message. Printing can continue, but the
printer might behave unexpectedly in
response to the changed settings.
1
Press
2
For 68.0 errors, turn the printer off and
then on.
3
If a 68.0 error persists, Initialize
NVRAM. See the caution and note in
To initialize NVRAM.
4
For 68.1 errors, use the HP Web
Jetadmin software to delete files from
the disk drive.
5
If this error message persists, replace
the formatter assembly. See Formatter
assembly .
6
If the 68.1 error persists, reinitialize the
hard disk. See the caution and note in
To initialize the hard disk.
7
If the 68.1 error persists, replace the
disk.
1
Press
2
Turn the printer off and then on.
3
If the 68.0 error persists, initialize the
NVRAM. See the caution and note in
To initialize NVRAM.
4
If this error message persists, replace
the formatter assembly. See Formatter
assembly .
5
For a 68.1 error message, reinitialize
the hard disk. See the caution and note
in To initialize the hard disk.
6
If the 68.1 error persists, replace the
disk.
1
Remove the duplexer.
printer error
2
Turn the printer off and then on.
To continue turn off then on
3
Replace the duplexer.
4
If the message persists, replace the
duplexer.
1
Turn the printer off and then on.
2
If the problem persists, reseat the
firmware DIMM.
STORAGE FULL
For help press
alternates with
68.X PERMANENT
STORAGE FULL
X Description
0 onboard NVRAM
1 flash DIMM or hard drive
To continue press
68.X PERMANENT
STORAGE WRITE FAIL
To continue press
A nonvolatile storage device is failing to
(SELECT button) should
write. Pressing
clear the message. Printing can continue,
but the printer might behave unexpectedly
in response to the changed settings.
( SELECT button) to continue.
(the SELECT button) to continue.
X Description
0 onboard NVRAM
1 removable disk (flash or hard)
69.X
79.XXXX
PRINTER ERROR
Display-message troubleshooting
The optional duplexer is not functioning.
A critical hardware error has occurred.
363
Table 7-7 Numerical printer messages (continued)
Control panel message
Description
To continue turn off then on
8X.YYYY
EIO ERROR
364
The EIO accessory card in slot X has
encountered a critical error.
Recommended action
3
Reseat the formatter.
4
Go to www.hp.com/go/lj4200_software,
www.hp.com/go/lj4250_software,
www.hp.com/go/lj4300_software, or
www.hp.com/go/lj4350_software.
Select Download Drivers and
Software. Check for the latest firmware
image version at the bottom of the
page. If this firmware image is newer
than the one installed on the printer
and the printer can receive a firmware
update, download the newer firmware
upgrade. Not all
HP LaserJet 4200/4300 printers can
receive firmware upgrades.
5
Replace the formatter. See Formatter
assembly .
6
Replace the firmware DIMM. See
Firmware DIMM (LJ 4200/4300 only).
1
Turn the printer off and then on.
2
If the problem persists, reseat the
EIO card.
3
Replace the EIO card.
4
Replace the formatter assembly. See
Formatter assembly .
7
Troubleshooting
Paper-path troubleshooting
The following sections describe how to troubleshoot problems in the paper path.
Overview
If a jam message appears on the printer control-panel display, look for jammed paper or other print
media in the locations that are indicated in the following figure. Then see the tables in this section for
information about clearing the jam. You might need to look for media in locations other than those
specified in the jam message. If the location of the jam is not obvious, look first in the top-cover area
underneath the print cartridge.
When clearing jams, be very careful not to tear the jammed media. If a small piece of media is left in
the printer, it could cause additional jams. If jams are a recurring problem, see Persistent jams.
NOTE After you have cleared the jammed media, you must open and then close the top
cover to clear a jam message.
2
1
6
5
4
3
Figure 7-7 Jam locations
1
Top-cover and print-cartridge areas
2
Optional envelope feeder
3
Tray areas (tray 1, tray 2, and optional trays)
4
Optional duplexer
5
Fuser area
6
Output areas (top, rear, and optional stacker or stapler/stacker)
7
Optional stacker or stapler/stacker
NOTE Loose toner might remain in the printer after a jam and cause poor print quality. Print
quality will improve after a few pages are printed.
Paper-path troubleshooting
365
Jam recovery
This printer can automatically provide jam recovery. You can use the jam-recovery to automatically
reprint jammed pages.
Select whether or not you want the printer to attempt to reprint jammed pages.
■
AUTO Printer will attempt to reprint jammed pages.
■
OFF Printer will not attempt to reprint jammed pages.
NOTE To improve print speed and increase memory resources, you might want to disable
the jam recovery. If jam recovery is disabled, the printer will not attempt to reprint the jammed
pages.
NOTE During the recovery process, the printer might reprint several pages that were printed
correctly before the jam occurred. Be sure to remove any duplicated pages.
To disable the jam recovery
1
Press
( SELECT button) or the MENU button to open the menus.
2
Press
( DOWN ARROW button) to scroll to CONFIGURE DEVICE.
3
Press
to select CONFIGURE DEVICE.
4
Press
to scroll to SYSTEM SETUP.
5
Press
to select SYSTEM SETUP.
6
Press
to scroll to JAM RECOVERY.
7
Press
to select JAM RECOVERY.
8
Press
to scroll to OFF.
9
Press
to select OFF.
10 Press the PAUSE/RESUME button to return to the READY state.
366
7
Troubleshooting
Avoiding jams
Use this table to help avoid specific types of jams.
Table 7-8 Common causes of paper jams
Cause
Solution
The print media does not meet
HP recommended media storage and
use specifications.
Use only media that meets HP specifications. See chapter 1 in this manual or the
HP print media guide (available at http://www.hp.com/support/ljpaperguide) for
media recommendations.
A supply item is installed incorrectly,
which causes repeated jams.
Verify that the print cartridge and the fuser are correctly installed.
You are reloading paper that has
already passed through a printer or
copier.
Do not use media that has been used previously in a printer or copier.
An input tray is loaded incorrectly.
Remove any excess media from the input tray. Make sure that the stack of media
fits below the indicators inside of the tray.
The print media is skewed.
The tray guides are not adjusted correctly. Adjust the guides to hold the media
firmly in place without bending it. If media heavier than 120 g/m2 (32 lb) is loaded
into tray 2, tray 3, or tray 4, the media might skew.
The print media is binding or sticking
together.
Remove the media and flex it, rotate it 180°, or flip it over. Reload the media into
the tray. Do not fan media.
The print media is removed before it
settles into the output bin.
Wait until the page completely exits the output delivery assembly before you
attempt to remove the it.
When you are using the duplex print
feature, the print media is removed
before the second side of the
document is printed.
Print the document again. During the duplex operation, the page will partially
protrude from the output delivery assembly (when the page is being reversed). Do
not attempt to grab or remove the page. Wait until the page completely exits the
output delivery assembly before you attempt to remove the it.
The print media is in poor condition.
Replace the print media.
The print media is not picked up by the
internal rollers from Trays 2, 3 or 4.
Remove the top sheet of media. If the media is heavier than 120 g/m2 (32 lb), it
might not be picked up properly from the tray.
The print media has rough or jagged
edges.
Replace the media.
The print media is perforated or
embossed.
If the media does not separate easily, you might need to feed single sheets from
tray 1.
The printer supply items have reached
the end of their useful life.
Check the printer control panel for messages that prompt you to replace supplies,
or print a supplies status page to verify the remaining life of the supplies.
The print media was not stored
correctly.
Replace the print media. The media should be stored in its original packaging and
in a controlled environment.
Paper-path troubleshooting
367
Persistent jams
If jams occur repeatedly, use the information in this section to diagnose the root cause of the
problem. The tables in this section list possible causes and recommended solutions for jams in each
area of the paper path. The information is listed in the order in which you conduct the investigation.
In general, items at the beginning of the list are relatively minor repairs. Items at the end of the list
are more significant repairs.
Basic troubleshooting for persistent jams
The basic troubleshooting process for jams consists of the following steps:
1
Gather data.
2
Identify the cause of the problem.
3
Fix the problem.
Data collection
To troubleshoot jams, gather the following information:
■
The exact error code that appears on the control panel
■
The location of the leading edge of all of the media that is in the paper path
■
The location of the media when the jam occurs: in the paper path or at the input tray
■
The timing of the jam: at power-up or while paper is moving
■
The location of any damage that occurs on the media and the location in the paper path where
the damaged media stops
■
The relationship to a particular tray
■
The relationship to duplex printing
■
The relationship to the type of paper
■
The use of any non-HP supplies (non-HP supplies are known to cause jams)
■
Paper-handling conditions, including storage conditions, overloading trays, damaging media
during loading, fanning of the paper ream, or use of paper that has already been fed through this
printer, another printer, or a copier
General paper-path troubleshooting
Use the following information to isolate the cause of the problem. When you have identified the
cause, use the tables that follow to find a recommended solution.
368
■
View or print the event log to determine if a particular jam error occurs more often than others.
Try to identify a pattern.
■
View or print the event log to determine the frequency of a particular jam. If a jam occurs
repeatedly at a particular page count, consider this event to be a single jam that the customer
tried to clear.
7
Troubleshooting
■
Try printing from all of the available input trays and to all of the available output bins to identify
whether the problem is isolated to one tray.
■
Print the job in both the simplex and duplex mode to identify whether the problem occurs only in
one mode or the other.
■
Try printing on paper from an unopened ream that has been stored correctly. If the jam does not
occur with this media, then the customer's media might be causing the problem.
■
If the jam occurs when the printer is first turned on, check the paper path for small, torn pieces of
media. Also check for broken sensors or flags, and check for loose or defective connections.
■
If the media is torn, folded, or wrinkled (typically along the leading edge), inspect the paper path
for items that might be causing the damage.
■
If the customer is using non-HP supplies, try replacing those supplies with genuine HP supplies
to see if the problem is resolved.
■
If necessary, explain the correct methods of media storage, media loading, and printer operation
to the customer. Make sure that the customer knows not to remove media from the output bin
(especially during duplex printing) until it completely exits the output delivery assembly.
Paper-path checklist
■
Verify that the media is correctly loaded in the input trays and that all length and width guides are
set correctly.
■
Clean the printer. Toner and paper dust in the paper path can inhibit free movement of the media
through the printer and can block the sensors.
■
Use the paper-path test on the Diagnostic menu to select various printer input and output
options to determine if the problem is associated with a particular area of the printer.
■
Worn rollers or separation pads can cause multifeeds. Check the condition of the rollers and
separation pads.
■
Defective paper-tray switches can cause jams by communicating the wrong paper size to the
formatter.
■
Defective paper sensors along the paper path might signal a false jam.
■
Scraps of media that remain in the paper path can cause intermittent jams. Always check that
the paper path is clear after cleaning the printer or clearing jams. Also, remove the fuser and
carefully check it for debris.
Paper-path test
This test generates one or more test pages that can be used to isolate the cause of jams.
Paper-path troubleshooting
369
To isolate a jam, you can specify which input tray to use, which output bin to use, whether to use the
duplex path, and the number of pages to print. Printing multiple pages helps to isolate intermittent
jam problems. The following options are available for this test.
■
Print test page. This option uses factory default settings to run the paper path test. The page
starts from tray 2, does not use the duplex path, and prints a single page. The user can specify
the number of pages to be printed.
■
Source. Use this option to select tray 1, tray 2, or tray X (if optional tray feeders are installed) as
the page source.
■
Destination. Use this option to send the test page to the optional stacker or stapler/stacker if this
accessory is installed.
■
Duplex. Use this option to send the test page through the duplex path.
■
Page count. Use this option to sets the number of test page copies to be printed. The choices
are 1, 10, 50, 100, and 500.
To perform a paper-path test
1
Press
2
Use
.
( UP ARROW button) or
3
Use
or
to scroll to PAPER PATH TEST, and then press
4
Use
or
to scroll through the available test options, and then press
5
After the test options are selected, use
to start the test.
( SELECT button) or the MENU button to open the menus.
(DOWN ARROW button) to scroll to DIAGNOSTICS, and then press
or
.
.
to scroll to PRINT TEST PAGE, and then press
NOTE To test the stacker and stacker/stapler paper path, see Stacker paper-path test and
Stapler/stacker paper-path test.
370
7
Troubleshooting
Jams in tray 1
Table 7-9 Causes of tray 1 jams
Cause
Solution
The pickup roller is dirty, worn, or damaged.
Clean the pickup roller. If it is dirty after cleaning, or if it is
worn or damaged, replace the pickup roller.
The separation pad is dirty, worn, or damaged.
Clean the separation pad. If it is dirty after cleaning, or if it is
worn or damaged, replace the separation pad.
The drive gears are damaged.
Check the drive gears in the tray 1 pickup assembly.
Replace the pickup assembly if the gears are damaged.
The tray 1 pickup solenoid (SL102) is defective.
1
Disconnect the connector for the tray 1 pickup solenoid
from the dc controller PCA (location J79).
2
Measure the resistance between the cable connectors.
3
If the measured resistance is not approximately
160 ohms for the HP LaserJet 4200/4300, or 110 ohms
for the HP LaserJet 4250/4350, replace the tray 1
pickup solenoid.
The tray 1 pickup assembly is defective.
Replace the tray 1 paper-pickup assembly. See Tray 1
paper-pickup assembly .
The dc controller PCA is defective.
Replace the dc controller PCA. See Dc controller PCA.
Damaged gears in the cassette pick-up drive unit.
Move the gears in the cassette pick up drive unit. If the
gears are not rotating correctly, or are damaged or worn
replace the cassette pick-up drive unit.
Dirty, worn, or deformed feed roller.
Clean the feed roller. If it is dirty after cleaning, or if it is worn
or damaged, replace the pickup roller.
Defective feed roller clutch.
Disconnect the connector J89. Measure the resistance
between the cable side connectors J89-1 and J89-3. If it is
not about 145 ohms, replace the feed roller clutch.
Paper-path troubleshooting
371
Jams in tray 2
Table 7-10 Causes of tray 2 jams
372
Cause
Solution
The feed or separation rollers are dirty, worn, or damaged.
Clean the rollers. If they are dirty after cleaning, or if they are
worn or damaged, replace the rollers.
The pickup roller is worn or damaged.
Replace the pickup roller.
The tray 2 paper pickup assembly drive gears are damaged
or the assembly is defective.
Check the drive gears in the paper pickup drive assembly.
Replace the pickup drive assembly if the gears are
damaged. See Paper-pickup drive assembly.
The tray 2 pickup solenoid (SL101) is damaged.
1
Disconnect the connector for the tray pickup solenoid
from the dc controller PCA (location J92).
2
Measure the resistance between the cable connectors.
3
If the measured resistance is not approximately
160 ohms for the HP LaserJet 4200/4300, or 110 ohms
for the HP LaserJet 4250/4350, replace the tray 2
pickup solenoid.
The tray 2 lifter-drive assembly or the stack position
sensor (PS107) is defective.
Replace the lifter-drive assembly. See Tray 2 lifter-drive
assembly and/or Printer switches and sensors.
The dc controller PCA is defective.
Replace the dc controller PCA. See Dc controller PCA.
Dirty, worn, or deformed pick-up roller, cassette separation
roller, and cassette feed roller.
Clean the rollers if they are dirty. Replace any worn or
deformed rollers. The cassette separation roller and the
cassette feed rollare are to be replaced together.
Damaged gears in the cassette pick-up drive unit.
Move the gears in the cassette pick up drive unit. If the
gears are not rotating correctly, or are damaged or worn,
replace the cassette pick-up drive unit.
7
Troubleshooting
Jams in tray 3 or tray 4
Table 7-11 Causes of tray 3 and or tray 4 jams
Cause
Solution
The feed or separation rollers are dirty, worn, or damaged.
Clean the rollers. If they are dirty after cleaning, or if they are
worn or damaged, replace the rollers. See 500-sheet feed
rollers or 1,500-sheet feeder feed rollers, or 1,500-sheet
feeder separation roller.
The pickup roller is worn or damaged.
Replace the pickup roller.
The drive transmission gear is damaged.
Check the gears, and replace any damaged or worn parts.
The tray 3 or tray 4 paper pickup drive gears are damaged,
or the assembly is defective.
Check the drive gears in the paper-pickup unit. Replace the
pickup drive assembly if the gears are damaged. See 500sheet feeder paper-pickup drive assembly or 1,500-sheet
feeder paper-pickup drive assembly.
The connector to the printer has poor contact.
Inspect the connector to the printer. Replace any damaged
connectors.
The paper-feeder pickup solenoid is damaged.
1
Disconnect the connector for the paper-feeder solenoid
from the feeder control PCA.
2
Measure the resistance between the cable connectors.
3
If the measured resistance is not approximately
160 ohms for the HP LaserJet 4200/4300, or 110 ohms
for the HP LaserJet 4250/4350, replace the paperfeeder pickup solenoid. See 500-sheet feeder switches,
sensors, solenoids, and PCAs or 1,500-sheet feeder
switches, sensors, solenoids, and PCAs.
The tray 3 or tray 4 lifter assembly or stack-position sensor
(PS802 or SR2) is defective.
Replace the lifter-drive assembly (500-sheet feeder) or the
lifter-drive assembly (1,500-sheet feeder). See 500-sheet
feeder lifter-drive assembly or 1,500-sheet feeder lifter-drive
assembly. Replace the surface stack sensor (PS802 for the
500-sheet feeder, or SR2 for the 1,500-sheet feeder. See
500-sheet feeder switches, sensors, solenoids, and PCAs or
1,500-sheet feeder switches, sensors, solenoids, and PCAs.
The paper-feeder control PCA is defective.
Replace the paper-feeder control PCA. See 500-sheet
feeder control PCA and 1,500-sheet feeder control PCA.
The dc controller PCA is defective.
Replace the dc controller PCA. See Dc controller PCA.
Paper-path troubleshooting
373
Jams in the paper path
NOTE Avoid using odd-sized media. Odd-sized media might not travel between the transfer
roller and the fuser without getting jammed.
Avoid using short-grain paper. Short-grain paper might curl excessively and become jammed.
This type of jam is often found between the fuser and the output destination or in the duplexer.
Table 7-12 Causes of paper-path jams
Cause
Solution
The cartridge shutter open/close mechanism is damaged.
The shutter in the print cartridge should open as you insert
the print cartridge. If the shutter does not open, replace the
print cartridge.
The registration roller is dirty, worn, or damaged.
Clean the registration roller assembly if it is dirty. If it is dirty
after cleaning, or if it is worn or damaged, replace the
registration assembly. See Registration assembly.
(This applies to jams that occur before the media reaches
the registration rollers.)
The paper-feed assembly (including clutch CL101) might be
damaged. (This applies to jams that occur before the the
media reaches the registration rollers.)
Replace the paper-feed assembly. See Paper-feed assembly.
The drive gears are damaged.
(This can cause jams that occur before the media reaches
the registration rollers.)
Check the drive gears in the paper pickup and main drive
assemblies. Replace the pickup or main drive assemblies if
the gears are damaged. See Paper-pickup drive assembly
or Main drive assembly.
The pre-feed (PS102), top-of-page (PS103), or fuserassembly (PS108) sensor is defective.
Replace any defective sensors. See Printer switches and
sensors.
The dc controller PCA is defective.
Replace the dc controller PCA. See Dc controller PCA.
Jams in the duplex path
Table 7-13 Causes of duplex path jams
374
Cause
Solution
The oblique rollers are worn or damaged.
Replace the duplexer.
The oblique roller drive gears are worn or damaged.
Replace the duplexer.
The reversing motor is defective.
Replace the reversing motor.
The duplex feed guide is damaged.
Replace the duplexer.
The duplexing unit feed belt is cut or sagged.
If the duplexing-unit feed belt is cut or sagging, replace the
belt.
The duplex sensors are defective.
Replace the duplexer.
Foreign materials or burrs are present on the reversing or
feed guide.
If foreign materials are present on the reversing or feed
guide, remove them. Replace the guide if it has burrs.
The dc controller PCA is defective.
Replace the dc controller PCA. See Dc controller PCA.
7
Troubleshooting
Media transport problems
If media is feeding incorrectly, use the information in this section to identify and resolve the problem.
Multiple pages feed
Table 7-14 Causes for multiple pages feeding
Cause
Solution
The tray 1 separation pad is worn.
Replace the separation-pad assembly.
Too much media (particularly envelopes) is loaded in tray 1.
Remove some of the media and resend the print job.
The separation rollers in the tray are worn or damaged
Replace the rollers. See Tray 2 feed rollers for tray 2, 500sheet feed rollers for a 500-sheet feeder, or 1,500-sheet
feeder feed rollers for a 1,500-sheet feeder.
The media edges are locked together.
Flex the media stack before loading it into the printer. Do not
fan the media.
The cassette claw is deformed.
Replace the cassette claw.
The torque limiter is defective.
Replace the torque limiter.
The spring that pushes the separation roller or pad is
defective.
Replace the spring.
Media is wrinkled or folded
Table 7-15 Causes for wrinkled or folded media at the paper-path entrance
Cause
Solution
The feed rollers or registration rollers are dirty or defective.
Replace the affected rollers.
The paper path contains foreign substances or dirt.
Remove any foreign substances or dirt from the paper path.
The cartridge shutter open/close mechanism is damaged.
The shutter in the print cartridge should open as you insert
the cartridge. If a shutter does not open, replace the print
cartridge.
(This can cause jams in which the media is crumpled into an
accordion fold under the print cartridge.)
The registration unit is defective.
Of the registration arm is dirty, clean it. If the arm is scarred
or worn, replace the registration unit.
Table 7-16 Causes for wrinkled or folded media at the media-path exit
Cause
Solution
The fuser inlet guide is dirty.
Replace the fuser. See Fuser.
The fuser pressure roller is dirty or damaged.
Run several cleaning pages through the printer. See
Running the cleaning page manually. If the problem persists,
replace the fuser. See Fuser.
Media transport problems
375
Media is skewed
Table 7-17 Causes for skewed media
376
Cause
Solution
Paper dust or dirt has accumulated on the tray feed roller or
separation roller.
Clean or replace the rollers.
The tray feed roller and separation roller are worn irregularly.
Replace the affected roller.
The registration assembly is defective.
Replace the registration assembly. See Registration assembly.
The cassestte separation claw does not move smoothly or is
deformend.
Replace the side guide plate.
7
Troubleshooting
Image-formation troubleshooting
The image-formation system is the central hub of the printer. During image formation, an image is
formed with toner and then fused onto the paper. The image-formation system consists of the
following physical components:
■
Laser/scanner
■
Print cartridge
■
Fuser
■
Transfer roller
■
Supporting circuitry (power supply and dc controller PCA)
Before beginning the image-formation troubleshooting, check that the media meets the specifications
listed in chapter 1 and the HP LaserJet Printer Family Print Media Guide. See Supported media
weights and sizes and Paper and print media.
Media-related print-quality problems
Some print-quality problems occur when inappropriate media is used.
■
Use media that meets HP specifications. See the specifications listed in the
HP LaserJet Printer Family Print Media Guide.
■
The surface of the media is too smooth. Use media that meets HP specifications. See the
specifications listed in the HP LaserJet Printer Family Print Media Guide.
■
The printer driver is set incorrectly. Change the paper-type setting.
■
The media is too heavy for the printer, and the toner is not fusing to the media.
■
The transparencies are not designed for adequate toner adhesion or high fusing temperatures.
Use only transparencies that are designed for monochrome HP LaserJet printers.
■
The moisture content of the paper is uneven, too high, or too low. Use paper from a different
source or from an unopened ream of paper.
■
Some areas of the paper reject toner. Use paper from a different source or from an unopened
ream of paper. Make sure that the paper has not been previously used.
■
The letterhead is printed on rough paper. Use a smoother, photocopy-grade paper. If this solves
the problem, consult with the letterhead supplier to verify that the paper used for the letterhead
meets the specifications for this printer.
■
The paper is excessively rough. Use a smoother, photocopy-grade paper.
■
The paper has a coating that is not compatible with the electrophotographic process.
■
The letterhead or other preprinted media was printed with inks or other materials that can
contaminate the fuser, which causes offset or repeated images.
■
The use of some carbonless papers contaminates the printer and can cause printer damage if
used repeatedly.
Image-formation troubleshooting
377
Overhead transparency defects
Overhead transparencies can show any of the image-quality problems that appear in other types of
media in addition to defects that are specific to transparencies. Also, because transparencies are
pliable, they can be affected by the media-handling components in the paper path.
NOTE
Allow transparencies to cool at least 30 seconds before handling them.
■
On the printer driver Paper tab, select Transparency as the media type. Also, make sure that
the tray is correctly configured for transparencies.
■
Make sure that the transparencies meet the specifications for this monochrome laserjet printer.
For more information, consult the HP LaserJet Printer Family Print Media Guide.
■
Handle transparencies by the edges. Skin oil on the surface of transparencies can cause spots
and smudges.
■
Small, random dark areas on the trailing edge of solid fill pages might be caused by
transparencies sticking together in the output bin. Try printing the job in smaller batches.
■
To show the printed transparency, use a standard overhead projector instead of a reflective
overhead projector
Print-quality problems that are related to the environment
■
The printer is operating in excessively humid or dry conditions. Verify that the printing
environment is within specifications. See Operating environment.
Print-quality problems that are related to jams
378
■
Make sure that all media is cleared from the paper path.
■
If the printer recently jammed, print two or three pages to clean the printer.
■
Repeated jams might require that you use the printer-cleaning procedures in chapter 3. It might
be necessary to process several cleaning pages through the printer. See Running the cleaning
page manually.
7
Troubleshooting
Image defects
This section helps you define print-quality problems and solutions. Often, print-quality problems can
be resolved by making sure that the printer is correctly maintained, using print media that meets
HP specifications, or running a cleaning page.
NOTE Do not use letterhead paper that is printed with low-temperature inks, such as those
that are used in some types of thermography.
Do not use raised letterhead.
The printer uses heat and pressure to fuse toner to the media. Make sure that any colored
paper or preprinted forms use inks that are compatible with the printer's temperature of 230°C
(446°F) for 0.05 second.
Avoid using paper that has already been used in a printer or copier. Also, do not print on both
sides of envelopes, transparencies, or labels.
Image quality
When you are working with customers, obtain a print sample before you begin troubleshooting their
printer. Ask the customer to explain the quality that is expected from the printer. The print sample will
also help clarify the image-quality issue.
Table 7-18 Image-quality checks
Image-quality check
Action
Does the problem repeat on the page?
Use the repetitive defect table to determine the cause of the
repeating defect. See Repetitive-defects troubleshooting.
Is the print cartridge full and is it manufactured by HP?
Check the print cartridge as described in this chapter and
verify that you are not using the EconoMode setting when
sending the print job. See Check the print cartridge and
EconoMode.
Is the customer using print media that meets all HP
standards?
For more information about HP's media specification
standards, see chapter 1 or the HP LaserJet Printer Family
Print Media Guide. See Supported media weights and sizes
and Paper and print media.
Is the print sample similar to one in the print-quality tables?
(See Image defect tables.)
Compare the sample to the print-quality tables in this
chapter and perform the corresponding procedures that are
recommended. See Image defect tables.
Is the problem in the print cartridge, the transfer roller, or the
fuser?
Perform the half self-test functional check and the drumrotation functional check to determine the location of the
defect. See Half self-test functional check and Drum-rotation
functional check.
If the toner image is present on the drum surface, assume
that the first four functions of the electrophotographic
process are functioning, and troubleshoot the failure as a
transfer or fusing problem. If the image on the media is
correct before it enters the fuser, then the problem exists in
the fuser.
Image-formation troubleshooting
379
Check the print cartridge
Image-formation defects are often the result of problems with the print cartridge. If you suspect that
the print cartridge is the source of the problem, replace the print cartridge before troubleshooting
image defects.
Use the following list to make sure that the print cartridge is still operable.
■
Check the print cartridge to see if it has been disassembled or refilled.
■
Inspect the cartridge for toner leaking through worn seals. (If the drum has been manually
rotated, it might have caused internal damage, and toner spills can result.)
NOTE Print cartridges are rated for 10,000 (LaserJet 4250/4350), 12,000 (LaserJet 4200),
18,000 (LaserJet 4300), and 20,000 (LaserJet 4250/4350) images at 5% coverage. It is
possible to wear out the photoconductive drum gears and the cartridge seals before TONER
LOW appears on the control panel if average toner coverage is less than 5%. See EconoMode.
■
Check the surface of the photosensitive drum in the cartridge to see if it has been damaged or
scratched. Touching the drum contaminates the photosensitive surface and can cause spotting
and defects during printing.
■
Dark areas on the page might indicate that the drum has been exposed to light for too long. If
dark areas appear, stop the printer and wait a few minutes This should eliminate most defective
images. If not, placing the print cartridge in a dark environment for several days can restore
some life to the drum.
EconoMode
EconoMode creates draft-quality printing by reducing the amount of toner on the printed page by up
to 50%. Advise the customer to turn EconoMode on or off from the printer driver or software
program, because those settings override the control-panel settings. EconoMode settings can also
be changed from the print-quality menu on the control panel.
CAUTION Hewlett-Packard does not recommend full-time use of EconoMode. If EconoMode
is always used, the toner supply will probably outlast the mechanical parts in the print cartridge.
380
7
Troubleshooting
Half self-test functional check
The electrophotographic process can be subdivided into the following stages:
■
Cleaning (removes excess toner from the drum surface)
■
Conditioning (places a uniform electrical charge on the drum)
■
Writing (the laser strikes the surface of the drum to create an electrostatic image)
■
Developing (forms the toner image on the drum)
■
Transferring (charges transfer the image to the print media)
■
Fusing (heat and pressure produces a permanent image)
The purpose of the half self-test check is to determine which process is malfunctioning. Use this
procedure to perform the test:
1
Print a configuration page from the control panel INFORMATION menu.
2
Open the top cover after the paper advances half-way through the printer (about 3 to 5 seconds
after the main motor begins rotation). The leading edge of the paper should have advanced past
the print cartridge.
3
Remove the print cartridge.
4
Open the print cartridge drum shield to view the drum surface.
If a dark and distinct toner image is present on the drum surface, assume that the first four functions
of the electrophotographic process are functioning (cleaning, conditioning, writing, and developing),
and troubleshoot the failure as a transfer or fusing problem.
If no image is present on the photosensitive drum, perform the following check.
Drum-rotation functional check
The photosensitive drum, located in the print cartridge, must rotate in order for the print process to
work. The photosensitive drum receives its drive from the main gear assembly. Use this procedure to
determine whether the drum is rotating:
1
Open the top cover.
2
Remove the print cartridge.
3
Mark the cartridge drive gear with a felt-tipped marker. Note the position of the mark.
4
Install the print cartridge and close the top cover. The start-up sequence should rotate the drum
enough to move the mark on the gear.
5
Open the printer and inspect the gear that was marked in step 3. Verify that the mark moved. If
the mark did not move, inspect the main gear assembly to make sure that it meshes with the
print-cartridge gears. If the drive gears function but the drum does not move, replace the print
cartridge.
NOTE This test is especially important if refilled print cartridges are in use.
Image-formation troubleshooting
381
Image defect tables
Compare a printed sample of the image quality to these defect tables in order to determine a remedy.
Table 7-19 Print-quality image defects
See Table 7-20 Light
print (partial page).
See Table 7-21 Light
print (entire page).
See Table 7-22
Specks or dots.
See Table 7-22
Specks or dots.
See Table 7-22
Specks or dots.
Aa BbCc
Aa BbCc
Aa BbCc
Aa BbCc
Aa BbCc
See Table 7-23 Drop
outs and character
voids.
See Table 7-23 Drop
outs and character
voids.
See Table 7-23 Drop
outs and character
voids.
SeeTable 7-24 Lines.
See Table 7-24 Lines.
Dear Mr. Abhjerhjk,
The dhjhfiuhu if teint hhkjhjnf j us a weue jd, fnk
ksneh vnk kjdfkaakd ss hsjhnckkajhdhf kashfhnduujdn.
Pkshkkhklhlkhkhyufwe4yrh9jjflkln djd skshkshdcnksnjcnal
aksnclnslskjlncsl nas lnslna, ncnsljsjscljckn nsnclknsllj
hwlsdknls nwljs nlnscl nijhsn clsncij hn. Iosi fsjs jlkh andjna this
is a hn. jns fir stie a djakjd ajjssk. Thsi ius vnvlu tyeh lch afted,
and when hghj hgjhk jdj a dt sonnleh.
Suolklv jsdj hvjkrt ten sutc of jthjkfjkn vjdj hwjd, an olk d
.at fhjdjht ajshef. Sewlfl nv atug ahgjfjknvr kdkjdh sj hvjk
sjskrplo book. Camegajd sand their djnln as orged tyehha
as as hf hv of the tinhgh in the cescmdal vlala tojk. Ho sn shj
shjkh a sjca kvkjn? No ahdkj ahhtuah ahavjnv hv vh aefve r
Tehreh ahkj vaknihidh was skjsaa a dhkjfn anj
cjkhapsldnlj llhfoihrfhthej ahjkkjna oa h j a kah w asj kskjnk as
sa fjkank cakajhjkn eanjsdn qa ejhc pjtpvjlnv4purlaxnwl. Ana
l, and the askeina of ahthvnasm. Sayhvjan tjhhjhr ajn ve fh k
v nja vkfkahjd a. Smakkljl a sehiah adheufh if you do klakc k
w vka ah call lthe cjakha aa d a sd fijs.
Sincerely,
Mr. Scmehnjcj
See Table 7-25 Grey
background.
See Table 7-26 Loose
toner or toner smear.
See Table 7-26 Loose
toner or toner smear.
See Table 7-27
Repeating defects
and repeating images.
See Table 7-27
Repeating defects
and repeating images.
See Table 7-29 Skew.
See Table 7-30 Curl
or wave.
See Table 7-31
Creases.
See Table 7-32 White
lines.
AaBbCc
AaBbCc
AaBbCc
AaBbCc
AaBbCc
AaBbCc
See Table 7-28
Distorted images.
382
7
Troubleshooting
Table 7-19 Print-quality image defects (continued)
Aa BbCc
Aa BbCc
Aa BbCc
Aa BbCc
Aa BbCc
See Table 7-32 White
lines.
See Table 7-33
Smudged lines (either
direction).
See Table 7-34 White
spots on black.
See Table 7-35
Scattered lines.
See Table 7-36
Blurred print.
See
Table 7-39 Dark print.
See Table 7-37 Black
page.
See Table 7-38 Blank
page.
Table 7-20 Light print (partial page)
Possible cause
Recommended action(s)
The print cartridge is not installed
correctly.
Remove the print cartridge and then
reinstall it. The top cover should close
completely when the cartridge is fully
seated.
The toner supply is low or the print
cartridge developer is defective.
1
Shake the print cartridge gently to
redistribute the toner.
2
Replace the cartridge.
The transfer roller is worn or
contaminated or maintenance might be
due.
Image-formation troubleshooting
Print a supplies status page
(seeSupplies status page) and look at
the maintenance-kit gauge. If
maintenance is due, install a
maintenance kit. For information about
ordering a maintenance kit, see
chapter 8.
383
Table 7-21 Light print (entire page)
Possible cause
Recommended action
Begin by performing the half self-test functional check (see Half self-test
functional check). If the image on the print drum is light, proceed with
actions 1, 2, 3, 6, and 7. If the drum image is normal, proceed with
actions 5, 6, and 8.
The toner supply is low.
Shake the print cartridge gently to
redistribute the toner, or replace the
cartridge.
EconoMode is on. EconoMode saves
toner by reducing the dot density. The
effect might appear to be a print-quality
problem.)
Turn EconoMode off.
The print density is set incorrectly
Change the toner density (see Printquality submenu) to a darker setting
and try to print the job again.
The media does not meet
specifications. The moisture content,
conductivity, or surface finish might not
work correctly with the
electrophotographic process.
Try a different media type.
The transfer roller is defective or not
installed correctly. If the transfer roller
loses conductivity, it cannot pull toner
from the drum effectively.
Verify that the transfer roller is installed
correctly. If the transfer roller is
damaged, replace it. See Transfer roller .
The high-voltage connector springs are
dirty or damaged.
The high-voltage connector springs
protrude into the print cartridge cavity.
Clean the springs if they are dirty.
Replace the springs if they are
damaged or missing.
The laser/scanner shutter door is not
opening correctly.
1
Remove and reseat the print
cartridge.
2
Verify that the laser/scanner
shutter door can open correctly. If
necessary, replace the laser/
scanner assembly. See Laser/
scanner assembly.
The power supply is defective. (The
power supply contains the high-voltage
circuit.)
384
Replace the power-supply assembly.
See Power supply.
7
Troubleshooting
Table 7-22 Specks or dots
Possible cause
Recommended action
Specks
The interior of the printer is dirty.
NOTE Specks might appear
onthe page after a jam has
been cleared. Print two or
three more pages and see if
the specks diappear.
1
Print a few more pages and see if
the problem corrects itself.
2
Clean the inside of the printer (see
chapter 3).
3
Process a printer cleaning page.
See Running the cleaning page
manually.
The print cartridge is damaged.
Replace the print cartridge.
The media does not meet
specifications or is not stored correctly.
1
Turn over the stack of media in the
tray. Also try rotating the media
180°.
2
Check the media type and quality.
Replace the media if it does not
meet specifications, and advise the
customer to use the HPrecommended media and to store
it correctly. See Media
specifications.
The fuser rollers are worn.
Replace the fuser. See Fuser.
Dots (in the paper-path direction)
Image-formation troubleshooting
The static-eliminator teeth are dirty.
Clean the static-eliminator teeth by
using a small brush or compressed air.
Poor contact exists between the staticeliminator teeth and the power supply.
Clean the contacts, if they are dirty. If
the problem persists after cleaning, or
the contacts are damaged or
deformed, replace them.
The transfer roller is deformed or has
deteriorated.
Replace the transfer roller. See
Transfer roller .
The power supply is defective.
Replace the power-supply assembly.
See Power supply.
385
Table 7-23 Drop outs and character voids
386
Possible cause
Recommended action(s)
The user is printing on the wrong side
of the paper. The label on the ream of
paper indicates which side to print on.
The different surface properties of
some papers might cause problems if
the paper is loaded incorrectly.
1
Check the arrow on the paper
wrapper. From tray 1, the printer
prints on the side of the paper that
faces up. From the other trays, the
printer prints on the side of the
paper that faces down.
2
Turn over the stack of paper in the
tray. Also try rotating the stack
180°. Do not fan the stack.
3
Check the media type and quality.
Replace the media If it does not
meet specifications, and advise the
customer to use the HPrecommended media and to store
it correctly. See Media
specifications.
The media surface is too smooth or too
rough for adequate toner adhesion.
Use media that meets
HP specifications (see the HP LaserJet
Printer Family Paper Specification
Guide).
The transparencies do not meet
HP specifications.
Use HP-approved transparencies for
monochrome laserjet printers (see the
HP LaserJet Printer Family Paper
Specification Guide).
The operating environment does not
meet specifications.
Make sure that the printer is installed in
an area that meets the environmental
specifications. See Operating
environment.
The fuser roller is dirty and is lifting part
of the image off of the paper.
Process a cleaning page (see chapter
4). Several pages might be required if
the fuser is very dirty.
The print cartridge is defective or
nearly empty.
Replace the print cartridge.
The toner-density setting is incorrect.
Open the print-quality menu at the
control panel and adjust the tonerdensity setting. See Print-quality
submenu. Make sure that EconoMode
is off.
7
Troubleshooting
Table 7-23 Drop outs and character voids (continued)
(Continued)
Possible cause
Recommended action(s)
The fuser setting is incorrect for the
media type.
Open the configure-device menu at the
control panel and change the fusermode setting or select another media
type. See Configure-device menu.
The transfer roller is damaged, has
finger oils on its surface, or is dirty or
worn.
Clean the transfer roller by using a dry,
lint-free cloth. Do not touch the transfer
roller with your fingers. If the problem
persists, replace the transfer roller. See
Transfer roller .
Poor high-voltage contact exists
between the power supply and the print
cartridge or transfer roller.
Inspect the contacts and clean them if
they are dirty. Replace them if they are
damaged.
The power supply is defective (the
transfer voltage is low).
Replace the power-supply assembly.
See Power supply.
Possible cause
Recommended action(s)
Table 7-24 Lines
Vertical lines (in the paper-path direction)
Aa BbCc
Aa BbCc
Aa BbCc
Aa BbCc
Aa BbCc
Image-formation troubleshooting
Circumfrential scars appear on the
photosensitive drum.
Replace the print cartridge.
Foreign materials are deposited on the
laser outlet of the printer or the laser
inlet of the cartridge.
Remove the foreign materials.
The print cartridge is not installed
correctly.
Remove the print cartridge and then
reinstall it. The top cover should close
completely when the print cartridge is
fully seated.
The print cartridge is defective.
Replace the print cartridge.
The fuser roller is worn or dirty.
Process a printer cleaning page. See
Running the cleaning page manually.
Several pages might be required if the
fuser is very dirty. If the problem
persists, replace the fuser. See Fuser.
The static-eliminator teeth (just beyond
the transfer roller) are contaminated or
defective.
Clean the static-eliminator teeth by
using a small brush or compressed air.
Replace the assembly if it is damaged.
Light is leaking into the printer.
Make sure that all of the covers are in
place. Move the printer away from
windows that face the outdoors.
387
Table 7-24 Lines (continued)
Possible cause
Recommended action(s)
Horizontal lines (parallel to the paper-path direction)
Aa BbCc
Aa BbCc
Aa BbCc
Aa BbCc
Aa BbCc
If the lines are repeated at a consistent
interval down the page, a repetitive
defect exists.
Use the repetitive defect ruler to
determine the cause of this defect. See
Repetitive-defects troubleshooting.
Sharp, random lines indicate a problem
with the laser/scanner control circuitry.
1
Check the cables between the
dc controller and the laser/scanner
assembly.
2
If the cables are not connected,
connect the cables.
3
If, after checking the cables
between the dc controller and the
laser/scanner, the problem
persists, replace the laser/scanner
assembly. See Laser/scanner
assembly.
4
If, after replacing the laser/
scanner, the problem persists,
replace the dc controller PCA. See
Dc controller PCA.
5
If, after replacing the
dc controller PCA, the problem
persists, replace the Formatter
assembly. See Formatter
assembly .
(Continued)
Horizontal scars on the photosensitive
drum.
Replace the print cartridge.
Defective fuser film.
Replace the fuser.
Possible cause
Recommended action(s)
The media does not meet
specifications or is not stored correctly.
1
Turn over the stack of media in the
tray. Also try rotating the media
180°.
2
Check the media type and quality.
Replace the media if it does not
meet specifications, and advise the
customer to use the HPrecommended media and to store
it correctly. See Media
specifications.
Table 7-25 Grey background
388
The inside of the printer is dirty (toner
leaked out of the print cartridge).
Clean the inside of the printer (see
chapter 3), and install a new print
cartridge.
The operating environment does not
meet specifications.
Make sure that the printer is installed in
an area that meets the environmental
specifications. See Operating
environment.
7
Troubleshooting
Table 7-25 Grey background (continued)
Possible cause
Recommended action(s)
The customer is printing on the
envelope seams. (Printing on an
envelope seam can cause a
background-scatter problem.)
Move the text to an area that has no
seams.
The toner-density setting is wrong.
Open the print-quality menu at the
control panel and adjust the tonerdensity setting. See Print-quality
submenu. Make sure that EconoMode
is off.
The high-transfer setting is turned off.
Open the print-quality menu at the
control panel (see Print-quality
submenu). Select OPTIMIZE and set
HIGH TRANSFER=ON.
The print cartridge is defective.
Replace the print cartridge.
The high-voltage connector springs are
dirty or damaged.
The high-voltage connector springs
protrude into the print cartridge cavity.
Clean the springs if they are dirty.
Replace the springs if they are
damaged or missing.
The power supply is defective.
Replace the power-supply assembly.
See Power supply.
Table 7-26 Loose toner or toner smear
Image-formation troubleshooting
Possible cause
Recommended action(s)
The interior of the printer is dirty.
1
Print a few more pages and see if
the problem corrects itself.
2
Clean the inside of the printer (see
chapter 4)
3
Process a printer cleaning page.
See Running the cleaning page
manually.
The fuser roller is dirty.
Process a cleaning page (see Running
the cleaning page manually). Several
pages might be required if the fuser is
very dirty.
The media surface is too smooth or too
rough for toner adhesion.
Use media that meets
HP specifications (see the HP LaserJet
Printer Family Paper Specification
Guide).
The static-eliminator teeth (just beyond
the transfer roller) are contaminated or
are not grounded, which allows a static
charge to remain on the page.
Clean the static-eliminator teeth by
using a small brush or compressed air.
Replace the assembly if it is damaged.
389
Table 7-26 Loose toner or toner smear (continued)
Possible cause
Recommended action(s)
The fuser is defective. The print will
smear if the fuser does not heat
sufficiently to bond the toner to the
paper.
Replace the fuser. See Fuser.
The dc controller PCA is defective. The
dc controller PCA regulates the fuser
roller temperature.
Replace the dc controller PCA. See
Dc controller PCA.
Table 7-27 Repeating defects and repeating images
Possible cause
Recommended action(s)
The print cartridge or fuser is
damaged. The circumference of the
photoconductive drum inside of the
print cartridge is 94.2 mm (3.7 inches).
If the defect repeats at this interval, the
defect is associated with the drum.
Repetitive defects caused by the
LJ 4300 fuser roller repeat at 94.0 mm
(about 3.7 inches). Because the
LJ 4300 fuser roller is only 2 mm
(.07 inch) smaller than the
photoconductive drum, distinguishing
defects that are caused by the
photoconductive drum from those that
are caused by the LJ 4300 fuser roller
can be difficult.
1
Inspect the drum for scratches or
other damage. Replace the print
cartridge for defects that repeat at
37.7 mm (1.5 inches), 62.8 mm
(2.5 inches), 54.0 mm (2.1 inches),
or 94.2 mm (3.7 inches).
2
Process a printer cleaning page.
See Running the cleaning page
manually.
3
If the problem persists, and the
defect repeats at 75.0 mm
(2.95 inches) or 94.0 mm (about
3.7 inches), replace the fuser (see
Fuser).
For more information about
troubleshooting repeating defects, see
Repetitive-defects troubleshooting.
The rollers are dirty. A dirty roller in the
paper path can cause a repetitive
defect.
Examine and clean (or replace) the
rollers in the paper path.
The media does not meet specifications. Try a different media type or quality.
Preprinted form paper is used.
390
Some preprinted forms (for example,
letterheads) use an ink that cannot
stand up to the high temperatures in
the fuser. Check the media for type
and quality. Replace the media, and
advise the customer to use the HPrecommended media and to store it
correctly. See Media specifications.
7
Troubleshooting
Table 7-28 Distorted images
AaBbCc
AaBbCc
Possible cause
Recommended action(s)
The media does not meet
specifications or is not stored correctly.
1
Turn over the stack of media in the
tray. Also try rotating the media
180°.
2
Check the media type and quality.
Replace the media if it does not
meet specifications, and advise the
customer to use the HPrecommended media and to store
it correctly. See Media
specifications.
AaBbCc
AaBbCc
AaBbCc
AaBbCc
The operating environment does not
meet specifications.
Make sure that the printer is installed in
an area that meets the environmental
specifications. See Operating
environment.
The cables are not securely connected
to the laser/scanner assembly.
Reseat the cables that are connected
to the laser/scanner assembly.
The cables are not securely connected
to the dc controller PCA.
Reseat the cables that are connected
to the dc controller PCA.
The laser/scanner assembly is
defective.
Replace the laser/scanner. See Laser/
scanner assembly.
The gears are worn.
Inspect the gears that drive the print
cartridge and fuser. Replace the main
drive assembly. See Main drive
assembly.
The print-cartridge motor is defective.
(HP LaserJet 4250/4300/4350 only)
Replace the print-cartridge motor
(HP LaserJet 4250/4300/4350 only).
See Print-cartridge motor
(HP LaserJet 4250/4300/4350 series
printer only).
The dc controller PCA is defective.
Replace the dc controller PCA. See
Dc controller PCA.
Possible cause
Recommended action(s)
The media does not meet
specifications or is not stored properly.
1
Turn over the stack of media in the
tray. Also try rotating the media
180 degrees.
2
Check the media for type and
quality. Replace the media if it
does not meet specifications, and
advise the customer to use the HPrecommended media and to store
it correctly. See Media
specifications.
Table 7-29 Skew
Image-formation troubleshooting
391
Table 7-29 Skew (continued)
392
Possible cause
Recommended action(s)
The media is not loaded correctly or
the trays are not adjusted correctly.
Make sure that the media is loaded
correctly and that the guides fit snugly
against the stack.
The registration assembly is not
installed correctly or is damaged.
Make sure that the registration
assembly is installed correctly. If
necessary, replace the registration
assembly. See Registration assembly.
7
Troubleshooting
Table 7-30 Curl or wave
Possible cause
Recommended action(s)
The media does not meet
specifications or is not stored correctly.
1
Turn over the stack of media in the
tray. Also try rotating the media
180°.
2
Check the media for type and
quality. Replace the media if it
does not meet specifications, and
advise the customer to use the HPrecommended media and to store
it correctly. See Media
specifications.
The operating environment does not
meet specifications.
Make sure that the printer is installed in
an area that meets the environmental
specifications. See Operating
environment.
The wrong output bin is in use.
Print to a different output bin (top or
rear output bin).
The fuser setting is incorrect for the
media type.
Open the configure-device menu at the
control panel, and change the fusermode setting or select another media
type. See Configure-device menu.
1
Press
(SELECT button) or the
MENU button to open the menus.
2
Use (UP ARROW button) or
(DOWN ARROW button to scroll to
CONFIGURATION, and then press
.
3
Use or to scroll to PRINT
QUALITY, and then press .
4
Use or to scroll to FUSER
MODES, and then press .
5
Use or to scroll to the
submenu item that you want, and
then press .
6
Press the PAUSE/RESUME button or
the MENU button to close the menu.
(Continued)
Image-formation troubleshooting
393
Table 7-31 Creases
Possible cause
Recommended action(s)
The media does not meet
specifications or is not stored correctly.
1
Turn over the stack of media in the
tray. Also try rotating the media
180°.
2
Check the media for type and
quality. Replace the media if it
does not meet specifications, and
advise the customer to use the HPrecommended media and to store
it correctly. See Media
specifications.
The operating environment does not
meet specifications.
Make sure that the printer is installed in
an area that meets the environmental
specifications. See Operating
environment.
The media is not loaded correctly or
the trays are not adjusted correctly.
Make sure that the media is loaded
correctly and that the guides fit snugly
against the stack.
The wrong tray is in use.
Print from tray 1 when you use a media
that can cause image-formation or
paper-path problems.
The wrong output bin is in use.
Print to a different output bin (top or
rear output bin).
An obstruction exists in the paper path.
1
Check the paper path for debris.
2
Check for damaged components
that might be creasing the paper.
Table 7-32 White lines
Possible cause
Recommended action(s)
White lines in the direction of the paper path
The toner supply is low or the print
cartridge is defective.
1
Shake the print cartridge gently to
redistribute the toner.
2
Replace the cartridge.
The laser path is dirty.
Clean the laser path. Remove the laser/
scanner assembly (see Laser/scanner
assembly) and check for dirt or other
obstructions in the beam path.
The fuser is defective.
Replace the fuser. See Fuser.
The mirror in the laser/scanner is dirty.
Replace the laser/scanner assembly.
See Laser/scanner assembly.
White lines in the opposite direction of the paper path
The print drum is damaged.
394
Replace the print cartridge.
7
Troubleshooting
Table 7-32 White lines (continued)
Possible cause
Recommended action(s)
The fuser roller is damaged.
■
Process a printer cleaning page.
See Running the cleaning page
manually.
■
If the problem persists, replace the
fuser. See Fuser.
1
Check the cables between the
dc controller and the laser/scanner
assembly.
2
If the cables are not connected,
connect the cables.
3
If, after checking the cables
between the dc controller and the
laser/scanner, the problem
persists, replace the laser/scanner
assembly. See Laser/scanner
assembly.
4
If, after replacing the laser/
scanner, the problem persists,
replace the dc controller PCA. See
Dc controller PCA.
5
If, after replacing the
dc controller PCA, the problem
persists, replace the Formatter
assembly. See Formatter
assembly .
The laser beam or beam circuitry is
unstable.
Image-formation troubleshooting
395
Table 7-33 Smudged lines (either direction)
Aa BbCc
Aa BbCc
Aa BbCc
Aa BbCc
Aa BbCc
Possible cause
Recommended action(s)
The paper path is contaminated or
damaged.
1
Perform the half self-test functional
check. See Half self-test functional
check. If the drum is damaged,
replace the print cartridge.
2
Process a printer cleaning page.
See Running the cleaning page
manually. If the problem persists,
replace the fuser. See Fuser.
3
Check the tray 1 feed roller and the
rollers in the other trays. Clean or
replace the rollers as necessary.
4
Check for other sources of
contamination or damage in the
paper path and clean or replace
parts as necessary.
This type of defect might also be a
repetitive defect. See Repetitivedefects troubleshooting.
The print cartridge has passed its life
expectancy.
The print cartridge has an expected life
of 12,000 pages for the
HP LaserJet 4200 printer and
18,000 pages for the HP LaserJet 4300
printer. Replace the print cartridge.
Possible cause
Recommended action(s)
The media does not meet
specifications or is not stored correctly.
1
Turn over the stack of media in the
tray. Also try rotating the media
180°.
2
Check the media for type and
quality. Replace the media if it
does not meet specifications, and
advise the customer to use the HPrecommended media and to store
it correctly. See Media
specifications.
Table 7-34 White spots on black
396
The operating environment does not
meet specifications.
Make sure that the printer is installed in
an area that meets the environmental
specifications. See Operating
environment.
The print cartridge is defective.
Replace the print cartridge.
7
Troubleshooting
Table 7-35 Scattered lines
Possible cause
Recommended action(s)
The media does not meet
specifications or is not stored correctly.
1
Turn over the stack of media in the
tray. Also try rotating the media
180°.
2
Check the media for type and
quality. Replace the media if it
does not meet specifications, and
advise the customer to use the HPrecommended media and to store
it correctly. See Media
specifications.
The operating environment does not
meet specifications.
Make sure that the printer is installed in
an area that meets the environmental
specifications. See Operating
environment.
The toner-density setting is incorrect.
Open the print-quality menu at the
control panel and adjust the tonerdensity setting. See Print-quality
submenu.
The high-transfer setting is turned off.
Open the print-quality menu at the
control panel (see Print-quality
submenu). Select OPTIMIZE and set
HIGH TRANSFER=ON.
The line-detail setting is turned off.
Open the print-quality menu at the
control panel (see Print-quality
submenu). Select OPTIMIZE and set
LINE DETAIL=ON.
Possible cause
Recommended action(s)
The media does not meet
specifications or is not stored correctly.
1
Turn over the stack of media in the
tray. Also try rotating the media
180°.
2
Check the media for type and
quality. Replace the media if it
does not meet specifications, and
advise the customer to use the HPrecommended media and to store
it correctly. See Media
specifications.
Table 7-36 Blurred print
Image-formation troubleshooting
The operating environment does not
meet specifications.
Make sure that the printer is installed in
an area that meets the environmental
specifications. See Operating
environment.
The toner-density setting is incorrect.
Open the print-quality menu at the
control panel and adjust the tonerdensity setting. See Print-quality
submenu.
397
Table 7-36 Blurred print (continued)
Possible cause
Recommended action(s)
The high-transfer setting is turned off.
Open the print-quality menu at the
control panel (see Print-quality
submenu). Select OPTIMIZE and set
HIGH TRANSFER=ON.
The line-detail setting is turned off.
Open the print-quality menu at the
control panel (see Print-quality
submenu). Select OPTIMIZE and set
LINE DETAIL=ON.
Possible cause
Recommended action(s)
The print cartridge is defective.
Replace the print cartridge.
The high-voltage connector springs are
dirty or damaged.
The high-voltage connector springs
protrude into the print cartridge cavity.
Clean the springs if they are dirty.
Replace the springs if they are
damaged or missing.
The laser-beam drive circuit or highvoltage circuit is defective (not
supplying the correct voltage).
1
Check the cables between the
dc controller PCA and the highvoltage circuitry (part of the powersupply).
2
If the cables are not connected,
connect the cables.
3
If the cables are connected, but
the problem persists, replace the
power supply. See Power supply.
4
If, after replacing the power supply,
the problem persists, replace the
dc controller PCA. See
Dc controller PCA.
Table 7-37 Black page
The laser/scanner assembly is
defective.
Replace the laser/scanner assembly.
See Laser/scanner assembly.
The cables between the laser/scanner
Inspect and reseat the connectors. If
assembly and the dc controller PCA
necessary, replace the cables.
are not seated correctly or are defective.
398
7
Troubleshooting
Table 7-38 Blank page
Possible cause
Recommended action(s)
The software configuration is incorrect
(intermittent problem).
Make sure that the software program is
not sending incorrect page-length
requests or extra page-eject commands.
The network configuration is incorrect.
Some sharing devices on networks
might generate a blank page as a printjob separator.
Check with the network administrator.
Multiple feeds are occurring. The
printer might be feeding two or more
pages at on time (intermittent problem).
Remove the media from the tray and
flex the stack in one direction and then
the other to separate the pages. Do not
fan the stack. Replace the stack in the
tray.
The sealing tape was left in the print
cartridge.
Remove the sealing tape.
The print cartridge is empty or defective. Replace the print cartridge.
The laser/scanner shutter door is not
opening correctly.
Remove and reseat the print
cartridge.
2
Verify that the laser/scanner
shutter door can open correctly. If
necessary, replace the laser/
scanner assembly. See Laser/
scanner assembly.
No transfer-roller voltage is being
generated.
Without transfer-roller voltage, toner
does not transfer correctly from the
surface of the drum to the paper.
Perform the half self-test functional
check (see Half self-test functional
check) to check the
electrophotographic process. If
necessary, replace the transfer roller.
See Transfer roller .
The high-voltage connector springs are
dirty or damaged.
The high-voltage connector springs
protrude into the print cartridge cavity.
Clean the springs if they are dirty.
Replace the springs if they are
damaged or missing.
No drum ground path exists.
When no drum ground path exists, the
drum cannot discharge. The negative
charge on the drum repels toner, and
leaves a nearly-white page (possibly
with bubbled print). Check the drum
ground that runs from the contact point
in the center of the print drum.
The high-voltage circuit is defective.
Replace the power-supply assembly.
See Power supply.
The laser/scanner cable is defective.
Low-level signals that are exchanged
between the laser/scanner assembly
and the dc controller PCA might be
affecting the laser output. Replace the
laser/scanner cables.
(Continued)
Image-formation troubleshooting
1
399
Table 7-39 Dark print
Possible cause
Recommended action(s)
The toner-density setting is incorrect.
Open the print-quality menu at the
control panel and adjust the tonerdensity setting. See Print-quality
submenu.
The print cartridge drum is close to the
end of its expected life.
Replace the print cartridge.
The media does not meet
specifications or is not stored correctly.
1
Turn over the stack of media in the
tray. Also try rotating the media
180°.
2
Check the media for type and
quality. Replace the media, and
advise the customer to use the HPrecommended media and to store
it correctly. See Media
specifications.
The high-voltage contact to the power
supply is poor.
Clean the contacts if they are dirty. If
the problem persists after cleaning, or
if the contacts are damaged or
deformed, replace the contacts.
The laser/scanner assembly is
defective.
Replace the laser/scanner assembly.
See Laser/scanner assembly.
The high-voltage circuit is defective.
Replace the power-supply assembly.
See Power supply.
Repetitive-defects troubleshooting
Defects on printer rollers can cause image defects to appear at regular intervals on the page,
corresponding to the circumference of the roller that is causing the defect. Measure the distance
between defects that recur on a page. Use the following table or the repetitive-defect ruler to
determine which roller is causing the defect. To resolve the problem, try cleaning the roller first. If the
roller remains dirty after cleaning or if it is damaged, replace the part that is indicated in Table 7-40
Repetitive defects.
CAUTION Do not use solvents or oils to clean rollers. Instead, rub the roller with lint-free
paper. If dirt is difficult to remove, rub the roller with lint-free paper that has been dampened
with water.
Table 7-40 Repetitive defects
Roller
Distance between defects
Replacement part
Primary charging roller
37.7 mm (1.5 inches)
Print cartridge
Developer roller*
62.8 mm (2.5 inches)
Print cartridge
Fuser
75.0 mm (2.95 inches)
Fuser
94.0 mm (3.75 inches)
400
7
Troubleshooting
Table 7-40 Repetitive defects (continued)
Roller
Distance between defects
Replacement part
Photosensitive drum
94.2 mm (3.75 inches)
Print cartridge
*The developer-roller circumference is 62.8 mm (2.5 inches). A defect that is related to the developing roller will most likely
repeat at intervals of 54.0 mm (2.125 inches) because of the way the roller is geared.
NOTE Defects on the tray pickup rollers or the tray 1 pickup roller do not cause a repetitive
defect. Defects on these rollers cause a defect to appear only on the leading edge of the
image.
Figure 7-8 Repetitive-defect ruler
Image-formation troubleshooting
401
Troubleshooting the stacker and the stapler/stacker
When troubleshooting problems are related to the stacker or stapler/stacker, you might find that it is
difficult to distinguish whether the malfunction relates to the stacker, the stapler/stacker, or the
printer. The troubleshooting procedures in this section assume that the stacker or stapler/stacker is
installed on a printer that is working normally. Always correct any printer errors before attempting to
troubleshoot the stacker or stapler/stacker.
Stacker and stapler/stacker errors fall into four groups:
■
Jam errors
■
Paper-transport errors
■
Malfunction errors
■
Component errors
Jam and transport errors result when media does not move successfully from the printer through to
the stacker or stapler/stacker. Malfunction errors cause the stacker or stapler/stacker to stop or to
operate incorrectly. Component errors that are the result of an internal component failure and
generate errors messages that appear on the control-panel display. For more information about
control-panel messages, see Alphabetical printer messages and Numerical printer messages.
Initial checks
402
■
Before troubleshooting the stacker or stapler/stacker, verify that any printer errors have been
corrected. The printer must be operating normally before you can troubleshoot the stacker or
stapler/stacker. See Alphabetical printer messages and Numerical printer messages.
■
Inspect the stacker or stapler/stacker connectors on the unit and on the printer. Verify that the
connectors are not damaged, and that the stacker or stapler/stacker is installed correctly. If the
stacker or stapler/stacker was installed while the printer power was on, turn the power off and
then on again.
■
Verify that the environmental specifications are met. The specifications for the stacker and
stapler/stacker are the same as for the printer. See Operating environment.
■
Verify that the media being used meets HP specifications. See Supported media weights and
sizes and Paper and print media.
■
If the stacker or stapler/stacker was recently moved from a cold environment (for example, a
warehouse) into a warm room, condensation within the device might be causing the problem. If
condensation occurs, either wipe the parts with a dry, lint-free cloth, or leave the stacker or
stapler/stacker turned on for 10 to 20 minutes.
7
Troubleshooting
Jam errors
The following sections describe stacker and stapler/stacker jam errors.
Stacker and stapler/stacker paper path
Figure 7-9 Stacker and stapler/stacker paper path
Troubleshooting the stacker and the stapler/stacker
403
Stacker paper-path test
Use the following procedure to perform a stacker paper-path test.
1
Press
2
Use
(UP ARROW button) or
3
Use
or
4
Use or
press .
5
Use or to scroll to COPIES then press
and then press .
6
Use or to scroll to PRINT TEST PAGE, and then press
number of pages and send them to the stacker.
(SELECT button) or the MENU button to open the menus.
(DOWN ARROW button) to scroll to DIAGNOSTICS, and then press
to scroll to PAPER PATH TEST, and then press
to scroll to DESTINATION, and then press
.
.
. Scroll to OPTIONAL BIN 1, and then
. Scroll to the approppriate number of test pages,
. The printer will print the selected
Stapler/stacker paper-path test
Use the following procedure to perform a stapler/stacker paper-path test.
1
Press
2
Use (UP ARROW button) or
press .
3
Use
or
to scroll to STAPLER STACKER, and then press
4
Use
or
to scroll to STAPLES, and then press
5
Press the PAUSE/RESUME button or the MENU button to exit the submenus.
6
Press
7
Use
or
to scroll to DIAGNOSTICS, and then press
8
Use
or
to scroll to PAPER PATH TEST, and then press
9
Use or
press .
10 Use
(SELECT button) or the MENU button to open the menus.
(DOWN ARROW button) to scroll to CONFIGURE DEVICE, and then
.
. Scroll to ONE, and then press
.
or THE MENU button to open the menus.
or
to scroll to DESTINATION, and then press
to scroll to COPIES, and then press
.
.
. Scroll to OPTIONAL BIN 1,and then
. Scroll to 10, and then press
.
11 Use or to scroll to PRINT TEST PAGE, and then press . The printer will print 10 test pages
and send them to the stapler/stacker where they are stapled.
Table 7-41 Printer-connection-area jam troubleshooting
Possible cause
Recommended action(s)
The leading edge of the media has emerged from the top of the printer.
404
The feed-motor is defective.
Turn the printer off and then on. Verify that the feed rollers
rotate correctly. If the rollers do not rotate, replace the
stacker or stapler/stacker.
The feed rollers are worn or defective.
Clean the rollers if they are dirty. If necessary, replace the
stacker or stapler/stacker.
7
Troubleshooting
Table 7-41 Printer-connection-area jam troubleshooting (continued)
Possible cause
Recommended action(s)
The inlet-sensor (PS1101) arm cannot move freely or is
damaged.
Inspect the inlet sensor (PS1101). See Stacker and stapler/
stacker switches and sensors. Verify that the sensor arm
can move freely. If necessary, replace the stacker or stapler/
stacker.
The inlet-sensor (PS1101) spring is defective or damaged.
Reseat the inlet-sensor (PS1101) spring. See Stacker and
stapler/stacker switches and sensors. If necessary, replace
the stacker or stapler/stacker.
The stacker or stapler/stacker PCA is defective.
Replace the stacker or stapler/stacker.
The leading edge of the media has not emerged from the top of the printer.
The deflector cannot move freely or is defective.
Inspect the deflector. Verify that it can move freely and is not
damaged. If necessary, replace the stacker or stapler/stacker.
The deflector solenoid (SL1101) is damaged.
If necessary, replace the deflector mechanism in the printer.
The stacker or stapler/stacker PCA is defective.
Replace the stacker or stapler/stacker.
Table 7-42 Delivery area jam troubleshooting
Possible cause
Recommended action(s)
The leading edge of the media has passed the stapler or stapler/stacker delivery rollers.
The staples are deformed (stapler/stacker only).
Replace the stapler unit. See Maintaining the stapler unit.
The paper-delivery-sensor (PS1102) arm cannot move
freely or is damaged.
Inspect the paper-delivery sensor (PS1102). See Stacker
and stapler/stacker switches and sensors. Verify that the
sensor arm can move freely. If necessary, replace the
stacker or stapler/stacker.
The paper-delivery-sensor (PS1102) spring is defective or
damaged.
Reseat the paper-delivery sensor (PS1102) spring. See
Stacker and stapler/stacker switches and sensors. If
necessary, replace the stacker or stapler/stacker.
The paper-delivery sensor (PS1102) is defective.
Replace the stacker or stapler/stacker.
Troubleshooting the stacker and the stapler/stacker
405
Paper-transport errors
Table 7-43 Paper-transport-error troubleshooting
Possible cause
Recommended action(s)
The rollers are worn, dirty, or defective.
Inspect all of the stacker or stapler/stacker rollers. Clean any
dirty rollers. If necessary, replace the stacker or stapler/
stacker.
The feed guide is damaged, causing the leading edge of the
media to bend
Inspect the feed guide. If, necessary, replace the stacker or
stapler/stacker.
An obstruction in the paper path causes skewed print.
■
The paper path is contaminated. Clean the paper path.
See Stacker and stapler/stacker paper path.
■
The rollers are worn, dirty or defective. Inspect all of the
stacker or stapler/stacker rollers. Clean any dirty rollers.
If necessary, replace the stacker or stapler/stacker.
Malfunction errors
Table 7-44 Malfunction-error troubleshooting
Possible cause
Recommended action(s)
No power
The stacker or stapler/stacker connector is not fully seated
or is damaged.
The stacker or stapler/stacker PCA is defective.
■
Inspect the stacker or stapler/stacker connectors on the
unit and on the printer. Verify that these connectors are
not damaged, and that the stacker or stapler/stacker is
installed correctly and fully seated. If the stacker or
stapler/stacker was installed when the printer power
was on, turn the power off and then on again.
■
Turn the printer power off. Remove and reinstall the
stacker or stapler/stacker. Turn the printer power on
again.
Replace the stacker or stapler/stacker.
No stapling (stapler/stacker only)
406
The staple cartridge contains no staples.
Replace the stapler-unit staple cartridge. See Stapler/
stacker stapler assembly.
The stapler unit is defective.
Replace the stapler unit. See Stapler/stacker stapler assembly.
The print job contains more than one paper size.
When using the stapler/stacker, limit the print job to a single
page size.
The stapler/stacker PCA is defective.
Replace the stapler/stacker.
7
Troubleshooting
Component errors
NOTE When component errors occur, a control-panel message appears on the controlpanel display. For more information about these messages, see Alphabetical printer
messages and Numerical printer messages.
Table 7-45 Component-error troubleshooting
Possible cause
Recommended action(s)
The jogger mechanism or motor (M1102) is defective
(stapler/stacker only).
Inspect the jogger mechanism. See Stacker and stapler/
stacker motors and solenoids. If necessary, replace the
stapler/stacker.
The paddle mechanism or motor (M1101) is defective
(stapler/stacker only).
■
Inspect the paddle mechanism. See Stacker and stapler/
stacker motors and solenoids. If necessary, replace the
stapler/stacker.
■
The stapler/stacker PCA is defective. Replace the
stapler/stacker.
■
The stapler unit has failed. Replace the stapler unit. See
Maintaining the stapler unit.
■
The stapler/stacker PCA is defective. Replace the
stapler/stacker.
■
The staples are defective. Replace the staple cartridge.
■
The stapler unit is defective. Replace the stapler unit.
See Maintaining the stapler unit.
■
The stapler/stacker PCA is defective. Replace the
stapler/stacker.
■
The staple cartridge contains no staples. Replace the
staple cartridge. See Loading staples.
■
Replace the stapler unit. See To remove and replace
the stapler unit.
■
The stapler/stacker PCA is defective. Replace the
stapler/stacker.
■
The inlet-sensor (PS1101) lever does not move
smoothly or is damaged. See Stacker and stapler/
stacker switches and sensors. Inspect the inlet sensor.
Verify that the sensor lever can move freely.
■
The delivery sensor (PS1102) lever does not move
smoothly or is damaged. See Stacker and stapler/
stacker switches and sensors. Inspect the delivery
sensor. Verify that the sensor lever can move freely.
■
If necessary, replace the stacker or stapler/stacker.
The stapler mechanism or motor (M1104) is defective
(stapler/stacker only).
The 13.12.07 JAM IN THE STAPLER message appears on
the control-panel display, but no jam is present in the stapler
unit (stapler/stacker only).
The STAPLER LOW ON STAPLES or STAPLER OUT OF
STAPLES message appears on the control-panel display,
but the stapler unit contains a staple cartridge (stapler/
stacker only).
A 13.XX.YY JAM message appears on the control-panel
display, but no jam is visible in the stacker or stapler/stacker.
Troubleshooting the stacker and the stapler/stacker
407
Table 7-45 Component-error troubleshooting (continued)
Possible cause
Recommended action(s)
The OUTPUT PAPER PATH OPEN message appears on
the control-panel display, but the jam access and stapler unit
doors are closed.
■
The door-open switch (SW1101) is damaged or
defective. See Stacker and stapler/stacker switches and
sensors. Replace the stacker or stapler/stacker.
■
The stapler/stacker PCA is defective. Replace the
stacker or stapler/stacker.
■
The paper-full sensor (PS1106) is damaged or
defective. See Stacker and stapler/stacker switches and
sensors. Replace the stacker or stapler/stacker.
■
The stapler/stacker PCA is defective. Replace the
stacker or stapler/stacker.
The optional bin 1 full message appears on the controlpanel display, but bin 1 is empty or not full.
408
7
Troubleshooting
Printer-component locations
The following sections describe the printer-component locations.
Main printer parts
4
3
5
2
6
1
Figure 7-10 Location of the main printer parts (1 of 4)
1
Feed roller assembly
2
Lifter-drive assembly
3
Laser/scanner assembly
4
Duplexing-pendulum assembly
5
Main-drive assembly
6
Paper-pickup-drive assembly
Printer-component locations
409
2
3
4
1
Figure 7-11 Location of the main printer parts (2 of 4)
410
1
Registration assembly
2
Delivery assembly
3
Fuser assembly
4
Tray 1 pickup assembly
7
Troubleshooting
2
1
3
Figure 7-12 Location of the main printer parts (3 of 4)
1
Transfer roller
2
Tray 1 pickup roller
3
Separation pad
Printer-component locations
411
1
2
3
Figure 7-13 Location of the main printer parts (4 of 4)
412
1
Pickup roller
2
Feed roller
3
Separation roller (in the tray)
7
Troubleshooting
Printer switches and sensors
PS104
SW102
SW101
TH2
PS108
PS106
PS109
PS103
PS102 PS101
PS107
PS105
Figure 7-14 Location of the printer switches and sensors
SW101
Top-cover-open switch
SW102
Paper-size switch
PS101
Tray 2 paper sensor
PS102
Pre-feed sensor
PS103
Top-of-page sensor
PS104
Output-bin-full sensor
PS105
Tray 1 paper sensor (on the tray 1 pickup assembly)
PS106
Paper-width sensor #1
PS107
Paper-stack-position sensor
PS108
Fuser-assembly-delivery sensor
PS109
Paper-width sensor #2 (LJ 4250/4350 only)
TH2
Fuser temperature sensor (LJ 4250/4350 only)
Printer-component locations
413
Printer motors and fans
2
3
4
1
5
Figure 7-15 Location of the printer motors and fans
414
1
Main cooling fan
2
Main drive motor
3
Right-side cooling fan (HP LaserJet 4250/4300/4350 only)
4
Print-cartridge motor (HP LaserJet 4250/4300/4350 only)
5
Lifter-drive motor
7
Troubleshooting
Printer PCAs
2
1
Figure 7-16 Location of the printer PCAs
1
Power-supply assembly (high-voltage and low-voltage circuits)
2
Dc controller PCA
Printer-component locations
415
Accessory component locations
The following sections describe the component locations within the printer accessories.
500-sheet feeder main parts
4
3
5
2
1
Figure 7-17 Location of the 500-sheet paper-feeder main parts
416
1
500-sheet feeder separation roller (in the tray)
2
500-sheet feeder feed roller
3
500-sheet feeder pickup roller
4
500-sheet feeder lifter-drive assembly
5
500-sheet feeder pickup-gear assembly
7
Troubleshooting
500-sheet feeder switches, sensors, solenoids, and PCAs
2
1
3
4
5
Figure 7-18 Location of the 500-sheet paper feeder switches, sensors, solenoids, and PCAs
1
500-sheet feeder paper-size switch (SW801)
2
500-sheet feeder control PCA
3
500-sheet feeder paper-stack-position sensor (PS802)
4
500-sheet feeder paper-pickup solenoid (SL801)
5
500-sheet feeder paper sensor (PS801)
Accessory component locations
417
1,500-sheet feeder main parts
1
2
Figure 7-19 Location of the 1,500-sheet paper feeder main parts (1 of 2)
418
1
1,500-sheet feeder lifter-drive assembly
2
1,500-sheet feeder pickup-gear assembly
7
Troubleshooting
1
2
3
Figure 7-20 Location of the 1,500-sheet paper feeder main parts (2 of 2)
1
1,500-sheet feeder feed roller
2
1,500-sheet feeder pickup roller
3
1,500-sheet feeder separation roller (in the door)
Accessory component locations
419
1,500-sheet feeder switches, sensors, solenoids, and PCAs
3
2
4
5
1
6
Figure 7-21 Location of the 1,500-sheet switches, sensors, solenoids, and PCAs
420
1
1,500-sheet feeder paper-stack-position sensor (SR2)
2
1,500-sheet feeder paper-size sensor (SW1)
3
1,500-sheet feeder control PCA
4
1,500-sheet feeder paper sensor (SR3)
5
1,500-sheet feeder paper-pickup solenoid (SL1)
6
1,500-sheet feeder door sensor (SR1)
7
Troubleshooting
Stapler/stacker stapler assembly
1
Figure 7-22 Location of the stapler/stacker stapler unit
1
Stapler unit (stapler/stacker accessory only)
Accessory component locations
421
Stacker and stapler/stacker switches and sensors
4
5
3
6
2
1
7
Figure 7-23 Location of the stacker and stapler/stacker switches and sensors
422
1
Delivery-roller disengaging sensor (stapler/stacker only; PS1104)
2
Paddle home-position sensor (stapler/stacker only; PS1103)
3
Paper-delivery sensor (PS1102)
4
Paper-full sensor (PS1106)
5
Jogger home-position sensor (stapler/stacker only; PS1105)
6
Door-open switch (SW1101)
7
Paper-inlet sensor (PS1101)
7
Troubleshooting
Stacker and stapler/stacker motors and solenoids
3
4
2
1
5
Figure 7-24 Location of the stacker and stapler/stacker motors and solenoids
1
Deflector solenoid (SL1101)
2
Paddle mechanism and motor (stapler/stacker only; M1101)
3
Jogger mechanism and motor (stapler/stacker only; M1102)
4
Clamp solenoid (stapler/stacker only; SL1102)
5
Feed mechanism and motor (M1103)
Accessory component locations
423
Stacker and stapler/stacker PCAs
2
1
Figure 7-25 Location of the stacker and stapler/stacker PCAs
424
1
Stacker or stapler/stacker driver PCA
2
Stacker or stapler/stacker LED PCA
7
Troubleshooting
Printer and accessory wiring diagrams
The following sections contain wiring diagrams for the printer and its accessories.
Printer and accessory wiring diagrams
425
HP LaserJet 4200 wiring diagram
Figure 7-26 HP LaserJet 4200 wiring diagram
426
7
Troubleshooting
Printer and accessory wiring diagrams
427
Figure 7-27 HP LaserJet 4250 wiring diagram
SW102
Paper size
switches
J90
J120
6
5
4
3
2
1
4
3
2
1
1
2
3
4
1 24R
2 /SEL2
3 GND
4 OPSOUT
5 OPSIN
6 OPSCLK
M103
M
12
J71
9
8
7
6
5
4
3
2
1
J1001(1500F)
J105LA
J105DA
B6
A6
Paper feeder or Paper deck
J105LB
J105D
J105L
J91
J80
B6
A6
6
5
4
3
2
1
1
2
3
1
2
3
4
5
6
1
2
3
1
2
1
2
M102
Drum motor
M
J121
J128DDW
J128LDW
2
J136M 1
J134M
TB28
HEATER1
1
FUSERBIAS2
J50
H2
1
H1
1
2
1 J136F
J135
1
2
Intermediate PCA
Formatter
J81
J73
J51
J1300
FN101
Cooling fan #1
J64
123
2
1
Environment
temperature
sensor
TH3
2
J63
Heater
1
2
3
J137
1
2
1
2
3
2
J103
N
H
FG
J82
3
2
1
H
FG
N
J77
J123
J106DB
M
M101
J97
J122
J98
Memory tag
J600
Main motor
J78
123
Cooling fan #2
FN103
DC controller PCA
J87
J106DA
J106LA
J1101
123
Operation panel
J96
8
7
6
5
4
3
2
1
8
7
6
5
4
3
2
1
GND
CAN-H
CAN-L
GND
GND
PWRON
24R
24R
Stacker
or
Staple
stacker
Paper width
Paper width
Top of page
#1 sensor
#2 sensor
sensor
PS106
PS108 Multi-purpose PS103
Pre-feed
tray paper
sensor
sensor
PS102
123
PS105
123
123
J150
J0150
LINE INPUT 100V
J01 LINE INPUT 200V
2
1
J1
Power supply PCA
H1
N2
N2
H1
1
2
3
4
1
2
3
4
5
8
7
6
5
1
2
3
4
J106L
J106D
8
7
6
5
1
2
3
4
4
3
2
1
5
4
3
2
1
1
2
3
4
5
6
7
8
1
2
3
4
5
6
7
8
1
2
3
MFDRV 1
MFLK 2
GND 3
J106LB
C15
C14
C13
C12
C11
C10
C16
C9
C8
C7
C6
C5
C4
C3
C2
C1
B15
B14
B13
B12
B11
B9
B10
B16
B8
B7
B6
B5
B4
B3
B2
B1
J200
A9
A16
A8
A15
A7
A6
A14
A5
A13
A4
A12
A3
A11
A2
A10
A1 J103F
A16
A15
A9
A8
A14
A7
A13
A6
A12
A5
A11
A4
A3
A10
A2
A1 J103M
B15
B14
B13
B12
B11
B9
B10
B16
B8
B7
B6
B5
B4
B3
B2
B1
C15
C14
C13
C12
C11
C10
C16
C9
C8
C7
C6
C5
C4
C3
C2
C1
J76
J86
TB15
TB16
J134F
HEATER2
1
2
3
4
5
6
1
FG HEATERC
FUSERBIAS1
J128LB
1
2
3
4
5
6
J131L
J131DH
J131D
TB14
Thermoswitch
TB17 TP1 TB18
1
2
TP
3.3V
GND
24VB
/FSRCK
1
2
3
GND
CAN-H
CAN-L
GND
GND
PWRON
24U
24U
Fuser unit
TB1301
1
2
3
4
1
2
3
J128MB
24VA
GND
GND
GND
3.3V
3.3V
J128DWH
J128DA
J128DB
1
2
3
4
5
6
1
2
3
4
5
6
J105DB
J807F
(500F)
J99
9
8
7
6
5
4
3
2
1
J109 Lifter motor
J93
J124DB
J124LB
PS107
Paper stack
surface sensor
1
2
3
4
5
6
3
2
1
1
2
3
GND
FSRTYP
GND
DELTH
FSRTHG1
FSRTH1
DELSNS
GND
DELDR
PS101
Cassette paper
sensor
24R
/SEL2
GND
OPSOUT
OPSIN
OPSCLK
TB33
TB36
TB32
TB34
TB31
TB35
PRIPWM
1
2 /PRACCK
/DEVACCK
3
4 /DEVACON
TNRSP1
5
6 TNRSP2
7
/PRDCPWM
8 /DEVDCCK
9
DEVACCH
10 /TRFMCK
11 /PRDCCK
12 /TRFPCK
13 TRFPPWM
TB10
14 TRFAD
15 /DEVDCPWM TB12
16 FSRPWM
TB11
17 /HISPD
18 GND
19 GND
20 24VB
TB1300
24VB
21
1
2
3
4
4
3
2
1
21
23
15
14
13
12
11
10
9
8
7
6
5
4
3
2
1
1
2
J129
1
2
3
4
5
6
6
5
4
3
2
1
J72
1 /CSTSIZE0
2 /CSTSIZE1
3 GND
4 /CSTSIZE2
5 CSTSNSDR
6 GND
7 /CSTSNS
8 PLVLSNSDR
9 GND
10 /PLVLSNS
3.3V 4
GND 3
24VB 2
/FSRCK 1
J124DA
1
2
3
4
5
6
7
8
9
10
1
2
3
4
5
6
7
8
24VA 1
GND 2
GND 3
GND 4
OPSCLK
3.3V 5
OPSIN
3.3V 6
OPSOUT
GND
/SEL0
24R
PRIPWM 1
NC
/PRACCK 2
/DEVACCK
3
/DEVACON 4
TNRSP1 5
3
TNRSP2
6
2
/PRDCPWM 7
1
/DEVDCCK
8
DEVACCH
9
24R
/TRFMCK
10
24R
/PRDCCK
11
/DMFG
/TRFPCK 12
/DMDEC TRFPPWM
13
/DMACC
TRFAD 14
GND /DEVDCPWM 15
GND
FSRPWM 16
GND
/HISPD 17
GND 18
GND 19
24VB 20
24VB 21
PWRON
CAN-L
CAN-H
GND
GND
/PDLV
/PFED
/TOP
/CCRT
SCLK
SC
GND
/BD
GND
VDO2
/VDO2
GND
GND
/VDO1
VDO1
GND
GND
5V
5V
FPO
FPCK
/FPCS
FPI
J124LA
3
2
1
1 24R
2 /LMON
1
2
3
4
5
6
7
1
2
3
4
5
6
7
8
28
27
26
25
24
23
22
21
20
19
18
17
16
15
14
13
12
11
10
9
8
7
6
5
4
3
2
1
ENVTMP 1
NC
1
ENVTMPG 2
2 ENVTMP ENVTMPG 3
3
ENVTMPG
4 MFLK
5
/MFHF
6 MFFL
MFDRV 1
7
/CURLIM
MFLK 2
8 CURRMS
GND 3
9
FSRSAFE
10 /RLD
11 FSRD2
12 FSRD1
13 /ZEROX
14 /AC200
15 5V
16 5V
17 5V
18 5V
19 5V
20 GND
GND
22 GND
GND
NC 1
ENVTMP 2
ENVTMPG 3
MFLK 4
/MFHF 5
MFFL 6
/CURLIM 7
CURRMS 8
/RLD 9
FSRSAFE 10
FSRD2 11
FSRD1 12
/ZEROX 13
/AC200 14
5V 15
5V 16
5V 17
5V 18
5V 19
GND 20
GND 21
GND 22
GND 23
J124L
S1103
S1102
S1101
3
2
1
S931 1
S932 2
1
2
3
4
5
6
7
7
6
5
4
3
2
1
28
27
26
25
24
23
22
21
20
19
18
17
16
15
14
13
12
11
10
9
8
7
6
5
4
3
2
1
TB85
3.3V
TB101
3.3V
GND
3.3V
FPO
FPI
FPCK
/FPCS
GND
5V
J703
3
2
1
1
2
3
3
2
1
4
3
2
1
7
6
5
4
3
2
1
PWRON
CAN-L
CAN-H
GND
GND
/PDLV
/PFED
/TOP
/CCRT
SCLK
SC
GND
/BD
GND
VDO2
/VDO2
GND
GND
/VDO1
VDO1
GND
GND
5V
5V
FPO
FPCK
/FPCS
FPI
TB86
GND
TB102
GND
/WIDTH2SNS 15
GND 14
WIDTH2DR 13
/MPSNS 12
GND 11
MPDR 10
/TOPSNS 9
GND 8
TOPDR 7
/PRESNS 6
GND 5
PREDR 4
/WIDTHSNS 3
GND 2
WIDTHDR 1
1
2
4
3
2
1
24VA 1
NC 2
24VC 3
24R 1
NC 2
/TRCL 3
24R
/MPSL
24R 1
/CSTSL 2
FULDR 1
GND 2
FULSNS 3
J84
J94
J143
J95
1
2
3
J89
1
2
3
6
5
4
3
2
1
J79
J92
1
2
J85
1
2
3
1
FT1
FT3
1
2
J905M
J118DA
J118DB
4
3
2
1
3
2
1
1
2
3
2
1
1
2
3
2
1
1
2
3
4
1
2
3
3
2
1
3
2
1
J83
J113
SW800
1
2
Test switch
4
3
2
1
4
3
2
1
J144
1
2
3
4
5
6
7
1
2
3
4
5
6
7
BD PCA
24R
/SMACC
/SMDEC
GND
3.3V
/BDI
GND
TB26
J905
J906
1
SW101
1
2
3
4
5
6
24R
/SEL1
GND
OPSOUT
OPSIN
OPSCLK
J145
Envelope feeder
J901
1
2
3
4
5
6
Door open
detection switch
Feed roller clutch
Multi-purpose tray
pick-up solenoid
Cassette pick-up
solenoid
Face-down tray
paper full sensor
Laser driver
Laser/scanner unit
12
11
10
9
8
7
6
5
4
3
2
1
12
11
10
9
8
7
6
5
4
3
2
1
1
2
3
4
5
6
7
8
9
10
11
VDO1 1
/VDO1 2
CNT0 3
CNT1 4
CNT2 5
VDO2 6
/VDO2 7
LPHI 8
PDOUT 9
GND 10
5V 11
Scanner motor
24R 6
/SEL1 5
GND 4
OPSOUT 3
OPSIN 2
OPSCLK 1
IOTTXD
3.3V
IOTRXD
GND
Fuser temperature
Paper temperature
thermistor
sensor
Fuser delivery
TH1
TH2
2
1
paper
sensor
2
1
PS108
6
5
4
3
2
1
1
2
3
4
FPCK
/FPCS
FPI
+5V
FPO
GND
SDL
SCL
GND
VDO1
/VDO1
GND
GND
GND
GND
VDO2
/VDO2
GND
/BD
GND
GND
SC
SCLK
GND
/CCRT
/TOP
GND
/PFED
/PDLV
+3.3V
+3.3V
+3.3V
+3.3V
+3.3V
+3.3V
+3.3V
+3.3V
+3.3V
GND
CAN-H
CAN-L
GND
PWRON
GND
GND
GND
GND
GND
8
7
6
5
4
3
2
1
1 24R
2 24R
3 24R
4 /MMFG
5 /MMDEC
6 /MMACC
7 GND
8 GND
9 GND
10
Duplexing unit
4
3
2
1
4
3
2
1
GND 6
/SEL0 5
24VA 4
OPSCLK 3
OPSIN 2
OPSOUT 1
FPCK
/FPCS
FPI
+5V
FPO
GND
SDL
SCL
GND
VDO1
/VDO1
GND
GND
GND
GND
VDO2
/VDO2
GND
/BD
GND
GND
SC
SCLK
GND
/CCRT
/TOP
GND
/PFED
/PDLV
+3.3V
+3.3V
+3.3V
+3.3V
+3.3V
+3.3V
+3.3V
+3.3V
+3.3V
GND
CAN-H
CAN-L
GND
PWRON
GND
GND
GND
GND
GND
8
7
6
5
4
3
2
1
1
2
3
4
5
6
7
8
1
2
3
4
5
6
7
8
1
2
3
4
5
6
7
8
9
10
9
8
7
6
5
4
3
2
1
3
CL
CL101
9
8
7
6
5
4
3
2
1
1
COILA 1
COILB 2
3
123
SL102
SL
12
1
123
J88
J118D
SL101
SL
PS104
HP LaserJet 4250 wiring diagram
HP LaserJet 4300 wiring diagram
Figure 7-28 HP LaserJet 4300 wiring diagram
428
7
Troubleshooting
Printer and accessory wiring diagrams
429
Figure 7-29 HP LaserJet 4350 wiring diagram
SW102
Paper size
switches
J90
J120
6
5
4
3
2
1
4
3
2
1
1
2
3
4
1 24R
2 /SEL2
3 GND
4 OPSOUT
5 OPSIN
6 OPSCLK
M103
M
12
J71
9
8
7
6
5
4
3
2
1
J1001(1500F)
J105LA
J105DA
B6
A6
Paper feeder or Paper deck
J105LB
J105D
J105L
J91
J80
B6
A6
6
5
4
3
2
1
1
2
3
1
2
3
4
5
6
1
2
3
1
2
1
2
M102
Drum motor
M
J121
J128DDW
J128LDW
2
J136M 1
J134M
TB28
HEATER1
1
FUSERBIAS2
J50
H2
1
H1
1
2
1 J136F
J135
1
2
Intermediate PCA
Formatter
J81
J73
J51
J1300
FN101
Cooling fan #1
J64
123
2
1
Environment
temperature
sensor
TH3
2
J63
Heater
1
2
3
J137
1
2
1
2
3
2
J103
N
H
FG
J82
3
2
1
H
FG
N
J77
J123
J106DB
M
M101
J97
J122
J98
Memory tag
J600
Main motor
J78
123
Cooling fan #2
FN103
DC controller PCA
J87
J106DA
J106LA
J1101
123
Operation panel
J96
8
7
6
5
4
3
2
1
8
7
6
5
4
3
2
1
GND
CAN-H
CAN-L
GND
GND
PWRON
24R
24R
Stacker
or
Staple
stacker
Paper width
Paper width
Top of page
#1 sensor
#2 sensor
sensor
PS106
PS108 Multi-purpose PS103
Pre-feed
tray paper
sensor
sensor
PS102
123
PS105
123
123
J150
J0150
LINE INPUT 100V
J01 LINE INPUT 200V
2
1
J1
Power supply PCA
H1
N2
N2
H1
1
2
3
4
1
2
3
4
5
8
7
6
5
1
2
3
4
J106L
J106D
8
7
6
5
1
2
3
4
4
3
2
1
5
4
3
2
1
1
2
3
4
5
6
7
8
1
2
3
4
5
6
7
8
1
2
3
MFDRV 1
MFLK 2
GND 3
J106LB
C15
C14
C13
C12
C11
C10
C16
C9
C8
C7
C6
C5
C4
C3
C2
C1
B15
B14
B13
B12
B11
B9
B10
B16
B8
B7
B6
B5
B4
B3
B2
B1
J200
A9
A16
A8
A15
A7
A6
A14
A5
A13
A4
A12
A3
A11
A2
A10
A1 J103F
A16
A15
A9
A8
A14
A7
A13
A6
A12
A5
A11
A4
A3
A10
A2
A1 J103M
B15
B14
B13
B12
B11
B9
B10
B16
B8
B7
B6
B5
B4
B3
B2
B1
C15
C14
C13
C12
C11
C10
C16
C9
C8
C7
C6
C5
C4
C3
C2
C1
J76
J86
TB15
TB16
J134F
HEATER2
1
2
3
4
5
6
1
FG HEATERC
FUSERBIAS1
J128LB
1
2
3
4
5
6
J131L
J131DH
J131D
TB14
Thermoswitch
TB17 TP1 TB18
1
2
TP
3.3V
GND
24VB
/FSRCK
1
2
3
GND
CAN-H
CAN-L
GND
GND
PWRON
24U
24U
Fuser unit
TB1301
1
2
3
4
1
2
3
J128MB
24VA
GND
GND
GND
3.3V
3.3V
J128DWH
J128DA
J128DB
1
2
3
4
5
6
1
2
3
4
5
6
J105DB
J807F
(500F)
J99
9
8
7
6
5
4
3
2
1
J109 Lifter motor
J93
J124DB
J124LB
PS107
Paper stack
surface sensor
1
2
3
4
5
6
3
2
1
1
2
3
GND
FSRTYP
GND
DELTH
FSRTHG1
FSRTH1
DELSNS
GND
DELDR
PS101
Cassette paper
sensor
24R
/SEL2
GND
OPSOUT
OPSIN
OPSCLK
TB33
TB36
TB32
TB34
TB31
TB35
PRIPWM
1
2 /PRACCK
/DEVACCK
3
4 /DEVACON
TNRSP1
5
6 TNRSP2
7
/PRDCPWM
8 /DEVDCCK
9
DEVACCH
10 /TRFMCK
11 /PRDCCK
12 /TRFPCK
13 TRFPPWM
TB10
14 TRFAD
15 /DEVDCPWM TB12
16 FSRPWM
TB11
17 /HISPD
18 GND
19 GND
20 24VB
TB1300
24VB
21
1
2
3
4
4
3
2
1
21
23
15
14
13
12
11
10
9
8
7
6
5
4
3
2
1
1
2
J129
1
2
3
4
5
6
6
5
4
3
2
1
J72
1 /CSTSIZE0
2 /CSTSIZE1
3 GND
4 /CSTSIZE2
5 CSTSNSDR
6 GND
7 /CSTSNS
8 PLVLSNSDR
9 GND
10 /PLVLSNS
3.3V 4
GND 3
24VB 2
/FSRCK 1
J124DA
1
2
3
4
5
6
7
8
9
10
1
2
3
4
5
6
7
8
24VA 1
GND 2
GND 3
GND 4
OPSCLK
3.3V 5
OPSIN
3.3V 6
OPSOUT
GND
/SEL0
24R
PRIPWM 1
NC
/PRACCK 2
/DEVACCK
3
/DEVACON 4
TNRSP1 5
3
TNRSP2
6
2
/PRDCPWM 7
1
/DEVDCCK
8
DEVACCH
9
24R
/TRFMCK
10
24R
/PRDCCK
11
/DMFG
/TRFPCK 12
/DMDEC TRFPPWM
13
/DMACC
TRFAD 14
GND /DEVDCPWM 15
GND
FSRPWM 16
GND
/HISPD 17
GND 18
GND 19
24VB 20
24VB 21
PWRON
CAN-L
CAN-H
GND
GND
/PDLV
/PFED
/TOP
/CCRT
SCLK
SC
GND
/BD
GND
VDO2
/VDO2
GND
GND
/VDO1
VDO1
GND
GND
5V
5V
FPO
FPCK
/FPCS
FPI
J124LA
3
2
1
1 24R
2 /LMON
1
2
3
4
5
6
7
1
2
3
4
5
6
7
8
28
27
26
25
24
23
22
21
20
19
18
17
16
15
14
13
12
11
10
9
8
7
6
5
4
3
2
1
ENVTMP 1
NC
1
ENVTMPG 2
2 ENVTMP ENVTMPG 3
3
ENVTMPG
4 MFLK
5
/MFHF
6 MFFL
MFDRV 1
7
/CURLIM
MFLK 2
8 CURRMS
GND 3
9
FSRSAFE
10 /RLD
11 FSRD2
12 FSRD1
13 /ZEROX
14 /AC200
15 5V
16 5V
17 5V
18 5V
19 5V
20 GND
GND
22 GND
GND
NC 1
ENVTMP 2
ENVTMPG 3
MFLK 4
/MFHF 5
MFFL 6
/CURLIM 7
CURRMS 8
/RLD 9
FSRSAFE 10
FSRD2 11
FSRD1 12
/ZEROX 13
/AC200 14
5V 15
5V 16
5V 17
5V 18
5V 19
GND 20
GND 21
GND 22
GND 23
J124L
S1103
S1102
S1101
3
2
1
S931 1
S932 2
1
2
3
4
5
6
7
7
6
5
4
3
2
1
28
27
26
25
24
23
22
21
20
19
18
17
16
15
14
13
12
11
10
9
8
7
6
5
4
3
2
1
TB85
3.3V
TB101
3.3V
GND
3.3V
FPO
FPI
FPCK
/FPCS
GND
5V
J703
3
2
1
1
2
3
3
2
1
4
3
2
1
7
6
5
4
3
2
1
PWRON
CAN-L
CAN-H
GND
GND
/PDLV
/PFED
/TOP
/CCRT
SCLK
SC
GND
/BD
GND
VDO2
/VDO2
GND
GND
/VDO1
VDO1
GND
GND
5V
5V
FPO
FPCK
/FPCS
FPI
TB86
GND
TB102
GND
/WIDTH2SNS 15
GND 14
WIDTH2DR 13
/MPSNS 12
GND 11
MPDR 10
/TOPSNS 9
GND 8
TOPDR 7
/PRESNS 6
GND 5
PREDR 4
/WIDTHSNS 3
GND 2
WIDTHDR 1
1
2
4
3
2
1
24VA 1
NC 2
24VC 3
24R 1
NC 2
/TRCL 3
24R
/MPSL
24R 1
/CSTSL 2
FULDR 1
GND 2
FULSNS 3
J84
J94
J143
J95
1
2
3
J89
1
2
3
6
5
4
3
2
1
J79
J92
1
2
J85
1
2
3
1
FT1
FT3
1
2
J905M
J118DA
J118DB
4
3
2
1
3
2
1
1
2
3
2
1
1
2
3
2
1
1
2
3
4
1
2
3
3
2
1
3
2
1
J83
J113
SW800
1
2
Test switch
4
3
2
1
4
3
2
1
J144
1
2
3
4
5
6
7
1
2
3
4
5
6
7
BD PCA
24R
/SMACC
/SMDEC
GND
3.3V
/BDI
GND
TB26
J905
J906
1
SW101
1
2
3
4
5
6
24R
/SEL1
GND
OPSOUT
OPSIN
OPSCLK
J145
Envelope feeder
J901
1
2
3
4
5
6
Door open
detection switch
Feed roller clutch
Multi-purpose tray
pick-up solenoid
Cassette pick-up
solenoid
Face-down tray
paper full sensor
Laser driver
Laser/scanner unit
12
11
10
9
8
7
6
5
4
3
2
1
12
11
10
9
8
7
6
5
4
3
2
1
1
2
3
4
5
6
7
8
9
10
11
VDO1 1
/VDO1 2
CNT0 3
CNT1 4
CNT2 5
VDO2 6
/VDO2 7
LPHI 8
PDOUT 9
GND 10
5V 11
Scanner motor
24R 6
/SEL1 5
GND 4
OPSOUT 3
OPSIN 2
OPSCLK 1
IOTTXD
3.3V
IOTRXD
GND
Fuser temperature
Paper temperature
thermistor
sensor
Fuser delivery
TH1
TH2
2
1
paper
sensor
2
1
PS108
6
5
4
3
2
1
1
2
3
4
FPCK
/FPCS
FPI
+5V
FPO
GND
SDL
SCL
GND
VDO1
/VDO1
GND
GND
GND
GND
VDO2
/VDO2
GND
/BD
GND
GND
SC
SCLK
GND
/CCRT
/TOP
GND
/PFED
/PDLV
+3.3V
+3.3V
+3.3V
+3.3V
+3.3V
+3.3V
+3.3V
+3.3V
+3.3V
GND
CAN-H
CAN-L
GND
PWRON
GND
GND
GND
GND
GND
8
7
6
5
4
3
2
1
1 24R
2 24R
3 24R
4 /MMFG
5 /MMDEC
6 /MMACC
7 GND
8 GND
9 GND
10
Duplexing unit
4
3
2
1
4
3
2
1
GND 6
/SEL0 5
24VA 4
OPSCLK 3
OPSIN 2
OPSOUT 1
FPCK
/FPCS
FPI
+5V
FPO
GND
SDL
SCL
GND
VDO1
/VDO1
GND
GND
GND
GND
VDO2
/VDO2
GND
/BD
GND
GND
SC
SCLK
GND
/CCRT
/TOP
GND
/PFED
/PDLV
+3.3V
+3.3V
+3.3V
+3.3V
+3.3V
+3.3V
+3.3V
+3.3V
+3.3V
GND
CAN-H
CAN-L
GND
PWRON
GND
GND
GND
GND
GND
8
7
6
5
4
3
2
1
1
2
3
4
5
6
7
8
1
2
3
4
5
6
7
8
1
2
3
4
5
6
7
8
9
10
9
8
7
6
5
4
3
2
1
3
CL
CL101
9
8
7
6
5
4
3
2
1
1
COILA 1
COILB 2
3
123
SL102
SL
12
1
123
J88
J118D
SL101
SL
PS104
HP LaserJet 4350 wiring diagram
500-sheet feeder wiring diagram
Figure 7-30 500-sheet feeder wiring diagram
430
7
Troubleshooting
1,500-sheet feeder wiring diagram
Figure 7-31 1,500-sheet feeder wiring diagram
Printer and accessory wiring diagrams
431
Duplex accessory wiring diagram
Figure 7-32 Duplex-accessory wiring diagram
432
7
Troubleshooting
Envelope-feeder-accessory wiring diagram
Figure 7-33 Envelope-feeder-accessory wiring diagram
Printer and accessory wiring diagrams
433
Stacker-accessory wiring diagram
Figure 7-34 Stacker-accessory wiring diagram
434
7
Troubleshooting
Stapler/stacker-accessory wiring diagram
Figure 7-35 Stapler/stacker-accessory wiring diagram
Printer and accessory wiring diagrams
435
Dc controller connectors diagram
Figure 7-36 Dc controller connectors diagram
436
7
Troubleshooting
General timing diagrams
The following sections contain timing diagrams for the printer.
General timing diagrams
437
HP LaserJet 4200 general timing diagram
438
7
Figure 7-37 HP LaserJet 4200 general timing diagram
Troubleshooting
General timing diagrams
Cooling fan #1 (FN101)
Cooling fan #2 (FN103)
8
9
0.5
25 fuser heater (H1, H2)
24 Pressure roller bias
23 fuser film bias
22 Transfer charging bias
21 Developing bias (DC)
20 Developing bias (AC)
19 Primary charging bias (DC)
18 Primary charging bias (AC)
17 Face-down tray paper full sensor (PS104)
16 fuser unit delivery paper sensor (PS108)
15 Paper width sensor (PS106)
14 Top of page sensor (PS103)
13 Pre-feed sensor (PS102)
12 Feed roller clutch (CL101)
11 Cassette pickup solenoid (SL101)
10 Top of page (/TOP)
Scanner motor
Drum motor (M102)
5
Laser
Main motor (M101)
6
Video (VDO1, /VDO1,VDO2, /VDO2)
3
4
7
Print reservation designation (EEC50)
Print start designation (EEC12)
1
Power switch ON
2
Signal
Approx.1.44
Approx. 0.5
Approx. 1.78
Negative bias
Approx.3.8
Approx. 0.17
Full-speed rotation
Approx.0.2
Approx.0.2
WAIT
Approx.0.2
Approx. 0.18
Stand-by control
30.0
STBY
Between-sheet bias
Approx.0.25
Print bias
Approx.0.17
Approx.0.02
Approx.0.43
Approx.0.8
Approx.0.1
0.5
Approx. 0.89
0.03
Approx.0.14
Approx. 1.01
Approx. 5
Approx. 5
Approx.0.09
Approx.0.02
Approx. 0.75
Eliminate drum charge
Approx.0.36
LSTR
Approx. 0.96 Approx. 1.01
Approx. 0.03
Approx.0.06
Approx.0.11
PRINT
Low-voltage biasApprox. 1.01
Approx.0.43
Approx.0.02
Approx.0.06
Approx.0.61
Approx.0.17
Approx.0.5
Approx.1.2
Approx.0.22
Approx.0.56
Approx.1.5
Approx.0.2
INTR
Timing chart for continuous 2 sheets printing in letter size
Approx. 5
Approx. 5
Stand-by control
30.0
(Unit: seconds)
STBY
HP LaserJet 4250 general timing diagram
Figure 7-38 HP LaserJet 4250 general timing diagram
439
HP LaserJet 4300 general timing diagram
440
7
Figure 7-39 HP LaserJet 4300 general timing diagram
Troubleshooting
General timing diagrams
Cooling fan #1 (FN101)
Cooling fan #2 (FN103)
8
9
0.5
25 fuser heater (H1, H2)
24 Pressure roller bias
23 fuser film bias
22 Transfer charging bias
21 Developing bias (DC)
20 Developing bias (AC)
19 Primary charging bias (DC)
18 Primary charging bias (AC)
17 Face-down tray paper full sensor (PS104)
16 fuser unit delivery paper sensor (PS108)
15 Paper width sensor (PS106)
14 Top of page sensor (PS103)
13 Pre-feed sensor (PS102)
12 Feed roller clutch (CL101)
11 Cassette pickup solenoid (SL101)
10 Top of page (/TOP)
Scanner motor
Drum motor (M102)
5
Laser
Main motor (M101)
6
Video (VDO1, /VDO1,VDO2, /VDO2)
3
4
7
Print reservation designation (EEC50)
Print start designation (EEC12)
1
2
Signal
Power switch ON
Approx.1.44
Approx.0.5
Approx.0.15
Negative bias
Approx.3.8
Approx.1.78
Full-speed rotation
Approx.0.2
Approx.0.2
WAIT
Approx.0.2
Approx.0.18
Stand-by control
30.0
STBY
Between-sheet bias
Approx.0.22
Print bias
Approx.0.18
Approx.0.02
Approx.0.43
Approx.0.8
Approx.0.1
0.5
Approx.0.03
Approx.0.07
Approx.0.12
Approx. 0.89
0.03
Approx.0.12
Approx. 1.01
Approx.5
Approx.5
Approx.0.08
Approx.0.02
Approx. 0.75
Eliminate drum charge
Approx.0.31
LSTR
Approx. 0.96 Approx. 1.01
PRINT
Low-voltage biasApprox. 1.01
Approx.0.43
Approx.0.04
Approx.0.06
Approx.0.52
Approx.0.15
Approx.0.5
Approx.1.2
Approx.0.22
Approx.0.48
Approx.1.7
Approx.0.2
INTR
Timing chart for continuous 2 sheets printing in letter size
Approx.5
Approx.5
Stand-by control
30.0
(Unit: seconds)
STBY
HP LaserJet 4350 general timing diagram
Figure 7-40 HP LaserJet 4350 general timing diagram
441
Stapler/stacker timing diagram
Figure 7-41 Stapler/stacker timing diagram
442
7
Troubleshooting
8
Parts and diagrams
Chapter contents
●
Ordering parts and supplies
●
Consumables and accessories
●
Covers
●
Internal components
●
Accessories
●
Alphabetical parts list
●
Numerical parts list
Chapter contents
443
Ordering parts and supplies
This section contains information about how to order parts and supplies for this device.
Parts
This chapter contains field replaceable unit (FRU) and accessory part numbers. Replacement parts
can be ordered from the HP Services. Go to http://www.hp.com/go/parts/ for information about
ordering service parts in your area. Go to http://www.hp.com/go/partsinfo/ for the online HP service
parts identification tool (HP PartSurfer).
CAUTION Use only the parts and accessories that have been specifically designed for this
printer. Order accessories from an authorized HP service or support provider, or online at
http://www.hp.com.
NOTE Parts that have no item number or part number listed are not field replacement parts
and cannot be ordered.
Related documentation and software
Order documentation and software from the companies that are listed in the following table; some
documentation and software is available at the following Web sites.
Table 8-1 Technical support Web sites
HP Channel Services
Network (CSN)
http://www.hp.com/partners/csn
(for HP partners)
HP CSN is an Internet site that is created exclusively for our partners. You can easily find all
the HP information that you need for your daily business. And you can get it earlier than
from any other site.
HP Customer Care Online
http://www.hp.com/support
Software drivers, support
documentation, and answers
to frequently asked questions
Select your country/region in the Select a country or region field located on the Web page.
Select the support block.
HP Technical Training
USA: http://www.hp.com/go/onlinelearning
Classes and schedules
Canada: http://www.canada.hp.com
Asia: http://partnercare.asiapac.hp.com
Latin America: http://www.conecta.latinamerica.hp.com
Parts
http://www.hp.com/go/parts/
Parts information
http://www.hp.com/go/partners/csn
http://www.partsurfer.hp.com
Supplies/paper
USA: http://www.hp.com/go/orderssupplies-na
Ordering information for
supplies and media
Canada:http://www.hp.ca/catalog/supplies
Europe:http://www.hp.com/go/supplies
Asia Pacific: http://www.hp.com/paper
444
8
Parts and diagrams
HP provides free telephone support during the product warranty period. When you call, you will be
connected to a responsive team waiting to help you. For the number you should call in your country/
region, see the support sheet that came in the box with your printer. Before calling have the following
information available:
■
Product name (for example, HP LaserJet 4350dtns printer)
■
Product serial number (found on the underside of the cartridge door)
■
The date of printer purchase and a description of the problem
Test the software installation. Attempt to print a test page from the software program. Try reinstalling
the software. If reinstalling the software does not correct the problem, see the Readme file on the CD
that came with the printer, or call the phone number for the country/region (phone numbers are listed
on the support sheet that came in the box with the printer). You can also find answers to frequently
asked questions at the following Web sites:
■
http//:www.hp.com/support/lj4200
■
http//:www.hp.com/support/lj4250
■
http//:www.hp.com/support/lj4300
■
http//:www.hp.com/support/lj4350
HP-authorized resellers and support
To locate HP-authorized resellers and support, call 800-243-9816 in the U.S. or 800-387-3867 in
Canada.
HP service agreements
For information about HP service agreements, call 800-386-1115 in the U.S. or 800-268-1221 in
Canada.
HP Partner Portal
You can use the following information to contact HP Partner Portal:
■
For Partner Portal, http://www.hp.com/partners
■
For Connect Online, http://www.connect-online.hp.com
■
For Asia Pacific countries/regions, http://partnercare.asiapac.hp.com
■
For Canada Partner, http://www.canada.hp.com
■
For Latin America, http://www.conecta.latinamerica.hp.com
Ordering parts and supplies
445
Supplies
See Ordering parts and supplies. Consumables are available directly from HP at the following
numbers:
■
US: 1-800-HPINVENT
■
Canada: 1-800-474-6836
■
United Kingdom: 0734-441212
■
Germany: 0130-3322
Contact your local HP Parts Coordinator for other local phone numbers.
446
8
Parts and diagrams
Consumables and accessories
Consumables
3
Figure 8-1 Consumables
Table 8-2 Consumables
Ref
Item
Product number
Service/exchange
number
1
10,000-page print cartridge, LJ 4250/4350 printers
Q5942A
Q5942-67901
1
12,000-page print cartridge, LJ 4200/4200L printers
Q1338A
Q1338-67901
1
18,000-page print cartridge, LJ 4300 printers
Q1339A
Q1339-67901
1
20,000-page cartridge, LJ 4250/4350 printers
Q5942X
Q5492-67902
2
Preventive maintenance kit, LJ 4200/4200L printers,
110-127 V
Q2429A
Q2429-67904
2
Preventive maintenance kit, LJ 4200/4200L printers,
220-240 V
Q2430A
Q2430-67904
2
Preventive maintenance kit, LJ 4250/4350 printers, 110-127 V Q5421A
Q5421-67901
2
Preventive maintenance kit, LJ 4250/4350 printers, 220-240 V Q5422A
Q5422-67901
2
Preventive maintenance kit, LJ 4300 printers, 110-127 V
Q2436A
Q2436-67905
2
Preventive maintenance kit, LJ 4300 printers, 220-240 V
Q2437A
Q2437-67905
3
1,000-staple cartridge (3-pack)
Q3216A
Q3216-60500
Consumables and accessories
447
Accessories
Figure 8-2 Accessories
448
8
Parts and diagrams
Table 8-3 Accessories
Ref
Accessory
Product number
Service/exchange
number
1
500-sheet tray and feeder
Q2240B
Q2440-67903
2
1,500-sheet tray and feeder
Q2444B
Q2444-67902
3
Duplexer
Q2439B
Q2439-67902
4
75-sheet envelope feeder
Q2438B
Q2438-67902
5
500-sheet stapler/stacker
Q2443B
Q2443-67908
6
500-sheet stacker
Q2442B
Q2442-67902
7
Printer stand
Q2445B
Q2445-60102
Consumables and accessories
449
Memory, fonts, and mass storage
Figure 8-3 Memory, fonts, and mass storage
Table 8-4 Memory, fonts, and mass storage
Ref
Item
Product number
Service/exchange
number
1
Firmware DIMM (LJ 4200, base model)
Q2453-67925
1
Firmware DIMM (LJ 4200, all models except for base model)
Q2453-67906
1
Firmware DIMM (LJ 4200L)
Q2453-67932
1
Firmware DIMM (LJ 4300)
Q2453-67915
1
SDRAM DIMM, 8 MB (LJ 4200/4300)
C7842-67901
1
SDRAM DIMM, 16 MB (LJ 4200/4300)
C7843-67901
1
SDRAM DIMM, 32 MB (LJ 4200/4300)
C7845-67901
1
SDRAM DIMM, 64 MB (LJ 4200/4300)
Q1887-67901
1
SDRAM DIMM, 128 MB (LJ 4200/4300)
C9121-67901
1
100-pin DDR DIMM, 48 MB (LJ 4250/4350)
Q6007-67951
1
100-pin DDR DIMM, 64 MB (LJ 4250/4350)
Q2625-67951
1
100-pin DDR DIMM, 80 MB (LJ 4250/4350)
Q6008-67951
1
100-pin DDR DIMM, 96 MB (LJ 4250/4350)
Q6009-67951
1
100-pin DDR DIMM, 128 MB (LJ 4250/4350)
Q2626A
Q2626-67951
1
100-pin DDR DIMM, 256 MB (LJ 4250/4350)
Q2627A
Q2627-67951
1
100-pin DDR DIMM, 512 MB (LJ 4250/4350)
Q2628A
Q2628-67951
1
Font DIMM, Korean language (LJ 4200/4300)
D4838A
1
Font DIMM, Simplified Chinese language (LJ 4200/4300)
C4293A
1
Font DIMM, Traditional Chinese language (LJ 4200/4300)
C4292A
2
EIO hard disk, 20 GB
J6073-61001
J6073-69001
450
8
Parts and diagrams
Table 8-4 Memory, fonts, and mass storage (continued)
Ref
Item
Product number
3
Flash DIMM, 8 MB (LJ 4200/4300)
C8530A
3
Flash DIMM, 12 MB (LJ 4200/4300)
C7867A
Consumables and accessories
Service/exchange
number
451
Cables and connectivity
Figure 8-4 Cables and connectivity
Table 8-5 Cables and connectivity
452
Ref
Item
Product number
Service/exchange
number
1
HP Jetdirect 615n Fast Ethernet internal print server (for
HP LaserJet 4200/4300 printers only)
J6057A
J6057-69001
1
HP Jetdirect 620n Fast Ethernet internal print server for
HP LaserJet 4250/4350 printers
J7934A
J7934-61001/J7934-69001
1
HP Jetdirect 625n Gigabit internal print server for
HP LaserJet 4250/4350 printers
J7960A
J7960-61001
1
HP Jetdirect 680n 802.11b wireless Ethernet internal print
server for HP LaserJet 4250/4350 printers
J6058A
J6058-61201
1
HP bt1300 Bluetooth wireless printer adapter
J6072A
J6072-61001/J6072-69001
Connectivity card for USB, serial, and Local Talk
J4135A
J4135-61001
2
IEEE_1284 parallel cable, 2-meter (6.6 feet)
C2950A
5063-1256
2
IEEE_1284 parallel cable, 3-meter (9.9 feet)
C2951A
5063-1257
3
USB cable, 2-meter (6.6 feet)
C6518A
4
Power cord, 2-meter (6.6 feet), with 90-degree C13
receptacle (For 120 Vac in the United States, Canada, Latin
America, Korea, Taiwan, and Thailand)
8120-5301
5
Power cord, 2-meter (6.6 feet), with straight C13 receptacle
(For 120 Vac in the United States, Canada, Latin America,
Korea, Taiwan, and Thailand)
8121-0740
8
Parts and diagrams
Formatters, laser/scanners, power supplies, and fusers
Table 8-6 Formatters, laser/scanners, power supplies, and fusers
Item
Product number
Service/exchange number
Q9652A
C9652-67902/C9652-69001
Formatters
Formatter, LJ 4200
Formatter, LJ 4200L
C9652-67903/C9652-69003
Formatter, LJ 4300
Q9651A
C9651-67901/C9651-69001
Formatter, LJ 4250/4350 (base models)
Q3653A
Q3653-67901/Q3653-69001
Formatter, LJ 4250/4350 (network models)
Q3652A
Q3652-67901/Q3652-69001
Laser/scanners
Laser/scanner, LJ 4200
RM1-0045-000CN
Laser/scanner, LJ 4250/4350
RM1-1067-000CN
Laser/scanner, LJ 4300
RM1-0113-000CN
Power-supply assemblies
Power-supply assembly, LJ 4200, 110-127 V
RM1-0019-050CN
Power-supply assembly, LJ 4300, 110-127 V
RM1-0107-000CN
Power-supply assembly, LJ 4250/4350, 110-127 V
RM1-1070-000CN
Power-supply assembly, LJ 4200, 220-240 V
RM1-0020-000CN
Power-supply assembly, LJ 4300, 220-240 V
RM1-0108-000CN
Power-supply assembly, LJ 4250/4350, 220-240 V
RM1-1071-000CN
Fusers
Fuser, LJ 4200, 110 V
RM1-0013-140CN
Fuser, LJ 4300, 110 V
RM1-0101-200CN
Fuser, LJ 4250/4350, 110 V
RM1-1082-000CN
Fuser, LJ 4200, 220 V
RM1-0014-140CN
Fuser, LJ 4300, 220 V
RM1-0102-200CN
Fuser, LJ 4250/4350, 220 V
RM1-1083-000CN
Consumables and accessories
453
Assembly locations (1 of 3)
454
Ref.
Description
Details
1
500-sheet universal replacement tray
See Figure 8-14 500-sheet feeder (1 of 2).
2
Feed roller assembly
See Figure 8-11 Feed roller assembly.
3
Registration assembly
See Figure 8-6 Internal components (1 of 3).
8
Parts and diagrams
Assembly locations (2 of 3)
Ref.
Description
Details
4
Power-supply assembly
See Figure 8-9 Electrical components.
5
Delivery assembly
See Figure 8-8 Internal components (3 of 3).
6
Fuser assembly
See Figure 8-8 Internal components (3 of 3).
7
Tray 1 pickup assembly
See Figure 8-12 Tray 1 pickup assembly.
Consumables and accessories
455
Assembly locations (3 of 3)
456
Ref.
Description
Details
8
Duplexing-pendulum assembly
See Figure 8-8 Internal components (3 of 3).
9
Main-drive assembly
See Figure 8-10 Main drive assembly
10
Paper-pickup-drive assembly
See Figure 8-7 Internal components (2 of 3).
11
Lifter-drive assembly
See Figure 8-8 Internal components (3 of 3).
8
Parts and diagrams
Consumables and accessories
457
Covers
Figure 8-5 Covers
458
8
Parts and diagrams
Table 8-7 Covers
Covers
Ref
Description
Part number
Qty
1
Cover, left (LJ 4200/4300)
RC1-0287-020CN
1
1
Cover, left (LJ 4250/4350)
RM1-1077-000CN
1
2
Cover, formatter
RC1-0288-000CN
1
3
Cover, paper-handling
RC1-0289-000CN
1
4
Cover, legal (LJ 4200/4300)
RC1-0290-000CN
1
4
Cover, legal (LJ 4250/4350)
RC1-3282-000CN
1
5
Cover, duplexing (LJ 4200/4300)
RC1-0291-000CN
1
5
Cover, duplexing (LJ 4250/4350)
RC1-3280-000CN
1
6
Cover assembly, right (LJ 4200/4300)
RM1-0046-000CN
1
6
Cover assembly, right (LJ 4250/4350)
RM1-1076-000CN
1
7
Spring, leaf grounding, top Cover (LJ 4250/4350 only)
RC1-0307-000CN
1
8
Cable, control panel (LJ 4200/4300)
RG1-4215-000CN
1
8
Cable, control panel (LJ 4250/4350)
RM1-1190-000CN
1
9
Cover assembly, top(LJ 4200/4300)
RM1-0049-000CN
1
9
Cover assembly, top (LJ 4250/4350)
RM1-1081-000CN
1
10
Cover assembly, front
RM1-0050-030CN
1
11
Cover, rear output bin
RM1-0027-020CN
1
12
Cover, cartridge door (LJ 4200)
RM1-0047-020CN
1
12
Cover, cartridge door (LJ 4300)
RM1-0114-020CN
1
12
Cover, cartridge door (LJ 4250/4350)
RM1-1080-000CN
1
12A
Control-panel assembly (LJ 4200/4300)
RG1-4276-020CN
1
12A
Control-panel assembly (LJ 4250/4350)
RM1-1195-000CN
1
13
Overlay, control panel, Turkish (LJ 4200/4300)
Q2431-40021
1
13
Overlay, control panel, Hebrew (LJ 4200/4300)
Q2431-40022
1
13
Overlay, control panel, Greek (LJ 4200/4300)
Q2431-40023
1
13
Overlay, control panel, EN/FR/DE/IT (LJ 4200/4300)
Q2431-60107
1
13
Overlay, control panel, EN/CS/HU/PL (LJ 4200/4300)
Q2431-60108
1
13
Overlay, control panel, NO/SW/FI (LJ 4200/4300)
Q2431-60109
1
13
Overlay, control panel, IT/ES/PT/SP (LJ 4200/4300)
Q2431-60110
1
13
Overlay, control panel, EN/RU (LJ 4200/4300)
Q2431-60111
1
13
Overlay, control panel, EN/AR (LJ 4200/4300)
Q2431-60112
1
13
Overlay, control panel, EN/FR/DE/NL (LJ 4200/4300)
Q2431-60113
1
13
Overlay, control panel, EN (LJ 4250/4350)
RC1-3356-000CN
1
13
Overlay, control panel, EN/FR/DE/IT (LJ 4250/4350)
Q5400-60102
1
459
460
Ref
Description
Part number
Qty
13
Overlay, control panel, CS/HU/PL/EL (LJ 4250/4350)
Q5400-60103
1
13
Overlay, control panel, NO/SV/FI (LJ 4250/4350)
Q5400-60104
1
13
Overlay, control panel, ES/PT/IT (LJ 4250/4350)
Q5400-60105
1
13
Overlay, control panel, EN/RU/TR (LJ 4250/4350)
Q5400-60106
1
13
Overlay, control panel, EN/AR (LJ 4250/4350)
Q5400-60107
1
13
Overlay, control panel, EN/DE/FR/NL (LJ 4250/4350)
Q5400-60108
1
13
Overlay, control panel, FR (LJ 4250/4350)
Q5400-60109
1
13
Overlay, control panel, AR (LJ 4250/4350)
Q5400-60111
1
(not
shown)
Name plate kit, LJ 4200
Q2425-67901
1
(not
shown)
Name plate kit, LJ 4300
Q2431-67908
1
(not
shown)
Name plate kit, LJ 4200L
Q3993-40001
1
(not
shown)
Name plate kit, LJ 4200Ln
Q3994-40004
1
(not
shown)
Name plate kit, LJ 4250
Q5400-67911
1
(not
shown)
Name plate kit, LJ 4350
Q5406-67912
1
502
Screw, tapping, pan head, m4x10
XB4-7401-007CN
n
8
Parts and diagrams
Covers
461
Internal components
Figure 8-6 Internal components (1 of 3)
462
8
Parts and diagrams
Table 8-8 Internal components (1 of 3)
Ref
Description
Part number
Qty
2
Spring, torsion
RC1-0061-000CN
1
3
Transfer roller, LJ 4200/4300
RM1-0699-020CN
1
3
Transfer roller, LJ 4250/4350
RM1-1110-000CN
1
4
Guide, flat cable
RC1-0269-020CN
1
5
Guide, flat cable
RC1-0270-020CN
1
6
Motor, print cartridge (M102), 8–pin (LJ 4250/4350)
RK2-0274-000CN
1
6
Motor, print cartridge (M102), 8–pin (LJ 4300)
RH7-1576-020CN
1
7
Motor, main (M101), 10–pin (LJ4200/4300)
RH7-1570-000CN
1
7
Motor, main (M101), 10–pin (LJ4250/4350)
RK2-0272-000CN
1
8
E-ring
XD9-0232-000CN
1
9
Gear, 14t/30t
RU5-0015-000CN
1
10
Screw, s, m3x8
XA9-1500-000CN
17
11
Screw, tapping, m3x6
XA9-1503-000CN
6
16
Flag, paper feed sensor
RC1-0060-000CN
1
17
Rod, fan 2 (LJ 4300)
RC1-0341-000CN
1
17
Rod, fan 2 (LJ 4250/4350)
RC1-3339-000CN
1
18
Guide, dc controller (LJ 4200/4300)
RC1-0271-000CN
1
18
Guide, dc controller (LJ 4250/4350)
RC1-3340-000CN
1
19
Feed roller assembly (also see Figure 8-11 Feed roller assembly) RM1-0012-020CN
1
20
Main drive assembly (LJ 4200/4300) (also see Figure 8-10
Main drive assembly)
RM1-0001-030CN
1
20
Main drive assembly (LJ 4250/4350) (also see Figure 8-10
Main drive assembly)
RM1-1066-000CN
1
21
Registration assembly
RM1-0011-060CN
1
22
Power-supply assembly, 110-127 V (LJ 4200) (also see Figure
8-9 Electrical components)
RM1-0019-050CN
1
22
Power-supply assembly, 220-240 V (LJ 4200) (also see Figure
8-9 Electrical components)
RM1-0020-000CN
1
22
Power-supply assembly, 110-127 V (LJ 4250/4350) (also see
Figure 8-9 Electrical components)
RM1-1070-000CN
1
22
Power-supply assembly, 220-240 V (LJ 4250/4350) (also see
Figure 8-9 Electrical components)
RM1-1071-000CN
1
22
Power-supply assembly, 110-127 V (LJ 4300) (also see Figure
8-9 Electrical components)
RM1-0107-000CN
1
22
Power-supply assembly, 220-240 V (LJ 4300) (also see Figure
8-9 Electrical components)
RM1-0108-000CN
1
Internal components
463
464
Ref
Description
Part number
Qty
501
Screw, tapping, pan head, m4x10
XB4-7401-007CN
14
502
Screw, w/washer, m3x6
XB2-7300-607CN
2
8
Parts and diagrams
Internal components
465
Figure 8-7 Internal components (2 of 3)
466
8
Parts and diagrams
Table 8-9 Internal components (2 of 3)
Ref
Description
Part number
Qty
1
Rod, switch
RC1-0268-000CN
1
2
Guide, scanner cable
RC1-0340-020CN
1
3
Guide, scanner cable
RC1-0385-000CN
1
4
Gear, 18t
RU5-0045-020CN
1
5
Shaft, retard drive
RL1-0264-000CN
1
6
Sensor, top-bin-full/stack (PS 104/PS 107), LJ 4200/4300
WG8-5362-000CN
1
6
Sensor, stack (PS 107), LJ 4250/4350
WG8-5624-000CN
1
7
Gear, 23t
RU5-0040-000CN
1
8
Bushing
RC1-0206-000CN
1
9
Laser/scanner assembly (LJ 4200)
RM1-0045-000CN
1
9
Laser/scanner assembly (LJ 4250/4350)
RM1-1067-000CN
1
9
Laser/scanner assembly (LJ 4300)
RM1-0113-000CN
1
10
Bushing, feed shaft
RC1-0264-000CN
1
12
Cable, laser (LJ 4200/4300)
RG1-4212-000CN
1
12
Cable, laser (LJ 4250/4350)
RM1-1198-000CN
1
13
Screw, s, m3x8
XA9-1500-000CN
20
14
E-ring
XD9-0232-000CN
1
15
Screw, rs, m3x10
XA9-1559-000CN
6
16
Solenoid, tray 2 pickup (LJ 4200/4300)
RH7-5355-000CN
1
16
Solenoid, tray 2 pickup (LJ 4250/4350)
RK2-0269-000CN
1
17
Pickup-sensor cable assembly (LJ4200/4300)
RG1-4221-000CN
1
17
Pickup-sensor cable assembly (LJ4250/4350)
RM1-1181-000CN
1
18
Roller, paper-pickup
RM1-0036-000CN
1
19
Roller, paper-feed
RM1-0037-020CN
1
20
Holder, paper sensing
RC1-0208-030CN
1
21
Flag, paper sensing
RC1-0209-000CN
1
22
Guide, power-supply, front
RC1-0243-000CN
1
23
Arm, paper pickup (LJ 4200/4300)
RC1-0211-000CN
1
23
Arm, paper pickup (LJ 4250/4350)
RC1-3352-000CN
1
24
Holder, paper pickup arm
RC1-0212-000CN
1
25
Gear, 23t
RC1-0371-000CN
1
26
Plate, swing
RL1-0013-000CN
1
27
Spring, compression
RC1-0213-000CN
1
29
Guide, tray 2
RC1-0153-030CN
1
Internal components
467
468
Ref
Description
Part number
Qty
31
Sheet, solenoid damper
RC1-0330-020CN
1
32A
Cable, feeder connector (LJ 4200/4300)
RG1-4223-000CN
1
32A
Cable, feeder connector (LJ 4250/4350)
RM1-1192-000CN
1
33
Kicker assembly
RL1-0015-000CN
1
35
Size-sensing assembly, tray 2
RM1-0041-020CN
1
36
Foot
RB1-8107-000CN
2
37
Guard, right-edge
RC1-0242-000CN
1
38
Guide, ECU, rear
RC1-0244-000CN
1
39
Guard, left-edge
RC1-0247-000CN
1
41
Screw, tapping, m3x6
XA9-1503-000CN
3
42
Cable, accessory interface
RM1-0042-000CN
1
43
Swing plate assembly
RM1-0043-020CN
1
44
Cable, sensor, top-bin-full (LJ 4200/4300)
RG1-4214-000CN
1
44
Cable, sensor, top-bin-full (LJ 4250/4350)
RM1-1189-000CN
1
45
Cable, envelope- feeder-connecting (LJ 4200/4300)
RG1-4224-000CN
1
45
Cable, envelope-feeder-connecting (LJ 4250/4350)
RM1-1193-000CN
1
49
Spring, torsion
RC1-0254-000CN
1
50
Spring, torsion
RC1-1923-000CN
1
51
Sensor, top-bin-full (PS104) (LJ 4200/4300)
WG8-5362-000CN
1
51
Sensor, stack (PS104) (LJ 4250/4350)
WG8-5624-000CN
1
52
Pickup drive assembly
RM1-0034-040CN
1
501
Screw, tapping, pan head, m4x10
XB4-7401-007CN
2
502
Screw, tapping, truss head, m3x8
XB4-7300-809CN
1
503
Screw, tapping, truss head, m4x8
XB4-7400-809CN
2
8
Parts and diagrams
Internal components
469
Figure 8-8 Internal components (3 of 3)
470
8
Parts and diagrams
Table 8-10 Internal components (3 of 3)
Ref
Description
Part number
Qty
1
Support, lifter-drive assembly
RC1-0200-020CN
1
2
Duct, fan 2 (right side) (LJ 4300)
RC1-0272-000CN
1
2
Duct, fan 2 (right side) (LJ 4250/4350)
RC1-3338-000CN
1
3
Guide, left
RC1-0273-000CN
1
4
Guide, right
RC1-0274-020CN
1
5
Holder, thermistor (plastic)
RC1-0342-020CN
1
6
Holder, thermistor (metal)
RC1-0343-020CN
1
7
Cover, fan connector
RC1-0344-020CN
1
8
Guide, connecting cable
RC1-0386-000CN
1
10
Dc controller (LJ 4200)
RG1-4236-040CN
1
10
Dc controller (LJ 4250/4350)
RM1-1108-000CN
1
10
Dc controller (LJ 4300)
RG1-4237-040CN
1
12
Screw, rs, m3x10
XA9-1559-000CN
1
13
Screw, s, m3x8
XA9-1500-000CN
16
14
Fan, right (LJ 4300)
RH7-1577-000CN
1
14
Fan, right (LJ 4250/4350)
RK2-0280-000CN
1
16
Fan, left (LJ 4200/4300)
RH7-1573-000CN
1
16
Fan, left (LJ 4250/4350)
RK2-0278-000CN
1
17
Thermistor (LJ 4200/4300)
RH7-7116-000CN
1
17
Thermistor (LJ 4250/4350)
RK2-0359-000CN
1
18
Spring, tension
RC1-0198-000CN
1
19
Microswitch, top cover
WC4-5139-000CN
1
20
Bushing, paper delivery
RC1-0136-000CN
1
21
Cable, door switch
RG1-4213-000CN
1
22
Cover, envelope
RC1-0320-000CN
1
23
Cover, inner front, right
RC1-0019-000CN
1
25
Fuser, 110-127 V (LJ 4200)
RM1-0013-140CN
1
25
Fuser, 110-127 V (LJ 4300)
RM1-0101-200CN
1
25
Fuser, 110-127 V (LJ 4250/4350)
RM1-1082-000CN
1
25
Fuser, 220-240 V (LJ 4200)
RM1-0014-140CN
1
25
Fuser, 220-240 V (LJ 4300)
RM1-0102-200CN
1
25
Fuser, 220-240 V (LJ 4250/4350)
RM1-1083-000CN
1
26
Cable, fuser (LJ 4200/4200L)
RG1-4205-000CN
1
26
Cable, fuser (LJ 4250/4350)
RM1-1216-000CN
1
Internal components
471
472
Ref
Description
Part number
Qty
26
Cable, fuser (LJ 4300)
RG1-4231-000CN
1
27
Paper-delivery assembly
RM1-0026-040CN
1
28
Duplexing-pendulum assembly
RM1-0002-020CN
1
29
Lifter-drive assembly (LJ 4200/4300)
RM1-0033-020CN
1
29
Lifter-drive assembly (LJ 4250/4350)
RM1-1074-000CN
1
30
Tray 1 pickup assembly (LJ 4200/4300) (also see Figure 8-12
Tray 1 pickup assembly)
RM1-0004-060CN
1
30
Tray 1 pickup assembly (LJ 4250/4350) (also see Figure 8-12
Tray 1 pickup assembly)
RM1-1097-000CN
1
501
Screw, tapping, pan head, m4x10
XB4-7401-007CN
4
502
Screw, tapping, truss head, m4x16
XB4-7401-605CN
2
8
Parts and diagrams
Internal components
473
Figure 8-9 Electrical components
474
8
Parts and diagrams
Table 8-11 Electrical components
Ref
Description
Part number
Qty
1
Power-supply assembly, 110-127 V (LJ 4200)
RM1-0019-050CN
1
1
Power-supply assembly, 220-240 V (LJ 4200)
RM1-0020-000CN
1
1
Power-supply assembly, 110-127 V (LJ 4250/4350)
RM1-1070-000CN
1
1
Power-supply assembly, 220-240 V (LJ 4250/4350)
RM1-1071-000CN
1
1
Power-supply assembly, 110-127 V (LJ 4300)
RM1-0107-000CN
1
1
Power-supply assembly, 220-240 V (LJ 4300)
RM1-0108-000CN
1
2
Feed assembly
RM1-0025-040CN
1
3
Cable, power-supply inlet, 110-127 V (LJ 4200/4300)
RG1-4209-000CN
1
3
Cable, power-supply inlet, 110-127 V (LJ 4250/4350)
RM1-1218-000CN
1
3
Cable, power-supply inlet, 220-240 V (LJ 4200/4300)
RG1-4230-000CN
1
3
Cable, power-supply inlet, 220-240 V (LJ 4250/4350)
RM1-1219-000CN
1
4
Connector, duplexer (LJ 4200/4300)
RG1-4222-000CN
1
4
Connector, duplexer (LJ 4250/4350)
VS1-7333-006CN
1
5
Screw, s, m3x8
XA9-1500-000CN
2
6
Cable, flat (J80-J50) (LJ 4250/4350)
RK2-0290-000CN
1
7
Cable, flat (J81-J51) (LJ 4250/4350)
RK2-0288-000CN
1
8
Screw, w/washer, m3x8
XA9-1420-000CN
7
501
Screw, w/washer, m4x6
XB2-7400-606CN
1
NOTE Flat cables for LJ 4200/4300 are wired to the power-supply assembly and are not
available separately.
Internal components
475
1
Figure 8-10 Main drive assembly
476
8
Parts and diagrams
Table 8-12 Main drive assembly
Ref
1
Internal components
Description
Part number
Qty
Main drive assembly (LJ 4200/4300)
RM1-0001-030CN
1
Main drive assembly (LJ 4250/4350)
RM1-1066-000CN
1
Arm, cartridge-release
RC1-0003-000CN
1
477
Figure 8-11 Feed roller assembly
478
8
Parts and diagrams
Table 8-13 Feed roller assembly
Ref
Description
Part number
Qty
Feed-roller assembly
RM1-0012-020CN
1
1
Clutch (CL101) (LJ 4200/4300)
RH7-5358-000CN
1
1
Clutch (CL101) (LJ 4250/4350)
RK2-0349-000CN
1
2
Gear, 30t
RU5-0050-000CN
1
3
E-ring (LJ4200/4300)
XD9-0137-000CN
1
3
E-ring (LJ4250/4350)
XD9-0234-010CN
1
Internal components
479
1
3
2
4
Figure 8-12 Tray 1 pickup assembly
480
8
Parts and diagrams
Table 8-14 Tray 1 pickup assembly
Ref
Description
Part number
Qty
Tray 1 pickup assembly (LJ 4200/4300)
RM1-0004-060CN
1
Tray 1 pickup assembly (LJ 4250/4350)
RM1-1097-000CN
1
1
Tray 1
RM1-0005-020CN
1
2
Separation pad
RL1-0007-000CN
1
3
Solenoid, tray 1 pickup (LJ 4200/4300)
RH7-5357-000CN
1
3
Solenoid, tray 1 pickup (LJ 4250/4350)
RK2-0276-000CN
1
4
Roller, pickup
RL1-0019-000CN
1
Internal components
481
Figure 8-13 PCAs
482
8
Parts and diagrams
Table 8-15 PCAs
Ref
Description
Part number
Qty
1
Dc controller (LJ 4200)
RG1-4236-040CN
1
1
Dc controller (LJ 4250/4350)
RM1-1108-000CN
1
1
Dc controller (LJ 4300)
RG1-4237-040CN
1
(not
shown)
Formatter assembly (LJ 4200 printer)
C9652-67902
1
(not
shown)
Formatter assembly (LJ 4200L printer)
C9652-67903
1
(not
shown)
Formatter assembly (LJ 4250/4350 printer, base model)
Q3653-67901
1
(not
shown)
Formatter assembly (LJ 4250/4350 printer, network models)
Q3652-67901
1
(not
shown)
Formatter assembly (LJ 4300 printer)
C9651-67901
1
NOTE Callout 2 indicates the electrical components assemblies. See Figure 8-9 Electrical
components for components and part numbers.
Internal components
483
Accessories
Figure 8-14 500-sheet feeder (1 of 2)
484
8
Parts and diagrams
Table 8-16 500-sheet feeder (1 of 2)
Ref
Accessories
Description
Part number
Qty
500-sheet feeder and tray
Q2440-67903
1
1
Lifter-drive assembly, 500-sheet feeder
RM1-1094-000CN
1
2
Paper-pickup-drive assembly, 500-sheet feeder
RM1-0056-000CN
1
3
500-sheet universal replacement tray (LJ 4200/4300)
RM1-0028-060CN
1
3
500-sheet universal replacement tray (LJ 4250/4350)
RM1-1088-000CN
1
(not
shown)
Stop, detent
RC1-3303-000CN
1
(not
shown)
Limiter, torque
RC1-3335-000CN
1
485
Figure 8-15 500-sheet feeder (2 of 2)
486
8
Parts and diagrams