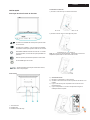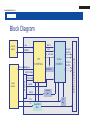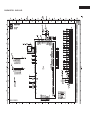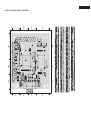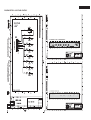
1
170S5FG/00
17" TFT LCD Colour Monitor
Service
Service
Service
ç
Volta ao Menu
Frequência horizontal
30 - 82KHz
Conteúdo
Página
Notas de Segurança..........................................................2
Especificações Técnicas......................................................................3
Precauções de Segurança...............................................................4
Manuseando Componentes SMD............................................................5
Aviso e Notas.....................................................................6
Instalação e Conectando o PC...............................................................7
Diagrama de Ligações...............................................................8
Instruções Mecânicas.........................................................9
Instruções Elétricas.............................................................11
Instruções DDC..................................................................14
Diagrama em Blocos..........................................................23
Layout..................................................................29
Painel Controle.....................................................................31
Esquema Elétrico Painel Alimentação................................................32
Layout....................................................................34
Vista Explodida...............................................................35
Impresso no Brasil
09/2004
Sujeito a alterações
Todos os direitos Reservados
4806 727 17290
2
170S5FG
NOTAS DE SEGURANÇA
A manutenção adequada é importante para segurança e confiabilidade de todos os produtos Phillips. Os procedimentos de manutenção
recomendados pela Phillips e descritos neste manual de serviço são
métodos de operação de manutenção.
PARA PRODUTOS COM LASER:
PERIGO-
Alguns desses métodos requerem o uso de ferramentas especialmente designadas para este fim. Estas ferramentas especiais devem
ser usadas quando recomendadas.
Radiação laser invisivel quando aberto.
EVITE EXPOSIÇÃO DIRETA AO RAIO.
CUIDADO- O uso de controles, ajustes ou realização
de procedimentos outros que não os
descritos aqui, podem resultar em
perigosa exposição à radiação.
É importante notar que este manual contém várias observações de
precauções e notas de segurança que devem ser lidas cuidadosamente a fim de minimizar o risco para o técnico. Há possibilidade de
que métodos não adequados de serviço podem danificar o equipamento. É também importante entender que estas observações não são
definitivas. A Phillips não tem como avaliar ou aconselhar os métodos
de serviço de cada um e suas possíveis conseqüência.
CUIDADO- O uso de instrumentos ópticos com este
produto aumentará o perigo de danos
aos olhos.
Conseqüentemente a Phillips não se compromete a qualquer avaliação. O técnico que usar os procedimentos de serviço ou ferramentas
não recomendadas pela Phillips deve estar ciente que este não é o
método recomendado e seguro e que corre risco ao usá-los.
PARA ASSEGURAR A CONTÍNUA CONFIABILIDADE
DESTE PRODUTO, USE APENAS COMPONENTES
ORIGINAIS QUE ESTÃO LISTADOS NA LISTA DE
MATERIAIS DE REPOSIÇÃO DESTE MANUAL.
CUIDADO
Componentes críticos que tem características especiais de segurança
são identificados com o símbolo I e delimitados com uma linha
tracejada * (quando vários componentes críticos são agrupados em
uma área), também são identificados com este símbolo nos esquemas
elétricos e vistas explodidas.
O uso de substitutos que não possuem as mesmas características de
segurança especificadas podem causar choque, fogo e outros danos.
Tome cuidado durante a manipulação do módulo do LCD com
unidade de backlight
-
Sob nenhuma circunstância o projeto deve ser modificado sem permissão por escrito da Phillips.
A Philips não assume qualquer responsabilidade por modificações não
autorizadas.
-
O serviço autorizado assumirá total responsabilidade.
-
* Linha Tracejada
Deve-se montar o módulo usando os furos de montagem localizados nos quatro cantos.
Não pressione o painel, cantos duros ou choque elétrico podem
resultar em danos à tela.
Não risque nem pressione o painel com nenhum objeto afiado, tais
como lápis ou caneta pois isto pode resultar em danos ao painel.
Proteja o módulo de ESD que pode danificar o circuito eletrônico
(C-MOS).
Assegure que o corpo dos técnicos esteja aterrado através de
pulseiras anti-estáticas.
Não deixe o módulo em altas temperaturas e em áreas com umidade elevada por muito tempo.
Evite o contato com água que pode provocar um curto-circuito
dentro do módulo.
Se a superfície do painel sujar, limpe-a com um material macio.
(a limpeza com um pano sujo ou áspero pode danificar o painel.)
3
170S5FG
ESPECIFICAÇÕES
EspecificaçõesTÉCNICAS
Técnicas
Especificações Técnicas
Painel LCD
Tipo
:TFT LCD
:17" / 43.2 cm diagonal
Tamanho da tela
Pixel Pitch
:0.264 x 0.264 mm
:1280 x 1024 pixels
Tipo do painel LCD
R.G.B. vertical stripe
Anti-glare polarizer, hard coated
Área efetiva de visão :337.9 x 270.3 mm
Nº de cores do Display :16M colors
Varredura
Taxa de refresh vertical :56 Hz-76 Hz
Frequência horizontal :30k Hz-82 kHz
VIDEO
:135 MHz
Frequência de vídeo
Impedância de entrada
-Vídeo
75 ohm
-Sinc.
2.2K ohm
Nível do sinal de entr. :0.7 Vpp
Sinal e entrada de sinc. :Sincronismo separado
Sincronismo composto
Sincronismo no verse
Polaridade do sinc.
: Positive e negativo
: D-Sub (analógico)
Interface de vídeo
Resolução & Modos Presets
Máximo
1280 x 1024 a 75 Hz
Recomendado 1280 x 1024 a 60 Hz
Características Ópticas
: 450:1 (tip.)
Faixa de contraste
Brilho
: 250 cd/m2 (tip.)
Ângulo de pico de contr. : 6º horário
Cromaticidade de branco: x: 0.283 y: 0.297 (a 9300K)
x: 0.313 y: 0.329 (a 6500K)
x: 0.313 y: 0.329 (a sRGB)
Ângulo de visão (C/R>5): Sup. >6
Infer. >75º (tip.)
Esq. >80º (tip.)
Dir. >80º (tip.)
Tempo de resposta:
<16 ms (tip.)
Dimensões
Dimensão( LxAxP) * :375 x 423 x 174 mm (incl. Pedestal)
: 4.2 Kg
Peso
: -5 ~ 25
Inclinação
: 100 240 VAC, 50/60 Hz
Alimentação
Consumo
: 30 W* (tip.)
Temperatura
: 5 to 40C (operação)
-20º a 60º (armazenagem)
: 20% a 80%
Umidade relativa
: 50K horas(incluindo CCFL 40K horas)
Sistema MTBF
Função dos Pinos
Os conctores de 15 pinos D-SUB do sinal de cabo.
Nº
Pino
Função
Nº
Função
Pino
1
Entrada vídeo vermelho
9
+5V
2
Entrada vídeo verde/SOG
10
Logic ground
3
Entrada vídeo azul
11
Terra
4
Sensor (GND)
12
Serial data line (SDA)
5
Detector Hot Plug
13
H. Sync / H+V
6
Terra vermelho
14
V. Sync (VCLK para DDC)
7
Terra verde
15
Data clock line (SCL)
8
Terra azul
Economia de energia automática
Se você tem uma placa ou software compatível com VESA DPMS
instalado em seu PC, o monitor pode automáticamente reduzir o consumo
de energia quando não estiver em uso. Se uma entrada via teclado,
mouse ou outro dispositivo for detectado, o monitor irá entrar em operação
automáticamente. A tabela a seguir mostra o consumo de potência e a
sinalização da economia automática de potência.
Definição do Gerenciamento de Potência
Modo VESA
ON
OFF
Video
H-sync
V-sync
Potencia
Consumida
Ativo
Sim
Sim
< 35 W
Verde
Não
Não
<1W
Âmbar
Apagado
Cor do
LED
Este monitor é compatível com ENERGY STAR. Como um
parceiro da ENERGY STAR, a Philips determinou que este
produto deve seguir as normas de economia de energia da
ENERGY STAR.
Armazenamento de Dados
Modos pré-ajustados de fábrica:
Este monitor tem 15 modos pré-ajustados de fábrica como mostra
a tabela abaixo:
H. freq (kHz)
Resolução
V. freq (Hz)
31.5
640*350
70
31.5
720*400
70
31.5
640*480
60
35.0
640*480
67
37.5
640*480
75
35.2
800*600
56
37.9
800*600
60
46.9
800*600
75
49.7
832*624
75
48.4
1024*768
60
60.0
1024*768
75
69.0
1152*870
75
71.8
1152*900
76
63.9
1280*1024
60
80.0
1280*1024
75
Há também espaço para armazenar 15 ajustes definidos
pelo usuário.
4
170S5FG
PRECAUÇÕES DE SEGURANÇA PARA SERVIÇOS TÉCNICOS EM TELEVISORES E MONITORES
Verificação de Segurança
Após o problema original do aparelho ter sido corrigido, uma verificação de segurança
completa deve ser feita. Certifique-se de verificar o conjunto inteiro, não somente as
áreas onde você trabalhou. Algum serviço anterior pode ter deixado uma condição
insegura, que pode não ter sido percebida pelo cliente. Certifique-se de verificar os
seguintes itens:
Perigo de incêndio e choque
1. Tenha certeza que todos os componentes estão posicionados de tal forma a evitar
a possibilidade de curto-circuito com o componente adjacente. Isto é especialmente
importante naqueles aparelhos que são transportados para o serviço autorizado.
2. Nunca libere uma unidade reparada a menos que todos dispositivos de proteção,
tal como, isoladores, tampas, alívios de esforço, e outro hardware estejam instalados
em conformidade com o projeto original.
3. As soldas e as ligações devem ser inspecionadas para localizar possíveis soldas
frias, corrosões, pontos de solda muito finos, mau contatos, conectores soltos ou
isolação danificada (incluindo a do cabo AC). Certifique-se de retirar respingos de
solda e todas outras partículas estranhas soltas.
4. Verifique as trilhas dos componentes e outros componentes para ver se não existe
dano físico ou deterioração e troque o componente se necessário. Siga o layout
original, comprimento dos terminais, e montagem.
5. Nenhum terminal ou componente deve tocar o tubo ou os resistores de 1 watt ou
mais. Evite encostar os terminais ou componentes em superfícies metálicas.
6. Componentes críticos que tem características de segurança especiais são identificados com um símbolo na lista de material e no esquema através de uma linha tracejada (onde vários componentes críticos estão agrupado em uma área) junto com os
símbolos de segurança nos diagramas esquemáticos e/ou nas vistas explodidas.
7. Quando estiver fazendo a manutenção em qualquer unidade, sempre use um transformador de isolação para o chassi. A falta de um transformador de isolação pode
expor você ao perigo de choque e pode causar danos aos instrumentos de serviço.
8. Muitos produtos eletrônicos usam cabo de força AC polarizado (um pino mais largo
no plug.) Eliminar este recurso de segurança pode criar um perigo potencial para o
serviço e o usuário. Cabos de força que não incorporam o recurso da polarização
não podem ser utilizados.
9. Depois de montar a unidade, sempre faça um teste de fuga de corrente ou teste de
resistência do cabo de força para todos os pontos de metal expostos do gabinete.
Verifique também todos os eixos de metal dos controles (removendo os knobs),
terminais de antena, cabos, parafusos, etc. Para ter certeza que a unidade pode ser
operada em segurança sem perigo de choque elétrico.
Implosão
1. Todos os tubos de imagem utilizados nos modelos atuais são equipados com um
sistema de implosão integral. Preste sempre muita atenção e utilize sempre óculos
de segurança quando estiver fazendo a manutenção de qualquer tubo de imagem.
Evite arranhar ou danificar o tubo de imagem durante a instalação.
2. Use unicamente tubos de reposição especificados pelo fabricante.
Radiação X
1. Tenha certeza que os procedimentos e instruções distribuídos a seu pessoal técnico, falem sobre radiação X. As fontes potenciais de raios X nos receptores de TV
são o tubo de imagem e os circuitos de alta tensão. A precaução básica é deixar a
área de alta tensão, no nível especificado pela fábrica.
2. Para evitar uma possível exposição à radiação X e a choque elétrico, devem ser
usados unicamente os conectores de anodo do tubo, fornecidos pela fábrica.
3. É essencial que o técnico de serviço tenha um medidor de alta tensão preciso,
disponível a qualquer momento. A calibragem deste medidor deve ser verificada
periodicamente com um padrão de referência.
4. Quando o circuito de alta tensão está operando apropriadamente, não há
possibilidade de problema de radiação X. A alta tensão deve estar sempre dentro
dos padrões especificados pelo fabricante para uma performance ótima. Toda vez
que um aparelho em cores está sendo analisado, o brilho deve ser aumentado e
abaixado enquanto se monitora a alta tensão com um medidor, para ter certeza
que a alta tensão está ajustada corretamente e que não excede o valor especificado.
Nós sugerimos que você e seus técnicos revejam procedimentos de teste de alta
tensão de modo que a regulagem de alta tensão seja sempre verificada como um
procedimento de serviço padrão, e a razão para esta rotina prudente é compreendida claramente por todos. É importante usar um medidor de alta tensão preciso
e confiável. É recomendado que o registro de alta tensão seja anexado a fatura do
cliente, o que demonstrará um procedimento apropriado à segurança do cliente.
5. Quando estiver verificando a árvore de defeitos e fazendo medições de teste em
um receptor com problemas de alta tensão excessiva, reduza a tensão da rede
por meio de um Variac para trazer a alta tensão para dentro dos limites aceitáveis
enquanto você faz o diagnóstico. Não deixe o chassi ligado mais do que o necessário para localizar a causa da alta tensão excessiva.
6. Os novos tubos de imagem são especificamente projetados para suportar excesso
de alta tensão sem criar radiação X indesejável. É fortemente recomendado que
os testes no serviço autorizado sejam feitos com um dos novos tipo de tubos
projetado para este serviço. A conexão permanente de um medidor de alta tensão
é também recomendada. Os tipos de CRT utilizados nestes novos conjuntos nunca
7.
8.
devem ser trocados por quaisquer outros tipos, pois isto pode resultar em radiação
X excessiva.
É essencial usar o tubo de imagem especificado para evitar um possível problema
de radiação X.
A Maioria dos receptores de TV contêm algum tipo de circuito de segurança para
prevenir excessos de alta tensão durante uma falha. Esses vários circuitos devem
ser compreendidos por todos os técnicos que fazem a manutenção, especialmente
os circuitos que não atuam enquanto o aparelho opera normalmente.
Verificação a frio do vazamento de corrente
1. Desconecte o cabo de força AC e conecte um jumper entre o dois pinos do plug.
2. Ligue a chave power.
3. Meça o valor da resistência entre o cabo AC e todas as partes metálicas expostas
do gabinete do aparelho, tal como cabeças de parafuso, antenas, e eixos dos controles. Quando a parte metálica exposta tem um retorno para o chassis, a leitura deve
ser entre 1 megohm e 5.2 megohms.
Quando a parte de metal exposta não tem um retorno para chassis, a leitura deve
ser infinita. Remova o o jumper do cabo de força AC.
Para uma
parte
Metálica
Exposta nos
Instrumentos
0.15 uF
1500 ohm, 10W
Para um Cano
D' Água Metálico
ou Ponto
Aterrado
Verificação a quente do vazamento de corrente
1. Não use um transformador de isolação para este teste. Ligue o aparelho, completamente montado, diretamente à tomada de força.
2. Conecte um resistor de 1.5k, 10W em paralelo com um capacitor de 0.15uF entre
cada parte metálica exposta do gabinete e um bom ponto de terra, tal como um
cano de água, como mostrado acima.
3. Use um voltímetro AC com pelo menos 5000ohms/volt de sensibilidade para medir
o potencial através do resistor.
4. O potencial em qualquer ponto não deve exceder 0.75 volts. Um analisador de
vazamento de corrente pode ser utilizado para fazer este teste; o vazamento de
corrente não deve exceder 0.5 mA. Se uma medida está fora dos limites especificados, há uma possibilidade de perigo de choque. O aparelho deve ser reparado e
verificado novamente antes de retornar ao cliente.
5. Repita o procedimento acima com a tomada AC invertida. ( Nota: Um adaptador
AC é necessário quando uma tomada polarizada é utilizada. Não retire o recurso
de polarização do plug.)
Reposição do Tubo de Imagem
A fonte primária de radiação X neste tipo de aparelho é o tubo de imagem. O tubo
de imagem utilizado neste chassis é especialmente construido para limitar a emissão
de radiação X. Para continuar com a proteção de radiação X, o tubo de reposição
deve ser do mesmo tipo do original, incluindo a letra de sufixo, ou um tipo aprovado pela Philips.
Peças de Reposição
Muitas partes mecânicas e elétricas em conjuntos de televisão da Philips têm características especiais de segurança. Essas características não estão frequentemente
evidentes em uma inspeção visual e nem podem ser obtidas utilizando componentes com tolerâncias mais altas de voltagem, potência e etc. O uso de uma peça
substituta que não tem a mesma característica de segurança que a recomendada
pela Philips neste manual de serviço pode causar choque, fogo, ou outros perigos.
170S5FG
5
MANUSEANDO COMPONENTES SMD
Retirando
Geral
Colocando
Pinça
Sugador à Vácuo
Ferro de Solda
A
A
Ferro de Solda
Solda
0,5 ~ 0,8mm
Ferro
de
Solda
Malha
para
Dessolda
Pressão
Tempo de Solda
< 3seg./lado
Pinça
Pressão
Aquecer
Solda
Componente
SMD
Aquecer
B
Solda
0,5 ~ 0,8mm
Ferro
de
Solda
B
Solda
Trilha de Cobre
P.C.I.
Ferro de Solda
Exemplos
Cola
Limpar
Malha
para
Dessolda
Precauções
C
Correto
Ferro de Solda
Correto
Trilha de Cobre
Ferro de Solda
Ferro de Solda
Não!
Pacote de Serviço
Componente
Atenção!
Teste de risco de choque e incêndio
Normas de segurança requerem que todos os ajustes sejam realizados para
as condições normais e todos os componentes de reposição devem atender
as especificações.
CUIDADO: Após reparar este aparelho e antes de devolve-lo ao consumidor, meça a resistência entre cada pino do cabo de força (desconectado
da tomada e com a chave Power ligada) e a face do painel frontal, botões de
controle e a base do chassis.
Advertência!
Todos os CI`s e vários outros semicondutores são suscetíveis à descargas
eletrostáticas (ESD).
Qualquer valor de resistência menor que 1 Megohms indica que o aparelho
deve ser verificado /reparado antes de ser conectado à rede elétrica e verificado antes de retornar ao consumidor.
NOTA DE SEGURANÇA:
ESD
A falta de cuidados no manuseio pode reduzir drasticamente a vida do
componente.
Quando estiver reparando, certifique-se de estar conectado ao mesmo
potencial de terra através de uma pulseira de aterramento com resistência.
Mantenha componentes e ferramentas também neste potencial.
Risco de choque ou incêndio. Componentes marcados com o símbolo ao
lado devem ser substituídos apenas por originais. A utilização de componentes não originais pode acarretar risco de incêndio ou choque elétrico.
SCANNING
Vertical refresh rate :56 Hz-76 Hz
Horizontal Frequency :30k Hz-82 kHz
VIDEO
6
170S5FG
Video dot rate
:135 MHz
Input impedance
-Video
75 ohm
-Sync
ohm
Economia de Energia2.2K
Automática
Input signal levels
:0.7 Vpp
Sync input signal
:Separate sync
Se você possui uma placa
de vídeosync
compatível com VESA’s DPMS
Composite
ou software instalado em
seuon
PC,
o monitor pode automaticamente
Sync
green
reduzir
o consumo de :energia
quando
a função (Power Saving) estiver
Sync
polarities
Positive
and negative
Video
: D-Sub
(analog)ou o mouse for acionado o
ativa.interface
E se qualquer tecla
for acionada
Resolution
Preset Modes voltar a operação normal. A tabela a
monitor irá&automaticamente
Maximum
1280dex potência
1024 at 75
seguir mostra o consumo
no Hz
modo de economia automáRecommended 1280 x 1024 at 60 Hz
tica.
Optical characteristics
Contrast ratio
: 450:1 (typ.)
Brightness
cd/m2 (typ.)
STATUS
H-sync : 250
V-sync
Vídeo
Potência Cor LED
Peak contrast angle : 6 o'clock
Verde/
Ligado
Sim
Sim
Ativo
<35W
White Chromaticity : x: 0.283 y: 0.297 (at 9300K)
x:
0.313
y:
0.329
(at
6500K)
Desligado Não
Não
Apagado <1W
Âmbar
x: 0.313 y: 0.329 (at sRGB)
Viewing Angle (C/R>5): Upper >65 (typ.)
Lower >75 (typ.)
Este monitor é compatível
com
Left
>80"ENERGY
(typ.) STAR". Como um parceiro
da Energy Star, a PhilipsRight
determinou
que este produto siga as normas
>80 (typ.)
Response
time
: <16
(typ.)
Energy Star
de economia
dems
energia.
Physical Specifications
Dimension (WxHxD)* :375 x 423 x 174 mm (incl. Pedestal)
Weight
: 4.2 Kg
Tilt
: -5 ~ 25
Power supply
: 100 240 VAC, 50/60 Hz
Power consumption : 30 W* (typ.)
Temperature
: 5 to 40C(operating)
-20 C to 60
(storage)
Relative humidity
: 20% to 80%
System MTBF
: 50K hours (including CCFL 40K hours)
Pin Assignment:
The 15 pin D-SUB connector(male) of the signal cable
Pin
Assignment
No.
Pin
Assignment
No.
1
Red video input
9
+5V
2
Green video input/SOG
10
Logic ground
3
Blue video input
11
Ground
4
Sense (GND)
12
Serial data line (SDA)
5
Hot Plug Detect
13
H. Sync / H+V
6
Red video ground
14
V. Sync (VCLK for DDC)
7
Green video ground
15
Data clock line (SCL)
8
Blue video ground
VESA Mode
Video
H-sync
V-sync
Power Used
LED color
ON
Active
Yes
Yes
< 35 W
Green
OFF
Blanked
No
No
<1W
Amber
This monitor is ENERGY STAR R compliant. As an ENERGY
STAR R Partner, PHILIPS has determined that this product
Armazenamento
de Dados
meets the ENERGY
STAR R guidelines for energy
Modos pré ajustados de fabrica
Data Storage
Factory
preset
mode:
Este
monitor
tem 15
modos pré-ajustados de fabrica como indicado na
This seguinte:
monitor has 15 factory-preset mode as indicated in the
tabela
following table
H. freq (kHz)
Resolution
V. freq (Hz)
31.5
640*350
70
31.5
720*400
70
31.5
640*480
60
35.0
640*480
67
37.5
640*480
75
35.2
800*600
56
37.9
800*600
60
46.9
800*600
75
49.7
832*624
75
48.4
1024*768
60
60.0
1024*768
75
69.0
1152*870
75
71.8
1152*900
76
63.9
1280*1024
60
80.0
1280*1024
75
Há também 15 configurações disponíveis para o usuário armazenar
novos
dados de
temporização.
Meanwhile,
it also
reverse 15 sets data space available for user
storage new times data
4
190P5
150S5
4
190P5 page
150S5
190P5
150S5
4 44Go to cover
190P5
150S5
190P5
150S5
4 Go to cover
190P5page
150S5
Go
to
cover
page
Front
View
Product
Description
Go
toto
cover
page
Go
cover
page
INSTALAÇÃO
Go to
cover
page
4Front
190P5
150S5
View
Product
Description
Front
View
Product
Description
Front
View
Product
Description
Front
View
Product
Description
da Vista
Frontal do
GoDescrição
to cover
page
Front View Product Description
Produto
Front View Product Description
Installation
170S5FG
Installation
Installation
Installation
Installation
Installation
Connecting
your
monitor
Conectanto seu
monitor
the
cord
intonomonitor
Firmly.
1) Plug
Connecting
your
monitor
Installation
Conecte
opower
cabo
de
força
monitor firmemente.
Connecting
your
monitor
Connecting
your
monitor
7
Connecting
yourinto
monitor
the power cord
monitor Firmly.
1) Plug
Connecting
your
monitor
Plug
the
power
cord
into
monitorFirmly.
Firmly.
1)
Plug
the
power
cord
into
monitor
1)1)
Plug
the
power
cord
into
monitor
Firmly.
1) Plug the power cord into monitor Firmly.
Connecting your monitor
1) Plug the power cord into monitor Firmly.
2) Clip the power cord and signal cable together for cable
the power cord and signal cable together for cable
2) Clip Management
Clip
the
power
cord
and
signal
cable
together
for
cable
2)
Clip
the
power
cord
and
signal
cable
together
forfor
cable
2)2)
Clip
the
power
cord
and
signal
cable
together
cable
Management
2) Prenda
ocord
caboand
de força
e cable
o cabotogether
de sinal juntos.
power
signal
for
cable
2) Clip the
Management
Management
Management
Management
2) Clip the power cord and signal cable together for cable
Management
UP and DOWN buttons are used when
adjusting
OSD of
monitor.
UP and
DOWNthe
buttons
areyour
used
when
asUP
teclas
UP
e
DOWN
são
usadas
para
ajuste do OSD
UP
and
DOWN
buttons
are
used
when
UP
and
DOWN
buttons
are
used
when
adjusting
the
OSD
of
your
monitor.
when
LEFTand
andDOWN
RIGHTbuttons
buttons,are
likeused
the UP
and
adjusting
the
OSD
of
your
monitor.
the
OSD
your
monitor.
do
seu monitor.
UP andadjusting
DOWN
buttons
areofalso
used
when
adjusting
the
OSD
of
your
monitor.
DOWN
buttons,
are
used
in
adjusting
the
LEFT and
RIGHT
buttons,
like the UP and
adjusting
theof
OSD
ofmonitor.
your monitor.
OSD
your
LEFT
and
RIGHT
buttons,
like
the
UP
and
andbuttons
RIGHT
buttons,
like
the UP
and
buttons,
are
also
used
adjusting
the
UPDOWN
andLEFT
DOWN
are
used in
when
RIGHT
buttons,
like
UP
ande DOWN,
asLEFT
teclasand
LEFT
e RIGHT
, como
asthe
teclas
UP
DOWN
buttons,
are
also
used
in
adjusting
the
DOWN
buttons,
are
also
used
in
adjusting
the
LEFT
and
RIGHT
buttons,
like
the
UPthe
and
OSD
of
yourOSD
monitor.
adjusting
the
of your
monitor.
DOWN
buttons,
are
also
used
in
adjusting
the
BRIGHTNESS
hotkey.
When
UP
and
Note: If you use an Apple Macintosh, you need to connect the
também
usadas
parainajuste
do OSD
OSD
of
your
monitor.
OSD
ofof
your
monitor.
DOWNsão
buttons,
are
also
used
adjusting
the do seu monitor.
OSD
your
monitor.
DOWN
arrow
buttons
are
pressed,
the
special
Macan
adapter
one end ofyou
theneed
monitor
signal cable.
BRIGHTNESS
hotkey.
When
the
UP
and
If you use
Apple to
Macintosh,
to connect
the
Note:
LEFT
and
RIGHT
buttons,
like
the
UP
and
OSD ofadjustment
your monitor.
controls
for
the
BRIGHTNESS
will
BRIGHTNESS
hotkey.
When
the
UP
and
If
you
use
an
Apple
Macintosh,
you
need
to
connect
the
Note:
BRIGHTNESS
hotkey.
When
the
UP
and
If
you
use
an
Apple
Macintosh,
you
need
tocable.
connect
the
Note:
DOWN
arrow
buttons
are
pressed,
the
special
MacIfadapter
one
end Macintosh,
of the monitor
BRIGHTNESS
the
UP
DOWN
buttons,
are alsohotkey.
used
inWhen
adjusting
theand
you usetoan
Apple
yousignal
need
to
connect
the
Note:
Tecla
BRIGHTNESSS.
Quando
as
teclas
UP
e
DOWN
show
up.
DOWN
arrow
buttons
are
pressed,
the
special
Mac
adapter
to
one
end
of
the
monitor
signal
cable.
DOWN
arrow
buttons
are
pressed,
the
special
Mac
adapter
toApple
one
end
ofof
the
monitor
signal
cable.
BRIGHTNESS
hotkey.
When
the
UP
and
adjustment
controls
for
the
BRIGHTNESS
will
If
you
use
an
Apple
Macintosh,
you
need
to
connect
the
Note:
DOWN
arrow
buttons
are
pressed,
the
OSD
of
your
monitor.
special
Mac
adapter
to
one
end
the
monitor
signal
cable.
Nota:
Se
você
usa
um
Macintos,
é
necessário
conectar
um
são pressionadas, os controles de ajuste para BRILHO
adjustment
controls
for
the
BRIGHTNESS
will
controls
forfor
the
BRIGHTNESS
will
DOWN
arrow
buttons
arewhen
pressed,
the
showadjustment
up.
specialadaptador
Mac adapter
to one
end
the de
monitor
signal
cable.
adjustment
controls
the
BRIGHTNESS
will
OK
button
which
pressed
will take you
especial
Mac
noofcabo
sinal do
monitor.
aparecem.
BRIGHTNESS
hotkey.
When
the UP and will
show
up.
Note: If you use an Apple Macintosh, you need to connect the
show
up.
adjustment
controls
for the
BRIGHTNESS
show
up.
to
the
OSD
controls.
OKup.
button
when
DOWN
arrowwhich
buttons
arepressed
pressed,will
thetake you
special Mac adapter to one end of the monitor signal cable.
show
OK
button
which
when
pressed
will
take
you OSD.
OK
button
which
when
pressed
will
take
to the
OSD
controls.
OK
button
which
when
pressed
will
take
you
adjustment
controls
forpressionada
the
BRIGHTNESS
will
Tecla
OK
quando
apresenta
o you
menu
to
the
OSD
controls.
to
the
OSD
controls.
OK
button
which
when
pressed
take
you on.
to
the
OSD
controls.
show
up.
POWER
button
switcheswill
your
monitor
to the OSD controls.
Tecla
POWER
liga
seu
monitor.
POWER
button
switches
your
monitor
on.
OK button which when pressed will take you
POWER
button
switches
your
monitor
on.
POWER
button
switches
your
monitor
on.
POWER
button
switches
your
monitor
on.
to the OSD
controls.
Automatically
adjust
themonitor
horizontal
POWER
button switches
your
on. position,
vertical position,
phase
and clock
etting.
s
Automatically
adjust the
horizontal
position,
POWER Automatically
button switches
yourthe
monitor
on. position,
adjust
horizontal
Automatically
adjust
the
horizontal
position,
vertical
position,
phase
andthe
clock
etting.
s horizontal
Automatically
adjust
horizontal
position,
Ajuste
automático
das
posições
e vertical,
vertical
position,
phase
and
clock
etting.
vertical
position,
phase
and
clock
etting.
setting.
Automatically
adjust
the
horizontal
position,
vertical
position,
phase
and
clock
ss
fase e temporização.
vertical position, phase and clocketting.
s
Automatically adjust the horizontal position,
3) Connect to PC
Rear View
vertical position, phase and clocketting.
s
3) Connect to PC
Vista traseira
Rear View
Connect
to
PCcomputer and unplug its power cable.
3)
Connect
toto
PC
3)3)
Connect
PC
Turn off
your
(a)
Rear
View
Rear
View
Rear View
3) Connect to PC
(a) Turn off your computer and unplug its power cable.
Rear View
Connect
the
monitor
signal
cable
toits
the
video
connector
on
(b)(a)
Turn
off
your
computer
and
unplug
its
power
cable.
Turn
your
and
unplug
power
cable.
your
computer
and
unplug
its
power
cable.
(a)
toTurn
PCoffoff
3) Connect
3) (a)
Conectando
aocomputer
PC
the
back
of your and
computer.
Rear View
Turn
off
your
computer
unplug
its
power
cable.
(a)(b)
Connect
the
monitor
signal
cable
to
the
video
connector
on
1) Desligue o computador e o cabo de força.
Connect
the
monitor
signal
cable
to
the
video
connector
on
(b)
Connect
the
monitor
signal
cable
toto
the
video
connector
onon
(b)
the
back
of your
computer.
Connect
the
monitor
signal
cable
the
video
connector
(b)
2) (c)
Conecte
o power
cabo
de
sinal
do
monitor
na parte
de
trás monitor
do
seu comPlug
the
cord
of
your
your
into
Turn
off
your
computer
and
unplug
its
cable.
(a)Connect
the
back
of
your
computer.
the
back
ofof
your
computer.
the
monitor
signal
cable
tocomputer
thepower
videoand
connector
on
(b)
the
back
your
computer.
athe
nearby
putador.
thePlug
back
of power
your outlet.
computer.
cord of your computer and your monitor into
(c)
3)
Ligue
othe
cabo
de força
do
computador
e doand
monitor
em
uma
the
monitor
signal
to
the
video
connector
on into
(b) Connect
Plug
the
power
cord
of
your
computer
and
your
monitor
into
(c)
Plug
power
cord
ofcable
your
computer
your
monitor
a (c)
nearby
outlet.
Plug
the
power
cord
of
your
computer
and
your
monitor
into
(c)
on
your
computer
and monitor.
If the
monitor
displays
the (d)
back
your
computer.
aof
nearby
outlet.
aTurn
nearby
outlet.
tomada
próxima.
the
power
cord
of your computer
and your
monitor
into
(c) Plug
a
nearby
outlet.
An
image,
installation
ismonitor.
complete.
a nearby
4)
Ligue
o computador
eand
o monitor.
Se Ifaparecer
a imagem
a
Turn
onoutlet.
your
computer
the monitor
displays
(d)
the
power
cord
ofcompleta.
your
computer
and your
monitor
into
(c) Plug
Turn
on
your
computer
and
monitor.
Ifthe
the
monitor
displays
(d)
Turn
on
your
computer
and
monitor.
If If
the
monitor
displays
(d)
An
image,
installation
is complete.
instalação
estará
Turn
on
your
computer
and
monitor.
monitor
displays
(d)
a nearby
outlet.
An
image,
installation
iscomplete.
complete.
image,
installation
isis
complete.
onAn
your
computer
and monitor.
If the monitor displays
(d) Turn
An
image,
installation
An image, installation is complete.
(d) Turn on your computer and monitor. If the monitor displays
An image, installation is complete.
1
Kensington anti-thief lock
1
anti-thief lock
1- Trava anti-furto
2 Kensington
VGA input
1
Kensington
anti-thief
lock
anti-thief
lock
Kensington
anti-thief
lock
2- Entrada 2VGA1 1 VGAKensington
input
3 Kensington
AC
power
input
1
anti-thief
lock
3- Entrada de cabo
VGA
input
2 22 de força
VGA
input
VGA
input
ACinput
power input
21 3
VGA
Kensington
anti-thief
lock
AC
power
input
3 33
AC
power
input
AC
power
input
32
AC
power
VGA
inputinput
3
AC power input
8
170S5FG
Wiring Message
DIAGRAMA DE LIGAÇÕES
11
170S5 LCD
Go to cover page
9
170S5FG
12
12
170S5
170S5LCD
LCD
12
LCD
12 12 170S5
170S5
LCD
170S5
LCD
Go
Goto
tocover
coverpage
page
Go
to
cover
page
GoGo
to to
cover
page
cover
page
12
170S5
LCD
Vista Frontal
Mechanical
Instructions
Mechanical
Instructions
Mechanical
Instructions
Mechanical
Instructions
Mechanical
Instructions
INSTRUÇÕES
MECÂNICAS
Mechanical Instructions
Go to
cover page
Front
View
Front
View
Front
View
Front
View
Front
View
Front View
Fig.6
Fig.6
Fig.6
Fig.6Fig.6
Fig.6
Fig.1
Fig.1
Fig.1
Fig.1Fig.1
Fig.1
Vista Traseira
Back
BackView
View
Back
View
Back
View
Back
View
Fig.7
Fig.7
Fig.7
Fig.7Fig.7
Back View
Fig.7
Fig.8
Fig.8
Fig.8
Fig.8Fig.8
Fig.2
Fig.2
Fig.2
Fig.2Fig.2
Step1.
Remove
the
base
Step1.
Remove
the
base
Step1.
Remove
the
base
Step1.
Remove
theas
base
Step1.
Remove
the
base
-Remove
the
screws
shown
ininin
Fig.3
&&Fig.4
-Remove
the
screws
shown
Fig.3
&Fig.4
Fig.4
-Remove
the
screws
asas
shown
Fig.3
Passo
1Remova
base
como
figs. 3 e 4.
-Remove
the the
screws
asa shown
in Fig.3
& Fig.4
-Remove
screws
as shown
in mostra
Fig.3
& as
Fig.4
Step1. Remove the base
-Remove the screws as shown in Fig.3 & Fig.4
Fig.2
Fig.3
Fig.3
Fig.3
Fig.3Fig.3
Fig.8
Step3.Remove
the
Back
cover
Step3.Remove
the
Back
cover
Step3.Remove
the
Back
cover
Step3.Remove
the
Back
cover
Step3.Remove
the
Back
cover
Passo
3Remova
a tampa
traseira
--Remove
the
two
clicks
as
shown
in
Fig.9
,then
remove
the
Control
-Remove
Remove
the
two
clicks
as
shown
in
Fig.9
,then
remove
the
Control
the two clicks as shown in Fig.9 ,then remove the Control
- board
Remove
the the
twotwo
clicks
as shown
in
Fig.9
,then
the the
Control
- Remove
as shown
in Fig.9
,then
remove
Control
Remova
os clicks
2 parafusos
como
mostra
aremove
fig.
9, então
remova
board
board
Step3.Remove
the Back cover
board
board
o
Painel
de
Controle.
-Use
the
thin
"" "two
screw
driver
toto
open
the
clicks
as
shown
ininin
Fig.10
-Use
the
thin
"type
type
screw
driver
open
the
clicks
shown
Fig.10
-Use
the
thin
"type
screw
driver
open
the
clicks
asas
shown
Fig.10
--Use
Remove
the
clicks
asscrew
shown
into
,then
remove
Control
the the
thin
" ""type
screw
driver
toFig.9
open
the the
clicks
as the
shown
in Fig.10
-Use
thin
" type
driver
to open
clicks
as shown
in Fig.10
board Use o parafuso fino tipo "I" para abrir os clicks como mostra
a fig.
-Use the thin
" 10.
" type screw driver to open the clicks as shown in Fig.10
Fig.9
Fig.9
Fig.9
Fig.9Fig.9
Fig.9
Fig.3
Fig.4
Fig.4
Fig.4
Fig.4Fig.4
Fig.4
Step2.
Remove
the
Front
Bezel
Step2.
Remove
the
Front
Bezel frontal
Passo
2- Remova
o pedestral
Step2.
Remove
the
Front
Bezel
Step2.
Remove
the
Front
Bezel
Step2.
Remove
the
Front
Bezel
-Remove
the
one
screw
shown
in
Fig.5
-Remove
the
one
screw
shown
Fig.5
-Remove
the
one
screw
asas
shown
inin
Fig.5
Remova
oas
parafuso
como
mostra a fig. 5.
-Remove
the
one
screw
as shown
in Fig.5
-Remove
the
one
screw
astoshown
inthe
Fig.5
-Use
the
thin
"
"
screw
driver
open
clicks
as
shown
-Use
the
thin
"
"
screw
driver
to
open
clicks
as
showncomo
-Use
the Remove
thinUse
" "the
driver
totipo
open
the
clicks
asos
shown
oscrew
parafuso
fino
"I"the
para
abrir
clicks
Step2.
Front
Bezel
-Use
the
thin
"
"
screw
driver
to
open
the
clicks
as shown
-Use
the
thin
"
screw
driver
to
open
the
clicks
as shown
inin-Remove
Fig.6-8
in
Fig.6-8the
Fig.6-8
one
screw
as
shown
in
Fig.5
mostra
as
figs.
6
,7
e
8.
in Fig.6-8
in Fig.6-8
-Use the thin " " screw driver to open the clicks as shown
in Fig.6-8
Fig.10
Fig.10
Fig.10
Fig.10
Fig.10
Fig.10
Step4.
Remove
the
Matel
frame
board
Step4.
Remove
the
Matel
frame
board
Step4.
Remove
the
Matel
frame
board
Step4.
Remove
the
Matel
frame
board
Step4.
Remove
the
Matel
frame
board
--Remove
the
four
screws
as
shown
in
Fig.11
-Remove
Remove
the
four
screws
as
shown
in
Fig.11
the four screws as shown in Fig.11
- Disconnect
Remove
the
fourfour
screws
as screws
shown
in as
Fig.11
- Remove
the
screws
asscrews
shown
inshown
Fig.11 Fig.11
--Disconnect
D-SUB
hexagonal
as
-Disconnect
D-SUB
hexagonal
Fig.11
D-SUB
hexagonal
screws
asshown
shownininin
Fig.11
Step4.
Remove
the
Matel
frame
board
Disconnect
D-SUB
hexagonal
screws
as in
shown
in Fig.11
Disconnect
D-SUB
hexagonal
screws
asin
shown
in Fig.11
--Remove
the
matel
frame
board
as
shown
Fig.12
-Remove
Remove
the
matel
frame
board
as
shown
Fig.12
the
matel
frame
board
as
shown
in
Fig.12
-- Remove
the
four
screws
as
shown
in
Fig.11
Remove
the the
matel
frame
board
as shown
in Fig.12
- Remove
matel
frame
board
as shown
in Fig.12
- Disconnect D-SUB hexagonal screws as shown in Fig.11
- Remove the matel frame board as shown in Fig.12
Fig.5
Fig.5
Fig.5
Fig.5Fig.5
Fig.5
Fig.11
Fig.11
Fig.11
Fig.11
Fig.11
Fig.11
10
170S5FG
Fig.10
PAINEL
Panel
Passo 4- Remova o painel Matel.
Remova os 4 parafusos com mostra a fig. 11.
Step4. Remove the Matel frame board
Desconecte os parafusos hexagonal D-SUB como
- Remove the four screws as shown in Fig.11
mostra
a fig.hexagonal
11.
- Disconnect D-SUB
screws as shown in Fig.11
Remova
o painel
como
mostrainaFig.12
fig. 12.
- Remove
the matel
frameMatel
board
as shown
Mechanical Instruction
Mechanical
Instruction
Mechanical
Instruction
170S5 LCD
13
Go to cover page
170S5 LCD
13
170S5 LCD
13
Go to cover page
Go to cover page
Fig.14
Fig.11
Fig.15
Fig.12
Fig.12
Fig.12
Step 5. Remove the sclar and power board.
- Disconnect
the
and 4 backlight cables
Passo
5- Remova
o 1505,1502,1413
painel scaler e power.
Step 5. Remove the sclar and power board.
as shown
in Fig.13
Step
5.Desconecte
Remove
the1505,
sclar1502,
and power
1413 eboard.
os 4 cabos de iluminação
- Remove
the scaler
power
board
as shown in Fig.14
traseira
comoand
mostra
aand
fig.
- Disconnect
the 1505,1502,1413
413.
backlight cables
- Disconnect
the
1505,1502,1413
and 4como
backlight
cables
Remova
o painel
power e scaler
mostra
a fig. 14.
as shown
in Fig.13
as shown
in Fig.13
- Remove
the scaler
and power board as shown in Fig.14
- Remove the scaler and power board as shown in Fig.14
4 backlight cables
4 backlight cables
4 backlight cables
1413 to Panel
1502 to Power board
1413 to Panel
1413
Paneboard
l
1505
to to
Control
1502 to Power board
1502 to Power board
1505 to Control board
1505 to Control board
Fig.13
Fig.13
Fig.13
Panel
Panel
Panel
Fig.15
Fig.15
**************************************************************************************
In warranty, it is not allowed to disassembly the LCD panel, even the
**************************************************************************************
backlightnão
unité defect.
Na garantia,
permitido a desmontagem do painel LCD, mesmo o
**************************************************************************************
Out of warranty, the replacement of backlight units is a correct way
defeito
da
unidade
da allowed
iluminação
traseira.
In warranty, it is not
to disassembly
the LCD panel, even the
when
the defect
caused
by to
backlight
(CCFL,
In warranty,
it is is
not
allowed
disassembly
theLamp).
LCD panel, even the
backlight
unit defect.
Fora
da garantia,
a troca da unidade de iluminação traseira deve ser
backlight
unit
defect.
Out
of
warranty,
the
replacement
of
backlight
units
is
a correct way
***************************************************************************************
feita quando
o defeito the
for causado
pela lâmpada.
(CCFL,
Out
warranty,
replacement
backlight
units isLamp).
a correct way
when
theofdefect
is caused
by backlightof(CCFL,
Lamp).
when the defect is caused by backlight (CCFL, Lamp).
***************************************************************************************
***************************************************************************************
14
170S5 LCD
14
170S5 LCD
Go to cover page
Go to cover page
11
170S5FG
Electrical Instructions Mode
Electrical Instructions Mode
Instruções Elétricas
2.2 Input signal mode
1. General points
1. Geral
1.
General points
1.1 During the test and measuring, supply a distortion free AC mains
1.11.1 Durantes
During theostest
ande measuring,
supply ao distortion
free AC de
mains
teste
medidas, alimente
aparelho através
um
voltage to the apparatus
an de
isolated
transformer
with low
transformador
de isolaçãovia
livre
distorção
e com resistência
voltage to the apparatus via an isolated transformer with low
interna. Resistance.
internal
internal Resistance.
1.21.2 All
measurements
hereafter
are carried
at a
Todas
as medidas mentioned
mencionadas
foram feitas
com oout
aparelho
1.2 All measurements mentioned hereafter are carried out at a
alimentado
com
um
tensão
alternada
entre
90-264
VAC,
menos
normal mains voltage (90 - 132 VAC for USA version, 195a -264
que
mencionado
em contrário.
normal
mains voltage
(90 - 132 VAC for USA version, 195 -264
VAC for EUROPEAN version, or 90 - 264 VAC for the model
VAC for EUROPEAN version, or 90 - 264 VAC for the model
1.3 with
Todas
tensões
sãosupply,
medidas
com otherwise
relação à stated.)
terra, a menoos que
fullasrange
power
unless
mencionado
em
contrário.
with full range
power
supply, unless otherwise stated.)
1.3 All voltages are to be measured or applied with respect to ground,
1.3 All voltages are to be measured or applied with respect to ground,
Nota:
use dissipadores
como ponto de terra.
unlessNão
otherwise
stated.
unless otherwise stated.
don'tdevem
use heat-sink
asinclusive
ground. no painel LCD, após pré1.4 Note:
Os testes
ser feitos,
Note: don't use
asem
ground.
aquecimento
de heat-sink
30 minutos
uma sala com temperatura de 25
1.4 The test has to be done on a complete set including LCD panel
griaus
+/5
graus.
1.4 The test has to be done on a complete set including LCD panel
after 30 minutes warm-up at least in a room with temperature of
after 30
at least
in a instruções
room with temperature
of
1.5 Todos
osminutes
valores warm-up
mencionados
nestas
de teste apenas
25 +/- 5 degree C.
são
aplicaveis
a
um
produto
corretamente
alinhado
e
com
sinal
25 +/- 5 degree C.
1.5 All
values mentioned in these test instruction are only applicable
apropriado.
1.5 All values mentioned in these test instruction are only applicable
of a well aligned apparatus, with correct signal.
1.6 A
e (S) apparatus,
colocadas após
as instruções
ofletras
a well(B)
aligned
with correct
signal. de teste significam:
(B): Efetuada
em toda
produção.
(S): behind
Efetuado
lote de
1.6 The
letters symbols
(B)aand
(S) placed
theem
testum
instruction
1.6 amostragem.
The letters symbols (B) and (S) placed behind the test instruction
denotes(B): carried out 100% inspection at assembly line(S):
denotes(B): carried out 100% inspection at assembly line(S):
1.7 carried
O balanço
(Colour temperature) deve ser testado em
out de
testbranco
by sampling
carried outpouco
test by
sampling
ambiente
iluminado.
1.7 The white balance (color temperature) has to be tested in subdued
1.7 The white balance (color temperature) has to be tested in subdued
1.8 O
ciclo room.
de ligar/desligar deve ser feito apenas com um intervalo
lighted
lighted room.
mínimo
de 6 segundos.
1.8 Repetitive power on / off cycle are allowed except it should be
1.8 Repetitive power on / off cycle are allowed except it should be
2 Sinal
de entrada
Avoided
within 6 sec.
Avoided within 6 sec.
2.2.1 Tipo
Input
signal
de sinal
2.
Input signal
2.1 Signal type
2.1.1 Fonte de sinal: Gerador de padrão (tabela 1 a 34). Gerador de
2.1 Signal type
referência:
802BT. O sinal de entrada pode ser
2.1.1 Video
signalQuantumData
input
2.1.1 aplicado
Video signal
inputformas:
de duas
Signal source: pattern generator format as attachment.
Signal source: pattern generator format as attachment.
1). VESA
(Tableanalógico
1 to 34) Reference generator: QuantumData 802BT
to 34) Reference
QuantumData
O(Table
vídeo1consiste
de sinais generator:
verde, vermelho
e azul. Os 802BT
sinais são
The input signals
cancorresponde
be applied in
different
modes:
analógicos
onde 0V
aotwo
preto
e 700mV
é o valor
The input signals can be applied in two different modes:
máximo
entrada. A impedância de entrada é de 75ohms.
1). VESAdeAnalog
1). VESA Analog
video de
input
consists
of red, green, and blue signals. The
2.1.2The
Entrada
sinal
de sincronismo
The video input consists of red, green, and blue signals. The
É
possivel
manipular
sincronismo
separado,
sincronismo to
composto
video signals are analog levels, where
0V corresponds
evideo
sincronismo
verde.
A impedância
de0V
entrada
é de 2K2ohms.
signals no
are
analog
levels, where
corresponds
to
black
and são
700mV
is the como
maximum
signal amplitude. Input
Os sinais
definidos
a seguir:
black and 700mV is the maximum signal amplitude. Input
Sincronismoofseparado
Nível TTL,
impedance
video pins is 75 ohm +- 1%.
Positivo/Negativo
impedance of video pins is 75 ohm +- 1%.
2.1.2 Sincronismo
Sync signal input
composto
Nível TTL,
2.1.2 Positivo/Negativo
Sync signal input
The capability of sync signal inputs shall include separate sync,
Sincronismo
noofverde
Nível TTL,sync,
The capability
sync signal inputs shall include separate
composite sync and sync on green. input impedance: 2k2 ohms
Positivo/Negativo
composite sync and sync on green. input impedance: 2k2 ohms
The signals are defined as follow:
Fonte
de sinal:
The signals
areGerador
defined de
as padrão
follow: (tabela 1 a 34). Gerador de
Separate sync
referência:
QuantumData 802BT.TTL level, Positive/Negative
Separate sync
TTL level, Positive/Negative
Composite sync
TTL level, Positive/Negative
Composite sync
TTL level, Positive/Negative
Sync on green H-sync
TTL level, Positive/Negative
Sync on green H-sync
TTL level, Positive/Negative
Signal source : pattern generator format as attachment (Table 1
Signal source : pattern generator format as attachment (Table 1
to 34) Reference generator: QuantumData 802BT
to 34) Reference generator: QuantumData 802BT
2.2Modos
Input signal
mode
2.2
do sinal
de entrada
Pre-set 34 modes
Pre-set 34 modes
34 modos pré-definidos
PRESET VIDEO RESOLUTION
PRESET VIDEO RESOLUTION
RESOLUÇÕES PRÉ-DEFINIDAS
#
#
Resolution
Resolution
1 640X350
1 640X350
2 720X400
2 720X400
H-Frequency Pixel rate
V-Frequency Comment
H-Frequency Pixel rate
V-Frequency Comment
31.5K
25.175
70Hz
IBM VGA 10h
31.5K
25.175
70Hz
IBM VGA 10h
31.5K
28.322
70Hz
IBM VGA 3h
31.5K
28.322
70Hz
IBM VGA 3h
3 640X480
3 640X480
4 640X480
4 640X480
5 640X480
5 640X480
6 640X480
6 640X480
7 640X480
7 640X480
31.5K
31.5K
35.0K
35.0K
37.9K
37.9K
37.5K
37.5K
43.3K
43.3K
25.175
25.175
30.24
30.24
31.5
31.5
31.501
31.501
36
36
60Hz
60Hz
67Hz
67Hz
72Hz
72Hz
75Hz
75Hz
85Hz
85Hz
8 800X600
8 800X600
9 800X600
9 800X600
10 800X600
10 800X600
11 800X600
11 800X600
12 800X600
12 800X600
13 832X624
13 832X624
35.2K
35.2K
37.9K
37.9K
48.1K
48.1K
46.9K
46.9K
53.7K
53.7K
49.7K
49.7K
36
36
40
40
50
50
49.498
49.498
56.251
56.251
57.28
57.28
56Hz
56Hz
60Hz
60Hz
72Hz
72Hz
75Hz
75Hz
85Hz
85Hz
75Hz
75Hz
14 1024X768
14 1024X768
15 1024X768
15 1024X768
16 1024X768
16 1024X768
17 1024X768
17 1024X768
18 1024X768
18 1024X768
48.4K
48.4K
56.5K
56.5K
60.0K
60.0K
61.1K
61.1K
68.7K
68.7K
65
65
75
75
78.75
78.75
83.096
83.096
94.5
94.5
60Hz
60Hz
70Hz
70Hz
75Hz
75Hz
76Hz
76Hz
85Hz
85Hz
19 1152X864
19 1152X864
20 1152X864
20 1152X864
21 1152X864
21 1152X864
22 1152X870
22 1152X870
23 1152X900
23 1152X900
24 1152X900
24 1152X900
54.0K
54.0K
67.5K
67.5K
63.9K
63.9K
68.7K
68.7K
61.8K
61.8K
71.8K
71.8K
79.9
79.9
108
108
94.5
94.5
100
100
92.94
92.94
108
108
60Hz
60Hz
75Hz
75Hz
70Hz
70Hz
75Hz
75Hz
66Hz
66Hz
76Hz
76Hz
25 1280X960
25 1280X960
26 1280X960
26 1280X960
60.0K
60.0K
75.0K
75.0K
108
108
129.895
129.895
60Hz
60Hz
75Hz
75Hz
27 1280X1024
27 1280X1024
28 1280X1024
28 1280X1024
29 1280X1024
29 1280X1024
30 1280X1024
30 1280X1024
31 1280X1024
31 1280X1024
64.0K
64.0K
71.7K
71.7K
76.0K
76.0K
80.0K
80.0K
81.1K
81.1K
108
108
117
117
130.223
130.223
135
135
135.008
135.008
60Hz
60Hz
67Hz
67Hz
72Hz
72Hz
75Hz
75Hz
76Hz
76Hz
32 688X556
32 688X556
31.3K
31.3K
27
27
50Hz
50Hz
33 960X720
33 960X720
44.76K
44.76K
57.58
57.58
60Hz
60Hz
MAC
MAC
IBM XGA-2
IBM XGA-2
non-VESA
non-VESA
non-VESA
non-VESA
MAC
MAC
SUN Mode IV
SUN Mode IV
SUN Mode II
SUN Mode II
non-VESA
non-VESA
SUN Mode V
SUN Mode V
DOS/V
DOS/V
SUN Mode I
SUN Mode I
TV-PAL
TV-PAL
2.3 Allowed 85 Hzoverscan signal mode specified
2.3 Permitido
modo
de of
85HZ.
Uma
vez
quemonitor
o sinal de
2.3 Once
Allowed
85signal
Hzoverscan
signal
mode
specified
theHoverscan
input
PC is
85Hz,
this
is
the
signal
offor
PC10isminutes.
85Hz,
display
atinput
least
Anmonitor
attention
entrada able
éOnce
de to
85Hz,o
monitor
funcionará
por 10 this
minutos.
Umissinal
able
toappears
at least
for 10isminutes.
An attention
and
showsThis
85Hz
fore5o
de alertasignal
sobre
odisplay
overscan
será
mostrado
por 5overscan
segundos
signal para
appears
and
showsThis
is 85Hz overscan for 5
change
computer
display
monitor seconds,
muda
1024x768
@ 60Hz.
seconds,
change computer
Input
to 1024*768
@ 60 Hz "display
Input to 1024*768 @ 60 Hz "
Dot rate (MHz)
Dot36.000
rate (MHz)
36.000
56.250
56.250
94.500
94.500
H. Freq (KHz)
H. Freq
(KHz)
43.269
43.269
53.674
53.674
68.677
68.677
Mode
Mode
VESA
VESA
VESA
VESA
VESA
VESA
Resolution
Resolution
640 * 480
640 ** 600
480
800
800 * 600
1024
768
1024 * 768
V. Freq (Hz)
V. 85.008
Freq (Hz)
85.008
85.061
85.061
84.997
84.997
Go to cover page
12
170S5FG
Allowed TV PAL signal mode specified
Electrical
Mode
Electrical Instructions
Instructions
Mode
4.5 EEPROM
presetting (B)
TV PAL Mode, this mode can be adjusted and saved.
DotTV
ratePAL
(MHz)
H freq (KHz)
Mode
Resolution
V freq (Hz)
Modo
permitido
27.000
31.25
TV PAL
688*556
Allowed
TV PAL
signal
mode
Allowed
PAL
signalpode
modespecified
specified
Modo TV
PAL,TV
este
modo
ser
ajustado e salvo.
50
TV
TVPAL
PALMode,
Mode,this
thismode
modecan
canbe
beadjusted
adjustedand
andsaved.
saved.
Dot
Dotrate
rate(MHz)
(MHz) HHfreq
freq(KHz)
(KHz) Mode
Mode Resolution
Resolution VVfreq
freq(Hz)
(Hz)
27.000
31.25
TV
PAL
688*556
50
27.000
31.25
TV PAL
688*556
50
After finishing all the adjustment, set:
170S5
15
170S5 LCD
LCD
15
Go
Gototocover
coverpage
page
to 100%
4.5Brightness
EEPROMcontrol
Presetting
Contrast
control
to 70%
4.5
presetting
(B)
4.5 EEPROM
EEPROM
presetting
(B)
Após concluir todos os ajuste, coloque o brilho em 100%, contraste
OSD
position
atadjustment,
middle
of screen
After
finishing
all
the
set:
After
finishing
all
the
adjustment,
set:da tela e COLOR ADJUST
em 70%, posição do OSD no centro
COLOR
ADJUST
to
6500K
color.
Brightness
control
to
100%
para
6500K.
Brightness control to 100%
4.6 WContrast
hen adjustment
is70%
finished,
monitor should be set to 6500K
control
Contrast
controltoto
70%
Color
OSD
position
at
middle
of
screen
3.1 Setup the AC I/P at 90VAC, add 2.6A loading to +12V O/P and DC 4.6 Quando
OSD
position
middleestiver
of screen
o ajuste
doatmonitor
terminado, o monitor deve ser
COLOR
toto6500K
ajustado
para 6500K.
3. Fonte
alimentaçã0
O/Pde
voltage
is 12V +/- 1.2V, 1A loading to 3.3V O/P and DC O/P
COLORADJUST
ADJUST
6500Kcolor.
color.
3.
POWER SUPPLY (Buy in power board)
voltageSUPPLY
isSUPPLY
3.3V +/0.165V,
1.5A loading
3.3. POWER
(Buy
ininpower
board)
POWER
(Buy
power
board)to 5V O/P and DC O/P
3.1 Ajuste o I/P AC para 90VAC, coloque uma carga de 2,6A no +12V
voltage
is
5V
+/0.5V
(B).
3.1
the
I/P
atat90VAC,
loading
3.1
theAC
AC
I/P
90VAC,
add
2.6A+/loading
to+12V
+12VO/P
O/Pand
andDC
DC
O/PSetup
eSetup
a tensão
DC
O/P
deve
seradd
de 2.6A
12V
1,2V,tocoloque
uma
3.2carga
Check
voltage
at
3.3V
O/P
should
be
within
the
range
3.3V
+/de
1A
no
3,3V
O/P
e
a
tensão
DC
O/P
deve
ser
de
3,3V
+/O/P
voltage
is
12V
+/1.2V,
1A
loading
to
3.3V
O/P
and
DC
O/P
O/P voltage is 12V +/- 1.2V, 1A loading to 3.3V O/P and DC O/P
0,165V,
coloque
uma
carga
debe
1,5A
no the
5V O/P
e a5.0V
tensão
DC O/P
O/P
0.165V.
5.0V
O/P
should
within
+/voltage
3.3V
+/1.5A
loading
toto5V
DC
voltageisis
3.3V
+/-0.165V,
0.165V,
1.5A
loadingrange
5VO/P
O/Pand
and0.5V
DC O/P
deve ser de 5V +/- 0,5V. (B)
12V
O/P isshould
be
within
the range 12V +/- 1.2V (B)
voltage
0.5V
(B).
voltage
is5V
5V+/+/0.5V
(B).
Check
voltage
atat3.3V
be
within
the
3.3V
+/3.33.2
Verifique
as
tensões
+12V
O/P
(12V
+/1,2V)
3,3V
O/P
(3,3V
+/3.2
Check
voltage
3.3VO/P
O/Pshould
should
be
within
therange
range
3.3V
+/e aAdjustment
5V
O/PO/P
(5Vshould
+/- 0,5V).
(B) the range 5.0V +/- 0.5V
4. 0,165V)
Display
0.165V.
5.0V
be
within
0.165V. 5.0V O/P should be within the range 5.0V +/- 0.5V
4.1 Access
to should
factory
mode
(RS232)
in auto-alignment
12V
O/P
the
12V
(B)
12V
shouldbe
bewithin
within
therange
range
12V+/+/-1.2V
1.2V system
(B)
4 Ajuste
do O/P
display
The communication protocol switch to RS232 .
4.1
Acesse
o
modo
de fábrica(B)
(RS232) no sistema de auto4.2
Auto
color
adjustment
4.4.
Display
Adjustment
Display
Adjustment
alinhamento.
a 640
* 480 mode
/60Ht
z signalinwith
16 level greysystem
pattern,
4.1
Access
totofactory
4.1 Apply
Access
factory
mode(RS232)
(RS232)
inauto-alignment
auto-alignment
system set
brightness
at 100%,
and
contrast
control
The
communication
protocol
switch
totoRS232
. .at 50%.
4.2 Ajuste
de
Autocontrol
Color (B)
The
communication
protocol
switch
RS232
Aplique
um
sinal
deB640x480
@ 60Hz
com
16 níveis
cinza,
Adjust
the
R.
G.
offset,
and
gain to
calibrate
the de
color
smoothly
4.2
Auto
color
adjustment
(B)
4.2
Auto
color
adjustment
(B)
ajuste
o
brilho
para
100%
e
o
contraste
para
50%.
aJUSTE
O RGB
and
64-gray
level
distinguishable.
Apply
aa640
* *480
/60Ht
z zsignal
with
level
640
480
/60Ht
signal
with16
16
levelgrey
greypattern,
pattern,set
set
offsetApply
e ganho
para
obter
64 níveis
de cinza
distinguíveis.
4.3 Adjustment
WHITE-D
(B) and
brightness
control
atat100%,
brightnessof
control
100%,
andcontrast
contrastcontrol
controlatat50%.
50%.
Apply
1280*1024/
60Hz
signal
with
pattern,
set
4.3 Ajuste
deaWHITE-D
(B)
Adjust
the
totowhite
calibrate
the
Adjust
theR.R.G.
G.B
Boffset,
offset,and
andgain
gain
calibrate
thecolor
colorsmoothly
smoothly
Aplique
um sinal
de 1280x1024
@ 60Hz
com
padrão
branco,
brightness
control
at
100%,
and
contrast
control
at
50%.
and
and64-gray
64-graylevel
leveldistinguishable.
distinguishable.
ajuste o brilho para 100% e o contraste para 50%. aJUSTE O RGB
Adjust
the R,ofG,
B Sub-Gain,
for the screen center, the
4.3
Adjustment
(B)
4.3
Adjustment
ofWHITE-D
WHITE-D
(B)
sub-gain
para obter,
no centro
da tela, a cromaticidade 1931 CIE
1931
chromaticity
(X,signal
Y)
co-ordinates
be;set
como
naCIE
tabela
abaixo. 60Hz
Apply
aa1280*1024/
with
pattern,
Apply
1280*1024/
60Hz
signal
withwhite
whiteshall
pattern,
set
brightness
brightnesscontrol
controlatat100%,
100%,and
andcontrast
contrastcontrol
controlatat50%.
50%.
Use um Minolta CA-110 para verificação das coordenadas de cor e
Adjust
the
R,R,G,
BBSub-Gain,
for
the
screen
center,
the
Adjust
the
G,
Sub-Gain,
for
the
screen
center,
the
luminância.
9300�K(X, Y) co-ordinates
6500�K
1931
CIE
chromaticity
shall
be;
A luminância
ser >200 Nits
no co-ordinates
centro da telashall
quando
1931 CIEdeve
chromaticity
(X, Y)
be; o brilho
x (center) estão em
0.283
� 0.008
0.313 � 0.008
e contraste
100%.
y (center)
0.297 � 0.008
0.329 � 0.008
x x(center)
(center)
9300�K
9300�K
0.283
0.283��0.008
0.008
6500�K
6500�K
0.313
0.313��0.008
0.008
y y(center)
(center)
0.297
0.297��0.008
0.008
0.329
0.329��0.008
0.008
Use Minolta CA-110 for color coordinates and luminance check.
4.4 Ajuste
de sRGB
Luminance
is > 200 Nits in the center of the screen when
brightness at 100% and contrast set to 100%.
Aplique um sinal de 1280x1024 @ 60Hz com padrão branco,
4.4ajuste
Adjustment
of
sRGB
Use
CA-110
for
coordinates
and
o Minolta
brilho
para
100%
ecolor
ocolor
contraste
para 50%.
aJUSTE
Ocheck.
RGB
Use
Minolta
CA-110
for
coordinates
andluminance
luminance
check.
sub-gain
para
obter,
no
centro
da
tela,
a
cromaticidade
1931
CIE
Apply
a
1280*1024/
60Hz
signal
with
white
pattern,
set
Luminance
is
>
200
Nits
in
the
center
of
the
screen
when
Luminance is > 200 Nits in the center of the screen when
como
na tabela abaixo.
brightness
at and
100%,
and contrast
control at 50%. Adjust
brightness
atat100%
set
brightnesscontrol
100%
andcontrast
contrast
settoto100%.
100%.
R, G, B Sub-Gain,
4.4
Adjustment
ofofsRGB
4.4 the
Adjustment
sRGB for the screen center, the 1931 CIE
chromaticity
(X, Y) co-ordinates
shall
be;
Apply
60Hz
Applyaa1280*1024/
1280*1024/
60Hzsignal
signalwith
withwhite
whitepattern,
pattern,set
set
brightness
brightnesscontrol
controlatat100%,
100%,and
andcontrast
contrastcontrol
controlatat50%.
50%.Adjust
Adjust
the
theR,R,G,
G,BBSub-Gain,
Sub-Gain,for
forthe
thescreen
screencenter,
center,the
the 1931
1931CIE
CIE
chromaticity
chromaticity (X,
(X,Y)Y)co-ordinates
co-ordinatesshall
shallbe;
be;
4.6
4.6 WW hen
henadjustment
adjustmentisisfinished,
finished,monitor
monitorshould
shouldbe
beset
settoto6500K
6500K
Color
Color
sRGB
x (center)
y (center)
Ynits
x x(center)
(center)
0.313 � 0.008
0.329 � 0.008
sRGB
sRGB
180
� 10
0.313
0.313��0.008
0.008
y y(center)
(center)
0.329
0.329��0.008
0.008
Ynits
Ynits
180
180��10
10
170S5FG
13
EQUIPAMENTOS DE SEGURANÇA REQUERIDOS
Todos os aparelhos que entrarem para consertos devem passar
pelos testes de segurança de fábrica. Os testes exigidos são o
de HI-POT e o de continuidade do terra.
3. Equipamento e conexões
3.1.
Equipamentos
Por exemplo :
- ChenHwa 9032 PROGRAMMABLE AUTO SAFETY
TESTER
- ChenHwa 510B Digital Grounding Continuity Tester
- ChenHwa 901 (AC Hi-pot test), 902 (AC, DC Hi-pot
test)
3.2.
Conexão
Instrução do Teste de HI-POT
1.
Requerimentos da aplicação.
1.1
Todos os produtos ligados à rede elétrica devem passar
pelo teste de HI-POT como descrito nesta Instrução.
1.2
Este teste deve ser feito novamente após o gabinete ser
fechado após o reparo, inspeção ou modificação do
produto.
2.
Método de Teste
2.1
Condições de conexão
* Ligue a chave power do monitor antes de fazer os
testes de HI-POT e continuidade de terra.
garra jacaré
2.1.1 O teste especificado deve ser aplicado entre os pinos do
plug do cabo de força e qualquer peça de metal acessível
no produto.
Clip
2.1.2 Antes de realizar o teste, conexões confiáveis de condutores, devem ser asseguradas e depois mantidas durante
todo o período de teste.
2.1.3 A chave power deve estar na posição ligada.
2.2
Requerimentos do teste
Todos os produtos devem ser testados no HI-POT e
continuidade de terra como mostrado a seguir:
Condição
Tensão
de teste
Teste Hi-Pot para
produtos onde
a faixa de tensão
é completa
ou 220V AC
Teste Hi-Pot para
produtos onde
a faixa de tensão
é apenas
110V AC
Requerimentos
para o teste de
continuidade de
terra.
2820VDC
(2000VAC)
1700VDC
(1200VAC)
Teste de corrente:
25A, AC
Tempo de teste:
3 segundos (min.)
Resistência
requirida:
<=0.09+R ohm,
R é a resistência
do cabo de força.
Tempo de 3 segundos
teste
(min.)
limitação Máx.
100 uA
Corrente
(Teste)
limitação Mín.
0,1 uA
1 segundo
5 mA
(ChenHwa 9032 )
Cabo de vídeo
Conecte o cabo de vídeo
ou o parafuso de aterramento
à garra jacaré do seu teste
Parafuso de terra
Tempo de ajuste para 2
subida
segundos
Conectado ao cabo de força
do monitor
.
2.2.1 O teste com tensão AC é só para a produção, os Serviços Autorizados usam a tensão DC.
Tomada de força
2.2.2 A duração mínina do teste para o controle de qualidade
deve ser de 1 minuto. Sem breakdown.
(Vista traseira do monitor)
2.2.3 A tensão de teste deve ser mantida dentro da tolerância
de + 5%.
4.
2.2.4 A lâmina de terra ou pino do plug do cabo de força deve
ligado com peças de metal acessíveis.
Os registros dos testes de Hi-pot e continuidade de terra devem
ser mantidos por um período de 10 anos
Gravação
14
60
170S5FG
150S5
DDC Instructions
Go to cover page
INSTRUÇÕES
DDC
60
150S5
General
Nota: O ajuste da caixa já possui um soquete de baterias configu-
Note: The
has already
build-in
a batteries
socket for
radoalignment
para usarbox
baterias
(9V) como
fonte.
Puxe o soquete
para
DDC Instructions
batteries
(8~12V)
using
powerda
source.
thenão
socket by
remover
4 parafusos
na as
traseira
caixa. Pull
Por out
favor,
GoRe-programming
to cover page
1. Geral
DDC
Data
remove
four
screws
atas
the
rear of depois
box. Please
do not forgetAthat
Hesqueça
de
remover
baterias
da
programação.
Re-programação
de Dados
domain
DDCEEPROM which storage all
In case
the DDC data memory
IC or
remove batteries after programming. The energy of batteriesSTATUS
can
sync
energia
da
bateria
pode
alimentar
os
circuitos
por
um
período
Note: The alignment box has already build-in a batteries socket for
60General
factory
settings150S5
were replaced due to a defect, the serial numbers have
only drive circuits for a short period of time.
batteries
(8~12V)
using
as
power
source.
Pull
out
the
socket
by
curto
de
tempo.
to beNo
re-programmed"
".
Analog
DDC
IC,
&
EEPROM
caso Re-programming
da EEPROM principal, que armazena todos os valores
DDC Data
to cover
page DDC IC and main EEPROM from the old
remove four screws at the rear of box. Please do not forget
that
It is Go
advised
to re-soldered
On
On
fábrica,
ser data
substituída
devido
um defeito,
o monitor
reparado
In de
case
the DDC
memory
IC or amain
EEPROM
which storage
all
remove batteries
after
programming.
The
energy
of
batteries
can
board onto the new board if circuit board have been replaced, in this case
To Printer port
factory
were replaced
to a defect, the serial numbers have
deve settings
ter os números
seriais due
reprogramados.
drive circuits
foralready
a shortbuild-in
period of
time.
Note: Theonly
alignment
box has
a batteries
socket for
the DDC data does not need to be re-programmed.
General
to Quando
be re-programmed"
". principal antiga
IC, & EEPROM
o defeito é Analog
no painelDDC
principal,
a EEPROM
Off
batteries
(8~12V)
using
as
power
source.
Pull
out
the socket Stand-by
by
DC 8~12V
It Data
is
advised
to re-soldered
DDC
IC and
main
EEPROM
the old
DDC
Re-programming
deve
ser
colocada
no novo
painel,
neste
caso
não há from
necessidade
remove four screws at the rear of box. Please do not forget that
Additional
information
board
onto
the
new
board
if
circuit
board
have
been
replaced,
in
this
case
Suspend
On
InAdditional
case
DDC
data memory
IC or(Display
main EEPROM
which storage
Printer
port
dethe
reprogramação.
remove batteriesToafter
programming.
The energy of batteries can
information
about DDC
Data Channel)
may beall
the settings
DDC data
does not need
to to
beare-programmed.
Monitor
factory
due
defect,
the serial numbers
only drive To
circuits
for a short period of time.
obtained
from were
Videoreplaced
Electronics
Standards
Association
(VESA). have
Off
Off
D-sub cable
toExtended
be re-programmed"
".
Analog DDC
IC, & EEPROM
DC 8~12V
DisplayAdicional
Identification
Data(EDID)
information
may be also
Informação
Additional
information
DC Power
It obtained
is advised
to re-soldered
DDC IC and main EEPROM from the old
from
VESA.
Informação
Adicional
DDC
(Canal
de Exibição
de may
Dados)
Additional
DDC
(Display
Data
Channel)
becase
board
onto theinformation
new
board about
if sobre
circuit
board
have been
replaced,
in
this
off
To
Printer
port
To
Monitor
from
Video
Electronics
Standards
Association
(VESA).
pode
ser
obtido
Associação
de Padrões
de Eletrônica
de Vídeo
the obtained
DDC
data
does
notda
need
to be re-programmed.
Power
D-sub
cable
System
and
equipment
requirements
Extended
(VESA).Display Identification Data(EDID) information may be also
indicator
DC 8~12V
1. obtained
An
i486
(or above)
personal
computer
or compatible.
from
VESA.
Additional
information
Informações
de (EDID)
Dados
de Identificação
de Display Exten
2.
Microsoft
operation
system
Windows
95/98
.
Additional
about DDC
(Display
Data Channel) may be
Fig. 3
dido,information
pode ser também
obtidas
da VESA.
To Monitor
Power
Youfrom
the EDID_PORT_Tool
under Win2000/XP
. As
haveVideo
to Install
obtained
Electronics
Standardsrequirements
Association
(VESA).
System
and
equipment
D-sub
cable
indicator
Fig. 1 .
Extended
Data(EDID)
information
may be also
1. AnDisplay
i486 (orIdentification
above) personal
computer
or compatible.
Fig. 1
Resolução
obtained
from
VESA.
Microsoft operation
system
Windows 95/98 .
2.2.Equipamentos
e Sistemas
requeridos
Fig.
3 de preset de fáb
Modos
You have to Install the EDID_PORT_Tool under Win2000/XP . As
Power
Fig. 1and
.
System
equipment
requirements
indicator
1. Um computador pessoal i486 (ou superior) ou compatível. Fig. 1
1. An i486 (or above) personal computer or compatible.
Configuração
dos Pinos
Sistemaoperation
operacional
Microsoft
Windows
2. 2. Microsoft
system
Windows
95/9895/98.
.
Fig. 3
Deve-se
instalar
o
programa
EDID_PORT_
TOOL
do
You have to Install the EDID_PORT_Tool under Win2000/XP . As
Função
dos
pinos:
Conector
15
pinos
D-Sub
WIN2000/XP.
Como mostra a fig. 1.
Fig.
1.
Modo
Resoluçã
Fig. 1
DDC Instructions
Pin assignment
A. 15-pin D-Sub Connector
A. Cody the "UserPort.sys" to C:\WINNT\system32\drivers(win2000)
Pin assignment
Nº pino
Sinal
A. 15-pin D-Sub Connector
1
Vermelho
C:\WINDOWS\system32\drivers(winXP)
2
Verde/SYNC
A. Cody the "UserPort.sys" to C:\WINNT\system32\drivers(win2000) Pin assignment
B. Running " io.exe" everytime, Before you start to programming
3
Azul
A. 15-pin D-Sub Connector
edid data .
4
sensor(GND)
C:\WINDOWS\system32\drivers(winXP)
5
Cabo detector(GND)
B. Running
" io.exe" everytime,
Before you start to programming
A. Cody
the "UserPort.sys"
to C:\WINNT\system32\drivers(win2000)
6
Vermelho GND
edid data .
A. Copie
o "UserPort.sys"
C:\WINNT\system32\drivers8win2000)
3.
EDID46.EXE
program para
.
7
Verde
GND
C:\WINDOWS\system32\drivers(winXP)
C:\WINDOWS\system32\drivers(winXP)
8
Azul GND
4.
A/D Alignment
kits
(3138
10079):
B.B.Execute
"io.exe",
antes
de 106
iniciar
a programação
edid data.
Running
everytime,
inclusion
:" io.exe"
a. Alignment
box Before
x1 (as you
Fig.start
2) to programming
9
DDC
+3,3V ou +5V
3. edid
EDID46.EXE
program .
data .
No.
SIGNAL
3. Programa EDID46.EXE .
10
LogicPIN
GND
4.
A/D
Alignment
kits
(3138
106
10079):
4. Kits de ajuste do A/D como mostrado na fig.2
1
Red
11
Sensor (GND)
inclusion : a. Alignment box x1 (as Fig. 2)
2
Green/SOG
12
Serial data
(SDA)
3. EDID46.EXE program .
PIN No.
SIGNAL
3
Blue
13
H/H+V sync
Fig. 2
1
Red
4. A/D Alignment kits (3138 106 10079):
Sense (GND)
14
V-sync 4
inclusion : a. Alignment box x1 (as Fig. 2)
2
Green/SOG
5
Test (GND)
15
Data
clock
PIN
No.3(SCL) Blue
SIGNAL
6
Red GND
Fig. 2
1 4 RedSense (GND)
7
Green GND
2 5 Green/SOG
Test (GND)
8
Blue GND
3 6 BlueRed GND
9
+5V
Fig. 2
4 7 Sense
(GND)
Green
GND
10
Sync GND
5 8 TestBlue
(GND)
GND
11
Sense (GND)
6 9 Red+5V
GND
12
Serial data (SDA)
b. Printer cable x1
7
Green
GND
10
Sync
GND
c. (D-Sub) to (D-Sub) cable x1
13
H/H+V sync
8 11 BlueSense
GND (GND)
14
V-sync
O kit contém: a) Caixa de ajuste x1
9 12 +5VSerial data (SDA)
b. Printer cable x1
15
Data clock (SCL)
b)c.Cabo
de Impressora
x1
(D-Sub)
to (D-Sub) cable
x1
10 13 Sync
GND sync
H/H+V
c) Cabo D-Sub para D-Sub x1
Note: The EDID46.EXE is a windows-based program, which cannot
11 14 Sense
(GND)
V-sync
be run in MS-DOS.
12 15 Serial
data
(SDA)
Data
clock
(SCL)
b. Printer cable x1
c. (D-Sub) to (D-Sub) cable x1
13
H/H+V sync
Note: The EDID46.EXE is a windows-based program, which cannot
14
V-sync
be run in MS-DOS.
15
Data clock (SCL)
61
190P5
150S5 190P5
61 61
150S5
DDC Instructions
190P5
150S5
DDC
Instructions
DDC Instructions
Go to cover
page
61
190P5
150S5
Go
to
cover
page
15
170S5FG
DDC Instructions
Go
to cover
page
Go
to cover page61
190P5
150S5
3. AtInstructions
the submenu,
the letter
of your
computer's
disk
drive
DDC
3. At thetype
submenu,
type
the letter
of your hard
computer's
hard disk drive
Configuration
and procedure
Configuration
and
procedure
3.
At
the
submenu,
type
the
letter
of
your
computer's
disk drive
followed by :EDID46
(for:EDID46
example,(for
C:\EDID46,
shown inGo
Fig.
6). hard
Configuration and procedure
followed by
example, as
C:\EDID46,
as
shown
in Fig.page
6). 61
to
cover
190P5
150S5
followed
by :EDID46
(for
example,
C:\EDID46,
as
shown
in Fig.
6).
3.
At
the
submenu,
type
the
letter
of
your
computer's
hard
disk
drive
DDC
Instructions
Configuration
and
procedure
3No
sub-menu
digite
a
letra
do
seu
drive
de
disquete
seguido
por :
4. Configuração
e
Procedimento
There are 2 There
chips
contained
OSD
string,
serial
number..etc
are 2 chips contained OSD string, serial number..etc
followed by :EDID46 (for example, C:\EDID46,
in page
Fig. 6).
Goas
toshown
cover
There
are 2 chips
contained
OSD
string, serial
number..etc
on the circuiton
board,
main board,
EEPROM
storage
all factory
settings,OSD
(por exemplo,
como
mostra
ahard
fig. 6)disk
the
circuit
mainwhich
EEPROM
which
storage
all factory settings,OSD
3. AtEDID46
the submenu,
type theC:\EDID46,
letter of your
computer's
drive
Configuration
and
procedure
on
the
circuit
board,
main
EEPROM
which
storage
all
factory
settings,OSD
There
are
2
chips
contained
OSD
string,
serial
number..etc
string. DDC string.
IC which
storage
128byte
EDID
data(serial
number
..etc.).
Há
dois
contidos
no
cordão
OSD,
número
denumber
série no..etc.).
painel de
DDC
ICchips
which
storage
128byte
EDID
data(serial
followed by :EDID46 (for example, C:\EDID46, as shown in Fig. 6).
string.
DDC
IC
which
storage
128byte
EDID
data(serial
number
..etc.).
on the descirptions
circuit
main
EEPROM
which
storage
all for
factory
settings,OSD
Following descirptions
areEEPROM
theboard,
connection
and
procedure
Analog
3. At the submenu, type the letter of your computer's hard disk drive
Following
are
the
connection
andfor
procedure
Analog
and
circuito
principal
que
armazena
todos
osand
ajustes
de fábrica.
Configuration
and
procedure
There
are
chips
contained
OSD
string,
serial
Following
descirptions
are
the128byte
connection
and
procedure
for Analog
and
string.
IC2which
storage
EDID
data(serial
main EEPROM
can
beDDC
re-programmed
along
with
Analog/Digital
ICnumber..etc
by number
followed by :EDID46 (for example, C:\EDID46, as shown in Fig. 6).
main
EEPROM
can
be re-programmed
along
with
Analog/Digital
IC..etc.).
by desCI
DDC
armazena
128byte
de
dados
EDID.
As
seções
seguintes
on
theEEPROM
circuit
board,
main
EEPROM
which
storage
factory
settings,OSD
main
canfunction
beare
re-programmed
along
with all
Analog/Digital
ICand
by
Following
descirptions
the
and
procedure
for Analog
enable factory
memory
data
write
onconnection
the
DDC
program
enable
factory
memory
data
write
function
on
the
DDCnumber..etc
program
There
are
2
chips
contained
OSD
string,
serial
crevem
a
conexão
e
o
procedimento
para
aplicação
do
software
DDC.
string.
DDC
IC
which
storage
128byte
EDID
data(serial
number
..etc.).
enable
factory can
memory
data write function
onwith
the Analog/Digital
DDC program IC by
main
EEPROM
be re-programmed
along
(EDID46.EXE).
(EDID46.EXE).
on
circuit
board,
main
EEPROM
whichand
storage
all factory
settings,OSD
Following
descirptions
are
the
connection
for a
Analog
Athe
EEPROM
principal
pode
ser
reprogramada
utilizando-se
funçãoand
(EDID46.EXE).
enable
factory
memory
data
write
function
on procedure
the
DDC
program
string.
DDC
IC
which
storage
128byte
EDID
data(serial
number
main
EEPROM
can
be
re-programmed
along
with
Analog/Digital
IC by
(EDID46.EXE).
"Factory memory data write" no programa DDC (EDID45.EXE)...etc.).
Following
descirptions
thewrite
connection
and
for Analog and
enable factory
memoryare
data
function
onprocedure
the DDC program
Initialize alignment
box
main
EEPROM
canbox
be re-programmed along with Analog/Digital IC by
Initialize
alignment
(EDID46.EXE).
Initialize alignment
box
Inicialize
caixa
de ajuste
enable
factory
memory
data write function on the DDC program
box
In order to (EDID46.EXE).
avoid
that
monitor
entering
power
saving
mode
due mode due
InInitialize
order
toalignment
avoid that
monitor
entering
power
saving
Fig. 6
In
order
to
avoid
that
monitor
entering
power saving
mode due
Fig. 6
to sync willto
cut
off by
alignment
box,
it is
necessary
initialize
Para
evitar
o monitor
entre
no modo
de
economia
de energia,
sync
will
cutque
off by
alignment
box,
it is to
necessary
to initialize
Fig. 6
Initialize
alignment
box
to
sync
will
cut
off by
alignment
box, it is power
necessary
to initialize
In
order
to
avoid
that
monitor
entering
saving
mode
due
alignment box
before
running
programming
software
alignment
before
programming
software
devido box
ao corte
do running
sincronismo
através da caixa
de
ajuste,
é
necessáFig. 6
150B3B
LCD
25
alignment
box
before
running
programming
software
to
sync
will
cut
off
by
alignment
box,
it
is
necessary
to
initialize
(EDID46.EXE).
Following steps
showsteps
you the
procedures
and
(EDID46.EXE).
show
you
the procedures
and4.
rio In
iniciar
a Following
caixa
de ajustes
antes
de
reprogramar
os
dados
DDC.
Initialize
alignment
box
Click
OK 4.
button.
menu
(as appears
shown in(as
Fig.
7). in Fig. 7).
order
to avoid
that
monitor
entering
saving
mode
due
(EDID46.EXE).
Following
steps
show
you power
thesoftware
procedures
and
alignment
box
before
running
programming
connection.connection.
Click The
OK main
button.
The appears
main menu
shown
Go
to
cover
page
Fig. 6
4. Clickalignment
OKbotão
button.
The
appears
shown(como
in Fig.mostra
7).
Os
seguintes
passos
mostram
os
procedimentos
e
a
conexão.
4OK.
O main
menumenu
principal
será (as
mostrado
This is for initialize
box.
to
sync will cutFollowing
off by alignment
box, you
it is the
necessary
to initialize
connection.
(EDID46.EXE).
steps show
procedures
and
ThisClique
is for oinitialize
alignment
box.
This
is
for
initialize
alignment
box.
In
order
to
avoid
that
monitor
entering
power
saving
mode
due
4.
Click
OK
button.
The
main
menu
appears
(as
shown
in
Fig.
7).
alignment
box
before
running
programming
software
a
fig.
7)
connection.
Step 1: Supply
8-12V
DC power
source
to thesource
Alignment
box by
Fig. 6
Step
1:sync
Supply
8-12V
DCby
power
to the
box to
byinitialize
to
will
cut8-12V
off
alignment
box,
it Alignment
is
necessary
This
is forainitialize
(EDID46.EXE).
Following
steps
show
you
the
procedures
1:power
Supply
DC
power
source
to
the
Alignment
box
Inicialize
caixa dealignment
ajuste. box.
Passo1:
Alimente
ausing
caixa
deor
ajustes
uma
fonte DC
de by
8and
~ 12V
pluggingStep
a
DC
or
batteries.
plugging
acord
DC
power
cord
using com
batteries.
4.
Click
OK
button.
The
main
menu
appears
(as
shown
in
Fig.
7).
alignment
box
before
running
programming
software
connection.
plugging
a um
DC
power
cord
ormonitor
using
batteries.
1: Supply
8-12V
DC
power
source
to
the
Alignment
by 4
Step 2: Connecting
cable
and
D-Sub
cable
of
as
4 box
ligando
cabo
de
força
DC
ou
usando
baterias.
StepStep
2: printer
Connecting
printer
cable
and
D-Sub
cable
ofFig.
monitor
as Fig.
This is for initialize alignment box.
(EDID46.EXE).
Following
steps
show
you
the
procedures
and
Rear
view
ofas
150B/
2: plugging
Connecting
printer
cable
and
D-Sub
cable
ofde
monitor
Fig. 4S
a DC
power
cord
or using
batteries.
PC
circuit board, Step
Passo
2:
Conecte
o
cabo
da
impressora
e
o
cabo
vídeo
do monitor
4. Click OK button. The main menu appears (as shown in Fig. 7).
connection.
Step
1: Connecting
Supply 8-12V
DC power
source
to the
Alignment
box as
by Fig. 4
Step
2:
printer
cable
and
D-Sub
cable
of
monitor
main
This is for initialize alignment box.
como na fig. 4. 1=Power connector
1=Power
connector
plugging a DC power cord or using
batteries.
1=Power connector
PC Step
2=D-SUB
connector
. Following
PCSupply
Passo
3: Instalação
do EDID45.EXE
1:
8-12V
DC
power
source
to
the
Alignment
box
by
2=D-SUB
connector
Step
2:
Connecting
printer
cable
and
D-Sub
cable
of
monitor
as
Fig.
4
Fig. 7
PC
2=D-SUBconnector
connector
Fig. 7
1=Power
Analog DDC
plugging a DC power cord or using batteries.
Fig. 7
PC
2=D-SUB
connector
reStep 2: Connecting printer cable and D-Sub cable of monitor as Fig. 4
Fig.
7
1=Power connector
ory memory
PC
2=D-SUB connector
Fig. 7
1.EXE).
1=Power connector
PC
2=D-SUB connector
D-SUB
DC Power
Fig. 7
8~12 V
~
DC Power DC Power
DC Power
mode due to
8-12 V
8-12 V
~
nitialize
~
DC8-12
Power
~ VV
(EDID301.EXE).
8-12To
Note 1: If theNote
connection
is improper, is
you
will see you
the following
error
Monitor
1: If the
improper,
will
see
the
following
error
Nota:
SeIfaconnection
conexão
é imprópria,
vocêyou
verá
a seguinte
mensagem
Printer
DC
Power 2
ction.
1:
the
is improper,
will
see
the following
error
1~
messageNote
(asmessage
shown
inconnection
Fig.
8)
before
entering
the
main
menu.
2
1
Port
(as
shown
in
Fig.
8)
before
entering
the
main
menu.
2
de
erro
antes
de
entrar
no
menu
principal
(como
mostra
1
8-12 V
To
message
(asfunction
shown
in
Fig.
8)
before
entering
the maina
menu.
Note
1:
If
the
connection
is
improper,
you
will
see
the
following
error
Meanwhile,
the
(read
EDID)
will
be
disable.
At
this
time,
To
DVI-D to D-Sub
Meanwhile, the (read EDID) function will be disable. At this time,
Monitor
~To To PC
DC
box by
MonitorPower
2 Adapter please make sure
Meanwhile,
the
(read
function
will fixedly,
beestará
disable.
At menu.
this time,
Printer
fig.
8).
Enquanto
isso,
a EDID)
função
(Read
desabili
1
message
(as
shown
in
Fig.
8)
before EDID)
entering
theand
main
all
cables
are
connected
correctly
and
Printer
Monitor
please
make
sure
all
cables
are
connected
correctly
fixedly,
Port
8-12
Port Printer
To V
1:
Ifplease
the
connection
is all
improper,
you
will will
seecabos
thedisable.
following
error
make
sure
cables
are
connected
correctly
and
Meanwhile,
(read
EDID)
function
be
thisfixedly,
time,
tada.
Por
favorthe
assegure-se
que
todos
os
estãoAt
conecta
and the Note
procedure
been
performed
properly.
Port ~
Monitor
and
thehas
procedure
has
been
performed
properly.
To PC
or as Fig. A
2
1
To PC
Printer
message
(ascorretamente
shown
in
Fig.
8)
before
entering
thetenha
main
menu.
and
themake
procedure
has
been
performed
properly.
please
sure
all
cables
are
connected
correctly
and
fixedly,
dos
e
fixados
e
que
o
procedimento
sido
To PC
Port
nu appears.
To
Note 1: If
thethe
connection
is has
improper,
you will will
see
thedisable.
following
Fig. 3
Meanwhile,
the (read
EDID)
be
At error
this time,
and
procedure
been function
performed
properly.
Monitor
realizado
apropriadamente.
2
1
message
(as shown
Fig. 8)are
before
entering
the main
menu.
Printer To PC
please make
sure allincables
connected
correctly
and
fixedly,
Fig.To4
Port
Fig. 4
Meanwhile,
the (read
willproperly.
be disable. At this time,
and the procedure
hasEDID)
been function
performed
Fig.
4
Monitor
Step 3: Installation
of
EDID46.EXE
Step 3: Installation of EDID46.EXE
Printer To PC
please make sure all cables are connected correctly and fixedly,
Step 3: Installation of EDID46.EXE
Port
Fig. 4
and the procedure has been performed properly.
Step
3:
Installation
of
EDID46.EXE
To PC
Method 1: Start
on DDC
program
Method
1: Start
on DDC program
Fig.
4
Method 1: Start on DDC program
Start Microsoft
Windows.
3: DDC
Installation
of EDID46.EXE
Microsoft
5.Microsoft
re-programming
Method
1: Windows.
Start
on
DDC
program
of
S StartStep
Start
Windows.
1. 150B/
The Program"EDID46.EXE"
in
service
manual
cd-rom
beinstructions
copyed
.
Fig.
4 tobeC:\
Fig. 8
1. TheInício
Program"EDID46.EXE"
manual
cd-rom
copyed
to C:\ .
Fig. 8
da
programa
DDCin service
1.
The
Program"EDID46.EXE"
in
service
manual
cd-rom be copyed to C:\ .
Start
Microsoft
Windows.
2. Click
,
choose
Run
at
start
menu
of
Windows
shown
Fig. 8
Step
3: Installation
of
EDID46.EXE
2. Click
, choose
Run
at start menu ofasWindows
as shown
Method
1:
Start
on
DDC
program
2.
Click
,
choose
Run
at
start
menu
of
Windows
as
shown
The
In Fig. 5. In1.Fig.
Start
on DDC program in service manual cd-rom be copyed to C:\ .
Fig. 8
5.Program"EDID46.EXE"
Start
Microsoft
Windows.
In Fig.
5.
Inicie
o 1:
Windows
Microsoft.
2.
Click
choose
at start menu of Windows as shown
Method
Start, on
DDCRun
program
Start
Microsoft
Windows.
1.1The
in service
manual
cd-rom
be copyed
In
Fig.
5.
Fig. 8
OProgram"EDID46.EXE"
programa
"EDID46.EXE"no
cd-rom
manual
de serviço
será to C:\ .
1. Microsoft
Insert theWindows.
disk
containing
Start
2. Click
, choose
Run atEDID301.EXE
start menu of program
Windowsinto
asfloppy
showndisk
copiado
para
C:\.
drive.
1. The
Program"EDID46.EXE"
in service manual cd-rom be copyed to C:\ . 1
In Fig.
5.
Fig. 8
1 1
escolha
Run
menu
inicial
do Windows
como
2. Click
Click
,,choose
atno
start
menu
of Windows
2.2-Click
, choose
RunRun
at
start
menu
of
Windows
as 95/98.
shown
D-SUB
Note
2:
During
the
loading,
EDID46
will
verify
the
EDID
data
mostra
In Fig.
5. a fig. 5.
NoteNota:
2: During the1
loading, EDID46 will verify thewhich
EDIDjust
data which just
Notemonitor
2: During
the loading,
EDID46
will function,
verify theonce
EDID data which just
loaded from
proceed
any
further
loaded from
monitor
before
any furtherosfunction,
once
Durante
obefore
carregamento
, o proceed
EDID45
verificará
dados de
EDID
loaded
from
monitor
before
proceed
any
further
function,
2: During
the loading,
EDID46
willbe
verify
EDIDthe
data
whichonce
just
the dataNote
structure
of EDID
canof
not
be
recognized,
the the
following
the
data
structure
EDID
can not
recognized,
following
1
que
carregou
do
monitor
antes
de
prosseguir
com
outra
função,
theappear
data
structure
of before
EDID
can
not Please
be
recognized,
the following
loaded
from
monitor
proceed
any
furtherPlease
function,
once
error message
will
on
the
screen
as
below.
error
message
will
appear
on
the
screen
as
below.
uma
vez
que
aavoid
estrutura
dos dados
do
EDID
podem
ser
recoFig. 5
2: the
During
loading,
EDID46
will
verify
thenão
EDID
data
which
just
error
message
will
on
the
screen
as
below.
Please
data
ofappear
EDID
be
recognized,
the
following
Fig. 5
confirm Note
following
steps
tostructure
this
message.
1the
confirm
following
steps
to
avoidcan
thisnot
message.
Fig. 5
loaded
from
monitor
before
proceed
anyde
further
function,
once
aparecerá
asteps
seguinte
mensagem
erro
na
tela.
Por
confirm
following
to on
avoid
this
message.
error
message
will
appear
the
screen
as
below.
Please
1. The data nhecidos,
structure
of
EDID
was
incorrect.
1.2:The
datathe
structure
ofEDID46
EDID was
incorrect.
Notefavor
During
loading,
willwas
verify
the
EDID
just
Fig. 5
the
datadata
structure
of EDID
not
be
recognized,
thewhich
following
1.confirme
The
structure
ofto
EDID
incorrect.
os
seguintes
passos
para
evitar
esta data
mensagem.
confirm
following
steps
avoid
this
message.
2. DDC IC that
you
are
trying
to
load
data
iscan
empty.
2. DDC
IC that
you
are
trying
to
load
data
is empty.
loaded
from
monitor
before
proceed
any
further
function,
once
error
message
will
appear
on
the
screen
as
below.
Please
2.
DDC
IC
that
you
are
trying
to
load
data
is
empty.
1.
The
data
structure
of
EDID
was
incorrect.
3. Wrong communication
channel
set at estava
configuration
setup
1.
A estrutura
do dadohas
dochannel
EDID
incorreta.
3. Wrong
communication
set
at configuration
setup
Fig. 5
the
data
structure
ofare
EDID
cantohas
not
bemessage.
recognized,
the following
confirm
following
steps
to channel
avoid
this
3.dado
Wrong
communication
has
set
configuration
DDC
IC
that
trying
load
data
isatempty.
windows. 2. windows.
O2.
DDC
IC you
queappear
você
esta
tentando
carregar
está
vazio.setup
error
message
will
on
the
screen
as
below.
Please
1.or
The
data
structure
of EDID
washas
incorrect.
windows.
3.
Wrong
communication
channel
set at configuration setup
4. Cables loosed
poor
contact
of connection.
Fig. 5
4. Cables
loosed
or poor
contact
of connection.
3.
Canal
de
comunicação
configurado
errado
noempty.
Windows.
confirm
following
steps
tocontact
avoid
message.
2.
DDC
IC
that you
trying
to this
load
data is
4.windows.
Cables
loosed
orare
poor
of connection.
4. Cabos
soltos
ou
mau
contato
na
conexão.
1.
The
data
structure
of
EDID
was
incorrect.
3.
Wrong
communication
channel
has
set
at
configuration
setup
4. Cables loosed or poor contact of connection.
2. DDC
IC that you are trying to load data is empty.
windows.
3.
channelofhas
set at configuration setup
4. Wrong
Cablescommunication
loosed or poor contact
connection.
windows.
4. Cables loosed or poor contact of connection.
ard of PC with
Fig. 9
Fig. 9
Fig. 9
Fig. 9
es and box as
Fig. 9
wer on the
Fig. 9
tions to staring
----->
----->----->----->
----->
----->----->----->
----->
----->
----->
----->
To printer port (LTP1)
To
printer
portport
(LTP1)
To printer
port
(LTP1)
To printer
port
(LTP1)
To
printer
(LTP1)
To printer
port (LTP1)
To video card
To printer port (LTP1)
DDC Instructions
150S5
150S5
62
62
DDC
DDC Instructions
Instructions
16
170S5FG
Go
page
Goto
tocover
cover
page
20
170S5 LCD
150S5
62
150S5
62
150S5
Re-programming
Analog
Re-programming
Analog DDC
DDC IC
IC
Go62
to cover page
Go
to cover
cover
page
Go
to
page
Reprogramando
IC DDC alignment
Step
1:
After
initialize
Step
1:
After
initialize
alignmentbox,
box,connecting
connectingall
allcables
cablesand
and
Go to cover
page
Fig. 8
DDC Instructions
Instructions
DDC
Instructions
DDC
Step
Step3:
3:Modify
ModifyDDC
DDCdata
data (verify
(verifyEDID
EDIDversion,
version,week,
week,year)
year)
DDC
Instructions
Passo 3: Modificando dados DDC (verificar as versões de EDD,
To printer port
To
To printer
printer
port (LTP1)
(LTP1)port
(LTP1)
To
printer
port
(LTP1)
1.1. Click
(new
Click
(newfunction)
function)icon
iconfrom
fromthe
thetool
toolbar,
bar,bring
bringup
up
Passo 1: box
Depois
de inicializar
ajuste de caixa, conecte todos os
ano, mês)
in
10
boxas
asshown
shown
inFig.
Fig.o
10
Modify
DDC
data
(Serial
No.)
Step 3: Modify
DDC
(verify
EDID
year)
Step
11ofofdata
99as
in
Fig.
14
Step
asshown
shown
in
Fig.version,
14. . week,
Re-programming
Analog
DDC
ICIC
Step 3:
3: Modify
Modify
DDC
data
(verify
EDID
version,
week, year)
year)
cabos
como
mostra
a
fig.
10
Step
DDC
data
(verify
EDID
version,
week,
Re-programming
Analog
DDC
Re-programming
Analog
DDC DDC
ICall cables
DDC
application
provides
function
selection
EDID46
DDC
application
provides
the
function
selection
and
Step EDID46
3:
Modify
DDC
data (verify
EDIDthe
version,
week,
year)and
Step 1:
After initialize alignment
box,
connecting
Analog
IC andand
1.o (new
Clickfunction)
icon
on from
thedetoosl
bar.
Clique
ícone
naicon
barra
ferramentas,
siga
os
passos de
Step 1:
1:Re-programming
After initialize
initialize
alignment box,
box,
connecting all
all cables
cables
and
1. 1.Click
the
tool
bar,
bring
up
PC
PC in
Step
After
alignment
connecting
text
change
(select
fill
out)
from
Step
1toto
Step
text
change
(select
&&fill
out)
from
Step
1bring
Step
9.9.
1=Power
connector
box
as
shown
Fig.
10
1=Power
connector
1.
Click
(new
function)
icon
from
the
tool
bar,
up
Step
After initialize
2.
till
the
7 ofbar,
9 window
appears.
function)
icon
from
the tool
bring up
box
as1:
shown
in Fig.
Fig. 10
10alignment box, connecting all cables and1. Click
91
como
afunction)
14.
Step
of(new
9 Click
asmostra
shown
infig.
Fig.
14 .Step
box
as
shown
in
1.1 1a1 of
Click
(new
from
the tool bar,
bring
up
2=D-SUB
2=D-SUBconnector
connector
Step
of3.
asType
shown
innew
Fig.Serial
14 ..icon
the
No.
(for
example,
TY00
0105000001).
box as shown in Fig. 10
Step
99DDC
as
shown
in
Fig.
14
EDID45
application
provides
the
function
selection
and
Aplicando
DDC
EDID46
melhora
a
seleção
das
funções
e mudanStep
1
of
9
as
shown
in
Fig.
14
.
EDID46
DDC
application
provides
the
function
selection
and
4.
Click
till
the
last
step
window
appears,
then
click
EDID46
DDC application
theStep
function
selection
and
PC
text
change
(select
&passos
fillprovides
out)de
from
1 tofunction
Step 9. selection
1=Power connector
ças
dos
textos
nos
1
a
9.
EDID46
DDC
application
provides
the
and
PC
text
change
(select
&
fill
out)
from
Step
1
to
Step
9.
exit
the
Step
window.
PC
1=Power
connector
text
change
(select
&
fill
out)
from
Step
1
to
Step
9.
1=Power
connector
2=D-SUB
connector
PC
text change (select & fill out) from Step 1 to Step 9.
1=Power
connector
2=D-SUB
connector
2=D-SUB
connector
2=D-SUB connector
1.
2.
3.
to
----->
----->
------->
----->
---->
---->
To
Toprinter
printerport
port(LTP1)
(LTP1)
To printer port (LTP1)
DC InstructionsDC
DCPower
Power
L
8-12V
8-12V
----->
----->
----->
----->
----->
------>
---->
----->
~
11 22
~~
DC
Power
Loading DDC
data
from monitor
DC
Power
k drive
DC Power
8-12V
8-12V
~ DConPower
2 up the Configuration Setup
To
1. Click 8-12V
the tools bar 1
to1 bring
ToTo
~icon
8-12V
~
Monitor
Monitor
1
Monitor
22
TY00 0105000001
~
windows as Fig.7
Printer
Printer
Printer
1
2
Port
Port
Port
2. Select the DDC2B
as the communication channel.Fig.
Fig.10
10
To
PC data write function and fill in page address
ToToPC
PC
To
3. Enable Factory
memory
ToMonitor
To
Printer
F0 to the
block.
Monitor
To
Printer
Port Monitor
Printer
Monitor
4. Disable
DDC function.
Fig. 10
Port Software
Port
Printer
To
ToPC
PC
Videoport
port(D-sub)
(D-sub)
Fig. 10
10
To Video
PC
Select
Selectand
andfill
fillout,
out,
Fig.
5. Click
button
to confirm your selection.
Port
To
PC
Fig. 10
To PC
If
necessary.
If
necessary.
Loading
DDC
data
from
monitor
To
PC
Step
from
monitor
Step2:
2:Read
ReadDDC
DDCdata
data
from
monitor
drivePasso
2:
Carregando
dados
DDC
do
monitor
Select and fill out,
Note: To
The
memory
data
write function will allow EDID301 to
Fig.
Fig.14
14
PCFactory
Video port
(D-sub)
1. Clique
o ícone
na
barra
de
ferramentas
(fig.
11)
para
entrar
rewrite
serial
numbers
both
Analog
DDC
IC
and
main EEPROM
To
PC
Video
port
(D-sub)
necessary.
1.
Click
icon
on
the
tools
bar
tothe
bring
up
the
Configuration
Setupto
PC
port (D-sub)
SelectIfand
and
fill out,
out,
1.1. Click
icon
as
shown
in
Fig.
11
from
tool
bar
to
bring
up
Click Tomake
iconVideo
as
shown
in
Fig.
11
from
the
tool
bar
to
bring
up
Select
fill
To
PC
Video
sure
both
S/Nport
are(D-sub)
exactly
same. You may confirm the
windows
as
Fig.7
Select and fill out,
emthe
"Configuration
Setup"
como
mostra
a fig.the
12.as
Step 2: Read
DDC
data
from
monitor
necessary.
Channels
"Configuration
Setup"
windows
shown
Fig.12.
12.
theDDC
Channels
"Configuration
Setup"
windows
as shown
ininFig.
IfIf necessary.
tep
2: Read
Read
data
from
monitor
function
by checking
thecommunication
S/N
at Product
information
of
the OSD
2. data
Select
the monitor
DDC2B
as the
channel.
ep 2:
DDC
from
If necessary.
Step
4:
Modify
DDC
data
(Monitor
Serial
Step
4:
Modify
DDC
data
(Monitor
SerialNo.)
No.)
Fig. 14
14
Step 2: 3.
ReadEnable
DDC
data
from
monitor
Fig.
menuFactory
after restarting
the
monitor.
memory
data
write
and fill
1. Click
icon as shown
in Fig.
11 from
the
toolfunction
bar to bring
upin page address
Fig. 14
1.
Click
Next
,
bring
up
Fig.
1.
Click
Next
,
bring
up
Fig.
15.
Fig. 14 15.
Click
icon
as
shown
in
Fig.
11
from
the
tool
bar
to
bring
up
F0
to
the
block.
Click
icon "Configuration
as shown in Fig.
11 from
the tool
bar
to bring
up 12.
the
Channels
Setup"
windows
asthe
shown
in Fig.
1.
Click
icon
as
shown
in
Fig.
11
from
tool
bar
to
bring
up
the Channels
Channels
"Configuration
Setup"
windows
as shown
shown in
in Fig.
Fig. 12.
12.
4. "Configuration
Disable Software
DDC
function.
the
Setup"
windows
as
Step 4: Modify DDC data (Monitor Serial No.)
the 5.
Channels
windows
shown in Fig. 12.Step
4: Modificando
dos dados
DDCNo.)
(número serial do monitor)
StepPasso
4: Modify
Modify
DDC data
data (Monitor
(Monitor
Serial
Click "Configuration
buttonSetup"
to confirm
your as
selection.
DDC
1. 4:Click
Next
, bring DDC
up Fig.
15. Serial No.)
Step
4: Next,
Modify
1. 1.
Click
Next
bringfig.
up15.
Fig.data
15. (Monitor Serial No.)
Clique
1.
Click
Next
,, bring
up
Fig.
15.
Note: The Factory memory data write function will allow EDID301 to 1. Click Next , bring up Fig. 15.
rewrite serial numbers both Analog DDC IC and main EEPROM to
make sure both S/N are exactly the same. You may confirm the
function by checking the S/N at Product information of the OSD
menu after restarting the monitor.
Fig.
Fig.11
11
DC Instructions
Select
DDC2Bi
as
channel.
Selectthe
theDDC2Bi
DDC2Bicomo
asthe
theocommunication
communication
channel.(fig. 12)
on Fig.
2.2.2.6).
Selecione
canal de comunicação.
Fig. 11
As
Asshown
shownininFig.
Fig.12.
12.
Fig. 11
11
Fig.
Fig. 11
2. Select the DDC2Bi as the communication channel.
. Select
Select the
the DDC2Bi
DDC2Bi as
as the
the communication
communication channel.
channel.
As
shown
in
Fig. 12. as the communication channel.
2.
Select
the
As shown
shown
in Fig.
Fig.DDC2Bi
12.
As
in
12.
As shown in Fig. 12.
and bar
n Fig. 6).
bar
Fig.
Fig.12
12
3.3.Click
ClickOK
OKbutton
buttontotoconfirm
confirmyour
yourselection.
selection.
2.2. Click
ClickNext
Next, ,bring
bringup
upFig.
Fig.16.
16.
Fig.Fig.
7 12
3.4.4.Click
Clique
OK
paraEDID
confirmar
sua to
seleção.
Fig.DDC
12 EDID
icon
(Read
function)
Click botão
icon
(Read
EDID
function)
toread
read
DDC
EDIDdata
datafrom
from
Fig.
12
Fig.
12
3.
Click OK
buttonThe
to confirm
your will
selection.
monitor.
The
EDIDcodes
codes
willdisplay
displayon
onscreen
screenas
asshown
shownininFig.
Fig.13.
13.
monitor.
EDID
bar
Click OK
OK
button
to confirm
confirm
your
selection.
Click
button
to
your
selection.
6.
Click
icon
toler
read
DDC
from
The EDID
2. 2. Click
NextNext,
, bring
fig.up
16.Fig. 16.
Clique
4.3. Click
Clique
no
ícone
para
os
dadosEDID
DDCdata
EDID
do monitor.
monitor. Os
OK
button
to
confirm
your
selection.
nd bar
2. are
Click Next
Next ,, bring
bring up
up Fig.
Fig. 16.
16.
2.
Click
codes
willmostrados
display ontona
screen
as following.
(The
EDID
codes
4. Click códigos
icon EDID
(Read
EDID
function)
read
DDC
EDID
data
from
serão
tela
como
a
seguir.
Os
códigos
2.
Click
Next
,
bring
up Fig. 16.
Click
icon
(Read
EDID
function)
to
read
DDC
EDID
data
from
ar
Click
icon
(Read
EDID
function)
to
read
DDC
EDID
data
from
depend
on
the
model.)
Meanwhile,
The
status
bar
will
indicate
00%
monitor.
The EDID
codes
will
display
on screen
as DDC
shown in Fig.
13.
4. Click
icon
(Read
EDID
function)
to read
EDID
variam
com
o
modelo.
monitor.
The EDID
EDID
codes
will
display
on screen
screen
as shown
shownEDID
in Fig.
Fig.data
13. from
monitor.
The
codes
will
display
on
as
in
13.
to
100%
when
reading.
monitor. The EDID codes will display on screen as shown in Fig. 13.
Fig. 15
Fig. 15
15
Fig.
Fig. 15
Fig. 7
Click
icon to read DDC EDID data from monitor. The EDID
codes will display on screen as following. (The EDID codes are
depend on the model.) Meanwhile, The status bar will indicate 00%
to 100% when reading.
error
e
make
the
Fig.
Fig.13
13
Fig. 13
Fig. 13
13
Fig.
Fig. 13
Don'tthis
close
this
screen.
---> --->
Don't close
Don't
Don't
close
close
this
this screen.
screen.
screen.
--->
--->
Don't
close
this
screen.
--->
6.
Don't
Don'tclose
closethis
thisscreen.
screen.--->
--->
error
he
e make
d the
ar
Fig.
Fig.15
15
Fig.
Fig.16
16
Fig. 16
Fig. 16
16
Fig.
Fig. 16
4.
3. 3. Click
Next
, bring
upup
Fig.
17.17.
Click
Next
, bring
Fig.
3.
3.
3.
6363
150S5
150S5
DDC
DDCInstructions
Instructions
Go
63
150S5
Gototocover
coverpage
page
DDC Instructions
17
170S5FG
Go
cover page
170S5
LCDto
6. 6. Click
Next
, bring
upup
Fig.
20.20.
170S5
LCD 21 21
Click
Next
, bring
Fig.
DDC
Instructions
DDC
Instructions
21
170S5 LCD
DDC Instructions
Go to cover page
Go to cover page
6. Click Next , bring up Fig. 20.
6. Clique Next, fig. 20.
Go to cover page
-Next
O número
de
pode ser preenchido acima ou ser mudado
6. Click
, bring
up série
Fig.
6. Click
Next
, bring
up20.
Fig. 20.
neste
momento.
Serial
number
can
be
filled
up orup
beor
changed
at thisatmoment.
6. - Click
Next
,
bring
up
Fig.
20.
- Serial number can be
filled
be changed
this moment.
- Click
Finish
to
exit
the
Step
window.
Finish
para
sair.
--Clique
- Serial
number
can
be
filled
up
or
be
changed
at this moment.
Click Finish to exit the Step window.
- Click Finish to exit the Step window.
Click Next , bring up Fig. 17.
3. Clique Next, fig. 17.
Click
Next Next
, bring
up Fig.
3. Click
, bring
up17.
Fig. 17.
Click Next , bring up Fig. 17.
Fig.
1717
Fig.
Fig.
2020
Fig.
Fig. 17
Fig. 20
Fig. Fig.
17
Fig.18.
17
4. 4.Clique
Click
Next
, fig.
bring
Next,
18.upup
4.
Click
Next
, bring
Fig. Fig.
17 18.
4.
4.
4.
Click Next , bring up Fig. 18.
Click
Next Next
, bring
up Fig.
4. Click
, bring
up18.
Fig. 18.
Click Next , bring up Fig. 18.
7.
7.
Fig.
1818
Fig.
Fig. 18
5.
Clique
Next,
fig.
19.
5. 5. Click
Next
, bring
up Fig.
19.19.
Click
Next
, bring
Fig.
Fig.up
18
Fig. 18
Fig.19.
18
5. Click Next , bring up Fig.
5.
5.
7. 7. Click
Next
, bring
upup
Fig.
21.21.
Click
Next
, bring
Fig.
Fig. 20
Fig. 20
7. Click Next , bring up Fig. 21.
Fig. 20
Click
Next Next
, bring
up Fig.
5. Click
, bring
up19.
Fig. 19.
Click Next , bring up Fig. 19.
Fig.
1919
Fig.
Fig. 19
Fig. 19
Fig. 19
Fig. 19
Click
Next Next
, bring
up Fig.
7. Click
, bring
up21.
Fig. 21.
7. Next
Clique
Next,upfig.
21.21.
Click
, bring
Fig.
Fig.
2121
Fig.
Fig. 21
8. 8. Click
Next
, bring
upup
Fig.
22.22.
Click
Next
, bring
Fig.
- Serial
number
can
bebe
filled
up or be changed at this moment.
Fig.
21
- Serial
number
can
filled
Fig.
21 up or be changed at this moment.
- Click
Finish
to
exit
the
Step
window.
8. Click
Next
,
bring
up
Fig.
22.
Fig.
21
- Click Finish to exit the Step
window.
- Serial number can be filled up or be changed at this moment.
Next,
fig.
22.
8.
Clique
- Click
to exit
the Step window.
8. Click
Next Next
,Finish
bring
up
Fig.
8. Click
, bring
up20.
Fig. 20.
8. Click Next , bring up Fig. 20.
Fig.
2222
Fig.
Fig. 22
Fig. 22
Fig. 22
Fig. 22
Step
Exit
DDC
program
Step
8: 8:
Exit
DDC
program
Step
Write
DDC
data
Step
6: 6:
Write
DDC
data
Configuration
should
Fig.
And
press
OK.
1. 1.
Configuration
should
bebe
asas
Fig.
23.23.
And
press
OK.
18
170S5FG
64 150S5
150S5
64
Go topage
cover page
Go to cover
Pull
down
File
menu
and
select
Exit
shown
in Fig.
Pull
down
thethe
File
menu
and
select
Exit
asas
shown
in Fig.
25.25.
Instructions
DDCDDC
Instructions
Passo 5:
Escrevendo
dados
DDC para o monitor
Step
6: Write DDC
data
Step 6: Write DDC data
1. Configuration should be as Fig. 23. And press OK.
1. Configuration should be as Fig. 23. And press OK.
1. A configuração deve ser como a fig. 23. Pressione OK.
21
X
21
X
Passo 7:Saindo
do programa
DDC
Step 8: Exit
DDC program
Step 8: Exit DDC program
1. Clique
o menu
e selecione
Exitselect
cmo Exit
mostra
fig. 25. in Fig. 25.
Pull
down File
the File
menu and
as shown
Pull down the File menu and select Exit as shown in Fig. 25.
Fig.
Fig.
2323
Access
Factory
Mode
2. 2.
Access
Factory
Mode
Step
Step
1 :1 :
Turn
monitor.
Turn
offoff
monitor.
Fig. 23
Fig. 23
Step
Step
2 :2 :
[Push
AUTO
& OK
" buttons
same
time
and
hold
[Push
AUTO
" " " &" OK
" " " buttons
at at
thethe
same
time
and
hold
2. Access
Factory
Modeuntill comes out "Windows screen"
+ [Press
power
" button
Access
Factory
t ]it2.
+] [Press
power
" "Mode
" button
untill comes out "Windows screen"
] =>
then
release
all
buttons.
] =>
then
release
allmodo
buttons.
2.
Acesso
ao
de Fábrica
Step 1 :
27
150B3B LCD
Step 1 :
Turn off monitor.
Turn
off
monitor.
Passo 1: Desligar o monitor.
Go to cover page
Click
(Write
EDID) icon from the tool bar to write DDC data.
3. 3.
Click
(Write
Step
2 : EDID) icon from the tool bar to write DDC data.
Step
2 :up
Bring
"Writing
0%~100%,
ready"
a progressing
bar
the
Bring
up
"Writing
0%~100%,
ready"
a "progressing
onon
the
leftleft +
Passo
2:
(Pressione
& OK
aobar
mesmo
tempo)
[Push
AUTO
"as teclas
" & AUTO
OK
" buttons
at
the
same
time and hold
down
corner.
[Push
AUTO
"
" & OK "
" buttons at the same time and hold
down
corner.
a tecla"monitor
até
aparecer
screen")
=> screen"
itWrite
](Pressione
+monitor
[Press
power
" button
untill"Windows
comes out
"Windows
DDC
4.
off/on
it ]Turn
+ off/on
[Press
power
" data" to
button untill comes out "Windows screen"
4.just
Turn
monitor
] =>
thensolte
release
allas
buttons.
então
todos
teclas.
=> then release all buttons.
nce] the
1.
Click
icon
from
the
tools
bar
tode
starting
rewrite para
DDC data.
3. the
Clique
ícone
(escrever
EDID)
na
barra
ferramentas
5.
Press
the
button
bring
up
the
OSD
main
manu.
5.error
Press
OKOK
button
to to
bring
up
the
OSD
main
manu.
2. Click
confirmation.
escrever
os dadosfor
DDC.
Press
the
DOWN
button
to
select
PRODUCTION
INFORMATION
3.
Click
(Write
EDID)
icon
from the
tool
bar to writelado
DDC data.
6. 6.
Press
the
DOWN
button
to0%~100%,
select
PRODUCTION
INFORMATION
Aparecerá
"Writing
ready"
barra
progressiva
3. Click
(Write
EDID)
icon from
the toolnabar
to write
DDC data.
press
the
OK
button
to
confirm
our
selection.
Bring
up
"Writing
0%~100%,
ready"
a
progressing
bar
on
the left
press
the
OK
button
to
confirm
our
selection.
Save
DDC
data
as
a
file
inferior
esquerdo.
Bring
up "Writing
0%~100%, ready" a progressing bar on the left
150B3B
down corner.
Sometimes,
you maybe need to save DDC data
as a text LCD
file for using27
down
corner.
4. Desligue
o monitor.
7.
Re-confirm
the
serial
Number
is
updated.
4.
Turn
off/on
monitor
onthe
other
DDC
chip. To
save
DDC data, follow the steps below:
7.etup
Re-confirm
serial
Number
is updated.
4. Turn
off/on
monitor
Go to cover page
5. Pressione
a tecla OK e aparecerá menu principal OSD.
6. Pressione
athe
tecla
selecionar
PRODUCTION
INFOR
1.Press
Click
icon
onpara
thebring
tools
bar
type
a file
name
you like. The
5.
OKDOWN
button
to
up
theand
OSD
main
manu.
5. Press the OK button to bring up the OSD main manu.
format isaddc
can be open by Microsoft WordPad.
MATIONfile
pressione
teclatype
OKwhich
para confirmar.
2.Press
Click
button.
6.
the DOWN
button
to select
PRODUCTION INFORMATION
7. A re-confirmação
do número
serial
é feita.
DDC
data
monitor
Press
theWrite
DOWN
button
totoselect
PRODUCTION
INFORMATION
h 6.
just
press
the
OK button to confirm our selection.
Step
7:
Save
DDC
data
Step
7:
Save
DDC
data
press
the
OK
button
to
confirm
our
selection.
once the
Click
icon
from
the
tools
bar
rewrite
DDC data.
Sometimes,
you
may
need
to
save
DDC
data
a text
using
Passo
6:1.
Salvando
dados
como
um
arquivo
Sometimes,
you
may
need
toDDC
save
DDC
data
astoas
astarting
text
filefile
forfor
using
ng error
2.IC chip.
ClickTo the
for
confirmation.
7.ICRe-confirm
serial
Number
is updated.
in other
save
DDC
follow
steps
below:
other
chip.
To save
DDC
data,
follow
thethe
steps
below:
Re-confirm
the serial
Number
is data,
updated.
m7. in
Fig.
Fig.
2525
nstructions
Instructions
As vezes, você pode necessitar salvar dados DDC como arquivo texto
Click (Save)
(Save)
icon
(or
click
"save
as")
from the
tool
bar
Save
DDC
data
asPara
a "file"->
filesalvar
1. 1.
Click
icon
(or
click
"file"->
"save
as")
from
tool
para usá-los
em
outro
chip.
dados
DDC,the
siga
osbar
passos
And
give
a file
name
shown
inneed
Fig.
Sometimes,
you
maybe
to save DDC data as a text file for using
And
give
a file
name
asas
shown
in Fig.
24.24.
abaixo:
The
type
is EDID46
file
(*.ddc)
which
can
open
inthe
WordPad.
onisother
DDC
To save
DDC
data,
follow
steps below:
n setup
The
filefile
type
EDID46
filechip.
(*.ddc)
which
can
bebe
open
in WordPad.
By
using
WordPad,
the
texts
of
DDC
data
& table
(128
bytes,hex
hex
Step
7: Save
DDC
data
By
using
WordPad,
the
texts
of
DDC
data
&
table
(128
bytes,
Step 7: Save DDC data
1.be
Click
icon
onTEXTS
the
barTable
and
a completely
file
name
like.
The
1.
Clique
oSometimes,
ícone
na
barra
detools
ferramentas
etype
dê
um
nome
code)
can
modified.
Ifyou
DDC
& HEX
Table
are
may
need
to
save
DDC
data
as
a textaoyou
file for
using
code)
can
be
modified.
If
DDC
TEXTS
&
HEX
are
completely
Sometimes, you may need to save DDC data as a text file for using
file
format
is
ddc
type
which
can
open
byIC
Microsoft
correct,
it can
be
saved
as
.ddc
flie
re-load
itbe
into
DDC
for
DDC
in
other
ICOas
chip.
Toflie
save
DDC
data,
the
steps
below:
(fig.
24).
tipo
de
arquivo
é DDC
efollow
pode
ser
aberto
no WordPad.
correct,
it can
be
saved
.ddc
to to
re-load
it the
into
DDC
IC
for
DDC
inarquivo
other
IC
chip.
To
save
DDC
data,
follow
steps
below:
2.Pad.Click
button.
Data
application.
Data
application.
Word
Usando o Word
Pad,os textos dos dados DDC e tabe1.
Click
(Save)
icon
(or
"file"->
"save
as") from the
las podem
sericon
modificados.
Se click
TEXTOS
DDC
& TABELAS
HEXtool bar
1. Click
(Save)
(or click "file"->
"save as")
from
the tool bar
And give a file name as shown in Fig. 24.
Andestão
give acorretas,
file name
as shown
in Fig.como
24. arquivo .ddc.
pode-se
salva-los
The file type is EDID46 file (*.ddc) which can be open in WordPad.
The file type is EDID46 file (*.ddc) which can be open in WordPad.
By using WordPad, the texts of DDC data & table (128 bytes, hex
By using WordPad, the texts of DDC data & table (128 bytes, hex
code) can be modified. If DDC TEXTS & HEX Table are completely
code) can be modified. If DDC TEXTS & HEX Table are completely
correct, it can be saved as .ddc flie to re-load it into DDC IC for DDC
correct, it can be saved as .ddc flie to re-load it into DDC IC for DDC
Data application.
150S5-DDC
Data150S5-DDC
application.
Load DDC data from file
1.
2.
3.
Click
from the tools bar.
Select the file you want to open.
Click .
Button.
C:\My
documents\150S5-DDC
C:\My
documents\150S5-DDC
150S5-DDC
150S5-DDC
Edid46
Files
Edid46
Files
to
Fig.
Fig.
2424
Load DDC data from file
2. Clique salvar.
C:\My documents\150S5-DDC
C:\My documents\150S5-DDC
1. Click
from the tools bar.
Edid46
Files
2. Select
the file
you
want to open.
Edid46 Files
3. Click .
Button.
Fig. 24
Fig. 24
to
4.
Now you can re-programming DDC data which you just loaded
Fig. 25
Fig. 25
170S5FG
DDC Data
DADOS DDC ANALÓGICO
19
170S5 LCD
23
Go to cover page
LPL Panel
*********************************************************************
EDID log file
*********************************************************************
Standard Timing Identification #4
Horizontal active pixels
Aspect Ratio
Refresh Rate
Vendor/Product Identification
ID Manufacturer Name
ID Product Code
ID Serial Number
Week of Manufacture
Year of Manufacture
:
:
:
:
:
EDID Version, Revision
Version
Revision
: 1
: 3
Detailed Timing #1
Pixel Clock (MHz)
: 108
H Active (pixels)
: 1280
H Blanking (pixels)
: 408
V Active (lines)
: 1024
V Blanking (lines)
: 42
H Sync Offset (F Porch) (pixels):48
H Sync Pulse Width (pixels) : 112
V Sync Offset (F Porch) (lines): 1
V Sync Pulse Width (lines) : 3
H Image Size (mm)
: 338
V Image Size (mm)
: 270
H Border (pixels)
: 0
V Border (lines)
: 0
Flags
: Non-interlaced
: Normal Display, No stereo
: Digital Separate sync.
: Positive Vertical Sync.
: Positive Horizontal Sync.
Monitor Descriptor #2
Serial Number
: TY 123456
Monitor Descriptor #3
Monitor Name
: Philips 170S
Monitor Descriptor #4
Monitor Range Limits
Min. Vt rate Hz
: 56
Max. Vt rate Hz
: 76
Min. Horiz. rate kHz
: 30
Max. Horiz. rate kHz
: 82
Max. Supported Pixel
: 140
No secondary GTF timing formula supported.
Extension Flag
: 0
Check sum
: 1D (HEX.)
PHL
0 81E (HEX.)
123456 (DEC.)
50
2003
Basic Display Parameters/Features
Video Input Definition : Analog Video Input
0.700V/0.300V (1.00Vpp)
Blank-to-Black Setup
Separate Sync
Composite Sync
Sync on Green
no Serration required
Maximum H Image Size : 34
Maximum V Image Size : 27
Display Transfer Characteristic: 2.2
(gamma)
Feature Support (DPMS) : Standby
Suspend
Active Off
Display Type
: RGB color display
Standard Default Color Space: Primary color space
Preferred Timing Mode
: Detailed timing block 1
Color Characteristics
Red X coordinate
Red Y coordinate
Green X coordinate
Green Y coordinate
Blue X coordinate
Blue Y coordinate
White X coordinate
White Y coordinate
: 0.641
: 0.342
: 0.292
: 0.611
: 0.147
: 0.068
: 0.313
: 0.329
Established Timings
Established Timings I : 720 x 400 @70Hz (IBM,VGA)
640 x 480 @60Hz (IBM,VGA)
640 x 480 @67Hz (Apple, Mac II)
640 x 480 @72Hz (VESA)
640 x 480 @75Hz (VESA)
800 x 600 @56Hz (VESA)
800 x 600 @60Hz (VESA)
Established Timings II : 800 x 600 @72Hz (VESA)
800 x 600 @75Hz (VESA)
832 x 624 @75Hz (Apple, Mac II)
1024 x 768 @60Hz (VESA)
1024 x 768 @70Hz (VESA)
1024 x 768 @75Hz (VESA)
1280 x 1024 @75Hz (VESA)
Manufacturer's timings:1152 x 870 @75Hz (Apple, Mac II)
Standard Timing Identification #1
Horizontal active pixels
: 1152
Aspect Ratio
: 4:3
Refresh Rate
: 70
Standard Timing Identification #2
Horizontal active pixels
: 1152
Aspect Ratio
: 4:3
Refresh Rate
: 75
Standard Timing Identification #3
Horizontal active pixels
: 1280
Aspect Ratio
: 4:3
Refresh Rate
: 60
: 1280
: 5:4
: 60
EDID data (128 bytes)
**********************************************************************
0: 00
1: ff 2: ff
3: ff
4: ff
5: ff
6: ff 7: 00
8: 41
9: 0c 10: 1e 11: 08 12: 40 13: e2 14: 01 15: 00
16: 32 17: 0d 18: 01 19: 03 20: 1f 21: 22 22: 1b 23: 78
24: ee 25: 2e 26: e5 27: a4 28: 57 29: 4a 30: 9c 31: 25
32: 11 33: 50 34: 54 35: bf 36: ef 37: 80 38: 71 39: 4a
40: 71 41: 4f 42: 81 43: 40 44: 81 45: 80 46: 01 47: 01
48: 01 49: 01 50: 01 51: 01 52: 01 53: 01 54: 30 55: 2a
56: 00 57: 98 58: 51 59: 00 60: 2a 61: 40 62: 30 63: 70
64: 13 65: 00 66: 52 67: 0e 68: 11 69: 00 70: 00 71: 1e
72: 00 73: 00 74: 00 75: ff 76: 00 77: 20 78: 54 79: 59
80: 20 81: 20 82: 31 83: 32 84: 33 85: 34 86: 35 87: 36
88: 0a 89: 20 90: 00 91: 00 92: 00 93: fc 94: 00 95: 50
96: 68 97: 69 98: 6c 99: 69 100: 70 101: 73 102: 20 103: 31
104: 37 105: 30 106: 53 107: 0a 108: 00 109: 00 110: 00 111: fd
112: 00 113: 38 114: 4c 115: 1e 116: 52 117: 0e 118: 00 119: 0a
120: 20 121: 20 122: 20 123: 20 124: 20 125: 20 126: 00 127: 1d
20
24
170S5FG
170S5
LCD
DDC Data
21
X
Go to cover page
QDI Panel
*********************************************************************
EDID log file
*********************************************************************
Standard Timing Identification #4
Horizontal active pixels
Aspect Ratio
Refresh Rate
Vendor/Product Identification
ID Manufacturer Name
ID Product Code
ID Serial Number
Week of Manufacture
Year of Manufacture
:
:
:
:
:
EDID Version, Revision
Version
Revision
: 1
: 3
Detailed Timing #1
Pixel Clock (MHz)
: 108
H Active (pixels)
: 1280
H Blanking (pixels)
: 408
V Active (lines)
: 1024
V Blanking (lines)
: 42
H Sync Offset (F Porch) (pixels):48
H Sync Pulse Width (pixels) : 112
V Sync Offset (F Porch) (lines): 1
V Sync Pulse Width (lines) : 3
H Image Size (mm)
: 338
V Image Size (mm)
: 270
H Border (pixels)
: 0
V Border (lines)
: 0
Flags
: Non-interlaced
: Normal Display, No stereo
: Digital Separate sync.
: Positive Vertical Sync.
: Positive Horizontal Sync.
Monitor Descriptor #2
Serial Number
: TY 123456
Monitor Descriptor #3
Monitor Name
: Philips 170S
Monitor Descriptor #4
Monitor Range Limits
Min. Vt rate Hz
: 56
Max. Vt rate Hz
: 76
Min. Horiz. rate kHz
: 30
Max. Horiz. rate kHz
: 82
Max. Supported Pixel
: 140
No secondary GTF timing formula supported.
Extension Flag
: 0
Check sum
: B9 (HEX.)
PHL
0 81E (HEX.)
1E240 (HEX.)
50
2004
Basic Display Parameters/Features
Video Input Definition : Analog Video Input
0.700V/0.300V (1.00Vpp)
Blank-to-Black Setup
Separate Sync
Composite Sync
Sync on Green
Serration required
Maximum H Image Size : 34
Maximum V Image Size : 27
Display Transfer Characteristic: 2.2
(gamma)
Feature Support (DPMS) : Standby
Suspend
Active Off
Display Type
: RGB color display
Standard Default Color Space: Primary color space
Preferred Timing Mode
: Detailed timing block 1
Color Characteristics
Red X coordinate
Red Y coordinate
Green X coordinate
Green Y coordinate
Blue X coordinate
Blue Y coordinate
White X coordinate
White Y coordinate
: 0.633
: 0.336
: 0.3
: 0.586
: 0.146
: 0.103
: 0.313
: 0.329
Established Timings
Established Timings I : 720 x 400 @70Hz (IBM,VGA)
640 x 480 @60Hz (IBM,VGA)
640 x 480 @67Hz (Apple, Mac II)
640 x 480 @72Hz (VESA)
640 x 480 @75Hz (VESA)
800 x 600 @56Hz (VESA)
800 x 600 @60Hz (VESA)
Established Timings II : 800 x 600 @72Hz (VESA)
800 x 600 @75Hz (VESA)
832 x 624 @75Hz (Apple, Mac II)
1024 x 768 @60Hz (VESA)
1024 x 768 @70Hz (VESA)
1024 x 768 @75Hz (VESA)
1280 x 1024 @75Hz (VESA)
Manufacturer's timings:1152 x 870 @75Hz (Apple, Mac II)
Standard Timing Identification #1
Horizontal active pixels
: 1152
Aspect Ratio
: 4:3
Refresh Rate
: 70
Standard Timing Identification #2
Horizontal active pixels
: 1152
Aspect Ratio
: 4:3
Refresh Rate
: 75
Standard Timing Identification #3
Horizontal active pixels
: 1280
Aspect Ratio
: 4:3
Refresh Rate
: 60
: 1280
: 5:4
: 60
EDID data (128 bytes)
******************************************************************
0: 00 1: ff
2: ff
3: ff
4: ff
5: ff
6: ff
7: 00
8: 41
9: 0c 10: 1e 11: 08 12: 40 13: e2 14: 01 15: 00
16: 05 17: 0e 18: 01 19: 03 20: 1f 21: 22 22: 1b 23: 78
24: ee 25: 0c 26: 95 27: a2 28: 56 29: 4c 30: 96 31: 25
32: 1a 33: 50 34: 54 35: bf 36: ef 37: 80 38: 71 39: 4a
40: 71 41: 4f 42: 81 43: 40 44: 81 45: 80 46: 01 47: 01
48: 01 49: 01 50: 01 51: 01 52: 01 53: 01 54: 30 55: 2a
56: 00 57: 98 58: 51 59: 00 60: 2a 61: 40 62: 30 63: 70
64: 13 65: 00 66: 52 67: 0e 68: 11 69: 00 70: 00 71: 1e
72: 00 73: 00 74: 00 75: ff 76: 00 77: 20 78: 54 79: 59
80: 20 81: 20 82: 31 83: 32 84: 33 85: 34 86: 35 87: 36
88: 0a 89: 20 90: 00 91: 00 92: 00 93: fc 94: 00 95: 50
96: 68 97: 69 98: 6c 99: 69 100: 70 101: 73 102: 20 103: 31
104: 37 105: 30 106: 53 107: 0a 108: 00 109: 00 110: 00 111: fd
112: 00 113: 38 114: 4c 115: 1e 116: 52 117: 0e 118: 00 119: 0a
120: 20 121: 20 122: 20 123: 20 124: 20 125: 20 126: 00 127: b9
DDC Data
170S5FG
170S5 LCD
21
25
Go to cover page
AU Panel
*********************************************************************
EDID log file
*********************************************************************
Standard Timing Identification #4
Horizontal active pixels
Aspect Ratio
Refresh Rate
Vendor/Product Identification
ID Manufacturer Name
ID Product Code
ID Serial Number
Week of Manufacture
Year of Manufacture
:
:
:
:
:
EDID Version, Revision
Version
Revision
: 1
: 3
Detailed Timing #1
Pixel Clock (MHz)
: 108
H Active (pixels)
: 1280
H Blanking (pixels)
: 408
V Active (lines)
: 1024
V Blanking (lines)
: 42
H Sync Offset (F Porch) (pixels):48
H Sync Pulse Width (pixels) : 112
V Sync Offset (F Porch) (lines): 1
V Sync Pulse Width (lines) : 3
H Image Size (mm)
: 338
V Image Size (mm)
: 270
H Border (pixels)
: 0
V Border (lines)
: 0
Flags
: Non-interlaced
: Normal Display, No stereo
: Digital Separate sync.
: Positive Vertical Sync.
: Positive Horizontal Sync.
Monitor Descriptor #2
Serial Number
: TY 123456
Monitor Descriptor #3
Monitor Name
: Philips 170S
Monitor Descriptor #4
Monitor Range Limits
Min. Vt rate Hz
: 56
Max. Vt rate Hz
: 76
Min. Horiz. rate kHz
: 30
Max. Horiz. rate kHz
: 82
Max. Supported Pixel
: 140
No secondary GTF timing formula supported.
Extension Flag
: 0
Check sum
: D4 (HEX.)
PHL
0 81E (HEX.)
1E240 (HEX.)
5
2004
Basic Display Parameters/Features
Video Input Definition : Analog Video Input
0.700V/0.300V (1.00Vpp)
Blank-to-Black Setup
Separate Sync
Composite Sync
Sync on Green
Serration required
Maximum H Image Size : 34
Maximum V Image Size : 27
Display Transfer Characteristic: 2.2
(gamma)
Feature Support (DPMS) : Standby
Suspend
Active Off
Display Type
: RGB color display
Standard Default Color Space: Primary color space
Preferred Timing Mode
: Detailed timing block 1
Color Characteristics
Red X coordinate
Red Y coordinate
Green X coordinate
Green Y coordinate
Blue X coordinate
Blue Y coordinate
White X coordinate
White Y coordinate
: 0.64
: 0.34
: 0.29
: 0.61
: 0.14
: 0.07
: 0.31
: 0.33
Established Timings
Established Timings I : 720 x 400 @70Hz (IBM,VGA)
640 x 480 @60Hz (IBM,VGA)
640 x 480 @67Hz (Apple, Mac II)
640 x 480 @72Hz (VESA)
640 x 480 @75Hz (VESA)
800 x 600 @56Hz (VESA)
800 x 600 @60Hz (VESA)
Established Timings II : 800 x 600 @72Hz (VESA)
800 x 600 @75Hz (VESA)
832 x 624 @75Hz (Apple, Mac II)
1024 x 768 @60Hz (VESA)
1024 x 768 @70Hz (VESA)
1024 x 768 @75Hz (VESA)
1280 x 1024 @75Hz (VESA)
Manufacturer's timings:1152 x 870 @75Hz (Apple, Mac II)
Standard Timing Identification #1
Horizontal active pixels
: 1152
Aspect Ratio
: 4:3
Refresh Rate
: 70
Standard Timing Identification #2
Horizontal active pixels
: 1152
Aspect Ratio
: 4:3
Refresh Rate
: 75
Standard Timing Identification #3
Horizontal active pixels
: 1280
Aspect Ratio
: 4:3
Refresh Rate
: 60
: 1280
: 5:4
: 60
EDID data (128 bytes)
*******************************************************************
0: 00 1: ff
2: ff
3: ff
4: ff
5: ff
6: ff
7: 00
8: 41 9: 0c 10: 1e 11: 08 12: 40 13: e2 14: 01 15: 00
16: 05 17: 0e 18: 01 19: 03 20: 1f 21: 22 22: 1b 23: 78
24: ee 25: c5 26: c6 27: a3 28: 57 29: 4a 30: 9c 31: 23
32: 12 33: 4f 34: 54 35: bf 36: ef 37: 80 38: 71 39: 4a
40: 71 41: 4f 42: 81 43: 40 44: 81 45: 80 46: 01 47: 01
48: 01 49: 01 50: 01 51: 01 52: 01 53: 01 54: 30 55: 2a
56: 00 57: 98 58: 51 59: 00 60: 2a 61: 40 62: 30 63: 70
64: 13 65: 00 66: 52 67: 0e 68: 11 69: 00 70: 00 71: 1e
72: 00 73: 00 74: 00 75: ff 76: 00 77: 20 78: 54 79: 59
80: 20 81: 20 82: 31 83: 32 84: 33 85: 34 86: 35 87: 36
88: 0a 89: 20 90: 00 91: 00 92: 00 93: fc 94: 00 95: 50
96: 68 97: 69 98: 6c 99: 69 100: 70 101: 73 102: 20 103: 31
104: 37 105: 30 106: 53 107: 0a 108: 00 109: 00 110: 00 111: fd
112: 00 113: 38 114: 4c 115: 1e 116: 52 117: 0e 118: 00 119: 0a
120: 20 121: 20 122: 20 123: 20 124: 20 125: 20 126: 00 127: d4
22
26
170S5FG
DDC Data
170S5 LCD
21
X
Go to cover page
CPT Panel
*********************************************************************
EDID log file
*********************************************************************
Standard Timing Identification #4
Horizontal active pixels
Aspect Ratio
Refresh Rate
Vendor/Product Identification
ID Manufacturer Name
ID Product Code
ID Serial Number
Week of Manufacture
Year of Manufacture
:
:
:
:
:
EDID Version, Revision
Version
Revision
: 1
: 3
Detailed Timing #1
Pixel Clock (MHz)
: 108
H Active (pixels)
: 1280
H Blanking (pixels)
: 408
V Active (lines)
: 1024
V Blanking (lines)
: 42
H Sync Offset (F Porch) (pixels):48
H Sync Pulse Width (pixels) : 112
V Sync Offset (F Porch) (lines): 1
V Sync Pulse Width (lines) : 3
H Image Size (mm)
: 338
V Image Size (mm)
: 270
H Border (pixels)
: 0
V Border (lines)
: 0
Flags
: Non-interlaced
: Normal Display, No stereo
: Digital Separate sync.
: Positive Vertical Sync.
: Positive Horizontal Sync.
Monitor Descriptor #2
Serial Number
: TY 123456
Monitor Descriptor #3
Monitor Name
: Philips 170S
Monitor Descriptor #4
Monitor Range Limits
Min. Vt rate Hz
: 56
Max. Vt rate Hz
: 76
Min. Horiz. rate kHz
: 30
Max. Horiz. rate kHz
: 82
Max. Supported Pixel
: 140
No secondary GTF timing formula supported.
Extension Flag
: 0
Check sum
: AE (HEX.)
PHL
0 81E (HEX.)
1E240 (HEX.)
5
2004
Basic Display Parameters/Features
Video Input Definition : Analog Video Input
0.700V/0.300V (1.00Vpp)
Blank-to-Black Setup
Separate Sync
Composite Sync
Sync on Green
Serration required
Maximum H Image Size : 34
Maximum V Image Size : 27
Display Transfer Characteristic: 2.2
(gamma)
Feature Support (DPMS) : Standby
Suspend
Active Off
Display Type
: RGB color display
Standard Default Color Space: Primary color space
Preferred Timing Mode
: Detailed timing block 1
Color Characteristics
Red X coordinate
Red Y coordinate
Green X coordinate
Green Y coordinate
Blue X coordinate
Blue Y coordinate
White X coordinate
White Y coordinate
: 0.637
: 0.334
: 0.31
: 0.582
: 0.143
: 0.1
: 0.313
: 0.329
Established Timings
Established Timings I : 720 x 400 @70Hz (IBM,VGA)
640 x 480 @60Hz (IBM,VGA)
640 x 480 @67Hz (Apple, Mac II)
640 x 480 @72Hz (VESA)
640 x 480 @75Hz (VESA)
800 x 600 @56Hz (VESA)
800 x 600 @60Hz (VESA)
Established Timings II : 800 x 600 @72Hz (VESA)
800 x 600 @75Hz (VESA)
832 x 624 @75Hz (Apple, Mac II)
1024 x 768 @60Hz (VESA)
1024 x 768 @70Hz (VESA)
1024 x 768 @75Hz (VESA)
1280 x 1024 @75Hz (VESA)
Manufacturer's timings:1152 x 870 @75Hz (Apple, Mac II)
Standard Timing Identification #1
Horizontal active pixels
: 1152
Aspect Ratio
: 4:3
Refresh Rate
: 70
Standard Timing Identification #2
Horizontal active pixels
: 1152
Aspect Ratio
: 4:3
Refresh Rate
: 75
Standard Timing Identification #3
Horizontal active pixels
: 1280
Aspect Ratio
: 4:3
Refresh Rate
: 60
: 1280
: 5:4
: 60
EDID data (128 bytes)
**********************************************************************
0: 00
1: ff
2: ff
3: ff
4: ff
5: ff
6: ff
7: 00
8: 41
9: 0c 10: 1e 11: 08 12: 40 13: e2 14: 01 15: 00
16: 05 17: 0e 18: 01 19: 03 20: 1f 21: 22 22: 1b 23: 78
24: ee 25: 04 26: a5 27: a3 28: 58 29: 4f 30: 95 31: 24
32: 19 33: 50 34: 54 35: bf 36: ef 37: 80 38: 71 39: 4a
40: 71 41: 4f 42: 81 43: 40 44: 81 45: 80 46: 01 47: 01
48: 01 49: 01 50: 01 51: 01 52: 01 53: 01 54: 30 55: 2a
56: 00 57: 98 58: 51 59: 00 60: 2a 61: 40 62: 30 63: 70
64: 13 65: 00 66: 52 67: 0e 68: 11 69: 00 70: 00 71: 1e
72: 00 73: 00 74: 00 75: ff 76: 00 77: 20 78: 54 79: 59
80: 20 81: 20 82: 31 83: 32 84: 33 85: 34 86: 35 87: 36
88: 0a 89: 20 90: 00 91: 00 92: 00 93: fc 94: 00 95: 50
96: 68 97: 69 98: 6c 99: 69 100: 70 101: 73 102: 20 103: 31
104: 37 105: 30 106: 53 107: 0a 108: 00 109: 00 110: 00 111: fd
112: 00 113: 38 114: 4c 115: 1e 116: 52 117: 0e 118: 00 119: 0a
120: 20 121: 20 122: 20 123: 20 124: 20 125: 20 126: 00 127: ae
170S5FG
Block Diagram
170S5 LCD
DIAGRAMA EM BLOCOS
Go to cover page
Block Diagram
RSTN
Key
Control
Board
O:0/1/2/3
/clk(N,P)
OSC
LEDR,G
IIC_SCL,SDA
Scaler
NT68F633L
NT68521
BL_EN, Brightness
EEPROM
ISPSCL,SDA
VGA_CAB
D-SUB
Power
Board
R/G/B
Schmitt
gate
HS/VS
3.3V
5V
EDEV, Ivone Lee, 2004/01/28
Panel PWR
MOS
E:0/1/2/3
/clk(N,P)
30 Pin Connector to panel
CPU
2.5V
Reg.
1
23
27
24
28
170S5FG
170S5 LCD
ESQUEMA
ELÉTRICO
Go to cover page
DSUB Diagram
170S5FG
ESQUEMA ELÉTRICO - PAINEL SCALER
Micro Diagram
170S5 LCD
Go to cover page
25
29
26
170S5FG
ESQUEMA ELÉTRICO - PAINEL SCALER
Micro Diagram
170S5 LCD
Go to cover page
29
170S5FG
30
ESQUEMA
ELÉTRICO - PAINEL SCALER
170S5 LCD
Go to cover page
Scaler Diagram
27
28
170S5FG
ESQUEMA ELÉTRICO PAINEL SCALER
Connector Diagram
170S5 LCD
Go to cover page
31
32
170S5 LCD
Go to cover page
GUIA DE PLACA DO PAINEL SCALER - COMPONENTES
Scaler Board C.B.A.-1
170S5FG
29
Go to cover pag
30
170S5FG
GUIA DE PLACA DO PAINEL SCALER - COBRE
170S5FG
Control Board Diagram
ESQUEMA
34 ELÉTRICO170S5 LCD LAYOUT PAINEL CONTROLE
Go to cover page
Control Board (C.B.A)
31
32
170S5FG
ESQUEMA ELÉTRICO PAINEL ALIMENTAÇÃO
170S5 LCD
Go to cover page
35
170S5FG
36
170S5 LCD ALIMENTAÇÃO
ESQUEMA
ELÉTRICO
Go to cover page
33
34
170S5FG
Power
LAYOUT COMPONENTES E COBRE
Board C.B.A.-1
Power Board C.B.A.-2
170S5 LCD
Go to cover page
37
170S5FG
VISTA EXPLODIDA
35
DVD703 /XX
DVD703 /XX
170S5FG
36
ANOTAÇÕES:
ANOTAÇÕES: