1
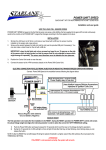
STEALTH
Installation and instruction manual.
Manuale d’installazione e uso.
STEALTH is an automatic chrono, an indispensable instrument for driver of:
Karts - Cars - Motorbikes and Scooters
STEALTH è un cronometro automatico, strumento indispensabile per i piloti di:
Kart - Auto - Moto - Scooter
1
English
Contents
Functions.
Installation of STEALTH.
Front panel.
Connection - Turning on and off the device.
Positioning the engine RPM reading wire. (K Vers.)
Installation of the Infrared Kit. (CR Vers.)
Installation of the magnetic sensor. (CM Vers.)
Multi-page menu.
Coding the infrared receiver. (CR Vers.)
Setting of the RPM reading parameters. (K Vers.)
Setting of the chrono functions.
Analysis of the stored times.
Cancelling of the time memory.
Setting of the Self Power Off.
Short keys.
Cleaning the surfaces.
Warranty.
Note.
2
Functions
STEALTH carries out the following functions:
* Indication of the lap time.
* Indication of the engine rev speed (RPM). (K Vers.)
* Storage and analysis of the lap times and of the practice sessions.
Installation of STEALTH
STEALTH is easily installed in the windshield of a Motorbike, on the fork plate, on
the steering wheel of a Go Kart, or on the dashboard of a Car.
Fix STEALTH with plastic strip fittings or O-Rings hooked up to the special hooking
points, or through the proper support on the steering wheel (K Vers. only). In the
case of installation on cars, 4 screws positioned at the rounded ends of the hooking up points can be used. To protect STEALTH from vibrations, always put the
special adhesive on the back.
Fix the battery/sensor box on the Go Kart chassis with the proper velcro (K Vers. only).
Front panel
The Best LED, the back-lit display and the keypad with 4 keys are located on the front panel.
Connection - Turning on and off the device
Connect the Red power supply wire to the +12V of the battery and the Black GND
wire to the chassis or to any ground point, such as the Negative of the battery, or connect STEALTH to a PP3 9V battery with the proper optional adapter.
In the K version supply STEALTH putting a PP3 9V battery in the battery/sensor box.
To turn STEALTH ON press the ON/OFF key on the keypad; to turn it OFF keep the
same key pressed for 2 seconds.
Positioning the engine RPM reading wire (K Vers.)
Determination of the engine revs takes place inductively by means of the special wire
3
which must be wound round the spark plug wire and fixed with a plastic strip.
If there are incorrect instantaneous values, the wire must be checked to ensure that
it does not receive any interference from the wires of other cylinders, and therefore to
make sure that the wire passes points of the chassis which are away from other cylinders and, if possible, it should be cut to the required length so that it does not receive any undesired signals.
The RPM reading wire can also be connected to the RPM signal wire on the connector of the original dashboard.
Attention! Never connect the RPM reading wire directly to the coil connector or
any other wire from the harness to prevent any inadequate voltage irreparably
damaging the instrument.
Installation of the Infrared Kit (CR Vers.)
The Infrared Kit accessory allows STEALTH to identify the finish line and therefore to
calculate the lap time.
The Infrared Kit consists of a Transmitter which must be positioned in the pits (normally on the wall) directed as perpendicularly as possible towards the path of the
motorbike along the straight, and of a sensor (IR Receiver) which must be fixed onto
the vehicle so that the small infrared (eye) sensor is directed towards the Transmitter
when passing along the straight. The IR Receiver must be positioned so that visibility towards the Transmitter is not obscured by any part of the motorbike or the driver.
Installation of the magnetic sensor (CM Vers.)
The CM STEALTH versions use the provided magnetic sensor to recognize the finish
line on circuits with magnetic band. Yet it’s possible to install the Infrared Kit as an
accessory for these versions.
Carry out the following operations to install the magnetic sensor:
1. Make a hole of 5mm in diameter where the fairing is closest to the ground.
2. Fasten the sensor with the proper nut so that it faces the ground.
3. Connect the sensor to the connector of the same colour and type of the STEALTH
harness throgh the proper patch band.
Multi-page menu
Apart from the main screen, the multi-page menu can be accessed and this is where the
operating parameters of STEALTH are set and the lap times acquired are displayed.
Press the ENTER key for 2 seconds to access the multi-page menu.
By pressing the DOWN ARROW and UP ARROW keys, it is possible to scroll through
the submenus:
* ANALYSIS
* CHRONO
* MEMORY
* OPTIONS
* IR SETUP
Press ENTER to enter the selected submenu.
4
To change an item carry out the following operations:
1. Position yourself on the item you want to set through1 ARROW keys.
2. Press ENTER: an asterisk ( ) appears near the value you’re changing.
3. Press ARROW keys to set the desired value.
4. Press ENTER to confirm the settino: the asterisk desappears.
*
Press CANC to return through the higher menus and back to the main screen.
Coding the infrared receiver (CR Vers.)
To prevent interference between various different Transmitters, even of other makes,
which would cause detection of incorrect times, each Starlane Transmitter is fitted
with a personal code. Your IR Receiver must therefore be programmed to recognise
its own Transmitter:
1. Position the Transmitter ten metres in front of the IR Receiver mounted on the
vehicle and connected to STEALTH.
2. Supply the Transmitter with power from a PP3 9V battery (the Transmitter can
also be powered by a 12 V dc external battery) and press the ON/OFF button to
turn it on.
3. From the main screen get to the IR SETUP submenu.
4. Follow instructions to put the transmitter on at ten meters from the receiver and
press ENTER.
5. When you see on the display “LEARNING CODE” wait for the confirm message
(or press CANC if you want to stop the operation).
6. When the confirm message “OPERATION COMPLETED” appears the Transmitter
code has been stored in the IR Receiver - After a few seconds you’ll automatically get back to the chrono screen.
7. Obscure the eye of the IR Receiver, passing your hand near the sensor several
times. The Red LED must go off and light up again when it is not obscured and
receives the signal from the Transmitter. (In closed rooms, reflections of the walls
might activate the sensor if it is directed in the opposite direction in relation to
the Transmitter. In this case, to check the code, completely obscure the sensor
by putting your finger over the receiving “eye”). If the LED flashes at regular
intervals, the code has not been stored, so the procedure under point 3 must be
repeated.
This procedure can be carried out with the IR Receivers installed on several vehicles,
still keeping the same Transmitter. This means that only a single Transmitter has to be
positioned on the wall for several bikes in the same team.
Setting the RPM reading parameters (K vers.)
It is necessary to set the number of pulses received for each revolution of the crank
shaft in STEALTH.
· For 2-stroke or 4-stroke engines, with non-phased ignition, set the number of pulses to 1.
· For modern 4-stroke engines with phased ignition, the number of pulses must be
set to 0.5.
In the submenu OPTIONS > RPM DIVISION = VALUE
5
Setting the chrono functions
Selection of how lap times are shown
The lap time can either be shown in a simplified way with immediate reading or in
a more complete way with the session and delay details.
The following information relative to timing performance is shown on the detailed
screen:
* Instantaneous time - at the bottom on the right.
* Current session number - at the bottom on the left.
* Current lap number - on the left above the session.
* Gap from the best lap - at the top on the left.
* Best lap number - at the top in the centre.
* Gap from previous lap - at the top on the right.
To activate display of the details:
In the submenu OPTIONS > CHRONO DETAILS = YES / NO.
Activation of the chrono
To activate the chrono manually, press the UP ARROW from the main screen. STEALTH can be set so that the chrono is activated automatically the first time the finish
line is passed.
In the submenu CHRONO > CHRONO START = MANUAL / AUTO.
Deactivation of the chrono
To deactivate the chrono, press the UP ARROW from the main screen.
Setting the Freeze Time
Indication of how long the lap time passing over the finish line lasts can be set.
In the submenu CHRONO > FREEZE TIME = VALUE.
“Best” LED
The LED “BEST” is a very useful indication to immediately give information on an
improvement in performance without distracting the driver by making him read the
display.
* When the “BEST” LED is permanently lit it indicates an improvement compared with
the previous lap.
* When the “BEST” LED flashes it indicates the driver’s best time of all.
Analysis of the stored times
At the end of the practice sessions, the times of 240* laps divided into 99 sessions
can be analysed. Each time the chrono is stopped and started again, a new test session is automatically created.
6
(* It can be different depending on the versions.)
The various sessions with the number of laps completed in each are listed in the
ANALYSIS submenu.
To display the stored times:
In the submenu ANALYSIS, position yourself over the session you are interested in
and press ENTER to access the list of stored laps for that session with the relative
times and gaps (In the K version maximum RPM value for each lap). The Best Lap
and the total number of stored laps are indicated in the top part of the screen.
Carry out the following operations to cancel the time memory:
1. From the main screen get to the submenu MEMORY.
2. Position yourself over CLEAR ALL SESSIONS.
3. Keep ENTER pressed for 2 seconds to cancel all the laps and all the stored sessions or position yourself over CLEAR LAST SESSION and keep ENTER pressed
for 2 seconds to only cancel the last session stored. This operation can be carried
out several times to eliminate the last sessions stored in sequence.
Setting the Self Power Off
It is possible to let STEALTH power off automatically if it’s not used for 4 consecutive minutes.
To activate the self power off:
In the submenu OPTIONS > SELF POWER OFF = ON / OFF.
Short keys
From the main screen it is possible to:
1. Press CANC to alternate the indication between LAP TIME and CHRONO DETAILS
(LAP TIME and RPM in the K version).
2. Press DOWN ARROW to activate and deactivate the backlight of the display (it
must be earlier activated in the OPTIONS submenu).
3. Press UP ARROW to activate and reset the chrono.
Cleaning the surfaces
Use a soft cloth wetted with water to clean the surfaces of your STEALTH. Using
alcohol or aggressive detergents might turn the transparent areas opaque.
Warranty
STEALTH is covered by a 12-month warranty for all manufacturing defects.
Note
STEALTH is not approved for road use.
Updates or integrations to the manual are available on the web site www.starlane.it
7
8
Italiano
Contenuti
Funzioni.
Installazione di STEALTH.
Pannello frontale.
Connessione - Accensione e spegnimento del dispositivo.
Posizionamento del cavo di lettura RPM. (Vers. K)
Installazione dell’ Infrared Kit. (Vers. CR)
Installazione del sensore magnetico. (Vers. CM)
Menù multipagina.
Codifica del ricevitore infrarosso. (Vers. CR)
Impostazione dei parametri di lettura RPM. (Vers. K)
Impostazione delle funzioni del cronometro.
Analisi dei tempi memorizzati.
Cancellazione della memoria tempi.
Impostazione di Autospegnimento.
Tasti rapidi.
Pulizia delle superfici.
Garanzia.
Note.
9
Funzioni:
STEALTH svolge le seguenti funzioni:
* Indicazione del tempo sul giro.
* Indicazione del regime di giri motore (RPM). (Vers. K)
* Memorizzazione e analisi dei tempi sul giro e delle sessioni di prove.
Installazione di STEALTH
STEALTH si installa facilmente nel cupolino della Moto, sulla piastra della forcella, sul
volante del Go Kart, o sul cruscotto dell’Auto.
Fissare STEALTH con fascette di plastica o O-Ring agganciati agli appositi punti di
aggancio o tramite apposito supporto a volante (solo Vers. K), in caso di installazione sulle auto è possibile utilizzare 4 viti posizionate alle estremità arrotondate dei
punti di aggancio. Al fine di proteggere STEALTH dalle vibrazioni posizionare sempre
l’apposito adesivo sul retro.
Fissare con l’apposito velcro il portabatteria/sensore sul pianale del Kart (solo Vers. K).
Pannello frontale
Sul pannello frontale sono disposti il LED Best, il display retroilluminato e la tastiera
a membrana a 4 tasti.
Connessione - Accensione e spegnimento del dispositivo
Connettere il cavo Rosso di alimentazione al +12V della batteria e il cavo Nero di
massa al telaio o ad un qualsiasi punto di massa, ad esempio il Negativo della batteria; oppure connettere STEALTH con l’apposito adattatore opzionale ad una batteria PP3 9V.
Nella versione K alimentare STEALTH inserendo una batteria PP3 9V nel portabatteria/sensore.
Per accendere STEALTH premere il tasto ON/OFF sul pannello frontale; per spegnerlo tenere premuto per 2 secondi il medesimo tasto.
10
Posizionamento del cavo di lettura RPM (Vers. K)
Il rilevamento dei giri motore avviene in modo induttivo attraverso l’apposito cavo che
deve essere appoggiato al cavo della candela e fissato con una fascetta di plastica.
Se si verificano valori istantanei non corretti è necessario verificare che il cavo non
riceva disturbi dai cavi di altri cilindri, accertarsi quindi che il cavo passi in punti del
telaio distanti da altri cilindri e,se possibile tagliarlo alla lunghezza desiderata in modo
che non riceva segnali indesiderati.
Il cavo di lettura RPM può anche essere collegato direttamente al filo del segnale
RPM sul connettore del cruscotto originale.
Attenzione! Non connettere mai direttamente il cavo di lettura RPM al connettore della bobina per evitare che tensioni inadeguate danneggino irreparabilmente lo strumento.
Installazione dell’Infrared Kit (Vers. CR)
L’accessorio Infrared Kit consente a STEALTH di identificare la linea del traguardo e
quindi di calcolare il tempo sul giro.
L’Infrared Kit è costituito da un Trasmettitore che deve essere posizionato ai box (tipicamente sul muretto) orientato in modo più perpendicolare possibile alla traiettoria
della moto in rettilineo e da un sensore (IR Receiver) che deve essere fissato sul
mezzo in modo che il piccolo sensore infrarosso (occhio) si trovi orientato verso il
Trasmettitore durante il passaggio sul rettilineo. L’ IR Receiver deve essere posizionato in modo che nessuna parte della scocca o del pilota ne oscuri la visibilità verso
il Trasmettitore.
Installazione del sensore magnetico (Vers. CM)
Le versioni CM di STEALTH utilizzano il sensore magnetico fornito per riconoscere la
linea del traguardo sui circuiti dotati di banda magnetica. E’ tuttavia possibile installare l’Infrared Kit come accessorio per tali versioni.
Eseguire le seguenti operazioni per installare il sensore magnetico:
1. Realizzare 1 foro da 5mm di diametro nel punto in cui la carenatura è più vicina al suolo.
2. Fissare il sensore con l’apposito dado in modo che sia rivolto verso l’asfalto.
3. Collegare il sensore tramite l’apposita prolunga al connettore di analogo colore e
tipologia sul cablaggio di STEALTH.
Menù multipagina
Oltre alla schermata principale è possibile accedere al menu multipagina attraverso il
quale vengono impostati i parametri di funzionamento di STEALTH e visualizzati i
tempi sul giro acquisiti.
Premere il tasto ENTER per 2 secondi per accedere al menu multipagina.
Premendo i tasti FRECCIA GIU e FRECCIA SU è possibile scorrere tra i sottomenu:
* ANALYSIS
* CHRONO
* MEMORY
* OPTIONS
* IR SETUP
Premere ENTER per entrare nel sottomenu selezionato.
11
Per modificare una voce eseguire le seguenti operazioni:
1. Posizionarsi sulla voce desiderata con i tasti FRECCIA
2. Premere ENTER: un asterisco ( ) compare a fianco del valore da modificare
3. Premere i tasti FRECCIA per impostare il valore desiderato.
4. Premere ENTER per confermare tale valore: l’asterisco scompare.
Premere CANC per tornare al menu superiore fino alla schermata principale.
*
Codifica del ricevitore infrarosso (Vers. CR)
Al fine di evitare interferenze tra vari Trasmettitori, anche di altre marche, che porterebbero al rilevamento di tempi errati, ogni Trasmettitore Starlane è dotato di un codice personale. E’ quindi necessario programmare il vostro IR Receiver in modo che
riconosca il proprio Trasmettitore:
1. Posizionare il Trasmettitore una decina di metri di fronte all’ IR Receiver montato
sul mezzo e connesso a STEALTH.
2. Alimentare il Trasmettitore con una batteria PP3 9V (il Trasmettitore può anche essere alimentato con una batteria esterna 12 V cc) e premere l’interruttore ON/OFF.
3. Dalla schermata principale di STEALTH accedere al sottomenu IR SETUP.
4. Seguire l’indicazione di posizionare il trasmettitore acceso a 10 metri di distanza
dal ricevitore, premere ENTER.
5. Quando appare la scritta “LEARNING CODE” attendere il messaggio di conferma
(o premere CANC per annullare l’operazione).
6. Quando il messaggio di conferma “OPERATION COMPLETED” appare sul display
il codice è stato memorizzato nell’ IR Receiver - Dopo alcuni secondi si ritorna
automaticamente alla schermata cronometro.
7. Oscurare l’occhio dell’IR Receiver passando più volte la mano vicino al sensore, il
LED rosso si deve spegnere e riaccendere quando non è oscurato e riceve il
segnale dal Trasmettitore.(In locali chiusi è possibile che le riflessioni delle pareti
attivino il sensore anche se orientato in senso opposto rispetto al Trasmettitore, in
questo caso, per verificare la codifica, oscurare completamente il sensore appoggiando il dito sull’ “occhio” di ricezione). Se il LED lampeggia ad intervalli costanti il codice non è stato acquisito, ripetere quindi la procedura dal punto 3.
E’ possibile eseguire tale procedura con gli IR Receiver installati su più mezzi mantenendo sempre lo stesso Trasmettitore, in questo modo, per più moto dello stesso
team, basterà posizionare sul muretto box un solo Trasmettitore.
Impostazione dei parametri di lettura RPM (Vers. K)
E’ necessario impostare in STEALTH il numero di impulsi ricevuti per ogni giro di
albero motore.
* Per motori 2 tempi o 4 tempi con accensione non fasata impostare il numero di
impulsi a 1.
* Per i moderni motori 4 tempi con accensione fasata il numero di impulsi deve
essere impostato a 0,5.
Per impostare il parametro:
Nel sottomenu OPTIONS > RPM DIVISION = VALORE.
12
Impostazione delle funzioni del cronometro
Scelta della rappresentazione dei tempi
E’ possibile avere una rappresentazione del tempo sul giro semplificata e di immediata lettura o una più completa con i dettagli della sessione e i distacchi.
Nella schermata con i dettagli sono rappresentate le seguenti informazioni relative
alla prestazione cronometrica:
* Tempo istantaneo - in basso a destra.
* Numero della sessione in corso - in basso a sinistra
* Numero del giro in corso - a sinistra sopra la sessione.
* Distacco dal miglior giro - in alto a sinistra.
* Numero del miglior giro - in alto al centro.
* Distacco dal giro precedente - in alto a destra.
Per attivare la visualizzazione dei dettagli:
Nel sottomenu OPTIONS > CHRONO DETAILS = YES / NO
Attivazione del cronometro
Per attivare il cronometro manualmente premere FRECCIA SU dalla schermata principale. E’ possibile impostare STEALTH in modo che il cronometro si attivi automaticamente al primo passaggio sul traguardo.
Nel sottomenu CHRONO > CHRONO START = MANUAL / AUTO.
Disattivazione del cronometro
Per disattivare il cronometro premere FRECCIA SU dalla schermata principale.
Impostazione del Freeze Time
E’ possibile impostare la durata dell’indicazione del tempo sul giro al passaggio sul
traguardo:
Nel sottomenu CHRONO > FREEZE TIME = VALORE.
LED “Best”
Il LED “BEST” è un’indicazione molto utile per dare immediatamente informazioni sul
miglioramento della prestazione senza distrarre il pilota costringendolo a leggere il display.
* Il LED “BEST” acceso fisso indica il miglioramento rispetto al giro precedente.
* Il LED “BEST” lampeggiante indica il miglior tempo assoluto del pilota.
Analisi dei tempi memorizzati
Al termine della sessione di prove è possibile analizzare i tempi di 240* giri divisi in 99
sessioni, ogni volta che il cronometro viene fermato e riattivato viene creata automaticamente una nuova sessione di prove.
Nel sottomenu ANALYSIS sono elencate le varie sessioni con il numero di giri com-
13
(*Può variare in funzione delle versioni.)
piuti in ognuna.
Per visualizzare i tempi memorizzati:
Nel sottomenu ANALYSIS, posizionarsi sulla sessione di interesse e premere ENTER
per accedere alla lista dei giri memorizzati per quella sessione con i relativi tempi e
distacchi (nella versione K il valore massimo di RPM per ogni giro), nella parte alta
dello schermo sono indicati il Best Lap ed il numero totale di giri memorizzati.
Cancellazione della memoria tempi
Eseguire le seguenti operazioni per cancellare la memoria tempi:
1. Dalla schermata principale accedere al sottomenu MEMORY.
2. Posizionarsi su CLEAR ALL SESSIONS.
3. Tenere premuto ENTER per 2 secondi per cancellare tutti i giri e tutte le sessioni
memorizzate oppure posizionarsi su CLEAR LAST SESSION e tenere premuto
ENTER per 2 secondi per cancellare solo l’ultima sessione memorizzata, questa
operazione può essere eseguita più volte per eliminare in sequenza le ultime sessioni memorizzate.
Attivazione dell’autospegnimento
E’ possibile fare si che STEALTH si spenga automaticamente se per 4 minuti consecutivi non viene utilizzato.
Per attivare l’autospegnimento:
Nel sottomenu OPTIONS > SELF POWER OFF = ON / OFF.
Tasti rapidi
Dalla schermata principale è possibile:
1. Premere il tasto CANC per alternare l’indicazione tra LAP TIME e CHRONO
DETAILS (LAP TIME e RPM nella versione K).
2. Premere FRECCIA GIU per attivare la retroilluminazione del display (deve essere
preventivamente attivata nel sottomenu OPTIONS).
3. Premere FRECCIA SU per attivare e azzerare il cronometro.
Pulizia delle superfici
Per pulire le superfici del vostro STEALTH usate un panno morbido bagnato con
acqua, l’uso di alcool o detergenti aggressivi può opacizzare le aree trasparenti.
Garanzia
STEALTH è coperto da 12 mesi di garanzia sui difetti di fabbricazione.
Note
STEALTH non è omologato per uso stradale.
Eventuali aggiornamenti ed integrazioni al presente manuale sono disponibili sul
sito www.starlane.it
14
15
Starlane s.r.l.
Starlane s.r.l. Via Madonna delle Rose, 72
24061 Albano s. Alessandro (BG) - Italia
Tel. +39 035-4243042 • +39 035-4521053
Fax. +39 035-4247274 • +39 035-4528337
www.starlane.it
Marketing:
Supporto Tecnico:
[email protected]
[email protected]
16