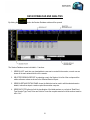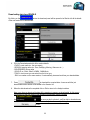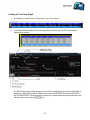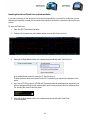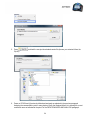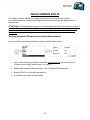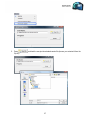
1
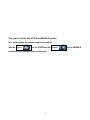
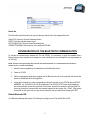
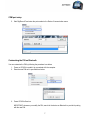
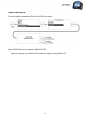
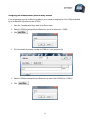
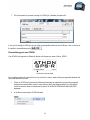
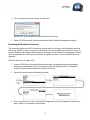
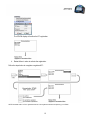
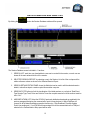
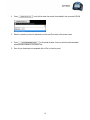
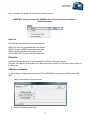
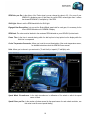
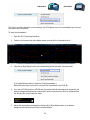
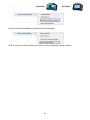
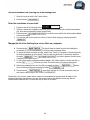
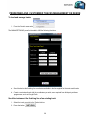
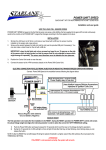
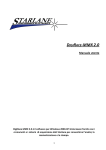
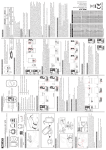
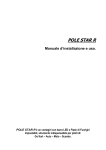
DigiRace-LE 2.0
User Guide
DigiRace Light Edition is the software for Windows XP and Vista (32bit) supplied with
ATHON and XENON-S systems to allow the data analysis, storage and printing.
1
INDEX
INSTALLATION.................................................................................................................................................. 4
Starting .......................................................................................................................................................... 4
User Interface ................................................................................................................................................ 5
Default Bluetooth PIN .................................................................................................................................... 6
COM port setup ............................................................................................................................................. 7
Customising the PIN on Bluetooth ................................................................................................................. 7
How to reset the PIN...................................................................................................................................... 8
Assigning the communication ports to many devices..................................................................................... 9
Personalizing your own ATHON ...................................................................................................................10
Protecting the Bluetooth Connection.............................................................................................................11
DATA DOWNLOAD AND ANALYSIS................................................................................................................13
Setting the speed measurement unit km/h mph............................................................................................14
Downloading data from ATHON ...................................................................................................................14
User Interface ...............................................................................................................................................16
Button Bar.....................................................................................................................................................17
USB driver installation...................................................................................................................................17
SETUP ..............................................................................................................................................................18
Settings List ..................................................................................................................................................18
The Button Bar in Setup Mode......................................................................................................................20
DATA DOWNLOAD AND ANALYSIS................................................................................................................21
Downloading data from XENON-S................................................................................................................22
Loading the Track map Graph ......................................................................................................................23
Inserting the desired Finish Line and Intermediates......................................................................................24
TRACK LIST CREATION AND MANAGEMENT FOR ATHON.........................................................................27
To load and manage tracks ..........................................................................................................................27
Send the instrument the finishing line of an existing track ............................................................................28
Enter the coordinates of a new track.............................................................................................................28
Manage the list of the finishing lines set on Athon on a computer ................................................................28
PREDEFINED AND CUSTOMIZED TRACKS MANAGEMENT ON XENON ...................................................29
To load and manage tracks ..........................................................................................................................29
Send the instrument the finishing line of an existing track ............................................................................29
Enter the coordinates of a new track.............................................................................................................30
Comparing different laps...............................................................................................................................32
Virtual race....................................................................................................................................................32
ATHON FIRMWARE UPDATE..........................................................................................................................33
XENON FIRMWARE UPDATE .........................................................................................................................36
2
This guide is valid for both ATHON and XENON-S systems,
for a easier reading the relative chapters are marked
with the
icon for ATHON and the
positioned in the top-right corner of the pages.
3
icon for XENON-S
INSTALLATION
Insert the DigiRace-LE 2.0 CD into the CD-ROM of your PC.
If the Autorun function is active the installation process will start automatically, otherwise click Start>Run and
type in the CD unit path followed by \Setup.exe (ex. D:\Setup.exe).
The installation process will start.
Proceed following the installer instructions.
Starting
Once DigiRace-LE is installed double-click the icon on the desktop to run the software, it’s also possible to run
it from Start>Program Files>Digirace LE>Digirace LE 2.0.
4
User Interface
DigiRace-LE Interface is composed by the Title Bar and the Menu on the top, the main Pane in the middle, the
Button Bar on the bottom and by the Communication Information in the Grey.
Title Bar
The Title Bar shows the DigiRace-LE version.
Menu
The Menu is composed by the following sections:
FILE: Exits the program.
DEVICE: Device selection (XENON or ATHON), communication settings and device software updates
(firmware).
COMMAND: Sends instructions to the device.
HELP: Language, user guides and infos about the software release.
IMPORTANT: Verify you selected the ATHON device in order to load the user interface for
ATHON-GPS instruments.
5
Button Bar
The Button Bar hosts the buttons for the main features and the list of the assigned Athon list:
ANALYSIS: Opens the Session Database window.
PRINT: Prints the selected session report.
DATA DOWNLOAD: Opens the Data Download panel.
CONNECTION MENU: Shows the list of the assigned ATHONS.
CONFIGURATION OF THE BLUETOOTH COMMUNICATION
To activate the communication between the PC and ATHON, it is necessary to equip the computer with a
Bluetooth device (now available as a standard on most mobile phones or purchasable at any supermarket as
an USB key).
NOTE: To improve the signal quality, above all at the time of data download, it is recommended to keep the PC at a
distance of max. 2-3 metres from ATHON.
1. Install the drivers supplied by the manufacturer of the Bluetood device.
2. Power on ATHON.
3. Start the management application supplied with the Bluetooth device on the computer and activate the
search for visible devices in this application.
4. A new device marked by a code corresponding to the univocal code of your ATHON device (DEVICE
ADDRESS, e.g.: 00:04:3E:22:2A:73) will be detected. The ATHON_GPS-R name will be displayed
after some seconds. Access the properties of this device. Activate the connection with the Serial Port
service and check the communication port number assigned by the system; E.g.: COM 5, if the system
should find out that more than one port can be referred to the one specified as Outgoing KC-SPP.
Default Bluetooth PIN
Your Bluetooth Manager will require a PIN during the pairing process. The default PIN is:0000.
6
COM port setup
5. Start DigiRace-LE and enter the port number in the Device>Communication menu.
Customising the PIN on Bluetooth
You can customise the PIN by following the procedure here below:
1. Power on ATHON to enable it to comunicate with the computer
2. Enter the new PIN as it is specified here below.
3. Power ATHON off and on.
IMPORTANT: whenever you modify the PIN, search for the device on Bluetooth to provide for pairing
with the new PIN.
7
How to reset the PIN
If you are unable to remember the PIN of your ATHON, just reset it.
Power ATHON off and on to restore the default PIN 0000.
Attention: whenever you modify the PIN, provide once again for pairing with the PC.
8
Assigning the communication ports to many devices
If you are managing a group of riders it’s possible for you to create an assigning list of the COM ports defined
by on the Bluetooth connection for each ATHON.
1. Open the Communication Setup panel in the Device menu.
2. Select the COM port assigned by the Bluetooth to one of the Athons (ex.: COM9).
3. Click
.
4. Fill in the name that you want to assign to COM9 (ex.: Luke) and press Ok.
5. Select the COM port assigned by the Bluetooth to another of the ATHONS (ex.: COM10).
6. Click
.
9
7. Fill in the name that you want to assign to COM10 (ex.: Matthew) and press Ok.
If you want to modify the COM port of one of the created profiles select the new COM port, click on the line of
the profile to be modified and click
.
Personalizing your own ATHON
Your ATHON is recognized as Bluetooth device with the generic name of Athon_GPS-R.
BLUETOOTH DEVICE NAME
It’s possible to replace the name with one of your choice in order to make it always recognizable between the
discovered Bluetooth devices:
1. Power on ATHON and (if previously defined and assigned as explained in the previous paragraph
Assigning the communication ports to many devices) verify the Assigned Athon List showing the
correct connection name as indicated at the point 5 of the DATA DOWNLOAD AND ANALYSIS
paragraph.
2. In the Device menu select ATHON>Rename.
10
3. Fill in the name that you want to assign and press OK.
(IMPORTANT: don’t use spaces or special characters in the name)
4. Restart ATHON and refresh the discovered devices list in the Bluetooth management software.
Protecting the Bluetooth Connection
The Bluetooth connection to the PC is wireless,so whoever within a short range could download or erase the
data of your ATHON. In order to void it you can protect the connection by registering only some PCs (max. 3)
into the ATHON that will send data and will accept communication only from those not considering the others.If
no PC is registered Athon will accept any connection, by registering at least 1 PC you will exclude all the not
registered.
Follow the steps below to register a PC:
1. Power on ATHON and (if previously defined and assigned as explained in the previous paragraph
Assigning the communication ports to many devices) verify the Assigned Athon List showing the
correct connection name as indicated at the point 5 of the next.
2. Enter the menu and execute the following procedure.
3. On the computer enter the menu Command>PC Registration and fill in the Name and Password you
want to assign to the computer and press Send.
11
The ATHON display will confirm the PC registration.
4. Restart Athon in order to activate the registration.
Follow the steps below to unregister a registered PC:
NOTE: Remember that if no PC is registered whoever in the neighborhoods will be accepted by your ATHON.
12
DATA DOWNLOAD AND ANALYSIS
By clicking the
button the Session Database window will be opened.
The Session Database screen is divided in 5 sections:
1. SESSION LIST: each time you download data a new raw is created for the session, on each row are
shown all the main values and infos of the session.
2. SELECTED SESSION REPORT: by selecting a row in the Session List a list of the run laps and the
relative reference values are shown in the Selected Session Report.
3. SESSION DETAILS EDITING PANE: shows the fields that can be used to edit the selected session
details,it also allows import a session copied from another computer.
4. SESSIONI FILTER: allows to limit the visualization of the listed sessions on a criteria of: Date,Event
Type,Session Type,Track, Driver and Vehicle.To see the complete session list all the sections must be
set to “ALL”.
5. ASSIGNED ATHON LIST: Select the ATHON (if previously defined and assigned as explained in the
previous paragraph Assigning the communication ports to many devices) to which DigiRace will
connect for all the data transmission-reception functions (ex.: Data Download, Firmware Update,
Finish Line sending etc.). If no ATHON has been assigned for all the communications the COM port
selected in the Communication Setup panel will be used.
13
Setting the speed measurement unit km/h mph
If you wish to change the speed measurement unit, follow the procedure here below:
The change will be active for the sessions you will download afterwards.
Downloading data from ATHON
By clicking on the
button the download panel will be opened to be filled in with all the details
of the new session to be downloaded:
1. Fill in the Download panel with all the session details:
- EVENT: event name (ex.: the race name)
- SESSION: session name (ex.: Free, Qualifying, Morning, Afternoon etc…)
- DRIVER/RIDER: Driver name
- VEHICLE: ex.: Bike1, Bike2, HONDA, YAMAHA etc.
- TRACK: circuit name you can select from the list or type
- RUN: run number on the same session, it’s automatically increased each time you download data.
NOTE: For the best signal quality, moreover during the data download it’s suggested to keep the PC within the
distance of 2-3 meters from ATHON.
14
2. Press
: in the field is shown the session list available in the connected ATHON.
3. Select the session you want to download on a Date and Time basis in the session name.
to download the data. A new row with the just downloaded
4. Press
session details is added to the Session List.
5. Once all your downloads are completed click on Exit to close the panel.
15
User Interface
DigiRace-LE Interface is composed by the Title Bar and the Menu on the top, the main Pane in the middle, the
Button Bar on the bottom and by the Communication Information in the Grey bar.
Title Bar
The Title Bar shows the DigiRace-LE version and, on the right, the loaded Model file name, a Model file is the
file storing all the Setup informations for a specific motorbike model, all the parameters that will be set in the
software will be saved in a .mod file that will be reloaded each time you need.
Menu
The Menu is composed by the following sections:
FILE: Exits the program.
DEVICE: Device selection (XENON or ATHON), communication settings and device software updates
(firmware).
COMMAND: Sends instructions to the device.
16
HELP: Language, user guides and infos about the software release.
IMPORTANT: Verify you selected the XENON device in order to load the user interface for
XENON instruments.
Button Bar
The Button Bar hosts the buttons for the main features:
ANALYSIS: Opens the downloaded session list window.
SET UP: Opens the XENON-S parameter setup panel.
PRINT: Prints the selected session laptimes report.
DATA DOWNLOAD: Opens the Data Download panel.
Button Bar
In the Button Bar are placed all the buttons needed for the Setup and Analysis features.
The Setup icon loads the Setup window in the Main pane and the Analysis icon loads the Analysis window in
the Main pane.
USB driver installation
In order to allow the communication between the PC and XENON-S it’s necessary to install the correct USB
driver.
1. Select Communication in the Device menu.
2. Press the USB driver Install button.
17
Note: on Windows Vista systems, to allow the driver installation,it’s necessary to deactivate the USER
ACCOUNT CONTROL in the USER ACCOUNT menu of the Windows Control Panel.
3. Wait for the message of successful driver installation and insert the USB cable to connect the PC to
the XENON-S.
4. Press the Search USB COM Port button, the panel will display the assigned COM port.
5. Double Click on the assigned port line to set it as default.
6. Power on XENON-S.
7. Press the Test Connection button: if the connection is correct a panel showing the serial number and
firmware version of your XENON-S will open.
8. Confirm and close all the opened panels.
Note: The COM is loaded only when XENON-S is connected, remember to always plug the cable in the same
USB socket, if plugged in a different socket, Windows will assign another port number and it will be necessary
to modify the COM port setting in DigiRace-LE.
SETUP
The Setup window allows you to setup the working parameters of your XENON-S, you can set all the
parameters on both the XENON-S dashboard menu or the DigiRace-LE Setup utility. You also can save the
settings to a .mod file into the DigiRace-LE>Model folder in order to be able to load the same settings in the
future and quickly set a new XENON-S for the same bike model.
Settings List
In the Setup window you can find the following settings:
18
RPM Pulse per Rev: is the divisor of the Tacho signal, you can change the value to 0,5-1-2 or more if your
XENON-S is displaying more or less than the correct RPM, values higher than 1 reduce
the showed RPM while 0,5 multiplies by 2 the RPM.
Shift Light: Allows to set the RPM threshold for the Shift Light.
Engaged Gear Recognition: Lets you set the Engine/Wheel speed ratio for each gear, it’s necessary for the
correct GEAR indication on the XENON-S display.
RPM Scale: The value must be identical to the maximum RPM indicated on yours XENON-S printed scale.
Freeze Time: Is the time in seconds during which the last lap time is kept printed on the display while the
finish line is overpassed.
Cooler Temperature Conversion: Allows you to set the correct linearization of the cooler temperature sensor,
for detailed instructions check the XENON-S user manual.
Units: Allows you to choose in you want metric (°C and Km/h) or imperial (°F and Mph) units.
Speed Wheel Circumference: Is the total circumference in millimetres of the wheel on which the speed
sensor is fitted.
Speed Pulses per Rev: Is the number of pulses sensed by the speed sensor for each wheel revolution, use
this value to set the correct speed reading.
19
Alarms: Allows you to set the alarms, the value stays for the analog value read by the specific channel. Follow
the XENON-S user manual to set interactively the alarms, these values are useful only if you import the
settings from the XENON-S and want to save them in a specific .mod file.
GPS: Allows the activation of the GPS chrono features and track paths acquisition.It must be activated if the
optional GPS receiver is installed.
Start Recording at Engine Speed: Defines the engine speed threshold above which the system automatically
starts the GPS paths recording.It works only if the GPS has been
activated.
Start Recording at Speed: Defines the speed threshold above which the system automatically starts the GPS
paths recording.
The Button Bar in Setup Mode
You can find 5 Buttons in the Button Bar in Setup Mode:
Send to Dashboard: Exports to the XENON-S the settings you set in the Setup window, all the previous
settings inside the XENON-S will be lost.
Open: Allows you to load a previously saved model .mod file.
Save: Allows you to save the parameters updating the current model file.
Save As: Allows you to save the parameters in a new different model file.
Import: Allows you to import in the PC the settings you already made directly on the XENON-S, this command
is useful to setup the parameters interactively on the XENON-S and then generate a model file to
store all the settings for future use. (For example when XENON-S firmware is updated it’s necessary
to send again the setup parameters.)
20
DATA DOWNLOAD AND ANALYSIS
By clicking the
button the Session Database window will be opened.
The Session Database screen is divided in 5 sections:
1. SESSION LIST: each time you download data a new raw is created for the session, on each row are
shown all the main values and infos of the session.
2. SELECTED SESSION REPORT: by selecting a row in the Session List a list of the run laps and the
relative reference values are shown in the Selected Session Report.
3. SESSION DETAILS EDITING PANE: shows the fields that can be used to edit the selected session
details,it also allows import a session copied from another computer.
4. SESSIONI FILTER: allows to limit the visualization of the listed sessions on a criteria of: Date,Event
Type,Session Type,Track, Driver and Vehicle.To see the complete session list all the sections must be
set to “ALL”.
21
Downloading data from XENON-S
By clicking on the
button the download panel will be opened to be filled in with all the details
of the new session to be downloaded:
6. Fill in the Download panel with all the session details:
- EVENT: event name (ex.: the race name)
- SESSION: session name (ex.: Free, Qualifying, Morning, Afternoon etc…)
- DRIVER/RIDER: Driver name
- VEHICLE: ex.: Bike1, Bike2, HONDA, YAMAHA etc.
- TRACK: circuit name you can select from the list or type
- RUN: run number on the same session, it’s automatically increased each time you download data.
7. Press
to download the acquired data. A new raw with the just
downloaded session details will be added to the Session List.
8. When the data download is completed click on Exit to return to the Analysis window.
Note: every time you download the data all the sessions in memory are downloaded, for this reason
it’s important to keep the memory clear activating the automatic memory clearing
flag
, in case you don’t activate it, you’ll be able to download many
times the same session and you will have to manually clear the memory clicking the
button.
22
Loading the Track map Graph
1. In the Session List select the row of the session you want to analyze.
2. In the Selected Session Report click on the single lap you want to see. The GPS Track Analysis
window will be opened.
The GPS Track Analysis window shows the circuit with the path drawn by the driver (tracking fidelity is
based on the GPS signal quality).The RED zones show the ACCELERATION phases and the BLUE
the DECELERATION. The vehicle position is shown buy a yellow marker that can be positioned at will
with the mouse or moved by the ,
keys.
23
Inserting the desired Finish Line and Intermediates
If you didn’t set directly on the device the Finish Line and Intermediates or you want to modify them you can,
after the data download, proceed with the insertion and upload to the device to male them active by the next
session.
To insert the Finish Line:
1. Open the GPS Track Analysis window.
2. Position with the mouse the yellow Marker where you want the Finish Line to be.
3. Click with the Right Mouse button on the window background and select Set Finish Line.
In the yellow Marker position is shown the FL flag (Finish Line).
To allow the device work with the new Finish Line it’s necessary you upload the coordinates to the
device
4. If you own a ATHON, power on ATHON and (if previously defined and assigned as explained in the
previous paragraph Assigning the communication ports to many devices) verify the Assigned Athon
List showing the correct connection name.
5. Click with the Right Mouse button on the window background and select Send Finish
Line/Intermediates.
24
The Finish Line setting allows the correct working of the GPS laptimer even if the Intermediates have not been
set because they are optional.
To insert the Intermediates:
1. Open the GPS Track Analysis window.
2. Position with the mouse the yellow Marker where you want the first Intermediate to be.
3. Click with the Right Mouse button on the window background and select Set Intermediate.
In the yellow Marker position is shown the i1 flag (Intermediate 1).
Repeat the same steps if you want to insert also the Intermediates 2 and 3 (i2, i3).
4. If you own a ATHON, power on ATHON and (if previously defined and assigned as explained in the
previous paragraph Assigning the communication ports to many devices) verify the Assigned Athon
List showing the correct connection name.
5. Upload the Intermediate coordinates by clicking with the Right Mouse button on the window
background and selecting Send Finish Line/Intermediates.
25
You can remove the intermediates by selecting Remove Intermediates.
NOTE: If you want to modify the Finish Line position you can just repeat the inserting procedure.
26
TRACK LIST CREATION AND MANAGEMENT FOR ATHON
To load and manage tracks
1. From the Control menu select
The MANAGE TRACKS panel is intended to fulfil the following functions:
a. Send the device the finishing line coordinates available in the list supplied for the main world tracks.
b. Create a customised track with the coordinates you wish, even acquired from third-party software
programmes, such as Google Earth.
c. From Athon download the list of tracks already directly learnt on the field, assign each track the name
you wish and send the list to the device to be able to choose the track directly from the menu on the
display.
d. Save the list on the computer to exchange it with your friends and load a list you have saved before.
27
Send the instrument the finishing line of an existing track
1. Select the track you wish in the Tracks Archive
2. Press the button
Enter the coordinates of a new track
1. Type the name of the new track in the
field
2. Type the Latitude and Longitude coordinates you wish for the finishing line and the intermediates
(e.g. after having acquired them from Google Earth)
to create the new track file that will be made available
3. Press the button
in the tracks archive.
4. You can also add the new track to the list to be sent to Athon simply by pressing the button
Manage the list of the finishing lines set on Athon on a computer
A. Press the button
. The list will show the tracks for which the finishing line
coordinates (FL) or the intermediates (i1-i2-i3) have been entered in Athon.
B. To assign each track the name you wish, select it (e.g. Track01). The panel on the left will specify
the exact coordinates you have stored. Type the name you wish (max. 7 characters) and press
the button
. Press
if you wish to preserve it and to make
it available in the tracks archive.
C. To add a track already created and made available in the Tracks Archive to the list, just click on
the box
of the line you wish. Choose the name of the track to be entered.
D. After having created the list, save it on file by pressing the button
list you have saved before by pressing the button
. Recall a
.
to send Athon the new list. You can choose the track you
E. Press the button
wish from the Athon menu LOAD TRACK COORDINATES.
Please Note: You can even create various versions of intermediates for the same track by means of the
features of the tracks management. Just save the various versions with different names (e.g. Monza1Monza2-Monza3-Monza4 etc.) to choose the one you wish on the device.
28
PREDEFINED AND CUSTOMIZED TRACKS MANAGEMENT ON XENON
To load and manage tracks
1. From the Control menu select
The MANAGE TRACKS panel is intended to fulfil the following functions:
a. Send the device the finishing line coordinates available in the list supplied for the main world tracks.
b. Create a customised track with the coordinates you wish, even acquired from third-party software
programmes, such as Google Earth.
Send the instrument the finishing line of an existing track
1. Select the track you wish in the Tracks Archive
2. Press the button
29
Enter the coordinates of a new track
1. Type the name of the new track in the
field.
2. Type the Latitude and Longitude coordinates you wish for the finishing line and the intermediates (e.g.
after having acquired them from Google Earth).
to create the new track file that will be made available in
3. Press the button
the tracks archive.
4. You can also add the new track to the list to be sent to Athon simply by pressing the button
Please Note: You can even create various versions of intermediates for the same track by means of the
features of the tracks management. Just save the various versions with different names (e.g. Monza1Monza2-Monza3-Monza4 etc.) to choose the one you wish on the device.
30
Comparing different laps
You can make an overlap of different tracks (max 3):
1. Double click the row of the first of the laps you want to compare, the Compare window will be opened
and the Lap Number cell is marked in yellow, if a session has at least one lap loaded into Compare
the event name cell is marked in white.
2. Double click other laps (also from different sessions) to add them to the Compare, they will be loaded
in Red and Green.
3. Click to position the Marker in the desired position and move it using the
If you want you can zoom in and out to give more detail using the
and
31
and
keys.
keys.
To exclude a lap from the Compare just double click again on its row in the list.
Virtual race
In the Compare you can make a virtual race between the loaded laps to find out in a very fast and interactive
way the performance differences.
key in the Compare window or
to start the simulation, Stop
( ) to stop or Rewind
Press the Play
( ) to move back the Markers to the start.
32
ATHON FIRMWARE UPDATE
The software installed in ATHON that manages all the features and functions is the Firmware.
It’s possible to update the Firmware when Starlane releases new versions with new implementations or
enhancements.
ATTENTION! The Firmware update procedure is a very delicate procedure for it works directly at the coreo f
your ATHON, so it must be executed only if necessary and with scruple paying attention to the following
indications. A not correct updating process could require the direct intervention of Starlane Technical
Department.
Verifying the installed Firmware version and updates download
In the lower right corner of the starting screen of your ATHON is shown the Firmware version.
FIRMWARE VERSION
1. Verify in the technical support page on the website www.starlane.com if you find more recent
Firmware versions (higher release name) for your device.
2. Download the compressed file and expand it in the C:\DigiRaceLE\Firmware folder.
3. Insert into your ATHON brand new batteries (if self powered versions) or be sure the vehicle
battery is fully charged (for 12V versions).
4. In the Device menu select Firmware Update.
33
5. Press
.Zip file).
and load the new just downloaded version file (be sure you extracted it from the
6. Power on ATHON and (if previously defined and assigned as explained in the previous paragraph
Assigning the communication ports to many devices) verify the Assigned Athon List showing the correct
connection name as indicated at the point 5 of the DATA DOWNLOAD AND ANALYSIS paragraph.
34
Note: The Firmware update could cause the total lost of your laptimer data in the device so we suggest
you download all the sessions before the update process.
ATTENTION! Absolutely don’t interrupt the update process that can last from 10 to 20 minutes, during
this time it’s suggested to not use the PC for other purposes. For a better communication we suggest
to place ATHON in a range of a few tens of inches from the computer.
7. Press the
key.
8. At the end of the process restart Athon, at the first reboot Athon will execute the new Firmware writing
process and the memory erasing.
IMPORTANT! Don’t touch the keys, the power supply or interrupt the process because it could
cause the complete damage of the software and require the intervention at the technical
department.
At the next startup the starting screen will display the new Firmware version.
35
XENON FIRMWARE UPDATE
The software installed in XENON that manages all the features and functions is the Firmware.
It’s possible to update the Firmware when Starlane releases new versions with new implementations or
enhancements.
ATTENTION! The Firmware update procedure is a very delicate procedure for it works directly at the core of
your ATHON, so it must be executed only if necessary and with scruple paying attention to the following
indications. A not correct updating process could require the direct intervention of Starlane Technical
Department.
Verifying the installed Firmware version and updates download
Execute on XENON the following procedure to verify the actual Firmware version.
1. Verify in the technical support page on the website www.starlane.com if you find more recent
Firmware versions (higher release name) for your device.
2. Download the compressed file and expand it in the C:\DigiRaceLE\Firmware folder.
3. Be sure XENON-S is connected and powered on.
4. In the Device menu select Firmware Update.
36
5. Press
.Zip file).
and load the new just downloaded version file (be sure you extracted it from the
37
Note: The Firmware update will cause the total setting and chrono data lost in the device. Before the
update process It’s necessary to import and save all the settings in a model file and also to execute a
data download of the recorded sessions.
ATTENTION! Absolutely don’t interrupt the update process, that can last some minutes, during this
time it’s suggested to not use the PC for other applications. Wait for the process to be completed and
the successful update confirmation message. Notice that during the Firmware update XENON-S will be
totally inactive and it will seem to be off, but it will working and it’s important you don’t power it off or
interrupt the connection in this phase.
Even if on the PC you see the progress bar stopping, wait for the end of procedure confirmation
message.
6. Press the
key.
Once the Firmware has been updated XENON-S will automatically reboot and clear the memory, at the end of
the memory clearing i twill be necessary to send the model file settings to the dashboard in order to make it
work correctly.
38
For any update to the present guide check the www.starlane.com website.
User Guide Version: DRLE2_004
--------------------------------------------------------------------------------------------------------------------------------------------------Starlane s.r.l. Via Madonna delle Rose, 70 - 24061 Albano S. Alessandro (BG) - Italia - Tel. +39 035-4521007 Fax +39 035-4528208
e-mail: [email protected]
www.starlane.com
39