1
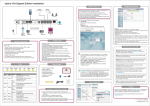
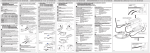
hybird 120 Gigaset Edition Installation Configuration interface Setting up with a PC Gigaset N720 PRO You should comply with the requirements for doing the configuration with the web interface. These are described in manual. In its ex works state, your hybird 120 GE is set up as a DHCP server. Therefore you need to make all the settings required for a connection on the PCs in your LAN that have no IP configuration. The PC you intend to use to perform the basic configuration must be set up to automatically obtain an IP configuration. DECT200 Gigaset N720 DM PRO DECT200 NTBA Handsets 1 FXS1 FXS2 S/U 1 FXO1 S/U 2 LAN1 LAN2 LAN3 LAN4 SD Card max. 10 terminals In the browser's address line, enter IP address 192.168.0.250 and log in with the following information: User: admin Password: admin You will be prompted to change the administrator password. Login to configuration interface 1 192.168.0.250 analogue (DECT-) Telephone SIPTelephone ISDNTelephone PC admin Safety notices System requirements For the configuration of the device, the following system requirements must be met: Microsoft Windows operating system Windows 2000 or higher; Windows XP SP3 requires the following hotfix: http://support.microsoft.com/kb/953761 Internet Explorer Version 7 or 9 or higher (security settings may need to be customised), Mozilla Firefox Version 4 or higher Installed network card (Ethernet) Installed TCP/IP protocol PC configured to automatically obtain IP address and DNS server High colour display (more than 256 colours) to show graphics accurately Caution: Any area that can only be opened using a tool is classed as an area of risk. The ventilation openings must be kept uncovered. The device should not be exposed to direct sunlight or any other source of heat. The equipment should be installed upright on a wall. When connecting any telecommunications network (TNV circuit), take care to avoid electrical shock. The device and the internal connections should only be assembled and installed inside a building! The device may only be operated using the approved power supply unit that comes supplied. Ensure that only CE-certified terminals are connected to the device. It will not be possible to access the device via the external ISDN during a power failure. No liquids should be allowed to get inside the device or the power supply unit. Before releasing the device for repair, you should save all data, then reset the telephone unit to its ex works state. LEDs Power LED Power Status Status SD Card Colour Status Yellow on off Yellow on SD card DSL Yellow SIP Yellow ISDN1 Yellow ISDN 2 Yellow slow flashing on off flickering off slow flashing on flickering on off on off on off DSL admin Connect devices and cables 2 Scope of supply SIP ISDN1 ISDN2 Information The power supply is connected No power supply After switching on: Device is started During operation: Fault The device is active SD card inserted, no read/write access No SD card inserted Read/write access Not supported Not supported Nor supported Nor supported Registered successfully with SIP provider No SIP registration Layer 1 activated On standby or not functioning Layer 1 activated On standby or not functioning hybird 120 Gigaset Edition Power supply unit Ethernet cable (yellow) ISDN BRI cable (black) SD card with voicemail data Installation Instructions Safety notices 2 3 Header Language: Select the language for the configuration interface. View: Select whether you want to use the default configuration interface or the builtin SNMP browser for configuration purposes. Online Help: Call the help function by clicking the button. Logout: Click this button to log out of the configuration interface. Navigation bar The various settings are sorted into groups in the navigation bar. Click on an entry in order to open the corresponding submenu. If you click on a submenu, the available settings parameters will then be displayed to you in the main configuration window. Main configuration window You can then switch back and forth between individual settings pages using the control elements in the top part ( ) of the main configuration window. Use the bottom part ( ) of the main configuration window in order to configure your device. 3 hybird 120 GE: Install the device in a suitable location (for assembly information, refer to the online guide at wiki.gigasetpro.com) and connect to the mains using the power unit supplied. In the web interface you can make other settings, e. g. for telephony. The manual provides information on connecting and starting up your SIP telephone. As an option, you may enter SIP providers for external telephone connections. For this, observe the online help description in the VoIP ® Settings ® SIP provider ® New menu. You can assign an internal number to your SIP telephone in the Terminals ® Other phones ® VoIP menu. Integrated online help provides detailed information on individual configuration options. For advanced configurations, we recommend that you refer to our wiki at wiki.gigasetpro.com. You can also enable service access via the ISDN login in the System Management ® Administrative Access menu. Here, enable the Service Login (ISDN web access) control box. Confirm with OK. Alternatively, you can initiate the service connection by entering the key sequence *96. Then complete your entry with #. Basic configuration ISDN: Use the black ISDN cable to connect your service operator's NTBA to the "S/U 2" slot of the hybird 120 GE. ISDN terminal: Connect an ISDN terminal to the internal ISDN connector of the hybird 120 GE. The "S/U 1" ISDN socket is preconfigured for operating internal ISDN devices with an S0 connection`. Analogue terminals: Connect your analogue terminals to analogue connectors FXS1, FXS2 of the hybird 120 GE. SIP telephones: Connect your SIP telephones to the 10/100/1000 Base-T Ethernet interfaces. You need to perform one last step on the PC. For information about this, refer to the guide provided in our wiki at wiki.gigasetpro.com. PC: Use an Ethernet cable to connect a suitable PC to one of the Ethernet interfaces on the hybird 120 GE. Should you encounter any problem with the connection between the PC and the hybird 120 GE, please read the relevant chapter in the manual. VoIP: For a purely IP connection without ISDN, use a dedicated cable and the quick installation guide furnished by the provider. Contact Available connections for terminals 2 x analogue terminal (RJ12 sockets, extendible via terminal block) 1 x ISDN (second connection adjustable through configuration from internal to external) 3 x SIP (4 x without PC, extendible through switch) A maximum of ten terminals can be directly connected. Use the cables supplied with the terminals to connect the terminals. Terminals can either be connected using the sockets on the bottom of the device, or using the connected adapters beneath the detachable faceplate. Questions? For rapid assistance, please visit www.gigasetpro.com. The trade outlet where you bought your telephone system will be happy to help you with further questions relating to our Gigaset Professional telephone system. If you have any questions when using your telephone system, please visit wiki.gigasetpro.com. V. 2.1 - 20140701 - 5500001561 A31008-N2002-N101-1-3N43