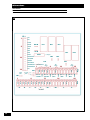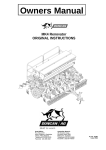
1
A LIRE ATTENTIVEMENT AVANT D’UTILISER LE BOÎTIER
PLEASE READ CAREFULLY BEFORE USING THE CONTROL UNIT
LÆS VENLIGST DENNE VEJLEDNING, FØR DU BRUGER
KONTROLBOKSEN
Réf: 400 305-02
- FR-GB-DK / SEM
Sulky Burel
BP 92111 - rue Fabien Burel
35221 Châteaubourg Cedex- FRANCE
Tél: 02.99.00.84.84 - Fax: 02.99.62.39.38
Site Internet : www.sulky-burel.com
e-mail : [email protected]
Consignes de sécurité
Safety instructions
Sikkerhedsforskrifter
FR
• Respecter les instructions de cette notice et les instructions du manuel d’utilisation du Semoir ou du Distributeur
correspondant.
• Ne jamais quitter le poste de conduite lorsque le tracteur est en marche.
• Réaliser les réglages du (Semoir ou du Distributeur) et du boîtier U LTRON MS tracteur à l’arrêt.
• Assurez-vous qu’il n’y ait personne autour de la machine avant d’effectuer l’étalonnage de l'U LTRON MS.
• Avant d’entreprendre des travaux sur l’installation électrique, interrompre le circuit de liaison batterie, il en est de
même pour les travaux de soudure sur le tracteur et la machine.
• L'U LTRON MS est uniquement conçu afin d’être utilisé avec les semoirs à grains ou Distributeur. Toute autre utilisation
sera considérée comme non conforme à l’usage. La responsabilité du constructeur ne sauraît être engagée, si des
modifications ont été effectuées sur le boîtier sans accord express.
Risque d’accident
Risque d’endommager
la machine
Faciliter le travail
Ne pas jeter le
boîtier
• Ces symboles sont utilisés dans cette notice chaque fois que des recommandations concernent votre
sécurité, celle d’autrui ou le bon fonctionnement de la machine.
• Transmettez impérativement ces recommandations à tout utilisateur de la machine.
GB
• Follow the instructions given in this guide and in the appropriate Seed Drill or Spreader user manual.
• Do not leave the driver’s seat when the tractor is running.
• Adjust the settings for the Seed Drill or Spreader and the ULTRON MS control unit with the tractor ignition switched
off.
• Make sure that nobody is near the machine when calibrating the ULTRON MS control unit.
• Cut power to the battery link circuit before carrying out any work on the electrical system or before performing
welding work on the tractor and the machine.
• The ULTRON MS control unit has been designed solely for use on seed drills or fertilizer spreaders, and using it for
any other purpose shall be deemed improper. The manufacturer cannot accept any responsibility for alterations made
to the unit without his express approval.
Risk of accident
Risk of damage
to the machine
Operating tip
Do not throw the
unit away
• These symbols are used in this guide whenever recommendations are made regarding your own or other
people’s safety or in order for the machine to operate smoothly.
• These recommendations must be passed on to other people using the machine.
DK
•
•
•
•
•
Overhold instrukserne i denne vejledning og instrukserne i brugervejledningerne til såmaskinen eller distributøren.
Forlad aldrig førersædet, når traktoren er startet.
Udfør forjusteringer på (såmaskine eller distributør) og ULTRON MS-kontrolboksen, når traktoren er standset.
Sørg for, at der ikke er nogen personer i nærheden af maskinen, inden du justerer ULTRON MS.
Afbryd batteriforbindelsen, før du udfører arbejde på det elektriske anlæg eller udfører svejsearbejde på traktoren og
maskinen.
• ULTRON MS er udelukkende fremstillet til brug sammen med såmaskiner eller distributør. Al anden brug betragtes
som ikke værende i overensstemmelse med formålet. Fabrikanten fraskriver sig alt ansvar, hvis der udføres ændringer
på kontrolboksen uden forudgående godkendelse.
Risiko for uheld
Risiko for beskadigelse
af maskinen
Et godt råd
Smid ikke enheden ud
• Disse symboler bruges i denne vejledning hver gang anbefalingerne vedrører sikkerheden eller et godt
råd om brug af maskinen.
• Disse anbefalinger skal gives til alle brugere af maskinen.
2
Français
SOMMAIRE
Pages
PRESENTATION / MISE EN FONCTIONNEMENT ULTRON MS SEMOIR
6-7
8-9
8-9
10-11
12-13
•A
•B
•C
•D
•E
Pages
UTILISATION ULTRON MS SEMOIR
14-15
14-21
22-29
30-35
• A Choix de l'utilisation
• B Fonction débit
• C Fonction vitesse
d'avancement
• D Fonction compteur d'Ha
Pages
ULTRON MS AVEC DISTRIBUTEUR
56-57
56-63
64-65
• A Choix de l'utilisation
• B Fonction débit
• C Fonction bordure
Pages
INFORMATIONS
66-67
67
68
• A Schématisation du circuit
• B Entretien
• C Remèdes aux problèmes
Schématisation du système
Connection au tracteur
Montage
Présentation du Boîtier
Mise en route rapide
1
1
36-47
48-51
52-55
• E Fonction jalonnage
• F Fonction turbine
• G Fonction alarme
1
2
1
3
1
4
Lire attentivement la notice avant l’utilisation. Comprendre son boîtier
FR
électronique, c’est mieux l’utiliser. En français suivre le symbole.
3
English
Pages
6-7
8-9
8-9
10-11
12-13
Pages
14-15
14-21
22-29
30-35
Pages
CONTENTS
PRESENTATION/OPERATING THE ULTRON MS FOR SEED DRILLS
•A
•B
•C
•D
•E
System overview
Connecting to the tractor
Fitting
The control unit
Quick start-up
USING THE ULTRON MS FOR SEED DRILLS
•A
•B
•C
•D
Choosing an application
Flow rate function
Forward speed function
Hectaremeter function
36-47
48-51
52-55
• E Tramlining function
• F Fan function
• G Alarm function
ULTRON MS WITH SPREADER
56-57
56-63
64-65
• A Choosing an application
• B Flow rate function
• C Border-spreading function
Pages
INFORMATION
66-67
67
68
• A Circuit overview
• B Maintenance
• C Troubleshooting
Read the manual carefully before use. Understanding your electronic control
unit will help you to make better use of it. For English instructions, follow this
symbol: GB
4
Dansk
Side
6-7
8-9
8-9
10-11
12-13
Side
14-15
14-21
22-29
30-35
Side
56-57
56-63
64-65
I NDHOLDSFORTEGNELSE
PRÆSENTATION / KLARGØRING AF SÅMASKINEN ULTRON MS
•A
•B
•C
•D
•E
Skema over systemet
Tilslutning til traktoren
Montering
Præsentation af kontrolboksen
Hurtig opstart
1
1
ANVENDELSE AF SÅMASKINEN ULTRON MS
•A
•B
•C
•D
Valg af anvendelse
Mængdefunktion
Kørehastighed
Arealmåler
36-47
48-51
52-55
• E Funktionen Sporangivelse
• F Turbinefunktion
• G Alarmfunktion
1
2
ULTRON MS MED DISTRIBUTØR
• A Valg af anvendelse
• B Mængdefunktion
• C Kantfunktion
1
3
Side
66-67
67
68
INFORMATIONER
• A Kredsløbsdiagram
• B Vedligeholdelse
• C Fejlretning
1
4
Læs denne vejledning meget nøje før brug. Hvis du kender din
elektroniske kontrolboks, får du det bedste udbytte af den.
Følg symbolet DK for at læse på dansk
5
Présentation / Mise en fonctionnement Ultron MS Semoir
Presentation/Operating the Ultron MS for seed drills
Præsentation / Klargøring af såmaskinen Ultron MS
A
1
4
7
5
6
9
2
3
10
8
11
12
6
Présentation / Mise en fonctionnement Ultron MS Semoir
Presentation/Operating the Ultron MS for seed drills
Præsentation / Klargøring af såmaskinen Ultron MS
FR
A Schématisation du système
Le boîtier ULTRON MS est un instrument de réglage
et de contrôle.
Les informations de poids et de surface données par
l'ULTRON MS ne peuvent pas être utilisées pour des
transactions commerciales.
Présentation
Boîtier ULTRON MS
Faisceau d’alimentation avec fusible 5 A (option)
3 Boîte de connection sur semoir
4 Capteur turbine.
5 Capteur de jalonnage (1 ou 2)
6 Capteur de vitesse / Surface
7 Capteur de l’arbre de distribution
8 Electrovanne jalonnage de prélevée
9 Capteur de fin de trémie
10 Jalonnage de post levée
11 Modulation de débit
- 1 vérin Semoir
- 2 vérins Distributeur
12 Mollette pour repasser en mode manuel du levier
du variateur.
1
2
1
1
GB
A System overview
The ULTRON MS is an adjustment and control unit.
Presentation
ULTRON MS unit
Power bundle with 5 amp fuse (optional)
3 Seed-drill connector unit
4 Fan sensor
5 Tramlining sensor (1 or 2)
6 Speed/area sensor
7 Metering device shaft sensor
8 Pre-emergence tramlining solenoid valve
9 Low seed level sensor
10 Post-emergence tramlining
11 Flow rate adjustment
- 1 Seed drill actuator
- 2 Spreader actuators
12 Knob for returning the variator lever to manual
mode.
1
2
Weight and surface area information provided by the
ULTRON MS unit may not be used for business
purposes.
DK
A Skema over systemet
Kontrolboksen ULTRON MS er et instrument til styring
og kontrol.
De oplysninger, som ULTRON MS giver om vægt og
overflade, må ikke bruges i handelsøjemed.
Præsentation
Kontrolboksen ULTRON MS
Strømkabler med 5 A-sikring (tilvalg)
3 Tilslutningsenhed til såmaskinen
4 Turbineføler
5 Sporangivelsesføler (1 eller 2)
6 Hastighedsføler / Overflade
7 Føler på distributionsaksel
8 Magnetventil til sporangivelse af fremspiring
9 Føler til "Såkasse tom"
10 Sporangivelse af efterspiring
11 Modulering af mængden
- 1 såmaskinestempel
- 2 distributørstempler
1
2
12
Hjul, der gør det muligt at stille variatorens
løftestang tilbage i manuel tilstand
7
Présentation / Mise en fonctionnement Ultron MS Semoir
Presentation/Operating the Ultron MS for seed drills
Præsentation / Klargøring af såmaskinen Ultron MS
B
+
a)
-
12 V
C
70 mm
110 mm
45 mm
Ø4 mm
50 mm
c)
1
2
3
8
100 mm
135 mm
b)
Présentation / Mise en fonctionnement Ultron MS Semoir
Presentation/Operating the Ultron MS for seed drills
Præsentation / Klargøring af såmaskinen Ultron MS
FR
B Connection au tracteur
a) Branchement de l'ULTRON MS
• Il est impératif de brancher l’alimentation
électrique du boîtier directement à la batterie 12
volts du tracteur.
C Montage
b) Encombrement
Le boîtier électronique doit être monté de manière à
ce qu’il soit bien visible pour le conducteur.
c) Fixation
Le boîtier ULTRON MS possède un accumulateur
permettant de garder en mémoire les données
programmées.
Le boîtier ULTRON MS est a protégé par des
fusibles 5 A sur son alimentation.
Faisceau d’alimentation dispo en option.
Il est possible de fixer le boîtier dans diverses
positions grâce aux 3 molettes. 1 2 3
1
1
R EMARQUE :
Si votre tracteur est pré-équipé avec une prise
identique (cobo), vérifier que le fusible est bien, un
5 ampères.
GB
B Connecting to the tractor
a) Connecting the ULTRON MS
• The unit’s electrical power supply must be
connected directly to the tractor’s 12-volt battery.
The ULTRON MS unit includes an accumulator for
storing the programmed data.
The ULTRON MS unit is protected by 5-Amp fuses.
Optional power bundle available.
C Fitting
b) Space required
The electronic unit must be fitted in clear view of
the driver.
c) Attaching
The unit can be attached in a number of positions
using the 3 adjusting screws. 1 2 3 .
NOTE:
If your tractor has been pre-fitted with an identical
socket (cobo), make sure that it includes a 5-Amp
fuse.
DK
B Tilslutning til traktoren
a) Forbindelse af ULTRON MS
• Kontrolboksens strømforsyning skal forbindes
direkte til traktorens 12 V-batteri.
Kontrolboksen ULTRON MS har et batteri, så det er
muligt at gemme programmeret data.
Kontrolboksen ULTRON MS er beskyttet af 5 Asikringer på strømtilførslen.
Der kan købes ekstra strømkabler.
C Montering
b) Pladsbehov
Den elektroniske kontrolboks skal monteres, så den er
synlig for føreren.
c) Fastgørelse
Kontrolboksen kan fastgøres på forskellige måder ved
hjælp af hjulene. 1 2 3
Bemærk:
Hvis traktoren er udstyret med en lignende sikring
(cobo) i forvejen, skal du kontrollere, at sikringen er til
5 ampere.
9
Présentation / Mise en fonctionnement Ultron MS Semoir
Presentation/Operating the Ultron MS for seed drills
Præsentation / Klargøring af såmaskinen Ultron MS
D
On/Off
A
B
C
D
E
F
J
I
H
G
1
10
2
3
4
5
Présentation / Mise en fonctionnement Ultron MS Semoir
Presentation/Operating the Ultron MS for seed drills
Præsentation / Klargøring af såmaskinen Ultron MS
FR
G
H
I
J
D Présentation du boîtier
. Interrupteur On / Off
. Boîtier standard
Contrôle turbine
Dose
Fin de trémie pour semoir
Mode bordure pour distributeur d'engrais
. Ecran multifonction
PARAMÉTRAGE
A Choix machine
B Repère de réglage
C Calibrage
1
2
3
4
FONCTIONS
D
E
F
5
Diminution des valeurs et du % de modulation
Avancement des passages jalonnage
Déplacement curseur et validation
Arrêt jalonnage et remise à zéro ha
Augmentation des valeurs et du % de modulation
1
1
Vitesse d'avancement Km/h
Surface
Jalonnage
GB
D The control unit
G
H
I
J
. On/Off switch
. Standard unit
Fan check
Application rate
Low seed level – seed drill”
Border-spreading mode for fertilizer spreader
. Multifunction screen
A Choice of machine
B Settings scale
C Calibration
S ETTINGS
1
2
3
FUNCTIONS
4
5
D
E
F
Forward speed (in km/h)
Area
Tramlining
Reduce setting and rate of adjustment (%)
Progress of tramlining passes
Cursor movement and confirmation
Stop tramlining run and reset ha to zero
Increase settings and rate of adjustment (%)
DK
D Præsentation af kontrolboksen
G
H
I
J
. Afbryder On / Off
. Standardkontrolboks
. Skærm med mange funktioner
Kontrol af turbine
Mængde
Såkasse tom på såmaskinen
Spredningsfunktion for gødningsspreder
I NDSTILLING
A Maskinvalg
B Reguleringspunkt
1
C Kalibrering
2
3
FUNKTIONER
4
5
D
E
F
Formindskelse af værdier og % af modulation
Fremskriden af sporangivelser
Placering af cursor og validering
Stands sporangivelse og nulstil ha
Forhøjelse af værdier og % af modulation
Hastighed Km/t
Overflade
Sporangivelse
11
Présentation / Mise en fonctionnement Ultron MS Semoir
Presentation/Operating the Ultron MS for seed drills
Præsentation / Klargøring af såmaskinen Ultron MS
E
A
SE
On/Off
B
-
+1
%
CAL
OK
100% STT OP
+
Ha 0
%
2 6
F
1
2
3
4
5
C
E
12
Présentation / Mise en fonctionnement Ultron MS Semoir
Presentation/Operating the Ultron MS for seed drills
Præsentation / Klargøring af såmaskinen Ultron MS
FR
E Mise en route rapide
Appuyer sur la touche 3 et entrer la dose
en Kg/ha avec les touches 1 et 5 .
Valider votre réglage en appuyant sur la
touche 3 .
M ETTRE LE BOÎTIER SOUS TENSION
A Débit
- Vérifier que vous êtes bien sur le bon
logiciel avec la touche 1 .
(SE = Semoir, DP = Distributeur et DPA)
- Appuyer sur la touche 3 .
B Jalonnage
- Vérifier le N° de passage et le mode de
jalonnage " SY-AS "
- Mettre la bonne valeur en début de parcelle
avec la touche 2 .
- Arrêt du comptage possible avec la touche 4
POUR ALLER DIRECTEMENT TRAVAILLER.
Appuyer sur la touche
touche 3 .
4
puis sur la
C Utilisation
POUR RÉALISER VOS ESSAIS DE DÉBIT.
- Consulter les différentes fonctions avec la
touche 3 .
- Sélectionner le compteur d'ha " t o t a l . 1 "
et " t o t a l . 2 " avec la touche 2 .
Remise à zéro du compteur avec la touche
touche 4 (après 5 secondes).
- Utiliser les touches 1 et 5 (±10%) pour
la modulation de dose.
Le retour à la dose se fait avec touche 4 . GB
Appuyer sur la touche .
(vérifier que le repère est bien 35)
Appuyer sur les touches 1 5 - ou +
pour valider le repère d’essai.
Appuyer sur la touche 3 .
(vérifier que vous êtes bien en test)
Appuyer sur la touche 3 et entrer la
valeur de la pesée en Kg avec les touches
1 et 5 .
3
E Quick start-up
Press button
followed by button
3
- Check the pass number and " SY-AS "
tramlining mode
- Use button 2 to enter the correct value at the
beginning of the plot.
- You can stop the count by pressing button 4
.
TO PERFORM A CALIBRATION TEST.
C Use
Press button 3 .
(make sure that it is set at 35)
Press the 1 5 - or + buttons to confirm
the calibration test mark.
Press button 3 .
(make sure that you are in test mode)
Press button 3 and enter the load value in
kg using buttons 1 and 5 .
E Hurtig opstart
SÆT SPÆNDING PÅ KONTROLBOKSEN
A Mængde
- Kontroller, at du bruger den rigtige software
med knappen 1 . (SE = Såmaskine),
DP = Distributør og DPA)
- Tryk på knappen 3 .
FOR AT PÅBEGYNDE ARBEJDET MED DET SAMME.
Tryk på knappen
4
og derefter på knappen
3
B Tramlining
TO BEGIN WORK IMMEDIATELY.
4
1
and enter the dose in kg/ha
using buttons 1 and 5 .
Press button 3 to confirm
the setting you have entered .
SWITCH THE CONTROL BOX ON
A Flow rate
- Press button 1 to check that the correct
software is running
(SE = Seed Drill, DP = Spreader and DPA) .
- Press button 3 .
Press button
1
3
FOR AT UDFØRE PRØVEMÆNGDE.
Tryk på knappen 3 .
(kontroller, at punktet er korrekt 35)
Tryk på knapperne 1 5 - eller + for at
validere testindstillingspunktet.
Tryk på knappen 3 .
(kontroller, at testen er ok)
Tryk på knappen 3 , og indtast værdien
for vægten i Kg med knapperne 1 og 5 .
Tryk på knappen 3 , og indtast
mængden Kg/ha med knapperne 1 og 5 .
- Press button 3 to bring up the various functions.
- Press button 2 to select the hectaremeter
"total.1" and "total.2" . Press button 4 to reset
the counter to zero (after 5 seconds).
- Use buttons 1 and 5 (±10%) to adjust the
application rate.
You can return to the original application rate
by pressing button 4 .
Godkend målingen ved at trykke på knappen
DK
3
B Sporangivelse
- Kontroller spornummeret og funktionen
Sporangivelse " SY-AS "
- Indtast den rigtige værdi ved starten af sporet
med knappen 2 .
- Stands tællingen med knappen 4 .
.
C Anvendelse
- Find frem til de forskellige funktioner vha.
knappen 3 .
- Vælg arealmåleren " t o t a l . 1 " og " t o t a l . 2 "
med knappen 2 .
Nulstil tælleren med knappen 4 (efter 5
sekunder).
- Brug knapperne 1 og 5 (±10 %) til
modulering af mængden.
Returner til mængden med knappen
4
.
13
Utilisation Ultron MS Semoir
Using the Ultron MS for Seed Drills
Anvendelse af såmaskinen Ultron MS
A
SE
43
A
B
-
+1
%
CAL
1
OK
3
100% S TOP
+
Ha 0
%
B
5
35
14
Utilisation Ultron MS Semoir
Using the Ultron MS for Seed Drills
Anvendelse af såmaskinen Ultron MS
FR
B Fonction débit
A Choix de l'utilisation
- Appuyer sur la touche
- Mettre l'instrument sous tension
Le message "
s'initialisent.
Le curseur latéral est placé devant le sigle
A
- Sélectionner la machine avec la touche
5
- Valider la sélection par l'appui sur la touche
3
.
L'afficheur indique le dernier réglage mémorisé
des vérins.
Pour les quantités par Ha < à 8Kg, il est conseillé
d’utiliser le réglage du variateur en mode manuel.
(vérin électrique déconnecté du variateur)
The side cursor will appear alongside the symbol
shown below
A
to confirm your choice.
The display will show the most recently stored
actuator setting.
For quantities per hectare < 8 kg, you are advised
to use the variator setting in manual mode (electric
actuator disconnected from the variator).
t e s t ".
R EMARQUE : " 3 5 " est la valeur moyenne pour
réaliser l'essai de débit.
GB
3
1
.
This message " i n i t " will appear and the
actuators will be initiated.
2
We recommend that you carry out your calibration
test as close as possible to the variator mark that
will be used when drilling:
- To do this press the - or + buttons ( 1 5 ) to
confirm the mark selected.
The display will read "
t e s t ".
NOTE : " 3 5 " is the average setting for performing a
calibration test.
DK
B Mængdefunktion
A Valg af anvendelse
- Tryk på knappen
- Sæt spænding på instrumentet
Den laterale cursor er placeret foran mærket
A
Meddelelsen "
3
.
i n i t " vises og stemplerne vises.
Den laterale cursor placerer sig foran mærket
B
Stemplerne placerer sig på stedet 35, og
meddelelsen "3 5 " vises.
- Vælg maskine med knappen 5 .
Der vises:
" S E " for såning.
" D P " for gødningsspredning.
- Godkend valget ved at trykke på knappen
L'afficheur indique "
The side cursor will appear alongside the symbol
shown below
B
The actuators will move to the 35 mark and "3 5 "
will be displayed.
to select a machine.
The display will read:
" S E " for an online seed drill.
" D P " for a fertilizer spreader.
3
Nous vous conseillons de faire votre essai de débit
au plus proche du repère du variateur qui sera
utilisé au semis:
- Pour cela appuyer sur les touches - ou +
( 1 5 ) pour valider le repère
choisi.
- Press button
- Switch the unit on.
- Press button
i n i t " apparaît et les vérins
B Flow rate function
A Choosing an application
5
.
Le curseur latéral se place devant le sigle
B
Les vérins se positionnent au repère 35 et le
message " 3 5 " apparaît.
.
L'afficheur indique:
" S E " pour semoir en ligne.
" D P " pour distributeur d'engrais.
- Press button
3
3
.
Der vises den sidst lagrede indstilling af
stempler.
For mængder mindre end 8Kg per ha anbefales det
at indstille variatoren i manuel tilstand. (frakobling af
variatorens elektriske donkraft)
Vi anbefaler dem at udføre deres
gennemstrømningstest med variatorens
indstillingspunkt så tæt som muligt på det, der vil
blive brugt under såningen:
- For at gøre dette, tryk på knapperne - ou +
( 1 5 ) for at validere det valgte indstillingspunkt.
Der vises "
".
BEMÆRK:
"3 5 " er en mellemværdi til udførelse af en
prøvemængde.
15
Utilisation Ultron MS Semoir
Using the Ultron MS for Seed Drills
Anvendelse af såmaskinen Ultron MS
B
a)
3.57
C
H
-
+1
%
CAL
1
OK
3
100% S TOP
+
Ha 0
%
5
88
Kg/ha
H
16
Utilisation Ultron MS Semoir
Using the Ultron MS for Seed Drills
Anvendelse af såmaskinen Ultron MS
FR
B
- Appuyer sur la touche 3 .
Le curseur se place sur la position
a) Essai de débit
- Appuyer sur la touche 3 .
Le curseur latéral est placé devant le sigle
C
L'afficheur indique un poids théorique en Kg
Le boîtier est en attente.
- Faire l'essai de débit
(cf notice d'utilisation de la machine).
et
1
5
Le boîtier calcule et note une quantité en
Kg/ha théorique.
Deux choix possibles:
a) La dose inscrite est la dose voulue.
- Appuyer sur la touche 3 .
Vous pouvez aller travailler.
b) La dose inscrite est différente de la dose
voulue.
- Appuyer sur la touche 1 ou 5 pour
mettre la dose désirée.
- Peser la quantité obtenue à l'essai.
- Entrer la valeur en Kg avec
H
.
R EMARQUE :
Pour les petites valeurs, entrer 3 chiffres après la
virgule. (0,000 Kg)
- Appuyer sur la touche 3 .
Vous pouvez aller travailler.
GB
B
- Press button 3 .
The cursor will move to
a) The calibration test
- Press button 3 .
The side cursor will appear alongside the
symbol shown below
C
The display will show a hypothetical weight in kg
The unit is on standby.
- Carry out the calibration test
(refer to the machine’s instructions for use).
- Weigh the amount obtained from the test.
- Enter the weight in kg using
1
and
5
.
NOTE:
For low weights, enter a figure to 3 decimal places
(0.000 Kg).
1
H
The unit will calculate and note a hypothetical
amount in kg/ha.
2
There are two possibilities:
a) If the application rate recorded is correct:
- Press button 3 .
You may now begin work.
b) If the application rate recorded is not correct:
- Press button 1 or 5 to enter the required
application rate.
- Press button 3 .
You may now begin work.
DK
B
- Tryk på knappen 3 .
Cursoren placerer sig på stedet
a) Prøvemængde
- Tryk på knappen 3 .
Den laterale cursor er placeret foran mærket
C
Der vises en teoretisk vægt i Kg
Kontrolboksen afventer.
- Udfør prøvemængden
(jf. maskinens brugervejledning).
- Vej den opnåede mængde ved prøven.
- Indtast værdien i Kg med
1
og
5
.
BEMÆRK:
Ved små værdier skal du indtaste 3 tal efter
kommaet. (0,000 Kg)
H
Kontrolboksen beregner og noterer en
teoretisk kvantitet i Kg/ha.
Der er to valgmuligheder:
a) Den skrevne mængde og den ønskede
mængde.
- Tryk på knappen 3 .
Og du kan begynde arbejdet.
b) Den skrevne mængde er forskellig fra den
ønskede mængde.
- Tryk på knappen 1 eller 5 for at angive
den ønskede mængde.
- Tryk på knappen 3 .
Og du kan begynde arbejdet.
17
Utilisation Ultron MS Semoir
Using the Ultron MS for Seed Drills
Anvendelse af såmaskinen Ultron MS
B
b)
88
Kg/ha
H
C
H
-
+1
%
CAL
OK
100% STOP
+
Ha 0
%
135
Kg/ha
H
3
4
Kg/ha
H
18
Utilisation Ultron MS Semoir
Using the Ultron MS for Seed Drills
Anvendelse af såmaskinen Ultron MS
FR
B
b) Accès direct au réglage après arrêt du boîtier
- Appuyer sur la touche
tension.
3
après la mise sous
- Appuyer sur la touche 4 .
Le curseur latéral se positionne sur
C
et l'afficheur indique le dernier réglage
mémorisé des vérins.
- Appuyer sur la touche 3 . pour initialiser la
même valeur.
L'écran indique “ i n i t ” le temps que le
vérin se positionne au repère programmé.
Vous pouvez aller travailler.
GB
B
1
b) Gaining direct access to the settings when the
unit has been switched off
- Press button
3
2
to initialise the same value.
- Press button 4 .
The side cursor will move to and the display
C
will bring up the most recently stored
actuator settings.
- Press button 3 to initialise the same value.
The message “ i n i t ” will be displayed on
screen while the actuator is transferring to
the programmed mark.
You may now begin work.
DK
B
b) Direkte adgang til indstilling efter
kontrolboksen har været standset
- Tryk på knappen
tryk på.
3
, efter der er sat
- Tryk på knappen 4 .
Den laterale cursor placerer sig på,
C
og der vises den sidst lagrede indstilling af
stemplerne.
- Tryk på knappen 3 . for at bruge den samme
værdi.
Skærmen viser “ i n i t ” tidspunktet, hvor
stemplet stiller sig på det programmerede
sted.
Du kan begynde arbejdet
19
Utilisation Ultron MS Semoir
Using the Ultron MS for Seed Drills
Anvendelse af såmaskinen Ultron MS
B
c)
135
Kg/ha
H
125
Kg/ha
H
H
-
+1
%
CAL
OK
100% STOP
+
Ha 0
%
d)
1
3
4
5
135
Kg/ha
H
115
Kg/ha
H
20
Utilisation Ultron MS Semoir
Using the Ultron MS for Seed Drills
Anvendelse af såmaskinen Ultron MS
FR
B
c) Modification de la dose de référence
- Rester appuyé 3 secondes sur 5 ou sur
La valeur de la dose clignote seule
1
lorsque
3
5
pour augmenter la
- Appuyer sur la touche
de référence.
4
pour revenir à la dose
.
- Modifier la valeur avec les touches 1 et 5 .
La valeur clignote.
La valeur de la dose réglée s'affiche.
- Valider en appuyant sur la touche
la valeur est obtenue à l'affichage.
- Appuyer sur la touche
dose de 10%.
R EMARQUE :
La modification de la dose de référence est à
effectuer uniquement avec la même semence.
Sinon procéder à un nouvel essai.
La dose est modulée par palier de 10% à
chaque impulsion.
La valeur de modulation (%) s'affiche en
alternance avec la dose réglée.
R EMARQUE :
Si la dose est trop fortement augmentée et que le
semoir, ou le distributeur ne peut la réaliser, la
quantité inscrite clignote.
faibles
d) Modulation
- Appuyer sur la touche
de 10%.
B
1
pour diminuer la dose
GB
c) Changing the standard application rate setting
- Hold button 5 or 1 down for 3 seconds.
The application rate setting will start to flash
- Change the application rate setting using buttons
1 and 5 .
The application rate setting will start to flash.
The new application rate setting will be
displayed.
- Press button 3 to confirm the new application
rate setting displayed.
NOTE :
The standard application rate setting should only
be changed for the same seed type. In other
cases, a new test should be performed.
- Press button
by 10%.
5
1
to increase the application rate
- Press button 4 to revert to the standard
application rate.
2
The application rate is adjusted up or down
by 10% each time the buttons are pressed.
The display switches back and forth between
the rate of adjustment (%) and the new
application rate.
NOTE :
If there is a sharp increase in the application rate
setting that the seed drill or spreader cannot handle,
the amount displayed on the screen will flash.
Do not use the adjustment for low seeding
rates per hectare (lower than 15 kg/ha).
d) Adjustments
- Press button
by 10%.
Ne pas utiliser la modulation pour les
faibles doses par ha.
(inférieures à 15Kg/ha)
1
to reduce the application rate
DK
B
- Tryk på knappen
10 %.
c) Ændring af referencemængden
- Tryk ned 3 sekunder på 5 eller på 1 .
Kun værdien på mængden blinker
- Ændr værdien med knapperne
Værdien blinker.
Den justerede værdi vises.
1
og
- Godkend ved at trykke på knappen
værdien vises på skærmen.
3
5
. for at forhøje mængden med
- Tryk på knappen 4 . for at komme tilbage til
reference-mængden.
.
, hvorefter
BEMÆRK:
Ændring af referencemængden skal kun udføres en gang
med den samme sæd. Fortsæt derefter med en ny prøve.
Mængden moduleres af lejer med 10 % ved
hver impuls.
Modulationsværdien (%) vises på skift med
den fastsatte mængde.
BEMÆRK:
Hvis mængden forhøjes meget, og hvis såmaskinen,
eller distributøren ikke kan håndtere den, vil den
skrevne mængde blinke.
Anvend ikke modulering til små mængder per
hektar. (mindre end 15Kg/ha)
d) Modulering
- Tryk på knappen
med 10 %.
5
1
. for at minimere mængden
21
Utilisation Ultron MS Semoir
Using the Ultron MS for Seed Drills
Anvendelse af såmaskinen Ultron MS
C
0
D
-
+1
%
CAL
OK
100% S TOP
+
Ha 0
%
D
3
22
Utilisation Ultron MS Semoir
Using the Ultron MS for Seed Drills
Anvendelse af såmaskinen Ultron MS
FR
C Fonction vitesse d’avancement
- Vérifier que le coefficient est toujours en
mémoire
a) Utilisation :
- Appuyer sur
Km/h.
3
pour amener le curseur sur
Au travail la vitesse d’avancement s’affiche.
Le boîtier ne fonctionne que pour une
vitesse d’avancement supérieure à 2 Km/h.
Le boîtier est programmé avec un
coefficient de 3.333 permettant une lecture
directe de la vitesse.
- Etalonner à nouveau le boîtier sur une distance
de 100m
R EMARQUE :
On peut observer une différence de quelques
pourcentages de la valeur Km/h du boîtier par
rapport à celle donnée par le tracteur.
L’étalonnage du boîtier sur 100 m est la solution la
plus précise pour obtenir une vitesse d’avancement
la plus proche de la réalité.
Si vous observez que la vitesse indiquée
n’est pas correcte, vous pouvez :
GB
C Forward speed function
a) Operation:
- Press
3
to move the cursor on to km/h.
The forward speed is displayed during
operation
The unit only works for forward speeds
greater than 2 km/h.
The unit is programmed with a coefficient of
3.333 so that the speed can be read off
directly.
1
- Check that the coefficient is still stored in
memory
- Recalibrate the unit over a distance of 100 m
2
NOTE:
A difference of a few per cent may be observed
between the k.p.h. indication on the unit and on the
tractor.
Calibrating the unit over 100 m is the most accurate
method of obtaining a reading as close as possible
to the actual forward speed.
If you notice that the speed indicated is not
correct:
DK
C Kørehastighed
a) Drift:
- Tryk på
3
for at flytte cursoren til Km/t.
- Kontrollere, om koefficienten stadig er i
hukommelsen
- Kalibrere kontrolboksen igen over en afstand af
100 m
Under arbejdet vises kørehastigheden.
Kontrolboksen kan kun fungere ved
hastigheder over 2 Km/t.
Kontrolboksen er programmeret med en
koefficient på 3.333, så hastigheden kan
aflæses direkte.
Bemærk:
Man kan se en forskel på nogle få procent mellem
den angivne værdi i Km/t på kontrolboksen i forhold
til den, der er vist for traktoren.
Kalibrering af kontrolboksen over 100 m er den
mest præcise løsning for at opnå en hastighed, der
er tættest på virkeligheden.
Hvis du bemærker, at den viste hastighed
ikke er korrekt, kan du:
23
Utilisation Ultron MS Semoir
Using the Ultron MS for Seed Drills
Anvendelse af såmaskinen Ultron MS
C
8
D
D
-
+1
%
CAL
OK
100% S TOP
+
Ha 0
%
0,000
D
2
3
3.333
D
24
Utilisation Ultron MS Semoir
Using the Ultron MS for Seed Drills
Anvendelse af såmaskinen Ultron MS
FR
C
b) Contrôle du coefficient :
- Appuyer sur 3 avec l'autre main pour modifier
le chiffre qui clignote.
- Sélectionner la fonction Km/h avec la
touche 3 .
- Relâcher lorsque le chiffre voulu apparaît.
- Appuyer sur
apparaît
- Effectuer la même opération pour les autres
chiffres et l’emplacement du point.
2
et maintenir : Le coefficient
S’il est correct relâcher
S’il est faux
Le coefficient théorique est de “3.333”
maintenir appuyé pendant
toute la programmation
GB
C
- With your other hand, press
figure which is flashing
b) Checking the coefficient :
- Select the km/h function by pressing
3
.
3
to modify the
1
- Release when the required figure appears.
- Press 2 and hold down: The coefficient is
displayed
if correct
release
if incorrect
keep pressed down
throughout programming
2
- Repeat this operation for the other figures and
for the location of the decimal point.
The coefficient should be “3.333”
DK
C
- Tryk på 3 med den anden hånd for at ændre
tallet, der blinker.
b) Kontrol af koefficient:
- Vælg funktionen Km/t med knappen
3
.
- Udløs knappen, når det ønskede tal vises.
- Tryk på
2
og hold: Koefficienten vises
Hvis den er korrekt, skal du udløse knappen
Hvis den er forkert, skal du holde trykket
under hele programmeringen
- Udfør det samme for de øvrige tal og
decimaltallene.
Den teoretiske koefficient er “3.333”
25
Utilisation Ultron MS Semoir
Using the Ultron MS for Seed Drills
Anvendelse af såmaskinen Ultron MS
C
0
D
3,333
D
-
+1
%
CAL
OK
100% STOP
+
Ha 0
%
D
2
4
AUTo
D
26
Utilisation Ultron MS Semoir
Using the Ultron MS for Seed Drills
Anvendelse af såmaskinen Ultron MS
FR
C
c) Etalonnage sur 100 m :
- Placer le semoir au premier jalon
1 . Sélectionner la fonction Km/h
2 . Appuyer sur 2 et maintenir :
Le coefficient apparaît
3 . Appuyer sur la touche 4 avec l'autre main pour
mettre en place la programmation automatique
Le coefficient "AUTo" apparaît
- Lâcher
100m
GB
C
c) Calibration over 100 metres:
- Position the seed drill at the first tramline.
1 . Select the km/h function
1
2 . Press 2 and hold down:
The coefficient is displayed
2
3 . Press 4 with your other hand to start automatic
programming
The "AUTo" coefficient will be displayed
- Release
100m
DK
C
c) Kalibrering over 100 m:
- Placer såmaskinen ved første markering
1 . Vælg funktionen Km/t
2 . Tryk på 2 og hold:
Koefficienten vises
3 . Tryk på knappen 4 med den anden hånd for at
sætte den automatiske programmering
Koefficienten "AUTo" vises
- Udløs
100m
27
Utilisation Ultron MS Semoir
Using the Ultron MS for Seed Drills
Anvendelse af såmaskinen Ultron MS
C
0,064
D
3,332
D
-
+1
%
CAL
OK
100% STOP
+
Ha 0
%
D
4
28
Utilisation Ultron MS Semoir
Using the Ultron MS for Seed Drills
Anvendelse af såmaskinen Ultron MS
FR
C
- Parcourir la distance de 100 m
Le nombre d’impulsion défile.
- Appuyer sur la touche 4 à la fin des 100 m:
le nouveau coefficient apparaît.
Le boîtier garde ce coefficient en mémoire
et annule le précédent.
100m
R EMARQUE :
la différence entre le coefficient théorique et le
coefficient obtenu à l’essai est en général très
faible.
GB
C
- Travel a distance of 100 metres
The number of pulses is displayed.
1
- Press 4 at the end of the 100 metres:
the coefficient is then displayed.
The unit stores this coefficient in memory and
cancels the previous value.
100m
2
NOTE:
the difference between the theoretical coefficient
and the coefficient obtained through testing is
generally very low.
DK
C
- Kør afstanden på 100 m
Impulstallene vises.
100m
- Tryk på knappen 4 ved afslutningen af de 100 m:
den nye koefficient vises.
Kontrolboksen gemmer koefficienten i
hukommelsen og annullerer den forrige.
BEMÆRK:
forskellen mellem den teoretiske koefficient og den
opnåede koefficient ved prøvekørslen er generelt
meget lille.
29
Utilisation Ultron MS Semoir
Using the Ultron MS for Seed Drills
Anvendelse af såmaskinen Ultron MS
D
35
E
E
-
+1
%
CAL
OK
100% S TOP
+
Ha 0
%
E
2
3
E
30
Utilisation Ultron MS Semoir
Using the Ultron MS for Seed Drills
Anvendelse af såmaskinen Ultron MS
FR
D Fonction compteur d'hectare
- Déplacer le curseur par appui sur la touche
3
.
- Placer le curseur sur la position
E
CHOIX DU COMPTEUR "TOTAL 1 OU 2":
- Sélectionner le compteur avec un appui
impulsionnel sur la touche 2 .
Le message " total.1 " ou " total.2 "
apparaît au moment de l'appui sur
.
2
La valeur de surface s'affiche après
relâchement de la touche
2
.
GB
D Hectaremeter function
- Press button
1
to move the cursor.
3
2
- Move the cursor to
E
S ELECTING THE "TOTAL 1 OR 2" METER:
- Press button
to select a meter.
2
" total.1 " or " total.2 " will appear when
you press button
2
.
The area reading will appear when you
release button
2
.
DK
D Arealmåler
- Flyt cursoren ved at trykke på knappen
.
3
- Placer cursoren på stedet
E
TÆLLER "TOTAL 1 ELLER 2":
- Vælg tæller ved impuls- tryk på knappen
2
.
Meddelelsen " t o t a l . 1 " eller "t o t a l . 2 "
vises, når der trykkes på
2
.
Overfladeværdien vises, når du udløser
knappen
2
.
31
Utilisation Ultron MS Semoir
Using the Ultron MS for Seed Drills
Anvendelse af såmaskinen Ultron MS
D
10.00
E
E
-
+1
%
CAL
OK
100% S TOP
+
Ha 0
%
4.000
E
2
3
4.000
E
32
Utilisation Ultron MS Semoir
Using the Ultron MS for Seed Drills
Anvendelse af såmaskinen Ultron MS
FR
D
CONTRÔLE DE LA LARGEUR DE TRAVAIL:
- Appuyer sur 2 et maintenir :
La largeur apparaît
Si elle est correcte relâcher.
Si elle est fausse
maintenir appuyé.
- Appuyer sur 3 avec l'autre main pour modifier
le chiffre qui clignote.
Semoir 3m
Semoir 3,5m
Semoir 4m
Semoir 4,5m
Semoir 4,8m
Semoir 5m
Semoir 6m
“3.000”
“3.500”
“4.000”
“4.500”
“4.800”
“5.000”
“6.000”
- Relâcher lorsque le chiffre voulu apparaît.
GB
D
1
CHECKING THE WORKING WIDTH:
- Press 2 and hold down:
The width appears
if it is correct
release
if it is incorrect
keep held down
- Press 3 with your other hand to modify the
figure which is flashing.
3m seed drill
3.5m seed drill
4m seed drill
4.5m seed drill
4.8m seed drill
5m seed drill
6m seed drill
“3.000”
“3.500”
“4.000”
“4.500”
“4.800”
“5.000”
“6.000”
2
- Release when the required figure appears
DK
D
KONTROL AF ARBEJDSBREDDEN:
- Tryk på 2 og hold:
Bredden vises
Hvis den er korrekt, skal du udløse knappen
Hvis den er forkert, skal du holde trykket.
- Tryk på 3 med den anden hånd for at ændre
tallet, der blinker.
Såmaskine 3 m
Såmaskine 3,5 m
Såmaskine 4 m
Såmaskine 4,5 m
Såmaskine 4,8 m
Såmaskine 5 m
Såmaskine 6 m
“3.000”
“3.500”
“4.000”
“4.500”
“4.800”
“5.000”
“6.000”
- Udløs knappen, når det ønskede tal vises.
33
Utilisation Ultron MS Semoir
Using the Ultron MS for Seed Drills
Anvendelse af såmaskinen Ultron MS
D
20.00
E
E
-
+1
%
CAL
OK
100% STOP
+
Ha 0
%
E
2
4
0.000
E
34
Utilisation Ultron MS Semoir
Using the Ultron MS for Seed Drills
Anvendelse af såmaskinen Ultron MS
FR
D
R EMISE À ZÉRO DU COMPTEUR:
- Appuyer et sélectionner le total à remettre à
zéro " total.1 " ou " total.2 "
- Relâcher lorsque le total obtenu s'affiche
- Appuyer sur
compteur.
4
et jusqu'à la remise à zéro du
L’effacement de la surface est précédé de 5
bips sonores.
" total.1 " ou " total.2 " vous permettent
d’avoir 2 niveaux de compteur ha (1 journalier
et 1 saisonnier par exemple)
GB
D
1
R ESETTING THE METER TO ZERO:
- Press and select which of the totals is to be
reset to zero " total.1 " or " total.2 "
2
- Release when the total is displayed.
- Press button
4
until the meter is reset to zero.
The meter will beep 5 times when the area
reading is about to be deleted.
" total.1 " or " total.2 " give you two types of
reading (e.g. 1 daily and 1 seasonal)
DK
D
N ULSTILLING AF TÆLLEREN:
- Tryk og vælg den total, der skal nulstilles
" t o t a l . 1 " eller " t o t a l . 2 "
- Udløs knappen, når den ønskede total vises
- Tryk på
4
lige til nullet vises på tælleren.
Der lyder 5 bip, inden sletning af overfladen
" total.1 " eller " total.2 " du kan have 2
niveauer på arealmåleren (1 daglig og 1 årlig
f.eks.)
35
Utilisation Ultron MS Semoir
Using the Ultron MS for Seed Drills
Anvendelse af såmaskinen Ultron MS
E
2
6
F
a)
F
-
+1
%
CAL
OK
100% STOP
+
Ha 0
%
F
3
4
b)
2
6
F
36
Utilisation Ultron MS Semoir
Using the Ultron MS for Seed Drills
Anvendelse af såmaskinen Ultron MS
FR
E Fonction Jalonnage
- Déplacer le curseur avec la touche
- Placer le curseur sur la position
3
.
F
Chiffre de gauche : comptage
Chiffre de droite :
chiffre programmé
Le comptage se fait par inversion des traceurs.
Le boîtier informe par un bip sonore le début de
débrayage des distributions.
- Appuyer sur
4
, une impulsion
Le message "
" apparaît en clignotant
en alternance avec la valeur de jalonnage.
Remarque :
Ne pas être sur le chiffre de programmation
(le Jalonnage fonctionnerait).
b) REPRISE DU COMPTAGE EN TRAVAIL:
a) ARRÊT DU COMPTAGE EN TRAVAIL:
Pour inversion des traceurs en milieu de
parcelle
Pour non utilisation du jalonnage
- Appuyer sur
4
, une impulsion
Le message "
" disparaît et les 2
valeurs de tramlines s'affichent à nouveau.
GB
E Tramlining function
1
- Press button 3 to move the cursor.
- Move the cursor to
F
LH figure:
RH figure:
- Press button
Counting is done by the markers being reversed.
The unit beeps when the metering devices begin
disengaging.
a) STOPPING THE COUNT WHILE WORK IS IN PROGRESS
in order to reverse the markers in mid plot
because the tramline will not be used
, once
2
the display will switch between a flashing
"
count
programmed figure
4
" message and the tramline setting.
NOTE:
Do not let the programme reach the pass number
that is stored in memory.
b) R ESTARTING THE COUNT WHILST WORK IS IN
PROGRESS:
- Press button
4
, once
The "
" message will disappear and the
two tramline settings will reappear.
DK
E Funktionen Sporangivelse
- Flyt cursoren med knappen
- Placer cursoren på stedet
- Tryk på knappen
3
.
F
Tal til venstre: tælling
Tal til højre: programmeringstal
Tællingen finder sted ved vending af markørerne.
Kontrolboksen viser ved en biplyd starten af
frakoblingen på distributørerne.
a) STANDS TÆLLING AF ARBEJDET:
Ved vending af markørerne i midten af et
jordstykke
Når der ikke skal anvendes sporangivelse
4
, en gang
Meddelelsen "
" vises og blinker
skiftevis med sporangivelsesværdien.
BEMÆRK:
Sørg for, at du ikke står på programmeringstallet
(Sporangivelse fungerer).
b) G ENOPTAG TÆLLING AF ARBEJDET:
- Tryk på knappen
4
, en gang
Meddelelsen "
" forsvinder, og de 2
værdier på tramlines vises påny.
37
Utilisation Ultron MS Semoir
Using the Ultron MS for Seed Drills
Anvendelse af såmaskinen Ultron MS
E
c)
2
6
F
F
-
+1
%
CAL
OK
100% S TOP
+
Ha 0
%
54.06
F
2
3
54.08
F
38
Utilisation Ultron MS Semoir
Using the Ultron MS for Seed Drills
Anvendelse af såmaskinen Ultron MS
FR
E
c) Programmation :
- Appuyer sur 2 et maintenir pendant toute la
programmation
Le chiffre de droite clignote
L’inscription de gauche correspond au mode
Si le mode est AR, faire défiler les chiffres
jusqu’à 12 pour avoir ensuite le mode AL,
puis jusqu’à 12 pour SY et vice versa.
de jalonnage :
A R Jalonnage aller/retour du semoir
AL
SY
(asymétrique droit) Non utilisé
Jalonnage aller/retour du semoir
(asymétrique gauche)
Jalonnage au centre du semoir
(symétrique)
- Appuyer sur 3 avec l'autre main pour modifier
le chiffre qui clignote.
GB
E
1
c) Programming:
- Press button
programming.
2
and keep held down throughout
The figure on the RH side will flash
The caption that appears on the left indicates
If the unit is in AR mode, scroll through the
figures until you reach number 12 to enter AL
mode, and then scroll to number 12 again to
enter SY mode and vice versa.
2
the tramlining mode:
A R To-and-fro seed drill tramlining
(asymmetrical on the right). Not used.
A L To-and-fro seed drill tramlining
(asymmetrical on the left)
S Y Centre seed drill tramlining
(symmetrical)
- Press button 3 with your other hand to alter
the flashing figure.
DK
E
c) Programmering:
- Tryk på knappen 2 og hold under hele
programmeringen
Tallet til højre blinker
Beskrivelsen til venstre svarer til
sporangivelses-funktionen:
Hvis funktionen er AR , skal du rulle igennem
tallene lige til 12 for at få vist funktionen AL
og derefter lige til 12 for at få vist SY og vice
versa.
A R Såmaskine med sporangivelse tur/retur
(asymmetrisk højre) Anvendes ikke
A L Såmaskine med sporangivelse tur/retur
(asymmetrisk venstre)
S Y Sporangivelse i midten af såmaskinen
(symmetrisk)
- Tryk på 3 med den anden hånd for at ændre
tallet, der blinker.
39
Utilisation Ultron MS Semoir
Using the Ultron MS for Seed Drills
Anvendelse af såmaskinen Ultron MS
E
d)
2
6
F
F
-
+1
%
CAL
OK
100% S TOP
+
Ha 0
%
2
6
F
2
40
3
Utilisation Ultron MS Semoir
Using the Ultron MS for Seed Drills
Anvendelse af såmaskinen Ultron MS
FR
E
d) Avance manuelle du comptage :
R EMARQUE :
Pour le commencement de la parcelle:
- Appuyer sur 3 pour sélectionner la fonction
jalonnage.
Pour jalonner directement :
- Appuyer sur 2 pour mettre le chiffre
précédent le chiffre de programmation.
L’avance manuelle n’est possible que s’il y a
un des traceurs baissé.
Ne pas oublier d’agir sur l’hydraulique (retirer
la pression) après que les chiffres clignotent
pour actionner le système de débrayage du
semoir.
- Agir sur l’hydraulique pour lever le traceur.
Le comptage passe directement au chiffre de
programmation et clignote.
- Baisser l’autre traceur pour agir sur le système
hydraulique et électrique du débrayage du
semoir.
GB
E
1
d) Manual counting advance:
NOTES:
To begin the plot:
- Press 3 to select the tramlining function.
2
The manual advance function can only be
used if one of the markers is lowered.
To mark tramlines directly:
- Press 2 to display the number preceding the
programming number.
Do not forget to release the hydraulic
pressure once the digits have started flashing
in order to activate the seed drill disengaging
system.
- Raise the marker using the hydraulic control.
The counter changes directly to the programming
number and flashes.
- Lower the other marker so that it acts on the
seed drill’s hydraulic and electrical clutch system.
DK
E
d) Manuelt styret tælling:
For at starte på jordstykket:
- Trykkes 3 for at vælge funktionen
Sporangivelse.
BEMÆRK:
Det er kun muligt at bruge manuel styring,
hvis markørerne ikke er sænkede.
Glem ikke at udløse hydraulikken (fjern
For direkte sporangivelse:
- Tryk på knappen 2 for at angive det forrige
programmeringstal.
trykket) når tallene blinker for at aktivere
frakoblingssystemet af såmaskinen.
- Løft markøren ved hjælp af traktorens hydraulik.
Tællingen anføres direkte på programmeringstallet
og blinker.
- Sænk den anden markør, så den reagerer på
såmaskinens hydrauliske og elektriske system.
41
Utilisation Ultron MS Semoir
Using the Ultron MS for Seed Drills
Anvendelse af såmaskinen Ultron MS
E
e1)
2
3
3 5
3
4
F
1
5
2
3
4
5
1
2
5 5
4m
10 m
F
e2)
3
3 6
3
2m
4
5
6
1
4m
12 m
2
3
4
5
6
1
2
3
F
6 6
F
42
1
Utilisation Ultron MS Semoir
Using the Ultron MS for Seed Drills
Anvendelse af såmaskinen Ultron MS
FR
E
e) Exemples de jalonnage
e1) Marquage au centre du semoir (symétrique)
e2) Marquage au centre du semoir (symétrique)
ex : Rampe 20 m semoir 4 m
ex: Rampe 24 m semoir 4 m
20 = 5 Nombre de passage impair
4
1
1
2
3
Programmer le boîtier sur S Y - 0 5
Mettre le chiffre de comptage sur 3
Commencer la parcelle par un passage complet
du semoir
A chaque demi-tour, le chiffre de comptage
doit avancer jusqu’au 5.
Agir sur l’inversion des traceurs hydrauliques
avant d’engager le 5ème passage.
Le chiffre doit ensuite revenir à 1 pour le
passage suivant.
2
3
24 = 6 Nombre de passage pair
4
Programmer le boîtier sur S Y - 0 6
Mettre le chiffre de comptage sur 3
Commencer la parcelle par un 1/2 semoir
(voir manuel du semoir).
A chaque demi-tour, le chiffre de comptage
doit avancer jusqu’au 6.
Agir sur l’inversion des traceurs hydrauliques
avant d’engager le 6ème passage.
Le chiffre doit ensuite revenir à 1 pour le
passage suivant.
GB
E
1
e) Tramlining examples
e1) Marking at the centre of the seed drill
(symmetrical)
1
2
3
e2) Marking at the centre of the seed drill
(symmetrical)
e.g. 20 m boom, 4 m seed drill
e.g. 24 m boom, 4 m seed drill
20 = 5 - Odd number of passes
4
24 = 6 - Even number of passes
4
Programme the unit to S Y - 0 5
Set the count number to 3
Begin the plot with a full seed drill pass.
At each field end, the count number should
increase by 1, up to 5. Invert the hydraulic
markers before starting the 5th pass.
The number should return to 1 for the next
pass.
1
2
3
2
Programme the unit to S Y - 0 6
Set the count number to 3.
Begin the plot with a half seed drill (see drill
manual).
At each field end, the count number should
increase by 1, up to 6.
Invert the hydraulic markers before starting the
6th pass.
The number should return to 1 for the next
pass.
DK
E
e) Eksempler på sporangivelse
e1) Markering i midten af såmaskinen
(symmetrisk)
e2) Markering i midten af såmaskinen (symmetrisk)
f.eks.: Bom 24 m såmaskine 4 m
f.eks.: Bom 20 m såmaskine 4 m
24 = 6 Lige antal spor
4
20 = 5 Ulige antal spor
4
1
1
2
3
Programmer kontrolboksen til S Y - 0 5
Sæt tælleren på 3
Start jordstykket ved et helt såmaskinespor
Ved hver vending skal tælleren rykke et skridt
frem lige til 5. Vend de hydrauliske spormarkører
før du starter på det 5. spor.
Tallet skal vende tilbage til 1 ved det
efterfølgende spor.
2
3
Programmer kontrolboksen til S Y - 0 6
Sæt tælleren på 3
Start jordstykket med halv såmaskine
(se i brugervejledning til såmaskinen).
Ved hver vending skal tælleren rykke et skridt
frem lige til 6.
Vend de hydrauliske markører, før du starter på
det 6. spor. Tallet skal derefter vende tilbage til 1
ved det efterfølgende spor.
43
Utilisation Ultron MS Semoir
Using the Ultron MS for Seed Drills
Anvendelse af såmaskinen Ultron MS
E
2
e3)
4 6
4
5
6
1
2
3
4
5
6
1
2
F
3
6 6
4m
12 m
3
F
44
Utilisation Ultron MS Semoir
Using the Ultron MS for Seed Drills
Anvendelse af såmaskinen Ultron MS
FR
E
e3) Marquage sur un Aller/Retour du semoir
(asymétrique)
ex: Rampe 24 m semoir 4 m
24 = 6 Nombre de passage pair
4
Attention au coté du semoir qui jalonne pour débuter la
parcelle
1 Programmer le boîtier sur A L - 0 6
2 Mettre le chiffre de comptage sur 4. Commencer
la parcelle bordure coté droit.
3 A chaque demi-tour, le chiffre de comptage
doit avancer jusqu’au 6. Agir sur l’inversion des
traceurs hydrauliques avant d’engager le 6ème
passage. Le chiffre doit ensuite revenir à 1 et
de nouveau jalonner à ce passage.
GB
E
1
e3) Marking over an outward and return pass
(asymmetrical)
e.g. 24 m boom, 4 m seed drill
2
24 = 6 Even number of passes
4
Pay attention to which side of the seed drill is marking
when starting the plot.
1 Programme the unit to A L - 0 6
2 Set the count number to 4. Start the plot on the
right-hand edge.
3 At each field end, the count number should
increase by 1, up to 6. Invert the hydraulic
markers before starting the 6th pass. The
number should then return to 1 and mark again
on this pass.
DK
E
e3) Markering på såmaskiner med Tur/Retur
(asymmetrisk)
f.eks.: Bom 24 m såmaskine 4 m
24 = 6 Lige antal spor
4
Vær opmærksom på hvilken side såmaskinen
markerer, når den starter på jordstykket
1 Programmer kontrolboksen til A L - 0 6
2 Sæt tælleren på 4. Start på jordstykket på højre
side.
3 Ved hver vending skal tælleren rykke et skridt
frem lige til 6. Vend de hydrauliske spormarkører
før du starter på det 6. spor. Tallet skal vende
tilbage til 1 og markere sporet igen.
45
Utilisation Ultron MS Semoir
Using the Ultron MS for Seed Drills
Anvendelse af såmaskinen Ultron MS
E
f)
m
5
m
SY
3
SY
9
12
15
18
21
24
.
.
.
3
4
5
6
7
8
3,5
21
28
.
.
6
8
4
12
16
20
24
28
32
36
.
.
.
3
4
5
6
7
8
9
4,5
18
36
.
.
4
8
4,8
24
5
15
20
.
3
4
12
18
24
36
.
.
.
2
3
4
6
6
46
AL
3
AL
SY
8
2
2
3
3
4
4
6
8
3
4
4
6
4
6
8
4
8
5
2
2
3
3
4
4
5
2
4
AL
3
4
5
4
5
3
4
5
3
5
3
4
2
4
6
2
2
1
2
2
3
3
2
3
4
Utilisation Ultron MS Semoir
Using the Ultron MS for Seed Drills
Anvendelse af såmaskinen Ultron MS
FR
E
f) Valeurs de programmation :
S Y Jalonnage au centre du semoir
A L Jalonnage sur un aller/retour du semoir
R EMARQUE :
Dans le cas d’un jalonnage Asymétrique,
vérifier qu’il n’y ait vraiment qu’un coté de la
distribution qui se débraye.
Ne pas oublier de faire correspondre la position
des jalonneurs arrières avec les distributions
débrayables.
GB
E
1
f) Programming values:
S Y Tramlining over an outward & return pass”
2
A L Tramlining over an Outward & Return pass
NOTE :
In the case of asymmetrical tramlining, check
that the metering devices are only disengaged
on one side.
Do not forget to match the position of the rear
markers with the disengaged metering devices.
DK
E
f) Programmeringsværdier:
S Y Sporangivelse i midten af såmaskinen
A L Sporangivelse med en såmaskine med tur/retur
BEMÆRK:
Ved asymmetrisk sporangivelse skal du
kontrollere, at det kun er den ene side af
distributionen der er slået fra.
Glem ikke at justere placeringen af de
forreste sporangivere med distributører, der
frakobles.
47
Utilisation Ultron MS Semoir
Using the Ultron MS for Seed Drills
Anvendelse af såmaskinen Ultron MS
F
3500
G
C
GH
-
+1
%
CAL
2
48
OK
3
100% STOP
+
Ha 0
%
4
Utilisation Ultron MS Semoir
Using the Ultron MS for Seed Drills
Anvendelse af såmaskinen Ultron MS
FR
F Fonction turbine
a) Utilisation :
- Sélectionner la fonction avec la touche
- Placer le curseur sur la position.
3
Cette vitesse doit être comprise entre 2300 et
.
3800 Tr/mn.
En cas de baisse de régime de la turbine, le curseur
se place automatiquement sur la fonction et est
suivi d’un bip sonore.
G
La valeur de la vitesse de rotation de la
turbine apparaît.. ex: 3500
- Le réglage s'effectue avec
et l'action sur la touche 3 .
Le boîtier informe aussi en cas d’un surrégime.
2
maintenu appuyé
- SÉLECTIONNER LA VITESSE DE ROTATION DE LA
TURBINE (LECTURE TR / MN)
GB
F Fan function
1
a) Use:
- Select the function using button
- Move the cursor to
3
.
This speed should be between 2300 and
G
If the fan speed drops, the cursor will automatically
move to the function, followed by a beep.
The fan rpm setting will appear, e.g. 3500
Use button
2
3800 rpm.
The unit will also warn you if the fan is over-revving.
3
to change the settings whilst
keeping button 2 pressed.
- S ELECT THE FAN RPM (READ RPM)
DK
F Turbinefunktion
a) Anvendelse
- Vælg funktionen med knappen
- Placer cursoren på stedet
Denne hastighed skal være mellem 2300 og
3
.
3800 O/mn
Hvis turbinehastigheden falder, vil cursoren
automatisk placere sig på funktionen og følges af
en biplyd
G
Værdien på turbinens rotation vises..f.eks.:
3500
- Justering udføres vha. knappen 2 , der
holdes nedtrykket, og ved tryk på knappen
Kontrolboksen viser også, hvis den kører for
hurtigt.
3
.
- VÆLG HASTIGHED PÅ TURBINENS ROTATION
(AFLÆSNING O/ MN)
49
Utilisation Ultron MS Semoir
Using the Ultron MS for Seed Drills
Anvendelse af såmaskinen Ultron MS
F
0
G
G
-
+1
%
CAL
2
OK
3
100% S TOP
+
Ha 0
%
2700
G
2700
G
50
Utilisation Ultron MS Semoir
Using the Ultron MS for Seed Drills
Anvendelse af såmaskinen Ultron MS
FR
F
b) Programmation :
Enregistrement de la valeur minimum de rotation
pour l’alarme
- Effectuer la même opération pour les autres
chiffres
Valeur :
“2700 Tr/mn“
- Appuyer sur 2 et maintenir:
La valeur apparaît
Si elle est correcte, relâcher
Si elle est fausse,
maintenir appuyé
pendant toute la
programmation
- Appuyer sur 3 avec l'autre main pour modifier
le chiffre qui clignote.
- Relâcher lorsque le chiffre voulu apparaît.
GB
F
1
b) Programming:
Setting the minimum rotation for the alarm.
Value :
- Press 2 and hold down:
the value is displayed
If it is correct
release
If it is incorrect
keep held down
throughout programming
- With your other hand, press
figure which is flashing.
- Repeat this operation for the other figures
3
2
“2700 rpm”
to change the
- Release when the required figure appears.
DK
F
b) Programmering:
- Udfør det samme for de øvrige tal
Indstilling af alarm for minimumsværdi for rotation
Værdi: “2700 O/mn“
- Tryk på 2 og hold:
Værdien vises
Hvis den er korrekt, skal du udløse knappen
Hvis den er forkert, skal du holde trykket på
knappen under hele programmeringen
- Tryk på 3 med den anden hånd for at ændre
tallet, der blinker.
- Udløs knappen, når det ønskede tal vises.
51
Utilisation Ultron MS Semoir
Using the Ultron MS for Seed Drills
Anvendelse af såmaskinen Ultron MS
G
a)
0001
H
H
-
+1
%
CAL
OK
3
52
100% S TOP
+
Ha 0
%
Utilisation Ultron MS Semoir
Using the Ultron MS for Seed Drills
Anvendelse af såmaskinen Ultron MS
FR
G Fonction alarme
a) Arbre de distribution
- Sélectionner la fonction avec la touche
- Placer le curseur sur la position
3
.
H
Le chiffre indiqué est le nombre d’impulsion
lors de la rotation de l’arbre.
En cas de non rotation de l’arbre de distribution,
le curseur se place automatiquement sur la
fonction, et est suivi d’un bip sonore.
GB
G Alarm function
1
a) Distribution shaft
2
- Press button 3 to select the function.
- Move the cursor to
H
The figure given shows the number of pulses
when the shaft is turning.
If the distribution shaft is not turning, the cursor
will move to the function automatically, followed
by a warning beep.
DK
G Alarmfunktion
a) DISTRIBUTIONSAKSEL
- Vælg funktionen med knappen
- Placer cursoren på stedet
3
.
H
Tallet, der vises, er tallet på impulser under
rotationen af akslen.
Hvis der ikke sker rotation af distributionsakslen,
vil cursoren automatisk placere sig på
funktionen og følges af en biplyd.
53
Utilisation Ultron MS Semoir
Using the Ultron MS for Seed Drills
Anvendelse af såmaskinen Ultron MS
G
b)
0001
I
c)
I
-
+1
%
CAL
OK
100% S TOP
+
Ha 0
%
alar
bip!
I
2
3
Prod
I
54
Utilisation Ultron MS Semoir
Using the Ultron MS for Seed Drills
Anvendelse af såmaskinen Ultron MS
FR
G
- Appuyer sur 2 , maintenir et avec
l'alarme fin de trémie.
= 1 pour alarme valide
= 0 pour alarme non valide
b) Fin de trémie
UTILISATION :
3
régler
L'alarme est activée ou désactivée par
Sert à avertir avant la vidange complète de la
trémie.
alternance à chaque pression.
- Régler la hauteur du capteur dans la trémie en
fonction du type de semence. Dès qu'une
alarme se déclenche le curseur se place devant
la fonction concernée
c) Déclenchement des alarmes
Dès qu'une alarme se déclenche le curseur se
place devant la fonction concernée.
I
PROGRAMMATION :
Il est possible de désactiver l’alarme.
Ex. Semis de colza.
- Sélectionner la fonction avec la touche
- Placer le curseur sur la position
Le message " a l a r " apparaît associé d'une
succession de bips + indications:
3
.
Distribution
Fin de trémie
Rota
Prod
I
GB
G
- Press button
b) Low seed level
2
, and hold down whilst using
button 3 to set the low seed
1
level alarm.
PURPOSE:
Warns when the hopper is almost empty.
- Adjust the height of the sensor in the hopper
according to the type of seed. When the alarm
sounds the cursor will move to the relevant
function.
PROGRAMMING:
The alarm can be disabled.
e.g. sowing rapeseed.
2
= 1 to confirm alarm
= 0 to cancel alarm
The alarm is activated and disabled in turn
each time the button is pressed.
c) When the alarm sounds
As soon as the alarm is triggered, the cursor will
move to the relevant function.
I
- Use button 3 to select a function.
- Move the cursor to
A series of warning beeps will sound and the
" a l a r " message will appear together with
the following indications:
Distribution
Low seed level
I
Ro t a
Pr o d
DK
- Tryk på knappen
for tom såkasse
G
b) Såkasse tom
Har til formål at give besked, inden såkassen er helt
tom.
- Juster højden på føleren i såkassen alt efter
hvilken type sæd, der bruges. Når en alarm lyder,
vil cursoren placere sig ved funktionen, det drejer
sig om.
PROGRAMMERING:
Det er muligt at deaktivere alarmen.
F.eks. raps.
I
hold, og juster alarmen
3
= 1 for gyldig alarm
= 0 for ugyldig alarm
ANVENDELSE:
- Vælg funktionen med knappen
- Placer cursoren på stedet
2
3
.
Alarmen aktiveres eller deaktiveres på skift
ved hvert tryk.
c) Udløsning af alarmer
Når der udløses en alarm, stiller cursoren sig
foran funktionen, der drejer sig om.
I
Meddelelsen " a l a r " vises sammen med en
række biplyde + visninger:
Distribution
Såkasse tom
ROTA
PROD
55
Ultron MS avec Distributeur
Ultron MS with Spreader
Ultron MS med distributør
A
DP
On/Off
43
A
B
-
+1
%
CAL
1
OK
3
100% S TOP
+
Ha 0
%
B
5
35
56
Ultron MS avec Distributeur
Ultron MS with Spreader
Ultron MS med distributør
FR
B Fonction débit
A Choix de l'utilisation
- Appuyer sur la touche
- Mettre l'instrument sous tension
Le curseur latéral est placé devant le sigle
Le message “
s'initialisent.
A
- Sélectionner la machine avec la touche
L'afficheur indique:
" D P " pour distributeur d'engrais.
5
.
i n i t ” apparaît et les vérins
Le curseur latéral se place devant le sigle
.
- Valider la sélection par l'appui sur la touche
L'afficheur indique le dernier réglage
mémorisé des vérins.
3
B
3
Les vérins se positionnent au repère 35 et le
message " 3 5 " apparaît.
L'afficheur indique “
t e s t ”.
R EMARQUE :
" 3 5 " est la valeur moyenne pour réaliser
l'essai de débit.
Pour les petites quantités/ha (ex: colza en
semoir / Anti limace en distributeur) mettre au
repère " 1 5 " par exemple à l'aide des touches
1 5 .
GB
A Choosing an application
- Switch the unit on
The side cursor will appear alongside the
symbol shown below
A
- Press button 5 to select a machine.
The display will read:
" D P " for a spreader.
- Press button 3 to confirm your choice.
The display will show the most recently
stored actuator setting.
B Flow rate function”
- Press button
.
3
The message “ i n i t ” will appear and the
actuators will be initialised.
The side cursor will appear alongside the
symbol shown below
B
The actuators will move to the 35 mark and
" 3 5 " will be displayed.
The display will read “
1
t e s t ”.
NOTE :
" 3 5 " is the average setting for performing a
calibration test.
For low quantities per hectare (e.g. rape seed in
the seed drill/slug pellets in the spreader) set to
the " 1 5 " mark, for example, using 1 5 .
3
DK
A Valg af anvendelse
- Sæt spænding på instrumentet
Den laterale cursor er placeret foran mærket
A
- Vælg maskine med knappen 5 .
Der vises:
" D P " for gødningsspredning.
- Godkend valget ved at trykke på knappen 3 .
Der vises den sidst lagrede indstilling af
stempler.
B Mængdefunktion
- Tryk på knappen
3
Meddelelsen “
vises.
.
i n i t ” vises, og stemplerne
Den laterale cursor placerer sig foran mærket
B
Stemplerne placerer sig på stedet 35, og
meddelelsen "3 5 " vises.
Der vises “
t e s t ”.
BEMÆRK:
"3 5 " er en mellemværdi til udførelse af en
prøvemængde.
Ved helt små mængder/ha
(f.eks.: rapsfrø / Anti-snegl i distributøren) skal du
sætte den på "1 5 " f.eks. vha. af knapperne 1 5 .
57
Ultron MS avec Distributeur
Ultron MS with Spreader
Ultron MS med distributør
B
a)
3.57
C
H
-
+1
%
CAL
1
OK
3
100% S TOP
+
Ha 0
%
5
88
Kg/ha
H
58
Ultron MS avec Distributeur
Ultron MS with Spreader
Ultron MS med distributør
FR
B
- Appuyer sur la touche 3 .
Le curseur se place sur la position
a) Essai de débit
- Appuyer sur la touche 3 .
Le curseur latéral est placé devant le sigle
C
L'afficheur indique un poids théorique en Kg
Le boîtier est en attente.
- Faire l'essai de débit
(cf notice d'utilisation de la machine).
et
1
5
Le boîtier calcule et note une quantité en
Kg/ha théorique.
Deux choix possibles:
a) La dose inscrite est la dose voulue.
- Appuyer sur la touche 3 .
Vous pouvez aller travailler.
b) La dose inscrite est différente de la dose
voulue.
- Appuyer sur la touche 1 ou 5 pour
mettre la dose désirée.
- Peser la quantité obtenue à l'essai.
- Entrer la valeur en Kg avec
H
.
R EMARQUE :
Pour les petites valeurs, entrer 3 chiffres après la
virgule. (0,000 Kg)
- Appuyer sur la touche 3 .
Vous pouvez aller travailler.
GB
B
- Press button 3 .
The cursor will move to
a) The calibration test
- Press button 3 .
The side cursor will appear alongside the
symbol shown below
H
The unit will calculate and note a hypothetical
amount in kg/ha.
C
The display will show a hypothetical weight in kg
The unit is on standby.
- Carry out the calibration test
(refer to the machine’s instructions for use).
- Weigh the amount obtained from the test.
- Enter the weight in kg using
1
and
5
.
NOTE :
For low weights, enter a figure to 3 decimal places
(0.000 Kg)
There are two possibilities:
a) If the application rate recorded is correct:
- Press button 3 .
You may now begin work.
b) If the application rate recorded is not
correct:
- Press button 1 or 5 to enter the
required application rate.
1
3
- Press button 3 .
You may now begin work.
DK
B
- Tryk på knappen 3 .
Cursoren placerer sig på stedet
a) Prøvemængde
- Tryk på knappen 3 .
Den laterale cursor er placeret foran mærket
C
Der vises en teoretisk vægt i Kg
Kontrolboksen afventer.
- Udfør prøvemængden
(jf. maskinens brugervejledning).
H
Kontrolboksen beregner og noterer en
teoretisk kvantitet i Kg/ha.
Der er to valgmuligheder:
a) Den skrevne mængde og den ønskede
mængde.
- Tryk på knappen 3 .
Du kan begynde arbejdet.
- Vej den opnåede mængde ved prøven.
- Indtast værdien i Kg med
1
og
5
.
BEMÆRK:
Ved små værdier skal du indtaste 3 tal efter
kommaet. (0,000 Kg)
b) Den skrevne mængde er forskellig fra den
ønskede mængde.
- Tryk på knappen 1 eller 5 for at angive
den ønskede mængde.
- Tryk på knappen 3 .
Du kan begynde arbejdet.
59
Ultron MS avec Distributeur
Ultron MS with Spreader
Ultron MS med distributør
B
b)
88
Kg/ha
H
C
H
-
+1
%
CAL
OK
100% STOP
+
Ha 0
%
135
Kg/ha
H
3
4
Kg/ha
H
60
Ultron MS avec Distributeur
Ultron MS with Spreader
Ultron MS med distributør
FR
B
b) Accès direct au réglage après arrêt du
boîtier
- Appuyer sur la touche
tension.
3
après la mise sous
- Appuyer sur la touche 4 .
Le curseur latéral se positionne sur
C
et l'afficheur indique le dernier réglage
mémorisé des vérins.
- Appuyer sur la touche 3 . pour initialiser la
même valeur.
L'écran indique “ i n i t ” le temps que le
vérin se positionne au repère programmé.
Vous pouvez aller travailler.
GB
B
b) Gaining direct access to the settings when
the unit has been switched off
- Press button
on.
3
after power has been switched
- Press button 4 .
The side cursor will move to
C
and the display will bring up the most
recently stored actuator settings.
1
- Press button 3 to initialise the same value.
The message “i n i t ” will be displayed on
screen while the actuator is transferring to
the programmed mark.
You may now begin work.
3
DK
B
b) Direkte adgang til indstilling efter
kontrolboksen har været standset
- Tryk på knappen
3
, efter der er sat tryk på.
- Tryk på knappen 4 .
Den laterale cursor placerer sig på,
C
og der vises den sidst lagrede indstilling af
stemplerne.
- Tryk på knappen 3 for at bruge den samme
værdi.
Skærmen viser “i n i t ” tidspunktet, hvor
stemplet stiller sig på det programmerede
sted.
Du kan begynde arbejdet.
61
Ultron MS avec Distributeur
Ultron MS with Spreader
Ultron MS med distributør
B
c)
135
Kg/ha
H
125
Kg/ha
H
H
-
+1
%
CAL
OK
100% STOP
+
Ha 0
%
d)
1
3
4
5
135
Kg/ha
H
115
Kg/ha
H
62
Ultron MS avec Distributeur
Ultron MS with Spreader
Ultron MS med distributør
FR
B
c) Modification de la dose de référence
- Rester appuyé 3 secondes sur 5 ou sur
La valeur de la dose clignote seule
d) Modulation
.
- Appuyer sur la touche
de 10%.
1
pour diminuer la dose
- Modifier la valeur avec les touches 1 et 5 .
La valeur clignote.
La valeur de la dose réglée s'affiche.
- Appuyer sur la touche
dose de 10%.
5
pour augmenter la
- Appuyer sur la touche
de référence.
4
pour revenir à la dose
- Valider en appuyant sur la touche
la valeur est obtenue à l'affichage.
3
1
lorsque
R EMARQUE :
La modification de la dose de référence est à
effectuer uniquement avec le même produit. Sinon
procéder à un nouvel essai.
La dose est modulée par palier de 10% à
chaque impulsion.
La valeur de modulation (%) s'affiche en
alternance avec la dose réglée.
R EMARQUE :
Si la dose est trop fortement augmentée et que le
semoir, ou le distributeur ne peut la réaliser, la
quantité inscrite clignote.
GB
B
c) Changing the standard application rate
setting
- Hold button 5 or 1 down for 3 seconds.
The application rate setting will start to flash
- Change the application rate setting using buttons
1 and 5 .
The application rate setting will start to flash.
The new application rate setting will be
displayed.
- Press button 3 to confirm the new application
rate setting displayed.
NOTE:
The standard load setting should only be changed
or the same seed type. In other cases, a new test
should be performed.
d) Adjustments
- Press button
by 10%.
1
to reduce the application rate
- Press button
by 10%.
5
to increase the application rate
- Press button 4 to revert to the standard
application rate.
The application rate is adjusted up or down
by 10% each time the buttons are pressed.
The display switches back and forth
between the rate of adjustment (%) and the
new application rate.
1
NOTE:
If there is a sharp increase in the application rate
setting that the seed drill or spreader cannot handle,
the amount displayed on the screen will flash.
3
DK
B
c) Ændring af referencemængden
d) Modulering
- Tryk ned 3 sekunder på 5 eller på 1 .
Kun værdien på mængden blinker
- Tryk på knappen
med 10 %.
1
- Tryk på knappen
10 %.
5
- Ændr værdien med knapperne
Værdien blinker.
Den justerede værdi vises.
1
og
- Godkend ved at trykke på knappen
værdien vises på skærmen.
3
5
.
, hvorefter
BEMÆRK:
Ændring af referencemængden skal kun udføres en
gang for det samme produkt. Fortsæt derefter med
en ny prøve.
. for at minimere mængden
for at forhøje mængden med
- Tryk på knappen 4 for at komme tilbage til
reference- mængden.
Mængden moduleres af lejer med 10 % ved
hver impuls.
Modulationsværdien (%) vises på skift med
den fastsatte mængde.
BEMÆRK:
Hvis mængden forhøjes meget, og hvis såmaskinen
eller distributøren ikke kan håndtere den, vil den
skrevne mængde blinke.
63
Ultron MS avec Distributeur
Ultron MS with Spreader
Ultron MS med distributør
C
bord
J
J
-
+1
%
CAL
OK
3
100% STOP
+
Ha 0
%
135
4
J
64
Ultron MS avec Distributeur
Ultron MS with Spreader
Ultron MS med distributør
FR
C Fonction bordure
- Sélectionner la fonction avec la touche
Le curseur se place devant le sigle
3
J
Le message " b o r d " s'affiche à l'écran.
Après 3 secondes, il s'affiche en alternance
avec la valeur de la dose Ha.
Le débit est automatiquement réduit de 20%
côté droit.
- Appuyer sur la touche 4 pour quitter le mode
bordure.
La valeur de la dose réglée s'affiche.
GB
C Border-spreading function
- Press button 3 to select the function.
The side cursor will appear alongside the
symbol shown below
J
" b o r d e r " will appear on the screen.
After 3 seconds, " b o r d e r " and the
application rate setting/ha will be displayed
alternately on the screen.
The flow rate is automatically reduced by 20%
on the right-hand side.
1
- Press button 4 to exit border-spreading mode.
The new application rate setting will appear.
3
DK
C Kantfunktion
- Vælg funktionen med knappen 3 .
Cursoren placerer sig foran mærket
J
Meddelelsen "b o r d e r " vises på skærmen.
Efter 3 sekunder, vises den skiftevis med
værdien for hektarmængden.
Mængden reduceres automatisk med 20 % på
højre side.
- Tryk på knappen 4 for at forlade kant-funktionen.
Den justerede værdi vises.
65
Informations
Information
Informationer
A
PL1
1
N/C
N/C
BLANC
MAUVE
5
RL1
OV IN
RL2
RL3
JAUNE
GRIS
VERT
+ V IN
RL4
BLEU
FUSE
BRUN
10
RL5
10 Ampères
ROUGE/BLEU
LK3
LK4
TURQUOISE
ORANGE
16
JAUNE/ROUGE
"ELECTROVANNE"
BLANC/ROUGE
1
10
15
T
Y
"MS" VERIN
OV + V
OP5
N1
PL2
22
BLEU
JAUNE
VERT
N2
COM
OP4
16
BLEU
BRUN
BLANC
NOIR
BRUN
H
OV + V
COM
OP3
BLEU
ROUGE
OV + V
11
BLEU
BRUN
BLEU
BRUN
BLEU
D
CO/TL2
S
PL3
6
OV + V
BRUN
CO/TL1
BRUN
"MS"
VERIN
COM
A
COM
COM
B
1
BLEU
6
"MS"
VERIN
ROUGE
BLEU
OV + V
BLEU
BRUN
LK2
N1-SNR
ONLY
LK1
66
"TL1"
VERIN
N/C
G-SNR
ONLY
G
LK5
LK4
VERT/ROUGE
X
Informations
Information
Informationer
FR
A Schématisation du circuit
G
Traceur gauche
D
Traceur droit
T
Turbine
H
Surface
S
Distribution
Y
Vérin modulation dose
TL1
Vérin jalonnage
B Entretien
a) Boîtier Electronique
Le boîtier ne nécessite pas d’entretien.
Il est impératif toutefois de le conserver dans un lieu
sec l’hiver.
b) Capteurs
Les capteurs inductifs ne demandent aucun entretien
toutefois attention aux chocs qui pourraient provoquer
le déréglage de leurs positionnements.
- Bien nettoyer le semoir aprés utilisation pour éviter
les dégats de rongeurs.
- Ne pas diriger le jet du nettoyeur haute pression
vers les vérins électriques et électrovannes.
GB
A Circuit overview
B Maintenance
a) Electronic control unit
G
LH marker
D
RH marker
T
Fan
H
Surface
S
Metering device
b) Sensors
Y
Application rate adjustment actuator
TL1
Tramlining actuator
The inductive sensors do not require maintenance.
However, care must be taken to avoid knocks as these
could throw their positional settings out of line.
The control unit does not require any maintenance.
It must nevertheless be kept in a dry place during winter.
- The seed drill should be cleaned thoroughly after
use to prevent damage caused by rodents.
- Do not aim high-pressure cleaning sprays at the
actuators or solenoid valves.
DK
A
Kredsløbsdiagram
G
Venstre markør
D
Højre markør
T
Turbine
H
Overflade
S
Distribution
Y
Stempel til modulationsmængde
TL1
Stempel til sporangivelse
B Vedligeholdelse
a) Elektronisk kontrolboks
Boksen behøver ikke vedligeholdelse.
Det er imidlertid vigtigt, at den opbevares på et tørt
sted om vinteren.
1
4
b) Følere
Induktiv-følerene kræver ikke vedligeholdelse; dog
skal man være opmærksom på ikke at udsætte
dem for stød, da dette kan påvirke deres indstilling.
- Sørg for omhyggeligt at rengøre såmaskinen
efter brug for at forhindre skader fra gnavere.
- Ret ikke en stråle fra rengøring under højtryk
mod de elektriske stempler og magnetventilerne.
67
Informations
Information
Informationer
FR
C Remèdes aux problèmes
PANNES
R EMÈDES
Le boîtier ne s’allume pas
Vérifier le branchement 12 V continu
Vérifier le fusible 5 A
Le boîtier s’allume puis s’éteint
Vérifier la polarité + / -
L’information vitesse est incorrecte
Vérifier le coefficient de vitesse
Vérifier le positionnement du capteur sur l’arbre
Le comptage des hectares est incorrect
Vérifier le coefficient de vitesse
Vérifier la largeur de travail dans le programme
Vérifier le positionnement du capteur sur l’arbre
Il n’y a plus de comptage automatique pour le
jalonnage (au comptage 2 fois au lieu de 1)
Vérifier le positionnement du capteur au niveau du
mécanisme d’inversion des traceurs.
Contrôle d’un capteur inox
100Ω
GB
C Troubleshooting
PROBLEMS
SOLUTIONS
The control unit does not come on.
Check the 12 V DC connection.
Check the 5 amp fuse.
The control unit comes on and then goes off.
Check the + / - polarity.
The information reading is incorrect
Check the speed coefficient
Check the position of the sensor on the shaft
The hectare count is incorrect
Check the speed coefficient
Check the working width in the programme
Check the position of the sensor on the shaft
The automatic count function is not working when
tramlining (or is counting double)
Check the position of the sensor on the markers’
reversing mechanism.
Check stainless steel sensor
100Ω
DK
C Fejlretning
FEJL
68
AFHJÆLPNING
Kontrolboksen tændes ikke
Kontroller forbindelse til 12 V-jævnstrøm
Kontroller 5 A-sikringen
Kontrolboksen tændes, men slukkes straks igen
Kontroller polariteten + / -
Hastighedsoplysningerne er forkerte
Kontroller hastighedskoefficienten
Kontroller placeringen af sensoren på akslen
Hektartællingen er forkert
Kontroller hastighedskoefficienten
Kontroller den programmerede arbejdsbredde
Kontroller placeringen af sensoren på akslen
Den automatiske tælling af markeringen
fungerer ikke (tæller 2 gange i stedet for 1)
Kontroller placeringen af sensoren ved niveauet på
vendemekanismen på markørerne.
Kontrol af stålføler
100Ω