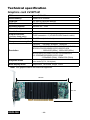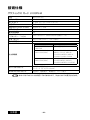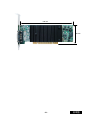
1
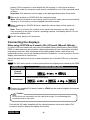
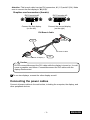
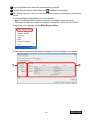
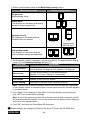
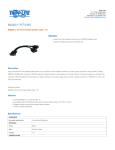
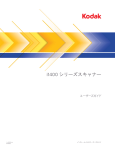
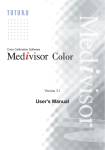
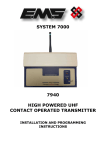
Graphics card LV32P5-M
User's Manual
グラフィックスカード LV32P5-M
取扱説明書
Graphics Card LV32P5-M
User's Manual
-1-
ENGLISH
FCC Information
FCC (U.S. Federal Communications Commission)
This equipment has been tested and found to comply with the limits for a Class A digital
device, pursuant to part 15 of the FCC Rules. These limits are designed to provide
reasonable protection against harmful interference in a residential installation. This
equipment generates, uses, and can radiate radio frequency energy, and if not installed
and used in accordance with the instructions, may cause harmful interference to radio
communications. However, there is no guarantee that interference will not occur in a
particular installation. If this equipment does cause unacceptable interference to radio or
television reception, which can be determined by turning the equipment off and on, the
user is encouraged to try to correct the interference by one or more of the following
measures:
- Reorient or relocate the receiving antenna.
- Increase the separation between the equipment and receiver.
- Connect the equipment into an outlet on a circuit different from that to which the
receiver is connected.
- Consult your dealer or an experienced radio/TV technician for help.
FCC Warning
To assure continued FCC compliance, the user must use a grounded power supply cord
and the provided shielded video interface cable with bonded ferrite cores. Also, any
unauthorized changes or modifications to this monitor would void the user's authority to
operate this device.
Responsible Party Located within the United States
U. S. ELECTRONICS, INC.
1324 Colorado Ave.S,
Minneapolis, MN 55416, U.S.A
Tel: (952)-285-5720
CE Certification
This device complies with the requirements of the EMC directive 89/336/
EEC "Electromagnetic Compatibility."
Warning
- When using at 240V in United States, supply must be from centertapped, 240V, single phase circuit.
- Concerning disposal of waste, please consult the dealer you have purchased this
device from.
ENGLISH
-2-
Content
Introduction ............................................................................................................4
Package contents..................................................................................................4
Hardware requirements.........................................................................................4
Safety precautions.................................................................................................4
Hardware installation..............................................................................................5
Disconnecting the power cables............................................................................5
Inserting the graphics card....................................................................................5
Connecting the displays.........................................................................................6
Connecting the power cables................................................................................7
Software installation and setup.............................................................................8
Installing software..................................................................................................8
Configuring display settings...................................................................................8
Software uninstallation.........................................................................................11
Q&A . ......................................................................................................................12
Prior to installation...............................................................................................12
Installation............................................................................................................12
Uninstallation.......................................................................................................14
Driver setup.........................................................................................................14
Miscellaneous......................................................................................................14
Technical specification.........................................................................................16
After-sale service..................................................................................................17
Repair..................................................................................................................17
Driver upgrade.....................................................................................................17
Disposing of the product......................................................................................17
* Company names and product names are brand names or registered brand names.
-3-
ENGLISH
Introduction
This manual provides step-by-step instructions on how to use the graphics card
LV32P5-M along with supported TOTOKU LCD's.
Package contents
Confirm that the package contains the following items:
Graphics card............................................1
Triple-head cable.......................................1
Low-profile bracket....................................1
Driver CD...................................................1
User's Manual............................................1
Hardware requirements
● PC/AT compatible computer with a processor equivalent to or higher than Intel Pentium
4 or AMD Athlon (This card cannot be used on a server computer.)
● PCI slot 32bit/33MHz
● Microsoft Windows XP/Vista
● Minimum system memory: 512MB (Recommended: 1024MB or more)
● Minimum hard disk space: 40MB
● CD-ROM Drive
● TOTOKU LCD Display(s) (ME/CCL series)
Pixels
Display model
2MP
ME201L, ME213L, ME251i, ME253i2, MS21i2,
CCL202, CCL204, CCL206, CCL208, CCL212, CCL250i,
CCL252i2,
3MP
ME315L plus, ME351i, ME355i2, MS31i2,
CCL350i, CCL352i2, CCL354i2
Safety precautions
Please take the following precautions for your safety in using this product:
● Do not try to repair or alter the product. It could cause fire, an electric shock, and/or
other injuries.
● If any abnormality is detected, such as odor, noise, and overheat, turn off the power
and unplug it immediately. Otherwise, it could cause fire and/or an electric shock.
● Do not touch the product with wet hands. It could cause an electric shock.
● This product is easily damaged by static electricity. Be careful when installing, storing,
and handling.
● Do not touch the electric terminals directly.
● Keep this product away from magnetized places and objects.
● Do not leave this product on the floor. If you accidentally step on it, you could get
injured or it could damage the product.
ENGLISH
-4-
Hardware installation
Notices
Please read the following notices before installing the graphics card:
● Make sure that the operating system is installed properly.
● Uninstall any currently installed display drivers such as Pivot.
● Log in as a user with administrative privileges to install the driver.
● Remove all currently installed old graphics cards.
● Disable the on-board graphic controller on the computer's motherboard if any. Contact
the computer manufacturer on how to disable it.
● Proper operation of this graphics card is not guaranteed when used with other graphics
cards for multi-display. If an error occurs, see Q&A in this manual.
Disconnecting the power cables
Disconnect power cables of the computer and other peripheral devices from the wall outlet.
Inserting the graphics card
1 Remove the computer cover. (See the user manual for your computer.)
Caution: ESD (Electrostatic Discharge) Breakdown
Static electricity could damage delicate components of the computer and the graphics
card. Discharge static electricity prior to installation, for example, by touching metal
parts of the computer. Do not touch electric parts or terminals.
2 Remove any currently installed graphics card if any or remove a bracket from the slot.
Caution: Burn
Internal parts may be hot if the computer has been turned on previously.
3 Insert the graphics card in a PCI slot (see the table below) firmly and evenly. Make
sure it does not touch any internal parts of the computer.
LV32P5-M
No
Slot Shape
AGP
No
No
PCI Express x16
PCI Express x1
Yes
PCI 32bit
Yes
PCI 64bit
Caution: Ventilation
Ensure the proper airflow for cooling the graphics card.
Install this graphics card in the slot where ambient temperatures are 55 degrees
C or lower.
Slot: Leave the adjacent slot or slot that is close to heat producing components unoccupied if multiple slots are available to release heat around the card sufficiently.
Inadequate heat release could shorten the product lifetime or cause some troubles.
Fan: Keep the computer’s internal cables away from the cooling fan, or keep things
away that could get caught in the fan. (E.g., labels are easy to come off when
-5-
ENGLISH
heated.) If the computer is used without the fan working, it could cause a failure.
Dust: Dust inside the computer could restrict ventilation to cool off the card and result
in failure.
Important: Our warranty may not apply to the damages arising from those facts.
4 Secure the bracket on LV32P5-M to the computer frame.
Note: When the bracket is not properly secured, the DVI cable cannot be inserted all
the way in. If necessary, use the supplied low-profile bracket.
5 When installing two LV32P5-M cards, repeat the above steps until all cards are
installed.
Note: There is a limit to the number of the cards one computer can take, which
vary according to the types of cards, operating systems, and display drivers. Do not
exceed the number limit.
6 Put the cover back on the computer.
Connecting the displays
When using LV32P5-M on i2 model LCDs (CCLxxxi2, MExxxi2, MSxxis) ...
i2 model LCDs are loaded with two sets of Extended Display Identification Data (EDID).
EDID is a data structure stored within a display describing its own information including
supporting resolution. Both landscape and portrait display modes (resolutions) are
supported but they need to be manually switched. By default, it is set to portrait. See the
display user manual for instructions.
Check the table below to find out in what orientation the i2 model LCDs are in the table
below.
Note The DVI cable needs to be disconnected from the display when checking the EDID.
Display mode
Portrait
(Default)
Landscape
LED behavior upon turn-on
The LED blinks twice.
The LED blinks three times.
1 Connect the supplied DVI branch cable to LFH60 on the card and tighten the screws
on the connector.
Caution
Do not force the connector into the card at an angle. It could damage the
connector pins or the mold.
Connect the DVI cable supplied with the display between the branch cable's DVI
connector and the display and tighten the screws.
ENGLISH
-6-
Attention: This branch cable has two DVI connectors, #1 (1/3) and #2 (2/4). Make
sure to connect the first display to "#1 (1/3)."
Graphics card connectors (female):
DVI Connector #1
DVI Connector #2
Connect the first display
(on the left)
Connect the second display
(on the right)
DVI Branch Cable
LFH60
connector
1/3
DVI branch cable
DVI Connector of Display 1
2/4
Caution
Do not connect/disconnect the DVI cable while the display is turned on. It could
cause a graphics card failure. Connect/disconnect the DVI cables with the
display disconnected.
2 To use two displays, connect the other display as well.
Connecting the power cables
Connect all power cables to the wall outlets, including the computer, the display, and
other peripheral devices.
-7-
ENGLISH
Software installation and setup
Follow the instructions below for software installation and display setup. See Q&A if any
trouble occurs.
Installing software
1 Turn on the displays and start up the computer in VGA mode.
2 Log into Windows as a user with administrative privileges.
3 When the Found New Hardware Wizard starts up, one of the following messages
appears. Cancel it properly according to the message.
• Welcome to the Found New Hardware Wizard: If this message appears, click "Cancel."
• Hardware Installation: If this message appears, click "Stop Installation" and "Finish."
5 Insert the driver CD in the CD-ROM drive on the computer.
6 Double-click Setup.exe in the appropriate directory below included in the CD-ROM.
XP/Vista 32-bit: DriverCD/VISTAx32bit
XP/Vista 64-bit: DriverCD/VISTAx64bit
One of the following messages may appear in the course of installation:
• Digital Signature Not Found: If this message appears, click "Yes."
• Hardware Installation: If this message appears, click "Continue Anyway."
Note: The display may black out during installation. Please wait for a moment.
7 Restart the computer.
Configuring display settings
Follow the instructions below after restarting the computer.
Pixel
Display mode
Resolution
2MP
Landscape
Portrait
1200 x 1600
1600 x 1200
3MP
Landscape
Portrait
1536 x 2048
2048 x 1536
Refresh
rate (Hz)
Display model
60
ME201L, ME201L/r, ME213L,
ME251i, ME253i2*, MS21i2*,
CCL202, CCL206, CCL208,
CCL212, CCL212/r, CCL250i,
CCL252i2*
30
ME315L plus, ME351i,
ME355i2*, MS31i2*,
CCL350i, CCL352i2*,
CCL354i2*
Note:
* Display modes for i2 models depend on the display orientation setting within the
display. See the display user manual on how to change orientation.
ENGLISH
-8-
1 Log into Windows as a user with administrative privileges.
2 Confirm that the Matrox PowerDesk icon
is added to the taskbar.
3 Set display resolution, color, and the multi-display setup by following the instructions
below.
1) Click the Matrox PowerDesk icon on the taskbar.
Note: The display driver includes a software to configure display settings.
Therefore, the Display Properties dialog box will not be used to set up LV33E1.
2) A pop-up menu appears. Select Multi-Display Setup.
3) The Matrox PowerDesk-SE dialog box appears. Set the dialog box as follows:
①
②
-9-
ENGLISH
1. Select a multi-display setup in the Multi-display setup section.
Multi-display mode
Display configuration
1
Single mode:
Single-display setup
Clone mode:
Two displays on the same card display
the same image respectively.
1 1
1
1
Stretched mode:
Two displays on the same card are
combined into one desktop.
2x1
Independent mode:
Two displays on the same card are
working independently and separately
1 2
1x2
*Supported by
ME213L only.
1 2
2 displays
2. Set the display rotation, resolution, and color palette for the selected Multi-display
setup (①) in the Displays Settings section (②).
Setting item
Explanation
Display rotation
Rotation angle in a counterclockwise direction. Selectable
from 0 degrees, 90 degrees, 180 degrees, 270 degrees
Mode source
Primary and secondary of connected displays.
Display 1 = Primary, Display 2 = Secondary
Color mode
Display resolution
Color palette
Number of colors on the screen
Reduce tearing
Reduction of residual image caused by tearing
Note: The two high-resolution displays cannot have different settings, regardless
of their display modes in stretched mode. Set the same resolution for both displays
in stretched mode.
3. Click "Apply" for the settings to take effect. If all three displays are properly set,
click "OK" to the confirmation message.
Note: If any of the screens go blank for a several seconds and come back on with
the original resolution settings, check if the resolutions are proper for the display by
referring to their specifications.
4. Click "OK" and close the PowerDesk-SE dialog box.
4 Display settings are configured. Remove the driver CD from the CD-ROM drive.
ENGLISH
- 10 -
Software Uninstallation
Follow the instructions below to uninstall the display driver for LV32P5-M.
1 Log into Windwos as a user with administrative privileges.
2 Select Control Panel>Add/Remove Programs from the Start menu.
3 Delete “Matrox Drivers” and "Matrox PowerDesk-SE" from the Currently installed
programs list.
4 End all applications and restart the computer.
Note: To complete uninstallation, make sure to restart the computer.
- 11 -
ENGLISH
Q&A
Prior to installation
What are the supported operating systems?
Windows XP/Vista
How many displays can this card take?
2 displays per card.
What are the supporting TOTOKU displays?
See the table below:
Pixels
Display model
2MP
ME201L, ME201L/r, ME213L, ME251i, ME253i2, MS21i2,
CCL202, CCL204, CCL206, CCL208, CCL212, CCL212/r, CCL250i,
CCL252i2
3MP
ME315L plus, ME351i, ME355i2, MS31i2,
CCL350i, CCL352i2, CCL354i2
Note: Displays below 2MP can also be connected.
What are the possible resolutions?
3MP x 2 screens: 1536x2048, 2048x1536
3MP x 2MP: 1536x2048, 2048x1536
2MP x 2 screens: 1200x1600, 1600x1200
(In addition, 640x480, 800x600, 1024x768 are possible.)
Is it possible to use multiple graphics cards?
Multiple graphics cards can be basically used in Windows XP. However, proper
operation is not guaranteed when combined with other graphics cards. In Windows
Vista, LV32P5-M cannot be used with non-Matrox cards. To use mulgiple cards, use
matrox cards with the same driver.
Which PCI slot should I insert this card to?
32 bit PCI and 64 bit PCI slots are useable. Also make sure that there is enough room
for the card inside the computer.
Does this card support OpenGL?
Yes, when set to 32 bit color (and 16 bit color). However, there are some restrictions.
Please check the performance on your system. OpenGL is not supported in any 8 bit mode.
Installation
Which display driver should I use?
Use the supplied driver or the designated customized driver for TOTOKU displays.
Proper operation of this card is not guaranteed when other display drivers are used.
The VGA boot screen (POST) does not appear.
Check the followings:
• The display is not turned on, or the signal cable is not connected properly.
• The display is not connected to the right card: There is output from the unplugged
on-board VGA or another card.
• Another card is conflicting.
ENGLISH
- 12 -
Can I install the display driver by overwriting?
No. Make sure to uninstall an existing driver before updating it or when adding/
removing cards, or changing slots, and reinstall it.
The new graphics card doesn’t get recognized as new hardware.
Check the followings:
• The graphics card is not inserted all the way in the slot.
• An older version of the display driver may have been installed. Uninstall the existing
driver before installing the latest one.
• A non-NVIDIA card may be conflicting. Remove it.
• Check Device Manager. If the Other devices section shows “[!] Video Controller
(VGA compatible),” the graphics card is detected. Install it from there.
The graphics card I installed doesn’t get recognized.
Confirm that the card is inserted all the way in the slot, and a proper graphics card
and/or a display driver is installed. If another graphics card coexists, remove it.
I can’t install the display driver when another graphics card coexists.
Remove another card once, insert this card, install and setup the display driver. Now
remove this card, insert another card in another slot, install and setup a display driver.
Put this card back into the slot where it was inserted. (In Windows XP only.)
The computer freezes at the Windows startup screen when restarting after the driver
is installed.
This happens when another graphics card coexists. Reinstall cards according to the
instructions above. (In Windows XP only.)
When I add another card after setting up this card, the computer freezes at the
Windows startup screen.
Remove this card once. Insert another card in another slot, install and set up a driver,
and put this card back into the slot where it was inserted.
The display blacks out during driver installation.
Wait for a while.
Any other measures for multi-display-related problems?
Try the followings as measures.
• Use the CMOS switch if the computer has one.
• Set the system BIOS from VGA boot to PCI primary.
• Share the same IRQ with all graphics cards.
• Install cards one by one.
• Check the card for the secondary display if it can be used for a secondary display.
• Update the computer motherboard BIOS.
• Use the latest chip set driver on the computer.
• Update the driver for another graphics card.
• Disable the on-board VGA in the system BIOS settings.
• Use a different slot.
• Remove PCI cards such as sound card.
• Change the driver version.
- 13 -
ENGLISH
Uninstallation
How can I uninstall the software for this graphics card?
Select Control Panel>Add/Remove Programs from the Start menu and delete the
following programs.
• Matrox Driver
• Matrox PowerDesk-SE
Driver setup
I can’t select the predetermined resolution.
Check the followings:
• Was the display connected when turning on the computer? Start up the computer
with the display being connected.
• Isn't the old display driver still active? Remove the old driver and reinstall the new one.
I can’t uncheck "Hide modes that this display cannot display."
Log in as a user with administrative privileges.
Can I have Portrait and Landscape displays or two different resolutions at the same
time using the two DVI outputs on this card?
Yes.
I don't get the PowerDesk-SE icon or its menu doesn't appear.
Is Microsoft .NET Framework 2.0 installed? Check to see if the display is connected to
this card on the Settings tab in the Display Properties dialog box.
One of two displays connected to this card doesn't work.
Confirm that it is not set to "Single Display Mode." Select Display
Properties>Settings(tab) and see if the display is connected to this card.
Miscellaneous
Grayscale images are not displayed properly.
Check the color setting. The following modes do not support 256 shades of gray: 8 bit
color, 16 bit color, and Programmable gray palette. Set it to one of the followings: 32
bit color, Fixed linear gray palette, or Fixed non-linear gray palette.
I tried to use a 32 bit color display and an 8 bit fixed linear gray monochrome display
together, display color changes.
The following symptoms occur due to restrictions for the Windows XP/Vista system
color palette. It is not a failure.
• When the primary display is set to 32 bit color and the secondary is set to 8 bit fixed
linear gray, the active title bar on the secondary display may appear dithered.
• When the primary display is set to 8 bit fixed linear gray and the secondary display is
set to 32 bit color, the background color on the secondary display turns to gray.
In Windows XP/Vista, the gray shades behind the menu temporarily changes.
This can happen when you have a 32 bit color display (primary) along with a fixed
linear gray monochrome display. Uncheck either "Use the following transition effect
for menus and tool tips: (Fade effect)" or "Show shadows under menus" in Display
Properties>Appearance>Effects.
ENGLISH
- 14 -
What is the display driver version?
Version 2.7.1.2 released in March 2010.
Driver upgrade history:
Version Release Changes
2.6.2.4
Dec/09 Released
2.7.0.7
Jan/10
Fixed bugs
2.7.1.2
Mar/10
Fixed bugs
What are the restrictions on display settings when calibrating displays?
• In an environment where an 8 bit color display is primary and a monochrome display
is secondary, proper calibration cannot be performed on the monochrome display.
To calibrate it properly, set the color display to 32 bit color or have the monochrome
display as the primary display.
• Displays set to 8 bit color mode cannot be calibrated.
• The Windows gamma correction function should be disabled.
• Calibration software for ME203L/ME213L/ME251i/ME253i2/ME315L/ME315L plus/
ME351i/ME355i2 supports 32 bit color and fixed gray palette.
• Calibration software for CCL250i/CCL252i2/CCL316/CCL350i/CCL352i2 supports
32 bit color. Do not calibrate displays in 8/16 bit color mode.
- 15 -
ENGLISH
Technical specification
Graphics card LV32P5-M
GPU
Matrox RAD LPX
Video memory
256MB DDR SDRAM
Card type
PCI 32bit (Low-profile design)
BUS
PCI 32bit / PCI 64bit
Operating system
Windows XP / Vista
# of video outputs
2
Max. # of cards
2
Output connector
(via triple-head cable)
LFH60 connector x 1 (LFH60-DVI/DVI branch cable)
Dimensions (W x H)
65 x 168 mm (w/o bracket)
Max. power consumption 10.55W
VGA boot
Resolution
: 640x480, 800x600, 1024x768
ME201L/CCL202/ME213L/CCL250i/ME251i/CCL212/
ME253i2/CCL252i2/MS21i2/CCL206/CCL208
: 1200x1600 (60Hz), 1600x1200 (60Hz)
ME315L/ME315L plus/CCL316/CCL350i/ME351i/
CCL352i2/ME355i2/MS31i2/CCL354i2
:1536x2048 (30Hz), 2048x1536 (30Hz)
Grayscale mode
Fixed linear gray palette
Color modes (8, 16, 32 bit/pixel)
Multi-display mode
Independent, Stretched, Single, Clone
Note: This graphics card is not Dual-link supported.
168 mm
65 mm
ENGLISH
- 16 -
After-sale service
Repair
1. Read this manual carefully and check if the problem solves.
2. If the problem remains, stop using the card, unplug it, and consult your dealer.
3. Do not try to repair yourself. It is very dangerous.
4. Use the original box and packing material to pack the product for shipping.
Driver upgrade
Contact your dealer.
Disposing of the product
Do not dispose of this product in domestic waste. The related national/local laws and
regulations may apply. Consult your dealer for more information.
◆ For more information on TOTOKU products, visit our web site at
www.totoku.com/display/
- 17 -
ENGLISH
This page is intentionally left blank.
ENGLISH
- 18 -
This page is intentionally left blank.
- 19 -
ENGLISH
TOTOKU
Graphics Card LV32P5-M User's Manual
March 2010 Edition
PZZ11-1846B
Notes for this user's manual
• No part of this manual, whether partly or wholly, may be reproduced or copied without authorization.
• The content of this manual is subject to change without notice.
• Although this manual has been prepared carefully, please let us know if you find any errors,
omissions, or ambiguous explanations.
ENGLISH
- 20 -
グラフィックス カード LV32P5-M
取扱説明書
-1-
日本語
もくじ
はじめに ......................................................................................................................................................................... 3
安全にお使いいただくために ..............................................................................................................................................................3
保証書について ...............................................................................................................................................................................................3
責任制限 ..............................................................................................................................................................................................................3
安全にお使いいただくための絵記号について ......................................................................................................................4
本文中の記号について .............................................................................................................................................................................4
安全上の注意 ............................................................................................................................................................. 5
パッケージ内容 ........................................................................................................................................................... 6
必要システム構成 .................................................................................................................................................... 6
ハードウェアのインストールとディスプレイ接続 ........................................................................................... 7
1. 電源コードの取り外し ...........................................................................................................................................................................7
2. グラフィックス カードの取り付け .................................................................................................................................................7
3. ディスプレイの接続 ...............................................................................................................................................................................8
4. 電源コードの接続 ................................................................................................................................................................................10
ソフトウェアのインストールと表示設定 ......................................................................................................... 11
1. ソフトウェアのインストール ..........................................................................................................................................................11
2. 表示設定 ...................................................................................................................................................................................................11
ソフトウェアのアンインストール ........................................................................................................................ 15
Q & A ......................................................................................................................................................................... 16
1. 導入前 ..........................................................................................................................................................................................................16
2. ソフトウェアのインストール ..........................................................................................................................................................17
3. ソフトウェアのアンインストール ..............................................................................................................................................18
4. 表示設定 ....................................................................................................................................................................................................18
5. その他 ............................................................................................................................................................................................................19
技術仕様 ................................................................................................................................................................... 20
保証とアフターサービス ........................................................................................................................................ 22
保証期間 ..........................................................................................................................................................................................................22
修理を依頼されるときは ....................................................................................................................................................................22
サポートを依頼されるときは ...........................................................................................................................................................22
ドライバのアップグレードについて ...............................................................................................................................................22
廃棄について ................................................................................................................................................................................................22
アフターサービスのお問い合わせ窓口 .....................................................................................................................................23
日本語
-2-
はじめに
このたびは、 弊社のグラフィックスカードをお買い上げいただき、 誠にありがとうございます。
本書は、 グラフィックスカードを弊社の液晶ディスプレイと組み合わせてお使いいただくための取扱説明書
です。 本書をよくお読みになり、 正しくお使いいただくようお願いいたします。
安全にお使いいただくために
本書には、 本製品をお使いいただくための重要な情報が記載されています。
本製品をお使いになる前に、 「安全上の注意」 をよくお読みになり、 ご理解された上で正しくお使いくだ
さい。
また、 本書は、 本製品の使用中にいつでも参照できるように大切に保管してください。
保証書について
保証書は内容をよくお読みの上、 必要事項を記入して大切に保管してください。
修理をするときには、 必ず保証書をご用意ください。
責任制限
● 火災、 地震、 第三者による行為、 その他の事故、 使用者の故意または過失、 誤用、 その他異常な
条件下での使用により生じた損害に関して、 当社は一切責任を負いません。
● 本製品の使用または使用不能から生ずる付随的な損害 (事業利益の損失、 事業の中断、 記憶内
容の変化、 消失など) に関して、 当社は一切責任を負いません。
● 取扱説明書で説明された以外の使い方によって生じた損害に対して、 当社は一切責任を負いません。
● 接続機器との組み合わせによる誤動作などから生じた損害に対して、 当社は一切責任を負いません。
● 本製品の使用のため弊社より供給されたソフトウェアの使用により発生したいかなる損害 (期限にか
かわるもの、 ビジネス上の、 利益の減少および遅延や情報にかかわるもの、 その他、 金銭上の不利
益) が、 たとえその発生が当方において予想されたとしても、 弊社は一切責任を負いません。
注意
この製品は、 情報処理装置等電波障害自主規制協議会 (VCCI) の基準に基づく
クラスA情報処理装置です。
この装置を家庭環境で使用すると電波妨害を引き起こすことがあります。
この場合には使用者が適切な対策を講ずるよう要求されることがあります。
-3-
日本語
安全にお使いいただくための絵記号について
ここでは、 お客様や他の人々への危害、 財産への損害を未然に防ぎ、 本製品を安全に正しくお使いい
ただくための注意事項を記載しています。
その表示と意味は次のようになっています。
■絵表示について
注意
この表示を無視して誤った取り扱いをすると、 人が障害を負う
可能性が想定される内容、 および物的損害のみの発生が想定
される内容を示しています。
この表示を無視して誤った取り扱いをすると、 人が死亡または
重傷を負う可能性が想定される内容を示しています。
警告
■絵記号の意味
で示した記号は警告、 注意を促す事項があることを告げるものです。
記号の中には、 具体的な警告内容が描かれています。
「感電注意」 を表す絵記号
例)
で示した記号は、 してはいけない行為 (禁止行為) です。
記号の中には、 具体的な禁止内容が描かれています。
例)
「分解禁止」 を表す絵記号
で示した記号は、 必ずしたがっていただく内容であることを告げるものです。
記号の中には、 具体的な指示内容が描かれています。
例)
「電源プラグをコンセントから抜いてください」 を表す絵記号
本文中の記号について
使用前に必ず読んでいただきたい内容を記述しています。
お使いになるときに注意していただきたいことや、 してはいけないことを記述しています。
操作や用語に関することを記述しています。 必要に応じてお読みください。
本書内の参照ページを記述しています。
日本語
-4-
安全上の注意
グラフィックスカードを安全にお使いいただくために、 下記の項目を守って正しくお使いください。
警告
分解禁止
本製品を分解 ・ 修理 ・ 改造はしないでください。
火災、 感電、 けが、 故障の原因となります。
修理 ・ 点検は、 お買い求めの販売店に依頼してください。
分解や改造をした場合、 修理をお断りしたり、 保証期間であっても有償修理となる
場合があります。
故障した状態や異常のまま使用しないでください。
そのまま使用を続けると火災や感電の原因になります。
火災
濡れた手で本製品を取り扱わないでください。
感電や本製品の故障の原因になります。
ぬれ手禁止
電源プラグを
抜く
煙が出たり変な臭いや音がしたら、 すぐにコンピュータの電源スイッチを切り、 電
源プラグをコンセントから抜いてください。
そのまま使用を続けると火災や感電の原因となります。
お買い求めの販売店にご相談ください。
注意
本製品を床などに放置しないでください。
踏みつけて壊したり、 けがの原因になります。
禁止
禁止
次のような場所に設置しないでください。
・ 強い磁界の発生する場所 ・ 振動の発生する場所
・ 腐食性のガスが発生する場所 ・ 静電気の発生する場所
故障の原因となります。
端子部分には指などで直接触れないでください。
故障の原因となります。
接触禁止
静電気による破壊を防止するため、 本製品を設置 ・ 保管 ・ 運搬する場合には十
分注意してください。
厳守
取り扱いの際は、 身体に溜まった静電気を放電 ( 逃がす ) するなどしてください。
-5-
日本語
パッケージ内容
パッケージに下記のものがすべて含まれていることを確認してください。
グラフィックス カード.........................................1 枚
分岐ケーブル........................................................1 本
ロープロファイル ブラケット...........................1 個
ドライバ CD..........................................................1 枚
取扱説明書 (本書).........................................1 冊
保証書....................................................................1 枚
必要システム構成
・ Intel Pentium 4 または AMD Athlon クラス以上のマイクロ プロセッサを搭載した PC/AT 互換機 (本製品は、 サーバ用コンピュータには使用できない場合があります。)
・ PCI スロット 32bit/33MHz
・ Microsoft Windows XP または Microsoft Windows Vista
・ 512MB 以上のシステムメモリ (推奨 : 1024MB 以上)
・ 40MB 以上のハードディスク空き容量
・ CD-ROM ドライブ
・ 400W 以上の電源
・ 弊社製の液晶ディスプレイ (ME/CCL シリーズ)
画素数
2MP
3MP
日本語
対象ディスプレイ
ME201L, ME213L, ME251i, ME253i2, MS21i2
CCL202, CCL204, CCL212, CCL250i, CCL206, CCL208, CCL252i2
ME315L plus, ME351i, ME355i2, MS31i2
CCL350i, CCL352i2, CCL354i2
-6-
ハードウェアのインストールとディスプレイの接続
新しいグラフィックスカードをインストールする前に、 以下の項目を確認してください。
● OS (Windows) が正しくインストールされていることを確認してください。
● 過去に使用していたディスプレイ ドライバやディスプレイ関連のソフトウェア (Pivot Software など)
は、 すべて削除しておいてください。
● ドライバをインストールする際は、 アドミニストレータとしてログオンしてください。
● 古いグラフィックス カードが実装されている場合は、 それを取り外してください。
● コンピュータのマザーボードにオンボードのグラフィックコントローラがある場合は、 それを無効 (Disable) にしてください。 無効にする方法は、 コンピュータ メーカーにお問い合わせください。
● マルチ ディスプレイ表示用に、 他の種類のグラフィックス カードと混在してお使いになる場合、 あら
ゆる組み合わせでの動作を保証するものではありません。 もしもインストールが正常に行えないな
どの問題が発生した場合は、 Q&A を参考にしてください。
1. 電源コードの取り外し
コンピュータ本体や周辺機器の電源コードをコンセントから抜き、 電源が入っていないことを確認してく
ださい。
2. グラフィックスカードの取り付け
1 コンピュータのカバーを取り外します。
(カバーの取り外し方は、 コンピュータの取扱説明書を参照してください。)
静電放電破壊
静電気が、 コンピュータやグラフィックス カード上のデリケートなコンポーネント類に損
傷を与える可能性があります。 コンピュータの金属部分に触れるなどして、 静電気を
放電させてから作業を行ってください。 電気部品や端子部分に触れないようにしてく
ださい。
2 古いグラフィックス カードを取り外すか、 スロットから補助ブラケットを取り外します。
やけど
直前にコンピュータを動作していた場合、 内部の部品が熱くなっていることがあります。
3 本グラフィックス カードをコンピュータの PCI スロットに差し込みます(下表参照)。 このとき、カー
ドがスロットに完全に差し込まれ、 かつコンピュータ内の他の部品に当たらないことを確認して
ください。
LV32P5-M
×
スロット形状
AGP
×
×
PCI Express x16
PCI Express x1
○
PCI 32bit
○
PCI 64bit
-7-
日本語
通風、 周囲温度
本カードは、 周囲温度* 55℃以下でご使用ください。
* : 周囲温度は、 コンピュータ内のグラフィックスカード周辺の温度です。
グラフィックスカードをコンピュータバスに追加するときは、 電源や発熱部品近くのスロ
ットは避けて、 スロットを一つ空けるなどして放熱に十分注意してください。
放熱の悪い環境で製品を使用しないでください。 製品寿命に影響するばかりでなく、
故障の原因となることがあります。
ホコリなどによりコンピュータ内の通気が悪くなると、 カードの冷却が不十分となり故障
に至る場合があります。 この場合は、 保証の対象外とさせていただくことがありますの
で、 予めご了承ください。
コンピュータ内の冷却ファンに内部ケーブルなどが接触していないことと、 ファンに巻き
込まれる恐れのあるもの (熱ではがれやすいラベルなど) がファンの近くにないことを
確認してください。
ファンが回らない状態で使用すると、 故障の原因となります。
部品破損
本カード上の部品には無理な力を加えないでください。 特に放熱器や実装部品に力を
加えてのグラフィックスカードの挿抜は避けてください。 故障の原因となります。
4 グラフィックス カードのブラケットをコンピュータの筐体に固定します。
必要であれば付属のロープロファイル ブラケットをご使用ください。
5 LV32P5-M を 2 枚使用する場合は、 すべてのカードを同様に取り付けてください。
枚数制限
1 台のコンピュータで同時に使用可能なグラフィックスカードの数は制限があります。
制限を越えた数のグラフィックスカードを取り付けないでください。 使用可能な枚数は
グラフィックスカードの種類や OS、 ディスプレイドライバによって異なります。
6 コンピュータにカバーを取り付けます。
3. ディスプレイの接続
i2 モデル (CCLxxxi2, MExxxi2, MSxxi2) を表示する場合の注意事項
i2 モデルは、 ポートレイト ( 以降 縦長表示 とする ) とランドスケープ ( 以降 横長表示 とする ) の
両方の表示モードをサポートしていますが、 表示モードの切替は手動で行う必要があります。
デフォルト ( 工場出荷設定 ) では、 縦長表示に設定されています。
i2 モデルを横長表示で使用する場合は、 必ず表示モードの切替を行ってください。
表示モードの切替方法については、 ディスプレイの取扱説明書をご覧ください。
表示モードの設定状態は、 ディスプレイから DVI ケーブルを外した状態でパワースイッチ
を ON にしたときのLEDインジケータの点滅状態で確認することができます。
日本語
-8-
表示モード
縦長表示
パワースイッチを ON にしたときの LED インジケータの点滅状態
緑色に2回点滅
緑色に3回点滅
横長表示
1 付属の DVI 分岐ケーブルを本カードの LFH60 コネクタに接続し、 ネジ止めロックします。
コネクタ破損
DVIコネクタは乱暴に斜めに接続すると、 コネクタのピンが折れ曲がることがありますの
で、 まっすぐ丁寧に接続してください。
DVI 分岐ケーブルの DVI コネクタとディスプレイ間を、 ディスプレイに付属の DVI ケーブルで接
続し、 ネジ止めロックします。
2 つのコネクタ
DVI 分岐ケーブルには 2 つの DVI コネクタ #1 (1/3) と #2 (2/4) があります。
コネクタ #1 (1/3) に 1 台目のディスプレイを接続してください。
DVIコネクタ #1
1 台目 ( 左側 ) の
ディスプレイを接続
DVIコネクタ #2
2 台目 ( 右側 ) の
ディスプレイを接続
LFH60
コネクタ
1/3
DVI 分岐ケーブル
2/4
ディスプレイ 1
DVI コネクタ
-9-
日本語
注意
電源が入った状態でDVIケーブルを接続すると、 グラフィックスカード故障の
原因となります。
DVIケーブルの接続は、 必ず電源コードを抜いた状態で行ってください。
2 複数台のディスプレイを使用する場合は、 すべてのディスプレイを接続してください。
4. 電源コードの接続
コンピュータやディスプレイ、 周辺機器の電源コードを、 すべてコンセントに差し込みます。
日本語
- 10 -
ソフトウェアのインストールと表示設定
ソフトウェア (ドライバ) は同梱のドライバ CD (もしくは指定のもの) を使用してください。
もしもトラブルが発生した場合は、 Q&A の章を参照してください。
1. ソフトウェアのインストール
1 接続したディスプレイの電源を入れ、 コンピュータを起動します。
2 アドミニストレータとして Windows にログインします。
3 新しいハードウェアが検出されウィザードが起動しますが、 キャンセルします。
表示されるウィザードにしたがって、 適切にキャンセルしてください。
・ 「新しいハードウェアの検出ウィザード」 : キャンセルをクリックしてください。
・ 「ハードウェアのインストール : インストールの停止 ⇒ 完了をクリックしてください。
4 コンピュータの CD-ROM ドライブに、 ドライバ CD を挿入します。
5 CD 内の次の該当フォルダ内にある Setup.exe を実行してください。
OS が XP または Vista で 32 ビットの場合 : DriverCD /XPVISTAx32 フォルダ
OS が XP または Vista で 64 ビットの場合 : DriverCD /XPVISTAx64 フォルダ
画面の指示に従ってディスプレイドライバをインストールします。
インストール中に、 以下のいずれかのメッセージが表示されることがあります。
・ 「デジタル署名が見つかりませんでした」 : はい をクリックしてください。
・ 「ハードウェアのインストール」 : 続行 をクリックしてください。
インストール中、 画面が一瞬消えることがありますが、 そのままお待ちください。
6 コンピュータを再起動します。
2. 表示設定
表示設定はソフトウェアをインストールして再起動した後に行ってください。
< 確認事項 >
ご使用のディスプレイにより、 表示できる解像度が異なります。
表示設定を行う前に、 次の内容を確認してください。
画素数
表示方向
解像度
リフレッシュレート
2MP
縦長表示
横長表示
1200 × 1600
1600 × 1200
60 Hz
3MP
縦長表示
横長表示
1536 × 2048
2048 × 1536
30 Hz
対象ディスプレイ
ME201L, ME213L, ME251i,
ME253i2 *1, MS21i2 *1
CCL202, CCL204, CCL212, CCL250i,
CCL206, CCL208, CCL252i2 *1
ME315L plus, ME351i, ME355i2 *1,
MS31i2 *1
CCL350i, CCL352i2 *1, CCL354i2 *1
各対象ディスプレイの解像度とリフレッシュレートの対応表
- 11 -
日本語
* 1 : i2 モデル (CCLxxxi2, MExxxi2, MSxxi2) の表示方向はディスプレイの表示モードに依存
します。 ディスプレイの表示モードの切替方法は、 各ディスプレイに付属の取扱説明書を
参照してください。
1 アドミニストレータとして Windows にログインします。
2 タスクバーに Matrox PowerDesk アイコン
が追加されることを確認します。
3 以下の手順にしたがって、 各ディスプレイの解像度、 色、 およびマルチ ディスプレイを
設定します。
1) タスクバーの Matrox PowerDesk アイコンをクリックします。
ディスプレイ ドライバには、 表示設定を行うソフトウェアが含まれています。
本カードを設定する際は、 画面のプロパティを使用しません。
2) ポップアップ メニューが現れたら、 Multi-Display Setup を選択します。
ポップアップ メニュー
Matrox PowerDesk-SE ダイアログボックスが現れたら、 以下の手順にしたがって、
設定します。
①が Multi-display setup 欄で、 ②が Displays Settings 欄となります。
①
②
Matrox PowerDesk-SE ダイアログボックス
日本語
- 12 -
① Multi-display setup欄で、マルチ ディスプレイ構成を選択します。
Multi-display setup
マルチ ディスプレイ構成
Single mode
シングルモード
単独表示モードで使用
Clone mode
クローンモード
クローン表示モードで使用
Stretched mode
ストレッチドモード
連結表示モードで使用
使用状態
1
1
1
1
1
2×1
Independent mode
インディペンデント
モード
独立表示モードで使用
1 2
1×2
1
2
2 Dispalys
・ 連結表示モード : 同一カード上で、 表示設定が同じ 2 台のディスプレイを連結させ、
1 つのワイド画面として表示させるモード。
(縦長表示の連結をサポートしているのは ME213L のみです。)
・ 独立表示モード : 同一カード上の 2 台のディスプレイを個々に表示させるモード。
② Displays Settings 欄で、 ①で選択したマルチディスプレイ構成の表示方向、 解像度、 およ
び色数を設定します。
設定項目
内 容
Display rotation (表示方向)
回転方向を決めます。
反時計回りの回転角を下記 4 つから選択できます。
0 degrees, 90 degrees, 180 degrees, 270 degrees
Mode source (プライマリ設定)
接続されたディスプレイのプライマリとセカンダリを設定し
ます。 Display 1 =プライマリ , Display 2 =セカンダリ
Display mode (表示解像度)
ディスプレイの解像度を設定します。
Color palette (色数)
画面の色数を設定します。
Reduce tearing (残像低減)
ティアリングによる残像を低減させます。
連結モードの場合は、 Display mode は同じ解像度に設定してください。
- 13 -
日本語
③ Apply をクリックし、 設定を反映させます。 すべてのディスプレイが正常に設定されていれば、
確認メッセージの OK をクリックします。
ディスプレイ画面が数秒間暗くなり、 設定前の解像度に戻ってしまう場合は、 当該
ディスプレイが対応する解像度が設定されているかどうか、 ディスプレイの仕様で確
認し、 正しく設定し直してください。
④ OK をクリックし、 PowerDesk-SE ダイアログ ボックスを閉じます。
4 ドライバ CD をコンピュータの CD-ROM ドライブから取り出し、 表示設定を完了します。
日本語
- 14 -
ソフトウェアのアンインストール
本グラフィックスカードのソフトウェアをアンインストールする場合は、 以下の手順で行ってください。
1 アドミニストレータとして Windows にログオンします。
2 タスクバーのスタートメニューから [設定] → [コントロールパネル] を選択します。
3 [コントロールパネル] が表示されたら [アプリケーション (プログラム) の追加と削除] をダブル
クリックします。
4 現在インストールされているプログラムの一覧より [Matrox Drivers] と [Matrox Power DeskSE] を削除します。
5 すべてのアプリケーションを終了し、 コンピュータを再起動します。
再起動を行わないとアンインストールは終了しません。
- 15 -
日本語
Q&A
1. 導入前
対応する OS は何ですか ?
Windows XP/Vista に対応します。
ディスプレイを何台表示できますか ?
本カード 1 枚で 2 台のディスプレイが表示可能です。
(2 枚のカードで 4 台のディスプレイまで保証)
TOTOKU のどの液晶ディスプレイと組み合わせて使用できますか ?
以下の組み合わせで使用できます。
ディスプレイモデル ME315L plus, CCL350i, CCL352i2, ME355i2, MS31i2, CCL352i2,
ME201L, CCL202, CCL204, CCL212, ME213L, CCL250i, ME251i,
CCL252i2, ME253i2, MS21i2, CCL206, CCL208
上記以外に 2M 以下の解像度のモデルとの組み合わせでも使用できます。
どの解像度を表示できますか ?
TOTOKU ディスプレイと組み合わせて、 以下の解像度を表示できます。
3 メガピクセル x 2 画面 (1536x2048 または 2048x1536) と (1536x2048 または 2048x1536)
3 メガピクセル x 2 メガピクセル (1536x2048 または 2048x1536) と (1200x1600 または
1600x1200)
2 メガピクセル x 2 画面 (1200x1600 または 1600x1200) と (1200x1600 または 1600x1200)
(上記以外に 640x480, 800x600, 1024x768 の解像度を選択可能です。)
複数枚のグラフィックスカードを混在してのマルチディスプレイ表示ができますか ?
Windows XP では基本的に使用できます。
ただし、 他の種類のグラフィックスカードと混在してお使いになる場合は、 あらゆる組み合わせでの
動作を保証はしておりません。 Vista では、 他社メーカーのグラフィックスカードと混在してお使いになることはできません。 使用す
る場合は、 同じメーカーで同じドライバのグラフィックスカードをお使いください。
本カードはコンピュータのどのスロットにセットできますか ?
32bit PCI スロットと 64bit PCI スロットで使用可能です。
基板サイズが物理的に入るスペースがコンピュータ内にあることをご確認ください。。
OpenGL に対応しますか ?
基本的には 32 ビットカラーモード (および 16 ビットカラーモード) において Open GL がサポートされ
ています。
ただし制約がいくつかありますので、 実際のシステムで動作をご確認の上ご利用ください。
なおリニアグレー固定パレットなど 8 ビットモードにおいての Open GL はサポートされておりません。。
日本語
- 16 -
2. ソフトウェアのインストール
どのディスプレイ ドライバを使用すればいいですか ?
同梱または指定の TOTOKU 液晶ディスプレイ用カスタムドライバを用いてください。
それ以外のディスプレイドライバでの動作は保証いたしかねます。
コンピュータ起動時の POST 画面 (VGA ブート画面) が表示されません。
以下のような理由が考えられますので、 ご確認ください。
・ ディスプレイの電源が入っていない、 または信号ケーブルが確実に接続されていない。
・ ディスプレイ未接続のオンボード VGA アダプタや他のグラフィックス カード (コンピュータのシステム
BIOS の VGA Boot 設定が、 AGP 優先やオンボード VGA 優先になっている) から出力されている。
・ オンボード VGA を含む他のグラフィックス カードの影響を受けている。
ディスプレイ ドライバを上書きインストールしてもよいですか ?
いいえ。 ドライバの更新、 カードの追加、 取り外し、 およびスロットの変更を行う場合には、
必ずいったんディスプレイ ドライバをアンインストールし、 再度ドライバをインストールしてください。
新しいグラフィックスカードを取り付けても、 新しいハードウェアとして検出されません。
以下のような理由が考えられますので、 ご確認ください。
・ グラフィックスカードがスロットに確実に挿入されていない可能性があります。
・ ディスプレイドライバが既にインストールされていた可能性があります。 古いバージョンのドライバが
インストールされていた場合、 そのドライバをアンインストールしてから最新ディスプレイドライバを
インストールしてください。
・ 混在して実装された他種グラフィックスカードの影響を受けている場合があります。 他種グラフィック
スカードを取り外してみてください。
・ 検出されないようでも、 実際はデバイスマネージャの 「その他のデバイス」 に 「! ビデオコントロー
ラ (VGA 互換)」 として認識されている場合があります。 そのままディスプレイドライバをインストー
ルしてください。
ディスプレイ ドライバをインストールしようとしたが、 取り付けたカードが認識されません。
グラフィックスカードがスロットに確実に挿入されているか、 またグラフィックスカードやディスプレイドラ
イバが誤っていないかを確認してください。 また、 他種グラフィックスカードが混在実装されている場
合は、 それを取り外してみてください。
他種グラフィックス カードが混在していると、 ディスプレイ ドライバがうまくインストールできません。
いったん他種グラフィックス カードを取り外し、 本カードのみを取り付けてディスプレイ ドライバのイン
ストール・設定を行ってください。 次に、本カードを取り外し、他種グラフィックス カードのみを別のスロッ
トに挿入し、 ディスプレイ ドライバのインストール ・ 設定を行ったあと、 再び本カードを元のスロットに
取り付けてみてください (Windows XP のみ)。
ドライバをインストールして再起動したら、 Windows 起動画面でフリーズしてしまいます。
他種グラフィックスカードが混在実装されている場合に起こりえます。 いったん他種カードを取り外し
本カードのみでセットアップを行い、 次に本カードを取り外して他種カードのみを取り付けてセットアッ
プを行った後、 本カードを元のスロットに取り付けてみてください (Windows XP のみ)。
このカードを設定後、 他種グラフィックス カードを追加したが、 Windows 起動画面でフリーズします。
いったん本カードを取り外し、 他種グラフィックスカードだけでインストールと設定を行った後に、 再び
本カードを元のスロットに取り付けてみてください。。
- 17 -
日本語
ディスプレイ ドライバのインストール中、 画面が一瞬消えて暗くなることがあります。
そのままの状態でしばらくお待ちください。
マルチディスプレイ表示でのトラブル対策として、 他に何か参考として考えられますか ?
以下の事項を行うことでトラブル対策となることがあります。
・ CMOS スイッチのあるコンピュータでは、 CMOS スイッチを利用する。
・ システム BIOS で VGA Boot を PCI 優先 (プライマリ) に設定する。
・ 1 つの IRQ を全グラフィックスカードで共有するようにしてみる。
・ カードを 1 枚ずつインストールする。
・ セカンダリディスプレイ用には、 セカンダリとして使用できるカードか確認する。
・ コンピュータのマザーボードの BIOS を最新のものにしてみる。 ・ コンピュータのチップセットのドライバを最新のものにしてみる。
・ 他種グラフィックスカードのドライバを最新のものにしてみる。
・ オンボード VGA が付いている場合は、 システム BIOS 等でオンボード VGA を無効化する。
・ カードを挿入するスロットを変えてみる
・ サウンドカードなど他の PCI カードを取り外す。
・ ドライバのバージョンを変える。
3. ソフトウェアのアンインストール
本カード用のソフトウェアを削除するには、 どうすればよいですか ?
「コントロールパネル」 の 「アプリケーション (プログラム) の追加と削除」 で、 下記のプログラムを
削除してください。
Windows XP/Vista の場合 : Matrox Driver
Matrox PowerDesk-SE
4. 表示設定
所定の解像度に設定できません。
以下のような理由が考えられますので、 ご確認ください。
・ コンピュータの電源を入れたときに所定のディスプレイが接続されていましたか?
→ 所定のディスプレイが接続された状態でコンピュータを起動してください。
・ 古いディスプレイドライバが有効になっていませんか?
→ そのドライバを削除した後に、 新しいドライバを再インストールしてください。
「このディスプレイでは表示できないモードを隠す」 のチェックが外せません。
アドミニストレータとして Windows にログオンし、 操作してください。
本カードの 2 つの DVI 出力で、 縦長表示と横長表示あるいは他の解像度を混在表示できますか ?
縦横表示や他の解像度と混在して表示が出来ます。
Windows XP/Vista で、 PowerDesk-SE アイコンおよびメニューが表示されません。
Microsoft .NET Framework 2.0 がインストールされているか確認してください。
本カード上のディスプレイが接続されているか [ 画面のプロパティ / 設定] を確認してください。。
本カード上の 2 台のディスプレイの内 1 台が表示できません。
マルチディスプレイモードが 「単独表示モード」 に設定されていないか確認してください。
本カード上のディスプレイが接続されているか [ 画面のプロパティ / 設定 ] を確認してください。。
日本語
- 18 -
5. その他
グレースケールの階調が階調落ちなどして正常に表示されません。
色の設定が、 カラーモードの 8 ビットカラーや 16 ビットカラー、 あるいはダイナミックグレーパレットに
設定されていないか確認してください。 32 ビットカラーあるいはリニアグレー固定パレット、 ノンリニア
グレー固定パレットでないと、 256 階調のグレースケールが表示できません。
32 ビットカラーディスプレイと 8 ビット固定グレーパレットのモノクロームディスプレイを混在すると色
が変わってしまいます。
以下は Windows XP/Vista のシステムカラーパレットの制約で起こるもので、 異常ではありません。
プライマリディスプレイが 32 ビットカラーモードでセカンダリディスプレイが 8 ビットグレー固定パレット
モードのときは、 セカンダリディスプレイ上のアクティブタイトルバーにディザがかかったりします。
逆にプライマリが 8 ビットグレー固定パレットモードのモノクロームディスプレイでセカンダリが 32 ビット
カラーモードのカラーディスプレイのときは、 セカンダリのカラーディスプレイのデスクトップ背景などの
色がグレーになります。
Windows XP/Vista で、 メニューの背面の階調表示が一時的におかしくなります。
Windows XP/Vista で、 32 ビットカラーディスプレイ (プライマリ) と混在してリニアグレー固定パレッ
トに設定したモノクロームディスプレイを表示した場合、 この現象が発生することがあります。
その場合、 [ 画面のプロパティ / デザイン / 効果 ] の 「次のアニメーション効果をメニューとヒントに
使用する (フェード効果)」 や 「メニューの下に陰を表示する」 のチェックボックスのチェックを外して
みてください。
ディスプレイドライバのバージョンについて教えてください。
本書改訂時のバージョンは、 Ver. 2.7.1.2 です。
ドライバ更新履歴 バージョン リリース 主な更新内容
Ver. 2.6.2.4 2009.12 リリース
Ver. 2.7.0.7 2010.01 バグ修正
Ver. 2.7.1.2 2010.03 バグ修正
ディスプレイのキャリブレーションを行うときの表示設定上の制約はありますか ?
以下の点にご注意ください。
・ モノクロームディスプレイのキャリブレーションを行うときに、 プライマリディスプレイとして他のカラー
ディスプレイを混在して使用されている場合、 プライマリディスプレイが 8 ビットカラーモードに設定
されているとキャリブレーションが正常に行えません。 その場合、 プライマリディスプレイを 32 ビット
カラーモードにするか、 キャリブレーションの対象となるモノクロームディスプレイをプライマリディスプ
レイにしてください。
・ 8 ビットカラーモードに設定されているモニタは、 キャリブレーションが行えません。
・ Windows 上でガンマ補正がかかっている場合は、 その機能をオフにしてください。
・ME203L/ME213L/ME251i/ME253i2, ME315L/ME315L plus/ME351i/ME355i2 用のキャリブレーショ
ンソフトウェアは、 32 ビットカラーモードおよびグレー固定パレットに対応しています。
・ CCL250i/CCL252i2/CCL316/CCL350i/CCL352i2 用のキャリブレーションソフトウェアは、 32 ビット
カラーモード対応です。
8/16 ビットカラーモードでキャリブレーションを行わないでください。。
- 19 -
日本語
技術仕様
グラフィックス カード LV32P5-M
GPU
Matrox RAD LPX
ビデオ メモリ
256MB DDR SDRAM
カード タイプ
PCI 32bit (ロープロファイル デザイン)
対応バス
PCI 32bit / PCI 64bit
対応オペレーション システム
Windows XP / Vista
ビデオ出力数
2 出力
最大混在枚数
2枚
出力コネクタ
(付属分岐ケーブル経由)
LFH60 コネクタ× 1 (LFH60-DVI/DVI 分岐ケーブル)
寸法 (H x L)
65 (H) x 168 (L) mm (ブラケット除く)
最大消費電力
10.55 W
解像度
640X480, 800X600,
1024X768
1200X1600 (60Hz),
1600X1200 (60Hz)
出力解像度
1536X2048 (30Hz),
2048X1536 (30Hz)
適用
(ブート表示用)
ME201L, CCL202, CCL250i,
ME251i, CCL212, ME213L,
CCL252i2, ME253i2, MS21i2,
CCL204, CCL206, CCL208
ME315L, ME315L plus, CCL316,
CCL350i, ME351i, MS31i2,
CCL352i2, ME355i2, CCL354i2
グレースケールモード
リニアグレー固定パレット
カラーモード (8, 16, 32 bit/pixel)
マルチディスプレイモード
独立表示、 連結表示、 単独表示、 クローン表示
本カードは Dual Link には対応しておりませんので、 Single Link での表示となります。
日本語
- 20 -
168 mm
65 mm
- 21 -
日本語
保証とアフターサービス
(この内容は日本国内に限られます。)
保証期間
保証期間はお買い上げの日から 3 年間です。
修理を依頼されるときは
① 本書をよくお読みの上、 もう一度お調べください。
② それでも異常があるときは、 使用をやめて電源コードをコンセントから抜き、 TOTOKU フィールド
サービスセンターにお問い合わせください。
ご自分での修理はしないでください。 大変危険です。
③ 保証期間中の修理は…
故障内容や使用状況により無料修理いたします。
④ 保証期間後の修理は…
TOTOKU フィールドサービスセンターにご相談ください。
修理によって機能が維持できる場合は、 ご要望により有料修理いたします。
⑤ 修理依頼での輸送は、 製品の梱包箱および梱包材をご使用ください。
サポートを依頼されるときは
トラブルのお問い合わせの際は、 必ず下記の情報をご連絡ください。
●
●
●
●
グラフィックスカード : モデル名、 使用枚数、 他のグラフィックスカードやオンボードVGAの有無
ディスプレイ
: モデル名、 使用台数、 他のモニタの有無
コンピュータ
: メーカー、 モデル名、 メモリサイズ、 CPU、 チップセットなど
OS
: バージョン (サービスパック含む)
● アプリケーション
● 画面の設定
● トラブル内容
: 使用アプリケーション (ビューア)
: 使用解像度と色数 (グレースケール、 カラー)
: トラブルの詳細と再現方法
ドライバのアップグレードについて
ドライバのアップグレードについては販売店にお問い合わせください。
廃棄について
本製品の廃棄については、 各自治体の廃棄ルールにしたがってください。
詳しくは、 各自治体へお問い合わせください。
日本語
- 22 -
アフターサービスのお問い合わせ窓口
アフターサービスのお問い合わせは、 下記サービスセンターにご相談ください。
[年間保守契約に対するご相談]
各営業 窓口
本社 情報機器生産本部 営業部
TEL.03-5860-2131
FAX.03-5860-2137
[修理に対するお問い合わせ]
〒940-0006東特長岡株式会社 新潟県長岡市東高見 1-2-1 東特長岡株式会社
TOTOKU フィールドサービスセンター
大阪支店
0120-24-7911
FAX.0258-24-6700
受付時間
9 : 00 ~ 12 : 00
13 : 00 ~ 17 : 00
(土、 日、 祝祭日および東特長岡休日は除く)
[サポートに対するお問い合わせ] 〒940-0006東特長岡株式会社 新潟県長岡市東高見 1-2-1 東特長岡株式会社
サポートデスク
0120-24-2061
FAX.0258-24-6700
受付時間
9 : 00 ~ 12 : 00
13 : 00 ~ 17 : 00
(土、 日、 祝祭日および東特長岡休日は除く)
[製品に関する営業窓口]
TEL.06-6352-3541
FAX.06-6354-0828
名古屋支店
TEL.052-771-1161
FAX.052-776-0643
信越営業所
TEL.0268-34-5285
FAX.0268-34-5497
受付時間
9 : 00 ~ 12 : 00
13 : 00 ~ 17 : 00
(土、 日、 祝祭日および当社休日は除く)
〒 105-0004
東京都港区新橋 6-1-11
(ダヴィンチ御成門ビル 3 階)
東京特殊電線株式会社
情報機器生産本部 営業部
TEL.03-5860-2131
FAX.03-5860-2137
受付時間
9 : 00 ~ 12 : 00
13 : 00 ~ 17 : 00
(土、 日、 祝祭日および当社休日は除く)
◆製品に関する詳しい内容は、 当社インターネットホームページをご覧ください。
www.totoku.co.jp/display/
- 23 -
日本語
TOTOKU
グラフィックス カード LV32P5-M 取扱説明書
2010年 3月版
PZZ11-1846B
取扱説明書に関するご注意
・ 本書の内容の一部、 または全部を無断転記することを禁止します。
・ 本書の内容について、 将来予告なしに変更することがあります。
・ 本書の内容については、 万全を期して作成いたしましたが、 万一ご不明な点や誤り、 記載もれなどお気づきの
点がありましたらご連絡ください。
日本語
- 24 -
TOTOKU ELECTRIC CO., LTD.
6-1-11 SHINBASHI, MINATO-KU,
TOKYO 105-0004 JAPAN
TEL: +81-3-5860-2132
FAX: +81-3-5860-2137
URL: http://www.totoku.com/display/
東京特殊電線株式会社
〒 105-0004 東京都港区新橋 6-1-11
(ダヴィンチ御成門ビル 3 階)
TEL: 03-5860-2131FAX: 03-5860-2137
http://www.totoku.co.jp/display/
Printed in Japan on recycled paper.
LV32P5-M