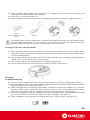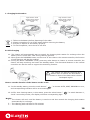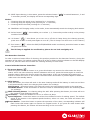
1
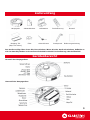
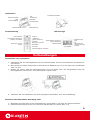
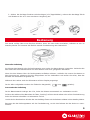
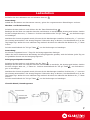
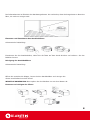
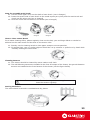
Zitruspresse orange
10008166
10008167
Saugroboter
10009786
10008168
Sehr geehrter Kunde,
zunächst möchten wir Ihnen zum Erwerb Ihres Gerätes gratulieren.
Bitte lesen Sie die folgenden Anschluss- und Anwendungshinweise sorgfältig durch und befolgen Sie
diese um möglichen technischen Schäden vorzubeugen.
Anwendungsbereiche
Dieses Gerät ist zur Reinigung vom eigenen Zuhause, Hotelzimmern und kleinen Büros geeignet. Es
können kurzflorige Teppiche, Holzfußböden, Hartböden und Fliesen gereinigt werden.
Sicherheitshinweise
Bitte lesen und verstehen Sie alle Warnungen und Anweisungen, die in dieser Anleitung aufgeführt sind.
Bewahren Sie die Anleitung auf. Das Gerät wurde nach den aktuellen Sicherheitsstandards entwickelt
und produziert.
Stromversorgung: Das Gerät darf
nur mit der passenden
Netz-spannung betrieben werden.
Halten Sie das Gerät und das
Netzkabel fern von Wasser.
Öffnen Sie nie das Gehäuse. Es Schützen Sie das Netzkabel. Vermeiden
dürfen keine metalernen FremdSie hohen Druck und treten Sie nicht
körper in das Gerät gelangen.
darauf. Ziehen oder knicken Sie es nicht.
Meiden Sie direktes
Sonnenlicht und Hitze.
Ziehen Sie bei längerer Nichtbenutzung den Netzstecker
aus der Steckdose.
2
Lieferumfang
Hauptgerät
Abstandshalter
Ladestation
Fernbedienung
Netzteil
Mopping Teil
(Mop und Halter)
Filter
Seitenbürsten
Staubpinsel
Bedienungsanleitung
Das Gerät verfügt über einen Ein/Aus-Schalter. Wenn Sie das Gerät einschalten, befindet es
sich im Standby-Modus und erwartet die Befehle mittels Fernbedienung oder Bedienfeld.
Geräteübersicht
Oberteil des Hauptgerätes
Unterteil des Hauptgerätes
3
Ladestation
Ein/Aus-Schalter
Volle
Geschwindigkeit
Netzanschluss
Uhr
Einstellung
Rutschfeste Streifen
Zeitsteller
Infrarotsender
Ladeelektrode
FernbedienungLED-Anzeige
LED-Indikator
Automatische Reinigung
„Entlang der Wand“
Bewegung „Links“
Pause
An/Aus
„Andocken“
„Spot“-Reinigung
Vorwärts
Bewegung „Rechts“
Rückwärts
Automatische Reinigung
„Spot“-Reinigung
Batteriestand
UV-Taste
Geschwindigkeit einstellen
Digitalanzeige
Zeit
UV
Fehleranzeige
Verschmutzungsanzeige
Vorbereitungen
Anschließen der Ladestation
1. Installieren Sie die Dockingstation auf dem flachen Boden und mit der Rückseite der Station an
einer Wand.
2. Bitte stellen Sie keine Hindernisse zu den Seiten im Abstand von 0,5 m und nach vorn im Abstand
vom 3 m auf.
3.Stellen Sie sicher, dass die Infrarotsensoren frei von Staub sind. Der Saugroboter kann die
Dockingstation nicht finden, wenn das Signal versperrt wird.
4. Verbinden Sie die Ladestation mit einer geeigneten Steckdose, sieh obere Abbildung.
Einsetzen und Entnehmen des Mopp-Teils
1. Befestigen Sie den Filter an der Filterhalterung (siehe Abb.1) mit Hilfe der Klettverschlüsse.
2. Rasten Sie das Mopp-Teil an der Unterseite des Gerätes ein (Siehe Abb. 2-4).
4
3. Sollten Sie die Mopp-Funktion nicht benötigen (z.B. Teppichböden), nehmen Sie das Mopp-Teil ab
und Bewahren Sie es in einer trockenen Umgebung auf.
Abb.1
Abb.2
Abb.3
Abb.4
Bedienung
Das Gerät verfügt über einen Ein/Aus-Schalter. Wenn Sie das Gerät einschalten, befindet es sich im
Standby-Modus und erwartet die Befehle mittels Fernbedienung oder Bedienfeld.
Manuelle Aufladung
Sie können das Netzteil oder die Dockingstation zum Laden des Saugroboters verwenden. Verbinden Sie
das Gerät über den Netzanschluss mit dem Netzteil und einer geeigneten Steckdose.
Wenn Sie den Roboter über die Dockingstation aufladen möchten, schließen Sie zuerst die Station an
das Stromnetz an, platzieren Sie den Saugroboter auf der Ladestation und stellen Sie sicher, dass der
Kontakt der Elektroden hergestellt ist.
Während des Ladens wird der Akkustatus auf dem Display angezeigt.
Ist der Akku vollgeladen werden drei Teilstriche dargestellt (
Leer,
geladen).
Automatische Aufladung
Ist der Batteriestand niedriger als 15%, kehrt der Roboter automatisch zur Ladestation zurück.
Drücken Sie während des Betriebes die Taste „Docking“ auf dem Gerät selbst oder auf der Fernbedienung
kehrt der Roboter ebenfalls zur Ladestation zurück.
Um die Suche Abzubrechen drücken Sie eine beliebige Taste und der Roboter schaltet in den Standby-Modus.
Benutzen Sie die Richtungstasten auf der Fernbedienung, um die den Roboter bei der Suche zu unterstützen.
5
Ladezeiten /Status
1. Während der manuellen Aufladung (Netzkabel an Hauptgerät angeschlossen), wird der Roboter
nicht auf Tastenbefehle reagieren solange das Kabel angeschossen ist.
2. Während der ersten 3 Aufladungen stellen Sie bitte sicher, dass das Gerät mindestens 12 Stunden
lang geladen wird.
3. Die normale Ladezeit beträgt danach 3-5 Stunden.
Funktionstasten am Gerät
1. Drücken Sie im Standby Modus die
-Taste, um AUTO, SPOT oder DOCKING-Modus auszuwählen.
2. AUTO:
AUTO-Automatische Reinigung. Wählen Sie zwischen den Modi 1-3 aus.
1- Die Reinigung erfolgt bis die Leitung des Akkus stark nachgelassen hat, danach sucht
das Gerät selbstständig die Ladestation auf.
2- Die Reinigung erfolgt 30 min. lang.
2- Die Reinigung erfolgt 15 min. lang.
3. SPOT :
SPOT-Funktion. Wählen Sie zwischen den Modi 1-3 aus.
1- Die Reinigung erfolgt spiralförmig 1-4 min.
2- Die Reinigung erfolgt zickzackförmig 1-4 min.
2- Die Reinigung erfolgt entlang der Wand 10 min. lang.
4. DOCKING:
Automatischer Lademodus(siehe autom. Aufladung)
5. UV-Taste
:
Das Gerät ist mit einer UV-Lampe ausgestattet, die zur Desinfektion von Böden dient. Sie ist speziell
geeignet für Personen mit Allergien oder Haushalte mit Tieren. Sie können diese An- oder Ausschalten.
Bitte blicke Sie nicht direkt in die Lampe.
6. Start-Taste
:
Startet den gewählten Modus.
Anmerkung: Die Tasten auf der Fernbedienung entsprechen den bereits beschriebenen Tasten am
Hauptgerät/Ladestation.
6
Ladestation
Schließen Sie die Ladestation an und schalten diese an
.
Anmerkung:
sobald Sie die Station vom Stromnetz trennen, gehen die vorgenommenen Einstellungen verloren.
Wochen- und Zeiteinstellung
.
Schalten Sie das Gerät ein und drücken Sie die Taste Zeiteinstellung
Betätigen Sie die Taste um zwischen Stunden und Minuten zu wechseln, die Anzeige wird blinken. Stellen
Sie den richtigen Wert mit „+“-Taste ein. Drücken anschließend die “full-go“-Taste
zu bestätigen.
, um die Änderungen
Nachdem die Uhrzeit eingestellt wurde, können Sie die Wochentage einstellen. Drücken Sie „+“ um einen
Wo-chentag auszuwählen. Die Anzeige beginnt 5 Sekunden lang zu blinken, hört das Blinken auf, ist der
Tag festge-legt. Wollen Sie zum nächsten Tag wechseln drücken Sie während des Blinkens die „+“-Taste
erneut.
Drücken anschließend die “full-go“-Taste
, um die Änderungen zu bestätigen.
Anmerkung:
Sie können insgesamt bis zu 7 Tage für die Reinigungspunkte festlegen.
Haben Sie keinen bestimmten Wochentag als Reinigungspunkt gewählt, wird der Roboter jeden Tag um
die gewählte Uhrzeit mit der Reinigung beginnen.
Reinigungszeitpunkt einstellen
Schalten Sie das Gerät ein und drücken Sie die Taste
.
Betätigen Sie die Taste um zwischen Stunden und Minuten zu wechseln, die Anzeige wird blinken. Stellen
Sie den richtigen Wert mit „+“-Taste ein. Drücken anschließend die “full-go“-Taste
, um die Änderungen zu be-stätigen.
Nachdem die Uhrzeit eingestellt wurde, können Sie die Wochentage einstellen. Drücken Sie „+“ um einen
Wo-chentag auszuwählen. Die Anzeige beginnt 5 Sekunden lang zu blinken, hört das Blinken auf, ist der
Tag festge-legt. Wollen Sie zum nächsten Tag wechseln drücken Sie während des Blinkens die „+“-Taste
erneut.
Drücken anschließend die “full-go“-Taste
, um die Änderungen zu bestätigen.
Virtuelle Wand/ Raumbegrenzer
Infrarotsender
Betriebs-LED
AN/AUS-Knopf
Reichweite
Gummifüße
0-4m
4-7m
Over 7m
7
Die Infrarotbarriere ist Zubehör des Staubsaugroboters. Sie verhindert, dass der Saugroboter in Bereiche
fährt, die nicht zu reinigen sind.
Einsetzen und Entnehmen des Staubbehälters
Schematische Darstellung:
Entnehmen Sie den Staubbehälter, indem Sie die Taste auf dem Gerät drücken und nehmen Sie den
Behälter heraus.
Reinigung des Staubbehälters
Schematische Darstellung:
Öffnen Sie zunächst die Klappe, leeren Sie den Staubbehälter und reinigen Sie
diesen anschließend mit dem Pinsel.
WICHTIGE ANMERKUNG: Bitte spülen Sie den Behälter nie mit dem Wasser ab.
Ersetzen und reinigen des Filters
Abb.1
Abb.2
Abb.4
Abb.3
Abb.5
8
1. Drücken Sie die auf die gekennzeichnete Stelle mit dem Daumen und ziehen Sie den Filter
horizontal raus(siehe Abb. 1-2).
2. Entnehmen Sie die Filter der Reihe nach (siehe Abb. 3).
3. Nehmen Sie die hintere Abdeckung ab (Abb. 4) und entnehmen Sie ebenfalls die Filter (Abb. 5).
4. Die Filter können mit Wasser abgewaschen werden und nach der Trocknung der Reihe nach
eingesetzt werden.
Reinigung der Hauptbürste
Schalten Sie das Gerät aus.
Die Hauptbürste kann mit Hilfe des beigelegten Staubpinsels gereinigt werden. Verwenden Sie
dazu die Kammseite. Entfernen Sie alle groben Partikel und Haare. Sie können die Bürste vorsichtig
drehen um diese komplett reinigen zu können.
Säuberung der Sensoren
Die Reinigung der Infrarot-Sensoren sollte mit einem trockenen Tuch oder wattebausch erfolgen.
Der Wanderkennungssensor ist an der vorderen Seite angebracht. Der Bodensensor und der InfrarotSensor befinden sich an der Unterseite des Gerätes.
Bitte halten Sie die Sensorfenster sauber, um eine fehlerfrei Funktion des Gerätes zu gewährleisten.
Ersetzen der Batterien
Ersetzen Sie die Batterien wie auf dem Bild zu sehen. Beachten Sie dabei die richtige Polung.
Staubsaugerroboter
Wandabstandshalter
Fernbedienung
9
10
SICHERHEITSHINWEISE UND GEWÄHRLEISTUNG
• Diese Bedienungsanleitung dient dazu, Sie mit der Funktionsweise dieses Produktes vertraut zu
machen. Bewahren Sie diese Anleitung daher stets gut auf, damit Sie jederzeit darauf zugreifen können.
• Sie erhalten bei Kauf dieses Produktes zwei Jahre Gewährleistung auf Defekt bei sachgemäßem
Gebrauch.
• Bitte verwenden Sie das Produkt nur in seiner bestimmungsgemäßen Art und Weise. Eine anderweitige
Verwendung führt eventuell zu Beschädigungen am Produkt oder in der Umgebung des Produktes.
• Ein Umbauen oder Verändern des Produktes beeinträchtigt die Produktsicherheit. Achtung
Verletzungsgefahr!
• Öffnen Sie das Produkt niemals eigenmächtig und führen Sie Reparaturen nie selber aus!
• Behandeln Sie das Produkt sorgfältig. Es kann durch Stöße, Schläge oder den Fall aus bereits geringer
Höhe beschädigt werden.
• Halten Sie das Produkt fern von Feuchtigkeit und extremer Hitze.
ACHTUNG:
Es wird keine Haftung für Folgeschäden übernommen. Technische Änderungen und Irrtümer
vorbehalten!
Wichtige Hinweise zur Entsorgung
Dieses Elektrogerät gehört NICHT in den Hausmüll. Für die fachgerechte Entsorgung wenden Sie sich
bitte an die öffentlichen Sammelstellen in Ihrer Gemeinde.
Einzelheiten zum Standort einer solchen Sammelstelle und über ggf. vorhandene Mengenbeschränkungen pro Tag/ Monat/ Jahr sowie über etwa anfallende Kosten bei Abholung entnehmen Sie
bitte den Informationen der jeweiligen Gemeinde.
Hinweise zur Batterieentsorgung
Batterien dürfen nicht in den Hausmüll gegeben werden. Als Endverbraucher sind Sie
zur Rückgabe gebrauchter Batterien gesetzlich verpflichtet. Sie können Batterien nach
Gebrauch in der Verkaufsstelle oder deren unmittelbarer Nähe (z.B. in kommunalen
Sammelstellen oder im Handel) unentgeltlich zurückgeben. Sie können Batterien auch per
Post an uns zurücksenden.
Batterien oder Akkus, die Schadstoffe enthalten, sind mit dem Symbol einer durchgekreuzten
Mülltonne gekennzeichnet, wie das oben stehende Symbol.
In der Nähe zum Mülltonnensymbol befindet sich die chemische Bezeichnung des Schadstoffes. »Cd«
steht für Cadmium, »Pb« für Blei und »Hg« für Quecksilber.
Viel Spaß mit unserem Produkt.
Warnhinweise
• Reparaturen am Gerät sollten nur von einer autorisierten Fachwerkstatt durchgeführt werden.
• Öffnen Sie in keinem Fall das Gerät.
• Falscher Zusammenbau führt möglicherweise zu Fehlfunktionen oder dem Totalausfall.
• Das Gerät sollte vor jeglichen Feuchtigkeit und direkter Sonneneinstrahlung geschützt werden.
• Das Gerät bitte nicht mit Reinigungsmitteln reinigen.
• Verwenden Sie zur Reinigung nur ein trockenes (Mikrofaser) Tuch.
• Schließen Sie das Gerät nur an die dafür vorgesehene Netzspannung.
• Schließen Sie das Gerät in keinem Fall an andere Spannungen als vorgesehen an.
Die Gewährleistung verfällt bei Fremdeingriffen in das Gerät.
CHAL-TEC Vertriebs- + Handels GmbH; Wallstraße 16; 10179 Berlin, Germany
11
Thank you for purchasing M-788!
Please read carefully this manual before using!
Please follow the safety precautions below:
These safety precautions are provided to avoid human or property damages, so please
read carefully and observe the following Means the following symbols:
Violation of the safety instructions
may cause injury or death!
Violation of the safety instructions
may cause slight personal injury or
damage of the product.
Warning
Caution
No one other than service personnel
designated by the company is allowed
to disassemble, repair or alter this
product, otherwise, fire, electric shock
or personnel injury may be caused.
Do not use any charger other than that
enclosed with this product, otherwise,
fire may be caused due to damage of
the product, electric shock or high
tension.
Never touch the electric wire of the
electrical appliance with a wet hand,
otherwise, electric shock may be
caused.
Do not bend the electric wire
excessively or place any weight on it,
otherwise, the cable may be damaged
and cause fire or electric shock.
Avoid putting your clothes or any part
of your body (head or finger, etc.) into
the brush or wheel of the machine,
otherwise, personal injury may be
caused.
Keep the product away from cigarette,
lighter, match as well as any other heat
resource or inflammable material
The power should be turned off when
transporting or storing the robot for a
long time, otherwise, the battery may
be damaged.
The plug of the electric wire of the
charger must be inserted tightly,
otherwise, electric shock, short circuit,
smoke or fire may be caused.
Check the charger and the socket for
proper connection so as to avoid fire.
Remove all objects that are easily
damaged (illuminants, fabrics and glass
bottles, etc.) before using, otherwise,
they may be damaged.
Please use the robot cautiously in the
presence of children to prevent the
children from being scared or damaged.
Do not stand on the robot, otherwise,
damage of the robot of personal injury
may be caused.
Make sure to prevent the robot from
absorbing water or any other liquid,
otherwise, the product may be
damaged..
Never use the robot in narrow space
(on the desk or chair, for instance),
otherwise, the product may be
damaged.
Never use the robot outdoors,
otherwise, the product may be
damaged.
Do not use the robot in any commercial
occasion, otherwise, it may be
damaged due to excessive usage.
This product is not applicable to (physically, sensibly or mentally) disabled people or those lacking
relevant knowledge and experience (including children) unless they are under care of their guardians and
provided with relevant guidance on the usage of the product.
12
Components
Auto Vacuum
Cleaner
Virtual Wall
Charging
Dock station
Remote
Controller
Power
Adapter
Mopping part
(rag and holder)
Filter
Side Brush
Cleaning
Brush
User’s
Manual
Names of Parts
Top of the Robot:
IR receiver
Front bumper
LED Display
Mode
Select
UV
Run /Pause
Dustbin
Bottom of the Robot:
Sensor
sensors
Charging electrode
Side brush
Main brush
sensor
Rubber brush
Power switch
charging socket
UV lamp
Universal wheel
Left/right wheel
Auxiliary wheel
Battery
Mopping part
13
1. Charging Dock station
Clock
Adjuster
Timing
Power switch
Full go
Floor skidproof pads
IR sending window
Power adapter socket
Charging terminals
FernbedienungLED-Anzeige
Indicator
Power
Auto
Wall-following
Docking
Spot
Forward
Rightward
Backward
UV button
Speed Adjuster
Leftward
Pause
Auto
Spot
Battery Power
Digital display
Time
UV
Error indicator
Dirt indicator
Cleaning Preparations
Installation of the Charging Dock station
01.
02.
03.
04.
05.
Place the charging dock station on level ground with the back against the wall.
Make sure that no obstacle and uneven ground in the area within 3 meters in front of the base
and 0.5m respectively on the left and right of it. (See figure 1)
Ensure that IR sending window on the base is clean without dust or something else covered,
otherwise, the function of self-charging will be influenced.
Connect the output plug of the adapter to the Power socket of the Dock Station. (See figure 2)
Tidy up the electric wire along the wall to avoid obstructing the operation of the Robot.
High tension! Avoid
electric shock. Please
operate with a dry hand!
Figure 2
Figure 1
Installation and Disassembly of the Mopping part
01. Attach the enclosed mopping rag to the mopping holder. (See figure 1)
02. Align the protruding fastener at end of the holder (See figure 2) to the sunken positions on the
inner sides of the 2 wheels (See figure 3) and press them down. Then both ends of holder will be
locked
14
03. After installing the mopping rag (See figure 4), mopping can be done while sweeping and
vacuuming, the cleaning effect will be better.
04. After using, just pull the holder out.
05. It’s recommend to wash and twist dry the mopping cloth before using the mopping function.
Figure 1
Fix the mopping rag on the
holder
Figure 2
Figure 3
Figure 4
The mopping part is mainly designed to cooperate with Robot adjunctively to fulfill cleaning floors,
you can disable this function. For the case non-use this part for a long time, please remove the
mopping holder and store it with the mopping rag in dry environment.
Turning on/off auto vacuum cleaner
01.Press the power switch when the cleaner is turned off (see the figure below), the display will be
on and the screen will flash for 3 seconds along with a startup sound, and the robot is then turned
into the standby status.
02. In the standby status of the robot, the current working mode will be displayed (default show as
“AUTO 1 UV” and the battery level on the screen).
03. Turn off the power in the standby status, the display will be shut.
04. In the power-off status of the cleaner, the remote controller cannot work.
Charging :
A. Manual Charging
01. You can directly charge the cleaner with its power adapter or with the charging dock station.
02. When charging directly via the power adaptor, please connect the output plug of the adapter with the
charging socket on the robot. (See figure 1)
03. When charging with the charging dock station, please first connect the adapter to it, and then
place the cleaner tightly against the dock station to ensure a nicer contact between the charging
electrode of the cleaner and the charging terminal on the dock station. (See figure 2)
04. During the charging process, the display will show the charging status, and the battery level bars
will turn red from the 1st bar to the 3rd bar in order repeatedly. (See figure 3)
05. Upon completion of the charging, the display will show 3 fully red bars. (See figure 4)
Figure 3
Figure 4
15
1. Charging Dock station
High tension! Avoid
electric shock. Please
operate with a dry
hand!
High tension! Avoid
electric shock. Please
operate with a dry
hand!
Figure 1
Figure 2
1.
2.
3.
4.
Take out the battery before disposing of the robot.
Always remember to cut off the power before removing the battery.
Recycle or dispose of the battery properly.
To avoid explosion, never throw it into fire!
B. Self-Charging
01. The cleaner will automatically start to search the charging dock station for recharge when the
battery level is lower than 15% during cleaning process.
02. When press the DOCKING button on the cover of the robot or the remote controller, the function
of self-charging will also be enabled.
03. During the above “DOCKING” mode, press any other button on cleaner or remote controller, the
cleaner will stop searching and enter the standby status. The directional buttons on the remote
controller can also be used to support the searching function.
The cleaner can find the charging dock
station when it reaches the area about 3
meters in front of the base within the 90°
fanshaped region.
How to use the function of the button on the cover:
01. In the standby status, press the mode button “
and corresponding indicator will be on accordingly .
” to choose AUTO, SPOT, DOCKING in turn,
02. AUTO: Auto cleaning status, in this status, press the select button “
2 and 3 secondary modes, the display will show corresponding digit.
” to switch between 1,
Modes:
1 – The cleaner will work until the battery is used out and then search the charging dock station
automatically for recharge.
2 – The cleaning work will last for 30 minutes.
3 – The cleaning work will last for 15 minutes.
16
03. SPOT: Spot cleaning, in this status, press the selection button “
3 secondary modes, the display will show corresponding digit .
” to switch between 1, 2 and
Modes:
1 – Cleaning along the spiral route (working for 1-4 minutes).
2 – Cleaning along the zigzag route (working for 1-4 minutes).
3 – Cleaning follow the walls (working for 10 minutes).
04. DOCKING: self-charging mode, in this mode, it can automatically search the charging dock station.
”: this enables you to select 1, 2, 3 secondary modes orderly in the primary
05. Select button “
models of AUTO/SPOT.
”: this allows you to turn on or off the UV lamp during the cleaning process,
06. UV button “
press once to turn on and press again to turn off. (The UV lamp is on when turn on the cleaner)
”: when the SPOT/AUTO/DOCKING mode is selected, press this button to start
07. Run button “
the particular mode.
The UV lamp is applied for sterilization, please do not look straightly at it.
Dirt Detection Function
In order to achieve better effect of cleaning, this product provide the dirt detection function, during the
operation of the robot, if it reaches a place with a lot of dirt or debris, the dirt indicator on the LED Display
will turn on, and the robot will increase the cleaning intensity to such areas.
Control with the Remote Controller:
1. The power button “ ”
When the power switch of cleaner is on, press this button can ensure the robot enter the sleep
status. which can save electricity and all indicators will be off, press this button again to enter the
standby status. When the cleaner enters the sleep status, it can not be started by pressing any
button on either the cover or the remote controller before this button is pressed again to make the
robot enter the standby status.
2. AUTO button:
Press this button, the robot will work in the auto cleaning mode till the battery is used out and then
it will automatically search the charging dock station for recharge.
SPOT button - Press this button, the robot will work in the spot cleaning mode in the spiral way
DOCKING button - Press this button to allow the robot to automatically search the charching base
for recharge
Wall-following Button - for cleaning along the wall: After pressing this button, the robot will be in
the mode to clean following the wall
UV button “- ”Press this button to turn on or off the UV lamp
Speed Adjuster - Press this button to select three different levels of walking speed. The default
speed of the cleaner is the optimal speed therefore, when it is reset, the robot will restore the
default speed
Pause button - Press this button to pause the operation of the robot, corresponding indicator will
flash. Press this button again to resume the original mode. If you press an other button after
pressing this button, the cleaner will start working in the new mode.
17
3. Directional buttons(Forward, Backward, Leftward, Rightward ):
Press the arrow buttons to control the robot to walk in the designated direction.
Forward - Press this button to make the robot clean forward and it will automatically stop when meet
obstacle.
Rightward - Press this button once to make the robot turn right by about 10°, then clean forward
and automatically stop when meet an obstacle, if you need a longer angle, please press and hold
this button till satisfactory angle is achieved.
Leftward - Press this button once to make the robot turn left by about 10°,then sweep forfard and
automatically stop when meet an obstacle,if you need a longer angle, please press and hold this
button till satisfactory angle is achieved.
Backward - Press this button once to make the robot walk beackward for about 0,3m, if you need a
longer distance, press the hold button till the robot reaches a satisfactory location.
If more than one above buttons were pressed at
the same time, the
status will be uncertain.
The effective distance of the remote controller is
5-7 meters, which
varies according to different surrounding.
Charging Status
01. When the cleaner is being charged manually, it will not work when you press any button unless
your pull out the plug of power adapter.
02. A full charging time is 3-5 hours, for the first 3 times of charging of a new cleaner, please ensure
it to be charged for more than 12 hours each time, please try to use out the battery power before
charging (ensure a 12-hour charging before you use the robot for the first time).
03. If you press the AUTO button on the remote controller while the cleaner is being charged on the
charging dock station, the robot will draw back from the dock station and turn around to walk
1m ahead, and then it will enter the AUTO mode for working.
04. The robot will enter the standby status when the power supply is cut off during the charging
process.
05. While the robot is being recharged on the station, if the preset time is reached, the robot will
draw back from the station and turn around to walk 1m ahead, and then it will enter the AUTO
mode for working.
06. By pressing the “Full-Go” button on the charging dock station, when the cleaner has been fully
charged on the dock station, it will draw back from the dock station and turn around to walk 1m
ahead, and then it will enter the AUTO mode for working.
07. While the robot is searching the station for recharge, if the battery power is lower than 8% of the
capacity, the robot will stop searching and enter the parking mode in a clear and bright place, and
it will sounds a “Toot” every 30 seconds.
08. During the charging process, the digital display will show the time of charging, 10 times of the
displayed value equals to the actual time of charging (min.)
The working time of the robot will also be shown during the cleaning process,
but the value displayed is the actual time of working (min.).
18
How to use the Charging dock station:
There are 5 buttons as shown in the figure below, including: power switch “
Clock button “
”, timing button “
”, Full-go button “
”,
” adjusting button “+”
During the process a setting, the power switch have the function of
“cancel” and the Full-go button have the function of “confirm”.
Connect the power socket on the dock station with external power supply, and then press the power
button “ ” to start the charging station (power on), the base will enter the LCD detection status and
show all content of the LCD as shown in the figure below:
The auto charging dock station have no the memory function ; if it’s
power off , all setting will be Cancelled and return to the default
1. Time setting:
In normal operation status, press the clock button “
” to enter the time setting status; press once
to switch between settings of minutes and hours, the current value of the selected item being set will
flash, by using this button, you can set the standard time. Press the adjusting button “+” to adjust
minutes, and hours. After time setting finished , then press the full-go button “
” to save the setting
values, if no button were pressed within 30 seconds, the base will quit the setting status without save
the values .
Press the power switch button “
” or timing button “
” will quit
the time setting status without saving the timing value.
2. Weekday setting:
After finishing settings of Hour and Minute. Entering setting for Weekday. Press “+“ key to select the
day of week. When a certain day is selected the corresponding day logo will flash for 5 seconds then
stop which indicates this day has been selected. If you don´t want to choose this day press the „+“ key
again wwhen it is flashing, then it will go to selection process of the next day. Selection can be made for
consecutive 7 days, or one or several days in one week. Press “
” to save setting and return to normal
working mode. If weekday setting is not selected, the machine will work every day as default setting. 3.
Timing clean setting :
In normal operation status, press the timing button “
” to enter the timing clean setting status; press
once to switch between settings of minutes and hours, the current value of the selected item being set
will flash, by using this button, you can set the standard time. Press the adjusting button “+” to adjuster
minutes, and hours. After timing clean setting finished , then press the full-go button “
” to save the
setting values, if no button were pressed within 30 seconds, the base will quit the setting status without
save the values .
19
Press the power switch button “
” or timing button “
” will quit
the time setting status without saving the timing value.
4. Auto clean setting :
In normal working status of the charging base, press the full-go button “
” to enable the full-go
function (when the battery is recharged fully, the robot will automatically start the cleaning work),.
Press this button again, this function will be disabled.
When the robot is fully charged, if both the timing cleaning function
and the full-go function are enabled, the timing cleaning will have priority.
When the battery power of the cleaner is low , it may be unable to seek the charging dock station for
recharge, for this case, please manually put the cleaner on the dock station and press the “ + ” button
for recharge.
Virtual Wall
The virtual wall is an accessory , it sends some special IR signals to form a blocked area to
prevent the cleaner from entering unnecessary areas, it is so named “virtual wall” because
this function acts like a wall.
01.
02.
03.
04.
05.
Before using the virtual wall, install the batteries as shown in figure 3, open the bottom cover of
the virtual wall, install 2 pcs A batteries (pay attention to the correct polarity). After the installation,
close the bottom cover and tighten the screws.
Select the distance selector of the virtual wall according to the actual requirements; pull the shift
switch to the top position to select the low level(0-4m), to the middle to select the medium
level(4-7m) and to the bottom to select the high level( above 7m) ; See figure 2. the lower level,
the lower power consumption and the longer working time of batteries, therefore, you should try
to select a lower level whenever possible.
Press the power button on the virtual wall, the indicator will flash, when the voltage is normal,
the indicator will twinkle at each longer interval, if the batteries are in low power, the indicator
will flash faster, indicating that the batteries should be replaced, to avoid wrong startup, you
should press and hold the switch for a comparatively longer time (about 3~5 seconds) when
turning on the power.
The virtual wall takes effect with IR signals, therefore, its functional range is a sector of about
15°, when the power is turned on, you should place it at the entrance of the area that you don’t
want the cleaner to clean, the cleaner won’t enter such area then.
The virtual wall uses 2pcs A (1.5V)batteries, when batteries’ power is short, you should replace
them, Continue to use the batteries with extremely short power may corrode the virtual wall.
Bottom cover
Rubber pad
IR guidance signal emitter
Wall signal emitter
indicator
Power switch
Distance selector
Figure 1
0-4m
4-7m
Over 7m
Figure 2
Figure 3
Figure 4
1.You need to use a screwdriver to open the bottom cover of the virtual wall (see Figure 3)
2.Please refer to figure 4 for the installation of batteries to avoid wrong polarity that may
damage the virtual wall.
20
1. Take out the battery before disposing of the cleaner.
2. Always remember to cut off the power before removing the battery.
3. Recycle or dispose of the battery properly.
4. To avoid explosion, never throw it into fire!
How to Use the Virtual Wall
01. The virtual wall should generally be placed at the doorway of the room you planned to clean
02. You can also place the virtual wall in any proper place to prevent the cleaner entering the blocked area.
03. Ensure no obstacle is placed in front of the virtual wall when you plan to block a particular area..
Dustbin
01. Press the button on the dustbin by hand. (See figure 1)
02. The dustbin will be ejected. (See figure 2)
03. Then you can take it out easily. (See figure 3)
04. Just push it by force to install the dustbin.
Figure 1
Figure 2
Figure 3
How to Clean the Dustbin 01. First, open the dustproof clapboard and dump the dust and
debris collected. (See Figure 1) 02. Then clean it with cleaning brush (See Figure 2)
How to Clean the Dustbin
01. First, open the dustproof clapboard and dump the dust and debris collected. (See Figure 1)
02. Then clean it with cleaning brush (See Figure 2)
Rinse by water
is prohibited!
Figure 1
Figure 2
How to Replace and Clean the Filter
Removal and cleaning:
01. Hold the middle part of the filter bracket located on the suction inlet by hand (See figure 1) and then
draw horizontally (See figure 2).
02. Take out the scouring pad (See figure 3) and the filter sponge (See figure 3) in order.
03. Put a finger into the bottom of the suction outlet and draw it out (See figure 4).
21
04. Take out the filter sponge inside the outlet window (See figure 5).
05. The scouring pad and the filter sponge can be cleaned in water and then reinstalled after drying.
It’s recommend to generally clean them.
Installation:
01. Suction inlet: Install the filter sponge and the scouring pad onto the filter mesh bracket orderly,
and then install them into the dustbin.
02. Suction outlet: First install the filter sponge in the outlet window, and then insert the top end of
the outlet window into the dustbin, and then press the fastener at the lower end to fix it.
Figure 1
Figure 2
Figure 4
Figure 3
Figure 5
Side Brush
Step for assemble and disassemble side brush:
01. Take out screwdriver ,side brush and screw which was set in package
02. Put the upper cover downward (see in image2),put the side brush into the shaft with force, then
lock side brush with screwdriver.(see in image3)
03. If need replace side brush ,unscrew the screw which fixed side brush with screwdriver. Repeat
the above step to change new brush.
Remarks: Please follow the step 01,02 before your first using ,or it maybe has an influence on the
function.
Image 1
Image 2
Image 3
Main Brush
Step for disassamble main brush
01. Put the upper cover downward ,take out the screw which was located in the left of main brush with
screwdriver.(see in image1)
02. Take out the main brush.(see in image2)
03. Separate the clutch upper cover and main brush.(see in image3)
Image 1
Image 2
Image 3
22
Step for assamble main brush
01. Put the clutch upper cover on the shaft of main brush .(see in Image1)
02. Insert the square side of main brush to the metal square port ,then pack the main brush and
clutch into the other side.(see in Image2)
03. Lock the clutch with screwdriver and screw.(see in Image3)
Image 1
Image 2
Image 3
How to clean center Brush
For a better cleaning effect, please regularly clean out the hair, yarn and large debris en-winded or
adhered on the main brush and the dust on the suction inlet.
01. Directly use the cleaning brush to clean paper scraps or minute particles.
02. En-winded hair, yarn or similar objects should be cut by scissors or pulled out by hand while
carefully rotating the main brush.
Cleaning Sensors
01. The sensors should be cleaned by cotton swab or soft cloth.
02. The wall-following sensors are installed in the front of bumper of the cleaner, the ground detection
sensors are installed at the front bottom of the cleaner (see the figure below)
To ensure a more effective cleaning of this robot, please
clean the sensors regularly.
Storing the Robot
The robot should be stored in ventilated and dry places.
23
Trouble shooting
Below inspections by yourself to this product before you request a repair.
A. The Robot Stops while Working
01. Check if the selected cleaning time is over.
02. Check if there’s any error information on the LED display and refer to the following
explanations to solve it.
B. The Cleaner Fail to Work or the Cleaning Ability is Weakened
01. Check the battery status.
02. Check whether the dustbin, the filter and the inlet of suction are cleaned; whether the side
brush is working.
03. Check whether the cleaner is turned on.
C. The Remote Controller Can not Work
01. Check the battery status of the controller.
02. Check the battery status of the cleaner.
03. Wipe the IR sensor or the beam sensor of the controller by clean and dry cloth.
04. Keep proper distance between the cleaner and the controller, and then operate the controller
directlyfacing the IR receiver on the cover of robot
D. The Robot Fails to fulfill self-Charging
01. Check whether the power supply is normally connected with the adapter and charging dock
station.
02. Check the battery power, if it’s too low, please manually charge it with the adapter.
E. Increased Noise when Cleaning
01. Clean the dust box and the filter.
02. Check whether the brushes are too dirty.
CHAL-TEC Vertriebs- + Handels GmbH; Wallstraße 16; 10179 Berlin, Germany
24